TORQUE WRENCH - EGA Master · A torque wrench converts the supplied pneumatic energy into mechanic...
22
OPERATING INSTRUCTIONS TORQUE WRENCH GUARANTEE ........................ 19 ZONA/ZONE M2 MINERÍA - MINING - MINIÉRE COD.79607
Transcript of TORQUE WRENCH - EGA Master · A torque wrench converts the supplied pneumatic energy into mechanic...

OPERATING INSTRUCTIONS
TORQUE WRENCH
GUARANTEE ........................ 19
ZONA/ZONEM2 MINERÍA - MINING -
MINIÉRE
COD.79607

2
SIGNAL WORD AND SYMBOL DEFINITION
The signal words and symbols used in the technical documentation (safety instructions, operating booklet, etc.) have the following meaning:
This symbol has the following meaning:
DANGERIndicates an immediate danger, which causes serious injuries to any person or even death, if not avoided.
WARNINGIndicates a threatening danger, which can cause serious injuries to any person or even death, if not avoided.
CAUTIONIndicates a danger or unsafe procedure which can cause injuries to any person or material damages, if not avoided.
NOTICEIndicates a potentially dangerous situation which can cause damage to the product or its surroundings, if not avoided.
WARNING – explosive atmosphereAir and flammable substances can mix and result in an explosive atmosphere. In areasexposed to explosion hazards, supplementary instructions and directives apply. Observe the safety instructions of the owner as well.
WARNING – explosive materialCaution should be exercised when working with explosive material or in its surrounding area.
PROHIBITION – No naked flame, fire, or ignition source and no smokingPrevent from fire and explosion hazards, which can be caused by naked flame, open ignition source or by smoking.
ENGLISH

3
Eating and drinking forbidden – The prohibition sign forbids the consumption of food.
REQUIREMENT – Observe the instructionEnsure that the operation process is adhered to and avoid accidents and expensive down times due to improper use of machines, devices and tools. By using the mandatory sign you refer to the adherence of operation instructions.
This symbol has the following meaning:
NOTICE – Gives recommendations and important hints for handling the productIMPORTANT – Indicates application advice and other particularly useful information.
REMARK:In each case the symbol used does not replace the safety text. The text must always be read fully. In some cases other symbols will be used with the signal words.
TECHNICAL SPECIFICATION
with rotatable handleOperating pressure 6 bar
Drive square 1“For screws up to M30
Wrench size 30-50 mmTorque 750 Nm
Rotation direction clockwise / anti-clockwiseAir connection Rd 32x1/8” maleID of hose min. 10 mm
Air consumption in average 0.8 m3/minWeight 10.2 kg
Noise pressure level LpA(1) 86 dB (A)Noise power level LWA 97 dB (A)
Vibration(2) <2.5 m/s2
ATEX Classification Ex IM2cT6Accuracy ±5-10%
(1)Remark: Measurement acc. to DIN EN ISO 15744(2)Remark: Measurement acc. to DIN EN ISO 28927-2
Measurement uncertainty K: 3 dB (A)
Measurement uncertainty K: 1.5 m/s2
INTENDED USE
These machines are designed for commercial/industrial use only.Only trained, skilled personnel are allowed to operate the machine.Impact wrenches are designed for the tightening and loosening of screw fittings in a range of
performance defined by the manufacturer.
Only use the impact wrench in combination with appropriate power socket wrenches.

4
Absolutely avoid the use of normal socket wrenches for hand tools.
It is allowed to use appropriate extensions, joints and adapters between square and power socket wrench. Only use the tools for the defined application areas.
IMPROPER USE
Any use deviating from the intended use as described is considered to be improper use.Working without personal protection equipment.Using the machine in a kind of area exposed to explosion hazards, which is prohibited for the
machine. Using the machine for drilling, mixing or grinding.
PRODUCT DESCRIPTION
Fig. 1 Valve trigger Reverse slide Air connection Air regulator Motor housing with pistol grip Gear Drive square Counter bracket
Functional principle
A torque wrench converts the supplied pneumatic energy into mechanic work. In other words, the compressed air drives the motor, which forwards the energy to the gear. While doing this, the drive rotates. Contrary to the impact wrench, the counter torque has to be compensated by a counter bracket.

5
IDENTIFICATION
INSTALLATION
Requirements to the air supply
The pneumatic torque wrench is designed for an operation pressure of 6 bar. Pay attention that the operation pressure is not lower.
For maximum performance, the values given in the table “Technical Specification“ have to be met.
The distance to the machine should not be bigger than 5 m.The supplied compressed air has to be free from foreign objects and humidity, in order to protect
the pneumatic wrench against damage, dirt and rust formation.For the lubrication we recommend installing an oiler or a maintenance unit upstream the
machine.This ensures a proper functioning of the pneumatic torque wrench. Always use acid and resin-
free oil (SAE 5W - SAE 10W).Oils of high viscosity cause vane sticking and impair the start and performance of the machine.
Optimal lubrication will multiply the service life time.In winter, or if the compressed air is very moist, an antifreeze lubricant, e.g. “BP-Energol AX 10”,
“Kilfrost” or “Kompranol N 74” should be used.Pay attention that the diameters of all lines are big enough and there are no restrictions. There
must be no buckles in the hoses. Check the supplied flow pressure.The flow pressure has to be adjusted with the pressure control valve (see technical
specifications). Supply hoses have to be designed for a minimum operating pressure of 6 bar.Replace hose lines regularly at preventative maintenance, even if there are no damages (observe
the instructions of the manufacturer).Always use hoses, which have an oil resistant inner surface and an abrasion-resistant outer
surface. If you are next to electric conductors, always use hoses which are proved and specified to be non-conductive.
For use in areas exposed to explosion hazards always use hoses and lubricating oil, which meet the safety requirements of the owner.
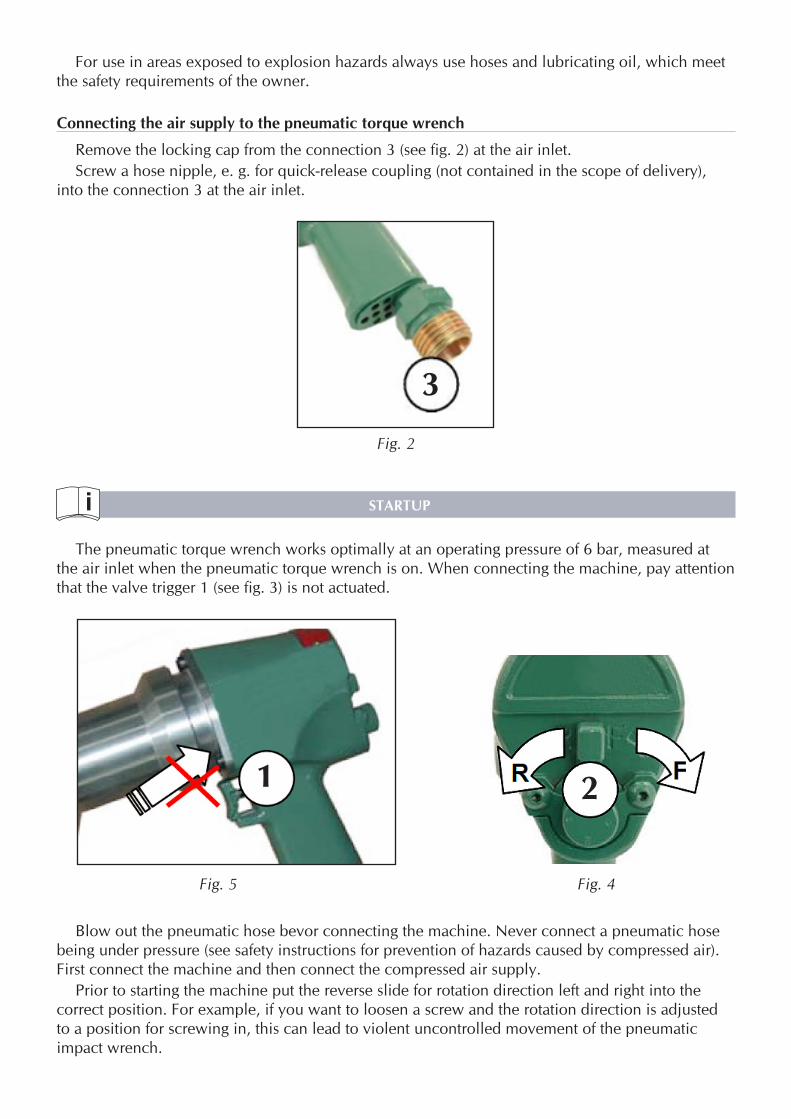
Connecting the air supply to the pneumatic torque wrench
Remove the locking cap from the connection 3 (see fig. 2) at the air inlet.Screw a hose nipple, e. g. for quick-release coupling (not contained in the scope of delivery),
into the connection 3 at the air inlet.
3
Fig. 2
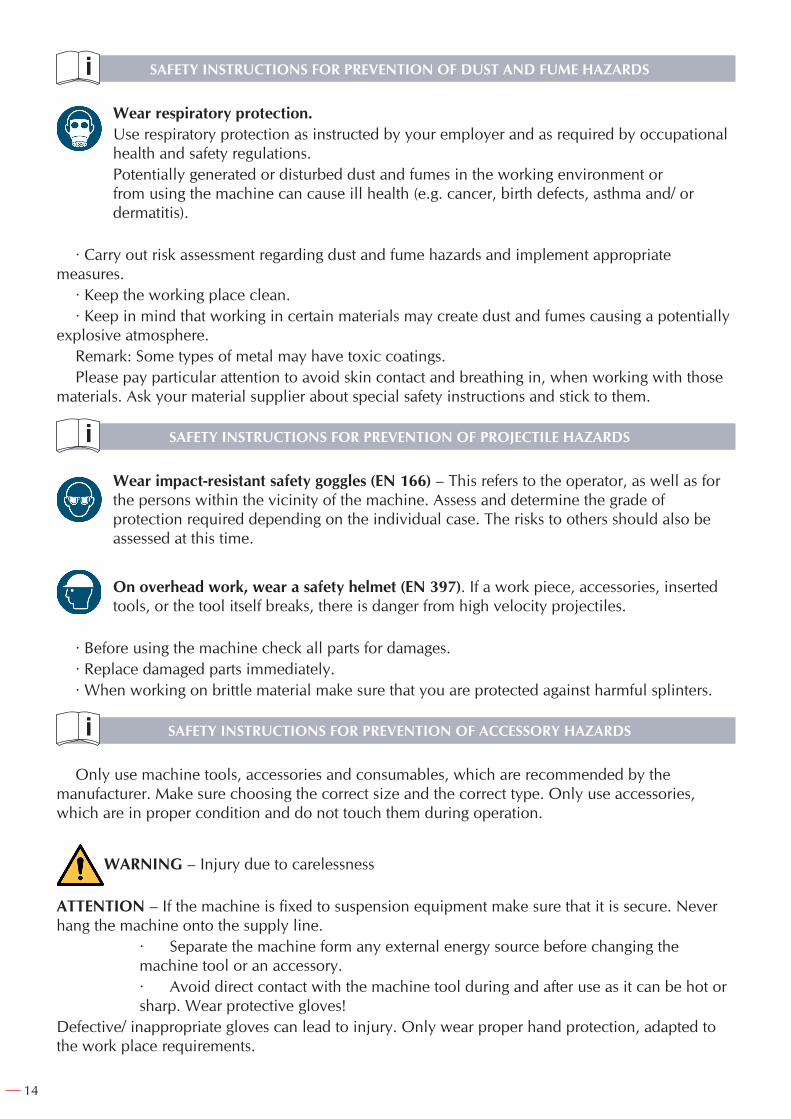
STARTUP
The pneumatic torque wrench works optimally at an operating pressure of 6 bar, measured at the air inlet when the pneumatic torque wrench is on. When connecting the machine, pay attention that the valve trigger 1 (see fig. 3) is not actuated.
1 2
Fig. 5 Fig. 4
Blow out the pneumatic hose bevor connecting the machine. Never connect a pneumatic hose being under pressure (see safety instructions for prevention of hazards caused by compressed air). First connect the machine and then connect the compressed air supply.
Prior to starting the machine put the reverse slide for rotation direction left and right into the correct position. For example, if you want to loosen a screw and the rotation direction is adjusted to a position for screwing in, this can lead to violent uncontrolled movement of the pneumatic impact wrench.

Setting the rotation direction
The rotation direction is set with the reverse slide 2 (see fig. 4).F “Forward“ means rotation direction right. R “Reverse“ means rotation direction left.Actuate the reverse slide only when the pneumatic torque wrench is switched off.
Rotation direction right: For screwing-in of screws and nuts turn the reverse slide clockwise to F.Rotation direction left: For unscrewing of screws and nuts turn the reverse slide anticlockwise to R.
The air regulator (power adjustment) is only for adjusting the output of the torque wrench, not for the adjustment of a constant torque (see fig. 5).
Remark: The required torque adjustment and the duration of the screwing process are depended on the type of screw connection. Ideally, this can be found out in practice.
Put the power socket wrench solidly and correctly on the screw head or the nut and start the pneumatic torque wrench. (fig. 6)
Fig. 5 Fig. 6 Press or release
Start and stop
4
Insert tool
Slide the tool over the drive square 7 of the tool holder. Before, mount the counter bracket 8 (see fig. 7).
7
8
Fig. 7

8
Pay attention that the circlip locks in the groove of the tool. Only use tools with suitable shank (see “Technical Specification).
Remove tool
Pull the tool from the tool holder. Stucking tools can be loosened by slight beats with a rubber hammer.
Change tools
When inserting a tool, pay attention that it is properly seated on the tool holder.If the tool is not firmly fixed to the tool holder, it can unscrew and cannot be controlled
anymore.Before each operation, make visual check of the machine and machine tools, as well as
accessories with regard to integrity and appropriateness for the application.Never operate the machine if one or more parts (e. g. machine tools, cables, lines) are damaged,
if it is not working properly, if any damages can be identified or are to be suspected (e. g. after it has been dropped).Replace damaged parts immediately.
Never remove protective devices from the machines where fitted.
Ensure they are in good condition and properly adjusted before starting the machine.A malfunction, which impairs operator safety, must be immediately removed.Pay attention that the machine is cleaned from dust and deposits of rust particles and other
deposits before and after the work.
Torques
The torque adjustment is done via the air pressure.
3 bar 3,5 bar 4 bar 5 bar 6 barSetting Md n Md n Md n Md n Md n
1 175 3 250 3 275 4 300 5 325 52 275 6 325 6 350 6 450 7 500 73 400 7 475 7 550 8 700 10 700 104 500 8 550 8 650 10 750 12 750 12
The torque values are guide values only, they depend basically on the application, the flow pressure and the applied accessories.
BASIC SAFETY INSTRUCTIONS
Read operation instructions/safety instructions!Before working on or with the tool, read the safety instructions and follow the instructionsduring operation.
Do not modify machine or machine tools and accessories after receipt. Permission from the manufacturer must be obtained before any modifications or alterations are done in compliance with all safety instructions. Use the machine only for its intended use. Observe the technical data of the equipment and the ambient temperatures. Pay attention to labels, restrictions of use and special instruction notes on the machine tools and the machine itself. Regularly check that the type plate and symbols on the machine are legible.

9
If necessary, contact the manufacturer to replace them. Only operators with technical knowledge, trained by authorized responsible technical personnel, may install, adjust, operate, transport and store the machine.
OWNER OBLIGATIONS
Generally, the machine owner is responsible for correct condition/operation of the machine and adherence to the safety regulations. The state-of-the-art machine is built according to recognized technical safety regulations. However there is still a risk of accidents to the operator or third parties or damage to the machine or other objects. All current regulations and specifications which apply to the site of operation in regards to accident prevention, installation of electrical and mechanical systems as well as radio interference must be observed.
IMPORTANT - The owner must make sure that…
· Risk assessment is carried out for the specific risks, which can occur due to any operation of themachine.· the function of the safety equipment is regularly checked.· the safety symbols and safety notes on the machine/ device and the operating instruction booklet are observed.
the safety instructions and the operating instruction booklet are available completely and in legible condition on site with the machine
The owner is obliged to only allow personnel to work on the machine who: · are familiar with the basic work environment safety rules and accident preventing regulations.Also, those persons must have been instructed in the correct use of the machine.
· have read and understood the safety and warning notes in the operating instruction booklet as well as all other documentation pertaining to the machine.
· have been tested at regular intervals in regards to their safety-conscious operation of the machine.
Safety-conscious workingAdditional to the safety instructions in this manual and the intended use, the following safety
regulations have to be observed: · Accident prevention instructions, safety and operation regulations. · Explosion protection directives. · Safety regulations for the operation with hazardous material. · Norms and laws being effective.
OPERATOR OBLIGATIONS
All persons who are assigned to work with the machine are obligated to:· always pay attention to the basic safety and accident preventing regulations.· always read and follow the safety and warning notes in the operating instruction booklet.
SYMBOL DEFINITION FOR SAFETY EQUIPMENT AND ACCIDENT PREVENTION
Use protective clothes – Protective clothes are necessary for diverse applications, e.g.protection against chemicals, heat and cold. Provide appropriate protective clothes to your staff and identify this requirement by convincing signage.

10
Use eye protection – whether goggles, laser safety goggles or etc. – identify areas where eye protection has to be used, by appropriate mandatory signs.
Use ear protection – Capsule hearing protectors or hearing protectors have to be used for ear protection, depending on the sound intensity at the work place.Provide appropriate ear protection and identify the obligation for using ear protection by appropriate mandatory signs.
Use foot protection – Foot injuries by vehicles, objects, hot material or hazardoussubstances can be avoided by appropriate protective shoes. Equip your staff withappropriate protective shoes and identify those requirements properly.
Use hand protection – Identify convincingly the safety requirement “Use hand protection“ by a gloves sign, respectively a gloves symbol.
Use respiratory protection – Ensure that the specified protection equipment is available and that it is used. Identify by mandatory signs, where and when respiratory masks are required.
Danger Zones
Operational
condition
-----------------------
Life phase
Normal function Malfunction Improper use Expected use
Transport
Transport of the
machine in an
inoperable condition
Drop of the
machine
Transport of the
machine in an
operable
condition
unknown
Startup
Equipment of the
machine with
designated tools /
wrenches
Unknown
Equipment of the
machine with
drilling tools or
other tools
unknown
Operation
Machine only works
with actuated valve
Machine runs
without intended
actuation
Valve is blocked
in actuated
condition;
drilling, mixing or
grinding
unknown
Machine moves the power socket wrench Tool blocks unknown
unknown
Maintenance
Regular
cleaning
Breakdown of
the machineunknown
unknown
Operation at a filter unit
Breakdown of
the machineunknown unknown

11
SAFETY INSTRUCTIONS FOR PREVENTION OF WORKPLACE HAZARDS
WARNINGThe following applies unless otherwise stated in the machine’s operating instructions booklet:The machine is not insulated to protect against an electrical power surge.
CAUTION – risk of injury!Hands may be crushed, seized or otherwise injured.Keep your hands away from areas which are marked with this symbol.
CAUTION – risk of injury!Remove all sources of danger which could lead to slipping, tripping or falling (e.g. slippery surface, hoses, cables).Keep the work area clean and dry.
PROHIBITION – Eating, drinking and smoking are forbidden during operation.
WARNING – Explosion hazard!Operate the machine according to the intended use only.The machine is designed for the use in areas exposed to explosion hazards as well.Observe the following:
· Valid local explosion protection directives. · Technical specification of the machine. · Markings on the machine. · Avoid the generation of sparks. · When operating the machine, do not push or beat against other material and hold
the machine firmly and safely by hand. · Do not slide the machine over the ground. · If heat generation exceeds the specified surface temperature, the machine has to be
stopped instantly. It only may be re-started after having eliminated the cause for the fault. · The work area and the next working areas should always be protected from sparks. · Flammable and explosible material has to be removed from the work area before
work is started. Among others, this relates to dust deposits, cardboard, packing material, textile, wood and wooden splints, but also flammable fluids and gas.
Make sure there is adequate lighting.Be extra careful in unfamiliar surroundings. There is a risk of hidden hazards such as electric lines or other supply lines. Make sure when operating the machine that no electrical cables, gas pipes or similar could be damaged. Use suitable and personal protective equipment.

12
SAFETY INSTRUCTIONS FOR PREVENTION OF HAZARDS CAUSED BY COMPRESSED AIR
WARNING – Compressed air can cause severe injury. Before working on the tools (e.g. installation, changing accessories or machine tools, prior to a long standstill, maintenance, etc.) depressurize pneumatic equipment (close valve and depressurize pneumatic hose).
CAUTION – Risk of injury by whipping pneumatic hose.Check pneumatic hoses, connection components and fittings regularly for any damages and proper fixture.
When connecting / disconnecting the machine to / from the pneumatic supply, please pay careful attention not to actuate the start lever while doing so. Never remove a pressurized pneumatic hose. Always switch the power supply off first and then depressurize the machine by pressing the valve latch.
The maximum operating pressure (flow pressure) according to the technical specification must not be exceeded. A pressure regulator has to be installed, which regulates the pressure before it reaches the machine. Never direct a pneumatic hose at yourself or anyone else. Never clean your clothes with compressed air. Direct cold air away from your hands. Do not pull or carry the machine by the pneumatic hose. When using claw couplings make sure that they are fitted with a suitable lock mechanism (e. g. lock pin) and a safety chain.
SAFETY INSTRUCTIONS FOR PREVENTION OF OPERATING HAZARDS
Before beginning work make sure that the hands are protected from the following hazards whilst working with the machine: impacts, crushing, hits, cuts, abrasions and heat.
The operating and maintenance personnel must be physically able to handle the bulk, weight, power and/or torque of the machine. Do not use the machine if you have taken any medication or drugs, after drinking alcohol or with any other constraints on your vision, reaction time or judgment. Work in the best possible position so that you can react with both hands to any normal or unexpected movements of the machine. Maintain a balanced body position and secure footing in order to avoid improper strain and to be able to support the reaction torque of the machine. If you cannot safely support the reaction torque of the machine, then use a torque support (e.g. linear stand, telescopic arm, holding fixture/ holder-on, support grip).
Additionally observe the following:· Only operate the machine after having carefully read the operation manual.· Only use impact wrench in combination with appropriate power socket wrenches. Never use
other types of socket wrenches.· Never use power socket wrenches with worn out drive square. Prior to each application,
check that the drive square at the power socket wrench and the extension or at the spindle of the impact wrench is not worn out, or if there are any crazes. Ensure that the power socket wrench is properly seated on the drive square before each startup.· Prior to each application check that the power adjustment is correctly set. Wrong adjustment
can lead to breaking or tearing of the screw connection, as well as to uncontrolled movements of the machine.
· Before each startup ensure that the reverse valve for rotation direction left and right is in the correct position. Do not start the machine, unless the power socket wrench is seated solidly and correctly on the screw head or on the nut.

13
Do not try to hold or guide the machine at the turning power socket wrench. Consider enough space behind you when loosening screw connections, so that the operating
hand cannot be jammed. Only use extensions, adapters and joints, which are explicitly approved for the application with
impact wrenches. If the machine shows any signs of abnormal operation and performance, work must to be
stopped instantly for maintenance and repair.
SAFETY INSTRUCTIONS FOR PREVENTION OF ENTANGLEMENT HAZARDS
CAUTION – Loose clothing, personal jewellery (e.g. necklace), scarves/ ties, long hair or gloves can get caught up in the machine tool or accessories and thus cause severe injuries (lack of breath by throttling, abrasions, skin injuries and/ or cuts and lacerations)
Wear suitable, close fitting work clothing!Wear a hair net, if you have long hair.When handling the machine, jewellery, necklaces, etc. have to be removed or are forbidden, respectively.
SAFETY INSTRUCTIONS FOR PREVENTION OF NOISE HAZARDS
Always wear hearing protection (EN 352) – This refers to the operator, as well as to any other person within the vicinity of the machine. Observe the instructions of the employer and of the professional association.High noise levels during operation can cause permanent hearing problems such as tinnitus (ringing, buzzing, whistling or humming in the ears), hardness of hearing or even deafness.
· Before starting work, ensure that the provided, respectively the factory-made, sound absorbers are mounted and in proper condition.
· If possible, use sound absorbing material, in order to avoid ringing noise at the work pieces.
SAFETY INSTRUCTIONS FOR PREVENTION OF VIBRATION HAZARDS
Vibrations can cause disabling damage to the nerves and blood supply of the hands and arms.· Wear warm clothing and keep your hands warm and dry when working in cold conditions.
Exercise hands and fingers regularly.· Do not hold the machine tool with the free hand· Use stands and/or weight balancers, if possible.· When using a support (e.g. stand) make sure the machine is securely fixed. If no support is
used, hold the machine with light but safe grip in order to support the tool’s reaction torque. The tighter the grip the greater the risk from vibrations.
· Mount the machine as described in the operating instruction booklet in order to avoid unnecessary high vibrations.
· Stop work immediately, if you feel any numbness, tingling, pain or whitening of fingers or hands. Inform the employer and consult a doctor.
14
SAFETY INSTRUCTIONS FOR PREVENTION OF DUST AND FUME HAZARDS
Wear respiratory protection.Use respiratory protection as instructed by your employer and as required by occupational health and safety regulations.Potentially generated or disturbed dust and fumes in the working environment or from using the machine can cause ill health (e.g. cancer, birth defects, asthma and/ or dermatitis).
· Carry out risk assessment regarding dust and fume hazards and implement appropriate measures.
· Keep the working place clean.· Keep in mind that working in certain materials may create dust and fumes causing a potentially
explosive atmosphere.Remark: Some types of metal may have toxic coatings.Please pay particular attention to avoid skin contact and breathing in, when working with those
materials. Ask your material supplier about special safety instructions and stick to them.
SAFETY INSTRUCTIONS FOR PREVENTION OF PROJECTILE HAZARDS
Wear impact-resistant safety goggles (EN 166) – This refers to the operator, as well as for the persons within the vicinity of the machine. Assess and determine the grade of protection required depending on the individual case. The risks to others should also be assessed at this time.
On overhead work, wear a safety helmet (EN 397). If a work piece, accessories, inserted tools, or the tool itself breaks, there is danger from high velocity projectiles.
· Before using the machine check all parts for damages.· Replace damaged parts immediately.· When working on brittle material make sure that you are protected against harmful splinters.
SAFETY INSTRUCTIONS FOR PREVENTION OF ACCESSORY HAZARDS
Only use machine tools, accessories and consumables, which are recommended by the manufacturer. Make sure choosing the correct size and the correct type. Only use accessories, which are in proper condition and do not touch them during operation.
WARNING – Injury due to carelessness
ATTENTION – If the machine is fixed to suspension equipment make sure that it is secure. Never hang the machine onto the supply line.
· Separate the machine form any external energy source before changing the machine tool or an accessory. · Avoid direct contact with the machine tool during and after use as it can be hot or
sharp. Wear protective gloves!Defective/ inappropriate gloves can lead to injury. Only wear proper hand protection, adapted to the work place requirements.
15
WARNING – Explosion hazard!When operating pneumatic impact wrenches in areas exposed to explosion hazards, only use accessories, respectively devices, which are ATEX approved and specified. Use low-sparking accessories.
SAFETY INSTRUCTIONS FOR PREVENTION OF TRANSPORT HAZARDS
CAUTION – Improper Transport, danger of life due to parts falling down! Damage of the machine!
· Never carry the machine at the supply line.
ATTENTION – Separate the machine form any external energy source before transportation.Check that the machine is undamaged and in proper condition.Wear worker’s protective shoes!
MAINTENANCE AND UPKEEP
Basic Safety Instructions:
WARNING – Maintenance and repair work on pneumatic equipment.Compressed air can cause severe injury. Observe legal regulations. Take precautions for persons and environment.
Additionally, observe the following:· Secure machine against unintentional starting and let the machine cool down to the ambient temperature· Use suitable transport equipment, hoists or lifting accessories for moving heavy assembly groups or parts. Protection against tipping, tumbling or falling down when assembling/ disassembling the machine/parts.
CAUTION – Skin exposure to hazardous dusts may cause severe dermatitis. Dust present at the work place could be disturbed during the maintenance procedure and inhaled. Clean machine and work place before maintenance work.
WARNING – Danger of explosion! Generation of sparks during maintenance work!
Observe local safety regulations. Avoid use of force when disassembling and assembling the machine. Always do maintenance work outside areas which are not exposed to explosion hazards.
PROHIBITION
Eating, drinking and smoking are forbidden during maintenance and repair work.
NOTICE – Only use original the manufacturer, in order to avoid damages. Check the adherence to the technical specifications according to the operation manual after each maintenance work. Only use genuine spare parts. Otherwise you risk a decrease in machine performance and an increase in maintenance work.

16
IMPORTANT – There is no warranty for damages and liability is disclaimed, if non-original spare parts are used.
Maintenance InstructionGenerally, pneumatic machines need little maintenance. If the following rules are observed, the
machine will have the expected long life-time and high reliability. Service life and performance of the machines are decisively determined by:
· The air purity· The lubrication conditions and maintenance· The regular control of the compressed air filter, as well as the regular checking of the machine
with regards to external damages.
Inspection and maintenance can be done by the operator. Disassembly and re-assembly of the machine have to be executed by qualified staff only. Incorrect assembly can lead to danger of accident for the operator and to defects on the machine.
As already mentioned, the maintenance of the pneumatic drive has to be done by using a maintenance unit, respectively by lubricating the air connection. Furthermore, it is compulsory to check, if there is enough grease in the impact mechanism and to refill or change it, if necessary.
Impact mechanisms, which are not properly greased, wear out earlier, have a decrease in performance and normally stop working after a certain period without lubrication .
After completing maintenance and repair work and before restarting production make sure that…· All materials, tools and other equipment which are required for maintenance or repairs have
been removed from the work area of the machine.· Any fluid leaks have been removed.· All safety devices on the machine have proper function.· The oil level was checked.· Fixtures of screw connections are tight· Removed container covers, screens or filters were reinstalledThe owner ensures that all maintenance, inspection and assembly work is done by authorized
and qualified experts, who have been appropriately informed by thorough study of the operation manual.
DISASSEMBLY- RE-ASSEMBLY
Maintenance and repairDisassembly and re-assembly should be done according to the exploded views, respectively the
sectional drawings (see repair instruction). All work regarding disassembly and re-assembly, as well as maintenance and repair have to be executed by skilled staff only.
DANGER – Working with the machine without appropriate preparation and disregarding of instructions. Shut down the machine properly and let it cool down to
the ambient temperature.
NOTICE – Special instructions apply for the repair of explosion-proof machines.Retrofits or modifications of the machine can affect the explosion protection. Therefore, retrofits or modifications are allowed upon agreement with the manufacturer only.

17
The explosion-proof machine is designed in the type of protection “c“ constructive safety. All work executed on the machine, influencing the explosion protection, e. g. repairs with mechanical machining, require an approval of an authorized expert or have to be done by the manufacturer. The internal structure must remain unmodified.
STORAGE
Unused machines and machine tools should be kept in a dry, closed room.Keep them free from damaging influences such as damp, frost or large temperature fluctuations
as well as mechanical damage.Always store the machine in a way that important machine instructions, e. g. on stickers and
signs, are legible.
DISPOSAL
Dispose worn out/defective machine tools according the local/national regulations. Fully disassemble machine for the necessary disposal. Separate materials according to local environmental specifications.
Dispose environmentally hazardous greasing, cooling or cleaning agents in order to avoid environmental contamination.
ENVIRONMENTAL REGULATIONS
When working on or with the equipment, it is imperative to observe all legal requirements in regards to waste-disposal and proper recycling.
In particular during installation, repair and maintenance work, water damaging agents, such as
· lubricating grease and oil,· hydraulic fluid,· coolant,· solvent containing cleaning agents must not leak into the ground or reach the sewage system.
These materials must be stored, transported, contained and disposed of in suitable containers!
18
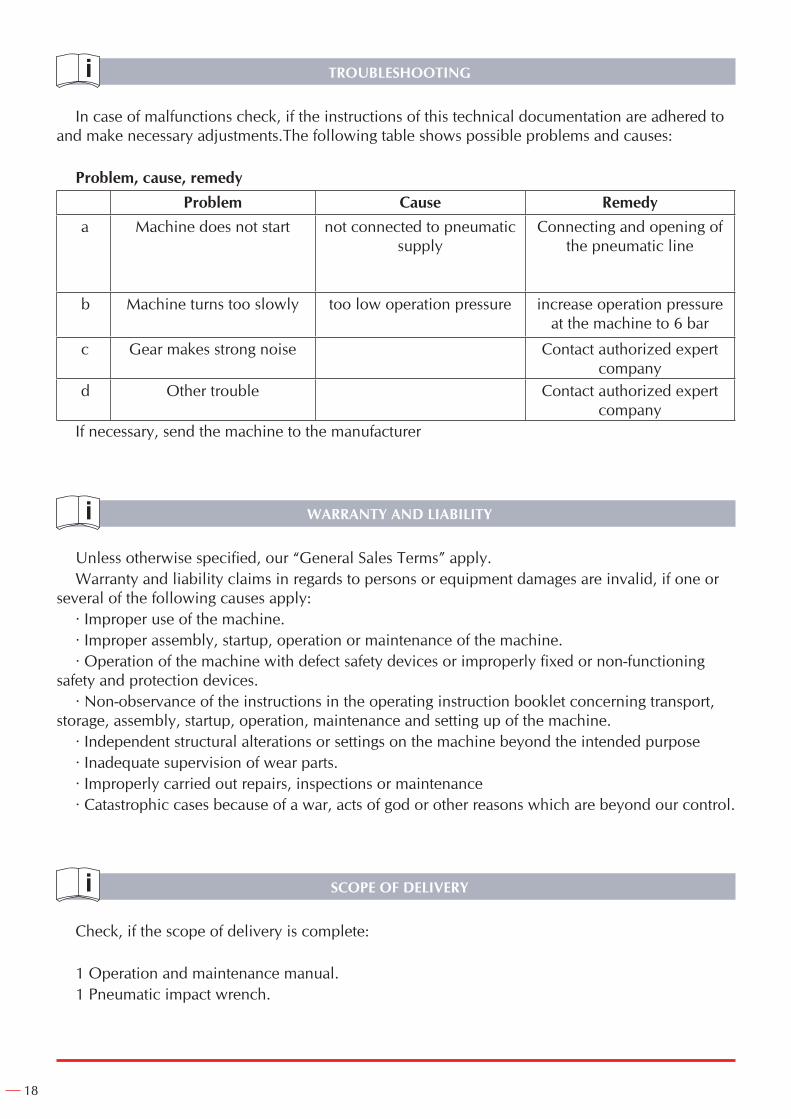
TROUBLESHOOTING
In case of malfunctions check, if the instructions of this technical documentation are adhered to and make necessary adjustments.The following table shows possible problems and causes:
Problem, cause, remedyProblem Cause Remedy
a Machine does not start not connected to pneumatic supply
Connecting and opening of the pneumatic line
b Machine turns too slowly too low operation pressure increase operation pressure at the machine to 6 bar
c Gear makes strong noise Contact authorized expert company
d Other trouble Contact authorized expert company
If necessary, send the machine to the manufacturer
WARRANTY AND LIABILITY
Unless otherwise specified, our “General Sales Terms” apply.Warranty and liability claims in regards to persons or equipment damages are invalid, if one or
several of the following causes apply:· Improper use of the machine.· Improper assembly, startup, operation or maintenance of the machine.· Operation of the machine with defect safety devices or improperly fixed or non-functioning
safety and protection devices.· Non-observance of the instructions in the operating instruction booklet concerning transport,
storage, assembly, startup, operation, maintenance and setting up of the machine.· Independent structural alterations or settings on the machine beyond the intended purpose· Inadequate supervision of wear parts.· Improperly carried out repairs, inspections or maintenance· Catastrophic cases because of a war, acts of god or other reasons which are beyond our control.
SCOPE OF DELIVERY
Check, if the scope of delivery is complete:
1 Operation and maintenance manual.1 Pneumatic impact wrench.

ARTICULO / ITEM / ARTICLE: ....................................................................................................................
Nº DE SERIE / SERIE Nº / Nº SERIE: ...........................................................................................................
DISTRIBUIDOR / DISTRIBUTOR / DISTRIBUTEUR: ...................................................................................
PAIS / COUNTRY / PAYS: .............................................................................TEL.:....................................
FECHA DE VENTA / SALE DATE / DATE VENTE: ........................................................................................
NOMBRE DEL COMPRADOR / BUYER NAME / NOM DE L’ACHETEUR: ..................................................
TEL. COMPRADOR / BUYER TEL. / TEL. DE L’ACHETEUR: ........................................................................
CERTIFICADO DE GARANTIAGUARANTEE CERTIFICATECERTIFICAT DE GARANTIE
SELLO / STAMP / CACHET
EGA MASTER GARANTIZA AL COMPRADOR DE ESTA MAQUINA LA GARANTIA TOTAL (DURANTE 12 MESES), DE LAS PIEZAS CON DEFECTOS DE FABRICACION. ESTA GARANTIA NO CUBRE AQUELLAS PIEZAS QUE POR SU USO NORMAL TIENEN UN DESGASTE. PARA OBTENER LA VALIDEZ DE LA GARANTIA , ES ABSOLUTAMENTE IMPRESCINDIBLE QUE COMPLETE Y REMITA ESTE DOCUMENTO A EGA MASTER , DENTRO DE LOS SIETE DIAS A PARTIR DE LA FECHA DE COMPRA.
EGA MASTER GUARANTEES TO THE BUYER OF THIS MACHINE THE TOTAL WARRANTY (DURING 12 MONTHS), OF THE PIECES WITH MANUFACTURING FAULTS.THIS GUARANTEE DOES NOT COVER THOSE PIECES WORN OUT DUE TO A NORMAL USE. IN ORDER TO OBTAIN THE VALIDITY OF THIS WARRANTY , IT IS ABSOLUTELY NECESSARY TO FULFILL THIS DOCUMENT AND RESEND IT TO EGA MASTER WITHIN 7 DAYS FROM SALE DATE.
EGA MASTER GARANTIE A L’ACHETEUR DE CETTE MACHINE LA GARANTIE TOTALE (PENDANT 12 MOIS) DES PIECES AVEC DEFAUTS DE FABRICATION. CETTE GARANTIE NE COUVRE PAS LES PIECES QUE PAR UN USAGE NORMAL, SOIENT DETERIOREES. POUR OBTENIR LA VALIDITE DE LA GARANTIE, IL EST ABSOLUMENT IMPERATIF COMPLETER ET ENVOYER CE DOCUMENT EGA MASTER, DANS UN DELAI DE 7 JOURS A PARTIR DE LA DATE D’ACHAT.
EJEMPLAR PARA EGA MASTER / COPY FOR EGA MASTER / EXEMPLAIRE POUR EGA MASTER
ARTICULO / ITEM / ARTICLE: ....................................................................................................................
Nº DE SERIE / SERIE Nº / Nº SERIE: ...........................................................................................................
DISTRIBUIDOR / DISTRIBUTOR / DISTRIBUTEUR: ...................................................................................
PAIS / COUNTRY / PAYS: .............................................................................TEL.:....................................
FECHA DE VENTA / SALE DATE / DATE VENTE: ........................................................................................
NOMBRE DEL COMPRADOR / BUYER NAME / NOM DE L’ACHETEUR: ..................................................
TEL. COMPRADOR / BUYER TEL. / TEL. DE L’ACHETEUR: ........................................................................
CERTIFICADO DE GARANTIAGUARANTEE CERTIFICATECERTIFICAT DE GARANTIE
SELLO / STAMP / CACHET
EGA MASTER GARANTIZA AL COMPRADOR DE ESTA MAQUINA LA GARANTIA TOTAL (DURANTE 12 MESES), DE LAS PIEZAS CON DEFECTOS DE FABRICACION. ESTA GARANTIA NO CUBRE AQUELLAS PIEZAS QUE POR SU USO NORMAL TIENEN UN DESGASTE. PARA OBTENER LA VALIDEZ DE LA GARANTIA , ES ABSOLUTAMENTE IMPRESCINDIBLE QUE COMPLETE Y REMITA ESTE DOCUMENTO A EGA MASTER , DENTRO DE LOS SIETE DIAS A PARTIR DE LA FECHA DE COMPRA.
EGA MASTER GUARANTEES TO THE BUYER OF THIS MACHINE THE TOTAL WARRANTY (DURING 12 MONTHS), OF THE PIECES WITH MANUFACTURING FAULTS.THIS GUARANTEE DOES NOT COVER THOSE PIECES WORN OUT DUE TO A NORMAL USE. IN ORDER TO OBTAIN THE VALIDITY OF THIS WARRANTY , IT IS ABSOLUTELY NECESSARY TO FULFILL THIS DOCUMENT AND RESEND IT TO EGA MASTER WITHIN 7 DAYS FROM SALE DATE.
EGA MASTER GARANTIE A L’ACHETEUR DE CETTE MACHINE LA GARANTIE TOTALE (PENDANT 12 MOIS) DES PIECES AVEC DEFAUTS DE FABRICATION. CETTE GARANTIE NE COUVRE PAS LES PIECES QUE PAR UN USAGE NORMAL, SOIENT DETERIOREES. POUR OBTENIR LA VALIDITE DE LA GARANTIE, IL EST ABSOLUMENT IMPERATIF COMPLETER ET ENVOYER CE DOCUMENT EGA MASTER, DANS UN DELAI DE 7 JOURS A PARTIR DE LA DATE D’ACHAT.
EJEMPLAR PARA EL CLIENTE / COPY FOR THE CUSTOMER / EXEMPLAIRE POUR LE CLIENT


C/ ZORROLLETA 11, POL. IND. JUNDIZ01015 VITORIA, SPAIN P.O.B. APTDO. 5005
TEL. 34 - 945 290 001 FAX. 34 - 945 290 [email protected]
www.egamaster.com