TM DS60 / DS70 Controller Installation Manual...Installation Manual Order/Part Number for this...
47
No. 50574, Issue 5. October 2000 TM Dynamic Controls Ltd. welcomes feedback from its customers on its products and documentation. If you would like to comment on this manual or the product it describes, please contact us at any of the addresses at the back of this manual, or by email at: [email protected] Installation Manual Re-order Information (Please quote this information when re-ordering this manual) DS60/70 Installation Manual - GBK50574 or visit the Dynamic Mobility web site to download the latest version (in PDF format) http://www.DynamicMobility.co.nz DS60 / DS70 Controller Installation Manual Order/Part Number for this Manual : GBK50574 issue 5 Important Notes 1. Read this Manual carefully before installing or operating your DS60 or DS70 Scooter Controller. 2. Due to continuous product improvement Dynamic reserves the right to update this Manual. This manual supersedes all previous issues which must not continue to be used. 3. Any attempt to gain access to or in any way abuse the electronic components and associated assemblies that make up the wheelchair system renders the Manufacturer’s warranty void and the Manufacturer free from liability.
Transcript of TM DS60 / DS70 Controller Installation Manual...Installation Manual Order/Part Number for this...

No. 50574, Issue 5. October 2000
TM
Dynamic Controls Ltd. welcomes feedback from its customers on itsproducts and documentation. If you would like to comment on this manual or
the product it describes, please contact us at any of the addresses at theback of this manual, or by email at:
Installation Manual Re-order Information(Please quote this information when re-ordering this manual)
DS60/70 Installation Manual - GBK50574
or visit the Dynamic Mobility web site to download the latest version (in PDF format)
http://www.DynamicMobility.co.nz
DS60 / DS70 Controller Installation Manual
Order/Part Number for this Manual : GBK50574 issue 5
Important Notes1. Read this Manual carefully before installing or operating your DS60 or DS70
Scooter Controller.
2. Due to continuous product improvement Dynamic reserves the rightto update this Manual. This manual supersedes all previous issueswhich must not continue to be used.
3. Any attempt to gain access to or in any way abuse the electronic componentsand associated assemblies that make up the wheelchair system renders theManufacturer’s warranty void and the Manufacturer free from liability.

GBK50574 - Issue 5 October 2000
Contents
��������
� ������� �� � � � � � � � � � � � � � � � � � � � � � � � � � � � � � � � � �
� ����������� �� �� � � � � � � � � � � � � � � � � � � � � � � � � � � � �2.1 General Features . . . . . . . . . . . . . . . . . . . . . . . . . . . . . . . . . . . . . . . . . . . . . . . 42.2 Safety and Protection Features . . . . . . . . . . . . . . . . . . . . . . . . . . . . . . . . . . . . 4
� ���� � ��� ��� � � � � � � � � � � � � � � � � � � � � � � � � � � � � � � � �3.1 Electrical Specifications . . . . . . . . . . . . . . . . . . . . . . . . . . . . . . . . . . . . . . . . . 53.2 Mechanical Specifications . . . . . . . . . . . . . . . . . . . . . . . . . . . . . . . . . . . . . . . 63.3 Environmental Specifications . . . . . . . . . . . . . . . . . . . . . . . . . . . . . . . . . . . . . 7
� ��������� �� � � � � � � � � � � � � � � � � � � � � � � � � � � � � � � � � � �4.1 General . . . . . . . . . . . . . . . . . . . . . . . . . . . . . . . . . . . . . . . . . . . . . . . . . . . . . . 84.2 Mounting . . . . . . . . . . . . . . . . . . . . . . . . . . . . . . . . . . . . . . . . . . . . . . . . . . . . 84.3 Connections and Wiring . . . . . . . . . . . . . . . . . . . . . . . . . . . . . . . . . . . . . . . . . 9
4.3.1 Connections . . . . . . . . . . . . . . . . . . . . . . . . . . . . . . . . . . . . . . . . . . . . 94.3.2 Wires and Terminations . . . . . . . . . . . . . . . . . . . . . . . . . . . . . . . . . . 104.3.3 Battery Connection . . . . . . . . . . . . . . . . . . . . . . . . . . . . . . . . . . . . . . 114.3.4 Motor and Park Brake Connections . . . . . . . . . . . . . . . . . . . . . . . . . 124.3.5 Battery Charger Connection . . . . . . . . . . . . . . . . . . . . . . . . . . . . . . . 124.3.6 On / Off Switch . . . . . . . . . . . . . . . . . . . . . . . . . . . . . . . . . . . . . . . . . 134.3.7 Speed Input . . . . . . . . . . . . . . . . . . . . . . . . . . . . . . . . . . . . . . . . . . . . 144.3.8 External LED (Optional) . . . . . . . . . . . . . . . . . . . . . . . . . . . . . . . . . 16
� ������ �� � � � � � � � � � � � � � � � � � � � � � � � � � � � � � � ��5.1 Introduction . . . . . . . . . . . . . . . . . . . . . . . . . . . . . . . . . . . . . . . . . . . . . . . . . 175.2 Programmable Characteristics . . . . . . . . . . . . . . . . . . . . . . . . . . . . . . . . . . . 19
5.2.1 Setup Menu Characteristics . . . . . . . . . . . . . . . . . . . . . . . . . . . . . . . 195.2.2 Options Menu Parameters . . . . . . . . . . . . . . . . . . . . . . . . . . . . . . . . . 22
5.3 DZ-DS Programmer Operation . . . . . . . . . . . . . . . . . . . . . . . . . . . . . . . . . . . 245.3.1 Main Menu . . . . . . . . . . . . . . . . . . . . . . . . . . . . . . . . . . . . . . . . . . . . 245.3.2 Setup Menu . . . . . . . . . . . . . . . . . . . . . . . . . . . . . . . . . . . . . . . . . . . . 265.3.3 Options Menu . . . . . . . . . . . . . . . . . . . . . . . . . . . . . . . . . . . . . . . . . . 275.3.4 Profiles Menu . . . . . . . . . . . . . . . . . . . . . . . . . . . . . . . . . . . . . . . . . . 28

GBK50574 - Issue 5 October 2000
Contents
� ������ �� � � � � � � � � � � � � � � � � � � � � � � � � � � � � � � � ��6.1 System Troubleshooting . . . . . . . . . . . . . . . . . . . . . . . . . . . . . . . . . . . . . . . . 33
6.1.1 If the Status LED if Off . . . . . . . . . . . . . . . . . . . . . . . . . . . . . . . . . . 336.1.2 If the Status LED is Flashing . . . . . . . . . . . . . . . . . . . . . . . . . . . . . . 336.1.3 If the Status LED is Permanently On : . . . . . . . . . . . . . . . . . . . . . . . 34
6.2 DS System Fault Handling . . . . . . . . . . . . . . . . . . . . . . . . . . . . . . . . . . . . . . 36
� ������� ���� �� � � � � � � � � � � � � � � � � � � � � � � � � � � ��
� !����������� �������� " � �#�$!%�& � � � � � � � � � � � � � � �'
' %� �������� � � � � � � � � � � � � � � � � � � � � � � � � � � � � � � �(
�( �����#����% �����)�� ��� � � � � � � � � � � � � � � � � � � � � ��
�� )����# � � � � � � � � � � � � � � � � � � � � � � � � � � � � � � � � � ��
�� �����������* ���������� �� � � � � � � � � � � � � � � � � � � � ��

GBK50574 - Issue 5 October 2000
1 Introduction 1
� ������� ��
The DS60 and DS70 are robust and versatile controllers for a wide range of DCmotor control applications. The DS70P is the same as the DS60S but has a highercurrent rating. The DS60NS is the same as the DS60S but has a short travel (60°)speed pot rather than a long travel (270°) speed pot, and will be treated in thismanual as the same product (DS60), except where necessary.
The DS60 and DS70 can be used with dual or single motor drives and dual orsingle direction speed inputs. Permanent magnet motors can be used with orwithout parking brakes. The power output to the motor is controlled by a fullbridge, ultrasonic pulse width modulation circuit. This silently provides smoothtransition between forward and reverse directions. Typical applications includescooters, electric vehicles, stair lifts and conveyor belts.
Superior safety features, smooth driving and programmable performance are allprovided by the microcontroller. A hand-held DZ-DS Programmer is available toallow performance customisation to individual requirements.
This manual provides operation and installation information for the DS60 andDS70 Controllers and the DZ-DS Programmer, and must be read and understood.For more information contact Dynamic Controls Ltd or an agent as listed in Section11 - Sales and Service Information.
A Typical DS60 or DS70 System

GBK50574 - Issue 5 October 2000
2 General Description2
� ����������� �� ��
The DS60 and DS70 Controllers are designed to operate with a nominal 24Vbattery input and to give a maximum output current of 60A and 70A respectively.If the battery voltage is low, the Status LED will flash slowly, as a warning torecharge the batteries. If a fault condition is detected, the Status LED (and theoptional External LED) will flash rapidly, with the number of flashes indicating thetype of fault. Faults can also be displayed by the DZ-DS Programmer.
The inbuilt microcontroller continually monitors the system, to ensure safe andreliable operation. Safety conditions that are monitored include:
� Speed control system integrity� Internal voltages and circuits� Motor voltages and circuits� Safety isolate relay� Battery voltages.
The installation and operational performance can be customised to the specificrequirements of the user by using the DZ-DS Programmer.
The Controller incorporates motor load compensation which provides precisemotor control over a wide range of driving conditions. When used on a scooter forexample, whether the vehicle is driven on carpet or an uneven grade, loadcompensation automatically adjusts the power to the motor to maintain the selectedspeed. This feature ensures less roll-back when stopping on a slope. The correctlevel of load compensation depends on the type of motor and the length of wiringand is easily set using the DZ-DS Programmer.
The Controller can be used with either a dual direction Speed Lever or with asingle direction Speed Lever and Forward / Reverse Switch. If required, amaximum speed potentiometer can be fitted in line with the speed control lever.
For safety, the Controller will not operate if the speed input lever is not in theneutral position when the Controller is turned on. The speed input should be set tothe neutral position and the Controller will then be able to operate normally.
If the system is turned on but not operated for a set period of time, the Controllercan be programmed to automatically turn itself off to conserve battery life. It canbe turned on again by turning the On/Off Switch off and then on again.

GBK50574 - Issue 5 October 2000
2 General Description 3
In order to limit the Controller case temperature, the output current is reduced athigh internal temperatures. In operation, the heating of the Controller is balancedby the cooling.
In most cases it is desirable for the motor to run at a constant speed irrespective ofbattery voltage. The Controller controls the motor voltage in this manner. Underthese conditions the voltage at the motor terminals is limited to 24V even withfreshly charged batteries.
The DS60 and DS70 control the power to the motor so as to limit drive at very highor very low battery voltages, thereby reducing battery damage and extendingbattery life. The Controller is protected against accidental reverse batteryconnection and a plastic vacuum moulded case protects the electronics.

GBK50574 - Issue 5 October 2000
2 General Description4
��� �������+������
The DS60 and DS70 have the following general features:
� Powered by a 24 V battery;
� Fully programmable with the DZ-DS Programmer for optimum drivingperformance;
� Load compensation to regulate speed to typical driving conditions;
� Two speed control options;
� Diagnostics displayed on the Status LED and DZ-DS Programmer;
� Electromagnetically compatible: - not susceptible to high levels of RFI;- emitting low levels of RFI;- protected against high levels of ESD;
� Compact enclosure protecting against dust to IP40.
��� �����#���������� ���+������
The DS60 and DS70 have the following safety and protection features:
� Out-of neutral inhibit to prevent unexpected movement when mountingscooter;
� ESD protection to all inputs and outputs;
� Open circuit park brake protection;
� Motor and park brake output short circuit protection when driving;
� Over, under and reverse battery protected;
� Compliance with ISO 7176 requirements;

GBK50574 - Issue 5 October 2000
3 Specifications 5
� ���� � ��� ���
��� !���� �������� � ��� ���
������� ,���� % � ,�� %�- .� ��
Operating Voltage Equivalent to batteryvoltage
17.5 24.0 31.0 V
Voltage Drop At 40 A 0.85 V
PWM Frequency 15.0 15.6 KHz
Peak Output Current DS60. For 3 secondsDS70. For 10 seconds @ambient
5464
6070
6676
AA
Continuous CurrentRating
At full speedAt half speed
2215
AA
Braking Current DS60DS70
6070
AA
Quiescent Current In sleep mode 1.25 mA
Parking Brake Output 2 A
Minimum ArmatureResistance
5 mOhms
Recommended MotorType
Permanent Magnet
External SpeedControl
3 Wire 5 KOhms Linear Travel Potentiometer. TheDS60S and DS70P travel is 270°, the DS60NS 60°.
Forward / ReverseControl
Bi-directional or Single direction lever with ReverseSwitch
Neutral ThrottleControl
Motor plug braked into neutral - power On; Unbraked - power Off.

GBK50574 - Issue 5 October 2000
3 Specifications6
��� %��/�� �������� � ��� ���
Size: 130 * 130 * 50 mm
Weight 0.5 Kg
Mounting: See Section 4.2 - Mounting
Case material: Clear Plastic Vacuum Moulded
Case sealing: IP40 if mounted as per mounting instructions
DS60 and DS70 Configuration

GBK50574 - Issue 5 October 2000
3 Specifications 7
��� !�* ������������� � ��� ���
��������� ����� ����� ������ ����
Operating ambienttemperature range
-25 50 �C
Storage temperature range -25 70 �C
Operating and storagehumidity
0 90 %RH
RFI Susceptibility 20 V / m precal method. IEC 801-3
RFI Emissions CISPR 22, class B
ESD 8 KV machine model. IEC 801-2
Vibration Specification BS2011 part 2Fd. BS7527 section 3.5, class5M3
Durability ISO7176-14

GBK50574 - Issue 5 October 2000
4 Installation8
63.540.5
118 118
128 128
70
118
118
128
128
Ø 4.5mm 4 places
Ø M4threaded
M4 mountingholes
M4 mountingholes
29.163.5
76.7
� ��������� ��
��� ������
Installing a DS60 or DS70 Controller requires the following steps:
a) Mounting . . . . . . . . . . . . . . . See Section 4.2 - Mounting
b) Connections and Wiring . . . . See Section 4.3 - Connections and Wiring
c) Programming . . . . . . . . . . . . See Section 5 - Programming
��� %���� ��
The recommended mounting orientation is to align the base plate vertically.Visibility of the Status LED should be considered. Two mounting arrangements areavailable:
� Outer mounting holes symmetrically located in the corners of the squarebase plate.
� Inner holes situated as shown. The DS70 has M4 threaded holes while theDS60 has M4.5 holes that are not threaded.
DS60 Base Plate Mounting Holes DS70 Base Plate Mounting Holes

GBK50574 - Issue 5 October 2000
4 Installation 9
��� ������� �������) ��
����� ������� ���
DS60 and DS70 Connections
Note: Do not use the frame of a wheelchair or scooter as the earth return forany lights or actuators. Making any low resistance connection to theframe is regarded as a possible safety hazard and not allowed byinternational performance and safety standards for wheelchairs andscooters.
Note: Ensure that all wiring to the DS70 is suitably restrained and of sucha length that incorrect assembly cannot occur.
GBK50574 - Issue 5 October 2000
4 Installation10
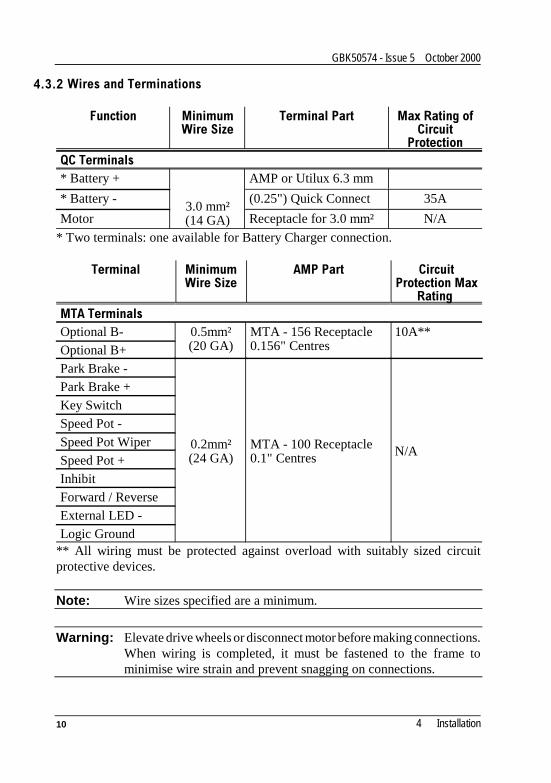
����� ) ������0�� ��� ���
����� ��������������
������ ����� ������������������
������������������ �* Battery +
3.0 mm²(14 GA)
AMP or Utilux 6.3 mm
* Battery - (0.25") Quick Connect 35A
Motor Receptacle for 3.0 mm² N/A
* Two terminals: one available for Battery Charger connection.
������ ��������������
�������� �������������������
���������������� �Optional B- 0.5mm²
(20 GA)MTA - 156 Receptacle0.156" Centres
10A**Optional B+Park Brake -
0.2mm²(24 GA)
MTA - 100 Receptacle0.1" Centres N/A
Park Brake +Key SwitchSpeed Pot -
Speed Pot WiperSpeed Pot +InhibitForward / ReverseExternal LED -Logic Ground
** All wiring must be protected against overload with suitably sized circuitprotective devices.
Note: Wire sizes specified are a minimum.
Warning: Elevate drive wheels or disconnect motor before making connections.When wiring is completed, it must be fastened to the frame tominimise wire strain and prevent snagging on connections.

GBK50574 - Issue 5 October 2000
4 Installation 11
����� 1����#�������� ��
The DS60 and DS70 Controllers are designed to perform optimally with either freeacid, AGM or Gel Cell deep cycle batteries. Consult Dynamic Controls for otherbattery types. It is recommended that two 12 V batteries with capacity greater than20 A hours be used.
Either of the two B- or B+ terminals can be used to connect the batteries.
A thermal circuit breaker must be installed in the battery wiring to protect thebatteries, wiring loom and Controller from external short circuits. If the twobatteries are permanently wired together (single battery box), the best position forthis circuit breaker is between the two batteries. If the batteries are individuallyplugged together (separate battery boxes), each battery requires a circuit breaker.
Battery Overload Protection and Wiring

GBK50574 - Issue 5 October 2000
4 Installation12
Inhibit
Battery -
Battery +
Battery Charger PlugBattery Charger Socket
Battery Charger
33
21 12
InhibitMTA Pin 7
Battery -
Battery +
*
����� %���������2�1�2��������� ���
The motor is connected to the QC terminals labelled M+ and M- in Section 4.3.1 -Connections.
The Park Brake is connected to Pins 1 and 2 of the 10 way MTA.
����� 1����#��/����������� ��
A battery charger socket is connected to the unused B+ and B- terminals andInhibit Pin 7 of the 10 way MTA. For safety, the motor is prevented from drivingwhen a correctly wired battery charger is plugged in to the Controller.
Battery Charger Wiring
* A suitably rated fuse or circuit breaker to protect the associated wiring. Forexample, 10A for 0.5mm wiring.
Note: The inhibit must be shorted to B- on the battery charger plug.
Alternatively, where a permanently fixed battery charger is used, a BatteryCharge/Run switch should be used to connect the inhibit to B- during charging.

GBK50574 - Issue 5 October 2000
4 Installation 13
���� 3��4�3����5 ��/
The On / Off Switch is wired between the Key Switch Pin 3 of the 10 way MTAconnector, and the B+ Optional terminal. A fuse or circuit breaker must be fittedas shown to protect the wiring as close as practical to the B+ terminal.
On / Off Switch Wiring
The switch life should be rated for at least 1 million cycles of operation and atleast 350 mA continuous DC.
The fuse must have a minimum rating of 200 mA and a maximum of 60% of theswitches DC rating.
Note: Excessive switch contact bounce can prevent the Controller fromturning on properly.

GBK50574 - Issue 5 October 2000
4 Installation14
����� ����������
The DS60S and the DS70P have standard long travel (270°) potentiometers. TheDS60NS has a short travel (60°) potentiometer for speed control.
In either case, resistance should be 5 KOhm with linear resistance tapers. Werecommend the use of a high quality long life (greater than 10 M cycles)potentiometer. Note that the use of carbon or wirewound potentiometers is notrecommended.
The long travel (270°) Speed Pot uses only the lower quarter of the pot travel.During operation, a Controller fault will occur if the pot shaft is rotated too faroutside the voltage ranges given in the table below.
The speed input potentiometer may be used for speed control in both directions,or alternatively in one direction with a separate Forward / Reverse switch. Thisoption is selected by the Single Ended Pot option using the DZ-DS Programmer.
The input requirements corresponding to the programmable options aresummarised below. All voltages given are nominal values.
6�������7�8� ������ ��������(�5�#%09����������) ��
� ����!������
+��������7�*����$6&
:�������$6&
+��������+�5��$6&
DS60S and DS70P(long 270°)
On N/A 2.5 3.35
Off 1.65 2.5 3.35
DS60NS(short 60°)
On N/A 2.5 4.3
Off 0.7 2.5 4.3
Note : The Controller is designed to Fault if the voltages are significantlyoutside these ranges.

GBK50574 - Issue 5 October 2000
4 Installation 15
B-B+Optional
Speed Pot
Forward / ReverseLogic Ground
Pin 8Pin 10
Pin 6Pin 5Pin 4
Speed Pot +Speed Pot Wiper
Speed Pot -
Forward / Reverse Direction Switch (used for Single Ended Pot option)
10 way MTA
Long Travel (270°) Speed Pot Short Travel (60°) Speed Pot
The long travel Speed Pot uses only the bottom quarter of its mechanical range,and the position of the wiper is determined by setting the impedance betweenSpeed Pot- and the wiper to 0.53 K Ohms. A short travel Speed Pot has the Wiperset in the middle, with 2.5V either side.
Speed Pot Wiring

GBK50574 - Issue 5 October 2000
4 Installation16
The Forward / Reverse Direction Switch, if used, is connected between theForward / Reverse Pin 8 of the 10 way MTA, and either Logic Ground Pin 10 ofthe MTA or the Optional B- terminal.
The Speed Pot in connected between Speed Pot- Pin 4 and Speed Pot+ Pin 6 of the10 way MTA, with the Speed Pot Wiper connected to Pin 5.
����� !-������;!���$3�� ����&
The External LED operates in exactly the same way as the internal Status LED anddisplays operation, low battery and fault conditions.
The External LED does not require a resistor and is wired between Key Switch Pin3 of the 10 way MTA or Optional B+ Pin 2 and External LED- Pin 9. The LEDcolour should be yellow.
Warning: LED’s with voltage ratings, e.g. for 12 V or 24 V, have internallyfitted resistors. These LED’s must not be used.

GBK50574 - Issue 5 October 2000
5 Programming 17
� ������ ��
Warning: Incorrect or inappropriate programming of a DS60 or DS70 may putthe vehicle into a dangerous state.
Dynamic Controls accept no responsibility or liability for accidentscaused by incorrect programming.
This chapter must be read and understood before attempting toprogram a DS60 or DS70.
Do not plug the DZ-DS Programmer into the Controller while thevehicle is in motion.
��� ������� ��
The driving performance of a DS60 or DS70 is dependant on its programming. AController can be adjusted for a particular application and the driving performancedefined to suit the requirements of an individual.
An Installation Programmer is available to the vehicle manufacturer. A simplifiedDZ-DS User Programmer is available for purchase by the user.
The DZ-DS Installation Programmer provides access to several menus:
• Setup Menu• Options Menu • Profile Menu• Speed Lever in Neutral Menu• Controller Version Menu
A Fault Menu appears when the Programmer is first plugged in if a fault is active.See Section 5.3.1 - Main Menu.
The Speed Lever in Neutral Menu is not accessible with the DS60 or DS70. TheController Version Menu is a screen to state the version of the Controller only.

GBK50574 - Issue 5 October 2000
5 Programming18
The Setup Menu contains performance characteristics so that the vehicle can beprogrammed to suit a particular set of conditions.
The Options Menu contains configuration parameters, some of which are inter-related with settings in the Setup Menu.
The Profile Menu allows the settings in the above two menus to be saved as oneof five Profiles. The DS Controller comes with a Default Profile installed duringmanufacture, but an additional five profiles can be programmed.
Note: If a wheelchair is programmed with settings other than default, undersome very rare fault conditions default settings could beautomatically restored, thereby changing driving characteristics. Thisin turn could lead to a chair moving in a direction or speed that is notintended. Programmers should consider this risk when programmingsettings other than default.

GBK50574 - Issue 5 October 2000
5 Programming 19
��� �������"����/����� �� ��
����� ������%�����/����� �� ��
See Section 5.3.2 - Setup Menu for step-by-step operation. The safety of the usermust be considered when setting some of these characteristics. Only thosecharacteristics marked (PD) are available in the DZ-DS User Programmer.
�������������� ���������������� �� ��� ��� � ����
Acceleration(PD)
Sets the maximum acceleration ofthe motor when not in current limit.The lower the setting, the slower theacceleration. A lower accelerationcan be used to give the motor softerperformance, or to compensate forspeed input jittering.
1 10 7 %/10of
max.
Deceleration(PD)
The time required to slow to a stopwhen the speed input requests zerospeed. Normally set higher thanacceleration except with very lowForward Speed values.
1 10 7 %/10of
max.
Forward Speed(PD)
Maximum forward speed of themotor. The higher the setting, thehigher the maximum speed.Commonly set to 10.
1 10 10 %/10of
max.
Reverse Speed(PD)
Maximum reverse speed of themotor. The higher the setting, thehigher the maximum speed. Usuallyset equal or less than ForwardSpeed..
1 10 6 %/10of
max
Reduce Speed Not available in the DS60 or DS70
BuzzerVolume
Not available in the DS60 or DS70

GBK50574 - Issue 5 October 2000
�������������� ���������������� �� ��� ��� � ����
5 Programming20
MotorResistance
The DS60 and DS70 has inbuiltLoad Compensation to maintainconstant speed with varying motorload. When the Motor resistance isset too low, the motor speeddecreases under load. When set toohigh the motor speed will increaseexcessively under load.
Begin the selection of this setting ata low value of 50 and graduallyincrease until the motor does notslow when under load, when at halfspeed. When testing, setAcceleration and Deceleration tolow values, e.g. 3 and 7 respectively.When the correct setting is found,reset Acceleration and Decelerationto suitable values.
Load Compensation is turned Offand On in the Option Menu.
5 255 50 m
Sleep Time(PD)
The maximum time that theController can be turned on inneutral before it goes into its lowpower Sleep Mode. In Sleep Modethe LED is off and the Controllerdoes not respond. The On/OffSwitch must be turned off and thenon again to restart.
5 60 10 min.

GBK50574 - Issue 5 October 2000
�������������� ���������������� �� ��� ��� � ����
5 Programming 21
Park BrakeDelay
The time between the motorstopping and the Park Brakesengaging.
A low value minimises creep whenthe motor stops under load. If, in thecase of an electric scooter, thestopping load varies, the valueshould be between that whenstopping on a smooth floor andstopping on a slope.
1 30 6 *50msec

GBK50574 - Issue 5 October 2000
5 Programming22
����� 3�� ����%������������
See Section 5.3.3 - Options Menu for step-by-step operation. None of theseparameters are available with the DZ-DS User Programmer.
�������������� ���������������� ������� ��� �
Single-endedPotentiometer
If On, speed control in only one directionavailable unless Forward/Reverse Switchconnected.
Set to Off if speed and direction arecontrolled by one lever and speed controlof both directions is required.
On / Off Off
Standard SpeedPot
Always set to Off. On / Off Off
Motor Reverse Set to On if the motor goes in theopposite direction to that required.
On / Off Off
Pot Reverse If set to Off, input voltages higher thanneutral provide forward speed, and inputvoltages lower than neutral producereverse speed.
Set to On if potentiometer polarity isreversed. The above input voltagerequirements are reversed.
On / Off Off
BrakeChecking
Set to On if the motor has a Park Brake.
Set to Off if there is no Park Brake
On / Off On
Enable Sleep If set to On, the Sleep Time value in theSetup Menu is applied. The Controllercan enter the low current mode toconserve power.
On / Off On

GBK50574 - Issue 5 October 2000
�������������� ���������������� ������� ��� �
5 Programming 23
Check forSlope
If set to On, the Park Brake Delay set inthe Setup Menu is bypassed. This cancause a jerk when stopping on levelground if the Deceleration rate is low.
Normally set to Off.
On / Off Off
Current LimitTimer
If set to On, the Controller can onlyoperate in Current Limit for 15 seconds.After this time the output current willreduce to zero and a Fault Code 4 willoccur.
If there is concern about the user being atrisk when the Scooter stalls, set this toOn.
When set to On, the Scooter may turn offwhen heavily loaded, e.g. when going upa long, steep hill. This may beundesirable for some users. Somecountries’ standards require thisparameter to be set to On.
On / Off On

GBK50574 - Issue 5 October 2000
5 Programming24
��� �:<�����������3���� ��
Warning: Do not plug the DZ-DS Programmer into the Controller while thevehicle is in motion.
Plug in the DZ-DS Programmer while the Controller is turned on.
If the Controller is turned off during programming, new setting willnot be saved and the Controller will retain all previous settings.
����� %� ��%���
1. While the Controller is turned on, plug in the Programmer. The initialscreen will appear for two seconds.
'<1$0,&�&21752/6
,QVWDOODWLRQ
�3URJUDPPHU
'6���30 9(5������
If a fault has occurred, the fault screen appears.
3UHVV�(17(5�WR�JR�WR
)$8/7�0(18
0(18 (17(5
Press ENTER and the display will show the fault, e.g.
)$8/7
6SHHG�3RW�1RW�,Q
1HXWUDO
0(18
See Section 6.2 - DS System Fault Handling for the list of faults that can bedisplayed.Press MENU to return to the Main Menu.

GBK50574 - Issue 5 October 2000
5 Programming 25
2. The main menu reads:
3UHVV�(17(5�WR�JR�WR
6(783�0(18
0(18��� (17(5�
3. Press the MENU button to cycle through each of the five menus :Setup MenuOptions MenuProfiles MenuSpeed Level in Neutral MenuController Version Menu
Note: The Speed Lever in Neutral Menu is not accessible with the DS60 orDS70.
4. Press ENTER to select the menu you wish to modify.

GBK50574 - Issue 5 October 2000
5 Programming26
����� ������%���
The Setup Menu provides access to nine performance characteristics, of whichseven are available for adjustment on the DS60 and DS70.
1. Press NEXT to cycle through the characteristics described in Section 5.2.1 -Setup Menu Characteristics.
6(783
$FFHOHUDWLRQ��
�
0(18��1(;7��9$5< (17(5�
2. To modify individual performance characteristics:
Pressing VARY changes the value of the performance characteristic on thedisplay.
3. Press ENTER to store the new value.
Some or all of the performance characteristics can be adjusted as manytimes as desired by pressing the NEXT button to step through thecharacteristics.
4. Unplug the Programmer to transfer the new information into the Controller.
5. Wait for two seconds before turning off the Controller. The Status LED willlight when the data transfer is complete.

GBK50574 - Issue 5 October 2000
5 Programming 27
����� 3�� ����%���
The Options Menu provides access to nine On / Off configuration parameters.
1. Press NEXT to cycle through the parameters described in Section 5.2.2 -Options Menu Parameters.
237,216
6LQJOH�HQGHG�3RW��
2))
0(18��1(;7��9$5< (17(5�
2. To modify individual configuration parameters:
Pressing VARY toggles between On and Off, on the display.
3. Press ENTER to store the new setting.
Some or all of the configuration parameters can be adjusted as many timesas desired by pressing the NEXT button to step through the parameters.
4. Unplug the Programmer to transfer the new information into the Controller.
5. Wait for two seconds before turning off the Controller. The Status LED willlight when the data transfer is complete.

GBK50574 - Issue 5 October 2000
5 Programming28
����� ��� ����%���
The DS60 and DS70 contains a Default Profile with factory settings specified bythe customer. Five other profiles can be programmed into the DZ-DS Programmerby the customer.
The Profiles Menu allows :
� Up-loading of the current profile and saving as a profile number betweenone and five.
� Down-loading of either the Default Profile or one of five previouslyprogrammed profiles. A Profile can be Locked when downloading the sameprofile onto multiple Controllers.
� Editing of up to five previously saved individual profiles or the and savingto the DZ-DS Programmer. The Default Profile can be edited but can onlybe saved as Profile 1 to 5. The Default Profile is held in ROM and can notitself be changed.
1. Press NEXT to cycle through the above three options.
2. Press ENTER to select one of the options.
To Up-Load a Profile from the DS60 or DS70 :
1. When Up-Loading a Profile from the Controller, the first screen reads:
352),/(6
3UHVV�(17(5�WR�8S�
/RDG�3URILOH
0(18����1(;7 (17(5�
Press ENTER.

GBK50574 - Issue 5 October 2000
5 Programming 29
2. The screen now reads:
83/2$'�352),/(
6WRUH�$V�3URILOH����
�
0(18 �9$5< (17(5�
Press VARY to select the profile number that you wish to save your profileinto. Profiles 1 to 5 are available. The Default Profile can not beoverwritten.
3. Press ENTER to store the profile.
4. Press MENU once to Upload another profile, and again to return to theMain Menu.
To Down-Load a Profile from the DZ-DS Programmer :
1. When Down-Loading a Profile from the DZ-DS Programmer, the firstscreen reads:
352),/(6
3UHVV�(17(5�WR�'RZQ�
/RDG�3URILOH
0(18����1(;7 (17(5�
Press ENTER.
2. The screen now reads:
'2:1/2$'�352),/(
3URILOH����
�
0(18��/2&.��9$5< (17(5�
Press VARY to select the profile number that you wish to download.Profiles 1 to 5 and the Default Profile are available.

GBK50574 - Issue 5 October 2000
5 Programming30
3. Press ENTER to store the profile.
4. The Programmer will now automatically enter the Check Profile Menu
&+(&.�352),/(
$FFHOHUDWLRQ��
�
0(18��1(;7
Press NEXT to cycle through the parameters to check that the correctprofile has been downloaded.
5. Press MENU.
The Programmer will automatically enter the Speed Lever Neutral Menu..
6. Press MENU once to return to the Profile Men, and again to return to theMain Menu.
If the DZ-DS Programmer is unplugged while in the Download Profile screen, itcan be plugged into another Controller and will immediately return to the samescreen. In this way the same profile can be downloaded to multiple Controller’swith minimum time wasted.
To prevent accidentally changing a profile, a Lock function is available for eachprofile. If the Lock is set, a combination is required to access that profile.

GBK50574 - Issue 5 October 2000
5 Programming 31
To Lock a Profile :
1. When in the Download Profile Menu:
'2:1/2$'�352),/(
3URILOH����
�
0(18��/2&.��9$5< (17(5�
Hold down the LOCK button while pressing:
MENU button 2 timesVARY button 3 timesENTER button 6 times Release the LOCK button.
The MENU and VARY selections are now gone.
The DZ-DS Programmer can now only download the locked profile, even afterdisconnecting and reconnecting.
To Unlock the Profile :
Repeat the Lock sequence. The MENU and VARY selections come back and theProgrammer will behave normally.
To Edit a Profile in the DS Programmer :
1. When Editing a Profile saved in the DZ-DS Programmer, the first screenreads:
352),/(6
3UHVV�(17(5�WR�(GLW
3URJUDPPHU�3URILOH
0(18��1(;7 (17(5�
Press ENTER.

GBK50574 - Issue 5 October 2000
5 Programming32
2. The screen now reads:
(',7�352),/(
3URILOH����
�
0(18 �9$5< (17(5�
Press VARY to select the profile number that you wish to save your profileinto. Profiles 1 to 5 and the Default Profile are available.
The Default Profile can be edited but can only be saved as Profile 1 to 5.The Default Profile is held in ROM and can not itself be changed.
3. Press ENTER
4. The screen now reads:
(',7�352),/(�6(783
$FFHOHUDWLRQ�
�
0(18��1(;7��9$5< (17(5�
5. Press NEXT to cycle through the parameters to check that the settings arecorrect.
6. Press ENTER to store the profile.
7. Press MENU once to Upload another profile, and again to return to theMain Menu.

GBK50574 - Issue 5 October 2000
5 Programming 33
� ������ ��
�� �#�����0��"���/��� ��
The following steps should be taken if a system with a DS60 or DS70 Controllerdoes not operate. This will help identify if the problem is in the Controller or someother part of the system.
Note: See Section 4.3.1 - Connections for referenced connections.
The following voltages are nominal only.
Turn the On / Off Switch On before beginning any diagnostics.
���� ����/���������;!�� ��3��
1. Confirm that the battery supply voltage is present on the Controllerterminals.
Connect a voltmeter between B+ and B- with the negative probe on B- andthe positive probe on B+. The voltmeter should measure between 23 V and27 V.
� If the voltage is negative, check for correct battery wiring polarity.
� If the voltage is 0 V, check the circuit breaker and for open circuitwiring.
2. Check that the Programmer is not plugged in.
���� ����/���������;!�� ��+���/ ��
1. Count the number of flashes and refer to Section 6.2 - DS System FaultHandling, ORplug in the Programmer to determine the cause of the fault.

GBK50574 - Issue 5 October 2000
6 Diagnostics34
���� ����/���������;!�� �����������#�3��=
Warning: Elevate the drive wheels or disconnect the motor before carrying outthe following tests.
1. Check the voltages on the Speed Pot terminals with the Speed Lever inneutral. The readings, in respect to B-, should be:
Long Travel Short TravelSpeed Pot - Pin 4 of 10 way MTA 1.3 ± 0.1 V 0.5 ± 0.1 V Speed Pot Wiper Pin 5 of 10 way MTA 2.5 ± 0.5 V 2.5 ± 0.5 V Speed Pot + Pin 6 of 10 way MTA 12.7 ± 0.1 V 4.5 ± 0.1 V
When the Speed Lever is moved in the Forward and Reverse directions, thevoltage on Pin 5 of the 10 way MTA should increase / decrease by ± 0.7 Vfor a long travel Speed Pot, and ± 2 V for a short travel Speed Pot.
� If this voltage swing is not present, check the potentiometer andwiring for open circuits.
2. Connect a voltmeter between M+ and M- . The voltmeter should measure0 V when the Speed Lever is in neutral and between 10 V and 24 V whenthe Speed Lever is out of neutral and at full speed
� If the voltage put of neutral is above 0 V but the motor is not driving,check the motor and wiring.
3. Connect a voltmeter between Park Brake - Pin 1 of the 10 way MTA andPark Brake + Pin 2 of the 10 way MTA. The voltmeter should measure 0 V when the Speed Lever is in neutral and 24 V when the Speed Lever isout of neutral.

GBK50574 - Issue 5 October 2000
6 Diagnostics 35
4. Measure the voltage at Inhibit Pin 7 of the 10 way MTA, in respect to B-.The voltmeter should measure 5 V.
� If the measurement is 0 V, check that an inhibit switch is not engagede.g. from a battery charger. When 0 V is applied to this terminal,driving will be inhibited.
If the Controller fails one of these tests and previous advice fails, try exchangingit with another working Controller, or contact your Service Agent.
If the Controller passes these tests, then the fault is likely to be in another part ofthe system.

GBK50574 - Issue 5 October 2000
6 Diagnostics36
�� ����#�����+�����>��� ��
Any fault condition on the DS60 or DS70 Controller, or associated system willcause the Status LED to flash. Flashing occurs in bursts of flashes separated bya two second pause. The number of flashes in each burst is referred to as the FlashCode and indicates the nature of the fault.
The DZ-DS Programmer automatically displays the fault when plugged into aController, when a fault is present. See Section 5.3.1 - Main Menu for details.
��!���� �����
�� � ����� ����"����
������
1 Batteryneedsrecharging
Will drive The battery voltage has droppedbelow 23.3 V in neutral. Rechargethe batteries soon.
2 Batteryvoltage toolow
Drive inhibited The battery voltage at the Controllerhas dropped to 16.5 V. Check thebattery condition and theconnections.
3 Batteryvoltage toohigh
Drive inhibited The battery voltage at the Controlleris greater than32 V. Check the battery conditionand the connections. Suspect acharger malfunction.
4 Current limittime out
Drive inhibited The Controller has detected a shortedmotor. Check the loom for shorts andcheck the motor. Contact yourService Agent.
5 Brakefeedbackerror
Drive inhibited Check that the Park Brake releaseswitch is off. Check the Park Brakeand wiring for open or short circuits.Contact your Service Agent.
6 Out ofNeutral atPower up
Drive Inhibited Check that the speed pot is notdeflected, and the wiring isconnected.

GBK50574 - Issue 5 October 2000
��!���� �����
�� � ����� ����"����
������
6 Diagnostics 37
7 Speed poterror
Drive inhibited Check speed pot wiring for open orshort circuits. Speed pot may not becorrectly set up. Contact your ServiceAgent.
8 Motor voltserror
Drive inhibited Contact your Service Agent.
9 OtherInternalerrors
Drive inhibited Contact your Service Agent.

GBK50574 - Issue 5 October 2000
7 Product Disclaimer38
� ������� ���� ��
Dynamic Controls Ltd. products built today allow our customers’ vehicles toconform to national and international requirements. In particular to:
ISO7176 - 9 Climatic Tests for Electric WheelchairsISO7176 - 14 Power and Control Systems for Electric WheelchairsISO7176 - 21 Requirements and Test Methods for Electromagnetic
Compatibility of Electric Powered Wheelchairs andScooters
However the performance of controllers fitted to wheelchairs and scooters is verydependant on the design of the wheelchair or scooter. Final compliance must beobtained by the vehicle manufacturer for their particular vehicle. No componentcertificate issued by Dynamic Controls Ltd. relieves a wheelchair or scootermanufacturer from compliance testing their particular vehicle.
If Dynamic Controls Ltd. controllers are fitted to vehicles or applications otherthan wheelchairs and scooters, testing to appropriate standards for the particularapplication must be completed as ISO7176 may be inappropriate.

GBK50574 - Issue 5 October 2000
8 Electromagnetic Compatibility (EMC) 39
� !����������� �������� " � �#�$!%�&
Dynamic Electronic Controllers have been tested on typical vehicles to confirmcompliance with the following appropriate EMC standards:
Emissions: CISPR22, class BSusceptibility: IEC1000-4-3ESD: IEC1000-4-2Compliance levels and set-up as per ISO 7176, part 21.
National and international directives require confirmation of compliance onparticular vehicles. Since EMC is dependant on a particular installation, eachvariation must be tested. The guidelines in this section are written to assist withmeeting EMC requirements.
Minimising Emissions
Motors : Motor brushes generate electromagnetic emissions. It may benecessary to fit capacitors between the brush holders and motor case.Ensure the leads are kept as short as possible.A suitable capacitor is 4n7, 250V Ceramic.
Wiring : Keep wire lengths as short as practical for a tidy layout.Minimise any wire loops, particularly loops of single wires asopposed to wire pairs.Endeavour to run wires in pairs or bunches.Where practical, tie cables to wheelchair frame.
Immunity to Radiated Fields
Follow the wiring recommendations for minimising emissions.
Immunity to ESD
Follow the wiring recommendations for minimising emissions.Ensure all vehicle sub-frames are electrically connected.Ensure speed setting potentiometers are electrically connected to thevehicle frame.Do not leave connections unnecessarily exposed.

GBK50574 - Issue 5 October 2000
9 Maintenance40
' %� ��������
1. All vehicle components should be regularly checked for loose, damaged orcorroded connectors, terminals, or cabling. All cables should be restrainedto protect them from damage. Damaged components should be replaced.
2. All switchable functions on the DS System should be regularly tested toensure they function correctly.
3. All DS System components should be kept free of dust, dirt and liquids. Ifnecessary, wipe with a cloth dampened with warm water or alcohol. Do notuse solvents or abrasive cleaners.
4. Where any doubt exists, consult your nearest Service Centre or Agent.
5. There are no user-serviceable parts in any DS System component - do notattempt to open any case or undertake any repairs as warranty claims willbe affected.
Warning: If any DS component is damaged in any way, or if internal damagemay have occurred (for example by being dropped), have it checkedby qualified personnel before operating.

GBK50574 - Issue 5 October 2000
10 Safety and Misuse Warnings 41
�( �����#����% �����)�� ���
����������#���� "�"���������������
The following warnings are applicable to both the installer and the user and mustbe passed on to the end user before use of the product.
• Do not install, maintain or operate this equipment without reading,understanding and following the proper instructions and manuals, otherwiseinjury or damage may result.
• A warning must be conveyed to the vehicle operator that the Controller couldcause the vehicle to come to a sudden stop. In situations where this may effectthe safety of the user this will require the fitting and wearing of a seat belt.
• Performance adjustments should only be made by professionals of the healthcare field or persons fully conversant with this process and the driverscapabilities. Incorrect settings could cause injury to the driver, bystanders,damage to the vehicle and surrounding property.
• Users and suppliers of Assistive Mobility products should give thought to thepossibility of a failure to operate, or an incorrect operation, by the product.Should an operator be left with limited or no mobility due to equipmentfailure, they should be able to summon assistance from where ever they are.
• A warning must be conveyed to the operator that they have the responsibilityto ensure that the vehicle is kept in a good, safe operating condition andensure that components, such as cables, are protected from damage bysecuring them in optimum positions.
• Do not operate the vehicle if it behaves erratically, or shows abnormalresponse, heating, smoke or arcing. Turn the vehicle off at once and consultyour Service Agent.
• Do not operate your vehicle if the battery is nearly flat as a dangeroussituation may result due to loss of power in an inopportune place.
• If the vehicle drives without demand, turn the key switch to the off positionto halt the scooter.
• The vehicle should not be operated when the temperature is below -25°C orabove 50°C.
• No connector pins should be touched, as contamination or damage due toelectrostatic discharge may result.

GBK50574 - Issue 5 October 2000
10 Safety and Misuse Warnings42
• If the vehicle speed surges when driving down hill, the common reason is theoperation of an over voltage protective device. When running down hill, thebraking energy from the over voltage motor is sent to the battery, whichcharges it. However, if the battery is fully charged, it won’t accept thegenerated energy without dramatically increasing its voltage. If this overvoltage condition were allowed to last, there would be a risk of damage to thebattery or an explosion. To prevent these risks, the controller forces thevehicle to slow down until the battery voltage drops to a safe level, afterwhich allowing the vehicle to speed up again. To prevent speed surging withcharged batteries, we advise drivers to descend hills slowly.
• The user should turn the system off while getting in and out of the vehicle.
• Ensure the vehicle is turned off when not in use.
• The vehicle must not be driven with the manual park brake release operated.
• The manual park brake release must not be operated on a slope.
• Most electronic equipment is influenced by Radio Frequency Interference(RFI). Caution should be exercised with regard to the use of portablecommunications equipment in the area around such equipment. While themanufacturer has made every effort to ensure that RFI does not causeproblems, very strong signals could still cause a problem. If RFI causes erraticbehaviour, turn the vehicle off immediately. Leave off while transmission isin progress. Turn the vehicle off before using a cell phone or portablecommunications device.
• In the event of a fault indicator flashing while driving (battery gauge and/orstatus LED), the user must ensure that the system is behaving normally. If not,the system must be turned off and a service agent called immediately.
• Report any malfunctions immediately to your Service Agent.
���$�����"������������������
The following warnings are applicable to the installation technician only.
• After the vehicle has been set up, check to ensure the vehicle performs to thespecifications entered in the programming procedure. If the vehicle does notperform to specifications, turn the vehicle off immediately and re-program.Repeat this procedure until the vehicle performs to specifications.
• The completed installation must be thoroughly checked, and all programmableoptions must be correctly adjusted for safe operation prior to use.

GBK50574 - Issue 5 October 2000
11 Warranty 43
�� )����#
All equipment supplied by Dynamic Controls Ltd is warranted by the company tobe free from faulty materials or workmanship. If any defect is found within thewarranty period, the company will repair the equipment, or at its discretion,replace the equipment without charge for materials and labour.
The Warranty is subject to the provisions that the equipment:
� Has been correctly installed.
� Has been used solely in accordance with this manual.
� Has been properly connected to a suitable power supply in accordance withthis manual.
� Has not been subjected to misuse or accident, or been modified or repairedby any person other than someone authorised by Dynamic Controls Ltd.
� Has been used solely for the driving of electrically powered vehicles inaccordance with the vehicle manufacturer’s recommendations.
� Setup of a DS60 or DS70 Controller is to be performed only by individualscertified by Dynamic Controls Ltd. The fine tuning adjustments of theController may affect other activities of the vehicle. Damage to theequipment could occur under these circumstances. If uncertified individualsperform any work on these units, the warranty is voided.

GBK50574 - Issue 5 October 2000
12 Sales and Service Information44
Dynamic Controls Ltd.Print Place Telephone: Int. +64 3 338 0016Christchurch Fax: Int. +64 3 339 1234New ZealandWeb site:Email:
http://[email protected]
Controls Dynamic Ltd.Lisle Avenue Telephone: Int. +44 1562 820 055Kidderminster Fax: Int. +44 1562 742 720DY11 7DLUnited KingdomEmail: [email protected]
Dynamic Controls, North America OfficeDynamic North America31335 Industrial Parkway, Suite 2 Tel: Int. +1 440 979 0657North Olmsted, Ohio 44070 Fax: Int. +1 440 979 1028USAEmail: [email protected]
Rosstron Inc.1521 W. 259th St Telephone: Int. +1 310 539 6293Harbor City, CA 90710 Fax: Int. +1 310 539 4078USAEmail: [email protected]
Electronic Mobile Service46 Berripa Close Tel - 24 hour: Int. +61 2 9887 2824North Ryde, Sydney Pager: Int. +61 2 9963 1778NSW Australia 2113 Fax: Int. +61 2 9887 2114Email: [email protected]
New Zealand Head Office
Sales and Service
Sales and Service
Service Agent
Service Agent
Europe
North America
Australia
NOTE:
The controller should be labelled with the manufacturer’s serviceagent’s telephone number.
�� �����������* ���������� ��
For Sales and Service advice, or in case of any difficulty, please contact:
Issue 5: PCO 3021, 3103, 3172, 3257, 3310, 3404, 3574, 3593.


![CANADÁ - MEDIDAS QUE AFECTAN A LA EXPORTACIÓN DE … · Technology Partnerships Canada] a la rama de producción canadiense de aeronaves de transporte 1 WT/DS70/RW, ... aeronaves](https://static.fdocuments.net/doc/165x107/5bcb3d5b09d3f2761f8b8e47/canada-medidas-que-afectan-a-la-exportacion-de-technology-partnerships-canada.jpg)