Time Matters and Billing Matters Installation Guide · The SQL Server Configuration Manager ... The...
47
Time Matters ® and Billing Matters ® Installation Guide Version 15.0 © 2015 LexisNexis. All rights reserved.
Transcript of Time Matters and Billing Matters Installation Guide · The SQL Server Configuration Manager ... The...

Time Matters®
and Billing Matters®
Installation Guide
Version 15.0
© 2015 LexisNexis. All rights reserved.

Copyright and TrademarkLexisNexis, Lexis, and the Knowledge Burst logo are registered trademarks of Reed Elsevier Properties Inc., used under license.
Time Matters and Billing Matters are registered trademarks of LexisNexis, a division of Reed Elsevier, Inc.
Other products and services may be trademarks or registered trademarks of their respective companies.
Copyright 2015 LexisNexis. All rights reserved.
Revision Date 9/28/2015 11:24 AM
LexisNexis1801 Varsity DriveRaleigh, North Carolina 27606United States of America
North America: 800.387.9785Outside North America: 919.467.1221Fax: 919.467.7181
About This GuideThe Installation Guide provides a list of tasks for installing LexisNexis Time Matters® and Billing Matters® Practice Management Software. If you need additional information, please refer to the online Support Center.
LexisNexis® Time Matters and Billing Matters Installation Guide Release 15.0
© 2015 LexisNexis. All rights reserved. 2 of 47

Giving Feedback on Time Matters DocumentationWe welcome feedback on our documentation! If you find any errors or have comments or suggestions, please send us an email. You can contact us at: [email protected]
Important Note: Please use the above email address solely for comments and feedback on Time Matters documentation. For technical questions and issues, contact either your organization’s help desk or Time Matters customer support.
Please include as much detail as possible, such as the following:
n The name of the book or online guide you are using.
n The page number (for printed books) or topic title.
n The version of Time Matters and of the documentation. In the printed books, you can find the version number on the title page. In online help and online books, the version is at the bottom of every topic.
LexisNexis® Time Matters and Billing Matters Installation Guide Release 15.0
© 2015 LexisNexis. All rights reserved. 3 of 47

Table of ContentsGiving Feedback on Time Matters Documentation 3
Pre-Installation Steps 5
Determine Who Should Install the Software 5
Choose Where to Install the Database 5
Install SQL Server 5
Installation Notes 6
Additional Configuration 6
Gather Needed Materials and Information 7
Download the Installation Software 7
Install the Database 8
Register the Software 20
Setup Your Firm Information 21
Create an Initial User and Configure Basic Settings 22
Create User Accounts 24
Create a Staff for a New User Account 29
Configure Security for a New User 33
Back Up Time Matters Data 38
Create a Manual Backup in Time Matters 38
Set up Mobility 40
Install the Client Application 41
Disable Protected Mode in Adobe Reader 43
Adobe Reader X 44
Adobe Reader XI 45
Uninstall the Software 46
Giving Feedback on Time Matters Documentation 47
LexisNexis® Time Matters and Billing Matters Installation Guide Release 15.0
© 2015 LexisNexis. All rights reserved. 4 of 47

Pre-Installation StepsDo the following before you begin installing Time Matters or Billing Matters.
Determine Who Should Install the SoftwareThe installation procedure is simple, but it is advisable that you choose a person familiar with your firm’s computer systems, such as:
n An Information Technology professional
n A LexisNexis Certified Independent Consultant (CIC)
To locate a CIC near you, see http://law.lexisnexis.com/spn/findcic
n A sole practitioner, or the person with primary responsibility for your firm’s computers
Choose Where to Install the DatabaseYour first installation should be on the server computer that will host the application’s database. Use the following checklist to select a computer.
n The computer must meet the system requirements.
n The computer must be connected to your firm’s network so that all Time Matters and Billing Matters users have access to the shared database. (If you are the only user in your firm, you can install the application’s database on your primary work computer, even if it lacks a network connection.)
n If your firm requires a large database (10GB or more), the computer should be running the full version of Microsoft SQL Server database software. If you do not already have SQL Server, a free version (SQL Server Express Edition) is available for download from Microsoft.
Install SQL ServerSQL Server 2008 R2 or later must be installed on the server computer where your Time Matters/Billing Matters database will reside.
If you do not already have SQL Server, you can download and install a free version from the Microsoft web site. To download the version of SQL Server Express recommended for your version of Microsoft Windows, go to www.microsoft.com/sqlserver/en/us/editions/express.aspx.
LexisNexis® Time Matters and Billing Matters Installation Guide Release 15.0
© 2015 LexisNexis. All rights reserved. 5 of 47

Installation NotesWhen you run the downloaded file, select the option to create a new installation or add features to an existing installation. A wizard opens to guide you through the installation process.
On the Database Engine Configuration page of the wizard, do the following:
1. In the Authentication Mode area, select Mixed Mode.
2. Enter a password for the SQL admin account. Write down this password immediately and store it in a secure place. LexisNexis Support cannot help you retrieve a lost SQL Server password.
Additional ConfigurationAfter SQL Server is installed, perform the following additional procedures.
Exclude the SQL Browser Service from the Windows Firewall:
1. On the computer running SQL Server, press the Windows Logo Key + R. The Run window opens.
2. In the Open box, type firewall.cpl and press Enter.
3. Depending on your version of Windows, do one of the following to modify the list of programs allowed through the Windows Firewall:
n Windows Vista: Click the Add Program button.
n Windows 7: Click Allow a program through Windows Firewall and then click the Allow another program button.
n Windows 8 and Windows 10: Click Allow another app or feature through the Windows Firewall, followed by Change settings, then Allow Another App.
4. Browse to either %programfiles%\Microsoft SQL Server\90 or %programfiles(x86)%\Microsoft SQL Server\90.
5. Select sqlbrowser.exe and click Open. (Note: If you don't see sqlbrowser.exe, check the \100 or \110 folder.)
6. Click Add or OK as needed to close the open windows.
Enable the TCP/IP protocol for SQL Server:
1. On the computer running SQL Server, press the Windows Logo Key + R. The Run window opens.
2. In the Open box, type SQLServerManager.msc and press Enter. The SQL Server Configuration Manager window opens.
3. In the left pane, expand SQL Server <version> Network Configuration and select Protocols for <name of SQL instance>.
4. In the right pane, right-click Named Pipes and select Enable.
5. Right-click TCP/IP and select Enable.
6. Right-click TCP/IP and select Properties. The Properties window opens.
LexisNexis® Time Matters and Billing Matters Installation Guide Release 15.0
© 2015 LexisNexis. All rights reserved. 6 of 47
7. On the IP Addresses tab, locate and select at least 1 valid IP address (but not 127.0.0.1) in the list and change the Enabled field to Yes.
8. Click OK to close the Properties window.
9. In the left pane, click SQL Server <version> Services.
10. In the right pane, right-click the name of your SQL Server instance and select Restart.
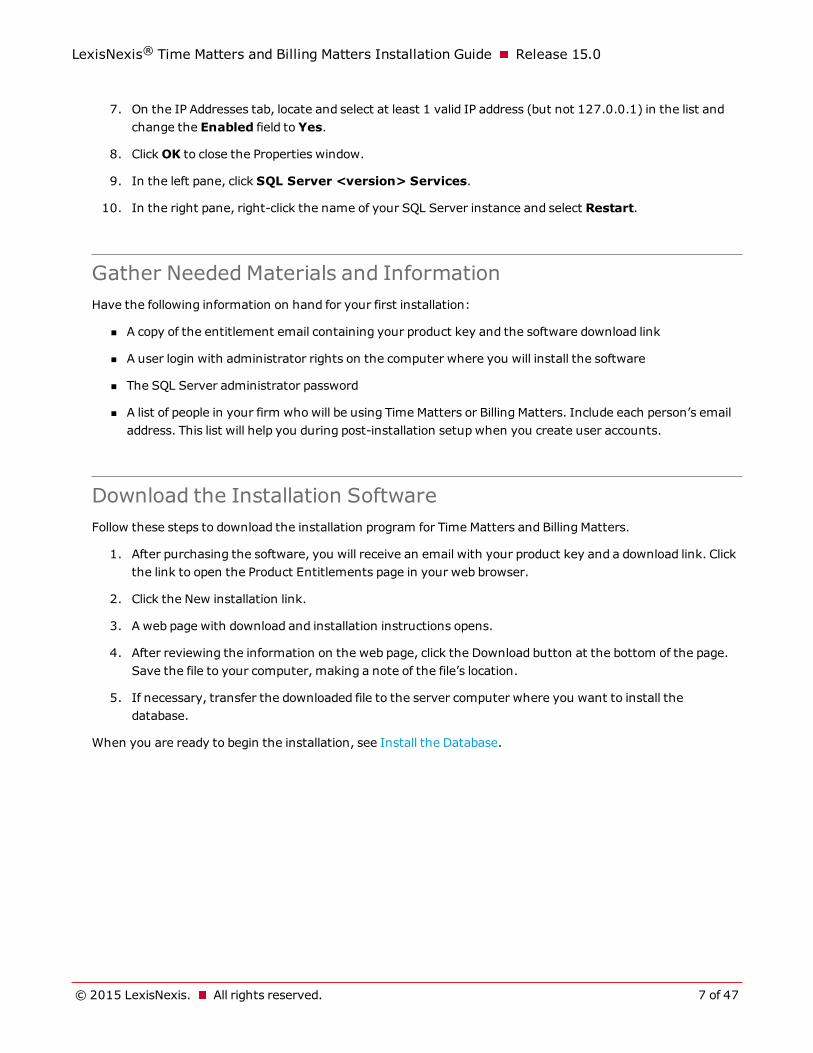
Gather Needed Materials and InformationHave the following information on hand for your first installation:
n A copy of the entitlement email containing your product key and the software download link
n A user login with administrator rights on the computer where you will install the software
n The SQL Server administrator password
n A list of people in your firm who will be using Time Matters or Billing Matters. Include each person’s email address. This list will help you during post-installation setup when you create user accounts.
Download the Installation SoftwareFollow these steps to download the installation program for Time Matters and Billing Matters.
1. After purchasing the software, you will receive an email with your product key and a download link. Click the link to open the Product Entitlements page in your web browser.
2. Click the New installation link.
3. A web page with download and installation instructions opens.
4. After reviewing the information on the web page, click the Download button at the bottom of the page. Save the file to your computer, making a note of the file’s location.
5. If necessary, transfer the downloaded file to the server computer where you want to install the database.
When you are ready to begin the installation, see Install the Database.
LexisNexis® Time Matters and Billing Matters Installation Guide Release 15.0
© 2015 LexisNexis. All rights reserved. 7 of 47

Install the DatabaseAfter you complete the pre-installation steps, you are ready to begin installing the database.
1. Close all open applications on the computer.
2. Double-click the installer file that you downloaded, setupe.exe.
If any of the following required software has not been installed on the machine, a window opens allowing you to install it now.
n Click Install to start installing the required software.
If all the required software is installed, the installation wizard opens.
LexisNexis® Time Matters and Billing Matters Installation Guide Release 15.0
© 2015 LexisNexis. All rights reserved. 8 of 47

3. Select Server in the Welcome window.
4. Click Next to continue.
The Disconnect External Drives window opens.
LexisNexis® Time Matters and Billing Matters Installation Guide Release 15.0
© 2015 LexisNexis. All rights reserved. 9 of 47

5. Check the All external drives have been disconnected or dismounted check box after ensuring that no external drives are connected or mounted.
6. Click Next to continue.
The Product Key window opens.
LexisNexis® Time Matters and Billing Matters Installation Guide Release 15.0
© 2015 LexisNexis. All rights reserved. 10 of 47

7. Complete the Product Key boxes.
You can either copy the product key in your entitlement email and then click the Paste Key button, or you can type the product key into the boxes manually.
8. Click Next to continue.
The License Agreement window opens.
LexisNexis® Time Matters and Billing Matters Installation Guide Release 15.0
© 2015 LexisNexis. All rights reserved. 11 of 47

9. Review the license agreement.
Important Note
You must read to the bottom of the End User License Agreement, and ensure that the scroll bar is at the bottom as well, in order for the 'Next' button to become available.
10. Click Next to continue.
Clicking the 'Next' button implies that you have read and agree with the End User License Agreement.
The Installation Agreement window opens.
LexisNexis® Time Matters and Billing Matters Installation Guide Release 15.0
© 2015 LexisNexis. All rights reserved. 12 of 47
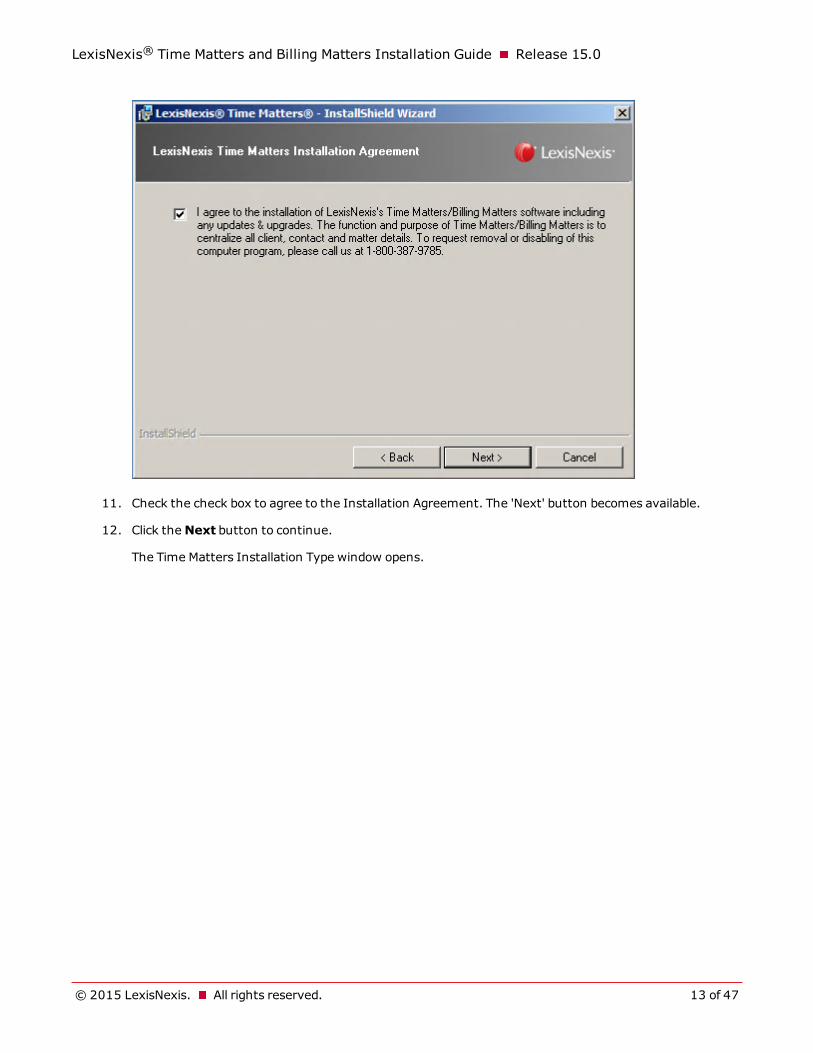
11. Check the check box to agree to the Installation Agreement. The 'Next' button becomes available.
12. Click the Next button to continue.
The Time Matters Installation Type window opens.
LexisNexis® Time Matters and Billing Matters Installation Guide Release 15.0
© 2015 LexisNexis. All rights reserved. 13 of 47

13. Select Complete if you want to install all program features, or select Custom if you want to choose the features that are to be installed.
14. Click Next to continue.
n If you selected Complete, click Next to continue.
n If you selected Custom, do the following:
a. Specify the folder in which the application files will be installed. To select a folder, click Change and browse to the desired folder, then click OK.
Click Next to continue to the Custom Setup page.
b. Choose the program features you want to install. To change the status of a feature, click the icon beside that feature and select either the option to install the feature or the option to not install the feature.
Click Next to continue.
The Shared Files window opens.
LexisNexis® Time Matters and Billing Matters Installation Guide Release 15.0
© 2015 LexisNexis. All rights reserved. 14 of 47

15. In the Shared Files Directory box, accept the default or use the Browse button to select a different location.
16. Click Next to continue.
The SQL Server Data and Login window opens.
LexisNexis® Time Matters and Billing Matters Installation Guide Release 15.0
© 2015 LexisNexis. All rights reserved. 15 of 47

17. Note
If you do not have SQL Server installed, a different page appears with an option to install it. Click the "Download and Install SQL Server"button to download and install SQL Server to this machine. In the window that opens, click the version of SQL Server Express recommended for your Windows version. For instructions on downloading and installing the software, see Install SQL Server. After SQL Server is installed, restart the installer.
18. In the SQL Server box, type the location of the SQL server on this machine, or click the Browse button to select it.
Important
You must select a SQL Server that is installed on this machine (i.e., the machine where you are attempting to install the database). If you attempt to install the database on a machine that does not have SQL Server installed, the installer will not be able to create the new database.
19. In the SQL Admin Login box, type the administrator login for the selected SQL Server.
20. In the SQL Admin Password box, type the administrator password for the selected SQL Server.
21. Click Next to continue.
The Database Information and Backup window opens.
LexisNexis® Time Matters and Billing Matters Installation Guide Release 15.0
© 2015 LexisNexis. All rights reserved. 16 of 47

22. Click Next to continue.
The Ready to Install window opens.
23. Review the installation settings.
LexisNexis® Time Matters and Billing Matters Installation Guide Release 15.0
© 2015 LexisNexis. All rights reserved. 17 of 47

24. Click the Install button.
25. If Adobe Reader is detected on your computer, a message about compatibility with Adobe Reader appears. For instructions, see Disable Protected Mode in Adobe Reader.
26. Click OK on the Adobe Reader message.
When the installation completes, an Application Installation Complete page displays.
27. Click the Print button to print the Application Setup instructions before continuing.
28. (Optional) Remove the check from the Start LexisNexis Time Matters box if you do not want to start Time Matters at this point in time.
LexisNexis® Time Matters and Billing Matters Installation Guide Release 15.0
© 2015 LexisNexis. All rights reserved. 18 of 47

29. (Optional) Remove the check from the Open the Installation Guide box if you do not want to open the Installation Guide PDF at this point in time.
30. Click the Finish button.
You are ready to create an initial user and configure your basic settings.
LexisNexis® Time Matters and Billing Matters Installation Guide Release 15.0
© 2015 LexisNexis. All rights reserved. 19 of 47
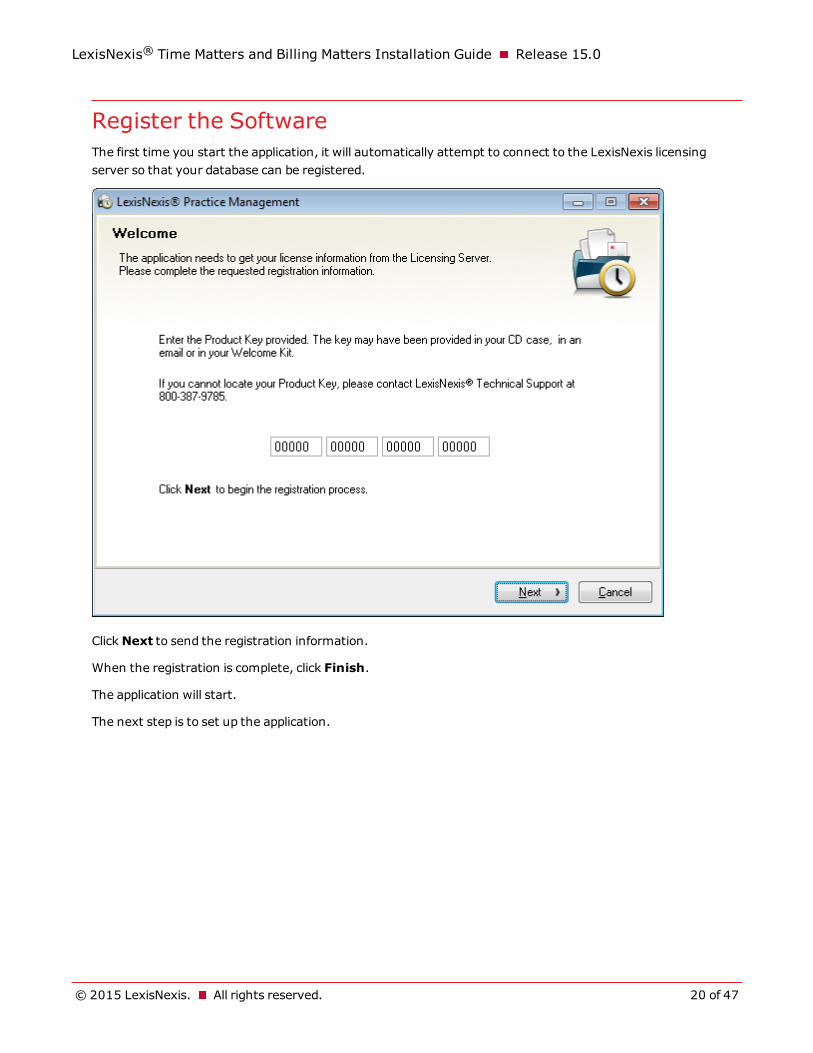
Register the SoftwareThe first time you start the application, it will automatically attempt to connect to the LexisNexis licensing server so that your database can be registered.
Click Next to send the registration information.
When the registration is complete, click Finish.
The application will start.
The next step is to set up the application.
LexisNexis® Time Matters and Billing Matters Installation Guide Release 15.0
© 2015 LexisNexis. All rights reserved. 20 of 47

Setup Your Firm InformationWhen you are finished registering your software, a Firm Information window opens. In this window, you enter the information to setup your firm in the Time Matters database.
1. In the Name box, type the name of your firm or organization.
2. In the Address box, type the street or mailing address of your firm or organization.
3. In the City/State boxes, type the city and state where your firm or organization is located.
4. In the Zip/Postal box, type the Zip code of your firm or organization.
5. In the Country box, type the country where your firm or organization is located.
6. In the Phone box, type the main number of your firm or organization.
7. In the Fax box, type te main fax number of your firm or organization.
8. In the Phone 2 box, type the secondary phone number of your firm or organization.
9. In the Fax 2 box. type a secondary fax number of your firm or organization.
10. Click Next to continue on to creating an initial user and configuring basic settings.
LexisNexis® Time Matters and Billing Matters Installation Guide Release 15.0
© 2015 LexisNexis. All rights reserved. 21 of 47

Create an Initial User and Configure Basic SettingsAfter you have installed and registered the software, a wizard will open to help you create a user account and enter basic program settings. The user account you create using this wizard is given administrative rights by default (this can be changed later from within the application).
1. Click Next to continue past the Welcome window.
2. Enter the name, address, and phone/fax numbers of your firm.
3. Click Next.
4. Enter the name of the initial user, a User ID, and a password. You will use the User ID and password to access the application. A Staff member will also be created for this user account. The Staff initials are based on the initials of the names you enter. If desired, you can change the Staff initials later from within the application.
5. Click Next.
6. Click the Main Opening Screen arrow and select the program window you want to open automatically. If you do not want a window to open, select “Main Menu”.
The following options are automatically set for this user.
LexisNexis® Time Matters and Billing Matters Installation Guide Release 15.0
© 2015 LexisNexis. All rights reserved. 22 of 47

n Show Alerts and Reminders Screen after Program Login: The Alerts, Reminders and Watches window opens automatically.
n Show if there are no Alerts and Reminders: The Alerts, Reminders and Watches screen opens even if there are no Alerts or Reminders to display for the current day.
n Show Tip of the Day after Program Login: The Tip of the Day screen opens automatically.
n Start the Messenger after Program Login: The Messenger opens automatically. The Messenger runs in a separate window from the main application.
n Start Application Maximized: The application opens in a maximized window.
7. Click Next.
8. Select the Terminology type applicable to your business or practice.
9. Click Next.
10. Determine whether to activate Security now.
n Select No Security to activate Security at a later time. (This is the default.)
n Select Enable Security if you want to activate Security now.
11. Click Next.
12. Click Finish to close the Initial User wizard.
You have finished entering initial user information and application settings. Next, create new user accounts to allow others in your firm to use the application.
LexisNexis® Time Matters and Billing Matters Installation Guide Release 15.0
© 2015 LexisNexis. All rights reserved. 23 of 47

Create User Accounts 1. If the New User wizard is not already open, do the following to open it now:
a. Click the File menu, point to Setup, then point to User and Security, and then click Users.
b. On the List of Users, click the Add button.
2. On the Introduction page, enter the First Name, Middle Initial, and Last Name of this user.
3. Enter a user ID and password for this user.
4. Select the Mobility User check box if this user will be using Time Matters Mobility.
5. Enter an email address for the user.
6. Click Next to continue to the Staff/Security page.
7. Accept the default selections on this page to create a new Staff and security settings for this user.
LexisNexis® Time Matters and Billing Matters Installation Guide Release 15.0
© 2015 LexisNexis. All rights reserved. 24 of 47

8. Click Next to continue to the Access page.
9. Select the user’s access privileges for normal (non-private) and private records.
If you select Show Records as “Restricted” or Show Records as “Private”, the user will be able to see that the records exist, but will not be able to view or open the records.
LexisNexis® Time Matters and Billing Matters Installation Guide Release 15.0
© 2015 LexisNexis. All rights reserved. 25 of 47

10. Click Next to continue to the Rights page.
11. Select whether to give the user full rights to view, edit, and delete records assigned to their Staff and to records they create. These rights are always granted, creating an exception to security settings that would normally restrict the user's rights to those records.
LexisNexis® Time Matters and Billing Matters Installation Guide Release 15.0
© 2015 LexisNexis. All rights reserved. 26 of 47

12. Click Next to continue to the Finish page.
13. Optionally, click the To Clipboard button to copy the information in the text box: the user ID and password and a link to the installation program. This information can be copied into an email and sent to the user.
LexisNexis® Time Matters and Billing Matters Installation Guide Release 15.0
© 2015 LexisNexis. All rights reserved. 27 of 47

14. Click Finish.
If you are creating a new Staff for the user, see Create a Staff.
LexisNexis® Time Matters and Billing Matters Installation Guide Release 15.0
© 2015 LexisNexis. All rights reserved. 28 of 47

Create a Staff for a New User AccountWhen you create a user account using the New User Wizard, you are prompted to choose whether to assign the new user an existing Staff or to create a new Staff for the user. If you choose to create a new Staff, the Staff wizard opens automatically after you click Finish on the New User wizard.
1. If the New Staff wizard is not already open, do the following to open it now:
a. Click the Database menu and then click Staff.
b. On the Staff list, click the Add button.
2. In the Introduction window, enter the Last, First, Middle initial or name, and Initials of the Staff.
Note
If the New Staff wizard opened automatically after you created a new user, some boxes will be completed automatically based on information you entered in the New User wizard.
3. Click Next to continue to the Address/Phone Numbers window.
4. Enter the address and phone numbers of the Staff.
LexisNexis® Time Matters and Billing Matters Installation Guide Release 15.0
© 2015 LexisNexis. All rights reserved. 29 of 47

5. Click Next to continue to the Custom window.
6. Optionally, enter information about the Staff in the Billing, Bar No, and Position boxes.
7. If you want to specify a color for this Staff’s records, click the Color button. The Select Color screen opens. Select a color and click OK. Records assigned to this Staff will appear in the selected color on lists and calendars.
LexisNexis® Time Matters and Billing Matters Installation Guide Release 15.0
© 2015 LexisNexis. All rights reserved. 30 of 47

8. Click Next to continue to the Billing window.
9. Select a rate type.
If you select a rate table, select the table from the drop-down list and a default level. If you select an hourly rate, enter the rate amount.
10. Optionally, select a matching Timeslips timekeeper and default payroll earnings item.
LexisNexis® Time Matters and Billing Matters Installation Guide Release 15.0
© 2015 LexisNexis. All rights reserved. 31 of 47

11. Click Next to continue to the Finish page.
12. Click Finish to close the wizard.
The next step is to configure security for the new user.
LexisNexis® Time Matters and Billing Matters Installation Guide Release 15.0
© 2015 LexisNexis. All rights reserved. 32 of 47

Configure Security for a New UserWhen you create a user account using the New User Wizard, you are prompted to choose whether to create individual security settings for the new user or to use the settings from a security profile or another user. If you choose to create individual security settings, the Security Setup wizard opens automatically after you click Finish on the New User wizard. (The Staff wizard opens first, if you are also creating a Staff for the new user.)
1. Review the information on the Introduction window.
2. Click Next to continue to the Setup Settings window.
3. Select Yes below each program setup feature the user should have access to.
4. Click Next to continue to the General Settings window.
5. Select Yes below each general program feature the user should have access to.
LexisNexis® Time Matters and Billing Matters Installation Guide Release 15.0
© 2015 LexisNexis. All rights reserved. 33 of 47
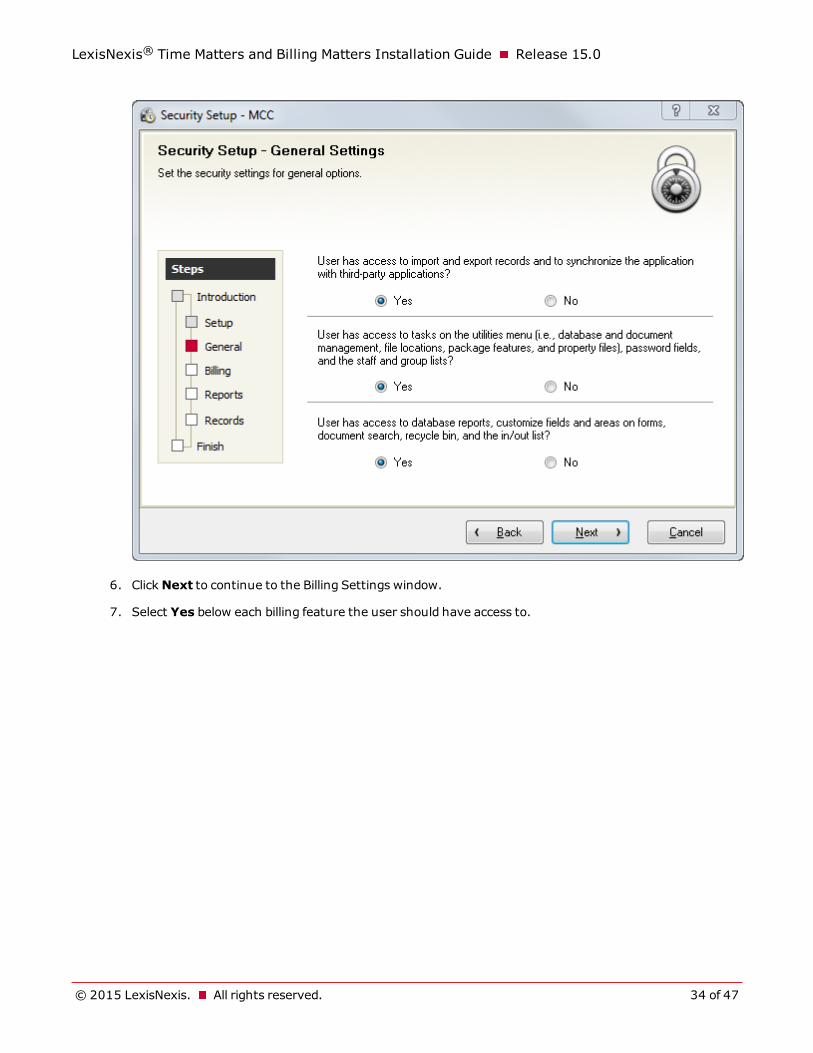
6. Click Next to continue to the Billing Settings window.
7. Select Yes below each billing feature the user should have access to.
LexisNexis® Time Matters and Billing Matters Installation Guide Release 15.0
© 2015 LexisNexis. All rights reserved. 34 of 47

8. Click Next to continue to the Standard Reports Settings page.
9. Select Yes to give the user access to all standard reports, or select No to select specific reports the user can access (or none).
LexisNexis® Time Matters and Billing Matters Installation Guide Release 15.0
© 2015 LexisNexis. All rights reserved. 35 of 47
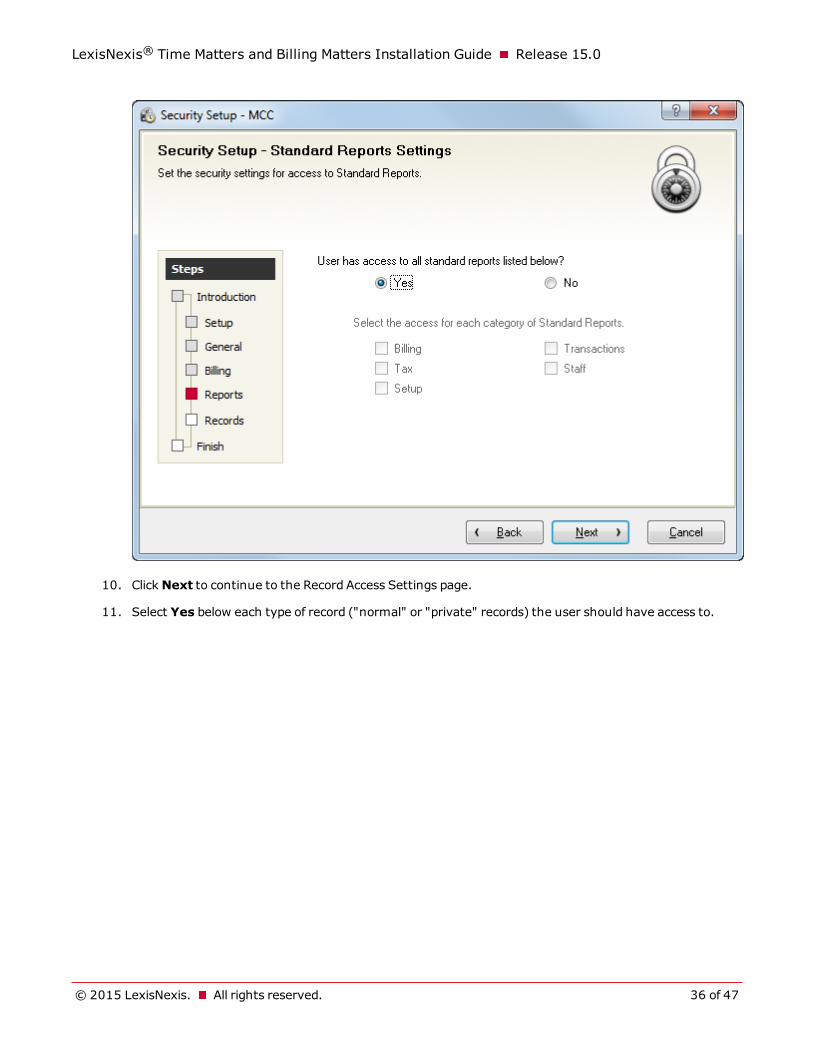
10. Click Next to continue to the Record Access Settings page.
11. Select Yes below each type of record ("normal" or "private" records) the user should have access to.
LexisNexis® Time Matters and Billing Matters Installation Guide Release 15.0
© 2015 LexisNexis. All rights reserved. 36 of 47

12. Click Next to continue to the Finish page.
13. Click Finish to close the wizard.
The Security Setup - List of Users window opens
LexisNexis® Time Matters and Billing Matters Installation Guide Release 15.0
© 2015 LexisNexis. All rights reserved. 37 of 47

Back Up Time Matters DataAfter installing the software, you should perform an initial backup, and also establish a schedule for making regular backups.
It is recommended that you schedule backups to occur automatically on a regular basis. You can also perform backups manually as needed, such as before upgrading the software.
There are different kinds of data involved in a backup:
n Data in the SQL database
n Files in the Shared Files folder
n Email attachments
Create a Manual Backup in Time MattersTo start a manual backup:
1. Select File > Backup Time Matters Data in the Time Matters Data menu.
The Time Matters Backup window opens.
LexisNexis® Time Matters and Billing Matters Installation Guide Release 15.0
© 2015 LexisNexis. All rights reserved. 38 of 47
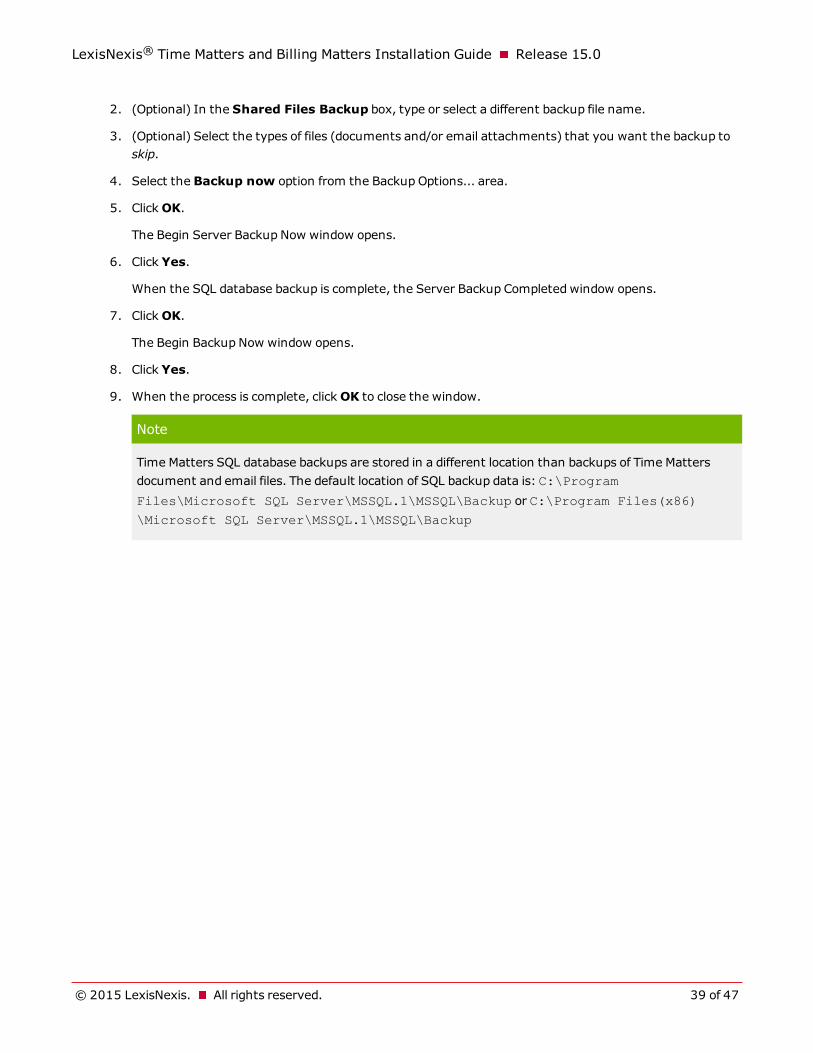
2. (Optional) In the Shared Files Backup box, type or select a different backup file name.
3. (Optional) Select the types of files (documents and/or email attachments) that you want the backup to skip.
4. Select the Backup now option from the Backup Options... area.
5. Click OK.
The Begin Server Backup Now window opens.
6. Click Yes.
When the SQL database backup is complete, the Server Backup Completed window opens.
7. Click OK.
The Begin Backup Now window opens.
8. Click Yes.
9. When the process is complete, click OK to close the window.
Note
Time Matters SQL database backups are stored in a different location than backups of Time Matters document and email files. The default location of SQL backup data is: C:\Program Files\Microsoft SQL Server\MSSQL.1\MSSQL\Backup or C:\Program Files(x86)\Microsoft SQL Server\MSSQL.1\MSSQL\Backup
LexisNexis® Time Matters and Billing Matters Installation Guide Release 15.0
© 2015 LexisNexis. All rights reserved. 39 of 47

Set up MobilitySetting up Mobility requires you to do the following:
1. Ensure that your firm has an active Annual Maintenance Plan (AMP).
2. Install the Mobility Manager (setup.exe) on the server that hosts your Time Matters or Billing Matters database.
3. Ensure that Enable Web Access is selected on the General tab of Program Level Setup (the option is selected by default).
4. Ensure the following for each user who will use Mobility:
n The Mobility User check box is selected on the User Form. (This check box is also present on the New User wizard when you create new user accounts.)
n An email address is entered on the User Form. This will be entered as the User ID when logging in to the Mobility web site.
n The user’s password meets strong password requirements. (Users without a strong password will be prompted to change their password the first time they attempt to log in to the Mobility web site.)
Note
Please allow 15 minutes for new Mobility users to become active after enabling Mobility for each user.
5. Provide users with the Mobility URL: https://tmmobility.lexisnexis.com
LexisNexis® Time Matters and Billing Matters Installation Guide Release 15.0
© 2015 LexisNexis. All rights reserved. 40 of 47

Install the Client ApplicationIn order to install the Time Matters or Billing Matters client application on a user’s computer, you will need to run the setup program that was created when you installed the database on your server. This setup program is pre-configured with your product key and the location of the database and shared files, so you will not have to enter that information during installation. The setup program is located in a sub-folder inside your Time Matters/Billing Matters shared files folder:
<sharedFilesFolder>/Setup/setupe.exe
Caution
Performing a workstation install on a user's computer with the setup program used for the initial installation on the server computer is not allowed. The installer will direct you to use the setup program from the shared files directory.
1. Run the setup program setupe.exe in the /Setup sub-folder of your Time Matters/Billing Matters shared files folder.
Your systems administrator can provide the location if needed.
The files are extracted, and then the Disconnect External Drives window opens.
2. Check the All external drives have been disconnected or dismounted check box after ensuring that no external drives are connected or mounted.
3. Click Next to continue to the Product Key page.
4. If the Product Key boxes are not already completed, enter your product key.
5. Click Next to continue to the License Agreement window.
6. Review the license agreement.
You must read to the bottom of the agreement, and ensure that the scroll bar is at the bottom as well, in order to activate the 'Next' button.
7. Click Next to continue.
Clicking the 'Next' button implies that you have read and agree with the End User License Agreement.
The Installation Agreement window opens.
8. Check the check box to agree to the Installation Agreement. The 'Next' button becomes available.
9. Click Next to continue to the Installation Type window.
10. Select Complete if you want to install all program features, or select Custom if you want to choose the features that are installed.
11. Click Next to continue.
12. Perform the following additional steps only if you selected Custom in the Installation Type window.
LexisNexis® Time Matters and Billing Matters Installation Guide Release 15.0
© 2015 LexisNexis. All rights reserved. 41 of 47

a. Optionally, click the Change button to select a different local folder in which to install the application.
b. Click Next to continue.
c. Optionally, deselect program features that you do not want to install. To deselect a feature, click the icon beside that feature and select the option "<feature> will not be installed."
d. Click Next to continue to the Ready to Install window.
13. Click Install to begin the installation. Wait for the installation process to complete.
14. When the client application has been installed, click Finish to close the installation wizard.
The installation is complete.
LexisNexis® Time Matters and Billing Matters Installation Guide Release 15.0
© 2015 LexisNexis. All rights reserved. 42 of 47

Disable Protected Mode in Adobe ReaderFor the Time Matters plug-in to function, you must disable Protected Mode in Adobe Reader.
Protected Mode is a feature of Adobe Reader X and later versions. Use the following links to view instructions for your version of Adobe Reader:
n Adobe Reader X
n Adobe Reader XI
Check the status of Protected Mode:
1. Open a document in Adobe Reader.
2. On the File menu, click Properties.
The Document Properties window opens.
3. On the Advanced tab, check the Protected Mode property.
LexisNexis® Time Matters and Billing Matters Installation Guide Release 15.0
© 2015 LexisNexis. All rights reserved. 43 of 47
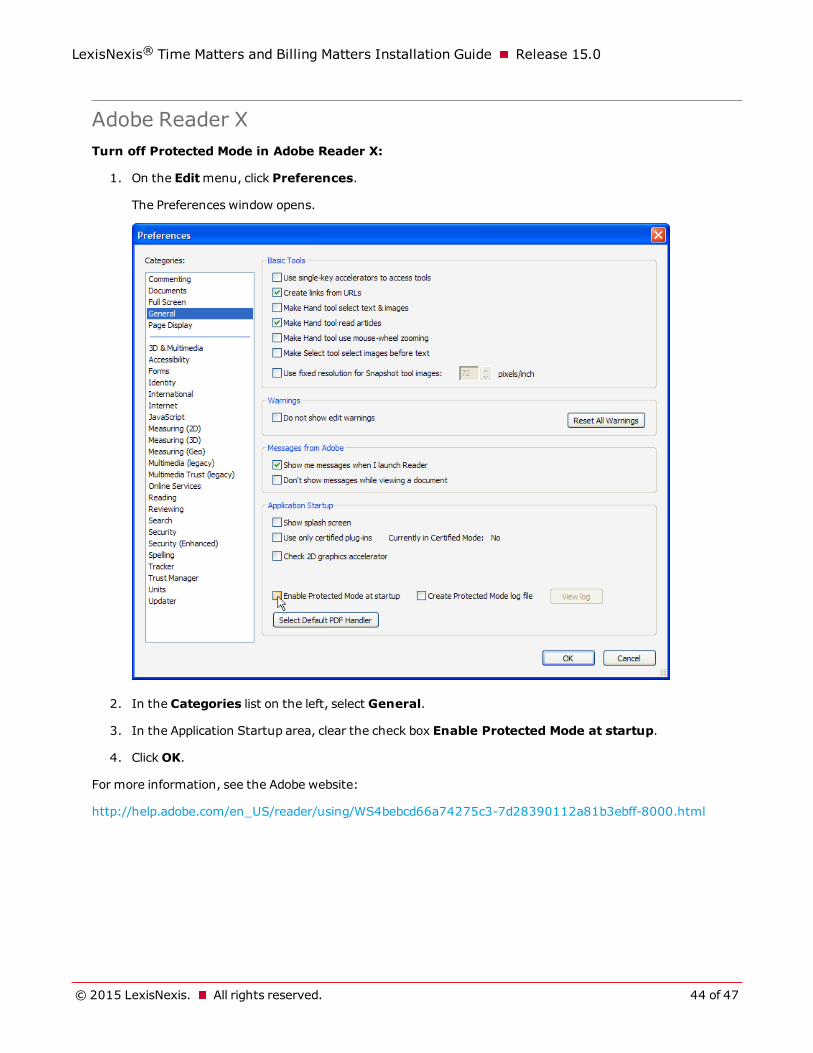
Adobe Reader XTurn off Protected Mode in Adobe Reader X:
1. On the Edit menu, click Preferences.
The Preferences window opens.
2. In the Categories list on the left, select General.
3. In the Application Startup area, clear the check box Enable Protected Mode at startup.
4. Click OK.
For more information, see the Adobe website:
http://help.adobe.com/en_US/reader/using/WS4bebcd66a74275c3-7d28390112a81b3ebff-8000.html
LexisNexis® Time Matters and Billing Matters Installation Guide Release 15.0
© 2015 LexisNexis. All rights reserved. 44 of 47

Adobe Reader XITurn off Protected Mode in Adobe Reader XI:
1. On the Edit menu, click Preferences.
The Preferences window opens.
2. In the Categories list on the left, select Security (Enhanced).
3. In the Sandbox Protections area, clear the check box Enable Protected Mode at startup.
4. Click OK.
For more information, see the Adobe website:
http://helpx.adobe.com/reader/using/protected-mode-windows.html
LexisNexis® Time Matters and Billing Matters Installation Guide Release 15.0
© 2015 LexisNexis. All rights reserved. 45 of 47

Uninstall the SoftwareWarning
If you currently have both Time Matters and Billing Matters and you only want to uninstall one of the applications, you must contact Customer Support to assist you. Do not use the following instructions for uninstalling, or it could result in loss of data.
Time Matters cannot be uninstalled without uninstalling Billing Matters, nor can Billing Matters be uninstalled without uninstalling Time Matters.
1. Do one of the following:
n In Windows Vista or Windows 7, go to Start > Control Panel > Add or Remove Programs.
n In Windows 8 or Windows 10, go to Control Panel > Programs > Programs and Features.
2. In the list of installed programs, select LexisNexis® Time Matters®.
3. Click the Uninstall button.
At your option, you can manually delete the folder containing Time Matters/Billing Matters configuration files. If you plan to reinstall the software with a different configuration (such as installing the database on a different SQL Server), it is a good idea to delete this folder.
The folder’s default location for Windows Vista and Windows 7 is:
n C:\ProgramData\LexisNexis\Time Matters
The folder’s default location for Windows 8 and Windows 10 is:
n Control Panel\Programs\Programs and Features
Note
You must have "Show Hidden Files and Folders" enabled in order to see the folders.
LexisNexis® Time Matters and Billing Matters Installation Guide Release 15.0
© 2015 LexisNexis. All rights reserved. 46 of 47

Giving Feedback on Time Matters DocumentationWe welcome feedback on our documentation! If you find any errors or have comments or suggestions, please send us an email. You can contact us at: [email protected].
Important Note: Please use the above email address solely for comments and feedback on Time Matters documentation. For technical questions and issues, contact either your organization’s help desk or Time Matters customer support.
Please include as much detail as possible, such as the following:
n The name of the book or online guide you are using.
n The page number (for printed books) or topic title.
n The version of Time Matters and of the documentation. In the printed books, you can find the version number on the title page. In online help and online books, the version is at the bottom of every topic.
LexisNexis® Time Matters and Billing Matters Installation Guide Release 15.0
© 2015 LexisNexis. All rights reserved. 47 of 47