THE ROLLEIFLEX: MODEL BY MODEL
63
THE ROLLEIFLEX: MODEL BY MODEL These green pages deal with the individual Rolleiflex cameras in detail. Self-contained sectionsfor each group of model coverpoints of loading, unloading, shooting, and specific controls. For afuller explanation of aspectscommon to all Rolleiflex cameras, compare these sections with the main text under the same headings. TheRolleiflex F and E Series TheRolleiflexAutomat Series Loading Unloading Shooting Using the Rolleiflex E Exposure Meter I0 Installing the Exposure Meter Special Controls The Rolleiflex T Loading Unloading Shooting Using the Rolleiflex T Exposure Meter Installing the Exposure Meter Special Controls The Rollei-Magic I,II Loading Unloading Shooting Special Controls TheRolleiflex4x4 Loading Unloading Shooting SpecialControls 6 Loading I Unloading g Shooting 29 30 30 34 II It Special Controls Early Rolleiflex Models Loading 38 Unloading 38 Shooting 38 SpecialControls 39 Lens Attachments and Accessories Tele and Wide-angle $ Close-up Work 40 Earlier Close-up Lens Sets 42 Soft Focus Lenses 42 The Lens Hood 43 The Rolleilux 43 Filters 43 The Rollei Micro Adapter 44 Yiewing Accessofies The Binocular Focusing Hood The EyeJevel Prism Finder The Rolleigrid Rolleiclear Screen The Rolleimeter The Extension Focusing Knob I4 I6 I5 t8 ,8 I9 20 22 22 22 25 25 25 26 45 45 45 45 45 45 fl i
Transcript of THE ROLLEIFLEX: MODEL BY MODEL

THE ROLLEIFLEX: MODEL BY MODELThese green pages deal with the individual Rolleiflex
cameras in detail.Self-contained sectionsfor each group of model cover points
of loading, unloading, shooting, and specific controls.For afuller explanation of aspects common to all Rolleiflex
cameras, compare these sections with the main text under thesame headings.
The Rolleiflex F and E Series The Rolleiflex Automat SeriesLoadingUnloadingShootingUsing the Rolleiflex E
Exposure Meter I0Installing the Exposure
MeterSpecial Controls
The Rolleiflex TLoadingUnloadingShootingUsing the Rolleiflex T
Exposure MeterInstalling the Exposure
MeterSpecial Controls
The Rollei-Magic I,IILoadingUnloadingShootingSpecial Controls
TheRolleif lex4x4LoadingUnloadingShootingSpecial Controls
6 LoadingI Unloadingg Shooting
29303034
I II t
Special Controls
Early Rolleiflex ModelsLoading 38Unloading 38Shooting 38Special Controls 39
Lens Attachments and AccessoriesTele and Wide-angle $Close-up Work 40Earlier Close-up Lens Sets 42Soft Focus Lenses 42The Lens Hood 43The Rolleilux 43Filters 43The Rollei Micro Adapter 44
Yiewing AccessofiesThe Binocular Focusing
HoodThe EyeJevel Prism
FinderThe RolleigridRolleiclear ScreenThe RolleimeterThe Extension Focusing
Knob
I4I6I5
t8
,8I9
20222222
25252526
45
45454545
45
f l ililt

Carnero Cases and HoldingAccessories
Ever-Ready Cases 48The Metal Ever-Ready Case 48The Rolleifix Tripod Head 50The Pistol Grip 50The Panorama Head 50The Stereo Slide 50The Rolleimarin
Underwater HousingRolleimot, remote control
Alternatiae Picture SizesThe Rolleiflex Mask SetThe Plate Adapter
The Rolleikin Cine FilmAdapter 54
The Rolleikin II 54Installing the Release
Knob 56Assembling the Rolleikin II 56Loading 56Film Transport 58Rewinding 58The Rolleikin I 58Assembling the Rolleikin I 58Film Loading and
Transport @Rewinding 60Early Designs of Rolleikin 62
5252
5353
Note: Various items of equipment mentioned in the following pagesare no longer manufactured. These items are denoted by the sign O
t 2

THE ROLLEIFLEX F and E SERES
THE ROLLEIFLEX 3.5F is equipped with either the 3 in. (75 mm.).6I Zeiss Planar or the 03 in. (75 mm.) Schneider Xenotar/3.5 lens with' '- an angle of view of 56o. The viewing lens is a 3 in. (75 mm.) Heidosmat,
., ' r'Dt f 2.8. The camera has a built-in photo-electric exposure meter(coup!"dj/(to aperture and shutter speed controls with control wheels permitting'individual adjustment of both settings. Filter factor correction can be
-) fed directly into the meter. This model is also available without itsbuilt-in meter, which can be easily fitted at any time. The shutter is theSynchro-Compur MXV. The camera further has an automatic depth offield indicator, film feeler, and rloqhlE.exposure lock yith provisionfor intentional double exposures. The camera back ha5 a two-positionTi6"sure plate.E-"additioh to th^6 position for 2]x.21in. nlctures therers a second one for 35 mm. film when used with the Rolleikin IIattachment. The focusing hood is removable and can be replaced byan eye-level pentaprism unit. An optical glass film plane can be fittedwith a three-position pressure plate, to obtain absolute flatness of thefilm. A back for single exposures on plates or cut film can be fitted. *The Rollei-Marin 4 underwater housing is designed for use with thisRolleiflex model for underwater photography. The finder hood isinterchangeable for an eye-level pentaprism. This model takes size IIbayonet accessories (filters, close-up lenses, lens hood) to fit thebayonet lens mount.O TIIE ROLLEIFLEX 3.5E3 is similar to 3.5F but has no exposuremeter built in. It has cross-coupled aperture and speed scale with expo-sure values. However the expoiure meter as in Rollei T can be installedlater (see ! tB T)
3e.,r-,, THE ROLLEIFLEX 2.8F is equipped with the 3$ in. (80 mm.).k Zeiss Planar or O Schneider Xenotar / 2.8 lens and is otherwise the
same as the Rolleiflex 3.5F. No Rollei-Marin underwater housing isavailable so far for this model. It takes size III bayonet accessories(filters. close-up lenses, lens hood) to fit its bayonet lens mount.O THE ROLLEIFLEX 2.8E3 is similar to the 2.8F but has no exposuremeter builtin. It has cross-coupled aperture and speed scalewithexpo-sure values. Flowever the exposure rneter as in Rollei T can be installed
. l a te r ( see I f 8T ) .---> O THE ROLLEIFLEX2.SEI? is similar to the Rolleiflex 2.8F"but the
' ., ̂ , ,Ni+ built-inphoto-electricexposuremeterisnotcoupledtotheapertuie-speedynf t 'setting.
The shutter has an exposure value scale. The same accessories' - are ulable on it as for the 2.8f and the camera also takes size IIIbayonet accessories. A special film counter and film release knob isbuilt in for use with the Rolleikin II outfit.
THE TELE-ROLLEIFLEX is basically the same as the Rolleiflex2.sBl2 in design and handling. The taking lens is a 58 in. (135 mm.)Zeiss Sonn ar f 4, with an angle of view of 33o. The viewing lens is also a5 $ in. (135 mm.) Zeiss Sonn ar f 4. The exposure meter is either built in,
F , E 3 l

THE ROLLEIFLEX 3.5F
Synchro-levcrHood
Pccp window
DOF rrngc
Distancer
Scrccn
Focus knobSctting marker
Metcr nccdlc
Fllter factoF
Shutter speedsApcrturcl
Film spcedr
Double cxpo3urc!
Releasc
Flash sockct
Back block
Thc synchronizing lever selects flash scttlngs and tcnslons thc sclf-timcr. The focusing hood lsrcmovabfc. The geep window indicatcs the shuttcr specd and aperturc scr. Thc de1th offield indicotorautomatically shows the sharp zone opposite the distonce scole, and is coupled with the oqerturecontrol. Thc focusing knob moves the wholc lens pancl forwards and backwards. Lining-up thcsetting morker with the meter needle scts thc corrcct exposure. A separate knob carries filter factor
. corrections and film speed settings. Cross-coupled whcels set the apertures and shutter speeds. The+,tronsDort cronk incorporates a double exposure releose. Thc releose button with cable release socket-+ t lso carr ies a safety and t ime cxposure lock.'
Thc above detai ls apply to the Rolleif lex 3.5F; apart from the larger dlametcr of the lenses, theRolleif lex 2.8F is idehi i ial .**'*- iiiii:i;:iii:i:ii:iii iiiiii:iiiii:i
fi$
:i.t. r.i .'.'*.....,...,..........'. .jrr:!i,z.ii:'iiiii:.:N'ii:.i.:.:,:.t t' :'i.'e.
t:l:,ffi1ill*S";...(GDFffiiiiii iliilli ii ii B.tIilH
iiiffimii , eillShooting with the Rolleiflcx 3.5F. From left to right: Swlng thc crank to advance the film; turn rheaper ture wheel to l ine up the set t ing marker and meter needle whi le tak ing an exposure reading;select an a l ternat ive aper ture-speed combinat ion i f requi red; focus the image on the screen; pressthe re lease to expose.
| 4 F r E \
butkusmi
New Stamp

The pccp window indicatcs thc rpcrturcs rnd shutter rpccdr ectually sct. The focusing hoodincorpoiates a mirror for eye-levcl viewing, but is not removablc. The shutter speed wheel carrics ancxpoiurc value scale and is cross-coupled with operturc wheel. Thc automatic depth of B:ld indicotorsh6ws the zone of sharpncss at al l distances and is coupled with thc aperture control. The exposuremeter conrrols in the focusing knob comprise che setting marker and the meter needle. Super mposingthc two yiclds correct expoiurc valucs. Thc rcleose button incorporates a cable release sockct, anda rcfcase and time lock. The film tronsport crdnk carries z double exposure,releose. Thc synchronizingleyer surrounds the flash socket and is tombined with the retaining catch for the flash cable.These details apply to the Rolleiflex 3.5E; the fcatures of thc 2,8E are slmilar, cxce.pt for thcprovision of a f i im tounter knob for 35 mm. f i lms and a combined synchronizing lever and self-t imcr(inset, top). The 2,8E12 model is similar ro thc 2.8E, but has a rcmovable focusing hood like the3.5F (oPposite Poge).
ffiiffiffiffiNShootf ng wlth the Rolleiflex 3.5E. From left to right: Advance the film and tension the shutter withthe t ransporg crank; set the exposure value wi th the aper ture wheel uncoupled; se lect a l ternat iveaper ture-speed combinat ions i f necessary wi th the shut ter speed wheel ; focus the image on thescreen; press thc release button to expose.
Peep window
Hood
Exposure values
Self-t imer
Apertures
DOF range
Distances
Focus knob
Setting marker
Meter needle
Relcase
Double exposures
Synchro-lever
THE ROLLEIFLEX 3.5E
F , E 5 I

o-r the^-camera is pre-wired for its subsequent installation. The opticalglass film plane with appropriate 3-position pressure plate is a standardfitting. The Tele-Rolleiflex takes the same accessories as the 2.8F andif accepls size III bayonet mount attachment. The focusing range isfrom infinity to 8+ ft. and a special Rolleinar 0.35 near lens set inligged-gt1 mount is available extending the near range to 5 ft. and a0.7 Rolleinar set further extending it to 3.3 ft. Theie lenses can beused in c_oniunction with the standard Rolleinar close-up lenses.
THE WIDE-ANGLE ROLLEIFLEX is basically the same as theTele-Rolleiflex in design and handling. The taking lens is a 2[ n.(55 mm.) ZeissDistaEgnr4 yrlh an angle of view of 71.. The viewinglens is also a 2$ in. (55 mm.) Zeiss Distagon. It takes the same acces-sories as the 2.8F and accepts size IV bayonet mount attachments.The focusing range is from infinity to 2ft.O THE ROLLEIFLEX 2.8E is siririlar to the Rolleiflex 2.BF,l2 but thehood is not interchangeable. In place of the ultra fine focusing screena normal ground glass screen is fltted. This model is available alsowithout the built-in meter, but fitted suitably wired for subsequentinstallation of the meter if required. No facility for installation 6f anoptical flat glass accessory is available but the camera can be usedwith the Rolleikin II for.35 mm. film, also the plate back. It acceptssize III bayonet accessories.O THE ROLLEIFLEX 3.5E is similarto the 2.8E but has a 3 in. (75mm.)Planar f 3.5 or Xenotar /3.5 lens. It can be used with the Rollei-Mariri3 underwater housing. It accepts size II bayonet accessories.
ACCESSORIES FOR ALL THE ABOVE MODELS include filtersfor black-and-white and for colour films, lens hood, close-up lens setswith parallax compensation, soft focus lenses, flash guns, a microa.ttaghqeqt, a pJa_te and cut film adaptor, Rolleikin 35 mm. film outfit,the Rolleifix quick-release tripod head, pistol grip, panorama head ancibinocular extension hood. All models-with tha exception of theTele and wide-angle models-can be used with the attaChment lensesfor tele and wide-angle effect.
Loading1. O-pen the camera back. Check that the pressure plate is correctly
adjuste-d. For models with three-position pressure plate, note thbtwo. different positions for 2{ x2f, in. When working without theoptical flat glas!, use the centre position which exposes a pictorialsymbol of a rollfilm. When working with the optical flat glass, pushthe pressure.plate up so that a symbol of a rollhlm with a flaf platebecomes visible.
2. Insert the fiIm.3. Close the camera.4. Get the film ready for the first exposure.5. Set the_fflm speed and type. To set the film speed on cameras with
co.u_pled. exposure meter (2.8F, 3.5F) gently press and turn themilled ring in the centre of the film speed disc untit the speed of the
f 6 F , E
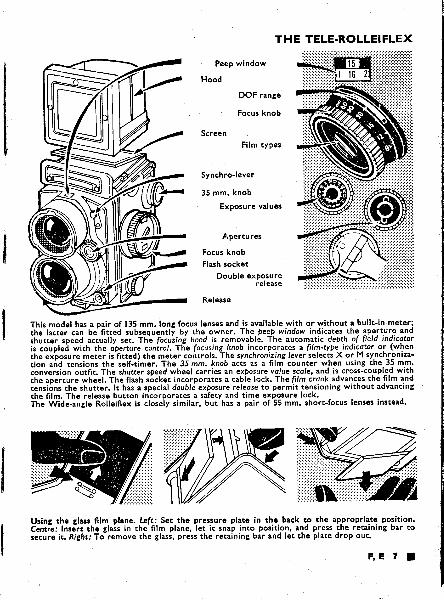
This model has a pair of 135 mm. long focus lenses and is avai lable with or without a bui l t- in meter;i t i"- t"t i" . ."n Ujnitea subsequentl i by the owner. The peep window indicates the apertur-e andjttrtttilpeed actually set. Th; focu'sini hood is removable. The automatic depth o.f field ind,icotoris couplej with the operture control. The focusing_.knob incorpo-rates a film-type -indicotor or (whenthe exposure meter is'fitted) the meter controls. T.he synchronizing lever selects X or M sy.nch_r_oniza't ion and tensions the self-t imer. The 35 mm. knob acis as a f i lm counter when using the-31 .-n1.ionversion outfit. The shutter speed wheel carries an exposure value scale, and is-cross-co.upl^ed withit"
"J"i i r ." *heel. The f lash sbcket incorporates a cabie lock. The f i lm cronk advances the f i lm and
iensi6ns the shutter. l t has a special doubli exposure release to permit tensioning without advancingthe f i lm. The release button incorporates a safety and t ime exposure lock.ft" Wiiu-"ngle Roileif lex is closeiy similar, but 'has a pair of
'55 mm. short-focus lenses instead.
Using the tlass film plene. Left: Set thc pressure plate in th-c- back co the aP.propriata position.Centie: InsJrr the glais in the'f i lm plane, let i t snap into posit ion, and press the retaining bar tosecure i t , Right: To remoye the glass, press the retaining bar and let the plate drop out.
Peep window
Hood
DOF range
Focus knob
Film types
Synchro-lever
35 mm. knob
Exposure values
tlrpertu res
Focus knob
Flash socket
Double exposurerelease
Release
THE TELE-ROLLEIFLEX
F , E , I
butkusmi
New Stamp

film u-sed appears in the appropriate DIN or ASA window. Thefilter factor indicator on thb-ouiside rim of this disc should be seito. "0". If, however, afilter is used,_set the correction factor (inmrnus -exposure values) to_ the _black arrow head. The exposuremeter then automatically allo_ws for the exposure increase reduireo.
To set the film sgegd on the cameras with uncoupled exposuiemeter (3.5E, 3.8E, Tele and wide-angle Rollei) turn the sdrratedouter rim of the meter _control (the oulermost ring of the focuiingknob) until the sp_eed_of the filni loaded into the cimera appears ii!hg. appqopriate DIN or ASA window. Intermediate vilues areindicated by dots.Ttru fitp typg_inficator is in the centre of the exposure meter knob.Turn the milled button until the appropriate fiim type appears inthe small window, pan, ortho, art,ificial right coloiri of iaiiigtricolour. This acts as a reminder.on cameras without exposure meter, set the film indicator in thefoc!_sing knob by turning the small cioss-bar. Turn in one directionqntil the appropriate film speed_appears in the ASA or DIN window,then turn in the appropriate direction to bring the required filnitype into the centre window.
Ilnload.ingl. Wind off the fiIm.2. Open the camera back.3. Remove the exposed film. Then close camera back or reload.
Shooting1. Advance the film. Swing out the crank and turn it forward with one
contingous swing until it stops. Then swing back again io stop. rniioperat_ion tensions the shutt-er, advances tle film i-o the next framiand advances the film counter.
2. set the.exposur.e. on_ the Rolleiflex2.8F and35Fpre-serect a shutterfpeed 9v. lorying the right-hand setting wheei between ttrJ twolenses (with the gamera held in the shooting position). The shutterhasj.peeds of t, ], *,b tlts, tl3o, t160, tltis, tl2so, i/soolec. ano5. lne shutter speed.appears in the peep window on top of thecamera front. The valuei l, 2, 4,8, 6tc., to 500 are fraitions ofseconds and stand therefore for l, +', +, +', etc., to l/500 sec. Thenwith the cpqle.ra pointing at the subi6ct (idi a refiected lighi riading)turn the left-hand setting wheel to line up the meter-needle aridsetting marker. rltqse are visible in the smdll window on top of thefocusi,rg knob. This sets the camera to a correcr exposure for iheprevailing,light. Y^ou can select alternative apertuie-speed com-brnations_(see step 3 below). /On models with nbn-coupled meter or without mete[ (2.gE,lZ,2.gF',3.5E Tele and wide-ang1e) the shutter has an exposurb val'ue scale.
I t F , E

3
l#
}
ROLLEIFLEX E EXPOSURE METER
Range swi tch or br ight and d im l ight .
Exposurc metcr ce l l .
Inc ident l ight d i f fuser .
Exposurc valuc rcadings for bright and dlm light.
Set t ing pointer .
F i lm spced set t ing.
Meter needlc .
Metcr set t ing r ing.Film type inJicaror. {--- A>A t*{ ?
a
To urc the mctcr, fircc sct thc film spced (left), thcn polnt thc cemcra ar rhc aub,cct, and turn thcsetting ring to bring the.setting pointer into coincidcnce with the meter needle (centre left). Rcad offthe exp-osure value in the appropriate window (cente right\ and set the camera to this-exposurcvalue (right)
l &
,i,$
The exposure meter has two measur ingranges contro l led by a swi tch ar rhe ropof the meter ce l l . Wi th the swi tchpushed upwards, the meter reads ex-posure values in br ight l ight ; the appro-priate exposure value is read off in thefront exposure value window (left). Inpoor l ight condi t ions push the swi tchdownwards and read off the exposurevalue in the rear window on the r im of rhefocusing knob (right).
ffi*---i r-tfu
ffi@HffiF , E t I

points to the required exposure value (from 3 to 18). You obtain thecorrect exposure value from a separate meter reading. Then let goof the centre of the left-hand setting wheel; the aperture-speedcontrols interlock again.Select the aperture-speed combination. Both speed and aperture arecontrolled by the right-hand setting wheel. To change the shutter-aperture combination, just move this wheel until the window abovethe finder lens shows the required aperture or shutter speed.
On the Rolleiflex models with non-coupled meter you can turneither setting wheel. While normally the speed and aperture controlsare fully coupled, there is an interlock release in the centre of theaperture (left-hand) wheel. To disengage the coupling, depress thecentre of the aperture wheel and turn the centre so that the two blackindex marks are at right-angles to the loops engraved on the outerrim. Turning the button so that the index marks point to the loopsagain, restores the aperture-speed coupling. Make certain that thecoupling has engaged by turning either or both of the wheels, andsee that the button is in the correct position.Focus and determine the picture area. To open the reflex hood pushup with one finger. To close, push in the sides, on E models pulldown the hood.
Turn the focusing knob while watching the image on the screen,until the subject appears sharp. Check with the magnifier.
Tobringthemagnifierinpositiongentlypress inthefrontpanel of theopened hood.Toclose, pressthemagnifier back.OnEmodelspullupthe ti..s-small catch in the top of the hood. To close, gently press the magnifier.
To use the direct vision sports finder push in the front panel ofthe opened hood until it clicks into position. To close, lightly pressthe sides of the hood. On E models push in the front of the opened
- 0 ffr4 hood; to close, press down gently on the magnifier. For eyei-levelW - *i_ viewing you ,can also use the pentaprism (s9e page a 45)
- This is marked on the front of the right-hand setting wheel. To set),the exposure value, depress the centriof the left-han? setiing wtreeiT,rrle,rr^puJLllr' v4ruri, u(,pr('ss Lll(i t;ti l l l l(i ul LItg ltlL-uallu sctturg wnggl
and turn either or both wheels until the arrow head in the centre
3.
4.
>4tY-_ ,i' viewing you can also use the pentaprism (see page a 45)/\J.ry] 5. Release the shutter gently by pressing the release button. The release, * [ has a safety lever. Swing this downwards to unlock the release, and,r;)t up to lock it asainst accidental exposures.
r Using the Rolleiflex E Exposure Meter
The photo-electric exposure meter built into the Rolleiflex 2.8E,Rolleiflex 3.5E and Tele-Rolleiflex has two measuring ranges. On thetop left-hand corner of the name plate a switch operates the high orlow ranges. The measuring indicator is built into the focusing knob onthe left-hand side of the camera.1. Set the film speed by turning the adjusting ring until the correct
speed appears in the cut-out above the indicator mark for ASA orDIN. Dots indicate intermediate values.
t l 0 F , E

t2. Set the measuring range. In bright light outdoors, turn the measuring
range switch on the top left-hand corner of the "Rolleiflex" nameplate upwards so that the red dot is covered. In poor light andindoors, turn the measuring range switch downwards so that thered dot is uncovered.
3. Measure the exposure value. Turn the finely serrated ring to line upthe red pointer with the black meter needle. With the range switchturned upwards (red dot covered) read off the correct exposurevalue in the forward window of the knob. fn poor light, with therange switch turned downwards (red dot uncovered), read off theexposure value in the rear, red window. The figures are full exposurevalues, the dots indicate half-values.
4. Set the exposure value on the shutter speed wheel.
Installing the Exposure MeterThe Tele and Wide-angle Rolleiflex and some Rolleiflex E models,
which are supplied without exposure meter" are pre-wired for subse-quent installation of the meter.1. Fit the meter cell by unscrewing the camera name plate with the
special pin supplied with the separate meter. Replace the nameplate by the photo-cell and replace the screws.
2. Insert the meter control unit into the focusing knob. Remove thethree screws at the retaining ring of the film indicator dial and letthe dial drop out. Loosen the retaining screw below the film typeindicator window of the meter control unit as far as it will go.
, The control unit is now inserted into the focusing knob with the red/ indicator window on top, pushed gently inwards and turned clock-
wise until it locks. Tighten the retaining screw again.3. Zero calibration. When the photo cell is completely covered up, the
black pointer should be in zero position, pointing to the shortgreen line. If the black pointer does not point to the green line,turn the retaining screw as far as it will go, turn the meter controlunit to the left to disengage it from its bayonet socket and remove it.Adjust the screw in the upper centre of the back of the control unituntil the black indicator needle points to the green index mark.Reinsert the control unit into position and tighten the retainingscrew.
The meter is now ready for use and is handled in the same way asthe E meter (described above).
Special ControlsTIME EXPOSURES with the Rolleiflex 3.5F and 2.8F are indicated
by green figpres in full seconds. After lining up the exposure meterpointers, the green numbers indicate the number of seconds the shutterhas to be kept open. At any of the green figures and also at intermediatevalues (but in the green field only) the shutter will remain open as long
$Nl
f;[fr
nlil
[|I
F , E t t r
rif
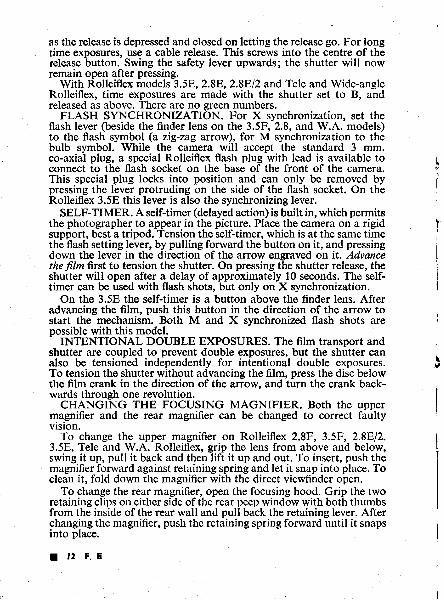
as the release is depressed and closed on letting the release go. For longtime exposures, use a cable release. This screws into the centre of therelease button. Swing the safety lever upwards; the shutter will nowremain open after pressing.
With Rolleiflex models 3.5E, 2.88,2.8F/2 and Tele and Wide-angleRolleiflex, time exposures are made with the shutter set to B, andreleased as above. There are no green numbers.
FLASH SYNCHRONIZATION. For X synchronization, set theflash lever (beside the finder lens on the 3.5F, 2.8, and W.A. models)to the flash symbol (a zig-zag arrow), for M synchronization to thebulb symbol. While the camera will accept the standard 3 mm.co-axial plug, a special Rolleiflex flash plug with lead is available toconnect to the flash socket on the base of the front of the camera.This special plug locks into position and can only be removed bypressing the lever protruding on the side of the flash socket. On theRolleiflex 3.5E this lever is also the synchronizing lever.
SELF-TIMER. A self-timer (delayed action) is built in, which permitsthe photographer to appear in the picture. Place the camera on a rigidsupport, best a tripod. Tension the self-timer, which is at the same timethe flash setting lever, by pulling forward the button on it, and pressingdown the lever in the direction of the arrow engraved on it. Advancethe film first to tension the shutter. On pressing the shutter release, theshutter will open after a delay of approximately 10 seconds. The self-timer can be used with flash shots, but only on X synchronization.
On the 3.5E the self-timer is a button above the finder lens. Afteradvancing the film, push this button in the direction of the arrow tostart the mechanism. Both M and X synchronized flash shots arepossible with this model.
INTENTIONAL DOUBLE EXPOSURES. The film transport andshutter are coupled to prevent double exposures, but the shutter canalso be tensioned independently for intentional double exposures.To tension the shutter without advancing the film, press the disc belowthe film crank in the direction of the arrow, and turn the crank back-wards through one revolution.
CHANGING THE FOCUSING MAGNIFIER. Both the uppermagnifier and the rear magnifier can be changed to correct faultyvlsron.
To change the upper magnifier on Rolleiflex 2.8F, 3.5F, 2.8F,12.3.5E, Tele and W.A. Rolleiflex, grip the lens from above and below,swing it up, pull it back and then lift it up and out. To insert, push themagnifier forward against retaining spring and let it snap into place. Toclean it, fold down the magnifier with the direct viewfinder open.
To change the rear magnifier, open the focusing hood. Grip the tworetaining clips on either side of the rear peep window with both thumbsfrom the inside of the rear wall and pull back the retaining lever. Afterchanging the magnifier, push the retaining spring forward until it snapsinto place.
I t 2 F . E

On the Rolleiflex 2.8E remove the upper magnifier by pulling backthe ring mount against the retaining spring and lift out. To insert, putthe magnifier into position with its back first, pull back against thespring and snap down.
To remove the rear magnifier push in sliehtly at top and lift out. Toinsert, slip the magnifier with its white dot uppermost between theretaining springs and push down until it snaps into place.
USING THE GLASS FILM PLANE. While the film is normallykept flat by the accurate machining of the film channel combined withthe pressrue plate, the optical glass film plane ensures plate-like flatnessof the film when extremely critically sharp negatives for extremeenlargemerrts are required. It is a standard fitting of the Tele and Wide-angle Rolleiflex and is also available for Rolleiflex models 3.5F, 2.8Fand2.8El2 in conjunction with a special back.
To insert the glass plate, open the camera back and tilt forward.Slide the glass with bevelled edge under the upper retaining bar of thellm gate. Let the glass plate snap into position and secure by pressingthe bar. The bevelled edges are held by the retaining bars of the filmgat9. To remove, turn the camera upside down, press the retaining barand let the glass drop into your hand.
Handle the glass by the edges only. Keep it absolutely clean, inparticular keep both sides free from dust and lint. Store the plate,when not in use, in the compartment provided in the ever-ready case.
Remember to adjust the pressure plate (see Loading).
llrfl
il* nil
ll
Hl{F , E
" t

THE ROLLEIFLEX TThis is a comparatively simplified Rolleiflex without some of the
trimmings of the more advanced models. It has a 3 in. (75 mm.) ZeissTessar/3.5 lens in Synchro-Compur shutter, and is available with orwithout dual range exposure meter. The model without rneter ispre-wired for subsequent installation of the meter. The focusing hoodis removable (for replacement by the pentaprism), but no eye-levelmirror is fitted. A single lever controls exposure values and aperture-speed selection, with facility for individual adjustment. The self-adjusting film counter is suitable for 12 exposures or for 16 pictureswith a special masking set. A back for single exposures on plates or cutfilm can be fitted. Cameras with serial Nos. above 2,151,000 are fittedwith the dual-size camera back and can be used also with the 24x36mm. Rolleikin. Models of lower serial NoS. can be converted togetherwith the ever-ready case. The camera takes all optical accessories withsize I bayonet mount; filters, hood, close-up, soft focus and attachmentlenses for tele and wide-angle effect, etc., may be used. Other accessoriesinclude the Rolleifix tripod head, Rollei pistol grip, panorama head,extension hood, flash guns, and micro attachment.
LoadingOpen the camera back.fniert the film. First transfer the empty spool in the bottom chamberto the top chamber. Pull out the film retaining knob, remove theempty spool and insert it in the top chamber after pulling out thecorresponding retaining knob. The grooved end of the spool shouldengage the cross bar of the film transport peg.
Insert the film ro11 into the bottom chamber after breaking theseal. Draw the pointed paper end over the two glide rollers into thewide slot of the top spool. Tighten the paper on this spool. Nowwind the transport crank until the triangular marks (or arrows)on the backing paper are opposite the red dots on either side nearthe base of the film aperture.
3. Close the camera,4. Get the film ,."dy for the first exposure by turning the transport
lever crank till it comes to a definite stop. Then turn it back andfold over to the rest position. The exposure counter sets itselfautomatically to No. 1.
5. Set the fiIm speed and type. On the Rolleiflex T without exposure meter,set the film speed indicator by turning the bar in centre of focusingknob to the right until the DIN or ASA speed appears in theappropriate cut out. Set the film type to ortho, pan, artificial lightcolour or daylight colour, by turning the same bar to the left.
On the Rolleiflex T with built-in exposure meter, set the speed byturning the serrated outer rim of the meter beyond the left or rightstop until the speed of the film loaded into the camera appears in
I t4 T
tI+
1.)

F
The.peep.windows above the finder tens indicate the aperture and shutter speed set. Another windowat the side shows the exoosure volues. All the settings are controllei-6i I jiitlr" lrie;rri" Lrli.li,irJf i lm counter shows the number of etp"lurer ta-k-en ano automatical ly switches over from l2 to l6exPosures onfrt t ing the l6-exposure mask. The_focusing tnoa c".r i .r ' th-e i ist"nce scale which movespast a depth of field scole. lt also.incorpor.ates.afiim .ind;i"t"i, * t*["n'irn="t"r ir uriiii"i in" .!i"icontrols. The tronsport cronk advanres the f i lmand tensions tt . i . frr i t" . . i . f" ."rbf"-*6;;;- . ; ; ; ; ;pos:ible. The synchronizing |eve.r sjts X or M synchroniiaii;";';i;;;;i;is ttre setf_iim;;. til; f,;;;soc.ket incorporates a cablL lock. The releose button carr ies a. i6td i i l r* i i ; ; tJi ' ; ; ' ; :#; ' ; ; ;t ime exposure lock.
' Peep window
Hood
ScreenExposure lever
Exposure values
F i lm counterDOF scale
Focus knob
Film indicator
Crank
Synchro-lever
Flash socket
Release
THE ROLLEIFLEX T
Shooting.with the Rolleif lex-!: - lr?^ left to r ight: Advance the f i lm and tension the shutter byturning the transport crank; set.the exposure va-lue; select alternati te'ap'eiture-rpeed 6g1nUin"i i"nii f required; focus the i .nage on the screen; p""rs the ;; t ; ; ; ; ; ; ; ; ; .- ' - '
T 1 5 I

the appropriate DIN or ASA window. Intermediate values areindicated 6y dots. The film type indicator is here in the centre of theexposure meter knob. Turn the milled centre button ring until theappropriate film type appears.
Unloading1. Wind off the film.2. Open the camera back.3. Remove the exlnsed ftlm, then close the camera or reload.
Shooting1. Advance ffus fflm, swing out the crank and turn it forward with one
continuous swing until it stops, and back again to stop. Thisoperation tensions the shutter, advances the film to the next frameand advances the film counter.
2. Set the exposure value. The exposure value is ascertained from eitherthe built-in exposure meter (see below), a separate meter, or the tableon the back of the camera. To set it, pull out the button of the leverat the left-hand side of the lens and move it up or down until therequired value is opposite the pointer in the exposure value windowon the left of the finder lens.
3. Set the aperfure speed combination. Each exposure value representsa range of shuttei speed-aperture combinations covered by a sin-glesettinE, which are interlocked. You can choose any shutter sp,ee{ o-raperture without changing the exposure. Move the lever at the leftol the taking lens, without pulling out its button, until the desiredaperture-spebd combination appears in the peep window_on lop gfthe finder-lens. The Synchro-Compur shutter has speeds of 1, |,+,+, l l l5, l l3O,l160,l l l25,l l250,1/500 sec. and B. The values 1,-2,4-, fi,6tc., to 500; are fractions of seconds and stand, therefore, forl, *, *, {, etc., to 1/500 sec.-To
iet the aperture and shutter speed independently, set first theshutter speed (if necessary go back over the scale) by moving theleft-hand lever, then pull out its button and set the aperture.
4. Focus and determine the picture area. To open the reflex hood liftup the back edge of the hood. To close it, fold in both sides and pgllback the front. To raise the magnifier, press the front panel of theopened hood gently inwards. To close the magnifier, push itdownwards.
Turn the focusing knob to get the image sharp.To use hood as dilect vision sports finder press in the front panel
of the open hood as far as it will go. To close, gently tap bo-thsides of-the hood. For eye-level viewing you can also use thepentaprism (see page a 45).
5. ileleaSe ttre itrutt-er gently 5y pressing the release button. Swing outthe shutter release first.
l 16 T

*
F
tTHE ROLLEIFLEX T METER
To fit the meter first unscrew the lugs of the name plate with the needle In the outfit (upper left)and replace the name plate by the meter ce l l . Unscrew the screws of thc reta in ing r ing of the f i imindicator (upper right) and remove the assembly. Unscrew the screw S below the film Indicatorwindow of the meter contro l un i t and inser t the la t ter in the focusing knob ( lower le f t ) , turn ing icto the r ight to engage the bayonet lock. T ighten the reta in ing screw S. For zero cal ibr ' i t ion ( lowerr ight ) the meter needle should be in l ine wi th the cal ibrat ion mark O when thc ce l l ls compiete lycovercd. l f th is is not the case rcmove the meter contro l un i t agaln and adjust the set t ing sdrew Zin the back.
To use the meter first set the film speed (left), then polnt chc camera at the sublecr and turn thesctting ring to linc up the setting pointcr with the meter needle (centre left). Read off the exposurevaf ue in the appropriato window (centre right), and set the camera to this cxposure value (rffir).
The cxposure mcccr hat two mcasuringrantcs controllcd by a switch at the topof the meter ccl l . With this switchpushcd upwards, thc meter reads ex-posurc valucs ln bright l ight; thc appro-priatc cxposure valuc is rcad off in thcfront window (left). In poor light pushthc switch downwards and rcad off thccxposurc valuc in the rcar window onthe rim of the focusing knob (right).
T t , I
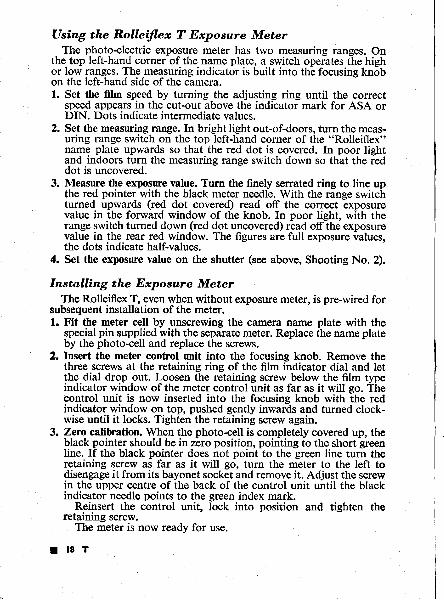
Using the Rolleitlex T Exposure MeterThe photo-electric exposure meter has two measuring ranges. On
the top left-hand corner of the name plate, a switch operates the highor low ranges. The measuring indicator is built into the focusing knobon the left-hand side of the camera.1. Set the fihn speed by turning the adjusting ring until the correct
speed appears in the cut-out above the indicator mark for ASA orDIN. Dots indicate intermediate values.
2. Set the measuring range. In bright light out-of-doors, turn the meas-uring range switch on the top left-hand corner of the "Rolleiflex"name plate upwards so that the red dot is covered. In poor lightand indoors turn the measuring range switch down so that the reddot is uncovered.
3. Measure the exposure value. Turn the finely serrated ring to line upthe red pointer with the black meter needle. With the range switchturned upwards (red dot covered) read off the correct exposurevalue in the forward window of the knob. In poor light, with therange switch turned down (red dot uncovered) read offthe exposurevalue in the rear red window. The figures are full exposure values,the dots indicate half-values.
4. Set the exposure value on the shutter (see above. Shooting No. 2).
Installing the Exposure MeterThe Rolleiflex T, even when without exposure meter, is pre-wired for
subsequent installation of the meter.1. Fit the meter cell by unscrewing the camera name plate with the
special pin supplied with the separate meter. Replace the name plateby the photo-cell and replace the screws.
2. Insert the meter control unit into the focusing knob. Remove thethree screws at the retaining ring of the film indicator dial and letthe dial drop out. Loosen the retaining screw below the film typeindicator window of the meter control unit as far as it will go. Thecontrol unit is now inserted into the focusing knob with the redindicator window on top, pushed gently inwards and turned clock-wise until it locks. Tighten the retaining screw again.
3. Zero calibration. When the photo-cell is completely covered up, theblack pointer should be in zero position, pointing to the short greenline. If the black pointer does not point to the green line turn theretaining screw as far as it will go, turn the meter to the left todisengage it from its bayonet socket and remove it. Adjust the screwin the upper centre of the back of the control unit until the blackindicator needle points to the green index mark.
Reinsert the control unit, lock into position and tighten theretaining screw.. The meter is now ready for use.
l l S T

Special ControlsTIME EXPOSURES. With the shutter speed lever set to B or to
any of the green numbers, the shutter opens on pressing the releasebutton and stays open until you let go. The values in green indicatethe required time in full seconds if you change from a large aperturewith a slow shutter speed to a small aperture at the same exposurevalue setting. These figures thus serve for calculation only and theactual exposure must be made by counting the seconds while keepingthe release depressed. To keep the shutter open for a long time, depressthe release and lock the release guard for the required time. Alternativelyuse a cable release-preferably with lock.
FLASH SYNCHRONIZATION. For X synchronization, set theflash lever (on the right of the taking lens) to the flash symbol (azig-zagarrow) for M synchronization to the bulb symbol. While the camerawill accept the standard 3 mm. co-axial plug, a special Rolleiflex flashplug with lead is available to connect to the flash socket on the leftside of the camera. This special plug locks into position and can onlybe removed by pushing down the locking lever on the side of theflash socket.
THE SELF-TIMER. A self-timer (delayed action) is built-in, whichpermits the photographer to appear in the picture. Place the camera ona rigid support, best a tripod. Pull out the self-timer lever (which is atthe same time the flash lever) and move it to the position marked "V".Advance the film first. On pressing the shutter release, the shutter willopen after a delay of approximately l0 seconds.
INTENTIONAL DOUBLE EXPOSURES are not possible withthis model.
T 1 9 I

THE ROLLET-MAGIC r, IO THE ROLLEI MAGIC I is the most automatic Rollei. It has a3 in. (75 mm.) Xenar f 3.5lens. A focusing wheel on the camera frontworks the combined front cell focusing movement of taking and finderlens. An automatic exposure control system consists of a built-in photo-electric meter geared to the continuous-range Prontomat S shutter.Flash and time exposures with individual aperture selection arepossible. An automatic filter factor control adjusts the exposure meterwhen filters are used. The brilliant focusing screen has a removablefolding hood with magnifier and frame finder.
With the 16-exposure mask set, 16 exposures 2* x 1$ in. or 18 x 18 in.(super slide size) are possible in place of the standard 12 exposures2*x2}- in. The film counter automatically switches over according tothe frame size selected. The Rollei-Magic takes a special Rolleiflash Mgun which fits into the camera accessory shoe on the side without use ofa cable. Accessories further include the pentaprism, Rolleifix tripodhead, panorama head, and all optical accessories in size II bayonetmounf (filters,lens hood, close-up, soft focus and tele and wide-angleattachment lenses). Neither the plate back nor the 35 mm. Rolleikinoutfit can be used.
THE ROLLEI MAGIC II has, in addition to the automatic operationof shutter/aperture, the choice of manual control of shutter speeds fromll30 to 1/500 sec. and aperture of /3.5 to f 22. The exposure meter isadditionally calibrated in exposure values and can be used when thecamera is set for manual operation. In all other respects, includingrange of accessories, model II is the same as Rollei Magic I.
Loading1. Open the camera back.2. Insert the film. First transfer the empty spool in the bottom chamber
to the top chamber. Press the black metal end of the rectangular plateon the camera side, remove the empty spool and insert it by a similaraction into the top chamber. The gtrooved end of the spool shouldengage the crossbar ofthe film transport peg.
Insert the film roll into the bottom chamber after breakingthe seal. Draw the pointed paper end over the two glide rollers intothe wide slot of the top spool. Tighten the paper on this spool. Nowwind the transport crank until the triangular marks (or arrows) onthe backing paper are opposite the red dots on either side of the filmaperture.
3. Close the camera.4. Get the film ready for the first exposure by turning the transport
crank until it comes to a definite stop. Then turn it back and foldover to the rest position. The exposure counter sets itself auto-matically to No. 1.
t 20 MAGIC

Thc focusing hood is removable and incorporates an eye-level frame finder. The metcr needle indicatcswheiher the l ight is good enough for an automat ic exposure. The f i /m speed set t ing contro ls the metereange. The filrr- coun{er switchei over from 12 to l6 exposures on fitting the mask set in the camera.ThJscole iindow shows the focusing scale as well as the aperture scales *hen the camera is not set forautomatic operation. The exposure
-wheel controls the aiertures and exposure ranges.. The focusing
wheel sets the correct distance. The fi/ter window shows the filter factor set on the automaticexposure control. The tronsport cronk advances the film and tensions the shutter.
Shooting with the Rollci-Magic. From left to right: Advance the film with the film crank; check themeter nledle to make sure that the l ight condit ions are adequate for an automatic exposure; focusthe image sharply on the screen; press the release to exPose.
Exporurc Valucs
Hood
Meter needlc
Screen
Film spccds
Shutter SpeedMeter cell
Fi lm counter
Scale windowt
Exposurc ValucExposure wheel
Focus wheelDcpth of Flcld
Shuttcr Release
F i l te r w indow
Crank
THE ROLLEI.MAGIC
MAGIC 2t I
1.2.3.
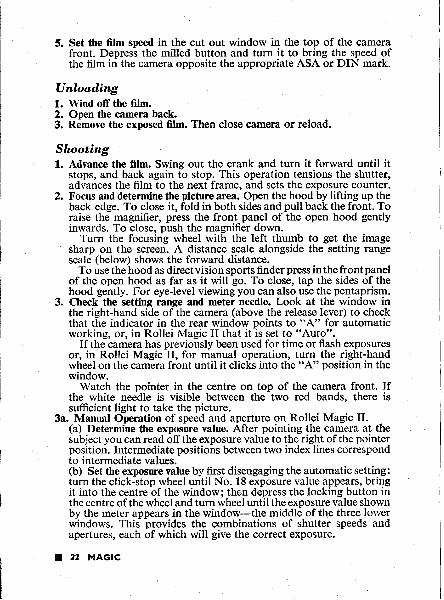
5. Set the film speed in the cut out window in the top of the camerafront. Depress the milled button and turn it to bring the speed ofthe film in the camera opposite the appropriate ASA or DIN mark.
UnloadingWind off the film.Open the camera back,Remove the exposed film. Then close camera or reload.
Shooting1. Advance the film. Swing out the crank and turn it forward until it
stops, and back again to stop. This operation tensions the shutter,advances the film to the next frame, and sets the exposure counter.
2. Focus and determine the picture area. Open the hood by lifting up theback edge. To close it, fold in both sides and pull back the front. Toraise the magnifieq press the front panel of the open hood gentlyinwards. To close, push the magnifier down.
Turn the focusing wheel with the left thumb to get the imagesharp on the screen. A distance scale alongside the setting rangescale (below) shows the forward distance.
To use the hood as direct vision sports finder press in the front panelof the open hood as far as it will go. To close, tap the sides of thehood gently. For eye-level viewing you can also use the pentaprism.
3. Check the setting range and meter needle. Look at the window inthe right-hand side of the camera (above the release lever) to checkthat the indicator in the rear window points to "A" for automaticworking, or, in Rollei Magic II that it is set to "Auto".
If the camera has previously been used for time or flash exposuresor, in Rollei Magic II, for manual operation, turn the right-handwheel on the camera front until it clicks into the "A" position in thewindow.
Watch the pointer in the centre on top of the camera front. Ifthe white needle is visible between the two red bands, there issufficient light to take the picture.
3a. Manual Operation of speed and aperture on Rollei Magic II.(a) Determine the exposure value. After pointing the camera at thesubject you can read offthe exposure value to the right of the pointerposition. Intermediate positions between two index lines correspondto intermediate values.(b) Set the exposure value by first disengaging the automatic setting:turn the click-stop wheel until No. 18 exposure value appears, bringit into the centre of the window; then depress the locking button inthe centre of the wheel and turn wheel until the exposure value shownby the meter appears in the window-the middle of the three lowerwindows. This provides the combinations of shutter speeds andapertures, each of which will give the correct exposure.
a 22 MAG|C

rl(c) Select speediaperture combination. On turning the wheel to theshutter speed required, it clicks into position in the middle of thetop of the three lower windows; the correspondingaperture sets itseiiat the same time to give correct exposure. The procedure can bereversed by setting with the wheel the aperture required and theshutter speed will set itself automatically for correct exposure.
The range of combinations is exhausted when you go to 1/30 sec.or beyond f22.
The top scale in the window below the distance to which the lenshas been set indicates the depth of field for the aperture selected.
5. Release the shutter gently by pressing the release lever on the lowerright-hand side of the camera. On Rollei Magic I, and RolleiMagic II when set to "Auto", this also sets the correct aperture andshutter speed immediately before the exposure.
Speeial ControlsTIME EXPOSURES. For time exposures on Rollei Magic f, press
the short protruding button on the left side of the camera front, near thebase. At the same time turn the right-hand wheel on the camera frontuntil the green coloured band with aperture numbers appears in thewindow in the side above the release. In this position, the automaticcontrol is disengaged and the shutter will remain open as long asthe release lever is depressed. The aperture required is set opposite theindex mark in the green field. Use a cable release; this screws into thesocket in the grey rim near the release lever.
On Rollei Magic II set "8" (in green) into the shutter speed windowby turning the setting wheel; select aperture by turning wheel with thecentre button depressed.
FLASH. A standard 3 mm. co-axial plug is fitted into the centre ofthe accessory shoe in the left-hand side of the camera. The camera isX-synchronized. To use flash on Rollei Magic I, press the button onthe left side of the camera front near the base and turn the right-handwheel on the camera front until the red coloured band with aperturefigures appears in the window above the release lever. In this position,the automatic control is disengaged and the shutter works with afixed speed of 1/30 sec. (suitable for flash bulbs and electronic flash).The aperture required is set in the red field against the index mark.
On Rollei Magic II set shutter speed to 1/30 sec. (with electronicflash U30 to 1i500 sec. can be used) and set aperture by turning wheelwith centre button depressed.
FILTER FACTOR SETTING. The exposure increase requiredwhen using filters can be set automatically. Mount the filter on thetaking lens and rotate it clockwise until the appropriate factor (inminus exposure values-as engraved on the filter rim) appears in thecut-out on the left of the lens mount.
MAGTC 23 f

CHANGING THE FOCUSING MAGNIFIER. On the Rollei-Magic, both the upper magnffier and the rear magnifier can be changedto correct faulty vision.
To change the upper magnifier, open the hood and grip the lensfrom above and below. Pull it back and then lift it up anil out. Toinsert, push the magnifier forward against the retaining springs and letit snap into place. To clean it, hold down the magnifier with the directviewfinder flap open.
To change the rear magnifier, remove and open the focusing hood.Grip the two retaining clips on either side of the rear peep window withboth thumbs from the inside of the rear and pull back the retaininglever. After changing the magnifier, push the retaining spring forwarduntil it snaps into place.
I 24 l.tAGtC

r
THE ROLLEIFLEX 4x4This is the l$x 18 in. (4x4 cm.) model of 1957. (Earlier Rolleiflex
4x4 models are described in the section on early models.) It has a2* in. (60 mm.) Xenar /3.5 lens in a Synchro-Compur shutter. Asingle setting ring controls the cross-coupled aperture and shutterspeed setting and the self-locking exposure value scale. The shutterrelease is locked while the hood is ciosed. The camera has a fine grainpolished field lens type ground glass screen in the fixed (not removable)finder hood.
This model accepts size I bayonet mounted optical accessories(filters, lens hood, close-up and soft focus lenses) and the Rolleifixtripod head, panorama head, micro-attachment, and pistol grip.
Loading1. Open the camera back. .2. Insert ffts fflm. Transfer the empty spool in the bottom chamber to
the top chamber. Press the red arrow on the tab in the lowerchamber and remove spool. Pull out the film wind knob of the topchamber and insert the spool, with its slotted end towards the filmknob.
Insert the film roll into the bottom chamber and push the spoolinwards. Break the seal and draw up the paper over the two rollersinto the wide slot of the empty spool. Stop the full film spool fromunrolling with the thumb. Turn the transport knob two to threetimes to anchor the paper leader securely.
3. Close the camera.4. Get the film ready for the first exposure by turning the film knob
until it locks. The film counter will now show No. 1.5. Set the fihn speed indicator by pressing the milled button in the centre
of the focusing knob, and turning to bring the desired value intothe DIN or ASA cut-out.
Unloading1. Wind off the film end by turning the transport knob through five or
six turns (more does no harm) after the last exposure.Open the camera back.Remove the exposed fiIm, then close the camera or reload.
Shooting1. Advance the film by turning the film knob until it locks. This
operation tensions the shutter, advances the film to the next frame,and sets the film counter.
2. Set the exposure value. The exposure value is ascertained from
2.3.
&
lx1 25 I

either an exposure meter, or the table on the back'of the camera.To set it, press back the small serrated lever at the left-hand sideof the lens and move it up or down until the required exposure valueis opposite the red dot on the right-hand side of the lens. If theexposure value cannot be reached, re-engage the lever and moveback a short distance; then repeat the original procedure.
3. Select the aperture/speed combination. Each exposure value repre-sents a range of shutter speed/aperture combinations covered by asingle setting. You can choose any shutter speed or aperture withoutchanging the exposure.Press the aperture lever to the left of the taking lens flrmly againstthe shutter speed ring, and turn the two together to bring the desiredaperture/speed combination opposite the arrow head (top left ofthe taking lens).
The Synchro-Compur shutter has speeds of 1, $, *, *,llt5,1130,1160, lll25, ll250, 1/500 sec. and B. The values 1,2, 4,8, etc.n to500, are fractions ofseconds and stand, therefore, for 1, f, {, }, etc.,to 1/500 sec.
To set the aperture and shutter speed independently, set first theshutter speed (if necessary, first move the aperture lever in theopposite direction). Then disengage the aperture lever and move itseparately.
4. Focus and determine the picture area. To open the reflex hood, liftup the back edge of hood. To close, press the sides inwards, simul-taneously pulling down the top. The shutter release is locked whenthe hood is closed.
Bring the magnifier into position by pressing against the openfinder front panel. To close, fold down the magnifier.
Turn the focusing knob to get the image sharp on the screen.To use the hood as a direct viewfinder, press the front panel of
the open hood inwards as far as it will go. To close, gently presson the right-hand panel; the front panel will then spring back.
Special ControlsTIME EXPOSURES. With the shutter speed set to B, the shutter
opens on pressing the release button and stays open until you let go.The values in the green section of the shutter speed scale indicate therequired time in full seconds if you change from a large aperture with aslow shutter speed to a small aperture at the same exposure valuesetting. These figures thus serve for calculation only and the actualexposure must be made by setting the shutter to B and counting theseconds while keeping the release depressed.
FLASH SYNCHRONIZATION. Before adjusting the synchroniz-ing control, press in the small button below the taking lens. Thisunlocks the lever. For X synchronization set the flash control (to theright of the taking lens) to the electronic flash symbol (azig-zag arrow),for M synchronization set to the bulb symbol. While the camera will
a 26 4x4

Distance scafc
Transport knob
Focus knob
Film counter
Exposurc levcrAperture and shuttcr
scales
Synchro-levcr
Rcleasc
Flash socket
Flash lock
Exposure values
T H E R O L L E I F L E X 4 x 4
!rf
ff
The focusing iood is not rcmovablc, but has to be opcncd beforc thc rcleasc is free. The distonce scoleon the- focusing knob moves past a depth of f ie ld scale. The focusing knob i tse l f incorporates afilm indicotor. The tronsport knob advanCes the film from frame'to frame and automaticilly locks.The flm couptet shows the number of exposures already made. The exposure value leyer selectscxPosure values on the appropr ia te scale and can a lso change the aper ture/speed combinat ion. Thesynchronizing lever selccts X or M synchronization and tensions the ielf-timei; it can only be movedon releasing the flosh lock underneath the taking lens. The releose button incorporates a cablerclease sockct.
,TFF: ffiffirulShoot ing wi th the Rol le i f lex 4x4.From lef t to r ight : Advance the f i lm; set the exposure value; se lectI the appropr ia te aper ture/speed combinat ion; focus the image on the screen; press the re lease tocxpose.
ffiY/
t 5
4x4 27 I

accept the standard 3 mm. co-axial plug, a special Rolleiflex flash plugwith lead is available to connect to the flash socket. This is just belowthe lens on the left of the camera front. The plug locks into position andcan only be removed by turning the locking rim at the base of theflash socket.
THE SELF-TIMER. A self-timer (delayed action) is built-in, whichpermits the photographer to appear in the picture. Place the cameraon a rigid support, best a tripod. Unlock the synchronizing button asfor X or M synchronization (above) and move the control to "V".Advance the film first. On pressing the shutter release, the shutter willopen after a delay of approximately 10 seconds.
CHANGING THE FOCUSING MAGNIFIER. Open the hoodand magnifier and push in the front flap. Grip the magnifier lens fromabove and below, and pull it towards the rear of the hood, pressingdown at the same time. To insert the lens, push it forward against thespring and let it engage.
I 28 l.xl

OROLLEIFLEX AUTOIVIAT SERIESThese are the Rolleiflexes with automatic loading feature (originally
introduced in 1937), setting wheels for aperture and shutter speed, butno exposure meter.
THE ROLLEIFLEX 2.8D has a 3* in. (80 mm.) Planar or Xenotar/2.8 lens in a Synchro-Compur shutter with exposure value scale. Thefocusing magnffier in the fixed hood is adjustable but not interchange-able. A 35 mm. film counter knob is built into the camera for use withthe 35 mm. attachment. Aperture and shutter speed are coupled toeach other; the coupling can be disengaged. A depth of field scale isopposite the focusing scale. A double exposure release is fitted intothe transport crank. A fllm speed and type indicator is built in, but noexposure meter.
THE ROLLEIFLEX 2.8 Chas 3* in. (80 mm.)Planar or Xenotar./2.8lens in Synchro-Compur shutter without exposure value settings. Thespeed range is slightly different from that of the model 2.8D,and so arethe release lock and flash cablellock. Special locking rims prevent in-advertent changing of the aperture and shutter speed settings.
THE ROLLEIFLEX 2.8 is basically a Rolleiflex Automat 3.5 (seebelow) fitted with a 3t in. (80 mm.) Tessar/2.8lens in a Compur-Rapid(later version: Synchro-Compur) shutter with a highest speed of1/400 sec. Only the latest models have an adjustable pressure plate (for35 mm. Rolleikin II) and the XM synchronization. The camera ishandled in the same way as the Rolleiflex Automat 3.5, except for theself-timer, which is a separate lever as on the Rolleiflex 2.8C.
The Rolleiflex 2.8D and 2.8C accept size III, and Rolleiflex 2.8size II, bayonet-mounted accessories: filters, lens hood, close-up andsoft focus lenses. The Rolleiflex 2.8D takes the model II Rolleikin35 mm. attachment; the Rolleiflex 2.8C takes the Rolleikin I attachment.Other accessories are the plate back for single exposures on plates orsheet film, flash attachment, Rolleifix tripod head, pistol grip, binocularextension hood, panorama head, micro attachment, also the Rollei-meter (an optical rangefinder to be used in conjunction with the framefinder).
THE ROLLEIFLEX AUTOMAT 3.5, produced between the years1937 and 1955, underwent a number of changes in design.
The lens is a Tessar 3 in. (75 mm.)/3.5 (Xenar/3.5 on a few models)in a Synchro-Compur shutter (1-1/500 sec.) with built-in delayed action.Earlier models have a Compur-Rapid shutter. The finder hood ofearlier models contains an eye-level reflex mirror, but no frame finder.The finder lens of the first (1937) version has a 28.5 mm. push-onmount, while the taking lens has a size I bayonet mount. Later on,both finder and taking lens have size I bayonet mounts.
The latest version of the Rolleiflex Automat 3.5 has a Synchro-Compurshutter with exposure value scale, coupled aperture and shutter speed
tilllilllt$ll
AUTOMAT, C, D 29 I

settings, and XM synchronization. Models before 1951 are Xsynchronized, those before 1949 have no flash contact. The focusingknob of versions after 1954 has a builfin film indicator, and thesemodels also incorporate a double exposure release.
All Rolleiflex 3.5 models take size I bayonet-mounted filters, lenshood, close-up and soft focus lenses. Other accessories include theRolleikin I or II (according to the serial No. of the camera), 35 mm.film attachment, plate back for single exposures on plates or sheet film,Rollei-Marin housing for underwater photography (cameras up toNo. 1,427,999 use the Rollei-Marin 1, cameras above this No. use theRollei-Marin 2), panorama head, micro attachment, binocularextension hood and (synchronized models) the Rollei flash. The modelssince 1950 can be used with the Rolleimeter, an optical rangefinder,rvhich transforms the frame finder into a focusing frame finder. Thelast Rolleiflex 3.5 model of 1955 will also accept the Rolleifix tripodhead and pistol grip.
Load,ing1. Open the camera back. On models with adjustable pressure plate
check that the pressure plate is correctly set so that the symbol ofa roll film is visible.
2. Insert the film.3. Close the camera back.4. Get the fiIm ready.5. Set the film speed and type on Rolleiflex 2.8C, 2.8D and later
Automat 3.5 models. Turn the centre bar of the focusing knobclockwise until the speed of the film loaded into the camera appearsin the appropriate DIN or ASA window, then turn it anti-clockwiseto uncover the type of film used in the cut-out.
Unload,ingWind off the film.Open the camera back.Remove the exposed fikn, then close the camera or reload.
Shooting1. Advance the film. Swing out the crank and turn it forward with one
continuous swing until it stops, then back again to stop. Thisoperation tensions the shutter, advances the film to the next frame,and sets the film counter.
2. Set the exposure value of the cameras with exposure value scale.The exposure value is engraved on the shutter setting wheel innumbers from 4 to 18. To set it, depress the centre of the aperturewheel and at the same time turn the shutter speed wheel until theindex in the speed wheel points to the exposure value required.
I 30 AUTOMAT, C, D
1.2.3.

THE ROLLEIFLEX AUTOMAT 1954 AND 2.8D
Peep window
Hood
Exposurc values
Self-t imer
Aperture wheel
Fi lm indicator
Double cxposurerelease
Focus knob
Release
Flash socket
Synchro-lever
Shoot ing wi th the Rol le i f lex 3.5.From lef t to r ight : Wind thc crank to tension the shut ter ; set theexposur t va lue; se lect the aper ture/speed combinat ion; focus the image on the screen; press thcrelease to expose.
llt
ilI
q
il
ilThc peep window shows the apertureand shutter specd settings actually in use. The fixed focusing hoodincorporates a folding magnifier and an eye-level mirror. The exposu'e volue scole is on the shutterspeed wheef ; thc latter is cross-couple-d with the operturewheel. The self-timer operates indcpendcntlyof the ffash synchronizing lever. The focusing knob incorporates a film indicotor. The releose Duttonwi th cable re lease socket , incorporates a t ime cxposure and safety lock. The synchroniz ing leversurrounds the flosh socket. The film transport crank incorporates a double exposure releose forin tent ional doublc exposures.Thc above deta i ls apply to the Rol le i f lex 3.5; the features of the model 2.8D are s imi lar , cxceptfor the larger lenses, a d i f ferent synchroniz ing lever incorporat ing the sel f - t imer lever ( in theposi t ion of ihe sel f - t imer on the model 3.5) , and a f i lm counter for 35 mm. f i lms (see inset to i le f t ) .
frAUTOMAT, C, D .3' I

Each exposure value presents a range of shutter speed/aperturecombinations covered by a single setting, which are interlocked.
On cameras without exposure value scale, set the shutter speed byturning the shutter speed knob until the required speed appears inthe peep window on top of the camera front. The values given (1,2, etc., to 500) are fractions of a second and stand, therefore, for1 sec., I sec., 1/50 sec., etc.
On the Rolleiflex 2.8C the shutter speed (and aperture) settingwheel can only be moved by pressing the shiny rim surrounding thetop of the wheel.
The shutter built into the later Rolleiflex Automat is theSynchro-Coff iFu, with speeds of 1, +, +,+,1115,l l3O,l160, t11,25,1,125O and 1/500 sec. and B (for brief time exposures). EarlierRolleiflex Automats are fitted with the Synchro-Compur or Compur-Rapid shutter, giving exposures of t,l,ll5,111,0, 1125,1150,1/100,71250 and 1/500 sec. (U400 sec. on the Rolleiflex 2.8C and first 2.8)as well as B.
3. Set the aperture or aperture/speed combination. On models withexposure value scale both speed and aperture are controlled by theshutter speed wheel. To change the shutter/aperture combination,just move the shutter speed setting wheel until the window showsthe required aperture or shutter speed respectively. Incidentally,intermediate light values can also be set, e.8., 5L, 6\, etc. Whilenormally the speed and aperture controls are fully interlocked, thecentre of the aperture wheel can be depressed and the aperture andshutter speed may be set independently. On the first models withexposure value scale, the aperture wheel changes only the aperture(and exposure value) without any locking catch. In that case setthe shutter speed first for independent settings, and then theaperture.
On models without exposure value scale, set the aperture byturning the aperture wheel to bring the required figure into thepeep window.
4. Focus and determine the picture area. Open the reflex hood of theRolleiflex Automat 3.5 by pushing back the rear catch. The hingedmagnifier can be folded upwards for use. To close, fold down. Toclose the hood, pull it down backwards.' On the Rolleiflex 2.8C and 2.8D, open hood by pushing it upwith one finger. The magnifier is brought into position by pullingup the small catch in the top of the hood. To close it, press themagnifier. Close the hood by pulling it down.
Turn the focusing knob (with all models) to get the image sharpon the screen.
To use the eye-level frame finder of the Automat models after1949 push in the front panel of the open hood. This also bringsdown a second mirror in the hood for focusing through the lowereyepiece in the back. Models before 1949 have no frame finder,
I 32 AUTOMAT, C, D

THE ROLLEIFLEX 2 8C
Magnif ier
Shutter wheel
Peep window
Self ' t imer35 mm. knob
Aperture wheel
Focus knob
Double exposurerelease
Flash socketSynchro-lever
Release
llif*
Thefocusing magni f ier in the hood is adiustable (but not in terchangeable) for ind iv idual eyesight * tvariations. The shutter speed whee, and the dperturc wheel carry locking ledges immediately behind il[to prevent acc identa l d isp lacement ofany set t ing. The peep window above the f inder lens shows the : I la l tua l ,aper tu le and shut ter speed set . The se/ f - t imer lever tens ions the delayed act ion re lease. i l lfhg Sl mm.f i lm knob^serves as a f i lm counter and f i lm re lease when us ing 35 mm. f i lm. The focusing f l [knob incorporates a f i lm ind icator . The f i lm t ranspo_r t crank is coupled wi th the shut ter te is ion in i l I l lmovement and has a double.exposure releose. The flosh socket incorporates a flash cable lock, Thisynchronizing /ever selects X or M synchronization. The shutter releose has a cable release socket andincorporates a t ime exposure and safety lock.
rl
ilShooting with the Rolleif lex 2.8C. From left to r ight:Advance the f i lm and tension the shutter with l lthe transport crank; select the shutter speed; select the aperture; focus the image on the ground I lglass screen; press the release to expose, t l
AUTOMAT, C, D 33 I

but permit eye-level focusing by a mirror in the hood. To use thismirror, pull back the lever at the side of the hood.
The built-in magnifier of Rolleiflex 2.8D and 2.8C is adjustableto correct for faulty eyesight. Swing the magnifier outwards untilthe lines on the ground glass screen can be clearly seen.
5. Release the shutter gently by pressing the release button. Therelease of the Rolleiflex 2.8D, 2.8C and later Automats 3.5 hasa safety catch which can be locked.
Special ControlsTIME EXPOSURES are made with the shutter set to B. On depres-
sing the release, the shutter will remain open until the pressure on therelease is removed. For long time exposures use a cable release; thisscrews into the centre of the release button (or into a socket on thecamera front, in the case of the earliest models).
FLASH SYNCHRONIZATION. Rolleiflex models 2.8D, 2.8Cand later Rolleiflex Automats are XM-synchronized. For X-synchronization, set the synchronizing lever (next to the flash socketor-on the 2.8C-between the lenses) to X, for M-synchronization toM. On the model 2.8D the lever is next to the finder lens. EarlierRolleiflex Automats have no setting lever and are permanently X-synchronized; the first models are not synchronized at all.
While all synchronized cameras will accept the standard 3 mm.co-axial plug, a special Rolleiflex flash plug is designed for the latermodels with a lead to connect to the flash socket on the base of thecamera front. This plug locks into position and can only be removedon pressing the lever surrounding the flash socket.
A DELAYED ACTION RELEASE (selfrtimer) is built into Rollei-flex Automat and is automatically tensioned on advancing the film.It is thus always ready for use. To bring it into action, push the delayedaction release button on top of the camera front in the direction of thearrow. After a delay of about 10 seconds, it will then automaticallyrelease the shutter.
With the 2.8C and D, the self-timer is worked by a lever on the topright of the front panel. This lever is not linked with the film transportand must be tensioned separately before use (move in the direction ofarrow marked "V" on model2.8D).
DELIBERATE DOUBLE EXPOSURES are possible with the2.8C, 2.8D and the last 3.5 models. The control is a milled segmentbelow the film crank. To tension the shutter a second time (after anexposure) without advancing the film, push this segment in the directionof the arrow and turn the crank backwards through one revolution
t 3f AUTOMAT, C, D

The peep window shows apertures and shutter speeds, as set by the operture and shutter speed wheelsrespect ive ly . The f losh socket is s impler than on la ter models and carr ies no cable lock. Theself-timer operates independently of the synchronizing lever, The releose incorporates a coble releosesocket , except on the pre-war Automat models. There is a lso a t ime exposure and safety lock, exceptata in on pre-war models which s imply have a protect ive cap that swings over the re lease but ton. 'The above deta i ls refer to the Rol le i f lex Automat 3.5 of 195 1. Ear l ier models f rom 1950 onwardsare s imi lar , but have no synchroniz ing lever , the shut ter being X-synchronized ( top in ponel ) , Modelsbefore 1945 have no f lash synchroniz ing out le t a t a l l , the cable re lease socket being in the posi t ionof the f fash socket of la ter models (ponel , centre l . Models before 1950 have a d i f ferent type of hoodwi th the magni f ier a t tached to the rear , and wi th an eye- level mir ror but no f rame f inder (panel ,6ot tom). The f i rs t Automat models of 1947 have a bayoner f i l ter mount only on the tak ing len i .
ffiffiffiffiffiShoot ing wi th the Rol le i f lex Automat. From lef t to r ight : Work the t ranspor t crank to advance thef i lm and tension the shut ter ; set the shut ter speed; ser the aper ture; focus the image on thescreen; press the release to expose.
EARLIER ROLLEIFLEX AUTOMATS
Release
Peep window
Flash socket
Sel f . t imer
ReleaseShut ter speeds
Focus knob
Apertures
Cable socket
Release
Synchro- leverFlash socket
Magnif ibr
il
ufil
FAUTOMAT C, D 35 t

OEARLY ROLLEIFLEX MODELSThese cameras do not have the automatic loading feature (feeler
rollers) of the Automat and subsequent models, nor are the filmtransport and shutter tensioning interlocked, except on one model.Apertures and shutter speeds are set by levers.
THE ROLLEIFLEX STANDARD NEW resembles the earlierAutomat models in appearance. It has a 3 in. (75 mm.) Tessar/3.5lens,Compur-Rapid shutter (1-1/500 sec.), but no self-timer. The filmtransport crank also tensions the shutter; the release button is on thefront of the camera. The viewing and taking lenses take size I bayonet-mounted accessories. The finder hood has an eye-level mirror, but noframe finder. Reduction of the screen area compensates for parallax.
THE ROLLEIFLEX STANDARD (also known as the lever wind)has a 3 in. (75 mm.) Tessar f 4.5, f 3.8 or f 3.5 lens. Early models havea Compur shutter (1 to 1/300 sec., B and T), later ones a Compur-Rapid (l-1/500 sec., B and T). The lens mount takes 28.5 mm. push-onaccessories. The finder lens aperture is /3.1. The finder hood has aframefinder but no mirror. Parallax is compensated by reduction of thereflex picture. The fllm transport is a lever crank; this does not tensionthe shutter.
ALL STANDARD MODELS can be used with the Rolleikin I35 mm. attachment, plate back for single exposures on plates or sheetfilm, panorama head and extension hood.
THE ROLLEIFLEX 4x4 (pre-1939). This model was originallyknown as the Baby Rolleiflex, then renamed Sports Rolleiflex, and is ascaled-down Rolleiflex Standard fitted with a 2* in. (60 mm.) Tessarf 3.5 or f 2.8 in a Compur or Compur-Rapid shutter, fot 12 exposuresi* x 18 in. (4 x 4 cm.) on 127 size film. Several versions exist; they arehandled in dhe same way as the large size Rolleiflex cameras of the sameperiod. The early Rolleiflex 4x4 models have 28.5 mm. push-on lensfittings and aperture and shutter scales marked around the taking lens.Latei modeli take size I bayonet-mounted accessories and have apeep window for exposure settings. The cameras accept the sameaccessories as the Rolleiflex Standard (except the plate back and 35 mm.Rolleikin back).
THE ORIGINAL ROLLEIFLEX (Vintase 1928-1929) takes sixexposures 2lx2[in. (6 x 6 cm.) on 81 (size 117) film. It can be convertedto take 12 exposures 2*x2[in. on 620 film. The film transpor,t iq 1winding knob, exposures are counted in a red window. It is fitted witha2fr in. (70 mm.) Tessar/4.5 orl3.8 in a Compur shutter (1 to U30Osec., B and T). The finder hood has a built-in mirror for eye-levelreflex focusing. The parallax is compensated by reduction of the reflexpicture. The iaking lens mount diameter is 24 mm. (ngsh-on fitting)-The only accessories made for this model are filters, lens hood andProxar close-up lenses.
I 36 STA,NDARD

p
THE ROLLEIFLEX STANDARD
Release
Frame f inder mirror
Hood
Peep window
Film counterCou nter sett ing
Frame f indor
Shutter speeds
Focus knobShutter speeds
Apertures
Ceble socket
Release
Crank
The releose on the Standard New model carries a protective guard. The frame finder mirror serves tol ine up the eye centra l ly behind the f inder f rame of the par t ly fo lded hood. The peep window indicatesaperture and shutter speed settings, The flm counter is coupled with the tronsport cronk; at thebeginning of every f i lm a specia l but ton resets the counter to No. l . The shut ter speeds andapertures are set by levers to each side of the taking lens. The releose lever is used both to tensionrnd to re lease the shut ter .The above deta i ls apply to the 2 lx2 l in . Rol le i f lex Standard made between 1932 and 1938. TheStandard New has the f i lm t ranspor t coupled wi th the shut ter tens ioning and has the shut ter re leaseas a but ton on the f ront panel ; th is model a lso has a d i f ferent type of hood as used on the la terAutomat (inset, top left).The Spor ts Rol le i f lex largely fo l lows the design of the Standard Rol le i f lex. Ear ly models, however ,have the shut ter not encased wi th the speeds set on a r ing and the aper tures by a separate lever(bottom of right-hond ponel).
I
il*
#l
ilt
illilt*l
FShooting with the Rolleiflex Standard. From leftto right:Work the transport crank to advance llthe f i lm; set the shutter speed; set the lens aperture; focus the image on the ground glass screen; I Itension ( l) and release (2) the shutter to €xpose. i l l
STANDARD 37 I

Loadingl. Open the camera back. Pull the latch down and swing the back open.
There is no locking latch, except on the Standard New.2. Insert the film by drawing the paper end over the two glide rollers
above and below the film aperture, and into the wide slot of thetake-up spool. A three-quarter turn on the crank will tighten thefilm and prevent the paper end from slipping out of the slot. Makesure the paper runs straight from spool to spool. On the originalRolleiflex simply turn the transport knob enough to tighten the filmand see that it runs straight.
3. Close the camera. On the Standard New do not close the secondlocking latch at this stage.
4. Get the film ready for the first exposure. Crank the film until a hand,then a sequence of four dots, and finally the No. I appears in thered window. Now close the window as it has fulfilled its purpose.Turn back the handle until it stops and fold it over into the restposition. Then depress the pin above the transport crank-base,which will cause the counting mechanism to spring back to No. Iin the automatic film counting window. The camera is ready for thefirst exposure.
Early Standard Rolleiflex models have a second window in thecentre of the camera back. This window, marked "B1", was forthe now discontinued ll7 film, and should be ignored.
With the Rolleiflex Standard New, crank until No. I appears inthe window before turning the locking catch of the back lock.The camera is ready for the first exposure.
On the original Rolleiflex wind the filmtransportknob untilNo. Iappears in the window on the camera back.
(inloa,ding
1. Wind off the filrn.2. Open the camera back.3. Remove the exposed film, then close the camera or reload.
Shooting1. Advance the film. Swing out the crank and turn it forward with one
continuous swing until it locks. Then turn back again to stop.On the original Rolleiflex wind the film transport knob until the
next number on the film backing paper appears in the red filmwindow.
2. Set the shutter speed. The shutter is a Compur or Compur-Rapidwith speeds l, +, | 15, I ll0, | 125, 1/50, 1/100, 1/300sec. (on Compur'Rapid ll250,l/500) B and T. Set the shutter speed by moving theshutter speed lever until the required speed appears _in _the peepwindow on top of the camera front. The values given 1, 2,5,l0,etc.
I 38 STANDARD

represent fractions of seconds and stand, therefore, for 1, t, lll5,1/10 sec. etc. The shutter requires tensioning by first pulling therelease lever to the right (the same lever is then pushed to the leftto release).
On early 4x4 models and in the original Rolleiflex turn theshutter speed ring to bring the required speed opposite the indexmark.
On the Rolleiflex Standard New, the shutter is automaticallytensioned on transporting the film.
3. Set the aperture by moving the aperture lever on the right of thecamera front (as seen from above) until the required aperture valueappears in the peep window on top of the camera front.
The original Rolleiflex and early 4 x 4 models have an aperturelever, which has to be moved to the chosen aperture engravedaround the shutter front.
4. Focus and determine the picture area. Open the focusing hood byreleasing the catch at the back (on the Standard New by pushingthe rear of the hood up). Swing up the magnifier, and focus theimage on the screen.
The folding focusing hood of the Standard New and originalRolleiflex has an eye-level reflex finder. This consists of a mirorin the hood, and can be swung into position. On the other modelsthe hood can be folded down so as to leave only the front frameerect. This is used as a sports finder with the aid of a special sightingmirror in the centre of the frame. To sight the subject, place youreye behind the frame so that you see the eye reflected in the mirror.
5. Tension and release the shutter gently by pushing the release leverto the right, and then to the left. On the original Rolleiflex andearly 4 x 4 models tension by pulling the lever up and release bypushing down. The shutter of the Standard New needs no tensioning;release by pressing the button.
Special ControlsFOR TIME EXPOSURES on the B setting, the shutter remains
open as long as the release lever remains pressed to the left (ordown). For long time exposures, set the shutter to T. On releasing, theshutter will then open and remain open. On releasing the shutter asecond time, it will close again. The shutter does not need tensioningfor time exposures or B or T. The Standard New has no T setting.
Use of a cable release is advisable for time exposures; it screws intoa socket on the shutter rim or camera front.
STANDARD 3' I

LENS ATTACHMENTS AND ACCESSORIES
- N4any of the Rollei ?ccessories are lens attachments to fit directly tolhe bayone! qognt of.the taking (and sometimes also viewing) li:ns.They-include Tele, wide-angle and close-up lenses, filters, lenJ-headsand the micro-adapter.
Tetre and Vide-angle work with the RolleiflexFor the Rolleiflex models with 45-mm. separation between taking
and finder lens: Models 3.5F, 2.8F, 3.5E3 ,2.983 and also for the modeFwith 42 mm. separation, (this excludes only the 4x4,Tele and Wide-angle_ Rolleiflex ,models of the current deries) the-Zeiss MUTARattachments can be used.
MUTAR 0.7 is a 4-component,_ widg-angle attachment increasingthe. angle of view by one third and is therefore suitable for interiors]architecture and street scenes where a wider angle of view is desired.
MUTAR 1.5 is a 5-component, tele attachment which brings distantsubjects 5p nel cent nearef and is therefore suitable for portra-its,long-range and architectural-detail photography.
The Mutars are interchangeable do-uble-iens attachments fitting overfind.er.and taFin-g lens and are fixed to the front bayonet. ThJy areavailable in tle bayonet sizes I, II, III, according to ihe camera lensT!9re is no change in exposure when using thesE lenses. When usedwith the 42-mm. finder-taking lens separation, slight vignetting ofthe finder image occurs, which however-does not exGnd to- the taftingiens nor does it affect accurate focusing.
Close-up Work u:ith the Rolleifl"*The unaided Rolleiflex can focus down to about 2l ft. and covers at
this distance a subject field of about 22x23 in.work at still shorter distances is possible with close-up supplemen-
tary lenses.-Two identical.lenses_, i.e. exactly matched in focif length,are required,.g^ne for the finder lens, the other for the taking lensl s6that the modification is equally performed by both renseJand'thereflex ima_ge show-s what the takine lens photogiaphs.. These close-up lens sets, called Rolleinars, do not require any changein exposure, but it is advisable to stop down in ordef to inciease tfiedepth of field, which is relatively small at such short distances.
The current Rolleinar sets contain a built-in prism for extra parallaxcompensation at this close range. The Rolleinar with the thicke? mountincorporates the prism. This lehs has to be placed over the viewing lenswith its red dot at the top of the mount. three sets are made:
-
Rolleinar set 1 for distances from l7g to 39* in.Rolleinar set 2 for distances from l2l to 19? in.Rolleinar set 3 for distances from 9$1o l2|-in.
. 40 LENS ATTACHMENTS

The Rol le i lux exposure meter consis ts ofa min iature meter at tached to a specia llens hood. The la t ter f i ts over the f rontof the tak ing lens; when not in use themeter can be swung inwards ( r ight ) .
t,rr Current Rol le i f lex models (except the
4x4 and Tele and Wide-angle Rol le i f lex)can use the Zeiss Mutar at tachments forWide-angle and Tele work. They f i t overf inder and tak ing lens and re avai lab le in' three bayonet s izes, accor- ng to cameralens,
The Rol le inar lehses for c lose-ups ( r ight )f i t in f ront of the f inder and tak ing lensof the camera. The Rol le i nar for the f i nderincorporates a g lass wedge to compensatefor c lose-up para l lax. (Ear l ier c lose-uplens sets used a separate Rol le ipar at tach-ment in f ront of the f inder lens. )
t\
The micro-at tachment consis ts of anadapter tube to go over the microscopeeye p iece, a beam-spl i t t ing v iewing device,and a bayonet r ing to connect to thetak ing lens of the camera. The uni t canalso be used wi thout the beam-spl i t t ingv iewer ( r ight ) , in which case the at tach-ment is mounted on the f inder lens andt h e n m o v e d t o t h e t a k i n g l e n s i m m e -diate ly before the exposure.
LENS ATTACHMENTS
LENS ATTACHMENTS 4 I O

The focusing range of the Tele-Rolleiflex is different from that of thestandard Rolleis. Two additional Rolleinar sets in twin mounts areavailable for this camera. They can be combined with any of theregular Rolleinars to cover the entire focusing range without inter-ruption.
Rolleinar 0.35 (Tele-Rolleiflex): range from 9 ft. to 4ft. 5 in._ Rolleinar 0.7 (Tele-Rolleiflex): range from 4 ft. 6t in. to 3 ft. 0* in.The bayonet-mounted Rolleinar lenses are made in four sizes.
-
Size I for Tessar and Xenar (except on the Rollei-Magic) /3.5lenses.
Size II for Planar and Xenotar f 3.5lenses and the Xenar/3.5of the Rollei-Magic.
Size III for Planar and Xenotar f2.8 and Sonnar/4 lenses.The focusing range of the wide-angle Rolleiflex, which entends to
2 ft., can be further increased with Rolleinar 2, to cover the wholerange down to 9| in.
Size IV for Distagon /4 lenses.For u1e_, lock the Rolleinars securely on the inside of the bayonet-
socket of both lenses by turning them to the right until they snap intoposition.
Earlier Close-up Lens SetsThe Rolleiflex close-up sets issued prior to 1939 were called Proxars
(in 1945 Curtars, and since 1947 Rolleinars). The performance and fieldof application of all these lenses is the same. Priof to the above detailedRolleinar sets with parallax compensating wedge built into one lens,sets_were supplied without the built-in wedge. A separate wedge, theRolleipar prism, is used which fits the bayonet mount in the Roll6inaron the viewing lens.
The Rolleipar I works in conjunction with the Rolleinar set I andthe Rolleipar II with the Rolleinar set II. Rolleipar lenses are availablewith either_bayonet or push-on mount. The former fits on top of thoseRolleinar finder lenses which are equipped with a bayonet fitting.
Having attached the two Rolleinar lenses on the camera. mount thecorresponding Rolleipar on top of the Rolleinar finder lens. Make surethe double atrow engraved on the mount is properly centred at the top.
Sets with a bayonet-mount on one and push-on mount on the otherRolleinar lens are to be used with those Rollei cameras which areprovided with a bayonet fitting on the taking lens, whereas the finderlens has a push-on mount., Sgts _ryilh a push-on mount on both Rolleinar lenses are designed for
the Rollei models no-t equipped with bayonet fittings at all. If necessary,adjust the springs of push-on mount until they fif over camera lenses.
Soft Focus LensesThe Rolleisoft lenses, supplied in bayonet mounts of same series as the
filters, are designed to soften critical definition, producing a diffused,
. 42 LENS ATTACHMENTS

halo-like effect, particularly with back lighting. Their particular field ofapplication is in portrait photography.^
The Rolleisoft 0 is for sfight softening effects and contrastin-g liehting.It is best used at full aperture. Full exposure increases the effect.
The Rolleisoft I is fbr stronger soft-focus effects and for use in softlighting. Stop down to f 5.6 for decreased softness.-Theiofteiing
effect ian be observed on the ground glass screen bymounting the Rolleisoft on the finder lens.
The Lens HoodExposures against the light give fascinating light effect-s. Use a lens
hood to protec.-t the lens fr-om ihe direct rays of the sgn..--Use it for allyour pictures, in fact, because it will engance the brilliance of theimaee. Furth6r it is useful for night photography, as it prevents strayside-light from reaching the lensbndcausing disturbing reflections. Itaffords excellent protection of the lens from rain or snow.
The Rolleiflex lens hood is made in the four sizes of bayonet mountto fit the different Rollei models. The hood is mounted over the outerrim of the bayonet socket of the taking lens and turned until it locks.
For earlier-models with push-on mouqt, a 28.5 mm. push-on lenshood was available with an excenter clip to fix the hood securely tothe lens rim. On the inside of the hood a filter rim will accept the specialRollei push-on filters which are held by a second clip.
The Rol,IeiluxThis is a lens hood with photo-electric exposure meter attached. It
fits all Rolleiflex models with series 1 bayonet mounts. The bayonetmount can be rotated through 180 degfees to suit various cameramodels. The tiny meter folds inside the hood when not in use. Tomeasure exposure, it hinges out to the left and covers the same angularfield as the Rolleiflex lenses. With the hood fitted over the lens, it isread from above, with the camera in the normal taking position. Ahinged translucent flap can be swung up from underneath for incidentlieh-t measurement. TEe meter is calibraied in ASA and DIN film speedritings and reads in exposure values and speed-stop combinations. Aleathlr case with loop io fit the camera neck strap is designed for useas an ever-ready case for the meter when not fitted on the camera.
FihersRolleiflex filters are available in the four bayonet sizes. Size I for
Tessar and Xenar (except Rollei-Magic) f 3.5lens, size lI for Planarand Xenotar f 3.5lenses-and also the Xenar/3.5 of the Rollei-Magic.Size III for Planar and Xenotar f2.8lenses and Sonnar f4. Size IV forDistagon /4 lenses.
ThJre are two gxoups of filters: for black and white and for colourphotography resplctively. The tables at the end of this guide list the
LENS ATTACHMENTS '3 O

filters available together with their purpose and exposure increaseexpressed also in exposure value adiuitmenm., rlt!. Rolleipol is supplied in fouf sizes for bayonet fitting cameraso. .10). For use fix it in front of the finder lensl rotate ttre"noiieipotuntil the effect-is right, and transfer it in the sam6 position (n;it;liii;markings) to the bayonet mount of the camera lens. The bernotariian earlier version of the polarizing filter in push-on mount 2g.5 mrnto fit the early Rolleiflei models-(except original Rolleiflex).
The Rollei Micro Adapter
Jhis nepits photograp-hy through the microscope with the Rolleiflexuttzrng the f-ull circle.of th-e 2*\2* in. and 4i4 cm. negative size.
The attachment consists of a micro-tube to clamp the camera to themicrosco-pe a_n$ a gricro prism with focusi"g
"v6piil"-ior observa-
tion of. the object. Both attachments are fittjd wiiti inte-rct iGiui"bayonet rrngs to connect to the bayonet mount of the cameri lens.
The micro-tube can bp rlse{ by itdef to photograptr stiiic i"u:e"ts.Fix the tube first to the finder leni for focusinfan-otfien-tiansrer to trrC11kins lens. Adding the prism attachment pirmits ptroto-iitogrlpttsgr,movrng subjects.as the micro_-subject can be obs-erved throu-ghiheqr$m.even d.uring the exposure. In this case the prism unit fits belweenthe mrcro-tube and the camera. The latter must always remain focusedat infinity.
a 4 LENS ATTACHMENTS

*
VIEWING ACCESSORIESThe accessories in.tl.rjs group are mainly-intended as aids to viewing
and focusing, especially (in some cases)- for the order models whiCfilack some of the refinements built into current Rolleiflexes.
The Binocular Focusing Hood,
. Tlis is a folding leather hood which can be fitted over the camerahood and is equipped with a binocular and a viewing magnifier. Thi;extension hood shuts out extraneous light to increase thd brightnessand clarity of the focusing.screen_image-. At the same time it i"i-iiiobservation of the image with b-oth_eyes and two times enlargeil. Bothmagnifiers c1n b9 adjusted individually, and snap into poiition onopening the hood.
An earlier model extension hood was made without magnifier.
The Prisrn Finder
-The-Rolleilex pentaprism attachment is suitable for all Rollei modelswith detachable hood. It replaces tle reflex hood to permit eyeJevelviewing pnd focu-sing. The eye-level position is a gr6at asset'for allaction photography, sports, press, flaih work, partiEularlv whenusedwith the pistol grips..The image seen in the peniaprism is upright andthg rightway-round. An adjustable rubber byepiece etiftinatiireflection. The standard model is for viewing without spectacles. Eye-sight -correction le_nses are available. The penta B spicial eye-pi6cemodel is universal, for the normal eye and for weaiers of distancespectacles who will see the full finder image perfectly sharp.
. with the pentaprism the camera can be- turned upside down tophotograph over heads in crowds.
To fit the pentapri.rtr, fit$_ rem-ov-e the focusing hood by pressing the-snrins caJchgq on either side of the hood and sliding itie lattei offbackwards. Place the pentaprism over the screen, piess down,-andslide forward until it locks into position. To chang6'5ack to the hood,proceed in the sarne way.
o The Rolleigrid
. This is a field l-ens, which can be used to brighten the screen image onolder models, where it facilitates viewing and focusing. The lenJ is athin square plate and is placed over the ground glass sJreen, embossedside downwards.
Rolleiclear ScreenThis.screen, fitted to the zlxzl- models since 1964, can be incorr
porated into some earlier models. It is an extra brishi screen with awedge rangefinder in its centre. The two halves of thd centre circle arelined up to be certain of pin sharp definition.
YIEWING ACCESSORIES 45 0

O The RolleitneterThe Rolleimeter is a coupled optical rangefinder which transforms
the direct viewfinder of the Rolleiflex Automat (1950 and later models)and Automat2.S into a focusing frame finder, permitting simultaneousviewing and focusing at eye level. This is specially useful when takingsports shots-rapid action is easier to follow in the frame finder than onthe screen-or when working in poor light where the screen irnage isdifficult to observe clearly.
The Rolleimeter is attached by means of a simple clamping screw tothe name plate of the camera. Focusing the camera causes the movingfront panel to actuate a lever which, in turn, transmits the motion tothe rangefinder. A vertical glass plate with a semi-silvered spot in themiddle, is located in the centre of the frame finder at 45" to the planeof the front frame. This provides the means for viewing the two clearlydistinguishable focusing images. On turning the focusing knob of thecamera the two images fuse into one when the camera is correctlyfocused.
Before using the Rolleimeter for the first time, a simple infinity (oo)adjustment of the instrument to coincide with the camera is required.A protective cap is provided over the adjustment screw to secure thesetting permanently. A special model Rolleimeter C is available foruse with the Rolleiflex 2.8 series.
The Rolleimeter is supplied in a leather case, which may be fastenedto the strap of the ever-ready camera case. It is not usable for theRolleiflex models E, F, T, Magic or 4x4.
O The Extension Focusing KnobThe Rolleiflex Automats since 1954 and the later models have a large
focusing knob, designed for focusing under adverse conditions, e.g.when wearing gloves, or when the camera is in its case. For the pre-1954 Automats an extension focusing knob is available. The extensionknob is bigger than the original focusing knob, and easier to grip.To fit the extension knob press in the spring-loaded outer disc andattach the knob by its three claws over the focusing knob. The extensionknob also carries a double film indicator to show the type and thespeed of the film in the camera.
The extension knob is available calibrated in either feet or metres.The knob will fit all but the earliest Rolleis.
46 V|E}Y|NG ACCESSORTES

vrEwtNG AccEssoRlEs
[e f t : The pentapr ism f inder can be used wi th a l l Rol le i models having a removable hood, andprovides an upr ight and r ight -way-round v iew of the screen at eye- level . Centre: The b inocularfocusing hood c l ips over the standard hood and complete ly shuts out a l l s t ray l ight . Right : TheRol le ic lear has a sp l i t image centre, L in ing i t up produces sharp def in i t ion on 2{ x2} models.
THE RO!.LEIMETER
---------+-
The Rol le imeter is an opt ica l coupled rangef inder which can be at tached to the Rol le i f lex and is usedwi th rhe bui l t - in f rame f inder . l t conta ins a g lass s t r ip 2 set at 45o to the f ront of the f rame f inder ,wi th a semi-s i lvered spot I in the middle. This ref lects an image ref lected by the p ivoted mir ror 3which is coupled ro rhe movement of the camera lens panel by the arm 7. When th is ref lectedimage coinc ides wi th the image seen d i rect ly through the g lass s t r ip , the camera is correcr ly focused.To f i t the Rol le imeter on the camera hook one end round the edge of the name plate, and f ix theother end wi th the c lamping screw 4.Before us ing the Rol le imeter for the f i rs t t ime, adiust i t to the in f in i ty set t ing of the camera by meansof the screw 5 underneath i ts protect ive cap. The whole set t ing screw assembly can a lso be movedon s lack ing of f the screw 5; th is compensates for deviat ions in the focal length of the lens f rom thenominal focus, but is important only at c lose d is tances.
123
4
56
vtEwlNG AccEssoRtEs 4t o
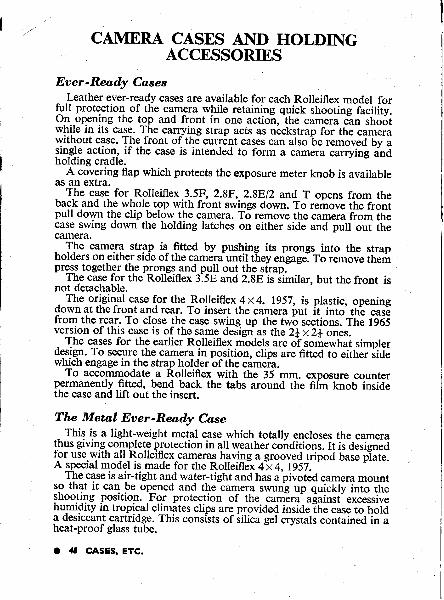
CAMERA CASES AI{D HOLDINGACCESSORIES
Eaer.Read,y CasesLeather ever-ready cases are available for each Roileiflex model for
fJll protection of the camera while retaining quick shooting faciiitl,.on.-opening the top and front in one action, ihe camera c-an sho5twhile in its case. The carrying strap acts as ni:ckstrap for the cu-iiiwithout case. The front of the culrent cases can aho be removeo by a$qglp actiog, if the case is intended to form a camera canying anOholding cradle.
A covering flap which protects the exposure meter knob is availableas an extra.
The case for Rolleiflex.3_.5!, 2.8F, 2.8E 12 and T opens from theback and the whole top with frbnt swings down. To rerirove ttre fronipull down the clip below the camera. To remove the camera rrom itricase swing down the holding latches on either side and pull out ihecamera., The camera strap is fitted by pusqlng its prongs into the strapnolders on elther srde ot the camera until they engage. To remove thempresf together the p_ro4gq and pull out the sirap.-
-
The case for the Rolleiflex 3.5E and 2.8E is iimilar, but the front isnot detachable.. The origin-al case for the Rolleiflex 4 x 4. 1957, is plastic, opening
down at the front and rear. To insert the camera iut it into' the cas6from the rear. To close the case swing up the twb sections. rtre tq65version of this case is of the same deslgn as the 2* x 2* ones.
The cases for the earlier Rolleiflex models are o? soriewhat simplerdgrigg. To secure_the camera in position, clips are fitted to eithei iidewhich engage in the strap holderbf the camera.
To accommodate a Rolleiflex with the 35 mm. exposure counterpermanently fitted, bend back the tabs around the fiim knob insidethe case and lift out the insert.
The Meta,l Eoer.Ready Case
.. Thig is a lighr-weight metal case which totally encroses the camerathus giving complete p.rotection in all weather coirditions. ItiJ aesi6;afor use with all Rolleiflex cameras having a grooved tripod uase piataA special model is made for the Rolleiflex 4t4,1957.'
The case is air-tight and water-tight and has a pivoted camera mountso that it can be opened and thelamera swung up quickly into theshootrng position. For protection of the camera- against- excessivehumidity in tropical climates clips are provided insideTtteiise to holda desrccant cartridge. This consists of silica gel crystals contained in aheat-proof glass tule.
o 4t cAsEs, ETC.

The ever- ready c i rse opens up f rom therear . wi th thd f ront fa l l ing down. Thefroni can be removed altogether bYunhooking the clip (lower left). To removethe camela from the cirse oPen thelatches at the s ide and Pul l out thecamera from the front (right).
ROLLEIFLEX CASES AND SUPPORTS
The panorama head (uq|er . rightl isdesigned for tak ing panoramic p ic turescr ies. l t takes the Rol le i f lex camera andpermi ts rotat ion of the camera throuthiixed and exact intervals to cover a viewof any width. The p is to l gr ip ( le f t ) pro 'v ides a handy way of hold ing the cameraand re leasing i t even wi th one hand. Thecable release screws into the camerarelease button and is then operatedby the t r igger on thegr ip . O The stereosl ide ( r ight ) automat ica l ly prov ides thecorrect separation for stereo pairs ofp ic tures taken by successive exPosures.
The Rol le imar in underwater housing is awater- t ight pressur ized case for under .water photography. The camera controlsarc operated f rom the outs ide and apr ism v iewing system prov ides an a lmostiye- level v iew of the p ic ture on thefocusing screen.
i:9,' a l. : . I
:|X{.,,K,:':,i,:':,i,:':,:,i,:,1: . : . : . : . : . i : . : . : . i : . : tJ. . . , ' . . ' . ' . ' . ' . ' . t. . , . . . . ' . " . . . . . . . . . . 1.1:. : . : . : . : . : . : : . : . : .1:. : . i : . : . : . : . : . : ' : ' : . : l
:;:j:i:::;:::::i:;:'::::i!1i:;:;:i:;:i:i:i:i:i:;:;:1:i:
cAsEs, ETc'. 19 o

The Rolleifi,x Tripod. HeadThe Rolleifix head screws on ro the tripod or flashgun bracket and is
left in position. To fix the Rolleiflex itls only necessary to slide thecamera on to the head and lock it fast by means of a lever. All Rollei-flexes with a grooved tripod base plate wiU nt the Rolleifix.
The Rollei Pistol GripThis is_a_pistol-_typegrip shaped to fit the right hand. It allows a very
comfortable steady hold for hand-held exposures. It embodies a Rollei-fix attachment for fitting to all cameras with a grooved edge on thetripod mount. A trigger releases the shutter via a cable release whichscrews into the release button. The latest version is fitted with a releaselock. A thread is also incorporated for attaching on the flash gunbracket.since1965, it has a locking device against unintentional release.
The Panorarna HeadThis is designed tqt tqLiog panoramic picture series, 10 exposures
covering the entire 360'horizon.- T- g panorama head can be used in conjunction with the tripodhead (see a_bove) or can be directly screwed into the tripod bush ofthecamera. After mounting the camera with head on a tripod, the cameracan be rotated by_ the correct amount by pressing the'self-lockingbutton on the head.
An earlier versiorl of the panorama head has two locating pins.To use this model insert the screw of the panorama head intd thetr-ino-d socket o_f tlre camera without, however, tightening up com-pletely. Leave the base plate just movable. Now press the soc'kets ofthe base plate against the two pins located on either side of the backlatch until they take a firm hold. After that tighten the screw com-pletely. When turning to the right a ratchet stbps the head at eachsecuon.
o The Stereo Slidewith the help of the stereo slide (now discontinued) the Rolleiflex
can be used like a stereo camer4, producing three-dirnensional pictures.The necessary separation of the stereo pair (65 mm., the- normal
separation of the eyes) is mechanically attained.lubjects with plenty of foreground are particularly effective.The stereo attachment must be used on a tripod.
I, Screw the stereo attachment on the tripod.2. Fix the camera.3. Adjust the case level.4. Puih the camera as far as it will go to the left and fasten the screw.5, Make the first exg)sure; wind on the fiIm.6. Loosen fitment screw, push camera to the right and tighten screw.7. Make the second exposure.
a) 50 cAsEs, ETc.

THE ROLLEIFIX TRIPOD HEAD
This attachme.nl permits quic.k.mounting and release of the camera on and from the tripod. tt irsuitable for el l Rol leif lex modelsvith.a groovgd edge on the socket ru..ounaing in" i i i -p"J'Ur-.t i .To use: l. Screw the Rolleifix to the tripoZ. 2. Push iiown the catch underneath. 3. Stiae lhl noifei.flex into the Rolleifix from behind. 4.'push the cat_ch-up ro secure the cameri i; el;e.--f;;;;;;the camera pull the catch down again and slide the Rolldiflex off towards rhe rear.
F
THE METAL EVER-READY CASE
This is su i tab le for a l l Rol le i f lex models wi th a grooved edge on the socket surroundins the r r ioodbush. In use rhe camera s i 's on top of the case; fdr .carry ing i i s imply s* ingr ao-nw; ;E;" i ; ; ; ; ' ; ; ; ;case^and af ter lock ing the la t ter , is protected against ius i and *a ier .To f i t the camera, . ra ise the handle of the case to ope.n i t (centre le f t ) and swing up the camera holder .Push the camera base wi th the t r ipod socket in tothe reta in ing l t i iaesof tnE i iml r " r r i , [ ; ; '6 ; ; ;centre right). To swing the camera into the case pull forward t-he-camera trotaer iio- b;irl;l j i lf i;;centre right) swing the camera.down, 4nd close the case. To remove the camera a.;;1il;;;;;;ho lder ( r ight ) , press down the lock ing but ton on the f ront of the holdcr and pul l t t re camera fo iwarJout of the holder .
cAsEs, ETC. 5' O

The two separate exposures must both be made with the sameshutter speed and as quickly as possible in succession. Persons in thepicture must not move during the exposures.-
Stereo pictures are most effective when printed as transparencieson lantern plates 6x13 or 4.5x1O.7 cm. For printing any printingframe with a glass plate will do, as long as it is large enough.
Stereo viewers are needed for viewing the stereo pictures.
The Eiolteirnolrin und,erwater HousingThis is a camera container for underwater photography with the
Rolleiflex Automat/3.5. It is pressure proof, and tested to a depth of330 ft. It is fitted with a prism and a viewing magnifier for groundglass screen focusing and has in addition a parallax compensated directvision viewfinder. The casing is finished in a corrosion resistant lacquer.
Transporting the film, setting shutter speed and aperture, and focus-ing are possible under water on large easily readable scales, with thehousing in shooting position. A built-in filter turret permits change offilters. There is provision for fitting a flash unit.
Rolleiflex Automat cameras with serial Nos. up to 1,427,990 requireuse of the Rolleimarin model 1, while for Nos. above that up to1,739,999 the Rolleimarin 2 is suitable. For Rolleiflex models fittedwith Planar f3.5 or Xenotar f3.5 lenses or those with numbers1,740,000-1,870,000, Rolleimarin 3 should be used. Rolleimarin 4 isdesigned for Rolleiflex 3.5 (above No. 2,250,000).
The RollehnotThis is an electric remore control release forthe 2Lx2* Rolleiflex
and Rollei Magic cameras.It transports the film and releases the shutterfrom distances up to 650 ft. and re-tensions it again via the transportcrank. It is suitable for single shots as well as for series of pictures.
The Rolleimot consists of a base for the camera which contains themotor, accumulater (or 4 U2 batteries) and transport mechanism, andan electric cable with switch for remote release.
o 52 CASES, ETC.

ALTERNATIVE PICTURE SIZES
The Rolleifl"* Mask SetThe mask set is designed exclusively for the Rolleiflex T and Rollei-
Magic, it will not fit other models. It enables 16 pictures, either26 x 18 in. (5.5 x 4 cm.) or the popular " superslide " size l* x l8 in.(4x4 cm.), to be taken on 120 rollfilm.
A single mask for 2* x l8 in, and 18 x 1* in. fits into the film aperturein the camera back. The mask defines the larger size and the 18 x 1$ in.format is indicated by notches in the top and bottom edges, which showon the rebate of the film. On inserting the mask, the film countermechanism is automatically switched from 12 to 16 frames. A white"12" ot "16" below the frame numbers in the counter window showswhether the mask is in place.
The focusing screen and the sports finder each have a separate maskfor each format. The focusing screen masks fit under the screen whichis removable together with the hood. The masks move with the focusingknob, giving automatic parallax correction. The sports finder masksclip over the opening in the focusing hood.
The Plate AdapterPlates offer advantages in all cases where individual treatment of
single negatives is essential or desirable. Technical photographs of allkinds, portraits and reproductions, for example, are generally producedon special negative material in limited numbers only, and usuallynecessitate immediate, individual development. Here, plates are theideal negative material.
The advantages of plates can be enjoyed by using the plate adapter.This is attached in place of the normal camera back.
The Rolleiflex 2f,x21 in. (6 x 6 cm.) uses 2bx3l in. (6.5 x 9 cm.)plates. whiie a special model O for the Rolleiflex 18 x li, in. (4 x 4 cm.)uses l* x2$ in. (4.5 x 6 cm.) plates. The actual picture size, however,is unaffected and remains the same as for rollfilm.
To use the plate back1. Remove the normal camera back by lifting the lock of the hinge of
the back (on early models by pushing the sprung hinge outwards).2. Remove the take-up spool from camera.3. Attach the plate adapter back without plate holder.4. Insert the plate holder by pushing it down the grooves on the
adapter back after having swung out the swing catch on the left-hand side top.
5. To expose, withdraw the slide, lift up the lever on the back of theplate holder, give it a quarter turn and let it slide forward into thefocal plane.
6. Remove the plate holder after reversing procedure under 5 (above).
ALTERNATIYE SIZES 53 O

To load the plate holder1. Withdraw the slide.2. Litt up the locking lever on the back of the plate holder.3. Give the lever a quarter turn and let it slide in.4. Slide _the plate or sheet film (with sheet film holder underneath;
into the camera.5. Reverse steps 3 and then 2.6. Insert the slide.
A focusing ,sueen holder is available to permit focusing directlyon the back of the camera, for example, with close-ups where parallaioperations are critical. To use it:1. Insert the closed holder.2. Withdraw the slide.3. After use re-insert slide and then remove holder.
The Rolleikin Cine Filrn AdapterThe cine film equipment makes it possible to take up to 36 exposures
on 35 mm. cine film combined with all the advantages offered by theRolleiflex. It is not suitable for the Rollei Magic or 4 x 4 models butcan be used with an adaptor on early Rolleiflex T models._ It aiso permits the use of types of colour film which are only availablein 35 mm. size._ The image obtained is upright; for horizontal photographs, view thefinder sideways as when photographing round the corner. Alterna-tively, use the eye-level pentaprism or frame finder in horizontalcamera position.
The Rolleikin equipment is further useful for picture sequences.In conjunction with the reduced picture size the fobal lengttr bf : in.of the Rolleiflex produces the effect of a long focus lens, which is awelcome feature in portraits, flower and still-life studies.
Film transport takes plice automatically as with the full size2Lx2* in. exposures, by turning the crank.
The Rolleikin IIThis model is suitable for current Rolleiflex cameras wtrere the
camera back has a two or three-position pressure plate (engraved24x36 mm.). It is also suitable for the Rolleiflex models with serialNo. 1,100,000 to approx. 1,160,000, but for these a new back isrequired, suitable for both 2Ix2I in. and 35 mm.
The Rolleikin II consists of:(l) Metal or leather case;(2) Film guide frame;(3) Take-up spool;(4) Release knob with film counter;(5) Extension spindle for rewind knob;
O 54 ALTERNATIYE SIZES

$ ROLLEIFLEX 3.5T AND ROLLEI.MAGIC MASK SET
inser t t -he f i lm mask behind the f i lm aper ture.spring loaded edge first, towards the'Uottomof the camera. Then s l ide the mask up underthe top of the aperture.
Press both spring catches eithcr side of thehood, sl ide i t backwards and l i f t off . Replaceby insert ing hood in the guides
"na pi" i i in"
lorward unti l i r locks. Remove the sdreen bipressing backwards and liftine off.
ri
Drop the gro_und g lass mask in to p lace so thar
l?il::t and punched holes fit over the studs
Sl ip the. tqp edge of the spor ts f inder masku n d e r t h e l i p o f t h e t o p b u t t o n o n t h e h o o d .r ress the s ide p ins in to the bushes e i ther s ideol the hood. Remove by l i f t ing the bot tom tabon the mask.
ALTERNATTVE STZES 5s o

(O Inner spool knob;(7) Focusing screen mask;(8) Frame finder mask; O(9) Lens hood mask.
Installing the Release KnobThe release knob accepts 35 mm. and size 120 film and is already
built into the Rolleiflex models 2.8C, D, E, Tele, and Wide-angleRolleiflex. On the other models:1. Remove the top fibn knob by unserewing the three countersunk screws.2. Fasten the release knob tightly by means of the three screws supplied.3. Remove protective lining from the gummed insert and paste it on the
release knob.
Assenrbling the Rolleikin IIl. Adjust the film pressure plate. Press the pressure plate down, and
slide it towards the bottom of the camera, till the inscription 24x36(l x 1+ in.) becomes visible.
2. Insert the take-up spool. Pull out the release knob, fit the take-upspool into the winding key on the right, and push the spool home.
3. Insert the rewind parts. Screw the extension on the rewind knob byrotating the latter. Push the intermediate knob over the oppositespool bearing pin (slipping the metal tongue between the filmfeeder rollers of the Rolleiflex).
4. Insert the film guide frame. Press the spring-actuated clamp-bar at aflat angle against the bottom of the fllm gate and insert completely.To remove, push the frame downward (against the clamp bar) andlift out.
5. Place the focusing screen mask into the focusing hood. On the 2.8F,3.5F,2.8F,12 and Tele-Rolleiflex remove the focusing hood, fold upthe screen, and drop the mask with its holes over the two smallpegs. Then close the screen and replace the hood. On cameras withfixed hood, drop the screen mask into the hood with ttre lettering"Rolleikin" legible and on the latest model press the ledge at therear of the finder hood to let the catch engage the mask. Snap thedirect finder mask on the two snap fasteners on front of the hood.
6. Push the 35 mm. frame finder mask over the press studs on the frontof the hood (now discontinued).
Looding1. Insert the film cassette. Open the camera back, pull out the rewind
knob and fit in the full film cassette in the feed chamber.2. Thread the film. Introduce the film leader which first passes between
the film feed rollers into the double slit of the take-up spool, againstthe right-hand edge. Tighten by giving the spool a short turn.
3. Close the camera. Make sure the mouth of the cassette points
. 56 ALTERNATIYE SIZES

THE ROLLEI PLATE ADAPTER
To load the p late holders, f i rs t re leasethe p late carr iers ins ide.
Sheet f i lms are f i rs t loaded in to s t i f ff i lm holders and then t reated l ikeplates.
The platc adapter takes the place ofthe normal h inged camera back.
Before exposure, g ive the handle atthe back of the p late holder a quar terturn. This br ings the p late in to thecorrcct plane of focus.
|mFor special purposes a ground glassslide can be fitted for back focusing.
ALTERNATTVE SIZES El O

straight ahead in line with the film reader, then close the cameraback.
4. set the flm cou4ter. Press and release the release knob until the reddots of the Rolleikin counter face each other. oisregiid the c*"tofor rollfilm. To set the Rolleikin counter for thJ drst exposure,advance the counter dial to No. I by pressing the reGase tnbu inciactuating the film transport three tirires
Film Transport1. Press and release the release knob before acfuating the film trans-^ po_rt. The fiIm counter advances autorratically to t[e next number.2. Advance the fitrm as usual to the stop with the irank.
- -
Reutind,ing1. After the last exg)sure press down the release knob.2. Qimultaneously rotate rewinaing knob clockwise.
The rewind also permi^t-s the removal of only partially exposed films.In ordgr to-prevent the film lead from slipping^into ttll, iiss"tte whenrewinding, be sgre to thread the film backwirdli.e. againii the windinedirection into the double slit of the take-up spbot wfiJn t.iio-i"!.--*"- when reloading a partially exposed casiette, advance the fiTm tworrames beyond the tast exposure (skipping one frame for safety).^,41*u{r.adjusj the film pressure'plal6 in-accordanCe wlitr ttre iipe orrtm used, rn order to ensurepe{egt registry. (A certain sign of incbhectadjustment when using the Roileikin: carireia back will"noi c]*i.j---
The Rolleikin IThis model of the 35 mm. attachment is designed for Rolleiflex
standard New and Automat models with seriai N5; i.o;200,00d-i;1,100,000.
It consists of the followine parts:(l) Rolleikin back panel;
- -
(J) Film guide frame;(Q) lale-up spool;(4) Release knob;(5) Rewind knob with(Q Fxtension_spindle (to be unscrewed);(7) Spool knob;(8) Screen mask.
Assernbling the Rolleikin I1. Eeplace the standard fiIm knobs by the release and rewind knob.
Replace the standard film knobs mounted on the came* uv t"ieuseand rewind knobs. IJnscrew the countersunk screwJino removethe two knobs. In their place, screw in firmry the release tnou andrewind knob.
o 5s ALTERNATTVE STZESI
I t
I

Thc Rolleikin lJ (right) consists of atat(e-up spool and film guide frameas well -as a counter ,"'i""." ino6.l r t t rngs lor the feed spool chamber.and I screen mask and O f rame f inderltlqk. lt, is used wittr ttrt noifeiuntversal back wi th adjustable ores-sure ptate for 35 mm. and ro l l f i lm.
After loadin-g outfit, press and releasethe release knob until the red dots ofthe Rolleikin counter tace e"ch ottrli.I nen press and work the f i lm t rans-p_o_rr,three times to ger the fitm reiaylor the exposure.
After the .last exposure keep theretease-knob pressed down and at thes a m c t i m e . r o t a t e t h e r e w i n d k n o blDetow nght).
O@The. lens hood mask increases theef f ic iency of the lens hood when useJw a t h t h e . R o l l e i k i n ( a n y m o d e l ) T h em-asK ts . srmply pushed in to the f rontof the hood.
l :t lt" the. rop -fi_tm knob by thererease knob with rhe Rolieikincounrer. .(Nor on Rolleif lex 2.9C, t ior E or Tele-Rolleiflex or Wid":;;;it
THE ROLLEIKIN I I
ALTERNATTVE STZES 59 o

2. Replace the staiidard back panel by the Rolleikin panel. Fully openand remove the standard back panel by turning the small levernear the top. Put the Rolleikin back panel in its place.
3. Insert take-up spool. Insert the take-up spool while pulling out therelease knob and holding it in that position.
4. Mount rewind knob. Screw the extension spindle on to the threadof the rewind knob by turning the latter. Press down the spoolknob on the fixed spool bearing pin of the camera.
5. Insert the film guide frame. Place the film guide frame in the filmwindow by means of the spring rail, and press down firmly. The slotin the guide plane should be pointing downwards.
6. Insert the screen mask. The screen mask reduces the focusing screento cine film size. After opening the focusing hood, place it over theground glass screen so that the engraved lettering "Rolleikin" isthe right way up.
On Rolleiflex Automat cameras since 1950 a special frame findermask for the cine size can be fitted to the two buttons in front ofthe focusing hood. This arrangement simplifies view-finding forhorizontal photographs with the Rolleikin.Important: Both the release and rewind knobs are so designed as
to take also the standard 'l2O' size spool, so that they can permanentlyremain on the camera. The film knobs on camera models since 1950are suitable for Rolleikin and need not be replaced.
Filrn Loading and, Tra,nsportI. Insert the fiIm cassette. Insert a standard 35 mm. film cassette into
the bottom chamber.2. Draw out the fiIm enil and ffx to the take-up spool by pushing it in
its slot. The film has to pass between the two feeler-rollers.3. Close the camera back. Set the counting mechanism of the Rolleikin
equipment first to zero by turning the milled wheel, ignoring thecounter in the side of the camera which does not apply to cine film.To wind on the film, first depress the locking knob of the back panelafter each exposure, release it and then turn the crank up to thenext stop. To make the camera ready for the first exposure, work thefilm transport in this way until No. l appears in the window ofthe Rolleikin counter.
4. Set the fiIm counter.
Reu:indingDisengage the transport. Press down the release knob and lock by ashort turning movementsRewind film. The rewind knob can then be turned clockwise untilthe whole of the film has been re-wound into the cassette, using theRolleikin counter as a check.
a 60 ALTERNATTVE S|ZES

THE ROLLEIKIN I CINE FILM ADAPTER
'ol;o'&r70p
The par ts of the Rol le ik in equipmentare: l . Cine back; 2. F i lm guide f rame;3. Take-up spool ;4. Release knob; 5.Rewind knob; 6. Extension spindle;7. Spool knob; 8. Focusing screenmask.
The release knob 4 and the rewindknob 5 take the place of the cor-responding knobs on the camera.Onie f ixed, they can be le f t in p lacefor rollfi lms too. The knobs fitted toAutomat 1950 are a lso sui tab le for theRol le ik in and need not be replaced.
ln the ear l ier Rol le ik in models therewinder knob 5 is of a differentdesign, whi le the extension spindle 6and spool knob 7 are replaced by acassette holder.
ALTERNATIVE SIZES 6I O

Early Designs of RolleikinOLD ROLLEIKIN I. It is designed for the same camera models,
bul has in place_of the rewind knob with separate extension spindle ddifferent rewind knob and spool holder.
Assembly is the same as described for the Rolleikin I.- To load, slide the spo.ol holder apart and insert the cartridge so that
the mouth of the cartqi{Se_ coincides with the red dot on ihe spoolholder. Push the spool holder together and place it in the boftomspqgl chamb-er_with the film end pointing towdrds take-up spool.
The rest of the manipulation is as before.ORIGINAL ROLLEIKIN. The flrst model of cine adapter designed
for the Rolleiflex Standard consists of: back panel with counteiandcutting knife, film mask, screen mask, one spool holder.
Assembly and handling is as follows:l. Remove the rollfiIm back by lifting it up, and pressing it rightly to
one side. The two lock-levers close to the strap ilots must be puJheOupwards. Now the cine back can take its place.
2. Insert the film mask by pushing it into the negiitive aperture.slot must be at the bottom.
3. rnsert the screen mask over the focusing screen so that the engravedname (Rolleiflex) is the right way up and upright.
4. Insert the 35 mm. fiIm cassette into the bottom chamber just like arollfilin.
5. Fix the film end to the centre spool of an empty cassette to be usedas take-up spool, close it and insert this take-up cassette into theryo91 holder,_ taking care that the winged key of the film transportfits into the slot in the spool holder. The film runs now from the fullcassette at the bottom into the empty one at the top.
6. Close the back panel and make four blind exposures by four timesalternalely yin$ing the transport and pressing the catch on topleft of the cine back.
7. Set the film counter by turning the milled wheel to No. l. you arenow ready for the first exposure.
8. After each exposure, press the catch and'transport the film until allexposures are made. Four more turns will wind the film end into thetake-up,cassette, so that the back can be opened and the filmremoved.
9. The built-in fflm cutting knife permits cutting off of exposed filmpa+s. Make tryo blind exposures after the last picture, and fullypull out -th9 knife. The camera can now be opene-d in diffused day-light and the take-up cassette with the exposed film removed f6rprocessing. The rest of film in the loaded cassette can be re-insertedwith a total loss of approximately 6 frames.
O 62 ALTERNATTYE STZES

ASSEMBLING AND LOADING THE ROLLEIKIN I'mw,u
l. Replace itandard film knobs byre lease and rewind knobs. 2.Remove camera back. 3. F i t Rol le ik inback. 4. Inser t take-up spool . 5 .Mount rewinder . 5 . lnser t f i lm guidcf rame. 7. Inser t focusing screen mask,'re'm
i1i"iii,:$'m-Mcamera back. 4. Set f i lm
ALTERNATTYE SIZES 63 O