
Rolleiflex Evolution Models
40
Transcript of Rolleiflex Evolution Models
7
The Rolleifl.ex CarneraRolleiflex EvolutionThe 4x4 cm. Rolleiflex
Models
Hand.ling the RolleiflerHoldingCarryingThe Reflex FinderViewingParallax CompensationFocusingShooting
Loading and Unloading
LoadingUnloading
Films and FiltersBlack-and-White FilmColour FilmColour Reversal FilmColour Negative FilmColour Film SpeedsThe Choice of Colour FilmFilters for Black-and-WhiteFilters for Colour FilmThe Polarizing Screen
CONTENTS
t9t922
2323A26272728293030
PageShutter Speeds and
Movement 39Aperture and Depth of Field 4OZone Focusing 58
Exposure 3lAperture and Speed 31Choosing the Cornbination 32Time Exposures 35The Self-Timer 35Using an Exposure Meter 35
Flash PhotographyHow to use FlashExposure Guide Numbers
Canrera Care in TroplcalClirnates
Fa.cts and FiguresConversion of Feet and
Inches into Metric UnitsZone FocusingDaylight Exposure ValuesShutter Speeds to Arrest
MovementApertures with Clear
Flash BulbsApertures with Blue
Flash BulbsClose-ups with 2|x 2L n.
RolleisClose-ups with 1* x 18 iu.
RolleisConversion of Film Speed
SystemsBlack-and-White Filter
DataColour Correction FiltersBlack-and-White FilmsColour Films
Hou to . . .lVhot is Where?
Page56
10
t212t4t4t4t 6t71 8
596062
63
64
646465
66
66
67
67
67
68
6869707l
72
The Green Section between pages 24 and 25
THE NOLLEIFLNX: MODEL BY MODEL
The Rollaifler F and E SeriesLoading6 - Unloading 8 - Shooting 8 - Using the Rolleiflex EExposuie Meter f 0 - Installing the Exposure Meter I I -Special Controls | |
The Rolleifler lxlLoading 5 - Unloadingtrols 6
Page
- Using thethe Exposure
5 -'shootin g,2s':Sp"diuf coir- 2s
20
The Rolleiflar Tioadine" 14 - unioaoini t5 :'sho;iine tCRolleiflex T Exposure Meter 18 - InstallingMeter 18 - Special Controls 19
The Rollei-Magic I,IILoading 0 - Unloading 2 - Shooting 2 - Special Con-trols 3
t4
The Rolleifl.ex Autotnat SeriesLoading 30 - Unloading 30 - Shooting 30 - Special Con-trols 34
Early Rolleifle* Mo&lsLoading 38 - Unloading 38 - Shooting 38 - Special Con-trols 39
Lens Attachrncnts cnd, AccessoriesTele and Wide-angle Work with the Rolleiflex 40 - Close-upWork with the Rolleiflex 40 -Earlier Close-up Lens Sets 4Soft Focus Lenses 4 -The Lens Hood 43 - The Rolleilux43 - Filters 43 - The Rollei Micro Adapter 44
Vieuing Accessories .The Binocular Focusing Hood 45 - The Eye-level PrismFinder 45 - The Rolleigrid 45 - Rolleiclear Screen 45 - TheRolleimeter 45 - The Extension Focusing Knob 46
Cam,era Cases and Eolding Accessories .Ever-Ready Cases 48 - The Metal Ever-Ready Case 48 - TheRolleifix Tripod Head 50 - The Pistol Grip 50 - The Pano-rama Head 50 - The Stereo Slide 50 - The Rollei MarinUnderwater Housing 5 - The Rolleimat 5
29
35
40
15
48
Alurnatioe Picture Sizes .The Rolleiflex Mask Set 53 - The Plate Adapter 53 - TheRolleikin Cine Film Adapter 54 - The Rolleikin II 54 -Installing the Release Knob 55 - Assembling the Rollei-kin II 56 - Loading 55 - Film Transport 58 - Rewinding 58- The Rolleikin I 58 - Assembling the Rolleikin I 58 - FilmLoading and Transport 50 - Rewinding 60 - Early Designsof Rolleikin 62
Some iterns of equipment or certnin moteriols mentioned in this book moy not be f reelyavoiloble in every country. Import ond marketing conditions vory widely, and ore outsidethe control ofthe photogrophic retoiler.
1967 Edition@ Focal Press Ltd., 1959
Printed 1967 n Great Britain by Staples Printers Limited, Rochester, Kent
53
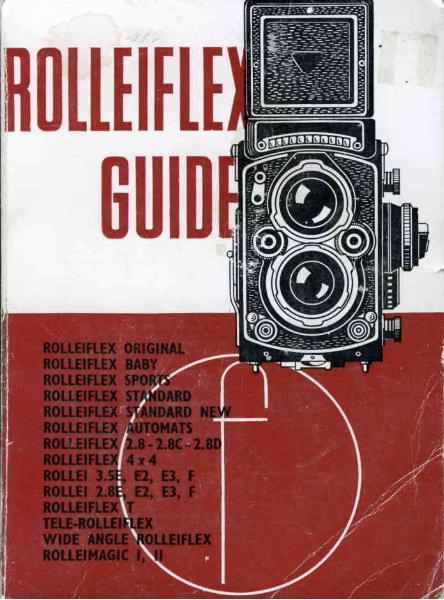
THE ROLLEIFLEX CAMERAThe Rolleiflex is the original rollfilm, twin-lens reflex
camera design, from which virtually all other cameras ofthis type are derived. It takes 12 exposures 2f x2l in.(6x6 cm.) on standard 120 rollfilm or 24 exposures on220 film with specially adapted models. A "baby Rolleiflex4x4 cm. for 12 exposures on 127 rollfilm is also available.
Two lenses-matched for focal length-are mountedone above the other on a common panel. The upper lens pro-jects an image of the subject via a mirror to a focusingscreen in the top of the camera, while the lower one projectsa similar image on to the film. The focusing screen image,therefore, shows at all times the full size picture-upright butreversed left to right-as it will appear on the film. To com-pensate for any parallax between the viewing and takinglens a mask is built into the viewing camera below thefocusing screen.
The focusing screen on top of the camera is protected inthe closed position by the folded-down finder hood. Whenopened, this forms a light excluding hood 2$ in. high; itcarries a magnifier for critical focusing. A frame finder foreye-level direct vision use is built into the hood.
The hood on current models is removable and can bereplaced by a pentaprism, which permits eye-level focusing,showing the image upright and right-way-round.
The finder lens in all models is faster than the taking lensand cannot be stopped down. This ensures a bright focusingscreen image and, having rather less depth of fleld than thetaking lens, allows for very critical focusing.
The interior of the camera body is fitted with light baffieswhich effectively avoid scatter of light and enhance thebrilliance of the picture.
The Rolleiflex is focused by a large focusing knob on theside of the camera. This is geared to the front panel andsmoothly and simultaneously controls both lenses. A depthof field indicator is incorporated.
Current models arc available with a built-in photo-electric
exposure meter which in most cases is coupled to theaperture setting.
A film type indicator is built into the film transport knob.Film transport is effected by a crank situated on the side
of the camera. It locks when the correct amount of film hasbeen wound on to bring each new frame of film intoposition. A counter registers the number of exposures made.
A tripod bush is located in the centre of the camera base.The back of the camera hinges open for the insertion and
removal of films and can also be removed. It carries a sub-stantial spring-loaded pressure plate.
Transporting the film automatically tensions the shutter.The shutter is released by a body release knob on the frontof the camera. When not in use, it can be locked to preventaccidental release. The shutter cannot be released until thefilm has been wound on, thus preventing double exposures.To avoid blank frames, the film cannot be wound on untilthe previous frame has been exposed.
The shutter on most current models is a Synchro-Compurwith speeds from 1 sec. to 1/500 sec. as well as B. It has built-in delayed action and is flash synchronised.
Both the taking and finder lenses together with theshutter are enclosed in a dustproof casing, which has peepwindows at the top showing shutter speeds and apertures.
A wide range of accessories is available for the Rolleiflex.Both finder and taking lens carry bayonet rings for fitting
filters, close-up lenses and similar attachments.The Rolleiflex is about 5$ in. high, 3f in. wide and 3f in.
deep. Its weight is about 341ozs. The body is an aluminiumalloy casting.
The Rollei Magic models have a few different featureswhich are detailed in the green pages.
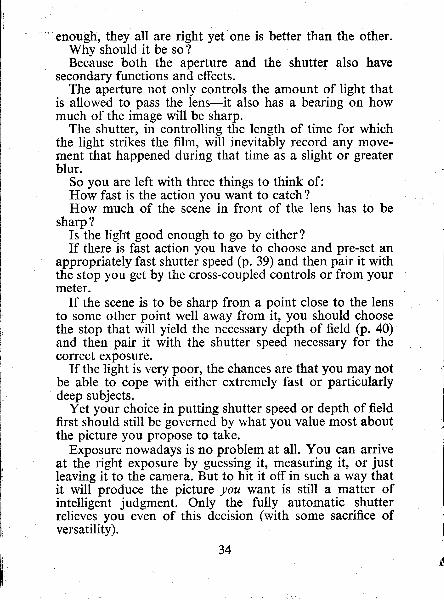
Rolleiflex EaolutionThe original Rolleiflex was introduced in 1928. It took six exposures
2tx2* in. on 117 film, which is now discontinued. It can be convertedto take 12 exposures 2|x 2l in. on size 620 film. A film transport knobadvances the film, exposures are counted in a red window. It is fittedwith a 70 mm. Tessar /4.5 lens in a Compur shutter (1 to 1/300 sec.
6
0nr G: t928
ROLLETFLEX EVOLUTION
AUT0I,|AI te3Z38
AUT(lMAT 3.5 E3.5
1954
T
1956
1958
Thc firrt Rolleiflcx of t928 started the basic system of the twin-lens rollfi lm reflex. The standard
moaeiot t9 j2 lo 1934 a l ready incorporated th i t ranspor t crank and lenses mounted on a commonp"nei, wtrite *e Automar froln 1937'onwards had apeiture a-nd sp-eed setting whejls and. automatic
foadirig features. The Standard New of 1939 is a sim'pler version of the Automat of that time.
IUI(lMAT3.5
r950
R0[tEllilAGrC
1960
The oost-war Automa! 3.5 models featured a redesigned finder hood and flash synchronised shutters.from 1954 onwards exposure value shutters wer€ bui l t in, and-since 1956-exposure.meters.On the model 3.5F of l i58 the meter is coupled with the aperture and speed sett ing. ln the sameieir i simpler model T appeared, while the'Rollei Magic of t960 has the exPosure meter coupledwith a ful ly programmed shutter for automatic control.
7
sTo.orD 193u34 srD.lttw
butkusmi
New Stamp
II
I !, T), The finder hood has a built-in mirror for eye-level reflex focusing.Parallax is compensate9.by redlrction of the reflex picture. The takinlglens mount diameter, 24 mm.In 1929 the same camera. but with i75 mm. Tessar /3.8 was marketed; the finder lens aperture is/3.1.
Rolleiflex Standard of 1932 has a 75 mm. Tessar f 4.5 or f 3.8lens inCompur shutter (1 to 1/300 sec., B and T). The lenl mount diameter is28.5 mm. Finder lens aperture is/3.1. Finder hood has a frame finder.Parallax is compensated by reduction of the reflex picture. Takes 12exposures on 120 or 2O film. Film transport by lever crank. Firstexposure set by red window, thereafter by automatic counter.ln 1934.the same mg{glappeared with a 75 mm. Tessar/3.5 and Compur Rapidshutter to 1/500 sec. B and T.
The Rolleiflex Automat 1937 has a 75 mm. Tessar/3.5 in CorirpurRapid sLtltter (1. to 1/500 sec., B, but not T) with built-in delayed actjonrelease. The taking-lens has bayonet mount to accept bayonel mountedatlachments. The/2.8 finder lens has push-on mount (iater also fittedwith bayonet mount). Finder hood contains mirror fof eye-level reflexfocusing, also automatic parallax compensation. Film tr.-ansport is bya lever crank, coupled with the shutter setting. This mafes doubleexposures impossible. Film feed is automatic, there is no red window.
The Rolleiflex Standard New of 1939 has a 75 mm. Tessar/3.5 inCgmpur_Rapid shutter (1 to 1/500 sec., and B), but no delayed actionrelease. It has a window for setting the first exposure, the automaticfilm counter then takes over. Film transport is coupled with shuttersgJting. Finder lens (also with bayonet mount like the taking lens) isf 3 . r .
The Rolleiflex Automat of 1945 has a 75 mm. Tessar or Xenar/3.5and bayonet mounts on both lenses; other features are the same ason the 1937 model.
The 1950 model has a coated 75 mm. Tessar or Xenar lens in aCompur Rapid shutter (l to 1i500 sec., B), and built-in flash contact.The redesigned finder hood has both an eye-level reflex finder mirrorand direct vision frame finder. In the same year, a second model ofthe same camera appeared with an 80 mm. Tessar f2.8 and a largerCompur shutter with a top speed of 1/400 sec.
In 1951 both the f 3.5 and the f2.8lens models appeared with aSynchro-Compur shutter with MX-synchronisation,
^ and a time
exposure lock.Th Rolleiflex 2.8C of 1953 with 80 mm. Xenotar or planar/2.8 lens
incorporates various improvements over the 1951 model:- internalbaffies to eliminate stray light, an extra large focusing knob with built-infilm indicator, an adjustable focusing mbgnifier, self-locking shutterspeed and aperture settings, and a fitted counter khob for the Rolleikinaccessories. The coupling of film transport and shutter setting can bedisconnected to permit intentional double exposures.
The Rolleiflex Automat 3.5 of 1954 has a Synchro-Compur shutterwith exposure value scale, internal baffies anda larger focirsing knob
2.8t
1960
ROLLEIFLEX EVOLUTION
1956
Special models.with_an f2.8 lens appeared from l95l onwards. These became progressively moreela-birate and in- 1956 appeared- with built-in exposure meter which was couiled-in the i.8 F of1960. Two special models also belong logical ly ro this series; the Tele-Rolleif lex oi 1959 with 135 mm.long focus lenses, and the Wide-angle Rolleif lex of l96l with 55 mm. shorr-focus lenses.
ln addition to the 2t x 2il in. Rolleiflex models small-size Rolleiflexes also were made from time to time.The first of these, the Baby Rolleiflex of 193 I and the Sports Rolleiflexf rom 1933 onwardc wercscaled-down versions of the current standard models. The'Rolleif lex 4x4 ol 1957 is in many resDecrsa counterPart of the larger model T, but has a transport knob instead of a winding crank.
9
951
rH.E-R0il.Et
1959
butkusmi
New Stamp
with built-in film indicator. Models since 1955 have an improvedaperture-speed coupling system with a coupling release button.
The Rolleiflex 2.8D of 1955 has a Synchro-Compur shutter withexposure value scale. The XM synchronising lever is combined withthe self-timer setting lever. A coupling release button on the aperturewheel disengages the aperture-speed coupling for independent settingswhen required.
*") The Rolleiflex 2.8E of 1956 is similar to the 2.8D model but has- built-in photo-electric exposure meter and automatic depth of fieldindicator. It is fitted with an 80 mm. Planar or Xenotarl'2.8 lens.
The Rolleiflex 3.5E, of 1956 is similar to the Rolleiflex Automat of1955, but has built-in photo-electric exposure meter and automaticdepth of field indicator. It is fitted with a 75 mm. Planar f 3.5lens andwas also available with Xenotar f 3.5lens but without exposure meter.
- Subsequent installation of the meter is possible on the latter model.-.fT '
fitted with a detachable hood and improved extra bright focusingscreen_
The Rolleiflex F of 1958 with /3.5 Planar or Xenotar lens is likemodel 3.5E but has the meter coupled to the stop-speed setting, isfitted with a detachable hood, and an improved extra bright focusingscreen.
Rolleiflex 3.5E3 of l962is a Rolleiflex F without the built-in exposuremeter. It was replaced iur1967 by the Rolleiflex F (both with/3.5 and/2.8 lens) without exposure meter. The meter can be built in andboupled to shutter speed and aperture settings.
The Rolleiflex T of 1958 has a75 mm.f3.5 Tessar, detachable hoodand improved extra bright screen and facilities for changing the formatfrom2lx2ito 2*x1* or 1*x1$ in.; models prior to 1962notfittedfor the 35 mm. Rolleikin outfit. A single lever (instead of the familiarwheels) controls exposure values, stops and shutter speeds. An exposuremeter is fitted or can be installed by the user.
The Tele-Rolleiflex, introduced in 1959, is a special model with' 135 mm. Sonnar f 4 long-focus lenses for professional and featurephotography. It has disengageable speed/stop coupling. An exposureheter is not fitted, but can be installed by the user. The back is fitted
- with a glass film plane.The Wide-angle Rolleiflex of 1961 is a special model with 55 mm"
Distagon /4 short focus lenses for wide-angle photography. It isotherwise similar to the Tele-Rolleiflex in all other control features.
The Rolleiflex 2.8F of 1960 with Planar or Xenotar f 2.8 is like themodel 2.8E,12 but has the meter coupled to the speed-aperture settings.
3.5F.)The Rolleiflex 3.5E3 and 2.8E3, 1963 arc similar to the 3.5F and
2.8F but without exposure meter. Aperture and shutter speed arecross-coupled and indicate exposure values.
10
*,
The Rolleiflex F models have also been available without exposuremeter, since 1964.
The Rollei-Magic of 1960 has a built-in photo-electric meter whichautomatically sets aperture-speed combinations on the built-in scalelessProntormat shutter.
Rolleiflex 2.883 of 1962 is a Rolleiflex 2.8F without the built-inexposure meter.
Rollei-Magic II of 1962 is a Rollei MAGIC I, but fitted with ashutter which permits in addition to fully-automatic operation alsoindividual setting of speeds (U30 to 1/500 sec.) and apertures.
The Rollei-Magic II, 1963 also permits manual exposure setting. Inthis case the exposure meter indicates exposure values, which can beset on the shutter.
All Rolleiflex models 2*x2l in. supplied since late 1964 are fittedwith the Rolleiclear Focusing Screen with split-image rangefinderwedge.
24-exposure 220 FilmA 220 film has been introduced, primarily designed for the pro-
fessional user, giving 24 exposures 2{ x2l in, on one roll. Specialversions of the current Rolleiflex 2+ n. models are made (at extra cost)accepting 120 and 22O film,
The 4 y 4 cm.. Rolleiflex ModelsThe Sports Rolleiflex of 1931 (the first few models were called Baby-
flex) takes 12 exposures 1* x 1$ in. (4 x 4 cm.) on standard vest pocket(size 127 or 27) film. It has a 60 mm. Tessar/3.5 or f 2.8lens, and aCompur shutter (1 to 1/300 sec., B and T). The lens mount diameter is28.5 mm., the finder lens/2.8. The finder hood has an eye-level framefinder. Parallax is compensated by reduction of finder picture. A levercrank advances the film. One lever sets and releases the shutter by atwo-way action. The first exposure is set in the red window, thereafterby automatic counter. Push-on filter and other attachments.
In 1933 this camera appeared with peep windows above the finderIens. In 1934, a 60 mm. /2.8 Tessar in a Compur Rapid shutter (1 to1/500 sec., B and T) replaced the previous lens and shutter, and doublebayonet mount on both lenses was added in 1938. All these modelswere discontinued in 1940.
The Rolleiflex 4 x 4 of 1957 has a 60 mm. Xenar/3.5 lens in Synchro-Compur exposure value shutter (1 to l/500 sec., XM synchronised, withself-timer). The finder hood incorporates an eye-level frame finderand the shutter cannot be fired while the hood is folded. Film transportis by winding knob on the right-hand side; exposure counting isautomatic.
l l
HANDLING THE ROLLEIFLEX
In order to simplify the desuiption and handling of theRolleiflex camera without being confused by dffirent featuresof individual models, this guide has been divided inio a generalsectionwhich applies to all Rolleiflex models while the require-ments and consequently dffirent handling of each model arefound on the green pages.
For convenience, a symbolic reference system is also used in thegeneral section. Wherever the sign I appears, further details will befound in the camera pages of the gf,een section for each cameraEpe. Similarly, the sign O refers to accessory sections. The appropriatepages are marked accordingly in the bottom left- or right-hand corner.
HoldingHold the camera as steady as possible, as the slightest
shake, even if its effect is not visible in the negative, willbecome apparent in the enlargement. Always stand withyour legs apart for extra steadiness.
IUhen working with the reflex finder at chest-level, placethe camera in the palm of the right hand, with right indexfinger on the release on the front while thumb and indexfinger of the left hand rest on the focusing knob.
When using the eye-levelfinder or pentaprismhold up thecamera so that the eye is level with the back sight in thefocusing hood or the eyepiece of the prism. Grip the bodywith both hands, placing the index finger of the right handon the release. Press the camera body against nose andforehead to give it additional support.
To release the shutter, press the button with the right handindex finger. Use finger pressure only, keeping the gripsteady. The pressure must be slow and smooth. The slowerthe exposure time, the smoother must be the release, as therisk of camera shake is greater.
For slow speed exposures in the hand at chest-level, holdthe breath and release smoothly to avoid shake.
When using long exposures while holding the cameta aleye-level, rest the camera against some support, or at least
12
HOLDING
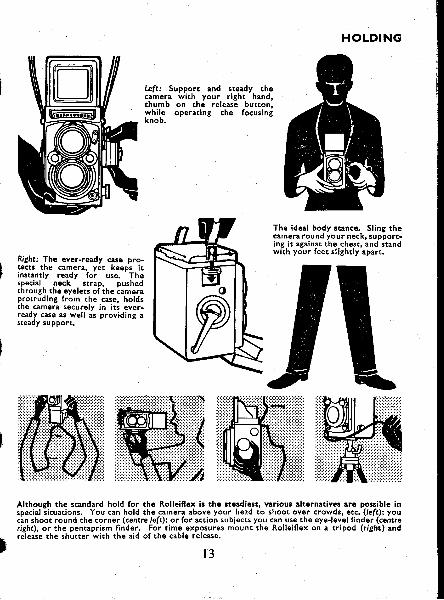
left: Support and steady thecamera wi th your r ight hand,thumb on the re lease but ton,whi le operat ing the focusingknob.
The ideal body stancc. Sling thecamera round your neck, support.ing i t against the chest, and standwith your feet sl ightly apart.
ILffiffiiffi ffi: iit ffiAlthough the standard hold for the Rolleiflex is the steadiest, yarious alternatives are possible inspecial situations. You can hold the camera above your head to shoot over crowds, etc. (left); youcan shoot round the corner (centre left); or for action subiects you can use the eye-level finder (centrer ight ) , or the pentapr ism f inder . For t ime exposures mount the Rol le i f lex on a t r ipod ( r ight ) andre lease the shut ter wi th the a id of the cable reJease.
Right: The ever-ready case pro-tects the camera, yet keeps itinstantly ready for use. Thespecia l neck srrap, pushedthrough the eyelets of the camoraprot ruding f rom the case, holdsthe camera secure ly in i ts ever-ready case as well as providing asteaoy supPort .
l 3
lean against something stable. In this way li8 sec., or more,can be risked without incurring camera shake.
A tripod is necessary when taking exposures of 1/15 sec.or longer with the delayed action release.
CorryingHowever elegant it may be to carry the camera on a long
strap from the shoulder, this is quite unsuitable for quickaction. A better method is to carry it on a short strap aroundthe neck at chest-level-ready for work.
The ever-ready case enables tle Rolleiflex to be usedwithout removing it and there is a holding screw whichprevents the camera from falling out.
The Refle* Find,erThe reflex finder is a viewing-cum-focusing device. It
consists of a focusing screen on top of the camera, a plasticscreen incorporating millions of minute refracting opticalelements. This gives an extremely bright image right to theedges, and high colour brilliance, without any noticeablepattern.-
The 2tx2t Rolleiflex models since 1964 have a focusingscreen with split-image rangefinder centre, the two halvesof which are lined up to get sharp definition. This 'Rollei-
clear' screen can be fitted to some earlier models.The image entering the camera through the finder lens is
reflected on to it by a mirror. This reflex image remainsvisible even during and after the exposure.
Its purpose is first to show the exact picture area, andsecondly to help in getting the picture sharp on the film.
YieuingThe picture on the screen appears upright but reversed
left to right. Movements are also reversed left to right.To follow a moving object the camera must be turnedagainst the apparent movement. A finder hood extension isavailable to keep stray light from the screen and so makesthe image appear brighter.
On the Rolleiflex models since 1960 the focusing hood isremovable and can be replaced by an eye-level pentaprism
l 4
#
THE ROLLEIFLEX FINDER SYSTEM
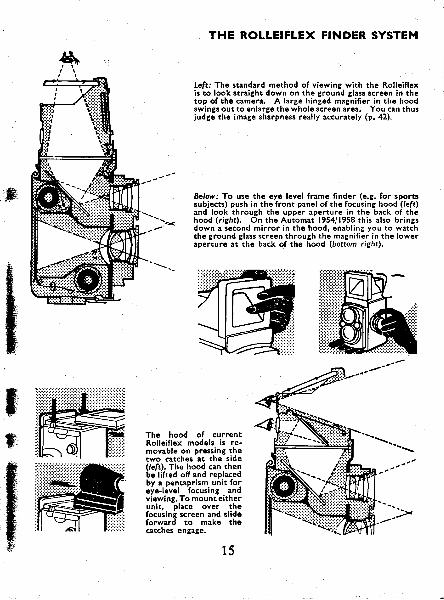
left: The standard method of viewing with the Rotteiflexis to look st ra ight down on the ground g lass screen in thetop of the camera. A large hinged magnifier in the hoodswings out to enlarge the whole screen area. You can thusiudge the image sharpness really accurately b, azl.
8elow.' To use the eyc leyel frame finder (e.g. for sporrsubiects) push in the front panel of the focusing hood (/eft)and look through the upper aperture in the back of thehood (rigbt). On the Automat 1954i 1958 this also bringsdown a second mirror in the hood, enabling you to watchthe ground glass screen through the magnif ier in the loweraperture at the back of the hood (bottom right),
#,#.
-+<
The hood of currentRolleiflex models is re-movable on press ing thetwo catches at the side(left). The hood can thenbe lifted off and replacedby a pentapr ism uni t foreye-level focusing andviewing. To mount e i theruni t , p lace over thefocusing screen and slidcforward to make thecatches engage.
-s r \ . \ r r r \ -
t t ' 1 " t ' ' "
15
giving an upright and right-way-round image even if thecamera is turned sideways or upside down.
\ryith the frame finder built into the focusing hood youcan also fbllow movement-it shows an upright andright-way-round image. The frame finder of the Rolleiflex(since 1950) has below its viewing eyepiece a second eye-piece with a built-in magnifier. Using the lower eyepiece,you can focus the image which is reflected by a mirror fromthe ground glass and then, by slightly lifting the eye, switchover to the frame finder. This enables you to focus and viewat eye-level, if not simultaneously so, at least with a mini-mum of time lag.
When using the frame finder, do not attempt to turn thecamera to the right or left away from the eye, nor try tomove the eye from the centre of the back sight. This" spying round the corner " is deceptive, as only thatsection will appear on the negative which you see in thefinder looking straight ahead with the eye close to and inthe centre of the opening.
Although one is likely to hold the camera reasonably level,make sure that vertical lines of the picture run parallel withthe grid, or on earlier models with the sides of the focusingscreen frame. You can tilt the camera intentionally but seethat the effect does not look like an accidental tilt.
P ar alla x C o nt p en s atiomAll Rolleiflex models produced since 1937 have a mask
built into the camera below the focusing screen. This movesautomatically with the distance setting to compensate theviewing error on the screen which would occur on accountof the different position of viewing and taking lens. YourRolleiflex is in consequence free from any parallax errorwhen using the reflex screen, either directly, or via thepentaprism.
The frame finder, however, yields a view of its own as it views froma point away from the lens. The greater the distance between the two,the bigger the difference of this point of view, i.e. the parallax. Parallaxhardly counts when viewing and taking something at a reasonabledistance, as the difference of viervpoint is negligible as compared withthe distance between camera and subject.
1 6

k
But if we photograph anything at close quarters-take a portrait forexample-the parallax may show. The image as seen through thetiame finder may include all of, say, a hat worn by the subject of yourportrait, while quite a portion of it may be cut off in the picture taken.
So do not use the frame finder at close quarters. If you must use it,make allowances by including in the frame finder view a strip on thetop you can do without in the picture. That strip must be the widerthe closer you are to the subject.
Focusing
The second purpose of the reflex finder-obtaining thebest possible definition-is at the same time one of themost important means to ensure good results.
The less experienced user of the reflex screen is apt toaccept, all too hastily, a seemingly sharp impression ofthe image for satisfactory definition. There are, however,different degrees of sharpness and you can make use ofthese very differences to find the best possible setting.
Turn the focusing knob to and fro while observing howthe main object to be focused becomes more and more sharpup to a point beyond which it will again lose definition.
At this "beyond" stage reverse the movement of the focus-ing knob. Slowly narrow down the degree of to and fromovement of the focusing knob until you unmistakablyarrive at the point of the very best definition.
You encircle, as it were, the point which you want abso-lutely sharp by going over and over again its neighbourhood,all of which will appear reasonably sharp. Before or beyondthe point of maximum definition the image still appearssufficiently sharp, but do not be deceived by this fact-theimage is not good enough for enlarging.
When watching the screen at waist-level, swing the built-inmagnifying glass into position; this will help to checkcritical sharpness. The camera is best raised near to the eyewhen using the magnifier. When you have finished with it,lower it again, otherwise-with the magnifier in front ofthe screen-you may get excellent definition, but may losesight of the picture as a whole. The magnifying lens can bechanged and users with defective eyesight can obtainalternative lenses with correction of * 3 to-3 diopters.
t7
The frame finder cannot be used for focusing, apart fromthe quick change arrangement of the models since 1950(not on Rollei Magic, T and 4x4).'
This procedure is unsuitable for photograplling.movlngsubjects. The frame finder is, however, more effective withzoie focusing methods (p. 58). These ensure that allsubjects within a certain depth of field will be recordedsha?p. This last method of focusing-is, in fact, preferableto any other when dealing with rapidly- moving-subjects infront-of a reflex camera. It is almost impossible to catchand shoot fast motion when you are looking down withyour attention fixed on the mirror that shows directionsand movement the wrong way round. With a frame finder,it is quite easy to follow-everything gnd \e9n the other eyeon thb subjeci before it comes into the fleld of the finder.
Alternatlvely for action shots you can pre-focus thecamera at a distance at which the subject will be at a givenmoment, or focus on a spot which the -s-ubject has 1o P.ass.
With subjects liable -
to react self-consciously (e.g.children), focus on some object which is the same distancefrom the camera as your feal subject, but in a differentdirection. When the range is found, swing the camera roundand shoot.Shootingr
Practiie the following operations first with an gmptycamera until you can do them practically automatically.1. Work the film transport. This advances the film counter
and tensions the shutter.2. Set the exposure. Adjust the shutter for the 4gqt amount
of light for the subject conditionq (p. 31). On RolleiflexmodEls with built-ii photo-electric exposure meter, themeter indicates the setting or even sets the controls.
3. Select the aperture-speed combination you qant to use;smaller aperture for greater depth of field (p. 31) or fasterspeed to arrest movement (P. 39).
4. fiocus and determine the picture area to obtain a sharppicture and the view you want.
5. Release the shutter gently.
l8
p,
w
LOADING AND TINLOADINGThe Rolleiflex uses the standard size 120 rollfilm. It gives
12 exposures 2f x2[ in. (6x6 cm.). The Rolleiflex 4x4uses the size L27 rollfilm for 12 exposures 18x18 in.(4x4 cm.). These are film spools which are loaded intothe camera in daylight. Avoid loading or unloading thecamera in brilliant sunlight. Choose a shady spot or do itin the shadow of your own body if nothing better isavailable.
Loading
L. Open the camera back by holding the camera upsidedown, turn the safety lock with arrow engraved on it inthe direction of the arrow. Then press the projectingend of the latch away from camera body. Now grip theback panel by the two side nipples and pull up.
It is important to check that the two position pressurelock has the inscription "2tx2$" visible below the filmpressure plate in the side of the back panel when rollfilmis used. If a 35 mm. film has previously been used andthe pressure lock shows 'oI xl$", press the pressure plateagainst the camera back and push it up until it stops.When released it must spring forward into its normalposition.
2. Insert the ftlm. The empty spool in the bottom chamberhas to be transferred into the top chamber. Pull out thespring-knob on the camera side wall and turn it a little,so that it locks in the out position. Remove the emptyspool and insert it into the top chamber. For this purpose,pull out the spring knob of top chamber, and turn tofix it in the open position. Place the empty spool withthe grooved end towards the film transport into the topchamber so that the groove engages in the film transportcross bar. Now allow the spring catch to spring back byturning it back into its original position: this will engagethe empty spool in the chamber.
Insert the roll of film in the bottom chamber after' $
19
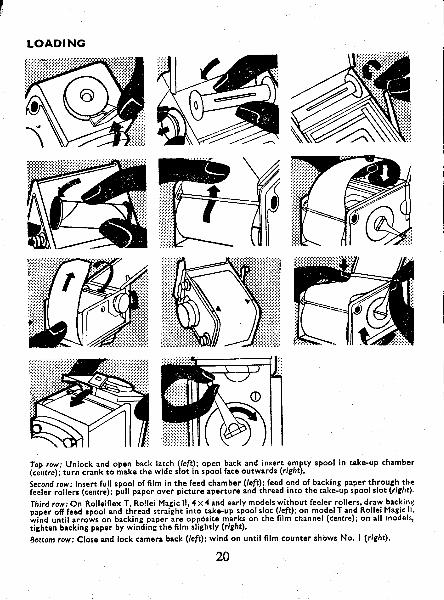
LOADING
lob row: Unlock and open back latch ( left); open back and insert empty spool in take-up chambcr(centre)l turn crank to make the wide slot in spool facc outwards (right),
Second row: Insert full spoot of film in the feed chamber (Jef0; feed. end of backing paper throu,Sh thefeeler rol lers (centre); pul l paper over picture aperture and thread into the take-up sPool slot (r ight).
Third row: On Rolleif lex T, Rotlei Magic l l , 4x 4 and early models without feeler rol lers, d raw backingpiJer off feed spool and thread straight into take-up spool slot ( left); on model Tand Rollei Magicl l 'i " ihO unti t i . .ows on backing paper ire opposite marks on the f i lm channel (centre); on al l models,t ighten backing paper by winding the f i lm sl ightly (r ighO.
Eottom row: Close and lock camera back (left); wind on until filtn counter shows No. | (right).
20
fr*
#
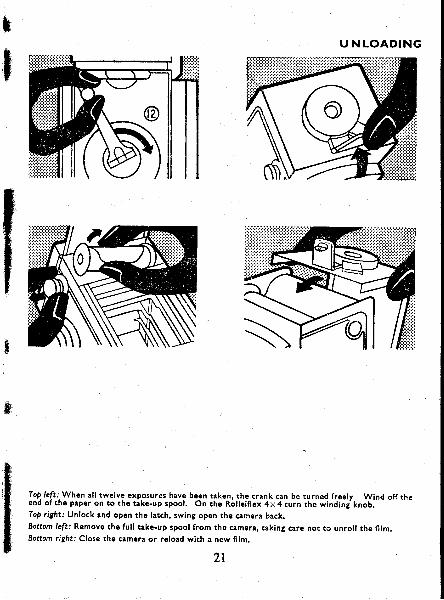
Top.left : .When al l twelve exp-osures have been taken, the crank can be turned freely Wind off thee n d o f t h e p a p e r o n t o t h o t i k e - u p s p o o l . o n t h e R o l l e i f l e x 4 x 4 t u r n t h e w i n d i n s k n o b .
- - -
Top r ight: Unlock and open the latch, swing open the camera back.Bottom left: Remove the full take-up spool from the camera, taking care not to unroll the film.Eottom right: Close the camera or reload with a new film.
2t
U NLOADING
breaking the seal so that the pointed end of the ba*ingpaper pbints upwards towards the empty -spool. Turn^Uuit
tlie spring knob, it rvill engage and hold the roll offilm in its correct position.
Draw the papei end between the two feeder rollersover the fih lperture to the empty take-up spgol. Insertthe wedge-shafed end of the paper into the wide slot ofthe take-up spool.
3. Close the iamera by pushing the back panel against thecamera body until-the latc[ engages. Now turn safetYlock back against the direction of the arrow engravedthere.
4. Get the film ready for the first exposure by cranking thefilm handle untilit comes to a definite stop shortly aftera slight resistance has been overcome. Now turn thehandle anti-clockwise back to the stop and fold it overinto rest position. The film counter will have set itselfautomatically, showing No. 1 in the window.
5. Set the film speed and tYPe.
Unloading
After all 12 exposures have been taken, the film transportcan be cranked
-freely. The film counting window shows a
white circle in place of a number.1. Wind off the paper by turning the crank five times.2. Open the camera back.3. R6move the exposed film, then close camera back or
reload with a new film.
22
FILMS AND FILTERS
There are two kinds of films available for the Rolleiflex:black-and-white and colour.
Black - and - White Filrn'This produces a negative in which the colours and bright-
ness range of the subject are translated into black and white.From it, prints or enlargements on paper (or, in specialcases, black-and-white transparencies) can be made.
The black-and-white film used normally is panchromatic,that means that it is sensitive to all colours. There is a choiceof several types differing mainly in sensitivity as well ascertain other characteristics.
SLOW FILMS are of low sensitivity, requiring compara-tively great exposure. Their main advantage is the extremelyfine gr-ain, permitting a high degree of enlargemg+l withoutits gianular structure becoming unpleasantly visible. Suchfilms also yield images of the greatest sharpness. On theother hand, these slow films are not very suitable for copingwith fast movement in other than exceptionally good light-ing, nor for general work in poor light. Such films are ratedat 40-80 ASA or 17-20 DIN.
MEDIUM SPEED FILMS still yield a reasonably finegrain with good gradation. They are the most suitablematerial for all-round photography, other than in poorlight. These films are rated at 80-160 ASA or 20-23 DIN.
FAST FILMS with somewhat coarser grain (still accept'able for reasonable degrees of enlargement) will cope withmost light conditions including poor light and interiors infavourable conditions. This is the right film for the photo-grapher who wants to be prepared for the unusual, to arrestfasf movement with high shutter speeds, as well as shots inpoor light. The speeds are 200-400 ASA or 24-27 DIN.
ULTRA FAST FILMS are primarily intended for high-speed sports shots in dull weather, interior snapshots inaoorlight, night photography and ill-lit stage pictures. These
23
films are specialist types for conditions where normalmaterials are totally inadequate. They should not be usedfor general photography. The high speed is achieved at somecosf in definition and graininess. Speed ratings range from500-1600 ASA or 28-33 DIN.
The above speed figures are based on the latest ASA Standard forfilm speeds (ahd on-the BS and DIN Standards under revision).These-figures', when used on the exposure meter, clvg minimumcorrect exposures, to make the most of the versatility of-the film andof the image quality. They are also the figures quoted- by most filmmanufactuiers. Sometimes films are, however, still rated according toearlier standards which in effect incorporated a generous safety factoragainst underexposure-by the simple process of overexposing-,fllmsabout 100 per c-ent (well within the exposure latitude of most black-and-white films). So you may come across films apparently only halfas fast as others of similar type, because of this difference in ratings.The table on p. 70 indicates the current film speeds to be usedwith the exposuie meter, even if the film packing gives a lower rating.
This applies to black-and-white negative materials only; speed ratingmethods have not changed for colour films.
There is a wide range of different makes of films in allspeeds on the market. Their characteristics, _apafi fromspeed, vary slightly from make to make. It is safe to,say thatall well-known brands are reliable and good. The best filmis the one you are used to. Professional photographers andadvanced amateurs may find one or the other characteristicsof a particular make-i.e., its gradation, granular structure,acutance, etc.-of particular value for speciflc jobs.
Colour FilmThese films produce an image in colour.after appropriate
processing, corresponding directly or indirectly to thenatural colours of the subject. From the practical point ofview, colour film is as easy to use as black-and-white filmbut needs a little more care in exposure. Processing is morecomplex and is often carried out by the film-maker orspecially appointed processing laboratories.-
There aie two basic types of colour film: reversal andnegative.
(continued on page 26 after the green tection')
24
l-ll'-lr I| 80-160 | 1200-4001 I b00'J\z\z\7
i i i
E=| 40-80 |\z
iaI
==I 6-25 |\z
i
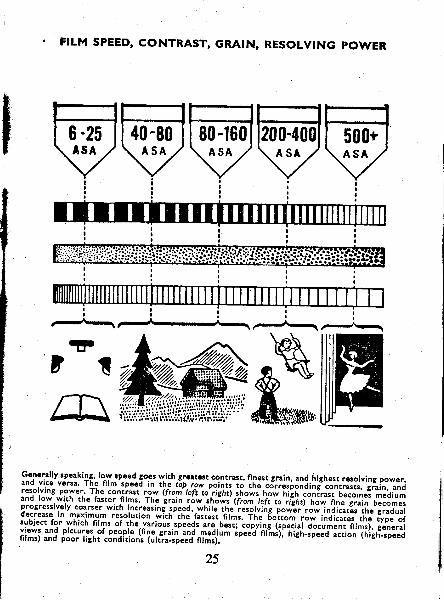
F|LM SPEED, CONTRAST, GRA|N, RESOLVTNG POWER
Gcncrally speaking, low speed goes with grcatcst contrast, finest grain, and.highest resolving power,and vice versa. The f i lm'speed in th-e t6p. r_ow points to t te cJiresi"ni,ng contrasts, grain, andresolving P.oyel.The contiast row (from'Ieft to-i i ini) .ho*iho-#-ni! [ ' . -on.."r. becomes mediumand low with the faster f i lms. The irain 1i,*ni1"rn" (from.-lef i io 'r , t* i t i -r . ,o*-f i*; ; i ;-6;; ; ; ; :progressivelv coarser with increasing:peSa, -while the'relgr"ii.'g i""ri.'row indicltls-i'ri" iiii'r-"rdecrease in maximum resolut ion wittr- i t ie 'rastuir. f i lms. rhe Soitom'row indicates the rype ofsubject for which f i lms of thc.varioui sp"eari."-ue;; l . ; ; td (: ;g. i" i io.rrn"nt f i tms), generalviews and pictures of oeople (f ine. grain' and medjum tpu"?'nf ' . i j l t r iJt,-rpu"o action (high-speecfilms) and poor light c6nditioni (uttlJJpeea Oimu.
25
(continucdfrom page 24 before the green section)
Colour Reaersal FiIm
This produces a colour transparency on the actual filmexposed in the camera. This transparency held up to thelight shows a positive image with all parJs of the qgbject intfeir original colours. It can be viewed in a suitable trans-parency viewer with a magnifier or it_c?g.be projected in ailide projector to give a large and brilliant picture on ascreen.
There is little doubt that the projected image is the mostnatural and best for showing colour.
Although the colour transparency is an end product, itcan still be used to make:(a) duplicate positive colour transparencies,(b) a black-and-white negative which can then be used to
produce black-and-white prints or enlargements,(c) a colour negative for making colour prints and enlarge-
ments, as fiom colour negative film (described below),(d) direct colour enlargements on colour reversal pape_r.- 'Colour
prints on paper invariably show a loss of colourquality as compared with the original positive tran-sparency.-
Fof correct colour rendering, colour reversal films haveto be carefully matched to the light by which they are to beexposed. Accordingly, most makes are available in two or.more of the following types:(a) daylight colour film (type D or T) whichwill give correct' '
colour reproduction in daylight or with blue-tinted flashbulbs,
(D) artificial light type colour flfm which will give correct' - rendering by photoflood illumination (type A or K),or high-power tungsten light,
(c) artificiaf light type colour film (type B) which will givecorrect rendering with the high-power studio lamps.
Colour films made for one kind of light may often be usedunder different light conditions with the aid of a conversionfilter as recommended by the manufacturer.
Dlserent makes of colour film may yield transparenciesof, a-slightly different characteristic colour quality, colour
'r*-.i '
r , . ! !
26
saturation and colour contrast. Which you prefer is verymuch a matter of personal taste, and you can only berecommended to try various makes to find the one whichsuits you best.
Colour Negatiae FilmOn processing, this produces a colour negative which
shows a negative image of the subject in its complementarycolours-e.g., blue appears yellow, red appears blue-green,and so on. These colours may sometimes be hidden underan overall orange or reddish tint.
The main purpose of the colour negative is the productionof colour prints on paper. The quatrity is generally higherthan that obtained from a positive transparency.
From the colour negative you can make:(a) any number of colour prints in varying sizes,(D) direct black-and-white prints or enlargements, in the
same way as from a black-and-white negative,(c) positive colour transparencies for viewing or projection.
Most colour negative films are suitable for exposure byany type of light-e.g., daylight, flash or photofloods. Thenecessary adjustment of the colour rendering is carried outduring the printing stage. Manufacturers sometimes recom-mend conversion fllters even with colour negative films.These mainly serve to simplify the subsequent correctionneeded in printing.
Colour Filrn Speeds
The majority of colour films, reversal and negative, arerated between 25 and 64 ASA or 15-19 DIN, correspondingto a slow to medium speed for black-and-white material. Afew films go up to 160 ASA or more for poor light con-ditions. Others may be as slow as 10 ASA or 1l DIN.
As with black-and-white films, the slower types tend toyield improved image detail, especially with negative colourfilm, while the fastest emulsions may show slightly reducedcolour saturation and image sharpness.
27
The Choiee of Colour FilrnMaking your choice between colour reversal or negative
film (in spite of the various uses that can be made of eithertype of material) remains an individual question.
First there is the way you want to see the result, as acolour print or as a colour transparency. The print has nodoubt much to commend itself. It is easily shown, storedand carried about. The transparency calls for the aid of aviewer or projector.
Next, the cost of a colour print is about three times thatof the transparency. This may at times be mitigated by thefact that from unsuitable negatives no colour prints needor can be made. The transparency user, however, hasadditional outlay in the form of a viewer or projector withscreen (in most cases both).
Rolleiflex transparencies made on size 120 film needprojecting in a large-size projector which takes 2frx2fr in.slides. Alternatively, you can cut down the transparency tofit 2x2 in. miniature slide frames (1$ x 1$ in. super slides).Certain Rollei models (r) can yield 18 x 18 in. transparen-cies directly. With the Rolleikin outfit (o) and 35 mm. filmyou get 24x36 mm. transparencies for mounting in2x2 in.standard frames.
A final point to consider is the quality. The transparencywill record each colour and its brilliance in full. Held to thelight or projected on a screen, the brightness range, whichmay be 100 : 1, is fully or almost fully retained. It showscolours brilliant with great depth and realism. The colourprint can at its best only reflect four-fifths of the light fallingon it and even the darkest tones reflect about one-twentiethto one-tenth, so that the full range is no more than 16 : l.While the colour print is, by necessity, duller than thetransparency, it is only fair to say that the eye soon adjustsitself to the reduced brightness range, and subjects withoutgreat contrasts will be very satisfying.
From the point of view of convenience, reversal fllm hasthe advantage that it directly gives finished colour picturesof high quality and is still capable of producing colour prints
28
$F
as well. For the maximum versatility and control in printmaking, however, negative film is superior.
Fihers for Blaek.and.White FilmBy its nature, a black-and-white film can only translate
colour values of the subject into tones of lighter or darkergrey. Mostly these correspond fairly closely to the brightnessof the colours, but do not, of course, differentiate betweenthem. In certain cases the difference between the brightnessof two colours may be so slight that both record in almostthe same tone of grey.
There a filter helps by modifying the depth of one or theother colour, and so making it show up lighter or darkerthan it would normally.
The commonest example is the blue sky in a landscape,with white clouds. The blue is so brilliant (and the film isoften excessively sensitive to it) that the clouds do not showup against it. By putting a yellow filter in front of thecamera lens we can subdue or "hold back" the blue, somaking it record darker in the final print. We can even gofurther and over-emphasize the effect progressively with anorange or red filter; these darken the blue so much that thesky looks almost black for a really dramatic effect.
The same considerations hold for other filter effects. Forinstance, the film renders a red rose in the same tone of greyas the green leaves of the rose bush. With the colour con-trast gone, the rose disappears in its surroundings. A greenfilter makes the rose darker and the leaves lighter; con-versely, a red filter will show up the rose as light againstdark foliage. Scientifically, both filters falsify the tonerendering, but produce a more acceptable pictorial result.
In all these cases a filter lightens objects of its own colourand darkens objects of its complementary colour. Apart fromisolated instances in pictorial photography, such contrastcontrol is very valuable in copying and scientific work (e.g.,photomicrography).
All filters cut out some part of the light and thus, as acompensation, an increase in exposure time is necessary
29
when using them. This is stated on most filters in the formof a filter factor indicating by how much (e.g., 2 times,3 times) the exposure must be increased with that filter.The factors are approximate for they depend not only onthe nature of the filter but also on the exact colour sensitivityof the film and on the colour of the prevailing light.
Fihers for Colour FihnThe normal yellow, orange and other filters for black-
and-white film must never be used with colour films as theywould give the colour picture a strong overall colour tint.
In daylight and with daylight type film, only a haze filteris required. It is almost colourless but for a slight strawtinge. It is usefully employed on hazy days and in highaltitudes to avoid excessive bluishness of the colour picture,especially with distant landscapes, seascapes and near water.This filter does not call for any change in exposure. It isalso useful for colour photography with electronic flashas it produces somewhat warmer tones.
The Planar, Xenotar, Sonnar and Distagon lenses havethe inherent characteristics of the haze filter, so that nosuch filter needs to be used with these lenses.
Conversion filters are used if a colour film, balanced forone type of light, should be used in another type of light.
The Polarizing ScreenHighly-polished subjects may reflect glare which obscures
the detail. This can be overcome by the polarizing screen.It has the special property of suppressing so-called
"polarized" light. Light reflections from glass, china,enamel, polished wooden surfaces, water, to a large extentare polarized and can, therefore, be almost extinguished byplacing the polarizing filter in proper position over the lens.
The filter must be rotated in front of the finder lens tofind out its best position and then transferred to the cameralens in this position. The filter has a 3 x factor.
The polarizing screen is, in addition, particularly usefulin colour photography where it darkens a blue sky.
30
E)(POSIJRE
Exposure means-to expose the film in your camera totight.^The dose of light any film needs to_ produce. the rightsort of image depends on how sensitive that film is to light.A fast film ls more sensitive than a slow film.
Once your choice of film is settled, the basic c-ondition ofexposure is settled with it. You are now left with theprbblem of scaling the light you find in front of your camerato the amount your film needs.
Your job is fo judge the light reflected from the subjectyou are about to photograph. Yoqt grandfather as anamateur photograplier used to take into account-his geo-graphicaipositibn, the time of the year, the hour of the day,Ihe-state df ttre sky, as well as the tone of the subject itself,and by so adding one thing to another size !P the lighlreflected from the subject. The experienced professional, ofcourse, hardly ever worked that way. He just had a lookand he knew.
Today a light meter or exposure meter does the same forany photographer. It takes a look, it rneasures the light andit lets you know.
In fact, it does more than that. It translates the lightmeasured straight into terms of photographic ex-posure. Itdoes so by piesenting you with the choice of aperturenumbers and-shutter speeds, sorting them out in pairs.
Aperture a,nd Speed'
The aperture number or / stop controls the qmount oJlight allowed to enter through the lens. These numbers runin a series : 2-2.8-4-5.6-8-11-16-22. Each higher stopnumber lets through half the light of the next lower number(next larger stop).-
The sFutter ipeed controls the length of time for whichthe lens is kept open to light. Shutter speed figures representfract ions of a second:2: $ second,4: f second500 : 1/500 second.
The actual exposure is a product of these two: "how
31
much" and "how long". A large amount of light strikingthe film for a short time may produce an image similar tolhat produced by a small amount of light striking the filmfor a long time. Hence the free choice from a-series ofbalanced aperture-shutter combinations offered by yourexposure meter: more or less open apertures paired withmore or less quick-shutter speeds, and more or l^ess stoppeddown apertures paired with more or less slow shutter speeds.
Cameras of recent vintage combine these pairs, made upof aperture stops and shutter speeds, into single figures whichare then called exposure values or light values. Once youset the exposure value suggested by the exposure meter boththe aperture and the shutter speed move up and down instep against each other, and so keep the resulting exposureright at every combination.
With el(posure meters built into the camera and coupledto cross-linked aperture-speed controls you set the iightexposure without looking up the number either on ihemeter or the camera. You set the exposure visually by fol-fowilg the swing of the needle in the meter and matbhingit with a pointer or a circle on the spot where the needlecomes to rest.
Certain shutters (e.g. Prontormat) are linked to the ex-posure meter in such a way that the meter automaticallyselects and sets a correct aperture-speed combination aninstant before release. In that case, no choice of alternativesettings is available; simpler operation is obtained at somesacrifice of versatility. This applies to Rollei-Magic I butnot the Model II.Choosing the Cornbination
But whether you work out the right exposure from anelaborate table or chart;
whether you are presented with a series of exposurevalues or pairs of aperture figures and shutter speeds;- whether you just set the exposure to the poinf shown by
the needle in your meter;you still have one decision to face: which aperture-shutter
combination to choose for any given shot. Paradoxically
32
fr
@@@
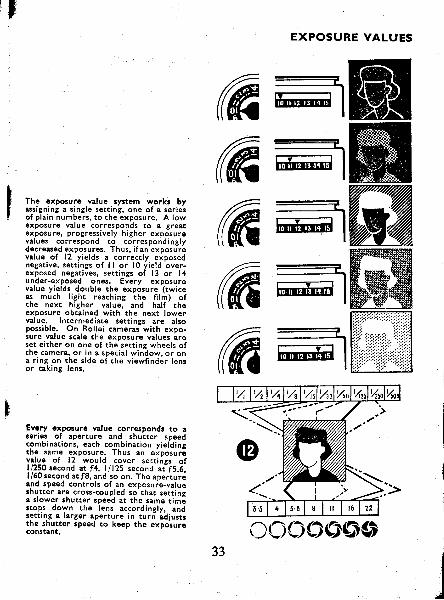
The exposurc value system works byassigning a s ingle set t ing, one of a ser iesof p la in numbers, to the exposure. A lowexposure value corresponds to a greatexposure, progress ive ly h igher exposurevalues correspond to correspondinglydecreased gxposures. Thus, i fan exposurevalue of 12 y ie lds a correct ly exposednegat ive, set t ings of | | or l0 y ie ld over-exposed negat ives, set t ings of l3 or 14under-exposed ones. Every exposurevalue y ie lds double the exposure ( twiceas much l ight reaching the f i lm) oft h e n e x t h i g h e r v a l u e , a n d h a l f ' t h eexposure obta ined wi th the next lowervalue. In termediate set t ings are a lsopossib le. On Rol le i cameras wi th expo-sure value scale the exDosure values areset e i ther on one of the set t ing wheels ofthe camera, or in a specia l window. or ona r i n g o n t h e s i d e o f t h e v i e w f i n d e r l e n sor tak ing lens.
@ffi1@ffil
EXPOSURE VALUES
WffiruffiW
--I
hilr*nrilrl I' l
--F----rI
!il@ |I
----t
ff iff i1
Evcry cxposurc value corresponds to aser ies of_ aper ture and shut ter speedcombinat ions, each combinat ion y ie ld ingthe same exposure. Thus an exposurevalue of l2 would cover set t ings off /250 second at f4 , l l l25 second a i f5 .6,l /60 second at f8 , and so on. The aperrureand speed contro ls of an exposuie-valueshut ter are cross-coupled so ' that set t insa s lower shut ter speed at the same t im6stops down the lens accord ingly , andset t ing a larger aperrure in turn Ldiuststhe shut ter speed to keep the expoiureconstanc.
7*'Iz
33oooo6rS(
enough, they all are right yet one is better than the other.Why should it be so ?Because both the aperture and the shutter also have
secondary functions and effects.The aperture not only controls the amount of light that
is allowed to pass the lens-it also has a bearing on howmuch of the image will be sharp.
The shutter, in controlling the length of time for whichthe light strikes the film, will inevitably record any move-ment that happened during that time as a slight or greaterblur.
So you are left with three things to think of:How fast is the action you want to catch?How much of the scene in front of the lens has to be
toilni. light good enough to go by either?
If there is fast action you have to choose and pre-set anappropriately fast shutter speed (p. 39) and then pair it withthe stop you get by the cross-coupled controls or from yourmeter.
If the scene is to be sharp from a point close to the lensto some other point well away from it, you should choosethe stop that will yield the necessary depth of field (p. 40)and then pair it with the shutter speed necessary for thecorrect exposure.
If the light is very poor, the chances are that you may notbe able to cope with either extremely fast or particularlydeep subjects.
Yet your choice in putting shutter speed or depth of fieldfirst should still be governed by what you value most aboutthe picture you propose to take.
Exposure nowadays is no problem at all. You can arriveat the right exposure by guessing it, measuring it, or justleaving it to the camera. But to hit it off in such a way thatit will produce the picturc you want is still a matter ofintelligent judgment. Only the fully automatic shutterrelieves you even of this decision (with some sacrifice ofversatility).
34
#Tirne Exposures :
When the light is very weak, especially when you have touse a small stop, even the slowest shutter speed may be tooshort. In that case, you need time exposurei. Set the shutterto B and press the release button. The shutter now remainsopen for any length of time until you let go of the releasebutton.
For such time exposures, the camera must be mountedon a firm support such as a tripod.
It is safest to release the shutter with the help of a cablerelease to avoid shaking the camera. This release screws intothe release button.
For long time exposures, where the shutter is to remainopen for longer than you can conveniently keep the releasedepressed, use a cable release with a lock. To make theexp_osure set_the shutter to B, press the cable release plungerwith the locking plate lifted. The shutter will nowlemainopen until the locking plate is depressed. On cable releaseswith locking screws, tighten the screw on pressing theplunger and undo the screw ro close the shuttei.
The Self.tirnerThe Rolleiflex carries a delayed-action release or self-
timer. This is controlled by the same lever as the flashsynchronization. When you press the release button withthe self-timer in operation, the shutter only goes off after adelay of 8-10 seconds and you have time to take your placein your own picture. The camera must, of course, bemounted on a tripod.
using an Exposure MeterTo get the best results an exposure meter has to be used
intelligently. This may look like a contradiction, since wehave already s_qid that it is an accurate light-measuring in-strument. But light from all parts of the subject-highlights,shadows and middle tones-falls on the rneter, so the readingit gives us is an average one for the whole subject area.
35
Meters are scaled to suit typically average subjects-i.e.,subjects with average areas of light, dark an_d middle tones.So lf you point the meter at a subject of this kind, theexposure reading will be correct.
But if the subject is not average-if there are large high-light areas and little shadow, or large shadow areas withfew highlights-then you have to modify the exposurereading to obtain the best results.
So there is more to using a meter than just pointing it atthe subject and accepting without question the readingindicated.
The usual method of using a meter is to point it directlyat the subject. This gives the correct exposure reading pro-vided the subject has an average mixture of highlights,shadows and middle tones. But if there is a large bright area,or a large dark area, the best method is to go near to themain subject and take a close-up reading. For example, ifthe subjeit is a figure against a white or dark background,by going closer you will reduce the amount of backgrouldaffecting the meter and therefore get a reading in terms of amore average subject, which is what you want.
For some subj-ects you can take a reading from reallyclose up, aiming the meter at the part of the subjectlhat youwant tb make sure has optimum exposure. For instance,many photographers take a close-up reading_ of the sitter'sface in portr-aiture; out of doors you can take the readingfrom the back of your hand instead of going up to thesubject.
If you cannot go close up to a subject that needs a close-upreading, then try to find something near at hand that issimilai in tone to the subject and take a reading from this.
When taking readings of general scenes including a gooddeal of sky, you have to tilt the meter down slightly toreduce thg area of sky "seen" by the meter. The sky is abright highlight, and by tipping the meter down to excludesome of it, the subject becomes "average" in tone range.
Open views, such as distant landscapes, usually have verylighf shadows, so you can give a shorter exposure than the
36

EXPOSURE METER MEASUREMENT
For normal readings point the camerawi th the oxposure meter at the subjectby observ ing rhe la t ter on the screen.With outdoor scenes point the camerasl igh. t ly downwards to exc lude excessive lybr ight sky areas.
For more accurate readings, especially off igu. res againsr a very l igh l or very d 'arkb.ackground, go c lose to the subiecr sothat the meter takes in just the iub iecttself.
Wi th very conrrast ing subiects wi th un-predic table propor t ions of very br ightand very dark areas, take seDaratec lose-up. readings of the l ight and darkparts. The correct exposure is a mean ofthe two.
For incident-light readings-especiatlywi th co lour f i lm-point the-cameia wi ththe meter f rom the subject towardsthe camera posi t ion to be used for theex-posure. For th is reading f i r rh€di f fus ing screen suppl ied wi t t r rhecamera over the exposure meter ce l l .Wi th a separate exposure merer there isof course no need to carry the cameraaround for such inc ident- l ight readings.
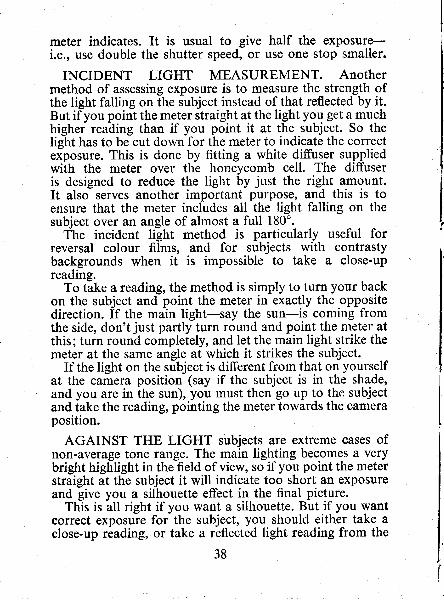
meter indicates. It is usual to give half the exposure-i.e., use double the shutter speed, or use one stop smaller.
INCIDENT LIGHT MEASUREMENT. Anothermethod of assessing exposure is to measure the strength ofthe light falling on the subject instead of that reflected by it.But if you point the meter straight at the light you getamuchhigher reading than if you point it at the subject. So thelight has to be cut down for the meter to indicate the correcteiposure. This is done by fitting a white diffuser suppliedwith the meter over the honeycomb cell. The diffuseris designed to reduce the light by just the right amount.It also serves another important purpose, and this is toensure that the meter includes all the light falling on thesubject over an angle of almost a full 180'.
The incident light method is particularly useful forreversal colour films, and for subjects with contrastybackgrounds when it is impossible to take a close-upreading.
To take a reading, the method is simply to turn your backon the subject and point the meter in exactly the oppositedirection. If the main light-say the sun-is coming fromthe side, don't just partly turn round and point the meter atthis; turn round completely, and let the main light strike themeter at the same angle at which it strikes the subject.
If the light on the subject is different from that on yourselfat the camera position (say if the subject is in the shade,and you are in the sun), you must then go up to the subjectand take the reading, pointing the meter towards the cameraposition.
AGAINST THE LIGHT subjects are extreme cases ofnon-average tone range. The main lighting becomes a verybright highlight in the field of view, so if you point the meterstraight at the subject it will indicate too short an exposureand give you a silhouette effect in the final picture.
This is all right if you want a silhouette. But if you wantcorrect exposuie for the subject, you should either take aclose-up reading, or take a reflected light reading from the
3 8
camera position and give four to eight times the exposureindicated.
COLOUR FILMS have little exposure latitude, so parti-cularly careful reading is advisable. The meter is used in thesame way as for black-and-white films.
Because of the importance of the highlights, if you areusing a meter from the camera position for an against-the-light shot, it is best only to double the reading, and notmultiply it four to eight times as recommended for black-and-white negative films.
Shutter Speeds ond fuIoaernentThe actual shutter speed you need within a series of
available aperture combinations is governed by con-siderations of camera steadiness as well as of subjectmovement.
An unsteady camera hold results in camera shake. Eventhe slightest shake will result in inferior definition of thenegative. Practical experience goes to show that llt25 sec.is safe, while you have to hold the camera particularlysteady when using 1/60 or 1/30 sec. Where lighting conditionsmake even longer exposure times essential and there is nosubject movement, either support the camera on a tripodor look round for extra support for your elbows and hands-e.9. a wall, r'ailing, etc.
The shutter speed required to arrest movement dependsof course primarily on the speed with which the subjectmoves. Remember, however, that parts of the subject (e.g.the legs of a runner) may move faster than the subject as awhole; you may sometimes have to compromise and showsuch parts slightly unsharp. Often that is not a serious fault,as slight blurring-provided the main part of the subject issharp-helps to emphasize the impression of movement.
Other factors to consider are the distance of the subject-the farther away, the less noticeable the movement blur; thefocal length of the lens-a long-focus lens in effect bringsthe subject nearer; and the direction of the movement.Objects noving across your field of view blur more than if
39
they are approaching or receding.1.n. moit conveniJnt way of allowing for all these factors
is with the aid of a simple table (p. 66).
Aperture a,nd, Depth of Field''When you focus the camera on a given qbjeqt-, the image
of that 6U5ect will be really sharp on the film. Thingsnearer or farther away will be gradually less and -less sharp,until they are noticeably blurred. The range oJ distancesover whi6h objects are sfill acceptably sharp, before y9P 99notice the losi of definition, is known as the depth of field.
You can control the extent of this sharp zone by the lensaperture. As you stop down the lens, the z9n2 of sharpnessgiows in boti directibns; as you open up the lens, its depthdecreases.
You can obtain the actual zone of sharpness at variousapertures and distances from depth tables, Frtll practicetfre most convenient way is to use the depth of field indi-cator. This exists in two types. On some Rolleiflex modelsit is a special scale of ap6iture numbers marked oppositethe distince scale. Theie are two sets of such numbersfrom the largest stop (f2.8) to the smallest (f2?) on eachside of the
-focusing index (the mark that indicates the
distance to which you have set the len-s).At any distance ietting, the distancg figqrglopposite each
pair of aperture numberi on the d:pth of field scale give theirear and far limits of sharpness. For example, at 10 ft. y9umay find the two stop values 5.6 on the-scale (f 5-6) oppositeabout 8 and 11 ft.-so you have a sharp zone from 8 to11 ft. At f 2.8, the distances opposite the stop values 2.8may be 9l and.10$ ft. respectively; at /11 you might get asharp zone from 7 ft. to 15 ft.
Y6u will also notice that the depth of field is greater atfar distances than at near ones. At 5 ft. and f 5.6 the sharpzone only covers from about 4! to 5$ f1. - less than 1+ ft.altogether-against nearly 3 ft. at the 10 ft- setting
Oiher RollJiflex models have an automatic depth of fieldindicator consisting simply of an extending white strip.
40


