The Raw processing, and color management pipeline in ...
17
The Raw processing, and Color Management pipeline in Photoshop Lightroom and Camera Raw. ! Andrew Rodney ! The Digital Dog ! www.digitaldog.net ! [email protected] Use the email address above if you need a PDF copy of this presentation. ©2007 Andrew Rodney 1
Transcript of The Raw processing, and color management pipeline in ...

The Raw processing, and Color Management pipeline in Photoshop
Lightroom and Camera Raw.
! Andrew Rodney
! The Digital Dog
! www.digitaldog.net
Use the email address above if you need a PDF copy of this presentation.
©2007 Andrew Rodney
1
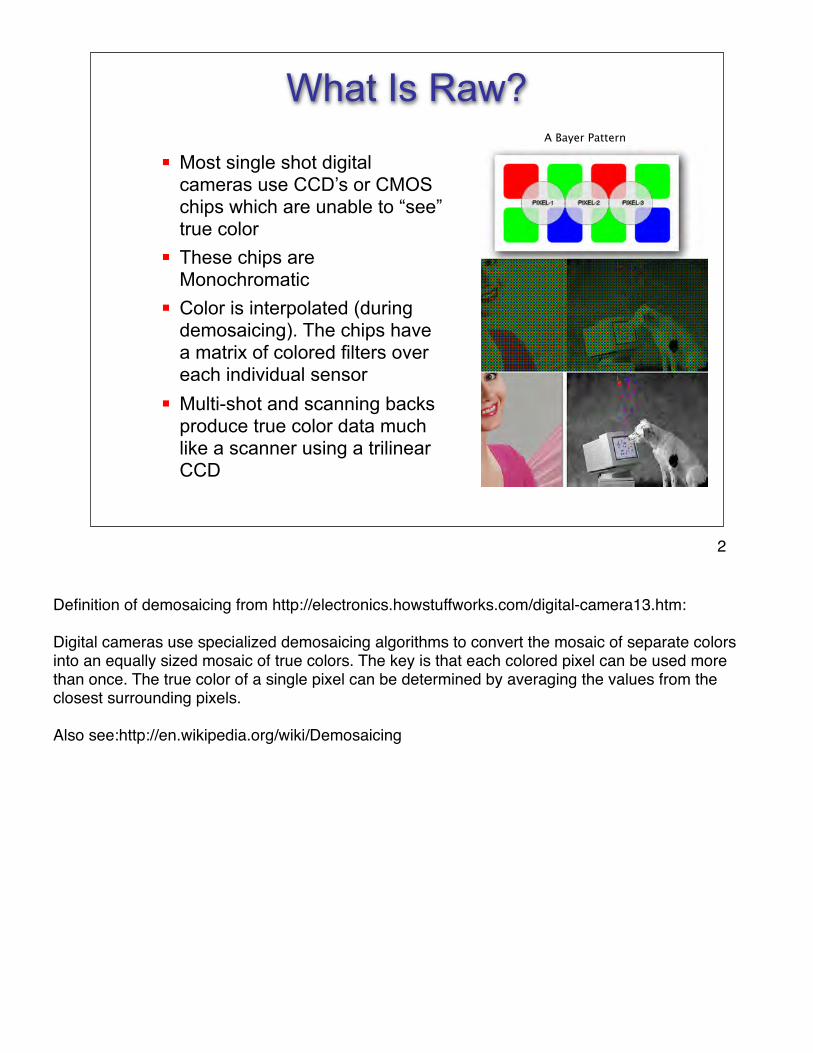
What Is Raw?
! Most single shot digital cameras use CCD’s or CMOS chips which are unable to “see” true color
! These chips are Monochromatic
! Color is interpolated (during demosaicing). The chips have a matrix of colored filters over each individual sensor
! Multi-shot and scanning backs produce true color data much like a scanner using a trilinear CCD
A Bayer Pattern
Definition of demosaicing from http://electronics.howstuffworks.com/digital-camera13.htm:
Digital cameras use specialized demosaicing algorithms to convert the mosaic of separate colors into an equally sized mosaic of true colors. The key is that each colored pixel can be used more than once. The true color of a single pixel can be determined by averaging the values from the closest surrounding pixels.
Also see:http://en.wikipedia.org/wiki/Demosaicing
2

What Is Raw?
! This Grayscale data is known as RAW data; it is the full sensor dump
! How RAW data is interpolated into full color plays a huge role in the color appearance and quality of the image
! Most cameras that allow RAW capture also allow direct conversion (rendering/encoding) into sRGB or Adobe RGB (1998) with some tweaks to the rendering (matrix settings) much like using different film emulsions
! Some cameras can produce RAW+JPEG where JPEG can be encoded into a preset color space
When you set your digital camera controls to capture an image (which is initially a RAW data file), yet request a color space (let!s use sRGB in this example), there are two fundamental parts to this process: rendering the data and then encoding the data. In creating an output-referred image, the camera or computer system has to perform the color rendering processing before it can encode the result of the processing into sRGB.
Therefore, first the data is rendered, based upon how a camera manufacturer feels they will produce the most pleasing image appearance for their customers. This rending varies from different camera manufacturer and perhaps even different models of camera from the same manufacturer; the rendering is not standardized. The rendering is that which the manufacturer feels produces visually pleasing color, not generally the colorimetrically correct color. This isn!t necessarily a problem; different film stocks have traditionally produced different color bias from the same scene and selected by the photographer based on their preferences. Many are under the mistaken impression that two sRGB encodings of the same scene from different camera brands should match, but that is rarely the case. No more than two perceptual rendering intents from two different ICC profiles created by two different profile packages will match identically. However the degree of mismatch in this case is usually more pronounced than printing because the range of the scene is so much greater.
The second process after rendering the data is the actual data encoding, which is standardized and unambiguous; the rendered data is encoded into sRGB in this example. Two identical renderings of the same scene will produce identical encodings in sRGB. This is how camera settings DO affect JPEG. They affect the rendering of the data.
3

! RAW is like working with a color negative. Processed color (in-camera rendering) is like working with a transparency. Processed color is less flexible; you get what you get!
! RAW files can have up to 1 stop more dynamic range
! As RAW processors improve, so does the final color files reprocessed from the original RAW data
! RAW provides flexibility. Only ISO (and of course exposure) affect the RAW data
! RAW provides the widest color gamut and data possible in high bit (more than 8-bits) per color channel
! Global Proxy-like editing can be done very quickly on multiple images. Original data is always untouched
Why Raw Data?
*Due to control over rendering, not due to the RAW data itself
*
4

! Raw data is linear so there are advantages to editing at this stage. Half of the data is in the lightest 1st stop!
! Whenever possible, “expose to the right” of the middle of a histogram without blowing out highlights
About Raw Data?
6 stops of dynamic range in a 12-bit file. The lightest stop has 2048 bits of data, the last only 64 bits!
Example above has 6 stops of range. The first stop of highlight data has 2048 levels where as the last stop only has 64 levels. If you expose too far to the left, you record even less data and produce more noise there. Expose for the highlights, “develop” for the shadows.
Example of Linear encoded data (humans, and film are not linear): Walk into a pitch black room and turn on a light bulb and observe the luminance you see in this room. Now turn on a second identical light bulb, what happens? You've doubled the light, but it doesn't LOOK that way. It looks lighter but not twice as bright. It looks substantially less bright even though twice the as much light is illuminating the scene. This illustrates how how human perception doesn!t react to a linear amount of light like a digital camera sensor does.
Raw conversion must remap the linear encoded capture into a non linear encoded space that more closely resembles how we see; tone mapping from a 1.0 gamma linear capture to (typically) a 1.8 or 2.2 gamma encoding.
Linear data from RAW provides different useful editing options not available after conversion to Gamma correct spaces! Edits can be applied linearly unlike a gamma corrected image which is applied non nonlinearly (over a curve)
5

“Expose to the Right*” isn’t about over-exposure
! Expose to the right is about proper exposure to place the most data over the entire range of the image
! Necessary to define your cameras actual ISO
! Keep in mind that current light meter technology is based on film, not digital capture!
! Use exposure compensation to affect proper ISO and highlight exposure values for digital
* http://www.luminous-landscape.com/tutorials/expose-right.shtml
Note that the on camera histogram is based on the JPEG conversion produced in-camera and is not at all useful for evaluating the exposure of the RAW linear data.
See: http://www.luminous-landscape.com/tutorials/expose-right.shtml
6

A few words about rendering
! You say you want “Accurate Color” but what does that mean?
! Scene referred is the measured color (colorimetry) of a the scene you are photographing
! Scene referred rendering is not pleasing when viewed (due to dynamic range, gamut etc)
! Output referred is the rendering of scene rendered to a device such as a display or other output device
! When you photograph the scene, you are not reproducing it as it is (colorimetry) but as you wish it to appear on some output device!
! Rendering is therefore very subjective. Rendering isn’t color correction, its color (and tone) creation. Get it right here!
Scene colorimetry is related to a term called Input or Scene-Referred. Since we need to view this image on something like a display or a print which has a far more limited range than the scene, it!s necessary to make the image appear more pleasing on the output device and to produce the desired color appearance the image creator wishes to express and reproduce. This is known as Output-Referred. The need to fit the color gamut and dynamic range of the scene-referred data to output referred data is called rendering. The camera usually performs this rendering when you select a color matrix setting such as sRGB or Adobe RGB (1998). If the camera is set to capture just RAW data, the rendering becomes the job of the image creator; you the photographer. When you produce an sRGB image file you aren't producing a colorimetric copy of the scene you took the picture of, you are producing an image as it would look rendered to an sRGB display or correctly previewed in an ICC aware application like Photoshop. What is being seen, and ultimately output, isn!t a colorimetric representation of the actual scene (scene-referred). This is one reason why producing “accurate” color from a digital camera can be difficult.
See: www.color.org/ICC_white_paper_20_Digital_photography_color_management_basics.pdf
7

Scene referred vs. Output referred
The data is rendered, based upon how a camera manufacturer feels they will produce the most pleasing image appearance for their customers. As such, this rending varies from different camera manufacturer and perhaps even different models of camera from the same manufacturer; the rendering is not standardized. Think of this rendering process as a perceptual rendering of sorts; the rendering is that which the manufacturer feels produces visually pleasing color, not generally the colorimetrically correct color. This isn’t necessarily a problem; different film stocks have traditionally produced different color bias from the same scene and selected by the photographer based on their preferences.
8

Adobe RAW processing
! Work top down, left to right with the rendering toolset.
! White Balance first if exposures are good. A Macbeth color checker shot at the beginning of each session is useful. Use the 2nd White square (not Gray) to balance
! Consider saving custom rendering settings for groups of similar images and making custom calibration presets using the Bruce Fraser technique with Macbeth color checker*:
* http://www.creativepro.com/story/feature/21351.html
EXIF data from RAW *may* provide White Balance data for CR but may look poor thus the white balance tool in CR is useful. Use on WHITE, not gray. Useful to SAVE CR White Balance ONLY in saved setting (do this under multiple lighting conditions, save and load as base setting). Make family of saved WB settings! Name camera and type of lighting/custom balance. Use HSB readout in Photoshop to enter into CR calibration tab.
See: http://www.creativepro.com/story/feature/21351.html
9

Camera Raw & Lightroom Color processing
! Uses two camera “profiles” D65 and Illuminate A (2856K) and can interpolate between the two using sliders
! Great deal of control over color appearance (just like Photoshop). Do all the heavy global lifting here, not later in Photoshop! 85-90% of color & tone can be optimized here
! Can produce color managed data (support for four working spaces in CR, three in LR)
! No need for custom profiles (however profiles can be made on top of ACR but why?)
! Color appearance and numbers match*, results are WYSIWYG (*in Camera Raw. LR uses percentages and “Melissa RGB”)
CR is fully color managed because the numbers and previews match what you get in Photoshop.
The 4 RGB working spaces supported are sRGB, ColorMatch RGB, Adobe RGB (1998), and ProPhoto RGB.
In Lightroom, the color space encoding options are sRGB, Adobe RGB (1998) and ProPhoto RGB. Numeric scales is zero to 100% using Melissa RGB which Is ProPhoto RGB using an sRGB tone response curve instead of a 1.8 gamma encoding.
10

Urban Legends: sRGB
At this point, we should put to bed the tired myth that
digital cameras capture sRGB: the truth is, we’ve never
seen a camera that was limited to capturing a gamut as
small as sRGB!
Very often, camera sensors capture saturated colors that
fall outside the gamut of even Adobe RGB.
For some images, if the goal is to maintain the maximum
gamut, the only RGB color space that can do so may be
ProPhoto RGB.
11

Which RGB Working (editing) Spaces?
Ideally the working space can contain all captured
colors and colors you wish to output. The “big 3” are:
sRGB: Smallest Gamut. Good for the web. Gamut of most displays.
Adobe RGB (1998): Useful gamut for many output needs but larger than the gamut of most displays.
ProPhoto RGB: Excellent in RAW workflow's. Not appropriate for 8-bit editing. Many possible colors outside display gamut!
While two of these working spaces can contain colors
you cannot see on your display, you will be working
with devices that can reproduce these colors.
ProPhoto RGB is supported in Adobe Camera RAW and I!ve been using more and more as often I find I have images that exceed the gamut of Adobe RGB (1998). I encode the data into ProPhoto RGB in 16-bit.
12

Lightroom RAW Processing
Select the encoding
Color space here. You
can select based on
the final output needs.
Use sRGB for web
export. For best quality
output, use ProPhoto
RGB in 16-bit!
Create as many
presets as
necessary
13

Just as you
did with the
export
presets,
select the
encoding
color space
for editing in
Photoshop
Lightroom RAW Processing
14

Lightroom RAW Processing
Beware of using Draft Printing expect for ‘quick and
dirty’ output like proof sheets. You may find color
inconsistencies. Draft mode uses the current
embedded preview, not necessarily the rendering you
select unless you build a high quality preview (1:1).
Preview Quality set to High
produces ProPhoto RGB as
are all 1:1 previews. Standard
Previews are in Adobe RGB
(1998). Original previews are
assumed to be in sRGB.
15

Adobe CR ProcessingSelect the encoding Color space here. You can select based
on the final output needs. Use sRGB for web export. For best
quality output, use ProPhoto RGB in 16-bit!
Unlike Lightroom, the RGB values and Histogram are based
on the current encoding color space (sRGB below)
In Lightroom, the RGB values and Histogram are based on
Melissa RGB (ProPhoto RGB, sRGB 2.2 tone curve). The values
are in percentages, not RGB numbers like CR
16
Question & Answers
Thank you for coming. If you were provided with evaluation forms, please fill them out.
Web sites you might want to investigate:
Holm and Rodney: http://www.color.org/documents/
ICC_white_paper_20_Digital_photography_color_management_basics.pdf
Reichmann’s “Expose to the Right”: http://www.luminous-landscape.com/tutorials/expose-
right.shtml
Bruce Fraser’s “Calibrating Camera RAW in Photoshop CS”: http://www.creativepro.com/story/
feature/21351.html
Allen Pacheco’s modification of the Fraser Camera RAW calibration technique:http://
home.comcast.net/~ajpacheco/CRCalibration.zip
Bruce Lindbloom’s synthetic Color checker: http://www.brucelindbloom.com/
17