The Guardian - Abbott
198
User’s Guide CAUTION: Federal law restricts this device to sale by or on the order of a physician.
Transcript of The Guardian - Abbott

8/13/2019 The Guardian - Abbott
http://slidepdf.com/reader/full/the-guardian-abbott 1/198
User’s Guide
CAUTION: Federal law restricts this device to sale by or on the order of a physician.

8/13/2019 The Guardian - Abbott
http://slidepdf.com/reader/full/the-guardian-abbott 2/198

8/13/2019 The Guardian - Abbott
http://slidepdf.com/reader/full/the-guardian-abbott 3/198

8/13/2019 The Guardian - Abbott
http://slidepdf.com/reader/full/the-guardian-abbott 4/198
I n t e n d e d U
s e

8/13/2019 The Guardian - Abbott
http://slidepdf.com/reader/full/the-guardian-abbott 5/198
Indications for UseTe FreeStyle Navigator® Continuous Glucose Monitoring System is indicated or continually
recording interstitial fluid glucose levels in people (ages 18 and older) with diabetes mellitusor the purpose o improving diabetes management. Readings and alarms about glucose
levels rom FreeStyle Navigator® Continuous Glucose Monitoring System are not intended
to replace traditional blood glucose monitoring. Beore adjusting therapy or diabetes
management based on the results and alarms rom the FreeStyle Navigator® Continuous
Glucose Monitoring System, traditional blood glucose tests must be perormed. Te FreeStyle
Navigator® Continuous Glucose Monitoring System provides a built-in blood glucose meter to
confirm the continuous glucose result.
Te FreeStyle Navigator® Continuous Glucose Monitoring System provides real-time readings,
graphs, trends, and glucose alarms directly to the user. Te FreeStyle Navigator® Continuous
Glucose Monitoring System is intended to be used in home settings to aid people with
diabetes in predicting and detecting episodes o hypoglycemia and hyperglycemia and in
clinical settings to aid health care proessionals in evaluating glucose control. Te FreeStyle
Navigator® Continuous Glucose Monitoring System is available only by prescription.
ContraindicationsTe FreeStyle Navigator® Continuous Glucose Monitoring System must be removed prior to
Magnetic Resonance Imaging (MRI).

8/13/2019 The Guardian - Abbott
http://slidepdf.com/reader/full/the-guardian-abbott 6/198

8/13/2019 The Guardian - Abbott
http://slidepdf.com/reader/full/the-guardian-abbott 7/198
How to Use this Guide?
Tis guide has many Sections arranged in a logical sequence that will be useul
or the first time use and every use thereafer. Clearly labeled tabs separate and
divide these Sections or ease o use. Most Sections begin with a purpose or that
Section, when to perorm the steps in that Section, materials required to perorm the
steps in that Section and important cautions, warnings and helpul inormation. Te
first page o each Section will be very useul when you are getting amiliar with the
system. Once you are amiliar with the system and the typical precautions, you may
find yoursel relying less on the first page o the individual Sections.
Te remainder o each Section describes the steps to perorm the tasks. Te
steps are organized in a simple manner to allow you to see what to do based on
what you experience and based on where you are in that particular Section. It is
important that you go through the steps in the order that they have been presented.
Every Section also indicates i you have reached the end o the Section. I you find
it difficult to use the guide or i you seem lost or conused, use the table o contents,
index, glossary and appendices to help you. Te table o contents provides a list o
Sections you will find in this guide and what each Section contains. Te appendices
have useul inormation that you may want to reer to. Te glossary provides a list o
terms and what they mean. Te index is a tool you could use to quickly find terms
and items that you are looking or.
Do not re-use emperature limitation
Rx only. For use byprescription only
Manuactured by
Sterile Consult operating instructions
Use by Batch code
Serial number Catalog number
FreeStyle®, FreeStyle Navigator®, are registered trademarks o Abbott Diabetes Care Inc.•
OpSite®, IV 3000, Uni-Solve® Adhesive Remover Wipe are trademarks o Smith and Nephew Inc.•Bluetooth® wireless technology is a trademark o the Bluetooth SIG Inc.•YSI 2300 SA Plus™ Glucose Analyzer is a trademark o Yellow Springs Instrument Inc.•Energizer® Max®, Energizer® e2® itanium®, and Energizer® Industrial Batteries are trademarks o•
the Eveready Battery Company Inc.

8/13/2019 The Guardian - Abbott
http://slidepdf.com/reader/full/the-guardian-abbott 8/198
Table of Contents
n Section 1: Getting Acquainted. . . . . . . . . . . . . . . . . . . . . . . . . . . . . . . . . . . . . . . . . . . . . . . . . . . . 1 – 12 Parts o the System. Daily Activities and raveling.
Preparing the System or the First ime. Warnings, Cautions and Important Notes. Hypoglycemia Unawareness. Modes o Operation (Continuous Monitoring Mode (CM) and Blood Glucose Mode (BG)). n Section 2: Install or Replace Transmitter and Receiver Batteries . . . . . . . . . . . . . . . . . . . . . 13 – 16 Installing the Batteries in Your System. Battery ypes or the ransmitter and the Receiver. When to Change the Batteries?
n Section 3: Set the Time and Date . . . . . . . . . . . . . . . . . . . . . . . . . . . . . . . . . . . . . . . . . . . . . . . . 17 – 19 Set the ime and Date.
n Section 4: Perorm a Control Solution Test. . . . . . . . . . . . . . . . . . . . . . . . . . . . . . . . . . . . . . . . 21 – 25 When to Perorm a Control Solution est? How to Perorm Control Solution est?
n Section 5: Insert or Remove Your Sensor. . . . . . . . . . . . . . . . . . . . . . . . . . . . . . . . . . . . . . . . . . 27 – 35 Insert Your Sensor. Remove Your Sensor. Sensor Insertion Sites. Prepare the Insertion Site. How Long You Can Wear the Sensor? Reconnect the ransmitter and Receiver.
n Section 6: Attach your Transmitter. . . . . . . . . . . . . . . . . . . . . . . . . . . . . . . . . . . . . . . . . . . . . . . 37 – 40 Attach the ransmitter. Sensor Code.
n Section 7: Calibrate your System/Test Blood Glucose Manually . . . . . . . . . . . . . . . . . . . . . . 41 – 51 System Calibration. ime to Perorm Calibration. Sample Calibration Schedules. Perorm Blood Glucose ests. Interpret Your Blood Glucose est Results.
n Section 8: Set, Review, or Change the Alarm Settings . . . . . . . . . . . . . . . . . . . . . . . . . . . . . . . 53 – 64 About Glucose Alarms. Choose Alarms Settings: On/Off, ype (beep vs vibrate) and Glucose Alarm Treshold. Set the Low and High Glucose Alarms. Set Projected (Early Warning) Alarms. What is Alarm Sensitivity? Set Data Loss Alarms, System Alarms, and Progress ones. Mute Alarms.
n Section 9: Daily Use. . . . . . . . . . . . . . . . . . . . . . . . . . . . . . . . . . . . . . . . . . . . . . . . . . . . . . . . . . . . 65 – 69
Maintain Connection Between the ransmitter and Receiver. Interpret the Glucose Results in the Continuous Monitoring Mode.
S b l A d I

8/13/2019 The Guardian - Abbott
http://slidepdf.com/reader/full/the-guardian-abbott 9/198
n Section 10: Respond to Alarms, Errors, and other Problems . . . . . . . . . . . . . . . . . . . . . . . . . . 71 – 90 Alarm Messages: What are they, What do they mean, and What you should do.
Error Codes: What are they, What do they mean, and What you should do. Other Problems: How to troubleshoot the problems you may encounter.
n Section 11: Add Events . . . . . . . . . . . . . . . . . . . . . . . . . . . . . . . . . . . . . . . . . . . . . . . . . . . . . . . . . . 91 – 94 Enter Events: Insulin, Meals, Exercise, and State o Health. Customize Generic Events.
n Section 12: Review Reports and Edit Events . . . . . . . . . . . . . . . . . . . . . . . . . . . . . . . . . . . . . . . 95 – 102 Enter Glucose argets. View Line Graph. View Statistics. Review the History o Events. Edit Events.
n Section 13: Clean Your System . . . . . . . . . . . . . . . . . . . . . . . . . . . . . . . . . . . . . . . . . . . . . . . . . 103 – 104 Clean Your ransmitter. Clean Your Receiver.
n Section 14: Link and Unlink your Transmitter and Receiver . . . . . . . . . . . . . . . . . . . . . . . . 105 – 107 Link and Unlink your System. What is the Difference Between Linking and Reconnecting?
n Section 15: Reset User Settings . . . . . . . . . . . . . . . . . . . . . . . . . . . . . . . . . . . . . . . . . . . . . . . . . 109 – 110 Reset Settings.
n Section 16: Change Country Settings. . . . . . . . . . . . . . . . . . . . . . . . . . . . . . . . . . . . . . . . . . . . 111 – 114
Change Language, Date and ime Formats, Decimal Point ormat.
n Section 17: Appendix A: Site Maintenance . . . . . . . . . . . . . . . . . . . . . . . . . . . . . . . . . . . . . . . . . . . . 115 How to Maintain the Sensor Insertion Site? How to Improve Sensor Adhesion?
n Section 18: Appendix B: Specifications . . . . . . . . . . . . . . . . . . . . . . . . . . . . . . . . . . . . . . . . . . 117 - 127 System Perormance Specifications.
n Section 19: Appendix C: FCC Compliance Inormation . . . . . . . . . . . . . . . . . . . . . . . . . . . . 129 - 135 Wireless Intererence.
n Section 20: Glossary . . . . . . . . . . . . . . . . . . . . . . . . . . . . . . . . . . . . . . . . . . . . . . . . . . . . . . . . . . 137 – 142 Definitions o erms Used in Tis Guide.
n Section 21: Index . . . . . . . . . . . . . . . . . . . . . . . . . . . . . . . . . . . . . . . . . . . . . . . . . . . . . . . . . . . . . 143 – 144 Find What You are Looking For.

8/13/2019 The Guardian - Abbott
http://slidepdf.com/reader/full/the-guardian-abbott 10/198

8/13/2019 The Guardian - Abbott
http://slidepdf.com/reader/full/the-guardian-abbott 11/198

8/13/2019 The Guardian - Abbott
http://slidepdf.com/reader/full/the-guardian-abbott 12/198
G e t t i n g A
c q u a i n t e d
Section 1 – Key Terms n Alarms
n Blood Glucose Mode
n Continuous Monitoring Mode
n Freestyle Navigator Continuous Glucose
Monitoring System
n Freestyle Test Strips
n in vitro
n Interstitial Fluid
n LEFT/RIGHT Option Buttons
n Receiver
n Receiver Display Screen
n Receiver Test Strip Port
n Reports
n Sensor
n Sensor Delivery Unit
n Sensor Inserter
n Sensor Insertion Button
n Sensor Locking Pin
n Sensor Release Tabs
n Sensor Support Mount
n Transmitter
n Transmitter Tabs
n UP/DOWN Arrow Buttons

8/13/2019 The Guardian - Abbott
http://slidepdf.com/reader/full/the-guardian-abbott 13/198
11 Getting Acquainted
Introduction
Important: Read all o the instructions in this User’s Guide beore using your FreeStyle Navigator®
Continuous Glucose Monitoring System. Adjustments to your treatment should be done under the
guidance o your healthcare team.
Your FreeStyle Navigator system continuously reads, displays, and records the glucose levels in the
fluids ound between the cells under your skin (interstitial fluids). It does this by using a small, thin,
plastic sensor inserted just under the skin.
Your FreeStyle Navigator system provides you with continuous glucose readings in real time. By
having access to more requent glucose measurements, you can monitor your glucose levels and gain
an understanding o patterns in your glucose levels. Tis will help you and your healthcare team seehow actors such as your diet, insulin, exercise, and diabetes medication affect your glucose levels,
and to adjust your treatment plan accordingly.
Your FreeStyle Navigator system has a number o helpul eatures.
Wireless communication between the transmitter and receiver.•
Disposable sensor that can be worn up to 5 days.•
Alarms to alert you to low or high glucose levels (hypoglycemia or hyperglycemia)• before
reaching those low and high glucose levels and when reaching those glucose levels.
Graphs and statistics that show your glucose in easy-to-understand ormats.•
Directional glucose trend arrows that show i your glucose values are rising or alling and•how ast.
Memory to hold up to 60 days worth o data.•
Wireless communication capabilities to a personal computer.•
Built-in FreeStyle® Blood Glucose Meter or perorming blood glucose measurements.•
Event entry capabilities (like meals, exercise, insulin and other).•
Backlit display.•
Important: Keep this User’s Guide or uture reerence. It will come in handy when you have to do
procedures that you do not do ofen enough to remember.
Section 1 1
Getting Acquainted

8/13/2019 The Guardian - Abbott
http://slidepdf.com/reader/full/the-guardian-abbott 14/198
How are the parts packaged?
Your FreeStyle Navigator system comes with two kits:
A System kit.•
A Sensor kit.•
In addition, FreeStyle Navigator system can transer data to a computer wirelessly using•Bluetooth® technology.
Important Notes:
Te F• reeStyle Navigator® Continuous Glucose Monitoring System is designed as a completesystem. Use only the FreeStyle Navigator Sensor, the FreeStyle Navigator ransmitter, the FreeStyleNavigator Receiver and FreeStyle est Strips.
Te system is intended or your personal use; do• NOT share your system with others.
The System Kit
1 FreeStyle Navigator Receiver •
2 AAA Alkaline Batteries (for the receiver)•
1 FreeStyle Navigator Transmitter •
1 Silver Oxide 357 HC Battery • (for the transmitter)
1 Belt Clip (for the receiver)•
1 FreeStyle Lancing Device•
1 Finger Cap (for the lancing device)•
1 User’s Guide•
1 Getting Started Guide•
1 Quick Reference Card •
1 Welcome Card •
6 Overbandages•
6 Alcohol Prep Pads•
6 IV wi • pes
30 Sterile Lancets•
1 Vial of FreeStyle Control Solution and Insert •
1 Vial of 50 FreeStyle Strips and Strip Insert •
1 Warranty Registration Card •
T he Sen sor K it
6 Sterile Sensor Deliver y Units ( each containing
•
a sensor ) and Product Insert
1 Silver O x ide 357 HC Re placement Batter y ( f or
•
the transmitter )
2 Section 1
Getting Acquainted

8/13/2019 The Guardian - Abbott
http://slidepdf.com/reader/full/the-guardian-abbott 15/198

8/13/2019 The Guardian - Abbott
http://slidepdf.com/reader/full/the-guardian-abbott 16/198
Your receiver comes with backlight capability to see the screen in dark environments. Te backlight
can be turned on by pressing and releasing the DOWN Arrow button and then pressing and releasing
the RIGH Option button.
For more details on the different symbols and icons on the screen, see Section 9 on “Daily Use”.
Key features of the System
Stats 21 day 08:30A
Highest CM: 298 mg/dL
Lowest CM: 61 mg/dL
Ave. CM: 160 mg/dL
Std. Dev: 20 mg/dLAbove Target: 19%
Next Back Statistics
Alarms
Select Event 08:30A
Insulin
Meals
Exercise
State of Health
Generic
Main Select Event Log
Line Graph
4 Section 1
Getting Acquainted

8/13/2019 The Guardian - Abbott
http://slidepdf.com/reader/full/the-guardian-abbott 17/198
Using your system
For Daily Activities
You will be wearing a sensor and a transmitter at all times while you are using the system. Keep the
ollowing in mind as you go about your normal routine.
Only wear the sensor and transmitter on a flat surace o either your abdomen or the back o your•
upper arm.
Sleeping• – Te sensor and transmitter should not interere with your normal sleeping patterns. As
you get ready to go to sleep, place the receiver within 10 eet to maintain the transmitter-to-receiver
connection.
Bathing • – Do NOT wear the receiver while bathing or showering. Do NOT allow the receiver to get
wet. However, you can wear the sensor and transmitter while bathing or showering.
Swimming• – You may swim while wearing the sensor and transmitter. Do NOT go deeper than 1 meter(approximately 3 eet).
Note: Te connection between the transmitter and receiver is NOT maintained when the transmitter is
underwater; thus, you will NOT receive continuous glucose readings. However, when you take the sensor
and transmitter out o the water, the continuous glucose readings will resume.
When raveling by Plane
Note: Do NOT perorm the upload data eature when you are on a commercial aircraf.
Follow the guidelines below when traveling. Always check with local authorities prior to departure as rulesand regulations may change without notice.
At the airport: Notiy the security personnel o the presence o the device when going through the security systems.
On the plane: Check with your airline beore departure whether the device will be permitted aboard the aircraf. Teairline companies set policy regarding the use o medical devices on board their flights.
I you want to disable the transmit unction o the transmitter, ollow these steps:
I you are currently wearing a sensor, remove the sensor.1.
Detach the transmitter rom the sensor support mount and remove the battery rom the transmitter.2.
Program into the receiver that you have ended a sensor session.3.
By removing the batteries rom the transmitter, you have broken the connection between the4.transmitter and receiver. You can set the data loss alarms and system alarms to a short vibration modein order to prevent the device rom sounding alarms. Once you put a new battery into the transmitter,make sure to set the alarms to the original setting.
Note: Insert a resh battery into the transmitter afer travel beore inserting a new sensor.
You can always use your receiver to check your blood glucose manually in the Blood Glucose mode.
Section 1 5
Getting Acquainted
8/13/2019 The Guardian - Abbott
http://slidepdf.com/reader/full/the-guardian-abbott 18/198
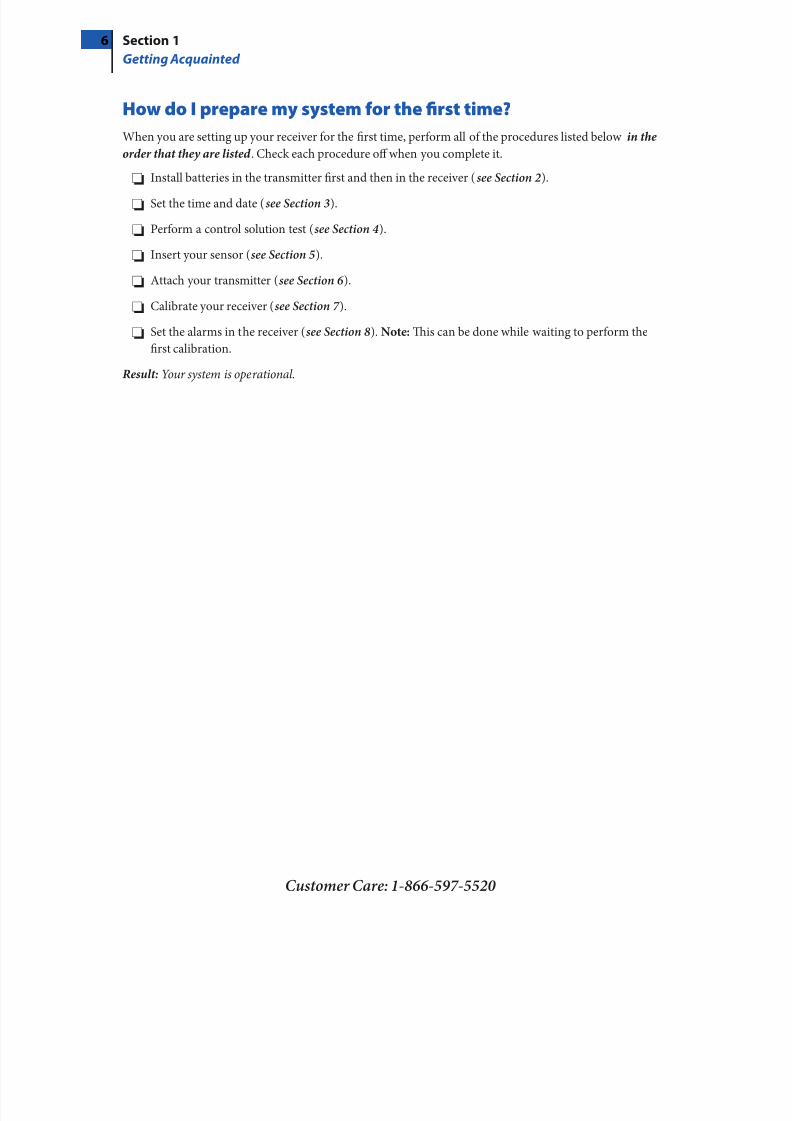
How do I prepare my system for the first time?
When you are setting up your receiver or the first time, perorm all o the procedures listed below in the
order that they are listed . Check each procedure off when you complete it.
o Install batteries in the transmitter first and then in the receiver (see Section 2).
o Set the time and date (see Section 3).
o Perorm a control solution test (see Section 4).
o Insert your sensor (see Section 5).
o Attach your transmitter (see Section 6 ).
o Calibrate your receiver (see Section 7 ).
o Set the alarms in the receiver (see Section 8). Note: Tis can be done while waiting to perorm thefirst calibration.
Result: Your system is operational.
6 Section 1
Getting Acquainted

8/13/2019 The Guardian - Abbott
http://slidepdf.com/reader/full/the-guardian-abbott 19/198
Warnings, Cautions And Important Notes
Important Notes About System Performance
Te following items describe situations that could lead to inaccurate or unreliable continuous glucoseresults.
Cautions:
Movement o the sensor support mount or excessive perspiration at the sensor insertion site due to•
activities like vigorous exercise or bumping against objects may lead to poor adhesion o the supportmount to the skin and cause the sensor to dislodge. I the sensor dislodges due to the sensor supportadhesive ailing to adhere to the skin, you may get unreliable results or no results. Te system may not
provide a warning in such circumstances. Choose the proper sensor insertion site when inserting thesensor and prepare the site by ollowing the instructions or site preparation.
I your results rom the Continuous Monitoring mode seem erroneous, check and make sure that the•sensor has not dislodged. I you notice the sensor is dislodged rom the skin, or i you see that the adhesiveon your overbandage or the sensor support mount is coming loose, discard the old sensor and insert anew sensor.
Te FreeStyle Navigator system includes built-in sel-checks to detect conditions that may cause•the sensor to not unction properly. On rare occasions the system may not be able to detect all suchconditions (or example i the adhesive peels up rom your skin), and you may get inaccurate results inthe Continuous Monitoring mode. I you believe your results are not reliable, or are inconsistent with how
you eel, perorm a Blood Glucose mode test to measure your glucose. I the problem continues, discardthe old sensor and insert a new sensor.
You should never reset your user settings when you are wearing a sensor. Tis will reset parameters that•
may affect your system perormance.
I you accept an incorrect transmitter ID, your glucose readings will be incorrect.•
Do• NO use the sensor delivery unit i the sterile package is open or damaged.
Important:
Once the code has been entered and you have hit the Set button, you will not be able to change the sensor•code number. I you have entered the code incorrectly, you will have to replace the sensor and enter theright sensor code. I you choose the wrong sensor code, you may get erroneous results rom the sensor. Tecode numbers MUS match to ensure accurate test results.
Do• NO remove or replace the transmitter rom the sensor support mount while wearing a sensor. I you
notice that the transmitter is not properly attached, replace the sensor with a new sensor and then re-attach the transmitter.
Important Things to Remember About System Calibration
Caution: Always calibrate the system using only a finger-stick blood sample. Do NO use alternate siteblood glucose measurements to calibrate the system. Te receiver contains a built-in FreeStyle® BloodGlucose Meter or perorming calibration tests.
Important: Your blood glucose level must be between 60 and 300 mg/dL (3.3 and 16.6 mmol/L) to be ableto perorm calibration tests. I your blood glucose level is changing rapidly, you may not be able to calibrate
the system. For example, during a meal or exercise, your glucose levels may vary rapidly. ry to time yoursensor insertion so that your calibration times do not coincide with your regular meal or exercise activities.
Section 1 7
Getting Acquainted

8/13/2019 The Guardian - Abbott
http://slidepdf.com/reader/full/the-guardian-abbott 20/198
Important Things to Remember About System Calibration (con’t)
Important: In clinical trials, we observed that the sensor signal sometimes temporarily decreases romthe true value. Tis typically happens at night during sleep, and recovers rapidly when the user moves
or is awakened. However, in order to avoid being affected by this phenomenon the system should not becalibrated when the wearer is asleep.
You may not be able to calibrate the system i your glucose levels are changing rapidly. (e.g. during or•afer exercise, meals or insulin dosing). Under such conditions, the system may not ask you to calibrate;instead, it will delay its request until conditions are acceptable.
You• MUST successully complete 4 calibration tests. You will calibrate at approximately 10, 12, 24 and72 hours afer sensor insertion. I you do not complete calibration tests successully in the allotted timeperiods, your glucose readings will NO be displayed and alarms will be inactive. Te system mayask you to perorm additional calibrations between 2nd and 3rd calibrations depending on the sensor
signal. In such cases, you will be prompted with a message to do additional BG tests.Te receiver will beep (or vibrate) to prompt you to do a calibration. Te receiver will display a blood•drop icon and the message “Do BG est.” Te system will prompt you with alarm messages whenyour calibrations are unsuccessul.
You will not have continuous monitoring until you have successully completed the first calibration (at•least or the first ten hours afer sensor insertion).
I you get a request or a calibration or expect additional calibration requests during a time when you•do not want to be disturbed (e.g. sleep time), you can choose to wait to perorm additional BG testsat a later point in time. I you choose to wait and the allotted time window or calibration has expired,please note that you will not get glucose results until you have perormed a successul calibration.
You can turn off the System Alarms (or set to vibrate) i you do not want to be disturbed by requentrequests or calibration. In order to silence the alarms that warn you when the allotted time window ora calibration has expired, you must turn off the data loss alarms and all the our glucose alarms (LowGlucose, High Glucose, Projected Low Glucose and Projected High Glucose).
Before You Get StartedInstallation and operation o the FreeStyle Navigator® Continuous Glucose Monitoring System requiresusing a specialized introducer needle to insert the glucose sensor into the skin. Inection, inflammation,or bleeding at the glucose sensor insertion site are possible risks o inserting a sensor into your skin.Te glucose sensor should be removed i redness, pain, tenderness, or swelling develops at the sensor
insertion site.Cautions:
Beore adjusting treatment or diabetes management based on the continuous glucose results rom your•FreeStyle Navigator system, perorm a Blood Glucose mode test to confirm the continuous result.
A portion o the membrane polymer will remain in the skin each time the sensor is removed. Although•no health effects were observed or reported in clinical studies, the long term effects o the sensormembrane ragments remaining in the skin have not been determined.
Perormance o the FreeStyle Navigator system has not been evaluated in pregnant women.•
Perormance o the system under conditions o fluctuating hydration levels such as during renal dialysis•has not been evaluated.
8 Section 1
Getting Acquainted

8/13/2019 The Guardian - Abbott
http://slidepdf.com/reader/full/the-guardian-abbott 21/198
Before You Get Started (con’t)
Cautions:
Low or high glucose measurements can indicate a potentially serious medical condition.•
I you have hypoglycemia, or hypoglycemia unawareness, then test ONLY on your fingers.•
Te high and low alarms are intended to assist you in managing your diabetes and should not be•exclusively used to detect hypoglycemia or hyperglycemia. Te alarms should always be used inconjunction with other indications o glycemic state such as your glucose level, trend, line graph etc.
High and low glucose alarms are DIFFEREN rom your glucose targets. Low and high glucose alarms•
alert you when you’ve crossed a certain low or high value. Glucose targets allow the reports and line graphs to show how your glucose levels have been perorming compared to your set targets.
Te Low Glucose alarm will NO indicate severe hypoglycemia because the alarm cannot be set below•60 mg/dL (3.3 mmol/L).
Te High Glucose alarm will NO indicate severe hyperglycemia because the alarm cannot be set above•300 mg/dL (16.7 mmol/L).
It is important to use the correct type o batteries in the receiver, otherwise the battery lie may not be•
accurately monitored.
Do NO immerse the receiver in water or in any other liquid. Avoid getting water or any other liquid in•
the test strip port.
Changes or modifications not expressly approved by Abbott Diabetes Care, Inc. could void the user’s•
authority to operate the equipment.
Te system should not be used in an oxygen-rich environment or in one where anesthetic gas is present.•
Te radio receiver and transmitter o your FreeStyle Navigator system operate on the requency o•433.6 MHz. Primary users o this requency band include amateur “HAM” radio transmitters. Becauseo the coexistence o the FreeStyle Navigator radio connection and HAM transmitters, there may beinstances where the connection between your transmitter and receiver may be lost when in proximityto HAM radio equipment. Te FreeStyle Navigator system is designed to sense and notiy you about alost connection. I your FreeStyle Navigator system loses the radio connection, increase the separationdistance between yoursel and the transmitter by moving away rom the HAM radio. Te FreeStyleNavigator radio connection should re-establish itsel. You should note that HAM radio products can be
fixed, mobile or portable handheld (“walkie talkie” type) units.
Important: Because you must insert a new sensor afer each battery replacement, you should replace the
batteries just beore you insert a new sensor. For example, i you drop your receiver and the batteries allout, you will have to insert a new sensor.
Warnings:
Keep your system and its components away rom young children because:
Tere• are small parts that may be dangerous i swallowed.
Te control solution caps are choking hazards.•
Te test strip vial and sens• or delivery unit packaging may contain a drying agent that could beharmul i inhaled or swallowed and may cause skin and eye irritation.
NEVER point a pre-cocked sensor inserter toward the eyes, ace, or any other body part where sensorinsertion is not desired.
Section 1 9
Getting Acquainted

8/13/2019 The Guardian - Abbott
http://slidepdf.com/reader/full/the-guardian-abbott 22/198
Helpful health related information:
Te ollowing pertain to your health and should always be kept in mind:Te system is intended to assist you in better managing your diabetes by allowing you to know your•glucose levels throughout the day.
est results below 60 mg/dL (3.3 mmol/L) mean your glucose levels are low.•
est results above 240 mg/dL (13.3 mmol/L) mean your glucose levels are high.•
Severe dehydration and excessive water loss may cause alse low results. I you believe you are•experiencing severe dehydration, consult your healthcare team immediately.
I you get results below 60 mg/dL (3.3 mmol/L) or above 240 mg/dL (13.3 mmol/L) and do not have•symptoms o hypoglycemia or hyperglycemia, test your glucose using the Blood Glucose mode.
I you have symptoms o hypoglycemia or hyperglycemia, or continue to get results below 60 mg/dL•(3.3 mmol/L) or above 240 mg/dL (13.3 mmol/L), consult your healthcare team.
I you are experiencing symptoms that are not consistent with your glucose test results, consult your•healthcare team. Physiologic differences between the interstitial fluid and capillary blood may resultin differences in glucose measurements. Differences in glucose measurement between interstitial fluidand your finger may be observed during times o rapid change in blood glucose, e.g. afer eating, dosinginsulin, or exercising.
– Interstitial fluid (ISF) is the fluid between cells in the body. Movement o nutrients, oxygenand glucose rom the blood into the cells happen across the ISF. Tereore, i the glucose in thebloodstream rises (e.g. during meals), that rise is not seen in the ISF until later. Similarly, i glucoselevels in the ISF drops (or example during exercise, the cells consume glucose rapidly) that drop is
not seen in the bloodstream until later.When testing your glucose levels in the Blood Glucose mode, differences in the blood circulation in•your finger or palm (at the base o your thumb) and other test sites (orearm, upper arm, hand, thigh,or cal) may result in different glucose readings. Differences in blood glucose readings between yourfinger or palm (at the base o your thumb) and other test sites (orearm, upper arm, hand, thigh, orcal) may be observed afer eating, taking insulin, diabetes medication, or exercising.
est your finger i you are testing or hypoglycemia or i you have hypoglycemia unawareness (see next•page or definition o hypoglycemia unawareness). Changes in glucose levels may be observed in fingerblood samples sooner than in samples rom alternative sites (orearm, upper arm, hand, thigh, or cal).I an alternate site must be used, vigorous rubbing o the alternate site beore lancing can help minimizethis difference.
Do not use the FreeStyle Navigator system or diagnosing diabetes, testing newborns, or testing arterial•or venous blood.
Before You Get Started (con’t)I your results rom the continuous monitoring mode do not reflect how you eel, test your glucose using•the Blood Glucose mode.
I you observe a significant change in your continuous glucose readings that you think is erroneous, or i• you eel the blood glucose measurement in the Blood Glucose mode is erroneous and you are close to anelectromagnetic intererence source, move away rom the source o intererence and check to see i thecondition ades away.
I you have a medical appointment that includes X-ray, MRI (Magnetic Resonance Imaging), C•(Computed omography) scan, or another type o exposure to radiation, keep your system and sensoraway rom the area. Beore exposure to such radiation, discard any sensor you are wearing and insert anew sensor afer the radiation session. Te effect o these types o radiation on the perormance o thesystem has not been evaluated.
10 Section 1
Getting Acquainted

8/13/2019 The Guardian - Abbott
http://slidepdf.com/reader/full/the-guardian-abbott 23/198
What is Hypoglycemia Unawareness?
Hypoglycemia unawareness is a condition where you are having hypoglycemia but you do not have
any o the usual warning symptoms (such as rapid heartbeat, sweating, shakiness, anxiety, or a tingling
sensation in your fingers or toes). Tose warning symptoms are either absent or greatly reduced. Instead,the first sign may be conusion or impaired thinking, which makes it even more difficult to know i you
are experiencing low blood glucose. You could find yoursel in the midst o a severe hypoglycemic episode
without any warning at all.
Symptoms o Hypoglycemia Unawareness:Because you would have missed the early warning signs o hypoglycemia, the only signs or symptoms you
may have would be due to the effects o low blood glucose on the brain:
Irritability •
iredness•
Conusion•
Forgetulness•
Pale skin•
Slurred speech•
Loss o consciousness•
Tis condition is potentially dangerous because hypoglycemia conusion can occur without warning.
I you were driving a car or operating heavy machinery, conusion or delayed reaction could cause an
accident.
Hypoglycemia unawareness can develop or several reasons:
Having requent hypoglycemic episodes.a.
Having long standing diabetes and autonomic neuropathy (a orm o diabetic neuropathy in whichb.
your body does not release its usual hormones to warn you o low blood glucose and to tell your liver to
release glucose as a protective mechanism).
I you think you have hypoglycemia unawareness, talk to your healthcare team.
Section 1 1
Getting Acquainted

8/13/2019 The Guardian - Abbott
http://slidepdf.com/reader/full/the-guardian-abbott 24/198
What are the Continuous Monitoring mode and BloodGlucose mode?
Your FreeStyle Navigator system operates in two modes:
Continuous Monitoring mode (Glucose CM).•
Blood Glucose mode (Glucose BG).•Continuous Monitoring Mode (Glucose CM)
Te Continuous Monitoring mode is the mode you will usemost o the time. It continuously displays the glucose level inthe fluid in the tiny spaces between your tissues (interstitialfluid). Tis glucose reading comes rom the sensor you willplace just beneath your skin and is updated every minute.
“Glucose CM” at the top lef o the display.•
Te glucose reading is typically accompanied by a•
directional trend arrow that indicates how ast your glucoseis changing and in what direction.
Most requently used mode.•
Measures glucose rom interstitial fluid detected by a•sensor in your skin.
– Uses a sensor to measure glucose levels.
– A transmitter sends the glucose readings to the receiver.
– Should only be used with FreeStyle Navigator system
ransmitters and FreeStyle Navigator Sensors.
Blood Glucose Mode (Glucose BG)You will perorm traditional blood glucose testing(BG testing) in the Blood Glucose mode using a FreeStyleest Strip and a drop o blood. You can use the Blood Glucosemode whenever you wish to perorm a traditional bloodglucose test. It is also used or calibrating the system. BloodGlucose mode tests used or calibrating the system can alsobe relied on like traditional blood glucose tests.
“Glucose BG• ” at the top lef o the display.
– Built-in FreeStyle Blood Glucose Meter.
– Used mainly to calibrate the system.Measures glucose rom a blood sample that you supply.•
Uses a FreeStyle est Strip to measure blood glucose levels.•
Note: Use ONLY FreeStyle est Strips and control solution.Other brands o test strips or control solution can give youinaccurate results.
Te system typically works in the Continuous Monitoring mode. It switches to the Blood Glucose modewhen you insert a FreeStyle est Strip into the receiver’s test strip port. In order to turn the Blood Glucosemode on, you have to insert the test strip when the receiver is either turned off or when it displays theglucose screen.
Glucose BG 08:30A
106mg/ dL
Home
END OF Section 1
12 Section 1
Getting Acquainted

8/13/2019 The Guardian - Abbott
http://slidepdf.com/reader/full/the-guardian-abbott 25/198

8/13/2019 The Guardian - Abbott
http://slidepdf.com/reader/full/the-guardian-abbott 26/198
B a t t e r i e s
Section 2 – Key Terms
n Alarm
n Icon
n Receiver
n Transmitter
n Battery Life
n Alkaline Batteries
n 357 HC Silver Oxide Battery
n Reconnect

8/13/2019 The Guardian - Abbott
http://slidepdf.com/reader/full/the-guardian-abbott 27/198
22 Install or Replace Transmitter and Receiver BatteriesPurpose o ensure that your FreeStyle Navigator system has power to operate properly.
Start Do this procedure:
• e rst time you use your FreeStyle Navigator system.• When the receiver displays the Low Battery message and alarm and the battery
icon appears on the screen.
• When the receiver sounds an alarm and displays the “Replace TX Battery withNew Sensor” message.
Materials Gather these materials beore you begin:
• 2 new AAA alkaline batteries for the receiver. We recommend Energizer® Max®,Energizer® e2® itanium®, and Energizer® Industrial batteries. Other batteriesmay not provide expected battery lie.
• 1 Silver Oxide 357 HC battery for the transmitter.• A coin.• Your FreeStyle Navigator Receiver.
• Your FreeStyle Navigator Transmitter.
Helpful Information
Caution: It is important to use the correct type o batteries in the receiver, otherwise the battery lie
may not be accurately monitored.
Important: An alarm will sound and a battery icon will appear on the screen when your receiver batteries are•
running low. You must replace your receiver batteries the next time you replace your sensor. Makesure to replace batteries beore inserting your next sensor.
An alarm will sound and a message will appear on the screen when your transmitter battery is•
running low. You have approximately 4 days o battery power remaining when this first happens.Because you must insert a new sensor afer each battery replacement, you should replace the•
batteries just beore you insert a new sensor. For example, i you drop your receiver and thebatteries all out, you will have to insert a new sensor.
Afer installing the transmitter or receiver batteries, allow a couple o minutes or the system to•
recognize new batteries. You may then access the status o the battery lie rom the System menu in your receiver (see Status Inormation in Section 10). I the batteries are new, the status screen willshow 75-100% as remaining battery lie.
• I your receiver batteries are low and you ail to replace them, they may run out without awarning and the receiver will neither display your glucose levels nor sound alarms.
• e transmitter’s battery life is estimated to be up to 30 days.
• e receiver’s battery life is estimated to be 60 days. However, battery life may be shorter than 60 days
i your receiver’s alarms are set to vibrate, i you use backlighting requently, or i the transmitter/receiver connection is broken ofen.
• If you will not be using your receiver for an extended period of time, remove the batteries from thereceiver to preserve battery lie.
• To avoid draining the receiver’s batteries, be careful not to accidentally press and hold the receiver’sbuttons or a long period o time.
• Aer changing the batteries, make sure that you reconnect the transmitter and receiver to establishcommunication between them.
• If you are replacing batteries on both the transmitter and receiver, replace the batteries in thetransmitter first.
Section 2 1
Install or Replace Transmitter and Receiver Batteries

8/13/2019 The Guardian - Abbott
http://slidepdf.com/reader/full/the-guardian-abbott 28/198
Install or Replace the Transmitter Battery
urn the circular battery door counterclockwise witha.either a coin or your fingernail. (Fig. 1)
Careb. ully remove the battery door.
Remove the old battery, i any, and discard it properly.c.
Insert a NEW silv d. er oxide 357 HC battery with the plus
sign (+) acing you. (Fig. 2)
Replace te. he battery door and secure it in place by
rotating clockwise. (Fig. 3)
Note: Te battery door must be closed securely to
create a seal. Do not apply excessive orce whenclosing. Excessive orce can damage the plastic materialo the battery door and the transmitter case. I youare not changing the receiver batteries at this time,reconnect the transmitter and receiver, then go to‘Check your work’ at the end o this Section.
Locate the battery door on the back o the receiver.a.
Press down on the ridged part o the battery door tob.slide the battery door completely out.
Remove old batteries, i any, and discard them properly.c.
Note: Be sure to finish within 5 minutes to preventlosing the date and time settings.
Insert the new batteries with the positive (+) as shownd.Align the + and - sign o the batteries with the signs asshown in the battery compartment.
Press each battery into its channel making sure thee.battery fits tightly.
Note: Te receiver will not operate i the batteries arenot inserted in the proper direction.
Replace the battery door with the tab acing the receiver..
Align the edges o the door with the channel in theg.battery compartment.
Slide the door into the receiver until it clicks.h.
Match the screen on your receiver withi. ONE o the screensin the next table and perorm the corresponding step.
Install or Replace the Receiver Batteries
Fig. 1
Fig. 2
Fig. 3
Battery door
14 Section 2
Install or Replace Transmitter and Receiver Batteries

8/13/2019 The Guardian - Abbott
http://slidepdf.com/reader/full/the-guardian-abbott 29/198
Match what you see on your Receiver with ONE of the screen
shots shown below.
If the display is Ten
Press the RIGH Option button to see i the screen•
turns on.
I screen turns on, compare with the screens below•
and perorm the matching steps.
I screen does• NOT turn on, then repeat thisprocedure ensuring that the batteries are:
– New.
– Oriented properly in the battery compartment.
– I the problem persists see Section 10 on
troubleshooting.
Te receiver is working properly. Go to “Check your•
work”. You may not see the icon i you haveconnection between the transmitter and receiverReconnect the transmitter and receiver i you see the
icon.
Te time and date need to be set. Go to Step 4 o•
Section 3.
Set the ime and Date. Afer setting the time and date,•
reconnect the transmitter and receiver. Ten, “Checkyour work”.
Select the mode that you want the system to operate in.•
Go to Section 14 to link the transmitter and receiver.•
Go to “Check your work”.•
Section 2 1
Install or Replace Transmitter and Receiver Batteries
Glucose CM 08:30A
Main
Set Date/Time 08:30A
08 : 30 A
05 - 10 - 2005
Next Set
Select Mode 08:30A
Continuous Mode CM
Blood Glucose BG
BG CM

8/13/2019 The Guardian - Abbott
http://slidepdf.com/reader/full/the-guardian-abbott 30/198
Reconnect the Receiver to the Transmitter.
Place the receiver within 10 eet o the transmitter.a.
Press theb. RIGH Option button twice to display theMain Menu screen.
Use the UPc. or DOWN Arrow button to highlight System.
Press the RIGHd. Option button (Select) to display the
System menu with Reconnect highlighted.
Pre. ess the RIGH Option button (Select).
Wait or th. e receiver to beep. I it beeps:
wice – Te s• ystem is connected.
Tree times – Te sys• tem is not connected. Make
sure the batteries in the transmitter are new and
ensure that the receiver and transmitter are linked
(see Section 14).
Note: I the transmitter and receiver are connected
properly, the disconnect icon will not appear on
the screen.
END OF Section 2
Check your work. Result: An operational system.
You have done this procedure correctly when:
o Te batteries have been installed and the battery doorshave been closed securely.
o Te old batteries have been disposed o properly.
o Te transmitter and receiver have been reconnected.
16 Section 2
Install or Replace Transmitter and Receiver Batteries
System Menu 08:30A
Reconnect Data Upload
Status
Link
Set Date/Time
Main Select

8/13/2019 The Guardian - Abbott
http://slidepdf.com/reader/full/the-guardian-abbott 31/198

8/13/2019 The Guardian - Abbott
http://slidepdf.com/reader/full/the-guardian-abbott 32/198
T i m e a n d D a t e
Section 3 – Key Terms n LEFT/RIGHT Option Buttons
n Main Menu
n Receiver
n System Menu
n Transmitter
n UP/DOWN Arrow Buttons

8/13/2019 The Guardian - Abbott
http://slidepdf.com/reader/full/the-guardian-abbott 33/198
33 Set the Time and Date
Purpose o ensure the correct time and date are associated with your data.
Start Do this procedure:
• e rst time you use your FreeStyle Navigator system.
• When you install new batteries.
Materials Your FreeStyle Navigator Receiver.
Helpful Information
Important: Be sure to set the date and time correctly. Te correctness o the line graph and statistical
reports depends upon the date and the time being correct.
Te re• ceiver is on whenever batteries with sufficient charge are in the receiver.
I the batteries are discharged or removed or 5 minutes or more, you must reset the date and time.•
I you make a mi• stake or want to exit rom the Set Date/ime screen, simply leave the receiver alone
or 12 seconds. It will automatically turn off, and any changes you made will be cancelled or cleared.
I you change the time and/or d• ate in the receiver, the line graphs and statistical reports will be
affected. For example, i you travel rom one time zone to another and change the time to match the
local time zone the appearance o your graph will be affected.
Steps Do This
1. Go to the Main screen.
a. urn the display on.
b. Press the RIGH Option button a second time to
display the Main screen. I your transmitter and receiver
are connected, you will not see the icon.
Section 3 1
Set the Time and Date
Glucose CM 08:30A
Main

8/13/2019 The Guardian - Abbott
http://slidepdf.com/reader/full/the-guardian-abbott 34/198
System Menu 08:30A
Reconnect
Data Upload
Status
Link
Set Date/Time
Main Select
Steps Do This
2. Go to the System screen.
a. Press the DOWN Arrow button to highlight System.
b. Press the RIGH Option button (Select) to go to the
System Menu screen.
3.Select Set Date/Time romthe System Menu screen.
a. Use the UP/DOWN Arrow buttons to highlight Set
Date/ime on the System Menu screen.
b. Press the RIGH Option button (Select) to display the
Set Date/ime screen.
4. Set the time.
a. Use the UP/DOWN Arrow buttons to set the
current hour.
b. Press the LEF Option button (Next) to move to
the minutes digits.
c. Use the UP/DOWN Arrow buttons to set the
current minutes.
d. Press the LEF Option button (Next) to move to
the AM or PM field.
e. Use the UP/DOWN Arrow buttons to select A
(AM) or P (PM).
. o set the date, go to Step 5.
Main 08:30A Glucose
Alarms
Reports
System
Add Event
Select
18 Section 3
Set the Time and Date

8/13/2019 The Guardian - Abbott
http://slidepdf.com/reader/full/the-guardian-abbott 35/198
Steps Do This
5. Set the date.
a. Press the LEF Option button (Next) to move to theMonth field.
b. Use the UP/DOWN Arrow buttons to set the currentmonth.
c. Press the LEF Option button (Next) to move to theDate field.
d. Use the UP/DOWN Arrow buttons to set the currentdate.
e. Press the LEF Option button (Next) to move to theYear field.
. Use the UP/DOWN Arrow buttons to set the currentyear.
g. Confirm that your selections are correct:
• If NO, press the LEF Option button (Next) andrepeat this procedure rom Step 5a.
• If YES, press the RIGH Option button (Set) toaccept your changes.
Result: Te screen displays the System menu.
h. Press the LEF Option button (Main) to return to theMain screen.
6. Check your work.Result: Your FreeStyle Navigator Receiver is operating with
the correct time and date.
You have done this procedure correctly when:
o Te time is correct.
o Te date is correct.
END OF Section 3
Section 3 1
Set the Time and Date

8/13/2019 The Guardian - Abbott
http://slidepdf.com/reader/full/the-guardian-abbott 36/198

8/13/2019 The Guardian - Abbott
http://slidepdf.com/reader/full/the-guardian-abbott 37/198

8/13/2019 The Guardian - Abbott
http://slidepdf.com/reader/full/the-guardian-abbott 38/198
C o n t r o l S o l u t i o n
Section 4 – Key Terms n Control Solution Test
n Freestyle Control Solution
n Freestyle Test Strips
n LEFT/RIGHT Option Buttons
n Receiver
n UP/DOWN Arrow Buttons

8/13/2019 The Guardian - Abbott
http://slidepdf.com/reader/full/the-guardian-abbott 39/198
44 Perform a Control Solution Test
Purpose Te purpose of the control solution test is to:
• Ensure that your receiver and test strips are working properly prior to calibrationor blood glucose testing.
• Check that you are following the correct testing procedure.
• Practice Blood Glucose mode testing without having to use your own blood,Control Solution test is not the same as calibration. See Section 7 for calibratingthe system.
Start Do this procedure when you:• Set up your receiver for the rst time.• Open and begin using a new container of test strips.• Suspect that your receiver or test strips are not working properly.• Suspect that your glucose test results are not accurate.• Suspect that your test results are not consistent with how you feel.• Drop, damage, or expose the receiver to liquids.• Are advised by your healthcare team to do so.
Materials Gather these materials before you begin:• FreeStyle Navigator Receiver.• FreeStyle Control Solution.• FreeStyle Test Strips.
Helpful Information
Caution:
• Do NOT use FreeStyle Control Solution for calibration. Do NOT perform the control solution testwhen the system asks you to ‘Do BG Test’ for calibration.
• Results from Control Solution tests do NOT reect your blood glucose level.
Important: e control solution range is a target range for the control solution only. It is NOT a target
range for your blood glucose levels.
Important: If your control solution test results continue to fall outside of the range printed on the teststrip container, the receiver may not be working properly. Do NOT use the system to test your glucose
levels. Call Customer Care.
Ensure accurate control solution results by doing the following:• Use ONLY FreeStyle Control Solution and FreeStyle Test Strips.
• Replace the cap on the control solution vial immediately aer using.
• Do NOT use your control solution past the expiration date or the discard date.
• Do NOT add water or any liquid to the control solution.
• Perform control solution tests only between 59° and 104° F (15° and 40° C).
For important test strip information, including detailed storage and usage information, refer to theFreeStyle Test Strip package insert.
Section 4 2
Perform a Control Solution Test

8/13/2019 The Guardian - Abbott
http://slidepdf.com/reader/full/the-guardian-abbott 40/198
Steps Do This
1. Verify that your FreeStyle
Control Solution is current.Note: FreeStyle Control Solution is good or three monthsafer opening the bottle, or until the expiration date printedon the label, whichever comes first. Count orward threemonths rom the date you open a new bottle o controlsolution. Tis is your discard date. Write this date on theside o the control solution bottle.
Example: You open the control solution on January 15th.
Count forward three months to April 15th. Tis is the
discard date that you record on the bottle.
2. Prepare test strip.
a. Locate the expiration date on the vial o FreeStyle
est Strips.
If strips are expired, obtain a new vial of strips.
b. Locate the code number (you’ll need it in a minute).
c. Remove a single test strip rom the vial.
d. Close the vial tightly beore continuing but do NOT
put the vial away.
22 Section 4
Perform a Control Solution Test

8/13/2019 The Guardian - Abbott
http://slidepdf.com/reader/full/the-guardian-abbott 41/198
Steps Do This
3. Insert test strip into the receiver.
a. Turn the test strip so “FreeStyle” text aces up.
b. Grasp the test strip by the end with the two hal circles.
c. Insert the end with the dark rectangle into the receiver
at the lower lef corner o the receiver.
Result: Te receiver display screen turns on and displays
the Strip Code screen.
Note: I the screen does not turn on, reer to the Section
10 on troubleshooting.
4. Compare code numbers.
Compare the code number on the display with the code
number on the vial o test strips.
• Te numbers match. a. Press the RIGHT Option button (Set).
b. Go to Step 5.
• Te numbers do NOT match. a. Use the UP/DOWN Arrow buttons tochange the code to match.
b. Press the RIGHT Option button (Set).
c. Go to Step 5.
• Te screen changes to the ApplySample screen.
I the numbers did NOT match:
a. Press the LEFT Option button (Back).
b. Repeat Step 4.
I the numbers match, go to Step 5.
If Ten
Section 4 2
Perform a Control Solution Test
Strip Code 08:30A
Cancel Set
27

8/13/2019 The Guardian - Abbott
http://slidepdf.com/reader/full/the-guardian-abbott 42/198
Apply Sample 08:30A
Back Cancel
Steps Do This
5. Apply control solution.Important: Do NO apply control solution to both edges o
the test strip.
Notes:
• Gently touch ONLY ONE EDGE o the test strip to the
control solution next to one o the dark hal-circles.
• If progress tones are turned on, the receiver will beep to
indicate that enough control solution was applied.
Result: A stopwatch will appear on the display
screen while the receiver measures the control solution.
• e receiv er will beep twice when the test results appear.
6. Confirm that you used acontrol solution.
Press the LEF Option button (Yes) to alert the receiverthat you used a control solution or this test.
Note: I you do NOT select yes, the system will record theresult as a blood glucose result instead o a control solutionresult, which can result in an incorrect statistical report.
Go to the next step.
Glucose BG 08:30A
Yes No
Control Solution?
106mg /dL
24 Section 4
Perform a Control Solution Test

8/13/2019 The Guardian - Abbott
http://slidepdf.com/reader/full/the-guardian-abbott 43/198
Steps Do This
7. Evaluate the test results.
Compare the test results displayed on the screen to the
range printed on the vial of test strips.
8. Check your work.
Result: Control solution test results displayed on the
receiver screen.
You have done this procedure correctly when:
o Te results are within the normal control solution range.
o Te used test strips have been discarded properly.
o Te control solution tests are marked as controlsolution tests.
END OF Section 4
If the result And Ten
• Fall WITHIN therange. ➜
Go to Step 8.
• Fall OUTSIDE ofthe range.
You’ve repeatedthe test.
Call Customer Care.
You’ve NOTrepeated the test.
Repeat the test from Step 1 with aNEW test strip.
• Is an error message.
➜Go to Section 10 ontroubleshooting.
77 – 115 mg/dL
Section 4 2
Perform a Control Solution Test
Glucose BG 08:30A
Yes No
106mg/dL
Control Solution?

8/13/2019 The Guardian - Abbott
http://slidepdf.com/reader/full/the-guardian-abbott 44/198

8/13/2019 The Guardian - Abbott
http://slidepdf.com/reader/full/the-guardian-abbott 45/198

8/13/2019 The Guardian - Abbott
http://slidepdf.com/reader/full/the-guardian-abbott 46/198
S e n s o r
Section 5 – Key Terms
Now that you are ready to insert a sensor, here are a few helpful tips.
Rec• onnect your transmitter and receiver BEFORE inserting a new sensor.
BEFORE• inserting a new sensor, program into the receiver that the old sensor has beenremoved.
Make sure there are no messages or icons related to low battery conditions on the receiver•
BEFORE inserting a sensor.
When attaching the transmitter, you may not always hear a click. Place the transmitter•
about halway over the sensor support mount and slide the transmitter back and orth tomake sure it moves reely beore you attach it. You will eel a click as you slide it into place.
Afer attaching the transmitter to a new sensor, allow the system a ew minutes to•
recognize a new sensor. Reconnect the receiver and transmitter to make sure they arecommunicating.
When responding to messages about sensor insertion and sensor removal, choose the•
appropriate answer (‘Yes’ or ‘No’).
Do• NOT use the Link/Unlink eature unless you have received a new transmitter orreceiver rom the manuacturer. o establish communication between them, ALWAYS use
the ‘Reconnect’ eature. {Note: Link ≠ Reconnect}
Avoid errors and messages related to calibration by ollowing a ew simple guidelines:•
Do not calibrate i your blood glucose is higher than 300 mg/dL or lower than 60 mg/dL.•
I you have just exercised, eaten or taken insulin, your glucose levels may be changing•
rapidly. Allow about an hour or the glucose levels to reach a relatively steady state beorecalibrating.
Te system automatically detects conditions that may not be suitable or calibration. It•
may delay calibration requests in such instances. Wait or the system to prompt you andLOOK or the icon on the screen.
It is normal during typical usage to get multiple messages about ailed calibrations (“Cal•
Failed”) or additional calibration requirements (“Cal Required”). Te system automaticallyevaluates conditions or calibration and displays appropriate messages i those conditionsare not met or i the calibrations ail. Tis helps maintain system accuracy. When you getthese messages, simply ollow the prompts on the screen or guidelines in the User’s Guide. Iyou get too many messages, please call customer care.
Do• NOT change batteries during a sensor wear. Changing the batteries resets the systemand will orce you to remove the sensor.
I you need assistance, please call customer care.
n Calibration n Sensor Inserter n Sensor Release Tabs
n Reconnect n Sensor Insertion Button n Sensor Support Mount
n Sensor n Sensor Insertion Site n Sharps Container
n Sensor Delivery Unit n Sensor Locking Pin n Transmitter Receiver Connection

8/13/2019 The Guardian - Abbott
http://slidepdf.com/reader/full/the-guardian-abbott 47/198
55 Insert or Remove Your Sensor
Purpose o insert, remove, or replace a small, thin, plastic sensor under your skin so that your
FreeStyle Navigator system can continuously monitor your glucose level.
Start Do this procedure:• e rst time you use your FreeStyle Navigator system.• Every 5 days aer that.• Replace your sensor sooner than 5 days when:
– Tere is any redness, pain, tenderness, or swelling at the insertion site.– An error code displays on your receiver indicating a sensor problem.
• When replacing batteries.
Materials Gather these materials beore you begin:• Soap and water.
• IV Prep wipes and alcohol prep pads.• A sensor delivery unit in its UNOPENED package.• Your transmitter.• Your receiver.
Helpful Information
Important: Keep the ollowing in mind when inserting your sensor.
• You will not have continuous monitoring data until you have successfully completed the rstcalibration (at least or the first ten hours afer sensor insertion).
• You may not be able to calibrate the system if your glucose levels are changing rapidly. For example,
during a meal or exercise, your glucose levels may vary rapidly. ry to time your insertion so that your calibration times do not coincide with your regular meal or exercise activities.
Note: You should keep your sensor inserted for 5 days. See the exceptions listed above under Start.
• e system will ask you to perform 4 calibrations at approximately -10, 12, 24 and 72 hours aerinserting a new sensor (See Section 7).
• You MUST change your sensor every 5 days, to reduce the chance o inection. Te systemautomatically terminates a sensor session afer 5 days. Do NOT leave the sensor inserted or morethan 5 days.
• Taking action at the rst sign of irritation or discomfort will keep small issues from turning intolarger or ongoing ones.
• You may not be able to perform the calibration aer you eat until your glucose levels stabilize.
• See Appendix A: Site Maintenance for additional helpful suggestions.
• Before inserting a new sensor make sure that there are no low battery messages displayed on thereceiver. Tis will help avoid data loss afer the insertion i the batteries are running low.
Intererents: In vitro and in vivo testing suggests that usual pharmacologic levels o ascorbic acid haveno effect on the unction o the system but salicylic acid has minimal effect. In vitro testing suggeststhat normal physiologic levels o uric acid, lipids, and bilirubin do not affect system unction. Teimpact o oral hypoglycemic agents and other potential interering substances has not been studied.
Section 5 2
Insert or Remove Your Sensor

8/13/2019 The Guardian - Abbott
http://slidepdf.com/reader/full/the-guardian-abbott 48/198
Important Tings to Know About Getting Reliable Results
Caution: Movement o the sensor support mount or excessive perspiration at the sensor insertion site
due to activities like vigorous exercise, bumping against objects may lead to poor adhesion o the supportmount to the skin and the cause the sensor to dislodge. I the sensor dislodges due to the sensor supportadhesive ailing to adhere to the skin, you may get unreliable results or no results. Te system may not
provide a warning in such circumstances. Choose the proper sensor insertion site when inserting thesensor and prepare the site by ollowing the instructions or site preparation.
Caution: I your results rom the Continuous Monitoring mode seems erroneous, check and make sure
that the sensor has not dislodged. I you notice the sensor is dislodged rom the skin, or i you see that theadhesive on your overbandage or the sensor support mount is coming loose, discard the old sensor andinsert a new sensor.
Steps Do This
1. Decide what to do.
• Change or remove your sensor. Go to Step 2.
• Insert your sensor. Go to Step 4.
If you want to Ten
28 Section 5
Insert or Remove Your Sensor

8/13/2019 The Guardian - Abbott
http://slidepdf.com/reader/full/the-guardian-abbott 49/198
Steps Do This
2. Remove the sensor.a. Wipe a small amount o isopropyl alcohol around the
edges o the sensor support mount.
Note: You can use a regular alcohol prep pad rom yourlocal drugstore.
b. Grasp the top end o the adhesive (the end nearest thesensor, see Fig.1) and slowly peel it off your skin in onecontinuous motion.
c. Pull down on the adhesive at the bottom o the supportmount (the end arthest rom the sensor, see Fig.2). Youwill hear a click as the transmitter separates rom thesupport mount.
d. Discard the sensor support mount (with the sensorattached).
Important:
• Do NO discard the transmitter.
• NEVER reuse the sensor support mount and sensor.
e. Gently wash the transmitter with soap and water.
. Dry the transmitter thoroughly with a clean, sof, lint-ree cloth. Be sure that you blot the sensor connector onthe end o the transmitter.
g. I necessary, use an alcohol wipe prep pad, baby oil, ora wet, soapy washcloth to remove any adhesive lef onyour arm.
h. Dry your arm with a clean dry towel beore continuing.
Important:
Do NO use adhesive remover wipes containing ether orether containing components to remove adhesive residue
rom the transmitter. Adhesive remover solutions suchas Uni-Solve® and others that contain ether componentscan damage the transmitter case. We recommend usingregular alcohol pads or cleaning adhesive residues.
i. Proceed to next step to end sensor session.
Fig. 1
Fig. 2
Section 5 2
Insert or Remove Your Sensor

8/13/2019 The Guardian - Abbott
http://slidepdf.com/reader/full/the-guardian-abbott 50/198
Steps Do This
3. End sensor session.a. Press the RIGH Option button twice to get to the
Main menu.b. Press the UP/DOWN Arrow button to highlight System.
c. Press the RIGH Option button to select System.
d. Press the UP/DOWN Arrow button to highlight Status.
e. Press the RIGH Option button to select Status.
. Press the RIGH Option button to select Removed Sensor.
g. Press the RIGH Option button to select Yes. Tesystem now knows you have removed the sensor. I youare going to replace your sensor now, continue to Step 4.
4. Reconnect the receiver to
the transmitter. a. Place the receiver within 10 eet o the transmitter.b. Press the RIGH Option button twice to display the
Main Menu screen.
c. Use the UP/DOWN Arrow button to highlight System.
d. Press the RIGH Option button (Select) to display theSystem menu with Reconnect highlighted.
e. Press the RIGH Option button (Select).
. Wait or the receiver to beep. I it beeps:
• Twice – e system is connected.
• ree times – e system is not connected. Make sure
the batteries in the transmitter are new and ensurethat the receiver and transmitter are linked (seeSection 14).
Note: I the transmitter and receiver are connectedproperly, the disconnect icon will not appear onthe screen.
5. Select an insertion site.
Notes:• Select a site ONLY on the back o the upper right arm, on
the back o the upper lef arm, or on your abdomen.• Do NOT insert the sensor where another sensor was just
removed (See “Site Selection” in Appendix A).• Rotate where you insert your sensor across several sites.• Avoid areas where the edges of clothing may catch or rub
against the sensor.• Avoid areas with scars, moles, stretch marks, or lumps.• Select an area of skin that stays at during your normal
daily activities (no bending or creasing).
• Avoid areas with excess hair, or consider shaving the area.• Choose a site that is at least 1 inch away from an insulin
i i i
System Menu 08:30A
Reconnect
Data Upload
Status
Link
Set Date/Time
Main Select
Abdomen
08:30A
No Yes
Did You Remove
The Sensor?
Caution: I the sensor dislodges due to the sensor support
adhesive ailing to adhere to the skin, you may get unreliableor no results. Improper site selection and improper site
preparation may cause poor adherence to the skin.
30 Section 5
Insert or Remove Your Sensor

8/13/2019 The Guardian - Abbott
http://slidepdf.com/reader/full/the-guardian-abbott 51/198
Steps Do This
6. Prepare the insertion site.
a. Wash your hands thoroughly with soap and water.
b. Clean the selected insertion site area with soapand water.
c. Rinse the area thoroughly and pat dry.
d. Wipe the area with an IV Prep wipe to helpwith adhesion.
Note 1: Te insertion area MUST be clean and dry.Otherwise:
• An infection could occur.
• e sensor support mount may not stick to the site.
Note 2: Do NOT place a bandage on the insertion
site beore inserting the sensor. Te sensor may notpenetrate the skin and the system will not work with abandage under the sensor.
7. Remove the sensor deliveryunit rom package.
a. Remove the sensor delivery unit rom its sterile packageby peeling off the oil on the back o the package.
b. Save the package.Note: You will need the sensor code number on the backo the package, later.
Important: We recommend that you save the sensor kitcarton or the sensor sterile package until the last sensor
rom your sensor kit has been used and discarded. Savingthe package will help you to have sensor lot inormation,expiration dates and sensor code etc. accessible when you
need them.
8. Remove the protective liner romthe sensor support mount.
a. Bend the two-piece protective liner slightly so you cansee the seam between the two pieces.
b. Peel away the smaller section.
c. Peel away the larger section.
Caution: Do NO use the sensor delivery unit i thesterile package is open or damaged.
Section 5 3
Insert or Remove Your Sensor

8/13/2019 The Guardian - Abbott
http://slidepdf.com/reader/full/the-guardian-abbott 52/198
op o the SensorSupport Mount
Steps Do This
9. Attach the sensor delivery unit.a. Locate the top o the sensor support mount.
b. Follow the instructions below as you place thesensor support mount, adhesive-side down, on
the insertion site:
10. Ensure that the adhesive pad isadhered to your skin.
a. Hold the sensor delivery unit firmly in place.b. Smooth the adhesive pad against your skin.
• Inserting the sensor on theback o your arm.
Place the sensor support mount lengthwiseon your arm with the top o the sensorsupport mount acing your shoulder.
• Inserting the sensor on yourabdomen.
Place the sensor support mount horizontallyon your abdomen.
If you are Ten
32 Section 5
Insert or Remove Your Sensor

8/13/2019 The Guardian - Abbott
http://slidepdf.com/reader/full/the-guardian-abbott 53/198
Blue Release ab
13. Remove inserter
Steps Do This
11. Remove the locking pin.a. Grasp the top o the locking pin with your thumb and
index finger.
b. wist the locking pin a 1/4
turn in either direction
until the locking pin clicks.
c. Pull the locking pin away to
remove it.
Note: Te sensor support mount adhesive will help
keep the sensor support mount in place.
12. Insert sensor.
a. Hold the Inserter as shown and press the button on thetop o the sensor inserter.
Important: Do NO press on the blue release tabs while
pressing the button on the top o the inserter.
Note: You will eel a slight pinch as the sensor is placed
just under your skin.
a. Hold the sensor inserter and firmly squeeze the twoblue release tabs at the inserter’s base, as you lif theinserter away rom the sensor support mount.
Note: Do NOT lif the inserter without squeezingthe blue release tabs as this may dislodge the sensorsupport mount.
Caution: Do NO press the button until you are readyto insert the sensor. Doing so may cause unintendedresults or injury.
Section 5 3
Insert or Remove Your Sensor

8/13/2019 The Guardian - Abbott
http://slidepdf.com/reader/full/the-guardian-abbott 54/198
Steps Do This
14. Check the sensor support
mount.a. Confirm the sensor support mount remains tightly
adhered to your skin by sliding your finger along the
edges o the adhesive pad and examine or any gaps
in adhesion.
b. Examine the area or a drop o blood. You may
see some blood rom the insertion site. I there is
continuous bleeding that does not stop in a ew
minutes even afer blotting with a clean cloth or
swab, repeat this procedure rom Step 2 to remove
the sensor support mount, select a new site andinsert a NEW sensor.
c. Use a mirror to check that sensor is correctly placed.
Sensor is correctly placed. You will see thetip o the sensor is inserted under the skinand the sensor is flush against the top edge
o the sensor support mount.
Sensor is incorrectly placed. You will seethat the sensor is not flush against the top
edge o the sensor support mount or youmay see the tip o the sensor is not insertedunder the skin.
1.Remove sensor support mount.
2.Go to step 1 to insert a new sensor.
If Ten
34 Section 5
Insert or Remove Your Sensor

8/13/2019 The Guardian - Abbott
http://slidepdf.com/reader/full/the-guardian-abbott 55/198
Steps Do This
15. Discard the sensor inserter
saely. We recommend a sharps container or a puncture-proo
container with a tight lid.
16. Check your work.
Result: An inserted sensor, a removed sensor, or areplaced sensor.
You have done this procedure correctly when:
o Te system successully recognized that you removeda sensor (i you removed a sensor).
o Te site was selected and prepared according to theguidelines given in this procedure.
o Te receiver and transmitter were reconnectedsuccessully.
o Te sensor support mount is tightly adhered to eitheryour abdomen or the back o your upper arm.
o Te sensor is inserted in a site that is different romthe site that was used or the last sensor.
o Te sensor is visible with the tip inserted into your skin.
o Te sensor inserter is disposed saely.
END OF Section 5
Section 5 3
Insert or Remove Your Sensor

8/13/2019 The Guardian - Abbott
http://slidepdf.com/reader/full/the-guardian-abbott 56/198

8/13/2019 The Guardian - Abbott
http://slidepdf.com/reader/full/the-guardian-abbott 57/198

8/13/2019 The Guardian - Abbott
http://slidepdf.com/reader/full/the-guardian-abbott 58/198
T r a n s m i t t e r
Section 6 – Key Terms n LEFT/RIGHT Option Buttons
n Receiver
n Sensor Code
n Sensor Support Mount
n System
n Transmitter
n UP/DOWN Arrow Buttons

8/13/2019 The Guardian - Abbott
http://slidepdf.com/reader/full/the-guardian-abbott 59/198
6 6 Attach Your Transmitter
Purpose o enable the transmitter to send glucose data to the receiver.
Start Do this procedure afer inserting a new sensor.
Materials Your FreeStyle Navigator ransmitter with battery installed.
Helpful Information
Important: Do NO remove or replace the transmitter rom the sensor support mount while wearinga sensor. I you notice that the transmitter is not properly attached, replace the sensor with a new
sensor and then re-attach the transmitter.
• Make sure that you establish communication between the receiver and transmitter by reconnectingthem i necessary.
• Aer you attach your transmitter, you must keep your receiver within 10 feet of the transmitter tomaintain a consistent connection. I the connection between the transmitter and receiver is brokenyou will not receive continuous glucose readings.
• e connection can also be aected by objects getting between the transmitter and receiver, bynearby large metal objects, and by some electronic devices that produce radio requencies.
• If a connection alarm sounds, move the transmitter closer to the receiver to restore the connection.I you have trouble with the connection between the transmitter and receiver, see Section 10 ontroubleshooting.
Section 6 3
Attach Your Transmitter

8/13/2019 The Guardian - Abbott
http://slidepdf.com/reader/full/the-guardian-abbott 60/198
Steps Do This
1. Attach the transmitter to the
sensor support mount.
a. Position the transmitter over the sensor support mount
so that the battery side aces the mount.
b. Lower the transmitter onto the mount.
Note: It helps to position the transmitter’s connectordirectly over the round part of the “keyhole” (Fig. 1)
as you lower the transmitter.
Result: Te transmitter fits flush against the mount
and slides smoothly back and orth on the guide rails.
c. Hold the transmitter between your orefinger and thumband slide the transmitter until it clicks into place. Applyfirm pressure as you slide the transmitter into place.(Fig. 2)
Fig. 1
Fig. 2
2. Confirm the transmitteris correctly attached to the
sensor support mount.a. Look at the side o the transmitter where the bottom
sits on the guide rails.
b. Is there a space between the bottom edge o the
transmitter and the top edge o the guide rails?
• No Te transmitter is correctly attached. Go to Step 3.
• Yes 1. Go to Section 5 to replace your sensor.
2. Repeat this procedure to attach your transmitter.
If Ten
Note: It is normal to see a gap between
the transmitter and the support mount
towards the top.
38 Section 6
Attach Your Transmitter

8/13/2019 The Guardian - Abbott
http://slidepdf.com/reader/full/the-guardian-abbott 61/198
Steps Do This
3. Apply an over-bandage(Optional).
Apply an over-bandage to hold down the transmitter andsensor support mount. Use an over-bandage i you find
that the sensor support mount is not adhering well during
daily activities.
Go to the next step.
4. Enter the sensor code into your receiver.
a. When you hear the receiver beep, press the RIGHOption button once to turn the receiver on.
Result: Te receiver screen says, “New Sensor detected.Have you recently inserted a new sensor?” (Fig. 1)
Note: ypically, it may take up to 3 minutes afer
attaching the transmitter beore the receiver beeps. SeeSection 10 to trouble shoot i you do not get the sensordetection message.
b. Press the RIGH Option button (Yes).
Note: I you ever see this message at any other time,press the LEF Option button (No).
c. Press the UP or DOWN Arrow button to change thenumber on the receiver screen to the number on thepackaging. (Fig. 2).
Important: Once the code has been entered and youhave hit the Set button as instructed below, you will notbe able to change the sensor code number. I you haveentered the code incorrectly, you will have to replace thesensor and enter the right sensor code. I you choose the
wrong sensor code, you may get erroneous results romthe sensor.
d Press the RIGH Option button (Set) to
08:30A
No Yes
New Sensor Detected.Have you recently
inserted a new sensor?
Fig. 1
Fig. 2
Sensor Code 08:30A
Cancel Set
105
Caution: I your results rom the Continuous Monitoring mode seem erroneous, check andmake sure that the sensor has not dislodged. I you notice the sensor is dislodged rom theskin, or i you see that the adhesive on your overbandage or the sensor support mount iscoming loose, discard the old sensor and insert a new sensor.
Caution: Te code numbers MUS match to ensure accurate test results.
Section 6 3
Attach Your Transmitter

8/13/2019 The Guardian - Abbott
http://slidepdf.com/reader/full/the-guardian-abbott 62/198
Steps Do This
5. Check your work.
Result: A transmitter ready to send glucose data.
You have done this procedure correctly when:
o Te transmitter is securely attached to the sensorsupport mount.
o You have applied an over-bandage as necessary tohold down the transmitter and the sensor supportmount.
o Te sensor code has been correctly entered into thereceiver.
o You see an icon on the top right hand corner o
the screen.
END OF Section 6
40 Section 6
Attach Your Transmitter

8/13/2019 The Guardian - Abbott
http://slidepdf.com/reader/full/the-guardian-abbott 63/198

8/13/2019 The Guardian - Abbott
http://slidepdf.com/reader/full/the-guardian-abbott 64/198
C a l i b r a t i o n
Section 7 – Key Terms n BG Mode
n Calibrate
n Calibration BG
n Control Solution
n Freestyle Test Strips
n Icon
n Lancet
n Lancing Device
n Lancing Device Cocking Handle
n Lancing Device Depth Indicator Window
n Lancing Device Depth Setting
n Lancing Device Lancet Cup Holder
n LEFT/RIGHT Option Buttons
n Receiver Test Strip Port
n Sharps Container
n UP/DOWN Arrow Buttons

8/13/2019 The Guardian - Abbott
http://slidepdf.com/reader/full/the-guardian-abbott 65/198
7 7 Calibrate Your System/Test Blood Glucose Manually
Purpose o ensure the receiver will calculate your glucose readings accurately.
Start Do this procedure:• Each time the receiver prompts you with the message, “Do BG est.” You will
see a blood drop icon on the screen and you will also hear the system beep(or vibrate).
• When you need to monitor your blood glucose manually using the built-inFreeStyle Meter.
Materials • Soap, water, and a clean towel. • FreeStyle Test Strips.
• A FreeStyle Lancing Device. • Your FreeStyle Navigator Receiver.
• Sterile lancets. • A Sharps container.
Helpful InformationImportant Tings to Remember About System Calibration
Te system is cali• brated using a capillary whole blood glucose measurement (perormed in the BloodGlucose mode using the built-in FreeStyle Blood Glucose Meter). In order to calibrate, the receivercompares the reading it gets rom the blood to the reading the sensor takes rom the interstitial fluid.Based on the calibration, the receiver calculates the glucose readings.
Do not use venous blood or calibrating the system.•
Important: : Your blood glucose level must be between 60 and 300 mg/dL (3.3 and 16.6 mmol/L)to be able to perorm calibration tests. I your blood glucose level is changing rapidly, you may notbe able to calibrate the system. For example, during a meal or exercise, your glucose levels may varyrapidly. ry to time your sensor insertion so that your calibration times do not coincide with yourregular meal or exercise activities.
Caution: Always calibrate the system only using a finger-stick blood sample. Do NO use alternate
site blood glucose measurements to calibrate the system. Te receiver contains a built-in FreeStyle®
Blood Glucose Meter or perorming calibration tests.
Important: : In clinical trials, we observed that the sensor signal sometimes temporarily decreases rom the true value. Tis typically happens at night during sleep, and recovers rapidly when the usermoves or is awakened. However, in order to avoid being affected by this phenomenon the systemshould not be calibrated when the wearer is asleep.
You may not be able to calibrate the system i your glucose levels are changing rapidly (e.g. during•
or afer exercise, meals or insulin dosing). Under such conditions, the system may not ask you tocalibrate; instead, it will delay its request until conditions are acceptable.
Section 7 4
Calibrate Your System/Test Blood Glucose Manually

8/13/2019 The Guardian - Abbott
http://slidepdf.com/reader/full/the-guardian-abbott 66/198
Helpful Information (con’t)
You• MUST successully complete 4 calibration tests. You will calibrate at approximately 10, 12, 24 and72 hours afer sensor insertion. I you do not complete calibration tests successully in the allotted time
periods, your glucose readings will NO be displayed and alarms will be inactive. Te system may askyou to perorm additional calibrations between 2nd and 3rd calibrations depending on the sensor signal.In such cases, you will be prompted with a message to do additional BG tests.
Te receiver will beep (or vibrate) to prompt you to do a calibration. Te receiver will display a blood•
drop icon and the message “Do BG est.” Te system will prompt you with alarm messages whenyour calibrations are unsuccessul.
You will not have continuous monitoring until you have successully completed the first calibration (at•
least or the first ten hours afer sensor insertion).
I you get a request or a calibration or expect additional calibration requests during a time when you do•
not want to be disturbed (e.g. sleep time), you can choose to wait to perorm additional BG tests at a later
point in time. I you choose to wait and the allotted time window or calibration has expired, please notethat you will not get glucose results until you have perormed a successul calibration. You can turn off theSystem Alarms (or set to vibrate) i you do not want to be disturbed by requent requests or calibration.In order to silence the alarms that warn you when the allotted time window or a calibration has expired,you must turn off the data loss alarms and all the our glucose alarms (Low Glucose, High Glucose,Projected Low Glucose and Projected High Glucose).
When to calibrate the system?
You will calibrate the system at approximately 10, 12, 24 and 72 hours afer sensor insertion.
For example:
Insertion at nightI you insert the sensor at 9:00 pm on Day 1,
the first calibration would be at 7:00 am on Day 2,
the second calibration would be at 9:00 am on Day 2,
the third calibration would be at 9:00 pm on Day 2,
the ourth calibration would be at 9:00 pm on Day 4.
Sensor removal would be at 9:00 pm on Day 6.
Although a typical calibration sequence will occur as shown, each calibration has to be perormed in aspecific window o time.
1st calibration: Must be perormed at approximately 10 hours afer a new sensor has been inserted.•
Te first calibration can be perormed afer the 10 hours. Continuous glucose readings will NO bereported until the 1st calibration is perormed successully.
2nd calibration: Must be perormed between 2 and 4 hours afer the 1st calibration or continuous•
glucose will not be reported. Te 2nd calibration can be perormed afer 4 hours; continuous glucosereporting will resume afer completing the 2nd calibration successully.
3rd calibration: Must be perormed between 12 and 20 hours afer the 2nd calibration or continuous•
glucose will not be reported. Te 3rd calibration can be perormed afer 20 hours; continuous glucosereporting will resume afer completing the 3rd calibration successully.
4th calibration: Must be perormed between 48 and 56 hours afer the third calibration or continuous•
glucose will not be reported. Te ourth calibration can be perormed afer 56 hours; continuous
glucose reporting will resume afer completing the 4th calibration successully.
What happens in the example if the first calibration does
not occur until 9 am on Day 2?
Te 2 hour delay will add on to the second, third and ourthcalibration. Second calibration will now happen at 11 am onday 2 and so on. However, sensor removal will still happen at9 pm on Day 6.
42 Section 7
Calibrate Your System/Test Blood Glucose Manually

8/13/2019 The Guardian - Abbott
http://slidepdf.com/reader/full/the-guardian-abbott 67/198
Helpful Information (con’t)
Some common reasons for unsuccessful calibrations
Your BG test result is below 60 mg/dL (3.3 mmol/L) or above 300 mg/dL (16.6 mmol/L). Perorm the•
calibration test when your blood glucose is within the above range.
Your blood glucose is changing too rapidly. Tis can happen during meal or exercise activities or i you have•
taken insulin. Give yoursel an hour beore you try to perorm a calibration test again. Do not perorm aBlood Glucose mode test or calibration i you do not see the blood drop icon on the screen.
e skin temperature may be out of range (the skin temperature has to be between 77° F (25° C) and 104° F•
(40° C).
Te sensor signal may be out o range or has changed relative to the last successul calibration.•
Improper Blood Glucose mode testing. Careully ollow the instructions in this Section to perorm a BG•
test (keep your hands clean, enter the right strip code and choose finger or calibration tests) to avoid errors
rom the Blood Glucose mode test.Te system will prompt you with alarm messages when your calibrations are unsuccessul. See Section 10or more inormation or call Customer Care. You will have to perorm additional Blood Glucose mode tests(BG tests) i your calibrations are unsuccessul.
Section 7 4
Calibrate Your System/Test Blood Glucose Manually

8/13/2019 The Guardian - Abbott
http://slidepdf.com/reader/full/the-guardian-abbott 68/198
Steps Do This
1. Insert a FreeStyle Test Strip into
the receiver’s test strip port.a. Insert the end with the dark rectangle.
b. Gently push until the test strip stops.
Result: Te receiver will display the most recently usedtest strip code number.
2. Ensure that the code numberon the screen matches the code
number on the test strip vial.
Compare the code number on the display with the codenumber on the vial of test strips.
Result: Te receiver will prompt you to “Apply Sample.”
• Te numbers match. a. Press the RIGHT Option button (Set).
b. Go to Step 3.
• Te numbers doNOT match.
a. Use the UP/DOWN Arrow buttons to change thecode to match.
b. Press the RIGHT Option button (Set).
c. Go to Step 3.
• Te screen changesto the Apply Samplescreen.
If the numbers do NO match:
a. Press the LEFT Option button (Back).
b. Repeat Step 2.
If the numbers match, go to Step 3.
If Ten
Caution: Te code numbers MUS match to ensure
accurate test results.
44 Section 7
Calibrate Your System/Test Blood Glucose Manually
Strip Code 08:30A
Cancel Set

8/13/2019 The Guardian - Abbott
http://slidepdf.com/reader/full/the-guardian-abbott 69/198
Steps Do This
3. Select a test site.
Note 1: Vary the sites rom test to test to avoid tenderness
and to avoid creating calluses.
Note 2: Avoid moles, veins, bones, and tendons.
• You are calibrating the system. Select ONLY a finger or testing (see redcircles).
• You are simply doing a manualglucose test and NOT calibrating.
Select rom among the sites shownincluding the circled areas.
If Ten
Calibration sites
n BG est Site
Caution:
Always calibrate the
system using only a finger-stickblood sample. Do NO use
alternate site blood glucose
measurements to calibrate the
system. Te receiver contains
a built-in FreeStyle® Blood
Glucose Meter or perorming
calibration tests.
Caution: I you have hypoglycemia, or hypoglycemia
unawareness, then test ONLY on your fingers.
Section 7 4
Calibrate Your System/Test Blood Glucose Manually

8/13/2019 The Guardian - Abbott
http://slidepdf.com/reader/full/the-guardian-abbott 70/198
Steps Do This
4. Prepare or lancing.a. Wash your hands and the selected test site with soap
and water. Make sure there is no lotion on the test site.
b. Toroughly dry your hands and the test site.
c. Snap the clear cap off the lancing device.
Important: Use a new sterile lancet or every test. NEVER
use a lancet or more than one person.
d. Insert a new FreeStyle Lancet firmly into the whitelancet cup holder.
Important: Do not touch the exposed needle on the lancet.
e. Hold the lancet firmly in place with one hand and use
your other hand to twist off the rounded top.
. Replace the cap until it snaps or clicks into place.
• A finger. Use the grey cap.
• Your orearm or a test site other
than the finger.
Use the clear cap.
If your test site is Ten
46 Section 7
Calibrate Your System/Test Blood Glucose Manually

8/13/2019 The Guardian - Abbott
http://slidepdf.com/reader/full/the-guardian-abbott 71/198
Steps Do This
4. Prepare or lancing. (con’t)g . Select the lancing device depth setting.
• e FreeStyle® Lancing Device oers four dierent depth
settings. Move the dial to the desired setting as shownin the depth indicator window. Level 1 is the shallowestdepth; Level 4 is the deepest. o lance parts o the bodyother than the finger, we recommend that you start atLevel (2) and use the clear cap.
o lance your finger, we recommend that you set thedepth setting to its shallowest depth (1) and use thegrey cap.
h. Pull the dark grey cocking handle out until it clicks.
Note: You may have already cocked the device in Step 4d.
i. Prepare the site:
• A nger. Set the depth setting to its shallowest depth (1).
• Your forearm. Start at Level (2) or higher i your experience withsetting 2 does not produce a usable sample.
I f you are lancing Ten
• A nger. Warm your hand, lower it to waist level, andgently massage the finger.
• Your forearm. Rub the test site vigorously until you eel it gettingwarm (three to five seconds).
If you are using Ten to stimulate blood flow
Section 7 4
Calibrate Your System/Test Blood Glucose Manually

8/13/2019 The Guardian - Abbott
http://slidepdf.com/reader/full/the-guardian-abbott 72/198
Steps Do This
5. Lance the site.To lance your finger (grey cap):
a. Lightly touch the lancing device against the side o
your fingertip.
b. Press the release button.
c. Put the lancing device down.
d. Gently squeeze your finger, i needed, until a drop o
blood the size o a pinhead orms.
To lance your orearm (clear cap):
a. Hold the lancing device against the test site.
b. Press the release button.
c. Continue to hold the lancing device against the test
site as you:
i) Inspect the test site through the clear cap.
ii) Gradually increase pressure until the sample is the
size o this dot:
Important: Do NO smear the sample as you do the
next step.
d. Lif the lancing device straight up.
48 Section 7
Calibrate Your System/Test Blood Glucose Manually

8/13/2019 The Guardian - Abbott
http://slidepdf.com/reader/full/the-guardian-abbott 73/198
Steps Do This
6. Test the sample. Do Not:
• Use test strips more than once. Discard used test strips.
• Scrape the blood.
• Apply blood to the at side of the test strip.
• Apply blood to the test strip when the test strip is out othe receiver.
• Apply blood to both edges o the test strip.
• Put blood or foreign objects into the receiver’s teststrip port.
a. Holding the receiver at a slight angle to the sample, gentlytouch the hal-circle on the test strip to the sample.
Important: Your blood glucose level must be between 60 and
300 mg/dL (3.3 and 16.6 mmol/L) to be able to perorm
calibration tests. I your blood glucose level is changing
rapidly, you may not be able to calibrate the system.
b. Observe the receiver:
• e stopwatch icon does NOTappear within 5 seconds.
Continue adding blood sample to theSAME hal-circle or up to 60 seconds.
• e receiver BEEPS ONCE (onlyi Progress ones are turned on).
Enough blood has been used.
• e stopwatch icon appears. Te receiver is measuring your bloodglucose level.
• e receiver BEEPS TWICE (onlyi Progress ones are turned on).
Te test is done. Go to Step 7.
• Your blood glucose results appearin the display (takes an average o7 seconds).
• e receiver beeps three times. Te test has ailed. Repeat the test.Reer to Section 10 or error messagesand troubleshooting.• You get an error message.
I f Ten
Proccessing 08:30A
Cancel
Section 7 4
Calibrate Your System/Test Blood Glucose Manually

8/13/2019 The Guardian - Abbott
http://slidepdf.com/reader/full/the-guardian-abbott 74/198
Steps Do This
7. Interpret the blood glucoseresults.
8. Confirm you did NOTuse Control Solution.
Press the RIGH Option button to indicate that you didNOT use a Control Solution.
Press the RIGH Option button to select ‘No’ and pressthe RIGH Option button again to view the continuousglucose results. See Section 10 to respond to alarmmessages is there are any.
Note: I you do not select ‘No’ or the “Control Solution?”
question in this step, the system automatically considers ita blood test.
I f And Ten
• LO appears inthe display.
You do NOT have low bloodglucose symptoms.
Repeat the test rom Step 3using:
• Your nger.
• A new test strip.
You have any o these symptoms:
• Weakness • Headache
• Sweating • Confusion
• Nervousness
Follow your healthcareteam’s recommendationsor treating hypoglycemia.
Tis is your second test.
• HI appears inthe display.
You do NOT have high bloodglucose symptoms.
Repeat the test rom Step 3with a new test strip.
You have any o these symptoms: • Fatigue • Excess urination
• irst • Blurry vision
Follow your healthcareteam’s recommendationsor treating hyperglycemia.
Tis is your second test.
• e receiver displays results from 20 to500 mg/dL (1.1 mmol/L to 27.8 mmol/L).
Continue to Step 8.
Glucose BG 08:30A
Y es No
Control Solution?
189mg/ dL
Caution: Low or high glucose measurements canindicate a potentially serious medical condition.
50 Section 7
Calibrate Your System/Test Blood Glucose Manually

8/13/2019 The Guardian - Abbott
http://slidepdf.com/reader/full/the-guardian-abbott 75/198
END OF Section 7
Steps Do This
9. Remove and discard the test strip. Important: est strips may be used only once. Discard used
test strips.
10. Discard the lancet. Note: Use a sealed container such as a Sharps container
to avoid biohazards.
a. Snap off the cap rom the lancing device.
b. Hold the lancet over a Sharps container or
other puncture-proo container with a lid.
c. Pinch the white clip that holds the lancet until the
lancet alls into the container.
11. Check your work. Result: A properly calibrated receiver. You have done this
procedure correctly when:
o Your hands and the test site have been cleaned with
soap and water and thoroughly dried with a clean towel.
o Te code number in the receiver matches the code
number or the test strips.
o Te test site or calibration was a finger.
o Te test site or manual blood glucose testing was
selected rom any o the other test sites showing step 3
o this Section.
o You used your finger, i you have hypoglycemia
unawareness.
o You used the grey cap on the lancing device or a finger
site. Or, you used the clear cap on the lancing device
or a orearm site.
o Te lancing produced an adequate amount o blood
without smearing.
o You ollowed all o the notes in Step 6 when testing
the blood.
o You interpreted the test results according in Step 7.
o You selected NO in response to the receiver’s inquiry,
“Control Solution?”
o You disposed the lancet in a Sharps container or in a
puncture-proo sealed container.
Section 7 5
Calibrate Your System/Test Blood Glucose Manually

8/13/2019 The Guardian - Abbott
http://slidepdf.com/reader/full/the-guardian-abbott 76/198

8/13/2019 The Guardian - Abbott
http://slidepdf.com/reader/full/the-guardian-abbott 77/198

8/13/2019 The Guardian - Abbott
http://slidepdf.com/reader/full/the-guardian-abbott 78/198
A l a r m S
e t t i n g s
Section 8 – Key Terms n Alarm Menu
n Alarm Sensitivity
n Alarm ype
n Data Loss
n High Glucose Alarm
n High Glucose Treshold
n LEF/RIGH Option Buttons
n Low Glucose Alarm
n Low Glucose Treshold
n Main Menu
n Progress ones
n Projected High Alarm
n Projected Low Alarm
n Receiver
n System
n System Alarms
n UP/DOWN Arrow Buttons

8/13/2019 The Guardian - Abbott
http://slidepdf.com/reader/full/the-guardian-abbott 79/198
88 Set, Review, or Change the Alarm Settings
Purpose o set the receiver to:
• Alert you when your glucose conditions change.• Notify you when the receiver needs attention.• Notify you when the receiver begins or completes certain activities.
Start Do this task:• Immediately aer you nish the rst set up of your FreeStyle Navigator system.• When your healthcare team gives you new glucose threshold numbers.• Anytime you get a “Preferences Lost Recongure” alarm message on the receiver.• Anytime you replace your receiver.• Anytime you want to change your alarm settings.• Anytime you want to review your alarm settings.
Materials • Your FreeStyle Navigator Receiver.
• Low and high glucose threshold values (from your healthcare team).
Helpful Information
• High and low glucose alarms let you know when your glucose levels are above or below your low andhigh glucose threshold values. You will decide the low and high glucose threshold values based oninput rom your healthcare team. I there is no glucose data, you will not get glucose alarms.
• A projected alarm is an alarm that provides an early warning o an event that is likely to occur i thecurrent trend continues. Projected alarms use the low and high glucose threshold values regardless owhether or not the low and high glucose alarms are turned on.
For example, a projected low alarm lets you know when you are approaching your low glucose threshold value. You will decide the amount o notice required (whether you should be notified 10 minutes, 20 minutesor 30 minutes in advance o reaching your threshold value) based on the input rom your healthcare team.
• A data loss alarm warns you when glucose results are no longer available. ey occur when the sensorhas expired, when the transmitter-receiver connection is broken, when a calibration has expired orwhen the sensor is not working properly. Te data loss alarm cannot be turned off without turning offthe glucose alarms (Low Glucose, High Glucose, Projected Low Glucose and Projected High Glucose).
• System alarms notiy o events like low battery or time to calibrate.
• Progress tones notiy you o errors, results, and successul completion o steps in activities like BloodGlucose mode testing.
Caution: Te high and low alarms are intended to assist you in managing your diabetes and should
not be exclusively used to detect hypoglycemia or hyperglycemia. Te alarms should always be used inconjunction with other indications o glycemic state such as your glucose level, trend, line graph etc.
Caution: High and low glucose alarms are DIFFEREN rom your glucose targets. Low and high glucose
alarms alert you when you’ve crossed a certain low or high value. Glucose targets allow the reports andline graphs to show how your glucose levels have been perorming compared to your set targets.
Caution: Beore adjusting treatment or diabetes management based on the continuous glucose results rom your FreeStyle Navigator system, perorm a Blood Glucose mode test to confirm the continuousresult.
Section 8 5
Set, Review, or Change the Alarm Settings

8/13/2019 The Guardian - Abbott
http://slidepdf.com/reader/full/the-guardian-abbott 80/198
About Glucose Alarms
Example o a High Glucose Treshold Alarm -Te alarm sounds when the glucose level crossesthe preset threshold value.
High Threshold(180 mg/dL)
Low Threshold(80 mg/dL)
High Threshold(180 mg/dL)
Low Threshold(80 mg/dL)
In addition to alerting you o a high or low glucose condition, the system can also alertyou before you reach such a high or low glucose condition. Tese alarms are called theprojected high and projected low glucose alarms. Tey can be set to alert you 10, 20 or 30minutes beore your glucose levels reach the high or low threshold values. You can turnall glucose alarms ON or OFF. I the alarms are turned OFF, you will not get any alarms.
Tese alarms are designed to help you takeaction as soon as you are notified. Projected lowand projected high glucose alarms increase theoverall ability to detect a condition o low orhigh glucose. However, they cannot be relied onexclusively or notification o all low and highglucose conditions.
High and low glucose threshold alarms can detecta low or high glucose condition more ofen thanprojected high and projected low glucose alarms(see alarm perormance under perormance
characteristics or more inormation). Tereore,do NOT turn off the low and high glucosethreshold alarms to rely just on the projected highand projected low glucose alarms.
In order to get maximum notification o low andhigh glucose conditions, use both the low andhigh glucose threshold alarms AND the projectedlow and projected high glucose alarms.
Example o a Low Glucose Treshold Alarm -Te alarm sounds when the glucose level crossesthe preset threshold value.
Example o a Projected High Glucose Alarm - Tealarm sounds before the glucose level reaches the
preset threshold value.
Example o a Projected Low Glucose Alarm - Tealarm sounds before the glucose level reaches the
FreeStyle Navigator® system is designed to alert you when your glucose levels reachpreset low or high values. Tese values or ‘threshold values’ can be programmed in the
receiver or any individual. Tese high and low glucose alarms or the threshold alarmsare designed to alert you when your glucose levels cross these threshold values.
54 Section 8
Set, Review, or Change the Alarm Settings

8/13/2019 The Guardian - Abbott
http://slidepdf.com/reader/full/the-guardian-abbott 81/198
Follow the guidelines below when selecting your alarm settings or detection o high and low glucoseconditions. When the detection rate is maximum, you will get the greatest number o alarms. When
the detection rate is minimum, you will get the ewest number o alarms.
About Glucose Alarms (con’t)
Caution: Do NO rely solely on the projected glucose alarms or detection o low or high glucose conditions. Always use both the low glucose and high glucose threshold alarms AND the projected low and projectedhigh glucose alarms or maximum notification o low or high glucose conditions.
Threshold Projected Alarm DetectionAlarm Alarm Rate
ON ON Maximum High Sensitivity (30 min)
ON ON Intermediate Low Sensitivity (10 min) or
Medium Sensitivity (20 min)
ON OFF Minimum
OFF OFF None
Section 8 5
Set, Review, or Change the Alarm Settings

8/13/2019 The Guardian - Abbott
http://slidepdf.com/reader/full/the-guardian-abbott 82/198
Main 08:30A
Glucose
Alarms
Reports
System
Add Event
Select
Steps Do This
1. Access the Alarms menu
rom the Main menu.Note: I you don’t press any buttons within 12 seconds,
the receiver screen will go blank and the last change will
be lost i you haven’t pressed the Select button.
a. Press the UP Arrow button or the DOWN Arrow
button to highlight Alarms.
b. Press the RIGH Option button (Select) to go to the
Alarms Setting screen.
2. Decide what to do.
Note: In all the subsequent steps choosing the Next button will allow you to go rom one field toanother. For example, you can go rom the ON/OFF field to the Glucose threshold field to thealarm setting field. Choosing the UP/DOWN Arrow button will allow you to choose the value youwant or the field.
For example, choose ON or OFF or the alarm, choose a number or the threshold like 70 mg/dLor choose medium beep or long beep or the alarm setting.
Review the alarm perormance data in Section 18 or a detailed analysis o the effectiveness o theglucose alarms.
• Set, review or change the Low glucose alarm. Go to Step 3.
• Set, review or change the High glucose alarm. Go to Step 4.
• Set, review or change the PROJECTED Low glucose alarm. Go to Step 5.
• Set, review or change the PROJECTED High glucose alarm. Go to Step 6.
• Set, review or change the Data loss alarms. Go to Step 7.
• Set, review or change the System alarms. Go to Step 8.
• Set Progress tones. Go to Step 9.
• Mute all audible alarms. Go to Step 10.
If you want to Ten
56 Section 8
Set, Review, or Change the Alarm Settings

8/13/2019 The Guardian - Abbott
http://slidepdf.com/reader/full/the-guardian-abbott 83/198
Alarm Settings 08:30A
Mute Alarms
Low Glucose (70)
High Glucose (275)
Projected Low (On)
Projected High (Off )
Main Select
Steps Do This
3. Set, review, or change theLow Glucose alarm.
a. Select Low Glucose rom the Alarms menu.
• Use the UP/DOWN Arrow buttons to highlightLow Glucose.
• Press the RIGH Option button to select LowGlucose.
b. Review or change your settings.
• Press the LEF Option button (Next) to move rom
one field to the next.• Use the UP/DOWN Arrow buttons to change
the setting in any field.
• Press the RIGH Option button (Set) to accept thesettings and return to the Alarms menu.
Note: Te receiver will respond with a brie sampleo the alarm you selected.
c. Decide what to do next.
• You are setting, reviewing, or changingall alarms.
Continue to the next step.
• You are nished setting, reviewing, andchanging alarms.
Go to Step 11.
If Ten
Decide what settings you want:
• Alarm on or o.• Your threshold value.
Note: Te alarm can only be setbetween 60 and 139 mg/dL(3.3 mmol/L and 7.7 mmol/L).
• Alarm type (Setting).
– Low, medium, or high beep.
– Short, medium, or long vibration.
Caution: Te Low Glucose alarm will NO indicate
severe hypoglycemia because the alarm cannot be set
below 60 mg/dL (3.3 mmol/L).
Section 8 5
Set, Review, or Change the Alarm Settings

8/13/2019 The Guardian - Abbott
http://slidepdf.com/reader/full/the-guardian-abbott 84/198
Alarm Settings 08:30A
Mute Alarms
Low Glucose (70)
High Glucose (275)
Projected Low (On)
Projected High (Off )
Main Select
Steps Do This
4. Set, review, or change the
High Glucose alarm.
a. Select High Glucose rom the Alarms menu.
• Use the UP/DOWN Arrow buttons to highlightHigh Glucose.
• Press the RIGH Option button to select HighGlucose.
b. Review or change your settings.
• Press the LEF Option button (Next) to move romone field to the next.
• Use the UP/DOWN Arrow buttons to change thesetting in any field.
• Press the RIGH Option button (Set) to acceptthe settings and return to the Alarms menu.
Note: Te receiver will respond with a brie sampleo the alarm you selected.
c. Decide what to do next.
Decide what settings you want:
• Alarm on or o.
• Your threshold value.
Note: Te alarm can only be setbetween 140 and 300 mg/dL(7.8 mmol/L and 16.7 mmol/L).
• Alarm type (Setting).
– Low, medium, or high beep.
– Short, medium, or long vibration.
• You are setting, reviewing, or changingall alarms.
Continue to the next step.
• You are nished setting, reviewing, andchanging alarms.
Go to Step 11.
If Ten
Caution: Te High Glucose alarm will NO indicate
severe hyperglycemia because the alarm cannot be set
above 300 mg/dL (16.7 mmol/L).
58 Section 8
Set, Review, or Change the Alarm Settings

8/13/2019 The Guardian - Abbott
http://slidepdf.com/reader/full/the-guardian-abbott 85/198
Alarm Settings 08:30A
Low Glucose (70)
High Glucose (275)
Projected Low (On)
Projected High (Off)
Data Loss
Main Select Alarm Settings 08:30A
Projected Low Glucose
ON
Sensitivity: Low
Setting: Medium Beep Next Set
Steps Do This
5. Set, review, or change yourProjected Low glucose alarm.
a. Select Projected Low rom the Alarms menu.
• Use the UP/DOWN Arrow buttons to highlightProjected Low.
• Press the RIGH Option button to selectProjected Low.
b. Review or change your settings.
• Press the LEF Option button (Next) to moverom one field to the next.
• Use the UP/DOWN Arrow buttons to changethe setting in any field.
• Press the RIGH Option button (Set) to accept thesettings and return to the Alarms menu.
Note: Te receiver will respond with a brie sampleo the alarm you selected.
c. Decide what to do next.
• You are setting, reviewing, or changingall alarms.
Continue to the next step.
• You are nished setting, reviewing, and
changing alarms.
Go to Step 11.
If Ten
I you want this much noticebeore reaching your Lowglucose level (approximately)
Ten set theSensitivity to:
• 30 minutes
• 20 minutes
• 10 minutes
High
Medium
Low
Decide what settings you want:
• Alarm on or o.
• Sensitivity.
• Alarm type (Setting).
– Low, medium, or high beep.
– Short, medium, or long vibration.
Section 8 5
Set, Review, or Change the Alarm Settings

8/13/2019 The Guardian - Abbott
http://slidepdf.com/reader/full/the-guardian-abbott 86/198
Alarm Settings 08:30A
Low Glucose (70)
High Glucose (275)
Projected Low (On)
Projected High (Off)
Data Loss
Main Select Alarm Settings 08:30A
Projected High Glucose
ON
Sensitivity: Low
Setting: Medium Beep Next Set
Steps Do This
6. Set, review, or change your
Projected High glucose alarm. a. Select Projected High rom the Alarms menu.
• Use the UP/DOWN Arrow buttons to highlightProjected High.
• Press the RIGH Option button to selectProjected High.
b. Review or change your settings.
• Press the LEF Option button (Next) to moverom one field to the next.
• Use the UP/DOWN Arrow buttons to changethe setting in any field.
• Press the RIGH Option button (Set) to accept thesettings and return to the Alarms menu.
Note: Te receiver will respond with a brie sample
o the alarm you selected.c. Decide what to do next.
Decide what settings you want:• Alarm on or o.
• Sensitivity.
• Alarm type (Setting).
– Low, medium, or high beep.
– Short, medium, or long vibration.
• You are setting, reviewing, or changingall alarms.
Continue to the next step.
• You are nished setting, reviewing, andchanging alarms.
Go to Step 11.
If Ten
I you want this much noticebeore reaching your Lowglucose level (approximately):
Ten set theSensitivity to:
• 30 minutes
• 20 minutes
• 10 minutes
High
Medium
Low
60 Section 8
Set, Review, or Change the Alarm Settings

8/13/2019 The Guardian - Abbott
http://slidepdf.com/reader/full/the-guardian-abbott 87/198
Alarm Settings 08:30A
Low Glucose (70)
High Glucose (275)
Projected Low (On)
Projected High (Off)
Data Loss
Main Select
Steps Do This
7. Set, review, or change the
Data Loss alarms.
Important: I you turn off your Data Loss alarms, you mustalso turn off your Low Glucose, High Glucose, Projected Lowand Projected High alarms.
a. Select Data Loss rom the Alarms menu.
• Use the UP/DOWN Arrow buttons to highlight DataLoss.
• Press the RIGH Option button to select Data Loss.
b. Review or change your settings.
• Press the LEF Option button (Next) to move
rom one field to the next.• Use the UP/DOWN Arrow buttons to change
the setting in any field.
• Press the RIGH Option button (Set) to accept thesettings and return to the Alarms menu.
Note: Te receiver will respond with a brie sample
o the alarm you selected.
c. Decide what to do next.
Decide what settings you want:• Alarm on or o.
• Alarm type (Setting).
– Low, medium, or high beep.
– Short, medium, or long vibration.
• You are setting, reviewing, or changingall alarms.
Continue to the next step.
• You are nished setting, reviewing, andchanging alarms.
Go to Step 11.
If Ten
Section 8 6
Set, Review, or Change the Alarm Settings

8/13/2019 The Guardian - Abbott
http://slidepdf.com/reader/full/the-guardian-abbott 88/198
Alarm Settings 08:30A
High Glucose (275)
Projected Low (On)
Projected High (Off)
Data Loss
System Alarms
Main Select
Steps Do This
8. Set System Alarms.Important: I you turn off the System Alarms, the receiver
will NO prompt you to do the calibration tests afer you
insert a new sensor.
a. Select System Alarms rom the Alarms menu.
b. Review or change your settings.
• Press the LEF Option button (Next) to move
rom one field to the next.
• Use the UP/DOWN Arrow buttons to change
the setting in any field.
• Press the RIGH Option button (Set) to accept thesettings and return to the Alarms menu.
Note: Te receiver will respond with a brie sample
o the alarm you selected.
c. Decide what to do next.
Decide what settings you want:• Alarm on or o.
• Alarm type (Setting).
– Low, medium, or high beep.
– Short, medium, or long vibration.
• You are setting, reviewing, or changingall alarms.
Continue to the next step.
• You are nished setting, reviewing, andchanging alarms.
Go to Step 11.
If Ten
62 Section 8
Set, Review, or Change the Alarm Settings

8/13/2019 The Guardian - Abbott
http://slidepdf.com/reader/full/the-guardian-abbott 89/198
Alarm Settings 08:30A
Projected Low (On)
Projected High (Off)
Data Loss
System Alarms
Progress Tones
Main Select
Decide what settings you want:
• Turn progress tones on or o.• Set progress tones volume low
or high.
Steps Do This
9. Set Progress Tones.
a. Select Progress ones rom the Alarms menu.
b. Review or change your settings.
• Press the LEF Option button (Next) to move
rom one field to the next.
• Use the UP/DOWN Arrow buttons to change
the setting in either field.
• Press the RIGH Option button (Set) to accept thesettings and return to the Alarms menu.
Note: Te receiver will respond with a brie sample
o the alarm you selected.
c. Decide what to do next.
• You want to mute alarms. Go to Step 10.
• You are nished setting, reviewing, andchanging alarms.
Go to Step 11.
If Ten
Section 8 6
Set, Review, or Change the Alarm Settings

8/13/2019 The Guardian - Abbott
http://slidepdf.com/reader/full/the-guardian-abbott 90/198
Alarm Settings 08:30A
Mute Alarms
Low Glucose (70)
High Glucose (275)
Projected Low (On)
Projected High (Off )
Main Select
Alarm Settings 08:30A
Mute Alarms For One Hour?
Cancel Select
END OF Section 8
Steps Do This
10. Mute all audible alarms or1 hour.
Note 1: You will still get vibration, visual alarms will still
be displayed and you will continue to get Low Glucose
alarms.
Note 2: I you want to turn off all alarms or more than
one hour, you should turn off each alarm individually.
Exercise caution when turning off or muting alarms. For
example, i you turn off the low and high glucose alarms,
you will NOT get low and high glucose alarms.
a. Select Mute Alarms rom the Alarms menu.
b. Press the RIGH Option button (Select) to mutealarms or 1 hour.
Note: I you change your mind beore you press the
RIGH Option button (Select), press the LEF Option
button (Cancel) to return to the Alarm screen without
muting the alarms. I the alarms are muted, you will see a
symbol indicating that the alarms are muted. Oncethe alarms have been muted, they cannot be turned on
beore the 1 hour expires.
11. Return to the main menu.Press the LEF Option button (Main) on the Alarmsmenu to return to the main menu.
12. Check your work.Result: Te result will be a receiver set up to alert you to
your glucose conditions, to system events, and to activity progress in a way that you preer.
You will have done this procedure correctly when thereceiver sounds alarms as you want it to.
64 Section 8
Set, Review, or Change the Alarm Settings

8/13/2019 The Guardian - Abbott
http://slidepdf.com/reader/full/the-guardian-abbott 91/198

8/13/2019 The Guardian - Abbott
http://slidepdf.com/reader/full/the-guardian-abbott 92/198
D a i l y U s e
Section 9 – Key Terms n BG Mode
n CM Mode
n Directional Glucose Trend Arrows
n Icon
n Receiver
n Transmitter
n Transmitter Receiver Connection

8/13/2019 The Guardian - Abbott
http://slidepdf.com/reader/full/the-guardian-abbott 93/198
9 9 Daily Use
Purpose o read and understand your display screen.
Start Do this procedure:• Anytime you are using your system in the Continuous Monitoring mode.
Materials Your receiver.
Helpful Information
• Your receiver and transmitter must be linked, connected, and calibrated in order to use the system in the Continuous Monitoring mode.
• When you sleep, place the receiver on a high headboard or on a nearby dresser rather than clipping it to your bed clothing or taking it to bed. Be aware that i the receiver is set to vibrateand i you place it too ar rom you, you may not hear it vibrate.
• You must keep your receiver within 10 feet of the transmitter to maintain a consistent connection.I the connection between the transmitter and receiver is broken you will not receive continuousglucose readings.
• e connection can also be aected by objects getting between the transmitter and receiver, likenearby large metal objects, and by some electronic devices that produce radio requencies.
• As a periodic check, turn your receiver on a ew times everyday to make sure that it is still
producing glucose results.
• As a periodic check, turn on the low glucose alarm everyday to make sure that it sounds analarm (or vibrates) based on your settings.
• If a connection alarm sounds, adjust the placement of the receiver, to restore the connection.Step 2 o this Section describes how to maintain connection between the receiver and transmitter.For general troubleshooting, reer to Section 10 as well.
• If the display turns o, press the RIGHT Option button to turn it back on.
Section 9 6
Daily Use

8/13/2019 The Guardian - Abbott
http://slidepdf.com/reader/full/the-guardian-abbott 94/198
Steps Do This
1. Decide what to do.
2. Reconnect the receiver to thetransmitter.
a. Place the receiver within 10 eet o the transmitter.
b. Decide what to do next.
• Connect your receiver and transmitter. 2
• Reconnect your receiver and transmitter. 2
• Interpret the CM screen. 3
• Interpret icons on the CM screen. 4
• Interpret icons on the Main screen. 4
• Turn the receiver backlight on. 5
If you want to Ten go to this Step
• For less than 30 minutes. 1. Wait or the connection icon to disappearautomatically rom the display to confirmconnection.
2. Go back to Step 1 o Section 9.
• For 30 minutes or more. 1. Press the RIGH Option button twice todisplay the Main Menu screen.
2. Use the UP/DOWN Arrow button to highlightSystem.
3. Press the RIGH Option button (Select) todisplay the System menu with Reconnecthighlighted.
4. Press the RIGH Option button (Select).
5. Wait or the receiver to beep. I it beeps:
• Twice – the system is connected. Go back toStep 1 o Section 9.
• Tree times – the system is not connected.Make sure the batteries in the transmitterare new and ensure that the receiver and
transmitter are linked (see Section 14).
If the receiver has
Ten lost connection
System Menu 08:30A
Reconnect
Data Upload
Status
Link
Set Date/Time
Main Select
66 Section 9
Daily Use

8/13/2019 The Guardian - Abbott
http://slidepdf.com/reader/full/the-guardian-abbott 95/198
Steps Do This
3. Interpret the CM screen.Press the RIGH Option button to turn the display on.
Result: Te Glucose CM screen is displayed.
Location Description
I CM appears here, the receiver is operatingin the Continuous Monitoring mode.
I BG appears here, the receiver isoperating in the Blood Glucose mode.
Te current time o day.
Te directional glucose trend arrow tellsyou the direction that your glucose levels
are trending and how ast (see Step 4).Te system uses 15 minutes o continuousglucose data to display the arrow.Occasionally, the arrow may not bedisplayed temporarily. Reer to the LineGraph or recent glucose history.
ells you what pressing the RIGH Optionbutton will do – in this case, it takes you tothe Main screen.
Your current glucose level. Follow therecommendations o your healthcare teamto treat low glucose (hypoglycemic) andhigh glucose (hyperglycemic) episodes.
Glucose CM 08:30A
Main
120mg/dL
Glucose CM 08:30A
Main
120mg/dL
Glucose CM 08:30A
Main
120mg/dL
Glucose CM 08:30A
Main
120mg/dL
Glucose CM 08:30A
Main
120mg/dL
Caution: Beore adjusting treatment or diabetes management based on thecontinuous glucose results rom your FreeStyle Navigator system, perorm a Blood
Section 9 6
Daily Use

8/13/2019 The Guardian - Abbott
http://slidepdf.com/reader/full/the-guardian-abbott 96/198
Steps Do This
4. Interpret the icons.Note: Te directional trend arrows are different rom the
projected glucose alarms (Section 8). For example, youcan have a projected low glucose alarm and still have a
relatively stable trend arrow.
Tis Icon Means
Your glucose is changing gradually, changing at a rate o lessthan 60 mg/dL/hr (3.3 mmol/L/hr).
Your glucose is increasing moderately, at a rate between60 mg/dL per hour and 120 mg/dL/hr (3.3 mmol/L/hr
and 6.7 mmol/L/hr).
Your glucose is decreasing moderately, at a rate between60 mg/dL/hr and 120 mg/dL/hr (3.3 mmol/L/hr and6.7 mmol/L/hr).
Your glucose is increasing rapidly, at a rate o greater than120 mg/dL/hr (6.7 mmol/L/hr).
Your glucose is decreasing rapidly, at a rate o greater than120 mg/dL/hr (6.7 mmol/L/hr).
Te system is processing a control solution or blood glucosesample in the Blood Glucose mode.
It is time to do a calibration. See Section 7.
Te system is waiting until it is time to do something (orexample, waiting to do the 1st calibration afer inserting asensor). You don’t need to do anything.
Tere is a problem with the transmitter-receiver connection.
See Step 2.
Te alarm is muted.
It is time to replace the batteries in the receiver. Install the newbatteries just beore you insert a new sensor. See Section 2.
Tis icon shows up or Blood Glucose mode test results thathappened when the operating temperature was beyond thesystem’s specified operating temperature range and may be
less accurate. Discard the test and repeat another test withinthe operating temperature range o the system.
68 Section 9
Daily Use

8/13/2019 The Guardian - Abbott
http://slidepdf.com/reader/full/the-guardian-abbott 97/198
END OF Section 9
Steps Do This
5. Turn the Backlight on.a. In order to turn the backlight on, your receiver has to
be turned off. I the receiver is on, wait or 12 secondsto allow the receiver to turn off.
b. Press and release the DOWN Arrow button. Tenimmediately press and release the RIGHT optionbutton. Your receiver will turn on with a backlight.
6. Check your work.
Result: You are aware o your glucose levels and trends.You have done this procedure correctly when:
o You correctly interpret the directional glucosetrend arrows.
o You can tell your current glucose level at a glance.
o You maintain the connection between your transmitterand receiver or can reconnect the transmitter andreceiver when the connection is lost.
o You can correctly interpret the icons that appear on
the receiver screen.
PressFirst
PressSecond
Section 9 6
Daily Use

8/13/2019 The Guardian - Abbott
http://slidepdf.com/reader/full/the-guardian-abbott 98/198

8/13/2019 The Guardian - Abbott
http://slidepdf.com/reader/full/the-guardian-abbott 99/198

8/13/2019 The Guardian - Abbott
http://slidepdf.com/reader/full/the-guardian-abbott 100/198
E r r o r s / P r o b l e m s
Section 10 – Key Terms n Alarms Menu
n Calibration BG
n CM Status
n Calibration
n High Glucose Alarm
n Icon
n Low Glucose Alarm
n Projected High Alarm
n Projected Low Alarm
n Receiver Status
n Sensor
n Sensor Support Mount
n Status Information
n Transmitter
n Transmitter Receiver Connection
n Transmitter Status

8/13/2019 The Guardian - Abbott
http://slidepdf.com/reader/full/the-guardian-abbott 101/198
1010 Respond to Alarms, Errors, and Other Problems
Purpose o resolve alarms messages, error codes, or other problems.
Start Do this any time you:• Receive either an alarm or an error code in the Continuous Monitoring mode or
the Blood Glucose mode.• Experience other problems with your FreeStyle Navigator system.
Materials Your FreeStyle Navigator system.
Helpful Information
• Press the RIGH Option button to respond to a vibration or audio alarm.• Press the LEFT Option button to turn o a text display message.• See Section 8, Step 10 to mute all audible alarms for 1 hour.• Alarms are given a level of urgency based on how soon you must respond. Alarms act dierently
depending upon the level o urgency:
High – H • Must never be ignored.• Cannot be muted.
• Is the same as a medium urgency alarm in all other respects.
Medium – M • Can be muted.• Sounds three short beeps every 6 seconds for 1 minute or
until you activate the display.• Repeats every 5 minutes until acknowledged or xed.• Repeats every 15 minutes aer acknowledged until xed.
Intermediate – I • Is the same as the medium urgency alarm except theintermediate alarm will stop and will not sound again:– Afer 1 hour.– When acknowledged.
– Can be muted.
Low – L • Does not need to be addressed right away.• It is a single beep that does not repeat. Can be muted.• Is turned o when acknowledged.
If the level of Ten the alarm
urgency is
Caution: For ALL alarms, i you do not turn on the display o the receiver within the first hour o thenotification o an alarm, the receiver will stop beeping (or vibrating). No urther alarms will sound(beep or vibrate) until the display has been activated.
• e level of urgency is indicated in some of the following tables with H for high, M for medium,I or intermediate, and L or low.
• e alarms are alphabetized in the tables below.• If you cannot nd the information you need, call Customer Care.
Section 10 7
Respond to Alarms, Errors, and Other Problems

8/13/2019 The Guardian - Abbott
http://slidepdf.com/reader/full/the-guardian-abbott 102/198
Status InformationTe receiver can provide you with a number o different types o Status Inormation. AvailableStatus Inormation is listed in the ollowing table. o access the Status inormation, press theRIGH option button twice to get to the Main menu and use the UP or DOWN arrow button to
highlight System. Select System by pressing the RIGH option button. Highlight and select Statusrom the System menu.
Removed Sensor Allows you to indicate you are removing a Sensorso Data Loss Alarm will not set off. Use this only iyou are removing a sensor.
Note: Once you select this option, the system willterminate any active sensor.
System Status Shows inormation about the System, includingSensor lie remaining (in hours) and time since
valid data was transmitted (in hours).
Receiver Status Shows inormation about the receiver, includingserial number and sofware version (may be useulwhen calling Customer Care), as well as battery lieremaining.
ransmitter Status Shows the transmitter’s serial number. You may needto veriy the serial number afer linking to a newtransmitter. Tis unique value is used by the receiverto accept data rom only the transmitter the receiveris linked to. It also shows battery lie remaining. Aferreplacing batteries, once the system has recognizednew batteries, it will display battery as 75-100%.
Status Information Description
08:30A
No Yes
Did You Remove
The Sensor?
System Status 08:30A
Sensor Life Left 000:000
Time Since
Sensor Data - - -
Back Main
Receiver Status 08:30A
Serial #: BAAH190-80020
SW Version: 0.61
Battery Life: 75-100%
Back Main
Transmitter Status 08:30A
Transmitter ID:
AAAH298-80008
TX Battery: 75-100%
Back Main
72 Section 10
Respond to Alarms, Errors, and Other Problems

8/13/2019 The Guardian - Abbott
http://slidepdf.com/reader/full/the-guardian-abbott 103/198
What is in this Section?
Status Information (con’t)
CM Status 08:30A
Last Reset: OK
Can’t Cal: 6
Cal Failed: BG High
Sensor Err: 207
Back Main
08:30A
Yes No
Do You Want To
Calibrate?
CM Status. Stores recent error codes related to the ContinuousMonitoring mode (may be useul when calling CustomerCare).
Note: Te CM Status screen shows inormation aboutcalibration and sensor errors. You can get inormationabout why the system did not prompt you to perorm acalibration (“Can’t Cal: xxx”) or why a calibration ailed (“CalFailed: xxx”) or why continuous glucose readings are notdisplayed (“Sen Err: xxx”). Tese numbers and inormationhelp troubleshoot your system perormance. Te CustomerCare representative may ask you to access the CM Statusinormation.
Calibration BG. Allow you to add a new blood glucose reading used orcalibration. Use this selection ONLY at the request o aCustomer Care representative.
Note: Once you use this eature to successully perorm anadditional calibration, the system discards the parametersrom the previous calibrations. It begins to calculate glucoseresults based on this calibration. When using the CalibrationBG eature, always perorm an additional Blood Glucosemode test to confirm the first test.Tis eature cannot be used in the first ten hours afer sensor
insertion. Using this eature does not change the regularscheduled times or calibration.
Status Information Description
1. Te system will notiy you o any conditions that may needyour attention through messages that will be displayedon your receiver screen. You can find out what thosemessages mean and how to respond to them. For example,see Fig. 1. Te messages are arranged alphabetically in thetable titled “Respond to alarm message”.
2. When you use your built in FreeStyle meter to makemeasurements, you may receive error codes on thereceiver. You can find out how to respond when you getthose codes. For example, see Fig. 2.
3. From time to time, you may experience problems with thesystem, you can find inormation on how to resolve suchproblems For example your receiver does not turn on
Fig. 1
Fig. 2
Glucose CM 03:00A
85mg/dL
Acknowledge Main
Projected LowGlucose
Glucose BG 08:30A
Er1
Home
Section 10 7
Respond to Alarms, Errors, and Other Problems

8/13/2019 The Guardian - Abbott
http://slidepdf.com/reader/full/the-guardian-abbott 104/198
O V E R
R e s
p o n d t o a l a r m m e s s a g e :
A
l a r m M e s s a g e
U r g e n c y
W h a t I t M
e a n s
W h a t t o D o
___
______
N / A
• S y s t e m i s n o t p r o d u c i n g c o
n t i n u o u s
g l u c o s e r e s u l t s .
• i s i s n o r m a l f o r n e w s e n s o r s b e f o r e t h e
fi r s t c a l i b r a t i o n ( B l o o d G l u
c o s e m o d e t e s t ) i s
p e r o r m e d . L o w a n d H i g h G l u c o s e a l a r m s c a n n o t
u n c t i o n w h i l e t h i s a p p e a r s o n t h e d i s p l a y .
• P r o b l e m w i t h t h e c o n n e c t i o n b e t w e e n t h e r e c e i v e r
a n d t r a n s m i t t e r .
• S e n s o r p r o b l e m ( o r s e n s o r
n o l o n g e r i n y o u r s k i n ) .
• T r a n s m i t t e r f a i l u r e .
• S e n s o r i s e x p i r e d .
W a i t o
r t h e r e c e i v e r t o p r o m p t y o u w i t h
a n a l a r m
m e s s a g
e .
“_________ ”
A F l a s h i n g l i n e o n t h e
b o t t o m o t h e s c r e e n .
N / A
Y o u a r e i n o n e o t h e m e n u i t e m s a n d a n e w a l a r m
m e s s a g e h a s j u s t b e e n t r i g g e
r e d .
B y u s i n
g t h e R I G H a n d L E F o p t i o n a n d U P /
D O W N
b u t t o n s o n t h e r e c e i v e r g o t o t h e G l u c o s e
s c r e e n a n d r e a d y o u r a l a r m .
F l a s
h i n g l i g h t a t t h e t e s t
s t r i p p o r t .
N / A
R e c e i v e r h a s r e s e t .
C a l l C u
s t o m e r C a r e .
A l a r m s I n a c t i v e I n s e r t
N e w
S e n s o r .
I
A l a r m s a r e n o t o p e r a t i n g b e c a u s e t h e 5 - d a y l i e o
t h e s e n s o r h a s e n d e d .
R e m o v e t h e s e n s o r a n d i n s e r t a n e w o n e
( s e e S e c t i o n 5 ) .
A l a r m s I n a c t i v e R e p l a c e
r e c e
i v e r .
I
R e c e i v e r m a l u n c t i o n . P r o b l e m h a s p e r s i s t e d o r a n
h o u r .
C a l l C u
s t o m e r C a r e .
A l a r m s I n a c t i v e R e p l a c e
s e n s o r .
I
T e s e n s o r i s n o t u n c t i o n i n g p r o p e r l y . T e a l a r m s
a r e n o t w o r k i n g .
R e m o v e t h e s e n s o r a n d i n s e r t a n e w o n e
( s e e S e c t i o n 5 ) .
A l a r m s I n a c t i v e R e p l a c e
r a n s m i t t e r .
I
r a n s m i t t e r p r o b l e m o r a n h o u r . A l a r m s a r e n o t
a c t i v e .
R e p l a c e t h e t r a n s m i t t e r , a n d i n s e r t a n e w
s e n s o r .
H i g h –
H , M e d i u m –
M , I n t e r m e d i a t
e –
I , L o w –
L
C u s t o m e r C a r e : 1 - 8 6 6 - 5 9 7 - 5 5 2 0
74 Section 10
Respond to Alarms, Errors, and Other Problems
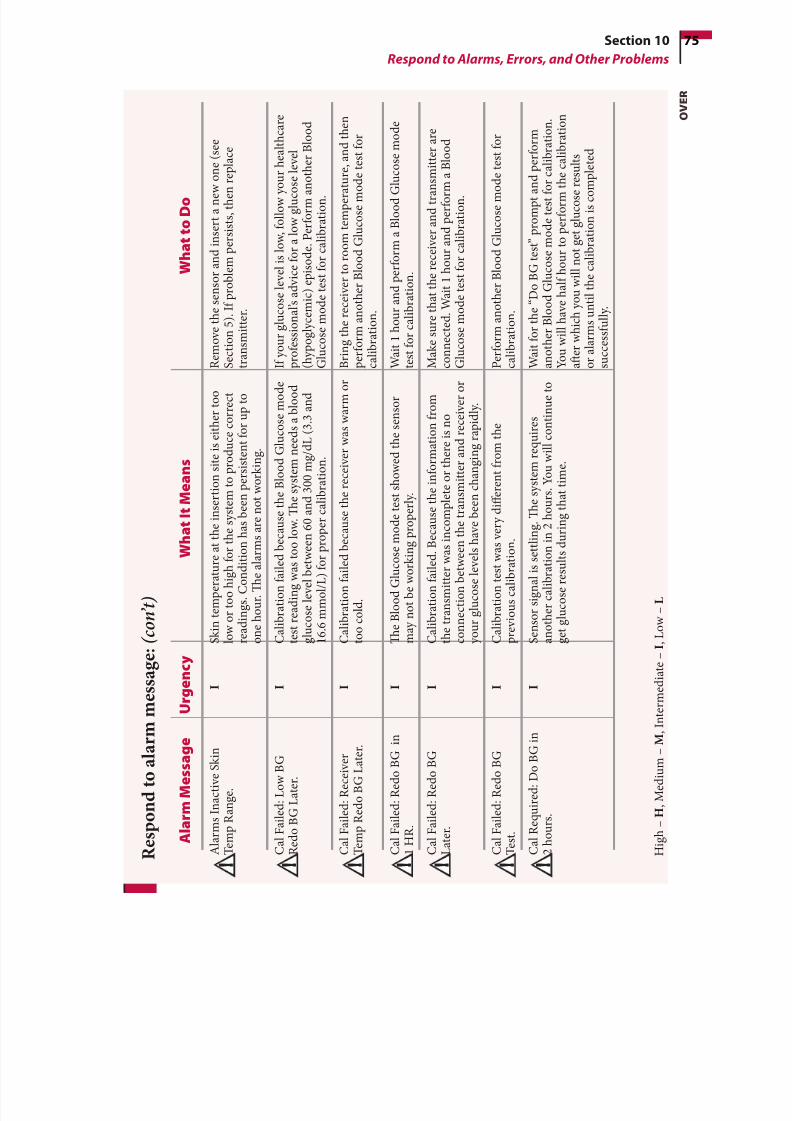
8/13/2019 The Guardian - Abbott
http://slidepdf.com/reader/full/the-guardian-abbott 105/198
O V E R
A l a r m s I n a c t i v e S k i n
e m
p R a n g e .
I
S k i n t e m p e r a t u r e a t t h e i n s e r t i o n s i t e i s e i t h e r t o o
l o w o r t o o h i g h o r t h e s y s t e m t o p r o d u c e c o r r e c t
r e a d i n g s . C o n d i t i o n h a s b e e n p e r s i s t e n t o r u p t o
o n e h o u r . T e a l a r m s a r e n o t w o r k i n g .
R e m o v e t h e s e n s o r a n d i n s e r t a n e w o n e
( s e e
S e c t i o n
5 ) . I p r o b l e m p e r s i s t s , t h e n r e p l a c e
t r a n s m i t t e r .
C a l
F a i l e d : L o w B G
R e d
o B G L a t e r .
I
C a l i b r a t i o n a i l e d b e c a u s e t h
e B l o o d G l u c o s e m o d e
t e s t r e a d i n g w a s t o o l o w . T e s y s t e m n e e d s a b l o o d
g l u c o s e l e v e l b e t w e e n 6 0 a n d 3 0 0 m g / d L ( 3 . 3 a n d
1 6 . 6 m m o l / L ) o r p r o p e r c a l i b r a t i o n .
I y o u r
g l u c o s e l e v e l i s l o w , o l l o w y o u r h
e a l t h c a r e
p r o e s s i o n a l ’ s a d v i c e o r a l o w g l u c o s e l e v e l
( h y p o g l y c e m i c ) e p i s o d e . P e r o r m a n o t h e r B l o o d
G l u c o s e m o d e t e s t o r c a l i b r a t i o n .
C a l
F a i l e d : R e c e i v e r
e m
p R e d o B G L a t e r .
I
C a l i b r a t i o n a i l e d b e c a u s e t h
e r e c e i v e r w a s w a r m o r
t o o c o l d .
B r i n g t h e r e c e i v e r t o r o o m t e m p e r a t u r e , a n d t h e n
p e r o r m
a n o t h e r B l o o d G l u c o s e m o d e t e s t o r
c a l i b r a t i o n .
C a l
F a i l e d : R e d o B G i n
1 H R .
I
T e B l o o d G l u c o s e m o d e t e s t s h o w e d t h e s e n s o r
m a y n o t b e w o r k i n g p r o p e r l y .
W a i t 1 h o u r a n d p e r o r m a B l o o d G l u c o
s e m o d e
t e s t o r
c a l i b r a t i o n .
C a l
F a i l e d : R e d o B G
L a t e r .
I
C a l i b r a t i o n a i l e d . B e c a u s e t h e i n o r m a t i o n r o m
t h e t r a n s m i t t e r w a s i n c o m p l e t e o r t h e r e i s n o
c o n n e c t i o n b e t w e e n t h e t r a n
s m i t t e r a n d r e c e i v e r o r
y o u r g l u c o s e l e v e l s h a v e b e e n c h a n g i n g r a p i d l y .
M a k e s u r e t h a t t h e r e c e i v e r a n d t r a n s m i t t e r a r e
c o n n e c
t e d . W a i t 1 h o u r a n d p e r o r m a B
l o o d
G l u c o s e m o d e t e s t o r c a l i b r a t i o n .
C a l
F a i l e d : R e d o B G
e s t .
I
C a l i b r a t i o n t e s t w a s v e r y d i ff
e r e n t r o m t h e
p r e v i o u s c a l i b r a t i o n .
P e r o r m
a n o t h e r B l o o d G l u c o s e m o d e t e s t o r
c a l i b r a t i o n .
C a l
R e q u i r e d : D o B G i n
2 h o
u r s .
I
S e n s o r s i g n a l i s s e t t l i n g . T e
s y s t e m r e q u i r e s
a n o t h e r c a l i b r a t i o n i n 2 h o u r s . Y o u w i l l c o n t i n u e t o
g e t g l u c o s e r e s u l t s d u r i n g t h
a t t i m e .
W a i t o
r t h e “ D o B G t e s t ” p r o m p t a n d p e r o r m
a n o t h e r B l o o d G l u c o s e m o d e t e s t o r c a l i b r a t i o n .
Y o u w i l l h a v e h a l h o u r t o p e r o r m t h e c a l i b r a t i o n
a f e r w h i c h y o u w i l l n o t g e t g l u c o s e r e s u l t s
o r a l a r m
s u n t i l t h e c a l i b r a t i o n i s c o m p l e t e d
s u c c e s s
u l l y .
R e s
p o n d t o a l a r m m e s s a g e :
( c o n ’ t )
A
l a r m M e s s a g e
U r g e n c y
W h a t I t M
e a n s
W h a t t o D o
H i g h –
H , M e d i u m –
M , I n t e r m e d i a t
e –
I , L o w –
L
Section 10 7
Respond to Alarms, Errors, and Other Problems

8/13/2019 The Guardian - Abbott
http://slidepdf.com/reader/full/the-guardian-abbott 106/198
O V E R
C o o
l D o w n S k i n .
L
U n a b l e t o c a l i b r a t e t h e s y s t e m b e c a u s e t h e s k i n
t e m p e r a t u r e i s t o o w a r m .
C o o l t h
e s k i n a t t h e i n s e r t i o n s i t e a n d w a i t o r
t h e “ D o B G e s t ” p r o m p t a n d p e r o r m a
n o t h e r
B l o o d G l u c o s e m o d e t e s t o r c a l i b r a t i o n . Y o u c a n
c o o l d o
w n y o u r s k i n t e m p b y m o v i n g t o
a c o o l e r
e n v i r o n
m e n t . I y o u a r e w e a r i n g w a r m c
l o t h i n g
( l i k e a s w e a t e r o r j a c k e t ) , t r y t a k i n g t h e m
o ff .
C o o
l D o w n S k i n R e d o
B G
L a t e r .
I
C a l i b r a t i o n a i l e d b e c a u s e y o u r s k i n t e m p e r a t u r e i s
t o o w a r m .
C o o l t h
e s k i n a t t h e i n s e r t i o n s i t e . W a i t o r h a l
a n h o u r a n d p e r o r m a n o t h e r B l o o d G l u
c o s e
m o d e t e s t o r c a l i b r a t i o n . Y o u c a n c o o l d
o w n y o u r
s k i n t e m p b y m o v i n g t o a c o o l e r e n v i r o n
m e n t . I
y o u a r e
w e a r i n g w a r m c l o t h i n g ( l i k e a s w e a t e r o r
j a c k e t ) , t r y t a k i n g t h e m o ff .
D i d
Y o u R e m o v e t h e
S e n s o r ?
L
• e s y s t e m h a s d e t e c t e d t h
a t t h e s e n s o r w a s j u s t
r e m o v e d .
• I f t h i s m e s s a g e a p p e a r s a n d y o u d i d n o t r e m o v e
t h e s e n s o r , t h e r e m a y b e a
a u l t y c o n n e c t i o n
b e t w e e n t h e s e n s o r a n d t h e t r a n s m i t t e r .
• I f y o u
d i d n o t j u s t r e m o v e t h e s e n s o r , s e l e c t N o .
• E n s u r e t h a t t h e t r a n s m i t t e r i s a t t a c h e d r m l y t o
t h e s e
n s o r s u p p o r t m o u n t .
• E n s u r e t h a t t h e s e n s o r s u p p o r t m o u n t i s a t t a c h e d
fi r m l y t o t h e s k i n .
• I f t h e
a l a r m p e r s i s t s , r e m o v e t h e s e n s o r
a n d i n s e r t
a n e w
o n e ( s e e S e c t i o n 5 ) .
D o B G t e s t .
M
A B l o o d G l u c o s e m o d e t e s t i s n e e d e d o r c a l i b r a t i o n .
T e r e c e i v e r w i l l p r o m p t y o u t o p e r o r m t h i s t e s t
a p p r o x i m a t e l y 1 0 h o u r s a f e r t h e s e n s o r i n s e r t i o n , 2
t o 4 h o u r s a f e r t h e fi r s t s u c c e s s u l c a l i b r a t i o n , 1 2 t o
2 0 h o u r s a f e r t h e s e c o n d s u c c e s s u l c a l i b r a t i o n a n d
4 8 t o 5 6 h o u r s a f e r t h e t h i r d
s u c c e s s u l c a l i b r a t i o n .
P e r o r m
a B l o o d G l u c o s e m o d e t e s t o r c a l i b r a t i o n
S e e S e c
t i o n 7 .
R e s
p o n d t o a l a r m m e s s a g e :
( c o n ’ t )
A
l a r m M e s s a g e
U r g e n c y
W h a t I t M
e a n s
W h a t t o D o
H i g h –
H , M e d i u m –
M , I n t e r m e d i a t
e –
I , L o w –
L
C u s t o m e r C a r e : 1 - 8 6 6 - 5 9 7 - 5 5 2 0
76 Section 10
Respond to Alarms, Errors, and Other Problems

8/13/2019 The Guardian - Abbott
http://slidepdf.com/reader/full/the-guardian-abbott 107/198
O V E R
D o B G e s t A l a r m s
I n a c t i v e .
I
C a l i b r a t i o n w a s n o t p e r o r m
e d w i t h i n t h e r e q u i r e d
t i m e ; t h e r e o r e , r e a d i n g s w i l l n o t b e d i s p l a y e d a n d
t h e a l a r m s a r e n o t w o r k i n g .
P e r o r m
a B l o o d G l u c o s e m o d e t e s t o r c a l i b r a t i o n .
H i g h G l u c o s e .
M
Y o u r g l u c o s e h a s r e a c h e d y o
u r p r e s e t h i g h g l u c o s e
t h r e s h o l d .
F o l l o w t h e r e c o m m e n d a t i o n s o y o u r h e a l t h c a r e
t e a m o
r t r e a t i n g a h i g h g l u c o s e l e v e l
( h y p e r g l y c e m i c ) e p i s o d e . †
L i n k .
L
T e r e c e i v e r i s n o t l i n k e d t o
t h e t r a n s m i t t e r . T e
l i n k i s n e c e s s a r y o r t h e s y s t e m t o o p e r a t e i n t h e
C o n t i n u o u s M o n i t o r i n g m o d e .
P l a c e t h e r e c e i v e r w i t h i n 1 0 e e t o t h e t r a n s m i t t e r .
S e l e c t S
y s t e m r o m t h e r e c e i v e r ’ s M a i n m
e n u , t h e n
s e l e c t L
i n k . I t h e t r a n s m i t t e r I D t h a t a p p
e a r s o n t h e
d i s p l a y
s c r e e n i s c o r r e c t , s e l e c t Y e s . S e e S e c t i o n 1 4 .
L o g
C l e a r e d .
L
H i s t o r y l o g h a s b e e n s u c c e s s u l l y c l e a r e d .
A c k n o w l e d g e t h e a l a r m .
L o g
C o r r u p t e d S o m e
D a t a L o s t .
L
H i s t o r y l o g i s c o r r u p t .
T e r e c
e i v e r d e t e c t e d a c o r r u p t s e c t o r i n
t h e l o g
a n d e r a
s e d i t . T e d a t a i n t h i s s e c t o r i s l o s t . Y o u r
r e p o r t s
w i l l n o t c o n t a i n t h i s l o s t d a t a . I
t h e e r r o r
o c c u r s , c a l l C u s t o m e r C a r e .
L o w
G l u c o s e .
H
Y o u r g l u c o s e h a s r e a c h e d y o
u r p r e s e t l o w g l u c o s e
t h r e s h o l d .
F o l l o w
t h e r e c o m m e n d a t i o n s o y o u r h e
a l t h c a r e
t e a m o
r t r e a t i n g a l o w g l u c o s e l e v e l ( h y p o g l y c e m i c )
e p i s o d e . †
R e s
p o n d t o a l a r m m e s s a g e :
( c o n ’ t )
A
l a r m M e s s a g e
U r g e n c y
W h a t I t M
e a n s
W h a t t o D o
H i g h –
H , M e d i u m –
M , I n t e r m e d i a t
e –
I , L o w –
L
† C
a u t i o n : B e f o r e a d j u s t i n g t r e a t m e n
t f o r
d i a b e t e s m a n a g e m e n t b a s e d o n t h e c o n t i n u o u s g l u c o s e r e s u
l t s f r o m y o u r
F r e e S t y
l e N a v i g a t o r s y s t e m , p e r f o r m
a B l o o d G l u c o s e m o d e t e s t t o c o n
fi r m t h e c o n t i n u o u s r e s u
l t .
Section 10 7
Respond to Alarms, Errors, and Other Problems

8/13/2019 The Guardian - Abbott
http://slidepdf.com/reader/full/the-guardian-abbott 108/198
O V E R
N e w
S e n s o r D e t e c t e d .
D i d
y o u r e c e n t l y i n s e r t
n e w
S e n s o r ?
L
• e s y s t e m h a s d e t e c t e d a
n e w s e n s o r .
• I f t h i s m e s s a g e a p p e a r s a n d y o u d i d n o t i n s e r t
a n e w s e n s o r , t h e r e m a y b e a a u l t y c o n n e c t i o n
b e t w e e n t h e s e n s o r a n d t h
e t r a n s m i t t e r .
I y o u j u s t i n s e r t e d a n e w s e n s o r , s e l e c t Y e s . I y o u
d i d n o t i n s e r t a n e w s e n s o r , s e l e c t N o . E n s u r e t h a t
t h e t r a n s m i t t e r i s a t t a c h e d fi r m l y t o t h e s e n s o r
s u p p o r t m o u n t . I t h e a l a r m p e r s i s t s , t h e
s e n s o r
m a y h a
v e a i l e d . R e m o v e t h e s e n s o r a n d
i n s e r t a
n e w o n
e ( s e e S e c t i o n 5 ) T i s m e s s a g e c a
n a p p e a r
d u r i n g
o r a f e r c l e a n i n g t h e t r a n s m i t t e r .
E n s u r e
t h a t t h e t r a n s m i t t e r i s t h o r o u g h l y d r y b e o r e
i n s e r t i n
g a n e w s e n s o r ( s e e S e c t i o n 1 3 ) .
P r e e r e n c e s L o s t
R e c o n fi g u r e .
L
A n e r r o r o c c u r r e d w i t h t h e r e c e i v e r c o n fi g u r a t i o n .
T e r e c e i v e r h a s r e s e t . Y o u r s t o r e d p r e e r e n c e s m a y
b e l o s t .
R e v i e w
y o u r a l a r m s e t t i n g s a n d o t h e r u s e r - s e t t a b l e
i t e m s l i k e t h e c o u n t r y s e t t i n g s .
P r o j e c t e d H i g h G l u c o s e .
M
T i s i s a n e a r l y w a r n i n g t h a t y o u r g l u c o s e l e v e l a n d
t h e r a t e a t w h i c h i t i s c h a n g i n g i n d i c a t e t h a t y o u
m a y s o o n r e a c h y o u r h i g h g l u c o s e t h r e s h o l d .
W h e n s e t t o
H i g h s e n s i t i v i t y , y o u h a v e a b o u t
3 0 m i n u t e s b e o r e r e a c h i n g y o u r h i g h g l u c o s e
t h r e s h o l d .
W h e n s e t t o
M e d i u m s e n s i t i v i t y , y o u h a v e a b o u t
2 0 m i n u t e s b e o r e r e a c h i n g y o u r h i g h g l u c o s e
t h r e s h o l d .
W h e n s e t t o
L o w s e n s i t i v i t y , y o u h a v e a b o u t
1 0 m i n u t e s b e o r e r e a c h i n g y o u r h i g h g l u c o s e
t h r e s h o l d .
F o l l o w
t h e r e c o m m e n d a t i o n o y o u r h e a
l t h c a r e
t e a m o
r t r e a t i n g o r s t o p p i n g t h e r i s e i n g l u c o s e
t h a t y o u a r e e x p e r i e n c i n g . †
† C
a u t i o n : B e f o r e a d j u s t i n g t r e a t m e n
t f o r
d i a b e t e s m a n a g e m e n t b a s e d o n t h e c o n t i n u o u s g l u c o s e r e s u
l t s f r o m y o u r
F r e e S t y
l e N a v i g a t o r s y s t e m , p e r f o r m
a B l o o d G l u c o s e m o d e t e s t t o c o n
fi r m t h e c o n t i n u o u s r e s u
l t .
R e s
p o n d t o a l a r m m e s s a g e :
( c o n ’ t )
A
l a r m M e s s a g e
U r g e n c y
W h a t I t M
e a n s
W h a t t o D o
H i g h –
H , M e d i u m –
M , I n t e r m e d i a t
e –
I , L o w –
L
C u s t o m e r C a r e : 1 - 8 6 6 - 5 9 7 - 5 5 2 0
78 Section 10
Respond to Alarms, Errors, and Other Problems

8/13/2019 The Guardian - Abbott
http://slidepdf.com/reader/full/the-guardian-abbott 109/198
O V E R
P r o j e c t e d L o w G l u c o s e .
M
T i s i s a n e a r l y w a r n i n g t h a t y o u r g l u c o s e l e v e l a n d
t h e r a t e a t w h i c h i t i s c h a n g i n g i n d i c a t e t h a t y o u
m a y s o o n r e a c h y o u r l o w g l u c o s e t h r e s h o l d .
W h e n s e t t o
H i g h s e n s i t i v i t y , y o u h a v e a b o u t
3 0 m i n u t e s b e o r e r e a c h i n g y o u r l o w g l u c o s e
t h r e s h o l d .
W h e n s e t t o
M e d i u m s e n s i t i v i t y , y o u h a v e a b o u t
2 0 m i n u t e s b e o r e r e a c h i n g y o u r l o w g l u c o s e
t h r e s h o l d .
W h e n s e t t o
L o w s e n s i t i v i t y , y o u h a v e a b o u t
1 0 m i n u t e s b e o r e r e a c h i n g y o u r l o w g l u c o s e
t h r e s h o l d .
F o l l o w
t h e r e c o m m e n d a t i o n s o y o u r h e
a l t h c a r e
t e a m o
r t r e a t i n g o r s t o p p i n g t h e d r o p i n
g l u c o s e
t h a t y o u r a r e e x p e r i e n c i n g . †
R e c e i v e r E r r o r A l a r m s
I n a c t i v e .
I
R e c e i v e r e r r o r .
T e p r o b l e m c o u l d g o a w a y i n 5 0 m i n u t e s o r l e s s .
I p r o b l e m p e r s i s t s , c a l l C u s t o m e r C a r e .
R e c o n n e c t .
L
T e r e c e i v e r h a s n o t b e e n r e c e i v i n g s i g n a l s s e n t b y
t h e t r a n s m i t t e r o r 5 m i n u t e s . T e r e c e i v e r i s e i t h e r
t o o a r r o m t h e t r a n s m i t t e r
o r t h e r e a r e m a t e r i a l s
o r s i g n a l s c a u s i n g i n t e r e r e n
c e .
B e s u r e
t h e r e c e i v e r a n d t r a n s m i t t e r a r e w i t h i n
1 0 e e t
o o n e a n o t h e r . I t h e a l a r m p e r s i s t s ,
s e l e c t S
y s t e m r o m t h e M a i n m e n u , t h e n
s e l e c t
R e c o n n
e c t . S e e S e c t i o n 9 , S t e p 2 .
R e c o n n e c t A l a r m s
I n a c t i v e .
M
T e r e c e i v e r h a s n o t b e e n r e c e i v i n g s i g n a l s s e n t b y
t h e t r a n s m i t t e r o r 8 m i n u t e s . T e r e c e i v e r i s e i t h e r
t o o a r r o m t h e t r a n s m i t t e r
o r t h e r e a r e m a t e r i a l s
o r s i g n a l s c a u s i n g i n t e r e r e n
c e .
B e s u r e
t h e r e c e i v e r a n d t r a n s m i t t e r a r e w i t h i n
1 0 e e t
o o n e a n o t h e r . I t h e a l a r m p e r s i s t s ,
s e l e c t S
y s t e m r o m t h e M a i n m e n u , t h e n
s e l e c t
R e c o n n
e c t . S e e S e c t i o n 9 , S t e p 2 .
R e m
o v e A n y S e n s o r
A l a r m s I n a c t i v e .
I
A l a r m s a r e n o t o p e r a t i n g . T
e r e c e i v e r t h o u g h t t h e
s e n s o r w a s i n s e r t e d w h e n t h
e r e c e i v e r w a s r e s e t .
R e m o v e t h e s e n s o r a n d i n s e r t a n e w o n e
( s e e
S e c t i o n
5 ) . I g n o r e t h e m e s s a g e i t h e r e i s n o
s e n s o r i n s e r t e d .
R e s
p o n d t o a l a r m m e s s a g e :
( c o n ’ t )
A
l a r m M e s s a g e
U r g e n c y
W h a t I t M
e a n s
W h a t t o D o
† C
a u t i o n : B e f o r e a d j u s t i n g t r e a t m e n
t f o r
d i a b e t e s m a n a g e m e n t b a s e d o n t h e c o n t i n u o u s g l u c o s e r e s u
l t s f r o m y o u r
F r e e S t y
l e N a v i g a t o r s y s t e m , p e r f o r m
a B l o o d G l u c o s e m o d e t e s t t o c o n
fi r m t h e c o n t i n u o u s r e s u
l t .
H i g h –
H , M e d i u m –
M , I n t e r m e d i a t
e –
I , L o w –
L
Section 10 7
Respond to Alarms, Errors, and Other Problems

8/13/2019 The Guardian - Abbott
http://slidepdf.com/reader/full/the-guardian-abbott 110/198
O V E R
R e p
l a c e R e c e i v e r
B a t t e r y W i t h i n 1 W e e k .
L
T e b a t t e r i e s i n y o u r r e c e i v e
r w i l l l o s e p o w e r i n
a p p r o x i m a t e l y 1 w e e k .
R e p l a c e t h e r e c e i v e r b a t t e r i e s b e o r e y o u
i n s e r t a
n e w s e n s o r ( s e e S e c t i o n 2 ) . R e p l a c i n g t h
e b a t t e r i e s
b e o r e a s e n s o r h a s e x p i r e d w i l l r e q u i r e y o u t o
i n s e r t a
n e w s e n s o r .
R e p
l a c e S e n s o r S o o n .
L
T e s e n s o r w i l l r e a c h t h e e n d
o i t s l i e w i t h i n 2 h o u r s . R e p l a c e t h e s e n s o r w i t h i n t h e n e x t 2 h o u r s ( s e e
S e c t i o n
5 ) .
R e p
l a c e X B a t t e r y
W i t h N e x t S e n s o r .
L
T e t r a n s m i t t e r b a t t e r y m o n
i t o r i n d i c a t e s t h e r e a r e
o n l y 4 d a y s o b a t t e r y l e f .
R e p l a c e t h e t r a n s m i t t e r b a t t e r y p r i o r t o i n s e r t i n g
t h e n e x
t s e n s o r . B e s u r e t o r e c o n n e c t t h e
t r a n s m i t t e r a n d r e c e i v e r .
S e n s o r E r r o r A l a r m s
I n a c t i v e .
I
U n s t a b l e s e n s o r s i g n a l . U n a b l e t o c a l c u l a t e g l u c o s e .
A l a r m s a r e n o t w o r k i n g .
W a i t o
r 5 0 m i n u t e s o r t h e p r o b l e m t o g
o a w a y .
E n s u r e
t h a t t h e s e n s o r i s fi r m l y a t t a c h e d
a n d t h a t
t h e t r a n s m i t t e r a n d t h e s e n s o r s u p p o r t m
o u n t a r e
n o t l o o s e . I t h e p r o b l e m p e r s i s t s , r e m o v
e s e n s o r
a n d i n s
e r t n e w o n e .
S e n s o r E r r o r R e p l a c e
S e n s o r .
I
S e n s o r a i l u r e . N o m o r e B G
a l a r m s w i l l o c c u r .
R e m o v e a n d i n s e r t a n e w s e n s o r ( s e e S e c t i o n 5 ) i
t h i s m e
s s a g e a p p e a r s w i t h i n t h e fi r s t 1 0 h o u r s a f e r
s e n s o r i n s e r t i o n . O t h e r w i s e , p l e a s e c a l l C u s t o m e r
C a r e b e o r e r e m o v i n g t h e s e n s o r .
S k i n
t e m p r a n g e A l a r m s
i n a c t i v e .
I
S k i n t e m p o u t o r a n g e ( t o o
w a r m o r t o o c o l d ) .
C o n d i t i o n h a s b e e n p e r s i s t e n t o r 1 0 m i n u t e s .
A l a r m s a r e n o t w o r k i n g .
B r i n g s k i n t e m p e r a t u r e w i t h i n r a n g e . E n
s u r e t h a t
t h e s e n s o r s u p p o r t m o u n t i s fi r m l y a t t a c
h e d t o
t h e s k i n . I t h e p r o b l e m p e r s i s t s a f e r 5 0
m i n u t e s ,
r e m o v e
t h e s e n s o r a n d i n s e r t a n e w o n e
( s e e
S e c t i o n
5 ) . I t h e p r o b l e m s t i l l p e r s i s t s , r e p l a c e
t r a n s m i t t e r .
R e s
p o n d t o a l a r m m e s s a g e :
( c o n ’ t )
A
l a r m M e s s a g e
U r g e n c y
W h a t I t M
e a n s
W h a t t o D o
H i g h –
H , M e d i u m –
M , I n t e r m e d i a t
e –
I , L o w –
L
C u s t o m e r C a r e : 1 - 8 6 6 - 5 9 7 - 5 5 2 0
80 Section 10
Respond to Alarms, Errors, and Other Problems

8/13/2019 The Guardian - Abbott
http://slidepdf.com/reader/full/the-guardian-abbott 111/198
O V E R
r a n s m i t t e r E r r o r
A l a r m s I n a c t i v e .
I
r a n s m i t t e r p r o b l e m .
A l a r m s a r e n o t w o r k i n g .
W a i t o
r t h e p r o b l e m t o g o a w a y . I t h e p
r o b l e m
p e r s i s t s a f e r 5 0 m i n u t e s , y o u w i l l g e t t h e a l a r m .
“ A l a r m s I n a c t i v e . R e p l a c e r a n s m i t t e r ” .
X
B a t t e r y E x h a u s t e d
R e p
l a c e B a t t e r y .
L
r a n s m i t t e r b a t t e r y p o w e r l o s s i s i m m i n e n t .
R e m o v e s e n s o r , r e p l a c e t r a n s m i t t e r b a t t e r y ,
r e c o n n e c t t r a n s m i t t e r a n d r e c e i v e r , a n d i n s e r t a
n e w s e n s o r .
W a r m U p S k i n .
L
U n a b l e t o c a l i b r a t e t h e S y s t e
m b e c a u s e t h e s k i n
t e m p e r a t u r e i s t o o c o l d .
W a r m t h e s k i n a t t h e i n s e r t i o n s i t e a n d w a i t o r t h e
“ D o B G
e s t ” p r o m p t a n d p e r o r m a n o t h e r B l o o d
G l u c o s e m o d e t e s t o r c a l i b r a t i o n . Y o u c a n w a r m
u p t h e s k i n t e m p e r a t u r e b y m o v i n g t o a w a r m e r
e n v i r o n
m e n t o r b y p u t t i n g o n s o m e w a r m c l o t h i n g .
W a r m U p S k i n R e d o
B G
L a t e r .
I
C a l i b r a t i o n a i l e d b e c a u s e y o u r s k i n t e m p e r a t u r e i s
t o o c o l d .
W a r m t h e s k i n a t t h e i n s e r t i o n s i t e . W a i t o r t h e
b l o o d d
r o p i c o n t o a p p e a r i n a b o u t h a l a n h o u r
a n d p e r o r m a n o t h e r B l o o d G l u c o s e m o
d e t e s t o r
c a l i b r a t i o n . Y o u c a n w a r m u p t h e s k i n t e m p e r a t u r e
b y m o v
i n g t o a w a r m e r e n v i r o n m e n t o r
b y p u t t i n g
o n s o m
e w a r m c l o t h i n g .
R e s
p o n d t o a l a r m m e s s a g e :
( c o n ’ t )
A
l a r m M e s s a g e
U r g e n c y
W h a t I t M
e a n s
W h a t t o D o
H i g h –
H , M e d i u m –
M , I n t e r m e d i a t
e –
I , L o w –
L
Section 10 8
Respond to Alarms, Errors, and Other Problems

8/13/2019 The Guardian - Abbott
http://slidepdf.com/reader/full/the-guardian-abbott 112/198
O V E R
R e s
p o n d t o B l o o d G l u c o s e M o d e e r r o r c o d e s . (
N o t e :
T e r e i s n o E r r o r 5 )
I f
e r r o r
c o
d e i s
A n d y o u h a v e a n y
o f
t h e s e s y m p t o m s
T h e n
E r 1
• W e a k n e s s
• S w e a t i n g
• N e r v o u s n e s s
• H e a d a c h e
• C o n f u s i o n
F o l l o w y o u r h e a l t h c a r e t e a m ’ s a d v i c e o r t r e a t i n g a l o w g l u c o s e l e v e l ( h y p o g l y c e m i c ) e p i s o d e .
➜
P e r o r m a c o n t r o l s o l u t i o n t e s t u s i n g a n e w t e s t s t r i p :
• I f r e s u l t s a r e w i t h i n t h e
r a n g e p r i n t e d o n t h e t e s t s t r i p v i a l , r e t e s t y o u r b l o o d u s i n g a n e w t e s t s t r i p .
• I f t h e t e s t d o e s n o t w o r k o r i f t h e e r r o r p e r s i s t s , c a l l C u s t o m e r C a r e .
E r 2
• i r s t
• F a t i g u e
• E x c e s s u r i n a t i o n
• B l u r r y v i s i o n
F o l l o w y o u r h e a l t h c a r e t e a m ’ s a d v i c e o r t r e a t i n g a h i g h g l u
c o s e l e v e l ( h y p e r g l y c e m i c ) e p i s o
d e .
➜
P e r o r m a c o n t r o l s o l u t i o n t e s t u s i n g a n e w t e s t s t r i p :
• I f r e s u l t s a r e w i t h i n t h e
r a n g e p r i n t e d o n t h e t e s t s t r i p v i a l , r e t e s t y o u r b l o o d u s i n g a n e w t e s t s t r i p .
• I f t h e t e s t d o e s n o t w o r k o r i f t h e e r r o r p e r s i s t s , c a l l C u s t o m e r C a r e
E r 3
➜
B e s u r e y o u s e e A p p l y S a m
p l e o n t h e r e c e i v e r s c r e e n b e o r e
y o u a p p l y b l o o d o r c o n t r o l s o l u t i o n .
P e r o r m a c o n t r o l s o l u t i o n t e s t u s i n g a n e w t e s t s t r i p :
• I f r e s u l t s a r e w i t h i n t h e
r a n g e p r i n t e d o n t h e t e s t s t r i p v i a l , r e t e s t y o u r b l o o d u s i n g a n e w t e s t s t r i p .
• I f t h e t e s t d o e s n o t w o r k o r i f t h e e r r o r p e r s i s t s , c a l l C u s t o m e r C a r e .
E r 4
➜
P e r o r m a c o n t r o l s o l u t i o n t e s t u s i n g a n e w t e s t s t r i p :
• I f r e s u l t s a r e w i t h i n t h e
r a n g e p r i n t e d o n t h e t e s t s t r i p v i a l , r e t e s t y o u r b l o o d u s i n g a n e w t e s t s t r i p .
• I f t h e t e s t d o e s n o t w o r k o r i f t h e e r r o r p e r s i s t s , c a l l C u s t o m e r C a r e .
E r 6
➜
N o t e : D o
N O T t o u c h t h e R I G H O p t i o n b u t t o n w h i l e a p p l y i n g b l o o d o r c o n t r o l s o l u t i o n t o t h e t e s t s t r i p .
1 . R e t e s t u s i n g a n e w t e s t s t r i p .
2 . I e r r o r p e r s i s t s , c a l l C u s t o m e r C a r e .
C u s t o m e r C a r e : 1 - 8 6 6 - 5 9 7 - 5 5 2 0
82 Section 10
Respond to Alarms, Errors, and Other Problems

8/13/2019 The Guardian - Abbott
http://slidepdf.com/reader/full/the-guardian-abbott 113/198
Troubleshoot other problemsTe problems you can trouble shoot in this Section are listed below and are arranged in the
order o appearance.
Receiver
• Te receiver will not turn on.
• Te blood glucose test won’t start afer you apply a sample.
• Unexpected characters on the receiver display screen, unusual or unexpected receiverscreen appearance.
• Tere is no glucose value on the screen.
Sensor Insertion
• Tere is skin irritation at the sensor insertion site.
• Te sensor support mount is not sticking to your skin.
• Discomort when inserting the sensor.
• Te system does not recognize a new sensor afer attaching the transmitter to the sensorsupport mount.
Note: Also see Appendix A on Site Maintenance.
Receiver and Transmitter
Connection
• You are not sure whether your receiver and transmitter are connected.
Calibration
• Te receiver does not prompt you to do a BG test or calibration.
Section 10 8
Respond to Alarms, Errors, and Other Problems

8/13/2019 The Guardian - Abbott
http://slidepdf.com/reader/full/the-guardian-abbott 114/198
a. Was the test strip inserted correctly (the “FreeStyle” side
was up as you inserted the end with the dark rectangle)?
I YES, go to Step c.
I NO, repeat the test with a new strip taking care thatthe “FreeStyle” side is up as you insert the end with thedark rectangle until it stops.
b. Did this solve your problem?
I YES, stop.
I NO, continue with Step c.
c. Are the batteries installed correctly?
I YES, go to Step d.
I NO, Install the batteries correctly and reset timeand date.
d. Te batteries may be dead, replace existing batteriesand reset time and date.
e. Repeat the test with a new test strip.
I this did not resolve your problem call Customer Care.
Note: Whenever batteries are removed and replaced orre-installed in the receiver, you will have to reconnectthe transmitter and receiver and insert a new sensor.
The receiver will not turn on.
Note: Ensure that you apply your sample when the
Apply Sample message appears on the display.
a. Repeat the test using a LARGER sample on a new
test strip.
b. I this did not resolve your problem call Customer Care.
The Blood Glucose test won’t start after you apply a sample.
84 Section 10
Respond to Alarms, Errors, and Other Problems

8/13/2019 The Guardian - Abbott
http://slidepdf.com/reader/full/the-guardian-abbott 115/198
Unexpected characters on the receiver display screen, unusualor unexpected receiver screen appearance.
a. Reconnect the transmitter and receiver.
b. Insert a new sensor.
c. I this did not solve the problem, call Customer Care.
Te batteries are installed correctly. I you are close to a source oelectromagnetic intererence (seeAppendix C or urther details),move away rom the interering sourceand see i the problems goes away. Ithere is consistent intererence roma source, contact the manuacturero the source or a certified electrician
or help. Te batteries may have to bereplaced. Replace batteries with reshones and reset date and time.
Te batteries are installed incorrectly. Install batteries correctly and reset dateand time.
If Ten
Section 10 8
Respond to Alarms, Errors, and Other Problems

8/13/2019 The Guardian - Abbott
http://slidepdf.com/reader/full/the-guardian-abbott 116/198
I none o the above helps solve the problem, replace the sensor (Section 5) or call Customer Care.
There is no glucose value on the screen.
I f And Ten
You are waiting or the firstcalibration.
It has been less than10 hours afer theinsertion o the sensor.
You will see an icon on thescreen. Wait or the system toprompt you to do a BG test orcalibration.
It has been more than 10 hoursafer insertion o the sensor.
You see an iconon the screen.
Allow the system up to 2 hoursto prompt you to do a BG estor calibration.
It has been more than 10 hoursafer insertion o the sensor.
You receive alarms(or example, skintemperature relatedalarms or connectionalarms).
Acknowledge the alarm, takeappropriate action (or example,bring the skin temperaturewithin range or establishconnection between thetransmitter and receiver) andallow the system up to 2 hours toprompt you to do a BG test orcalibration.
Te time window or calibration(or example, you have 2 hours toperorm the second calibration,see Section 7) has expired.
You have notperormed a BG estor calibration.
Perorm a BG test or calibration.(see Section 7).
You have perormed all theappropriate calibrationssuccessully.
You see an iconon the screen.
Follow the guidelines or trouble-shooting connection betweenthe transmitter and receiver.
You have perormed all theappropriate calibrationssuccessully.
➜Allow the system up to 1 hourto start displaying the glucose
values on the screen.
86 Section 10
Respond to Alarms, Errors, and Other Problems

8/13/2019 The Guardian - Abbott
http://slidepdf.com/reader/full/the-guardian-abbott 117/198
Skin irritation at sensor insertion site.
a. Ensure that seams, waistbands, or other constrictive
clothing or accessories do not cover the site causingriction.
b. Inspect the site.
c. I none o the above works, consult your healthcare
team or other suggestions.
The sensor support mount is not sticking to your skin.
Note: Do Steps a through c BEFORE placing the sensor
support mount on your skin.
a. Clean the insertion site by washing with soap and water.
b. Dry the site thoroughly with a clean towel.
c. Wipe the site with an IV prep wipe.
d. I your skin-type requires more adhesive than provided
on the sensor support mount, or i you anticipate an
activity level that may require more adhesive, place an
over-bandage over the transmitter AFTER connecting
the transmitter to the sensor support mount.
Around the edges o the adhesiveor tape.
Lif the edges slightly all around thedressing.
Wherever the adhesive touches skin. You may be sensitive to the adhesive ormaterial, consult your healthcare teamto identiy the best solution.
If the irritation is Ten
Section 10 8
Respond to Alarms, Errors, and Other Problems

8/13/2019 The Guardian - Abbott
http://slidepdf.com/reader/full/the-guardian-abbott 118/198
Discomfort when inserting the sensor.
a. Rub the insertion site with ice beore inserting the sensor.
b. I that doesn’t work, call Customer Care.
If Ten
I none o the above solves the problem, there may be something wrong with your
transmitter. Call Customer Care.
Your transmitter and receiver
are not connected.
You will see the icon on the screen. ry
establishing connection between the receiverand transmitter. I the system still does notrecognize a new sensor in about 3 minutes,remove the sensor and insert a new sensor(Section 5).
Your receiver and transmitterare connected.
a. Make sure that the transmitter is firmlyattached to the sensor support mount andwait or 3 minutes to allow the system torecognize the sensor.
b. I the system still does not recognize
the sensor, remove the sensor (Section5), establish connection between thetransmitter and receiver (Section 9) inserta new sensor, and attach the transmitter tothe sensor support mount (Section 6). Makesure that the contact pins on the transmitterare dry and clean.
Your system is not linked andyou see the “Link” message onyour screen.
a. Your system may not be linked. Perorm thesteps to link the system (Section 14). Makesure you reconnect the system afer linking
(Section 9). Remove and insert a new sensor.
The system does not recognize a new sensor after attaching the
transmitter to the sensor support mount.
88 Section 10
Respond to Alarms, Errors, and Other Problems

8/13/2019 The Guardian - Abbott
http://slidepdf.com/reader/full/the-guardian-abbott 119/198
You are not sure whether your receiver and transmitter
are connected.
You do not see the iconon the screen.
Your system is connected.
You see the icon. Tere is no connection between the receiverand transmitter. Reconnect the transmitter andreceiver, see Section 9.
You see the icon and
the reconnect procedurewas unsuccessul.
Check and make sure that the transmitter
battery is not old or exhausted.I the battery is old or exhausted, then
a. Remove the sensor.
b. Change the battery.
c. Establish connection between transmitterand receiver.
d. Insert a new sensor.
You continue to see theicon even afer replacing the
battery in the transmitter.
Wait or a couple o minutes afer inserting thenew battery to allow the system to recognizethe new battery. I afer two minutes, thesystem still does not recognize the new battery,there is probably something wrong with yourtransmitter. Call Customer Care.
You see the “Link” messageon the screen.
Your system is not linked. Perorm the stepsto link the system (Section 14). Make sure youreconnect the system afer linking (Section 9).
If Ten
Section 10 8
Respond to Alarms, Errors, and Other Problems

8/13/2019 The Guardian - Abbott
http://slidepdf.com/reader/full/the-guardian-abbott 120/198
The system does not prompt you with a message to do
BG test for calibration.
I none o the above helps solve the problem, replace the sensor (Section 5) or callCustomer Care.
Check your work. Result: Inormation on what to do in the event o alarmmessages, error codes, or other common problems.
You will have done this task correctly when you
have resolved the problem or contacted either yourhealthcare team or Customer Care or additionalsuggestions or help.
END OF Section 10
I f And Ten
Te system did not promptyou with a message recognizinga new sensor afer you attachedthe transmitter to the sensorsupport mount.
➜Follow the troubleshootingguidelines on sensor recognition.
It has been less than 10 hoursafer insertion o the sensor. ➜
Wait or the 10 hour time periodto end and allow the system toprompt you to do a BG est or
calibration.
It has been more than 10 hoursafer the insertion o the sensor.
Tere is a iconon the screen.
Reconnect the transmitter andreceiver (Section 9) and allow thesystem up to 2 hours to prompt youto do a BG est or calibration.
It has been more than 10 hoursafer the insertion o the sensor.
You have receivedalarm messages onthe receiver.
Acknowledge the alarm message,take appropriate action and allowthe system up to 2 hours to promptyou to do a BG est or calibration.
90 Section 10
Respond to Alarms, Errors, and Other Problems

8/13/2019 The Guardian - Abbott
http://slidepdf.com/reader/full/the-guardian-abbott 121/198

8/13/2019 The Guardian - Abbott
http://slidepdf.com/reader/full/the-guardian-abbott 122/198
A d d E
v e n t s
Section 11 – Key Terms n Events
n Exercise Event
n Generic Event
n Insulin Event
n LEFT/RIGHT Option Buttons
n Meal Event
n State Of Health Event
n UP/DOWN Arrow Buttons

8/13/2019 The Guardian - Abbott
http://slidepdf.com/reader/full/the-guardian-abbott 123/198
1111 Add Events
Purpose o create a record o events that may affect your glucose levels.
Start Do this procedure any time you observe anything that may affect your glucose
levels, including your state o health and daily activities such as meals, exercise,
and insulin dosages.
Materials • Your FreeStyle Navigator Receiver.
• Data and details about the event that you want to record.
Helpful Information
Important: o edit an event, go to Section 12, Review Your Reports and Edit Events.
• Pressing the RIGH Option button (Set) completes the entry o your event regardless o how
much or how little detail you have provided.
• e current date and time are automatically recorded when you enter an event. If you enter the
event at a later time, you must change the date and time o the event to when it actually occurred
beore you press the RIGH Option button (Set) to save the event.
• I you change your mind about saving the event, use the UP/DOWN Arrow button to change
SAVE to CANCEL beore you press the RIGH Option button (Set).
Main 08:30A
Glucose
Alarms
Reports System
Add Event
Select
Steps Do This
1. Access the Add Event screenrom the Main menu.
Note: I you don’t press any buttons or 12 seconds, the
receiver screen will go blank and the last change will be
lost i you haven’t pressed the Select button.
a. Press the UP Arrow button or the DOWN Arrow
button to highlight Add Event.
b. Press the RIGH Option button (Select) to go to
the Select Event screen.
Section 11 9
Add Events

8/13/2019 The Guardian - Abbott
http://slidepdf.com/reader/full/the-guardian-abbott 124/198
History 08:30AMeal 04-09-05 08:30 A
Carbs: 15g
SAVE
Next Set
SAVE
CANCEL
Note: For all the steps below, make sure that you have entered the correct date and time.
Steps Do This
2. Select the type o event youwant to record.
Use the UP Arrow button or the DOWN Arrow button to
highlight the type o event:
3. Record meal events.a. Use the LEF Option button (Next) to select which
item to enter or change (Carbohydrate grams, SAVE/CANCEL, Date, ime).
b. Use the UP Arrow button or the DOWN Arrowbutton to change the selected item.Note: You can change the carbohydrate grams rom0 to 350 grams in 1 gram increments.
c. When you are done, press the RIGH Option button(Set) to save (or cancel) the event.
• Meals or snacks. 1.Highlight Meals.
2. Press the RIGH Option button (Select).3.Go to Step 3.
• Details o an insulin dose.
(injection or pump)
1. Highlight Insulin.2. Press the RIGH Option button (Select).3. Go to Step 4.
• Exercise. 1. Highlight Exercise.2. Press the RIGH Option button (Select).3. Go to Step 5.
• Your state o health. 1. Highlight State o Health.2. Press the RIGH Option button (Select).3. Go to Step 6.• Symptoms.
• Other health related observations.
• Other events. 1. Highlight Generic.2. Press the RIGH Option button (Select).3. Go to Step 7.
If the event deals with Ten
92 Section 11
Add Events

8/13/2019 The Guardian - Abbott
http://slidepdf.com/reader/full/the-guardian-abbott 125/198
Steps Do This
4. Record insulin events.
a. Use the LEF Option button (Next) to select whichitem to enter or change (ype, Units, SAVE/CANCEL, Date, ime).
b. Use the UP Arrow button or the DOWN Arrow buttonto change the selected item.
Note: Your insulin choices are Rapid, Intermediate,Long Acting, or Pre-mix.
c. When you are done, press the RIGH Option button
(Set) to save (or cancel) the event.
5. Record exercise events.
a. Use the LEF Option button (Next) to select which itemto enter or change (ype, Duration, Intensity, SAVE/CANCEL, Date, ime).
b. Use the UP Arrow button or the DOWN Arrow buttonto change the selected item.
Note: Your exercise choices are:
• Type: Aerobics, Walking, Jogging, Running,Swimming, Biking, Weights, or Other.
• Duration: 0:00 to 2:30 (hrs:minutes) in 15 minuteincrements.
• Intensity: None, Low, Medium, or High.
c. When you are done, press the RIGH Option button(Set) to save (or cancel) the event.
6. Record state o health events.
a. Use the LEF Option button (Next) to select whichitem to enter or change (State o health, SAVE/CANCEL, Date, ime).
b. Use the UP Arrow button or the DOWN Arrow buttonto change the selected item.
Note: Your state o health choices are Normal, Cold,Sore Troat, Inection, ired, Stress, Fever, Flu, Allergy,Period, Dizzy, Alcohol, Low Symptoms, or HighSymptoms.
c. When you are done, press the RIGH Option button(Set) to save (or cancel) the event.
History 08:30AInsulin 04-09-05 08:30 A
Type: Rapid
Units: 0.25
SAVE
Next Set
History 08:30AExercise 04-09-05 08:30 A
Type: Jogging
Duration: 0:30
Intensity: None SAVE
Next Set
History 08:30AState Of Health 04-09-05 08:30 A
Low Symptoms
SAVE
Next Set
Aerobics
Walking
JoggingRunning
Swimming
Biking
Weights
Other
None
Low
MediumHigh
Normal
Cold
Sore Throat
Infection
Tired
Stress
Fever
Flu
Allergy
Period
Dizzy
Alcohol
Low Symptoms
High Symptoms
SAVE
CANCEL
SAVE
CANCEL
SAVE
CANCEL
Rapid
Pre-Mix
Intermediate
Long Acting
Section 11 9
Add Events

8/13/2019 The Guardian - Abbott
http://slidepdf.com/reader/full/the-guardian-abbott 126/198
Steps Do This
7. Record generic events.a. Use the LEF Option button (Next) to select which item
to enter or change (Event, SAVE/CANCEL, Date, ime).
b. Use the UP Arrow button or the DOWN Arrow button
to change the selected item.
Note 1: Tere are eight generic event numbers that
you or your healthcare team can assign to specific
events (For example, #1 can reer to “Dining Out,” #2
to “Shopping,” #3 to “Inactive Day, #4 to “Party,” etc.)
Note 2: Write down the meanings or each number as
you assign them so you don’t orget what they represent(you don’t have to assign meanings to all the numbers).
c. When you are done, press the RIGH Option button
(Set) to save (or cancel) the event.
8. Check your work.Result: An electronic record o all events that may affect
your glucose levels.
You have done this procedure correctly when the event
records are complete and accurate.
History 08:30AGeneric 04-09-05 08:30 A
Event: 2
SAVE
Next Set
END OF Section 11
SAVE
CANCEL
94 Section 11
Add Events

8/13/2019 The Guardian - Abbott
http://slidepdf.com/reader/full/the-guardian-abbott 127/198

8/13/2019 The Guardian - Abbott
http://slidepdf.com/reader/full/the-guardian-abbott 128/198
R e p o r t s
Section 12 – Key Terms n Event History Reports
n Events
n Exercise Event
n Generic Event
n Glucose Targets
n Insulin Event
n LEFT/RIGHT Option Buttons
n Line Graph
n Main Menu
n Meal Event
n Multi-Day Statistics
n Reports
n Single-Day Statistics
n State Of Health Event
n Statistical Reports
n UP/DOWN Arrow Buttons

8/13/2019 The Guardian - Abbott
http://slidepdf.com/reader/full/the-guardian-abbott 129/198
1212 Review Reports and Edit Events
Purpose • To review your glucose levels.
• To help you and your healthcare team detect patterns in your glucose levels relative
to your targets.
• To review a history o events that are important to your treatment plan.
• To edit event history.
Start • When you or your healthcare team want to know about your glucose levels
or about events that may either explain your glucose levels or influence your
treatment plan.
• When you need to make changes to your event history.
Materials Gather these materials beore you begin:
• Your glucose targets (your healthcare team can help determine these).
• Your receiver.
Helpful Information
• Your healthcare team will usually give you glucose targets. Compare your actual glucose levels withthese targets to see how you are doing. Ask your healthcare team to tell you how your levels shouldcompare to each target.
• Glucose targets are DIFFERENT rom the thresholds or low and high glucose alarms. Low andhigh glucose alarms alert you when you’ve reached the low or high threshold value. Glucose targets
allow the reports and line graphs to show how your glucose levels have been perorming compared
to your set targets.
Main 08:30A
Glucose
Alarms
Reports
System
Add Event
Select
Steps Do This
1. Access the Reports menu rom
the Main menu.
a. Press the UP Arrow button or the DOWN Arrow but-
ton to highlight Reports.
b. Press the RIGH Option button (Select) to go to the
Select Reports screen.
Section 12 9
Review Reports and Edit Events

8/13/2019 The Guardian - Abbott
http://slidepdf.com/reader/full/the-guardian-abbott 130/198
Steps Do This
2. Decide what you want to do.
Note: Your reports will be more meaningul i you setglucose targets. Glucose targets give you something to
compare your actual glucose levels with.
Decide what to do:
3. Set your glucose targets.
a. Select Glucose argets rom the Select Report menu.
i) Press the UP Arrow button or DOWN Arrowbutton to highlight Glucose argets.
ii) Press the RIGH Option button (Select) to go tothe Glucose argets screen.
b. Enter your low glucose target using the UP or DOWN
arrows.c. Press the LEF Option button (Next) to move to the
High Glucose target setting.
d. Enter your high glucose target using the UP or DOWNarrows.
e. Press the RIGH Option button (Set) to save thesettings.
Result: Te settings are saved and the Select Reportscreen appears.
. Return to Step 2 to decide what to do next.
Set Target Range 08:30A
Low Target: 80
High Target: 180
Next Set
• Set glucose targets. Go to Step 3.
• See a line graph showing a historyo your glucose levels.
Go to Step 4.
• See a statistical summary o yourglucose levels over time.
Go to Step 5.
• Review or edit the events you haverecorded in your receiver.
Go to Step 7.
• Quit and return to the Main menu. Press the LEF Option button (Main) onthe Reports menu.
If you want to Ten
96 Section 12
Review Reports and Edit Events

8/13/2019 The Guardian - Abbott
http://slidepdf.com/reader/full/the-guardian-abbott 131/198
Steps Do This
4. View a line graph o your
glucose level history. a. Select Line Graphs rom the Select Report menu.
i) Use the UP Arrow button or DOWN Arrowbutton to highlight Line Graph.
ii) Press the RIGH Option button (Select) to go tothe Select ime Period screen.
b. Select the time period (2, 4, 6, 12, or 24 hours) usingthe UP Arrow button or the DOWN Arrow button.
c. Interpret the graph:
• Notice your glucose target range (the shadedhorizontal band).
• Notice your glucose level (in mg/dL along the lehand side) at different times (bottom line).
• Notice the trends and the times that your glucoselevel is outside o your target range.
• Notice how dierent events that you entered arelocated in relation to your glucose profile. Eventsentered will be shown on the line graph with lettersindicating the event - “I” or Insulin, “M” or meals,“E” or exercise, “H” or state o health and thenumber (1 thru 8) or a generic event.
Note: Te line shows both your continuous readings(plotted every 10 minutes) and your blood glucosereadings (the “+” symbols on the line graph).
When viewing the line graph, you can scroll orwardon time axis by pressing the UP Arrow button and youcan scroll backward on the time axis by pressing theDOWN Arrow button. You will not be able to see thedate on the time axis.
d. Decide what to do next.
Note: Te line Graph display
range is between 20 mg/dL
(1.1 mmol/L) and 350 mg/dL
(19.4 mmol/L).
Glucose values exceeding
350 mg/dL (19.4 mmol/L)
will be plotted as 350 mg/dL
(19.4 mmol/L).
Glucose values falling below
20 mg/dL (1.1 mmol/L) will
be plotted as 20 mg/dL.
Select Time Period 08:30A
2 Hour
4 Hour
6 Hour
12 Hour
24 Hour
back Select
• View a line graph or anothertime period.
1.Press the RIGH Option button to returnto the Select ime Period screen.
2. Go to Step 4b.
• End viewing line graphs. 1. Press the RIGH Option button to returnto the Select ime Period screen.
2. Press the LEF Option button (Back) toreturn to the Select Reports screen.
3. Go to Step 2 to decide what to do next.
If you want to Ten
Section 12 9
Review Reports and Edit Events

8/13/2019 The Guardian - Abbott
http://slidepdf.com/reader/full/the-guardian-abbott 132/198
Steps Do This
5. View a statistical summary
o your glucose levels.a. Select Statistics rom the Select Reports menu.
i) Use the UP Arrow button or DOWN Arrow button
to highlight Statistics.
ii) Press the RIGH Option button (Select) to go to the
Statistics screen.
Note: Te Stats screen shows you a summary o glucose
results relative to your glucose targets.
b. Press the LEF Option button (Next) to advance to the
desired period.
Note: You can view statistical reports or 1, 3, 7, 14, 21,
or 28 day periods, in that order.
(Continue to Step 6)
Stats 3 day 08:30A
Highest CM: 298 mg/dL
Lowest CM: 61 mg/dL
Ave. CM: 160 mg/dL
Std. Dev: 80 mg/dL
Above Target: 19%
Next back
98 Section 12
Review Reports and Edit Events

8/13/2019 The Guardian - Abbott
http://slidepdf.com/reader/full/the-guardian-abbott 133/198
Steps Do This
6. Select the desired statistical
reading.
Note: Statistics include ONLY continuous glucose results.
Glucose readings that were taken in the Blood Glucose modeare NOT included in the statistics.
a. Use the UP Arrow button or DOWN Arrow button
to highlight the statistic you want to review for the
selected period .
b. Press the LEF Option button (Next) to view other periods.
Note: You can view reports or 1, 3, 7, 14, 21, or 28 day
periods, in that order.
c. Press the RIGH Option button (Back) to return to the
Select Reports screen.
d. Go to Step 2 to determine what to do next.
• Your highest glucose reading. Highest CM.
• Your Lowest glucose reading. Lowest CM.
• Your average glucose reading. Ave. CM.• How well you are maintaining your
levels near the average value.Std. Dev .Note: A small number indicates thatmost o your glucose readings areclose to your average value. A largenumber indicates that many o yourglucose levels vary considerably romyour average value.
• e percentage of readings that areabove your high glucose target.
Above arget.
• e percentage of readings that arewithin your glucose targets (betweenthe high and low targets).
Within arget.
• e percentage of readings that arebelow your low glucose target.
Below arget.
• e average number of low glucosealarm events per day.
Low/Day.
• e average number of high glucosealarm events per day.
High/Day.
• e average number of projected lowalarm events per day (early warnings).
Proj Low/Day.
• e average number of projected highalarm events per day (early warnings).
Proj High/Day.
If you want to know Ten highlight
Section 12 9
Review Reports and Edit Events

8/13/2019 The Guardian - Abbott
http://slidepdf.com/reader/full/the-guardian-abbott 134/198
Steps Do This
7. Review or change your
event history. a. Select Event History rom the Select Reports menu.
b. Use the UP or DOWN Arrow button to highlight the
event you want to review or edit.
c. Use the RIGH Option button (Select) to go to the
highlighted report.
d. Decide what to do next.
Select Filter 08:30A
CM 60
CM 120
CM 10
BG
Insulin
Back Select
If you want to At Ten highlight
review/edit your
• Continuous glucosemeasurements.*
10 minute intervals CM 1060 minute intervals CM 60
120 minute intervals CM 120
• Blood glucose readings.* ➜ BG
• Insulin events. ➜ Insulin
• Meal events. ➜ Meals
• Exercise events. ➜ Exercise
• State o health. ➜ State o Health
• Miscellaneous events. ➜ Generic
• Alarms history.* ➜ Alarm history
• All events. ➜ User Events
• Edit the event. Go to Step 9.
• Interpret the event. Go to Step 8.
• Review other events. 1. Select the LEF Option button (Back) to goto the Select Filter screen.
2. Go to Step 7b.
• Stop reviewing events. 1. Select the LEF Option button (Back) to goto the Select Filter screen.
2. Select the LEF Option button to go to the
Select Report screen.3. Go to Step 2 to decide what to do.
If you want to Ten
(* = Cannot be edited)
100 Section 12
Review Reports and Edit Events

8/13/2019 The Guardian - Abbott
http://slidepdf.com/reader/full/the-guardian-abbott 135/198
Steps Do This
8. Interpret your events.a.
Interpret the events using the notes about each type oevent in the table below:
b. Go to Step 7d.
• CM (CM 60,
CM 120,and CM 10)
• Each recorded measure is displayed on one screen with itsdate and time.
• Displays actual measures at the indicated intervals.
• Does NOT display averaged measures.
• Use the RIGH Option button (Next) to move to the next
recorded CM reading.
BG • Each BG measure is displayed on one screen with its dateand time.
• All BG measures are displayed.
• A check mark 3 indicates that the measure was markedas a control.
• Use the RIGH Option button (Next) to move to the nextrecorded BG screen.
Insulin Each recorded insulin event is displayed with type, dosage inunits, date, and time.
Meals Each recorded meal event is displayed with its carbohydrate value in grams, date, and time.
Exercise Each recorded exercise event is displayed with its description,duration in hours and minutes, intensity, date, and time.
State o Health • Each recorded event is displayed with its description, date,and time.
Note: Generic events do NOT include a description, just anumber that represents the event.
Generic
Alarm History
User Events
Event Notes
Section 12 1
Review Reports and Edit Events

8/13/2019 The Guardian - Abbott
http://slidepdf.com/reader/full/the-guardian-abbott 136/198
Steps Do This
9. Edit the event.
Note: You CANNOT edit your glucose measurements.
a. Press the RIGH Option button (Edit).
b. Use the LEF Option button (Next) to select the item
you want to change.
c. Use the UP or DOWN Arrow button to change the
selected item.
d. Repeat this process rom Step 9b until you’ve changed
every item that you wanted to change.
Note: I you change your mind about saving youredits, change SAVE to CANCEL.
e. Press the RIGH Option button to save or cancel
your edits.
10. Check your work.Result: Te result will be an increased awareness o your
glucose level history, glucose level patterns, and events that
could affect your treatment plan.
You will have done this procedure correctly when:
o Your glucose targets are set correctly.
o You view and correctly interpret line graphs or any
available period.
o You correctly select and view any desired statistical
summary or any o the available time periods.
o You can review any o the available event history
reports.
o Your events have been edited to your satisaction.
END OF Section 12
102 Section 12
Review Reports and Edit Events

8/13/2019 The Guardian - Abbott
http://slidepdf.com/reader/full/the-guardian-abbott 137/198

8/13/2019 The Guardian - Abbott
http://slidepdf.com/reader/full/the-guardian-abbott 138/198
C l e a n Y o u r S y s t e m
Section 13 – Key Terms n Receiver
n Transmitter
n Transmitter Contact Points

8/13/2019 The Guardian - Abbott
http://slidepdf.com/reader/full/the-guardian-abbott 139/198
1313 Clean Your System
Purpose o maintain the appearance o your system.
Start Do this procedure:
• Every time you change your sensor (transmitter).
• Any time the system needs cleaning.
Materials Make sure you have access to these materials beore you begin:
• Mild soap.
• Running water.
• A clean, so, lint-free towel for cleaning and drying. For example, a dish towel.
• 70% isopropyl alcohol.
Helpful Information
• Your FreeStyle Navigator system needs minimal maintenance aside rom cleaning and battery
replacement.
• Avoid getting dust, dirt, blood, control solution, water, or any other substance in the receiver’s test
strip port.
• Keep your receiver in its protective carrying case when you are not using it.
Note: Your transmitter and receiver cannot be repaired when broken. Tere are no replaceable
parts or these devices other than batteries.
• Te transmitter should be removed rom the sensor support mount and cleaned each time you
remove a used sensor (every 5 days).
• Contact your healthcare team or Customer Care when you need to replace your transmitter or
receiver. Tey will suggest a proper way to dispose o the old parts.
• Your transmitter has a lie o 2 years rom the date o first use. Replace transmitter afer that
time period.
• Do NOT use adhesive remover wipes or solutions containing ether or ether containing
components or cleaning or removing residual adhesive rom the transmitter or receiver. Tesesolutions can damage the casing o the receiver and transmitter.
Section 13 1
Clean Your System

8/13/2019 The Guardian - Abbott
http://slidepdf.com/reader/full/the-guardian-abbott 140/198
Steps Do This
1. Clean your transmitter.a. Wash the transmitter with mild soap and water.
b. Rinse the transmitter thoroughly under running water.
c. Dry the transmitter thoroughly with a clean, sof, lint-
ree towel.
d. Shake any water out o the transmitter’s contact points
and blot on a clean, dry, lint-ree towel.
e. Make sure that the contact points are clean and dry.
2. Clean your receiver.
Wipe the outside o your receiver with a clean, sof, lint-
ree towel dampened with either a mild soapy solution or
70% isopropyl alcohol.
3. Check your work.Result: A clean transmitter and receiver.
You have done this procedure correctly when:
o All visible dust, dirt, grime, and other oreign
substances have been removed.
o Te transmitter is thoroughly dry, including the
contact points.
Contact Points
END OF Section 13
Caution: Do NO immerse the receiver in water orin any other liquid. Avoid getting water or any otherliquid in the test strip port.
104 Section 13
Clean Your System

8/13/2019 The Guardian - Abbott
http://slidepdf.com/reader/full/the-guardian-abbott 141/198

8/13/2019 The Guardian - Abbott
http://slidepdf.com/reader/full/the-guardian-abbott 142/198
L i n k / U n l i n k
Section 14 – Key Terms n BG Mode
n CM Mode
n Link/Unlink
n Receiver
n Transmitter

8/13/2019 The Guardian - Abbott
http://slidepdf.com/reader/full/the-guardian-abbott 143/198
1414 Link and Unlink Your Transmitter and Receiver
Purpose o enable secure communication between your transmitter and your receiver.
Start Do this procedure:
• When you replace either your transmitter or your receiver.
Materials Gather these materials beore you begin:
• Your receiver.
• Your transmitter.
Note: Your system may need resh batteries i it cannot establish communication.
Helpful Information
Important: You will NO receive continuous glucose data while the transmitter and receiver are
unlinked and all alarms associated with the Continuous Monitoring mode will be turned off.
• You MUST unlink your receiver rom your old transmitter and link your receiver to your new
transmitter whenever you replace your transmitter.
• Once the transmitter and receiver are linked, they don’t have to be re-linked or unlinked unless
you want to link the receiver to a new transmitter. I you attempt to link your receiver to a new
transmitter, you must replace current sensor with a new sensor.
• You can still perorm blood glucose measurements in the blood glucose mode while the transmitter
and receiver are unlinked.
• Link is NOT the same as Reconnect. ypically, when you receive the system kit, your receiver
and transmitter are already linked – your receiver knows which transmitter it is paired with. Te
receiver will then accept data only rom that transmitter. Once your receiver and transmitter
are linked, you do not need to link them again unless you have had to unlink them (i changing
transmitter). “Reconnect” (see Section 9 Step 2) establishes connection i your receiver and
transmitter have been temporarily moved beyond the normal range o communication (10 eet).
Section 14 1
Link and Unlink Your Transmitter and Receiver

8/13/2019 The Guardian - Abbott
http://slidepdf.com/reader/full/the-guardian-abbott 144/198
Steps Do This
1. Decide what you want to do.
2. Unlink your receiver rom your transmitter.
a. Press the RIGH Option button twice to display the
Main menu.
b. Use the UP or DOWN Arrow button to highlight
System.
c. Press the RIGH Option button (Select) to display the
System menu.d. Use the UP or DOWN Arrow button to highlight Link.
e. Press the RIGH Option button (Select) to display the
Link screen.
. Press the LEF Option button (Unlink) to unlink your
transmitter rom your receiver.
g. Press the LEF Option key (BG) to operate your system
in the Blood Glucose mode. By choosing this option,
you have shut off the Continuous Monitoring mode.
Note: You can now use your receiver to perorm blood
glucose measurements (See Section 7).
h. Go to Step 1 to decide what to do next.
Link 08:30A
Blood Glucose Mode
or
Relink to Transmitter
BG Relink
• Unlink your receiver from your transmitter. 2
• Link your receiver to your transmitter. 3
• Check your work. 4
If you want to
Ten go to Step
106 Section 14
Link and Unlink Your Transmitter and Receiver

8/13/2019 The Guardian - Abbott
http://slidepdf.com/reader/full/the-guardian-abbott 145/198
Steps Do This
3. Link your receiver to your
transmitter.a. Place the receiver within 10 eet o the transmitter.b. Press the RIGH Option button twice to display the
Main menu.
c. Use the UP or DOWN Arrow button to highlightSystem.
d. Press the RIGH Option button (Select) to display theSystem menu.
e. Use the UP or DOWN Arrow button to highlight Link.
. Wait while the receiver searches or the transmitter.
Note: It may take the receiver up to 70 seconds to findthe transmitter.
Result: Te receiver displays the transmitter’s ID number.
4. Check your work.Result: A linked or unlinked transmitter and receiver. Youhave done this procedure correctly when:
o Your system is linked when you wanted it linked.
o Your system is unlinked when you wanted it unlinked.
o You called Customer Care afer your 2nd attempt tolink ailed.
o Te ID number o the transmitter displayed by thereceiver (under the ransmitter Status menu item)matches the ID on the transmitter label
Link 08:30A
Searching For
Transmitter
Allow 70 Seconds
Cancel
Link 08:30A
Transmitter ID:
AAAF293-80359
located Is this yours?
No Yes
• Are the same.
➜1. Press the RIGH Option
button (Yes).
Result: Te Main menu isdisplayed.
2. Go to Step 4.
• Are NOT the same.
1st attempt Press the Lef Option button(No). Te receiver will continueto search or another transmitterin the vicinity.
2nd attempt Call Customer Care.
If the And this Ten
ID numbers is your
Veriy that the IDnumber displayedon the screen isthe same as theID number on thebottom o yourtransmitter.
Caution: I you accept an incorrect transmitter ID, your glucose readings will be incorrect.
Section 14 1
Link and Unlink Your Transmitter and Receiver

8/13/2019 The Guardian - Abbott
http://slidepdf.com/reader/full/the-guardian-abbott 146/198

8/13/2019 The Guardian - Abbott
http://slidepdf.com/reader/full/the-guardian-abbott 147/198

8/13/2019 The Guardian - Abbott
http://slidepdf.com/reader/full/the-guardian-abbott 148/198
R e s e t U s e r S e t t i n g s

8/13/2019 The Guardian - Abbott
http://slidepdf.com/reader/full/the-guardian-abbott 149/198
1515 Reset User Settings
Purpose o reset the user settings to the deault values.
Start Do this procedure anytime you eel a need to return your settings to the actory
deaults.
Materials Your FreeStyle Navigator Receiver.
Helpful Information• I you don’t press any button within 12 seconds, the receiver screen will go blank and the last
change will be lost i you haven’t pressed the Select button.
• Be careful to avoid making unintentional changes to the system settings and conguration.
• Resetting user settings resets the following items to their default . Note: Te units o glucosecannot be changed. [Te deault values are shown in brackets]:
Steps Do This
1. Access the System menurom the Main menu.
a. Press the UP or DOWN Arrow button to highlight
System.
b. Press the RIGH Option button (Select) to go to the
System Menu screen.
Main 08:30A
Glucose
Alarms
Reports
System
Add Event
Select
• High Glucose Target.[180 mg/dL (10 mmol/L)]
• Low Glucose Target. [80 mg/dL (4.4 mmol/L)]
• Alarm Settings: [Med Beep]
– On/Off – Low beep– Medium beep– High beep– Short vibe– Medium vibe– Long vibe– Alarm Tresholds
• Country Settings: [Local settings]– Date ormat – Language– ime ormat – Decimal ormat
• Displays for the items in the Add Event menu:
– Insulin type [Rapid] – Exercise intensity [Medium]– Insulin dose [1 unit] – State o Health [Normal]– Exercise type [Walking] – Generic Event [1]– Exercise duration [30 min.]
• Strip Cal code. [18]
• Sensor Code. [109]
• Low Glucose Alarm [65 mg/dL (3.6 mmol/L)]
• High Glucose Alarm [300 mg/dL (16.7 mmol/L)]
Section 15 1
Reset User Settings

8/13/2019 The Guardian - Abbott
http://slidepdf.com/reader/full/the-guardian-abbott 150/198
Steps Do This
2. Access the Reset User
Settings menu.a. Press the UP or DOWN Arrow button to highlight
Reset User Settings.
b. Press the RIGH Option button (Select) to go to the
Reset User Settings Screen.
3. Reset your settings.
Confirm what you want to do:
4. Check your work.
Result: Your receiver with the settings you want.
You have done this procedure correctly when the
receiver’s settings match your desired settings:
o Deault settings OR,
o Your personal settings (i you changed your mind).
System Menu 08:30A
Status
Link
Set Date/Time
Country Settings
Reset User Settings
Main Select
08:30A
Are You Sure
You Want To
Reset to Default?
No Yes
END OF Section 15
• Return your system to itsdeault settings.
Press the RIGH Option button (Yes).
Note: You will lose your personal settings.
• Change your mind. Press the LEF Option button (No).
Note: Your personal settings will be retained.
If you want to Ten
Caution: You should never reset your user settingswhen you are wearing a sensor. Tis will reset
parameters that may affect your system perormance.
110 Section 15
Reset User Settings

8/13/2019 The Guardian - Abbott
http://slidepdf.com/reader/full/the-guardian-abbott 151/198

8/13/2019 The Guardian - Abbott
http://slidepdf.com/reader/full/the-guardian-abbott 152/198
C o u n t r y
S e t t i n g s
Section 16 – Key Terms n LEFT/RIGHT Option Buttons
n Receiver
n System Menu
n UP/DOWN Arrow Buttons

8/13/2019 The Guardian - Abbott
http://slidepdf.com/reader/full/the-guardian-abbott 153/198
16 16 Change Country Settings
Purpose o set the date and time ormats, the language, and the decimal ormat.
Start Do this procedure when your requirements differ rom the country setting currently
being used by the system.
Materials Gather these materials beore you begin:
• Your requirements for displaying date, time format and the other items
mentioned in the purpose statement.
• Your FreeStyle Navigator Receiver.
Helpful Information• Check with your healthcare team i you have any questions about your requirements.
• I you don’t press any button within 12 seconds the receiver screen will go blank and the last change
will be lost i you haven’t pressed the RIGH Option button (Select).
Steps Do This
1. Access the System menu
rom the Main menu
a. Press the UP or DOWN Arrow button to highlight
System.
b. Press the RIGH Option button (Select) to go to the
Select System screen.
Main 08:30A
Glucose
Alarms
Reports
System
Add Event
Select
Section 16 1
Change Country Settings

8/13/2019 The Guardian - Abbott
http://slidepdf.com/reader/full/the-guardian-abbott 154/198
Steps Do This
2. Access the Country Settingsmenu.
a. Press the UP or DOWN Arrow button to highlightCountry Settings.
b. Press the RIGH Option button (Select) to go to theCountry Settings screen.
c. Decide what you want to do:
d. Press the LEF Option button (Back) twice to return tothe Main menu.
e. Go to Step 7 to check your work.
3. Change the Language.
a. Use the UP or DOWN Arrow button to highlight
Language.
b. Press the RIGH Option button (Select) to go to the
Select Language screen.
c. Use the UP or DOWN Arrow button to highlight the
language that you want to use.
d. Press the RIGH Option button (Set) to accept yourselection.
Result: Te Country Settings screen is displayed.
e. Go to Step 2c to decide what to do next.
Country Settings 08:30A
Language (English)
Date Format (mm-dd-yy)
Time Format (12h)
Decimal Format (x, y)
Back Select
• Language. 3
• Date. 4
• ime. 5
• Decimals. 6
• None of the above. (you are done changing the country settings.)
2d
If you want to change how Ten go this is displayed to Step
System Menu 08:30A
Data Upload
Status
Link
Set Date/Time
Country Settings
Main Select
112 Section 16
Change Country Settings

8/13/2019 The Guardian - Abbott
http://slidepdf.com/reader/full/the-guardian-abbott 155/198
Steps Do This
4. Change the Date Format.a. Use the UP or DOWN Arrow button to highlight Date
Format.
b. Press the RIGH Option button (Select) to go to the
Select Date Format screen.
c. Use the UP or DOWN Arrow button to select either
the mm-dd-yy or the dd-mm-yy ormat.
d. Press the RIGH Option button (Set) to acceptyour choice.
Result: Te Country Settings screen is displayed.
e. Go to Step 2c to decide what to do next.
5. Change the Time Format.a. Use the UP or DOWN Arrow button to highlight ime
Format.
b. Press the RIGH Option button (Select) to go to the
Select ime Format screen.
c. Use the UP or DOWN Arrow button to select either
the 12h or the 24h ormat.
d. Press the RIGH Option button (Set) to accept
your choice.
Result: Te Country Settings screen is displayed.
e. Go to Step 2c to decide what to do next.
Country Settings 08:30A
Language (English)
Date Format (mm-dd-yy)
Time Format (12h)
Decimal Format (x, y)
Back Select
Country Settings 08:30A
Language (English)
Date Format (mm-dd-yy)
Time Format (12h)
Decimal Format (x, y)
Back Select
Section 16 1
Change Country Settings

8/13/2019 The Guardian - Abbott
http://slidepdf.com/reader/full/the-guardian-abbott 156/198
Steps Do This
6. Change the Decimal Format.
a. Use the UP or DOWN Arrow button to highlightDecimal Format.
b. Press the RIGH Option button (Select) to go to the
Select Decimal Format screen.
c. Use the UP or DOWN Arrow button to select either the
x.y or the x,y ormat.
d. Press the RIGH Option button (Set) to accept your
choice. Result: Te Country Settings screen is displayed.
e. Go to Step 2c to decide what to do next.
7. Check your work.Result: A display that presents inormation in the ormat
that you preer.
You have done this procedure correctly when you are
satisfied with the ormat the system uses to display
inormation.
Country Settings 08:30A
Language (English)
Date Format (mm-dd-yy)
Time Format (12h)
Decimal Format (x, y)
Back Select
END OF Section 16
114 Section 16
Change Country Settings

8/13/2019 The Guardian - Abbott
http://slidepdf.com/reader/full/the-guardian-abbott 157/198

8/13/2019 The Guardian - Abbott
http://slidepdf.com/reader/full/the-guardian-abbott 158/198
A p p e n d i x
A
Section 17 – Appendix A n Adhesive Enhancers
n Antiseptics
n Dressings
n Site Rotation
n Skin Barriers

8/13/2019 The Guardian - Abbott
http://slidepdf.com/reader/full/the-guardian-abbott 159/198
17 17 Appendix A: Site Maintenance
IntroductionCareul site selection, preparation, and maintenance can help to lower the risk o inection and
improve sensor adhesion. In addition to site selection, a number o helpul products are available.
Site SelectionSite rotation helps prevent discomort, irritation, bruising, skin rashes, and sensitivity to adhesives. It
is important or you to rotate across several sites and to insert sensors only in the abdomen or in the
back o the upper arm. ALWAYS change the insertion site each time a new Sensor is used.
Rotating the sites in a predictable pattern may help you remember to rotate them evenly. For example,
you may want to start in the upper-right corner o your abdomen, and then move one inch to the lef
when you insert a new sensor, continuing in a circular direction. Or, you may want to start on the
right arm at a high position, move to a low position on the right arm, then repeat on the lef arm.
Helpful productsChoose rom the list o products below as needed.
• Antiseptics – If you tend to develop inections at the sensor insertion site, consider prepping the
skin with an antiseptic. Ask your healthcare team to recommend which antiseptic is best or you.
• Dressings and skins – I you are having trouble with the sensor support mount sticking to your skin,
consider applying a bandage over the transmitter. A variety o such bandages are available at yourlocal pharmacy. Ask your healthcare team to recommend which type o bandage is best or you.
• Adhesive enhancers – If you’re having trouble getting the sensor support mount to stick to your
skin, you may want to try an adhesive enhancer. Adhesive enhancers help the adhesive pad on the
sensor support mount stick to your skin. Te IV Prep wipes that are included in your sensor kit
are adhesive enhancers. Afer applying this type o product, be sure that the sensor insertion site is
thoroughly dry beore placing the sensor support mount on your skin. Ask your healthcare team to
recommend which adhesive enhancer is best or you.
• Skin barriers – If you experience sensitivity to adhesives, there are products that may help prevent
irritation or sensitivity by placing a barrier between your skin and the sensor support mount’sadhesive pad. Tese products may also help the adhesive stick better. Be sure to allow the skin to dry
thoroughly beore inserting the sensor or applying another tape or dressing. Ask your healthcare
team to recommend which skin barrier product is best or you.
END OF Section 17
Section 17 1
Appendix A: Site Maintenance

8/13/2019 The Guardian - Abbott
http://slidepdf.com/reader/full/the-guardian-abbott 160/198

8/13/2019 The Guardian - Abbott
http://slidepdf.com/reader/full/the-guardian-abbott 161/198

8/13/2019 The Guardian - Abbott
http://slidepdf.com/reader/full/the-guardian-abbott 162/198
A p p e n d i x B
Section 18 – Appendix B n Calibration
n Hematocrit Interstitial Fluid
n Receiver
n Transmitter

8/13/2019 The Guardian - Abbott
http://slidepdf.com/reader/full/the-guardian-abbott 163/198
1818 Appendix B: Specifications
Operating emperature 40º F to 104º F (4º C to 40º C).
Storage emperature 14º F (-10º C) to 113º F (45º C). Store the sensor deliveryunit, test strips between 37º F (3º C) and 86º F (30º C).Control solution should be stored between 50º F (10º C)and 86º F (30º C).
Operating Humidity (Receiver) 5% to 90% (non-condensing).
Operating and Storage Altitude Sea level to 10,000 eet (3,048 meters).Operating Pressure 14.7 psia (sea level) to 10.1 psia (10,000 eet).
Sensor Lie Up to 5 days.
Sensor Operating Skin Suraceemperature
77º F (25º C) to 104º F (40º C).
Glucose Result Range 20 to 500 mg/dL (1.1 to 27.8 mmol/L).
Glucose Assay Method(or CM mode)
Amperometric electrochemical sensor using WIREDENZYME™ technology. Continuous subcutaneous
measurement o glucose in interstitial fluid by a sensorinserted approximately 5mm under the skin.
Power Source ransmitter: One silver oxide 357 HC battery (small coincell battery), replaceable (battery lie is ~ 30 days).Receiver: wo AAA alkaline batteries, replaceable (batterylie is ~ 60 days). We recommend Energizer® MAX®,Energizer® e2® itanium®, and Energizer® Industrial batteries.Other batteries may not provide expected battery lie.
ransmitter Size Height: 2.05 in. (5.2 cm). Width: 1.23 in. (3.1 cm).Depth: 0.43 in. (1.1 cm).
ransmitter Weight 0.48 oz. (13.61 grams) – including batteries.
ransmitter Battery Lie Up to 30 days.
Wearing ransmitter Under Water Up to 1 meter under water or no more than 30 minutes.
Receiver Size Height: 2.5 in. (6.3 cm). Width: 3.24 in. (8.2 cm).Depth: 0.88 in. (2.2 cm).
System Specifications
Your FreeStyle Navigator system specifications are listed in the ollowing table:
Section 18 1
Appendix B: Specifications

8/13/2019 The Guardian - Abbott
http://slidepdf.com/reader/full/the-guardian-abbott 164/198
Receiver Weight 3.5 oz. (99.2 grams) – including batteries.
Receiver Battery Lie Up to 60 days.
Automatic Shutoff Built-in blood glucose meter: 2 minutes afer last useraction. Receiver: 12 seconds afer last user action.
Receiver Memory • 60 days of normal use including continuous glucosereadings (stored every 10 minutes) and daily bloodglucose readings.
• Date/time will be remembered f or 5 minutes afer receiverbattery removal.
Calibration Plasma equivalent.
Calibration ime • 1st calibration: Must be performed at approximately10 hours afer a new sensor has been inserted. Tefirst calibration can be perormed afer the 10 hours.Continuous glucose readings will NO be reported untilthe 1st calibration is perormed successully.
• 2nd calibration: Must be performed between 2 and 4 hoursafer the 1st calibration or continuous glucose will notbe reported. Te 2nd calibration can be perormed afer4 hours; continuous glucose reporting will resume afer
completing the 2nd calibration successully.• 3rd calibration: Must be performed between 12 and 20
hours afer the 2nd calibration or continuous glucose willnot be reported. Te 3rd calibration can be perormedafer 20 hours; continuous glucose reporting will resumeafer completing the 3rd calibration successully.
• 4th calibration: Must be performed between 48 and 56hours afer the third calibration or continuous glucose willnot be reported. Te ourth calibration can be perormedafer 56 hours; continuous glucose reporting will resumeafer completing the 4th calibration successully.
Blood Glucose est ime(or BG mode)
Average o 7 seconds.
Blood Glucose Assay Method(or BG mode)
Coulometric electrochemical sensor.
Blood Sample ype (or BG mode) Whole blood, capillary.
Hematocrit (or BG mode) 15% to 65%.
18 Appendix B: Specifications (con’t)
118 Section 18
Appendix B: Specifications

8/13/2019 The Guardian - Abbott
http://slidepdf.com/reader/full/the-guardian-abbott 165/198
Performance CharacteristicsNote: Please consult your healthcare team on how to use the inormation in this section.Perormance o the FreeStyle Navigator® Continuous Glucose Monitoring System was evaluated in a controlled clinical study. Testudy was conducted in 3 centers and included a total o 58 subjects with diabetes. Each subject wore two FreeStyle NavigatorSensors over a 5-day period. Te subjects wore one sensor on the back o the upper arm and one on their abdomen. TeFreeStyle Navigator system was calibrated with capillary finger-stick measurements using the built-in FreeStyle Blood GlucoseMeter at approximately 10, 12, 24 and 72 hours afer insertion o the sensor. All measurements were perormed by a trainedclinic study staff or the subject.
During the study, subjects came to the clinical center or requent glucose samples measured once every 15 minutes on the YSI(Yellow Springs Instrument) SA Plus™ Glucose Analyzer. YSI measurements were perormed in duplicate on venous wholeblood and the FreeStyle measurements were perormed in duplicate on capillary blood rom the finger. All YSI whole bloodmeasurements were adjusted by applying a +12% correction actor (based on a normal hematocrit value o 45%).
Users and healthcare providers should consider that perormance in this study might be idealized. Participants enrolled in theclinical study and certain conditions o the study tend to result in above average glucose control. Tis, in turn, may result in the
appearance that the FreeStyle Navigator Continuous Glucose Monitoring System agrees with blood glucose levels better than itdoes under typical conditions. Monitors that measure glucose in interstitial fluid ofen show better agreement to blood glucoselevels when glucose levels are not changing rapidly or when glucose levels are not extremely low or high. Te ollowing are someexamples o why perormance o the FreeStyle Navigator Continuous Glucose Monitoring System may be idealized.
Subjects saw, on average, 15 fingerstick results per day in the clinic and 8 fingerstick results per day at home. Tis enables•
subjects to control their glucose levels better.
While subjects participated in the clinic portion o the study, they were more limited in their activities than someone at•
home. Tey were also provided with all their meals. Subjects who are more active, or with poor eating habits, may createmore challenging conditions or the FreeStyle Navigator Continuous Glucose Monitoring System.
Te built-in FreeStyle glucose meters used in the study were well maintained. Because the built-in FreeStyle meter is used•
to calibrate the FreeStyle Navigator Continuous Glucose Monitoring System, perormance may be poorer i the system isnot well maintained. It is important to carry out quality-control checks on the system and code the system according to the
manuacturer’s instructions to optimize perormance o the FreeStyle Navigator Continuous Glucose Monitoring System.
Accuracy able 1 below shows the distribution o all the data rom the In-Clinic study on the Clarke Error Grid. Accuracy was assessedby comparing the differences between the FreeStyle Navigator system and the YSI laboratory reerence. Te Clarke Error GridAnalysis evaluates the clinical relevance o the differences by dividing a correlation plot (Figure 1) into five zones as describedin able 1. Te YSI results and the corresponding glucose results rom the FreeStyle Navigator system together (called a ‘datapair’ or ‘matched data points’) determine what zone o the error grid the results all into. able 1 also shows that glucose datameasured by FreeStyle Navigator system on the arm and on the abdomen have similar distribution on the error grid. Tisdemonstrates that there is no difference in the perormance o the system when worn on the abdomen or on the back o theupper arm.
able 1. Clarke Error Grid Analysis. Continuous glucose results rom FreeStyle Navigator System (mg/dL) vs. the YSI (mg/dL)
Zone in the Clarke Error Grid
N (pairs o data) Percentage in the different zones (%)
Sensor Insertion Site
Abdomen % Arm %
A 16627 81.7 81.5 81.8
B 3398 16.7 16.8 16.6
C 19 0.1 0.1 0.1
D 316 1.6 1.6 1.5
E 2 0.0 0.0 0.0
Total 20362 Tere is no difference between the perormance o the system onthe arm and the perormance o the system on the abdomen.
Error Grid Explanation
A - Clinically accurate; would lead to correct and sae treatmentB - Benign; would lead to benign decisions or no treatment decisionsC - Overcorrection; would lead to overcorrection o normal glucose levelsD F il t d t t ld l d t il t d t t d t t hi h l l l l
18 Appendix B: Specifications (con’t)
Section 18 1
Appendix B: Specifications

8/13/2019 The Guardian - Abbott
http://slidepdf.com/reader/full/the-guardian-abbott 166/198
18 Appendix B: Specifications (con’t)
able 2 is a summary o the statistics that describe how well data rom the FreeStyle Navigator system
correlates to the results rom the reerence method. Glucose results rom the FreeStyle Navigatorsystem and the corresponding results rom the YSI (a total 20362 pairs o data points) in the In-Clinic study were used to determine the correlation.
YSI Reerence (mg/dL)
N a v i g a t o r C M
( m g / d L )
Figure 1.
y = x B
B
A
AC
E
D D
EC
0 100 200 300 400 500
500
400
300
200
100
0
able 3a displays the distribution o all the data rom the In-Clinic study on the Clarke Error Grid.It breaks the data set into smaller groups based on the glucose value reported by the YSI. For each othese smaller groups, the table shows what percentage o data all into different zones o the grid.
Table 3a. Accuracy perormance at different glucose levels using the Clarke Error Grid Analysis
ReerenceGlucose Level
(mg/dL)
Number oPaired
Readings
A and B(%)
A(%)
B(%)
C(%)
D(%)
E(%)
20-40 22 54.5 54.5 N/A* N/A* 45.5 0.0
41-80 1295 77.7 55.2 22.5 0.0 22.3 0.0
81-120 3820 99.9 69.5 30.4 0.1 N/A* N/A*
121-240 11430 99.9 85.4 14.4 0.1 N/A* 0.0
241+ 3795 99.5 91.7 7.8 0.0 0.4 0.1
Overall 20362 98.3 81.7 16.7 0.1 1.6 0.0
*N/A means that the Clarke Error Grid does not consider the possibility o these zones in thatconcentration range.
able 3b displays the same data as in table 3a on the Continuous Glucose-Error Grid. Tis is
a modified error grid that is designed to evaluate the clinical accuracy o continuous glucosemonitoring systems based on both glucose data points in time and the rate o change o glucose.
Table 3b. Accuracy perormance at dierent glucose levels using the Continuous Glucose-Error GridAnalysis
ZoneYSI ≤ 70 mg/dL
70 mg/dL < YSI≤180 mg/dL
YSI > 180 mg/dL All
N % N % N % N %
AccurateReadings
369 59.5 10407 98.9 8364 98.6 19140 97.5
BenignErrors
5 0.8 99 0.9 74 0.9 178 0.9
ErroneousReadings 246 39.7 22 0.2 41 0.5 309 1.6
ALL 620 100.0 10528 100.0 8479 100.0 19627 100.0
Slope 0.92
Intercept 14.3 mg/dL
Correlation Coefficient (r) 0.93
N 20362
Range 25 – 533 mg/dLOverall mean bias +0.8 mg/dL
Table 2. Regression Analysis. FreeStyleNavigator System (mg/dL) vs the YSI (mg/dL)
120 Section 18
Appendix B: Specifications

8/13/2019 The Guardian - Abbott
http://slidepdf.com/reader/full/the-guardian-abbott 167/198
18 Appendix B: Specifications (con’t)
Perormance Relative to the Reerence (YSI)
Error grid analysis (like the Clarke Error Grid Analysis and Continuous Glucose-Error Grid Analysis)is one way to evaluate the accuracy o the FreeStyle Navigator system. he accuracy can also beassessed by analyzing the dierence in the glucose results rom the FreeStyle Navigator system whencompared to the results rom the YSI. able 4a shows an analysis o the measure o closeness o theFreeStyle Navigator system to the YSI. It breaks the data into smaller groups based on the glucose
value reported by the YSI. he table reports the mean absolute dierence or the data pairs in eacho the smaller groups. able 4b shows the same data at dierent levels o glucose and urther groupsthem by the amount o dierence rom the YSI. able 5 breaks out the overall perormance relative tothe YSI or the two sites o sensor insertion.
he overall median absolute relative dierence or all the data pairs is 9.3%.
Table 4a. Perormance relative to YSI at dierent glucose levels
Glucose (mg/dL) Perormance
20-40 Mean Absolute Difference = 32.3 mg/dL
41-80 Mean Absolute Difference = 18.1 mg/dL
81-120 Mean Absolute Difference = 16.3 mg/dL
121-240 Mean Absolute Relative Difference = 11.0%
>240 Mean Absolute Relative Difference = 9.5%
Table 4b. Perormance relative to YSI at dierent levels o glucose – grouped by amount o dierencerom the YSI
Glucose Range(mg/dL)
Number oPaired Readings
Percent Within20% o the YSI
Percent Within30% o the YSI
Percent Within40% o the YSI
20-40* 22 31.8 54.5 72.7
41-80* 1295 65.9 82.0 90.7
81-120 3820 69.5 85.2 92.7
121-240 11430 85.4 95.1 98.3
>241 3795 91.7 98.8 99.9
Overall 20362 82.3 93.1 97.0
*Te absolute difference rom the YSI reading is measured in mg/dL i the YSI reading is 20-80 mg/dL.
Table 5. Perormance relative to YSI at dierent insertion sites
Overall MeanAbsolute
RelativeDifference
MARD by Insertion Site
Abdomen Arm
12.8% (Std. Dev. = 13.6%) 13.1% 12.6%
Section 18 1
Appendix B: Specifications

8/13/2019 The Guardian - Abbott
http://slidepdf.com/reader/full/the-guardian-abbott 168/198
18 Appendix B: Specifications (con’t)
Perormance Over the Duration o Wear
his section presents the perormance data in a variety o ways to demonstrate the perormance othe system over time during the entire sensor wear period. he sensor is worn on the body or upto 5 days, during which time the system has to be calibrated 4 times. ypically, the system has to becalibrated at 10, 12, 24 and 72 hours ater sensor insertion. Data presented in this section demonstrateshow the sensor perorms as a unction o time.
Sensor Stability ables 6a-6b show there is little dierence in accuracy over the ive days o sensor wear according tothe Clarke Error Grid Analysis (able 6a) and the Continuous Glucose-Error Grid Analysis (able 6b).
Table 6a. Clarke Error Grid Analysis by day o wear
Zone
Day 1 Day 2 Day 3 Day 4 Day 5
% % % % %
A 82.5 82.4 79.4 84.0 80.9
B 16.4 16.6 18.3 14.2 16.9
C 0.2 0.1 0.0 0.0 0.0
D 0.9 0.9 2.2 1.8 2.1
E 0.0 0.1 0.0 0.0 0.0
Overall Mean AbsoluteRelative Difference (%)
MARD0
12.6 12.3 14.1 11.9 13.0
Table 6b. Continuous Error Grid Analysis by day o wear
Zone Day 1 Day 2 Day 3 Day 4 Day 5
% % % % %
AccurateReadings
97.9 97.8 97.1 97.4 97.3
BenignErrors
1.0 1.2 0.7 0.8 0.8
ErroneousReadings
1.1 1.0 2.2 1.8 1.9
able 6c groups the difference between glucose results rom the FreeStyle Navigator system and theYSI into different blocks (within 20%, within 30% and within 40% rom the YSI). It shows there is littlechange in the difference rom YSI over time, thus demonstrating sensor stability.
Table 6c. Dierence rom the YSI at dierent times ater sensor insertion
Time Afer Insertion(hours)
Percent ReadingsWithin 20% o the
YSI*
Percent ReadingsWithin 30% o the
YSI*
Percent ReadingsWithin 40% o the
YSI*
10-12 86 92 96
12-24 82 93 97
24-72 81 92 97
72-122 82 93 97*Te absolute difference rom the YSI reading is measured in mg/dL i the YSI reading is at or below75 mg/dL.
122 Section 18
Appendix B: Specifications

8/13/2019 The Guardian - Abbott
http://slidepdf.com/reader/full/the-guardian-abbott 169/198
18 Appendix B: Specifications (con’t)
Stability o Sensor Calibration
FreeStyle Navigator system typically requires a calibration at 10, 12, 24 and 72 hours ater insertion othe sensor. his section presents inormation about the perormance o the system by the 4 calibrationperiods. he table (able 6d) breaks each calibration period into smaller slots and summarizes thedierence rom YSI in each slot. he data below demonstrates that there is little change in the systemperormance within each period.
Table 6d. Distribution o the dierence rom the YSI in the dierent calibration windows
Calibration Period Percent ReadingsWithin 20%* o
the YSI
Percent ReadingsWithin 30%* o
the YSI
Percent ReadingsWithin 40%* o
the YSI
Cal 1
(typically occurs 10 hrsafer sensor insertion)
First Calibration Period
80 88 94
Cal 2(typically occurs 12 hours
afer sensor insertion)
First Tird o SecondCalibration Period
83 94 98
Second Tird o SecondCalibration Period
83 94 98
Final Tird o SecondCalibration Period
84 95 98
Cal 3(typically occurs 24 hours
afer sensor insertion)
First Tird o TirdCalibration Period
84 94 98
Second Tird o Tird
Calibration Period
80 92 97
Final Tird o TirdCalibration Period
80 91 95
Cal 4(typically occurs 72 hours
afer sensor insertion)
First Quarter o FinalCalibration Period
86 93 96
Second Quarter o FinalCalibration Period
84 92 96
Tird Quarter o FinalCalibration Period
80 93 98
Final Quarter o FinalCalibration Period
82 93 97
* Te absolute difference rom the YSI reading is measured in mg/dL i the YSI reading is at or below75 mg/dL.
Sample Glucose Traces
he ollowing igures show examples o glucose traces rom the In-Clinic study. hese traces arerepresentative examples o excellent, average and poor perormance o the system. hese traces showan overlay o the continuous glucose readings rom the FreeStyle Navigator system and the bloodglucose measurements made using the laboratory YSI reerence. he blood glucose measurements thatwere used to calibrate the system are marked with ‘x’ in the traces. Glucose results rom the FreeStyleNavigator system are shown using circles and the glucose results rom the laboratory reerence (YSI)are shown using triangles. ime (hours since sensor insertion) is on the horizontal axis, and glucose
value in mg/dL is on the vertical axis.
Section 18 1
Appendix B: Specifications

8/13/2019 The Guardian - Abbott
http://slidepdf.com/reader/full/the-guardian-abbott 170/198
Figure 2. Sample o a Representative ‘Excellent’ Glucose race
Figure 3. Sample o a Representative ‘Average’ Glucose race
Figure 4. Sample o a Representative ‘Poor’ Glucose race
18 Appendix B: Specifications (con’t)
xx
x
x
Sensor Time (hours)
G l u c o s e ( m g / d L )
FreeStyle Navigator YSI Reference FreeStyle Calibration Night Time (11pm to 6am)
10 14 18 22 26 30 34 38 42 46 50 54 58 62 66 70 74 78 82 86 90 94 98 102 106 110 114 118 122
500
400
300
200
100
0
x
x
x
x
x
Sensor Time (hours)
G l u c o s e ( m g / d L )
FreeStyle Navigator YSI Reference FreeStyle Calibration Night Time (11pm to 6am)
10 14 18 22 26 30 34 38 42 46 50 54 58 62 66 70 74 78 82 86 90 94 98 102 106 110 114 118 122
500
400
300
200
100
0
xx
xx
Sensor Time (hours)
G l u c o s e ( m g / d L )
FreeStyle Navigator YSI Reference FreeStyle Calibration Night Time (11pm to 6am)
10 14 18 22 26 30 34 38 42 46 50 54 58 62 66 70 74 78 82 86 90 94 98 102 106 110 114 118 122
500
400
300
200
100
0
124 Section 18
Appendix B: Specifications

8/13/2019 The Guardian - Abbott
http://slidepdf.com/reader/full/the-guardian-abbott 171/198
18 Appendix B: Specifications (con’t)
Determination of Alarm Performance
Te threshold alarm is characterized below. Te projected alarm performance has not been established.
Te performance of low and high glucose alarms was assessed in an in-clinic study using 58 subjects with type 1 diabetes wearing oneFreeStyle Navigator sensor on the arm and one sensor on the abdomen. FreeStyle Navigator continuous data were masked from the
subjects and investigators and the alarms were not turned on. During 50 hours the subjects’ venous glucose was tested with a YSI 2300Stat Plus glucose analyzer at 15 minute intervals. Arm and abdomen data were pooled in the alarm analysis. Alarm performance was
evaluated in a retrospective analysis of the study data. As alarm performance was developed retrospectively, your results may vary fromthose reported below.
Definitions:
Hypoglycemic event – two or more successive YSI measurements below the alarm threshold or one YSI measurement 6 mg/dL below
the alarm threshold.
Hyperglycemic event - two or more successive YSI measurements above the alarm threshold or one YSI measurement 6% above the
alarm threshold.rue Treshold Alarm – a threshold alarm that occurred ± 30 minutes from the start of a hypoglycemic or hyperglycemic event
rue Alarm Rate – the percentage of time the glucose level was beyond the threshold and an alarm was activated
100XEventsTotal
AlarmsThresholdTrue byDetectedEvents
Missed Alarm Rate – the percentage of time the glucose level was beyond the threshold and an alarm was not activated
100XEventsTotal
AlarmsThresholdTrueByDetected NotEvents
False Treshold Alarm – a threshold alarm that occurred when a YSI measurement within ± 30 minutes was not beyond the threshold
settingFalse Alarm Rate – the percentage of time an alarm occurred when glucose level was not beyond the threshold setting
100XAlarmsThresholdTotal
AlarmsThresholdFalse
Detection of Low Glucose
See able 7 below for detection of low glucose. As an example, when the threshold alarm was set at 70 mg/dL (during the day), 56 % ofthe low glucose events were detected by FreeStyle Navigator.
able 7 Low Glucose Detection
DAY NIGH
Low Alarm
Setting (mg/dL)
Day True
Alarms*
Day Missed
Alarms**
Day False
Alarms***
Night True
Alarms*
Night Missed
Alarms**
Night False
Alarms***
% (n/N†) % (n/N) % (n/N) % (n/N) % (n/N) % (n/N)
65 46 (56/121) 54 (65/121) 19 (18/95) 80 (12/15) 20 (3/15) 41 (11/27)
70 56 (98/176) 44 (78/176) 16 (21/132) 79 (19/24) 21 (5/24) 40 (14/35)
75 59 (130/219) 41 (89/219) 9 (15/161) 72 (23/32) 28 (9/32) 37 (14/38)
85 61 (189/308) 39 (119/308) 7 (17/228) 65 (22/34) 35 (12/34) 33 (14/43)
* rue Alarms are the percentage of time the glucose level was below the threshold and an alarm was activated**Missed Alarms are the percentage of time the glucose level was below the threshold and an alarm was not activated.***False Alarms are the percentage of time an alarm occurred but the glucose level was not below the threshold setting.
Section 18 1
Appendix B: Specifications

8/13/2019 The Guardian - Abbott
http://slidepdf.com/reader/full/the-guardian-abbott 172/198
18 Appendix B: Specifications (con’t)
Detection of High Glucose
See Table 8 for detection of high glucose. As an example, when the threshold alarm was set at 240 mg/dL
(during the day), 78 % of the high glucose events were detected by FreeStyle Navigator.
Table 8 High Glucose Detection
DAY NIGHT
High Alarm
Setting (mg/dL
Day True
Alarms*
Day Missed
Alarms**
Day False
Alarms*
Night True
Alarms**
Night Missed
Alarms***
Night False
Alarms***
% (n/N†) % (n/N) % (n/N) % (n/N) % (n/N) % (n/N)
180 89 (561/630) 11 (69/630) 11 (68/628) 69 (29/42) 31 (13/42) 7 (3/44)
240 78 (295/376) 22 (81/376) 12 (47/393) 41 (12/29) 59 (17/29) 25 (7/28)
270 70 (193/274) 30 (81/274) 12 (32/265) 21 (3/14) 79 (11/14) 36 (5/14)
300 61 (117/192) 39 (75/192) 12 (20/161) 12 (1/8) 88 (7/8) 33 (1/3)
* True Alarms are the percentage of time the glucose level was above the threshold and an alarm was activated
**Missed Alarms are the percentage of time the glucose level was above the threshold and an alarm was not activated.
***False Alarms are the percentage of time an alarm occurred but the glucose level was not above the threshold setting†n/N is the (n)umber of observations divided by the total (N)umber
126 Section 18
Appendix B: Specifications

8/13/2019 The Guardian - Abbott
http://slidepdf.com/reader/full/the-guardian-abbott 173/198
18 Appendix B: Specifications (con’t)
END OF Section 18
Measuring Glucose in Interstitial FluidFreeStyle Navigator system measures glucose in the interstitial fluid (ISF) by means o a sensor that is
inserted about 5 mm under the skin. Interstitial fluid is the fluid between the body’s cells. Physiologic
differences between the interstitial fluid and capillary blood may result in differences in glucose
measurements. Differences in glucose measurement between interstitial fluid and your finger may be
observed during times o rapid change in blood glucose, e.g. afer eating, dosing insulin, or exercising.
Movement o nutrients, oxygen and glucose rom the blood into the cells happen across the ISF.
Tereore, i the glucose in the bloodstream rises (e.g. during meals), that rise is not seen in the ISF
until later. Similarly, i glucose levels in the ISF drop (or example during exercise, the cells consume
glucose rapidly) that drop is not seen in the bloodstream until later.
On average, glucose levels in the ISF lag the glucose levels in capillary blood by 14 minutes. Tis is aphysiological phenomenon that can vary rom one person to another.
PrecisionData rom two sensors inserted at different insertion sites was used to calculate the between sensor
reproducibility. Based on 312953 pairs o data sets, the average between sensor reproducibility was 10%.
Sensor Insertion, Calibration and Sensor WearHome Use Study : Sensor insertion, calibration and sensor wear were evaluated in a Home Use Study
where 137 participants used the product on their own in a home environment. Te participants wore
8 sensors during the study period o 40 days. Tey wore the sensors either on the arm or abdomen.
During the first 20 days o the study, continuous glucose results were not visible to the participants.During the ollowing 20 days, participants had access to the glucose measurements. In addition to
required calibration tests, the participants perormed 4 finger stick measurements a day using the
built-in FreeStyle meter. Te ollowing inormation is based on the findings rom this study.
When used as directed, 96.8% o the total sensor insertions were successul. 92.6% o the sensors were
calibrated successully and began producing glucose results within 12 hours afer sensor insertion. Te
median time or a successul first calibration was 10.1 hours. Te median duration o wear o
calibrated sensors was 120 hours. 83% o sensor wears lasted at least 108.3 hours. Te median wear
time or sensors inserted on the arm was 0.4 hours longer than or sensors inserted on the abdomen.
Skin InteractionBased on the examination o 124 study participants at a 21-day ollow up, the ollowing incidence o
skin issues were observed in 304 site exams.
Moderate to severe itching – 1.6% o the time
Moderate bruising – 0.3% o the time
Moderate erythema – 1.0% o the time
Moderate pain – 0.3% o the time
Rate o mild incidences or any individual category o skin issues above including edema, rash,
induration, bleeding and others was less than 5%.
Section 18 1
Appendix B: Specifications

8/13/2019 The Guardian - Abbott
http://slidepdf.com/reader/full/the-guardian-abbott 174/198
128 Section 18
Appendix B: Specifications

8/13/2019 The Guardian - Abbott
http://slidepdf.com/reader/full/the-guardian-abbott 175/198

8/13/2019 The Guardian - Abbott
http://slidepdf.com/reader/full/the-guardian-abbott 176/198
A p p e n d i x
C

8/13/2019 The Guardian - Abbott
http://slidepdf.com/reader/full/the-guardian-abbott 177/198
19 19 Appendix C: FCC Compliance Inormation
Electromagnetic Interference and Your FreeStyle Navigator®
Continuous Glucose Monitoring System
Important Information about Electromagnetic Interference
Te FreeStyle Navigator® ransmitter and Receiver communicate using radio requency waves. Te
FreeStyle Navigator system has been designed to be reliable and immune to common electromagnetic
intererence so that it is not influenced by such intererence. However, under rare circumstances, i you
happen to be in an environment o strong electromagnetic radiation, there may be some intererence.
Examples o possible sources o intererence are: store doorways, store checkout counters, metal
detectors like those used in airport security systems or electronic surveillance devices, and radio
transmitting devices such as cellular phones, 2-way radio and cordless phones.Intererence may occur in the vicinity o equipment marked with symbol.
I such intererence happens, it tends to be temporary. Tis makes it unlikely that you will experience
any noticeable difference in the perormance o the system. In the event o electromagnetic
intererence, you may experience loss o communication between the receiver and transmitter, you
may see unrecognizable characters on the receiver display screen, or you may not see continuous
glucose results. Te system is designed to alert you o these conditions through audio (beep or vibrate)
or visual (icons, unrecognizable characters on the screen or lack o glucose results) means.
I you observe a significant change in your continuous glucose readings that you think is erroneous, or
i you eel the blood glucose measurement in the Blood Glucose mode is erroneous and you are closeto an electromagnetic intererence source, move away rom the source o intererence and check to see
i the condition ades away. Always maintain a minimum separation distance rom potential sources o
electromagnetic intererence (see ables 3 and 4 in this section or guidance).
Depending on your distance rom the source o intererence, the strength o the interering signal,
and the relative orientation between you and the source o intererence, you may or may not see or
experience these conditions. When in doubt, move away from any likely source of electromagnetic
interference. I you experience consistent intererence rom any source, contact the manuacturer or
dealer or that source and have a trained technician assess the situation. In addition, please report any
consistent intererence issues to Abbott Diabetes Care Customer Care.
I you have a medical appointment that includes X-ray, MRI (Magnetic resonance Imaging), C
(Computed omography) scan, or another type o exposure to radiation, keep your system and sensor
away rom the area. Beore exposure to such radiation, discard any sensor you are wearing and insert a
new sensor afer the radiation session. Te effect o these types o radiation on the perormance o the
system has not been evaluated.
Section 19 1
Appendix C: Classification/Compliance/Declaration

8/13/2019 The Guardian - Abbott
http://slidepdf.com/reader/full/the-guardian-abbott 178/198
19 Appendix C: FCC Compliance Inormation (con’t)
d a n c e a n d M a n u f a c t u r e r ’ s D e c l a r a t i o n –
E l e c t r o m a g n e t i c E m i s s i o n s
b l e 1 . T
e F r e e S t y l e N a v i g a t o r s y s t e m i s i n t e n d e d f o r u s e i n t h e e l e c t r o m a g n e t i c
e n v i r o n m e n t s p e c i fi e d b e l o w . T e c
u s t o m e r o r t h e u s e r o f t h e
e S t y l e N
a v i g a t o r s y s t e m s h o u l d a s s u r e t h a t i t i s u s e d i n s u c h a n e n v i r o n m e n t .
i s s i o n s
T e s t
C o m p l i a n c e
E l e c t r o m a g n e t i c E n v i r o n m e n t – G u i d a n c e
E m i s s i o n
s
P R 1 1
G r o u p 1
T e F r e e S t y l e N a v i g a t o r s y s t e m u s e s R F E n e r g y o n l y f o r i t
s I n t e n d e d f u n c t i o n . T e r e f o r e , i t s
R F e m i s s i o n s a r e v
e r y l o w a n d a r e n o t l i k e l y t o c a u s e a n y i n t e r f e r e n c e i n n e a r b y e l e c t r o n i c
e q u i p m e n t .
E m i s s i o n
s
P R 1 1
C l a s s B
T e F r e e S t y l e N a v i g a t o r s y s t e m i s s u i t a b l e f o r u s e i n a l l e s t a b l i s h m e n t s , i n c l u d i n g d o m e s t i c
e s t a b l i s h m e n t s a n d t h o s e d i r e c t l y c o n n e c t e d t o t h e p u b l i c
l o w - v o l t a g e p o w e r s u p p l y n e t w o r k
t h a t s u p p l i e s b u i l d
i n g s u s e d f o r d o m e s t i c p u r p o s e s .
m o n i c e m i s s i o n s
6 1 0 0 0 - 3
- 2
N o t A p p l i c a b l e
a g e fl u c t u a t i o n s /
e r e m i s s i o n s
6 1 0 0 0 - 3
- 3
N o t A p p l i c a b l e
d a n c e a n d M a n u f a c t u r e r ’ s D e c l a r a t i o n - E l e c t r o m a g n e t i c I m m u n i t y
b l e 2 . T
e F r e e S t y l e N a v i g a t o r s y s t e m i s i n t e n d e d f o r u s e i n t h e e l e c t r o m a g n e t i c
e n v i r o n m e n t s p e c i fi e d b e l o w . T e c
u s t o m e r o r u s e r o f t h e F r e e S t y l e
i g a t o r s
y s t e m s h o u l d a s s u r e t h a t i t i s u s e d i n s u c h a n e n v i r o n m e n t .
m u n i t y
t e s t
T e s t L e v e l
F r e e S t y l e N a v i g
a t o r S y s t e m
C o m p l i a n c e L e v
e l
E l e c t r o m a g n e t i c E n v i r o n m e n t – G u i d a n c e
R x E l e c t r o s t a t i c D i s c h a r g e
D )
6 0 6 0 1 - 1 - 2
± 8 k V C o n t a c t
D i s c h a r g e
± 1 5 k V A i r D i s
c h a r g e
± 8 k V C o n t a c t D i s c h a r g e
± 1 5 k V A i r D i s c h a r g e
F l o o r s s h o u l d b e w o o d ,
c o n c r e t e o r c e r a m i c t i l e . I f fl o o r s
a r e c o v e r e d w i t h s y n t h e
t i c m a t e r i a l , t h e r e l a t i v e h u m i d i t y
s h o u l d b e a t l e a s t 3 0 % .
R x E l e c t r o s t a t i c D i s c h a r g e
D )
3 0 0 4 8 9 - 3
± 4 k V C o n t a c t
D i s c h a r g e
± 8 k V A i r D i s c h a r g e
± 4 k V C o n t a c t D i s c h a r g e
± 8 k V A i r D i s c h a r
g e
F l o o r s s h o u l d b e w o o d ,
c o n c r e t e o r c e r a m i c t i l e . I f fl o o r s
a r e c o v e r e d w i t h s y n t h e
t i c m a t e r i a l , t h e r e l a t i v e h u m i d i t y
s h o u l d b e a t l e a s t 3 0 % .
n e t i c F i e l d I m m u n i t y
6 0 6 0 1 - 1
- 2
3 A / m @ 5 0 H z a n d 6 0 H z
5 m i n d w e l l t i m
e
3 A / m @ 5 0 H z a n d
6 0 H z
5 m i n d w e l l t i m e
P o w e r f r e q u e n c y m a g n e t i c fi e l d s s h o u l d b e a t l e v e l
c h a r a c t e r i s t i c o f a t y p i c a l l o c a t i o n i n a t y p i c a l c o m m e r c i a l o r
h o s p i t a l e n v i r o n m e n t .
n s m i t t e r
R a d i a t e d E m i s s i o n s
4 7 P a r t
1 5 . 2 3 1 ( e )
M u s t b e b e l o w
7 2 . 9 d B u V / m @
4 3 3 . 5 6 M H z
6 7 . 9 d B u V / m @ 4 3 3 . 5 6 M H z
C u s t o m e r C a r e : 1 - 8 6 6 - 5 9 7 - 5 5 2 0
130 Section 19
Appendix C: Classification/Compliance/Declaration

8/13/2019 The Guardian - Abbott
http://slidepdf.com/reader/full/the-guardian-abbott 179/198
19 Appendix C: FCC Compliance Inormation (con’t)
n s m i t t e r
R a d i a t e d E m i s s i o n s
E N 3 0 0
2 2 0 - 3
M u s t b e b e l o w
1 0 7 . 5 d B u V / m
@ 4 3 3 . 5 6 M H z
8 3 . 1 d B u V / m @ 4 3 3 . 5 6 M H z
n s m i t t e r
I n t e n t i o n a l R a d i a t i o n
u p i e d B a n d w i d t h f o r F C C
3 0 0 2 2 0 - 3
L e s s t h a n
1 0 8 4 k H z @ 4 3 3
. 5 6 M H z
2 5 3 k H z @ 4 3 3 . 5 6 M H z
n s m i t t e r
U n i n t e n t i o n a l
i a t i o n
P R 1 1 C l a s s B
L e s s t h a n
3 0 d B u V / m @ 2 0 3 . 4 8 M H z
1 2 . 6 d B u V / m @ 2 0 3 . 4 8 M H z
e i v e r U n i n t e n t i o n a l R a d i a t i o n
P R 1 1 C l a s s B S e c 5
B e l o w 3 0 d B u V
/ m
( 3 0 - 2 3 0 M h z 3 7
d B u V / m )
( 2 3 0 M h z - 1 G H z )
2 1 . 1 d B u V / m @ 4 2 9 . 7 9 M H z
R x R a d i a t e d I m m u n i t y
6 0 6 0 1 - 1
- 2
8 0 M h z - 3 0 0 0 M H z
1 0 V / m @ 8 0 %
1 k H z A M M o d u l a t i o n
1 0 8 s e c o n d d w e l l t i m e
8 0 M h z - 3 0 0 0 M H z
1 0 V / m @ 8 0 %
1 k H z A M M o d u l a t i o n
1 0 8 s e c o n d d w e l l t i m e
R a d i a t e d
I m m u n i t y
6 0 6 0 1 - 1
- 2
3 0 0 2 2 0 - 3
8 0 M h z - 2 5 0 0 M H z
3 V / m @ 8 0 %
1 k H z A M M o d u l a t i o n
2 . 8 7 4 m s e c d w e l l t i m e
8 0 M h z - 2 5 0 0 M H z
3 V / m @ 8 0 %
1 k H z A M M o d u l a t i o n
2 . 8 7 4 m s e c d w e l l t i m e
r e q u e n c y S t a b i l i t y
3 0 0 2 2 0 - 3
8 0 M h z - 2 5 0 0 M H z
3 V / m @ 8 0 %
1 k H z A M M o d u l a t i o n
2 . 8 7 4 m s e c d w e l l t i m e
W i t h i n 4 3 3 . 0 5 - 4 3 4 . 7 9 M H z
o p e r a t i n g r a n g e a n
d
< 1 0 0 p p m F r e q u e n c y E r r o r
t r i c a l F a
s t r a n s i e n t / B u r s t
6 1 0 0 0 - 4
- 4
± 2 k V f o r p o w e r s u p p l y l i n e s
± 1 k V f o r i n p u t / o u t p u t l i n e s
N o t A p p l i c a b l e
B a t t e r y O p e r a t e d
M a i n s p o w e r q u a l i t y s h o u l d b e t h a t o f a t y p i c a l c o m m e r c i a l
o r h o s p i t a l e n v i r o n m e n t .
g e 6 1 0 0 0 - 4
- 5
± 1 k V f o r D i ff e r e n t i a l m o d e
± 2 k V f o r c o m m o n m o d e
N o t A p p l i c a b l e
B a t t e r y O p e r a t e d
M a i n s p o w e r q u a l i t y s h o u l d b e t h a t o f a t y p i c a l c o m m e r c i a l
o r h o s p i t a l e n v i r o n m e n t .
a g e D i p s o n P o w e r S u p p l y
u t l i n e s
6 1 0 0 0 - 4
- 1 1
< 5 % f o r 0 . 5 c y c
l e
4 0 % U t * f o r 5 c
y c l e s
7 0 % U t * f o r 2 5
c y c l e s
< 5 % U t * f o r 5 s e c
N o t A p p l i c a b l e
B a t t e r y O p e r a t e d
M a i n s p o w e r q u a l i t y s h o u l d b e t h a t o f a t y p i c a l c o m m e r i c i a l
o r h o s p i t a l e n v i r o n m e n t . I f t h e u s e r o f t h e d e v i c e r e q u i r e s
c o n t i n u e d o p e r a t i o n d u
r i n g p o w e r m a i n s i n t e r r u p t i o n s ,
i t i s r e c o m m e n d e d t h a t
t h e d e v i c e b e p o w e r e d f r o m a n
u n i n t e r r u p t i b l e p o w e r s u p p l y o r b a t t e r y p a c k .
U t i s t h e a . c . m a i n s v o l t a g e p r i o r t o a p p l i c a
t i o n o f t h e t e s t l e v e l .
d a n c e a n d M a n u f a c t u r e r ’ s D e c l a r a t i o n - E l e c t r o m a g n e t i c I m m u n i t y .
( c o n ’ t )
Section 19 1
Appendix C: Classification/Compliance/Declaration

8/13/2019 The Guardian - Abbott
http://slidepdf.com/reader/full/the-guardian-abbott 180/198
19 Appendix C: FCC Compliance Inormation (con’t)
o m m e n d e d s e p a r a t i o n d i s t a n c e b e t w e e n
p o r t a b l e a n d m o b i l e R F C o m m u n
i c a t i o n s e q u i p m e n t
t h e F r e e S t y l e N a v i g a t o r s y s t e m .
l e 3 . T
e F r e e S t y l e N a v i g a t o r s y s t e m i s i n t e n d e d f o r u s e i n a n e l e c t r o m a g n e t i c e n v i r o n m e n t i n
c h r a d i a t e d R F d i s t u r b a n c e s a r e c o n t r o l l e d . T e c u s t o m e r o r t h e u s e r o f t h e F r e e S t y l e N a v i g a t o r
e m c a n
h e l p p r e v e n t e l e c t r o m a g n e t i c i n t e r f e r e n c e b y m a i n t a i n i n g a m i n i m u m d i s t a n c e b e t w e e n
t a b l e a n
d m o b i l e R F c o m m u n i c a t i o n s e q u i p
m e n t ( t r a n s m i t t e r s ) a n d t h e F r e e S t y l e N a v i g a t o r s y s t e m
e c o m m e n d e d b e l o w , a c c o r d i n g t o t h e m a x i m u m o u t p u t p o w e r o f t h e c o m m u n i c a t i o n s e q u i p m e n t .
d i a t e d m a x i m u m p o w e r o f
T r a n s m i t t e r W
S e p a r a t i o n
d i s t a n c e a c c o r d i n g t o f r e q u e n c y o f t r a n s m i t t e r ( m )
8 0
– 8 0 0 M H z
d = 1 . 2
8 0 0 M H z - 3 G H z
d = 2 . 3
0 . 0 1
0 . 1 2
0 . 2 3
0 . 1
0 . 3 8
0 . 7 3
1
1 . 2 0
2 . 3 0
1 0
3 . 7 9
7 . 2 7
1 0 0
1 2 . 0 0
2 3 . 0 0
r r a n s m i t t e r s r a t e d a m a x i m u m o u t p u t p o w e r n o t l i s t e d a b o v e t h e r e c o m m e n
d e d s e p a r a t i o n
s t a n c e d
i n m e t e r s ( m ) c a n b e e s t i m a t e d u s i n g t h e e q u a t i o n a p p l i c a b l e t o t h e f r e
q u e n c y o f t h e
a n s m i t t e r w h e r e P i s t h e m a x i m u m o u t p u t p o w e r r a t i n g o f t h e t r a n s m i t t e r i n w a t t s ( W ) a c c o r d i n g t o
e t r a n s m
i t t e r m a n u f a c t u r e r .
o t e 1 : A
t 8 0 M H z a n d 8 0 0 M H z t h e s e p a r a t i o n d i s t a n c e f o r t h e h i g h e r f r e q u e n c y
r a n g e a p p l i e s .
o t e 2 : T
e s e g u i d e l i n e s m a y n o t a p p l y i n a l l
s i t u a t i o n s E l e c t r o m a g n e t i c p r o p a g a
t i o n i s a ff e c t e d b y
a b s o r p t i o n a n d r e fl e c t i o n f r o m s t r u c t u r e s , o b j e c t s a n d p e o p l e .
o t e 3 : 1
m e t e r = 3 . 2 8 f e e t .
C u s t o m e r C a r e : 1 - 8 6 6 - 5 9 7 - 5 5 2 0
132 Section 19
Appendix C: Classification/Compliance/Declaration

8/13/2019 The Guardian - Abbott
http://slidepdf.com/reader/full/the-guardian-abbott 181/198
19 Appendix C: FCC Compliance Inormation (con’t)
d a n c e a n d M a n u f a c t u r e r s ’ D e c l a r a t i o n –
E l e c t r o m a g n e t i c I m m u n i t y .
l e 4 . T
e F r e e S t y l e N a v i g a t o r s y s t e m i s i n t e
n d e d f o r u s e i n t h e e l e c t r o m a g n e t i c
e n v i r o n m e n t s p e c i fi e d b e l o w . T e C
u s t o m e r o r t h e u s e r o f t h e
e S t y l e N
a v i g a t o r s y s t e m s h o u l d a s s u r e t h a t i t i s u s e d i n s u c h a n e n v i r o n m e n t .
I m m u n i t y T e s t
T e s t L e v e l
C o m p l i a n c e L e v e l
E l e c t r o m a g n e t i c E n v i r o n
m e n t – G u i d a n c e
x / R x R a d i a t e d
I m m u n i t y e s t
8 0 M H z - 3 0 0 0 M H
z
1 0 V / m @ 8 9 %
1 k H z A M M o d u l a t i o n
1 0 8 s e c o n d d w e l l i m e
8 0 M H z - 3 0 0 0 M H z
1 0 V / m @ 8 9 %
1 k H z A M M o d u l a t i o n
1 0 8 s e c o n d d w e l l i m e
P o r t a b l e a n d m o b i l e R F C o m m u n i c a t i o n s e q u i p m e n t s h o u l d b e u s e d
n o
c l o s e r t o a n y p a r t o f t h e F r e e S t y l e N
a v i g a t o r , i n c l u d i n g c a b l e s , t h a n
t h e
r e c o m m e n d e d s e p a r a t i o n d i s t a n c e
c a l c u l a t e d f r o m t h e e q u a t i o n
a p p l i c a b l e t o t h e f r e q u e n c y o f t h e t r a n s m i t t e r .
R e c o m m e n d e d S e p a r a t i o n D i s t a n c e
d = 1 . 2
( m ) @ 8 0 M H
z t o 8 0 0 M H z
d = 2 . 3
( m ) @ 8 0 0 M H z t o 2 . 5 G H z
W h e r e P i s t h e m a x i m u m o u t p u t p o w e
r r a t i n g o f t h e t r a n s m i t t e r i n
w a t t s ( W ) a c c o r d i n g t o t h e t r a n s m i t t e r
m a n u f a c t u r e r a n d d i s t h e
r e c
o m m e n d e d s e p a r a t i o n d i s t a n c e i n m
e t e r s ( m ) .
F i e
l d s t r e n g t h s f r o m R F t r a n s m i t t e r s , a
s d e t e r m i n e d b y a n
e l e c t r o m a g n e t i c s i t e s u r v e y a s h o u l d b e
l e s s t h a n t h e c o m p l i a n c e l e v e l
i n e a c h f r e q u e n c y r a n g e b .
I n t e r f e r e n c e m a y o c c u r i n t h e v i c i n i t y o f e q u i p m e n t m a r k e d w i t h t h e
f o l l o w i n g s y m b o l :
o t e 1 : A
t 8 0 M H z a n d 8 0 0 M H z , t h e h i g h e r
f r e q u e n c y r a n g e a p p l i e s .
o t e 2 : T
e s e g u i d e l i n e s m a y n o t a p p l y i n a l l
s i t u a t i o n s . E l e c t r o m a g n e t i c p r o p a g a t i o n i s a ff e c t e d b y a b s o r p t i o n a n d r e fl e c t i o n f r o m s t r u c t u r e s ,
o b j e c t s a n d p e o p l e .
a F i e l d s t r e n g t h s f r o m fi x e d t r a n s m i t t e r s , s u
c h a s b a s e s t a t i o n s f o r r a d i o ( c e l l u l a
r / c o r d l e s s ) t e l e p h o n e s a n d l a n d m o
b i l e r a d i o s , a m a t e u r r a d i o ,
A M a n
d F M r a d i o b r o a d c a s t c a n n o t b e p r e d i c t e d t h e o r e t i c a l l y w i t h a c c u r a c y . o a s s e s s t h e e l e c t r o m a g n e t i c e n v i r o
n m e n t d u e t o fi x e d R F
t r a n s m
i t t e r s , a n e l e c t r o m a g n e t i c s i t e s u r v e y s h o u l d b e c o n s i d e r e d . I f t h e m e a s u r e m e n t fi e l d s t r e n g t h i n t h e l o c a t i o
n i n w h i c h t h e F r e e S t y l e
N a v i g a t o r s y s t e m i s u s e d e x c e e d s t h e a p p l i c a b l e R F c o m p l i a n c e l e v e l a b o v e t h e
F r e e S t y l e N a v i g a t o r s y s t e m s h o u l d
b e o b s e r v e d t o v e r i f y n o r m a l
o p e r a t
i o n . I f a
b n o r m a l p e r f o r m a n c e i s o b s e r v e d , a
d d i t i o n a l m e a s u r e s m a y b e n e c e s s a r y , s u c h a s r e - o r i e n t i n g o r r e
l o c a t i n g t h e F r e e S t y l e
N a v i g a t o r s y s t e m .
b O v e r t h e f r e q u e n c y r a n g e 1 5 0 k H z t o 8 0 M
H z , fi e l d s t r e n g t h s s h o u l d b e l e s s t h a n 3 V / m .
Section 19 1
Appendix C: Classification/Compliance/Declaration

8/13/2019 The Guardian - Abbott
http://slidepdf.com/reader/full/the-guardian-abbott 182/198
19 Appendix C: FCC Compliance Inormation (con’t)
Caution: Te radio receiver and transmitter o your FreeStyle Navigator system operate on the requency o 433.6 MHz. Primary users o this requency band include amateur “HAM” radiotransmitters. Because o the coexistence o the FreeStyle Navigator radio connection and HAMtransmitters, there may be instances where the connection between your transmitter and receiver maybe lost when in proximity to HAM radio equipment.
Te FreeStyle Navigator system is designed to sense and notiy you about a lost connection. I yourFreeStyle Navigator system loses the radio connection, increase the separation distance between
yoursel and the transmitter by moving away rom the HAM radio. Te FreeStyle Navigator radioconnection should re-establish itsel. You should note that HAM radio products can be fixed, mobileor portable handheld (“walkie talkie” type) units.
ClassificationTe transmitter and receiver are classified as ollows:
• Internally-powered equipment.
• Type B equipment.
• Mode of operation for the receiver is “continuous operation”.
• Mode of operation f or the transmitter is “continuous operation with intermittent loading”.
FCC Compliance Informationransmitter
Model Number: PR03831-xxx.
FCC Rules: ested to comply with FCC Part 15, Class B, Security/Remote control ransmitter.Tis device complies with Part 15 o the FCC Rules. Operation is subject to the ollowing twoconditions:
1. Tis device may not cause harmul intererence.
2. Tis device must accept any intererence received, including intererence that may causeundesired operation.
Note: Tis equipment has been tested and ound to comply with the limits or a Class B digital device,pursuant to Part 15 o the FCC Rules. Tese limits are designed to provide reasonable protectionagainst harmul intererence in a residential installation. Tis equipment generates, uses, and canradiate radio requency energy and, i not installed and used in accordance with the instructions, may
cause harmul intererence to radio communications. However, there is no guarantee that intererencewill not occur in a particular installation. I this equipment does cause harmul intererence to radioor television reception, which can be determined by turning the equipment off and on, the user isencouraged to try to correct the intererence by one or more o the ollowing measures:
• R eorient or locate the receiving antenna.
• Increase the separation between the equipment and transmitter.
• Consult the dealer or an experienced radio/V technician or help.
Caution: Changes or modification to the device not expressly approved by Abbott Diabetes Care Inc.
could void the user’s authority to operate this equipment.
134 Section 19
Appendix C: Classification/Compliance/Declaration

8/13/2019 The Guardian - Abbott
http://slidepdf.com/reader/full/the-guardian-abbott 183/198

8/13/2019 The Guardian - Abbott
http://slidepdf.com/reader/full/the-guardian-abbott 184/198
136 Section 19
Appendix C: Classification/Compliance/Declaration

8/13/2019 The Guardian - Abbott
http://slidepdf.com/reader/full/the-guardian-abbott 185/198

8/13/2019 The Guardian - Abbott
http://slidepdf.com/reader/full/the-guardian-abbott 186/198
G l o s s a r y

8/13/2019 The Guardian - Abbott
http://slidepdf.com/reader/full/the-guardian-abbott 187/198
2020 Glossary
Adhesive
Enhancers
Products that can help the adhesive pad on the sensor support mount stick better to your skin
Alarms Sounds, vibrations, or text that are used by the receiver to notiy you o certain conditions.
Alarms Menu A menu you can access rom the Main menu. From the Alarms menu, you can turn an alarm onor off, set its sensitivity, and select alarm type.
Alarm
Sensitivity
A setting that you can adjust to trigger the Projected Low/High Glucose alarms (early warningalarms) sooner or later. Te higher the sensitivity, the sooner the alarm will sound.
Alarm Type Reers to the sound or vibration o the alarm. Alarm types include low, medium, or high beepsand short, medium, or long vibrations.
Antiseptics Products that you can use at the sensor insertion site i you tend to develop inections.
Backlighting A light inside the receiver that lets you see the display screen in the dark.
Blood Glucose
Mode One o two modes in which the system unctions (the other is Continuous Monitoring mode).
In the Blood Glucose mode, you can perorm traditional blood glucose testing manually using
a FreeStyle est Strip and a drop o blood. Although you can use the Blood Glucose mode
whenever you wish, its main use is or calibrating the system.
Calibration Te system must be calibrated at approximately 10 , 12, 24 and 72 hours afer sensor insertion.
Te system is calibrated using a blood glucose measurement (perormed in the Blood Glucose
mode using the built-in FreeStyle Blood Glucose Meter). Te receiver compares the readingit gets rom the blood to the reading the sensor takes rom the interstitial fluid. Based on the
calibration, the receiver calculates real-time glucose readings.
Calibration BG Allows you to add a new blood glucose measurement that is used or sensor calibration. Use this
eature only under the direction o a Customer Care representative or your healthcare team. Use
o this eature will discard all the earlier calibrations. Te sensor lie will not be reset.
Capillary Blood Blood rom the tiny blood vessels in your body (such as in the tip o your finger or alternate
sites) used to measure glucose levels in the Blood Glucose mode. Capillary blood is also used or
measuring glucose levels with traditional glucose meters.
CM Status Lets you view recent error codes related to the Continuous Monitoring mode. Tese codes appearonly when the system is not unctioning properly. Use this option only under the direction o a
Customer Care representative or your healthcare team.
Continuous
Monitoring Mode
One o two modes in which the system unctions (the other is Blood Glucose mode). You will use
this mode most o the time. It displays the glucose level in your interstitial fluid continuously, as
measured by the sensor you place just beneath your skin. Along with the glucose numbers, this
mode also displays a directional glucose trend arrow.
Section 20 1
Glossary

8/13/2019 The Guardian - Abbott
http://slidepdf.com/reader/full/the-guardian-abbott 188/198
Control
Solution Test
A test done with FreeStyle control solution in the Blood Glucose mode using the built-in
FreeStyle Blood Glucose Meter to ensure that the system is working properly in the BloodGlucose mode.
Data Loss
Alarm
An alarm that tells you when you are about to lose data, or when your alarms are about to stop
working. Data Loss alarms sound when the transmitter-receiver connection is broken or when
the sensor has expired.
Data Upload Te act o transerring data rom your FreeStyle Navigator system to a computer.
Dressings and
Skins
Products that can be used as over-bandages to cover the transmitter. Tese can help the sensor
support mount adhesive stick to your skin.
Events Activities and observations that can affect your glucose levels that you record in your system.Reviewing events may help you to see patterns in your glucose levels and how you manage your
diabetes. Once entered into the system, events may be viewed in several ways, including Event
History reports or Line Graph reports.
Event History
Reports
A type o report that incorporates the event inormation you enter (For example, histories o
recent glucose results, insulin doses, carbohydrate content o meals, exercise, state o health, etc.).
Exercise Event A record o many popular orms o exercise. You may also speciy the intensity and duration o
each exercise event.
FreeStyle Control
Solution
A solution containing a known amount o glucose. Used to perorm Control Solution tests
to make sure your receiver and test strips are working properly prior to calibration or bloodglucose testing.
FreeStyle
Navigator®
Continuous
Glucose
Monitoring
System
Also reerred to as the system, this device is designed to give people with diabetes a continuous
reading o their glucose levels in real-time.
FreeStyle Test
Strips
A small strip into which you place a drop o blood to perorm Blood Glucose mode tests. You
must use ONLY FreeStyle test strips with the system.
Generic Event A record o any event that you or your healthcare team thinks is useul in evaluating glucose
patterns. You may assign up to eight generic events to observations o your choosing.
Glucose Targets Te high and low levels that you would like your glucose to stay between. Used to make reports
more meaningul. Glucose targets are separate rom – and independent o – the levels you may be
using or high and low glucose alarms.
Glucose Trend
Arrows
Arrows shown on the receiver that let you know whether your glucose levels are stable,
increasing, or decreasing, and how quickly they are changing.
Hematocrit A measure o the amount o red blood cells in your body.
20 Glossary (con’t)
138 Section 20
Glossary

8/13/2019 The Guardian - Abbott
http://slidepdf.com/reader/full/the-guardian-abbott 189/198
High Glucose
Alarm
Notifies you when you go above your high glucose threshold (a number you and your healthcare
team will set).
High Glucose
Threshold
Te level you do not want your glucose level to rise above. You and your healthcare team
choose the level that is right or you, and you set in the system. Te High Glucose alarm
and the Projected High Glucose alarm use the high glucose threshold.
Icons Simple graphic symbols that appear on the receiver display screen to alert you to system
conditions or actions required.
Insulin Event A record o insulin doses (injection or pump) that you enter in the system to help you evaluate
current therapy. Te time and date o an Insulin event are always recorded. You may also enter
the type o insulin and dose amount (units).
Interstitial Fluid Te fluid in the tiny spaces between the cells in your body. Te system uses this fluid to measure
your glucose levels.
in vitro Te measuring o something out o the body. For example, in a test tube.
in vivo Te measuring o something in the body.
Lancet A tiny, sharp-pointed, disposable component used with the lancing device to obtain a drop o
blood or a Blood Glucose mode test.
Lancing Device A handheld piece o equipment that is used with a lancet to obtain a drop o blood or a Blood
Glucose mode test.
Lancing Device
Cocking Handle
A part o the lancing device that you pull to position the lancet or pricking the test site.
Lancing Device
Depth Indicator
Window
A window on the lancing device that shows you the depth setting you have chosen.
Lancing Device
Depth Setting
A part o the lancing device that lets you to adjust how deep the lancet pricks your skin. A
higher number means a deeper penetration o the lancet.
Lancing Device
Lancet CupHolder
A part o the lancing device that holds the lancet in place when pricking your skin.
LEFT/RIGHT
Option Buttons
Buttons on the bottom o the receiver ace that allow you to select options shown on the display
screen. Te RIGH Option Button also turns the receiver display screen on.
Line Graph
Reports
Show continuous glucose lines (plotted at 10-minute intervals) or several different periods (2, 4,
6, 12, or 24 hours).
Link Tis procedure is perormed so that the receiver can be paired with a transmitter. Once linked,
the receiver would know to accept inormation rom that transmitter alone. When shipped out o
the actory, receiver and transmitter are already linked.
20 Glossary (con’t)
Section 20 1
Glossary

8/13/2019 The Guardian - Abbott
http://slidepdf.com/reader/full/the-guardian-abbott 190/198
20 Glossary (con’t)
Low Glucose
Alarm
An alarm that tells you when you go below your low glucose threshold (a number you and your
healthcare team will set).
Low Glucose
Threshold
Te level that you do not want your glucose level to all below. You and your healthcare team
choose the level that is right or you, and you set it in the system. Te Low Glucose alarm and the
Projected Low Glucose alarm use the low glucose threshold.
Main Menu Displays a list o options that allow you to perorm many unctions and view specific inormation.
Meal Event A record o a meal and snack that you enter in the system to help you see patterns in your glucose
levels. Te time and date are always recorded. You may also record carbohydrate grams to help
you count carbohydrates or determine insulin/carbohydrate ratios.
Multi-DayStatistics
A type o statistical report that shows a summary o glucose results in relation to your glucosetargets over a specified number o days. You can choose 3, 7, 14, 21, or 28-day periods.
Progress Tones Communicate progress, errors, and successul completion o system activities such as Blood
Glucose mode testing.
Projected High
Alarm
Provides an early warning when you are approaching your high glucose threshold.
Projected Low
Alarm
Provides an early warning when you are approaching your low glucose threshold.
Receiver (Rx) Also called Rx. A wireless component o the system that looks and eels much like a traditional
blood glucose meter. However, unlike traditional blood glucose meters, the receiver can provide
you with continuous glucose readings rom the sensor. Te receiver also has a built-in FreeStyle
Blood Glucose Meter that works as a traditional blood glucose meter when a FreeStyle test strip is
inserted into the test strip port. You can wear the receiver on your belt or carry it in your pocket
or purse.
Receiver Display
Screen
Te rectangular window on the center o the receiver that displays glucose levels and other
important inormation.
Receiver Status Provides you with inormation regarding the receiver, including serial number, sofware version,
and remaining battery lie. Tis inormation can be accessed rom your System menu item in the
Main menu.
Receiver Test
Strip Port
Te slot on the lower lef edge o the receiver where you insert the FreeStyle est Strips to
calibrate the system or perorm Blood Glucose mode tests.
Reports Inormation about your glucose levels shown in a way to help you and your healthcare team
analyze changes in your glucose levels and your treatment plan (such as changes in insulin doses,
carbohydrate intake, etc.) Several types o reports are available.
Sensor Te part o the system that you insert under your skin. Each inserted sensor is intended to remain
in place and provide a continuous glucose reading or up to 5 days.
140 Section 20
Glossary

8/13/2019 The Guardian - Abbott
http://slidepdf.com/reader/full/the-guardian-abbott 191/198
20 Glossary (con’t)
Sensor Code A number that you will find on the sensor delivery unit packaging. Tis code number must
be entered into the receiver afer you insert a new sensor and beore you complete the systemcalibration.
Sensor Delivery
Unit
Te sensor delivery unit is designed and packaged to enable sae insertion o the sensor into
your skin. Te sensor delivery unit has 2 parts assembled and packaged together: the sensor
inserter with pre-installed sensor (which puts the tip o the sensor under your skin) and the
sensor support mount (which stays on your skin to hold the sensor in place and which attaches
the sensor to the transmitter).
Sensor Inserter Te sensor inserter is a cylindrical-shaped, plastic-cased device. A pre-cocked, coiled spring is
connected to a stainless steel needle, used to guide the sensor or insertion. With a single push o
the insertion button, the needle guides the sensor into the skin and is quickly withdrawn rom
the skin. Te Locking Pin is designed to avoid accidental discharge o the sensor inserter. Do not
remove the locking pin until the sensor support mount is adhered to the skin.
Sensor Insertion
Button
With a single push o the insertion button, the needle guides the sensor into the skin and is
quickly withdrawn rom the skin.
Sensor Insertion
Site
Te place on your body where you insert a sensor, on either the abdomen or the back o the
upper arm. Always change the sensor insertion site each time a new sensor is used. Te sensor
should be inserted at least 1 inch rom the previous site.
Sensor Locking
Pin
A pin on the sensor delivery unit that was designed to prevent accidental release o the sensor.
Tis pin must be removed beore the sensor can be inserted.
Sensor Release
Tabs
Parts o the sensor delivery unit that release the sensor inserter rom the sensor support mount.
Sensor Support
Mount
Te sensor support mount is designed to stay on your skin to hold the sensor in place and attach
the sensor to the transmitter. Te blue release tabs release the sensor inserter rom the sensor
support mount afer the sensor is inserted into the skin.
Sharps Container A sae place or disposal o sensor inserters and lancets.
Single-day
Statistics
A type o statistical report that shows a summary o glucose results in relation to your glucose
targets over a one-day period.
Site Rotation Te practice o using a different location on the body each time you insert a new sensor. Te new
Sensor should be inserted at least 1 inch rom the previous site.
Skin Barriers Products that can help prevent irritation or sensitivity problems at the sensor insertion site.
State of Health
Event
A record o health-related events, symptoms, and other observations that may help you see
patterns in your glucose levels.
Section 20 1
Glossary

8/13/2019 The Guardian - Abbott
http://slidepdf.com/reader/full/the-guardian-abbott 192/198
Statistical
Reports
A comprehensive summary o glucose results relative to your glucose targets. You can view
statistical reports or 1, 3, 7, 14, 21, or 28-day periods. Viewing this kind o inormation canhelp you see patterns in your glucose levels.
Status
Information
Inormation about the system and how it is working, such as sensor time or battery lie
remaining.
System A short name or the FreeStyle Navigator Continuous Glucose Monitoring System.
System Alarms System messages (For example, low battery lie, time or calibration).
System Menu A menu available rom the Main menu that is used to access status inormation and other unctions.
Transmitter (Tx) Also called x. A small electronic device that makes an electrical connection to the portion o
the sensor that extends above the skin. Te transmitter processes the very low current signals it
receives rom the sensor and sends the glucose data to the receiver once every minute.
Transmitter
Contact Points
Conductive points that connect the transmitter to the sensor support mount.
Transmitter/
Receiver
Connection
Te wireless connection needed or the system to unction. Te transmitter and the receiver must
be within 10 eet o each other or the connection to be valid.
TransmitterSensor Support
Mount Latch
A connector that helps secure the transmitter to the sensor support mount.
Transmitter
Status
Allows you to view the transmitter serial ID number and battery lie remaining.
Transmitter Tabs Connectors that help secure the transmitter to the sensor support mount.
Unlink Te process o removing the transmitter ID rom the receiver. Once unlinked, the receiver will no
longer be paired with a specific transmitter. Beore beginning to use the system, the receiver and
transmitter have to be linked.
UP/DOWN Arrow
Buttons
Buttons on the right ace o the receiver that allows you to move through lists to highlight
options. Also used to change numbers.
20 Glossary (con’t)
END OF Section 20
142 Section 20
Glossary

8/13/2019 The Guardian - Abbott
http://slidepdf.com/reader/full/the-guardian-abbott 193/198

8/13/2019 The Guardian - Abbott
http://slidepdf.com/reader/full/the-guardian-abbott 194/198
I n d e x

8/13/2019 The Guardian - Abbott
http://slidepdf.com/reader/full/the-guardian-abbott 195/198
2121 Index
Add Events 91
Adhesive
Adhesion o Skin 33, 87 Adhesive Enhancers 115 Adhesive Removers 29
Alarms
Change Te Alarms 53 Mute Alarms 64 Respond o Alarms 71, 74 Glucose Alarms 53-60, 125-126
Arrow
Directional Glucose rend Arrow 67, 68 Arrow Buttons 3
Average 99
Backlight 4, 69
Battery
Replace ransmitter Battery 14 Replace Receiver Battery 14 Battery Lie 13, 117, 118
Blood Glucose
Perorm Blood Glucose est 44 Blood Glucose Mode 12
Calibrate
Calibrate Your System 41 Sites For Calibration 45 ime o Calibrate 42
Carbs 92
Clean
Clean Te Receiver 104 Clean Te ransmitter 104 Clean Te Insertion Site 31
Control Solution
Perorm Control Solution est 21 Control Solution Expiration 22 Mark A Control Solution est 24
Country Settings 111, 114
Daily Use 65
Data
Data Loss Alarm 53, 61 Data Upload 5 Glucose Data And Reports 96
Date
Change Te Date 19 Change Te Date Format 113
Edit Events 95, 102
Error
Respond o Error Messages 74 Error Codes In BG Mode 82
Events
Add Events 91 Edit An Event 95, 102 Markers On Line Graph 97
Exercise
Add Exercise Event 93
Features 4
Glucose
Glucose CM 12 Glucose BG 12 rend 67, 68, 138 Alarm 53-60, 125-126 Blood Glucose 12, 41, 50 Range 117 arget 95, 96
Hyperglycemia
Hyperglycemia 10, 50 Hyperglycemia Alarm 58, 77
Hypoglycemia
Hypoglycemia 10, 45, 50, 77, 79, 82 Hypoglycemia Alarm 57, 77 Hypoglycemia Unawareness 11, 45
Section 21 1
Index

8/13/2019 The Guardian - Abbott
http://slidepdf.com/reader/full/the-guardian-abbott 196/198
21 Index (con’t)
Icons 68
Insertion
Sensor Insertion 33 Insertion Site 30, 31
Insulin 92, 93
Interference 129, 134, 135
Interstitial Fluid 1, 10, 127
Line Graph 4, 97
Link 105
Meals 92
Mode
Continuous Monitoring Mode 12 Blood Glucose Mode 12
Mute Alarms 64
Receiver
Clean Your Receiver 104 Link Te Receiver And ransmitter 107 Unlink Te Receiver And ransmitter 106 Reconnect 66
Reconnect 66
Reports 95, 102
Reset
Reset User Settings 109
Sensor
Change Sensor 27 Remove Sensor 29 Insert Sensor 33 Sensor Delivery Unit 2, 3, 31, 32 Sensor Code 39 Sensor Lie 117
Site
Select An Insertion Site 30 Blood Glucose est Site 45 Maintain Your Site 115 Site Rotation 115 Prepare Insertion Site 30, 31
Specifications 117
Standard Deviation 99
State Of Health 93, 100
Statistics 100
Status 72, 73
Symbols 67, 68
System
Parts O Te System 3 Clean Te System 103 Specifications 117 Calibrate Your System 41
Time
Change Te ime 18 Change Te ime Format 113 ime For Calibration 42
Transmitter
Clean Te ransmitter 104 Link ransmitter And Receiver 107 Unlink ransmitter And Receiver 106 Change Battery In Te ransmitter 14 Reconnect 66
Travel
Air ravel With Te System 5
Trouble Shoot
Errors In BG Mode 82 Problems 83 Alarm Messages 74
Water Resistance
Bathing 5 Swimming 5
END OF Section 21
144 Section 21
Index

8/13/2019 The Guardian - Abbott
http://slidepdf.com/reader/full/the-guardian-abbott 197/198

8/13/2019 The Guardian - Abbott
http://slidepdf.com/reader/full/the-guardian-abbott 198/198