The Complete and Utter Newby Tutorials
100
1 The Complete and Utter Newby Tutorial for Dwarf Fortress – Part 1: “WTF?” February 9, 2009 at 6:54 am | In Fantasy , Tutorial | 68 Comments Tags: Dwarf Fortress Dwarf Fortress is an extremely interesting and complex game, but one which people find exceptionally difficult to g et into. Although it isn’t hard to f ind tutorials, many assume some basic knowledge of the interface and what the player is looking at. They also don’t take into account different tilesets and versions and the difficulty new users have in finding a good site for that first fortress. But all that is in the past as AfterActionReporter.com is pleased to present The Complete and Utter Newby Tutorial for Dwarf Fortress! It comes with a pre-made world and save and full game download for you to play along with. And a ton of screenshots. Yes, many, many screenshots. So grab a drink, get your thinking cap on and be prepared for some dwarfy fun! And carp. Never forget the carp… Set Up First things first. You need to grab a copy of the client. Lucky for you we’ve made that easy and the copy you’ll need for this tutorial is available here (mirrored at FileDropper, FileFactory and SaveFile). Even if you’ve already got DF installed you should grab this version as it has the world and save file we’ll be working from for this tutorial. In case you’re wondering, this version is a copy of MayDay’s Green tileset and it’s worth grabbing new versions as the game is updated. Next you need to unzip the folder on to your had drive. Then create a shortcut on your desktop (if you wish) leading to dwarfort.exe. While you’re at it, go into the DwarfManager folder and create a shortcut to DwarfManager.exe, we’ll need that later. Run the Game Now we’re ready to get going! Run the dwarfort.exe shortcut and you should get the screen below. Bear in mind, this game version is optimised to run in 1280 x 800 resolution, if your game doesn’t look like the screenshot, you might have to fiddle with the .ini file found in \data\init\init.txt. You can read the DFWiki entry on grid size for a bit of help. By TinyPirate
-
Upload
tinypirate -
Category
Documents
-
view
221 -
download
1
Transcript of The Complete and Utter Newby Tutorials

8/14/2019 The Complete and Utter Newby Tutorials
http://slidepdf.com/reader/full/the-complete-and-utter-newby-tutorials 1/100
1
The Complete and Utter Newby Tutorial for Dwarf Fortress – Part 1: “WTF?” February 9, 2009 at 6:54 am | In Fantasy, Tutorial | 68 Comments Tags: Dwarf Fortress
Dwarf Fortress is an extremely interesting and complex game, but one which people
find exceptionally difficult to get into. Although it isn’t hard to find tutorials, many
assume some basic knowledge of the interface and what the player is looking at.
They also don’t take into account different tilesets and versions and the difficulty
new users have in finding a good site for that first fortress.
But all that is in the past as AfterActionReporter.com is pleased to present The
Complete and Utter Newby Tutorial for Dwarf Fortress! It comes with a pre-made world and save and full
game download for you to play along with. And a ton of screenshots. Yes, many, many screenshots.
So grab a drink, get your thinking cap on and be prepared for some dwarfy fun! And carp. Never forget the
carp…
Set Up
First things first. You need to grab a copy of the client. Lucky for you we’ve made that easy and the copy you’ll
need for this tutorial is available here (mirrored at FileDropper, FileFactory and SaveFile). Even if you’ve
already got DF installed you should grab this version as it has the world and save file we’ll be working from for
this tutorial. In case you’re wondering, this version is a copy of MayDay’s Green tileset and it’s worth grabbing
new versions as the game is updated.
Next you need to unzip the folder on to your had drive. Then create a shortcut on your desktop (if you wish)
leading to dwarfort.exe. While you’re at it, go into the DwarfManager folder and create a shortcut to
DwarfManager.exe, we’ll need that later.
Run the Game
Now we’re ready to get going! Run the dwarfort.exe shortcut and you should get the screen below. Bear in
mind, this game version is optimised to run in 1280 x 800 resolution, if your game doesn’t look like the
screenshot, you might have to fiddle with the .ini file found in \data\init\init.txt. You can read the DFWiki entry
on grid size for a bit of help.
By TinyPirate

8/14/2019 The Complete and Utter Newby Tutorials
http://slidepdf.com/reader/full/the-complete-and-utter-newby-tutorials 2/100
2
So, you’ve got the game running and enjoyed the exciting ASCII intro movie. Well done! I can tell you’ll go far!
Next step is to hit “enter” on “Continue Playing”, which should be highlighted. You’ll then be presented with
this screen.
This is the save game list, which gets cluttered very quickly as seasonal saves build up. But for now all you have
to do is use the down-arrow key (not the number pad arrow key) to select the region1-spr-201 save. Hit enter
and the game will load.
First Look
Once the game loads you will be presented with this screen. Although it’s confusing on first glance, don’t panic!
It will all be made clear shortly. First thing though, hit “space” to pause the game. Space pauses DF and also
backs out of any menu you’re currently in.
Lets talk about what you can see. First up, the screen is divided into three sections: The left shows the local
view. The center shows the action menu, the right shows the area map. To make things a lot neater hit “tab”.
“Tab” cycles through various menu arrangements. Stop when your view matches the one below.
8/14/2019 The Complete and Utter Newby Tutorials
http://slidepdf.com/reader/full/the-complete-and-utter-newby-tutorials 3/100
3
Now we’re really cooking with gas! Soon you’ll be melting foes with magma-falls, and drowning goblins in
artfully engineered traps! But before then, lets look around. Use the arrow keys to navigate around the localarea. You’ll notice the we’ve got a decent amount of space to work with.
While you examine your surroundings you should be able to spot trees and the grassy areas easy enough, same
with ponds and rivers and bushes. Other tiles won’t make much sense, these tend to be the slightly-arcane
zones like open air spaces (pale blue tiles, or tiles with dots) and the earth (brown tiles) and slope tiles (up and
down triangles). The screenshot below should help point those features out.
Key to understanding DF’s local view is getting your head around the fact that DF is a 3D game displayed on a 2D
map. To display a variety of heights the world is sliced into dozens of Z-levels. Each Z-level is numbered.
8/14/2019 The Complete and Utter Newby Tutorials
http://slidepdf.com/reader/full/the-complete-and-utter-newby-tutorials 4/100
4
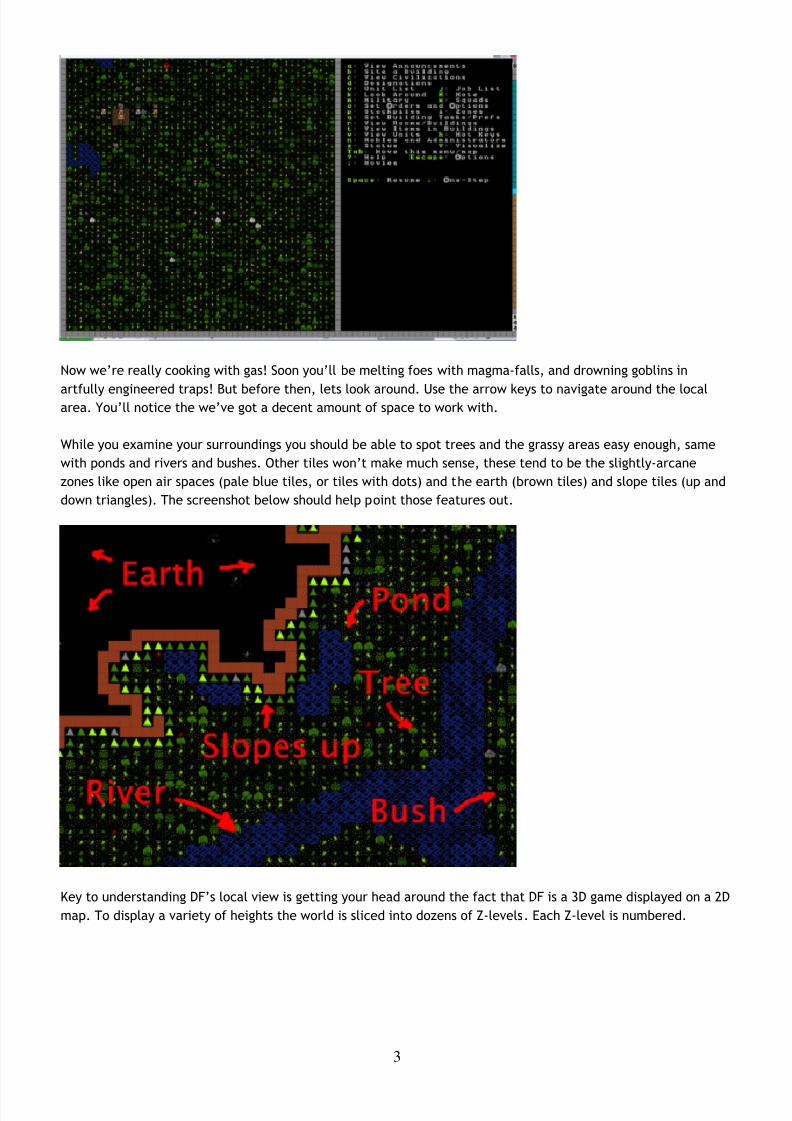
If you look on the bottom right of the window you’ll see we’re currently at level 144. To
move between levels you need to hit “Shift+<” to go up, and “Shift+>” to go down. If you go up a level the map
will look like image below. Try it yourself now.
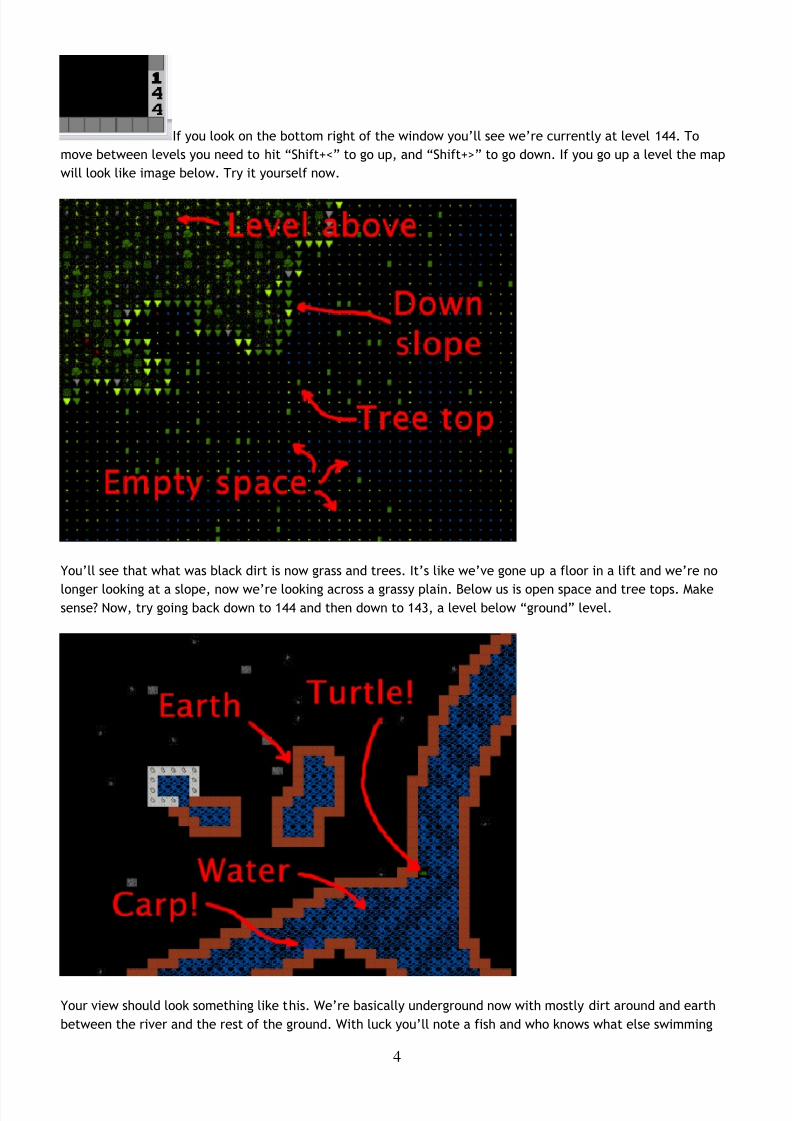
You’ll see that what was black dirt is now grass and trees. It’s like we’ve gone up a floor in a lift and we’re no
longer looking at a slope, now we’re looking across a grassy plain. Below us is open space and tree tops. Makesense? Now, try going back down to 144 and then down to 143, a level below “ground” level.
Your view should look something like this. We’re basically underground now with mostly dirt around and earth
between the river and the rest of the ground. With luck you’ll note a fish and who knows what else swimming
8/14/2019 The Complete and Utter Newby Tutorials
http://slidepdf.com/reader/full/the-complete-and-utter-newby-tutorials 5/100
5
around down there. You may have noticed the river doesn’t appear to have changed much, but don’t be
confused. The difference is that on this lower level we’re on the same level as the body of the river itself, at
the level above, we’re actually above the river a little looking at the top of it.
Continue having a look around. If you follow the river to the west you’ll note it drops down a few levels into a
chasm before flowing off the map, what a pretty waterfall! See if you can find it yourself. When you’re done
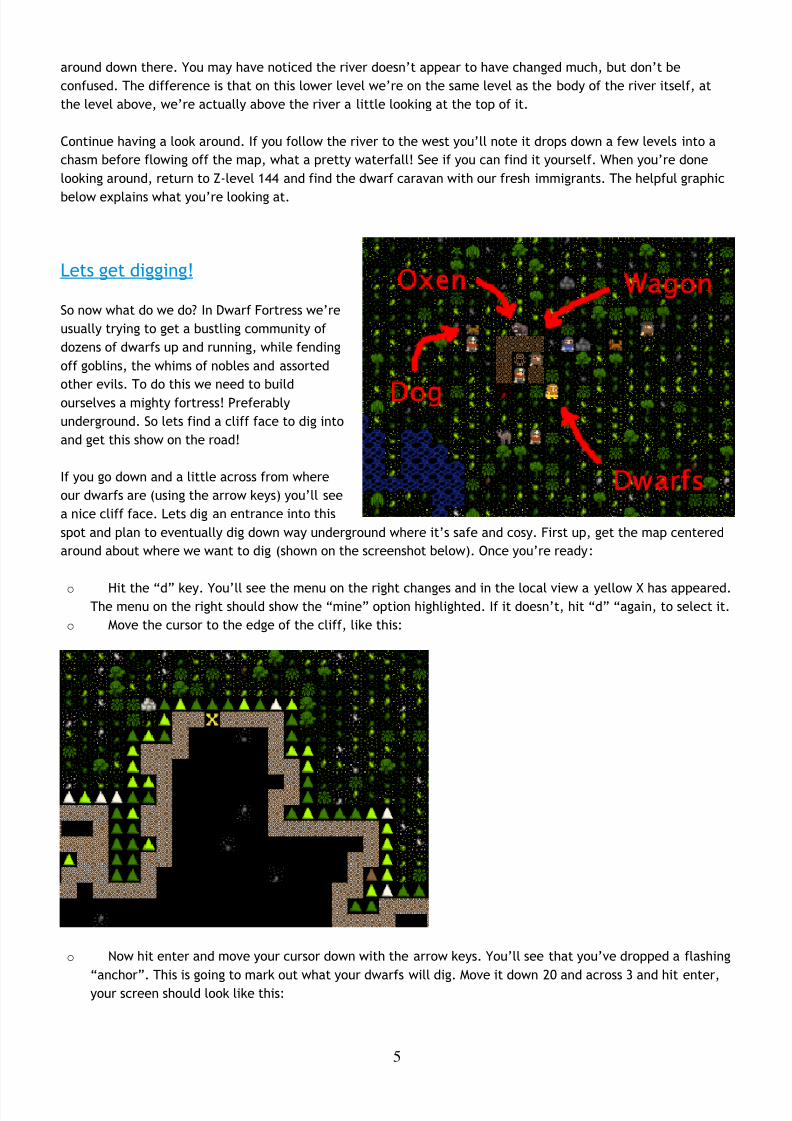
looking around, return to Z-level 144 and find the dwarf caravan with our fresh immigrants. The helpful graphic
below explains what you’re looking at.
Lets get digging!
So now what do we do? In Dwarf Fortress we’re
usually trying to get a bustling community of
dozens of dwarfs up and running, while fending
off goblins, the whims of nobles and assorted
other evils. To do this we need to build
ourselves a mighty fortress! Preferably
underground. So lets find a cliff face to dig into
and get this show on the road!
If you go down and a little across from where
our dwarfs are (using the arrow keys) you’ll see
a nice cliff face. Lets dig an entrance into this
spot and plan to eventually dig down way underground where it’s safe and cosy. First up, get the map centered
around about where we want to dig (shown on the screenshot below). Once you’re ready:
o Hit the “d” key. You’ll see the menu on the right changes and in the local view a yellow X has appeared.The menu on the right should show the “mine” option highlighted. If it doesn’t, hit “d” “again, to select it.
o Move the cursor to the edge of the cliff, like this:
o Now hit enter and move your cursor down with the arrow keys. You’ll see that you’ve dropped a flashing
“anchor”. This is going to mark out what your dwarfs will dig. Move it down 20 and across 3 and hit enter,
your screen should look like this:

8/14/2019 The Complete and Utter Newby Tutorials
http://slidepdf.com/reader/full/the-complete-and-utter-newby-tutorials 6/100
6
The browned out area shows where your miners are going to come along and dig. But they won’t act until you
back out of the “designations” menu as the game is paused. Hit “space” and you should see the game unpause
and the menu reset to its master list. Oh, when you have the “d” menu up you can actually click on the map
with your mouse and select areas to mine. Some people prefer to select areas this way.
With the game unpaused you should notice three dwarfs race to the cliff face and start digging. With our
entrance underway we should also think about laying out some rooms for our dwarfs to live in, who wants to
spend time out under that hot yellow disk when lovely rock and earth beckon!
Right now we’re not worried about making our fortress perfect and creating the strongest entrance, we’re
simply trying to scratch out a
space to live! To that end we’ll
need three or four rooms off this
main entrance.
See if you can match the layout
below by marking out areas to
dig, as you’ve learnt. If you make
a mistakeyou can hit “x” from the
“designations” (”d”) menu andyou’ll note that the menu on the
right has “remove designation”
highlighted. Now when you hit
enter and select an area, any area
set for digging will be cleared of
that designation. Anyway, enough
detail, on with the room building!
Look at my little dwarfs go! Aren’t they industrious! They’re quickly digging away and leaving a lot of dirt floorbehind them. Good lads! Lets leave them to their work while we sort out some other important jobs.

8/14/2019 The Complete and Utter Newby Tutorials
http://slidepdf.com/reader/full/the-complete-and-utter-newby-tutorials 7/100
7
Chopping trees, setting up piles
Dirt and rocks are handy, but so is wood to make nice dwarven beds, and we’re short on it right now. To get
wood, we need to chop down some trees. And we do that by designating an area of trees to be chopped. Lets
get cracking and clear the trees infront of the entrance.
Designating trees to chop is like designating rocks to be dug, so lets decimate the local environment!
o Move the map around so you’re looking out front of your fortress.
o Hit “d”. Hopefully this time you’ll notice the game has automatically got “Chop down trees” selected, if
it doesn’t, hit “t” and it will be highlighted.
o Move the cursor to the upper left, hit enter, and move the cursor to the bottom right, hit enter again.
Any trees in that area will now be set to be cut, as indicated by them all being marked brown.
Your view now should look something like this, note all the trees highlighted in brown:
Although you’ve done well neither man nor dwarf can live on wood and dirt alone! Luckily for us there are
plenty of bushes out there loaded with ripe berries. Lets set some of them to be picked:
o
Hit “d” again and then “p”. One the right “Gather plants” is now selected.o Designate about the same area as we did with the wood cutting.
o All the bushes will be highlighted now, and when you unpause you should see a plant harvesting dwarf
join the woodcutter.
Now lets sit back and watch the dwarfs work for a minute! It won’t take long before our miners have cleared out
our temporary living quarters and our woodcuter and plant gatherer have begun their work. Once the interior
space is clear we have lots of work to do, so lets break it down into useful chunks.
Our First Farm
Farming is how you will make most of your food in Dwarf Fortress, and it’s important to get farming quite
quickly. If food runs out your dwarfs will starve and your game will end prematurely, and we don’t want that,

8/14/2019 The Complete and Utter Newby Tutorials
http://slidepdf.com/reader/full/the-complete-and-utter-newby-tutorials 8/100
8
right? Dwarfs usually farm underground and handily, we have a space all prepared. So follow along, and lets get
some tasty mushrooms growing for our stumpys to chow down on!
o Find the bottom right room.
o Hit “b” for the build menu and then “p” for farm plot.
o Move the cursor to your farm area.
o The screen instructions tell you how you can increase the size, we need a good 6 by 6 plot, so hit “u”
and “k” a few times until you’ve got a big green grid, like the one below.o Move the grid around with the arrow keys until it’s in about the same position as the one in the
screenshot. If you get the size wrong, “h” and “m” will reduce the plot.
o Hit “enter” and the green area marker will change to a flashing brown field marker. When stuff flashes
it indicates that dwarfs are on their way to come build the construction, in this case, a field. And lookee-
here! A farmer has come to build our field for us!
He will take a short while to build your field. When you see the
dwarf run off, you know he’s done. Now it’s time to set the field to
grow delicious plump helms all year round.
o Hit the “q” key. This is the key for “Set building tasks and
preferences”. Again you’ll notice a cursor on the local screen
and if it’s anywhere near the field, the field will be flashing.
You can move that cursor around with your arrow keys, this is
useful later on when you need to select different workshops and buildings.
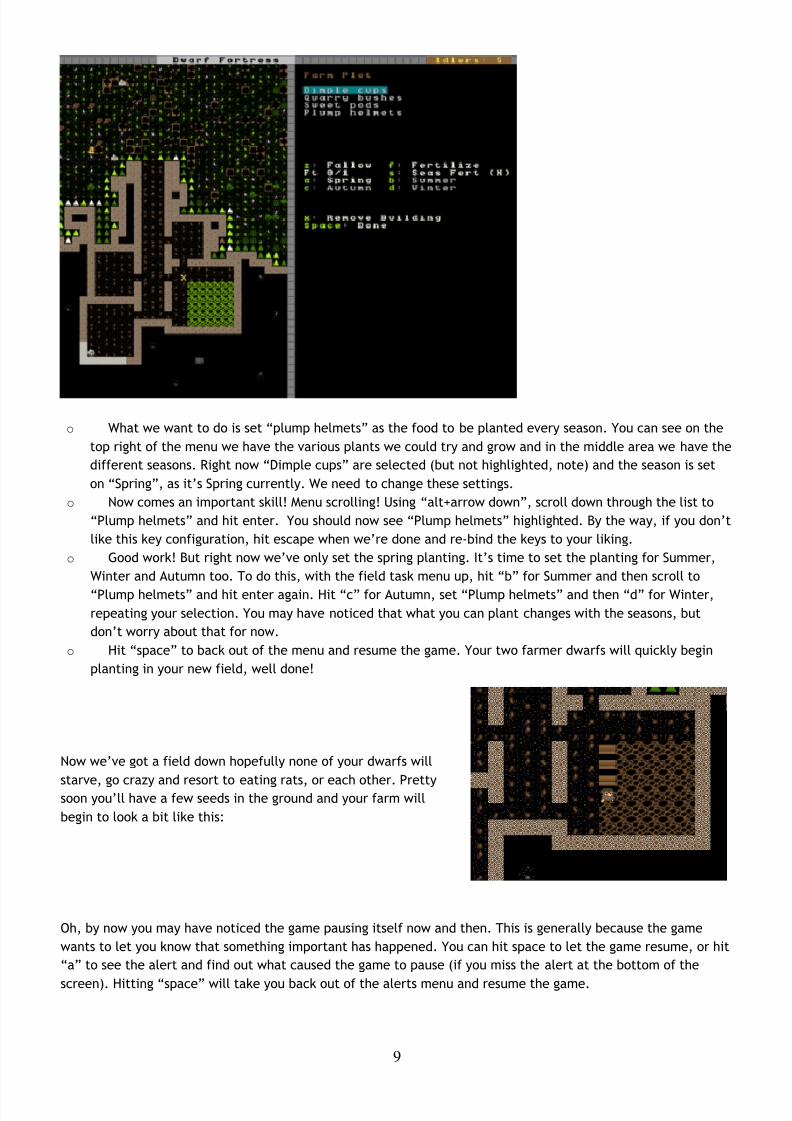
o You’ll note that on the right the menu now shows you specific task details associated with that field,
like so:
8/14/2019 The Complete and Utter Newby Tutorials
http://slidepdf.com/reader/full/the-complete-and-utter-newby-tutorials 9/100
9
o What we want to do is set “plump helmets” as the food to be planted every season. You can see on the
top right of the menu we have the various plants we could try and grow and in the middle area we have the
different seasons. Right now “Dimple cups” are selected (but not highlighted, note) and the season is set
on “Spring”, as it’s Spring currently. We need to change these settings.
o Now comes an important skill! Menu scrolling! Using “alt+arrow down”, scroll down through the list to
“Plump helmets” and hit enter. You should now see “Plump helmets” highlighted. By the way, if you don’t
like this key configuration, hit escape when we’re done and re-bind the keys to your liking.
o Good work! But right now we’ve only set the spring planting. It’s time to set the planting for Summer,
Winter and Autumn too. To do this, with the field task menu up, hit “b” for Summer and then scroll to
“Plump helmets” and hit enter again. Hit “c” for Autumn, set “Plump helmets” and then “d” for Winter,
repeating your selection. You may have noticed that what you can plant changes with the seasons, but
don’t worry about that for now.
o Hit “space” to back out of the menu and resume the game. Your two farmer dwarfs will quickly begin
planting in your new field, well done!
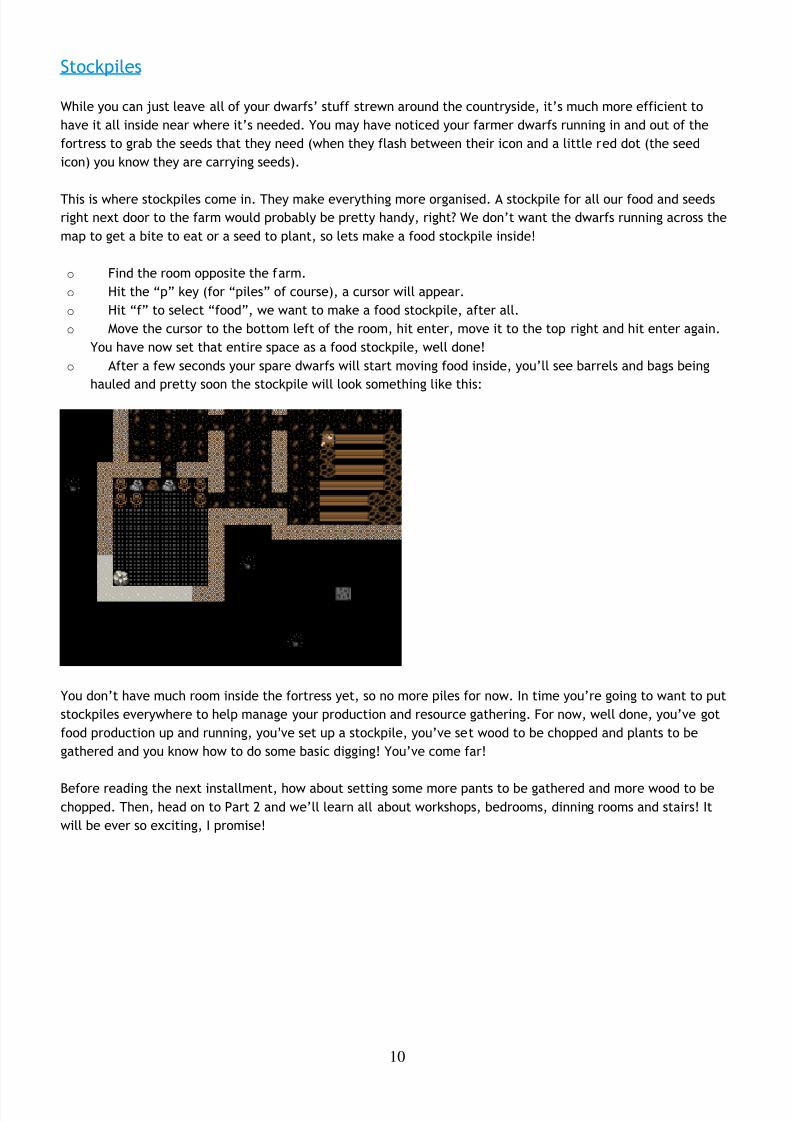
Now we’ve got a field down hopefully none of your dwarfs will
starve, go crazy and resort to eating rats, or each other. Prettysoon you’ll have a few seeds in the ground and your farm will
begin to look a bit like this:
Oh, by now you may have noticed the game pausing itself now and then. This is generally because the game
wants to let you know that something important has happened. You can hit space to let the game resume, or hit
“a” to see the alert and find out what caused the game to pause (if you miss the alert at the bottom of the
screen). Hitting “space” will take you back out of the alerts menu and resume the game.
8/14/2019 The Complete and Utter Newby Tutorials
http://slidepdf.com/reader/full/the-complete-and-utter-newby-tutorials 10/100
8/14/2019 The Complete and Utter Newby Tutorials
http://slidepdf.com/reader/full/the-complete-and-utter-newby-tutorials 11/100
11
The Complete and Utter Newby Tutorial for Dwarf Fortress – Part 2: “No,srsly, WTF?!”February 10, 2009 at 4:39 am | In Fantasy, Tutorial | 30 Comments Tags: Dwarf Fortress
Lets continue on with our exciting and fascinating Complete and Utter Newby
Tutorial for Dwarf Fortress! In this section we’ll work on getting some workshops set
up and we’ll dig out a lot more space for our shorties. There’s lots to do, so lets getcracking!
Building a Workshop
Workshops are a central feature of DF so lets get to grips with them right away. Workshops are places your
dwarfs work, usually turning base materials into useful goods. The list of workshops can be a little overwhelming
(”b” then “w”), but don’t worry, we only need to worry about a couple early on.
First up we need a carpenter’s workshop, this workshop allows us to turn wood logs into furniture and other
items. You should see a lot of wood scattered around in front of the fort, where the wood cutter has left it after
felling trees. We have no wood pile for it to be moved to, you see.
Ideally, we’d like to build the carpenter’s workshop inside, but we haven’t dug a nice enough space for the
workshop yet, so lets chuck it outside for now:
o Move the view to the front of the fortress.
o Hit “b” for “build”, and then “w” for “workshop”. You can also just scroll down to “Workshops” using
“alt+down arrow” and hit enter.
o
You will now see a list of workshops. It scrolls off the bottom of the page (scroll around if you like)! Hit“c” for “Carpenter’s workshop”.
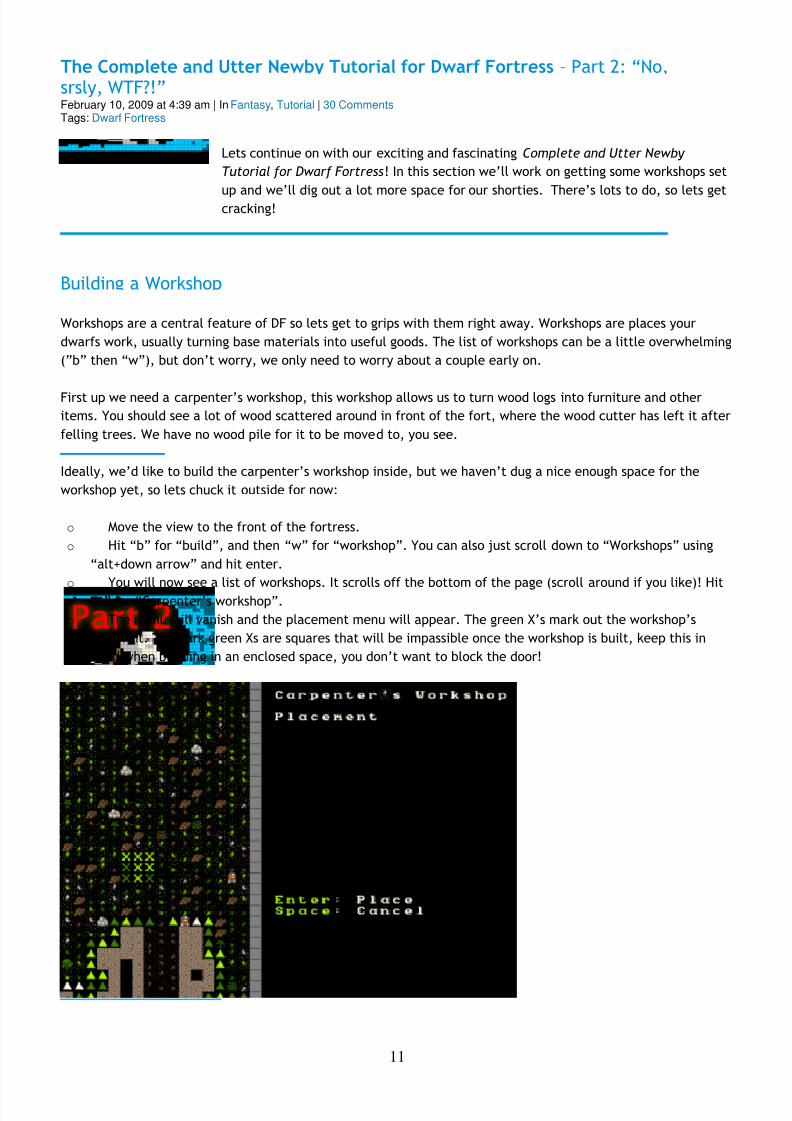
o The menu will vanish and the placement menu will appear. The green X’s mark out the workshop’s
footprint. The dark green Xs are squares that will be impassible once the workshop is built, keep this in
mind when building in an enclosed space, you don’t want to block the door!

8/14/2019 The Complete and Utter Newby Tutorials
http://slidepdf.com/reader/full/the-complete-and-utter-newby-tutorials 12/100
12
o Chose a spot in front of the fortress. Somewhere round where mine is marked should do. Once you’re
ready to place your workshop hit “enter”.
o The menu on the right will now change to a list of items you could use to build the workshop with.
Mostly it will be a list of wood and it will look something like this:
o At this point you could just hit enter and the first item on the list will be used to build the workshop.
Instead, for fun, hit “x” and “expand” the view to show a list of every single item the workshop can be
built from. Expanding the item selection is a nice way to chose exactly the item you want to be used. Most
of the time you can ignore this option, but it will come in handy later on.
o Close the expanded menu with “x” again. For your interest note that items are sorted by distance from
the workshop’s current location. Usually you want to build with the closest items to save your dwarfs a
slow walk.
o Once you’ve hit enter (selecting the building material) the workshop will be placed in an un-built state
on the map. It will look like this:
Your workshop is now about to be built. You will have to hit space a
couple of times to un-pause the game, but as soon as you do I bet you
that a helpful wee dwarf will run over and start building it. If you’re
quick you can hit “q” and see the status of the workshop, it should say
“Construction initiated” or something similar.
A few seconds later, the workshop is built!
8/14/2019 The Complete and Utter Newby Tutorials
http://slidepdf.com/reader/full/the-complete-and-utter-newby-tutorials 13/100
13
It doesn’t look like much, but it’s really useful! I promise! So lets get turning some of this lumber into stuff our
dwarfs can use. Just don’t tell the Elves, ok? They really hate us chopping down trees. Pointy-eared gits, a
magma-steam death is to good for them!
Making beds
Dwarfs don’t like sleeping in the dirt, they like nice, comfy beds. Which is strange, because in all other regards
they live like hobos:
1. They hate drinking water, much prefering booze.
2. They’ll eat just about everything, mostly raw.
3. They never shower.
I guess that makes us the owner of the worlds’ most complex homeless shelter! So lets make them work for their
hot soup and institutional sheets!
Follow along with me:
o Hit “q” and move the cursor over the carpentry workshop.
o The menu on the right now shows you the actions you can take, specifically, we’re interested in “a: Add
new task”.
o Hit “a” (duh)!
o Note the right menu is now a large list of stuff we can make. We’re after beds.
o You can scroll down to beds using “alt+down arrow”, or simply hit “b”.
o The menu now changes back to the “q” list and you’ll see “Construct bed” listed. But we want more
than one bed!
o Hit “a” again, and then “b”. Repeat until we’ve got five beds up there. We don’t need a bed for every
dwarf just yet, luckily for us they seem happy to sleep in shifts.
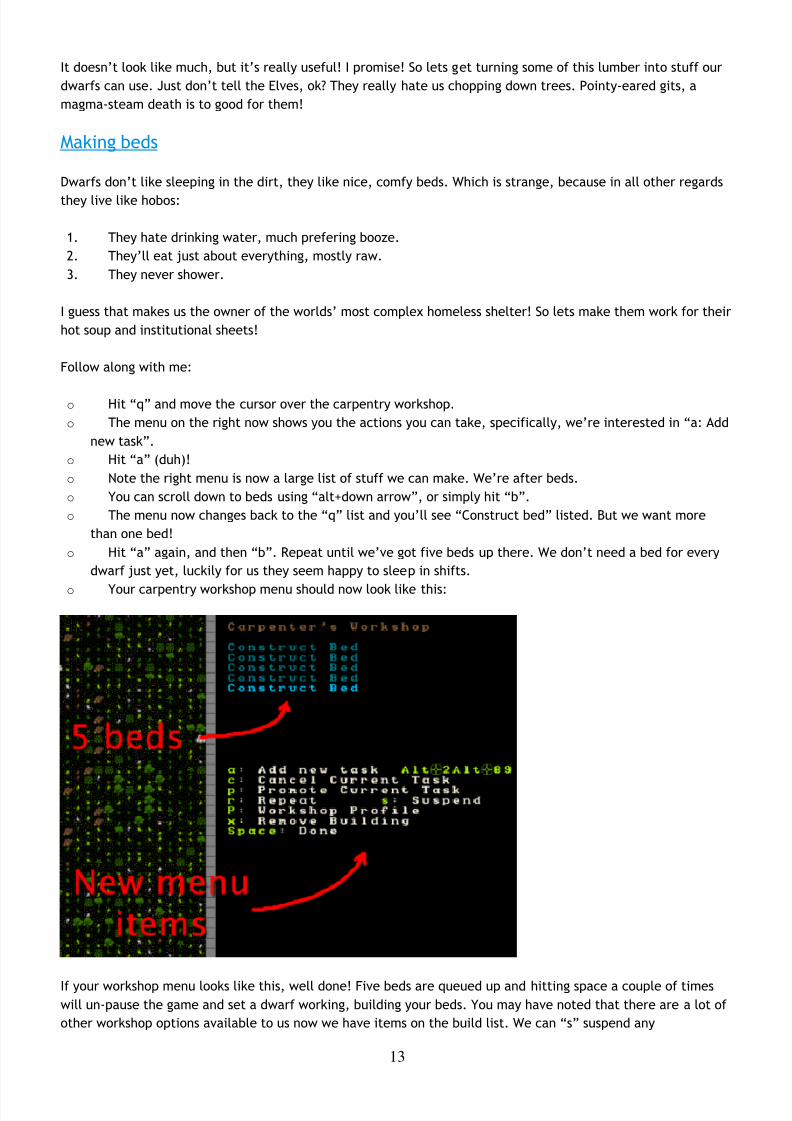
o Your carpentry workshop menu should now look like this:
If your workshop menu looks like this, well done! Five beds are queued up and hitting space a couple of times
will un-pause the game and set a dwarf working, building your beds. You may have noted that there are a lot of
other workshop options available to us now we have items on the build list. We can “s” suspend any

8/14/2019 The Complete and Utter Newby Tutorials
http://slidepdf.com/reader/full/the-complete-and-utter-newby-tutorials 14/100
14
construction, set any item to be “r”, repeat built, or we can hit “c” and cancel the construction of the current
listed item. We can also fiddle with the workshop profile by using shift+p, “P”, or have the entire workshop
removed using “x”. For now, lets just watch the beds get built!
Note, you won’t see the beds being put anywhere. Want to know why? The answer is simple, and if you’re extra-
special clever you may have already worked it out: We have no furniture stockpile! Lets fix that:
o Hit “p” from the main menu.o hit “u” for “Furniture stockpile”.
o Move the X near the workshop, hit enter, and designate a pile about 5 tiles by 5 tiles.
Here’s my pile after a few seconds of the game resumed:
You’ll note the dwarfs have moved the constructed beds to the pile as well as some spare barrels, our anvil anda bag. As stated above, we don’t usually like to leave our stuff lying around outside, even in tidy piles, but as a
temporary solution it helps keep things organised and gets the furniture moved from the workshop. If items
aren’t pulled out from under the carpenter’s feet then eventully the workshop will get cluttered (marked with
“[CLT]” when you “q” over the workshop) and a cluttered workshop works slower.
Later on we can remove piles by using “p” and then “x” and selecting the whole area of the stockpile. What’s
better is that helpful dwarfs will grab those items and move them to another suitable pile. But enough of that,
lets get on with building our fortress!
Digging down, down, down!
What kind of Dwarfs would we be if we only scratched around on the top of this mound like dirty hobbits? We
want to dig down, down, down! The easiest way of doing this is to build some stairs. Well, to be precise, we’re
going to designate some stairs using the “d” menu. We are going to designate some un-dug space to be stairs
and then see what’s going on a few feet down. So follow along, and lets get
expanding!
o Move the map to the bottom end of our corridor.
o Hit “d” and then “j” for “downward stairway”.
o Move the X into the black and hit enter, move the cursor down one,
and hit enter again.o You should see two downwards stairs marked, like this:

8/14/2019 The Complete and Utter Newby Tutorials
http://slidepdf.com/reader/full/the-complete-and-utter-newby-tutorials 15/100
15
But what’s this? We have a problem! How will our miners get there to dig out our stairs? Best we designate an
area around those stairs to be dug using “d” and “d” (”Mine”). Here’s how I set it up:
You may be wondering why I have set two stairs down. The reason is that dwarfs need space to move past each
other. If the corridor, or stairs, are only 1 wide, then they have to pause to let each other pass. This slows
movement around your fortress down terribly once you have dozens of dwarfs running around. Two stairs down
should be enough for now.
Hit space until the game is running and let that area get built. It should look something like this when it’s done:
Super! A hallway and two downward staircases! At this point you may be feeling pretty chuffed with yourself.
But if you go down a level (”shift+>”, you’ll recall) you’ll not see any stairs going up, or much of anything, just
these tan blobs:
Where are our stairs going up? Where are our vast stores of mineral wealth? Well, this is where stairs get crazy-
strange. Let me explain…
To dwarves a down stair is just an exploratory stair dug down to see what’s on the level below. It’s like knocking
a hole in the floor so you can look down on your neighbours in the flat below, hoping perhaps to work out what
that strange moaning and banging was all about. Ok, so I used a drill, and didn’t literally knock the floor out so

8/14/2019 The Complete and Utter Newby Tutorials
http://slidepdf.com/reader/full/the-complete-and-utter-newby-tutorials 16/100
16
much as make precise holes all across their ceiling, and I didn’t look so much as hook up a fiber optic camera,
but the principle is the same.
But enough about my pending court cases. To actually go down to the level below, you need to build stairs going
up from the level you’re digging to. Or in our case, we want to build an “Up/Down Stairway” as we are looking
to dig down a long, long way. An Up/Down stairway pokes the proverbial holes in both directions. It links up
with a stairway above (if there’s one there) and tries to lik up with a stairway below (if there’s one there). If
there’s no stairway to link up with it will provide access to those other levels so you can build the needed stairs.To build one, do this:
o Go down one level from our main area.
o At this level, below our down stairs, hit “d” and then “i” for “Up/Down Stairway”.
o Move the X over the two tan blocks. Hit enter, move down one, hit enter again.
o Two brown X’s now show that your up-down stairway has been designated.
o If you mess it up, “d” and then “x” can undesignate the space for you.
o Resume the game and the up/down stairs will be dug. Once dug, they will look like this:
Lovely! Two perfect up-down stairs. But we’re not done yet. Go down a level and build two more up-down
stairs. Once you’ve done this, drop a level again and designate two upward stairways using “d” and “u”. You
should end up seeing something like this once they are built.
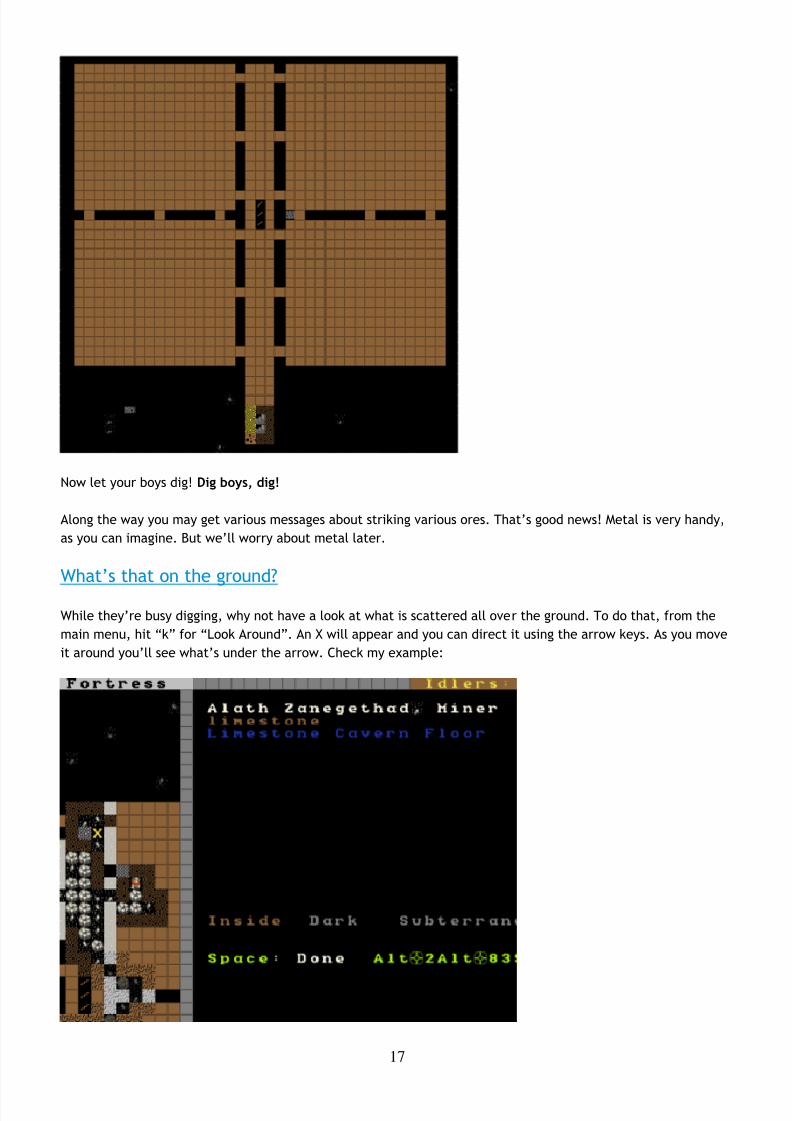
Rock! We’ve got some rock around us! This is the sort of place a good dwarf loves! How about we dig out some
of this space? I suggest a long corridor running north some twenty squares, and we’ll make it three squares
wide. Midway down this corridor we will have some stairs going down and some 15×15 size rooms on each side.
Just a simple layout for now, but it will be enough for our needs for now. See if you can match mine.
8/14/2019 The Complete and Utter Newby Tutorials
http://slidepdf.com/reader/full/the-complete-and-utter-newby-tutorials 17/100
17
Now let your boys dig! Dig boys, dig!
Along the way you may get various messages about striking various ores. That’s good news! Metal is very handy,
as you can imagine. But we’ll worry about metal later.
What’s that on the ground?
While they’re busy digging, why not have a look at what is scattered all over the ground. To do that, from the
main menu, hit “k” for “Look Around”. An X will appear and you can direct it using the arrow keys. As you move
it around you’ll see what’s under the arrow. Check my example:

8/14/2019 The Complete and Utter Newby Tutorials
http://slidepdf.com/reader/full/the-complete-and-utter-newby-tutorials 18/100
18
As you can see, underneath my X is a dwarf, some limestone, and a limestone cavern floor. I can use the
alternate scroll (”alt+”down arrow”) to move through those three items, and hitting enter will display me some
info about each. Ok, except for the floor. I mean, what do you want to know? It’s a floor!
“Look around” is a very handy way to see what is in a square. Sometimes items get stacked a few deep and
you’re not sure what is what, “k” will show you. Also, it is very handy way to find out what the walls and ground
are made of. For example, without irrigation you won’t be able to build a farm plot inside on anything but soil,
sand, silt, clay or loam. “Look around” will show you what the ground is made of.
Toy with “k” for a while, see if you can find the bauxite. We’re lucky, bauxite is a very handy material to make
magma-proof mechanisms and floodgates out of. Lets leave the dwarfs digging, we’ve got a very important job
to do…
Chucking out the trash!
By now, believe it or not, some rubbish may be building up in your fortress. I’ve taken a shot of some rubbish
near our food pile. Have a look:
Using “k” I can have a closer look and see exactly what this trash is:
Yuck! This is the remains of some food turtles we brought with us on our journey. We can’t have this left lying
around our tidy fortress, can we? Well, we could, but the end result would be a stinking cloud of purple miasma.
Miasma makes our dwarfs unhappy. While they may never shower and probably reek to high-heaven, they really
don’t like the smell of rotting leftovers. Go figure.
So how do we get rid of the refuse? Easy! We build a “p” “stockpile for “r” “refuse”. But note, we need to build
this pile outside or we’ll get miasma buildup. Outside, the wind blows the stink away.
See if you can set up a refuse pile on your own like mine. It’s just like making any other pile, except we set “r”
for refuse as we plot it.

8/14/2019 The Complete and Utter Newby Tutorials
http://slidepdf.com/reader/full/the-complete-and-utter-newby-tutorials 19/100
19
Look, one of my adorable wee dwarfs is moving rubbish there as we speak! Phew, miasma criss averted!
But we still have one really, really important job to do…
Making booze!
Booze is the lifeblood of dwarven society. Literally so. Dwarfs, unless injured, will prefer to drink booze over
water 100% of the time. If there is no booze, they will drink water, but that often involves dangerous trips to
the nearest river, where deadly carp may end your dwarf’s life prematurely. DO NOT UNDERESTIMATE THE FISH!
Dwarfs without booze also work slower. Like me.
So what do we do about the dwarf booze demands? Simple! We build a still!
Follow along, dear reader:
o Hit “b” for “Build”.
o Hit “w” for “Workshops”.
o Hit “l” for “Still”, or scroll through and find the still yourself, and hit enter.
o Place the still in the room next to the food stockpile, like this.
Placing it near food makes sense, as it will turn food items into booze. Teh less walking for our brewer, the
better. Once you’ve placed it and selected the materials (any will do), your still should be quickly built and look
something like this:
8/14/2019 The Complete and Utter Newby Tutorials
http://slidepdf.com/reader/full/the-complete-and-utter-newby-tutorials 20/100
20
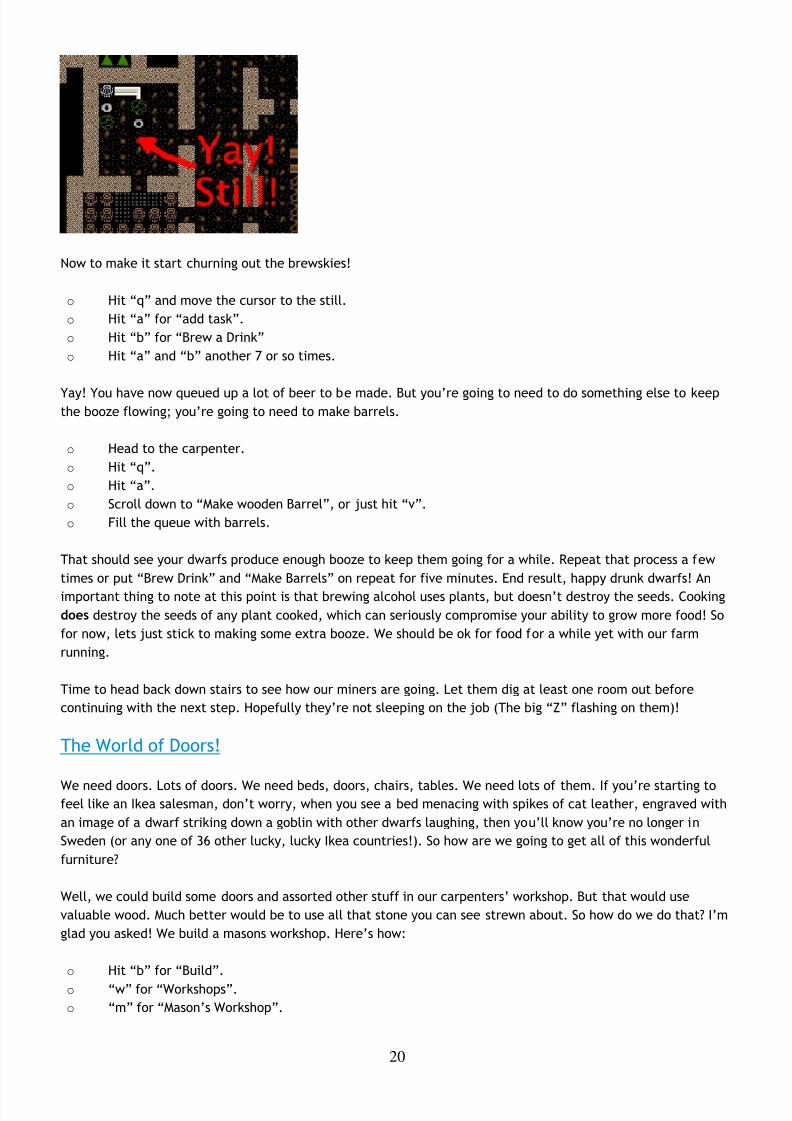
Now to make it start churning out the brewskies!
o Hit “q” and move the cursor to the still.
o Hit “a” for “add task”.
o Hit “b” for “Brew a Drink”
o Hit “a” and “b” another 7 or so times.
Yay! You have now queued up a lot of beer to be made. But you’re going to need to do something else to keepthe booze flowing; you’re going to need to make barrels.
o Head to the carpenter.
o Hit “q”.
o Hit “a”.
o Scroll down to “Make wooden Barrel”, or just hit “v”.
o Fill the queue with barrels.
That should see your dwarfs produce enough booze to keep them going for a while. Repeat that process a few
times or put “Brew Drink” and “Make Barrels” on repeat for five minutes. End result, happy drunk dwarfs! An
important thing to note at this point is that brewing alcohol uses plants, but doesn’t destroy the seeds. Cooking
does destroy the seeds of any plant cooked, which can seriously compromise your ability to grow more food! So
for now, lets just stick to making some extra booze. We should be ok for food for a while yet with our farm
running.
Time to head back down stairs to see how our miners are going. Let them dig at least one room out before
continuing with the next step. Hopefully they’re not sleeping on the job (The big “Z” flashing on them)!
The World of Doors!
We need doors. Lots of doors. We need beds, doors, chairs, tables. We need lots of them. If you’re starting tofeel like an Ikea salesman, don’t worry, when you see a bed menacing with spikes of cat leather, engraved with
an image of a dwarf striking down a goblin with other dwarfs laughing, then you’ll know you’re no longer in
Sweden (or any one of 36 other lucky, lucky Ikea countries!). So how are we going to get all of this wonderful
furniture?
Well, we could build some doors and assorted other stuff in our carpenters’ workshop. But that would use
valuable wood. Much better would be to use all that stone you can see strewn about. So how do we do that? I’m
glad you asked! We build a masons workshop. Here’s how:
o Hit “b” for “Build”.
o “w” for “Workshops”.
o “m” for “Mason’s Workshop”.

8/14/2019 The Complete and Utter Newby Tutorials
http://slidepdf.com/reader/full/the-complete-and-utter-newby-tutorials 21/100
21
o Chose an area near our main stairs up, in one of our new rooms. You can check the shot below to see
where I’m going to place mine.
o Select some stone and get the thing built!
Once it’s up it’s time to get it producing some useful items:
o “q” over the Mason’s Workshop.
o “a” for “add task”, then “d” for door. Do this four times.
o “a” for add task, then “t” for table, do this twice.
o “a for add task, then “c” for chair, do this twice.
Wee! Look at all that lovely furniture queued up! Soon our mason will turn up and start cutting blocks of stone
into something more useful. Unfortunately, someone is going to end up trying to haul all that furniture up stairs
to the furniture stockpile, and we can’t have that, so lets make a big stockpile in the middle of this room.
While you’re at it, why not remove the furniture stockpile upstairs and get all of that stuff out of the rain. Go
up to the pile, hit “p” for pile, then “x” and then hit enter at one corner of the outdoors furniture stockpile,
and then move the cursor to the other end and hit enter again. Here’s my downstairs stockpile, complete with
some just-moved furniture and some doors!
Now it’s time to get those doors and beds into use, and when the tables and chairs are built, we’ll use thosetoo!

8/14/2019 The Complete and Utter Newby Tutorials
http://slidepdf.com/reader/full/the-complete-and-utter-newby-tutorials 22/100
22
Home Sweet Home
You may have noticed that our dwarfs have been sleeping on the ground when they get tired. This is really not
much fun for them and we’d like to give them a place to stay. With some beds built, lets set up a big bedroom
on the top floor so our dwarfs can get some shuteye.
o Head to the top floor, we’re going to build in the spare room.
o Hit “b” and then “b” again (for “bed”).
o Move the cursor and place a bed in the corner (hit enter, select a bed and hit enter again).
o Spread the five bed around the room.
o Hit “space” until we’re back at the main menu.
o Hit “b” again, and “d” for “door”.
o Place doors at each of the room entrances.
Here’s my room layout. The shadowy beds and door show that the beds and doors aren’t placed yet. The green X
shows me about to place the next door.
Pretty soon the room will be laid out and we’ll be ready to use it to house our little workers. Here’s mine
finished, doesn’t it look pretty?
But the dwarfs won’t use it as a bedroom yet. We have to specify what the room is to be used for first. To do
this:
o Hit “q”.
o Move the cursor near one of the beds. It will start flashing.
o On the right, you’ll see the option “r: Make Bedroom”.
o Hit “r”.
o You will now see a flashing blue square. Here’s mine, as selected from the bottom-left bed.
We could hit enter now and set the room at this size, but that would leave two beds out. So we need to make
the room size bigger. With the blue square flashing…

8/14/2019 The Complete and Utter Newby Tutorials
http://slidepdf.com/reader/full/the-complete-and-utter-newby-tutorials 23/100
23
o Hit “alt+down arrow” and this will make the blue square bigger until it fills the whole room.
You will note that the room won’t “leak” beyond the boundaries of the walls and doors. This is why we need
doors, to prevent leaky rooms! Makes sense? Right? Ok… moving on…
o Hit enter with the room set at max size, a new menu will appear on the right.
This menu gives you options for the room. It will always appear when you “q” over the item you set a room’s usefrom. Note, you don’t have to set every bed in the room as a bedroom (although the game will let you do that).
DF is smart enough to know that the room is a bedroom, and all the beds in the room should be used.
On the new menu you want to:
o Hit “b” for “Barracks”, this will turn the “(N)” to a “(Y)”.
With the room set as a barracks any dwarf without their own room will use the beds in the barracks to sleep in.
When you have a military, the barracks is also where dwarfs will spar and sleep when off duty.
Well done! We have a bedroom for our shorties to sleep in! But what’s this, something weird has happened…
…a monkey ran into our fortress, probably planning to steal something, when it came face to face with our
woodcutter (the sandy-coloured dwarf). End result, chop-chop, a dead monkey! The red “M” is the dead
monkey, the other red stuff is the monkey’s blood splattered everywhere. Don’t worry though, your dwarfs will
soon drag the body outside and throw it on the refuse pile. This may not happen in your game, but it’s good to
know what a fight looks like when it does.
That’s all for now! In the next tutorial we’ll build a fine dining room, set up some more workshops, and start to
build some proper living quarters for our dwarfs. We might also build some fearsome traps! I can’t wait!

8/14/2019 The Complete and Utter Newby Tutorials
http://slidepdf.com/reader/full/the-complete-and-utter-newby-tutorials 24/100
24
The Complete and Utter Newby Tutorial for Dwarf Fortress – Part 3:“Dwarf whatnow?”February 10, 2009 at 10:40 am | In Fantasy, Tutorial | 10 Comments Tags: Dwarf Fortress
In this tutorial we’ll set up some more living space for our dwarfs as well as more
workshops and stockpiles. This will just be a short one as I’m going to give you some
tasks to do on your own at the end. Are you up to the challenge?! Lets do it!
Recap time
We’ve covered quite a lot so far, and if you’ve played through, and you’re still reading, you’re well on your way
to being a master of Dwarf Fortress. Lets look at what we’ve learned:
o How to look around and work out what you’re looking at.
o How to dig out space and how to dig stairs.
o How to set up rooms and workshops.
o How to get some basic resource production and gathering going.
One thing we haven’t covered is saving your game! Perhaps an oversight?! Simply hit “escape” and then select
“Save Game”. But don’t do it now! “Save Game” assumes you want to exit and it will take you back to the main
menu. Don’t, for the love of [insert deity here] chose “Abandon the Fortress”, it kills it!
One thing I should note about saves is that, for me, it never, ever seems to put the save in any logically named
folder. When you come back to DF and hit “Continue Game” choosing the last save in the list won’t necessarilyresult in your most recent game starting. Instead, you may have to look in your DF \data\save folder and see
which folder has the most recently modified files. Then you might, as I do, rename the older folders.
Worse, if you chose the wrong save you can’t seem to easily exit DF. You can save, and then exit, or hit
“Abandon the Fortress” from the menu. Clearly neither are ideal so I usually use task manager to kill
dwarfort.exe.
I know, it’s really bloody annoying and I don’t know how to fix the save issue. Man up and deal with it!
Good luck! And lets continue…
Making our Hole our Home
Ok, perhaps that title didn’t sound quite right! But lets look at making this place a little more comfortable for
our dwarfs. First up, they really need a nice place to eat. Just picking at food on the floor isn’t much fun,
dwarfs want a beautiful hall in which they can quaff beer and eat cat biscuits (yes, you can make biscuits out of
cats. Ugggh). Lets help them set one up.
For now we’re going to set it up near our newly-dug space. I’m also going to make a bunch of 2 by 2 rooms,
which will serve as permanent bedrooms for our dwarfs. Long time players of DF might argue that setting up the
dinning room and bedrooms next to the workshops is going to be bad because of noise , and that we really we
should move all of this living space a few levels underground, and they would be right on both counts. But for
this tutorial we really want to get the function right and worry about the form later. Worry about perfect layout
in your next fortress.
8/14/2019 The Complete and Utter Newby Tutorials
http://slidepdf.com/reader/full/the-complete-and-utter-newby-tutorials 25/100
25
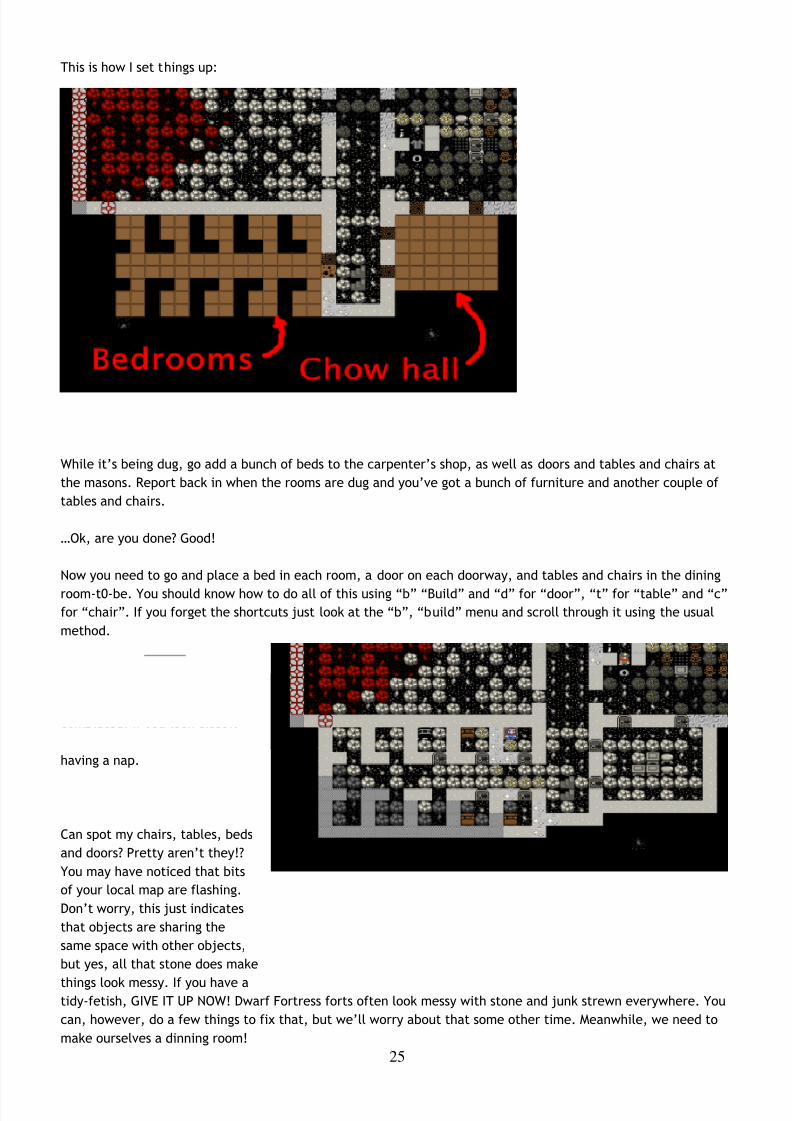
This is how I set things up:
While it’s being dug, go add a bunch of beds to the carpenter’s shop, as well as doors and tables and chairs at
the masons. Report back in when the rooms are dug and you’ve got a bunch of furniture and another couple of
tables and chairs.
…Ok, are you done? Good!
Now you need to go and place a bed in each room, a door on each doorway, and tables and chairs in the dining
room-t0-be. You should know how to do all of this using “b” “Build” and “d” for “door”, “t” for “table” and “c”
for “chair”. If you forget the shortcuts just look at the “b”, “build” menu and scroll through it using the usual
method.
Here are my rooms partly
completed. If you look closely
you can see a slacker dwarf
having a nap.
Can spot my chairs, tables, beds
and doors? Pretty aren’t they!?
You may have noticed that bits
of your local map are flashing.
Don’t worry, this just indicates
that objects are sharing the
same space with other objects,
but yes, all that stone does make
things look messy. If you have atidy-fetish, GIVE IT UP NOW! Dwarf Fortress forts often look messy with stone and junk strewn everywhere. You
can, however, do a few things to fix that, but we’ll worry about that some other time. Meanwhile, we need to
make ourselves a dinning room!

8/14/2019 The Complete and Utter Newby Tutorials
http://slidepdf.com/reader/full/the-complete-and-utter-newby-tutorials 26/100
26
What’s that? Oh bugger!
Just got a message which reminded me that I’ve forgotten to do something…
Damn! A trade caravan arrived but couldn’t make it to our fortress because, 1: it is inaccessible, 2: we don’t
have a trade depot. This may have happened to you already, if so, don’t worry about it much, we’ll get that
problem fixed soon. Trade caravans come by fairly regularly and represent other civilisations wanting to trade
their valuables for yours. They are important, and handy, but we’ll discuss them later some time.
Oh, you may get various windows pop up from the visiting trade liaison. Just space back out of them for now.
Back to the eating place thing!
By now you should have the dining room furniture set up, so it’s time to let the dwarfs know it’s the official
dining room of the fortress. We do that in much the same way we set up bedrooms:
o Hit “q” and move the cursor over any one of the tables (and for good fun, move it over a chair and and
read what sort of rooms chairs set up).
o When over a table, hit “r”, and again you should see a flashing blue box which doesn’t quite fill the
room.
o Use “alt”+”down arrow” to expand the room to fill the dining room space.
o Hit “enter”.
o Now hit “h” to turn the dining room into a meeting hall as well. You’ll see the (N) gets turned into a (Y)
on the menu.
o “Space” back out to resume the game. All tables and chairs and the entire space will now be used.
Well done! A dining room and meeting hall is now set up! Without a meeting space immigrant dwarfs get
confused and don’t know where to go when they arrive, milling about at the edge of the map. A meeting space
seems to send out invisible mind-control rays and any newly-arrived dwarfs will immediately home in on it and
into your fortress. Handy!
For amusement, go back up stairs and find the wagon we arrived with. I bet you it has a few dwarfs hanging
around it. Know why? Because by default your wagon is your first meeting area!
But the wagon is outside and a long way from the fort and we’d much prefer our dwarfs to be safe and sound
within our walls. We should probably remove that temptation to stand outside and get killed by carp, elephants,
monkeys, unicorns, skeletal whales, zombies, giant eagles, deer, goblins, etc, so lets remove the wagon. Hit “q”
and move the X over to the wagon, then hit “x” and the wagon will be “slated for removal”. This should free up
a few logs (which the wagon is made up) and will prompt any lazy, slacker dwarfs to head back inside!
Everyone gets their own room!
Dwarfs love to have their own room, much preferring it to sharing a barracks (which they will do by default
otherwise), and conveniently we have set up a number of little rooms. Lets assign a dwarf to each room:
o Go to your empty bedrooms, hit “q”.
o Chose a bedroom, moving the X over a bed until it’s flashing.o Hit “r”. The blue selection area probably fills the room.
o Hit “enter”.

8/14/2019 The Complete and Utter Newby Tutorials
http://slidepdf.com/reader/full/the-complete-and-utter-newby-tutorials 27/100
27
o Hit “a” for “Assign Bed”.
o Use the alternate scroll, “alt”+”down arrow” to chose a dwarf.
o Hit enter.
You have now assigned a dwarf to a bedroom. The bedroom status will now look something like this:
If you get confused about a bedroom (or any room’s status), just hit “q” again and move around over each
object. Of interest is the fact that you can assign one room to have multiple uses, for example, put a bed and
table in the same room and specify that the room is both a bedroom and a dining room, but doing so reduces the
overall quality of both rooms. Don’t bother unless you have some clever and good reason to.
While you’ve got your X up, move it over the door and look at those options. You can lock doors and you can also
mae them impassable to pets. Don’t bother with that for now, just have a look around.
Now that you know how to assign one dwarf to a bedroom, assign each dwarf their own room. They will love you
for it!
Workshop fun!
Lets set up more workshops. First, put another mason workshop in with the other mason shop. It will be handy inthe long run, I am sure. Set up a couple of carpenter’s workshops in the room next door. While you’re at it,
setup a big wood pile (”p”, “w”). The next thing to do is to set up some more piles. How about we go through
and make a “Finished Goods” pile? Build it using “p” and then “g”. Lets continue chucking piles up in those
rooms. A few squares for cloth (”h”), leather, (”l”), and bars/blocks (”b”) makes sense. Where one pile starts
and another stops gets confusing with all that stone around, but give it your best shot.
Finally, lets also add a Craftsdwarf’s Workshop to our room. Use “b”, “w” and then “r”, chose the goods and
place the workshop. These are particularly handy and profitable workshops, but more on them later!
This is how mine looks:

8/14/2019 The Complete and Utter Newby Tutorials
http://slidepdf.com/reader/full/the-complete-and-utter-newby-tutorials 28/100
28
That’s all for now, except before I go I have some homework for you. But don’t worry, this is the fun kinda
homework. See if you can complete these tasks before we meet again:
1. Destroy the carpenter’s workshop upstairs.
2. Designate another wide area of trees to harvest. If the seasons have changed to autumn by now you’ll
notice all the trees a pretty gold colour. Admire them before you saw them down. Just don’t set any trees
to be harvested too close to the river, ok?
3. Designate a bunch of plants to be harvested.
4. Make a lot more beer and a lot more barrels
5. Make some “bins” in the carpenters shop. About 15 or so should do. You’ll have to scroll to find them in
the carpenter “a” “Add new task” list. (or go “a” then “n”). Bins are what everything that isn’t food or
booze are stored in.
6. Go to the mason’s workshop and set it to build blocks on repeat (”q”, then “a” then “b” then “r”). Do
this only if you’ve already managed to mamke a LOT of bins or your Bar/Block pile will get filled quickly!
7. See if you can make some stone crafts. You will find them under the “rock” submenu from the “add
task” menu on the craftsdwarf’s workshop. You better make sure you have lots of wood bins for your crafts
to go in though, and a big “Finished goods” stockpile too!
Good luck! And see you soon!

8/14/2019 The Complete and Utter Newby Tutorials
http://slidepdf.com/reader/full/the-complete-and-utter-newby-tutorials 29/100
29
The Complete and Utter Newby Tutorial for Dwarf Fortress – Part 4: “It almostmakes sense!”February 11, 2009 at 10:31 am | In Fantasy, Tutorial | 16 Comments Tags: Dwarf Fortress
Welcome to Part 4 of the Dwarf Fortress Complete Newby tutorial. No nancying
around, lets get right back into it! I hope you’ve diligently completed your
homework. If you look below, you’ll see I have…
EXXTREEEEEME Home Makeover: Dwarf Edition!
…Lots of Crafts! I’ve gone through and completed all of
the tasks at the end of Tutorial 3, and to prove it, here
is a picture of my pile of crafts. Looks like I haven’t
made much in the way of bins yet, so the crafts haven’t
been tidily stored in a single bin. Don’t worry, once bins
are produced the dwarfs will sort all this out.
I’ve also got piles everywhere, workshops set up and
food and booze production going. Things are looking
good! But we have yet more useful jobs to do.
First up, we need to move our booze production down stairs. I want to set up a trade depot upstairs and I’ve
decided I don’t want to leave the depot outside, and I don’t want to dig out any more of our limited top-floorspace just now. Of course, we have many options for how we expand the fortress, but we’ll go for simple right
now, so lets get shifting stuff.
Before we head on to the trade depot, lets get get on with some digging and our new booze space. Hell, lets
move the food downstairs as well and keep it nice and close to the dining room, where dwarfs are going to want
to eat it.
Here’s how I’ve plotted things out:
Once that digging is done, set up the big food storage hall as a food stockpile. Then build a still downstairs using
“b”, “w”, “l”. This should be easy-peasy for you now! Your next job is go to upstairs and remove the food
stockpile and the still. Let everything clear and we’ll go on to trade depots!
Blankets, beads, muskets and cat skull totems!

8/14/2019 The Complete and Utter Newby Tutorials
http://slidepdf.com/reader/full/the-complete-and-utter-newby-tutorials 30/100
30
Trading is very important for your fortress. Every few months you’re likely to get a trade caravan and envoy
arrive at your fortress looking to trade with you. They offer a wide range of goods and one of the most common
things we trade back to them is crafts made from the craftsdwarf’s workshop. And the easiest crafts to trade
are rock ones. Rock mugs and instruments are popular as well, so get a bunch made of all of the above when
you’ve got the time.
But for the traders to visit properly they need a trade depot. This is a big structure which requires a 3-wide
corridor for the trader wagons to access. Often people build them close to the fortress entrance, but there’s noreason you couldn’t build a trade depot deep inside your fortress to keep it nice and safe.
For now, we’re going to enlarge the space we have upstairs with a little digging and get this depot set up.
Here’s what I’ve set to be dug out:
Once the space is dug out, hit “b” and then “D” for “Trade Depot”, note, that’s a capital-d, not the usual lower
case “d”. Place it near the back. Here’s mine:
Now that we have the depot up we can expect to see traders turn up to unload their goods here now and then.
To trade with them you “q” over the building and follow the options: “g” to move goods to the trade depot, and
“r” to request your boss dwarf to go do the trading. Once he turns up you hit “t” and then enter the tradescreens. Note again, do not trade anything wooden to the elves, including wooden barrels and bins! They will
get pissy, leave, and attack you some years later! Trading is beyond the scope of this current tutorial as there’s
quite a lot to it, but you can read a lot more about it on the Dwarf Fortress Wiki. I suggest you make an effort to

8/14/2019 The Complete and Utter Newby Tutorials
http://slidepdf.com/reader/full/the-complete-and-utter-newby-tutorials 31/100
31
trade as trading encourages new immigrants to come to your fortress and provides you with items you can’t
make or find yourself. Speaking of which…
Look what the cat dragged in!
At some point you’re going to get immigrants. I got some right now.
Soon after the message a stream of new loafers streak into the fortress. And what’s the first thing they do? Eat
and drink! Slacker bastards! This has me a little concerned about our food stocks, and if this has happened to
you, I suggest you do what I do and sort out some more booze and dig some more bedrooms downstairs and
assign those new dwarfs to it. Next tutorial we’re also going to have our first close look at our dwarfs, but not
until after we build ourselves a nice new farm and ensure we are overflowing with food (and food goods to
produce booze out of).
Outdoor farming for fun and profit
You know about farming inside, now how about farming outside? As you may recall we’ve had some plant
gathering going on outside. In temperate climates that means we’re generally gathering strawberries. And once
we’ve eaten strawberries, what do we have? Well, if you’re a dwarf, you end up with strawberry seeds. And
wouldn’t it be great to plant them? Yes it would! Do we have some? I don’t know yet! But I think so!
We’ll cover looking at our stocks of goods later, by the way, so just trust me for now.
But strawberries are going to require being planted outside, as they love the sun don’t they? Of course, we don’t
want to go outside where it could be nasty and dangerous, so what do we do?. We can’t really expect
strawberries to grow in a dark cave, can we? So how about we compromise with these fruity demons. We’ll buildan outdoor farm, but we’ll lock it off from the world with a wall and an entrance only available to us. Can’t we
all just be friends?
To achieve our goals we first need to dig some handy exit to the outdoors. Perhaps near our existing farm. This
is what I did:
I’ve expanded the farm room a little and set a passage to the outside to be dug. Once the space is dug you’ll
notice that the slope icons still exist around the exit. This could be a problem. If we built walls around a nicely
enclosed farm now enemies would still be able to get to it from above, by walking down the slopes! So we need
to remove the slopes. To remove it, we hit “d” for “Designations” and then “z” for “Remove Stairs/Ramps”.

8/14/2019 The Complete and Utter Newby Tutorials
http://slidepdf.com/reader/full/the-complete-and-utter-newby-tutorials 32/100
32
I’ve selected almost all of the slopes across the front of my fortress. I don’t want any surprises “dropping” in
anywhere along our front. Here you can see my miners hard at work stripping away the outside ramps so there’s
essentially a sharp drop between the level above and this level. That will keep us safe from wandering critters.
While you’re at it, you could tidy up the outside edge of the fortress with digging and ramp removal. Here’s my
much tidier fortress entrance:
Later on we might incorporate some complex defenses into this area. Perhaps later.
So, lets get on with this farm! We need to surround a nice large area with walls, right? Keep our dwarfs safe
from wandering critters. To build walls we need to:
o Hit “b”.
o Hit “C” (that’s “shift+c”), or scroll through the list and look for “Wall/Floor/Stairs” and hit enter.
o “Wall” is selected by default, hit enter.
o You now have a green X. Like the farm plot you can change the size with “u”, “m”, “k” and “h”.
o Hit “u” until you’ve got a max-height wall.
o Place the wall right next to the entrance, hit enter (below you can see how I placed mine).
o Scroll through the materials list using “alt”+”down arrow” and select limestone.
o Hit enter until the list goes away and you see the wall outline. You’re selecting one limestone for each
segment of the wall.
o Hit “space” until the game resumes.

8/14/2019 The Complete and Utter Newby Tutorials
http://slidepdf.com/reader/full/the-complete-and-utter-newby-tutorials 33/100
33
You will now have a wall under construction! Again, hit “q” and move it down your wall, you’ll see the
construction status. Don’t worry, your dwarfs will get to the wall pretty quickly.
While you’re waiting, clear all the trees and bushes from inside your soon-to-be farm space using “d”, “t” (cut
down trees) and “d”, “p” (harvest plants).
Once you’ve got this under way, build two lengths of wall across to the right go down a length and a bit, and
back to the cliff face. Of course, use stone for each piece of the wall, no need on wasting wood we’ve workedhard to chop down. Here’s how my outdoor farm plot looks so far:
Isn’t it coming along nicely? Yes it is! Soon we’ll be able to hide inside and behind our walls and ignore the nasty
outside world. Yay!
Once your walls are complete you could easily build two 6×6 farm plots inside this space. One point though,
make sure all those trees are cut down and plants harvested, otherwise you’re going to end up with a patchy
farm plot. Also, if there are any trees in the way of a wall being built you won’t be able to place the wall. Get
them cleared and the problem will go away.
Oh, I’ve just noticed. Our farm plots will have holes in them anyway, there are white blobs on the ground which
a farm square won’t be built on. If you hit “k” and move the cursor around you’ll see that those white spots are
limestone. Clearly plants don’t like clinging to
rock so no plot will grow there. Never mind, a
holey farm isn’t really a big problem.
Here’s my private outdoors farm yard with the
farm plots built as well:
There you go! Beautiful! Now, just like farms
inside, you need to specify what the fields willbuild (”q”). On the first, I’ve set strawberries
for every season (don’t forget to cycle through
the seasons using “a”, “b”, “c”, “d”). When I

8/14/2019 The Complete and Utter Newby Tutorials
http://slidepdf.com/reader/full/the-complete-and-utter-newby-tutorials 34/100
34
tried to select strawberries on the second field they were red, suggesting to me we won’t have enough seeds. So
instead, I selected some other random plant. Not sure we’ve got seeds for those, but we’ll find out all about
that later! And later on you can come back and fix up some better planting instructions. Oh, don’t select “Seas
Fert” or “Fertilize”. We don’t have any fertilizer yet.
While I remember things, lets take a moment to build a wall along the top edge above our outside farm. We
don’t want any goblins walking up to the edge of the cliff, looking down, and shooting up our farmers with their
crossbows! So go up a level, using good-old “shift”+”<” and plan out your wall. Here I’ve built a wall (afterstripping trees, which should once and for all block off any possible approach to my farm.
But what’s this, we have a problem! Can you spot what it is? Yup, our stupid dwarf has gone and got himself
sutck on the wrong side of the wall. He can’t get out! Now, we could use the “b”, “C” menu to construct some
up stairs to him (and then down stairs to connect from this level down to the upstairs), but how about I show
you a handy trick…
You see, dwarfs getting stuck will happen to you a lot unless you take countermeasure. Here’s how you fix our
current problem, and how prevent it from happening again:
o Hit “d”.
o Hit “n” for “Remove construction”.
o Select a single wall space and hit enter.
o Once the wall space is removed you’ll have a gap. On the inside of the wall gap (where we don’t want
our dwarf to stand), set a wall to be built that completely covers the gap.o Resume the game and then immediately pause it.
o Hit “q” and move down each piece of your fake-wall and hit “s” to “Suspend construction” of each
segment. Dwarfs don’t like standing where buildings are due to be placed, so this means when our dwarf
comes back to fill in the gap he won’t lock himself in again.
Here’s how my gap and “fake” wall look. You can see my X over a fake wall segment, and on the right, the wall
segment is suspended:

8/14/2019 The Complete and Utter Newby Tutorials
http://slidepdf.com/reader/full/the-complete-and-utter-newby-tutorials 35/100
35
You can now build a single wall space to close the gap and our dwarf won’t get trapped. Once you’ve done that,
go back over each wall space with “q” and hit “x” to remove the suspended wall spaces. Look here, job done!
Dwarfs safe!
And when I go down and look at my fresh outside farm plot, something is being planted! Great!
That’s all for now. We’ve got traders in our trade depot and we need to sort out all these scummy immigrants.
That will take a while, so lets leave all of that for Part 5 of this tutorial.
Until then go make a bunch of crafts, get the booze flowing and wait on my return!

8/14/2019 The Complete and Utter Newby Tutorials
http://slidepdf.com/reader/full/the-complete-and-utter-newby-tutorials 36/100
36
The Complete and Utter Newby Tutorial for Dwarf Fortress – Part 5: “Onwardsto Victory!”February 12, 2009 at 10:13 am | In Fantasy, Tutorial | 12 Comments Tags: Dwarf Fortress
Welcome to Part 5! This will be a bit of a short tutorial as I’m away for the weekend,
but we’re going to cover some important information, none-the-less. So stay tuned
for more dwarfy goodness!
Trading for fun and profit
At some point you’re going to get some traders turn up and with your depot up, they’ll soon make themselves at
home in your depot. They’ll unload all their goods and stand around waiting for something to happen. This is
how it will look when traders have arrived and unloaded:
Look at them, filling our trade depot with their mess! Lets get trading so
they’ll bugger off and we can make the place all tidy again. Yes, I like
things tidy in my fortress, it helps my fortress run like a well-oiled
machine! So how do we gouge the visitors trade with our friends?
Essentially, trading is a five step process:
1. Set goods to be moved to the trade depot for us to trade with.
2. Call the trader dwarf to the depot.
3. Engage in trade.4. Deal with the trade liaison and his questions.
5. Wave goodbye to the traders and enjoy your loot!
So lets get through these stages! First up, move goods. Go “q” over the trade depot, and with traders in there,
the options will be quite different to what you see when it’s empty. What we’re looking for is hitting “g” for
“Move goods to/from the depot”. Do it and you’ll get this screen:
This is a list of everything in our fortress. On the left we have item categories. In the middle, we’ve got the
items themselves, and on the right, the distance from the trade depot. Looking at the distance measure you
now know why some people prefer to put the depot all the way inside – remembering the 3-wide corridor or
ramp all the way to the depot, of course.
Don’t worry about all of this detail for now, just scroll down to “Crafts” using the down arrow key. Once you’re
there, this is what you’ll see:
8/14/2019 The Complete and Utter Newby Tutorials
http://slidepdf.com/reader/full/the-complete-and-utter-newby-tutorials 37/100
37
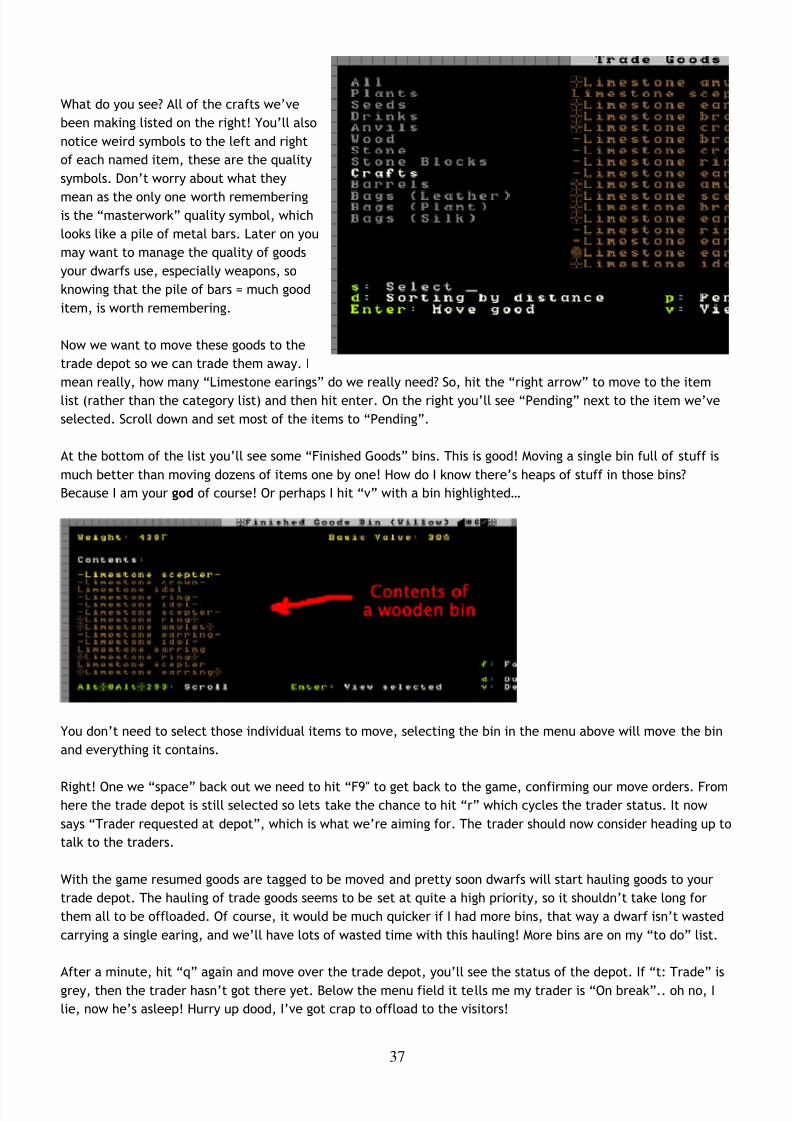
What do you see? All of the crafts we’ve
been making listed on the right! You’ll also
notice weird symbols to the left and right
of each named item, these are the quality
symbols. Don’t worry about what they
mean as the only one worth rememberingis the “masterwork” quality symbol, which
looks like a pile of metal bars. Later on you
may want to manage the quality of goods
your dwarfs use, especially weapons, so
knowing that the pile of bars = much good
item, is worth remembering.
Now we want to move these goods to the
trade depot so we can trade them away. I
mean really, how many “Limestone earings” do we really need? So, hit the “right arrow” to move to the item
list (rather than the category list) and then hit enter. On the right you’ll see “Pending” next to the item we’ve
selected. Scroll down and set most of the items to “Pending”.
At the bottom of the list you’ll see some “Finished Goods” bins. This is good! Moving a single bin full of stuff is
much better than moving dozens of items one by one! How do I know there’s heaps of stuff in those bins?
Because I am your god of course! Or perhaps I hit “v” with a bin highlighted…
You don’t need to select those individual items to move, selecting the bin in the menu above will move the bin
and everything it contains.
Right! One we “space” back out we need to hit “F9″ to get back to the game, confirming our move orders. Fromhere the trade depot is still selected so lets take the chance to hit “r” which cycles the trader status. It now
says “Trader requested at depot”, which is what we’re aiming for. The trader should now consider heading up to
talk to the traders.
With the game resumed goods are tagged to be moved and pretty soon dwarfs will start hauling goods to your
trade depot. The hauling of trade goods seems to be set at quite a high priority, so it shouldn’t take long for
them all to be offloaded. Of course, it would be much quicker if I had more bins, that way a dwarf isn’t wasted
carrying a single earing, and we’ll have lots of wasted time with this hauling! More bins are on my “to do” list.
After a minute, hit “q” again and move over the trade depot, you’ll see the status of the depot. If “t: Trade” is
grey, then the trader hasn’t got there yet. Below the menu field it tells me my trader is “On break”.. oh no, I
lie, now he’s asleep! Hurry up dood, I’ve got crap to offload to the visitors!

8/14/2019 The Complete and Utter Newby Tutorials
http://slidepdf.com/reader/full/the-complete-and-utter-newby-tutorials 38/100
38
While you’re waiting, why not go and set a bunch of barrels and bins and booze to be made. You can never, ever
have too much of any of that stuff!
Oh, look! Trader dood finally bothered to turn up to trade! See, it says “Trade at Depot” for his current job, and
the “Trade” option is white and therefore, usable.
Now hit “t” and we’ll be taken to the trade screen, which looks like this:
On the left, we have what the traders are offering. On the right, we have our stuff. At this point you can start
selecting stuff to trade away. Left and right arrows move between the panels and up and down through the list.
Remember, don’t trade bins or wooden items to elves! Not sure if they’re elves? Look at the top of the screen
and you’ll see who you’re trading with, in my case I’m trading with traders from “Riseilime”. If I “space” back
out of the trading to the main menu and hit “c” I will see a list of in this world civilisations. I see that Riseilime
is an elf civilisation. I can hit “enter” and learn more about it and then “Tab” through more info. Interesting.
In case you’re wondering you can actually
read all of the history of each of those
civilisations in Legends mode. There’s some
crazy stuff that the game auto-generates
and the detail is remarkable (like stories
about dwarf children, kidnapped by goblins,
who go native and in adulthood lead goblin
raiding parties against dwarf cities!). But
don’t worry about that for now, lets get
back to trading.
Go through your list of items, and being
careful not to select the wooden bins, hit
enter on all those crafts.

8/14/2019 The Complete and Utter Newby Tutorials
http://slidepdf.com/reader/full/the-complete-and-utter-newby-tutorials 39/100
39
As you can see, I’ve got lots of stuff up for trade (marked with a “T”). On the left bottom there it tells me how
much my junk is worth, 4980! That’s a lot of loot I can get off the elves! On the right, allowed weight is 14. This
number starts much higher and drops as you add goods and represents the amount of weight the traders can
take away with them.
So now we’ve set a huge pile of junk for us to sell, lets pick a bunch of junk off the elves! I suggest buying food,
booze, animals in cages, weapons (but not the very best ones) like steel crossbows, chainmail (steel and iron),
shields, etc. But don’t stress, buy what amuses you! Oh, definitely buy a few cloth or leather bags (what seedsget stored in) and some rope (for setting up animals as guards). Type of rope or bags doesn’t really matter. So
much shopping to do!
One important point! Your dwarfs can’t wear anything “Narrow” or “Large”, so don’t buy it.
Once you’ve chosen all that’s useful you should have a look at the bottom left, “Trader Profit”. If it’s more than
a token tip you will want to un-select some of your own trade goods. No point in giving away lots of junk for
free!
When you’re happy with your trading, hit “t”, the trade will either go through, or you’ll get a counter offer.
“Enter” lets you consider the counter offer, which you can adjust down more in your favour. Hit “t” again and
hopefully the trade completes. Keep working at it until it pans out. Until your trader is experienced your “tip”
could be quite large.
If the trade completes you will see the message “[name] seems pleased with the trading”. Job done! Hit
“space” to go back to the local map and let the game resume. You don’t need to do anything else now, dwarfs
will come and haul your spoils and the traders will leave happy with their trinkets. Even better, they will take
news of your awesome limestone mugs, earings and braclets back to the world and that will attract even more
immigrants. Super!
The next likely thing to happen is that the trade liaison will want to talk to you about what goods you want. Feelfree to suggest to the trader items you’d like (using the arrow keys to scroll and upgrade the “Want” of an
item). Note, the more you want the item, the higher the price they will charge when they bring it, so mild
suggestions for prefered items are probably better than setting the “want” meter all the way over to the right.
The trader will also tell you what they’re interested in geting in trade goods. The higher the priority the more
they will pay for the good. I largely ignore this as, frankly, if you churn out a ton of good crafts, and trade
regularly, you should have plenty of junk to trade for most things you want, let alone junk from dead invading
goblins etc. If/when you do get those screens, read the screen prompts carefully, and experiment! It can’t hurt!
That’s all for now folks. I’m away for the weekend so I’ll see you again in a few days. Next time we’ll cover
managing your dwarfs, which is an interesting challenge of immense potential depth. But don’t worry it’s not
that hard, really!

8/14/2019 The Complete and Utter Newby Tutorials
http://slidepdf.com/reader/full/the-complete-and-utter-newby-tutorials 40/100
40
The Complete and Utter Newby Tutorial for Dwarf Fortress – Part 6: “Dwarf Resource Management”February 18, 2009 at 9:52 am | In Fantasy, Tutorial | 10 Comments Tags: Dwarf Fortress
In Part 6 of this newby tutorial we’ll look at managing our dwarfs, a topic we have
ignored until now. Dwarf management isn’t that hard, but there’s lots of subtelty to
it, as I’m sure you can imagine. You also have to learn to navigate the interface,which is its own special challenge!
So lets dive right in! In the end you will find managing your dwarfs well quite
rewarding, trust me!
“TinyPirate needs alcohol to get through the working day”
Lets jump right in where we left off. Hit “u”! You will be presented with a list much like this:
On the left, a list of dwarfs with their name and current profession (the game works out the dwarf’s profession
based on their best skill, unless you assign them a custom profession name, more on that later). On the right,we have the current job the listed dwarf is doing. You will note that the list includes more then just dwarfs.
You can scroll up and down using “PageDown” and “PageUp” as well as the arrow keys so have a look around.
This is the full list of all living creatures in the current area (excluding vermin), so it’s a good way to see how
many goblins you’re facing when the inevitable siege occurs!
Had a good look? Great! Now lets get on with working with our dwarfs. With the first dwarf selected, hit “c” for
“Zoom-Cre”. Using this shortcut will become extremely familiar to you as you jump to this list, select a dwarf,
and whack “c” to see what on earth they are up to now!

8/14/2019 The Complete and Utter Newby Tutorials
http://slidepdf.com/reader/full/the-complete-and-utter-newby-tutorials 41/100
41
Lets examine what we can see here. On the left we have a yellow X over the dwarf we selected. If we were to
move the X around using the arrow keys we’d see the info on the right change as the closest dwarf to the X
changes. By the way, you can pull up the X directly without going through “u” just by hitting “v” from the main
map. This is really handy for when you’re trying to work out which dwarf is skulking around the dining room not
doing any work!
So, lets focus back on Ingish Noramshem, Miner. You can see some info about this stunty. First up, you can go to
the “l” for “Labour” menu, the “e” for “Work Dogs”, “s” for “Soldiering and Hunting” or you can “A” “activate”the dwarf. Don’t worry about any of those just yet! Instead, look at the bottom menu list. We’ve got “z”, “View
profile” and a list of other shortcuts.
Things can get a little confusing from here, so follow along carefully. For some reason known only to Toady, the
coder, the menus get extremely circular, but we’ll get there in the end!
So, hit “z”, and you’ll see this:
Not much to see. We can see that this dwarf owns 14 things (*snore*), has a modest quarters. The text is in
blue, which I’m guessing is a good thing. Below, we can see we have three options, we can hit enter, view
relationships with “r” or customize with “y”. Lets go ahead and hit “enter”. Oof! Wall of text!
You’ll have to read this on your own screen to see what it says. In essence it’s a blow by blow of the happy
thoughts and sad thoughts of the selected dwarf as well as some bio details. As you will read from the first
paragraph Ingish is quite happy, except for the vermin problem (erm, my fault, I forgot to bring any cats with
us. A couple of cats will hunt vermin away). On the whole, a content dwarf, which is good. Upset dwarfs go
crazy and kill other dwarfs. It’s annoying.
The text in blue concerns the religious and group affiliations of this dwarf. I’ve never found much need to worry
about this stuff, although of note is that the god the dwarf worships can be read about in Legends mode.
Reading about the gods, creatures and civilisations in your world can be quite an amusing post-game sideline.
Next you’ll see a list of things the dwarf likes. Over time it’s quite possible your dwarf will accumulate items
based on the things they like, especially once the dwarven economy kicks in. Of note is that this dwarf likes
“cows for their haunting moos”, how strange! Mind you, we could take advantage of this later on by putting a
cage in this dwarf’s quarters and shoving a cow in it. Then the dwarf will be happy ever time they see the cow,
because it’s a favoured animal of theirs.

8/14/2019 The Complete and Utter Newby Tutorials
http://slidepdf.com/reader/full/the-complete-and-utter-newby-tutorials 42/100
42
Food preferences are interesting as well. This dwarf likes quarry bush leaves. We’re not growing any right now
(you need to grow them in an indoors field and then at a Farmer’s Workshop, process them to a bag), but it
might be a good idea to grow some if we ever worried about this dwarf’s happiness, or just to ensure those
dwarfs that do like quary bush leaves are kept extra happy.
The next block of text covers the personality traits of the dwarf. There’s not much to act on here, although it’s
interesting to note the dwarf’s tolerance for the outside world. Over time dwarfs that spend all their time
underground will become nauseous at the sight of the sun, which slows them down when they go outside. Thiscan have a big impact on your military and so some fortress designers like to build open air spaces into their
fortress. But more on that later.
Don’t be alarmed by the note on drinking. All dwarfs love drink!
With this examining done, space back a menu and hit “r”.
To be honest, I seldom view this screen and I’m not sure if we really need to. I just noticed that with the
selection over the deity you can hit “v” and get information on the god worshiped, cool! This dwarf worships
Agesh, who “often takes the form of a female dwarf and is associated with fame, rumors, agriculture, the rain
and rainbows”, sounds delightful!
You also get a list of friends here, and in time, partners and children. It’s interesting, but not particularly useful
Anyway, back out of that menu and hit “y” for “Customize”. You get an option now, customize nickname and
customise profession. Some people use these to tag their dwarfs for more easy viewing, or to name them after
friends and family for general hilarity, I leave this option alone because I have plans for them using the Dwarf
Manager utility, but more on that later.
Hit “spac” and back out to the main dwarf
menu. Hit “g” for “Gen”. You’ll see some
skill information and stat information for
this dwarf:
As you can see, all of this mining and
digging has made our dwarf tough and
agile. Ingish is also becomign a skilled
miner and is also an adept mason! Other
skills have been built up through time in
our fortress. There’s more to see than thislist though, I’ve highlighted the down arrow
which indicates that there are more skills
and so use “alt”+”down arrow” and have a
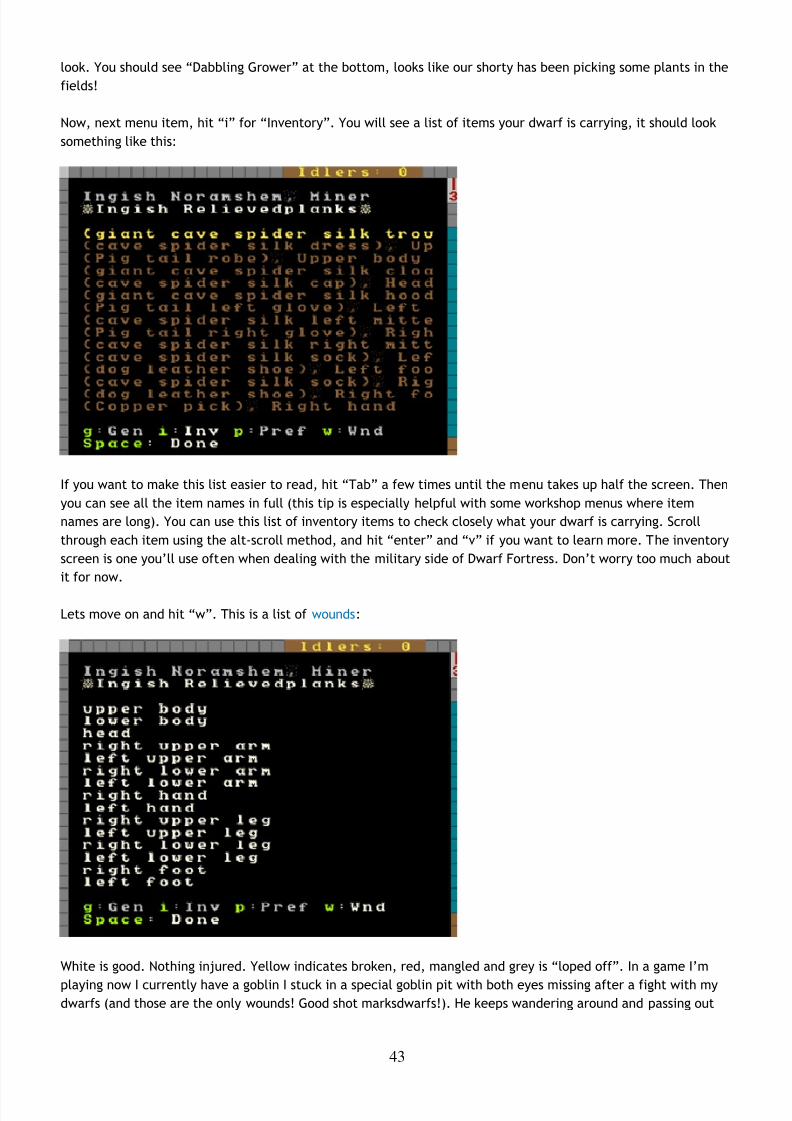
8/14/2019 The Complete and Utter Newby Tutorials
http://slidepdf.com/reader/full/the-complete-and-utter-newby-tutorials 43/100
43
look. You should see “Dabbling Grower” at the bottom, looks like our shorty has been picking some plants in the
fields!
Now, next menu item, hit “i” for “Inventory”. You will see a list of items your dwarf is carrying, it should look
something like this:
If you want to make this list easier to read, hit “Tab” a few times until the menu takes up half the screen. Then
you can see all the item names in full (this tip is especially helpful with some workshop menus where item
names are long). You can use this list of inventory items to check closely what your dwarf is carrying. Scroll
through each item using the alt-scroll method, and hit “enter” and “v” if you want to learn more. The inventory
screen is one you’ll use often when dealing with the military side of Dwarf Fortress. Don’t worry too much about
it for now.
Lets move on and hit “w”. This is a list of wounds:
White is good. Nothing injured. Yellow indicates broken, red, mangled and grey is “loped off”. In a game I’m
playing now I currently have a goblin I stuck in a special goblin pit with both eyes missing after a fight with my
dwarfs (and those are the only wounds! Good shot marksdwarfs!). He keeps wandering around and passing out

8/14/2019 The Complete and Utter Newby Tutorials
http://slidepdf.com/reader/full/the-complete-and-utter-newby-tutorials 44/100
44
before waking up and wandering around again, no doubt bumping into other goblins before collapsing again. Ok,
so I found it amusing, anyway…
What you can’t immediately see in this list are organs. Yes, Dwarf Fortress does model internal organs! If your
dwarfs, or critters, get wounded, you can see exactly how much and to what degree from this screen. Dwarfs
that get wounded will be taken (or make their own way) to your barracks where they will be fed, watered (you
need a bucket made in the carpenters for your dwarfs to fetch water for the injured dwarf) and left to recover.
This can take a substantial amount of time, weeks, months or even years! And they may never recover fromsome injuries.
Hit “p” to be taken back to the info-screen about that dwarf. For now, ignore the “Activate” and “Work Dogs”
option (we have no trained dogs yet) and lets focus on “Labour”. When you hit “l” you’ll see a screen like this:
What you’re looking at is a big, big list (it goes down a couple of pages) of different “labours” that the dwarf is
enabled for. The jobs in white are turned on, the ones in grey, off. At the bottom of the list are all the hauling
jobs, from stone hauling to cleaning.
An important job in DF is thinking about and managing the labours of your dwarfs. For example, do you want
your wood cutter to also have hauling jobs on? If they have that job on they’re going to spend their time cutting
wood and then walking half way across the map to move a piece of food to a food store, and then walk back
across the map to go back to chopping. Perhaps it would be best if you turn off the hauling jobs on your
woodcutter? How about your miner? Do you have a lot of mining work to do? Turn off all the jobs except mining
and your digger will drink, eat, sleep, rest and dig, and that’s all. No distractions!
But hauling jobs are important, so how about turning all the extraneous labours of all those lye makers and
potash maker immigrants and turning them into full-time peasant haulers. You can’t go wrong with up to 1/4 of
your workforce just hauling stuff and the rest divided between important jobs. At times you’ll want to do a lot
of bulk job modifying so you can get a lot of hauling done, or a lot of digging, or whathaveyou. This is especially
the case once your fortress grows to a substantial size and you have multiple dwarfs doing about the same sort
of job.
But how does one do this without working ones way through dozens of labour settings for dozens of dwarfs? Well
thankfully the answer is at your fingertips! Remember the “Dwarf Manager” shortcut we made right at the start?Good! Run it! If you skipped that step you’ll find “Dwarf Manager” in your Dwarf Fortress folder. Run the exe in
there.

8/14/2019 The Complete and Utter Newby Tutorials
http://slidepdf.com/reader/full/the-complete-and-utter-newby-tutorials 45/100
45
If the program doesn’t run, you may need to do some .net installing. You can check this all out at the Dwarf
Manager website.
Once you get the program up and running, the first thing you should do is hit the “Load from DF” button in the
bottom right of the program. The program will pull all the dwarf data from DF and you should see a screen
something like this:
The extremely cunning among you may have noticed that my Dwarf Manager is v0.2, but the one on the website
is v0.6. I suggest we all go to the Dwarf Manager website, grab the latest version, and install it on top of the
Dwarf Manager folder in your DF folder. Come back when you’re done!
What you’re looking at now is a very neat way of adjusting the labour of large numbers of dwarfs at once. It also
gives you a great way of quickly seeing what your dwarfs are set to do, and it allows grouping in useful ways.
Please note, in my screenshot I’ve had a few immigrants, so don’t worry if your numbers next to professions
don’t match mine.
Now, go through and double click on each profession and expand them out. The green blocks show what labour
the dwarf has, the grey dot in the middle shows how skilled they are at that labour – the bigger the dot, the
better they are. If you double click on any dwarf name you can pull up more information about the dwarf
including their name and profession and what they’re skilled in.
Note that the grey bars across the profession names indicate what is turned on in that profession group. Clicking
on those boxes turns on jobs for everyone in that profession. And this is where we can make things easier for
ourselves. I’ll show you how:
o Look at your miners in Dwarf Manager.
o Double click on the first one, change their “Profession” to “Digger”.
o Hit enter.
You have now created a custom profession. Now…
o Right click on the next dwarf, chose custom profession, click on “Digger”, like the picture.

8/14/2019 The Complete and Utter Newby Tutorials
http://slidepdf.com/reader/full/the-complete-and-utter-newby-tutorials 46/100
46
Do this for all of your miners, and then hit the bottom right button “Write to DF” (you need to do this to make
any change stick, and always click “Load from DF” before making any modifications to!). With this custom
profession I now have easy control over groups of dwarfs. I group dwarfs into the following groups, how you do it
is up to you though:
o Diggers (miners)
o Farmers (dwarfs who farm!)
o Minions (dwarfs that only haul)
o Crafters (dwarfs with all the craft skills on)
o Brickies (dwarfs who engrave and do masonry)
o Chippies (dwarfs who cut wood and do carpentry)
o Metalers (dwarfs who smelt/armor/weaponsmith)
o Foodies (dwarfs who cook and brew)
…And so on. I’m sure you can come up with a scheme of your own. Anyway, the point is, once you get beyond a
dozen dwarfs Dwarf Manager is an awesome way of herding your shorties easily and quickly. Give it a go
yourself!
Managing labour is how you get things done. If you see a building or workshop not being built, hit “q” and check
to see if there’s a “need XYZ labour” message. If there is, check to see if anyone has the labour on. If theydon’t, find someone, and turn it on. Your dwarfs can do just about anything you set them to do, but remember
they do it better when they are good at it, not only quicker, but with higher quality.
Keep in mind that mining and wood cutting require specialist tools (a pickaxe and a waraxe respectively). Also
note that farmers with no skill may screw up and lose your seed, producing no food. While this is ok when
you’ve got a lot of food and farmers and you’re training up some new recruits, it’s not so useful when you are
low on food and supplies!
I think this may be enough for this lesson. I am sure I will come up with more useful tips as we go, but now you
have the tools to look after your dwarfs so taking advantage of my tips will be no problem!
Next lesson we’re going to get back to expanding the fortress and increasing our uberness!

8/14/2019 The Complete and Utter Newby Tutorials
http://slidepdf.com/reader/full/the-complete-and-utter-newby-tutorials 47/100
47
The Complete and Utter Newby Tutorial for Dwarf Fortress – Part 7: “AMighty Fortress!”February 21, 2009 at 12:55 am | In Fantasy, Tutorial | 17 Comments Tags: Dwarf Fortress
You have come a long way, young jedi! Your dwarf herding skills are strong! You now
know the basics of building, production, trading and managing your dwarfs. But we
still have work to do, so lets get back to our fortress!
More Production!
We took a bit of a detour earlier by getting into managing dwarfs and trading and whatnot, but I think you’ll
agree those were important lessons. But what really gets us going is building awesome new stuff in our fortress,
right? Lets start with some new workshops you should get to grips with. I won’t list the keys you need to use for
every task, you should be able to remember the basic stuff from earlier lessons, so lets just get building these
workshops around our four big production rooms:
o Mechanic’s Workshop
o Leather Works
o Farmer’s Workshop
o Kitchen
o Butchers
o Metalsmith’s Forge
In addition, go to the Furnaces menu (from “b” and then “e” for “Furnaces”) and build:
o Wood Furnace
o Smelter
While those places get built lets look at expanding a bit. In the middle of our four room area we have three
stairs going down. Right now they go nowhere, so lets go down about 5 levels. Remember, “d” and then “i” for
“Up/Down Stairs”, set to the level below, will get that construction going.
We also have room to expand between our production floor and our entrance, so lets go up a level and put some
storage there. I suggest the easiest way to do this will be to “b”, “build” a “C” “construction”, that is, an up-
stair. So chose the space I highlight below, and then follow along!
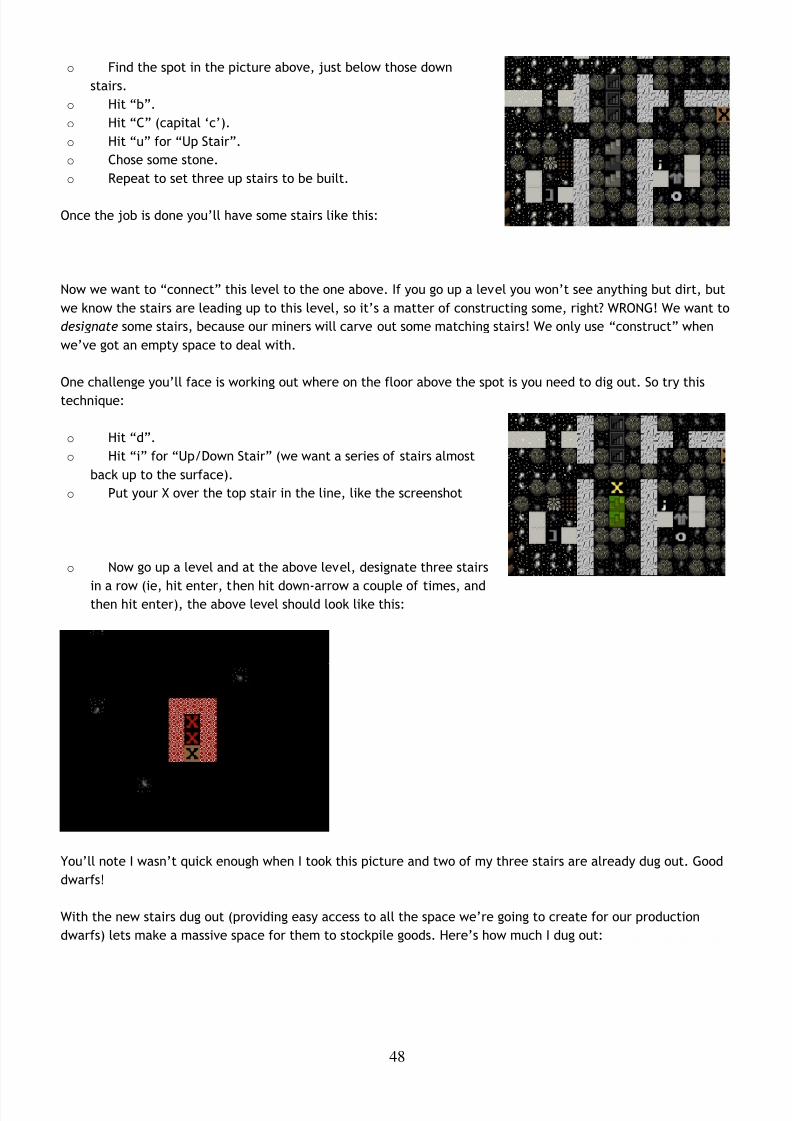
8/14/2019 The Complete and Utter Newby Tutorials
http://slidepdf.com/reader/full/the-complete-and-utter-newby-tutorials 48/100
48
o Find the spot in the picture above, just below those down
stairs.
o Hit “b”.
o Hit “C” (capital ‘c’).
o Hit “u” for “Up Stair”.
o Chose some stone.
o Repeat to set three up stairs to be built.
Once the job is done you’ll have some stairs like this:
Now we want to “connect” this level to the one above. If you go up a level you won’t see anything but dirt, but
we know the stairs are leading up to this level, so it’s a matter of constructing some, right? WRONG! We want to
designate some stairs, because our miners will carve out some matching stairs! We only use “construct” when
we’ve got an empty space to deal with.
One challenge you’ll face is working out where on the floor above the spot is you need to dig out. So try this
technique:
o Hit “d”.
o Hit “i” for “Up/Down Stair” (we want a series of stairs almost
back up to the surface).
o Put your X over the top stair in the line, like the screenshot
o Now go up a level and at the above level, designate three stairs
in a row (ie, hit enter, then hit down-arrow a couple of times, andthen hit enter), the above level should look like this:
You’ll note I wasn’t quick enough when I took this picture and two of my three stairs are already dug out. Good
dwarfs!
With the new stairs dug out (providing easy access to all the space we’re going to create for our production
dwarfs) lets make a massive space for them to stockpile goods. Here’s how much I dug out:

8/14/2019 The Complete and Utter Newby Tutorials
http://slidepdf.com/reader/full/the-complete-and-utter-newby-tutorials 49/100
49
In case you’re wondering, that’s about a 40×40 box with our first stairs at the bottom. And one nice thing about
digging in dirt (which this layer is), is that it doesn’t leave any messy rock around to clutter up our nice
stockpiles!
While that’s completing, lets start an important job,
making our dining room awesome! You see, dwarfs love
to spend time in an attractive meeting hall. Right now
mine is packed with loafers. They clearly need a bit
more room! A bit of digging will sort that:
Once the room is expanded, fit doors and some more
tables and chairs. Once that’s done you’ll need to do
something important, and that’s resize the room. As
you may remember we set the room up from one of the
tables. But if you “q” over the dining room table now
you’ll see it doesn’t fill the space:
The room will be more “valuable” and widely used if it’s
set to be bigger, to fill this space. Lets do that now:
o Hit “q” and move the X over the table which is

8/14/2019 The Complete and Utter Newby Tutorials
http://slidepdf.com/reader/full/the-complete-and-utter-newby-tutorials 50/100
50
setting the room up…
o Hit “r” for “Resize Room”.
o Using “alt”+”down arrow” expand the room size till you fill the space:
o Hit “enter”
Job done! The room is resized and better. But we want to make it MUCH better because I noticed a dwarf with a
red down arrow flashing and when I viewed his info it turned out he was pretty unimpressed with his
surroundings. Lets get to impressing him!
How do we do that? Simple! We smooth the walls and then engrave them with fine carvings all about our
fortress! To do this:
o Hit “d”.
o Hit “s” for “Smooth Stone”.o Select the entire dining room and walls using “enter”, move cursor, “enter”.
The room will now look all flashy like this (until you back out of the menu, anyway):
Any dwarf with the “Stone detailing” labour on will now set about smoothing the walls and floors. The next
step, once the space is smooth, is to designate the room to be engraved using “d” and “e”. Engraved walls make
dwarfs happy and increase the value of your fortress. You can even look at them by using “k” and hitting enter
with the engraving highlighted. Some walls have some quite amusing engravings (randomly generated and based
on the history of your dwarfs and your fortress), so it’s worth looking around and finding the good ones. The
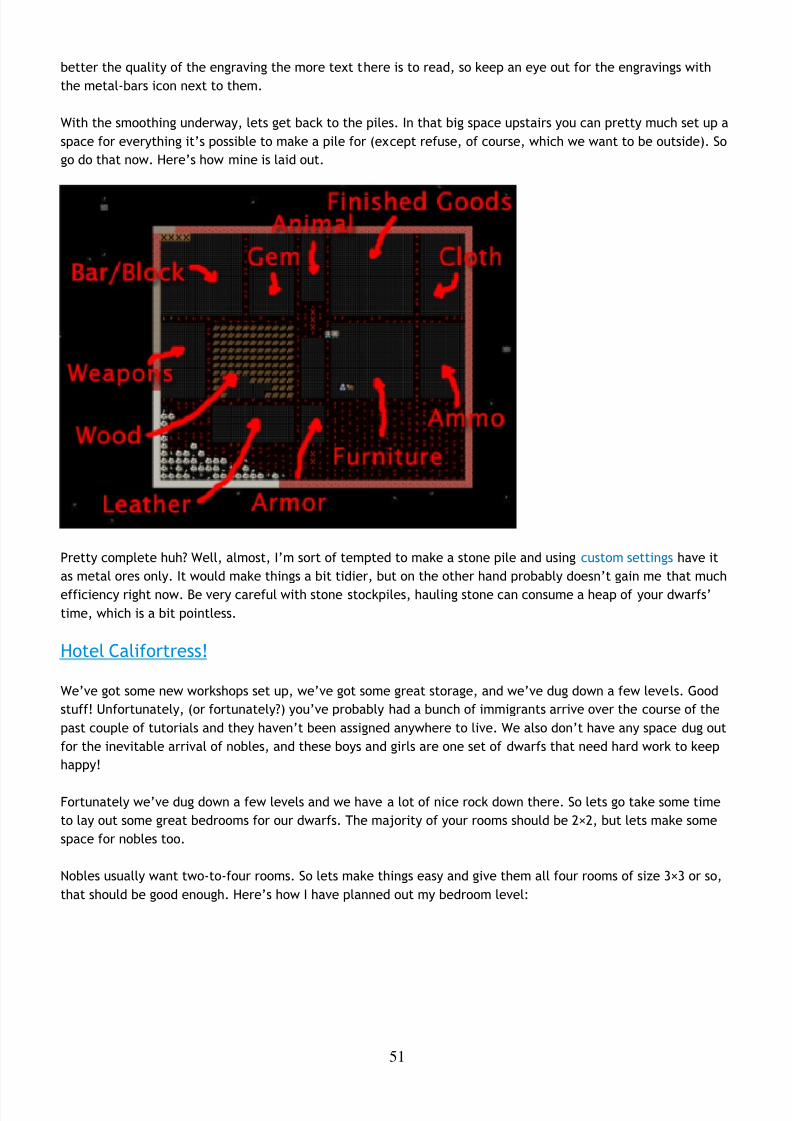
8/14/2019 The Complete and Utter Newby Tutorials
http://slidepdf.com/reader/full/the-complete-and-utter-newby-tutorials 51/100
51
better the quality of the engraving the more text there is to read, so keep an eye out for the engravings with
the metal-bars icon next to them.
With the smoothing underway, lets get back to the piles. In that big space upstairs you can pretty much set up a
space for everything it’s possible to make a pile for (except refuse, of course, which we want to be outside). So
go do that now. Here’s how mine is laid out.
Pretty complete huh? Well, almost, I’m sort of tempted to make a stone pile and using custom settings have it
as metal ores only. It would make things a bit tidier, but on the other hand probably doesn’t gain me that much
efficiency right now. Be very careful with stone stockpiles, hauling stone can consume a heap of your dwarfs’
time, which is a bit pointless.
Hotel Califortress!
We’ve got some new workshops set up, we’ve got some great storage, and we’ve dug down a few levels. Good
stuff! Unfortunately, (or fortunately?) you’ve probably had a bunch of immigrants arrive over the course of the
past couple of tutorials and they haven’t been assigned anywhere to live. We also don’t have any space dug out
for the inevitable arrival of nobles, and these boys and girls are one set of dwarfs that need hard work to keep
happy!
Fortunately we’ve dug down a few levels and we have a lot of nice rock down there. So lets go take some time
to lay out some great bedrooms for our dwarfs. The majority of your rooms should be 2×2, but lets make some
space for nobles too.
Nobles usually want two-to-four rooms. So lets make things easy and give them all four rooms of size 3×3 or so,
that should be good enough. Here’s how I have planned out my bedroom level:

8/14/2019 The Complete and Utter Newby Tutorials
http://slidepdf.com/reader/full/the-complete-and-utter-newby-tutorials 52/100
52
A couple of points. Firstly, the
whole right side of my new
bedroom level won’t be dug
because it’s not connected to the
stairs, etc. I’ll connect it up later
once we’ve got the left side done.
Second, my layout is pretty
boring, go and check out some of the bedroom designs on the wiki.
I love the fractal pattern! Very
efficient! Finally, you’ll notice
the big wide corridors for the
main arterial routes. Dwarfs need
space to move around,
remember!
Also, remember that you will
need a lot of new doors and beds
for our beautiful hotel. While
you’re at it, build a ton of tables
and chairs and at least a half
dozen coffers, cabinets, armor
stands, weapon stands. You’ll find
all those items under the masonry
workshop menus. Oh, and lets connect up the southern most stairs (the first ones we built way back in tutorial 1
or 2) with this level as well. Construct down stairs from the workshop floor and then designate Up/Down stairs
till we’re all connected up.
While that is being built (oh, we’re going to find some jems too, cool!) lets continue with…
The Joy of Traps!
Traps form the majority of many people’s defences, so it’s best we get sorted and make some. First up, we will
need a lot of mechanisms, so go find that mechanic’s workshop and fill it’s job queue with mechanisms. They’ll
end up in a finished goods pile when done.
Next, go to the Carpenter’s workshop and add a ton of cages (”j” is the shortcut from the “Add Task” menu).
Try and get ten built. Add another carpenter’s workshop to your workshop floor if you fancy, makes it easier to
queue up more than a few of any item and get things made faster.
While you’re at it, queue up a bunch of booze at the still too, we don’t want to run out, ok!
Now would be a good time to go fiddle with Dwarf Manager. Sort out your profession groups, make sure your
diggers have no job other than diggers and your masons and stone details are doing nothing but those jobs, after
all, we want them to stay on task and not get distracted, right? Set all the peasants to haul jobs only, remove all
hauling jobs but food hauling from your farmers, you get the picture!
Here’s how I’ve got my lads and ladies sorted:

8/14/2019 The Complete and Utter Newby Tutorials
http://slidepdf.com/reader/full/the-complete-and-utter-newby-tutorials 53/100
53
Couple of interesting points. First up, I’ve got 14 dwarfs assigned to the “Pleb” profession: All they do is haul
stuff. The others are grouped around certain jobs – farming, crafting, digging, masonry/stone detailing, etc. In a
few situations, for example, my “Foody” class, I have a dwarf who is good at cooking and another who is good at
brewing, and to make life easier I’ve turned on both jobs for both dwarfs. Eventually they’ll be great at both,
and it saves me a little admin with dozens of production classes. I engage in this sort of rationalisation
frequently in my dwarf management.
I’ve also got four dwarfs set to farm, and they only farm and haul food, nothing else. With nothing to distract
them they will fill the fields with crops! I’ve also got at least one dwarf in there who has no farming skill, it’s
never to soon to start training them up though!
With so many dedicated haulers I can afford to leave some dwarfs to specialise in these various production
tasks. But be careful of having to many dwarfs who aren’t doing anything, idle hands are the devil’s plaything,
after all! Dwarfs with no jobs will eventually get bored and throw parties that tie up lots of time and dwarfs. If
your dwarfs have little to do, set a few making stone blocks (blocks make any item made out of them more
valuable and can also be stacked in bins, a great way to remove stone clutter) or have them out their harvesting
plants, smoothing stone or whathaveyou. No need to have them lazing about!
Hang on a second.. weren’t we meant to be talking about traps? Yes! I think we were! So, with cages andmechanisms built lets get on and make some cage traps…
Dwarfs and their strange moods!
…or not! Oh dear! Something is going down in dwarf land!
If you get a dwarf in a strange mood, find them using “u”, looking for their name, and then “c”. You will see the
dwarf flashing with a grey exclamation mark (red is very bad, by the way). Follow this dwarf closesly. This dwarf
has got a strange mood and is off to claim a workshop to start building some amazing object based on their
whim and fancy. We can’t control what they build, all we can do is hope they build something cool and that
they can find all the materials they want for their fancy. If not, they go suicidal or homicidal. Oh dear! Lets
watch and see what happens. Of course, this event is random, so it might not happen to you at this point in the
game, but it will happen sooner or later.
Right, my dwarf, Endok Oltarisos has rushed off to claim a leather workshop. No surprise, he’s a tanner after all.
Once he claims the workshop you can “q” and see the status of the workshop, and if you wait, it will scroll
through what items the dwarf is looking for. Endok is looking for “stacked leather” and “skeletons”. I’m not sure
if I’ve got any. I’ll find out pretty quickly though, the dwarf will either run off and start fetching stuff, or sit in
the workshop, seemingly doing nothing…

8/14/2019 The Complete and Utter Newby Tutorials
http://slidepdf.com/reader/full/the-complete-and-utter-newby-tutorials 54/100
54
Well, the leather isn’t a problem, I just bought a ton from a trader, and the bones, I think he’s grabbed some
from the refuse pile. Thankfully, my worries about the dwarf not getting stuff are put to rest when I get this
message:
Endok has begun a mysterious construction! Great! Now we just wait and see what crazy object the dwarf
produces. With luck it will be useful!
..or maybe not! Our dwarf has made a cap, a simple hat, out of dog leather! Damn! On the plus side though the
dwarf has become a legendary tanner. If they gain skill from a mood it often leaves them “Legendary”, which is
pretty neat. With legendary skill I could use Endok to make leather armour and it would be as good as metal
armour, handy.
Lets look at the item. If we hit “l” we get a “list” of artifacts. With only one artifact there’s no list, so we can
go straight in to hitting “v” to “View”.
Behold! Triberiddle, the dog leather cap (click on the picture here if you can’t read the text)!
A nice hat depicting when one of the trade caravan guards shot a goblin. No one will wear it though, it’s an
artifact, only champions consider themselves important enough to grab artifacts from stock piles.
We were lucky this time with our moody dwarf. He was able to get everything he needed to make his artifact. If he couldn’t find it he would go quite crazy in the workshop, or if a suitable workshop isn’t available, in his
room. When you see the dwarf start to go crazy (flashing down arrows and not moving from their workshop are a
good sign) it’s time to either assign the dwarf some war dogs (more on that later) or to construct some walls and
wall them in to their workshop, or to lock the door on their quarters. At some point the dwarf will go beserk and
either get attacked by nearby military dwarfs or war dogs, or if locked inside, slowly starve to death.
If the crazy dwarf is ignored they will destroy stuff and attack dwarfs, probably killing a couple before they are
put down, so watch those moody stunties closely!
…Hang on a second, weren’t we supposed to be doing something about traps? Bugger! We’re out of time. How
about next time? OK? Seriously? I really promise we’ll get to traps, ok!
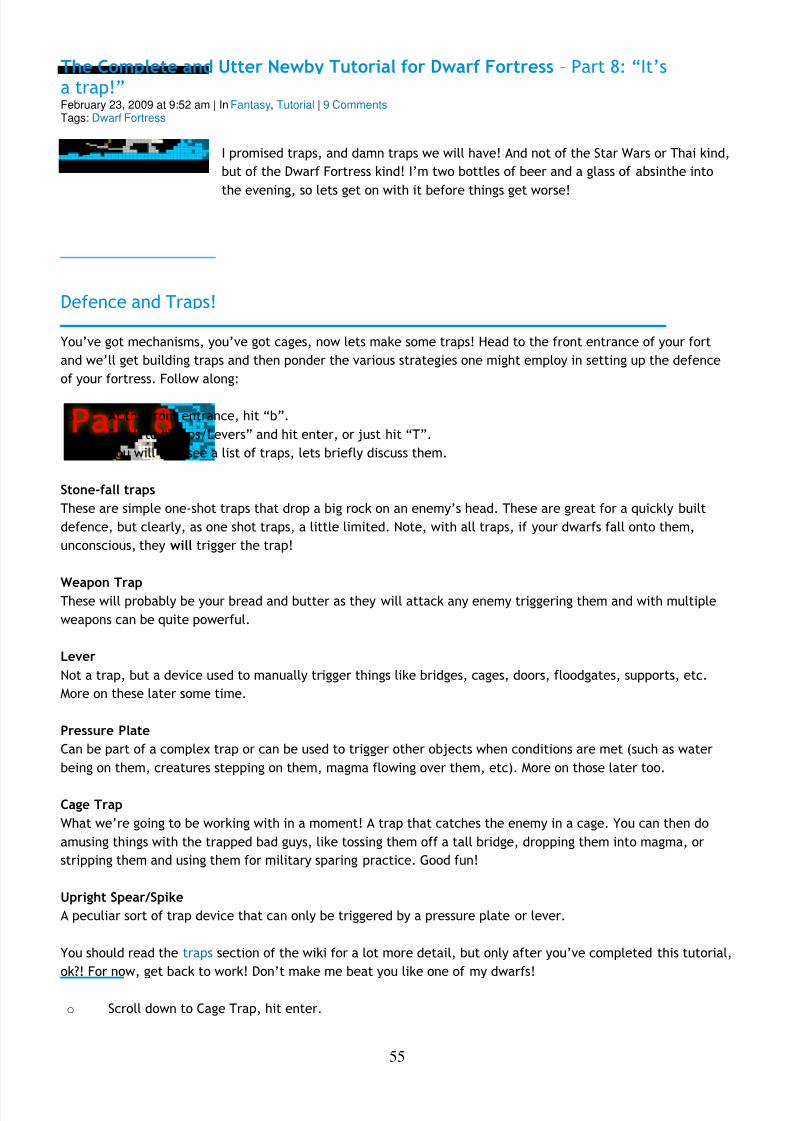
8/14/2019 The Complete and Utter Newby Tutorials
http://slidepdf.com/reader/full/the-complete-and-utter-newby-tutorials 55/100
55
The Complete and Utter Newby Tutorial for Dwarf Fortress – Part 8: “It’sa trap!”February 23, 2009 at 9:52 am | In Fantasy, Tutorial | 9 Comments Tags: Dwarf Fortress
I promised traps, and damn traps we will have! And not of the Star Wars or Thai kind,
but of the Dwarf Fortress kind! I’m two bottles of beer and a glass of absinthe into
the evening, so lets get on with it before things get worse!
Defence and Traps!
You’ve got mechanisms, you’ve got cages, now lets make some traps! Head to the front entrance of your fort
and we’ll get building traps and then ponder the various strategies one might employ in setting up the defence
of your fortress. Follow along:
o At the front entrance, hit “b”.
o Scroll to “Traps/Levers” and hit enter, or just hit “T”.
o You will now see a list of traps, lets briefly discuss them.
Stone-fall traps
These are simple one-shot traps that drop a big rock on an enemy’s head. These are great for a quickly built
defence, but clearly, as one shot traps, a little limited. Note, with all traps, if your dwarfs fall onto them,
unconscious, they will trigger the trap!
Weapon TrapThese will probably be your bread and butter as they will attack any enemy triggering them and with multiple
weapons can be quite powerful.
Lever
Not a trap, but a device used to manually trigger things like bridges, cages, doors, floodgates, supports, etc.
More on these later some time.
Pressure Plate
Can be part of a complex trap or can be used to trigger other objects when conditions are met (such as water
being on them, creatures stepping on them, magma flowing over them, etc). More on those later too.
Cage Trap
What we’re going to be working with in a moment! A trap that catches the enemy in a cage. You can then do
amusing things with the trapped bad guys, like tossing them off a tall bridge, dropping them into magma, or
stripping them and using them for military sparing practice. Good fun!
Upright Spear/Spike
A peculiar sort of trap device that can only be triggered by a pressure plate or lever.
You should read the traps section of the wiki for a lot more detail, but only after you’ve completed this tutorial,
ok?! For now, get back to work! Don’t make me beat you like one of my dwarfs!
o Scroll down to Cage Trap, hit enter.

8/14/2019 The Complete and Utter Newby Tutorials
http://slidepdf.com/reader/full/the-complete-and-utter-newby-tutorials 56/100
56
o You now have a green X, place it in front of your entrance somewhere with “enter”. Do this a few
times, you can see below how I’ve set a few traps to be built.
This is hardly an impressive defence, but it will do for now. With luck it might help against any casual raiders,
although “thief” monsters will still be able to sneak past your traps. To beef our defence up a bit we need toget some weapon traps installed as well as sort out some way to strike back at attackers who aren’t so gracious
to step on all of our traps. So with that in mind, get producing a lot more mechanisms (at least 10) and follow
along as we produce some trap components!
Smelting and other dwarfy things!
This wouldn’t be a dwarf fortress if we didn’t fill the place with the clang of forge hammers and the stink of
furnaces, right? Lets have some fun then and make some sharp things to hurt our enemies!
First up, let me point out that item production can be fairly confusing. Essentially what we’re going to do is turn
some wood into charcoal (at a wood furnace), then use the charcoal to turn metal ores into metal bars (at a
smelter), then we’re going to use more charcoal to smith metal bars into items (at a metalsmith’s forge). As
you can no doubt imagine the problem we will face is the charcoal bottleneck. It will take a lot of wood to fuel
all our furnaces! Most of the time this problem is got around by players using magma smelters and magma
forges. We haven’t struck magma yet, so we’re going to plough ahead with the hard way, at least for a while.
The goal of all this is to produce a few fearsome trap components to fit out some weapon traps – think spinning
disks from Indiana Jones! So follow along:
o Find your wood furnace, hit “q” and “a” for “add task”.
o Select “Make Charcoal”.
o
Queue up a full list of Charcoal.o Wait until your list is half-empty. Fill it some more!
o Now go to the smelter, and try to “a”, “Add new task”. You will now see a list of the tasks available at
this workshop. Note, the tasks will change as you uncover more ores or deplete older ores. For interest,
note that you can set the workshop to melt objects you wish to dispose of (turns the object back into a
metal bar). More on that some other time.
o Chose “Smelt Magnetite Ore”, hit “enter”. Magnetite contains iron, this will turn those sparkly rocks
lying around to iron bars.
o Fill the queue and then fill it again (or build another smelter and fill both queues).
o Try and make sure your charcoal production keeps up with the smelting. If it falls behind your smelt task
will be canceled and you’ll have to reissue it.
o Once we’re done with this tutorial why not go and smelt all of that native platinum ore you saw on thelist as well? If you’ve dug downstairs out you may have gold to smelt too!

8/14/2019 The Complete and Utter Newby Tutorials
http://slidepdf.com/reader/full/the-complete-and-utter-newby-tutorials 57/100
57
Your dwarfs should be pretty busy now, hauling charcoal, wood, ores and bars around. If things aren’t moving
quick enough turn off the hauling jobs for anyone involved in your metalworking industry. While you’re at it,
make sure you’ve got enough wood around for charcoal by cutting more down outside!
If you want to check your progress, go look at your Bar/Block stockpile and see what is being built up. If you
suspect all of your production is in bins, use “k”, find the bin, hit “enter” and look inside the bin.
A little on food processing
While all this is going on, why not go to your farmer’s workshop and add a task of “Process Plants (to bag)”. Set
it on repeat. Then add a task of “Process Plants (to barrel)”, again, set it on repeat. Now, anyone with the
“Plant Processing” labour on (no one by default) will go and process anything you’ve grown that needs
processing. I won’t list those plants here now (go look at crops for all the detail), but suffice to say, some plants
need to be processed so they can be eaten or used in other sorts of manufacture (eg, cloth making).
Hopefully you’re not short on bags. If you are, try and pick up a bunch off a trader. Alternately, buy leather
and/or cloth off a trader and using the Leather Workshop or Clothier’s Shop (we’ve not built one yet) make
bags. Bags are very handy for storing seeds and processed plants, you can never have too many of them. They’re
like barrels and bins in that way.
Back to the iron!
With a few iron bars made, head on back to the smelter. Go and “a”, “Add task”. You should now see a new
task listed “Make Pig Iron Bar”. Pig Iron is made out of one iron bar and one piece of flux material (eg,
limestone, which we’ve got a lot of). Next on the production chain for us will be steel (which requires a pig iron
bar an an iron bar and a flux material), which is second only to Adamantium in sharp awesomeness, and will let
us make some great weapons, trap components and armor.
Before your imagination gets carried away, go produce a lot of iron bars and a dozen or so pig iron bars. Check
in here again when you’re done.
Right, with iron and pig iron bars complete, go back to your smelter and check the “Add tasks” menu. You
should now see steel as a smelting option! Awesome! Smelt up a half-dozen steel bars. And while you’re at it,
build a lot more cages and mechanisms and put at least half-a-dozen cage traps around your entrance. Come
back once you’ve got a bunch of steel bars made.
Ok! Now we’re ready to rock! I hope, at this point, that you’ve not been invaded, attacked or otherwise
molested. With our fortress around two years old now it’s likely you’ll start to see the odd goblin ambush –
especially if you send your dwarfs outside a lot. I hope you survive those ambushes just fine! Perhaps we should
have started this tutorial sooner…
Anyway, head over to your metalsmith’s forge, and:
o Hit “q”.
o Hit “a”. You will now see a list! Explore the list, see all the neat things we can make! You might need to
hit “tab” to expand the menu size so you can see everything.
o Scroll to “Trap Components” and hit “enter”.
o Scroll to “Steel”, hit “enter”.
o Hit “tab” twice so we can see the full item names.
o Chose to make a “large, serrated Steel disc”. I love the sound of that!o Queue up three disks.
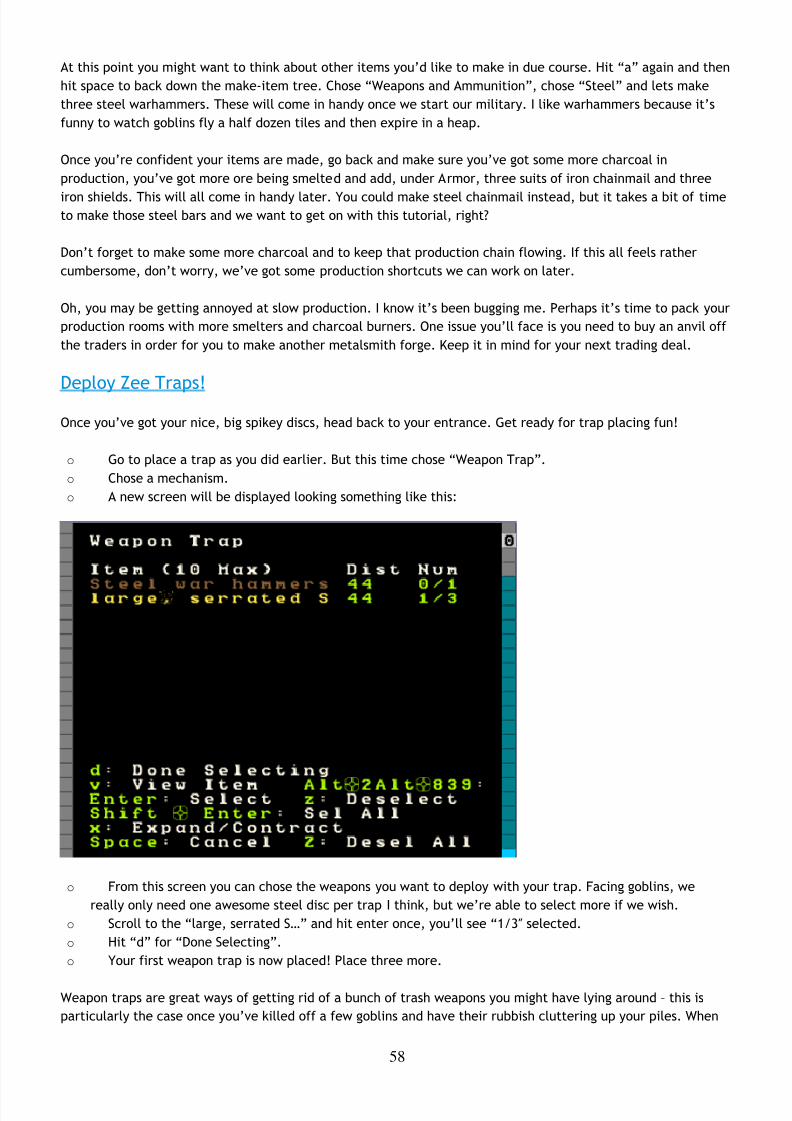
8/14/2019 The Complete and Utter Newby Tutorials
http://slidepdf.com/reader/full/the-complete-and-utter-newby-tutorials 58/100
58
At this point you might want to think about other items you’d like to make in due course. Hit “a” again and then
hit space to back down the make-item tree. Chose “Weapons and Ammunition”, chose “Steel” and lets make
three steel warhammers. These will come in handy once we start our military. I like warhammers because it’s
funny to watch goblins fly a half dozen tiles and then expire in a heap.
Once you’re confident your items are made, go back and make sure you’ve got some more charcoal in
production, you’ve got more ore being smelted and add, under Armor, three suits of iron chainmail and three
iron shields. This will all come in handy later. You could make steel chainmail instead, but it takes a bit of timeto make those steel bars and we want to get on with this tutorial, right?
Don’t forget to make some more charcoal and to keep that production chain flowing. If this all feels rather
cumbersome, don’t worry, we’ve got some production shortcuts we can work on later.
Oh, you may be getting annoyed at slow production. I know it’s been bugging me. Perhaps it’s time to pack your
production rooms with more smelters and charcoal burners. One issue you’ll face is you need to buy an anvil off
the traders in order for you to make another metalsmith forge. Keep it in mind for your next trading deal.
Deploy Zee Traps!
Once you’ve got your nice, big spikey discs, head back to your entrance. Get ready for trap placing fun!
o Go to place a trap as you did earlier. But this time chose “Weapon Trap”.
o Chose a mechanism.
o A new screen will be displayed looking something like this:
o From this screen you can chose the weapons you want to deploy with your trap. Facing goblins, we
really only need one awesome steel disc per trap I think, but we’re able to select more if we wish.
o Scroll to the “large, serrated S…” and hit enter once, you’ll see “1/3″ selected.
o Hit “d” for “Done Selecting”.
o Your first weapon trap is now placed! Place three more.
Weapon traps are great ways of getting rid of a bunch of trash weapons you might have lying around – this is
particularly the case once you’ve killed off a few goblins and have their rubbish cluttering up your piles. When
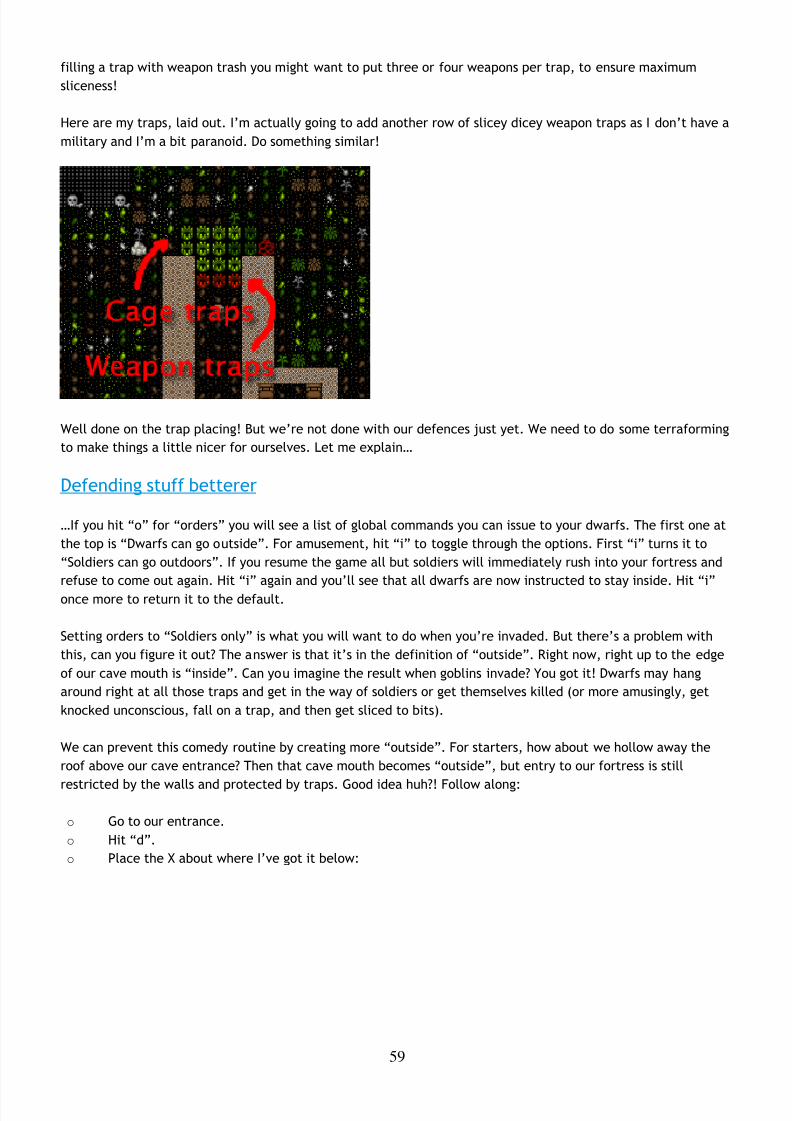
8/14/2019 The Complete and Utter Newby Tutorials
http://slidepdf.com/reader/full/the-complete-and-utter-newby-tutorials 59/100
59
filling a trap with weapon trash you might want to put three or four weapons per trap, to ensure maximum
sliceness!
Here are my traps, laid out. I’m actually going to add another row of slicey dicey weapon traps as I don’t have a
military and I’m a bit paranoid. Do something similar!
Well done on the trap placing! But we’re not done with our defences just yet. We need to do some terraforming
to make things a little nicer for ourselves. Let me explain…
Defending stuff betterer
…If you hit “o” for “orders” you will see a list of global commands you can issue to your dwarfs. The first one at
the top is “Dwarfs can go outside”. For amusement, hit “i” to toggle through the options. First “i” turns it to
“Soldiers can go outdoors”. If you resume the game all but soldiers will immediately rush into your fortress and
refuse to come out again. Hit “i” again and you’ll see that all dwarfs are now instructed to stay inside. Hit “i”
once more to return it to the default.
Setting orders to “Soldiers only” is what you will want to do when you’re invaded. But there’s a problem with
this, can you figure it out? The answer is that it’s in the definition of “outside”. Right now, right up to the edge
of our cave mouth is “inside”. Can you imagine the result when goblins invade? You got it! Dwarfs may hang
around right at all those traps and get in the way of soldiers or get themselves killed (or more amusingly, get
knocked unconscious, fall on a trap, and then get sliced to bits).
We can prevent this comedy routine by creating more “outside”. For starters, how about we hollow away the
roof above our cave entrance? Then that cave mouth becomes “outside”, but entry to our fortress is still
restricted by the walls and protected by traps. Good idea huh?! Follow along:
o Go to our entrance.
o Hit “d”.
o Place the X about where I’ve got it below:

8/14/2019 The Complete and Utter Newby Tutorials
http://slidepdf.com/reader/full/the-complete-and-utter-newby-tutorials 60/100
60
o Go up one level.
o Hit “h” for channel.
o Channel all the way up to the tree:
Channeling cuts down through the ground to the level below. It can be used in place of mining to clear space
and provides a safer way for dwarfs to get to stuff below their toes. Note, it is possible to cause cave ins by
removing land connecting terrain to the rest of the world. This may be fatal for your dwarfs, so be careful! But
for now:
o Designate all those trees around this level to be cut down. We can’t dig a channel on a tree, right? Come
back when the cutting is done.
o Continue designating the channel all the way to the end of the spit of land.
o Designate another channel the same full length to the right of the first designation.
o When these are complete, finish our three-channel wide cut with another designation to the right of
the second designation. Don’t designate all three at once or your dwarfs may accidently cause some cave
ins by cutting the wrong piece of land in the wrong order. Very annoying.
o When finished, your three channels will be open space above our entrance, like this:

8/14/2019 The Complete and Utter Newby Tutorials
http://slidepdf.com/reader/full/the-complete-and-utter-newby-tutorials 61/100
61
Now, when we issue the order for our lads to “stay inside” they won’t be hanging around the entrance! Super!
One thing I’m concerned about is that anyone above our entrance could get a clear shot down to fleeing dwarfs.
Lets stop that by building a wall. While we’re at it lets tidy the bits of land poking out over open air. Flip up and
down between levels and you’ll see where some tidying needs to be done. Channel away! As for the wall, youknow how to make walls using “b” and “C”, so go ahead and do it, here’s how mine turned out!
Walls to secure anyone dropping in, nice open space to out outdoors/indoors problem.
While you’re fiddling with “o”, “orders”, have a look at “r” for “refuse” orders. Unless I’m in battle, or worried,
I like to toggle “o” under the refuse menu so it’s set at “dwarfs gather refuse from outside”. They will then
grab all the lewt from dead goblins that is scattered around on the grass. Pretty handy huh? Nothing like free
stuff, is there?
Arg! More goblins!
Oh dear! I got badly ambushed by goblins. I drafted my miners into the military (they tend to be strong and are
armed with picks – ok scratch defence) and they were cut down by the hordes of goblins! Terrible! On the plus
side a number of goblins were caught in traps and two were killed by my miners. Others are out there still so all
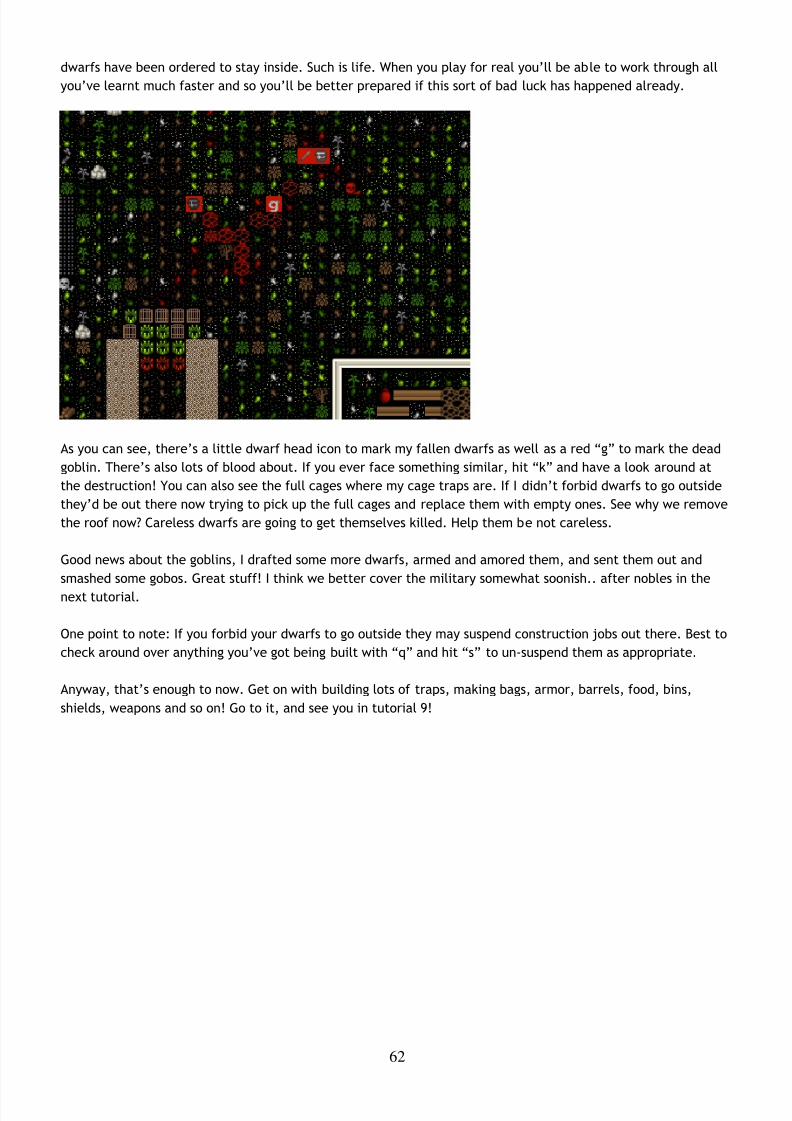
8/14/2019 The Complete and Utter Newby Tutorials
http://slidepdf.com/reader/full/the-complete-and-utter-newby-tutorials 62/100
62
dwarfs have been ordered to stay inside. Such is life. When you play for real you’ll be able to work through all
you’ve learnt much faster and so you’ll be better prepared if this sort of bad luck has happened already.
As you can see, there’s a little dwarf head icon to mark my fallen dwarfs as well as a red “g” to mark the dead
goblin. There’s also lots of blood about. If you ever face something similar, hit “k” and have a look around at
the destruction! You can also see the full cages where my cage traps are. If I didn’t forbid dwarfs to go outside
they’d be out there now trying to pick up the full cages and replace them with empty ones. See why we remove
the roof now? Careless dwarfs are going to get themselves killed. Help them be not careless.
Good news about the goblins, I drafted some more dwarfs, armed and amored them, and sent them out and
smashed some gobos. Great stuff! I think we better cover the military somewhat soonish.. after nobles in the
next tutorial.
One point to note: If you forbid your dwarfs to go outside they may suspend construction jobs out there. Best to
check around over anything you’ve got being built with “q” and hit “s” to un-suspend them as appropriate.
Anyway, that’s enough to now. Get on with building lots of traps, making bags, armor, barrels, food, bins,
shields, weapons and so on! Go to it, and see you in tutorial 9!
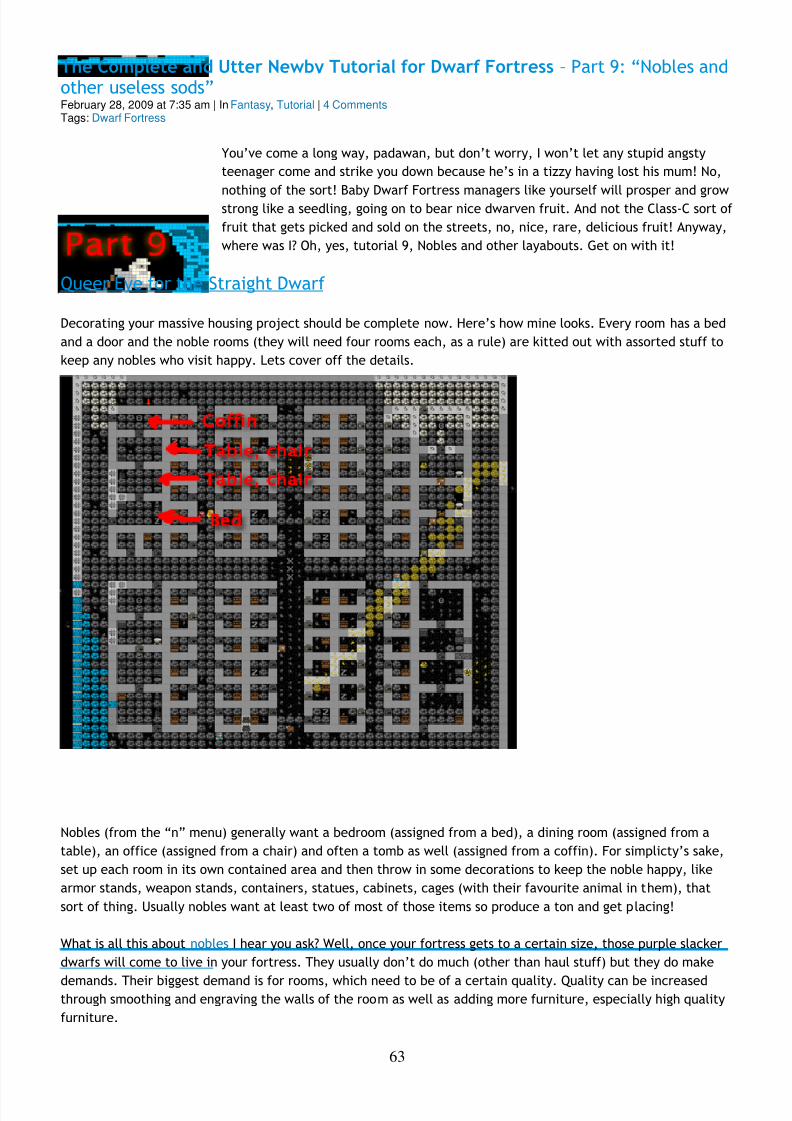
8/14/2019 The Complete and Utter Newby Tutorials
http://slidepdf.com/reader/full/the-complete-and-utter-newby-tutorials 63/100
63
The Complete and Utter Newby Tutorial for Dwarf Fortress – Part 9: “Nobles andother useless sods”February 28, 2009 at 7:35 am | In Fantasy, Tutorial | 4 Comments Tags: Dwarf Fortress
You’ve come a long way, padawan, but don’t worry, I won’t let any stupid angsty
teenager come and strike you down because he’s in a tizzy having lost his mum! No,
nothing of the sort! Baby Dwarf Fortress managers like yourself will prosper and growstrong like a seedling, going on to bear nice dwarven fruit. And not the Class-C sort of
fruit that gets picked and sold on the streets, no, nice, rare, delicious fruit! Anyway,
where was I? Oh, yes, tutorial 9, Nobles and other layabouts. Get on with it!
Queer Eye for the Straight Dwarf
Decorating your massive housing project should be complete now. Here’s how mine looks. Every room has a bed
and a door and the noble rooms (they will need four rooms each, as a rule) are kitted out with assorted stuff to
keep any nobles who visit happy. Lets cover off the details.
Nobles (from the “n” menu) generally want a bedroom (assigned from a bed), a dining room (assigned from a
table), an office (assigned from a chair) and often a tomb as well (assigned from a coffin). For simplicty’s sake,
set up each room in its own contained area and then throw in some decorations to keep the noble happy, like
armor stands, weapon stands, containers, statues, cabinets, cages (with their favourite animal in them), that
sort of thing. Usually nobles want at least two of most of those items so produce a ton and get placing!
What is all this about nobles I hear you ask? Well, once your fortress gets to a certain size, those purple slacker
dwarfs will come to live in your fortress. They usually don’t do much (other than haul stuff) but they do make
demands. Their biggest demand is for rooms, which need to be of a certain quality. Quality can be increasedthrough smoothing and engraving the walls of the room as well as adding more furniture, especially high quality
furniture.

8/14/2019 The Complete and Utter Newby Tutorials
http://slidepdf.com/reader/full/the-complete-and-utter-newby-tutorials 64/100
64
The other thing nobles do is make mandates. Mandates are demands by the noble for things to be done, like the
production of certain goods, or a ban on the export of certain goods. It pays to try and meet the demands of
your nobles or they may go crazy and cause all kinds of problems.
Lets have a look at nobles. Go ahead and hit “n”. This is your noble list, right now it should be very short, but in
time it will grow. Chances are it looks like this (click for big):
With a newby fortress only one dwarf is set as expedition leader. As the fortress grows more noble ranks will
appear in this list and more positions will be filled. Lets look at the current expedition leader. Hit “enter” and
you’ll see info about the current leader. Our dwarf owns 14 objects (mostly clothes and stuff), has “meager
quarters”. Lets assign Eshtan Urdimfash a full set of noble rooms, just for kicks. He’s not demanding any, but
we’ll do it for practice. If he were demanding more rooms you would see them in red on the left. If he had a
room, but not a good enough room, it would show what he’s currently got and what he’s actually demanding.
Once you’ve assigned the bedroom, office, dining room and tomb, if you go back to the noble list and view our
chap you will now see his holdings have changed (clicky biggy):
Next job for you is to assign a book keeper. Usually, if you embark with at least one dwarf with the “appraiser”
skill (good idea, by the way), this job would already be filled. But for now it’s vacant. This skill is what makes
our stock count accurate (more on that later). Fortunately for us we can chose a dwarf to do the job. They
might not be doing a good job at first (having no skill), but they will learn, and they provide a useful function,
accurate stocktaking!
So, in the nobles screen use the arrow keys to scroll down to “Bookkeeper” and hit “enter”. Find Eshtan and hit
enter, assigning him to this job. The bookkeeper requires an office to work, just as well we just assigned him
one, right?
Next, with Bookkeeper still highlighted hit “s” for “settings” (the only noble role you can assign settings for).
The screen you’ll see now dictates how much time your dwarf will spend counting. Use the arrow to scroll to
“Highest” and hit enter. Eshtan will now work very hard to get all our stock counts accurate!
There you go, a quick overview of nobles. As you play the game more you will have to deal with nobles a lot, but
don’t worry, the Dwarf Fortress Wiki should provide you with heaps of tips and advice should you get confused.
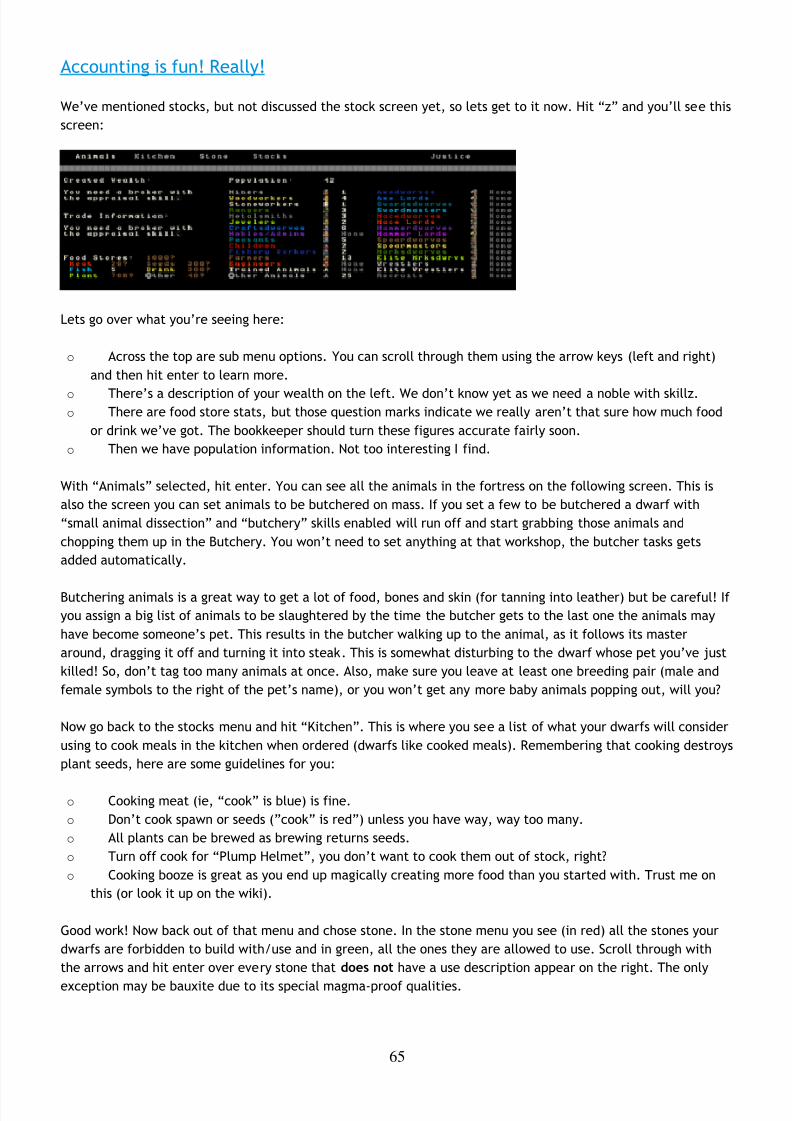
8/14/2019 The Complete and Utter Newby Tutorials
http://slidepdf.com/reader/full/the-complete-and-utter-newby-tutorials 65/100
65
Accounting is fun! Really!
We’ve mentioned stocks, but not discussed the stock screen yet, so lets get to it now. Hit “z” and you’ll see this
screen:
Lets go over what you’re seeing here:
o Across the top are sub menu options. You can scroll through them using the arrow keys (left and right)
and then hit enter to learn more.
o There’s a description of your wealth on the left. We don’t know yet as we need a noble with skillz.o There are food store stats, but those question marks indicate we really aren’t that sure how much food
or drink we’ve got. The bookkeeper should turn these figures accurate fairly soon.
o Then we have population information. Not too interesting I find.
With “Animals” selected, hit enter. You can see all the animals in the fortress on the following screen. This is
also the screen you can set animals to be butchered on mass. If you set a few to be butchered a dwarf with
“small animal dissection” and “butchery” skills enabled will run off and start grabbing those animals and
chopping them up in the Butchery. You won’t need to set anything at that workshop, the butcher tasks gets
added automatically.
Butchering animals is a great way to get a lot of food, bones and skin (for tanning into leather) but be careful! If
you assign a big list of animals to be slaughtered by the time the butcher gets to the last one the animals may
have become someone’s pet. This results in the butcher walking up to the animal, as it follows its master
around, dragging it off and turning it into steak. This is somewhat disturbing to the dwarf whose pet you’ve just
killed! So, don’t tag too many animals at once. Also, make sure you leave at least one breeding pair (male and
female symbols to the right of the pet’s name), or you won’t get any more baby animals popping out, will you?
Now go back to the stocks menu and hit “Kitchen”. This is where you see a list of what your dwarfs will consider
using to cook meals in the kitchen when ordered (dwarfs like cooked meals). Remembering that cooking destroys
plant seeds, here are some guidelines for you:
o Cooking meat (ie, “cook” is blue) is fine.
o Don’t cook spawn or seeds (”cook” is red”) unless you have way, way too many.
o All plants can be brewed as brewing returns seeds.
o Turn off cook for “Plump Helmet”, you don’t want to cook them out of stock, right?
o Cooking booze is great as you end up magically creating more food than you started with. Trust me on
this (or look it up on the wiki).
Good work! Now back out of that menu and chose stone. In the stone menu you see (in red) all the stones your
dwarfs are forbidden to build with/use and in green, all the ones they are allowed to use. Scroll through with
the arrows and hit enter over every stone that does not have a use description appear on the right. The only
exception may be bauxite due to its special magma-proof qualities.

8/14/2019 The Complete and Utter Newby Tutorials
http://slidepdf.com/reader/full/the-complete-and-utter-newby-tutorials 66/100
66
The reason you are doing this is so that the dwarfs have much more choice in the stone they will use to make
doors, walls, etc etc. This stops them running half way across the map to get some boring stone when a
perfectly useful stone (that just happens to be yellow) is sitting next to them, but ignored.
Backing out to “z” the final menu is “stocks”. This is a master list of all items in your fortress and is a good way
to see exactly how much of certain items you’ve got . Until your bookkeeper gets working you won’t get any
detail, but trust me, you’ll see heaps, in time.
You can use this menu to manage the items in your fortress more easily. For example, you might find, after a
goblin raid, that you’ve got a ton of their crappy weapons lying around, what to do with them? Well, you could
add them to weapons traps, or you could find them in the stocks menu and hit “m” for “melt” when they are
selected and then any smelter with the “melt metal object” task on will have a dwarf grab the item and then
melt it back to a metal bar.
You can also use this menu to “forbid” items. If you have a bunch of low-quality junk you don’t want your
dwarfs to use, hit “f” for “Forbid” with the item highlighted and you’ll find they will ignore it. This is handy
when setting weapons and armor up for your military as you can prevent them from picking up wooden swords
and thus push them to pick up your non-forbidden steel swords!
The last menu “Justice” doesn’t come in to play until we have more nobles who will start wanting to throw
dwarfs into jail if they ignore their mandates. Worry about that latter!
Homework time!
You’ve got a tricky job to do now, ok, not so tricky really. I want you to dig exploratory tunnels in EVERY
DIRECTION from your living room and the below levels. Try and cover much of the map with your grid of tunnels.
We’re looking for three things: 1. Ore, 2. Gems, 3. Magma. You may want to assign another dwarf or two to
mining duty, and to make a few more picks as well (at the metalsmith’s forge, under “weapons”). We’ll see
what this map is like when we return in Tutorial 10!

8/14/2019 The Complete and Utter Newby Tutorials
http://slidepdf.com/reader/full/the-complete-and-utter-newby-tutorials 67/100
67
The Complete and Utter Newby Tutorial for Dwarf Fortress – Part 10: “Soldiersand your army”February 28, 2009 at 12:03 pm | In Fantasy, Tutorial | 8 Comments Tags: Dwarf Fortress
While you’re exploring and digging around (see Tutorial 9) how about we set up a
military? You’re going to need one, goblins are pesky bastards and likely to bother
you more and more (if they haven’t already). Soldiers can be a bit fiddly tomanipulate, but once you get the hang of it you’ll find it second nature.
Drafting some dwarfs
The first thing you will need to do, fairly obviously, is draft some dwarfs into your military. There are a few
different strategies for this. First up, you can pick complete newbies and let them work up their skills and
strength through sparing. Another strategy is to have some peasants work on screw pumps to quickly build up
their strength and toughness before drafting them. Others like to use miners (which train up quickly and are
thus easy to replace) as they usually are quite strong and tough already.
As a further consideration, some don’t like to recruit women as soldiers. When they give birth it’s not
uncommon to see them running into battle carrying a baby. This is both somewhat alarming and somewhat risky
as you’re going to have potentially dead babies on your hands due to combat, something that might cause a lot
of emo among your dwarfs.
For this tutorial we’re not going to worry about detail to much and we’re just going to grab 6 peasants – which is
10% of my current fortress population. Something similar will work for you for now. So here’s what we’ll do:
o
Hit “m” for the “military” screen.
You’ll note this screen is not unlike the “u”, “units” screen. The difference is that there are a few different
commands at the bottom of the panel. Primarily, this screen lets you organise your squads and it lets you set
squad weapons. We’re going to aim for two squads of three dwarfs. Smaller squads helps your response time to
enemy threat and gives you a bit more control. Lets get on with it:
o Scroll to one of your no-life peasant dwarfs, hit “enter”. Now when you move your arrow you will see
the peasant is marked and there’s an arrow to chose another dwarf. Chose another pleb, hit enter.
o Scroll, chose another dwarf, and hit enter again.
o Hit space to stop promoting. We’ve created our first squad.
o Chose another spare peasant, hit enter to promote and then choosing two more dwarfs, create squadtwo.
You will now note that the dwarfs in the same squad are now sharing the same squad name, “The Relieved
Irons” and “The Muscular Palaces” for me, awesome! But they’re not doing anything yet, they’re assigned to
squads but aren’t active doing soldierly stuff, so:
o Scroll to the first squad leader, hit “a” for activate.
o Scroll to the second squad leaders and “a” activate him as well.
o Scroll to the top of your military list, your squads are now up there with their names in grey.
o On the first squad leader, hit “v” for view squad.
o If the squad is “on duty” hit “t” to stand them down.
o Hit “f” for “Food carried” and they’ll go get backpacks and put a stock of food in them for long duties.
o Leave other settings and repeat for squad two.

8/14/2019 The Complete and Utter Newby Tutorials
http://slidepdf.com/reader/full/the-complete-and-utter-newby-tutorials 68/100
68
Our dwarfs are now soldiers and are going to go do soldierly things. What’s that you ask? Well, drink, eat and
hang around the barracks sparing mostly. But shouldn’t we give them some weapons and armor? Maybe, is the
answer, lets show you how:
o With the military screen up, hit “w” for weapons.
o You now have a field you can move around using the arrow keys and cycle using “enter”. Leave the
dwarfs unarmed.
o Scroll to the first “A”, which is for “armor” and hit “enter” until the field shows “Lth” for leather. Thengo to the next column and hit “enter” until you see “Shd” for shield.
o If you look further down your weapons list you may note how woodcutters are armed with an axe. And
note that any you’ve told to be woodcutters who don’t have an axe won’t cut wood… although they might
try and arm themselves due to being tasked. Anyway…
o Space back out.
Your soldiers will now go and get a bunch of leather armor and a shield each. You did remember to make a
bunch of armor as instructed earlier, right? They will then go to the barracks and spar. Why do we want them to
spar unarmed? A few reasons:
1. Sparing unarmed trains “Wrestling” which is very handy, as it builds the key stats (like all training) but
also trains quickly. Wrestling Hammer weapon skill is the skill used by crossbow dwarfs when out of bolts.
Yes, they bash the enemy to death with their crossbows. We can train hammering latter.
2. Wrestling helps when an enemy disarms your dwarfs as they have to fight unarmed then, and yes, a few
enemies can disarm your lads.
3. Finally, picture newby dwarfs with no skill training with razor sharp steel battleaxes. Yes, picture a few
graves. Wrestling gets them tough enough to spar with decent weapons without a lot of weapon access
micromanagement in the stocks screen (ie. forcing them to pick up wooden weapons and later on dropping
them in favour of proper weapons).
One odd side effect of wrestling training is that your soldiers will tear clothes off each other. I call it The 300 Factor . Don’t worry, it’s entirely normal. If you roll that way…
One thing you might want to think about is providing food and drink and somewhere to eat close to your military
dwarfs. That way they will hopefully spend more time training and less time walking! Here’s how I set up a small
dining room and a small food stockpile. Note, the whole area is outside – I’m hoping that some regular exposure
to the sun while the soldiers eat will prevent them getting too cave adapted. I’ve had to roof over the bit with
the tables and chairs though, those need to be placed inside. You can “b”, “C” construct a ramp in the outdoors
area and then “b”, “C” construct a floor to cover the area (you go up a level, build a floor over the space, and
it thus becomes a roof). But we will cover some of this in another tutorial as well.

8/14/2019 The Complete and Utter Newby Tutorials
http://slidepdf.com/reader/full/the-complete-and-utter-newby-tutorials 69/100
69
…hmm, actually, I have so many bloody dwarfs I’m going to put each squad up to four members each. That
means we’ll have up to 8 dwarfs sparing at once, good stuff. To add more dwarfs, go to the military screen
again, hit enter on the leader and then chose a dwarf to add to the squad.
Note: It’s possible to end up with really convoluted command structures by accidentally making the boss of one
squad the boss of another squad. This is annoying and pointless, as far as I can tell. To fix it, chose the
problematic squad or person, hit enter on them, and then hit enter again. Hopefully that will remove them back
up the chain of command. Or, hit enter on the boss and then enter on the dwarfs 2 steps down, that will pull
them back up to being directly under the boss’s command.
While the boys are sparing go to your leather workshop and make sure you’ve got some backpacks, armor andhelms on order. You can check your stocks too, to make sure there’s enough kit to go around. In time we’ll get
our lads into steel chainmail and plate, but for now, we need to get them into leather, and yes, armor does
stack later.
War Puppies!
A nice addition to your military are some war dogs. How do you get war dogs? Easy! Find a space in your
workshop and “b” build a “k” kennel. Note, this is a big building, so you may have to free up some space to
place it. Then ensure you have someone with the animal training labour on (so it gets built and so you will be
training animals).
Then, go to the kennels using “q” and hit “a” for add task and then “w” for “Train War Dog”. Hit “r” to set the
task on repeat. Hopefully all the adult dogs will now go about being trained. You’ll soon start getting messages
like “An animal has become a stray war dog”. Good!
How can these help us? Well, we can either assign them to restraints we build (using “b” and then “v” and
chosing either a rope or a chain and then once placed, using “q” to assign an animal to the restraint) or we can
assign them to soldiers. Lets assign one to each soldier:
o Hit “m” to bring up your military.
o Hit “c” to look at a soldier.o Hit “p” for “preferences”.
o Hit “e” for “Work Dogs”.
o Hit “r” to assign a dog to that dwarf. Once you have enough trained, assigned one each.

8/14/2019 The Complete and Utter Newby Tutorials
http://slidepdf.com/reader/full/the-complete-and-utter-newby-tutorials 70/100
70
You can also trian hunting dogs at a kennels and they are quite handy for hunters, since they too have the
“ambush” skill that Hunters use. I don’t usually bother with hunter dwarfs so wardogs is all I want! Hordes of
the buggers! Oh, a note on caged animals. Cages, when built (”b”, “j”), allow the assigning of animals to them,
and can be set as a zoo room. Dwarfs enjoy relaxing in Zoos and looking at animals they like (happy thoughts).
Consider building a zoo near the dining room. When placing cages, if you already have animals in them, hit “x”
to expand the view and chose hte exact cage you want to place. Here’s my zoo, where the old housing used to
be before we moved it all down stairs.
Right, where were we!?
Get tough, little guys!
So your boys are training, tearing each others clothes off, putting each other in arm bars and whatnot. It’s all
very ancient Greece, don’t you think? But anyway, if you use “v” and look around your soldiers, hitting “g” for
General, you should see their skills climbing. Use “alt”+”arrows” to see the full range.
Let them keep this up until they become champions or heros. At this point they will no longer accept work dogs
and become impossible to assign other jobs. The good news though, is that champions will actually use artifact
items! Yay! So, let them train and while that goes on, keep digging as per the last tutorial. Grid up all the
digable space on the various levels and find gems, ore and a special surprise! You’ll know it when you find it,you’ll be alerted by DF’s equivelant of a popup. We’ll cover what to do with your special surprise later. If you
come across it put a door on the passage to the surprise and leave it until later.
Ok, lets assume your boys have trained up to pretty damn good wrestlers, getting very tough and agile in the
process. What’s the next step? Well, we’d like them to use chainmail, right? We could set them right into plate,
but plate slows them down if they aren’t very good armor users (they won’t be yet). Chain will be just fine.
Hopefully you’ve build a good pile of steel chainmail, helms, shields, greives and whatever else you can see on
the list. Now it’s time to assign.
At the same time you’ve set a lot of steel warhammers to be built, right? Good!
But before we assign the weapons we want to make sure our soldiers don’t pick up the wrong armor, right? So
this is what we do:

8/14/2019 The Complete and Utter Newby Tutorials
http://slidepdf.com/reader/full/the-complete-and-utter-newby-tutorials 71/100
71
o Go to your stocks menu under “z”. You should now see all your stocks updated by your bookkeeper,
handy!
o Find the “weapons” first. Scroll through and look for any other sort of hammer. Chances are “steel
hammers” are all you have. For good measure, set everything that looks useless (ie, not an axe or a pick) to
“m” for melt. Or put that trash into weapon traps.
o Go to the “armor” list (and subsequent clothing lists) and look for chainmail. Any chain item that isn’t
steel chainmail set to “forbid” using “f”. Now your boys won’t go picking up the rubbish when you change
their armor setting. Make sure you’ve got enough suits of chainmail armor, steel shields, helms, etc, toequip your lads. Or near enough.
o If you’re unhappy with how your armor settings turn out, set everyone to no armor and once they’ve
dumped all their items, go back through the equiping process again.
Now, you can go to the “m” military menu and hit “w” for the weapons and change them from “Lth” to “Chn”
and the weapon to “Ham”. Your dwarfs will rush off, grab a warhammer and throw some steel chainmail on top
of their leather armor, great! If a few of them get to be awesome armor users you can change them to plate and
they will even put the plate on top of their chain on top of their leather. A tiny, cute, drunk, ball of fury!
M.A.D: Mutually Assured Dwarfiness
How do you use your dwarfs then? Well, when they aren’t mucking about your barracks working on their skills
they can be out fighting bad guys! How I do it, when invaded is:
o Hit “m”.
o Go to a squad leader, hit “v” (NOT “a”, that turns them back to peasants – but “a” again will turn them
back to squadies).
o Hit “t” to make the squad respond to orders.
o hit “z” to zoom to the commander.
o I then go to the level and place I want the squad to go.
o Hit “s” to station the soldiers there, or hit “p” to place a patrol point and then move your cursor aroundand hit p again to place another point (and keep hitting “p” to place more).
Your soldiers will now stop what they are doing and rush to the station point. Sometimes it’s a good idea to set
it in a safe place first, so you can at least get a few moving all at the same time. If you just drop the station
point in the middle of the bad guys you risk your lads charging in one by one.
There’s a lot of ways of handling military, and we haven’t even covered crossbow weilding marksdwarfs,
multiple weapons, archery targets, or any of that stuff. For now, go and build your military and come back for
the next tutorial where we’ll round out your Dwarf Fortress lesson with some thoughts on magma, construction
and fortress design!
Thanks for reading and please let us know if you have any feedback.

8/14/2019 The Complete and Utter Newby Tutorials
http://slidepdf.com/reader/full/the-complete-and-utter-newby-tutorials 72/100
72
The Complete and Utter Newby Tutorial for Dwarf Fortress – Part 11: “Burninghot mag-ma!”March 2, 2009 at 9:50 am | In Fantasy, Tutorial | 19 Comments Tags: Dwarf Fortress
This is our second-to-last tutorial (unless you all beg for more). Today we’re covering
building magma forges and smelters and how you can set up some magma channels.
Then we’ll talk a bit about constructing steps and how to remove constructions. Readon!
Mmm! Mag-maaaa!
By now you should have discovered the magma pool. If you find it at any level lower than our workshop floor
you’ll get a message about hot stone and digging will stop. If you discover the pool at the workshop level you’ll
see something like this…
What we have here is a magma pool on the right, with an open floor for us to walk around on, and a passage I’ve
dug from the workshop floor to the pool. I didn’t know the pool was just there, but it is extremely handy for us
that it is! Why, I hear you ask? Well, the reason is that magma helps us skip a step in the metal production phase
– charcoal! We can just use the heat of the magma to do the work for us, neat!
But how do we tap this awesome source of power? Easy! We dig of course! But before we get carried away, lets
talk generally about magma. In addition to being a source of smelting power magma is also extremely
dangerous. If a dwarf falls into it, they’re dead quickly. If a monster falls into it they also die quickly. The
exception is certain magma creatures like Fire Imps. You will see a few of these in our magma pool if you go
down a few levels.
Fire Imps are quite dangerous. If your dwarfs go sight-seeing around the edge of a magma pool you can be pretty
sure Fire Imps will eventually make an appearance and start breathing fire at your dwarfs. And yes, your dwarfs
can catch on fire and set other things on fire! Like your precious booze (which will explode)! To help prevent
this I’ve put a door on the passage to the pool, and I suggest you do the same!
Harness the POWER!

8/14/2019 The Complete and Utter Newby Tutorials
http://slidepdf.com/reader/full/the-complete-and-utter-newby-tutorials 73/100
73
With those notes in mind, lets get expanding our workshop floor and plan to harness the magma. We’ll cover the
ins and outs of why once we’re underway. So follow along:
o Expand your workshop floor using the dig command so you’re taking up most of the space right up to the
pool. But don’t breech the pool wall! Try something like this:
o While that’s being dug, go up a level and expand our storage floor as well. We’re going to want room to
expand and we’re going to want to put bar storage as close to the new furnaces we’ve got planned as
possible. Something like this perhaps?
o With those levels dug, go to a level below your workshop floor and dig some tunnels like this, right up to
within a couple of spaces of your magma pipe. We’re aiming to eventually create a grid of magma which
workshops above will be able to tap for their smelting. Like this:
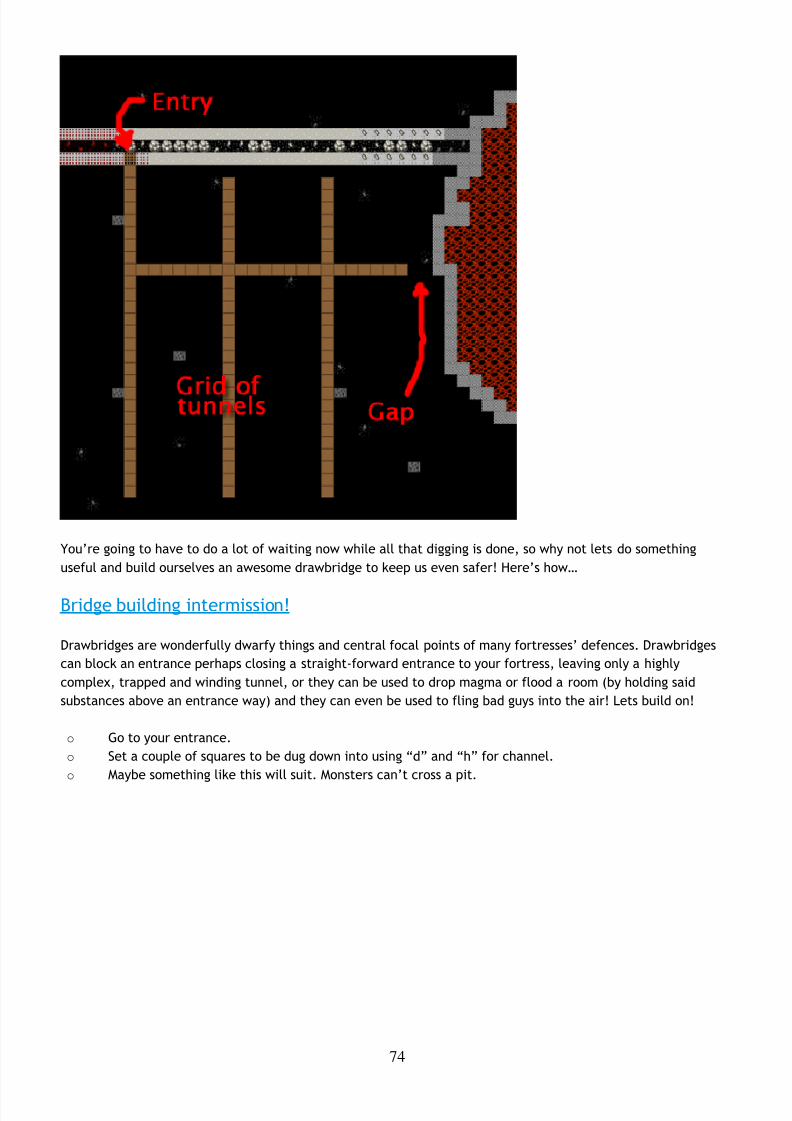
8/14/2019 The Complete and Utter Newby Tutorials
http://slidepdf.com/reader/full/the-complete-and-utter-newby-tutorials 74/100
74
You’re going to have to do a lot of waiting now while all that digging is done, so why not lets do something
useful and build ourselves an awesome drawbridge to keep us even safer! Here’s how…
Bridge building intermission!
Drawbridges are wonderfully dwarfy things and central focal points of many fortresses’ defences. Drawbridges
can block an entrance perhaps closing a straight-forward entrance to your fortress, leaving only a highly
complex, trapped and winding tunnel, or they can be used to drop magma or flood a room (by holding said
substances above an entrance way) and they can even be used to fling bad guys into the air! Lets build on!
o Go to your entrance.
o Set a couple of squares to be dug down into using “d” and “h” for channel.
o Maybe something like this will suit. Monsters can’t cross a pit.

8/14/2019 The Complete and Utter Newby Tutorials
http://slidepdf.com/reader/full/the-complete-and-utter-newby-tutorials 75/100
75
o Once it’s dug you’ll end up with a pit, trapping your dwarfs inside and outside. So lets move quickly and
get this bridge built!
o Hit “b” and then “g”, you will have one green square. Expand the bridge’s width to cover the width of
the hall and make it one higher and deeper than the channel. It’s not really required to be that big, I just
think it looks cooler. Here’s how mine will be laid out.
o DO NOT HIT ENTER just yet (if you have, “q” over the bridge and hit “x” to cancel the construction).
Look at the top of the placing/size window. See the text that says “Bridge (retracts)”? This is where you
can change the bridge to either retract (pretty much vanish) or to raise in one of the cardinal directions.
Work through “w”, “a”, “s”, “d” and “x” and see how the arrow changes. Me, I hit “x” as I want it to raise
downwards, sealing my dwarfs into the fortress.
o Hit “enter” and then select the stone you wish to build with.
o Your bridge now needs someone with architecture enabled to come and plan it, and then it needs
masons to come place the stone. It will happen in due course.

8/14/2019 The Complete and Utter Newby Tutorials
http://slidepdf.com/reader/full/the-complete-and-utter-newby-tutorials 76/100
76
Meanwhile, you need to build a lever to trigger your bridge! The lever, when pulled by a dwarf, causes the
bridge to raise (after a brief delay). Once the lever is build we’ll connect it to the bridge. Both of these tasks
require the mechanics skill, so make sure you have a dwarf with mechanics enabled. Follow along:
o Head back down to your dining room and chose a corner for your lever. Don’t do what a friend did and
put the lever close to the bridge and then groan as the dwarf running to pull the lever gets cut down by the
invaders (who then stormed his fortress and killed all but one of his dwarfs, who then went mad and killed
most of the immigrants who arrived at his fortress, and who then died of thirst (he was to busy chasingimmigrants to bother with drink)).
o Hit “b”, “T”, chose “Lever”, place the lever in a corner of
your dining room, choosing a mechanism along the way.
o Wait for the lever to be built.
o With the lever and bridge built you need to hook the lever up
to the bridge.
o Hit “q” over the lever.
o Hit “a” and then “b” to link up the lever with a bridge.
o You only have one bridge right now so it should go right to it
with a big yellow X over it, like this:
o Hit “enter”, and then hit “enter” twice to select the two mechanisms for the lever/bridge hookup (one
at the bridge end, one at the lever end). Since we don’t have to worry about magma, chose any
mechanism. If there was magma involved we’d want to be using bauxite mechanisms as they are magma
proof .
Now simply sit back and wait! Once the hook-up job is done (check by doing a “q” over your lever) have a bit of fun and go “q” and then “P” to “Pull the Lever”. It might take a few seconds, but hopefully someone comes
over and pulls the lever promptly and then a few seconds later your bridge should be up. Here’s mine up!
If you look closely you’ll see that I’ve got a stunned dwarf on the edge of my pit. Amusingly, he was crossing the
bridge when it went up and got tossed in the air. Thankfully, he’s ok, but somewhat surprised I’m guessing! Pullthe lever again and let the dwarfs get in and out of your fortress once more.
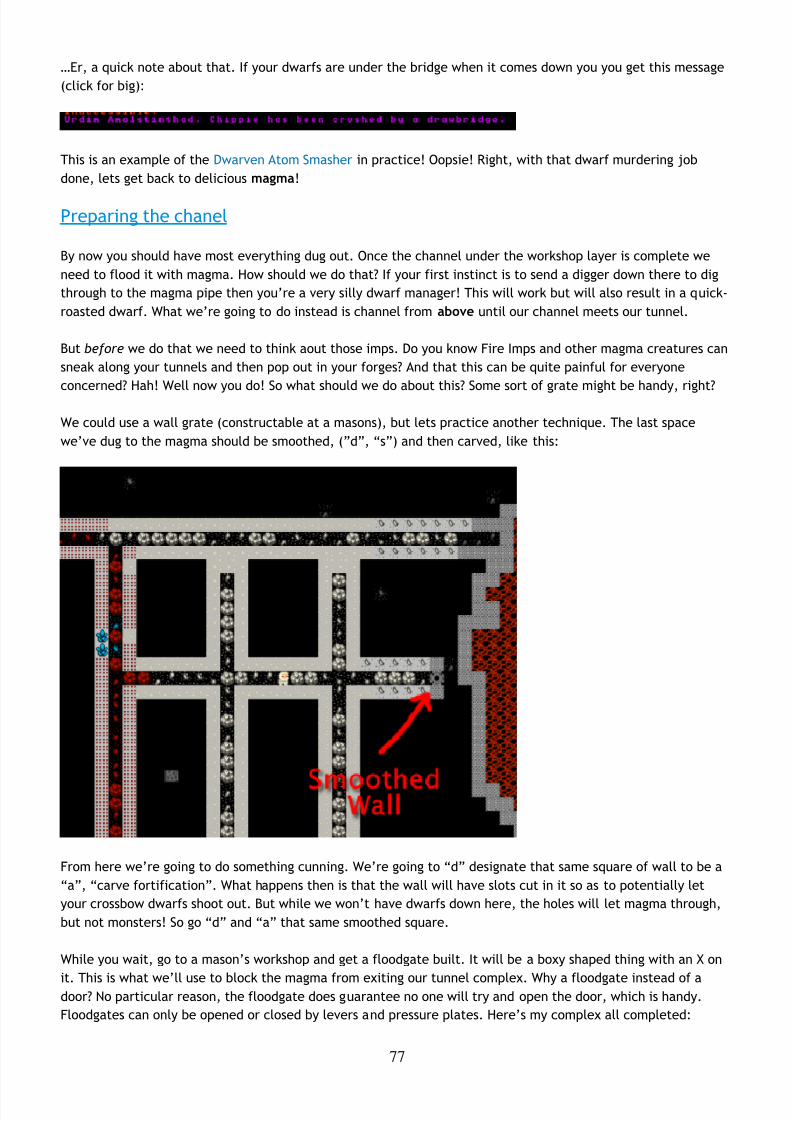
8/14/2019 The Complete and Utter Newby Tutorials
http://slidepdf.com/reader/full/the-complete-and-utter-newby-tutorials 77/100
77
…Er, a quick note about that. If your dwarfs are under the bridge when it comes down you you get this message
(click for big):
This is an example of the Dwarven Atom Smasher in practice! Oopsie! Right, with that dwarf murdering job
done, lets get back to delicious magma!
Preparing the chanel
By now you should have most everything dug out. Once the channel under the workshop layer is complete we
need to flood it with magma. How should we do that? If your first instinct is to send a digger down there to dig
through to the magma pipe then you’re a very silly dwarf manager! This will work but will also result in a quick-
roasted dwarf. What we’re going to do instead is channel from above until our channel meets our tunnel.
But before we do that we need to think aout those imps. Do you know Fire Imps and other magma creatures can
sneak along your tunnels and then pop out in your forges? And that this can be quite painful for everyone
concerned? Hah! Well now you do! So what should we do about this? Some sort of grate might be handy, right?
We could use a wall grate (constructable at a masons), but lets practice another technique. The last space
we’ve dug to the magma should be smoothed, (”d”, “s”) and then carved, like this:
From here we’re going to do something cunning. We’re going to “d” designate that same square of wall to be a
“a”, “carve fortification”. What happens then is that the wall will have slots cut in it so as to potentially let
your crossbow dwarfs shoot out. But while we won’t have dwarfs down here, the holes will let magma through,
but not monsters! So go “d” and “a” that same smoothed square.
While you wait, go to a mason’s workshop and get a floodgate built. It will be a boxy shaped thing with an X on
it. This is what we’ll use to block the magma from exiting our tunnel complex. Why a floodgate instead of adoor? No particular reason, the floodgate does guarantee no one will try and open the door, which is handy.
Floodgates can only be opened or closed by levers and pressure plates. Here’s my complex all completed:

8/14/2019 The Complete and Utter Newby Tutorials
http://slidepdf.com/reader/full/the-complete-and-utter-newby-tutorials 78/100
78
So now what? Clearly we need to remove the stone. To do that we need to channel from above, which isrelatively safe. Lets do that now:
o Viewing your tunnel complex hit “d”, and then “h”.
o Place your X over the first spot to be removed, like this:
o Now go up a level and you will see your X near the edge of the magma.
o Hit “enter” and move the cursor across three places, hit “enter again”, the end result will look like this:
o Wait, the channel will be dug and magma will flow into your channels, through your fortification grill
(which you can’t see unless you “k” and place it over the spot, by the way). Awesome!

8/14/2019 The Complete and Utter Newby Tutorials
http://slidepdf.com/reader/full/the-complete-and-utter-newby-tutorials 79/100
79
Here are my channels slowly filling with lava. Now lets USE THE HOTNESS!
Magma Forges for fun and profit
Lets get sorted with some magma stuff. Chose a square in your magma channels where there’s some magma, go
up a level, and cut a single channel down. Here’s the spot ready to be cut. This will give our magma workshops
access to the lovely hot stuff.
Now, to build:
o “b”, then “e” for smelters.
o “l” for “Magma Smelter”.
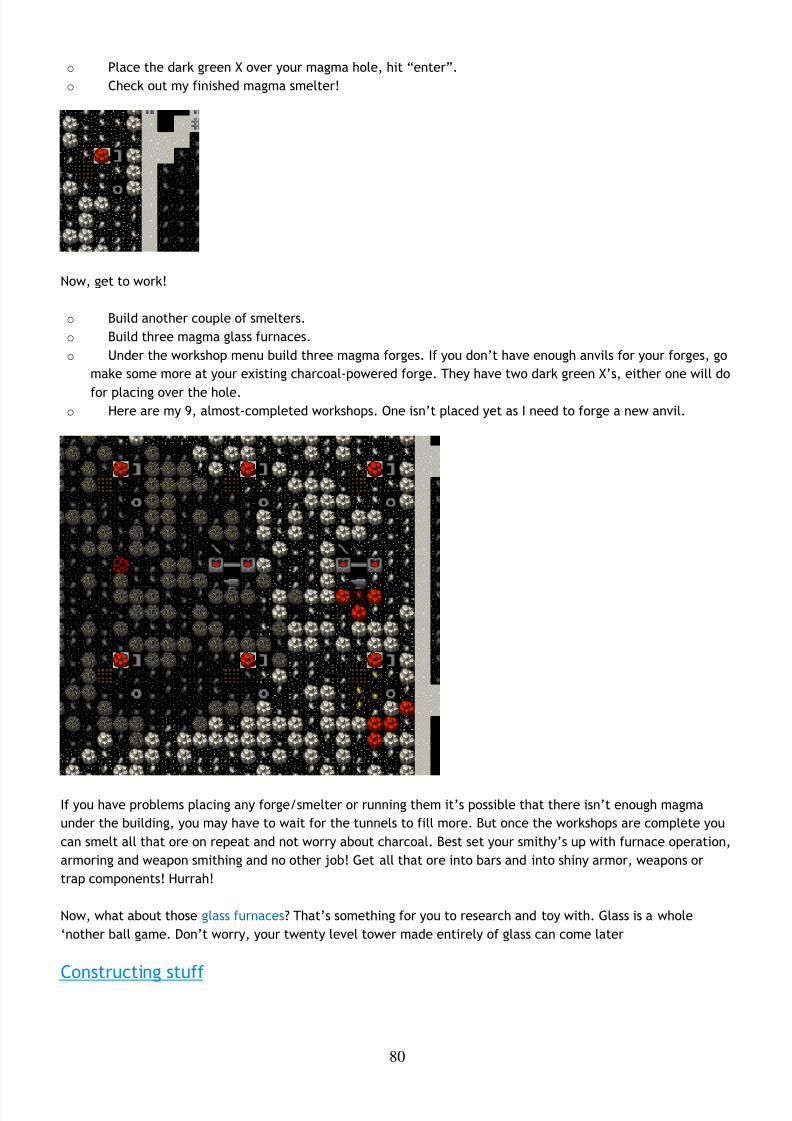
8/14/2019 The Complete and Utter Newby Tutorials
http://slidepdf.com/reader/full/the-complete-and-utter-newby-tutorials 80/100
80
o Place the dark green X over your magma hole, hit “enter”.
o Check out my finished magma smelter!
Now, get to work!
o Build another couple of smelters.
o Build three magma glass furnaces.
o Under the workshop menu build three magma forges. If you don’t have enough anvils for your forges, go
make some more at your existing charcoal-powered forge. They have two dark green X’s, either one will do
for placing over the hole.o Here are my 9, almost-completed workshops. One isn’t placed yet as I need to forge a new anvil.
If you have problems placing any forge/smelter or running them it’s possible that there isn’t enough magma
under the building, you may have to wait for the tunnels to fill more. But once the workshops are complete you
can smelt all that ore on repeat and not worry about charcoal. Best set your smithy’s up with furnace operation,
armoring and weapon smithing and no other job! Get all that ore into bars and into shiny armor, weapons or
trap components! Hurrah!
Now, what about those glass furnaces? That’s something for you to research and toy with. Glass is a whole
‘nother ball game. Don’t worry, your twenty level tower made entirely of glass can come later
Constructing stuff
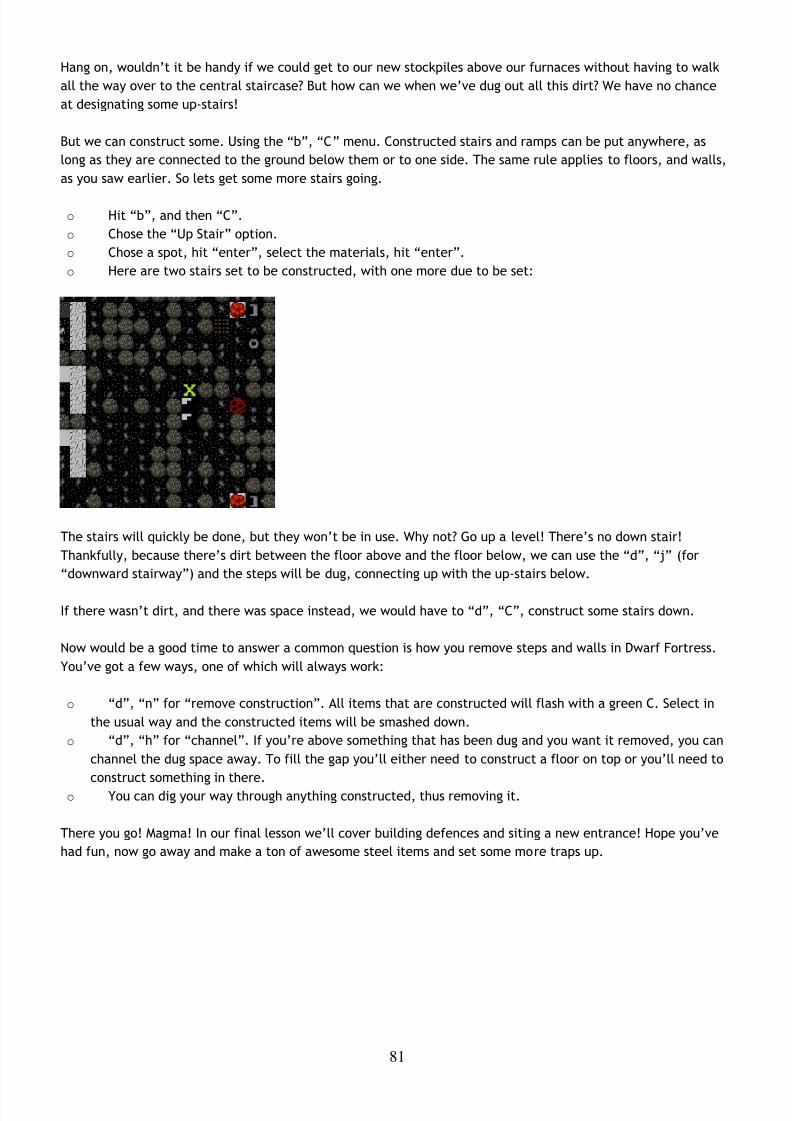
8/14/2019 The Complete and Utter Newby Tutorials
http://slidepdf.com/reader/full/the-complete-and-utter-newby-tutorials 81/100
81
Hang on, wouldn’t it be handy if we could get to our new stockpiles above our furnaces without having to walk
all the way over to the central staircase? But how can we when we’ve dug out all this dirt? We have no chance
at designating some up-stairs!
But we can construct some. Using the “b”, “C” menu. Constructed stairs and ramps can be put anywhere, as
long as they are connected to the ground below them or to one side. The same rule applies to floors, and walls,
as you saw earlier. So lets get some more stairs going.
o Hit “b”, and then “C”.
o Chose the “Up Stair” option.
o Chose a spot, hit “enter”, select the materials, hit “enter”.
o Here are two stairs set to be constructed, with one more due to be set:
The stairs will quickly be done, but they won’t be in use. Why not? Go up a level! There’s no down stair!
Thankfully, because there’s dirt between the floor above and the floor below, we can use the “d”, “j” (for
“downward stairway”) and the steps will be dug, connecting up with the up-stairs below.
If there wasn’t dirt, and there was space instead, we would have to “d”, “C”, construct some stairs down.
Now would be a good time to answer a common question is how you remove steps and walls in Dwarf Fortress.
You’ve got a few ways, one of which will always work:
o “d”, “n” for “remove construction”. All items that are constructed will flash with a green C. Select in
the usual way and the constructed items will be smashed down.
o “d”, “h” for “channel”. If you’re above something that has been dug and you want it removed, you can
channel the dug space away. To fill the gap you’ll either need to construct a floor on top or you’ll need to
construct something in there.
o You can dig your way through anything constructed, thus removing it.
There you go! Magma! In our final lesson we’ll cover building defences and siting a new entrance! Hope you’ve
had fun, now go away and make a ton of awesome steel items and set some more traps up.

8/14/2019 The Complete and Utter Newby Tutorials
http://slidepdf.com/reader/full/the-complete-and-utter-newby-tutorials 82/100
82
The Complete and Utter Newby Tutorial for Dwarf Fortress – Part 12: “That’sall folks?!”March 7, 2009 at 9:04 am | In Fantasy, Tutorial | 66 Comments Tags: Dwarf Fortress
As promised, the final Dwarf Fortress tutorial from me! That is, unless you demand
more. In this tutorial we’ll cover some broader fortress design questions, stuff that
I’ve previously forgotten to mention and thoughts about fortifications. Oh, I’ll do awrap-up post with links to more resources some time after this post comes out. Ok!
Lets get to it!
Engineering your ultimate fortress
If you’ve lasted this far you’ve had an excellent grounding in Dwarf Fortress. What’s more, you understand the
concepts well enough that a bit of digging around DwarfFortressWiki.net will answer most of your questions. If
the wiki fails, there’s always the Q&A forum over on Bay12 Games.
But something that seems to stump a lot of people are the big engineering jobs such as digging pits, sorting
defences, and building above ground. So lets get on with it and do some of that ourselves! We’ll do so in the
name of choosing a new, more secure, more roomy entrance for our fortress.
Lets see, I think about a screen north and a screen east of our main entrance is a nice, open, flat area, and one
we could easily defend if we were to dig some passage down. If you think about it, wouldn’t it be cool to have
the trade depot close to our big storage stockpile? Then our dwarfs wouldn’t spend too long hauling crafts and
with the trade depot deep inside the fortress we could more easily defend it. So lets get on with it!
o
Find a spot.o Clear it of trees. About a screen full of clearing will be required.
o Go down a level and used “d”, “r” for “ramp” to set a 10-wide row to be turned into ramps. Now is a
good time to remind you that shift+arrow keys makes the X move in blocks of 10.
o Here’s how mine is laid out, I’ve dropped the top width of ramps first so that I can check I’m happy with
how it will be laid out.
o Now I’ll continue setting a ton of ramps at the below ground level. My selection there is 10 x 20:

8/14/2019 The Complete and Utter Newby Tutorials
http://slidepdf.com/reader/full/the-complete-and-utter-newby-tutorials 83/100
83
o Now, make your I-shaped diggings into an L-shape by digging some amps off to the left. Here’s minedone with another 10×10 ramp selection dug to the side of the first diggings as well as another 10 x 10
space dug. More on that later:
With the first level dug out we now want to go down another level, that would put us on the same level as the
storage level, which would be a handy place to have an entrance huh? And we could move the barracks here as
well, nice and close to the action, right? But before we do that, we need to remove the spare ramps. Those are
the ramps which we don’t actually want to be part of the entrance slope.
o Hit “d” and “z” for “remove ramps”.
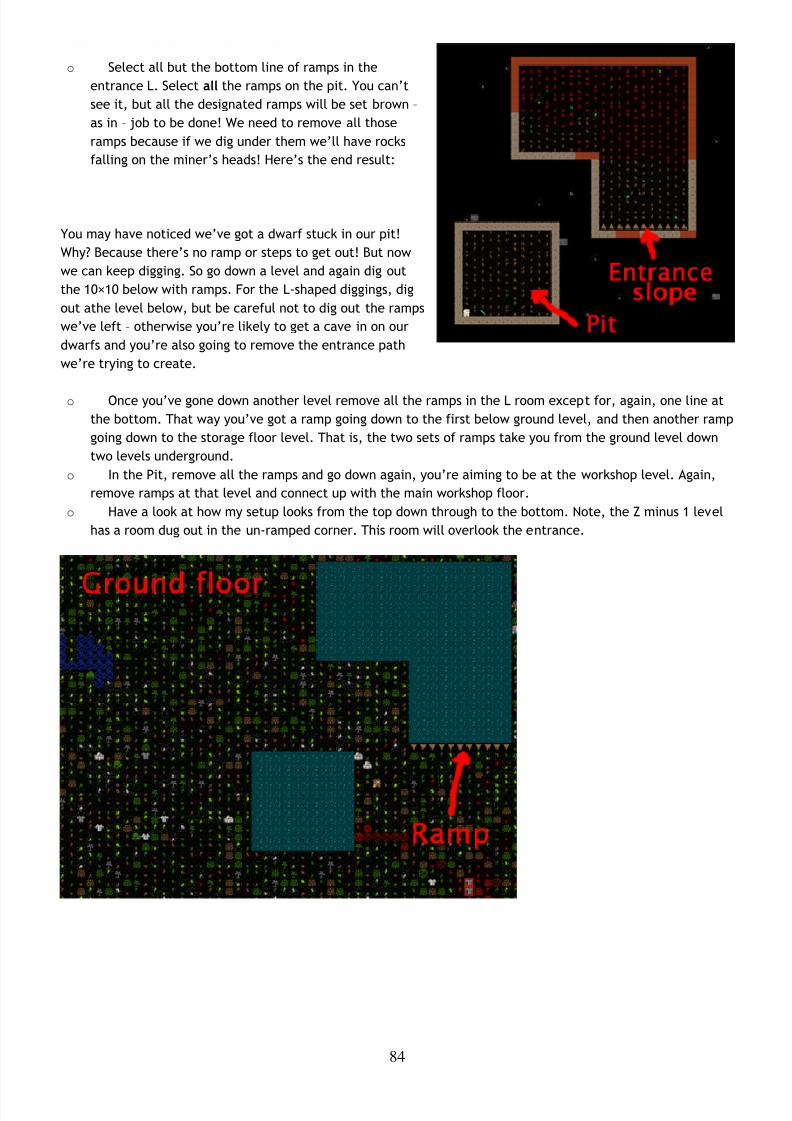
8/14/2019 The Complete and Utter Newby Tutorials
http://slidepdf.com/reader/full/the-complete-and-utter-newby-tutorials 84/100
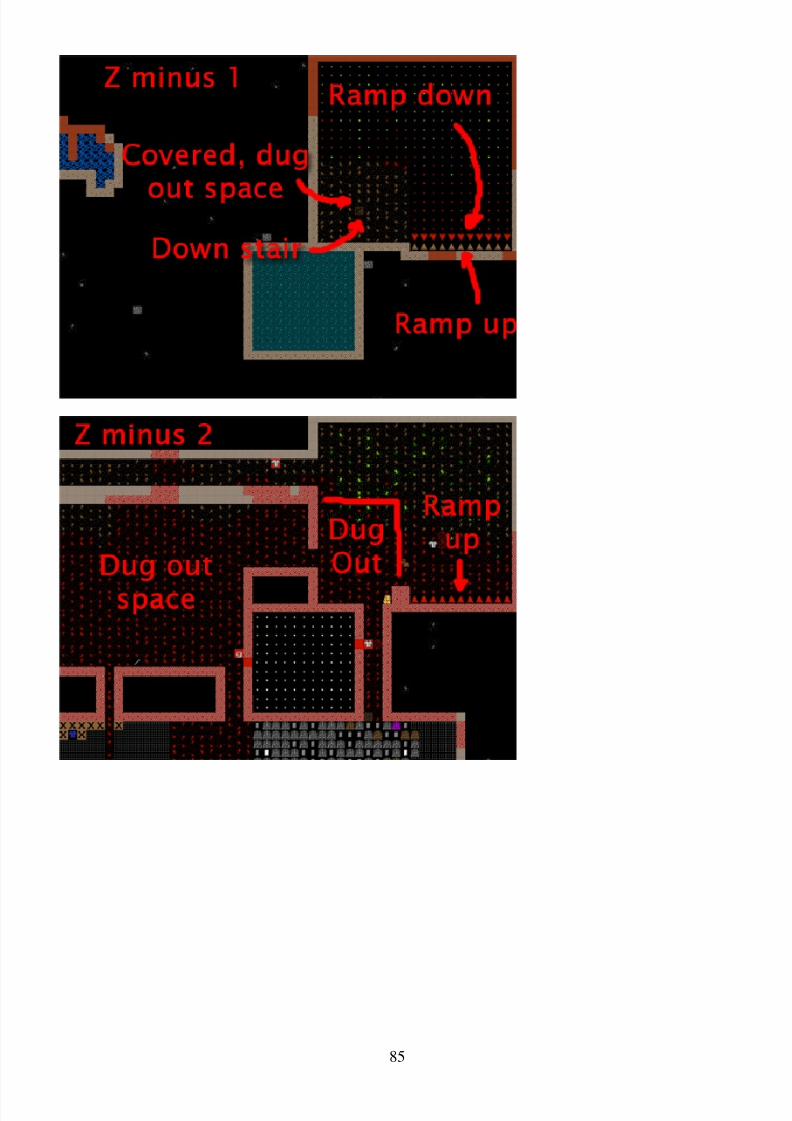
8/14/2019 The Complete and Utter Newby Tutorials
http://slidepdf.com/reader/full/the-complete-and-utter-newby-tutorials 85/100
85

8/14/2019 The Complete and Utter Newby Tutorials
http://slidepdf.com/reader/full/the-complete-and-utter-newby-tutorials 86/100
86
That should give you a pretty good idea of the sort of digging we’ve done. As you can see, the pit goes down
deeper than the entrance right into the heart of the fortress. We want this because this open air space means
we can set a refuse pile down there and not generate miasma! Cool huh? Now our dwarfs only have to walk
across the hall to drop rubbish in a secure place, rather than walking all the way up to the surface to drop
rubbish outside, where it’s dangerous. You might also want to make some statues at a masons to place them in
the middle of the pit and to turn that area into an statue garden (”q” over a placed statue). Dwarfs like to hang
around statue gardens and since the bottom of that pit counts as outside it will help prevent cave adaption.
You may be wondering about all the dug-out space. I set the crook of our L to be dug out as rooms for our
soldiers to overlook the entrance. First the bottom room, (before digging steps up) and then the room above at
the Z minus 1 level. I would have left the room walls up but then I remembered that those silty, clay walls can’t
be carved into fortifications, so I had to dig out all the dirt. I plan to replace the dirt with constructed walls,
which I will cave to be fortified. I’ll show you a couple of pictures when I’m done and you can try something
similar.
Marksdwarfs go PEW PEW!
I’d feel bad if I didn’t spend more time on marksdwarfs as they are a very handy part of one’s army. So lets go
over them a bit. First up, lets build some archery targets. I’ve got a corner of the storage room chosen. Do the
same:
o Hit “b”, “A” (or find “Archery Target” at the bottom).
o Place four-or-so targets roughly near to each other. Here are mine almost all built:

8/14/2019 The Complete and Utter Newby Tutorials
http://slidepdf.com/reader/full/the-complete-and-utter-newby-tutorials 87/100
87
o Hit “q” over the middle one when they’re built.
o Hit “r” for “Make Archery Range”.
o Increase the blue size until it covers each of the targets neatly, hit “enter”
o Look at the top right. You’ll see “Shoot from Left to Right”. Use WASD to chose the proper direction.
For me, I want them shooting down (from where the dwarf is in my picture) so I hit “s”.
o Job done! Range is now ready!
Now we need some soldier types!
o Go and make a new squad of half-a-dozen slackers.
o Set them to be equipped in leather armor only.
o Now, go and make a bunch of useful items! Like crossbows, perhaps steel ones.
o Make some steel bucklers as well (that’s a small shield that can be strapped to ones arm and doesn’t
slow one down as much as a shield does).
o Go to your leatherworks and queue up some more backpacks and add some quivers as well.
o Make some more assorted steel armor bits.
o Let your archer dwarfs skill up a bit as wrestlers. Strong and tough dwarfs are always good.
o Once you’re happy, change them all to carrying crossbows and bucklers and chainmail armor. They will
go equip themselves and start to practice at the range:
o You will need to keep them supplied with bolts. You can make wooden ones at a craftsdwarf’s workshop
(and these are used for practice) and bone ones there as well (for fighting with).
o You can also forge metal bolts, which are better, but at 25-or-so bolts per steel bar, it gets a bit costly.
At least they will only be used in a fight when it really counts.
Now you have marksdwarfs! Over time they will be awesome shots, and fire quickly. They will be useful in firing
through our fortifications that overlook the entrance L. If you look at the picture below you can see how I’ve put
in double-thickness walls that have been carved with fortifications in areas I want me dwarfs to be safe in. I firstput in one wall, carved it, then another. Double-thickness walls keep the enemy a bit further away and makes it
harder for them to shoot in at us, while we can still shoot out just fine.

8/14/2019 The Complete and Utter Newby Tutorials
http://slidepdf.com/reader/full/the-complete-and-utter-newby-tutorials 88/100

8/14/2019 The Complete and Utter Newby Tutorials
http://slidepdf.com/reader/full/the-complete-and-utter-newby-tutorials 89/100
89
Bottom of the pit
I’ve gone ahead and smoothed the bottom of the pit, put in the refuse, and in one corner I’ve placed a few
statues and set the area as a statue garden.
Further fortification
While I was digging away downstairs I thought it might be nice to have a place above ground from which to shoot
at invaders and perhaps somewhere to build some siege engines as well. Hence, I’ve started construction of a
keep overlooking the entrance. In the picture below you can see I’ve dug a stair down to the level below (Which
is hollowed out and walled in and has constructed stairs up) and I’ve put a wall around this area.

8/14/2019 The Complete and Utter Newby Tutorials
http://slidepdf.com/reader/full/the-complete-and-utter-newby-tutorials 90/100
90
Now, I could go and set these ground floor walls as fortification, but I prefer my archers to shoot from above the
enemy. It makes them much harder to get shot in return! So, instead of fortifying this level I’ve constructed
another stair upwards.
As you can see below, on the level up, I have matching down stairs constructed and thus now have access to this
level. If my dwarfs wanted to go up here they’d have to walk on the tops of walls (walls come with a floor and a
ceiling component, by the way, so the top of a wall counts as a floor). But wouldn’t it be better to have some
floor? Yes! I agree! So I’m using the build, construct (”b”, “C”) menu to set a big floor to be built. Eventually I’ll
ensure the whole area is built over. But, if you do the same, do not put a floor over a wall top. This will prevent
you from building a wall on that space. Walls can never be built on top of another construction. So leave the
wall tops free and a wall all the way around on top of your existing walls. We’re building a tower you see! Also,
make sure you leave one space clear of floor. This is where you can “b”, “C”, construct another set of steps
going up.

8/14/2019 The Complete and Utter Newby Tutorials
http://slidepdf.com/reader/full/the-complete-and-utter-newby-tutorials 91/100
91
The picture below shows the floor built with fortified walls around the edges. This will be a great place for our
marksdwarfs to stand and shoot at any invaders as they approach the fortress. You can also see another set of
steps I’ve built going up.
And here’s the floor above. No walls, a smooth surface. Ready for me to put siege engines on, perhaps.
And for a special treat here’s a screenshot from 3Dwarf Visualizer, which is a third-party tool which roughly
displays how your fortress looks in 3D. you can see the entrance (but from this angle, not the ramps down), the
keep and the pit.

8/14/2019 The Complete and Utter Newby Tutorials
http://slidepdf.com/reader/full/the-complete-and-utter-newby-tutorials 92/100
92
The End!
And welcome to the end of the tutorial! By now you should be able to play the game on your own. If you’re lost
as to what to do next, how about digging around and looking for more ore to smelt? How about building a well so
any injured dwarfs can be brought water more safely?
You might also build a shop as part of your dwarfen economy, or consider a mega project like an enormous
tower, castle, or a fortress entirely surrounded by magma. What about a stupid dwarf trick such as a drowning
chamber or a booze bomb? There are many options, and just surviving the increasingly severe raids from goblins
and other critters can be a challenge. Good luck! And thanks for reading this far!
I will do one more small update with links to more resources. See you then.

8/14/2019 The Complete and Utter Newby Tutorials
http://slidepdf.com/reader/full/the-complete-and-utter-newby-tutorials 93/100
93
The Complete and Utter Newby Tutorial for Dwarf Fortress – Part 13: “WorldBuilding Badness”March 31, 2009 at 9:38 am | In Fantasy, Tutorial | 18 Comments Tags: Dwarf Fortress
Welcome to the tutorial that was never meant to be! The 13th Tutorial, by popular
request, on world building. If you’ve played along with our tutorial so far you may be
itching to try out making your own world and finding a new place to build your nextdwarfy citadel (perfectly laid out – as detailed on the notepaper you doodled on at
work all day). Well, you’re in luck, because that’s what we’re talking about today!
A tutorial on custom party settings (organising what your dwarfs embark with) will come some time after this
one, scout’s honour.
Why World Build?
World building is a subtle and arcane art in Dwarf Fortress. You can do it the easy way (default world
generation), the slightly complex way (custom parameter setting) or the really hard way (world gen file
manipulation). We’re going to be covering just the first way as the others make my brain hurt and I’m not a
damn masochist! If you are interested in doing things the hard way you can head over to the wiki and check out
the guides to advanced world generation and pregenerated worlds. Me, I got confused reading those so when I
wanted something tricky done chose to whine on the Bay12 forums until someone helped me! Thanks forum
geeks!
Er, where was I, perhaps I should answer the question in my title there! Why do we want to generate our own
worlds? Well, generally it is because we want to create a specific type of environment (haunted glaciers with
skeletal whales FTW!) or we want to make sure we have an interesting and exciting place to build (build a
volcano inside a fortress inside a volcano!). Or perhaps you just want to start a new game in a new land.
Making Worlds the Easy Way
Fire up Dwarf Fortress and from the start menu scroll down and chose “Create World Now”. At the next screen
hit “F9″ as instructed and the world will start to generate. You’ll get a lot of stuff happening on the screen as
the world is generated. Mountains will form and be eroded, forests will spread, rivers will spawn, civilisations
will rise and fall. It’s pretty cool actually!
Here’s a shot of the world history being generated, which happens after the geography is formed. Did you know
you can actually go and read all of this history in “Legends” mode? Yes, it’s all there! Tons of history and
mythology to soak in. We’ll have a look at that later.

8/14/2019 The Complete and Utter Newby Tutorials
http://slidepdf.com/reader/full/the-complete-and-utter-newby-tutorials 94/100
94
Once the world is created you’ll end up with a menu as well as a little information, such as the name of your
world. Mine, the “Enchanted Plane of Portents” looks mountainous and pretty frozen! Neato! Use the arrow keys
to look around and get a rough idea for the kind of world created. Hit “Enter” to accept the world. The world is
now being stored and you will be taken back to the main menu. You can now chose “start playing” and a new
world will be there, probably the attractively named “Region 2″.
You’re a bloody legend, mate
With your new region selected, hit “Enter” and you can see the three game modes available. Dwarf Fortress,
which you know well by now, Adventurer, which you may have dipped into and Legends. Select Legends with the
arrow key and hit enter. After some loading you’ll get a screen showing a list of histories to read. Scroll around,
hit enter to drill down and space to go back up a menu layer. The first history I read is about “Angot Torridbrand
The Firey Wealths of Heat, a skeletal dragon”. Oh dear!
When you’re bored, space back out to the main menu.
Play the Damn Game Already!
Head back in to “Start playing” and select your region and then “Dwarf Fortress”. You’ll then get a screen
somewhat like this. It is the “settle” screen where you chose where you’re going to found your fortress. I’ve
scribbled on the picture below so as to give you a better idea of what you’re looking at. The image below
explains the three map windows you can see:

8/14/2019 The Complete and Utter Newby Tutorials
http://slidepdf.com/reader/full/the-complete-and-utter-newby-tutorials 95/100
95
On the right is more information and it relates entirely to what’s in the embark box in the left window. Lets see
what we can do about navigating around! Start off by hitting the arrow keys a while. What you’ll notice is that
the arrow keys move the X on the region map. Holding down an arrow key results in the local map zipping past,
the region map moving square by square and the world map X moving fairly slowly. As you move the cursor
around you should see the info on the right change. Note, this info does NOT relate to the region window!Instead, it relates to the local window, but as you’ve noticed by now we don’t seem to have much control over
the placement of that local window box… or do we?
If you read the text on screen you’ll see you can move the local area box around using “u”, “m”, “k” and “h”.
Try it now! You’ll notice lots of information changing on the right. You can also resize the local space using
“shift” + “u”, “m”, “k” or “h”. You probably want to leave the box at 4×4, but 5×5 will give you more space
when you’re playing. 6×6 should only be used by those who like the game going particularly slowly as those sort
of sizes can become somewhat crippling for the CPU to keep up with. 1×1 micro-fortresses are also doable, but
check the forums for seeds and ideas.
Hit “shift”+”u” and make your space 4×5. Make it small again by “shift”+”m”. Easy huh? But rather than just
selecting some random area and hitting “e” for “embark”, lets use the “Find” system to get us a nice site.
Finding somewhere to live
Follow along:
o Hit “f” for “Find”. A new window will pop up with settings to fiddle with.
o Use the arrow keys to scroll down to temperature and use the left and right arrows to set the
temperature to “Medium”. Skip this step if you’re feeling brave!
o
Set “Flux Stone” to “Yes”. Flux stone is one of the ingredients you need to make steel so we really dowant it.
o Set “Aquifer” to “No” unless you want to play with pumps and like a challenge.
o Set “River” to “Yes”.
o Set “Magma Pipe” to “Yes”.
o You can try setting any of the three options below to “Yes” as well, but there might not be a site that
matches, so for now, leave them and hit “Enter” for “do search”.
o DF will now look for a location matching your preferences.
Now, I’ve chosen the particular settings above to set up a fairly straight forward fortress location. You can have
a lot of fun by not going for some of these settings, so don’t be afraid to experiment. Check the big comment at
the bottom of the tutorial for more ideas on this by commenter Benkyo.

8/14/2019 The Complete and Utter Newby Tutorials
http://slidepdf.com/reader/full/the-complete-and-utter-newby-tutorials 96/100
96
Once the search is run a suitable site will be found (hopefully) and the local map will be centered on it. Hit
“space” to back out of the find menu. Here’s what I’ve found.
You can see the climate looks quite good. The temperature is warm, it’s got lots of wood. It’s wilderness, which
will be somewhat challenging and fun and there’s some sand too – always nice if you want to make glass.
However, one thing I don’t see is any flux stone…. or do I? Flux stone shows up white on the side info box
normally, and you’ll recall I set the preferences to include it. Perhaps it’s in another biome? biomes are how
land is divided up in DF. Plains will be one biome, a mountain range another, a forest yet another. Clearly
there’s a forested biome here, and there are two options next to “View Biome”; “F1″ and “F2″. By default we’re
viewing the biome that dominates this space inside the local embark box and this is the “F1″ biome. if I hit “F2″
I will switch to seeing what’s on the other biome as well as what land it covers. The flashing Xs show the
boundary and I can hit “F1″ to see how it compares to the other biome. Here’s what I see when I check the
second biome. Note, it’s possible to have three or even four biomes all intersecting on the area you’re lookingat embarking to!
The sharp eyed among you may note that it looks like no green X is covering my start area. I think what’s
happening is that the red magma bit isn’t flashing, although it should be as it’s part of the “F2″ biome. Perhaps
it was me fiddling with the ini file recently that made this so. Oh, also, when you go through the world
generation process you may not actually see any indication on the map that there’s magma in your starting
location. But if you’ve set Magma Pipe to “Yes” and “Find” has worked then you know it will be down there
somewhere. There are ini edits which change how visible certain features are in the world creation screen, to
go into more detail might offer spoilers so you can go research it yourself if you fancy!
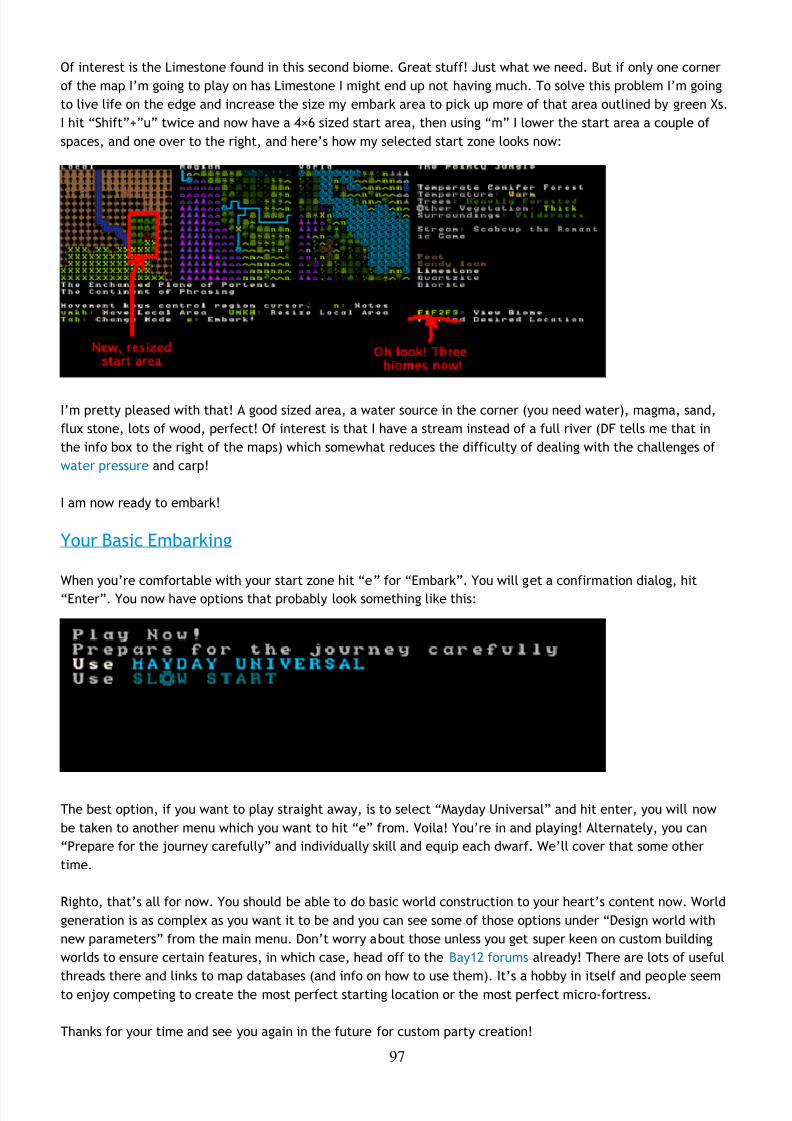
8/14/2019 The Complete and Utter Newby Tutorials
http://slidepdf.com/reader/full/the-complete-and-utter-newby-tutorials 97/100
97
Of interest is the Limestone found in this second biome. Great stuff! Just what we need. But if only one corner
of the map I’m going to play on has Limestone I might end up not having much. To solve this problem I’m going
to live life on the edge and increase the size my embark area to pick up more of that area outlined by green Xs.
I hit “Shift”+”u” twice and now have a 4×6 sized start area, then using “m” I lower the start area a couple of
spaces, and one over to the right, and here’s how my selected start zone looks now:
I’m pretty pleased with that! A good sized area, a water source in the corner (you need water), magma, sand,
flux stone, lots of wood, perfect! Of interest is that I have a stream instead of a full river (DF tells me that in
the info box to the right of the maps) which somewhat reduces the difficulty of dealing with the challenges of
water pressure and carp!
I am now ready to embark!
Your Basic Embarking
When you’re comfortable with your start zone hit “e” for “Embark”. You will get a confirmation dialog, hit
“Enter”. You now have options that probably look something like this:
The best option, if you want to play straight away, is to select “Mayday Universal” and hit enter, you will now
be taken to another menu which you want to hit “e” from. Voila! You’re in and playing! Alternately, you can
“Prepare for the journey carefully” and individually skill and equip each dwarf. We’ll cover that some other
time.
Righto, that’s all for now. You should be able to do basic world construction to your heart’s content now. World
generation is as complex as you want it to be and you can see some of those options under “Design world with
new parameters” from the main menu. Don’t worry about those unless you get super keen on custom building
worlds to ensure certain features, in which case, head off to the Bay12 forums already! There are lots of useful
threads there and links to map databases (and info on how to use them). It’s a hobby in itself and people seemto enjoy competing to create the most perfect starting location or the most perfect micro-fortress.
Thanks for your time and see you again in the future for custom party creation!

8/14/2019 The Complete and Utter Newby Tutorials
http://slidepdf.com/reader/full/the-complete-and-utter-newby-tutorials 98/100
98
The Complete and Utter Newby Tutorial for Dwarf Fortress – Part 14: “Embarking…to your doom!”June 2, 2009 at 10:20 am | In Fantasy, Tutorial | No Comments Tags: Dwarf Fortress
A while ago I promised a final tutorial (although I’m always open for to pleading for
more) on how to use the custom embark feature of Dwarf Fortress. This is a handy
part of the game as it lets you customize exactly what sort of dwarfs you take withyou and allows you to set their supplies to your exact specifications. Read on for
more information!
Embarking the custom way
So you’ve chosen your perfect location, as per the previous tutorial, and now you’re ready to embark. What you
want to be doing now is selecting “Prepare for your journey carefully” from the embark menu. You will now be
presented with your list of dwarfs and the skills they can access.
Have a fiddle with your controls. The left-right arrows move between the list on the left (dwarfs) and the list on
the right (dwarf skills). Select your first dwarf, then arrow over to the skill list and scroll through it. Currently
this dwarf has no skills assigned. Find “Mining”, hit “alt+down arrow” and keep hitting it until the dwarf is set as
a “Proficient Miner”. Do the same for “Mason”.
You have now made your dwarf a pretty good mason and a miner! Note, there’s a zero next to his name? This
means he can’t accept any more skills. Most of the time you’re going to be giving each dwarf a couple of skills,
but one or two dwarfs might be given some outlier skills (leadership skills, for example) to ensure you have a
broker from the get-go. There are many strategies when it comes to skill selection, we’ll cover some samples
later.
Meanwhile, get back to a dwarf using the arrow key. You’ll see at the bottom the “c” menu for “Customize” and
“v” for “View”. Hit “v” and have a read about your dwarf’s personality. I usually look for the most ‘friendliest’
and mark them in my head for any possible leadership skills.
Head back to the list (”space-bar”) and then hit “c”. Here you can modify a dwarf’s nickname and profession
name. This is handy if you want to make a note of how you’ve skilled each dwarf, or just for your own
amusement, of course! Once you’re done there, hitting “Shift+F” or “Shift+G” takes you to a group and fortress
menu list. Fiddle around here and come up with a creative name if you want!
When you’re done, (you may have to hit F9 to head back out of the menu), hit “tab” to go to the item list. Manyitems will be on your list already, on the left, with animal options on the right.
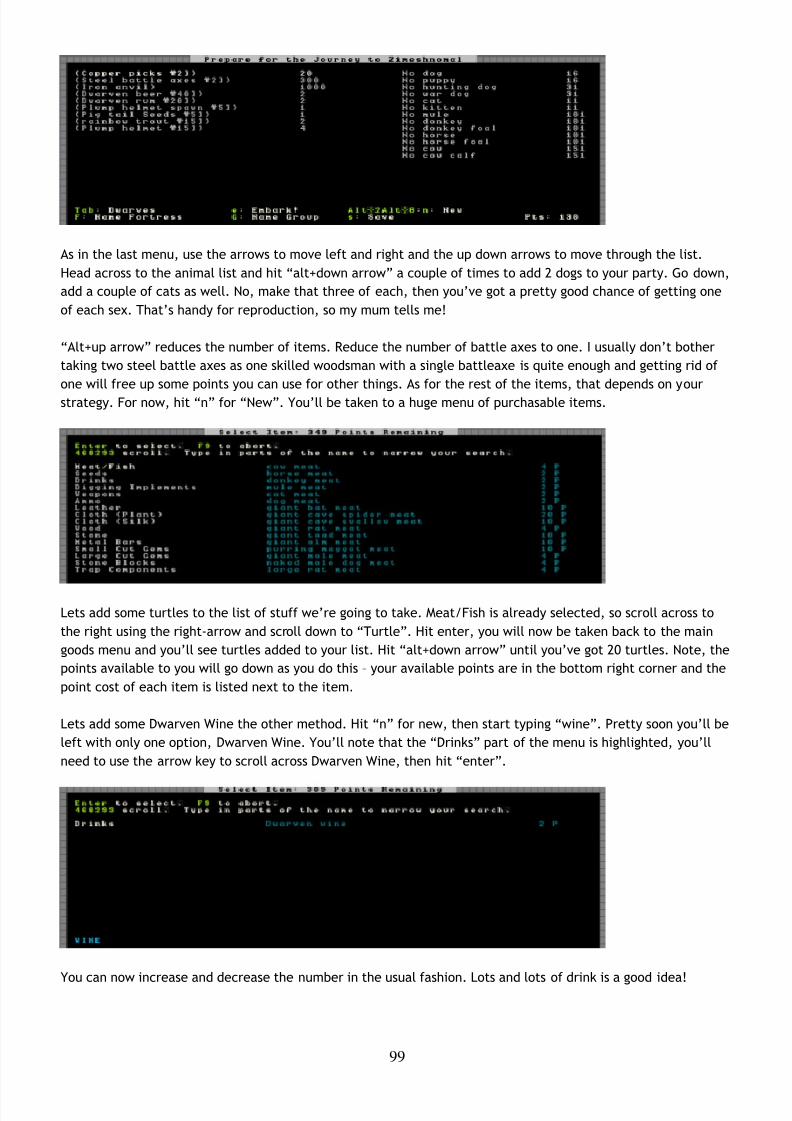
8/14/2019 The Complete and Utter Newby Tutorials
http://slidepdf.com/reader/full/the-complete-and-utter-newby-tutorials 99/100
99
As in the last menu, use the arrows to move left and right and the up down arrows to move through the list.
Head across to the animal list and hit “alt+down arrow” a couple of times to add 2 dogs to your party. Go down,
add a couple of cats as well. No, make that three of each, then you’ve got a pretty good chance of getting one
of each sex. That’s handy for reproduction, so my mum tells me!
“Alt+up arrow” reduces the number of items. Reduce the number of battle axes to one. I usually don’t bother
taking two steel battle axes as one skilled woodsman with a single battleaxe is quite enough and getting rid of
one will free up some points you can use for other things. As for the rest of the items, that depends on your
strategy. For now, hit “n” for “New”. You’ll be taken to a huge menu of purchasable items.
Lets add some turtles to the list of stuff we’re going to take. Meat/Fish is already selected, so scroll across to
the right using the right-arrow and scroll down to “Turtle”. Hit enter, you will now be taken back to the main
goods menu and you’ll see turtles added to your list. Hit “alt+down arrow” until you’ve got 20 turtles. Note, the
points available to you will go down as you do this – your available points are in the bottom right corner and the
point cost of each item is listed next to the item.
Lets add some Dwarven Wine the other method. Hit “n” for new, then start typing “wine”. Pretty soon you’ll be
left with only one option, Dwarven Wine. You’ll note that the “Drinks” part of the menu is highlighted, you’ll
need to use the arrow key to scroll across Dwarven Wine, then hit “enter”.
You can now increase and decrease the number in the usual fashion. Lots and lots of drink is a good idea!

8/14/2019 The Complete and Utter Newby Tutorials
http://slidepdf.com/reader/full/the-complete-and-utter-newby-tutorials 100/100