
THE ADCOR A-556 ELITE ADCOR A-556 ELITE TM Featuring international patents for innovations not found...
23
THE ADCOR A-556 ELITETM OWNER’S MANUAL TM MADE IN USA
Transcript of THE ADCOR A-556 ELITE ADCOR A-556 ELITE TM Featuring international patents for innovations not found...

THE ADCOR A-556 ELITETM
OWNER’S MANUAL
TM
MADE IN USA

Congratulations! You are the owner of the most advanced and innovative firearm in the world.
The ADCOR A-556 ELITE TM
Featuring international patents for innovations not found on any other rifle in its class,
the ADCOR A-556 ELITE TM is an engineering marvel of safety, durability and reliability proven
on the range and in the field.
1

WARNING - IMPROPER OR CARELESS HANDLING OF THIS RIFLE
MAY RESULT IN AN UNINTENTIONAL DISCHARGE AND CAUSE SERIOUS INJURY, PROPERTY DAMAGE OR DEATH
WARNING - PROPER OPERATION OF THIS RIFLE REQUIRES THAT
YOU READ AND UNDERSTAND THIS SAFETY AND INSTRUCTION MANUAL BEFORE OPERATING THE RIFLE
WARNING - ALWAYS BE CERTAIN THE RIFLE IS POINTED IN A SAFE
DIRECTION SO THAT A DISCHARGE OF THE FIREARM WILL NOT CAUSE INJURY OR DAMAGE
WARNING - ALWAYS KEEP YOUR FINGER AWAY FROM AND OFF
THE TRIGGER UNTIL YOU ARE READY TO FIRE
WARNING - ALWAYS KEEP THE RIFLE UNLOADED UNTIL YOU ARE
READY TO USE IT – WHENEVER YOU PICK UP THE RIFLE, LOOK TO BE CERTAIN THE SAFETY IS ENGAGED
WARNING - NEVER HANDLE OR USE YOUR RIFLE IF YOU HAVE
CONSUMED ALCOHOL OR DRUGS (INCLUDING OVER-THE-COUNTER DRUGS), BECAUSE THESE SUBSTANCES CAN
IMPAIR YOUR JUDGMENT AND PHYSICAL COORDINATION
WARNING - ALWAYS WEAR EAR AND EYE PROTECTION
WARNING - ALWAYS USE HIGH-QUALITY, FACTORY-MANUFACTURED
AMMUNITION OF THE CALIBER FOR WHICH YOUR FIREARM IS CHAMBERED
WARNING - ALWAYS SAFELY STORE YOUR UNLOADED RIFLE SO IT IS NOT ACCESSIBLE TO UNAUTHORIZED INDIVIDUALS
WARNING - ALWAYS CLEAN YOUR RIFLE SO THAT IT WILL OPERATE PROPERLY AND IN A SAFE MANNER
The rifle is designed to enhance safety and durability. It is critical that you learn the rifle’s basic parts before attempting to load or operate the firearm.
This safety / instruction manual will detail all of the rifle’s parts, explain how to load and unload ammunition, and how to maintain and disassemble the rifle.
SAFETY FIRST
2

TABLE OF CONTENTS
Features 6
Physical Parameters 7
DescriPtion oF riFle anD its unique systems 8 - 11
4- Position regulator 12 - 13
reversing the ForwarD charging hanDle 14 - 15
maintenance / Disassembly 16 - 22
cleaning / lubrication 24 - 26
assembly / saFety / Function check 26-29
loaDing a magazine 30
loaDing anD charging the riFle 31
malFunction clearing 32
troubleshooting 33 - 35
rePair services 36
warranty 37
warnings 38
5
TM
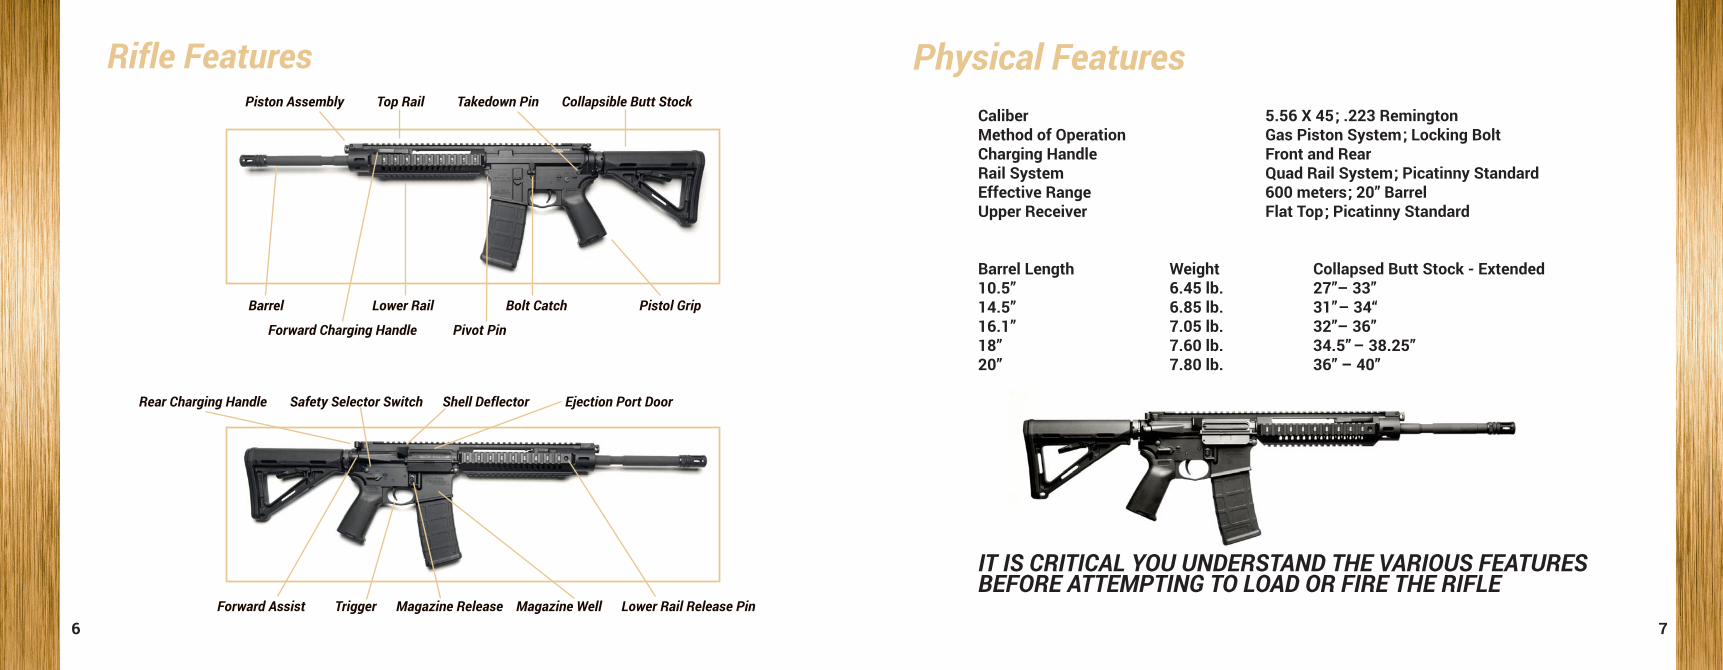
Piston Assembly Top Rail Takedown Pin Collapsible Butt Stock
Rear Charging Handle Safety Selector Switch Shell Deflector Ejection Port Door
Forward Assist Trigger Magazine Release Magazine Well Lower Rail Release Pin
Barrel Lower Rail Bolt Catch Pistol Grip Forward Charging Handle Pivot Pin
6 7
Caliber 5.56 X 45; .223 RemingtonMethod of Operation Gas Piston System; Locking BoltCharging Handle Front and RearRail System Quad Rail System; Picatinny StandardEffective Range 600 meters; 20” BarrelUpper Receiver Flat Top; Picatinny Standard
Barrel Length Weight Collapsed Butt Stock - Extended10.5” 6.45 lb. 27”– 33”14.5” 6.85 lb. 31” – 34“16.1” 7.05 lb. 32”– 36”18” 7.60 lb. 34.5” – 38.25”20” 7.80 lb. 36” – 40”
IT IS CRITICAL YOU UNDERSTAND THE VARIOUS FEATURES BEFORE ATTEMPTING TO LOAD OR FIRE THE RIFLE
Rifle Features Physical Features

Description of the Rifle and its New Piston SystemThe ADCOR A-556 ELITE TM has a gas-driven piston incorporated into the top rail, replacing the standard gas impingement design. The piston drive ensures reliability by preventing hot gases and carbon particulates from entering the receiver. This system reduces heat introduced to the upper receiver; therefore, Cleaner Lubricant and Preservative ( CLP) applied to this area will evaporate at a lower rate. This design allows for less maintenance and increases overall reliability of the rifle.
Our newly designed top rail houses the piston and exhaust ports, which protect the operator from exhaust and lowers the rifle’s heat signature.
Mounting the piston on the underside of the top rail allows the barrel to float freely, reducing muzzle rise and ensuring greater accuracy.
The lower half of the rail system detaches with a unique tool-less design for ready access to the piston base and gas block assembly, enhancing o p e r a t i o n a l maintenance and cleaning.
The operator in the field can adjust the piston’s cyclical rate to keep the rifle operating within a controlled rate of fire by means of a simple twist of the gas plug in the front piston assembly. No tools are needed to make this adjustment; the tip of a FMJ cartridge or firing pin can be used in place of a punch. 8 9
Patented Ambidextrous Non-Reciprocating Forward Charging Handle/Forward Assist
The operator can charge, clear, or forward assist the rifle without losing engagement with the target. The operator reaches forward and pulls back on the forward charging handle while maintaining target acquisition.
If the rifle malfunctions, this same charging handle can be used to clear the problem. Simply pull the handle back, then push forward to re-seat the bolt into the battery.
The ambidextrous forward charging handle can be installed on either side of the rifle without the use of tools.The handle is spring loaded so that it returns to a forward locked position when not deployed. To use the handle again, the operator simply reaches forward, swings the handle outward and back in a single motion.
The forward charging handle is non-reciprocating and can only be engaged by the operator to charge or clear the weapon.

Patented Ejection Port Dust Wiper System
The ADCOR A-556 ELITE TM rifle has a spring-loaded dust wiper mounted on the rifle’s bolt carrier to prevent dust, sand and debris from entering the rifle.The dust wiper assembly has two springs between the bolt carrier and the wiper to continuously push outward away from the bolt carrier. This allows the dust wiper to continually engage the inner surface of the receiver when cycling. Each time the rifle fires and the bolt carrier returns to the forward ready position, the dust wiper moves into the ejection port opening flush with the inside of the upper receiver to seal the ejection port opening.
The dust wiper is manufactured from a self-lubricating polymer that withstands extreme heat and cold and is highly durable.
NOTE: ThE duST wIpER ShOuLd NOT BE REmOvEd FROm ThE BOLT cARRIER ASSEmBLY. IF REmOvEd REpLAcE BOTh ThE wIpER ANd ThE SpRINgS wITh A NEw ASSEmBLY, hOwEvER ThE RIFLE wILL FuNcTION NORmALLY wITh OR wIThOuT ThE duST wIpER.
SpRINg LOAdEd duST wIpER
10 11
Patented Rail System
The new key- locked, highly rigid rail system mounts seamlessly to the upper receiver. The top rail and lower rail separate using the unique tool-less push button design. A redesigned boss ensures proper alignment of the top rail with the Picatinny rail on the upper receiver. This rigid system guarantees proper alignment of sights, optics or other operator- installed equipment.
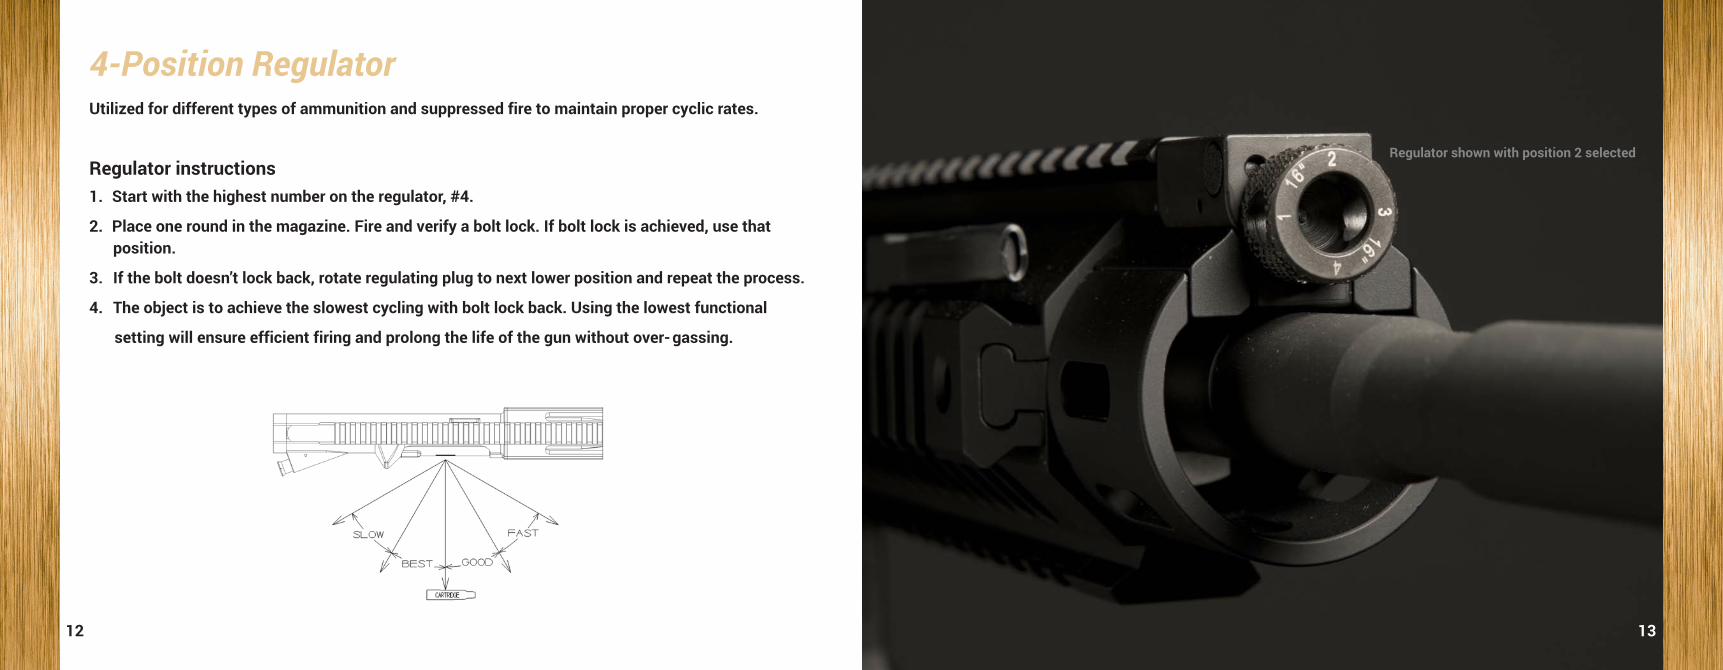
4-Position Regulator Utilized for different types of ammunition and suppressed fire to maintain proper cyclic rates.
Regulator instructions1. Start with the highest number on the regulator, #4.
2. Place one round in the magazine. Fire and verify a bolt lock. If bolt lock is achieved, use that position.
3. If the bolt doesn’t lock back, rotate regulating plug to next lower position and repeat the process.
4. The object is to achieve the slowest cycling with bolt lock back. Using the lowest functional
setting will ensure efficient firing and prolong the life of the gun without over- gassing.
12 13
Regulator shown with position 2 selected
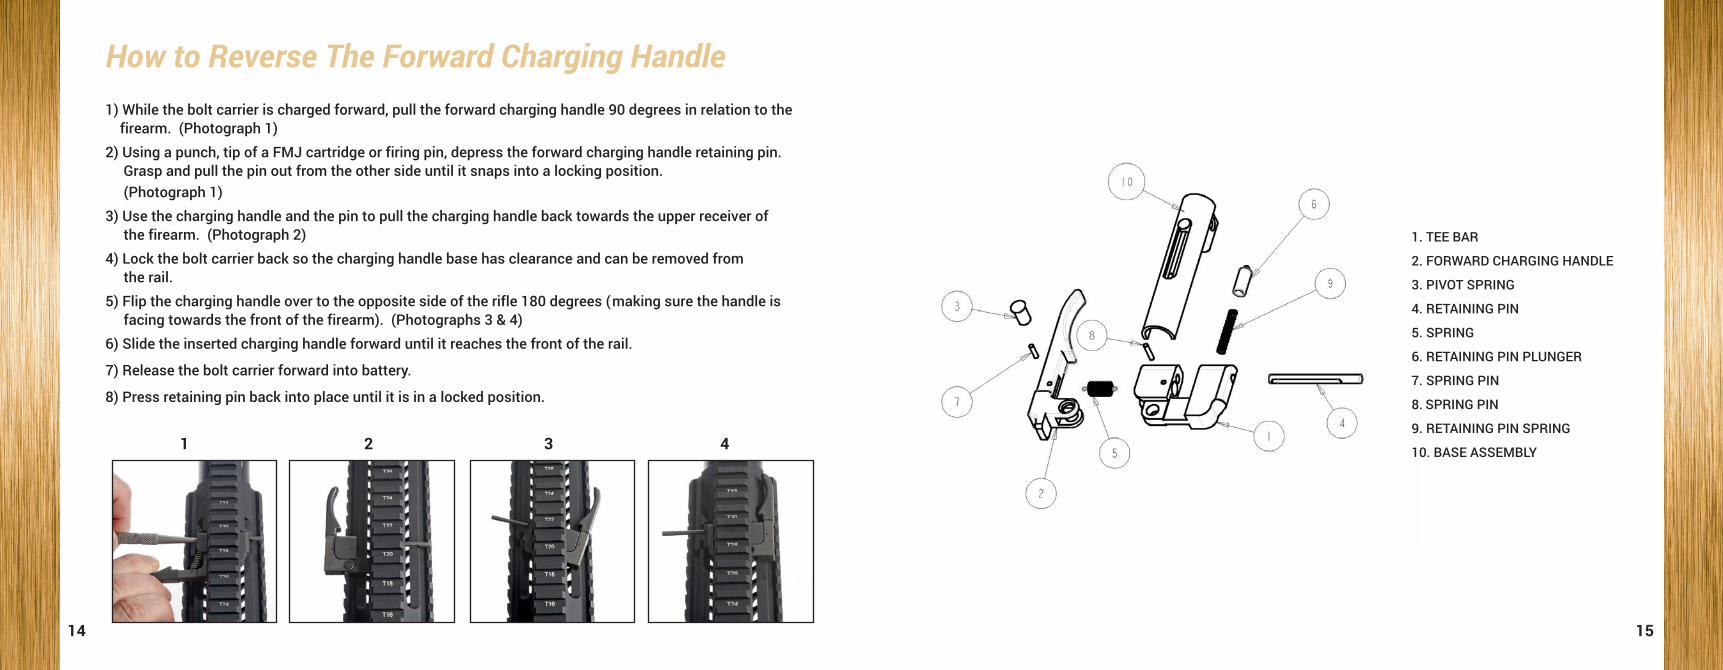
How to Reverse The Forward Charging Handle1) While the bolt carrier is charged forward, pull the forward charging handle 90 degrees in relation to the firearm. (Photograph 1)2) Using a punch, tip of a FMJ cartridge or firing pin, depress the forward charging handle retaining pin. Grasp and pull the pin out from the other side until it snaps into a locking position. (Photograph 1)3) Use the charging handle and the pin to pull the charging handle back towards the upper receiver of the firearm. (Photograph 2)4) Lock the bolt carrier back so the charging handle base has clearance and can be removed from the rail.5) Flip the charging handle over to the opposite side of the rifle 180 degrees ( making sure the handle is facing towards the front of the firearm). (Photographs 3 & 4)6) Slide the inserted charging handle forward until it reaches the front of the rail.
7) Release the bolt carrier forward into battery.
8) Press retaining pin back into place until it is in a locked position.
1 2 3 4
14 15
1. TEE BAR
2. FORWARD CHARGING HANDLE
3. PIVOT SPRING
4. RETAINING PIN
5. SPRING
6. RETAINING PIN PLUNGER
7. SPRING PIN
8. SPRING PIN
9. RETAINING PIN SPRING
10. BASE ASSEMBLY

MaintenanceFailure to properly maintain your firearm can be potentially dangerous causing property damage , bodily injury or death. The rifle should be given a thorough cleaning after each use. It does not matter whether you fired 1 round or 100 rounds.
The rifle should be cleaned anytime it has been exposed to adverse weather conditions ( i.e., rain, snow, fog, heat and humidity).
dISASSEmBLY Point the rifle in a safe direction.
Place the selector switch on SAFE. Remove the magazine from the rifle (if loaded) by depressing the magazine release.
Remove round from the chamber by pulling either charging handle to the rear and engage the lower portion of the bolt catch simultaneously. This will lock the bolt carrier to the rear. NOTE: This same procedure should be followed even if the rifle is not loaded.
Push the charging handle forward until it locks into its original position. Make sure the chamber and magazine well are empty. Perform this procedure twice.
Forward charging handle Rear charging handle
Bolt catch
16 17

Disassemble the rifle ( pAgE 22)
1) Push the upper portion of the bolt catch to release the bolt carrier forward.2) Place the selector on SAFE.3) Push in the rear takedown pin and the front pivot pin to separate the upper and lower receivers.4) Pull the rear charging handle to the rear of the upper receiver.
NOTE: The bolt carrier will move with the charging handle.Remove the bolt carrier assembly and then remove the rear charging handle by pulling down and to the rear. (Photograph 1 and 2 )
Using a punch, remove the firing pin retaining pin from the bolt carrier by lifting it outward.
Remove the firing pin from the bolt carrier by tapping the open end of the carrier on the palm of your hand. (Photograph 1) Next, push bolt back into carrier (locked position) until the cam pin moves to rear position.Once the bolt is in locked position, turn the cam pin 90 degrees and remove. (Photograph 2)
Photograph 1 Photograph 2
Inspect the Dust Wiper located on the side of the Bolt Carrier. If the springs behind the dust wiper require replacement, the wiper can be pried from the retaining lugs. The wiper system should then be replaced in its entirety.
Photograph 1 Photograph 2
CAM PIN
18 19
NOTE: ThE duST wIpER ShOuLd NOT BE REmOvEd FROm ThE BOLT cARRIER ASSEmBLY. IF REmOvEd REpLAcE BOTh ThE wIpER ANd ThE SpRINgS wITh A NEw ASSEmBLY.
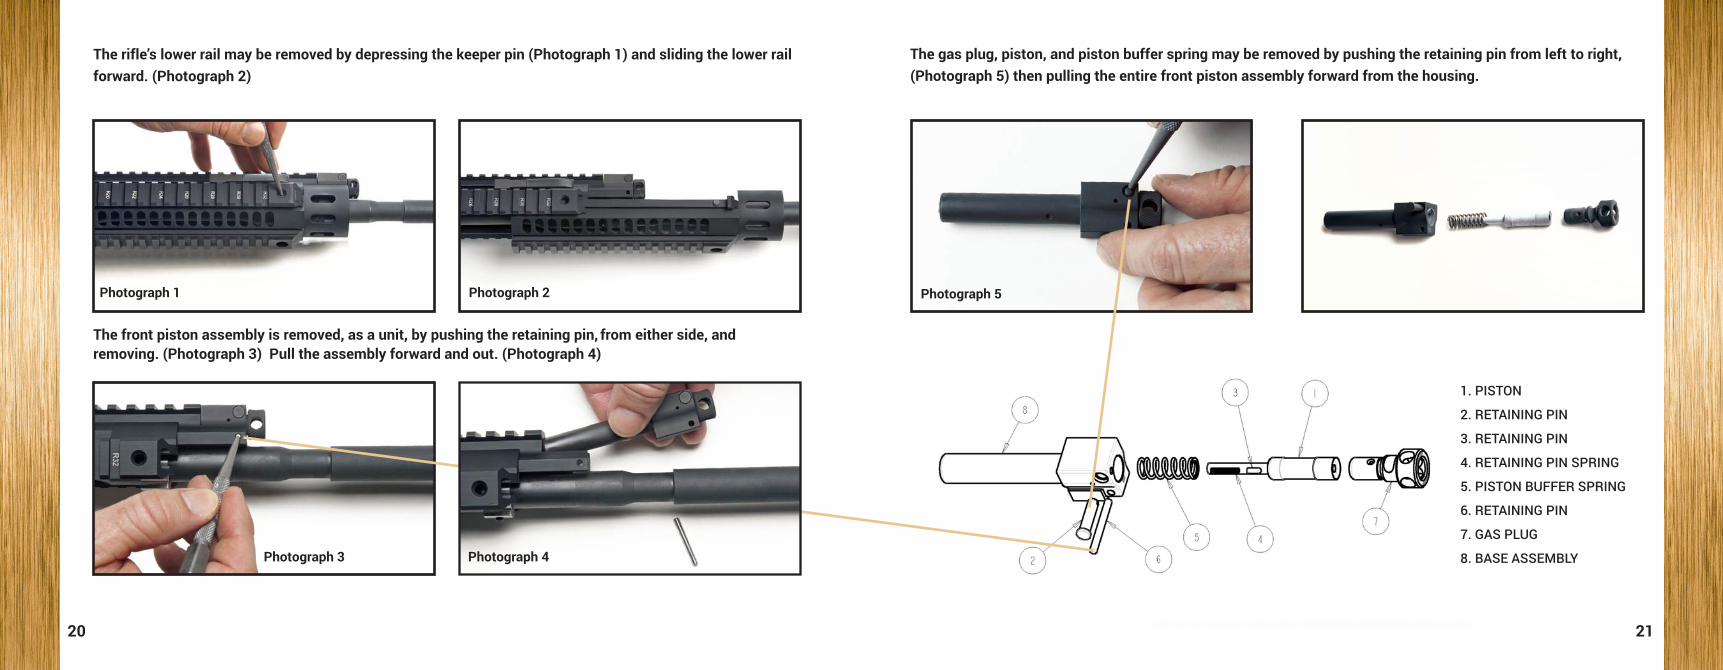
The gas plug, piston, and piston buffer spring may be removed by pushing the retaining pin from left to right, (Photograph 5) then pulling the entire front piston assembly forward from the housing.
Photograph 1 Photograph 2
Photograph 3
Photograph 5
The rifle’s lower rail may be removed by depressing the keeper pin (Photograph 1) and sliding the lower rail forward. (Photograph 2)
The front piston assembly is removed, as a unit, by pushing the retaining pin, from either side, and removing. (Photograph 3) Pull the assembly forward and out. (Photograph 4)
20 21
1. PISTON
2. RETAINING PIN
3. RETAINING PIN
4. RETAINING PIN SPRING
5. PISTON BUFFER SPRING
6. RETAINING PIN
7. GAS PLUG
8. BASE ASSEMBLYPhotograph 4
Photograph 1
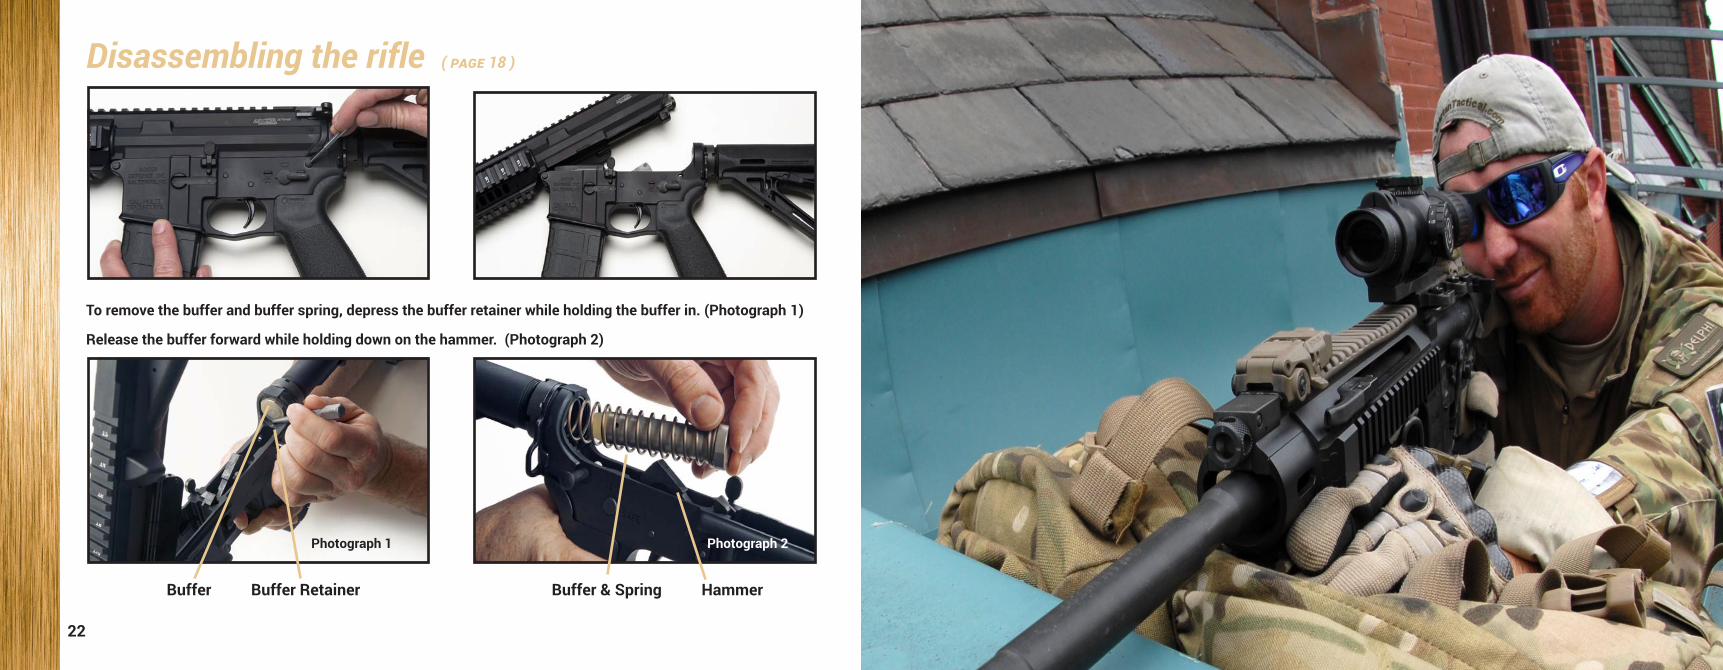
Buffer Buffer Retainer Buffer & Spring Hammer
Photograph 2
Disassembling the rifle ( pAgE 18 )
To remove the buffer and buffer spring, depress the buffer retainer while holding the buffer in. (Photograph 1)
Release the buffer forward while holding down on the hammer. (Photograph 2)
22

Cleaning / LubricationCLEANING THE UPPER RECEIVER GROUP . Use cleaning patches with CLP (Cleaner, Lubricant, Preservative) to clean the upper receiver.
. Use a utility brush with a small amount of CLP for hard to reach places.
. After disassembling the bolt carrier group, clean all the parts with CLP, a utility brush, and patches.
. Wipe clean and leave a thin coating of CLP.
CLEANING THE BARREL ASSEMBLY . The barrel assembly consists of two main parts fused together; the barrel extension and the barrel.
. Clean the compensator on the front end of the barrel using CLP and a brush if necessary.
. Clean the bore by using a bore brush. Use only brass or nylon bore brushes. Do not use stainless steel bore brushes, they are too hard and will damage the barrel.
. Using a cleaning rod and a push jag, push a patch saturated with bore cleaner through the barrel from the chamber end. Repeat with several patches until the bore is well saturated and loose carbon has been removed.
. Attach a clean bore brush to the cleaning rod. Insert the brush into the barrel from the chamber end and push the brush completely through the barrel letting it twist with the rifling. Never reverse while in the barrel. Pull the brush back through the barrel. This should be repeated at least 10 times.
. Follow up with patches saturated with bore cleaner through the bore. Finish with several dry patches until clean.
CLEANING THE CHAMBERUse a utility brush to clean and sweep away any carbon around the locking area. Attach the chamber brush to the cleaning rod. Insert into chamber and pull out. Repeat at least 10 times. Sweep chamber area and locking lugs with the chamber brush by rotating it in the chamber. Use clean dry patches on a slotted jag to clean and dry chamber.
CLEANING THE LOWER RECEIVER ASSEMBLYClean the inside of the lower receiver assembly (Fire Control System) using CLP, patches and a brush.This area is difficult to clean. DO NOT REMOVE the Fire Control System to clean. Pay particular attention to the hammer, disconnect, selector switch and springs. Wipe off the buffer and buffer spring. Clean the outside of the lower receiver group. DO NOT use a wire brush on aluminum surfaces on the upper and lower receivers.
CLEANING THE FRONT PISTON ASSEMBLYClean all of the parts of the front piston assembly with a utility brush and CLP; wipe dry and leave lubricant free.
24 25

LUBRICATION
Upper Receiver GroupApply one drop of CLP to the forward assist, ejection port door latch, and the ejection port door spring.
Bolt Carrier Assembly Put a light coating of CLP on all surfaces of the bolt carrier group and then wipe off excess.
Lower Receiver Group
Apply one drop of CLP on the action springs, pins, detents, pivot pin and takedown pin.
ASSEMBLYThe bolt carrier assembly is reassembled in reverse order. Install the rear charging handle and bolt carrier assembly into the upper receiver. Install the buffer and buffer spring. The front piston assembly is reassembled in reverse order as is the lower rail. Make sure the selector is on SAFE. Place the upper and lower receivers together and push in the pivot pin and the takedown pin.
AFTER RE-ASSEMBLING THE RIFLE, ALWAYS PERFORM A SAFETY/FUNCTION CHECK1. Point the rifle in a safe direction.
2. Set the selector lever to “SAFE” position.
3. Remove the magazine and clear the rifle chamber. Be certain there is no ammunition in the chamber.
4. Pull the charging handle (either the rear charging handle or the forward charging handle) backward and release the handle.
5. Pull the trigger. The rifle’s hammer should not fall.
6. Release the trigger.
7. Set the selector lever to “SEMI” position.
8. Slowly pull back on the trigger and hold it. You should hear the hammer fall.
9. With the trigger pulled back, pull and release the charging handle while letting the trigger slowly move forward. You should hear an audible click, but the hammer should not fall.
10. Repeat this process several times.
ThE RIFLE ShOuLd NOT mALFuNcTION duRINg ThIS SAFETY chEcK. IF IT dOES, dO NOT LOAd OR ATTEmpT TO OpERATE ThE RIFLE. TAKE ThE RIFLE TO A pROFESSIONAL ANd cOmpETENT guNSmITh.
26 27

If the rifle is capable of full auto fire, do the following:
1. Pull the charging handle to the rear and release.
2. Set the fire control selector on “AUTO”.
3. Pull and keep the trigger pulled. You should hear the hammer fall.
4. Pull the charging handle to the rear and release while keeping the trigger to the rear.
5. Release the trigger and listen; no click should be heard.
6. Pull the trigger ; no click should be heard. The auto sear has released the hammer to continue to fire until the trigger is released.
7. Recharge the rifle and repeat the above sequence.
ThE RIFLE ShOuLd NOT mALFuNcTION duRINg ThIS SAFETY chEcK. IF IT dOES, dO NOT LOAd OR ATTEmpT TO OpERATE ThE RIFLE.TAKE ThE RIFLE TO A pROFESSIONAL ANd cOmpETENT guNSmITh.
28 29
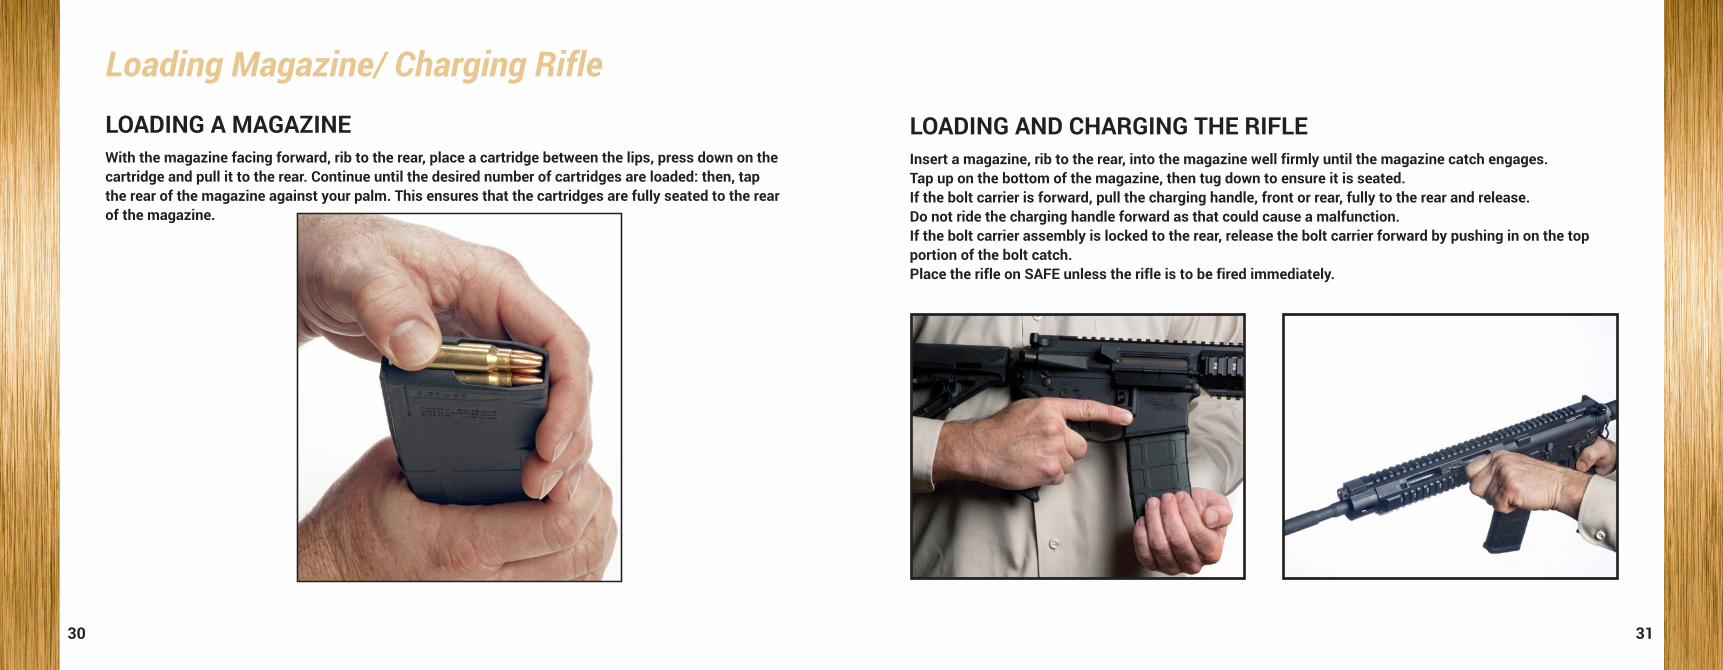
LOADING AND CHARGING THE RIFLEInsert a magazine, rib to the rear, into the magazine well firmly until the magazine catch engages. Tap up on the bottom of the magazine, then tug down to ensure it is seated.If the bolt carrier is forward, pull the charging handle, front or rear, fully to the rear and release. Do not ride the charging handle forward as that could cause a malfunction.If the bolt carrier assembly is locked to the rear, release the bolt carrier forward by pushing in on the top portion of the bolt catch.Place the rifle on SAFE unless the rifle is to be fired immediately.
Loading Magazine/ Charging RifleLOADING A MAGAZINEWith the magazine facing forward, rib to the rear, place a cartridge between the lips, press down on the cartridge and pull it to the rear. Continue until the desired number of cartridges are loaded: then, tap the rear of the magazine against your palm. This ensures that the cartridges are fully seated to the rear of the magazine.
30 31

Malfunction ClearingIF YOuR RIFLE STOpS FIRINgSLAP the bottom of the magazine to make sure it is seated.
PULL the charging handle, front or rear, (Photograph 1) all the way to the rear to eject the casing or cartridge and quickly observe for problems. If no additional problems exist, release the charging handle under its own force. Do not ride the charging handle forward.If there is a double feed, or a failure to extract, the shooter must: lock the bolt carrier to the rear first, remove the magazine from the rifle, cycle the action to remove the cartridge from the chamber, reseat the magazine, and release the bolt carrier forward.
TAP the forward assist forward. (Photograph 2) Note: The forward charging handle can be used as a forward assist by rotating the handle out; moving it to the rear until it engages and then pushing it forward.
REmEmBER, mOST mALFuNcTIONS cAN BE AvOIdEd BY chEcKINg YOuR AmmuNITION, mAINTAININg YOuR RIFLE, ANd uSINg pROpER TEchNIquE.
Photograph 1 Photograph 2
Forward Assist
32 33
MALFUNCTION TEST OR INSPECTION CORRECTIVE ACTIONWill Not Fire Selector Lever on Safe Place Selector Lever
in Firing Position
Improper Assembly of Firing Pin
Assemble Firing Pin Correctly With Retaining Pin Behind Large Shoulder
of Firing Pin
Excess Oil in Firing Recess Clean Firing Pin Recess
Defective Ammunition Discard and Replace Ammunition
Light Indentation on Round Primer
Take to Gunsmith
Bolt Will Not Unlock Dirty or Burred Bolt Take to Gunsmith
Will Not Feed Dirty or Corroded Ammunition Clean or Replace Ammunition
Dirty Magazine Clean Magazine
Defective Magazine Replace Magazine
Overloaded Magazine Remove Excess Rounds
Buffer Assembly Action Is Restricted
Clean Buffer and Spring
Magazine Not Fully Seated Tap on Magazine or Adjust Magazine Catch
Troubleshooting

34 35
Troubleshooting TroubleshootingMALFUNCTION TEST OR INSPECTION CORRECTIVE ACTION
Double Feed Dirty Magazine Clean Magazine
Round Will Not Chamber Dirty or Corroded Ammunition Clean or Replace Ammunition
Damaged Ammunition Replace Ammunition
Carbon in Chamber Clean Chamber
Bolt Will Not Lock Dirt, Corrosion, or Carbon in Barrel or Bolt Locking Lugs Clean Bolt Locking Lugs
Bolt Will Not Extract Round Frozen Extractor Remove Bolt and Clean Extractor
Restricted Buffer Assembly Clean Buffer and Spring
Restricted Movement of Bolt Carrier Group Remove, Clean, and Lubricate Bolt
Dirty or Corroded Ammunition Clean or Replace Ammunition
Dirty Chamber Clean Chamber
Cartridge StuckPush Cartridge Out With Cleaning Rod
MALFUNCTION TEST OR INSPECTION CORRECTIVE ACTIONShort Recoil Carbon or Dirt in
Piston AssemblyLow Gas Pressure
Clean Piston AssemblyAdjust Gas Regulating Plug
Bolt Fails to Lock After Last Round
Dirty or Corroded Bolt LatchLow Gas Pressure
Clean Bolt LatchAdjust Gas Regulating Plug
Faulty Magazine Replace Magazine
Selector Lever Binds Overly Dry Selector Lever Lubricate Selector Lever
Dirt or Sand Under Trigger Clean Trigger Assembly
Bolt Carrier Hung UpRound Jammed Between Bolt
and Upper Receiver and/or Double Feed
****Caution, Bolt May Slam Forward When Removing Rounds ****
Remove Magazine, Remove Rounds. If rounds cannot be removed, secure
and take to Gunsmith.
REmEmBER, mOST mALFuNcTIONS cAN BE AvOIdEd BY chEcKINg YOuR AmmuNITION, mAINTAININg YOuR RIFLE, ANd uSINg pROpER TEchNIquE.

Repair ServicesAny repairs covered under the warranty require a Return Authorization (RA) number. To obtain this number, please visit www.adcordefense.com and fill out the return authorization form, or call our toll free number 888-612-3267, Monday-Friday, 9am-5pm EST
Please include the following information on your form or have it ready before calling:
Contact InformationModel Serial #Date PurchasedPurchased FromFull Description of the Problem
If shipment of your firearm is required, please follow instructions below.• Record the serial number of your firearm before shipping.
• Pack your firearm for safety and to prevent further damage in shipping and handling. Preferably, ship in a firearm box.
• Remove all accessories from the firearm to prevent loss or damage.
• Include your Return Authorization number, your full name and address (P.O. Box and Street Address), including zip code, daytime telephone number and e-mail address.
• Ship your firearm by either UPS, FEDEX or Parcel Post (US Post Office). Adcor Defense is not responsible for damage or loss during shipment, so you may elect to purchase insurance from your carrier.
wARNINg! dO NOT SENd LIvE OR SpENT ShELLS IN YOuR FIREARm OR IN ThE SAmE BOX wITh ThE FIREARm. ThIS IS A vIOLATION OF FEdERAL LAw.
WarrentyLIFETIME LIMITED WARRANTYAll Adcor Firearms come with a Lifetime Limited Warranty. Adcor firearms are warrantied to the original retail customer against all defects in material and workmanship. All parts and labor (or replacement of the firearm at our sole discretion) are covered by this warranty.
Shipping to and from our repair facility is also covered by this warranty.
Damage attributable to steel-cased ammo, hand loads, ammunition higher than 77 grain, or any other nonstandard, noncommercial and inappropriate (high velocity and high pressure) ammunition voids this warranty.
The warranty does not cover damage to the rifle caused by poor or inadequate maintenance or abuse. Unauthorized modifications, repairs, misuse, and alteration of the rifle are not covered by the warranty.
All implied warranties, including the implied warranties of merchantability and fitness for a particular purpose, are limited to ONE (1) year from date of purchase. Consequential or incidental damages and/or expenses, or any other expenses, are not covered by this warranty.
To obtain warranty performance, please call 1-888-61-ADCOR or [email protected]
36 37

WarningsALTERATION & MODIFICATIONAltering or modifying parts is dangerous and will void the warranty.
Improper assembly, modification or repair of this rifle with modified parts or parts other than genuine Adcor parts may result in destruction of the rifle, serious personal injury or death.
ALWAYS HAVE A PROFESSIONAL AND QUALIFIED GUNSMITH REPAIR YOUR ADCOR FIREARM.
38 39
The ADCOR A-556 ELITETM
MADE IN USA

The ADCOR A-556 ELITETM ModelsMethod of Operation Gas Piston System; Locking BoltCharging Handle Front and RearRail System Quad Rail System; Picatinny StandardEffective Range 600 meters; 20” BarrelUpper Receiver Flat Top; Picatinny Standard
Barrel Length Weight Collapsed Butt Stock - Extended10.5” 6.45 lb. 27” – 33”14.5” 6.85 lb. 31 “ – 34”16.1” 7.05 lb. 32” – 36”18” 7.60 lb. 34.5” – 38.25”20” 7.80 lb. 36” – 40”
. Non-Reciprocating Forward Charging Handle
. 4- Position Gas Regulator
. Free Floating Barrel
. All Chambered for 5.56
. Ejection Port Dust Wiper
. 1:7 Twist Hard Chrome Lined Barrels
. 2 Piece Keyed Quad Rail Design. Tool - Less Field Strip Design
10.5” Barrel
14.5 “ Barrel
16.1” Barrel
18” Barrel
20” Barrel
Also Available: Check with your dealer for details
A complete line upper receiver assemblies Gas Impingement models All models are optics-ready
COMPONENTS MACHINED BY STATE-OF-THE-ART CNC EQUIPMENT FROM BILLET 7075-T6 AIRCRAFT QUALITY ALUMINUM
ALL MODELS FEATURE:
ADCOR DEFENSE - What sets us apart... Adcor Defense, Inc.is a wholly owned subsidiary of Baltimore, MD based Adcor Industries, Inc.
For over 20 years, Adcor Industries has been a national defense contract supplier and is one of the few firearm manufacturers certified to quality
standard AS9100 in the country. We build nine of the critical components for the Trident missile system, radar system components for the F-16 Fighter Jet,
and other components for the U.S. military small arms industrial base.
888-612-3267 www.adcordefense.com...

TM
Adcor Defense, Inc.P.O. Box 12239
Baltimore, MD 21224888 - 61ADCOR (612-3267)