Terragen Blender Com Positing
8
Compositing Terrage n Animations with Blender written by: Brian Cordell Hynds Terragen has it's wide known reputation for creating awesome, realistic landscapes, but what if you want more? Let's say you have this sleek fighter-jet that you want to want to animate into your scene and have it doing impossible dare devil stunts across you r landscape. Using Terrage n alone, you will not be able to achieve this (maybe Terragen 2 can prove this wrong, but that's just wishful thinking). The easiest, and cheapest, way I have found is to import all the the rendered frames into Blender using the Sequence Editor. I am going to walk you through step-by-step on importing your rendered frames into Blender and setting everything up for editing. What I am not going to teach you in this article is how to use Blender to model anything to include into your scene, s orry. This article could get very long if I decided to explain every feature about Blender (considering my manual for Blender 2.3 is 768 pages thick). Without further ado, let's begin. First, open up Blender. As of the date of publishing, the current build of Blender is 2.37, and is the build I will be using for this tutorial. Figure 1.1 "Opening Blender" Now, we will want to concentrate on the Sequence Editor. So, let's open it up. Click on the Screen selector at the top the the application (see Figure 1.2), and select Sequence Editor. A window will appear that looks much like Figure 1.3. Figure 1.2 "Open the Sequence Editor"
Transcript of Terragen Blender Com Positing

8/3/2019 Terragen Blender Com Positing
http://slidepdf.com/reader/full/terragen-blender-com-positing 1/8
Compositing Terragen Animations with Blenderwritten by: Brian Cordell Hynds
Terragen has it's wide known reputation for creating awesome, realistic landscapes, but what if you wantmore? Let's say you have this sleek fighter-jet that you want to want to animate into your scene and have itdoing impossible daredevil stunts across your landscape. Using Terragen alone, you will not be able toachieve this (maybe Terragen 2 can prove this wrong, but that's just wishful thinking). The easiest, andcheapest, way I have found is to import all the the rendered frames into Blender using the Sequence Editor. Iam going to walk you through step-by-step on importing your rendered frames into Blender and settingeverything up for editing. What I am not going to teach you in this article is how to use Blender to modelanything to include into your scene, sorry. This article could get very long if I decided to explain every featureabout Blender (considering my manual for Blender 2.3 is 768 pages thick). Without further ado, let's begin.
First, open up Blender. As of the date of publishing, the current build of Blender is 2.37, and is the build I willbe using for this tutorial.
Figure 1.1 "Opening Blender"
Now, we will want to concentrate on the Sequence Editor. So, let's open it up. Click on the Screen selector atthe top the the application (see Figure 1.2), and select Sequence Editor. A window will appear that looksmuch like Figure 1.3.
Figure 1.2 "Open the Sequence Editor"

8/3/2019 Terragen Blender Com Positing
http://slidepdf.com/reader/full/terragen-blender-com-positing 2/8

8/3/2019 Terragen Blender Com Positing
http://slidepdf.com/reader/full/terragen-blender-com-positing 3/8
Figure 1.6 "Adding the Images"
Once the images are in place, you will notice there are 2 triangle shapes at the beginning and end of eachstrip. This signifies the beginning and end of that strip. For now, we will leave the strip as it is, and continuewith the rest of the setup.
Assuming that you have a model that you would like to composite into your animation ready to add, lets startby adding the scene into the Sequence Editor. Click "Add" in the header, and select "Scene" from the menu.You will be presented with another menu asking which scene you want to add. Click on the appropriatescene. You will then again have to line up the scene strip the same way you aligned the image sequence.Ensure that the strip lines up with frame 1, as done previously. You may have noticed a problem when you setit in place (if you didn't, use the middle mouse button to zoom out the Sequence Editor window to see). Most ofthe time, if your animation settings are not set right, your scene ending will not match the image sequenceending. There is a very simple fix for this. In your animation rendering settings (F10), ensure that your Endframe is matched with the end of your image sequence (i.e. if your image sequence is 300 frames long, thenthis setting should be set to 300 to match your strips).
Figure 1.7 "Setting the End Frame"
This will change your Scene settings, but will not automatically be refreshed in the Sequence Editor. What youneed to do is go to the Sequence Editor, select Scene script we last added, and press the "C" key (or select"Strip > Change Scene..." (Figure 1.8). The change scene menu will appear, and click on "Update Start andEnd" (Figure 1.9). Your strips should now line up (Figure 2.0).

8/3/2019 Terragen Blender Com Positing
http://slidepdf.com/reader/full/terragen-blender-com-positing 4/8
Figure 1.8 "Select Change Scene"
Figure 1.9 "Select Update Start and End"
Figure 2.0 "The Updated Sequence Editor"
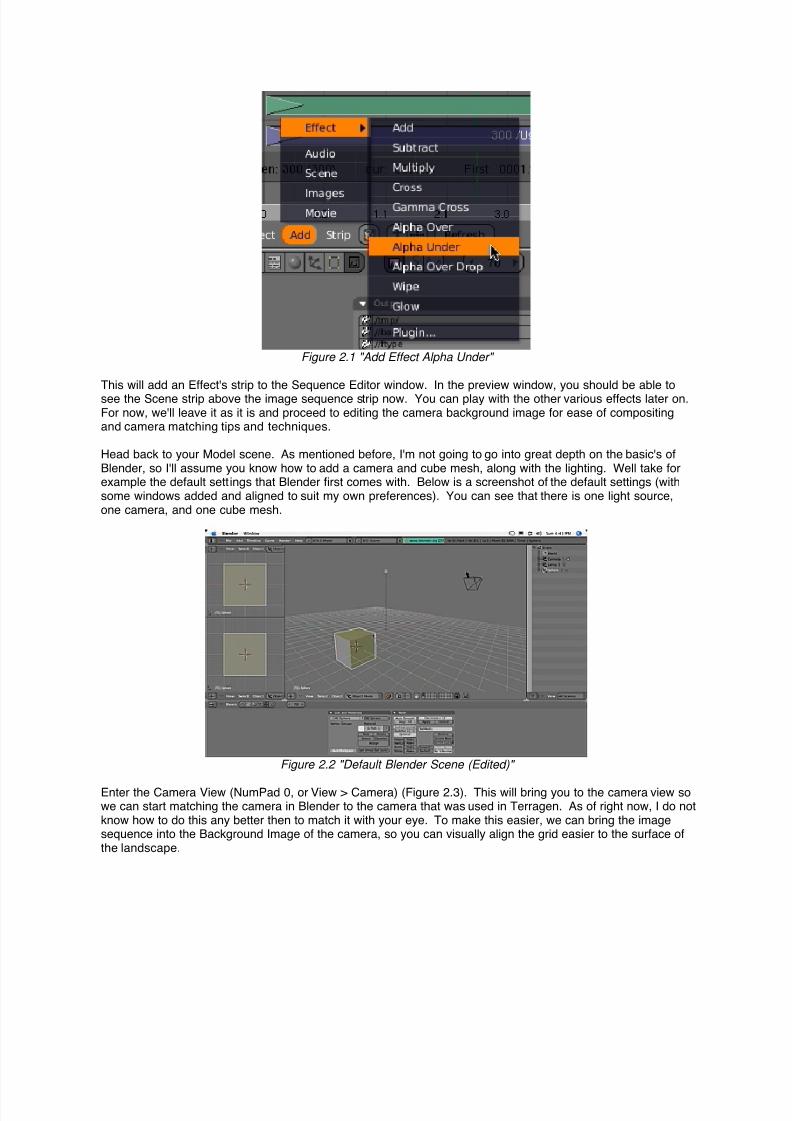
Ok, now that your are caught up to speed, we have some work to do with the blending of the strips. As of now,you will only be able to see the image sequence if you rendered the animation, simply because the Scenestrip is not currently viewable. Let's fix this. Select BOTH strips (PC Users: Shift+RMB, Mac OS X Users: Apple+RMB). Then, click on "Add > Effect > Alpha Under" (Figure 2.1).
8/3/2019 Terragen Blender Com Positing
http://slidepdf.com/reader/full/terragen-blender-com-positing 5/8
Figure 2.1 "Add Effect Alpha Under"
This will add an Effect's strip to the Sequence Editor window. In the preview window, you should be able tosee the Scene strip above the image sequence strip now. You can play with the other various effects later on.For now, we'll leave it as it is and proceed to editing the camera background image for ease of compositingand camera matching tips and techniques.
Head back to your Model scene. As mentioned before, I'm not going to go into great depth on the basic's ofBlender, so I'll assume you know how to add a camera and cube mesh, along with the lighting. Well take forexample the default sett ings that Blender first comes with. Below is a screenshot of the default settings (withsome windows added and aligned to suit my own preferences). You can see that there is one light source,one camera, and one cube mesh.
Figure 2.2 "Default Blender Scene (Edited)"
Enter the Camera View (NumPad 0, or View > Camera) (Figure 2.3). This will bring you to the camera view sowe can start matching the camera in Blender to the camera that was used in Terragen. As of right now, I do notknow how to do this any better then to match it with your eye. To make this easier, we can bring the imagesequence into the Background Image of the camera, so you can visually align the grid easier to the surface ofthe landscape.

8/3/2019 Terragen Blender Com Positing
http://slidepdf.com/reader/full/terragen-blender-com-positing 6/8
Figure 2.3 "The Camera View (Zoomed)"
To do this, you must apply a new texture to the cube mesh. Select the mesh, open the Texture Panel (F6) andapply a new Texture to the mesh (Figure 2.4). Change the Texture Type to "Image" and click on "Load Image"(Figure 2.5).
Figure 2.4 "Add New Texture"
Figure 2.5 "Load Image"
Select ONLY the first image of the sequence and click Load Image from the selection window. You now havethe first image loaded onto the texture. To get the rest, next to the "Image" panel in the Texture Panel is an"Anim and Movie" Panel. You will need to set the Frames value to the number of frames in your imagesequence. In the example, I have 300 images, so this value should be 300 (Figure 2.6).
Figure 2.6 "Set Frames value to 300"
This texture is now ready to be applied to our Camera Background Image. But first, lets ensure our animationrender resolution is set correctly.
Open your Anim Panel (F10), click on "Do Sequence". This will enable Sequence Output Rendering (thedefault is 3D Rendering) (Figure 2.7).

8/3/2019 Terragen Blender Com Positing
http://slidepdf.com/reader/full/terragen-blender-com-positing 7/8
Figure 2.7 "Enable Sequence Rendering"
Now, in the Format Panel, set the SizeX and SizeY settings to match the resolution of your image sequence. Ifyou don't know this, I suggest you open one of the images in an image editor and find out.
Figure 2.8 "Format Settings"
You should have noticed that your camera has changed to match the resolution you just set. Now, we areready to load our Background Image. Select "View" from the Camera View Window header and clickBackground Image (Figure 2.9).
Figure 2.9 "Select Background Image"
The Background Image floater window will appear. Select "Use Background Image" and then click on thebutton next to "Texture" to select the Texture you want to use (Figure 3.0).
Figure 3.0 "Select the Animated Texture"
Your texture should now be applied to the Background Image, and should change accordingly to the framethat you are currently on (in the example, frames 1 through 300 should now be synced to the 300 frames in theSequence Editor). You can change the Blend settings, etc. for viewing the background differently, but I'm justgoing to leave it where it is.

8/3/2019 Terragen Blender Com Positing
http://slidepdf.com/reader/full/terragen-blender-com-positing 8/8
Now is the time to match your camera to the scene. I don't know of any "proper" way to approach this, but tomove the camera until the plane of the grid matches the perspective of the landscape. See Figure 3.1 for amore visual explanation.
Figure 3.1 "Before and After Camera Alignment"
Hopefully this should be enough to start making your composites. There are some aspects of Blender that Ihaven't covered, and you should look more into them to make your animations nicer. There are manyresources on the internet, and I wish you much of luck with your project. If you need help with this tutorial, youcan be more then welcome to join me in #terragenusers on irc.freenode.net , or e-mail me [email protected].


![Kant on Relations and the Selbstsetzungslehre [Self-Positing]researchrepository.murdoch.edu.au/id/eprint/22456/1/Kant.pdf · Kant on Relations and the Selbstsetzungslehre [Self-Positing]](https://static.fdocuments.net/doc/165x107/5b91e5dd09d3f204338cb86f/kant-on-relations-and-the-selbstsetzungslehre-self-positing-kant-on-relations.jpg)