Teacher Guide - Technokids · This Teacher Guide contains the following three ... instructional...
52
Teacher Guide For Microsoft Office 2013 Copyright © 1993 – 2014 TechnoKids Inc. All Rights Reserved
Transcript of Teacher Guide - Technokids · This Teacher Guide contains the following three ... instructional...

Teacher Guide
For Microsoft Office 2013
Copyright © 1993 – 2014 TechnoKids Inc.
All Rights Reserved


Publisher
TechnoKids Inc.
TechnoSpecialist is published by TechnoKids Inc.
TechnoKids is a trademark of TechnoKids Inc. © Copyright 1993 – 2014. All Rights Reserved.
This book may not be duplicated in whole or in part without the expressed written consent of the
publisher, except in the form of brief excerpts or quotations for the purposes of review. The
information contained herein is for the personal use of the reader and may not be incorporated
in any other books, databases, or any kind of software without written consent of the publisher.
Making copies of this book or any portion for any purpose other than your own is a violation of
International copyright laws.
Limits of Liability and Disclaimer of Warranty
The author and publisher of this book have used their best efforts in preparing the book and the
activities contained in it. These efforts include the development, research, and testing of the
theories and programs to determine their effectiveness. The author and publisher make no
warranty of any kind, expressed or implied, with regard to these programs or the documentation
contained in this book.
Trademarks
Trademarked names appear throughout this book. Rather than list the names and entities that
own trademarks or insert a trademark symbol with each mention of the trademarked name, the
publisher states that it is using the names for editorial purposes only and to the benefit of the
trademark owner, with no intention of infringing upon that trademark.
From the Publisher
TechnoKids Inc. develops and publishes computer curriculum that provides a project-based
approach to learning. Students integrate the use of Information and Communication
Technology (ICT) to complete innovative theme-related activities.
TechnoKids Computer Curriculum is available in five categories: Primary, Junior, Intermediate,
Senior, and Camp. Each category contains a set of projects designed to integrate a range of
ICT skills into student learning including word processing, programming, graphics, spreadsheets,
desktop publishing, applied technology, telecommunications, databases, operating systems,
and multimedia.
Projects are thoroughly evaluated and tested by certified teachers to ensure they teach
leading-edge ICT skills and are developmentally appropriate for students. Each project comes
complete with teacher resource materials, such as handouts, activity sheets, evaluation forms,
parent letters, extension activities, and certificates.
TechnoKids Inc. projects enable teachers to help students become powerful technology users
while developing the problem-solving skills, self-confidence, and positive attitudes that will make
them the social and business leaders of tomorrow.
Our mission is to combine education and technology
to provide children with the core computing skills
that will best prepare them for the future.


TECHNOSPECIALIST CONTENTS
Teaching the skills of tomorrow… today!
Table of Contents
Introduction - Getting Started
How to Use This Guide ................................................................................................................................... i How to Use the Resource Files .................................................................................................................... iii Project Overview ........................................................................................................................................... iii Preparing to Teach TechnoSpecialist ....................................................................................................... iv
Session 1 – Introduction to the Computer
Getting Started .......................................................................................................................................... 1-1
Overview ................................................................................................................................................. 1-1 Materials .................................................................................................................................................. 1-1 Teacher Preparation ............................................................................................................................. 1-1 Teaching Strategy ................................................................................................................................. 1-1 Lesson Plan .............................................................................................................................................. 1-5 Learning Objectives .............................................................................................................................. 1-6
Assignment 1: Become an IT Specialist ................................................................................................. 1-7 Assignment 2: What is a Computer? ..................................................................................................... 1-9 Assignment 3: Input Devices ................................................................................................................. 1-13 Assignment 4: Output Devices .............................................................................................................. 1-17 Assignment 5: Introduction to Microsoft PowerPoint ........................................................................ 1-19 Assignment 6: Slide Master Design ....................................................................................................... 1-23 Session 1 Review: About the Computer .............................................................................................. 1-33 Session 1 Skill Review: History of the Computer ....................................................................................... 1 Session 1 Extension Activity: More About Computers ............................................................................ 2


INTRODUCTION Getting Started
Follow the instructions in this section to prepare materials necessary to
implement this project.
How to Use this Guide
How to Use Resource Files
Project Overview
Preparing to Teach


TECHNOSPECIALIST GETTING STARTED
TECHNOKIDS INC. i
How to Use This Guide
This Teacher Guide contains the following three sections:
1) Getting Started 2) Project Instructions 3) Appendices
Below is an explanation of each section.
1) Getting Started – this section contains the overview that provides a description of the project
theme, explanation of activities, and preparatory instructions.
2) Project Instructions – this section contains the project instructions. A project is seven sessions
in length. A session is a problem-solving task that relates to the theme of the project
containing assignments which are the small steps needed to complete the task. A session
includes the following parts:
Overview – an explanation of the session activities and their purpose.
Materials – a list of handouts, sample files, templates, flashcards, and teacher
resource materials needed to teach the session.
Teaching Strategies – instructional methods recommended for teaching the
activities.
Lesson Plan – a detailed list of each step in the session.
Learning Objectives – a summary of the content knowledge and technical
skills taught throughout the session. Content knowledge is information about
the topic area. Students learn about a particular topic or subject area. A
technical skill is the ability to use the computer to complete a given task.
Students acquire knowledge of software tools and program features to use
the computer to solve a problem effectively.
Assignments – a session consists of assignments completed by students.
Actions to be performed on the computer by the student are indicated with a
mouse button (). Background information and instructions are indicated
with a dash (–).
Review – a session review that contains a list of fill-in-the-blank, multiple
choice, or short-answer questions intended to review both concept and
technical knowledge (answers included).
Skill Review – an additional assignment intended to review technical skills
(includes completed sample).
Extension Activity – an additional activity that relates to the problem-solving
task presented in the session.
3) Appendices – this section contains additional information or materials including the following
resources.
Command Summary – additional information for teachers about the software
applications used to complete the project.
Terminology – a list of terms used within the project.
Glossary – a definition of each term.
Contact Information – how to contact TechnoKids Inc. for curriculum support.


TECHNOSPECIALIST GETTING STARTED
TECHNOKIDS INC. iii
How to Use the Resource Files
Accompanying the Teacher Guide in the TechnoSpecialist Resource folder are resource files.
These files are needed to complete the project activities. Below is a description of each
resource.
Acceptable Use Policy is an agreement between the student and learning
organization giving expressed written consent for a child to use the Internet.
Assessment Tools are digital files that list the learning objectives addressed
within the project. These files are customizable.
Flashcards are enlarged pictures of program commands. Designed on 3.75" x
3.75" cards, they provide an essential visual aid while teaching.
Handouts are any document that must be printed or photocopied, and
distributed to students. These can be modified by the teacher as necessary,
such as the parent letter and project certificate.
Review Questions are customizable files for evaluating knowledge about the
topic or program. Questions are multiple choice, short answer, or fill-in-the-
blank.
Sample Files are examples of a finished product. They are provided to assess
the components that complete the project and the computer tools used
during its' creation. They are designed to model activities and set a standard
upon which students should strive to achieve. These files allow students to
study the components of an activity individually or as a unit.
Skill Reviews are customizable files used to complete activities that focus on
practicing technology skills addressed in the project.
Templates are any pre-made document outline used to complete projects.
These files must be made available to the student.
Project Overview
In this project, students become information technology specialists who work for a company that
manufactures and sells personal computers. The business has launched a new initiative that will
have consumers choose components for their computer. It is called "Your Computer, Your Way!"
To help the customer pick the right hardware component to suit their needs, students create an
information package using Microsoft PowerPoint. The package explains the aspects to consider
when selecting devices using bulleted lists, tables, graphic organizers, clip art, picture files, video,
and sound clips. The information package is transformed into a presentation, interactive tutorial,
web page, and handout to educate the purchaser.
Students complete the following tasks:
In session 1, students become Information Technology Specialists. Their job is
to help customers purchase computer hardware by creating an information
package that explains computer parts in simple terms. To prepare for this task,
students learn about different types of computers, input devices, and output
devices. Afterwards, they use Microsoft PowerPoint to customize the slide
master to make a unique design for their information package. Upon
completion, students use the slide master to create a title and introduction
slide.

iv TECHNOKIDS INC.
Preparing to Teach TechnoSpecialist
In preparation of this project, ensure that each workstation is ready for students. Follow the
outlined steps below to prepare ALL necessary materials.
Complete the following:
Step 1: Install Apps Step 2: Copy the Specialist Folder Step 3: Create a Shortcut to the Specialist Folder (Optional) Step 4: Modify the Shortcut Icon (Optional) Step 5: Print Handouts (Optional) Step 6: Prepare Flashcards (Optional) Step 7: Internet Acceptable Use Policy (AUP) (Optional)
Step 1: Install Apps
Microsoft PowerPoint
Adobe Reader XI or higher (visit www.adobe.com)
Step 2: Copy the Specialist Folder
The Specialist Folder contains session materials and must be made available to each student.
1. If you have a CD, place it into the CD drive. If it does not automatically play, open
Computer and then double click the CD drive icon. Now double click the
TechnoSpecialist Resource folder in the snr-specialist-2013 folder.
If you do not have a CD, go to where the project files are stored, and double click the
TechnoSpecialist Resource folder. Locate the Specialist folder.
2. Right click on the Specialist folder and choose Copy.
3. Go to the location where you want to place the folder; for example, computer or server
share.
4. Right click at this location and choose Paste.
Step 3: Create a Shortcut to the Specialist Folder (Optional)
Create a shortcut to create quick easy access to the project files.
1. Right click on the newly pasted Specialist Folder (see step 2 above).
2. Select Copy.
3. Go to the location where students will have access to project files.
4. Right click and choose Paste Shortcut.
Step 4: Modify the Shortcut Icon (Optional)
Modify the icon to create quick easy recognition of project files.

TECHNOSPECIALIST GETTING STARTED
TECHNOKIDS INC. v
1. Right click on the "Shortcut to Specialist" icon and select Properties.
2. Click Change Icon.
3. Click Browse and go to the Icon folder within the Specialist Folder pasted in Step 2.
4. Click to select the icon and then click Open.
5. Click OK to close the Change Icon dialog box.
6. Click Apply to close the Properties dialog box and apply the changes.
Step 5: Print Handouts (Optional)
From the TechnoSpecialist Resource folder, open the Handout folder found within the following
session folders.
TechnoSpecialist Certificate (Session 7)
TechnoSpecialist Parent Letter (Session 7)
Step 6: Prepare Flashcards (Optional)
Flashcards can be used throughout the project to help students easily identify a specific
command on the ribbon. Images have been enlarged to 3.75" x 3.75" cards, with approximately
four cards per page. Adobe Reader is required to open these files. Download from
www.adobe.com.
Print the following PowerPoint 2013 flashcards:
Home Tab
View Tab
Slide Master Tab
Insert Tab
Picture Tools Format Tab
Drawing Tools Format Tab
Mini Toolbar
Table Tools Design Tab
Table Tools Layout Tab
Smart Art Tools Design Tab
Smart Art Tools Format Tab
Review Tab
Slide Show Tab
1. Open the TechnoSpecialist Resource folder and double click the Flashcards folder.
2. Open each document and print to a color printer if available.
3. Cut along the dotted guidelines to separate each card.
4. Process through electric laminating machine to coat each card in a plastic film, or
mount onto sturdy paper to increase durability.
5. Keep available as a teaching tool, or affix to wall or other surface for easy reference by
students.


SESSION 1 Introduction to the
Computer
In this session, students become Information Technology Specialists. Their job is
to help customers purchase computer hardware by creating an information
package that explains computer parts in simple terms. To prepare for this task,
students learn about different types of computers, input devices, and output
devices. Afterwards, they use Microsoft PowerPoint to customize the slide
master to make a unique design for their information package. Upon
completion, students use the slide master to create a title and introduction slide.
Assignment 1: Become an IT Specialist
Assignment 2: What is a Computer?
Assignment 3: Input Devices
Assignment 4: Output Devices
Assignment 5: Introduction to PowerPoint
Assignment 6: Slide Master Design
Session 1 Review: About the Computer
Session 1 Skill Review: History of the Computer
Session 1 Extension Activity: More About the Computer


TECHNOSPECIALIST SESSION 1
TECHNOKIDS INC. 1-1
Session 1: Introduction to the Computer
Getting Started
Overview
In this session, students become Information Technology Specialists. Their job is to help customers
purchase computer hardware by creating an information package that explains computer parts
in simple terms. To prepare for this task, students learn about different types of computers, input
devices, and output devices. Afterwards, they use Microsoft PowerPoint to customize the slide
master to make a unique design for their information package. Upon completion, students use
the slide master to create a title and introduction slide.
Materials
Microsoft PowerPoint
PowerPoint 2013 Flashcards (Optional)
o View Tab
o Slide Master Tab
o Mini Toolbar
o Insert Tab
o Picture Tools Format Tab
o Drawing Tools Format Tab
o Home Tab
TechnoSpecialist Computers sample file, TechnoSpecialist Computers Kiosk sample file,
TechnoSpecialist Computers Video sample file
Session 1 Review: About the Computer
Session 1 Skill Review: History of the Computer
o Computer History template
o Computer History sample file
Teacher Preparation
Make the Specialist folder available to students.
Determine a location for students to save their work during this project.
(Optional) Print the flashcards listed in the materials list for this session.
Teaching Strategy
In this project, students become IT Specialists who create an information package for customers
to help them select hardware components for their computer. Explain scenario to students.
In this project, you become an Information Technology (IT) Specialist,
who works for a company that manufactures and sells computers. The
business has launched an initiative that will have consumers choose
their components for their computer. It is called "Your Computer, Your
Way!" To help the customer pick the hardware component to suit their
needs, you create an information package to educate the purchaser.

TECHNOSPECIALIST
1-2 TECHNOKIDS INC.
In this session, students are introduced to computers. Explain scenario to students.
In this session, you begin your job as an IT Specialist. To start, you learn about the different
types of computers and then you help customers select a machine that suits their needs.
Afterwards, you learn about input and output devices. This information will come in
handy when you have to assist customers.
Next, you begin construction of the information package. This package will contain
helpful information about hard drives, memory, storage devices, processors, monitors,
graphic cards, and sound cards. To get ready for this task, you create a slide master for
the information package. A slide master is a design that sets the layout of placeholders,
background style, font formatting, bullet style, headers, and footers. Customizing the slide
master is a great way to create a unique look that is "one-of-a-kind." Once you have
finished changing the slide master, you will create a title and introduction slide. You may
find that once you add content to the information package, additional edits to the slide
master are needed to perfect the layout or design choices.
TEACHER TIP: ABOUT THE STRUCTURE OF EACH SESSION
In this project, each session is divided into two parts. In the first part, students learn about
computer hardware. In the second part, students use Microsoft PowerPoint to create an
information package by designing slides that explain the computer part in simple terms. The
information package will be shared with customers in a presentation, interactive tutorial,
video, and handout.
You may wish to view samples of completed work. These are available in the Specialist folder:
TechnoSpecialist Computers Presentation (presented in Assignment 22)
TechnoSpecialist Computers Kiosk (interactive tutorial created in Assignment 23)
TechnoSpecialist Computers Video (produced in Assignment 24)
TechnoSpecialist Computers with Animations (Session 6 extension activity)
Students will create the following slides:
Title
Slide
Introduction
Slide
Storage Devices Optical
Drive
Flash
Drive
Hard
Drive
Storage
Capacity
Memory
ROM RAM
CPU Monitor
Attributes
Graphics Card Sound
Card
Assignment 1 Become an IT Specialist
In this assignment, students learn about the job duties of an IT Specialist. They consider the
information and skills they already possess about the computer. Afterwards, they select a name
for the company where they work.

TECHNOSPECIALIST SESSION 1
TECHNOKIDS INC. 1-3
Assignment 2 What is a Computer?
In this assignment, students learn about types of computers. They read descriptions about each
type and then answer questions to select the computer that is most suitable for the task.
Assignment 3 Input Devices
In this assignment, students learn about input devices, including the keyboard, mouse, scanner,
microphone, joystick, trackball, touch pad, touch screen, and light pen. It is a good idea to take
apart a broken keyboard and mouse for your students to study.
Assignment 4 Output Devices
In this assignment, students learn about output devices, including the speakers, headphones,
monitor, printer, plotter, and speech synthesizer.
Assignment 5 Introduction to Microsoft PowerPoint
In this assignment, students are introduced to the Microsoft PowerPoint environment. Students
are asked to read a description of each part of the application window and then label a
diagram. Encourage students to click around in the program to discover the function of each
part. Next, students explore the ribbon. This is a great way to learn about the location of
commonly used commands. One suggestion is to turn the activity into a scavenger hunt. You
can give students "clues" to see if they can find the tab, group, or command.
Terminology
Introduce the following terminology:
views: A bar at the bottom right of the PowerPoint window that is used to switch
between Normal view, Slide Sorter view, and Slide Show view.
file tab: A tab which opens a menu of basic commands used in many Microsoft Office
programs, such as New, Open, Save and Print.
quick access toolbar: A customizable toolbar found beside the Office Button that holds
commands that are used often.
zoom slider: A slider on the status bar that changes the magnification level of the slide in
the window.
slide pane: A pane in the middle of the screen used to display the current slide.
notes pane: A pane at the bottom of the window used to add speaker notes.
slides tab: A pane at the left side of the window used to display thumbnails of all the
slides in the presentation. When the outline tab is selected, the text on the slides is shown.
window controls: A set of three controls at the top right corner of a program window
used to minimize, maximize/restore, or close the program window.
ribbon: A band that contains a set of tabs including Home, Insert, Design, Transitions,
Animations, Slide Show, Review, View and Add-Ins.
tab: A collection of commands organized into groups, located on the ribbon.
group: A set of commands on a tab that do similar actions.
command: A button, box, or menu that tells the computer what to do.

TECHNOSPECIALIST
1-4 TECHNOKIDS INC.
Assignment 6 Slide Master Design
In this assignment, students create a unique design for their information package by editing the
slide master. Students customize the background, text, bullet style, clip art, shape, header, and
footer on the slide master. Upon completion, they "test" their design by creating a title slide and
inserting a new slide with a title and content layout. Once students add some text, they will be
able to determine if the slide master needs some additional changes.
Prior to beginning, discuss the purpose of a slide master. A slide master:
creates a unique design
produces a consistent look for each slide
allows a company logo to be displayed on each slide without having to insert it on each
slide separately
places a slide number on each slide
puts a date and time stamp on each slide that updates automatically
places the same words on each slide such as the company name or company motto in
the header or footer
Terminology
Introduce the following terminology:
slide master: A template that gives a presentation a consistent look by controlling the
background, formatting of text, and placement of objects on a slide.
slide master view: A view used to edit the slide master by changing the background,
text, and objects. In this view, a list of slide layouts is displayed in the left pane and the
current slide being edited is displayed in the right pane.
normal view: A view used to create slides. In this view, a list of slides in the presentation is
displayed in the left pane, the current slide is displayed in the center pane, and the
speaker notes are shown in the bottom pane.
contextual tab: An additional tab on the ribbon that appears when doing a specific task
such as formatting a shape.
background: The fill of a slide which can be a color, gradient, texture, pattern, or picture.
gradient: A background for a slide that has smooth blending from one color to another.
texture: A background for a slide that consists of a design that has a surface quality such
as sandstone, marble, or wood.
placeholder: A box used to hold text or graphics on a slide.
bullet: A symbol that is added before text.
clip art: A collection of images that can be inserted into a document.
object order: To stack objects one on top of another.
rotate: To turn an object.
flip: To turn an object over.
header: The area at the top of a slide that can be used to place information for
identification purposes such as the date, slide number, or text.
footer: The area at the bottom of a slide that can be used to place information for
identification purposes such as the date, slide number, or text.

TECHNOSPECIALIST SESSION 1
TECHNOKIDS INC. 1-5
Lesson Plan
Assignment 1 - Become an IT Specialist
Read about the job duties of an IT specialist.
Select a company name.
Assignment 2 - What is a Computer?
Read about different types of computers.
Select a suitable computer to complete the task.
Consider the impact of computers on society.
Assignment 3 - Input Devices
Learn about input devices and then complete the crossword.
Assignment 4 - Output Devices
Learn about output devices and then match the device to the definition.
Assignment 5 - Introduction to Microsoft PowerPoint
Label the diagram of the Microsoft PowerPoint window.
Answer questions about the ribbon to learn about the tabs, groups, and commands.
Use the Zoom slider and answer questions about how it works.
Assignment 6 - Slide Master Design
Open Microsoft PowerPoint.
View the slide master.
Select the default slide master.
Change the background color of the slide master to a solid fill, gradient, or texture.
Change the look of the text on the slide master by formatting the letters.
Change the bullet style for each level on the slide master.
Insert a clip art to act as a company logo.
Format the appearance of the logo.
Draw a shape to create a border, draw interest towards the title, or frame the text box.
Format the appearance of the shape.
Insert a header and footer to include the date, slide number, and company name.
Close slide master view.
Test the layout and design of the slide master.
o Add a title and student name to the title slide.
o Insert a new slide. Add a title and text to the introduction slide.
o Study the design of the slide. Make changes to the slide master if necessary.

TECHNOSPECIALIST
1-6 TECHNOKIDS INC.
Learning Objectives
Below is a list of the learning objectives for this session. Students should be able to complete
each task independently.
Content Knowledge:
define the term computer, input device, and output device
identify different types of computers including the microcomputer, laptop computer,
workstation, minicomputer, mainframe, and super computer
determine what type of computer a person should purchase based upon their needs
identify different input devices including the keyboard, mouse, scanner, microphone,
joystick, trackball, touch pad, touch screen, and light pen.
deduce the input device based on the definition
identify different output devices including the speakers, headphones, monitor, printer,
plotter, and speech synthesizer
match the definition to the output device
Technical Skills:
Operating Environment
open and close a program
open and close a file
save a file
use the Zoom slider to change the magnification
Presentation Skills
view the slide master
select the default slide master
format slide background to a solid color, gradient, or texture
format the font, font size, font style, alignment, and font color of text
change the bullet style for each level on the slide master
insert a picture onto the slide master and format the appearance
format the picture by changing the brightness, contrast, and color, applying a style,
adding a border, or applying an effect
draw a shape on the slide master and format the appearance
format the shape by changing the style, fill, border, and effect
change the object order of slide objects
align an object on a slide
rotate or flip an object on a slide
set the header and footer on the slide master
close slide master view
add text to a placeholder
insert a new slide
select a slide layout
change the slide in view
Applied Technology:
create a unique design for a presentation by editing the slide master
create a title slide and an introduction slide

TECHNOSPECIALIST SESSION 1
TECHNOKIDS INC. 1-7
Assignment 1: Become an IT Specialist
What is an IT Specialist?
An IT Specialist is someone who has expertise when working with computers. It is a general term
used to describe this profession but most people have a specialty such as networking, data
management, software, or customer support.
What are the job duties of an IT Specialist?
plan the installation of new hardware and software
install hardware and software
repair hardware and software
test hardware and software
maintain hardware and software
network computers
maintain security of the computer network
manage system resources such as printers and files
develop a procedure for data management such as sharing and storing files
maintain the security of data such as back up procedures
assist co-workers with using hardware and software
assist customers with using hardware and software sold by company
1. What do you know about computers that could help someone who knows nothing
about computers?
In this project, you will become an Information
Technology (IT) Specialist, who works for a
company that manufactures and sells
personal computers.
The business has launched a new initiative that
will have consumers choose their components
for their computer. It is called "Your Computer,
Your Way!"
To help the customer pick the right hardware
component to suit their needs, you must
create an information package that can be
used to educate the purchaser.

TECHNOSPECIALIST
1-8 TECHNOKIDS INC.
Where Do You Work?
Combine your name with your product – Karen's Computers
Say it with initials – K.M. Computers
Salute your street – Kenilworth Computers
Abbreviate your name – Kar Computers
Say what you do – Computer Customization
Be first in the telephone book – AAAmazing Computers
Be last in the telephone book – ZZZany Computers
Link what with where – Computers for Home or Office
Link benefit with product with superiority – Quality Customized Computers
Make a name for yourself – Karen's
Say what your customers should do – Computers for Connections
Nominate your neighborhood – Hamilton Mountain Computers
Tell of your town – Hamilton Computers
2. What do you want to call your business?
3. Why did you choose this name for your business?
To get started, you need to decide on a name for
the company where you work. Below are some tips
that will give you some great ideas.

TECHNOSPECIALIST SESSION 1
TECHNOKIDS INC. 1-9
Assignment 2: What is a Computer?
You are going to become an Information Technology (IT) Specialist for
a company that manufactures and sells computers.
Read the information about different types of computers and then
answer the questions to help customers find the computer that meets
their needs.
What is a Computer?
A computer is a device that has the ability to store, retrieve, and process data, and can be
programmed with instructions that it remembers. The parts that make up a computer are called
hardware. Hardware includes input devices, output devices, internal components, and memory.
Different Types of Computers
When you use the word computer, it is similar to saying the word dog. The word describes the
type of animal but ignores all the different breeds and how each kind can be very different in
appearance and disposition. Computer is a very general term; however, there are many
different types. It is important to note that just like dogs, there are mixed breeds so there can be
considerable overlap.
There are four different types of computers: 1) microcomputer, 2) minicomputer, 3) mainframe,
and 4) super computer.
1. Microcomputer
A microcomputer is a small personal computing device that has
a microprocessor. This generic term includes a range of devices
such as desktop computer, workstation, laptop, tablet,
smartphone, gaming console, and other forms of mobile
technology.
A. Desktop Computer
A desktop computer is a small computer that fits on a desk and is to be
used by one person. It is based on the microprocessor technology that
enables manufacturers to put an entire computer-processing unit (CPU) on
one chip, which acts as the brain of the computer, telling each part what
action to perform. Today, the world of personal computers is divided
between the Macintosh and PC.
Macintosh: The Macintosh computer is usually called a Mac. It was introduced by the company
Apple in 1984. It was the first widely used computer with an operating system that used pictures
to help a person make selections by clicking on icons on the screen that looked like file folders, a
trashcan, and other items that could be found in a real office. This made it easy for a person to
change computer settings, open software, and copy or delete files because the icons were
familiar.
PC: PC is short for personal computer. It is the type of equipment that conforms to the standard
set by the company IBM many years ago when desktop computers were just becoming popular.
The PC is based on the Intel microprocessor and mostly uses the Windows operating system.

TECHNOSPECIALIST
1-10 TECHNOKIDS INC.
B. Workstation
A workstation is more powerful and faster than most personal computers. It is typically used for
graphics, scientific computing, computer assisted design (CAD), and other applications
requiring high performance and memory. Like microcomputers, most workstations are to be
used by one person. In terms of computing power, workstations lie between microcomputers
and minicomputers, although the line is fuzzy on both ends.
C. Laptop Computer or Notebook Computer
A laptop is a portable personal computer that is small enough to fit in a
person's lap and weighs only a few pounds. It has two halves that are
joined by a hinged area that allows the device to close. The top half is a
flat screen and the bottom half includes computer components such as
a keyboard, track pad, and disk drive. The device is powered by a
rechargeable battery. Today, laptops are sometimes called notebooks
or netbooks. In terms of computing power, they are nearly equivalent to
personal computers. They have similar processing speed, memory
capacity, and storage space. However, all this power in a small
package is expensive, costing often twice as much as a desktop computer.
D. Tablet
A tablet is a flat portable personal computer that uses a touch screen. The device is
powered by a rechargeable battery. Often a screen protector is used to shield the
device.
E. Smartphone
A smartphone is a mobile personal device that is pocket sized. Its primary use is to make
phone calls and send text messages. However, it can also take photos or video. As well,
apps can be installed, turning it into a mini computer. Some devices have a touch
screen while others are controlled using buttons or a keyboard. The device is powered by a
rechargeable battery.
F. Gaming Console
A gaming console is a device used primarily to play video games, although it can
also be used to play movies, access the Internet, or stream content. There are
stationary and portable devices. Stationary consoles are typically attached to a
television to display the image and use a handheld controller to interact with the
device. Whereas, a portable gaming console has a built in screen and
uses buttons or motion to give commands.
2. Minicomputer or Server
A minicomputer is a midsize computer. In the past, the minicomputer was a computer that was
sold to small and medium sized business to run various office applications. In recent years, the
minicomputer has evolved into the "mid-range server." A server is a computer system that stores
files and runs programs. It can carry out more than one program or instruction at the same time,
allowing it to support hundreds of users at once. Each computer is networked together and is
connected to the server. People login to the server by typing in a username and password and
then access the applications and documents while working from their personal computer.

TECHNOSPECIALIST SESSION 1
TECHNOKIDS INC. 1-11
3. Mainframe
A mainframe is a large computer that is about the size of a refrigerator. It is
typically used for commercial applications by large businesses. A long time
ago mainframes used vacuum tubes and generated a lot of heat, thus
they needed air-conditioned rooms. Today, the large vacuum tubes have
given way to transistors. These powerful computers have the ability to
support thousands of users at one time and have enormous storage
capacity. A mainframe computer can process millions of instructions per
second. A mainframe computer is used by data centers that process large
amounts of information such as banking transactions. A mainframe has the
processing power of over 1500 servers. They are very expensive.
4. Super Computer
A supercomputer is the fastest type of computer. Supercomputers are very expensive and are
employed for specialized applications that require immense amounts of mathematical
calculations. For example, weather forecasting requires a supercomputer. Other uses of
supercomputers include fluid dynamic calculations, nuclear energy research, and petroleum
exploration. The chief difference between a supercomputer and a mainframe is that a
supercomputer channels all its power into executing a few programs as fast as possible, whereas
a mainframe uses its power to execute many programs at the same time.
What Computer is Right for the Job?
Determine what type of computer each person should purchase. Pick from the list.
desktop computer laptop gaming console
tablet mainframe smartphone
1. Megan does a lot of traveling. She is a journalist who writes newspaper articles from
remote locations all over the world. She needs to purchase a new computer. What type
should she purchase? Explain your answer.
Megan needs a laptop computer because it is portable and lightweight, which means
she can take it anywhere she travels.
2. A company has over 20 000 employees. The office staff must maintain stock, bill
customers, and process order information. They need a computer that can store lots of
information in a central location that employees can access from their office computer
or using the Internet. What type of computer should they purchase? Explain your answer.
They should purchase a mainframe computer because it has a large storage capacity.
Moreover, it can support hundreds of thousands of users at one time.

TECHNOSPECIALIST
1-12 TECHNOKIDS INC.
What is the Impact of Computers on Society?
4. How do you use the computer to learn?
5. How do you or your parents use the computer to work?
6. How do you use the computer to communicate?
7. How do you use the computer to entertain yourself?
8. What improvement to the computer would you make so that it would improve your life?
Why do you think this improvement will make such a difference? Do you think the
improvement will ever happen?
There are many different kinds of computers. They have
changed the way people communicate, learn, work, and play.
Consider how computers influence you.

TECHNOSPECIALIST SESSION 1
TECHNOKIDS INC. 1-13
Assignment 3: Input Devices
An input device is a computer part that allows the user to enter
information into the computer. Input devices include the
keyboard, mouse, scanner, microphone, joystick, trackball,
touch pad, touch screen, and light pen. You need to learn
about input devices because you will be selling them to
customers.
Keyboard
On most computers, a keyboard is the main text input device. The keyboard contains letters,
numbers, standard function keys, cursor movement (ARROW) keys, formatting keys, and other
manufacturer-customized keys.
The keyboard uses the same key arrangement as the
mechanical and electronic typewriter keyboards that came
before the computer. This arrangement dates back to the
1870s. The standard arrangement of alphabetic keys is known
as the QWERTY (pronounced KWEHR-tee) keyboard. Its name
results from the arrangement of the six keys at the upper left of
the first of the three rows of alphabetic keys.
How does the computer know that the letter “a” key is being pressed?
The keyboard is made up of wires that connect together in a grid
pattern. The purpose of the keys on a keyboard is to forcibly make
these wires touch when the key is pressed (they would not touch
otherwise). When the wires touch, an electrical pulse is sent through
the wires to a computer chip inside the keyboard.
The chip determines the location where the wire are touched, and based on the position it
knows the key that was pressed because it has a character map of all the keys on the
keyboard. This map tells the computer when the letter “a” is pressed.
How do the keys “bounce” back up after being pressed?
Underneath each key is a piece of material called a dome. When a key is pressed, a plunger on
the bottom of the key pushes down against the dome. When the key is released, the dome
springs back to its original shape, forcing the key back up to its at-rest position.
The keys on the keyboard need to be pressed at a certain speed. If a key is held for a longer
amount of time, then the wires connect for a long time. The computer then thinks it should type
many letters instead of only one.
Do you have a broken
keyboard? Ask you
teacher if you can take it
apart to see how it works.

TECHNOSPECIALIST
1-14 TECHNOKIDS INC.
Mouse
The mouse is also a main input device. It is a small
device that a person pushes across a desk surface to
position the mouse pointer. The buttons on the top of
the mouse are used to perform tasks such as making
a selection, changing the view in a window, moving
an item on the screen, or resizing an object.
There is the optical mouse and the mechanical mouse.
Optical Mouse
The optical mouse uses a tiny camera that takes over a thousand pictures per second to
determine how to move the mouse pointer. The mouse has a small, red light-emitting diode
(LED) that bounces light off the desk onto a sensor. The sensor changes the light into an image.
The sensor sends each image to a digital signal processor (DSP) for analysis. The DSP compares
the new image to the previous one to see how the position of the mouse has changed. Based
on these changes the DSP determines how far the mouse has moved and sends the information
to the computer. The computer then moves the cursor on the screen.
Mechanical Mouse
The mechanical mouse uses a ball and rollers to determine how to move the mouse pointer.
When the mouse is moved along the mouse pad, it causes a ball inside the mouse to move. As
the ball moves, it touches rollers inside the mouse. One of the rollers is set to notice motion in a
horizontal direction so it knows when the mouse is being pushed left or right. The other roller is set
to notice motion in a vertical direction so it knows when the mouse is pushed up or down.
Each roller connects to a shaft. The shaft is attached to a wheel. When the mouse ball touches
the roller, it causes the shaft to spin, making the wheel turn. An infrared light and an infrared
sensor are located on either side of the wheel. When the wheel turns, the light shines through the
holes in the wheel. This causes the infrared sensor to see pulses of light. The rate of the pulsing is
directly related to the speed of the mouse and the distance it travels.
A processor chip reads the pulses from the infrared sensors and turns them into binary data that
the computer can understand. The chip sends the binary data to the computer through the
mouse's cord. A mouse-responsive program translates the binary data and uses the information
to move the cursor on the screen.
Scanner
A scanner is an input device. It can read text or pictures printed on paper
and translate the information into a form the computer can use. A scanner
serves as the eyes of the computer.
Scanners use a range of processes to copy an image. Some use a lamp that shines light across
the object being scanned. In this case, the light is reflected off mirrors into a device. The device
can tell the color of the pixel, as well as the lightness or darkness. The device converts each pixel
into a binary number that when combined, make up the image.
Many new scanners are replacing the mixture of lights and mirrors, with light emitting diodes
(LEDs). The LEDs create a white light that is captured by a row of sensors. These sensors convert
the information into an image.
Do you have a broken
mouse? Ask you teacher if
you can take it apart to
see how it works.

TECHNOSPECIALIST SESSION 1
TECHNOKIDS INC. 1-15
Microphone
A microphone is used to record or transmit sound made by a person’s voice
when they talk or sing. The voice may be recorded in order to make music or
create a narration. As well, it can be used to communicate with another
person using a computer in a separate location. In this case, it acts as a
phone with the microphone being the instrument used to speak to someone.
Joystick
A joystick is a lever that moves in all directions and controls the movement of a
pointer or some other symbol. A joystick is similar to a mouse, except that with
a mouse the cursor stops moving as soon as the mouse stops moving. With a
joystick, the pointer continues moving in the direction the joystick is pointing. To
stop the pointer, the joystick must be returned to its upright position. Most
joysticks include buttons called triggers. Joysticks are used mostly for computer
games, but they are also used occasionally for computer assisted design and
other applications.
Trackball
A trackball contains a ball which, when rotated, changes the position of the
pointer on the screen. Unlike the mouse, a trackball is not pushed along the
desktop but remains stationary, with only the ball moving. Sometimes a
mouse contains a trackball to adjust the mouse pointer quickly. Often a
laptop computer or keyboard will have a trackball to move the mouse.
Touch Pad
A touch pad is used to position the mouse pointer. It reacts to the touch of a
finger as it is moved across the pad. It attaches to the computer in the same
fashion as the mouse. However, it remains stationary as the finger moves across
it to control the mouse pointer. A touch pad is often placed below the
keyboard on a laptop computer.
Touch Screen
A touch screen is a special monitor that is touched with the
finger to make selections. This input device is popular with
handheld devices such as tablets, cell phones, and music
players. It is also often used in a kiosk in public places such as
museums or bank machines. It can be used in businesses as a
means for cashiers to enter a customer order.
Light Pen
A light pen is a pen-shaped object that is dragged over a computer screen,
tablet, or other surface. The pen is used to make menu selections, write
handwritten notes, or draw. This device is also called a digital pen or scribe.
Digital pens are perfect for handheld devices, in harsh workplace
environments, during a lecture to make notes, or to create a signature on a
document.

TECHNOSPECIALIST
1-16 TECHNOKIDS INC.
Putting Information IN
keyboard mouse scanner
microphone joystick trackball
light pen touch pad touch screen
3.T O U C H S C R E E N
R
1.K A 4.T
E C O
7.J O Y S T I C K U
B B C
5.M O U 2.S E A H
A C 8.L I G H T P E N
R A L A
D N D
N
E
6. M I C R O P H O N E
Down Across
1. An input device that contains keys
used to type letters and numbers.
3. An input device that is a special monitor
which, when touched with a finger, is
used to make selections.
2. An input device that uses lights and
mirrors to copy an image on a piece
of paper and place it into a format
the computer can use.
5. An input device used to move the
mouse pointer on the screen, by pushing
the object across the surface of a desk.
3. An input device that contains a ball
which when rotated changes the
position of the mouse pointer on the
screen.
6. An input device used to record or
transmit sound made by a person’s
voice when they talk or sing.
4. An input device that reacts to the
touch of a finger as it is moved
across the pad.
7. An input device used to move the
mouse pointer or other symbol, by
moving a lever in all directions.
8. An input device shaped like a pen that is
used to draw, make menu selections, or
write notes.

TECHNOSPECIALIST SESSION 1
TECHNOKIDS INC. 1-17
Assignment 4: Output Devices
An output device is a component that allows information to
come out of the computer. The output can be seen or heard.
Output devices include speakers, headphones, monitor, digital
projector, printer, plotter, and speech synthesizer. You need to
learn about output devices because you will be selling them to
customers.
Speakers
Speakers are used to hear sound from the computer. The volume is controlled by
turning a knob.
Headphones
Headphones are small speakers that are placed over or into the ear. This
device is used to hear the sound from the computer privately.
Monitor
The monitor is an essential part of a computer system that displays text and graphics
generated by a computer. Monitors display information in many colors and are best
compared with color televisions. The number of colors is almost endless on almost
any monitor; however, the number of colors you see depends on the limitations on
the graphics card that drives the monitor.
Video or Digital Projector
A video or digital projector is a device attached to a computer that
receives a video signal and projects an enlarged image onto another
surface such as a screen or wall. It is widely used in conference rooms or
classrooms to share information.
Printer
A printer is a device that accepts text and graphic output from a computer and transfers the
information to paper. Although there are several types of printers, the two standard types of
printers are ink jet and laser jet.
Ink Jet: The inkjet sprays ink from an ink cartridge at very close range
to the paper as it rolls by.
Laser Jet: The laser printer uses a laser beam reflected from a mirror
to attract ink (called toner) to selected paper areas as a sheet rolls
over a drum.

TECHNOSPECIALIST
1-18 TECHNOKIDS INC.
Plotters/Large Format Printer
A plotter is a printer that uses one or more pens, which can be raised,
lowered, and moved over the paper to draw lines. As a result, a plotter
can produce continuous lines, whereas printers can only simulate lines
by printing a closely spaced series of dots. In the past, a plotter was
commonly used to create technical documents such as blue prints
because they made more precise drawings than a standard printer did.
However, today, the plotter is being replaced by a large format printer. These printers have a
print head that contains more than 15 000 nozzles. These nozzles spray ink in a high density on
the paper to produce sharp lines and bold color. The ability of the large format printer to create
quality images quickly means that they are now commonly used to create blueprints and large
posters.
Speech Synthesizers
A speech synthesizer is a card that goes into the computer that is used to
convert words into speech. The speech is heard using an external speaker. A
speech synthesizer can be used to translate text from English to Spanish. People
who are unable to speak can also use this device. They can type what they
want to say into the computer and the speech synthesizer speaks the words.
People with learning disabilities also use this device. They can use the speech
synthesizer to read the text so that they can understand the words. As well, if a
person is unable to see, they can use a Braille typewriter to open a document
and have the computer read the contents.
Information is Given OUT
Match the output device to its description by writing the correct letter beside the name of the
computer part.
A. An output device that speaks aloud words on the
screen. E 1. printer
C 2. plotter B. An output device that displays pictures and words on a
screen.
B 3. monitor C. An output device that prints graphs, charts, and other
documents using pens that draw lines, arches, and
curves on paper.
D 4. headphones
D. An output device that is worn on the head and has a
speaker over each ear.
A 5. speech synthesizer
E. An output device that prints pictures and words by
placing dots on the paper.

TECHNOSPECIALIST SESSION 1
TECHNOKIDS INC. 1-19
Assignment 5: Introduction to Microsoft PowerPoint
You will be using Microsoft PowerPoint to create an information package that will
explain, in simple language, computer hardware to customers looking to build
their own computer system or purchase individual components. Answer the
questions to learn more about the program.
Open Microsoft PowerPoint
Open PowerPoint 2013.
Click Blank Presentation.
Label the Parts of the PowerPoint Window
Use the descriptions on the next page to label the parts of the window below.
1. File Tab 4. Window Controls 7. View Shortcuts
2. Quick Access Toolbar 5. Slides Tab 8. Zoom Slider
3. Ribbon 6. Title Bar 9. Slide Pane

TECHNOSPECIALIST
1-20 TECHNOKIDS INC.
Part Description
file tab A tab which displays file management options such as New, Open, Save, Save As,
Print, Share, Export, and Close.
ribbon A band along the top of the window that holds the quick access toolbar, title bar,
tabs, commands, window controls, and other tools.
slides tab A tab at the left side of the window used to display thumbnails of all the slides in the
presentation. Use the thumbnails to view, delete, or move slides.
title bar A bar at the top of the window that displays the file and program name.
quick access
toolbar
A customizable toolbar that holds frequently used commands such as Save, Undo,
Redo, or Repeat.
view shortcuts A set of tools at the bottom of the PowerPoint window used to switch views.
zoom slider A slider that changes the magnification level of the slide in the window.
slide pane A pane in the middle of the screen used to display the current slide.
window controls A set of controls used to minimize, maximize/restore, or close the program window.
Change the View
Click Notes at the bottom of the window.
– A pane opens. You can type speaker notes into this pane.
10. How could you use speaker notes during a presentation?
Click Comments at the bottom of the window.
– A pane opens on the right. You can view, add, and delete comments.
11. How can comments from viewers help you to improve your presentation?
Study the View Shortcuts.
12. Which View Shortcut will display slides as thumbnails to make it easy to sort?
Slide Sorter
13. Which View Shortcut will play the presentation?
Slide Show
Which view do you prefer? Depending on the task you want to
complete there are several view options. Try them!

TECHNOSPECIALIST SESSION 1
TECHNOKIDS INC. 1-21
A Closer Look at the Ribbon
14. The ribbon has tabs. Each tab holds commands that do a similar job.
Draw a box around the Home tab.
15. Each tab is divided into groups. A group is a set of commands that do similar actions like
insert, delete, or change the layout of a slide. Draw a box around the Slides group.
16. Each group has commands. Commands are a button, box, or menu that tells the
computer what to do. Draw a box around the Cut command in the Clipboard group.
Questions About the Ribbon
17. Look at the Home tab. In which group of commands can you change the format of text,
such as selecting font, size, bold, italic or underline styles?
Font group
18. Look at the Home tab. What group has the command Layout?
Slides group
19. If you want to add an object such as a picture, shape, or header and footer, which tab
of the ribbon should you choose?
Insert tab
20. Click the View tab. What group has the command Slide Master?
Master Views
21. Which tab would you select to find the Spelling command?
Review tab
The Ribbon is a band along the top of the window that
holds the quick access toolbar, title bar, tabs, commands,
window controls, and other tools. Have a closer look.
Group Command
Tab
TECHNOSPECIALIST
1-22 TECHNOKIDS INC.
Change the Zoom Level
22. Drag the Zoom slider to the left. Now drag the Zoom slider to the right.
What happens when the Zoom slider is dragged to the right?
The slide look bigger and the Zoom level number gets bigger.
23. Click Zoom In . Now click Zoom Out .
What happens when the Zoom Out button is clicked?
The slide look smaller and the Zoom level number gets smaller.
24. Click on the Zoom level.
Click to select Fit from the Zoom options. Click OK.
25. What happens when the Fit button is clicked?
The whole slide fits on the screen.
Exit PowerPoint
Click the Close button.
The Zoom level lets you get a better look at your slide on the screen.
Zoom Out Zoom In
Zoom level Zoom
Zoom level

TECHNOSPECIALIST SESSION 1
TECHNOKIDS INC. 1-23
Assignment 6: Slide Master Design
Open PowerPoint
Open PowerPoint 2013.
Click Blank Presentation.
View the Slide Master
You are going to change from Normal View to Slide Master View. In Slide Master
View the left pane shows the different slide layouts. In the right pane is the blank
slide master.
Click the View tab, find the Master Views group, and then click Slide Master.
– The view changes to Slide Master view.
You are going to create an information package using PowerPoint. To
make the information package look unique, you will edit the slide
master. The slide master sets the look of the background, text, bullets,
header, and footer. You will customize the slide master for your
company. The slide master will help to make the information package
look professional because each slide will have a similar design.
To edit the slide master you will:
customize the background fill
format the font, font size, font style, and font color of text
change the alignment of text
select a bullet style
insert and format a clip art to act as the company logo
draw and format a shape to accent the text boxes
include a header and footer with the date, company name,
and slide number
slide thumbnail pane
shows different slide
layouts
blank slide master

TECHNOSPECIALIST
1-24 TECHNOKIDS INC.
Select the Default Slide Master
You need to select the slide layout you want to edit from the slide thumbnail pane.
Since you want to change the background, text, and footer on ALL the sides you
need to select the default slide master.
Click the TOP slide in the slide thumbnail pane.
Change the Background Color of the Slide Master
Right now the background color of the slide is white. You can change the
background to a solid color, gradient, or texture.
On the Slide Master tab find the Background group and click the dialog box launcher in
the bottom right corner.
Look for the contextual tab that shows up on the ribbon. A contextual tab is an
additional tab on the ribbon that appears when doing a task such as formatting the
slide master.
dialog box launcher
default slide master

TECHNOSPECIALIST SESSION 1
TECHNOKIDS INC. 1-25
Apply a Solid Color
Click Solid fill.
In the Format Background pane, click the drop-down arrow beside Color and click on a
color or click More Colors…
If you picked More Colors, click on a color
and click OK.
Apply a Fill Effect: Gradient fill
Click Gradient fill. Experiment with the choices:
Apply a Fill Effect: Texture
Click Picture or texture fill. Click the arrow beside Texture: and click on any pattern.
Use your skills to choose a solid fill, gradient, or textured background.
Click Apply to All. Click Close on the Format Background pane.
Do not Close Slide Master View.
TIP:
If you cannot see any color in
the background, check that
the transparency has not been
set to 100%.
Preset gradients are a set of
premade color designs. Type allows you to choose a
shape for the color gradient.
Direction allows you to choose
an angle for the color gradient.
Gradient stops allow you to
customize the colors, position,
brightness, transparency, and
brightness of each of the colors
in a gradient.

TECHNOSPECIALIST
1-26 TECHNOKIDS INC.
Change the Look of the Text on the Slide Master
You can change how the title and information on each slide look. You will want
the words to be easy to read.
Triple click the mouse inside the Title placeholder to select the words.
Right click the mouse.
Try the following commands on the Mini toolbar to change the way the title looks. After
using each command, put a checkmark in the box.
Change the font.
Change the font size.
Increase the size of the letters.
Decrease the size of the letters.
Bold the text to make the letters look darker.
Apply italics to make the letters slant.
Align text to the left.
Align text to the center.
Align text to the right.
Change the color of the letters.
Use your skills to make the title and text inside the textbox look great.
The Mini toolbar shows up on the screen. It has commands you can use to edit text.

TECHNOSPECIALIST SESSION 1
TECHNOKIDS INC. 1-27
Change the Bullets on the Slide Master
You can change the bullet style. You will notice that on the slide master there are
levels of text. Each level has its own bullet style. You can change the bullet style
from a circle or line to a square, checkmark, or other fun shape.
Click the mouse to position the cursor in the TOP level of the text box.
Right click the mouse.
Hold the mouse pointer over Bullets on the menu.
Make a selection from the gallery.
Use your skills to change the bullet style for each level.
Insert a Clip Art to Act as the Company Logo
You are going to use clip art as the logo. A logo is a picture or symbol that is used to
represent a company.
Click the Insert tab.
Find the Images group, and choose Online Pictures.
In the Office.com Clip Art box, type computer. Click Search.
Use the scroll arrows along the side of the pane to view the results.
When you find a clip art that you like, click on it and click Insert to add it to the slide.
TIP: You can try other
search words such as
laptop, company, or
monitor.

TECHNOSPECIALIST
1-28 TECHNOKIDS INC.
Format the Company Logo
You can change the clip art to make a great looking logo. Use the commands on
the Picture Tools tab to change the color, style, shape, border, and effects.
Double click on the clip art.
On the Picture Tools Format tab, find the Adjust group, and click Corrections.
Hold the mouse pointer over an option to see a live preview. Click on an option to apply
it to the picture.
On the Picture Tools Format tab, click Color.
Click on a color you like, or click More Variations to see more choices.
On the Picture Tools Format tab, find the Pictures Styles group. Try the following
commands to change the way the clip art looks. After using each command, put a
checkmark in the box.
Pick a preset fill, outline, and effects style from a gallery.
Change the color, weight, and dash style of the clip art border.
Add an effect such as a shadow, reflection, glow, soft edges, bevel, or
3-D rotation to the clip art.
Use your skills to make the logo look great.
Click on the clip art. Drag a round corner handle to resize the clip art.
Drag the green handle to rotate the clip art.
Click on the center of the clip art and drag to place the logo on the slide.
Look for the Picture Tools contextual tab that shows up on the ribbon.
TECHNOSPECIALIST SESSION 1
TECHNOKIDS INC. 1-29
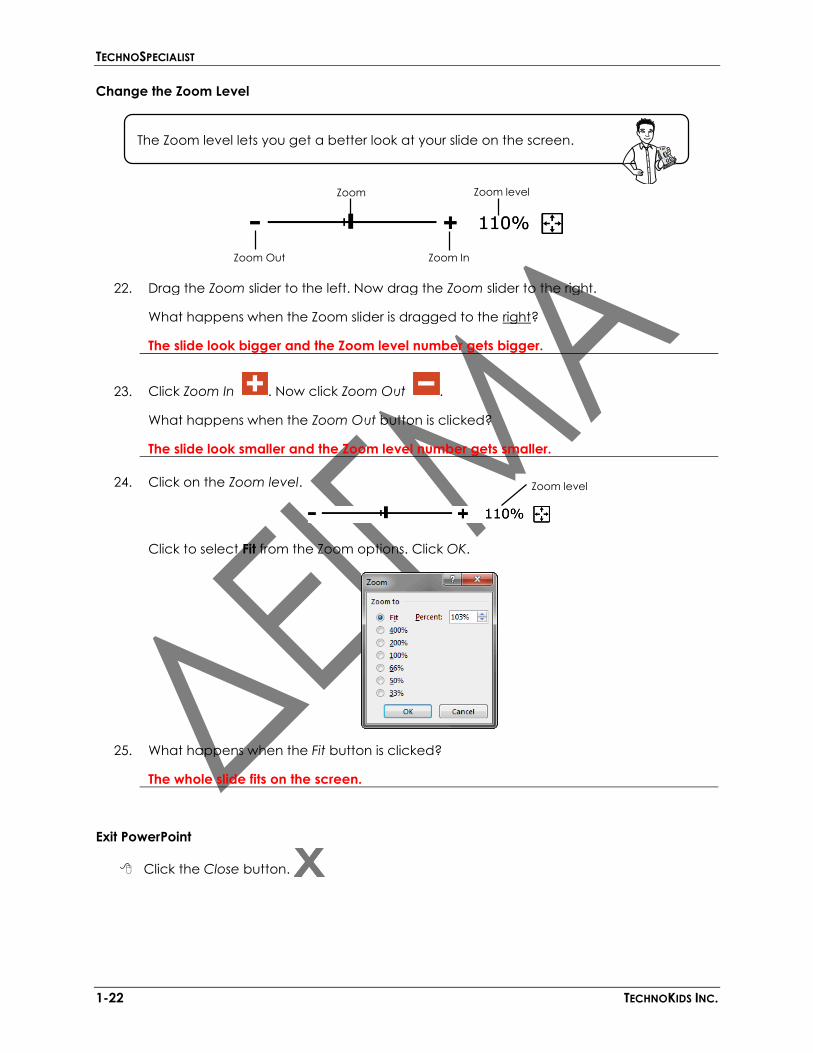
Draw a Shape on the Slide Master
You are going to draw a shape that will appear on every slide. You can use the
shape to create a border, draw interest towards the title, or frame the text box.
Click the Insert tab.
Find the Illustrations group, and choose Shapes.
Pick a shape from the gallery.
Click and drag to draw a shape. DO NOT WORRY IF THE SHAPE COVERS THE TEXT BOX.
YOU WILL MOVE IT LATER.
Format a Shape on the Slide Master
Use the commands on the Drawing Tools tab to change the color, style,
shape, border, effects, object order, alignment, and orientation.
Double click on the shape.
Format the Fill, Border, and Effect
On the Drawing Tools Format tab, find the Shape Styles group. Try the following
commands to change the way the shape looks. After using each command, put a
checkmark in the box.
Pick a preset fill, outline, and effects style from a gallery.
Fill a shape with a color, gradient, texture, or picture.
Change the color, weight, and dash style.
Add an effect such as a shadow, reflection, glow, soft edges, bevel, or 3-
D rotation.
Look for the Drawing Tools contextual tab that shows up on the ribbon.
TIP: You may want to draw a shape
on the left side of the slide, below
the title, or behind the text box.

TECHNOSPECIALIST
1-30 TECHNOKIDS INC.
Change the Object Order
Object order is the how slide objects are placed in a stack. The shape may be blocking the text
box or logo. You can change the object order to move the shape BEHIND the other objects.
Click on the shape.
Click the Drawing Tools Format tab and find the Arrange group.
Click the Send Backward arrow and select Send Backward.
Align the Shape
You can align the shape to the left, center, right, top, middle, or bottom of the slide.
On the Drawing Tools Format tab, find the Arrange group. Click Align.
Try the following commands to change the location of the shape. After using each
command, put a checkmark in the box.
Place at left edge of the slide.
Place at the top of the slide.
Place in the center of the slide.
Place in the middle of the slide.
Place at the right edge of the slide.
Place at the bottom of the slide.
Rotate or Flip the Shape
You can rotate or flip the shape. This is a good way to create a one-of-a-kind design.
Click on the shape.
Click the Drawing Tools Format tab and find the Arrange group. Click Rotate.
Try the following commands to change the orientation of the shape. After using each
command, put a checkmark in the box.
Rotate right 90̊. Flip vertically.
Rotate left 90 ̊. Flip horizontally.
Use your skills to format the shape.
Change or Resize the Placeholders
Click on a placeholder.
Drag the blue handle to resize the placeholder.
Click the center of the placeholder and drag to move it.

TECHNOSPECIALIST SESSION 1
TECHNOKIDS INC. 1-31
Insert a Header or Footer on the Slide Master
You are going to add the date, slide number, and name of the company onto the
header or footer of each slide.
Click the Insert tab.
Find the Text group, and choose Header and Footer.
Add the date, slide number, and name of the company:
Click Apply to All.
Close Slide Master View
You are finished making your slide master. All the slides in your information package will be
based on this design. You now need to close Slide Master View and return to Normal View.
Click the Slide Master tab.
Click Close Master View.
Click inside the Don't show
on title slide box.
Click inside the Date and
time box. Click Update
automatically.
Click inside the Slide
number box.
Click inside the Footer
box. Type the Name of
the Company.
YOU WILL SEE A TITLE SLIDE
You will see the Title slide layout when you returned to
Normal View. You will add a slide to see the Title and
Content slide layout you have been designing.
TIP: Use your skills to change the
look of the header and footer.
You may also want to move or
resize the placeholders.
TECHNOSPECIALIST
1-32 TECHNOKIDS INC.
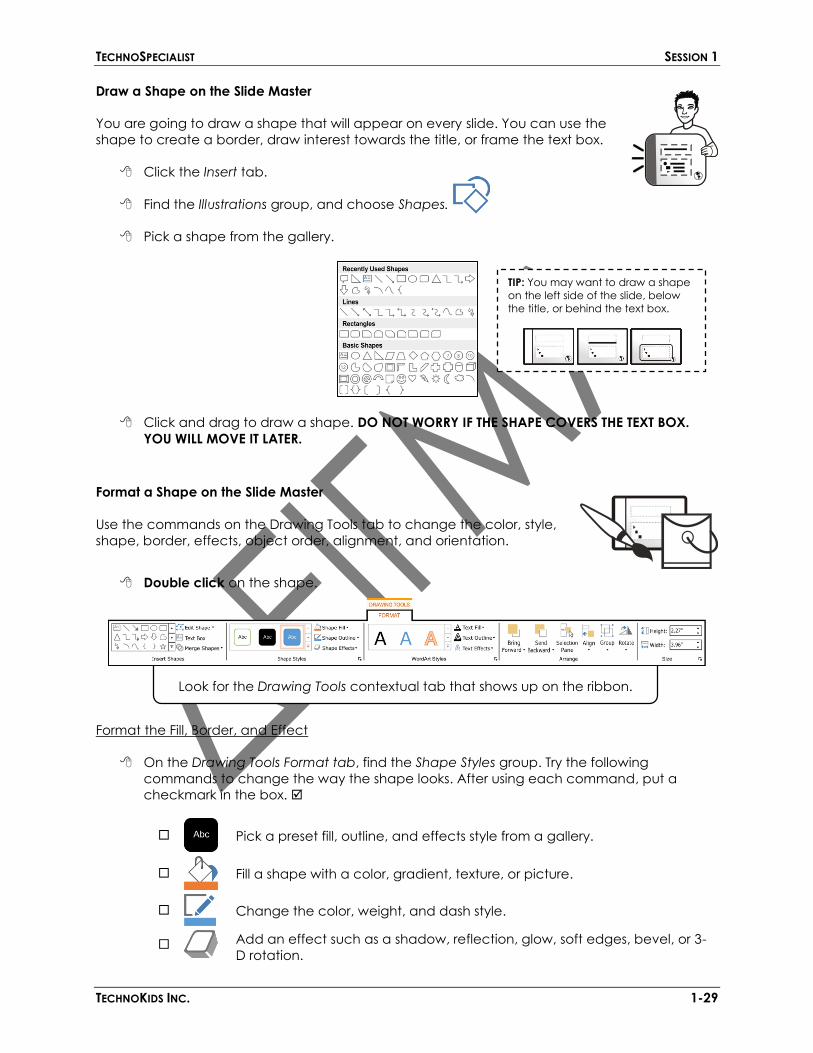
Test the Layout and Design of the Slide Master
It is a good idea to "test" the layout and design of the slide master. To do this, you
will type text onto the Title Slide. Next, you will insert a slide and add words to the
title and text box. If you like the design, then no more changes are needed. If you
do not like the layout, you will need to make changes to the Slide Master.
On the title slide, in the Click to add title placeholder type Name of
Company, press ENTER, then type Information Package.
In the Click to add subtitle placeholder type By Student Name.
On the Home tab, find the Slides group and click New Slide.
In the Click to add title placeholder type Your Computer - Your Way, Computer
Customization, or Design a Computer.
In the Click to add text placeholder type At Company Name you design your own
computer. You can pick: press ENTER.
Press the TAB key. Type Storage Devices. Press ENTER. Continue to type the list:
o Memory Chips
o Central Processing Unit
o Monitor
o Graphics Card
o Sound Card
IF YOU DO NOT LIKE THE SLIDE, click the View tab, find the Master Views
group, and then select Slide Master.
Click the TOP slide in the slide thumbnail pane. TIP: You may need to scroll up to see the top slide. Look for the number 1.
Use your skills to make changes.
When you are finished, click the Slide Master tab and select Close Master View.
Save the Information Package and then Exit PowerPoint
Click the File tab and choose Save.
Go to your student folder. Type company name in the File name box and click Save.
Click the Close button to exit PowerPoint.
YOU WILL NOT BE EDITING THE TITLE SLIDE LAYOUT.
YOU MAY NEED TO EDIT THIS SLIDE LAYOUT.

TECHNOSPECIALIST SESSION 1
TECHNOKIDS INC. 1-33
Session 1 Review: About the Computer
Write the terms beside the definition.
monitor mainframe desktop computer
laptop server scanner
1. laptop a small portable computer
2. desktop computer a computer that fits on a desk and is also called a
personal computer
3. mainframe a large computer used by data centers to process
information such as banking transactions
4. server a device used to run applications, store files and share
resources with hundreds of people
5. monitor an output device that displays text and pictures on a
screen
6. scanner an input device that creates an exact copy of an image
or document
Select the best answer from the list of choices.
7. How does the computer know the location of the key on the keyboard that is being pressed?
a. A computer chip sits underneath each key and it sends a message to the computer
when it is touched.
b. When a key is pressed, it forces the wires underneath the key to touch, which sends
a message to the computer chip inside the keyboard about the position of the key.
c. Each key on the keyboard has a roller ball underneath that when pushed rolls in a
particular direction thus telling the computer the location of the key that is being
pressed.
8. How does the computer know the direction the mechanical mouse is being moved?
a. When the mouse is pushed the ball inside the mouse touches rollers, which are
connected to a wheel that starts to spin. A light shines through holes in the wheel,
creating light pulses. A computer chip inside the mouse converts the light pulses into
information the computer can understand so that it knows which direction the
mouse is being moved.
b. When the mouse is pushed the ball inside the mouse touches a spot on the chip
and depending on the location it touches, the computer knows which direction the
mouse is being moved.
c. When the mouse is pushed the ball inside the mouse touches a particular wire. The
computer chip inside the mouse determines which wire is being pressed and then
sends a message to the computer about the direction the mouse is being moved.

TECHNOSPECIALIST
1-34 TECHNOKIDS INC.
9. When would a plotter or large format printer be used instead of a desktop inkjet printer?
a. To draw large graphs and blueprint drawings
b. To print out a scanned photograph
c. To print a word processing document
10. Which list contains only input devices?
a. monitor, touch screen, headphones
b. scanner, mouse, keyboard
c. mouse, printer, speakers
11. Which list contains only output devices?
a. monitor, printer, light pen
b. scanner, mouse, touch pad
c. printer, monitor, speakers
12. When would a microphone be an ideal input device?
a. For a disabled user who cannot use a keyboard
b. When a mouse is not available, such as for a smartphone or tablet user
c. Both of the above
/12

TECHNOKIDS INC. 1
Session 1 Skill Review: History of the Computer
Follow the instructions to change the Computer History presentation by editing the slide master.
1. Open the template Computer History.
2. Save the presentation in your student folder:
a) Click the File tab. Click Save As.
b) Go to your student folder. Click Save.
3. Click the View tab, find the Master Views group, and then click Slide Master.
4. Click the TOP slide in the slide thumbnail pane.
5. Change the background:
a) On the Slide Master tab find the Background group and click the dialog
box launcher in the bottom right corner. b) Pick a solid fill, gradient fill, or texture fill.
c) Click Apply to All. Click Close.
6. Change the look of the words in the title and text box using the following commands:
7. Change the bullet style for each level using Bullets.
8. Insert a picture of a computer and then change how it looks:
9. Draw a shape on the slide to create a border, draw interest to the title, or frame the
text box. Change how the shape looks using the following commands:
10. Insert a header or footer.
a) Include the date and time. Click Update automatically.
b) Include the slide number.
c) Include Student Name in the footer.
d) Select Don't show on title slide.
e) Click Apply to All.
11. Click the Slide Master tab. Click Close Master View.
12. Review all slides. Make any necessary changes. TIP: Check to make sure the picture does not
cover any text. You can make the picture very small, place it in the header or footer, or adjust the size of
placeholders on each slide to ensure that the image is not covered by text boxes or a table.

2 TECHNOKIDS INC.
13. Click Save on the Quick Access Toolbar.
Session 1 Extension Activity: More About Computers
1. Compare the cost of a tablet, laptop, desktop computer, workstation/server, and
mainframe.
2. List the ways a business uses the desktop computer.
3. List the ways a computer is used at home.
4. Identify ports used to connect input devices. Disconnect and reconnect the mouse
and keyboard.
5. Identify ports used to connect output devices. Disconnect and reconnect the
speakers, monitor, and printer.
6. It is essential to keep a mechanical mouse clean. Dust and lint can get into the mouse
and rest on the contacts, making the mouse drag slowly and often hard to use. To
clean the mouse use rubbing alcohol and a cotton swab. Remove the backing that
supports the mouse ball. Dip the swab in the alcohol and wipe against the contacts
removing all the lint. This will keep the mouse working great!
7. The keyboard can get very dirty! To keep it clean, take a cotton swab and dip it in
alcohol. Now rub the swab between and on top of each key. WOW – look at how dirty
the keys are, evident from the fact that the swab turns brown.
8. There are many input and output devices that are used by people with special needs.
There are keyboards that have Braille on the keys, monitors that display text and
graphics in a Braille format, and printers that print Braille characters. Learn more about
the devices that are used to help those with special needs. Create a list of ways that
computers are improving the quality of life for people with disabilities.
9. Many keyboards, mouse pads, and keyboard pads are now being designed to reduce
muscle and skeletal strain. Research the types of products available that reduce safety
issues.
10. The computer has changed the way people work, learn, communicate, and play.
What are the benefits and drawbacks to the strong influence the computer has on our
lives?