TAKATA INFLATOR FIELD QUALITY PARTS COLLECTION … · Nissan is conducting this Takata Inflator...
18
1/18 Classification: Reference: Date: RS18-002 NTB18-053 August 2, 2018 TAKATA INFLATOR FIELD QUALITY PARTS COLLECTION INITIATIVE 2009-2010 CUBE INITIATIVE ID #: P8309, P8310 APPLIED VEHICLES: 2009-2010 cube (Z12) Check Service COMM or Dealer Business Systems (DBS) National Service History to confirm eligibility. Use the ID # listed for each specific vehicle (VIN). INTRODUCTION Nissan is conducting this Takata Inflator Field Quality Parts Collection Initiative to replace the driver air bag inflator on certain pre-selected 2009-2010 cube vehicles in the states of Florida, Georgia and New York. This service will be performed at no charge to the customer for parts or labor. Collected parts will be sent for analysis. Return packaging, shipping labels, documents, and directions supplied must be used and followed in order to properly carry out this initiative. Takata’s documentation is attached and is part of this bulletin. NOTE: This activity will expire when sufficient quantities have been collected. As part of this initiative, a complementary engine oil and filter change may be performed. IDENTIFICATION NUMBER For this initiative, Nissan has assigned identification numbers P8309 and P8310. The correct number must appear on all communications and documentation of any nature dealing with this initiative. DEALER RESPONSIBILITY Dealers are to repair vehicles falling within the range of this initiative that enter the service department. This includes vehicles purchased from private parties, vehicles presented by transient (tourists) owners, and vehicles in a dealer’s inventory. Nissan Bulletins are intended for use by qualified technicians, not 'do-it-yourselfers'. Qualified technicians are properly trained individuals who have the equipment, tools, safety instruction, and know-how to do a job properly and safely. NOTE: If you believe that a described condition may apply to a particular vehicle, DO NOT assume that it does. See your Nissan dealer to determine if this applies to your vehicle.
Transcript of TAKATA INFLATOR FIELD QUALITY PARTS COLLECTION … · Nissan is conducting this Takata Inflator...
1/18
Classification: Reference: Date:
RS18-002 NTB18-053 August 2, 2018
TAKATA INFLATOR FIELD QUALITY PARTS COLLECTION INITIATIVE
2009-2010 CUBE INITIATIVE ID #: P8309, P8310 APPLIED VEHICLES: 2009-2010 cube (Z12)
Check Service COMM or Dealer Business Systems (DBS) National Service History to confirm eligibility.
Use the ID # listed for each specific vehicle (VIN). INTRODUCTION
Nissan is conducting this Takata Inflator Field Quality Parts Collection Initiative to replace the driver air bag inflator on certain pre-selected 2009-2010 cube vehicles in the states of Florida, Georgia and New York. This service will be performed at no charge to the customer for parts or labor. Collected parts will be sent for analysis. Return packaging, shipping labels, documents, and directions supplied must be used and followed in order to properly carry out this initiative. Takata’s documentation is attached and is part of this bulletin.
NOTE: This activity will expire when sufficient quantities have been collected. As part of this initiative, a complementary engine oil and filter change may be
performed. IDENTIFICATION NUMBER
For this initiative, Nissan has assigned identification numbers P8309 and P8310. The correct number must appear on all communications and documentation of any nature dealing with this initiative. DEALER RESPONSIBILITY
Dealers are to repair vehicles falling within the range of this initiative that enter the service department. This includes vehicles purchased from private parties, vehicles presented by transient (tourists) owners, and vehicles in a dealer’s inventory. Nissan Bulletins are intended for use by qualified technicians, not 'do-it-yourselfers'. Qualified technicians are properly trained individuals who have the equipment, tools, safety instruction, and know-how to do a job properly and safely. NOTE: If you believe that a described condition may apply to a particular vehicle, DO NOT assume that it does. See your Nissan dealer to determine if this applies to your vehicle.
2/18 NTB18-053
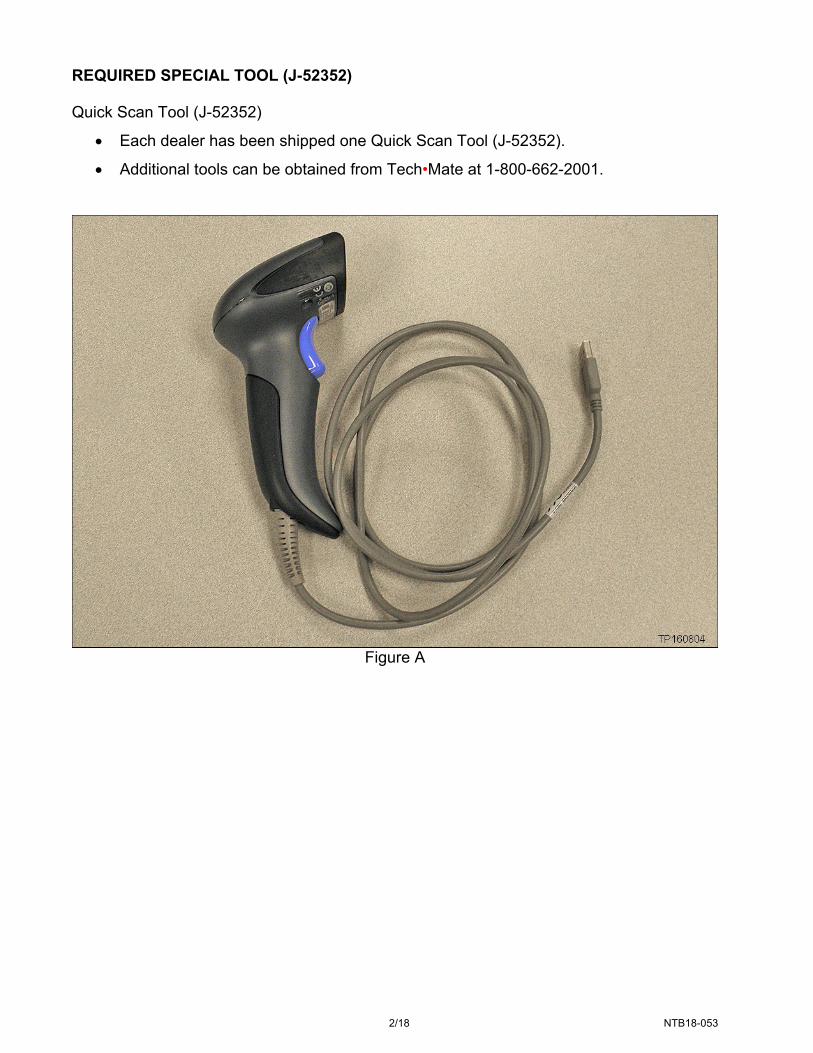
REQUIRED SPECIAL TOOL (J-52352) Quick Scan Tool (J-52352)
Each dealer has been shipped one Quick Scan Tool (J-52352).
Additional tools can be obtained from Tech•Mate at 1-800-662-2001.
Figure A
3/18 NTB18-053
SERVICE PROCEDURE
IMPORTANT: Follow all cautions, warnings, and notes in the Electronic Service Manual (ESM) when working on or near a Supplemental Restraint System (SRS), such as an air bag.
CAUTION: Handle interior trim carefully to avoid damage. Work with clean hands and clean tools to avoid dirt and stains. Use protective covers as needed.
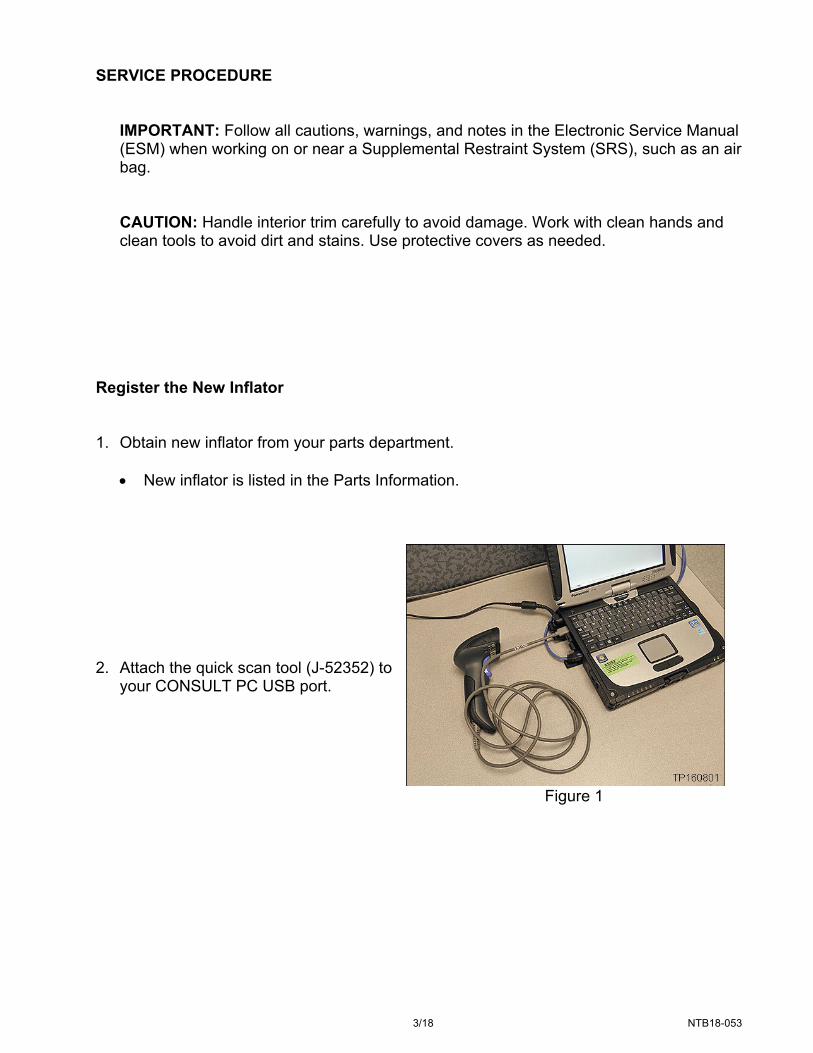
Register the New Inflator 1. Obtain new inflator from your parts department.
New inflator is listed in the Parts Information.
Figure 1
2. Attach the quick scan tool (J-52352) to
your CONSULT PC USB port.
4/18 NTB18-053
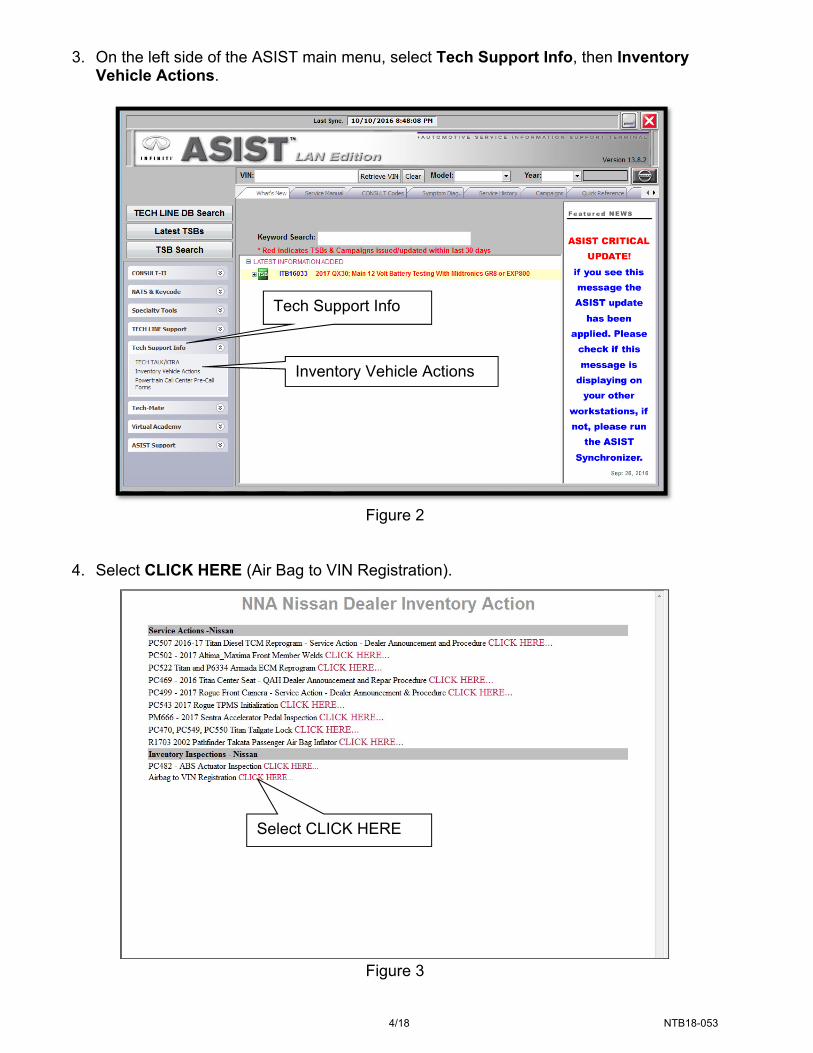
3. On the left side of the ASIST main menu, select Tech Support Info, then Inventory Vehicle Actions.
Figure 2
4. Select CLICK HERE (Air Bag to VIN Registration).
Figure 3
Tech Support Info
Inventory Vehicle Actions
Select CLICK HERE
5/18 NTB18-053
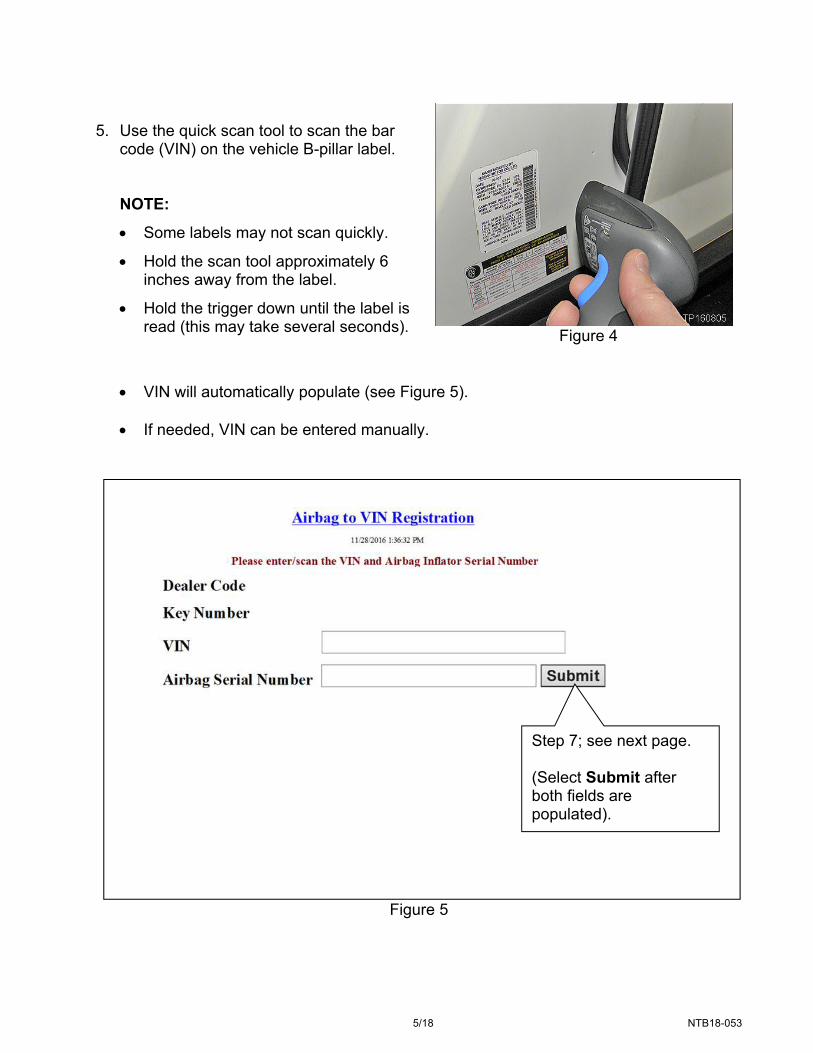
Figure 4
VIN will automatically populate (see Figure 5).
If needed, VIN can be entered manually.
Figure 5
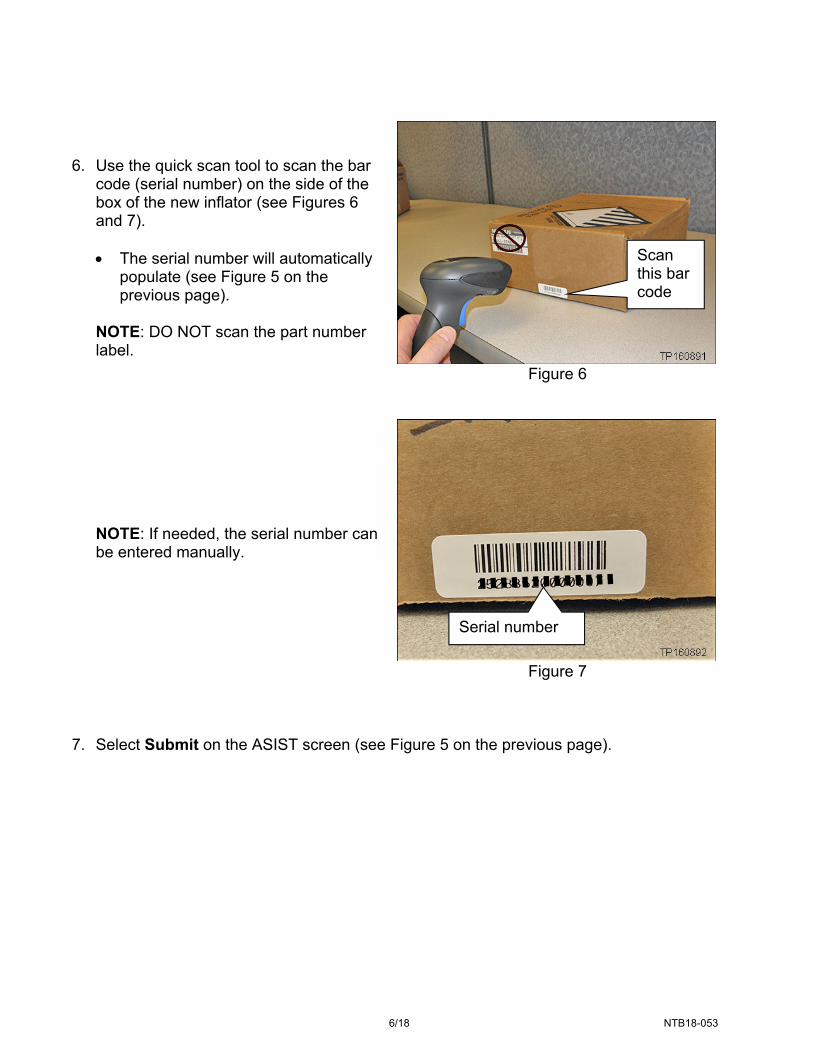
5. Use the quick scan tool to scan the bar
code (VIN) on the vehicle B-pillar label.
NOTE:
Some labels may not scan quickly.
Hold the scan tool approximately 6 inches away from the label.
Hold the trigger down until the label is read (this may take several seconds).
Step 7; see next page. (Select Submit after both fields are populated).
6/18 NTB18-053
Figure 6
Figure 7
7. Select Submit on the ASIST screen (see Figure 5 on the previous page).
6. Use the quick scan tool to scan the bar
code (serial number) on the side of the box of the new inflator (see Figures 6 and 7).
The serial number will automatically
populate (see Figure 5 on the previous page).
NOTE: DO NOT scan the part number label.
NOTE: If needed, the serial number can be entered manually.
Serial number
Scan this bar code
7/18 NTB18-053
Driver Side Air Bag Inflator Replacement 1. Write down the radio settings.
Presets 1 2 3 4 5 6
AM
FM 1
FM 2
SAT 1
SAT 2
SAT 3
Bass Treble Balance Fade Speed Sen. Vol.
2. Turn the ignition OFF. 3. Disconnect both battery cables, negative cable first. 4. Wait at least 3 minutes. 5. Remove the driver air bag module (module) from the vehicle.
Refer to the ESM, section SRS - Supplemental Restraint System, for module removal.
8/18 NTB18-053
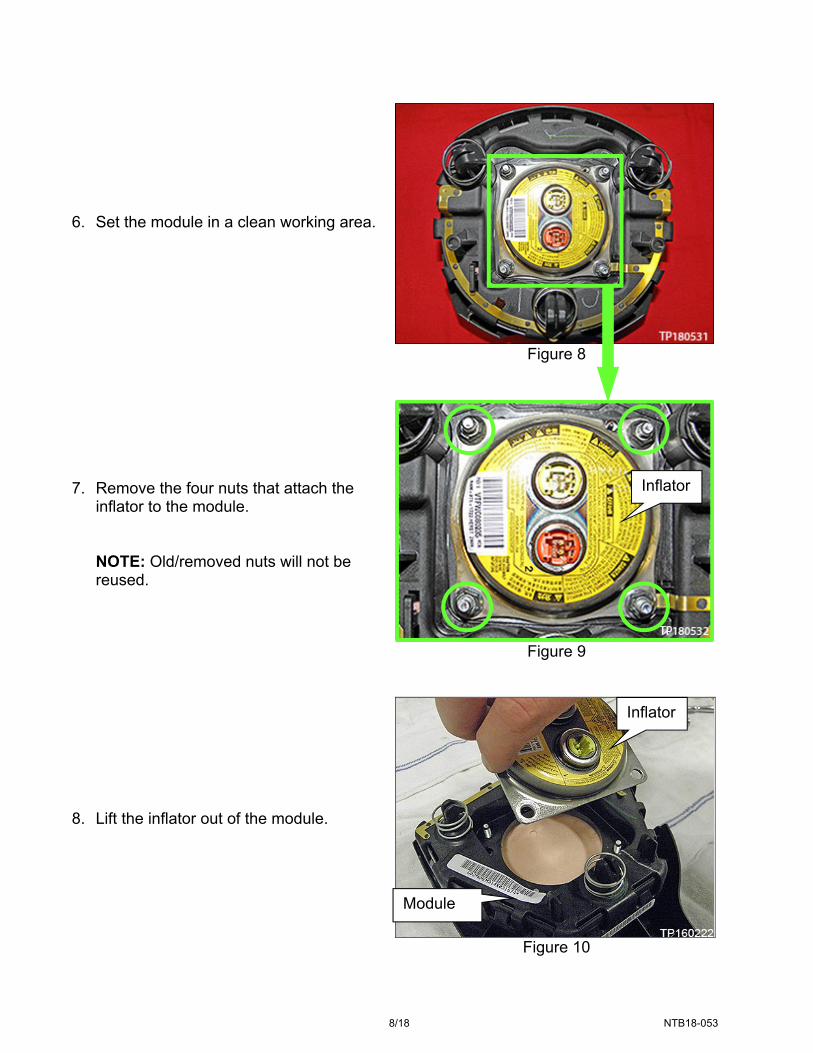
Figure 8
Figure 9
Figure 10
6. Set the module in a clean working area.
7. Remove the four nuts that attach the inflator to the module.
NOTE: Old/removed nuts will not be reused.
8. Lift the inflator out of the module.
Inflator
Inflator
Module
9/18 NTB18-053
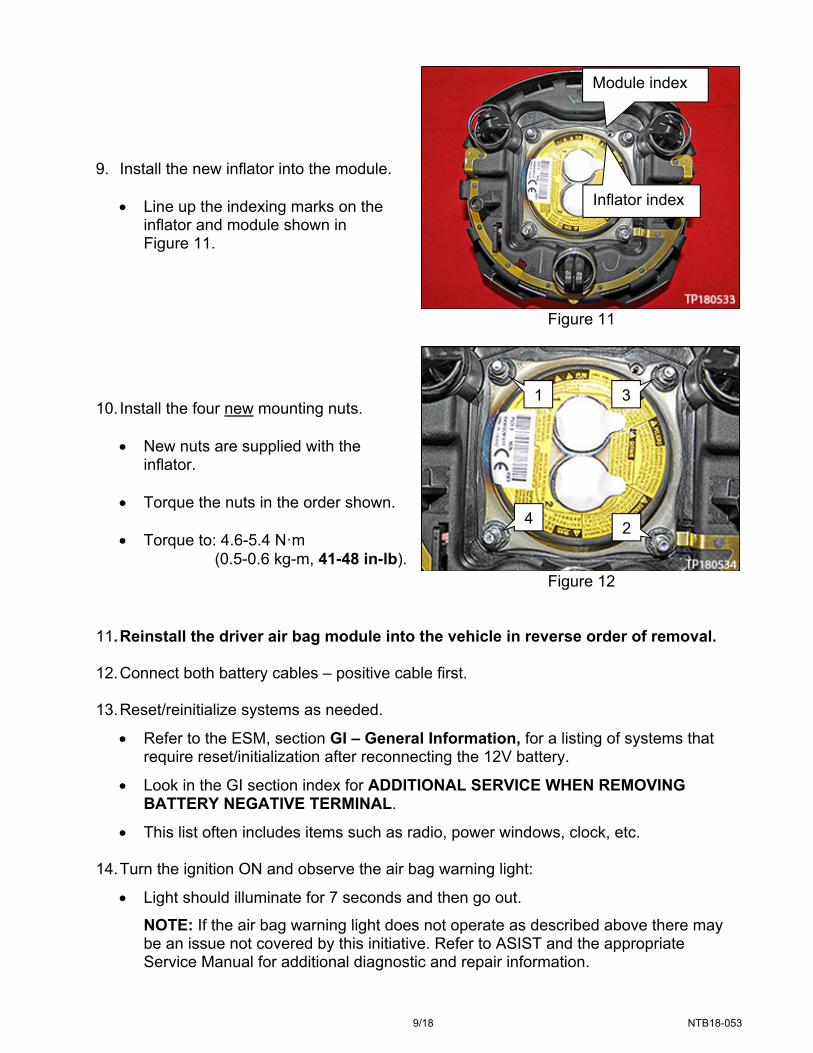
Figure 11
Figure 12
11. Reinstall the driver air bag module into the vehicle in reverse order of removal. 12. Connect both battery cables – positive cable first. 13. Reset/reinitialize systems as needed.
Refer to the ESM, section GI – General Information, for a listing of systems that require reset/initialization after reconnecting the 12V battery.
Look in the GI section index for ADDITIONAL SERVICE WHEN REMOVING BATTERY NEGATIVE TERMINAL.
This list often includes items such as radio, power windows, clock, etc. 14. Turn the ignition ON and observe the air bag warning light:
Light should illuminate for 7 seconds and then go out.
NOTE: If the air bag warning light does not operate as described above there may be an issue not covered by this initiative. Refer to ASIST and the appropriate Service Manual for additional diagnostic and repair information.
9. Install the new inflator into the module.
Line up the indexing marks on the inflator and module shown in Figure 11.
10. Install the four new mounting nuts.
New nuts are supplied with the inflator.
Torque the nuts in the order shown.
Torque to: 4.6-5.4 N·m
(0.5-0.6 kg-m, 41-48 in-lb).
Inflator index
Module index
1
2
3
4
10/18 NTB18-053
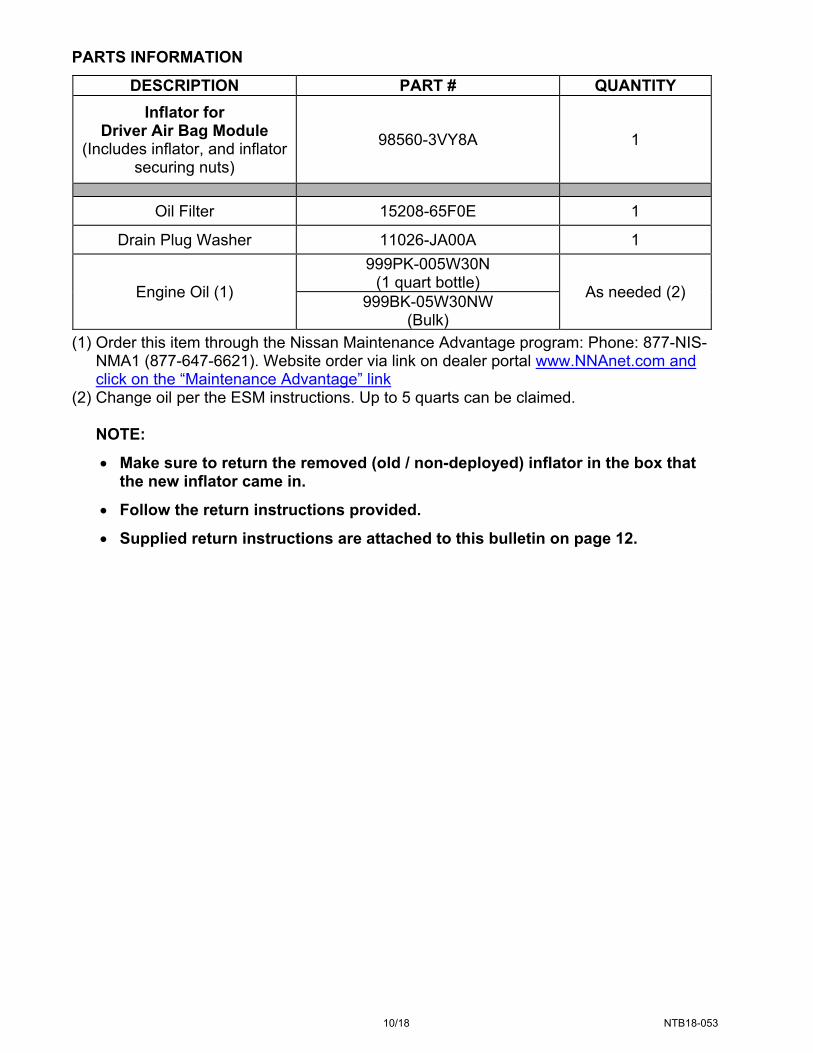
PARTS INFORMATION
DESCRIPTION PART # QUANTITY
Inflator for Driver Air Bag Module
(Includes inflator, and inflator securing nuts)
98560-3VY8A 1
Oil Filter 15208-65F0E 1
Drain Plug Washer 11026-JA00A 1
Engine Oil (1)
999PK-005W30N (1 quart bottle)
As needed (2) 999BK-05W30NW
(Bulk)
(1) Order this item through the Nissan Maintenance Advantage program: Phone: 877-NIS-NMA1 (877-647-6621). Website order via link on dealer portal www.NNAnet.com and click on the “Maintenance Advantage” link
(2) Change oil per the ESM instructions. Up to 5 quarts can be claimed.
NOTE:
Make sure to return the removed (old / non-deployed) inflator in the box that the new inflator came in.
Follow the return instructions provided.
Supplied return instructions are attached to this bulletin on page 12.
11/18 NTB18-053
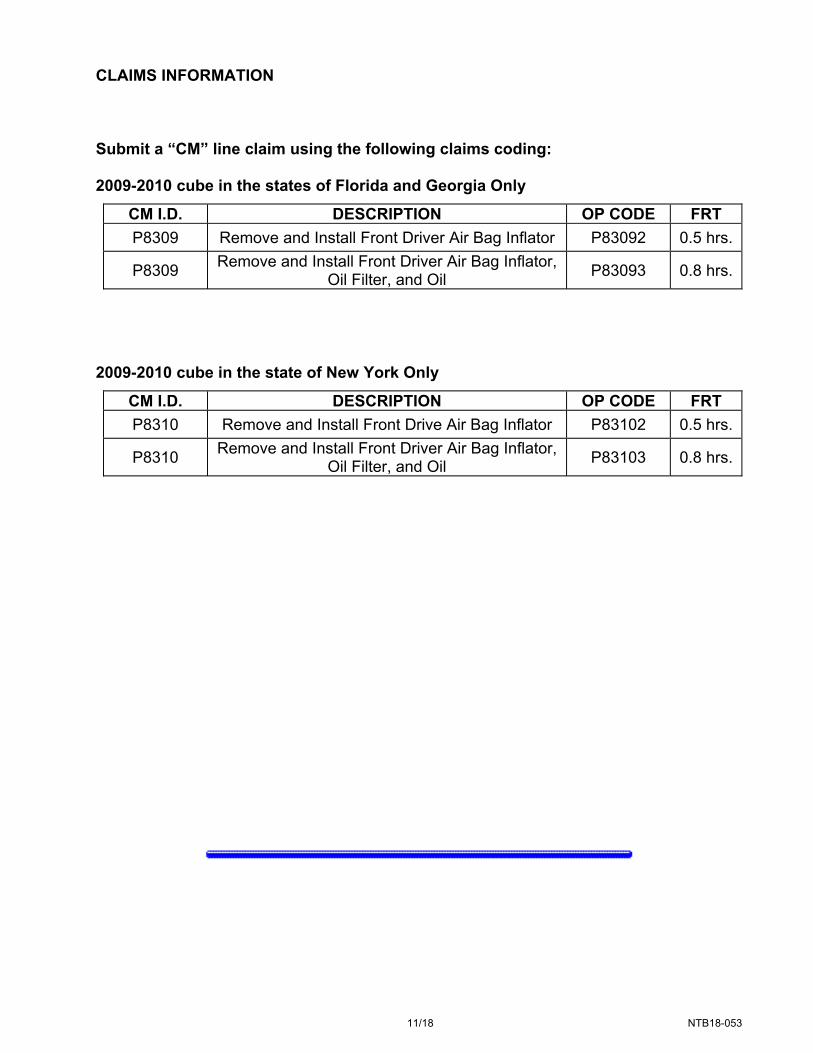
CLAIMS INFORMATION Submit a “CM” line claim using the following claims coding: 2009-2010 cube in the states of Florida and Georgia Only
CM I.D. DESCRIPTION OP CODE FRT
P8309 Remove and Install Front Driver Air Bag Inflator P83092 0.5 hrs.
P8309 Remove and Install Front Driver Air Bag Inflator,
Oil Filter, and Oil P83093 0.8 hrs.
2009-2010 cube in the state of New York Only
CM I.D. DESCRIPTION OP CODE FRT
P8310 Remove and Install Front Drive Air Bag Inflator P83102 0.5 hrs.
P8310 Remove and Install Front Driver Air Bag Inflator,
Oil Filter, and Oil P83103 0.8 hrs.

12/18 NTB18-053
RETURN INSTRUCTIONS
NOTE: Use these instructions for cube (Z12). The cube (Z12) front driver air bag inflator does not require shorting pins.
AIR BAG INFLATOR RETURN PACKING & SHIPPING INSTRUCTIONS If a new box or replacement shipping labels are needed, please contact the representative listed below by phone or email to request replacement materials.
Primary Contact: - Tel #: 210-250-5079 E-Mail: [email protected]
Check List Fill out Orange Label. Attach Orange Label to the Outside of shipping box. 1. Ensure the shorting pin has been connected to the inflator harness(s).
2. Place the un-deployed inflator in the "cradle" of the shipping box (the box the new inflator came in).
Do not include any other hardware in the box that may rattle and cause rejection of the shipment.
3. Close the box flap per the box instructions.
4. Firmly tape the box flap as follows:
a. Use 2-inch wide clear packing tape. b. Tape strip must be a minimum of 4 inches long. c. There must be at least 2 inches of the 4-inch tape strip on the flap of the box and at least 2 inches
on the bottom of the box. 5. Fill out orange label and attach to side of box. 6. Complete and affix the FedEx Ground paperwork as follows: Hazardous Materials Certification form
(OP-900PRP) included with these instructions.
a. Separate the bottom 4 labels and place them in the re-closeable pouch. Affix the re-closeable pouch to the bottom of the box (provided).
b. Put the shipping date on the "FedEx copy" and the "Customer copy" labels. b. Peel off the "Apply to box" label and firmly apply it to the box flap. d. On the "FedEx copy" and the "Customer copy labels", fill in the 15 digit Tracking ID.
The 15-digit tracking ID is found beneath the large barcode on the FedEx PRP label provided The 15-digit tracking ID is also on the peel off "Shipper Receipt" and "Receipt" labels at the top
of the FedEx PRP label. e. Keep the "Customer copy" label for dealer records and retain it for a minimum of 2 years. f. Give the "FedEx copy" label to the FedEx Ground Driver.
Takata Document (pages 12 – 18)
13/18 NTB18-053
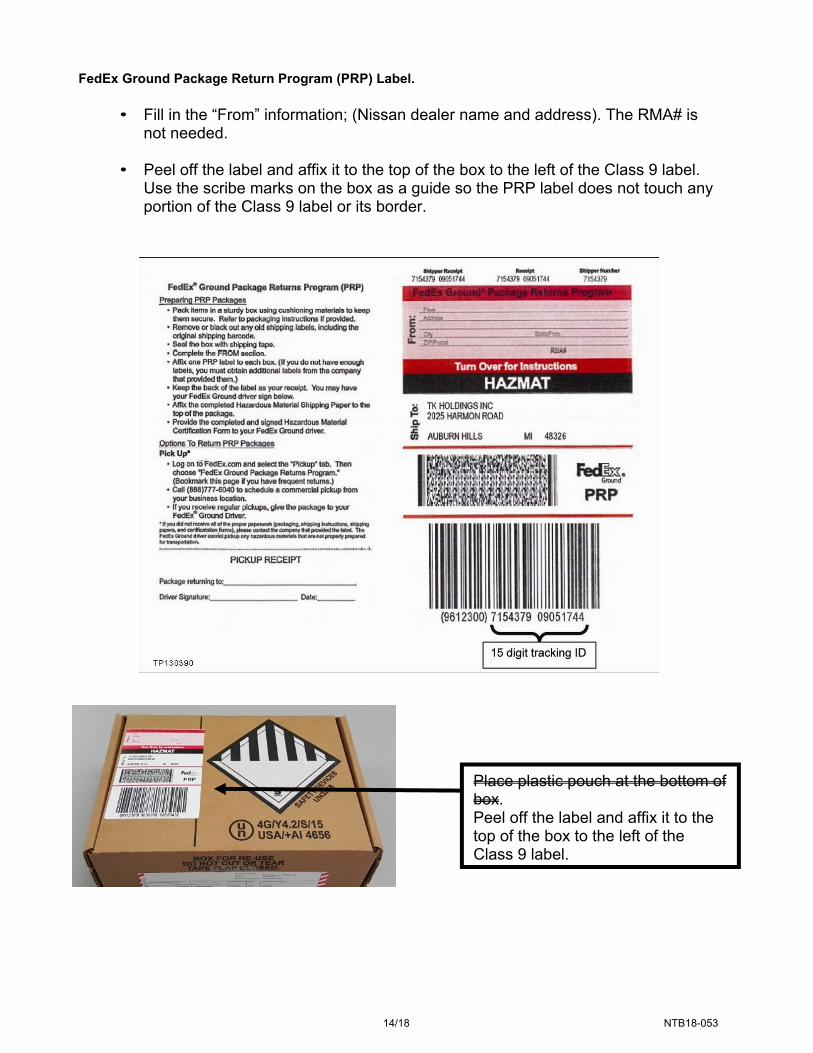
FedEx Ground Package Returns Program (PRP) shipping label (included with these instructions) a. Fill in the "From" information; (Nissan dealer name and address). The RMA# is not needed. b. Peel off the label and affix it to the top of the box to the left of the Class 9 label. Use the scribe marks
on the box as a. guide so the PRP label does not touch any portion of the Class 9 label or its border. c. When the shipment is ready, call for a FedEx Ground pick-up using the number listed for business
locations (888-777-6040 800-463-3339), or, if you receive regular pick-ups, give the package to your FedEx Ground Driver.
Cautions: a. Remove or blackout any old shipping labels or barcodes (not "hazard" marks or labeling). b. Take care not to cover any portion of the Class 9 label, proper shipping name, UN number, or UN box
specifications. c. Prior to shipment, ensure all steps have been properly completed. All packages must be prepared in
accordance with all DOT and FedEx Ground requirements. Incomplete or missing information will result in return to sender and delay of return credit.
Tel # 210-250-5079 [email protected]
14/18 NTB18-053
FedEx Ground Package Return Program (PRP) Label.
• Fill in the “From” information; (Nissan dealer name and address). The RMA# is
not needed.
• Peel off the label and affix it to the top of the box to the left of the Class 9 label. Use the scribe marks on the box as a guide so the PRP label does not touch any portion of the Class 9 label or its border.
Place plastic pouch at the bottom of box. Peel off the label and affix it to the top of the box to the left of the Class 9 label.

15/18 NTB18-053
Healthy Vehicle Please do not return LTL
VIN:______________________ RO#:______________________ Dealer Code:_______________ Veh. Mileage:_______________
Fill the orange label properly with the correct information of the vehicle.
16/18 NTB18-053
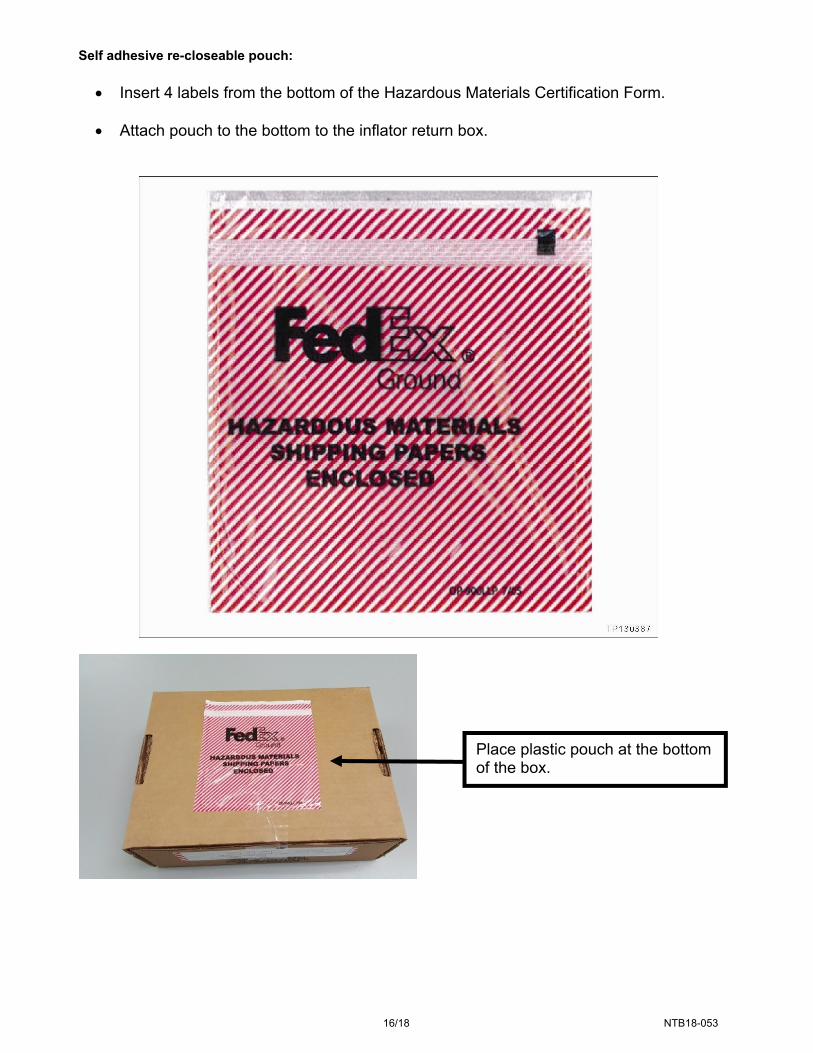
Self adhesive re-closeable pouch:
Insert 4 labels from the bottom of the Hazardous Materials Certification Form.
Attach pouch to the bottom to the inflator return box.
Place plastic pouch at the bottom of the box.

17/18 NTB18-053
EXAMPLE
Fill in here: CCN780061
Fill in here: CCN780061