TABLE OF CONTENTS DEFINITIONS - Institute of Actuaries of ...

TABLE OF CONTENTS
INTRODUCTION ............................................................................................ 1
PALPATING THE SURFACE ANATOMY ................................................................ 3
SIMPLE GUIDELINES AND COMMON SENSE ....................................................... 5
CONTRAINDICATIONS ................................................................................... 7
PRECAUTIONS .............................................................................................. 9
GUIDELINES FOR THE TECHNIQUES .............................................................. 10
STROKES USED IN THE NECK AND POLL REGIONS ........................................... 12
PROBLEMS ASSOCIATED WITH THE NECK AND POLL REGIONS .......................... 16
NECK RELEASE TECHNIQUES ........................................................................ 16
POLL RELEASE TECHNIQUES......................................................................... 18
CONCLUSION ............................................................................................. 20
COPYRIGHT © 1995 DEBRANNE PATTILLO, EQUINOLOGY, INC® AND EQUI-INK PUBLICATIONS. ALL RIGHTS RESERVED.
NO PORTIONS OF THIS ARTICLE MAY BE REPRODUCED WITHOUT WRITTEN CONSENT FROM DEBRANNE PATTILLO. IT IS INTENDED FOR PERSONAL USE ONLY
AND NOT TO BE USED IN A CLASSROOM, WORKSHOP OR CLINIC SETTING. THE
ROUTINE PRESENTED IN THE FOUNDATION MASSAGE COURSE IS UNIQUE TO EQUINOLOGY, INC® AND IS ALSO PROTECTED BY COPYRIGHT LAWS. ALL
ILLUSTRATIONS AND PHOTOS ARE PROTECTED BY COPYRIGHT LAWS. EQUINOLOGY, INC® IS A REGISTERED TRADEMARK AND SERVICE MARK. IT MAY
NOT BE USED IN ANY ADVERTISING OR PRODUCTS UNLESS PRODUCED BY EQUINOLOGY, INC®. THIS INCLUDES VARIATIONS OF THE SPELLING OF
EQUINOLOGY.
BE ADVISED: LEGAL ACTION WILL BE TAKEN AGAINST THOSE VIOLATING
COPYRIGHT AND TRADEMARK LAWS.
1
1
Introduction
You've all experienced muscle discomfort at some point in your lives. When your muscles are tight and sensitive you try to avoid repeating the strain by limiting use in the area and taking it easy. Unfortunately, many of our horses do not complain loud enough and they will do the same work day after day. When your horse ends up with a problem, if you think back hard enough you will remember when his performance slowly declined or his behavior changed.
Muscle injuries can sneak up on your horse little by little until you have an actual problem. You can help head these issues off early by using simple massage techniques.
Many of you have included massage on a regular basis as part of your own wellness program. Your massage provider knows your problem areas and can often tell when you've worked out too hard or sat in that airplane seat too long. They know what is normal for you. Knowing what is normal for your horse by working on him regularly is a huge benefit too. If your horse has accepted and welcomed these massage strokes on a regular basis and then objects, this information should tell you something is not quite right.
If you own a horse or have been in the horse industry for some time, you may have heard the statement, “if a horse is ridden correctly they do not need body work.” Well, horses are athletes just like humans. Even with the best approach, techniques and equipment used in our own training, conditioning and exercise, we still need to look after our bodies and a horse is no different in this regard. On top of it, in riding disciplines we place our weight on their spine which not really meant to carry a rider. We can all agree that horses ridden correctly may have fewer issues than those pounding the surface or traveling upside down. However, there are too many variables, many of which we have no control that cause problems stemming from emotional, biomechanical or chemical origin. Some horses don’t have the best conformation (they way they are structurally put together), others have tack that doesn’t quite fit, some housing limits normal activity in addition to problems associated with feed imbalances, shoeing or trimming, worming, vaccination, medications as well as vices, emotion, hormones, disease, injury, poor use of training devices, footing, and spinal issues. The variables which contribute to body sensitivity and dysfunction involve a long list and all the “correct riding” in the world cannot undo many of the burdens our companions may have to endure.
In regards to the statement about a horse ridden "correctly", yes they should be fewer problems in the “ideal” horse that goes happens well under saddle. On the other side of the coin, some horses are ridden in a “frame” where the neck is shortened and compressed without the establishing the required muscling to straighten or lift the base of the neck so they do eventually end up with issues. This type of structural limitation can cause problems in the rest of the spine as well as soft tissue issues (muscle, tendon and ligament). Add the riding factor to any of the other possible issues and most horses will have some problem at some point in their career or as they age. We can help manage the discomfort by recognizing it and addressing it.
Let's face it, many of us are still learning how to ride and we will never be the "perfect" rider. Our horses compensate for our lack of skills while other horses avoid that perfect self carriage for any one the variables previously listed. Here are a few of those variables in more detail.
Saddle: If a saddle restricts proper movement, the horse is going to adapt his way of moving avoiding the discomfort. Slide your hand in between the front of top edge of the saddle flap where it comes in contact

2
2
with the shoulder. You should be able to slide your flat hand through this area. It will be snug. Try leaving your hand there and have someone move your horse’s neck side to side. If you have feel any discomfort, you probably now have a good idea as to why your horse did not want to bend to that direction. With your hand still in place, have someone bring your horse’s leg on that side forward. Again, any discomfort felt is contributing to him shortening his stride as he reaches with that limb. Any lower limb problems: If you have a blister on your foot, you will tighten your muscles as you load that leg to minimize the pain you are about to feel. The horse’s front legs are analogous to your arms and are intimate in the working relationship to the horse’s neck. If the horse has a bruise on the sole, injury to the lower limb, compromised joint, abscess, sore foot, shoeing or trimming problems or any type of lower limb syndrome, he will do whatever he can to avoid loading the limb completely. This is accomplished by bracing the muscles in the neck and continues to the rest of the body. Dental: A horse that is uncomfortable in the mouth is going to resist and brace through the neck. This discomfort will not just remain in the neck and will eventually show up in the rest of the horse’s body. Bridle and Bit: Check that the brow band is large enough for your horse, especially those double bridles. Some horses object to pressure from the bridle at the base of the ears on the poll piece. This pressure comes from brow bands that are too short or the bridle is not properly fitted to the horse. Not all horses carry the bit in the same place. Some horses carry it close to the cheek teeth while other like it lower depending on the structure of their mouth. Remember to check the length of the bit and the thickness. A thicker bit in a mouth without a lot of space in-between the skull and lower jaw is actually more uncomfortable than a thinner bit.

3
3
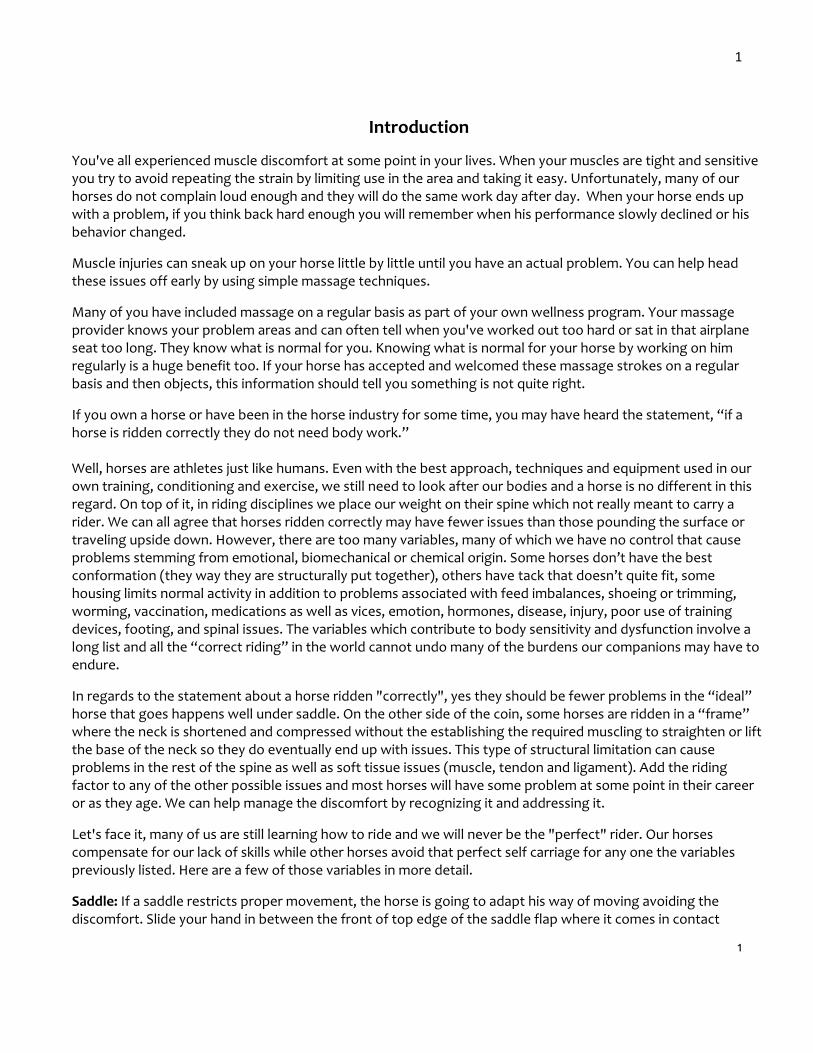
Palpating the Surface Anatomy of the Neck and Head This photo above demonstrates the external parts of the horse as well as some skeletal structures that we will feel at the surface of the horse. These are considered "lay" terms and understood by many horse owners. One should be very familiar with the skeletal structure lying under the skin before attempting any type of bodywork.
TMJ (temporomandibular joint): You've probably heard this term in the past. This is the joint space or hinge where the skull meets the lower jaw. Just behind the eye there is a very large projection of bone (zygomatic arch). Below it you will feel the space which is the TMJ. The projection below (mandibular process or condyle) will keep you from moving downward any further.
The Poll: The area starting at the bumps in-between the ears (the nuchal crest or occipital ridge) and the area behind the ears is referred to as the poll. To feel the bumps (nuchal crest), stand off to the side of the horse and slide your hand up slowly to feel these.
Feeling the beginning of the poll

4
4
Locating the wing of atlas
Wing of atlas: Place your fingers behind the base of the ears. Move them backwards (caudally) until you come to an obvious, bony enlargement. This is the wing of the atlas (C1). If you ask the horse to lower his head, you will see this process. There will be a space in between the wing of atlas and the jaw. You can also try rest your hand on the horse and use your thumb to locate the wing as shown here.
Neck (cervical bones): It is important that you do not use any significant pressure against the neck bones. While the first two neck bones are close to the "poll" the spine dips away from the mane. Make a note where the jugular groove is marked on the photo with the external parts. Usually the bottom of fourth through sixth neck bones lie at this jugular groove. The projections of the bones (transverse processes) can be appreciated above that jugular groove. On some horses you may also feel the processes of the third neck bone. Place your hands on the lower portion of the neck at its widest part these are easily felt. It is even easier to see if you step to the front of the horse and off to the side facing the hind end and incline the neck away from your body. Sometimes it helps to squat and look up at it, just mind your safety. Usually C5 is the most prominent bone from this view. C7 is usually covered by the bridging neck and shoulder muscles.
Finding C5 on the neck

5
5
Crosstie with "mock ties". Note the free end of the rope
wrap around the portion going to the halter.
SIMPLE GUIDELINES and COMMON SENSE
Before you try the bodywork techniques there are a few simple guidelines to follow to keep you and your horse safe: Do not "hard" ties or use conventional "crossties" When you are first trying these techniques and more importantly do not know how your horse will react when you hit an area which is sensitive, it is best not to "hard tie". If your horse should pull back or panic, you want your tie to release slowly. Quick release knots and panic snaps are useless for our purposes because the horse has already hit the end of the rope by the time you can undo it. Instead, run the rope through a smooth ring and hold on to the other end or wrap the free end around the portion going to the halter (what we call a "mock" tie). If you are in a stall you can also try weaving the rope through the rails or slots. There are some great hardware devices which also that allow the rope to slowly release with any pressure. Once you know how your horse is going to react it might be okay to hard tie. However, if there is any doubt avoid any unsafe situation. You can use a handler, but sometimes the horse will be distracted and not focus on the work if someone is holding him. Choose a quiet area to work If he is comfortable in a stall this an easy place to massage. If he is usually in a pen with other horses, work on him outside the fenced area to keep some distance from his curious friends. If your horse is used to crossties, this will work well too. You can put up your own "mock ties" but make sure there is not a lot of distraction and traffic. In any crosstie area there must be a wall behind the horse to stop him should he start to go backwards. He should be also tied loose enough so he can relax his head and neck. If you have a horse than tends to nibble on you with his teeth during the session, cross ties take away this problem (as well as running the rope through a ring for single tie applications.) You should think about the surface that you are working on too. Uneven surfaces are hard on both you and the horse and slippery surfaces are just not safe. Restraint during session If you are used to working on your horse loose in the stall or in smaller area you might work without a halter or lead rope. However, until you know that he will stand quietly you should really have some sort of control. Snoozing horses can be moving in a blink of an eye. We don't always have control of all the external factors (like a dog chasing a ball right under your horse's belly) and you might be your horse's escape path. It's the quiet horses that catch you off guard because you don't expect it where the fussy and difficult horse keeps you on your toes.
6
6
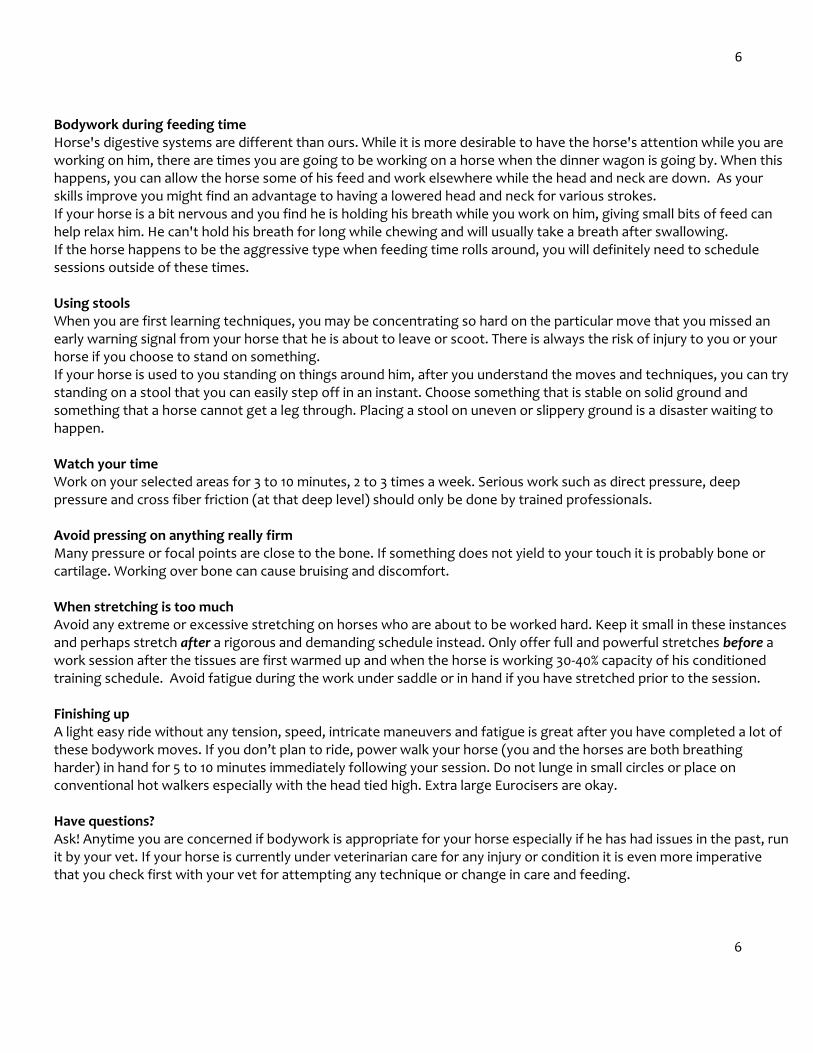
Bodywork during feeding time Horse's digestive systems are different than ours. While it is more desirable to have the horse's attention while you are working on him, there are times you are going to be working on a horse when the dinner wagon is going by. When this happens, you can allow the horse some of his feed and work elsewhere while the head and neck are down. As your skills improve you might find an advantage to having a lowered head and neck for various strokes. If your horse is a bit nervous and you find he is holding his breath while you work on him, giving small bits of feed can help relax him. He can't hold his breath for long while chewing and will usually take a breath after swallowing. If the horse happens to be the aggressive type when feeding time rolls around, you will definitely need to schedule sessions outside of these times. Using stools When you are first learning techniques, you may be concentrating so hard on the particular move that you missed an early warning signal from your horse that he is about to leave or scoot. There is always the risk of injury to you or your horse if you choose to stand on something. If your horse is used to you standing on things around him, after you understand the moves and techniques, you can try standing on a stool that you can easily step off in an instant. Choose something that is stable on solid ground and something that a horse cannot get a leg through. Placing a stool on uneven or slippery ground is a disaster waiting to happen. Watch your time Work on your selected areas for 3 to 10 minutes, 2 to 3 times a week. Serious work such as direct pressure, deep pressure and cross fiber friction (at that deep level) should only be done by trained professionals. Avoid pressing on anything really firm Many pressure or focal points are close to the bone. If something does not yield to your touch it is probably bone or cartilage. Working over bone can cause bruising and discomfort. When stretching is too much Avoid any extreme or excessive stretching on horses who are about to be worked hard. Keep it small in these instances and perhaps stretch after a rigorous and demanding schedule instead. Only offer full and powerful stretches before a work session after the tissues are first warmed up and when the horse is working 30-40% capacity of his conditioned training schedule. Avoid fatigue during the work under saddle or in hand if you have stretched prior to the session. Finishing up A light easy ride without any tension, speed, intricate maneuvers and fatigue is great after you have completed a lot of these bodywork moves. If you don’t plan to ride, power walk your horse (you and the horses are both breathing harder) in hand for 5 to 10 minutes immediately following your session. Do not lunge in small circles or place on conventional hot walkers especially with the head tied high. Extra large Eurocisers are okay. Have questions? Ask! Anytime you are concerned if bodywork is appropriate for your horse especially if he has had issues in the past, run it by your vet. If your horse is currently under veterinarian care for any injury or condition it is even more imperative that you check first with your vet for attempting any technique or change in care and feeding.

7
7
CONTRAINDICATIONS (When bodywork is not appropriate for your horse)
Do not work on your horse if you notice any obvious problem that has not been diagnosed by your veterinarian When you observe anything on your horse that is not normal for him, do not attempt any type of bodywork. Red flags can include a gait abnormality or lameness; especially a weight bearing lameness. He might be unwilling to move or perhaps not interested in food or lethargic or ill. Other red flags might be a significant change in behavior or performance or heat or swelling on any part of the body or dehydration. These conditions must first be evaluated by a veterinarian and not masked by a technique or drug. Several sites regarding emergency situations and information can be found here: http://www.bendequine.com/documents/TopTenEquineEmergencies.pdf http://www.arlingtonequine.com/resources/articles/
Never attempt bodywork with elevated vital signs Learn your horse's normal vital signs. Elevated vital signs means the respiration rate, the heart rate or temperature is too high. Vital signs can be too low also. Something is going on with your horse and massage may not be appropriate for him at this time. Good resources can be found here: http://www.thehorse.com/videos/30388/how-to-take-your-horses-vital-signs http://www.equusite.com/articles/health/healthVitalSigns.shtml http://www.ehow.com/how_2077233_take-horses-vital-signs.html Stay away from injured areas, unexplained heat or swelling Avoid any work on recent soft tissue injuries or when there are problems that are associated with abnormal heat or swelling. Recent (acute) injured areas tend to feel softer with less clearly defined edges compared to the chronic problems. The horse will resent the work in the acute areas whereas in the chronic areas where initially the horse might act uncomfortable upon initial contact, he will actually ask for more work in the area by gradually leaning into you. You can try pressing into the area maintaining a pressure for 10 to 15 seconds. If the horse’s discomfort increases you are probably in an area of acute inflammation. If the discomfort decreases this tends to indicate a non acute state. If your fingertip leaves an indentation in the area, this is pitted edema and the area should be avoided and questioned. Some horses "stock up" in the limbs when confined. Once they move around the limbs return to normal with the circulatory increase. If this is normal for your horse massage should be fine but it is always a good idea that the condition had been addressed by your veterinarians at some point in time. To read more on the differences between stocking up and swelling as well as causes spend some time reading this: http://www.thehorse.com/articles/19171/all-stocked-up http://www.horsechannel.com/horse-experts/horse-vet-advice/stocking-up.aspx Avoid working on skin lesions possibly caused by bacterial, fungal or viral infection Some skin lesions can be spread by massage making this a contraindication. Ringworm (fungal infection), Rain scald (bacterial infection) and warts (viral infection) can be transmitted animal to animal. Other symptoms may be present with these infections which make massage unsuitable. Some infections such as ringworm can be transmitted to the human. A good source of information can be found at: http://www.thehorse.com/photos/slideshows/30256/common-equine-skin-conditions http://useventing.com/news/rain-rot-ringworm-lumps-and-bumps-skin-disease-refresher Check with your vet first before you apply any techniques on your horse while they are on medications

8
8
If your horse is on a course of medication which he usually does not take such as antibiotics, sometimes it is best to wait to do any significant bodywork on him until the drugs are finished. If your horse is on pain medication over a longer course of time ask your vet first to see if massage is appropriate at the stage of the injury. While not everyone agrees, it might be a good idea to wait on bodywork after serious vaccinations, worming etc., especially on horses imported and not used to the local vaccinations. Some horses might run a fever for a short time. To read up more on vaccination reactions visit: http://www.myhorse.com/vaccine-reactions-horses.html For more on worming: http://www.myhorse.com/its-time-rethink-your-current-deworming-strategy.html
Please note: We are not necessarily recommending you follow the information or protocols listed on websites in regards to feed, worming, use of natural products and vaccinations. Some sites are funded by pharmaceutical companies promoting products.

9
9
PRECAUTIONS Geriatric horses Horses have an amazing talent to adapt to existing conditions. A geriatric horse for our purpose of discussion is any older horse who has issues. The issues may be a medical condition, a lameness or some kind of structural issue; there are a variety of problems one can add to the list. We tend to use the term "senior" horses when they are older and in good shape for their age. Similar to humans, you will meet an individual that is 70 years old, still very active and in good health and another person the same age who seems 20 years older. When first working on geriatric horses, keep your sessions short and light. Reevaluate your horse the next day. How did he handle the session? Does he seems sensitive the following day, did he take longer to warm up? Sometimes these geriatric horses have their own "Band-Aids" which they have relied on to move in a certain manner due to an underlying condition. We don't necessarily want to remove all of these, some of which may keep them functionally sound or comfortable. Just remember to go slow with them and keep reevaluating after your sessions. Don't "go for the gold" on the first few sessions. Working on stallions To be honest most of the stallions that I have attended have been just fine. I've had more issue with confused geldings if anything. The disposition of the stallion will come into play here. Many stallions know what their job is and are fine to handle, if not, use common sense; stay clear. You are obviously not going to want to work on a stallion or any horse for that matter that has not had proper handling or has had a rough start in life. Leave those to knowledgeable professionals who are kind and patient. Massage is a vital component in the care of stallions especially during the breeding season. Bodywork and pregnant mares It is a good idea to leave them alone for 4-6 weeks after being bred. If you have massaged your horse before being bred you can go back to your normal routine after this time. Most the strokes and techniques learned in this course are general and broad strokes that can be used just about anywhere. However, do avoid any work with intent (deep, prolonged, direct pressure on focal, stress trigger or acupoints etc) in the “forbidden” areas listed below. If you have not tried body work on your pregnant mare, approach them as a “geriatric” horse again avoiding the “forbidden” areas. Try some gentle topline work with small lifts and exercises to help as they grow. What are those “forbidden” areas? Avoid work with intent on the inside of the forelimb from the "knee" (carpus) upward, on the inside of the hindlimb from the hock (tarsus) upward and the flank area which is the area between the last rib and the front of the thigh. Also avoid the "conception vessel which starts on the chin running on the midline and underside (ventral) of the body and ends at the anus. After the mare has foaled it really depends on how she is around her baby as to when massage is appropriate. Bodywork and young horses When should a horse have their first session? You can start introducing bodywork to your youngster as soon as possible. You can really integrate the idea of touch and later reduce that resistance to first pressure by making this a part of the youngster’s training. The first sursingle will not be such a big deal. You will of course keep the sessions short and light starting with just a few minutes. Working on the juvenile early also establishes a baseline as to what is normal for them instead of waiting until the horse is in training and a question in the behavior or performance arises. A horse should have body work before any demands such as ground driving, lunging and backing are made.

10
10
GUIDELINES FOR THE TECHNIQUES
There are a few guidelines to keep in mind in regards to applying the strokes. Remember to follow these few guidelines for successful application of these general strokes on the healthy sound horse. Make a note of the horse's favorite strokes or the areas that are his favorite scratch zones. If you find the horse objecting to a particular move or work in a specific region return to something he previously enjoyed even if it’s a good scratch! Ending your session with the horse’s favorites, especially if you've targeted a sensitive area, leaves you with a happy horse. When you are first learning the strokes always repeat each one at least three times. This way you get the concept of the move and the horse gets to decide whether or not he really likes the particular move. After you have learned the strokes and are not concentrating on the technique as much as you did in the beginning, your moves begin to flow. Once you are adept in these strokes, you may find areas which need quite a bit of work which require over five minutes until the tissues yield as the horse relaxes. At this level of expertise you can drop the "3 pass" rule and use your instincts to guide your work. Weight of Touch You'll hear people go on about different weights of touch to achieve various levels of pressure. Weight and pressure tolerance varies horse to horse just like it does in people. While one individual may find a pressure quite enjoyable and comforting, another will fine that same pressure unbearable. While we all agree that a stroke should never get aggressive when working right next to bone or perhaps around the ribs, flank area and stomach, we should also use common sense. Adjust your pressure for each horse by listening and reading his response. The trick to comfortably increase the pressure of an application is to start light. If you approach aggressively and heavy initially the horse will splint or brace his muscles not allowing you in further. In this instance you can actually cause bruising. When splinting or bracing, the horse is actually contracting (shortening) muscle fibers in that area which is the opposite of what is desired for the massage application. Feel this bracing for yourself. Bend your arm about 90 degrees at the elbow but keep the hand open and relaxed. Rest your other hand on above the elbow and on the muscle of the bent arm. Now tighten your fist of the bent arm to feel the contraction. The muscles will not yield when you press and this is what we wish to avoid in the sessions. While working on a horse try to think about sinking or melting into the tissue more so than pushing. If you lay your fingertips on your closed eyelids this is close to a light touch and of course this will again vary with each individual. Think about placing your hands on the horse with enough contact that he can feel your presence but not be irritated as if it were a fly. Lean into him just a bit more so he meets your weight. If he moves away use less. What you will notice as your work develops is the horse will actually weight the limb on the side you are working and apply his desired amount of pressure. Keep trying to offer more and watch for the response of the horse. Some people may say that their horse has been trained to move away with pressure and feel that bodywork may confuse the horse. When grooming the typical horse, he knows the difference and usually does not step away so it should not be any different with the bodywork. If you happen to run across a horse who does not like to be touched (tactile defensive) and has been reported to object to grooming, try using your hands as grooming tools for awhile. These horses as well as those who have not been handled much won’t be able to tolerate a full body session with significant pressure the first one or two times. If you limit your session to some lighter comforting strokes even if it means you are basically grooming the horse with your hands, you will actually train the horse to accept and look forward to future sessions. Rest your elbow on the counter and lean on your forehead into the palm of the same arm. Accept and relax your full weight into your palm. At your palm, this is about the weight of medium pressure. Most horses can accept medium

11
11
pressure throughout their body. To move from your light weight of pressure to your medium, you would inhale and as you exhale begin to sink inviting the horse to meet the next level of pressure. Deep pressure or weight should never be confused with the word hard. You can not apply the deep weight unless the horse is a willing participant. The horse will really lean into you for the pressure. Partner up with a person and ask them to turn away from you. Then ask them to lean back into your hands or loose fists so you can accept their weight and actually hold them up. You are meeting the weight of the person. This feeling is deep pressure or weight with a horse. It is a willing trust and involvement as they relax and lean into the move. Remember to avoid this depth of pressure when near the ribs, flank area, stomach or directly on and against bone. Contraindications: Although you have already checked the horse for any reason why bodywork is contradicted before you began the work, sometimes we miss something until we've started. Discontinue the session if there are any contraindications. The list of contraindications can be found on in the text. Speed of Application: You need to move at a comfortable pace for the horse especially when you first begin your session. Think about rocking the horse with the rhythm of the strokes. Rocking is typically soothing for the healthy sound horse. If the horse is aged or has significant joint problems he may not appreciate rocking. If you think you are moving too fast; you probably are. Your Hands: Hands communicate with the horse. A calm relaxed hand offers comfort and can quiet the horse whereas, tense; stiff hands serve to aggravate the horse. Leave a slight bend in your knuckles so your finger pads rest lightly on the horse’s body when using any palm applications. The horse will recognize that as a welcoming touch. In addition, this relaxed approach allows less wear and tear on your joints and helps avoid tendonitis. If you are applying a loose fist, think about holding an egg in your hand. If you are squeezing too hard you will break the egg and this is the tension one tries to avoid. Leave your knuckles out of the work too. Try not to twist too much with any of the strokes; this will pull on the horse’s hair. On that note, you will want to avoid working on wet horses. Wet hair pulls easily. For Learning Purposes and Review:
Open an area with at least 3 passes of a particular stroke Close an area with at least 1 pass of a particular stroke
Always start with light pressure or weight before building the intensity of the stroke Discontinue the session if there are any contraindications
Move at a comfortable pace for you and the horse Work with a relaxed hand
Keep a consistent rhythm with all strokes

12
12
Strokes Used in the Neck and Poll Regions Effleurage Effleurage or ironing is a great way to relax the muscles prior to more pressure. It can be done with a flat relaxed hand or a loose fist. Increase the pressure when the stroke is moving towards the heart and lighten on the return. Sometimes this can be hard to accomplish on a horse when the firmer stroke may leave you going against the horse’s hair. In this case keep the pressure lighter. You can increase the pressure by placing one hand over the other. This stroke can be done just about anywhere the horse likes to be touched. However, do avoid any pressure over bony projections and lighten your touch as you run over them.
Hand Currying Hand or shampoo currying along with ironing is a great way to desensitize a horse or introduce them to body work. It is accomplished with your fingertips. Rest your palm on the horse and move in a circular pattern. Keeping the palm on the horse encourages one to relax the hand instead of getting "claw-like". This stroke can be used anywhere you would iron.

13
13
Palmar Compression: Note the bend in the knuckles enabling the finger pads to touch the horse thus keeping the hand relaxed.
Palmar Compression Compression is one of the primary techniques used in sports massage. Palmar compression is accomplished by using the heel of the hand. It is important to have a relaxed hand keeping the wrist in line with the arm avoiding dorsiflexion and your finger tips on the horse. Whenever possible; the stroke incorporates a rocking motion with the thrust coming from the shoulder. The body worker is in a lunging or fencing position. Some areas may require you to bend your elbow for access to a lower area but keep it minimal. There are times according to the muscle you are addressing (like the leg muscles) or the height of the horse where you'll point your fingers down instead. When you are in this position, lock your arm against your body for better leverage and more control. Horses find this stroke comforting and will lean into you for more pressure. Compression involves a thrusting motion almost like kneading bread. It usually follows in the same direction as the muscle fibers so you see why the knowledge of anatomy can be very beneficial. The thrusting effectively separates the muscle fibers to help break up adhesions and increase the circulation as well as preparing and isolating the muscle for any type of focal point therapy or deeper work. Palmer compression can be used on many muscles and muscle groups works just about anywhere except under the belly and on the inside of the thigh as long as you stay avoid edges of bone. Resting one hand over the other allows more pressure when needed.
Forearm Drag You can use your entire forearm for drags too. It works well on as long as you don't run across bone. Alternating your arms keep the pressure on the muscle and balanced the horse to maintain your weight. When use one arm like the photo to the right, rest one arm on the horse and direct it by cupping the first with the hand of the arm which is not working. Think about the arm being the “tool” and the first of the other arm being the “motor”.

14
14
Palm glides on the spinatus muscles Loose fist glide on serratus ventral cervicis
Fingertip compression (digital compression) This stroke is very effective on areas where conventional compression is difficult such as the chest muscles, the inner thigh muscles, the inside of the limbs and in-between the buttocks to address the semimembranosus (hamstring). Curl your fingers and let your hand rest on the horse. Make small circular motions or just press with your finger pads. Try to stay on top of the line of fiber or tendon you are addressing. Don't flick it back and forth like a guitar string. This would be a transverse move and a different one all together. Shaking Shaking is a very relaxing move for most horses. You have to make sure that your hand is not clamping so you can move it along. Glides Glides are similar to effleurage but in this case, think about placing your hands, loose fist(s) or arm on the horse. Wait for him to meet your pressure or until he leans into the move. It is always easier to apply this technique by using gravity. Starting low on the muscles allows your hands, fist or arm to move upward with the constant contact while the horse weights the side you are working. On some of the higher muscles for example the poll muscles or the gluteal (rump) muscles you will let your hands, fist or arm move away from you in the same manner. The speed of this move can vary. You can move at the pace of a rock using the horse's momentum. For example, if you were working on the muscles on either side of the scapula spine (supraspinatus/blue and infraspinatus/magenta shown in the photo) you could set your hands and move upward pushing the horse away and then replacing your hands back at the bottom of the muscles in the rhythm as the horse rocks back to you, or you can move very slowly.
Glides using the loose fist work well in this manner too. You can use either one or two fists.

15
15
The Rhomboid “Melt” Stand facing the neck and place the palms of your hand cupping the bottom edge of the firm muscle just below the mane (rhomboideus cervicis) for the melt. This is the magenta muscle in this picture. It is best to try this around the middle of the neck. Try to keep as much bend out of your wrist as possible by pointing keeping your elbows downward. Put a slight bend in your knuckles to take the tension out of your hands. Lean into the horse just enough so he meets the pressure without stepping away. If possible hold for at least 90 seconds and continue as long as the horse is working with you. As he relaxes you will notice your horse lower his head and neck to ask for more stretch.
The “Forearm Press” on the Neck Rest your entire arm just above the brachiocephalicus which is the green muscle in this photo. Think about sinking inwards offering the horse to counter the pressure. Once the horse offers some pressure on your arm, meet his lean and lift upwards towards the mane, still keeping contact with entire forearm. Try to avoid slipping across the skin. You will notice he will lower his neck for more pressure. When he does, hold for 90 seconds and maintain as long as the horse wishes (or you can manage!)

16
16
Illustration 1: Skeletal Curves of the Neck
Problems Associated with the Neck and Poll Regions
What causes problems in the neck and poll regions? Incorrect riding, training and gimmicks: This area in the spine actually has two curves; the nuchal curve and the cervical curve as shown in the illustration here. When the whole body is working properly the horse is as he develops self carriage as he learns to carry himself properly and efficiently. However, these curves in the neck are compromised with hurried training, discomfort, conformation, soft tissue concerns, neurological issues and bony changes. With any one of these denominators present problems within the neck can actually manifest. For instance, the horse which tends to hyperflex (overbend) at the poll will make the cervical curve or lower portion of the neck look like it is bulging at the base. A horse that is early on in training needs to be able to straighten the base and develop the muscles requiring the position in order to allow it to bend at the poll naturally and within a proper range without gimmicks. While most humane training aids used sensibility as a suggestion not as a loop hole for proper training and conditioning may be fine, forced frames with the improper use of training aids can cause physical problems. To understand how the neck works, first of all, think about your nose extending the length of a horse’s face. Get on your hands and knees and hollow your back. You will notice that your chest drops towards the ground along with the base of your neck and your “horse nose” points outward similar to a horse with a hollow back and leading with the nose. Now raise and arch your back. You will feel the base of your neck straightening and your “horse nose” points to the ground much like a horse “telescoping”. This is just one cause to consider. Saddle fit, riding, orthopedic problems and all of the other variables listed at the beginning of this text can be the culprit too.
Neck Release Techniques: Muscle Groups: upper neck and middle neck. Some muscles crossing to the shoulder.
Iron/Effleurage: Include all the muscles in the area from the mane down to the top of the neck bones. Use your palm keeping your hands relaxed. Shake: Keep your hand loose
and move down from as far forwards as you can reach and towards the start of the withers. It works to leave your hand in the

17
17
Loose fist glide on serratus ventral cervicis
middle of the mane too. Watch for the underside of the neck to move too as a sign of relaxation. Compress: Cover the same area as the iron. Reach as far forward as you did with the iron and use your palm to compress towards the shoulder. Once you reach the shoulder, slide towards the head and repeat. Include all the muscles above the brachiocephalicus (the large strap muscle of the neck)
Gravity /slide (2 fists): Set your relaxed fists above the brachiocephalicus just in front of the shoulder. Wait for the horse to lean into you and allow your fists to slowly glide upward. Move to the adjacent area moving towards the head and repeat.
Melt: Stand facing the neck and place the palms of your hand cupping the bottom edge of the firm muscle just below the mane (rhomboideus cervicis) for the melt. This is the magenta muscle in this picture. It is best to try this around the middle of the neck. Try to keep as much bend out of your wrist as possible by pointing keeping your elbows downward. Put a slight bend in your knuckles to take the tension out of your hands. Lean into the horse just enough so he meets the pressure without stepping away. If possible hold for at
least 90 seconds and continue as long as the horse is working with you. As he relaxes you will notice your horse lower his head and neck to ask for more stretch. The “Forearm Press” on the Neck Rest your entire arm just above the brachiocephalicus which is the green muscle in this photo. Think about sinking inwards offering the horse to counter the pressure. Once the horse offers some pressure on your arm, meet his lean and lift upwards towards the mane, still keeping contact with entire forearm. Try to avoid slipping across the skin. You will notice he will lower his neck for more pressure. When he does, hold for 90 seconds and maintain as long as the horse wishes (or what you can manage!)

18
18
Roll the subclavius: Point your fingertips towards the shoulder and slide them gently under the scapula (“tuck in the sheets”). Think about sinking in this area rather than pushing. With your fingertips, gently roll the medial surface of the subclavius. Be careful not to roll this muscle over the scapula’s edge.
Release: As you stay just above that big brachiocephalicus muscle (the large strap), let your fingers point towards the neck and sink towards the bones. With your free hand, hold on to the halter and rock the horse back and forth to encourage him to lower the head and neck. Hold as long as the horse works with you.
Stretch and lengthen: Stand on the opposite side of the area you've just finished working. Place your back and shoulders against the horse so both of your shoulder blades rest against his shoulders (if he is an average sized horse). Milk the lead rope until you can comfortably place one hand on the halter’s cheek piece or a hand on the opposite side behind the wing of the atlas. Guide him around your torso but keep his head vertical to the ground. When he stops, wait a moment and then take up the slack and hold 8-10 seconds. When your horse is used to the stretch you may hold it up to 30 seconds. Repeat this at least two times.

19
19
Poll Release Techniques: Muscle Groups: muscles of the poll and some of the upper neck muscles
Cross fiber massage: Concentrate on the lateral and dorsal (the ones close to the mane) poll muscles using your fingertips, palms or thumb for the cross-fiber massage just behind the wing of atlas. Palmar compression: Stand at the shoulder, point your toes forward and reach up so your palm rests just behind the wing of the atlas. Compress using the heel of the hand staying in this area. Your fingers will actually overlap the wing of atlas so your palm is in the correct position.
Glide or Slide: Now step beyond the head and set your palm just behind the wing of atlas. Gently press with your palm and wait for the horse to meet your pressure and lower his head. As the head lowers, your palm with naturally glide across the hair.

20
20
Fingertip or digital compression: Use your fingertips to soften the structures next to the mane. You can do this from other side of the horse for an enhanced effect.
The Hook: If you have not stepped to the other side yet, do so now. Start just behind the ears slightly below the mane. You will feel one (or two) structures running parallel to the mane. Hook it with your finger pads and press holding for 10 seconds. If it helps, think about gently bending the structure. Move rearward about a hands width a repeat. Move back another hand’s width and repeat again.

21
21
Stretch the Poll Muscle: Finish by lengthening these muscles for a release. It is really important to wait for the horse to accept this move. Let your palm rest on the edge of the jaw. Allow your other hand to rest lightly high on the bridge of the nose. Incline the head keeping it in a vertical position with the ground towards you. Think about only bending the top of the neck. Relax for a moment when he stops and take up the slack allowing it to move a bit further and hold for 8-10 seconds. When your horse is used to the stretch you may hold it up to 30 seconds. Repeat this at least two times.

22
22
CONCLUSION
I do hope you have enjoyed this “how-to” PDF. If you found yourself wanting to know the veterinary and medical terminology in regards to the subject matter you will enjoy our EQ50 Equine Anatomy Online Course. It is a self paced course and the full details can be found: https://equinology.com/product/eq50-equine-anatomy-precourse-distance-study/. If you scroll down to the bottom of the page you can follow the registration process. The tuition is free and is open to everyone. There is a $95USD admin/set up fee for the course. This EQ50 is a prerequisite for the Equinology® Equine Body Worker Certification Course. Other programs are now requiring this course and some schools are using it a part of their curricula.
If you would like to learn how to work on your own horse, please come join us for the 3 day onsite course: Equine Body Work and Massage for Owners and Trainers. Full details and locations can be found here: https://equinology.com/product/eq75-equine-massage-bodywork-for-owners-and-trainers/ If you are interested in becoming a professional certified Equinology® Equine Body Worker (EEBW) please view our course details on the site. There are four different versions of the certification course all presenting the same material but over a variety of time lines. EQ100 is the 9 day version, EQ101 is the 2 week version, EQ105 Parts A and B each 5 days run back to back, and the EQ102 is the three week versions. All versions require the prerequisite EQ50 Equine Anatomy course and case studies following the EEBW course. The EQ100 is offered worldwide; the other EEBW courses are only offered in Northern California, USA. We have many other courses which you may find of interest. You do not necessarily need to go through our EEBW course to join in. We have people just beginning their studies, trainers, owners, human massage therapist, physical therapists and veterinarian joining in on our courses. The courses are developed in such a way that a good cross section of the horse industry can attend and learn. We have other anatomy courses, myofascial release, craniosacral therapy, acupressure, biomechanics, saddle fit, gait lameness and abnormalities, red light therapy, neurology, nutrition, first aid and advanced courses for all the modalities presented. Oh...and we have canine courses too! Specialists and veterinarians like Dr. Hilary Clayton, Dr. Barb Crabbe, Dr. Carrie Schlachter, Dr. Nicole Rombach and so many others join us to present the latest in the equine health care world. I am pleased to say and I don't feel I am boasting when I say Equinology has continued to raise the education standards in the profession. We were the first education company that offered a variety of courses to help fulfill the need in continuing education and one of the first requiring case studies and testing following the course before certification is acquired. Others are following and that is good for everyone involved. Thank you for continuing to learn about the animals in your care!
Debranne Pattillo, Equinology CEO, COA and founder Master Equinology Equine Body Worker