TruControltruvistanet.businesscatalyst.com/pdfs/Security/Tru... · Press the Quickarm button on the...
28
User Manual • TouchScreen • Key Fob Keychain Remote • Web Access • iPhone ® /iPod touch ® / iPad ® Access Welcome to a whole new level of interactive home security! TruControl
Transcript of TruControltruvistanet.businesscatalyst.com/pdfs/Security/Tru... · Press the Quickarm button on the...

User Manual
• TouchScreen
• Key Fob Keychain Remote
• Web Access
• iPhone®/iPod touch®/ iPad® Access
Welcome to a whole new level of interactive home security!
TruControl

TruControlUser Manual
Introducing TruControl, a whole new level of security for the things that matter most in your life. Whether you’re home or away, at your desk or on the go, our interactive home security system makes it simple to monitor your property, keep your loved ones safe, and stay connected to home and family from anywhere.
This user manual was designed to help you learn how to use the features of your new system.

ContentsSystem Status Icons ............................................................................................................ 1
System & Zone Trouble Header ................................................................................ 1
TouchScreen .............................................................................................................................. 2Introduction .................................................................................................................................. 2Home Screen .............................................................................................................................. 2Security Status Header ........................................................................................................... 2Arm ..................................................................................................................................................... 3Disarm .............................................................................................................................................. 3Quickarm ........................................................................................................................................ 3Emergency..................................................................................................................................... 3Settings ............................................................................................................................................ 4Home Management ................................................................................................................ 4 Information, Media and Entertainment....................................................................... 6
Key Fob Keychain Remote ............................................................................................. 9Introduction .................................................................................................................................. 9Checking System Status ................................................................................................................9Arming the System ................................................................................................................... 9
Web Access ..............................................................................................................................11Introduction ...............................................................................................................................11Signing In ....................................................................................................................................11Main Tab .......................................................................................................................................11Security .........................................................................................................................................12History ...........................................................................................................................................13Saved Videos & Pictures ......................................................................................................14Cameras ........................................................................................................................................14Manage Contacts ...................................................................................................................15Rules (Alerts, Automations and Schedules) ...........................................................15Manage TouchScreen Widgets ......................................................................................16Thermostat/Lights .................................................................................................................18
iPhone®/iPod Touch®/iPad® Access ....................................................................19Introduction ...............................................................................................................................19Security .........................................................................................................................................20Cameras ........................................................................................................................................21History ...........................................................................................................................................21Thermostat .................................................................................................................................22Lights ..............................................................................................................................................22
Security Monitoring ........................................................................................................21Introduction ...............................................................................................................................21How to Test Your System....................................................................................................22

1
System Status IconsThe various user interfaces include the following icons that provide an at-a-glance overview of the status of your system.
The Security status of your security system is displayed in the large Security Status header.
System & Zone Trouble HeaderThe System & Zone Trouble header displays in the upper right hand of the Subscriber Portal and TouchScreen. It only displays when there is a connectivity or power problem with the TouchScreen (power, broadband, etc.). It also displays when a sensor is inoperable (such as due to a battery failure) or is being tampered.
This is the Security Status header when the status is “Armed”.
This is the Security Status header when the status is “Disarmed”.
When you arm the system, an exit delay period begins. The System Status Header indicates the number of seconds before the system is armed. You must exit the premises and secure the entry/ exit door before the exit delay period ends.
No Wi-Fi Signal
Critical Sensor Failure
No Connectivity Power Failure
Multiple Troubles
You must exit the premises and secure the entry/ exit door before the exit delay period ends. When someone enters an armed premises, an entry delay period starts (generally, around 30 seconds long).
When a System & Zone header is displayed, click it to display more information.

2
TruControl - TouchScreen
Home ScreenThe Home screen is the main display that provides quick access to all TouchScreen features. In addition to the descriptive icons that make it easy to navigate, this screen provides a visible and audible alert if a sensor is triggered when the system is armed or if an environmental sensor, such as a smoke detector, is activated.
Press the button on the TouchScreen at anytime to return to the Home screen.
Security Status HeaderThe Security Status header displays in the upper left hand of the TouchScreen. It displays whether the system is armed or disarmed. During an alarm, the Security Status header changes to show an Alarm state.
Displayed events that prevent arming replace the Security Status Header altogether.
Introduction
The interactive TouchScreen acts as the control center that enables you to operate your security system and interact with your home at the touch of a button. Use it to arm and disarm your system, view live video from cameras placed in your home and view real-time web content all from the full-color display. The following section provides an overview of your TouchScreen and offers quick tips on how to use the various features.

3
Arm1. Touch the Disarmed - Press to Arm button on the Home Screen.
2. Select Arm Stay to arm the sensors on your doors and windows only with a 30-second exit delay, or Arm Night with no delay. Or select Arm Away to arm all sensors including the motion detectors.
3. Press the Turn Zone Off button for any security zones that you want to bypass.
4. Follow prompt to enter code to Turn Zone Off.
5. Enter your 4-digit security code to arm the system.
Note: The TouchScreen generates short, audible alerts while arming, indicating 60 seconds for exit. Audible alerts last for 30 seconds for entry.
Disarm1. Touch the Armed Away - Press to Disarm button on the Home Screen.
2. Enter your 4-digit security code to disarm the system.
QuickarmPress the Quickarm button on the lower front of the TouchScreen to immediately arm the system in Arm Away mode.
EmergencySends an immediate alarm to the central monitoring station, indicating an emergency of a specific type — medical, fire or police.
1. Touch on the bottom of the TouchScreen to display the individual emergency buttons.
2. Press the applicable button to alert the proper authorities.
3. Note: Enter your 4-digit security code to cancel the alarm.
Note: Pressing the police button will sound a silent panic. Pressing the screen a second time will sound an audible alarm.
TruControl - TouchScreen

4
SettingsDisplays a list of settings options to customize your TouchScreen. Categories include:
1. TouchScreen – Clean screen, screensaver, sound and button configurations, etc.
2. Security – Manage keypad codes, default arming widget configuration, alarm test.
3. Sensors & Zones – Change zone order, etc.
4. Home Devices – Add, edit and delete devices that control cameras, key fobs and more.
5. Widgets – Add, remove and reorder widgets.
6. Advanced Settings – Account information, security secret word, connectivity and TouchScreen reboot features.
7. About – Detailed TouchScreen information.
Home ManagementView live video from in-home cameras.
Cameras
View live video from cameras installed on your system.
1. Touch the Cameras widget
2. Touch the camera image to view live video from that camera. If only one camera is connected to the system, live video will automatically appear.
TruControl - TouchScreen
Lights
Adjust settings for lights throughout your home.
1. Touch the Lights widget to display a list of the lighting modules installed in your home, as well as the current setting of each.
2. Change the current setting to the ON or OFF position.
3. For lamps equipped with a dimmer function, use the slider bar to adjust the brightness level.

5
TruControl - TouchScreen
Thermostats
Adjust settings for thermostats installed throughout your home.
1. Touch the Thermostats widget.
2. Change mode to Cool, Heat or Off.
3. When in Cool or Heat Mode, use the slider or - + toggles to change the setpoint.
4. Touch Hold to maintain the mode and ignore any other programming configured on the Thermostat device.
Word of the Day
Displays word of the day and its definition.

6
TruControl - TouchScreen
Information, Media and EntertainmentQuick-glance, customizable information.
Clock
Touch the clock widget icon to display the time.
1. Touch the Clock widget.
2. Touch to add seconds to the digital time display.
3. Touch to change to an analog clock.
Traffic
Displays a map of your area with live traffic data.
• Green patterns indicate no traffic delays.• Yellow patterns indicate slightly delayed traffic.• Red patterns indicate stop-and-go traffic.
1. Touch the Traffic widget.
2. Touch Destination to change locations.
3. Use the - + buttons to zoom in and out of the map.

7
TruControl - TouchScreen
Calculator
Basic mathematical functions similar to handheld or desktop calculators.
Photos
Displays photos from your Yahoo! flickr account in full-screen mode on the TouchScreen.
Note: You need a Yahoo! flickr® account with at least one photo set to personalize this feature. If you do not have a Yahoo! flickr® account, you can sign up for one free at www.flickr.com and upload the photos you want to view on your TouchScreen. Once you have a Yahoo! flickr® account:
1. From your subscriber portal, add photos widget, then follow prompts to sync your flickr® account with your TouchScreen.
2. Touch Photos widget.
3. Answer YES to the Widget Needs Permission page if presented.
4. Touch the display.
5. Use the [<] and [>] buttons to scroll through your photos
6. Touch the photos button at the bottom to choose a new photo album.

8
TruControl - TouchScreen
Sudoku
Challenge your mind and have fun at the same time.
1. Touch the Sudoku widget.
2. Choose the level of difficulty – easy, medium or hard.
3. Play game.

9
TruControl - Key Fob Keychain Remote
Introduction
The wireless key fob gives you additional access to your system, enabling you to:
• Check the current system status (armed, disarmed, or “not ready”). • Arm the system in Arm Away mode or Arm Stay mode.• Disarm the system before entering the premises. • Send an audible Panic alarm for police assistance.
Checking System Status 1. Press the button to light the LED to show the current
status of the security system.
2. The LED flashes red once to indicate that it has contacted the system then:
• Lights green for three seconds if the system is disarmed.
• Lights red for three seconds if the system is armed.
• Lights red for three seconds if the system is not ready to be armed (for example, a door is open).
Arming the System From the key fob, you can arm your system in Arm Away mode or Arm Stay (Arm Night mode must be performed from the TouchScreen or Subscriber Portal).
Arm Away
Press the button for about 2 seconds to arm the system in Arm Away mode (the home is unoccupied).
The LED flashes red once to indicate that it has contacted the system then lights red for one second. The Exit Delay starts.
Arm Stay
Press the button for about 2 seconds to arm the system in Arm Stay mode (there are still people within the premises).
The LED flashes red once to indicate that it has contacted the system then lights red for one second. The Exit Delay starts.

10
Disarming the System
Before entering the premises in Armed state, press the button for about 2 seconds to disarm the system without entering the premises.
The LED flashes green once to indicate that it has contacted the system then lights green for one second indicating that the system is disarmed.
Sending an Emergency Police Alarm
Press and hold the button for 3 seconds to send an audible alarm to central monitoring for police assistance. The LED flashes red to indi-cate that the alarm has been sent.
TruControl - Key Fob Keychain Remote

11
TruControl - Web Access
Signing InYou will need to sign in each time you access the website.
1. Go to www.truvista.net/icontrol.
2. Enter your username and password.
3. Click Sign In.
Main TabThe Main tab provides a snapshot overview of your entire system. From this page, you can view general status information about your home and security system, and access various tabs to change system settings.
Introduction
Access your interactive home security system through your personal, secure web page. Check the status of your home, arm and disarm your system, see live video of your home, view video clips and pictures, change settings and much more from anywhere you have Internet access.
See Page 14See Pages 15-16
See Pages 12-13
See Page 14
See Page 13
2
3
12
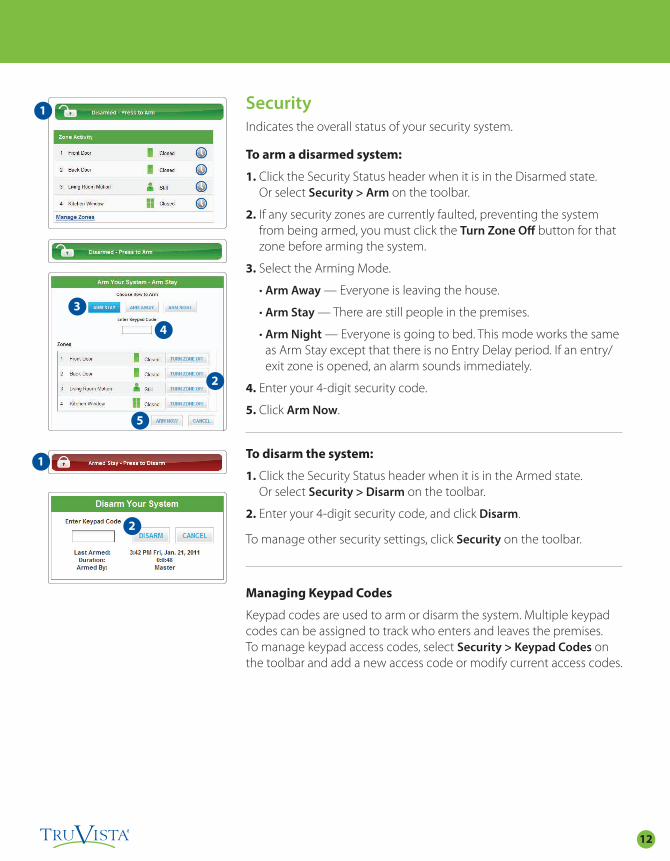
SecurityIndicates the overall status of your security system.
To arm a disarmed system:
1. Click the Security Status header when it is in the Disarmed state. Or select Security > Arm on the toolbar.
2. If any security zones are currently faulted, preventing the system from being armed, you must click the Turn Zone Off button for that zone before arming the system.
3. Select the Arming Mode.
• Arm Away — Everyone is leaving the house.
• Arm Stay — There are still people in the premises.
• Arm Night — Everyone is going to bed. This mode works the same as Arm Stay except that there is no Entry Delay period. If an entry/exit zone is opened, an alarm sounds immediately.
4. Enter your 4-digit security code.
5. Click Arm Now.
To disarm the system:
1. Click the Security Status header when it is in the Armed state. Or select Security > Disarm on the toolbar.
2. Enter your 4-digit security code, and click Disarm.
To manage other security settings, click Security on the toolbar.
Managing Keypad Codes
Keypad codes are used to arm or disarm the system. Multiple keypad codes can be assigned to track who enters and leaves the premises. To manage keypad access codes, select Security > Keypad Codes on the toolbar and add a new access code or modify current access codes.
TruControl - Web Access
1
1
2
2
3
4
5

13
TruControl - Web Access
Zone Activity
The current state of all security devices connected to your system appears here. Click the device number to see the recent history.
1. Click the clock icon next to the sensor name to see the recent history.
2. Click Manage Zones to edit zone names and to turn zones off.
HistoryView recent security device activity, alarm events and more.
1. Use the scroll bar to view all of the 30 most recent events.
2. Click View History or click the History Tab to view all events or to sort by date and event type.
1
2
1
2

14
TruControl - Web Access
CamerasDisplays live video and enables you to capture manual pictures or video clips from cameras installed in your home. Viewing & Capturing Live Video and Snapshots
To view live video from the cameras attached to your system and take snapshots or videos, click Cameras > Live Video on the toolbar.
One of the cameras is displayed as live video. The other camera views (not live video) are arrayed over it.
1. Click an image above the video to view live video from each camera.
2. To take a snapshot with the currently selected camera, click Take Picture.
3. To take a video clip (about 20 seconds) with the currently selected camera, click Take Video Clip.
4. To delete snapshots or video clips, select one or more check boxes, and click the trash can.
Viewing Captured Pictures and Video Clips
To view captured images:
1. Select Cameras > Saved Pictures and Videos on the toolbar. The displayed screen lists the pictures and video clips captured manually and automatically (during alarm events).
2. Click on an image to view the captured images
3. Images that were captured automatically during an alarm, have an ALARM button and display the security zone that cause the images to be taken.
4. Images that were captured manually have a camera icon.
5. To delete an image or video, select the check box for each captured image or video and click the trash can.
1
23
4
2
5

15
TruControl - Web Access
Manage ContactsManage contacts by adding people you want to receive system alerts such as arming/disarming events, alarm activity and more. After you add a contact, refer to the Rules ( Alerts, Automations, and Schedules) section below to customize how and when your contacts receive system alerts.
1. Click Contacts on the toolbar.
2. Click Add Contact to add a new contact.
3. Click to modify a contact.
4. Click to remove a contact from the list.
Rules (Alerts, Automations and Schedules)The Rules are flexible methods for generating a variety of system actions (such as sending an email alert) whenever something else happens under specific circumstances.
To manage rules, click the Rules Tab. The Rules screen is displayed.
To add a rule, click Add Rule and determine which type of rule you’d like to configure:
• Schedule - Actions occur regularly on specified times, dates, and date ranges without regard to an additional event.
• Event - Actions occur when a specified event occurs at a security zone (door, window, motion detector, smoke alarm, etc.).
• Non-event - Actions occur when an expected event does not occur at a security zone. For example, send an SMS notification if the front door does not open between 3:30pm and 5pm on Monday through Friday when the kids are expected home.
To set a Schedule:
1. Determine the Start Time for your Schedule. Check the box if you would like to add an End Time. Determine if you want the Schedule to repeat during the set times and then click the applicable Days.
2. Determine the action the rule will take. Depending on the action, you may have additional items to select.
3. Select the arming mode the rule applies.
4. Describe the rule.
5. Click Save.
1
2
3
4 5
Note: This is not the Emergency Dispatch contact information used by the Central Monitoring Station when an alarm occurs. Emergency Dispatch contacts are available to view, submit, or edit by selecting Security/Emergency Dispatch Setup.

16
TruControl - Web Access
To set an Event rule:
1. Select a specific security zone that will trigger the action, or select the entire system.
2. Determine what happens at the security zone or the security system to trigger the action.
3. Select the action the rule will take. Depending on the action, you may have additional items to select.
4. Determine the time range and days of the week when the rule is applicable. You can select Any Time to have the rule apply whenever the selected event occurs.
5. Select the arming mode the rule applies.
6. Describe the rule.
7. Click Save. To set a Non-Event rule:
1. Select a specific security zone to monitor.
2. Determine the event that fails to occur during the specified time range.
3. Determine the time/day range when the rule is applicable.
4. Select the action the rule will take if the specified conditions are met. Depending on the action, you may have additional items to select.
5. Select the arming mode the rule applies.
6. Describe the rule.
7. Click Save.
Manage TouchScreen Widgets You can manage what TouchScreen widgets are displayed on your TouchScreen, configure them, and determine how they are displayed from the Subscriber Portal only.
Click Widgets on the toolbar.
The widgets at the top of the screen are those available to be added to the TouchScreen. The widgets displayed in the TouchScreen image are those apps currently displayed on the TouchScreen. The widgets are positioned in the image just as they are on the actual TouchScreen.
1
1
2
2
3
3
4
4
5
5
6
6
7
7

17
TruControl - Web Access
Adding TouchScreen Widgets
1. Click on the TouchScreen widget you want to add from the top menu bar.
2. Click Add Widget. The Subscriber Portal pushes the widget to the TouchScreen. An “updating” message is displayed while the widget is being added.
3. Once you’ve added more than 10 widgets, you must manage widgets from your TouchScreen.
Editing TouchScreen Widgets
Several TouchScreen widgets have the capability to be personalized.
1. From the Manage Widgets screen, hover your cursor over the widget you want to edit. A label is displayed over the widget.
2. Click Edit.
3. Each widget will have a different edit menu.
Deleting TouchScreen Widgets
1. From the Manage Widgets screen, hover your cursor over the widget you want to delete. A label is displayed over the widget.
2. Click Delete.
3. Click Delete Widget in the displayed confirmation dialog box.
Repositioning TouchScreen Widgets
You can change the order in which TouchScreen widgets are displayed on the TouchScreen. All widgets, except the Security, Settings, and Cameras widgets, can be moved to the preferred location on the TouchScreen.
1. Click Reposition Widgets to re-arrange the widgets.
2. Drag and drop the widgets to the preferred location on the TouchScreen.
3. When all the widgets are repositioned to your satisfaction, click Update.
1
2
2
2
1

18
TruControl - Web Access
ThermostatsThe current states of your thermostats are displayed on the Main screen. To manage your thermostat:
1. On the Main screen, in the Thermostats tool, click Manage Thermostats or click the Thermostats Tab. The current temperature appears in the middle of the screen. The unit of measure button on the right indicates whether the temperature is displayed in Fahrenheit or Celsius.
2. You can click unit of measure button to toggle the display between Fahrenheit or Celsius.
3. On the left side of the screen, you can click Cool, Heat, or Off to set the mode.
4. You can click Fan to turn on the fan continuously, regardless of whether the heat or air conditioning is active. Click Fan again to change it back to Auto, so the fan comes on only when the heat or air conditioning is active.
5. You can click Hold to maintain the mode and temperature settings and ignore any programming configured on the thermostat device.
LightsThe current state of your light settings is displayed on the Main screen. To manage your lights:
1. On the Main screen, in the Lights tool, click Manage Lights or click the Lights Tab.
2. In the Lights tool, you can turn the light on or off and set dimming percentage.
1
2
43
5
1
2

19
TruControl - iPhone®/ iPod touch®/ iPad® Access
Introduction
The iPhone® application allows you to access a core set of security system functions using your using your iPhone®, iPod touch® or iPad®. The application contains only the essential functionality available through web access.
Download the “uControl” app from the App Store. Then, launch the application by tapping on the home screen of your iPhone®, iPod touch® or iPad®.
Note: This application requires your iPhone®, iPod touch® or iPad® to be connected to the Internet.
Instructions for accessing the app from your iPhone®/iPad®/ iPod Touch® for the first time:
1. Click on the box (with two wheels) at the top right corner.
2. Then enter truvista.net/icontrol in the Custom 1 text box and make sure there is a Check Mark to the right of the text box by tapping directly to the right of the Custom 1 textbox.
3. Then click on the Done button at the top.
4. Then enter your TruControl Username and Password and click Login.
1
3
4
2

20
TruControl - iPhone®/ iPod touch®/ iPad® Access
SecurityRemotely control your security system and view current arm/disarm status.
To arm your security system:
1. On the Home screen, tap Security.
2. To bypass any Home Security Zone, tap the respective zone and use the On/Off toggle.
3. On the Security screen, tap Disarmed – Press to Arm.
4. Tap Arm Stay to arm the sensors on your doors and windows only with a 30-second exit delay, or Arm Night with no delay. Or select Arm Away to include the motion detectors.
5. Enter your 4-digit security code to arm the system.
6. Once activated, your system will arm in a few seconds and indicate the new status.
To disarm your security system:
1. On the Home screen, tap Security.
2. On the Security screen, tap Armed – Press to Disarm.
3. Enter your 4-digit security code to disarm the system.
2
3
1
2
3 4
5

21
TruControl - iPhone®/ iPod touch®/ iPad® Access
CamerasView live video or captured pictures and video clips.
To view live video from your cameras:
1. On the Home screen, tap Cameras.
2. From the list, tap the camera you’d like to access. Live video will appear for that respective camera.
To view captured video clips or pictures from your cameras:
1. On the Home screen, tap History.
2. Use the menu at the top of the screen to filter the History:
• All – View images captured manually from the Subscriber Portal or as a result of a Schedule rule configured in the Subscriber Portal.
• Alarm – View images captured as part of an alarm.
• Arm – View images captured as part of an arming event.
• Zone – View images captured as part of a zone event.
3. Tap the listing to view the captured images.
2
2
3
HistoryView a log of events that have occurred in the system.
1. On the Home screen, tap History.
2. Choose to view a history of recent events based on the following criteria:
• All – All logged events.
• Alarm – Alarm events.
• Arm – Arm/Disarm events.
• Zone – Events related to security zones
2

22
TruControl - iPhone®/ iPod touch®/ iPad® Access
ThermostatsAdjust all thermostats connected to your system.
1. On the Home screen, tap [Thermostats].
2. Tap the name of any thermostat to control that thermostat.
3. Tap to turn off the thermostat.
4. Tap to set the thermostat to Cool mode.
5. Tap to set the thermostat to Heat mode.
6. Drag the orange bar right or left change the Heat or Cool temperature setting.
7. Tap Settings to view your current settings. Here you can:
• Turn on Hold to maintain the Heat/Cool/Off mode and temperature you have set for the device from the iPhone app or Subscriber Portal, and ignore any other programming configured directly on the Thermostat device.
• Turn on Fan Auto Mode to have the system activate the fan only when the Cool/Heat comes on. Turn it off to have the fan run all the time.
3 4 5
6
7
LightsAdjust all lights connected to your system via the plug-in modules.
1. On the Home screen, tap [Lights].
2. If the light is on, tap [Off] to turn it off.
3. If the light is off, tap [On] to turn it on.
4. If the light includes the dimmer function, you can adjust its brightness by sliding the slide bar. Slide to the left to make the light dimmer. Slide to the right to make the light brighter.
2
3
4

23
TruVista’s central monitoring station provides local 24/7 U.L. approved monitoring for your residence or business.
The following information will provide you an overview of what occurs when the central monitoring station receives an alarm signal:
Burglary and Fire1. Customer Notification - Two calls are placed in an attempt to notify the customer2. Dispatch Authorities3. Contact List Notification
Panic1. Dispatch Authorities - No calls are made first2. Contact List Notification
Monitoring Station Number: 1 (800) 868-0063
Suggested Action: Leave the house immediately if you have any doubt about your safety.
TruControl - Security Monitoring

24
TruControl - Security Monitoring
How to Test Your System
TruControl alarm system testing procedures
The purpose of testing the alarm system is to ensure proper local operation and proper communication to the central station. The following procedure should be done at least once per month.
1. Call the security monitoring station at 1-800-868-0063 to place your account on test. You will need your account number and your personal security password.
2. Arm your system in the “stay” mode, this will allow you to test your perimeter devices – doors, windows, etc. Remember your entry door has a time delay, it will not activate the alarm until both the entry and exit delay has expired. As you open each door or window it is not necessary to re-set the system each time.
3. Arm your system in the “away” mode. This will allow you to test the interior devices. Open an entry exit door.
4. If you have any external panic devices such as a wireless key fob, they can be tested at this time.
5. After all testing is complete; insure you re-set your alarm system by entering your code or using your off button on your wireless key fob.
6. Call the security monitoring station and ask if they have received all of your test alarms. If there is any question, re-test the affected part of the system again.
7. Please call our business office at 800-768-1212 if you have any other questions.

© 2011 iControl Networks, Inc. All rights reserved. iControl, iControl Networks, Powered By iControl and the iControl logos are trademarks of iControl Networks.
TruControl