System Center 2012 R2 SP1 Configuration Manager ... · System Center 2012 R2 SP1 Configuration...
26
System Center 2012 R2 SP1 Configuration Manager & Microsoft Intune 2015 DEPLOYING MICROSOFT OFFICE 2016 RONNI PEDERSEN RONNIPEDERSEN.COM | Microsoft MVP: Enterprise Client Management
Transcript of System Center 2012 R2 SP1 Configuration Manager ... · System Center 2012 R2 SP1 Configuration...

System Center 2012 R2 SP1
Configuration Manager &
Microsoft Intune
2015
DEPLOYING MICROSOFT OFFICE 2016 RONNI PEDERSEN
RONNIPEDERSEN.COM | Microsoft MVP: Enterprise Client Management

Document Properties
Author: Ronni Pedersen
Microsoft MVP: Enterprise Client Management
Revision: 1.00.01 (2. October 2015)
Check http://www.ronnipedersen.com/configmgr-2012-guides/ for the latest version.
About the author I’m a Senior Technology Consultant that specializes in designing and deploying management solutions
based on various Microsoft technologies. My main focus and passion has always been related to client
management, but during the years, I’ve been working with many different products and technologies.
Additionally, I’ve been an active Microsoft Certified Trainer since 2007.
In July 2008 I was awarded the prestigious Microsoft Most Valuable Professional (MVP) award for the first
time, and have been rewarded every year for the past eight years.
Blog: http://www.ronnipedersen.com/
If you have any comments or feedback to this guide, feel free to send me an email at
Thank you.

Table of Contents Document Properties ................................................................................................................................... 1
About the author ......................................................................................................................................1
I’m a Senior Technology Consultant that specializes in designing and deploying management solutions
based on various Microsoft technologies. My main focus and passion has always been related to client
management, but during the years, I’ve been working with many different products and technologies.
............................................................................................................. Fejl! Bogmærke er ikke defineret.
Additionally I’ve been an active Microsoft Certified Trainer since 2007. Fejl! Bogmærke er ikke defineret.
In July 2008 I was awarded the prestigious Microsoft Most Valuable Professional (MVP) award for the
first time, and have been rewarded every year for that past six years. .. Fejl! Bogmærke er ikke defineret.
General Description ..................................................................................................................................... 3
Prepare Office 2016 for deployment ............................................................................................................ 4
Overview ..................................................................................................................................................4
Pre-requirements .....................................................................................................................................4
Process Steps ............................................................................................................................................4
Create/import the Application for Office 2016 ........................................................................................... 10
Overview ................................................................................................................................................10
Pre-requirements ...................................................................................................................................10
Process Steps ..........................................................................................................................................10
Deploy Microsoft Office 2016 .................................................................................................................... 20
Overview ................................................................................................................................................20
Pre-requirements ...................................................................................................................................20
Process Steps ..........................................................................................................................................20
End User Experience .................................................................................................................................. 23
Overview ................................................................................................................................................23
Pre-requirements ...................................................................................................................................23
Process Steps ..........................................................................................................................................23

General Description This document describes how to prepare, add and deploy an application (Microsoft Office
Professional Plus 2016) using the Application library of System Center 2012 R2 SP1
Configuration Manager.
This document describes how to prepare, add and deploy an application (Microsoft Office
Professional Plus) using the Application library of System Center 2012 R2 SP1 Configuration
Manager.
I know that there are a lot of scenarios to cover, but instead of waiting for a big release, I’ve
decided to make this document dynamic. You should expect to see new releases of this guide
until all common deployment scenarios are covered.
Don’t forget to update your bookmarks and check if this is the latest release before you start.

Prepare Office 2016 for deployment
Overview This procedure describes how to prepare Microsoft Office Professional Plus 2016 to be installed
unattended. The aim of this procedure is to create and prepare the installation source folder,
for use with System Center 2012 R2 SP1 Configuration Manager or Microsoft Intune.
This procedure does not cover:
Download the Volume License Edition of Microsoft Office 2016 installation files.
Configuration of KMS or Active Directory-Based activation
Pre-requirements In order for the operator to perform the steps describes below, the following requirements
must be in place:
The operator must have access to the volume license edition of Microsoft Office
Professional Plus 2016.
Process Steps
1. Copy all content from the Microsoft Office 2016 DVD to a source share like:
\\CM01\Source$\Applications\Microsoft Office Professional Plus 2016 ENU\DT-
MSI_x86\.
Note: If an application has more than one deployment type, we need to create a source
folder (DT-MSI_x86) for each deployment type.
2. Start the Office Customization Tool (OCT), by running Setup.exe /admin, from the
source folder.
Note: The OCT is available only with the volume license editions of Office.
3. If required, click OK to the User Account Control (UAC) prompt.

4. Verify that the correct product and version is selected, and then click OK.
5. In the Default File Types, pop-up, select the format you wish to use. The default is
“Keep Current Settings”. In this example, we will select Office Open XML formats
as the default, and then click OK.
6. In the Microsoft Office Customization Tool wizard, you can customize almost all
available settings, but in this example, we will only configure a few of these settings, to
make the installation completely silent, and to provide a simple user experience to the
end users, when they install Microsoft Office Professional Plus 2016, from the System
Center 2012 Application Catalog.
7. Select Install location and organization name, and fill-in your company name.
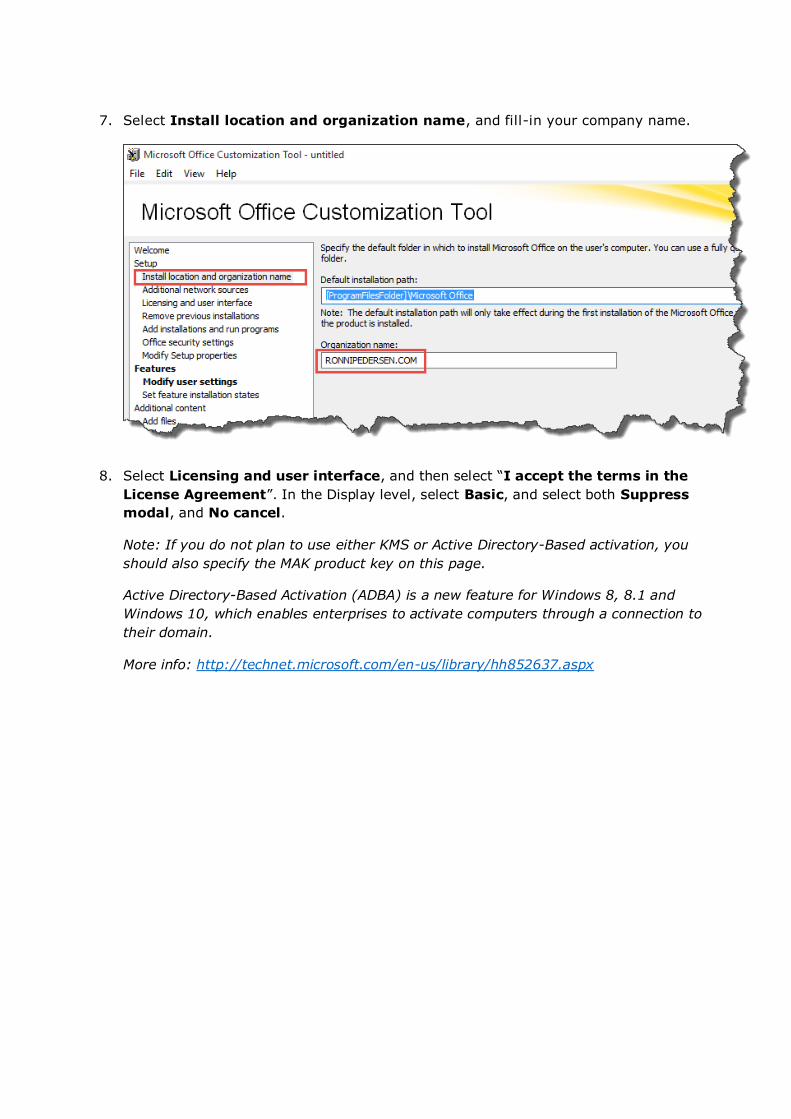
8. Select Licensing and user interface, and then select “I accept the terms in the
License Agreement”. In the Display level, select Basic, and select both Suppress
modal, and No cancel.
Note: If you do not plan to use either KMS or Active Directory-Based activation, you
should also specify the MAK product key on this page.
Active Directory-Based Activation (ADBA) is a new feature for Windows 8, 8.1 and
Windows 10, which enables enterprises to activate computers through a connection to
their domain.
More info: http://technet.microsoft.com/en-us/library/hh852637.aspx
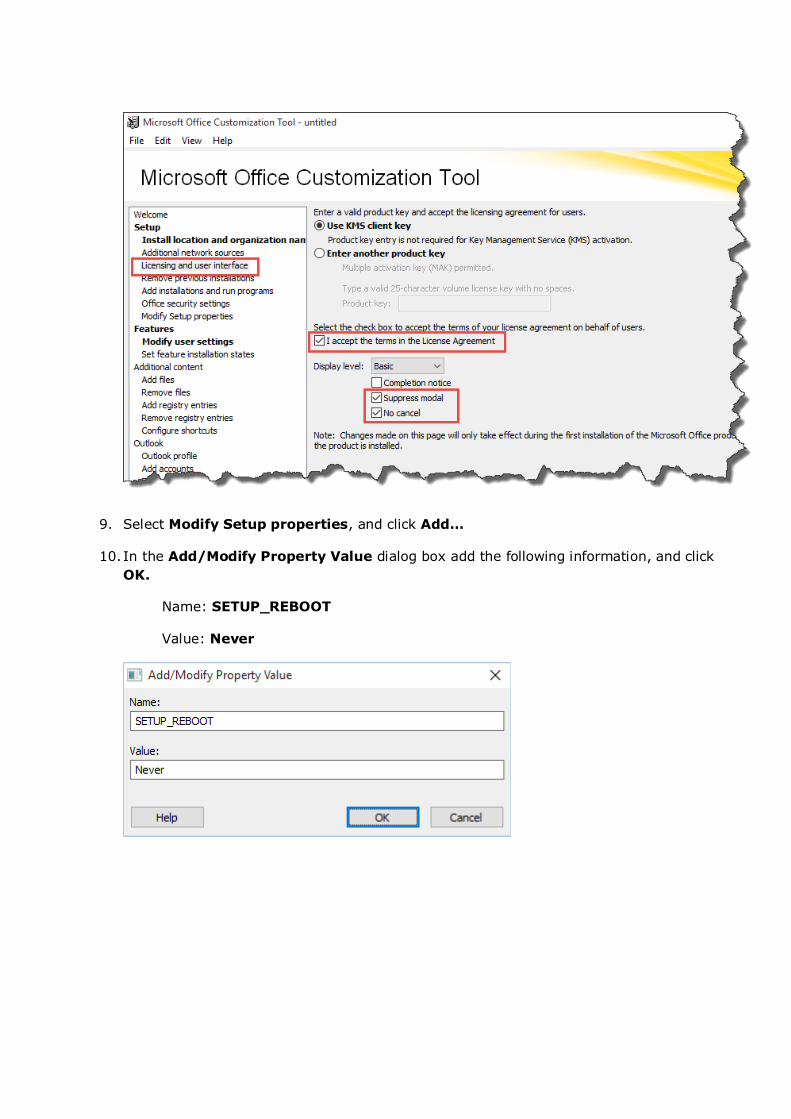
9. Select Modify Setup properties, and click Add…
10. In the Add/Modify Property Value dialog box add the following information, and click
OK.
Name: SETUP_REBOOT
Value: Never
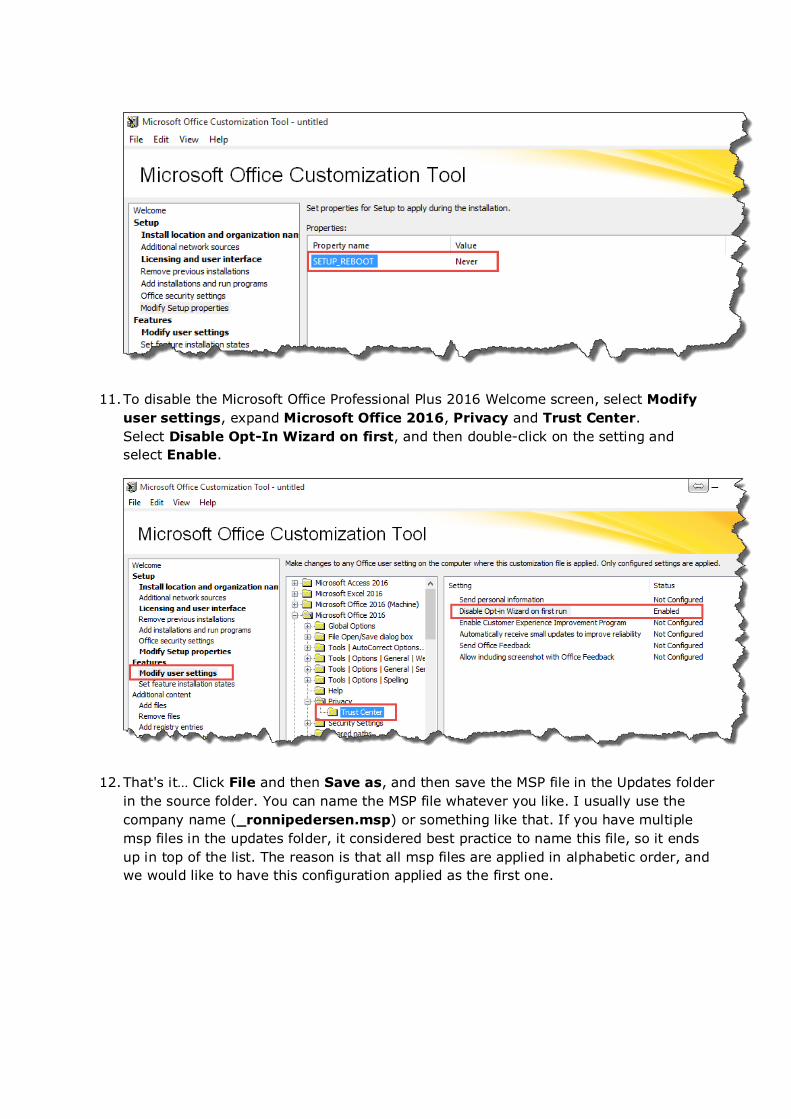
11. To disable the Microsoft Office Professional Plus 2016 Welcome screen, select Modify
user settings, expand Microsoft Office 2016, Privacy and Trust Center.
Select Disable Opt-In Wizard on first, and then double-click on the setting and
select Enable.
12. That's it… Click File and then Save as, and then save the MSP file in the Updates folder
in the source folder. You can name the MSP file whatever you like. I usually use the
company name (_ronnipedersen.msp) or something like that. If you have multiple
msp files in the updates folder, it considered best practice to name this file, so it ends
up in top of the list. The reason is that all msp files are applied in alphabetic order, and
we would like to have this configuration applied as the first one.
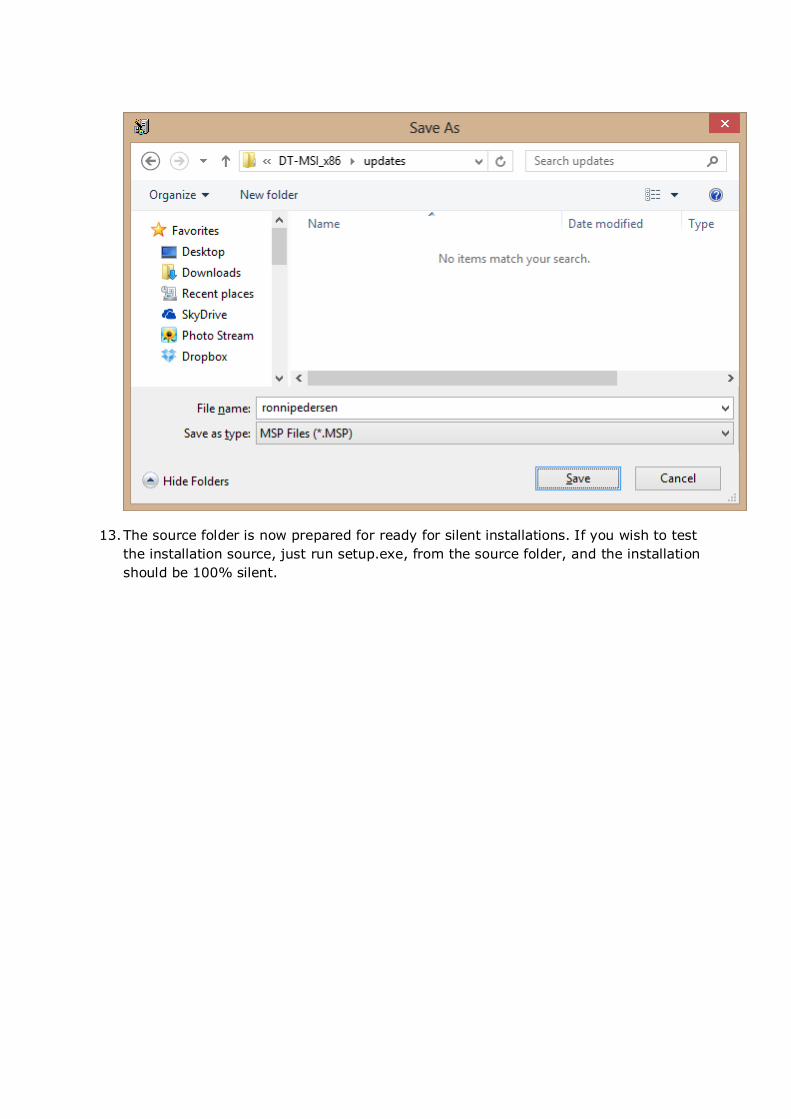
13. The source folder is now prepared for ready for silent installations. If you wish to test
the installation source, just run setup.exe, from the source folder, and the installation
should be 100% silent.
Create/import the Application for Office 2016
Overview This chapter describes how to create a new application (Microsoft Office Professional Plus
2016) in System Center 2012 R2 SP1 Configuration Manager.
Pre-requirements In order for the operator to perform the steps describes below, the following requirements
must be in place:
The operator must have access to a system running the Configuration Manager
Administration Console
The operator must be logged in with a user account with permissions to create and
deploy applications.
Process Steps
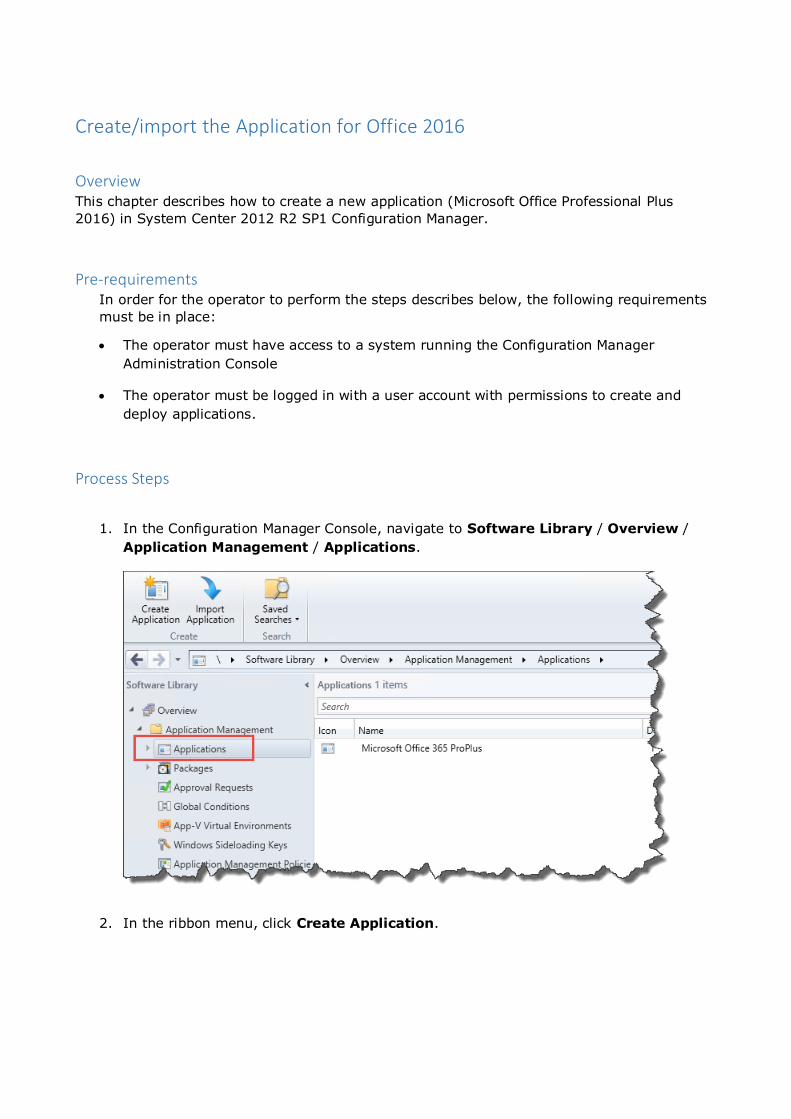
1. In the Configuration Manager Console, navigate to Software Library / Overview /
Application Management / Applications.
2. In the ribbon menu, click Create Application.
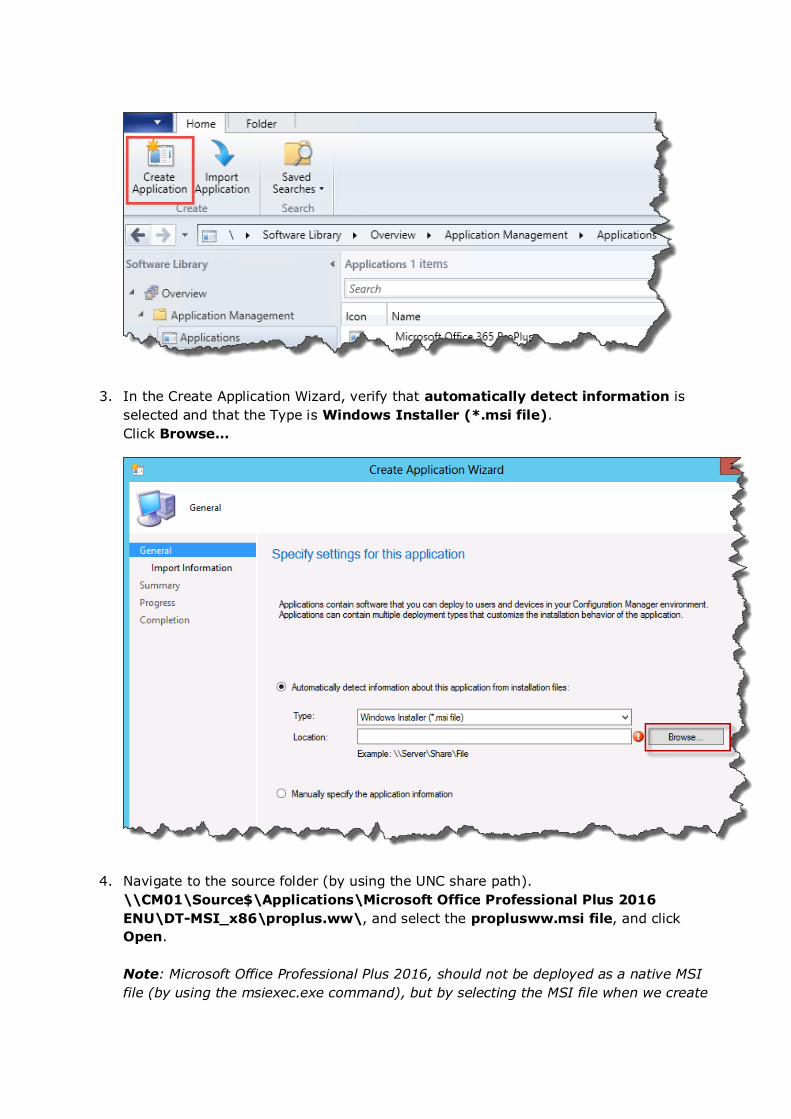
3. In the Create Application Wizard, verify that automatically detect information is
selected and that the Type is Windows Installer (*.msi file).
Click Browse…
4. Navigate to the source folder (by using the UNC share path).
\\CM01\Source$\Applications\Microsoft Office Professional Plus 2016
ENU\DT-MSI_x86\proplus.ww\, and select the proplusww.msi file, and click
Open.
Note: Microsoft Office Professional Plus 2016, should not be deployed as a native MSI
file (by using the msiexec.exe command), but by selecting the MSI file when we create
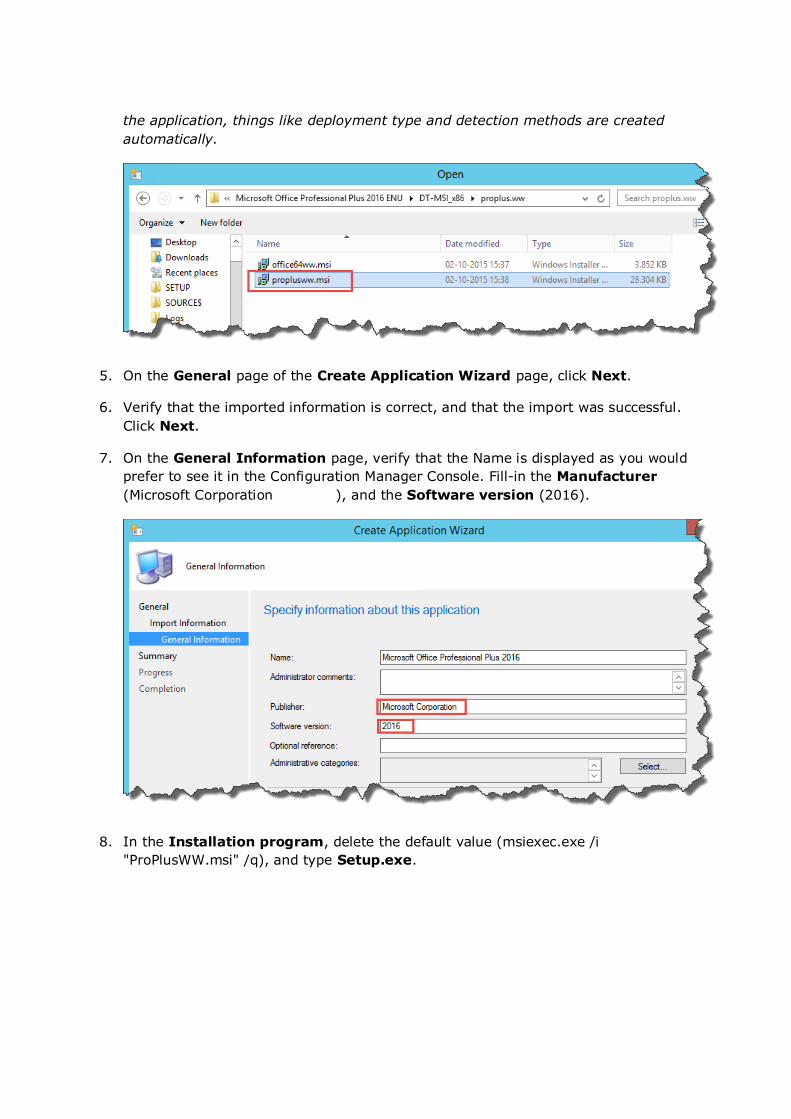
the application, things like deployment type and detection methods are created
automatically.
5. On the General page of the Create Application Wizard page, click Next.
6. Verify that the imported information is correct, and that the import was successful.
Click Next.
7. On the General Information page, verify that the Name is displayed as you would
prefer to see it in the Configuration Manager Console. Fill-in the Manufacturer
(Microsoft Corporation ), and the Software version (2016).
8. In the Installation program, delete the default value (msiexec.exe /i
"ProPlusWW.msi" /q), and type Setup.exe.
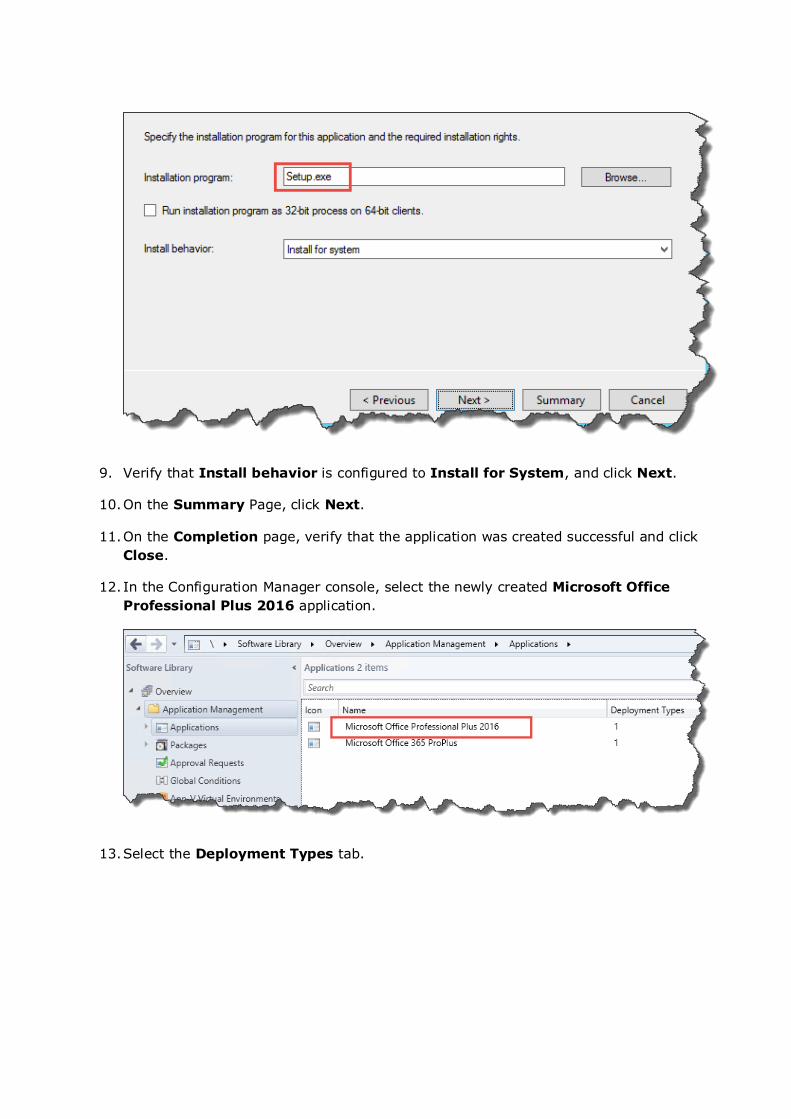
9. Verify that Install behavior is configured to Install for System, and click Next.
10. On the Summary Page, click Next.
11. On the Completion page, verify that the application was created successful and click
Close.
12. In the Configuration Manager console, select the newly created Microsoft Office
Professional Plus 2016 application.
13. Select the Deployment Types tab.
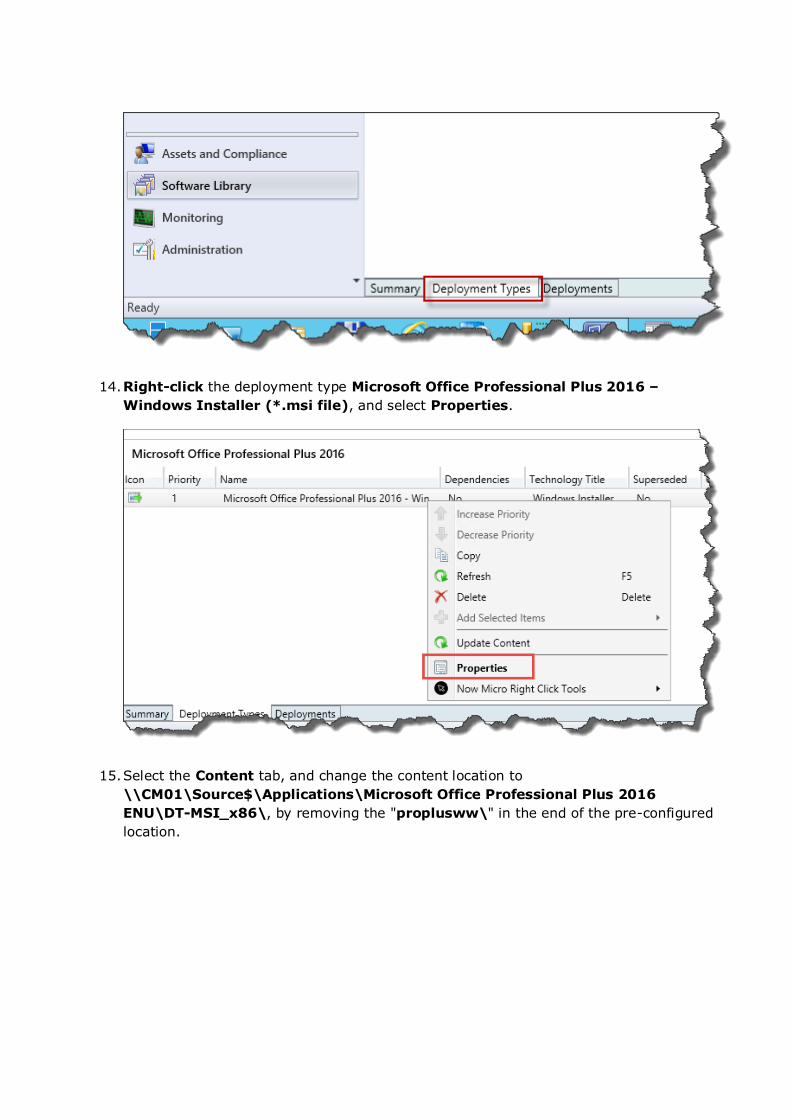
14. Right-click the deployment type Microsoft Office Professional Plus 2016 –
Windows Installer (*.msi file), and select Properties.
15. Select the Content tab, and change the content location to
\\CM01\Source$\Applications\Microsoft Office Professional Plus 2016
ENU\DT-MSI_x86\, by removing the "proplusww\" in the end of the pre-configured
location.

16. Select the Programs tab and change the Uninstall program command to Setup.exe
/uninstall ProPlus.
Note: In order to uninstall Office 2016 and other similar products like Project and Visio, we
need to run Setup with the [ProductID] switch. You can look up the value of [ProductID] in the
Setup.xml file for the product that you want to modify.
You can also customize the /uninstall option by using it with /config and a modified
Config.xml file. This is necessary if you want to run a 100% “silent” uninstall.
Example (SilentUninstallConfig.xml):
<Configuration Product="ProPlus">
<Display Level="none" CompletionNotice="no" SuppressModal="yes" AcceptEula="yes" />
</Configuration>
More information on uninstall can be found here:
http://technet.microsoft.com/en-us/library/cc178956.aspx#BKMK_uninstall

17. Select the Detection Method tab, and verify that a detection method for the MSI
Product Code has been created.
18. Select the Requirements tab, and click Add…
Note: You can create many different types of requirement rules, but in this example, I
will provide three common examples on requirement rules, we can use to target the
right deployment type for the right system/environment.
19. Create a Requirement rule with the following settings, and click OK.
a. Category = Device
b. Condition = Total physical memory
c. Rule Type = Value
d. Operator = Greater than or equal to
e. Value (MB)= 2048

20. Click Add..
21. Create a Requirement rule with the following settings, and click OK.
a. Category = Device
b. Condition = Disk Space
c. Rule Type = Value
d. Select local logical drive = System drive
e. Operator = Greater than or equal to
f. Value (MB)= 2000

22. Click Add…
23. Create a Requirement rule with the following settings, and click OK.
a. Category = Device
b. Condition = Operating System
c. Rule Type = Value
d. Operator = One of
i. All Windows 8.1 (64-bit)
ii. All Windows 10 (64-bit)
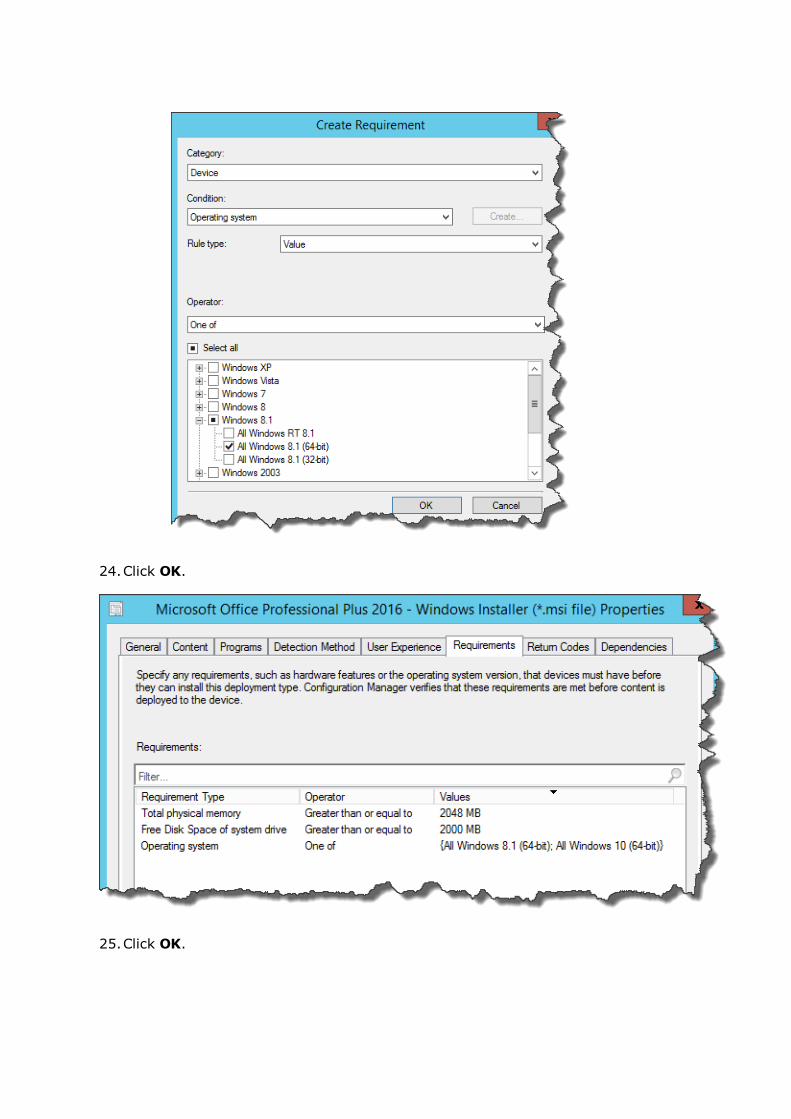
24. Click OK.
25. Click OK.

Deploy Microsoft Office 2016
Overview This chapter describes how to deploy an application (Microsoft Office Professional Plus 2016)
using System Center 2012 R2 SP1 Configuration Manager.
Pre-requirements In order for the operator to perform the steps describes below, the following requirements
must be in place:
The operator must have access to a system running the Configuration Manager
Administration Console
The operator must be logged in with a user account with permissions to create and
deploy applications.
Process Steps
1. In the Configuration Manager Console, navigate to Software Library / Overview /
Application Management / Applications.
2. Select Microsoft Office Professional Plus 2016.
3. In the ribbon, Select the Home tab, and click Deploy.

4. On the General Page, click Browse… to select the target collection.
5. Select All Users, and click OK.
6. Click Next.
7. On the Content tab, click Add and then Distribution Point.
Note: Most customers would prefer to target all content to Distribution Point Groups,
but in this example, we only have a single Distribution Point.

8. Select the Distribution Point, and click OK.
9. Click Next.
10. Complete the wizard, by Next 6 times and then Close.
Leave all settings at the default value.

End User Experience
Overview This chapter describes the end user experience when deploying Microsoft Office Professional
Plus 2016 using System Center 2012 R2 SP1 Configuration Manager Application Catalog.
Pre-requirements In order for the operator to perform the steps describes below, the following requirements
must be in place:
The operator must have access to a Windows 8.1 or Windows 10 client system with the
System Center 2012 R2 SP1 Configuration Manager Client Agent installed.
The Windows Client must be a member of the same Active Directory forest as the
Configuration Manager Site Server.
The operator must be logged in with a domain user account that is a member of the All
Users Collection in System Center 2012 R2 SP1 Configuration Manager
The Application Catalog should be installed and configured in the System Center 2012
R2 SP1 Configuration Manager environment.
Process Steps
1. Login to the Windows client, and start Internet Explorer.
Note: If you are using a Windows 10 client, you should start Internet Explorer from the
Desktop. Not Microsoft Edge. Internet Explorer should also be the default browser.
2. Open http://cm01/CMApplicationCatalog.
3. Select Microsoft Office Professional Plus 2016, and click Install.

4. On the Application Installation pop-up notification, click YES.
5. Verify that the application installation has started, and wait for the installation to
complete.

6. When the software installation is completed, you can Start Microsoft Word 2016, to
verify that Microsoft Office Professional Plus 2016 has been installed successfully, and
that the settings configured in the Office Customization Wizard, had been applied
correct.
7. That’s it… Happy deployment!