Step-By-Step Installation and Configuration of SCCM 2012 SP1
System Center 2012 R2 SP1
Configuration Manager &
Microsoft Intune
2015
DEPLOYING MICROSOFT OFFICE 365 PROFESSIONAL PLUS RONNI PEDERSEN & HANS CHRISTIAN ANDERSEN
RONNIPEDERSEN.COM | Microsoft MVP: Enterprise Client Management
Document Properties
Author: Ronni Pedersen, Microsoft MVP: Enterprise Client Management
Hans Christian Andersen, Cloud Solution Architect
Revision: 1.00.03 (1. October 2015)
Check http://www.ronnipedersen.com/configmgr-2012-guides/ for the latest version.
If you have any comments or feedback to this guide, feel free to send me an email at
Thank you.
About the authors
Ronni Pedersen
I’m a Senior Technology Consultant that specializes in designing and deploying management solutions
based on various Microsoft technologies. My main focus and passion has always been related to client
management, but during the years, I’ve been working with many different products and technologies.
Additionally, I’ve been an active Microsoft Certified Trainer since 2007.
In July 2008 I was awarded the prestigious Microsoft Most Valuable Professional (MVP) award for the first
time, and have been rewarded every year for the past eight years.
Blog: http://www.ronnipedersen.com/
Hans Christian Andersen
I’m a Cloud Solution Architect that works with designing and implementing Microsoft Cloud infrastructure
solutions. My main focus areas are System Center Configuration Manager, Remote Desktop Services, the
Enterprise Mobility Suite, Office 365 and core Azure services.
Blog: http://www.itfaq.dk
Table of Contents
Document Properties ................................................................................................................................... 1
About the authors.....................................................................................................................................1
Ronni Pedersen .................................................................................................................................... 1
Hans Christian Andersen ...................................................................................................................... 1
General Description ..................................................................................................................................... 4
Prepare Microsoft Office 365 ProPlus for deployment ................................................................................. 5
Overview ..................................................................................................................................................5
Pre-requirements .....................................................................................................................................5
Process Steps ............................................................................................................................................5
Deploy Office 365 ProPlus using an SCCM Package..................................................................................... 10
Creating a Standard Package ...................................................................................................................10
Overview............................................................................................................................................ 10
Pre-requirements ............................................................................................................................... 10
Process Steps ..................................................................................................................................... 10
Create a new Device Collection ...............................................................................................................13
Overview............................................................................................................................................ 13
Pre-requirements ............................................................................................................................... 13
Process Steps ..................................................................................................................................... 13
Deploy the Microsoft Office 365 ProPlus Package ...................................................................................16
Overview............................................................................................................................................ 16
Pre-requirements ............................................................................................................................... 16
Process Steps ..................................................................................................................................... 17
End User Experience ...............................................................................................................................17
Deploy Office 365 ProPlus using an SCCM Application................................................................................ 20
Creating Microsoft Office 365 ProPlus as an application ..........................................................................20
Overview............................................................................................................................................ 20
Pre-requirements ............................................................................................................................... 20
Process Steps ..................................................................................................................................... 20
Deploy the Application............................................................................................................................37
Overview............................................................................................................................................ 37
Pre-requirements ............................................................................................................................... 37
Process Steps ..................................................................................................................................... 38
End User Experience ...............................................................................................................................40
Overview............................................................................................................................................ 40
Pre-requirements ............................................................................................................................... 40
Process Steps ..................................................................................................................................... 40
Deploy Microsoft Office 365 ProPlus using Microsoft Intune ...................................................................... 43
Create the Microsoft Office 365 Application in Microsoft Intune .............................................................43
Overview............................................................................................................................................ 43
Pre-requirements ............................................................................................................................... 43
Process Steps ..................................................................................................................................... 43
Deploying Microsoft Office 365 ProPlus ..................................................................................................53
Overview............................................................................................................................................ 53
Pre-requirements ............................................................................................................................... 53
Process Steps ..................................................................................................................................... 53
End User Experience ...............................................................................................................................55
Overview............................................................................................................................................ 55
Pre-requirements ............................................................................................................................... 55
Process Steps ..................................................................................................................................... 55

General Description This document describes how to prepare, add and deploy Microsoft Office 365 Professional Plus
(2016) using various technologies from Microsoft such as System Center Configuration
Manager, Microsoft Intune and Microsoft Deployment Toolkit.
We know that there are a lot of scenarios to cover, but instead of waiting for a big release, we
have decided to make this document dynamic. You should expect to see new releases of this
guide at least once per month until all common deployment scenarios are covered.
Don’t forget to update your bookmarks and check if this is the latest release before you start.
Prepare Microsoft Office 365 ProPlus for deployment
Overview This procedure describes how to prepare Microsoft Office 365 Professional Plus (2016) to be
installed unattended. The aim of this procedure is to create and prepare the installation source
folder for use with System Center Configuration Manager.
Pre-requirements In order for the operator to perform the steps described below, the following requirements
must be in place:
The operator must have access to the Internet.
Process Steps
1. Download the Office 2016 Deployment Tool from Microsoft using this link:
http://www.microsoft.com/en-us/download/details.aspx?id=49117.
2. Run the downloaded file, and follow the wizard.
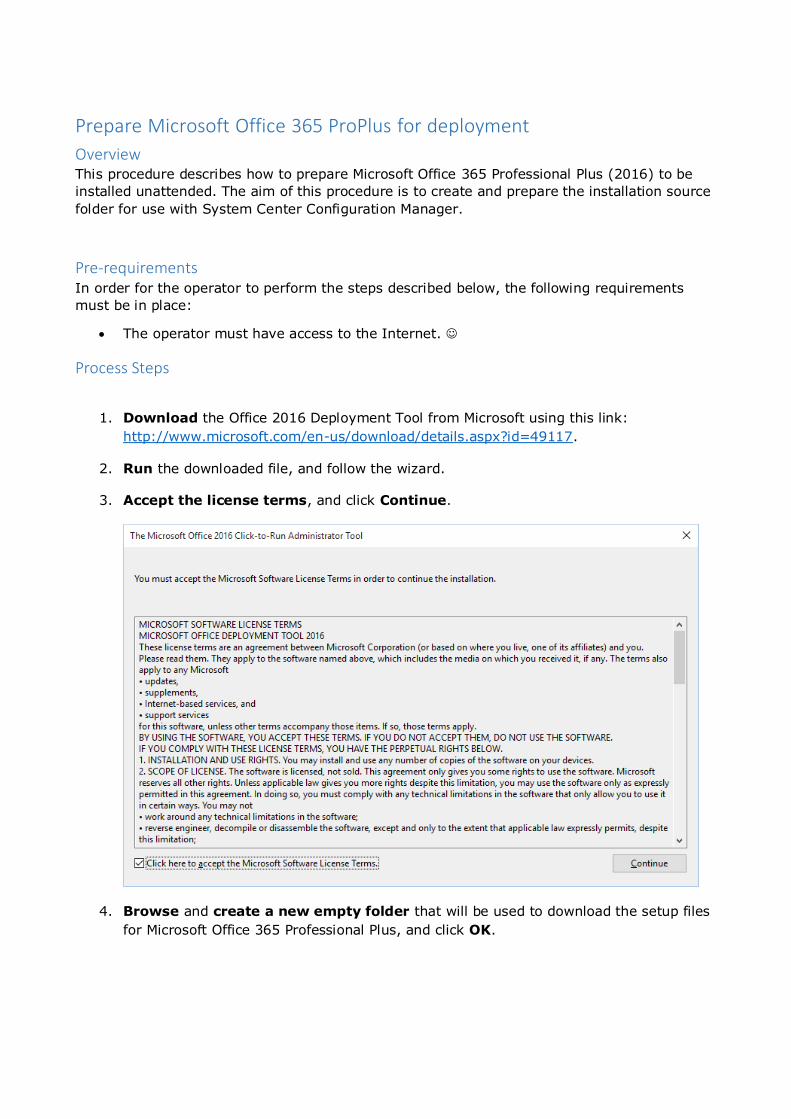
3. Accept the license terms, and click Continue.
4. Browse and create a new empty folder that will be used to download the setup files
for Microsoft Office 365 Professional Plus, and click OK.
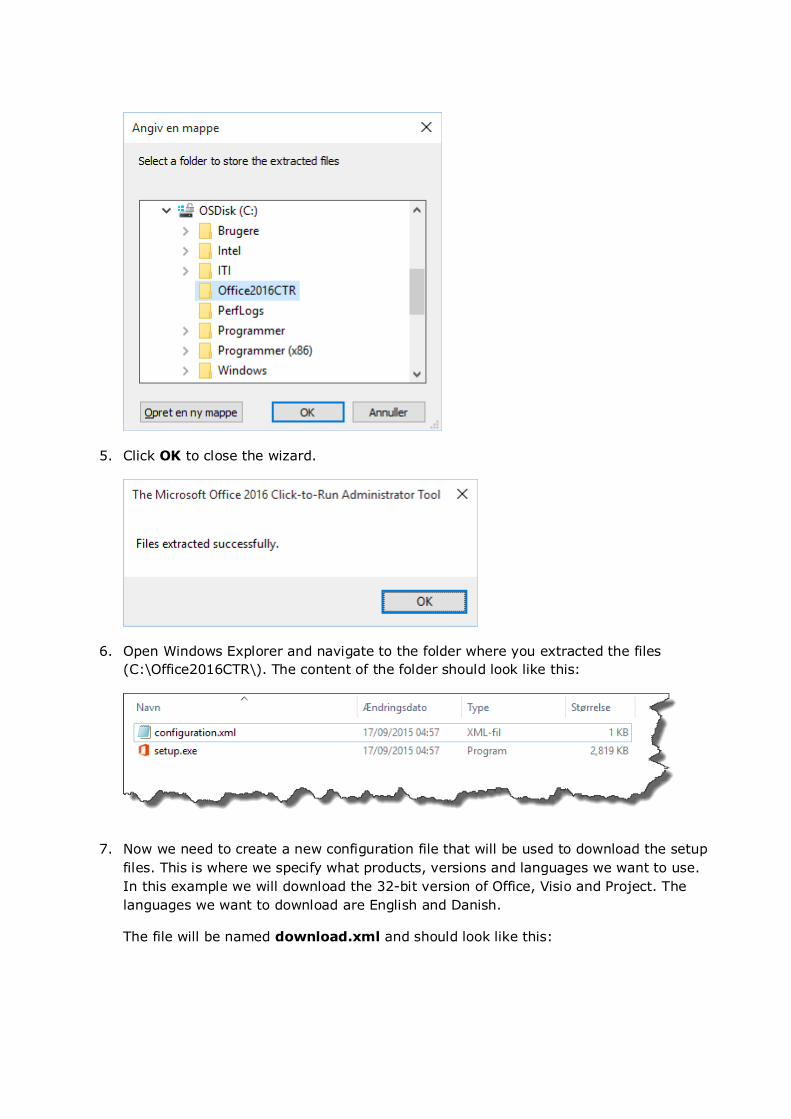
5. Click OK to close the wizard.
6. Open Windows Explorer and navigate to the folder where you extracted the files
(C:\Office2016CTR\). The content of the folder should look like this:
7. Now we need to create a new configuration file that will be used to download the setup
files. This is where we specify what products, versions and languages we want to use.
In this example we will download the 32-bit version of Office, Visio and Project. The
languages we want to download are English and Danish.
The file will be named download.xml and should look like this:
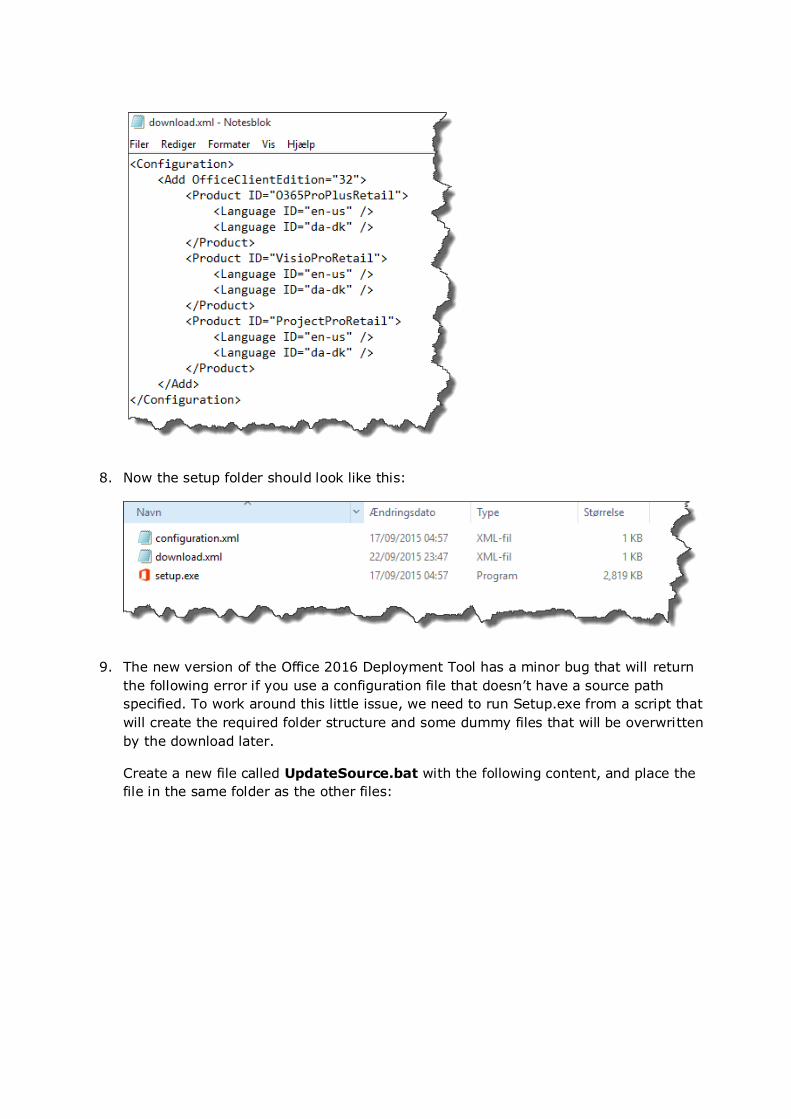
8. Now the setup folder should look like this:
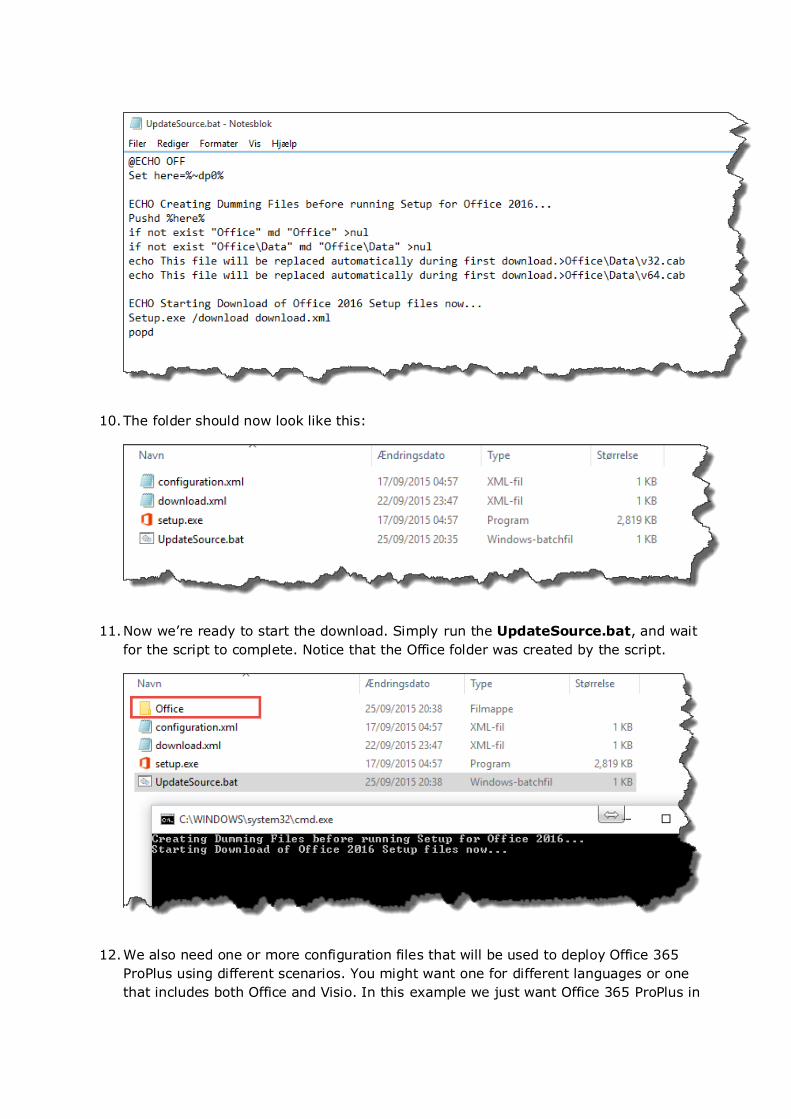
9. The new version of the Office 2016 Deployment Tool has a minor bug that will return
the following error if you use a configuration file that doesn’t have a source path
specified. To work around this little issue, we need to run Setup.exe from a script that
will create the required folder structure and some dummy files that will be overwritten
by the download later.
Create a new file called UpdateSource.bat with the following content, and place the
file in the same folder as the other files:
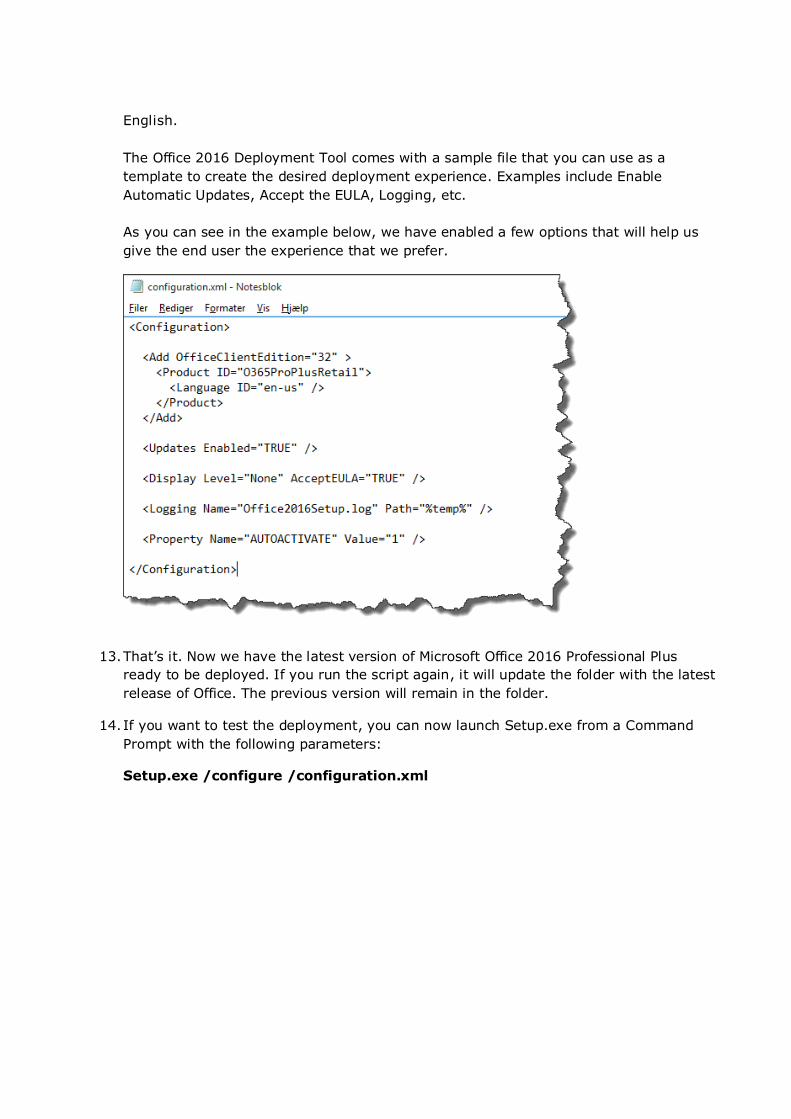
10. The folder should now look like this:
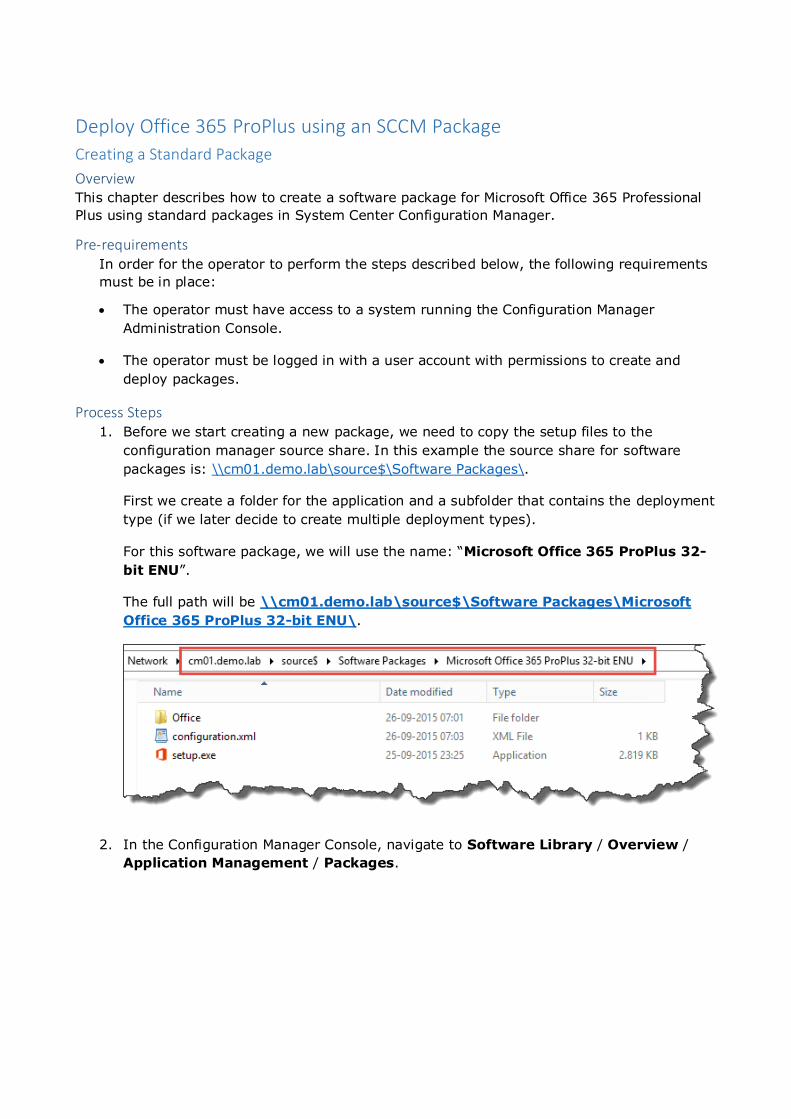
11. Now we’re ready to start the download. Simply run the UpdateSource.bat, and wait
for the script to complete. Notice that the Office folder was created by the script.
12. We also need one or more configuration files that will be used to deploy Office 365
ProPlus using different scenarios. You might want one for different languages or one
that includes both Office and Visio. In this example we just want Office 365 ProPlus in
English.
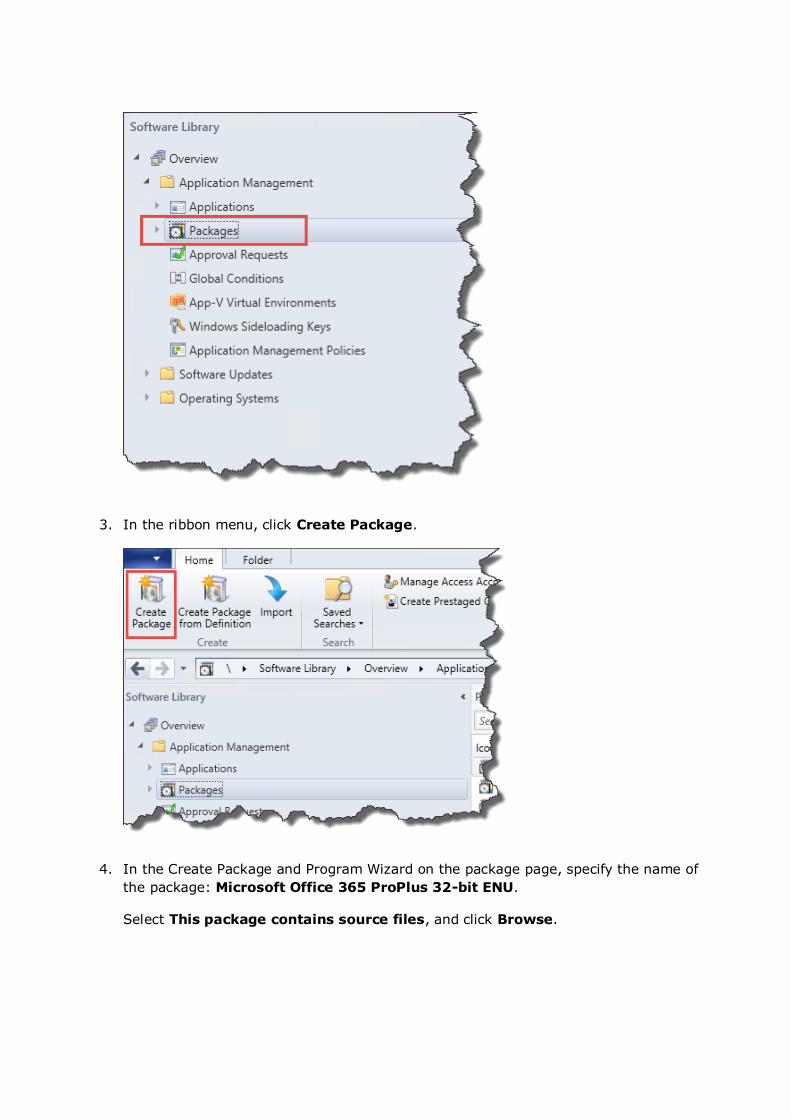
The Office 2016 Deployment Tool comes with a sample file that you can use as a
template to create the desired deployment experience. Examples include Enable
Automatic Updates, Accept the EULA, Logging, etc.
As you can see in the example below, we have enabled a few options that will help us
give the end user the experience that we prefer.
13. That’s it. Now we have the latest version of Microsoft Office 2016 Professional Plus
ready to be deployed. If you run the script again, it will update the folder with the latest
release of Office. The previous version will remain in the folder.
14. If you want to test the deployment, you can now launch Setup.exe from a Command
Prompt with the following parameters:
Setup.exe /configure /configuration.xml
Deploy Office 365 ProPlus using an SCCM Package
Creating a Standard Package
Overview This chapter describes how to create a software package for Microsoft Office 365 Professional
Plus using standard packages in System Center Configuration Manager.
Pre-requirements In order for the operator to perform the steps described below, the following requirements
must be in place:
The operator must have access to a system running the Configuration Manager
Administration Console.
The operator must be logged in with a user account with permissions to create and
deploy packages.
Process Steps 1. Before we start creating a new package, we need to copy the setup files to the
configuration manager source share. In this example the source share for software
packages is: \\cm01.demo.lab\source$\Software Packages\.
First we create a folder for the application and a subfolder that contains the deployment
type (if we later decide to create multiple deployment types).
For this software package, we will use the name: “Microsoft Office 365 ProPlus 32-
bit ENU”.
The full path will be \\cm01.demo.lab\source$\Software Packages\Microsoft
Office 365 ProPlus 32-bit ENU\.
2. In the Configuration Manager Console, navigate to Software Library / Overview /
Application Management / Packages.
3. In the ribbon menu, click Create Package.
4. In the Create Package and Program Wizard on the package page, specify the name of
the package: Microsoft Office 365 ProPlus 32-bit ENU.
Select This package contains source files, and click Browse.
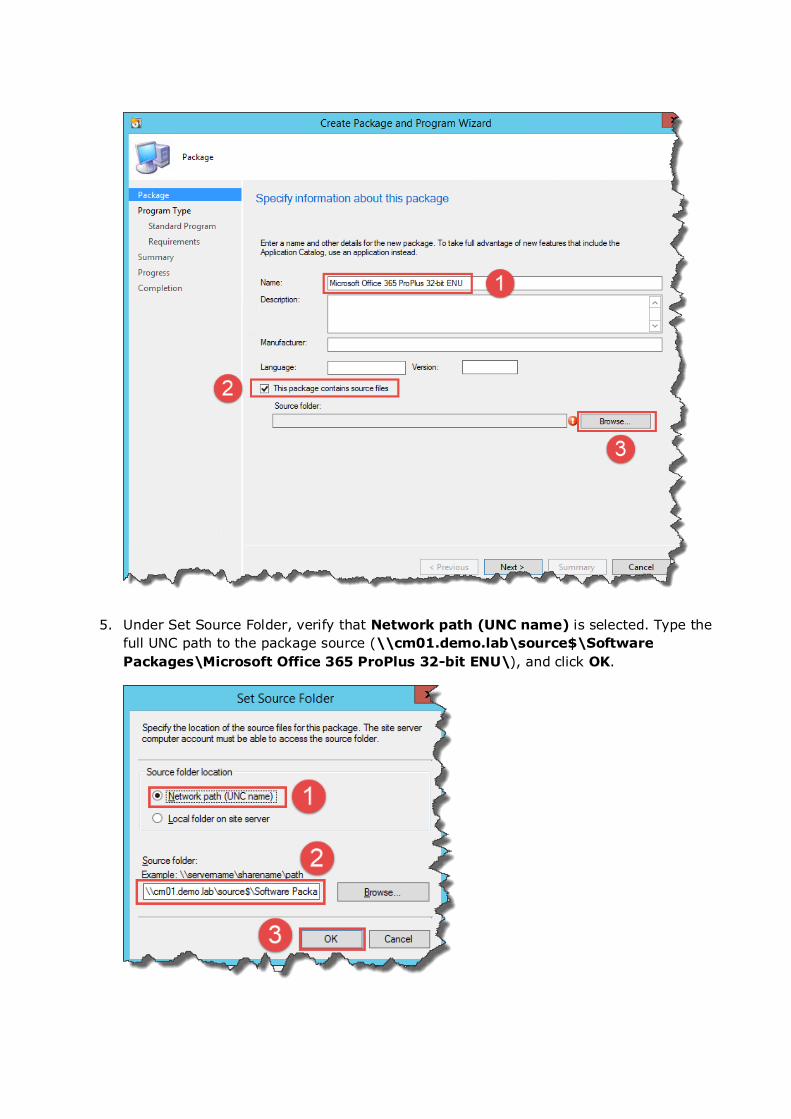
5. Under Set Source Folder, verify that Network path (UNC name) is selected. Type the
full UNC path to the package source (\\cm01.demo.lab\source$\Software
Packages\Microsoft Office 365 ProPlus 32-bit ENU\), and click OK.
6. On the Package page, click Next.
7. On the Program Type page, verify that Standard program is selected, and click
Next.
8. On the Standard Program page, type the following name: Install, and click
Browse…
9. In the Open window, select the Setup.exe file, and click Open.
10. On the Standard Program page, set Program can run to Whether or not a user is
logged on, and click Next.
11. On the Requirements page, set the Estimated disk space to 1000 MB and the
Maximum allowed run time (minutes) to 30, and click Next.
12. On the Summary page, verify all the settings and click Next.
13. On the Completion page, click Close.
Create a new Device Collection
Overview This chapter describes how to create a new test collection in System Center Configuration
Manager to target the deployment of Microsoft Office 365 ProPlus.
Pre-requirements In order for the operator to perform the steps described below, the following requirements
must be in place:
The operator must have access to a system running the Configuration Manager
Administration Console.
The operator must be logged in with a user account with permissions to create
collections.
Process Steps 1. Packages are often used to target device collections when something should be
deployed as required, so in this example we’ll start by creating a test collection that just
has a single Windows 10 client as a direct member.
In the Configuration Manager Console, navigate to Assets and Compliance /
Overview / Device Collections.
2. In the Ribbon, Select the Home tab, and click Create Device Collection.
3. On the General page, name the collection Office 365 Test Clients, and configure the
Limiting collection to All Desktop and Server Clients. Click Next.
4. On the Membership Rule page, click Add Rule and select Direct Rule.
5. This will launch the Direct Membership Rule Wizard, and on the Welcome page,
click Next.
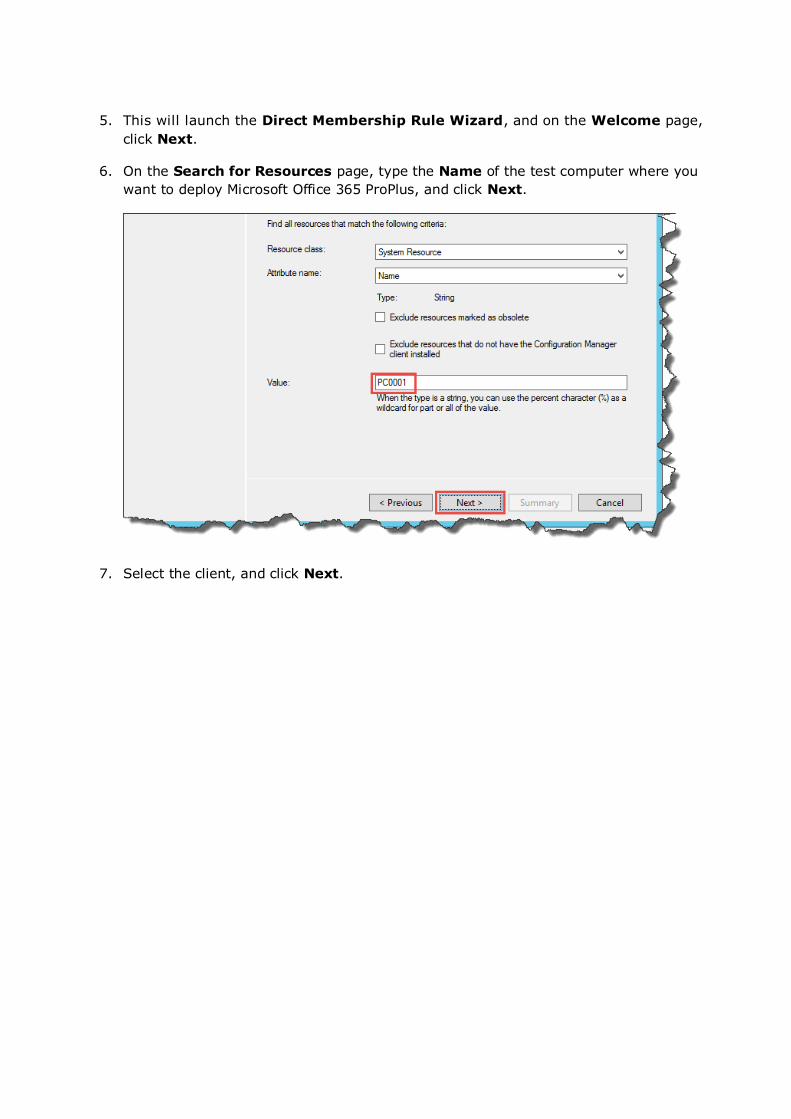
6. On the Search for Resources page, type the Name of the test computer where you
want to deploy Microsoft Office 365 ProPlus, and click Next.
7. Select the client, and click Next.
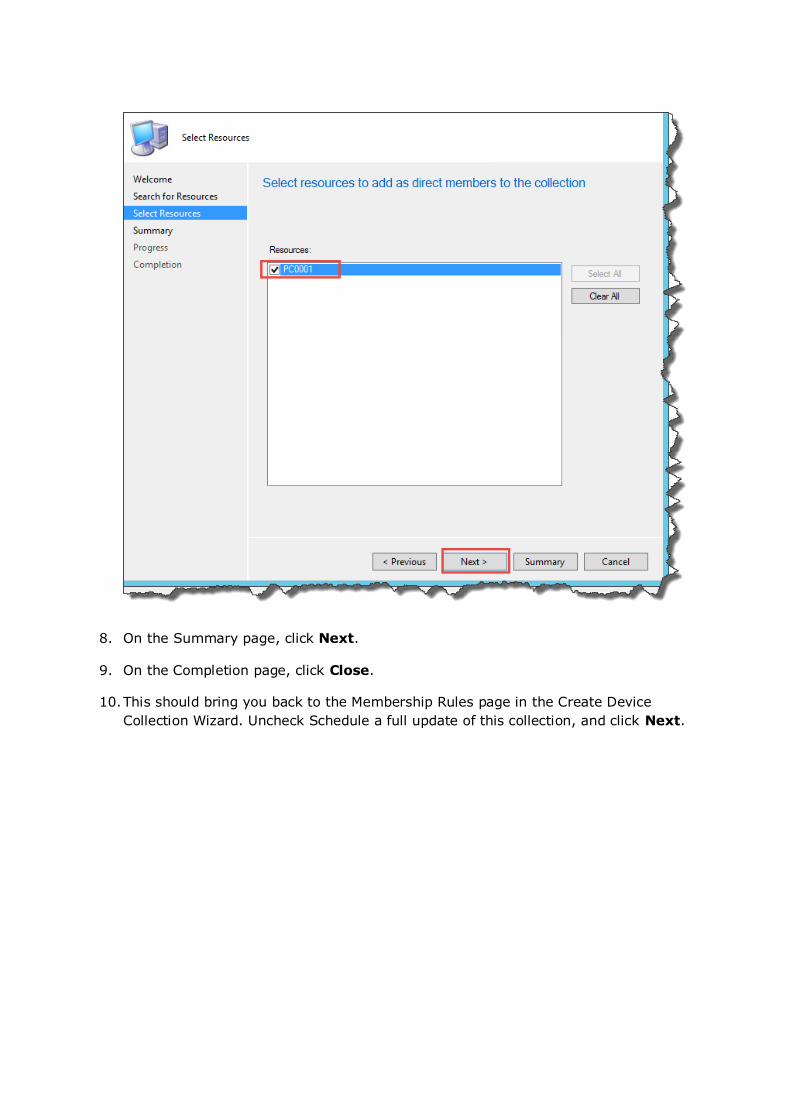
8. On the Summary page, click Next.
9. On the Completion page, click Close.
10. This should bring you back to the Membership Rules page in the Create Device
Collection Wizard. Uncheck Schedule a full update of this collection, and click Next.
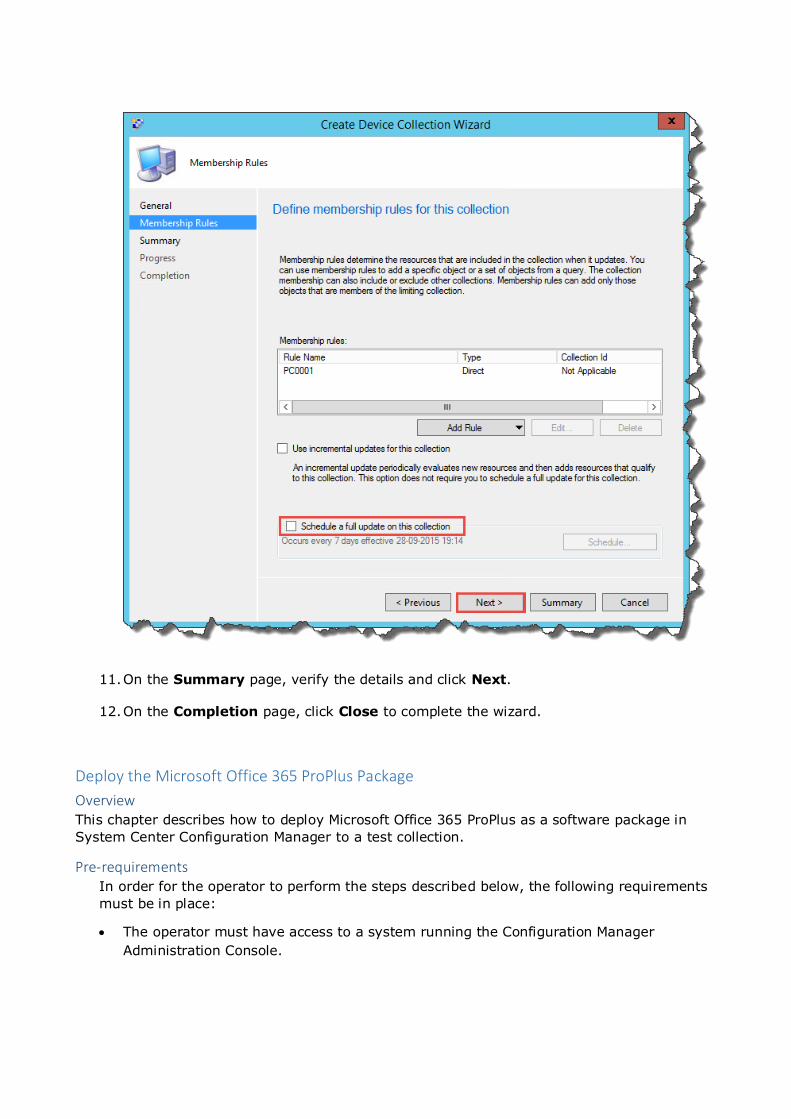
11. On the Summary page, verify the details and click Next.
12. On the Completion page, click Close to complete the wizard.
Deploy the Microsoft Office 365 ProPlus Package
Overview This chapter describes how to deploy Microsoft Office 365 ProPlus as a software package in
System Center Configuration Manager to a test collection.
Pre-requirements In order for the operator to perform the steps described below, the following requirements
must be in place:
The operator must have access to a system running the Configuration Manager
Administration Console.

The operator must be logged in with a user account with permissions to deploy
applications.
Process Steps 1. In the Configuration Manager Console, navigate to Software Library / Overview /
Application Management / Packages.
2. Select Microsoft Office 365 ProPlus 32-bit ENU.
3. In the Ribbon, select the Home tab, and click Deploy.
4. On the General page, click Browse… to select the target collection.
5. Select the Office 365 Test Clients collection that we created in the previous step, and
click OK.
6. On the General Page, click Next.
7. On the Content page, click Add, and select Distribution Point.
8. In the Add Distribution Points wizard, select the distribution(s), and click OK.
9. On the Content page, click Next.
10. On the Deployment Settings page, verify that Required is selected, and click Next.
11. On the Scheduling page, click New…
12. On the Assignment Schedule page, select Assign immediately after this event,
and verify that As soon as possible is selected. Click OK.
13. On the Scheduling page, click Next.
14. On the User Experience page, leave the default settings, and click Next.
15. On the Distribution Points page, leave the default settings, and click Next.
16. On the Summary page, verify the details and click Next.
17. On the Completion page, click Close to complete the wizard.
End User Experience
1. Log on to the client computer as a standard user.
2. Run the Machine Policy Retrieval & Evaluation Cycle action from the Configuration
Manager client in the control panel.
3. This should kick off the setup process, and after a few minutes you should see the
Microsoft Office 365 ProPlus deployment progress on the desktop. The installation
should take no more than 5 to 10 minutes to complete.
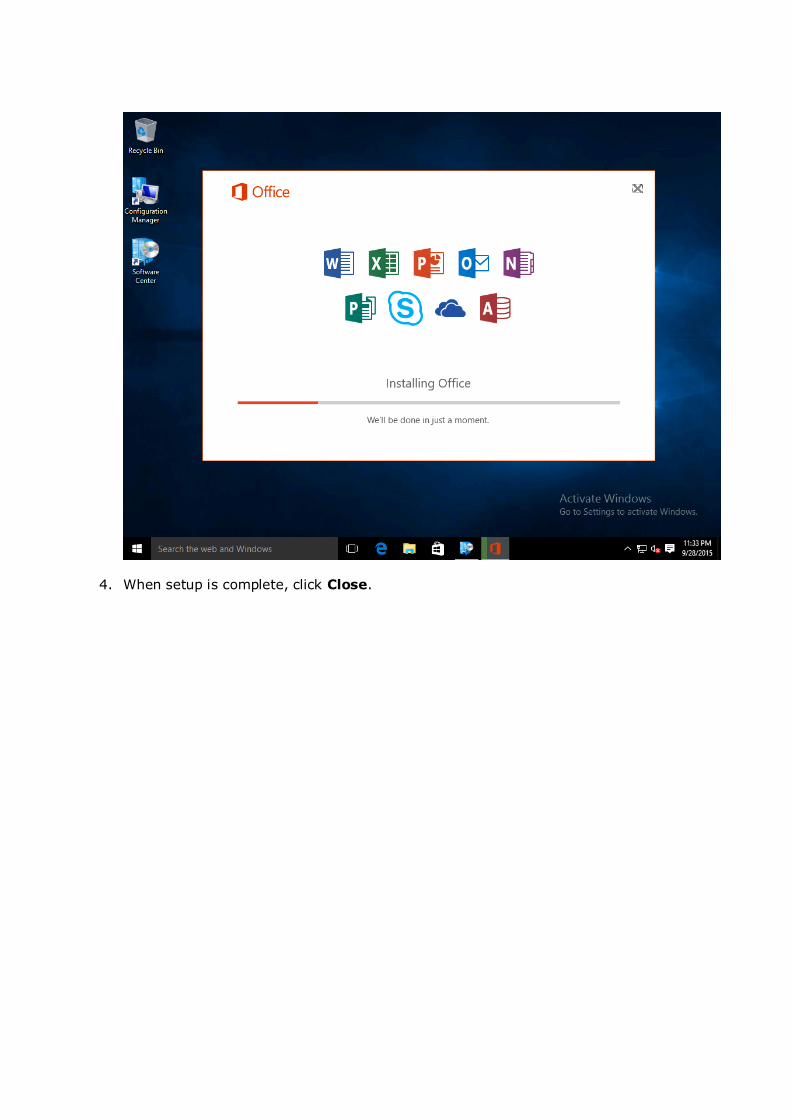
4. When setup is complete, click Close.

5. That’s it. The user can now use Office 2016. Happy deployment
Deploy Office 365 ProPlus using an SCCM Application
Creating Microsoft Office 365 ProPlus as an application
Overview This chapter describes how to create an application for Microsoft Office 365 Professional Plus in
System Center Configuration Manager.
Pre-requirements In order for the operator to perform the steps described below, the following requirements
must be in place:
The operator must have access to a system running the Configuration Manager
Administration Console.
The operator must be logged in with a user account with permissions to create and
deploy applications.
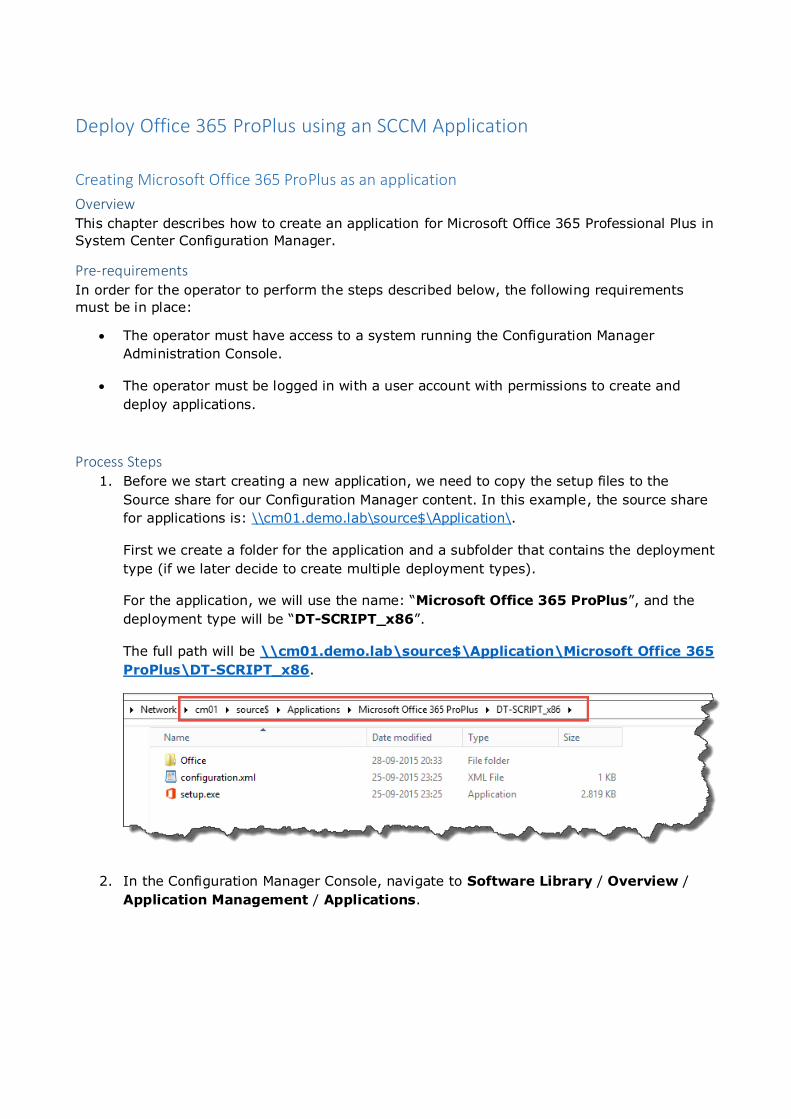
Process Steps 1. Before we start creating a new application, we need to copy the setup files to the
Source share for our Configuration Manager content. In this example, the source share
for applications is: \\cm01.demo.lab\source$\Application\.
First we create a folder for the application and a subfolder that contains the deployment
type (if we later decide to create multiple deployment types).
For the application, we will use the name: “Microsoft Office 365 ProPlus”, and the
deployment type will be “DT-SCRIPT_x86”.
The full path will be \\cm01.demo.lab\source$\Application\Microsoft Office 365
ProPlus\DT-SCRIPT_x86.
2. In the Configuration Manager Console, navigate to Software Library / Overview /
Application Management / Applications.
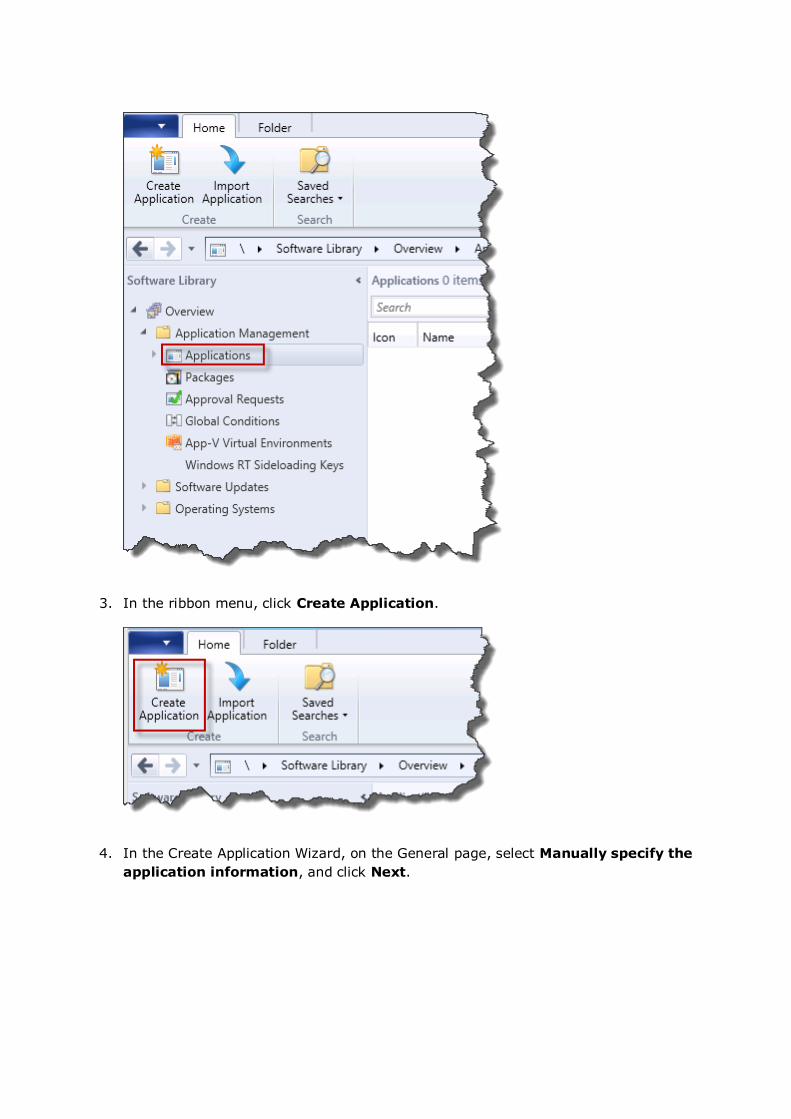
3. In the ribbon menu, click Create Application.
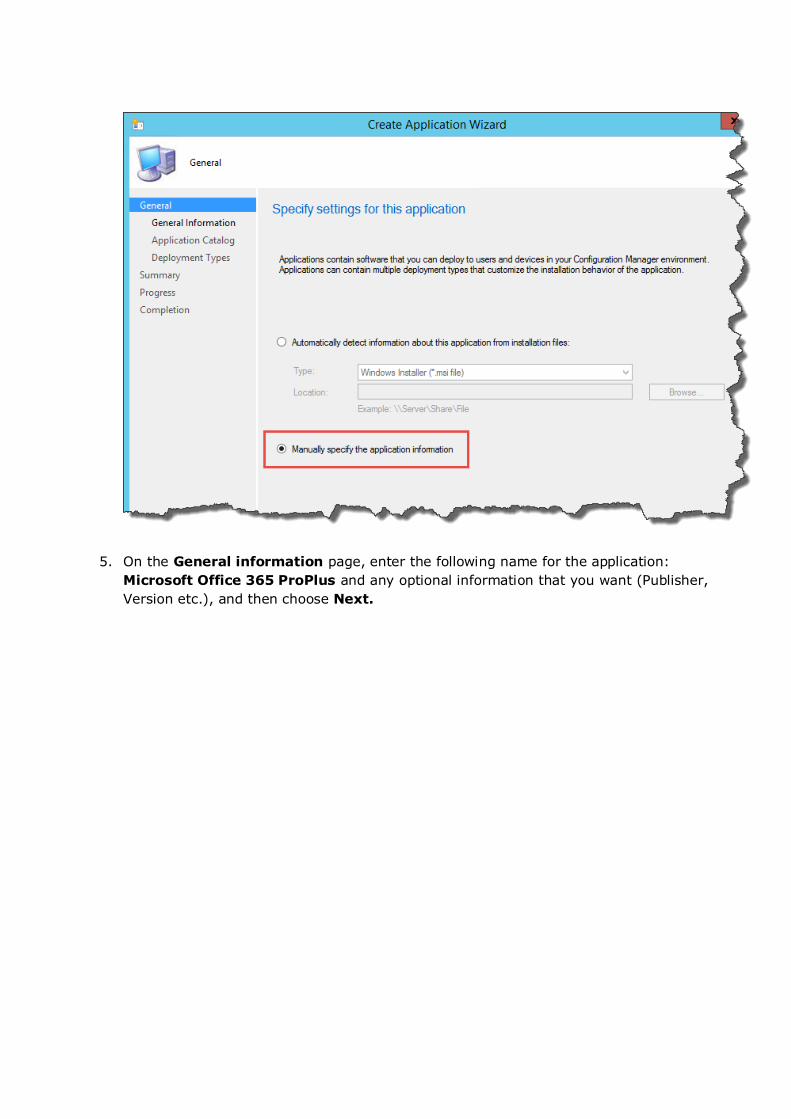
4. In the Create Application Wizard, on the General page, select Manually specify the
application information, and click Next.
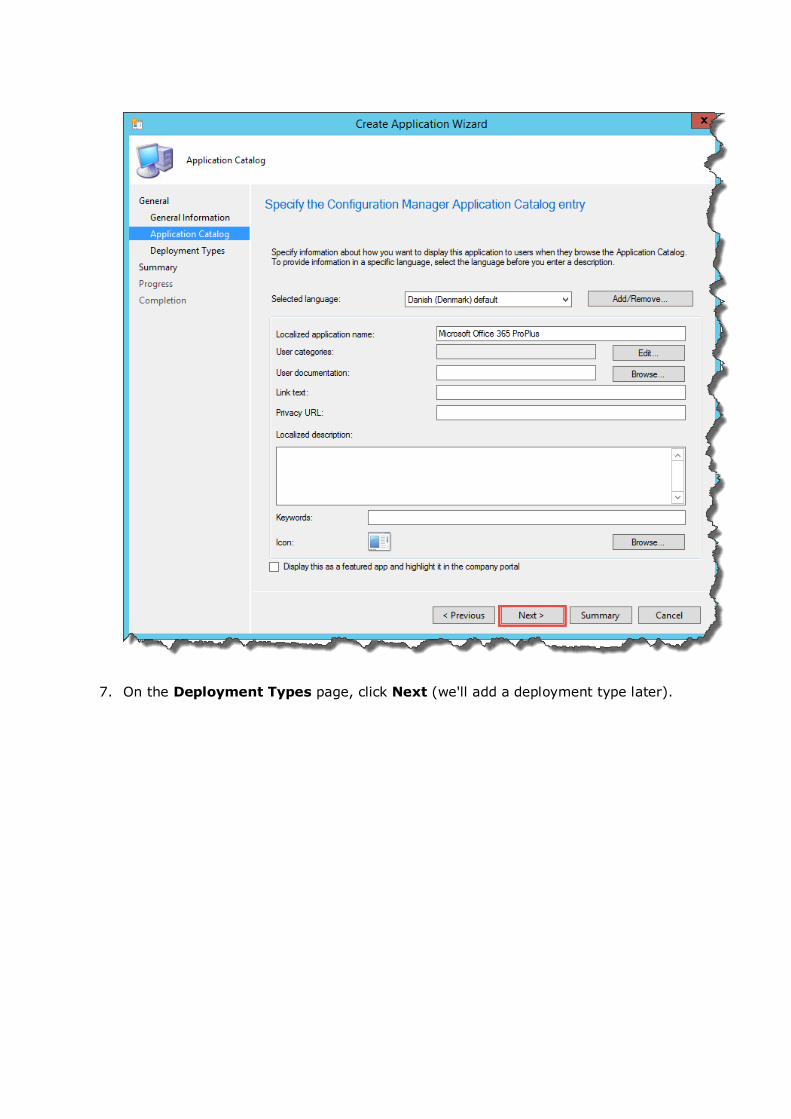
5. On the General information page, enter the following name for the application:
Microsoft Office 365 ProPlus and any optional information that you want (Publisher,
Version etc.), and then choose Next.

6. On the Application Catalog page, provide the information that's appropriate for your
environment, and then choose Next.
7. On the Deployment Types page, click Next (we'll add a deployment type later).
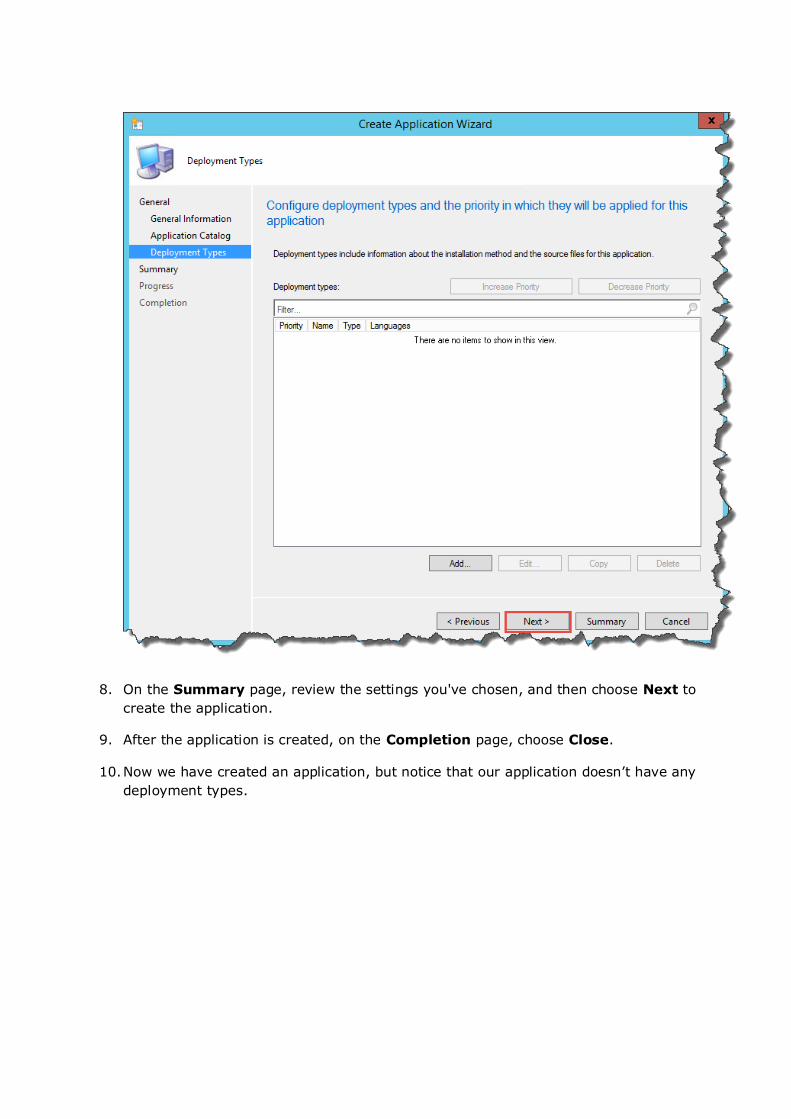
8. On the Summary page, review the settings you've chosen, and then choose Next to
create the application.
9. After the application is created, on the Completion page, choose Close.
10. Now we have created an application, but notice that our application doesn’t have any
deployment types.

11. Select the Microsoft Office 365 ProPlus application, and then on the Home tab, click
Create Deployment Type.
12. On the General page, in the Type list, select Script Installer, and then click Next.

13. On the General page, enter the following name for the deployment type; DT-
SCRIPT_x86, and click Next.
14. In the Content location box, type the network path (UNC) to the source files for
Microsoft Office 365 ProPlus. In this scenario, the path is:
\\cm01\source$\Applications\Microsoft Office 365 ProPlus\
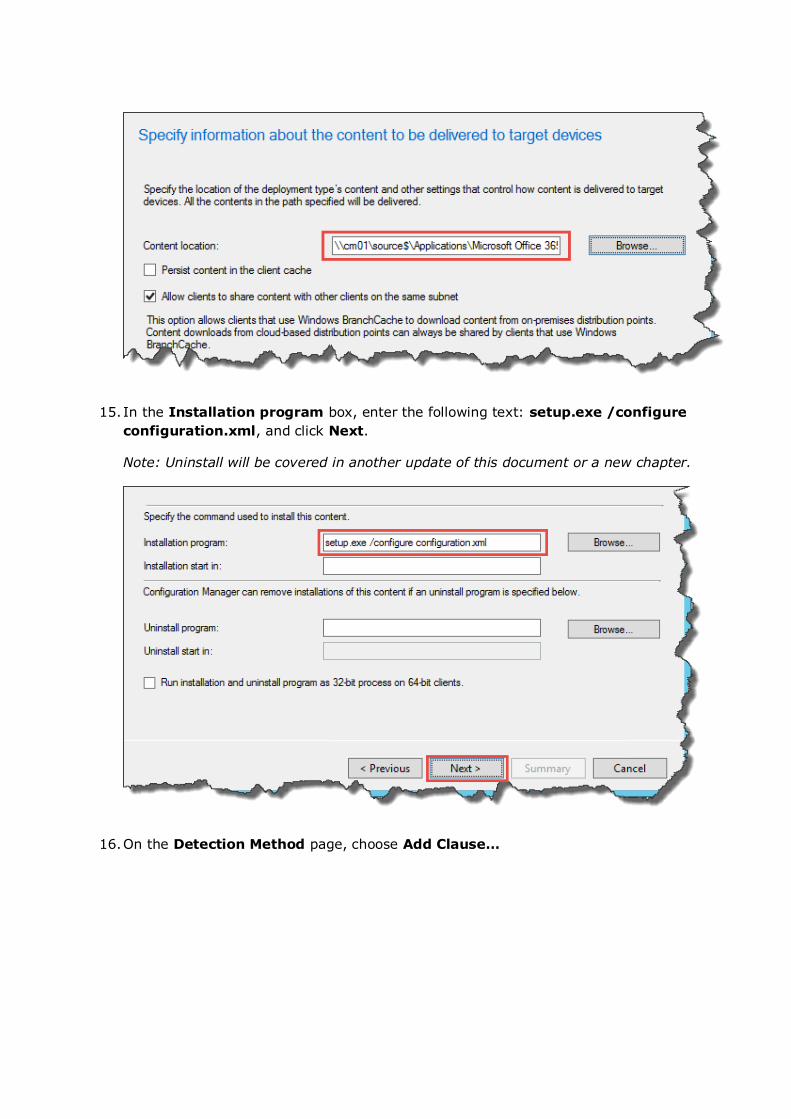
15. In the Installation program box, enter the following text: setup.exe /configure
configuration.xml, and click Next.
Note: Uninstall will be covered in another update of this document or a new chapter.
16. On the Detection Method page, choose Add Clause…
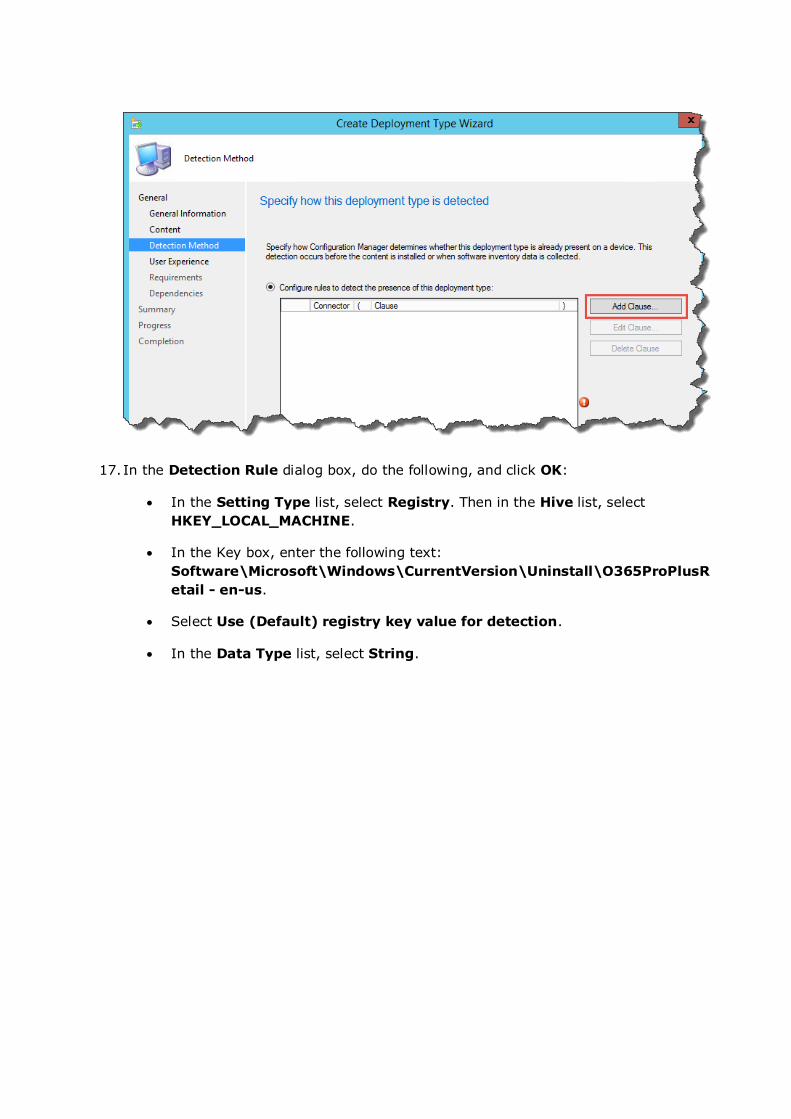
17. In the Detection Rule dialog box, do the following, and click OK:
In the Setting Type list, select Registry. Then in the Hive list, select
HKEY_LOCAL_MACHINE.
In the Key box, enter the following text:
Software\Microsoft\Windows\CurrentVersion\Uninstall\O365ProPlusR
etail - en-us.
Select Use (Default) registry key value for detection.
In the Data Type list, select String.
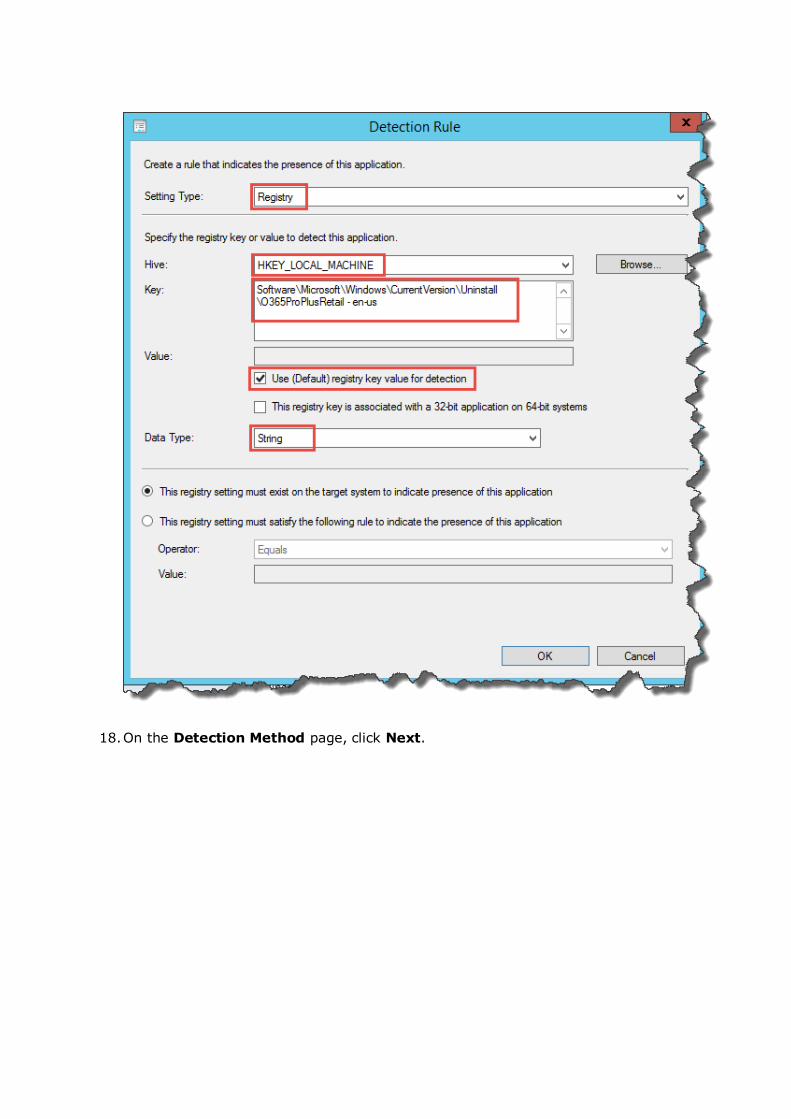
18. On the Detection Method page, click Next.
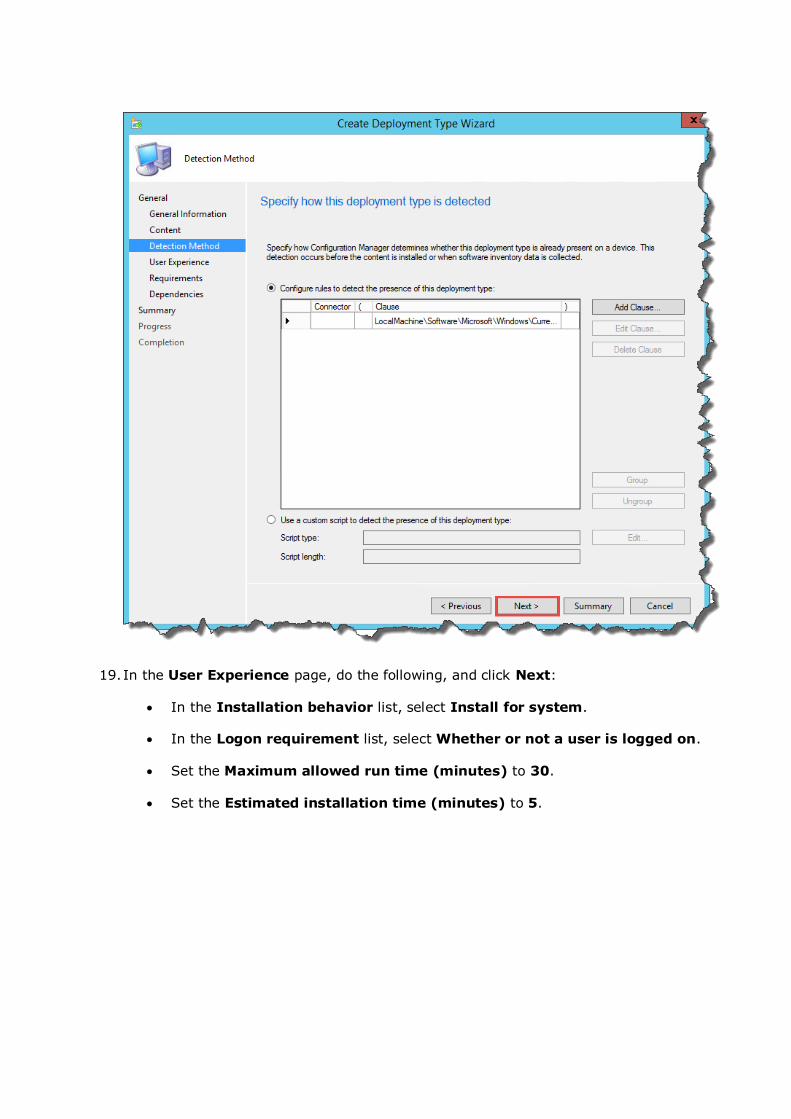
19. In the User Experience page, do the following, and click Next:
In the Installation behavior list, select Install for system.
In the Logon requirement list, select Whether or not a user is logged on.
Set the Maximum allowed run time (minutes) to 30.
Set the Estimated installation time (minutes) to 5.
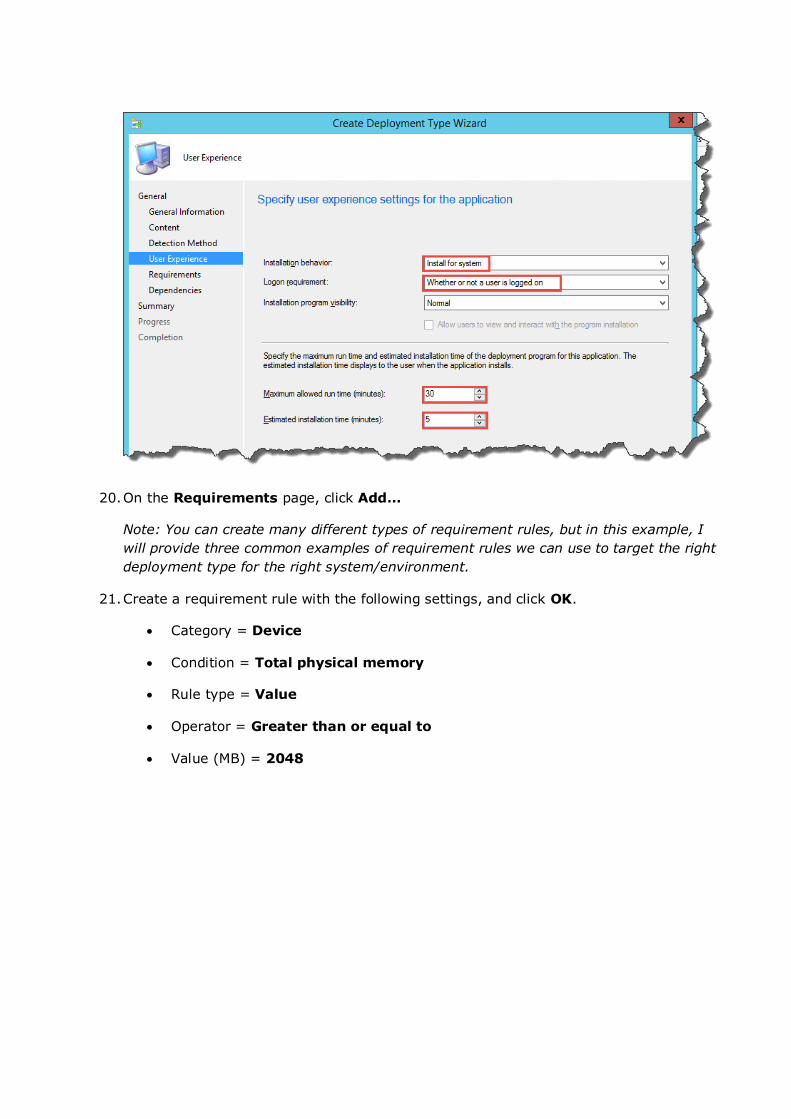
20. On the Requirements page, click Add…
Note: You can create many different types of requirement rules, but in this example, I
will provide three common examples of requirement rules we can use to target the right
deployment type for the right system/environment.
21. Create a requirement rule with the following settings, and click OK.
Category = Device
Condition = Total physical memory
Rule type = Value
Operator = Greater than or equal to
Value (MB) = 2048
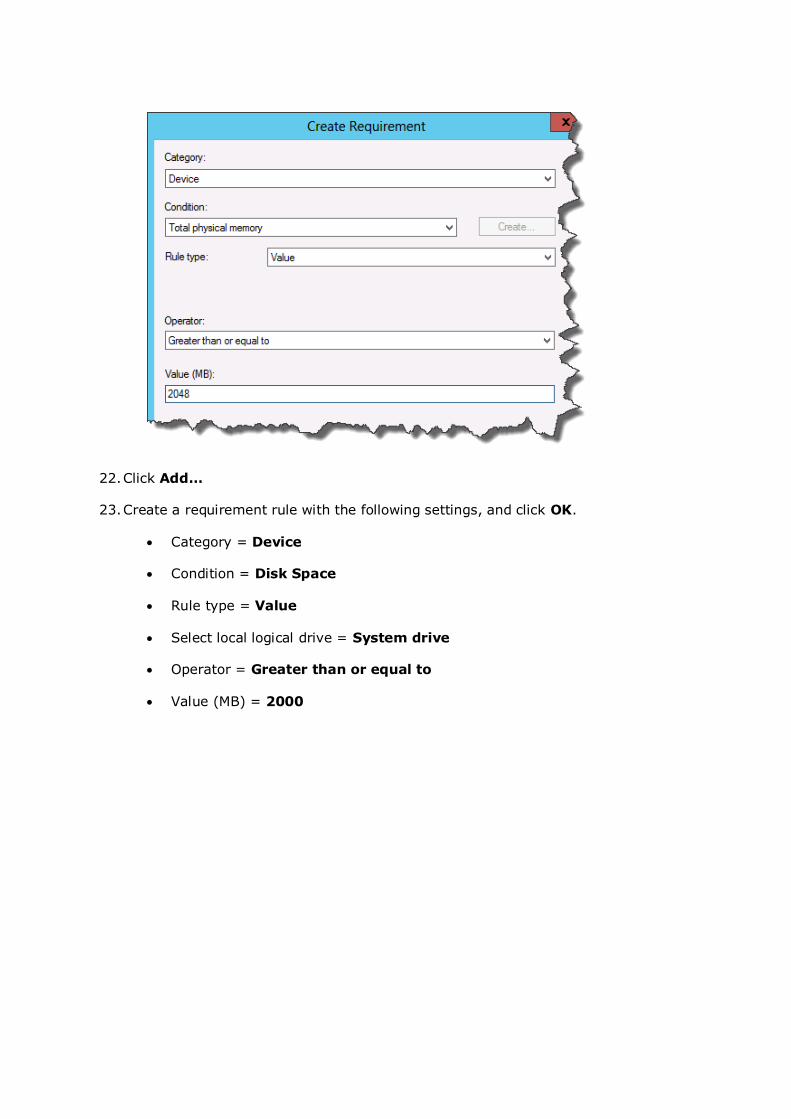
22. Click Add…
23. Create a requirement rule with the following settings, and click OK.
Category = Device
Condition = Disk Space
Rule type = Value
Select local logical drive = System drive
Operator = Greater than or equal to
Value (MB) = 2000
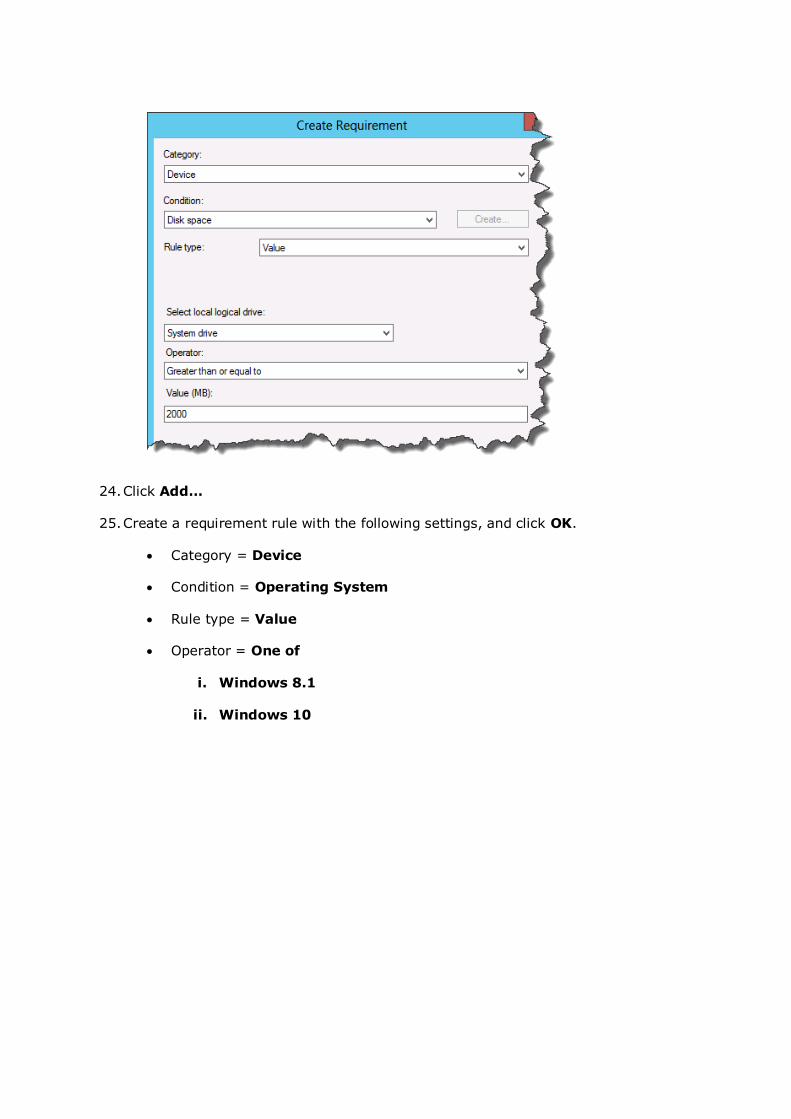
24. Click Add…
25. Create a requirement rule with the following settings, and click OK.
Category = Device
Condition = Operating System
Rule type = Value
Operator = One of
i. Windows 8.1
ii. Windows 10

26. Click Next.
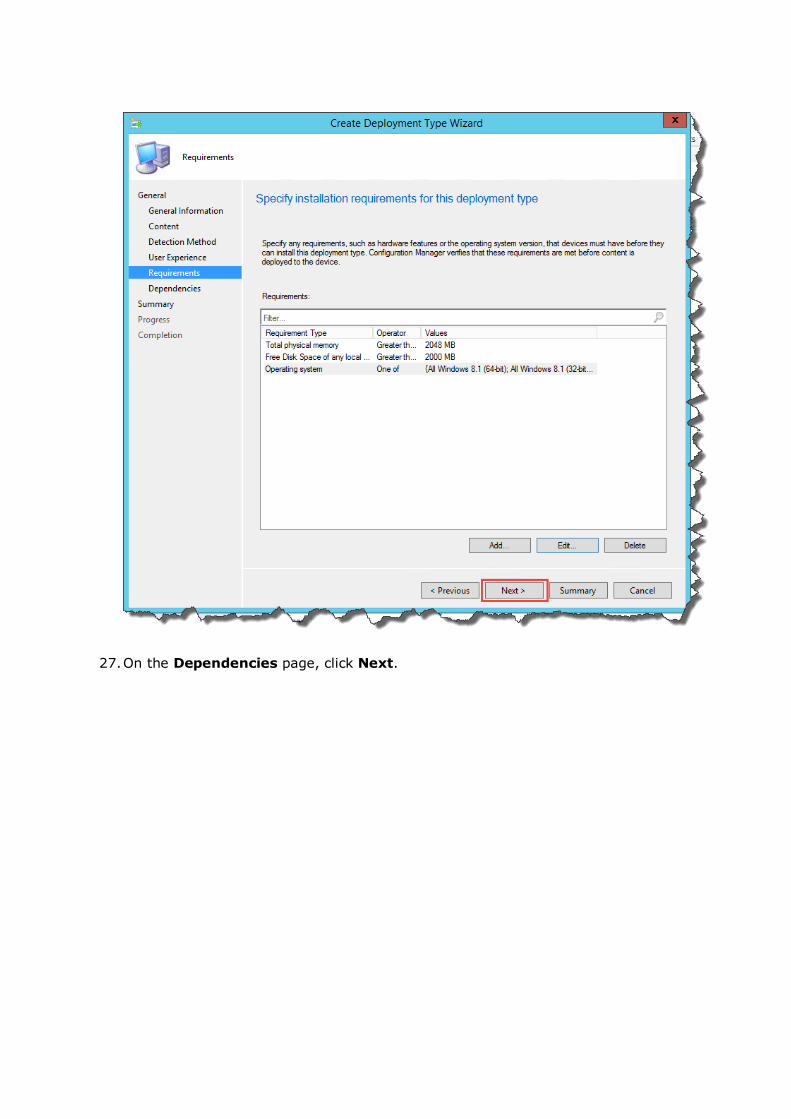
27. On the Dependencies page, click Next.
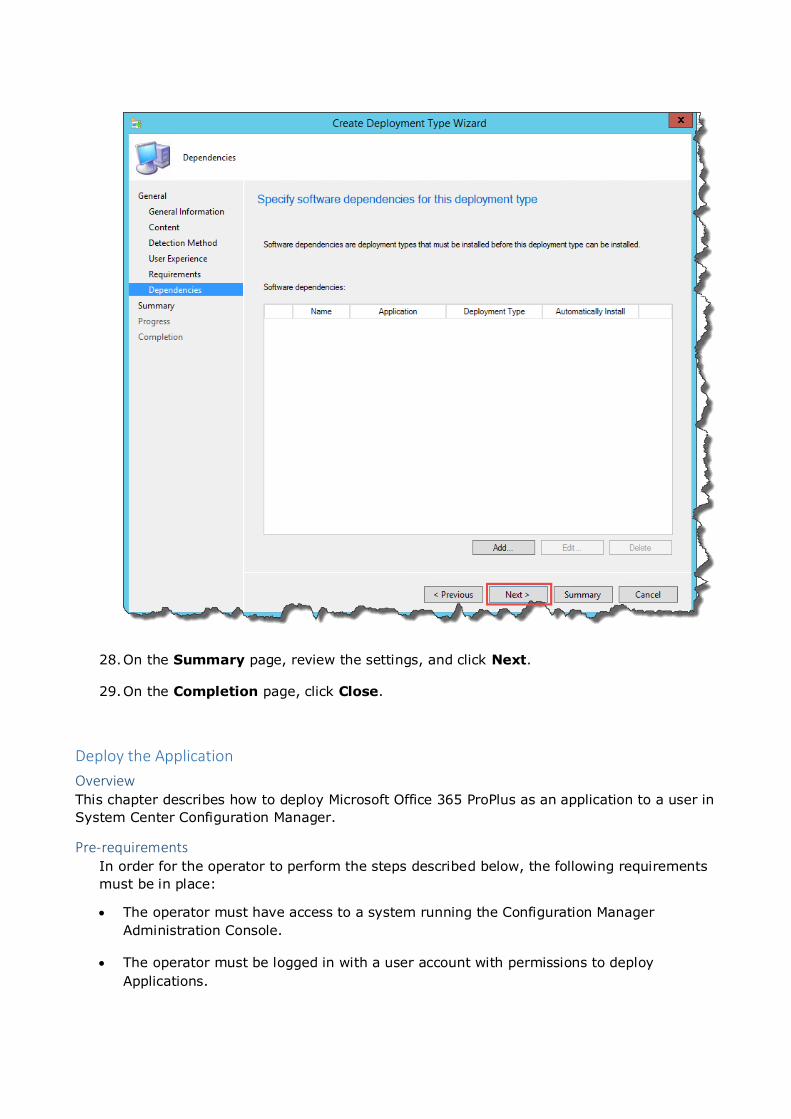
28. On the Summary page, review the settings, and click Next.
29. On the Completion page, click Close.
Deploy the Application
Overview This chapter describes how to deploy Microsoft Office 365 ProPlus as an application to a user in
System Center Configuration Manager.
Pre-requirements In order for the operator to perform the steps described below, the following requirements
must be in place:
The operator must have access to a system running the Configuration Manager
Administration Console.
The operator must be logged in with a user account with permissions to deploy
Applications.
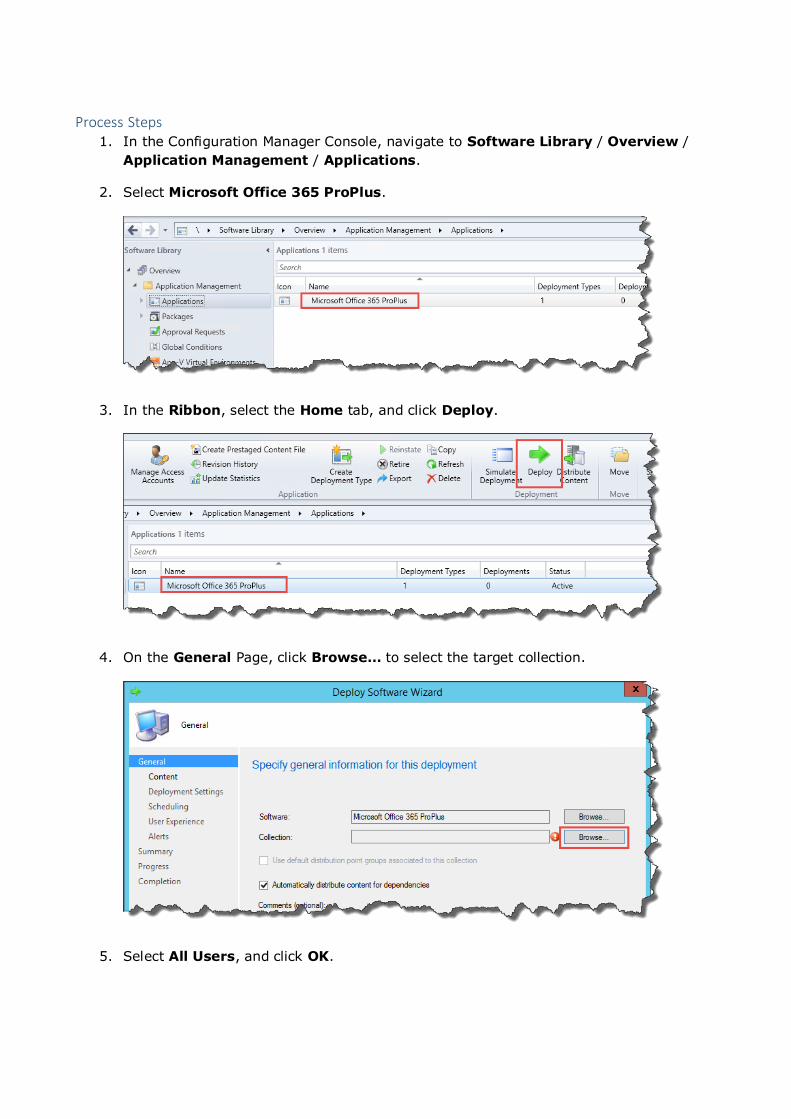
Process Steps 1. In the Configuration Manager Console, navigate to Software Library / Overview /
Application Management / Applications.
2. Select Microsoft Office 365 ProPlus.
3. In the Ribbon, select the Home tab, and click Deploy.
4. On the General Page, click Browse… to select the target collection.
5. Select All Users, and click OK.
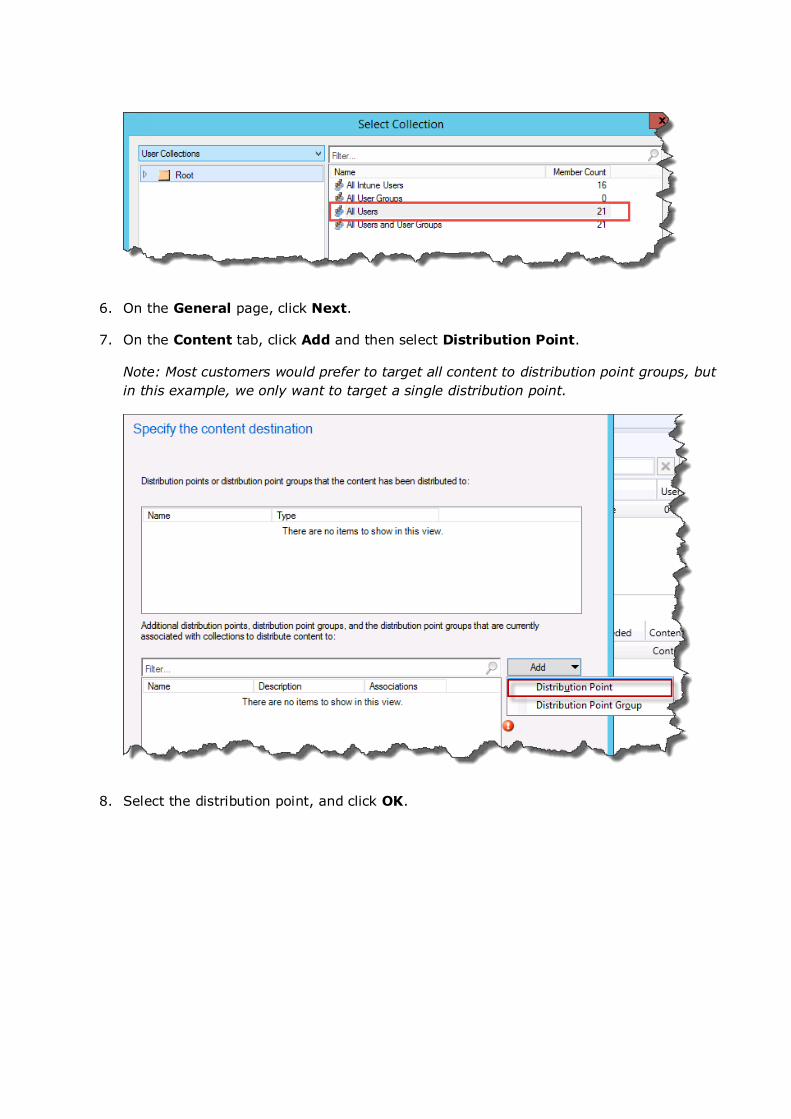
6. On the General page, click Next.
7. On the Content tab, click Add and then select Distribution Point.
Note: Most customers would prefer to target all content to distribution point groups, but
in this example, we only want to target a single distribution point.
8. Select the distribution point, and click OK.
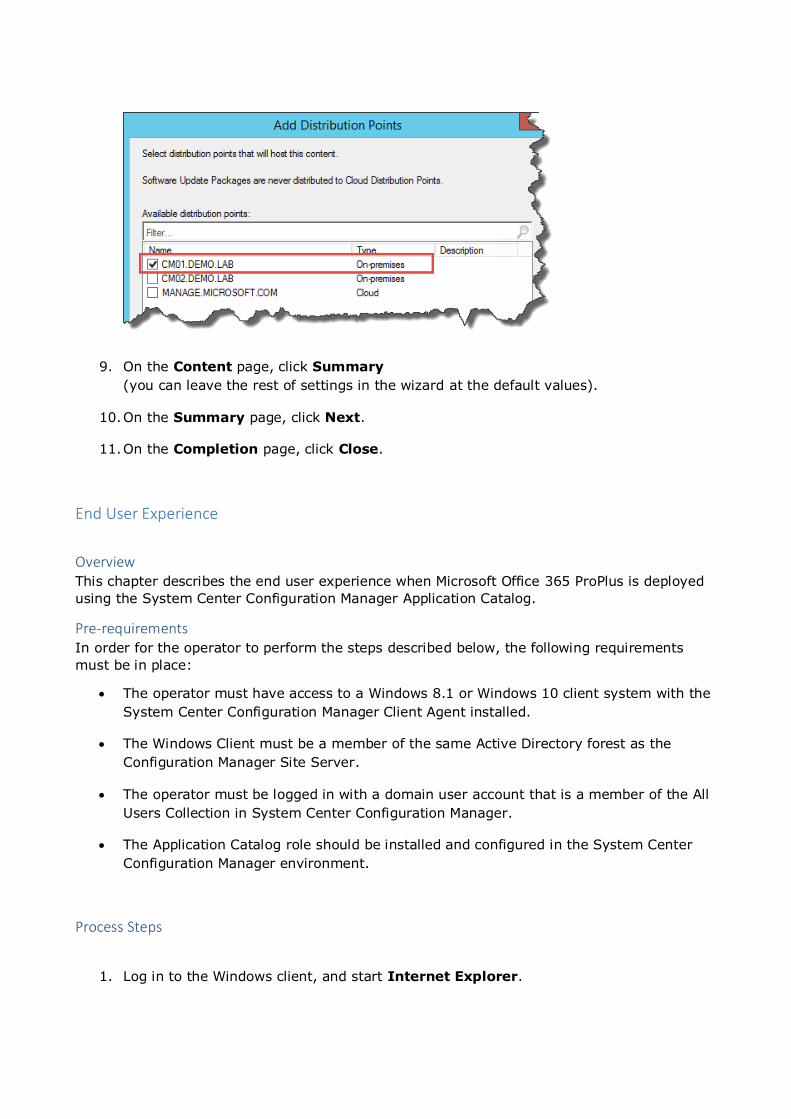
9. On the Content page, click Summary
(you can leave the rest of settings in the wizard at the default values).
10. On the Summary page, click Next.
11. On the Completion page, click Close.
End User Experience
Overview This chapter describes the end user experience when Microsoft Office 365 ProPlus is deployed
using the System Center Configuration Manager Application Catalog.
Pre-requirements In order for the operator to perform the steps described below, the following requirements
must be in place:
The operator must have access to a Windows 8.1 or Windows 10 client system with the
System Center Configuration Manager Client Agent installed.
The Windows Client must be a member of the same Active Directory forest as the
Configuration Manager Site Server.
The operator must be logged in with a domain user account that is a member of the All
Users Collection in System Center Configuration Manager.
The Application Catalog role should be installed and configured in the System Center
Configuration Manager environment.
Process Steps
1. Log in to the Windows client, and start Internet Explorer.
Note: If you are using a Windows 10 client, you should start Internet Explorer from the
desktop, not from Microsoft Edge. The current version of Configuration Manager does
not support Microsoft Edge as the Application Catalog requires Silverlight. This will be
fixed in the next version of Configuration Manager that is scheduled to be released in
Q4 2015.
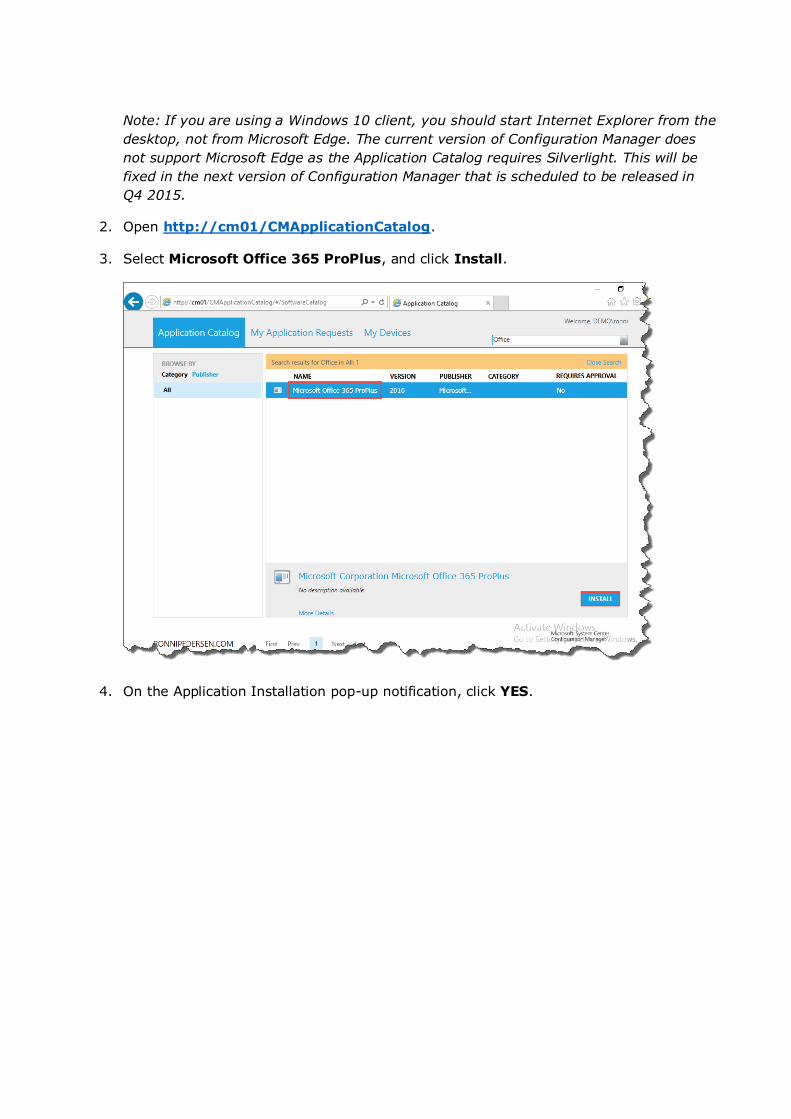
2. Open http://cm01/CMApplicationCatalog.
3. Select Microsoft Office 365 ProPlus, and click Install.
4. On the Application Installation pop-up notification, click YES.
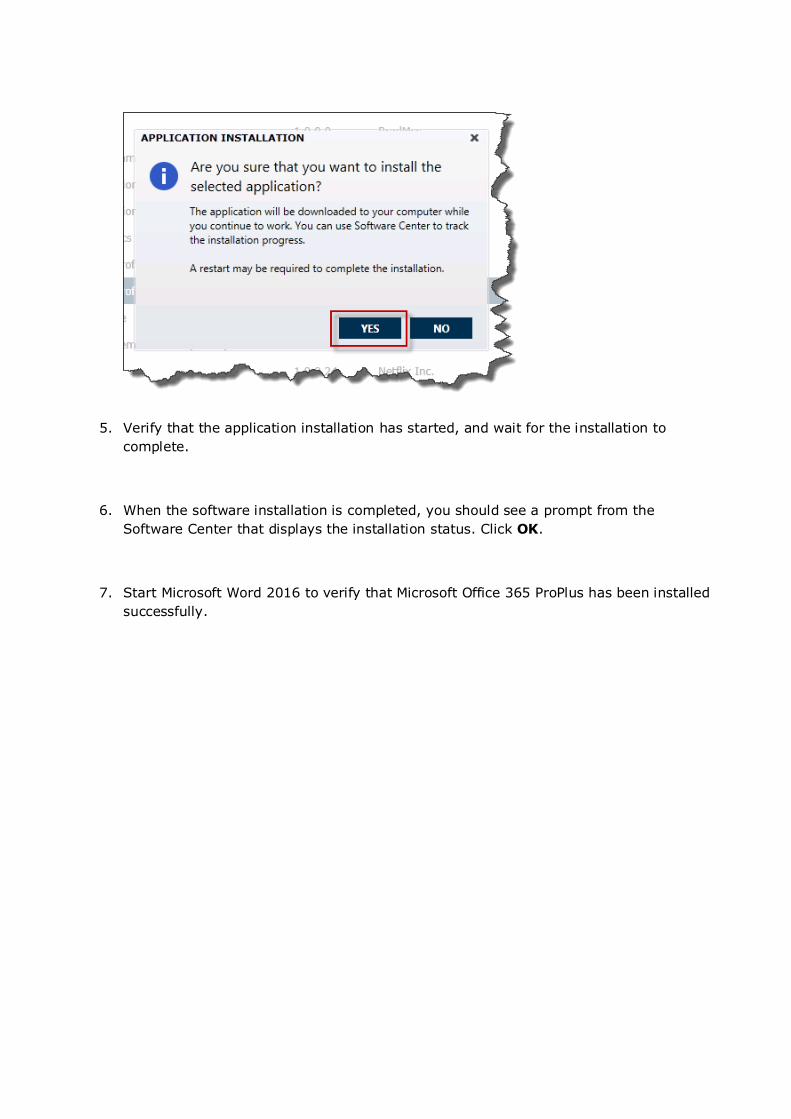
5. Verify that the application installation has started, and wait for the installation to
complete.
6. When the software installation is completed, you should see a prompt from the
Software Center that displays the installation status. Click OK.
7. Start Microsoft Word 2016 to verify that Microsoft Office 365 ProPlus has been installed
successfully.
Deploy Microsoft Office 365 ProPlus using Microsoft Intune
Create the Microsoft Office 365 Application in Microsoft Intune
Overview This chapter describes how to deploy Microsoft Office 365 Professional Plus using Microsoft
Intune. It doesn’t cover setting up a Microsoft Intune subscription or installation of Intune
Agent on client machines.
Pre-requirements In order for the operator to perform the steps described below, the following requirements
must be in place:
The operator must have a Microsoft Intune subscription. You can get a trial account at
http://www.microsoft.com/en-us/server-cloud/products/microsoft-intune/.
The operator must be logged in with a user account with permissions to create and
deploy applications.
Microsoft Internet Explorer.
Microsoft Office logo (check http://www.iconfinder.com/).
The installation files from the “Prepare Office 365 ProPlus for deployment” chapter.
Process Steps 1. Log in using your Microsoft Intune administrator account at
https://admin.manage.microsoft.com.
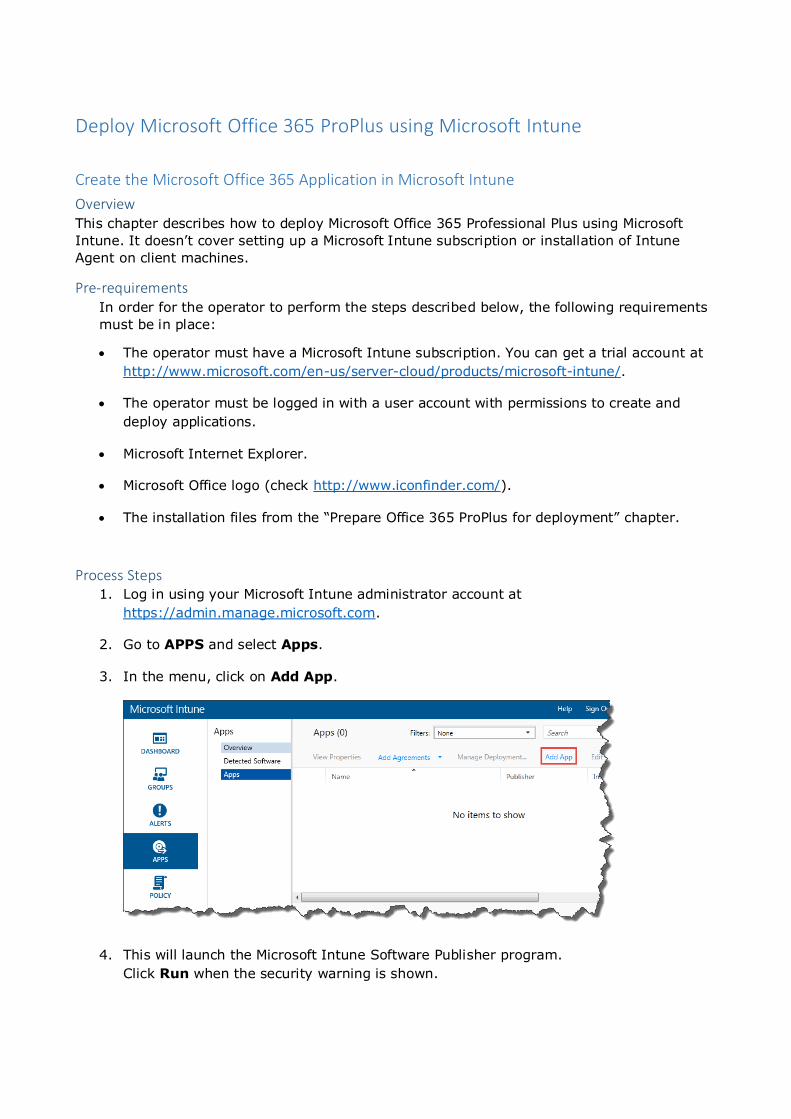
2. Go to APPS and select Apps.
3. In the menu, click on Add App.
4. This will launch the Microsoft Intune Software Publisher program.
Click Run when the security warning is shown.
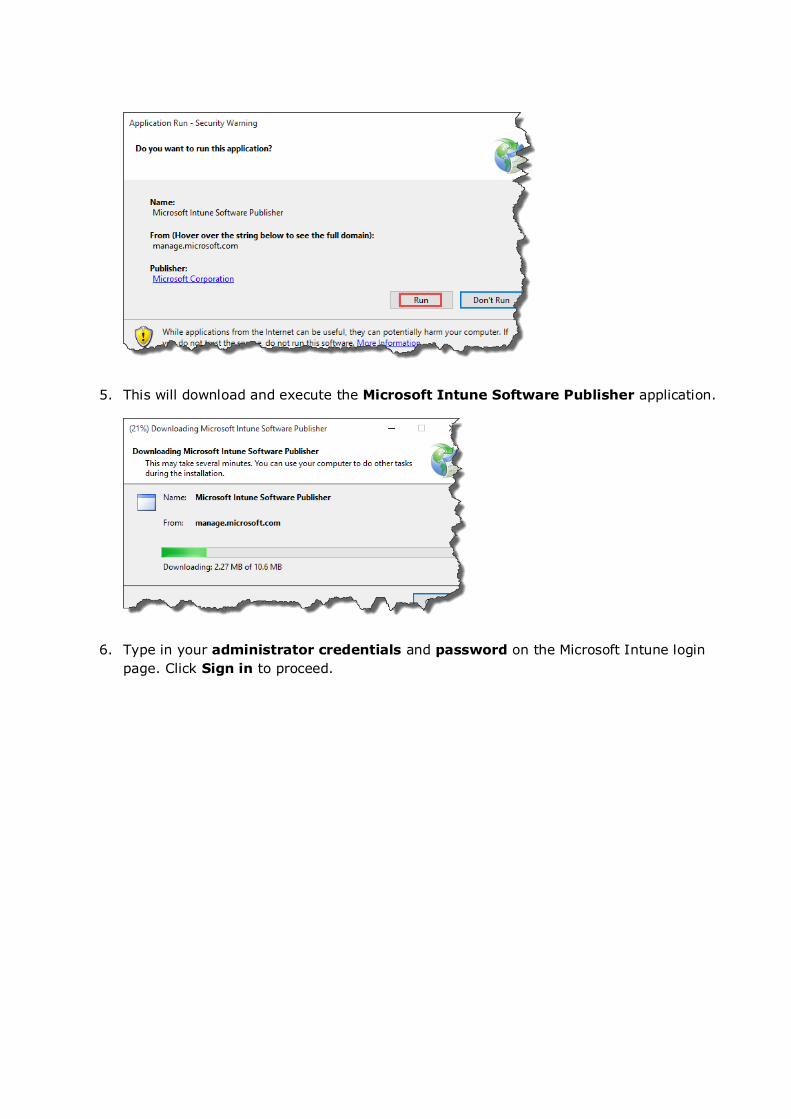
5. This will download and execute the Microsoft Intune Software Publisher application.
6. Type in your administrator credentials and password on the Microsoft Intune login
page. Click Sign in to proceed.
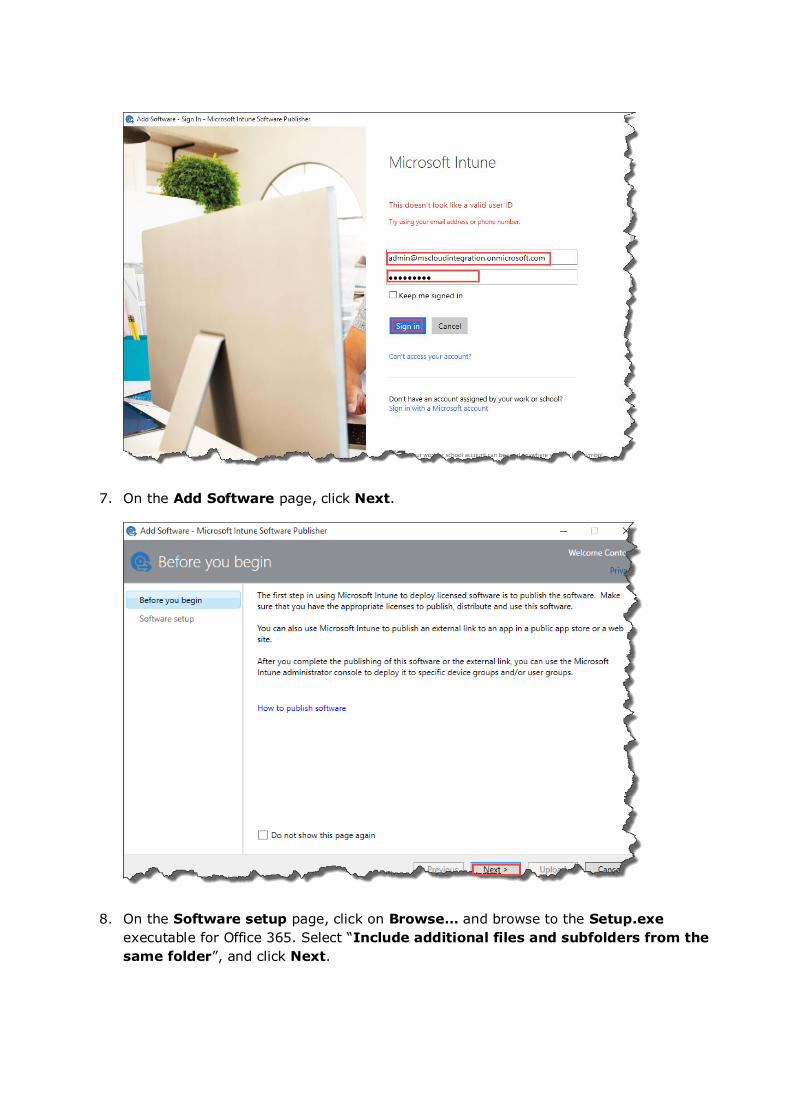
7. On the Add Software page, click Next.
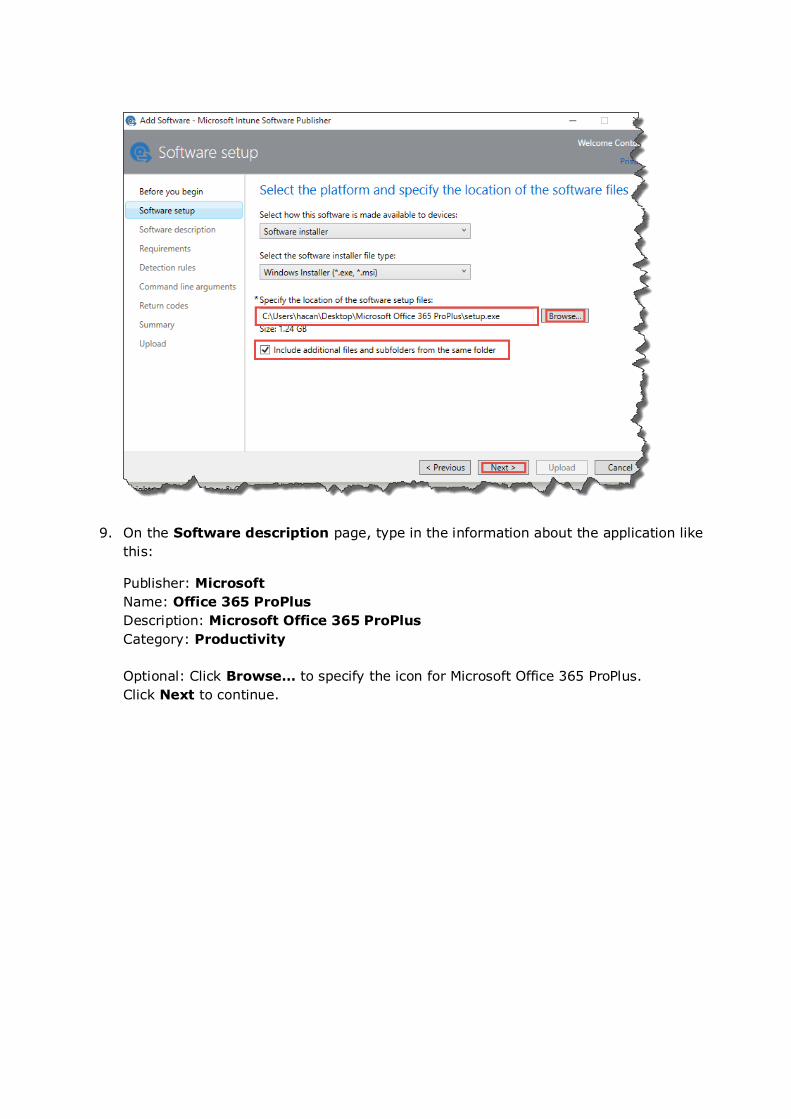
8. On the Software setup page, click on Browse… and browse to the Setup.exe
executable for Office 365. Select “Include additional files and subfolders from the
same folder”, and click Next.
9. On the Software description page, type in the information about the application like
this:
Publisher: Microsoft
Name: Office 365 ProPlus
Description: Microsoft Office 365 ProPlus
Category: Productivity
Optional: Click Browse… to specify the icon for Microsoft Office 365 ProPlus.
Click Next to continue.
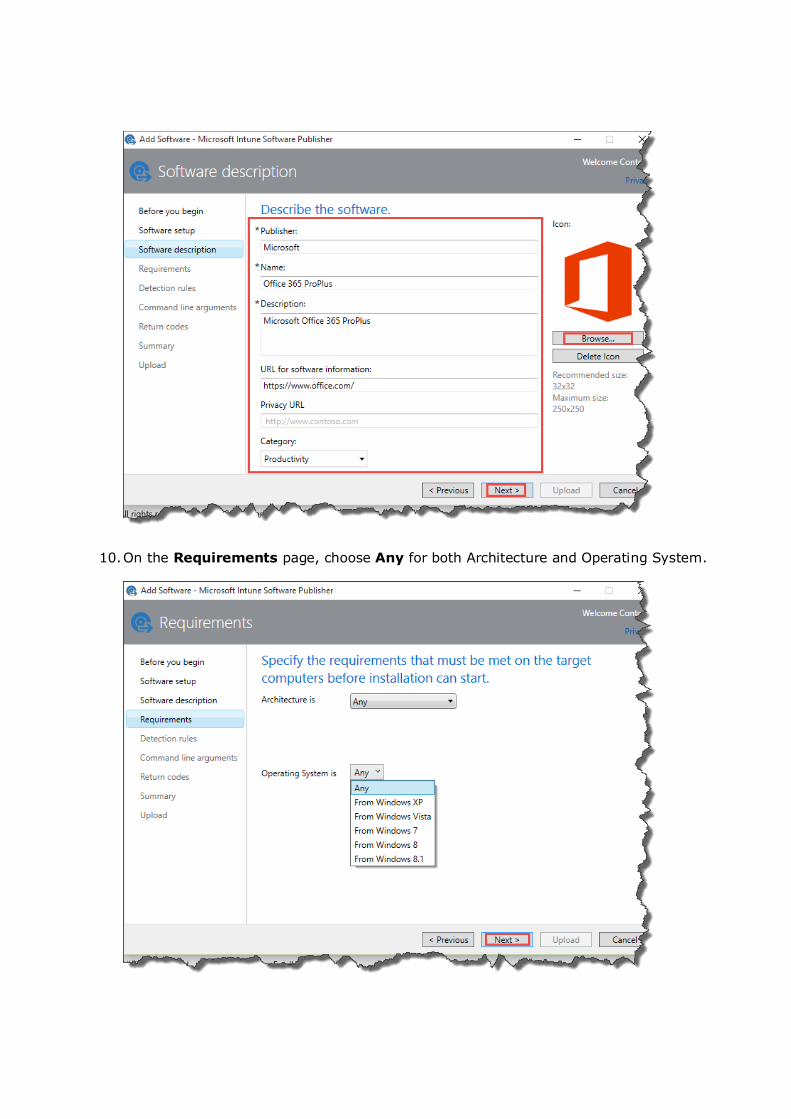
10. On the Requirements page, choose Any for both Architecture and Operating System.
Note: As of the time of writing, it’s not possible to choose Windows 10 as an operating system
requirement. Hopefully this will be updated in an upcoming update of Microsoft Intune.
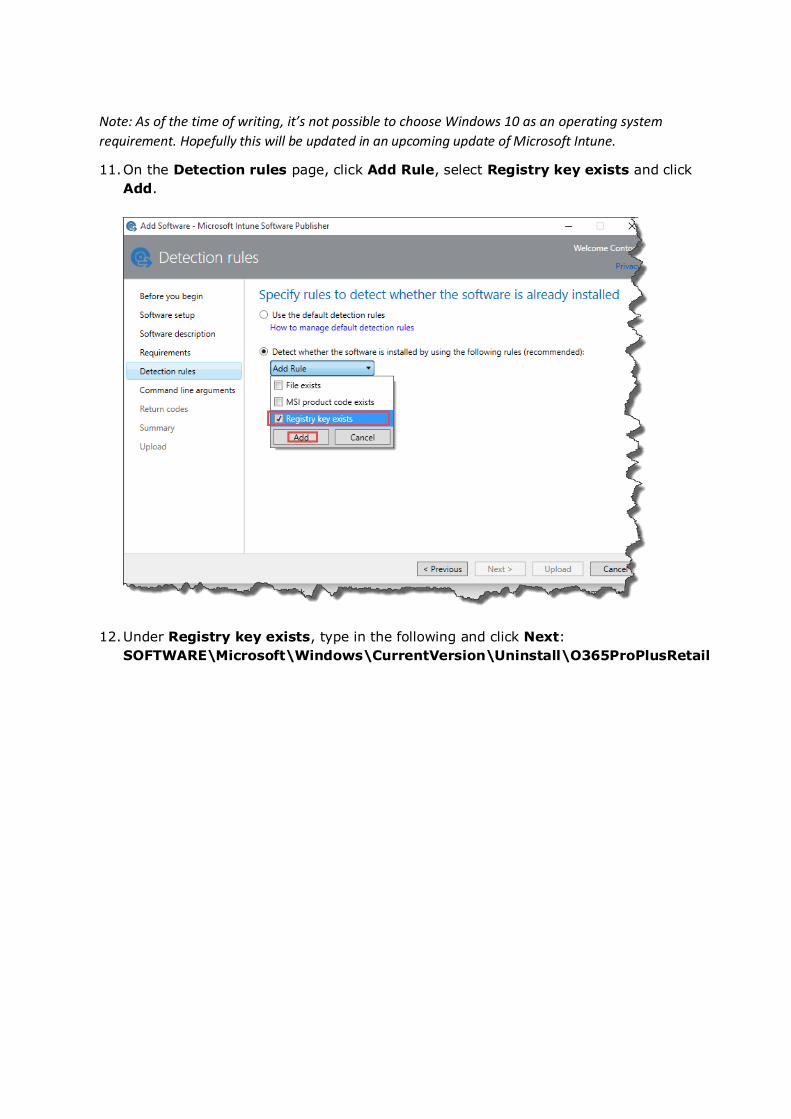
11. On the Detection rules page, click Add Rule, select Registry key exists and click
Add.
12. Under Registry key exists, type in the following and click Next:
SOFTWARE\Microsoft\Windows\CurrentVersion\Uninstall\O365ProPlusRetail
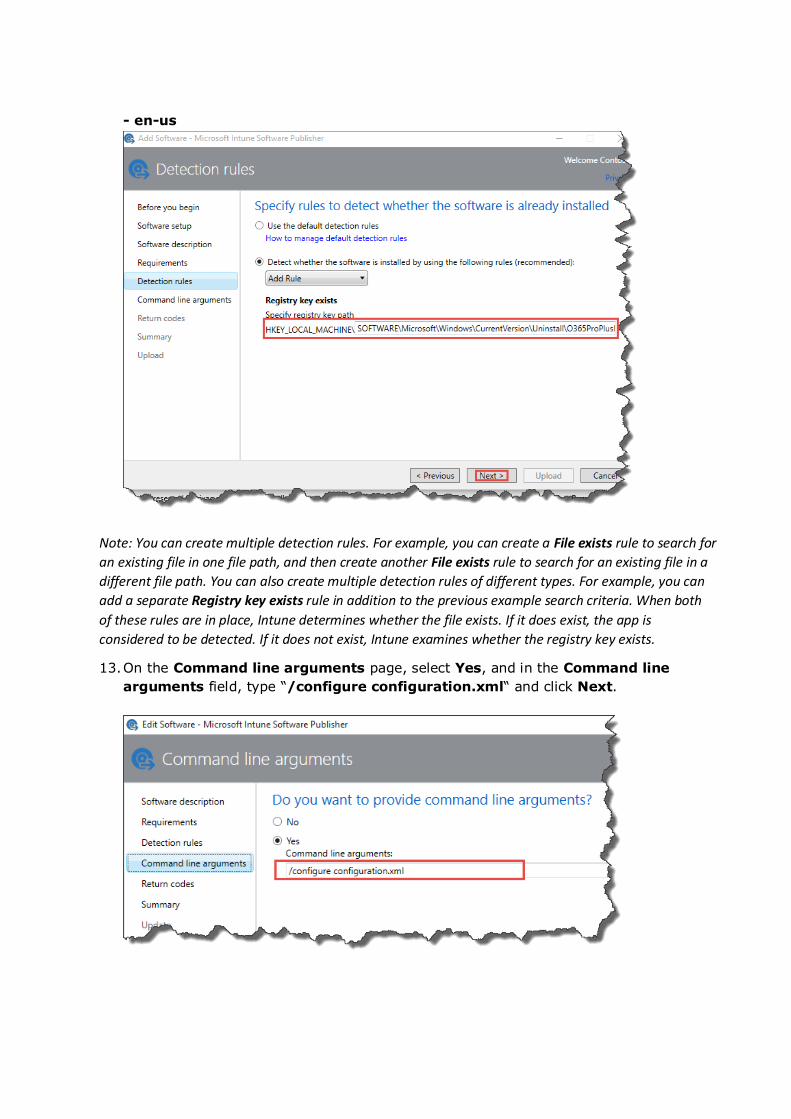
- en-us
Note: You can create multiple detection rules. For example, you can create a File exists rule to search for
an existing file in one file path, and then create another File exists rule to search for an existing file in a
different file path. You can also create multiple detection rules of different types. For example, you can
add a separate Registry key exists rule in addition to the previous example search criteria. When both
of these rules are in place, Intune determines whether the file exists. If it does exist, the app is
considered to be detected. If it does not exist, Intune examines whether the registry key exists.
13. On the Command line arguments page, select Yes, and in the Command line
arguments field, type “/configure configuration.xml“ and click Next.
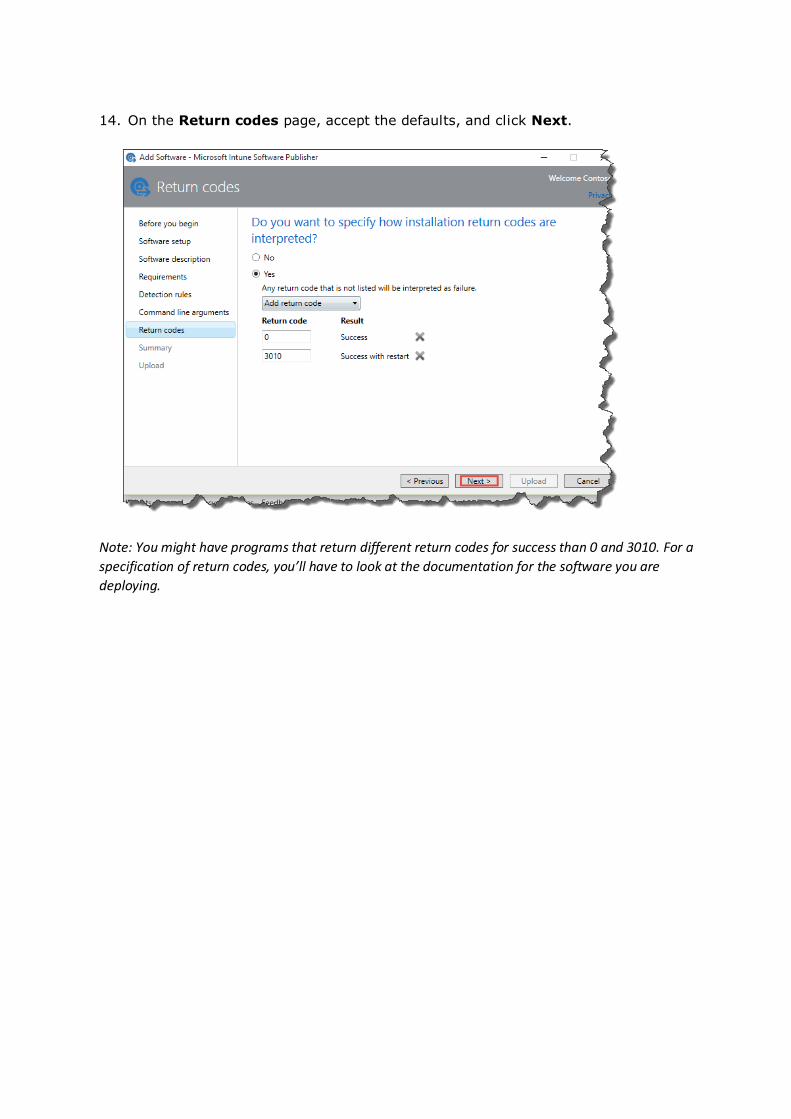
14. On the Return codes page, accept the defaults, and click Next.
Note: You might have programs that return different return codes for success than 0 and 3010. For a
specification of return codes, you’ll have to look at the documentation for the software you are
deploying.
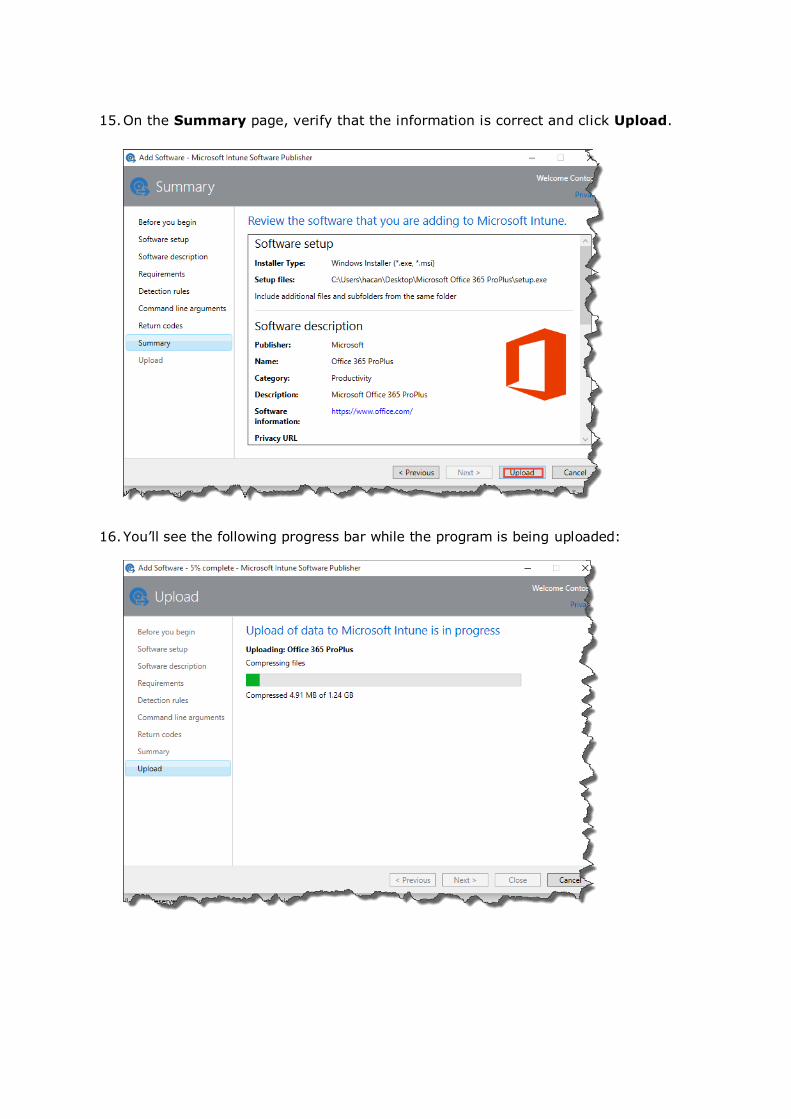
15. On the Summary page, verify that the information is correct and click Upload.
16. You’ll see the following progress bar while the program is being uploaded:
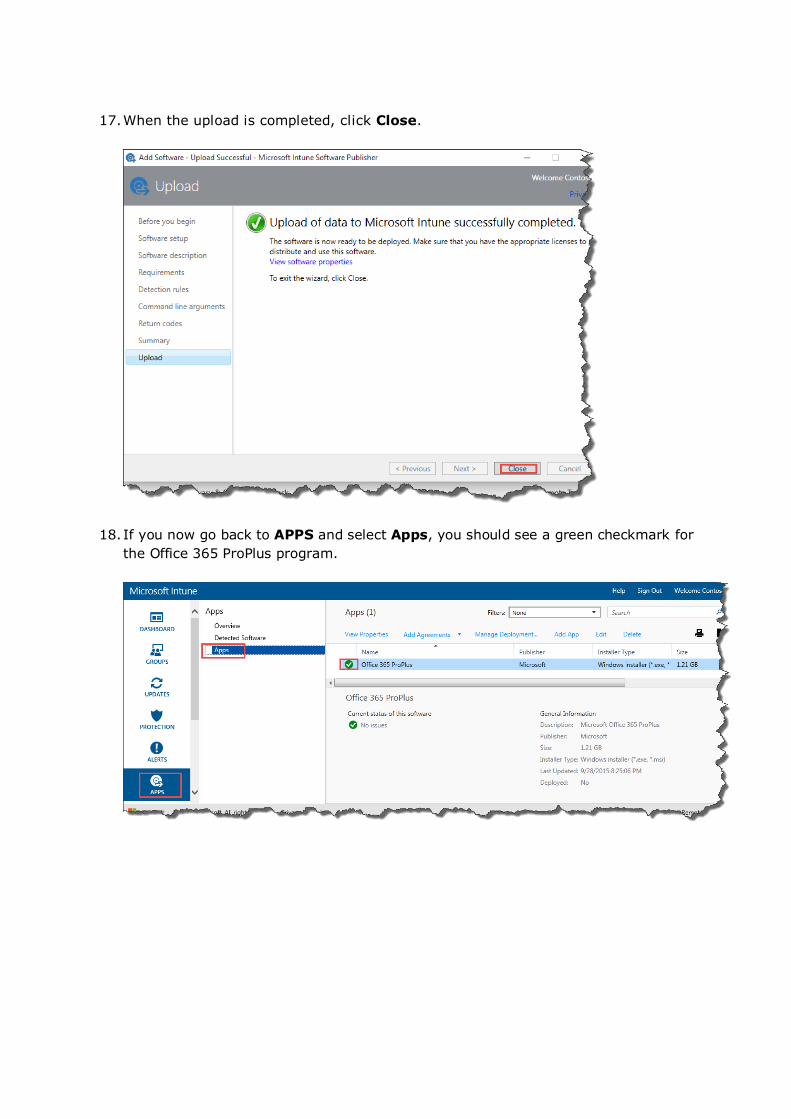
17. When the upload is completed, click Close.
18. If you now go back to APPS and select Apps, you should see a green checkmark for
the Office 365 ProPlus program.
Deploying Microsoft Office 365 ProPlus
Overview This chapter describes how to deploy Microsoft Office 365 Professional Plus using Microsoft
Intune.
Pre-requirements In order for the operator to perform the steps described below, the following requirements
must be in place:
The operator must have access to the Microsoft Intune administration console.
Microsoft Internet Explorer.
Process Steps
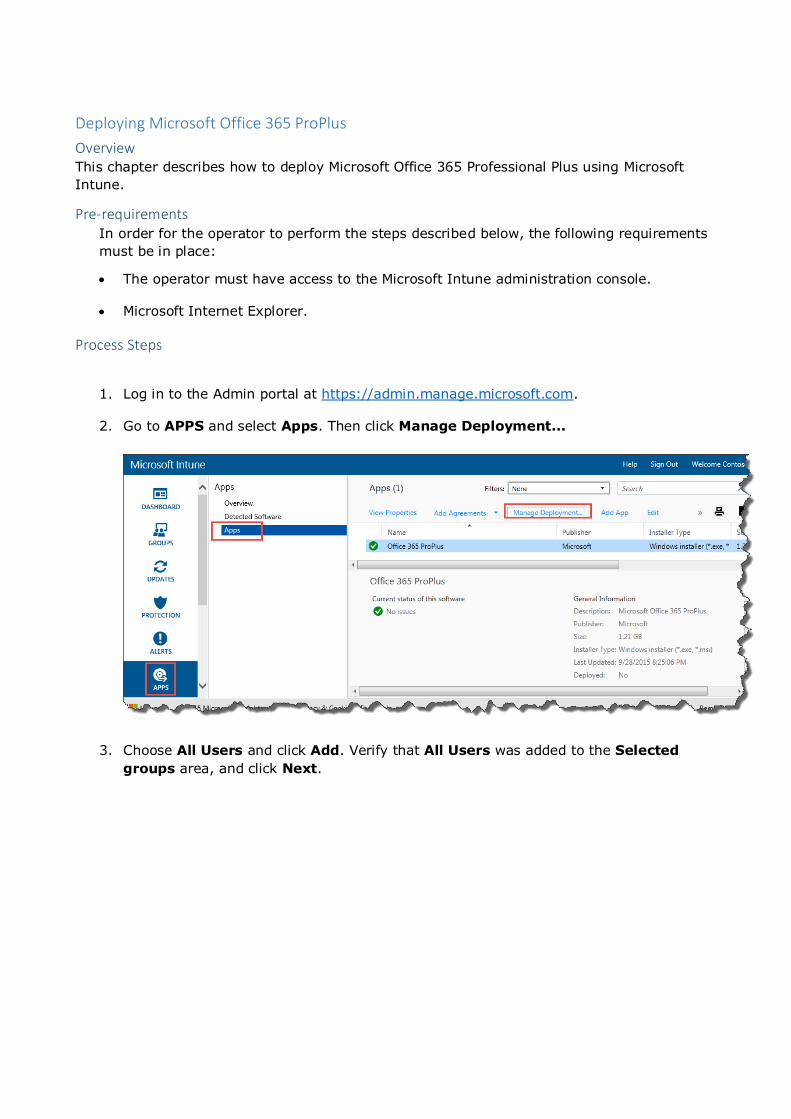
1. Log in to the Admin portal at https://admin.manage.microsoft.com.
2. Go to APPS and select Apps. Then click Manage Deployment...
3. Choose All Users and click Add. Verify that All Users was added to the Selected
groups area, and click Next.

4. Click Deployment and select Available Install. Click Finish.
Note: The reason why you don’t get the option to choose Uninstall is that we’re only able to install when
the installation file is an executable (.exe). We would need to create another package to do the
uninstallation of Microsoft Office 365 ProPlus. The required install option is only available for
deployment to computers.
5. When you go back to the previous page, you’ll see that the Deployed column has
changed to Yes.
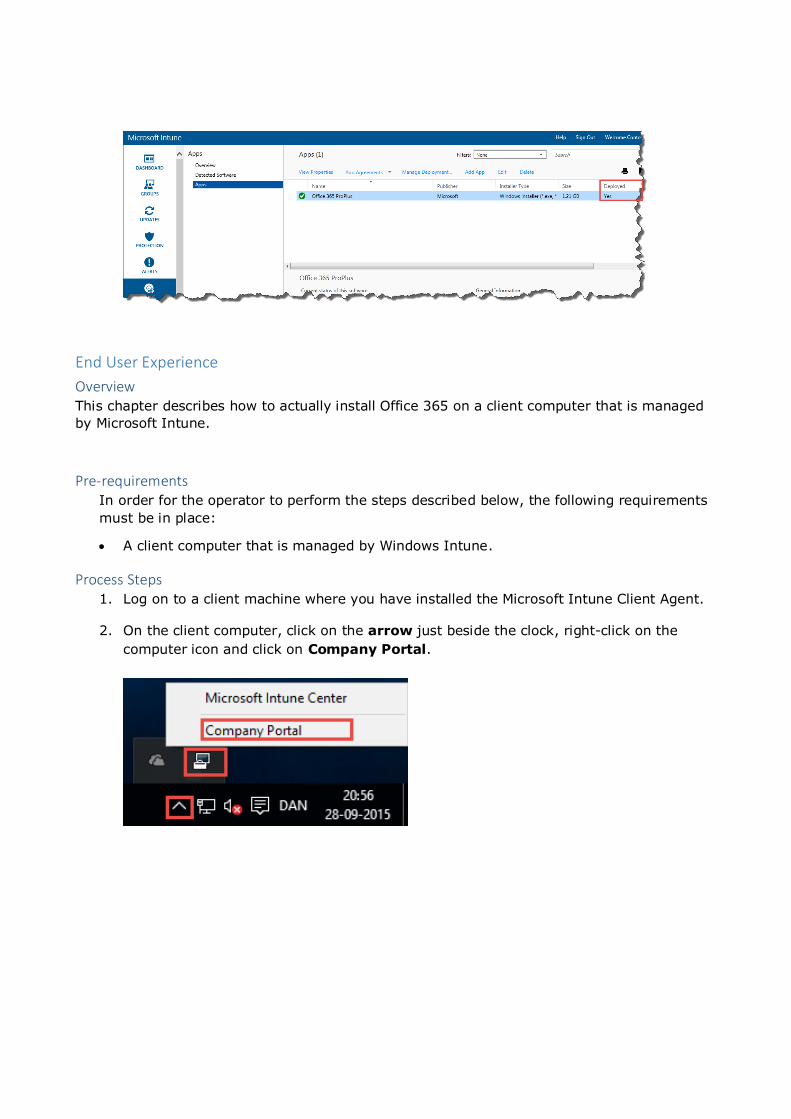
End User Experience
Overview This chapter describes how to actually install Office 365 on a client computer that is managed
by Microsoft Intune.
Pre-requirements In order for the operator to perform the steps described below, the following requirements
must be in place:
A client computer that is managed by Windows Intune.
Process Steps 1. Log on to a client machine where you have installed the Microsoft Intune Client Agent.
2. On the client computer, click on the arrow just beside the clock, right-click on the
computer icon and click on Company Portal.
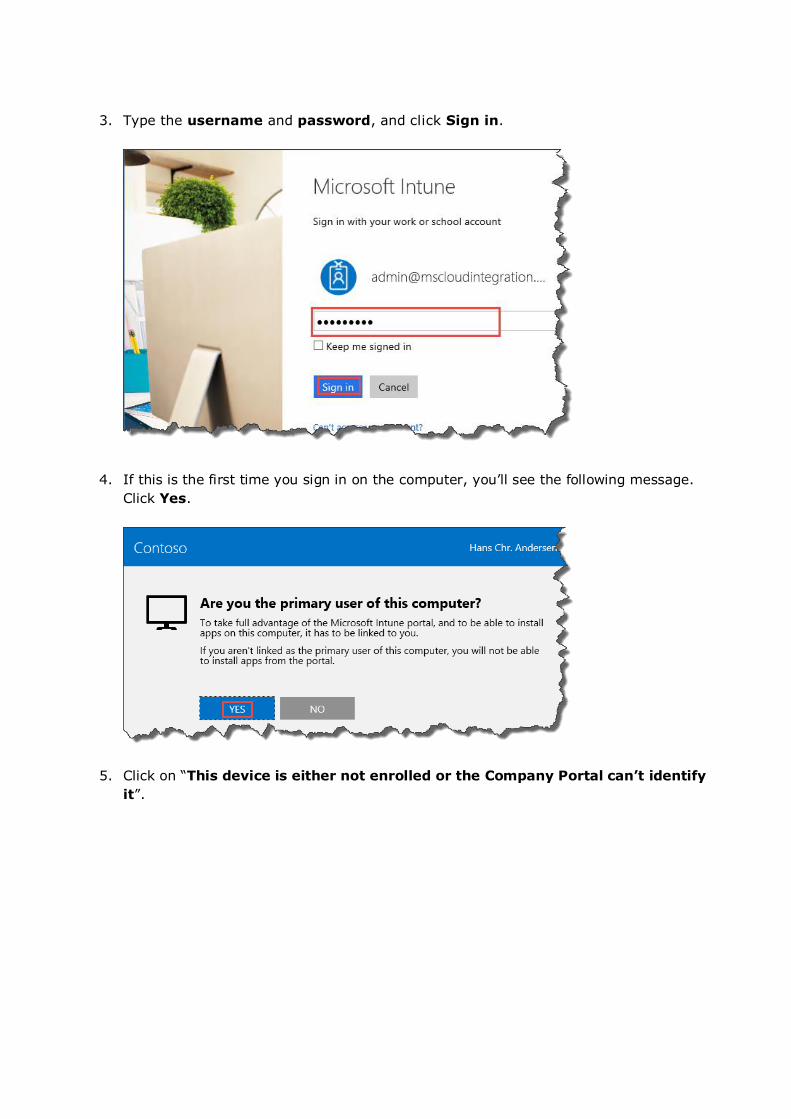
3. Type the username and password, and click Sign in.
4. If this is the first time you sign in on the computer, you’ll see the following message.
Click Yes.
5. Click on “This device is either not enrolled or the Company Portal can’t identify
it”.
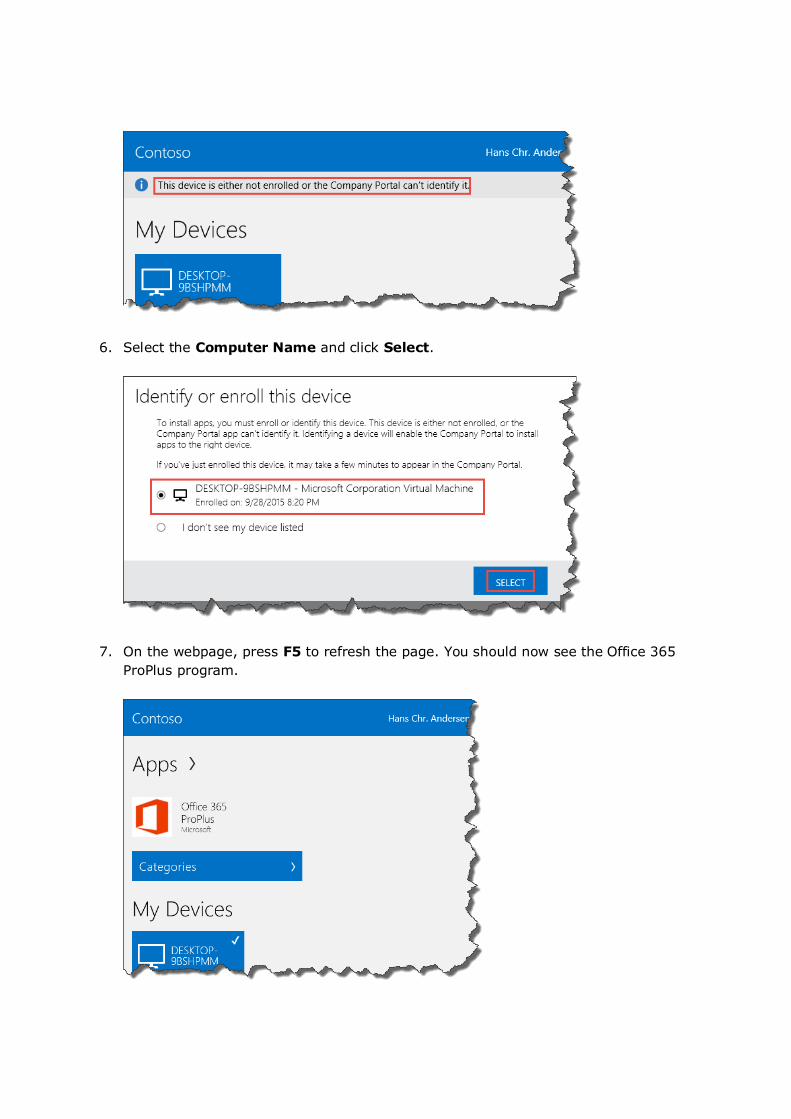
6. Select the Computer Name and click Select.
7. On the webpage, press F5 to refresh the page. You should now see the Office 365
ProPlus program.
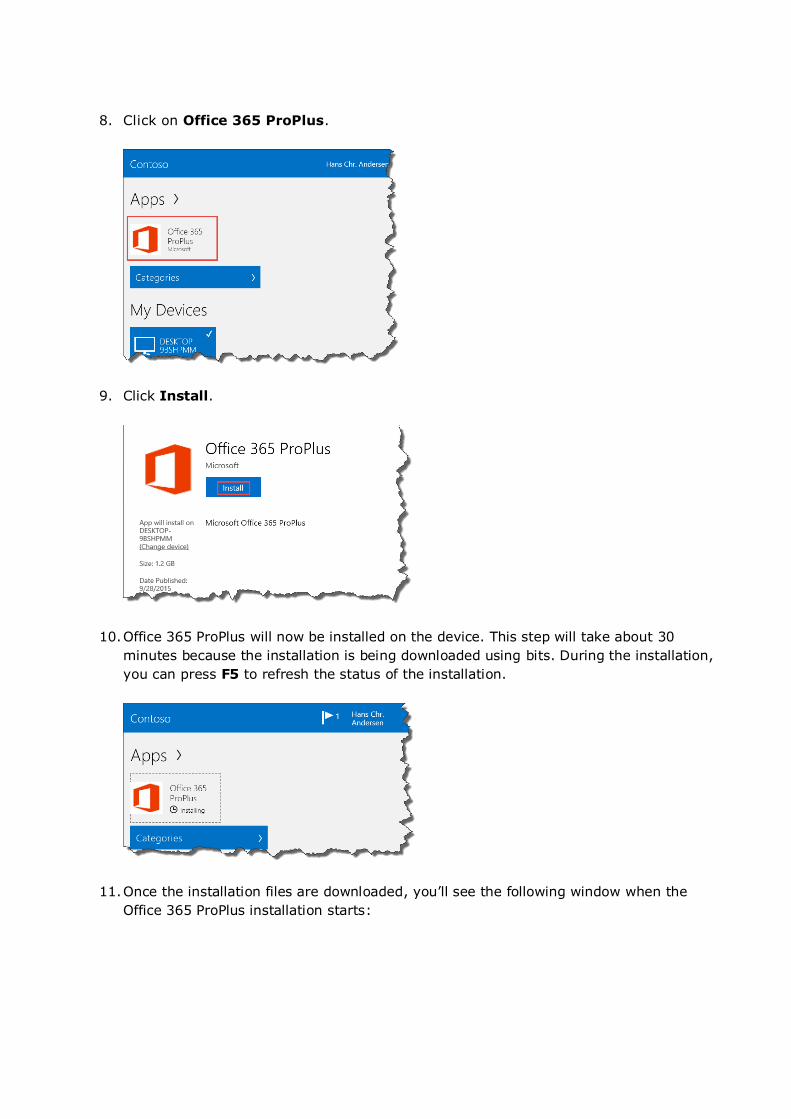
8. Click on Office 365 ProPlus.
9. Click Install.
10. Office 365 ProPlus will now be installed on the device. This step will take about 30
minutes because the installation is being downloaded using bits. During the installation,
you can press F5 to refresh the status of the installation.
11. Once the installation files are downloaded, you’ll see the following window when the
Office 365 ProPlus installation starts:
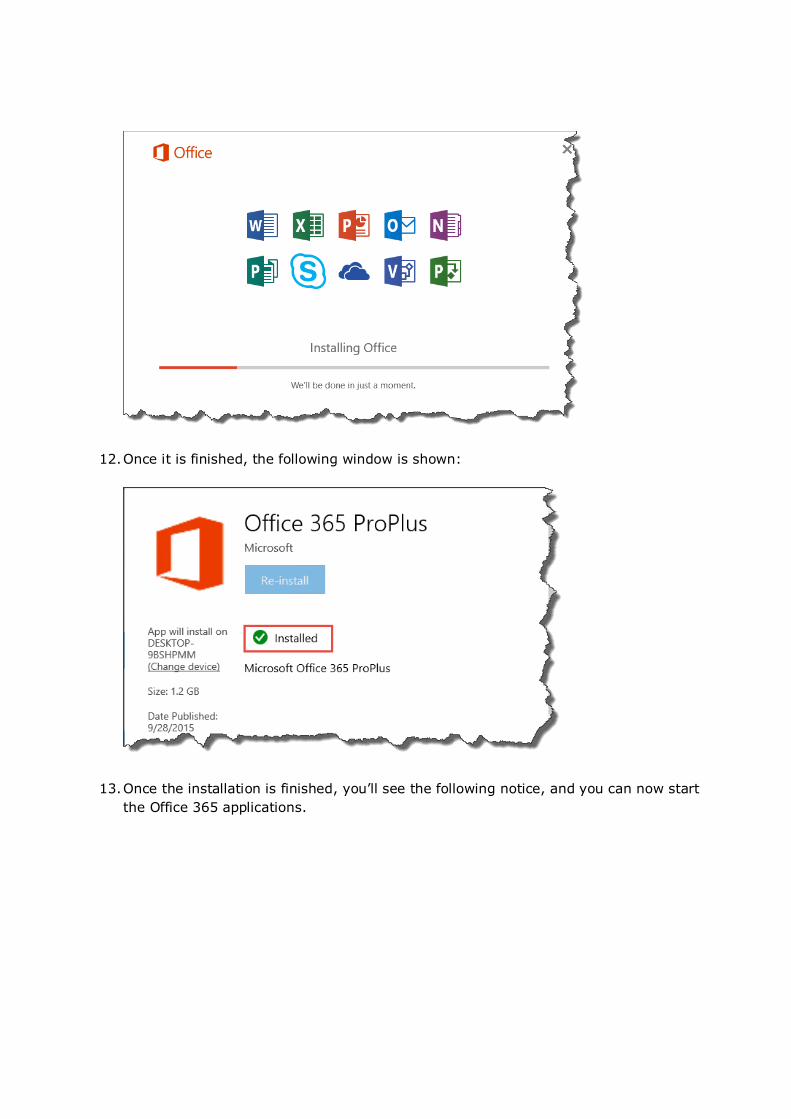
12. Once it is finished, the following window is shown:
13. Once the installation is finished, you’ll see the following notice, and you can now start
the Office 365 applications.