Surveon NVR3000 Megapixel RAID NVR Troubleshooting Guide
63
Surveon Training Program NVR3000 Troubleshooting Guide Sales & Marketing Department Surveon Technology 2015 Version 1.0
-
Upload
surveon-technology -
Category
Technology
-
view
210 -
download
7
Transcript of Surveon NVR3000 Megapixel RAID NVR Troubleshooting Guide
Surveon Training Program
NVR3000 Troubleshooting Guide
Sales & Marketing Department
Surveon Technology 2015
Version 1.0
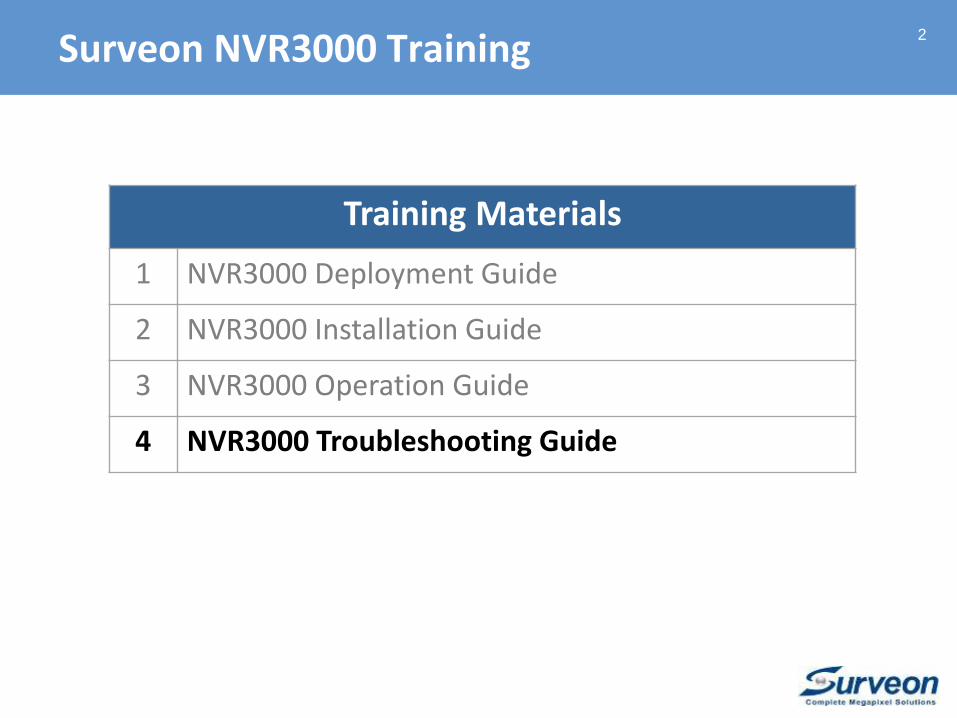
Surveon NVR3000 Training
Training Materials
1 NVR3000 Deployment Guide
2 NVR3000 Installation Guide
3 NVR3000 Operation Guide
4 NVR3000 Troubleshooting Guide
2
The Objective
This troubleshooting guide is here to help you solve the
frequently encountered problems when operating the
NVR3000.
For other themes that are not covered here, please
refer to the NVR3000 user manual.
3
Click to read the user manual.
4
● Basic Troubleshooting
● Advanced Troubleshooting
● Contact Support
● Appendix
The Contents
Basic Troubleshooting5
Why Can’t NVR3000 Find Cameras?
Why Can’t NVR3000 Add Cameras?
Why Can’t I See the Live View?
Why Can’t I See the Playback Videos?
Why Can’t NVR3000 Record Videos?
Why Can’t Remote Client Access NVR3000?
Why Is the Camera Time Different from the NVR3000 Time?
Why Does the GUI Respond Slowly?
Why Is the Image not in Real-time on NVR3000?
Why Is the Video not Smooth in Playback?
6
In this section, you’ll learn how to clear up the possible
problem when NVR3000 can’t find cameras:
Network Configuration Issues
Why Can’t NVR3000 Find Cameras?
For network configuration issues, use the following to check which part went wrong.
1. Check Camera:
Power on: Surveon camera status LED shows green when the camera is working properly.
Camera’s IP address is located in the same network segment as NVR3000’s.
Camera (3rd party camera) in use is supported. NVR3000 can’t find unsupported cameras.
Check NVR3000 support camera list: http://www.surveon.com/product/NVR_support.asp
2. Check Switch:
Ethernet switch port is lighting on and blinking when the switch is working properly.
Some advanced switches might block the network broadcast packets. Check the switch or use a simple switch to test.
3. Check NVR:
NVR3000’s IP address is located in the same network segment as the camera’s.
4. Simple Verification Procedure:
Connect NVR3000 and IP cameras to the same switch under the same network segment.
Set the IP addresses of NVR3000 and of IP cameras to the same network segment.
The default IP address of the Surveon camera is 192.168.88.10.
If the IP cameras are supported by NVR3000, scan cameras to add the cameras in.
If not, add the cameras in manually.
7
Why Can’t NVR3000 Find Cameras?
8
In this section, you’ll learn how to clear up the possible
problems when NVR3000 can’t add cameras:
Surveon Cameras
Surveon Supported 3rd Party Cameras
ONVIF Supported Cameras
Why Can’t NVR3000 Add Cameras?
Why Can’t NVR3000 Add Cameras -Surveon Cameras
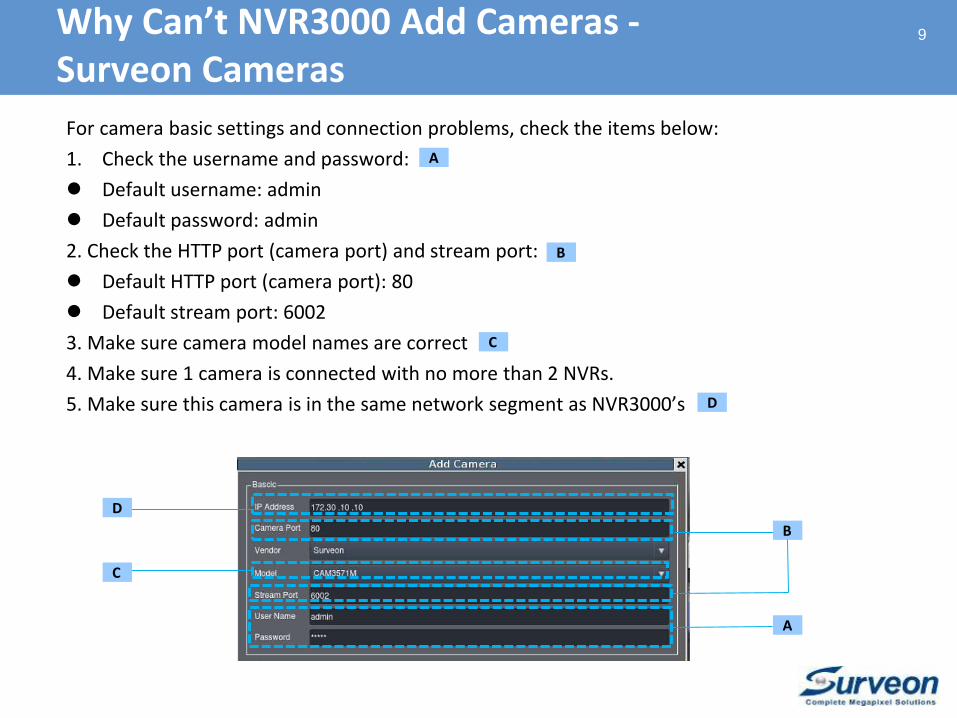
For camera basic settings and connection problems, check the items below:
1. Check the username and password:
Default username: admin
Default password: admin
2. Check the HTTP port (camera port) and stream port:
Default HTTP port (camera port): 80
Default stream port: 6002
3. Make sure camera model names are correct
4. Make sure 1 camera is connected with no more than 2 NVRs.
5. Make sure this camera is in the same network segment as NVR3000’s
9
D
A
B
C
A
B
C
D
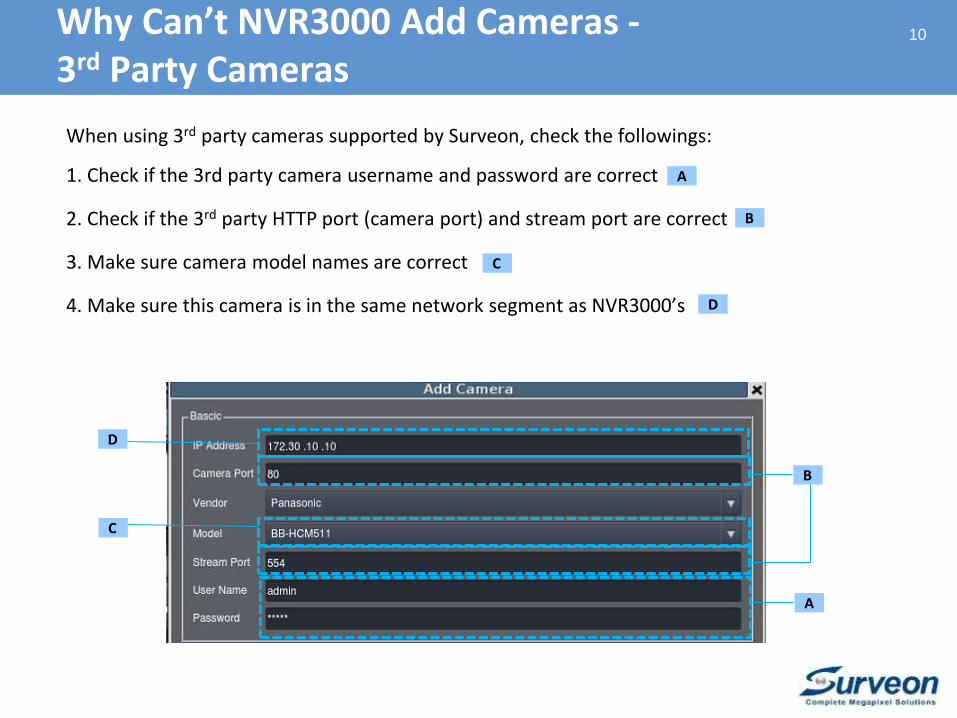
When using 3rd party cameras supported by Surveon, check the followings:
1. Check if the 3rd party camera username and password are correct
2. Check if the 3rd party HTTP port (camera port) and stream port are correct
3. Make sure camera model names are correct
4. Make sure this camera is in the same network segment as NVR3000’s
10
A
B
C
D
Why Can’t NVR3000 Add Cameras -3rd Party Cameras
A
B
C
D

When using the ONVIF cameras, make sure it is ONVIF conformant.
1. Click to check if the camera is ONVIF conformant on the website.
2. Or click to download the ONVIF Device Manager (odm-v2.2.250.msi, 22.0 MB) to
check the ONVIF conformant products offline. Click to read ONVIF Device Manager
installation and user guide.
Input the camera user name and password and click “Log in” button
Select target camera
11
Note: If the camera is found on the ONVIF conformant product list but cannot be added in the NVR3000, refer to Contact Support in the later section.
Why Can’t NVR3000 Add Cameras -ONVIF Supported Cameras (1)
A
B
B
A
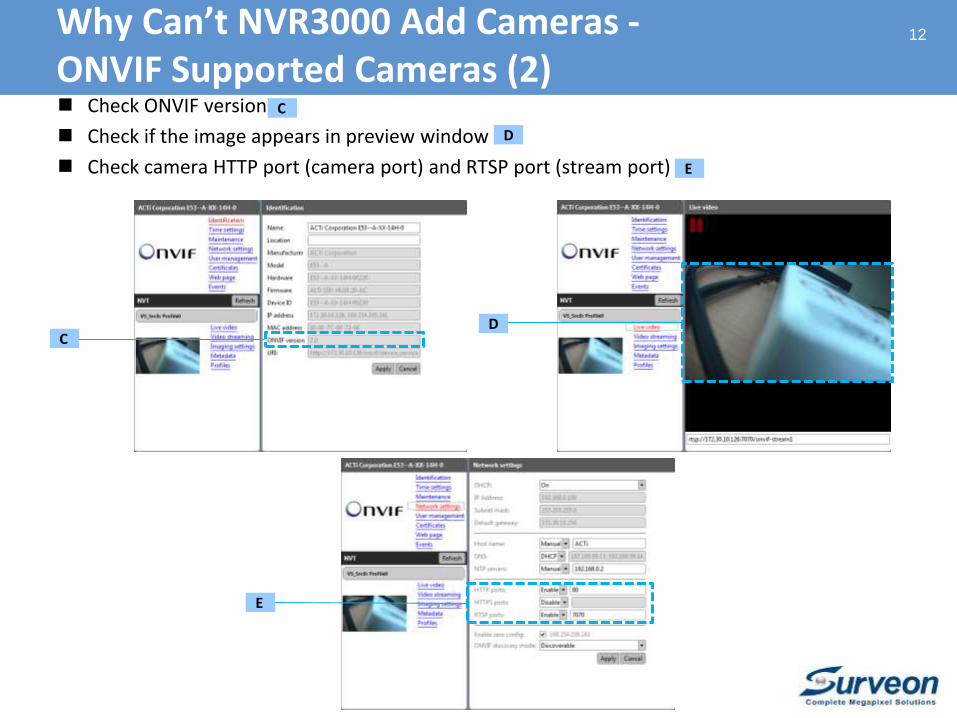
Check ONVIF version
Check if the image appears in preview window
Check camera HTTP port (camera port) and RTSP port (stream port)
12Why Can’t NVR3000 Add Cameras -ONVIF Supported Cameras (2)
C
D
E
CD
E
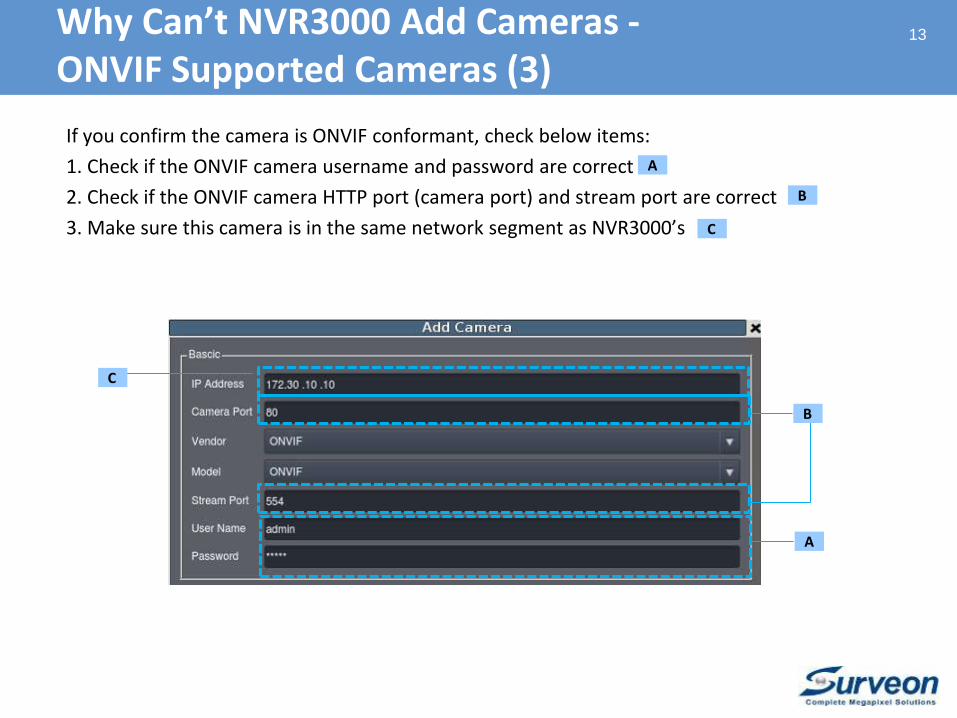
If you confirm the camera is ONVIF conformant, check below items:
1. Check if the ONVIF camera username and password are correct
2. Check if the ONVIF camera HTTP port (camera port) and stream port are correct
3. Make sure this camera is in the same network segment as NVR3000’s
13
A
A
B
C
Why Can’t NVR3000 Add Cameras -ONVIF Supported Cameras (3)
C
B
14
In this section, you’ll learn how to clear up the possible
problems when you cannot see the camera liveview:
NVR3000 Connection Problems
Camera Connection Problems
Surveon Camera Concurrent Connection Limit
The 3rd Party Camera Configuration Problems
Why Can’t I See the Live View?
Why Can’t I See the Live View -NVR3000 Connection Problems
15
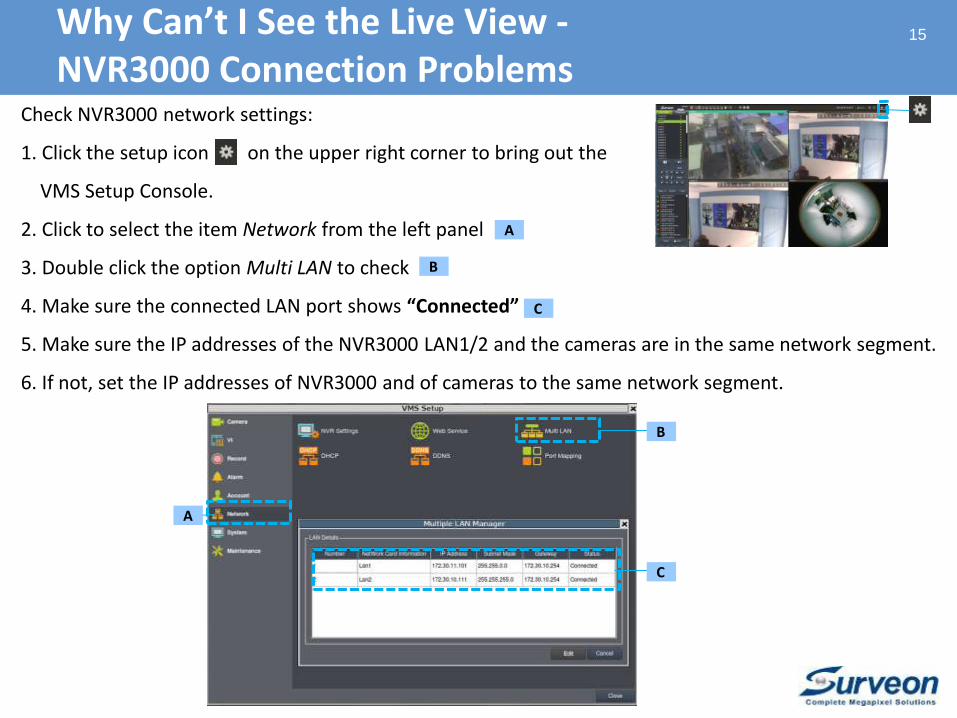
Check NVR3000 network settings:
1. Click the setup icon on the upper right corner to bring out the
VMS Setup Console.
2. Click to select the item Network from the left panel
3. Double click the option Multi LAN to check
4. Make sure the connected LAN port shows “Connected”
5. Make sure the IP addresses of the NVR3000 LAN1/2 and the cameras are in the same network segment.
6. If not, set the IP addresses of NVR3000 and of cameras to the same network segment.
A
B
A
B
C
C
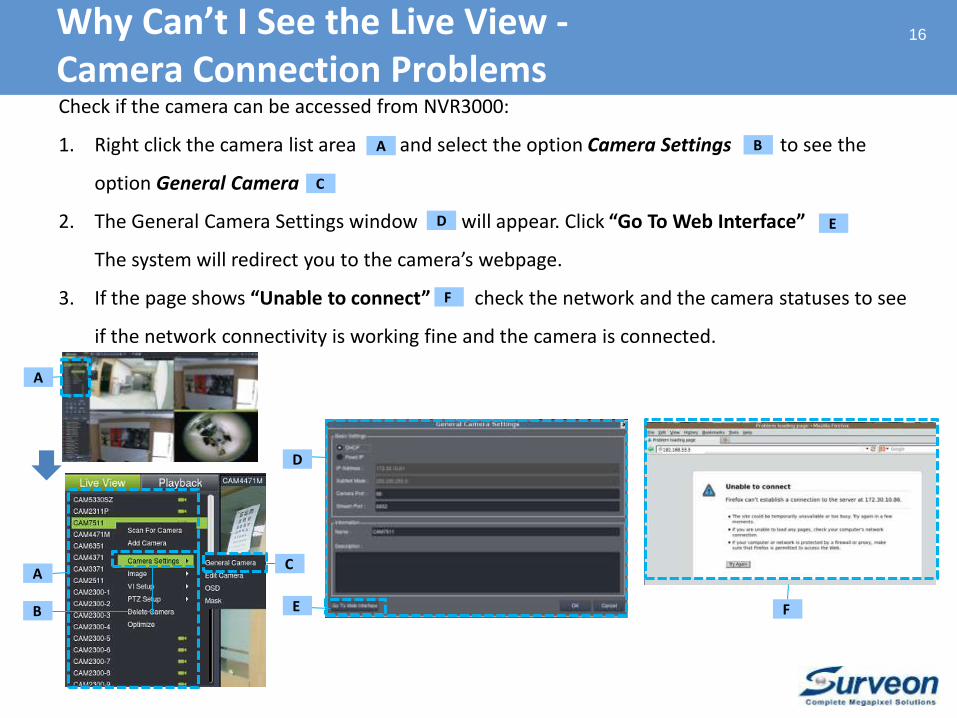
Check if the camera can be accessed from NVR3000:
1. Right click the camera list area and select the option Camera Settings to see the
option General Camera
2. The General Camera Settings window will appear. Click “Go To Web Interface”
The system will redirect you to the camera’s webpage.
3. If the page shows “Unable to connect” check the network and the camera statuses to see
if the network connectivity is working fine and the camera is connected.
16
A
A
B
C
D
C
A B
D
E
E
F
F
Why Can’t I See the Live View -Camera Connection Problems
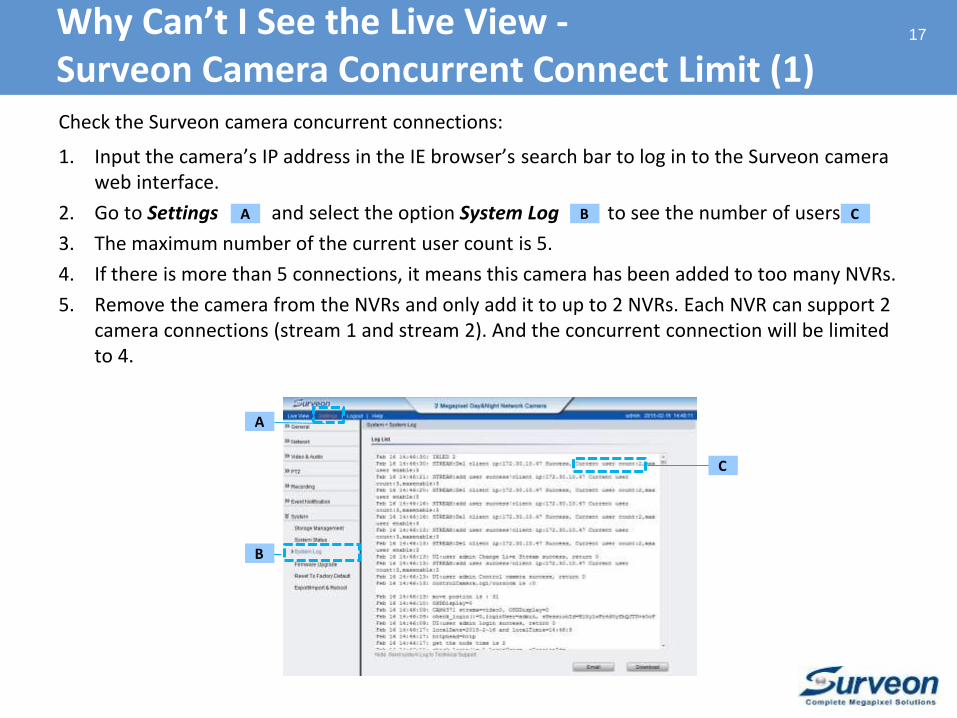
Check the Surveon camera concurrent connections:
1. Input the camera’s IP address in the IE browser’s search bar to log in to the Surveon camera web interface.
2. Go to Settings and select the option System Log to see the number of users
3. The maximum number of the current user count is 5.
4. If there is more than 5 connections, it means this camera has been added to too many NVRs.
5. Remove the camera from the NVRs and only add it to up to 2 NVRs. Each NVR can support 2 camera connections (stream 1 and stream 2). And the concurrent connection will be limited to 4.
17
A
B
C
A C
Why Can’t I See the Live View -Surveon Camera Concurrent Connect Limit (1)
B
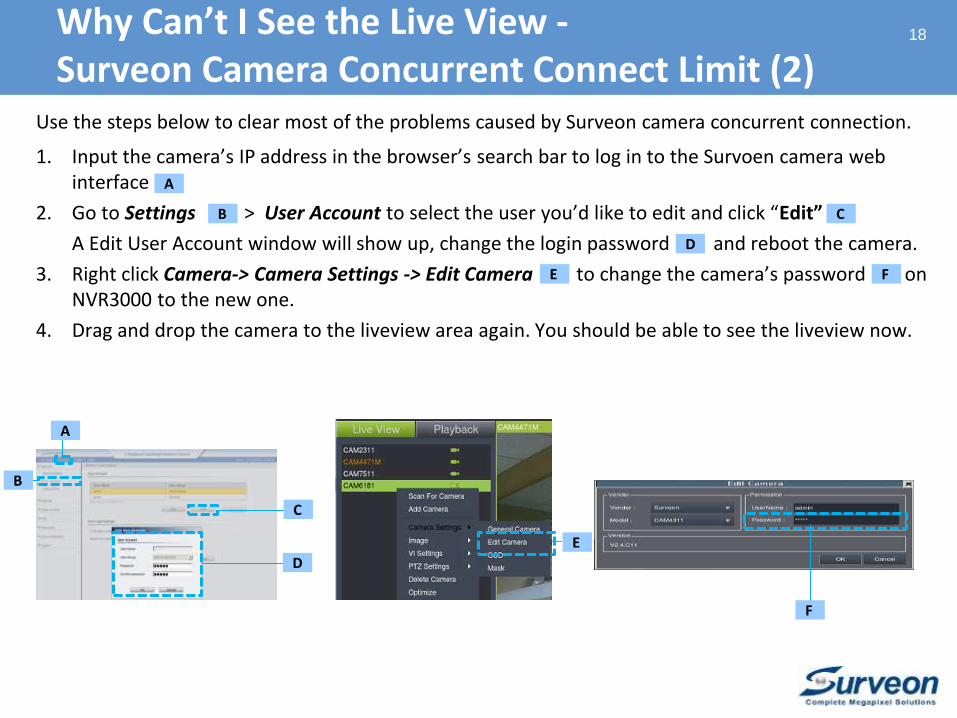
Use the steps below to clear most of the problems caused by Surveon camera concurrent connection.
1. Input the camera’s IP address in the browser’s search bar to log in to the Survoen camera web interface
2. Go to Settings > User Account to select the user you’d like to edit and click “Edit”
A Edit User Account window will show up, change the login password and reboot the camera.
3. Right click Camera-> Camera Settings -> Edit Camera to change the camera’s password on NVR3000 to the new one.
4. Drag and drop the camera to the liveview area again. You should be able to see the liveview now.
18
D
A
B C
E
F
A
B
C
D
E F
Why Can’t I See the Live View -Surveon Camera Concurrent Connect Limit (2)
19
If you have successful added the 3rd party cameras to NVR3000, check their settings:
1. Make sure the 3rd party camera model is supported by NVR3000.
Check NVR3000 support camera list: http://www.surveon.com/product/NVR_support.asp
2. Go to the 3rd party camera’s webpage. Check if the profile setting is “Base Profile”. If not,
change the setting to “Base Profile”.
If you still cannot see the live view, you can refer to the section Why can’t NVR3000 Add Cameras -
The ONVIF Camera Connection Problem to clarify the problem.
Why Can’t I See the Live View -3rd Party Camera Settings Problem
20
In this section, you’ll learn how to clear up the possible
problem when the playback is not working:
No Recording Data Problem
Why Can’t I See the Playback Videos?
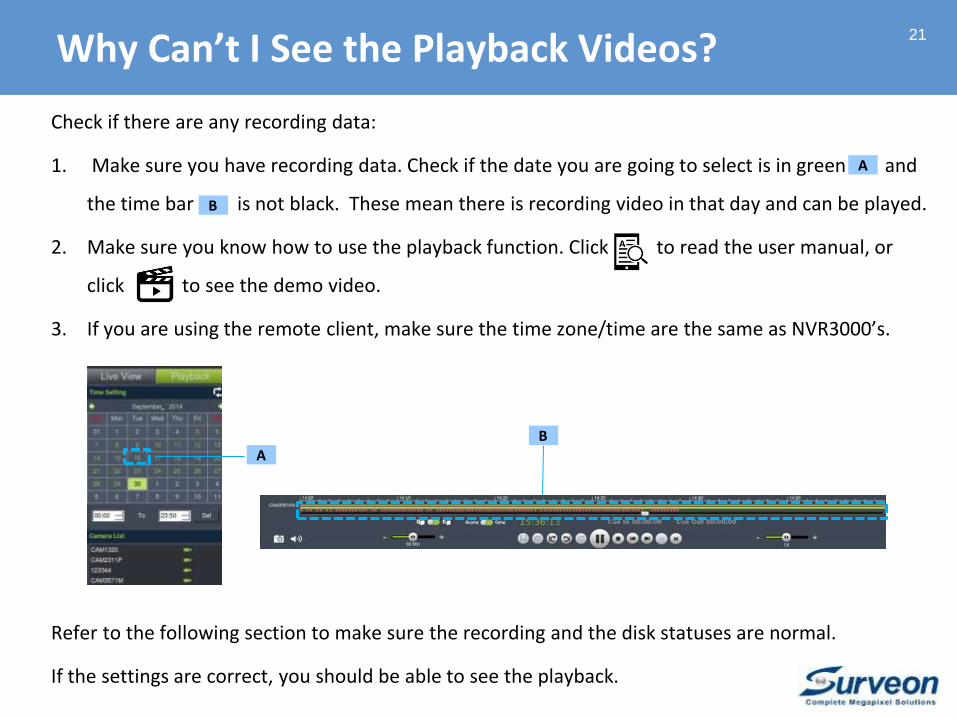
Check if there are any recording data:
1. Make sure you have recording data. Check if the date you are going to select is in green and
the time bar is not black. These mean there is recording video in that day and can be played.
2. Make sure you know how to use the playback function. Click to read the user manual, or
click to see the demo video.
3. If you are using the remote client, make sure the time zone/time are the same as NVR3000’s.
Refer to the following section to make sure the recording and the disk statuses are normal.
If the settings are correct, you should be able to see the playback.
21
A
A
B
B
Why Can’t I See the Playback Videos?
22
In this section, you’ll learn how to clear up the possible
problems when the recording is not working:
Recording Status
Recording Schedule Problem
Motion Recording Problem with Surveon Cameras
Motion Recording Problem with 3rd Party Cameras
Storage Status
Why Can’t NVR3000 Record Videos?

Why Can’t NVR3000 Record Videos -Recording Status
23
Check if the recording icon is shown (red) on the upper right corner of each liveview window to confirm the image is being recorded.
If you are using the motion recording, make sure there will be motions detected.
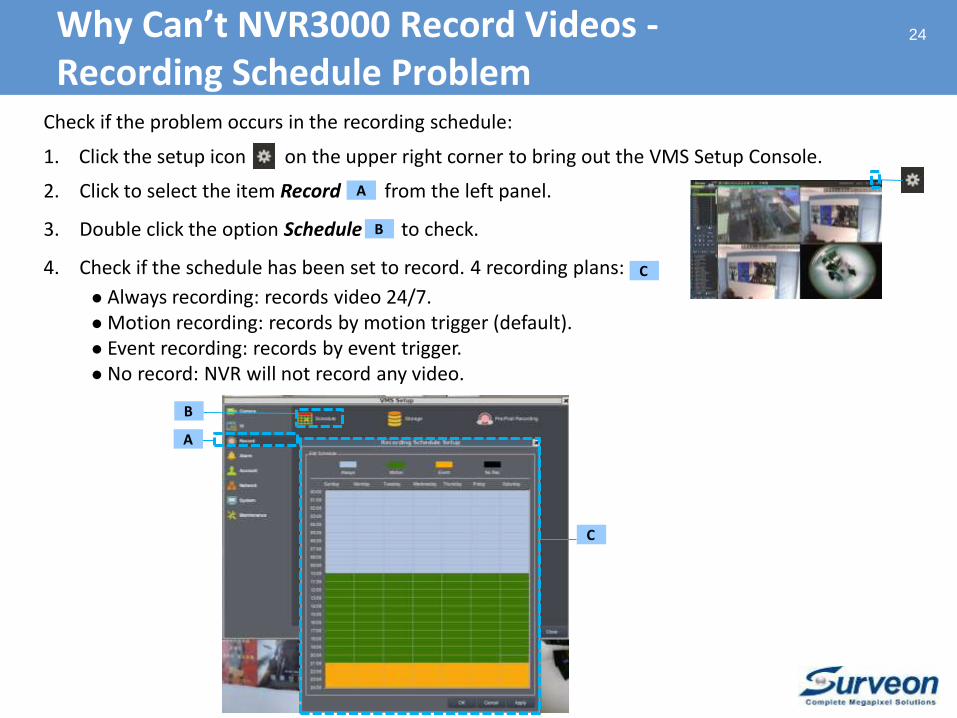
Check if the problem occurs in the recording schedule:
1. Click the setup icon on the upper right corner to bring out the VMS Setup Console.
2. Click to select the item Record from the left panel.
3. Double click the option Schedule to check.
4. Check if the schedule has been set to record. 4 recording plans:
Always recording: records video 24/7. Motion recording: records by motion trigger (default). Event recording: records by event trigger. No record: NVR will not record any video.
24
A
B
C
A
B
Why Can’t NVR3000 Record Videos -Recording Schedule Problem
C
25
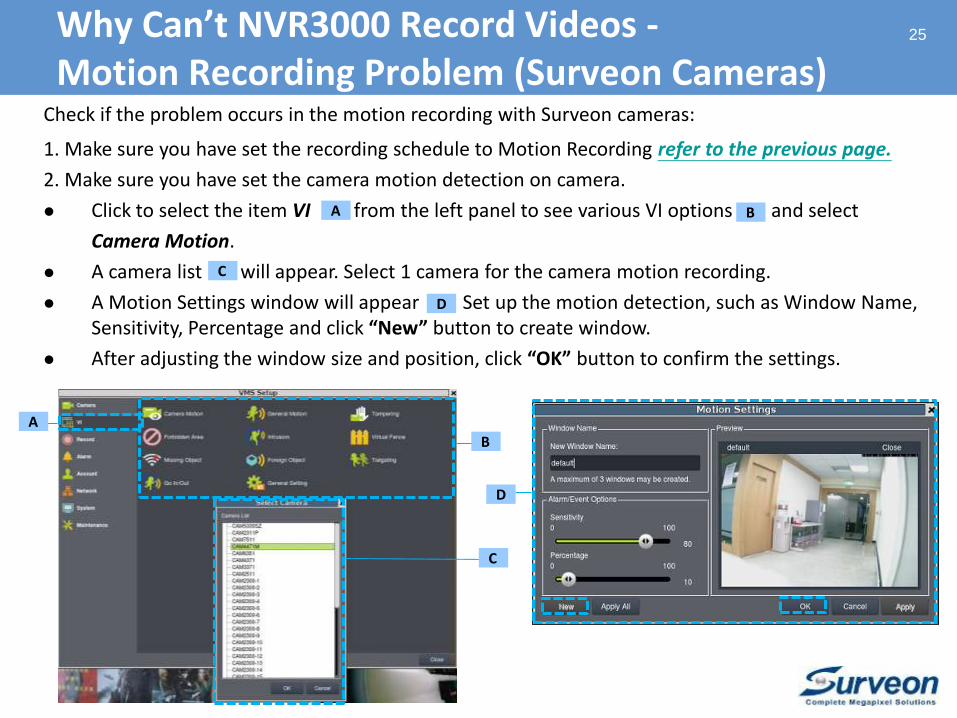
Check if the problem occurs in the motion recording with Surveon cameras:
1. Make sure you have set the recording schedule to Motion Recording refer to the previous page.
2. Make sure you have set the camera motion detection on camera.
Click to select the item VI from the left panel to see various VI options and select
Camera Motion.
A camera list will appear. Select 1 camera for the camera motion recording.
A Motion Settings window will appear Set up the motion detection, such as Window Name, Sensitivity, Percentage and click “New” button to create window.
After adjusting the window size and position, click “OK” button to confirm the settings.
A
B
A
C
C
D
D
B
Why Can’t NVR3000 Record Videos -Motion Recording Problem (Surveon Cameras)
Check if the problem occurs in the motion recording with 3rd party cameras:
1. Click to check if the camera is supported by Surveon.
2. Make sure you have set the recording schedule to Motion Recording refer to Recording
Schedule Problem
2. If the 3rd party camera supports Camera Motion Detection, go to its web page to make sure
you have enabled this functionality.
3. If the camera does not support Camera Motion Detection, you can use General Motion
Detection instead.
4. To set up the General Motion Detection, Click to watch the demo video for VI
configurations.
Warning: The General Motion Detection will take a lot of CPU resources. Apply this
option only for necessary cameras to avoid heavy loading on your NVR3000.
26Why Can’t NVR3000 Record Videos -Motion Recording Problem (3rd Party Cameras)
27
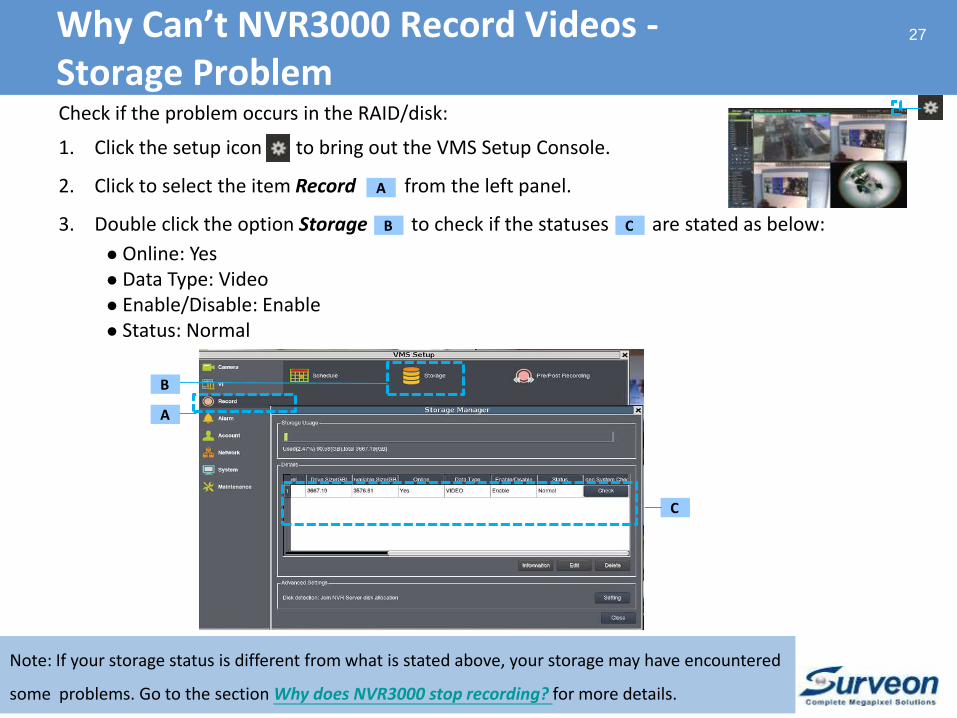
Check if the problem occurs in the RAID/disk:
1. Click the setup icon to bring out the VMS Setup Console.
2. Click to select the item Record from the left panel.
3. Double click the option Storage to check if the statuses are stated as below:
Online: Yes Data Type: Video Enable/Disable: Enable Status: Normal
A
B
B
A
C
C
Note: If your storage status is different from what is stated above, your storage may have encountered
some problems. Go to the section Why does NVR3000 stop recording? for more details.
Why Can’t NVR3000 Record Videos -Storage Problem
28
In this section, you’ll learn how to clear up the possible
problem when the remote client cannot access NVR3000:
Check and Download the Latest Remote Client Version
Why Can’t Remote Client Access NVR3000?
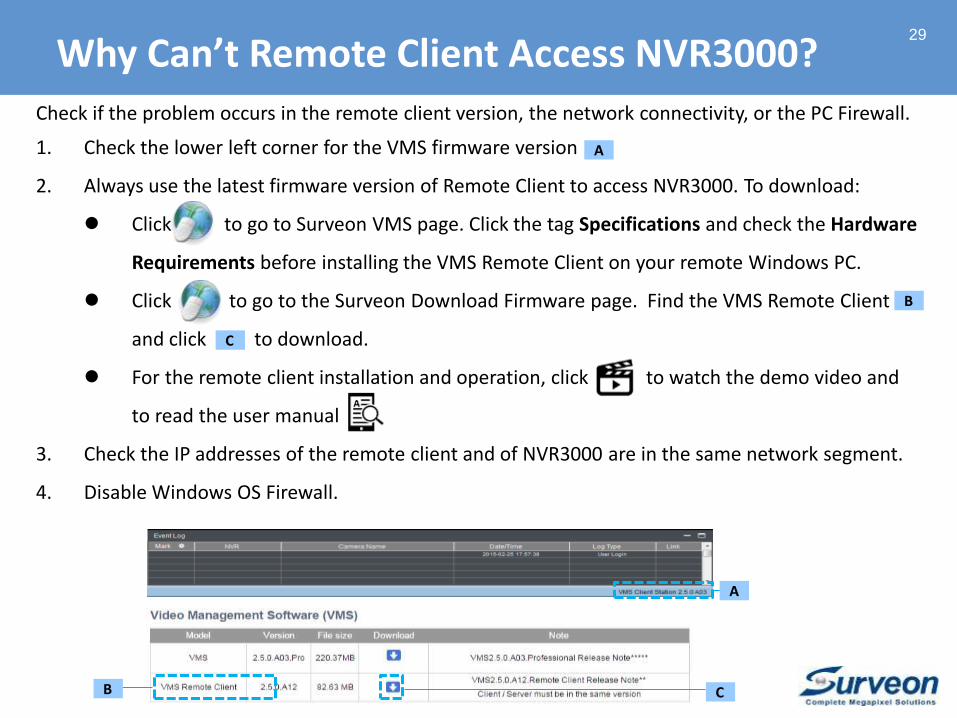
Check if the problem occurs in the remote client version, the network connectivity, or the PC Firewall.
1. Check the lower left corner for the VMS firmware version
2. Always use the latest firmware version of Remote Client to access NVR3000. To download:
Click to go to Surveon VMS page. Click the tag Specifications and check the Hardware
Requirements before installing the VMS Remote Client on your remote Windows PC.
Click to go to the Surveon Download Firmware page. Find the VMS Remote Client
and click to download.
For the remote client installation and operation, click to watch the demo video and
to read the user manual
3. Check the IP addresses of the remote client and of NVR3000 are in the same network segment.
4. Disable Windows OS Firewall.
29
CB
A
B
C
A
Why Can’t Remote Client Access NVR3000?

30
In this section, you’ll learn how to clear up the possible
problem when the camera time and the NVR time are
not the same.
Set up the Time Synchronization
Why is the Camera Time Different from NVR3000 Time?
31
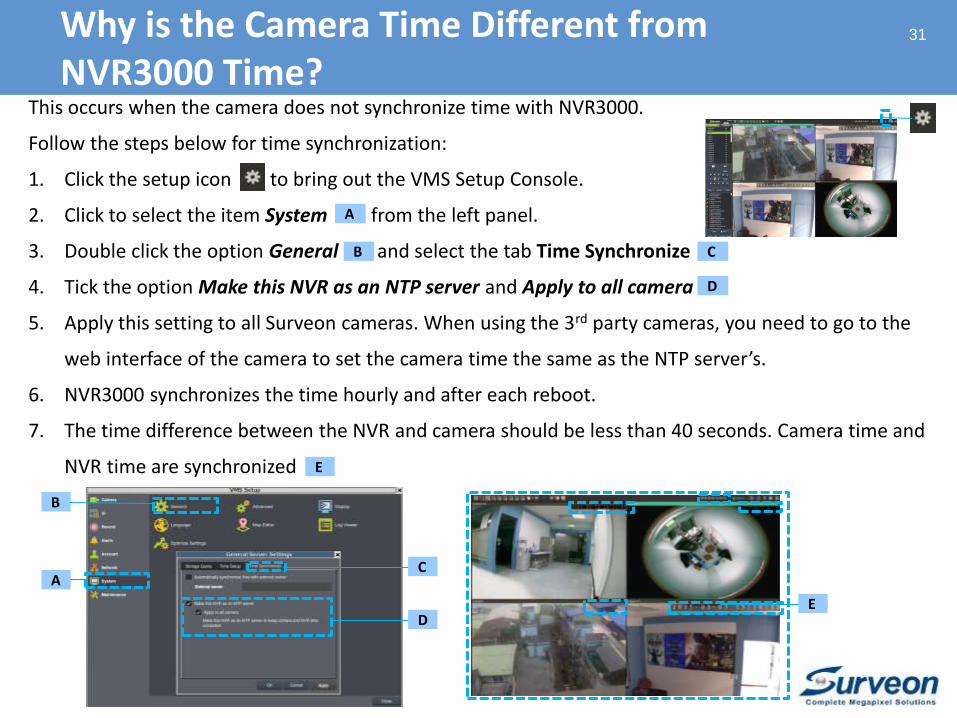
This occurs when the camera does not synchronize time with NVR3000.
Follow the steps below for time synchronization:
1. Click the setup icon to bring out the VMS Setup Console.
2. Click to select the item System from the left panel.
3. Double click the option General and select the tab Time Synchronize
4. Tick the option Make this NVR as an NTP server and Apply to all camera
5. Apply this setting to all Surveon cameras. When using the 3rd party cameras, you need to go to the
web interface of the camera to set the camera time the same as the NTP server’s.
6. NVR3000 synchronizes the time hourly and after each reboot.
7. The time difference between the NVR and camera should be less than 40 seconds. Camera time and
NVR time are synchronized
A
B
B
A
C
D
C
DE
E
Why is the Camera Time Different from NVR3000 Time?
32
In this section, you’ll learn how to clear up the possible
Problems when the GUI responds slowly.
Heavy Loading on the CPU
Why Does the GUI Respond Slowly?
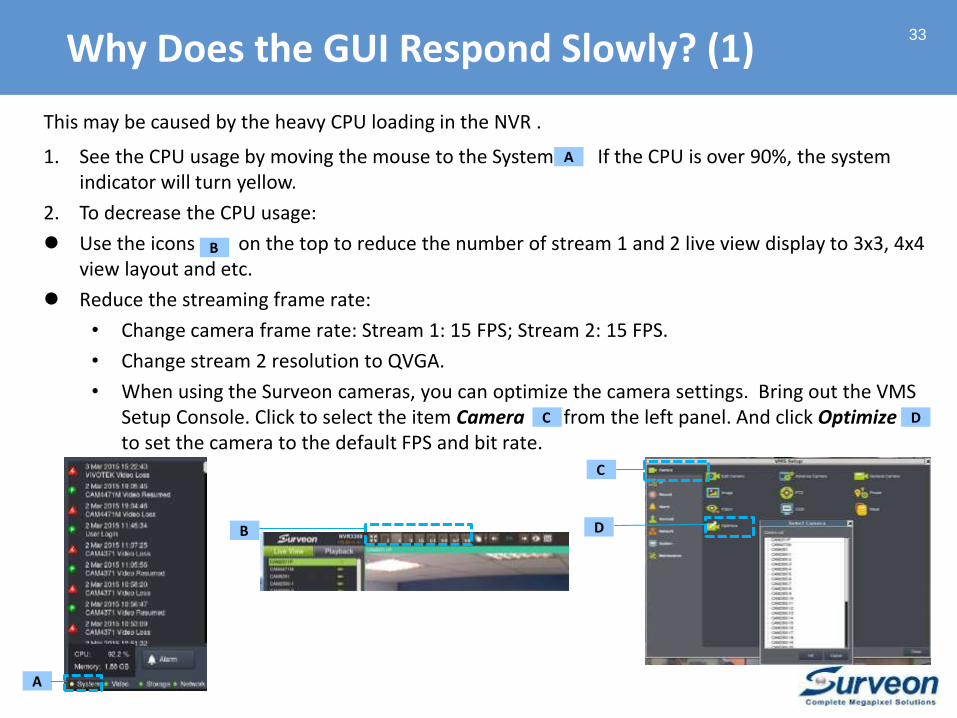
This may be caused by the heavy CPU loading in the NVR .
1. See the CPU usage by moving the mouse to the System If the CPU is over 90%, the system indicator will turn yellow.
2. To decrease the CPU usage:
Use the icons on the top to reduce the number of stream 1 and 2 live view display to 3x3, 4x4 view layout and etc.
Reduce the streaming frame rate:
• Change camera frame rate: Stream 1: 15 FPS; Stream 2: 15 FPS.
• Change stream 2 resolution to QVGA.
• When using the Surveon cameras, you can optimize the camera settings. Bring out the VMS Setup Console. Click to select the item Camera from the left panel. And click Optimizeto set the camera to the default FPS and bit rate.
33
A
A
B
B
C
C
D
D
Why Does the GUI Respond Slowly? (1)

Reduce the VI numbers:
• NVR3000 currently supports the maximum 8 VIs .
• Only the Camera Motion Detection does not impact the CPU loading.
• To deactivate VIs:
Bring out the VMS Setup Console.
Click to select the item VI from the left panel.
Double click the VI you’d like to disable and then select the camera you’d like to inactivate the VI functionality.
Tick off the “Enable Event” and click “Apply All”
34
A
B
C
A
B C
Why Does the GUI Respond Slowly? (2)
D E
E
D
35
In this section, you’ll learn how to clear up the possible
problems when the image is not in real-time on NVR3000:
Camera Problems
Switch Problems
NVR Problems
Why Is the Image not in Real-time on NVR3000?
1. Megapixel camera streaming is not 100% in real-time:
In general the delay time is between 0.3 to 1 second depending on the network status.
2. If you use a basic switch to connect the camera with NVR3000 directly, the latency time
should be 0.3 to 0.7 seconds.
3. The latency is caused by the camera:
Use a computer and open Internet Explorer browser to connect the camera (which should
not be connected with other network devices). Check if the latency issue still exists. If yes,
the camera may be overloading. You can:
Reduce the resolution.
Reduce the FPS.
Reduce the connections: go to Camera Settings > System > System Log. Check current
count of users. Change password and reboot the camera to cut off other connections.
Reduce the connections under 2, refer to Why Can’t I See the Live View – Surveon
Camera Concurrent Connect Limit for more details.
36
Why Is the Image not in Real-time on NVR3000? (1)
4. The latency is caused by the switch:
Use a basic switch to connect the camera and computer directly. Check if the latency issue
still exists. If yes, the switch may be overloading. You can:
Select 1Gbps core switch.
Setup VLAN to avoid network traffic jam.
5. The latency is caused by the NVR:
Use other camera models to connect with NVR. Check if the latency issue still exists. If yes,
the NVR CPU loading may be too high, you can refer to Why does the GUI respond slowly for
more details.
37
Why Is the Image not in Real-time on NVR3000? (2)
38
In this section, you’ll learn how to clear up the possible
problems when the video playback is not smooth.
Camera FPS
Disk I/O
Why is the Video not Smooth in Playback?
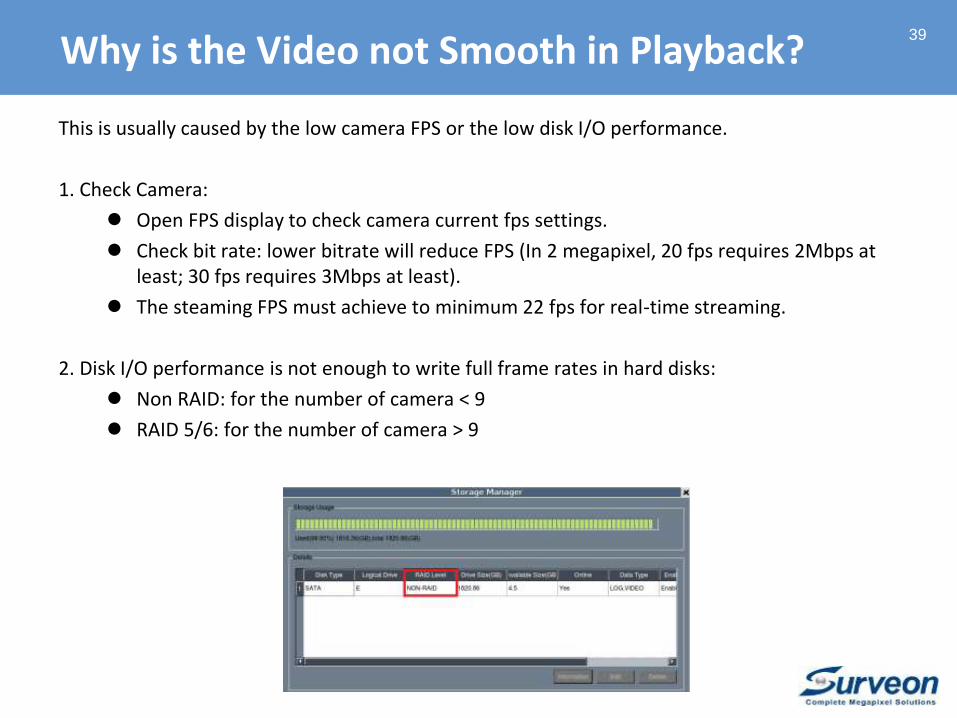
This is usually caused by the low camera FPS or the low disk I/O performance.
1. Check Camera:
Open FPS display to check camera current fps settings.
Check bit rate: lower bitrate will reduce FPS (In 2 megapixel, 20 fps requires 2Mbps at least; 30 fps requires 3Mbps at least).
The steaming FPS must achieve to minimum 22 fps for real-time streaming.
2. Disk I/O performance is not enough to write full frame rates in hard disks:
Non RAID: for the number of camera < 9
RAID 5/6: for the number of camera > 9
39
Why is the Video not Smooth in Playback?
Advanced Troubleshooting
Why Does NVR3000 Stop Recording?
What to Do When the RAID Got Degraded?
What to Do When the RAID Failed?
What to Do When NVR3000 Boots from SSD?
40

41
Before this section started, go to Why Can’t NVR3000 Record Videos
and eliminate the possible settings problems.
In this section, you’ll learn how to clear up the possible
problems when NVR3000 stops recording:
RAID in the Pending Mode Problems
RAID Failure Problems
Why Does NVR3000 Stop Recording?
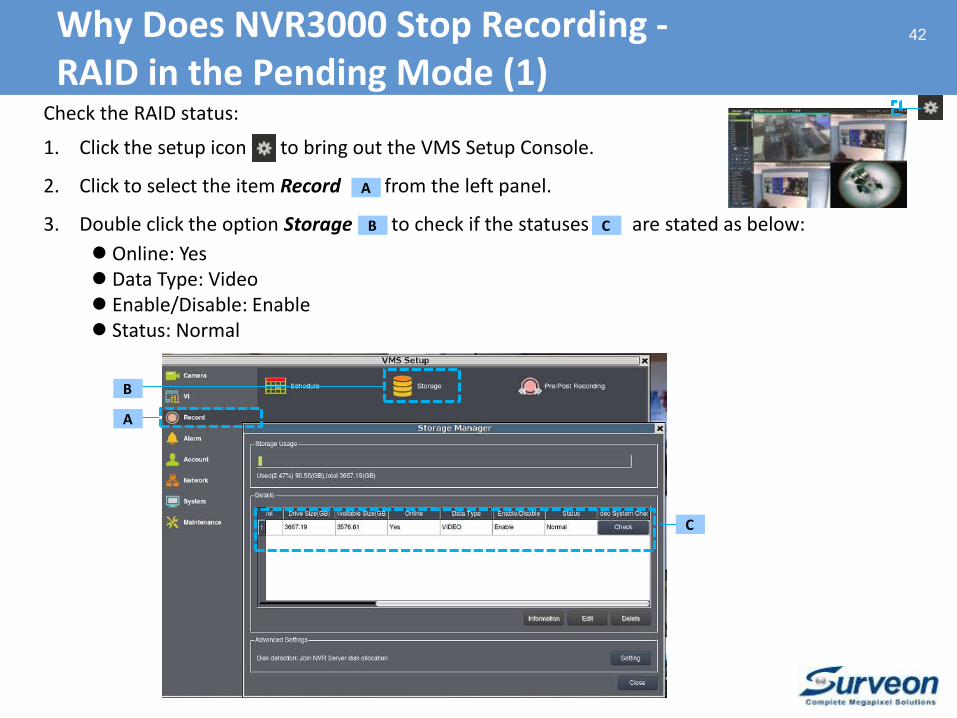
42Why Does NVR3000 Stop Recording -RAID in the Pending Mode (1)
Check the RAID status:
1. Click the setup icon to bring out the VMS Setup Console.
2. Click to select the item Record from the left panel.
3. Double click the option Storage to check if the statuses are stated as below:
Online: Yes Data Type: Video Enable/Disable: Enable Status: Normal
A
B
B
A
C
C
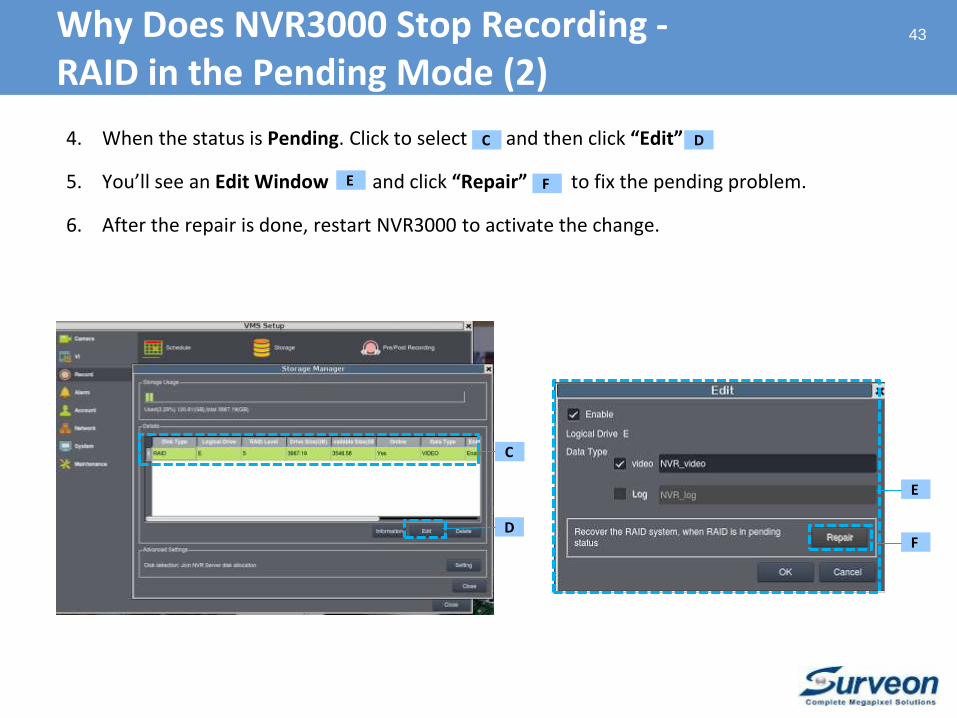
4. When the status is Pending. Click to select and then click “Edit”
5. You’ll see an Edit Window and click “Repair” to fix the pending problem.
6. After the repair is done, restart NVR3000 to activate the change.
43
C
C
D
D
E
F
E F
Why Does NVR3000 Stop Recording -RAID in the Pending Mode (2)
44
In this section, you’ll learn what to do when the RAID
got degraded:
RAID Degraded Definition
RAID Rebuild
What to Do When the RAID Got Degraded?
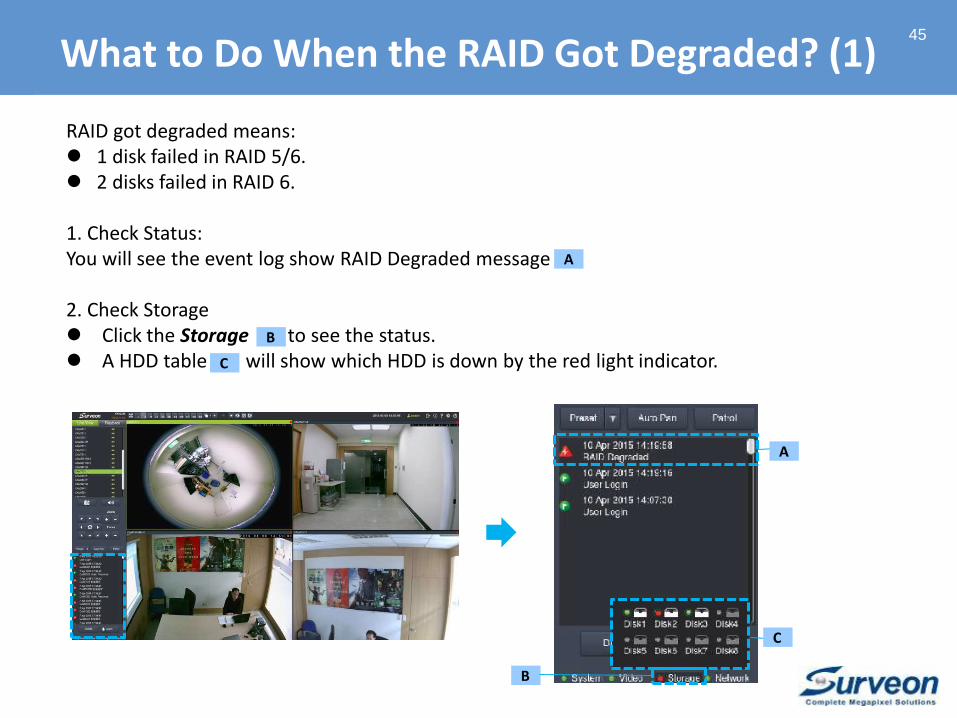
RAID got degraded means: 1 disk failed in RAID 5/6. 2 disks failed in RAID 6.
1. Check Status:You will see the event log show RAID Degraded message
2. Check Storage Click the Storage to see the status. A HDD table will show which HDD is down by the red light indicator.
45
B
B
A
C
C
What to Do When the RAID Got Degraded? (1)
A
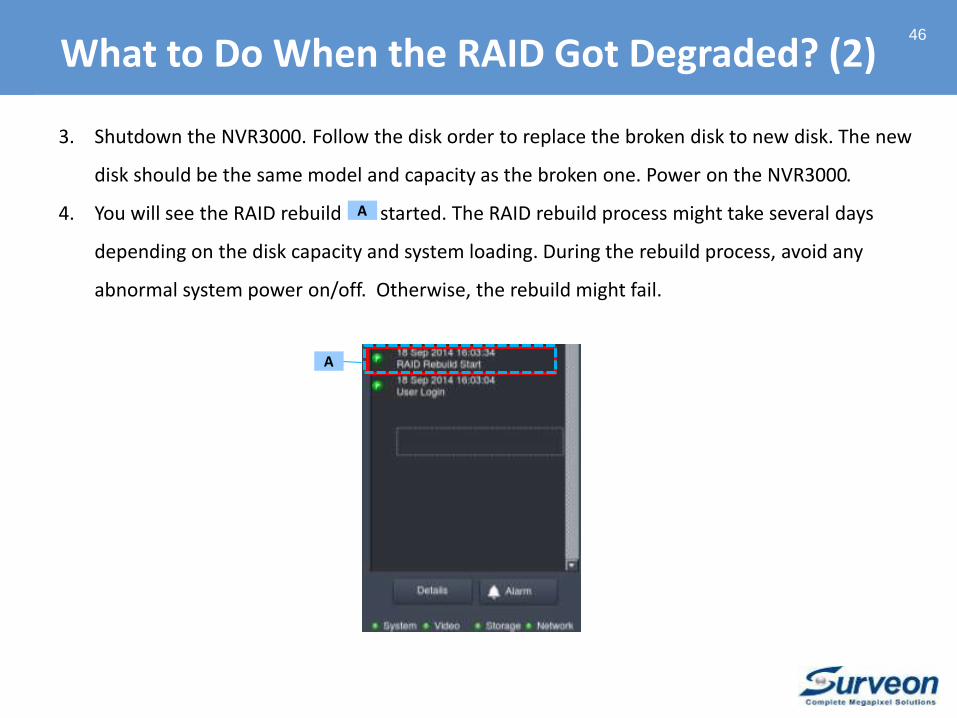
3. Shutdown the NVR3000. Follow the disk order to replace the broken disk to new disk. The new
disk should be the same model and capacity as the broken one. Power on the NVR3000.
4. You will see the RAID rebuild started. The RAID rebuild process might take several days
depending on the disk capacity and system loading. During the rebuild process, avoid any
abnormal system power on/off. Otherwise, the rebuild might fail.
46
A
A
What to Do When the RAID Got Degraded? (2)

47
In this section, you’ll learn what to do when the RAID
failed.
What to Do When the RAID Failed?
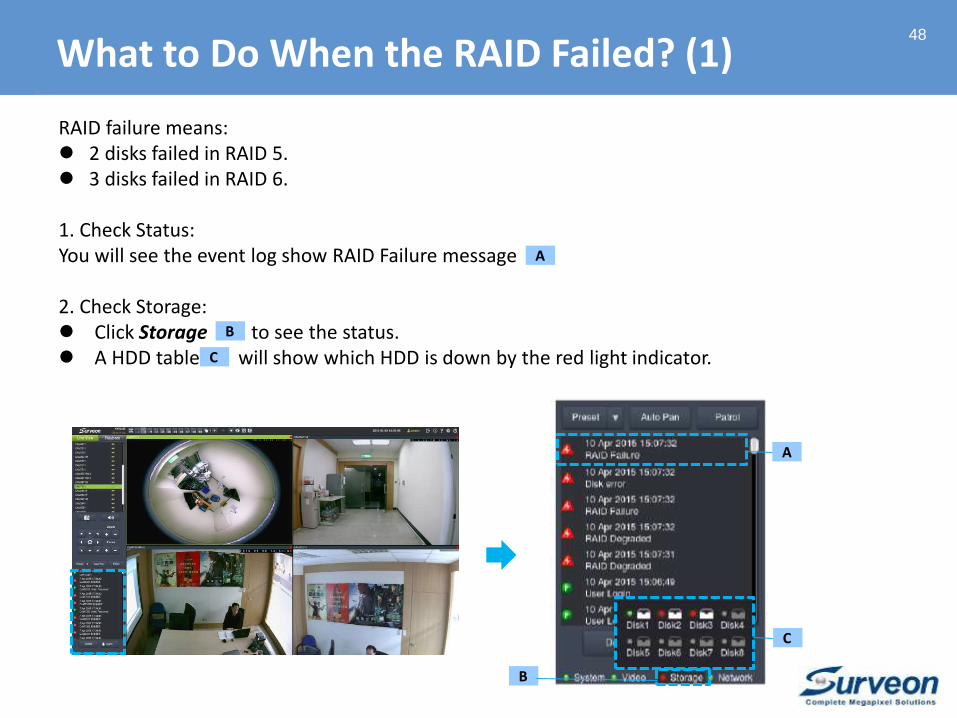
RAID failure means: 2 disks failed in RAID 5. 3 disks failed in RAID 6.
1. Check Status:You will see the event log show RAID Failure message
2. Check Storage: Click Storage to see the status. A HDD table will show which HDD is down by the red light indicator.
48
B
C
A
C
B
What to Do When the RAID Failed? (1)
A
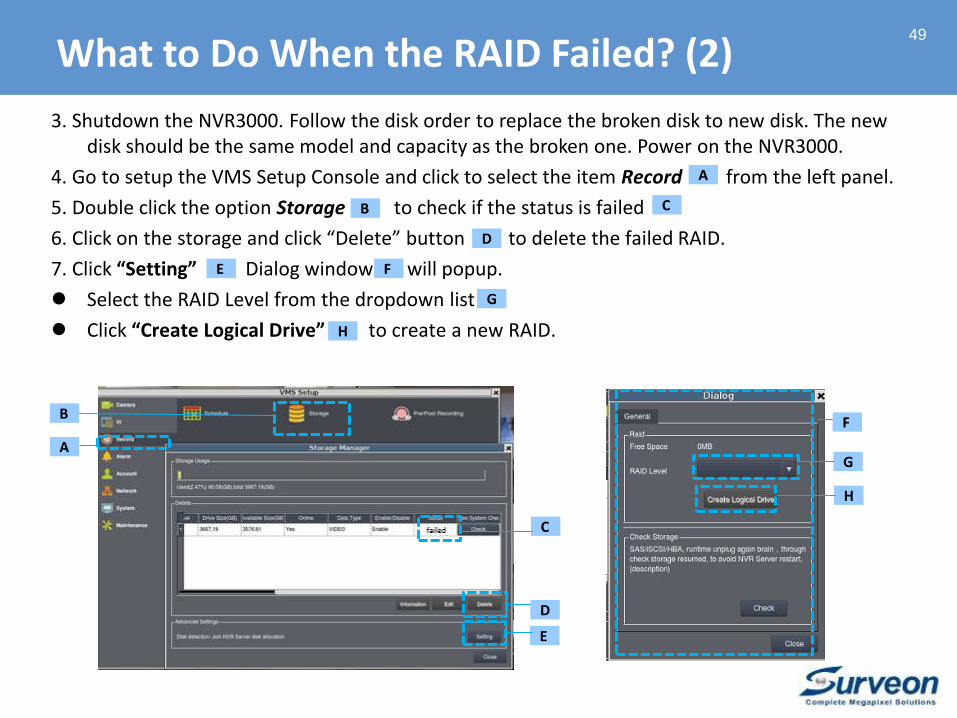
3. Shutdown the NVR3000. Follow the disk order to replace the broken disk to new disk. The new disk should be the same model and capacity as the broken one. Power on the NVR3000.
4. Go to setup the VMS Setup Console and click to select the item Record from the left panel.
5. Double click the option Storage to check if the status is failed
6. Click on the storage and click “Delete” button to delete the failed RAID.
7. Click “Setting” Dialog window will popup.
Select the RAID Level from the dropdown list
Click “Create Logical Drive” to create a new RAID.
49
A
B
A
B C
F
D
G
C
D
E
G
H
E
H
What to Do When the RAID Failed? (2)
F
50
In this section, you’ll learn what to do when the system
is booting from SSD.
What to Do When NVR3000 Boots from SSD?
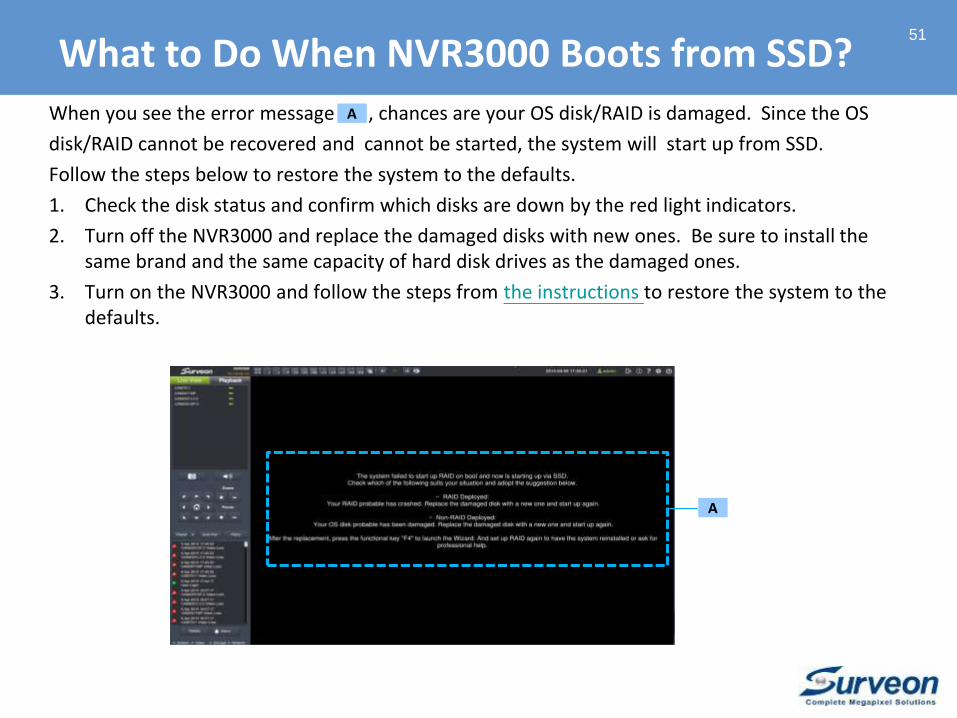
When you see the error message , chances are your OS disk/RAID is damaged. Since the OS
disk/RAID cannot be recovered and cannot be started, the system will start up from SSD.
Follow the steps below to restore the system to the defaults.
1. Check the disk status and confirm which disks are down by the red light indicators.
2. Turn off the NVR3000 and replace the damaged disks with new ones. Be sure to install the same brand and the same capacity of hard disk drives as the damaged ones.
3. Turn on the NVR3000 and follow the steps from the instructions to restore the system to the defaults.
51
A
A
What to Do When NVR3000 Boots from SSD?

52
In this section, you’ll learn how to contact
Support if you cannot solve the problems:
Collect the Required Information
Run the TeamViewer
Contact Support
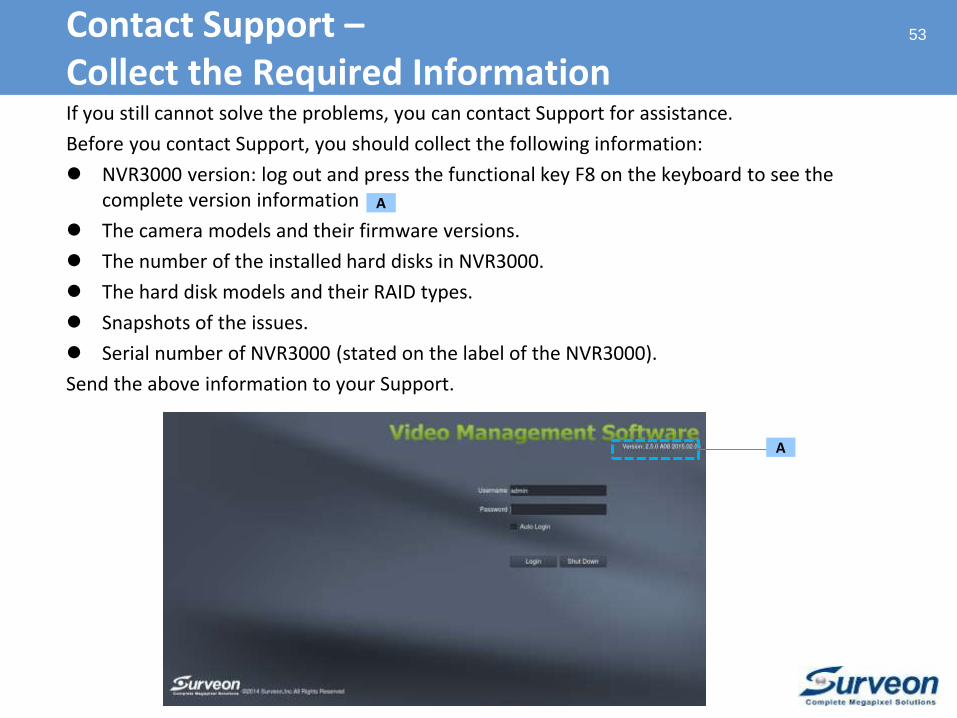
Contact Support –Collect the Required InformationIf you still cannot solve the problems, you can contact Support for assistance.
Before you contact Support, you should collect the following information:
NVR3000 version: log out and press the functional key F8 on the keyboard to see the complete version information
The camera models and their firmware versions.
The number of the installed hard disks in NVR3000.
The hard disk models and their RAID types.
Snapshots of the issues.
Serial number of NVR3000 (stated on the label of the NVR3000).
Send the above information to your Support.
53
A
A
54
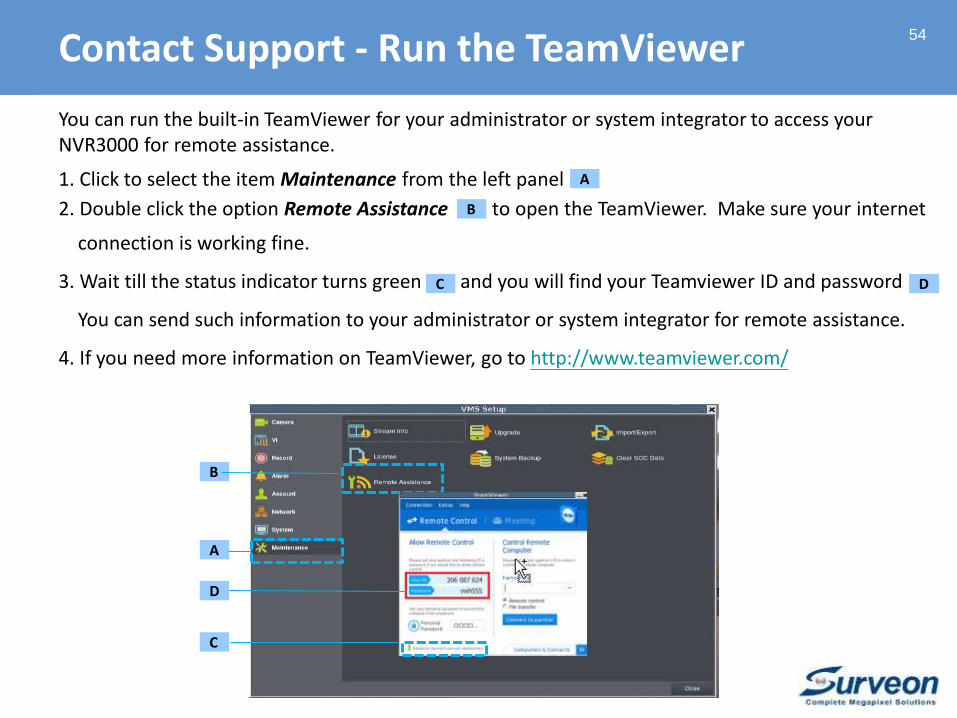
You can run the built-in TeamViewer for your administrator or system integrator to access your NVR3000 for remote assistance.
1. Click to select the item Maintenance from the left panel
2. Double click the option Remote Assistance to open the TeamViewer. Make sure your internet
connection is working fine.
3. Wait till the status indicator turns green and you will find your Teamviewer ID and password
You can send such information to your administrator or system integrator for remote assistance.
4. If you need more information on TeamViewer, go to http://www.teamviewer.com/
A
A
B
B
D
D
Contact Support - Run the TeamViewer
C
C
You have learned how to solve the frequently encountered problems
from the:
Basic Troubleshooting
Advanced Troubleshooting
which can help you handle many issues on your own. For more
details, please refer to the NVR3000 user manual.
55
Click to read the user manual.
To Sum Up
56
In this section, you will learn:
● Where to Find More Useful Materials
● Where to Watch More Demo Videos
Appendix
57
Appendix - Useful Materials (1)
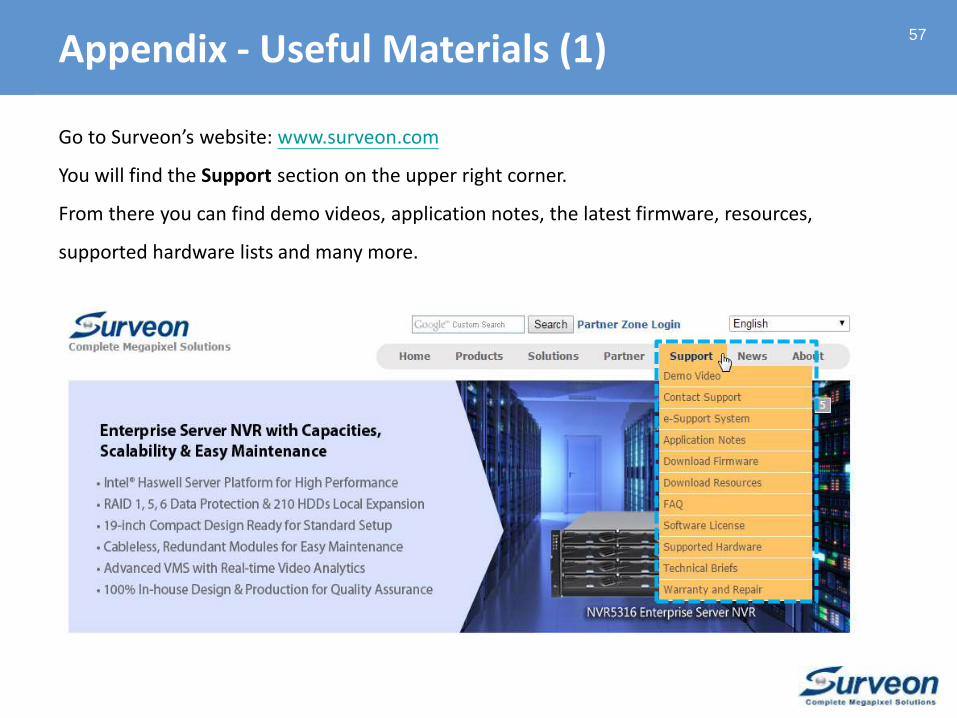
Go to Surveon’s website: www.surveon.com
You will find the Support section on the upper right corner.
From there you can find demo videos, application notes, the latest firmware, resources,
supported hardware lists and many more.
The NVR3000 Training Program includes the comprehensive training materials:
NVR3000 Deployment Guide: learn how to choose NVR3000 for your projects.
NVR3000 Installation Guide: learn how to install NVR3000.
NVR3000 Operation Guide: learn the daily operations of NVR3000.
NVR3000 Troubleshooting Guide: find solutions for some common issues.
Find the training materials here:
http://www.surveon.com/Partner/training-materials.asp
58
Appendix - Useful Materials (2)
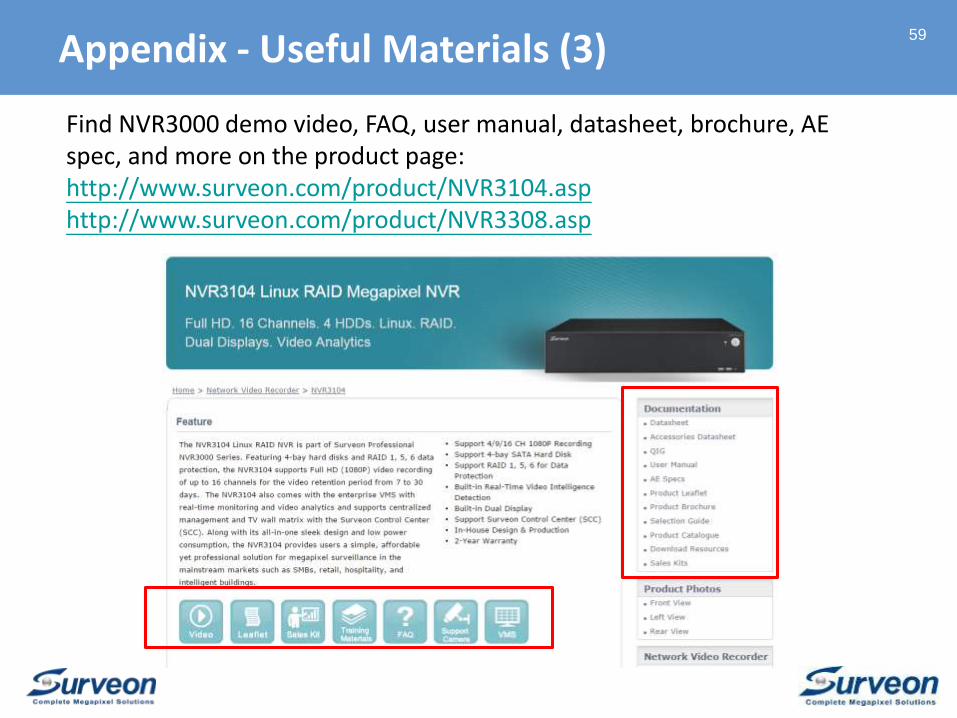
Find NVR3000 demo video, FAQ, user manual, datasheet, brochure, AE spec, and more on the product page: http://www.surveon.com/product/NVR3104.asphttp://www.surveon.com/product/NVR3308.asp
59
Appendix - Useful Materials (3)
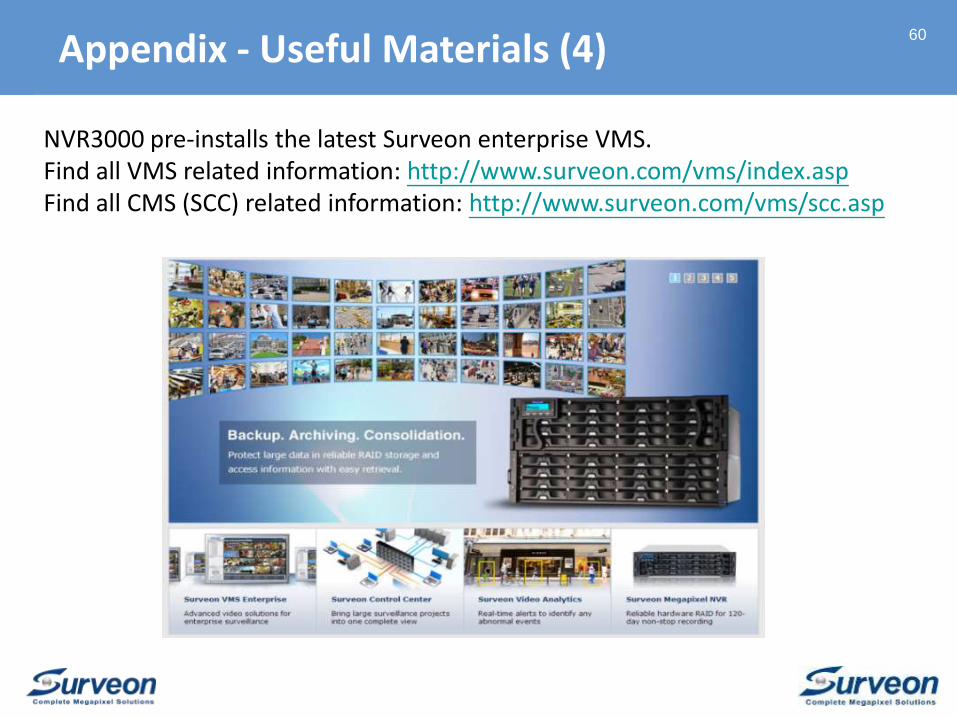
NVR3000 pre-installs the latest Surveon enterprise VMS.Find all VMS related information: http://www.surveon.com/vms/index.aspFind all CMS (SCC) related information: http://www.surveon.com/vms/scc.asp
60
Appendix - Useful Materials (4)
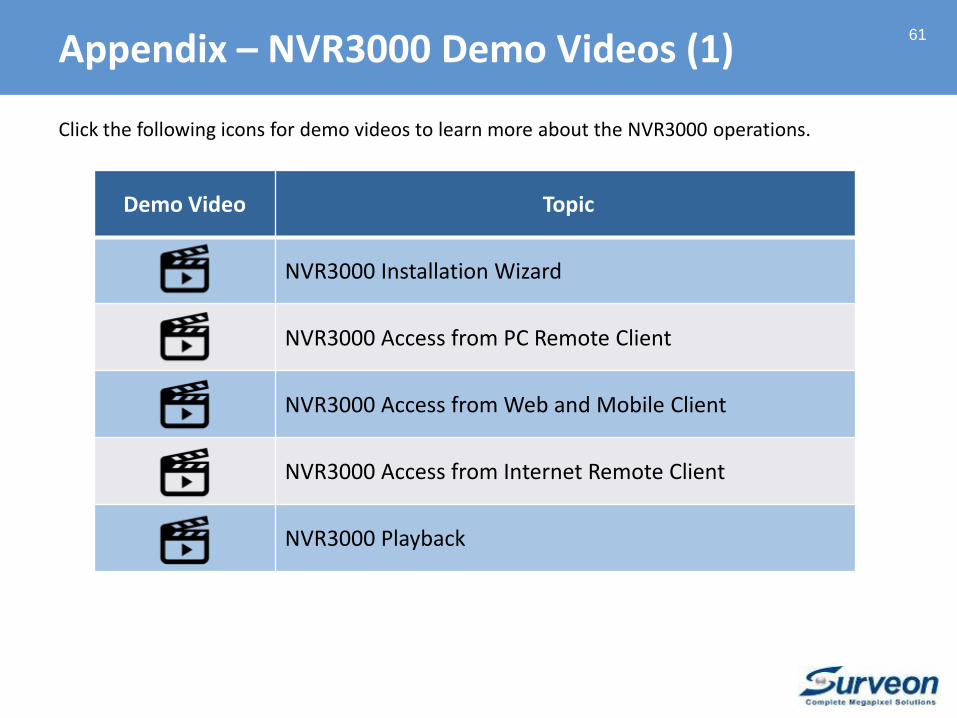
Demo Video Topic
NVR3000 Installation Wizard
NVR3000 Access from PC Remote Client
NVR3000 Access from Web and Mobile Client
NVR3000 Access from Internet Remote Client
NVR3000 Playback
61
Click the following icons for demo videos to learn more about the NVR3000 operations.
Appendix – NVR3000 Demo Videos (1)
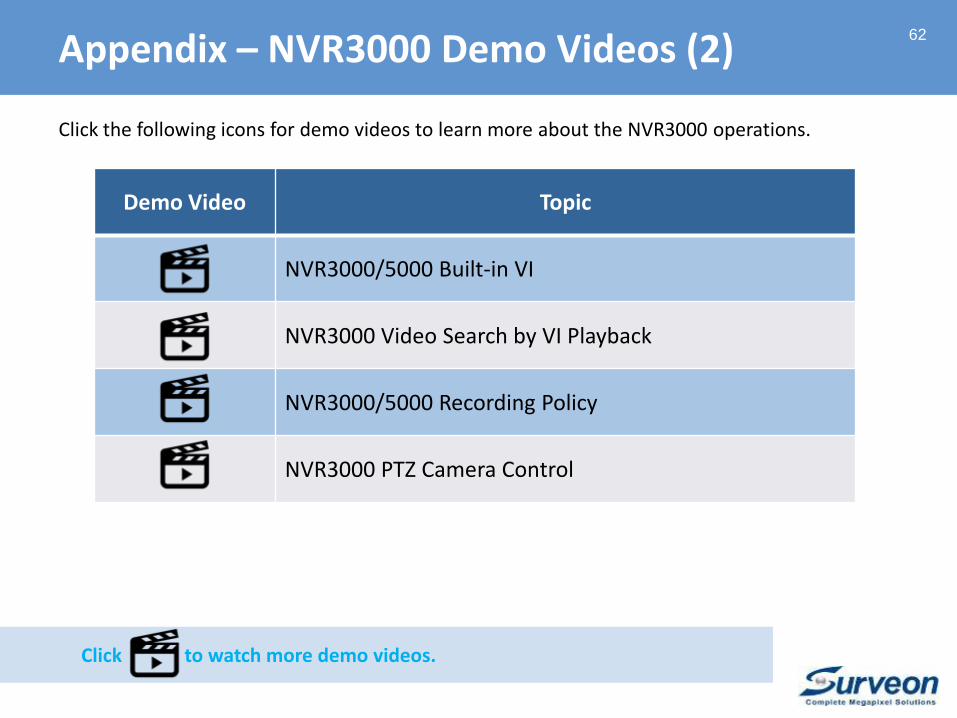
Demo Video Topic
NVR3000/5000 Built-in VI
NVR3000 Video Search by VI Playback
NVR3000/5000 Recording Policy
NVR3000 PTZ Camera Control
62
Click the following icons for demo videos to learn more about the NVR3000 operations.
Appendix – NVR3000 Demo Videos (2)
Click to watch more demo videos.
63
Contact Surveon
Surveon Official Website
www.surveon.com
Technical Support If you are an end-user, contact your vendor or system integrator. If you are system integrator, contact Surveon Tech Support:
- Ticket system http://esupport.surveon.com/LoginPage.aspx- Support: http://www.surveon.com/support/support.asp
Sales Contact