SunDiag User's Guide - Oracle · The product described in this manual may be protected by one or...
192
2550 Garcia Avenue Mountain View, CA 94043 U.S.A. SunDiag User’s Guide A Sun Microsystems, Inc. Business
Transcript of SunDiag User's Guide - Oracle · The product described in this manual may be protected by one or...
2550 Garcia AvenueMountain View, CA 94043U.S.A.
SunDiag User’s Guide
A Sun Microsystems, Inc. Business

PleaseRecycle
1994 Sun Microsystems, Inc.2550 Garcia Avenue, Mountain View, California 94043-1100 U.S.A.
All rights reserved. This product and related documentation are protected by copyright and distributed under licensesrestricting its use, copying, distribution, and decompilation. No part of this product or related documentation may bereproduced in any form by any means without prior written authorization of Sun and its licensors, if any.
Portions of this product may be derived from the UNIX® and Berkeley 4.3 BSD systems, licensed from UNIX SystemLaboratories, Inc., a wholly owned subsidiary of Novell, Inc., and the University of California, respectively. Third-party fontsoftware in this product is protected by copyright and licensed from Sun’s font suppliers.
RESTRICTED RIGHTS LEGEND: Use, duplication, or disclosure by the United States Government is subject to the restrictionsset forth in DFARS 252.227-7013 (c)(1)(ii) and FAR 52.227-19.
The product described in this manual may be protected by one or more U.S. patents, foreign patents, or pending applications.
TRADEMARKSSun, the Sun logo, Sun Microsystems, Sun Microsystems Computer Corporation, SunSoft, the SunSoft logo, Solaris, SunOS,OpenWindows, DeskSet, ONC, ONC+, and NFS are trademarks or registered trademarks of Sun Microsystems, Inc. in the U.S.and certain other countries. UNIX is a registered trademark of Novell, Inc., in the United States and other countries; X/OpenCompany, Ltd., is the exclusive licensor of such trademark. OPEN LOOK® is a registered trademark of Novell, Inc. PostScriptand Display PostScript are trademarks of Adobe Systems, Inc. All other product names mentioned herein are the trademarksof their respective owners.
All SPARC trademarks, including the SCD Compliant Logo, are trademarks or registered trademarks of SPARC International,Inc. SPARCstation, SPARCserver, SPARCengine, SPARCstorage, SPARCware, SPARCcenter, SPARCclassic, SPARCcluster,SPARCdesign, SPARC811, SPARCprinter, UltraSPARC, microSPARC, SPARCworks, and SPARCompiler are licensedexclusively to Sun Microsystems, Inc. Products bearing SPARC trademarks are based upon an architecture developed by SunMicrosystems, Inc.
The OPEN LOOK and Sun™ Graphical User Interfaces were developed by Sun Microsystems, Inc. for its users and licensees.Sun acknowledges the pioneering efforts of Xerox in researching and developing the concept of visual or graphical userinterfaces for the computer industry. Sun holds a non-exclusive license from Xerox to the Xerox Graphical User Interface,which license also covers Sun’s licensees who implement OPEN LOOK GUIs and otherwise comply with Sun’s written licenseagreements.
X Window System is a product of the Massachusetts Institute of Technology.
THIS PUBLICATION IS PROVIDED “AS IS” WITHOUT WARRANTY OF ANY KIND, EITHER EXPRESS OR IMPLIED,INCLUDING, BUT NOT LIMITED TO, THE IMPLIED WARRANTIES OF MERCHANTABILITY, FITNESS FOR APARTICULAR PURPOSE, OR NON-INFRINGEMENT.
THIS PUBLICATION COULD INCLUDE TECHNICAL INACCURACIES OR TYPOGRAPHICAL ERRORS. CHANGES AREPERIODICALLY ADDED TO THE INFORMATION HEREIN; THESE CHANGES WILL BE INCORPORATED IN NEWEDITIONS OF THE PUBLICATION. SUN MICROSYSTEMS, INC. MAY MAKE IMPROVEMENTS AND/OR CHANGES INTHE PRODUCT(S) AND/OR THE PROGRAM(S) DESCRIBED IN THIS PUBLICATION AT ANY TIME.

iii
Contents
Part 1—Running SunDiag
1. Introducing the SunDiag System Exerciser . . . . . . . . . . . . . . . 1-1
1.1 Overview . . . . . . . . . . . . . . . . . . . . . . . . . . . . . . . . . . . . . . . . 1-1
1.2 Hardware and Software Requirements . . . . . . . . . . . . . . . 1-3
1.2.1 OpenWindows Software Requirements . . . . . . . . . . 1-3
1.2.2 Special Note on Testing Multiple Framebuffers . . . 1-4
1.2.3 Volume Management . . . . . . . . . . . . . . . . . . . . . . . . . 1-5
1.2.4 Booting and New Device Drivers . . . . . . . . . . . . . . . 1-6
1.2.5 Swap Space Requirements . . . . . . . . . . . . . . . . . . . . . 1-7
1.2.6 Setting the Maximum Number of Processes . . . . . . 1-8
1.2.7 Loopback Connectors . . . . . . . . . . . . . . . . . . . . . . . . . 1-10
1.2.8 Scratch CDs, Tapes, Diskettes . . . . . . . . . . . . . . . . . . 1-10
1.2.9 TTY Terminals . . . . . . . . . . . . . . . . . . . . . . . . . . . . . . . 1-10
1.3 Preparing to Start the SunDiag Exerciser . . . . . . . . . . . . . 1-11
1.4 Starting the SunDiag Exerciser . . . . . . . . . . . . . . . . . . . . . . 1-12

iv SunDiag User’s Guide—August 1994
1.5 Stopping the SunDiag Exerciser . . . . . . . . . . . . . . . . . . . . . 1-13
1.6 Using Batch Files . . . . . . . . . . . . . . . . . . . . . . . . . . . . . . . . . 1-14
1.7 Running the SunDiag Exerciser on a Remote System . . . 1-15
1.8 Running the SunDiag Exerciser on a Stand-alone System 1-16
1.9 Adding Your Own Tests in .usertest . . . . . . . . . . . . . . 1-17
1.9.1 Setting up a .usertest file . . . . . . . . . . . . . . . . . . . 1-17
1.9.2 Test Writing Precautions . . . . . . . . . . . . . . . . . . . . . . 1-18
1.10 SunDiag Exit Status Codes . . . . . . . . . . . . . . . . . . . . . . . . . 1-19
2. The SunDiag OPEN LOOK Interface . . . . . . . . . . . . . . . . . . . . 2-1
2.1 SunDiag Main Window . . . . . . . . . . . . . . . . . . . . . . . . . . . . 2-3
2.1.1 System Status Panel . . . . . . . . . . . . . . . . . . . . . . . . . . 2-3
2.1.2 Console Window. . . . . . . . . . . . . . . . . . . . . . . . . . . . . 2-5
2.1.3 Performance Monitor Panel. . . . . . . . . . . . . . . . . . . . 2-6
2.1.4 Control Panel . . . . . . . . . . . . . . . . . . . . . . . . . . . . . . . . 2-7
2.2 Setting SunDiag Options . . . . . . . . . . . . . . . . . . . . . . . . . . . 2-10
2.2.1 Start/Stop Button . . . . . . . . . . . . . . . . . . . . . . . . . . . . 2-10
2.2.2 Reset/Suspend/Resume Button . . . . . . . . . . . . . . . . 2-10
2.2.3 Print Button . . . . . . . . . . . . . . . . . . . . . . . . . . . . . . . . . 2-10
2.2.4 Log Files Window Button . . . . . . . . . . . . . . . . . . . . . 2-11
2.3 Changing Individual Test Options . . . . . . . . . . . . . . . . . . . 2-25
2.3.1 Options Menu Buttons . . . . . . . . . . . . . . . . . . . . . . . . 2-26
2.4 Running the SunDiag Program from an Icon . . . . . . . . . . 2-28
3. The SunDiag TTY Interface . . . . . . . . . . . . . . . . . . . . . . . . . . . . 3-1
3.1 Using the SunDiag Program from a Terminal. . . . . . . . . . 3-2

Contents v
3.1.1 Starting TTY Mode from a Shell Tool . . . . . . . . . . . . 3-2
3.1.2 Executing Commands in TTY Mode —Use the Abbreviations . . . . . . . . . . . . . . . . . . . . . . . . 3-2
3.1.3 Navigating the Screens. . . . . . . . . . . . . . . . . . . . . . . . 3-3
3.1.4 Main Display Commands . . . . . . . . . . . . . . . . . . . . . 3-4
3.1.5 Scrolling . . . . . . . . . . . . . . . . . . . . . . . . . . . . . . . . . . . . 3-6
3.1.6 Redrawing the Screen. . . . . . . . . . . . . . . . . . . . . . . . . 3-6
3.1.7 Running the SunDiag Exerciser in the Background 3-7
3.1.8 Enabling and Disabling Individual Tests . . . . . . . . . 3-7
3.2 Options Menu . . . . . . . . . . . . . . . . . . . . . . . . . . . . . . . . . . . . 3-8
3.3 System Status Display . . . . . . . . . . . . . . . . . . . . . . . . . . . . . 3-11
3.3.1 Status View Equivalents. . . . . . . . . . . . . . . . . . . . . . . 3-12
3.4 Option Files Menu . . . . . . . . . . . . . . . . . . . . . . . . . . . . . . . . 3-13
3.5 Log Files Menu . . . . . . . . . . . . . . . . . . . . . . . . . . . . . . . . . . . 3-15
3.6 Setting Individual Test Options in TTY Mode . . . . . . . . . 3-18
3.7 Setting Processor Affinity Masks in TTY Mode . . . . . . . . 3-20
4. Scaling SunDiag Hardware Tests. . . . . . . . . . . . . . . . . . . . . . . . 4-1
4.1 Scalability Options . . . . . . . . . . . . . . . . . . . . . . . . . . . . . . . . 4-1
4.1.1 Scalable Tests . . . . . . . . . . . . . . . . . . . . . . . . . . . . . . . . 4-1
4.1.2 Non-scalable Tests. . . . . . . . . . . . . . . . . . . . . . . . . . . . 4-2
4.1.3 Setting Scalable Test Options. . . . . . . . . . . . . . . . . . . 4-2
4.1.4 Setting Your Own Scalable Tests . . . . . . . . . . . . . . . . 4-2
4.1.5 Test Instances. . . . . . . . . . . . . . . . . . . . . . . . . . . . . . . . 4-3
4.1.6 Processor Affinity Mask . . . . . . . . . . . . . . . . . . . . . . . 4-3
vi SunDiag User’s Guide—August 1994
4.2 A Scalability Example . . . . . . . . . . . . . . . . . . . . . . . . . . . . . 4-4
▼ How to Set up Scalable Testing . . . . . . . . . . . . . . . . . 4-7
5. Running Individual SunDiag Testsfrom the Command Line . . . . . . . . . . . . . . . . . . . . . . . . . . . . . . . 5-1
5.1 Standard Arguments . . . . . . . . . . . . . . . . . . . . . . . . . . . . . . 5-1
5.1.1 Tests Supported by the Command Line Interface. . 5-3
5.2 Running SunDiag Tests - Overview . . . . . . . . . . . . . . . . . . 5-4
Part 2—SunDiag Tests
6. SunDiag Test Descriptions . . . . . . . . . . . . . . . . . . . . . . . . . . . . . 6-1
6.1 Physical Memory Test (pmem) . . . . . . . . . . . . . . . . . . . . . . . 6-2
6.1.1 pmem Test Description . . . . . . . . . . . . . . . . . . . . . . . . 6-2
6.1.2 pmem Option Menu . . . . . . . . . . . . . . . . . . . . . . . . . . . 6-2
6.1.3 pmem Configurations . . . . . . . . . . . . . . . . . . . . . . . . . 6-3
6.1.4 pmem Command Line Syntax. . . . . . . . . . . . . . . . . . . 6-3
6.1.5 pmem Quick Test Description . . . . . . . . . . . . . . . . . . . 6-3
6.2 Virtual Memory Test (vmem) . . . . . . . . . . . . . . . . . . . . . . . . 6-3
6.2.1 Swap Space Considerations. . . . . . . . . . . . . . . . . . . . 6-3
6.2.2 vmem Test Description . . . . . . . . . . . . . . . . . . . . . . . . 6-4
6.2.3 vmem Option Menu . . . . . . . . . . . . . . . . . . . . . . . . . . . 6-4
6.2.4 vmem Configurations . . . . . . . . . . . . . . . . . . . . . . . . . 6-5
6.2.5 vmem Options. . . . . . . . . . . . . . . . . . . . . . . . . . . . . . . . 6-5
6.2.6 vmem Command Line Syntax. . . . . . . . . . . . . . . . . . . 6-5
6.2.7 vmem Quick Test Description . . . . . . . . . . . . . . . . . . . 6-6
6.3 Floating Point Unit Test (fputest ) . . . . . . . . . . . . . . . . . . 6-6
Contents vii
6.3.1 fputest Command Line Syntax . . . . . . . . . . . . . . . 6-7
6.3.2 fputest Quick Test Description . . . . . . . . . . . . . . . 6-7
6.4 Network Hardware Test (nettest ) . . . . . . . . . . . . . . . . . 6-7
6.4.1 nettest Test Description . . . . . . . . . . . . . . . . . . . . . 6-7
6.4.2 nettest Option Menu . . . . . . . . . . . . . . . . . . . . . . . 6-9
6.4.3 nettest Configurations . . . . . . . . . . . . . . . . . . . . . . 6-10
6.4.4 nettest Options . . . . . . . . . . . . . . . . . . . . . . . . . . . . 6-10
6.4.5 nettest Command Line Syntax . . . . . . . . . . . . . . . 6-11
6.4.6 nettest Quick Test Description . . . . . . . . . . . . . . . 6-11
6.4.7 nettest Error Messages . . . . . . . . . . . . . . . . . . . . . . 6-12
6.5 Audio Hardware Test (autest ) . . . . . . . . . . . . . . . . . . . . . 6-13
6.5.1 autest Option Menu. . . . . . . . . . . . . . . . . . . . . . . . . 6-13
6.5.2 autest Command Line Syntax . . . . . . . . . . . . . . . . 6-14
6.5.3 autest Quick Test Description . . . . . . . . . . . . . . . . 6-14
6.6 Multiprocessing Test (mptest ). . . . . . . . . . . . . . . . . . . . . . 6-14
6.6.1 mptest Test Description . . . . . . . . . . . . . . . . . . . . . . 6-14
6.6.2 mptest Option Menu. . . . . . . . . . . . . . . . . . . . . . . . . 6-15
6.6.3 mptest Options . . . . . . . . . . . . . . . . . . . . . . . . . . . . . 6-16
6.6.4 mptest Command Line Syntax . . . . . . . . . . . . . . . . 6-18
6.6.5 mptest Quick Test Description . . . . . . . . . . . . . . . . 6-19
6.6.6 mptest Error Messages . . . . . . . . . . . . . . . . . . . . . . . 6-19
6.7 Disk Test (rawtest ). . . . . . . . . . . . . . . . . . . . . . . . . . . . . . . 6-20
6.7.1 rawtest Test Description . . . . . . . . . . . . . . . . . . . . . 6-21
6.7.2 rawtest Option Menu . . . . . . . . . . . . . . . . . . . . . . . 6-22

viii SunDiag User’s Guide—August 1994
6.7.3 rawtest Options . . . . . . . . . . . . . . . . . . . . . . . . . . . . 6-23
6.7.4 rawtest Command Line Syntax . . . . . . . . . . . . . . . 6-23
6.7.5 rawtest Quick Test Description . . . . . . . . . . . . . . . 6-24
6.8 File-system Test (fstest ) . . . . . . . . . . . . . . . . . . . . . . . . . . 6-24
6.8.1 fstest Test Description . . . . . . . . . . . . . . . . . . . . . . 6-24
6.8.2 fstest Option Menu. . . . . . . . . . . . . . . . . . . . . . . . . 6-25
6.8.3 fstest Options . . . . . . . . . . . . . . . . . . . . . . . . . . . . . 6-26
6.8.4 fstest Command Line Syntax . . . . . . . . . . . . . . . . 6-27
6.8.5 fstest Quick Test Description . . . . . . . . . . . . . . . . 6-27
6.9 Compact Disc Test (cdtest ). . . . . . . . . . . . . . . . . . . . . . . . 6-28
6.9.1 cdtest Option Menu. . . . . . . . . . . . . . . . . . . . . . . . . 6-29
6.9.2 cdtest Options . . . . . . . . . . . . . . . . . . . . . . . . . . . . . 6-30
6.9.3 cdtest Command Line Syntax . . . . . . . . . . . . . . . . 6-31
6.9.4 cdtest Quick Test Description . . . . . . . . . . . . . . . . 6-31
6.10 Tape Drive Test (tapetest ) . . . . . . . . . . . . . . . . . . . . . . . . 6-32
6.10.1 tapetest Options . . . . . . . . . . . . . . . . . . . . . . . . . . . 6-36
6.10.2 tapetest Command Line Syntax . . . . . . . . . . . . . . 6-38
6.10.3 tapetest Quick Test Description . . . . . . . . . . . . . . 6-39
6.11 Framebuffer Test (fbtest ) . . . . . . . . . . . . . . . . . . . . . . . . . 6-39
6.11.1 fbtest Command Line Syntax . . . . . . . . . . . . . . . . 6-39
6.11.2 fbtest Error Messages . . . . . . . . . . . . . . . . . . . . . . . 6-40
6.11.3 fbtest Quick Test Description . . . . . . . . . . . . . . . . 6-40
6.12 Serial Ports Test (sptest ) . . . . . . . . . . . . . . . . . . . . . . . . . . 6-40
6.12.1 sptest Test Description . . . . . . . . . . . . . . . . . . . . . . 6-40

Contents ix
6.12.2 sptest Syncloop Testing . . . . . . . . . . . . . . . . . . . . . 6-40
6.12.3 sptest Option Menus. . . . . . . . . . . . . . . . . . . . . . . . 6-42
6.12.4 sptest Options . . . . . . . . . . . . . . . . . . . . . . . . . . . . . 6-43
6.12.5 sptest Command Line Syntax . . . . . . . . . . . . . . . . 6-45
6.12.6 sptest Quick Test description . . . . . . . . . . . . . . . . . 6-46
A. Developing Your Own Tests . . . . . . . . . . . . . . . . . . . . . . . . . . . . A-1
A.1 How to Use This Appendix. . . . . . . . . . . . . . . . . . . . . . . . . A-1
A.2 Test Design Guidelines . . . . . . . . . . . . . . . . . . . . . . . . . . . . A-2
A.3 Test Implementation Guidelines. . . . . . . . . . . . . . . . . . . . . A-4
A.3.1 The SunDiag Programming Environment . . . . . . . . A-4
A.4 Requirements . . . . . . . . . . . . . . . . . . . . . . . . . . . . . . . . . . . . A-8
A.5 Standard Library Routines . . . . . . . . . . . . . . . . . . . . . . . . . A-11
A.5.1 Standard Command Line Arguments . . . . . . . . . . . A-15
A.5.2 Standard Formats Display . . . . . . . . . . . . . . . . . . . . . A-16
A.6 A Sample Test File . . . . . . . . . . . . . . . . . . . . . . . . . . . . . . . . A-17
A.7 A Sample Makefile . . . . . . . . . . . . . . . . . . . . . . . . . . . . . . . . A-22
B. Loopback Connectors. . . . . . . . . . . . . . . . . . . . . . . . . . . . . . . . . . B-1
B.1 25-Pin RS-232 Loopback Plug . . . . . . . . . . . . . . . . . . . . . . . B-4
B.2 25-pin RS-232 Port-to-Port Loopback Cable . . . . . . . . . . . B-5
B.3 8-Pin to 8-Pin Loopback Cable . . . . . . . . . . . . . . . . . . . . . . B-6
B.4 8-Pin Loopback Plug . . . . . . . . . . . . . . . . . . . . . . . . . . . . . . B-7
B.5 25-pin Port A-to-Port B Loopback Plug. . . . . . . . . . . . . . . B-8
B.6 25-pin Port A-to-A Port B-to-B Loopback Plug . . . . . . . . B-9
C. The what_rev Utility. . . . . . . . . . . . . . . . . . . . . . . . . . . . . . . . . . C-1

x SunDiag User’s Guide—August 1994

xi
Figures
Figure 1-1 Example of a .usertest File . . . . . . . . . . . . . . . . . . . . . . . . . . . 1-18
Figure 2-1 Magnify Help Window. . . . . . . . . . . . . . . . . . . . . . . . . . . . . . . . . 2-1
Figure 2-2 SunDiag OPEN LOOK Interface Main Window. . . . . . . . . . . . 2-2
Figure 2-3 Sample System Status Panel. . . . . . . . . . . . . . . . . . . . . . . . . . . . . 2-4
Figure 2-4 Sample Console window . . . . . . . . . . . . . . . . . . . . . . . . . . . . . . . 2-5
Figure 2-5 Performance Monitor Panel . . . . . . . . . . . . . . . . . . . . . . . . . . . . . 2-6
Figure 2-6 SunDiag Control Panel . . . . . . . . . . . . . . . . . . . . . . . . . . . . . . . . . 2-9
Figure 2-7 Log Files Window . . . . . . . . . . . . . . . . . . . . . . . . . . . . . . . . . . . . . 2-11
Figure 2-8 Displaying the Error Log File . . . . . . . . . . . . . . . . . . . . . . . . . . . 2-12
Figure 2-9 Error Log File . . . . . . . . . . . . . . . . . . . . . . . . . . . . . . . . . . . . . . . . . 2-13
Figure 2-10 Confirming Error Log Removal . . . . . . . . . . . . . . . . . . . . . . . . . 2-15
Figure 2-11 Test Schedule Menu . . . . . . . . . . . . . . . . . . . . . . . . . . . . . . . . . . . 2-16
Figure 2-12 Set Options Menu . . . . . . . . . . . . . . . . . . . . . . . . . . . . . . . . . . . . . 2-18
Figure 2-13 Option Files Menu. . . . . . . . . . . . . . . . . . . . . . . . . . . . . . . . . . . . . 2-22
Figure 2-14 Using the Status View Button . . . . . . . . . . . . . . . . . . . . . . . . . . . 2-24
Figure 2-15 Options Menu for rawtest . . . . . . . . . . . . . . . . . . . . . . . . . . . . 2-27

xii SunDiag User’s Guide—August 1994
Figure 2-16 Icons for SunDiag . . . . . . . . . . . . . . . . . . . . . . . . . . . . . . . . . . . . . 2-28
Figure 3-1 SunDiag TTY Main Display . . . . . . . . . . . . . . . . . . . . . . . . . . . . . 3-3
Figure 3-2 System Option Menu . . . . . . . . . . . . . . . . . . . . . . . . . . . . . . . . . . 3-8
Figure 3-3 System Status Display Screen . . . . . . . . . . . . . . . . . . . . . . . . . . . 3-11
Figure 3-4 TTY Option Files Menu . . . . . . . . . . . . . . . . . . . . . . . . . . . . . . . . 3-13
Figure 3-5 TTY Log File Menu . . . . . . . . . . . . . . . . . . . . . . . . . . . . . . . . . . . . 3-15
Figure 3-6 TTY UNIX (System Messages) Log. . . . . . . . . . . . . . . . . . . . . . . 3-16
Figure 3-7 TTY Info Log . . . . . . . . . . . . . . . . . . . . . . . . . . . . . . . . . . . . . . . . . 3-17
Figure 3-8 TTY Test Options for c0t0d0 (rawtest ) . . . . . . . . . . . . . . . . . 3-18
Figure 3-9 Setting the Processor Affinity Masks onMultiprocessor Systems . . . . . . . . . . . . . . . . . . . . . . . . . . . . . . . . 3-20
Figure 4-1 fputest Option Menu Example (Multiprocessor) . . . . . . . . . 4-4
Figure 4-2 fputest Option Menu Example (Single Processor) . . . . . . . . 4-5
Figure 4-3 Processor Affinity Masks . . . . . . . . . . . . . . . . . . . . . . . . . . . . . . . 4-6
Figure 6-1 pmem Option Menu . . . . . . . . . . . . . . . . . . . . . . . . . . . . . . . . . . . . 6-2
Figure 6-2 vmem Option Menu . . . . . . . . . . . . . . . . . . . . . . . . . . . . . . . . . . . . 6-4
Figure 6-3 nettest Option Menu . . . . . . . . . . . . . . . . . . . . . . . . . . . . . . . . 6-9
Figure 6-4 autest Option Menu. . . . . . . . . . . . . . . . . . . . . . . . . . . . . . . . . . 6-13
Figure 6-5 mptest Option Menu. . . . . . . . . . . . . . . . . . . . . . . . . . . . . . . . . . 6-15
Figure 6-6 rawtes t Option Menu . . . . . . . . . . . . . . . . . . . . . . . . . . . . . . . . . 6-22
Figure 6-7 fstest Option Menu. . . . . . . . . . . . . . . . . . . . . . . . . . . . . . . . . . 6-25
Figure 6-8 cdtest Option Menu. . . . . . . . . . . . . . . . . . . . . . . . . . . . . . . . . . 6-29
Figure 6-9 tapetest Notice Window . . . . . . . . . . . . . . . . . . . . . . . . . . . . . 6-32
Figure 6-10 tapetest Option Menu (Exabyte™ 8mm 2.3 GB) . . . . . . . . . 6-33
Figure 6-11 tapetest Option Menu (half-inch front-load) . . . . . . . . . . . . 6-34
Figure 6-12 tapetest Option Menu (quarter-inch) . . . . . . . . . . . . . . . . . . 6-35

Figures xiii
Figure 6-13 sptest Option Menu. . . . . . . . . . . . . . . . . . . . . . . . . . . . . . . . . . 6-42
Figure 6-14 sptest Option Menu for Multi-Terminal Interface Boards . 6-43
Figure B-1 25-pin RS-232 Loopback Plug . . . . . . . . . . . . . . . . . . . . . . . . . . . B-4
Figure B-2 25-pin RS-232 Port-to-Port Loopback Cable . . . . . . . . . . . . . . . B-5
Figure B-3 8-Pin to 8-Pin Loopback Cable. . . . . . . . . . . . . . . . . . . . . . . . . . . B-6
Figure B-4 8-Pin Loopback Plug . . . . . . . . . . . . . . . . . . . . . . . . . . . . . . . . . . . B-7
Figure B-5 Port A-to-Port B Loopback Plug . . . . . . . . . . . . . . . . . . . . . . . . . B-8
Figure B-6 Port A-to-A, Port B-to-B Loopback Plug . . . . . . . . . . . . . . . . . . B-9

xiv SunDiag User’s Guide—August 1994

xv
Tables
Table P-1 Typographic Conventions . . . . . . . . . . . . . . . . . . . . . . . . . . . . . . xix
Table 1-1 Framebuffer Window Locking and TTY Mode. . . . . . . . . . . . . 1-5
Table 1-2 Device names used for diskette and CD-ROM drives . . . . . . . 1-6
Table 1-3 SunDiag Syntax . . . . . . . . . . . . . . . . . . . . . . . . . . . . . . . . . . . . . . . 1-12
Table 1-4 SunDiag Exit Status Codes. . . . . . . . . . . . . . . . . . . . . . . . . . . . . . 1-19
Table 2-1 Log File Test Message Syntax . . . . . . . . . . . . . . . . . . . . . . . . . . . 2-14
Table 5-1 Standard Argument Syntax for Individual SunDiag Tests . . . 5-1
Table 5-2 Tests Supported by the Command Line Interface . . . . . . . . . . 5-3
Table A-1 An Overview of SunDiag Global Variables. . . . . . . . . . . . . . . . A-4
Table A-2 SunDiag Reserved #define Statements. . . . . . . . . . . . . . . . . . . . A-7
Table A-3 Exit codes reserved by send_message() . . . . . . . . . . . . . . . . A-8
Table A-4 SunDiag Standard Command Line Arguments . . . . . . . . . . . . A-15
Table B-1 Pin Connections for Loopback Plugs . . . . . . . . . . . . . . . . . . . . . B-2

xvi SunDiag User’s Guide—August 1994

xvii
Preface
About This BookThe SunDiag™ on-line system exerciser runs diagnostic hardware tests. Thesediagnostic tests can be run from the SunDiag OPEN LOOK® window interface,through serial ports, or individually from shell command lines.
As part of the Solaris® 2.4 for System Administrators AnswerBook®, thismanual explains how to set up and run the SunDiag diagnostic tests, as well ashow to run the tests individually from command lines. This manual also givesyou tips on creating your own diagnostic tests.
The primary audience of this manual is hardware testing and verificationorganizations. However, SunDiag is simple enough that anyone with Solarisoperating environment experience can run it.
xviii SunDiag User’s Guide—August 1994
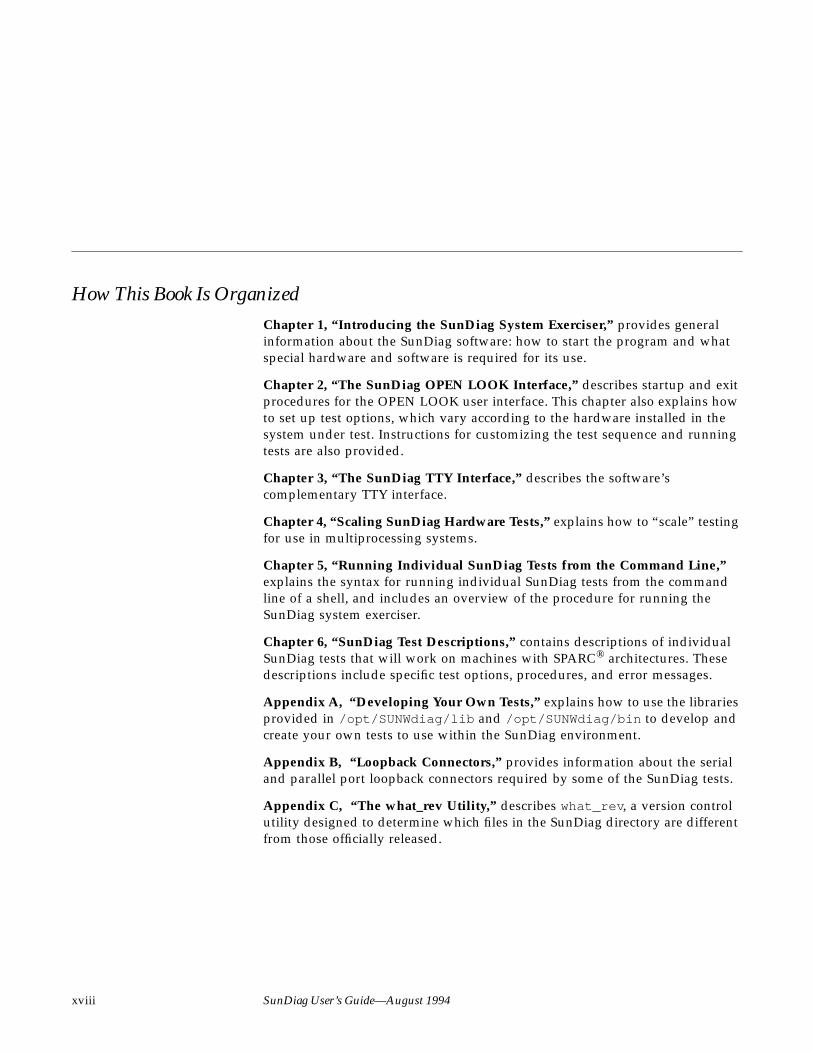
How This Book Is OrganizedChapter 1, “Introducing the SunDiag System Exerciser,” provides generalinformation about the SunDiag software: how to start the program and whatspecial hardware and software is required for its use.
Chapter 2, “The SunDiag OPEN LOOK Interface,” describes startup and exitprocedures for the OPEN LOOK user interface. This chapter also explains howto set up test options, which vary according to the hardware installed in thesystem under test. Instructions for customizing the test sequence and runningtests are also provided.
Chapter 3, “The SunDiag TTY Interface,” describes the software’scomplementary TTY interface.
Chapter 4, “Scaling SunDiag Hardware Tests,” explains how to “scale” testingfor use in multiprocessing systems.
Chapter 5, “Running Individual SunDiag Tests from the Command Line,”explains the syntax for running individual SunDiag tests from the commandline of a shell, and includes an overview of the procedure for running theSunDiag system exerciser.
Chapter 6, “SunDiag Test Descriptions,” contains descriptions of individualSunDiag tests that will work on machines with SPARC® architectures. Thesedescriptions include specific test options, procedures, and error messages.
Appendix A, “Developing Your Own Tests,” explains how to use the librariesprovided in /opt/SUNWdiag/lib and /opt/SUNWdiag/bin to develop andcreate your own tests to use within the SunDiag environment.
Appendix B, “Loopback Connectors,” provides information about the serialand parallel port loopback connectors required by some of the SunDiag tests.
Appendix C, “The what_rev Utility,” describes what_rev , a version controlutility designed to determine which files in the SunDiag directory are differentfrom those officially released.
xix
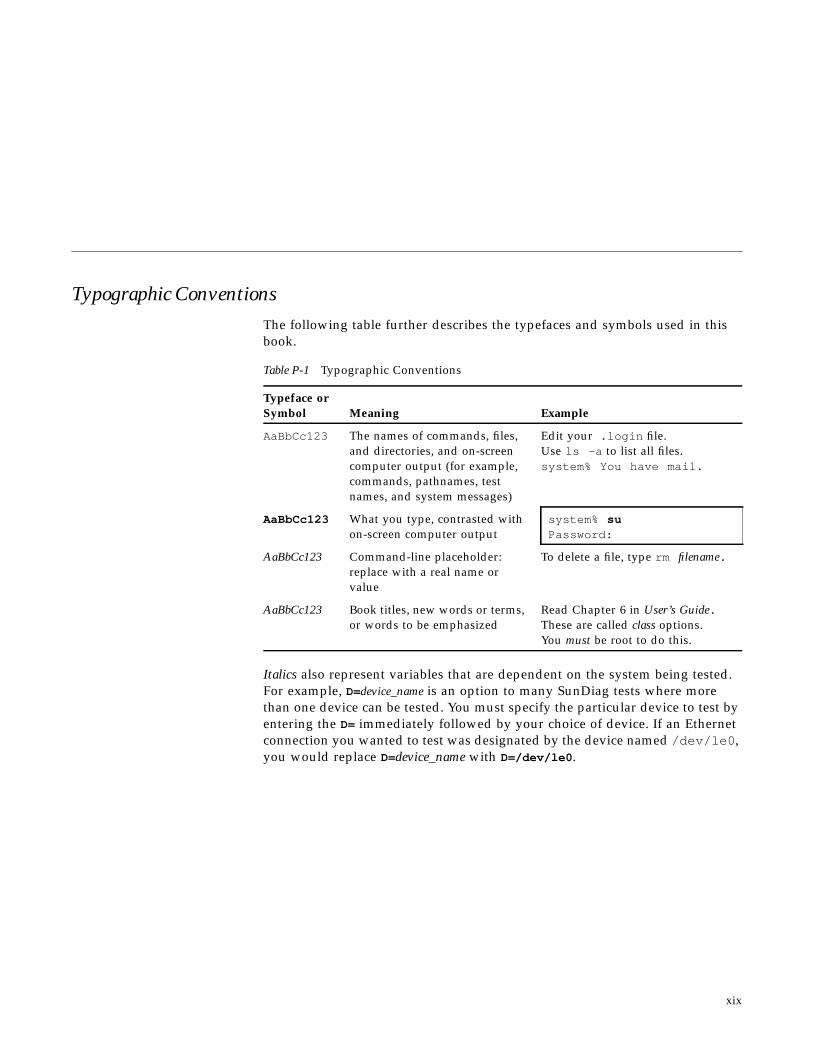
Typographic ConventionsThe following table further describes the typefaces and symbols used in thisbook.
Italics also represent variables that are dependent on the system being tested.For example, D=device_name is an option to many SunDiag tests where morethan one device can be tested. You must specify the particular device to test byentering the D= immediately followed by your choice of device. If an Ethernetconnection you wanted to test was designated by the device named /dev/le0 ,you would replace D=device_name with D=/dev/le0 .
Table P-1 Typographic Conventions
Typeface orSymbol Meaning Example
AaBbCc123 The names of commands, files,and directories, and on-screencomputer output (for example,commands, pathnames, testnames, and system messages)
Edit your .login file.Use ls -a to list all files.system% You have mail.
AaBbCc123 What you type, contrasted withon-screen computer output
system% suPassword:
AaBbCc123 Command-line placeholder:replace with a real name orvalue
To delete a file, type rm filename.
AaBbCc123 Book titles, new words or terms,or words to be emphasized
Read Chapter 6 in User’s Guide.These are called class options.You must be root to do this.

xx SunDiag User’s Guide—August 1994

Part 1— Running SunDiag


1-1
Introducing the SunDiag SystemExerciser 1
1.1 OverviewThe SunDiag on-line system exerciser runs multiple diagnostic hardware testsfrom a single interface. It is used primarily with the OpenWindows™ userinterface that enables you to set test parameters quickly and easily whenrunning the diagnostic tests.
Support for SunDiag 4.4This manual describes revision 4.4 of the SunDiag software package, releasedwith the Solaris 2.4 operating environment. The SunDiag 4.4 exerciser is anoptional, relocatable software package on the Solaris 2.4 System disk. Thedefault installation directory for SunDiag is /opt/SUNWdiag/bin . When youchoose to install the SunDiag software, you can change this directory.
Window InterfaceSunDiag allows you to select tests and test options with a click of the mouse.See Chapter 2, “The SunDiag OPEN LOOK Interface” for detailed informationon the OPEN LOOK interface. You can create your own test environment andsave it for future use. SunDiag also features an extensive on-line MagnifyHelp™ facility to quickly answer questions about the interface. If you have aquestion about a specific part of the interface (a button, field, or setting), trythe on-line help before consulting this manual. You can usually find the answerby pointing to a specific part of the SunDiag window and pressing the Helpkey.

1-2 SunDiag User’s Guide—August 1994
1
TTY InterfaceUsing the TTY interface, you can run the SunDiag software from a terminal ormodem attached to a serial port. This feature requires you to type commandsinstead of using the mouse, and it displays one screen of information at a time.However, it emulates the window system whenever possible; choices are“toggled” by entering a single letter instead of clicking the mouse button.
See Chapter 3, “The SunDiag TTY Interface,” for detailed information.
Command Line InterfaceYou can also run each of the SunDiag tests individually from a shell commandline using the command line syntax. Each test description contains thecommand line syntax to use. See Chapter 5, “Running Individual SunDiagTests from the Command Line” for a list of standard arguments common to allSunDiag tests.
Hardware VerificationThe SunDiag exerciser automatically probes the system kernel for installedhardware devices. Those devices are then displayed on the SunDiag controlpanel with the appropriate tests and test options. This provides a quick checkof your hardware setup. However, you may need to create other tests to verifyspecific hardware devices (see the “Adding Your Own Tests in .usertest” onpage 1-17 and Appendix A, “Developing Your Own Tests.”).
The SunDiag exerciser verifies the configuration, functionality, and reliabilityof most hardware controllers and devices.
Introducing the SunDiag System Exerciser 1-3
1
1.2 Hardware and Software RequirementsThe SunDiag 4.4 software will run on any system installed with the Solaris 2.4operating environment. The operating system kernel must be configured tosupport all peripherals that are to be tested.
1.2.1 OpenWindows Software Requirements
You must meet the following three requirements to run SunDiag with theOpenWindows™ software.
1. OpenWindows Version 3.0You must be running the OpenWindows software, version 3.0, or later.
2. Display PermissionYou must have permission to display the SunDiag window on your screen.Typing the following command at a shell prompt will give you the displaypermission (server access) you need. Substitute the machinename variablewith the actual name of your workstation.
Note – Use the /usr/openwin/bin/xhost command before obtaining rootprivileges (become superuser). xhost will not work in superuser mode.
This command must be used for every workstation that you intend todisplay the SunDiag window on.
3. Correct Library PathYou may also have to set the LD_LIBRARY_PATH variable, depending onthe location of the OpenWindows directory in your system. If you haveinstalled or mounted OpenWindows files in /usr/openwin (the defaultlocation), you can ignore this step.
/usr/openwin/bin/xhost + machinename
1-4 SunDiag User’s Guide—August 1994
1
If you have installed the OpenWindows software in a different location,then you must specify where the OpenWindows libraries reside. Use thefollowing command and substitute the pathname variable for the actual pathwhere you installed the OpenWindows software:
You can check the existing LD_LIBRARY_PATH by typing setenv .
1.2.2 Special Note on Testing Multiple Framebuffers
These rules apply when testing multiple framebuffers (displays)simultaneously:
• You can test multiple framebuffers on a system simultaneously, but only oneframebuffer can be running OpenWindows software.
• The framebuffer running OpenWindows software must have windowlocking enabled to avoid incorrect test failures. Other framebuffers musthave window locking disabled.
Caution – If window locking is disabled (unlocked) on framebuffers that arerunning OpenWindows software, the SunDiag tests will return spurious errormessages if you move the mouse during testing. Even slight mouse movementcan cause a test to fail.
• By default, SunDiag enables window locking on framebuffers that have unitnumber 0 (for example, cgsix0 ).If your system has more than one framebuffer with unit number 0, you mustdisable window locking on all of them except the one runningOpenWindows software.
If you are running a framebuffer test from a command line, you can disablewindow locking by specifying the L argument.
setenv LD_LIBRARY_PATH pathname
!

Introducing the SunDiag System Exerciser 1-5
1
TTY Mode and Framebuffer Window LockingYou can run the SunDiag exerciser in TTY mode in one of three ways: from aterminal attached to a serial port, from a Shell Tool window using the -t
option (see Table 1-3), or on a monitor that is not running OpenWindowssoftware.
Warning – Do not attempt to run the TTY mode on the console monitor andframebuffer tests concurrently in this way; doing so causes the framebuffertests to fail.
1.2.3 Volume Management
Volume Management is a layer of removable media support software that hasbeen added to the Solaris operating environment. This layer managesinteractions between users and their removable media and providestransparent access to the media by automatically mounting media with labels.
rawtest , fstest , and cdtest test the diskette and CD-ROM drivesregardless of whether the Volume Management software is installed andrunning. If the Volume Management software is installed, these tests will test
Table 1-1 Framebuffer Window Locking and TTY Mode
TTY Mode Window Locking Issues
Terminal attached to aserial port
Window locking not necessary because the terminalcannot run OpenWindows software
Shell tool using -t option Enables window locking on Framebuffer with unitnumber 0
Monitor not runningOpenWindows software
The SunDiag software will probe and find framebufferdevices (cgsix , for example), but it will not enablewindow locking on those devices because theOpenWindows software is not running

1-6 SunDiag User’s Guide—August 1994
1
the diskette and CD-ROM drives with device names listed in the secondcolumn of Table 1-2. If the Volume Management software is not installed, thedevice names in columns 3 are used.
Warning – Do not edit the /etc/vold.conf file to change the logical name ofthe diskette drive (floppy0 ) and CD-ROM drive (cdrom0 ). Currently,SunDiag is hard-wired to use these pathnames as the default logical name.
1.2.4 Booting and New Device Drivers
When adding a new device driver in the Solaris operating environment, youmust reboot the machine with the boot -r command to reconfigure thesystem and allow the SunDiag exerciser to recognize the new driver.
When you use the boot -r command, the system will probe all attachedhardware devices and assign nodes in the filesystem to represent only thosedevices actually found. It will also configure the logical namespace in /dev aswell as the physical namespace in /devices . If you have removed a devicefrom the system, then you also need to reboot the system with boot -rcommand before the SunDiag kernel sees the correct devices. See thekernel (1M) man page for more information.
Starting with Solaris 2.1, boot messages, SCSI error messages and some otherdebugging messages are no longer sent to the /var/adm/messages file. Tocontinue to see these types of messages, make sure to boot your system usingthe boot -v (verbose) option.
Table 1-2 Device names used for diskette and CD-ROM drives
Device With Volume Manager Without Volume Management
diskette D=/vol/dev/aliases/floppy0 D=/dev/diskette
CD-ROM D=/vol/dev/aliases/cdrom0 D=/dev/dsk/c0t6d0
Introducing the SunDiag System Exerciser 1-7
1
1.2.5 Swap Space Requirements
The amount of swap space the SunDiag exerciser requires varies widely withindividual hardware and software configurations. Most systems have enoughswap space already configured to satisfy the SunDiag testing requirements.
When you start testing with the SunDiag system exerciser (by clicking on theStart button), the program will calculate the amount of swap space it will needfor testing. The program does this calculation by first determining the amountof swap space available on the system under test, and then calculating howmuch of this swap space is needed to run the program itself, the various tests,and the virtual memory test.
If there is not enough swap space available on your machine, a pop-upwindow will display, preventing you from testing. This pop-up window willdisplay how much swap space you will need to add to your system in order torun all of the SunDiag diagnostic tests.
If you do not have enough swap space to run all of the SunDiag tests, you caneither deselect some of tests or you can add more swap space to your system.(Refer to the Solaris 2.4 Administering File Systems manual for information onincreasing swap space.)
Look at the test’s option menu to find out how much swap space an individualtest will use while testing. The amount of swap space used by the test will beshown in Kilobytes next to the word Configuration. Knowing these swap spaceamounts will help you decide which SunDiag tests to de-select.
Caution – If your system does not have enough swap space configured, someof the SunDiag tests may run very slowly or they may freeze your screen. Inthese instances, the SunDiag kernel will usually return error messagesindicating that the problem is due to insufficient swap space.
!

1-8 SunDiag User’s Guide—August 1994
1
1.2.5.1 Starting SunDiag With the Virtual Memory Test
The SunDiag virtual memory test (vmem) is designed to stress test the virtualmemory of the system; therefore it uses all of the system’s remaining swapspace.
Because vmem uses all of the system’s remaining swap space, you must start allnon-SunDiag processes (for example, OpenWindows applications) before youbegin to test the system. Starting a process after you have begun testing yoursystem may cause the SunDiag exerciser to run slowly or freeze your screen.
If you plan on starting other processes after you have started the virtualmemory test, you must use the vmem reserve option to leave space for theseprocesses before you start testing.
Reserve Option to vmem
The vmem Reserve option allows you to reserve additional amounts of swapspace for other processes or tests. This option can be exercised from either thevmem test options menu (within the SunDiag control panel) or from thecommand line.
1.2.6 Setting the Maximum Number of Processes
The SunDiag system exerciser runs under the Solaris 2.4 operatingenvironment. The SunDiag kernel controls hardware specific tests from oneinterface. Each test displayed on the Status Panel is a separate UNIX® process,independent from the SunDiag kernel and other processes.
As a system’s configuration grows, the number of processes needed forSunDiag testing also grows (especially on multi-processor systems). If thenumber of processes needed by SunDiag tests exceeds the maximum numberof processes allowed by your system, the SunDiag application will fail.
However, you can change the maximum number of processes on your systemby setting the maxusers parameter in your /etc/system file. The followingsection describes how to set this parameter to allow for all SunDiag processes.

Introducing the SunDiag System Exerciser 1-9
1
1.2.6.1 Setting the maxusers Parameter in the /etc/system file
Beginning with the Solaris 2.3 operating environment, the default value ofmaxusers will be set automatically based on the amount of RAM installed onthe system. For example, if your system has 32 Mbytes of RAM, the kernel willset the maxusers to 32.
The maximum number of UNIX processes allowed on a system is 16 times thevalue of maxusers (16*maxusers ). Therefore, the maximum number orprocesses allowed on a system with 32 Mbytes of RAM is 512 (16* 32).
However, the default number of UNIX processes set by a system may beinsufficient to run all of the SunDiag tests. The number of test processes thatthe SunDiag exerciser may create while testing is approximately:
For example, the SunDiag exerciser will generate 1008 processes on aSPARCcenter™ 2000 system with 6 CPUs and 32 disks [(20 + 32* 2)* (6* 2)].Therefore, this system will conservatively need 1200 processes (includingsystem, network, and window system processes) to run without problems,especially if you have set the Concurrent Tests # to a very high value (see“Concurrent Tests #” on page 2-21). With 1200 processes needed, the maxusersparameter should be set to 75 (maxusers = (1200/16) = 75).
If this machine has more than 75 MBytes of RAM, then there is no need toadjust the default value of maxusers . Otherwise, in this example, thefollowing line must be added to the /etc/system file:
Refer to the Solaris 2.4 Transition Guide and the SunOS 5.4 AdministeringSecurity, Performance, and Accounting manual for more information on settingsystem configuration parameters.
set maxusers=75
(20 + number of disks * 2) * (Maximum # of instances for = Maximum # ofscalable tests) SunDiag Processes
Default value is the number of CPUstimes twoFor the Filesystem (fstest ) and Disk(rawtest ) tests
Estimated value for built-in tests

1-10 SunDiag User’s Guide—August 1994
1
1.2.7 Loopback ConnectorsCertain SunDiag tests require loopback plugs or cables to run successfully. Seethe individual test descriptions to find out which tests need loopback cables orplugs. Also see Appendix B, “Loopback Connectors” for directions on how toobtain loopback plugs or cables.
1.2.8 Scratch CDs, Tapes, DiskettesSunDiag requires that “scratch” tapes, diskettes, or optical discs (CDs) beinstalled in Sun’s tape and disk drives for tests to run correctly. Scratch mediaare spare (usually blank) tapes and diskettes that can be overwritten as well asoptical discs. These scratch media devices must be inserted before the kernel isprobed by SunDiag, or else SunDiag will report an error message.
For CD-ROM tests, a test CD with a well-known table of contents must beloaded in the CD drive. It is recommended you use a demonstration CDshipped with the drive. Do not use an operating system distribution disc.
For tape tests, you need 4mm, 8mm, 1/2”, or 1/4” scratch tapes (depending on thetype of drive being tested). Make sure the tape heads have been properlycleaned.
For hard disk and diskette tests, be sure there is enough space on your diskpartition. Double or triple density diskettes (1.4 Mbyte) are required,depending on the diskette drive in your system. An additional megabyte ofswap space is needed to run fstest .
Note – Beware of using old or scratched tapes and diskettes; they could causespurious errors in specific tests.
1.2.9 TTY Terminals
SunDiag is designed to run in a window environment, but may be used from aterminal attached to a serial port. Chapter 3, “The SunDiag TTY Interface”describes the user interface when running in TTY mode.

Introducing the SunDiag System Exerciser 1-11
1
1.3 Preparing to Start the SunDiag ExerciserYou must have server access (display) permission on the system under test todisplay the SunDiag window. Typing /usr/openwin/bin/xhost + displayhostwill give you display permission to run SunDiag on displayhost. Remember thatyou must run this command before you become superuser.
You must be logged in as superuser (root) to run the program. The SunDiagsoftware needs to write log and error files to the /var/adm/sundiaglogdirectory, which should be owned by root.
Note – While the SunDiag software is running, you should not run otherprograms or software that use the same hardware devices that the program istesting. In particular, when the virtual memory test is running, there may notbe enough free memory to run any other programs. However, the Reserveoption in the virtual memory (vmem) menu lets you specify the amount ofmemory to reserve from being tested. This option allows you to free upmemory to run another application while running the SunDiag software.
If you log in remotely (rlogin ) or log in from a serial port, the SunDiagapplication will automatically run in TTY mode. See Chapter 3, “The SunDiagTTY Interface.”
The syntax for using the sundiag command is shown below. You will find ithelpful to read Chapter 3, “The SunDiag TTY Interface” before actually startingthe program in TTY mode.
Note – The SunDiag exerciser enables all available tests when it is invoked(except those that require intervention mode). Starting all the enabled tests willslow your system down drastically. Be sure to read the “Hardware andSoftware Requirements” section in this chapter before running all availabletests.

1-12 SunDiag User’s Guide—August 1994
1
1.4 Starting the SunDiag ExerciserRead through the argument descriptions listed in Table 1-3 before actuallystarting the SunDiag exerciser. If you don’t need any of those options, just typethese basic commands:
If you are running OpenWindows software, the SunDiag window will displayby default; otherwise, SunDiag will display in TTY mode (See Chapter 3, “TheSunDiag TTY Interface” for more details). Table 1-3 shows the full syntax forstarting the SunDiag exerciser.
example% xhost + machinename machinename being added to access control listexample% suPassword: ( enter your root password)example# /opt/SUNWdiag/bin/sundiagSunDiag: Starting probing routine, please wait...
(Next, you may see some error messages if you haven’t inserted scratch tapes, disks, or CDs inyour system. The SunDiag window then displays on your screen.)
Table 1-3 SunDiag Syntax
/opt/SUNWdiag/bin/sundiag [-Cpqtw] [-i number] [-o options_file][-b batch_file] [-k kernel_name]
Argument Description
-C Redirects the console output from any existing console windowto the SunDiag console window. If you are using the TTYinterface, the console message is displayed in the message line ofthe status screen.
-p Tells SunDiag to ignore the kernel probe for devices. Use thiswhen running user-defined tests found in .usertest .
-q Automatically quits the SunDiag program when testing stops.This option can only be issued from a command line.
-t Instructs SunDiag to run in TTY mode. See Chapter 3, “TheSunDiag TTY Interface” for information on running SunDiag inthis mode.

Introducing the SunDiag System Exerciser 1-13
1
1.5 Stopping the SunDiag ExerciserTo exit SunDiag from the OpenWindows interface, click the Stop button at thetop of the control panel to stop any tests that are running. Some of the tests,such as the tape tests, may delay before actually stopping, because these testsrequire time to rewind the tapes.
To exit SunDiag from a terminal or remote login, type q for quit .
-w Writes the system hardware configuration to the/var/adm/sundiaglog/sundiag.conf file.
-i number Specifies the maximum number of instances for scalable tests.This setting overrides the default setting of two times the numberof processors on the system under test.
-o options_file Directs the SunDiag software to use a specific “saved option” file.See the “Option Files Window Button” section in Chapter 2 fordirections on creating an options file. If you do not use the -oargument, SunDiag uses the default option file/var/adm/sundiaglog/options/.sundiag , if it exists.
-b batch_file Enables you to use a batch_file (collection of option files) tospecify testing parameters when running the SunDiag software.See the “Using Batch Files” section in this chapter for moredetails.
-k kernel_name Specifies a customized kernel name. The default kernel name is/kernel/unix . Since the rstatd that the performance monitorrequires is hard-wired to use /vmunix as kernel name, theperformance monitor is disabled when the -k option is specified.
Table 1-3 SunDiag Syntax (Continued)
/opt/SUNWdiag/bin/sundiag [-Cpqtw] [-i number] [-o options_file][-b batch_file] [-k kernel_name]
Argument Description

1-14 SunDiag User’s Guide—August 1994
1
1.6 Using Batch FilesBatch files are lists of option files which specify SunDiag tests and theiroptions. To use the SunDiag -b option, you must first create a batch_file in/var/adm/sundiaglog/configs before invoking SunDiag. Thebatch_file must use the following format:
In the example above, optfile1 and optfile2 are created using the OptionFiles menu button on the SunDiag control panel (See Section 2.1.4, “ControlPanel”). These files list the SunDiag tests to be run. They run for the timesspecified (in minutes) in the runtime column.
Files with a runtime of 0 display the final status of tests that have alreadyrun. This feature can be used to give the status of some or all of the option filesin the batch file. For instance, the example file above first runs optfile1 andoptfile2 . Assume that optfile3 is a concatenation of optfile1 andoptfile2 . Running optfile3 with a runtime of 0 will return the final statusof optfile1 and optfile2 .
The delay_before_loading_next_option_file field ensures that all testshave been stopped before the next option file is loaded. SunDiag reservesenough time to ensure a smooth transition between tests, even if the delayspecified in this field is not long enough.
The settings in the SunDiag Options menu override those in batch files. Forexample, if the value for Max # of passes is reached before the runtime setin the batch file is over, the test will stop. For this reason, you should set largevalues on the Set Options menu when using batch files and avoid using theSingle Pass values.
Note – The SunDiag schedule option does not work with the batch option.
#option file runtime delay_before_loading_next_option_file (min.)#----------- ------- ------------------------------------optfile1 60 3optfile2 1020 5optfile1 60 16optfile3 0 0#
Introducing the SunDiag System Exerciser 1-15
1
1.7 Running the SunDiag Exerciser on a Remote SystemUse the following commands to run the SunDiag exerciser remotely with theOpenWindows interface. In the cases below, you must be logged in assuperuser (root) to run the program. The SunDiag exerciser must be able towrite the log and error files to the /var/adm/sundiaglog directory, whichshould be owned by root.
Note – To get the OpenWindows display on a remote machine, be certain toopen the permissions of that window server using the/usr/openwin/bin/xhost + hostname command.
On a Local SystemUse one of the following commands to run the SunDiag exerciser with theOpenWindows interface from a local system:
# ./sundiag If OpenWindows software is running, the Sundiag OpenWindowsinterface displays. Otherwise, SunDiag starts in TTY mode.
# ./sundiag -display remotehost:0 If OpenWindows software is running on the remote system, theSundiag OpenWindows interface will display on the remotesystem. Otherwise an error message is returned:
XView Error: Cannot open display on window_server: remotehost:0
1-16 SunDiag User’s Guide—August 1994
1
From a Remote SystemUse one of the following commands to run the SunDiag exerciser with theOpenWindows interface from a remote machine. These cases assume that youhave used rlogin to log in as superuser on remotehost, and that you want theSunDiag OpenWindows interface to appear on your local system:
1.8 Running the SunDiag Exerciser on a Stand-alone SystemSome SunDiag applications require a network connection to run successfully.However, you can run the SunDiag exerciser “stand-alone” (without a networkconnection) by following these steps.
1. Edit the /etc/rc2.d/S72inetsvc script file, and comment out thefollowing line:
2. Comment out all remote mount file systems from /etc/vfstab (sincethere will be no network connection).
3. Make sure ypbind is not running in the stand-alone system.This step will make sure that ypbind is not started by any of the rc scripts.
4. Reboot your system.The SunDiag software will now run properly on stand-alone machines.
# ./sundiag Sundiag TTY mode will display on your localwindow/console. See Chapter 3; this is the default mode.
# ./sundiag -display localhost:0 If OpenWindows software is running on the local system, theSundiag OpenWindows interface displays on the localhost.Otherwise, an error message is returned:
XView Error: Cannot Open display on window_server: localhost:0
# ./sundiag -display remotehost:0 If OpenWindows is running on the remote system, the SundiagOpenWindows interface displays on the remote server.Otherwise, an error message is returned:
XView Error: Cannot open display on window_server: remotehost:0
# /usr/sbin/ifconfig -au netmask + broadcast +
Introducing the SunDiag System Exerciser 1-17
1
1.9 Adding Your Own Tests in .usertest
You can add your own tests and have them appear as options on the SunDiaginterface. Any file that can be run from a UNIX® shell can be used as a test file(including shell scripts).
To run your test through the SunDiag interface, you need to put the test file inthe /opt/SUNWdiag/bin directory, and create a new/opt/SUNWdiag/bin/.usertest file using the syntax below.
1.9.1 Setting up a .usertest file
Use the following syntax to set up a .usertest file:
The options you set in the .usertest file will become the default options foreach test. You can change these options using the pop-up option menus on theSunDiag window interface, but the Reset button will return the options to thedefault settings specified in the .usertest file.
device_name_label, testname, test_specific_arguments, SCA
Argument Description
device_name_label device_name_label is the device name to be displayed for yourtest on the control panel.
testname testname is the actual name of the file that contains your test(for example, vmem for the virtual memory test). It is used asthe test name on the status panel.
test_specific_arguments These are the optional test-specific command-line argumentsyou use to execute your test. Since commas are used todelimit arguments in a .usertest line, use spaces todelimit the test-specific arguments instead. See theindividual test descriptions in “SunDiag Tests” for the test-specific arguments.
SCA This optional flag specifies that the test will be scalable. See“Scalable Tests” on page 4-1 for a list of scalable tests. Notall are tests are designed to be scalable.

1-18 SunDiag User’s Guide—August 1994
1
The following is an example of a .usertest file. SunDiag will ignore linesthat are commented out (lines that begin with #).
Figure 1-1 Example of a .usertest File
1.9.2 Test Writing Precautions
When writing tests for the SunDiag program, you should note the followingprecautions: (For more thorough instructions on developing your own tests,see Appendix A, “Developing Your Own Tests.”)
• The file descriptor, stdin , will be closed, and stdout and stderr will beredirected to /dev/null .
Therefore, there will be no direct interaction between the user and the test.Tests should be written to use other methods of logging messages (forexample, you can program your tests to write to output files).
• When the test exits with a status code of 0, SunDiag will count this exit as apass.
Status counts of 1 through 90 are indications of errors and the error countwill increment. The other status codes are reserved by SunDiag and shouldnot be used.
# @(#).usertest Rev MM/DD/YY
SPC/S Internal Test,newtest,D=any T=1SPC/S 25-pin LB on ttyz00,newtest,D=/dev/ttyz00 T=8#SPC/S 25-pin LB on ttyz01,newtest,D=/dev/ttyz01 T=8#SPC/S 25-pin LB on ttyz02,newtest,D=/dev/ttyz02 T=8#SPC/S 25-pin LB on ttyz03,newtest,D=/dev/ttyz03 T=8#SPC/S 25-pin LB on ttyz04,newtest,D=/dev/ttyz04 T=8#SPC/S 25-pin LB on ttyz05,newtest,D=/dev/ttyz05 T=8#SPC/S 25-pin LB on ttyz06,newtest,D=/dev/ttyz06 T=8#SPC/S 25-pin LB on ttyz07,newtest,D=/dev/ttyz07 T=8SPC/S Echo TTY on ttyz00,newtest,D=/dev/ttyz00 T=16SPC/S 96-pin LB on board 1,newtest,D=sb1 T=4SPC/S 96-pin LB on board 2,newtest,D=sb2 T=4SPC/S 96-pin LB on board 3,newtest,D=sb3 T=4

Introducing the SunDiag System Exerciser 1-19
1
• If the test requires a large amount of memory to run (greater than 1 MByte),you should use the reserve option of the vmem test to set aside extramemory for the test.
See Section 6.2, “Virtual Memory Test (vmem)” for instructions.
1.10 SunDiag Exit Status CodesSunDiag will exit with the following status codes:
Table 1-4 SunDiag Exit Status Codes
Code Description
0 The SunDiag kernel exited normally and the tests that were run (if any) allcompleted successfully.
-1 The SunDiag kernel exited due to an abnormal condition in the execution ofits kernel.
1 The SunDiag kernel exited normally but one or more of the tests that wererun, failed.

1-20 SunDiag User’s Guide—August 1994
1

2-1
The SunDiag OPEN LOOKInterface 2
This chapter explains how to run the SunDiag system exerciser using theOPEN LOOK Graphical User Interface. This is the interface that appears if theSunDiag software is started from within the OpenWindows environment (ashell tool, for example).
Remember, Magnify Help™ is available for all items (buttons, settings, panels,etc.) in the SunDiag window. You can view the Magnify Help window bypointing to an item, and then pressing the Help key. A pop-up window with amagnifying glass will display, giving more information about the item.
Figure 2-1 Magnify Help Window

2-2 SunDiag User’s Guide—August 1994
2
Figure 2-2 SunDiag OPEN LOOK Interface Main Window
System Status PanelThis panel shows testing status.Asterisks appear next to tests thatare currently in progress.
Performance Monitor PanelThese graphs show the samestatistics as the SolarisPerformance Meter program.
Control PanelThis is the main control panel for theSunDiag interface.
Console WindowMessages appear in the console window. You can also execute SolarisOperating Environment commands as superuser from this window.
Option Menu ButtonsEach individual test has an option menubutton for setting various options.

The SunDiag OPEN LOOK Interface 2-3
2
2.1 SunDiag Main WindowWhen you start the SunDiag system exerciser, an OPEN LOOK window isdisplayed, as shown in Figure 2-2. The window is divided into four smallersections:
• A system status panel that shows testing status.
• A performance monitor panel that displays performance statistics for thesystem under test.
• A control panel with buttons, settings, and window buttons for changing testparameters and options.
• A console window that displays operating system messages and test message.As superuser, you can execute operating system commands from thiswindow.
The Options menu buttons are also noted in Figure 2-2; they are explained inthe “Options Menu Buttons” section later in this chapter.
2.1.1 System Status Panel
The System Status panel is located in the upper left of the SunDiag mainwindow, as shown in Figure 2-3. This window shows you know how the testsare progressing. The top of the system status panel shows:
• Current system status (idle, testing, or stopped)• Number of successful system passes• Total number of errors• Elapsed time that testing has taken• Page number in the current view (for example, 1 of 4)
You can reset all the values in these fields to zero by clicking the Reset buttonon the control panel.
The lower portion of the panel shows the number of successful passes anderrors for each of the tests being run. The tests are grouped by device type, andan active test is marked with an asterisk. Use the Status View button tomanipulate this list. (See Section 2.2.4.4, “Status View Button.”)
The results displayed in this panel are stored in special log files. See the “LogFiles Window Button” section in this chapter for details.

2-4 SunDiag User’s Guide—August 1994
2
The “System passes:” field always shows the least number of passes that thelongest test has completed. For example, if the pmem test has completed twopasses while all other tests have completed four passes, the system status panelshows two system passes.
Figure 2-3 Sample System Status Panel
The SunDiag OPEN LOOK Interface 2-5
2
2.1.2 Console Window
The console window is displayed in the lower left corner of the SunDiag mainwindow. This console window is a standard Solaris console window; you canenter commands from this window as superuser and display the results.
Using the -c option when starting the SunDiag program redirects systemmessages from your system console window to the SunDiag console window.
Note – Do not start another Solaris console window after starting the SunDiagprogram. If you do, the SunDiag window will stop receiving system consolemessages. The SunDiag console will continue to receive SunDiag messages, butnot system console messages. Even if the new console window is closed later,the SunDiag console window will not receive console messages.
Figure 2-4 Sample Console window
2-6 SunDiag User’s Guide—August 1994
2
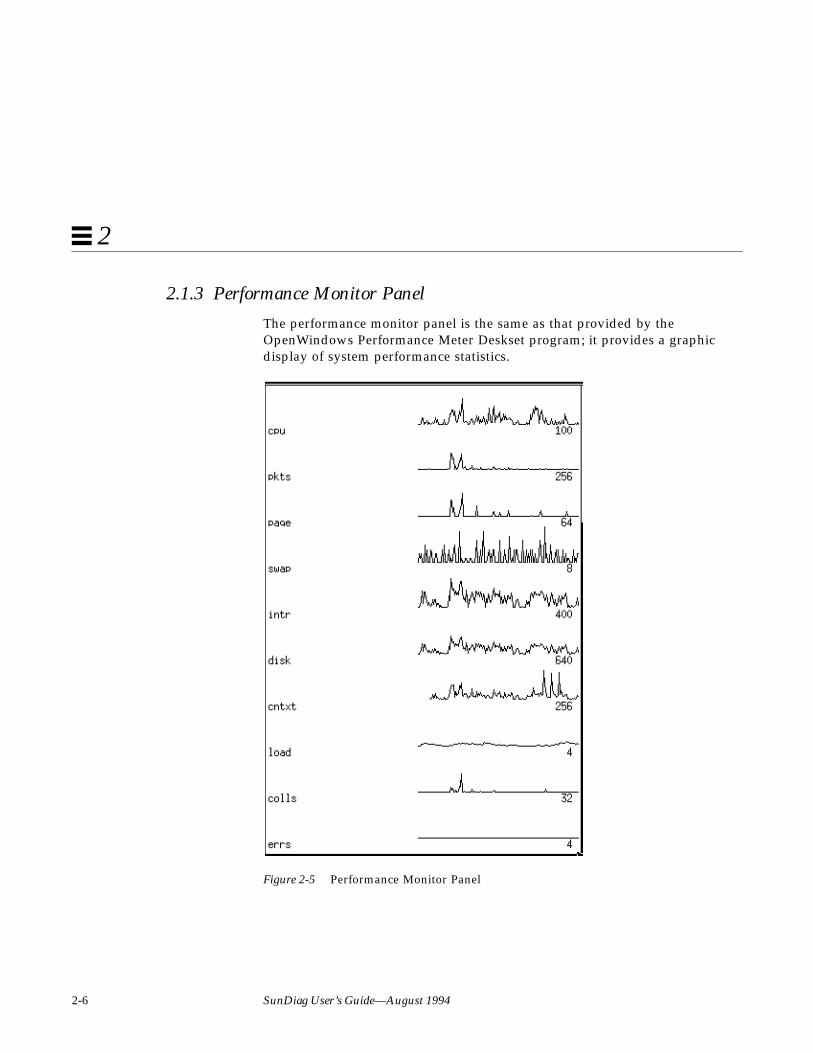
2.1.3 Performance Monitor Panel
The performance monitor panel is the same as that provided by theOpenWindows Performance Meter Deskset program; it provides a graphicdisplay of system performance statistics.
Figure 2-5 Performance Monitor Panel

The SunDiag OPEN LOOK Interface 2-7
2
The following table describes what each graph on the performance monitorpanel represents:
2.1.4 Control Panel
The contents of the lower part of the control panel are determined by yoursystem configuration. The SunDiag software automatically probes for availabledevices and displays them in this part of the control panel. Figure 2-6 onpage 2-9 shows the control panel for a generic SPARCstation™ system thatcontains:
• Physical and virtual memory• Two SCSI disk drives• Floppy disk drive• Floating point accelerator• Ethernet connection• Serial ports• Audio port• Color graphics accelerator• Special parallel port
When this window is displayed, check the devices listed in it against thedevices you know are installed on your system. If there are any discrepancies,check the boot-up information in the /var/adm/messages file to make surethat the operating environment sees all of your hardware devices.
Graph Description
cpu Percent of CPU being utilized
pkts Ethernet packets per second
page Paging activity in pages per second
swap Jobs swapped per second
intr Number of device interrupts per second
disk Disk traffic in transfers per second
cntxt Number of context switches per second
load Average number of runnable processes over the last minute
colls Collisions per second detected on the Ethernet
errs Errors per second on receiving packets

2-8 SunDiag User’s Guide—August 1994
2
If the operating system does not recognize a hardware device that you know isattached to your system, check the hardware and the Solaris kernelconfiguration.
Note – When adding a new device driver in the Solaris operating environment,you must reboot the machine with the boot -r command before the SunDiagsoftware will recognize the new driver.
When the software configuration agrees with the hardware configuration, youcan begin to select settings for the devices you want to test.
In Figure 2-6, the tests shown with bold frames are enabled for testing.
2.1.4.1 Selecting Options and Clicking Buttons
Move the pointer to a button and click SELECT. Click buttons to performactions such as Start/Stop and Reset/Suspend/Resume. Click window buttons(such as the Set Options and Log Files window buttons) to display a pop-upmenu that contains additional controls.
Clicking SELECT on a setting chooses that setting. Selected settings aredisplayed with bold frames on monochrome monitors. On color monitors,selected settings appear shaded, as if they are “pushed in.”
2.1.4.2 Dimmed Buttons
Some of the window buttons appear to be dimmed once testing has started.These buttons are not available until testing has stopped.

The SunDiag OPEN LOOK Interface 2-9
2
Figure 2-6 SunDiag Control Panel

2-10 SunDiag User’s Guide—August 1994
2
2.2 Setting SunDiag OptionsThe following sections describe the various buttons and settings that appear inthe top part of the control panel.
2.2.1 Start/Stop Button
When you click the Start button, the SunDiag exerciser starts all enabled tests.Once testing has started, the wording on the Start button changes to Stop.Clicking Stop will stop testing.
Note – Click Stop only once. This button does not change back to Start until alltests have stopped, and some tests do not stop immediately.
The System status item on the system status panel changes from “idle” to“testing” once testing has started. When you stop testing, the system statuschanges to “stopping,” then “idle.”
2.2.2 Reset/Suspend/Resume Button
The Reset button resets the passes and error count for each test in the systemstatus panel to zero. It also resets system passes, total errors, and elapsed timeto zero. This button works only when testing has stopped.
Once tests have started, this button becomes Suspend. If you click Suspend,System status in the system status panel changes to “Suspended,” and theSuspend button changes to Resume. When you are ready to resume testing,click the Resume button. After testing has stopped, the button changes toReset.
2.2.3 Print Button
Click the Print button to take a snapshot of the current screen and print the fileto the printer specified in the Set Options menu.

The SunDiag OPEN LOOK Interface 2-11
2
2.2.4 Log Files Window Button
The SunDiag system exerciser saves the status of its progress in three log files.These files contain Error, Information, and UNIX Messages. You can accessthese files by clicking the Log Files window button.
Warning – Do not attempt to edit message files while the SunDiag exerciser isrunning. You may only display, print, or remove these files. Editing these fileswhile SunDiag exerciser is running causes the software to crash.
With the resulting pop-up menu you can to display, remove, or print each ofthose log files.
Figure 2-7 Log Files Window
The three log files in this menu are:
/var/adm/sundiaglog/sundiag.err SunDiag’s Error Status Log/var/adm/sundiaglog/sundiag.info SunDiag’s Information Log/tmp/unix.msg Solaris System Message Log
The sundiag.err file contains SunDiag test error messages and start/stoptimes. The status log file sundiag.info contains informative SunDiag andprobe messages generated while starting and stopping the SunDiag program.The /tmp/unix.msg file is a concatenation of general UNIX messages in the/var/adm/message* files.
2-12 SunDiag User’s Guide—August 1994
2
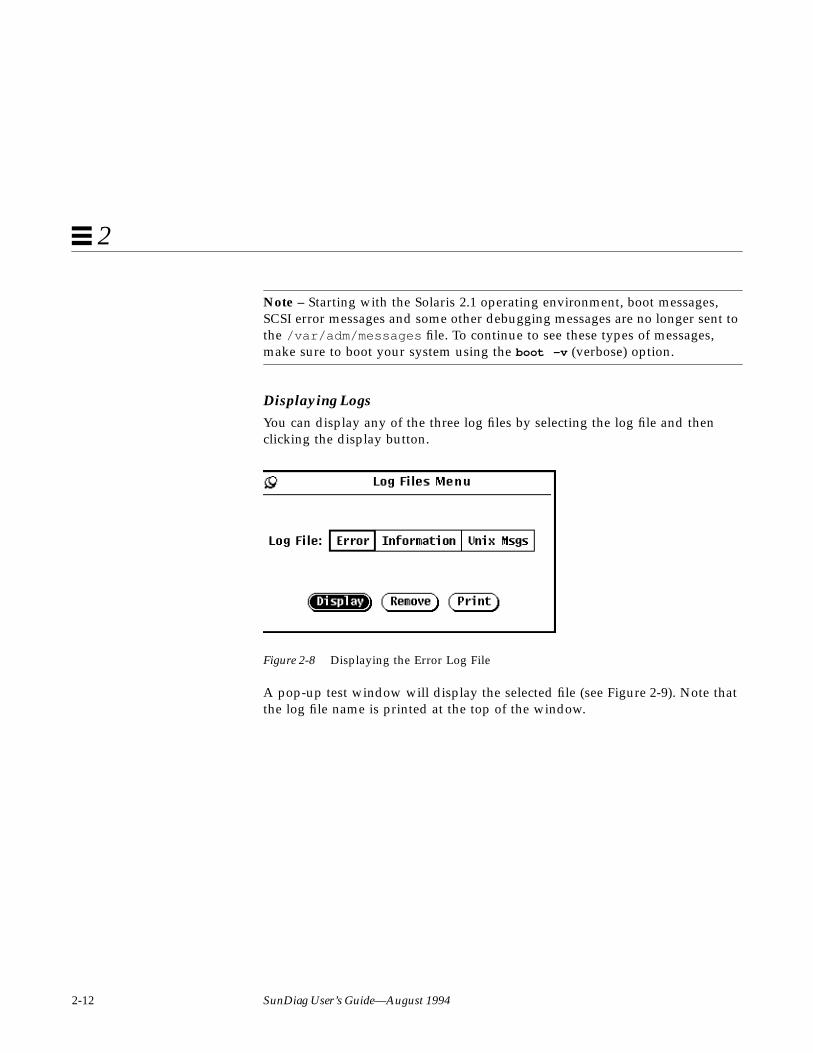
Note – Starting with the Solaris 2.1 operating environment, boot messages,SCSI error messages and some other debugging messages are no longer sent tothe /var/adm/messages file. To continue to see these types of messages,make sure to boot your system using the boot -v (verbose) option.
Displaying LogsYou can display any of the three log files by selecting the log file and thenclicking the display button.
Figure 2-8 Displaying the Error Log File
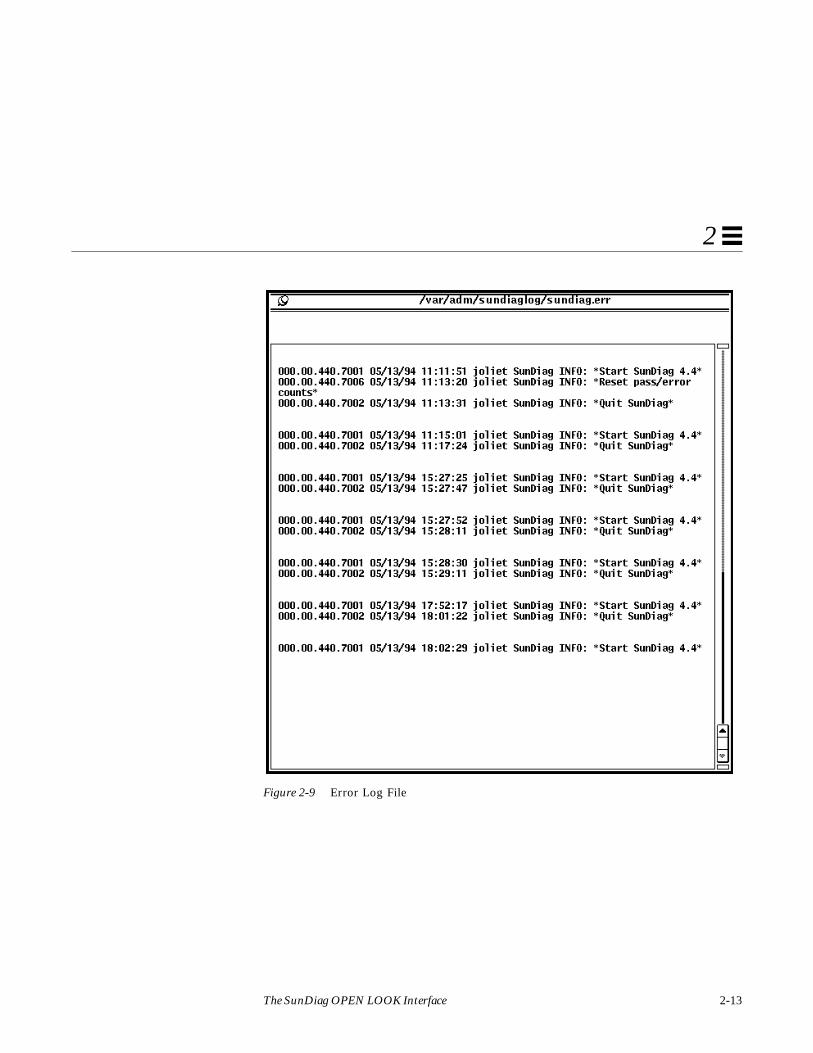
A pop-up test window will display the selected file (see Figure 2-9). Note thatthe log file name is printed at the top of the window.
The SunDiag OPEN LOOK Interface 2-13
2
Figure 2-9 Error Log File

2-14 SunDiag User’s Guide—August 1994
2
Log File Test Message SyntaxTTT.VV.SSS.EEEE date time devicename testname [ERROR|FATAL|INFO|WARNING]
message
A typical error message generated by a test looks like this:
Refer to Table 5-2 on page 5-3 for a list of tests and their correspondingidentification numbers.
The format of SunDiag kernel messages is:
Table 2-1 Log File Test Message Syntax
Arguments Description
TTT The test identifier.
VV The two digit test version identifier.
SSS The subtest identifier.
EEEE The error identifier; the first digit is the priority identifier(message type) and the last three digits are the message identifier.The priority identifier number is one of the following:
9: ERROR
7: INFO
5: WARNING
3: FATAL
date time Tells when the error occurred.
devicename The device under test where the error occurred.
testname The name of the test reporting the error.
message This argument varies considerably, depending on the type of testrunning when the error occurred.
009.33.999.9025 12/13/89 18:54:49 xy0 fstest ERROR:not enough trace blocks on xy0
TTT.VV.SSS.EEEE date time hostname sundiag [ERROR|FATAL|INFO|WARNING]:message

The SunDiag OPEN LOOK Interface 2-15
2
When the SunDiag kernel probes for devices at power-up, a message isdisplayed if any problems are found. The format is:
Removing Log FilesClick Remove on the Log Files window to truncate the selected log file (removeall but the most recent few entries of the log file).
Figure 2-10 Confirming Error Log Removal
Printing Error LogsClick Print to print the entire log file to your default printer.
Note – These logs can be very long. Make sure you want the entire file beforeprinting it.
TTT.VV.SSS.EEEE date time hostname probe [ERROR|FATAL|INFO|WARNING]

2-16 SunDiag User’s Guide—August 1994
2
2.2.4.1 Schedule Window Button
Click the Schedule window button to display a pop-up menu like the oneshown in Figure 2-11. The test schedule menu allows you to set start and stopdates and times to automatically run the SunDiag exerciser.
Figure 2-11 Test Schedule Menu

The SunDiag OPEN LOOK Interface 2-17
2
▼ How to Use SunDiag’s Schedule Feature
1. Click Enable.This setting needs to be enabled for the schedule feature to work.
2. Fill in the necessary times and dates for automatic testing.Type times in the form of hours:minutes:seconds .
For example: 2:30:00 runs SunDiag for two-and-a-half hours.
Type dates in the form of month/day/year .
For example: 1/15/93 represents January 15, 1993.
Include the colons and slashes.
Note – You don’t have to fill in all of the fields for the schedule feature towork. Stop Date, Stop Time, and Run Time override each other. If you set thesefields with conflicting times, the SunDiag software will stop testing at theearliest specified time.
3. Click Apply.The SunDiag exerciser will begin automatic testing at the start time andcontinue testing until either the Run Time or Stop Time parameter is met.
2-18 SunDiag User’s Guide—August 1994
2
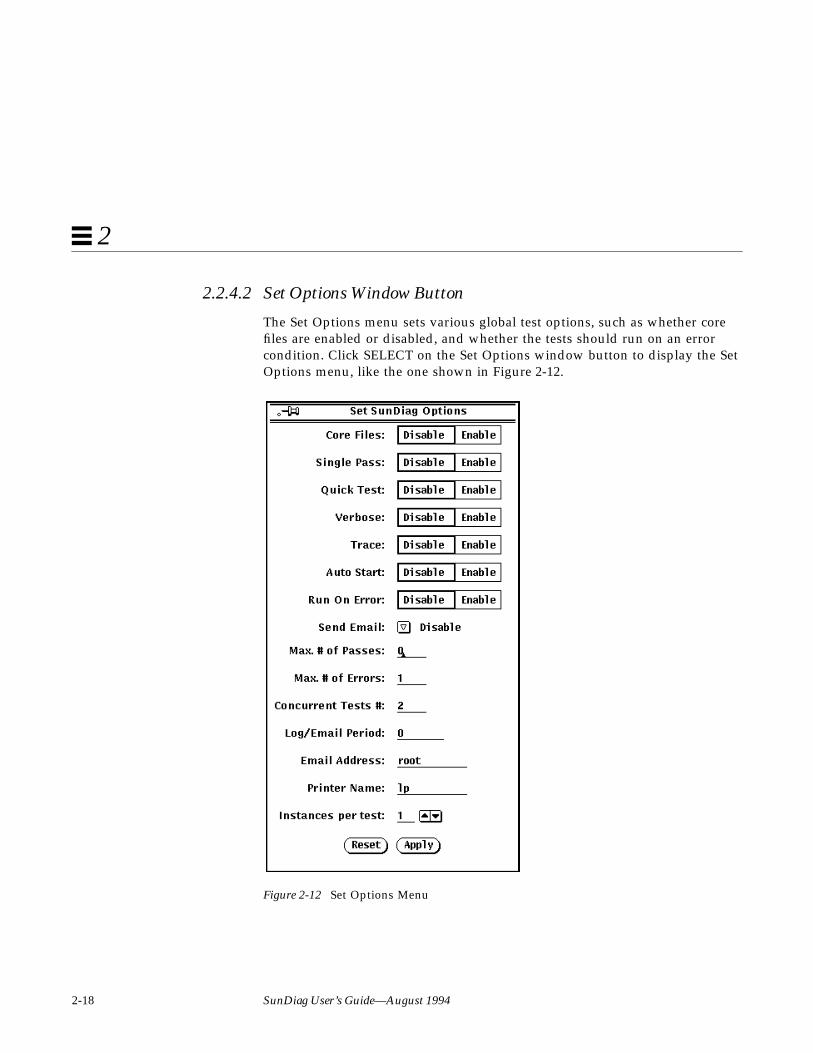
2.2.4.2 Set Options Window Button
The Set Options menu sets various global test options, such as whether corefiles are enabled or disabled, and whether the tests should run on an errorcondition. Click SELECT on the Set Options window button to display the SetOptions menu, like the one shown in Figure 2-12.
Figure 2-12 Set Options Menu

The SunDiag OPEN LOOK Interface 2-19
2
You can only change items on this menu when testing is stopped. The settingsare enabled or disabled by clicking SELECT. Selected items appear in boldframes on monochrome monitors, and “pushed-in” on color monitors.
Core FilesWhen you click Disable, the tests try to capture the signals that cause coredumps. This means that you receive informative messages instead of a corefile. These messages will appear on the SunDiag console window, and they willbe stored in the information log file /var/adm/sundiaglog/sundiag.infoand in the error logs file /var/adm/sundiaglog/sundiag.err . See “LogFiles Window Button” on page 2-11 for more details.
Single PassWhen enabled, all SunDiag tests will only execute one time.
Quick TestWhen enabled, abbreviated versions of the enabled tests are run. See theindividual test descriptions in Part 2 of this book for details; some testsperform normally when this option is specified.
VerboseWhen enabled, more diagnostic messages are printed in the console windowwhile tests are running.
TraceWhen enabled, the test programs are traced down by function names.Messages are printed in the console window while the tests are running.
Caution – Enabling trace is not recommended for the normal operation of theSunDiag system exerciser. Trace should be used for debugging purposes only,and it should be started from the command line.!

2-20 SunDiag User’s Guide—August 1994
2
Auto StartTo eliminate the need to click the Start button to start SunDiag testing:
1. Click the Auto Start setting.
2. Save the global options and test options (using the Option Files menudescribed in the next section) to a specified option file.
3. Specify the saved option file (using the -o argument) when you type thecommand line to invoke the SunDiag system exerciser. The program willstart testing after the window is displayed.
Run On ErrorWhen enabled, SunDiag runs failing tests continuously until the numberspecified for Max. # of Errors is reached.
Send EmailThis feature is designed to keep you apprised of testing status by sending themost recent 60 lines of the SunDiag information file,/var/adm/sundiag.info . Email is sent to the host machine.
To select the automatic send mail feature, press MENU on the Send Emailabbreviated menu button. The choices are:
• Disable - no email is sent.• On_Error - email is sent when the SunDiag software finds an error.• Periodically - used in conjunction with the Log/Email Period option.
When running, the SunDiag software sends email onceevery x minutes, where x is the period set in the Log/Emailfield.
• Both - SunDiag sends email both on error and periodically.
Max. # of PassesIf you enable this option, the SunDiag exerciser runs passing tests continuouslyuntil the number specified for Max. # of Passes is reached. Setting this optionto 0 runs the tests indefinitely until interrupted.
The SunDiag OPEN LOOK Interface 2-21
2
Max. # of ErrorsSee “Run On Error” above. A setting of 0 will continue testing no matter howmany errors are encountered.
Concurrent Tests #Type the number of tests you want to run concurrently.
Note – If you set this parameter to a high value, then you may need to set themaxusers parameter to accommodate the increased number of UNIX processes.See Section 1.2.6, “Setting the Maximum Number of Processes,” on page 1-8,for more information.
Log/Email PeriodThis option sets the time period you want the email error message to be sent (ifenabled) and enables the periodic status log. To set the Log/Email Period, typethe number of minutes. A zero entry disables this function.
Email AddressThis option tells SunDiag where to send the email message. The default is root.To change the address, remove the root entry and type a new address.
Printer NameType the name of the printer you want to use. The name should match an entryin your /etc/printcap file, such as lp1 , or the name of the host to which theprinter is attached. If you do not specify a printer, SunDiag uses the printerspecified with the PRINTER environment variable. If there is no PRINTERvariable, SunDiag prints on the printer specified by the lp entry in your/etc/printcap file. Any printer you specify must exist in the printcap file.
Instances Per TestSee Section 4.1, “Scalability Options” for instructions.
PAM (Scalable)See Section 4.1, “Scalability Options” for instructions.

2-22 SunDiag User’s Guide—August 1994
2
PAM (Non-scalable)See Section 4.1, “Scalability Options” for instructions.
The Reset and Apply buttonsClick the Reset button to reset the options to the default values (shown inFigure 2-12) and close the window. The Apply button applies the changedoptions to the SunDiag tests when they are started. You must click Apply forthe changes to take effect.
Note – “Unpinning” the Set Options window before clicking Reset or Applynegates any changes you make.
2.2.4.3 Option Files Window Button
Clicking the Option Files window button displays a pop-up window menu forthe option files that exist in the /var/adm/sundiaglog/options directory.The options stored in these files are those you have chosen from the SetOptions menu and from the control panel for specific tests. The Option Filesbutton works only when tests are stopped.
Figure 2-13 Option Files Menu

The SunDiag OPEN LOOK Interface 2-23
2
▼ How to Save Options to an Option File
1. Type the name of your option file in the test field.The SunDiag default option file is named .sundiag . If you start thesoftware without the -o option, the .sundiag file is used, if it exists.
2. Click Store.The SunDiag exerciser saves all options — including those from the SetOptions file and from individual test option menus — to the specified filename.
▼ How to Load an Option File
1. Press MENU on the abbreviated menu button to select an option file.The options saved in the available option files listed here are the ones youset in the Set Options menu, in addition to the options chosen for eachindividual test.
2. Click Load.This loads your current settings from the named file. To write a new file,click Store, and then Click Load. The next time you start testing, the optionsyou saved will be used, and the control panel will reflect these choices.
Click Remove to remove the named option file. The SunDiag program willprompt you for confirmation before removing the file.
Note – In option files, the Processor Affinity filed is a binary value (or “bitposition”) that simulates check boxes in the OpenWindows software. SeeSection 3.7, “Setting Processor Affinity Masks in TTY Mode,” on page 3-20 formore information about setting Processor Affinity Masks in ascii format.

2-24 SunDiag User’s Guide—August 1994
2
2.2.4.4 Status View Button
In some large systems, such as the SPARCcenter™ 2000 system, the SunDiagsystem exerciser may have as many as 100 disk tests running at one time. Eachtest is listed in the system status panel. You to quickly scroll the system statuspanel to a specific device using the Status View button.
The Errors Only option changes the system status panel to only list tests thathave failed. Errors Only is the default option; clicking SELECT toggles betweenviewing Errors Only and All Tests. The first, last, previous, and next pageitems scroll the list to the desired page.
Note – The status view menu button is available if the system status panel ismore than one page long, but certain choices (Next Page, Previous Page, FirstPage, and Last Page) are unavailable. Errors Only lists only tests that havefailed. Go To Device has no effect.
Figure 2-14 Using the Status View Button

The SunDiag OPEN LOOK Interface 2-25
2
2.2.4.5 Intervention Mode
This setting serves as a reminder that you must intervene before a test or testscan be run successfully. This setting affects two categories of tests:
• Tests of drives that require scratch media (tapes, discs, or diskettes)• Tests that require loopback connectors
The SunDiag software will not run these tests until you have enabledintervention mode by clicking Enable for the “Intervention Mode” setting onthe Control Panel. This setting does not change the program’s behavior; it justserves as a reminder that you must intervene.
2.2.4.6 Test Setting
The test setting below the intervention setting is a quick way for you to selectgroups of tests. Click Default to enable the default group of tests. The lowerpart of the control panel will enable those tests. Click None to enable none ofthe individual tests. Click All to select all of the tests.
Note – Clicking SELECT on an individual test name (“disabling”) while testsare running stops that particular test. Likewise, clicking None while tests arerunning is the same as clicking the Stop button.
2.3 Changing Individual Test OptionsThe lower part of the control panel lists the devices and corresponding testsavailable for testing. For example, fstest is a test that checks the file systemstructure for a disk, and so the SunDiag program provides an fstest for eachinstalled disk drive. Options menu buttons for each particular test are alsoshown. Click the Options menu buttons to display menus to change individualtest parameters. See “Options Menu Buttons” on page 2-26 for more details.
Devices are arranged into the following categories:
• MEMORY DEVICES• DISK DEVICES• CPU DEVICES• SBUS DEVICES• TAPE DEVICES

2-26 SunDiag User’s Guide—August 1994
2
When started, the SunDiag software probes the kernel for available hardwaredevices and displays them in this part of the control panel.
When the SunDiag main window appears, the control panel shows all teststhat have been enabled. This list includes all the devices found during thekernel probe, except those which require intervention or additional equipment.Clicking on the Start button will start all enabled tests.
Enable or disable tests by clicking the test names. Test names that are framed inbold or appear to be “pushed in” are selected. You can also enable or disablegroups of tests by selecting the device category name.
If a device is enabled during testing, the test(s) are started as soon as possible.If an enabled device is disabled during testing, the test(s) stop immediately.
Note – tapetest may not stop until the tape has fully rewound.
2.3.1 Options Menu Buttons
All tests have options menus that allow you to specify test parameters. Optionsmenus are displayed by clicking SELECT on the options window buttons to theright of each test listed on the control panel. (See Figure 2-2) All test optionsmenus have configurations and options fields.
Figure 2-15 shows the rawtest option menu for SCSI disk #0. It shows that thedisk has a 327.5 MB capacity, and that its controller ID is an SCSI CCS. Thisinformation comes from the operating system kernel. This test offers anexclusive setting control that can be “toggled” between read-only andread/write testing.

The SunDiag OPEN LOOK Interface 2-27
2
Figure 2-15 Options Menu for rawtest
Refer to the individual test descriptions in Part 2 — “SunDiag Tests” for test-specific options. When you are ready to view another option menu, double-click on the pushpin to dismiss the option menu, or Reset or Apply anychanges you have made. You can only view or make changes to one optionmenu at a time.

2-28 SunDiag User’s Guide—August 1994
2
2.4 Running the SunDiag Program from an IconThe SunDiag program continues to run if you close the SunDiag window to anicon. Close the SunDiag window as you would any other OPEN LOOKwindow by clicking SELECT on the window menu button on the upper left ofthe window frame. (You can also use the OPEN key keyboard shortcut). Evenin icon mode, you can monitor the SunDiag program for test failures.
Figure 2-16 Icons for SunDiag
This icon shows that SunDiag is running.
This icon shows that an error has occurred, and SunDiag may havestopped running. SunDiag continues to run if the “Run On Error” optionis enabled, or if the “Maximum # of Errors” has not been reached.

3-1
The SunDiag TTY Interface 3
This chapter describes how to set testing parameters using the SunDiag TTYinterface. This interface makes it possible to run the SunDiag system exerciserfrom a terminal attached to a TTY (or serial) port. This interface is also used bydefault when you remotely log into a system.
To use this interface, a terminal can be attached to a serial port of the systemunder test or connected with a modem. All the options available in the OPENLOOK version of the SunDiag interface have command equivalents in TTYmode. These commands are described in more detail in Chapter 2, “TheSunDiag OPEN LOOK Interface.”
Note – If you are remotely logged into a Sun system, you may still run theSunDiag software with the OpenWindows interface. Refer to Section 1.7,“Running the SunDiag Exerciser on a Remote System,” on page 1-15 for moreinformation.
3-2 SunDiag User’s Guide—August 1994
3
3.1 Using the SunDiag Program from a TerminalThe workstation under test must have the SunDiag software already loaded. Aterminal must be remotely logged into the system, or attached to a serial port.
Starting SunDiag from a TTY port (terminal) is almost identical to starting it inOPEN LOOK. Type in the command line described in Section 1.4, “Starting theSunDiag Exerciser.” The program senses that you are logging in from aterminal interface and automatically brings up the TTY version of the controlpanel.
Note – You can run the SunDiag software in TTY mode from a monitor.However, some framebuffer tests will fail. See Section , “TTY Mode andFramebuffer Window Locking,” on page 1-5 for more information.
3.1.1 Starting TTY Mode from a Shell Tool
To run the SunDiag software in TTY mode from an OpenWindows shell toolwindow, become superuser, and type:
A brief initialization message is displayed, followed by the main display, asshown in Figure 3-1.
Multiprocessing systemsIf your system under test is a multiprocessing system, the SunDiag programdisplays the number of processors at the top of each TTY screen after thehostname.
3.1.2 Executing Commands in TTY Mode — Use the Abbreviations
You can execute commands, set options, or change screens by typing at theCommand: prompt at the bottom of each TTY screen. Each of the TTYcommands has a one-letter abbreviation shown in parenthesis. You can typethe full command name, but you may find that it’s easier to type theabbreviation.
# /opt/SUNWdiag/bin/sundiag -t

The SunDiag TTY Interface 3-3
3
3.1.3 Navigating the Screens
You can view other screens and menus using the commands displayed at thetop of each screen. To go back to a previous screen, type d for done at thecommand prompt.
Figure 3-1 SunDiag TTY Main Display

3-4 SunDiag User’s Guide—August 1994
3
3.1.4 Main Display Commands
This section describes what to expect when you enter the commands shown inbrackets at the top of the TTY main display screen. The commands aredescribed in the order they appear on the screen, from left to right.
Note – Options are typed at the Command prompt at the bottom of the screen.Press Return after you type any of these commands.
[START]Typing start or s begins testing. After you have selected the tests and enteredthe system level and test level options of your choice, type start to begintesting. The Status window at the top of the screen will display “testing.”
[OPTIONS]Type options or o to display a menu of global system level options that affectevery test. See Section 3.2, “Options Menu,” on page 3-8 for an example of thedisplay and a description of each option.
[STATUS]Type status or a to display information about the tests in progress.
[SCHEDULE]Type schedule or m to display the scheduling options (See “How to UseSunDiag’s Schedule Feature” on page 2-17.)
[OPTFILES]Type optfiles or f to display global options you can save (see “Option FilesWindow Button” on page 2-22.)
[STOP]Type stop or t to stop all testing. While the SunDiag exerciser is stopping thetests in progress, the top right of the screen displays:
When all tests are stopped, the system status is idle .
System Status: stopping

The SunDiag TTY Interface 3-5
3
To stop an individual test, type the test name:
If a test has already stopped, type the test name to restart it.
[QUIT]Type quit or q to exit the SunDiag TTY interface. If you have remotely loggedin, change directories to your remote entry point and exit the remote log-in.
[RESET]Type reset or r to reset the passes to zero. This also resets the error count foreach test, the system passes, and the total errors. This option is valid onlywhile tests are stopped.
[SUSPEND]Type suspend or p to suspend all testing. When you type this command, thesystem status window at the top of the screen displays “suspended.”
[RESUME]Type resume or u to resume testing after you’ve suspended testing. When youtype this command, the system status window displays “testing.”
[EEPROM]The SunDiag software and the Solaris environment only support SPARCarchitectures. Typing eeprom or e will report the following error:
The EEPROM feature is not available!
[LOGFILES]Type logfiles or l to display the operations you can perform on the log filesstored in the /var/adm/sundiaglog directory. See “The Log Files WindowButton” in Chapter 2 for more details.
[HELP]This option is not available at this time.
[NEXT]Type next or n to display the next screen of information when a second screenis needed. When you reach the end of the display, type n again to page back tothe beginning, or type a new command from those in brackets at the top of thescreen.
Command: memMessage:

3-6 SunDiag User’s Guide—August 1994
3
[INTERVENTION]When you type intervention or i in the control panel display, the[INTERVENTION]: text item toggles from Disable to Enable or fromEnable to Disable. When you enable intervention mode, you can nowenable tests that require special loopback connectors and scratch media. If youtry to enable a test that requires intervention mode and it is not enabled, amessage at the bottom of the screen reminds you to enable it.
[TESTS]Type tests default or c d to run all default tests when you type start.A -> symbol will appear before each default test. All default tests run whenyou type start .If you type tests none or c n , no tests are enabled, and the -> symbolsdisappear from the test names.If you type tests all or c a and intervention is disabled, all tests that do notrequire user intervention are enabled, and an arrow is displayed in front ofeach test. If intervention mode was enabled before you entered tests all , alltests displayed are enabled.
3.1.5 Scrolling
With the next command you can view a display that is too long to fit on oneterminal screen. When you reach the end of the display, the next commandtakes you back to the beginning.
When you type the first character of a command, the screen clears anymessages at the bottom of the screen.
3.1.6 Redrawing the Screen
To redraw the screen, type Control-L.
When tests are actively running, an asterisk is displayed before the test name,as in the OPEN LOOK mode.
Some commands bring up a secondary display that replaces the existing one.You can type d for done from most displays and return to the control paneldisplay.
The SunDiag TTY Interface 3-7
3
The SunDiag TTY interface attempts to simulate all the windows you see whenyou use the OPEN LOOK interface. In some cases, features are combined foryour convenience. For example, the status panel shows whether a test is inprogress or has failed. A secondary display either shows all available controlpanel commands besides those available from the current level, or provides adone command that returns you to the original display.
Note – When you choose to Display a log file, the SunDiag TTY interface usesvi to display the file. You must then use the vi command :q to exit from thatdisplay.
3.1.7 Running the SunDiag Exerciser in the Background
To run the SunDiag exerciser with the TTY interface in the background, pressControl-X. This frees your screen for other functions. You can also log out ofthe remote system after placing the program in background mode. CustomerSupport personnel often run the SunDiag software in the background to freeup the system for other diagnostic applications.
To bring the SunDiag exerciser back into view, log back into the remote system,if necessary, and type /opt/SUNWdiag/bin/sundiagup . The SunDiag displaywill reappear.
3.1.8 Enabling and Disabling Individual Tests
If you do not want to run the preselected default tests or all the tests, you canenable or disable any test by entering its name as shown in parentheses. Forexample, if there is no -> symbol in front of the display
you can type mem to enable the physical memory test. An arrow is displayedbefore the test name. Typing mem again disables the test and removes the arrow.Tests that do not have an arrow in front of the test name are not run when youtype start . As mentioned earlier, you can also type a test name to stop anindividual test in progress, or start a new test.
(mem) Physical [OPTION]

3-8 SunDiag User’s Guide—August 1994
3
3.2 Options MenuTyping options or o in the control panel displays the system option menu asshown in Figure 3-2.
Figure 3-2 System Option Menu
Commands can be entered as complete words or with the abbreviationsdisplayed in parentheses after each command word.
These commands correspond to the Set Options menu items described in detailin Chapter 2, “The SunDiag OPEN LOOK Interface.”
The SunDiag TTY Interface 3-9
3
When you type default or f , the preselected default system options areenabled. The display should display enabled after each default option.
To exit from this display, type done or d.
The corefile (o), single pass (s ), quick test (q), verbose (v), auto start (a) and run onerror (r ) options toggle from disable to enable when you type their commands.For example, if the display shows:
and you type corefile or o, the option of having a core dump saved in a fileis enabled, and the display changes to Enable . When you type the commandagain, the display changes back to Disable , and the tests attempt to capturethe signals that cause core dumps. Messages will be displayed instead of a corefile.
To change the maximum number of errors the SunDiag exerciser allows beforestopping tests, type:
or:
When you press Return, the number you have typed is displayed aftermaxerrors .
To specify the maximum number of tests you want to execute concurrently,type:
[COREFILE] disable
maxerrors number
y number
concurrent number orc number

3-10 SunDiag User’s Guide—August 1994
3
To specify where you want your log files to be printed, type the printer name as itappears when you type lpstat -v . For example:
You can also type:
Note – You cannot print a screendump in TTY mode.
printer lp1
p printer_name

The SunDiag TTY Interface 3-11
3
3.3 System Status DisplayType status or a in the control panel to display the screen shown inFigure 3-3.
Figure 3-3 System Status Display Screen
Test messages display in the message line at the bottom of the screen.

3-12 SunDiag User’s Guide—August 1994
3
3.3.1 Status View Equivalents
TTY mode includes complementary commands for the Status View button. SeeSection 2.1.1, “System Status Panel,” on page 2-3 and Section 2.2.4.4, “StatusView Button,” on page 2-24 for more information on the system status display.The TTY commands change the behavior of the System Status Display in thefollowing ways:
[NEXT]Typing next or n scrolls the system status display to the next page, ifapplicable.
[PREV]Typing prev or p scrolls the system status display to the next page, ifapplicable.
[GOTO]Typing goto or g and then typing a page number scrolls the display to thespecified page. For example, typing g 3 would scroll the display to page 3.
[ERRORS]Typing errors or e restricts the system status display to show only those testswhich have failed.
[ALL]Typing all or a returns the display to the default: all tests.

The SunDiag TTY Interface 3-13
3
3.4 Option Files MenuType optfiles or f from the control panel to display the Option File menu.
Figure 3-4 TTY Option Files Menu

3-14 SunDiag User’s Guide—August 1994
3
The Option Files menu provides the opportunity to load and store the globalsystem options and the individual test options you have selected. The defaultoption file is .sundiag . You can create option files with different names, anduse the -o option when you invoke the SunDiag exerciser to use the optionsspecified in the named file. Any command you enter applies to the latest filethat was named.
For example, if you want the selected options to be stored in the .sundiagfile, listed after [NAME] , type store or s . If you want to remove the .sundiagfile, type remove or r . If you want to use the options that are stored in thenamed file the next time you run SunDiag tests, type load or l .
If you want to create a new option file, type:
The name you enter is displayed after [NAME] . To save the file, type store .
The option files named in this display are stored in the/var/adm/sundiaglog/options directory. If there are more files than thescreen is able to display at one time, type next or n to page forward. When youwant to return to the previous display, type done or d.
[NAME]
name newfilename
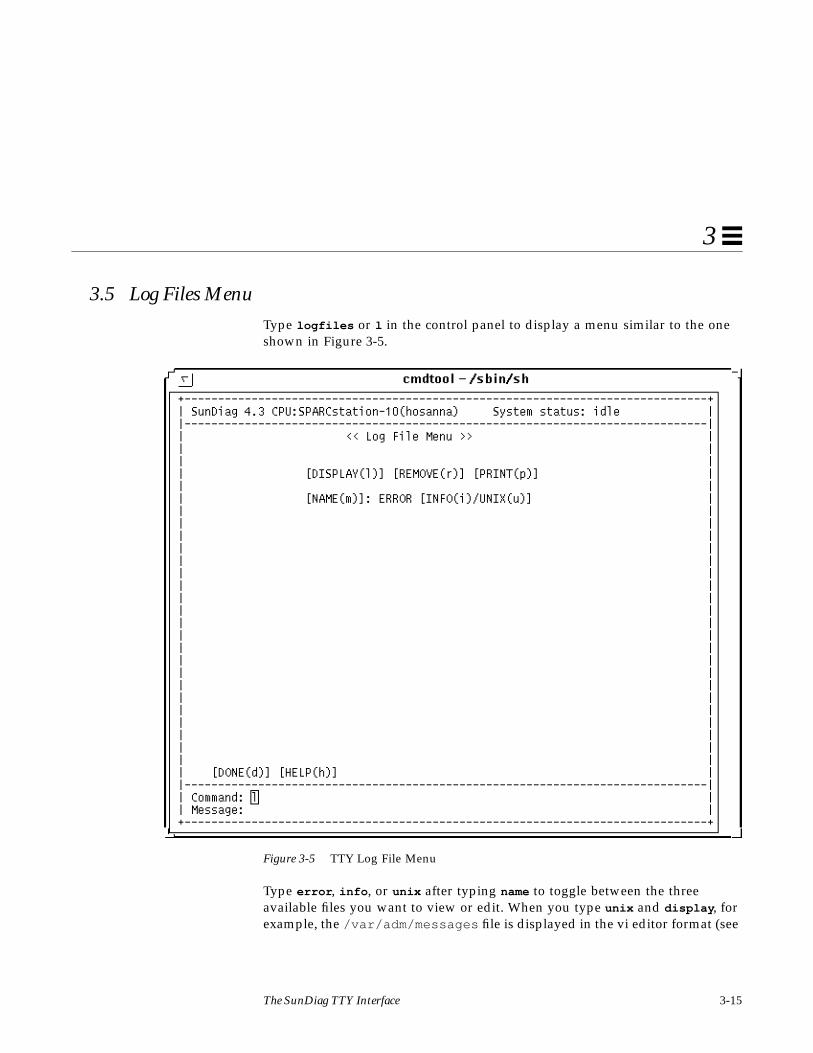
The SunDiag TTY Interface 3-15
3
3.5 Log Files MenuType logfiles or l in the control panel to display a menu similar to the oneshown in Figure 3-5.
Figure 3-5 TTY Log File Menu
Type error , info , or unix after typing name to toggle between the threeavailable files you want to view or edit. When you type unix and display , forexample, the /var/adm/messages file is displayed in the vi editor format (see
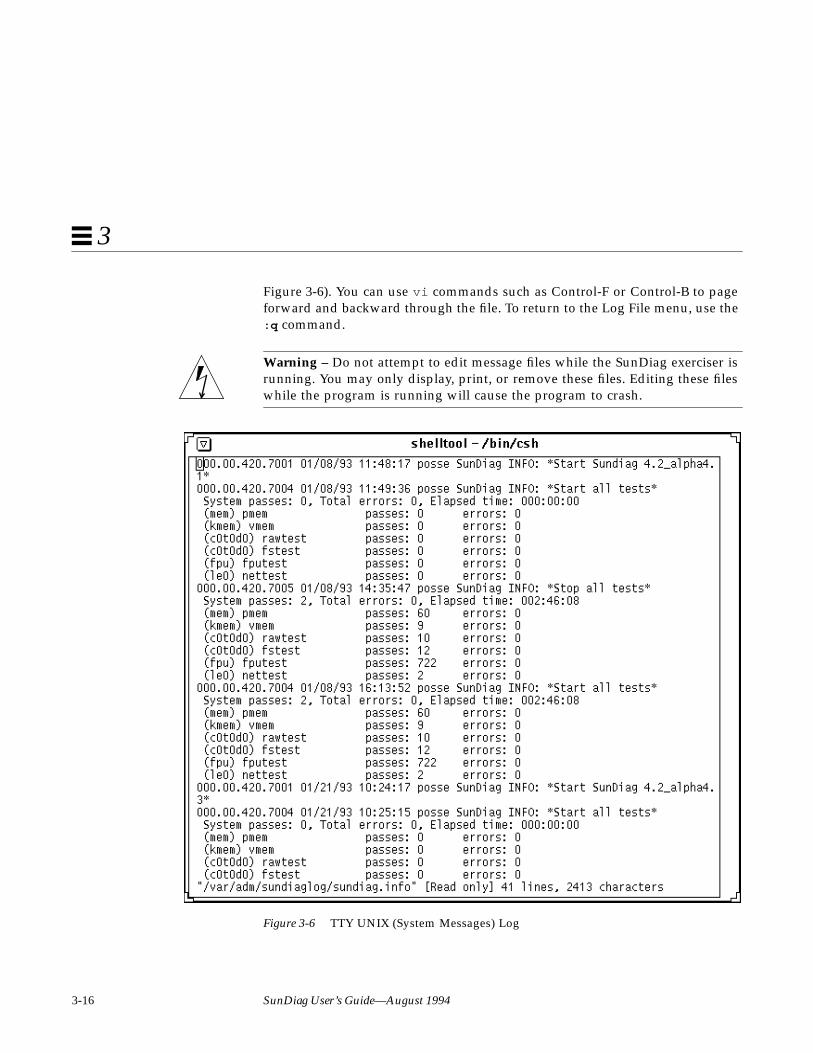
3-16 SunDiag User’s Guide—August 1994
3
Figure 3-6). You can use vi commands such as Control-F or Control-B to pageforward and backward through the file. To return to the Log File menu, use the:q command.
Warning – Do not attempt to edit message files while the SunDiag exerciser isrunning. You may only display, print, or remove these files. Editing these fileswhile the program is running will cause the program to crash.
Figure 3-6 TTY UNIX (System Messages) Log

The SunDiag TTY Interface 3-17
3
Type name info or i , and then display or l , to display the TTY info log.
Figure 3-7 TTY Info Log
Enter remove or r to remove the log file listed after [NAME] .
When you are ready to return to the previous menu, type done or d.
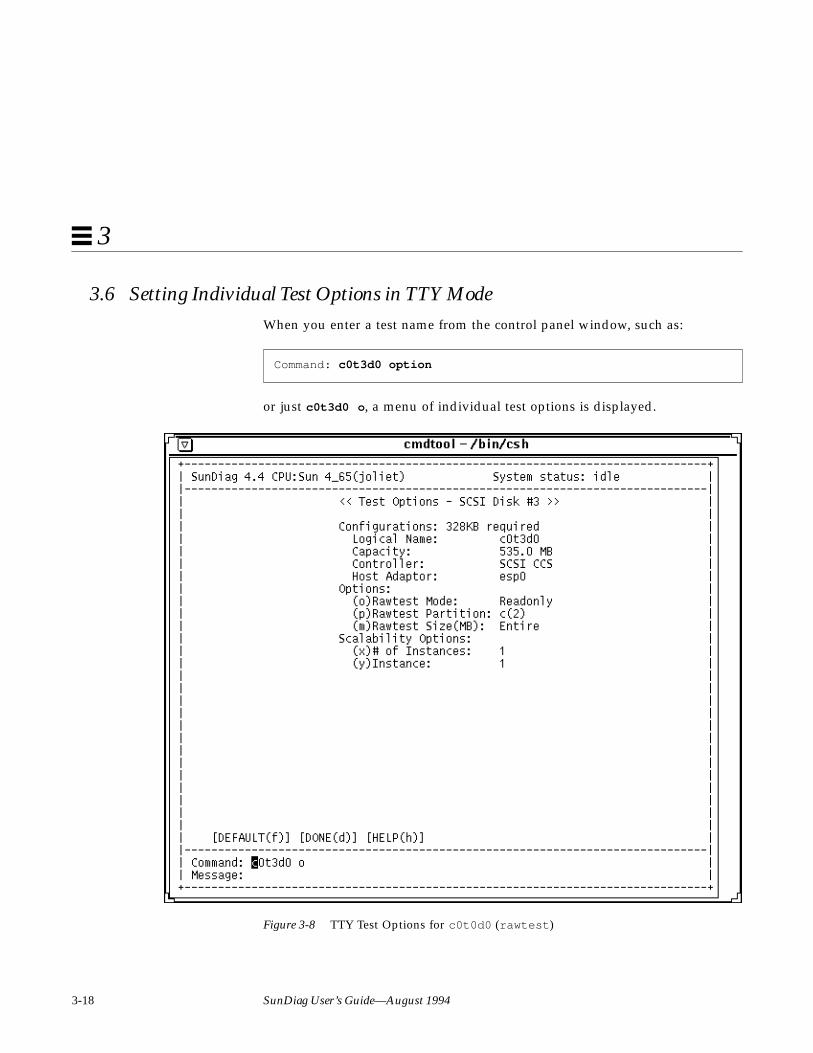
3-18 SunDiag User’s Guide—August 1994
3
3.6 Setting Individual Test Options in TTY ModeWhen you enter a test name from the control panel window, such as:
or just c0t3d0 o , a menu of individual test options is displayed.
Figure 3-8 TTY Test Options for c0t0d0 (rawtest )
Command: c0t3d0 option
The SunDiag TTY Interface 3-19
3
These options vary according to the type of test. Each menu displays[DEFAULT] [DONE] [HELP] at the bottom, and the devices found during thekernel probe are listed. Type f for default and the default options areenabled. Type d for done to go back to the previous menu. Help is notimplemented at this time.
Type the character in parentheses next to the sub-test or option to toggle theoption from Enable to Disable . Type the character again to toggle the optionor sub-test back from Disable to Enable .
Some options, like the Wait Time option to vmem, have a range of values tochoose from. Typing the option letter (w, in the case of the vmem Wait Timeoption) and then pressing Return will cycle the option through the range ofavailable values.
Other options, like the Reserve option to vmem, can be set to arbitrary values.Type the option letter (r , in the case of the vmem Reserve option) followed bythe value to be set. For example, typing r 10 reserves 10 megabytes in thevmem test.
In all cases, though, the TTY test option window emulates the OpenWindowsoption menu for each individual test where possible. For toggled items, typingthe command is sufficient. For text items, a value needs to follow thecommand. If you have trouble changing individual test options, refer to theoption menu printed in Chapter 6, “SunDiag Test Descriptions” for more detailon how the option works.
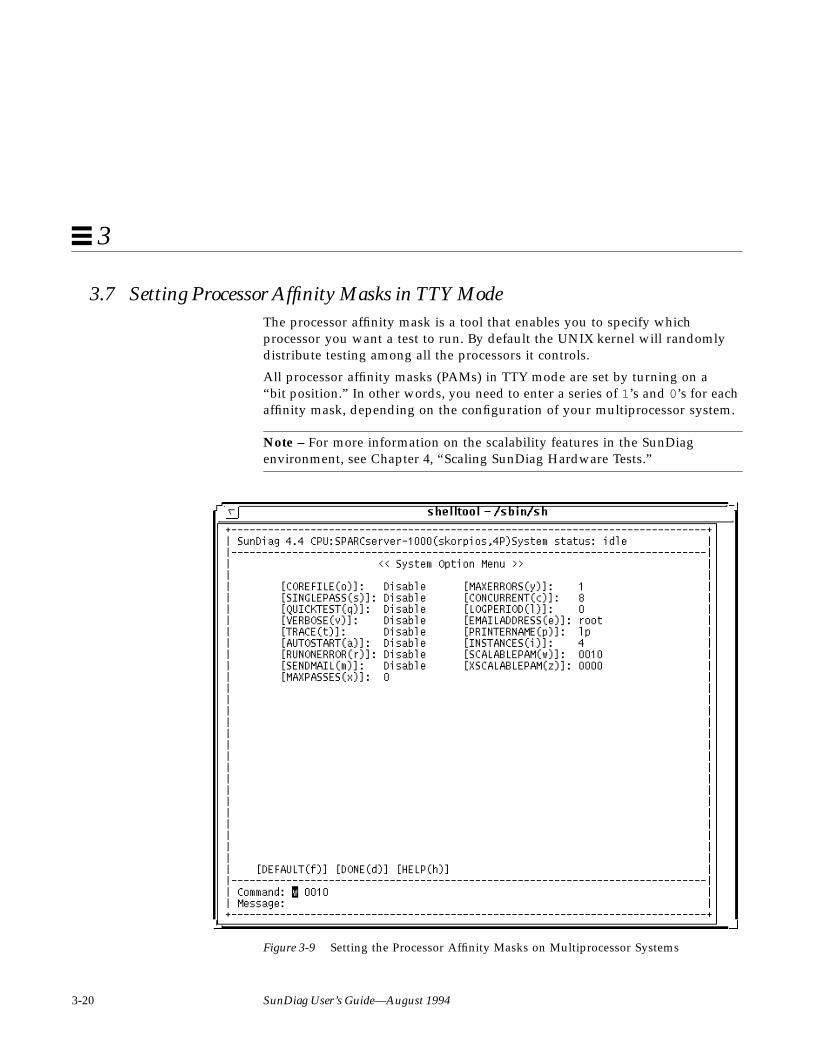
3-20 SunDiag User’s Guide—August 1994
3
3.7 Setting Processor Affinity Masks in TTY ModeThe processor affinity mask is a tool that enables you to specify whichprocessor you want a test to run. By default the UNIX kernel will randomlydistribute testing among all the processors it controls.
All processor affinity masks (PAMs) in TTY mode are set by turning on a“bit position.” In other words, you need to enter a series of 1’s and 0’s for eachaffinity mask, depending on the configuration of your multiprocessor system.
Note – For more information on the scalability features in the SunDiagenvironment, see Chapter 4, “Scaling SunDiag Hardware Tests.”
Figure 3-9 Setting the Processor Affinity Masks on Multiprocessor Systems

The SunDiag TTY Interface 3-21
3
In the Figure 3-9, there are four binary digits beside each PAM option for thefour processors in the system. There are four digits because there are fourprocessors in this system.
[SCALABLEPAM(w)]: 0010[XSCALABLEPAM(z)]: 0000
Note – On the OPEN LOOK interface, these four processors would benumbered: 0, 1, 2, and 3.
By default, no processor will be selected, so all the digits will be 0’s. To selectonly one of the processors for testing, you must set the processor digit to 1.
The [SCALABLEPAM(w)] option is used to reserve processors for scalable tests.In Figure 3-9, the third processor was chosen for testing by typing w 0010 . Inthis example, all the scalable tests will be run only on the third processor. Torun the scalable tests on only the second processor, you would type: w 0100 .
The [XSCALABLEPAM(z)] option is used to reserve processors fornon-scalable tests. For example, to run non-scalable tests on only the fourthprocessor, you would type: z 0001 .
Note – For a complete discussion on the PAM tool, see Section 4.1.6, “ProcessorAffinity Mask.”
3-22 SunDiag User’s Guide—August 1994
3

4-1
Scaling SunDiag Hardware Tests 4
4.1 Scalability OptionsTo thoroughly test single processor and multiprocessor systems, the SunDiagsoftware has been expanded to allow a much greater breadth and depth oftesting. Testing can now be scaled up as far as you need, to fully “stress” asystem. The SunDiag program allows you to run multiple copies of somespecific tests. This section describes the these scalability options and how touse them.
4.1.1 Scalable Tests
To stress processors adequately, some SunDiag tests have been modified so thatmultiple “Instances” (copies) of them can be run on a device simultaneously.These tests are known as Scalable Tests.
Scalable Tests• pmem (Read-only Physical Memory Test)• vmem (Write/Read/Compare Virtual Memory Test)• fputest (FPU Test)• fstest (Disk Filesystem Test)• rawtest (Disk Write/Read/Compare Test)• nettest (Network Interface Test, e.g. Ethernet)
4-2 SunDiag User’s Guide—August 1994
4
4.1.2 Non-scalable Tests
All SunDiag tests that are described in Chapter 6, “SunDiag Test Descriptions”that are not listed in the “Scalable Tests” section are non-scalable. Only onecopy of a non-scalable test can be run on a device at any one time.
4.1.3 Setting Scalable Test Options
Scalable test options can be set from the Set SunDiag Options menu (seeFigure 4-3) or from the individual test option menus. The processors availablehave boxes next to their names. If a check mark appears in the box, then testswill run on that processor. Click SELECT on these check boxes to toggle thesetting from enable to disable and back.
Figure 4-3 shows a Set SunDiag Options menu illustrating the scalabilityoptions near the bottom of the menu. Since no boxes are checked in this figure,the operating system will run scalable tests on any available processor.Figure 4-1 shows an fputest option menu with scalability options. In thisfigure, processor1 is enabled for testing.
Note – Saving scalable options to an options file is a somewhat complicated. Ifyou set scalable options globally using the Set SunDiag Options menu andthen save those options to an options file, the scalability options will appear tobe lost when you then load that options file. The options are reflected on theindividual test option menus, but not globally in the Set SunDiag Optionsmenu.
4.1.4 Setting Your Own Scalable Tests
If you have added your own scalable SunDiag test, you will need to add theSCA option flag to the /opt/SUNWdiag/bin/.usertest file. The SCA flagspecifies that the test will be scalable.
See Section 1.9.1, “Setting up a .usertest file,” on page 1-17 for moreinformation about the .usertest file.

Scaling SunDiag Hardware Tests 4-3
4
4.1.5 Test Instances
“Instances” are copies of a test running simultaneously on the same device. Forexample, if a test has eight instances, then eight copies of that test can be run,and each copy can be run on either one or all the processors in the systembeing tested.
The number of instances can be set from the Set SunDiag Options menu orfrom the individual test option menus. The maximum number of instances foran individual test is defined, by default, as twice the number of processors inthe system. You can run any number of instances of a test up to the defaultmaximum.
The maximum number of instances can be overridden by specifying the“-i number” option when you start the SunDiag exerciser. See Section 1.4,“Starting the SunDiag Exerciser,” on page 1-12 for more details.
You enable or disable testing on a processor by clicking SELECT on the checkbox next to each processor number.
4.1.6 Processor Affinity Mask
The Processor Affinity Mask (PAM) is a tool that enables you to specify onwhich processors a test will run. Masks are only used on multiprocessorsystems, and each processor has one corresponding mask. When a processor’smask is checked, that processor is enabled to run the test. You can set globalmasks from the Set SunDiag Options menu, or you can set a mask for each testfrom the individual test option menus.
If no processors are specified, then the SunDiag program will let the operatingsystem randomly distribute testing among the processors it controls. It is notrecommended you use random distribution, because there is no way ofverifying that all processors have been adequately tested.

4-4 SunDiag User’s Guide—August 1994
4
4.2 A Scalability ExampleFigure 4-1 shows the fputest option menu on a multiprocessing system,illustrating the scalability features. The “Scalability Options” section allowsyou to set the number of Instances (copies) of a test that will run on theprocessor you specify. Figure 4-2 shows the same option menu on auniprocessing system.
Figure 4-1 fputest Option Menu Example (Multiprocessor)
The “# of Instances” field displays how many copies of a scalable test areavailable to run. The default maximum number of instances is twice thenumber of processors in the system under test. The system in Figure 4-1 hasfour processors, so there are eight available test instances.
The Instance field in Figure 4-1 shows that the second of the eight instances ofthis test will be run on processor1.
Any of the instances of a scalable test can be set to any one of the processorsavailable. That processor selection is set with the “Affinity Mask” field. Thatfield contains a check box for each of the processors available.

Scaling SunDiag Hardware Tests 4-5
4
Click SELECT on the check box next to the processor you wish to enable fortesting. Click SELECT again to disable testing on that processor. A checked boxshows which processor the test will be run on. You can only check oneprocessor to run the test on; if no processors are selected, the test is run on allof the processors.
Figure 4-2 fputest Option Menu Example (Single Processor)
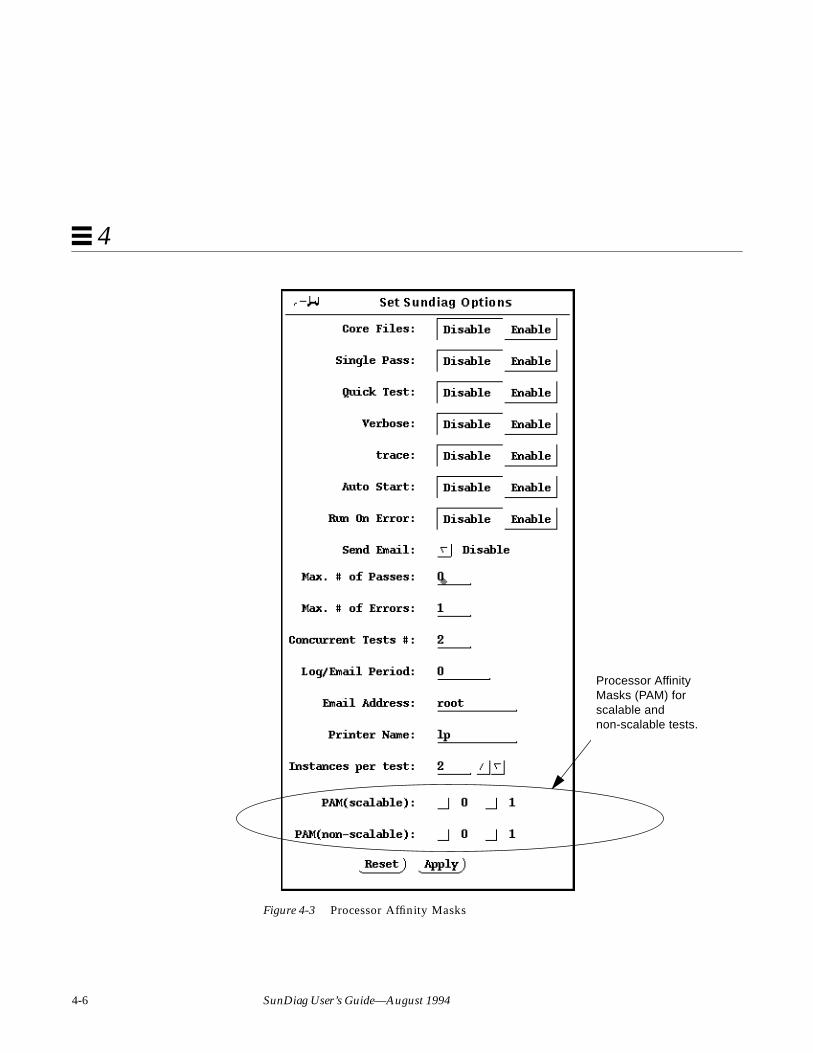
4-6 SunDiag User’s Guide—August 1994
4
Figure 4-3 Processor Affinity Masks
Processor AffinityMasks (PAM) forscalable andnon-scalable tests.

Scaling SunDiag Hardware Tests 4-7
4
▼ How to Set up Scalable Testing
1. Decide which SunDiag tests you want to run and enable them on thecontrol panel.
2. Set the testing parameters using the SunDiag control panel buttons. Openthe Set SunDiag Options menu and assign global Scalable and Non-scalable tests to specific processors.The choices you make here will be constant across all tests and processors.Remember, if you save these options to an options file and then load thatoptions file again, the tests won’t appear on the Set SunDiag Options menu.They will, however, be reflected in the individual option menus.
3. Adjust the scalability options in the individual test option menus, ifdesired.The Set SunDiag Options menu and individual test option menus canoverride each other. The SunDiag exerciser uses the settings applied last.

4-8 SunDiag User’s Guide—August 1994
4

5-1
Running Individual SunDiag Testsfrom the Command Line 5
This chapter describes how to execute individual SunDiag tests from acommand line. When running SunDiag tests individually from a commandline, change directories to the directory where SunDiag is located.
5.1 Standard ArgumentsEvery SunDiag test will accept ten standard command arguments. Thecommon line syntax is explained in Table 5-1.
Table 5-1 Standard Argument Syntax for Individual SunDiag Tests
/opt/SUNWdiag/bin/ testname test_specific_arguments [cprquvdt] [h hostname]
Arguments:
testname The name of the SunDiag test as it appears in the/opt/SUNWdiag/bin directory.
test_specific_arguments Refer to the individual test descriptions in “SunDiag Tests”for test-specific command arguments.
c Enable Core Dump. Creates a core dump file if a systemcrash happens.
p Single Pass Only.
r Run On Error. If an error occurs, the test continues with thenext test sequence instead of exiting.

5-2 SunDiag User’s Guide—August 1994
5
q Quick Test. Runs a faster, abbreviated version of the test if itexists. Not all tests have a quick option. See the individualtest descriptions in the chapters that follow for more details.
u List Usage. Shows how to run the test. It displays threeparts: command line usage, standard arguments, and routinespecific arguments.
v Verbose Mode. Displays verbose messages regarding the test.These messages tell you more about the testing process. Thismode is more valuable for some tests than others; forexample, graphics tests only return start and stopmessages/failures.
d Debug Mode. Displays debug messages from the test. Thesemessages provide more sophisticated information (mainlyfor test programmers).
t Trace Mode. Displays messages that enable you to tracedown function calls and the sequences being used by the testcode.
h hostname RPC host name. Allows you to specify a separate host nameto receive messages regarding this test.
Table 5-1 Standard Argument Syntax for Individual SunDiag Tests (Continued)
/opt/SUNWdiag/bin/ testname test_specific_arguments [cprquvdt] [h hostname]
Arguments:

Running Individual SunDiag Tests from the Command Line 5-3
5
5.1.1 Tests Supported by the Command Line Interface
The following table shows each individual test in the SunDiag exercisersupported by the command line interface and its identification number definedwithin the SunDiag kernel. For further information about these tests, refer tothe individual test descriptions in “SunDiag Tests” or the“SunDiag User’s Guide — Addendum for SMCC Hardware.”
Table 5-2 Tests Supported by the Command Line Interface
Test Names and ID Numbers
sundiag 0 probe 1
autest 2
cdtest 4
cg6test 6
rawtest 8
fstest 9 mono 17
fputest 12 nettest 18
newtest 19
pmem 21 sptest 23
sunbuttons 24 sundials 25
sunlink 26
tapetest 28
vmem 30 pstest 31
cg12 32 bpptest 33
lpvitest 34
spiftest 36 mptest 37
gttest 38 fbtest 39
audbri 41
xbtest 43
isdntest 45

5-4 SunDiag User’s Guide—August 1994
5
5.2 Running SunDiag Tests - OverviewThe following is an overview of the SunDiag testing procedure.
1. Log into the system under test as superuser and type the appropriatecommand to start SunDiag (as described in Section 1.4, “Starting theSunDiag Exerciser,”).Be sure to obtain display permission (server access) using thexhost + hostname command. See Chapter 1, “Introducing the SunDiagSystem Exerciser,” for a list of all software and hardware requirements forrunning the program.
2. Display the SunDiag window and check the devices shown in the controlpanel against the devices you know to be physically present in thesystem. Section 2.1.4, “Control Panel,” if there is a discrepancy.Starting the SunDiag exerciser often serves as a quick check for mosthardware devices. If you have just installed a device and reconfigured yourmachine accordingly, the SunDiag test for that device can confirm properinstallation.
Likewise, if the SunDiag environment fails to display a device you know isphysically present in your system, there is a problem, and you shouldrecheck your installation carefully.
3. Choose the global options from the Set SunDiag Options menu.These include both testing parameters and scalability options.
You can create a special global options file. You can load this file before youbegin testing, or you can specify the file with the -o option when startingthe SunDiag exerciser.
4. Choose options from the individual test option menus.If you want to exercise any different options from those set globally in theSet SunDiag Options menu, click the Options button next to the test name todisplay individual test option menus. These menus include individual testparameters, test-specific options, and scalability options.
5. Click the Start Button.Or, if you have enabled the Auto Start option from the Set SunDiag Optionsmenu and saved an options file, type sundiag -o options_filename from acommand line.

Part 2— SunDiag Tests

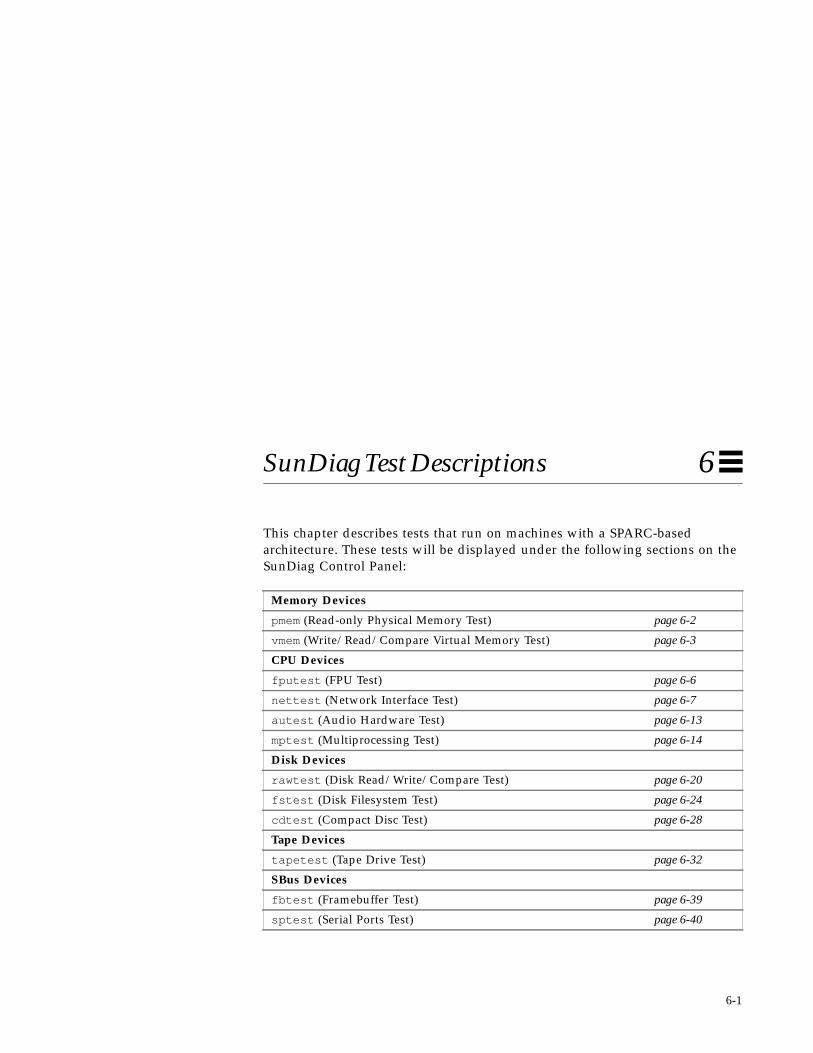
6-1
SunDiag Test Descriptions 6
This chapter describes tests that run on machines with a SPARC-basedarchitecture. These tests will be displayed under the following sections on theSunDiag Control Panel:
Memory Devices
pmem (Read-only Physical Memory Test) page 6-2
vmem (Write/Read/Compare Virtual Memory Test) page 6-3
CPU Devices
fputest (FPU Test) page 6-6
nettest (Network Interface Test) page 6-7
autest (Audio Hardware Test) page 6-13
mptest (Multiprocessing Test) page 6-14
Disk Devices
rawtest (Disk Read/Write/Compare Test) page 6-20
fstest (Disk Filesystem Test) page 6-24
cdtest (Compact Disc Test) page 6-28
Tape Devices
tapetest (Tape Drive Test) page 6-32
SBus Devices
fbtest (Framebuffer Test) page 6-39
sptest (Serial Ports Test) page 6-40

6-2 SunDiag User’s Guide—August 1994
6
6.1 Physical Memory Test (pmem)This test checks the physical memory of the system.
6.1.1 pmem Test Description
pmem locates parity errors, hard and soft error correction code (ECC) errors,memory read errors, and addressing problems. Through the memory device/dev/mem , pmem maps and then reads a page repeatedly throughout memory.
6.1.2 pmem Option Menu
Click the Options window button for the pmem test to display the windowshown in Figure 6-1.
Figure 6-1 pmem Option Menu
SunDiag Test Descriptions 6-3
6
6.1.3 pmem Configurations
The amount of memory shown in the Configurations field is the total physicalmemory probed by the kernel. It reflects the amount of memory found,rounded up to the nearest megabyte by any fraction.
6.1.4 pmem Command Line Syntax
/opt/SUNWdiag/bin/pmem s= size standard_arguments
6.1.5 pmem Quick Test Description
Specifying the q (quick test) option from the standard_arguments does notchange the pmem test procedure.
6.2 Virtual Memory Test (vmem)This test checks virtual memory; that is, it tests the combination of physicalmemory and the swap partitions of the disk(s).
Note – This test may not stop immediately after being disabled.
6.2.1 Swap Space Considerations
Running this test puts a significant burden on the operating system, since ituses the majority of swap space available for testing. You should use the swapspace reserve option to vmem when it is run with other tests or processes. See“Swap Space Requirements” on page 1-7 for a complete discussion of swapspace requirements. In addition, setting the Wait Time option can help youavoid problems of vmem hogging the system memory.
Arguments
s=size size is the amount of memory to be tested in page frames. Forexample, a system with 32 Mbytes of physical memory wouldhave 8192 page frames of 4096 bytes.

6-4 SunDiag User’s Guide—August 1994
6
6.2.2 vmem Test Description
This test uses the Solaris valloc (page aligned) system call to allocate, write,and then read as much virtual memory as is feasible. This test also detects ECCparity errors, memory read errors, addressing problems, and displays thecorresponding virtual memory addresses on failure.
6.2.3 vmem Option Menu
Click the Options window button for the vmem test to display the windowshown in Figure 6-2.
Figure 6-2 vmem Option Menu

SunDiag Test Descriptions 6-5
6
6.2.4 vmem Configurations
The amount of memory listed in the Configurations section is equivalent to thesum of the used and available swap space amounts returned by theswap -s command. It reflects the amount of virtual memory found, roundedup to the nearest megabyte by any fraction.
6.2.5 vmem Options
Wait TimeThe Wait Time option controls the time interval between vmem sessions. Theavailable time intervals are 0, 5, 10, 15, 30, 60, 90, or random minutes.Specifying “random” will use time intervals between 0 and 90 minutes for eachpass.
ReserveThe reserve option specifies the amount of memory to reserve from beingtested by vmem. The reserved space is used for other processes or SunDiag testsrunning concurrently. The reserve option can be used to reserve memory inaddition to the default.
6.2.6 vmem Command Line Syntax
/opt/SUNWdiag/bin/vmem U M= pattern_modifier m=#_of_MB R= #_of_MBpage cerrs= #_of_errors nerrs= #_of_errors standard_arguments
Arguments
U Returns an enhanced description of the vmem test, but doesnot run the test.
M=pattern_modifier pattern_modifier can be any integer. The integer defines thepattern used in the vmem test.
m=#_of_MB #_of_MB is the number of megabytes of memory to reservefor the operating system instead of the default amount.
R=#_of_MB #_of_MB is the number of megabytes of memory to reservein addition to the default amount.

6-6 SunDiag User’s Guide—August 1994
6
6.2.7 vmem Quick Test Description
Specifying the q (quick test) option from the standard_arguments does notchange the vmem test procedure.
6.3 Floating Point Unit Test (fputest )
Note – This test is not supported by machines with x386 or x486 processors.
This test checks the floating point unit on machines with SPARC architecture. Itperforms the following subtests:
• FSR Register test• Registers test• NACK test• Move Registers test• Positive to Negative test• Negative to Positive test• Absolute test• Single Precision Integer to Floating Point test• Double Precision Integer to Floating Point test• Single Precision Floating Point to Integer test• Double Precision Floating Point to Integer test• Single Precision Round Toward Zero test• Double Precision Round Toward Zero test• Single to Double Precision Format Conversion test• Double to Single Precision Format Conversion test• Single and Double Precision Addition, Subtraction, Multiplication, Square-
root, Division and Compare tests• Single and Double Precision Compare and Exception if Unordered tests• Branching and no Branching on Condition Instructions tests• Single and Double Precision Chaining tests• Weitek Status tests
page Tells the write/read memory to proceed one page at a time.
cerrs =#_of_errors Tells the test to simulate a number of contiguous errors.
nerrs =#_of_errors Tells the test to simulate a number of noncontiguous errors.
Arguments (Continued)
SunDiag Test Descriptions 6-7
6
• Lock test• Single and Double Precision Datapath tests• Timing (load) test• Linpack test
6.3.1 fputest Command Line Syntax/opt/SUNWdiag/bin/fputest standard_arguments
6.3.2 fputest Quick Test Description
Specifying the q (quick test) option from the standard_arguments does notchange the fputest test procedure.
6.4 Network Hardware Test (nettest )
Note – This new version of nettest will be used for all networking devices,including Ethernet (ie and le ), token ring (tr ), quad ethernet (QED), fiberoptic (fddi ), SPARCcluster™ 1 System (em), and 100 megabits per secondethernet (be) devices.
This test checks all the networking hardware on the system CPU board andseparate networking controllers (for example, a second SBus Ethernetcontroller). For this test to be meaningful, the machine under test must beattached to a network with at least one other system on the network.
6.4.1 nettest Test Description
nettest mainly uses the internet control message protocol (ICMP), andrequires at least two machines on a network — the machine under test andanother machine reliable enough to be a test target. Both machines mustsupport the transport control protocol/interface program (TCP/IP) (ICMP ispart of TCP/IP). The target machine must either be configured to respond toICMP broadcast or to RPC broadcast.

6-8 SunDiag User’s Guide—August 1994
6
The first thing nettest does is to determine the target machine(s) to testagainst. If no targets are specified, it will send an ICMP broadcast to find them.If it fails to find all necessary targets, it will try RPC broadcast to the RPC portmapper daemon. If you specify the targets, nettest uses the specifiedtarget(s) instead.
Random, Incremental, and PatternAfter finding the necessary targets, nettest performs the Random test, theIncremental test, and the Pattern test.
The Random test sends out 256 packets with random data length and randomdata.
The Incremental test sends out packets with length from minimum tomaximum packet size using incremental data. (Minimum and maximumvalues differ for each device.)
The Pattern test sends 256 packets of maximum length, where each packetcontains one test pattern, and all byte patterns (0 to 0xFF hex) will be used.That is, first packet contains pattern 0, second packet contains pattern 1, and soon, until the last packet pattern of 0xFF.
Note – nettest is a scalable test. However, the maximum number ofnetworked devices allowed on a system is 255, and the number of instances foreach device is limited to 200. So, if you start the SunDiag exerciser using the -ioption to specify a default number of instances for all tests, note that nettestcannot assign more than 200 instances per each networked device.

SunDiag Test Descriptions 6-9
6
6.4.2 nettest Option Menu
Figure 6-3 nettest Option Menu

6-10 SunDiag User’s Guide—August 1994
6
6.4.3 nettest Configurations
The Configurations section of the nettest Options menu describes the HostName, Host ID, Host Address, and Domain Name of the system under test.
6.4.4 nettest Options
The Target Host field specifies one or more targets to be tested against. Targethost entries may either be a host name or an internet address. When no targethost is specified, the test will find necessary targets via broadcasting. Thedefault setting leaves this field empty.
Use the check boxes to select either the Random, Increment, or Pattern tests.All three tests are selected as a default.
The Delay Time field default is 120 seconds, but it can be changed. Choose avalue from this list: 10, 30, 60, 120, 180, 240, 300, 360, 420, 480, 540, 600, or 1200.
The Receive Timeout field default is 120 seconds, but it can be changed.Choose a value from this list: 10, 30, 60, 120, 180, 240, 300, 360, 420, 480, 540, or600.
The No. of Retries field default retry is 7 retries before flagging an error. Thisfield can also be changed — use a range between 0-128 retries.
The Print Warning setting is disabled by default. Click on Enable to seewarning errors, such as retry on timeout.
The No. or Packets field default is 256. You can choose another field value fromthis list: 256, 512, 1024, 2048, 4096, 8192, 16000, 32000, or 64000.

SunDiag Test Descriptions 6-11
6
6.4.5 nettest Command Line Syntax
/opt/SUNWdiag/bin/nettest [TARGET= h1+h2+...] [IF= interface] [TEST= n]
[N= nopkts] [P= pattern] [D= seconds] [T= seconds] [R= retries] W standard_arguments
6.4.6 nettest Quick Test Description
If you specify the q (quick test) option from the standard_arguments, nettestruns only the Random test with 256 packets.
Arguments
[TARGET=h1+h2+...] Specify a list of test targets, by hostname or internetaddress.
[IF= interface] Network interface name. The default value is le0 forEthernet networks.
[TEST= n] Specifies the test type. Type 1 for only the Random test, 2for the Incremental test, 3 for the Pattern test. The defaultvalue is 7, which specifies all tests to be run.
[N= nopkts] Number of random/pattern packets. The default is 256.
[P= pattern] Specifies a data pattern, in hexadecimal form. The defaultis all patterns from 0 to 0xff .
[D= seconds] Delay time between subtests in seconds. The default is 30seconds.
[T= seconds] Number of seconds to wait before time-out. The default is30 seconds.
[R= retries] Number of test timeout retries. The default is 7 retries.
W Print warning messages.

6-12 SunDiag User’s Guide—August 1994
6
6.4.7 nettest Error Messages
Unable to find any test target
No target is found, test can’t be done. This test requires a reliable target hostbe connected to the network.
ICMP echo reply timeout from < target_hostname>
Transmitted packet is lost or the target host couldn’t receive, or the targetdoesn’t respond, and the machine under test has tried three times withoutsuccess.
ICMP echo reply incorrect length, exp %d obs %d
Packet is corrupted.
ICMP echo reply length %d, data mismatch at byte %d, exp0x%02x obs 0x%02x
Packet data is corrupted at the indicated byte offset.
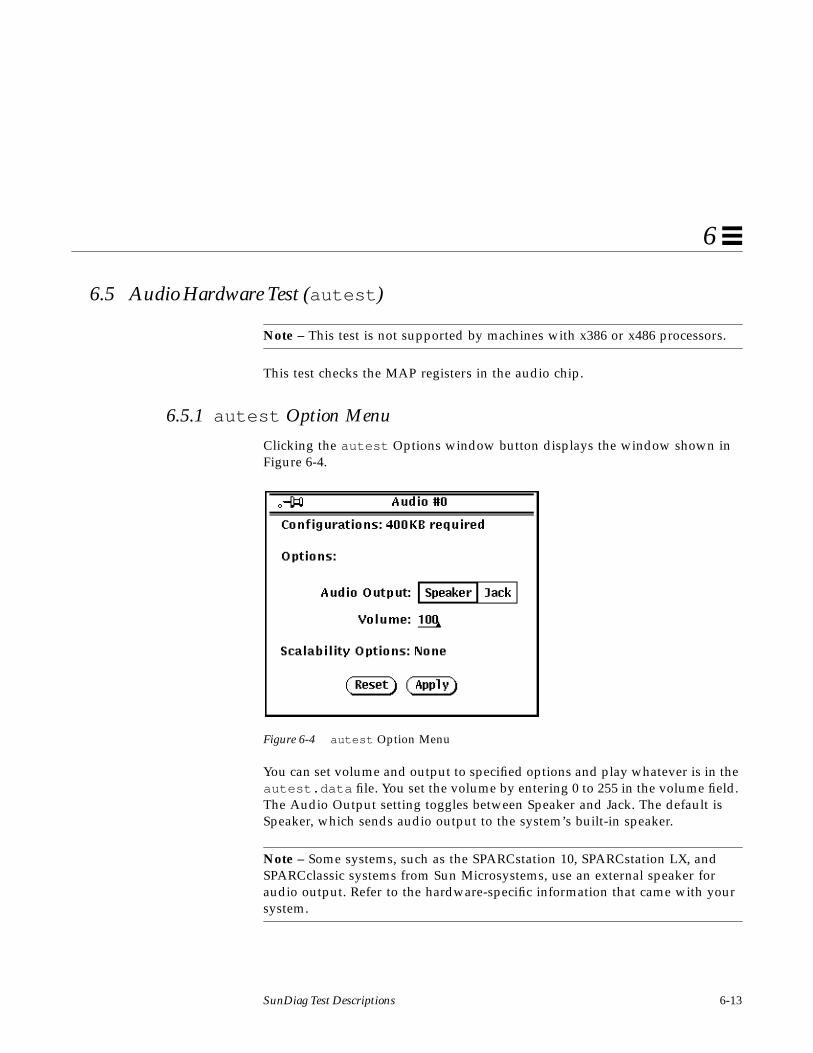
SunDiag Test Descriptions 6-13
6
6.5 Audio Hardware Test (autest )
Note – This test is not supported by machines with x386 or x486 processors.
This test checks the MAP registers in the audio chip.
6.5.1 autest Option Menu
Clicking the autest Options window button displays the window shown inFigure 6-4.
Figure 6-4 autest Option Menu
You can set volume and output to specified options and play whatever is in theautest.data file. You set the volume by entering 0 to 255 in the volume field.The Audio Output setting toggles between Speaker and Jack. The default isSpeaker, which sends audio output to the system’s built-in speaker.
Note – Some systems, such as the SPARCstation 10, SPARCstation LX, andSPARCclassic systems from Sun Microsystems, use an external speaker foraudio output. Refer to the hardware-specific information that came with yoursystem.
6-14 SunDiag User’s Guide—August 1994
6
6.5.2 autest Command Line Syntax
/opt/SUNWdiag/bin/autest V= volume O= output standard_arguments
6.5.3 autest Quick Test Description
Specifying the q (quick test) option limits the test data size length to 0x1000.
6.6 Multiprocessing Test (mptest )
6.6.1 mptest Test Description
The SunDiag Multiprocessor test verifies the functionality of multiprocessinghardware. This test starts by allocating a page of virtual memory for the test,declaring the page shared, locking the page against swapping, and forkingchild processes to each of the processors being tested. This test uses those childprocesses to verify that the processors are functioning properly.
Arguments
V=volume Specifies the audio volume. The range is 0 through 255.
O=output Specifies the audio output. The choices are speaker or jack .
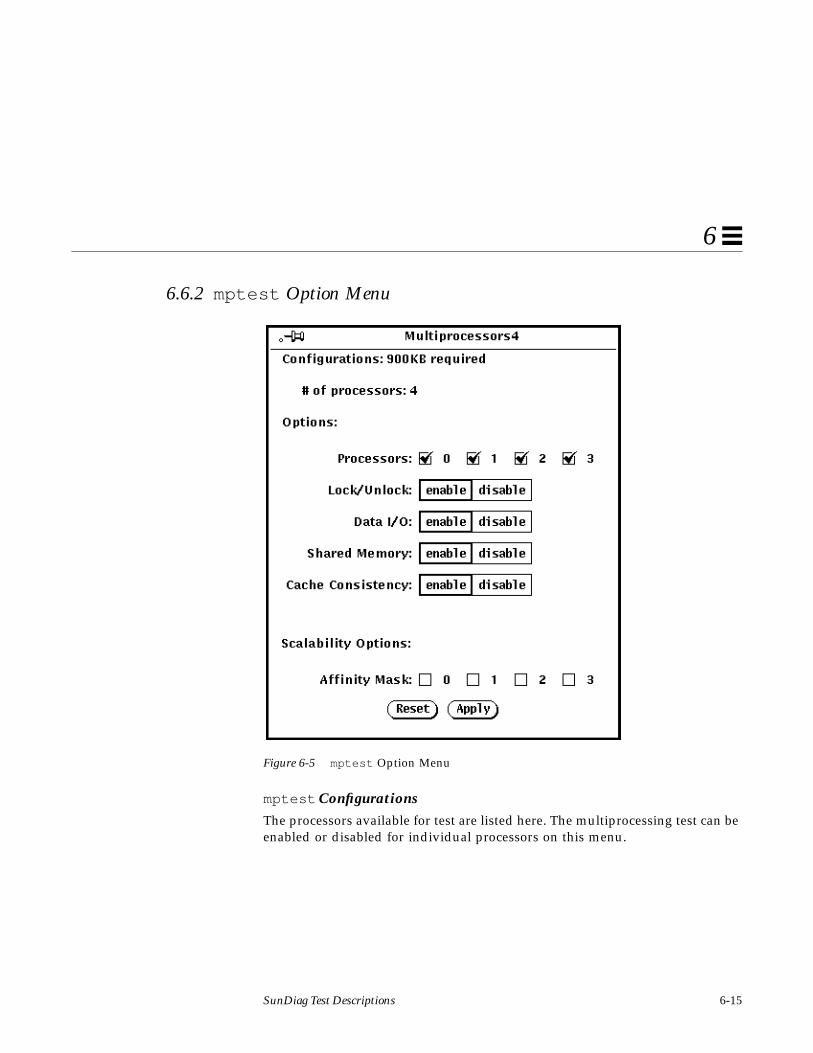
SunDiag Test Descriptions 6-15
6
6.6.2 mptest Option Menu
Figure 6-5 mptest Option Menu
mptest ConfigurationsThe processors available for test are listed here. The multiprocessing test can beenabled or disabled for individual processors on this menu.

6-16 SunDiag User’s Guide—August 1994
6
6.6.3 mptest Options
The following options can be run individually or concurrently:
ProcessorsThis option allows you specify which processors to test. Click SELECT on thecheck boxes to enable or disable each processor. A check mark means theprocessor is enabled for testing; the default setting is all processors enabled.Note that mptest requires at least two enabled processors to testmultiprocessing systems.
Lock/UnlockThis option tests the lock/unlock mechanism which guarantees exclusiveaccess to a physical page to one processor. A child process is forked to each ofthe processors. Each processor uses the SPARC atomic instruction ldstub towrite to the same shared physical memory page. While one processor isattempting the write, the other processors should be free spinning for theirturn. As each processor acquires the lock, it writes an ordinal number to ashared tracebuffer using a shared write pointer. After the test cycle is complete,the tracebuffer is dumped for analysis.
This test fails and returns an error message if the trace buffer does not containan equal number of ordinal numbers for each processor. For example, if thespecified loop count is 5, the trace buffer should contain five 0s, five negative1s, five 2s, etc.
Data I/OThis test requires two or more processes, each of which locks onto one of theprocessors. Each processor, in turn, writes data to a temporary file that hasbeen mapped to the physical address. The modified data is immediately readby other processors being tested. This test will hang and fail if the processorsdo not recognize the expected data.
Shared MemoryA shared memory buffer is divided into a number of contiguous chunks, onefor each of the CPUs participating in the test. Each CPU is assigned a uniquechunk based upon its ID (1-N).

SunDiag Test Descriptions 6-17
6
This subtest has two parts. First, each CPU locks and writes data to its datachunk. The data written is identical for each CPU. Then each CPU reads andcompares the information on its data chunk with that of another CPU.
If two CPUs do not confirm consistent data, the test will fail and return anerror message. If that happens, testing stops, and this test is run again inverbose mode to return more detailed information.
Cache ConsistencyThis option requires two or more processors to access and write to the samephysical address. This test verifies that a change in physical address by oneprocessor is confirmed by another.
If two processors do not confirm consistent data, the test will continue to run,but the Pass Count in the SunDiag status window will stop incrementing. Ifthat should happen, stop testing and run this test again in verbose mode for amore detailed picture of the problem.
Scalability OptionsSee Section 4.1, “Scalability Options.”

6-18 SunDiag User’s Guide—August 1994
6
6.6.4 mptest Command Line Syntax
/opt/SUNWdiag/bin/mptest T= n C= n standard_arguments
Arguments
T=n n is one of the following integers, representing the bit pattern of the subtests tobe enabled. If T= is not specified, the default is to enable all options.
1 = lock/unlock test2 = Data I/O test3 = lock/unlock and Data I/O test4 = Shared memory test5 = lock/unlock and Shared memory test6 = Data I/O and Shared memory test7 = lock/unlock and Data I/O and Shared memory test8 = Cache consistency test9 = lock/unlock and Cache consistency test10 = Data I/O and Cache consistency test11 = lock/unlock and Data I/O and Cache consistency test12 = Shared memory and Cache consistency test13 = lock/unlock and Shared memory and Cache consistency test14 = Data I/O and Shared memory and Cache consistency test15 = lock/unlock and Data I/O and Shared memory and Cache consistency test
C=n n is one of the following integers, representing the bit pattern of the processorsto be enabled. If C= is not specified, the default is to enable all availableprocessors.
1 = processor0 Enabled2 = processor1 Enabled3 = processor0 and processor1 Enabled4 = processor2 Enabled5 = processor0 and processor2 Enabled6 = processor1 and processor2 Enabled7 = processor0, processor1, and processor2 Enabled8 = processor3 Enabled9 = processor0 and processor3 Enabled10 = processor1 and processor3 Enabled11 = processor0, processor1, and processor3 Enabled12 = processor2 and processor3 Enabled13 = processor0, processor2, and processor3 Enabled14 = processor1, processor2, and processor3 Enabled15 = processor0, processor1, processor2, and processor3 Enabled

SunDiag Test Descriptions 6-19
6
6.6.5 mptest Quick Test Description
The quick option to mptest is not available. If this option is enabled, mptestruns normally.
6.6.6 mptest Error Messages
mptest may return one of the following error messages. These messagesspecify problems with specific command-line arguments:
ERROR: Must be super-user
You must start SunDiag as superuser.
Please specify the ’T=’ argument again
The integer specified for the “T=n” argument was not acceptable; you mustspecify another. See 6.6.4“mptest Command Line Syntax” for a list ofacceptable choices.
Can not run mptest! You need to enable at least twoprocessors.
There was an error in the non Multiprocessor environment. You must addanother processor using the mptest Option Menu, or the “C=n” option.
Not an MP system!
The system being tested does not have Multiprocessing capability.
FAIL: MIOCSPAM, mask = < mask value representing number processors>
The kernel support ioctl failed to get the correct processor affinity mask.
FAIL: to open /tmp/iotest.< processID>
/tmp/iotest.< processID> could not be opened for the Data I/O test.
FAIL: to open /dev/null
/dev/null could not be opened.
FAIL: to open /dev/mem
/dev/mem could not be opened for the Lock/Unlock test, the Data I/O test,or both.

6-20 SunDiag User’s Guide—August 1994
6
FAIL: to fork!
A new process could not be spawned.
FAIL: Lock/Unlock: mmap address space to device
SunDiag could not map the virtual address to the physical address for theLock/Unlock test.
FAIL: Cache Consistency Test: mmap address apace to device
SunDiag could not map the virtual address to the physical address for theCache Consistency test.
FAIL: Data I/O Test: mmap address to space to device
SunDiag could not map the virtual address to the physical address for theData I/O test.
FAIL: <single/double> precision FPU test, process < processnumber>, processor < processor number>
FPU test failed on a specified process and processor.
FAIL: in function getnextbitmsk!
The getnextbitmsk function fails. This function will search the nexthigher order bit for the mask and base given.
Lock/Unlock Test: Trace buffer is corrupted due to brokenlock.
The processors being tested are not correctly locking or unlocking a childprocess.
6.7 Disk Test (rawtest )This test performs read-only or read-write tests on a 'raw' disk partitions. Thistest treats a disk as one large chunk of contiguous data, which it will attempt toread. In order to test the structural elements (filesystems) on a disk, see “File-system Test (fstest)” on page 6-24.
Caution – If a power failure occurs while rawtest is being run in read-writemode, disk data will be destroyed.!

SunDiag Test Descriptions 6-21
6
6.7.1 rawtest Test Description
rawtest performs 64 Kbytes of read and/or write in a loop until the totalnumber of data selected through the Rawtest Size option is reached (seeFigure 6-6).
rawtest is a scalable test; you can run multiple copies of it in read-write modeon the same disk partition. To avoid data corruption, all simultaneousinstances of rawtest communicate through a shared memory service. Thisensures that the different copies of rawtest don’t overlay the same 64 Kbyteblock at the same time.
rawtest will not perform the read-write test on a mounted disk partitionbecause doing so risks the danger of corrupting data integrity on the disk.Conversely, fstest requires a disk partition to be mounted for testing and willmount and unmount partitions during testing (see the fstest description).Consequently, there is a possibility that rawtest may fail on a partitionbecause it is mounted by an instance of fstest that is running concurrently.
This test supports most types of disk drives, such as SCSI disks, native or SCSIfloppy diskettes, and so on. The type of drive under test is named at the top ofthe options menu.
Note – fstest will fail if rawtest is running in read-write mode on the samedisk. It is recommended that you set up fstest and rawtest so that theydon't generate any conflict during system testing.
Volume Management Software and Diskette Drivesrawtest tests the diskette drive(s) regardless of whether the VolumeManagement software is installed and running. If the Volume Managementsoftware is installed, rawtest will test the diskette drive with device nameD=/vol/dev/aliases/floppy0 . If the Volume Management software is notinstalled, rawtest tests the diskette drive with device nameD=/dev/diskette .
Do not edit the /etc/vold.conf file to change the logical name of CD-ROM(cdrom0 ) and diskette drives (floppy0 ). Currently, the SunDiag software ishard-wired to use these pathnames as the default logical name.
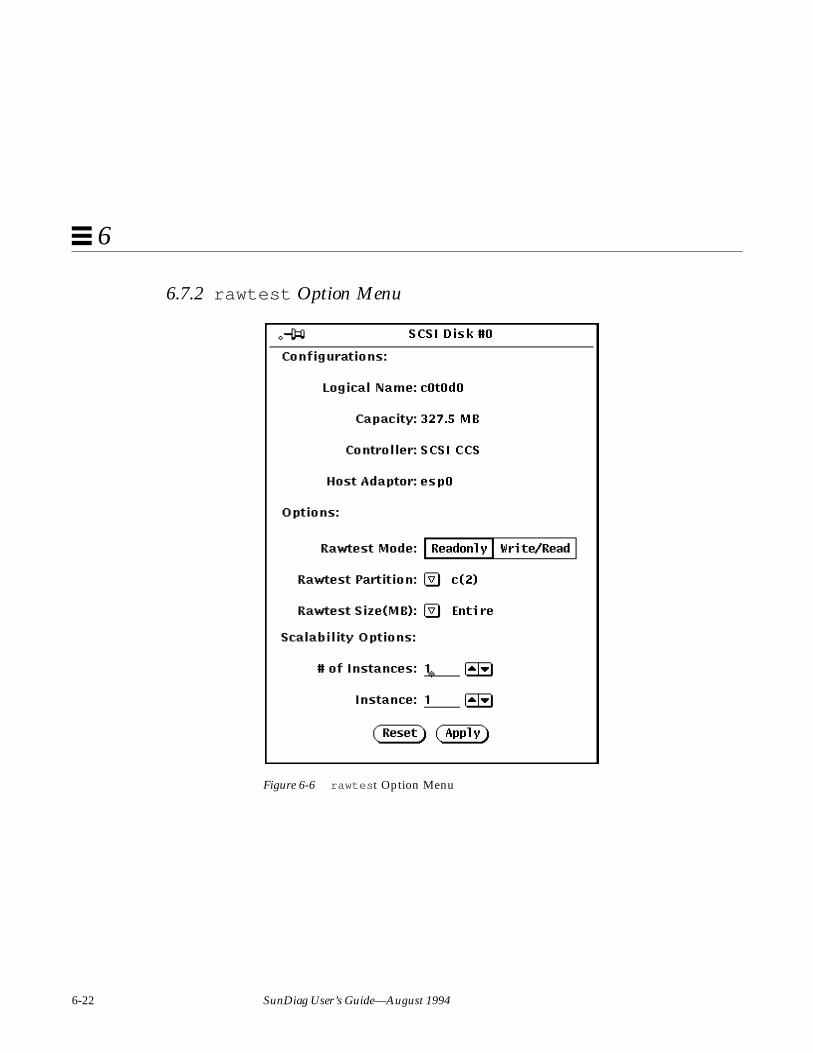
6-22 SunDiag User’s Guide—August 1994
6
6.7.2 rawtest Option Menu
Figure 6-6 rawtes t Option Menu
SunDiag Test Descriptions 6-23
6
6.7.3 rawtest Options
Rawtest ModeChoose read-only or read-write testing. The default is read-only. In read-onlymode, read() is the only operation performed. In read-write mode, the dataon disk is first backed up in memory, and then a known pattern of data iswritten to disk and read back for comparison. The original data is restored andthe test proceeds on to the next 64 Kbyte of data.
Rawtest PartitionSpecifies the device partition to test. The default is partition c(2) .
Rawtest SizeSpecify the Rawtest Size option parameter; the default setting is the entirepartition size (in megabytes). If you specify a value for Rawtest Size that issmaller than the partition size, rawtest will randomly pick a contiguous dataarea of that size within the partition for testing. Hence, each pass of rawtestexercises different areas within the partition.
6.7.4 rawtest Command Line Syntax
/opt/SUNWdiag/bin/rawtest D= device_name W P= partition S= sizestandard_arguments
Arguments
D=device_name device_name is the device to be tested. See “Volume ManagementSoftware and Diskette Drives” for specific path names whenrunning rawtest with the Volume Management software.
W This option causes rawtest to be run in read-write mode; thedefault (without this option) is read-only.
P=partition partition is the partition to be tested. The choices are a, b, c , d, e ,f , and g; the default is partition c .
S=size size is the size of the partition (100MB-1200MB). The default is theentire partition. (See Rawtest Size above).
6-24 SunDiag User’s Guide—August 1994
6
6.7.5 rawtest Quick Test Description
Specifying the q (quick test) option from the standard_arguments restricts thistest to a maximum of 64 KBytes of data on the chosen partition.
6.8 File-system Test (fstest )This test verifies the integrity of the software structural elements (file systems)of a disk. In contrast, rawtest treats disks as one large chunk of contiguousdata, which it attempts to read.
6.8.1 fstest Test Description
This test exercises the disk controller and drive using the Solaris filesystemdevice driver. It writes two 0.5 Mbyte files with a specified data pattern, thenreads and compares them.
fstest requires the partition under test to be mounted. If it is not alreadymounted, fstest will mount the partition, perform the test, and unmount thepartition when the test is complete. The mount point bears the name of thedisk partition appended with a system-wide unique number. For example, ifthe disk name is /dsk/c0t3d0 , fstest will mount it as superuser under thename c0t3d0. XXXXXX where XXXXXX is a six digit system-wide uniquenumber.
fstest is a scalable test; it is possible to run multiple copies of fstestsimultaneously on the same disk partition. If that partition is not mounted, thefirst fstest to run will mount the partition, and the final fstest willunmount that partition.
Note – fstest will fail if rawtest is running in read-write mode on the samedisk. It is recommended that user set up fstest and rawtest so that theydon't generate any conflict during system testing.
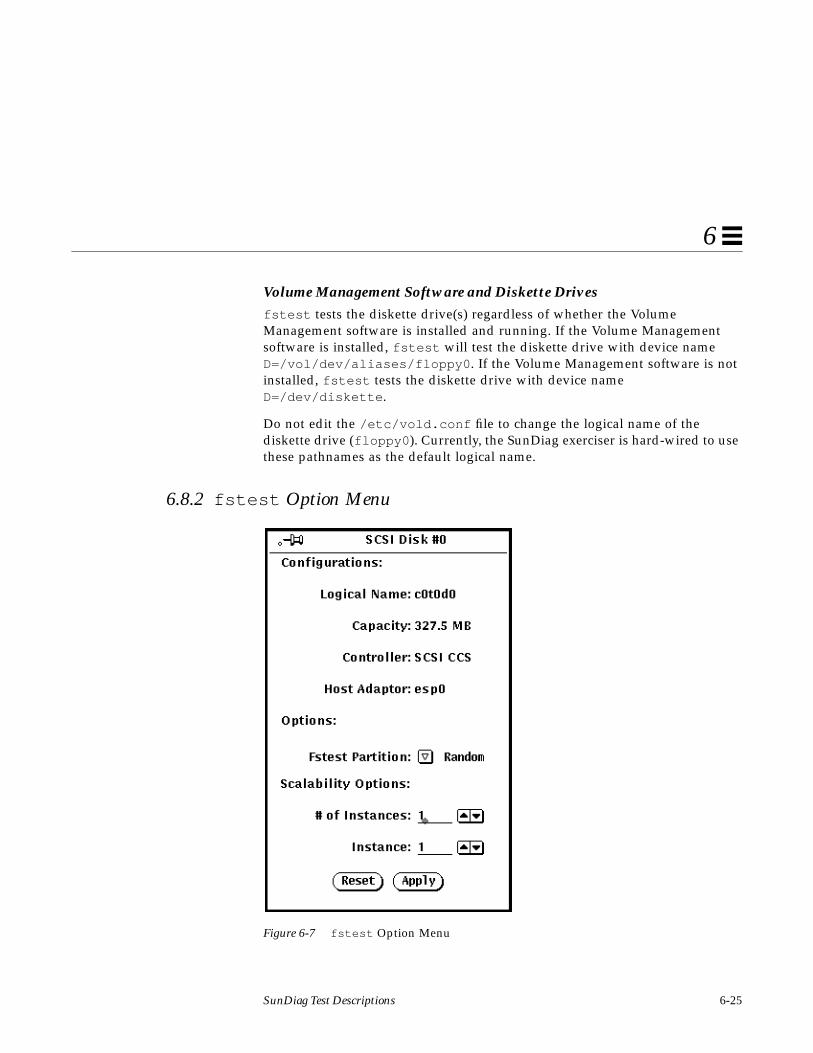
SunDiag Test Descriptions 6-25
6
Volume Management Software and Diskette Drivesfstest tests the diskette drive(s) regardless of whether the VolumeManagement software is installed and running. If the Volume Managementsoftware is installed, fstest will test the diskette drive with device nameD=/vol/dev/aliases/floppy0 . If the Volume Management software is notinstalled, fstest tests the diskette drive with device nameD=/dev/diskette .
Do not edit the /etc/vold.conf file to change the logical name of thediskette drive (floppy0 ). Currently, the SunDiag exerciser is hard-wired to usethese pathnames as the default logical name.
6.8.2 fstest Option Menu
Figure 6-7 fstest Option Menu
6-26 SunDiag User’s Guide—August 1994
6
6.8.3 fstest Options
PartitionSelect an available partition to run the test on. The selected partition must meetthe following three requirements:
1. It must have a file system built on it
2. It must have enough space to hold two 0.5 MByte files
3. There can not be a read-write rawtest test running on it (see the rawtestdescription above), or the test will fail.
fstest also allows you to randomly test partitions by selecting random as theoption value. If random is selected, fstest will try to test different partitions,except partitions b(1) and c(2), with each pass. If you want to test partition b(1)or c(2), then you need to manually mount the partition and select either b(1) orc(2) from the Fstest Partition menu.
Note – Since most disks use a partition “C” (which overlays all of the otherpartitions), running fstest on this partition causes problems and is not arecommended procedure. The only exception is if c is the only partition on thedisk and if you have mounted it manually. The random selection does not pick“C” as a candidate for testing. Thus, if you want to test the “C” partition, youmust mount the partition manually.

SunDiag Test Descriptions 6-27
6
6.8.4 fstest Command Line Syntax
/opt/SUNWdiag/bin/fstest D= device_name P= partition p= data_patternstandard_arguments
6.8.5 fstest Quick Test Description
Specifying the q (quick test) option from the standard_arguments restricts thistest to testing two blocks of data on the specified partition.
Arguments
D=device_name device_name is the name of the device to be tested. See“Volume Management Software and Diskette Drives”for specific pathnames when running fstest with theVolume Management software.
P=partition partition is the partition to be tested. The choices are a,b, c, d, e, f, g, h, and random.
p=data_pattern data_pattern is the data pattern specified by one of thefollowing arguments:
s sequential,
a all a’s,
0 all zeros
1 all ones
5 all fives
r random.

6-28 SunDiag User’s Guide—August 1994
6
6.9 Compact Disc Test (cdtest )This test checks the CD table of contents and when the proper CD is specified,the test verifies that the table of contents matches cdtest ’s own TOC table.cdtest classifies each track as either Mode 1 or Mode 2. In Mode 1 the trackuses error detection/correction code (288 bytes), and in Mode 2 it uses thatspace for auxiliary data, or as an audio track. cdtest is not a scalable test.
Note – Make sure a scratch CD disc with a well-known table of contents isloaded into the drive before starting this test. It is recommended you use ademonstration CD shipped with the drive, such as the “SunCD™ DemoDisc-1.0” (Sun Microsystems Part No. 704-1000-10.) Do not use an operatingsystem distribution disc. See Section 1.2.8, “Scratch CDs, Tapes, Diskettes” formore information.
Volume Management and Compact Discscdtest tests the CD-ROM drive(s) regardless of whether the VolumeManagement software is installed and running. If the Volume Managementsoftware is installed, cdtest will test the CD-ROM drive with device nameD=/vol/dev/aliases/cdrom0 . If the Volume Management software is notinstalled, cdtest tests the CD-ROM drive with device nameD=/dev/dsk/c0t6d0 .
Do not edit the /etc/vold.conf file to change the logical name of theCD-ROM drive (cdrom0 ). Currently, the SunDiag exerciser is hard-wired touse these pathnames as the default logical name.
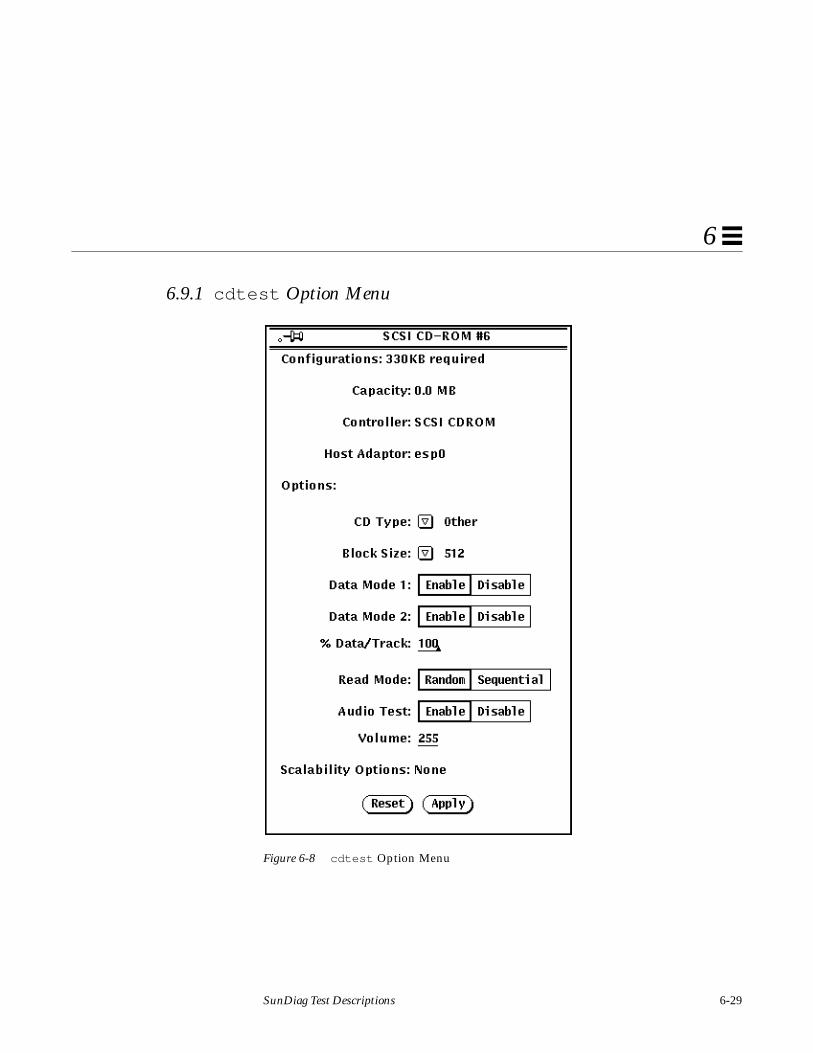
SunDiag Test Descriptions 6-29
6
6.9.1 cdtest Option Menu
Figure 6-8 cdtest Option Menu

6-30 SunDiag User’s Guide—August 1994
6
6.9.2 cdtest Options
CD TypeSelect a type of compact disk to test from the CD Type menu. The choices are:sony2, hitachi4, cdassist, pdo, multi-session, SunOS, or other. The default CDtype is other.
Note – Your choice must correspond with the disk used for testing.
Data Mode 1 and Data Mode 2Click to enable or disable the corresponding track test.
% Data/TrackType a value between 0 and 100 in this field to test a percentage of data on eachtrack.
Read ModeChoose between Random or Sequential reading.
Audio TestClick to enable or disable the audio test. You must connect headphones or aspeaker to the audio jack on the CD player to hear audio output.
VolumeAdjust the volume by typing a value between 0 and 255 in this field.

SunDiag Test Descriptions 6-31
6
6.9.3 cdtest Command Line Syntax
/opt/SUNWdiag/bin/cdtest D= device_name S= skip_track R=[random |
sequential] P= %_of_data V= volume T= CD_type standard_arguments
6.9.4 cdtest Quick Test Description
Specifying the q (quick test) option from the standard_arguments causes cdtestto test only one block of data. The first block of data is tested if the read accessoption is set to sequential , and one random block is tested if the read accessoption is set to random .
Arguments
D=device_name device_name is the name of the raw device to betested. See “Volume Management and CompactDiscs” for specific pathnames when runningcdtest with the Volume Management software.
S=skip_track Skip tracks. The choices aredata1 , data2 or audio .
R=[random | sequential] Read access.
P=%_of_data The percentage of data to be tested. You can specify0 through 100 percent.
V=volume Audio volume control. You can specify 0 through255 . The default is 255 .
T=CD_type The type of CD used for the test. It can be sony2 ,hitachi4 , cdassist , pdo , multi-session,sunos, other .The default isother .
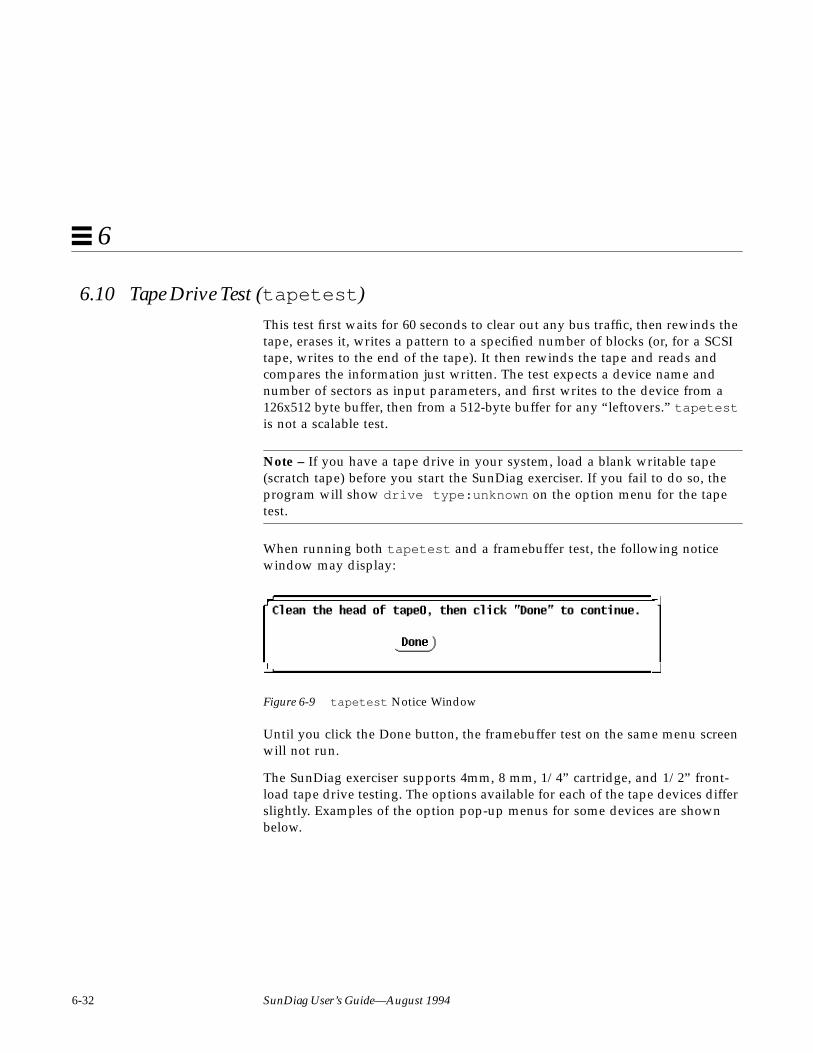
6-32 SunDiag User’s Guide—August 1994
6
6.10 Tape Drive Test (tapetest )This test first waits for 60 seconds to clear out any bus traffic, then rewinds thetape, erases it, writes a pattern to a specified number of blocks (or, for a SCSItape, writes to the end of the tape). It then rewinds the tape and reads andcompares the information just written. The test expects a device name andnumber of sectors as input parameters, and first writes to the device from a126x512 byte buffer, then from a 512-byte buffer for any “leftovers.” tapetestis not a scalable test.
Note – If you have a tape drive in your system, load a blank writable tape(scratch tape) before you start the SunDiag exerciser. If you fail to do so, theprogram will show drive type:unknown on the option menu for the tapetest.
When running both tapetest and a framebuffer test, the following noticewindow may display:
Figure 6-9 tapetest Notice Window
Until you click the Done button, the framebuffer test on the same menu screenwill not run.
The SunDiag exerciser supports 4mm, 8 mm, 1/4” cartridge, and 1/2” front-load tape drive testing. The options available for each of the tape devices differslightly. Examples of the option pop-up menus for some devices are shownbelow.

SunDiag Test Descriptions 6-33
6
Figure 6-10 tapetest Option Menu (Exabyte™ 8mm 2.3 GB)
Note – This test may take a while to stop after being disabled.
The example above depicts the options menu for an 8mm tape drive. Thismenu differs from other tape drive option menus in that it has no format orreconnect option choices.
If the drive is a half inch front-load tape drive, the menu shown in Figure 6-11will be displayed.

6-34 SunDiag User’s Guide—August 1994
6
Figure 6-11 tapetest Option Menu (half-inch front-load)
A quarter-inch tape drive option menu looks like Figure 6-12.
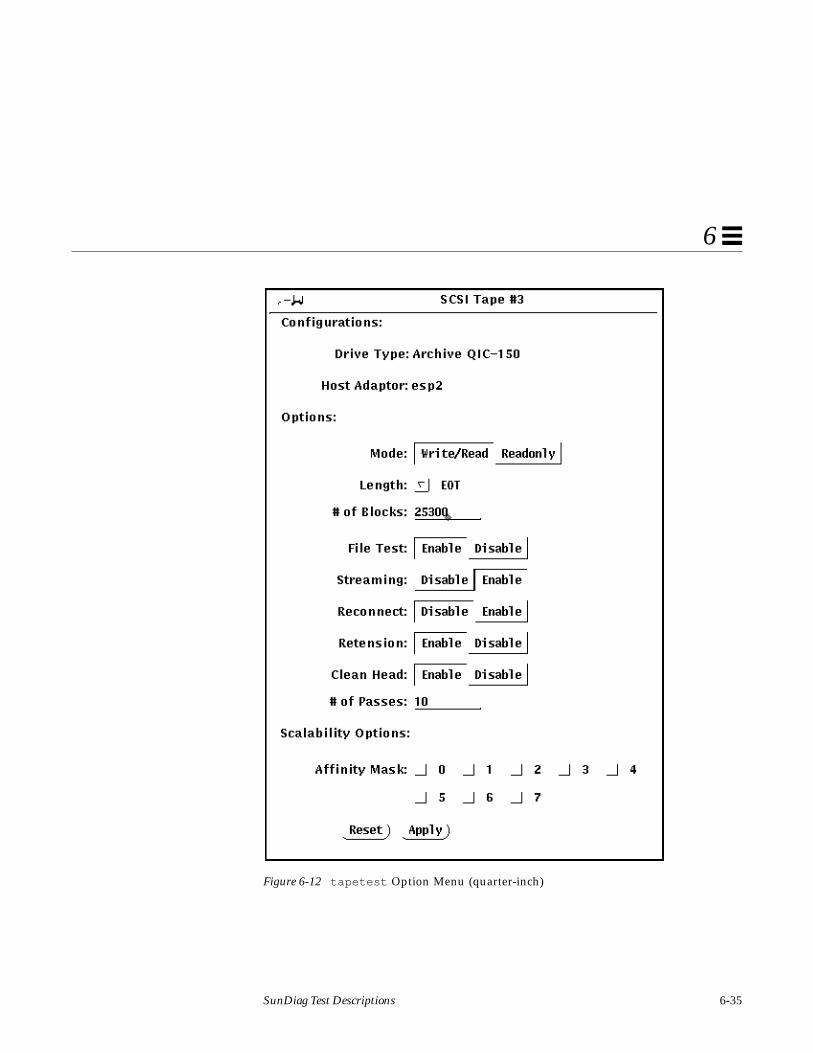
SunDiag Test Descriptions 6-35
6
Figure 6-12 tapetest Option Menu (quarter-inch)
6-36 SunDiag User’s Guide—August 1994
6
6.10.1 tapetest Options
Format:QIC-11 and QIC-24 are quarter-inch tape formats that this test uses when itwrites to the scratch tape you inserted. QIC-11 uses a 1-byte block ID whileQIC-24 uses 4 bytes, meaning that each block on a QIC-24 tape is uniquelyidentifiable.
Use a standard scratch tape for this test.
QIC-11 format is the default testing format. If you cycle through the options,you may choose QIC-24 only, or both of QIC-11 and QIC-24 formats. If youchoose both, the test will first write one pass to the tape in QIC-11 format, andthen write a second pass over it in QIC-24 format.
DensityThe following settings are available for 8mm Tape Drives:
EXB8200 Writes 2.3 Gbytes of data to the tape.
EXB8500 Increases the density and writes 5 GBytes of date to thetape.
Both Writes both 2.3 GBytes, and 5 GBytes of data to the tape.
For half-inch tape drives the available settings are 800 , 1600 , and 6250 BPIs.
ModeIf you enable Write/Read mode, the test first writes to the tape and then readsit back to compare. If you enable Readonly mode, the test assumes the tape hasbeen properly written and merely reads and compares. This mode is useful tocheck proper head alignment.
SunDiag Test Descriptions 6-37
6
Length The amount of the tape to be tested. The choices are:
EOT The default; tests to the entire tape.
Long The SCSI tape tests 70,000 blocks of the tape.
Short Only the first 1000 blocks are tested.
Specified You must type the number of blocks to be tested in the# of block s field.
# of BlocksIf you select Specified under the Length option, you must type a number ofblocks you want to test.
File TestThe tape file test writes three files, rewinds and then reads part of the first fileand forward spaces to the start of the second file, reads the second file, forwardspaces to the start of the third file, and tries to read to the end of that file. ForSCSI tapes only, the test then tries to back space to the start of the second fileand read it.
StreamingWhen streaming is enabled, the test performs the Write/Read at top speed to“stream” to tape.
ReconnectWhen you enable Reconnect from the options menu, the SunDiag exerciserattempts to check whether or not disconnect/reconnect is working, on asystem with a SCSI3 board and both SCSI disk and tape devices. The test forksa child process to test the SCSI disk, which sets up a signal handler to catch asignal from the parent process. It then sleeps for three seconds, reads in twoblocks from the disk, sleeps again, and expects to have received a signal fromthe parent process in the interim. The parent process retensions the tape andthen notifies the child.
6-38 SunDiag User’s Guide—August 1994
6
RetensionWhen enable is selected, the program retensions the tape.
Clean HeadClick enable to select head cleaning.
# of passesIf you have enabled the head cleaning option, you must enter the number oftest passes the SunDiag exerciser should execute before suspending testing toprovide time to clean the tape drive head.
6.10.2 tapetest Command Line Syntax
/opt/SUNWdiag/bin/tapetest D= device_name b= block_count sq nr ro ns ft
rc m= x k= y standard_arguments
Arguments
D=unit_number unit_number is the unit number of the tape device to betested. For example:D=0 for st0.
b=block_count Specifies the number of blocks to be tested.
sq Tells the test to switch the tape format
nr Specifies no retension.
ro Specifies a read-only test.
ns Tells the test no tape sleep.
ft Enables a file test
rc Enables a reconnect test.
m=x For 20 Gbyte 4 mm tape auto-loader type tape drives, x isthe magazine size. The choices are 4 or 12 .
k=y Indicates if the tape drive is a 20 Gbyte 4 mm tapeauto-loader type. The choices are:0 - not a 20 Gbyte 4 mm tape auto-loader type drive1 - 20 Gbyte 4 mm tape auto-loader type drive

SunDiag Test Descriptions 6-39
6
6.10.3 tapetest Quick Test Description
If the q standard argument is specified, tapetest tests three large blocks(512x126 bytes) and two small blocks (512 bytes) of memory, and does notsleep for 60 seconds.
6.11 Framebuffer Test (fbtest )
Note – This test is not supported by machines with x386 or x486 processors.
fbtest is a generic test for all dumb framebuffers used with Solaris 2.2.
fbtest tests the framebuffer by sequentially writing, reading, and verifyingsmall blocks of random patterns across the entire video RAM. The block size is64 by 64 pixels. If a mis-compare occurs, the test stops with an error messageindicating the location of the error.
If a generic framebuffer device name (/fb ) is specified, fbtest automaticallydetects the ‘depth’ of the framebuffer, and adjusts testing to the framebuffersize. There is no option menu for fbtest .
6.11.1 fbtest Command Line Syntax
/opt/SUNWdiag/bin/fbtest D =device_name L standard_arguments
Arguments
D=device_name device_name specifies which framebuffer to test.
L Disables framebuffer locking. See the “Special Note onTesting Multiple Framebuffers” in Chapter 1 of the SunDiag4.3 User’s Guide for details. Framebuffer locking is enabledby default on the window server running theOpenWindows software.

6-40 SunDiag User’s Guide—August 1994
6
6.11.2 fbtest Error Messages
Video memory error at 0x%X, expect 0xXXXXXXXX, see0xXXXXXXX
This error is displayed when fbtest finds a mismatch between the datapatterns it expects to find.
6.11.3 fbtest Quick Test Description
Specifying the q (quick test) option from the standard_arguments does notchange the fbtest test procedure.
6.12 Serial Ports Test (sptest )
6.12.1 sptest Test Description
This test checks the system’s on-board serial ports (zs0 , zs1 ), as well as anyMulti-Terminal Interface (ALM2) boards (mcp0, mcp1, mcp2, mcp3). It writesdata to the source device and then reads it back from the receiver device,verifying the data after each byte sent.
Intervention Mode must be enabled before clicking the option window buttonfor sptest . sptest is not a scalable test.
6.12.2 sptest Syncloop Testing
With this release of the SunDiag software, sptest has been enhanced tosupport syncloop testing. Syncloop testing involves the sending and receivingof data packets as HDLC frames over synchronous serial lines.
The syncloop test to sptest runs in three phases. The first phase is to listen tothe port for any activity. If no activity is seen for at least four seconds, the testproceeds to the next phase. Otherwise, you are informed that the line is activeand the test cannot proceed. sptest will exit with an error if the line is active.

SunDiag Test Descriptions 6-41
6
In the second phase, called the ‘first packet” phase, the test attempts to sendand receive one packet. If no packets are seen after five attempts, the test exitswith an error message. If a packet is returned, the result is compared with theoriginal. If the length and content of the packets do not match exactly, the testissues an error message.
The third phase is the “multiple packet” phase, where the test attempts to sendmany packets through the loop. Because the test has verified the integrity ofthe link in the first packet phase, the test will not fail after a particular numberof time-outs. If a packet is not seen after the wait time expires, a message isdisplayed. The number and size of the packets sent during this phase isdetermined by a default value. Each packet is compared with its original forlength and content. If a mismatch is detected, the test issues an error message.
6.12.2.1 Syncloop Testing Software Requirements
Syncloop testing requires the zsh0 and zsh1 devices to be located in /dev . Ifyou don’t have these devices configured, make sure the following two lines arein the /etc/devlink.tab file:
Warning – The white spaces in the lines above must be a single Tab characterbefore and after the zsh variables; using spaces will not work.
When these lines have been added to the /etc/devlink.tab file, changedirectories to /kernel/drv , and execute the add_drv zsh command. If thiscommand does not work at first, execute the rem_drv zsh command and thenexecute the add_drv zsh command again.
type=ddi_pseudo;name=zshzsh\M0type=ddi_pseudo;name=clone;minor=zshzsh

6-42 SunDiag User’s Guide—August 1994
6
6.12.3 sptest Option Menus
Figure 6-13 sptest Option Menu

SunDiag Test Descriptions 6-43
6
Figure 6-14 sptest Option Menu for Multi-Terminal Interface Boards
6.12.4 sptest Options
LoopbackThe loopback settings refer to serial port testing. You must use loopbackconnectors (described in Appendix C) to connect the CPU board ports youchoose. The default is to link ports A and B with a loopback cable, as indicatedby a-b. If you choose a only or b only, the SunDiag exerciser tests just that port,and expects a loopback connector on that port. If you choose a b, the programtests ports A and B separately, and expects a loopback connector on each port.
Loopback Assignments (Multi-Terminal Interface)The loopback assignments for Multi-Terminal Interface boards are listed here.You must use loopback connectors (described in Appendix C) to test theseports. All ports (from 0 to 15) are listed as the default.
Test ModeChoose between synchronous or asynchronous testing, or both.

6-44 SunDiag User’s Guide—August 1994
6
Internal TestClick Enable to perform a quick internal check of the serial ports on the CPUboard. You do not need to connect any loopback connectors to the serial portsto perform this test. This option is available only in synchronous mode.
Loopback PlugClick Enable to provide data transmission loopback testing of the selectedserial port. You must attach a loopback connector (See Appendix C) to theserial port being tested. This option is available only in synchronous mode.
Modem LoopbackClick Enable if the Transmit and Receive clock sources are external (viamodem). This option requires that one of the local modems or the remotemodems be set in a loopback configuration. This option is available only insynchronous mode.
Baud RatePress MENU to select the baud rate. The choices are: 110, 300, 600, 1200, 2400,4800, 9600, 19200, or 38400 baud. If you have changed the baud rate, the newvalue will be used. This new value may not correspond to what the Baud Ratemenu displays.
Note – You can only change the baud rate if you are testing in synchronousmode. If you are testing in asynchronous mode, the pstest will use thedefault baud rate (usually 9600).
Data TypeData Type specifies the selected hexadecimal type pattern. The choices are0x55555555, 0xaaaaaaaa, or random. 0x55555555 and 0xaaaaaaaa areabbreviated on the option menu. This option is only available in synchronousmode.

SunDiag Test Descriptions 6-45
6
6.12.5 sptest Command Line Syntax
/opt/SUNWdiag/bin/sptest D= device_name M=mode T= subtest_numberB=baud_rate I= loopback_pattern standard_arguments
Arguments
D=device_name device_name specifies which serial port(s) to test. There is nodefault value; you must specify device name such as:zs0 /dev/term/azs0 /dev/term/bzs0 /dev/term/a,b
M=mode The default test mode is asynchronous. Specify one of thefollowing modes:s - synchronousa - asynchronousb - both synchronous and asynchronous
T=subtest_number Specify one of the following numbers:1 - Internal Test2 - Test using Loopback Plug3 - Internal Test and Test using Loopback Plug4 - Modem Loopback Test
B=baud_rate If you are testing in synchronous mode, you can specify oneof the following baud rates:11030060012002400480096001920038400Note: If you are testing in asynchronous mode, the defaultbaud rate will be used (usually 9600 ).
I= loopback_pattern The default test data pattern is r . You may specify thefollowing:5 = 0x55555555a = 0xaaaaaaaar = random

6-46 SunDiag User’s Guide—August 1994
6
6.12.6 sptest Quick Test description
Specifying the q (quick test) option from the standard_arguments limits thenumber of bytes per test pass to 100. 3000 bytes per pass is the default. Also, ifmultiple ports are available for testing, the quick test will only test the firstport.
A-1
Developing Your Own Tests A
A.1 How to Use This AppendixA feature of the SunDiag system exerciser is the ability to develop your owntests. If you’re familiar with the C programming language, you can now usethe libraries and routines in the /opt/SUNWdiag/lib and/opt/SUNWdiag/include directories to build your own SunDiag tests. You’lluse these routines to communicate directly with the SunDiag kernel.
After you’ve created your own tests, refer to Section 1.9, “Adding Your OwnTests in .usertest,” on page 1-17 to learn how to run your tests.
The header file sdrtns.h is in the /opt/SUNWdiag/include directory, andthe library file libtest.a is in the /opt/SUNWdiag/lib directory. ThisAppendix is divided into the following sections:
Test Design Guidelines:general guidelines to think about when designing your tests
page A-2
Test Implementation Guidelines:description of the SunDiag programming environment, includingglobal variables, special messaging facilities, and reserved errorcodes
page A-4
Requirements:five requirements you must meet to be compatible with theSunDiag kernel
page A-8

A-2 SunDiag User’s Guide—August 1994
A
A.2 Test Design GuidelinesThis section provides general guidelines to follow when developing your ownSunDiag tests. You should try to incorporate most of these ideas whenplanning your tests. Most SunDiag tests already included in the/opt/SUNWdiag/bin directory adhere to these guidelines.
OptionsEach SunDiag test should have two main options — a quick test mode, and adetailed step-by-step mode:
• The quick test mode for periodic system monitoring to ensure that the unitbeing tested is available and on-line. This mode has a requirement that, ifthe quick test option is set by the user, the test will run for a maximum of 30seconds under normal system load.
• The step-by-step mode for detailed information in case the quick test fails todiagnose the device and provide service information.
For example, a quick test for a disk drive could be a read/ write/ compare teston the diagnostics cylinder. If the quick test fails, a sequence of sub-tests couldbe used to verify the path of the I/ O device. Generally, all I/ O devices underUNIX pass data through several stages before reaching the final destination.Build your test with these intermediate stages in mind, instead of using thestandard, functional I/ O route.
Error MessagesThe SunDiag environment provides special messaging facilities that allow yourtest to send information and error messages to log files or the console window,or to both. See “Special Messaging Facilities” on page A-6 for more informationon how to account for these error messages.
Standard Library Routines:detailed description of library routines
page A-11
Sample Test File page A-17
Sample Makefile page A-22

Developing Your Own Tests A-3
A
Device Driver SupportSince all SunDiag tests run under UNIX, hardware components and externaldevices are accessed through their associated device drivers. The purpose ofthe device driver is to provide a uniform interface to the application program,providing calls such as open() , read() , write() , and ioctl() . This designphilosophy of device-independent programming in UNIX actually worksagainst writing an on-line diagnostic program, since device-specificcharacteristics are “hidden” by the device driver. The “hooks” that can beimplemented into the device driver are provided through the ioctl() calls.Base your test design not only on existing driver support, but also on possibleways of directly accessing the device through new ioctl() calls.
FRU Fault IsolationIf a device can be partitioned into more than one FRU (Field Replaceable Unit),then organize your test so that each FRU can be tested separately.
Low Impact on System PerformanceSometimes, it is desirable to design a test to exploit system resources touncover any hidden stress/load failure conditions. But, the test should be ableto co-exist with whatever applications are running and not interfere with mostof those applications’ activities.
Non-IntrusivenessIf your test involves I/O, design the test so that it does not introduce anypossibility for the system to lose or damage data. For example, if the testwould need to write a data pattern on a type of media and read that patternback for verification, make the test write to a diagnostic or maintenance area inthe media, rather than to a normal, user-accessible area.
Utilization of Self-test CapabilityIf a device to be tested has a built-in self-test capability, then use that self-testcapability to gain more detailed information about a failure. Also, many devicedrivers provide the IOCTLDIAG ioctl() flag to find the error code for thelast command issued to the device.

A-4 SunDiag User’s Guide—August 1994
A
A.3 Test Implementation GuidelinesThe purpose of defining SunDiag test implementation guidelines is tominimize, as much as possible, the restrictions and requirements placed on youwhen you develop new tests, without compromising the SunDiag systemintegrity or the test efficiency. In addition to detailing the SunDiagprogramming environment, SunDiag library routines included in/opt/SUNWdiag/lib are explained. Use these libraries so that you do nothave to re-invent the basic programming environment each time you develop anew test.
A.3.1 The SunDiag Programming Environment
A.3.1.1 Global VariablesWhen users begin testing with SunDiag, they specify options from the OPENLOOK user interface (which is, in fact, the SunDiag kernel.) These options aretranslated by the kernel into command line arguments (see “StandardCommand Line Arguments” on page A-15) which are passed to individualtests, where the corresponding global variables will be set. It is theresponsibility of each test to examine the state of these global variables and actaccordingly.
Using these global variables insures consistent behavior in your tests.
Table A-1 An Overview of SunDiag Global Variables
Read-Only Global Variables Definition
int single_pass = FALSE; TRUE, if single_pass enabled
int core_file = FALSE; TRUE, if core_file to be created
int verbose = FALSE; TRUE, if verbose mode enabled
int quick_test = FALSE; TRUE, if quick_test enabled
int run_on_error = FALSE; TRUE, if run_on_error enabled
int exec_by_sundiag = FALSE; TRUE, if executed by Sundiag
int debug = FALSE; TRUE, if debug mode is enabled
int trace = FALSE; TRUE, if trace mode is enabled
int instances = n; where n is the number of totalinstances for the test
int which_instance = n; where n is the instance this testis assigned

Developing Your Own Tests A-5
A
int single_pass is set to FALSE by default; if a user specifies single_passfrom the command line, then your test needs only to run one pass.
int core_file is flagged by the user to capture core files. If this flag is set toTRUE, the tests should not catch the signals. See signal() handling in the“Requirements” section of this appendix.
int verbose is set to TRUE when the user wants to see each test‘sfunctionality being traced.
int quick_test is set to TRUE for quick testing mode (a faster, abbreviatedversion of the test).
int run_on_error is set to TRUE by the user. If an error occurs, the testcontinues to run the next test sequence instead of exiting.
Writeable Global Variables Description
You must set these four values in the tests you develop:
char *versionid=”unknown_version”; SCCS version id; printed in tracemode
char *device_name=”unknown_device”; name of UNIX device beingtested
char *func_name = “unknown_function”; function (routine) name;primarily used in trace mode
int subtest_id = 999; subtest identification number,where you supply a value for afunctional subtest within yourtest. See “Standard FormatsDisplay” for this variable’susage.
Global Reserved Variables
The following are SunDiag reserved global variables and therefore should not beused:
char *test_name;
char *hostname;
int list_usage = FALSE; TRUE, if list_usage is enabled
Table A-1 An Overview of SunDiag Global Variables (Continued)
A-6 SunDiag User’s Guide—August 1994
A
int exec_by_sundiag is set to TRUE if the test is executed by the SunDiagkernel, and FALSE if the test is executed from the command line.
int list_usage shows the user how to run the test. It provides three parts:command line usage, standard arguments, and routine-specific arguments.
int debug is set to TRUE if debugging mode is enabled.
int trace is set by the user to see the test’s functionality traced down byfunction name in the console window.
char *func_name is a label used to indicate the name of the function withinthe test. It is used mainly in test trace mode to indicate which function the testis currently executing. This label is used as an argument in the debuggingmacros, TRACE_IN and TRACE_OUT.
instances = n is the number of total instances for the test.
which_instance = n is the instance this particular test is assigned.
char *versionid is a label used to indicate the SCCS version of theparticular test. It is used to identify the version level of the test’s sourcerevision level. See “Standard Formats Display” on page A-16.
char *device_name is the name of the device being tested.
A.3.1.2 Special Messaging Facilities
The SunDiag software logs errors in a tiered manner using two log files. Thefirst log file is the Info log file, where non-catastrophic errors are logged. Thesecond log file is the Error log file, where more serious (catastrophic) errors arelogged.
The SunDiag error-logging/message-handling routine send_message() (see“Standard Library Routines” on page A-11) recognizes the message typesshown in Table A-2. They direct the error logger to send user-providedmessage to the proper log files.

Developing Your Own Tests A-7
A
Note – The #define statements are reserved and unique in the SunDiagexerciser, so you should not use the same define name for other purposes.
Note – You should not use printf() or fprintf() in your test code todisplay messages or information. Instead, use send_message() with one ofthe message types defined in Table A-2.
VERBOSE lets general SunDiag users understand how testing is progressing.When VERBOSE mode is enabled by the user, test and subtest messages areprinted to the console window while testing is conducted.
DEBUG gives test programmers or sophisticated users more detail or internalinformation about the tests they are developing. This type of information mayinclude a data structure snapshot, data buffer contents, more detailedprocedures, or even describe a changed variable value that could be importantfor debugging.
TRACE lets users understand the test code structure and the procedures thetest goes through. More importantly, TRACE can tell a developer at whatfunction scope level the system hangs.
1. The format is described in “Standard Formats Display” later in this appendix.
Table A-2 SunDiag Reserved #define Statements
Define Name ID # Defined…
#define INFO 0 to info log only
#define WARNING 1 to info log only
#define FATAL 2 to info and error logs
#define ERROR 3 to info and error logs
#define LOGFILE 4 to info log (unformatted)1
#define CONSOLE 5 to SunDiag console (unformatted)
#define VERBOSE 6 same as CONSOLE, but formatted in SunDiagmode, unformatted in on-line command mode
#define DEBUG 7 same as VERBOSE
#define TRACE 8 to console with trace format
A-8 SunDiag User’s Guide—August 1994
A
VERBOSE and DEBUG messages are not associated; they don’t control orsupervise each other.
For the sake of standardization, the SunDiag console window always displays“formatted” messages for all the message types except CONSOLE andLOGFILE. However, for testing in the on-line command mode, all messages aredisplayed “unformatted.” TRACE messages are somewhat different, but theyshould be self-explanatory to the user. Note that there is one special messagetype, VERBOSE+DEBUG or DEBUG+VERBOSE, that allows the specifiedmessage to be displayed while either the VERBOSE or DEBUG flag is enabled.
A.3.1.3 Reserved Exit Codes
Table A-3 shows a reserved exit code used by send_message() . You candefine your own exit codes; however, the SunDiag reserved exit code shouldnot be changed.
The exit codes -1 and 90-99 are SunDiag reserved exit codes and thereforeshould not be used.
A.4 RequirementsNow that you know the basic structure of the SunDiag programmingenvironment, you’ll need to follow these five requirements.
1. Use the standard routine send_message() for error or message handling.
The standard routine send_message() has only two categories of exit status:zero (SKIP_ERROR), and nonzero (ERROR). Use the nonzero status, messagetype, and string for SunDiag logging errors and program exit. If some error isminor and tolerable, and the program needs to continue after error logging,use SKIP_ERROR in send_message() .
Do not use the printf() type of macro, since stdout is redirected to theSunDiag console window.
Table A-3 Exit codes reserved by send_message()
Define Name ID # Definition
#define SKIP_ERROR 0 skip error, continue testing

Developing Your Own Tests A-9
A
To write a message to the SunDiagLog use send_message() withret_status zero (SKIP_ERROR); the program will continue to the next lineof code after send_message() returns.
Always use send_message() , instead of printf() , to report text messagesas follows:
send_message(SKIP_ERROR, VERBOSE, “....%s..%d”, par1, par2) ;
or
send_message(0, DEBUG, “......”) ;
or
send_message(0, DEBUG+VERBOSE, “....%d..%s”, par1, par2) ;
Note – The current version of send_message() is capable of handlingvariable arguments, just like printf() does. Often, it’s useful to print theerror message after a system call error. Just pass strerror(errnum) as thethird argument to send_message() .
2. Always use the proper exit code for terminating tests.
For the normal non-error termination, the test code should use exit(0) at theend. Do not use error codes -1 and 90-99 , since they are reserved SunDiagexit codes.
3. Define device_name in your test code.
send_message() uses the global variable device_name to pass the currentdevice name to the server for error logging. This variable has to be set with theproper string values at the earliest phase. For example:
Code Example A-1 Defining device_name
main(argc, argv) int argc; char *argv[];
{device_name = “/dev/rsd0”...
}

A-10 SunDiag User’s Guide—August 1994
A
In this example, the device_name is set to a fixed device string name at thebeginning of the main routine.
However, for some complicated tests that may go through several devices inone test, you might want to assign a string pointer variable to device_name .But beware; avoid using the statement:
strcpy (device_name, “/dev/llllllonggggggnnnname”)
or
strcpy (device_name, device_string);
since device_name , from your viewpoint, is just defined as:
extern char *device_name;
indicating no known adequate space allocated to this pointer.
4. Always provide clean_up() in your test code.
clean_up() is a routine that is called by the SunDiag library routinefinish() , which will be called by the signal() handler described below.This routine allows you to return the programming environment to the state itwas before running the test. You’ll need to write your own clean_up() .
For example, if you disabled the mouse pointer during your test, this is theroutine where you would re-enable the mouse pointer.
5. signal() Handling
One of the functions of the SunDiag library routine test_init() is to catchsignal() for the SIGHUP, SIGTERM, and SIGINT signals. When any of theabove signals are detected, a call is made to the SunDiag library routinefinish() , which, in turn, calls your test routine clean_up() , and then thetest will exit.
If you want to use your own signal-catching mechanism, you must remap thesignal vector in your test code. This can be done by calling signal() aftercalling test_init() .

Developing Your Own Tests A-11
A
A.5 Standard Library RoutinesThe SunDiag program provides some standard routines for communicationwith each test. You should use these routines in your test to communicate withthe SunDiag kernel.
1. void send_message(exit_code, type, format[, arg]...)This routine is used for SunDiag message handling.It has three required arguments:
int exit_code : If this argument is zero (SKIP_ERROR),send_message() logs the error message and returns to its caller; if non-zero, it calls your clean_up() routine and exits with exit_code . Theexit_code will also become the “message identifier” in the loggedmessage. See Section A.5.2, “Standard Formats Display” for details.
int type : Indicates message type based on its error status or severity(for example, ERROR, WARNING or INFO).
char *format : This argument uses the same format as printf() . Thisdefines the number of arguments that will follow. The message providedhere will be formatted by the SunDiag program if its msg_type isVERBOSE, INFO, WARNING, FATAL, or ERROR; otherwise, themessage will appear unformatted.
Note – If the exec_by_sundiag flag is not set, send_message() will redirectall output to stderr , thus allowing the test to be executed from the UNIX shellcommand line.
2. void test_init(argc, argv, process_test_args, routine_usage, test_usage_msg)This routine simplifies the procedures required by SunDiag for each testcode. It combines almost all the necessary test initialization proceduresrequired by SunDiag into one routine.
This routine requires five arguments:
int argc : UNIX standard input arguments
char *argv[] : UNIX standard input arguments
int (*process_test_args)(argv, argindex) :This argument is a pointer to a function that processes test-specificcommand line arguments. This function is invoked once for each
A-12 SunDiag User’s Guide—August 1994
A
command line argument process by test_init() , and it requires twoarguments: char *argv[] , and int argindex , where argindex is anindex for the argv[] array.For SunDiag naming conventions, the test portion of the routine name isusually replaced by “test ”. For example, in the disk test, the name isprocess_scsidisk_args() .
int (*routine_usage)() :This argument is a pointer to a function that displays explanations of thetest-specific command arguments.
char *test_usage_msg :This is a pointer to a string that contains the general usage of the testcommand. For example, if the test uses a device “foo,” then thetest_usage_message might say something like:testname D=foo
test_init takes care of the following test initialization procedures:
• Gets test_name from argv[0] .• Sets up the signals SIGHUP, SIGTERM, and SIGINIT, and links them to
the SunDiag library finish() routine.• Checks and processes the SunDiag standard command line arguments.• Checks and processes test-specific arguments by calling the user-provided
process_args routine, which gives you some flexibility to check andmanage your own test-specific arguments.
• Checks the existence of any test_usage_msg for test-specific arguments.This argument allows the user to type the test name to run in an on-linecommand mode if no test_usage_msg is required.
• Displays a user-provided test_usage_msg if an argument check erroroccurs.
• Displays test usage by invoking the user-provided routine_usage()routine when the ‘u’ (usage) argument is detected at command lineparsing.
• If the global variable core_file is set to TRUE, sets up the signalsSIGILL, SIGBUS, and SIGSEGV to link with the SunDiag libraryexception() routine to avoid core dumps.
• If the verbose flag is set to TRUE, displays the verbose message “Started”to show a test has started executing.

Developing Your Own Tests A-13
A
3. void test_end()This routine works in tandem with test_init() to do the following:
• Display the verbose message “Stopped” as indication of end of testing• Exit with exit(0) .
You should use test_init() and test_end() to start and end yourSunDiag test code, since they simplify your test code structure. Usingtest_init() and test_end() also ensures compatibility with future,enhanced versions of SunDiag software.
4. void trace_before(string)This routine attaches the user-provided string to the end of the trace formatmessage. It traces down the control flow of the testing program bydisplaying the function names being called and their scope level relative tothe program’s main routine (L0) .
This routine takes one argument:
char *string : The string argument is any user-supplied string value.
This routine derives one macro, called TRACE_IN, that is often used inSunDiag test code. TRACE_IN is defined in sdrtns.h as
(void)trace_before((char *)NULL)
which is also equivalent to
(void)trace_before(func_name).
You may want to put a trace_before() call before you enter some routinethat may be suspected:
Code Example A-2 Using trace_before and trace_after to bracket suspectfunction calls
trace_before(“entering suspect routine”)suspect_routine()trace_after(“exited out of suspect_routine”)

A-14 SunDiag User’s Guide—August 1994
A
5. void trace_after(string)This routine works in conjunction with trace_before() . Usetrace_before() prior to entering one area, then use trace_after()after leaving that area. As in trace_before() , a macro calledTRACE_OUT is defined in sdrtns.h as
(void)trace_out((char *)NULL)
To properly write a SunDiag test, you should use the TRACE_IN andTRACE_OUT macros for each function to complete the trace mode of yourtest:
Code Example A-3 Using the TRACE_IN and TRACE_OUT macros to bracket eachfunction in your test. Remember that “func_name” is a librarydefined global variable.
function(){
func_name = “function”;TRACE_IN......TRACE_OUTreturn(0)
}

Developing Your Own Tests A-15
A
A.5.1 Standard Command Line Arguments
Every SunDiag test should be able to handle the command arguments shownin Table A-4.
For more details about each command line argument function, see Chapter 5,“Running Individual SunDiag Tests from the Command Line.” For the globalvariable associated with these command line arguments, see the section“Global Variables” on page A-4 of this appendix.
1. The variable will be set to TRUE if the option was specified in the command line and after test_init() wascalled.
Table A-4 SunDiag Standard Command Line Arguments
Command Line Argument Global Variables1
s , sundiag mode exec_by_sundiag
c , enable core dump file_core_file
p, single pass only single_pass
r , run on error run_on_error
q, quick test quick_test
u, list usage list_usage
v, verbose mode verbose
d, debug mode debug
t , trace mode trace
i = n, where n is the number of totalinstances for the test
instances = n
w = n, where n is the instance thistest is assigned
which_instance = n

A-16 SunDiag User’s Guide—August 1994
A
A.5.2 Standard Formats Display
Messages that appear in info log files or error log files are formatted in thefollowing way:
where:
999 = test identifier (three digits) signifies “user-defined” tests
VV = test version identifier (two digits) uses “versionid” variable
SSS = subtest identifier (three digits) uses “subtest_id” variable
EEEE = error identifier. The first digit is the priority identifier (message type)and the other three digits are the message identifier. See Table 2-1 for thedefinition of the priority identifier.
For more information, see “Log Files Window Button” on page 2-11.
A.5.2.1 Trace Mode Formats
The formats for trace mode display are the following:
For on-line command mode:
@test device: L# func_name(Enter) string (for TRACE_IN)
@test device: L# func_name(Leave) string (for TRACE_OUT)
where L# indicates the scope level of the function func_name in the testcode relative to the main scope level (L0).
For SunDiag window mode:
date time device test: L# func_name(Enter) string (forTRACE_IN)
date time device test: L# func_name(Leave) string (forTRACE_OUT)
999.VV.SSS.EEE date time device test [ERROR/FATAL/INFO/WARNING]: message

Developing Your Own Tests A-17
A
A.6 A Sample Test FileYou can use the following sample test file as a template for developing yourown SunDiag test.
Code Example A-4 Sample SunDiag Test (1 of 5)
”@(#)newtest.c 1.11 90/01/05 Copyright Sun Micro”.#ifndef lintstatic char sccsid[] = “%Z%%M% %I% %E% Copyright Sun Micro”;#endif#include <stdio.h>#include “newtest_msg.h”#include “sdrtns.h”/* sdrtns.h should always be included */
#define DEVICE_NAME “newdevice”#define TOTAL_PASS 7/* number of test loops */#define ERROR_LIMIT 5/* max number of errors allowed if run_on_error *//* error return code definitions(can be put in a.h file) */#define NEWTEST_ERROR 1#define TOO_MANY_ERRORS 2
static char *test_usage_msg = “[test_specific_cmd1] [test_specific_cmd2]”;static int flag1, flag2;/* * This is a test template for SunDiag, and is intended to show how you * should write a test to be run by SunDiag. * * First, get the command-line arguments, then validate and/or assign the device * name, probe for the device, and then run the test(s). The verify mode is * not currently used by SunDiag, but may be useful for running the test by * itself under Unix. Note that the average test should run from three to * five minutes, and the TOTAL_PASS symbolic constant can be adjusted to * generate proper testing period. * * Note: When run by SunDiag, stdout and stderr will be redirected to SunDiag’s * console window. stdin is disabled. */
main(argc, argv)int argc;char *argv[];{
extern int process_test_args();

A-18 SunDiag User’s Guide—August 1994
A
extern int routine_usage();versionid = “%I%”;
/* device_name can be fixed or passed in from command line */device_name = DEVICE_NAME;/* fixed in this case */
/* Always start with test_init to enter SunDiag environment */test_init(argc, argv, process_test_args, routine_usage, test_usage_msg);
if (!exec_by_sundiag){
valid_dev_name();probe_newdev();
}run_tests(single_pass ? 1 : TOTAL_PASS);/* pass the desired loop count and do real testing from here */
clean_up();/* Always end with test_end to close up SunDiag environment */test_end();
}
/* * Process_test_args() processes test-specific command line arguments. */process_test_args(argv, argindex)char *argv[];int argindex;{
if (strcmp(argv[argindex], “test_specific_command_1”) == 0)flag1 = TRUE;
else if (strcmp(argv[argindex], “test_specific_command_2”) == 0)flag2 = TRUE;
elsereturn FALSE;
return TRUE;}
/* * routine_usage() explain the meaning of each test-specific command * argument. */
Code Example A-4 Sample SunDiag Test (2 of 5)

Developing Your Own Tests A-19
A
routine_usage(){
send_message(0, CONSOLE, “%s specific arguments [defaults]:\n\test_specific_cmd1 = meaning of command 1\n\test_specific_cmd2 = meaning of command 2\n”, test_name);
}
/* * You may also want to consider validating the device name, if your test is * also to be run standalone (i.e., without SunDiag) under Unix. */valid_dev_name(){
func_name = “valid_dev_name”;TRACE_INTRACE_OUTreturn (0);
}
/* * The probing function should check that the specified device is available * to be tested(optional if run by Sundiag). Usually, this involves opening * the device file, and using an appropriate ioctl to check the status of the * device, and then closing the device file. There are several flavors of * ioctls: see dkio(4s), fbio(4s), if(4n), mtio(4), and so on. It is nice to * put the probe code into a separate code module, because it usually has * most of the code which needs to be changed for a new SunOS release or * port. */probe_newdev(){
func_name = “probe_newdev”;TRACE_IN
TRACE_OUTreturn (0);
}
/* * Run the test while pass < total_pass. * * Re: send_message, there are 3 variables for send_message(exit_code, type, * msg). “exit_code” indicates the type of error(such as TOO_MANY_ERRORS). A * non-zero exit_code will force send_message to terminate the test and use
Code Example A-4 Sample SunDiag Test (3 of 5)

A-20 SunDiag User’s Guide—August 1994
A
* it as exit code. Ret_code 97-99 are reserved by SunDiag for * RPCFAILED_RETURN(97), INTERRUPT_RETURN(98), and EXCEPTION_RETURN(99). For * “type”, use INFO, WARNING, FATAL, ERROR, LOGFILE, or CONSOLE. For “msg”, * use a pointer (char *) to a message buffer. * * send_message() always writes the “msg” to stderr, and if run by SunDiag, it * will also log “msg” to INFO log and ERROR log (for msg_type FATAL and * ERROR). * * The “msg” is formatted as follows before written: (void)sprintf(msg_buf, * “%02d/%02d/%02d %02d:%02d:%02d %s %s %s: %s\n”, (tp->tm_mon + 1), * tp->tm_mday, tp->tm_year, tp->tm_hour, tp->tm_min, tp->tm_sec, * device_name, test_name, msg_type, msg); * * For more details, read sdrtns.c and sdrtns.h. */run_tests(total_pass)int total_pass;{
int pass = 0;int errors = 0;
func_name = “run_tests”;TRACE_IN
while (++pass <= total_pass){
send_message(0, VERBOSE, “Pass= %d, Error= %d”, pass, errors);
if (!newdev_test())if (!run_on_error)
send_message(NEWTEST_ERROR, ERROR, failed_msg);else if (++errors >= ERROR_LIMIT)
send_message(TOO_MANY_ERRORS, FATAL, err_limit_msg);}TRACE_OUT
}
/* * The actual test. Return True if the test passed, otherwise FALSE. * * Note: the “quick_test” flag is used to force an error here. Its normal use is * to force a “quick(short)” version of the test. */
Code Example A-4 Sample SunDiag Test (4 of 5)

Developing Your Own Tests A-21
A
intnewdev_test(){
func_name = “newdev_test”;TRACE_IN
TRACE_OUTreturn (quick_test ? FALSE : TRUE);
}
/* * clean_up(), contains necessary code to clean up resources before exiting. * Note: this function is always required in order to link with libtest.a * successfully. */clean_up(){
func_name = “clean_up”;TRACE_IN
TRACE_OUTreturn (0);
}
Code Example A-4 Sample SunDiag Test (5 of 5)

A-22 SunDiag User’s Guide—August 1994
A
A.7 A Sample MakefileThe following Makefile is a general example of what happens when you“make” your SunDiag test code.
Code Example A-5 Sample SunDiag Makefile (1 of 2)
## @(#)Makefile 1.12 90/01/05 Copyright(c) Sun Microsystems, Inc.#
.DEFAULT:sccs get -G$@ $@
DBX=-O# specify DBX=-g for dbx version
DESTDIR =PROGRAM = newtestINCLUDES= newtest_msg.h sdrtns.hLIBS =SOURCES = newtest.c newtest_msg.cOBJECTS = $(SOURCES:.c=.o)LINTFILES = $(SOURCES:.c=.ln)
CFLAGS = $(DBX) -D$(REV) -D`arch`LDFLAGS = $(DBX)LINTFLAGS= -D$(REV) -D`arch`
.KEEP_STATE:
##### beginning of dependency lines #####
all: $(INCLUDES) $(PROGRAM)
$(PROGRAM): $(OBJECTS)cc $(LDFLAGS) -o $@ $(OBJECTS) $(LIBS)
install: all FRC@if [ $(DESTDIR) ]; then \
set -x; \install -s $(PROGRAM) $(DESTDIR); \
else \set -x; \install $(PROGRAM) ../../bin; \
fi

Developing Your Own Tests A-23
A
clean: FRCrm -f $(PROGRAM) $(OBJECTS) $(LINTFILES) core
lint: $(LINTFILES)lint $(LINTFLAGS) $(LINTFILES) $(LIBS)
info: FRCsccs info
Code Example A-5 Sample SunDiag Makefile (2 of 2)
A-24 SunDiag User’s Guide—August 1994
A

B-1
Loopback Connectors B
Loopback connectors are designed for the testing of communication ports.They take the form of either a single plug or a port-to-port cable with somecommunication connections shorted (looped-back).
Note – Loopback connectors must be wired properly and connected firmly forthe Serial Port Tests to work correctly. Miswired, poorly soldered, or missingloopback connectors can cause erroneous diagnostic error messages.
Table B-1 depicts the pin assignments for most loopback plugs and cables thatmay be used when testing a system.

B-2 SunDiag User’s Guide—August 1994
B
Table B-1 Pin Connections for Loopback Plugs
Signal Description EIACCITT
#RS-449
“A” “B”
DIN 88-pinround
DB99-pin
DB2525-pin Direction
AlphaID
Chassis/frame ground AA 101 1 NC NC NC 1 none AA
Transmit Data(TxDa)
BA 103 4 22 3 3 2 output BA
Receive Data(RxDa)
BB 104 6 24 5 2 3 input BB
Request To Send(RTSa)
CA 105 7 25 6 7 4 output CA
Clear To Send(CTSa)
CB 106 9 27 2 8 5 input CB
Data Set Ready(DSRa)
CC 107 11 29 NC 6 6 input/output
CC
Signal Ground(SG)
AB 102 19 NC 4 5 7 none AB
Data Carrier Detect(DCDa)
CF 109 13 31 7 1 8 input CF
Transmit Clock In(TRxCa)
DB 114 5 23 NC NC 15 input DB
Receive Clock in(RTxCa)
DD 115 8 26 8 NC 17 input DD
Data TerminalReady (DTRa)
CD 108 12 30 1 4 20 output CD
External Clock Out(TRxCa)
DA 113 17 35 NC NC 24 output DA
Secondary DataCarrier Detect(DCDb)
SCF 122 NC NC NC NC 12 input SCF
Secondary Clearto Send (CTSb)
SCB 121 NC NC NC NC 13 input SCB

Loopback Connectors B-3
B
Notes: NC = No connection
Secondary TransmitData (TxDb)
SBA 118 NC NC NC NC 14 output SBA
Secondary ReceiveData (RxDb)
SBB 119 NC NC NC NC 16 input SBB
Secondary Requestto Send (RTSb)
SCA 120 NC NC NC NC 19 output SCA
Table B-1 Pin Connections for Loopback Plugs (Continued)
Signal Description EIACCITT
#RS-449
“A” “B”
DIN 88-pinround
DB99-pin
DB2525-pin Direction
AlphaID
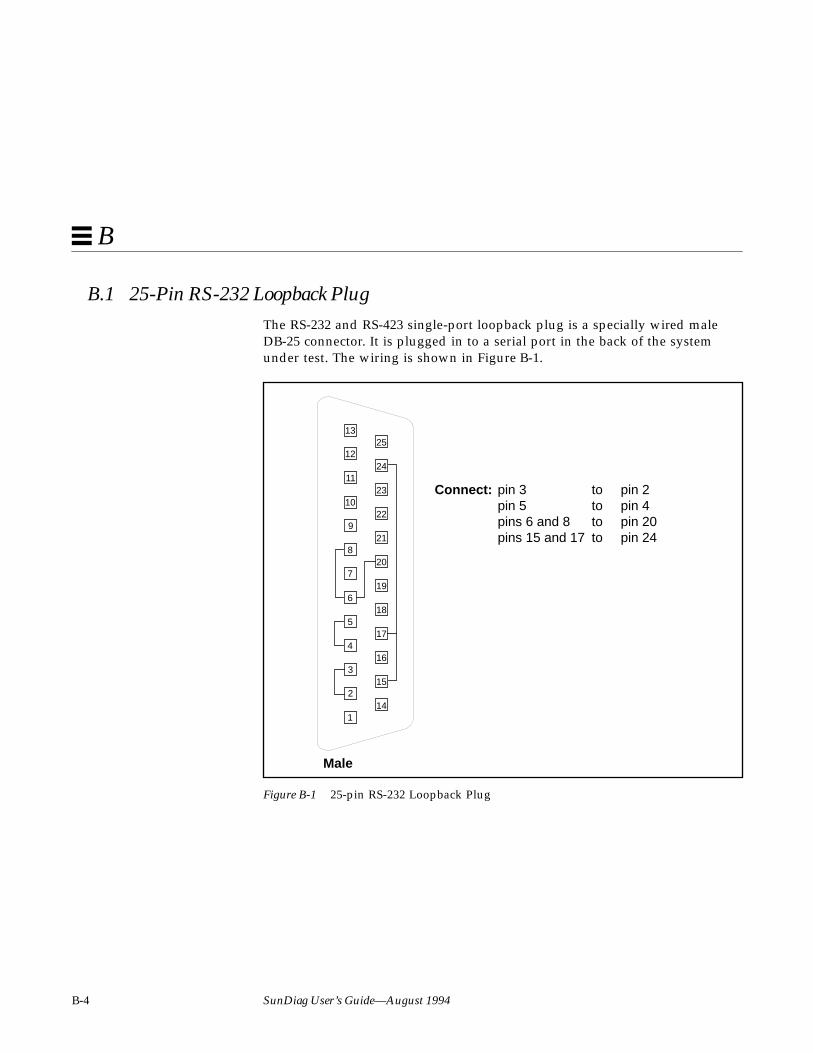
B-4 SunDiag User’s Guide—August 1994
B
B.1 25-Pin RS-232 Loopback PlugThe RS-232 and RS-423 single-port loopback plug is a specially wired maleDB-25 connector. It is plugged in to a serial port in the back of the systemunder test. The wiring is shown in Figure B-1.
Figure B-1 25-pin RS-232 Loopback Plug
Connect: pin 3 to pin 2pin 5 to pin 4pins 6 and 8 to pin 20pins 15 and 17 to pin 24
1
2
3
4
5
6
7
8
9
10
11
12
1325
24
23
22
21
20
19
18
17
16
15
14
Male

Loopback Connectors B-5
B
B.2 25-pin RS-232 Port-to-Port Loopback CableUse these wiring directions for 25-pin RS-232 and RS-423 port to 25-pin RS 232and RS 423 port loopback cables (two DB-25 connections). It is plugged into apair of serial ports in the back of the system under test. Both connectors aremale. The wiring is shown in Figure B-2.
Figure B-2 25-pin RS-232 Port-to-Port Loopback Cable
1
2
3
4
5
6
7
8
9
10
11
12
1325
24
23
22
21
20
19
18
17
16
15
141
2
3
4
5
6
7
8
9
10
11
12
1325
24
23
22
21
20
19
18
17
16
15
14
Connect:First SecondConnector to Connector
pin 2 pin 3pin 3 pin 2pin 4 pin 5pin 5 pin 4pins 6 and 8 pin 20pin 7 pin 7pins 15 and 17 pin 24pin 20 pins 6 and 8pin 24 pins 15 and 17
Male Male
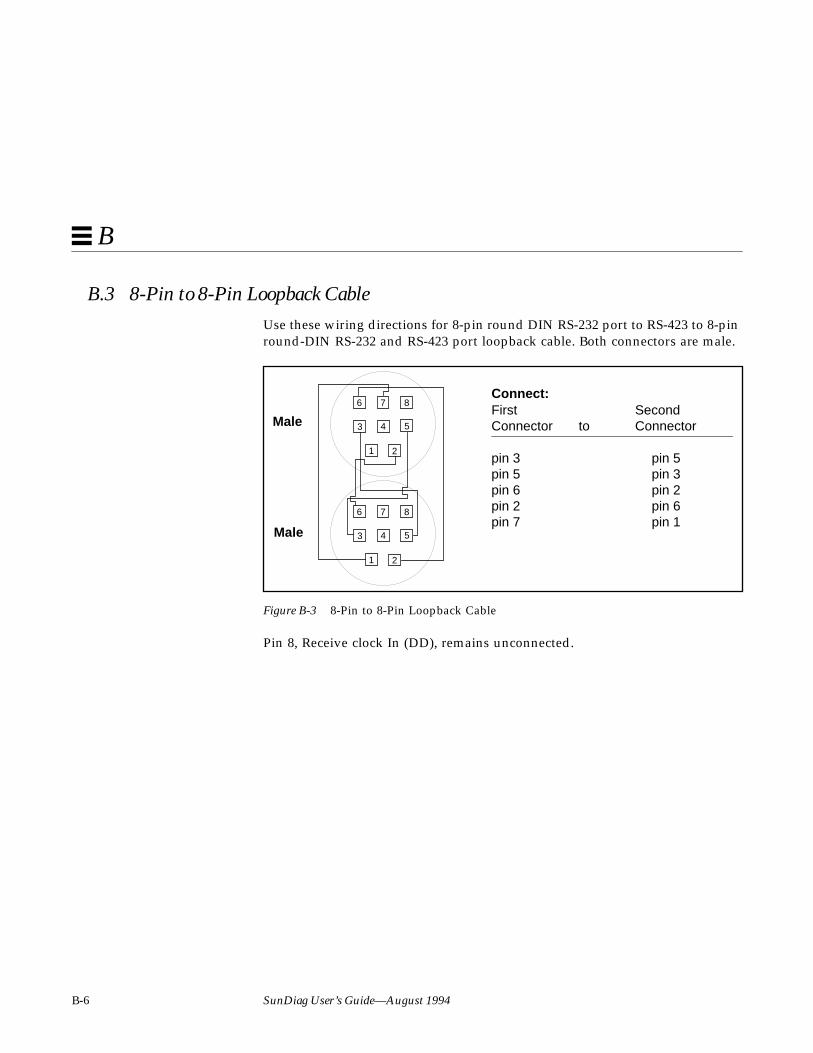
B-6 SunDiag User’s Guide—August 1994
B
B.3 8-Pin to 8-Pin Loopback CableUse these wiring directions for 8-pin round DIN RS-232 port to RS-423 to 8-pinround-DIN RS-232 and RS-423 port loopback cable. Both connectors are male.
Figure B-3 8-Pin to 8-Pin Loopback Cable
Pin 8, Receive clock In (DD), remains unconnected.
Connect:First SecondConnector to Connector
pin 3 pin 5pin 5 pin 3pin 6 pin 2pin 2 pin 6pin 7 pin 1
1 2
3 4 5
6 7 8
1 2
3 4 5
6 7 8
Male
Male

Loopback Connectors B-7
B
B.4 8-Pin Loopback PlugUse these wiring directions for male 8-pin round-DIN RS-232 and RS-423Single port loopback plugs.
Figure B-4 8-Pin Loopback Plug
Pin 8, Receive Clock In (DD), remains unconnected.
Connect: pin 3 to pin 5pin 6 to pin 2pin 1 to pin 7
1 2
3 4 5
6 7 8
Male

B-8 SunDiag User’s Guide—August 1994
B
B.5 25-pin Port A-to-Port B Loopback PlugUse these wiring directions for a 25-pin Port A to Port B loopback plug formost systems.
Figure B-5 Port A-to-Port B Loopback Plug
Connect: pin 16 to pin 2pin 3 to pin 14pin 13 to pin 4pin 5 to pin 19pins 6 and 8 to pin 11pin 12 to pin 20pin 18 to pin 24pins 15 and 17 to pin 25
1
2
3
4
5
6
7
8
9
10
11
12
1325
24
23
22
21
20
19
18
17
16
15
14
Male

Loopback Connectors B-9
B
B.6 25-pin Port A-to-A Port B-to-B Loopback PlugIf your system has a single communication port to connect it to peripherals,use these wiring instructions for making a male 25-pin loopback plug for thatcommunication port:
Figure B-6 Port A-to-A, Port B-to-B Loopback Plug
Connect: pin 3 to pin 2pin 5 to pin 4pins 6 and 8 to pin 20pin 12 to pin 11pin 13 to pin 19pin 16 to pin 14pins 15 and 17 to pin 24pin 25 to pin 18
1
2
3
4
5
6
7
8
9
10
11
12
1325
24
23
22
21
20
19
18
17
16
15
14
Male

B-10 SunDiag User’s Guide—August 1994
B

C-1
Thewhat_rev Utility C
This utility provides version control facilities and is provided in the/opt/SUNWdiag/bin directory with the release. Its purpose is to allow you todetermine which files in the SunDiag exerciser are different from thoseofficially released.
When you type the command what_rev, you receive a report of thedifferences between the officially released files and those files in your SunDiagdirectory.
The -v option gives you the SunDiag version; the -h option provides you witha usage message.

C-2 SunDiag User’s Guide—August 1994
C
Index-1
Index
Numerics25-pin port A-to-A port B-to-B loopback
plug, B-925-pin port A-to-port B loopback
plug, B-825-pin RS-232 loopback plug, B-425-pin RS-232 port-to-port loopback
cable, B-58-pin loopback plug, B-78-pin to 8-pin loopback cable, B-6
Aabbreviations using TTY, 3-2adding new device drivers, 1-6adding tests
adding your own tests in.usertest , 1-17
See also Appendix Aaffinity mask, 3-20, 4-4arguments
See individual test standardarguments, 5-1
audio test, 6-13autest audio test, 6-13auto start system option, 2-20
Bbackground, running SunDiag in, 3-7batch files, using, 1-14boot -r command, 1-6
CCD-ROM test, 6-28cdtest CD ROM test, 6-28command lines
running SunDiag tests from, 5-1See also Part Two
concurrent number of tests systemoption, 2-21
core files system option, 2-19CPU tests
audio test autest , 6-13floating point unit test fputest , 6-6multiprocessing test mptest , 6-14network test nettest , 6-7
Ddeveloping SunDiag tests, A-1
command line syntax, A-15design guidelines, A-2library routines, A-11message formats, A-16

Index-2 SunDiag User’s Guide—August 1994
programming environment, A-4requirements, A-8sample Makefile, A-22sample test template, A-17
device driver, adding, 1-6dimmed buttons, explanation of, 2-8disk tests
CD-ROM test cdtest , 6-28file system test fstest , 6-24read-only disk test rawtest , 6-20
Eediting message files, warning, 3-16email address system option, 2-21error log files, 2-11ethernet test, 6-7exit status codes for SunDiag, 1-19exiting SunDiag, 1-13
FFB locking, framebuffer locking, 1-4fbtest framebuffer test, 6-39fiber optic test, 6-7filesystem test fstest , 6-24floating point unit test, 6-6fonts, use of, xixfputest floating point unit test, 6-6framebuffer locking
rules for using, 1-4framebuffer locking (FB locking), 1-4framebuffers, testing multiple, 1-4fstest filesystem test, 6-24
Ggreyed out buttons, explanation of, 2-8
Iidentification numbers to tests, 5-3individual test standard arguments, 5-1
c enable core dump, 5-1
d debug mode, 5-2h hostname, 5-2p single pass only, 5-1q quick test, 5-2r run on error, 5-1t trace mode, 5-2u list usage, 5-2v verbose mode, 5-2
information log files, 2-11intervention mode, 2-25
Kkernel identification numbers, 5-3
Llibrary routines
void send_message(), A-11void test_end(), A-13void test_init(), A-11void trace_after(), A-14void trace_before(), A-13
log files, 2-11log/email period system option, 2-21loopback connectors
25-pin port A-to-A port B-to-Bplug, B-9
25-pin RS-232 plug, B-425-pin RS-232 port-to-port cable, B-58-pin plug, B-78-pin to 8-pin cable, B-6pin connections, B-2port A-to-port B plug, B-8See Appendix B
MMAP registers, 6-13maximum number of errors system
option, 2-21maximum number of passes system
option, 2-20memory tests
physical memory pmem, 6-2
Index-3
virtual memory vmem, 6-3monitors, testing systems with
multiple, 1-4mptest multiprocessing test, 6-14multiple framebuffers, testing, 1-4multiprocessing test, 6-14
Nnettest network hardware test, 6-7
Ooption files, how to save, 2-23options
See individual test standardarguments
options menu buttons, 2-26
Pphysical memory test, 6-2pin connections for loopback plugs, B-2pmem physical memory test, 6-2printer name system option, 2-21processor affinity mask (PAM), 3-20, 4-3
Qquad ethernet test, 6-7quick test system option, 2-19
Rrawtest read-only test, 6-20remote systems, running SunDiag
on, 1-15run on error system option, 2-20
SSBus test
serial ports test sptest , 6-40SBus tests
framebuffer test fbtest , 6-39
scalabilityhow to set up scalable testing, 4-7instances, 4-3list of scalable tests, 4-1non-scalable tests, 4-2on your own tests, 4-2processor affinity mask (PAM), 3-20,
4-3setting test options, 4-2
schedule feature, how to use, 2-17scratch media, using, 1-10send email system option, 2-20serial ports test, 6-40setting maxusers , 1-8
shell command linesrunning SunDiag tests from, 5-1See also Part 2
single pass option, 2-19speaker test
See audio testsptest serial ports test, 6-40standalone, running SunDiag
standalone, 1-16standard argument syntax, 5-1starting SunDiag
with the vmem test, 1-8SunDiag, A-15
adding your own tests, 1-17an overview, 1-1command syntax, 1-11, 1-12, A-15developing tests, A-1error message syntax, 2-14exit status codes, 1-19hardware and software requirements
LD_LIBRARY PATHvariable, 1-3
OpenWindows revision, 1-3swap space, 1-7TTY terminals, 1-10xhost permission, 1-3
icon mode, 2-28programming environment, A-4quick summary, 5-4running individual tests, 5-1

Index-4 SunDiag User’s Guide—August 1994
running on remote systems, 1-15running standalone, 1-16starting SunDiag, 1-11stopping SunDiag, 1-13
sundiagup , 3-7swap space requirements, 1-7syncloop testing, 6-40system options
auto start, 2-20concurrent number of tests, 2-21core files, 2-19email address, 2-21log/email period, 2-21maximum number of passes, 2-20maximum number of system
options, 2-21printer name, 2-21quick test, 2-19run on error, 2-20send email, 2-20single pass, 2-19trace, 2-19verbose, 2-19
Ttapetest tape drive test, 6-32terminal
See TTY modetest design guidelines, A-2test names, and identification
numbers, 5-3test option buttons, use of, 2-26token ring test, 6-7trace system option, 2-19TTY Mode, using SunDiag in
backgrounding SunDiag, 3-7enabling/disabling tests, 3-7individual test options, 3-18log files menu, 3-15option files menu, 3-13options menu, 3-8processor affinity mask (PAM), 3-20re-drawing the screen, 3-6
scrolling, 3-6starting SunDiag, 3-2system status display, 3-11
typographic conventions, xix
UUNIX message log file, 2-11.usertest file
adding your own tests in, 1-17syntax, 1-17test writing precautions, 1-18
Vvalloc , 6-4verbose system option, 2-19virtual memory test, 6-3vmem
swap space requirements, 1-8vmem
Reserve option to, 1-8vmem virtual memory test, 6-3void send_message(), A-8, A-11void test_end(), A-13void test_init(), A-11void trace_after(), A-14void trace_before(), A-13
Wwhat_rev , C-1
Xxhost permission, 1-3
Yypbind on standalone systems, 1-16