STUDY DESIGN - s3.amazonaws.com · Web viewFor ISH tests for TERC or MYC or HPV 16 or HPV 18:...
44
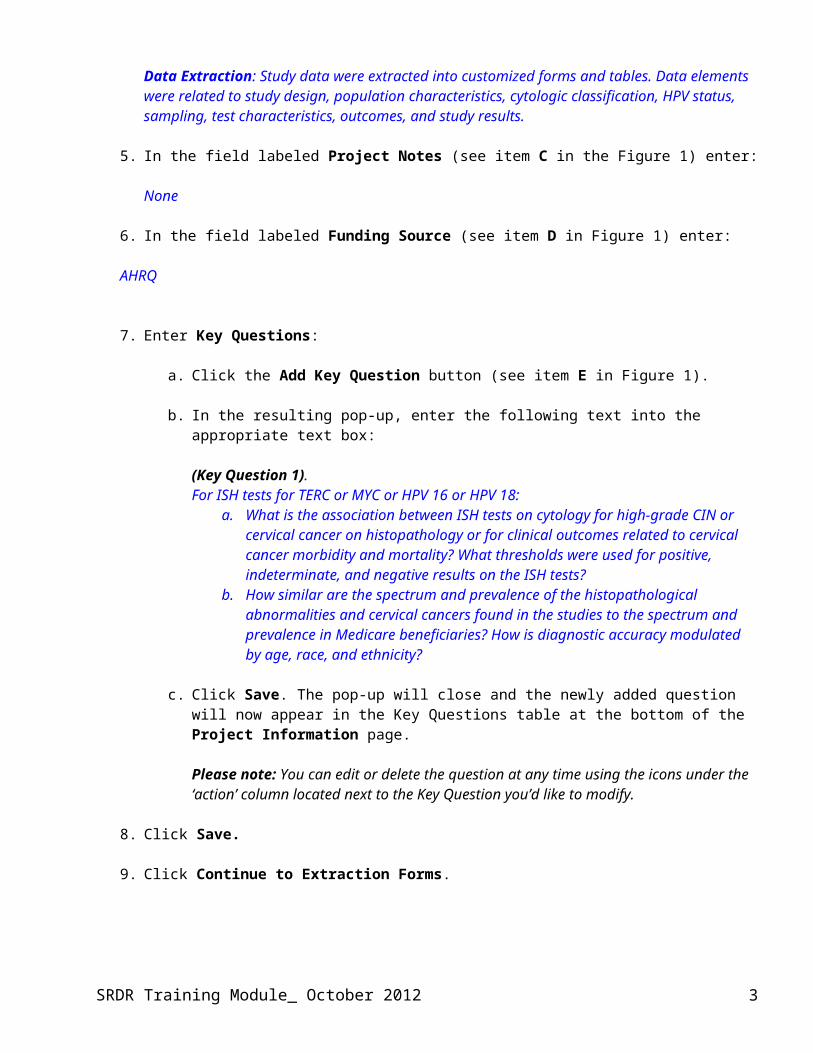
Systematic Review Data Repository (SRDR) Training – Example Case for Diagnostic Tests Jalali GR. Amplification of the chromosome 3q26 region shows high negative predictive value for nonmalignant transformation of LSIL cytologic finding. American Journal of Obstetrics and Gynecology. 2010; 202: 581.e1-5 Welcome to Systematic Review Data Repository (SRDR)! In this module, we will ask you to initiate a new project, create an extraction form, and extract data from one study. The goal of this exercise is to familiarize new users with the SRDR by walking through the extraction of data from one sample study into a new systematic review project. Please plan to devote 2-2.5 hours for this part of the training. All materials for successfully completing this training are provided, including step-by-step instructions and a sample study to extract. Please read the notes below before beginning these exercises. Notes: Please use Firefox, Google Chrome, IE 7, 8, 9 or Safari browser when using SRDR Throughout this exercise, information specifically designated for entry into SRDR Web forms during this exercise will be noted in italic blue. Feel free to cut and paste these sections into the indicated fields. For more detailed information on how to use the SRDR site, please refer to the SRDR user manual which can be linked through the homepage. SRDR Training Module_ October 2012 1
Transcript of STUDY DESIGN - s3.amazonaws.com · Web viewFor ISH tests for TERC or MYC or HPV 16 or HPV 18:...
Systematic Review Data Repository (SRDR) Training – Example Case for Diagnostic TestsJalali GR. Amplification of the chromosome 3q26 region shows high negative predictive value for nonmalignant transformation of LSIL cytologic finding. American Journal of Obstetrics and Gynecology. 2010; 202: 581.e1-5
Welcome to Systematic Review Data Repository (SRDR)!
In this module, we will ask you to initiate a new project, create an extraction form, and extract data from one study. The goal of this exercise is to familiarize new users with the SRDR by walking through the extraction of data from one sample study into a new systematic review project. Please plan to devote 2-2.5 hours for this part of the training.
All materials for successfully completing this training are provided, including step-by-step instructions and a sample study to extract. Please read the notes below before beginning these exercises.
Notes:
Please use Firefox, Google Chrome, IE 7, 8, 9 or Safari browser when using SRDR
Throughout this exercise, information specifically designated for entry into SRDR Web forms during this exercise will be noted in italic blue. Feel free to cut and paste these sections into the indicated fields.
For more detailed information on how to use the SRDR site, please refer to the SRDR user manual which can be linked through the homepage.
SRDR Training Module_ October 2012 1

Log In
1. Go to http://srdr.training.ahrq.gov/
2. Click register and create your account. Your account will be automatically approved and you can start using the training website and its features.
3. If you are not already logged in after registration, please log in using your username and password.
A. Create a New PROJECT
To initiate a new project, follow the steps below:
1. Login to the SRDR with your personal username & password.
2. Once logged in, click Create a New Project, located on the top right of the MySRDR tab, to initiate a new project.
3. In the field labeled Project Title (see item A in Figure 1) enter:
Fluorescence In Situ Hybridization (FISH) Testing for Chromosomal Damage in Uterine Cervical Cells to Predict Potential for Dysplasia/Malignancy
4. In the field labeled Project Description (see item B in Figure 1) enter:
Purpose: We aimed to examine the role of in situ hybridization (ISH) tests, including fluorescence ISH (FISH), to detect genetic abnormalities on cervical cytologic specimens to increase the clinical validity of identification of precancerous lesions or cervical cancer.Data Sources: MEDLINE® (from inception to October 2011, week 2), the Cochrane Central Trials Registry (through the fourth quarter of 2011), and Scopus (including Embase) on November 7, 2011, with no language exclusion. The searches were updated on July 12, 2012.Study Selection: We included any study using ISH with any of the four probes in cervical cytology specimens to detect high-grade CIN or cervical cancer (or clinical outcomes). Cervical cytology had to be classified as ASCUS or LSIL according to the Bethesda classification. Histology outcomes had to be defined as CIN and had to be expressible as either CIN 3+ (i.e., CIN3 or cervical cancer) or CIN2+ (i.e., CIN 2, CIN3, or cervical cancer). Studies had to provide data that allowed for calculation of sensitivity and specificity.Data Extraction: Study data were extracted into customized forms and tables. Data elements were related to study design, population characteristics, cytologic classification, HPV status, sampling, test characteristics, outcomes, and study results.
5. In the field labeled Project Notes (see item C in the Figure 1) enter:
None
6. In the field labeled Funding Source (see item D in Figure 1) enter:
AHRQ
SRDR Training Module_ October 2012 2
7. Enter Key Questions:
a. Click the Add Key Question button (see item E in Figure 1).
b. In the resulting pop-up, enter the following text into the appropriate text box:
(Key Question 1). For ISH tests for TERC or MYC or HPV 16 or HPV 18:
a. What is the association between ISH tests on cytology for high-grade CIN or cervical cancer on histopathology or for clinical outcomes related to cervical cancer morbidity and mortality? What thresholds were used for positive, indeterminate, and negative results on the ISH tests?
b. How similar are the spectrum and prevalence of the histopathological abnormalities and cervical cancers found in the studies to the spectrum and prevalence in Medicare beneficiaries? How is diagnostic accuracy modulated by age, race, and ethnicity?
c. Click Save. The pop-up will close and the newly added question will now appear in the Key Questions table at the bottom of the Project Information page.
Please note: You can edit or delete the question at any time using the icons under the ‘action’ column located next to the Key Question you’d like to modify.
8. Click Save.
9. Click Continue to Extraction Forms.
SRDR Training Module_ October 2012 3
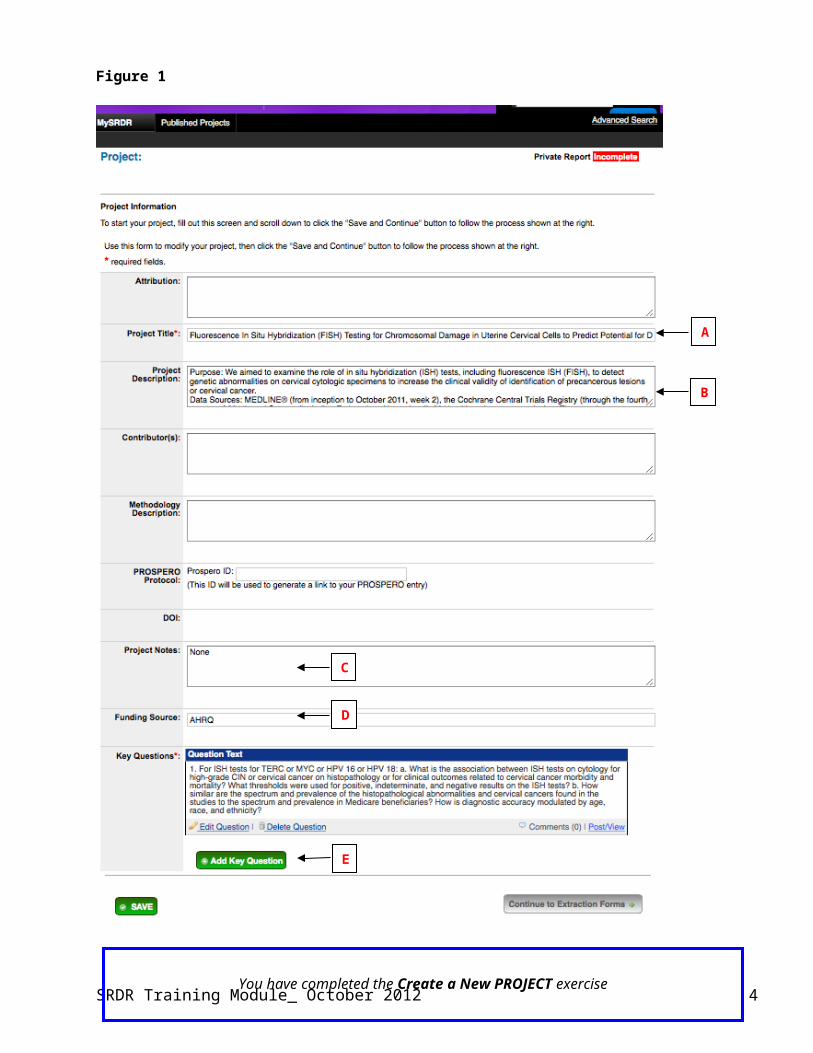
Figure 1
SRDR Training Module_ October 2012
A
B
C
D
E
You have completed the Create a New PROJECT exercise
4
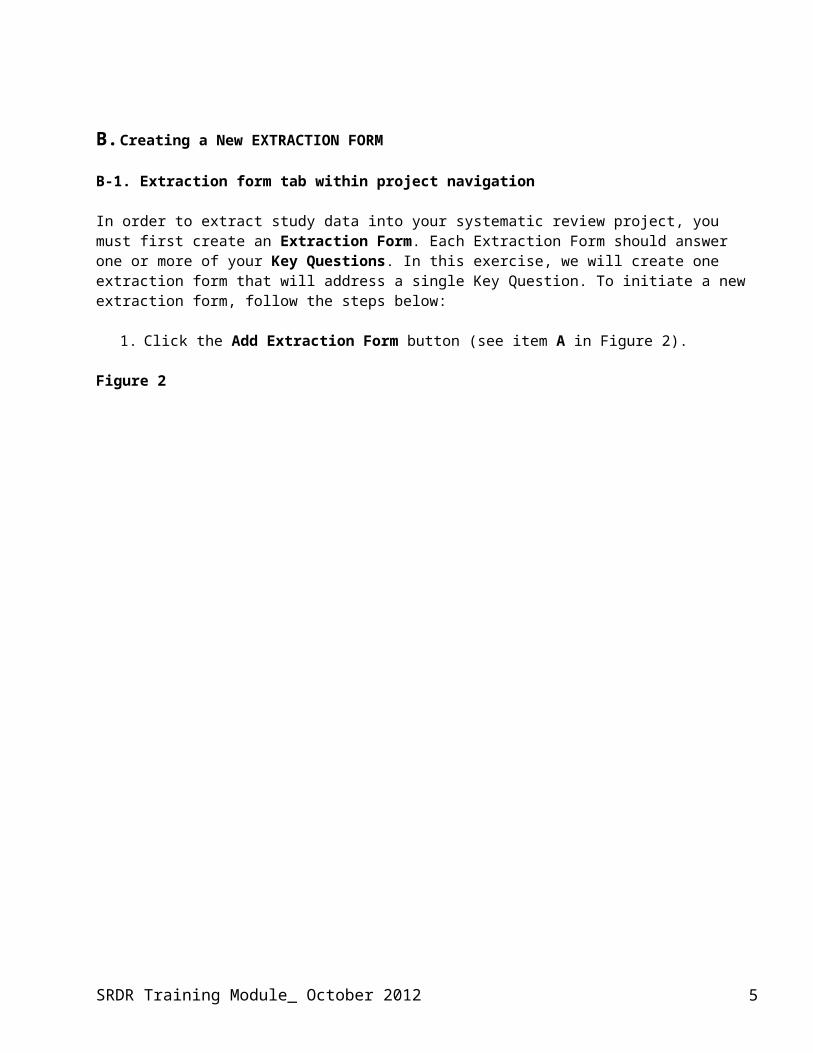
B. Creating a New EXTRACTION FORM
B-1. Extraction form tab within project navigation
In order to extract study data into your systematic review project, you must first create an Extraction Form. Each Extraction Form should answer one or more of your Key Questions. In this exercise, we will create one extraction form that will address a single Key Question. To initiate a new extraction form, follow the steps below:
1. Click the Add Extraction Form button (see item A in Figure 2).
Figure 2
SRDR Training Module_ October 2012 5
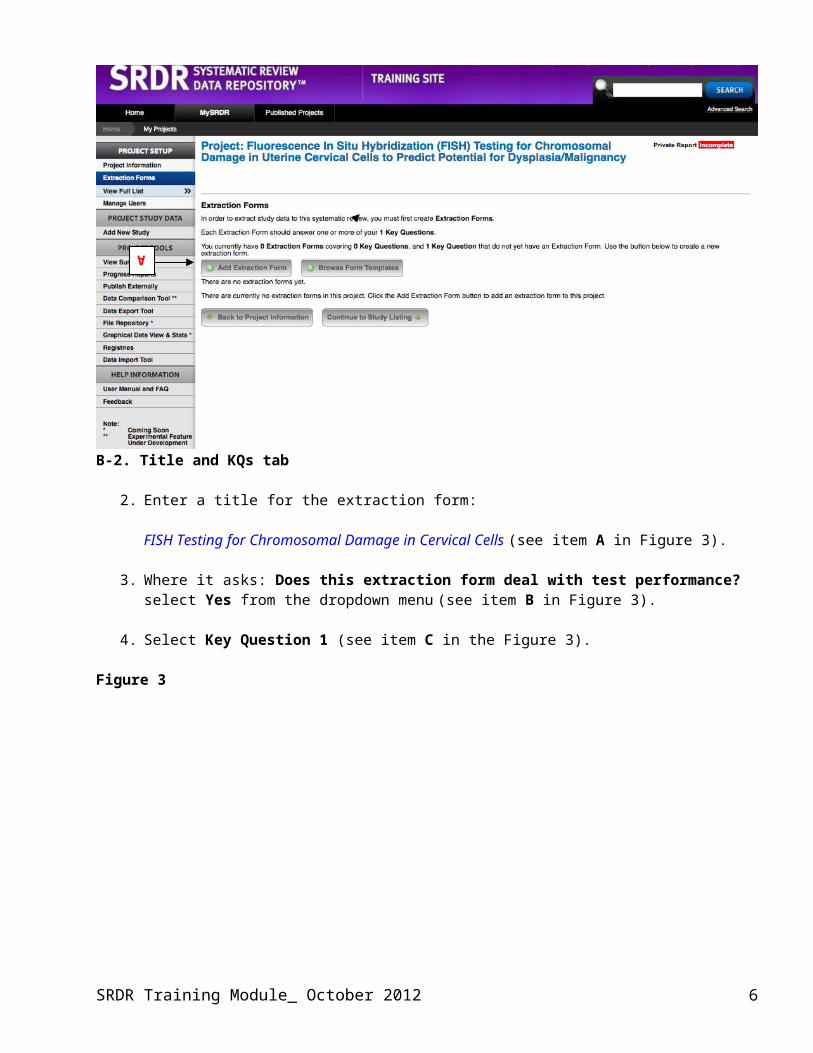
B-2. Title and KQs tab
2. Enter a title for the extraction form:
FISH Testing for Chromosomal Damage in Cervical Cells (see item A in Figure 3).
3. Where it asks: Does this extraction form deal with test performance? select Yes from the dropdown menu (see item B in Figure 3).
4. Select Key Question 1 (see item C in the Figure 3).
Figure 3
SRDR Training Module_ October 2012
A
B
C
A
D E
6

5. Click Save (see item D in Figure 3).
6. Click Continue to Create your Extraction Form (see item E in Figure 3).
Please note: Following this initial step, a set of tabs will have appeared along the top of the page, each representing a potential section of the newly initiated extraction form. You may choose to include a section or not, per the needs of your project. You may also navigate among the tabs in any order by simply clicking on the desired tab. We will include all sections in this exercise.
SRDR Training Module_ October 2012 7

B-3. Publication tab
7. Please review the standard publication information to be extracted, and click Next when finished. (see Figure 4)
Please note: Although not enabled here, additional study identifiers can be added during individual study extraction.
Figure 4. Publication tab:
SRDR Training Module_ October 2012 8

B-4. Study Design tab
1. Leave the Design Details section as included in the extraction form by leaving the initial response (Yes) as selected.
2. Click Add a New Design Detail (see item A in Figure 5).
Figure 5
3. In the resulting pop-up (Figure 6), enter Country in the Question text box (see item A in the Figure 6).
4. Choose Text (user will enter their own value) for the answer type using the drop-down list at the bottom of the pop-up (see item B in Figure 6).
Please note: Besides text, you may also allow data extractors to respond among a number of possible choices via drop-down lists, radio buttons, and/or check boxes.
SRDR Training Module_ October 2012
A
9
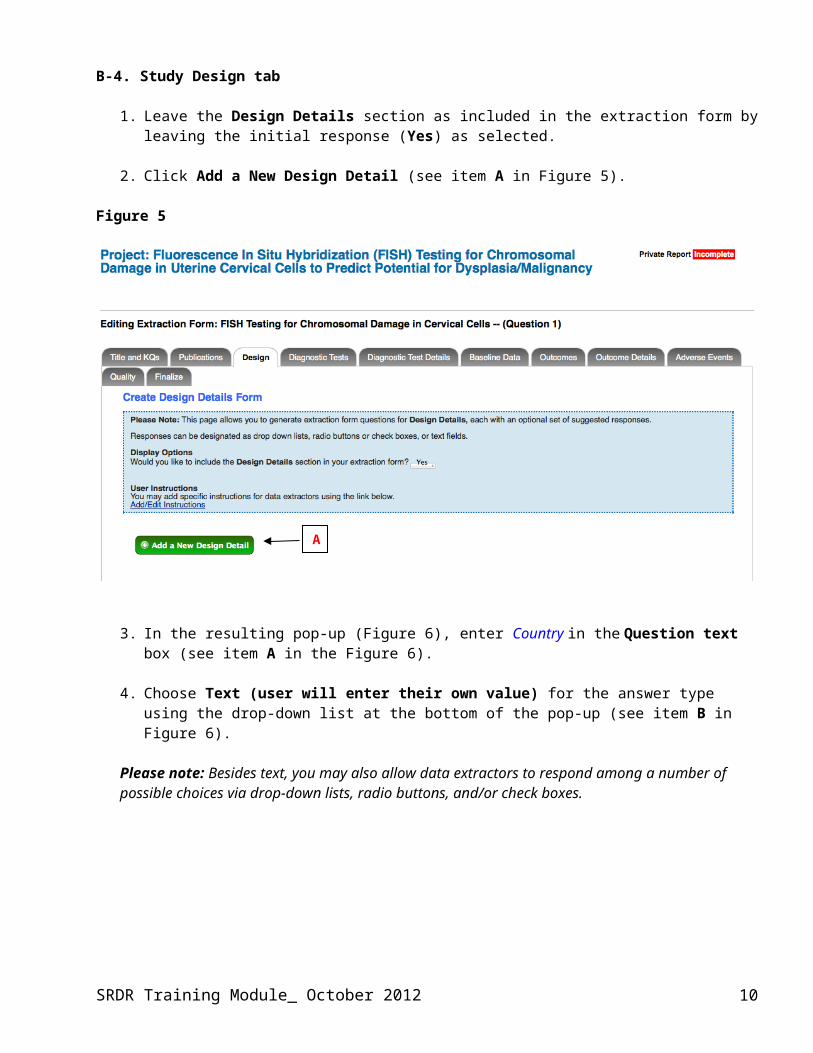
Figure 6
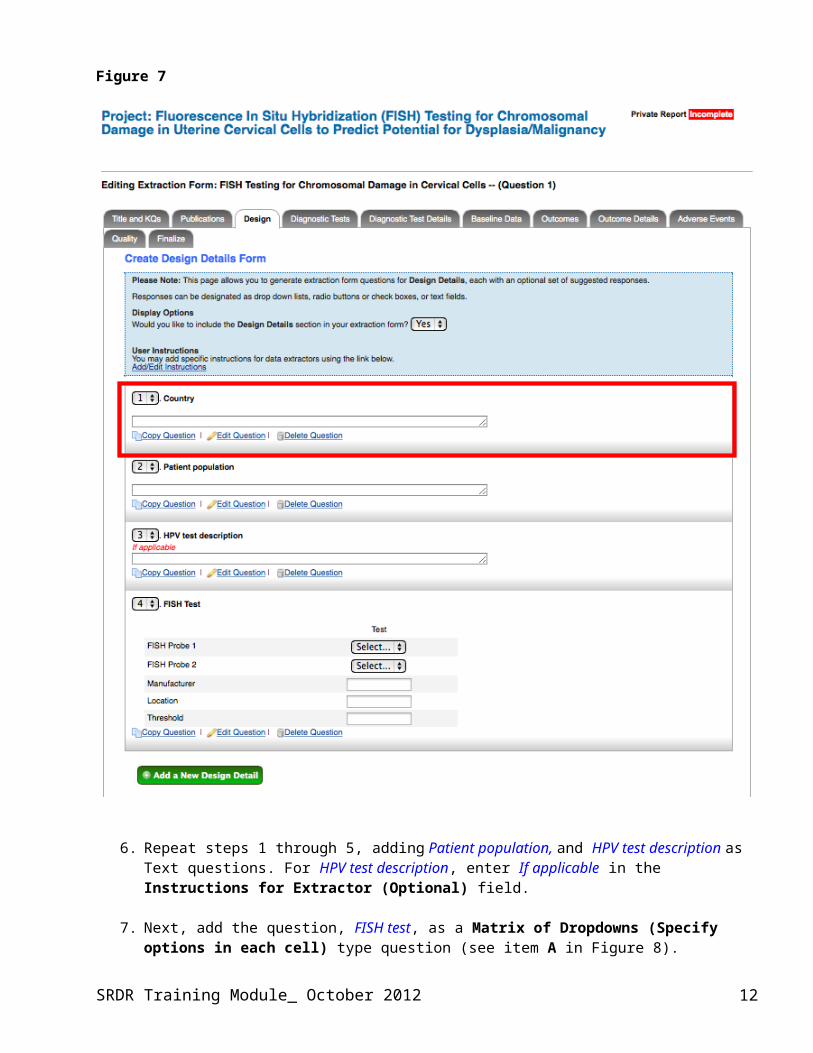
5. Click Save. The pop-up will close and the newly defined question will be displayed at the bottom of the page (see highlighted area in Figure 7).
SRDR Training Module_ October 2012
B
A
10
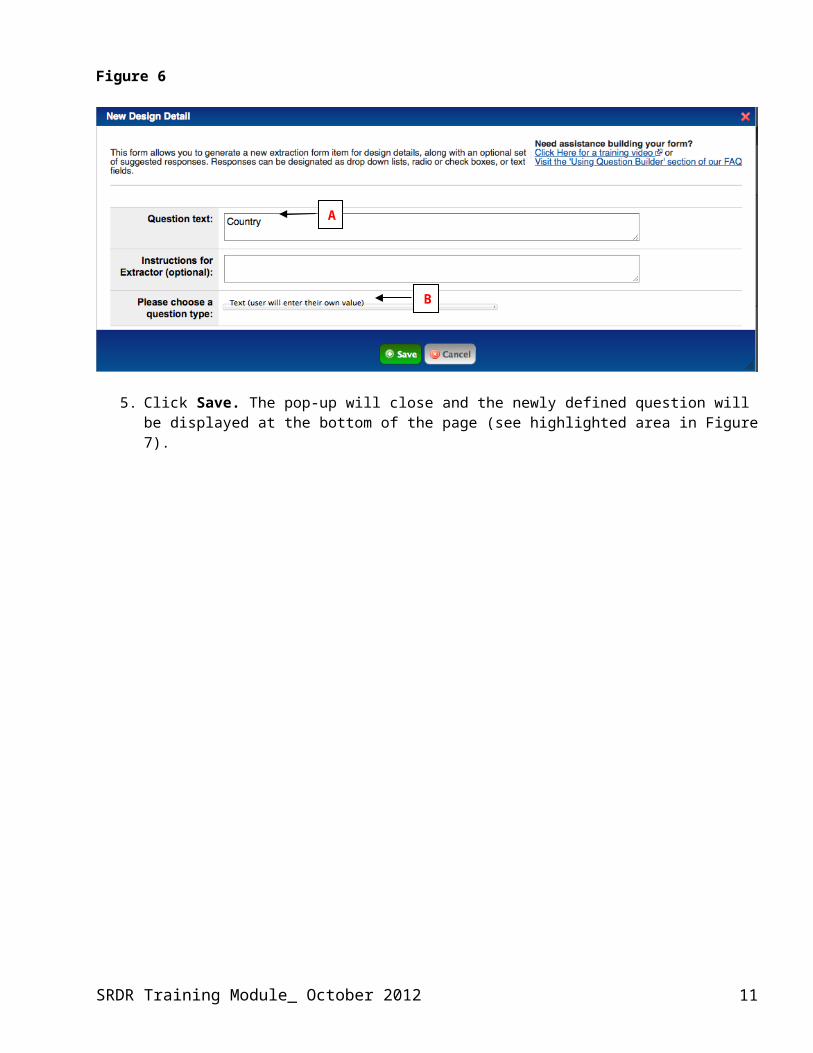
Figure 7
6. Repeat steps 1 through 5, adding Patient population, and HPV test description as Text questions. For HPV test description, enter If applicable in the Instructions for Extractor (Optional) field.
7. Next, add the question, FISH test, as a Matrix of Dropdowns (Specify options in each cell) type question (see item A in Figure 8).
SRDR Training Module_ October 2012 11
8. Include 5 rows and 1 column using the Rows -- /++ and Cols -- / ++ buttons as necessary. (see item B in Figure 8)
9. In the column header enter Test and in the 5 row headers, enter: FISH probe 1, FISH Probe 2, Manufacturer, Location, and Threshold. (see item C in Figure 8)
10. Next, for the rows labeled, FISH probe 1 and Fish Probe 2, within the text boxes under the Test column, enter the following options TERC and MYC on separate lines using the “enter” key. (see item D in Figure 8)
11. Click the checkbox at the bottom of the pop-up window for Include options named ‘Other’ for each dropdown box in table. (see item E in Figure 8)
12. Click Save.
Figure 8
13. Review the design detail queries you’ve added for accuracy, and when satisfied click Next or move to the next tab.
SRDR Training Module_ October 2012
AB
E
D
C
12
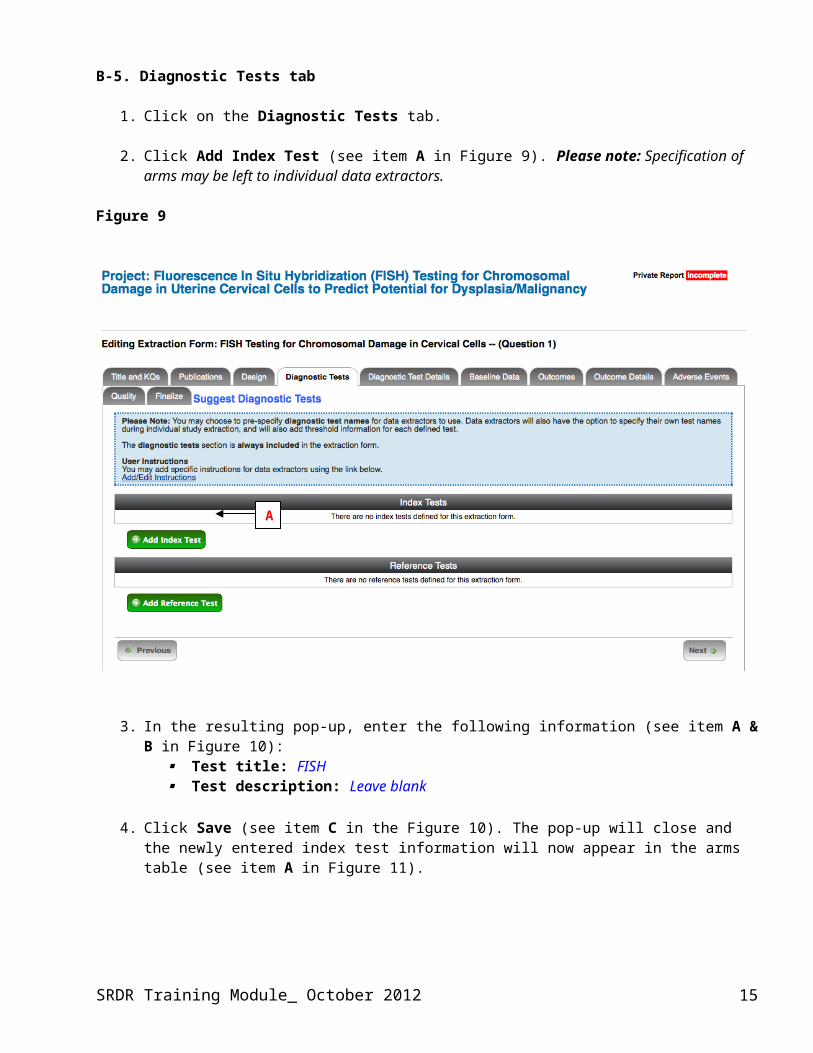
B-5. Diagnostic Tests tab
1. Click on the Diagnostic Tests tab.
2. Click Add Index Test (see item A in Figure 9). Please note: Specification of arms may be left to individual data extractors.
Figure 9
3. In the resulting pop-up, enter the following information (see item A & B in Figure 10): Test title: FISH Test description: Leave blank
4. Click Save (see item C in the Figure 10). The pop-up will close and the newly entered index test information will now appear in the arms table (see item A in Figure 11).
SRDR Training Module_ October 2012
A
13
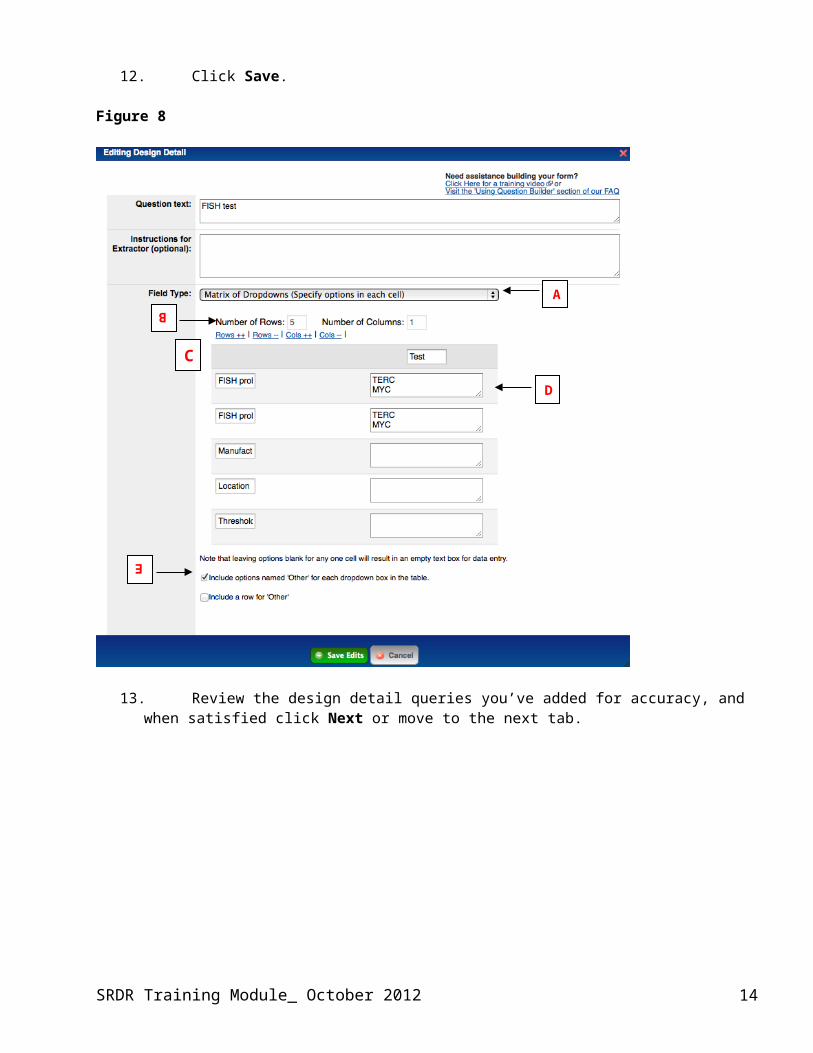
Figure 10
Figure 11
5. Next enter the Reference Test using the same methods as in steps 2-4 above.
6. In the pop-up, enter the following information (see item B in Figure 11).: Test title: Biopsy Test description: Histological confirmation of CIN2+ and CIN 3+
7. Click Next or move to the next tab.
SRDR Training Module_ October 2012
A
B
C
A
B
14
B-6. Baseline Data tab:
1. As on previous tabs, leave the Baseline Data section as included in the extraction form by leaving the initial response (Yes) as selected.
2. Using the same instructions as described for the Design tab, enter the following baseline characteristic queries:
Question text: Question type Rows Columns OptionsN Enrolled Matrix of
DropdownsASCUS
N
NoneLSIL NoneTotal None
Check box next to Include a row for ‘Other’
Sampling Characteristics
Matrix of Dropdowns
Include options named ‘Other’ for each dropdown box in table
Specimen
Sample
Cytologic
HistologicSampling Purposive
SystematicSetting Screening
Testing/Diagnosis
MixedCheck box next toInclude Options named‘Other’ for eachdropdown box in table
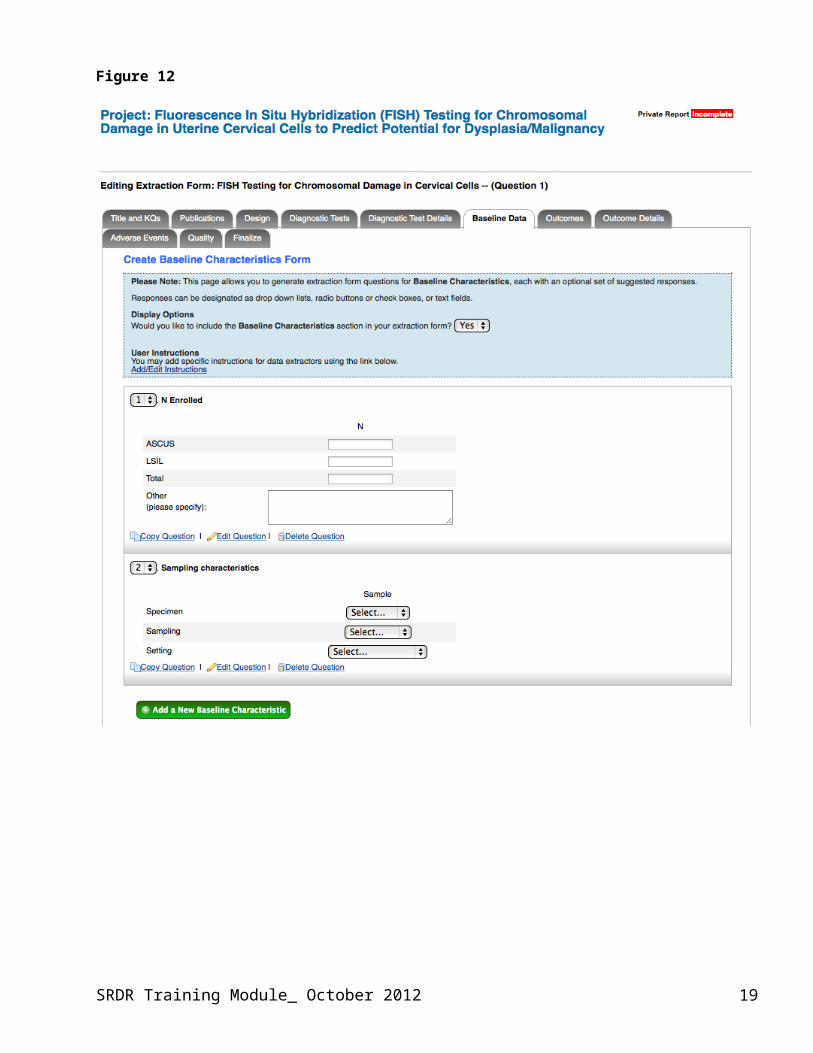
3. Review the baseline characteristics queries you’ve added for accuracy (see Figure 12), and when satisfied move to the next tab.
SRDR Training Module_ October 2012 15

Figure 12
SRDR Training Module_ October 2012 16

B-7. Outcomes tab
1. As on previous tabs, leave the Outcomes section as included in the extraction form by leaving the initial response (Yes) as selected.
Please note: In some cases, selecting No will eliminate the Outcomes section and all sections which depend on that section (including the Outcome Details tab) from appearing in the final extraction from.
2. Click Add a New Outcome Name.
Please note: Specification of outcomes may be left to individual data extractors based on the outcomes of interest for the review.
3. In the resulting pop-up, enter the following outcome information the appropriate fields: Title: CIN2+ (see item A in Figure 13) Description: Leave blank
4. Select Categorical using the radio button at the bottom of the pop-up (see item B in the Figure 13).
5. Click Save. The pop-up will close and the newly added outcome will now appear in the table at the bottom of the page (see highlighted area in Figure 14).
Figure 13
SRDR Training Module_ October 2012
A
B
17
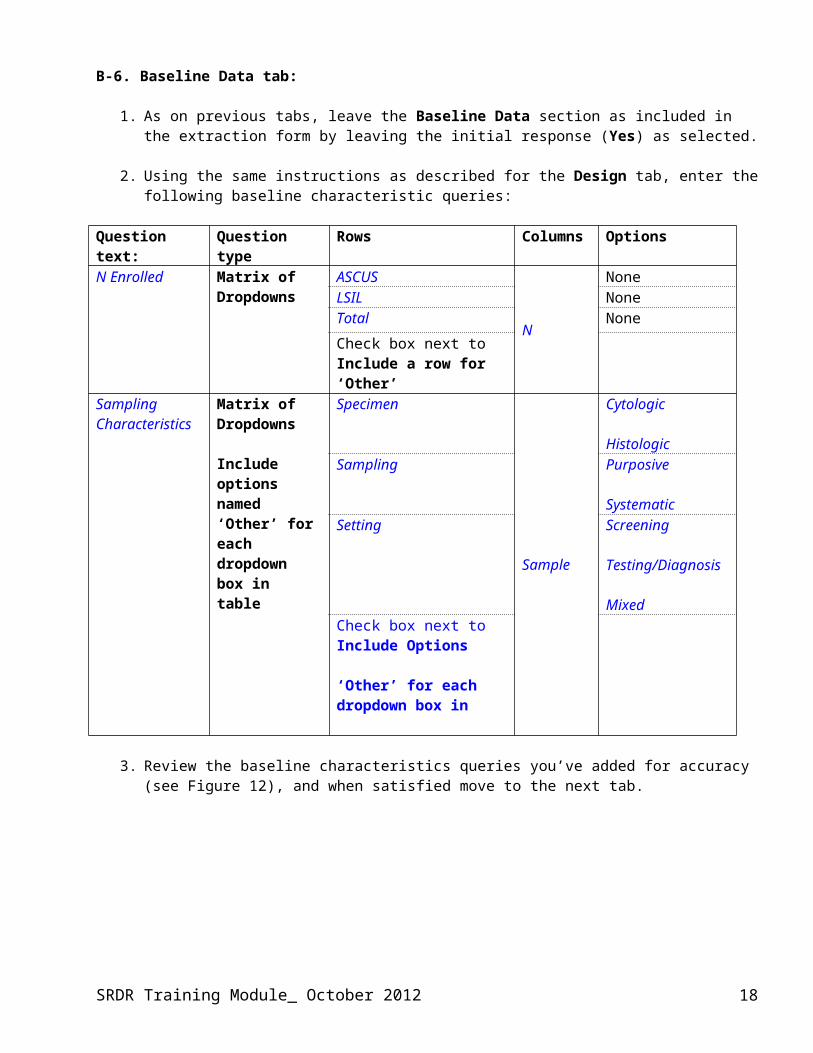
Figure 14
6. Repeat steps 2-5 for the outcome of CIN3+.
7. When you are done click Next or move to the next tab.
SRDR Training Module_ October 2012 18
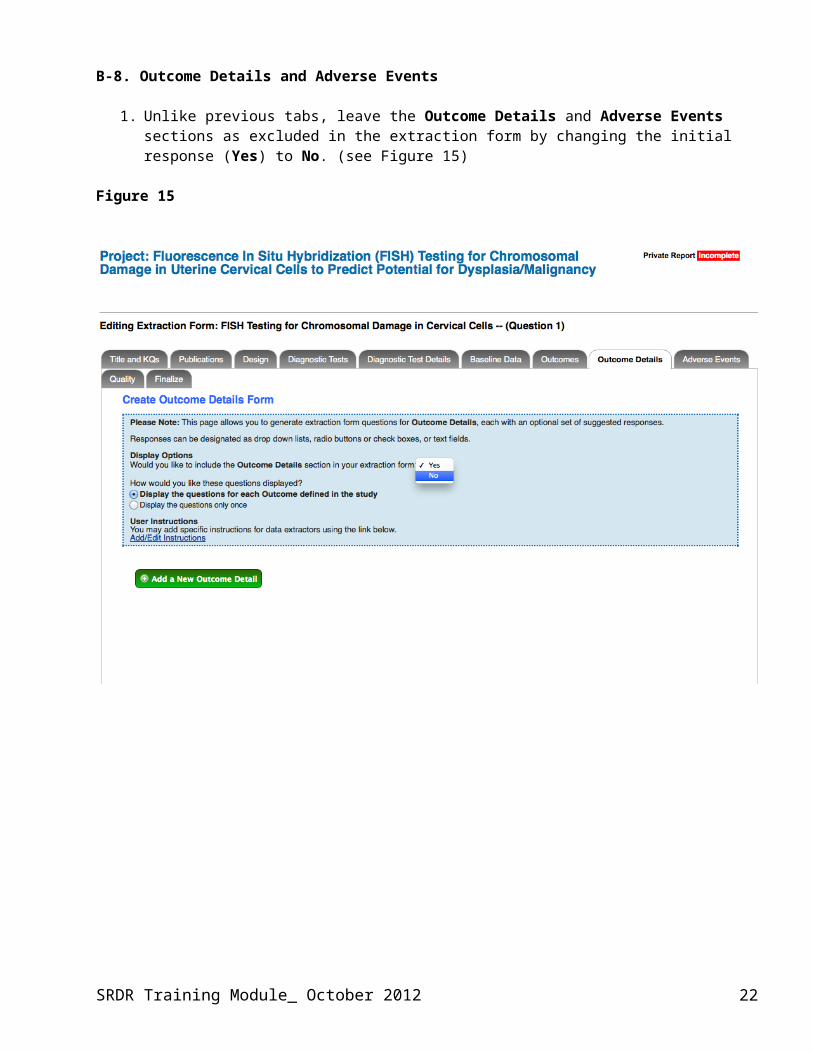
B-8. Outcome Details and Adverse Events
1. Unlike previous tabs, leave the Outcome Details and Adverse Events sections as excluded in the extraction form by changing the initial response (Yes) to No. (see Figure 15)
Figure 15
SRDR Training Module_ October 2012 19

B-9. Quality tab
1. As on previous tabs, leave the Quality Dimensions section as included in the extraction form by leaving the initial response (Yes) as selected.
2. Click Add a New Quality Dimension Field.
3. In the resulting pop-up, click on the Choose a quality dimension drop-down list (see Figure 16) and select Add all QUADAS2 Dimensions from the drop down list.
Figure 16
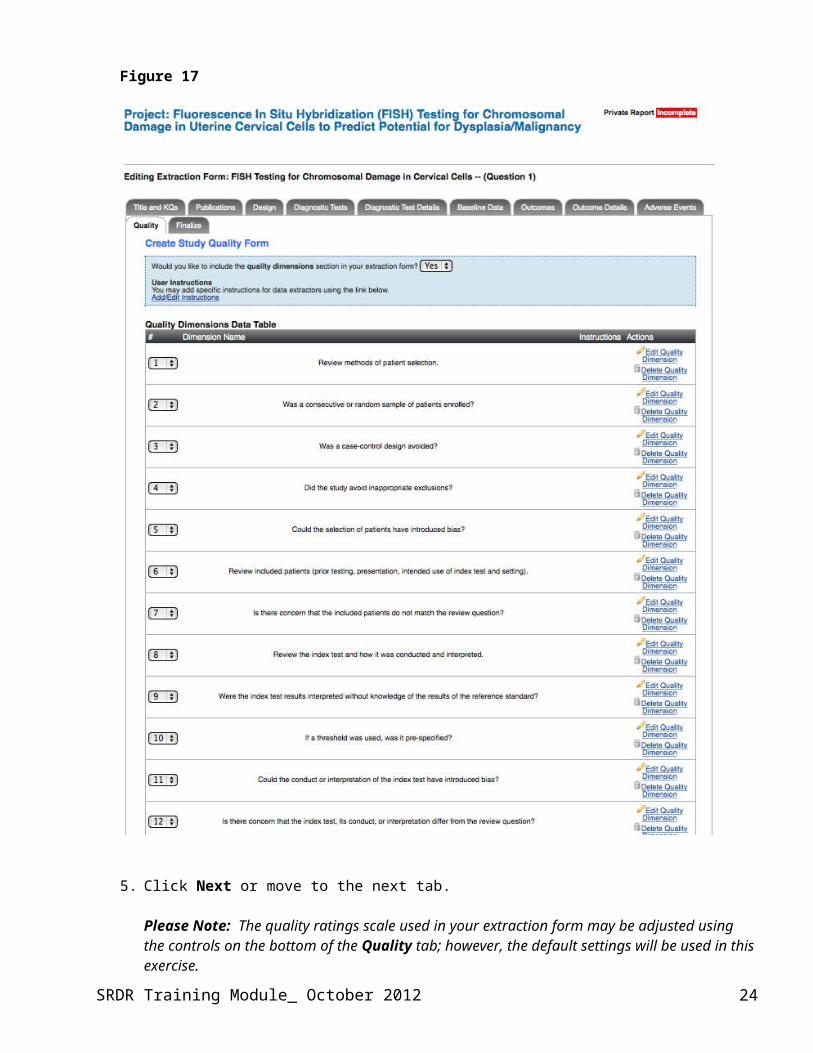
4. Click Save. The new quality dimensions with instructions should now appear in the quality dimensions data table (see Figure 17).
SRDR Training Module_ October 2012 20

Figure 17
5. Click Next or move to the next tab.
Please Note: The quality ratings scale used in your extraction form may be adjusted using the controls on the bottom of the Quality tab; however, the default settings will be used in this exercise.
SRDR Training Module_ October 2012 21
B-11. Finalize tab
6. You will see that your Current Status in the Finalize tab is now marked as Incomplete (Private). (Figure 21)
7. After you click the Finalize this Extraction Form button (see item A in Figure 22), the Current Status of your project will read: Finalized. (see item A in Figure 23).
Figure 18
SRDR Training Module_ October 2012
A
22

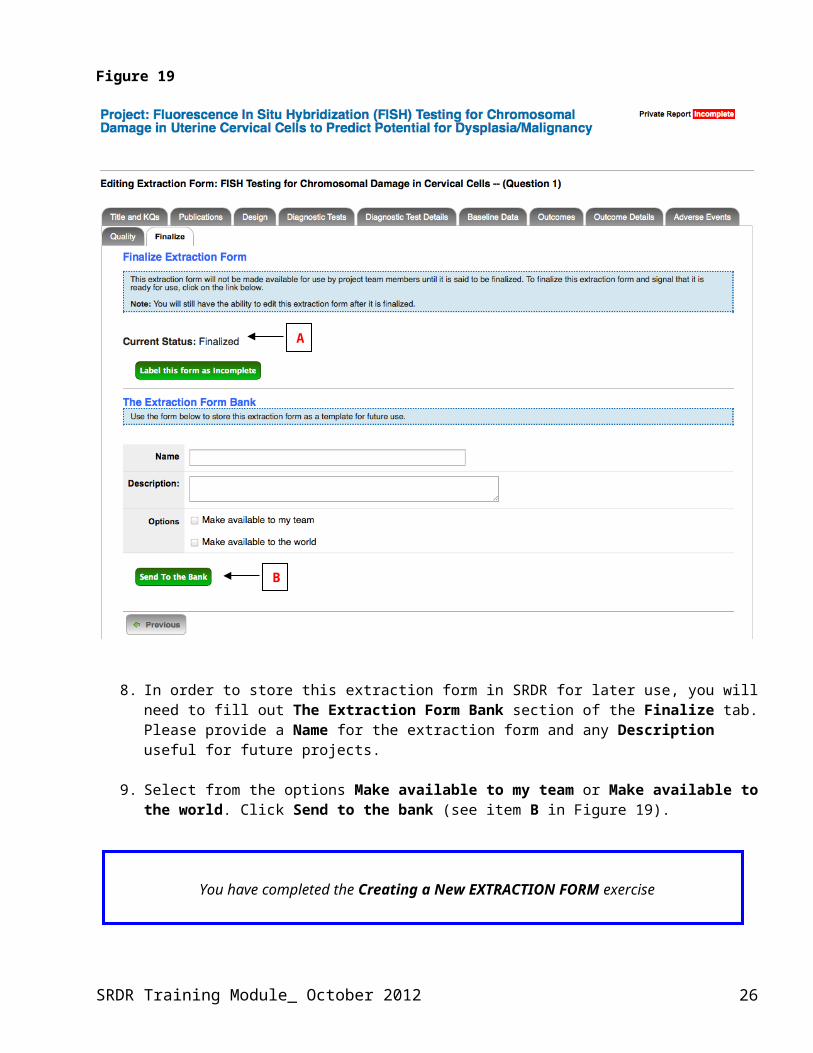
Figure 19
8. In order to store this extraction form in SRDR for later use, you will need to fill out The Extraction Form Bank section of the Finalize tab. Please provide a Name for the extraction form and any Description useful for future projects.
9. Select from the options Make available to my team or Make available to the world. Click Send to the bank (see item B in Figure 19).
You have completed the Creating a New EXTRACTION FORM exercise
SRDR Training Module_ October 2012
A
B
23
C. Extract Study Data
In this exercise, you will extract study data into the extraction form you created in the previous exercise.
1. Click the MySRDR tab at the top of the page. (You can access all projects to which you belong at any time by clicking on this tab)
2. You will be returned to the My Projects tab.
3. Below the title of the project you created in Part B of this tutorial, click the Add a Study icon.
C-1. Key questions
4. On the New Study page, select the first option One study created individually (see item A in Figure 20).
5. In the resulting Add a Single Study dialog appearing at the bottom of the page, select Key Question 1 by marking the appropriate check box (see item B in Figure 20).
6. Click Save and continue (see item C in Figure 20).
Figure 20
SRDR Training Module_ October 2012
A
B
C
24

C-2. Publication
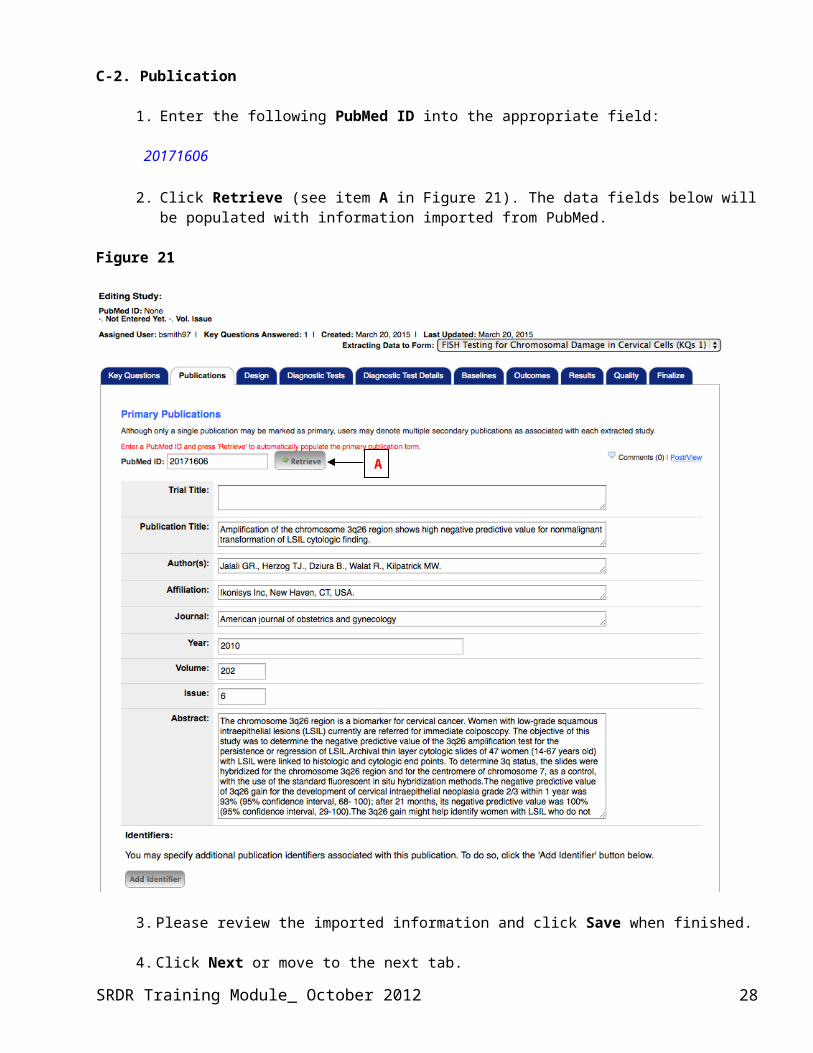
1. Enter the following PubMed ID into the appropriate field:
20171606
2. Click Retrieve (see item A in Figure 21). The data fields below will be populated with information imported from PubMed.
Figure 21
3. Please review the imported information and click Save when finished.
4. Click Next or move to the next tab.
SRDR Training Module_ October 2012
A
25
C-3. Design details1. On the Design Details page, fill in the following information (see Figure 22):
Q# Question text: Data to be entered:1 Country US2 Patient population Archival thin layer cytologic slides of 31 women with LSIL.3 Age range 14-674 HPV test description NR5 FISH test FISH probe: TERC
FISH probe: Other, Specify CEP7Manufacturer: Abbott MolecularLocation: Des Plaines, ILThresholds: A case was considered positive for 3q gain by having ≥2 cells with ≥5 3q-FISH signals.
2. Please review your responses and click Save Data when finished.
3. Click Next or move to the next tab.
SRDR Training Module_ October 2012 26

Figure 22
SRDR Training Module_ October 2012 27
C-4. Diagnostic Tests
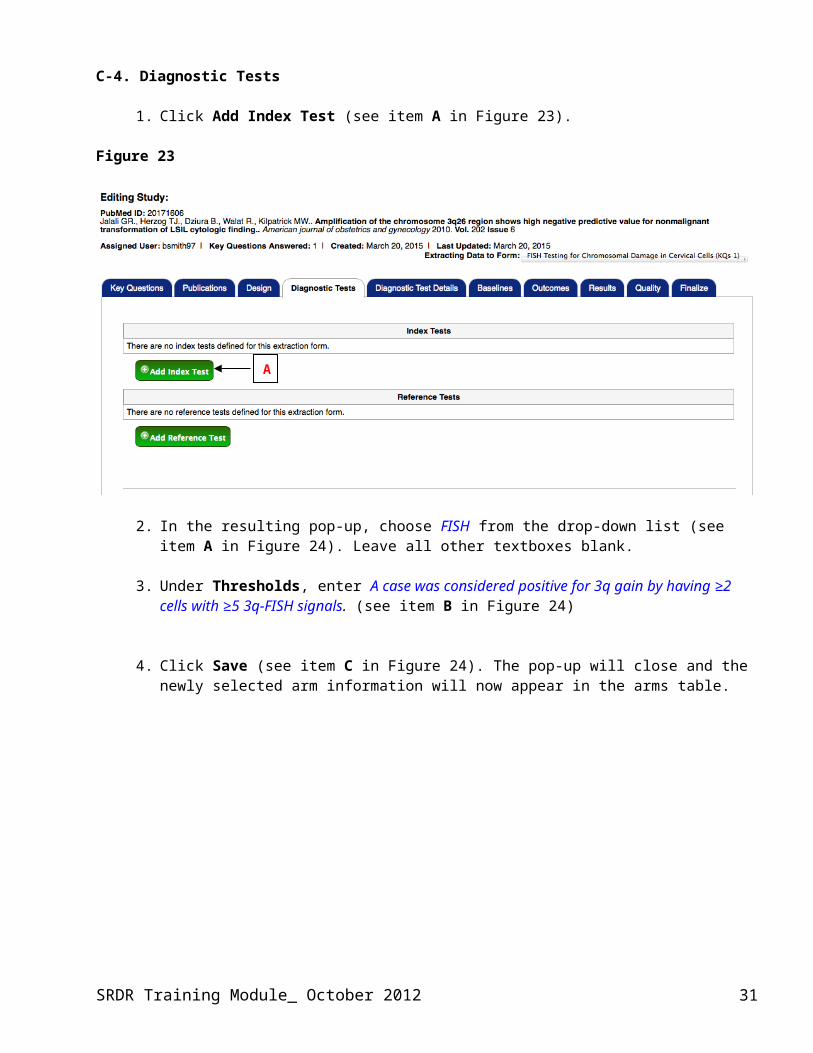
1. Click Add Index Test (see item A in Figure 23).
Figure 23
2. In the resulting pop-up, choose FISH from the drop-down list (see item A in Figure 24). Leave all other textboxes blank.
3. Under Thresholds, enter A case was considered positive for 3q gain by having ≥2 cells with ≥5 3q-FISH signals. (see item B in Figure 24)
4. Click Save (see item C in Figure 24). The pop-up will close and the newly selected arm information will now appear in the arms table.
SRDR Training Module_ October 2012
A
28
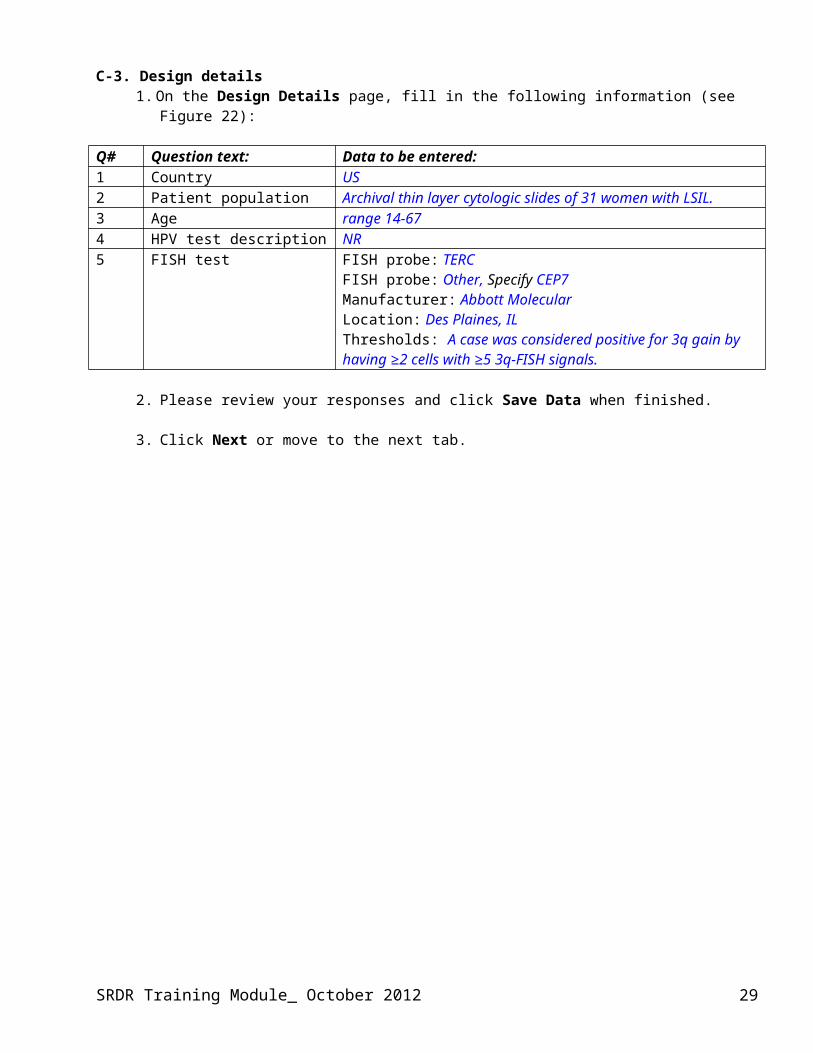
Figure 24
5. Click the Add Reference Test button and choose Biopsy from the dropdown menu. Under Thresholds enter, Histological confirmation of CIN2+ or CIN3+. Click, Save.
6. Now you will see both your diagnostic test selections in the list under this tab. (see Figure 25)
7. Please review the arms information and click the Baselines tab when finished.
SRDR Training Module_ October 2012
A
C
B
29

Figure 25
SRDR Training Module_ October 2012 30
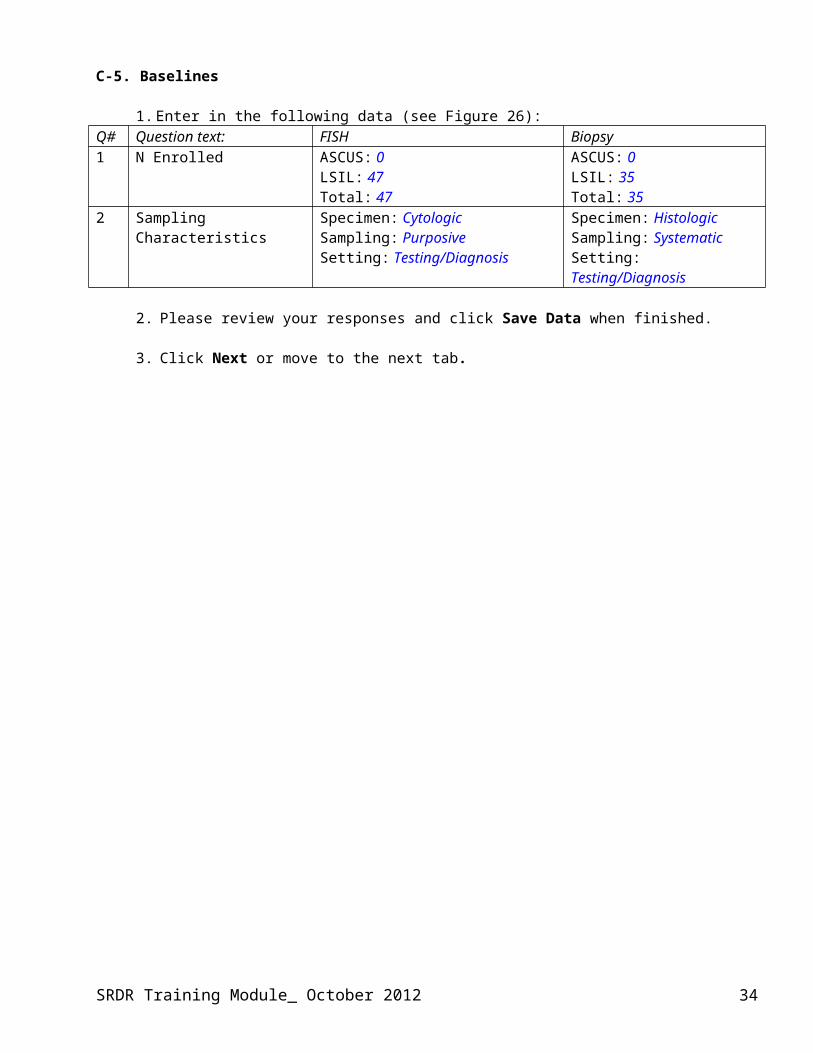
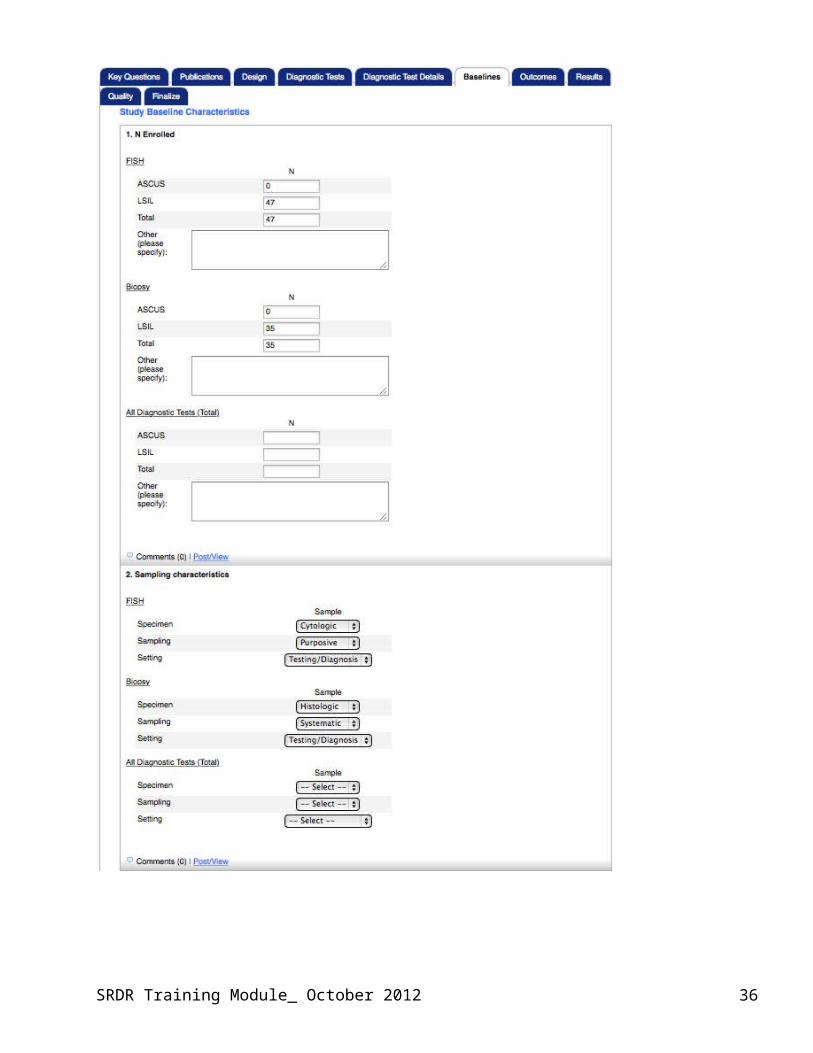
C-5. Baselines
1. Enter in the following data (see Figure 26):Q# Question text: FISH Biopsy1 N Enrolled ASCUS: 0
LSIL: 47Total: 47
ASCUS: 0LSIL: 35Total: 35
2 Sampling Characteristics Specimen: CytologicSampling: PurposiveSetting: Testing/Diagnosis
Specimen: HistologicSampling: SystematicSetting: Testing/Diagnosis
2. Please review your responses and click Save Data when finished.
3. Click Next or move to the next tab.
SRDR Training Module_ October 2012 31

Figure 26
SRDR Training Module_ October 2012 32

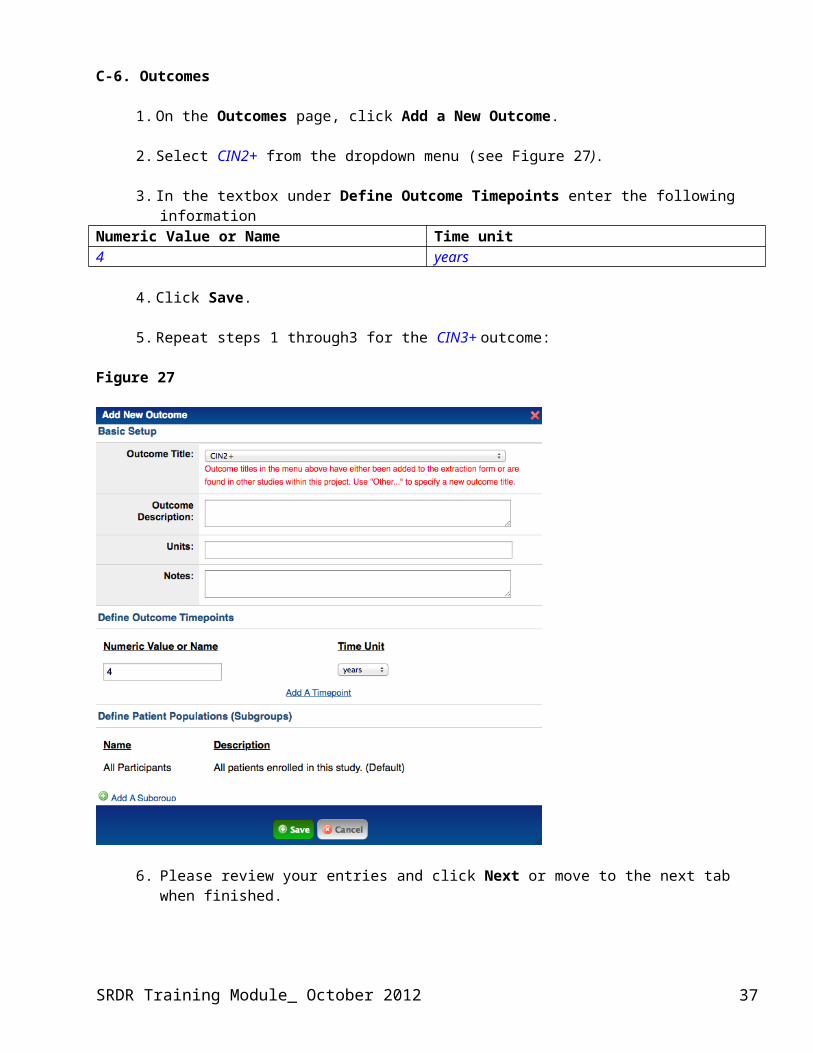
C-6. Outcomes
1. On the Outcomes page, click Add a New Outcome.
2. Select CIN2+ from the dropdown menu (see Figure 27).
3. In the textbox under Define Outcome Timepoints enter the following information Numeric Value or Name Time unit4 years
4. Click Save.
5. Repeat steps 1 through3 for the CIN3+ outcome:
Figure 27
6. Please review your entries and click Next or move to the next tab when finished.
SRDR Training Module_ October 2012 33
C-7. Results
In this section, you will be creating analysis tables based on the information that you have previously entered.
1. From the drop-down list labeled Step 1. Choose the outcome and population to enter data for, select CIN2+.
Hide sections for Descriptive Statistics and Additional Analysis.
2. From the dropdown menus located above the Descriptive Statistics section, select Index test: FISH and Reference test: Biopsy (see item A in Figure 29)
3. Next, on the section for Assuming Reference Standard, click the Edit Measures link. Next, in the following window (see Figure 28), select the measures below:
2x2 Table Sensitivity (%) Sensitivity 95% LCI Sensitivity 95% HCI Specificity (%) Specificity 95% LCI Specificity 95% HCI
4. Click Save.
5. Enter the following values into the 2X2 table (see item B in Figure 29):
Disease (+) Disease (-) TotalTest (+) 10 7 17Test (-) 1 29 30Total 11 36 47
6. Enter the following additional data into the appropriate rows (see item C in Figure 29):
Sensitivity (%) 90.9Sensitivity 95% LCI 57.1Sensitivity 95% HCI 99.5Specificity (%) 80.5Specificity 95% LCI 63.4Specificity 95% HCI 91.1
7. Click Save Table Data. (see item D in Figure 29) and proceed to the Quality tab. Note: If you receive the error, “uncommitted data detected” after navigating away from
the Results tab, simply click the OK button. Your data will be saved.
SRDR Training Module_ October 2012 34

Figure 28
Figure 29
SRDR Training Module_ October 2012 35
C-9. Quality
SRDR Training Module_ October 2012
B
C
D
A
36
1. Select the following Values from the drop-down menus for each of the questions listed (see Figure 30):
1 Review methods of patient selection. [] Other, N/A
2Was a consecutive or random sample of patients enrolled? [Yes, No, Unclear]
Other, NR
3 Was a case-control design avoided? [Yes, No, Unclear] No4 Did the study avoid inappropriate exclusions? [Yes, No, Unclear] Yes
5Could the selection of patients have introduced bias? [Risk: Low, Risk: High, Unclear]
Unclear
6Review included patients (prior testing, presentation, intended use of index test and setting). []
Other, N/A
7Is there concern that the included patients do not match the review question? [Concern: Low, Concern: High, Unclear]
Other, N/A
8 Review the index test and how it was conducted and interpreted. [] Other, N/A
9Were the index test results interpreted without knowledge of the results of the reference standard? [Yes, No, Unclear]
Yes
10
If a threshold was used, was it pre-specified? [Yes, No, Unclear] Yes
11
Could the conduct or interpretation of the index test have introduced bias? [Risk: Low, Risk: High, Unclear]
Low
12
Is there concern that the index test, its conduct, or interpretation differ from the review question? [Concern: Low, Concern: High, Unclear]
Other, N/A
13
Review the reference standard and how it was conducted and interpreted. []
Other, N/A
14
Is the reference standard likely to correctly classify the target condition? [Yes, No, Unclear]
Yes
15
Were the reference standard results interpreted without knowledge of the results of the index test? [Yes, No, Unclear]
Yes
16
Could the reference standard, its conduct, or its interpretation have introduced bias? [Risk: Low, Risk: High, Unclear]
Low
17
Is there concern that the target condition as defined by the reference standard does not match the review question? [Concern: Low, Concern: High, Unclear]
Other, N/A
18
Review any patients who did not receive the index test(s) and/or reference standard or who were excluded from the 2x2 table (refer to flow diagram). []
Other, N/A
19
Review the time interval and any interventions between index test(s) and reference standard. []
Other, N/A
20
Was there an appropriate interval between index test(s) and reference standard? [Yes, No, Unclear]
Other, NR
21
Did all patients receive a reference standard? [Yes, No, Unclear] No
22
Did patients receive the same reference standard? [Yes, No, Unclear] Yes
23
Were all patients included in the analysis? [Yes, No, Unclear] No
24
Could the patient flow have introduced bias? [Risk: Low, Risk: High, Unclear]
High
SRDR Training Module_ October 2012 37

2. Please review your entries and click Save Table Data when finished.
Figure 30
You have completed the Extract Study Data exercise
SRDR Training Module_ October 2012 38