Staff User Guide - MYCaunj.orgUsing the Shortcut Bar The shortcut bar is designed to provide faster...
40
1 CareLogic: Staff User Guide
Transcript of Staff User Guide - MYCaunj.orgUsing the Shortcut Bar The shortcut bar is designed to provide faster...

2
Table of Contents
Logging into Care Logic ................................................................................................................................. 5 How to Change Your Log In Password and Electronic Password .................................................................. 7 Care Logic Shortcuts ...................................................................................................................................... 8 ECR: Maintaining Client Information .......................................................................................................... 10 Maintaining Client Demographics ............................................................................................................... 11 Client Contact Information (phone # and email address) .......................................................................... 11 Schedule Process Flow ................................................................................. Error! Bookmark not defined.3 Scheduling Member Activity ....................................................................................................................... 23 Scheduling Group Activity ......................................................................................................................... 266 Scheduling Staff Activity ........................................................................................................................... 277 Scheduling a Recurring Activity................................................................................................................... 30 Status an Appointment ............................................................................................................................... 32 Outpatient Clinical Workflows ..................................................................... Error! Bookmark not defined.2 Resolving Action Alerts ............................................................................................................................. 322 Accessing Alternate Alerts .......................................................................................................................... 34

3
What is CareLogic?
CareLogic supports the way organizations operate on a daily basis by integrating key workflow functions, such as Intake, Clinical Record, Case Management, and Enterprise Management.
Using CareLogic, organizations can access and analyze uniform client, payer, and organizational information through an Internet browser. CareLogic links the delivery of care to the business of care at every level of your organization, improving efficiency, increasing revenues, and freeing staff to focus on their work.
CareLogic Process Flow
The following diagram illustrates the high-level CareLogic process flow. An outline of the process flow is also provided.
Steps 2, 3 & 4 are completed primarily by DSP’s
& clinical staff. Every staff assigned to a
member will be required to complete the
scheduled activity and required documentation
before the end of every shift.

4
CareLogic Process Flow cont’d
1 Intake/Referral. All clients are entered into the system through the Point of Entry module. The following information can be entered for new clients: demographic information, guarantor information, payer information, payer authorizations, and co-pay information.
2 Schedule Services. After gathering client information through the Point of Entry module, you must schedule the client for an intake assessment. Once the intake assessment is complete, the client can be assigned to the appropriate treatment program.
For out-patient services, the client can be scheduled for an appointment. The process of scheduling an appointment automatically puts the client on a staff member’s caseload.
For in-patient or residential services, the client must be assigned to a bed. The process of assigning a client to a bed automatically schedules an appointment and puts the client on a staff member’s caseload.
3 Deliver Services. All treatment information is recorded and maintained in the client’s electronic clinical record (ECR). At a minimum, the following information is included in each client’s ECR: an intake assessment, a diagnosis, a treatment plan, and progress notes.
4 Billing System Checks. The billing system checks are performed by the Claim Engine. Each night when the Claim Engine runs, it attempts to convert activities (services) into claims that can be sent out for billing. When processing activities, the Claim Engine performs two major checks: activity validation and claim validation.
Activity Validation. If errors are found during activity validation, the activity does not become a claim and the error must be either resolved or overridden before the activity can pass the activity validation. Failed activities are caused by service errors, such as no primary staff credential, service document not found, service document not signed, or missing or incomplete client address information. The Claim Engine moves all activities that fail during the activity validation check into Failed Activities.
Claim Validation. If errors are found during claim validation, the activity becomes a claim, but it cannot be billed until the error is either resolved or overridden. Failed claims are caused by financial errors, such as no activity/procedure crosswalk, standard fee is less than contracted rate, or no fee matrix setup for procedure, licensure, or payer. The Claim Engine moves all claims that fail during the claim validation check into Failed Claims.
Claim Approval. If no errors are found during the activity validation and claim validation checks, the activity becomes a claim and is moved into Claim Approval.

5
Logging in to CareLogic
To log in to CareLogic:
1 Open your Internet Explorer Web browser.
2 Enter the following URL in the Address field: caunj.qualifacts.org.
Note: Your specific company designator is defined during implementation. If you do not know your company designator, contact your system administrator. After entering the URL for CareLogic, it is recommended that you add it to the list of Favorites in your Web browser.
The Login page appears.

6
Logging in to CareLogic cont’d
Note: The Login ID and Password fields are case sensitive. These fields can consist of characters, numerals, and non-alphanumeric characters, such as !, #, $, and %.
In the Account field, enter your system friendly name. If you are unsure of this field, contact your system administrator.
In the Login field, enter your user account name.
In the Password field, enter the password associated with the user account.
Click Submit in the status bar.
The Dashboard page appears. See Configuring the Dashboard for information about the components of the system.
Note: If you forget your user name or password, contact your system administrator. You are given three attempts to log in to the system. If you fail to successfully log in after three attempts, your user account is disabled for two minutes. After two minutes, you are given three additional attempts to log in to the system. This process continues until you successfully log in to the system.
Note: If your account is not active you will be unable to access CareLogic. Contact your system administrator for assistance.

7
Changing Your Password This task is used to change your password and electronic signature. All passwords and electronic signatures must conform to the password rules defined by your system administrator.
To change your password:
1 Click the Change Password icon on the navigation bar.
The Change Password/Electronic Signature page appears for the selected user.
In the Change Password section, enter the following information.
2 In the Existing Password field, enter your current password.
3 In the New Password field, enter a new password.
4 To confirm the new password, you must re-enter it in the Confirm New Password field.
Electronic signatures provide a second level of security for authenticating users in the system. Typically, electronic signatures are used in the clinical system to lock completed documents. In the Change Electronic Signature section, enter the following information.
1 In the New Signature field, enter a new electronic signature.
2 To confirm the electronic signature, you must re-enter it in the Confirm New Signature field.
3 Click Submit in the status bar.
The password and electronic signature are saved for your user account.

8
Using the Shortcut Bar
The shortcut bar is designed to provide faster access to the menu items you use most often. The options on the shortcut bar are specific to the menu system selected. The shortcut bar is completely customizable, which means you can specify which menu items appear on the shortcut bar, and in what order, for each menu system.
The shortcut bar allows you to perform the following tasks:
Adding Shortcuts
Rearranging Shortcut Options
Selecting Shortcut Options
Deleting Shortcuts
Searching Client Records
Selecting Menu Options
Adding Shortcuts For each CareLogic menu system, you can add the most often used menu items to the shortcut bar. In the following task, a shortcut is added to the Schedule menu system. The process of adding a shortcut is the same regardless of the menu system in which you are adding it.
To add shortcuts:
1 Access the menu system you want to add a shortcut to.
2 Click the Show Menu arrow on the right of the shortcut bar.
The menu items appear in the drop-down list for the selected menu system. In the example, the menu items appear for the Schedule menu system.
3 Click the menu item you want to add to the shortcut bar, and drag and drop it on the shortcut bar.

9
Adding Shortcuts cont’d The selected menu item is copied to the shortcut bar. At this point, the menu item is available on the shortcut bar and in the drop-down list for the selected menu system. In the following example, the Batch Activity Entry menu item was added to the shortcut bar.
4 Click Hide Menu arrow.
The menu items for the selected menu system are hidden.
Note: Repeat this task for each menu system until you have customized CareLogic to display all of the desired shortcuts.
Selecting Shortcut Options After adding menu items to the shortcut bar and arranging them in your desired order, you can use this task to select items on the shortcut bar.
To select shortcut options:
1 Access the desired menu system.
In the following example, the Schedule menu system is displayed with four options on the shortcut bar.
2 Click the item on the shortcut bar you want to access.
The corresponding page appears. For example, if you click the New Client Activity shortcut, the Schedule a Client Activity page appears.
Deleting Shortcuts Once a menu item is added to the shortcut bar, you must use this task to delete it.
To delete shortcuts:
1 Access the menu system that contains the shortcut you want to delete.
2 Click the shortcut you want to delete, and drag and drop it on the trash can icon.
Note: Repeat this task for each menu system until you have customized CareLogic to display only the shortcut options you use most often.

10
Searching Client Records The Client Search feature is used to access both clients who have been admitted to programs (active clients) and clients who have not been admitted to programs (inactive clients). This search feature allows you to access the clinical records of the clients in your current organization branch (this includes the clients in your current organization as well as the clients in organizations above and below your current organization). The Client Search feature does not include the clients that are in different organization branches. Once the Client Search results page appears, you can access a client’s clinical record, view a client’s schedule, and view basic information about a client.
The Client Search field uses a soundex search feature, which means you do not have to know the exact spelling of a client’s name in order to access the clinical record. The soundex feature allows you to search for a client based on the way in which the name is pronounced. When you initiate a search, the system returns all literal matches and all phonetic matches (those with similar pronunciations). For example, if you search for Jo Cambel, the search will locate the client Joe Campbell.
To search client records:
1 In the Client Search field, enter the client’s full or partial name, client ID number, social security number, or date of birth. Depending on the search criteria you enter, your entry must be in one of the following formats:
The client name must be in one of the following formats.
Full or partial first, middle, maiden, or last name.
A combination of a full or partial first, middle, maiden, or last name (for example, d thompson).
Note: If you enter a name combination in any other order (for example, last name followed by first name), the system will not locate the requested clinical record.
The full client ID number must be entered.
The full social security number must be entered in the following format: 999-99-9999. Dashes are the only separators allowed in the social security number.
The full date of birth must be entered in the following format: mm/dd/yyyy. Forward slashes are the only separators allowed for date entries.
In the following example, the partial name ‘da’ is entered. The system will locate all clients with either a first name, middle name, maiden name, or last name that begins with ‘da’.

11
Searching Client Records cont’d The Client Search Results page appears, which lists all of the clinical records that match your search criteria. The client search feature searches for matches in your current organization, as well as the organizations above and below your current organization. In the example, the search criteria matched three clients (the last names Davidson and Davis, and the first name David).
Note: CareLogic offers you the ability to update and track client name information. If a client who appears in your search results has had a name change recorded in the system, you will see an asterisk next to the client name, notifying you that if you hover over the client name, a dialog box will appear and display the name history for the client.
This page contains the following buttons.
ECR. Click this button to access the client’s clinical record. When you click this button, the Client Demographics page appears in the ECR. See page 20 the Clinical Record Guide for more information.
Episodes. Click this button to access the selected client’s episodes of care list and view information about the client’s episodes of care such as episode type, admission date and program, and discharge date.
Schedule. Click this button to view a client’s schedule. See page 11 the Scheduling Guide for more information.
Info. Click this button to access basic information about the client without entering the ECR menu system. This button allows you to verify you have selected the desired client before entering the ECR.
Note: In various parts of the system, such as the Schedule a Client Activity page, the Failed Activity Search page, and the Failed Claims Search pages, a Client search field exists, as shown below. This field contains a text entry field followed by a drop-down list. The text entry field adheres to the same search constraints as the Client Search field described in Step 2. After entering your search criteria in the text entry field, press the Tab key or click off of the field to filter the drop-down list and then select the desired client.

12
Logging Out of CareLogic
Important: It is recommended that you follow the instructions in this task to logout of the system. By following this task, you will properly close your current session. If you close the browser window without following the steps in this task, your session remains open and your session data remains in the database.
This task is used to logout of the system. It is recommended that you follow this task each time you end a session.
To log out of CareLogic
1 Click the Log Out icon on the navigation bar.
A confirmation prompt appears.
2 Click OK to confirm you want to log out of the system.
Your current session is closed and the CareLogic Login page appears. At this point, you can close your Browser window.
Schedule Features
The Schedule module provides the following features.
Access and maintain the activities on your schedule.
Access the schedule of another staff member and client.
Schedule client, group, and staff activities.
Edit an activity on your schedule as long as the status has not been marked.
Mark the status on activity as Checked In, In Session, Kept, Error, Cancelled by Client, Cancelled by Therapist, or Did Not Show.
Complete the service documentation associated with the activity.
Schedule a client’s next appointment.
Set up your schedule availability, including in which organizations and days of the week you will be available for appointments.

13
Schedule Process Flow
The following diagram shows the process flow for the Schedule module. An outline of the process flow follows the diagram.
1. Schedule Appointment. In order to schedule an appointment, the client must be active and entered into the system through the Point of Entry module. Appointments can be scheduled either through the Schedule module or the Front Desk Schedule. Prior to scheduling an appointment, the client must be enrolled in a treatment program.
2. Meet with Client/Group. Once the appointment date and time arrives, the clinician meets with the client or group for the session. In order to bill for the service, the clinician must have a primary credential set up in his employment record.
3. Mark Appointment Status. During the session, the appointment status can be marked as Checked In or In Session. After the session, the appointment must be marked with one of the following statuses.
Error. This status is used to indicate the appointment was scheduled in error. If the appointment status is marked as Error, the process ends because there is no activity to bill.
Kept. This status is used to indicate the clinician and the client met for the appointment. If the appointment is marked as Kept, you must complete any required service documentation for the activity. Once the activity is marked as Kept, it is automatically processed during the nightly run of the Claim Engine.
CBC, CBT, DNS. Select one of these statuses to indicate the appointment was cancelled by the client (CBC), cancelled by the therapist (CBT), or if the client did not show (DNS) for the appointment. If the appointment is marked as CBC, CBT, or DNS, you can add a memo to the client’s chart. Unless the system is set up bill activities that are marked CBC or DNS, the process ends at this point because there is no activity to bill.

14
Accessing the Schedule Menu Options This task includes instructions for accessing the menu options within the Schedule module.
To access the Schedule menu options:
1. Navigate to Schedule > Show Menu.
The Schedule menu appears.
2. The Schedule menu contains the following options.
Client Schedule. This option is used to access a client’s schedule (see Accessing a Client’s Schedule).
My Schedule. This option is used to access your schedule (see Accessing Your Schedule).
Staff Shifts/Organization. This option is used to set up your staff schedule availability (see Setting Up Staff Shifts).
Staff Schedule. This option is used to access another staff member’s schedule (see Accessing Other Staff Member’s Schedule).
New Client Activity. This option is used to schedule client activities (see Scheduling Clients).
New Staff Activity. This option is used to schedule staff activities (see Scheduling Staff Activities).
New Group Activity. This option is used to schedule group activities (see Find Staff).
Batch Activity Entry. This option is used to enter activities that have already occurred into the system in batch mode (see Entering Batch Activities).
My Mileage. This option is used to enter and track your mileage for reimbursement (see Adding Mileage Records).
Alternate Mileage. This option is used to track another staff member’s mileage for reimbursement (see Accessing Other Staff Member’s Mileage Record).
Recurring Client Appointment. This option is used to schedule recurring client activities (see Scheduling Recurring Activities).
Recurring Staff Appointment. This option is used to schedule recurring staff activities (see Scheduling Recurring Activities).
Recurring Group Appointment. This option is used to schedule recurring group activities (see Scheduling Recurring Activities).
Manage Recurrences. Once a recurring activity is scheduled, you can use this option to either increase the number of appointments associated with the recurring activity or discontinue all of the remaining appointments associated with the recurring activity (see Modifying the Number of Appointments Associated with Recurring Activities).
15
Accessing Your Schedule
You have complete access to your own schedule. This means you can schedule activities (clients, groups, and staff), enter service documentation, and mark an appointment status. See Scheduling Activities for instructions on performing these tasks.
To access your schedule:
Navigate to Schedule > Show Menu > My Schedule.
The Schedule page appears (see Components of the Schedule Page). By default, you can maintain (add, update, and delete) the services that are scheduled at your current organization and all of its child organizations. In addition, you can view, in read-only mode, the services that they have scheduled at other organizations. In order to maintain the services at other organizations, you must log into the appropriate organization.
Accessing Other Staff Member’s Schedule
The level of access you have to another staff member’s schedule depends on your privilege level. At a minimum, you will be able to view the activities on another staff member’s schedule.
To access other staff member’s schedule:
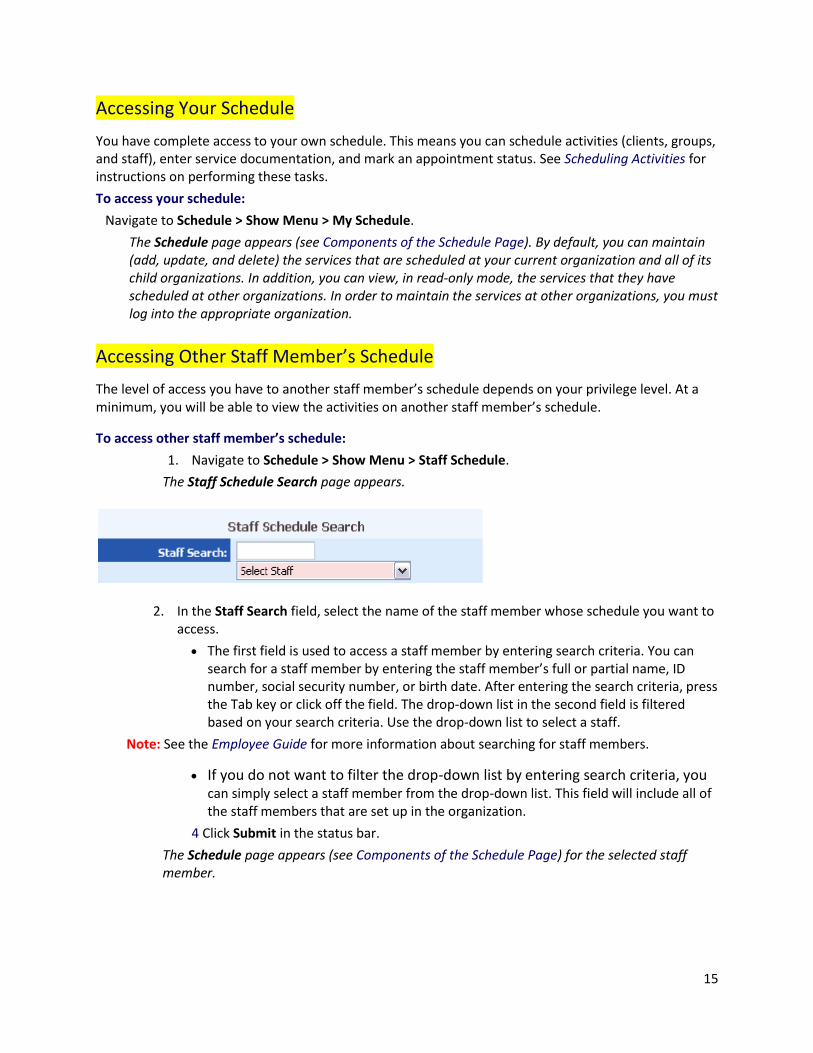
1. Navigate to Schedule > Show Menu > Staff Schedule.
The Staff Schedule Search page appears.
2. In the Staff Search field, select the name of the staff member whose schedule you want to access.
The first field is used to access a staff member by entering search criteria. You can search for a staff member by entering the staff member’s full or partial name, ID number, social security number, or birth date. After entering the search criteria, press the Tab key or click off the field. The drop-down list in the second field is filtered based on your search criteria. Use the drop-down list to select a staff.
Note: See the Employee Guide for more information about searching for staff members.
If you do not want to filter the drop-down list by entering search criteria, you can simply select a staff member from the drop-down list. This field will include all of the staff members that are set up in the organization.
4 Click Submit in the status bar.
The Schedule page appears (see Components of the Schedule Page) for the selected staff member.
16
Accessing a Client’s Schedule
To access a client’s schedule, you must perform a client search. Once the search results are returned, you can access the client’s schedule. This task includes instructions for performing a client search and then accessing a client’s schedule.
To access a client’s schedule:
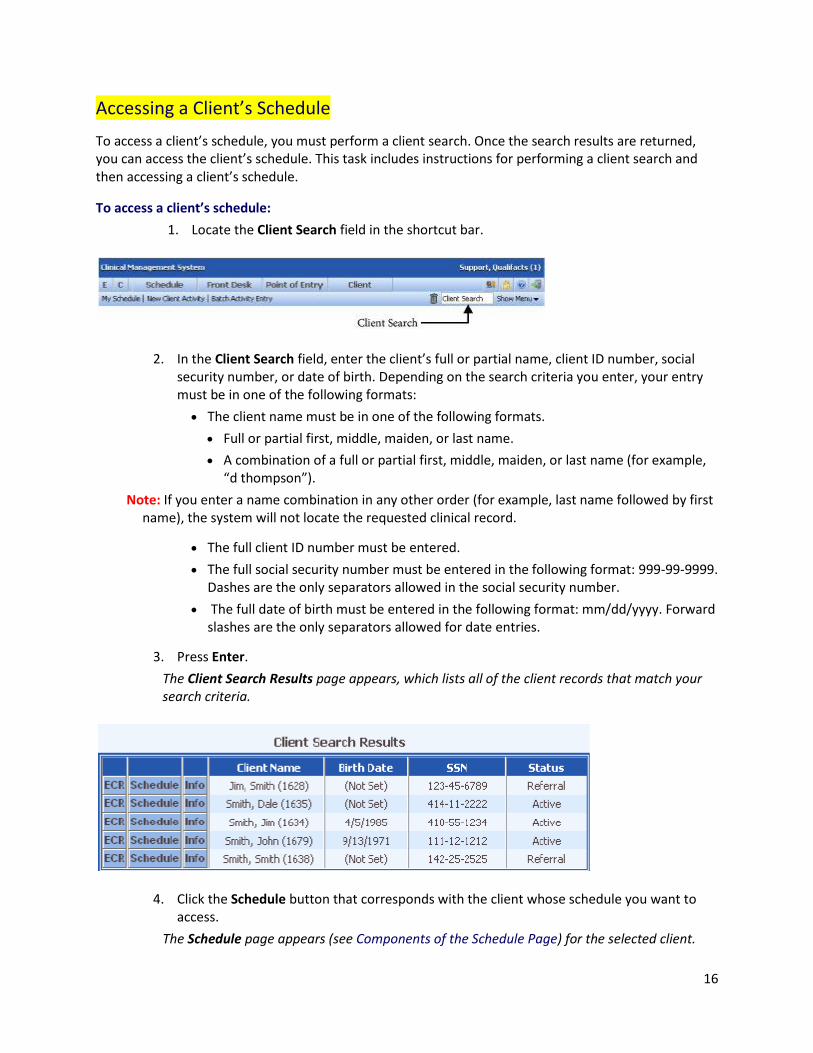
1. Locate the Client Search field in the shortcut bar.
2. In the Client Search field, enter the client’s full or partial name, client ID number, social security number, or date of birth. Depending on the search criteria you enter, your entry must be in one of the following formats:
The client name must be in one of the following formats.
Full or partial first, middle, maiden, or last name.
A combination of a full or partial first, middle, maiden, or last name (for example, “d thompson”).
Note: If you enter a name combination in any other order (for example, last name followed by first name), the system will not locate the requested clinical record.
The full client ID number must be entered.
The full social security number must be entered in the following format: 999-99-9999. Dashes are the only separators allowed in the social security number.
The full date of birth must be entered in the following format: mm/dd/yyyy. Forward slashes are the only separators allowed for date entries.
3. Press Enter.
The Client Search Results page appears, which lists all of the client records that match your search criteria.
4. Click the Schedule button that corresponds with the client whose schedule you want to access.
The Schedule page appears (see Components of the Schedule Page) for the selected client.

17
Components of the Schedule Page
Note: You can access the Schedule page for yourself (see Accessing Your Schedule), another staff member (see Accessing Other Staff Member’s Schedule), or a client (see Accessing a Client’s Schedule).
The Schedule page provides a view of all the scheduled activities (services) for the selected day. By default, staff members can maintain (add, update, and delete) their services at their current organization and all of its child organizations. In addition, staff members can view, in read-only mode, the services that they have scheduled at other organizations. In order to maintain the services at other organizations, staff members must log into the appropriate organization.
By default, the current system date is displayed. If desired, you can select another date and display the corresponding schedule (see Using the Calendar Pane).
The Schedule page contains the following information.
C, G, S, Schedule buttons. The first column will contain either the C, G, and S buttons or a Schedule button. For time intervals that do not have a scheduled activity, the C, G, and S buttons appear in this column. For time intervals that do have a scheduled activity, the Schedule button appears in this column.
C Button. This button is used to schedule client activities (see Scheduling Clients).
G Button. This button is used to schedule group activities (see Find Staff).
S Button. This button is used to schedule staff activities (see Scheduling Staff Activities).
Schedule Button. This button is used to edit scheduled activities (see Editing Scheduled Activities).
Begin and End Columns. These columns list the time increments by which the schedule is set up. By default, the time increments are set to 30 minutes. This means the default activity length is 30 minutes. If desired, you can change the default activity length.
Note: Once the status of an activity is marked Kept, the Begin and End times show actual times.
Client Column. For client activities, this column lists the client name and ID number as a hyperlink. To view information about the client, click the hyperlink. For group activities, this column lists the group name and group code as a hyperlink. To view the group roster, click the hyperlink.

18
Components of the Schedule Page cont’d
Note: If desired, you can change the Schedule view so that only the client’s ID number is displayed in the Client column (see Hiding Client Names). This feature helps your organization to protect the privacy of clients.
Activity Column. This column lists the activity name and activity code that is scheduled.
Status Column. This column lists the status of the appointment. See Marking the Status for Client Activities for information about marking an appointment status.
SvcDoc Column. This column is used to attach service documentation to an activity (see Attaching Service Documents to Activities).
Next Column. This column is used to schedule a client’s next appointment (see Scheduling a Client’s Next Appointment).
Note: Once the status of the activities are marked, and the required service documentation has been completed and signed, your day is complete.
Hiding Client Names By default, the Schedule page lists both the client name and ID number for all scheduled client services. This task includes instructions for modifying the Schedule view so that only the client’s ID number is displayed in the Client column. By hiding the client’s name, this feature helps your organization to protect the privacy of clients.
To hide client names:
1. Navigate to Schedule > Show Menu > My Schedule.
The Schedule page appears. By default, the Client column lists both the client name and ID number for all client services.
2. Click the Hide Client Names button in the status bar.
The Schedule page is refreshed and the Client column lists only the client ID numbers. The client names are removed from this view.
Note: This view of the Schedule is saved until you change it back to the original view. Once this view is displayed, the Show Client Names button appears in the status bar. This button is used to return to the original view, where the client name and ID number is displayed in the Client column.

19
Viewing a Week at a Glance
This task is used to access a summary view of all the activities that are scheduled for the selected week.
To view a week at a glance:
1. Navigate to Schedule > Show Menu > My Schedule.
The Schedule page appears.
2. Click the Week at a Glance button in the status bar.
The Weekly Schedule at a Glance page appears. This page provides a summary view for the selected week. For each day of the week, this page lists the scheduled appointment times, the client ID number, and the activity code.
Based on the Staff Shift you have set up, each day also displays the organization ID and scheduled hours, based on your staff shift. You can schedule directly from Week at a Glance by selecting the standard CareLogic shortcuts C, G, and S to schedule client, group, and staff activities.
The total time scheduled and the total scheduled time kept is also listed for each day of the week. The bottom of the page lists the total scheduled time for each activity code.
Important: You can navigate to past or future weeks’ schedules by clicking Previous Week and Next Week respectively in the status bar.
Using the Calendar Pane
The Calendar pane, which is located in the left pane of the Schedule page, allows you to select a date and view the corresponding schedule for that date.
20
Viewing a Week at a Glance cont’d
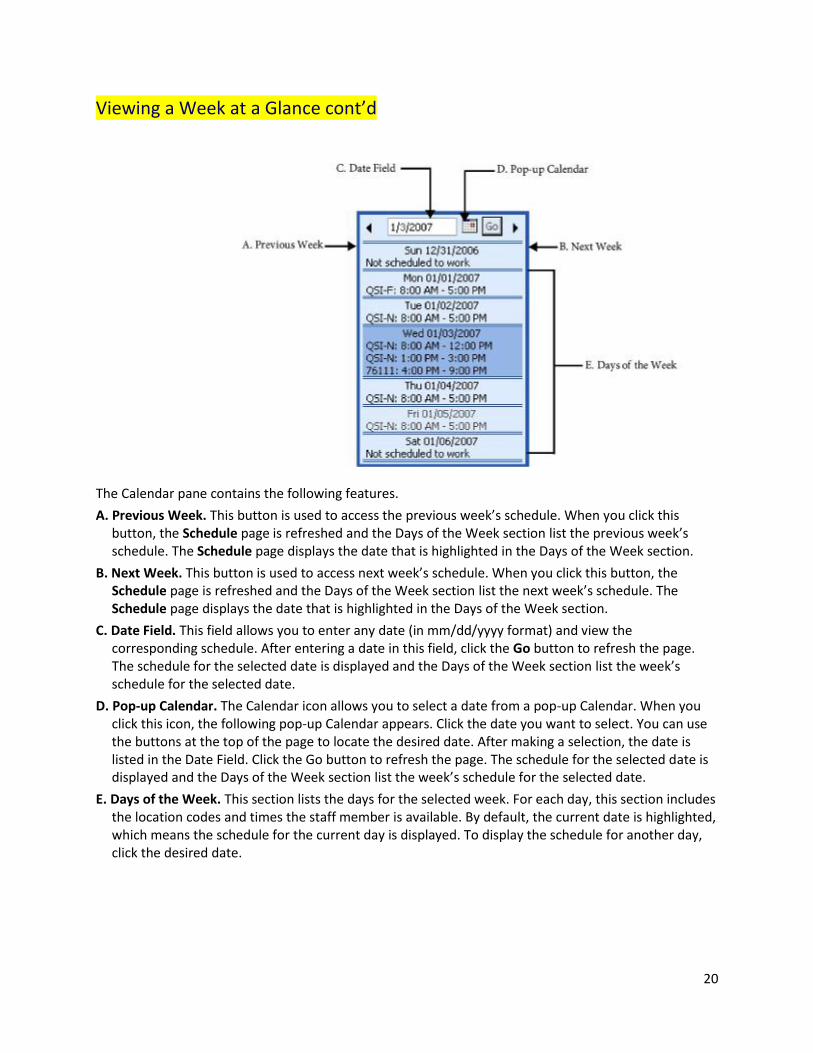
The Calendar pane contains the following features.
A. Previous Week. This button is used to access the previous week’s schedule. When you click this button, the Schedule page is refreshed and the Days of the Week section list the previous week’s schedule. The Schedule page displays the date that is highlighted in the Days of the Week section.
B. Next Week. This button is used to access next week’s schedule. When you click this button, the Schedule page is refreshed and the Days of the Week section list the next week’s schedule. The Schedule page displays the date that is highlighted in the Days of the Week section.
C. Date Field. This field allows you to enter any date (in mm/dd/yyyy format) and view the corresponding schedule. After entering a date in this field, click the Go button to refresh the page. The schedule for the selected date is displayed and the Days of the Week section list the week’s schedule for the selected date.
D. Pop-up Calendar. The Calendar icon allows you to select a date from a pop-up Calendar. When you click this icon, the following pop-up Calendar appears. Click the date you want to select. You can use the buttons at the top of the page to locate the desired date. After making a selection, the date is listed in the Date Field. Click the Go button to refresh the page. The schedule for the selected date is displayed and the Days of the Week section list the week’s schedule for the selected date.
E. Days of the Week. This section lists the days for the selected week. For each day, this section includes the location codes and times the staff member is available. By default, the current date is highlighted, which means the schedule for the current day is displayed. To display the schedule for another day, click the desired date.
21
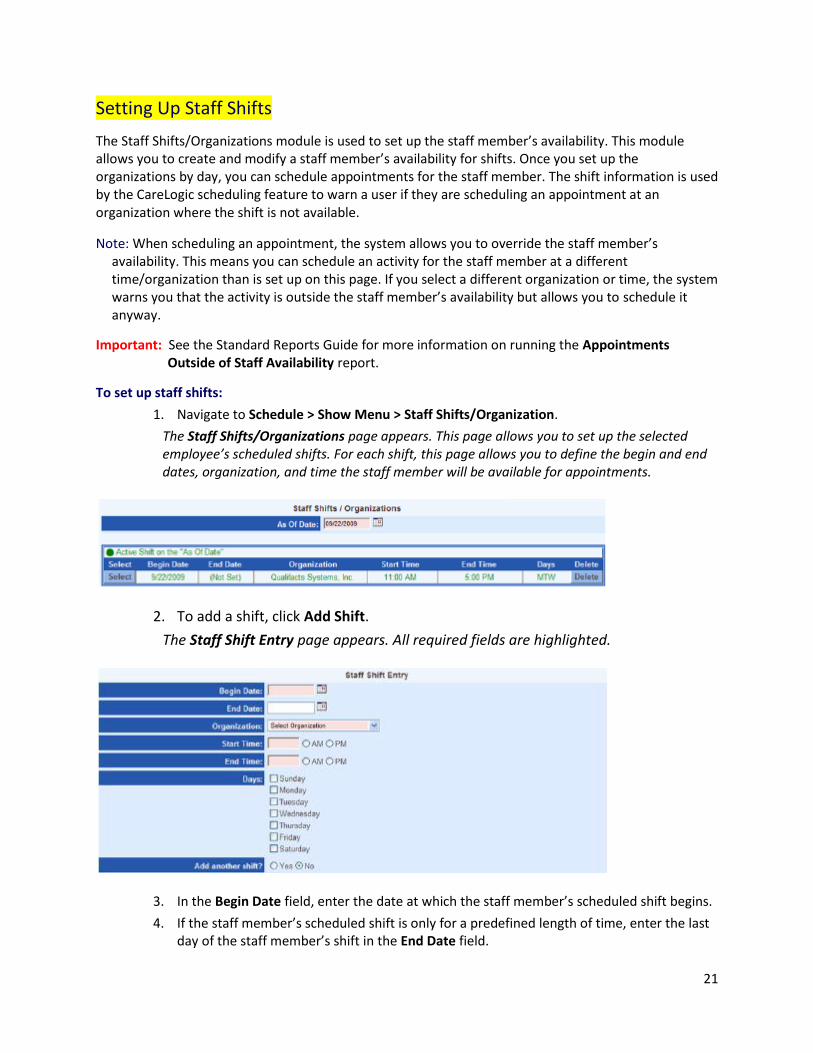
Setting Up Staff Shifts
The Staff Shifts/Organizations module is used to set up the staff member’s availability. This module allows you to create and modify a staff member’s availability for shifts. Once you set up the organizations by day, you can schedule appointments for the staff member. The shift information is used by the CareLogic scheduling feature to warn a user if they are scheduling an appointment at an organization where the shift is not available.
Note: When scheduling an appointment, the system allows you to override the staff member’s availability. This means you can schedule an activity for the staff member at a different time/organization than is set up on this page. If you select a different organization or time, the system warns you that the activity is outside the staff member’s availability but allows you to schedule it anyway.
Important: See the Standard Reports Guide for more information on running the Appointments Outside of Staff Availability report.
To set up staff shifts:
1. Navigate to Schedule > Show Menu > Staff Shifts/Organization.
The Staff Shifts/Organizations page appears. This page allows you to set up the selected employee’s scheduled shifts. For each shift, this page allows you to define the begin and end dates, organization, and time the staff member will be available for appointments.
2. To add a shift, click Add Shift.
The Staff Shift Entry page appears. All required fields are highlighted.
3. In the Begin Date field, enter the date at which the staff member’s scheduled shift begins.
4. If the staff member’s scheduled shift is only for a predefined length of time, enter the last day of the staff member’s shift in the End Date field.

22
Setting Up Staff Shifts cont’d
5. In the Organization field, use the drop-down list to select the organization at which the staff is scheduled to work.
Note: Date fields require four digits. The initial digit must be 1 or 0.
6. In the Start Time field, enter the beginning time the staff member will be available at the selected organization, and select either AM or PM.
7. In the End Time field, enter the ending time the staff member will be available at the selected organization, and select either AM or PM.
8. In the Days field, indicate which days of the week the staff member is scheduled to work the selected shift.
9. In the Add another shift? field, indicate if you want to set up another shift for this staff member or not.
Note: If you select Yes, a new Staff Shift Entry page appears when you click Submit.
10. After setting up the desired shift, click Submit in the status bar.
The staff member’s schedule is saved and listed on the Staff Shifts/Organizations page.
Important: If you modify or delete an existing staff shift, you will see a Staff Shift Confirmation page that will alert you to any scheduled client appointments affected by the modification to the staff member’s schedule. You must select View Report on this confirmation page to see all affected appointments, so they can be rescheduled or assigned to another staff member.
23
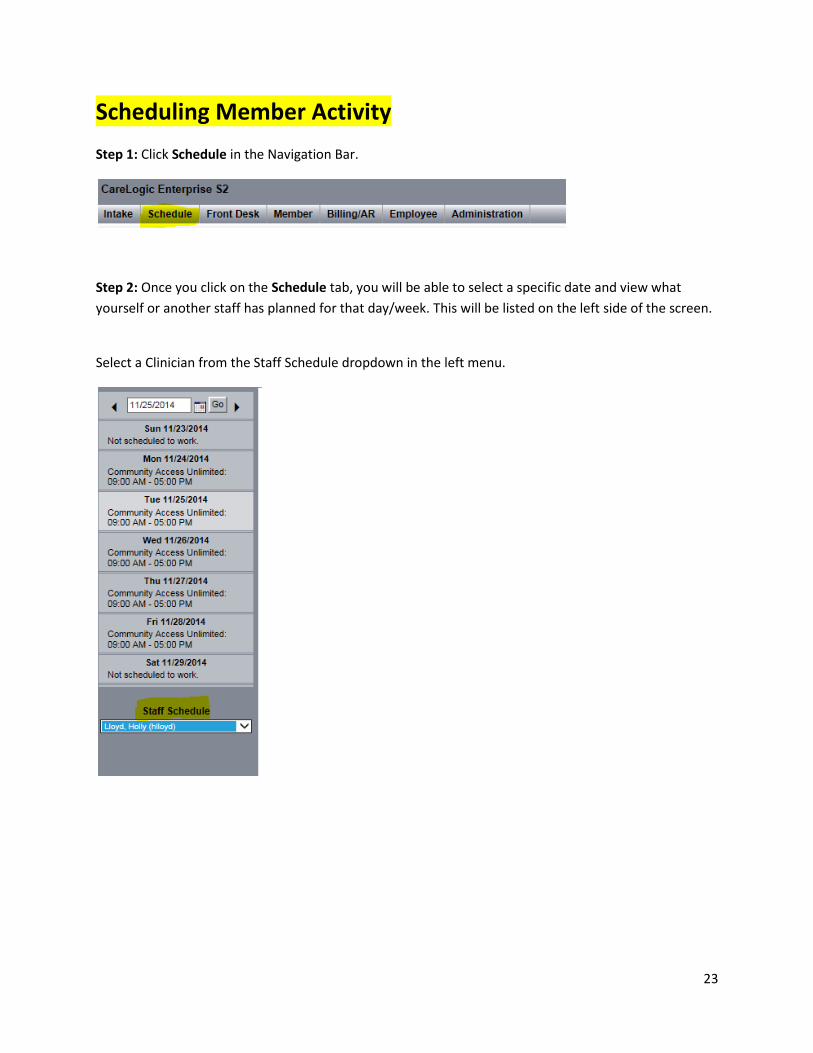
Scheduling Member Activity
Step 1: Click Schedule in the Navigation Bar.
Step 2: Once you click on the Schedule tab, you will be able to select a specific date and view what
yourself or another staff has planned for that day/week. This will be listed on the left side of the screen.
Select a Clinician from the Staff Schedule dropdown in the left menu.

24
Scheduling Member Activity cont’d
Step 3: C button is used when you want to schedule a client activity.
Click the C button on the Schedule page. Or, click the Show Menu arrow in the shortcut bar and select
New Client Activity. The Schedule a Client Activity page appears.
Note: When scheduling a member for an activity, staff must 1st check that member’s ECR to obtain the
correct Payer Authorization that matches the service they will be providing. The payer authorization is
located at the bottom left corner of every member’s ECR.

25
Scheduling Member Activity cont’d
Step 4: Complete the Schedule a Client Activity page.
i. Under the Client field, this displays all the members that are on the staff’s caseload.
Note: If you clicked the C button on the Schedule page to access the Schedule a Client Activity page,
the Service Date, Time From and Time To fields are automatically populated. You can change this if you
need more/less time for the activity.
Note: the members that are on the staff’s caseload will automatically populate in the Client drop down
box. However, you can search for any member in the agency by typing their name in the text box next to
the drop down and the name will then appear in the drop down box.
Note: If you are unable to pick from a program in the drop down list then this may mean that the
member is not yet admitted in the system. To admit a member in the system, the activity that was
scheduled during the member’s intake needs to be marked as “kept”.
Step 5: Click Submit in the status bar.
Step 6: If there is a scheduling conflict the confirmation page will appear. Click Yes in the Are you sure
you want to schedule this activity? field to confirm you want to schedule this appointment.
Step 7: Click Submit in the status bar.
If there are multiple documents mapped to that particular activity then you will have the option to
select submit and continue to document.
Complete the document(s) for the activity and then type in your electronic signature.

26
Scheduling Group Activity
G button is to schedule a group activity. Are we going to be using this as a billable service in the future?
If so, we will have to keep updating the roster since the members are constantly shifting programs.
We can still use the G button if it is for non-billable services. We may want to use this to capture how
many times the member attended a certain meeting and how often it happened.
Step 1: Click Schedule in the Navigation Bar
Step 2: Click the G button or, click the Show Menu arrow in the shortcut bar and select New Group
Activity.
Step 3: Complete the Schedule a Group Activity page.
There are a few things we need to select on the Schedule a Group Activity page. Under “Group”, there
is a list of all the group rosters that have been built into CAU’s system. Ex. Apartment meeting,
independent living skills, parenting group (demo).
27
Scheduling Group Activity cont’d
Note: If you clicked the G button on the Schedule page to access the Schedule a Group Activity page,
the Time From and Time To fields are automatically populated.
The members that are at a part of that specific group meeting will then populate on the schedule. At the
bottom of your schedule, you will see under “group members” the list of the members in this group. In
order for this to work, we would have to create an apartment meeting roster for each program that
holds an apartment meeting and then link it to the apartment meeting or whatever group activity you
want to add.
Step 4: Click Submit in the status bar.
The group activity is saved and listed on the Schedule page. All of the individual clients who are assigned
to the group are listed at the bottom of the Schedule page, under the heading, Group Members.
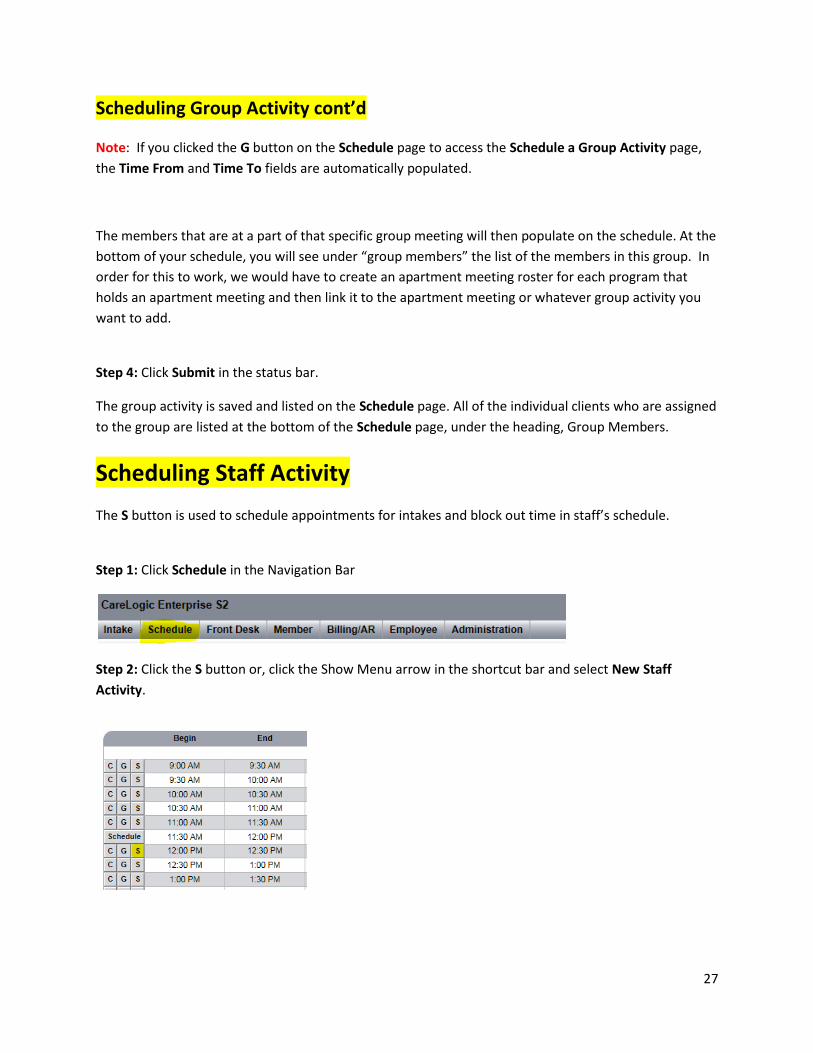
Scheduling Staff Activity
The S button is used to schedule appointments for intakes and block out time in staff’s schedule.
Step 1: Click Schedule in the Navigation Bar
Step 2: Click the S button or, click the Show Menu arrow in the shortcut bar and select New Staff
Activity.

28
Scheduling Staff Activity cont’d
Step 3: Complete the Schedule a Staff Activity page.
Note: If you clicked the S button on the Schedule page to access the Schedule a Group Activity page,
the Time From and Time To fields are automatically populated.
Step 4: Click Submit in the status bar.
If you are going on vacation or PTO for 2 weeks and a staff would like to move all his/her meetings onto
another staff’s schedule for 2 weeks then you will have to manually enter each activity and assign it to
another staff’s schedule. Your supervisor will always be able to go onto your schedule and assign the
meetings to a certain staff schedule.
To transfer a meeting/activity on your schedule to another staff’s schedule follow these steps:
1. Click on the “staff schedule” drop down on the left side where the wizard is under schedule and click your name
2. Find the activity that you want to move to another staff’s schedule and click on “schedule” on the left hand side

29
Scheduling Staff Activity cont’d
3. Locate the staff’s name under Staff: that you want to transfer this activity to
4. Click Submit. This activity is no longer listed on Holly’s schedule and has been moved to Rosa’s schedule.

30
Scheduling a Recurring Activity
You have the capability to schedule reoccurring meetings so they appear on your schedule the same
day/time for every week, once a month, etc.
Step 1: Click Schedule in the Navigation Bar
Step 2: Click the Staff Schedule drop-down in the left menu to select the staff to schedule.
Step 3: Click the Show Menu arrow in the shortcut bar and select one of the following options:
Recurring Client Appointment
Recurring Group Appointment
Recurring Staff Appointment
Step 4: Complete the Schedule tab.
Refer to the appropriate step action guide for Scheduling a client, group, or staff activity.
Step 5: Click the Recurrence tab and complete the page.

31
Scheduling a Recurring Activity cont’d
Step 6: Click Submit in the status bar.
The Confirm Recurrences page appears. This page provides a summary of the activities to be scheduled,
including the dates and any scheduling conflicts.
Step 7: Confirm all scheduled appointments by selecting the corresponding check box.
Step 8: Click Submit in the status bar.
The recurring activity is saved and the individual scheduled activities are listed on the Schedule page.
Resolving Scheduling Errors
Note: When scheduling an activity, the system may encounter both scheduling errors and scheduling conflicts (see Confirming Scheduling Conflicts) and display them both on the Schedule page. All scheduling errors are listed in red text in the Error field. All scheduling conflicts are listed in blue text in the Attention field. Errors will be listed before conflicts.
32
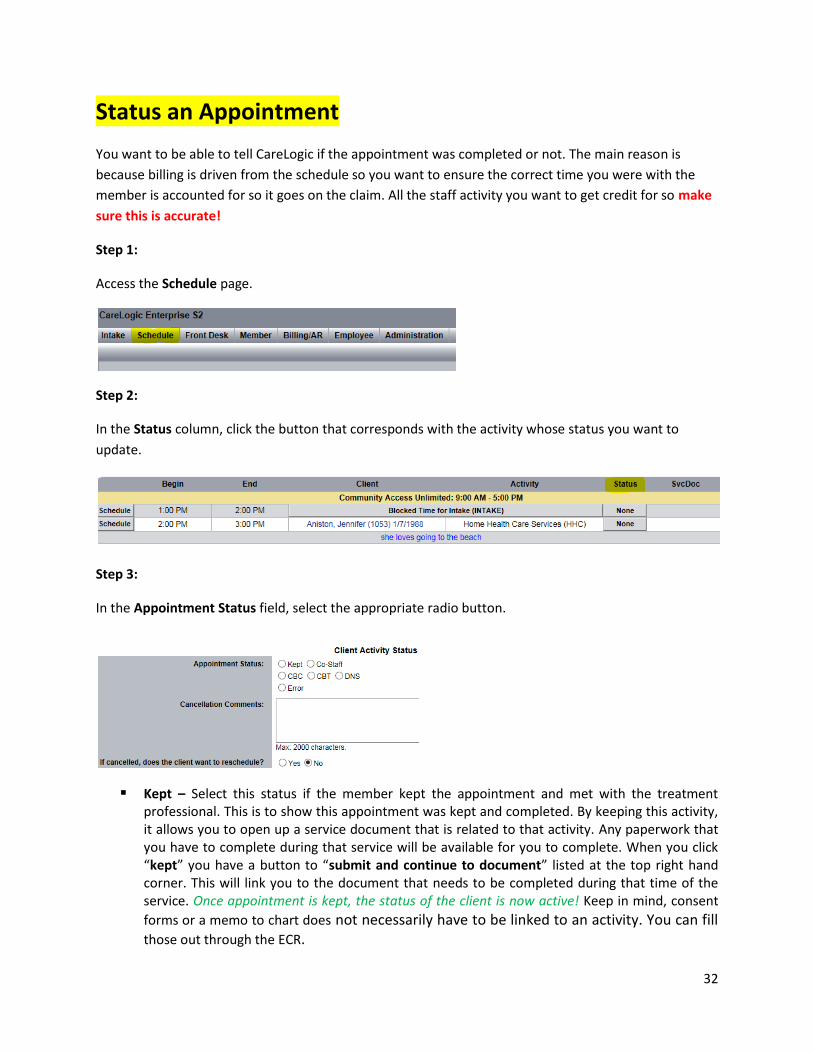
Status an Appointment
You want to be able to tell CareLogic if the appointment was completed or not. The main reason is
because billing is driven from the schedule so you want to ensure the correct time you were with the
member is accounted for so it goes on the claim. All the staff activity you want to get credit for so make
sure this is accurate!
Step 1:
Access the Schedule page.
Step 2:
In the Status column, click the button that corresponds with the activity whose status you want to
update.
Step 3:
In the Appointment Status field, select the appropriate radio button.
Kept – Select this status if the member kept the appointment and met with the treatment professional. This is to show this appointment was kept and completed. By keeping this activity, it allows you to open up a service document that is related to that activity. Any paperwork that you have to complete during that service will be available for you to complete. When you click “kept” you have a button to “submit and continue to document” listed at the top right hand corner. This will link you to the document that needs to be completed during that time of the service. Once appointment is kept, the status of the client is now active! Keep in mind, consent
forms or a memo to chart does not necessarily have to be linked to an activity. You can fill those out through the ECR.

33
Status an Appointment cont’d
Co-Staff. This status is used when multiple staff members provide services for a group activity.
When a staff member marks a client as Co-Staff, he will not have the option to complete service documentation. Because activities marked as Co-Staff are not billable, only one service is created for each client in the group. (CAU most likely will not use this)
Checked In. Select this status when the client arrives at the Front Desk for a session. (CAU will not use this)
In Session. Select this status when the client is meeting with the treatment professional. The system allows us to check this if we are completing the documents while in the meeting/session.
CBC “Canceled by client” - Select this status if the appointment was cancelled by the client. The member called staff ahead and tells them they cannot attend the meeting.
CBT “Canceled by therapist” – Select this status if the appointment was cancelled by the therapist or someone at CAU proactively reached out to the member and canceled the appointment.
DNS “did not show” – Select this status if the member did not show for the appointment. Error. Select this status if the appointment was scheduled in error. If you select this status, you
do not have to enter service documentation for the appointment, the activity is not processed by the Claim Engine, and the time interval on your schedule will become available so you can schedule another appointment. You can look at this as a delete from the schedule. It does not delete it entirely though, you will still have a record of it. It will show up under Cancelled and Error Activities which is listed underneath the actual schedule. This will only be listed on that particular day though; there will not be a reoccurring list for each day.
If the appointment was cancelled either CBC, CBT, or DNS, then enter the reason for the cancellation
in the Cancellation Comments field. The cancellation comments are automatically copied to the
member’s memo to chart.
Step 4:
Click Submit in the status bar.
If you marked the appointment status as Kept or Checked In, the Status column on the Schedule page is
updated with the status as a button. If desired, you can click the button again to change the
appointment status.

34
Resolving Action Alerts
Step 1: Click the My Alerts icon in the navigation bar.
Step 2: Select the Alert type in the left menu to view alerts of that type.
Step 3: Click the Select button that corresponds with the alert you want to resolve.
The corresponding page appears which allows you to resolve the alert.
Step 4: After resolving the alert, click Submit in the status bar.
Resolved alerts are removed from your Alerts page.
Accessing Alternate Alerts
Step 1: Click Member in the navigation bar.
Step 2: Click the Show Menu arrow in the shortcut bar and select Alternate Alerts. The Alternate Staff
Alerts page appears.

35
Accessing Alternate Alerts cont’d
Step 3: Use the drop-down list to select the clinician whose caseload alerts you want to access.
Step 4: Click Submit in the status bar.
The selected staff member’s Alerts page appears.
Accessing Your Caseloads
Step 1: Click Member in the navigation bar.
Your Caseload list page will appear listing all clients currently on your caseload.

36
Setting Up iCal Feed in Outlook
CareLogic allows providers to export their CareLogic schedules to their Outlook, Google Calendar, or iCal calendar to view scheduled appointments when not logged into CareLogic. System Administrators can modify the format of your iCal feeds (see the System Administration Guide).
Important: The iCalendar feed is only a one-way transmission of schedule information. Your CareLogic schedule can be displayed in Outlook, but Outlook appointments do not flow back into CareLogic.
Appointments are pulled from 30 days prior to the current date and to the furthest date in the future that a scheduled appointment exists. Microsoft Outlook will continually update your schedule information. If you are using Google Calendar or iCal, you must repeat this process manually to update your CareLogic schedule information in your external calendar.
Block Staff Activities, Per Diem Activities, and Order Activities are not pulled into the iCal feed.
To set up iCal feed in Outlook:
1. Navigate to Schedule > Show Menu > iCalendar.
The iCalendar Address page appears, displaying your distinct calendar feed.
Note: Each provider must set their iCal feed up independently.
2. Click the iCalendar Address URL.
Note: This copies the iCal feed address to the computer’s clipboard.
3. Open Microsoft Outlook.
4. Click Tools.
5. Select Account Settings...

37
Setting Up iCal Feed in Outlook cont’d
The Account Settings screen appears.
6. Click the Internet Calendars tab.
7. Click New... .
The New Internet Calendar Subscription dialog box appears.

38
Setting Up iCal Feed in Outlook cont’d
8. Click in the text box, and press Ctrl + V (at the same time) on your keyboard.
The CareLogic schedule URL pastes into the text field.
9. Click Add.
The Subscription Options page appears.
10. The calendar is named ‘carelogic’ by default. You can modify the name of the calendar if desired.
11. Make sure the Update this subscription with the publisher’s recommendation. Send/Receive groups do not update more frequently... checkbox is selected.
12. Click OK.
13. Click Close.
14. Access your Outlook Calendar.
The new calendar appears with the name you assigned to it.

39
Setting Up iCal Feed in Outlook cont’d
15. Select the CareLogic calendar checkbox.
Your CareLogic calendar appears.

40