Spring Loaded Slip Joint Pliers ... - West Coast Chainmailheavier) in armor applications. I like to...
2
Spring Loaded Slip Joint Pliers and Spring Loaded Needle-Nose Pliers I find this combinaon works best for heavy steel links (14 ga or heavier) in armor applicaons. I like to hold the needle nose pliers in my leſt hand poinng towards the 12 o’clock posion, gripping a link such that the cut is also at the 12 o’clock posion (fig. 1). Then I bring the slip joint pliers in at a 90 degree angle (poinng towards the 9 o’clock posion) and grip the right side of the link. (fig. 2). I then twist the two ends toward one another while applying inward pressure, sliding the faces of the cut link past one another (fig. 3), then back together (fig. 4). Depending on the material it is somemes necessary to overshoot the closure by a small amount to account for the “springback” of the material. Note that these pliers typically come with teeth on the jaws. If working with soſter materials, it is advisable to file the teeth down so that they don’t mark your rings. Fig. 1 Fig. 2 Fig. 3 Fig. 4 Helpful Tips for Closing Rings There are many different ways to close rings when making chainmail. People oſten ask me which pliers are “best” and which method is “best.” The answer to that queson is “Whatever works best for you!” I encourage you to experi- ment with different tools and find the method that best suits you as an arst. In my 20+ years of experience, I have used a number of different methods. Here I present the three that I found to work best for me over the years. Whatever technique you choose, do your best to keep your wrists in a neutral posion, and take frequent breaks to stretch! WWW.CHAINMAILDUDE.COM © 2012 West Coast Chainmail
Transcript of Spring Loaded Slip Joint Pliers ... - West Coast Chainmailheavier) in armor applications. I like to...

Spring Loaded Slip Joint Pliers and Spring Loaded Needle-Nose Pliers
I find this combination works best for heavy steel links (14 ga or heavier) in armor applications. I like to hold the needle nose pliers in my left hand pointing towards the 12 o’clock position, gripping a link such that the cut is also at the 12 o’clock position (fig. 1). Then I bring the slip joint pliers in at a 90 degree angle (pointing towards the 9 o’clock position) and grip the right side of the link. (fig. 2). I then twist the two ends toward one another while applying inward pressure, sliding the faces of the cut link past one another (fig. 3), then back together (fig. 4). Depending on the material it is sometimes necessary to overshoot the closure by a small amount to account for the “springback” of the material. Note that these pliers typically come with teeth on the jaws. If working with softer materials, it is advisable to file the teeth down so that they don’t mark your rings.
Fig. 1 Fig. 2
Fig. 3 Fig. 4
Helpful Tips for
Closing Rings
There are many different ways to close rings when making chainmail. People often ask me which pliers are “best” and which method is “best.” The answer to that question is “Whatever works best for you!” I encourage you to experi-ment with different tools and find the method that best suits you as an artist. In my 20+ years of experience, I have used a number of different methods. Here I present the three that I found to work best for me over the years.
Whatever technique you choose, do your best to keep your wrists in a neutral position, and take frequent breaks to stretch!
WWW.CHAINMAILDUDE.COM
© 2012 West Coast Chainmail
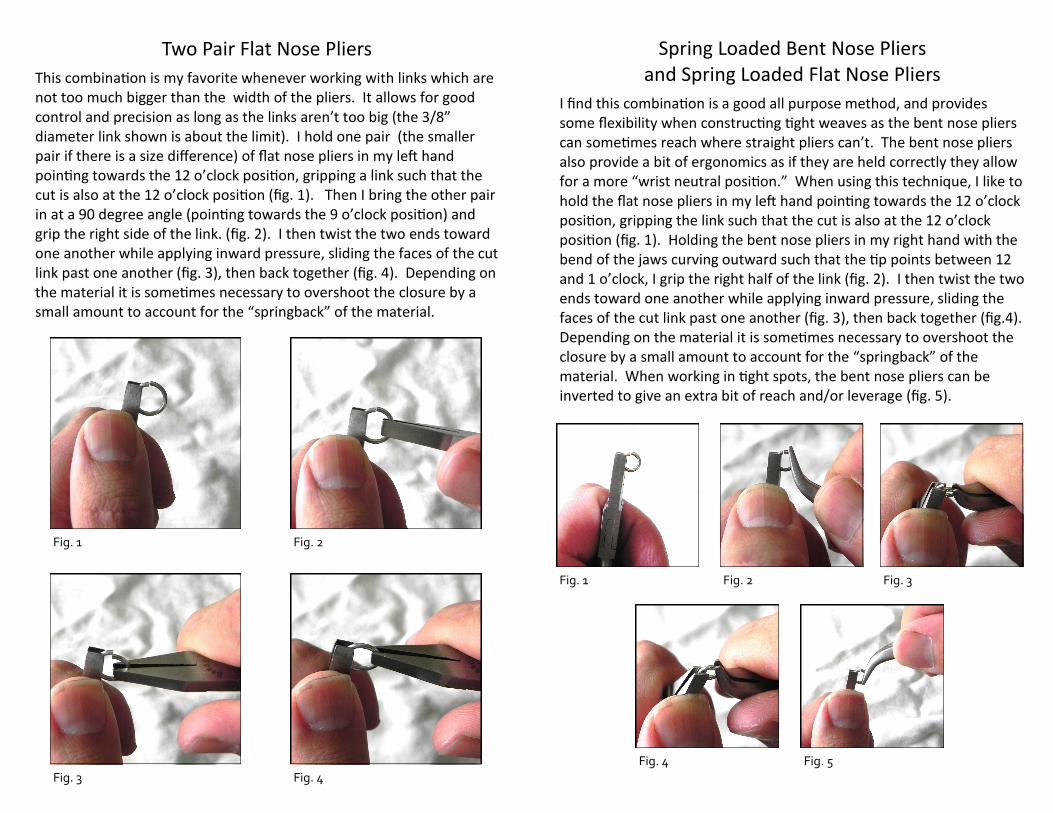
Two Pair Flat Nose Pliers
This combination is my favorite whenever working with links which are not too much bigger than the width of the pliers. It allows for good control and precision as long as the links aren’t too big (the 3/8” diameter link shown is about the limit). I hold one pair (the smaller pair if there is a size difference) of flat nose pliers in my left hand pointing towards the 12 o’clock position, gripping a link such that the cut is also at the 12 o’clock position (fig. 1). Then I bring the other pair in at a 90 degree angle (pointing towards the 9 o’clock position) and grip the right side of the link. (fig. 2). I then twist the two ends toward one another while applying inward pressure, sliding the faces of the cut link past one another (fig. 3), then back together (fig. 4). Depending on the material it is sometimes necessary to overshoot the closure by a small amount to account for the “springback” of the material.
Fig. 1 Fig. 2
Fig. 3 Fig. 4
Spring Loaded Bent Nose Pliers and Spring Loaded Flat Nose Pliers
I find this combination is a good all purpose method, and provides some flexibility when constructing tight weaves as the bent nose pliers can sometimes reach where straight pliers can’t. The bent nose pliers also provide a bit of ergonomics as if they are held correctly they allow for a more “wrist neutral position.” When using this technique, I like to hold the flat nose pliers in my left hand pointing towards the 12 o’clock position, gripping the link such that the cut is also at the 12 o’clock position (fig. 1). Holding the bent nose pliers in my right hand with the bend of the jaws curving outward such that the tip points between 12 and 1 o’clock, I grip the right half of the link (fig. 2). I then twist the two ends toward one another while applying inward pressure, sliding the faces of the cut link past one another (fig. 3), then back together (fig.4). Depending on the material it is sometimes necessary to overshoot the closure by a small amount to account for the “springback” of the material. When working in tight spots, the bent nose pliers can be inverted to give an extra bit of reach and/or leverage (fig. 5).
Fig. 1 Fig. 2 Fig. 3
Fig. 4 Fig. 5