Spinal Cord Injury...
97
A publication of the Regional Spinal Cord Injury Center of the Delaware Valley Spinal Cord Injury Manual The Regional Spinal Cord Injury Center of the Delaware Valley provides a comprehensive program of patient care, community education, and research. It is a federally designated program of Thomas Jefferson University and its affiliated institutions of Thomas Jefferson University Hospital and Magee Rehabilitation Hospital. JG 10-1325
Transcript of Spinal Cord Injury...

A publication of theRegional Spinal Cord Injury Centerof the Delaware Valley
Spinal CordInjury Manual
The Regional Spinal Cord Injury Center of the Delaware Valley
provides a comprehensive program of patient care, community
education, and research. It is a federally designated program
of Thomas Jefferson University and its affiliated institutions
of Thomas Jefferson University Hospital and Magee
Rehabilitation Hospital.
JG 10-1325

Spinal Cord InjuryPatient-Family Teaching Manual
A Publication of the Regional Spinal Cord Injury Center of the Delaware Valley
Researched and prepared by the clinical personnel of Thomas Jefferson University Hospital and Magee Rehabilitation Hospital
Available online at:
www.spinalcordcenter.org
© 1993, 2001, 2009 Thomas Jefferson University. This publication is the property of Thomas Jefferson University. All rights reserved. This Manual is intended for use in a total system of care that meets all applicable CARF standards for SCI Centers. Neither Thomas Jefferson University Hospital, nor Magee Rehabilitation Hospital is responsible for any liability, claims, demands or damages asserted to be the result, either directly or indirectly, of the information contained herein. The use or reprinting of any part of this manual requires the express permission of Thomas Jefferson University.
3.11.10

3.11.10

3.11.10
Dedication
The Handbook Committee of the RSCICDV gratefully acknowledges the assistance and dedication of all who contributed to this manual, and all the others who worked so hard to make this Handbook a reality.
Lori Bennington, RN
Amy Bratta, PT, DPT, NCS
Sharon Caine, PT
Catharine M. Farnan, RN, MS, CRRN, ONC
Dawn Frederickson, BSN
Karen Fried, RN, MSN, CRRN, CCM
Colleen Johnson, PT, NCS
Nicole Krafchek, PT
Cynthia Kraft-Fine, RN, MSN
Marlene Kutys, MSW
Linda Lantieri, PT, ATP
Frank Lindgren
Mary Grace Mangine, OTR/L
Dina Mastrogiovanni, OTR/L, ATP
Vilma Mazziol, LPC
John Moffa, RT
Mary Patrick, RN (Editor)
Evelyn Phillips, MS, RD, LDN, CDE
Marie Protesto, RN
Julie Rece, RN, MSN, CRRN, CWOCN
Katheleen Reidy, PhD
Jessica Rickard, CTRS
Margaret Roos, PT, DPT, MS
Susan Sakers Sammartino, BS
Mary Schmidt Read, PT, DPT, MS (Editor)
Patricia Thieringer, CTRS
John Uveges, PhD
Cheryl West, PT, DPT
This publication is supported in part by Thomas Jefferson University, a grant received from the National Institute on Disability and Rehabilitation Research (NIDRR), Office of Special Education and Rehabilitative Services (OSERS), U.S. Department of Education, Washington, D.C. and by the Geoffrey Lance Foundation.

theRegional Spinal Cord Injury Centerof Delaware Valley

Spinal Cord Injury Manual
Mobility
Introduction . . . . . . . . . . . . . . . . . . . . . . . . . . . . . . . . . . . . . . . . . . . . . . . . . . . 1
Elevation in Bed . . . . . . . . . . . . . . . . . . . . . . . . . . . . . . . . . . . . . . . . . . . . . . . . 2
Sitting in the Wheelchair . . . . . . . . . . . . . . . . . . . . . . . . . . . . . . . . . . . . . . . . . 2
Weight Shifts . . . . . . . . . . . . . . . . . . . . . . . . . . . . . . . . . . . . . . . . . . . . . . . . . . . 3
Tilt Back Weight Shift . . . . . . . . . . . . . . . . . . . . . . . . . . . . . . . . . . . . . . . . . . .3
Lateral Weight Shift . . . . . . . . . . . . . . . . . . . . . . . . . . . . . . . . . . . . . . . . . . . . .4
Modified Lateral Weight Shift . . . . . . . . . . . . . . . . . . . . . . . . . . . . . . . . . . . .4
Push-Up Weight Shift . . . . . . . . . . . . . . . . . . . . . . . . . . . . . . . . . . . . . . . . . . .5
Modified Push-Up Weight Shift . . . . . . . . . . . . . . . . . . . . . . . . . . . . . . . . . . .5
Forward Weight Shift. . . . . . . . . . . . . . . . . . . . . . . . . . . . . . . . . . . . . . . . . . . .5
Rolling in Bed (See Skin Section for Position Schedules) . . . . . . . . . . . . . .6
Range of Motion of Upper and Lower Extremities . . . . . . . . . . . . . . . . . . . . 6
Upper-Extremity Passive Range of Motion for People with Tetraplegia Performed in a Sitting Position . . . . . . . . . . . . . . . . . . . . . . . . . 7
Shoulder Flexion . . . . . . . . . . . . . . . . . . . . . . . . . . . . . . . . . . . . . . . . . . . . . . . 7
Shoulder Abduction . . . . . . . . . . . . . . . . . . . . . . . . . . . . . . . . . . . . . . . . . . . . . 7
Shoulder Horizontal Abduction and Adduction . . . . . . . . . . . . . . . . . . . . . .8
Shoulder Rotation . . . . . . . . . . . . . . . . . . . . . . . . . . . . . . . . . . . . . . . . . . . . . .8
Elbow Flexion and Extension . . . . . . . . . . . . . . . . . . . . . . . . . . . . . . . . . . . . .9
Forearm Pronation and Supination . . . . . . . . . . . . . . . . . . . . . . . . . . . . . . . .9
Wrist and Finger Flexion and Extension . . . . . . . . . . . . . . . . . . . . . . . . . . .10
Thumb Movements . . . . . . . . . . . . . . . . . . . . . . . . . . . . . . . . . . . . . . . . . . . .10
Upper-Extremity Passive Range of Motion for People with Tetraplegia Performed Lying in Bed. . . . . . . . . . . . . . . . . . . . . . . . . . . . . . . 11
Shoulder Flexion . . . . . . . . . . . . . . . . . . . . . . . . . . . . . . . . . . . . . . . . . . . . . . 11
Shoulder Abduction . . . . . . . . . . . . . . . . . . . . . . . . . . . . . . . . . . . . . . . . . . . . 11
Shoulder Horizontal Abduction and Adduction . . . . . . . . . . . . . . . . . . . . . 12
Shoulder Rotation . . . . . . . . . . . . . . . . . . . . . . . . . . . . . . . . . . . . . . . . . . . . . 12
Elbow Flexion and Extension . . . . . . . . . . . . . . . . . . . . . . . . . . . . . . . . . . . . 13
Forearm Supination and Pronation . . . . . . . . . . . . . . . . . . . . . . . . . . . . . . . 13
Wrist and Finger Flexion and Extension . . . . . . . . . . . . . . . . . . . . . . . . . . . 14
Thumb Movements . . . . . . . . . . . . . . . . . . . . . . . . . . . . . . . . . . . . . . . . . . . . 14
Lower-Extremity Self Passive Range of Motion for People With Paraplegia or Low Tetraplegia . . . . . . . . . . . . . . . . . . . . . . . . . . . . . . . 15
Hip And Knee Flexion . . . . . . . . . . . . . . . . . . . . . . . . . . . . . . . . . . . . . . . . . . 15
Hip External Rotation with Abduction . . . . . . . . . . . . . . . . . . . . . . . . . . . . 15
11.9.09 © 2001 RSCIDV 12-TOC

Regional Spinal Cord Injury Center of the Delaware Valley
Hip Internal Rotation and Adduction . . . . . . . . . . . . . . . . . . . . . . . . . . . . . 16
Ankle Dorsiflexion . . . . . . . . . . . . . . . . . . . . . . . . . . . . . . . . . . . . . . . . . . . . . 17
Straight Leg Raise . . . . . . . . . . . . . . . . . . . . . . . . . . . . . . . . . . . . . . . . . . . . . 18
General Transfer Rules . . . . . . . . . . . . . . . . . . . . . . . . . . . . . . . . . . . . . . . . . 19
Repositioning In Wheelchair. . . . . . . . . . . . . . . . . . . . . . . . . . . . . . . . . . . . . 21
Purpose of Repositioning . . . . . . . . . . . . . . . . . . . . . . . . . . . . . . . . . . . . . . . 21
Lifting the Hips Back to the Chair: Attendant in Front Method. . . . . . . . 21
Lifting Hips Back Into Chair: Attendant Behind Method . . . . . . . . . . . . .22
Lifting Hips Back Into Chair: Alternate Attendant Behind Method. . . . .22
Lifting Hips Back Into Chair: Two-Person Method . . . . . . . . . . . . . . . . . .22
Lift Hips Forward in Chair: Two-Person Method. . . . . . . . . . . . . . . . . . . .23
Centering Hips in Chair. . . . . . . . . . . . . . . . . . . . . . . . . . . . . . . . . . . . . . . . .24
Centering Hips in Chair: Alternate Attendant in Front Method. . . . . . . .24
Assisted Lateral Transfer (With or without Transfer Board). . . . . . . . . . . 25
Bed-to-Chair Method. . . . . . . . . . . . . . . . . . . . . . . . . . . . . . . . . . . . . . . . . . .25
Chair-to-Bed Method. . . . . . . . . . . . . . . . . . . . . . . . . . . . . . . . . . . . . . . . . . .26
Assisted Stand-Pivot-Sit Transfer. . . . . . . . . . . . . . . . . . . . . . . . . . . . . . . . . 27
When to Use . . . . . . . . . . . . . . . . . . . . . . . . . . . . . . . . . . . . . . . . . . . . . . . . . .27
Special Considerations. . . . . . . . . . . . . . . . . . . . . . . . . . . . . . . . . . . . . . . . . .27
Assisted Stand-Pivot Transfer. . . . . . . . . . . . . . . . . . . . . . . . . . . . . . . . . . . . 28
Transferring from the Wheelchair . . . . . . . . . . . . . . . . . . . . . . . . . . . . . . . 28
Sitting-to-Supine Transfer. . . . . . . . . . . . . . . . . . . . . . . . . . . . . . . . . . . . . . . 29
Method One . . . . . . . . . . . . . . . . . . . . . . . . . . . . . . . . . . . . . . . . . . . . . . . . . .29
Method Two . . . . . . . . . . . . . . . . . . . . . . . . . . . . . . . . . . . . . . . . . . . . . . . . . .29
Supine-to-Sitting Transfer. . . . . . . . . . . . . . . . . . . . . . . . . . . . . . . . . . . . . . . 30
Method One . . . . . . . . . . . . . . . . . . . . . . . . . . . . . . . . . . . . . . . . . . . . . . . . . 30
Method Two . . . . . . . . . . . . . . . . . . . . . . . . . . . . . . . . . . . . . . . . . . . . . . . . . 30
Wheelchair-to-Commode / Toilet Transfer - Side Approach . . . . . . . . . . 31
Commode / Toilet-to-Wheelchair Transfers - Angled Approach . . . . . . . 32
Toilet-to-Wheelchair Transfers - Front Approach . . . . . . . . . . . . . . . . . . . 33
Chair-to-Toilet Method . . . . . . . . . . . . . . . . . . . . . . . . . . . . . . . . . . . . . . . . .33
Toilet-to-Chair Method . . . . . . . . . . . . . . . . . . . . . . . . . . . . . . . . . . . . . . . . .33
Tub Transfers . . . . . . . . . . . . . . . . . . . . . . . . . . . . . . . . . . . . . . . . . . . . . . . . . 34
General Tub Transfer Rules and Comments . . . . . . . . . . . . . . . . . . . . . . . .34
Tub Transfers (With or without Transfer Board) . . . . . . . . . . . . . . . . . . . . 35
Front-On Method . . . . . . . . . . . . . . . . . . . . . . . . . . . . . . . . . . . . . . . . . . . . . .35
Side Approach Method . . . . . . . . . . . . . . . . . . . . . . . . . . . . . . . . . . . . . . . . .37
Stand-Pivot-Sit Assisted Method . . . . . . . . . . . . . . . . . . . . . . . . . . . . . . . . .39
12-TOC © 2001 RSCIDV 11.9.09

Spinal Cord Injury Manual
Independent Transfer to / from Bottom of Tub (Side Approach) . . . . . . 41
Independent Transfer to / from Bottom of Tub (Front Approach) . . . . .43
Car Transfers (With or without Transfer Board) . . . . . . . . . . . . . . . . . . . . 45
One-Person Assist Method . . . . . . . . . . . . . . . . . . . . . . . . . . . . . . . . . . . . . .45
One-Person Assist Method: For Dependent Patient . . . . . . . . . . . . . . . . 48
Two-Person Assist Method . . . . . . . . . . . . . . . . . . . . . . . . . . . . . . . . . . . . . 50
Independent Method . . . . . . . . . . . . . . . . . . . . . . . . . . . . . . . . . . . . . . . . . . .53
General Floor Transfer Rules for an Assistant . . . . . . . . . . . . . . . . . . . . . . 54
Helpful Hints . . . . . . . . . . . . . . . . . . . . . . . . . . . . . . . . . . . . . . . . . . . . . . . . .55
Wheelchair-to-Floor Transfers (One person assisting) . . . . . . . . . . . . . . . 55
Transferring from Wheelchair-to-Floor . . . . . . . . . . . . . . . . . . . . . . . . . . .55
Transferring from Floor-to-Wheelchair (One person) . . . . . . . . . . . . . . . . 58
Wheelchair-to-Floor Transfer (Two persons assisting) . . . . . . . . . . . . . . . 61
Floor-to-Wheelchair Transfers (Two persons assisting) . . . . . . . . . . . . . . 63
Helpful Hints . . . . . . . . . . . . . . . . . . . . . . . . . . . . . . . . . . . . . . . . . . . . . . . . 64
Mechanical-Lift Instructions. . . . . . . . . . . . . . . . . . . . . . . . . . . . . . . . . . . . . 65
Sling Placement (For a Wrap Around Sling). . . . . . . . . . . . . . . . . . . . . . . .65
Mechanical-Lift Instructions . . . . . . . . . . . . . . . . . . . . . . . . . . . . . . . . . . . 66
Mechanical-Lift Safety Guidelines . . . . . . . . . . . . . . . . . . . . . . . . . . . . . . . .67
Assisting a Person in a Wheelchair Up and Down Curbs. . . . . . . . . . . . . . 68
Going Up Curbs Forward . . . . . . . . . . . . . . . . . . . . . . . . . . . . . . . . . . . . . . 68
Going Up Curbs Backwards . . . . . . . . . . . . . . . . . . . . . . . . . . . . . . . . . . . . 69
Going Down Curbs . . . . . . . . . . . . . . . . . . . . . . . . . . . . . . . . . . . . . . . . . . . . .70
Carrying a Person in a Wheelchair Up and Down Stairs . . . . . . . . . . . . . . 72
Wheelchair on Stairs . . . . . . . . . . . . . . . . . . . . . . . . . . . . . . . . . . . . . . . . . . .72
To Go Up Steps . . . . . . . . . . . . . . . . . . . . . . . . . . . . . . . . . . . . . . . . . . . . . . . .72
Wheelies. . . . . . . . . . . . . . . . . . . . . . . . . . . . . . . . . . . . . . . . . . . . . . . . . . . . . . 74
Wheelie with Assistance . . . . . . . . . . . . . . . . . . . . . . . . . . . . . . . . . . . . . . . .74
Independent Wheelies . . . . . . . . . . . . . . . . . . . . . . . . . . . . . . . . . . . . . . . . . .75
Neuromuscular Electrical Stimulation (NES) Program . . . . . . . . . . . . . . . 76
Benefits of Neuromuscular Electrical Stimulation . . . . . . . . . . . . . . . . . . .76
Tenodesis . . . . . . . . . . . . . . . . . . . . . . . . . . . . . . . . . . . . . . . . . . . . . . . . . . . . . 77
Avoid the Following . . . . . . . . . . . . . . . . . . . . . . . . . . . . . . . . . . . . . . . . . . . . 77
Tendon Transfers for Tetraplegia . . . . . . . . . . . . . . . . . . . . . . . . . . . . . . . . . 78
Potential Complications Interfering with Mobility. . . . . . . . . . . . . . . . . . . 80
Glossary . . . . . . . . . . . . . . . . . . . . . . . . . . . . . . . . . . . . . . . . . . . . . . . . . . . . . . 81
References . . . . . . . . . . . . . . . . . . . . . . . . . . . . . . . . . . . . . . . . . . . . . . . . . . . . 83
11.9.09 © 2001 RSCIDV 12-TOC

Regional Spinal Cord Injury Center of the Delaware Valley
12-TOC © 2001 RSCIDV 11.9.09

Spinal Cord Injury Manual
Mobility
Introduction Mobility is defined as those activities involved in getting you out of bed into a wheelchair, movement in the wheelchair, standing and walking. This is accomplished by first stabilizing the spine through surgery, external immobilization (bracing, traction or casting), or both, so you can safely move without further damage to your spinal cord. Following your spinal cord impairment, you are limited in the ability to move because of muscle weakness, immobilization devices, bed rest, or a combination of these factors. Since staying in one position for long periods of time can lead to other medical complications such as skin breakdown, infections, pneumonia and joint contractures, it is important to get you moving as quickly as possible, but in a way that is safe for your spine. It is very important for you to keep in mind that the amount of independence you achieve is not only based on the level of your injury and associated medical complications, but also on your motivation and effort in completing your rehabilitation program. Complications interfering with mobility include: contractures (permanent shortening of a muscle), heterotopic ossification (calcium build up around a joint), osteoporosis (loss of bone matter) and spasticity (over-activity of a muscle, causing muscular tension).
11.9.09 © 2001 RSCIDV 12-1

Regional Spinal Cord Injury Center of the Delaware Valley
Elevation (or sitting up) in bed and transfer to a wheelchair will progress as follows:
1. In acute care, the orthopedic surgeon will decide when our spine is stable and write orders for mobility.
2. Therapists and nurses will work together to begin the gradual process of sitting up.
3. The head of the bed will be raised approximately 10 to 20 degrees to allow your body to adjust. This is to avoid postural hypotension. Postural hypotension is the medical term for what you may experience as a slight dizziness or light-headedness. This is caused by a decrease in blood pressure. This is a common reaction to the upright position after being on bed rest. It is important to inform your therapist or nurse when you have this feeling.
4. You may do some breathing exercises, shoulder or arm exercises, or have the head of the bed lowered slightly until this feeling passes. Your blood pressure also will be monitored at this time as necessary.
5. The head of the bed can then be raised, a few more degrees at a time, until you reach a 60 degree-sitting position. This is done gradually to minimize postural hypotension.
You have probably been anxiously awaiting sitting up. The first time you try sitting up, you may only achieve 30 degrees of elevation. It is common to feel off balance. As your body becomes used to elevation, sitting up will become a faster and easier process. TEDs and an abdominal binder may be ordered for you at this time. TEDs are white support stockings that come up over your thighs, and an abdominal binder is an elastic corset worn around your abdomen. These garments help you to maintain your blood pressure during elevation and once you are in a sitting position.
Sitting in the Wheelchair
1. Once you are able to tolerate sitting at approximately 60 degrees for one hour or more, you will then be transferred to a wheelchair.
2. If necessary, the back of the wheelchair will be reclined or the wheelchair will tilt, and your legs will be supported by elevating leg rests.
Elevation in Bed
12-2 © 2001 RSCIDV 11.9.09

Spinal Cord Injury Manual
3. As your body tolerates it, the back of the wheelchair will be raised and the leg rests will be lowered. This is done using the same procedure as in “Elevation in Bed.” This process may take several days.
4. When you begin sitting, you will be instructed in either forward, lateral, push-up or tilt back weight shifts (See “Weight Shifts” section). These should be done at least every half an hour.
5. The time you spend in the wheelchair will be limited at first but will increase gradually.
6. If you feel dizzy while sitting in the wheelchair, the wheelchair can be tilted back until the feeling passes. If you continue to feel dizzy, you may need to keep your legs elevated, wear an abdominal binder and TEDs for a while longer. This is temporary and your body will gradually adjust.
Weight Shifts Weight shifts should be done every 15 to 30 minutes. Your therapist will teach you several ways to shift your weight. You may be able to do certain weight shifts yourself, others with assistance. The type of weight shift that you do may change throughout you rehabilitation.
Weight shifts are important so that your weight is redistributed to avoid prolonged pressure in any one area. Prolonged pressure, especially over bony areas of your body, is the greatest contributor to pressure ulcers. During your rehabilitation stay, you will be trained to do weight shifts or to instruct others to assist you if you are unable to do them by yourself.
Tilt Back Weight Shift
This is usually the first pressure relief technique introduced to you once you are seated in the wheelchair. This shift is used early on in the rehabilitation process for both people with paraplegia and tetraplegia. How to do this:
1. Make sure the brakes on the wheelchair are locked.
2. The person helping with the weight shifts will sit behind the wheelchair.
3. The person helping with the weight shifts should raise the anti-tippers and then tilt the wheelchair backwards onto their lap, or onto 3 to 4 pillows piled on top of a steady mat or locked bed. The person doing the weight
11.9.09 © 2001 RSCIDV 12-3

Regional Spinal Cord Injury Center of the Delaware Valley
shift should make sure the chair is tilted back at least 45 degrees to make sure the pressure on your buttocks is transferred to your back. Maintain this position for 3 to 5 minutes making sure the weight is off your buttocks.
Lateral Weight Shift
This weight shift is used to relieve the pressure underneath one buttock at a time and must be done in both directions each time a weight shift is performed. How to do this:
1. Set-up wheelchair laterally next to bed or mat. Make sure your brakes are locked on the wheelchair and the front casters are straight.
2. Remove one armrest.
3. If a person is assisting you, the person should stand in front of you and help you to lean toward the side of the wheelchair onto pillows placed on a bed or a mat.
4. You, or the person assisting you, should check to make sure all the pressure is relieved under one of your buttocks. Crossing the legs will provide more buttock clearance.
5. Maintain this position for one minute and then repeat to the other side.
Modified Lateral Weight Shift
1. Make sure your brakes are locked on the wheelchair and the front casters are straight.
2. Remove one armrest.
3. Hook onto the push-handle opposite the armrest you removed either by grasping it with your hand or hooking your forearm.
4. Lean laterally over the side of the wheelchair.
5. If a person is assisting you, the person should stand in front of you and help you lean toward the side in which the armrest is removed.
6. You, or the person assisting you, should check to make sure all the pressure is relieved under one of your buttocks. Crossing the legs will provide more buttock clearance.
7. Maintain this position for one minute and then repeat to the other side.
12-4 © 2001 RSCIDV 11.9.09

Spinal Cord Injury Manual
Push-Up Weight Shift
This weight shift is used by both people with paraplegia and tetraplegia to relieve the pressure underneath both buttocks at the same time. How to do this:
1. Make sure your brakes are locked.
2. Place your hands on either the arm rests or on the wheels of your wheelchair
3. Push down on the armrests or tires with straight arms and lift your buttocks completely off of the seat of the chair.
4. This weight shift should be held for 30 seconds to 1 minute to relieve the pressure completely underneath both of your buttocks.
Modified Push-Up Weight Shift
1. Make sure your brakes are locked.
2. Place one hand on either the armrest or on the wheel of your tire and your opposite forearm on the armrest.
3. Push down with the hand on the armrest or tire with straight arm and lean onto opposite forearm lifting your buttock completely off of the seat of the chair.
4. This weight shift should be held for 30 seconds to 1 minute to relieve pressure completely, and then repeat to the other side.
Forward Weight Shift
This weight shift is usually performed by a person independently. However, a person may require assistance for balance when first learning this weight shift. Some people chose to use loops to provide adequate clearance in leaning forward and to maintain their balance. Loops can be attached to the push handles. How to do this:
1. Make sure your brakes are locked.
2. Place your hands on your knees and walk them slowly down the front of your shin toward your feet.
3. You will reach toward your feet or the floor in attempts to lift your buttocks up off of the cushion.
4. Hold this position for 30 seconds to one minute and check to make sure you have adequate clearance underneath your buttocks.
11.9.09 © 2001 RSCIDV 12-5

Regional Spinal Cord Injury Center of the Delaware Valley
Rolling in Bed (See Skin Section for Position Schedules)
At first, this should be done every two hours. If a person is able to sleep on his or her stomach all night, rolling in bed is not necessary to relieve pressure. It is important to make sure that pillows are placed underneath all bony areas to prevent any pressure.
Range of Motion of Upper and Lower Extremities
Range of motion refers to the degree of movement at each joint. Performing these movements helps to maintain normal motion in the joints. These exercises will not restore function of paralyzed muscles, but will decrease the risk of complications caused by joint inactivity. Because you cannot move about as you used to, your joints may become stiff and not straighten or bend as they should. Range of motion also increases blood flow and will decrease the risk of blood clots forming. Your therapist will teach your family or attendant how to assist you in performing these exercises if you are unable to do them by yourself.
1. Each arm and leg should be ranged a minimum of one time per day. If moderate to severe spasticity exists, or if you have experienced contractures (permanent shortening of a muscle) or heterotopic ossification (calcium build up around a joint), your arms and legs should be ranged a minimum of two times a day.
2. Range just past joint tightness or until the point of discomfort.
3. Each motion should be repeated 10 times or as otherwise instructed by your therapists.
4. Perform the range slowly so that spasticity is not triggered.
5. Stretch the joints and the muscles with only as much force as your therapist instructs you. Do not over force the range.
6. Be alert for changes during range of motion. If range decreases in one joint, more time and repetitions may be necessary for that joint. If it continues to decrease, or if excessive range is noted, consult a physician or someone in the Spinal Cord Injury Follow-Up Clinic.
12-6 © 2001 RSCIDV 11.9.09

Spinal Cord Injury Manual
Upper-Extremity Passive Range of Motion for People with Tetraplegia Performed in a Sitting Position
These exercises should be performed at least once a day and are important to keep the joints from becoming painful and stiff. Do each exercise at least 10 times.
Shoulder Flexion
Stand at the person’s side. Place your hand on his or her upper arm and your other hand on the lower arm. With the elbow straight, slowly move the arm forward and downward.
Shoulder Abduction
Stand behind the person. With his or her elbow straight, slowly move the arm upward, away from the side of the body. At shoulder height, make sure the palm is turned up and continue until the arm is completely overhead.
11.9.09 © 2001 RSCIDV 12-7

Regional Spinal Cord Injury Center of the Delaware Valley
Shoulder Horizontal Abduction and Adduction
Lift the arm to shoulder height, supporting under the upper arm and at wrist. Bring the arm across the chest to touch the opposite shoulder and then back out to the side.
Shoulder Rotation
Stand by the person’s side and with one hand, support under the person’s upper arm. Bend the elbow to a 90 degree angle with the arm at shoulder level. Holding the upper arm still, move the lower arm down, pointing from ceiling to the floor.
12-8 © 2001 RSCIDV 11.9.09

Spinal Cord Injury Manual
Elbow Flexion and Extension
With one hand on his or her upper arm and your other hand on the wrist, bend the elbow to bring the hand to his or her shoulder and then straighten the arm completely. Add pressure behind the elbow joint if necessary.
Forearm Pronation and Supination
With the elbow bent and supported, put your hand into his or her hand as if to shake hands. Turn the hand so the palm faces up and then down.
11.9.09 © 2001 RSCIDV 12-9

Regional Spinal Cord Injury Center of the Delaware Valley
Wrist and Finger Flexion and Extension
Support above the person’s wrist with one hand. With your other hand, bring his or her wrist back and curl fingers into the palm. Then drop the wrist and allow the fingers to straighten.
Thumb Movements
Stretch his or her thumb away from the index finger. Then rotate it in across the palm to touch tip of the little finger.
12-10 © 2001 RSCIDV 11.9.09

Spinal Cord Injury Manual
Upper-Extremity Passive Range of Motion for People with Tetraplegia Performed Lying in Bed
Shoulder Flexion
Stand at the person’s side. Place one hand on his or her upper arm and your other hand on the person’s lower arm, supporting the wrist. Lift the arm forward, reaching toward the ceiling. Continue toward the head of the bed until tightness or discomfort occurs. Return to the arm to the person’s side.
Shoulder Abduction
Stand at the person’s side. Place one hand close to the elbow and the other hand on the lower arm, supporting the wrist. Bring the arm out to the side, turn the palm up and toward the ceiling and continue lifting the arm toward the person’s head. Bend the elbow, if necessary, to avoid the head board. You may need to move your hand from the elbow to the person’s shoulder to prevent it from “hiking up” toward the
11.9.09 © 2001 RSCIDV 12-11

Regional Spinal Cord Injury Center of the Delaware Valley
Shoulder Horizontal Abduction and Adduction
Place one hand on the upper arm and your other hand on the lower arm, supporting the wrist. Bring the arm across the chest to touch the opposite shoulder and then back out to the side.
Shoulder Rotation
Stand at the person’s side. Place one hand on the person’s upper arm and the other hand on his or her wrist. Lift the arm to shoulder height and bend the elbow to a 90 degree angle. Holding the upper arm still, move the lower arm down so that the palm touches the bed and up so that the back of the hand touches the bed. Do not force the palm down if it does not touch the bed.
12-12 © 2001 RSCIDV 11.9.09

Spinal Cord Injury Manual
Elbow Flexion and Extension
Place one hand on the person’s upper arm and the other hand supporting his or her wrist. Bend and straighten the elbow alternatively, bringing the hand toward the shoulder and then the chin. Add pressure behind the elbow joint, if necessary, to keep the arm straight.
Forearm Supination and Pronation
Bend the elbow to 90 degrees and support it against the person’s side. This will allow movement at the forearm and not the shoulder. Grasp the person’s hand (as if to shake hands), support the wrist and turn the person’s palm toward the head of the bed and then toward the foot of the bed.
11.9.09 © 2001 RSCIDV 12-13

Regional Spinal Cord Injury Center of the Delaware Valley
Wrist and Finger Flexion and Extension
With one hand, grasp the forearm at the wrist. With the other hand, bend the wrist down and allow fingers to straighten. Bend wrist up and curl fingers into the palm. Unless instructed by a therapist, do not straighten the fingers all the way out. This could inhibit a tenodesis (an individual’s active attempt to promote finger dexterity) action.
Thumb Movements
Stretch the thumb away from the index finger. Then rotate the thumb across the palm to touch the tip of the little finger. Move the thumb in a circle.
12-14 © 2001 RSCIDV 11.9.09

Spinal Cord Injury Manual
Lower-Extremity Self Passive Range of Motion for People With Paraplegia or Low Tetraplegia
Hip And Knee Flexion
1. Place your hand under your knee and pull your knee up to your chest. You may lean against the wall or headrest for extra trunk support.
2. Place your hand on your shin and pull your knees as close to your chest as possible. Avoid letting your leg bounce in or out as your move it.
3. You will be stretching your knee and hip joints and muscles in your buttocks in front of your thigh.
Hip External Rotation with Abduction
1. Place the bottom of your foot against your opposite leg.
11.9.09 © 2001 RSCIDV 12-15
Regional Spinal Cord Injury Center of the Delaware Valley
2. Hold it in place with your hand.
3. Push gently down on your knee.
4. You will be stretching your hip joint and muscles of your inner thigh.
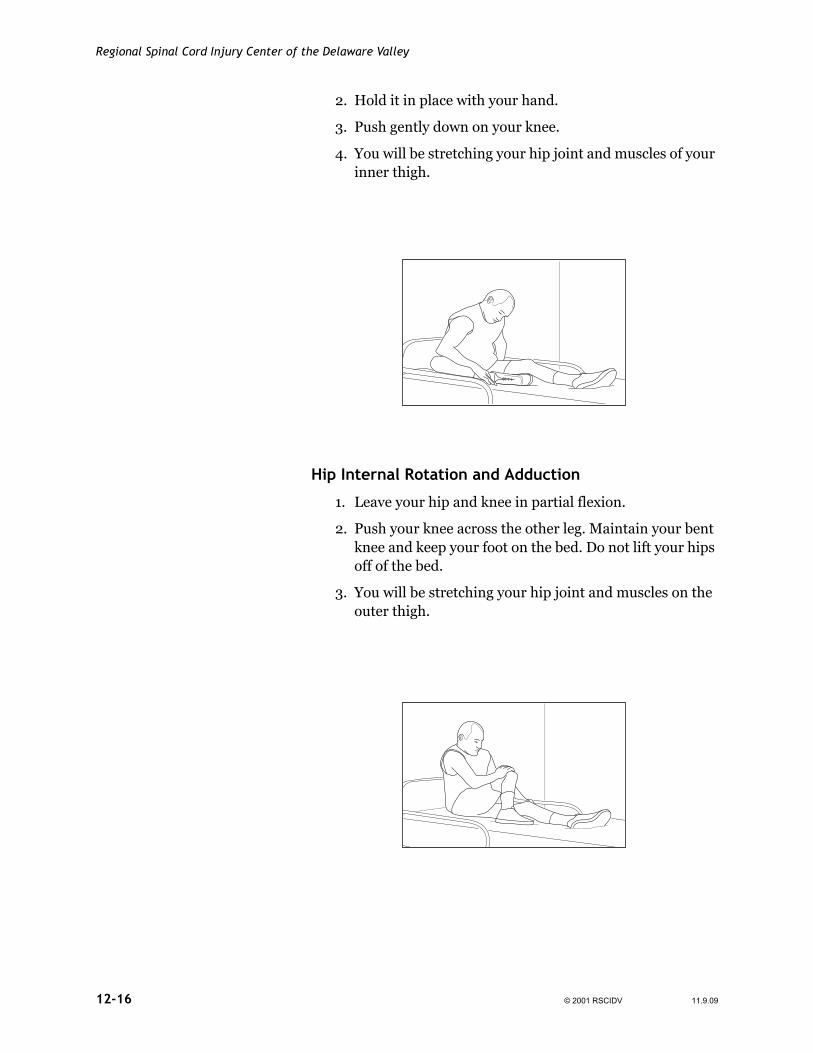
Hip Internal Rotation and Adduction
1. Leave your hip and knee in partial flexion.
2. Push your knee across the other leg. Maintain your bent knee and keep your foot on the bed. Do not lift your hips off of the bed.
3. You will be stretching your hip joint and muscles on the outer thigh.
12-16 © 2001 RSCIDV 11.9.09

Spinal Cord Injury Manual
Ankle Dorsiflexion
Method One
1. Position your leg as illustrated for hip external rotation.
2. Brace yourself by leaning on your arm in front of you or by your side.
3. Place the heel of your hand under the ball of the foot and push your toes toward your knee.
4. You will be stretching the ankle joint and muscles in the back of your calf.
Method Two
To perform this method, your hamstring range of motion must be 120 degrees. Your therapist will let you know if this is appropriate for you.
1. Sit with your legs straight in front of you.
2. Place your hand under the ball of your foot and pull your toes toward your knee. (The ball of your foot is the portion just behind the toes.)
11.9.09 © 2001 RSCIDV 12-17

Regional Spinal Cord Injury Center of the Delaware Valley
Please remember that with this stretch, you must place the focus of the stretch on your hamstrings and not your lower back.
Method Three
This method is used if your hamstring range of motion is 90 degrees or less. You will need to use a range of motion stick to perform this activity. Your therapist will let you know if this method is appropriate for you.
1. Sit with your legs out in front of you.
2. Using the range of motion stick, hook the loop on the end of your stick around the ball of your foot, twist the stick to tighten the loop around your foot.
3. Pull the stick towards you making sure your ankle does not twist. You will be stretching the ankle joint and muscles in the back of your calf.
Straight Leg Raise
Method One
1. Lie on your back and grasp your thigh or pants with your hand.
2. Pull your leg toward your chest. If you have difficulty grabbing your leg while lying down, you may grasp it in the sitting position and lay back slowly while continuing to hold your leg.
3. Grasp the ankle with your other hand.
4. Place the palm of one hand on the front of your knee. Pull the leg toward your chest while keeping
12-18 © 2001 RSCIDV 11.9.09

Spinal Cord Injury Manual
the knee straight by pushing it out with the other hand.
Method Two
1. Sit with your legs out in front of you.
2. Using the range of motion stick, hook the loop on the end of your stick around the ball of your foot, twist the stick to tighten the loop around your foot.
3. Lie on your back. Lift your leg straight up by using the stick. Use one hand to pull the stick up over your head, use your other hand to stabilize the front of your knee to make sure it does not bend. Try to achieve 90 degrees for an adequate hamstring stretch.
General Transfer Rules Your therapist will teach you several different types of transfers to provide safety and protection of your skin.
• There should be as little distance as possible between the transfer surfaces.
• Height of transfer surfaces should be as equal as possible or as level as possible.
11.9.09 © 2001 RSCIDV 12-19

Regional Spinal Cord Injury Center of the Delaware Valley
• Do not scrape your skin against wheels, leg rests, tub seats or other surfaces during the transfer or you may develop skin breakdown.
• Always lock or stabilize the transfer surfaces (including the bed) before attempting any transfer.
• Always be sure that your catheter or external collecting device will not get caught on anything during the transfer.
• Always remove the arm rests, leg rests and brake extensions before transferring. They may interfere with your transfer.
• Always be sure you are balanced before and during the transfer.
• Wear non-skid shoes.
• When possible, transfer toward your stronger side.
• During a car transfer, be sure not to bump your head on the door jam. Place the car seat as far back as possible. It may be helpful to recline the back of the seat.
• Use a transfer board when the distance is too great to transfer safely. Be sure the transfer board is completely underneath one buttock and on the transfer surface to which you are going. The board is not to be used as a sliding board. Full clearance is required.
• Have an attendant assist you whenever you lack strength or stability to transfer safely.
– Always take time to explain the proper transfer technique to your attendant.
– Advise the attendant to keep his or her knees bent and his or her lower back flat during the transfer to prevent injury.
– During the transfer, the attendant should lift with the legs, not his or her back, to prevent injury to themselves.
– Always do as much you can for yourself. The attendant is there only to assist in what you cannot do.
– Have your attendant look toward the transfer surface.
– Be sure you and your attendant move together after counting to three when transferring.
12-20 © 2001 RSCIDV 11.9.09

Spinal Cord Injury Manual
– It is not recommended that belts or belt loops (straps wrapped above the knees to help an individual lift his or her legs) be used in any transfer. Attendants should place hands underneath the buttocks.
– When transferring into or out of a motorized wheelchair, make sure the power wheelchair is turned off and the motor is locked.
Repositioning In Wheelchair
Purpose of Repositioning
A person must be positioned far back in the chair to optimize postural support and to prevent skin breakdown over bony areas. Skin breakdown often occurs over the sacral area when a person is not sitting correctly in the wheelchair. This is otherwise known as sacral sitting. Attendant positioning and body mechanics are critical to prevent injury.
Lifting the Hips Back to the Chair: Attendant in Front Method
1. Lock the wheelchair brakes.
2. The attendant stands in front of the wheelchair.
3. The attendant’s knees should straddle and hold your knees (not at the thighs).
4. Bend forward with arms folded across the lap over the attendant’s shoulder.
5. The attendant grasps under your buttocks.
11.9.09 © 2001 RSCIDV 12-21
Regional Spinal Cord Injury Center of the Delaware Valley
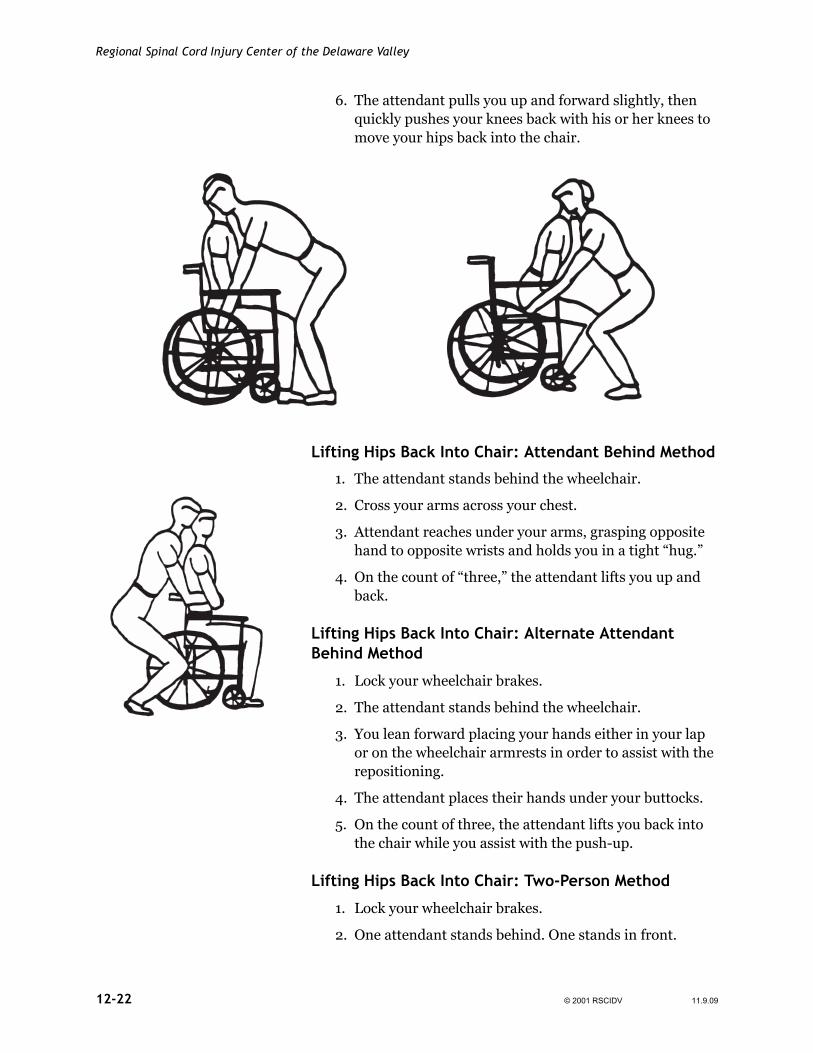
6. The attendant pulls you up and forward slightly, then quickly pushes your knees back with his or her knees to move your hips back into the chair.
Lifting Hips Back Into Chair: Attendant Behind Method
1. The attendant stands behind the wheelchair.
2. Cross your arms across your chest.
3. Attendant reaches under your arms, grasping opposite hand to opposite wrists and holds you in a tight “hug.”
4. On the count of “three,” the attendant lifts you up and back.
Lifting Hips Back Into Chair: Alternate Attendant Behind Method
1. Lock your wheelchair brakes.
2. The attendant stands behind the wheelchair.
3. You lean forward placing your hands either in your lap or on the wheelchair armrests in order to assist with the repositioning.
4. The attendant places their hands under your buttocks.
5. On the count of three, the attendant lifts you back into the chair while you assist with the push-up.
Lifting Hips Back Into Chair: Two-Person Method
1. Lock your wheelchair brakes.
2. One attendant stands behind. One stands in front.
12-22 © 2001 RSCIDV 11.9.09

Spinal Cord Injury Manual
3. Cross your arms across the chest.
4. The attendant behind reaches under your arms grasping opposite hand to your opposite wrists and gives you a tight “hug.”
5. The attendant in front places both hands under your thighs.
6. On the count of “three,” tighten your shoulders or take a deep breath. The attendant behind lifts you up while the attendant in front lifts your knees back. Make sure both attendants use his or her legs and not his or her back to lift you.
Lift Hips Forward in Chair: Two-Person Method
1. Lock your wheelchair brakes.
2. One attendant stands behind. One stand in front.
3. The attendant in front grasps both legs behind your knee or at the hip level.
4. The attendant behind reaches under your arms grasping opposite hand to your opposite wrists and gives you a tight “hug.”
5. On the count of “three,” tighten your shoulders or take a deep breath. The attendant behind lifts you up while the attendant in front lifts your knees up. Make sure both
11.9.09 © 2001 RSCIDV 12-23

Regional Spinal Cord Injury Center of the Delaware Valley
attendants uses his or her legs and not his or her back to lift you.
Centering Hips in Chair
1. Lock your wheelchair brakes.
2. The attendant stands to the side of the wheelchair that the hips need to move toward.
3. The attendant grasps the hips under the buttock and lifts the hips to the side so that the hips are in the center of the chair. Make sure your attendant uses his or her legs and not his or her back to lift you.
Centering Hips in Chair: Alternate Attendant in Front Method
1. Lock wheelchair brakes.
2. Attendant stands in front of wheelchair and towards the side the person needs to be repositioned to.
3. Person leans forward and supported in this position by the attendant’s trunk and arm. The opposite hand is under the person’s buttocks.
4. On the count of three, the attendant lifts and repositions the person’s buttocks in the center of the wheelchair.
5. Person is assisted back to the sitting position.
12-24 © 2001 RSCIDV 11.9.09

Spinal Cord Injury Manual
Assisted Lateral Transfer (With or without Transfer Board)
With board
Without board
Bed-to-Chair Method
1. Position the wheelchair next to the bed with the front edge of the wheelchair as close to the bed as possible. Lock the brakes.
2. Remove the armrest and legrest closest to the bed.
3. The attendant will assist you to move to the edge of the bed and into a sitting position with your feet flat on the floor.
4. The attendant stands in front, stabilizes your knees with his or hers and stabilizes your shoulders for balance.
5. If using a transfer board, position the transfer board so it bridges the space between the wheelchair and bed. It should be resting under the buttocks and overlap the wheelchair seat or cushion.
6. Assist the attendant by placing both arms out and to your side.
7. Attendant grasps you under your buttocks.
8. Bend forward toward the attendant.
9. On the count of “three,” push down on the bed and help lift your buttocks up and into the chair. The attendant will lift your buttocks off the bed and toward the wheelchair.
10.Remove the transfer board and reposition in wheelchair if needed.
11.9.09 © 2001 RSCIDV 12-25

Regional Spinal Cord Injury Center of the Delaware Valley
With board
Without board
Chair-to-Bed Method
1. Position your chair next to the bed with the front edge as close as possible. Lock your wheelchair brakes
2. Remove the armrest and legrest closest to the bed.
3. Position your feet on floor.
4. Attendant stands in front, stabilizes your knees with his or her knees and stabilizes your shoulders for balance.
5. If using a transfer board, position the transfer board so that it bridges the space between the wheelchair and bed. It should be resting under the buttocks and overlap the wheelchair seat or cushion.
6. endant grasps under your buttocks and on the count of “three,” you assist by pushing down through your arms and lift your buttocks onto the bed.
7. Remove the transfer board and lie down.
12-26 © 2001 RSCIDV 11.9.09

Spinal Cord Injury Manual
Assisted Stand-Pivot-Sit Transfer
When to Use
• When your attendant is physically capable of assisting you to stand and turn.
• When it is safe to bear weight on your legs.
• When you are capable of assisting to a standing posture by holding onto the attendant or triggering spasticity in your legs to allow them to straighten when standing.
Special Considerations
• Always try to wear some non-skid shoes to protect your feet and prevent your feet from slipping.
• Always lift yourself or have your attendant lift you high enough to clear the wheel of the wheelchair. Failure to do so may lead to skin problems.
• If you are able, try to transfer with your stronger side toward the surface to which you are transferring unless your therapist advises otherwise.
• The attendant’s head always goes on the side to which you are being transferred so the attendant can see where you are going.
11.9.09 © 2001 RSCIDV 12-27

Regional Spinal Cord Injury Center of the Delaware Valley
Assisted Stand-Pivot Transfer
Transferring from the Wheelchair
1. Place the wheelchair as close as possible to the surface to which you are transferring.
2. Lock your wheelchair brakes. Make sure the bed, commode or chair to which you are transferring is stable and will not move.
3. Remove armrests, legrests or anything that may interfere with the transfer.
4. Lift yourself to the edge of your wheelchair. Your feet should be flat on the floor.
5. Push from the wheelchair, if possible. Or, fold your arms across your chest or place your arms in your lap.
6. Attendant stabilizes your knees with his or her own knees. Lean forward over the attendant’s shoulder.
7. Attendant grasps you at your buttock or waist level.
8. On the count of “three,” the attendant rocks you up and forward with his or her hands to a partial stand and then props your knees with his or her knees.
9. Attendant continues to pivot you around to sit on transfer surface in one smooth, quick motion.
12-28 © 2001 RSCIDV 11.9.09

Spinal Cord Injury Manual
Sitting-to-Supine Transfer
Method One
1. The attendant grasps your shoulders and lowers you onto your side and then back onto the bed.
2. The attendant lifts your legs onto the bed.
3. The attendant straightens your body.
4. The attendant must use good body mechanics by bending his or her knees and keeping his or her lower back straight
Method Two
1. The attendant grasps your shoulders with one arm and grasps under both knees with the other arm.
2. The attendant rocks your feet up, pivots you onto your buttocks and lowers you to the bed in one smooth motion.
3. The attendant must use good body mechanics by bending his or her knees and keeping his or her lower back straight.
11.9.09 © 2001 RSCIDV 12-29

Regional Spinal Cord Injury Center of the Delaware Valley
Supine-to-Sitting Transfer
Method One
1. Attendant lifts you to the edge of the bed. It may take a few lifts to get to the edge of the bed.
2. Your feet are placed over the edge of the bed so that your knees are bent.
3. The attendant grasps your shoulders, keeping his or her knees flexed and back straight and brings up to the sitting position.
4. The attendant must use good body mechanics by bending his or her knees and keeping his or her lower back straight.
Method Two
1. Attendant assists you into a sidelying position by rolling you to the side of the bed.
2. The attendant supports you under your shoulders with one arm and hooks under both knees with the other arm.
3. The attendant rocks your feet down and pivots you up onto your buttocks in one smooth motion so that you are sitting at the edge of the bed.
4. The attendant must use good body mechanics by bending his or her knees and keeping his or her lower back straight.
12-30 © 2001 RSCIDV 11.9.09

Spinal Cord Injury Manual
Wheelchair-to- Commode / Toilet Transfer - Side Approach
Note: If using a commode, place the commode against the wall or stable surface.
Pants can be removed before or after your transfer. Your therapist will discuss this with you.
1. Remove the footrest and armrest closest to the toilet.
2. Position wheelchair parallel or on slight angle with the toilet.
3. Lock the wheelchair’s brakes.
4. Lift yourself to the front of the seat so that your feet are flat on the floor.
5. Position the transfer board under your buttocks and onto the toilet seat.
6. Place the hand closest to the toilet on the wheelchair armrest or seat of the wheelchair.
7. Do push-up movements to the toilet seat. Be sure to clear your buttocks.
8. Change your hand position, if necessary, to complete the transfer.
9. Gently remove the transfer board by leaning slightly to the side, away from the transfer board.
11.9.09 © 2001 RSCIDV 12-31
Regional Spinal Cord Injury Center of the Delaware Valley
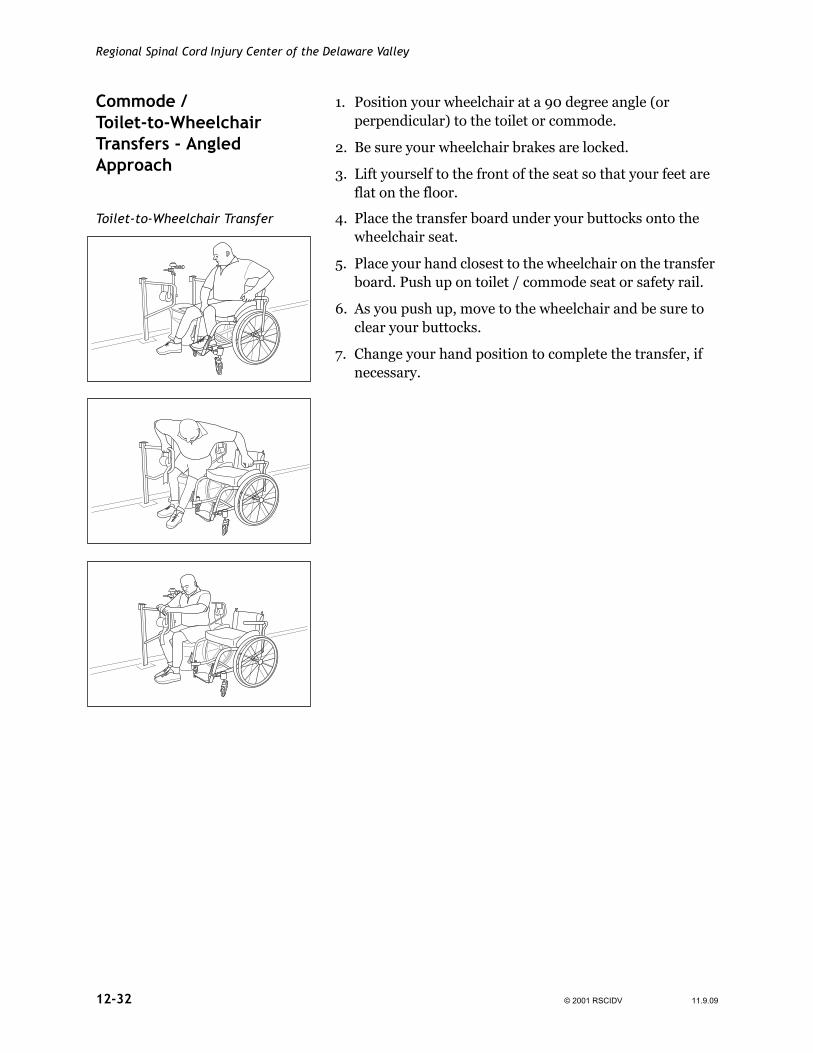
Commode / Toilet-to-Wheelchair Transfers - Angled Approach
1. Position your wheelchair at a 90 degree angle (or perpendicular) to the toilet or commode.
2. Be sure your wheelchair brakes are locked.
3. Lift yourself to the front of the seat so that your feet are flat on the floor.
Toilet-to-Wheelchair Transfer 4. Place the transfer board under your buttocks onto the wheelchair seat.
5. Place your hand closest to the wheelchair on the transfer board. Push up on toilet / commode seat or safety rail.
6. As you push up, move to the wheelchair and be sure to clear your buttocks.
7. Change your hand position to complete the transfer, if necessary.
12-32 © 2001 RSCIDV 11.9.09
Spinal Cord Injury Manual
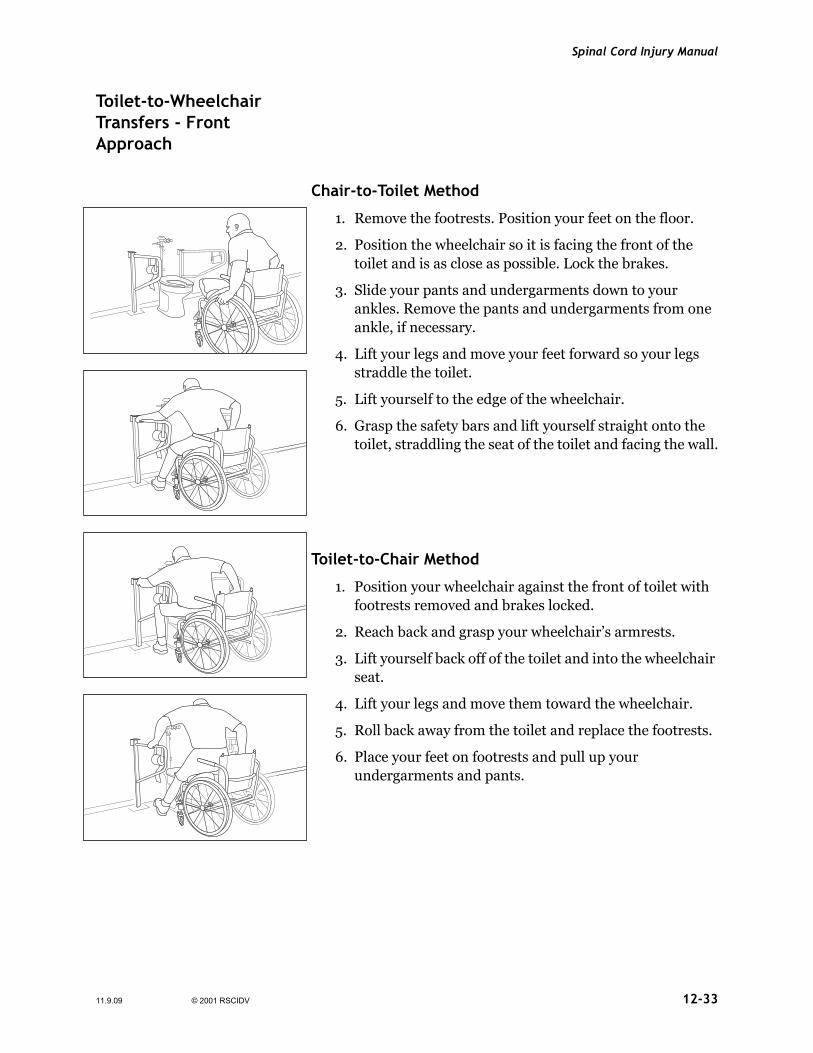
Toilet-to-Wheelchair Transfers - Front Approach
Front-On Toilet Transfer
Chair-to-Toilet Method
1. Remove the footrests. Position your feet on the floor.
2. Position the wheelchair so it is facing the front of the toilet and is as close as possible. Lock the brakes.
3. Slide your pants and undergarments down to your ankles. Remove the pants and undergarments from one ankle, if necessary.
4. Lift your legs and move your feet forward so your legs straddle the toilet.
5. Lift yourself to the edge of the wheelchair.
6. Grasp the safety bars and lift yourself straight onto the toilet, straddling the seat of the toilet and facing the wall.
Toilet-to-Chair Method
1. Position your wheelchair against the front of toilet with footrests removed and brakes locked.
2. Reach back and grasp your wheelchair’s armrests.
3. Lift yourself back off of the toilet and into the wheelchair seat.
4. Lift your legs and move them toward the wheelchair.
5. Roll back away from the toilet and replace the footrests.
6. Place your feet on footrests and pull up your undergarments and pants.
11.9.09 © 2001 RSCIDV 12-33

Regional Spinal Cord Injury Center of the Delaware Valley
Tub Transfers General Tub Transfer Rules and Comments
• Always test the temperature of the water on a part of your body where your sensation is fully intact.
• Be sure to have a non-skid mat or strips on the bottom of the tub, but make sure it is not too rough for your skin.
• Discuss with your therapist or nurse when to remove clothing.
• Always transfer into a dry tub. This will help to prevent your feet from slipping.
• Always empty the water from the tub before transferring out of the tub. This helps prevent your feet from slipping.
• You may want to dry your body while still sitting on the tub seat. Drying your feet before transferring back to the wheelchair will make your feet less slippery in the tub when you are transferring. You may want to place a dry towel in the bottom of the tub for additional safety.
• Sitting on a dry towel while transferring can make the transfer easier — your buttocks won’t stick to the transfer board when you try to move. You also can shake baby powder onto the transfer board to decrease the friction.
• Do not substitute soap dishes or towel racks for safety bars.
* Also, refer to the Bathing Section.
12-34 © 2001 RSCIDV 11.9.09

Spinal Cord Injury Manual
Tub Transfers (With or without Transfer Board)
Front-On Method
Wheelchair-to-Tub Seat
1. Position the wheelchair so it is facing the tub. Wheelchair should be positioned one and one-half feet away from the tub.
2. Lock the brakes. Remove the footrests by swinging them out of the way. Place feet on the floor.
3. Lift the feet onto the side of the tub. Unlock the brakes and position the wheelchair against the side of the tub, slowly letting your feet ease down into the tub.
4. Lock the brakes. Remove the armrest, if necessary, and lift yourself to the edge of the seat so your feet are flat on the bottom of the tub.
5. Position the transfer board so it “bridges” the space between the wheelchair and tub seat. It should rest under your buttocks and on the tub seat.
6. Grasp the safety bar on the side of the tub or grasp the tub seat.
7. Carefully lift yourself up and over the side of the tub and onto the tub seat.
8. An attendant may be necessary to stand either in front or behind you and stabilize your shoulders or help lift your hips.
11.9.09 © 2001 RSCIDV 12-35

Regional Spinal Cord Injury Center of the Delaware Valley
Tub Seat-to-Wheelchair
Tub Seat-to-Wheelchair 1. Make sure your wheelchair is positioned so it is facing the tub. Lock the brakes and remove the footrests. If necessary, the armrest should be removed.
2. Position the transfer board so it “bridges” the space between the tub seat and wheelchair. It should rest under your buttocks and on the wheelchair seat.
3. Grasp the wheelchair and tub seat or safety bar on the side of the tub.
4. Carefully lift yourself up and over the side of the tub and onto the wheelchair seat. (Your legs should still be in the tub.)
5. An attendant may be necessary to stand either in front or behind you and stabilize your shoulders or help lift your hips.
6. Unlock the brakes. Back the wheelchair slowly from the tub until your feet are on the edge of the tub. Lock the brakes. Lift your feet onto the floor.
7. Replace the footrests.
12-36 © 2001 RSCIDV 11.9.09

Spinal Cord Injury Manual
Side Approach Method
Wheelchair-to-Tub Seat
1. Remove the footrest closest to the tub. Position the wheelchair next to the tub. Lock brakes.
2. Remove the armrest closest to the tub. Place your feet on the floor.
3. Position the transfer board so it “bridges” the space between the wheelchair and tub seat. It should rest under your buttocks on the tub seat.
4. Place the foot closest to the tub in the tub. Carefully lift yourself up and over the side of the tub and onto the tub seat.
5. At attendant may be necessary to stand either in front or behind you and stabilize your shoulders or help lift your hips.
6. Place the other foot in the tub.
11.9.09 © 2001 RSCIDV 12-37

Regional Spinal Cord Injury Center of the Delaware Valley
Tub Seat-to-Wheelchair
1. Make sure your wheelchair is positioned so it is next to the tub. Lock the brakes and remove the closest footrest and armrest.
2. Position the transfer board so it “bridges” the tub seat and wheelchair. It should rest under your buttocks and on the wheelchair seat.
3. Place your foot closest to the wheelchair out of the tub. Carefully lift yourself up and over the side of the tub and onto the wheelchair seat.
4. An attendant may be necessary to stand either in front or behind you and stabilize your shoulders or help lift your hips.
5. Lift your other foot out of the tub.
12-38 © 2001 RSCIDV 11.9.09

Spinal Cord Injury Manual
Stand-Pivot-Sit Assisted Method
Wheelchair-to-Tub Seat
1. Remove the footrest closest to the tub. Position the wheelchair so it is next to the tub. Lock the brakes.
2. Remove the armrest closest to the tub. Place your feet flat on the floor.
3. Lift yourself (with attendant’s help) to edge of wheelchair.
4. Your attendant should stand in front of you and stabilize your knees with his or her knees.
5. The attendant must use good body mechanics by bending his or her knees and keeping his or her lower back straight.
6. Your attendant grasps you at your hip level. A towel may be used as a sling and placed under your buttocks. If a towel is used, the attendant will grab the towel to lift you.
7. On the count of “three,” the attendant pulls you to a partial stand, pivots and sits you on the tub seat.
8. Rest against the back of the tub seat while your attendant lifts your feet into the tub.
11.9.09 © 2001 RSCIDV 12-39

Regional Spinal Cord Injury Center of the Delaware Valley
Tub Seat-to-Wheelchair
1. Make sure your wheelchair is positioned so it is next to the tub. Lock the brakes and remove the closest armrest and footrest.
2. Rest against the back of the tub seat while your attendant lifts your feet out of the tub.
3. Your attendant stands in front of you and stabilizes your knees with his or her knees.
4. The attendant must use good body mechanics by bending his or knees and keeping his or her lower back straight.
5. Your attendant grasps you at your hip level. A towel may be used as a “sling” and placed under your buttocks. If a towel is used, the attendant will grab the towel to lift you.
6. On the count of “three,” the attendant pulls you to a partial stand, pivots and sits you on the wheelchair seat.
7. Rest against the back of your wheelchair while your attendant assists you in repositioning.
12-40 © 2001 RSCIDV 11.9.09

Spinal Cord Injury Manual
Independent Transfer to / from Bottom of Tub (Side Approach)
Wheelchair-to-Tub Bottom
1. Remove the foot rest closest to the tub. Position the wheelchair next to the tub at the rear third of the tub. Lock the brakes.
2. Remove the armrest closest to the tub. Place your feet on the floor. Lift yourself to the edge of the tub.
3. Place your feet into the tub.
4. Grab the safety bar on the wall. Place your other hand on the wheelchair seat or edge of the tub.
5. Carefully lift yourself up and over the edge of the tub. Slowly lower yourself down into the tub.
11.9.09 © 2001 RSCIDV 12-41

Regional Spinal Cord Injury Center of the Delaware Valley
Tub Bottom-to-Wheelchair
1. Make sure your wheelchair is positioned next to the tub at the rear of the tub. Lock the brakes and remove the closest armrest and footrest.
2. Grab the safety bar on the wall. Place your other hand on the edge of the tub.
3. Carefully lift yourself up from the bottom of the tub and rest your buttocks on the edge of the tub.
4. Place one hand on the wheelchair armrest and the other on the edge of the tub. Carefully lift yourself up and into your wheelchair.
5. Lift your feet out of the tub and reposition in the wheelchair.
12-42 © 2001 RSCIDV 11.9.09

Spinal Cord Injury Manual
Independent Transfer to / from Bottom of Tub (Front Approach)
Wheelchair-to-tub bottom
1. Position the wheelchair so it is facing the tub, at the rear third of the tub. Wheelchair should be positioned approximately one and one-half feet away from the tub.
2. Lock the brakes. Remove the footrests by swinging them out of the way and place your feet on the floor.
3. Lift your feet onto the sides of the tub, unlock the brakes and position the wheelchair against the side of the tub, slowly letting your feet ease down into the tub.
4. Remove the armrest, if necessary.
5. Grab safety bar on the wall. Place your other hand on the wheelchair edge of the tub.
6. Carefully lift yourself up and over the edge of the tub and slowly lower yourself down into the tub.
11.9.09 © 2001 RSCIDV 12-43

Regional Spinal Cord Injury Center of the Delaware Valley
Tub bottom-to-wheelchair
1. Make sure your wheelchair is positioned so it is facing the tub at the rear third of the tub. Lock the brakes and remove both footrests. If necessary, the armrest should be removed.
2. Grab safety bar on the wall. Place your other hand on the edge of the tub.
3. Carefully lift yourself up from the bottom of the tub and rest your buttocks on the edge of the tub.
4. Place one hand on the wheelchair armrest and the other on the edge of the tub or both hands on the wheelchair. Carefully lift yourself up and into your wheelchair.
5. Unlock the brakes. Back the wheelchair slowly away from the tub until your feet are on the edge of the tub. Lock the brakes. Lift your feet onto the floor.
6. Replace the footrests.
12-44 © 2001 RSCIDV 11.9.09

Spinal Cord Injury Manual
Car Transfers (With or without Transfer Board)
One-Person Assist Method
Wheelchair-to-car
1. Open the front door of the passenger side of the car. Move the front seat back as far as possible.
2. Remove the footrest closest to the car and place both feet on the other footrest.
3. The attendant stands in front of you.
4. Position the wheelchair so it is as close to the car seat as possible. Lock the brakes.
5. Place both feet on the ground. Remove the remaining footrest.
6. The attendant lifts you to the edge of the wheelchair. Remove the armrest closest to the car.
7. The transfer board is positioned so that it “bridges” the space between the car and wheelchair and rests under your buttock and on the car seat.
8. The attendant stabilizes your knees with his or her knees.
9. The attendant grasps you under your buttocks.
11.9.09 © 2001 RSCIDV 12-45

Regional Spinal Cord Injury Center of the Delaware Valley
10.Bend forward toward the attendant.
11. On the count of “three,” assist the attendant by placing both arms out and to your side and push down into the wheelchair to help lift your buttocks up and into the car. It may take several lifts.
12.The attendant leans you forward and assists you in positioning your buttocks towards the center of the car seat. Then lean back against the car seat for stability.
13.The attendant assists you in lifting your feet, one at a time, into the car.
14.Once you are stabilized in the car, attach an over the shoulder chest and lap safety belt.
15.The attendant places your wheelchair in the back seat or trunk.
12-46 © 2001 RSCIDV 11.9.09

Spinal Cord Injury Manual
Car-to-Wheelchair
1. Open the front door of the passenger’s side of the car. Move the front seat back as far as possible.
2. Make sure your wheelchair is positioned so it is as close as possible to the car seat. Lock the brakes and remove both footrests and the nearest armrest.
3. Release the over the should chest and lap safety belt.
4. The attendant assists you in lifting your feet, one at a time, out of the car while you lean back against the car seat for stability.
5. Lean forward so your head is out of the car, then reposition to the edge of the car seat so both feet are resting flat on the ground. An attendant may need to assist.
6. The transfer board is positioned so that it “bridges” the space between the wheelchair and car and rests under your buttocks and on the wheelchair seat.
7. Your attendant stands in front of you and stabilizes your knees with his or her knees.
8. Your attendant grasps you under your buttocks.
9. Bend forward toward the attendant.
10.On the count of “three,” assist the attendant by placing both arms out and to your side and push down into car seat to help lift your buttocks up and out of the car. It may take several lifts.
11. Replace the armrest, then replace the footrest furthest away from the car. The attendant lifts both your feet onto this footrest.
12.Unlock the brakes. Move the wheelchair away from the car. Replace the other footrest.
11.9.09 © 2001 RSCIDV 12-47
Regional Spinal Cord Injury Center of the Delaware Valley
One-Person Assist Method: For Dependent Patient
Wheelchair-to-Car
1. Open the front door of the passenger side of the car. Move the front seat back as far as possible.
2. Remove the footrest closest to the car and place both feet on the other footrest.
3. The attendant will stand in front of you.
4. Position the wheelchair so it is as close to the car seat as possible. Lock the brakes.
5. Place both feet on the ground. Remove the remaining footrest.
6. The attendant lifts you to the edge of the wheelchair. Remove the armrest closest to the car.
7. The transfer board is positioned so that is “bridges” the space between the car and wheelchair and rests under your buttocks and on the car seat.
8. The attendant stabilizes your knees with his or her knees.
9. Fold your arms across your chest or lay your hands in your lap. The attendant will lean you forward over his or her shoulder.
10.The attendant grasps under your buttocks.
11. On the count of three, the attendant lifts you across the transfer board and moves your buttocks onto the car seat. It may take several lifts.
12.The attendant leans your forward and lifts your buttocks towards the center of the car seat. Then the attendant will lean you back against the car seat for stability.
13.The attendant lifts your feet, one at a time, into the car.
14.Once you are stabilized in the car, the attendant should straighten out your body from either the passenger’s or driver’s side of the car.
15.Attach and over the shoulder chest and lap safety belt.
16.The attendant places your wheelchair in the back seat or trunk.
12-48 © 2001 RSCIDV 11.9.09

Spinal Cord Injury Manual
Car-to-Wheelchair
1. Open the front door of the passenger’s side of the car. Move the front seat back as far as possible.
2. Make sure your wheelchair is positioned so it is as close as possible to the car seat. Lock the brakes and remove both footrests and the nearest armrest.
3. Release the over the shoulder chest and lap safety belt.
4. The attendant lifts your feet, one at a time, out of the car while you lean back against the car seat for stability.
5. The attendant leans your forward so your head is out of the car then lifts you to the edge of the car seatso both feet are resting flat on the ground.
6. The transfer board is positioned so that it “bridges” the space between the wheelchair and car and rests under your buttocks and on the wheelchair seat.
7. Your attendant stands in front of you and stabilizes your knees with hir or her knees.
8. Fold your arms across your chest or lay your hands in your lap. The attendant will lean you forward over his or her shoulders.
9. Your attendant grasps uner your buttocks.
10.On the count of three, the attendant lifts you across the transfer board and moves you buttocks onto the wheelchair seat. It may take several lifts.
11. Replace the armrests, then replace the footrest furtherest away from the car. The attendant lifts both your feet onto this footrest.
12.Unlock the brakes. Move the wheelchair away from the car. Replace the other footrest and have the attendant reposition you in wheelchair if needed.
11.9.09 © 2001 RSCIDV 12-49
Regional Spinal Cord Injury Center of the Delaware Valley
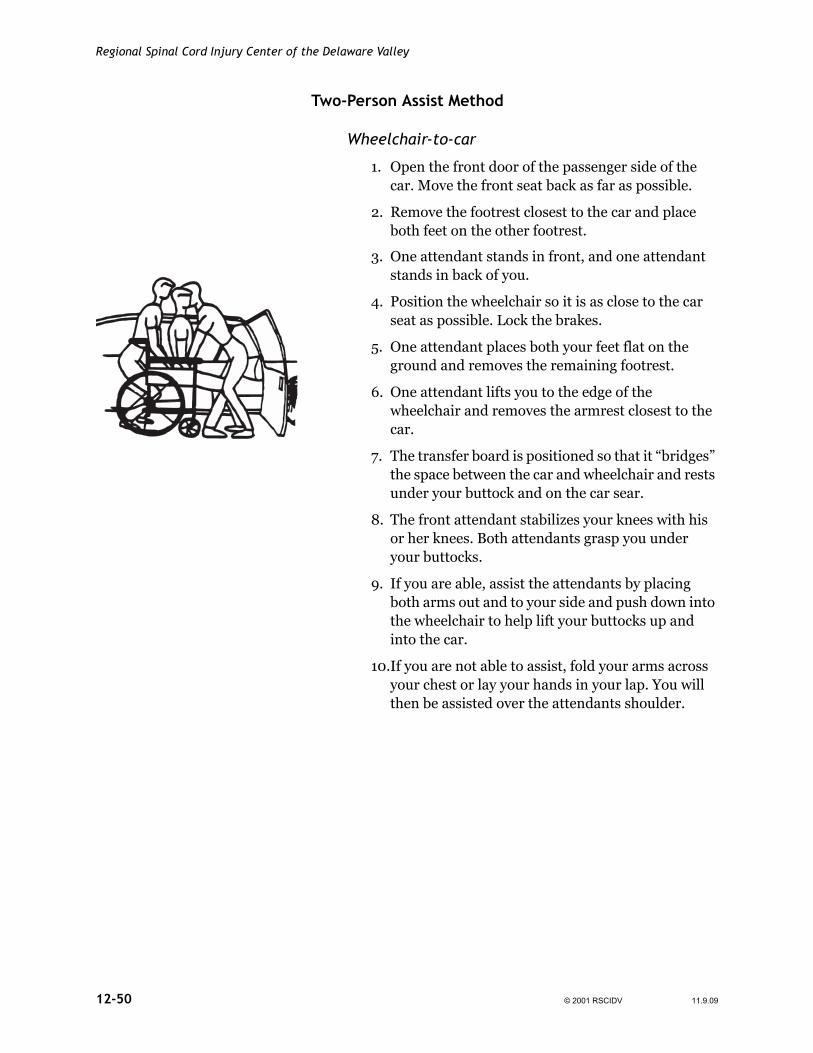
Two-Person Assist Method
Wheelchair-to-car
1. Open the front door of the passenger side of the car. Move the front seat back as far as possible.
2. Remove the footrest closest to the car and place both feet on the other footrest.
3. One attendant stands in front, and one attendant stands in back of you.
4. Position the wheelchair so it is as close to the car seat as possible. Lock the brakes.
5. One attendant places both your feet flat on the ground and removes the remaining footrest.
6. One attendant lifts you to the edge of the wheelchair and removes the armrest closest to the car.
7. The transfer board is positioned so that it “bridges” the space between the car and wheelchair and rests under your buttock and on the car sear.
8. The front attendant stabilizes your knees with his or her knees. Both attendants grasp you under your buttocks.
9. If you are able, assist the attendants by placing both arms out and to your side and push down into the wheelchair to help lift your buttocks up and into the car.
10.If you are not able to assist, fold your arms across your chest or lay your hands in your lap. You will then be assisted over the attendants shoulder.
12-50 © 2001 RSCIDV 11.9.09

Spinal Cord Injury Manual
11. On the count of “three,” the attendants lift you across the transfer board and move your buttocks onto the car seat.
12.The front attendant holds you steady while the back attendant gets in the car from the driver’s side.
13.While the front attendant holds you steady, the attendant in the car lifts your buttocks further into the center of the car seat. Lean back against the car seat for stability.
14.The attendant in the car holds you steady while the front attendant lifts your feet into the car, one at a time.
15.Both attendants position you and secure an over the shoulder and lap safety belt.
16.The attendants place the wheelchair in the back seat or trunk.
11.9.09 © 2001 RSCIDV 12-51

Regional Spinal Cord Injury Center of the Delaware Valley
Car-to-Wheelchair
1. Open the front door of the passenger’s side of the car. Move the front seat back as far as possible.
2. Make sure your wheelchair is positioned so it is as close as possible to the car seat. Lock the brakes and remove both footrests and the nearest armrest.
3. Release the over the shoulder chest and lap safety belt.
4. One attendant lifts your feet, one at a time, out of the car while you lean back against the car seat for stability.
5. The other attendant, beside you in the car, lifts your buttocks back towards the driver’s side of the car seat while the front attendant turns you toward the open door and stabilizes your head and shoulder.
6. The attendants lift you to the edge of the car seat so both feet are resting flat on the ground.
7. The transfer board is positioned so that it “bridges” the space between the wheelchair and car and rests under your buttocks and the wheelchair seat.
8. The front attendant stands in front of you and stabilizes your knees with his or her knees and the other attendant gets out of the car and stands in back of you. Both attendants grasp you under your buttocks.
9. If you are able, assist the attendants by placing both arms out and to your side and push down into the car seat to help lift your buttocks up and into the wheelchair.
10.If you are not able to assist, fold your arms across your chest or lay your hands in your lap. You will then be assisted over the front attendant’s shoulder.
11. Bend forward toward the front attendant.
12.On the count of “three,” the attendants will pull you to a partial stand, pivot and sit you on the wheelchair.
12-52 © 2001 RSCIDV 11.9.09

Spinal Cord Injury Manual
13.Replace the armrest. Replace the footrest furthest away from the car. Your attendant will lift both feet onto this footrest.
14.Unlock the brakes. Move the wheelchair away from the car. Replace the other footrest.
Independent Method
Wheelchair-to-car
1. Open the front door of the car. Move the front seat back as far as possible.
2. Remove the footrest closest to the car and place both feet on the other footrest.
3. Position the wheelchair as close to the car seat as possible. Lock the brakes.
4. Place both feet flat on the ground. Remove the remaining footrest.
5. An alternative method, if you have no spasticity in legs or trunk, is to place feet into the car instead of on the ground.
6. Lift yourself to the edge of the wheelchair. Remove the armrest closest to the car.
7. Position the transfer board so that it “bridges” the space between the car and wheelchair and rests under your buttocks and on the car seat.
8. Keeping your head low, lift yourself into the car.
9. Lean back against the car seat.
10.Lift one leg at a time into the car.
11. Place your wheelchair into the car.
12.Attach an over the shoulder chest and lap safety belt.
11.9.09 © 2001 RSCIDV 12-53

Regional Spinal Cord Injury Center of the Delaware Valley
Car-to-Wheelchair
1. Release the over the shoulder chest and lap safety belt.
2. Remove wheelchair from the car.
3. Make sure the wheelchair is positioned so it is as close as possible to the car seat. Lock the brakes and remove both footrests and the nearest armrest.
4. Lift one leg at a time out of the car.
5. An alternative method, if you have no spasticity in legs or trunk, is to keep both feet in the car instead of on the ground.
6. Lift yourself to the edge of the car seat.
7. Position the transfer board so that it “bridges” the space between the wheelchair and car and rests under your buttocks and on the car seat.
8. Keeping your head low, lift yourself out of the car and into the wheelchair.
9. Replace the armrest and the footrest furthest away from the car. Lift both feet onto the footrest.
10.Unlock the brakes. Move the wheelchair away from the car. Replace the other footrest.
General Floor Transfer Rules for an Assistant
For you safety, as well as the person you are helping, always use good body mechanics. When lifting from the floor:
1. Use your legs and hips for lifting. Bend your knees while keeping your back straight.
2. Keep the person close to your body and balanced. Avoid leaning and stretching.
3. Keep your feet slightly separated to provide a more stable base of support.
4. Lift by holding the person’s waist or buttocks. Do not grab under the shoulders or on the arms. This may decrease the person’s ability to push up into the chair in addition to injuring the person.
12-54 © 2001 RSCIDV 11.9.09

Spinal Cord Injury Manual
Helpful Hints
• The cushion increases the height of the lift.
• Removing the cushion prior to helping the person return to the chair will make the lift easier.
• The brakes should be locked.
Note: To avoid skin problems, always lift high enough to clear the chair without scraping the person’s skin.
Wheelchair-to-Floor Transfers (One person assisting)
Transferring from Wheelchair-to-Floor
Method One - Front Approach
1. Lock your wheelchair brakes and point the caster wheels forward.
Method One 2. Remove your feet from the footplates and swing the footrests off to the side.
3. Place your feet under the wheelchair.
4. Lift your hips forward in the seat.
5. Attendant stands to one side and holds at your waist or buttocks.
6. Holding onto your wheelchair armrests, slowly lower yourself onto your knees, keeping your head near the back of the wheelchair.
7. Reach forward with one or both hands and slowly lower your buttocks forward and to one side of the wheelchair.
11.9.09 © 2001 RSCIDV 12-55

Regional Spinal Cord Injury Center of the Delaware Valley
Method Two - Side Approach with Assistance
Method Two 1. Lock your wheelchair brakes and point the caster wheels forward.
2. Remove your feet from the footplates and swing the footrests off to the side.
3. Place both your feet out to one side of the wheelchair with your knees straight.
4. Lift your buttocks to the front edge of the seat, turning your hips slightly so you face toward the side your feet are on.
5. Attendant stands off to the side of the wheelchair opposite where your feet are and holds your buttocks or waist.
6. Hold on to the chair with the inside hand and reach down to the floor with the outside hand.
7. Slowly lower your buttocks off the chair and down to the floor.
12-56 © 2001 RSCIDV 11.9.09

Spinal Cord Injury Manual
Method Three - Turn Around Method
Method Three 1. Lock your wheelchair brakes and point the caster wheels forward.
2. Remove your feet from the footplates and swing the footrests off to the side.
3. Lift your buttocks forward in the wheelchair.
4. Cross one ankle over the other.
5. Attendant stands to one side and holds your buttocks or waist.
6. Twist your buttocks sideways in the chair so you can look back over one shoulder toward the back of the wheelchair.
7. Still facing backward, grab your left armrest with your right hand and your right armrest with your left hand.
8. Do a push-up as you continue to turn your buttocks, then slowly lower your knees to the floor.
9. Slowly lower your hips backward and to one side until they are lowered onto the floor.
Transferring from Floor-to-Wheelchair (One Person)Method One
11.9.09 © 2001 RSCIDV 12-57

Regional Spinal Cord Injury Center of the Delaware Valley
Transferring from Floor-to-Wheelchair (One Person)
Method One - Backward (Stool) Approach
1. Lock your wheelchair brakes and point the caster wheels forward.
2. Swing the footrests out to the side.
3. Place a stool in front of the wheelchair.
4. Position yourself so you are sitting in front of the stool with your back toward the stool and your legs out straight in front of you.
5. Attendant squats off to one side in back of you and lifts from your waist or buttocks.
6. Place your hands back up on the stool and lift your buttocks up onto the stool by doing a push-up.
7. Position your feet closer to you.
8. Place your hands back up on the wheelchair and do a push-up to lift your buttocks up onto the seat of the wheelchair.
Note: Stool may be eliminated, if possible, and transfer done directly into the wheelchair.
12-58 © 2001 RSCIDV 11.9.09

Spinal Cord Injury Manual
Method Two - Front Approach
Method Two 1. Lock your wheelchair brakes and point the caster wheels forward.
2. Swing the footrests out to the side.
3. Position yourself so you are sitting on the floor in front of the wheelchair, facing the wheelchair.
4. Tuck your legs so they are bent but slightly off to one side.
5. Attendant stands in back of you and lifts from the buttocks or waist.
6. Reach up to the seat of the wheelchair or armrests with one hand closer toward the front of the chair than the other.
7. Do a push-up to lift yourself up into the chair, twisting sideways toward the most forward hand.
8. Continue to push up until your hips are securely in the wheelchair. You may have to change hand positions quickly.
11.9.09 © 2001 RSCIDV 12-59

Regional Spinal Cord Injury Center of the Delaware Valley
Method Three - Side Approach
Method Three 1. Lock your wheelchair brakes and point the caster wheels forward.
2. Swing the footrests out to the side.
3. Position yourself so you are sitting sideways in front of the wheelchair with your knees straight and your feet off to one side of the wheelchair.
4. Place the hand nearest the wheelchair up on the wheelchair seat and your other hand on the floor near your hips.
5. Attendant stands in back of you and lifts from the buttocks or waist.
6. Do a push-up as you twist your head away from the wheelchair and swing your buttocks up onto the seat of the wheelchair.
7. Once your buttocks are in the chair, change the one hand from the seat to the pull handle and place the other hand in the seat or on the armrest.
8. Continue to push up and bring your buttocks toward the back of the wheelchair.
12-60 © 2001 RSCIDV 11.9.09
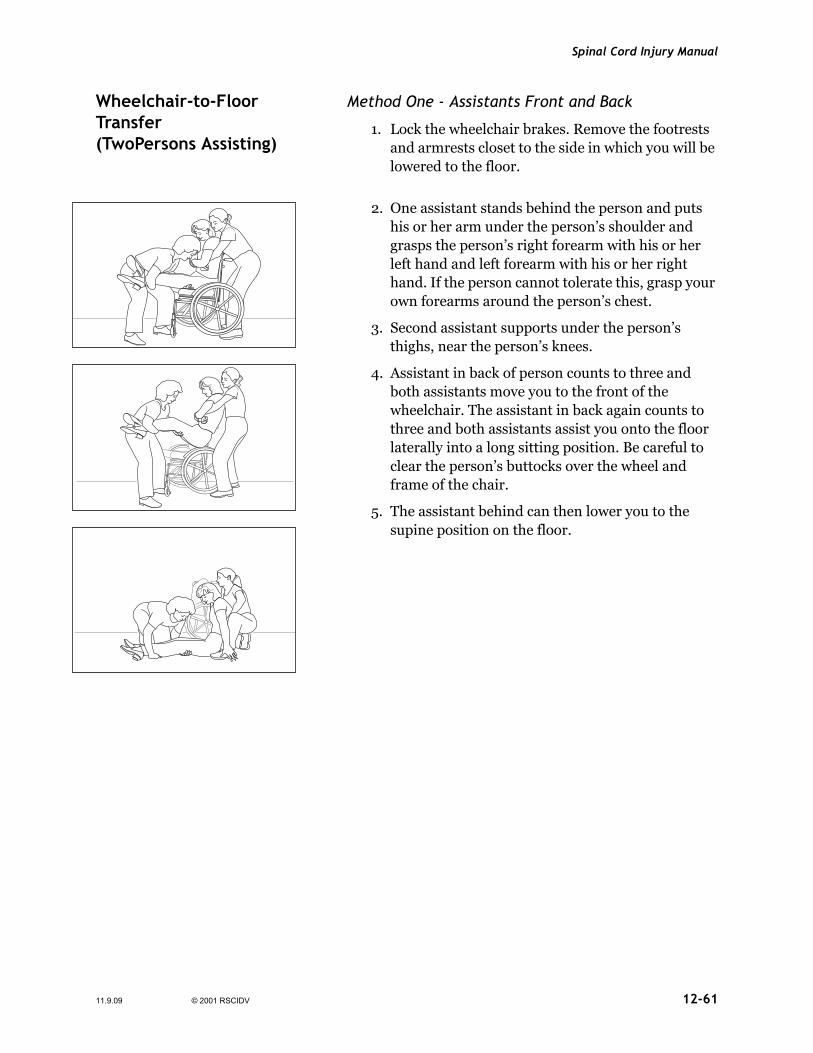
Spinal Cord Injury Manual
Wheelchair-to-Floor Transfer (TwoPersons Assisting)
Method One - Assistants Front and Back
1. Lock the wheelchair brakes. Remove the footrests and armrests closet to the side in which you will be lowered to the floor.
2. One assistant stands behind the person and puts his or her arm under the person’s shoulder and grasps the person’s right forearm with his or her left hand and left forearm with his or her right hand. If the person cannot tolerate this, grasp your own forearms around the person’s chest.
3. Second assistant supports under the person’s thighs, near the person’s knees.
4. Assistant in back of person counts to three and both assistants move you to the front of the wheelchair. The assistant in back again counts to three and both assistants assist you onto the floor laterally into a long sitting position. Be careful to clear the person’s buttocks over the wheel and frame of the chair.
5. The assistant behind can then lower you to the supine position on the floor.
11.9.09 © 2001 RSCIDV 12-61

Regional Spinal Cord Injury Center of the Delaware Valley
Method Two - Assistants on Each Side
1. Lock the wheelchair brakes. Remove the footrests from the front of the wheelchair.
2. Assistants face away from the chair, one on each side of the person.
3. Assistant should hook one arm under the person’s shoulder around the person’s back. The other hand grasps under the person’s thigh, near the knees. Assistants can interlock arms around person’s back and under thighs for added support.
4. On the count of three, the assistants lift the person forwardly out of the wheelchair to a long sitting position on the floor. Be careful to clear the person’s buttocks on the chair seat.
5. The person can then be lowered to the floor.
12-62 © 2001 RSCIDV 11.9.09

Spinal Cord Injury Manual
Floor to Wheelchair Transfers (Two Persons Assisting)
Method One - Assistants Front and Back
1. If on the floor, bring the person into sitting position, keeping the legs straight (Long-sit position).
2. Place the wheelchair next to the person so the seat is parallel to a person’s hips. The wheelchair should be facing the same direction as the person.
3. Place the caster wheels forward with all four wheels locked, if possible.
4. Remove the arm and footrest nearest the person.
5. One assistant stands behind the person and puts his or her arm under the person’s shoulder and grasps the person’s right forearm with his or her left hand and left forearm with his or her right hand. If the person cannot tolerate this, grasp your own forearms around the person’s chest.
6. Second assistant supports under the person’s thighs, near the person’s knees.
7. Assistant in back of person counts to three and both assistants lift person into the chair, being careful to clear the person’s buttocks over the wheel and frame of wheelchair.
Remember: Keep your knees bent and lift with your legs and not your back.
11.9.09 © 2001 RSCIDV 12-63

Regional Spinal Cord Injury Center of the Delaware Valley
Method Two - Assistants on Each Side
1. If on the floor, bring the person into sitting position, keeping the legs straight (Long-sit position).
2. Place the wheelchair behind the person with the wheels forward and all four wheels locked, if possible. The wheelchair should be facing the same direction as the person is facing.
3. Assistants face the chair; one on each side of the person.
4. Assistant should hook one arm under the person’s shoulder. The other hand grasps under the person’s thigh, near the knees (assistant could interlock forearms beneath person’s thigh).
5. On the count of “three,” lift the person into the chair. Be careful to clear the person’s buttocks on chair seat.
Remember: Keep your knees bent and lift with your legs and not your back.
Helpful Hints
• The cushion increases the height of the lift.
• Removing the cushion prior to returning to the chair will make the lift easier.
Note: To avoid skin problems, always lift the person high enough to clear the chair without scraping his or her skin.
12-64 © 2001 RSCIDV 11.9.09

Spinal Cord Injury Manual
Mechanical-Lift Instructions
A mechanical-lift transfer may be used when someone must be transferred dependently. Often times, a lift will decrease the number of people needed to perform the transfer safely. It also promotes optimal body mechanics for the caregiver.
Sling Placement (For a Wrap Around Sling)
If Sitting
1. Lean the person forward and place the sling behind the person’s back. Try to position the bottom of the sling at the top of the cushion. Be sure that the leg straps are not twisted.
2. Lift one leg at a time to place the strap underneath the thigh.
3. Cross the loops between the legs to maintain the leg position during the transfer.
11.9.09 © 2001 RSCIDV 12-65

Regional Spinal Cord Injury Center of the Delaware Valley
If In Bed
1. Raise the bed to waist level. This will reduce the strain on your lower back when assisting the person.
2. If the person is in an electric bed, raise the head of the bed so the person is seated in a long-sit position. Lean the person forward and place the sling behind the person’s back. Make sure the sling is positioned as far down as possible.
3. An alternative to raising the head of the bed to position the sling is to roll the person to his or her side and place the folded sling lengthwise behind his or her back. Have bottom of the sling at the base of his or her spine. Roll the person to the other side and pull the sling through until it is even on each side.
4. Bring the straps underneath each thigh and cross the loops between the person’s legs. Be sure that the leg straps are not twisted and that all of the slack is taken out.
5. When the person is ready to be lifted, lower the side rails and the level of the bed. This will decrease the distance that you have to elevate the person in the lift.
Mechanical-Lift Instructions
Transfer
1. Place the lift underneath the bed or surrounding the wheelchair. Center the cradle over the person and position it so that it looks like an open half circle at the person’s head. Attach the straps of the sling to the respective side of the cradle.
2. Have the person cross his or her arms across his or her chest. Place the urine bag on the leg strap to ensure that the bag is not caught during the transfer.
3. Raise the lift slowly until the person’s buttocks are clear from the surface, both from and to, the direction you are going. Double check to make certain that all of the straps are securely in place. Repositioning of the person may be needed to
12-66 © 2001 RSCIDV 11.9.09

Spinal Cord Injury Manual
ensure that a safe sitting position is attained as the person is raised.
4. Grasp the steering handles and move the person to desired place. Slowly lower the person into position. If going into a wheelchair, make sure the brakes are locked first. Pull up on the handle on the back of this sling to position the person as upright as possible. This will decrease the amount of repositioning that will need to occur after the sling is removed.
5. Place one hand on the person’s knees and push against them to get the hips back into the seat while slowly lowering the person.
6. Check to make sure the person’s feet do not catch on any obstacles and that the cradle does not hit the person’s head.
7. Check where the urine bag is and put in a safe place.
8. Remove the leg straps one at a time by lifting the leg first and then moving the leg strap. Then lean the person forward or to the side and remove the sling. Make sure not to shear the person’s skin as you remove the sling. Also, remember to guard the person’s body as you remove the sling.
9. Make sure the person is positioned properly in the wheelchair or in bed.
10.If in a wheelchair, make sure the seat and chest belts are around the person.
Mechanical-Lift Safety Guidelines
• Use good body mechanics by bending your knees and using your legs rather than your back.
• Check that the straps are secure.
• Check where the urine bag is.
• Check that the person’s buttocks are not falling out of the bottom of the sling before moving the lift system.
• If transporting the person over a short distance, ensure the person is facing the attendant and keep the person as low as possible. A lower center of gravity reduces the risk of tipping over.
11.9.09 © 2001 RSCIDV 12-67
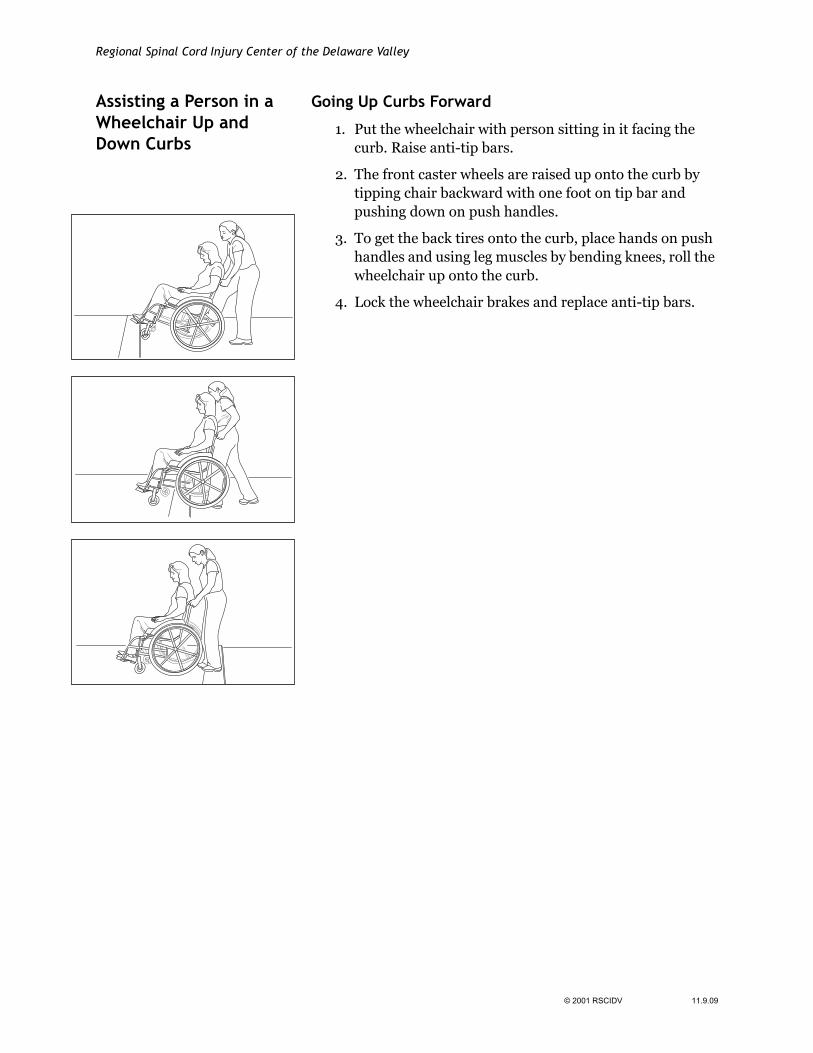
Regional Spinal Cord Injury Center of the Delaware Valley
Assisting a Person in a Wheelchair Up and Down Curbs
Going Up Curbs Forward
1. Put the wheelchair with person sitting in it facing the curb. Raise anti-tip bars.
2. The front caster wheels are raised up onto the curb by tipping chair backward with one foot on tip bar and pushing down on push handles.
3. To get the back tires onto the curb, place hands on push handles and using leg muscles by bending knees, roll the wheelchair up onto the curb.
4. Lock the wheelchair brakes and replace anti-tip bars.
12-68 © 2001 RSCIDV 11.9.09

Spinal Cord Injury Manual
Going Up Curbs Backwards
1. Position the chair with rear wheels to the curb. Raise the anti-tip bars. Unlock the brakes.
2.
Going Up Curbs Backward
Tip the wheelchair back into a wheelie position by using one leg to push through the anti-tip bars while simultaneously pushing down on push handles of chair.
3. Assistant staggers feet on curb in order to optimize good body mechanics.
4. Carefully pull chair up onto the curb while maintaining wheelie position.
5. Continue to roll the chair back until there is room to lower the front wheels onto the curb and then lower the front wheels.
6. Lock brakes and lower anti-tip bars.
11.9.09 © 2001 RSCIDV 12-69

Regional Spinal Cord Injury Center of the Delaware Valley
Going Down Curbs
Backward
1. Unlock wheelchair brakes and raise anti-tip bars.
2. Bring the back wheels down the curb by lowering the chair with bent knees. Keep knees bent to prevent back strain. Control the descent by using leg muscles.
3. Tip the chair backward with one foot on the tip bar and pushing down on push handle. Lower the caster wheels down off the curb.
4. Alternate: Once back wheels are on the bottom level with the chair still tipped back, the chair can be turned and spun off the curb to one side before the casters are lowered.
12-70 © 2001 RSCIDV 11.9.09

Spinal Cord Injury Manual
Forward
1. Raise the anti-tip bars. Unlock the brakes. Position the chair with front casters at edge of curb.
2. Tip the wheelchair back into a wheelie position by using one leg to push through the anti-tip bars while simultaneously pushing down on push handles of chair.
3. With the chair maintained in a wheelie position, lower the back tires off the curb controlling the descent with good body mechanics.
4. Once back tires on ground, lower wheelchair from wheelie position so that front casters are now on the ground.
5. Lock brakes and lower anti-tip bars.
11.9.09 © 2001 RSCIDV 12-71

Regional Spinal Cord Injury Center of the Delaware Valley
Carrying a Person in a Wheelchair Up and Down Stairs
To lift the wheelchair up several steps, at least two people are needed. More people are helpful. Before lifting, check to make sure the handgrips on the push handles are secure. Person in wheelchair must be secured in the chair by the seatbelt.
Wheelchair on Stairs
Important
• These activities should be done with a minimum of two people assisting.
• Person in the wheelchair should be seated fully back into the chair with his or her legs in the footrests and secured with a seat belt.
• Never hold removable parts on the chair.
• Use proper body mechanics, such as lifting with your legs and maintaining a solid and wide base of support.
To Go Up Steps
1. Place the wheelchair with the person in it backward in front of the step. Strongest person stands behind wheelchair with legs staggered holding onto the frame of the chair just below push handles (one foot on higher step and one on lower). Other person(s) stands in front of the chair or caster wheels. If more than one person is on bottom level, it is advisable to stand on either side of the chair and hold onto the frame. Alternative is to remove one legrest and put both feet on same legrest in order to allow access to frame of chair (back person will be responsible for the majority of the lifting while the person in front must maintain forward pressure through the frame of the chair to maintain tire position on the step).
2. Unlock brakes and raise anti-tip bars. Tilt the wheelchair back (back person will be responsible for the majority of the lifting while the person in front must maintain forward pressure thru the frame of the wheelchair to maintain tire position on the step).
3. Person in back of the chair counts to three and all lift together onto the next step, maintaining the chair in backward tilt.
12-72 © 2001 RSCIDV 11.9.09

Spinal Cord Injury Manual
4. Rest momentarily and continue to the next step.
5. Repeat this procedure until the top of the stairs are reached.
6. Once the top is reached, continue to roll the chair forward until there is enough room to lower the front wheels and then lower them.
7. Check to make sure the brakes are set before leaving the chair unattended.
Down the Stairs
1. Begin with the wheelchair facing down the stairs. Lock the brakes and raise the anti-tip bars. Unlock the brakes.
2. Attendant position is the same as that described for carrying the wheelchair up the stairs. The front attendant will grasp firmly the front of the frame while the rear attendant will hold onto the push handles on the chair (the back person will be responsible for controlling the descent of the wheelchair while the front attendant must maintain forward pressure through the frame of the chair to maintain tire position on the step).
3. Tip the wheelchair back into a wheelie position by using one leg through the anti-tip bars while simultaneously pushing down on push handles of chair.
4. Person in back of chair counts to three and both attendants lower the chair one step down.
5. Rest momentarily in order to allow the attendants to reposition feet and continue to next step.
6. Once the bottom is reached, continue to roll the chair forward until there is enough room to lower the front caster wheels to the floor.
7. Lock brakes and lower anti-tip bars.
11.9.09 © 2001 RSCIDV 12-73

Regional Spinal Cord Injury Center of the Delaware Valley
Wheelies A wheelie is a technique to push a wheelchair over rough terrain, curbs and steps by maintaining the wheelchair in a tipped back position. The wheelie position provides maximum safety and conservation of energy when propelling the wheelchair on these surfaces. People who are unable to be independent with this technique should be able to instruct any other person to assist them in managing this barrier.
Wheelie with Assistance
Wheelie with Assistance 1. Make sure seat belt is secured. Have assistant raise the anti-tip bars.
2. Your assistant stands behind the wheelchair and tips the wheelchair back by pressing on the anti-tip bars while pulling back and down on the frame of the wheelchair just below the push handles.
3. It is best for your assistant to pull the chair back towards him or her until he or she can comfortably stand with wheelchair balanced.
4. Your assistant can now push the wheelchair while maintaining this balance point.
12-74 © 2001 RSCIDV 11.9.09

Spinal Cord Injury Manual
Independent Wheelies
Independent Wheelie You will begin by finding your balance point and then trying to maintain it with small, smooth movements of the handrims. The balance point will always be further back than you think. When you are trying to balance, a backward movement of the handrim will lower your front casters, while a forward movement will raise your front caster wheels.
1. Start with your hands on the handrims directly over the axle of the wheel.
2. Push forward to bring your hands near the brakes.
3. Pull back on the wheel until your hands are behind the axle.
4. Quickly push forward while tucking your chin and bringing your shoulders forward into your chest while pushing the small of your back into the back of the chair to “pop” the wheelie.
5. Make small, smooth movements forward and backward to maintain your balance point.
If You Should Fall, Remember To
• Tuck your head by bringing your chin to your chest. This will prevent your head from hitting the ground.
• Cover your face with your arms to prevent your knees from hitting your face.
Using these precautions, you will be able to slide out of your wheelchair unharmed.
11.9.09 © 2001 RSCIDV 12-75

Regional Spinal Cord Injury Center of the Delaware Valley
Neuromuscular Electrical Stimulation (NES) Program
The NES program is an outpatient program that includes two different programs. One is riding a computerized bicycle and the other is taking steps with the Parastep ® system. Both of these devices have electrodes placed on your skin, and by using electrical signals, the electrodes make your muscles move. The computerized bicycle program is appropriate for any patient with a cervical injury and most thoracic level injuries. The Parastep ® program is appropriate for people who have enough muscle control in their trunk to be able to stand upright. Typically, these are people with lower thoracic injuries or an incomplete cervical injury. Some people have injuries that will not allow them to join the NES program. Evaluations are done to see if you are able to join the NES program.
Benefits of Neuromuscular Electrical Stimulation
Both computerized bicycle riding i.e., RT300 and Parastep® provide the individual with many benefits. It is important to understand that one, both or none of these programs may be the right thing for you. Both programs require a commitment from you to the time and effort that is needed to have the evaluation and participate in the program. Both programs are expensive and you need to decide (with your family, doctor and therapist) if it is the right thing for you. However, it doesn’t hurt to speak with your doctor or physical therapist about either one of the programs.
Riding a computerized bicycle can provide many of the same benefits of riding any bicycle. It gives your heart and lungs a good workout (called cardiovascular conditioning) and helps to provide an overall sense of feeling good. Using the bicycle can help to decrease spasticity, and helps to maintain muscle tone. Just as with any exercise program, you need to start slow and build up your endurance.
The Parastep ® Program provides people with the opportunity to stand and take some steps. The distance that you are able to walk varies from person to person. For most people, this system is not one that you can use for great distances. The benefits of using Parastep ® include helping to prevent osteoporosis by standing on the bones in your legs, helping to prevent contractures in your hips, knees and ankles, decreasing spasticity, helps to maintain muscle tone, helps to improve your cardiovascular conditioning, and helps to provide for an overall sense of feeling good.
Computerized Bicycle Ergometry: Electrodes are placed on your buttocks and front and back of your thighs. These
12-76 © 2001 RSCIDV 11.9.09

Spinal Cord Injury Manual
electrodes are connected by cables to a computer that coordinates your leg muscles to pedal the bicycle.
Parastep ® Program: Electrodes are placed on your buttocks, the front of your thighs and just below your knees. These electrodes are connected to a computer and a walker by cables. When electricity goes through the electrodes, you stand and then can take some steps.
There are three phases of physical therapy in the NES program. The first phase is an evaluation to see if by placing electrodes on your legs and using the computer system, your legs would move. After the evaluation, you and the physical therapist can decide if the computerized bicycle program or the Parastep® program is best for you.
The second phase is getting used to exercising with the equipment. Also, you will be learning how to use the equipment independently or with the assistance of a family member. The third phase is ordering the equipment for your use at home or deciding to use Magee’s computerized bicycles at the Riverfront facility.
Tenodesis People with C6-7 tetraplegia use a tenodesis grasp to compensate for weak or absent active finger movement in order to manipulate objects during daily activities.
With active movement of the wrist up (extended), there is passive movement of the fingers closed (flexed). When the wrist is down (flexed), the fingers open (extend) to release an object.
Tendon transfer surgery has been performed on people with C5 injury level to promote increased distal mobility (for C6 function). Also, if active finger movement is desired, tendon transfer surgery is an option for stronger grasp.
Passive range of motion exercise should be performed daily. The wrist must be down (flexed) when fingers are opened (extended). Fingers close (flex) when wrist comes up (extends). A tenodesis splint (short opponeons) may be prescribed to increase tenodesis grasp by maintaining proper thumb position.
Avoid the Following
• Over-stretching the fingers
– During passive range of motion exercises
11.9.09 © 2001 RSCIDV 12-77

Regional Spinal Cord Injury Center of the Delaware Valley
– During weight bearing and transfers (fingers / hand must be closed)
It is common for people with C5 and some C4 tetraplegia to regain function in the C6 myotome during the first eight months after injury. Therefore, it is extremely important to retain tendon tightness in the fingers for future tenodesis grasp.
Tendon Transfers for Tetraplegia
Traumatic tetraplegia is one of the most overwhelming injuries patients and their families can sustain. Individuals become dependent on their upper extremities for mobility and activities of daily living. The greatest potential for improvement of quality of life lies in rehabilitation and maximal restoration of arm and hand function to meet social, functional and cosmetic needs.
Early emergency and acute care are important. Proper attention to upper limbs is essential to prevent contractures, deformities and stiffness. Research indicates that 75 percent of individuals with tetraplegia preferred restoration of upper extremity function over bowel, bladder and sexual functioning.
The goal of upper extremity reconstruction is not to return patients to normal, but to regain some use of a previous non-functioning extremity. Surgery will enable a patient to use functioning proximal musculature to control distal parts. In other words, it is the transfer of a muscle having active function so that it restores motion in a joint with no function.
Tendon transfers are not performed before a person completes a rehabilitation program of the upper extremities that includes:
• Splinting
• Active / Passive Movement
• Strengthening
• Time for psychological adjustment
• Clients must be at least one-year post injury, demonstrate neurological stability and be highly motivated.
• A full evaluation is completed to effectively select surgical candidates.
There are several kinds of transfers. The four most commonly performed are:
• For elbow extension:
12-78 © 2001 RSCIDV 11.9.09

Spinal Cord Injury Manual
– Posterior Deltoid to Triceps
– Biceps to Triceps
• For wrist extension:
– Moberg passive
– Moberg active
Surgical restoration of upper extremity function offers significant potential for improving the quality of life after tetraplegia. With careful pre-operative assessment, and appropriate post-operative management, people with tetraplegia can see improved upper extremity function after surgery.
11.9.09 © 2001 RSCIDV 12-79

Regional Spinal Cord Injury Center of the Delaware Valley
Potential Complications Interfering with Mobility
Problem What is it? Symptoms What to do
Contracture A permanent shortening of soft tissue resulting in a limitation in the range of motion of the joint.
Tightness or loss of range of motion
• Range of motion
• Proper use of splints and other positioning devices
• Proper positioning in bed and the wheelchair
• Appropriate spasticity management
Osteoporosis A condition that reduces the volume of bone tissue
None • Range of motion and strengthening exercises
• Weight-bearing activities
• Medications
Spasticity Uncontrolled or involuntary movements of the extremities or increased resistance to passive movement.
Movement of an extremity, which may appear to be normal, but is actually uncontrolled reflex movement. The involved limb or trunk is difficult to move.
• Frequent range of motion
• Medications
• Surgery to implant devices to control spasticity
Heterotopic Ossification
The abnormal growth of bone into connective tissue, muscles or soft tissue. It is usually found below the level of injury, around the hips, elbows and shoulders.
Loss of range of motion in the affected joint.
Swelling in the affected joint.
Redness in the affected joint.
• Aggressive range of motion
• Medications
• Surgery for severe heterotopic ossification
12-80 © 2001 RSCIDV 11.9.09
Spinal Cord Injury Manual
GlossaryAbdominal Binder Elastic band worn around the torso to help prevent low blood
pressure associated with changes in positioning.
Abduction Movement of an extremity away from the body.
Adduction Movement of an extremity toward the body.
Attendant Someone who assists with daily needs. (Can be hired help.)
Dorsiflexion Backward flexion of either the hand or foot.
Flexion Movement of a joint upward.
Heterotopic Ossification Calcium build up around a joint.
Joint Contractures A permanent contraction or shortening of a muscle due to spasm fibrosis or paralysis.
Mechanical Lift A piece of durable medical equipment that aids in transferring an individual from one surface to another.
Myotome Mapping of the body according to spinal levels.
Osteoporosis Loss of bone matter.
Pneumonia Inflammation of the lungs characterized by chills, cough and fever.
Postural Hypotension Low blood pressure associated with changes in position.
Pronation Turning of the hand so the palm faces downward.
Spasticity Hypertension (over-activity) of a muscle of sustained increased muscular tension.
Supination Turning of the hand so palm faces upward.
TEDs Tight stockings worn on the legs, either short or long, to aid in increasing the circulation and decreasing the possibility of blood clots.
Tenodesis An attempt to promote greater finger dexterity by passively closing the hand and raising the wrist. Used primarily to grasp and retrieve objects.
Transfers Moving from one surface to another. (e.g., From a wheelchair to a bed, or a toilet to a wheelchair)
11.9.09 © 2001 RSCIDV 12-81

Regional Spinal Cord Injury Center of the Delaware Valley
Weight Shifts / Pressure Relief
A change in body position either by performing tilt back, lateral, push-up and forward shifts when in a wheelchair. This process helps relieve pressure from bony prominences.
12-82 © 2001 RSCIDV 11.9.09

Spinal Cord Injury Manual
References1. Apple D. Topics in Spinal Cord Injury Rehabilitation
(Mobility). 1(1). Gaithersburg, MD: Aspen Publishing, 1995.
2. Miller KL, Simcik C. Transfer Methods for Persons with High Tetraplegia. Topics in Spinal Cord Injury Rrehabilitation (Mobility). 1(1), 21-29. Gaithersburg, MD: Aspen Publishing, 1997.
11.9.09 © 2001 RSCIDV 12-83

Regional Spinal Cord Injury Center of the Delaware Valley
12-84 © 2001 RSCIDV 11.9.09

Spinal Cord Injury Manual
Comments and Feedback
The staff of the center has recently spent a lot of time and effort in revising this manual. However, we realize that those who are actively reading and using the manual can improve it. As a part of our program of continuous quality improvement, we ask you to help guide our efforts to improve the manual.
In the next section of the chapter are two forms. The first form is an overview by chapter that seeks to identify those areas of the manual that could benefit the most from additional work. We also seek to identify any major areas of concern that have not been addressed.
The second section is a more focused questionnaire that has as its goal the specific items that should be targeted. For example, should an item be added to the glossary or the definition changed. Should a drug be added to the discussion of bowel programs?
The more specific the comments are the more likely that we will be able to make the improvements that form the basis of your idea. By communicating with the Regional Spinal Cord Injury Center of the Delaware Valley, however, users grant us permissionto use any information, suggestions, ideas, drawings or concents communicated for any purpose we choose, commercial, public or otherwise, without compensation or acknowledgement whatsoever.
Thank you for taking the time to assist us in improving this manual.
Sincerely,
SCI Manual Committee
Regional Spinal Cord Injury Center of the Delaware Valley Thomas Jefferson University Hospital 132 S. 10th Street 375 Main Building Philadelphia, PA 19107
10.21.09 © 2001 RSCIDV

Regional Spinal Cord Injury Center of the Delaware Valley
Feedback Form
Rate each chapter by placing an “X” on the scale underneath the term that best captures your opinion. Using the next page, provide specific comments regarding your ratings. Feel free to make copies of the next page.
No Opinion Fair Satisfactory Good Excellent
Credits / Front Matter
Table of Contents
Introduction
Spinal Cord Injury
Bladder
Bowel
Respiratory
Respiratory Dependent
Skin
Cardiovascular
Nutrition
Activities of Daily Living
Equipment
Mobility
Psychology
Vocational Services
Recreational Therapy / Resource Guide
Travel and Transportation
Sexuality
Spinal Cord Injury Follow-Up Care System
Master Glossary
© 2001 RSCIDV 10.21.09

Spinal Cord Injury Manual
Suggestions and Comments
Chapter: ________________________________________________________
Page(s): ________________________________________________________
Comments: ________________________________________________________
________________________________________________________
________________________________________________________
Any terms that need to be added to the glossary? How would you define the terms?
Any section or paragraph that was not clear?
Any drawing or sketch that would help to illustrate the material being covered?
Any additional topic that should be covered?
Any questions you have that you feel should have been answered by the manual?
What is the question?
What is the suggested answer?
Any references that should be added? Any other resources that should be mentioned?
By communicating with the Regional Spinal Cord Injury Center of the Delaware Valley, however, users grant us permission to use any information, suggestions, ideas, drawings or concepts communicated for any purpose we choose, commercial, public or otherwise, without compensation whatsoever.
10.21.09 © 2001 RSCIDV

Regional Spinal Cord Injury Center of the Delaware Valley
© 2001 RSCIDV 10.21.09


![[Dunlap 2015 Chp12] Wave Energy](https://static.fdocuments.net/doc/165x107/563db843550346aa9a920e44/dunlap-2015-chp12-wave-energy.jpg)