Specimen Imaging Documentation
37
Consortium of Pacific Northwest Herbaria 11/2/2011 i Specimen Imaging Documentation Consortium of Pacific Northwest Herbaria Version 4.0 November 2, 2011 http://www.pnwherbaria.org/documentation/specimenimaging.php Ben Legler Informatics Specialist, CPNWH WTU Herbarium, Burke Museum of Natural History and Culture University of Washington [email protected] 1-206-221-5234
Transcript of Specimen Imaging Documentation

Consortium of Pacific Northwest Herbaria 11/2/2011
i
Specimen Imaging Documentation
Consortium of Pacific Northwest Herbaria
Version 4.0
November 2, 2011
http://www.pnwherbaria.org/documentation/specimenimaging.php
Ben Legler
Informatics Specialist, CPNWH WTU Herbarium, Burke Museum of Natural History and Culture
University of Washington [email protected]
1-206-221-5234

Consortium of Pacific Northwest Herbaria 11/2/2011
ii

Consortium of Pacific Northwest Herbaria 11/2/2011
iii
Table of Contents 1. Introduction ........................................................................................................................ 1
2. Who to contact for help ...................................................................................................... 3
3. List of imaging hardware and software ............................................................................... 4
3.1 Hardware ..............................................................................................................................4
3.2 Software ...............................................................................................................................4
4. Initial configuration of the hardware and software ............................................................. 5
4.1 Assemble the lightbox ..........................................................................................................5
4.2 Prepare the camera ..............................................................................................................6
4.3 Configure the laptop computer and install software ...........................................................6
4.4 Configure the laptop to auto-start EOS Utility when the camera is connected ..................7
5. Setting up the imaging workstation in an herbarium ........................................................... 8
5.1 Find a suitable location for the equipment ..........................................................................8
5.2 Check the specimen holder and ruler ..................................................................................9
5.3 Attach the camera mount to the top of the lightbox ...........................................................9
5.4 Plug it all in and connect the camera to the mount and laptop ....................................... 10
5.5 Configure the camera settings .......................................................................................... 11
5.6 Configure the EOS Utility settings ......................................................................................12
5.7 Configure the external hard drive ......................................................................................13
5.8 Position the camera using Live View ................................................................................. 14
5.9 Take a test image and check image quality ....................................................................... 15
5.10 Prepare the image metadata form ................................................................................... 15
6. Daily imaging workflow: preparing for imaging ..................................................................15
6.1 Turn on the imaging equipment .........................................................................................15
6.2 Format the Compact Flash card .........................................................................................15
6.3 Open the EOS Utility and check settings ............................................................................16
6.4 Use Live View to double-check specimen alignment .........................................................17
6.5 Open the Quick Preview window ...................................................................................... 18
6.6 Open the Metadata entry form and check settings .......................................................... 19

Consortium of Pacific Northwest Herbaria 11/2/2011
iv
7. Daily imaging workflow: metadata and image capture .......................................................20
7.1 Metadata capture for each folder of specimens ............................................................... 20
7.2 Image capture for each folder of specimens ..................................................................... 21
8. Daily imaging workflow: finishing image capture and shutting down equipment ..............22
8.1 Back up the metadata and images .................................................................................... 22
8.2 Shut down the imaging workstation ................................................................................. 22
9. Daily imaging workflow: dealing with problems during image capture ...............................23
9.1 Specimen sheet does not lie flat ........................................................................................23
9.2 The camera won’t focus .....................................................................................................25
9.3 Specimen sheet contains a packet with plant material inside ...........................................25
9.4 Multiple specimens on a single sheet ...............................................................................27
9.5 The folder name was incorrectly entered into the metadata entry form .........................27
9.6 The folder name was not entered before imaging specimens in that folder ................... 28
9.7 How to re-shoot or delete an image ................................................................................. 28
9.8 The Compact Flash card is full ........................................................................................... 29
10. Sending images and metadata to WTU ............................................................................ 29
11. Disassembling the workstation for transport ................................................................... 30
Consortium of Pacific Northwest Herbaria 11/2/2011
1
1. Introduction This document provides instructions for imaging specimens under the Consortium of Pacific Northwest Herbaria’s 2010-2013 collaborative NSF Grant (DBI0956414). It is intended for use by project facilitators and imaging personnel working under the grant. The instructions are specific to the equipment we have chosen to use and may need modification if used elsewhere. In addition to this document, there are separate instructions for creating the customized equipment (camera mount, specimen holder, rulers, weights, etc.) required here, and cheatsheets to which imaging personnel can quickly refer during the imaging process. The default workflow used here (Figure 1) assumes each collection is being imaged sequentially from start to finish by capturing the entire collection or an easily defined subset such as all Pacific Northwest specimens (Alaska, Idaho, Montana, Oregon, Washington, British Columbia, and Yukon Territory). It also assumes the specimens are not already databased and, therefore, the images do not need to be matched up to existing database records. Under this scenario, the images can be used to populate a new database with label data later captured from the images using keystroking or OCR. The databases are hosted on the Consortium’s web server with data entry interfaces accessible over the internet. This eliminates the need for smaller collections to develop and manage their own in-house server. It further simplifies the transfer of data and images to the Consortium’s online search portal.
Figure 1. Simplified overview of the default imaging workflow, including image capture, transfer to server, image processing, and databasing from the images. Barcoding is optional. There is no need to barcode specimens unless desired by the collection being imaged. However, barcoding is a recommended option, particularly for collections that already have a database. If barcoding, each specimen is given a barcode before imaging and the corresponding database record is updated to include the barcode. Then, during image capture, a custom script and barcode reader are used to rename each image to match the

Consortium of Pacific Northwest Herbaria 11/2/2011
2
barcode. Following image capture, the image processing scripts match image names to existing database records. Alternatively, images can be renamed to the acronym+accession number. This must be done by manually typing the acronym and accession into the custom renaming script (thereby introducing the possibility of typos and mis-matched images). If images are not named to the barcode or accession, then image names are assigned automatically by the camera software, consisting of the herbarium acronym plus a zero-padded sequential number. The imaging technology used here was chosen for ease of use and efficiency. The core components of the system are a high-resolution digital SLR, an enclosed lightbox, and a laptop computer. This system involves fewer pieces of equipment than one based on external flash units, thereby reducing the number of potential failure points. Although higher quality digital imaging solutions exist, such as medium-format sensors or flatbed scanners, they require significant tradeoffs in higher equipment costs or slower imaging rates. One disadvantage of the system used here is the relatively low light intensity of the lightbox, which requires a slow shutter speed to maintain adequate exposure and depth of field. This can be accommodated by placing the lightbox on a stable surface and using a sturdy camera mount attached to the top of the lightbox. We are using a Canon EOS 5D Mark II camera with a 21 MP sensor. Images are captured in RAW format (CR2) and archived in RAW format (either CR2 or DNG), with high-quality JPEGs created for general use and tiled images for the online image viewer. Together, these files require about 32.5 MB (if using DNG) or 36.5 MB (if using CR2). 100,000 images will require about 3.1 to 3.5 terabytes of storage space. The archival images could alternatively be stored as 8-bit LZW-compressed TIFF images instead. These are similar in size to the DNG images. Initial use of the equipment suggests an image capture rate of between 100 and 180 specimens per hour, depending on the number of difficult specimens encountered and the skill of the imaging person. A four hour workday for a single person will thus generate between 400 and 720 images. A single person working for 19 hours per week will finish a collection of 20,000 specimens in about 6 to 10 weeks. About the Consortium: The Consortium of Pacific Northwest Herbaria is a regional partnership of herbaria from Pacific Northwestern North America, formed in 2007. Its primary objective is the formation of a network of collections data accessible through a single online search portal. The Consortium supports digitization of specimens at participating regional herbaria by providing technical assistance, equipment, and funding. Funding for the Consortium has been provided primarily by the National Science Foundation, first with a supplement to the WTU Herbarium’s 2004-2007 NSF grant (0346624), and currently with a collaborative NSF grant between WTU (0956414), OSC (0955887), ID (0955475), and MONT (0955277). Administration and web site development occur at WTU.

Consortium of Pacific Northwest Herbaria 11/2/2011
3
2. Who to contact for help If you have questions or encounter problems, check with the imaging coordinator from your state or the project coordinator. Additional documentation, including software scripts and folder hierarchies, is available at http://www.pnwherbaria.org/documentation/specimenimaging.php. Project coordinator and programmer:
Ben Legler Herbarium University of Washington PO Box 355325 Seattle, WA 98195 email: [email protected] office phone: 1-206-221-5234 cell phone: 1-206-940-6723
Imaging coordinator, Washington:
Andrea Taylor Herbarium University of Washington PO Box 355325 Seattle, WA 98195 email: [email protected] office phone: 1-206-221-5234
Imaging coordinator, Idaho:
Emily Poor College of Natural Resources Stillinger Herbarium PO Box 441130 Moscow, ID 83844-1130 [email protected]
Imaging coordinator, Oregon:
Linda Hardison Dept. Botany & Plant Pathology Oregon State University Corvallis, OR 97331-2902 email: [email protected] office phone: 1-541-737-4338 fax: 1-541-737-3573 office: 1048 Cordley Hall
Imaging coordinator, Montana:
Ryan Quire Dept of Plant Sciences & Plant Pathology P.O. Box 173150 Bozeman, MT 59717-3150 [email protected]

Consortium of Pacific Northwest Herbaria 11/2/2011
4
3. List of imaging hardware and software Not listed here are custom components as described in “Custom Imaging Components.pdf” 3.1. Hardware:
Item Cost (in 2010) Notes Ortery Lightbox $1,200 http://ortery.com/support/where_to_buy.php
or call 1-949-859-5580 Canon EOS 5D Mark II $2,399 w/rebate Get the body only, without a kit lens 50 mm macro lens, one of: • Canon EF 5omm f/2.5
Compact Macro • Sigma Macro 50mm f/2.8 EX
DG with Canon mount
$299 (either one) The Canon lens only goes to ½ life size, while the Sigma goes to full 1x life size. Both are equal in image quality and price. The Sigma’s extra magnification may be useful for close-ups of small parts of a specimen.
Canon AC Adaptor Kit (ACK-E6) $149 to $189 Purchasing online is probably cheaper than in-store. 16 or 32 GB Compact Flash (e.g., Sandisk Ultra 15x)
$65 or $130 16 GB will hold about 550 CR2 images (4 hrs of imaging). 32 GB will hold about 1,100 CR2 images (7 hrs).
Laptop computer, min specs: • 17”, 1600x900 pixel screen • 500 GB 7200 RMP hard drive • 3 to 4 GB RAM • Newer processor such as Intel
T6600, i3, i5, or i7 • Dedicated graphics card with
at least 512 MB memory • Windows 7 (can use OS X)
$700 to $1000 Try an HP Pavillion 17” or a Dell Vostro 17”. Get a model with an anti-glare screen if possible.
2 portable hard drives, 500 GB minimum for each
$100 each Get something compact like the Western Digital 500 GB or 1 TB Passport Drives with USB connections.
3.2. Software:
Item Cost (in 2010) Notes Canon Software (including EOS Utility)
Free (comes on CD with the camera)
All we use are EOS Utility and Digital Photo Professional.
Python 2.7 Free (open source) http://www.python.org/download/ (get version 2.6 or higher, but not 3.x)
wxPython Free (open source) http://www.wxpython.org/download.php Adobe Reader Free (proprietary) http://get.adobe.com/reader/
(for viewing imaging documentation)

Consortium of Pacific Northwest Herbaria 11/2/2011
5
4. Initial configuration of the hardware and software The steps given here should only need to be done once when the equipment is first purchased. They do not need to be performed when moving the workstation to each herbarium. All documents, scripts, and folder hierarchies referred to below are available for download at http://www.pnwherbaria.org/documentation/specimenimaging.php 4.1. Assemble the Lightbox: The Lightbox comes unassembled. An instruction sheet should be included with the Lightbox. During assembly, note the following modifications: 1) Leave the front panel completely off (Figure 2). The front panel has a door cut into it, but it
is too small. It is easier to insert and remove specimens if the entire front side is open. 2) Attach the fabric door cover to the front of the Lightbox. Affix self-adhesive Velcro strips to
the fabric door to allow the door to be easily held out of the way (Figure 3). Refer to “Custom Imaging Components.pdf” for recommended positions for the Velcro strips.
3) Remove the square metal brackets and the Velcro strap on the top of the box. These are not used and will get in the way of the custom camera mount.
4) Four holes need to be drilled in the top of the box to attach the custom camera mount. See “Custom Imaging Components.pdf” for instructions on building and attaching this mount.
5) A custom specimen backdrop and weights need to be created to go inside the lightbox. This backdrop provides a deep black background, allows quick positioning of the specimen, and includes a ruler and logo for the collection being imaged. See “Custom Imaging Components.pdf” for instructions on building this insert and positioning it within the lightbox, and making a ruler.
Figure 2. Front side of the Lightbox with the front panel removed, a custom specimen holder inside, and a custom camera mount.
Figure 3. Fabric door on front of Lightbox, with Velcro tabs added to allow a corner to be easily held out of the way.

Consortium of Pacific Northwest Herbaria 11/2/2011
6
4.2. Prepare the camera: 1) Attach the lens by removing the lens mount covers on both the camera and the lens, lining
up the red dots on the lens and the camera, and twisting the lens until it locks into place. 2) Insert the Compact Flash card into the slot on the right side of the camera (behind and
below the shutter release). The card should only go in one way, so don’t force it. 3) Charge the battery (it arrives completely drained). We’ll be using an AC adaptor instead of
the battery, but it is good to have the battery on hand just in case. 4.3. Configure the laptop computer and install software: Before proceeding with these steps, you may want to let your university IT upgrade Windows and install Microsoft Office and anti-virus software. 1) Install the Canon software that came on the CD with the camera. Create desktop shortcuts
to the EOS Utility and Digital Photo Professional (Figure 4). 2) Install Python 2.7. If you are using a 64-bit computer be sure to get the 64-bit version of
Python. Don’t install Python 3; it is incompatible with the scripts used here. 3) Install wxPython 2.8. If you are on a 64-bit machine use the wxPython runtime for Windows
called “Win64-Unicode”. 4) Install Adobe Reader, if not already present. 5) Download and unzip “Imaging Computer Configuration.zip” Copy the folder
“PNWHerbaria\” and all of its contents over to the C:\ drive on the laptop. You should end up with the folder hierarchy shown in Figure 5.
6) Create a desktop shortcut to the “imagemetadata.pyw” script (Figure 4). This script is located in C:\PNWHerbaria\Scripts\”. Make sure Windows is set to open .pyw files using python.exe as the default option.
Figure 4. Software icons.
Figure 5. Folder hierarchy.

Consortium of Pacific Northwest Herbaria 11/2/2011
7
4.4. Configure the laptop to auto-start EOS Utility when the camera is connected: 1) Connect the camera to the laptop via the USB cord and turn on the camera. 2) If this is the very first time the camera is connected, you should see a Windows dialog
asking you what you want to do with this device. Select the option “download images to computer using EOS Utility.” This will tell Windows to automatically open EOS Utility whenever the camera is connected.
3) The window shown in Figure 6 should appear. Click the “Preferences” button. 4) Another window will appear (Figure 7). Under the “Basic Settings: tab, select the option for
“Show [Camera settings/Remote shooting] screen” and check the box for “Start EOS Utility automatically when the camera is connected”
Figure 6. EOS Utility main window.
Figure 7. EOS Utility preferences.

Consortium of Pacific Northwest Herbaria 11/2/2011
8
5. Setting up the imaging workstation in an herbarium These steps should be performed each time the imaging workstation is moved to a new herbarium. Some of these steps may not need to be done every time, but you should at least check to make sure the camera and other equipment are still configured as given here. 5.1. Find a suitable location for the equipment: The Lightbox should be placed on a sturdy table or other surface that will not transmit vibrations up to the camera. The surface must be large enough for the lightbox (24” x 24”) and the laptop (16” wide). Specimens can be placed on this same surface to one side of the lightbox or, preferably, on a separate cart or table at a right-angle to the lightbox and at the same height (Figure 8). Positioning the specimens this latter way may increase the ease with which they can be inserted into and removed from the lightbox. • It is OK if the room is brightly lit or there are windows. The inside of the lightbox is well-
enough covered to keep ambient light out as long as the curtain is used. • Make sure there are enough power outlets nearby (three are needed, for the lightbox,
camera, and laptop). • Find a chair that is at the right height to allow the imaging person to comfortably move
specimens in and out of the lightbox and operate the laptop. • Check the lightbox to make sure it does not wobble when pushed from any of the four
upper corners. If it does, then adjust the feet on the bottom of the box until the box is stable.
Figure 8. Suggested arrangement of imaging equipment, and movement of specimens.
Consortium of Pacific Northwest Herbaria 11/2/2011
9
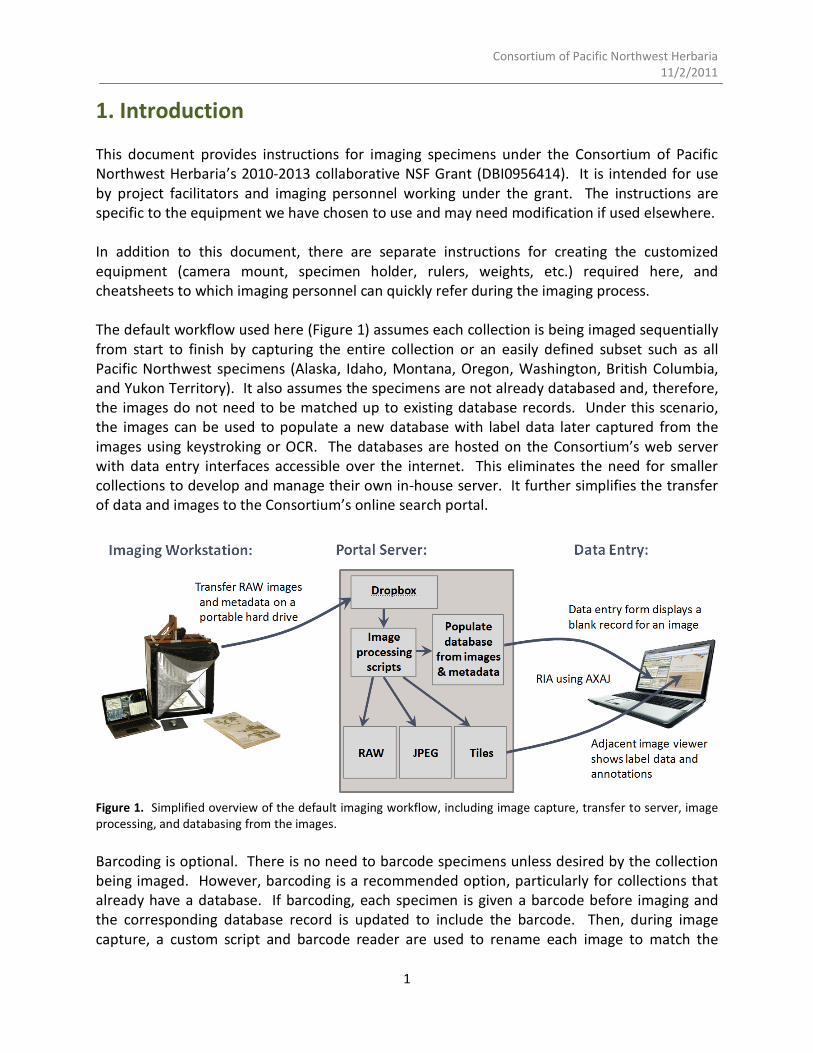
5.2. Check the specimen holder and ruler: Check the black specimen holder to make sure it hasn’t shifted from its proper position. It should be centered from left to right, with the back edge pushed against the white power plug in the back of the box (Figure 9). If the holder appears to be out of alignment, refer to “Custom Imaging Components.pdf” for instructions on aligning the holder. If the holder is frayed or dirty from use, a new one should be made. Each herbarium requires a custom-made ruler with the name and logo of the herbarium or institution printed on it (Figure 10). If there is another ruler attached to the specimen holder, remove it and replace it with a ruler for the herbarium being imaged. Rulers can be obtained from Ben Legler or created using the Photoshop template in “Documents.zip”. The ruler should be placed along the top edge of the specimen holder and centered above the specimen. Use removable double-sided tape to attach it so it can be replaced once imaging is completed. If desired, a small, slender color card can be placed along-side the ruler. This will require shortening the ruler (e.g., by combining the inches and centimeter measures on one side of the logo and eliminating the other side).
Figure 9. Proper position of specimen holder.
Figure 10. Custom ruler with logo, positioned at top of specimen holder and held in place using removable, double-sided tape.
5.3. Attach the camera mount to the top of the lightbox: The mount should be positioned as shown in Figure 11. If correctly positioned, the cork-padded surface to which the camera is attached will be facing to your right when you are looking at the front of the lightbox, and the cork surface will be positioned just to the left of the circular opening on the top of the box. Once positioned, place the aluminum bars over the ends of the mount and use the provided wingnuts to gently tighten down the bars to hold the mount in place. CAUTION: do not over tighten the wingnuts or you may damage the plastic. It doesn’t take much pressure to hold the mount securely in place.

Consortium of Pacific Northwest Herbaria 11/2/2011
10
Figure 11. Custom camera mount attached to top of the Lightbox and oriented at a right angle to the front of the Lightbox. The aluminum bars and wingnuts are used to secure the mount in place. Position the AC adaptor and USB cords out of the way of the lens. Use the alignment guide shown in the inset to position the camera. 5.4. Plug it all in and connect the camera to the mount and laptop: 1) Plug in the lightbox. 2) Plug in the laptop. 3) Plug in the camera’s AC adaptor, and insert the battery adaptor into the camera’s battery
slot. There is a small rubber flap on one side of the battery slot that can be removed to expose a hole for the adaptor’s cord. Do not force it. If things don’t seem to fit, refer to the instruction sheet that came with the AC adaptor.
4) Plug the camera’s USB cord into the port on the left side of the camera body (beneath a large rubber flap), and the other end into a free USB port on the laptop.
5) Use the thumb bolt to attach the camera to the mount on top of the box. There should be a mark on the cork pads indicating the proper position for the camera. However, don’t worry about precisely positioning the camera right now; you’ll fine tune it later. Make sure the cords are out of the way of the lens.
6) Remove the lens cap. 7) Turn on the lightbox (power switch on left side near the back) and let it warm up a minute. 8) Start up the laptop.

Consortium of Pacific Northwest Herbaria 11/2/2011
11
5.5. Configure the camera settings: Most camera settings will be specified using the EOS Utility software. Here are the only steps you need to do on the camera itself. 1) Turn the power switch (located near bottom right corner of LCD) to the line directly above
the “ON” position.
2) Turn the large dial on the top left side of the camera to the “M” (Manual mode).
3) Enter the camera’s Menu, select the 5th menu tab (the icon of a wrench with a single dot), and go down to the “Auto Rotate” entry. Select “Off”.
4) While still in this 5th menu tab, go down to the “Format” entry and format the Compact Flash card to clear out any images from previous imaging sessions.

Consortium of Pacific Northwest Herbaria 11/2/2011
12
5.6. Configure the EOS Utility: The EOS Utility should have opened when the camera was turned on. If not, click the icon on the Windows Desktop. The remote shooting window should be open by default. If not, refer to section 4.4. Click the “Preferences …” button at the bottom of the remote shooting window to bring up the EOS Utility preferences dialog (Figure 7). Set preferences as follows: 1) On the “Destination Folder” tab, set to “C:\PNWHerbaria\Images\NewImages”. 2) On the “File Name” tab, change the drop-down list to “Prefix + Number”. Set the “File
Prefix” to the acronym of the collection being imaged. Set the “Number of Digits” to 6 (regardless of how small the collection is), and the “Start” number to 1.
3) On the “Remote Shooting” tab, check the box for “Save also on the camera’s memory card”. On this same tab, uncheck the box for “Rotate image”.
4) On the “Linked Software” tab (may not be visible until you click the arrow to the right of the tabs), set “Software to link” to None, unless you are renaming images to barcodes or accessions. In that case, select “C:\PNWHerbaria\Scripts\renameimage\renameimage.exe”
5) Click OK to dismiss the preferences dialog and return to the remote shooting window.
Configure camera settings using the remote shooting window: 1) In the upper half of the window is a gray panel of
camera settings. Each of these settings can be adjusted by clicking the setting to highlight it, then using the mouse scroll wheel or the left/right arrow keys on the keyboard. Adjust the settings to the following values:
a. Shutter speed: 1/4 second b. Aperture: F18 c. White balance: Kelvin (the “K” symbol) d. Color temperature: 6500 e. ISO: 100 f. Image quality: RAW (not SRAW1 or SRAW2) g. Storage mode: Computer + Camera
2) Click the Camera icon (about halfway down the window
on the left side). Adjust the WB SHIFT (white balance shift) as follows:
a. Click the “WB Shift” entry to bring up a dialog with a color chart (shown on next page).
Consortium of Pacific Northwest Herbaria 11/2/2011
13
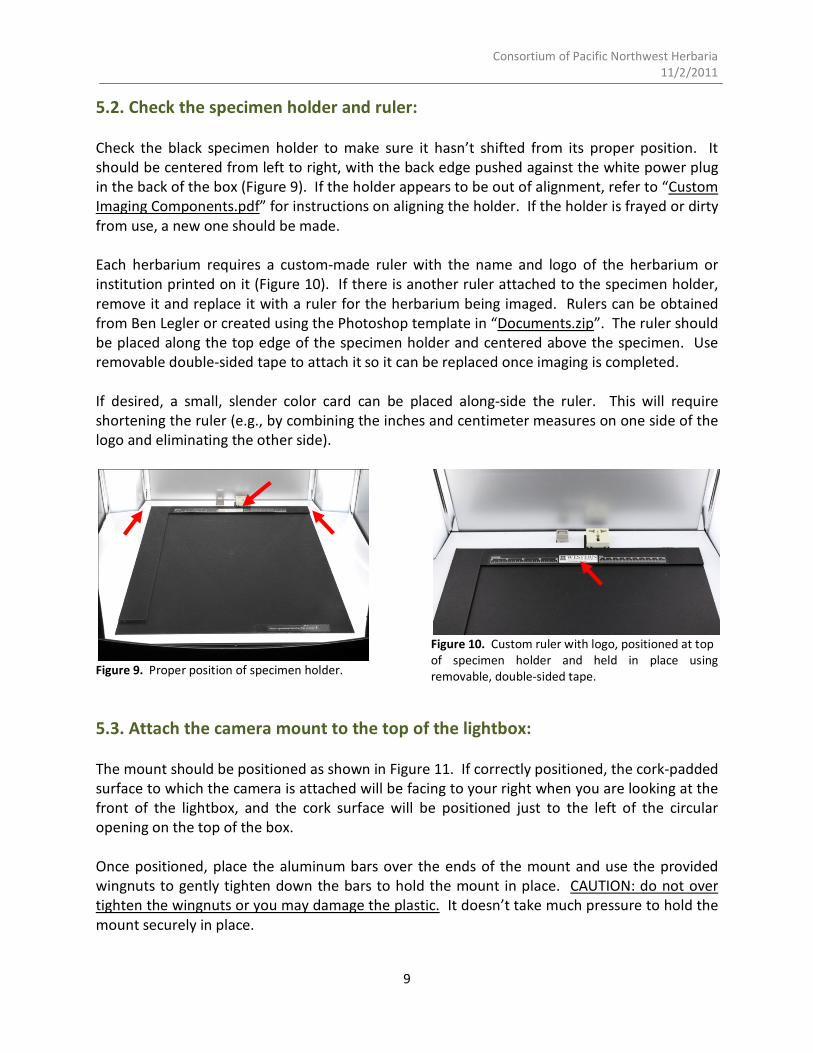
b. Use the mouse to select the position corresponding to (A1, M3), and click the “Return” button. This setting produces images that are closer to neutral because the lightbox lights apparently diverge slightly from their 6500K rating.
3) Click the Set-up menu icon (icon of a cross and a
wrench, to the right of the Camera icon) and enter settings as follows:
a. Owner’s name: enter the herbarium and/or institution name
b. Author: herbarium/institution name c. Copyright: herbarium/institution name d. Date/Time: select the option for “Always match
the computer time”. It is important that the images are stamped with the computer’s date and time, not the camera’s.
e. Live view/Movie func. set.: click this entry and, in the window that appears, select the “Stills only” option and the “Still display” option.
5.7. Configure the external hard drive: 1) Connect the hard drive to the laptop using an available USB port. 2) Open Windows Explorer and browse to the external drive. 3) Make sure the following folders exist on the external drive. If not, create them:
4) Make sure the Images, Metadata, and Backups folders are empty. If there are any existing images or metadata files (.db extension), then these may need to be deleted. In most cases, the external drive will arrive at a collection already empty. However, if more than one collection is imaged back-to-back then the existing images and metadata must not be deleted.

Consortium of Pacific Northwest Herbaria 11/2/2011
14
5.8. Position the camera using Live View: Use Live View to adjust the position of the camera and/or the camera mount to precisely frame the specimen within the view finder. 1) Place a normal-sized specimen in the lightbox and hover the mouse over the shutter-release
button to make the camera focus on the specimen. 2) Open the Live Preview window by clicking the “Live View
shoot…” button near the bottom of the EOS Utility window. 3) A new window will appear, similar to that shown below. This
window shows the specimen as it appears through the camera’s sensor. Don’t worry if the exposure looks incorrect.
4) Check for the following, and reposition the camera and/or mount as needed:
5) Once you are satisfied that the alignment is correct, close the Live View window. If you adjusted the camera mount, remember to re-tighten the wingnuts.
Thin black margins all the way around the specimen, about equal in thickness.
All parts of the specimen are visible, especially the edge of the label.
Margins of specimen are parallel with edge of image frame.
Ruler and logo are completely visible.

Consortium of Pacific Northwest Herbaria 11/2/2011
15
5.9. Take a test image and check image quality: It is a good idea to image a specimen and check that the image quality is adequate. This check helps ensure the image exposure, white balance, lighting, and framing are acceptable.
1) Select a fairly new specimen. It should be mounted on clean, bright white paper and be of average size for your collection, without too much plant material on the sheet.
2) Place the specimen inside the lightbox and capture an image. 3) Open Digital Photo Professional (shortcut on desktop). Once open, navigate to the
folder “C:\PNWHerbaria\Images\NewImages\”. You should see a thumbnail preview of the image just captured.
4) Double-click the image to open it in a preview window. 5) First check the general specimen positioning within the frame and the overall evenness
of lighting. 6) Then position the mouse over a white area on the ruler at the top of the frame (the
white space near the herbarium logo is a good spot). 7) Displayed in the lower left corner of the window are three numbers indicating the RGB
(red, green, blue) value of the pixel where the mouse is being held. This RGB value should be within about 5 units of (215, 215, 210). A slightly lower blue value provides a better looking image than if all values are equal.
8) If the values differ from the above, adjust the camera settings as follows: a. If all RGB values are uniformly lower, then increase F-stop to F16. b. If RGB values are differentially skewed (say, one color is noticeably higher or
lower), then adjust camera color temperature or white balance shift. 9) When done, refer back to section 5.6 and reset the starting image number to 1.
5.10. Prepare the image metadata form: Open the Metadata entry form by clicking the desktop icon (shown at right). This form needs to be cleared of any entries from previous herbaria before beginning imaging at the current herbarium. The form can be cleared by selecting “Admin -> Clear Metadata List” from the menu. However, if there are existing entries, then make sure they have already been sent to WTU for processing before deleting them. If imaging multiple collections back-to-back, then save a copy of the previous herbarium’s metadata using the “File -> Save List to File” menu item. When saving, rename the metadata file to begin with the previous herbarium’s acronym so it can be distinguished later. Save to “C:\PNWHerbaria\Metadata\” on the laptop hard drive, and to “PNWHerbaria\Metadata\” on the external drive.

Consortium of Pacific Northwest Herbaria 11/2/2011
16
6. Daily imaging workflow: preparing for imaging This section describes the steps that imaging personnel should follow to begin each day’s imaging session. The steps described under section 6.3 and 6.4 should not always be necessary, but should still be quickly checked to ensure no changes to the software settings or camera position occurred since the previous day’s imaging session. 6.1. Turn on the imaging equipment: 1) Check that everything is plugged in and connected. The laptop, lightbox, and camera should
be plugged in to a wall outlet. The camera should be connected to the laptop via the USB cord.
2) Turn on the lightbox first. This will allow the bulbs to warm up and reach a stable color temperature before imaging. Also check the black specimen holder inside the lightbox and make sure it is clean of excessive dust or plant fragments.
3) Start up the laptop. 4) Then, once the laptop is fully up, turn on the camera. Make sure you turn
the camera switch past the ON position to the angled-line below the scroll wheel, as shown at right.
5) Remove the camera’s lens cap. 6.2. Format the compact Flash card: You may need a stool or chair to stand on for this step. Press the Menu button on the back of the camera (left side of the LCD), and navigate to the first Tools icon (wrench with a single dot above it). Use the Format entry to format the card, as depicted below. This will clear out the previous day’s images to ensure sufficient space is available for today’s images.

Consortium of Pacific Northwest Herbaria 11/2/2011
17
6.3. Open the EOS Utility and check settings: The EOS Utility should have automatically opened when you turned on the camera. If it didn’t, start it now by clicking the desktop icon (shown at right). If you see the window shown in Figure 5, click the “Camera settings/Remote shooting” option. Quickly check the settings displayed in the EOS Utility window to ensure they are still set properly. If not, adjust the settings until they match the values below and on the next page. If necessary, refer to section 5.6 on page 9.
1) Images should be sent to the “NewImages” folder. 2) In the upper half of the window is a gray panel of
camera settings that should be set as follows: a. Manual mode b. Shutter speed: 1/4 second c. Aperture: F18 d. White Balance: K (Color Temperature) e. Color Temperature: set to 6500 f. ISO: 100 g. Image quality: RAW (Not SRAW1 or SRAW2) h. Storage mode: camera + computer
3) Click the Camera icon (about halfway down the window on the left side). Make sure the WB SHIFT is set to A1,M3
4) Click the Set-up menu icon (icon of a cross and a wrench, to the right of the Camera icon) and quickly check the following settings:
a. Owner’s name: herbarium/institution name. b. Author: herbarium/institution name. c. Copyright: herbarium/institution name. d. Click the “Date/Time” entry to bring up a
dialog and make sure the option for “Always match the computer time” is selected. This stamps images with the computer date and time, not the camera data and time.
e. Live view/Movie func. set.: select the “Stills only” option and the “Still display” option.

Consortium of Pacific Northwest Herbaria 11/2/2011
17
6.4. Use Live View to double-check camera alignment: Use Live View to double-check that the specimen is still properly framed within the camera view finder. 6) Place a normal-sized specimen in the lightbox and hover the mouse over the shutter-release
button to make the camera focus on the specimen. 7) Open the Live Preview window by clicking the “Live View
shoot…” button near the bottom of the EOS Utility window. 8) A new window will appear, similar to that shown below. This
window shows the specimen as it appears through the camera’s sensor. Don’t worry if the exposure looks incorrect.
9) Check for the following, and reposition the camera and/or mount as needed:
10) Once you are satisfied that the alignment is correct, close the Live View window. If you adjusted the camera mount, remember to re-tighten the wingnuts.
Thin black margins all the way around the specimen, about equal in thickness.
All parts of the specimen are visible, especially the edge of the label.
Margins of specimen are parallel with edge of image frame.
Ruler and logo are completely visible.

Consortium of Pacific Northwest Herbaria 11/2/2011
18
11) 6.5. Open the Quick Preview window:
1) Click the “Other Functions…” button near the bottom of the EOS Utility window (shown at right).
2) A drop-down menu of options will appear. click the “Quick Preview Window” option to open the Quick Preview window (Figure 12). Keep the Quick Preview window open while capturing specimen images. It will allow you to visually check the images as they are captured.
Figure 12. Quick Preview window. Use this to quickly check each specimen image during image capture.

Consortium of Pacific Northwest Herbaria 11/2/2011
19
6.6. Open the metadata entry form and check settings: Open the Metadata entry form by clicking the desktop icon (shown at right). Check the values in the fields for “Your Name” and Collection Acronym” (Figure 13, upper left corner of window). If necessary, overwrite these values with your own name (as the person doing the imaging), and the acronym of the collection being imaged. If you are not sure what acronym to use, contact your imaging coordinator. The metadata entry form allows for the capture of basic metadata for each image, including who is doing the imaging, the herbarium acronym, and the folder where the specimen is stored. Each entry in this form represents a single herbarium folder. The images for each specimen in that folder will be associated with the metadata entry via the timestamps embedded in the image file and recorded in the metadata entry. For this reason, it is important that the metadata entry be captured right BEFORE any specimens are imaged from a folder. Otherwise, the specimen images will end up associated with the previous folder.
Figure 13. Metadata entry form.

Consortium of Pacific Northwest Herbaria 11/2/2011
20
7. Daily imaging workflow: metadata and image capture Imaging personnel should follow these steps during each imaging session to capture images and their metadata. The general workflow is to pull a batch of folders out of a cabinet and, for each folder, first create a folder entry using the metadata form then, second, image each specimen in the folder. The folders are then returned to the cabinet. It is important that you capture the metadata for a folder BEFORE imaging its specimens and AFTER imaging the previous folder’s specimens. Do not enter metadata for multiple folders at once. 7.1. Metadata capture for each folder (do this before imaging its specimens):
1) Click the “Add Folder” button on the metadata entry form (Figure 13). A dialog box will appear (Figure 14) where you can select the species and family for the folder.
2) Click in the “Name Code” field to place the curser there. Then type in a code that identifies the name on the folder. This code combines the first three letters each of the genus, the species, and optionally the subspecies or variety (e.g, “pinconlat” for Pinus contorta var. latifolia or “achmil” for Achillea millefolium). You can enter partial entries (“pin” will match all Pinus species). If the folder is for an entire family or genus, then enter the first three letters of the family or genus (“equ” will match Equisetaceae). Manually type in alphabetical ranges if present (e.g., “Penstemon A-F”).
3) After entering the name code, tab to the “Folder Name” field and either use the up/down arrows on the keyboard or the mouse to select the folder name from the list. If the name does not appear in the list then manually type it in. You can also modify a selected name if needed.
4) Once you’ve selected a folder name, the family name should auto-fill. If it does not, or if you had to enter the folder name manually, then manually type in the family name.
5) Use the Folder Code field to enter an optional code to more precisely identify the folder (for example, by geography if the collection is organized in such a manner).
6) Click the “Save” button to save this entry and return to the main metadata entry window. You should see a new row appear at the bottom of the list of folder names.
Figure 14. Folder name dialog box showing the code “sentri” entered and the drop- down box displaying names that match “sentri”.

Consortium of Pacific Northwest Herbaria 11/2/2011
21
7.2. Image capture for each folder (after capturing folder’s metadata): Be sure to handle the specimens with care, using the following guidelines:
a) Most sheets should be held with two hands. b) Do not bend the sheet. c) Watch for loose pieces of material that may fall off the specimen. d) Do not flip any specimens upside down. e) Do not slide one specimen across another. Instead pick them up and place them down.
Repeat the steps below for each specimen sheet within the folder. When you are finished with the folder, remember to create a metadata entry for the next folder before imaging that folder’s specimens. If you experience any problems, refer to section 9 (page 23).
1) Carefully insert the specimen into the lightbox. The specimen goes in with the top of the sheet oriented to the back of the box and the label towards you (Figure 16). Push the sheet in until it tightly abuts the raised edges of the black specimen holder. Make sure the specimen is not crooked and is not pushed over the top of the raised edges.
2) If any part of the specimen sheet sticks up more than about ¼ inch, refer to section 9.1. 3) If there are any packets on the sheet that contain material, refer to section 9.3. 4) Close the fabric curtain on the front of the lightbox. 5) Use the mouse to click the shutter release button near the top right corner of the EOS
Utility window (indicated by the red arrow in Figure 15). 6) The camera will focus (making a slight whirring sound), then take the picture. If it fails
to focus, see section 9.2. It will take a moment for the image to transfer to the computer, after which the image will appear in the Quick Preview window. Use this to quickly check that the image looks OK; if it does not, delete and reimage (section 9.7).
7) If renaming images to the barcode or accession, a popup window will appear. Use a barcode reader to scan the barcode into the field on this window, or manually type in the herbarium acronym+accession, then click the “Rename” button.
8) Remove the specimen from the lightbox and place it into a pile of completed specimens. 9) Return to step 1 and insert the next specimen into the lightbox.
Figure 15. Shutter release button on the EOS Utility window.
Figure 16. Proper placement of the specimen sheet.
Label in this corner.
Edges of sheet tight against raised edges of holder.

Consortium of Pacific Northwest Herbaria 11/2/2011
22
8. Daily imaging workflow: finishing image capture and shutting down equipment
8.1. Back up the metadata and images: The following steps should be performed at the end of an imaging session, or at least at the end of the day. These steps are designed to keep the images well organized and ensure that there are always at least two copies of the images and metadata in two separate locations to minimize the chances of losing images or data. Please follow these steps exactly or problems may arise!
1) Connect the external hard drive to a free USB port on the laptop. 2) Create a backup copy of the metadata list. In the metadata entry form (Figure 13),
select the “File -> Save List to File” menu command. Save this file to the external hard drive (not the laptop) in the folder “PNWHerbaria\Backups\” using the default name given. At this point, DO NOT clear the metadata list.
3) Using Windows Explorer, copy all images in "C:\PNWHerbaria\Images\NewImages\" to the folder “PNWHerbaria\Images\" on the external drive.
4) While still in Windows Explorer, move all images in this same folder "C:\PNWHerbaria\Images\NewImages\" to "C:\PNWHerbaria\Images\ArchivedImages\" for storage until the images are sent to WTU. This process makes it easier to track which images have already been backed up to the external drive and which have not, and which have been sent to WTU.
8.2. Shut down the imaging workstation: The following steps can be skipped if another person will continue imaging immediately after you.
1) Close the metadata entry form. There is no need to save anything. 2) Close the EOS Utility window. 3) Turn off the camera and place the lens cap back on the lens. 4) Turn off the lights on the lightbox, and make sure the fabric door is covering the opening
of the lightbox. Make sure there isn’t a specimen left in the lightbox. If there are plant fragments or excessive dust on the black specimen holder, then clean these off.
5) Shut down the computer. 6) Optionally, store the computer and hard drive in a location where they are out of sight
or more secure against potential theft. The camera should be left on the lightbox since it is time-consuming to reposition it if removed.

Consortium of Pacific Northwest Herbaria 11/2/2011
23
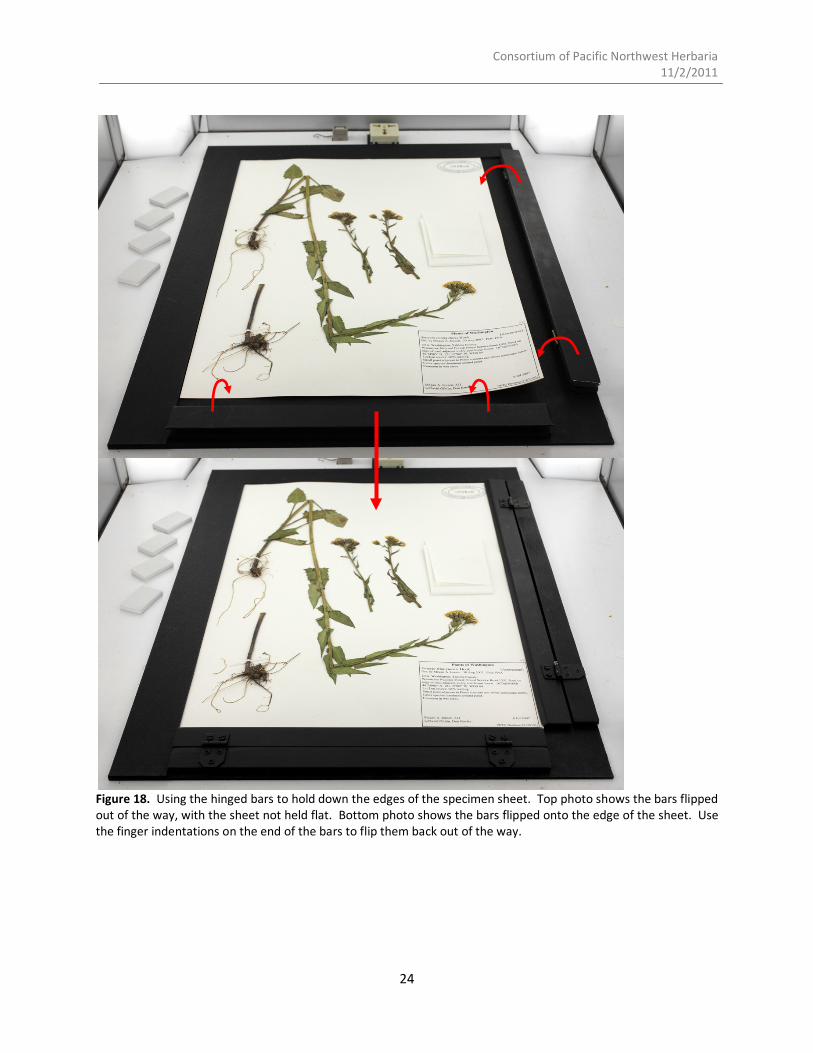
9. Daily imaging workflow: dealing with problems during image capture Most specimens can be imaged quickly by simply placing them in the lightbox, closing the curtain, and clicking the shutter release. However, occasional specimens will present problems that must be dealt with to obtain a good image. Also, you may inadvertently make errors or perform certain steps out of order, and these will need to be corrected. If you encounter a problem not covered here, please contact your imaging coordinator or the project coordinator. 9.1. Specimen sheet does not lie flat (due to curves or bends in the sheet): Use either the short black weights (Figure 17) or the hinged bars (figure 18) as needed to hold down the edges of the sheet. Try to keep the weights as close to the edge of the sheet as possible to minimize their visibility in the final image. Don’t bother trying to get the specimen perfectly flat. As long as no parts are sticking up more than about ¼ inch there should be sufficient depth of field to capture a sharp image. The corner of the sheet at the specimen label is often the only part that needs to be weighted down. Small white weights can be placed directly on the sheet to hold down the top and left edges.
Figure 17. Using the black weights to hold down curved edges of a specimen sheet. Shown here is a curved label corner held down by barely overlapping the weight with the corner of the sheet, and the side of a sheet held down with a longer black weight.
Black weight to hold down side of sheet
Black weight to hold down label corner
Consortium of Pacific Northwest Herbaria 11/2/2011
24
Figure 18. Using the hinged bars to hold down the edges of the specimen sheet. Top photo shows the bars flipped out of the way, with the sheet not held flat. Bottom photo shows the bars flipped onto the edge of the sheet. Use the finger indentations on the end of the bars to flip them back out of the way.

Consortium of Pacific Northwest Herbaria 11/2/2011
25
9.2. The camera won’t focus: Specimen sheets that contain large blank areas near their center may cause problems for the camera’s autofocus. If the camera will not focus when you move the mouse over the shutter release button or click the button, then try this trick (it might take a little practice!):
1) Move the mouse completely off the shutter release button and wait until the camera stops trying to focus.
2) Place your hand under the fabric door and into the light box and hold it gently on the specimen sheet near the middle of the sheet.
3) With your hand in place, move the mouse back over the shutter release button and hold the mouse in position without moving it. The camera should then focus on your hand.
4) Then, without moving the mouse even a tiny bit, remove your hand from the lightbox (don’t disturb the specimen sheet), and click the mouse button to trigger the camera shutter. If the camera tries focusing again, it probably means you moved the mouse slightly after removing your hand from the lightbox or while clicking the button.
9.3. Specimen sheet contains a packet with plant material inside: If there is a packet on the sheet, open it up to see if there are any plant fragments inside. If so, it is desirable to include this material in the specimen image. There a three possible ways to accommodate material in packets, depending on the packet’s position and its contents:
1) Take the image with the packet flaps held open and the plant material left inside the packet (Figure 18). Use the small white weights to hold down the packet flaps. This works if there is nothing around the packet so that the opened flaps do not cover any part of the specimen, label, annotations, or other text.
Figure 19. Taking a single image of the specimen with the packet opened to reveal contents. Use the small white weights to hold the packet flaps open.
Weights

Consortium of Pacific Northwest Herbaria 11/2/2011
26
2) Carefully remove the contents of the packet, then re-close the packet and set the contents on top of the closed packet (Figure 19). Do not set the contents elsewhere on the sheet. Take the image, then remember to return the contents to the packet. This won’t work for packets containing many small objects such as seeds that are cumbersome to remove.
3) Take two images of the same specimen (Figure 20). Take the first image with the packet closed. Then open the packet, using the white weights to hold the flaps out, and take a second image. Now, open Windows Explorer and find the two images. Rename the second image so it is identical to the first (same acronym and same number), but with a suffix appended to identify the image as a second copy of the same specimen. The suffix must consist of an underscore followed by a lower-case letter beginning with “a” for the duplicate image (e.g., “WTU_013937.CR2” and “WTU_013937_a.CR2”). If a third image is needed, use “_b” as its suffix. The first image should not have any suffix. WTU_013937.CR2 WTU_013937_a.CR2
Figure 21. Taking two images of the same specimen. In the first, the packet is left closed. In the second, the packet is opened. It is OK if the packet flaps cover other parts of the specimen.
Figure 20. Contents of packet placed on top of closed packet.
Flower heads removed and placed on top of closed packet
Consortium of Pacific Northwest Herbaria 11/2/2011
27
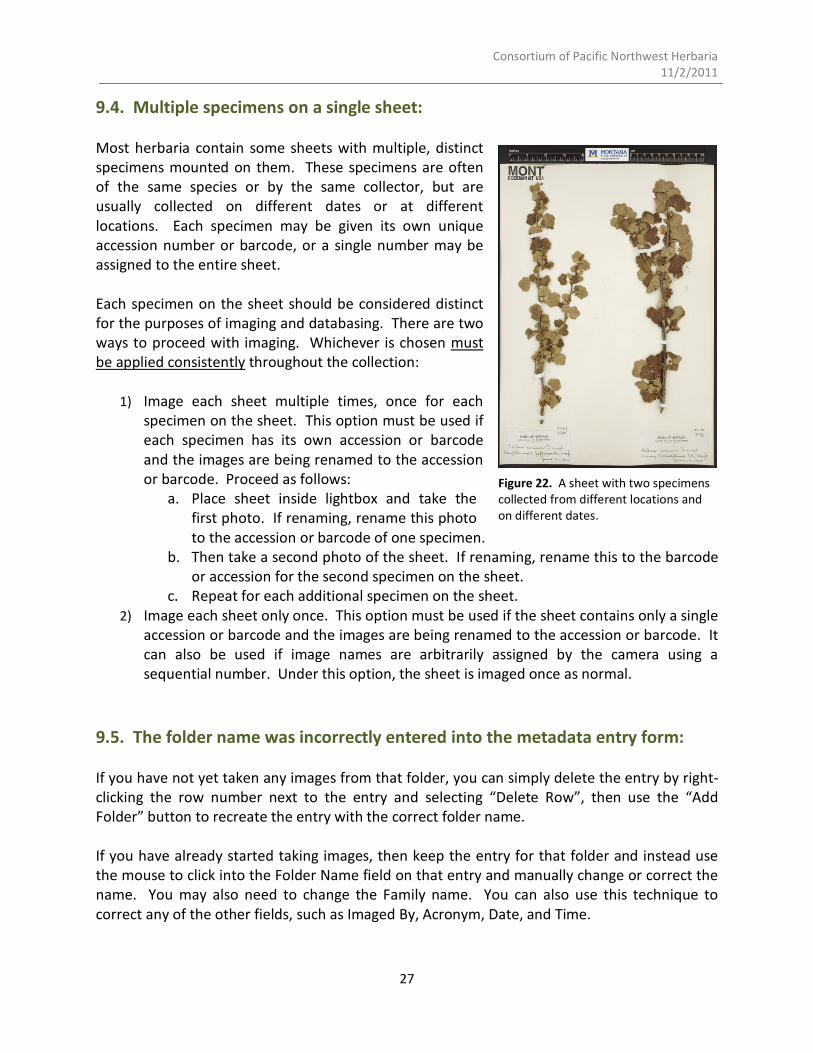
9.4. Multiple specimens on a single sheet: Most herbaria contain some sheets with multiple, distinct specimens mounted on them. These specimens are often of the same species or by the same collector, but are usually collected on different dates or at different locations. Each specimen may be given its own unique accession number or barcode, or a single number may be assigned to the entire sheet. Each specimen on the sheet should be considered distinct for the purposes of imaging and databasing. There are two ways to proceed with imaging. Whichever is chosen must be applied consistently throughout the collection:
1) Image each sheet multiple times, once for each specimen on the sheet. This option must be used if each specimen has its own accession or barcode and the images are being renamed to the accession or barcode. Proceed as follows:
a. Place sheet inside lightbox and take the first photo. If renaming, rename this photo to the accession or barcode of one specimen.
b. Then take a second photo of the sheet. If renaming, rename this to the barcode or accession for the second specimen on the sheet.
c. Repeat for each additional specimen on the sheet. 2) Image each sheet only once. This option must be used if the sheet contains only a single
accession or barcode and the images are being renamed to the accession or barcode. It can also be used if image names are arbitrarily assigned by the camera using a sequential number. Under this option, the sheet is imaged once as normal.
9.5. The folder name was incorrectly entered into the metadata entry form: If you have not yet taken any images from that folder, you can simply delete the entry by right-clicking the row number next to the entry and selecting “Delete Row”, then use the “Add Folder” button to recreate the entry with the correct folder name. If you have already started taking images, then keep the entry for that folder and instead use the mouse to click into the Folder Name field on that entry and manually change or correct the name. You may also need to change the Family name. You can also use this technique to correct any of the other fields, such as Imaged By, Acronym, Date, and Time.
Figure 22. A sheet with two specimens collected from different locations and on different dates.

Consortium of Pacific Northwest Herbaria 11/2/2011
28
9.6. The folder name was not entered before imaging specimens in that folder: The easiest way to fix this is by creating an entry for that folder, and then manually adjusting the Time value in that entry to reset it to a time just before the first image from that folder was taken. The time must also be set to a value later than the time for the last image captured from the previous folder.
1) Open Digital Photo Professional (there should be an icon on the desktop), and use it to browse to the folder containing the images (“C:\PNWHerbaria\Images\NewImages\”).
2) Use the thumbnail previews in this program to identify the first image from the folder. 3) Right-click on this image and select “Info” from the popup menu. This will bring up a
window with metadata extracted from the image file. 4) Look for the “Shooting Date/Time” value and make a note of the time. Convert this
time to 24-hour format (e.g., 3:53:09 PM = 15:53:09) and subtract a few seconds so the time is slightly earlier than when the image was taken (e.g., 15:53:05 in this example).
5) In the Metadata entry form, create a new entry for this folder, and save it. Then, find the entry in the Folder Names list, and click into the Time field. Enter the adjusted time you derived from the image info window, in the 24-hour format (HH:MM:SS), and click out of the field to make sure it saves your change.
9.7. How to re-shoot or delete an image: Reasons for which an image may need to be retaken or deleted include:
1) The specimen sheet was not properly aligned (crooked, or part cut off from view). 2) Part of the sheet is curved and sticks up too high to be in focus or to look good. 3) After taking the image you noticed a packet on the sheet that needs to be opened. 4) The specimen is not part of the set being imaged.
Follow these steps to delete the incorrect image and possibly re-shoot it:
1) Open Windows Explorer and browse to “C:\PNWHerbaria\Images\NewImages\”. 2) Find the image that needs to be deleted and delete it (probably the very last one; if you
can’t tell, then open Digital Photo Professional and use the thumbnail views to identify and delete the image).
3) Put the specimen back into the lightbox and take a new image according to the normal procedures. If image names are auto-assigned by the camera, there is no need to rename the new image to match the old image’s number, and there is no reason to be concerned about having a gap in the image numbering sequence.

Consortium of Pacific Northwest Herbaria 11/2/2011
29
9.8. The Compact Flash card is full: A 16 GB CF card will hold about 550 CR2 images, while a 32 GB card will hold about 1100 images. At 150 images per hour, the 16 GB card will fill up in less than 4 hours, and the 32 GB in about 7 hours. The CF card is used mostly as a redundant backup for images also sent to the computer. When the card fills up, do the following:
1) Refer to section 8.1 on how to copy images from the laptop to the external hard drive. This ensures there are still two copies of the images even after the CF card is cleared.
2) Then, reformat the card to clear out the images. Refer to the instructions in section 6.1. 3) Once the card is cleared, continue with imaging as normal. If you are in the middle of a
folder, there is no need to create a new folder metadata entry.

Consortium of Pacific Northwest Herbaria 11/2/2011
30
10. Sending images and metadata to WTU Images should be sent to WTU for processing and uploading to the web server when imaging is completed at an herbarium, or the laptop’s hard drive is getting full (a 500 GB drive can hold about 16,000 CR2 images). Images are transferred by mailing the external drive to Ben Legler at WTU, as follows. Please follow these instructions exactly!
1) Make sure the last day’s images are copied over to the external drive according to the instructions in section 8.1.
2) On the laptop, move all images in “C:\PNWHerbaria\Images\ArchivedImages\” to “C:\PNWHerbaria\Images\SentImages\” so you know which have been sent to WTU.
3) Open the Metadata entry form and use the “File -> Save List to File” menu command to save the metadata to the external drive. This time, place the file into the folder “PNWHerbaria\Metadata\”. This metadata file should contain entries for all images on the hard drive (but it is OK if the metadata is divided among several separate files).
4) Use the “File -> Save List to File” to also save copies of the metadata file(s) to the laptop in the folder “C:\PNWHerbaria\Metadata\” to serve as a backup in case the hard drive is lost or damaged during transit (both images and metadata should remain on the laptop while the hard drive is in transit).
5) Now, clear the metadata list on the laptop by selecting the “Admin -> Clear List” menu command. This will ensure the same metadata is not sent again to WTU.
6) Package the hard drive into a small padded box, such as the ones used to ship CDs or video cassettes at the post office. Use extra padding (crumpled paper, foam, bubble wrap, etc.) to make sure the hard drive does not jostle around inside the box. You don’t need to include the USB cable with the hard drive; we have one at WTU.
7) Mail the hard drive via USPS (not UPS or FedEx) to the following address: Ben Legler Herbarium University of Washington P.O. Box 355325 Seattle, WA 98195
While the drive is in transit, continue shooting using the second drive. Once the drive arrives at WTU the images will be transferred to the PNW Herbaria server, then the drive will be cleared of all images and metadata and mailed back. Don’t delete the images or metadata backup on the laptop just yet. After you receive confirmation that the images have been transferred to the server at WTU, then you can optionally delete them from the laptop to free up space if needed.

Consortium of Pacific Northwest Herbaria 11/2/2011
31
11. Disassembling the workstation for transport The following steps will help ensure all equipment is accounted for and packaged safely for transport between herbaria. Use the provided plastic storage bin (Figures 21, 22) to hold all gear except the lightbox and camera mount.
1) Unplug the camera, lighbox, and laptop. Remove the battery adaptor from the camera and insert the regular battery into the camera. Place all the power cords and the camera’s USB cord into the large cubby in the plastic tub.
2) Place the camera into its cubby in the plastic tub. Make sure the lens cap is on. 3) Remove any loose objects from within the lightbox (such as weights), and place these
into the cubbies in the plastic tub. The black specimen holder, ruler, and hinged weights should remain inside the lightbox.
4) Remove the camera mount from the top of the lightbox, and set it aside. Place the wing nuts and thumb knob into the small cubby, and the aluminum bars into the large cubby. There should be four white plastic caps that can be placed over the exposed bolts on top of the lightbox to reduce the chance someone will get hurt by them.
5) Place the external hard drives into their small cubby in the corner of the plastic tub. 6) Insert the mouse’s USB receiver into the bottom of the mouse, and place in a cubby. 7) Place the laptop into the provided foam tray, and place this into the plastic tub on top of
the other cubbies. Cover the laptop with the large, flat foam insert. 8) Place all documentation and papers into the top of the tub, and close the tub.
Figure 23. Lower set of cubbies for placement of camera and small items.
Figure 24. Laptop in its tray, set on top of the lower set of cubbies.
Hard drives Camera
Small items (wing-nuts, bolt caps, thumb knob, etc.)
Power cords, USB cords, aluminum bars, mouse, weights
Laptop

Consortium of Pacific Northwest Herbaria 11/2/2011
32
Make sure the following equipment is accounted for before leaving the herbarium:
1) Lightbox 2) Camera mount 3) Aluminum bars, wingnuts, plastic caps, and thumb knob for camera mount 4) Specimen holder, rulers, and hinged weights. 5) Paper weights (four 6” black, one 3” black, and five 1-½” white) 6) Camera 7) Camera battery and lens cap (both should be in/on the camera) 8) Compact flash card (should be inside the camera) 9) Laptop and mouse (and mouse’s USB receiver and spare AA battery) 10) Power cords for lightbox and laptop, AC adaptor for camera, and USB cord for camera 11) User manuals (imaging documentation, cheatsheets, camera manual) 12) External hard drives with their USB cords 13) Plastic tub and its foam inserts
When finished, you should have only three items to transport: lightbox, camera mount, and plastic tub.