SMEPAYROLL V 9.0 User Guide V 9.0 User Guide.pdf · user guide – a&b payroll version 9.0 - 3 -...
139
USER GUIDE – A&B PAYROLL VERSION 9.0 - 1 - USER GUIDE A&B PAYROLL V 9.0 Advanced and Best Technologies Pte Ltd http://www.smepayroll.com Support: [email protected] © All Rights Reserved. This SOFTWARE PRODUCT is protected by copyright laws and international copyright treaties, as well as other intellectual property laws and treaties. This SOFTWARE PRODUCT is licensed, not sold. © All Rights Reserved. SMEPAYROLL and their respective logos are copyright of Advanced and Best Technologies Pte Ltd in Singapore. All other trademarks and logos belong to their respective owners.
Transcript of SMEPAYROLL V 9.0 User Guide V 9.0 User Guide.pdf · user guide – a&b payroll version 9.0 - 3 -...

USER GUIDE – A&B PAYROLL VERSION 9.0
- 1 -
USER GUIDE A&B PAYROLL V 9.0
Advanced and Best Technologies Pte Ltd http://www.smepayroll.com Support: [email protected]
© All Rights Reserved.
This SOFTWARE PRODUCT is protected by copyright laws and international copyright treaties, as well as other intellectual property laws and treaties. This SOFTWARE PRODUCT is licensed, not sold. © All Rights Reserved. SMEPAYROLL and their respective logos are copyright of Advanced and Best Technologies Pte Ltd in Singapore. All other trademarks and logos belong to their respective owners.
USER GUIDE – A&B PAYROLL VERSION 9.0
- 2 -
End User License Agreement
1. License
In this license agreement ("License Agreement"), you, the purchaser of the license rights granted by this Agreement,
are referred to as "Licensee" or "You." In accordance with the terms and conditions of this License Agreement,
Advanced & Best Technologies Pte Ltd. ("Licensor") grants Licensee the non-exclusive license to use the
accompanying software ("Software") and documentation ("Documentation"). In this License Agreement, the Software
and Documentation and any copies or modifications are referred to as the "Licensed Product."
All rights to and in the Licensed Product, including, but not limited to, copyrights, trademarks, and trade secret rights,
belong to Licensor and Licensor holds title to each copy of the Software. Licensee shall not transfer or distribute the
Licensed Product to others, and this Agreement shall automatically terminate in the event of such a transfer or
distribution. Licensee shall not copy or modify the Licensed Product, except that Licensee may copy the Software for
the sole purpose of backup as long as all copyright and other notices are reproduced and included on the backup
copy.
2. Term
This License Agreement is effective until terminated. Licensee may terminate this License Agreement by returning the
Licensed Product to Licensor. Licensor may terminate this License Agreement if Licensee breaches any of the terms
and conditions. Upon termination of this License Agreement for any reason, Licensee shall return the Licensed
Product to Licensor. All provisions of this Agreement relating to disclaimers of warranties, limitation of liability,
remedies, or damages, and Licensor's proprietary rights shall survive termination.
3. Object Code
The Software is delivered in object code only. Licensee shall not reverse compile or otherwise reverse engineer the
Software. Licensee shall not decompile the code for the purposes of developing a competing product.
4. Limited Warranty
Licensor does not warrant that the functions contained in the Licensed Product will meet Licensee's requirements or
that the operation of the Software will be uninterrupted or error-free. Licensor does warrant that the media on which
the Software is furnished will be free from defects in materials and workmanship under normal use for a period of
thirty (30) days from the date of delivery ("Warranty Period"). Any other software and any hardware furnished with
or accompanying the Software is not warranted by Licensor. Licensee's exclusive remedy under this limited warranty
is the replacement of any defective physical media on which the Software is furnished, as provided below. To receive
a replacement for defective media under this limited warranty, return the defective media to Supplier during the
Warranty Period, with proof of payment.
USER GUIDE – A&B PAYROLL VERSION 9.0
- 3 -
EXCEPT AS PROVIDED ABOVE, THE LICENSED PRODUCT IS PROVIDED "AS IS" WITHOUT WARRANTY OF ANY KIND,
EITHER EXPRESSED OR IMPLIED, INCLUDING, BUT NOT LIMITED TO, THE IMPLIED WARRANTIES OF
MERCHANTABILITY AND FITNESS FOR A PARTICULAR PURPOSE, AND THE ENTIRE RISK AS TO THE QUALITY AND
PERFORMANCE OF THE LICENSED PRODUCT IS WITH LICENSEE.
5. Limitation Of Liability
LICENSOR'S SOLE OBLIGATION OR LIABILITY UNDER THIS AGREEMENT IS THE REPLACEMENT OF DEFECTIVE
MEDIA ACCORDING TO THE LIMITED WARRANTY ABOVE. IN NO EVENT WILL LICENSOR BE LIABLE FOR ANY
CONSEQUENTIAL, INCIDENTAL OR INDIRECT DAMAGES, INCLUDING, WITHOUT LIMITATION, ANY LOSS OF DATA,
OR LOSS OF PROFITS OR LOST SAVINGS, ARISING OUT OF USE OF OR INABILITY TO USE THE SOFTWARE OR
DOCUMENTATION (OR ANY HARDWARE FURNISHED WITH THE SOFTWARE), EVEN IF LICENSOR HAS BEEN
ADVISED OF THE POSSIBILITY OF SUCH DAMAGES, OR FOR ANY CLAIM BY ANY THIRD PARTY. IN NO EVENT
SHALL LICENSOR BE LIABLE FOR ANY DAMAGES.
6. General
Any attempt to sublicense, assign or transfer any of the rights, duties or obligations hereunder is void, unless
Licensee has been given "Reseller" status by Licensor. This Agreement shall be governed by and interpreted under
the laws of the Singapore.
7. Payment
Licensee shall pay the Total Fee in accordance with the terms of payment set forth by Licensor. Licensee shall pay all
invoices rendered by Licensor within Seven (7) calendar days after the invoice date, or within a time frame agreed
upon by Licensor. If Licensee fails to pay any amount due within Seven (7) days from the invoice date, Licensee shall
be responsible to pay to Licensor late charges equal to the lesser of 1.5% per month or the highest interest rate
allowable by applicable law, together with all expenses and collection costs, including reasonable attorneys' fees,
incurred by Licensor in enforcing the Agreement. Licensee shall reimburse Licensor for any out-of-pocket expenses
incurred in connection with duties performed by Licensor hereunder. Upon request, Licensor shall provide Licensee
with reasonable documentation evidencing the out-of-pocket expenses incurred by Licensor
USER GUIDE – A&B PAYROLL VERSION 9.0
- 4 -
Minimum System Requirements
Web Server
• .Net Framework 2.0 or above {Included in the installation disk}
• Windows XP Professional* / Windows server 2003 or above
• IIS 5.0 or 6.0 or above
• 512 megs RAM
• Hard drive Space: 100 megs
• Database: SQL EXPRESS 2005 {Included in the installation disk}
*Note: Windows XP Home \ Vista home or Windows 7 Home editions do not include IIS, therefore is not
supported.
Client PC
• IE 6.0+
USER GUIDE – A&B PAYROLL VERSION 9.0
- 5 -
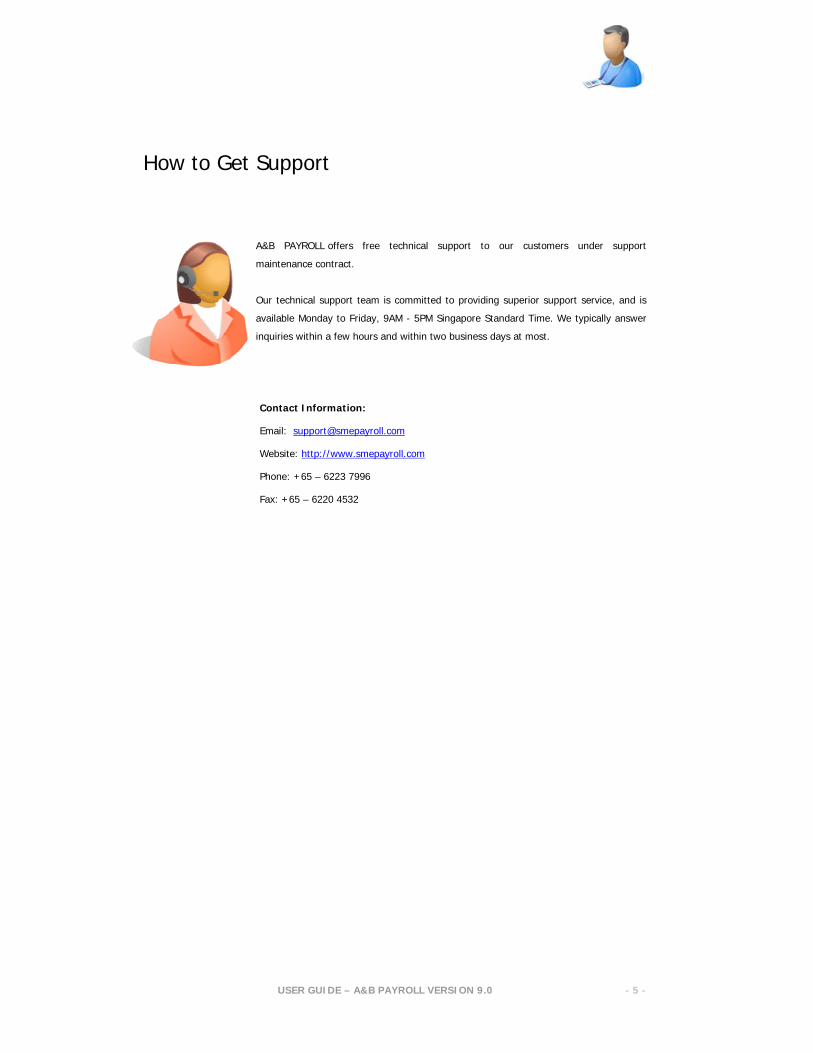
How to Get Support
A&B PAYROLL offers free technical support to our customers under support
maintenance contract.
Our technical support team is committed to providing superior support service, and is
available Monday to Friday, 9AM - 5PM Singapore Standard Time. We typically answer
inquiries within a few hours and within two business days at most.
Contact Information:
Email: [email protected]
Website: http://www.smepayroll.com
Phone: +65 – 6223 7996
Fax: +65 – 6220 4532

USER GUIDE – A&B PAYROLL VERSION 9.0
- 6 -
SMEPAYROLL MODULES
Admin Management Module:
Admin Management Module - manages system preferences Company setup,
holiday’s management, Users & User rights as well as system wide lookups.
--------------------------------------------------------------------
Employee Management Module:
Employee Management Module covers the entire employee information as well
as overtime rate.
--------------------------------------------------------------------
Claims Management Module:
Claim Management Module covers a complete flow of claim processing in a
company. Starting from claim application to approval.
--------------------------------------------------------------------
Leave Management Module:
Leave Management Module covers a complete flow of leave processing in a
company. Starting from leave application to approval.
--------------------------------------------------------------------
USER GUIDE – A&B PAYROLL VERSION 9.0
- 7 -
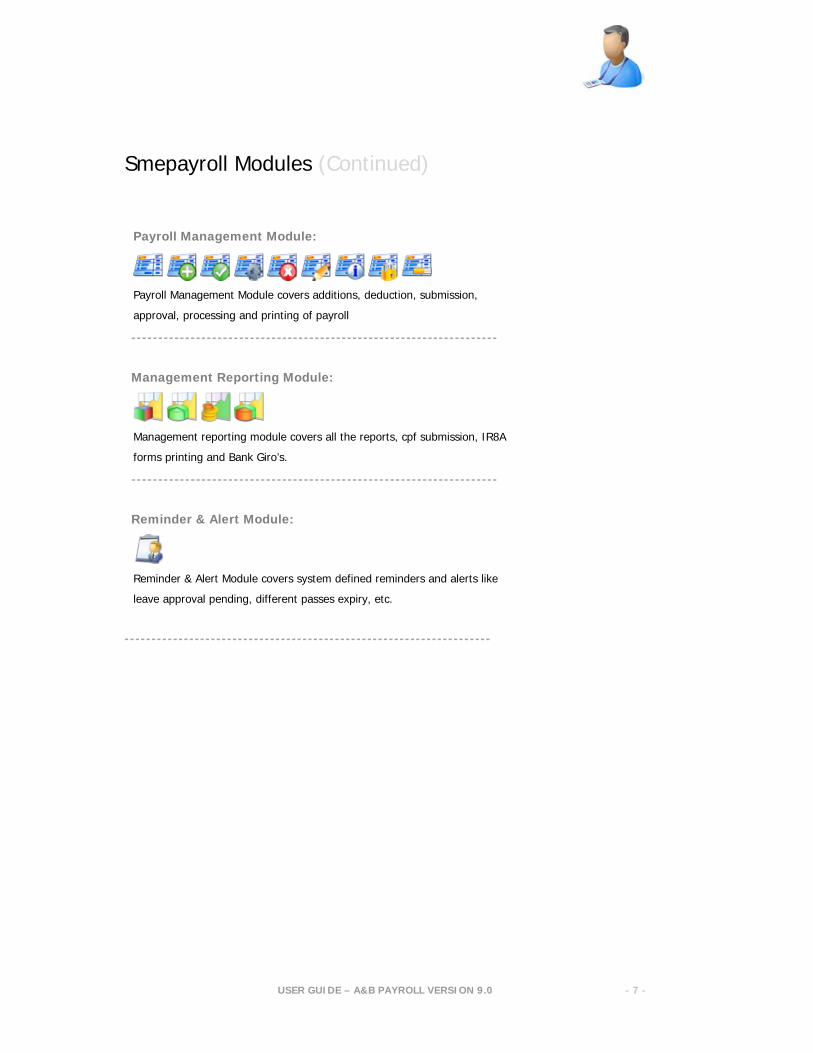
Smepayroll Modules (Continued)
Payroll Management Module:
Payroll Management Module covers additions, deduction, submission,
approval, processing and printing of payroll
--------------------------------------------------------------------
Management Reporting Module:
Management reporting module covers all the reports, cpf submission, IR8A
forms printing and Bank Giro’s.
--------------------------------------------------------------------
Reminder & Alert Module:
Reminder & Alert Module covers system defined reminders and alerts like
leave approval pending, different passes expiry, etc.
--------------------------------------------------------------------
USER GUIDE – A&B PAYROLL VERSION 9.0
- 8 -
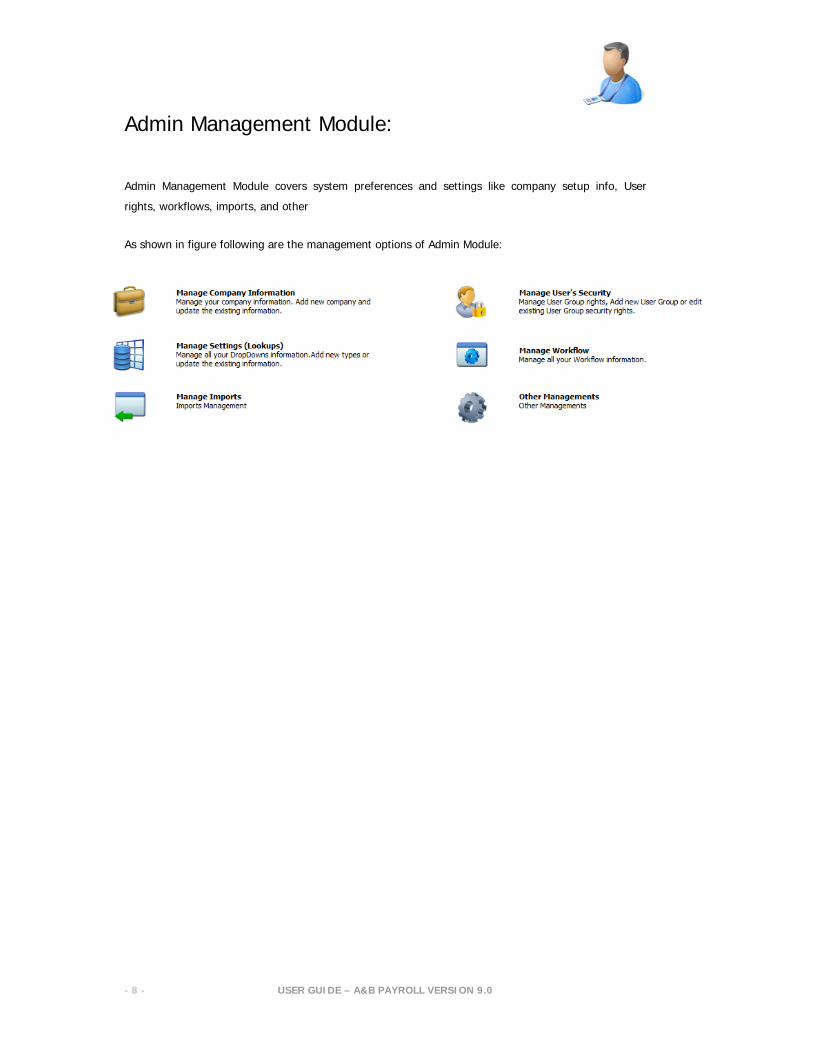
Admin Management Module:
Admin Management Module covers system preferences and settings like company setup info, User
rights, workflows, imports, and other
As shown in figure following are the management options of Admin Module:
USER GUIDE – A&B PAYROLL VERSION 9.0
- 9 -
Admin Management
{Manage Company Information}
USER GUIDE – A&B PAYROLL VERSION 9.0
- 10 -
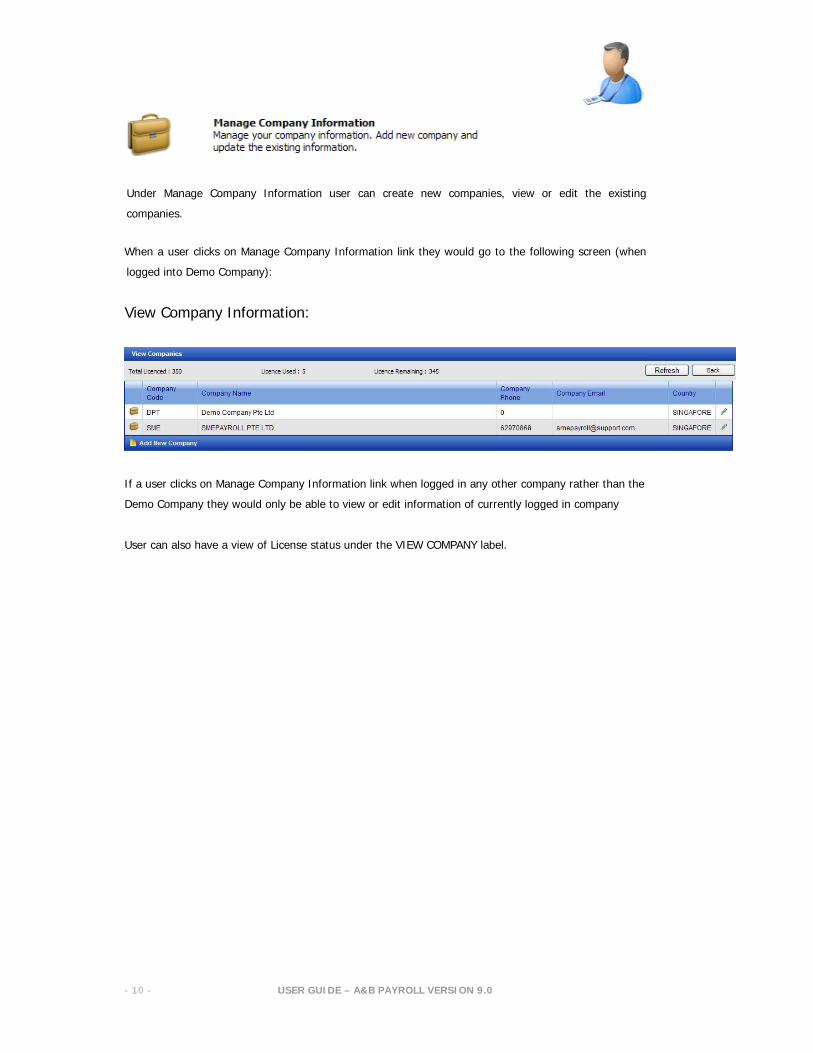
Under Manage Company Information user can create new companies, view or edit the existing
companies.
When a user clicks on Manage Company Information link they would go to the following screen (when
logged into Demo Company):
View Company Information:
If a user clicks on Manage Company Information link when logged in any other company rather than the
Demo Company they would only be able to view or edit information of currently logged in company
User can also have a view of License status under the VIEW COMPANY label.
USER GUIDE – A&B PAYROLL VERSION 9.0
- 11 -
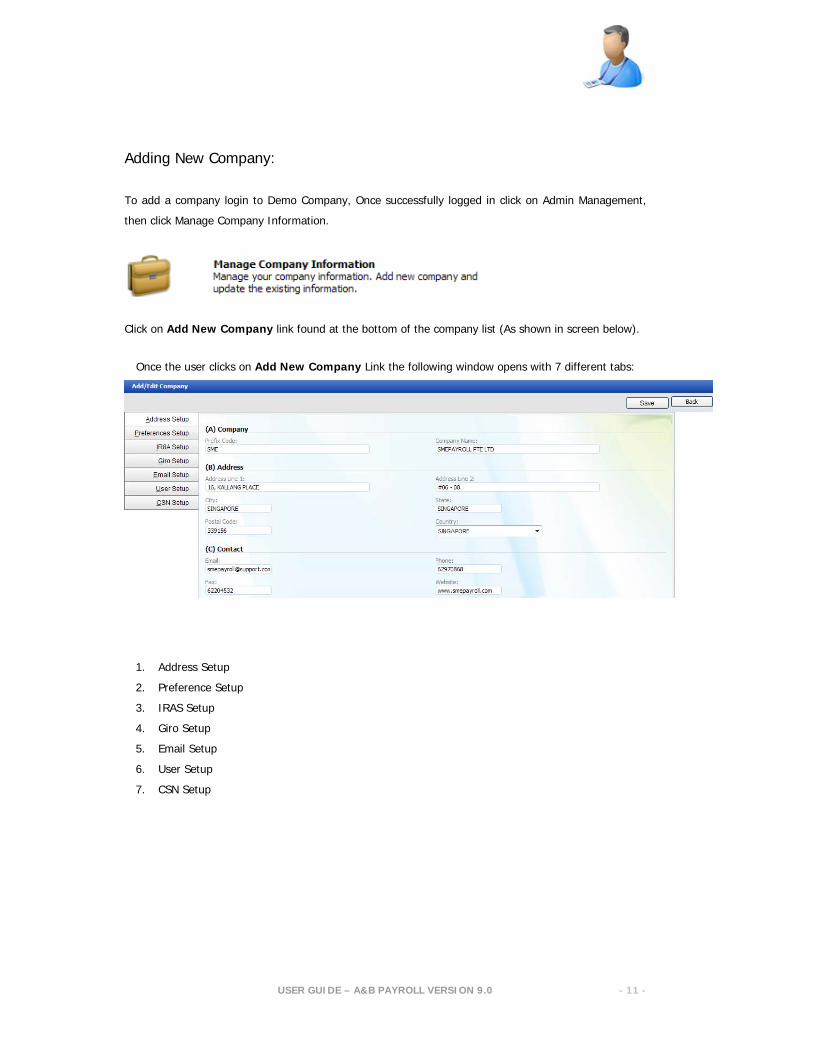
Adding New Company:
To add a company login to Demo Company, Once successfully logged in click on Admin Management,
then click Manage Company Information.
Click on Add New Company link found at the bottom of the company list (As shown in screen below).
Once the user clicks on Add New Company Link the following window opens with 7 different tabs:
1. Address Setup
2. Preference Setup
3. IRAS Setup
4. Giro Setup
5. Email Setup
6. User Setup
7. CSN Setup
USER GUIDE – A&B PAYROLL VERSION 9.0
- 12 -
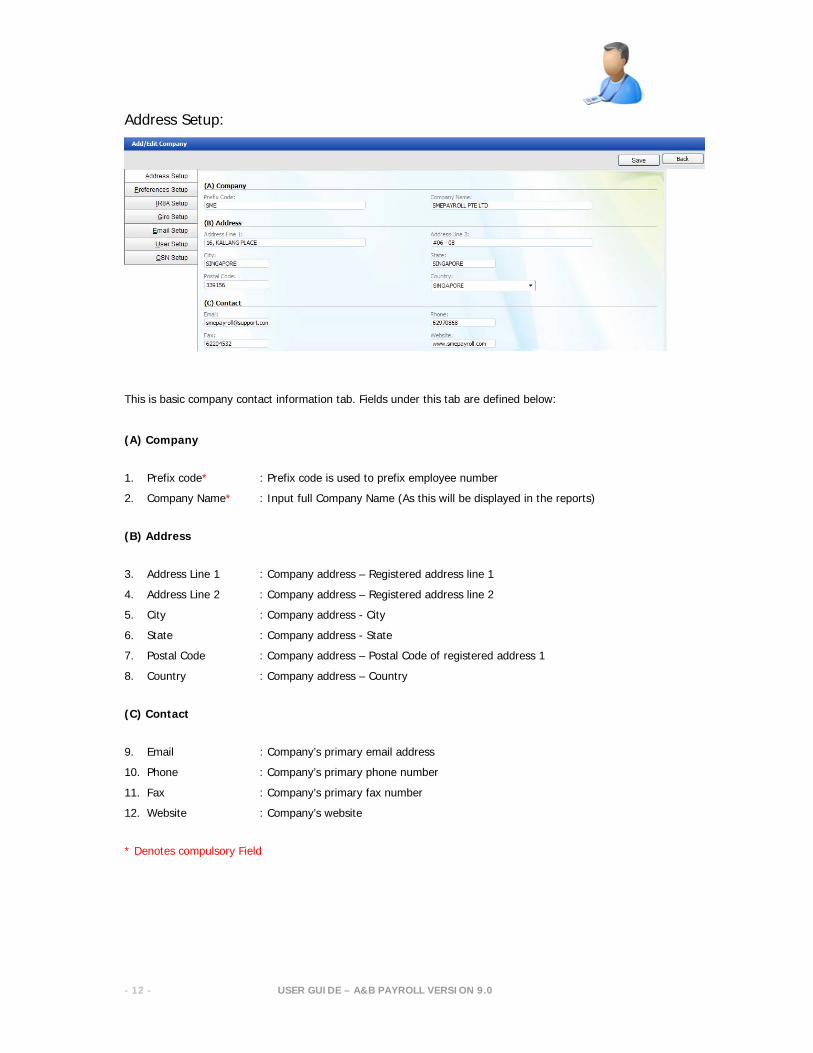
Address Setup:
This is basic company contact information tab. Fields under this tab are defined below:
(A) Company
1. Prefix code* : Prefix code is used to prefix employee number
2. Company Name* : Input full Company Name (As this will be displayed in the reports)
(B) Address
3. Address Line 1 : Company address – Registered address line 1
4. Address Line 2 : Company address – Registered address line 2
5. City : Company address - City
6. State : Company address - State
7. Postal Code : Company address – Postal Code of registered address 1
8. Country : Company address – Country
(C) Contact
9. Email : Company’s primary email address
10. Phone : Company’s primary phone number
11. Fax : Company’s primary fax number
12. Website : Company’s website
* Denotes compulsory Field
USER GUIDE – A&B PAYROLL VERSION 9.0
- 13 -
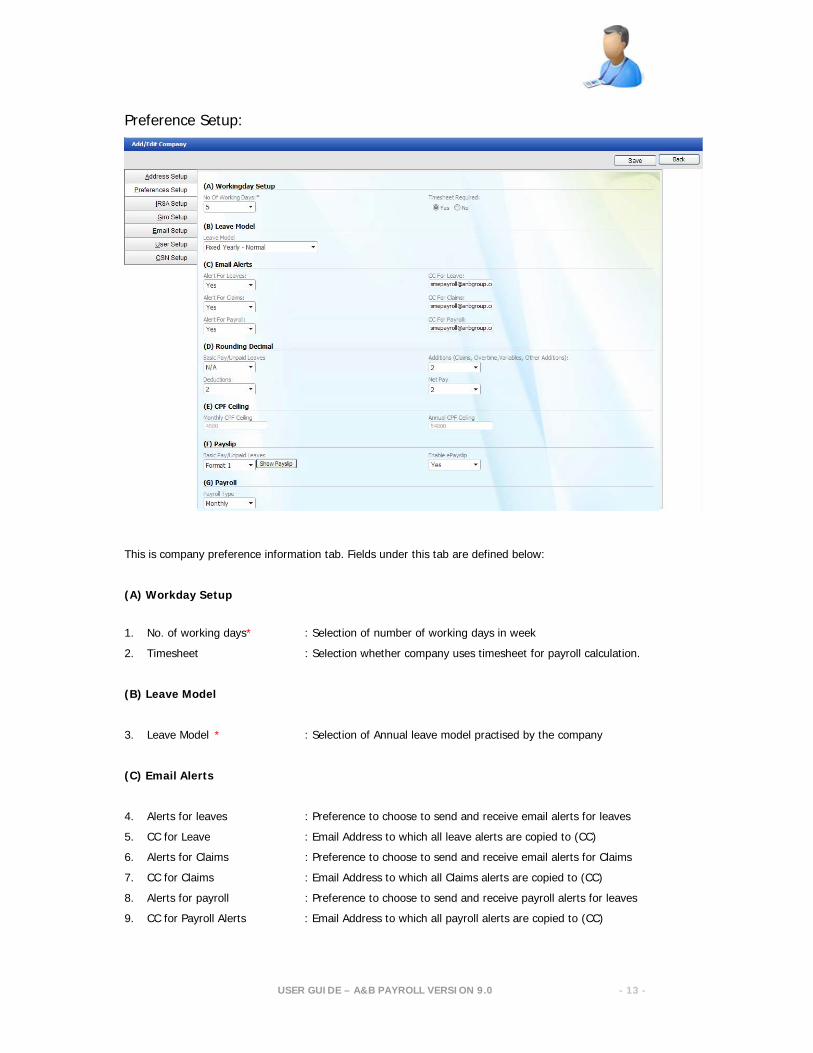
Preference Setup:
This is company preference information tab. Fields under this tab are defined below:
(A) Workday Setup
1. No. of working days* : Selection of number of working days in week
2. Timesheet : Selection whether company uses timesheet for payroll calculation.
(B) Leave Model
3. Leave Model * : Selection of Annual leave model practised by the company
(C) Email Alerts
4. Alerts for leaves : Preference to choose to send and receive email alerts for leaves
5. CC for Leave : Email Address to which all leave alerts are copied to (CC)
6. Alerts for Claims : Preference to choose to send and receive email alerts for Claims
7. CC for Claims : Email Address to which all Claims alerts are copied to (CC)
8. Alerts for payroll : Preference to choose to send and receive payroll alerts for leaves
9. CC for Payroll Alerts : Email Address to which all payroll alerts are copied to (CC)
USER GUIDE – A&B PAYROLL VERSION 9.0
- 14 -
(D) Rounding Decimal
10. Basic Pay / Unpaid Leaves : Rounding Basic pay and unpaid leaves decimal value
- options available 0, 2 , 3, Unlimited
11. Additions (Claims, Overtime
Other Additions) : Rounding payroll addition types decimal value
- options available 0, 2 , 3, Unlimited
12. Deductions : Rounding payroll deduction types decimal value
- options available 0, 2 , 3, Unlimited
13. Net Pay : Rounding Net pay decimal value
- options available 0, 2 , 3, Unlimited
(E) CPF Ceiling
14. Monthly CPF Ceiling : This is an auto field for information only
15. Annual CPF ceiling : This is an auto field for information only
(F) Payslip
16. Payslip Print Format : Choose a payslip formats.
17. Enable ePayslip : Option to enable sending electronic payslip
(F) Payroll
18. Payroll Type : Type of payroll Monthly or Bi-monthly
* Denotes compulsory Field
Preference tab continued..
USER GUIDE – A&B PAYROLL VERSION 9.0
- 15 -
Additional Information for Fields in Preference Tab (Company Management):
LEAVE MODELS (Annual Leaves):
Fixed Year / Year of Service - Normal: Under this leave model, all the leaves are available to an
employee at any given time of the year.
For Example: An employee has joined the company on 01. Jan and has 14 Annual leaves entitled for
that year. So if the employee is applying for leave in the month of April he/she would have 14 leaves
available to consume.
Fixed Year / Year of Service - Prorated: Under this leave model, leaves available to an employee
are prorated based on number of months of service.
For Example: An employee has joined the company on 01. Jan and has 14 Annual leaves entitled for
that year. The leaves will be prorated by the formula – 14 (Leaves) /12 (Months) = 1.16 leaves earned
per month. So if the employee is applying for leave in the month of April he/she would have 3.48
leaves available to consume.
(i.e.) 1.16 X 3 months {Jan – Mar (completed months)} = 3.48
Fixed Year / Year of Service - Prorated (Floor): Under this leave model, leaves available to an
employee are prorated based on number of months of service.
For Example: An employee has joined the company on 01. Jan and has 14 Annual leaves entitled for
that year. The leaves will be prorated by the formula – 14 (Leaves) /12 (Months) = 1.16 leaves earned
per month. So if the employee is applying for leave in the month of April he/she would have 3 leaves
available to consume.
(i.e.) 1.16 X 3 months {Jan – Mar (completed months)} = 3.48
As we are using prorated by floor the decimals are dropped so leaves available = 3
Fixed Year / Year of Service – Prorated (Ceiling): Under this leave model, leaves available to an
employee are prorated based on number of months of service.
For Example: An employee has joined the company on 01. Jan and has 14 Annual leaves entitled for
that year. The leaves will be prorated by the formula – 14 (Leaves) /12 (Months) = 1.16 leaves earned
per month. So if the employee is applying for leave in the month of April he/she would have 4 leaves
available to consume.
(i.e.) 1.16 X 3 months {Jan – Mar (completed months)} = 3.48
As we are using prorated by ceiling the decimals are considered so leaves available = 4
USER GUIDE – A&B PAYROLL VERSION 9.0
- 16 -
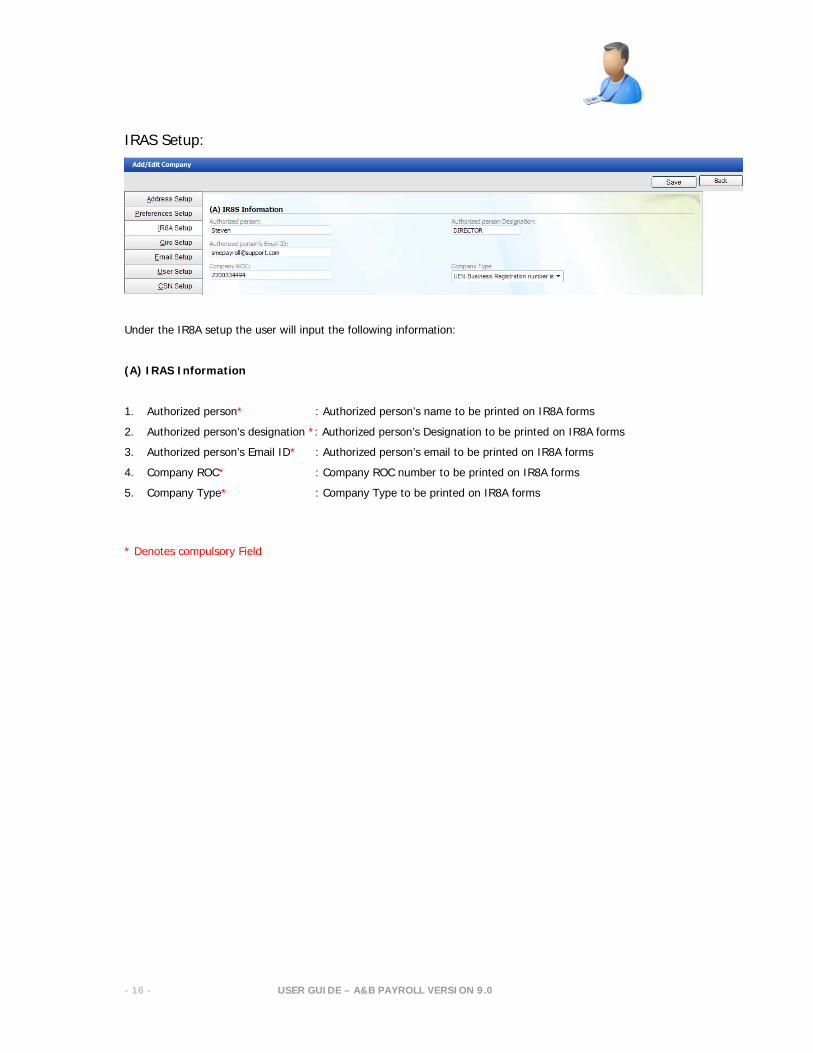
IRAS Setup:
Under the IR8A setup the user will input the following information:
(A) IRAS Information
1. Authorized person* : Authorized person’s name to be printed on IR8A forms
2. Authorized person’s designation *: Authorized person’s Designation to be printed on IR8A forms
3. Authorized person’s Email ID* : Authorized person’s email to be printed on IR8A forms
4. Company ROC* : Company ROC number to be printed on IR8A forms
5. Company Type* : Company Type to be printed on IR8A forms
* Denotes compulsory Field

USER GUIDE – A&B PAYROLL VERSION 9.0
- 17 -
Giro Setup:
Once the company name and company preference are saved user will be able to setup the Bank Giro
account for payment of salaries to the employees. To create a new bank giro account click on Add New
Bank Details
1. Bank name : Select bank name from the drop down of available banks.
2. Value Date : Date of salary transfer
3. Bank Branch Code : Banks branch code where the bank account is opened
4. Bank Account Number : Company’s bank account number
5. Bank Account Name : Company’s bank account name
6. Company code provided by bank : (Applicable to DBS Bank )
7. Approver code provided by bank : (Applicable to Mizuho Bank )
8. Operator code provided by bank : (Applicable to Mizuho Bank )
Then click insert to save the information.
USER GUIDE – A&B PAYROLL VERSION 9.0
- 18 -
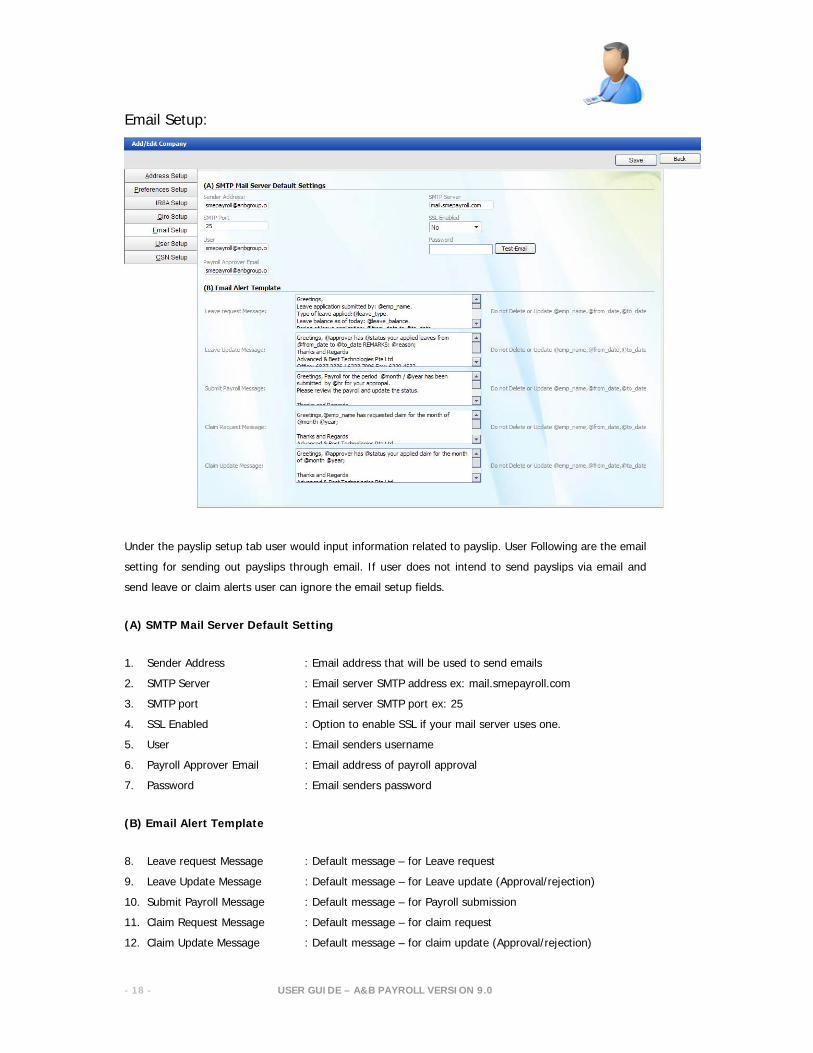
Email Setup:
Under the payslip setup tab user would input information related to payslip. User Following are the email
setting for sending out payslips through email. If user does not intend to send payslips via email and
send leave or claim alerts user can ignore the email setup fields.
(A) SMTP Mail Server Default Setting
1. Sender Address : Email address that will be used to send emails
2. SMTP Server : Email server SMTP address ex: mail.smepayroll.com
3. SMTP port : Email server SMTP port ex: 25
4. SSL Enabled : Option to enable SSL if your mail server uses one.
5. User : Email senders username
6. Payroll Approver Email : Email address of payroll approval
7. Password : Email senders password
(B) Email Alert Template
8. Leave request Message : Default message – for Leave request
9. Leave Update Message : Default message – for Leave update (Approval/rejection)
10. Submit Payroll Message : Default message – for Payroll submission
11. Claim Request Message : Default message – for claim request
12. Claim Update Message : Default message – for claim update (Approval/rejection)
USER GUIDE – A&B PAYROLL VERSION 9.0
- 19 -
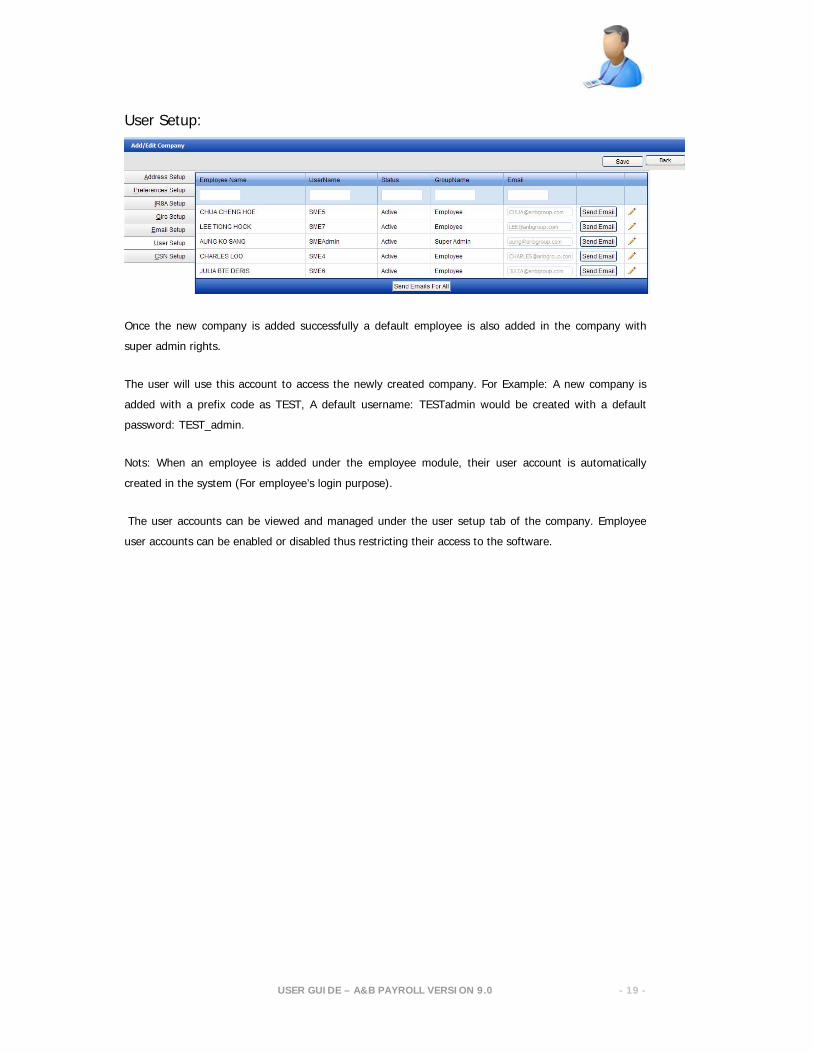
User Setup:
Once the new company is added successfully a default employee is also added in the company with
super admin rights.
The user will use this account to access the newly created company. For Example: A new company is
added with a prefix code as TEST, A default username: TESTadmin would be created with a default
password: TEST_admin.
Nots: When an employee is added under the employee module, their user account is automatically
created in the system (For employee’s login purpose).
The user accounts can be viewed and managed under the user setup tab of the company. Employee
user accounts can be enabled or disabled thus restricting their access to the software.
USER GUIDE – A&B PAYROLL VERSION 9.0
- 20 -
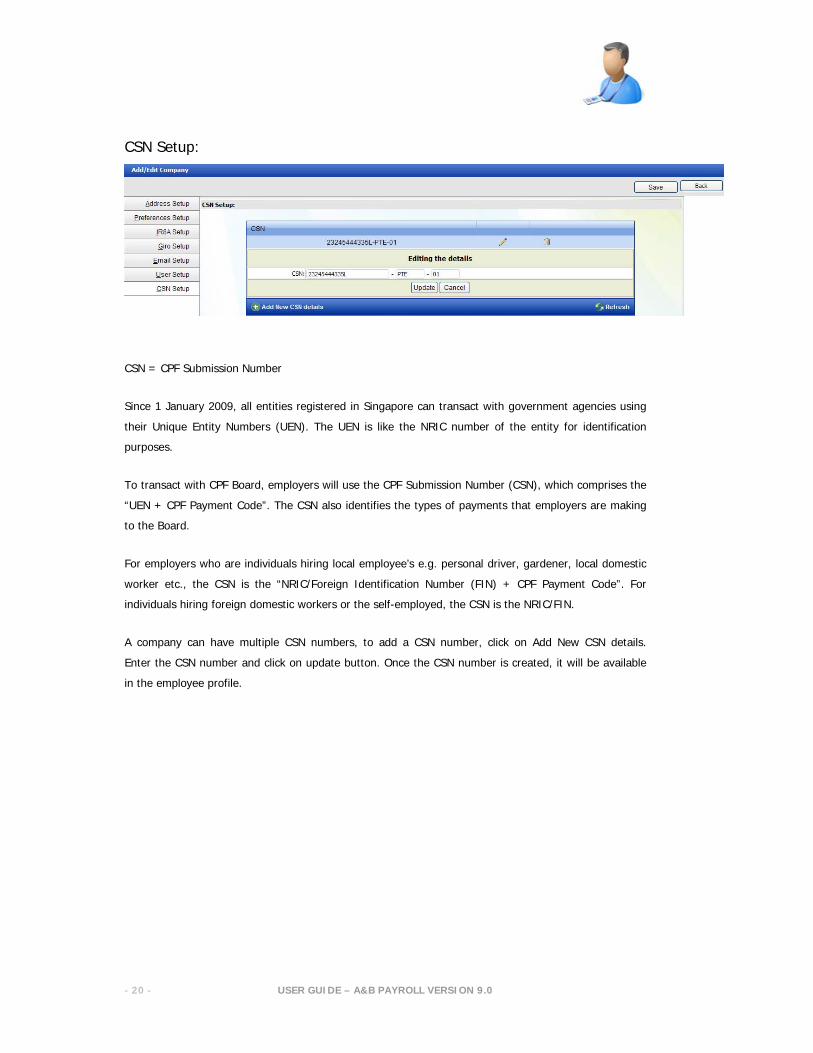
CSN Setup:
CSN = CPF Submission Number
Since 1 January 2009, all entities registered in Singapore can transact with government agencies using
their Unique Entity Numbers (UEN). The UEN is like the NRIC number of the entity for identification
purposes.
To transact with CPF Board, employers will use the CPF Submission Number (CSN), which comprises the
“UEN + CPF Payment Code”. The CSN also identifies the types of payments that employers are making
to the Board.
For employers who are individuals hiring local employee’s e.g. personal driver, gardener, local domestic
worker etc., the CSN is the “NRIC/Foreign Identification Number (FIN) + CPF Payment Code”. For
individuals hiring foreign domestic workers or the self-employed, the CSN is the NRIC/FIN.
A company can have multiple CSN numbers, to add a CSN number, click on Add New CSN details.
Enter the CSN number and click on update button. Once the CSN number is created, it will be available
in the employee profile.
USER GUIDE – A&B PAYROLL VERSION 9.0
- 21 -
Admin Management
{Manage User’s Security}
USER GUIDE – A&B PAYROLL VERSION 9.0
- 22 -
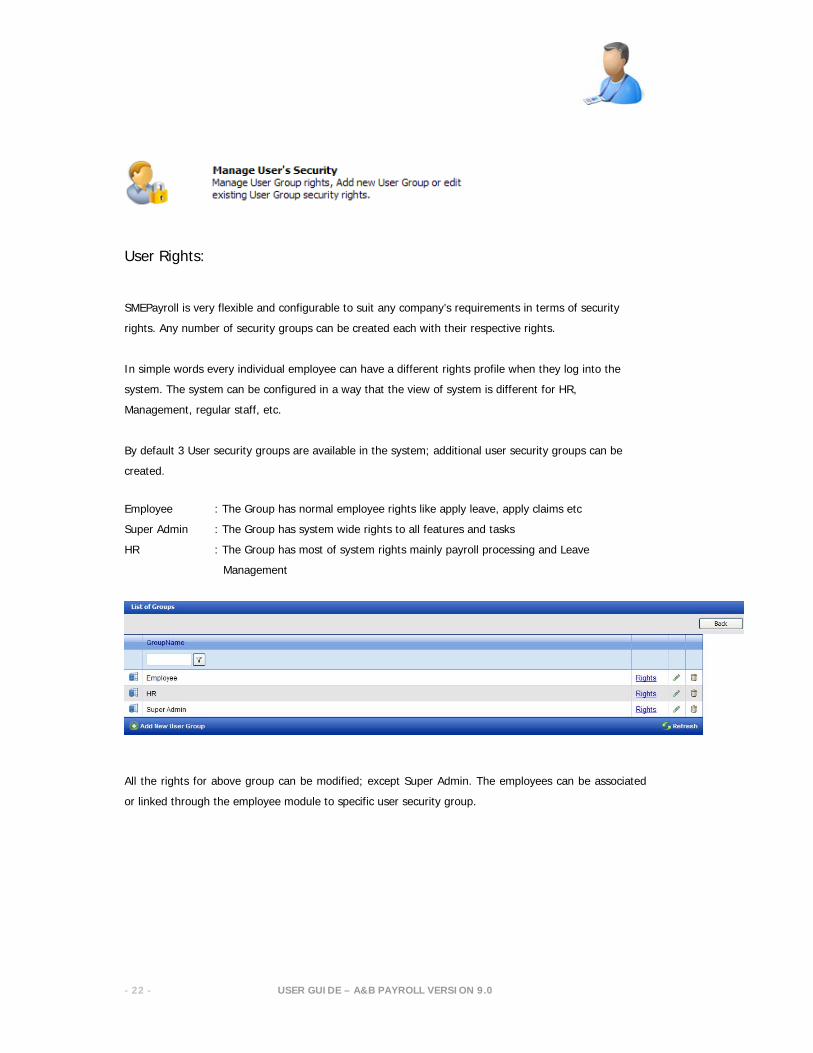
User Rights:
SMEPayroll is very flexible and configurable to suit any company’s requirements in terms of security
rights. Any number of security groups can be created each with their respective rights.
In simple words every individual employee can have a different rights profile when they log into the
system. The system can be configured in a way that the view of system is different for HR,
Management, regular staff, etc.
By default 3 User security groups are available in the system; additional user security groups can be
created.
Employee : The Group has normal employee rights like apply leave, apply claims etc
Super Admin : The Group has system wide rights to all features and tasks
HR : The Group has most of system rights mainly payroll processing and Leave
Management
All the rights for above group can be modified; except Super Admin. The employees can be associated
or linked through the employee module to specific user security group.
USER GUIDE – A&B PAYROLL VERSION 9.0
- 23 -
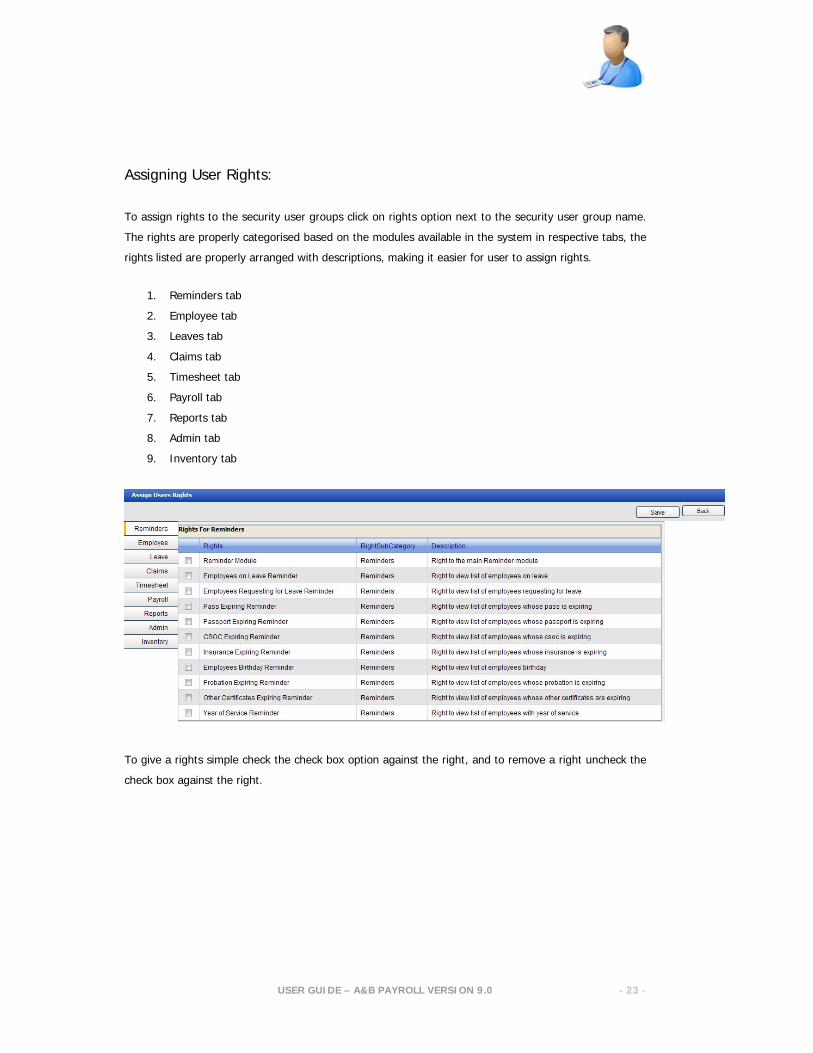
Assigning User Rights:
To assign rights to the security user groups click on rights option next to the security user group name.
The rights are properly categorised based on the modules available in the system in respective tabs, the
rights listed are properly arranged with descriptions, making it easier for user to assign rights.
1. Reminders tab
2. Employee tab
3. Leaves tab
4. Claims tab
5. Timesheet tab
6. Payroll tab
7. Reports tab
8. Admin tab
9. Inventory tab
To give a rights simple check the check box option against the right, and to remove a right uncheck the
check box against the right.

USER GUIDE – A&B PAYROLL VERSION 9.0
- 24 -
Admin Management
{Manage Settings (Lookups)}
USER GUIDE – A&B PAYROLL VERSION 9.0
- 25 -
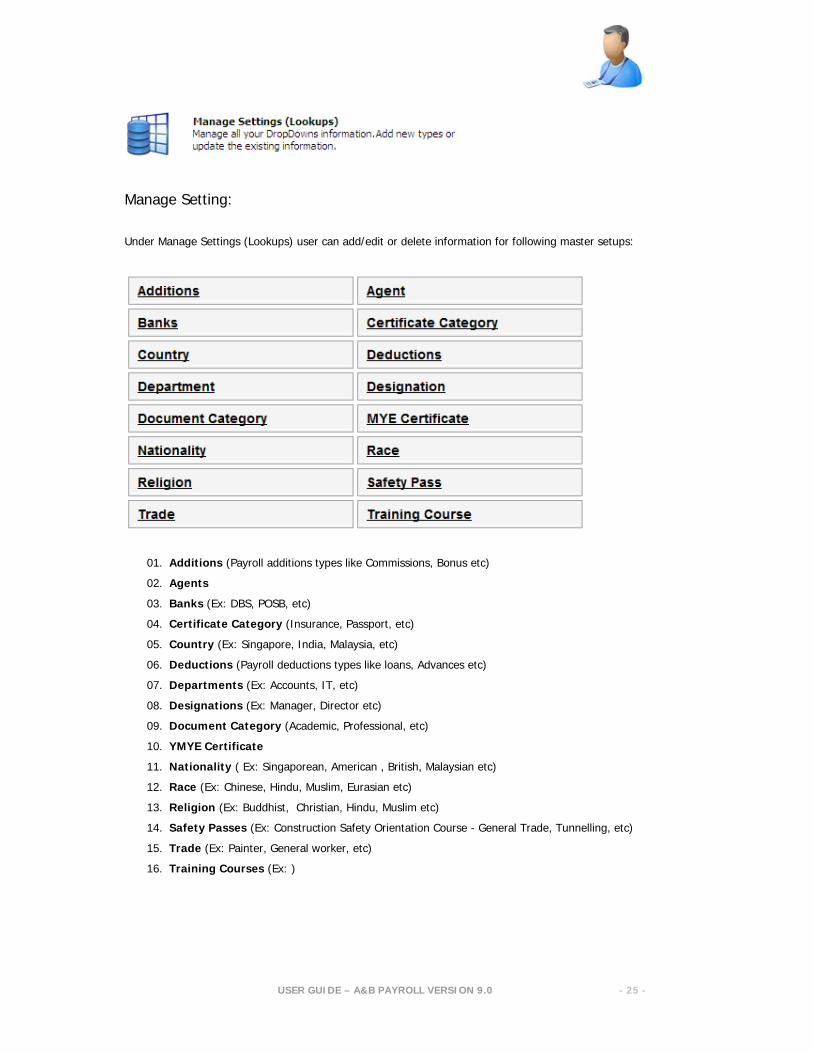
Manage Setting:
Under Manage Settings (Lookups) user can add/edit or delete information for following master setups:
01. Additions (Payroll additions types like Commissions, Bonus etc)
02. Agents
03. Banks (Ex: DBS, POSB, etc)
04. Certificate Category (Insurance, Passport, etc)
05. Country (Ex: Singapore, India, Malaysia, etc)
06. Deductions (Payroll deductions types like loans, Advances etc)
07. Departments (Ex: Accounts, IT, etc)
08. Designations (Ex: Manager, Director etc)
09. Document Category (Academic, Professional, etc)
10. YMYE Certificate
11. Nationality ( Ex: Singaporean, American , British, Malaysian etc)
12. Race (Ex: Chinese, Hindu, Muslim, Eurasian etc)
13. Religion (Ex: Buddhist, Christian, Hindu, Muslim etc)
14. Safety Passes (Ex: Construction Safety Orientation Course - General Trade, Tunnelling, etc)
15. Trade (Ex: Painter, General worker, etc)
16. Training Courses (Ex: )
USER GUIDE – A&B PAYROLL VERSION 9.0
- 26 -
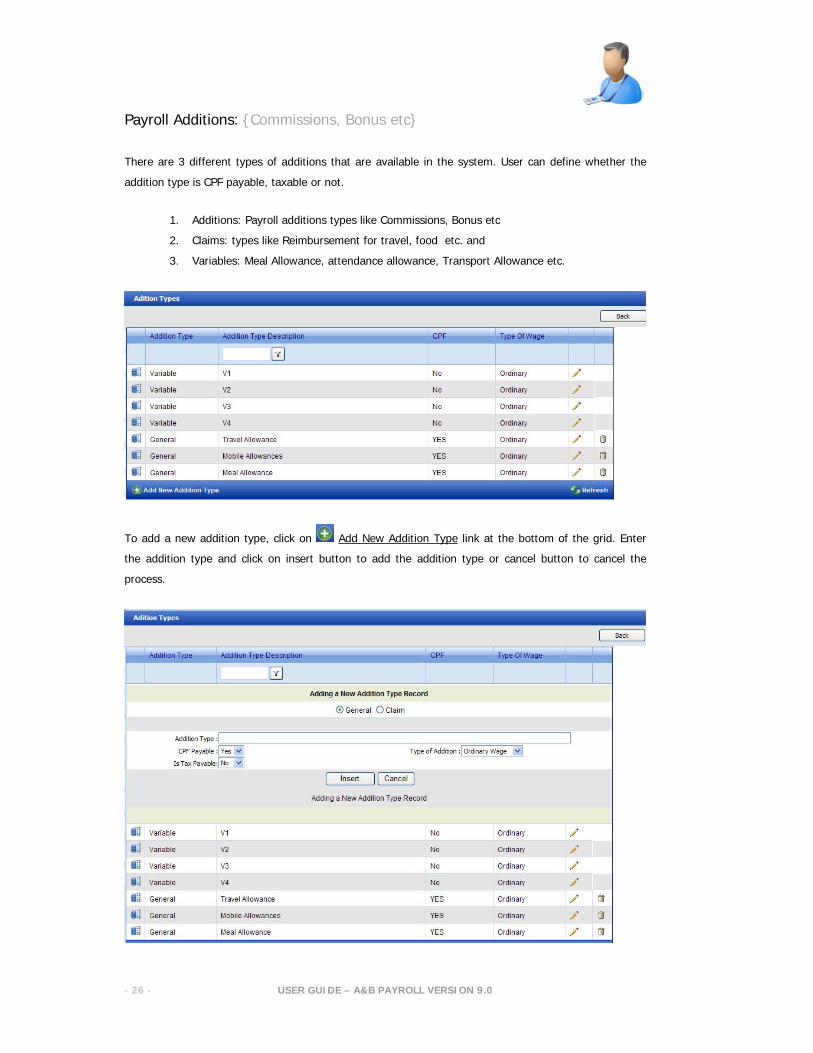
Payroll Additions: {Commissions, Bonus etc}
There are 3 different types of additions that are available in the system. User can define whether the
addition type is CPF payable, taxable or not.
1. Additions: Payroll additions types like Commissions, Bonus etc
2. Claims: types like Reimbursement for travel, food etc. and
3. Variables: Meal Allowance, attendance allowance, Transport Allowance etc.
To add a new addition type, click on Add New Addition Type link at the bottom of the grid. Enter
the addition type and click on insert button to add the addition type or cancel button to cancel the
process.
USER GUIDE – A&B PAYROLL VERSION 9.0
- 27 -
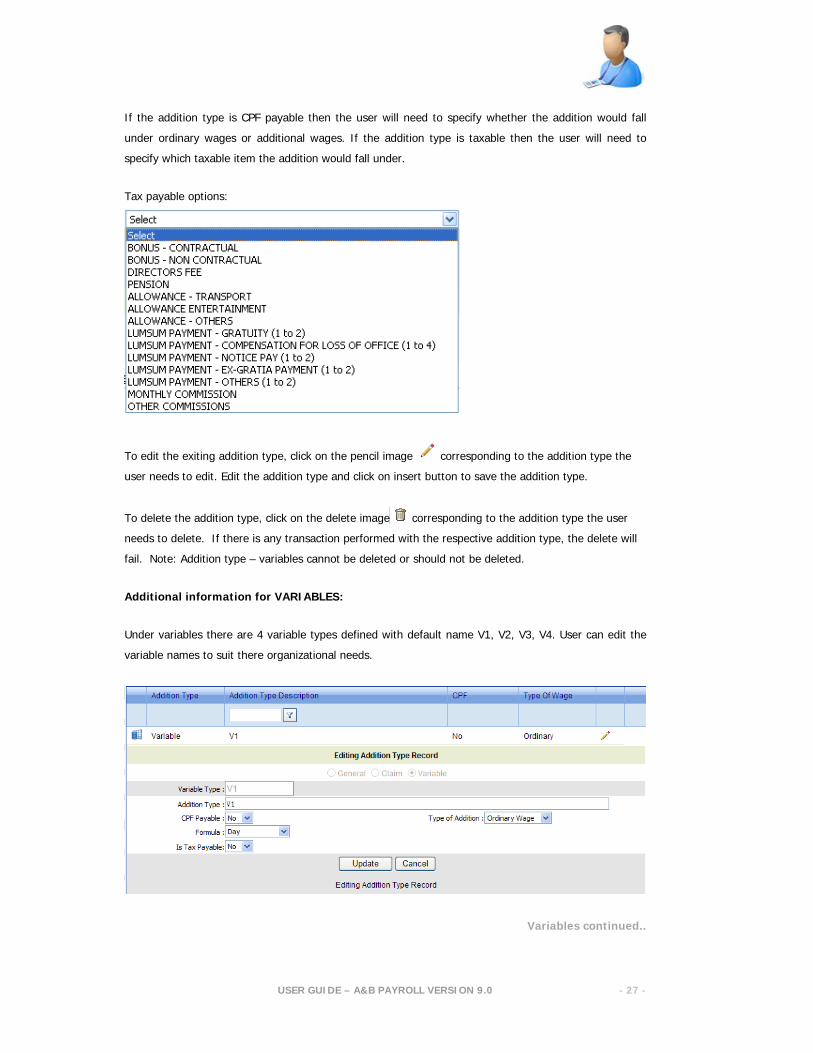
If the addition type is CPF payable then the user will need to specify whether the addition would fall
under ordinary wages or additional wages. If the addition type is taxable then the user will need to
specify which taxable item the addition would fall under.
Tax payable options:
To edit the exiting addition type, click on the pencil image corresponding to the addition type the
user needs to edit. Edit the addition type and click on insert button to save the addition type.
To delete the addition type, click on the delete image corresponding to the addition type the user
needs to delete. If there is any transaction performed with the respective addition type, the delete will
fail. Note: Addition type – variables cannot be deleted or should not be deleted.
Additional information for VARIABLES:
Under variables there are 4 variable types defined with default name V1, V2, V3, V4. User can edit the
variable names to suit there organizational needs.
Variables continued..
USER GUIDE – A&B PAYROLL VERSION 9.0
- 28 -
Example 1 (formula Day): An organisational policy is sets for Attendance Allowance - Any employee
who comes on time; this allowance is paid for each day of the month the employee fulfils the policy.
Step 1: User renames the variable V1 to Attendance Allowance and selects the formula as day.
Step 2: Under individual employees salary Tab; rate for the variable Attendance Allowance is set (For
example $1 is set for employee A)
Step 3: Under the Manage overtime {Refer page 72} in payroll module Key in the number of days the
employee came on time (For example the employee comes on time for 20 days)
Once the above fields are update - Employee A’s payroll will have an addition of $20 for Addition type
Attendance Allowance. {i.e. $1 x 20days = $20}
_____________________________
Example 2 (formula Time): An organisational policy is sets for Meal Allowance - Any employee who
works later than 8:30pm; this allowance is paid for each day of the month the employee fulfils the
policy.
Step 1: User renames the variable V2 to Transport Allowance and selects the formula as time and sets
time as 8:30pm
Step 2: Under individual employees salary Tab; rate for the variable Meal Allowance is be set (For
example $6 is set for employee B)
Step 3: Under the Manage overtime {Refer page 72} in payroll module Key in the number of days the
employee worked later than 8:30pm (For example the employee works for 10 days later than 8:30pm)
Once the above fields are update - Employee B’s payroll will have an addition of $60 for Addition type
Meal Allowance. {i.e. $6 x 10days = $60}
USER GUIDE – A&B PAYROLL VERSION 9.0
- 29 -
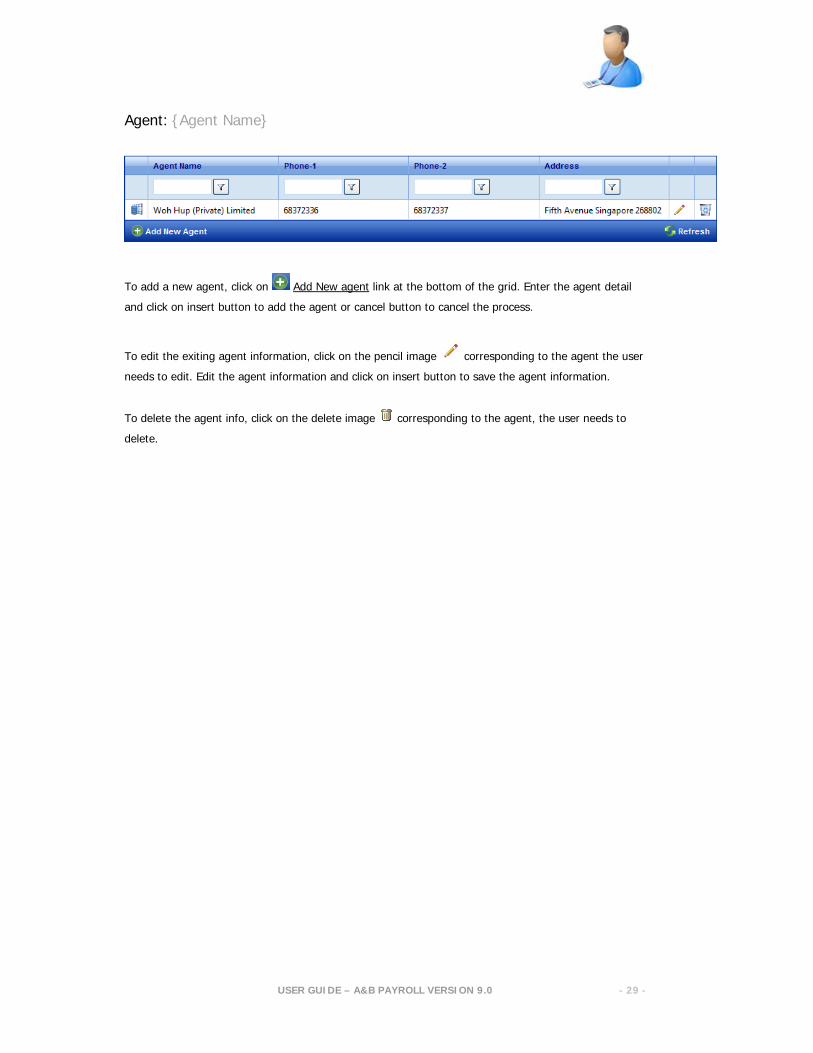
Agent: {Agent Name}
To add a new agent, click on Add New agent link at the bottom of the grid. Enter the agent detail
and click on insert button to add the agent or cancel button to cancel the process.
To edit the exiting agent information, click on the pencil image corresponding to the agent the user
needs to edit. Edit the agent information and click on insert button to save the agent information.
To delete the agent info, click on the delete image corresponding to the agent, the user needs to
delete.
USER GUIDE – A&B PAYROLL VERSION 9.0
- 30 -
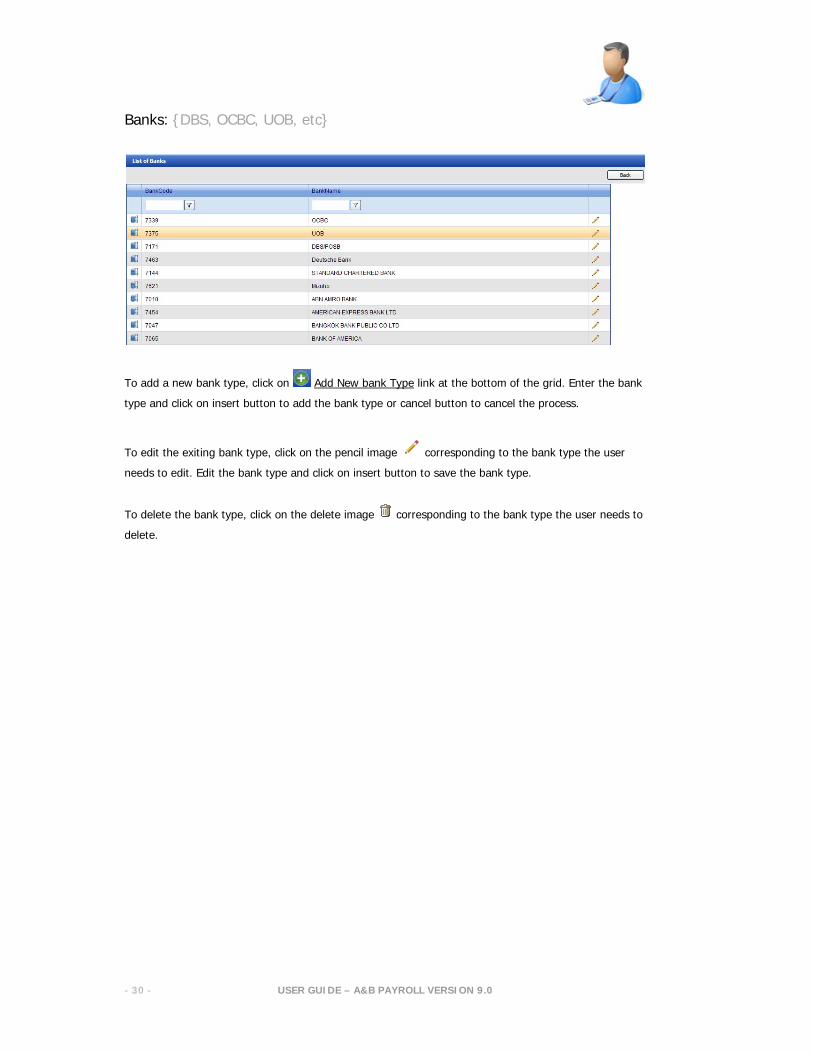
Banks: {DBS, OCBC, UOB, etc}
To add a new bank type, click on Add New bank Type link at the bottom of the grid. Enter the bank
type and click on insert button to add the bank type or cancel button to cancel the process.
To edit the exiting bank type, click on the pencil image corresponding to the bank type the user
needs to edit. Edit the bank type and click on insert button to save the bank type.
To delete the bank type, click on the delete image corresponding to the bank type the user needs to
delete.
USER GUIDE – A&B PAYROLL VERSION 9.0
- 31 -
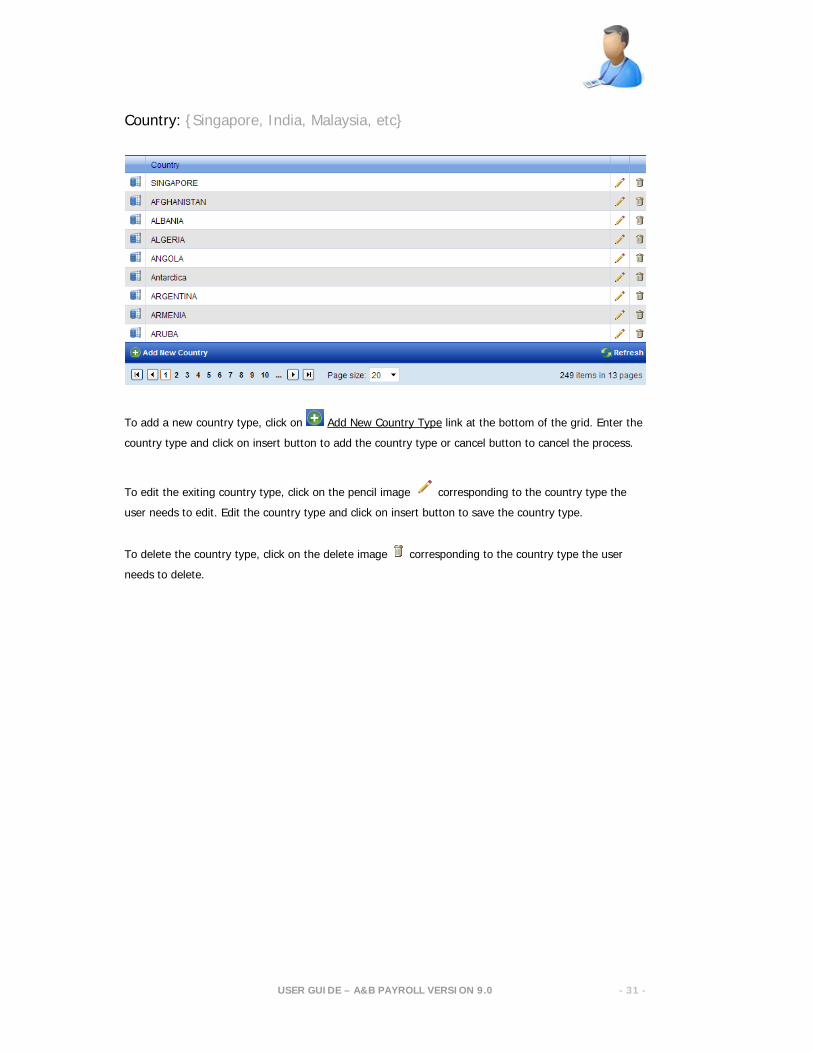
Country: {Singapore, India, Malaysia, etc}
To add a new country type, click on Add New Country Type link at the bottom of the grid. Enter the
country type and click on insert button to add the country type or cancel button to cancel the process.
To edit the exiting country type, click on the pencil image corresponding to the country type the
user needs to edit. Edit the country type and click on insert button to save the country type.
To delete the country type, click on the delete image corresponding to the country type the user
needs to delete.
USER GUIDE – A&B PAYROLL VERSION 9.0
- 32 -
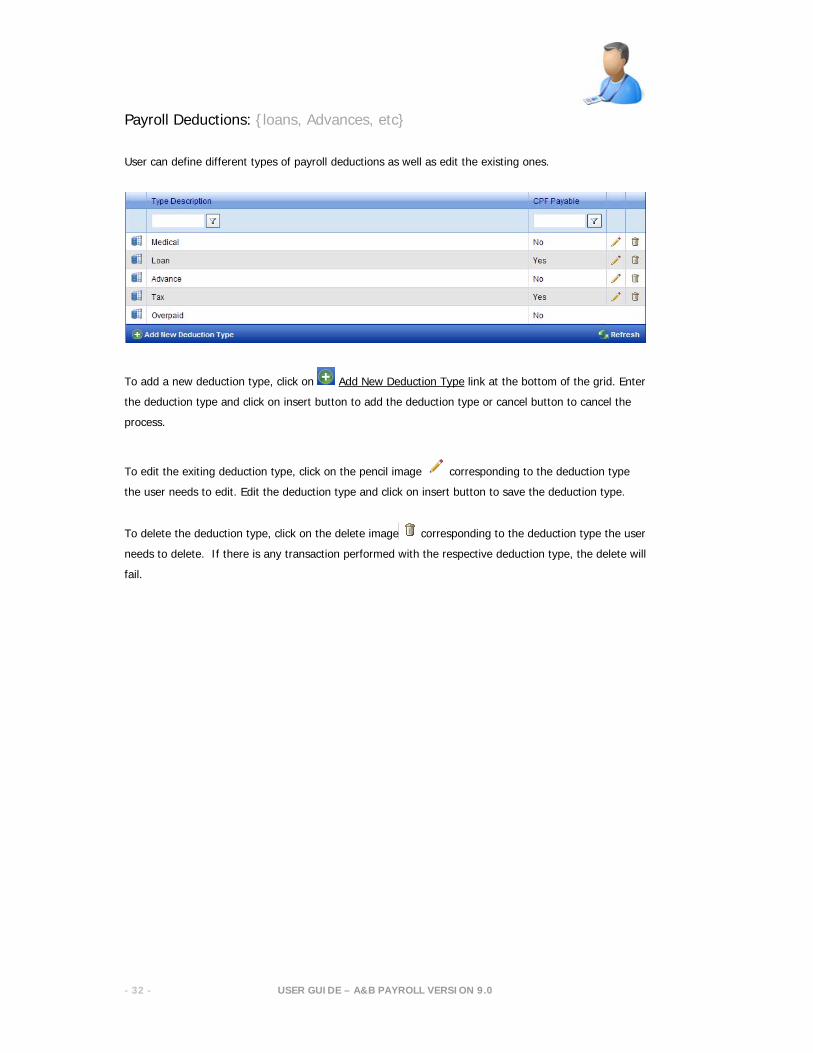
Payroll Deductions: {loans, Advances, etc}
User can define different types of payroll deductions as well as edit the existing ones.
To add a new deduction type, click on Add New Deduction Type link at the bottom of the grid. Enter
the deduction type and click on insert button to add the deduction type or cancel button to cancel the
process.
To edit the exiting deduction type, click on the pencil image corresponding to the deduction type
the user needs to edit. Edit the deduction type and click on insert button to save the deduction type.
To delete the deduction type, click on the delete image corresponding to the deduction type the user
needs to delete. If there is any transaction performed with the respective deduction type, the delete will
fail.
USER GUIDE – A&B PAYROLL VERSION 9.0
- 33 -
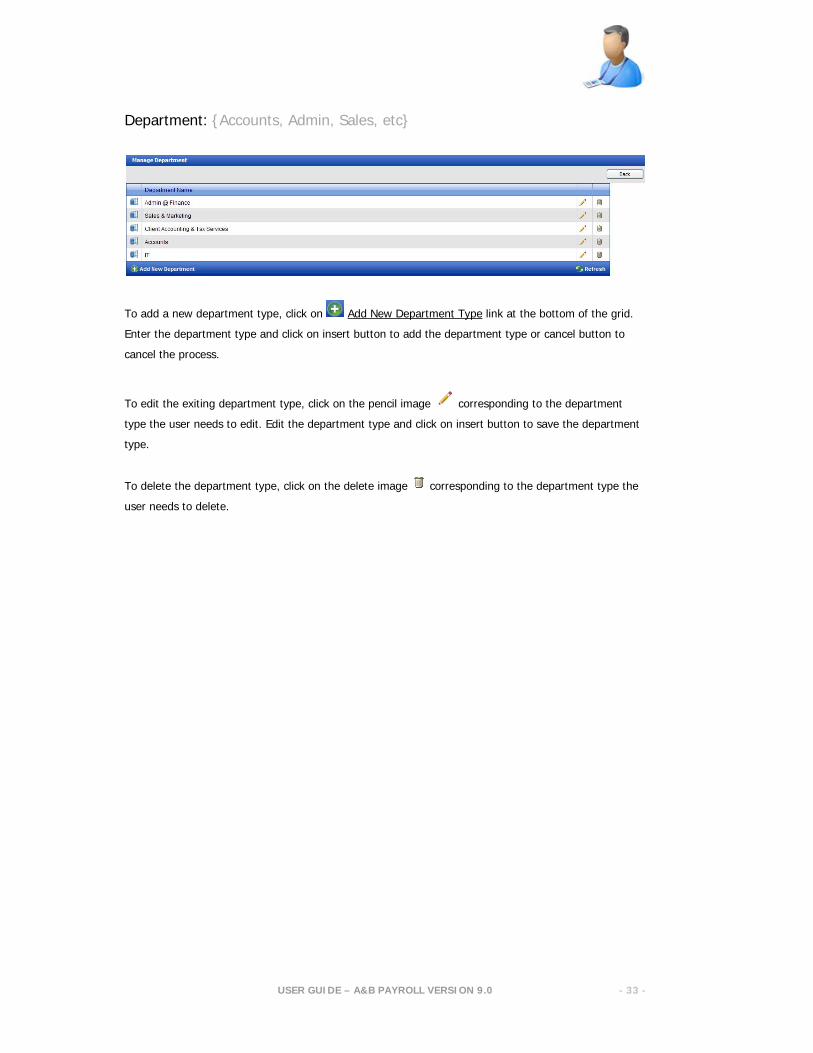
Department: {Accounts, Admin, Sales, etc}
To add a new department type, click on Add New Department Type link at the bottom of the grid.
Enter the department type and click on insert button to add the department type or cancel button to
cancel the process.
To edit the exiting department type, click on the pencil image corresponding to the department
type the user needs to edit. Edit the department type and click on insert button to save the department
type.
To delete the department type, click on the delete image corresponding to the department type the
user needs to delete.

USER GUIDE – A&B PAYROLL VERSION 9.0
- 34 -
Designation: {Manager, Director, Hr Executive, etc}
To add a new designation type, click on Add New Designation Type link at the bottom of the grid.
Enter the designation type and click on insert button to add the designation type or cancel button to
cancel the process.
To edit the exiting designation type, click on the pencil image corresponding to the designation type
the user needs to edit. Edit the designation type and click on insert button to save the designation type.
To delete the designation type, click on the delete image corresponding to the designation type the
user needs to delete.
USER GUIDE – A&B PAYROLL VERSION 9.0
- 35 -
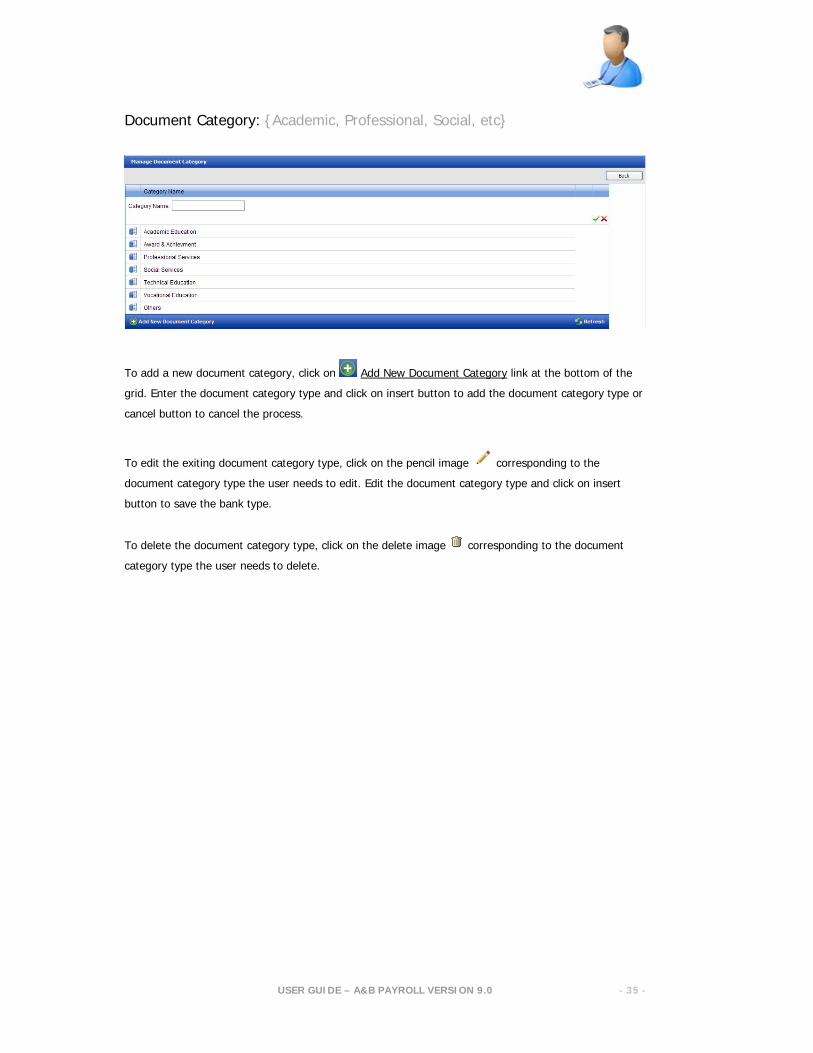
Document Category: {Academic, Professional, Social, etc}
To add a new document category, click on Add New Document Category link at the bottom of the
grid. Enter the document category type and click on insert button to add the document category type or
cancel button to cancel the process.
To edit the exiting document category type, click on the pencil image corresponding to the
document category type the user needs to edit. Edit the document category type and click on insert
button to save the bank type.
To delete the document category type, click on the delete image corresponding to the document
category type the user needs to delete.
USER GUIDE – A&B PAYROLL VERSION 9.0
- 36 -
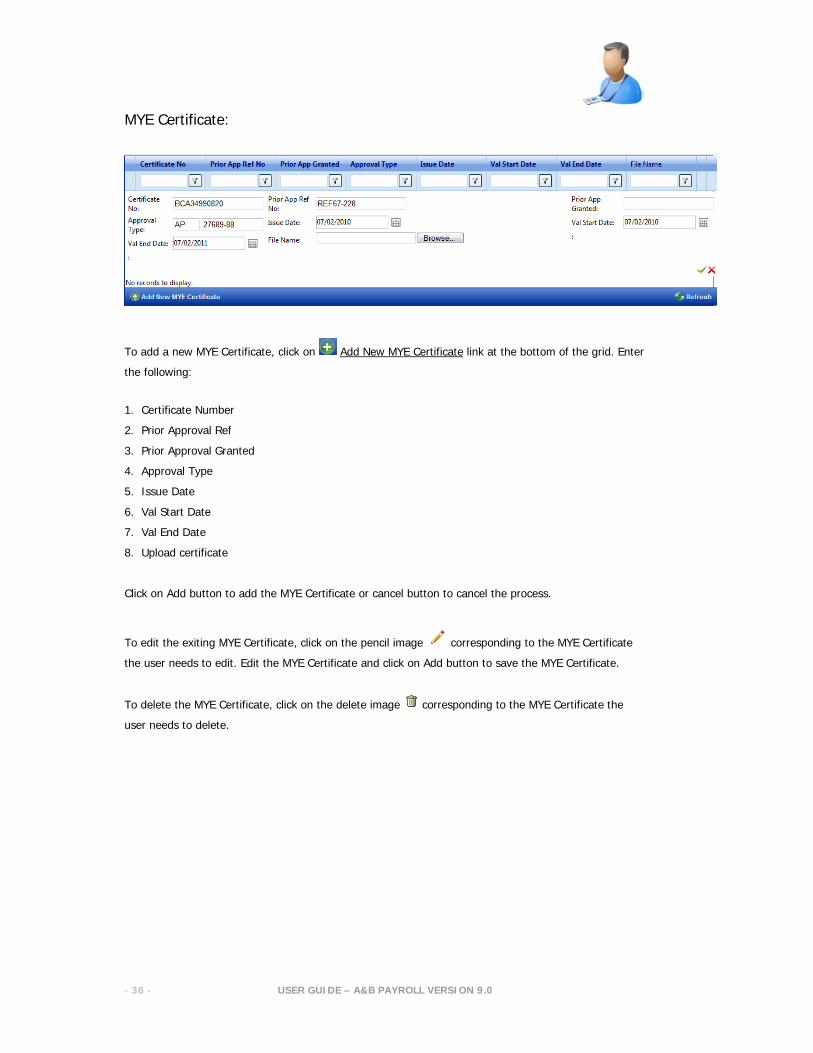
MYE Certificate:
To add a new MYE Certificate, click on Add New MYE Certificate link at the bottom of the grid. Enter
the following:
1. Certificate Number
2. Prior Approval Ref
3. Prior Approval Granted
4. Approval Type
5. Issue Date
6. Val Start Date
7. Val End Date
8. Upload certificate
Click on Add button to add the MYE Certificate or cancel button to cancel the process.
To edit the exiting MYE Certificate, click on the pencil image corresponding to the MYE Certificate
the user needs to edit. Edit the MYE Certificate and click on Add button to save the MYE Certificate.
To delete the MYE Certificate, click on the delete image corresponding to the MYE Certificate the
user needs to delete.
USER GUIDE – A&B PAYROLL VERSION 9.0
- 37 -
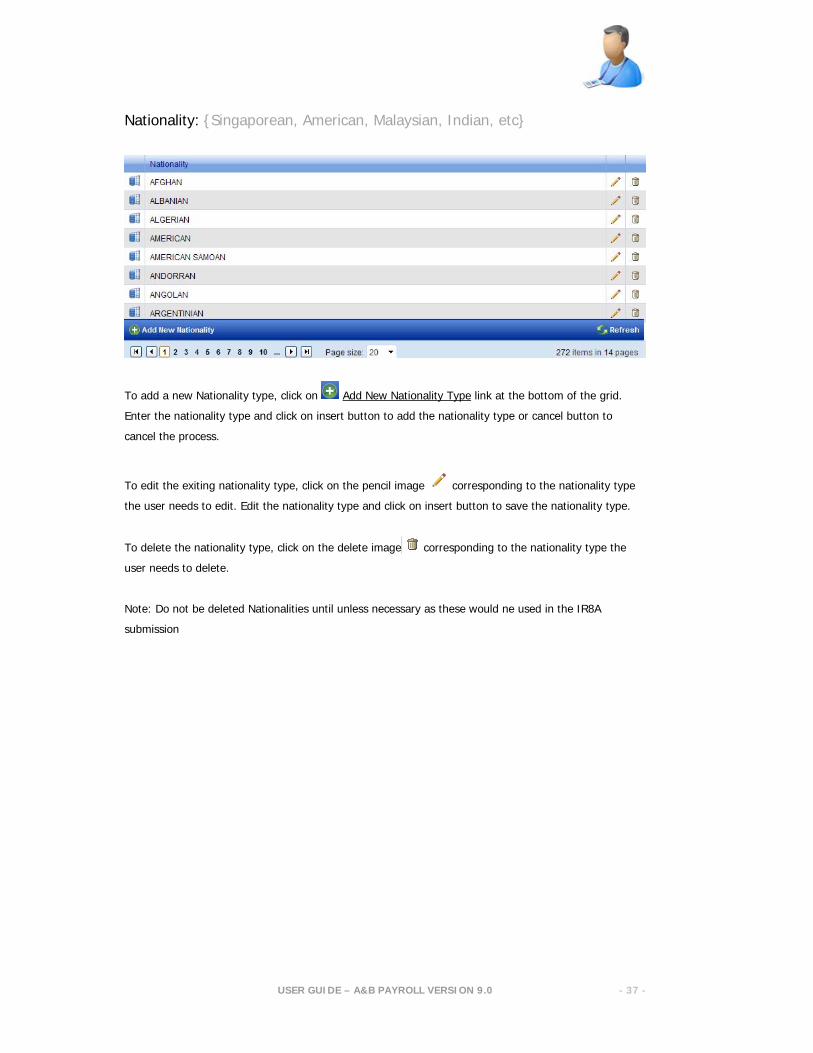
Nationality: {Singaporean, American, Malaysian, Indian, etc}
To add a new Nationality type, click on Add New Nationality Type link at the bottom of the grid.
Enter the nationality type and click on insert button to add the nationality type or cancel button to
cancel the process.
To edit the exiting nationality type, click on the pencil image corresponding to the nationality type
the user needs to edit. Edit the nationality type and click on insert button to save the nationality type.
To delete the nationality type, click on the delete image corresponding to the nationality type the
user needs to delete.
Note: Do not be deleted Nationalities until unless necessary as these would ne used in the IR8A
submission
USER GUIDE – A&B PAYROLL VERSION 9.0
- 38 -
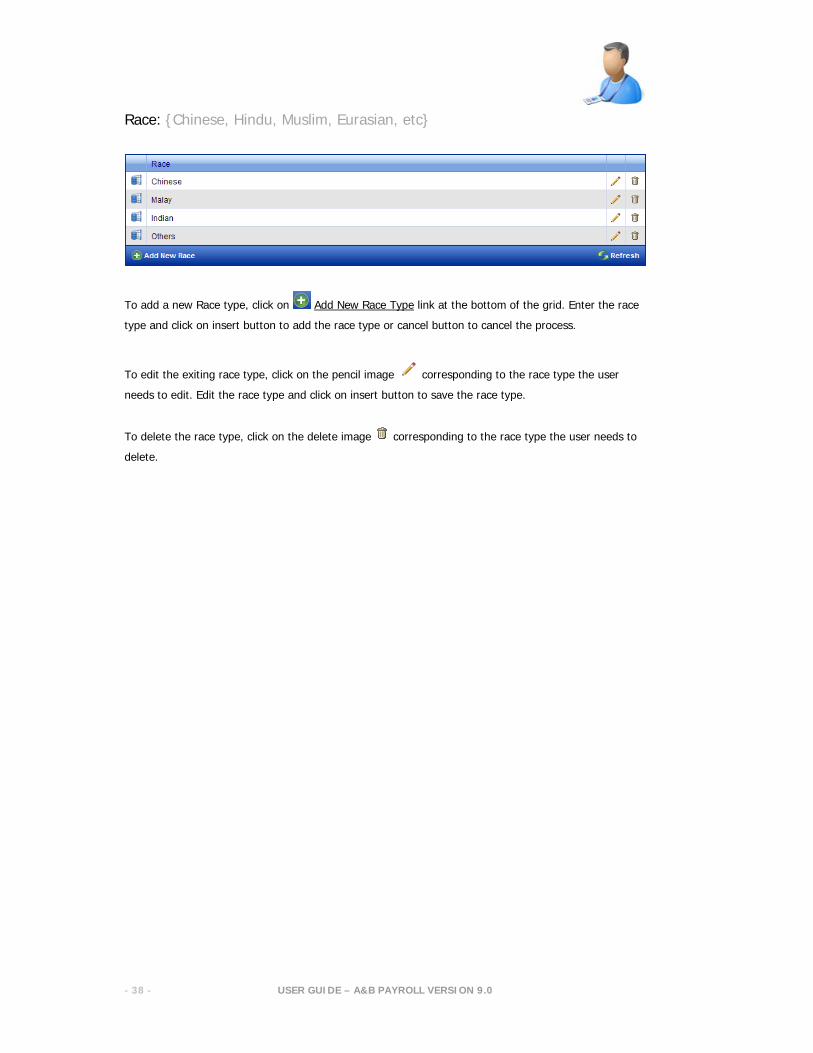
Race: {Chinese, Hindu, Muslim, Eurasian, etc}
To add a new Race type, click on Add New Race Type link at the bottom of the grid. Enter the race
type and click on insert button to add the race type or cancel button to cancel the process.
To edit the exiting race type, click on the pencil image corresponding to the race type the user
needs to edit. Edit the race type and click on insert button to save the race type.
To delete the race type, click on the delete image corresponding to the race type the user needs to
delete.
USER GUIDE – A&B PAYROLL VERSION 9.0
- 39 -
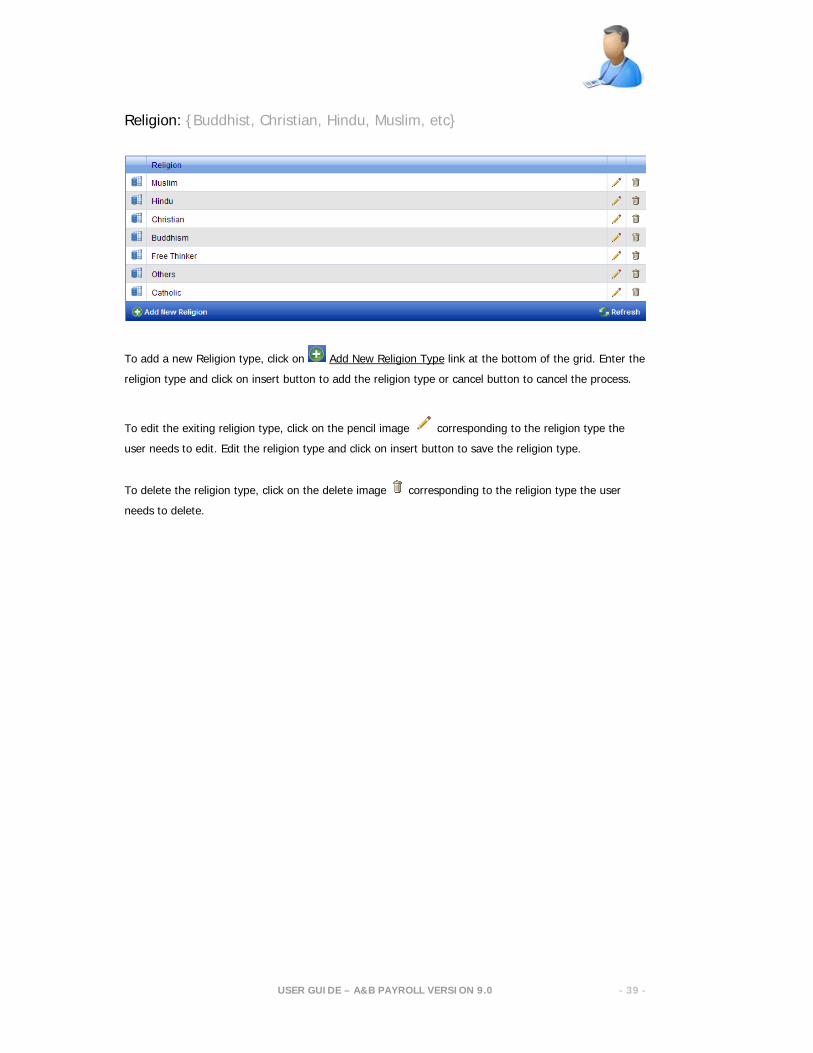
Religion: {Buddhist, Christian, Hindu, Muslim, etc}
To add a new Religion type, click on Add New Religion Type link at the bottom of the grid. Enter the
religion type and click on insert button to add the religion type or cancel button to cancel the process.
To edit the exiting religion type, click on the pencil image corresponding to the religion type the
user needs to edit. Edit the religion type and click on insert button to save the religion type.
To delete the religion type, click on the delete image corresponding to the religion type the user
needs to delete.
USER GUIDE – A&B PAYROLL VERSION 9.0
- 40 -
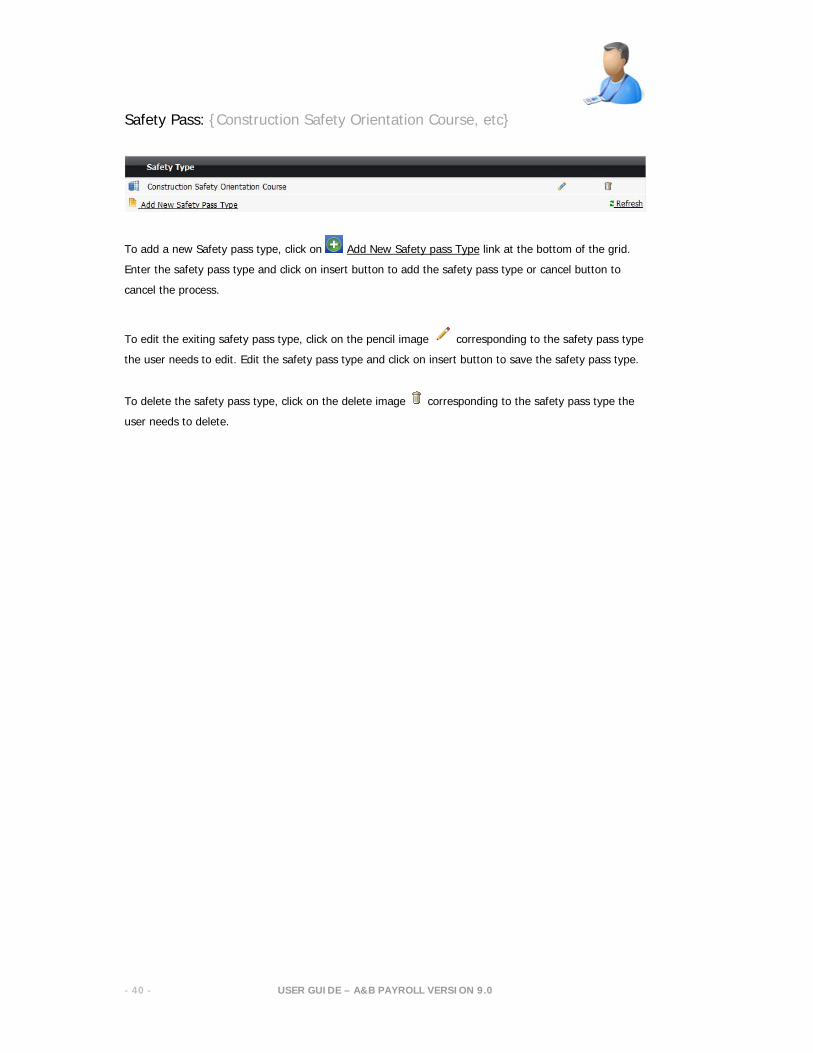
Safety Pass: {Construction Safety Orientation Course, etc}
To add a new Safety pass type, click on Add New Safety pass Type link at the bottom of the grid.
Enter the safety pass type and click on insert button to add the safety pass type or cancel button to
cancel the process.
To edit the exiting safety pass type, click on the pencil image corresponding to the safety pass type
the user needs to edit. Edit the safety pass type and click on insert button to save the safety pass type.
To delete the safety pass type, click on the delete image corresponding to the safety pass type the
user needs to delete.
USER GUIDE – A&B PAYROLL VERSION 9.0
- 41 -
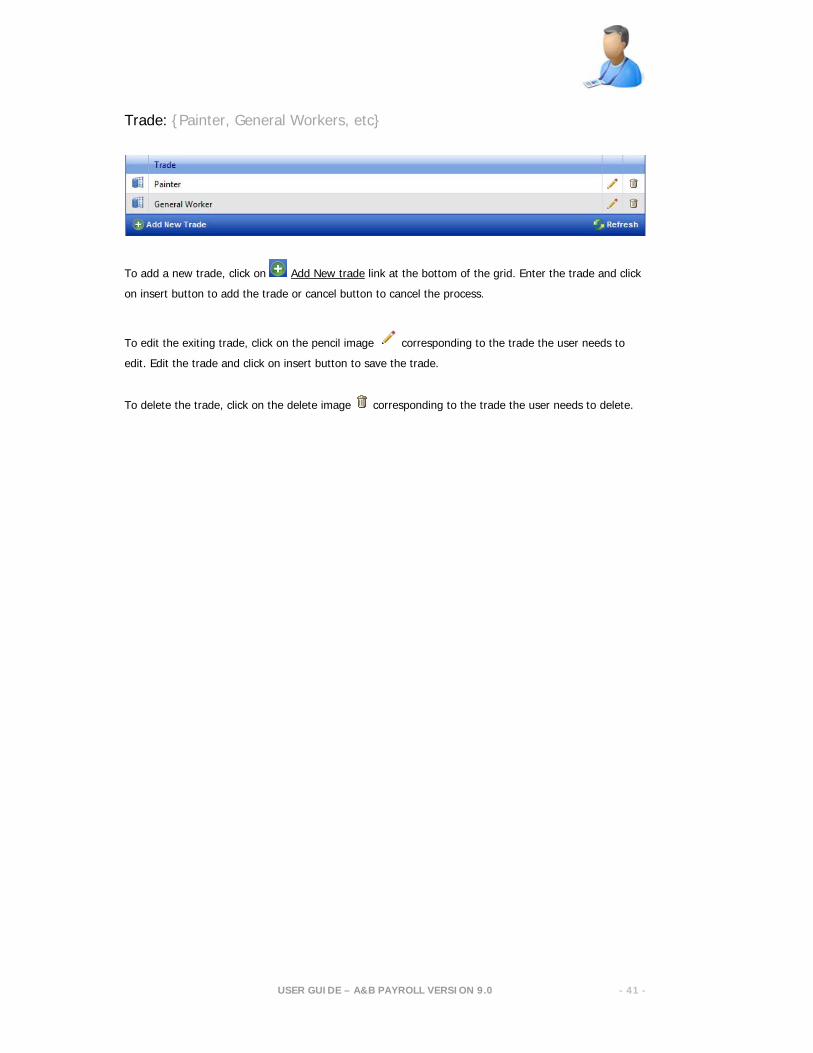
Trade: {Painter, General Workers, etc}
To add a new trade, click on Add New trade link at the bottom of the grid. Enter the trade and click
on insert button to add the trade or cancel button to cancel the process.
To edit the exiting trade, click on the pencil image corresponding to the trade the user needs to
edit. Edit the trade and click on insert button to save the trade.
To delete the trade, click on the delete image corresponding to the trade the user needs to delete.
USER GUIDE – A&B PAYROLL VERSION 9.0
- 42 -
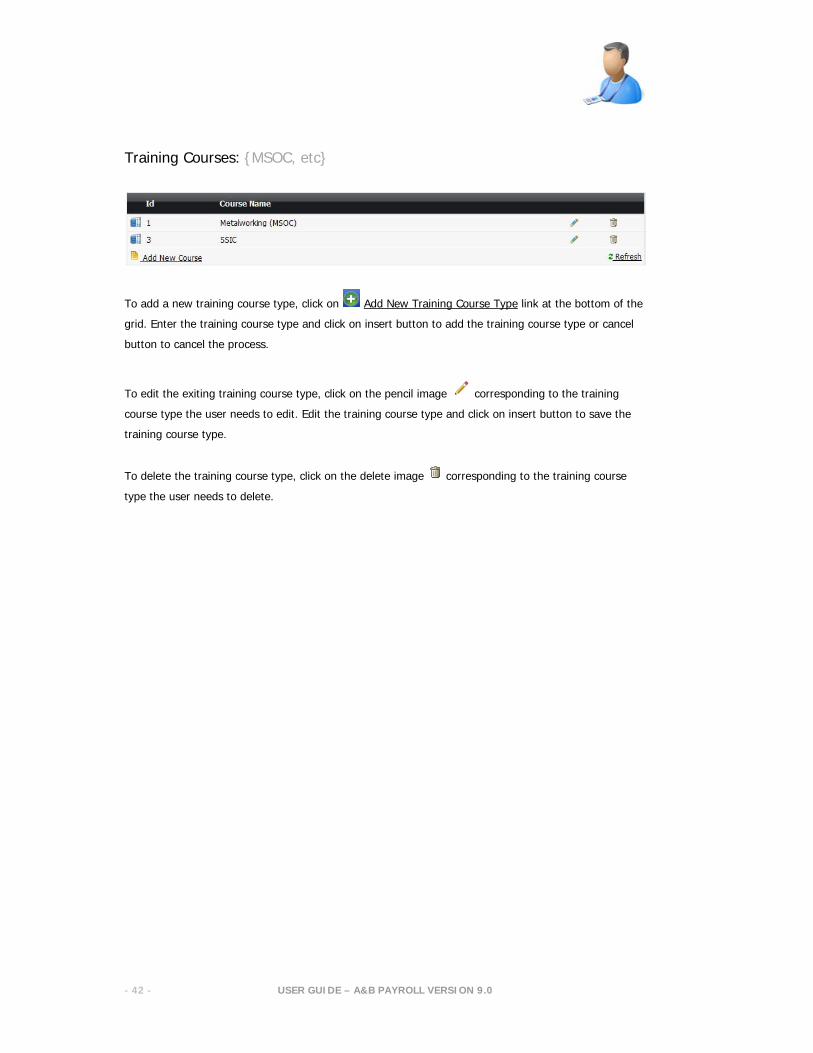
Training Courses: {MSOC, etc}
To add a new training course type, click on Add New Training Course Type link at the bottom of the
grid. Enter the training course type and click on insert button to add the training course type or cancel
button to cancel the process.
To edit the exiting training course type, click on the pencil image corresponding to the training
course type the user needs to edit. Edit the training course type and click on insert button to save the
training course type.
To delete the training course type, click on the delete image corresponding to the training course
type the user needs to delete.

USER GUIDE – A&B PAYROLL VERSION 9.0
- 43 -
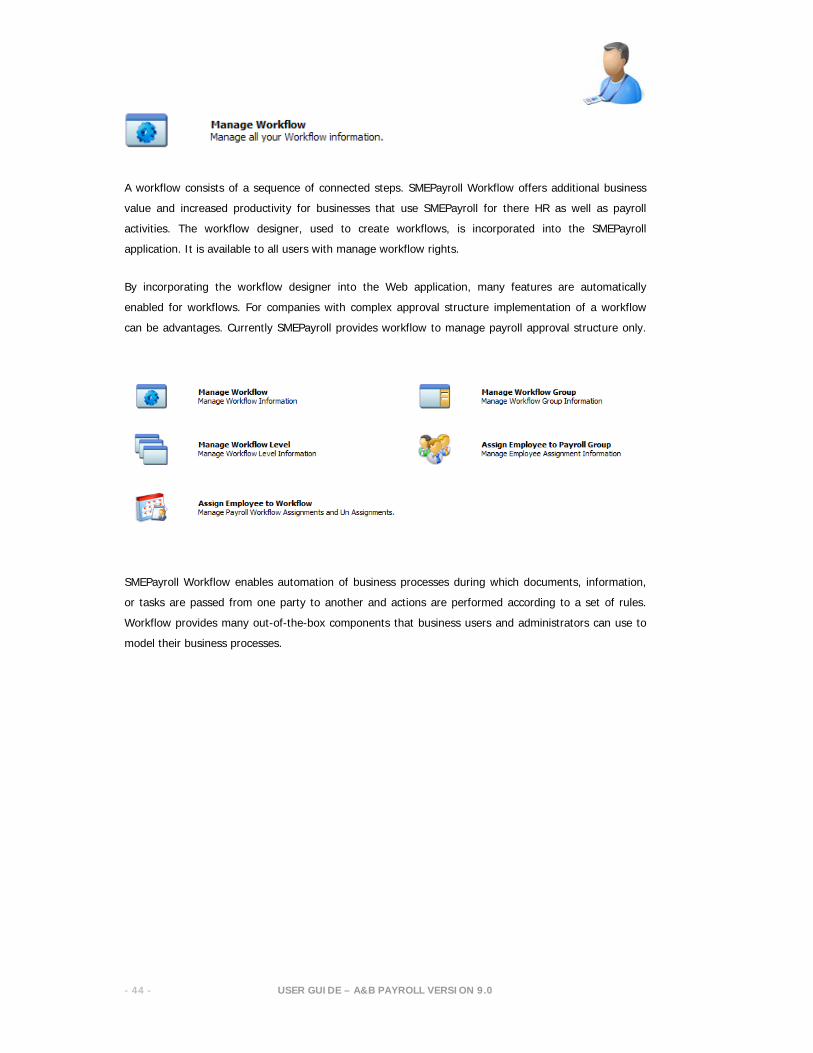
Admin Management
{Manage Workflow}
USER GUIDE – A&B PAYROLL VERSION 9.0
- 44 -
A workflow consists of a sequence of connected steps. SMEPayroll Workflow offers additional business
value and increased productivity for businesses that use SMEPayroll for there HR as well as payroll
activities. The workflow designer, used to create workflows, is incorporated into the SMEPayroll
application. It is available to all users with manage workflow rights.
By incorporating the workflow designer into the Web application, many features are automatically
enabled for workflows. For companies with complex approval structure implementation of a workflow
can be advantages. Currently SMEPayroll provides workflow to manage payroll approval structure only.
SMEPayroll Workflow enables automation of business processes during which documents, information,
or tasks are passed from one party to another and actions are performed according to a set of rules.
Workflow provides many out-of-the-box components that business users and administrators can use to
model their business processes.
USER GUIDE – A&B PAYROLL VERSION 9.0
- 45 -
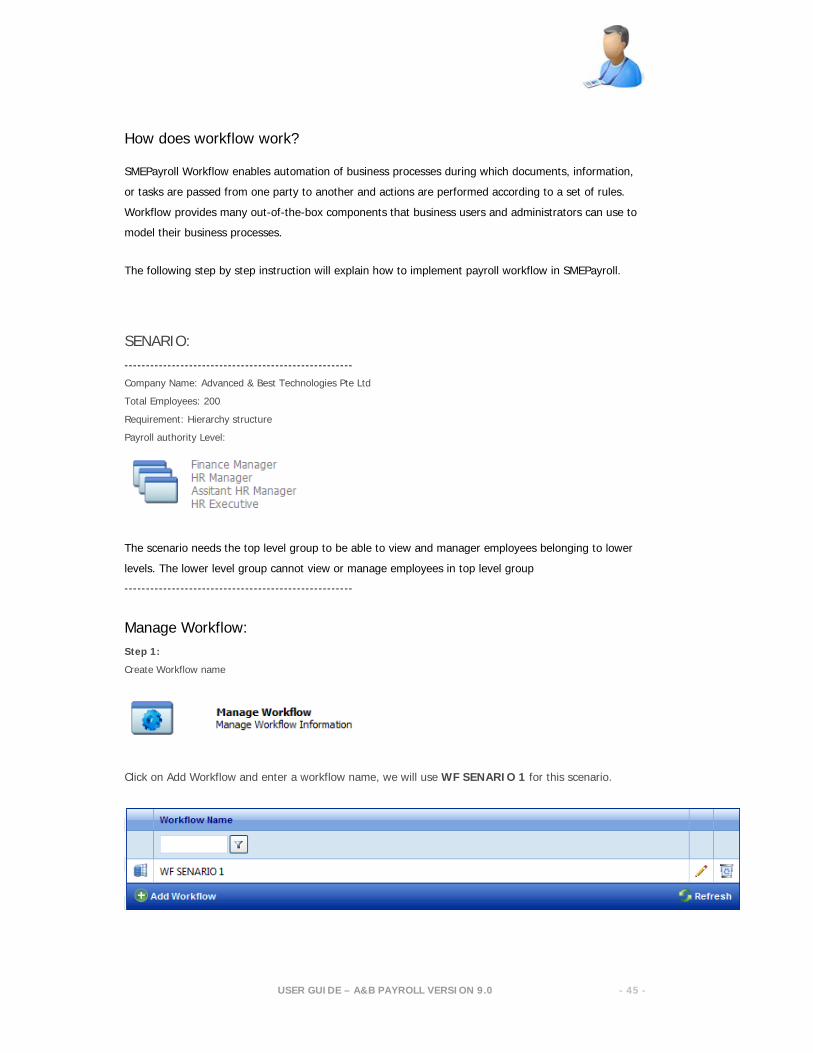
How does workflow work?
SMEPayroll Workflow enables automation of business processes during which documents, information,
or tasks are passed from one party to another and actions are performed according to a set of rules.
Workflow provides many out-of-the-box components that business users and administrators can use to
model their business processes.
The following step by step instruction will explain how to implement payroll workflow in SMEPayroll.
SENARIO: -----------------------------------------------------
Company Name: Advanced & Best Technologies Pte Ltd
Total Employees: 200
Requirement: Hierarchy structure
Payroll authority Level:
The scenario needs the top level group to be able to view and manager employees belonging to lower
levels. The lower level group cannot view or manage employees in top level group
-----------------------------------------------------
Manage Workflow: Step 1:
Create Workflow name
Click on Add Workflow and enter a workflow name, we will use WF SENARIO 1 for this scenario.
USER GUIDE – A&B PAYROLL VERSION 9.0
- 46 -
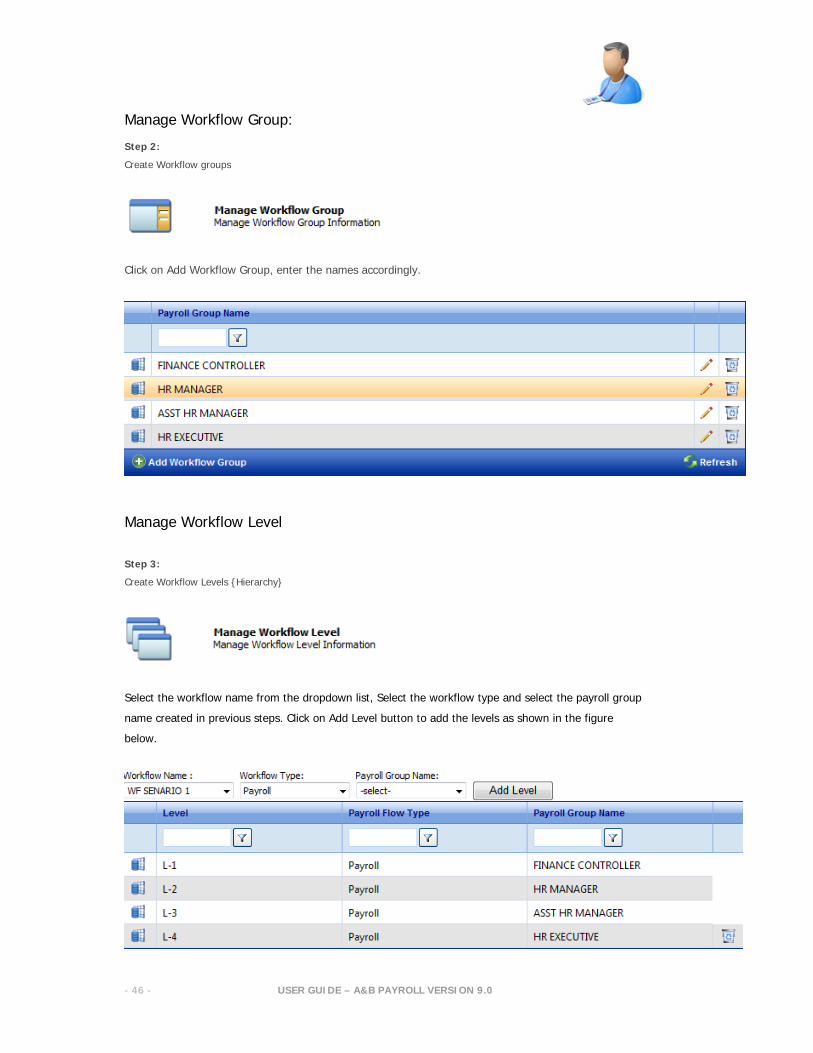
Manage Workflow Group: Step 2:
Create Workflow groups
Click on Add Workflow Group, enter the names accordingly.
Manage Workflow Level
Step 3:
Create Workflow Levels {Hierarchy}
Select the workflow name from the dropdown list, Select the workflow type and select the payroll group
name created in previous steps. Click on Add Level button to add the levels as shown in the figure
below.
USER GUIDE – A&B PAYROLL VERSION 9.0
- 47 -
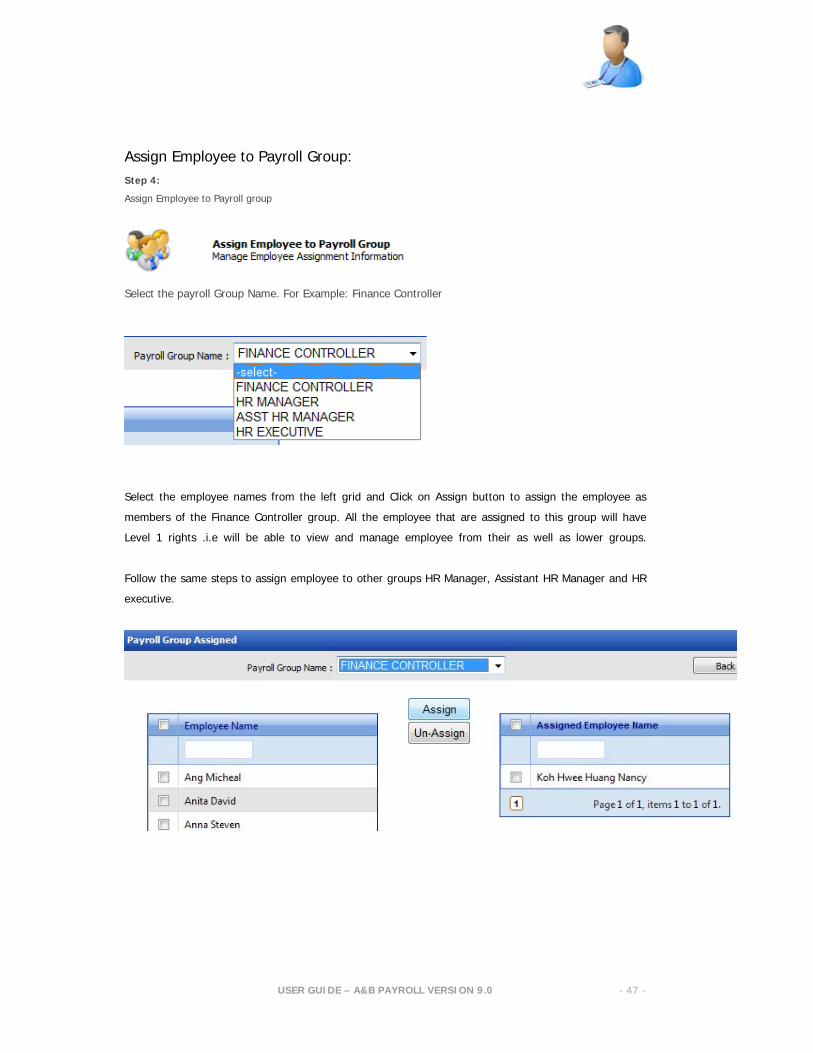
Assign Employee to Payroll Group: Step 4:
Assign Employee to Payroll group
Select the payroll Group Name. For Example: Finance Controller
Select the employee names from the left grid and Click on Assign button to assign the employee as
members of the Finance Controller group. All the employee that are assigned to this group will have
Level 1 rights .i.e will be able to view and manage employee from their as well as lower groups.
Follow the same steps to assign employee to other groups HR Manager, Assistant HR Manager and HR
executive.
USER GUIDE – A&B PAYROLL VERSION 9.0
- 48 -
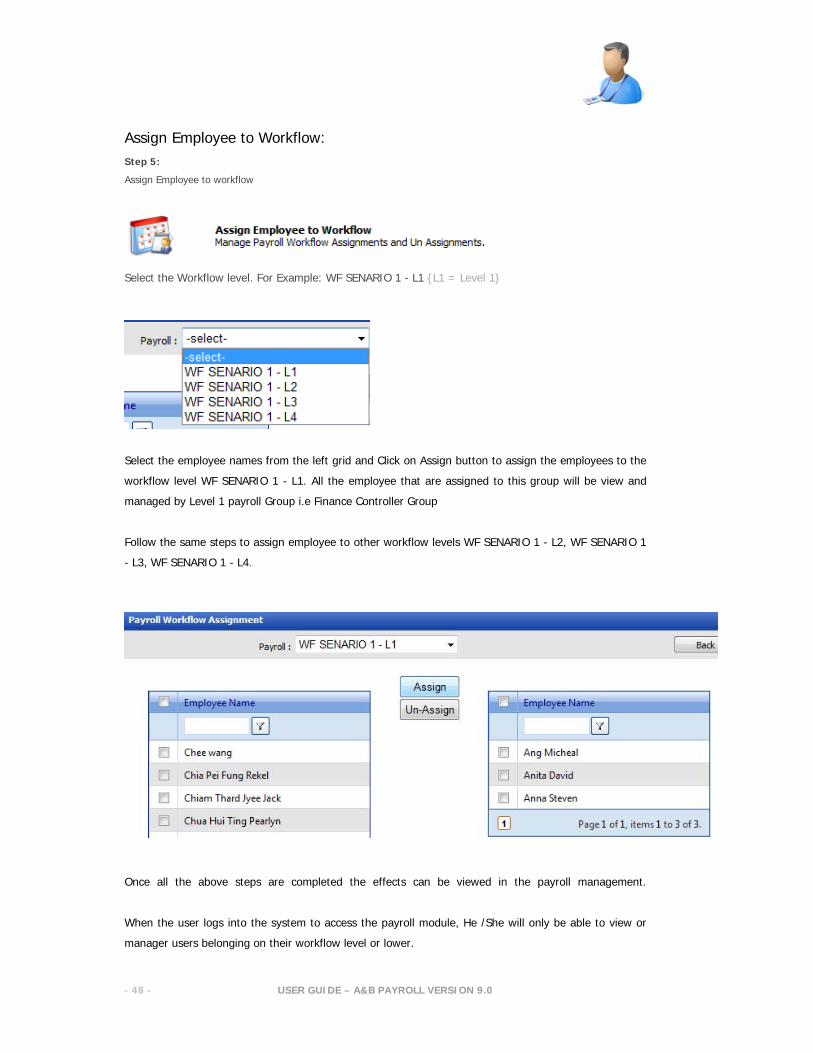
Assign Employee to Workflow: Step 5:
Assign Employee to workflow
Select the Workflow level. For Example: WF SENARIO 1 - L1 {L1 = Level 1}
Select the employee names from the left grid and Click on Assign button to assign the employees to the
workflow level WF SENARIO 1 - L1. All the employee that are assigned to this group will be view and
managed by Level 1 payroll Group i.e Finance Controller Group
Follow the same steps to assign employee to other workflow levels WF SENARIO 1 - L2, WF SENARIO 1
- L3, WF SENARIO 1 - L4.
Once all the above steps are completed the effects can be viewed in the payroll management.
When the user logs into the system to access the payroll module, He /She will only be able to view or
manager users belonging on their workflow level or lower.
USER GUIDE – A&B PAYROLL VERSION 9.0
- 49 -
Admin Management
{Manage Assignments}

USER GUIDE – A&B PAYROLL VERSION 9.0
- 50 -
Manage Assignments module enables user to assign employees to different categories at one go, rather
than entering data for individual employees which could be very time consuming and non productive.
The following are the assignments currently available under this module.
1. Department Assignment
2. Leave Supervisor Assignment
3. Claims Supervisor Assignment

USER GUIDE – A&B PAYROLL VERSION 9.0
- 51 -
Department Assignment:
How to assign department to multiple employees?
Step 1:
Click on Department Assignment under the Manage Assignment
Select the Department name
Step 2:
Select the employee names from the left grid and Click on Assign button to assign the employee
to selected department, for this scenario Administration department.
USER GUIDE – A&B PAYROLL VERSION 9.0
- 52 -
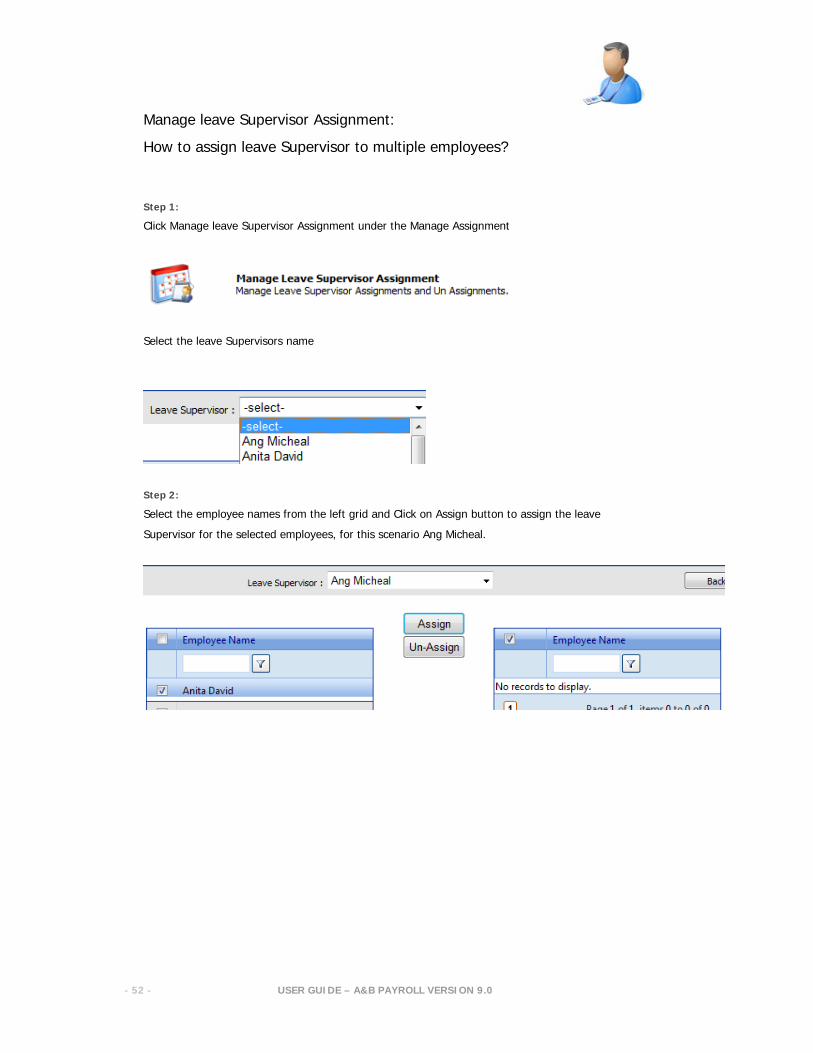
Manage leave Supervisor Assignment:
How to assign leave Supervisor to multiple employees?
Step 1:
Click Manage leave Supervisor Assignment under the Manage Assignment
Select the leave Supervisors name
Step 2:
Select the employee names from the left grid and Click on Assign button to assign the leave
Supervisor for the selected employees, for this scenario Ang Micheal.
USER GUIDE – A&B PAYROLL VERSION 9.0
- 53 -
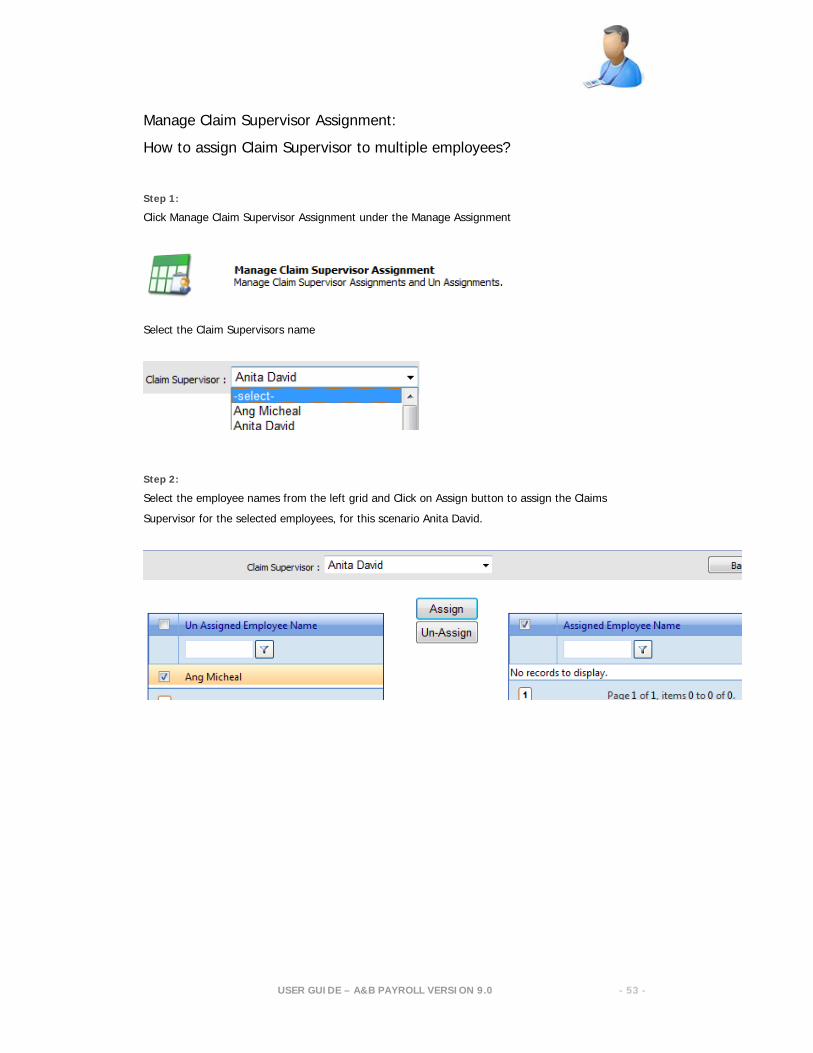
Manage Claim Supervisor Assignment:
How to assign Claim Supervisor to multiple employees?
Step 1:
Click Manage Claim Supervisor Assignment under the Manage Assignment
Select the Claim Supervisors name
Step 2:
Select the employee names from the left grid and Click on Assign button to assign the Claims
Supervisor for the selected employees, for this scenario Anita David.
USER GUIDE – A&B PAYROLL VERSION 9.0
- 54 -
Employee Management
{Employee}
USER GUIDE – A&B PAYROLL VERSION 9.0
- 55 -
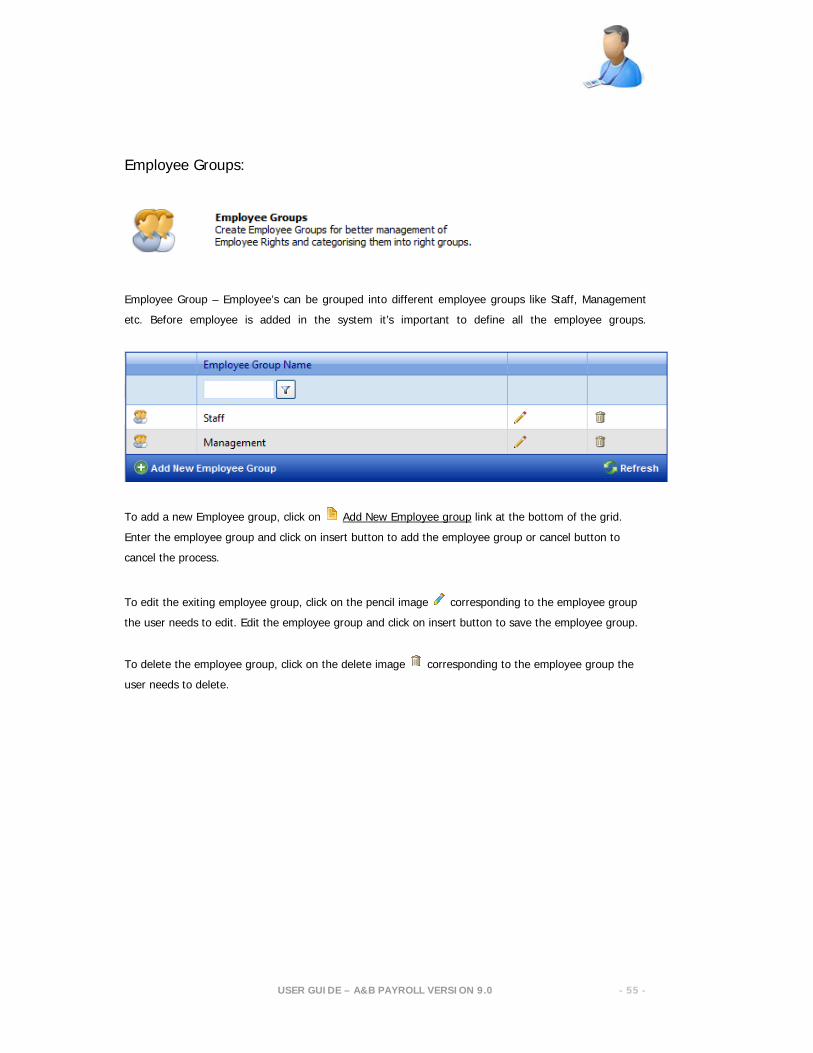
Employee Groups:
Employee Group – Employee’s can be grouped into different employee groups like Staff, Management
etc. Before employee is added in the system it’s important to define all the employee groups.
To add a new Employee group, click on Add New Employee group link at the bottom of the grid.
Enter the employee group and click on insert button to add the employee group or cancel button to
cancel the process.
To edit the exiting employee group, click on the pencil image corresponding to the employee group
the user needs to edit. Edit the employee group and click on insert button to save the employee group.
To delete the employee group, click on the delete image corresponding to the employee group the
user needs to delete.
USER GUIDE – A&B PAYROLL VERSION 9.0
- 56 -
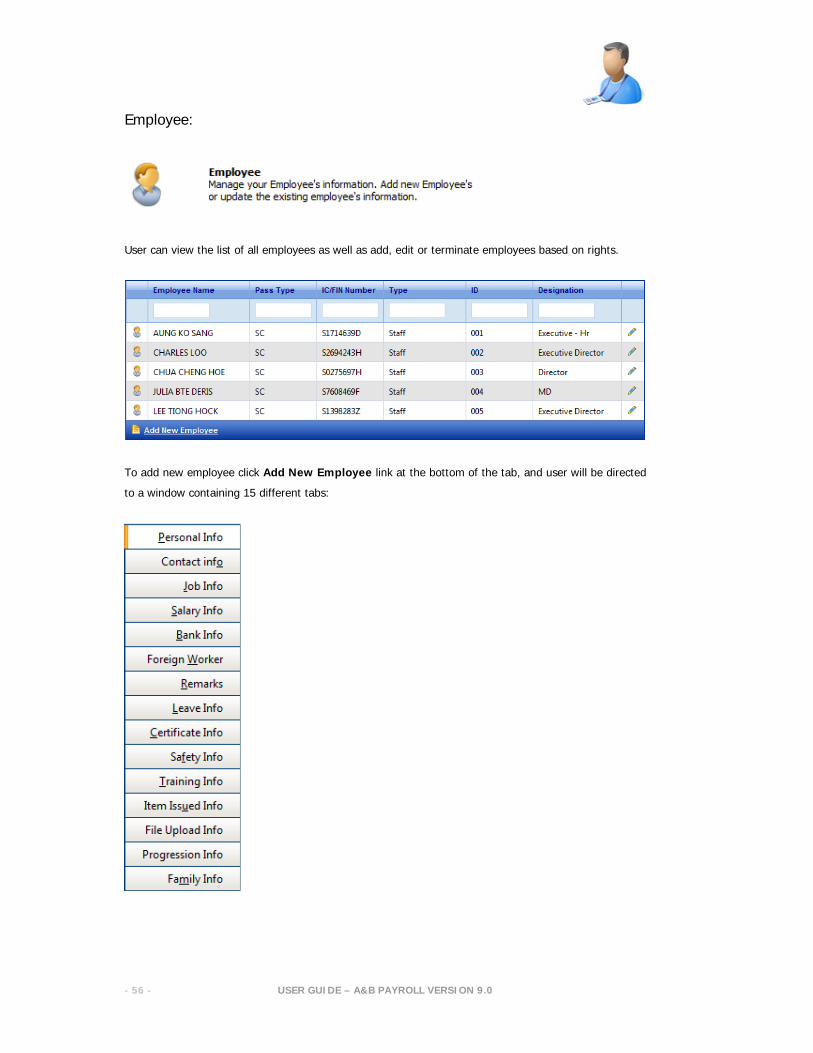
Employee:
User can view the list of all employees as well as add, edit or terminate employees based on rights.
To add new employee click Add New Employee link at the bottom of the tab, and user will be directed
to a window containing 15 different tabs:
USER GUIDE – A&B PAYROLL VERSION 9.0
- 57 -
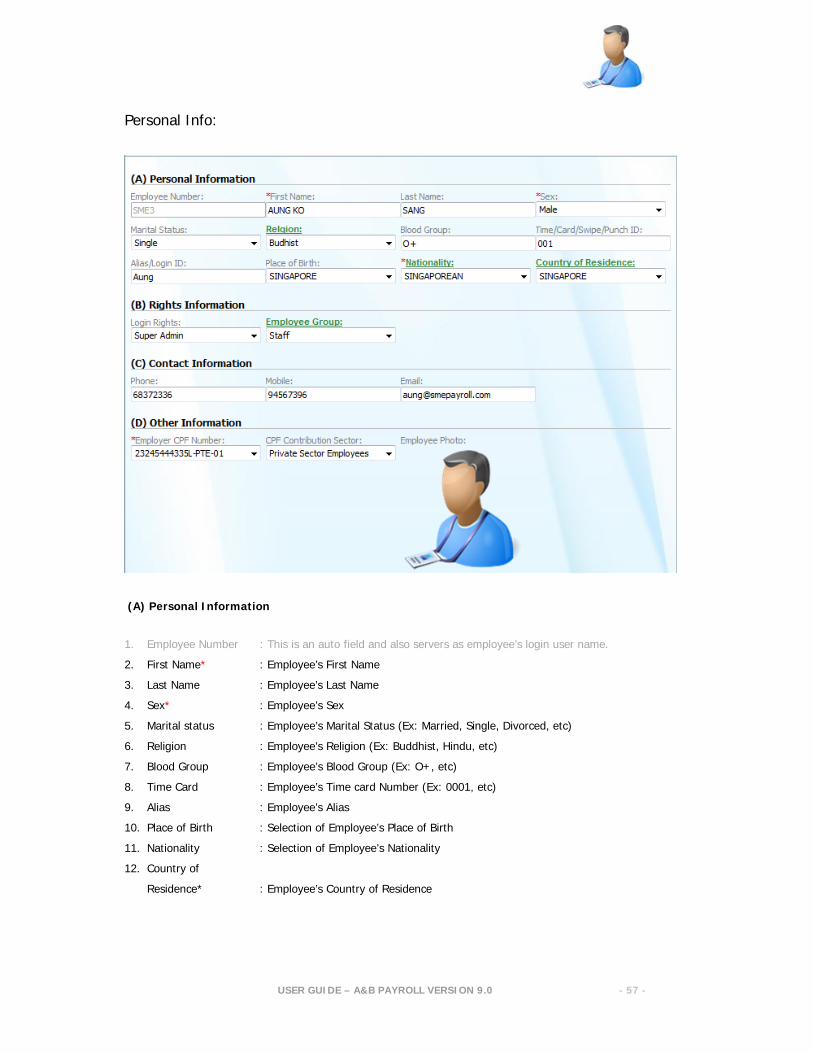
Personal Info:
(A) Personal Information
1. Employee Number : This is an auto field and also servers as employee’s login user name.
2. First Name* : Employee’s First Name
3. Last Name : Employee’s Last Name
4. Sex* : Employee’s Sex
5. Marital status : Employee’s Marital Status (Ex: Married, Single, Divorced, etc)
6. Religion : Employee’s Religion (Ex: Buddhist, Hindu, etc)
7. Blood Group : Employee’s Blood Group (Ex: O+, etc)
8. Time Card : Employee’s Time card Number (Ex: 0001, etc)
9. Alias : Employee’s Alias
10. Place of Birth : Selection of Employee’s Place of Birth
11. Nationality : Selection of Employee’s Nationality
12. Country of
Residence* : Employee’s Country of Residence
USER GUIDE – A&B PAYROLL VERSION 9.0
- 58 -
(B) Rights Information
13. Login Rights : Selection of User (Rights) Group the employee belongs to
14. Employee Group : Employee’s group (Ex: Staff, Management, etc)
(C) Contact Information
15. Phone : Employee’s Phone Number
16. Mobile : Employee’s Hand Phone Number
17. Email : Employee’s Email Address
(D) Other Information
18. Employer CPF A/C : Select employers CPF Submission Number (CSN)
19. CPF Contribution
Sector : Employee’s CPF Group (Ex: Private sector, Government Sector, etc)
20. Employee photo : Employee’s Photo ( Upload)
* Denotes compulsory Field
USER GUIDE – A&B PAYROLL VERSION 9.0
- 59 -
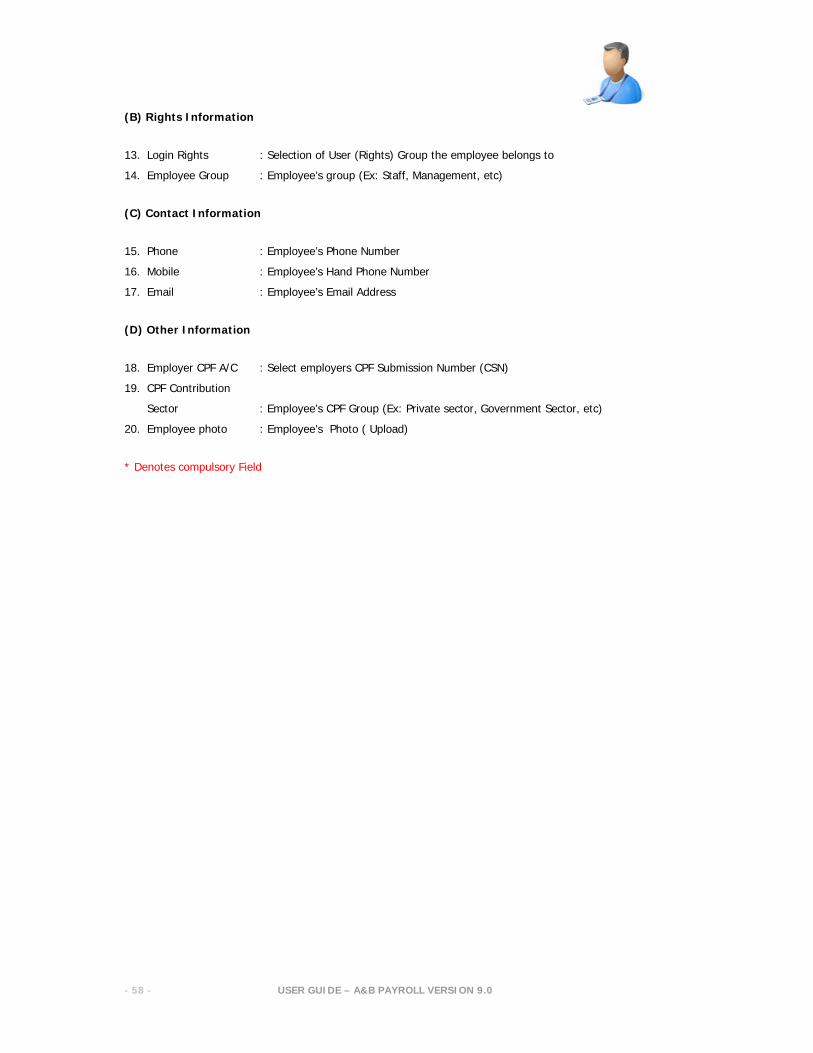
Contact Info:
(A) Local Address Information
1. Block : Employee’s Singapore’s Formatted Address – Block No
2. Street / building : Employee’s Singapore’s Formatted Address – Street Name
3. level : Employee’s Singapore’s Formatted Address – Level
4. Unit : Employee’s Singapore’s Formatted Address – Unit
5. Postal Code : Employee’s Singapore’s Formatted Address – Postal Code
(B) Foreign Address Information
6. Address 1 : Employee’s Foreign Address Line 1
7. Address 2 : Employee’s Foreign Address Line 2
8. Postal Code : Employee’s Foreign Postal Code
(C) Emergency Contact Address Information
9. Contact Person : Employee’s Emergency Contact Person
10. Relationship : Employee’s relationship with Emergency Contact Person
11. Phone-1 : Emergency Contact Person phone Number 1
12. Phone-2 : Emergency Contact Person phone Number 2
13. Address : Emergency Contact Person Address
14. Remarks : Any specific remarks to take note of in case of emergency
* Denotes compulsory Field
USER GUIDE – A&B PAYROLL VERSION 9.0
- 60 -
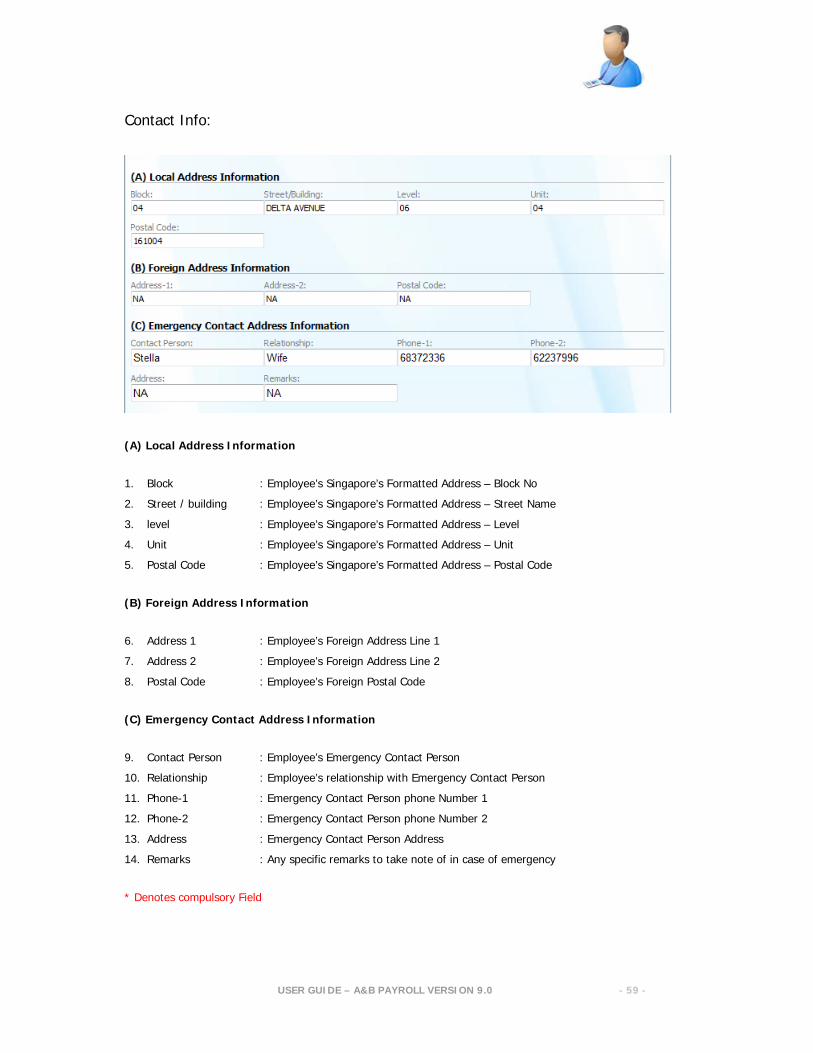
Job Info:
(A) Job Information
1. Joining Date* : Employee’s Joining Date
2. Probationary Period : Employee’s Probationary Period. (In months).
3. Confirmation Date : Employee’s Job Confirmation Date
4. Termination Date : Employee’s Termination Date
5. Termination Remarks : Employee’s Reason for Termination
6. Birth Date* : Employee’s Date of Birth
(B) Other Information
7. Designation : Selection of Employee’s Designation
8. Department : Selection of Employee’s Department
9. Trade : Selection of Employee’s Trade
10. Highest Education : Selection of Employee’s highest
(C) Alert Supervisor
11. Leave Supervisor : Employee’s leave Supervisor; Email request for leaves will be sent
to the email address specified
12. Claim Supervisor : Employee’s Claim Supervisor; Email request for Claims will be sent
to the email address specified
(D) Workflow
13. Payroll : Employee’s workflow level
* Denotes compulsory Field
USER GUIDE – A&B PAYROLL VERSION 9.0
- 61 -
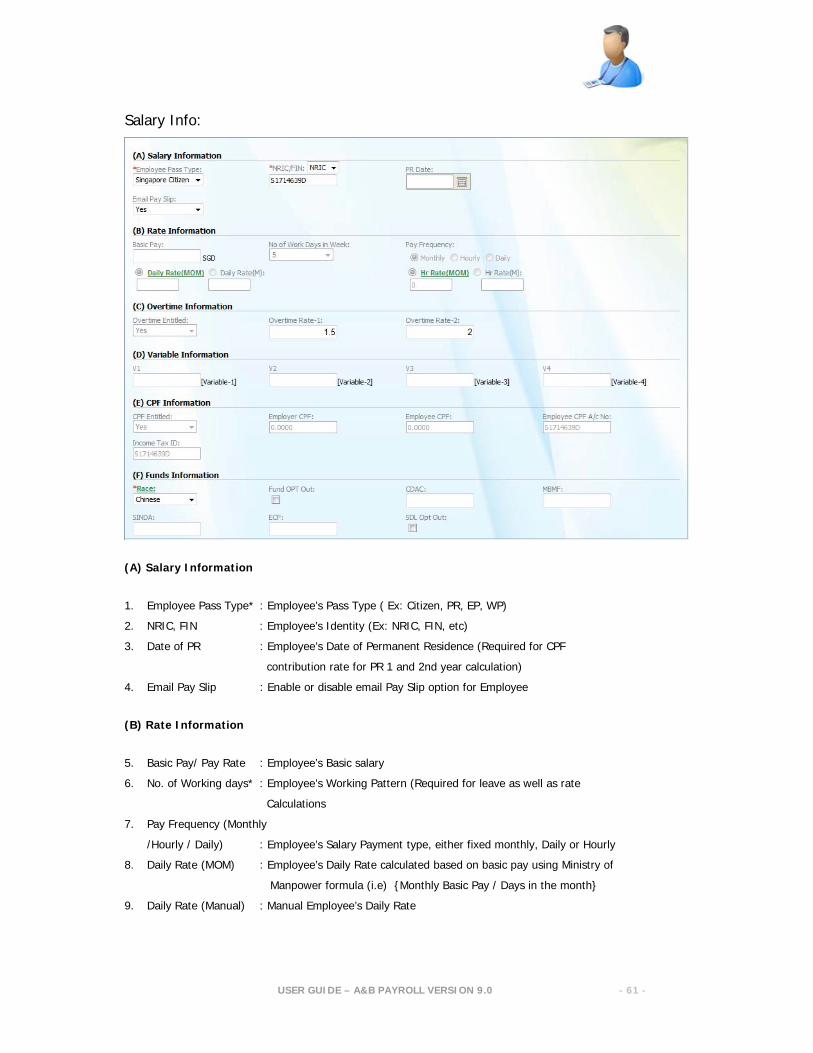
Salary Info:
(A) Salary Information
1. Employee Pass Type* : Employee’s Pass Type ( Ex: Citizen, PR, EP, WP)
2. NRIC, FIN : Employee’s Identity (Ex: NRIC, FIN, etc)
3. Date of PR : Employee’s Date of Permanent Residence (Required for CPF
contribution rate for PR 1 and 2nd year calculation)
4. Email Pay Slip : Enable or disable email Pay Slip option for Employee
(B) Rate Information
5. Basic Pay/ Pay Rate : Employee’s Basic salary
6. No. of Working days* : Employee’s Working Pattern (Required for leave as well as rate
Calculations
7. Pay Frequency (Monthly
/Hourly / Daily) : Employee’s Salary Payment type, either fixed monthly, Daily or Hourly
8. Daily Rate (MOM) : Employee’s Daily Rate calculated based on basic pay using Ministry of
Manpower formula (i.e) {Monthly Basic Pay / Days in the month}
9. Daily Rate (Manual) : Manual Employee’s Daily Rate
USER GUIDE – A&B PAYROLL VERSION 9.0
- 62 -
10. Hourly Rate (MOM) : Employee’s Hourly Rate calculated based on basic pay using Ministry of
Manpower formula (i.e) {12 * Monthly Basic Pay / 52 Weeks * 44 Hours}
11. Hourly Rate (Manual) : Manual Employee’s Hourly Rate
(C) Overtime Information
12. O.T Entitled* : Selection of Employee’s overtime entitled (YES or NO)
13. Overtime 1 Rate :
14. Overtime 2 Rate :
(D) Variable Information
15. Variable 1 (V1) : Variable Payment rate for variable V1 {Variable can be renamed to
suit the organizations needs, more info on page 27 (variables under
Additions Types)}
16. Variable 2 (V2) : Variable Payment rate for variable V2 {Variable can be renamed to
suit the organizations needs, more info on page 27 (variables under
Additions Types)}
17. Variable 3 (V3) : Variable Payment rate for variable V3 {Variable can be renamed to
suit the organizations needs, more info on page 27 (variables under
Additions Types)}
18. Variable 4 (V4) : Variable Payment rate for variable V4 {Variable can be renamed to
suit the organizations needs, more info on page 27 (variables under
Additions Types)}
(E) CPF Information
19. CPF Entitled : Selection of Employee’s CPF Entitlement
20. Employer CPF : This is an auto field for information only
21. Employee CPF : This is an auto field for information only
22. Employee CPF Num : This is an auto field for information only
23. Income Tax Id : This is an auto field for information only
(F) Funds Information
24. Race* : Selection of Employee’s Race
25. Fund Opt Out : Selection whether Employee wished to opt out from Funds
contribution.
26. CDAC : This is an auto field for information only
27. MBMF : This is an auto field for information only
28. SINDA : This is an auto field for information only
29. ECF : This is an auto field for information only
30. SDL Opt Out : Selection whether Employee excluded from SDL contribution

USER GUIDE – A&B PAYROLL VERSION 9.0
- 63 -
Bank Info:
(A) Bank Information
1. Pay Mode* : Selection of Employee’s Salary Payment (Ex: Cash, Cheque, Giro)
2. Giro Account No* : Employee’s Giro Account No. (Applicable only if pay mode is Giro)
3. GIRO Bank Code* : Employee’s Giro Bank Code. (Applicable only if pay mode is Giro)
4. GIRO Branch Code* : Employee’s Giro Branch Code. (Applicable only if pay mode is Giro)
5. Giro Account Name* : Employee’s Giro Acc Name. (Applicable only if pay mode is Giro)
* Denotes compulsory Field
Note: If the pay mode is other than cheque or cash all the other fields under bank info tab become
mandatory

USER GUIDE – A&B PAYROLL VERSION 9.0
- 64 -
Foreign Worker:
(A) Work Permit Information
1. WP Number : Employee’s Work Permit Number
2. WP Application Date : Employee’s Work Permit Application Date
3. WP Issue Date : Employee’s Work Permit Issue Date
4. Date of Arrival : Employee’s Giro Branch Code. (Applicable only if pay mode is Giro)
5. MYE certificate : Employee’s Giro Acc Name. (Applicable only if pay mode is Giro)
6. Monthly Levy : Employee’s Monthly Foreign Workers Levy Amount
7. Workers Levy : Selection of Foreign Workers Levy type – High or Low
8. FWL Code : Employee’s Foreign Workers Levy Code
(B) Other Information
9. Shipyard Quota : Employee’s Shipyard Quota
10. Batch No. : Employee’s Insurance Number
11. Agent Name : employee’s Agent Name
12. Photo No. : Employee’s Photo Number (Client Reference)
* Denotes compulsory Field
USER GUIDE – A&B PAYROLL VERSION 9.0
- 65 -
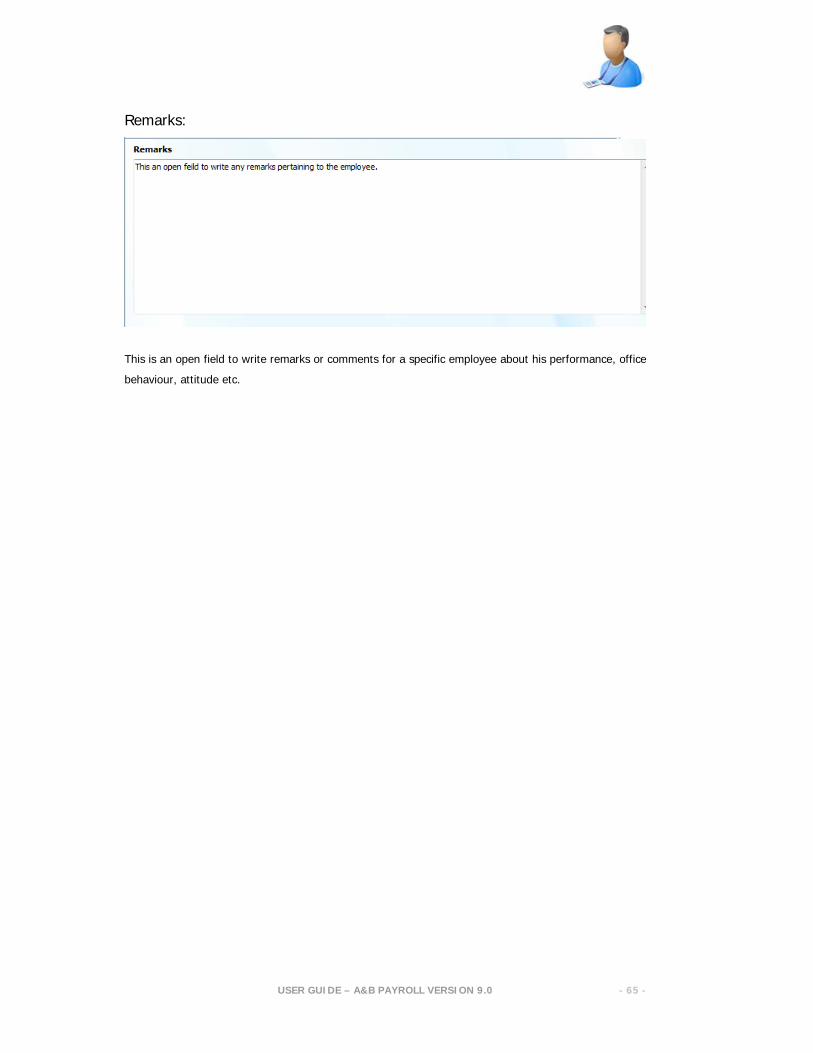
Remarks:
This is an open field to write remarks or comments for a specific employee about his performance, office
behaviour, attitude etc.
USER GUIDE – A&B PAYROLL VERSION 9.0
- 66 -
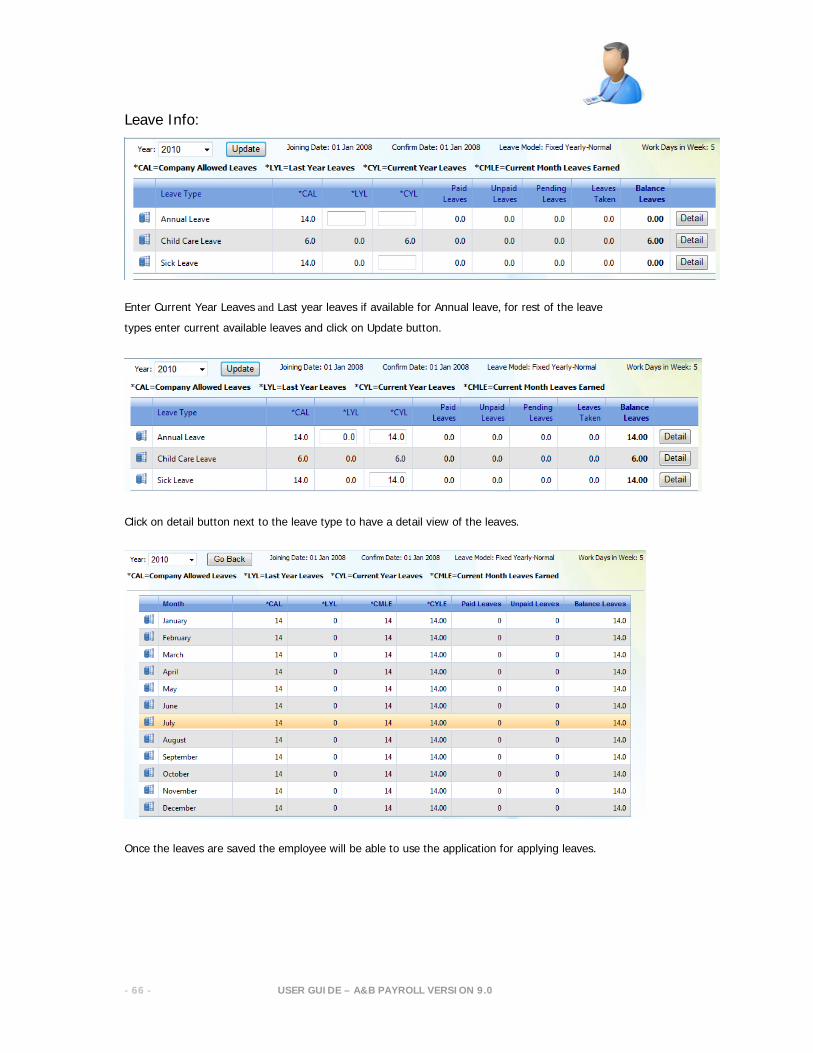
Leave Info:
Enter Current Year Leaves and Last year leaves if available for Annual leave, for rest of the leave
types enter current available leaves and click on Update button.
Click on detail button next to the leave type to have a detail view of the leaves.
Once the leaves are saved the employee will be able to use the application for applying leaves.
USER GUIDE – A&B PAYROLL VERSION 9.0
- 67 -
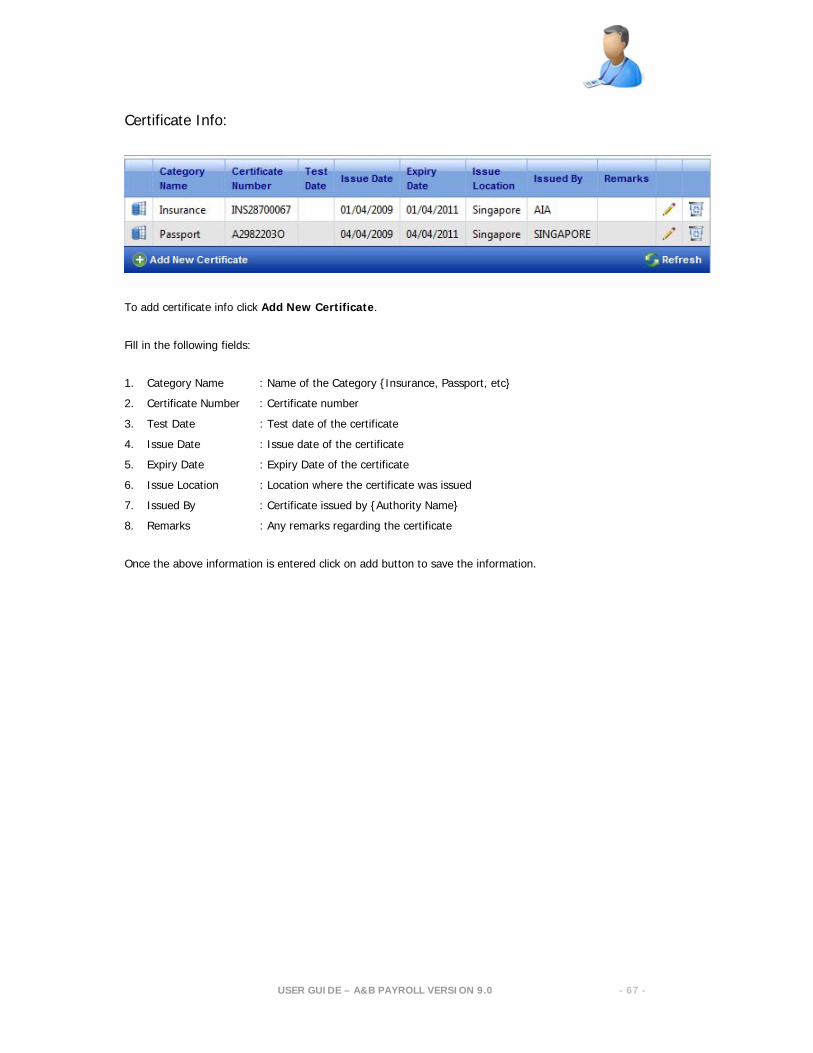
Certificate Info:
To add certificate info click Add New Certificate.
Fill in the following fields:
1. Category Name : Name of the Category {Insurance, Passport, etc}
2. Certificate Number : Certificate number
3. Test Date : Test date of the certificate
4. Issue Date : Issue date of the certificate
5. Expiry Date : Expiry Date of the certificate
6. Issue Location : Location where the certificate was issued
7. Issued By : Certificate issued by {Authority Name}
8. Remarks : Any remarks regarding the certificate
Once the above information is entered click on add button to save the information.
USER GUIDE – A&B PAYROLL VERSION 9.0
- 68 -
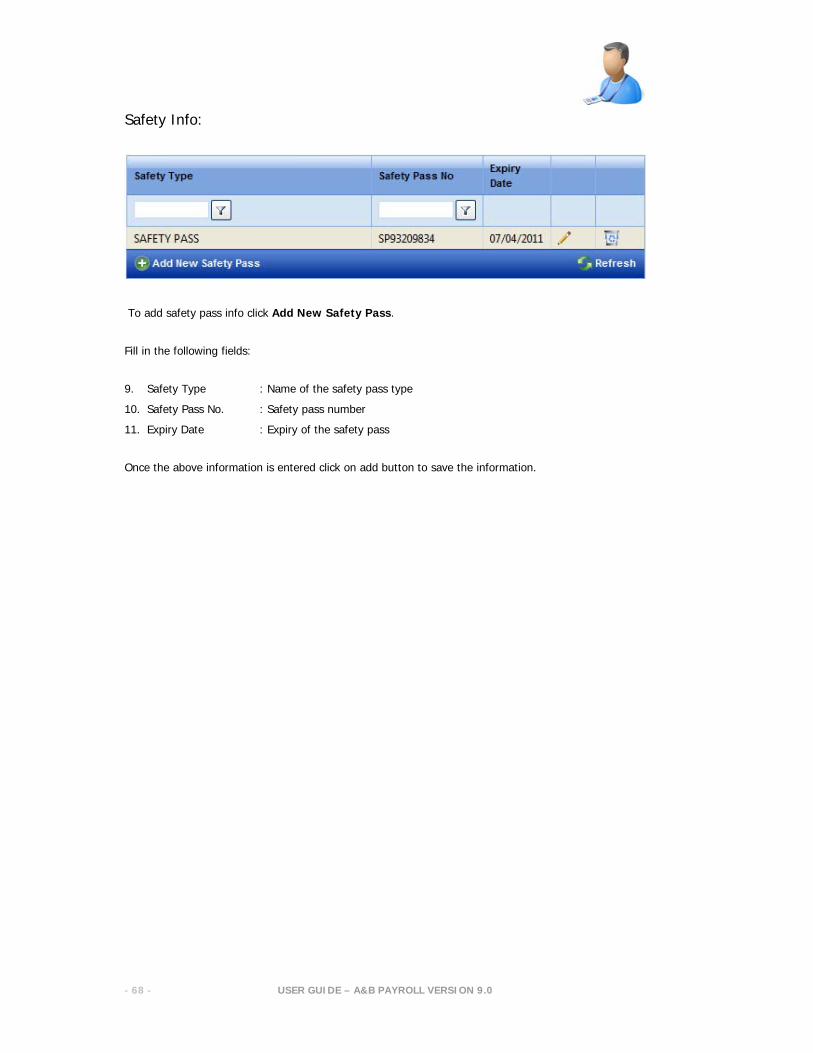
Safety Info:
To add safety pass info click Add New Safety Pass.
Fill in the following fields:
9. Safety Type : Name of the safety pass type
10. Safety Pass No. : Safety pass number
11. Expiry Date : Expiry of the safety pass
Once the above information is entered click on add button to save the information.
USER GUIDE – A&B PAYROLL VERSION 9.0
- 69 -
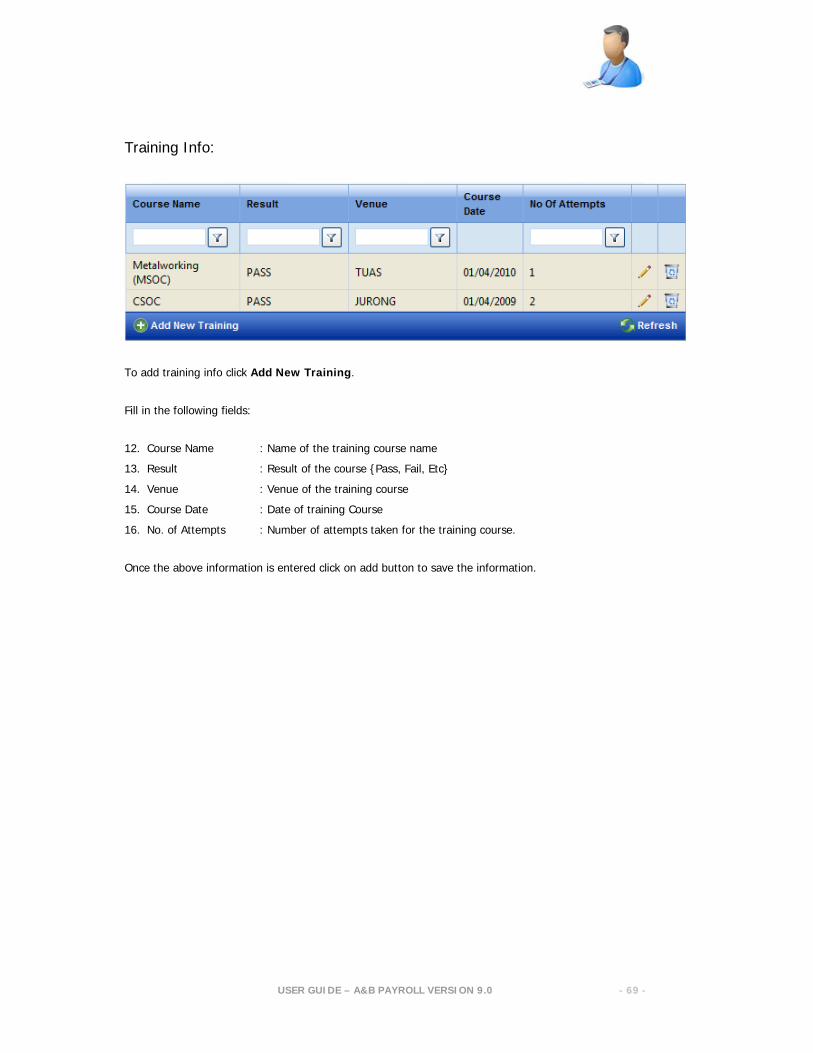
Training Info:
To add training info click Add New Training.
Fill in the following fields:
12. Course Name : Name of the training course name
13. Result : Result of the course {Pass, Fail, Etc}
14. Venue : Venue of the training course
15. Course Date : Date of training Course
16. No. of Attempts : Number of attempts taken for the training course.
Once the above information is entered click on add button to save the information.
USER GUIDE – A&B PAYROLL VERSION 9.0
- 70 -
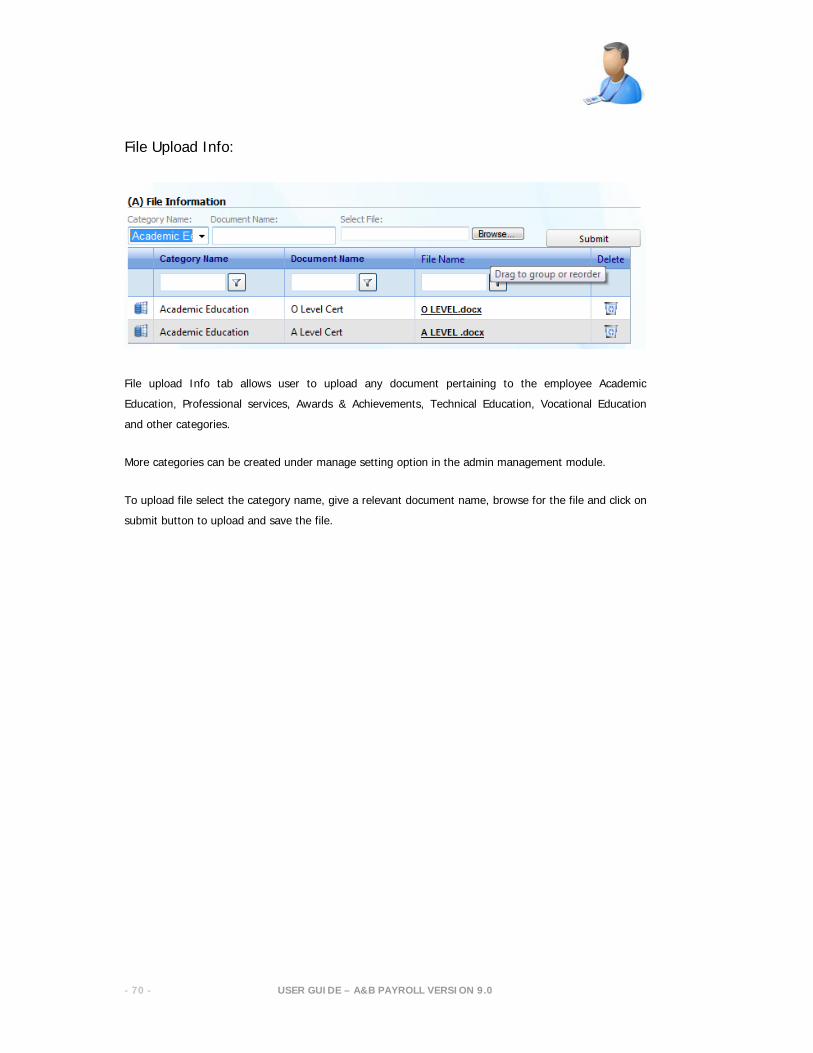
File Upload Info:
File upload Info tab allows user to upload any document pertaining to the employee Academic
Education, Professional services, Awards & Achievements, Technical Education, Vocational Education
and other categories.
More categories can be created under manage setting option in the admin management module.
To upload file select the category name, give a relevant document name, browse for the file and click on
submit button to upload and save the file.

USER GUIDE – A&B PAYROLL VERSION 9.0
- 71 -
Progression Info:
Progression info tab records all the changes pertaining to the employee in terms of:
1. Basic pay
2. Pay frequency {Monthly, Hourly or Daily}
3. Number of working days pattern
4. Department
5. Hourly Rate calculation mode {Auto or Manual}
6. Hourly Rate
7. Daily Rate calculation mode {Auto or Manual}
8. Daily Rate
9. Designation
10. Overtime Entitlement
11. CPF Entitlement
12. Overtime 1 Rate
13. Overtime 2 Rate
Update any of the above parameter that need to be changed and click Update Pay Record button. The
“From Date” parameter will define the date from which the new change will takes affect.
USER GUIDE – A&B PAYROLL VERSION 9.0
- 72 -
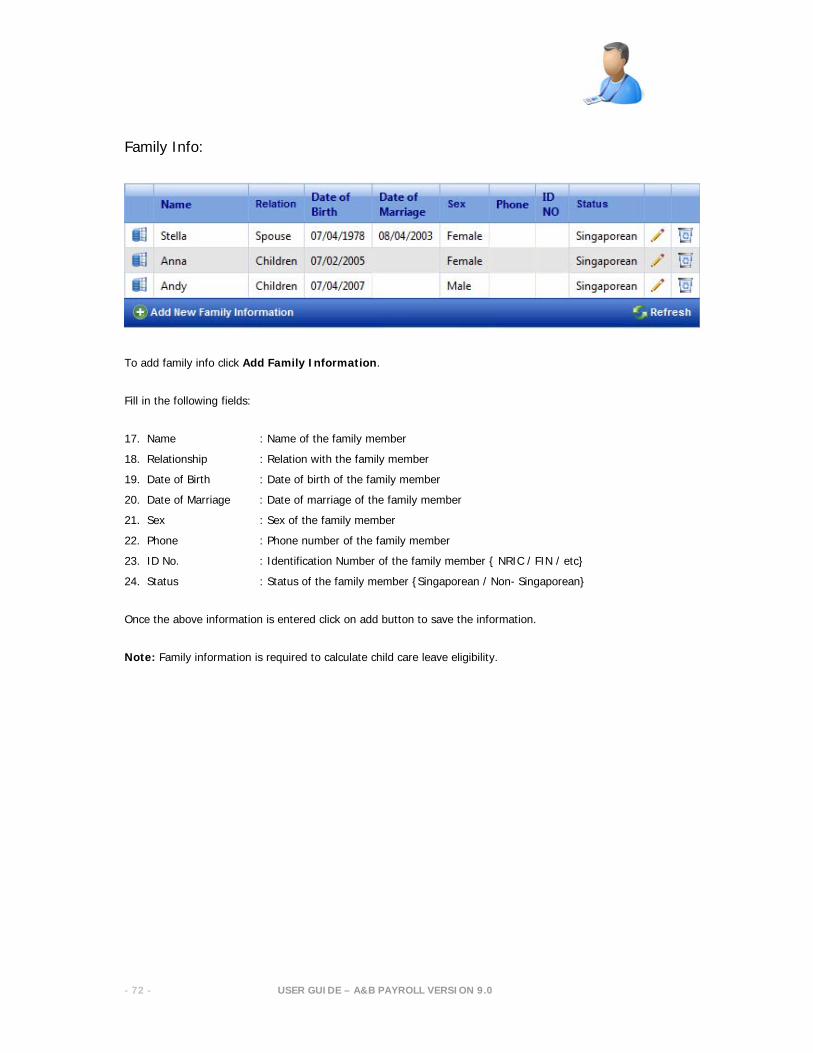
Family Info:
To add family info click Add Family Information.
Fill in the following fields:
17. Name : Name of the family member
18. Relationship : Relation with the family member
19. Date of Birth : Date of birth of the family member
20. Date of Marriage : Date of marriage of the family member
21. Sex : Sex of the family member
22. Phone : Phone number of the family member
23. ID No. : Identification Number of the family member { NRIC / FIN / etc}
24. Status : Status of the family member {Singaporean / Non- Singaporean}
Once the above information is entered click on add button to save the information.
Note: Family information is required to calculate child care leave eligibility.
USER GUIDE – A&B PAYROLL VERSION 9.0
- 73 -
Claims Management
{Claim application to approval Process}

USER GUIDE – A&B PAYROLL VERSION 9.0
- 74 -
Claims Management Module:
Claims Management Module covers the claims application, relevant document upload and approval
process. As shown in figure following are the management options of claims Module:

USER GUIDE – A&B PAYROLL VERSION 9.0
- 75 -
Claims Process:
User (Employee) can apply for different types of claims from this link.
Step 1:
To add a new claim, click on Add New Claims link at the bottom of the grid.
User will input the following fields to apply for a claim:
1. Employee : Selection of Employee Name
2. Amount Only * : Claim Amount
3. Transaction period* : Claim applied for the period From - To
4. Receipt uploaded : Upload Claim document if any
5. Claims type : Selection of claim type ( Ex: Travel, medical Reimbursement)
6. Remarks : Any remarks pertaining to the Claim
* Denotes compulsory Field

USER GUIDE – A&B PAYROLL VERSION 9.0
- 76 -
Click Insert to add the claim.
Step 2:
Submitting Claim:
Once the claim is added user can select the claim and submit for approval; an email will be sent to the
respective supervisor for approval.
Following are the messages the user receives once the claim is submitted.
HR, Super Admin or any other user group with appropriate rights can also apply claims on behalf of the
employee.
USER GUIDE – A&B PAYROLL VERSION 9.0
- 77 -
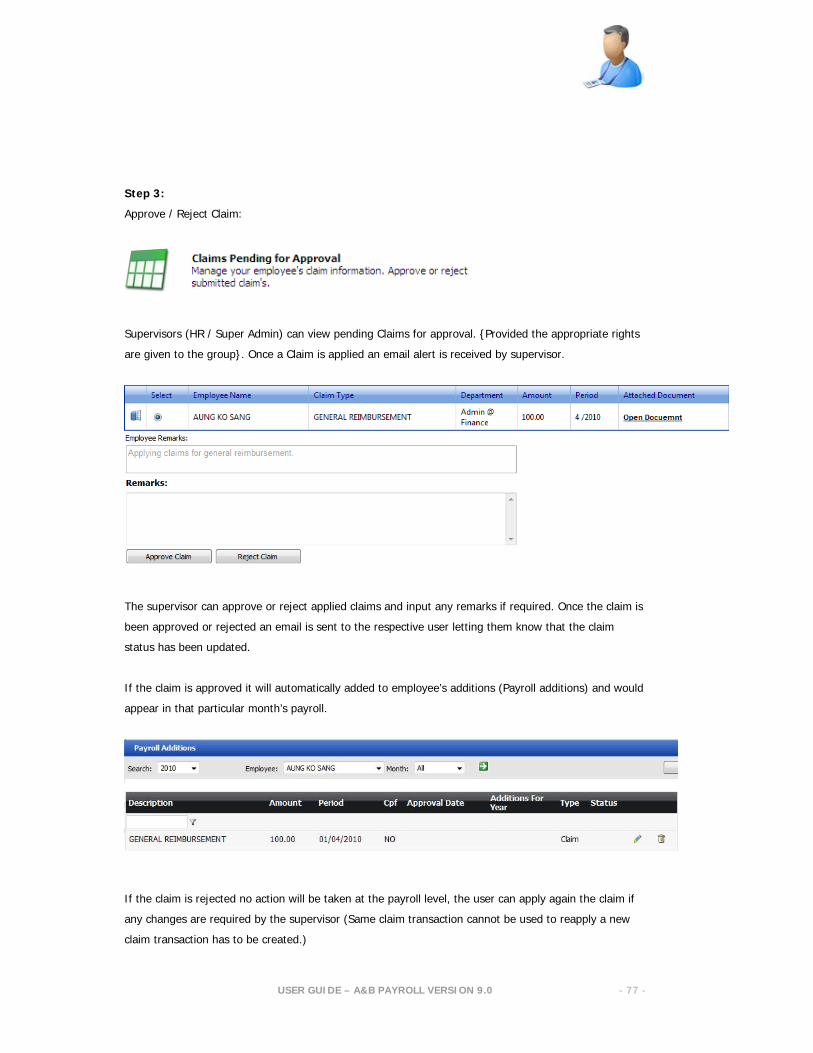
Step 3:
Approve / Reject Claim:
Supervisors (HR / Super Admin) can view pending Claims for approval. {Provided the appropriate rights
are given to the group}. Once a Claim is applied an email alert is received by supervisor.
The supervisor can approve or reject applied claims and input any remarks if required. Once the claim is
been approved or rejected an email is sent to the respective user letting them know that the claim
status has been updated.
If the claim is approved it will automatically added to employee’s additions (Payroll additions) and would
appear in that particular month’s payroll.
If the claim is rejected no action will be taken at the payroll level, the user can apply again the claim if
any changes are required by the supervisor (Same claim transaction cannot be used to reapply a new
claim transaction has to be created.)

USER GUIDE – A&B PAYROLL VERSION 9.0
- 78 -
Step 4:
Viewing Status of Claims applied:
User can view the status of all there applied claims. {Approved, Rejected, Open, Etc}
Supervisor can edit the existing claim period (month) for pending claims if required to assign the claim
to different month’s payroll. To edit the exiting claim, click on the pencil image corresponding to the
claim. Edit the claim period and click on insert button to save the claim.
The user can have other views like viewing only approved claims and viewing only rejected claims.
Users can view all the approved claims for current and past year.
USER GUIDE – A&B PAYROLL VERSION 9.0
- 79 -
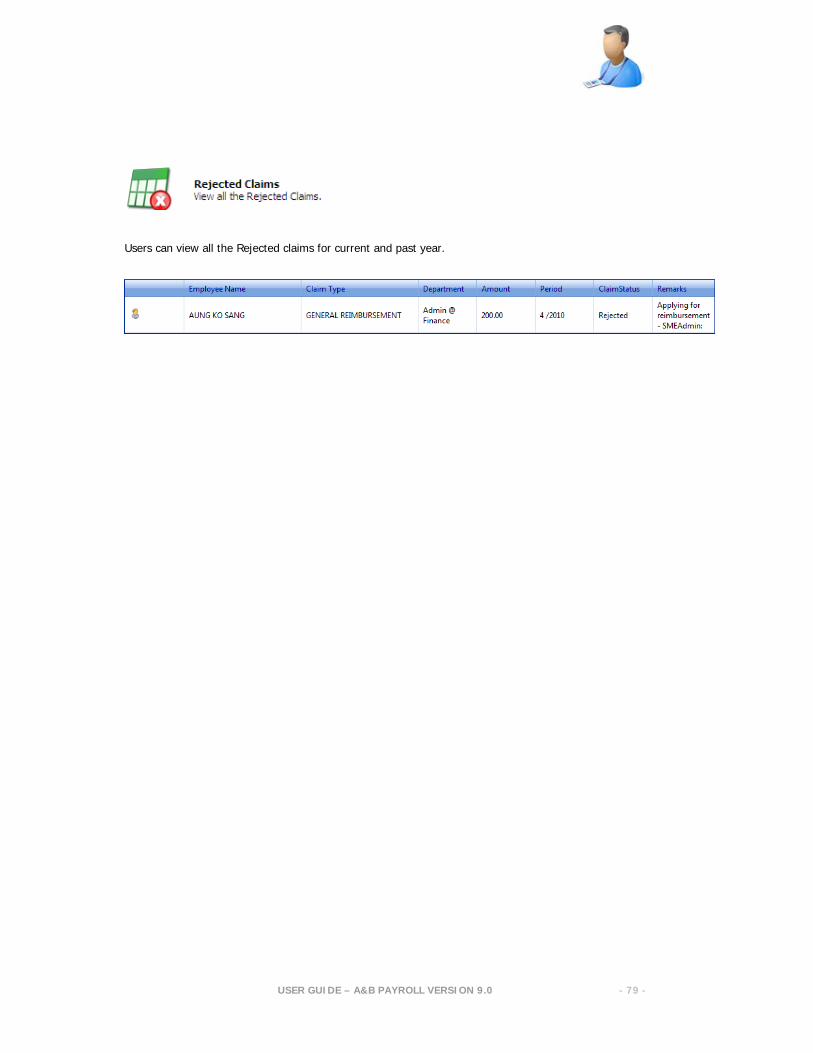
Users can view all the Rejected claims for current and past year.

USER GUIDE – A&B PAYROLL VERSION 9.0
- 80 -
Leaves Management
{Leaves}
USER GUIDE – A&B PAYROLL VERSION 9.0
- 81 -
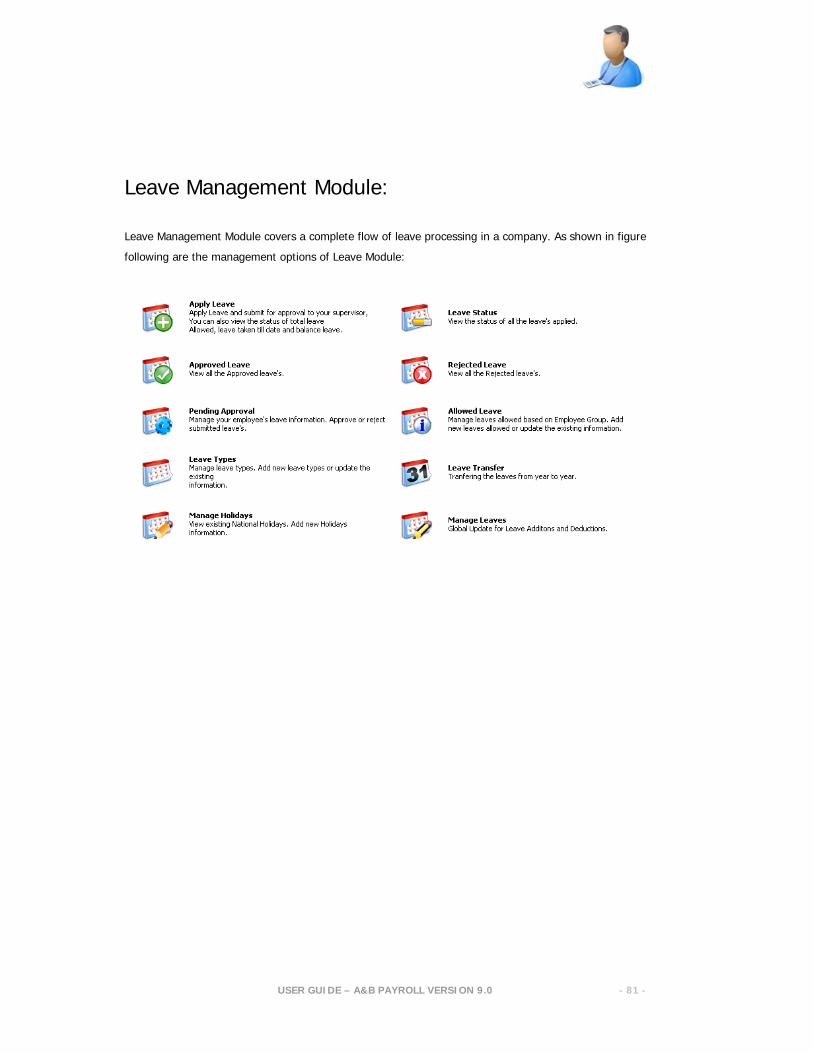
Leave Management Module:
Leave Management Module covers a complete flow of leave processing in a company. As shown in figure
following are the management options of Leave Module:
USER GUIDE – A&B PAYROLL VERSION 9.0
- 82 -
Leaves Management
{Leave Model Setup Process}
USER GUIDE – A&B PAYROLL VERSION 9.0
- 83 -
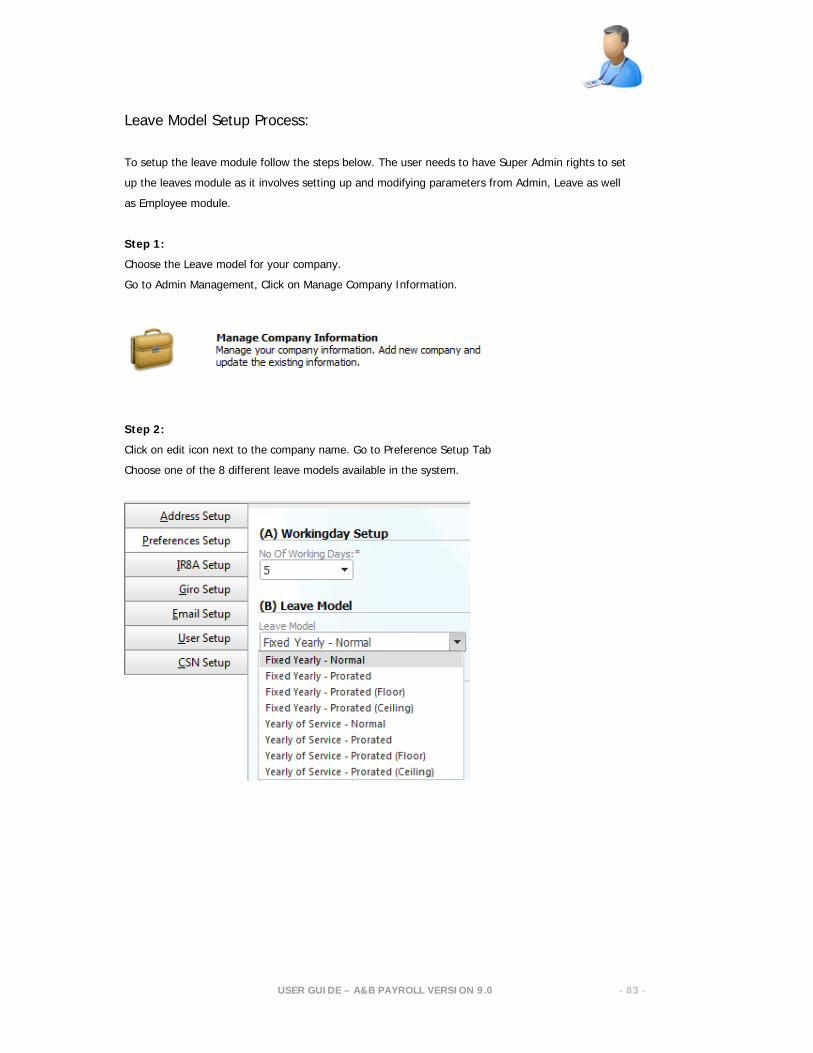
Leave Model Setup Process:
To setup the leave module follow the steps below. The user needs to have Super Admin rights to set
up the leaves module as it involves setting up and modifying parameters from Admin, Leave as well
as Employee module.
Step 1:
Choose the Leave model for your company.
Go to Admin Management, Click on Manage Company Information.
Step 2:
Click on edit icon next to the company name. Go to Preference Setup Tab
Choose one of the 8 different leave models available in the system.
USER GUIDE – A&B PAYROLL VERSION 9.0
- 84 -
Leave Models are broadly divided into 2 categories - Fixed yearly and Year of service.
Fixed Yearly leave model - Leaves period - Calendar year January to December
For Example: Mr. Tan Joins on 1 June 2010. the leave period would be from 1 June 2010 to
31 December 2010, and the following year January 2011 to December 2011.
Year of Service leave model - Leaves period - Employee's joining anniversary.
For Example: Mr. Tan Joins on 1 June 2010. the leave period would be from 1 June 2010 to 30
May 2011, and the following year 1 June 2011 to 30 May 2012.
Choosing between Fixed Yearly and Year of Service leave model is very important at this stage as it
would define all further modification or additions the user will perform.
-----------------------------------------
Fixed Yearly / Year of service - Normal: Under this leave model, all the leaves are available to
an employee at any given time of the year.
For Example: An employee has joined the company on 01. Jan and has 14 Annual leaves entitled
for that year. So if the employee is applying for leave in the month of January or any other month
he/she would have 14 leaves available to consume
-----------------------------------------
Fixed Yearly / Year of service - Prorated: Under this leave model, leaves available to an
employee are prorated based on number of months of service.
For Example: An employee has joined the company on 01. Jan and has 14 Annual leaves entitled
for that year. The leaves will be prorated by the formula:
14 (Leaves) /12 (Months) = 1.16 * Number of completed months. So if the employee is applying for
leave in the month of April he/she would have 3.49 leaves available to consume. (i.e. 14/12 = 1.16 x
3 (Jan, Feb, March) = 3.49)
-----------------------------------------
USER GUIDE – A&B PAYROLL VERSION 9.0
- 85 -
Fixed Yearly / Year of service - Prorated (Floor): Under this leave model, leaves available to
an employee are prorated based on number of months of service
For Example: An employee has joined the company on 01. Jan and has 14 Annual leaves entitled
for that year. The leaves will be prorated by the formula:
14 (Leaves) /12 (Months) = 1.16 * Number of completed months. So if the employee is applying
for leave in the month of April he/she would have 3 leaves
available to consume. (i.e. 14/12 = 1.16 x 3 (Jan, Feb, March) = 3.49 in the concept of floor all the
decimal are dropped = 3)
-----------------------------------------
Fixed Yearly / Year of service - Prorated (Ceiling): Under this leave model, leaves available to
an employee are prorated based on number of months of service
For Example: An employee has joined the company on 01. Jan and has 14 Annual leaves entitled
for that year. The leaves will be prorated by the formula:
14 (Leaves) /12 (Months) = 1.16 * Number of completed months. So if the employee is applying for
leave in the month of April he/she would have 4 leaves available to consume. (i.e. 14/12 = 1.16 x 3
(Jan, Feb, March) = 3.49 in the concept of ceiling the decimal are raised = 4)
-----------------------------------------
Step 3:
Setting up Leaves Allowed at company level, later we will setup leaves allowed at employee level.
Go to Leave Management, Click on Allowed leave.
Based on your selection Fixed yearly or Year of service the following screen will be available.
USER GUIDE – A&B PAYROLL VERSION 9.0
- 86 -
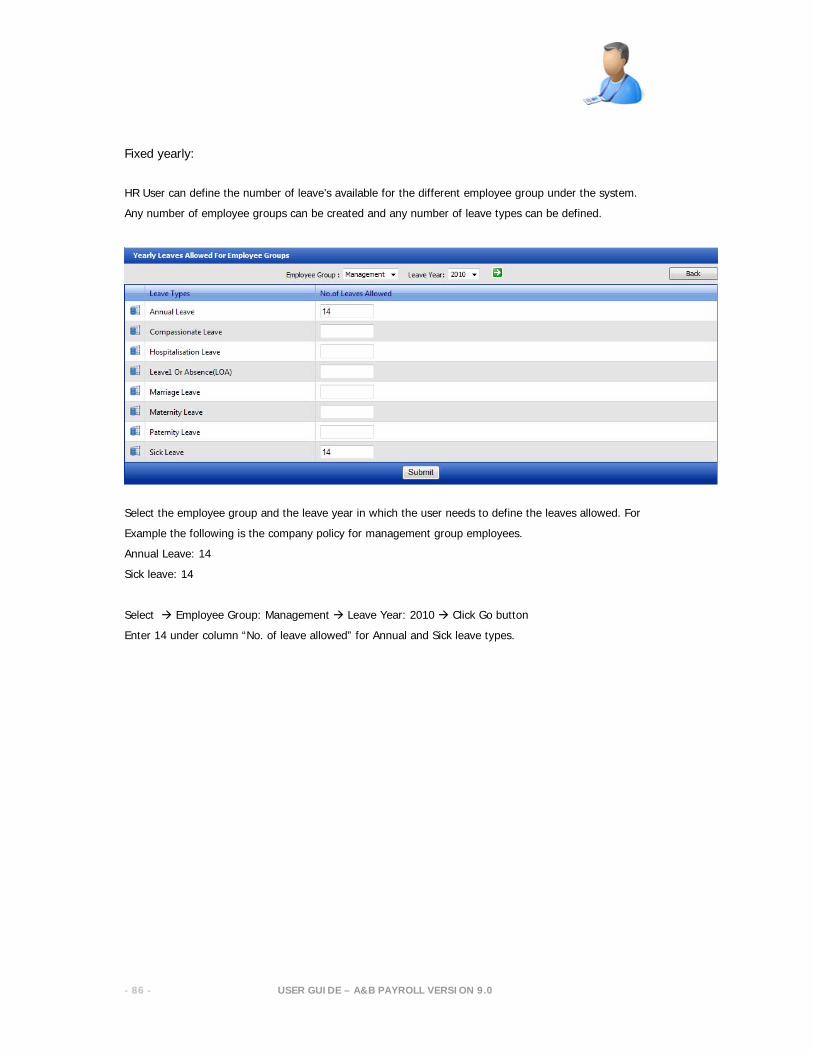
Fixed yearly:
HR User can define the number of leave’s available for the different employee group under the system.
Any number of employee groups can be created and any number of leave types can be defined.
Select the employee group and the leave year in which the user needs to define the leaves allowed. For
Example the following is the company policy for management group employees.
Annual Leave: 14
Sick leave: 14
Select Employee Group: Management Leave Year: 2010 Click Go button
Enter 14 under column “No. of leave allowed” for Annual and Sick leave types.
USER GUIDE – A&B PAYROLL VERSION 9.0
- 87 -
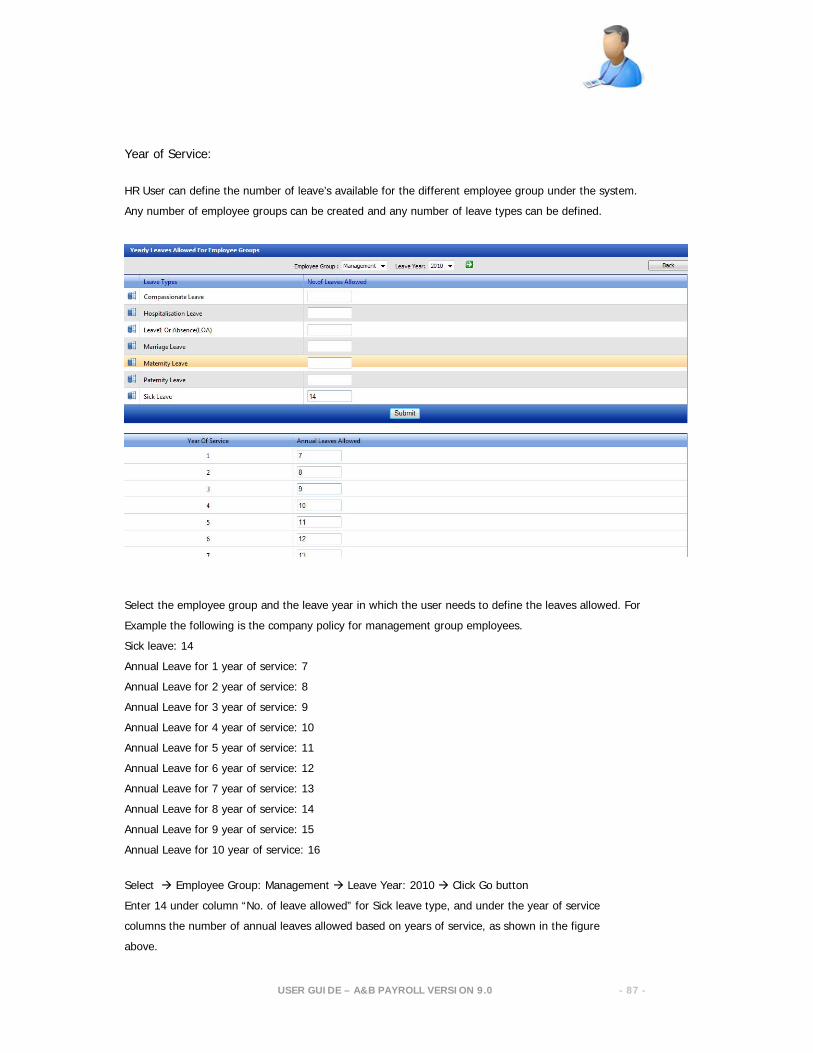
Year of Service:
HR User can define the number of leave’s available for the different employee group under the system.
Any number of employee groups can be created and any number of leave types can be defined.
Select the employee group and the leave year in which the user needs to define the leaves allowed. For
Example the following is the company policy for management group employees.
Sick leave: 14
Annual Leave for 1 year of service: 7
Annual Leave for 2 year of service: 8
Annual Leave for 3 year of service: 9
Annual Leave for 4 year of service: 10
Annual Leave for 5 year of service: 11
Annual Leave for 6 year of service: 12
Annual Leave for 7 year of service: 13
Annual Leave for 8 year of service: 14
Annual Leave for 9 year of service: 15
Annual Leave for 10 year of service: 16
Select Employee Group: Management Leave Year: 2010 Click Go button
Enter 14 under column “No. of leave allowed” for Sick leave type, and under the year of service
columns the number of annual leaves allowed based on years of service, as shown in the figure
above.
USER GUIDE – A&B PAYROLL VERSION 9.0
- 88 -
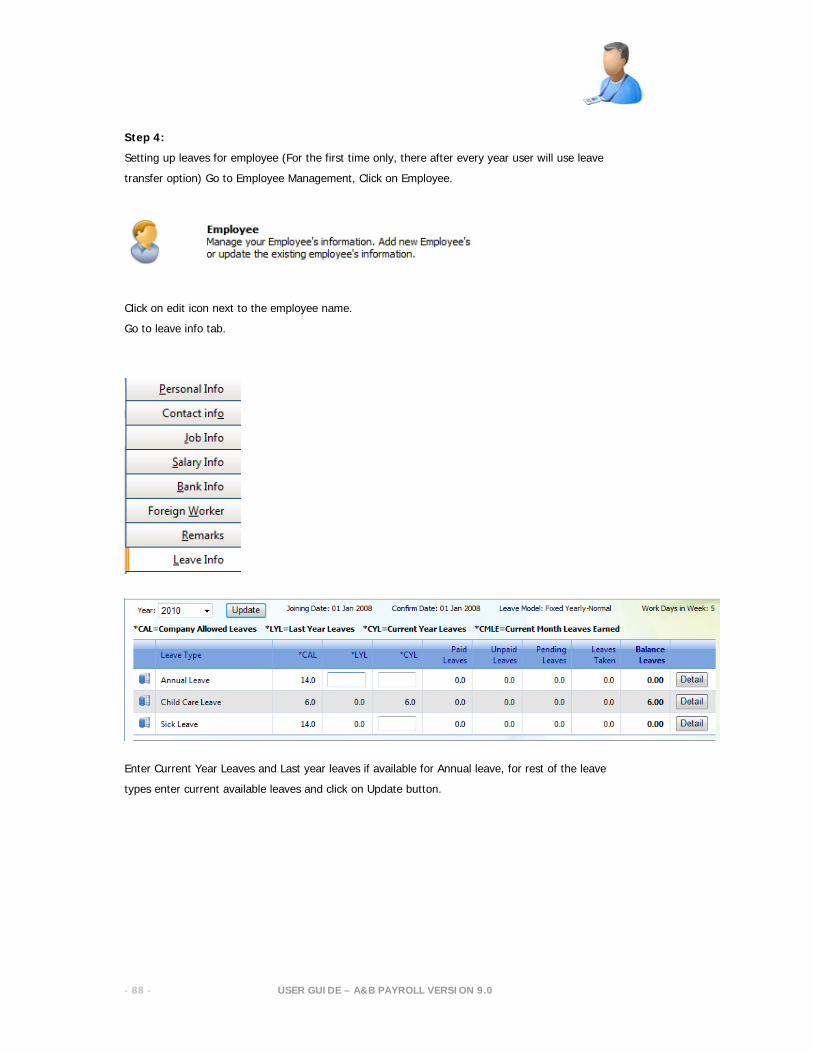
Step 4:
Setting up leaves for employee (For the first time only, there after every year user will use leave
transfer option) Go to Employee Management, Click on Employee.
Click on edit icon next to the employee name.
Go to leave info tab.
Enter Current Year Leaves and Last year leaves if available for Annual leave, for rest of the leave
types enter current available leaves and click on Update button.
USER GUIDE – A&B PAYROLL VERSION 9.0
- 89 -
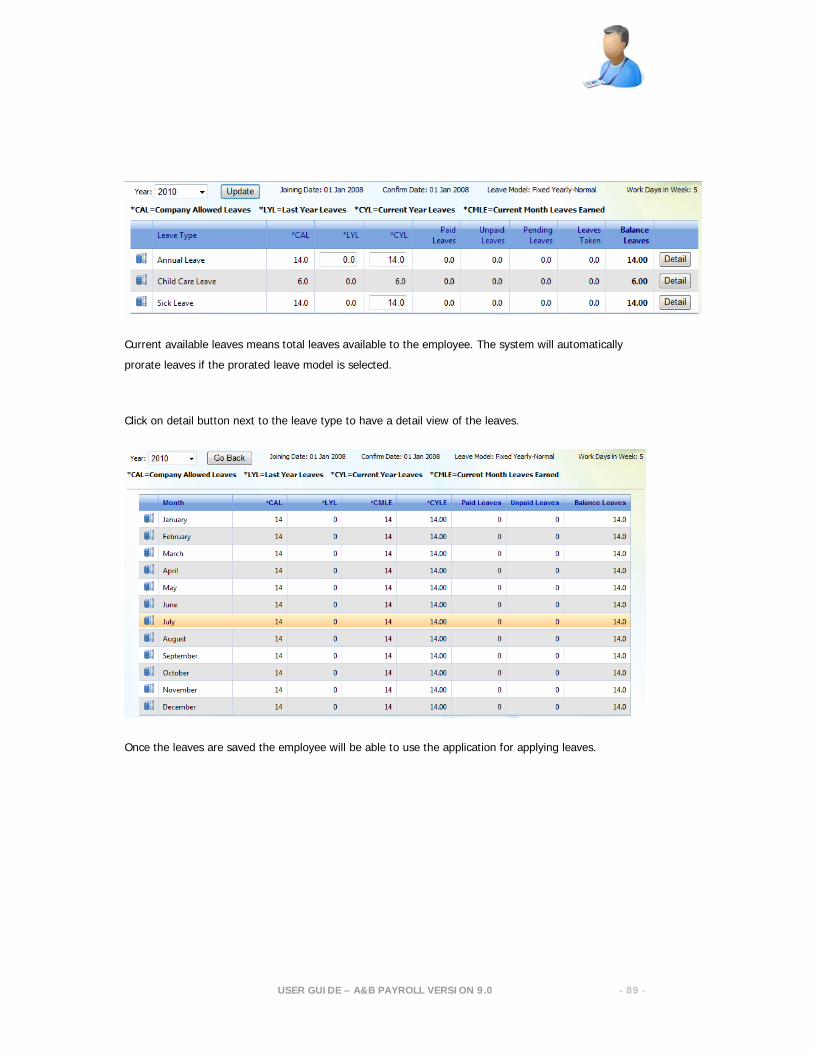
Current available leaves means total leaves available to the employee. The system will automatically
prorate leaves if the prorated leave model is selected.
Click on detail button next to the leave type to have a detail view of the leaves.
Once the leaves are saved the employee will be able to use the application for applying leaves.
USER GUIDE – A&B PAYROLL VERSION 9.0
- 90 -
Leaves Management
{Leaves application to approval Process}
USER GUIDE – A&B PAYROLL VERSION 9.0
- 91 -
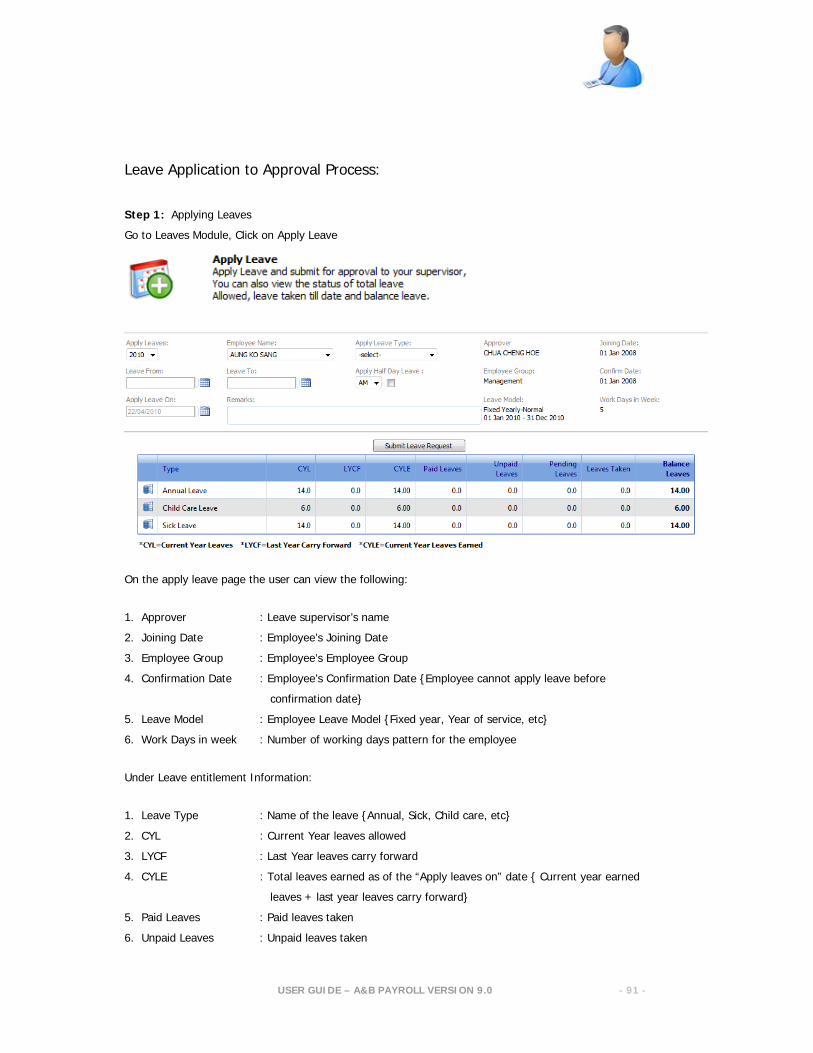
Leave Application to Approval Process:
Step 1: Applying Leaves
Go to Leaves Module, Click on Apply Leave
On the apply leave page the user can view the following:
1. Approver : Leave supervisor’s name
2. Joining Date : Employee’s Joining Date
3. Employee Group : Employee’s Employee Group
4. Confirmation Date : Employee’s Confirmation Date {Employee cannot apply leave before
confirmation date}
5. Leave Model : Employee Leave Model {Fixed year, Year of service, etc}
6. Work Days in week : Number of working days pattern for the employee
Under Leave entitlement Information:
1. Leave Type : Name of the leave {Annual, Sick, Child care, etc}
2. CYL : Current Year leaves allowed
3. LYCF : Last Year leaves carry forward
4. CYLE : Total leaves earned as of the “Apply leaves on” date { Current year earned
leaves + last year leaves carry forward}
5. Paid Leaves : Paid leaves taken
6. Unpaid Leaves : Unpaid leaves taken
USER GUIDE – A&B PAYROLL VERSION 9.0
- 92 -
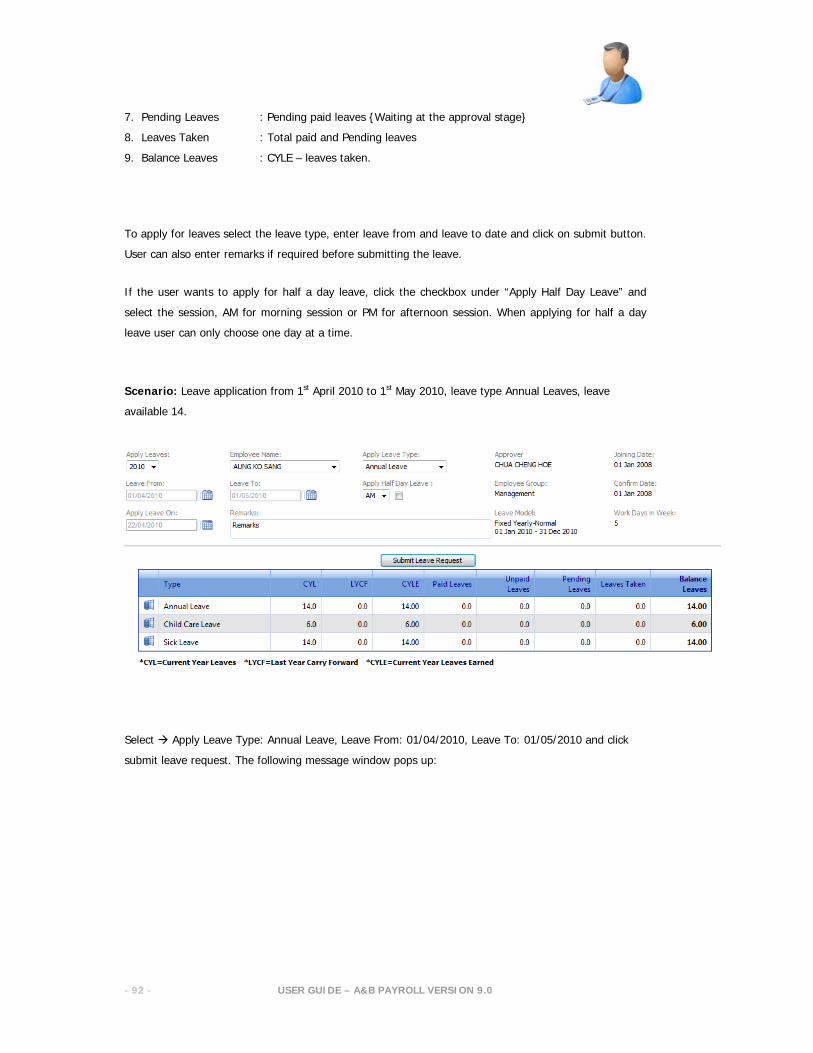
7. Pending Leaves : Pending paid leaves {Waiting at the approval stage}
8. Leaves Taken : Total paid and Pending leaves
9. Balance Leaves : CYLE – leaves taken.
To apply for leaves select the leave type, enter leave from and leave to date and click on submit button.
User can also enter remarks if required before submitting the leave.
If the user wants to apply for half a day leave, click the checkbox under “Apply Half Day Leave” and
select the session, AM for morning session or PM for afternoon session. When applying for half a day
leave user can only choose one day at a time.
Scenario: Leave application from 1st April 2010 to 1st May 2010, leave type Annual Leaves, leave
available 14.
Select Apply Leave Type: Annual Leave, Leave From: 01/04/2010, Leave To: 01/05/2010 and click
submit leave request. The following message window pops up:

USER GUIDE – A&B PAYROLL VERSION 9.0
- 93 -
The Message window has the following information:
1. Users name applying for leave
2. Leave type applied for
3. Number of leaves applied for
4. Number of paid leaves applied for
5. Number of unpaid leaves applied for
6. Number of public holidays falling in the leave period applied for
7. Balance leave available after applying the leave
If user prefers to go ahead the following message box pops up informing the leave request has been
successfully applied and email has been sent to respective supervisor and or HR.
USER GUIDE – A&B PAYROLL VERSION 9.0
- 94 -
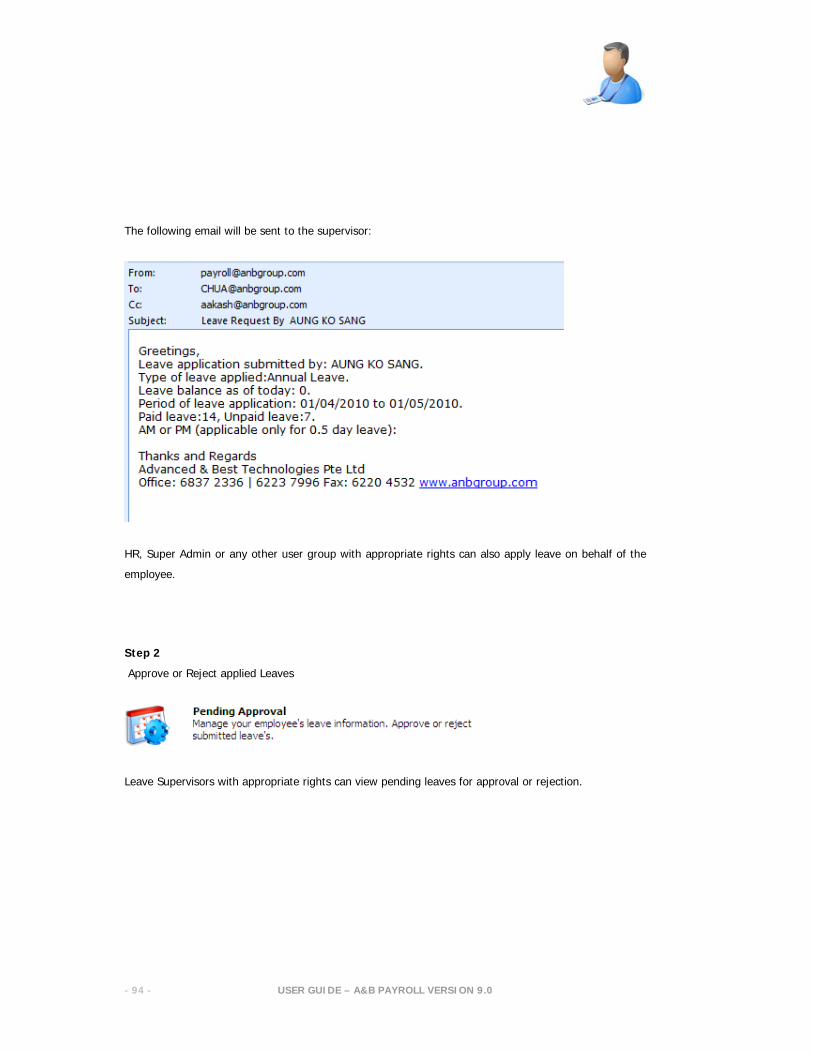
The following email will be sent to the supervisor:
HR, Super Admin or any other user group with appropriate rights can also apply leave on behalf of the
employee.
Step 2
Approve or Reject applied Leaves
Leave Supervisors with appropriate rights can view pending leaves for approval or rejection.

USER GUIDE – A&B PAYROLL VERSION 9.0
- 95 -
The supervisor can approve or reject leave applied and input any remarks if required. Once the leave is
been approved or rejected an email is sent to the respective user letting them know that the leave
status has been updated.
If there are any unpaid leaves that are approved, they will be reflected in that month’s payroll as shown
below. {There were 7 unpaid leaves in our scenario}
Step 3:
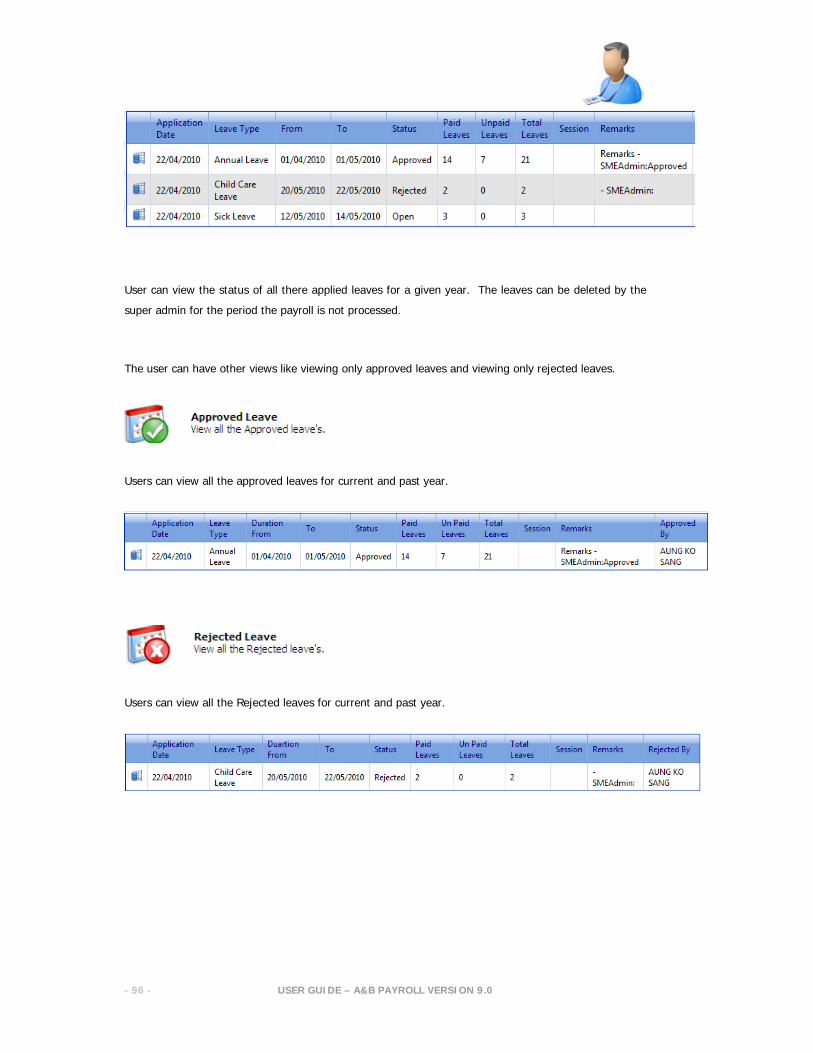
View Leaves Status
User can view the status of all there applied Leaves. {Approved, Rejected, Open, Etc}
USER GUIDE – A&B PAYROLL VERSION 9.0
- 96 -
User can view the status of all there applied leaves for a given year. The leaves can be deleted by the
super admin for the period the payroll is not processed.
The user can have other views like viewing only approved leaves and viewing only rejected leaves.
Users can view all the approved leaves for current and past year.
Users can view all the Rejected leaves for current and past year.
USER GUIDE – A&B PAYROLL VERSION 9.0
- 97 -
Leaves Management
{Other Features}
USER GUIDE – A&B PAYROLL VERSION 9.0
- 98 -
Leave Types:
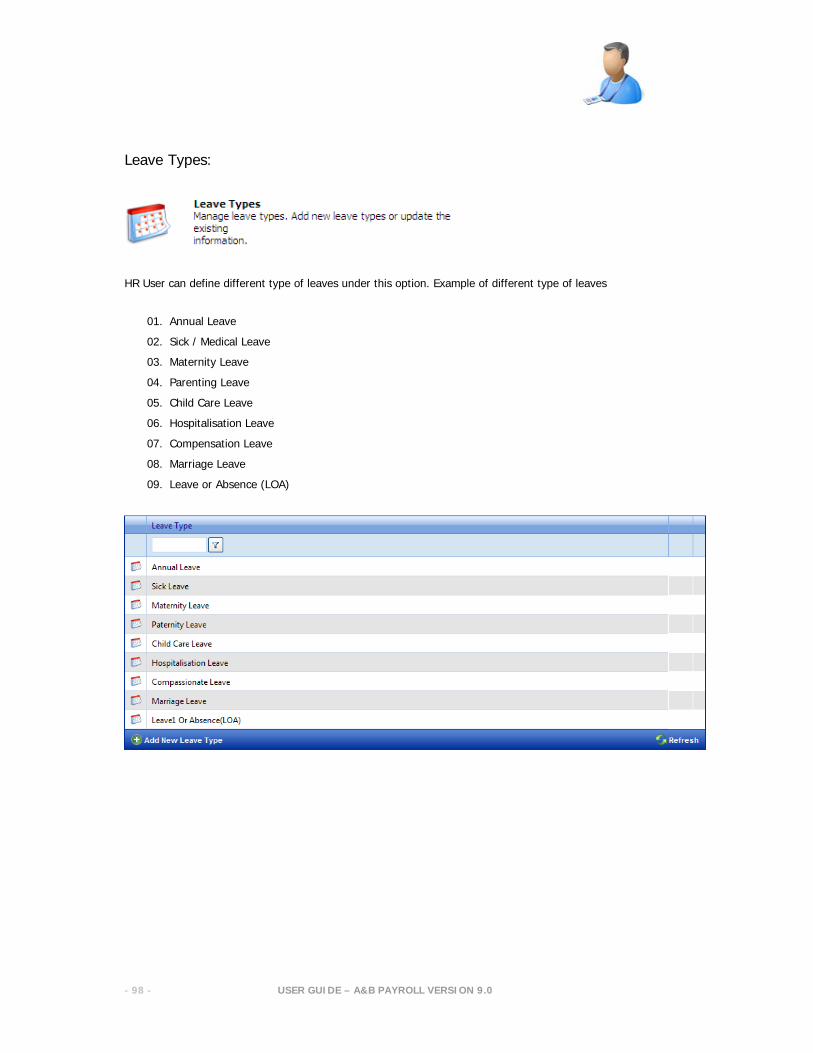
HR User can define different type of leaves under this option. Example of different type of leaves
01. Annual Leave
02. Sick / Medical Leave
03. Maternity Leave
04. Parenting Leave
05. Child Care Leave
06. Hospitalisation Leave
07. Compensation Leave
08. Marriage Leave
09. Leave or Absence (LOA)
USER GUIDE – A&B PAYROLL VERSION 9.0
- 99 -
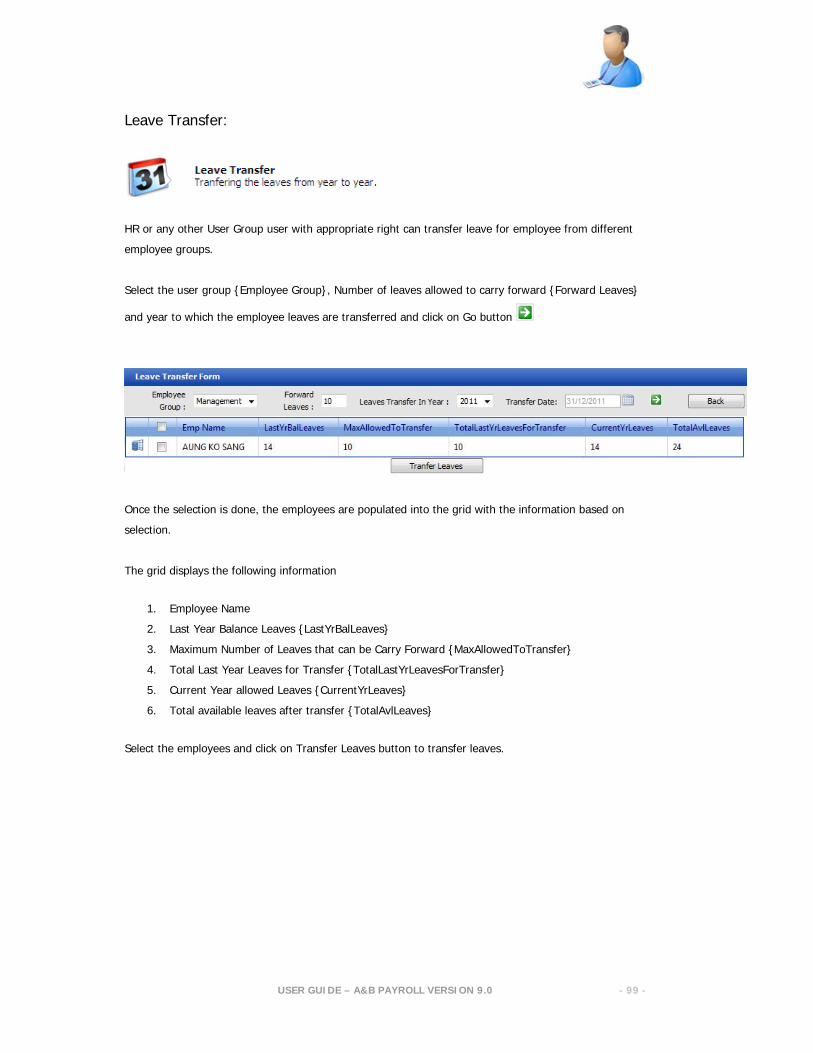
Leave Transfer:
HR or any other User Group user with appropriate right can transfer leave for employee from different
employee groups.
Select the user group {Employee Group}, Number of leaves allowed to carry forward {Forward Leaves}
and year to which the employee leaves are transferred and click on Go button
Once the selection is done, the employees are populated into the grid with the information based on
selection.
The grid displays the following information
1. Employee Name
2. Last Year Balance Leaves {LastYrBalLeaves}
3. Maximum Number of Leaves that can be Carry Forward {MaxAllowedToTransfer}
4. Total Last Year Leaves for Transfer {TotalLastYrLeavesForTransfer}
5. Current Year allowed Leaves {CurrentYrLeaves}
6. Total available leaves after transfer {TotalAvlLeaves}
Select the employees and click on Transfer Leaves button to transfer leaves.
USER GUIDE – A&B PAYROLL VERSION 9.0
- 100 -
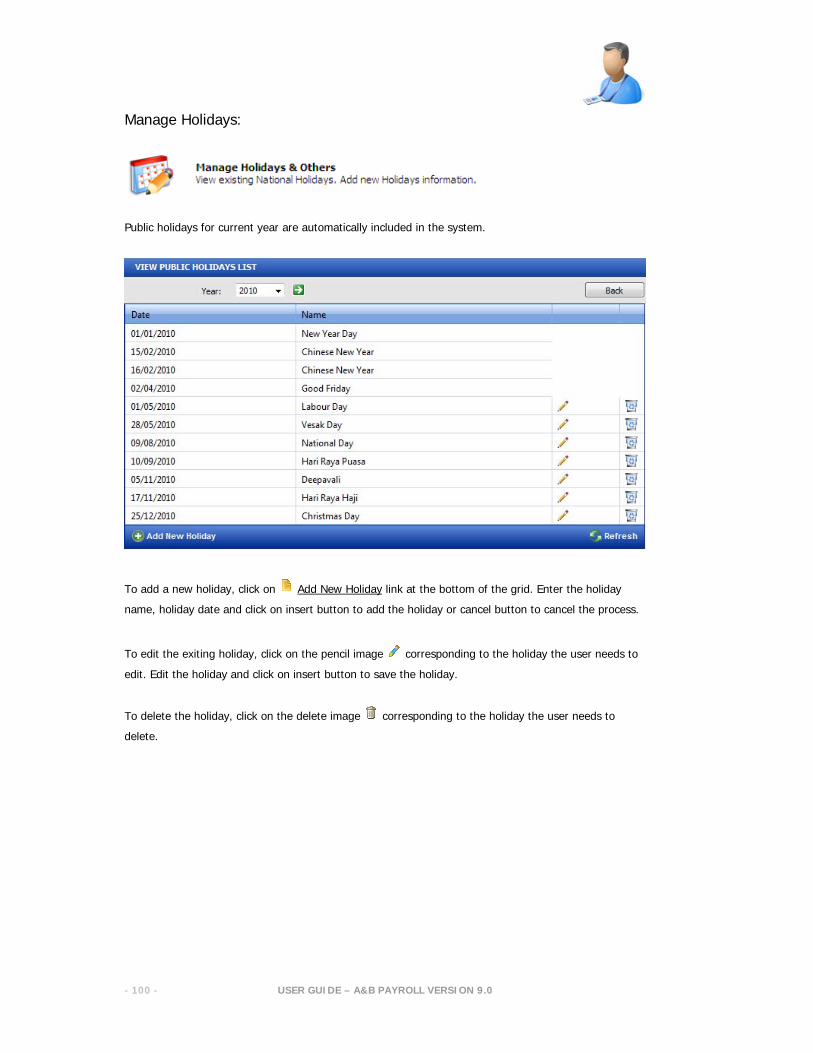
Manage Holidays:
Public holidays for current year are automatically included in the system.
To add a new holiday, click on Add New Holiday link at the bottom of the grid. Enter the holiday
name, holiday date and click on insert button to add the holiday or cancel button to cancel the process.
To edit the exiting holiday, click on the pencil image corresponding to the holiday the user needs to
edit. Edit the holiday and click on insert button to save the holiday.
To delete the holiday, click on the delete image corresponding to the holiday the user needs to
delete.
USER GUIDE – A&B PAYROLL VERSION 9.0
- 101 -
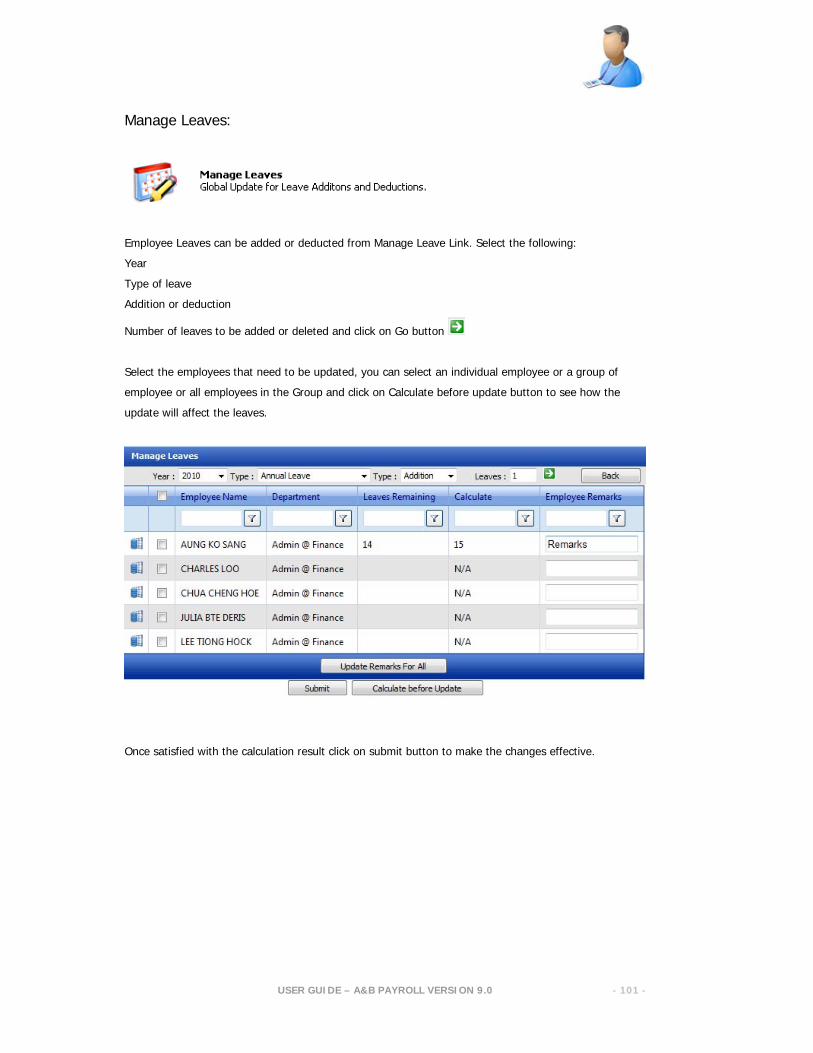
Manage Leaves:
Employee Leaves can be added or deducted from Manage Leave Link. Select the following:
Year
Type of leave
Addition or deduction
Number of leaves to be added or deleted and click on Go button
Select the employees that need to be updated, you can select an individual employee or a group of
employee or all employees in the Group and click on Calculate before update button to see how the
update will affect the leaves.
Once satisfied with the calculation result click on submit button to make the changes effective.

USER GUIDE – A&B PAYROLL VERSION 9.0
- 102 -
Payroll Management
{Payroll}

USER GUIDE – A&B PAYROLL VERSION 9.0
- 103 -
Payroll Management Module:
Payroll Management Module covers additions, deduction, submission, approval, processing and printing
of payroll.
HR or Super Admin or any other user who has the appropriate rights to the Payroll module can perform
all the payroll functions like addition, deductions, submission, approval, generation and printing of
payroll.
USER GUIDE – A&B PAYROLL VERSION 9.0
- 104 -
Payroll Management
{Payroll Process}
USER GUIDE – A&B PAYROLL VERSION 9.0
- 105 -
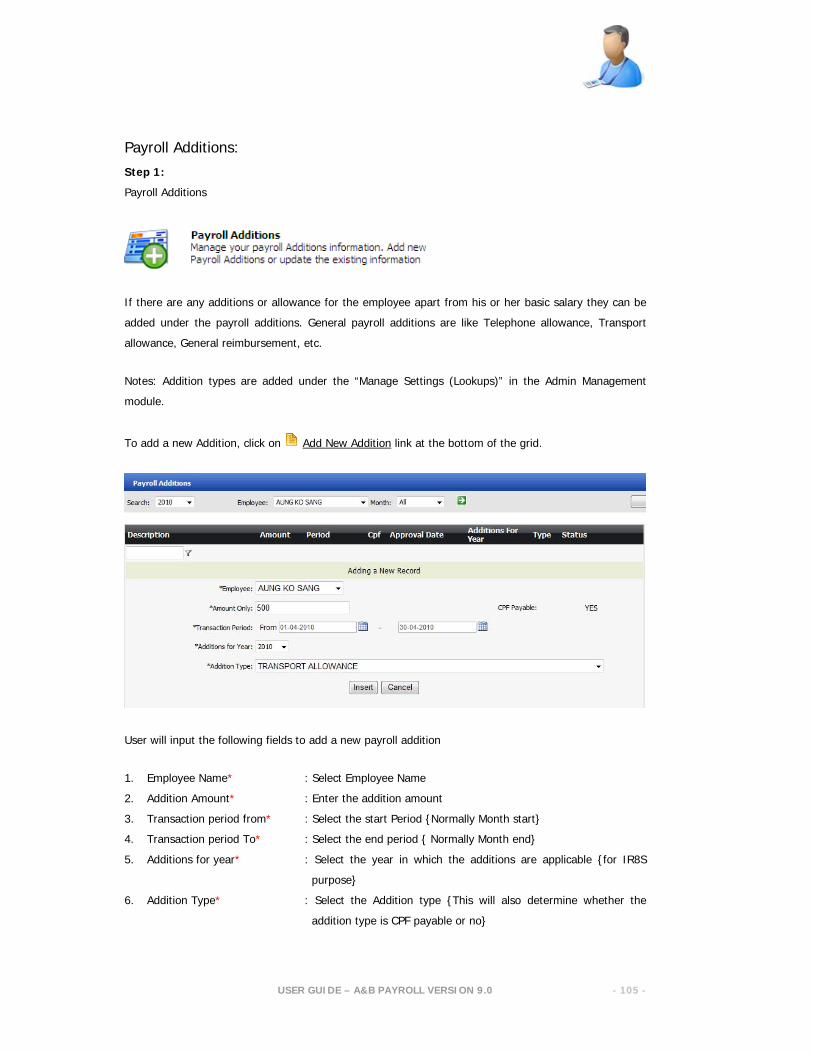
Payroll Additions:
Step 1:
Payroll Additions
If there are any additions or allowance for the employee apart from his or her basic salary they can be
added under the payroll additions. General payroll additions are like Telephone allowance, Transport
allowance, General reimbursement, etc.
Notes: Addition types are added under the “Manage Settings (Lookups)” in the Admin Management
module.
To add a new Addition, click on Add New Addition link at the bottom of the grid.
User will input the following fields to add a new payroll addition
1. Employee Name* : Select Employee Name
2. Addition Amount* : Enter the addition amount
3. Transaction period from* : Select the start Period {Normally Month start}
4. Transaction period To* : Select the end period { Normally Month end}
5. Additions for year* : Select the year in which the additions are applicable {for IR8S
purpose}
6. Addition Type* : Select the Addition type {This will also determine whether the
addition type is CPF payable or no}
USER GUIDE – A&B PAYROLL VERSION 9.0
- 106 -
* Denotes compulsory Field
Click Insert to add the payroll addition.
Note: The transaction period can be for a month or few months, if you select one month, the addition
would be included into that month’s salary. If you choose few months then the addition type will be
added to all the selected months.
Once the addition type is selected the system will automatically display whether this addition type is CPF
PAYABLE or no
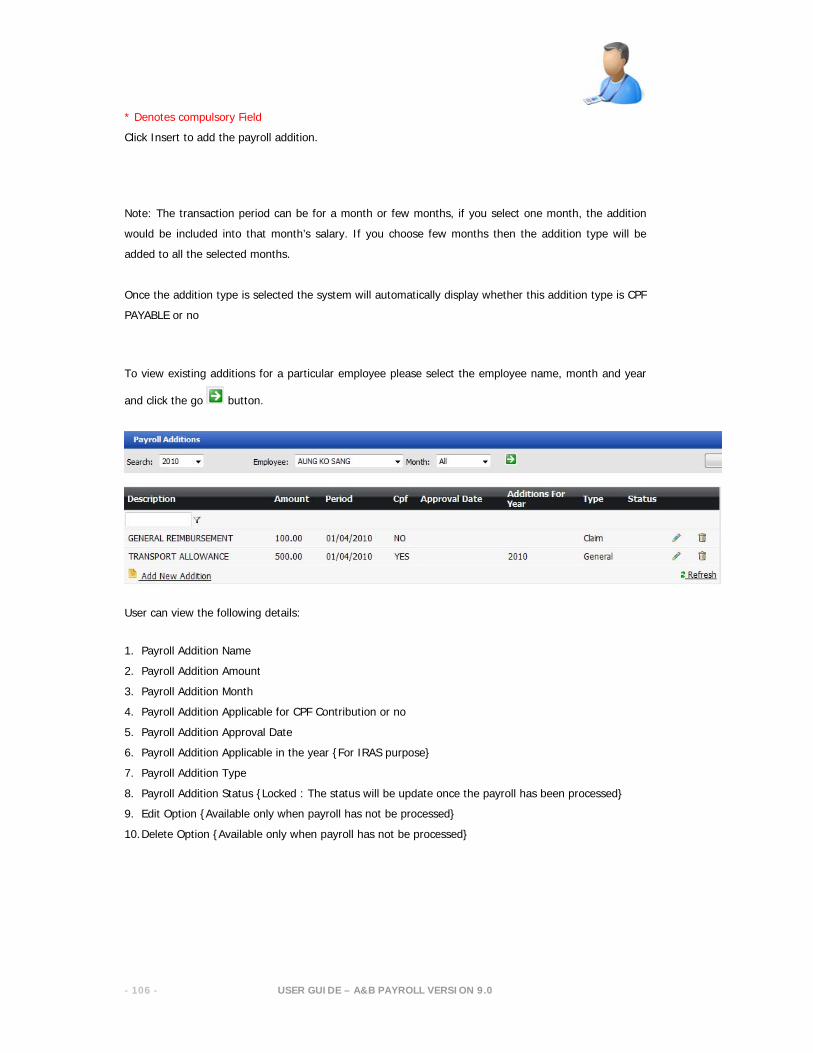
To view existing additions for a particular employee please select the employee name, month and year
and click the go button.
User can view the following details:
1. Payroll Addition Name
2. Payroll Addition Amount
3. Payroll Addition Month
4. Payroll Addition Applicable for CPF Contribution or no
5. Payroll Addition Approval Date
6. Payroll Addition Applicable in the year {For IRAS purpose}
7. Payroll Addition Type
8. Payroll Addition Status {Locked : The status will be update once the payroll has been processed}
9. Edit Option {Available only when payroll has not be processed}
10. Delete Option {Available only when payroll has not be processed}

USER GUIDE – A&B PAYROLL VERSION 9.0
- 107 -
Payroll Deductions:
Step 2:
Payroll Deductions
If there are any Deductions for the employee they can be added under the payroll deductions. General
payroll deductions are like Loans, Advances, etc.
Notes: Deduction types are added under the “Manage Settings (Lookups)” in the Admin Management
module.
To add a new Deduction, click on Add New Deduction link at the bottom of the grid.
User will input the following fields to add a new payroll addition
1. Employee Name* : Select Employee Name
2. Deduction Type* : Select the Addition type
3. Transaction period from* : Select the start Period {Normally Month start}
4. Transaction period To* : Select the end period { Normally Month end}
5. Deduction Amount* : Enter the deduction amount
* Denotes compulsory Field
Click Insert to add the payroll deduction.
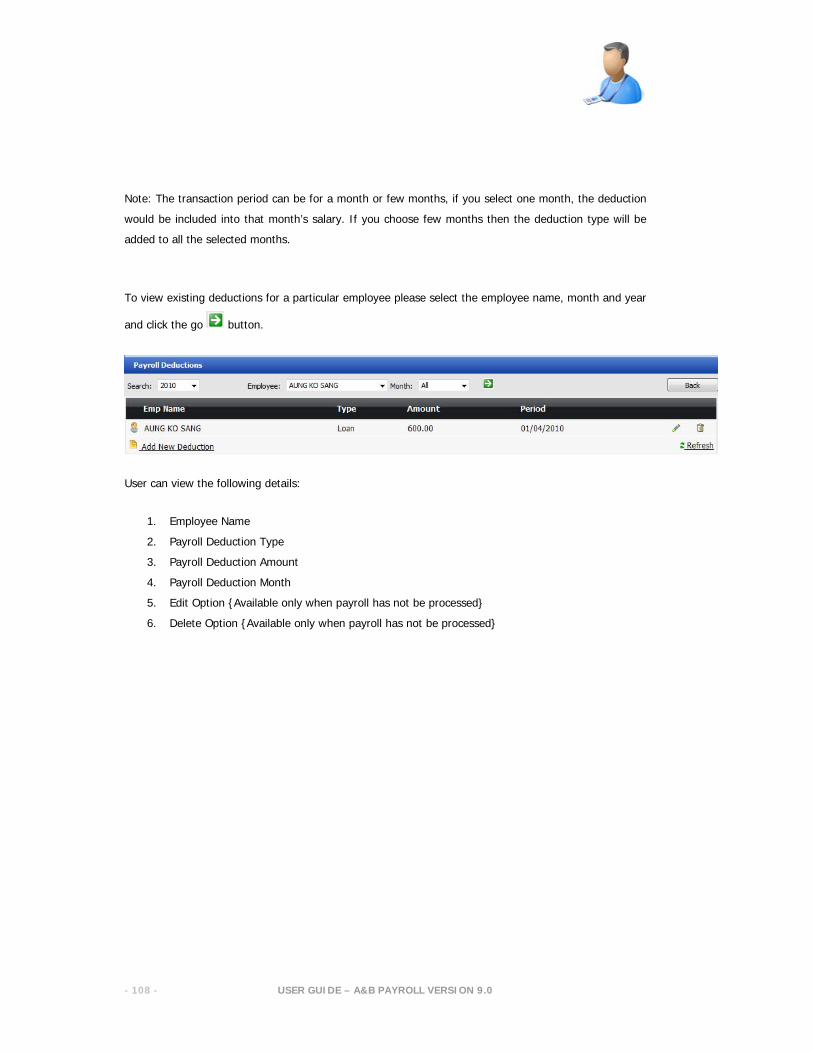
USER GUIDE – A&B PAYROLL VERSION 9.0
- 108 -
Note: The transaction period can be for a month or few months, if you select one month, the deduction
would be included into that month’s salary. If you choose few months then the deduction type will be
added to all the selected months.
To view existing deductions for a particular employee please select the employee name, month and year
and click the go button.
User can view the following details:
1. Employee Name
2. Payroll Deduction Type
3. Payroll Deduction Amount
4. Payroll Deduction Month
5. Edit Option {Available only when payroll has not be processed}
6. Delete Option {Available only when payroll has not be processed}

USER GUIDE – A&B PAYROLL VERSION 9.0
- 109 -
Payroll Overtime:
Step 3:
Payroll Overtime
Select the Year, month from and to dates and click the go button.
User can enter the following for individual employee:
01. Normal Hours {NH} : Input the number of normal hours worked during the
selected period. {This field is for hourly paid employee}
02. Overtime 1 Hours {OT-1 Hrs} : Input the number of overtime 1 hour worked during the
selected period.{This field is for hourly/monthly paid
employee}
03. Overtime 2 Hours {OT-2 Hrs} : Input the number of overtime 2 hour worked during the
selected period.{ This field is for hourly/monthly
employee}
04. Days Worked {Days Work} : Input the number of days worked during the selected
period{ This field is for Daily paid employee}
05. V1 : Input the number of days for selected period
06. V2 : Input the number of days for selected period
07. V3 : Input the number of days for selected period
08. V4 : Input the number of days for selected period
After entering the hours have to click submit button to save it.
Note: When entering the hours and minutes value for Normal hours, Overtime 1 and
Overtime 2 – please enter in normal minutes (ex: 30.45 i.e. 30 hours and 45 minutes)
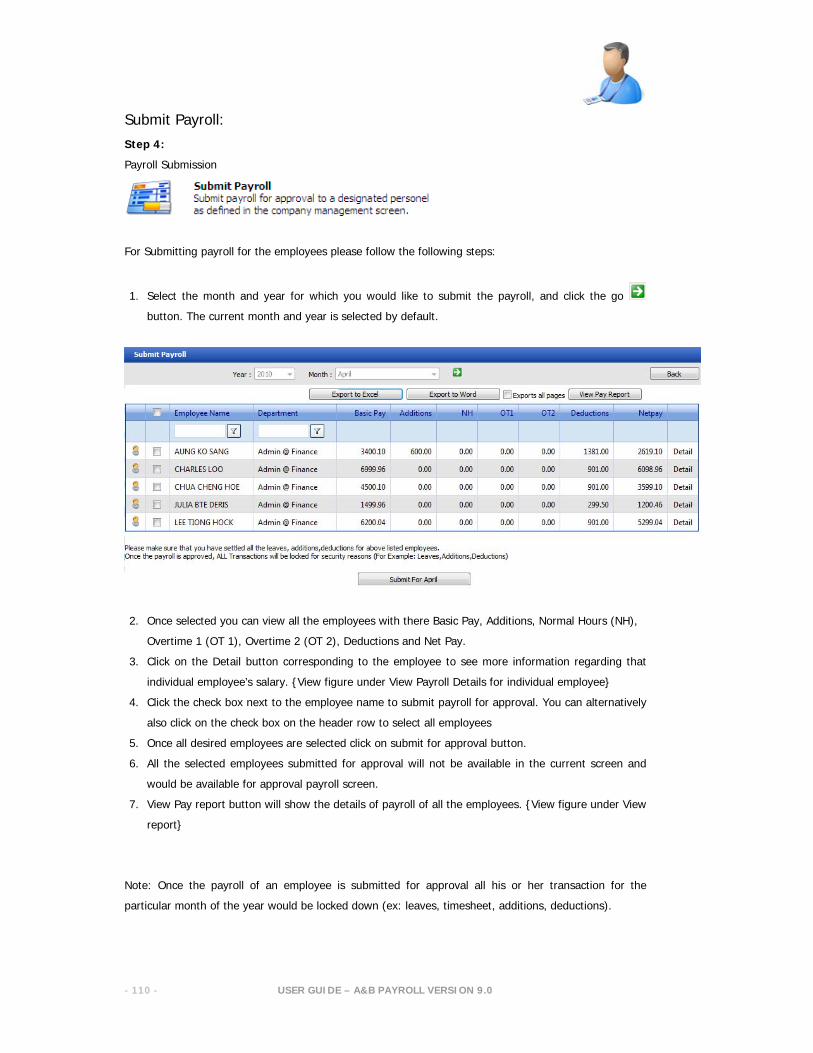
USER GUIDE – A&B PAYROLL VERSION 9.0
- 110 -
Submit Payroll:
Step 4:
Payroll Submission
For Submitting payroll for the employees please follow the following steps:
1. Select the month and year for which you would like to submit the payroll, and click the go
button. The current month and year is selected by default.
2. Once selected you can view all the employees with there Basic Pay, Additions, Normal Hours (NH),
Overtime 1 (OT 1), Overtime 2 (OT 2), Deductions and Net Pay.
3. Click on the Detail button corresponding to the employee to see more information regarding that
individual employee’s salary. {View figure under View Payroll Details for individual employee}
4. Click the check box next to the employee name to submit payroll for approval. You can alternatively
also click on the check box on the header row to select all employees
5. Once all desired employees are selected click on submit for approval button.
6. All the selected employees submitted for approval will not be available in the current screen and
would be available for approval payroll screen.
7. View Pay report button will show the details of payroll of all the employees. {View figure under View
report}
Note: Once the payroll of an employee is submitted for approval all his or her transaction for the
particular month of the year would be locked down (ex: leaves, timesheet, additions, deductions).

USER GUIDE – A&B PAYROLL VERSION 9.0
- 111 -
View Payroll Details for individual employee:
This is comprehensive information, which gives the HR person 360 degree view of the employee’s
payroll details and related information.
1. Employee Name & Number of years and days old he or she is.
2. Employee Type {Singaporean, SPR, Dependent SPR,EP, S Pass, DP}
3. Department Employee belongs to
4. Payment Mode {Cash, Cheque, Bank Giro}
5. Employee Joining Date
6. Employee Termination Date
7. Number of working days in the current month
8. Employee Group employee belongs to
9. Employee is applicable for CPF {Yes or No}
10. Employee’s CPF Age Group {1-35, etc}
11. Employee’s CPF contribution rate
12. Employer’s CPF contribution rate
13. Permanent Residence (PR) Date {To make sure employee PR year and CPF rate are correct}
14. Actual number of working days of the employee in the current month
15. Employee’s working pattern {5 days, 5.5 Days, 6 Days, & Days}
16. Employee’s Daily Rate
17. Employee’s Hourly Rate
18. Employee overtime entitlement {Yes or No}
19. Employee’s Overtime 1 Rate
20. Employee’s Overtime 2 Rate
21. Employee’s Unpaid Leaves in the current month

USER GUIDE – A&B PAYROLL VERSION 9.0
- 112 -
22. Actual Basic Salary = Basic Salary – Unpaid Leaves
23. Additions
24. Deductions
25. CPF calculation for ordinary and additional wages
26. Funds contribution
27. Gross Pay = Actual Basic Pay + Additions
28. Net Pay = (Actual Basic Pay + Additions) – Deductions
29. Employers CPF Contribution
30. SDL Contribution and
31. Leaves Status { Earned, Paid, Unpaid, Balance}
View pay Report:
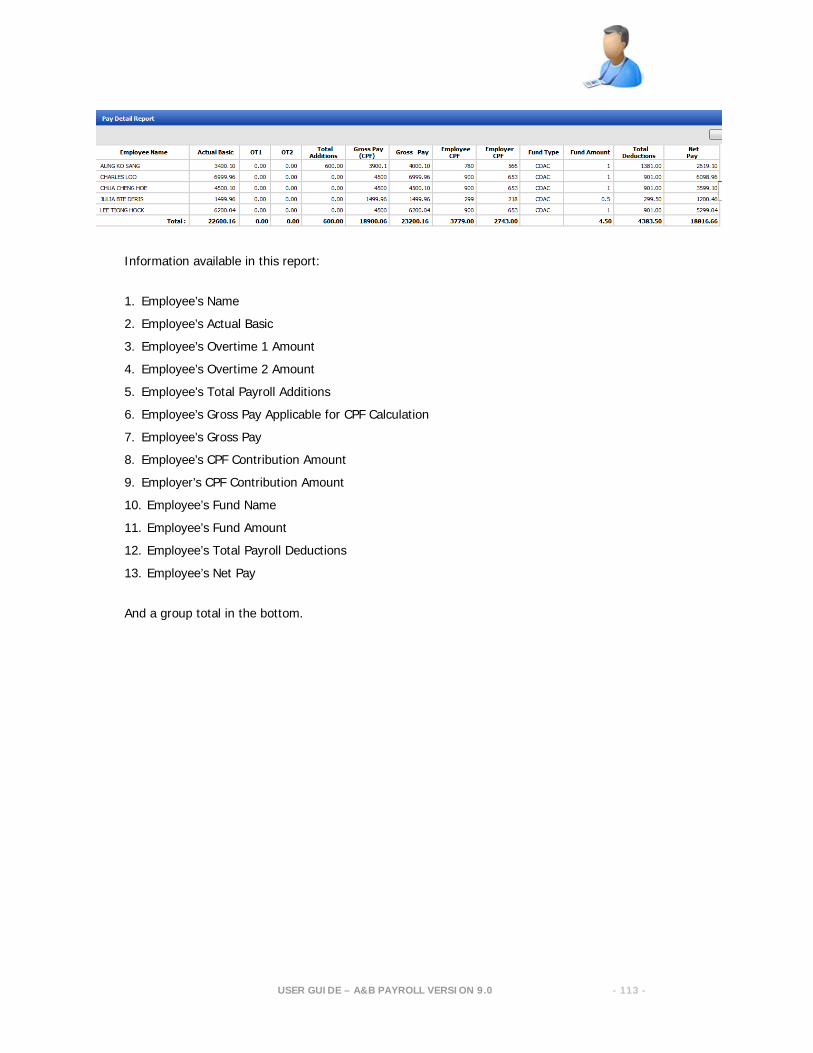
USER GUIDE – A&B PAYROLL VERSION 9.0
- 113 -
Information available in this report:
1. Employee’s Name
2. Employee’s Actual Basic
3. Employee’s Overtime 1 Amount
4. Employee’s Overtime 2 Amount
5. Employee’s Total Payroll Additions
6. Employee’s Gross Pay Applicable for CPF Calculation
7. Employee’s Gross Pay
8. Employee’s CPF Contribution Amount
9. Employer’s CPF Contribution Amount
10. Employee’s Fund Name
11. Employee’s Fund Amount
12. Employee’s Total Payroll Deductions
13. Employee’s Net Pay
And a group total in the bottom.
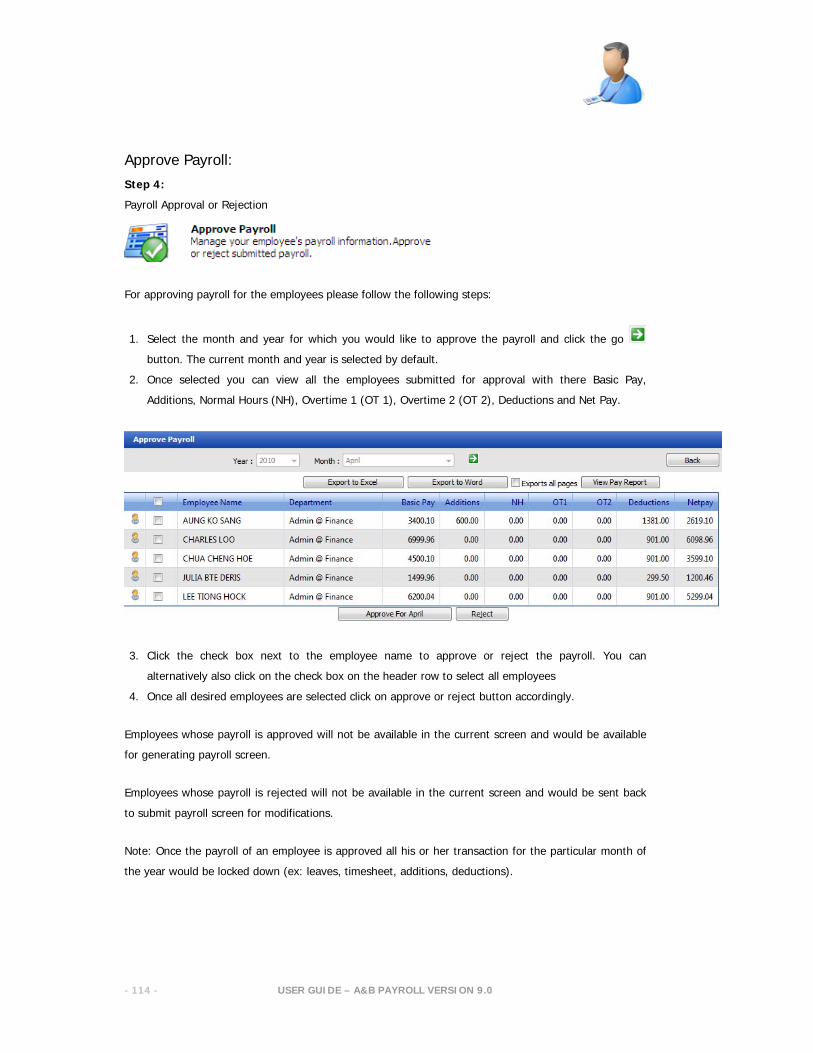
USER GUIDE – A&B PAYROLL VERSION 9.0
- 114 -
Approve Payroll:
Step 4:
Payroll Approval or Rejection
For approving payroll for the employees please follow the following steps:
1. Select the month and year for which you would like to approve the payroll and click the go
button. The current month and year is selected by default.
2. Once selected you can view all the employees submitted for approval with there Basic Pay,
Additions, Normal Hours (NH), Overtime 1 (OT 1), Overtime 2 (OT 2), Deductions and Net Pay.
3. Click the check box next to the employee name to approve or reject the payroll. You can
alternatively also click on the check box on the header row to select all employees
4. Once all desired employees are selected click on approve or reject button accordingly.
Employees whose payroll is approved will not be available in the current screen and would be available
for generating payroll screen.
Employees whose payroll is rejected will not be available in the current screen and would be sent back
to submit payroll screen for modifications.
Note: Once the payroll of an employee is approved all his or her transaction for the particular month of
the year would be locked down (ex: leaves, timesheet, additions, deductions).
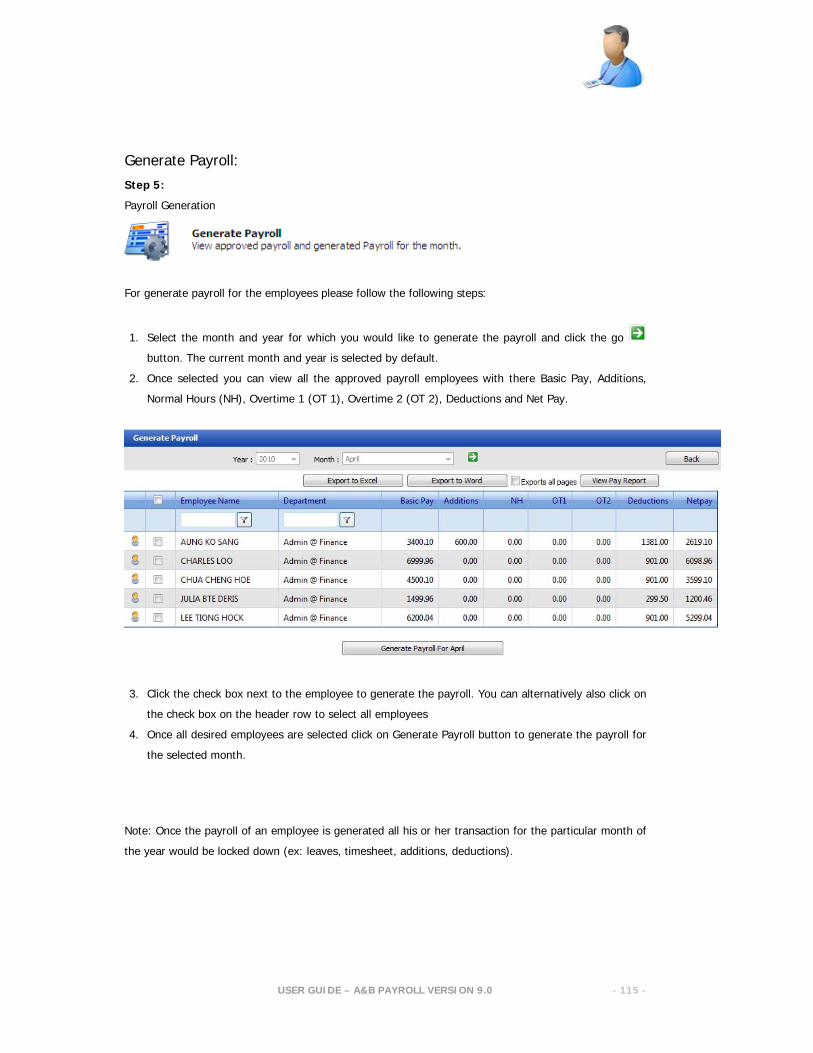
USER GUIDE – A&B PAYROLL VERSION 9.0
- 115 -
Generate Payroll:
Step 5:
Payroll Generation
For generate payroll for the employees please follow the following steps:
1. Select the month and year for which you would like to generate the payroll and click the go
button. The current month and year is selected by default.
2. Once selected you can view all the approved payroll employees with there Basic Pay, Additions,
Normal Hours (NH), Overtime 1 (OT 1), Overtime 2 (OT 2), Deductions and Net Pay.
3. Click the check box next to the employee to generate the payroll. You can alternatively also click on
the check box on the header row to select all employees
4. Once all desired employees are selected click on Generate Payroll button to generate the payroll for
the selected month.
Note: Once the payroll of an employee is generated all his or her transaction for the particular month of
the year would be locked down (ex: leaves, timesheet, additions, deductions).
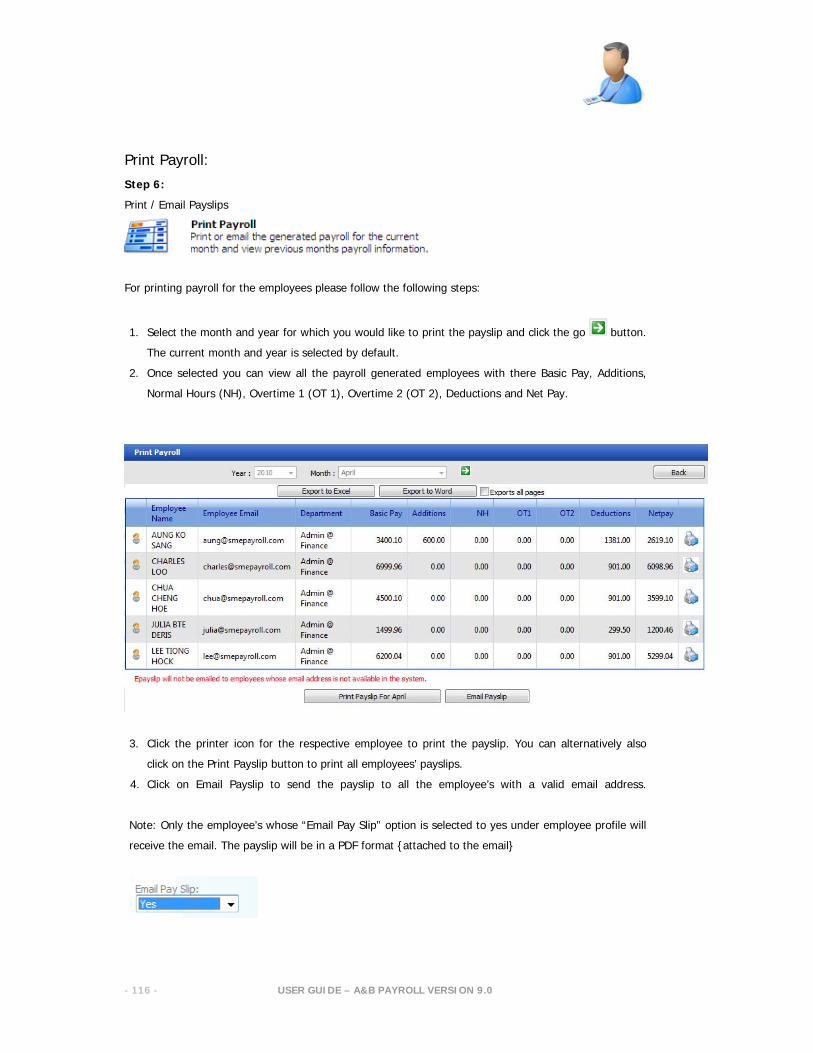
USER GUIDE – A&B PAYROLL VERSION 9.0
- 116 -
Print Payroll:
Step 6:
Print / Email Payslips
For printing payroll for the employees please follow the following steps:
1. Select the month and year for which you would like to print the payslip and click the go button.
The current month and year is selected by default.
2. Once selected you can view all the payroll generated employees with there Basic Pay, Additions,
Normal Hours (NH), Overtime 1 (OT 1), Overtime 2 (OT 2), Deductions and Net Pay.
3. Click the printer icon for the respective employee to print the payslip. You can alternatively also
click on the Print Payslip button to print all employees’ payslips.
4. Click on Email Payslip to send the payslip to all the employee’s with a valid email address.
Note: Only the employee’s whose “Email Pay Slip” option is selected to yes under employee profile will
receive the email. The payslip will be in a PDF format {attached to the email}

USER GUIDE – A&B PAYROLL VERSION 9.0
- 117 -
Payroll Management
{Other Options}
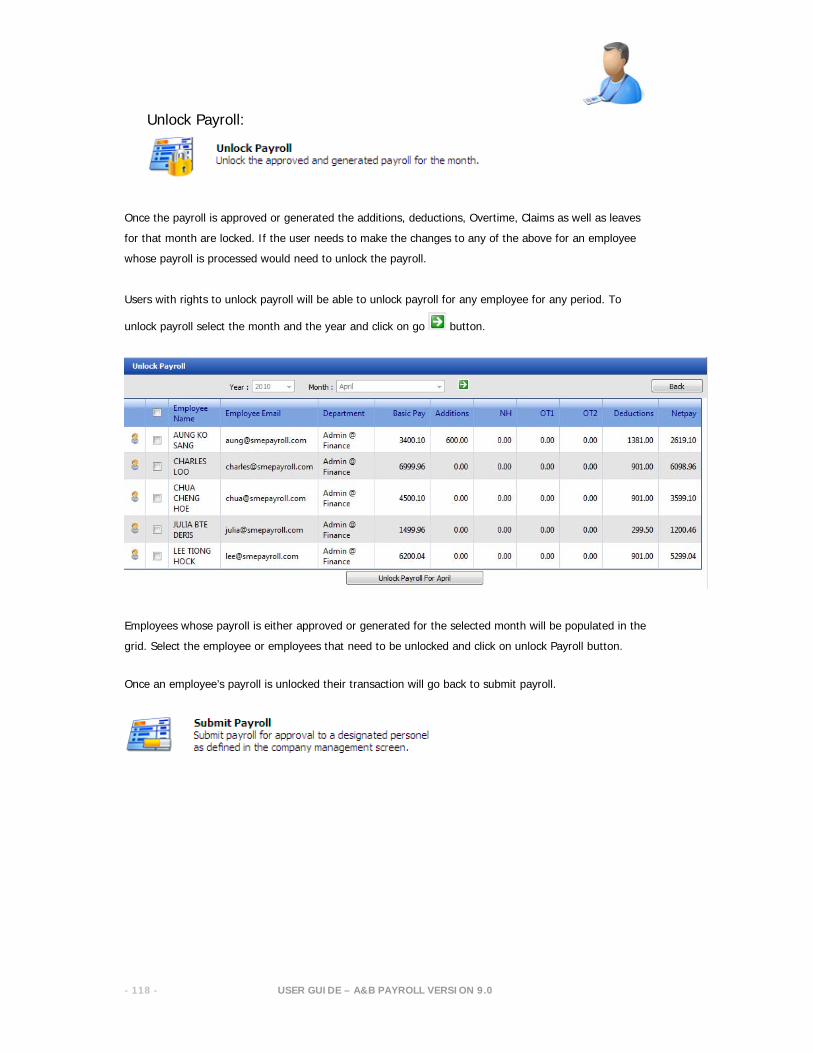
USER GUIDE – A&B PAYROLL VERSION 9.0
- 118 -
Unlock Payroll:
Once the payroll is approved or generated the additions, deductions, Overtime, Claims as well as leaves
for that month are locked. If the user needs to make the changes to any of the above for an employee
whose payroll is processed would need to unlock the payroll.
Users with rights to unlock payroll will be able to unlock payroll for any employee for any period. To
unlock payroll select the month and the year and click on go button.
Employees whose payroll is either approved or generated for the selected month will be populated in the
grid. Select the employee or employees that need to be unlocked and click on unlock Payroll button.
Once an employee’s payroll is unlocked their transaction will go back to submit payroll.
USER GUIDE – A&B PAYROLL VERSION 9.0
- 119 -
Reports Management
{CPF, AMCS, BANK GIRO, IRAS, Custom Reports}
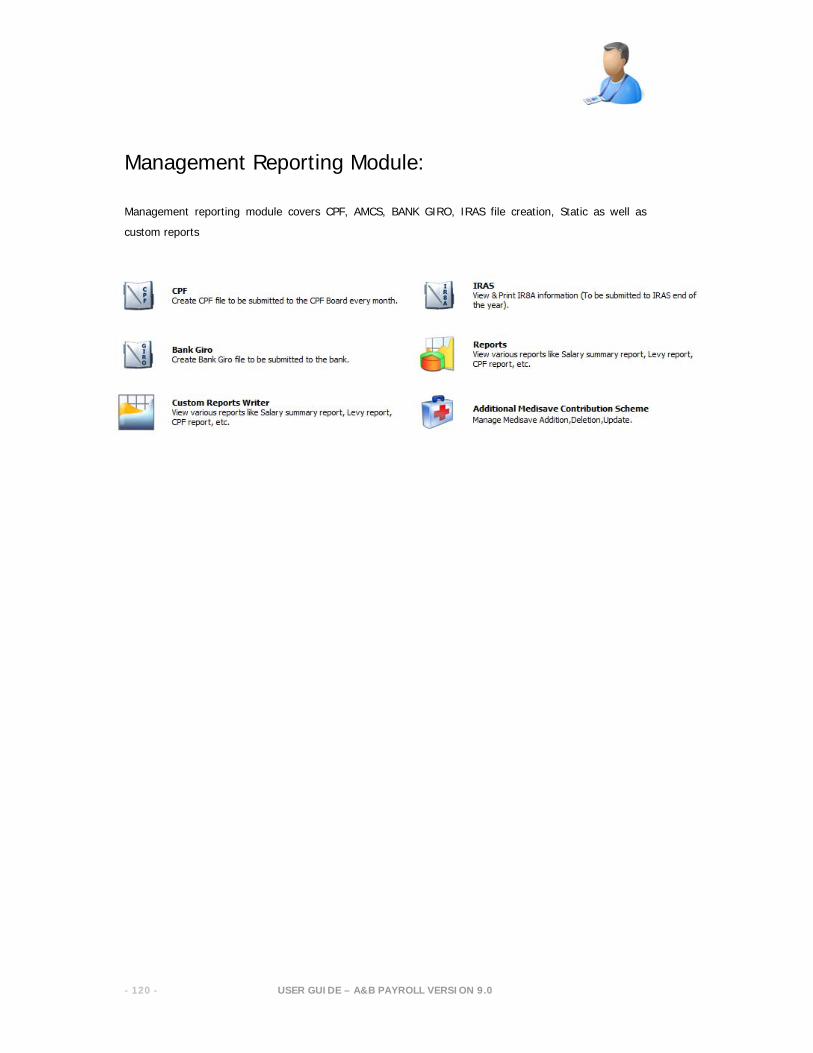
USER GUIDE – A&B PAYROLL VERSION 9.0
- 120 -
Management Reporting Module:
Management reporting module covers CPF, AMCS, BANK GIRO, IRAS file creation, Static as well as
custom reports

USER GUIDE – A&B PAYROLL VERSION 9.0
- 121 -
Reports Management
{CPF File Creation}

USER GUIDE – A&B PAYROLL VERSION 9.0
- 122 -
CPF File Creation:
CPF File can be created and submitted to CPF BOARD for CPF Contribution. The system will calculate the
CPF Contribution and Funds Contribution for all CPF Payable employees.
Only employees whose payroll has been generated will be available under CPF contribution summary
page for the selected month.
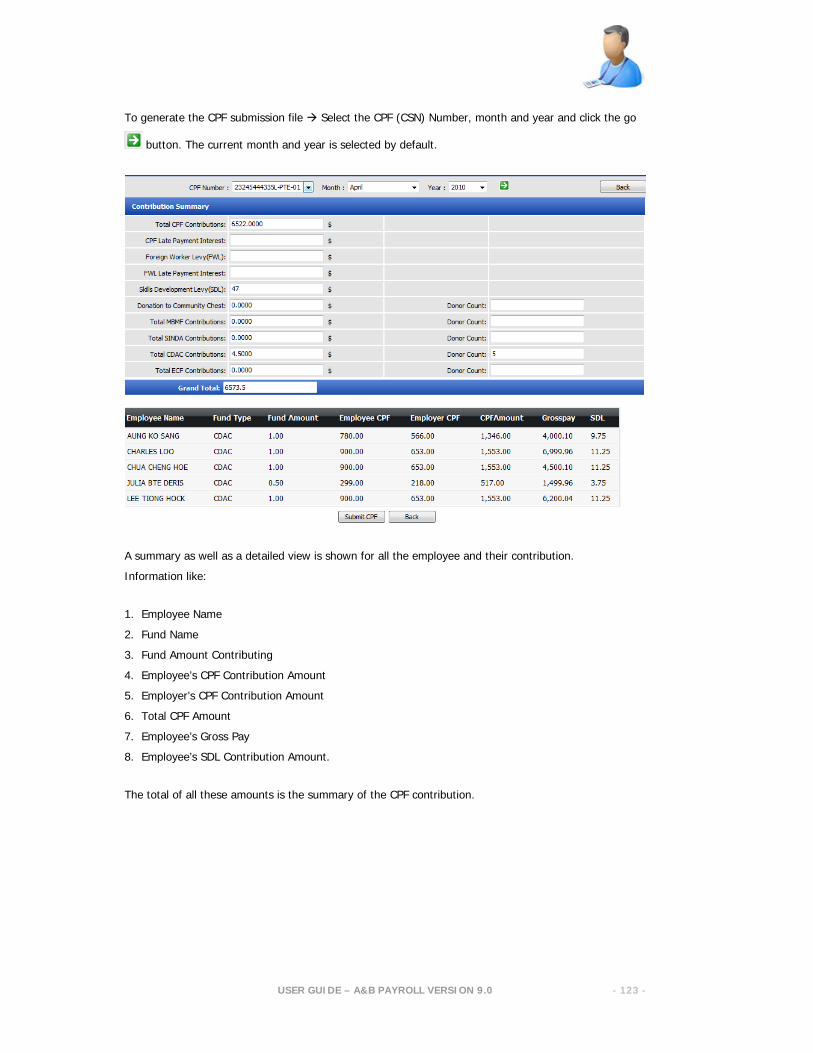
USER GUIDE – A&B PAYROLL VERSION 9.0
- 123 -
To generate the CPF submission file Select the CPF (CSN) Number, month and year and click the go
button. The current month and year is selected by default.
A summary as well as a detailed view is shown for all the employee and their contribution.
Information like:
1. Employee Name 2. Fund Name 3. Fund Amount Contributing 4. Employee’s CPF Contribution Amount 5. Employer’s CPF Contribution Amount 6. Total CPF Amount 7. Employee’s Gross Pay 8. Employee’s SDL Contribution Amount.
The total of all these amounts is the summary of the CPF contribution.
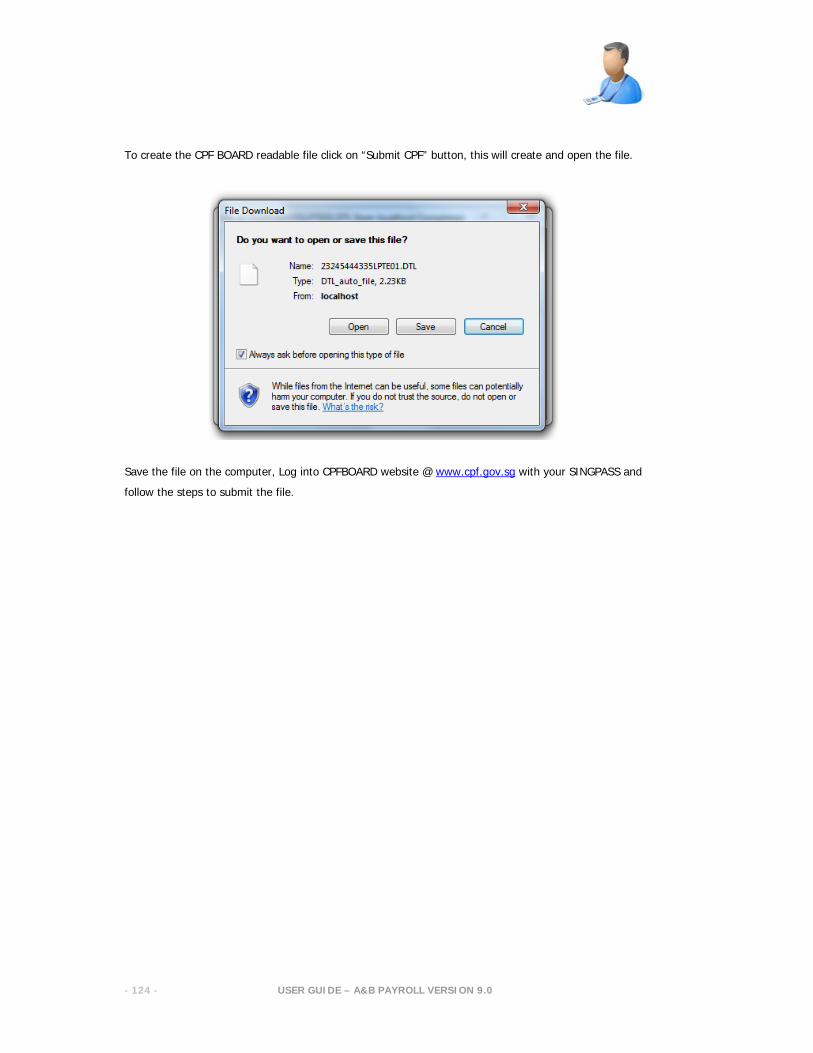
USER GUIDE – A&B PAYROLL VERSION 9.0
- 124 -
To create the CPF BOARD readable file click on “Submit CPF” button, this will create and open the file.
Save the file on the computer, Log into CPFBOARD website @ www.cpf.gov.sg with your SINGPASS and
follow the steps to submit the file.
USER GUIDE – A&B PAYROLL VERSION 9.0
- 125 -
Reports Management
{Bank Giro Setup & File Creation}
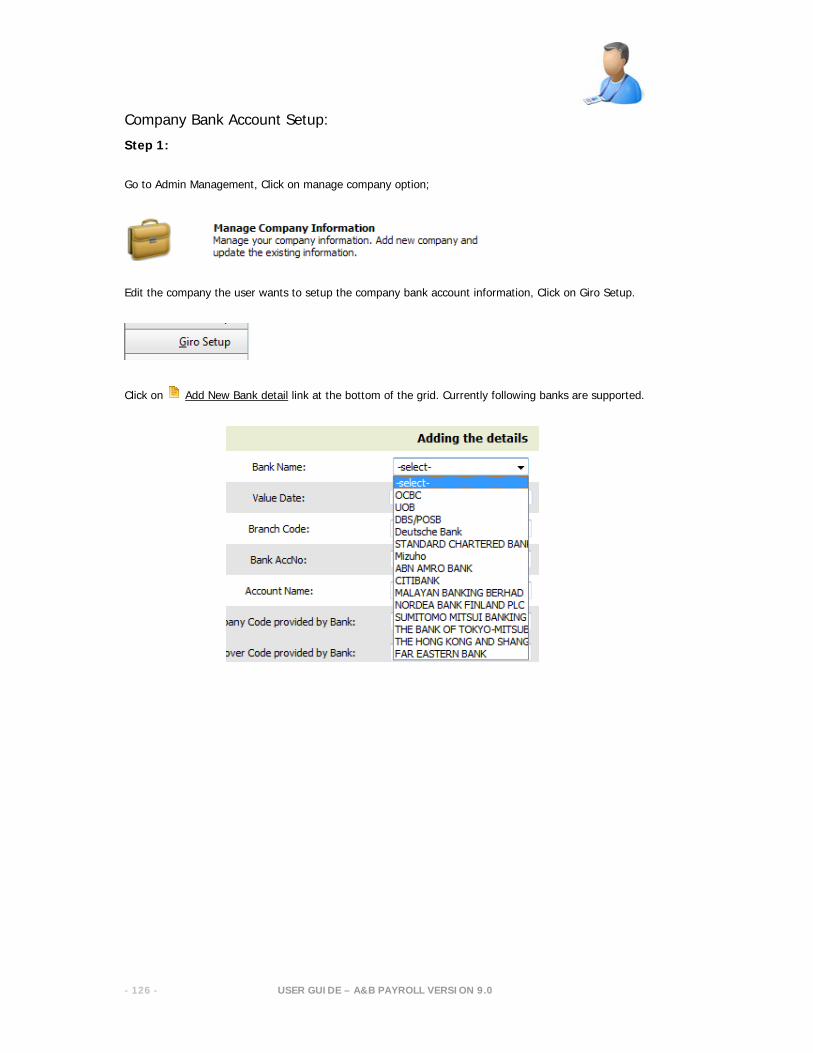
USER GUIDE – A&B PAYROLL VERSION 9.0
- 126 -
Company Bank Account Setup:
Step 1:
Go to Admin Management, Click on manage company option;
Edit the company the user wants to setup the company bank account information, Click on Giro Setup.
Click on Add New Bank detail link at the bottom of the grid. Currently following banks are supported.
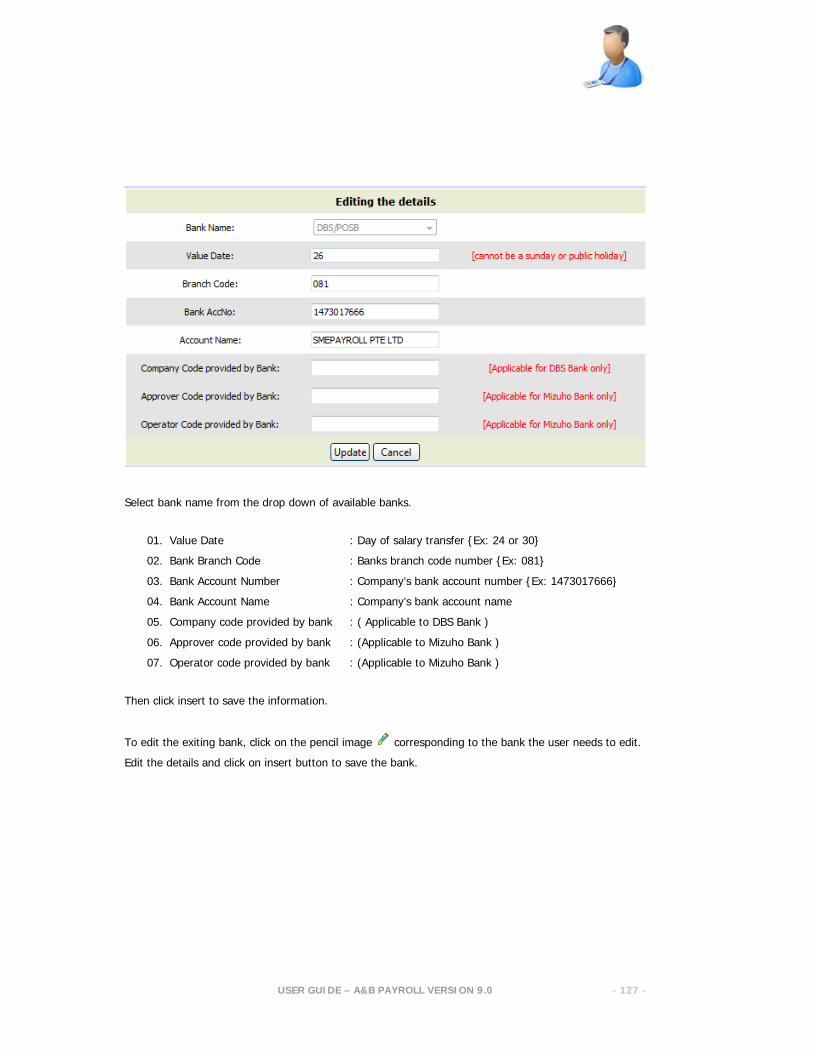
USER GUIDE – A&B PAYROLL VERSION 9.0
- 127 -
Select bank name from the drop down of available banks.
01. Value Date : Day of salary transfer {Ex: 24 or 30}
02. Bank Branch Code : Banks branch code number {Ex: 081}
03. Bank Account Number : Company’s bank account number {Ex: 1473017666}
04. Bank Account Name : Company’s bank account name
05. Company code provided by bank : ( Applicable to DBS Bank )
06. Approver code provided by bank : (Applicable to Mizuho Bank )
07. Operator code provided by bank : (Applicable to Mizuho Bank )
Then click insert to save the information.
To edit the exiting bank, click on the pencil image corresponding to the bank the user needs to edit.
Edit the details and click on insert button to save the bank.
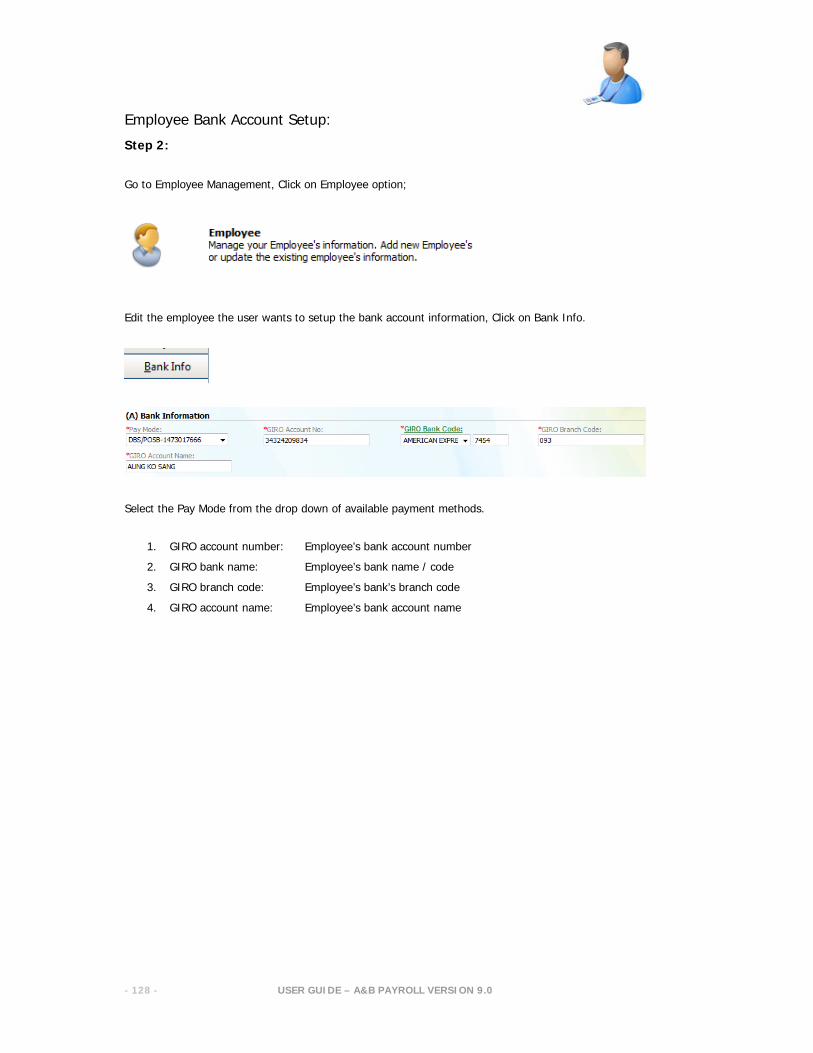
USER GUIDE – A&B PAYROLL VERSION 9.0
- 128 -
Employee Bank Account Setup:
Step 2:
Go to Employee Management, Click on Employee option;
Edit the employee the user wants to setup the bank account information, Click on Bank Info.
Select the Pay Mode from the drop down of available payment methods.
1. GIRO account number: Employee’s bank account number
2. GIRO bank name: Employee’s bank name / code
3. GIRO branch code: Employee’s bank’s branch code
4. GIRO account name: Employee’s bank account name

USER GUIDE – A&B PAYROLL VERSION 9.0
- 129 -
Bank Giro File Creation:
Step 3:
Go to Reports Management, Click on Bank Giro Link.
Select the following to create the giro file for the bank:
01. Bank name
02. Bank account number
03. Month and
04. Year for which you need the file to be generated and click on go button.
This will display list of all employees whose payroll has been processed for that month and year. Select
the check box next to the employee and click on submit button to generate the bank giro file.
To select all employees check the checkbox on the top of the grid.

USER GUIDE – A&B PAYROLL VERSION 9.0
- 130 -
Reports Management
{Static Reports}
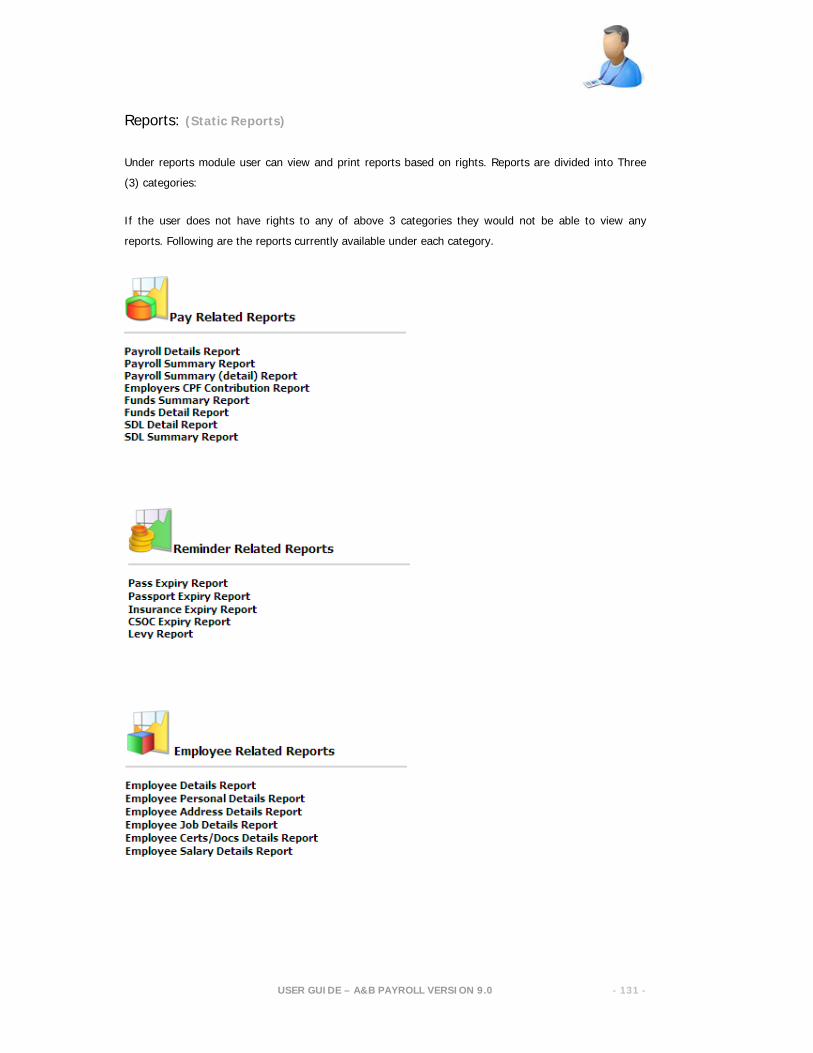
USER GUIDE – A&B PAYROLL VERSION 9.0
- 131 -
Reports: (Static Reports)
Under reports module user can view and print reports based on rights. Reports are divided into Three
(3) categories:
If the user does not have rights to any of above 3 categories they would not be able to view any
reports. Following are the reports currently available under each category.

USER GUIDE – A&B PAYROLL VERSION 9.0
- 132 -
Reports Management
{Custom Reports}
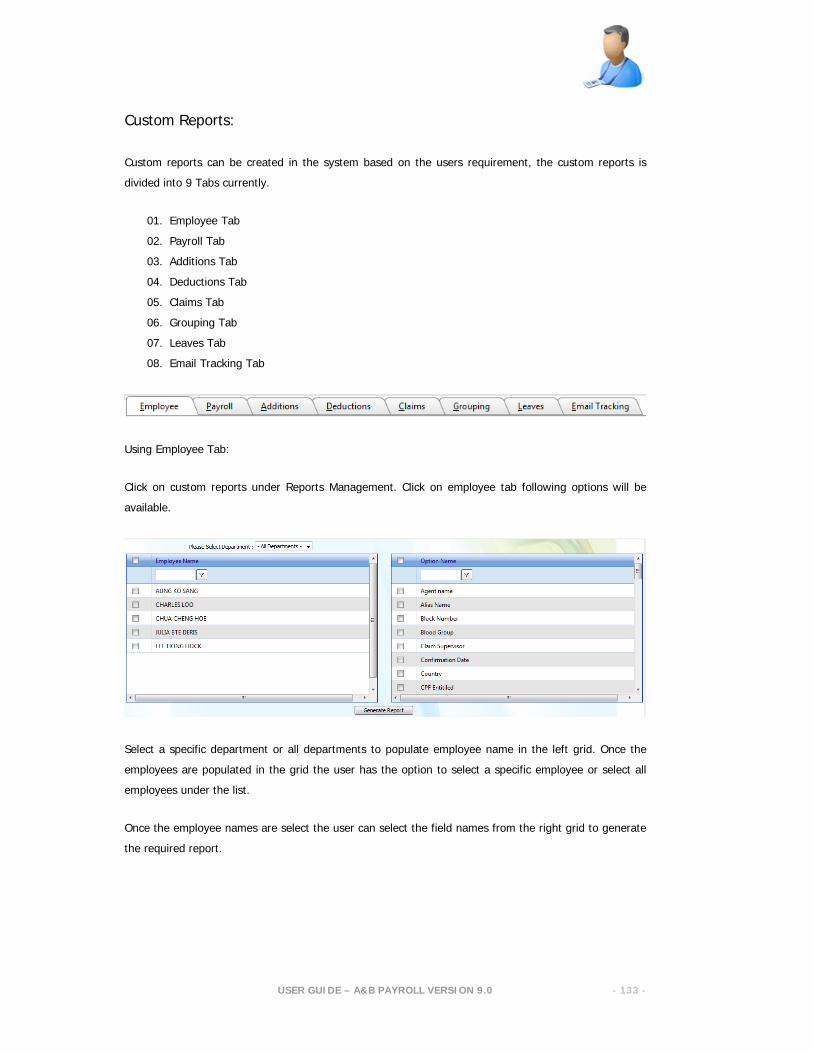
USER GUIDE – A&B PAYROLL VERSION 9.0
- 133 -
Custom Reports:
Custom reports can be created in the system based on the users requirement, the custom reports is
divided into 9 Tabs currently.
01. Employee Tab
02. Payroll Tab
03. Additions Tab
04. Deductions Tab
05. Claims Tab
06. Grouping Tab
07. Leaves Tab
08. Email Tracking Tab
Using Employee Tab:
Click on custom reports under Reports Management. Click on employee tab following options will be
available.
Select a specific department or all departments to populate employee name in the left grid. Once the
employees are populated in the grid the user has the option to select a specific employee or select all
employees under the list.
Once the employee names are select the user can select the field names from the right grid to generate
the required report.
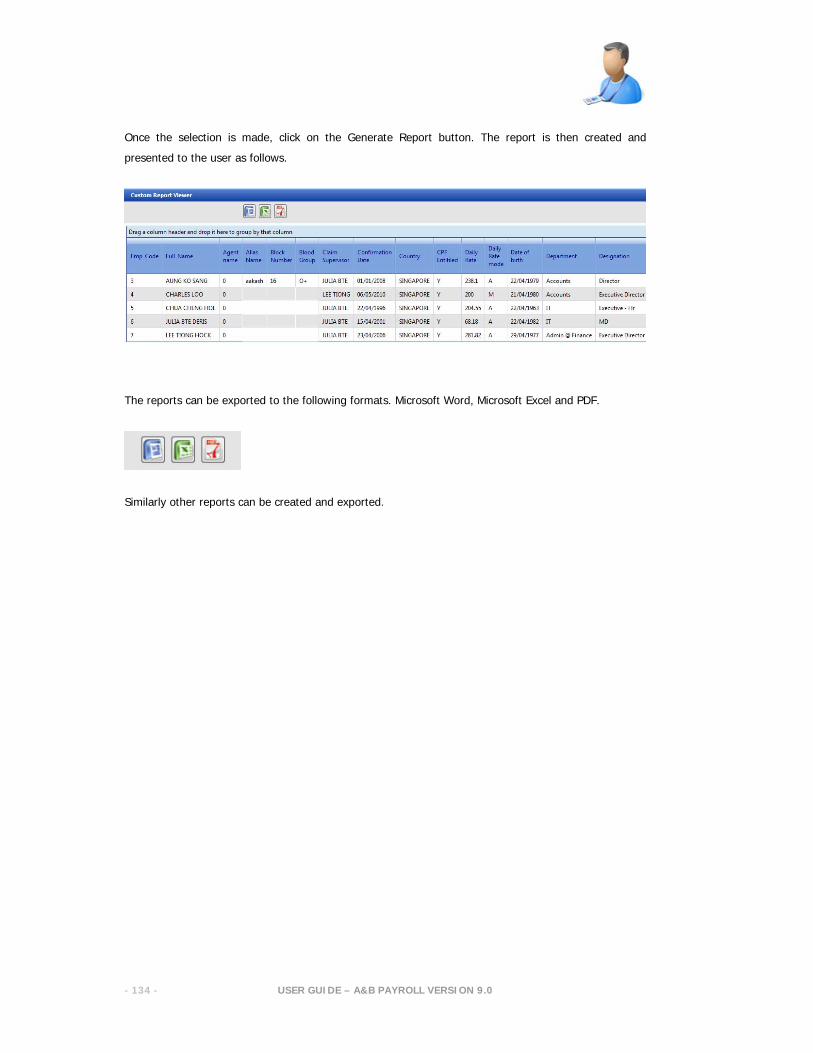
USER GUIDE – A&B PAYROLL VERSION 9.0
- 134 -
Once the selection is made, click on the Generate Report button. The report is then created and
presented to the user as follows.
The reports can be exported to the following formats. Microsoft Word, Microsoft Excel and PDF.
Similarly other reports can be created and exported.

USER GUIDE – A&B PAYROLL VERSION 9.0
- 135 -
Reports Management
{IRAS File Creation}
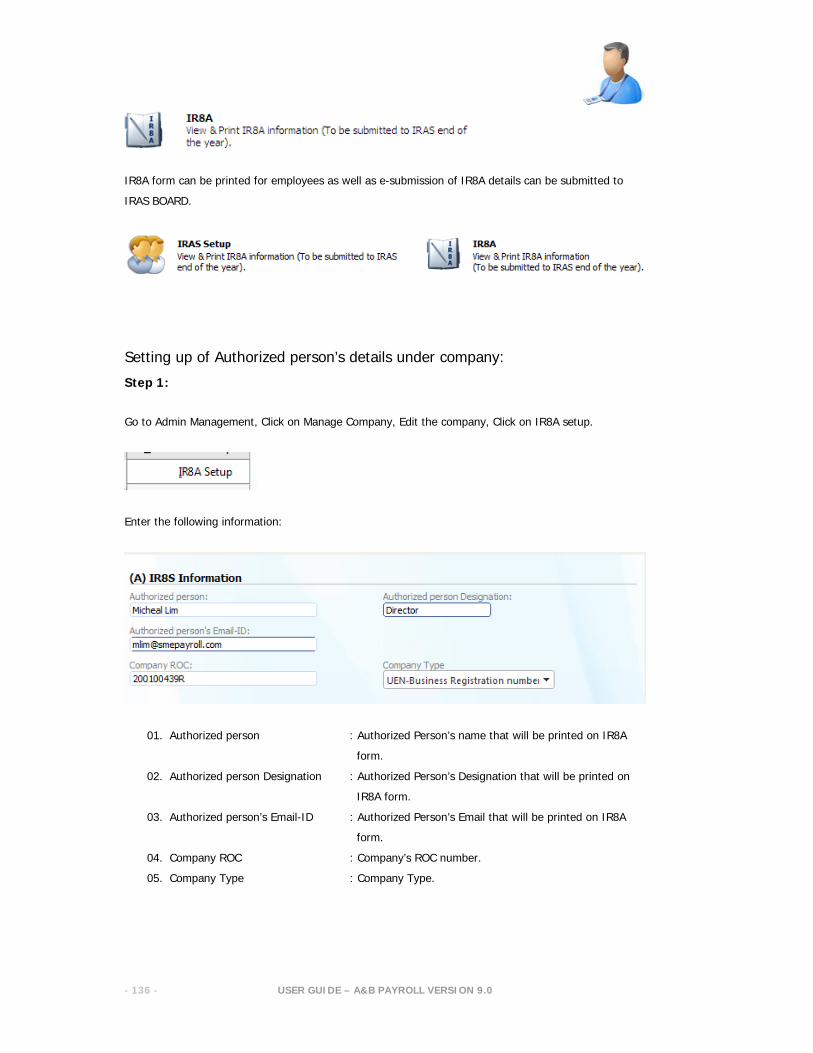
USER GUIDE – A&B PAYROLL VERSION 9.0
- 136 -
IR8A form can be printed for employees as well as e-submission of IR8A details can be submitted to
IRAS BOARD.
Setting up of Authorized person’s details under company:
Step 1:
Go to Admin Management, Click on Manage Company, Edit the company, Click on IR8A setup.
Enter the following information:
01. Authorized person : Authorized Person’s name that will be printed on IR8A
form.
02. Authorized person Designation : Authorized Person’s Designation that will be printed on
IR8A form.
03. Authorized person’s Email-ID : Authorized Person’s Email that will be printed on IR8A
form.
04. Company ROC : Company’s ROC number.
05. Company Type : Company Type.
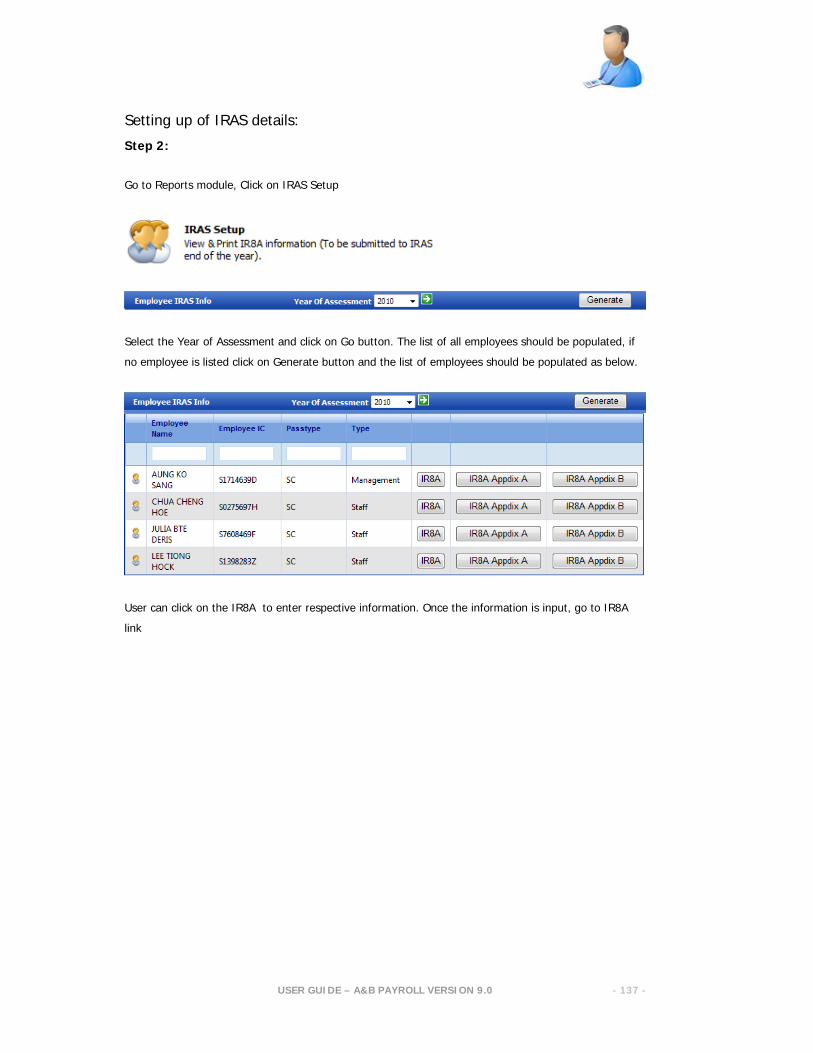
USER GUIDE – A&B PAYROLL VERSION 9.0
- 137 -
Setting up of IRAS details:
Step 2:
Go to Reports module, Click on IRAS Setup
Select the Year of Assessment and click on Go button. The list of all employees should be populated, if
no employee is listed click on Generate button and the list of employees should be populated as below.
User can click on the IR8A to enter respective information. Once the information is input, go to IR8A
link
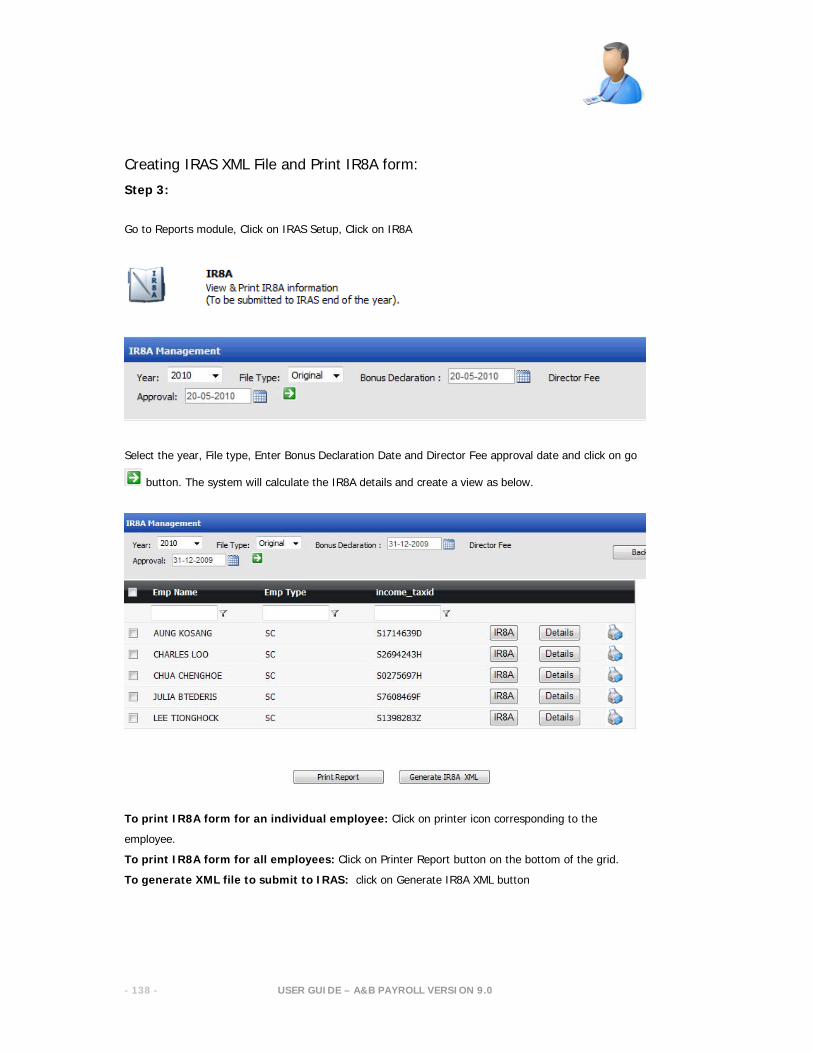
USER GUIDE – A&B PAYROLL VERSION 9.0
- 138 -
Creating IRAS XML File and Print IR8A form:
Step 3:
Go to Reports module, Click on IRAS Setup, Click on IR8A
Select the year, File type, Enter Bonus Declaration Date and Director Fee approval date and click on go
button. The system will calculate the IR8A details and create a view as below.
To print IR8A form for an individual employee: Click on printer icon corresponding to the
employee.
To print IR8A form for all employees: Click on Printer Report button on the bottom of the grid.
To generate XML file to submit to IRAS: click on Generate IR8A XML button
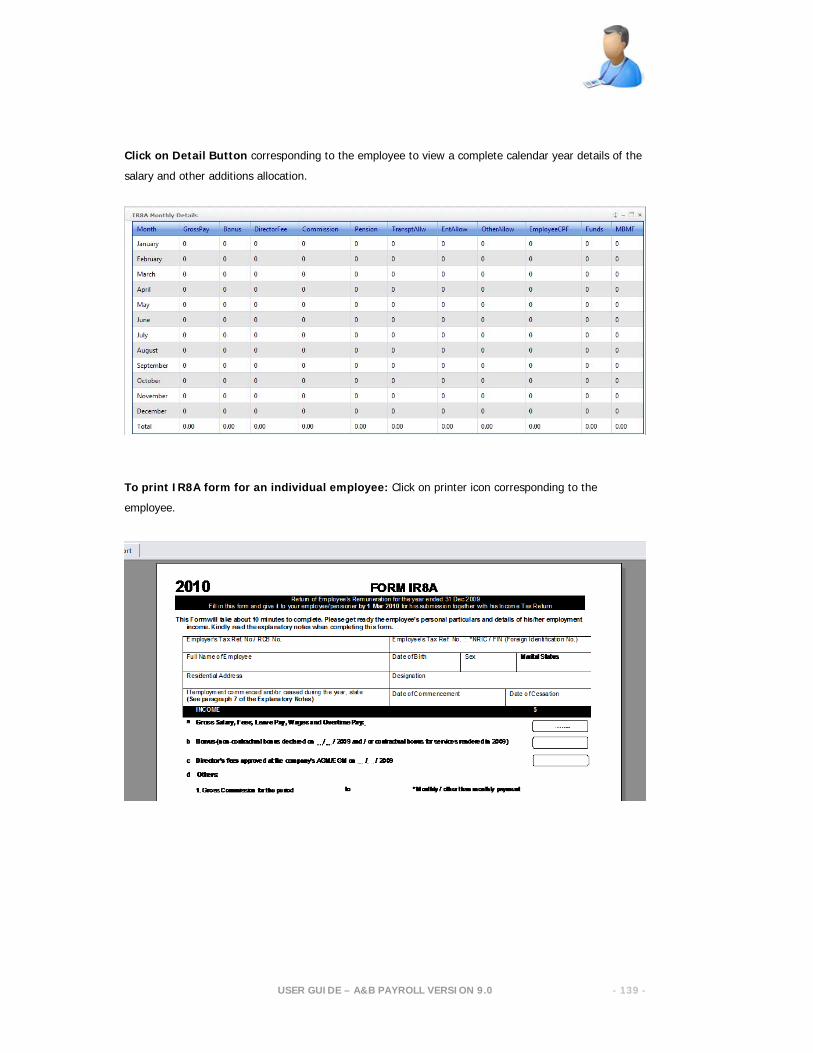
USER GUIDE – A&B PAYROLL VERSION 9.0
- 139 -
Click on Detail Button corresponding to the employee to view a complete calendar year details of the
salary and other additions allocation.
To print IR8A form for an individual employee: Click on printer icon corresponding to the
employee.