HR Software, Online Human Resource Information System|pro HR software

ESV Region IV – RMIC 1 2/2011
SMART Systems Software
SMART HR System Management and Reporting Tools for
Human Resources
Processing Payroll Using
SMART HR

ESV Region IV – RMIC 2 2/2011
Logging onto SMART HR ................................................................................................................. 5 Human Resource Modules .............................................................................................................. 5 Menus ............................................................................................................................................. 6 Icons Defined .................................................................................................................................. 6 Acronyms Used in This Document .................................................................................................. 7 Binoculars ........................................................................................................................................ 7 Dropdown Listboxes (DDLB) ........................................................................................................... 8 Print Screen ..................................................................................................................................... 8 GROUP: MN Employee Information .............................................................................................. 8
Payroll Information for the New Bookkeeper .......................................................................... 8 Certified and Non-Certified Employees ..................................................................................... 8
New Employee Check-Off List ......................................................................................................... 9 Form W-4 ............................................................................................................................ 9 Form W-5 ............................................................................................................................ 9 I-9 Form ............................................................................................................................... 9
I-9 Penalty ............................................................................................................................... 9 Self-audit Your Form I-9 File ................................................................................................... 9
Criminal Background Check ............................................................................................. 10 123B.03 BACKGROUND CHECK in Subdivision 1., (b) states: ................................................ 10
Insurance Forms/Policies ................................................................................................. 10 MN New Hire ................................................................................................................................ 11
Employee Basic Information (Social Security Card Name) ..................................................... 11 New Hire Status Information ................................................................................................... 13 Employee Initial Address ......................................................................................................... 13 Optional .................................................................................................................................... 13 Prevent Web Access .................................................................... Error! Bookmark not defined. Save New Hire Screen .............................................................................................................. 14 Notes Icon ................................................................................................................................. 14 MN Employee Information ...................................................................................................... 16 Icons Used on Employee Windows .......................................................................................... 16 Status Changes Tab .................................................................................................................. 17 Supp Info Tab ............................................................................................................................ 17 Basic Information Tab .............................................................................................................. 18 Name/Address Tab ................................................................................................................... 18 Criminal Background Tab ......................................................................................................... 19 Contract Information and Photo Tabs are not used. .............................................................. 20 MN Employee Information | MN Employee Info – Addnl ...................................................... 20 MN Paycheck Data ................................................................................................................... 23 Pay Tab...................................................................................................................................... 23 REGPAY (Regular Pay) Defined ................................................................................................ 23 EXTRA-CURRICULAR PAY Defined ............................................................................................ 23
Earn Sched..................................................................................................................... 24 Overrides ............................................................................................................................... 25

ESV Region IV – RMIC 3 2/2011
Pay Codes ...................................................................................................................................... 25 Pay Auth Tab............................................................................................................................. 26 Lump Sum Payoff Code of 1, 2 or 3 - EMPLOYEE RECEIVES ONE CHECK ................................ 26
Multiple Check Payoff Codes of 4, 5 or 6 – EMPLOYEE RECEIVES MULTIPLE CHECKS ......... 26 Split Lump Sum Payoff Code of 7, 8 or 9 – EMPLOYEE RECEIVES TWO CHECKS .................. 27 No Payoff ............................................................................................................................... 27
Deduction/Benefits Tab ........................................................................................................... 27 Deduction/Benefit Codes Defined ........................................................................................ 29 Voluntary Deductions ........................................................................................................... 29 Flexible Benefits Program - Section 125 Cafeteria Compensation Program ...................... 30 Reviewing Deduction/Benefit Codes for New Fiscal Year .................................................... 30
Distribution Tab ........................................................................................................................ 31 Reviewing Distribution Codes for New Fiscal Year ............................................................... 31
Taxes Tab .................................................................................................................................. 32 FEDERAL TAX ............................................................................................................................ 32
STATE TAX ............................................................................................................................. 33 Depositing Taxes; Publication 15, Circular E, Employer’s Tax Guide .................................... 33
How to Calculate Your Tax Payment(s) ............................................................................. 33 Tax Due Date ..................................................................................................................... 34 IRS Penalties ...................................................................................................................... 34 Form W-4 .......................................................................................................................... 34 Form W-5 .......................................................................................................................... 34
Minnesota Income Tax Withholding ..................................................................................... 34 Depositing State Taxes (SITMN) ............................................................................................ 34
How to Calculate Your Tax Payment(s) ............................................................................. 34 Tax Due Date ..................................................................................................................... 35 Penalties ............................................................................................................................ 35 Student Workers – Tax Exemption ................................................................................... 35
Retirement Tab ......................................................................................................................... 35 PERA Membership ................................................................................................................ 36 TRA Membership .................................................................................................................. 36 PERA / TRA Annuitants.......................................................................................................... 36 TRA Leave of Absence ........................................................................................................... 37 Updating TRA Service Credit ................................................................................................. 38 Part-time Teacher Program .................................................................................................. 38
Tracking Part-time Teachers in SMART HR ....................................................................... 39 TRA_EE07 .................................................................................................................................. 39
TRA Form 7600 .................................................................................................................. 40 Check Delivery .......................................................................................................................... 41 Garnishments and Savings Bonds Tabs are not used in our software today. ....................... 41 Pay Detail Tab ........................................................................................................................... 42 Setting up Pay Detail for a Pay Code ....................................................................................... 42 Setup Pay Detail ....................................................................................................................... 44 STAR Employee Data ................................................................................................................ 44

ESV Region IV – RMIC 4 2/2011
MN Employee Data Sheet ........................................................................................................ 45 Sort Employee Datasheet ..................................................................................................... 45 Select Employees .................................................................................................................. 45 Print ....................................................................................................................................... 45
Terminating Employees in SMART HR .......................................................................................... 46 Stopping MN Unique Records .................................................................................................. 48 Property Assigned To Employee .............................................................................................. 48 Prevent Web Access for Terminating and Deceased Employees ........................................... 49 MN Rehire Employee ............................................................................................................... 49 MN Sample Check .................................................................................................................... 50
GROUP: MN Payroll Processing Menu ......................................................................................... 52 MN Timecard Master or MN Timecard......................................................................................... 52
PAY TAB .................................................................................................................................... 52 DEDUCT TAB ............................................................................................................................. 52 MN Timecard Override............................................................................................................. 53 MN Calculate Payroll ................................................................................................................ 53 Report Retrieval Window – General Rules .............................................................................. 54 Report Defaults Using Multiple Argument Retrievals ............................................................ 55
GROUP: MN Payroll Processing Menu ......................................................................................... 57 MN Timecard Detail by Employee ........................................................................................... 57 MN Current Check .................................................................................................................... 58 Online Payroll Proof ................................................................................................................. 58 MN Payroll Proof Report .......................................................................................................... 59
Run the proof for all employees ........................................................................................... 59 Run the proof for selected employees ................................................................................. 59 Run the proof for codes ........................................................................................................ 59
Payoff Mini Proof ..................................................................................................................... 59 Create Paychecks ...................................................................................................................... 60 MN Print Checks ....................................................................................................................... 60 MN Create Direct Deposit File ................................................................................................. 62 MN Print Direct Deposit Notices ............................................................................................. 62 MN Payck & DirDep Notice Tally ............................................................................................. 63 Outstanding Check/Direct Deposit Register ........................................................................... 63 MN Reconcile Checks ............................................................................................................... 64

ESV Region IV – RMIC 5 2/2011
Logging onto SMART HR Begin by clicking on the icon for the SMART HR shortcut
Database: HR1234 (where 1234 is your district number) User ID: Enter your employee ID from payroll Password: Enter the password assigned to you by Region IV
Human Resource Modules
Modules are accessed by clicking on the module group at the top of the screen after you have logged in. To select a specific module, click on the item from the drop down menu. An easy way to access a module is by clicking on the shortcut icons.
Heart – Personnel Graph – Position Budgeting Car – Recruitment Diamond – Benefits Dollar Sign - Payroll Mailbox – Mail Box Notepad – User Unique EXIT – Exits the application

ESV Region IV – RMIC 6 2/2011
Menus Each module offers menu GROUPS to choose from with corresponding WINDOWS or REPORTS.
Icons Defined Depending on the window or group you select you will see all or some of the following icons.
1 2 3 4 5 6 7 8 9 10 11 12 13 14 15 16
ICON Description
Zoom 1) Allows you to increase or decrease the viewable report size on screen
Run Report
2) Click on the running man to run reports where this icon is in the toolbar.
Sort 3) Option to sort the report in a different order either ascending or
descending
Print 4) When you click on this icon a print specification box will pop up allowing
you the option of which printer to print to and which pages of the report you want to print
Save to File
5) You can save the report as a file. You can select the file type such as text, Excel, Access or Word
First Page 6) Takes you to the first page of the report
Previous Page
7) Takes you back to the previous page

ESV Region IV – RMIC 7 2/2011
Next Page 8) Takes you to the next page
Last Page 9) Allows to go to the last page of the report
Retrieve 10) Click on the retrieve icon to run a report or retrieve a screen in SMART HR
Refresh 11) Used to refresh the screen
Print Window
12) Allows you to print exactly what you see on the screen
Filter 13) Some of the reports give you an option to filter by code. For example the pay code reports will pop up a list of pay codes to further define your selection after the full report has been retrieved.
Post It 14) Allows multiple users of SMART HR to share information electronically
within the software regarding personnel information. Clicking this icon routes information for another user to view or approve. You can attach any window from the application to your message.
Done 15) To exit a window or report
Exit 16) To exit the application
Acronyms Used in This Document SHR. Smart HR DDLB. Drop down list box PERA. Public Employees Retirement Association TRA. Teachers Retirement Association OASDI. 4.2% portion of employee social security Mediare. 1.45% portion of employee social security FIT. Federal Income Tax SITMN. State Income Tax Minnesota ESS. Employee Self Service Website
Binoculars
The binoculars are found on employee windows.
The binoculars are used to look up and select an employee. Begin typing the employee last name in the Name field, then click on Select
Active Employees. Displays only active status employees
All Employees. Displays active and inactive employees

ESV Region IV – RMIC 8 2/2011
Dropdown Listboxes (DDLB) Listboxes are created using the MN Setup windows in SMART HR. If you are interested in
creating some district unique codes call Region IV – RMIC staff to ask how.
Print Screen
To print a screen within the application, click on the computer monitor icon
If you need to print an error message the computer monitor icon is not available. Press the Alt key and P key on your keyboard. This copies the window to the clipboard. Open up Microsoft Word. Press Ctrl and V keys. This will paste the print screen into word so you can save the error message or print screen window.
Payroll Module
GROUP: MN Employee Information
Payroll Information for the New Bookkeeper There are many terms in school payroll that differ from other entities. Many are defined here. We offer support on all personnel and payroll concerns so please do not hesitate to call.
Certified and Non-Certified Employees Certified employees are normally the Superintendent, Administrators, Teachers and employees who are required to have a license to do their job. Teachers belong to a union. The union will be defined as _EA (Your town, Education Association), MEA (Minnesota Education Association), or NEA (National Education Association). Union dues are normally withheld from certain months such as Oct. – April payroll checks. Each school will vary on when and how this is done. Non-certified employees are non-teacher support staff positions such as bookkeepers, secretaries, custodians and clerical aides. Some may be salaried employees but most will be paid by the hour. Some non-certified employees, depending on the district, will belong to an organized union or bargaining group that is recognized by the State of MN.

ESV Region IV – RMIC 9 2/2011
New Employee Check-Off List Form W-4
Employees are required to complete the Form W-4 for federal and state tax withholding. If an employee claims an EXEMPT status they have to submit a new form W-4 each year.
Form W-5 Advance Earned Income Credit. If an employee wants to claim EIC they must complete form W-5 by December 31st each year.
I-9 Form U. S. Department of Justice, Immigration and Naturalization Service, Employment Eligibility Verification Form. This form is very important and must be completed for every new employee. The Department of Justice has audited school districts and fined them for not complying. It is suggested that these forms be kept in a separate file in case you are audited to make them easily accessible.
I-9 Penalty Not having an I-9 on file can cost your district $1,000 for each affected employee. While most districts understand the need for having I-9 forms, some do not properly complete or maintain them.
Self-audit Your Form I-9 File Forms I-9 must be filled out within three days after the date the employee is hired to work. Be sure the form is not dated before the actual date of hire; this is against the law. Review date of hire entered for the employee. Be sure it is the actual date of hire and not the first payroll date paid. The employee’s section. Be sure the employee has marked one of the following boxes on the Form I-9:
A citizen or national of the United States A lawful permanent resident An alien authorized to work
If you have I-9’s that don’t have this area checked, it can cost you $150 per error. If there is a problem with any of the employee’s information, he or she must fix the section personally and initial the change. It is against the law for the employer to fix this section of the I-9. The employer’s section. If you find you have failed to fill in the proper document numbers or have made other errors in Section 2 or 3 of the form, fix the mistake and initial the change. Review the employee’s documentation again to make certain it has not expired. You must have I-9 forms on file either three years after the date of hire for an employee or one year after the employee leaves your company, whichever is later.

ESV Region IV – RMIC 10 2/2011
Criminal Background Check As a public school it is recommended that you request all applicants who receive an offer of employment be subject to a background check as described in the Minnesota Child Protection background Check Act, Minnesota Statute Section 123B.03 or other background checks as allowed by law. The offer of employment shall be conditioned upon a determination by the district that an applicant’s criminal history does not preclude the applicant from employment with the school district. If an applicant has resided in a state other than Minnesota, he/she should also be requested to consent to a Federal Bureau of Investigation (FBI) background check. There is a fee associated with the background check that must be paid by the applicant.
123B.03 BACKGROUND CHECK in Subdivision 1., (b) states: A school hiring authority, at its discretion, may elect not to request a criminal history background check on an individual who holds an initial entrance license issued by that state board of teaching or the state board of education within the 12 months preceding an offer of employment. (b) A school hiring authority may use the results of a criminal background check conducted at the request of another school hiring authority if: (1) the results of the criminal background check are on file with the other school hiring authority or otherwise accessible; (2) the other school hiring authority conducted a criminal background check within the previous 12 months; (3) the individual who is the subject of the criminal background check executes a written consent form giving a school hiring authority access to the results of the check; and the check that would disqualify the individual for employment. For the full statute go to this website:
Insurance Forms/Policies Part-time, non-certified employees are normally not eligible for benefits such as health, dental or life insurance. Verify that all forms are complete and have been returned. Mail insurance forms in to the company. Suggested procedure to follow (this will vary by district): Enclose a cover letter with the insurance application form defining the coverage the employee applied for and the effective date of the insurance. Keep a copy of the insurance application form for the employee’s personnel file. Proof the next billing to be sure the employee has been added to the policy. Update the employee record in payroll for proper employee and board share (employer benefit) deductions. Be sure to give the employee an insurance waiver form if they do not want insurance coverage. This is a safeguard for your district against future and proof that the benefit was offered to the employee. Send out reminders for forms that are not returned. Many insurance companies allow 30 days from the employment date for the employee to enroll.

ESV Region IV – RMIC 11 2/2011
MN New Hire MN Employee Information | MN New Hire Use this window to enter information for a new employee. It is a law in the State of MN that all new hires be reported to the Minnesota New Hire Center where they track information relating to child support agreements that are in arrears. This reporting has been automated in SHR and will be covered later in this document under the MN Agency Reporting section.
Press the enter key when you’re in the Employee ID field to have the system automatically select the next available employee number.
Employee Basic Information (Social Security Card Name)
Enter employees First, Middle and Last name as is appears on their social security card
SSN/SIN. Enter the employee social security number
Birth Date. Enter the employee’s date of birth. This is not a required field.
Gender. Use the ddlb to select Female or Male
Privacy. If the employee has indicated they would like to have their social security number (SSN), phone or address private in the database you can make that selection using the ddlb. Default is 00 with all dashes.
Employee Type. Default is Employee. You can select Supervisor if this employee will be authorized for approval items in SHR such as workers comp or timesheets.

ESV Region IV – RMIC 12 2/2011
PERA Number. If the employee has been a member of Public Employees Retirement Association (PERA) you will enter that number in this field. For most new employees this field will remain blank.
TRA Number. Enter the TRA number assigned by Teachers Retirement Association.
Ethnic Code. Use the drop down listbox (ddlb) to select the employee’s ethnicity code. This is used for STAR reporting.
Blank
A Native American
B African American
C Caucasian
H Hispanic
O Asian/Pacific Islander
SMARTeR Access. Use the drop down listbox (ddlb) to view the employee’s access to SMARTeR/ESS.
o Enabled. Employee has access to SMARTeR/ESS o Enabled, but 1 login mistake. Employee tried logging in unsuccessfully one time. o Enabled, but 2 login mistakes. Employee tried logging in unsuccessfully two
times. o Enabled, but 3 login mistakes. Employee tried logging in unsuccessfully three
times. o Locked out.
Employee tried logging in and was unsuccessful more than three times and SMART System security has locked the account.
If a district needs to disable access for an employee for some reason they will choose this option to disable the employee’s ESS account.
Ethnicity. Use the drop down listbox (ddlb) to select the employee’s ethnicity. This is used for STAR reporting.
o Not Hispanic/Latino o Hispanic/Latino
Race(s). If you report an individual as Hispanic/Latino you must also report one or more of the other five categories as a Y by check marking the box. According to federal guidance, individuals reported as Hispanic/Latino should be reported as American Indian or Alaska Native in the second set of requirements. However, you should always check with the individual being reported to ensure this is the closest designation appropriate for them. (Refer to Sec. 2-10 of the MDE STAR Manual for additional information.)
Subtrack Export. This field is used for districts using the AESOP sub tracking software.
Subtrack Work Title. This field is used to identify the employee’s work title using the AESOP sub tracking software.
Create SMART Finance User. If you click in this box the new employee will be given access to SMART Finance by the security you authorize.

ESV Region IV – RMIC 13 2/2011
Status Information Primary Status. This will default to AC Active Employee for all new hires
Secondary Status. Select the employment status for this employee using the ddlb arrow.
Retire Status. Select N, New Employee, if the employee is eligible for DCP, PERA or TRA retirement coverage
NCLB Eligible. Box is check marked by default
Orig Hire Date. Enter the employee’s date of hire
Adj Hire Date. Enter the employee’s date of hire. Note: This date can be changed at a later time if the employee’s secondary status or position with the district changes.
Department. Optional field
Job. Optional field
Location. Enter the employee’s work location using the ddlb
EEO Location. Not used
Check Location. Select the check location from the ddlb that you want the employee’s check, direct deposit notice, labels or report selections to sort by.
Unemp Location. Each employee must be assigned to an unemployment location. Use the ddlb to select the building location this employee is employed in. If the employee is a board member or a student worker you may want to exempt them from the hours worked quarterly report by assigning them to unemployment location 999. This field is used for quarterly unemployment reporting.
W-2 Output. Automatic (will print a form at calendar year-end unless the employee consents to print their own W-2 using ESS)
Employee Initial Address
Date Changed. Displays the date the address was last updated
Address Type. Permanent or Alternative
Address Line 1. Enter the employee’s mailing address
Address Line 2. Enter the second line of employee’s mailing address. Optional field
City, State/Zip. Enter the employee’s city, state and zip code
Optional Payroll Setup Pattern
This option allows you to copy information from another employee to the new hire. This option copies the previous employee’s pay codes, deductions, benefits, salary distribution codes (UFARS), sets up their payroll authorization so they can be paid, enters a retirement row and leave records. Many schools use this option to quickly setup new substitute teachers.

ESV Region IV – RMIC 14 2/2011
Employee to be copied. Enter the employee ID or use the binoculars to find the employee to be copied.
Enter Start Dates
o Paycodes. Enter the start date for the paycodes you are copying. When you tab out of this field all other date fields in this box will automatically fill using the same date entered for paycodes.
o Deductions, Distribution, Pay Authorization, Retirement, Timeoff. If the start date for these fields is different you can go over the top and enter it. If you do not want a particular field to duplicate information change the date back to 00/00/0000.
Save New Hire Screen
Click on the icon to SAVE the new hire information you have entered. You cannot use this screen to make changes or proof employee information. Use the MN Employee Info and MN Paycheck Data windows to proof or make changes.
Notes Icon
The notes icon is available on every window that retrieves by using the employee ID. You can make notes about the employee. We suggest you do not record anything in the notes icon that you wouldn’t also put into the employee’s personnel file.

ESV Region IV – RMIC 15 2/2011
Date. Date field sorts in DESCENDING order. Confidential. If you would like these notes to be viewable only to the ID of the person entering them, click into the box to mark it. This marks it as confidential. Another employee, with access to SMART HR, will not be able to view your notes if they are marked as confidential. Description (Required). Enter a brief description of the note you are making. This field is limited to 30 characters. Notes area. To make a note click on the + (plus sign) to open up a notes box to record detailed information in the field. Delete Note. If you want to delete a note, click on a row and click on the Delete Note button. If the attachments option has been used for this entry the attachments will also be deleted. Insert Note. This inserts a row with today’s date. You cannot change the date. Save. Saves your notes entries. Close. Closes the notes window.
Note Window Choices: 1) Add one row dated 07/01/2009 with a Description of ’09-10 FY’ and make all the notes made during the fiscal year using this one entry. 2) Add a new date row each time an entry is made for an employee. Allow Attachments to the Notes Icon The notes icon option also allows you to attach documents.

ESV Region IV – RMIC 16 2/2011
If you are interested in using the attachments call regional support to set this up for your district.
MN Employee Information This window records personnel information about the employee such as social security number, building location, status, hire date, name and address. Remember to always insert a row when it has a “date changed” field. Do not go over the top of the existing row. Notice how the tabs are stacked similar to a notebook you would tab mark. Each tab holds additional fields of information about the personnel status of the employee. The Status Changes, Supp Info, Basic Information and Name/Address tabs are bold. This is to tell (remind) the user that some or all of the information on a specific tab is required for payroll processing. The Criminal Background, Contract Information and Photo tabs contain additional, non-required information for personnel tracking.
Icons Used on Employee Windows
1 2 3 4 5 6 7 8 9 10
ICON Description
Copy a Row
1) Allows you to copy and insert an existing row
Insert a Row 2) Inserts a blank row
Save 3) Allows you save the window
Delete a Row 4) Deletes the row you specify
Retrieve 5) Click on the retrieve icon to retrieve the window
Refresh 6) Used to refresh the screen
Print Window
7) Allows you to print exactly what you see on the screen
Post It 8) Allows multiple users of SMART HR to share information
electronically within the software regarding personnel information. Clicking this icon routes information for another user to view or approve. You can attach any window from the application to your message.
Show/Hide 9) The show/hide icon is a user defined feature in SHR. The district can define a time limit on information they want to view on the active screen. To see older information click on the show/hide icon to display all data for the employee
Done 10) To exit a window or report

ESV Region IV – RMIC 17 2/2011
Status Changes Tab MN Employee Information | MN Employee Info | Status Changes Tab
Use this window to proof your new hire information or to make future changes. Do not change the date of hire (Orig Hire Date field). Instead put the new date in the adjusted hire date field (Adj Hire Date).
Supp Info Tab MN Employee Information | MN Employee Info | Supp Info Tab Use this tab to record additional personnel items about the employee.
Union. Use to record the bargaining unit for this employee. This field will be very helpful to you in sorting reports and doing report retrievals. This is an optional field but a field the region strongly encourages you to use. Folder Nbr. File folder number is required for STAR reporting for certified employees. This is not a required field for non-certified employees.
SHR offers three fields to track employee seniority. These are optional fields. Seniority. Date field. Enter in mm/dd/yyyy format. Seniority No. Numeric field. Seniority Code. Alpha/numeric field.

ESV Region IV – RMIC 18 2/2011
Tenure. Use to record the employee’s date of tenure with your district. Optional field. Home Phone, Mobile Phone, Work Phone, Work Ext. You can record employee phone numbers using these fields. These fields are optional. Work Email, Home Email. Use to record employee’s e-mail addresses. Email Pref. Select Work or Home as the employee’s e-mail preference. Work E-mail and Home E-mail. Use these fields to record an employee’s work or home e-mail address. These fields are not required fields. Maiden Name. This field can be use to record the maiden name for an employee. This is an optional field. Spouse Name. This field can be use to record the spouse’s name for an employee. This is an optional field.
Basic Information Tab MN Employee Information | MN Employee Info | Basic Information Tab
Record information about the employee as shown on their social security card. This
name is used for quarterly and tax reporting (Form W-2).
Other fields on this screen were completed using the New Hire window. You can make changes to those entries using this tab.
Name/Address Tab MN Employee Information | MN Employee Info | Name/Address Tab

ESV Region IV – RMIC 19 2/2011
If the employee would like something other then their social security name to print on
their check or direct deposit notice you can update it here. Note: When an employee has a legal name change you must update both the Basic Information tab and the Name/Address tab.
Verified. The verified box allows you to verify information entered by the employee using ESS.
Criminal Background Tab MN Employee Information | MN Employee Info | Criminal Background Tab
This is an optional tab that can be used to record the criminal background check
information for an employee. There is a report available in the Personnel Module | Personnel Reports | Employee Criminal Check .
Criminal Background Check
http://www.revisor.leg.state.mn.us/stats/123B/03.html As a public school it is recommended that you request all applicants who receive an offer of employment be subject to a background check as described in the Minnesota Child Protection background Check Act, Minnesota Statute Section 123B.03 or other background checks as allowed by law. The offer of employment shall be conditioned upon a determination by the district that an applicant’s criminal history does not preclude the applicant from employment with the school district. If an applicant has resided in a state other than Minnesota, he/she should also be requested to consent to a Federal Bureau of Investigation (FBI) background check. There is a fee associated with the background check that must be paid by the applicant. 123B.03 BACKGROUND CHECK in Subdivision 1., (b) states: A school hiring authority, at its discretion, may elect not to request a criminal history background check on an individual who holds an initial entrance license issued by that state board of teaching or the state board of education within the 12 months preceding an offer of employment.

ESV Region IV – RMIC 20 2/2011
(b) A school hiring authority may use the results of a criminal background check conducted at the request of another school hiring authority if: (1) The results of the criminal background check are on file with the other school hiring authority or otherwise accessible; (2)The other school hiring authority conducted a criminal background check within the previous 12 months; (3)The individual who is the subject of the criminal background check executes a written consent form giving a school hiring authority access to the results of the check; and the check that would disqualify the individual for employment.
Contract Information and Photo Tabs are not used.
MN Employee Information | MN Employee Info – Addnl MN Employee Information | MN Employee Info – Addnl | Name/Address Tab This window will be used to record optional information about the employee. It is not a required window to run payroll. Emergency contacts exist in this window. Many of the items in this window are available in ESS and are employee interactive.

ESV Region IV – RMIC 21 2/2011

ESV Region IV – RMIC 22 2/2011

ESV Region IV – RMIC 23 2/2011
MN Paycheck Data This window records pay, deduction, benefit, pay distribution and check delivery information for each employee.
Pay Tab MN Employee Information | MN Paycheck Data | Pay Codes Tab
Pay Code. Select the paycode you want to use for the employee from the ddlb. If you
would like a specific paycode built please call the Region and we will add a code for you.
REGPAY (Regular Pay) Defined
You will see this printed on various reports. REGPAY is what we call a “memo pay code”. It does not pay the employee a dollar amount but is used in formula.
Contract, hourly and unit paid regular pay codes.
Hourly or unit pay codes end in _HR, _UNIT or _OT.
Regular pay defines the pay codes that voluntary deductions are to be withheld from.
Board share benefits are distributed to regular pay codes.
Regular pay codes do not start with X.
EXTRA-CURRICULAR PAY Defined
Pay codes used for extracurricular payments (not regular pay) begin with the letter X.
X paycodes do not have voluntary deductions withheld such as dental, health, life, dues and so on. X paycodes do not distribute board share amounts such as dental board share, health board share and life board share against labor distribution. When you pay coaches or extra pay to employees you do not want a percentage of their board share amounts for insurances to be distributed to coaching pay. Instead these amounts are in the budget against their normal teacher or non-certified salary.
If an employee has regular pay, extracurricular pay and voluntary deductions, you will use non-X codes for regular pay and X pay codes for extracurricular payments.
Example: TEACHER and XFOOTBALL
If you do not use X codes, board share amounts such as health, dental and life insurance will be distributed against the extracurricular payment(s) when you create the general ledger (GL) file that is imported into finance.
Statutory benefits are distributed against X codes. These include social security match amounts and contributions towards retirement. These codes are defined as MEDICARER, OASDIR, DCP_ER, PERA_ER and TRA_ER.

ESV Region IV – RMIC 24 2/2011
Workers compensation wage and deductions are calculated using X pay codes also. Workers compensation is required to be withheld on all salary payments.
Start date. Start date must be equal to or later than the hire date.
It would be useful for you to make a copy of the coverage dates for each payroll and put by your computer to reference when you are entering start and stop dates in the MN Paycheck Data window.
Stop Date. Stop dates are used to stop an employee’s pay
To stop contract pay for the current payroll, use the last day of the previous payroll coverage period. If you enter hourly pay and do not want it to have a stop date, leave the stop date field set at 00/00/0000.
Pay Base. Enter unit and hourly pay here. If you want to manually override a contract you can take the annual amount divided by pay periods and enter the calculated contract amount to be paid each pay period here.
Annual Contract. Enter the annualized salary (contract pay) for the employee. Pay is determined one of three ways: 1) If a rate table is used, it references the Salary Schedule field and divides by the number of pay periods entered on the pay tab to calculate the pay rate. 2) If Annual Contract is entered it takes this amount and divides by the number of pay periods to calculate the pay rate. 3) If pay rate is entered it ignores the salary schedule field and the annual contract field and will pay the amount entered in pay rate. The annual contract (limit) will be acknowledged for fiscal-to-date earnings.
Nbr Pds. Enter the number of times the employee will be paid for this pay code.
This field is also used in calculating taxes. It takes the rate of pay times the number of pay periods to calculate the annual amount for taxing. If you enter a 1 it will know the employee is only receiving one payment for the year. If you enter 12, 24 or 26 it will annualize the amount for taxing. Note: If an employee is receiving a one-time payment it is a good idea to use a 1 for pay periods for taxing. For substitutes you may want to consider using a 12, 24 or 26 so taxes are calculated at the maximum amount for the calendar year.
Earn Sched. Earning schedules are recorded on the pay calendar and attached to pay codes. They are used to record when the employee earned the salary and are sent into Public Employees Retirement Association (PERA) and Teachers Retirement Association (TRA) as a part of the employee’s retirement record with the State of MN.
Std Hrs. The standard hours field is usually left blank (.000). It can be used to record hours for a unit or hourly paid employee if those hours never change from one pay period to another and will automatically generate pay for the employee. Pay is calculated by taking standard hours times the pay base. This eliminates the need for a timecard entry for employees who are paid the same number of hours each pay period.
Pay Type. Pay type describes what kind of pay the employee is receiving. Pay type can be changed by going to MN Payroll Setup | MN Change Pay Codes. This is a view only field on this screen.
ESV Region IV – RMIC 25 2/2011
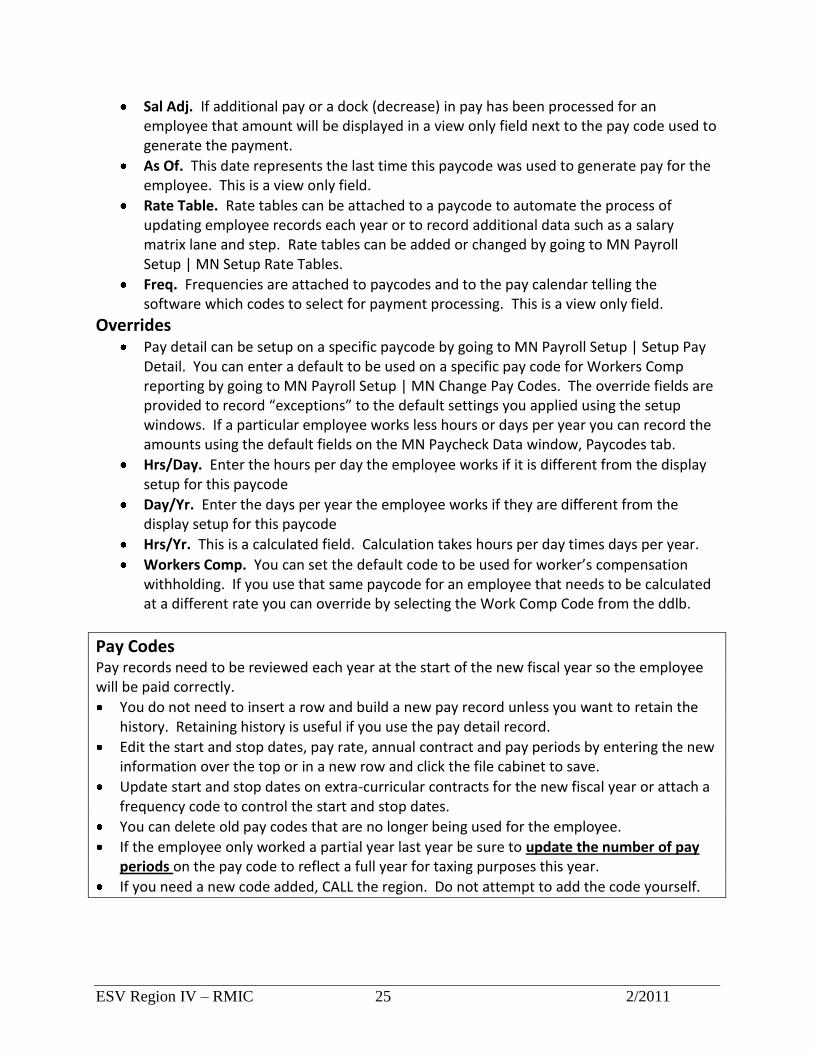
Sal Adj. If additional pay or a dock (decrease) in pay has been processed for an employee that amount will be displayed in a view only field next to the pay code used to generate the payment.
As Of. This date represents the last time this paycode was used to generate pay for the employee. This is a view only field.
Rate Table. Rate tables can be attached to a paycode to automate the process of updating employee records each year or to record additional data such as a salary matrix lane and step. Rate tables can be added or changed by going to MN Payroll Setup | MN Setup Rate Tables.
Freq. Frequencies are attached to paycodes and to the pay calendar telling the software which codes to select for payment processing. This is a view only field.
Overrides Pay detail can be setup on a specific paycode by going to MN Payroll Setup | Setup Pay
Detail. You can enter a default to be used on a specific pay code for Workers Comp reporting by going to MN Payroll Setup | MN Change Pay Codes. The override fields are provided to record “exceptions” to the default settings you applied using the setup windows. If a particular employee works less hours or days per year you can record the amounts using the default fields on the MN Paycheck Data window, Paycodes tab.
Hrs/Day. Enter the hours per day the employee works if it is different from the display setup for this paycode
Day/Yr. Enter the days per year the employee works if they are different from the display setup for this paycode
Hrs/Yr. This is a calculated field. Calculation takes hours per day times days per year.
Workers Comp. You can set the default code to be used for worker’s compensation withholding. If you use that same paycode for an employee that needs to be calculated at a different rate you can override by selecting the Work Comp Code from the ddlb.
Pay Codes Pay records need to be reviewed each year at the start of the new fiscal year so the employee will be paid correctly.
You do not need to insert a row and build a new pay record unless you want to retain the history. Retaining history is useful if you use the pay detail record.
Edit the start and stop dates, pay rate, annual contract and pay periods by entering the new information over the top or in a new row and click the file cabinet to save.
Update start and stop dates on extra-curricular contracts for the new fiscal year or attach a frequency code to control the start and stop dates.
You can delete old pay codes that are no longer being used for the employee.
If the employee only worked a partial year last year be sure to update the number of pay periods on the pay code to reflect a full year for taxing purposes this year.
If you need a new code added, CALL the region. Do not attempt to add the code yourself.

ESV Region IV – RMIC 26 2/2011
Pay Auth Tab MN Employee Information | MN Paycheck Data | Pay Auth Tab Every employee must have an active pay authorization to be processed for pay. If the pay authorization is a future date they will not show up on the timecard screen(s) and will not be calculated for pay.
Start Date. This must be equal to or greater then the employee’s date of hire.
Stop Date. Do not enter a stop date unless the employee resigns. Default setting is 00/00/0000.
Payroll FTE. FTE is the full-time equivalent for the employee’s position. Default setting is 1.00.
Pay-off Codes: When you hire new teachers and set them up in payroll be sure you are setting the payoff codes right away. We had several districts forget to do this and missed paying teachers off in the spring.
Lump Sum Payoff Code of 1, 2 or 3 - EMPLOYEE RECEIVES ONE CHECK Use a payoff code of a 1, 2 or a 3 to payoff the balance of a contract pay code for several pay periods in one single check at the end of the fiscal year. This is frequently used for those individuals who are retiring at the end of the year. 1 = Lump Sum 2 = Lump Sum (second code to use if you run payoffs in more than one calendar) 3 = Lump Sum (third code to use if you run payoffs in more than one calendar) Example: Employee is retiring and has requested one check dated May 20th for the remainder of their fiscal year contract.
Multiple Check Payoff Codes of 4, 5 or 6 – EMPLOYEE RECEIVES MULTIPLE CHECKS
Use a payoff code of a 4, 5 or a 6 to payoff a contracted pay code for several pay periods in several individual checks. Employee will receive multiple checks or direct deposits dated in June or they can be dated June, July and August to be distributed individually throughout the summer months on the district's normal paydays. The check dates that are printed on the individual checks or direct deposits are the check dates that appear on the pay calendar. 4 = Multiple Check 5 = Multiple Check (second code to use if you run payoffs in more than one calendar) 6 = Multiple Check (third code to use if you run payoffs in more than one calendar)

ESV Region IV – RMIC 27 2/2011
Example: Employee receives three checks dated June 20th, July 20th, and August 20th, to pay off the remainder of the fiscal year contract.
Split Lump Sum Payoff Code of 7, 8 or 9 – EMPLOYEE RECEIVES TWO CHECKS
Use a payoff code of a 7, 8 or 9 to pay off the balance of a contract pay code for several pay periods in two checks. The first check will be a normal check including timecard entries of the sequence zero, the originating payroll. The second check will be a lump sum check representing the balance of the contract. The check dates will be determined by the check dates entered on the pay calendar. 7 = Split Lump Sum 8 = Split Lump Sum (second code to use if you run payoffs in more than one calendar) 9 = Split Lump Sum (third code to use if you run payoffs in more than one calendar) Example: Employee receives a check dated May 20th for sequence zero and a second check dated June 20th for the remainder of their fiscal year contract.
No Payoff Blank Field = No payoff will happen for the employee contract. Click on the blank field in the drop down list box if a payoff code exists on an employee and it should not; entering a blank will clear the field so no payoffs happen.
Grouping. The payoff code grouping letter displays here. Pay Cycle. This is a required field and defines how your district’s payroll is setup. i.e. MONTHLY, SEMIMONTH or BIWEEK Min Ck. We do not define a minimum check amount in our software. The default setting is .00 (zero). Do not change this setting! Annual Salary. Optional field. Does not generate pay and is for information purposes only. Hourly Rate. Optional field. Does not generate pay and is for information purposes only. Std Hrs Pay Pd. Optional field. Does not generate pay and is for information purposes only. Annual Hours. Optional field. Does not generate pay and is for information purposes only. Annualized Wage. Not used in our software.
Deduction/Benefits Tab MN Employee Information | MN Paycheck Data | Deductions Tab

ESV Region IV – RMIC 28 2/2011

ESV Region IV – RMIC 29 2/2011
Deduction/Benefit Codes Defined. Use the ddlb to select deduction/benefit codes.
Deduction/benefit codes that end with an R are board share benefits. These include codes such as DENTALR, HEALTHR and LIFER.
Deduction codes that end with FLX are deductions that are flexed. These include codes such as DENTALFLX and HLTHFLX.
Other flex codes start with FSA (Flexible Spending Account) or REIMB (reimbursement). Examples include FSADEP10 (Flexible Spending Account for dependent care deduction for the tax year 2010) and REIMBDEP10 (reimbursement of dependent care for the tax year 2010).
Deduction amounts will be automatically withheld if they have a frequency code that is scheduled on the current pay calendar. If the frequency is not scheduled on the pay calendar, you can still use the deduction code by entering it on the deduction timecard screen. Logic: Timecard entries are considered “overrides”. Frequency codes are used in SMART HR to define when a pay, deduction, benefit or tax code is scheduled to be withheld for a given calendar. Examples include ALL, ALLPAY, ALLDED, FLEX07 and DUES.
Deduction amounts will be withheld if an employee has regular pay (REGPAY). If the employee does not have regular pay (X pay codes) the deduction will not be withheld.
Your school offers several choices for tax sheltered annuities (TSA’s). The codes available for this in SMART HR are: TSA, TSA2, TSA3 and possibly some matching board share codes such as TSAMATCH. To define the company name, enter a payee in the Payee field by clicking on the dropdown listbox (ddlb). These vendor names are built in MN Payroll Setup | Setup Payees.
Voluntary Deductions Voluntary deductions are deductions employees elect to be deducted from their payroll checks. These deductions include health, dental, life, tax sheltered annuities (TSA) and flex elections.
Start Date. Enter the start date for this deduction or benefit code.
Stop Date. Enter the stop date for this deduction or benefit code. If the code is withheld from each and every check and continues from one fiscal year to another you will not enter a stop date. Leave it as 00/00/0000.
Amount. Enter the amount to be deducted each payroll. Exception: Some districts schedule deduction frequencies to happen only one time per month for a semi-monthly or bi-weekly pay cycle. If this is the case you would enter the monthly amount here.
Limit. If you have a set amount that needs to be deducted for this employee for the fiscal year enter that amount in the limit field. Once the limit is met no further deduction/benefits will be withheld. Flex codes would be good examples of deduction codes with known limits. Using limits:
1. Ensures the proper limit for the year has been met 2. Allows for you to easily see adjusted limits for new employee’s that will not work
a full year 3. Provides useful information for budget reports

ESV Region IV – RMIC 30 2/2011
4. Will help you when you move into using the HR modules
Payee. The Payee field is used to further define the deduction or benefit being withheld for an employee. It is very helpful on the gl reports. Payee setup is also used to create the voucher file import which brings your deduction and benefit amounts into SMART Finance to post and to make the payments.
Use the ddlb to select the Payee (vendor code) for the deduction or benefit
Payee codes can be attached to a specific deduction or benefit code so they always display in this window each time they are selected by going to MN Payroll Setup | MN Change Deduction Code window
Do not default TSA code payees. TSA codes are used for multiple vendors (payees) and need to be assigned at the employee level
If you assign payees to your deduction, benefit or tax codes you will see the payee name instead of the code name on your reports. i.e. Instead of seeing TSA you will see Horace Man, IDS or VALIC all listed separately with the totals withheld from each. If you assign payees to tax codes you will see MN Department of Revenue instead of SITMN.
Freq. View only field. This defines the frequency code that is setup for this deduction or benefit code. This frequency code is entered on the calendar and determines when a code is scheduled to be deducted. Rate Table. If your district uses rate tables for deductions or benefits select that rate table from the ddlb. Look for the deduction name with RATE on the end.
Flexible Benefits Program - Section 125 Cafeteria Compensation Program If you aren’t taking the time to educate your employee’s on the benefits of participating in a flex benefits program you could be losing valuable dollars for your district. Districts use a variety of vendors to administer their flex programs. Call your flex provider the next time your flex plan renews to see if they will come out to talk your employees at a staff in-service or another time. The flex benefits program provides tax savings for both the employee and employer. Employee’s save 20-30% on the amounts they flex because flexed dollars are sheltered from federal, state and social security withholding. The employer saves 7.65% of every dollar flexed because of the matching social security savings. For example, if one employee flexes the dependent care maximum of $5,000 it saves the district $382.50 in matching social security.
Reviewing Deduction/Benefit Codes for New Fiscal Year Deduction/benefit records need to be reviewed each year at the start of the new fiscal year.
Health, Dental, Life Insurance: When did the policies renew? Have the rates changed? Are both employee and employer shares affected by the change?
Flex Benefits: When does your flex year renew? Remember to use the new flex codes each year. The last two digits of the calendar year on the end of the flex code(s) defines the the calendar year the flex plan ends. Example: FSAMED08 means the ending date of the plan year is in 2008 calendar year. Remember to call the region to do a mass change to save you time.

ESV Region IV – RMIC 31 2/2011
Do employees have deductions that need to be stopped so they aren’t withheld by mistake this year such as United Way?
You can delete old deduction/benefit codes that are no longer active on the employee’s deduction/benefit tab.
If you need a new code added, CALL the region. Do not attempt to add the code yourself.
Distribution Tab MN Employee Information | MN Paycheck Data | Distribution Tab
Pay Code. Click on the ddlb to select the paycode you are assigning the 17-digit UFARS
(distribution) code to.
Account Code. Use a valid 17-digit UFARS number. UFARS codes are further defined in the UFARS Manual published by the Minnesota Department of Education.
Start Date. Enter the start date for this distribution code.
Stop Date. Enter a stop date for codes that are no longer being used, that have changed during the year or if the employee has terminated employment. Use 00/00/0000 if you do not want to use a stop date.
Percent or Dollar. This is a display only field.
Amount. The default for this field is $.00 (zero). You can enter an amount if a specific dollar amount if there is a code you need to control for budgeting purposes.
Percent. Use this field to divide the employee pay over multiple distribution codes. The total split must equal 100%
Limit. You can set a dollar limit per fiscal year for budgeting purposes if needed.
Note: Do NOT mix several percentages with several dollar amounts for the same pay code. Choices are:
Enter several distribution codes as percentages totaling 100%
Enter several dollar amounts with the final code being a percentage of 1.00 (100%)
Enter one dollar amount with the second code being a percentage of 1.00 (100%)
Reviewing Distribution Codes for New Fiscal Year Distribution records should be reviewed each year at the start of the new fiscal year so salary and benefit amounts are properly posted to finance.
Have any employees moved buildings for this fiscal year?
Are any of last year’s employees working in a different position this year?
Update the percents or amounts for federal funds, Title I, grants, etc.
If distribution changes for a specific pay code, you can stop the old code and insert a row or you can type the correct information over the top of the old information.

ESV Region IV – RMIC 32 2/2011
If you are no longer using distribution code on an employee, the code should be stopped or deleted.
Taxes Tab The factors affecting how much you must withhold from a given wage payment are (1) the frequency of your payroll period, (2) the employee's marital status, (3) the number of withholding exemptions the employee claims, and (4) the size of the wage payment. MN Employee Information | MN Paycheck Data | Taxes Tab
FEDERAL TAX (displays as FIT – Federal Income Tax - on employee’s check)
Start Date. Enter a date equal to or greater then the date of hire
Stop Date. Do not enter a stop date unless you want to track Form W-4 changes for the employee. We encourage you to go over the top of existing tax rows so only one row is visible in this window.
Marital. Enter the marital status from the Form W-4
Allow. Enter the allowances entered on Form W-4
Additional Withhold. Enter the additional withholding the employee recorded on Form W-4. If the employee elects an extra dollar amount you will enter it in the Additional Withhold field. Less then 1.00 is a percentage; greater then or equal to 1.00 is a dollar amount. The amount entered here will be withheld from every check.
EIC. No longer allowed by the IRS effective 12/31/2010. Enter Earned Income Credit if the employee turns in Form W-5. Note: This is rare and will normally say NO in the EIC field. If there is a Form W-5 on file select one of the following choices:
o No. Employee does not have a Form W5 on file o Single or HOH. Single or head of household is marked in question 2 on the Form
W5 o Mar w/o Sp Cert. Select this option if they have answered NO o question 3: If
you are married, does your spouse have a Form W-5 in effect for (current calendar year) with any employer?

ESV Region IV – RMIC 33 2/2011
o Mar w/Sp Cert. Select this option if the employee answered YES to question 3: If you are married does your spouse have Form W-5 in effect for (current calendar year) with any employer?
Tax State. Select MN for Minnesota from the ddlb. After you enter the state (MN) it will create the state row for you to use to update information.
Medicare. This is a view only field and tells you this employee is not exempt from the 1.45% Medicare portion of social security withholding
OASDI. This is a view only field and tells you this employee is not exempt from the 4.2% OASDI (Old Age Survivors Disability Insurance) portion of social security withholding
FUTA. This is a view only field and tells you schools are exempt from federal unemployment withholding.
STATE TAX (displays as SITMN – State Income Tax Minnesota – on employee’s check)
Tax Code. This automatically populates when you select TAX STATE in the federal setup row
Start Date. This automatically populates when you enter the start date and tax state on the federal setup row
Marital. Enter the marital status from the Form W-4
Allow. Enter the allowances entered on Form W-4
Additional Withhold. Enter the additional withholding the employee recorded on Form W-4. If the employee elects an extra dollar amount you will enter it in the Additional Withhold field. Less then 1.00 is a percentage; greater then or equal to 1.00 is a dollar amount. The amount entered here will be withheld from every check.
Depositing Taxes; Publication 15, Circular E, Employer’s Tax Guide Federal law requires you to deposit federal income tax withheld, both the employee and employer portions of social security less any advance Earned Income Credit, EIC, payments. Payments are made by EFT (electronic funds transfer). We suggest filing your taxes as soon as you complete your payroll and make the withdrawal date for the tax payment the same as your check date for the payroll to avoid penalty.
How to Calculate Your Tax Payment(s)
Use the last page(s) of the Payroll Register and add up the amounts for FIT, MEDICARE, MEDICARER, OASDI, OASDIR and subtract EIC. Note: EIC withholding is rare. Use EFTPS website https://www.eftps.com/eftps/ on the Internet to submit your payment. See separate handout for detailed tax submission information. FIT = Federal Income Tax EIC = Earned Income Credit MEDICARE = 1.45% portion of social security MEDICARER = 1.45% employer matching amount OASDI = Old-Age, Survivors, and Disability Insurance program is 4.20% of social security OASDIR = 6.20% employer contributed amount

ESV Region IV – RMIC 34 2/2011
Tax Due Date
The due date will be three working days following the pay date. Exceptions will be any time the payday falls early or when the total tax deposit exceeds $100,000.00. When the deposit exceeds $100,000.00 you are required to file one banking day following payroll.
IRS Penalties
Don’t get caught on a late payment; the penalty is very high. If by chance it happens, call or write the IRS and explain you are new and to please abate the penalty and late filing charges.
Form W-4
Employees are required to complete the Form W-4 for federal and state tax withholding. If an employee claims an EXEMPT status they have to submit a new form W-4 each year.
Form W-5
Advance Earned Income Credit. If an employee wants to claim EIC they must complete form W-5 by December 31st each year.
Minnesota Income Tax Withholding After the employee determines the number of federal withholding allowances to claim, they must determine the number of Minnesota withholding allowances. Employees may claim up to, but not more than, the number of federal allowances they claim. Minnesota does not have a special withholding allowance form. If an employee claims the same number of federal and Minnesota withholding allowances, only one W-4 is necessary. If an employee claims fewer Minnesota withholding allowances then federal allowances, have the employee fill out a second W-4 claiming Minnesota allowances. Write “Minnesota Withholding” across the top of the form. The W-4 remains in effect until the employee gives you a new W-4 that replaces the existing one.
Depositing State Taxes (SITMN) Using the payroll register look up the state tax due for this payroll. The due date will be three working days following the pay date. The MN Department of Revenue requires you deposit state income tax withheld from employee checks using EFT (electronic funds transfer). We suggest filing your taxes as soon as you complete your payroll and make the withdrawal date for the tax payment the same as your check date for the payroll to avoid penalty.
How to Calculate Your Tax Payment(s)
Use the last page(s) of the Payroll Register and look up the amount for SITMN. Use MN Department of Revenue website http://www.taxes.state.mn.us/on the Internet to submit your payment. See separate handout for detailed tax submission information.

ESV Region IV – RMIC 35 2/2011
Tax Due Date
The due date will be three working days following the pay date.
Penalties
Penalties will be issued on all late payments to the MN Department of Revenue.
Student Workers – Tax Exemption
If you employ student workers you may assume they are short-term employees and are EXEMPT from federal and state tax. To qualify for that status they must meet all three of the following conditions: 1) They earn less than the applicable standard deduction, 2) All their federal income tax withheld the previous year was refunded because they had no tax liability and 3) They expect no federal income tax liability in the current year. In addition, an individual who can be claimed as a dependent on someone else’s return cannot claim exemption from withholding if he or she will have more than $750 of income and more than $250 of it is non-wage income such as dividends or interest.
Student workers are NOT automatically exempt!
Retirement Tab MN Employee Information | MN Paycheck Data | Retirement Tab
Plan. Select the retirement plan. The choices are: DCP, NONE, PERA or TRA. Coverage. Use the dropdown listbox to select the correct coverage for the retirement plan you have selected. State Date. Enter the starting date of the retirement plan for the employee. Stop Date. Only enter this when one plan is being stopped and a new plan is starting. Position Code. Click on the drop down listbox to select the position for this employee. PERA EXCLUSION Terminated. This field will default to N. If the employee has been terminated you can change the field setting to Y. This field is used for the PERA Exclusion Report that is processed each year in August. Exclude Code. Use the ddlb to select the PERA exclusion code if the employee does not belong to PERA or TRA.

ESV Region IV – RMIC 36 2/2011
Remember to record the PERA exclusion code for all new employees if they do not qualify for PERA or TRA. TRA Annuitants returning to non-certified positions will need to have a PERA Exclusion code entered if they earn less then $425 per month. TRA Annuitants working in certified positions or as certified substitutes would have a PERA Exclusion code of 999, which means they will not be reported.
(PERA) Eligibility Date. Enter a date for PERA if the eligibility date is different then the employee’s date of hire. If it is the same you do not need to enter a date. (PERA) Position Class. Use the dropdown list box to select the employee’s position. i.e. full-time, part-time, seasonal. (TRA) Default Days. This field is populated by the Cont Days field you enter in MN Setup Federal Entities and is a view only field on the retirement tab. (TRA) Cont Serv Cd. Teachers Retirement Association (TRA) records the number of service credit days a member completes each fiscal year.
You will update this field if the TRA employee is part-time or if you need to adjust the service credit on a full-time employee that has reduced days because of leave without pay.
If the employee is an active substitute teacher set their secondary status code on the MN Employee Info window to 07 Casual Employee or 08 Substitute. You will also need to set the service credit field found on the retirement tab to 999.9 so service credit is not reported to TRA unless they sub. If they do sub the service credit will be recorded on the timecard window.
Default service credit days are entered in MN Payroll Setup | MN Setup Federal Entities | Contract Days field.
(TRA) Eligibility Code. Select the code that defines the reason why this employee is eligible to participate in TRA. This code is required and will be reported to TRA in the demographic record.
PERA Membership There isn’t a form to complete for PERA. The SMART HR payroll software creates a demographic record for all new hires. The demographic and payroll information is downloaded to PERA when the file(s) are submitted to the PERA office for your district.
TRA Membership There isn’t a form to complete for TRA. The SMART HR payroll software creates a demographic record for all new hires. The demographic and payroll information is downloaded to TRA when the file(s) are submitted to the TRA office for your district.
PERA / TRA Annuitants An annuitant is a person who paid retirement into PERA or TRA and has officially retired and is receiving a retirement benefit. If you are unsure of an employee’s retirement status be sure to call either PERA or TRA to clarify.

ESV Region IV – RMIC 37 2/2011
If an employee is an annuitant it means you need to setup their retirement record so retirement is not withheld from their paychecks. You will set them up using their retirement plan of either PERA or TRA and choosing the coverage type of Annuitant. Minnesota law requires you to report their earnings (wages) to either PERA or TRA. Annuitant Setup for PERA or TRA
1. Insert a new row and change the start date to be the effective date for the annuitant 2. Stop the current retirement row (i.e. PERA or TRA COORD) 3. On the new row the Plan will remain as PERA or TRA 4. The Coverage field needs to be changed to ANNUITANT 5. Change the TRA Cont Serv Cd to 999.9 so service credit is not reported to TRA unless a
timecard entry is completed for the employee 6. Update the status change row for the ANNUITANT. Go to MN Employee Info | Status
Changes | Secondary Status. Select 08 Active Substitute.
TRA Leave of Absence MN Employee Information | MN Employee Info | Status Changes tab Record a TRA leave of absence by inserting a status row in the SMART HR application.
Retire Status. Select the correct leave type from the ddlb. Primary Status LV – Info Box. Record the leave reason and dates and SAVE This entry will be automatically reported to TRA in the next demographic file sent

ESV Region IV – RMIC 38 2/2011
Updating TRA Service Credit MN Employee Information | MN Paycheck Data | Retirement Tab, TRA Cont Serv Cd (Contracted Service Credit) field
If contract days are less than or greater than zero it reports the value found on the employee record for TRA contract days (Cont Serv Cd field)
If TRA contract days equal zero on the employee it defaults and reports the service credit found in the MN Payroll Setup | MN Setup Federal Entities, Cont Days field.
If TRA contract days equal zero and the employee has a pay status of 07 (active casual) or 08 (active substitute) it will report zero service credit days to TRA. It does not use the default from MN Setup Federal Entities, Cont Days field.
If 999 or 999.00 are entered in the Cont Serv Cd field it will report zero service credit days for the employee. This may be a valid entry if the employee is on an approved TRA leave of absence.
Part-time Teacher Program
http://www.tra.state.mn.us/FormsPub/Worddocs/TRA-7500-w.doc
A Part-Time Teacher Program agreement must be approved before October 1 of the year of participation, unless participation is for an elected legislator. This form must be submitted by October 1 of the year of participation. Legislators wishing to participate in the program should submit this form as soon as possible after the election. Late submissions are subject to a $5.00 per day fine, paid by the employer. After 15 months, late forms will not be accepted. Member must have at least 3 full years of Minnesota teaching service. Participation is limited to a maximum of 10 full fiscal years. Partial years are not permitted. Program participants must teach the equivalent of at least 50 full days, but may not earn
more than 80 percent of a full-time teacher salary of the same lane and step. A program participant may not teach full time or part time with any other TRA-covered
employer while participating in this program. Authorized substitute teaching is permitted. Participants may not accrue service or contribute to another Minnesota public pension plan.
Participation in the program is based on a full fiscal year and the employment pattern during the most recent fiscal year.
Member contributions based on a full fiscal year salary, including contributions for the unearned salary, will be classified as tax sheltered only if paid through payroll withholding. Employer contributions must be paid at the same time, either by the member or by the employer or by an agreed upon combination. Member-paid employer contributions are not tax-sheltered contributions.
Bargaining agreements may specify other provisions consistent with Section 354.66.

ESV Region IV – RMIC 39 2/2011
Tracking Part-time Teachers in SMART HR
If the employer agrees to pay the employer share on the unearned salary, then assign the UNEARNED06 memo pay code to the employee’s PAY TAB and set it up like a contract. The employee contribution on this unearned salary will be deducted via the TRA_EE deduction code. The employer contribution will be calculated via the TRA_ER benefit code.
If the employer does not agree to pay the employer share on the unearned salary, then the employee will have to pay that amount themselves with after tax dollars. To make this work, assign the UNEARNED07 memo pay code to the employee’s PAY TAB and set it up like a contract. Also assign the TRA_EE07 deduct code to the employee’s DEDUCT TAB with the same start/stop as the UNEARNED07 code. You don’t need to put any other values on the TRA_EE07 row because the formula takes care of all of the calculations. The employee contribution on this unearned salary will be calculated via the TRA_EE deduction code. The employer contribution on this unearned salary will be calculated via the TRA_EE07 deduction code. There is no TRA_ER benefit amount calculated on the UNEARNED07 memo pay code because the employee must pay the board share amount.
Board Approved Part-time Teacher Program Pay Code Deduction/Benefit Code
Employer continues their contribution to the part-time wages
UNEARNED06 None
Employer will NOT contribute to the part-time teacher wages
UNEARNED07 TRA_EE07

ESV Region IV – RMIC 40 2/2011
TRA Form 7600
This remittance form includes the reconciliation needed to properly report the part-time teacher wages and deductions.

ESV Region IV – RMIC 41 2/2011
Check Delivery MN Employee Information | MN Paycheck Data | Ck Delivery Tab This screen contains information that tells the application how the employee is to receive their compensations. They will either receive a paper check or direct deposit (ACH).
Start Date. This is the effective date of the record. All priorities must have the same date to be effective. This screen does not use stop dates so it looks for the most recent date on a row and used that for check delivery. Priority. Every employee must have a priority 99 record to get paid. Priority 98, 97, on down are used to record multiple direct deposit account information. The application allows up to 99 different accounts to be used. Your district will normally limit the number of accounts an employee can use for direct deposit to control costs. Amount. The priority 99 record will always be 100% (.00 with the $ sign marked) for both check and ACH. If they have additional ACH accounts, insert a row and enter the additional priority bank information. If the employee has elected a dollar amount to go to a specific checking or savings account enter that here and mark the $ radio button. If they want a specific percentage to go to an account enter that here and mark the % radio button. Anything less then 1.00 is considered a percentage. For example, .25 with % radio button would distribute 25 percent of the employees net pay to the designated account. Delivery Option.
Check = employee is to receive a paper check DD-Checking = this is a direct deposit checking account DD-Savings = this is a direct deposit savings account
Bank Routing #. Select a routing number from the drop down listbox. If the routing number doesn’t exist, double click in the field. This will open up a box that will allow you to add a new bank with the routing number you need. Bank Account. Enter the employee’s checking or savings account number. Prenote Date. If this date is left as 00/00/0000 the priority record information will be issued as a check the first time the account is used. If you enter a date (any date) it will process the direct deposit (ACH) the first time the account is used.
Garnishments and Savings Bonds Tabs are not used in our software today.

ESV Region IV – RMIC 42 2/2011
Pay Detail Tab MN Employee Information | MN Paycheck Data | Pay Detail Tab The Pay Detail tab has information relating to calculating an employee’s contracted daily and hourly pay, based on the hours per day and days per year that you enter. It also will calculate the estimated annual amount for hourly employees based on hours per day and days per year that you enter. Some additional setup information is needed in order for the calculation/estimate process to happen.
Setting up Pay Detail for a Pay Code MN Payroll Setup | Setup Pay Detail Setup a default record that holds the values for each pay code for the number of days and the hours per day that “as a general rule” most employees assigned to that pay code would work. This can be set up one pay code at a time or for multiple codes that have the same start and stop dates. For example, teachers work 8 hours a day for 182 days per year but two teachers have 200 day contracts. You would use the 182 days as the default for the TEACHER pay code then go to the two employee records to record their exceptions manually. Enter the start and stop date that the pay code would normally be active in. This window only allows a one year period of time. You only need to fill in fiscal year if you want to retrieve a specific fiscal year’s setup information.

ESV Region IV – RMIC 43 2/2011
After you click on the yellow retrieve icon this window is displayed.
Enter the “default” hours per day and the “default” days per year.
Display flag should be set to Y. This flag needs to remain at Y for the information to display on the new Pay Detail Tab. This can be changed to N in future years if you do not want to see previous year’s information on the Pay Detail Tab.
MN Paycheck Data window display looks like this before you Setup Pay Detail
MN Paycheck Data window display shows Pay Detail after setup is complete
Click on the Pay Detail tab to see the calculated values you entered in setup

ESV Region IV – RMIC 44 2/2011
If rate tables are used it will prorate the annual contract amount and hours per day by the FTE found on the Pay Auth tab
To record exceptions to the default setting go to the employees PAY tab
After you save the exception the new hours per day will display on the Pay Detail tab
Setup Pay Detail MN Payroll Setup | Setup Pay Detail This report shows you the default values you entered in the Setup Pay Detail window
STAR Employee Data See the Regional STAR Manual to review window field details and the STAR reporting process.

ESV Region IV – RMIC 45 2/2011
MN Employee Data Sheet This provides a paper copy of the employee information found on the MN Employee Info and MN Paycheck Data windows.
Sort Employee Datasheet Paycycle and Emp Name. This option is not used by Region IV school districts. Emp Name Only. This is the default setting and will print the datasheet(s) by employee name.
Select Employees All. This will select all of the employees found in the database. Active. This will select all active employees in the database Inactive. This selects all inactive employees in the database With Changes. This option selects only those employees that have been changed since the last time the window was retrieved.
Print Click on this button to print the datasheets you have selected. Note: These will take a long time to print because each employee is run as a separate print job.
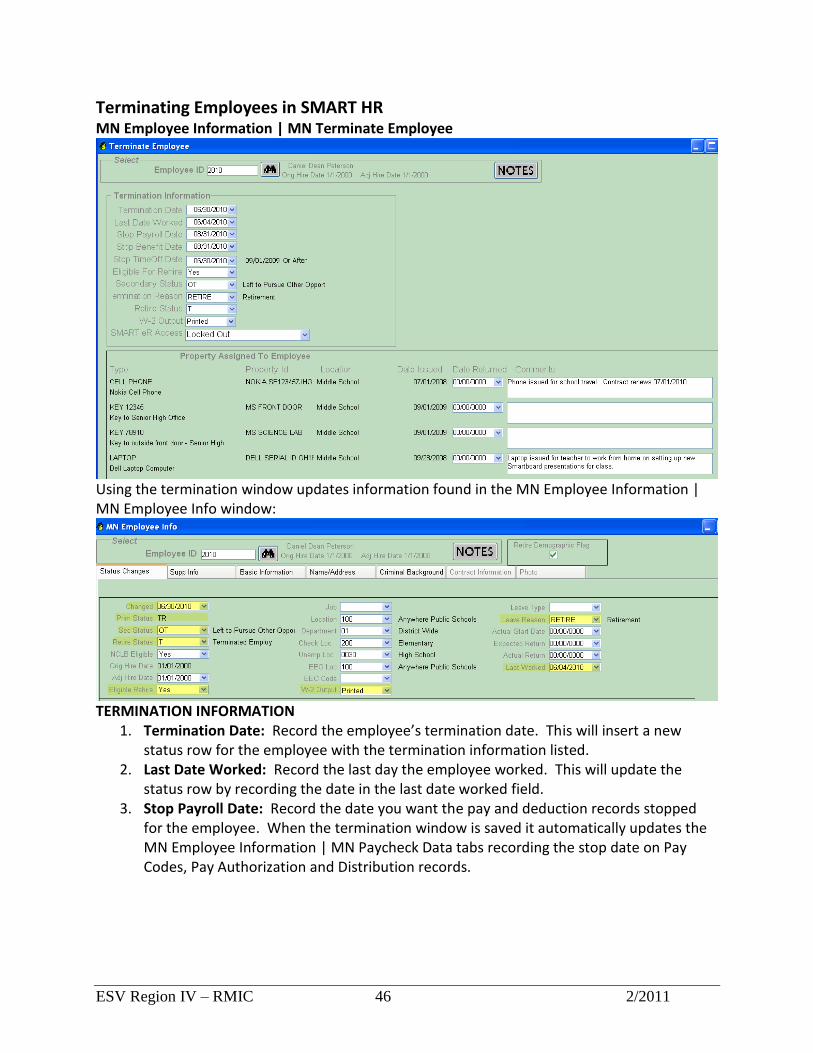
ESV Region IV – RMIC 46 2/2011
Terminating Employees in SMART HR MN Employee Information | MN Terminate Employee
Using the termination window updates information found in the MN Employee Information | MN Employee Info window:
TERMINATION INFORMATION
1. Termination Date: Record the employee’s termination date. This will insert a new status row for the employee with the termination information listed.
2. Last Date Worked: Record the last day the employee worked. This will update the status row by recording the date in the last date worked field.
3. Stop Payroll Date: Record the date you want the pay and deduction records stopped for the employee. When the termination window is saved it automatically updates the MN Employee Information | MN Paycheck Data tabs recording the stop date on Pay Codes, Pay Authorization and Distribution records.

ESV Region IV – RMIC 47 2/2011
4. Stop Benefit Date: Record the date you want benefits stopped for the employee.
When the termination window is saved it automatically updates the MN Employee Information | MN Paycheck Data tabs recording the stop date on the Deductions tab for all employee deduction and board paid benefits.
5. Eligible for Rehire: Use the radio buttons to mark YES if the employee is eligible for
rehire or NO if they are not 6. Secondary Status: Select the status for the employee using the ddlb. This updates the
status row 7. Termination Reason: Record the reason the employee left employment with your
district 8. Retire Status: Select the status for the employee using the ddlb. This records the status
change for PERA and TRA. 9. Recording Dates on the Termination Window: Note that these dates might all be
exactly the same or they can all be different depending on your districts’ termination policy.
10. W-2 Output. Select “Printed” for all terminated/retired/deceased employees.

ESV Region IV – RMIC 48 2/2011
Stopping Minnesota STAR Record(s) You will need to manually stop the STAR record so the employee will not be reported during the next STAR reporting cycle (October 1st and March 1st each year). MN Employee Information | MN STAR Employee Data
Inactive/TransferTermination. Enter the reason the employee has terminated using the drop down listbox. Termination Date. Enter the termination date.
Property Assigned To Employee If you are tracking property assigned to employees you can record the date the property was returned to the district. There are two places to record returned property. Personnel Module | Employee Personnel Forms | Property Assignment window Payroll Module | MN Employee Information | Terminate Employee window

ESV Region IV – RMIC 49 2/2011
Prevent Web Access for Terminating and Deceased Employees If your district is using ESS for employees to view their pay, leave and W-2 tax information you might want to think about the ESS settings used today for employees who are deceased or terminate. You may have a policy set that says once they consent it doesn’t change unless the employee makes the request. For deceased employees you will want to set their consent back to no so a Form W-2 will be printed at calendar-year-end. MN Payroll Utilities | ESS Management This can also be set using the Terminate Window shown above.
MN Rehire Employee MN Employee Information | MN Rehire Employee If you have used the terminate window or if you have manually terminated an employee you can use this window to rehire the employee. It assigns their old employee number, inserts a new status row and gives you a chance to review or change personnel data.
1. Verify populated fields by using the new personnel/payroll forms the employee fills out 2. Select the secondary status, retirement status, location, check location and unemployment
location from the ddlb 3. Enter the employee’s address 4. Change the SMARTeR Access from Locked Out to Enabled 5. Verify the W-2 Output. Automatic means the district will print a W-2 at calendar year-end.
Printed means the employee will print their own using ESS. 6. Go to MN Employee Info to update union code, phone numbers and e-mail addresses 7. Go to MN Paycheck Data to update other information such as pay, deductions, benefits, pay
distribution (UFARS code), tax withholdings and direct deposit information 8. Go to STAR Employee Data to update rehire information as needed

ESV Region IV – RMIC 50 2/2011
MN Sample Check MN Employee Information | MN Sample Check This window is helpful if an employee asks you how their net pay would change if they change benefits. For example, if the employee wanted to increase their current TSA deduction from $75 to $200 per check you can use this window to calculate their new net pay amount without touching any of their “live” data until you know for sure the employee is going to make the change.

ESV Region IV – RMIC 51 2/2011
Select
Enter employee id or select employee using the binoculars, TAB
Select a calendar from the ddlb, TAB
Select a calendar sequence number from the ddlb, TAB
Select the check sequence from the ddlb, ENTER or click on the retrieve icon Payroll Calendar
These are view only fields and will display the information you retrieved Paycheck
These are view only fields and will display the Gross and Net pay amounts after you calculate
Timecards
If any timecards have been entered for the employee those timecards will be displayed here
Check Detail
This area will be populated after you retrieve the employee and click on the calculate button
In this example after you calculate you can insert a row to add a line for HEALTHFLX and
enter an amount in the amount field. Or you can increase an existing deduction such as TSA. After you make your changes click on Calculate again to see the net pay results of your changes.
When you click on done to exit the window you will see a message box telling you all of the checks that were accessed have been reset and will not generate pay. This is correct because this is considered a “what if” type window and we do not want the changes saved.
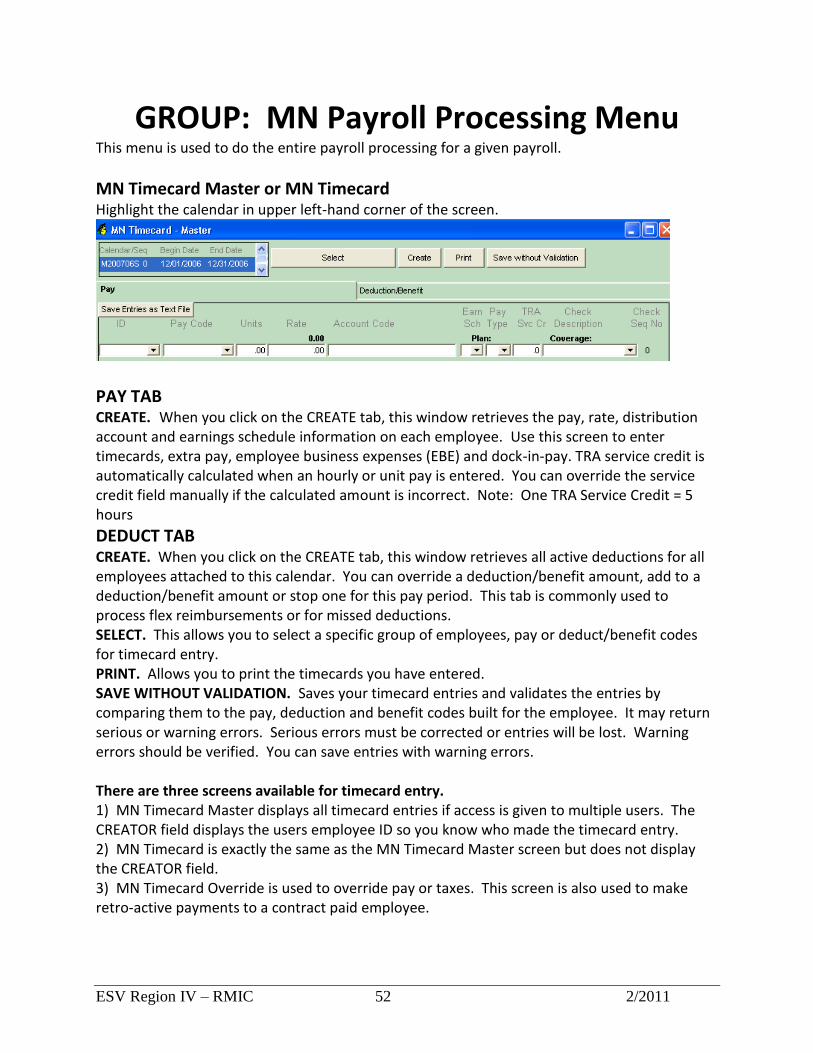
ESV Region IV – RMIC 52 2/2011
GROUP: MN Payroll Processing Menu This menu is used to do the entire payroll processing for a given payroll.
MN Timecard Master or MN Timecard Highlight the calendar in upper left-hand corner of the screen.
PAY TAB CREATE. When you click on the CREATE tab, this window retrieves the pay, rate, distribution account and earnings schedule information on each employee. Use this screen to enter timecards, extra pay, employee business expenses (EBE) and dock-in-pay. TRA service credit is automatically calculated when an hourly or unit pay is entered. You can override the service credit field manually if the calculated amount is incorrect. Note: One TRA Service Credit = 5 hours DEDUCT TAB CREATE. When you click on the CREATE tab, this window retrieves all active deductions for all employees attached to this calendar. You can override a deduction/benefit amount, add to a deduction/benefit amount or stop one for this pay period. This tab is commonly used to process flex reimbursements or for missed deductions. SELECT. This allows you to select a specific group of employees, pay or deduct/benefit codes for timecard entry. PRINT. Allows you to print the timecards you have entered. SAVE WITHOUT VALIDATION. Saves your timecard entries and validates the entries by comparing them to the pay, deduction and benefit codes built for the employee. It may return serious or warning errors. Serious errors must be corrected or entries will be lost. Warning errors should be verified. You can save entries with warning errors. There are three screens available for timecard entry. 1) MN Timecard Master displays all timecard entries if access is given to multiple users. The CREATOR field displays the users employee ID so you know who made the timecard entry. 2) MN Timecard is exactly the same as the MN Timecard Master screen but does not display the CREATOR field. 3) MN Timecard Override is used to override pay or taxes. This screen is also used to make retro-active payments to a contract paid employee.

ESV Region IV – RMIC 53 2/2011
MN Timecard Master or MN Timecard screens are used to enter daily or hourly units to pay employees.
MN Timecard Master or MN Timecard screens are used for pay codes that are not scheduled on the pay calendar or built on the employee.
MN Timecard Master or MN Timecard screens are used to deduct or add to a contract pay.
MN Timecard Override The override timecard screen is used to make a retro payment of salary to an employee. This entry is “included in” their annual contract for the current fiscal year.
Pay Calendars. Click on the calendar.
ID. Use the drop down listbox (ddlb) to select the employee id or type in the id number
Pay-Tax. Use the ddlb to select the pay code.
Override. Use the ddlb and click on “Add to Pay Amt” if you process retro-pay with the regular payroll. Click on “Override Pay Amt” if you process retro-pay using a supplemental payroll.
Amount. Enter the amount of the retro-pay.
Account Code. Enter the 17-digit code for this payment ONLY if you are using a pay code that is not built at the employee level.
Earn Sch. This will default to the earning schedule built for this paycode at the employee level.
Pay Type. Select 05 for retro-pay
TRA Srv Cr. Enter service credit in this field.
Check Description. This field is optional.
SAVE
MN Calculate Payroll This screen is used to calculate your payroll. This process calculates gross to net pay for each employee attached to the pay calendar selected. If errors are found during the proofing process you will correct them and come back to this screen to recalculate the payroll.
Highlight the pay calendar
Click on Recalculate
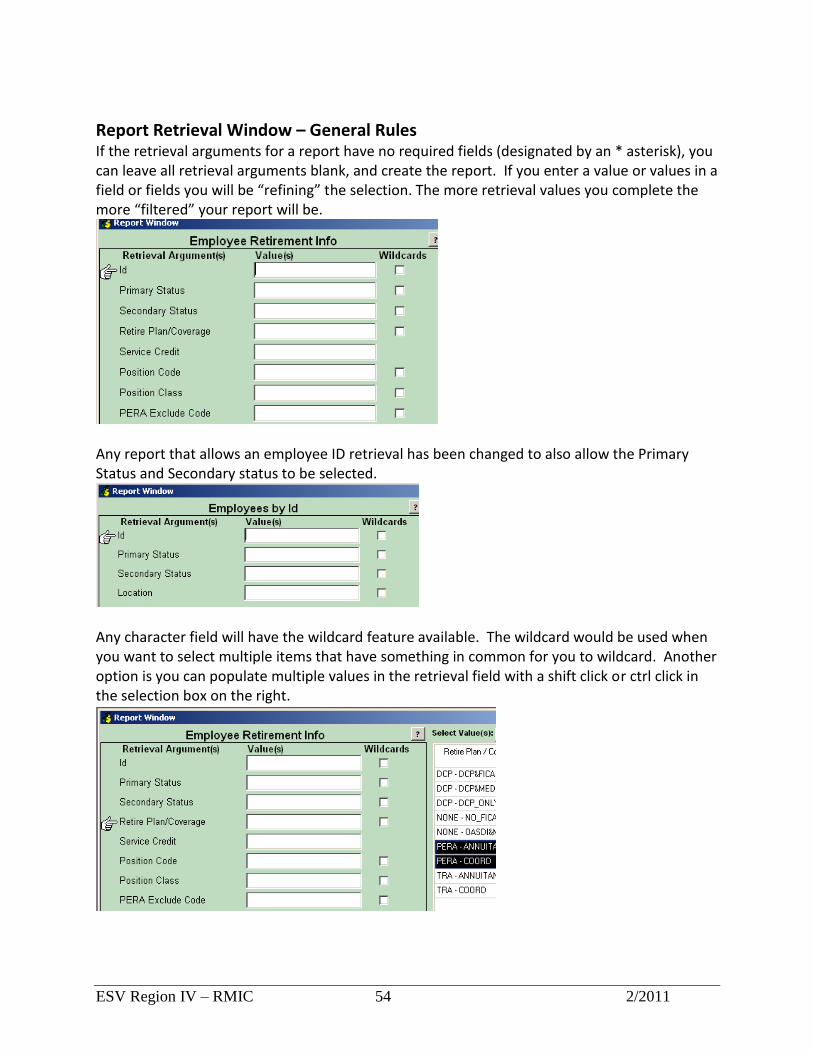
ESV Region IV – RMIC 54 2/2011
Report Retrieval Window – General Rules If the retrieval arguments for a report have no required fields (designated by an * asterisk), you can leave all retrieval arguments blank, and create the report. If you enter a value or values in a field or fields you will be “refining” the selection. The more retrieval values you complete the more “filtered” your report will be.
Any report that allows an employee ID retrieval has been changed to also allow the Primary Status and Secondary status to be selected.
Any character field will have the wildcard feature available. The wildcard would be used when you want to select multiple items that have something in common for you to wildcard. Another option is you can populate multiple values in the retrieval field with a shift click or ctrl click in the selection box on the right.

ESV Region IV – RMIC 55 2/2011
Any report that has a retrieval based upon an effective date will need a date or a range of dates to report accurate data. Therefore, start and stop date or as of date fields are necessary when the data is retrieved. This will also affect which rows are selected from a table which has an effective date on each row (ie: primary and secondary status which comes from emp_status_chg).
The retrieval “Calendar” will always find the payoff sequences. If the populated selection box has the same payroll calendar displayed 5 times, the selection of one of the rows will result in all pay calendar data, including payoffs being selected.
The retrieval Cal/Cal Seq is used to find a specific sequence within a payoff pay calendar. When this retrieval is allowed, you will be limited to one calendar in your retrieval.
Report Defaults Using Multiple Argument Retrievals The retrieval argument window allows the user a choice to save multiple sets of retrieval arguments for a particular report. The Report Default fields are found in the bottom-right corner for the report retrieval window.

ESV Region IV – RMIC 56 2/2011
The following illustrates how the Report Defaults can be used:
Enter the desired retrieval arguments in the usual way
Enter up to a 20 character name in the area to the right of the “Save As” box.
Click the Save As button.
Enter a new set of retrieval arguments.
Enter a name for this new setup in the area to the right of the “Save As” box.

ESV Region IV – RMIC 57 2/2011
Click the Save As button.
Click on each of the two rows and notice that the retrieval arguments change
accordingly.
Move the selected row up or down by clicking an arrow.
Delete a row by selecting it and clicking the Delete button.
To change a previously saved set of retrieval arguments, select the row, change
the arguments in the usual way, and click the Save button.
GROUP: MN Payroll Processing Menu
Timecard Detail by Employee Use this report to proof all pay and deduction timecard exceptions you have entered for employees. The retrieval arguments fields available for this report allow the user to select all data by leaving all of the fields blank and clicking on the CREATE REPORT button on the lower right-hand side of the screen.
You can select one employee id if you need to view specific data you entered for the employee
You can select data for a specific pay or deduct code
You can select data by timecard type
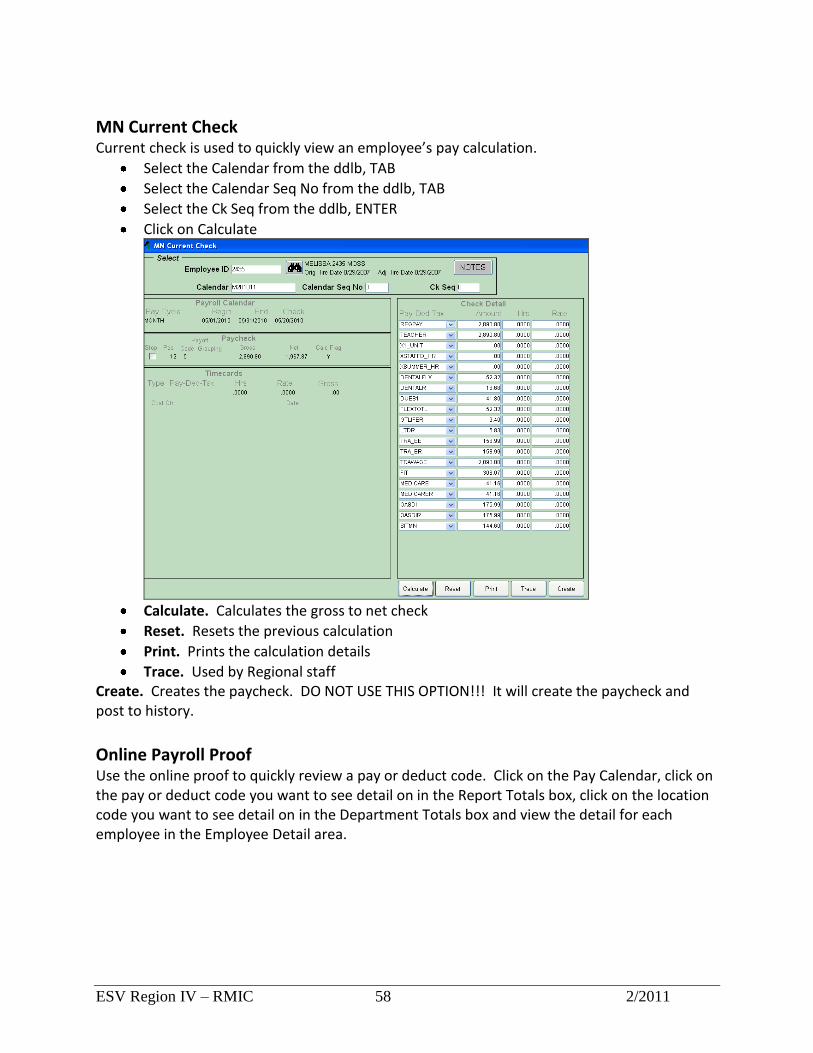
ESV Region IV – RMIC 58 2/2011
MN Current Check Current check is used to quickly view an employee’s pay calculation.
Select the Calendar from the ddlb, TAB
Select the Calendar Seq No from the ddlb, TAB
Select the Ck Seq from the ddlb, ENTER
Click on Calculate
Calculate. Calculates the gross to net check
Reset. Resets the previous calculation
Print. Prints the calculation details
Trace. Used by Regional staff Create. Creates the paycheck. DO NOT USE THIS OPTION!!! It will create the paycheck and post to history. Online Payroll Proof Use the online proof to quickly review a pay or deduct code. Click on the Pay Calendar, click on the pay or deduct code you want to see detail on in the Report Totals box, click on the location code you want to see detail on in the Department Totals box and view the detail for each employee in the Employee Detail area.

ESV Region IV – RMIC 59 2/2011
MN Payroll Proof Report This report is used to proof all your timecard and deduction entries. The proof report will list all the employees that will be paid for this payroll showing the gross to net detail. If changes are made to payroll you need to calculate again and run another proof report to keep for the current payroll. Use this report to proof your employee totals. This report is similar to the payroll register but is printed prior to creating payroll.
Run the proof for all employees
Click to highlight your current pay calendar
Leave the Pay Code, Deduct Code, Benefit Code and Tax Code boxes highlighted to send all calculated payroll data to the screen
Leave the Employee box unhighlighted to send all employees to the screen
Click on the SEND button to run the report
Run the proof for selected employees Click to highlight your current pay calendar
Leave the Pay Code, Deduct Code, Benefit Code and Tax Code boxes highlighted to send all calculated payroll data to the screen
Click to highlight the employee name(s) you want to proof
Click on the SEND button to run the report
Run the proof for codes Click to highlight your current pay calendar
Click on the Pay Code, Deduct Code, Benefit Code and Tax Code boxes so they are no longer highlighted. Now click back on the specific code(s) you want to proof
Leave the Employee box un-highlighted to send all employees to the screen
Click on the SEND button to run the report
Payoff Mini Proof The mini proof is used at payoff time to view the payoff passes for an employee. The report is displayed by employee name with each payoff sequence pass shown for gross and net.

ESV Region IV – RMIC 60 2/2011
Create Paychecks This window is the last step in the payroll process. After you proof all your payroll entries and changes and the calculation flag is at a Y (yes all employees have been calculated) then you can create checks. The create checks process posts all pay, deduction, benefit and tax information to the history tables. This window no longer does an automated backup before creating checks. If there are errors you will need to contact Region IV staff to “undo” your payroll.
Click to highlight the calendar
Be sure the CAL (calculated) flag is Y
Click on CREATE
MN Print Checks SHR automatically prints the routing number and bank account number on every check. You use blank check stock and MICR toner to print checks.
Highlight the calendar you want to print checks for
Click on the SELECT ALL button. Note: You can print only selected checks by looking at the Check Review and Select box shown below the pay calendar selection box. You can either click on the Select All button to select all checks to be printed or you can use your Ctrl key and highlight only those checks you need to print.
Click on PRINT
You will be prompted with the following message box:
It is important you use MICR toner. If you do not the bank will not be able to scan the check and your paychecks will be rejected.

ESV Region IV – RMIC 61 2/2011
The above box asks if you want to include a message on the checks to be printed. If you do click on YES. If you do not want to include a message click on NO.
SHR can automatically print the board signatures on the check for you. To access this
option you need to have your board members sign their names very close together on a blank white sheet of paper. Region IV staff will assist you by creating a bitmap file of the signatures that can be used to automatically sign the payroll checks. If SHR cannot find the signature bitmap file you will be prompted with the following message:
You will be prompted with the print checks selection box. There are two reports, 1)
Checks which prints each of your checks to blank check stock and 2) Check/DD Summary which prints a summary report of the net total and number of checks you print. Notice the PREVIEW tab. You can click on this tab to preview the checks before you print them. This window also allows you to define the PRINTER SETUP.

ESV Region IV – RMIC 62 2/2011
MN Create Direct Deposit File If you use direct deposit of payroll (ACH) you will need to create the direct deposit file to be processed by your bank. Click on the calendar.
Directory + File Name. This displays the location your file will be saved in. The default for district users is: c:\smarthr\client\ACHdistrictnumbercalendar Prenote. Pre-note files are no longer required in MN. However, if you have setup a direct deposit account and the employee has not been paid yet it will prenote the account. If you setup a new direct deposit on an employee and forget to assign a prenote date at the employee level it will prenote the account this payroll, automatically assign a prenote date then issue the direct deposit next check. CREATE. If you click on the create button it will create the direct deposit file and pop up a box telling you where the file was saved (directory + file name). Pay Calendars. You will highlight the calendar you want to create the direct deposit for Direct Deposit Review. This portion of the window lists all the employees that will be included in the direct deposit (ACH) file. The bottom of the screen shows the net total of direct deposits.
MN Print Direct Deposit Notices This window gives you an option to print direct deposit notices for employees. SMARTeR is a web based employer application that provides an ESS (Employee Self Service) option for employee’s to view and print their own direct deposit notice.
Highlight the calendar you want to print checks for
Employees who have NOT consented to print their own direct deposit notice in ESS will be highlighted for print

ESV Region IV – RMIC 63 2/2011
Click on the SELECT ALL button if you need to print ALL of the direct deposit notices. This will include the employees who have consented to print their own notice using ESS.
Click on PRINT
You will be prompted with the following message box:
The above box asks if you want to include a message on the checks to be printed. If you
do click on YES. If you do not want to include a message click on NO.
MN Payck & DirDep Notice Tally This report returns a count of the number of checks and direct deposits that were printed by check location. You have the option to retrieve the report by checks only, direct deposits only or both. You can print a summary report which returns totals or a detail report which shows all employees in a specific location with a totals line underneath.
Outstanding Check/Direct Deposit Register This report displays your outstanding checks and direct deposit for bank reconciliation purposes. You can retrieve the report by employee ID, by check or direct deposit option, by payee, by bank account or by a specific date.

ESV Region IV – RMIC 64 2/2011
MN Reconcile Checks You can reconcile checks in SHR. Most of our districts use SMART Finance to reconcile both payroll and finance checks. If your district is using the reconcile option in finance and you try to clear checks using this window you will see the following error:
Select Bank Account. Use the ddlb to select the bank account you want to reconcile checks for
Reconciliation Options On-line. Use this option to manually clear (reconcile) checks then click on the EXECUTE button Export. Use this to export outstanding checks and direct deposits for your local bank to process Import. Use this option to import a file from your bank of cleared checks for reconciliation Undo. Use this option to undo cleared checks. This options sets the checks or direct deposit file bank as outstanding.