
Shifting Culture without a Louisville Slugger: Building Trust, Pride, Honesty, and Integrity

Slugger 4 x 4Slugger Portable Magnetic Drilling Machine
OPERATOR’S MANUAL
EYE PROTECTIONREQUIRED
HEARING PROTECTIONREQUIRED
MOdEL #17985 (120V) OR #17987 (240V)
Serial # Date of Purchase
WARNING!
before use, be sure everyone using this machine reads and understands
all safety and operating instructions in this manual.
NEVER PLACEFINGERS NEAR
CUTTING AREA ORMACHINE ARBOR
LINE VOLTAGEPRESENT
BEWARE OFROTATING
MACHINE PARTS
Slugger Portable Magnetic Drilling MachineCongratulations on your purchase of a Slugger portable magnetic drilling machine. Slugger drilling machines are designed to deliver fast, efficient hole drilling performance in portable applications. Please take a moment to complete and mail your product warranty registration card. Doing so will validate your machine’s warranty period and ensure prompt service if needed. Thank you for selecting a Slugger product from Jancy Engineering Inc..
table of contentsImportant Safety Instructions . . . . . . . . . . . . . . . . . . . . . . . . . . . . . . . . . . . 3 -4
Guideline for Shift Lever Position . . . . . . . . . . . . . . . . . . . . . . . . . . . . . . . . 4
Special Instructions . . . . . . . . . . . . . . . . . . . . . . . . . . . . . . . . . . . . . . . . . 5
Grounding Instructions and Extension Cords . . . . . . . . . . . . . . . . . . . . . . . . 6
Contents of Package. . . . . . . . . . . . . . . . . . . . . . . . . . . . . . . . . . . . . . . . 7
Getting Started . . . . . . . . . . . . . . . . . . . . . . . . . . . . . . . . . . . . . . . . . . . 7
Machine Operation . . . . . . . . . . . . . . . . . . . . . . . . . . . . . . . . . . . . . . . . 8
Basic Troubleshooting . . . . . . . . . . . . . . . . . . . . . . . . . . . . . . . . . . . . . . . 9
Regular Maintenance . . . . . . . . . . . . . . . . . . . . . . . . . . . . . . . . . . . . . . 10
Machine Breakdown . . . . . . . . . . . . . . . . . . . . . . . . . . . . . . . . . . . . . . 11
Machine Parts List . . . . . . . . . . . . . . . . . . . . . . . . . . . . . . . . . . . . . . . . 12
Control Panel, Arbor Assembly and Parts List . . . . . . . . . . . . . . . . . . . . . . . 13
Motor Assembly. . . . . . . . . . . . . . . . . . . . . . . . . . . . . . . . . . . . . . . . . . 14
Motor Parts List . . . . . . . . . . . . . . . . . . . . . . . . . . . . . . . . . . . . . . . . . . 15
JANcy ENgiNEERiNg RESERVES ThE RighT TO MAkEiMPROVEMENTS ANd MOdificATiONS TO dESigN wiThOUT PRiOR NOTicE.
limited warranty
Jancy Engineering Inc. will, within one (1) year from the original date of purchase, repair or replace any goods found to be defective in materials or workmanship, provided the product warranty registration card has been returned to Jancy Engineering Inc. within thirty (30) days of purchase date. This warranty is void if the item has been damaged by acci-dent, neglect, improper service or other causes not arising out of defects in materials or workmanship. This warranty does not apply to machines and/or components which have been altered, changed, or modified in any way, or subjected to use beyond recommended capacities and specifications. Electrical components are subject to respective manufacturers’ warranties. All goods returned defective shall be returned prepaid freight to Jancy, which shall be the buyer’s sole and exclusive remedy for defective goods. In no event shall Jancy Engineering be liable for loss or damage resulting directly or indirectly from the use of merchandise or from any other cause. Jancy Engineering is not liable for any costs incurred on such goods or consequential damages. No officer, employee or agent of Jancy is authorized to make oral representations of fitness or to waive any of the foregoing terms of sale and none shall be binding on Jancy.
2
™

important safety instructions
WARNING!
when using electric tools, basic safety precautions should always be followed
to reduce risk of fire, electric shock and personal injury.
READ AND SAVE ALL INSTRUCTIONS FOR FUTURE REFERENCE.
1. keep work Area clean •Cluttered areas and benches invite injuries.
2. consider work Area Environment •Do not expose power tools to rain. •Do not use power tools in damp or wet locations. •Keep work area well lit. •Do not use tool in presence of flammable liquids or gases.
3. guard Against Electric Shock •Prevent body contact with grounded surfaces. For example: pipes, radiators, ranges and refrigerator enclosures.
4. keep children Away •Do not let visitors contact tool or extension cord. •All visitors should be kept away from work area.
5. Store idle Tools •When not in use, tools should be stored in a dry, high and locked-up place, out of reach of children.
6. do Not force Tool • It will do the job better and safer at the rate for which it was intended.
7. Use Right Tool •Do not force a small tool or attachment to do the job of a heavy-duty tool. •Do not use tool for unintended purpose. For example: Do not use a circular saw for cutting tree limbs or logs.
8. dress Properly •Do not wear loose clothing or jewelry. They can be caught in moving parts. •Non-skid footwear is recommended when working outdoors. •Wear protective hair covering to contain long hair.
9. Use Safety glasses •Also use face or dust mask if cutting operation is dusty.
10. do Not Abuse Electrical cord •Never carry tool by cord or yank it to disconnect from receptacle. •Keep cord from heat, oil and sharp edges.
11. Secure work •Use clamps or a vise to hold work. It’s safer than using your hand and it frees both hands to operate tool.
12. do Not Overreach •Keep proper footing and balance at all times.
3
13. Maintain Tools with care •Keep tools sharp and clean for better and safer performance. •Follow instructions for lubricating and changing accessories. • Inspect tool cords periodically and if damaged, have repaired by authorized service facility. • Inspect extension cords periodically and replace if damaged. •Keep handles dry, clean, and free from oil and grease.
14. disconnect Tools •Unplug when not in use, before servicing, and when changing accessories, such as bits and cutters.
15. Remove Adjusting keys And wrenches •Form habit of checking to see that keys and adjusting wrenches are removed from tool before turning it on.
16. Avoid Unintentional Starting •Do not carry a plugged-in tool. Always disconnect from power source before moving. •Be sure switches are off before connecting to a power source.
17. Outdoor Use Extension cords •When tool is used outdoors, use only extension cords intended for use outdoors and so marked.
18. Stay Alert •Watch what you are doing. Use common sense. Do not operate tool when you are tired. •Do not use when taking medications that may cause drowsiness.
19. check damaged Parts •Before further use of the tool, a guard or other part that is damaged should be carefully checked to determine that it will operate properly and perform its intended function. •Check alignment of moving parts, binding of parts, breakage of parts, mounting, and any other conditions that may affect its operation. A guard or other part that is damaged should be properly repaired or replaced by an authorized service center. •Do not use this tool if switches do not turn it on and off. Have defective switches replaced by authorized service center.
important safety instructions
4
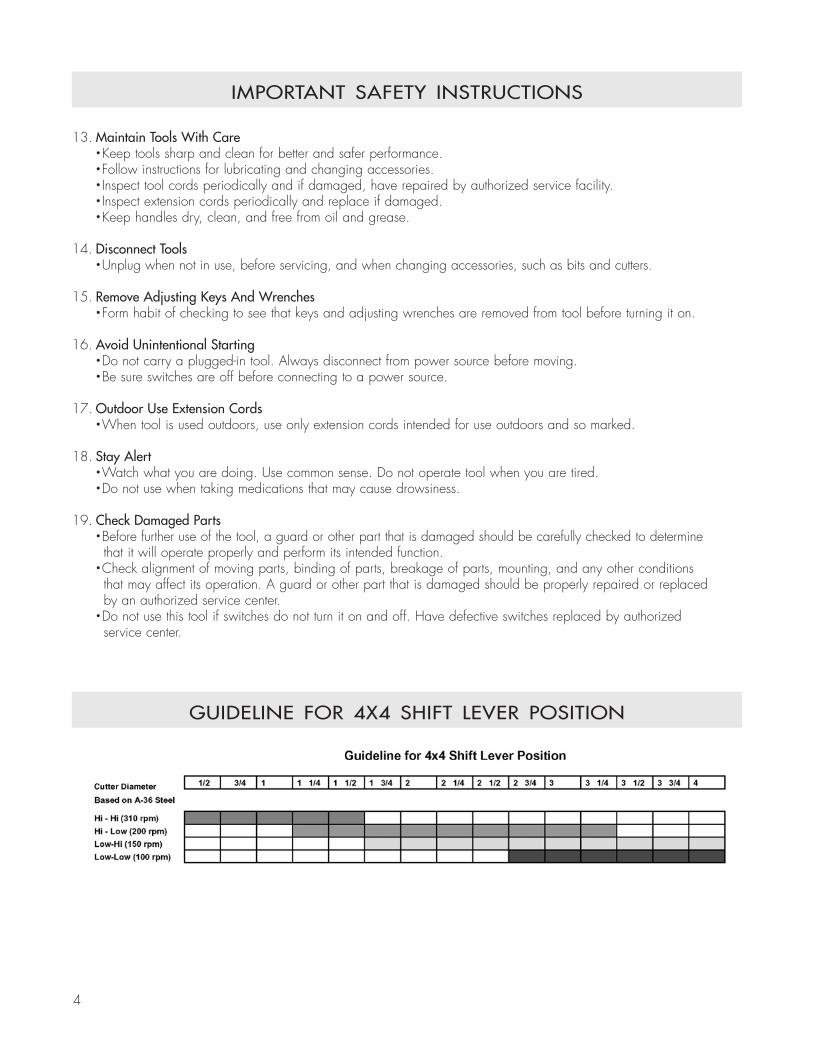
guideline for 4x4 shift lever position
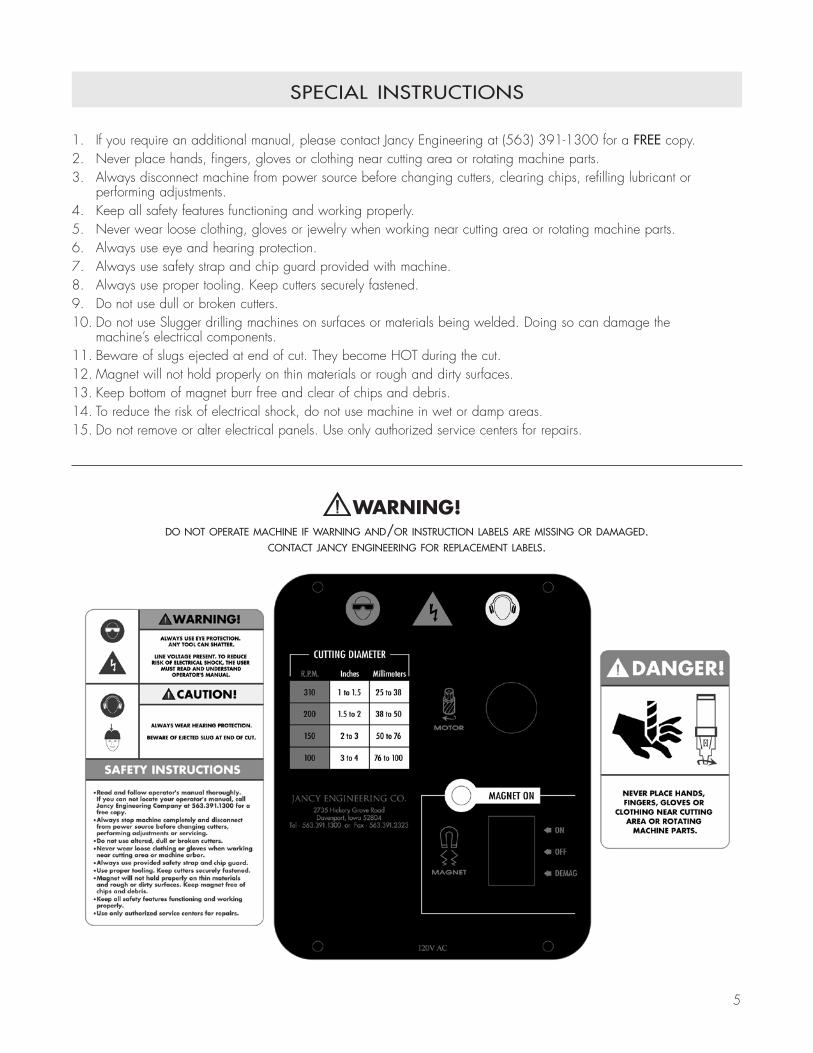
WARNING!do not operate machine if warning and/or instruction labels are missing or damaged.
contact jancy engineering for replacement labels.
1. If you require an additional manual, please contact Jancy Engineering at (563) 391-1300 for a fREE copy.2. Never place hands, fingers, gloves or clothing near cutting area or rotating machine parts.3. Always disconnect machine from power source before changing cutters, clearing chips, refilling lubricant or performing adjustments.4. Keep all safety features functioning and working properly.5. Never wear loose clothing, gloves or jewelry when working near cutting area or rotating machine parts.6. Always use eye and hearing protection.7. Always use safety strap and chip guard provided with machine.8. Always use proper tooling. Keep cutters securely fastened.9. Do not use dull or broken cutters.10. Do not use Slugger drilling machines on surfaces or materials being welded. Doing so can damage the machine’s electrical components.11. Beware of slugs ejected at end of cut. They become HOT during the cut.12. Magnet will not hold properly on thin materials or rough and dirty surfaces.13. Keep bottom of magnet burr free and clear of chips and debris.14. To reduce the risk of electrical shock, do not use machine in wet or damp areas.15. Do not remove or alter electrical panels. Use only authorized service centers for repairs.
special instructions
5
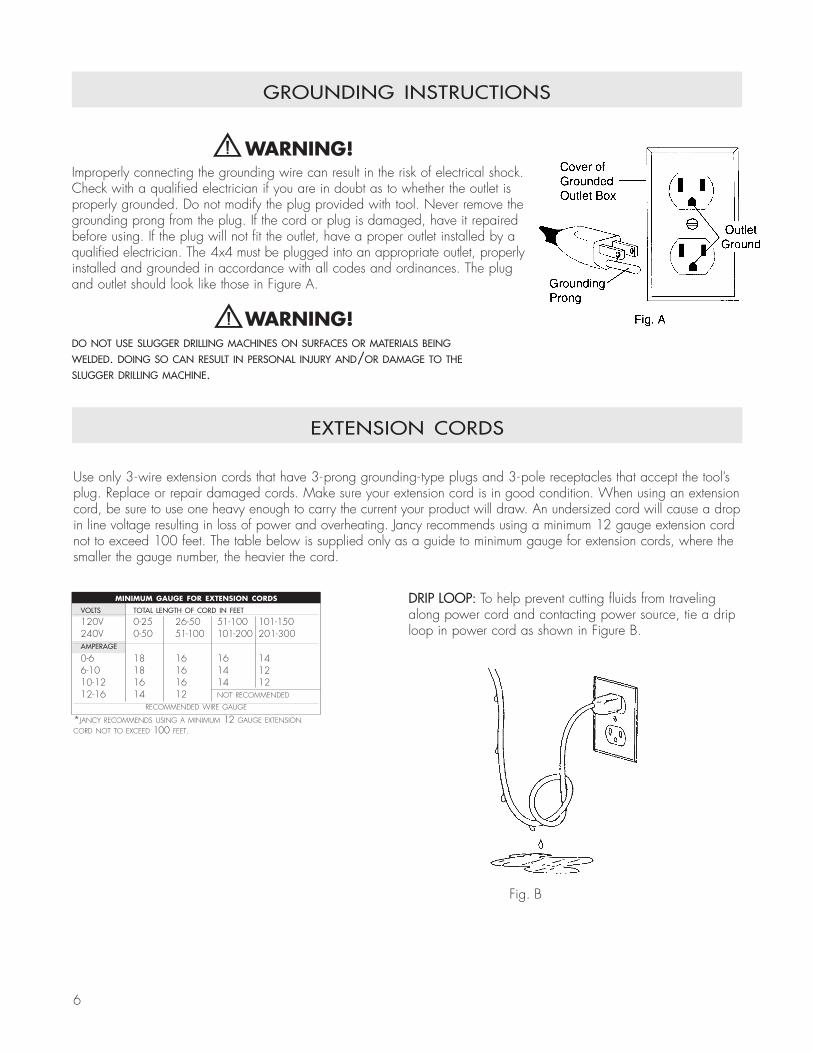
WARNING! Improperly connecting the grounding wire can result in the risk of electrical shock.Check with a qualified electrician if you are in doubt as to whether the outlet is properly grounded. Do not modify the plug provided with tool. Never remove the grounding prong from the plug. If the cord or plug is damaged, have it repaired before using. If the plug will not fit the outlet, have a proper outlet installed by a qualified electrician. The 4x4 must be plugged into an appropriate outlet, properly installed and grounded in accordance with all codes and ordinances. The plug and outlet should look like those in Figure A.
WARNING! do not use slugger drilling machines on surfaces or materials being
welded. doing so can result in personal injury and/or damage to the
slugger drilling machine.
grounding instructions
6
dRiP LOOP: To help prevent cutting fluids from traveling along power cord and contacting power source, tie a drip loop in power cord as shown in Figure B.
Use only 3-wire extension cords that have 3-prong grounding- type plugs and 3-pole receptacles that accept the tool’s plug. Replace or repair damaged cords. Make sure your extension cord is in good condition. When using an extension cord, be sure to use one heavy enough to carry the current your product will draw. An undersized cord will cause a drop in line voltage resulting in loss of power and overheating. Jancy recommends using a minimum 12 gauge extension cord not to exceed 100 feet. The table below is supplied only as a guide to minimum gauge for extension cords, where the smaller the gauge number, the heavier the cord.
extension cords
minimum gauge for extension cords
volts total length of cord in feet
120V 0-25 26-50 51-100 101-150 240V 0-50 51-100 101-200 201-300 amperage 0-6 18 16 16 14 6-10 18 16 14 12 10-12 16 16 14 12 12-16 14 12 notrecommended
recommendedwiregauge
*jancyrecommendsusingaminimum12gaugeextensioncordnottoexceed100feet.
Fig. B
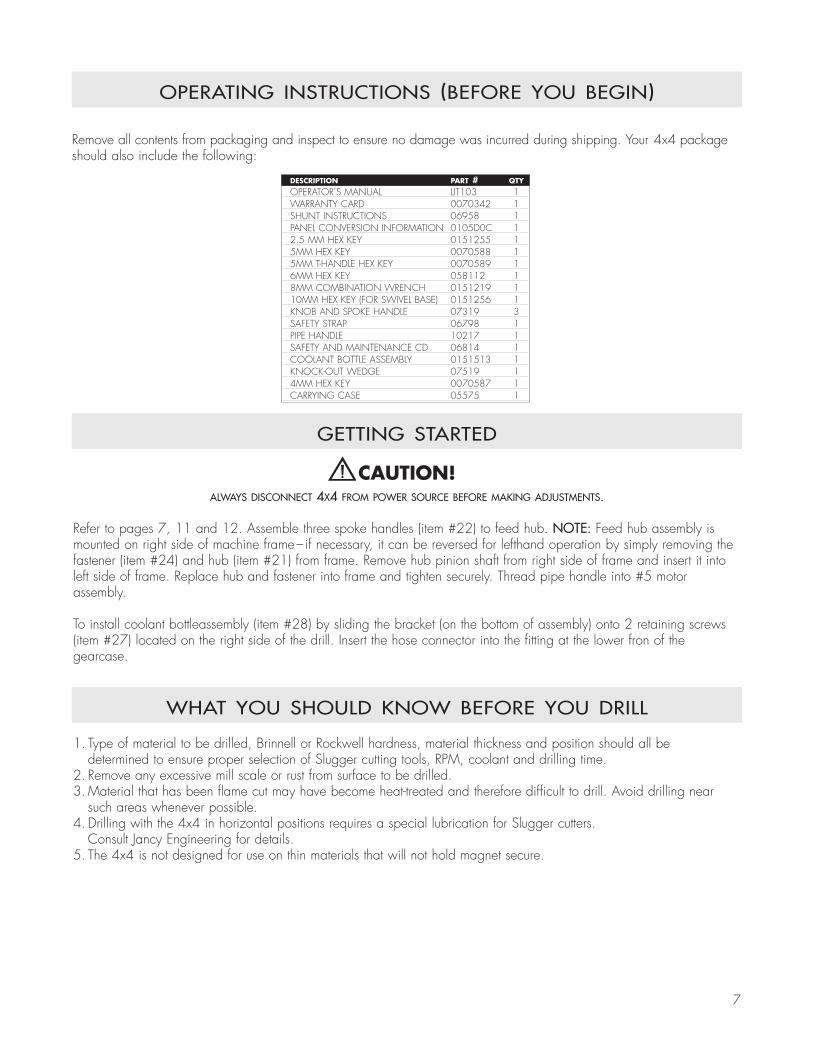
Remove all contents from packaging and inspect to ensure no damage was incurred during shipping. Your 4x4 package should also include the following:
operating instructions (before you begin)
description part # qty
OPERATOR’S MANUAL LIT103 1 WARRANTY CARD 0070342 1 SHUNT INSTRUCTIONS 06958 1 PANEL CONVERSION INFORMATION 0105D0C 1 2.5 MM HEx KEY 0151255 1 5MM HEx KEY 0070588 1 5MM T-HANDLE HEx KEY 0070589 1 6MM HEx KEY 058112 1 8MM COMBINATION WRENCH 0151219 1 10MM HEx KEY (FOR SWIVEL BASE) 0151256 1 KNOB AND SPOKE HANDLE 07319 3 SAFETY STRAP 06798 1 PIPE HANDLE 10217 1 SAFETY AND MAINTENANCE CD 06814 1 COOLANT BOTTLE ASSEMBLY 0151513 1 KNOCK-OUT WEDGE 07519 1 4MM HEx KEY 0070587 1 CARRYING CASE 05575 1
getting started
what you should know before you drill
CAUTION!
always disconnect 4x4 from power source before making adjustments.
Refer to pages 7, 11 and 12. Assemble three spoke handles (item #22) to feed hub. NOTE: Feed hub assembly is mounted on right side of machine frame– if necessary, it can be reversed for lefthand operation by simply removing the fastener (item #24) and hub (item #21) from frame. Remove hub pinion shaft from right side of frame and insert it into left side of frame. Replace hub and fastener into frame and tighten securely. Thread pipe handle into #5 motor assembly.
To install coolant bottleassembly (item #28) by sliding the bracket (on the bottom of assembly) onto 2 retaining screws (item #27) located on the right side of the drill. Insert the hose connector into the fitting at the lower fron of the gearcase.
1. Type of material to be drilled, Brinnell or Rockwell hardness, material thickness and position should all be determined to ensure proper selection of Slugger cutting tools, RPM, coolant and drilling time.2. Remove any excessive mill scale or rust from surface to be drilled.3. Material that has been flame cut may have become heat-treated and therefore difficult to drill. Avoid drilling near such areas whenever possible.4. Drilling with the 4x4 in horizontal positions requires a special lubrication for Slugger cutters. Consult Jancy Engineering for details.5. The 4x4 is not designed for use on thin materials that will not hold magnet secure.
7
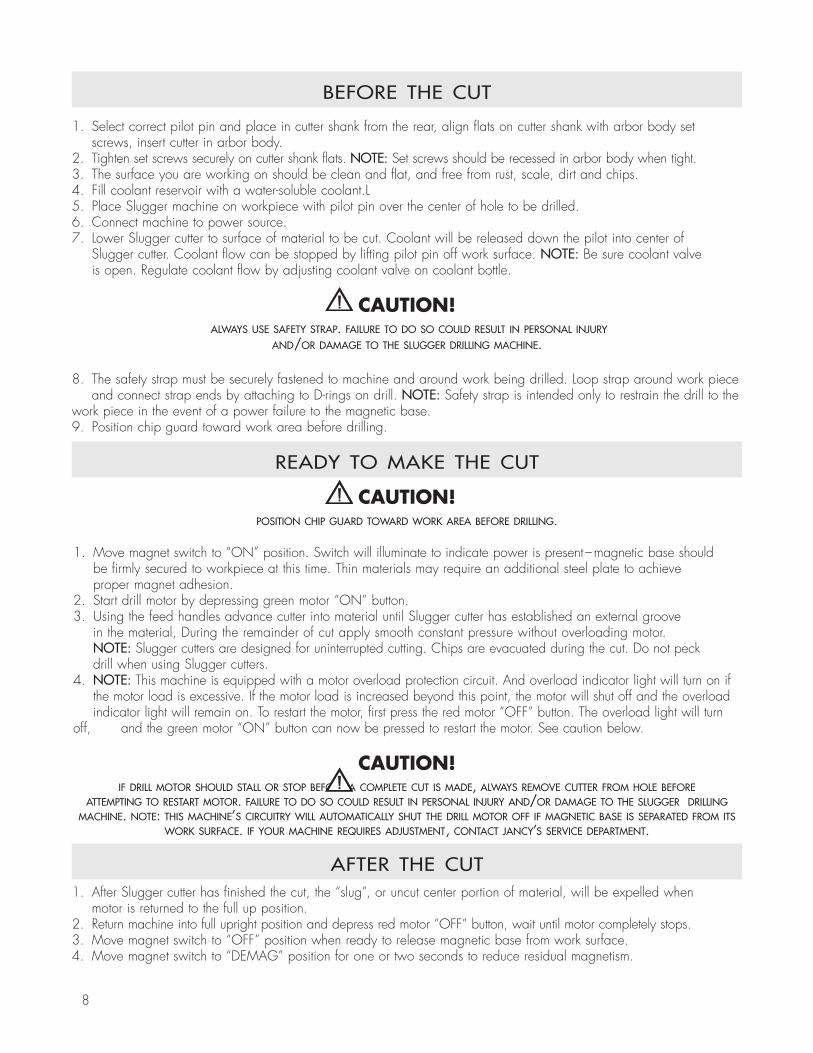
1. Select correct pilot pin and place in cutter shank from the rear, align flats on cutter shank with arbor body set screws, insert cutter in arbor body.2. Tighten set screws securely on cutter shank flats. NOTE: Set screws should be recessed in arbor body when tight.3. The surface you are working on should be clean and flat, and free from rust, scale, dirt and chips.4. Fill coolant reservoir with a water-soluble coolant.L5. Place Slugger machine on workpiece with pilot pin over the center of hole to be drilled.6. Connect machine to power source.7. Lower Slugger cutter to surface of material to be cut. Coolant will be released down the pilot into center of Slugger cutter. Coolant flow can be stopped by lifting pilot pin off work surface. NOTE: Be sure coolant valve is open. Regulate coolant flow by adjusting coolant valve on coolant bottle.
CAUTION! always use safety strap. failure to do so could result in personal injury
and/or damage to the slugger drilling machine.
8. The safety strap must be securely fastened to machine and around work being drilled. Loop strap around work piece and connect strap ends by attaching to D-rings on drill. NOTE: Safety strap is intended only to restrain the drill to the work piece in the event of a power failure to the magnetic base. 9. Position chip guard toward work area before drilling.
before the cut
ready to make the cut
CAUTION! position chip guard toward work area before drilling.
1. Move magnet switch to “ON” position. Switch will illuminate to indicate power is present –magnetic base should be firmly secured to workpiece at this time. Thin materials may require an additional steel plate to achieve proper magnet adhesion.2. Start drill motor by depressing green motor “ON” button.3. Using the feed handles advance cutter into material until Slugger cutter has established an external groove in the material, During the remainder of cut apply smooth constant pressure without overloading motor. NOTE: Slugger cutters are designed for uninterrupted cutting. Chips are evacuated during the cut. Do not peck drill when using Slugger cutters.4. NOTE: This machine is equipped with a motor overload protection circuit. And overload indicator light will turn on if the motor load is excessive. If the motor load is increased beyond this point, the motor will shut off and the overload indicator light will remain on. To restart the motor, first press the red motor “OFF” button. The overload light will turn off, and the green motor “ON” button can now be pressed to restart the motor. See caution below.
CAUTION!
if drill motor should stall or stop before a complete cut is made, always remove cutter from hole beforeattempting to restart motor. failure to do so could result in personal injury and/or damage to the slugger drilling
machine. note: this machine’s circuitry will automatically shut the drill motor off if magnetic base is separated from its work surface. if your machine requires adjustment, contact jancy’s service department.
1. After Slugger cutter has finished the cut, the “slug”, or uncut center portion of material, will be expelled when motor is returned to the full up position. 2. Return machine into full upright position and depress red motor “OFF” button, wait until motor completely stops.3. Move magnet switch to “OFF” position when ready to release magnetic base from work surface.4. Move magnet switch to “DEMAG” position for one or two seconds to reduce residual magnetism.
after the cut
8

1. Magnetic base not holding securely •Material is too thin to engage magnet. •Surface of material being drilled must be free of chips, debris, rust and mill scale. •Does size of cutter exceed machine’s rated capacity? •Check magnet face for unevenness, nicks and burrs. • Is welding equipment connected to material being drilled?
2. drill motor running, arbor and spindle not turning •Possible sheared spindle key. 3. Motor slows when drilling • Is an extension cord being used? If so, see page 6 for recommended wire gages and cord lengths. •Excessive downfeed pressure during drilling cycle will cause motor to slow and overheat. •Does cutting tool need to be resharpened?
4. coolant system not working •Coolant system is gravity dependent, machine must be in a upright position to operate properly. •Check operation of coolant valve. Valve must turn freely. •Check coolant lines for blockage. •Dirt or debris in coolant tank. •Consistency of coolant mixture too thick. • Is correct pilot pin being used? •Vent hole in coolant tank lid blocked.
5. Slugs not ejecting from cutter •Lack of coolant causing slugs to expand in cutter bore. • Is correct pilot pin being used? •Possible broken internal arbor parts.
6. Breaking cutters •How is coolant being applied? Coolant must be supplied to interior of cutter. •Excessive feed pressure being applied when cutter initially contacts work surface. •Confirm material hardness. •Drilling stacked materials with incorrect cutter. •Dull cutters; dull or chipped cutting edges require excessive feed pressure, resulting in breakage. •Excessive arbor runout – see regular maintenance on page 10. •Possible bent motor spindle or worn arbor sleeve. • Improperly adjusted motor slide – see page 10.
7. Oversized or rough holes • Insufficient coolant. •Excessive feed pressure. •Dull cutter. •Worn support bracket roller bearing or arbor body sleeve. •Bent motor spindle. •Motor slide improperly adjusted.
basic troubleshooting
9
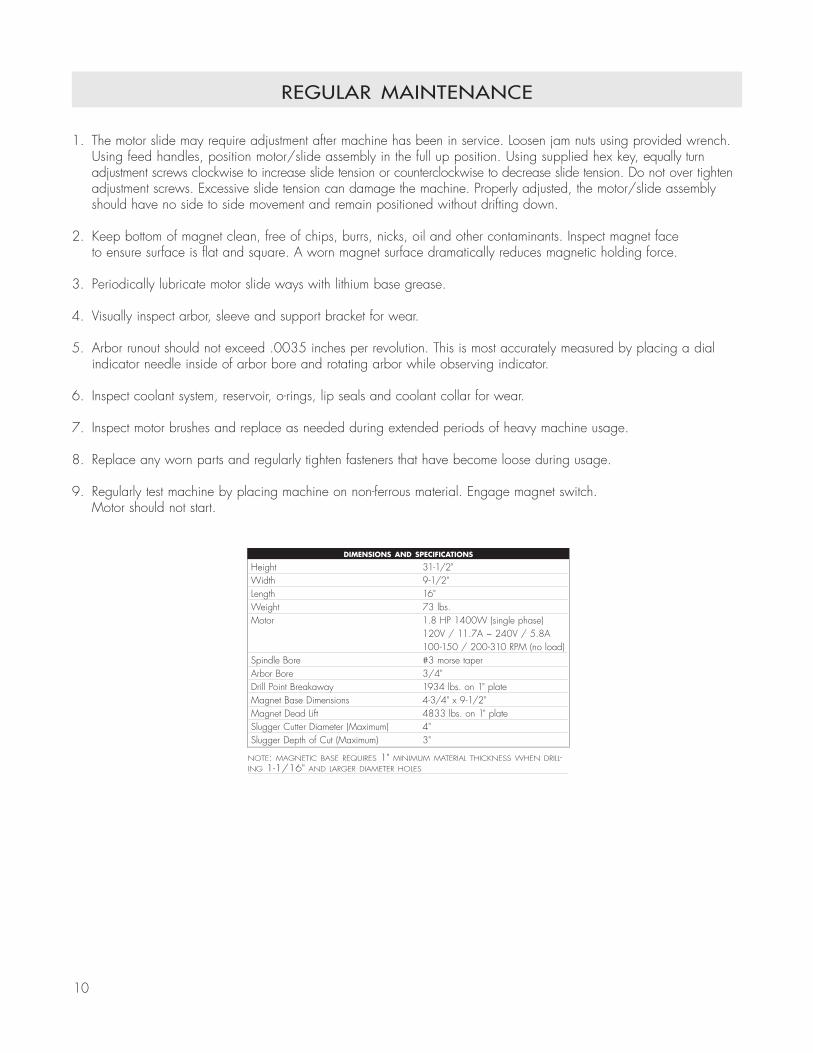
1. The motor slide may require adjustment after machine has been in service. Loosen jam nuts using provided wrench. Using feed handles, position motor/slide assembly in the full up position. Using supplied hex key, equally turn adjustment screws clockwise to increase slide tension or counterclockwise to decrease slide tension. Do not over tighten adjustment screws. Excessive slide tension can damage the machine. Properly adjusted, the motor/slide assembly should have no side to side movement and remain positioned without drifting down.
2. Keep bottom of magnet clean, free of chips, burrs, nicks, oil and other contaminants. Inspect magnet face to ensure surface is flat and square. A worn magnet surface dramatically reduces magnetic holding force.
3. Periodically lubricate motor slide ways with lithium base grease.
4. Visually inspect arbor, sleeve and support bracket for wear.
5. Arbor runout should not exceed .0035 inches per revolution. This is most accurately measured by placing a dial indicator needle inside of arbor bore and rotating arbor while observing indicator. 6. Inspect coolant system, reservoir, o-rings, lip seals and coolant collar for wear.
7. Inspect motor brushes and replace as needed during extended periods of heavy machine usage.
8. Replace any worn parts and regularly tighten fasteners that have become loose during usage.
9. Regularly test machine by placing machine on non-ferrous material. Engage magnet switch. Motor should not start.
regular maintenance
dimensions and specifications
Height 31-1/2" Width 9-1/2" Length 16" Weight 73 lbs. Motor 1.8 HP 1400W (single phase) 120V / 11.7A ~ 240V / 5.8A 100-150 / 200-310 RPM (no load) Spindle Bore #3 morse taper Arbor Bore 3/4" Drill Point Breakaway 1934 lbs. on 1" plate Magnet Base Dimensions 4-3/4" x 9-1/2" Magnet Dead Lift 4833 lbs. on 1" plate Slugger Cutter Diameter (Maximum) 4" Slugger Depth of Cut (Maximum) 3"
10
note:magneticbaserequires1"minimummaterialthicknesswhendrill-ing1-1/16"andlargerdiameterholes
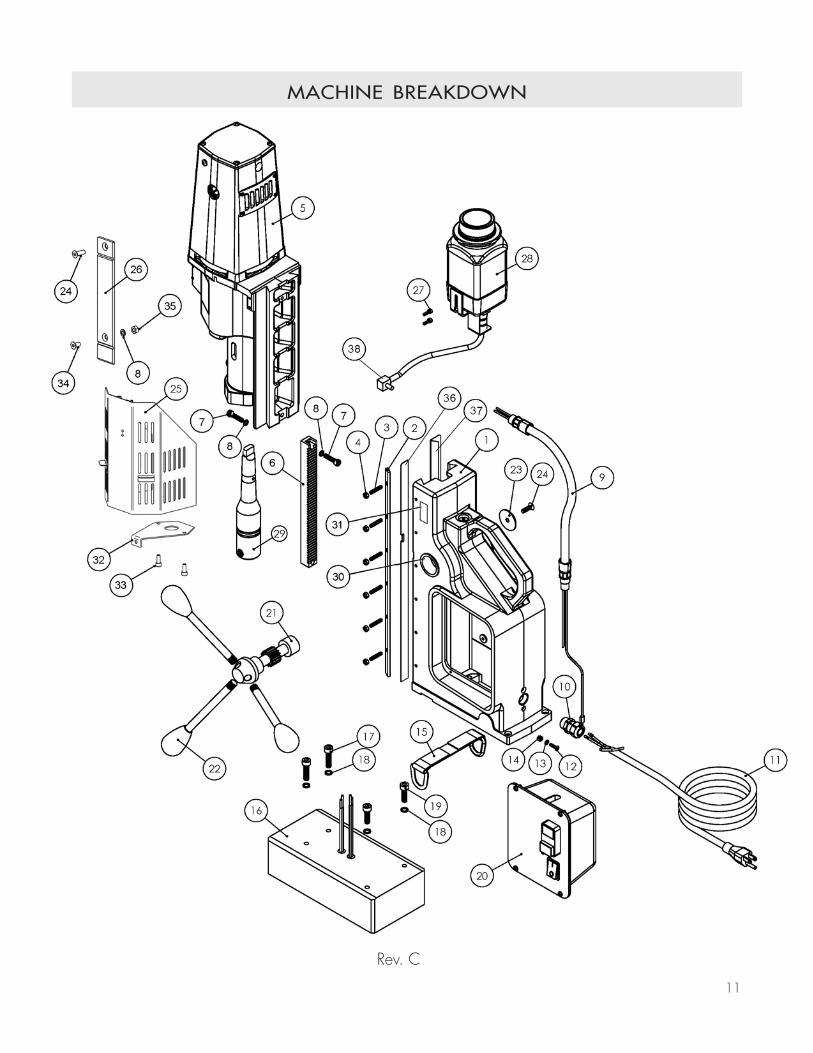
machine breakdown
11
Rev. C

machine parts list
12
ITEm DESCRIpTION pART # qTy 1 FRAME, 4x4 07305 1 2 PRESSURE PLATE 07304 1 3 M5 - .8 x 25MM FLAT POINT SSS 07020 6 4 NUT, M5 - .8 0151181 6 5 MOTOR ASSEMBLY 120V 054001 1 6 GEAR RACK, 4x4 07323 1 7 SHCS, M6 - 1 x 25MM 0070538 2 8 WASHER, SPLIT M6 07016 3 9 MOTOR CORD 07420 1 10 STRAIN RELIEF 0151064 1 11 CORD, POWER 16-3 SEO 10' 0012180 1 12 SCR, FHSCS M4 - .7 x 16MM 07116 1 13 WASHER, INTERNAL M4 04576 1 14 NUT, M4 - .7 0070133 1 15 D-RING STRAP 06797 1 16 MAGNET ASSY, 4x4 07316 1 17 SHCS, M8 - 1.25 x 25MM 07318 2 18 WASHER, SPLIT M8 07317 4 19 SHCS, M8 - 1.25 x 30MM 07315 2 20 CONTROL PANEL ASSEMBLY 07310P 1 21 PINION HUB, 4x4 07320 1 22 SPOKE HANDLE, 4x4 07319 3 23 HUB WASHER 07306 1 24 SCR, FHSCS M6 - 1 x 20MM 07007 2 25 CUTTER SHIELD 07345 1 26 SLIDE 07346 1 27 SCR, SHCS M4 - .7 x 12MM DIN912 06770 2 28* COOLANT BOTTLE ASSY 0151511 1 29 ARBOR ASSY, 3MT 07324 1 30 SLEEVE, SELF LUBRICATING 07375 2 31 LABEL GIB ADJUSTMENT 07376 1 32 BACK REST 07377 1 33 SCR, SHCS M6 x 16 0070536 2 34 SCR, FHSCS M6 x 16 07378 1 35 NUT, M6 BM113 1 36 SLIDE INSERT STRIP, LEFT (NEW) 054160 1 37 SLIDE INSERT RIGHT (NEW) 054162 1 38* CONNECTOR, COOLANT BOTTLE 07327 1
Rev. C* Part 0151513 includes both item 28 & 38.
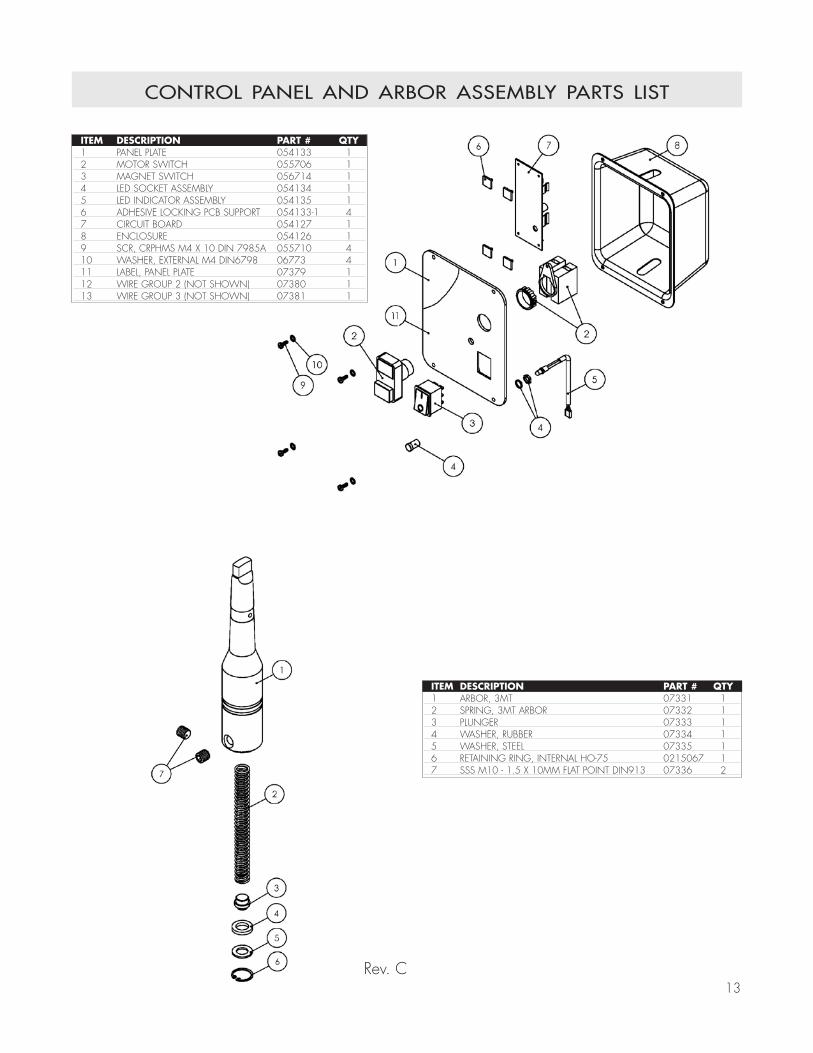
control panel and arbor assembly parts list
13
ITEm DESCRIpTION pART # qTy 1 PANEL PLATE 054133 1 2 MOTOR SWITCH 055706 1 3 MAGNET SWITCH 056714 1 4 LED SOCKET ASSEMBLY 054134 1 5 LED INDICATOR ASSEMBLY 054135 1 6 ADHESIVE LOCKING PCB SUPPORT 054133-1 4 7 CIRCUIT BOARD 054127 1 8 ENCLOSURE 054126 1 9 SCR, CRPHMS M4 x 10 DIN 7985A 055710 4 10 WASHER, ExTERNAL M4 DIN6798 06773 4 11 LABEL, PANEL PLATE 07379 1 12 WIRE GROUP 2 (NOT SHOWN) 07380 1 13 WIRE GROUP 3 (NOT SHOWN) 07381 1
ITEm DESCRIpTION pART # qTy 1 ARBOR, 3MT 07331 1 2 SPRING, 3MT ARBOR 07332 1 3 PLUNGER 07333 1 4 WASHER, RUBBER 07334 1 5 WASHER, STEEL 07335 1 6 RETAINING RING, INTERNAL HO-75 0215067 1 7 SSS M10 - 1.5 x 10MM FLAT POINT DIN913 07336 2
Rev. C

motor assembly
Rev. C14

15
motor assembly parts list
ITEm DESCRIpTION pART # qTy 1* GEARCASE 07458 1 2 SEAL, LIP 24 x 40 x 7 07367 1 3 BEARING, BALL 6250 ZZ SHIELDED 07366 1 4 SEAL, LIP 35 x 55 x 10 04807 1 5 SEAL, LIP 35 x 56 x 12 04805 1 6 RETAINING RING, ExTERNAL 35Z 07373 1 7 BEARING, BALL 6007 ZZ SHIELDED 07466 1 8 SPINDLE 07368 1 9 RETAINING RING, INTERNAL 62W 04801 1 10 KEY, SQUARE 6 x 6 x 18 07467 1 11 GEAR 36T 07448 1 12 RETAINING RING, ExTERNAL 20Z 07447 1 13 BERING, NEEDLE RNA 4901 07425 1 14 WASHER, THRUST 07426 1 15 GEARSHAFT 14T 07427 1 16 GEAR 33T 07428 1 17 RETAINING RING, ExTERNAL 18Z 07429 1 18 BEARING, NEEDLE RHNA 101410 07430 1 19 BEARING, NEEDLE RHNA 081512 07431 1 21 SHAFT, PINION 14T 07439 1 22 KEY, SQUARE 3 x 3 x 45 07438 1 23 GEAR, DUAL 33T / 39T 07440 1 24 BEARING, NEEDLE RHNA 081210 07151 3 25 BEARING, BALL 608 SEALED 04544 2 26 SHAFT, PINION 19T / 25T 07432 1 27 KEY, SQUARE 3 x 3 x 38 07433 1 28 GEAR, DUAL 31T / 42T 07434 1 29 GEARSHAFT 18T 07446 1 30 GEAR 29T 07444 1 31 KEY, WOODRUFF #403 04564 1 32 GEAR HELICAL 04582 1 33 SHIFT FORK 07357 2 34 SHIFT PIN, SHORT 07356 1 35 SHIFT LEVER I 07450 1 36 PIN, SPRING 04571 2 37 SPRING, COMPRESSION 04591 2 38 GUIDE, SHIFT LEVER 04524 2 39 WASHER, INTERNAL M5 04563 2 40 SCR, SHCS M5 x 35MM 04572 2 41 TAG, SHIFT 04514 2 42 SCR, CRPHMS M3 x 5MM 045793 4 43 SHIFT PIN, LONG 07343 1 44 SHIFT LEVER II 07424 1 45 SNAP BUSHING LA6 07441 3
ITEm DESCRIpTION pART # qTy 46 WASHER 07443 1 47 PIN, DOWEL M5 x 12 06778 1 48 GASKET, GEARCASE 04593 1 49 COVER, GEARCASE 07442 1 50 WASHER, SPLIT M8 07317 4 51 SCR, SHCS M8 x 40MM 07460 4 52 LABEL, SPEED RANGE 07422 1 53 BEARING HOUSING 07445 1 54 SCR, SHCS M6 x 20MM 0014102 1 55 PIN, DOWEL M5 x 12MM 07451 1 56 FIELD CASE 3/4 054074 1 57 FIELD CASE COVER 054061 1 58 LABEL, WIRING DIAGRAM 054062 1 59 INTAKE LOUVER 054070 2 60 BRUSH HOLDER 04551 2 61 MOTOR BRUSH 04549 2 62 BRUSH CAP 04552 2 63 INSULATOR, FIELD SLEEVE 04558 1 64 INSULATOR, SCREW 04557 4 65 FIELD 120V 04633 1 66 WASHER, LOCK ExTERNAL STAR M4 06773 2 67 SCR, SHCS M4 x 60 04562 2 68 COVER, ARMATURE FAN 054079 1 69 WASHER, SPRING 04560 1 70 BEARING, BALL 608 ZZ 04544 1 71 ARMATURE ASSEMBLY 120V 04631 1 73 BEARING, BALL 6001 ZZ 04543 1 74 CIRCUIT BOARD, OVERLOAD 054067 1 75 PIPE HANDLE HOLE PLUG 054011 1 76 MOTOR TAG 120V 054057 1 77 DRIVE SCREW, #2 x 4MM 0070028 2 78 INSULATOR, CIRCUIT BOARD 054012 2 79 SCR, CR THRD CTNG M3 x 10 DIN 7516A 054014 8 80 WASHER, ExTERNAL M4 06773 4 81 SCR, CRPHMS M4 x 8MM 04820 4 82 SCR, SSS M6 x 12 0070526 2 83 SCR, CRMS OVAL CNTRSNK M5 x 16MM 054013 4 84 LED SOCKET 054054 1 85 LED INDICATOR 054085 1 86 INTERNAL RETAINING RING 42W 07369 1 87 SCR. CRPHMS M3 x 8 048072 1 88 WASHER, M3 LOCK 048073 1 89 LABEL, OVERLOAD 07374 1 90 KEY, 5MM x 5MM x 12MM 07435 1
Rev. C
* Note: Order 07459 for complete Gear Case assembly.
yourdistributor
Tel · 563.391.1300 or Fax · 563.391.2323
2735 Hickory Grove Road · Davenport, Iowa 52804email · [email protected] / web · jancy.com
LIT103C©8/06
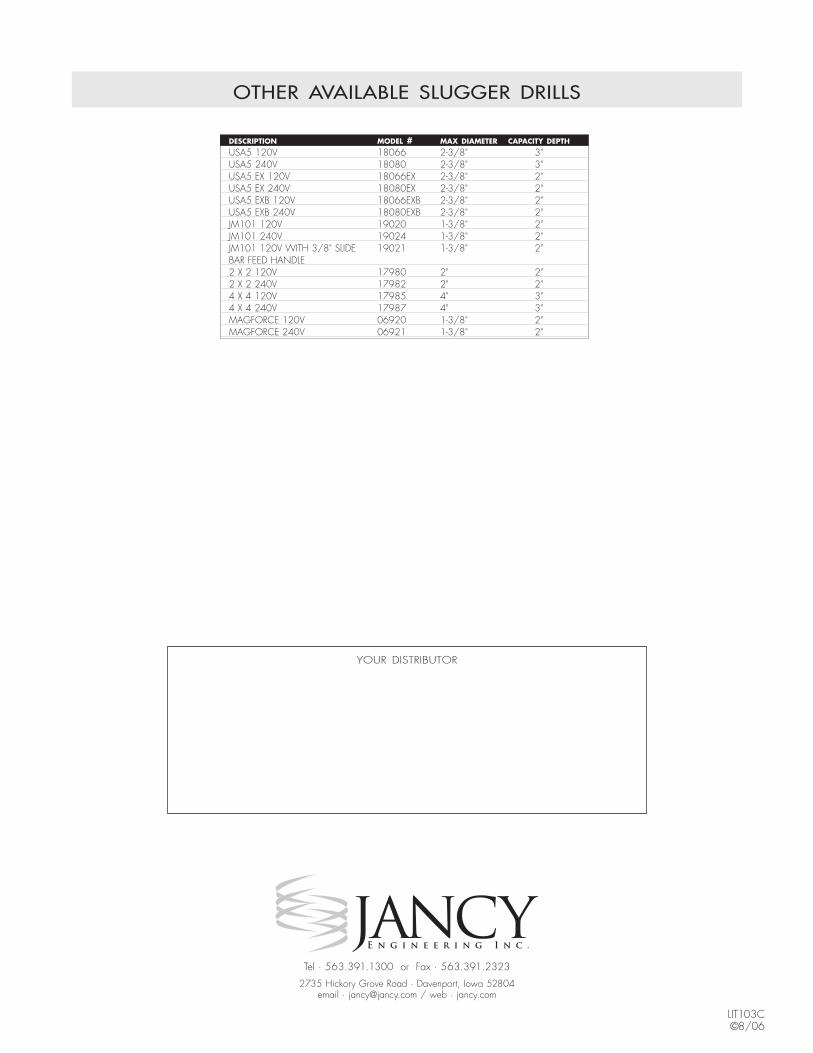
description model # max diameter capacity depth
USA5 120V 18066 2-3/8" 3" USA5 240V 18080 2-3/8" 3" USA5 Ex 120V 18066Ex 2-3/8" 2" USA5 Ex 240V 18080Ex 2-3/8" 2" USA5 ExB 120V 18066ExB 2-3/8" 2" USA5 ExB 240V 18080ExB 2-3/8" 2" JM101 120V 19020 1-3/8" 2" JM101 240V 19024 1-3/8" 2" JM101 120V WITH 3/8" SLIDE 19021 1-3/8" 2" BAR FEED HANDLE 2 x 2 120V 17980 2" 2" 2 x 2 240V 17982 2" 2" 4 x 4 120V 17985 4" 3" 4 x 4 240V 17987 4" 3" MAGFORCE 120V 06920 1-3/8" 2" MAGFORCE 240V 06921 1-3/8" 2"
other available slugger drills