SITE PREPARATION - FBi Buildings
24
7 TIPS SITE PREPARATION UNLOCK A SUCCESSFUL BUILDING PROJECT
Transcript of SITE PREPARATION - FBi Buildings

7TIPS
SITE PREPARATION
UNLOCK A SUCCESSFUL BUILDING PROJECT

b
7TIPS TO UNLOCKING A SUCCESSFUL
BUILDING PROJECT
TIP #5Your Building Pad
pages 10-17
TIP #4Protect Your Investment
pages 8-9
TIP #3Maximize
Perimeter Accesspages 6-7
TIP #2Gain Site
Access pages 4-5
TIP #1Determine Location
& Elevation pages 2-3
TIP #7Finish on Time
pages 20-21
TIP #6Set Your Crew
Up to Win pages 18-19

1
A Smooth Construction Experience This brochure will empower you to:
1
• Make better decisions early in the construction process
• Save money• Maximize the value of your building investment• Minimize delays
Our goal is to help ensure that your project runs smoothly, on time and on budget, while maximizing your project objectives, such as:
• Exterior site flow• Interior building layout• Proper drainage• Code compliance• Fire precaution options• Many other critical issues that improve your
satisfaction and help avoid regret
If you want to get the best price on your new building project, it’s important to consider all of the seven tips and make sure your building works well with the site during construction and your long-term ownership.

2N
A Finish Floor Elevation Benchmark: top of stake
A
N
64′x70′ existing building
Purchaser to remove this existing building72′x144′x16′
Proposed FBi Building
Gravel building pad, level within 8′′
Proposed FBi building is parallel to and located 15' to the West and 35' to the North of 64' x 70' existing building
Purchaser to remove trees to
allow 30′ of clear access on west end
wall
Asphalt Road
20′ 30′
30′
30′35′
18′
Clay/grass accessClay/grass
access
Gravel staging area
Gravel stag-ing area
30′30′
Gravel drive Gravel access
15'
A
TIP #1: DETERMINE LOCATION & ELEVATION
I dentifying the exact location of your new building is the first step in your building process. Your FBi Project Sales Consultant (PSC) can assist you by
shooting grade, staking the corners, and checking your site after excavation. Your PSC can also help put together an extensive site plan to your layout (as shown below), which can be communicated with your excavator. Factors to Consider When Setting The Location• Access: Your flow of people and equipment between buildings and to
your building.
• Drainage: Managing where the water will flow away from the building.
• Aesthetics: Lining up the building parallel or perpendicular to existing buildings, the road or driveway, or other factors that affect “curb appeal.”
• Excavation: A level site location along with a minimum amount of trees or obstacles around your building location. This will reduce the amount of excavation needed, and will save money on site prep and construction costs.

3
Why Finish Floor MattersFinish floor (FF) sets the location of your grade board (as shown in detail to the right) and sets your needed concrete depth. Depending on if you are planning on 4” or 8” of concrete this dictates how high or low your grade board will be. Miscommunication on this step can result in building floor height and drainage issues. Your PSC can help set your FF and help communicate with your crew foreman.
Finish Floor ElevationOnce you have determined the appropriate finish floor elevation (FF), identify a permanent benchmark nearby which can be documented and referenced by your FBi Buildings crew foreman. Some examples are noted below:
1. FF to be 6” higher than the concrete floor of existing building 30’ to the East, as measured immediately inside the walk door at the north end of the west wall of that building.
2. FF to match the finish floor of the existing building at a connection.
3. FF benchmark needs to be established before completing excavating and starting construction. This will enable the excavator, FBi Buildings’ crews, and concrete contractors to all be on the same page. A stake is set next to an existing building to avoid getting disturbed. The FF stake needs to be clearly identified (illustrated in the image to the left). Every contractor should know the FF height from start to finish. 3TIP 1: Determine Location & Elevation
Cross Section

4
50’
Skid-steer
Crew Trailer
Crew Truck
Building Pad
Y our builder will need to gain site access with some of the following equipment and materials:
• Semi for material delivery
• Gradall / telehandler
• Crew truck and trailer
Factors to Consider For Site Accessibility• Road, driveway and culvert width
• Tandem axle trailers can damage existing concrete drives
• Turning radius of semis and other large equipment
• Area for materials to be staged & unloaded
• The width of your building will determine the size of your trusses. Typical truss size will vary from 24’ - 100’.
TIP #2: GAIN SITE ACCESS
• Porta-john and dumpster
• Crane for certain jobs
• Skid-steer

5
Prepare for Clean & Dry Staging AreaOnce we have gained access to your site, a gravel staging area will keep the materials clean and undamaged during construction.
5TIP 2: Gain Site Access
• As you take ownership of the building, there is less work in fixing ruts, if you install a gravel drive before construction starts.
• Reduces the risk of major schedule delays due to adverse weather conditions such as mud that limits equipment access.
Consider all weather conditions for your building site before and after construction. It is critical prior to construction to have gravel for:• Site access
• Parking areas
• Material staging area (see picture below)

6
T o optimize labor, the perimeter areas need to be clear and dry for materials, equipment, and crew access. Gravel perimeter access
allows you to stay on schedule so equipment and crews can access the job site even in wet conditions.
By staying on schedule, this will help minimize additional time and costs during construction.
Perimeter Access Tips1. Consider future site flow and the flexibility of possible expansion
around the building perimeter.
2. Think of space needed for equipment during construction. It’s not uncommon for cranes, skid-steers, or scissor-lifts to show up on site, depending on the project needs. Sites with narrow perimeter access make it difficult for larger equipment to navigate the job site.
TIP #3: MAXIMIZE PERIMETER ACCESS

7TIP 3: Maximize Perimeter Access 7
Poorly Prepared Perimeter AccessHaving a dirt perimeter access can lead to ruts on your site, causing water to pool up. This can cause expensive site re-finishing, but it also allows your building materials to be exposed to mud and water during construction. This will affect the finished look of your building. The top right photo is a poorly prepared perimeter access.
Tight Perimeter AccessHow does the perimeter access look around your building? Do you have ample room for the crews to mobilize equipment?
Limited access around your building can hinder the crews’ ability to use construction equipment. This can cause a longer construction period, while also affecting quality. Crews are forced to find different alternatives, such as ladders. The middle photo is an example of tight perimeter access.
Good Perimeter AccessSufficient access around your building allows your crew to use their equipment to full capacity. Having good perimeter access will result in the highest level of quality construction. In addition, it enables the crew to stay on schedule and minimize change orders, allowing you to finish your project under budget. The bottom right photo is a good example of perimeter access.

8
4 Key Points to Protecting Your Property and Reducing Your Risk:1. Safety: Make sure your builder has a safety program and a full-time
safety manager. This will help determine what hazards are present on the job site that you might not be aware of.
2. Project Manager: Having a designated Project Manager allows you to not have to oversee the construction of your building, giving you much-needed peace of mind.
TIP #4: PROTECT YOUR INVESTMENT
3. Builder’s Risk: A Builder’s Risk Insurance Policy is a must, protecting you during construction from any theft, storm damage, or vandalism that may occur.
4. Warranty: A comprehensive warranty plan provided by your builder is crucial for your building project’s long term security.

99Tip 4: Protect Your Investment
Potential Job Site Safety Hazards (Public & Private)
• All underground utilities need to be located and marked before crew mobilization. This will help the crews identify their location to avoid hitting them when digging holes or foundations. The top right photo shows a good example of underground utilities that have been marked.
• Consider trees that are close to the building perimeter, as they may have limbs that hang over or into the roof line. This can be a future maintenance issue or may even cause damage from falling limbs. If you have trees along your building perimeter, are they far enough away that they wouldn’t cause building damage if they were to fall? The middle photo shows potential proximity issues between a tree and your building.
• Evaluate the location of overhead power lines and plan to have them shut off or relocated if within ten feet of the building or equipment. This avoids the risk of electrical shock during construction. The bottom right photo is a good illustration of the minimum distance you need between your building and power lines (per OSHA code).
• It is critical to have a reliable trash containment system to prevent materials from blowing around, causing damage, and becoming a safety risk. Be sure your builder of choice includes a dumpster on site to keep your job site clean.
10’
10’
10’
10
TIP #5: YOUR BUILDING PAD: OVERVIEW
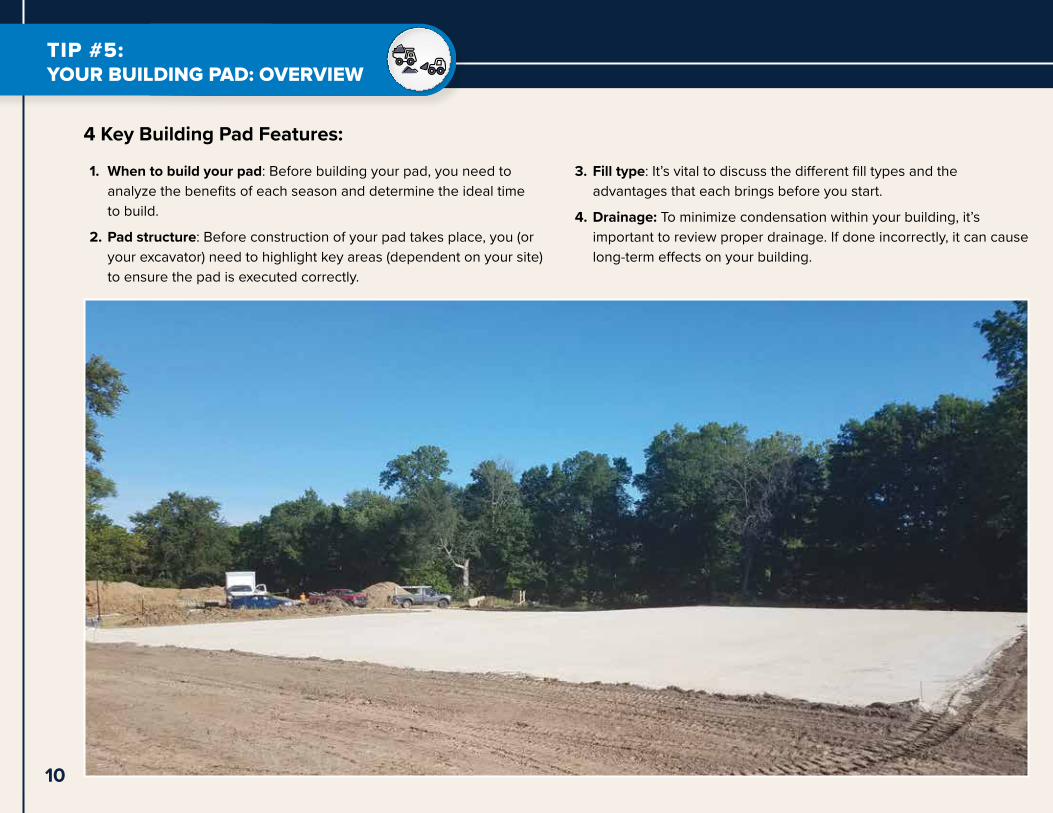
4 Key Building Pad Features:
1. When to build your pad: Before building your pad, you need to analyze the benefits of each season and determine the ideal time to build.
2. Pad structure: Before construction of your pad takes place, you (or your excavator) need to highlight key areas (dependent on your site) to ensure the pad is executed correctly.
3. Fill type: It’s vital to discuss the different fill types and the advantages that each brings before you start.
4. Drainage: To minimize condensation within your building, it’s important to review proper drainage. If done incorrectly, it can cause long-term effects on your building.
1111Tip 5: Your Building Pad: Overview
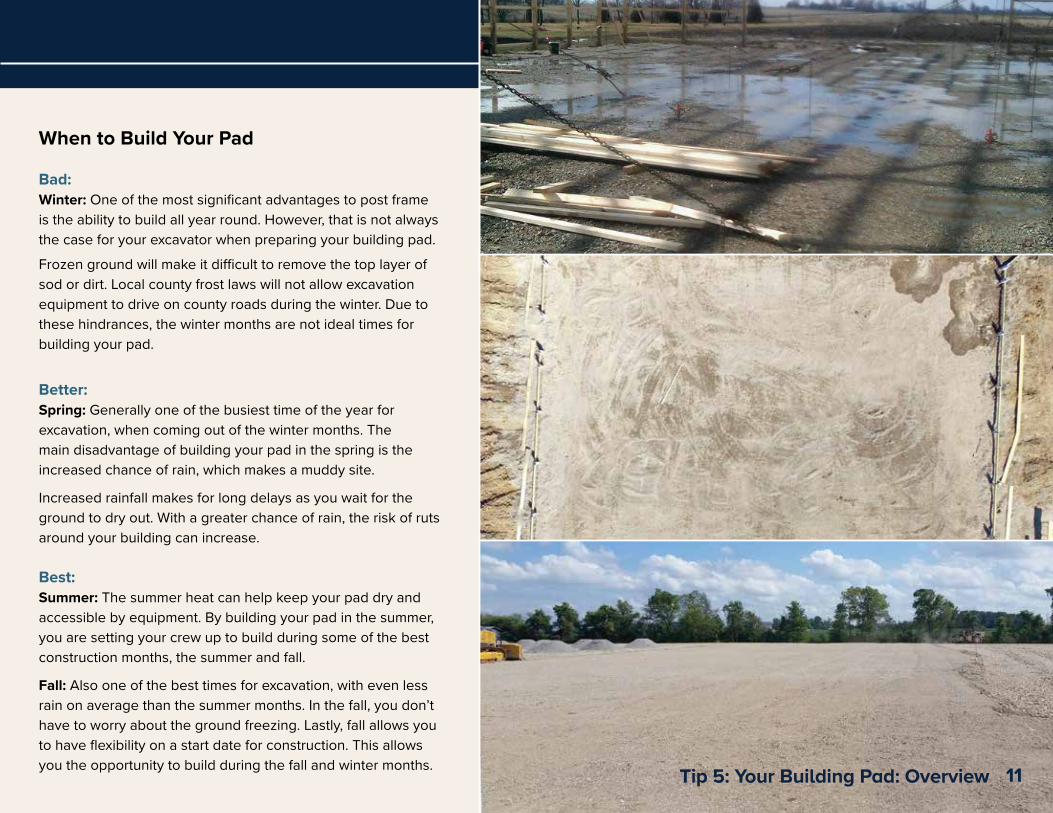
When to Build Your Pad
Bad: Winter: One of the most significant advantages to post frame is the ability to build all year round. However, that is not always the case for your excavator when preparing your building pad.
Frozen ground will make it difficult to remove the top layer of sod or dirt. Local county frost laws will not allow excavation equipment to drive on county roads during the winter. Due to these hindrances, the winter months are not ideal times for building your pad.
Better: Spring: Generally one of the busiest time of the year for excavation, when coming out of the winter months. The main disadvantage of building your pad in the spring is the increased chance of rain, which makes a muddy site. Increased rainfall makes for long delays as you wait for the ground to dry out. With a greater chance of rain, the risk of ruts around your building can increase.
Best: Summer: The summer heat can help keep your pad dry and accessible by equipment. By building your pad in the summer, you are setting your crew up to build during some of the best construction months, the summer and fall. Fall: Also one of the best times for excavation, with even less rain on average than the summer months. In the fall, you don’t have to worry about the ground freezing. Lastly, fall allows you to have flexibility on a start date for construction. This allows you the opportunity to build during the fall and winter months.

12
Center of building pad “crowned” for proper drainage away from building
Tapered to avoid erosion
Minimum 10’ from building line to taper
10’ min.
12’ wide gravel access to site
3 Key Points to Your Building Pad Structure:1. Elevation: Building your pad up will allow you to “crown” from the
center and keep water drainage away from your building.
2. Size: Building your pad 10’ wider on all four sides allows for gradual tapering to occur. This is imperative to minimize the risk of erosion from happening. By eliminating erosion, your column’s structural integrity can stay intact.
3. Compaction: Compaction helps stabilize your pad and reduces the damage that can happen from common construction equipment. Allowing time for your pad to get rained on and settled before construction starts is helpful for natural compaction to take place. The illustration below represents a proper building pad.
TIP #5: YOUR BUILDING PAD: STRUCTURE

13
Compacted Fill Material
Excavation Needed
Compacted Fill Material
Building Location
Building Pad
13Tip 5: Your Building Pad: Structure
Fill Material
May require longer columns to reach virgin soil to secure a solid foundation
Uneven SiteAn uneven pad will require extensive excavation because you will need to build up the pad to create a level area for your building. Once the pad is built, ensuring a thorough compaction is key.
Once compacted, it is best practice to allow some time for natural settling to occur. This is an important step to take because it will reduce the chance of the columns washing out, which can cause structural issues to your building. The top right illustration is an example of an uneven pad built.
Flat SiteA flat site is an ideal site to build a pad on because your excavation costs will be reduced. Requiring less dirt to be hauled in and needing compaction will also allow for a building pad to be constructed faster.
A flat site enables the columns to be secure in at least 4’ of virgin soil and will help secure the structural integrity of your building. The middle illustration is an example of a flat pad built.
Hilltop SiteSometimes the best approach to constructing a building pad is by removing the top layer of soil to create a level pad. This can save on some fill cost but will be offset with the labor of removing the soil (allowing the excavator to leave soil on site and not haul off will save time and cost). The removed soil will then need to be hauled off, adding some labor and trucking cost.
The most significant benefit of this approach is it still allows your building columns to be set in virgin soil. The bottom right illustration is an example of a hilltop pad built.

14
Types of Granular Fill and Typical Uses
Limestone (1 1/2” - 3” stone)
Used as a base to solidify the building pad, parking areas and
driveway. Typically would be placed as a base no more than 6-8” deep prior to 53’s or 73’s;
more than 6-8” could cause cave-ins during dig-in.
Limestone (1 1/2” to dust)
Commonly used as a finished surface for the building pad, parking areas and driveway.
Typically used as a compacted base under concrete slabs. Has 1 1/2” to fines that allows good
compaction.
Limestone (1” to dust)
Has similar qualities as 53’s stone, but some prefer to have 73’s on driveways and parking areas as
the stone is smaller and easier to walk on. Has 1” to fines that also
allows good compaction.
Crushed LimestoneCommonly used as a finish
surface in many equine applications.
SandUsed as a fill in areas containing
sandy soils; needs to be top dressed with a compacted
stone.
Flowable Materials Fill types used prior to concrete slab, but not recommended to be placed until the columns are set and concrete is ready to be poured.
Pea Gravel (or Pea Fill) Commonly used under concrete slabs. This material does not compact, is a flowable fill, and will cause cave-ins during dig-in.
Limestone (1/4” to 1/2” stone)Commonly used to backfill underground pipe and tile. No compaction.
3 Keys to Picking Fill Types:
1. Future Concrete: If you plan on finishing with concrete, you will want to prep the ground accordingly. A compacted sand pad is acceptable, along with limestone. Be sure to remove the organic topsoil to help eliminate settling and future cracks in your concrete.
2. Not Concrete: If your building will be used primarily for cold storage, then you will want a solid fill type that will hold up over time. 53’s or
73’s/CA6 and limestone (road mix) will also provide a solid base for storage and hold up over time.
3. Arenas: The best fill type for a horse arena is crushed limestone. We recommend this fill type because it reduces dust and is best for the horse’s health.
TIP #5: YOUR BUILDING PAD: FILL TYPES

15
Sand Pad• Pros: Depending on your location, a sand pad can be
a cost effective fill type. Sand will drain water allowing you to avoid puddle formation on your pad, unlike clay and dirt pads.
• Cons: Sand pads can easily be damaged by equipment during construction. This can force you to rebuild your pad if you plan to pour concrete. Sand can be susceptible to erosion by weathering. The middle photo is an example of a sand pad.
Stone Pad• Pros: Stone (53’s and 73’s) is overall the best fill to use
when building your pad. It compacts and drains well. Stone helps reduce your risk of ruts and damage to your pad during construction. It also allows flexible construction start dates as you are not dependent on dry weather.
• Cons: Stone can be the most expensive fill type depending on your area. The top right photo is an example of a stone pad.
Dirt/Clay Pad• Pros: Dirt and clay pads are generally cost effective
as less fill is needed to be hauled in. Dirt/clay pads can be finished after the building is complete, although this is not ideal.
• Cons: There is a high chance of ruts during construction. Clay and dirt also have a poor ability to drain water, resulting in materials getting dirty if there’s no proper staging area. If poor weather occurs, crews aren’t able to access the site with their equipment, resulting in construction delays. The bottom right photo is an example of a dirt pad. Tip 5: Your Building Pad: Fill Types 15

16Photo courtesy of
Midwest Drainage, LLC.
There are 2 Types of Drainage: Subsurface & Surface Drainage
Subsurface Drainage: Consists of an underground network of piping or tiling for conveying water to the point of disposal, such as a storm sewer or ditches.
Surface Drainage: Is the grading of the land in a way to divert rain and other surface water into a natural drainage pattern. Drainage needs to be carefully considered in locating the building pad on the site. We recommend having both types of drainage to minimize moisture issues in and around your new building.
TIP #5: YOUR BUILDING PAD: DRAINAGE

1717Tip 5: Your Building Pad: Drainage
Grading To ensure proper drainage, the elevation should allow a 2% (2.4” in 10’) grade away from the building for a minimum of 10’ – 15’ around the entire perimeter. Note: soil/fill types can affect this and it may be a code issue in certain areas (e.g., International Building Code 2000, Sec 1803.3 states that a 5% slope is required for a minimum of 10’ final grade, not necessarily during construction). The perimeter of the proposed building should have proper drainage to avoid water runoff into or under the building at perimeter and door locations. The top right image shows improper grading away from the pad.
Water Removal Proper water drainage on your new building roof is critical. The easiest way to control water away from your building is by gutters. Being strategic about your downspout locations can keep water away from your door openings, and common travel areas.Connecting a tile system to your gutters is the best way to ensure water removal. By doing this, you control exactly where the water is going & avoid it from pooling up next to your building. The middle image shows proper gutter drainage.
Water Risks Without correct grading and drainage control, you can cause condensation issues for your new building once complete.Improper drainage during construction can cause erosion. This is most commonly seen in sand, clay, and dirt pads. This can result in more excavation cost to fix your pad once the building is in place (especially important if you will be pouring concrete). The bottom right image shows erosion on a building pad.

18
TIP #6: SET YOUR CREW UP TO WIN
3 Advantages to Setting Your Crew Up to Win:1. Time: There is nothing worse than your project being delayed.
When your crew is set up to win, they build more efficiently. A proper building pad allows their work schedule to be more predictable, regardless of the weather.
2. Quality: Predictability creates happy and efficient crews. Happy crews, not building on dangerous sites or in the mud, build with
higher quality and more precision. Well prepared sites and properly executed building pads allow you to get the building you expect without sacrificing the quality.
3. Cost: A properly prepared site that is optimized for crew efficiency will save you money up front, as well as reduce completion delays.
1919Tip 6: Set Your Crew Up to Win
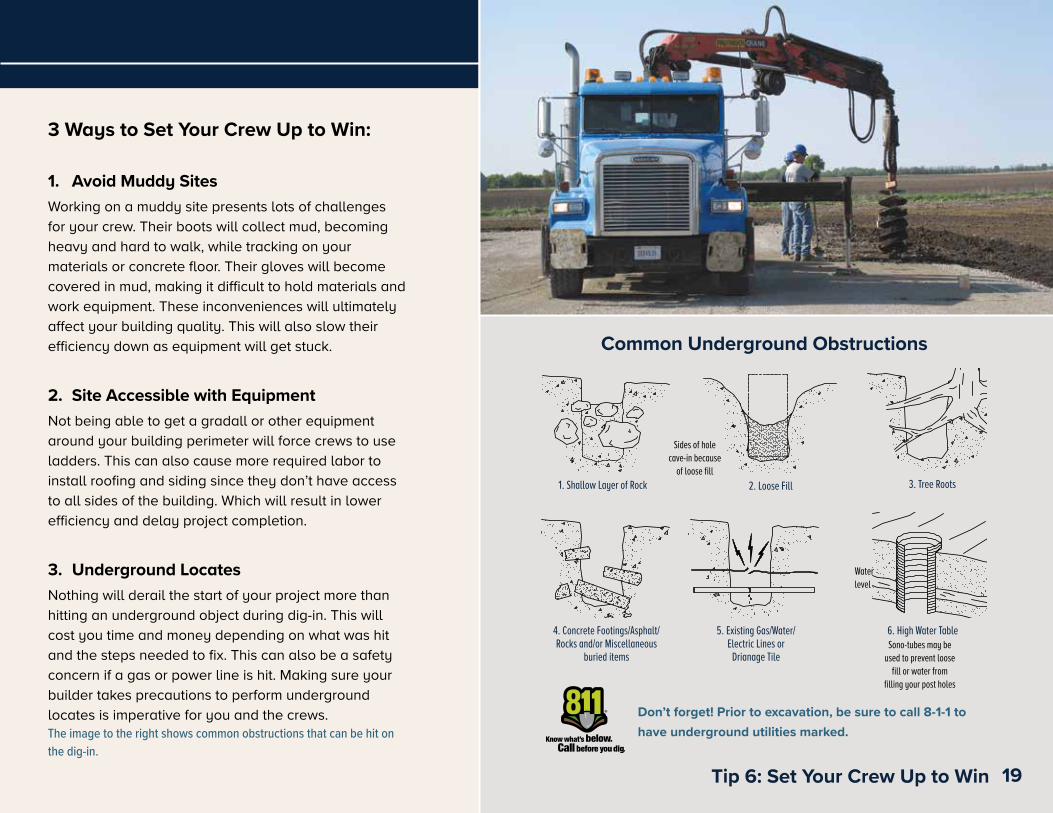
Common Underground Obstructions
Don’t forget! Prior to excavation, be sure to call 8-1-1 to have underground utilities marked.
3 Ways to Set Your Crew Up to Win:
1. Avoid Muddy SitesWorking on a muddy site presents lots of challenges for your crew. Their boots will collect mud, becoming heavy and hard to walk, while tracking on your materials or concrete floor. Their gloves will become covered in mud, making it difficult to hold materials and work equipment. These inconveniences will ultimately affect your building quality. This will also slow their efficiency down as equipment will get stuck.
2. Site Accessible with EquipmentNot being able to get a gradall or other equipment around your building perimeter will force crews to use ladders. This can also cause more required labor to install roofing and siding since they don’t have access to all sides of the building. Which will result in lower efficiency and delay project completion.
3. Underground LocatesNothing will derail the start of your project more than hitting an underground object during dig-in. This will cost you time and money depending on what was hit and the steps needed to fix. This can also be a safety concern if a gas or power line is hit. Making sure your builder takes precautions to perform underground locates is imperative for you and the crews. The image to the right shows common obstructions that can be hit on the dig-in.
Sides of hole cave-in because
of loose fill
Sono-tubes may be used to prevent loose
fill or water from filling your post holes
1. Shallow Layer of Rock 2. Loose Fill 3. Tree Roots
Water level
4. Concrete Footings/Asphalt/Rocks and/or Miscellaneous
buried items
5. Existing Gas/Water/Electric Lines or
Drianage Tile
6. High Water Table

20
TIP #7: FINISH ON TIME
4 Phases of Construction:
Purchase AgreementSigned
✍
• Review construction guide • Intro to Project Manager (PM) (expect a call within 2 weeks)
Discuss Next Actions:
Down Paymentdue to FBi $ PM Calls
Customer☎
• Site preparation• Obtaining permit• Financing update• Approximate start time• Any change orders?• Pending/missing details• Review contract details
Financing Approved
ConstructionDrawingsComplete & Sent
Customer ReviewsConstructionDrawings FBi Calls
Customer☎
• Have permits been obtained? • Site preparation update • Construction drawings - discuss & review• Any change orders?• Update/validate approximate schedule slot• Discuss scheduling material with long lead time
Notify your Project Manager of your:
1) Permit number2) Financing status3) Site progress, including building corners staked and a finished floor elevation marked.
ConstructionDrawingsApproved
LocalPermitObtained
FBi CallsCustomer☎
FBi PerformsSite Inspection
Site Approval by FBi
FBi CrewScheduled
All Materials Ordered
FBi CallsCustomer☎ Customer Meets
FBi ForemanConstruction Begins
Final Walk ThroughWith Foreman(final payment due)
FBi Calls Customer☎
Contact from Project Sales Consultant
Complete the CSISurvey
• Site preparation complete• Schedule site check• Any change orders?
• Finalize start date & time • Any change orders?• Reminder of delivery payment
• Customer / crew introduction• Delivery payment due• Confirm building location & finished floor elevation• Review construction drawings/prints
• Schedule time to pick up left over materials & equipment• Confirm satisfaction• Explain Repair/Renovation Services
Final Discussion:
Phase 1: Processing Phase 2: Design & Permit Phase 3: Pre-Mobilization Phase 4: Construction(contract documentation) (site approval & material ordered)
KEY= FBi activity/responsibility
= Customer activity/responsibility
Balance of Down PaymentTo FBi
$
Point of Contact - FBi ForemanPoint of Contact - Project Sales Consultant Point of Contact - Project Manager
TOP 5 THINGS THAT COST CUSTOMERS TIME & MONEY1. Missing/Pending Details (ie: colors) 2. Permitting Process3. Change Orders requiring rework, potentially causing schedule delays4. Improper and/or Incomplete Site Preparation5. Safety - Power lines, dig-in obstructions and challenges
Site Work (to avoid delays, check with your local permitting o�ce to confirm when site prep can start)
(mobilization and construction)
1. Processing: Overview of the first steps to your construction project for your purchase agreement and down payment once you have selected a builder.
2. Design & Permit: Overview of the first actions your builder will be taking after the processing phase to start your pre-mobilization.
3. Pre-Mobilization: Detailing the steps your Project Manager will be taking to set up the date the crew and materials will arrive and start construction.
4. Construction: Details the main milestones that will happen during construction that you need to be aware of, along with the finishing steps upon completion.

21
Purchase AgreementSigned
✍
• Review construction guide • Intro to Project Manager (PM) (expect a call within 2 weeks)
Discuss Next Actions:
Down Paymentdue to FBi $ PM Calls
Customer☎
• Site preparation• Obtaining permit• Financing update• Approximate start time• Any change orders?• Pending/missing details• Review contract details
Financing Approved
ConstructionDrawingsComplete & Sent
Customer ReviewsConstructionDrawings FBi Calls
Customer☎
• Have permits been obtained? • Site preparation update • Construction drawings - discuss & review• Any change orders?• Update/validate approximate schedule slot• Discuss scheduling material with long lead time
Notify your Project Manager of your:
1) Permit number2) Financing status3) Site progress, including building corners staked and a finished floor elevation marked.
ConstructionDrawingsApproved
LocalPermitObtained
FBi CallsCustomer☎
FBi PerformsSite Inspection
Site Approval by FBi
FBi CrewScheduled
All Materials Ordered
FBi CallsCustomer☎ Customer Meets
FBi ForemanConstruction Begins
Final Walk ThroughWith Foreman(final payment due)
FBi Calls Customer☎
Contact from Project Sales Consultant
Complete the CSISurvey
• Site preparation complete• Schedule site check• Any change orders?
• Finalize start date & time • Any change orders?• Reminder of delivery payment
• Customer / crew introduction• Delivery payment due• Confirm building location & finished floor elevation• Review construction drawings/prints
• Schedule time to pick up left over materials & equipment• Confirm satisfaction• Explain Repair/Renovation Services
Final Discussion:
Phase 1: Processing Phase 2: Design & Permit Phase 3: Pre-Mobilization Phase 4: Construction(contract documentation) (site approval & material ordered)
KEY= FBi activity/responsibility
= Customer activity/responsibility
Balance of Down PaymentTo FBi
$
Point of Contact - FBi ForemanPoint of Contact - Project Sales Consultant Point of Contact - Project Manager
TOP 5 THINGS THAT COST CUSTOMERS TIME & MONEY1. Missing/Pending Details (ie: colors) 2. Permitting Process3. Change Orders requiring rework, potentially causing schedule delays4. Improper and/or Incomplete Site Preparation5. Safety - Power lines, dig-in obstructions and challenges
Site Work (to avoid delays, check with your local permitting o�ce to confirm when site prep can start)
(mobilization and construction)
5 Scheduling Factors1. Look for a builder that will help you facilitate a project
schedule and pull in an excavator early on to understand and meet deadlines.
2. Locate underground obstructions and hazards. Do they need to be relocated or removed before site preparation to minimize re-work?
3. Site preparation, in some instances, may be executed during the design and permitting phase. Check with local
building officials to verify if a permit is needed to start your earthwork.
4. It’s ideal to prepare a weatherproof site (gravel drives, gravel perimeter accesses, and gravel staging areas in addition to a gravel building pad), prior to the start of construction. This minimizes project delays due to possible muddy site conditions.
5. Keep in mind, the schedule and duration of excavation will be affected by how your excavator is set up and operates (size and type of equipment, competencies & specialties, crew power, backlog, etc).
21Tip 7: Get Your Project Done on Time

7TIPS
3823 W 1800 S Remington, IN 47977
800-552-2981 fbibuildings.com 190401-DG/KB-LPC-0.25