SI-11X Installation Manual - Sandia
19
3700 Osuna Road NE Suite 711 Albuquerque, NM 87109 www.sandia.aero 905020-IM Rev A SI-11X Installation Manual
Transcript of SI-11X Installation Manual - Sandia

3700 Osuna Road NE Suite 711 Albuquerque, NM 87109 www.sandia.aero
905020-IM
Rev A
SI-11X
Installation Manual

1
3700 Osuna Road NE Suite 711 Albuquerque, NM 87109 www.sandia.aero
This document and the information contained herein is the propriety data of SANDIA aerospace
Corporation. No part of this document may be transmitted, reproduced, or copied in any form or by
any means without the prior written consent of SANDIA aerospace.
Due to SANDIA aerospace’s continued product and quality improvement programs, information
contained in this document is subject to change without prior notice Copyright 2019 SANDIA
aerospace Corporation, all right rights reserved.
Printed in USA.
Record of Revision
Revision Date Description Approval
A-RR 190813 Initial release FWH

2
3700 Osuna Road NE Suite 711 Albuquerque, NM 87109 www.sandia.aero
Table of Contents
Section 1 - General Description ...........................................................................................................................4
1.1 Introduction ..........................................................................................................................................4
1.2 SI-11X Product Description .................................................................................................................4
1.2.1 System Functions ............................................................................................................................4
1.2.2 System Interfaces ............................................................................................................................4
1.2.3 Unit Outer Dimensions ...................................................................................................................5
1.3 Specifications .......................................................................................................................................6
1.3.1 Physical Characteristics ..................................................................................................................6
1.3.2 Electrical Characteristics ................................................................................................................6
1.4 Environmental Characteristics .............................................................................................................7
Section 2 - Installation Considerations ................................................................................................................8
2.1 General .................................................................................................................................................8
2.2 Cooling Considerations ........................................................................................................................8
Section 3 – Installation Procedures ......................................................................................................................9
3.1 General .................................................................................................................................................9
3.2 Equipment Required ............................................................................................................................9
3.2.1 Supplied ..........................................................................................................................................9
3.2.2 Operational Software ......................................................................................................................9
3.2.3 Required, But Not Supplied ..........................................................................................................10
3.3 Mounting Hole ...................................................................................................................................10
3.4 Mounting Bracket Installation ...........................................................................................................10
3.5 Wiring Installation .............................................................................................................................11
3.6 Unit Mounting ....................................................................................................................................13
3.7 System Configuration ........................................................................................................................15
3.7.1 Entry & Exit Configuration Mode ................................................................................................15
3.7.2 Configuration Page .......................................................................................................................16
Section 4 – Operation .........................................................................................................................................17
List of Illustrations
Figure 1 – Unit Outer Dimensions .......................................................................................................................5
Figure 2 – Unit Front and Rear Views .................................................................................................................9
Figure 3 - Instrument Cutout ..............................................................................................................................10
Figure 4 – Front & Rear Mounting Bracket .......................................................................................................11
Figure 5 - Wiring Diagram ................................................................................................................................13
Figure 6 - Unit Mounting With Tab/Slot Cutaway ............................................................................................14
Figure 7 - Power On Screen ...............................................................................................................................15
Figure 8 – Setup Mode Entry .............................................................................................................................15
Figure 9-Configuration Screen...........................................................................................................................16

3
3700 Osuna Road NE Suite 711 Albuquerque, NM 87109 www.sandia.aero

4
3700 Osuna Road NE Suite 711 Albuquerque, NM 87109 www.sandia.aero
Section 1 - General Description
1.1 Introduction This manual describes the installation of the SANDIA aerospace SI-11X Electronic Course
Deviation Indicator. It is intended for use by experimental aircraft builders in experimental aircraft.
This product is not approved for installation in type certificated aircraft.
The installer must ensure that all functions are operating properly according to their intended purpose
in their particular installation.
1.2 SI-11X Product Description The SI-11X Electronic Course Deviation Indicator is a panel mounted device to display lateral and
vertical needles from a typical navigation receiver or GPS navigator.
All information is displayed on a color 3.5” diagonal LCD display in traditional aerospace
symbology.
1.2.1 System Functions
The SI-11X performs the following functions:
▪ Display of Lateral Deviation (Either VOR, ILS or GPS)
▪ Display of Vertical Deviation (Either ILS or GPS)
▪ Display of VOR OBS Degrees
▪ Display of VOR TO/FROM indication
▪ Display of 4 Annunciations.
• NAV or VLOC
• GPS
• BC (Back Course)
▪ Backlight Control (%)
Various parameters can be configured by the installer (not pilot accessible):
▪ Configuration of Analog Gain and Offsets
▪ OBS Resolver interface Ratio and Swap Rotor D/F
1.2.2 System Interfaces
The SI-11X provides a typical analog electrical interface to typical navigation receiver and GPS
navigators. Bipolar +-150mVdc Left/Right, Up/Down and To/From. Unipolar 0-150mV
Left/Right, Up/Down Flags and 6 wire, resolver.
5
3700 Osuna Road NE Suite 711 Albuquerque, NM 87109 www.sandia.aero
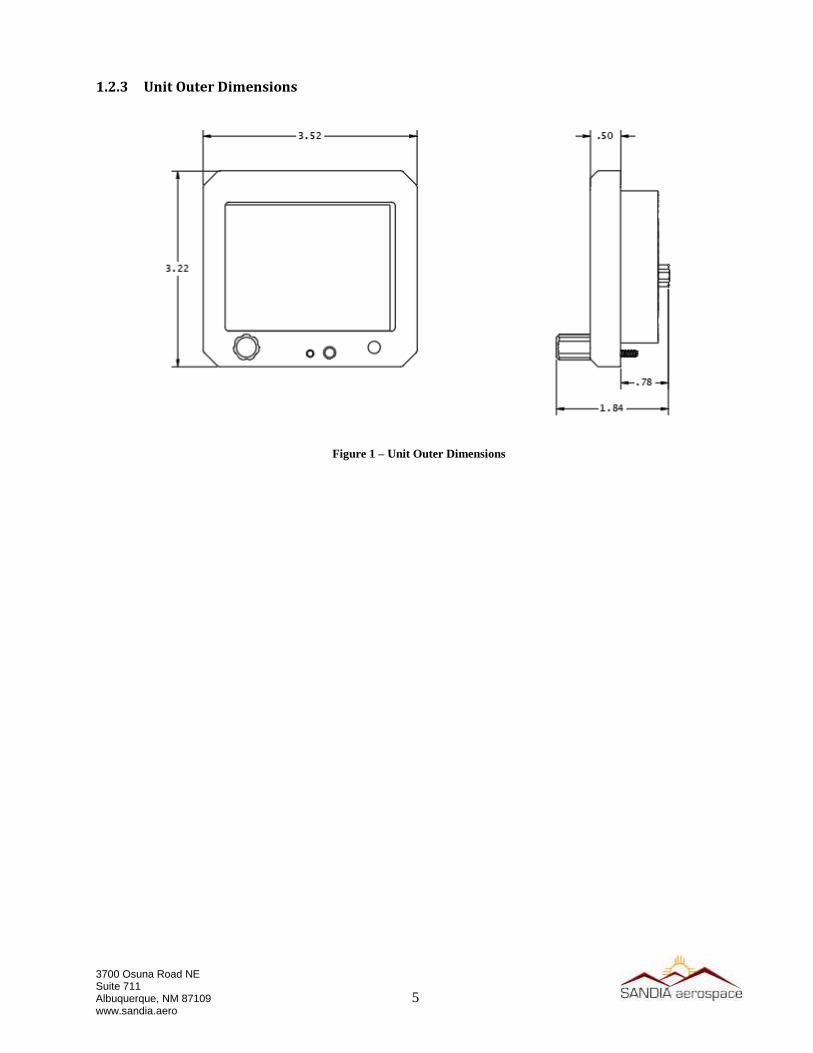
1.2.3 Unit Outer Dimensions
Figure 1 – Unit Outer Dimensions

6
3700 Osuna Road NE Suite 711 Albuquerque, NM 87109 www.sandia.aero
1.3 Specifications
1.3.1 Physical Characteristics
Mounting ...........................................................Standard 3-1/8” Round Hole
Overall Dimensions ...........................................3.52 x 3.22 x 1.84 in
Bezel Dimensions..............................................3.52 x 3.22 x 0.50 in
Weight ...............................................................0.56 lbs (Including Bracket and Connector)
Viewing Angle ..................................................60° Left/Right, 45° Up/Down
Operating Temp ................................................-20°C to +55°C
Power Input .......................................................10-32 VDC
Current ..............................................................1 Amp Max
Power ............................................................... 5 Watts at Max Display Brightness
1.3.2 Electrical Characteristics
Needle Range ...................................................+-150mV Full Scale Deflection
Needle Accuracy ...............................................2% of Full Scale Deflection
Needle Max Deflection ....................................+-175mV Max Deflection
Needle Common Mode Voltage ........................+-3Vdc
Needle Differential Load ...................................1 kOhm
To/From Threshold ...........................................+-40mV (To Positive)
To/From Threshold Accuracy ...........................+-2mV
To/From Common Mode Voltage .....................+-3Vdc
To/From Differential Load ................................1 kOhm
Flags Threshold .................................................+125mV
Flags Common Mode Voltage ..........................+3Vdc
Flags Load .........................................................1 kOhm
Max Rotor Input Voltage ..................................up to 8 Vp-p - Vcm
Rotor Input Frequency ......................................30 to 500Hz
Rotor Common Mode ......................................+- 2.5Vdc
Stator D/F Accuracy ..........................................<1 degree
Stator D/F Resolver Ratio .................................0.2 to 1.0
Stator Common Mode Voltage .........................+-3Vdc

7
3700 Osuna Road NE Suite 711 Albuquerque, NM 87109 www.sandia.aero
1.4 Environmental Characteristics
Temperature .....................................................-20 to 55 Degrees C
Humidity ..........................................................DO-160G Standard Humidity, TBD
Power ................................................................DO-160G Section 16, TBD
EMI ..................................................................TBD
RFI ...................................................................TBD

8
3700 Osuna Road NE Suite 711 Albuquerque, NM 87109 www.sandia.aero
Section 2 - Installation Considerations
2.1 General The SI-11X interfaces to typical navigation receiver or GPS navigators via the standard analog that
typically drove mechanical needle movements and flags. The resolver circuit in the SI-11X can also
emulate electrically the mechanical resolver found in traditional mechanical CDI’s.
2.2 Cooling Considerations The SI-11X does not require any special cooling considerations.

9
3700 Osuna Road NE Suite 711 Albuquerque, NM 87109 www.sandia.aero
Section 3 – Installation Procedures
3.1 General Installation consists of securely fastening the mounting bracket to the instrument panel, constructing
& connecting the power cable assembly and mounting the unit to the bracket. Power-On is then
performed, followed by unit configuration and finally unit checkout procedures.
Figure 2 – Unit Front and Rear Views
3.2 Equipment Required
3.2.1 Supplied
SI-11X (Unit) ............................................... P/N 905020-00
Kit, Install Electrical SI-11X ......................... P/N TBD
Conn, “D” 25 Pos, Rcpt, Sldr Cup ............ P/N TBD
Clamp, D Conn 45/180 Deg ...................... P/N TBD
Kit, Install Mechanical SI-11X ..................... P/N 306187-00
Bracket, Mounting Front ........................... P/N 306179
Gasket........................................................ P/N 306505
Bracket, Mounting Rear ............................ P/N 306185
Screw, Phillips, Flat Undercut SS (X4) ..... 6-32 x 3/8
Nut, Nylon Insert, Std Zinc (X4) ............... 6-32
Hex Wrench, 3/32” L-WR Short ............... P/N 306333
3.2.2 Operational Software
SI-11X Operation Software ........................... P/N 905321-00-OC-VX.Y

10
3700 Osuna Road NE Suite 711 Albuquerque, NM 87109 www.sandia.aero
3.2.3 Required, But Not Supplied
Wire (24 AWG, Stranded unless otherwise noted)
24 AWG Shielded Twisted Pair.
3.3 Mounting Hole The SI-11X is designed to mount in a standard 3” round mounting hole. The supplied front mounting
bracket (P/N 306179) and rear mounting bracket (P/N 306185) must be utilized to mount the
instrument. The panel cutout should be as follows:
Figure 3 - Instrument Cutout
Front and rear mounting brackets adapt the unit connection points to the 3” round instrument hole
cutout. The rear bracket is utilized to fasten the unit to the panel. The supplied screws and nuts must
be used to retain the brackets.
3.4 Mounting Bracket Installation
1. Install the bracket per Figure 4 and tighten the four screws & nuts.

11
3700 Osuna Road NE Suite 711 Albuquerque, NM 87109 www.sandia.aero
Figure 4 – Front & Rear Mounting Bracket
3.5 Wiring Installation 1. The power line must be protected by a 1 AMP circuit breaker.
2. Keep power and ground lines less than 1 meter in length.
The SI-11X is supplied with one 25 pin Sub-D female mating connector and back-shell. The Sub-D
connector uses screw lock assemblies to secure the connector to the unit. The screw lock assemblies
can be replaced with slide lock posts if desired by the installer.
NUM NAME I/O DESCRIPTION
P1-1 Rotor H Input Rotor Reference
P1-2 Rotor C Input Rotor Reference
P1-3 Stator D Output Cosine of Rotor Reference
P1-4 Stator F Output Sine of Rotor Reference
P1-5 Stator E Output Return for Stator D
P1-6 Stator G Output Return for Stator F
P1-7 VLOC+
Flag Input Flag +- differential. Positive for needle active at 125mV
P1-8 VLOC-
Flag Input Flag +- differential return

12
3700 Osuna Road NE Suite 711 Albuquerque, NM 87109 www.sandia.aero
NUM NAME I/O DESCRIPTION
P1-9 VOR TO Input VOR TO/FROM differential input. TO positive for TO indication
at 40mV
P1-10 VOR
FROM Input
VOR TO/FROM differential input. FROM positive for FROM
indication at -40mV
P1-11 VLOC
LEFT Input
VLOC LEFT/RIGHT differential. LEFT positive for left needle
movement. 150mV for Full Scale (5 dots)
P1-12 VLOC
RIGHT Input
VLOC LEFT/RIGHT differential. RIGHT positive for right needle
movement. -150mV for Full Scale(5 dots)
P1-13 GS UP Input Glideslope UP/DOWN differential. UP positive for up needle
movement. 150mV for full scale(5 dots)
P1-14 GS DOWN Input Glideslope UP/DOWN differential. DOWN positive for down
needle movement. -150mV for full scale(5dots)
P1-15 GS +FLAG Input Glideslope Flag differential. Positive for needle active at 125mV
P1-16 GS -FLAG Input Glideslope Flag differential return.
P1-17 GPS ANN Input Active Low for GPS annunciation
P1-18 VLOC Ann Input Active low for VLOC annunciation
P1-24 NAV ANN Input Active low for NAV annunciation
P1-25 BC ANN Input Active low for BC (back course) annunciation
P1-19 A/C PWR Input 10-32Vdc. Diode OR’d with P1-20
P1-20 A/C PWR Input Alternate Power input Diode OR’d with P1-19
P1-21 GND PWR Input Power Return
P1-22 RS232 RX Input DNC
P1-23 RS232 TX Output DNC
Table 1- Electrical Pin-Out

13
3700 Osuna Road NE Suite 711 Albuquerque, NM 87109 www.sandia.aero
Figure 5 - Wiring Diagram
3.6 Unit Mounting 1. The unit connects to the mounting bracket utilizing two upper tabs and a lower fastener.
2. Place gasket on unit before installing unit onto bracket.
3. The unit is installed by engaging the two upper tabs first, then securing the bottom screw.
4. Hold the unit at a slight angle off of the instrument panel (as shown below) and align the upper
tabs with the slots on the rear of the unit.

14
3700 Osuna Road NE Suite 711 Albuquerque, NM 87109 www.sandia.aero
Figure 6 - Unit Mounting With Tab/Slot Cutaway
5. Push the unit toward the instrument panel until it stops against the bracket.
6. While maintaining inward pressure, rotate the bottom such that the unit is now parallel to the
panel.
7. Once parallel to the panel, apply downward pressure to ensure the upper tabs remain fully
engaged.
8. While holding in-ward and down-ward pressure on the unit, tighten the lower screw with the 3/32
hex drive. Torque to 5 inch-lbs. Do not over-tighten.
9. Verify that the unit is firmly attached to the instrument panel. (The bezel of the unit will stand-
off slightly from the instrument panel, which is normal.)
Motion 1:
Motion 3:
Motion 2:

15
3700 Osuna Road NE Suite 711 Albuquerque, NM 87109 www.sandia.aero
3.7 System Configuration The following section provides instructions for initial setup configuration of the SI-11X
Upon normal power-on, the unit will display the company logo, model number, part number and
software version as follows:
Figure 7 - Power On Screen
After displaying the splash screen for approximately 7 seconds, the unit will enter the main
operating mode.
3.7.1 Entry & Exit Configuration Mode
Setup mode is enabled when the unit is powered-on while the rotary knob is being held in the
pressed state. The unit will display a “Caution: Enter Config Mode? NO YES”. To enter
configuration mode, rotate the encoder until YES is yellow and press the knob.
Figure 8 – Setup Mode Entry
Exiting the configuration mode is accomplished by long press and hold of the knob or cycling
power to the unit. CAUTION: When setting have changed, the SI-11X needs to write to non-

16
3700 Osuna Road NE Suite 711 Albuquerque, NM 87109 www.sandia.aero
volatile memory. The Configuration Page display a yellow box in the upper left hand
corner of the display. DO NOT CYCLE POWER WHILE THIS BOX IS DISPLAYED.
Otherwise, a corruption of the non-volatile memory may occur and the unit will default it’s
configuration.
3.7.2 Configuration Page
Upon entry of configuration mode, the unit displays the following page:
Figure 9-Configuration Screen
Setup Page Purpose Min
Value
Max
Value
Increment
VLOC GAIN Lateral needle gain adjustment .8 1.2 .001
VLOC OFFSET Lateral needle zero offset adjustment (10ths of mV) -2000 2000 1
GS GAIN Vertical needle gain adjustment .8 1.2 .001
GS OFFSET Vertical needle zero offset adjustment (10ths of mV) -2000 2000 1
TO/FROM
GAIN
TO/FROM input gain .8 1.2 .001
TO/FROM
OFFSET
TO/FROM zero offset (10ths of mV) -2000 2000 1
LOC FLAG
GAIN
LOC Flag gain adjustment .8 1.2 .001
LOC FLAG
OFFSET
LOC Flag zero offset (10ths of mV) -2000 2000 1
GS FLAG GAIN GS Flag gain adjustment .2 1.0 0.01
SWAP GS Flag zero offset (10ths of mV) -2000 2000 1
RATIO Rotor to Stator Transfer Ratio 0.2 1.0 .01
SWAP Can swap SIN/COS on Stator D/F either 0 or 1. 0 1 1
OBS Current displayed OBS 1 360 1
OBZ Electrically Zero OBS 1 360 1 Table 2 - Configuration Parameters
The reading column shows the mV reading on that input. The ELEC column on the ZERO row gives the
electrically output angle on Stator D/F.

17
3700 Osuna Road NE Suite 711 Albuquerque, NM 87109 www.sandia.aero
To edit an adjustment, rotate the knob until the desired item is selected with a yellow box. Press the knob and
that element will be highlighted in blue. Rotate the knob to the desired value and resulting reading. Press the
knob to store the value and allow selection of another item.
3.7.3 Installation Adjustment
The SI-11X needs to be adjusted to the navigation receiver or GPS navigator that it’s interfaced to. Many
modern receivers have configuration pages that help in adjustment of the CDI. Garmin GNS4XX/5XX for
example have a configuration page to drive the needles to Full Left, Right, Up and Down that can assist in the
adjustment. A calibrated DMM is also useful in determining the voltages that are being applied by the
navigation system.
For a typical navigation receiver, the following steps should be performed with the receiver and a NAV Test
Set.
1. Starting with the lateral VLOC needle, inject a strong localizer signal nav receiver.? Adjust DDM to
zero and adjust the VLOC OFFSET so that VLOC READING is 0 +- 1.5 mV.
2. The LOC FLAG READING should be greater than 125mV.
3. Adjust DDM to .155 “Left” and adjust VLOC GAIN so that VLOC READING is 150mV +-1.5mV.
4. Adjust DDM to .155 “Right” and Observe the VLOC READING is 150mV +-1.5mV.
5. Remove the localizer signal and observe the VLOC FLAG READING is 0 + 1.5mV.
6. Switch to the Glideslope receiver. Inject a strong glideslope signal. Adjust DDM to zero and adjust
GS OFFSET so that GS READING is 0 +- 1.5mV
7. The GS FLAG READING should be greater than 125mV
8. Adjust DDM to .175 “UP” and adjust GS GAIN so that GS READING is 150mV +-1.5mV.
9. Adjust DDM to .175 “DOWN” and observe that GS READING is -150mV +-1.5mV
10. Remove the glideslope signal and observe the GS FLAG READING is 0 + 1.5mV
The VLOC and GS needles should now be calibrated.
3.7.3.1 OBS Resolver Adjustment
Various navigation equipment has different methods for checking the operation of the OBS resolver.
Typically, the OBZ is set to 300, the RATIO is 1.0 and SWAP is 0. If the navigation equipment is reading
incorrectly, adjust the OBZ. If when incrementing the OBS and the navigation equipment readout is
decreasing, change the SWAP to 1. This will swap SIN/COS signals on STATOR D/F resulting in the proper
rotation direction.
Verify OBS operation by checking that the navigator is reading within 2 degrees. Do this at 30 degree
intervals.
3.7.3.2 VOR TO/FROM Check
After the needles and flags have been adjusted and the OBS Resolver is accurate, the system VOR operation
should be verified. Typically, the TO/FROM indications do not need adjustment.
3.7.3.3 Annunciator Checks
Operate the navigation equipment through its various modes and ensure that the connected ANNUNCIATOR
inputs are operating normally.

18
3700 Osuna Road NE Suite 711 Albuquerque, NM 87109 www.sandia.aero