ShipConstructor Installation Guide - ds-t.com in this ShipConstructor manual is the property of...
41
ShipConstructor Installation Guide By Albacore Research Ltd. COPYRIGHT © 2003 ALBACORE RESEARCH LTD. Information in this ShipConstructor manual is the property of Albacore Research Ltd. No part of it can be reproduced, translated, resold, rented, adapted, modified, stored in a retrieval system or transmitted in any form or by any means, in whole or in part. All Rights Reserved. ShipConstructor is a trademark of Albacore Research Ltd.
Transcript of ShipConstructor Installation Guide - ds-t.com in this ShipConstructor manual is the property of...

ShipConstructor Installation Guide
By Albacore Research Ltd.
COPYRIGHT © 2003 ALBACORE RESEARCH LTD.
Information in this ShipConstructor manual is the property of Albacore Research Ltd. No part of it can be reproduced, translated, resold, rented, adapted, modified, stored in a retrieval system or transmitted in any form or by any means, in whole or in part. All Rights Reserved. ShipConstructor is a trademark of Albacore Research Ltd.

SHIPCONSTRUCTOR LICENSE AGREEMENT
1. License Grant. Albacore Research Ltd., #304 – 3960 Quadra Street, Victoria, B.C. Canada, V8X 4A3 (“ARL”) grants to the person accepting this Agreement (the “Licensee”) a non-exclusive, non-transferable right to use (the “License”) in object code form those program modules (“Software”) specified in the Licensee’s purchase order or request (“Order”) solely on the software and hardware listed in the Software manual (“System Configuration”).
2. Ownership. All rights, title and interests in and to the Software and related documentation shall remain the sole property of ARL. Licensee shall not remove or alter any proprietary rights notices on the Software and the documentation, and shall reproduce such notices on any copies that it makes. Licensee shall be liable for the security of the Software and the documentation in its possession.
3. Expertise Required. Licensee is responsible for evaluating whether the Software meets Licensee’s requirements, and for operating the Software and the results obtained. The Software is intended for ship modeling and construction purposes only, and must be used by a person who has expertise and knowledge in this field. The Software requires independent confirmation of the reliability and accuracy of all designs, drawings and other Software output.
4. Restrictions on Software Use. Licensee shall not merge, translate or modify the Software, attempt to defeat any copy protection, make copies of the Software or related documentation (except for object code copies required to run the Software on the System Configuration, and archive, back-up and recovery copies), sub-license, sell, loan, rent, lease or otherwise transfer the Software to any person, or decompile, disassemble or reverse engineer the Software.
5. Term of License. The License term commences on the delivery of the Software to the Licensee, and is either perpetual if so requested on the Order, or on a month to month basis that converts to a perpetual term (a) automatically after 12 months of payment of License fees, or (b) earlier on Licensee’s payment of the balance of the perpetual License fee (prior monthly payments receiving 80% credit). All Licenses are subject to termination in accordance with this Agreement.
6. System Configuration. Operation of the Software requires use of the specified System Configuration, which Licensee shall acquire and implement. ARL shall not be responsible for any operational problems caused by the System Configuration.
7. Hardware Keys. Software use requires “Hardware Keys” supplied by ARL, which can be used only at the site(s) authorized by ARL. Upon failure of its System Configuration, Licensee may upon advising ARL use the Hardware Keys and Software on another system and/or location.
8. License Fees. Licensee shall pay to ARL the License fees applicable for the Software requested in the Order as either a perpetual License, or a month to month License.
9. Services. Support services after the Warranty period (Section 13), as well as all installation, consulting, training and implementation services, are at an additional charge and are only provided if requested in the Order.
10. Taxes. All amounts payable by Licensee to ARL are exclusive of all taxes such as sales, use, value added, custom duties, excise taxes and other similar government charges, all of which will be paid by Licensee. If Licensee is required by law to withhold any taxes, then Licensee shall pay ARL a gross amount of money such that the net amount received by ARL after deducting or withholding the required taxes is equal to the amount of the fee originally charged by ARL.
11. Interest Charges. If any amount payable under this Agreement is not paid within 30 days of becoming due, ARL shall have the right to impose a charge of 2% per month (24% annually) on the unpaid balance of the amount, from the due date until the date of receipt of all amounts in arrears including interest.
12. Purchase Orders. Any Order from Licensee shall be deemed to incorporate this Agreement by reference. Any terms and conditions on the Order shall not apply except for information which was requested by ARL. All future Orders for additions to the original Order shall be subject to the terms of this Agreement.
13. Limited Warranty. ARL warrants that during a period of 90 days from the date of delivery of the Software to Licensee, the Software will perform substantially in accordance with the Software documentation specifications, when used in accordance with this Agreement on a properly operating System Configuration. ARL’s sole obligation under this Warranty, and Licensee’s exclusive remedy, are the “Maintenance Services” provisions (Section 15).
14. WARRANTY EXCLUSIONS. THE LIMITED WARRANTY CONTAINED IN SECTION 13 IS IN LIEU OF ALL OTHER WARRANTIES, EXPRESS OR IMPLIED. ALL OTHER CONDITIONS, WARRANTIES, AND REPRESENTATIONS, EITHER EXPRESS OR IMPLIED, ARE EXCLUDED, INCLUDING BUT NOT LIMITED TO CONDITIONS, REPRESENTATIONS AND WARRANTIES RELATING TO MERCHANTABILITY AND FITNESS FOR A PARTICULAR PURPOSE. ARL DOES NOT WARRANT THAT

THE SOFTWARE IS COMPLETELY ERROR FREE OR THAT ITS OPERATION WILL BE CONTINUOUS AND UNINTERRUPTED.
15. Maintenance Term. Maintenance Services shall commence on expiry of the Warranty and continue until the end of the calendar year requested in the Order (“Maintenance Term”). Maintenance Services are automatically renewed on the same conditions (except the fees which may change) for successive periods of one year, unless Licensee cancels the renewal at least 60 days prior to the renewal date.
16. Maintenance Services. During the Warranty period and the Maintenance Term, between the hours of 7:00 a.m. to 5:00 p.m. Pacific Time (Canada) ARL’s help desk will use reasonable commercial efforts to correct errors that Licensee identifies, by fixes or workarounds. If ARL determines that it is unable to make the Software perform substantially as warranted, Licensee may terminate the License and receive a refund of a portion of the License fees, determined on a three year straight-line depreciation basis beginning on the date of delivery of the Software to the Licensee. Upon ARL delivering “Updates” to address known errors in the Software, Licensee shall install and use the Updates within 30 days of their delivery. Upon ARL delivering Software with new functionalities (“New Releases”) as part of Maintenance Services, Licensee shall install and use the New Releases within 6 months of their delivery.
17. Excluded Events Maintenance Services do not include correction of errors due to: (a) Software which has been modified by any person other than ARL’s representative, (b) use of a version of the Software which has been superseded by a more current Update or New Release for more than 6 months, (c) incorrect operation of the Software or use of the Software for purposes other than ship modelling and construction, (d) any fault in the System Configuration, or incompatible third party software, or (e) use of the Software with products or services not supplied or approved by ARL.
18. Licensee’s Cooperation. Licensee shall cooperate in investigating each reported Software error, including assisting in duplicating the error and verifying that the error has been corrected.
19. Loss of Data. ARL shall not be responsible for any loss of or damage to files or data caused by the Software, or be required to restore or rebuild files or data. Licensee shall implementing adequate backup procedures to avoid any loss of files and data.
20. Modifications. Only ARL shall have the right to modify the Software. Modifications requested by Licensee shall be subject to prior written agreement as to scope and fees payable. Ownership of all Software modifications shall vest in ARL.
21. Confidential Information. Each party will not use the confidential information of the other party for any purpose except for the purpose described in this Agreement, and shall not disclose it to any other person except on a confidential basis to its employees and representatives who have a need-to-know the confidential information for such purposes. This Section 21 shall not apply to confidential information which (a) is or has become readily available to the public in the same form other than by an act or omission of the receiving party, (b) was lawfully obtained in the same form by the receiving party from a third party not under an obligation of confidence to the disclosing party, (c) was in the receiving party’s possession in the same and material form prior to its receipt from the disclosing party and did not otherwise originate from the disclosing party, or (d) is required to be disclosed by operation of law.
22. Termination. This Agreement may be terminated by either party, immediately by written notice, if the other party commits a breach of any material provision of this Agreement and fails to correct or rectify such breach within 30 days of receipt of the notice requesting it to do so.
23. Effect of Termination. Upon termination of this Agreement Licensee shall immediately cease using the Software, and within 14 days of termination return all Hardware Keys to ARL.
24. CONSEQUENTIAL DAMAGES. IN NO EVENT SHALL ARL BE LIABLE FOR ANY LOSS OF DATA OR PROFITS, ECONOMIC LOSS OR SPECIAL, INDIRECT, INCIDENTAL, CONSEQUENTIAL OR PUNITIVE DAMAGES WITH RESPECT TO THIS AGREEMENT OR THE SOFTWARE, HOWEVER CAUSED, EVEN IF ARL HAD OR SHOULD HAVE HAD ANY KNOWLEDGE OF THE POSSIBILITY OF SUCH DAMAGES.
25. DAMAGES LIMITATION. THE MAXIMUM LIABILITY OF ARL FOR ALL CLAIMS AND DAMAGES OF ANY KIND, WHETHER FOR FUNDAMENTAL BREACH OR ANY OTHER CAUSE UNDER THIS AGREEMENT, SHALL BE LIMITED IN THE AGGREGATE TO THE TOTAL OF ALL FEES PAID BY LICENSEE.
26. LIMITATION OF NON-APPLICABILITY. IN SOME JURISDICTIONS THE EXCLUSION OR LIMITATION OF WARRANTIES OR LIABILITY MAY NOT BE APPLICABLE, AND IN SUCH JURISDICTIONS ARL HEREBY LIMITS ITS LIABILITY TO THE FULLEST EXTENT PERMITTED BY LAW.
27. Applicable Law. This Agreement shall be subject to and construed in accordance with the laws of the Province of British Columbia, Canada, excluding its conflict of laws rules and the application of the UN Convention on Contracts for the International Sale of Goods.

28. References. ARL shall be allowed to incorporate Licensee’s name in ARL’s customer reference list and to use it for marketing.
29. Dispute. If any dispute arises under this Agreement, a good faith attempt to resolve the dispute will be made by senior management of both parties at a mutually agreeable site and time. If the parties are unable to reach agreement within 30 days after a request for such meeting, the dispute shall be referred to arbitration in English, before one arbitrator in Victoria, British Columbia, Canada, in accordance with the commercial arbitration rules of the British Columbia International Commercial Arbitration Centre.
30. Entire Agreement. This Agreement contains the entire agreement between the parties and shall supersede all prior discussions and agreements between the parties regarding its subject matter.
31. Amendment. Any amendment of this Agreement must be in writing and signed by duly authorized representatives of the parties.
32. Waiver. The waiver by any party of a breach by the other party of this Agreement shall not be construed as a waiver by such party of any succeeding breach by the other party of the same or another provision.
33. Assignments. Licensee may not assign or transfer the License or Licensee’s rights or obligations under this Agreement without ARL’s prior written consent, and any such assignment or transfer without consent shall be null and void.
34. Successors and Assigns. This Agreement will bind and enure to the benefit of the parties and their respective successors and permitted assigns.
35. Severability. In the event that any provision of this Agreement is declared invalid, illegal or unenforceable by a court having jurisdiction, then the remaining provisions shall continue in full force and effect.
36. Force Majeure. Except as related to Licensee’s obligation to make payments to ARL, neither party shall be liable for delays or non-performance if such delays or non-performance are beyond such party's reasonable control. A delayed party shall promptly notify the other party in writing stating the cause of the delay and its expected duration and shall use commercially reasonable efforts to remedy a delay or non-performance as soon as reasonably possible.
37. Survival. The provisions of Sections 2, 19, 21, 23, 24, 25, 29 and 37 shall survive the expiry or termination of this Agreement.
38. Language. It is the express will of the parties that this Agreement and related documents have been prepared in English. C’est la volonté expresse des parties que la présente Convention ainsi que les documents qui s’y rattachent soient rédiges en anglais.

Your ShipConstructor Team Andrew Wong Kevin van Donkersgoed Chris Bracken Larry Varga Chris Phillips Matthew Barber Christian Zuger Matthew Fox Darren Larkins Paul Crawford Denis Morais Peter Andrews Eric Dionne Petra Sommerfeld Jacob Trakhtenberg Philipa Lattey Jane Sun Rolf Oetter Jason Paterson Scott Hansen Jason Rancourt Silke Sommerfeld Karen Congdon Walter Langer
Cover model courtesy of Bender Shipbuilding and Repair Co.
#304 – 3960 Quadra St. Victoria, BC Canada V8X 4A3
Toll Free: Phone: Fax:
1-888-210-7420 1-250-479-3638 1-250-479-0868
www.ShipConstructor.com
November 03


ShipConstructor Installation Guide Contents • i
Contents
Introduction 1 Overview ...................................................................................................................................1 Database Issues with ShipConstructor2004...............................................................................2
Installation 3 Hardware and Software Requirements ......................................................................................3
Hardware .....................................................................................................................3 Software ......................................................................................................................4
What is on this CD-ROM ..........................................................................................................5 Running the ShipConstructor Installer.......................................................................................5
Software Dependencies ...............................................................................................5 Installing the Demo .....................................................................................................5
Recommended 2004 Network Installations ...............................................................................6 Standalone Installations .............................................................................................................6 Installing ShipConstructor2004 Components ............................................................................7
Overview .....................................................................................................................7 Installing ShipConstructor2004...................................................................................8 ShipConstructor2004 Typical Installation Types ......................................................11 ShipConstructor2004 Installation Features................................................................13
Removing ShipConstructor2004..............................................................................................14 Modifying ShipConstructor2004 Installation ..........................................................................15 Installing MS SQLServer 2000 Desktop Engine .....................................................................16 Installing Third Party Software................................................................................................ 17
Installing NavisWorks Demo ....................................................................................17 Installing Adobe Acrobat Reader 6.0 ........................................................................18 Install MS PowerPoint Viewer ..................................................................................18
Electronic Manuals ..................................................................................................................18 Installation Help.......................................................................................................................18 Contact ARL............................................................................................................................19 Installing the Hardware Lock (licensed users only).................................................................19 Information on MS Data Access Components (MDAC) .........................................................19
Patching and Upgrading 20 Overview .................................................................................................................................20 Downloading the Patch............................................................................................................20 Applying the Patch ..................................................................................................................21 Updating the Project Databases ...............................................................................................22
SCServerSetup2004 24 Overview .................................................................................................................................24 Express Installation..................................................................................................................25 Custom Installation..................................................................................................................26
Selecting an Instance .................................................................................................26

ii • Contents ShipConstructor Installation Guide
Admin Login .............................................................................................................26 Databases to Install....................................................................................................27 ShipConstructor2004 User Password ........................................................................27 Login Synchronization ..............................................................................................27
Post Install Re-Configuration ..................................................................................................28 Ensuring Authentication Method...............................................................................28 ShipConstructor2004 sysadmin user .........................................................................28 Revert Databases .......................................................................................................28 Configure a different instance of SQL Server ...........................................................29
Troubleshooting.......................................................................................................................29 Unable to connect to server .......................................................................................29 Server in use ..............................................................................................................30 Unable to overwrite database ....................................................................................30 An error occurred while copying the database files ..................................................30 Unable to restart server..............................................................................................31
Technical Support 32
ShipConstructor Installation Guide Introduction • 1
Introduction
Overview ShipConstructor2004 contains many new features not found in previous versions of ShipConstructor such as: HVAC – Heating, Ventilation, Air Conditioning:
• On-the-fly or from a catalog of pre-defined parts • Logical connections • Interference checking
Penetrations: • Sleeves, Collars and Plates • Unique ID • Integrated penetration approval system
Structure module: • Fully functional corrugated bulkheads • Intelligent marking lines • Improved quality control measurements • Center thrown plates
Build Strategy Module: • Non-spooled Items
Database Management & Reporting: • Manager Module
Customizable reporting functionality “View Only” permission Insulation library Corrugated plate stock definition Improved penetration reports
• Administrator Improved security Multiple database update Enhanced user flexibility

2 • Introduction ShipConstructor Installation Guide
Pipe & Equipment: • Pipe Module:
Bent pipes Spec driven accessory packages Extended pipe catalog Improved functionality for valve operators Improved spool manager Improved output for spool drawings Import pipe stock items from an Excel flat file
• Outfit Module: Spec driven pipe connections Collaboration between Pipe and Outfit module Connected drawings
Nesting: • Manual Nest Module:
Soft collisions • Automatic Nest Module:
Improved nesting algorithm • Profile Nest Module:
Automatic nesting Tracking tools Nest revision tracking Integrated remnant tracking
NC Processing: • Inside and outside leads • Support for Bystronic controllers
All Modules: • AutoCAD 2004 support • Redesigned Navigator • Lock codes • Simplified access to drawings
Database Issues with ShipConstructor2004 ShipConstructor2004 uses MS SQL Server 2000 as the central database engine. The installation allows you to install a free licensed version of MS SQL Server 2000 called the SQL Server Desktop Engine if you do not already have SQL Server. The Desktop Engine is optimized for up to five simultaneous users. The Administrator tool provides all required functions to backup, restore, and manage your project databases. We recommend that you purchase a full MS SQL Server 2000 license if you work on projects larger than 8000 parts or have several projects on the go simultaneously.

ShipConstructor Installation Guide Installation • 3
Installation
Hardware and Software Requirements
Hardware Important: A hardware lock is required to run ShipConstructor products. Without the hardware lock all products will run in DEMO MODE (will only run with the demo project).
Minimum hardware requirements are detailed in the table below.

4 • Installation ShipConstructor Installation Guide
• Hard drive space requirements for servers are per project.
• These figures are for guidance only; actual requirements may vary for individual clients or servers due to project size. Please consult with ARL for details.
Software ShipConstructor2004 is designed to run on PC computers with the following operating systems:
• Windows NT4 SP5 or higher • Windows 2000 • Windows XP
For ShipConstructor2004, AutoCAD 2000 or newer must be installed.
Note: While ShipConstructor2004 may run on Windows 98 SE / ME, Albacore Research Ltd. does not recommend the use of these operating systems. Technical support will not be provided for installations on these platforms.

ShipConstructor Installation Guide Installation • 5
What is on this CD-ROM This CD-ROM features the latest products from ARL along with several accompanying products that enhance the functionality of ShipConstructor or allow users to view the included documentation.
ShipConstructor2004 – The full suite including all ShipConstructor modules, NC-Pyros and ShipCAM.
MS SQL Server 2000 Desktop Engine SP3 – Required for a server or standalone installation of ShipConstructor2004 if you do not already have an existing installation of SQL Server.
Adobe Acrobat Reader 6.0 – Required to read and print the online manuals.
NavisWorks Demo – Required for ShipConstructor’s FlyThrough module.
Running the ShipConstructor Installer ShipConstructor2004’s Installer allows you to install all the necessary ShipConstructor2004 components, documentation and any required support software. To run the installer start setup.exe located on the CD-ROM.
Warning: After having installed the desired ShipConstructor2004 components it may be necessary to reboot the computer to complete the installation. The rebooting process may take a couple minutes longer than usual as a number of components must be configured before the install will be complete.
Software Dependencies MS SQL Server 2000 – All 2004 products require at least a single machine running MS SQL Server 2000; this does not have to be the “server” in your company’s network. A free licensed version of MS SQL Server Desktop Engine is packaged with ShipConstuctor2004. It is recommended that all of the project databases be kept on the same project server to make administration tasks easier. For larger projects it may be in your best interest to purchase a full version of MS SQL Server 2000, as it is vastly superior in terms of performance and scalability.
AutoCAD – ShipConstructor2004 runs inside of AutoCAD2000, 2000i, 2002 or 2004. ShipCAM and NC-Pyros are independent of the version of your CAD system. They will work with any CAD system that can read and write DXF files.
Installing the Demo ShipCAM – When installing ShipCAM, what you install depends on the level of integration with the other ShipConstructor modules you desire to achieve. If you include ShipConstructor and the Project Templates with ShipCAM you will be able to define and integrate the plate stocks in the project databases with the plates created in the ShipCAM modules.
NC-Pyros – When installing NC-Pyros, what you install depends on the level of integration with the other ShipConstructor modules you desire to achieve.
Structure, Nest, Outfit, Pipe, etc. – You require AutoCAD2000, 2000i, 2002 or 2004.
6 • Installation ShipConstructor Installation Guide
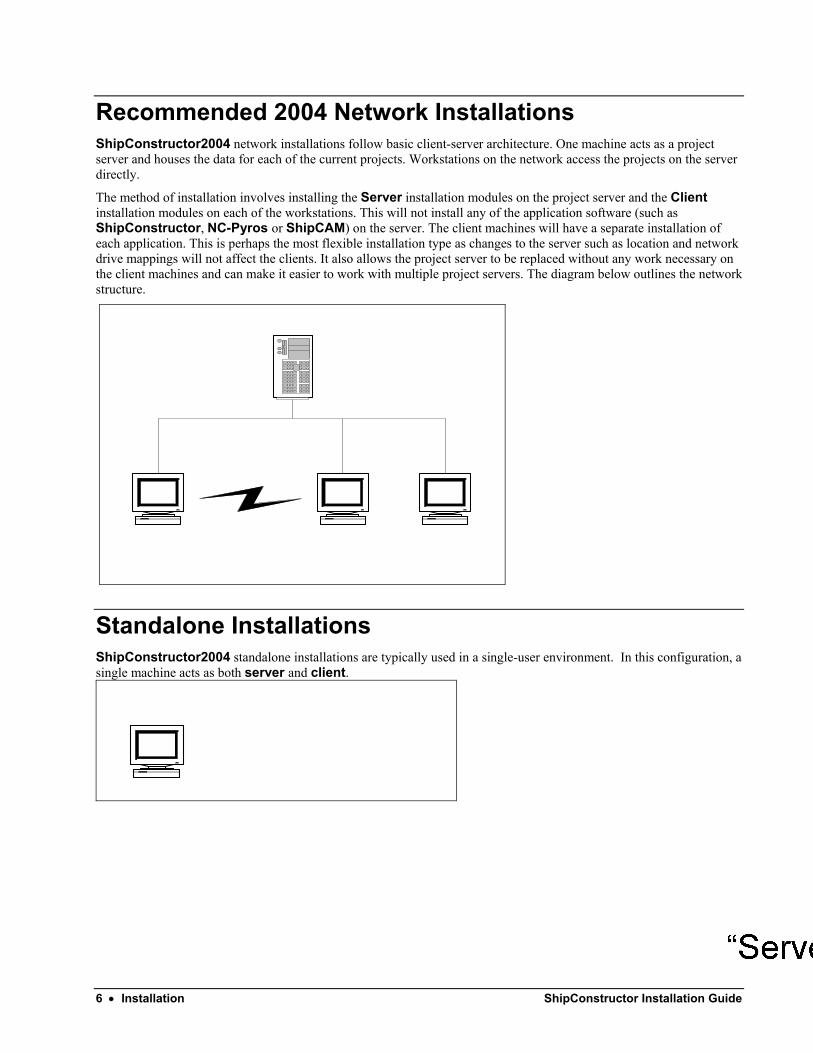
Recommended 2004 Network Installations ShipConstructor2004 network installations follow basic client-server architecture. One machine acts as a project server and houses the data for each of the current projects. Workstations on the network access the projects on the server directly.
The method of installation involves installing the Server installation modules on the project server and the Client installation modules on each of the workstations. This will not install any of the application software (such as ShipConstructor, NC-Pyros or ShipCAM) on the server. The client machines will have a separate installation of each application. This is perhaps the most flexible installation type as changes to the server such as location and network drive mappings will not affect the clients. It also allows the project server to be replaced without any work necessary on the client machines and can make it easier to work with multiple project servers. The diagram below outlines the network structure.
Standalone Installations ShipConstructor2004 standalone installations are typically used in a single-user environment. In this configuration, a single machine acts as both server and client.

ShipConstructor Installation Guide Installation • 7
Installing ShipConstructor2004 Components
Overview
Install – Changes to a page where you can select from various applications to install.
Installation Help – Opens the installation manual in Windows help format.
Electronic Manuals – Changes to a page from which you can view the manuals for ShipConstructor2004 in PDF format.
View Presentation – Shows a presentation on the new features in ShipConstructor2004. If you do not have MS PowerPoint viewer installed on your computer, one has been provided on this CD. Go to Install / Install Third Party Software / Install MS PowerPoint Viewer.
Contact ARL – Changes to a page listing contact information for Albacore Research Ltd.
Exit Installation – Closes the ShipConstructor2004 installation.

8 • Installation ShipConstructor Installation Guide
Installing ShipConstructor2004
Note: If you do not have an instance of SQL Server installed to use for your ShipConstructor2004 projects, you will first need to install one before continuing. See the section Install MS SQLServer 2000 Desktop Engine on page 16 of this manual for information on how to install the free desktop edition provided with ShipConstructor2004.
1. Click Install. You will see the screen shown below.
2. Click Install ShipConstructor2004.
Click Next.

ShipConstructor Installation Guide Installation • 9
3. You are now presented with the License Agreement.
Please read the agreement carefully, then click Next.
4. You are now prompted for your user information as shown below.
Enter your User Name, Organization, and specify whether ShipConstructor2004 is to be available for all users on this machine, then click Next.
5. The next screen will prompt you to choose which type of installation you are performing. A detailed explanation of each installation type can be found in the section ShipConstructor2004 Typical Installation Types on page 11.

10 • Installation ShipConstructor Installation Guide
Select the appropriate installation type and click Next.
6. The next screen allows you to select from all of the available modules those to install. Individual modules have already been selected for you based on the installation step you chose in the previous step. If you would like to add any additional modules you may do so at this time.

ShipConstructor Installation Guide Installation • 11
To select additional components to install, click the icon and you will be presented with the drop-down menu shown below.
Modules to include in the install depend on whether this machine is to be a Client or Server, and which version(s) of AutoCAD are available. A detailed description of each feature is available in the section ShipConstructor2004 Installation Features on page 13.
7. Choose the desired installation modules, and if desired, change the destination path for the installation. Click Next. 8. The install program will ask you to choose a location in which to install the demo and template projects.
Enter the desired folder, or leave the default. Click OK.
9. SCServerSetup2004 will now perform the database portion of the installation. For details on SCServerSetup2004, see page 24.
ShipConstructor2004 Typical Installation Types
Client This installation method installs the necessary components on the current workstation for ShipConstructor2004 to be run while accessing project files and databases on a remote server. Typical modules to include in this type of installation are shown below.
12 • Installation ShipConstructor Installation Guide
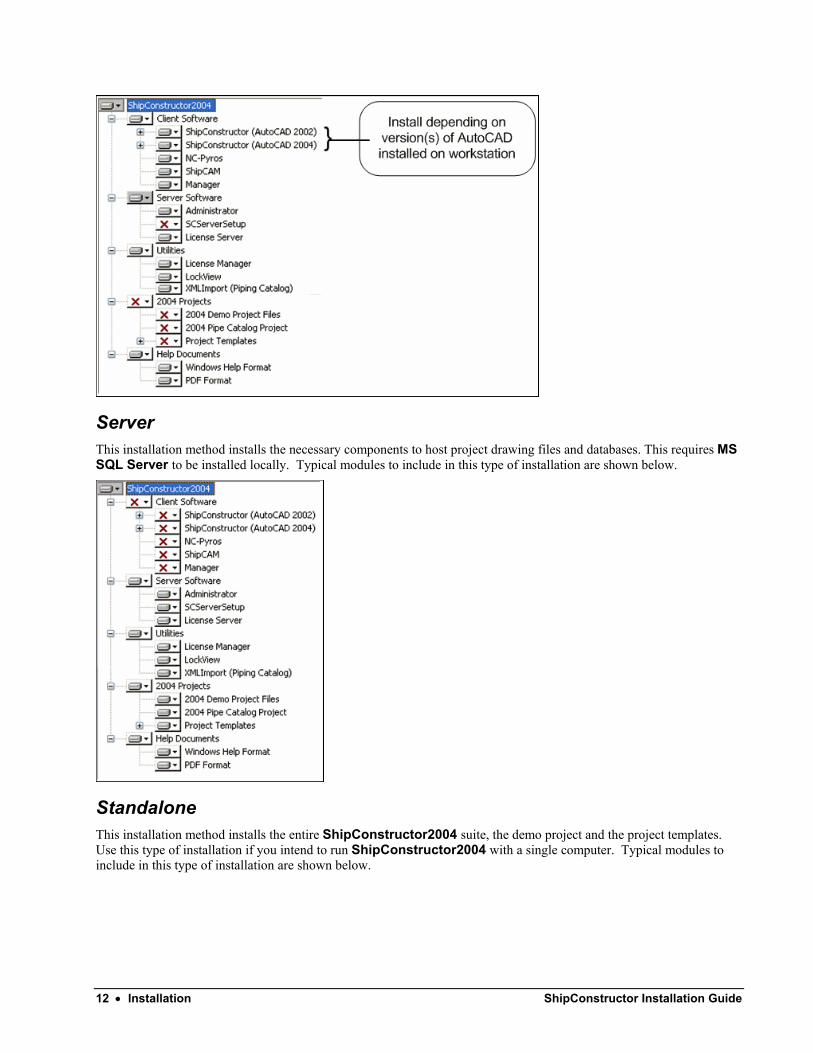
Server This installation method installs the necessary components to host project drawing files and databases. This requires MS SQL Server to be installed locally. Typical modules to include in this type of installation are shown below.
Standalone This installation method installs the entire ShipConstructor2004 suite, the demo project and the project templates. Use this type of installation if you intend to run ShipConstructor2004 with a single computer. Typical modules to include in this type of installation are shown below.

ShipConstructor Installation Guide Installation • 13
ShipConstructor2004 Installation Features The following is a breakdown of the features available for installation:
Client Software • ShipConstructor (AutoCAD2002) – Installs the main ShipConstructor2004 program files for
AutoCAD2000, 2000i, and 2002. FlyThrough – Installs the FlyThrough module for AutoCAD2000, 2000i, and 2002.
• ShipConstructor (AutoCAD2004) – Installs the main ShipConstructor2004 program files for AutoCAD2004.
FlyThrough – Installs the FlyThrough module for AutoCAD2004. • NC-Pyros – Installs the main program files for NC-Pyros. • ShipCAM – Installs the main program files for ShipCAM. • Manager – Installs Manager.
Server Software • Administrator – Installs the database administrator utility. • SCServerSetup – Installs the SCServerSetup2004 utility that can be used to restore the demo and template
databases to their original state. • License Server – This feature is required to run either a local or network lock on this computer. See the ARL
License Service section of the Manager manual for information regarding the configuration of this service once it has been installed.
Utilities • License Manager – Installs a utility that allows you to monitor the licenses on a local or network lock. Users can
use this utility to determine who has a particular license checked out when they require it. Users who have the required password can revoke licenses in use by a user. The Manager manual outlines the use of the License Manager in more detail.
• Lock View – This feature can be used to view the licenses available on a lock.

14 • Installation ShipConstructor Installation Guide
• XML Import (Piping Catalog) – This feature can be used to import Pipe Catalog data in XML format.
2004 Projects • 2004 Demo Project Files – Drawings for the ShipConstructor2004 Tutorial Demo Project. • 2004 Pipe Catalog Project – Contains many predefined pipe stocks. • Project Templates
Metric Template – Use this project as the basis for new Metric projects. Imperial Template – Use this project as the basis for new Imperial projects.
Help Documents • Windows Help Format – Installs electronic copies of the ShipConstructor help manuals in Microsoft Help
(.hlp) format. • PDF Format – Installs electronic copies of the ShipConstructor help manuals in Adobe (.pdf) format.
Removing ShipConstructor2004 To remove an installation of ShipConstructor2004, perform the following steps: 1. Open the Control Panel. 2. Open Add or Remove Programs. 3. Find ShipConstructor2004 in the list of installed applications.
4. Click Remove. You will be shown the confirmation dialog shown below.
5. Click Yes to remove ShipConstructor2004.

ShipConstructor Installation Guide Installation • 15
Modifying ShipConstructor2004 Installation To add or remove features from a ShipConstructor2004 installation, perform the following steps:
1. Open the Control Panel. 2. Open Add or Remove Programs.
3. Find ShipConstructor2004 in the list of installed applications
4. Click Change. You will be presented with the dialog shown below.
Choose Modify and click Next.
16 • Installation ShipConstructor Installation Guide
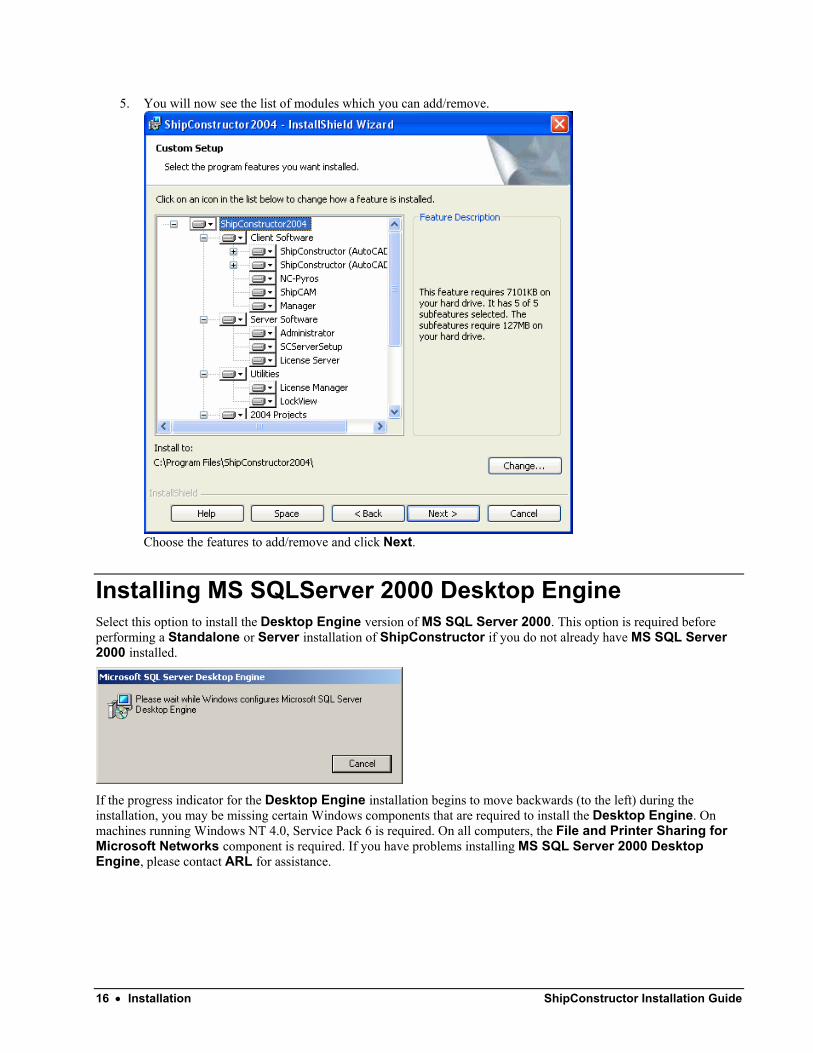
5. You will now see the list of modules which you can add/remove.
Choose the features to add/remove and click Next.
Installing MS SQLServer 2000 Desktop Engine Select this option to install the Desktop Engine version of MS SQL Server 2000. This option is required before performing a Standalone or Server installation of ShipConstructor if you do not already have MS SQL Server 2000 installed.
If the progress indicator for the Desktop Engine installation begins to move backwards (to the left) during the installation, you may be missing certain Windows components that are required to install the Desktop Engine. On machines running Windows NT 4.0, Service Pack 6 is required. On all computers, the File and Printer Sharing for Microsoft Networks component is required. If you have problems installing MS SQL Server 2000 Desktop Engine, please contact ARL for assistance.

ShipConstructor Installation Guide Installation • 17
Installing Third Party Software
Installing NavisWorks Demo Clicking on this link will install a demo version of NavisWorks which will allow you to use the FlyThrough portion of ShipConstructor. To install NavisWorks demo you will need the NavisWorks serial number that accompanied the ShipConstructor CD-ROM. This trial serial number will have to be registered online at www.navisworks.com before it becomes active.

18 • Installation ShipConstructor Installation Guide
Installing Adobe Acrobat Reader 6.0 Acrobat Reader, or any other application capable of reading .pdf files, is required to view the electronic documentation accompanying the ShipConstructor CD-ROM. Click Install Adobe Acrobat Reader 6.0 and follow the on screen instructions if you do not already have it installed
Install MS PowerPoint Viewer The presentation on this installation CD is a Microsoft PowerPoint presentation. Click Install MS Powerpoint Viewer and follow the on screen instructions if you do not already have it installed
Electronic Manuals
All manuals are included on the ShipConstructor2004 CD-ROM in .pdf format. View a manual by clicking on its link. Click Back to return to the main installation interface.
Installation Help This will open the Installation Manual in a standard Windows help file format. From here you can search the installation guide for information pertaining to the problem you are having.

ShipConstructor Installation Guide Installation • 19
Contact ARL
Contact information for Albacore Research Ltd. is available from this page. Click one of the e-mail addresses listed to open a new mail addressed to that recipient in your default e-mail client. Click Back to return to the main installation page.
Installing the Hardware Lock (licensed users only) A hardware lock is shipped with the licensed software to operate the program. Without a hardware lock the program will only run in demo mode.
The hardware lock plugs into the parallel port of your computer. The lock is a pass-through device, which allows you to keep other devices connected to the parallel port (printers, etc.). Attach the end of the lock labeled ⇑COMPUTER⇑ to a parallel port. Tighten the screws to connect the lock securely to the port.
If you have multiple locks connected to the same parallel port, make sure this lock is the last lock in the chain (farthest from your computer).
Turn ON all devices that are connected to the lock. A device connected to the parallel port that is switched OFF prevents the proper operation of the hardware lock.
Information on MS Data Access Components (MDAC) ShipConstructor requires specific support components from Microsoft to run. The installation program automatically detects if up-to-date components are already on your system. The correct ones will be automatically installed if they are not present.
If you are running applications that use the earlier versions of these components, problems may occur due to the upgraded drivers. If problems occur, contact the vender of the incompatible software to obtain versions compatible with the newest version of MDAC.
20 • Patching and Upgrading ShipConstructor Installation Guide
Patching and Upgrading
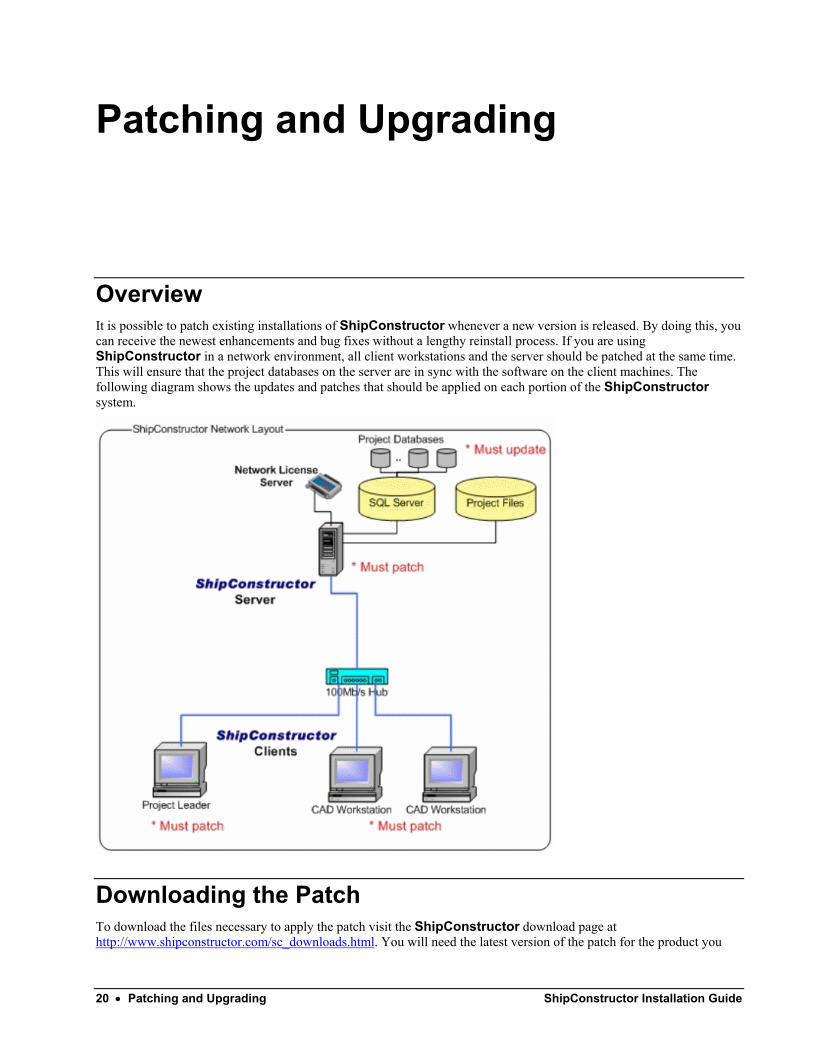
Overview It is possible to patch existing installations of ShipConstructor whenever a new version is released. By doing this, you can receive the newest enhancements and bug fixes without a lengthy reinstall process. If you are using ShipConstructor in a network environment, all client workstations and the server should be patched at the same time. This will ensure that the project databases on the server are in sync with the software on the client machines. The following diagram shows the updates and patches that should be applied on each portion of the ShipConstructor system.
Downloading the Patch To download the files necessary to apply the patch visit the ShipConstructor download page at http://www.shipconstructor.com/sc_downloads.html. You will need the latest version of the patch for the product you
ShipConstructor Installation Guide Patching and Upgrading • 21
wish to update. If the version of your project databases is not equal to the version available for download from this page, you will also need to download the backup file to update your project databases.
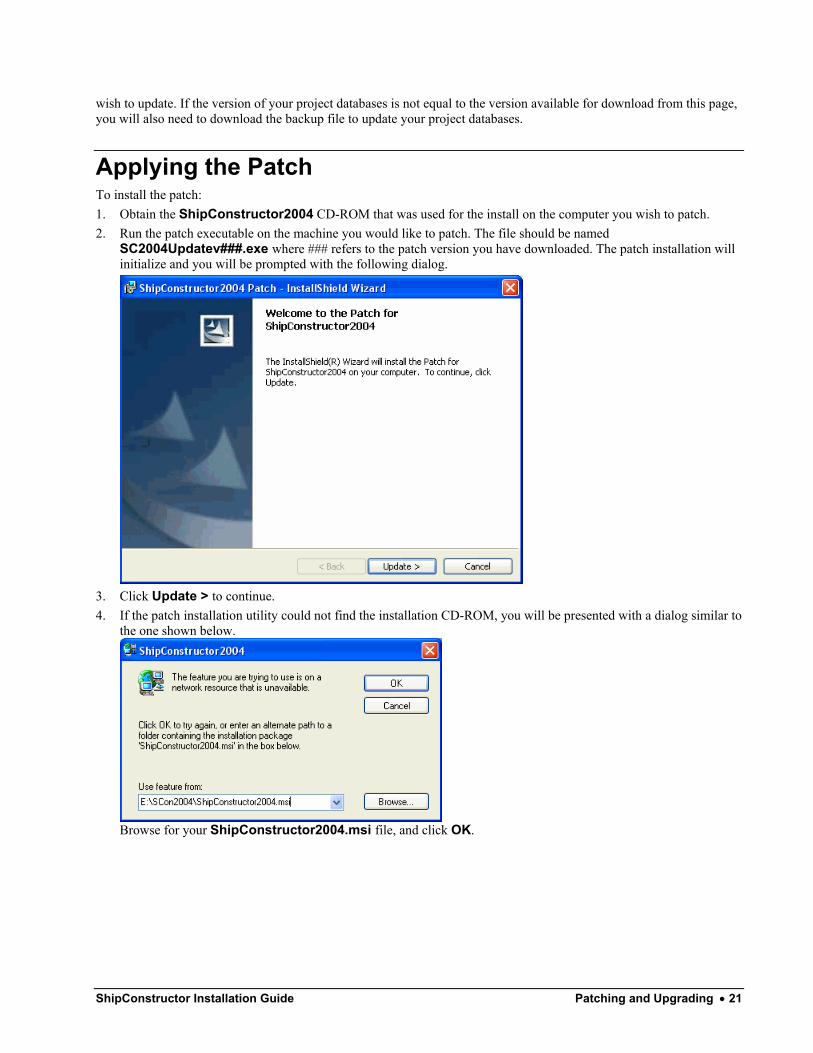
Applying the Patch To install the patch: 1. Obtain the ShipConstructor2004 CD-ROM that was used for the install on the computer you wish to patch. 2. Run the patch executable on the machine you would like to patch. The file should be named
SC2004Updatev###.exe where ### refers to the patch version you have downloaded. The patch installation will initialize and you will be prompted with the following dialog.
3. Click Update > to continue. 4. If the patch installation utility could not find the installation CD-ROM, you will be presented with a dialog similar to
the one shown below.
Browse for your ShipConstructor2004.msi file, and click OK.

22 • Patching and Upgrading ShipConstructor Installation Guide
5. When the patch has completed successfully, you will see the dialog shown below.
Click Finish to conclude the patch process.
Note: This will complete the updating of the software portion of ShipConstructor on this computer. After you have patched all of the machines on your network you may still need to update the project databases for use with the updated software.
Updating the Project Databases When ARL creates a new patch for ShipConstructor it is often the case that the structure of the database behind ShipConstructor has changed. ShipConstructor will check the version of the database you are attempting to register with and will not allow you to register if you do not have the required version.
To update your project databases, you must first place the backup file that you have downloaded onto the computer running SQL Server. Once you have done so, run Administrator on any computer that has already had the patch applied.
To update the project database, perform the following actions:
1. Select the appropriate database(s) from the project list.
2. Select Update from the Project Menu or right-click menu. A file select dialog will appear showing all folders accessible by the database server.

ShipConstructor Installation Guide Patching and Upgrading • 23
Select the new database file from the file select dialog and click OK.
3. Administrator will then prompt you to confirm that you do indeed wish to update the selected databases along with a warning that the operation may take some time.
Click Yes.
Note: The update process may take several minutes to complete, during which time the screen may not refresh. Please be patient and do not abort the job part way through.
Note: Before the update actually occurs, a backup database will be created in the SQL server’s default backup dir located at <SQLDataRoot>\BACKUP\<database name> <current date&time>.bak
4. Once the update is complete, you will be presented with the following dialog:
If no errors occurred during the update, the Restore from backup option will be disabled. If errors occurred during the update, the Restore from backup option will be enabled and selected by default which will restore your database to its pre-update state.
5. If you just updated a ShipConstructor2002 database to ShipConstructor2004, you will be presented with the Synchronizing Logins dialog. For more information on the synchronization process, refer to the section Synchronizing User Logins in the Administrator manual.
24 • SCServerSetup2004 ShipConstructor Installation Guide
SCServerSetup2004
Overview This chapter details all of the steps necessary to install the databases required for ShipConstructor2004 on your database server.
For this process, the SCServerSetup2004 application has been bundled with your ShipConstructor2004 software to perform the necessary installation steps.
This chapter covers the following topics: 1. Express Installation 2. Custom Installation 3. Post-install reconfiguration 4. Troubleshooting
Please consult the appropriate section of this chapter based on your installation method.

ShipConstructor Installation Guide SCServerSetup2004 • 25
Express Installation
To perform an Express installation you must meet the following requirements:
1. You must have an instance of Microsoft SQL Server 2000 currently running on the local machine.
2. The “sa” account for the server must have NO password (password is blank). This will be the case if you are using MS SQL Server 2000 Desktop Engine. If you have a non-empty password for the “sa” account (recommended) please use the Custom Install method instead.
3. If you are running more than one instance of Microsoft SQL Server on the local machine, the ShipConstructor2004 databases will be installed on the DEFAULT instance.
When using the Express installation, you will notice that the majority of the dialog functions are grayed-out. To perform the Express installation, simply click Install at the top right corner of the dialog.
The Express Install will perform the following tasks:
1. Verify that the default instance of Microsoft SQL Server supports SQL Authentication mode. If your Microsoft SQL Server is set to Windows Authentication Only then it will change the setting to Mixed Mode which supports BOTH Windows Authentication and SQL Authentication modes.
2. Connect to the server using the sa account (and no password).
3. Add the user ShipConstructor2004 with the password “sc2004” as a sysadmin account.
4. Install all 4 provided databases (Metric Template, Imperial Template, Piping Catalog, and Demo Project)

26 • SCServerSetup2004 ShipConstructor Installation Guide
Custom Installation
Selecting an Instance In a Custom Install, you can configure any of the default installation parameters.
If you are running multiple instances of Microsoft SQL Server on your machine, you can select from any of these instances for your installation of ShipConstructor2004 by choosing the appropriate instance from the drop-list as shown below:
If you do not see the desired instance of Microsoft SQL Server 2000 in the drop-list, ensure that the server is currently running. If it is not currently running, start the service and hit Refresh.
Note: SCServerSetup2004 will only list the first 30 instances of MS SQL Server it finds on the local machine. If you have more than 30 instances running and wish to install the ShipConstructor2004 database on an instance that is not shown, please turn off some of your currently running instances so that you can see the desired instance in the dropdown list.
Admin Login You can use the fields Admin Username and Admin password to provide login information for the selected MS SQL Server. Any user that belongs to the sysadmin role can be used for this purpose. This admin user login is only

ShipConstructor Installation Guide SCServerSetup2004 • 27
used once here for the server installation and configuration. ShipConstructor2004 will use its own login (ShipConstructor2004) after this procedure.
Databases to Install You may not require all of the databases that are installed with ShipConstructor2004 by default. If this is the case, you can omit specific databases from the installation by un-checking the appropriate checkbox next to the database name as shown below.
In this example, we will install all of the databases with the exception of the Imperial Template database.
ShipConstructor2004 User Password Default settings create a new login created with the name ShipConstructor2004 and the password “sc2004”. This user login will have sysadmin privileges on the database. We suggest you change the password to something more secure by entering the new password into the appropriate fields
Note: This field will only be enabled if the ShipConstructor2004 login does not currently exist. If the ShipConstructor2004 login already exists on the server, then its password will remain unchanged.
Login Synchronization Starting with ShipConstructor2004, SQL Server Authentication is now used to perform user login authentication. When the databases are added, all user accounts will be automatically added as SQL Server Logins.
User logins will be added automatically without requiring any user input.
Note: If these logins existed prior to running SCServerSetup2004, their password will be reset to blank.

28 • SCServerSetup2004 ShipConstructor Installation Guide
Post Install Re-Configuration In addition to being run during installation, SCServerSetup2004 can be run at any time to restore the preconfigured database settings to their original configuration.
You can use this utility to:
1. Ensure that you have SQL Server Authentication enabled.
2. Ensure that the ShipConstructor2004 user exists and belongs to the sysadmin role on the server.
3. Revert any of your databases to their original state.
4. Configure a different instance of SQL Server for use with ShipConstructor2004 without reinstalling ShipConstructor2004
Ensuring Authentication Method When run, SCServerSetup2004 will check to ensure that your instance of MS SQL Server 2000 supports SQL Authentication mode. If your SQL Server is set to Windows Authentication Only then it will change the setting to Mixed Mode which supports BOTH Windows Authentication and SQL Authentication modes.
ShipConstructor2004 sysadmin user When executed, SCServerSetup2004 will make sure that a SQL login exists by the name of ShipConstructor2004. If the user does not exist, it will be created with the password provided in the appropriate fields (“sc2004” by default) shown below:
If the user does exist, it will ensure that it belongs to the sysadmin role on the server.
Note: If the ShipConstructor2004 user already exists, the password for it will NOT be affected by running SCServerSetup2004.
Revert Databases If for some reason you need to re-install any of the provided databases to their original state, you can use SCServerSetup2004 to perform this operation.
Choose the appropriate database from the list, and click Install.
Before overwriting an existing database, you will be prompted to make sure that this is what you want to do:

ShipConstructor Installation Guide SCServerSetup2004 • 29
Warning: When overwriting an existing database, ALL work that you have performed on that database WILL BE LOST! This will not modify the drawings for these projects, so they may not be synchronized once you overwrite the project databases.
Configure a different instance of SQL Server If you are already running ShipConstructor2004 but would like to change which instance of MS SQL Server on the local machine is being used, then running SCServerSetup2004 will install a new copy of the databases on the desired server instance.
Note: This does not copy databases from your current instance to the new instance. It installs a new set of databases to the server.
Troubleshooting
Unable to connect to server
If you see the above dialog, it is because SCServerSetup2004 was not able to connect to the specified instance of MS SQL Server with the specified Admin account. For express installations, and as a default for Custom Installs, this account login is as follows:
Username: sa Password: (none)
Make sure that your Microsoft SQL Server supports SQL Authentication Mode, and that the username/password used for the admin account is valid and belongs to the sysadmin role on the server. If you are trying an express installation, switch to custom if you need to change the password for the “sa” user.
If the above doesn’t work, check that the Server Instance drop-list is not empty. If the drop-list is empty, it is because SCServerSetup2004 was not able to find any available instances of MS SQL Server on your machine. Check to make sure that the MS SQL Server is currently running, and click Refresh to refresh the list of available servers.

30 • SCServerSetup2004 ShipConstructor Installation Guide
Server in use If you are presented with a dialog similar to the following, it is because you are attempting to overwrite an existing database while someone is connected to it. Ensure that all users disconnect from the database and try again.
Unable to overwrite database
If you see the above dialog, it is because you are overwriting an existing database and SCServerSetup2004 is unable to detach the current database.
First, restart your database server and try again. In most cases, this will solve the problem, as the database was currently being accessed.
If that does not work, delete the database manually, ensuring that the .mdf/ldf files no longer exist in the server’s data folder, and run SCServerSetup2004 again.
An error occurred while copying the database files
If you see a dialog similar to the one above, it is because SCServerSetup2004 is unable to copy the database ldf/mdf files to their target location. Please ensure that the source and destination directories exist:
Source directory
<SCServerSetup2004_folder>\data\
Default Instance:
<SQLDataroot>\data\
Named Instance (default installation):
<SQLDataroot>$<instance_name>\data\

ShipConstructor Installation Guide SCServerSetup2004 • 31
Note: By default the <SQLDataRoot> directory is C:\Program Files\Microsoft SQL Server\MSSQL
Unable to restart server
Your SQL server was reconfigured to accept SQL Authentication, but could not be restarted automatically. Please restart the server manually and restart SCServerSetup2004. Your server should now be running in Mixed Mode (which supports BOTH NT Authentication and SQL Authentication modes).

32 • Technical Support ShipConstructor Installation Guide
Technical Support
Albacore Research Ltd. offers all customers technical support for the first 3 months after purchase. Additional support can be obtained through our maintenance and support program. In some cases our staff will offer to check out the problem with your data file. In this case it is advisable to compress the data file, for example with WinZip, and e-mail it to us. We will investigate the problem and forward a solution to you.
Office hours: 7:00 am – 5:00 pm Pacific Time Toll-free: 1-888-210-7420 Phone: 1-250-479-3638 Fax: 1-250-479-0868 E-mail: [email protected] Web: www.ShipConstructor.com

ShipConstructor Installation Guide Technical Support • 33