SharePoint 2013 End User Training Tutorial - Tennessee Tech · 2 SharePoint 2013 – End User...
19
1 SharePoint 2013 – End User Training Tutorials SharePoint 2013 End User Training Tutorial Contents Using Team Site Calendars .................................................................................................................................. 2 Adding & Editing Announcements ..................................................................................................................... 4 Using Custom Lists ............................................................................................................................................... 6 Creating Alerts to Stay Updated .......................................................................................................................... 9 Communicating Through Discussions................................................................................................................ 12 Collaborating in the Document Library ............................................................................................................ 14
Transcript of SharePoint 2013 End User Training Tutorial - Tennessee Tech · 2 SharePoint 2013 – End User...

1
SharePoint 2013 – End User Training Tutorials
SharePoint 2013 End User Training Tutorial
Contents Using Team Site Calendars .................................................................................................................................. 2
Adding & Editing Announcements ..................................................................................................................... 4
Using Custom Lists ............................................................................................................................................... 6
Creating Alerts to Stay Updated .......................................................................................................................... 9
Communicating Through Discussions ................................................................................................................ 12
Collaborating in the Document Library ............................................................................................................ 14

2
SharePoint 2013 – End User Training Tutorials
Using Calendars in SharePoint gives you the ability to post events specific to the group accessing your site. You can use
the calendar as a common place to post meetings, deadlines, events and more. This calendar can also be linked to your
personal Outlook calendar on your computer.
Accessing the Calendar
Select the Calendar link in the Navigation menu
Add New Events
There are two ways to add an event to the calendar.
1. From the Calendar
a. Place your cursor over the date
b. Click the Add link
2. From the Ribbon
a. Select the Events Ribbon
b. Select New – Event
Complete the form for adding a new event:
The required fields are Title, Start and End Time.

3
SharePoint 2013 – End User Training Tutorials
Link the SharePoint Calendar to Outlook
** This only works with Windows computers **
Select the Calendar ribbon
Select Connect to Outlook
A prompt will appear asking to allow the browser to create the connection (in Chrome it asks permission to
Launch a program).
It will prompt asking if you want to connect the calendar, click Yes.
The Calendar will now be an option you can choose to view in your personal Outlook calendar.
Deleting an Event
Select the event and choose Delete Item from
the Events ribbon

4
SharePoint 2013 – End User Training Tutorials
The Announcements section in SharePoint allows team members to share information with others on their site. These
can be for upcoming events, issues, deadlines, etc.
Accessing the Announcements
Select the Announcements link in the left hand navigation bar
Adding an Announcement
There are two ways to add announcements to your site.
1. Click the New Announcement link (in some views
this may be Add New Announcement)
2. Select the Items ribbon – New Item
Complete the form by entering the necessary information
To add an attachment, select the Edit ribbon and click Attach File
Click Save
This form can be different if the site administrator changes the fields.
5
SharePoint 2013 – End User Training Tutorials
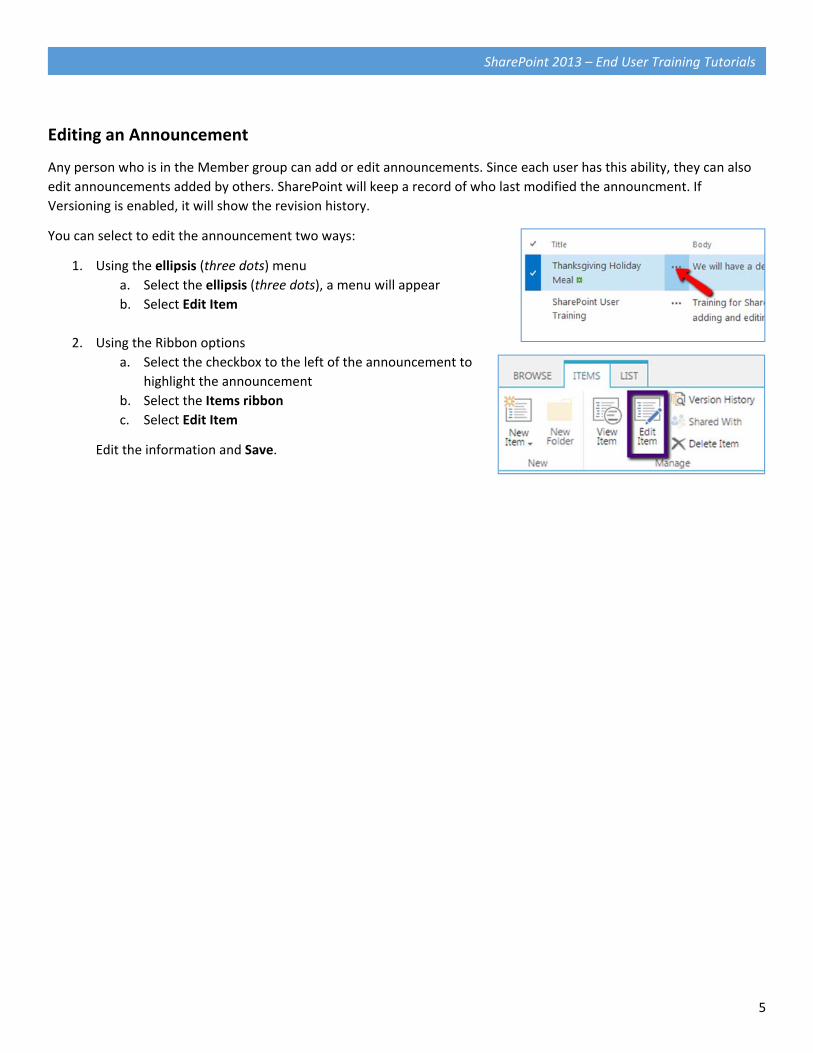
Editing an Announcement
Any person who is in the Member group can add or edit announcements. Since each user has this ability, they can also
edit announcements added by others. SharePoint will keep a record of who last modified the announcment. If
Versioning is enabled, it will show the revision history.
You can select to edit the announcement two ways:
1. Using the ellipsis (three dots) menu
a. Select the ellipsis (three dots), a menu will appear
b. Select Edit Item
2. Using the Ribbon options
a. Select the checkbox to the left of the announcement to
highlight the announcement
b. Select the Items ribbon
c. Select Edit Item
Edit the information and Save.

6
SharePoint 2013 – End User Training Tutorials
A Custom List is any collection of data that can be shared with team members. The list is set up like a spreadsheet with
columns and rows. Lists can be set up for multiple purposes. Examples include a contact list, URLs for resources, task list,
phone logs, equipment inventory, calendars (yes, calendars) and more.
The default view of a Custom List is a tabular (spreadsheet) view, however there are different views available for lists. A
Calendar is a list with dates and using the Grid View it puts the information in the correct cell of the grid based on the
date.
View a Custom List
Select the link to the left for the particular list.
NOTE: There are several ways to do most things in SharePoint. This tutorial will cover two ways to add, edit and delete
items in a list.
Add New Items to a List
1. Enter new items in the form view
a. Select New Item (some views have an Add new item link)
b. Enter the information in the form
c. Click Save
7
SharePoint 2013 – End User Training Tutorials
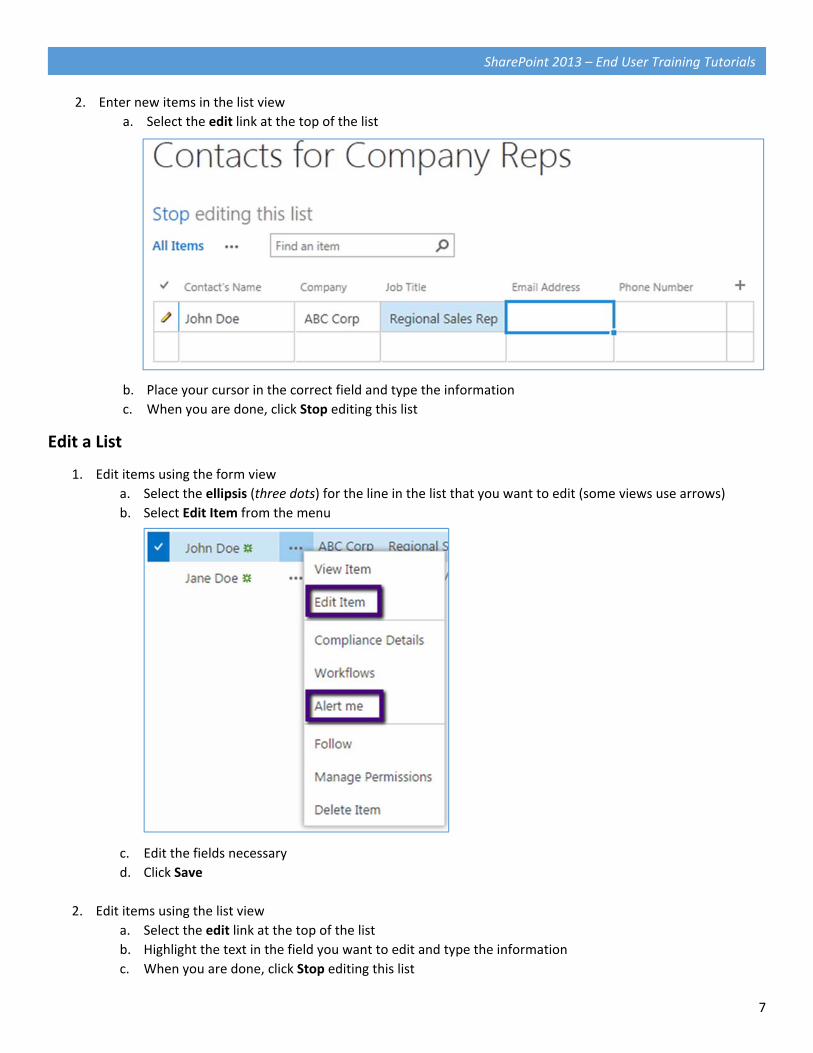
2. Enter new items in the list view
a. Select the edit link at the top of the list
b. Place your cursor in the correct field and type the information
c. When you are done, click Stop editing this list
Edit a List
1. Edit items using the form view
a. Select the ellipsis (three dots) for the line in the list that you want to edit (some views use arrows)
b. Select Edit Item from the menu
c. Edit the fields necessary
d. Click Save
2. Edit items using the list view
a. Select the edit link at the top of the list
b. Highlight the text in the field you want to edit and type the information
c. When you are done, click Stop editing this list
8
SharePoint 2013 – End User Training Tutorials
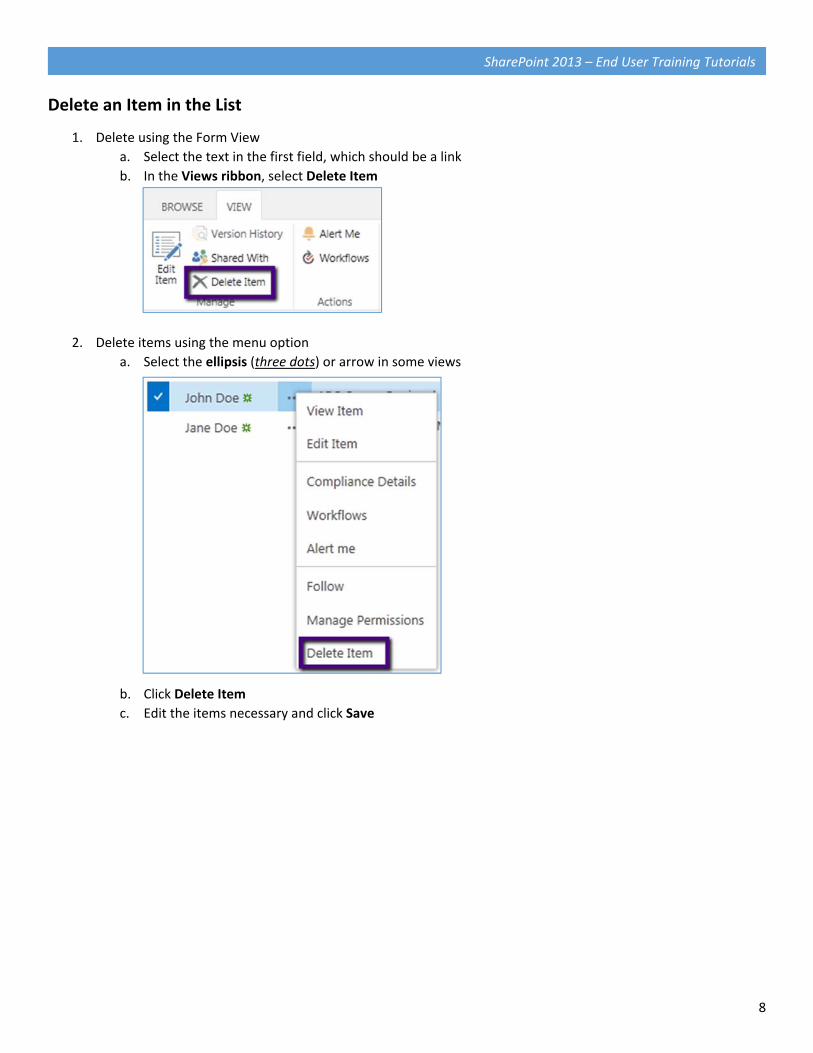
Delete an Item in the List
1. Delete using the Form View
a. Select the text in the first field, which should be a link
b. In the Views ribbon, select Delete Item
2. Delete items using the menu option
a. Select the ellipsis (three dots) or arrow in some views
b. Click Delete Item
c. Edit the items necessary and click Save

9
SharePoint 2013 – End User Training Tutorials
You can create Alerts to stay updated when a file, folder, document set, Library, List or Discussion change. These are
very helpful when trying to keep up with a specific document that you are collaborating on or a discussion thread you
posted so you are aware of replies.
Creating Alerts for…
Files, Folders and Document Sets
o Select the checkbox to the left of the specific file, folder or document set
o Select the Files ribbon
o Choose Alert Me – Set alert on this document
Entire Document Libraries
o Select the Document Library
o Select the Library ribbon
o Choose Alert Me – Set alert on this library
List Items (specific line item in a list)
o Select the checkbox to the left of the specific item
o Select the Items ribbon
o Choose Alert Me – Set alert on this item
Entire Lists
o Select the List
o Select the List ribbon
o Choose Alert Me – Set alert on this List
Discussions
o Open the discussion thread
o Select Alert Me option on your own threads, or the select the ellipsis
(three dots) and select Alert Me from the menu on threads and posts
by other people.
Calendar
o Open the Calendar and select the event you would like to set the alert for
o Select Alert Me option in the View ribbon
NOTE: As with most things in SharePoint, there are other ways to get to the same Alert Option screen. Most tools have
ellipses or a menu of some type where you can also select the Alert Me option.

10
SharePoint 2013 – End User Training Tutorials
Select the options you would like and setup the Alert then click OK
11
SharePoint 2013 – End User Training Tutorials
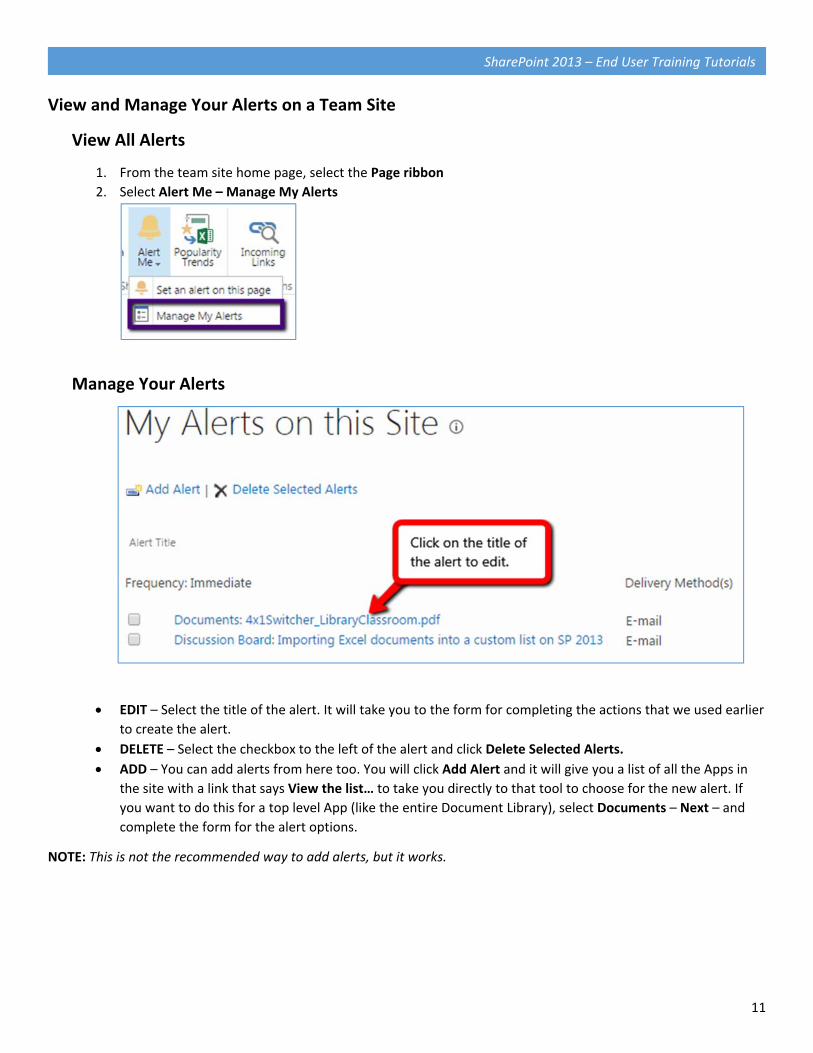
View and Manage Your Alerts on a Team Site
View All Alerts
1. From the team site home page, select the Page ribbon
2. Select Alert Me – Manage My Alerts
Manage Your Alerts
EDIT – Select the title of the alert. It will take you to the form for completing the actions that we used earlier
to create the alert.
DELETE – Select the checkbox to the left of the alert and click Delete Selected Alerts.
ADD – You can add alerts from here too. You will click Add Alert and it will give you a list of all the Apps in
the site with a link that says View the list… to take you directly to that tool to choose for the new alert. If
you want to do this for a top level App (like the entire Document Library), select Documents – Next – and
complete the form for the alert options.
NOTE: This is not the recommended way to add alerts, but it works.

12
SharePoint 2013 – End User Training Tutorials
The Discussion area in SharePoint is an area where team members can post questions or comments about issues. Each
member can respond to the question and resolve issues or come up with the best solutions for specific situations.
There are two communication tools in SharePoint that seem similar, the Discussions and Newsfeed. Here are the
differences.
Discussions works more as a discussion area that can be used to create a knowledgebase with solutions to common and
obscure issues. Posts can be marked to show the best solution to a question. They are searchable through the web site
and you can setup an Alert on a specific topic or question.
Newsfeed (Site Feed) works more like a social media site, like Facebook, where people just post comments about topics,
reply to those posts and like those comments that they choose. It is NOT searchable and does not define the best
solution for particular question asked.
We recommend for actual discussion that deals with problems and solutions, you choose Discussions.
View the Discussions
Select the Discussions link in the left navigation bar
Add a New Discussion
1. Select the New Discussion link
2. Enter the necessary information
3. If this is a question where you would like to get
responses to choose a Best Reply (as opposed to simply
posting a solution or basic information for people to
see and discuss), check the Question box.
4. Click Save

13
SharePoint 2013 – End User Training Tutorials
Setup an Alert on a specific topic
1. Select the topic you want to view
2. If it is a topic you posted, select the ellipsis (three dots) and select Alert Me
3. If it is a topic posted by someone else, click Alert Me
Reply to a Discussion
1. You can click the Reply link within the specific post and click Reply, OR
2. Begin typing in the Add a reply box below the list of replies and click Reply
NOTE: By default, the discussion does not post the replies under the specific one you responded to. They are just listed
in the order they are posted.
Edit Your Own Post
1. Select the topic to edit
2. Click the Edit link
3. Edit the information, click Save
Mark a Post as Best Reply
When you post a discussion topic that is marked as a question, you will have an option to select the Best Reply on the
post that best answers the question or provides the best solution. Only the person who posted the original topic and the
Site Owner will be able to mark the best reply.
1. Select the discussion topic
2. Select the ellipsis (three dots) below the specific post
3. Click Best Reply
If a post comes in after you mark a Best Reply, you will have the option to
Remove Best Reply and mark the newest one as Best Reply.
14
SharePoint 2013 – End User Training Tutorials
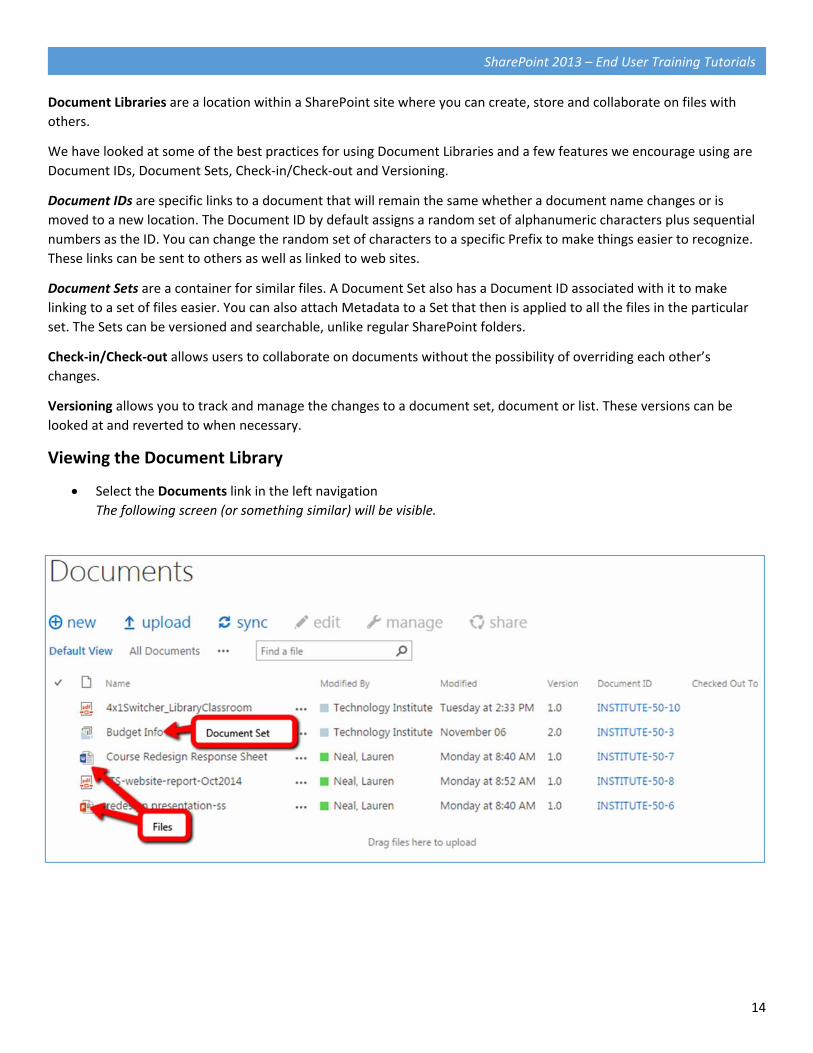
Document Libraries are a location within a SharePoint site where you can create, store and collaborate on files with
others.
We have looked at some of the best practices for using Document Libraries and a few features we encourage using are
Document IDs, Document Sets, Check‐in/Check‐out and Versioning.
Document IDs are specific links to a document that will remain the same whether a document name changes or is
moved to a new location. The Document ID by default assigns a random set of alphanumeric characters plus sequential
numbers as the ID. You can change the random set of characters to a specific Prefix to make things easier to recognize.
These links can be sent to others as well as linked to web sites.
Document Sets are a container for similar files. A Document Set also has a Document ID associated with it to make
linking to a set of files easier. You can also attach Metadata to a Set that then is applied to all the files in the particular
set. The Sets can be versioned and searchable, unlike regular SharePoint folders.
Check‐in/Check‐out allows users to collaborate on documents without the possibility of overriding each other’s
changes.
Versioning allows you to track and manage the changes to a document set, document or list. These versions can be
looked at and reverted to when necessary.
Viewing the Document Library
Select the Documents link in the left navigation
The following screen (or something similar) will be visible.

15
SharePoint 2013 – End User Training Tutorials
Uploading a Document
You have several options for uploading a document into a SharePoint site.
1. Open a File Explorer window locally and drag the
document to the Documents area on your site
and drop it, then the upload will begin, OR
2. Select the Upload link in the Documents area, OR
3. Select the Files ribbon and click Upload
Document
4. Click Choose File and select the file from your
computer that you would like to upload.
5. Click OK
Creating a New Document (this does not include all types of documents, only Word
documents)
1. Select the Files Ribbon – New Document
2. It may prompt you to launch an application in
some browsers (it is attempting to open the
appropriate program to edit the document); you
will want to do this.
To create all types of documents, you can create them locally on your computer and then upload.

16
SharePoint 2013 – End User Training Tutorials
Editing a Document
To edit a document, you need to first Check Out the file. You can do this several ways.
1. Edit Offline Using the Files Ribbon Option
a. Select the file using the checkbox to the left of the name of the file.
b. Click Edit Document
c. If you are in IE, it will open in the appropriate MS Office program. If you are in another browser, it may
prompt you to allow your computer to launch an application to open the file in the appropriate MS
Office program.
d. The appropriate editing program will prompt you to Check Out the document before you can edit the
file.
e. Edit the file as you normally would
f. When done, go to the File menu and select Check In
If you made no changes, select the Discard Check Out so it does not create a new version of the
document.
g. A prompt window will open for you to enter comments about your changes; click OK.
h. The document has been sent back to the team site and checked back in for others to view or edit.
17
SharePoint 2013 – End User Training Tutorials
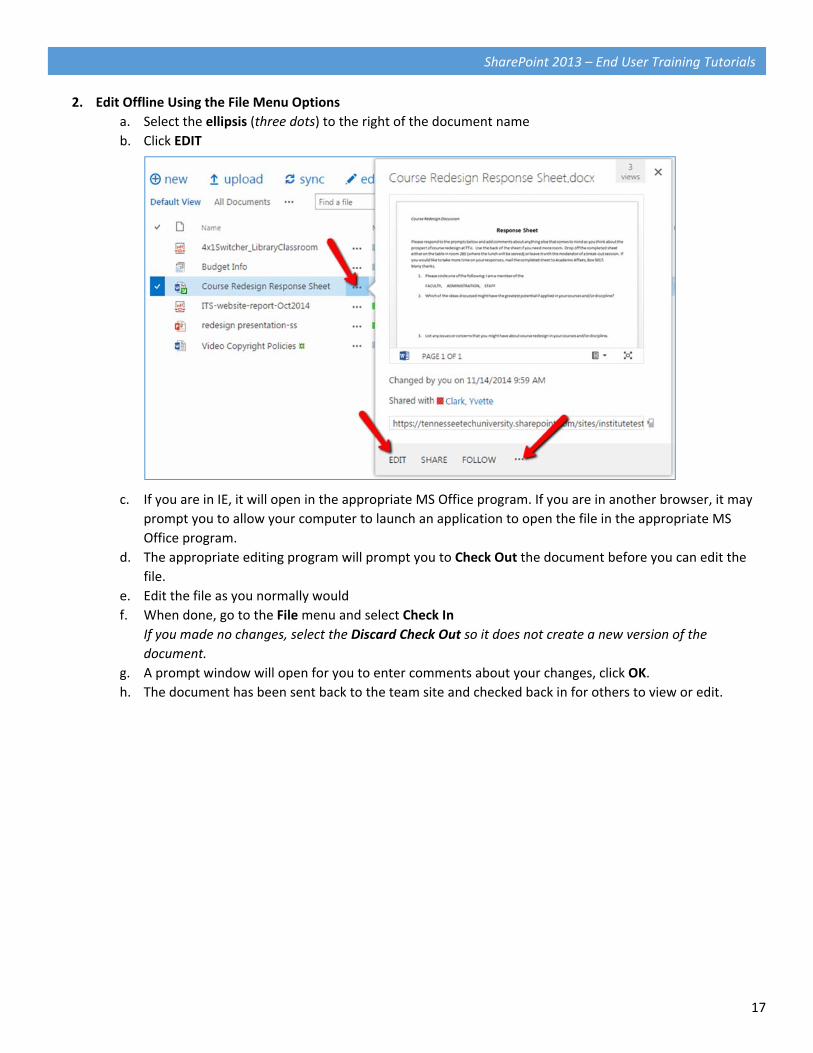
2. Edit Offline Using the File Menu Options
a. Select the ellipsis (three dots) to the right of the document name
b. Click EDIT
c. If you are in IE, it will open in the appropriate MS Office program. If you are in another browser, it may
prompt you to allow your computer to launch an application to open the file in the appropriate MS
Office program.
d. The appropriate editing program will prompt you to Check Out the document before you can edit the
file.
e. Edit the file as you normally would
f. When done, go to the File menu and select Check In
If you made no changes, select the Discard Check Out so it does not create a new version of the
document.
g. A prompt window will open for you to enter comments about your changes, click OK.
h. The document has been sent back to the team site and checked back in for others to view or edit.

18
SharePoint 2013 – End User Training Tutorials
3. Edit Files Online Using Office365 using the File Menu Options
a. Select the ellipsis (three dots) to the right of the document name
b. Select the ellipsis in the next window to expand your options
c. Click Check Out
d. Select the ellipsis (three dots) to the right of the document name
e. Select the ellipsis in the next window to expand your options
f. Click Edit in Browser
g. Edit the document in the browser and when done, click the back button on
the browser (OR the link at the top of the window in the breadcrumbs that
goes back to your team site). The document will Auto Save.
h. Check the document back in to your site
i. Using the Files ribbon
1. Select the checkbox to the left of the document
2. Go to the Files ribbon and select Check In
3. Enter any comments necessary about your changes, click OK.
ii. Using the File Menu Options
1. Select the ellipsis (three dots) to the right of the document name
2. Select the ellipsis in the next window to expand your options
3. Click Check In
4. Enter any comments necessary about your changes, click OK.
If you made no changes, select the Discard Check Out so it does not create a new version of the document.
Creating Documents Sets
1. Go to the Document Library
2. Select the Files ribbon
3. Select the New Document arrow (don’t just click on the icon)
4. Select the Document Set from the drop‐down menu
5. Enter a Name for the Document Set and a description of the files
to be stored there.
6. Click Save
NOTE: To create a Document Set, the site owner will have to enable the
option on each Document Library in a site. If you do not see the option in
the New Document drop‐down, contact your Site Owner.
19
SharePoint 2013 – End User Training Tutorials
Uploading to the Document Set
You will put files in the Folder the same way as we described in the beginning of this document.
1. Open the Document Set by clicking on it
2. Upload the files
Document Sets cannot contain other Document Sets, but you can use folders to help organize your files.
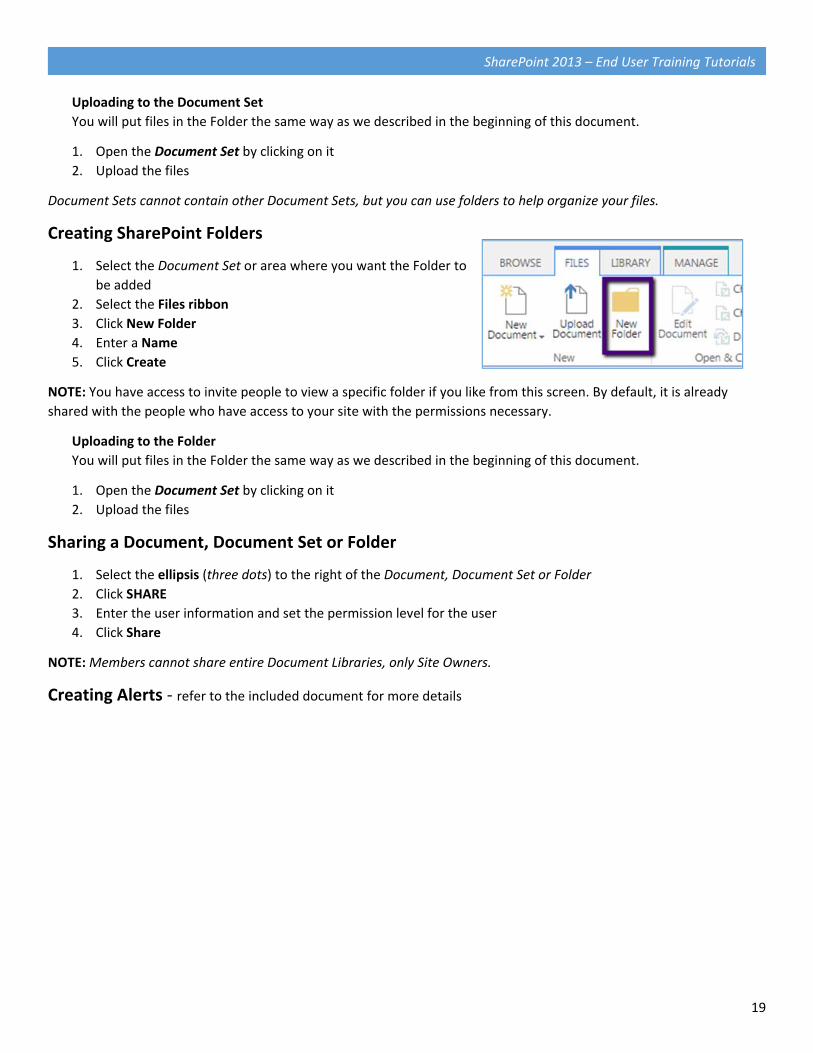
Creating SharePoint Folders
1. Select the Document Set or area where you want the Folder to
be added
2. Select the Files ribbon
3. Click New Folder
4. Enter a Name
5. Click Create
NOTE: You have access to invite people to view a specific folder if you like from this screen. By default, it is already
shared with the people who have access to your site with the permissions necessary.
Uploading to the Folder
You will put files in the Folder the same way as we described in the beginning of this document.
1. Open the Document Set by clicking on it
2. Upload the files
Sharing a Document, Document Set or Folder
1. Select the ellipsis (three dots) to the right of the Document, Document Set or Folder
2. Click SHARE
3. Enter the user information and set the permission level for the user
4. Click Share
NOTE: Members cannot share entire Document Libraries, only Site Owners.
Creating Alerts ‐ refer to the included document for more details