Service Virtualization in the IBM Pure Application … · Web viewIBM® Rational ® Test Workbench...
73
IBM® Rational ® Test Workbench and IBM® Pure Application Server® Service Virtualization in the IBM Pure Application Server
Transcript of Service Virtualization in the IBM Pure Application … · Web viewIBM® Rational ® Test Workbench...

IBM® Rational ® Test Workbench and IBM® Pure Application Server®
Service Virtualization in the IBM Pure Application Server
Lab Exercises

IBM Software
5/8/2023
Contents 11/16/2013 Page 1

IBM Software
Contents
LAB 1 SETTING UP PATTERNS.......................................................................................71.1 DEPLOY IBM SHARED SERVICE FOR RATIONAL INSTALLATION MANAGER REPOSITORY.........................71.2 DEPLOY IBM SHARED SERVICE FOR RATIONAL LICENSE KEY SERVER.................................................71.3 DEPLOY IBM SHARED SERVICE FOR RATIONAL TEST VIRTUALIZATION SERVER....................................71.4 CONFIGURE THE IBM RATIONAL TEST WORKBENCH PATTERN.............................................................71.5 COMMUNICATE TO SOFTWARE ENGINEERS THAT THE PATTERN IS READY FOR USE.............................12
LAB 2 DEPLOYING THE SYSTEM UNDER TEST..................................................................142.1 CONSTRUCT THE DAYTRADER SAMPLE VIRTUAL SYSTEM PATTERN...................................................142.2 DEPLOY THE DAYTRADER SAMPLE VIRTUAL SYSTEM INSTANCE.........................................................16
LAB 3 DEPLOYING A RATIONAL TEST WORKBENCH INSTANCE..........................................203.1 DEPLOY THE IBM RATIONAL TEST WORKBENCH INSTANCE................................................................203.2 CONNECT TO THE INSTANCE.............................................................................................................21
LAB 4 PREPARING THE SUT FOR VIRTUALIZATION...........................................................234.1 ANALYZE THE SYSTEM UNDER TEST...................................................................................................244.2 INSTRUMENT THE APPLICATION SERVER............................................................................................29
LAB 5 PREPARING THE SHARED SERVICES FOR VIRTUALIZATION....................................325.1 OPEN FIREWALL PORTS ON HTTP PROXY HOST................................................................................335.2 OPEN FIREWALL PORTS ON RIT AGENT HOST....................................................................................345.3 RESPOND TO SOFTWARE ENGINEER.................................................................................................35
LAB 6 VIRTUALIZING A WEB SERVICE.............................................................................366.1 RECORD WEB SERVICE MESSAGES..................................................................................................366.2 CREATE AND TEST A WEB SERVICE STUB.........................................................................................406.3 DEPLOY THE STUB TO RATIONAL TEST VIRTUALIZATION SERVER.......................................................41
LAB 7 TESTING AN APPLICATION USING A STUB..............................................................44APPENDIX A. DEPLOYMENT TOPOLOGY...................................................................................46APPENDIX B. TROUBLESHOOTING...........................................................................................47APPENDIX C. GLOSSARY........................................................................................................48APPENDIX D. NOTICES...........................................................................................................49Appendix E. Trademarks and copyrights....................................................................................................51
Page 2 Using IBM Rational Quality Manager to Manage your Quality Process and Automate Testing

IBM Software
OverviewThe capabilities of the Rational Test Virtualization Server Shared Service and the Rational Test Workbench Pattern can best be demonstrated through a realistic example. The DayTrader sample from the Apache Geronimo project will be used in this workshop. A very simple architectural diagram is shown in .
Figure 1: DayTrader Topology
Although both the web client and the web services components are running in the same instance of WebSphere Application Server, this is a three-tier architecture system. The DayTrader Web component is a client of the services provided by the DayTrader Web Service component. The DayTrader Web Service component is a client of services provided by the TRADEDB database.
Consider for a moment that you are a developer working on the DayTrader Web component. You need to test your work, but you find that because the DayTrader Web Service component is under development, it is constantly being taken down for maintenance and updates. This is making it very difficult for you to conduct integration testing.
Or consider you are a developer working on the DayTrader Web Services. You are finding that the test database you use is shared by many people. Constant updates and changes to the data are making it difficult for you to isolate issues you are finding in your code. You would really like to test your work with a variety of test data but have control over when it is refreshed and what goes into the database.
Test virtualization can help with both of those scenarios. In Lab 6 you will create and deploy a web service stub, enabling you to test the DayTrader web with minimal dependencies on the DayTrader Web Services.
How to perform these labs
There are several software components, patterns and host machines involved in this workshop and keeping track of all the hostnames, IP addresses, ports, etc. can be challenging. Appendix A contains a topology diagram including all the components that will be involved in these labs. The full architecture will be introduced a piece at a time as you perform the labs. It is recommended that you print out Appendix A and write the values for your specific deployment in the table in the lower left. Referring to this topology diagram often as you perform the labs will help you understand the concepts being taught.
Overview 5/8/2023 Page 3

IBM Software
Roles
This lab is divided up into two roles: Shared Service System Administrator and Software Engineer
Shared Service Administrator (Adam)
Typically there are only a few Shared Service Administrators supporting a team. This person is responsible for Shared Service running within the cloud. They need to have Workload resources administration with full permissions or the Cloud Administrator role. See the InfoCenter for more details.
Software Engineer (Evan)
This person may be a Test Engineer or a Developer. They wish to record and test their application that is under development that is dependent upon some Web Services and a Database. The Software Engineer needs to have permission to Deploy patterns.
Page 4 Service Virtualization in the IBM Pure Application Server

IBM Software
Figure 2: Roles and communication between roles
Overview 5/8/2023 Page 5

IBM Software
Icons
The following symbols appear in this document at places where additional guidance is available.
Important!This symbol calls attention to a particular step or command. For example, it might alert you to type a command carefully because it is case sensitive.
Information This symbol indicates information that might not be necessary to complete a step, but is helpful or good to know.
Trouble-shooting This symbol indicates that you can fix a specific problem by completing the associated troubleshooting information.
Shared Service Administrator
Section or task to be performance by the Shared Service Administrator
Software Engineer Section or task to be performed by the Software Engineer
Figure 3: ICON Table
Page 6 Service Virtualization in the IBM Pure Application Server

IBM Software
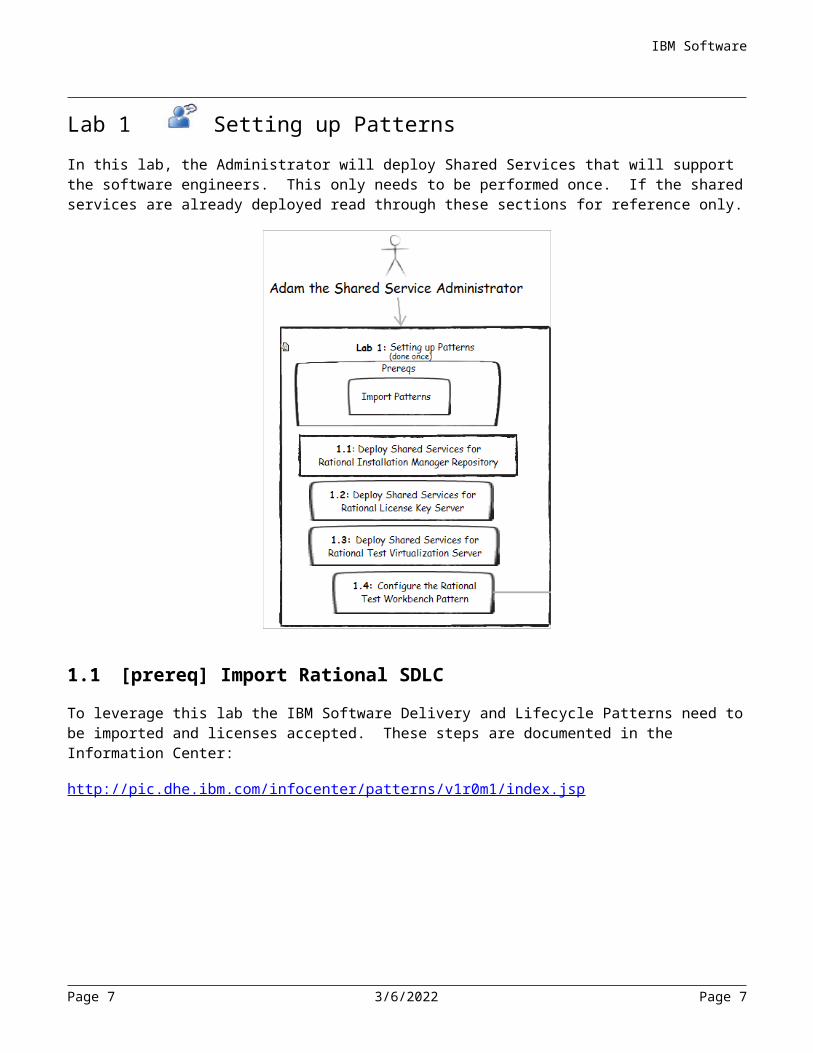
Lab 1 Setting up PatternsIn this lab, the Administrator will deploy Shared Services that will support the software engineers. This only needs to be performed once. If the shared services are already deployed read through these sections for reference only.
1.1 [prereq] Import Rational SDLC To leverage this lab the IBM Software Delivery and Lifecycle Patterns need to be imported and licenses accepted. These steps are documented in the Information Center:
http://pic.dhe.ibm.com/infocenter/patterns/v1r0m1/index.jsp
Page 7 5/8/2023 Page 7
IBM Software
1.2 Determine Cloud GroupShared Services are deployed into specific Cloud Groups. A Cloud group is a mechanism used by IBM Pure Application System to partition the total cloud resources. For this Lab you will need to identify a Cloud Group to use which all Shared Services and Patterns will be deployed into.
All Shared Services and Patterns need to be deployed into the same Cloud Group
1.3 Deploy IBM Shared Service for Rational Installation Manager Repository
These steps are documented in the Information Center:
http://pic.dhe.ibm.com/infocenter/patterns/v1r0m1/index.jsp
1.4 Deploy IBM Shared Service for Rational License Key ServerThese steps are documented in the Information Center:
http://pic.dhe.ibm.com/infocenter/patterns/v1r0m1/index.jsp
Page 8 Service Virtualization in the IBM Pure Application Server

IBM Software
1.5 Deploy IBM Shared Service for Rational Test Virtualization Server
These steps are documented in the Information Center:
http://pic.dhe.ibm.com/infocenter/patterns/v1r0m1/index.jsp
When deploying the Shared Services the Shared Service Administrator can provide a public SSH key. This allows the Administrator to login via SSH to the machines using their private SSH key. This will be necessary later in the lab when configuring the Shared Services.
Verify now that you can login to the Shared Services via SSH.
If you can not login to the Shared Services use the following directions on the wiki (https://jazz.net/wiki/bin/view/Deployment/SharedServicesAccessingSSH) or consult the IBM Pure Application System Information Center.
1.6 Configure the IBM Rational Test Workbench PatternConfiguring the IBM Rational Test Workbench pattern consists of setting and locking default values for several of the configuration properties used by the pattern’s script packages. In most cases, these properties reference elements that are unique to your instances of the shared services deployed in the
Page 9 5/8/2023 Page 9

IBM Software
steps, above. These values will be required to deploy the IBM Rational Test Workbench pattern but will likely not be known by the Software Engineer performing the deployment. Furthermore, the Software Engineer will likely not have the permissions necessary to discover these values. For example, during deployment, IBM Rational Test Workbench is installed on the instance using the software packages available through the NFS share available through the Shared Service for Rational Installation Manager. The location of the NFS share is provided to the script packages through a property. By configuring the default property value in the IBM Rational Test Workbench pattern, you eliminate the need for the Software Engineer to deal with this detail.
In this section, you will follow this basic procedure:
Navigate to the instances of your shared services in the Workload Console
Record the value of the required parameter
Set that value as the default property value in the IBM Rational Test Workbench pattern
Optionally lock that property value
It requires the least number of steps if you collect all the values first, and then set them all at one time in the IBM Rational Test Workbench pattern.
1.6.1 Determine the location of your NFS shareDeploying the Rational Test Workbench pattern involves installing several IBM Rational software components. The installation packages for these components are made available through an instance of the IBM Shared Service for Rational Installation Manager Repository. As the Shared Service Administrator, you will need to identify the path to the file server on your IPAS system in order to set the value on the IBM Rational Test Workbench pattern.
__1. Select Instances > Shared Services from the Workload Console menu.
__2. Select the instance of the IBM Shared Service for Rational Installation Manager Repository.
__3. Click the Endpoint link near the Repository middleware perspective.
Page 10 Service Virtualization in the IBM Pure Application Server

IBM Software
__4. Record the path for ENDPOINT. It will be in the form <ip address>:/storage/shared. This value will be referenced later as NFS_SHARE.
__5. Cancel the dialog.
1.6.2 Determine the results database connection parametersAll Software Engineers that deploy the IBM Rational Test Workbench pattern will create a Rational Integration Tester test project. This project utilizes a database to store results of the tests. The database is hosted on a node within the IBM Shared Service for Rational Test Virtualization Server.
__1. Select Instances > Shared Services from the Workload Console menu.
__2. Select the instance of the IBM Shared Service for Rational Test Virtualization Server.
__3. Click the Endpoint link near the DB2 middleware perspective. Two endpoints will be displayed – one for DBA connections and one for general application users.
__4. Record the path for the AppUser ENDPOINT. The path will be broken down into three components later – RESULTDB_URL, RESULTDB_USER and RESULTDB_PASSWORD. (Note: do not include the semicolon in the password.)
__5. Cancel the dialog.
Page 11 5/8/2023 Page 11

IBM Software
1.6.3 Determine the hostnames of shared service nodesYour users will require some additional information about nodes within the IBM Shared Service for Rational Test Virtualization Server in order to use it. You should document the hostname values for the following nodes and share these values with any users of the IBM Rational Test Workbench pattern.
__1. Select Instances > Shared Services from the Workload Console menu.
__2. Click IBM Shared Service for Rational Test Virtualization Server – Shared Cloud Group.
__3. Expand Virtual machine perspective if necessary. Record the Public IP hostname for the following nodes in your deployment topology. You will share this information with your Software Engineers in section 1.6.8.
Cloud Group
Placeholder Node Virtual Machine Name Public IP/hostname
RTCP_HOST RTCP-HVM.nnnnnn
RITPP_HOST RITPP-HVM.nnnnnn
RITA_HOST RTVS-HVM.nnnnnn
1.6.4 Clone the prebuilt IBM Rational Test Workbench patternWhen changes to a prebuilt pattern are required, a recommended best practice is to create a clone of the original pattern rather than to edit it. In this section, you will clone the prebuilt IBM Rational Test Workbench pattern to create a new pattern that is configured specifically for your cloud group.
__1. Select Patterns > Virtual Systems from the Workload Console menu.
__2. Select the IBM Rational Test Workbench Pattern v8.5.1 pattern from the list of Virtual System Patterns.
__3. Click the Clone tool on the toolbar above the pattern view.
__4. Enter a name for the new pattern. A suggestion would be to append the name of the cloud group being used. For example, if your shared services are running in the Shared Cloud Group, name your new pattern IBM Rational Test Workbench Pattern v8.5.1 - Shared Cloud Group.
__5. Click OK to create the clone.
Page 12 Service Virtualization in the IBM Pure Application Server

IBM Software
1.6.5 Set the IBM Rational Test Workbench NFS_SHARE parameter__6. Select Patterns > Virtual Systems from the Workload Console menu.
__7. Select the new IBM Rational Test Workbench Pattern v8.5.1- Shared Cloud Group pattern from the list of Virtual System Patterns.
__8. Click the Edit tool on the toolbar above the pattern view. (Note that you must be listed in the Grant Access to field of the pattern in order to edit it.)
__9. Click the Parameters tool on the Rational Configure File Server script package.
__10. Enter the value you recorded in step 1.6.1for NFS_SHARE. Use the lock icon to ensure that this value cannot be overridden during deployment of the pattern.
__11. Click OK to exit the script package parameters dialog.
1.6.6 Set the IBM Rational Test Workbench RESULTDB parameters__1. While still editing the pattern, click the Parameters tool on the Set Default ResultDB (On
Deployment) script package.
Page 13 5/8/2023 Page 13

IBM Software
__2. Enter the values you recorded in step 1.6.2 for RESULTDB_URL, RESULTDB_USER and RESULTDB_PASSWORD. Use the lock icon to ensure that these values cannot be overridden during deployment of the pattern.
__3. Click OK to exit the script package parameters dialog.
__4. Click Done editing above the pattern editing area to close the editor.
1.6.7 Add the shared service hostnames to the commentsAs a convenience to users of the new pattern, Adam will add comments to the pattern that contain the hostnames of the nodes users will require.
__1. Scroll to the bottom of the pattern viewing area and expand Comments.
__2. In the comments box, enter the Placeholder Node and Public IP/hostname for the nodes from section 1.6.3. Enter each node in a separate comment.
Page 14 Service Virtualization in the IBM Pure Application Server

IBM Software
1.6.8 Update permissions on the Pattern so that the team can view itUsers will only see resources that they either own, or have permissions to see. Now that the Virtual System Pattern is ready for use by the team we can add them to it. This is simply a matter of adding an individual or team (LDAP group) to the ‘Access granted to’ field. You may also use the group name ‘Everyone’.
To add an individual, group or Everyone simply type their name in the field
1.7 Communicate to Software Engineers that the pattern is ready for use
At this point, the IBM Rational Test Workbench pattern has been configured for your IBM PureApplication System environment and is ready for use by the Software Engineers. Your team can decide the best method to use to communicate this information to the users – email, wiki, website, etc. An email template is provided below.
IBM Rational Test Workbench Users:
A new IBM Rational Test Workbench virtual system pattern has been deployed on <IPAS System Name>.
IBM Rational Test Workbench Pattern v8.5.1- Shared Cloud Group
<URL to the pattern>
You may create personal instances of the pattern by following the URL above, logging into the system, and selecting “Deploy”. You will be required to provide passwords as part of the deployment process. Note that these passwords must comply with our corporate policies.
To use your Rational Test Workbench instance for integration testing and test virtualization, you will likely need to leverage the IBM Shared Service for Rational Test Virtualization Server. Hostnames for nodes in the shared services are provided below:
Page 15 5/8/2023 Page 15

IBM Software
Cloud Group
Placeholder Node Virtual Machine Name Public IP/hostname
RTCP_HOST RTCP-HVM.nnnnnn
RITPP_HOST RITPP-HVM.nnnnnn
RITA_HOST RTVS-HVM.nnnnnn
Summary
As the Shared Services Administrator, you have deployed the IBM Shared Service for Rational Installation Manager Repository, IBM Shared Service for Rational License Key Server and IBM Shared Service for Rational Test Virtualization Server to your IBM PureApplication System. These services are now available for any Software Engineers to leverage to do their jobs.
You also setup the IBM Rational Test Workbench virtual system pattern with values that correspond to your unique deployment of the shared services, making it easier for the Software Engineers using the pattern to deploy and use it.
Finally, you documented information that users of the IBM Rational Test Workbench pattern will require to effectively leverage the shared services for Rational Test Virtualization Server.
Page 16 Service Virtualization in the IBM Pure Application Server

IBM Software
Lab 2 Deploying the System Under TestIn this lab, you will create a sample system under development that you will test against in later labs. This sample system will be a Virtual System Pattern (VSP) that you will create on your IBM PureApplication System (IPAS) system from pre-installed virtual images and script packages that you will construct. File artifacts have been provided that will make this process easier for you.
The DayTrader system is a three-tier architecture. The web client tier is implemented in JSP and Servlet technology and deployed to a WebSphere Application Server (WAS) instance. The web services tier is implemented in Enterprise Java Beans and also deployed to WAS. The DB2 database is hosted on the DB2 server.
2.1 Construct the DayTrader Sample Virtual System PatternThe IBM PureApplication System Workload Console will be used to construct a sample VSP. This VSP will consist of two parts – a WebSphere Application Server (WAS) part and a DB2 Database Server part.
The DayTrader application will be deployed into the WAS part using a script package that you will create from the downloaded files.
The DB2 server part provides a mechanism to create a blank database as part of the deployment process. This will be sufficient for our needs.
2.1.1 Download the provided zip fileWe have provided a zip file on the Jazz.net deployment wiki that will be used to create the DayTrader sample pattern.
Page 17 5/8/2023 Page 17

IBM Software
__1. Browse to https://jazz.net/wiki/bin/view/Deployment/GreenHatPatternWorkbook from your desktop workstation or any machine that has access to the internet.
__2. Download the file deployDayTraderWASApplications.zip from the wiki page and store it on your hard drive.
2.1.2 Create the script package__1. In your IPAS web interface, open the Workload Console.
__2. Select Catalog > Script Packages from the menu.
__3. Click the green plus sign at the top of the list of Script Packages to create a new script package.
__4. In the dialog box, enter Install DayTrader Sample - XXX as the script name where XXX represents your initials and click OK.
__5. In the Install DayTrader Sample view, click in the field to the right of the Script package file label. Browse to the deployDayTraderWASApplications.zip file you downloaded in step 2.1.1.
__6. Click Upload. The system will upload your file and parse the relevant information such as description, environment, working directory, etc. from the script package file.
2.1.3 Create the pattern__1. Select Patterns > Virtual Systems from the Workload Console menu.
__2. Click the green plus sign at the top of the list of Virtual System Patterns.
__3. In the dialog box, enter DayTrader Sample Pattern - XXX as the name of the pattern where XXX represents your initials and click OK.
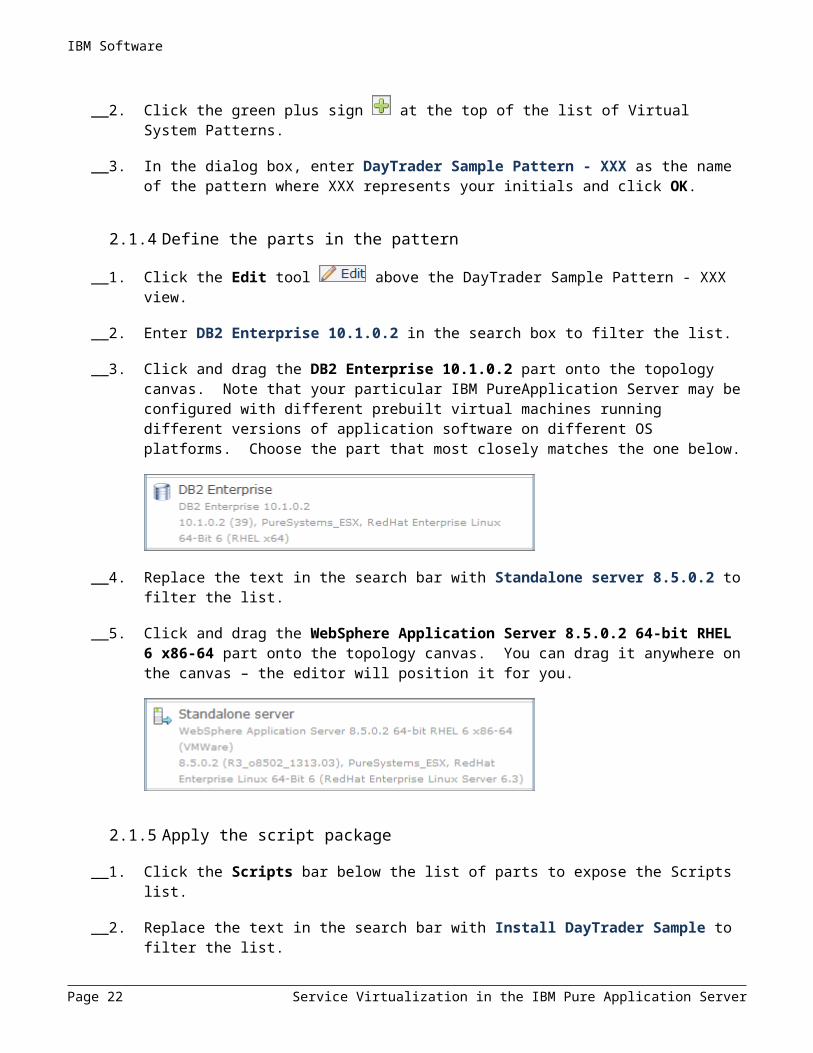
2.1.4 Define the parts in the pattern
__1. Click the Edit tool above the DayTrader Sample Pattern - XXX view.
__2. Enter DB2 Enterprise 10.1.0.2 in the search box to filter the list.
__3. Click and drag the DB2 Enterprise 10.1.0.2 part onto the topology canvas. Note that your particular IBM PureApplication Server may be configured with different prebuilt virtual machines running different versions of application software on different OS platforms. Choose the part that most closely matches the one below.
Page 18 Service Virtualization in the IBM Pure Application Server

IBM Software
__4. Replace the text in the search bar with Standalone server 8.5.0.2 to filter the list.
__5. Click and drag the WebSphere Application Server 8.5.0.2 64-bit RHEL 6 x86-64 part onto the topology canvas. You can drag it anywhere on the canvas – the editor will position it for you.
2.1.5 Apply the script package__1. Click the Scripts bar below the list of parts to expose the Scripts list.
__2. Replace the text in the search bar with Install DayTrader Sample to filter the list.
__3. Click and drag the Install DayTrader Sample – XXX script package to the Standalone server part on the topology canvas.
__4. Click Done editing to the far right above the DayTrader Sample view.
2.2 Deploy the DayTrader Sample Virtual System InstanceIn this section, you will deploy an instance of the virtual system pattern you developed in the previous section. The deploy process will create a virtual machine instance for each of the parts defined in the pattern. The script packages will be run on the virtual machines as you defined them in the pattern. Several properties are available for customization. Values for some of these properties will be of your choosing – such as passwords for usernames. Other properties will require specific values you must provide – such as the name of the database you want created when the pattern is deployed.
2.2.1 Deploy an instance of DayTrader__1. If the DayTrader Sample Pattern – XXX view is no longer open, select Patterns > Virtual
Systems from the Workload Console menu and select the pattern in the list.
__2. Click the Deploy tool on the toolbar.
__3. Enter DayTrader Sample - XXX for the Virtual system name where XXX represents your initials.
Page 19 5/8/2023 Page 19

IBM Software
__4. To simplify the parameter selection, click Default password for all virtual parts (optional). Enter a password for the root user and the virtuser user. Note that passwords may need to conform to the policies defined by your system administrator.
__5. Click Configure virtual parts and DB2 Enterprise.
__6. Enter a password for Instance owner, Fenced user and DAS user.
__7. Find the Database creation property in the list and set to Create-new-database.
__8. Enter TRADEDB in the Name for the new database property.
__9. Click OK to dismiss the DB2 Enterprise properties dialog.
__10. Click OK to dismiss the deploy dialog. This will start the process of deploying an instance of the pattern you have created in section 2.1. You will be taken to the view for the DayTrader Sample - XXX instance. The current status will change as the deployment progresses. Do not continue until the current status is The virtual system has been deployed.
2.2.2 Verify the instance is operational__1. Expand Virtual Machines on the DayTrader Sample instance view.
__2. Expand the WAS server virtual machine node identified with “Standalone” in its name.
__3. Make note of the hostname under Network interface 1, similar to what is seen in the image, below. Record this hostname as DAYTRADER_HOST in your deployment topology diagram. In future steps of the workbook, use this value anywhere you see the placeholder <DAYTRADER_HOST>.
__4. Expand the DB2 server virtual machine node identified with “DB2-ESE” in its name.
__5. Make note of the hostname under Network interface 1. Record this hostname as DAYTRADER_DB_HOST in your deployment topology. In future steps of the workbook, use this value anywhere you see the placeholder <DAYTRADER_DB_HOST>.
Page 20 Service Virtualization in the IBM Pure Application Server

IBM Software
__6. Open a browser to Error! Hyperlink reference not valid.. Note that you will need to be able to access the DayTrader system from a machine outside your IPAS environment. If your IPAS installation does not permit such access, you may need to log into <DAYTRADER_HOST> using VNC and run the system from within <DAYTRADER_HOST>. You will see the DayTrader home page in your browser window.
__7. Select the Trading & Portfolios tab
__8. Click Log in, accepting the default username (uid:0) and password. You should see the user and account summary page for user uid:0.
__9. Click Quotes/Trade. You should see a table containing quotes for securities s:0 through s:4.
Summary
In this lab, you created a virtual system pattern to contain the DayTrader sample system. Your pattern consists of two nodes or “parts”. The first part is a pre-defined DB2 database host running the Red Hat Linux operating system. You selected properties on this part which caused a blank database to be created as it was instantiated.
Page 21 5/8/2023 Page 21

IBM Software
The second part is a pre-defined WebSphere Application Server host. The DayTrader application is installed into WAS on this part by the custom script package you downloaded earlier in the lab.
The result of this lab is a fully reusable pattern that can be deployed again and again to produce identical operational instances of your DayTrader sample.
You then deployed a single instance of that pattern and verified that the DayTrader system was functional.
Page 22 Service Virtualization in the IBM Pure Application Server
IBM Software
Lab 3 Deploying a Rational Test Workbench InstanceIn this lab, you will deploy an instance of the IBM Rational Test Workbench Virtual System Pattern. This pattern consists of a single node hosting several components of Rational Test Workbench including Rational Integration Tester. In an operational environment, an instance would be deployed for each tester responsible for creating integration tests or virtual services (stubs).
The Rational Test Workbench instance will be a fully operational “virtual workstation” complete with Rational Test Workbench installed and configured.
3.1 Deploy the IBM Rational Test Workbench InstanceThe IBM Rational Test Workbench Pattern includes all the components of Rational Test Workbench pre-installed and configured. You will be using the Rational Integration Tester component in this workshop to create service and database virtualizations.
3.1.1 Create an instance of the IBM Rational Test Workbench pattern__1. Select Instances > Virtual Systems from the Workload Console menu.
__2. Click the green plus sign at the top of the list of Virtual System Instances to create a new instance.
__3. Select the IBM Rational Test Workbench Pattern v8.5.1 from the list and click OK.
__4. Enter IBM Rational Test Workbench - XXX for the Virtual system name where XXX represents your initials.
__5. Click Configure virtual parts and Rational Desktop Part.
Page 23 5/8/2023 Page 23

IBM Software
__6. Enter passwords for root, virtuser and VNC user.
__7. Set SSH Tunneling to FALSE if you have that option available. Note that your company’s security policies may require SSH tunneling. See the InfoCenter reference at Administering > Setting up and running an SSH tunneling session for more information on using SSH tunneling.
__8. Set Enable Firewall to FALSE if you have that option available. Your company’s security policies may require the firewall to be active on your deployments. If your firewall is active, you will need to perform additional configuration in later labs to open ports in your firewall.
__9. Click OK to dismiss the Rational Desktop Part properties dialog.
__10. Click OK on the deploy dialog. This will start the process of deploying an instance of the Rational Test Workbench Pattern. You will be taken to the view for the IBM Rational Test Workbench - XXX instance. The current status will change as the deployment progresses. Do not continue until the current status is The virtual system has been deployed.
__11. Once the instance has been deployed, expand the Virtual Machines node and the virtual machine node. Make note of the hostname under Network interface 1. Record this hostname as RTW_HOST in your deployment topology.
3.2 Connect to the InstanceYou can connect to the running instance via the VNC viewer of your choice. One such VNC viewer is Real VNC. You connect to the hostname of the instance using the credentials you provided when deploying the instance. IPAS also provides a web-based VNC client that does not require you to install a VNC viewer. The web-based VNC client is not a full-featured VNC client. It will be sufficient for the exercises in this workbook, but we suggest the use of a more robust VNC solution for project work.
You may connect using Real VNC as detailed in section 3.2.1 or using the IPAS web-based VNC detailed in section 3.2.2.
3.2.1 Connect using Real VNC__1. Expand Virtual machines and the osNode machine in the Rational Test Workbench
instance view. Note the hostname of the machine under Network interface 1 and record this hostname as RTW_HOST in your deployment topology.
__2. Open VNC Viewer on your workstation and enter <RTW_HOST>:2 for the VNC Server and click Connect.
__3. Enter the password you provided for Password (VNC user)) in section 1.6.2. A desktop view will open to the instance.
Page 24 Service Virtualization in the IBM Pure Application Server

IBM Software
3.2.2 Connect using the IPAS web-based VNC__1. Expand Virtual Machines on the My Rational Test Workbench instance view and expand
the node for the machine.
__2. Click on the VNC link at the bottom of the screen.
__3. A new browser tab will open. Accept any Java security dialogs that might appear. (Note that you must have Java installed in your browser to use this web-based client.)
__4. Enter the password you provided for Password (VNC user)) in section 1.6.2. A desktop view will open to the instance.
Summary
In this lab, you deployed an instance of an RTW desktop machine Virtual System Pattern. Deploying the pattern creates an instance of a Red Hat Linux virtual machine and installs the components of Rational Test Workbench for you. The deployment operation enables you to enter several parameters such as passwords to customize your deployment.
Page 25 5/8/2023 Page 25

IBM Software
Lab 4 Preparing the SUT for Virtualization“Stubbing” or Service Virtualization has traditionally been undertaken by developers and requires coding knowledge and specialist skills. This has often resulted in sparsely documented and poorly understood testing environments that rely on key individuals, and make continuous integration testing unachievable or prohibitively expensive to maintain. Rational Test Workbench and Rational Test Virtualization Server change all of this: testers can now take control of their own destiny without needing any programming language knowledge, creating virtualized applications in a commonly understood form that can be readily shared and easily updated as underlying systems and data change.
The use of stubs during testing provides the following benefits:
Testing can begin while dependent web services are still in development and not yet ready for integration testing.
Error conditions, poor response times and other forms of negative testing are easily simulated by stubs where they may be quite difficult to achieve with live systems.
Stubs can easily be modified to simulate “what if” scenarios or represent upcoming changes to service functionality. Applications can be tested before dependent services go live.
Testing can be conducted without invoking third-party services that potentially have a fee associated with their use.
In this workshop, the Rational Test Workbench Pattern instance will be used to record messages flowing between the DayTrader client application and the DayTrader web service operations. Those recordings will then be turned into stubs to virtualize the DayTrader web services.
Rational Test Workbench depends on “interceptor” technology to enable recording of messages and stubbing of services. The specific form of the interceptor will depend on the messaging protocol technology used. In the upcoming lab, you will be intercepting web service traffic implemented as SOAP messages on the HTTP protocol. For the HTTP protocol, the interceptor is implemented as an HTTP proxy.
The interceptors for most technologies are deployed as part of the Rational Test Virtualization Server Shared Service in the IPAS environment. To intercept message flowing between the DayTrader client and DayTrader web services, the WebSphere Application Server hosting the DayTrader client will be configured to use the HTTP proxy running in the Rational Test Virtualization Server Shared Service. This is done by adding JVM parameters through the WAS Integrated Solutions Console.
In the following lab, Evan the Software Engineer will prepare his DayTrader System Under Test (SUT) for virtualization. This involves instrumenting the IBM WebSphere Application Server to route messages through the Rational Integration Tester Platform Pack (HTTP Proxy) which is part of the IBM Shared Services for Rational Test Virtualization Server. Messages that used to flow directly from the DayTrader Web component to the DayTrader Web Services component will now travel through the HTTP Proxy on the RITPP_HOST. There may be firewall implications to doing this, depending on how firewalls are configured on the various nodes in your system. This lab will walk you through the process of identifying the ports that are used by the System Under Test. A request must be made to the Shared Service Administrator to open these ports on nodes within the shared service.
Page 26 Service Virtualization in the IBM Pure Application Server

IBM Software
4.1 Analyze the system under testEach system being tested will be unique. The Software Engineers testing the system will need to have a solid understanding of the messaging paths used by the various components to communicate with each other. This lab will use the DayTrader sample as an example, but the process of analysis you need to go through basically comes down to this:
1. Break the system down into the fundamental components you want to test or stub.
2. Gather all relevant information about the communication paths between those components.
3. Determine how you will use the facilities in Rational Test Virtualization Server to record, emulate and stub those messages.
4. Identify any access or firewall changes needed enable these new paths.
5. Configure or “instrument” your system under test to use those RTVS facilities.
The specific values and steps required will be unique to the system being tested, but this process applies to most any system you wish to test. The following steps demonstrate this process using the DayTrader sample pattern.
4.1.1 Identify the fundamental componentsEvan will begin by analyzing the DayTrader Topology initially introduced in Figure 1 and reproduced in Figure 4 for convenience.
Page 27 5/8/2023 Page 27

IBM Software
Figure 4: DayTrader Topology
Evan wants to stub or virtualize the DayTrader Web Services. That means he wants to intercept and record messages flowing between the DayTrader Web component and the DayTrader Web Services component. This is where Evan will focus his attention.
4.1.2 Gather relevant information about communication pathsFrom the topology diagram, Evan identifies that the DayTrader Web Services listen on port 9080. He needs more information that what is on the diagram, however. Through some research and talking with the DayTrader architects and developers, he discovers that the messages are in SOAP format and are carried on the HTTP application protocol.
DayTrader is not using a secure connection between the Web and Web Services components, but security is always something to be aware of. If this were a secure connection, Evan would likely need to consider SSL certificates, WS-Security, or various other security technologies that would need to be addressed in order for Rational Integration Tester to record messages.
4.1.3 Determine how you will use RTVSSince the messaging protocol is HTTP, Evan will use the Rational Integration Tester HTTP Proxy in the IBM Shared Services for Rational Test Virtualization Server to intercept messages. The HTTP Proxy will copy requests and replies to Rational Integration Tester during the recording phase and will route requests to stubs when appropriate. The proxy acts as a gatekeeper or “switch”. This switch is inserted into your System Under Test by reconfiguring the client of the conversation to route through the HTTP Proxy.
Figure 5 shows the basic topology of recording messages with the HTTP Proxy. Request messages flow from the DayTrader Web component through the HTTP Proxy to the DayTrader Web Service. Responses will flow from the DayTrader Web Service through the HTTP Proxy and back to the DayTrader Web component.
Page 28 Service Virtualization in the IBM Pure Application Server

IBM Software
Figure 5: HTTP Recording Topology
Figure 6 shows the basic topology for stubbing the DayTrader Web Services with the HTTP Proxy. Request messages flow from the DayTrader Web component through the HTTP Proxy. If the stub rules indicate that the message is not to be routed to the stub, the message flow continues to the DayTrader Web Service much like it did for recording. Responses will flow from the DayTrader Web Service through the HTTP Proxy and back to the DayTrader Web component.
If the message is to be routed to the stub, it will be sent from the HTTP Proxy to the stub running on the RIT Agent node. Responses will flow from the stub on the Agent through the HTTP Proxy and back to the DayTrader Web component.
There is one more subtle path that is easy to overlook. Stubs can include a “pass through” rule. This directs the stub to pass the request through to the live service if matching conditions are not met. A message path must therefore exist from the RIT Agent node to the live service as well.
Page 29 5/8/2023 Page 29

IBM Software
Figure 6: HTTP Stubbing Topology
4.1.4 Enable communications through firewallsThe best way to think this through is to trace the message path from client to service on each host through to the destination and then trace the response back to the client. There will potentially need to be a rule on each end of the connection (an output rule on the source and an input rule on the destination). Exactly what needs to be done to the firewall settings will depend on how they are initially configured, but your starting point should always be to trace the message paths.
Evan identifies the following message paths for recording.
Request:
1. DAYTRADER_HOST OUTPUT New request to RITPP_HOST destination port 3128
2. RITPP_HOST INPUT New request on destination port 3128
3. RITPP_HOST OUTPUT New request to DAYTRADER_HOST destination port 9080
4. DAYTRADER_HOST INPUT New request on destination port 9080
Reply:
5. DAYTRADER_HOST OUTPUT response on Existing connection through source port 9080
6. RITPP_HOST INPUT response on Existing connection from source port 9080
7. RITPP_HOST OUTPUT response on Existing connection from source port 3128
Page 30 Service Virtualization in the IBM Pure Application Server

IBM Software
8. DAYTRADER_HOST INPUT response on Existing connection from source port 3128
Evan identifies the following additional message paths for stubs running on the RIT Agent.
Request:
9. RITPP_HOST OUTPUT New request to RITA_HOST destination port 9080
10. RITA_HOST INPUT New request on destination port 9080
Reply:
11. RITA_HOST OUTPUT response on Existing connection through source port 9080
12. RITPP_HOST INPUT response on Existing connection from source port 9080
Evan identifies the following additional message paths for pass through messages.
Request:
13. RITA_HOST OUTPUT New request to DAYTRADER_HOST destination port 9080
14. DAYTRADER_HOST INPUT New request on destination port 9080
Reply:
15. DAYTRADER_HOST OUTPUT response on Existing connection through source port 9080
16. RITA_HOST INPUT response on Existing connection from source port 9080
Evan sees that there are several paths that apply to the DayTrader system and others that apply to the IBM Shared Services for Rational Test Virtualization Server. Evan has control over the DayTrader system and can make those changes.
The DayTrader host firewall was configured to allow input messages to port 9080 and their responses when the pattern was deployed. This was required for the application to work at all. That existing rule set will enable paths #4, #5, #14 and #15.
Because he knew he would be interfacing with the RITPP proxy, he also added a rule to allow DayTrader to send messages and receive responses with a destination port 3128 (#1 and #8).
Evan will need to get Adam the Shared Services Administrator to make the changes to the shared services for him. He sends an email to Adam with the list of hosts and ports affected based on the list above.
Hey, Adam,
In order to use the IBM Shared Services for Rational Test Virtualization Server to record and run stubs for my DayTrader Web Services, I need the following ports opened on the shared service nodes:
Page 31 5/8/2023 Page 31

IBM Software
1. RITPP_HOST INPUT New request on destination port 3128
2. RITPP_HOST OUTPUT New request to DAYTRADER_HOST destination port 9080
3. RITPP_HOST INPUT response on Existing connection from source port 9080
4. RITPP_HOST OUTPUT response on Existing connection from source port 3128
5. RITPP_HOST OUTPUT New request to RITA_HOST destination port 9080
6. RITA_HOST INPUT New request on destination port 9080
7. RITA_HOST OUTPUT response on Existing connection through source port 9080
8. RITPP_HOST INPUT response on Existing connection from source port 9080
9. RITA_HOST OUTPUT New request to DAYTRADER_HOST destination port 9080
10. RITA_HOST INPUT response on Existing connection from source port 9080
Thanks,
Evan
While Adam works on that request, Evan can begin instrumenting his DayTrader system instance to use the HTTP proxy.
4.2 Instrument the Application ServerIn order to enable the RTVS HTTP proxy interceptor to see the messages from the DayTrader Web to the DayTrader web service, Evan must instrument the JVM of the DayTrader Web container. By configuring the JVM to route requests through the HTTP proxy, the proxy will be able to choose which messages should be recorded and send that information to RIT. The proxy will then relay the request on to the DayTrader web service component. The web service component will be unaware that the request routed through the proxy and will reply as normal. The reply will also be recorded by the HTTP proxy as it relays it on to the DayTrader Web component.
4.2.1 Retrieve the HTTP Proxy hostnameIn order to configure the proxy settings for the IBM WebSphere Application Server JVM, you must know the hostname and port of the virtual machine on which the HTTP Proxy is running. This is information that Adam provided in the comments of the IBM Rational Test Workbench Pattern v8.5.1 – Shared Cloud Group pattern.
__1. In the Workload Console, select Instances > Virtual Systems and locate your IBM Rational Test Workbench - XXX instance where XXX represents your initials.
__2. Click the link to the IBM Rational Test Workbench Pattern v8.5.1 – Shared Cloud Group pattern next to From pattern.
Page 32 Service Virtualization in the IBM Pure Application Server

IBM Software
__3. Scroll to the bottom of the pattern editor and observe the hostnames left in the comments by Adam. Make note of these hostnames – in particular RITPP_HOST.
4.2.2 Instrument the WAS serverYou will add two custom properties to the JVM configuration for WAS server1.
__1. Open a browser to Error! Hyperlink reference not valid.. You may need to accept security certificate warnings.
__2. Log into WebSphere using username virtuser and the password you provided as the default virtuser password in section 2.2.1.
__3. Expand Servers > Server Types and click WebSphere application servers in the left navigation area.
__4. Click server1 in the Application Servers view area.
__5. Expand Java and Process Management under Server Infrastructure and click Process Definition.
__6. Click Java Virtual Machine under Additional Properties.
__7. Click Custom properties under Additional Properties.
__8. Click New… to add the following properties
Name Value
http.proxyHost <RITPP_HOST>
http.proxyPort 3128
Your JVM custom properties should look similar to the following screen shot (your value for http.proxyHost will be different).
Page 33 5/8/2023 Page 33

IBM Software
__9. Click Save directly to the master configuration.
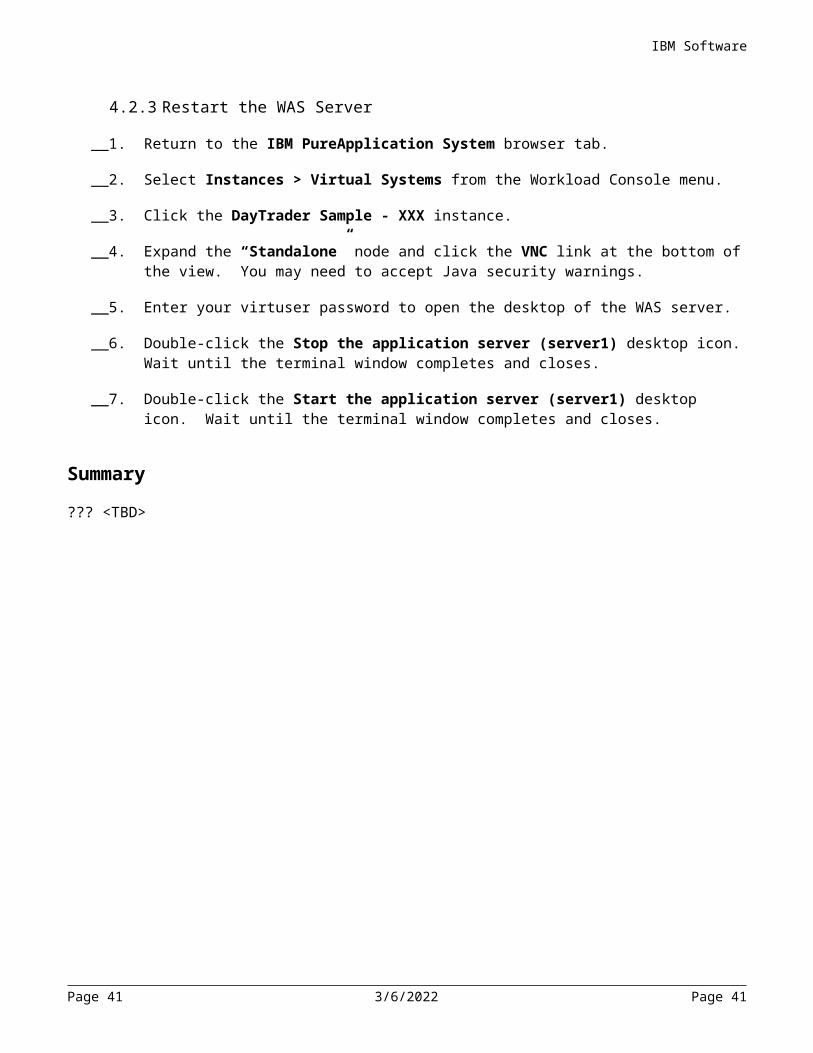
4.2.3 Restart the WAS Server__1. Return to the IBM PureApplication System browser tab.
__2. Select Instances > Virtual Systems from the Workload Console menu.
__3. Click the DayTrader Sample - XXX instance.
__4. Expand the “Standalone” node and click the VNC link at the bottom of the view. You may need to accept Java security warnings.
__5. Enter your virtuser password to open the desktop of the WAS server.
__6. Double-click the Stop the application server (server1) desktop icon. Wait until the terminal window completes and closes.
__7. Double-click the Start the application server (server1) desktop icon. Wait until the terminal window completes and closes.
Summary
??? <TBD>
Page 34 Service Virtualization in the IBM Pure Application Server

IBM Software
Lab 5 Preparing the Shared Services for VirtualizationThis lab will only need to be done once per shared service instance. Once the first administrator performs this tutorial on a given shared service, this section of the workbook does not need to be repeated. In these cases, it serves as a reference.
One of the tasks of the Shared Services Administrator is to support the users of the shared services. Software Engineers will be using instances of the IBM Rational Test Workbench pattern to connect to and use capabilities of the shared services such as the HTTP Proxy and RIT Agents. If the shared services are deployed in a high security environment, this will require opening firewall ports for each system under test.
Adam the Shared Services Administrator received an email earlier from Evan the Software Engineer requesting several ports be opened on nodes in the shared services.
Hey, Adam,
In order to use the IBM Shared Services for Rational Test Virtualization Server to record and run stubs for my DayTrader Web Services, I need the following ports opened on the shared service nodes:
1. RITPP_HOST INPUT New request on destination port 3128
2. RITPP_HOST OUTPUT New request to DAYTRADER_HOST destination port 9080
3. RITPP_HOST INPUT response on Existing connection from source port 9080
4. RITPP_HOST OUTPUT response on Existing connection from source port 3128
5. RITPP_HOST OUTPUT New request to RITA_HOST destination port 9080
6. RITA_HOST INPUT New request on destination port 9080
7. RITA_HOST OUTPUT response on Existing connection through source port 9080
8. RITPP_HOST INPUT response on Existing connection from source port 9080
9. RITA_HOST OUTPUT New request to DAYTRADER_HOST destination port 9080
10. RITA_HOST INPUT response on Existing connection from source port 9080
Thanks,
Evan
Adam will use the Linux iptables command to configure the firewalls of the machines. The iptables command is a very powerful tool with many options. This workbook will not teach you everything about the iptables command. There are many resources on the internet documenting the iptables command. It is suggested that you feel comfortable with firewalls and iptables before continuing.
Page 35 5/8/2023 Page 35

IBM Software
5.1 Open firewall ports on HTTP Proxy hostTo avoid jumping back and forth between machines, Adam sorts the requests into the two nodes and turns his attention to the HTTP Proxy host first. Here are Evan’s requested paths for the HTTP Proxy host:
RITPP_HOST INPUT New request on destination port 3128
RITPP_HOST OUTPUT New request to DAYTRADER_HOST destination port 9080
RITPP_HOST INPUT response on Existing connection from source port 9080
RITPP_HOST OUTPUT response on Existing connection from source port 3128
RITPP_HOST OUTPUT New request to RITA_HOST destination port 9080
RITPP_HOST INPUT response on Existing connection from source port 9080
Adam immediately sees the last rule is a duplicate of the third rule so he can eliminate that one from the list.
He also recognizes that port 3128 is the standard port used by the HTTP Proxy and that the shared services are already configured to allow requests and responses to the destination port 3128 on the proxy host. He is left with the following list:
RITPP_HOST OUTPUT New request to DAYTRADER_HOST destination port 9080
RITPP_HOST INPUT response on Existing connection from source port 9080
RITPP_HOST OUTPUT New request to RITA_HOST destination port 9080
Page 36 Service Virtualization in the IBM Pure Application Server

IBM Software
Adam will not filter his firewall rules based on hosts, only ports. That means the first and third paths will be satisfied by a single rule. Adam now translates Evan’s requests into iptable commands:
RITPP_HOST OUTPUT New request to ANY_HOST destination port 9080-I OUTPUT -p tcp --dport 9080 -m state --state NEW,ESTABLISHED -j ACCEPT
RITPP_HOST INPUT response on Existing connection from source port 9080-I INPUT -p tcp --sport 9080 -m state --state ESTABLISHED -j ACCEPT
These are the two rules he will add to the RITPP_HOST.
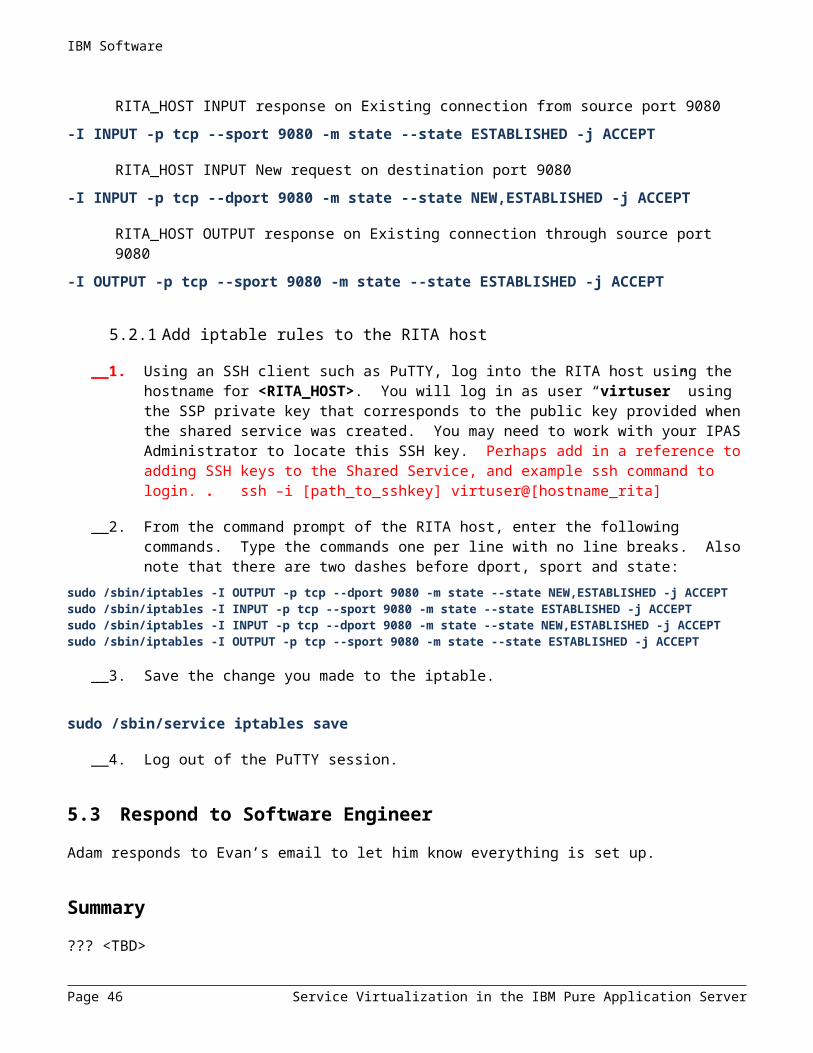
5.1.1 Add iptable rules to the RITPP host__1. Using an SSH client such as PuTTY, log into the <RITPP_HOST> virtual machine. You will
log in as user “virtuser” using the SSP private key that corresponds to the public key provided when the shared service was created. You may need to work with your IPAS Administrator to locate this SSH key.
__2. From the command prompt of the RITPP host, enter the following commands. Type each command on one line (no line breaks). Also note that there are two dashes before dport, sport and state:
sudo /sbin/iptables -I OUTPUT -p tcp --dport 9080 -m state --state NEW,ESTABLISHED -j ACCEPTsudo /sbin/iptables -I INPUT -p tcp --sport 9080 -m state --state ESTABLISHED -j ACCEPT
__3. Save the change you made to the iptable.
sudo /sbin/service iptables save
__4. Log out of the PuTTY session.
5.2 Open firewall ports on RIT Agent hostThe remaining paths for the RITA_HOST are as follows:
RITA_HOST OUTPUT New request to DAYTRADER_HOST destination port 9080-I OUTPUT -p tcp --dport 9080 -m state --state NEW,ESTABLISHED -j ACCEPT
RITA_HOST INPUT response on Existing connection from source port 9080-I INPUT -p tcp --sport 9080 -m state --state ESTABLISHED -j ACCEPT
RITA_HOST INPUT New request on destination port 9080-I INPUT -p tcp --dport 9080 -m state --state NEW,ESTABLISHED -j ACCEPT
RITA_HOST OUTPUT response on Existing connection through source port 9080-I OUTPUT -p tcp --sport 9080 -m state --state ESTABLISHED -j ACCEPT
Page 37 5/8/2023 Page 37

IBM Software
5.2.1 Add iptable rules to the RITA host __1. Using an SSH client such as PuTTY, log into the RITA host using the hostname for
<RITA_HOST>. You will log in as user “virtuser” using the SSP private key that corresponds to the public key provided when the shared service was created. You may need to work with your IPAS Administrator to locate this SSH key. Perhaps add in a reference to adding SSH keys to the Shared Service, and example ssh command to login. . ssh –i [path_to_sshkey] virtuser@[hostname_rita]
__2. From the command prompt of the RITA host, enter the following commands. Type the commands one per line with no line breaks. Also note that there are two dashes before dport, sport and state:
sudo /sbin/iptables -I OUTPUT -p tcp --dport 9080 -m state --state NEW,ESTABLISHED -j ACCEPTsudo /sbin/iptables -I INPUT -p tcp --sport 9080 -m state --state ESTABLISHED -j ACCEPTsudo /sbin/iptables -I INPUT -p tcp --dport 9080 -m state --state NEW,ESTABLISHED -j ACCEPTsudo /sbin/iptables -I OUTPUT -p tcp --sport 9080 -m state --state ESTABLISHED -j ACCEPT
__3. Save the change you made to the iptable.
sudo /sbin/service iptables save
__4. Log out of the PuTTY session.
5.3 Respond to Software EngineerAdam responds to Evan’s email to let him know everything is set up.
Summary
??? <TBD>
Page 38 Service Virtualization in the IBM Pure Application Server

IBM Software
Lab 6 Virtualizing a Web ServiceOnce the Shared Service Administrator acknowledges that the firewall rules have been put in place, the Software Engineer can record messages, create tests and stubs from them and deploy stubs to the Rational Test Virtualization Server.
6.1 Record Web Service MessagesOnce the web service client has been configured to route messages through the HTTP Proxy, you can simply invoke the RIT recorder, interact with the application normally and the recorder will capture message requests sent to the web service and their responses. These message events can be used to generate an integration test or a stub.
6.1.1 Force update of VIE Port setting in Rational Integration Tester
Due to defect 60367 : Fixed VIE Port value is not picked up by RIT , the user must open and close the Rational Integration Tester Library Manager before starting Rational Integration Tester to ensure the VIE Port setting is observed by Rational Integration Tester.
__1. From the Red Hat menu, select Applications > System Tools > Terminal.
__2. Enter the following command to launch Rational Integration Tester:
/opt/IBM/RationalIntegrationTester/LibConfig
__3. When the Library Manager appears, simply click OK to close it.
Page 39 5/8/2023 Page 39

IBM Software
6.1.2 Create a Rational Integration Tester ProjectRational Integration Tester assets – including recordings – are maintained in Rational Integration Tester projects.
__4. Return to the VNC viewer connected to your IBM Rational Test Workbench instance.
__5. From the Red Hat menu, select Applications > System Tools > Terminal.
__6. Enter the following command to launch Rational Integration Tester:
/opt/IBM/RationalIntegrationTester/GHTester
__7. When the Welcome dialog appears, choose to create a New Project.
__8. Enter DayTrader for the project name and click Next.
__9. On the Server Settings dialog, click Test Connection in the Results Database area. You should get a dialog indicating the connection was made successfully. This confirms that the results database parameters entered by the Shared Services Administrator are correct and a connection can be established to the database in the shared services. Click OK to dismiss the message.
__10. Confirm the Rational Test Control Panel URL contains the link to your RTCP instance in the Rational Test Virtualization Server shared service: http://<RTCP_HOST>:7819/RTCP. It should NOT contain “localhost”.
__11. For Domain, select default_domain.
__12. Click Finish to create the project
6.1.3 Publish the results database connectionOnce a project has been created, the results database can be shared with the Rational Test Control Panel. This will enable users to browse and review test results using the RTCP web interface rather than the full RIT client. This is useful for managers and other stakeholders that are interested in testing progress but not directly involved in executing the tests.
__1. From the Rational Integration Tester menu, choose Project > Project Settings.
__2. Select the Server Settings tab and select Domain default_domain.
__3. Click Publish results database connection. Dismiss the message and settings dialogs.
6.1.4 Import the DayTrader WSDLThe project will open to the Logical View of the Architecture School perspective. The Architecture School models the connections and operations in the system. The model can be constructed a piece at a time by manually adding components to the Logical View. Many elements of the model such as operations
Page 40 Service Virtualization in the IBM Pure Application Server

IBM Software
can be identified during recording so you often can start with a minimal model definition and let Rational Integration Tester do the work of building the model as you record.
Some technologies such as web services provide interface specifications from which Rational Integration Tester can derive significant portions of the architecture model. Web services use a file called a Web Services Description Language file (WSDL file) that specifies the endpoints, operations and data formats for the system. WSDL files can be imported to build the model.
You will import the WSDL file which describes the DayTrader web services interfaces. When Rational Integration Tester imports the WSDL file, it will construct a logical model and a physical model based on the contents of the interface specifications it finds in the WSDL file.
__1. From the Logical View toolbar, select Web > WSDL.
__2. Click New configuration in the Create a new External Resource dialog.
__3. Click Change in the New WSDL dialog.
__4. Select the URL tab and enter the following in the URL field:
http://<DAYTRADER_HOST>:9080/daytrader/services/TradeWSServices?wsdl
__5. Click OK to return to the New WSDL dialog.
__6. Click Analyze and select Schema Analysis and Schema Validity to verify the WSDL path was entered correctly. If errors occur, review the URL and correct any problems.
__7. Click Finish to return to the New WSDL dialog then OK to return to the Create a new External Resource dialog.
__8. Click Next twice.
Page 41 5/8/2023 Page 41
IBM Software
__9. On the final screen of the wizard, select Perform the synchronization but don’t switch views and click Finish. Rational Integration Tester will analyze the interface specification in the WSDL file and produce a logical and physical model.
6.1.5 Configure Proxy RecordingRecording will be done through the use of the HTTP proxy on the RITPP node in the Rational Test Virtualization Server shared service. This is enabled in the model through a setting on the TradeWSServices endpoint.
__1. Right-click the TradeWSServices element in the model and choose Physical Resource.
__2. Select the Recording tab and switch Recording Mode to External Proxy Server.
__3. Click OK to close the dialog.
6.1.6 Get the DayTrader application to the correct stateFor simplicity’s sake, you will record only one request to retrieve a quote for the security “s:0”.
__1. Open the DayTrader application in a browser by visiting
http://<DAYTRADER_HOST>:9080/daytrader/
__2. Select the Trading & Portfolios tab.
__3. Click Log in, accepting the default username of uid:0.
__4. Select the Quotes/Trade link.
Page 42 Service Virtualization in the IBM Pure Application Server

IBM Software
6.1.7 Record messagesWhen you engage the recorder in Rational Integration Tester, RIT sends a request to Rational Test Control Panel which in turn configures the HTTP Proxy. The proxy will continue to pass messages from source to destination, but will also log those events that match the recording rule to the Rational Integration Tester recorder.
__1. Return to the VNC viewer connected to your IBM Rational Test Workbench instance.
__2. Right-click getQuote operation and select Add event monitor. This switches RIT to the Recording Studio perspective and asks you if you would like to record all messages coming to the TradeWSServices endpoint. You will only record getQuote at this time so click OK without selecting anything in the References dialog.
__3. Click the red Start Recording button on the Events View toolbar to start the recorder.
__4. In the DayTrader web interface, click the “s:0” link in the symbols column of the Quotes table. Four events will appear in the Events View in Rational Integration Tester.
__5. Click Pause Recording on the Events View toolbar. These events will be used to create a service stub in the next section.
6.2 Create and Test a Web Service StubA service stub or “virtualization” can be created by hand but can also be created from recorded messages. Your stub will be created using the messages you just recorded.
6.2.1 Save recorded events as a stub__1. Select only the 3rd and 4th events in the Recording Studio Events View (click and ctrl-click).
__2. Click the Save Events button in the Events View toolbar.
__3. Choose Stubs and click Next.
__4. Choose as hard coded values and click Summary.
__5. Enter getS0Quote for the stub name and click Finish. RIT switches to the Test Factory perspective and opens the setS0Quote.
6.2.2 Enhance the stubIn this section, you will edit the stub to return some fictitious data, making it easier to identify when the stub is responding to DayTrader requests. You will also edit the stub to ensure messages not intended for the stub are passed on to the live service.
__1. Select the Output tab just below the event name.
Page 43 5/8/2023 Page 43

IBM Software
__2. Locate the text “S0 Incorporated” in the companyName field of the message. Replace the text S0 Incorporated with text of your choosing, for example “My Great Company”.
__3. Select the Properties tab near the top of the stub editor.
__4. In the Pass-Through section, change the configuration from Discard to Pass Through.
__5. Save the changes.
6.2.3 Test the StubNow that the stub has been created, you can run it under limited constraints from the Rational Integration Tester workbench in order to verify its functionality. In this section, you will start the stub on the workbench and then invoke the same quote operation in DayTrader to verify the DayTrader requests are serviced by the stub and not the live service.
6.2.4 Start the stub__1. Right-click on getSOQuote in the Logical explorer on the left side of the Test Factory
perspective and choose Run. RIT will switch to the Test Execution perspective and the stub will launch. Wait for the status to be Ready.
6.2.5 Invoke the quote operation__1. In your DayTrader web page, click s:0 to retrieve a new quote for the security. The
company name will now contain the text you provide in step 6.2.2, above.
__2. In the Test Execution perspective Console of Rational Integration Tester, note the messages that indicate the stub was invoked.
6.2.6 Stop the stub__1. Select the getS0Quote task in the Rational Integration Tester Task Monitor and click Stop
selected.
6.2.7 Verify DayTrader uses the live service again__1. Return to DayTrader and click s:0 to retrieve a quote again for the s:0 security. The
company name should once again be “S0 Incorporated” because the DayTrader client is once again calling the live DayTrader service.
6.3 Deploy the Stub to Rational Test Virtualization ServerRunning stubs from Rational Integration Tester is useful for development and verification of the stubs, but in order to scale and share these valuable assets across your teams, you need to deploy the stubs to
Page 44 Service Virtualization in the IBM Pure Application Server

IBM Software
Rational Test Virtualization Server so they can be started and stopped as needed by anyone on the team.
When a stub is published, the stub is uploaded from Rational Integration Tester to the Rational Test Control Panel in the Rational Test Virtualization Server shared service. Later, when a user chooses to start the stub, it is deployed to a RIT Agent running in the shared service. A routing rule is registered with the HTTP Proxy. This routing rule informs the proxy that if it receives a request for the DayTrader web service getQuote operation, that request should be routed to the stub running on the RIT Agent instead of the live service. By default, the stub will use the same port on the Agent machine as the live service uses.
Figure 7: HTTP Stubbing Topology
6.3.1 Publish the stub to RTCP__1. Back in Rational Integration Tester, switch to the Test Factory perspective by pressing F10.
__2. Right-click on the Stubs node under getQuote in the Logical explorer on the left side of the screen and choose Publish Stubs.
Page 45 5/8/2023 Page 45

IBM Software
__3. In the Publish Stubs dialog, ensure the Domain default_domain is selected and the Environment TradeWSServices is selctec and then click Publish.
__4. Click OK when the publish operation has finished.
Page 46 Service Virtualization in the IBM Pure Application Server
IBM Software
Lab 7 Testing an Application using a Stub
Publishing the stub to RTCP simply makes it available for others to use. To run the stub, a user visits the Rational Test Control Panel and starts the stub on an agent.
7.1.1 Verify local stub is not running__1. In DayTrader, request a quote for s:0. Verify the company name appears as “S0
Incorporated”. If your customized name appears, it is most likely because the stub is still running in Rational Integration Tester. Follow the steps in section 6.2.6 to stop the stub.
7.1.2 Start the stub in RTCP__1. Open a web browser to http://<RTCP_HOST>:7819/RTCP.
__2. Log in with the credentials admin/admin.
__3. Select the VIE tab in RTCP.
__4. Select the default_domain Domain and the TradeWSServices Environment and click View Dashboard.
__5. Click the green plus sign next to the getQuote operation and click Start stub. This will deploy the stub to the RITA Agent. After several minutes, the status of the stub will go from Deploying to Initializing to Ready.
7.1.3 Invoke a quote request against the stub__1. When the stub’s status is Ready, invoke a quote request for s:0 in DayTrader. You should
see your customized company name appear.
7.1.4 Stop the stub in RTCP__1. Return to the VIE tab of RTCP.
Page 47 5/8/2023 Page 47

IBM Software
__2. Click the down-arrow next to the getS0Quote 1.0 service and select Stop stub. Click Yes to confirm. Wait for the stub to stop.
7.1.5 Invoke a quote request against the live system__1. When the stub has stopped, invoke a quote request for s:0 in DayTrader. You should see
the company name is once again “S0 Incorporated”.
Summary
In this lab, you “virtualized” a web service by creating a stub that was run in place of the live service operation. This first involved recording interactions on a live system. To enable recording, you instrumented the DayTrader web client to route communications through the HTTP proxy. The proxy was then used to capture events while you manually interacted with the DayTrader application.
Once you had the recorded events, you generated a simple stub from the information contained in the recorded events. You used the graphical interface to customize the stub’s response data and verified that the stub worked by running it within your Rational Integration Tester IDE.
In order to share this stub with others and to scale your deployment to the enterprise, you published the stub to the Rational Test Control Panel in the Rational Test Virtualization Server shared service. The stub was then started and run on an agent machine. Once running on the agent, the stub – rather than the live service – handled the requests and produced responses for the DayTrader system under test.
You have successfully completed the Lab Exercises!
List Bullet 3 (Alt+V)
Page 48 Service Virtualization in the IBM Pure Application Server

Appendix A. Deployment Topology
Appendix Page 49

Appendix B. Shared Service Information Table
Cloud Group
Placeholder Node Virtual Machine Name Public IP/hostname
RTCP_HOST RTCP-HVM.nnnnnn
RITPP_HOST RITPP-HVM.nnnnnn
RITA_HOST RTVS-HVM.nnnnnn

Appendix C. Troubleshooting
Appendix Page 51

Appendix D. NoticesThis information was developed for products and services offered in the U.S.A.
IBM may not offer the products, services, or features discussed in this document in other countries. Consult your local IBM representative for information on the products and services currently available in your area. Any reference to an IBM product, program, or service is not intended to state or imply that only that IBM product, program, or service may be used. Any functionally equivalent product, program, or service that does not infringe any IBM intellectual property right may be used instead. However, it is the user's responsibility to evaluate and verify the operation of any non-IBM product, program, or service.
IBM may have patents or pending patent applications covering subject matter described in this document. The furnishing of this document does not grant you any license to these patents. You can send license inquiries, in writing, to:
IBM Director of LicensingIBM CorporationNorth Castle DriveArmonk, NY 10504-1785U.S.A.
For license inquiries regarding double-byte (DBCS) information, contact the IBM Intellectual Property Department in your country or send inquiries, in writing, to:
IBM World Trade Asia CorporationLicensing2-31 Roppongi 3-chome, Minato-kuTokyo 106-0032, Japan
The following paragraph does not apply to the United Kingdom or any other country where such provisions are inconsistent with local law: INTERNATIONAL BUSINESS MACHINES CORPORATION PROVIDES THIS PUBLICATION "AS IS" WITHOUT WARRANTY OF ANY KIND, EITHER EXPRESS OR IMPLIED, INCLUDING, BUT NOT LIMITED TO, THE IMPLIED WARRANTIES OF NON-INFRINGEMENT, MERCHANTABILITY OR FITNESS FOR A PARTICULAR PURPOSE. Some states do not allow disclaimer of express or implied warranties in certain transactions, therefore, this statement may not apply to you.
This information could include technical inaccuracies or typographical errors. Changes are periodically made to the information herein; these changes will be incorporated in new editions of the publication. IBM may make improvements and/or changes in the product(s) and/or the program(s) described in this publication at any time without notice.
Any references in this information to non-IBM Web sites are provided for convenience only and do not in any manner serve as an endorsement of those Web sites. The materials at those Web sites are not part of the materials for this IBM product and use of those Web sites is at your own risk.
IBM may use or distribute any of the information you supply in any way it believes appropriate without incurring any obligation to you.
Any performance data contained herein was determined in a controlled environment. Therefore, the results obtained in other operating environments may vary significantly. Some measurements may have

been made on development-level systems and there is no guarantee that these measurements will be the same on generally available systems. Furthermore, some measurements may have been estimated through extrapolation. Actual results may vary. Users of this document should verify the applicable data for their specific environment.
Information concerning non-IBM products was obtained from the suppliers of those products, their published announcements or other publicly available sources. IBM has not tested those products and cannot confirm the accuracy of performance, compatibility or any other claims related to non-IBM products. Questions on the capabilities of non-IBM products should be addressed to the suppliers of those products.
All statements regarding IBM's future direction and intent are subject to change or withdrawal without notice, and represent goals and objectives only.
This information contains examples of data and reports used in daily business operations. To illustrate them as completely as possible, the examples include the names of individuals, companies, brands, and products. All of these names are fictitious and any similarity to the names and addresses used by an actual business enterprise is entirely coincidental. All references to fictitious companies or individuals are used for illustration purposes only.
COPYRIGHT LICENSE:
This information contains sample application programs in source language, which illustrate programming techniques on various operating platforms. You may copy, modify, and distribute these sample programs in any form without payment to IBM, for the purposes of developing, using, marketing or distributing application programs conforming to the application programming interface for the operating platform for which the sample programs are written. These examples have not been thoroughly tested under all conditions. IBM, therefore, cannot guarantee or imply reliability, serviceability, or function of these programs.
Appendix Page 53
Appendix E. Trademarks and copyrightsThe following terms are trademarks of International Business Machines Corporation in the United States, other countries, or both:
IBM Rational Rational Quality Manager
Rational Functional Tester
Rational Performance Tester
Rational Integration Tester
Rational Test Virtualization
Server
Rational Test Control Panel DB2 developerWorks Rational Team
Concert
Adobe, Acrobat, Portable Document Format (PDF), and PostScript are either registered trademarks or trademarks of Adobe Systems Incorporated in the United States, other countries, or both.
Cell Broadband Engine is a trademark of Sony Computer Entertainment, Inc. in the United States, other countries, or both and is used under license therefrom.
Java and all Java-based trademarks and logos are trademarks of Sun Microsystems, Inc. in the United States, other countries, or both. See Java Guidelines
Microsoft, Windows, Windows NT, and the Windows logo are registered trademarks of Microsoft Corporation in the United States, other countries, or both.
Intel, Intel logo, Intel Inside, Intel Inside logo, Intel Centrino, Intel Centrino logo, Celeron, Intel Xeon, Intel SpeedStep, Itanium, and Pentium are trademarks or registered trademarks of Intel Corporation or its subsidiaries in the United States and other countries.
UNIX is a registered trademark of The Open Group in the United States and other countries.
Linux is a registered trademark of Linus Torvalds in the United States, other countries, or both.
ITIL is a registered trademark and a registered community trademark of the Office of Government Commerce, and is registered in the U.S. Patent and Trademark Office.
IT Infrastructure Library is a registered trademark of the Central Computer and Telecommunications Agency which is now part of the Office of Government Commerce.
Other company, product and service names may be trademarks or service marks of others.
NOTES

NOTES

© Copyright IBM Corporation 2011.
The information contained in these materials is provided for
informational purposes only, and is provided AS IS without warranty
of any kind, express or implied. IBM shall not be responsible for any
damages arising out of the use of, or otherwise related to, these
materials. Nothing contained in these materials is intended to, nor
shall have the effect of, creating any warranties or representations
from IBM or its suppliers or licensors, or altering the terms and
conditions of the applicable license agreement governing the use of
IBM software. References in these materials to IBM products,
programs, or services do not imply that they will be available in all
countries in which IBM operates. This information is based on
current IBM product plans and strategy, which are subject to change
by IBM without notice. Product release dates and/or capabilities
referenced in these materials may change at any time at IBM’s sole
discretion based on market opportunities or other factors, and are not
intended to be a commitment to future product or feature availability
in any way.
IBM, the IBM logo and ibm.com are trademarks or registered
trademarks of International Business Machines Corporation in the
United States, other countries, or both. If these and other IBM
trademarked terms are marked on their first occurrence in this
information with a trademark symbol (® or ™), these symbols
indicate U.S. registered or common law trademarks owned by IBM at
the time this information was published. Such trademarks may also be
registered or common law trademarks in other countries. A current
list of IBM trademarks is available on the Web at “Copyright and
trademark information” at ibm.com/legal/copytrade.shtml
Other company, product and service names may be trademarks or
service marks of others.