Resource Certification For MyAPNIC 170316 signed by the IP custodian, thus validation tools can...
11
Resource Certification Registration Guide for MyAPNIC Page 1 of 11 Resource Certification Guide to Resource Certification in MyAPNIC
Transcript of Resource Certification For MyAPNIC 170316 signed by the IP custodian, thus validation tools can...

Resource Certification
Registration Guide for MyAPNIC Page 1 of 11
Resource Certification
Guide to Resource Certification in MyAPNIC

Resource Certification
Registration Guide for MyAPNIC Page 2 of 11
Table of Contents 1 Guide to Resource Certification in MyAPNIC ................................................................................. 3
1.1 Access to Resource Certification 31.2 Activate Resource Certification 41.3 Creating Route Origin Authorization (ROA) objects 71.4 View or delete ROA objects 9

Resource Certification
Registration Guide for MyAPNIC Page 3 of 11
1 Guide to Resource Certification in MyAPNIC This guide explains how to use the Resource Certification (RPKI) feature in MyAPNIC. Resource Public Key Infrastructure (RPKI) is a public key infrastructure framework designed to secure the Internet's routing infrastructure.
1.1 Access to Resource Certification All users should have Two-Factor-authentication enabled in MyAPNIC to use the Resource Certification feature
§ Corporate Contacts by default have the “update” privilege
§ Other contacts by default only have the “view” privilege
The Corporate Contact can manage user privileges from the Manage Contact menu in MyAPNIC.

Resource Certification
Registration Guide for MyAPNIC Page 4 of 11
1.2 Activate Resource Certification
To start using the Resource Certification feature, click on the Certification menu under Resources.
Select if you want to operate in the MyAPNIC RPKI portal or if you want to host your own certificate authority.
After selecting the first option, you will be taken to the terms and conditions.
Please read this carefully, and if you agree to the conditions please accept by clicking the following button at the bottom of the page.
With that your RPKI engine will be activated. This is required to request/receive your Resource Certificate from APNIC and create your ROA (Route Origin Authorization) objects in MyAPNIC. Once

Resource Certification
Registration Guide for MyAPNIC Page 5 of 11
this service is activated, it is available to all MyAPNIC users from that account with the Resource Certification privilege.
Option 2. Host your own Certificate Authority
Select the second option and click “Next”.

Resource Certification
Registration Guide for MyAPNIC Page 6 of 11
Read the terms and conditions and click on “I accept. Enable provisioning protocol to my own Certification Authority”.
Click on “Upload XML” and attach your identity.xml file.

Resource Certification
Registration Guide for MyAPNIC Page 7 of 11
After you attach your identity.xml file, click on “Submit”.
Click on “Download parent XML” to download the XML file that is needed to configure the parent of your RPKI engine.
Should your RPKI engines business PKI (BPKI) certificate change in the future, you need to upload your new identity XML file by clicking on “Upload new XML”.
Resource Certification
Registration Guide for MyAPNIC Page 8 of 11
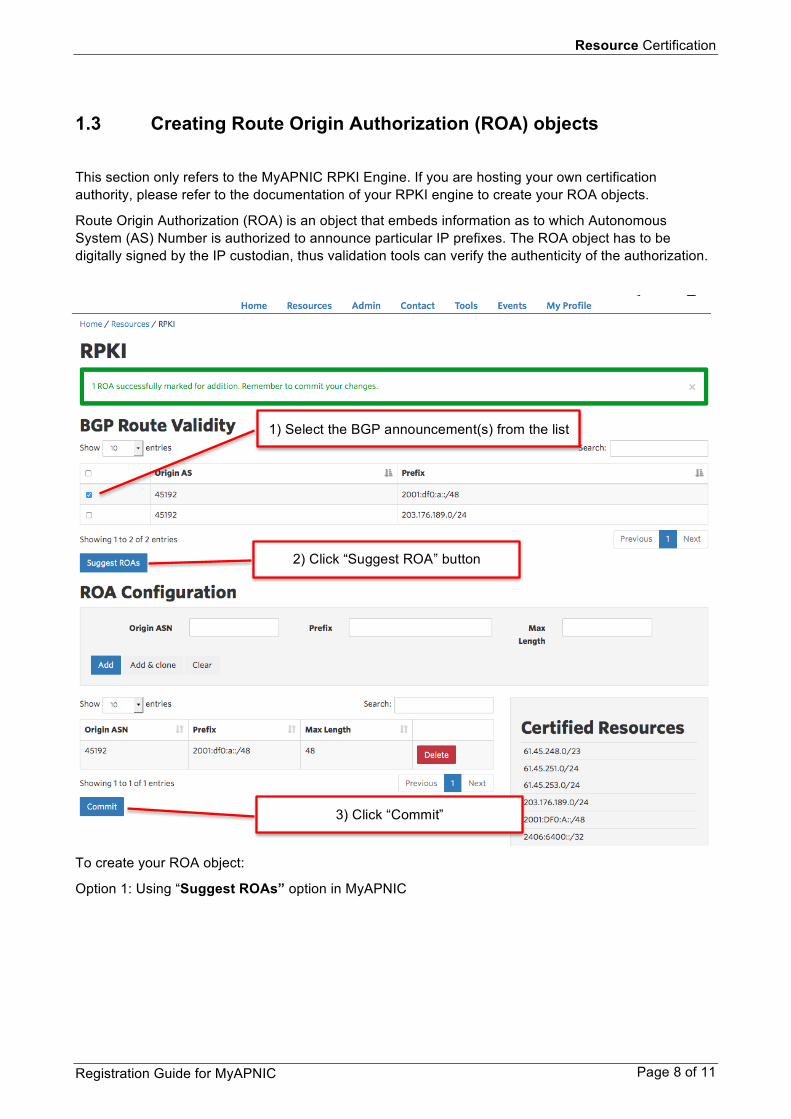
1.3 Creating Route Origin Authorization (ROA) objects
This section only refers to the MyAPNIC RPKI Engine. If you are hosting your own certification authority, please refer to the documentation of your RPKI engine to create your ROA objects.
Route Origin Authorization (ROA) is an object that embeds information as to which Autonomous System (AS) Number is authorized to announce particular IP prefixes. The ROA object has to be digitally signed by the IP custodian, thus validation tools can verify the authenticity of the authorization.
To create your ROA object:
Option 1: Using “Suggest ROAs” option in MyAPNIC
1) Select the BGP announcement(s) from the list
3) Click “Commit”
2) Click “Suggest ROA” button

Resource Certification
Registration Guide for MyAPNIC Page 9 of 11
Option 2 : Manual ROA configuration
1) Enter the Origin ASN you authorize to announce routes for your IP prefix
3) Enter the most specific prefix that you authorize for this ROA
2) Enter your IP prefix that is being announced
4) Click “Add”

Resource Certification
Registration Guide for MyAPNIC Page 10 of 11
Example: With IP prefix 61.45.248.0/23 and max length entered as 24, the following are considered authorized announcements with origin AS45192.
§ 61.45.248.0/23
§ 61.45.248.0/24
§ 61.45.249.0/24
After you click on “Add” you will be requested to commit the changes by clicking on “Commit”.
Click on “Commit” to register your ROA object.

Resource Certification
Registration Guide for MyAPNIC Page 11 of 11
1.4 View or delete ROA objects
You can view, search and sort the list of your ROA objects in the RPKI page. To delete an existing ROA click on the delete icon corresponding to the ROA you wish to delete and then click “Commit”.
If successful, the following message will be displayed.