QUICK START QUICK START TRAINING Updated – September 15, 2011.

Do not connect to power source until after wiring valves to timer
RESET
PROGRAM
RAIN DELAY
AUTO
OFF
SETCLOCK
SETD
ATE
BU
DG
ET HOW OFTEN
RUNTIME
STARTTIME
PN 57896-50 rJ
Or
1. SELECT LOCATION
.. .
..
. .
.
.. ..
..
..
. ..
...
..
.
.
.
....
..
.. .
...
..
. ..
....
..
.. .
..
..
....
..
.. .
...
..
. .
..
...
.
RESET
PROGRAM
RAIN DELAY
AUTO
OFF
SETCLOCK
SETD
AY
BU
DG
ET HOW OFTEN
RUNTIME
STARTTIME
.
For detailed instructions on outdoor wiring, please download the full manual “Outdoor Swing Panel Timer” at www.orbitonline.comWarning: Check state and local codes. Orbit recommends using
a licensed electrical contractor for outdoor wiring of timer.
Indoor
Outdoor
Clean, dry, and out of direct sunlightAllow 9 inch clearance for the swing door
A
F
G
H
B
C
D
E
ENTER - To confirm a new setting MANUAL - To water manually
CLEAR - To clear a setting
PROGRAM - to switch between programs - A, B, and C
ARROW [ ] - To skip to the next setting / watering station or move to other programs/settings
ARROW [ ] - To go back to the previous setting / watering station or move to other programs/settings
RAIN DELAY - To pause operation for 24-72 hours due to rain or other factors
[+] - To increase a numeric setting
[ -] - To decrease a numeric setting
Button Function:
I
N
O
P
J
K
L
M
AUTO - Watering mode
SET CLOCK - Set calendar and clock time
SET DATE - Year, Month, and Day
START TIME - Set time to begin watering
RUN TIME - Set watering duration for each station
HOW OFTEN - Set frequency of watering days
BUDGET - Adjust overall watering as a percentage
OFF - Turn all stations off
Dial Position Function:
RESET
PROGRAM
RAIN DELAY
AUTO
OFF
SETCLOCK
SETD
ATE
BU
DG
ET HOW OFTEN
RUNTIME
STARTTIME
A
B
C
F
DE
G
H
Reset
IndicatorSwing
Out Panel Release
5. CONNECT TO ELECTRICAL POWER
Indoor
.
RESET
PROGRAM
RAIN DELAY
AUTO
OFF
SETCLOCK
SETD
AY
BU
DG
ET HOW OFTEN
RUNTIME
STARTTIME
Outdoor
Warning: See manual for outdoor wiring instructions
4. CONNECT VALVE WIRE TO TERMINAL
Station 1
Push tabupward torelease wire
Strip wire
Push in
Only connect one valve to each terminal (station)
E Set Watering Days or Interval
Turn dial to how often to select watering days ([ARROWS] to move and [ENTER] to select).
To water on Odd or Even days or to water using Intervals days, please download the full manual “Outdoor Swing Panel Timer” (at www.orbitonline.com) for instructions.
Set Auto ModeF
Turn dial to AUTO—you have programmed your timer!
Keyhole
Pre-formedmounting holes
No. 8 Screw
Wall
1/8"
2. MOUNT TIMER
Level
Screw through one of thepre-formed mounting holes.
MOUNTING TEMPLATEGABARIT D`INSTALLATIONGUIA DE COLGAR
4.17”(106mm)
p 801 295 9820f 801 951 5815
www.fl uid-studio.net
1065 South 500 WestBountiful, Utah 84010
proof no: 3date: 10.05.07
des: SM spck: SM
job no: 07WTM005259
client: Orbit
sku: 57880
upc: ? ????? ????? ?
fi le name: 07WTM00525957880-04 rA.indd
software: Illustrator CS2
colors
additional instructions:··
crop colornon printing
PMS????
PMS????
colornon printing
PMS????
Registration
K
Printers are responsible for meeting print production requirements. Any changes must be approved by the client and Fluid Studio. printed piece must meet designated specifi cations on this form.
dimensions:
fl at: w: 9" h: 7"
fi nished: w 9" d: 0" h 7"
© 2007 Fluid Studio. This work is the property of Fluid Studio, and cannot be used, reproduced or distributed in any way without their express permission.Use included mounting template
to mark screw locations.Hang timer on screw
using keyhole.
ToTimerWire Nut
Solenoid
Common Wire
Valve
Connect one of the two wires from each valve to the common wire leading to the timer (usually white).
Connect the other wire from each valve to one of the colored wires leading to the timer.
3. CONNECT SPRINKLER VALVES TO TIMER WIRES
6. ACTIVATE BATTERY
RESET
PROGRAM
RAIN DELAY
AUTO
OFF
SETCLOCK
SETD
ATE
BU
DG
ET HOW OFTEN
RUNTIME
STARTTIME
Remove plastic strip to activate battery
One Lithium CR2032 battery (included) is required to retain
the program in memory during power loss. Annual
replacement is recommended.
Remove the plastic strip to activate the
pre-installed battery.
Battery
TIMERQUICK START GUIDE
REQUIRED TOOLS:
Phillips Screwdriver
Wire Strippers
Note: The quick start guide is intended to help you get up and running with your new timer. It includes basic installation and programming help. For more detailed and advanced instruction, please download
the full manual “Outdoor Swing Panel Timer” at www.orbitonline.com
8. ADDITIONAL FEATURESRAIN DELAY
• Turn dial to AUTO and Press the [RAIN DELAY] button.
• Push the [+/-] to select 24, 48 or 72 hours.
• Press [ENTER] to begin.
• Press [CLEAR] to cancel the rain delay.
MANUAL WATERINGYour timer has the ability to allow you to manually water without disturbing the preset program.
HELP 1-800-488-6156 or 1-801-299-5555
www.orbitonline.com
Before returning this sprinkler timer to the store, contact Orbit® Technical Service at: 1-800-488-6156, 1-801-299-5555.
LISTINGS The sprinkler timer is tested to UL60730 standard & is ETL® listed.
Appropriate international models are CSA® and CE® approved.
This Class B digital apparatus complies with Canadian ICES-003.
Disconnection : Type 1Y
Input: 120V, 60Hz, 0.2A; Output: 26V, 5OOmA
Rated impulse voltage: 2500V
Pollution degree: 2
The supply cord of this control can be replaced only by the manufacturer or his accredited service agent.
NOTICE The information in this manual is primarily intended for the user who will establish a watering schedule and enter that schedule into the sprinkler timer. This product is intended to be used as an automatic sprinkler timer for activating 24 VAC irrigation valves, as described in this manual.
WARRANTY AND STATEMENTOrbit® Irrigation Products, Inc. warrants to its customers that its products will be free from defects in materials and workmanship for a period of six years from the date of purchase.
We will replace, free of charge, the defective part or parts found to be defective under normal use and service for a period of up to six years after purchase (proof of purchase required).
We reserve the right to inspect the defective part prior to replacement.
Orbit® Irrigation Products, Inc. will not be responsible for consequential or incidental cost or damage caused by the product failure. Orbit® liability under this warranty is limited solely to the replacement or repair of defective parts.
To exercise your warranty, return the unit to your dealer with a copy of the sales receipt.
This device complies with Part 15 of the FCC Rules. Operation is subject to the following two conditions: (1) This device may not cause harmful interference, and (2) This device must accept any interference received, including interference that may cause undesired operation.
Warning: Changes or modifications to this unit not expressly approved by the party responsible for compliance could void the user’s authority to operate the equipment.
NOTE: This equipment has been tested and found to comply with the limits for a Class B digital device, pursuant to Part 15 of the FCC Rules. These limits are designed to provide reasonable protection against harmful interference in a residential installation. This equipment generates, uses and can radiate radio frequency energy and, if not installed and used in accordance with the instructions, may cause harmful interference to radio communications. However, there is no guarantee that interference will not occur in a particular installation.
If this equipment does cause harmful interference to radio or television reception, which can be determined by turning the equipment off and on, the user is encouraged to try to correct the interference by one or more of the following measures:
• Reorient or relocate the receiving antenna.
• Increase the separation between the equipment and receiver.
• Connect the equipment into an outlet on a circuit different from that to which the receiver is connected.
• Consult the dealer or an experienced radio/TV technician for help.
Caution: This appliance is not intended for use by young children or infirm persons without supervision. Young children should be supervised to ensure that they do not play with the appliance.
7. PROGRAM TIMERSet Current Time (e.g. pacific, mountain standard)
A
Turn dial to set clock enter current time (+/-)
Set DateB
SETDATE
• Turn dial to SET DATE to enter the Year, Month and Day.• Use the (+/-) button to select the Year.• Press [ENTER] to advance to Month and Day.
C Set Start TimeTime to begin watering
D Select Watering DurationSet for each stationthen press enter
Turn dial to run time enter the watering duration (+/- ) for each station ([ENTER] or [ARROW] to move between stations).
• Turn dial to START TIME position.• Enter one start time using the (+/-) button.• Press the [ENTER] button to save.
Note: Additional start times – Additional start times can be entered if you want your sprinklers to water the same area multiple times a day. For instructions please download the “Outdoor Swing Panel Timer” manual at www.orbitonline.com.
To Run all stations at the pre-programed duration• Turn the dial to AUTO.• Press the [MANUAL] button. Display will show A B and ALL. • Press [ENTER] (or wait a few seconds) to begin manual watering.All stations will water consecutively for their programmed duration.
To Run a specific station for specified time• Turn the dial to AUTO.• Press the [MANUAL] button.• Press the [ / ] buttons until desired station number appears.• Press the [+/–] to enter the desired duration.• Press [ENTER] (or wait a few seconds) to begin manual watering. To stop Manual Watering press [CLEAR].
Note: After the [MANUAL] button has been pushed, if a selection is not made within 5 seconds all stations and programs will begin watering using the programmed RUN TIMES. If no RUN TIMES have been set, nothing will happen and the display will return to the time of day.
BACKUP BATTERY Your timer requires a CR2032 Lithium battery to maintain your program in case of an AC power loss.
Tip: The Battery should be replaced every year, to avoid loss of programming.
BATTERY WARNING: Chemical Burn Hazard. Keep batteries away from children. This product contains a lithium coin cell battery. If a new or used button/coin cell battery is swallowed or enters the body, it can cause severe internal burns and can lead to death in as little as two hours. Always completely secure the battery compartment. If the battery compartment does not close securely, stop using the product, remove the battery, and keep it away from children. If you think the battery might have been swallowed or placed inside any part of the body, seek immediate medical attention. The battery should be disposed of properly and kept away from children. Even used batteries may cause injury.
Note: A battery alone will not operate the valves in your sprinkling system. The sprinkler timer transformer must be connected to an AC line voltage source.
For instructions on “Water Budgeting”, connecting the timer to a “Pump Start” relay, replacing the “Backup Battery” or for installing your timer outdoors, please download the full manual “Outdoor Swing Panel Timer” at www.orbitonline.com
DOWNLOAD THE ORBIT B-HYVE LITE APPLet the Orbit B-hyve Lite app take the guess work out of programming your sprinkler timer.
Download the “Orbit B-hyve Lite” app.After download, the app will guide you through setting up an account and entering information about your landscape.
B-HYVE LITE APP FEATURES Weather Alerts Weather alert notifications on your smart device offer suggestions for when to activate the rain delay feature or adjust programming.
Programming RecommendationsUsing historical local weather data and information about your landscape, the B-hyve Lite app will make monthly programming recommendations customized to your yard.
Water Audit Conduct your own watering audit—in app watering app tool allows for up to 50% savings on water use—catch cup watering tool.
Save Water and Money Based on historical weather data for your zip code, you will receive recommendations on how to program your timer for optimal watering throughout the season, saving water and money.
Zone Identity Name and photograph each of your watering zones making it easy to identify each of your water areas.
*Upgrade easily to the B-hyve WiFi Sprinkler Timer and make smart watering automatic while giving you control of your sprinkler timer from anywhere in the world. The Orbit WiFi timer communicates to the B-hyve cloud and automatically adjusts your sprinkler programming throughout the watering season. B-hyve WiFi timers are EPA WaterSense certified and may be eligible for rebates in your area.
**The easy-set-logic timer is not wifi enabled. The B-hyve Lite app offers programming set-up and adjustments you can manually enter to potentially improve your watering performance.
BATTERY WARNING: Chemical Burn Hazard. Keep batteries away from children. This product contains a lithium coin cell battery. If a new or used button/coin cell battery is swallowed or enters the body, it can cause severe internal burns and can lead to death in as little as two hours. Always completely secure the battery compartment. If the battery compartment does not close securely, stop using the product, remove the battery, and keep it away from children. If you think the battery might have been swallowed or placed inside any part of the body, seek immediate medical attention. The battery should be disposed of properly and kept away from children. Even used batteries may cause injury.
A
F
G
H
B
C
D
E
ENTER: Para confirmar una nueva configuración MANUAL: Para regar manualmente
CLEAR: Para borrar una configuración
PROGRAM: Para cambiar entre programas: A, B y C
FLECHA [ ]: Para pasar a la configuración/estación de riego siguiente o moverse a otros programas/configuraciones
FLECHA [ ]: Para volver a la configuración/estación de riego anterior o moverse a otros programas/configuraciones
RAIN DELAY: Para detener el funcionamiento durante 24 a 72 horas por lluvia u otros factores
[+]: Para aumentar una configuración numérica
[ -]: Para disminuir una configuración numérica
Función de los botones:
I
N
O
P
J
K
L
M
AUTO: Modo de riego
SET CLOCK: Para configurar el calendario y la hora del reloj
SET DATE: Días, mes y año
START TIME: Para configurar la hora de comienzo del riego
RUN TIME: Para configurar la duración del riego para cada estación
HOW OFTEN: Configura la frecuencia de los días de riego
BUDGET: Ajusta el riego total como un porcentaje
OFF: Apaga todas las estaciones
Funciones de las posiciones del selector:
RESET
PROGRAM
RAIN DELAY
AUTO
OFF
SETCLOCK
SETD
ATE
BU
DG
ET HOW OFTEN
RUNTIME
STARTTIME
A
B
C
F
DE
G
H
Restablecer
IndicadorPanel de apertura
hacia fuera
5. CONECTE A LA ALIMENTACIÓN ELÉCTRICA
Interiores
.
RESET
PROGRAM
RAIN DELAY
AUTO
OFF
SETCLOCK
SETD
AY
BU
DG
ET HOW OFTEN
RUNTIME
STARTTIME
Exteriores
Advertencia: Consulte las instrucciones sobre el cableado para exteriores en el manual
4. CONECTE EL CONDUCTOR DE LA VÁLVULA AL TERMINAL
Estación 1
Empuje la lengüeta hacia arriba para liberar el cable
Pele el cable
Empuje
Solo conecte una válvula a cada terminal (estación).
No conecte al suministro de electricidad hasta haber cableado las válvulas al temporizador
Orificio con forma de bocallave
Orificios de montaje preformados
Tornillo No. 8
Pared
1/8"
2. MONTE EL TEMPORIZADOR
Nivel
Atornille a través de uno de los orificiosde montaje preformados.
MOUNTING TEMPLATEGABARIT D`INSTALLATIONGUÍA DE MONTAJE
4.17”(106 mm)
Use la plantilla de montaje incluida para marcar la
ubicación de los tornillos.
Cuelgue el temporizador en el orificio con forma de bocallave con un tornillo.
Altemporizador
Empalmeplástico
Solenoide
Conductor común
Válvula
Conecte uno de los dos conductores de cada válvula al conductor común que va al temporizador (gener-almente blanco). Conecte el otro conductor de cada
válvula a uno de los conductores de colores que van al temporizador.
3. CONECTE LAS VÁLVULAS DEL REGADOR A LOS CONDUCTORES DEL TEMPORIZADOR
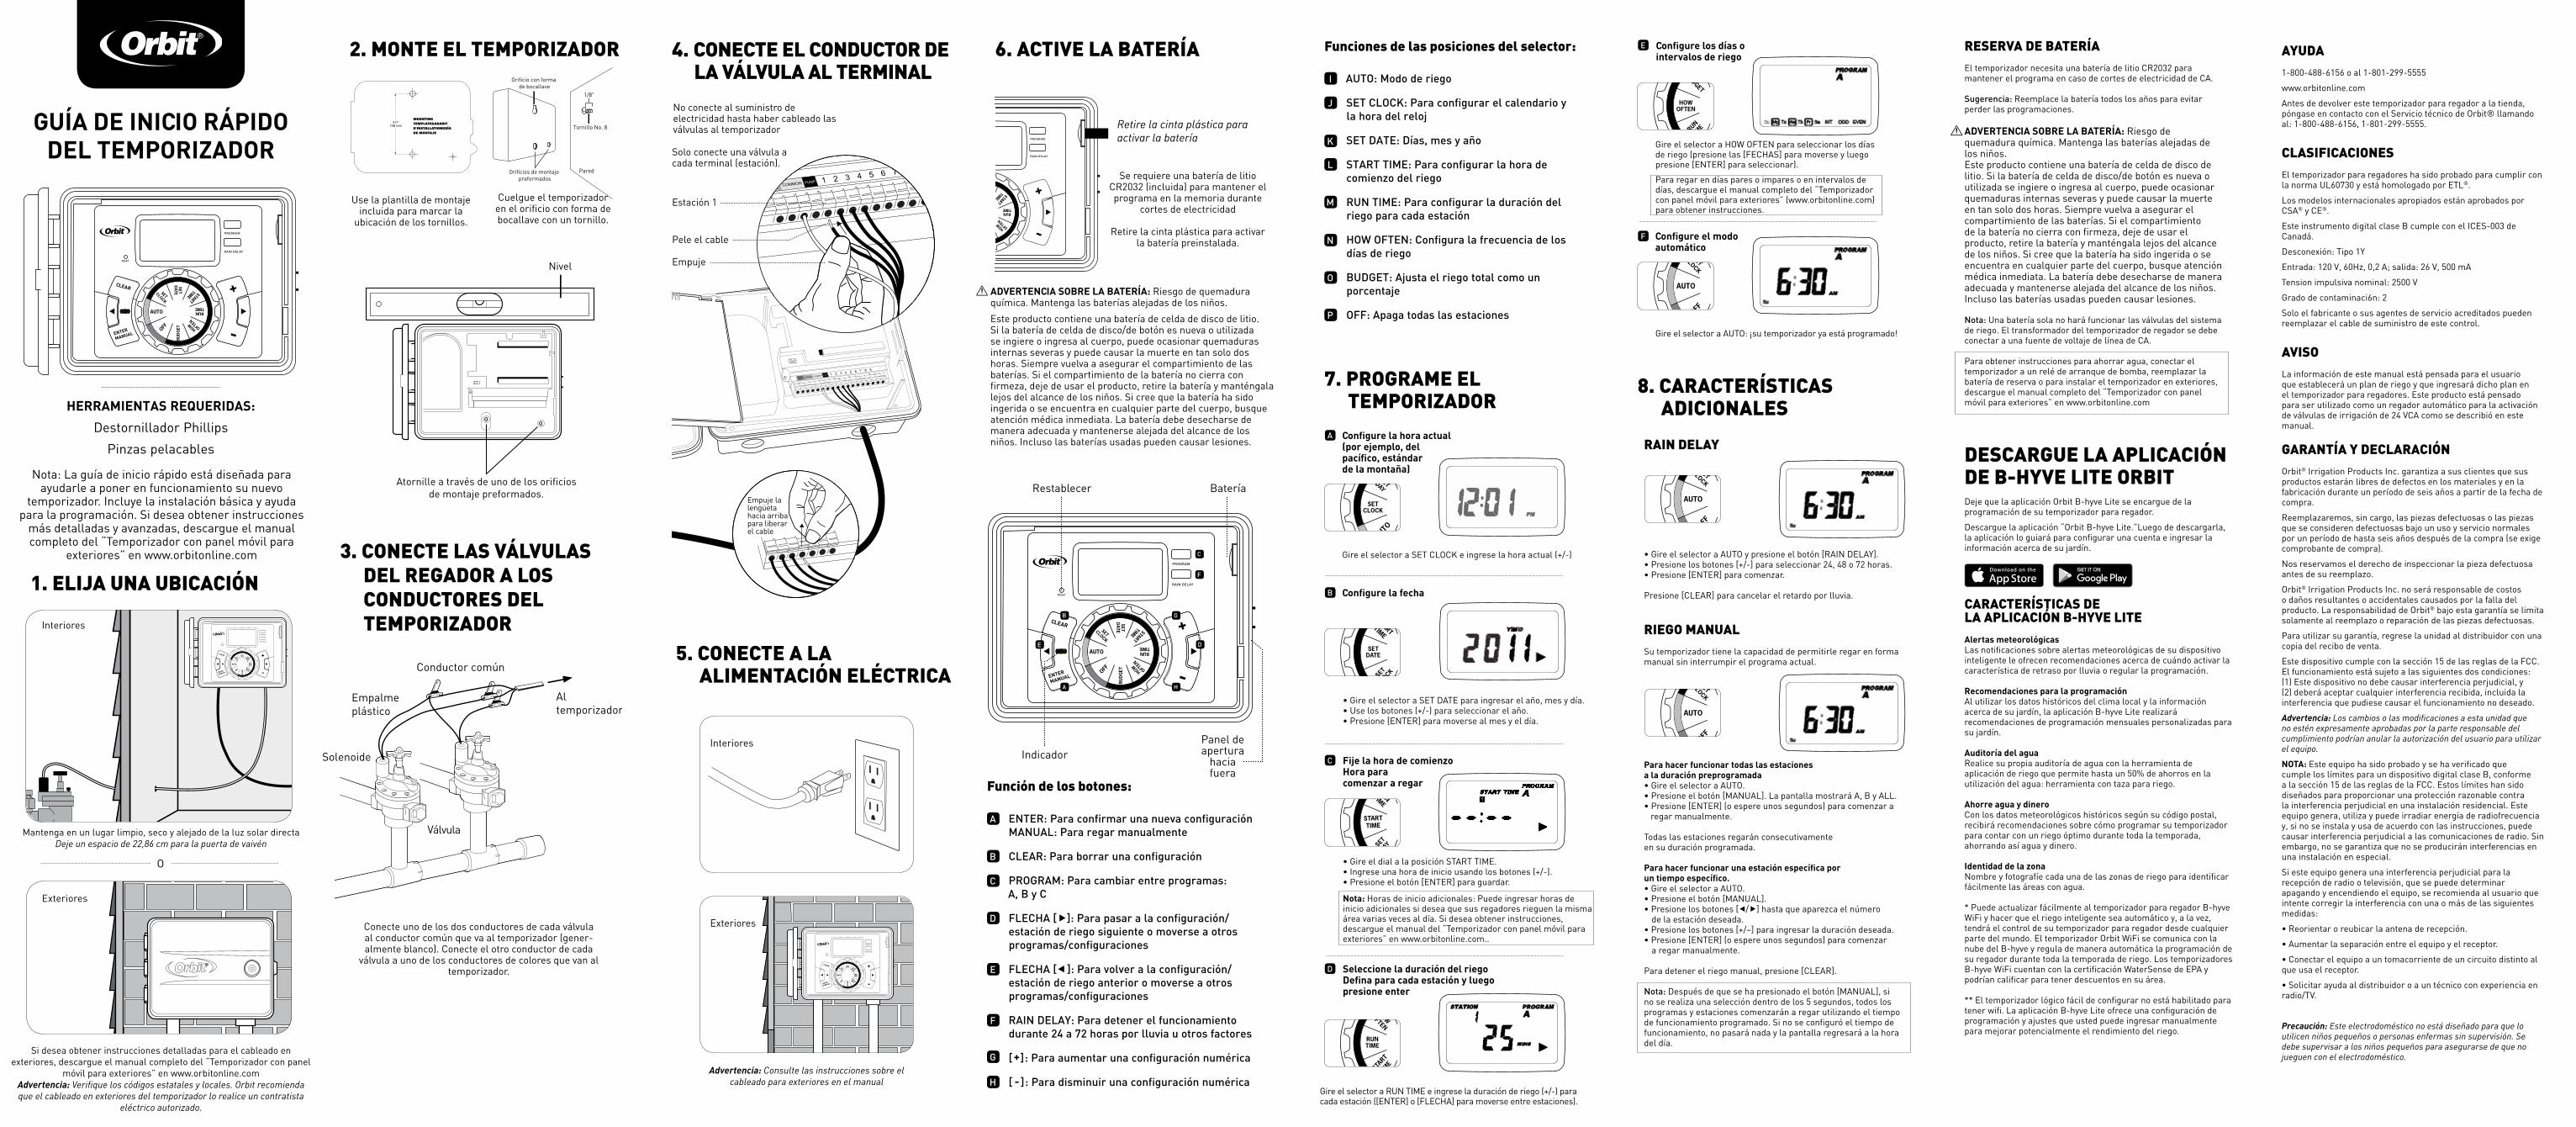
6. ACTIVE LA BATERÍA
RESET
PROGRAM
RAIN DELAY
AUTO
OFF
SETCLOCK
SETD
ATE
BU
DG
ET HOW OFTEN
RUNTIME
STARTTIME
Retire la cinta plástica para activar la batería
Se requiere una batería de litio CR2032 (incluida) para mantener el programa en la memoria durante
cortes de electricidad
Retire la cinta plástica para activar la batería preinstalada.
Batería
RESET
PROGRAM
RAIN DELAY
AUTO
OFF
SETCLOCK
SETD
ATE
BU
DG
ET HOW OFTEN
RUNTIME
STARTTIME
O
1. ELIJA UNA UBICACIÓN
.. .
..
. .
.
.. ..
..
..
. ..
...
..
.
.
.
....
..
.. .
...
..
. ..
....
..
.. .
..
..
....
..
.. .
...
..
. .
..
...
.
RESET
PROGRAM
RAIN DELAY
AUTO
OFF
SETCLOCK
SETD
AY
BU
DG
ET HOW OFTEN
RUNTIME
STARTTIME
.Si desea obtener instrucciones detalladas para el cableado en
exteriores, descargue el manual completo del “Temporizador con panel móvil para exteriores” en www.orbitonline.com
Advertencia: Verifique los códigos estatales y locales. Orbit recomienda que el cableado en exteriores del temporizador lo realice un contratista
eléctrico autorizado.
Interiores
Exteriores
Mantenga en un lugar limpio, seco y alejado de la luz solar directaDeje un espacio de 22,86 cm para la puerta de vaivén
GUÍA DE INICIO RÁPIDO DEL TEMPORIZADOR
HERRAMIENTAS REQUERIDAS:
Destornillador Phillips
Pinzas pelacables
Nota: La guía de inicio rápido está diseñada para ayudarle a poner en funcionamiento su nuevo
temporizador. Incluye la instalación básica y ayuda para la programación. Si desea obtener instrucciones
más detalladas y avanzadas, descargue el manual completo del “Temporizador con panel móvil para
exteriores” en www.orbitonline.com
AYUDA 1-800-488-6156 o al 1-801-299-5555
www.orbitonline.com
Antes de devolver este temporizador para regador a la tienda, póngase en contacto con el Servicio técnico de Orbit® llamando al: 1-800-488-6156, 1-801-299-5555.
CLASIFICACIONES El temporizador para regadores ha sido probado para cumplir con la norma UL60730 y está homologado por ETL®.
Los modelos internacionales apropiados están aprobados por CSA® y CE®.
Este instrumento digital clase B cumple con el ICES-003 de Canadá.
Desconexión: Tipo 1Y
Entrada: 120 V, 60Hz, 0,2 A; salida: 26 V, 500 mA
Tension impulsiva nominal: 2500 V
Grado de contaminaci6n: 2
Solo el fabricante o sus agentes de servicio acreditados pueden reemplazar el cable de suministro de este control.
AVISOLa información de este manual está pensada para el usuario que establecerá un plan de riego y que ingresará dicho plan en el temporizador para regadores. Este producto está pensado para ser utilizado como un regador automático para la activación de válvulas de irrigación de 24 VCA como se describió en este manual.
GARANTÍA Y DECLARACIÓNOrbit® Irrigation Products Inc. garantiza a sus clientes que sus productos estarán libres de defectos en los materiales y en la fabricación durante un período de seis años a partir de la fecha de compra.
Reemplazaremos, sin cargo, las piezas defectuosas o las piezas que se consideren defectuosas bajo un uso y servicio normales por un período de hasta seis años después de la compra (se exige comprobante de compra).
Nos reservamos el derecho de inspeccionar la pieza defectuosa antes de su reemplazo.
Orbit® Irrigation Products Inc. no será responsable de costos o daños resultantes o accidentales causados por la falla del producto. La responsabilidad de Orbit® bajo esta garantía se limita solamente al reemplazo o reparación de las piezas defectuosas.
Para utilizar su garantía, regrese la unidad al distribuidor con una copia del recibo de venta.
Este dispositivo cumple con la sección 15 de las reglas de la FCC. El funcionamiento está sujeto a las siguientes dos condiciones: (1) Este dispositivo no debe causar interferencia perjudicial, y (2) deberá aceptar cualquier interferencia recibida, incluida la interferencia que pudiese causar el funcionamiento no deseado.
Advertencia: Los cambios o las modificaciones a esta unidad que no estén expresamente aprobadas por la parte responsable del cumplimiento podrían anular la autorización del usuario para utilizar el equipo.
NOTA: Este equipo ha sido probado y se ha verificado que cumple los límites para un dispositivo digital clase B, conforme a la sección 15 de las reglas de la FCC. Estos límites han sido diseñados para proporcionar una protección razonable contra la interferencia perjudicial en una instalación residencial. Este equipo genera, utiliza y puede irradiar energía de radiofrecuencia y, si no se instala y usa de acuerdo con las instrucciones, puede causar interferencia perjudicial a las comunicaciones de radio. Sin embargo, no se garantiza que no se producirán interferencias en una instalación en especial.
Si este equipo genera una interferencia perjudicial para la recepción de radio o televisión, que se puede determinar apagando y encendiendo el equipo, se recomienda al usuario que intente corregir la interferencia con una o más de las siguientes medidas:
• Reorientar o reubicar la antena de recepción.
• Aumentar la separación entre el equipo y el receptor.
• Conectar el equipo a un tomacorriente de un circuito distinto al que usa el receptor.
• Solicitar ayuda al distribuidor o a un técnico con experiencia en radio/TV.
Precaución: Este electrodoméstico no está diseñado para que lo utilicen niños pequeños o personas enfermas sin supervisión. Se debe supervisar a los niños pequeños para asegurarse de que no jueguen con el electrodoméstico.
8. CARACTERÍSTICAS ADICIONALES
RAIN DELAY
• Gire el selector a AUTO y presione el botón [RAIN DELAY].• Presione los botones [+/-] para seleccionar 24, 48 o 72 horas.• Presione [ENTER] para comenzar.
Presione [CLEAR] para cancelar el retardo por lluvia.
RIEGO MANUALSu temporizador tiene la capacidad de permitirle regar en forma manual sin interrumpir el programa actual.
Para hacer funcionar todas las estaciones a la duración preprogramada• Gire el selector a AUTO.• Presione el botón [MANUAL]. La pantalla mostrará A, B y ALL. • Presione [ENTER] (o espere unos segundos) para comenzar a regar manualmente.
Todas las estaciones regarán consecutivamente en su duración programada.
Para hacer funcionar una estación específica por un tiempo específico.• Gire el selector a AUTO.• Presione el botón [MANUAL].• Presione los botones [ / ] hasta que aparezca el número
de la estación deseada.• Presione los botones [+/–] para ingresar la duración deseada.• Presione [ENTER] (o espere unos segundos) para comenzar
a regar manualmente.
Para detener el riego manual, presione [CLEAR].
Nota: Después de que se ha presionado el botón [MANUAL], si no se realiza una selección dentro de los 5 segundos, todos los programas y estaciones comenzarán a regar utilizando el tiempo de funcionamiento programado. Si no se configuró el tiempo de funcionamiento, no pasará nada y la pantalla regresará a la hora del día.
E Configure los días o intervalos de riego
Gire el selector a HOW OFTEN para seleccionar los días de riego (presione las [FECHAS] para moverse y luego presione [ENTER] para seleccionar).
Para regar en días pares o impares o en intervalos de días, descargue el manual completo del “Temporizador con panel móvil para exteriores” (www.orbitonline.com) para obtener instrucciones.
F
Gire el selector a AUTO: ¡su temporizador ya está programado!
Configure el modo automático
7. PROGRAME EL TEMPORIZADOR
Configure la hora actual (por ejemplo, del pacífico, estándar de la montaña)
A
Gire el selector a SET CLOCK e ingrese la hora actual (+/-)
Configure la fechaB
SETDATE
C Fije la hora de comienzo Hora para comenzar a regar
D Seleccione la duración del riegoDefina para cada estación y luego presione enter
Gire el selector a RUN TIME e ingrese la duración de riego (+/-) para cada estación ([ENTER] o [FLECHA] para moverse entre estaciones).
• Gire el selector a SET DATE para ingresar el año, mes y día.• Use los botones (+/-) para seleccionar el año.• Presione [ENTER] para moverse al mes y el día.
• Gire el dial a la posición START TIME.• Ingrese una hora de inicio usando los botones (+/-).• Presione el botón [ENTER] para guardar.
Nota: Horas de inicio adicionales: Puede ingresar horas de inicio adicionales si desea que sus regadores rieguen la misma área varias veces al día. Si desea obtener instrucciones, descargue el manual del “Temporizador con panel móvil para exteriores” en www.orbitonline.com..
RESERVA DE BATERÍAEl temporizador necesita una batería de litio CR2032 para mantener el programa en caso de cortes de electricidad de CA.
Sugerencia: Reemplace la batería todos los años para evitar perder las programaciones.
ADVERTENCIA SOBRE LA BATERÍA: Riesgo de quemadura química. Mantenga las baterías alejadas de los niños.Este producto contiene una batería de celda de disco de litio. Si la batería de celda de disco/de botón es nueva o utilizada se ingiere o ingresa al cuerpo, puede ocasionar quemaduras internas severas y puede causar la muerte en tan solo dos horas. Siempre vuelva a asegurar el compartimiento de las baterías. Si el compartimiento de la batería no cierra con firmeza, deje de usar el producto, retire la batería y manténgala lejos del alcance de los niños. Si cree que la batería ha sido ingerida o se encuentra en cualquier parte del cuerpo, busque atención médica inmediata. La batería debe desecharse de manera adecuada y mantenerse alejada del alcance de los niños. Incluso las baterías usadas pueden causar lesiones.
Nota: Una batería sola no hará funcionar las válvulas del sistema de riego. El transformador del temporizador de regador se debe conectar a una fuente de voltaje de línea de CA.
Para obtener instrucciones para ahorrar agua, conectar el temporizador a un relé de arranque de bomba, reemplazar la batería de reserva o para instalar el temporizador en exteriores, descargue el manual completo del “Temporizador con panel móvil para exteriores” en www.orbitonline.com
DESCARGUE LA APLICACIÓN DE B-HYVE LITE ORBITDeje que la aplicación Orbit B-hyve Lite se encargue de la programación de su temporizador para regador.
Descargue la aplicación “Orbit B-hyve Lite.”Luego de descargarla, la aplicación lo guiará para configurar una cuenta e ingresar la información acerca de su jardín.
CARACTERÍSTICAS DE LA APLICACIÓN B-HYVE LITEAlertas meteorológicasLas notificaciones sobre alertas meteorológicas de su dispositivo inteligente le ofrecen recomendaciones acerca de cuándo activar la característica de retraso por lluvia o regular la programación.
Recomendaciones para la programaciónAl utilizar los datos históricos del clima local y la información acerca de su jardín, la aplicación B-hyve Lite realizará recomendaciones de programación mensuales personalizadas para su jardín.
Auditoría del aguaRealice su propia auditoría de agua con la herramienta de aplicación de riego que permite hasta un 50% de ahorros en la utilización del agua: herramienta con taza para riego.
Ahorre agua y dineroCon los datos meteorológicos históricos según su código postal, recibirá recomendaciones sobre cómo programar su temporizador para contar con un riego óptimo durante toda la temporada, ahorrando así agua y dinero.
Identidad de la zonaNombre y fotografíe cada una de las zonas de riego para identificar fácilmente las áreas con agua.
* Puede actualizar fácilmente al temporizador para regador B-hyve WiFi y hacer que el riego inteligente sea automático y, a la vez, tendrá el control de su temporizador para regador desde cualquier parte del mundo. El temporizador Orbit WiFi se comunica con la nube del B-hyve y regula de manera automática la programación de su regador durante toda la temporada de riego. Los temporizadores B-hyve WiFi cuentan con la certificación WaterSense de EPA y podrían calificar para tener descuentos en su área.
** El temporizador lógico fácil de configurar no está habilitado para tener wifi. La aplicación B-hyve Lite ofrece una configuración de programación y ajustes que usted puede ingresar manualmente para mejorar potencialmente el rendimiento del riego.
ADVERTENCIA SOBRE LA BATERÍA: Riesgo de quemadura química. Mantenga las baterías alejadas de los niños.
Este producto contiene una batería de celda de disco de litio. Si la batería de celda de disco/de botón es nueva o utilizada se ingiere o ingresa al cuerpo, puede ocasionar quemaduras internas severas y puede causar la muerte en tan solo dos horas. Siempre vuelva a asegurar el compartimiento de las baterías. Si el compartimiento de la batería no cierra con firmeza, deje de usar el producto, retire la batería y manténgala lejos del alcance de los niños. Si cree que la batería ha sido ingerida o se encuentra en cualquier parte del cuerpo, busque atención médica inmediata. La batería debe desecharse de manera adecuada y mantenerse alejada del alcance de los niños. Incluso las baterías usadas pueden causar lesiones.