Reproductions supplied by EDRS are the best that can be ... 451 152 TITLE INSTITUTION SPONS AGENCY...
73
ED 451 152 TITLE INSTITUTION SPONS AGENCY PUB DATE NOTE CONTRACT AVAILABLE FROM PUB TYPE EDRS PRICE DESCRIPTORS ABSTRACT DOCUMENT RESUME SP 039 826 Hands-On Mathematics and Science Activities for Students in Grades K-8: A Guide for Teachers, Tutors, and Parents. Quality Education for Minorities Network, Washington, DC. Department of Education, Washington, DC. 2000-00-00 72p.; Supported by the U.S. Department of Education's Minority Science and Engineering Program. P120A80029-98 Quality Education for Minorities Network, 1818 N Street, N.W., Suite 350, Washington, DC 20036; Tel: 202-659-1818; Fax: 202-659-5408; E-mail: [email protected]; Web site: http://www.qemnetwork.qem.org. Guides Classroom Teacher (052) MF01/PC03 Plus Postage. Elementary Education; *Experiential Learning; *Hands on Science; *Mathematics Activities; *Mathematics Instruction; *Science Activities; *Science Instruction; Teaching Methods This guide is a resource for K-8 teachers, college student tutors, parents, and others engaged in learning activities to help primary, elementary, and middle school students learn mathematics and science. It presents a collection of activities adapted from printed and electronic sources which help motivate student interest in mathematics and science and make learning fun and challenging. Most items used in the activities are found in the home, particularly in the kitchen. Activities are arranged in three grade-level groups: K-2, 3-5, and 6-8. Each group includes individual activities that closely relate to grade-appropriate concepts from several science disciplines. Each activity has the following components: purpose, materials needed, what to do, questions to ask, brief explanation of mathematical or scientific concepts related to the activity, and extension activities. This publication also includes a list of Web sites and other references for finding appropriate materials for K-8 students beyond the scope of the guide. (Contains 46 Web site and print references. (SM) Reproductions supplied by EDRS are the best that can be made from the original document.
Transcript of Reproductions supplied by EDRS are the best that can be ... 451 152 TITLE INSTITUTION SPONS AGENCY...

ED 451 152
TITLE
INSTITUTIONSPONS AGENCYPUB DATENOTE
CONTRACTAVAILABLE FROM
PUB TYPEEDRS PRICEDESCRIPTORS
ABSTRACT
DOCUMENT RESUME
SP 039 826
Hands-On Mathematics and Science Activities for Students inGrades K-8: A Guide for Teachers, Tutors, and Parents.Quality Education for Minorities Network, Washington, DC.Department of Education, Washington, DC.2000-00-0072p.; Supported by the U.S. Department of Education'sMinority Science and Engineering Program.P120A80029-98Quality Education for Minorities Network, 1818 N Street,N.W., Suite 350, Washington, DC 20036; Tel: 202-659-1818;Fax: 202-659-5408; E-mail: [email protected]; Web site:http://www.qemnetwork.qem.org.Guides Classroom Teacher (052)MF01/PC03 Plus Postage.Elementary Education; *Experiential Learning; *Hands onScience; *Mathematics Activities; *Mathematics Instruction;*Science Activities; *Science Instruction; Teaching Methods
This guide is a resource for K-8 teachers, college studenttutors, parents, and others engaged in learning activities to help primary,elementary, and middle school students learn mathematics and science. Itpresents a collection of activities adapted from printed and electronicsources which help motivate student interest in mathematics and science andmake learning fun and challenging. Most items used in the activities arefound in the home, particularly in the kitchen. Activities are arranged inthree grade-level groups: K-2, 3-5, and 6-8. Each group includes individualactivities that closely relate to grade-appropriate concepts from severalscience disciplines. Each activity has the following components: purpose,materials needed, what to do, questions to ask, brief explanation ofmathematical or scientific concepts related to the activity, and extensionactivities. This publication also includes a list of Web sites and otherreferences for finding appropriate materials for K-8 students beyond thescope of the guide. (Contains 46 Web site and print references. (SM)
Reproductions supplied by EDRS are the best that can be madefrom the original document.

r. A
U.S. DEPARTMENT OF EDUCATION , II 1 IOffice of Educational Research and Improvement
EDUCATIONAL RESOURCES INFORMATIONCENTER (ERIC) I I I
O This document has been reproduced asreceived from the person or organization . II -originating it.
Minor changes have been made to e - Iimprove reproduction quality.
Points of view or opinions stated in thisdocument do not necessarily representofficial OERI position cr policy. 2
BEST COPY AVAILABLE

About the QEM Network
The Quality Education for Minorities (QEM) Network was established in July 1990, as a non-profitorganization in Washington, DC, dedicated to improving education for minorities throughout thenation. Operating with support from the Carnegie Corporation of New York, the QEM Network be-gan where the MIT-based QEM Project left off. It is a focal point for the implementation of strategies tohelp realize the vision and goals set forth in the QEM Project's January 1990 report: Education ThatWorks: An Action Plan for the Education of Minorities.
The QEM Network serves as a national resource and catalyst to help unite and strengthen educationalrestructuring efforts to the benefit of minority children, youth, and adults, while advancing minorityparticipation and leadership in the national debate on how best to ensure access to a quality educationfor all citizens. It seeks to put into practice the recommendations in the QEM Action Plan by workingwith minority and non-minority individuals, groups, organizations, and institutions around the country.
The QEM Network employs an extensive networking and coalition building approach. One level ofeffort is focused on the national education scene. The other is directed towards helping local groups,organizations, and institutions develop the capacity to mobilize their communities around needededucational improvements.
The development of this guide was supported through a grant from the U.S. Department of Education'sMinority Science and Engineering Program (MSEIP), Grant #P120A80029-98. Any opinions, findings,conclusions, or recommendations expressed in this document are those of the contributors and do notnecessarily reflect the views of the U.S. Department of Education.
Copyright © 2000 by the Quality Education for Minorities Network, Washington, DC

The Hands-on Mathematics and Science Activities guide is designed to serve as a resource for K-8 teach-ers, college student tutors, parents, and others engaged in, or planning to become engaged in, learn-ing activities to assist primary, elementary, and middle-school students. These activities may be con-ducted during the school day or after school. The guide is a collection of activities adapted fromseveral sources (printed and electronic) in use across the country to motivate student interest in math-ematics and science and to make learning about these subjects both fun-filled and challenging. Gener-ally, the materials used in carrying out the activities are among items found in the home, especially inthe kitchen.
To allow users of this guide to focus on students in particular grades, the activities are arranged inthree grade-level groups: K-2, 3-5, and 6-8. Each of these groups includes individual activities thatclosely relate to grade-appropriate concepts from several science disciplines, including biology, chem-istry, mathematics, and physics. This clustering allows the user to choose among activities suitable forchildren at various grades and that are linked to fundamental concepts in a given major field of sci-ence.
The activities presented in this guide are only a small sample of the myriad examples available on theInternet, on videodiscs, or in printed publications. In view of this, we have included a list of websitesand other references so that the user can continue to find appropriate materials for K-8 students be-yond the scope of this guide.
Although such activities are widely available through electronic means, many children who couldbenefit from the reinforcement of scientific concepts the activities offer have limited or no access tothese means. Therefore, we have designed the guide to serve as a ready-made source that can be usedimmediately by individuals who wish to assist children in learning challenging mathematics andscience. Such individuals need not be trained mathematicians or scientists but persons who have hadsome science and mathematics at the high school level. They must be interested in trying the activitiesthemselves, sharing their experiences, and engaging children in the hands-on activities with whichthey feel comfortable.
A minimal student group size and an approximate time requirement are given for each activity. Mostof the activities are individualized and can be done by as few as 1-2 students or up to 15-18 students.
Each activity has the following components:
Purpose (what the activity would like to have students accomplish)What You Need, (materials needed to carry out the activity)What To Do (step-by-step instructions for carrying out the activity)Ouestions To Ask (suggested questions, accompanied by answers, users should ask participatingstudents)Brief Explanation (a brief discussion of the mathematical or scientific concepts related to theactivity)Extension (suggestions for extending the activity beyond its original scope to allow participatingstudents to investigate alternative assumptions or experimental conditions)
In assisting children to learn more about science and mathematics, we anticipate that the users of thisguide will find the experience tobe both intellectually stimulating and personally rewarding.
4

1 vikrod 'cal.° vb
i4i.wdereartevu - 4racte 2Mobius Madness (Mathematics)Money Match (Mathematics)Extra Senses (Biology)Copper Caper (Chemistry)It's in the Bag (Chemistry)Lava Lamp (Chemistry)Roto-copter (Physics)
4raoles s - 5Hiding Hurkle (Mathematics)"Sum" Tic-Tac-Toe (Mathematics)Tangrams (Mathematics)Bacteria Hunters (Biology)The Big Bang (Chemistry)Fizz Rocket (Physics)Wingless Glider (Physics)
Page1468
101315
19212328313335
t-ctoles & - I?Nimble Calculator (Mathematics) 38
Three Bean Salad (Mathematics) 41
Toothpick Geometry (Mathematics) 44DNA - Now you see it! (Biology) 48Lube Lab (Chemistry) 50
Building a Building (Physics) 53
Mini Air-Cannon (Physics) 58
Referewaes 60

C7)

I
GROUP SIZE: 1-2TIME: 15 minutes
To investigate the relationship between 2-dimensional and 3-dimensional objects.
To compare and contrast geometric figures.
legal (8 1/2" x 14") paperscissorstapecrayons /markers
I (P WH-AT TO DO
Fold the paper in half lengthwise to create a 4 1/4" x 14" rectangle.
Fold the paper in half again in the same manner to form a 2 1/8" x 14" rectangle.
Unfold the paper and cut along the creases formed by the folds.
On each of the four strips, starting left to right and top to bottom, label each corner A, B, C,and D.
A B
C D
A 13
C
2
A 13
3
C D
A R
C D
After labeling the corners, assign each strip a different number from 1 to 4.
With strip 1, make a loop by overlapping corner A with the backside of corner C and corner Bwith the backside of corner D. Secure the ends with tape. This will be loop 1.
Next half-twist strip 2 and then make a loop by placing corner A over corner D and corner Bover corner C. Secure the ends with tape. This will be loop 2. Follow the same procedurewith strip 3 to make loop 3. Save strip 4 for a spare.
Draw a line along the center of loops 1, 2, and 3.
Use scissors to cut along the line for loop 1, and observe what happens.
Use scissors to cut along the line for loops 2 and 3, and observe what happens.
Compare and contrast the new shapes formed after cutting loops 1, 2, and 3.
(Alkswers are Lo parentheses)
1) How many sides does loop 1 have?(Loop 1 has two sides.)
2) How many sides does loop 2 have?(Answers may vary; however, loop 2 only has one side.)
3) When a line is drawn around loop 1, what happens?(The line is on the outer surface of the loop.)
4) When a line is drawn around loop 2, what happens?(The line is on the outer and inner surfaces of the loop.)
5) What happens when loop 1 is cut along the line?(Two separate loops of the same circumference but half as wide are formed.)
6) What happens when loop 2 is cut along the line?(A new loop is formed that has the same shape, is half as wide, and longer than loop 2.)
7) What will happen to loop 3 when it is cut along the line?(The same thing that happened to loop 2 since the procedures for forming loops 2 and 3were identical.)

1m BRIEF EXPLANATION
In the 1800s, the German mathematician and astronomer August Ferdinand Mobius discovered aunique loop by twisting a rectangular strip 180 degrees and connecting the ends. This loop hasoneside; however, if it is cut in the middle, it becomes a long loop with two sides. This original loop iscalled a Mobius Strip or Mobius Band.
The Mobius Strip has been very useful in creating products such as conveyor belts and audio tapes.These products, when shaped like the Mobius Strip, wear evenly on both sides and thereby lastlonger.
EXTENSION
Construct additional loops with one and two complete twists. Observe what happens.
Adapted from public domain (scidiv.bcc.ctc.edu/Math/Mobius.html)
3

GROUP SIZE: 2-4TIME: 15 minutes
To practice counting.To convert currency from one form to another (e.g., to convert pennies to nickles, nickels to dimes,and nickles and dimes to quarters).
one 6-sided dieassortment of pennies, nickles, dimes, and quartersa bowl or plate to hold the coins
IIP IP Ill
Review the name and value of each coin: penny, nickel, dime, and quarter.
Explain that the object of Money Match is to be the first player to earn a set amount of money, forexample, 20, 30, or 40 cents. Students earn money by taking turns rolling the die. As each studentrolls, he or she earns the same number of pennies as the number on the die.
Give the students the die and a plate or bowl of coins (the 'bank"). Decide who will go first andbegin play. Allow each student to draw his or her own coins from the bank after rolling the die.
Once a student earns five pennies, he or she should trade them in at the bank for a nickel. Oncetwo nickles are earned, exchange these for a dime, and so on.
The first player to reach the set amount wins.
IP (Answers are i.K.parewtheses)
1) How many games of Money Match did you play? Who won the most games?(Students' responses will vary.)
2) How do we tell different valued coins from each other? Can we tell by their shapes? Colors?Sizes? Something else?(Students' responses may vary.)
4
in

3) Do you see any relationship between the size of a coin and how much the coin is worth? Whichcoin(s) used in this game, if any, do not fit that pattern?(Students will probably recognize that, except for the dime, the larger a coin is, the larger its worth.)
4) Do you think there is a relationship between the size of different dollar bills and their worth?(Dollar bills in the United States do not vary in size, but it may be interesting to show studentssamples of currency from countries whose paper money does vary in size and/or color such asIreland and India.)
131215F EXPLANATION
This activity helps students learn the names and values of various coins while practicing two basicmathematical skills: addition and conversion. However, with creative questioning, students alsomaybegin to identify characteristics of the coins, notice relationships and patterns between the coins'characteristics, and classify the coins according to their characteristics.
ifi EXTENSION
Have students imagine they are founding members of the United States and must create a newcurrency. Tell them to create new coins (with original names) for their new country and ask them toexplain how their conversion system works.
Adapted with permission from U.S. Department of Education, 2000.
511

IGROUP SIZE: 1-2TIME: 15 minutes
To examine the sense of sight and the sense of hearing.To create simple tools to enhance the senses of sight and hearing.
index cardsafety pinlarge sheet of papertape
To Make a Magnifying GlassMake a hole in the center of an index card with a safety pin.
Cover one eye and lean approximately 4-5 inches above a piece of paper on which a sentencehas been typed in very small print ( love science and mathematics!).
Place the index card with the hole in front of the uncovered eye. Focus the uncovered eye tolook through the hole. Read the sentence.
Switch eyes and re-read the sentence.
Open both eyes and read the sentence without using the index card.
To Make a Hearing Aid
Roll a large sheet of paper into a cone. Make one end of the cone the size of a dime and theother end as wide as possible.
Tape the sides of the cone in place to keep the cone from unraveling.
Hold the narrow end of the cone to the ear.
Carefully listen and observe different sounds through the cone.
? '1'2742 auesTio NS TO ASK (Answers are LiAlareputlieses)
1) Could you read the sentence in small print using the index card?(Responses will vary)
2) Could you read the sentence in small print after the card was placed in front of your eye?(Yes.)
6
12

3) Did the size or shape of the sentence change when you used the card?(Yes, the picture appears larger and sharper.)
4) What did you hear when you placed the cone to your ear?(Answers will vary.)
5) Did the cone make sounds and noises louder?(Yes, the sounds were louder.)
13R-I FF ext> LA NAT! 0 N
Explanation for the Magnifying Glass
All objects give off a type of energy called radiant energy, or light. During sight, the eye receives theenergy and uses that energy to "see" an object. If the object is too small, too close, or too far away,then the object appears blurry.
Special tools such as magnifiers, or pinholes, can help with sight because they "trick" the eyes. Theytrick the eyes by narrowing the focus on the object and bending the light before it reaches the eye,thus, limiting the amount of light that enters the eye. As a result, it makes the object appear larger.
Explanation for the Hearing Aid
The outer structure of the ear plays an important role in allowing sounds to be heard. The ear isshaped similar to a cone; it begins as a small opening and ends as a wide piece of cartilage on theside of the head. Cone-shaped objects allow large amounts of air, for example, to be collected andpassed through a very small opening. The ear collects sounds, which are vibrations of moving air,and funnels the vibrations to the cochlea (spiral cavity of the inner ear) which then sends signalsalong the nerves to the brain.
Typically, the larger the cone, the more air vibrations that can be collected and funneled. Consideranimals in the wild that depend on good hearing for hunting or spotting enemies. Many of themhave larger ears. By creating the cone-shaped "hearing aid" that is larger than the human ear, moresounds can be collected and heard.
Change the size of the hole and examine how the size affects what is seen.Change the size of the cone and examine how the new size affects hearing.
Adapted with permission from Science Exploratorium, 2000.
7-
13

GROUP SIZE: 1-4TIME: 30 minutes
To introduce the concept of chemical reactions.
To develop observation skills by examining changes in the appearance of a penny placed in anacid (vinegar-salt) solution.
WI-fAT yo NEED
2 "dirty" penniesvinegarsaltwater
WHAT TO DO
paper towelscupmarker
Put 1/4 cup of vinegar and 1 teaspoon of salt in the cup.
Carefully put the two pennies in the cup.
Gently swirl the cup for a few seconds.
Put the cup on a table and allow it to remain undisturbed for 15 minutes. Periodically, observewhat happens to the pennies.
Tear off two sheets of paper towel and use a marker to label one sheet "Rinsed" and the other"Unrinsed."
After the 15 minutes, remove one penny from the cup and put it on the "Unrinsed" towel.
Remove the remaining penny from the cup. Immediately rinse the penny in a cup of water, dryit with a clean paper towel, and put it on the "Rinsed" towel.
Let both of the pennies dry.
Observe what happens to the pennies as they dry
152.14USTIONS TD ASK- (Answers are 1.wparentheses)
1) What happened to the pennies when they were put into the cup with the vinegar and salt?(The pennies began to shine.)
2) What happened to the pennies that were rinsed? What happened to the pennies that were notrinsed?(The pennies on the "Rinsed" towel remained shiny but the pennies on the "Unrinsed" towelturned green.)
3) Why do you think the "Rinsed" pennies look different from the "Unrinsed" pennies?(Answers will vary.)
p
2
14
UXPLA NATI 0 N
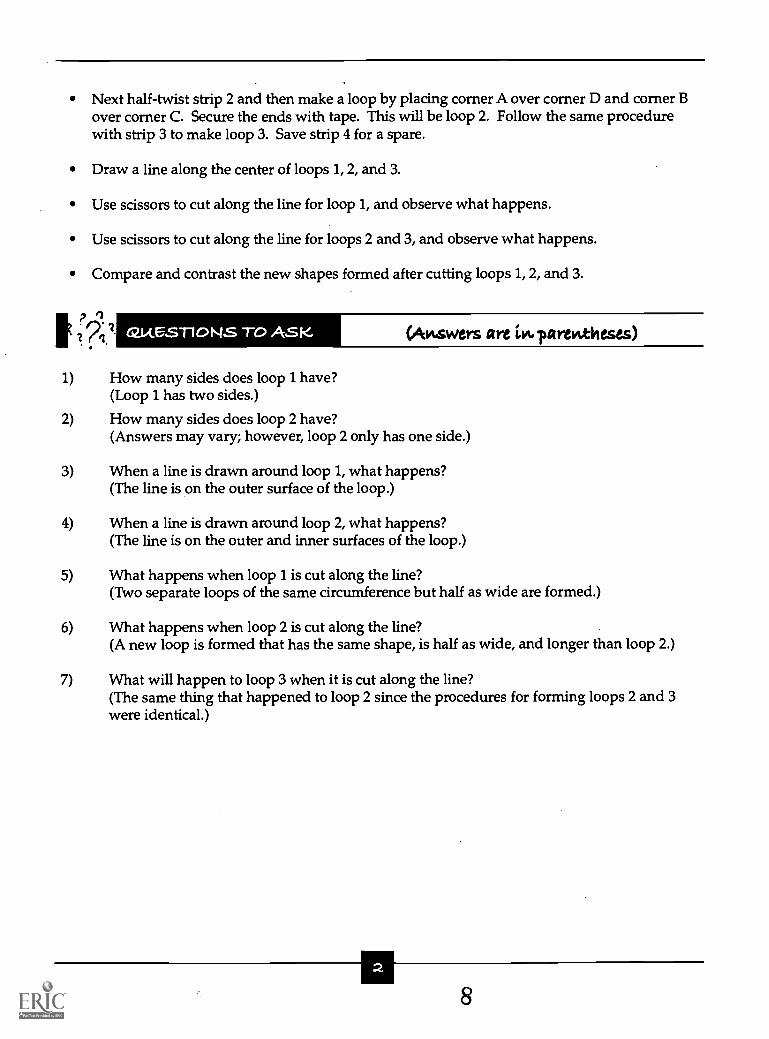
Chemical reactions are everywhere and they are constantly occurring because everything is made ofchemicals. During a chemical reaction, two or more chemicals combine to form new chemicals.
In this activity, three different chemical reactions took place. The first reaction was the tarnishing ofthe penny. (The first reaction actually occurred prior to the activity; however, the end result can benoted in this activity.) When pennies are new, they are bright and shiny. As pennies age, they losetheir shiny, bright color and become dull and dark. This dulling process is referred to as tarnishing.All pennies contain a chemical element called copper. Tarnishing occurs when the copper is exposedto air for long periods of time. When copper is exposed to air, it combines with another chemicalelement called oxygen to form a chemical called copper oxide or tarnish.
The second reaction to occur in this activity is the removal of tarnish. Tarnish can be removed withan acid which is a chemical. Acids can be found in foods such as lemons, oranges, and vinegar. Theycan also be found in many commonly used products including sodas, batteries, polishes, and fertil-izers. They also are found in the human body. For instance, the human stomach contains acid that isused in digesting food.
The third and final reaction to occur was the formation of the green substance on the "Unrinsed"penny. The "Unrinsed" penny turned green because the vinegar and salt were not removed as theywere from the "Rinsed" penny. Vinegar and salt are chemicals. These chemicals also react withoxygen to form a green colored chemical called malachite.
EXTENSION
Repeat the experiment substituting the vinegar with another acid such as lemon juice. Does theacid remove the tarnish faster than vinegar? Does a new chemical form on the surface of thepenny if the acid is not removed?
Add non-coated steel nails, screws, and/or paper clips to the vinegar and salt after the pennieshave been in the cup. Observe what happens. What conclusions can you reach?
Adapted with permission from Science Exploratorium, 2000.
15
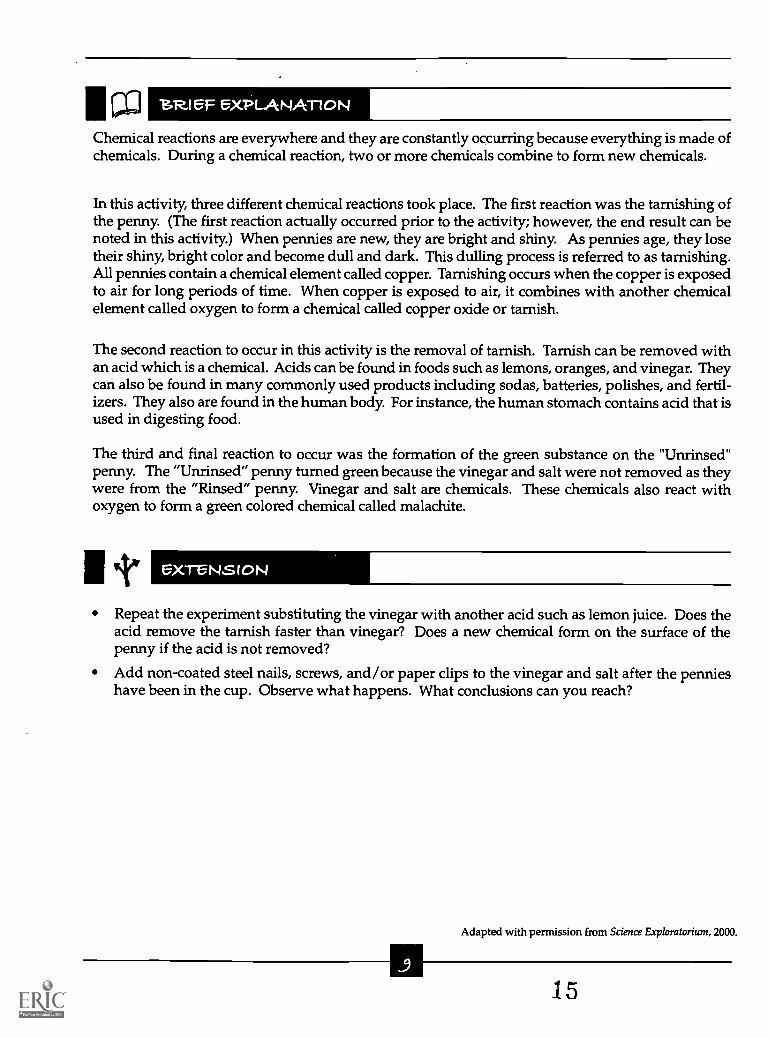
GROUP SIZE: 1-2TIME: 30 minutes
To observe the changing forms of matter.To study how the process of heat transfer is used in the preparation of ice cream.
1 cup milk4 tbsp sugar1/4 tsp vanillarock saltice
1-gallon size storage baggiesandwich size baggiesnewspapersduct tape
IP
In the small baggie, combine the milk, vanilla, and sugar.
Seal the baggie. Make sure to remove the excess air.
Fill 1/3 of the large baggie with ice. Add enough salt to cover the top surface of the ice.
Place the small baggie inside the large baggie.
Add more ice and salt around the small baggie.
Seal the large baggie. Make sure to remove the excess air.
Wrap the baggies in newspaper to form a bundle.
Seal the newspaper with duct tape.
Toss and shake the bundle vigorously for 5-10 minutes.
Open the bundle and see if the ingredients have solidified into ice cream. If not, rewrap thebundle and shake again.
Eat and enjoy.
10
16

QMEST1 0 NS TO AS K (A .ewers are i.wparewtheses)
1) How does shaking and tossing the baggies help make ice cream?(The shaking and tossing of the baggies allow all of the ingredients to mix evenly.)
2) What is the purpose of adding salt to the ice? Could the ice cream be made without using salt?(The salt causes the ice to melt at a faster rate. The ice cream can be made without the salt but itwould take more time (possibly, hours).)
3) What is the purpose of wrapping the baggies and ingredients in newspaper?(The newspaper insulates the baggies. The insulation prevents the baggies from receiving orreleasing heat into the environment.)
4) Did the ice cream freeze within 10 minutes? Why or why not?(Answers will vary. Possible reasons for the ice cream not freezing are not enough shaking, toolittle salt, too little ice, or too little newspaper.)
SRI 5F exP LA NATI 0 N
Cooking and preparation of foods provide a wonderful opportunity to study basic concepts in sci-ence while at the same time enjoying good food. The preparation of ice cream, for example, demon-strates two principles of chemistry: the changing forms of matter and heat transfer.
Matter is a term used to describe anything that takes up space and has mass (weight). Matter hasthree forms: gas, liquid, and solid. It can change between these forms through the processes ofboiling, melting, and freezing. For instance, the ingredients for ice cream are liquid and they freezeinto a solid, while the ice and salt begin as solids and melt into a liquid.
When matter changes forms, heat is either released or absorbed. The laws of nature require thatmatter can only give or absorb heat from other matter. The movement of heat between differentmatter is called heat transfer. In the preparation of ice cream, heat is being transferred between thesmall baggie containing the ice cream ingredients to the big baggie containing the ice and salt. Asthe ingredients freeze into the ice cream, heat is given to and taken by the salt and ice to melt.
I IP EXTENSION
Add your favorite toppings/additional ingredients to the mixture. Do the toppings/ingredientschange how long it takes for the ice cream to form?
Take and record the temperature of the ice before the salt is added and then after the formation ofthe ice cream. Take and record the temperature of the milk before and after the formation of theice cream. Graph the recorded temperatures. Is the change in temperature the same betweenboth baggies?
11
.1 7

Change one of the following and observe what happens:1) the amount of newspaper used as insulator2) the amount of salt3) the fat content of the milk.
Adapted from public domain ([email protected]).

10 PlARPOSe
GROUP SIZE: 1- 2TIME: 30 minutes
To examine density as a property of water, oil, and salt.To study how immiscible (non-mixing) fluids interact with each other.
WI-fAT yO Neer)
20 oz. clear plastic bottle with lidwaterfood coloringvegetable oilsalt
14 WHAT TO DO
Fill the 20 oz. plastic bottle with approximately 4-5 inches of water.
Add 1-2 drops of food coloring.
Add 1/4 cup of vegetable oil to the bottle. Wait until two layers form.
Shake the salt into the jar while slowly counting to five. Watch what happens.
After counting to five, stop adding the salt but continue observing the bottle.
Repeat the last two steps and continue to watch what happens.
13
19

I (Awswers are Lou parewtheses)?"1
1) Do the oil and the water mix? Why or why not?(The oil and the water do not mix because they are immiscible fluids, fluids that cannot be mixedbecause of their chemical make-up.)
2) Why does the oil float to the top when it is added to the water?(The oil floats because it is less dense than the water. The oil molecules are less tightly packedthan the water molecules are.)
3) What happened when the salt was added to the oil and water?(The salt and the oil formed a glob that sank to the bottom of the bottle.)
4) Describe what happened after the salt was no longer added?(After the salt and oil globs sank to the bottom of the bottle, the globs began to float back up to thetop.)
5) What happened to the salt that sinks to the bottom of the bottle?(The salt dissolves in the water.)
Oil and water do not mix. No matter how hard or vigorously they are blended, shaked, stirred, ormixed, they will never become one. Therefore, oil and water are called immiscible liquids. Immis-cible liquids have certain properties that cause the liquids to quickly separate themselves from eachother to form different, distinct layers.
One property that immiscible liquids use to separate themselves is density. Density is the ratio ofmass (weight) to volume. It determines the "heaviness" of one thing to another within a given spaceor area. Oil has a lower density than water, which is why it floats on top of water. Salt has a higherdensity than both oil and water, so it sinks in both oil and water.
1 tNext use a 2-liter soda bottle. Use scissors to cut the top two inches from the bottle. Add water andoil to form two distinct layers of fluids, then add kerosene to create yet a third layer. Drop a penny,a small candle, and a cork into the bottle. Ask students what they can deduce about the density ofthese objects' /fluids' molecules based on what they see in the bottle.
Adapted with permission from Science Exploratorium, 2000.
1420

I O PIARPOS e
GROUP SIZE: 1- 2TIME: 30 minutes
To model a helicopter rotor and examine how a helicopter works.
I Wf-fAT yo t4 N E 5-A
Roto-copter patterns (See examples on page 18.)scissorsmarkers or crayonspencillarge sheet of paper or newspaper
1 f WHAT TO PO
Color and decorate each of the Roto-copter patterns.
Cut out the patterns along the solid lines.
Fold each pattern along the dotted lines in the following manner: fold A towards you 90 degrees,B away from you 90 degrees, C and D towards each other so that theyoverlap, and the bottomupwards.Attach a paper clip to the bottom fold.
Drop or throw each of the Roto-copters. Observe what happens.
On one of the Roto-copters, change the directions of the folds for A and B. Fold A away from youand B towards you. Again, drop or throw the Roto-copter and observewhat happens.
152 1

To play a Roto-copter game, first make a target. Open a newspaper sheet on the floor so that itforms a large rectangle. Use tape to keep the paper in place.
In the center of the sheet, draw a circle about 20 inches in diameter. Inside this circle, draw asmaller circle about 14 inches in diameter. Fill in the smaller circle with a marker; this will be thebull's eye.
To play the game, divide students into teams.
Players should line up 1-3 feet away from the target. Taking turns, each player should throw hisor her Roto-copter at the target.After all players have thrown their Roto-copters, each team should tally the points according towhere each of the Roto-copters landed. Students receive 3 points for a bull's eye, 2 points for thecircle surrounding the bull's eye, and 1 point for landing somewhere on the paper outside ofboth circles. No points are awarded if the copter does not land somewhere on the paper.
QI4EST1 0 NS TO ASK (Answers are LK. parentheses)
1) What happened to the Roto-copter as it fell to the ground?(The Roto-copter spun in circles like the rotor of a helicopter.)
2) What differences, if any, do you notice between how the small and large Roto-copters fly?(The small Roto-copter spins more quickly than the larger one does.)
3) When you changed the direction of the folds for parts A and B, what effect did this have on theRoto-copter, if any?(When you change the direction of the folds, the Roto-copter will spin in the opposite direction asit falls. That is, it will spin counterclockwise instead of clockwise.)
A Roto-copter is a model of the rotor on a helicopter. A rotor is the wing-like blade on top of ahelicopter that allows the helicopter to take off vertically without the need of a runway. The rotor hasa design similar to an airplane's propeller, but serves a greater function. The propeller on an airplaneonly gives the plane thrust (forward movement), and the plane's wings give it lift (vertical move-ment). The helicopter's rotor provides both thrust and lift.
Basically, here is how a rotor works: When the rotor is directly parallel to the ground, the helicoptercan move directly up or down, or sit still. When the rotor is tilted slightly forward, backward, left, orright, the helicopter moves in those directions. Changing the speed of the spinning rotor allows thehelicopter to change altitude. The propeller on the tail changes the direction in which the nose of thehelicopter points.
-16
22

The smaller Roto-copter spins more quickly than the larger one because its shorter wings encounterless air resistance than do the longer wings. The direction in which the Roto-copter spins dependsupon how the wings are fixed around its central (vertical) axis. The outside edge of each wing of therotor (i.e., the edge farthest from the central axis) spins against the air.
UXTENSION
Try using other materials to create a better Roto-copter. Build even larger or smaller sizes to testwhich ones fly best.
Adapted with permission from Science Exploratorium, 2000.
23

Rpto-copier PattermsColor and decorate each of the Roto-copter patterns.
Cut out the patterns along the solid lines.
Fold each pattern along the dotted lines in the following manner: fold A towards you 90 de-grees, B away from you 90 degrees, C and D towards each other so that they overlap, and foldthe bottom upwards.
Attach a paper clip to the bottom fold.
A B
C D
A
24


GROUP SIZE: 2-4TIME: 20 minutes
To practice naming points on a coordinate grid and using compass directions.
pencil or pengraph paper
I fExplain or review the directions on a compass: North, South, East, West, Northeast, Southeast,and so on.
Explain or review how to name coordinates on an X-Y coordinate system (coordinate plane).
Using graph paper, create two identical X-Y coordinate systems on which to play the game. Forstudents who have just begun graphing coordinates, it may be best to begin with a simplifiedplane that has only positive numbers. As students' skills improve, use a larger or complete coordi-nate system to make the game more challenging.
Explain that a "Hurkle" is a fuzzy, imaginary creature that loves to hide and can hide almostanywhere even behind a small point on a coordinate system. In this game, a leader will hidethe Hurkle somewhere on the X-Y system, and the remaining players must try to find it.
To begin, choose a leader who will hide the Hurkle for the first game. (In subsequent games, eachplayer should have an opportunity to be the leader.) Give the leader one copy of the two identicalX-Y systems and the other copy to the remaining students. Have the leader secretively choose anypoint on the X-Y coordinate system. This point is where the Hurkle is hiding for this game. With-out showing the other players, the leader draws an "X" on his or her grid to mark where thisHurkle is hiding. Then announce to the players, "A Hurkle is hiding! Can you find it?"
The other students now take turns guessing where the Hurkle is. They should do this bynaming a set of coordinates, not by pointing to a spot on the graph. As students make theirguesses, they will mark these points on their graph paper.
4-9 6

Following each guess, the leader draws a small dot on his or her grid marking the point that wasguessed. The leader then responds to the students, telling them whether they have or have notfound the Hurkle. If the students did not find the Hurkle, the leader must give them a clue. As aclue, the leader tells the players what direction they should travel from their last guess to find theHurkle.
The students should keep track of their guesses and clues, narrowing down the space on thecoordinate system until they find the Hurkle. Talk with students about the best strategies forfinding the Hurkle with the fewest guesses possible.
62.14ESTIONS TO ASK (Answers are parentheses)
1) Who was best at finding the Hurkle? Who was best at hiding it?(Students' responses will vary.)
2) When you were looking for the Hurkle, how did you decide where to make your guesses? Didanyone come up with a strategy for making good guesses?(Initially, students' guesses will probably be random. After a few games, however, students maybegin to use the directional clues to "scratch out" portions of the grid where they know the Hurklecannot be hiding. In this way, additional guesses and clues help them narrow the search area.)
SRA EF EXPI-.ANAT1ON
Simply, this game is designed to make work fun. The skills students use in this game are fundamen-tally important in algebra, geometry, physics, and advanced mathematics classes. Furthermore, ap-proximating area and distance, translating clues into useful information, and making good guesses(hypothesizing) are also important skills for students who might enjoy careers as scientists, engineers,navigators on boats or airplanes, or topographers (map makers).
iv EXTENSION
Play the game on all four quadrants of a complete X-Y coordinate system.
Adapted with permission from Family Math, Lawrence Hall of Science, 1986.
2027

PRRPOSe
GROUP SIZE: 2TIME: 10 minutes
To practice basic addition and mental arithmetic.To develop strategy and problem solving skills.
WHAT you. NEED
paperpencil or pen
I f WliAT TO DO
To begin, draw an ordinary tic-tac-toe grid. Decide who will go first.
As in ordinary tic-tac-toe, two students will alternate turns. Rather than playing with. "X's" and"O's" however, students will take turns adding a number, 1 through 9, to a space on the tic-tac-toeboard. The object of the game is to be the first student to make three numbers in a row -- verti-cally, horizontally, or diagonally -- add up to exactly 15.
Play begins when the first student chooses a number from 1-9 and writes that number in one ofthe nine spaces on the board. Once a number has been used in a game, it cannot be used again byeither player. For example, if the first student puts an 8 in the center of the board, then the nextstudent can only choose from 1-7, or 9.
Next, the other student chooses from the remaining numbers and adds one number to the board.The student should choose carefully, however. Either student can use any of the numbers on theboard to make 15; students are not limited to using the numbers they have written themselves.Thus, the student who takes the second turn should be careful not to set up his or her opponentfor an easy win.
Students alternate turns until someone plays a number that makes three squares in a row total15, or until all the spaces are filled and the game ends in a tie.
Remind students that each number from 1-9 can only be played once, and that it takes threenumbers in a row to make a winning sum of 15.
21 28

6214eST1 0 NS TO ASK. (Awswers are LK. pareputheses)
1) How many times did you play with your partner? Who won the most games?(Students' responses will vary)
2) Did you find that certain numbers or spaces were better to use than others? Why?(Students' answers may vary However, only one strategy provides a consistent advantage to aplayer. See the explanation below.)
3) Can you explain how a good defensive strategy can help you to win a game?(As in traditional tic-tac-toe, after a few games students will realize that to win they must playdefense well. If a player cannot win during a turn, then the player must choose a number and aspace on the board that will not give the opponent a chance to win.)
SR.( eF exP L.A NATI 0 N
Winning strategies depend upon number selection and placement. Unlike traditional tic-tac-toe, inthis activity each player may use all spaces on the board to win, not just his or her own spaces. Afterseveral games students may discover a strategy that allows the first player to win everytime: placinga 5 in the center square on his or her first turn. In the 1-9 number set, there are four numbers on eitherside of the 5, each with a match that adds to 10. For example, 1 matches with 9, 2 with 8, and so on.So, no matter what number or where the opponent chooses to play next, the first player can then playthat number's match and win the game.
I IP xTeNsioN
Develop a variation on this game that uses a larger board, restricts players to using only evennumbers, or contains a number set that includes both positive and negative numbers.
Adapted with permission from Family Math, Lawrence Hall of Science, 1986.
2229

PKIRPDS E
GROUP SIZE: 1-2TIME: 30 minutes
To move and manipulate three types of geometric shapes (triangles, squares, and parallelo-grams) of different sizes.
To recognize spatial and geometric patterns.
To develop an understanding of spatial relationships.
Wt-tAT yoR Neep.
worksheets: "Tangram Template," "Tangram Puzzles," and "Tangram Puzzles Solutions"scissorsposterboardcrayons/markersglue/paste
1N WHAT TO DO
On a blank sheet of paper, trace the pattern from the "Tangram Template."
Decorate the pattern using crayons/markers.
Cut out the pattern by first cutting along the square boundary lines. Then, cut along the solidlines within the pattern in order to get 7 shapes: 1 square, 1 parallelogram, 2 small triangles, 1medium triangle, and 2 large triangles.
Paste or glue the shapes separately on a posterboard and cut out the shapes.
Using the shapes, solve as many tangram puzzles as possible from the "Tangram Puzzles"worksheet. Remember to use all 7 pieces for each puzzle. The pieces must not overlap.
62.ResTio NS TO ASK (Answers are i.n.laren,theses)
1. Which puzzles were easiest to solve? Why?(Responses will vary.)
2. Which puzzles were most difficult to solve? Why?(Responses will vary.)
22.30

The tangram is an ancient Chinese puzzle used for entertainment throughout the centuries. Eachpuzzle consists of one large shape or figure formed by seven smaller shapes: a square, a parallelo-gram, and five triangles (one medium, two small, and two large). The puzzle is solved when allseven shapes have been arranged, without overlapping, to resemble the identified figure (barn, candle,chair, etc.).
Solving tangram puzzles requires the use of important problem-solving skills, including the abilityto recognize the relationships among geometric shapes. These skills will not only be important inthe study of other mathematics such as geometry but also in everyday activities such as packing.
XTUNSION
Have each student design an original puzzle using the seven tangram pieces.
Adapted with permission from Family Math, Lawrence Hall of Science, 1986.
24
31

Tawgraw. Template worieslieet
Decorate and cut out the following pieces. You should end up with 7 shapes total: 5 triangles, 1square, and 1 parallelogram.
.2534

rawer/4m Puzzle worksheet
BARN BRIDGE
CANDLE CHAIR
MAN MOUNTAIN
26
33

Temercom. Puzzle Said Loiks Worksheet
BARN
0
BRIDGE
CANDLE CHAIR
MAN MOUNTAIN
.27-
34
PlA.R.POS 5
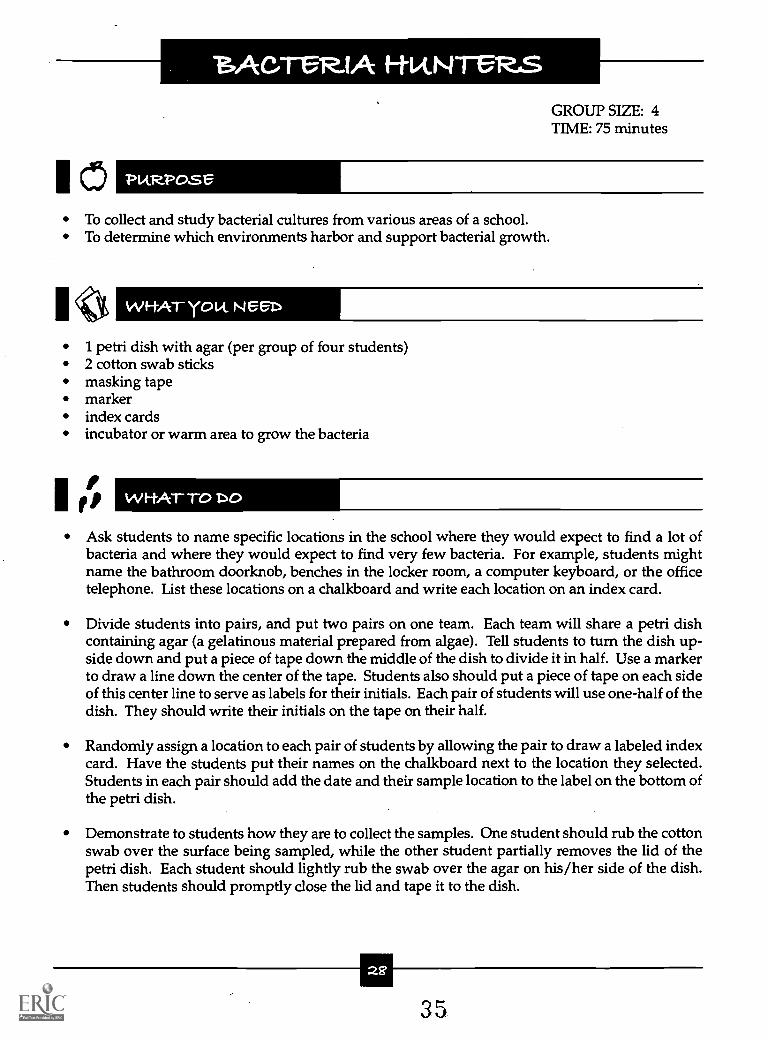
GROUP SIZE: 4TIME: 75 minutes
To collect and study bacterial cultures from various areas of a school.To determine which environments harbor and support bacterial growth.
WHAT you. N 55A
1 petri dish with agar (per group of four students)2 cotton swab sticksmasking tapemarkerindex cardsincubator or warm area to grow the bacteria
I r,Ask students to name specific locations in the school where they would expect to find a lot ofbacteria and where they would expect to find very few bacteria. For example, students mightname the bathroom doorknob, benches in the locker room, a computer keyboard, or the officetelephone. List these locations on a chalkboard and write each location on an index card.
Divide students into pairs, and put two pairs on one team. Each team will share a petri dishcontaining agar (a gelatinous material prepared from algae). Tell students to turn the dish up-side down and put a piece of tape down the middle of the dish to divide it in half. Use a markerto draw a line down the center of the tape. Students also should put a piece of tape on each sideof this center line to serve as labels for their initials. Each pair of students will use one-half of thedish. They should write their initials on the tape on their half.
Randomly assign a location to each pair of students by allowing the pair to draw a labeled indexcard. Have the students put their names on the chalkboard next to the location they selected.Students in each pair should add the date and their sample location to the label on the bottom ofthe petri dish.
Demonstrate to students how they are to collect the samples. One student should rub the cottonswab over the surface being sampled, while the other student partially removes the lid of thepetri dish. Each student should lightly rub the swab over the agar on his/her side of the dish.Then students should promptly close the lid and tape it to the dish.
35

Give students fresh cotton swabs and send them to quickly collect their samples.
Tell students not to leave the lid off of their dish or touch the agar with their fingers. Bacteria inthe air or on students' hands could contaminate the sample. Similarly, students should be carefulnot to contaminate the cotton swabs before collecting their samples.
Once students return from collecting their samples, have each one draw what his or her dishlooks like and label the drawing with the date and sample location. Also, have students recordthe number of colonies they see. Fuzzy colonies are fungus, not bacteria.
Move the petri dishes to the incubator/warm area. Have students regularly re-examine the dishes.
7;1' 62.145ST1 0 NS TO AS K. (Awswers are LK. parewtheses)
1) How many colonies of bacteria are growing in your petri dish? How does this compare with thebacteria in other petri dishes?(Students' answers will vary)
2) Considering where you collected your sample, did your dish have more or less bacteria than youexpected? Why?(Students' answers will vary.)
3) Think about all the locations whose samples had lots of bacteria. What are some common thingsabout these locations that might make them good spots for bacteria to grow? Which locationsdid not have lots of bacteria? Why not?(Students' answers will vary)
4) How can you control how much bacteria with which you come in contact?(Students' answers will vary.)
co 7,R.1 5F EXPLANATION
Bacteria are microorganisms too small to be seen by the naked eye. Most bacteria are helpful toanimals and humans. For example, there are many bacteria in the soil that break down dead plantand animal matter to help return nutrients to the soil. Millions of beneficial bacteria also live in thehuman digestive tract and help in digestive processes. However, the bacteria that are best knownare those few that are harmful to humans and can cause disease, such as salmonella.
Bacteria exist almost everywhere, but they grow best inwarm, dark environments. Students shouldknow that a simple hygiene practice like washing their hands before eating can limit their encoun-ters with harmful bacteria.
36

1tLeave a petri dish out in the classroom without a lid for an hour or two. Tell students that bacteriain the air are landing on the dish all the time. Add this dish to the students' samples.
Adapted with permission from E.S. Balasic, www.middleschoolscience.com, 2000.
so
37

GROUP SIZE: 1-2TIME: 10 minutes
To observe the formation of a gas when an acid and a base are mixed.To study how gases can exert pressure on their surroundings.
WH-AT yolA. Neer.
water1 small zippered plastic bagpaper towels1 1/2 tablespoon baking soda3/4 cup vinegar1 bowl (large enough to hold the zippered bag)
I (p WHAT TO DO
Test the zippered bag for holes by filling it halfway with water and turning it upside down. Ifthe bag does not leak, empty the bag and continue. If it leaks, try a new bag.Put 1 1/2 tablespoons of baking soda in the center of a paper towel sheet.Fold the sides of the paper towel over the baking soda. Make sure the baking soda still remainsin the center. Then, fold the top and bottom portions of the paper towel over the baking soda.This will result in a small packet.Gently lay the packet on a flat surface with the folded portions of the paper towel facing thesurface.Pour 3/4 cup of vinegar into the plastic bag.Carefully place the packet containing the baking soda inside the bag and zip the bag closed.Do not let the packet touch the vinegar immediately.Slowly release the packet into the vinegar.Gently shake the bag and put the bag into the bowl.Stand back.
(Amswers are LK, parewtheses)
1. What happened when the packet of baking soda and vinegar were mixed?(The vinegar began to fizz and the bag began to expand.)
2. Why did the bag expand and pop?(Responses will vary.)
3. Did the bag pop immediately or did it take some time?(Responses will vary.)
31
38

The reaction between vinegar (an acid) and baking soda (a base) represents one of the most impor-tant reactions in chemistry. The reaction is referred to as an acid-base reaction.
In this activity, vinegar is an acid called acetic acid and baking soda is a base called sodium bicarbon-ate. When vinegar and baking soda are mixed they produce a white salt and water. They alsoproduce a gas called carbon dioxide.
Since the carbon dioxide was confined to the small area inside the bag, it exerted pressure on thesides of the bag. The pressure continued to increase until finally the bag popped.
Repeat the activity by making one of the following changes:- Add less baking soda.
Decrease the amount of vinegar to 1/2 cup and add 1/4 cup of water.- Use toilet paper or tissue paper instead of paper towels to contain the baking soda.
Observe any changes in the reaction.
Adapted with permission from Science Exploratorium, 2000.
3239
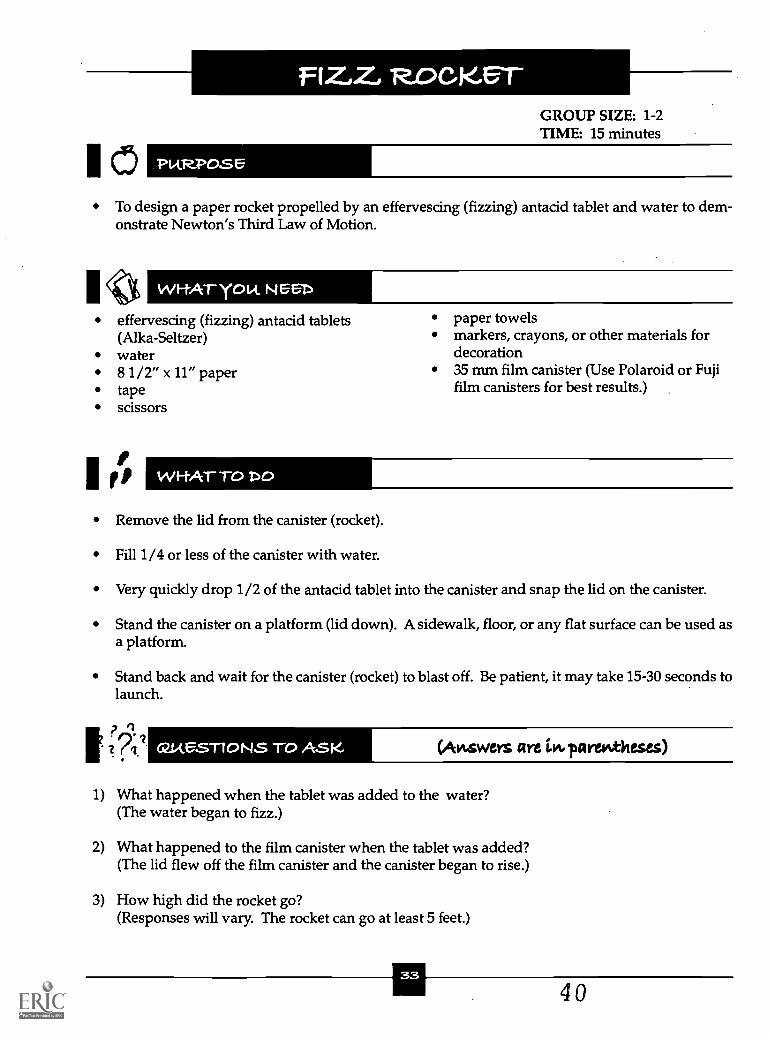
GROUP SIZE: 1-2TIME: 15 minutes
To design a paper rocket propelled by an effervescing (fizzing) antacid tablet and water to dem-onstrate Newton's Third Law of Motion.
effervescing (fizzing) antacid tablets paper towels(Alka-Seltzer) markers, crayons, or other materials forwater decoration8 1/2" x 11" paper 35 mm film canister (Use Polaroid or Fujitape film canisters for best results.)scissors
I I
Remove the lid from the canister (rocket).
Fill 1/4 or less of the canister with water.
Very quickly drop 1/2 of the antacid tablet into the canister and snap the lid on the canister.
Stand the canister on a platform (lid down). A sidewalk, floor, or any flat surface can be used asa platform.
Stand back and wait for the canister (rocket) to blast off. Be patient, it may take 15-30 seconds tolaunch.
(Amswers are LK, *pareputheses)
1) What happened when the tablet was added to the water?(The water began to fizz.)
2) What happened to the film canister when the tablet was added?(The lid flew off the film canister and the canister began to rise.)
3) How high did the rocket go?(Responses will vary. The rocket can go at least 5 feet.)
3340

Sir Isaac Newton (1642-1727), a famous mathematician and scientist, developed explanations onhow and why objects move. These explanations are known as Newton's Three Laws of Motion. Thisactivity demonstrates one of the laws, Newton's Third Law: The Law of Action and Reaction. TheLaw of Action and Reaction states, "for every action there is an equal and opposite reaction."
During the activity, the rocket is launched using water and an antacid tablet as fuel. When the tabletis enclosed in the water-filled canister, the tablet and water begin to react to produce a gas. As thereaction continues, more gas is produced which eventually puts pressure against the film canister.The building gas pressure increases so much that eventually the lid, which is on the bottom since thecanister is upside down, pops. The water and the gas rush down and out of the canister. The releaseof the water and gas pushes the rocket upwards.
Based upon the Law of Action and Reaction, the action is the gas leaving the canister and the oppo-site reaction is the rise of the rocket. The speed of the rocket is proportional to the speed of the gasbeing released; therefore, the faster the gas leaves the canister, the faster the rocket rises.
I tUse different amounts of water and/or tablets and see how it affects the height of the rocket.What is the best combination to produce the maximum height?
Design and launch a rocket powered by two or more film canisters.
Adapted from public domain (http://spaceplace.jpl.nasa.govirocket.htm).
34
41

WI NCIL-ESS CIL-MFR.GROUP SIZE: 1- 2TIME: 60 minutes
To examine gravity and air resistance.To collect sample measurements and compute an average.
drinking straw (non-flexing)scotch tapeindex cardscissorsrulermakers or crayons20' measuring tape
FIP
Cut the index card into three equal strips lengthwise. Each strip should be about one inch wideby five inches long. Have students decorate the strips with markers or crayons.
Take one of the three strips and bend it into a loop. Tape the ends of the loop together. Thecircumference (perimeter) of the loop should be about the same as that of a ping-pong ball.
Tape the remaining two strips together, end to end, to make one long strip that is one inch wideand about ten inches long. Then, bend this long strip into a big loop and tape the ends. Thecircumference of this loop will be approximately the same as that of a baseball.
Place the straw on a flat surface and tape the middle of the straw to the surface. This holds thestraw in place while the loops are being added.
Take the small loop and slide it under one end of the straw. Push it onto the straw so that its outeredge aligns with the end of the straw. Put a piece of tape on the inside of the loop, and tape theloop to the straw.
Take the larger loop and slide it under the other end of the straw. Again, make sure its outer edgealigns with the end of the straw. Use tape to secure this loop to the straw.
3542

Once both loops are in place, remove the tape that holds the straw to the desk. Now the glider isready to fly. Let students know that the small loop is the front of the glider and the large loop isthe rear. Find an open space and give the glider a toss.
Have students collect sample measurements of the distances flown by their gliders. Then, findthe average distance flown by all of the gliders.
(Awswers are imlareputheses)I (I.
1) In your records, what was the farthest distance a glider flew? What was the shortest distance aglider flew? On average, about how far did most gliders fly?(Distances and averages will vary from class to class.)
2) Imagine we are going to have a contest to win a pizza. To win, you must guess how far my gliderwill go before I throw it. I will choose a glider at random after you have written your guess.Whoever comes closest to the correct distance will win. Based on the data we have collectedabout the gliders, what guess would you make? Why?(Students' answers will vary.)
3) Today when we threw the gliders, what are some things that affected how far a glider would go?List as many things as you can.(Students' answers will vary and could include the following: gravity, wind, slope of the land,glider construction/materials, arm strength/coordination, and air resistance.)
4) What is the main reason the glider falls to the ground? What is gravity?(Gravity causes the glider to fall because it is a force that pulls everything -- even air toward theground. When one lifts a book, its weight can be felt because gravity pulls it downward. Allmatter has a gravitational force that attracts other matter. Even a pencil has a tiny gravitationalforce that attracts other objects. However, only very, very large objects -- like a planet or moonhave enough mass to create a gravitational force strong enough to be felt and measured.)
5) What is the main thing that keeps the glider temporarily up in the air?(Air slows the glider's fall and keeps it up. Air resists all falling objects; the larger the surface areaof the object, the greater the air resistance. For example, consider how a parachute slows the fallof a person being pulled to Earth by gravity. In the same way, the loops of a glider are likeparachutes that the air acts against during the glider's fall.)
43

$RIFF= EXPLANATION
The average of a set of numbers is the value that is most typical of that set. For example, imagine that20 gliders were each thrown once and the distances of their flights were measured. To find theaverage distance that the gliders flew, students would add the distances of all the trials together andthen divide by the total number of trials, which is 20. If students understand the concept of anaverage and know the average distance the gliders flew, they can make an educated guess abouthow far the glider would fly in the pizza contest.
Aside from heavy winds, gravity is the strongest force pulling the glider to the ground. Alterna-tively, air acting on the wide surfaces of the loops provides the greatest resistance (air resistance) tothe downward force of gravity.
I IP x-rNsioN
To introduce students to the scientific method, propose the question, "What changes do you thinkwe could make to a glider to make it fly farther?" Treat the students' responses as hypotheses.Based on the hypotheses, the students' procedure would be to design and test a number of newprototype gliders. Have the students collect sample distances flown by the gliders and report theresults. In conclusion, state whether the hypotheses tested were true. (The basic steps of the scien-tific method are italicized and listed sequentially.)
Adapted with permission from Science Exploratosium, 2000.
37 44
t
010

PLARPOS 5
GROUP SIZE: 2TIME: 15-30 minutes
To develop strategies, use patterns as clues, practice addition and subtraction, and learn calcula-tor operation skills.
WI-tAT yOtA. NEED
basic calculator
I (p a IP
Group students in pairs and give each pair a calculator. Give each pair a copy of the NimbleCalculator worksheet (included below) which explains a series of six games, each one more chal-lenging than the previous one.
To play each game, follow the instructions provided in the worksheet. Choose who will go first,then begin. After each match, let.the loser choose who will play first in the next match. Play afew matches in each game before moving on to the next one.
Have players watch for the point in each match where it is clear who will win. Have them lookfor patterns or strategies that decide who will win. Ask them to discuss their observations withtheir respective partners.
r?62.1-tesTio NS TO ASK. (Answers are parentheses)
1) Who won the most games? Which games were most interesting or challenging? Why?(Students' responses will vary.)
2) What patterns did you discover, if any? Based on the patterns, what were your strategies forwinning?(All of these games utilize one basic mathematical "strategy," as described in the explanation.However, each game has a different start point, end point, and range of numbers that studentsmust identify in order to win consistently.)
3) Did you discover the twist in Century?(Unlike the other games in which taking the first turn is an advantage, in Century it is advanta-geous to go second. This is because the end point in Century is an even number.)
3846

WR-16F UXPLA NATI O N
Students can discover how to win each of the games by counting backwards from a game's end point.For example, Kay and Gene are playing 7LIp, where the goal is to reach 7 by adding l's or 2's. Movingbackwards from 7, Kay knows that if she makes the total either 5 or 6 on her turn, then Gene can winby adding 1 or 2. Reciprocally, if Gene makes the total either 5 or 6, Kay can win on her next turn. So,Kay deduces that she can win if she ensures that Gene on his turn makes a total of 5 or 6. To "force"Gene to do that, Kay realizes she should aim at getting a sum of 4; then, she would be guaranteed awin. But, if Gene gets to 4 first, then he's sure to win.
So, how does Kay get to 4 before Gene does? Kay knows that if she makes the total 2 or 3, then Genecan get to 4 by adding 1 or 2. Then, he would eventually win. Reciprocally, if Gene makes the total 2or 3, Kay can get to 4 and win the game. So, if Kay does not want to make the total 2 or 3, then the onlyoption left is 1. If Kay makes it to 1 first, then she is guaranteed to win!
If Kay understands the strategy of the game and can get to 1 first, then she knows she will win, nomatter what Gene does.
How can Kay get to 1 first? The only guaranteed way is to have the first turn. Students may find itremarkable to discover that the winner of the game can be determined from the very first move!
EXTENSION
Have students create their own calculator games by choosing a start point, end point, and range ofnumbers that can be added on each turn. Ask them to explain the best strategies for winning theirgames.
Older students can use this activity as a springboard for discussing mathematical "game theory,"the study of human behavior/choices using mathematical models.
Adapted with permission from Family Math, Lawrence Hall of Science, 1986.
3.5

worle,sheet: Ni.m.ble calculator
7UpClear the calculator so it reads 0. Taking turns, each player adds either 1 or 2 to the calculatorsum. The winner is the first person to reach 7 exactly.
Start: 0 Add: 1 or 2 Target: 7
11 DownClear the calculator and enter 11. Subtract 1 or 2 on each turn. The winner is the first person toreach 0.
Start: 11 Subtract: 1 or .2 Target: 0
Now You're 21Clear the calculator so it reads 0. Add 1,2,3, or 4 on each turn. The first person to get 21 exactlyis the winner.
Start: 0 Add: 1,2,3, or 4 Target: 21
Travel Down 101Enter 101 on the calculator. Each person in turn subtracts 1,2,3,4,5,6,7,8, or 9 from the number inthe display. The winner is the first person to make the display read 0.
Start: 101 Subtract: 1-9 Target: 0
CenturyStart at 0 and add 1-9 on each turn. The first person to reach 100 exactly is the winner.
Start: 0 Add: 1-9 Target: 100
2001Enter 2001 in the calculator. Subtract 1-99 on each turn. The first person to reach 0 exactly wins.
Start: 2001 Subtract: 1-99 Target: 0
40
48

GROUP SIZE: 1- 2TIME: 20 minutes
To practice working with ratios and using basic algebra to discover the exact ingredients of theeight bean recipes.
3 types of dry beans (about 15 red beans, 15 lima beans, and 15 black-eyed peas)paper plates or bowls to hold the beans
Distribute the three types of beans to each student so that each has a set of red beans, lima beansand black-eyed peas. Give each student an extra plate or bowl on which to make a salad.
Distribute the recipes' worksheet (given below) to each student. Tell students that all three typesof beans go into each salad. Using the beans provided, students should follow the clues in eachrecipe to discover how many red beans, lima beans, and black-eyed peas are needed to completeeach salad.
(Aptzwers are imlarevutheses)
1) How did you determine the number of beans that are needed in each recipe?(Students' answers will vary.)
2) Which recipes were easy to solve? Which ones were difficult? Why?(Depending upon the students' exposure to ratios, proportions and basic algebra, they may treatthe recipes as mathematical word problems, working out their solutions on paper. Other stu-dents might use a trial and error method, manipulating the beans to discover the correct ingredi-ents. In the former case, recipes with the most straightforward language might be the easiest tocomplete. In the latter case, recipes with the fewest total beans might be easiest because theiringredients could be discovered in fewer trials.)
3) What might these recipes look like if they were algebra problems?(The answer varies for each recipe. See the following explanation and example.)
41
49

Lo "BR-1 eF expl-A NATI 0 N
Explain or review the term ratio.
A ratio is a measure of the relative size of two quantities or numbers and is expressed as the quotient ofone divided by the other. For example, if we have 3 times as many red beans as lima beans, ourratio is 3 (red beans) to 1 (lima bean), or 3/1. Or, if we have only one black-eyed pea for every2 red beans, then the ratio is 1 (black-eyed pea) to 2 (red beans), or 1/2.
Though students may not realize it, they will use algebraic skills to solve these problems. Showthem how each recipe has the same basic mathematical formula:
Red beans + Lima beans + Black-eyed peas = Total beans
This formula can be abbreviated with letters to symbolize the amount of Red beans (R), Lima beans(L), Black-eyed peas (B), and Total beans (T).
R+L+B=T
For Recipe 1, two clues say that the recipe has 2 Limas and 10 beans total, so enter these numbers intothe formula, because L=2 and T=10.
R + 2 + B = 10
The third clue is a bit tricky. "Twice as many Reds as Limas" can be written mathematically in a fewways, but both ways really say the same thing: the ratio of Red beans to Lima beans is 2 to 1, or 2/1.Look at these options and ask students which one they prefer.
R = 2L or R/2 = Lor example, use R = 2L to figure out how many Red beans are in the salad. If it is known that thereare 2 Limas in the salad, then:
R = 2(2) which is R = 4
So now there are 4 Reds, 2 Limas and 10 beans all together. All that remains is to find the number ofBlack-eyed peas in the salad. Ask the students if they can show you the rest.
4 + 2 + B = 10
6 + B = 10 which is B = 10 - 6
B = 4
1t EXTENSION
Create a new salad and then write clues (instructions) on how to make it. Share the clues with afriend to see if he or she can discover the correct ingredients.
Adapted with permission from Family Math, Lawrence Hall of Science, 1986.
4250

Worksheet: Three Be salad 'Recipes
1
This salad contains:2 Lima beansTwice as many Red beans as Lima beans10 beans in all
2This salad contains:
4 Red beans1/2 as many Black-eyed peas as Red beans10 beans in all
3This salad contains:
Lima beans that make up 1/2 of the saladExactly 2 Red beansLima beans that double the number of Red beans
4This salad contains:
The same number of Red beans as Lima beans3 more Black-eyes than Red beansA total of 18 beans
5This salad contains:
Exactly 12 beansRed beans as 1/2 of the beansLima beans that make up 1/4 of the salad
6This salad contains:
At least 12 beansOne more Lima beans than Red beansOne more Red beans than Black-eyes
7This salad contains:
3 times as many Red beans as Black-eyesOne more Lima beans than Red beans8 beans in all
8This salad contains:
An equal number of Red beans and Black-eyes5 more Lima beans than Red beans and Black-eyesNo more than 20 beans
43
51

GROUP SIZE: 1-2TIME: 30 minutes
To develop creative problem solving skills and spatial thinking abilities using a hands-onmathematics manipulative.
WHAT yOR NEED
toothpicks (about 25)a coinpuzzle sheetcolored paper (1 sheet)
1/Each toothpick puzzle begins with a design made of toothpicks. Using the colored paper as aworkspace, create the beginning picture with your toothpicks.
Each puzzle has a challenge for you to solve. To solve the challenge; you will have to move orremove some of the toothpicks in your design to create something new. Follow the instructionsclosely. If some puzzles seem odd or impossible to solve, they may require you to think about or"see" the puzzle in new ways. Some of the puzzles have more than one correct answer.
62.14UST1ONS TO ASK (Awswers are i.wparewtlieses)
1. Which puzzles did you find most interesting? Most challenging? What made some of the puzzleseasy for you, and others more difficult?(Responses will vary)
2. Were there any puzzles for which you found more than one answer? Which ones?(Responses will vary.)
3. What was "tricky" about some of the puzzles? In other words, how did you have to change yourthinking or perspective to solve those puzzles?(Responses will vary)
44
52

BRIEF EXPLANATION
Often when we are presented with a problem in life, we first try to solve it using methods that wehave already used before. Sometimes our problem solving methods become "habitual" in the sensethat we want to use the same method to solve lots of different problems, even though it's not alwaysthe best method for every problem. Students can develop similar kinds of bad habits in school if theyaren't challenged to be creative and look at a mathematics problem, science project, or English poemin a new way. These toothpick puzzles train the brain to look for alternative ways of thinking thatmight help us find new ways of doing things. They also develop our "right-brain" thinking skills byteaching us new ways to visualize possible outcomes.
Change the rules or the goal for one of the puzzles. Try it on a friend.
Create your own puzzles using toothpicks, coins or other objects.
Source: Gigantic Book of Puzzles, 1999
46

Tootivizie 4eovwetrd Puzzle woriesheet
Starting design: Instructions:
Square DealThe toothpicks in this diagram have been arranged to form squares.Can you remove two of the toothpicks so that only two squaresremain?
1 1
1 I
ArchitectBuild a house using 11 toothpicks as shown in the diagram. See ifyou can make the house face the opposite direction by moving onlyone toothpick.
/\ \In and OutThe four toothpicks in this diagram represent a wine glass with acoin inside. See if you can move two toothpicks so that the coin isoutside the glass.
//NAquariumMake a fish using eight toothpicks and a coin as shown in the dia-gram. Move only three toothpicks and the coin so that the fish isswimming to the right. You may change the location of the eye.
/\ /\ /\PyramidsUse nine toothpicks to make three congruent (same-sized) triangles.See if you can move three of the toothpicks to create four congruenttriangles.
1 I
Criss-crossArrange 12 toothpicks as shown in the diagram. Can you move onlythree toothpicks and end up with exactly three congruent squares?
1 I
1 1
CheckerboardUse 24 toothpicks to create the checkerboard in the diagram. Canyou remove exactly eight toothpicks so that two squares remain?
1 1 I
I1 1
1
I 1
54

Tootkpizle 4eontetro intz-zlesolu.ti,ovu worleslieet
Square DealThe toothpicks in this diagram have been arranged to form squares.Can you remove two of the toothpicks so that only two squaresremain? (Remove the two toothpicks as shown.)
1
1 1
ArchitectBuild a house using 11 toothpicks as shown in the diagram. See ifyou can make the house face the opposite direction by moving onlyone toothpick. (Move one toothpick as shown.)
/. /\
.
In and OutSee if you can move two toothpicks so that the coin is outside theglass. (Slide the horizontal toothpick midway under the verticaltoothpick on the right. Move the vertical toothpick on the left tothe bottom right side.)
1 1
/', /.
AquariumMake a fish using eight toothpicks and a coin as shown in the dia-gram. Move only three toothpicks and the coin so that the fish isswimming to the right. (Move the three toothpicks as shown fromthe original design to get the new design.)
PyramidsUse nine toothpicks to make three congruent (same-sized) triangles.See if you can move three of the toothpicks to create four congruenttriangles. (Move the third triangle on the right to the top of andbetween the first two triangles.)
/\ /\Criss-crossArrange 12 toothpicks as shown in the diagram. Can you move onlythree toothpicks and end up with exactly three congruent squares?(Move the three toothpicks shown to the left, right, and top sides toform the three congruent squares.)
1 I
I1 I 1
CheckerboardUse 24 toothpicks to create the checkerboard in the diagram. Canyou remove exactly eight toothpicks so that two squares remain?(Move the eight toothpicks that touch the middle square.)
I.
I
. .._..II
. .1
I
I
4.7-

I cD
DNA NOW yo. see 1-11GROUP SIZE: 1-2TIME: 30 minutes
To learn the technique of DNA extraction by observing the DNA of a banana.
bananablenderliquid dishwashing detergentmeat tenderizerstrainer
cupsmall glass jarrubbing (isopropyl) alcoholsalttoothpick
II
Cut the banana into pieces.
Put the banana pieces into the blender. Pour enough warm water into the blender to barely coverthe pieces in the blender. Add a teaspoon of salt.
Blend the mixture for 5-10 seconds. The mixture should be mushy, but not runny.
Using the strainer to strain the mush into a cup. Discard the solid pieces that remain in thestrainer and keep the liquid in the cup. The liquid in the cup will be referred to as the soup.
Add 2 teaspoons of liquid detergent to the soup and gently stir. Try to avoid creating bubbleswhile stirring.
Add 1 teaspoon of meat tenderizer to the soup and continue stirring for 5 minutes.
Pour half of the soup into a glass jar.
Carefully pour an equal amount of rubbing alcohol down the side of the jar.
Let the mixture sit for 5 minutes. Wait for two layers to form.
With a toothpick, remove the white, stringy stuff. That is DNA!
48
56

(Awswers are LiAlareputheses)
1) What happened when you poured the mush through the strainer? How much liquid remainedafter straining? Was it more or less than you expected?(Only a small amount, approximately one-fourth, of the mush will pass through the strainer. Theremaining portion, the large banana pieces and chunks, will remain in the strainer. Answers willvary on whether the amount was more or less than expected.)
2) What happened to the soup after the detergent was added?(The.soup. will begin to look cloudy.)
3) What happened to the soup after the meat tenderizer was added?(White, stringy stuff will begin to appear in the soup.)
4) What happened to the soup when the alcohol was added?(Two layers began to form. The bottom layer contained the soup and the top layer contained thealcohol and white stringy stuff.)
5) What is the white stringy stuff?(The white, stringy stuff is DNA.)
BRIEF= EXP LA NATI 0 N
The white stringy stuff appearing at the end of the experiment is DNA. DNA stands for deoxyribo-nucleic acid. DNA is found in every living (and formerly living) thing. It is often referred to as theblueprint of life because it determines what a living organism will become and how the organismwill function.
Normally, DNA cannot be seen by the naked eye because it exists within cells and is very compact.DNA can be separated from the cell and unraveled using a method called DNA extraction whichmakes it visible.
DNA can be extracted in a variety of ways. However, all DNA extraction techniques require at leastthree key ingredients added in this order: Detergent, eNzyme, Alcohol. The detergent breaks thecell apart to release the DNA and other cell parts. The enzyme causes the DNA to unravel and uncoilby cutting proteins that keep the DNA in a tight bundle. (DNA is very long, and if it were not coiledand packaged tightly, cells containing it would have to be very large. For instance, if the DNA ofhumans were unraveled and laid end to end, it would stretch the distance between the Earth and themoon approximately 6,000 times.) The alcohol separates the DNA from the other cell parts.
I IPTry extracting DNA from one of the following sources: spinach, onions, broccoli, or bakingyeast. Compare the source's DNA with the banana's DNA. Do the DNAs differ?
Experiment with different types of detergents or meat tenderizers. Do certain detergents ormeat tenderizers work better than others?
Source: Natural History of Genes, University of Utah.
5"

I
GROUP SIZE: 1- 2TIME: 45 minutes
To test the quality of different chemical substances as lubricants.To examine how lubricants work.
4 envelopes unflavored gelatinsquare baking panmixing bowlliquid dish detergentvegetable oil2 bowlswatch with a second handtable knife8-ounce cupsheet of paper and a pencil
In a mixing bowl, dissolve 4 envelopes of gelatin in 2 cups of hot tap water.
Coat the inside of the baking pan with vegetable oil. Pour the gelatin mixture into the pan andput it in the refrigerator until firm (about 3 to 4 hours).
Use the knife to cut the gelatin into cubes about 1 cubic inch. This should make about 64 cubes.
Have each student create a table of two columns and four rows. Label the first column "Type oflubricant," and the second column "Number of cubes moved." Under the heading for lubricants,in the first row write "No lubricant," in the second row, write "Dishwashing detergent," in thethird, "Water," and in the fourth, "Vegetable oil."
Place 15 cubes into a bowl. Place an empty bowl about 1 foot away from this bowl.
One student's task will be to quickly but gently pick up -- with thumb and index finger --individual cubes and move them to the empty bowl. Another student will time this studentwith a watch to see how many cubes the student moves in 15 seconds. Have students switchroles so that each has the opportunity to move the cubes and use the watch. Students shouldrecord these data in their tables.
58

Put all the cubes back in the bowl from which they were taken. Pour 1/4 cup dishwashing deter-gent over the cubes. Gently mix the detergent and the cubes so that the cubes are well-coated.
Use the same method as before to have students transfer as many cubes as possible in 15 seconds.Again record the data.
Throw away the cubes and detergent, then wash and dry both bowls. Put about 15 new cubesinto one bowl and pour 1 /4 cup water over the cubes, making sure the cubes are thoroughlycoated. Have students see how many cubes they can transfer in 15 seconds. Record the data.
Throw away the cubes and water. Put about 15 new cubes into one bowl. Pour 1/4 cup ofvegetable oil over the cubes. Make sure they are well coated. See how many cubes studentscan transfer in 15 seconds. Record the data.
11 ?; AP (Aptswers are i.vtlarewtheses)
1) In which trial were you able to transfer the most cubes? In which trial did you transfer the least?(Students' answers may vary.)
2) Based on your trials, which substance was the best lubricant (the most slippery)? Which was theworst?(Students' answers may vary)
3) What are some other substances that you know are lubricants? When chemists look for newlubricants, what qualities do you think those lubricants should have?(Students' lists of other lubricants will vary and may include the following: motor oil, grease,"WD-40", vaseline, or the synovial fluid in body joints that allows bones to slide past each other.As chemists work to discover or invent new lubricants, especially for engines, they look for sub-stances that have a tolerance for high temperature, maintain their durability over time, and, natu-rally, further reduce the level of friction between moving parts.)
In engines, machines, and the human body lubricants help to protect parts that rub against eachother by reducing the friction between them. Lubricants help these parts to move together smoothlyand easily. There are many types of lubricants, natural and artificial, that serve a wide variety ofpurposes. Most lubricants are liquids, and many are made from crude oil. However, some solids(for example, graphite) also can be used as lubricants.
Cars, trucks, airplanes and the human body all have moving parts that depend on lubricants tofunction. Without lubricants, these moving parts would soon heat up, wear down, and eventuallystop working.
5159

I t eXTe NS ION
Try using other common, safe liquids to test them as lubricants. Have students compare theirfindings against the data they collected for water, a detergent, and vegetable oil.
Adapted with permission from Department of Education, <wurw.ed.govIpubsIparents/Science/Home.htm>, 2000.
60

F'IAR-POS 5
GROUP SIZE: 4-16TIME: 90 minutes
To apply studer understanding of physics to the design and construction of a small supportstructure.To practice bookkeeping and resource management skills.
WI-fAT yo LA. N 55A
thick uncooked spaghettimarshmallowsglue or rubber cementplay moneywatch with a second hand
Ift, OP OP
rulerpiece of posterboard (6 inches by 6 inches)paperweight (i.e. paperback book)Expenses Worksheet
Divide the students into teams. Teams can have as few as 2 members or as many as 4.
Give each team a copy of the Expenses Worksheet and $4,000 (play money) that team memberswill use to purchase materials.
Explain the purpose and procedure of the activity as written below in italics. Show the studentsa "beam," "joint," and the "cement" while describing the activity. Put a copy of the buildingcodes on an overhead transparency or on piece of poster paper where everyone can read them.
The purpose of this project is to build a structure that withstands the weight of a paperback book at least threeinches above a base of posterboard for 60 seconds. This project also involves keeping track of the money that isspent for each team to build its structure.
The materials for construction of the building are "beams" (noodles), "joints" (marshmallows), and "cement"(glue). Each beam costs $100, each joint costs $50 and cement is free. Each team will have $4,000 (play money)to purchase its materials. Each team should choose an "accountant" to manage the money and keep a record ofexpenses. (See the Expenses Worksheet that shows students how to record expenses.)
Before construction begins, each member of the team should sketch a design for the structure. As you createyour design, keep in mind that you have a limited amount of money and materials to build your structure. You
will have 10 minutes to design your structure on paper. Then, within your team, you will decide on one designthat your team will build. After making this decision, your team can purchase its materials from the "SupplyStore."
61

Teams will have 40 minutes to complete their structures. Teams can choose any combination of materials touse, and materials can be purchased anytime during the construction process. However, all constructionteams must follow these important building codes (rules):
Building Codes:Teams can only use glue to attach the base beams or joints to the posterboard to prevent these items fromsliding off the board.Teams may break the beams.The beams must be joined using joints, not cement.Teams may not touch another group's table or project.If teams have extra materials left over, they cannot sell these back to the Supply Store. However, they cansell the materials to another team or make a trade.Teams should try to keep as much money as possible until the end.Team members must make decisions together and divide responsibilities.
The winning team is the one whose members follow directions, cooperate, have the most money left over andwhose structure succeeds in supporting the weight of the paperback book for 60 seconds.
After students complete their structures, ask them to report on how much money their teamshave remaining. Post the amounts in front of the whole group.
Test the structures with the designated weight and a watch. Allow teams to place the weight ontheir structures themselves. Besure each structure is at least three inches tall.
Use the following three criteria to determine which team wins. The team that meets the mostcriteria is the winner. If there is a tie between two or more teams, then the tie is broken bydetermining which team had the most money remaining at the end of construction.
Criteria to determine the winner:1) Did the team members cooperate when choosing a design, constructing the building, and
making other decisions?2) Did the team members follow all of the building codes?3) Did the team's structure support the weight for 60 seconds?
Tie-breaker: How much money did the team have left over at the end of construction?
54
62

21-tesTio NS TO ASK (Answers are i.14, parentheses)
1) Whose building was the strongest? Which team cooperated best? Which team had the most moneyleft over?(Students' answers will vary)
2) What made some buildings stronger than others? Which designs worked best?(Students' answers will vary. Generally speaking, buildings that utilize arches or zig-zaggedbeams are strongest. Buildings with vertical beam structures will twist and fall under weight.)
Im BRIEF EXPLANATION
This activity encourages students to be creative and practice teamwork while trying to accomplish atask. Students also use their natural understanding of the physical world to make choices aboutwhich designs they think could work and which ones will fail. There are no correct or incorrectdesigns for the buildings, and there are no right or wrong processes for completing the task. Instead,this activity encourages students to use whatever skills they have. For example, students use goodcommunication skills, creativity, leadership ability, spatial thinking skills, mathematics skills, andcooperation to help their team complete the task. Additionally, each student also may improve inone or more of these skill areas through informal interaction with his or her peers.
I It EXTENSION
Try other materials for the construction process or try to build other structures, like bridges.Have a contest to see who can build the tallest building with just $4,000.
Adapted with permission from public domain, barbaralkosmicwindstudios.com, 2000.
55 n',
D

I. -
' ' - I - e e .op . - il -
I . e . 41 " . .II
'1 A ': 'PA IIIS. ' ' A A -.11.
" 5
I
; , I I I Iregt#::;-:.. %.,,,77, ,,-,,,,,,, 2. ,-,,.. .E:,i-74:7Z;7.27.7-7-,7,A 1:1,..;17--=.547.FI ,,,,f;-1-44---reg:70-,.i:7.7.;;321
I I
50 5I I
``11,-;74'}i-'441Vg,7A
-I, 1 .4:5411*ZZ 4:
1 S
I I I

ititildi.we a iutildiaksa PLau mowed
This page contains a total of $1,000 in play money. Make copies and cut outfour sheets to total $4,000 in play money.
$10 $20
$20 $50
$50 $50
$100 $100
$100 $500
57-

MINI AIR-CANNON
P KRPOS
GROUP SIZE: 1- 2TIME: 20 minutes
To explore how air moves in waves and how the flow of air can be condensed using a "funnel."To examine how changes in volume cause air to flow in or out of a container.
W 11-AT y o (A. N ED
20 oz. plastic bottlerubber bandmatchespiece of plastic wrap (about the size of a paper towel)scissorscandle
Cut off the bottom of the plastic bottle using the scissors. Make your cut about 1-2 inches fromthe bottom of the bottle. Save the bottom of the bottle for later use.
Fold the plastic wrap into a square that is 2-layers thick and large enough to cover the new holein your bottle. The square should cover the entire hole and wrap over onto the sides of the bottle.Cover the hole with the plastic wrap and secure the wrap with a rubber band. If there is a cap onthe bottle, remove it.
Hold the bottle in one hand so that the mouth is pointing away from your body and the end withthe plastic wrap is facing your body. Use your other hand to flick the plastic wrap with yourindex finger. Test the bottle (cannon) to be sure that a spurt of air is "shooting" from the mouthwhen the plastic wrap is flicked. Try testing the cannon by aiming it at a piece of paper oranother light object.
Find the bottom that was cut from the bottle and set it on a flat surface. Put the candle in thebottom to catch melting wax. Carefully light the candle. Move about 3-4 feet from the candle,and try to blow it out using your mini air-cannon. See how far the cannon can "shoot" the air toblow out the candle.
66

6214EST1ONS TO ASK (Answers are 1.w pa reputheses)
1) How far can you "shoot" the cannon? Who could shoot the farthest?(Answers will vary)
2) How does the air-cannon work? Is it easier to blow out a candle with your breath or with thecannon? Why?(When you use your lips and mouth to blow air, you create a steady movement of air from yourmouth out into the room. The force of this moving air is strongest and most focused near yourlips, but then the wave of air quickly spreads out and looses its force. The air-cannon also causesa movement of air, but its wave of air is much smaller in shape because of the funnel shape of thebottle. This concentrated wave of air is also pushed from the bottle with great speed, allowing itto remain more forceful over a distance and blow out a single candle several feet away)
3) Which would be faster at blowing out candles on a birthday cake: your mouth or the air-cannon?(Your mouth would probably be faster at blowing out several candles at once because the airfrom your lips spreads out in a big and steady wave to hit more candles more quickly)
BRIEF= EXP L.A NATI 0 N
Even when a bottle looks empty, it's really full... of air, that is! There is always some volume of airinside the bottle. (For example, in a 20 ounce bottle, 20 ounces of air fill the bottle.) Air fills all of thespace inside the bottle, just as water would if the bottle was full of water. When the plastic wrap isflicked, the space inside the bottle suddenly gets smaller. When the space inside the bottle suddenlyshrinks, some of the air is forced quickly from the bottle. The funnel-shaped bottle focuses thatrushing air into a small but powerful wave that shoots out of the bottle and into the room. Immedi-ately after the flick of the finger, the wrap returns to its regular position and new air enters the bottleto fill the space.
The human lungs work in a similar way. A muscle in the chest -the diaphragm- continuously causesthe space in the lungs to grow and shrink and grow and shrink. When the space inside of the lungsshrinks, air is pushed out of the lungs like the air pushed out of the bottle. This happens when thediaphragm muscle relaxes. Next, the diaphragm contracts for a moment, which causes it to stretchthe lungs. This stretching causes the space in the lungs to grow. Since there is now more room insidethe lungs, new air rushes in from outside to fill up the extra space, that is, until the diaphragmrelaxes again and the whole process starts over!
t EXTENSION
Make an air-cannon from a 2-liter soda bottle. Does it work as well as the small one? Why or whynot?
Adapted with permission from Bill Nye Outreach, 2000.

Listed below are website and printed references that include "hands-on" mathematics andscience activities and other helpful information for assisting students at various grade levels.
Website References
Organization/Activity
AIMS Education Foundation
Amazing Space
A Tour of Fractions
Bizarre Stuff You Can Makein Your Kitchen
Busy Teacher's Web Site
Cosmic Quest
Education 4 Kids
Enchanted Learning
Exploring Planets in theClassroom
Hands-on Science Outreach, Inc.
Hands-on Technology (HOT)
Math Lessons that are Fun! Fun! Fun!
Microgravity Science News andResearch
Microscopes, Cells, DNA, and You
Nebraska Earth Science EducationNetwork (NESEN)
Newton's Apple
Web Address (http://) Grade Level
www.aimsedu.org
amazing-space.stsci.edu
forum.swarthmore.edu/ paths/fractions/index.html
freeweb.pdq.net/ headstrong/default.htm
www.ceismc.gatech.edu/busyt
www.childrensmuseum.org/cosmicquest
www.edu4kids.com
www.enchantedlearning. com
www.soest.hawaii.edu/SPACEGRANT/ class_acts /
www.hands-on-science.org
www.galaxy.net/
math.rice.edu/lanius/lessons /
www.microgravity.com
chroma.mbt.washington. edu/outreach
nerds.unl.edu
www.tpt.org/newtons
00
K-9
K-12
K-12
K-12
K-12
4-12
K-12
1-8
K-12
Pre K-6
K-8
K-12
7-12
4-12
K-12
6-9
68

Website References (Continued)
Optimizing National Education
Practical Uses of Mathematics andScience (PUMAS)
Science on the Web
SEP Program
Space Food and Nutrition
The Exploratorium
The Science House
The Science of Light
Surfing the Net with Kids
Teachers Helping Teachers
What an Idea! ClassroomActivities
www.opnated.org/main. htm
pumas.jpl.nasa.gov
www.sec.noaa.gov
www.sep.org
spacelink.nasa.gov/ products/space.Food.and. Nutrition
www.exploratorium.com
www.science-house.org
www.learner.org/ teacherslab/science/light
www.surfnetkids.com
www.pacific.net.net/ mandel/Math.html
www.startribune.com /education/subjects.html
61.
K-6
K-12
6-12
K-12
K-8
K-12
K-12
5-8
K-12
K-12
K-12
b9

Printed References
American Association for the Advancement of Science. In Touch With Preschool.Washington, DC, 2000. (K)
American Association for the Advancement of Science. Annotated Bibliography of Science,Mathematics and Technology Preschool/Early Childhood Educational Program.Washington, DC, 1998. (Pre K-3)
American Association for the Advancement of Science and American Library Association.Exploring Science in the Library: Resources and Activities for Young People.Washington, DC, 2000. (K-12)
Brisk, Marion. 1001 Ideas for Science Projects. Prentice Hall. New York, NY, 1992. (K-8)
Brown, Robert. 333 More Science Tricks and Experiments. TAB Books. New York, NY,1984. (K-8)
Coates, Grace Davila and Stenmark, Jean Kerr. Family Math for Young Children.University of California at Berkeley, Berkeley, CA, 1997. (K-6)
Eisenhower National Clearinghouse for Mathematics and Science Education.The Guidebook of Federal Resources for K-12 Mathematics and Science.The Ohio State University, Columbus, OH, 1998. (K-12)
EQUALS. EQUALS Investigation: Scatter Matters. University of California at Berkeley.Berkeley, CA, 1994. (K-12)
Goodman, Jan and Kopp, Jaine. Group Solutions, Too!: More Cooperative Logic Activities for GradesK-4. University of California at Berkeley, Berkeley, CA, 1986. (K-4)
Hardy, George. Gigantic Book of Puzzles. Sterling Publishing Company, Incorporated.New York, NY, 1999. (K-8)
Jackson, Michelle. Logic Fun. Instructional Fair. Grand Rapids, MI, 1997.(6-8)
Kaye, Peggy Games for Math: Playful Ways to Help Your Child Learn Math fromKindergarten to Third Grade. Pantheon Books. New York, NY, 1987. (K-3)
Mandell, Muriel. Simple Science Experiments With Everyday Materials. Sterling PublishingCompany, Incorporated. New York, NY, 1989. (K-6)

Printed References Continued
National Science Foundation. Webs, Wires, Waves: The Science and Technology ofCommunication. Washington, DC, 1997. (2-8)
National Science Resource Center. Resources for Teaching Middle School Science.Washington, DC, 1998. (6-8)
Raudsepp, Eugene and Hough, George, Jr. Creative Growth Games: 75 Fascinating Games toExpand Your Imagination and Unleash Your Originality. First Harvest/ HJB.New York, NY, 1977. (9-12)
Stenmark, Jean Kerr, Thompson, Virginia, and Cossey, Ruth. Family Math. University ofCalifornia at Berkeley, Berkeley, CA, 1986. (K-6)
United States Department of Education. Helping Your Child Learn Math.Washington, DC, 1994. (K-6)
United States Department of Education. Helping Your Child Learn Science.Washington, DC, 1994. (K-6)
63
71

Quality Education for Minorities (QEM) Network
72

ERIC.U.S. DEPARTMENT OF EDUCATION
Office of E.ducs:lortal Research and Improvement (0ERnEducvlone Rev:Jur:es Information Canter (ERIC) '
NOTICE
REPRODUCTION BASIS
This document is covered by a signed "Reproduction Release(Blanket)" form (on file within the ERIC system), encompassing allor classes of documents from its source organization and, therefore,does not require a "Specific Document" Release form.
This document is Federally-funded, or carries its own permission toreproduce, or is otherwise in the public domain and, therefore, maybe reproduced by ERIC without a signed Reproduction Releaseform (either "Specific Document" or "Blanket")..