Report Gateway User Guide (5141) - CA Technologies -...
79
Report Gateway User Guide Document 5141
-
Upload
phungthien -
Category
Documents
-
view
216 -
download
0
Transcript of Report Gateway User Guide (5141) - CA Technologies -...

Report GatewayUser Guide
Document 5141
Report GatewayUser Guide
Page 2
Document 5141
NoticeCopyright Notice Copyright © 2003 by Aprisma Management Technologies, Inc. All rights reserved worldwide. Use, duplication, or disclosure by the United States government is subject to the restrictions set forth in DFARS 252.227-7013(c)(1)(ii) and FAR 52.227-19.
Liability Disclaimer Aprisma Management Technologies, Inc. (�Aprisma�) reserves the right to make changes in specifications and other information contained in this document without prior notice. In all cases, the reader should contact Aprisma to inquire if any changes have been made.
The hardware, firmware, or software described in this manual is subject to change without notice.
IN NO EVENT SHALL APRISMA, ITS EMPLOYEES, OFFICERS, DIRECTORS, AGENTS, OR AFFILIATES BE LIABLE FOR ANY INCIDENTAL, INDIRECT, SPECIAL, OR CONSEQUENTIAL DAMAGES WHATSOEVER (INCLUDING BUT NOT LIMITED TO LOST PROFITS) ARISING OUT OF OR RELATED TO THIS MANUAL OR THE INFORMATION CONTAINED IN IT, EVEN IF APRISMA HAS BEEN ADVISED OF, HAS KNOWN, OR SHOULD HAVE KNOWN, THE POSSIBILITY OF SUCH DAMAGES.
Trademark, Service Mark, and Logo Information SPECTRUM, IMT, and the SPECTRUM IMT/VNM logo are registered trademarks of Aprisma Management Technologies, Inc., or its affiliates. APRISMA, APRISMA MANAGEMENT TECHNOLOGIES, the APRISMA MANAGEMENT TECHNOLOGIES logo, MANAGE WHAT MATTERS, DCM, VNM, SpectroGRAPH, SpectroSERVER, Inductive Modeling Technology, Device Communications Manager, SPECTRUM Security Manager, and Virtual Network Machine are unregistered trademarks of Aprisma Management Technologies, Inc., or its affiliates. For a complete list of Aprisma trademarks, service marks, and trade names, go to:
http://www.aprisma.com/manuals/trademark-list.htm
All referenced trademarks, service marks, and trade names identified in this document, whether registered or unregistered, are the intellectual property of their respective owners. No rights are granted by Aprisma Management Technologies, Inc., to use such marks, whether by implication, estoppel, or otherwise. If you have comments or concerns about trademark or copyright references, please send an e-mail to [email protected]; we will do our best to help.
Restricted Rights Notice (Applicable to licenses to the United States government only.)This software and/or user documentation is/are provided with RESTRICTED AND LIMITED RIGHTS. Use, duplication, or disclosure by the government is subject to restrictions as set forth in FAR 52.227-14 (June 1987) Alternate III(g)(3) (June 1987), FAR 52.227-19 (June 1987), or DFARS 52.227-7013(c)(1)(ii) (June 1988), and/or in similar or successor clauses in the FAR or DFARS, or in the DOD or NASA FAR Supplement, as applicable. Contractor/manufacturer is Aprisma Management Technologies, Inc. In the event the government seeks to obtain the software pursuant to standard commercial practice, this software agreement, instead of the noted regulatory clauses, shall control the terms of the government's license.
Virus Disclaimer Aprisma makes no representations or warranties to the effect that the licensed software is virus-free. Aprisma has tested its software with current virus-checking technologies. However, because no antivirus system is 100-percent effective, we strongly recommend that you write protect the licensed software and verify (with an antivirus system with which you have confidence) that the licensed software, prior to installation, is virus-free.
Contact Information Aprisma Management Technologies, Inc., 273 Corporate Drive, Portsmouth, NH 03801 USA
Phone: 603.334.2100U.S. toll-free: 877.468.1448Web site: http://www.aprisma.com
Report GatewayUser Guide
Page 3
Document 5141
Contents
Notice ........................................................................................... 2
Preface ......................................................................................... 6
Intended Audience ..................................................................... 6
Text Conventions ....................................................................... 6
Document Feedback ................................................................... 7
Online Documents ...................................................................... 7
Overview ...................................................................................... 8
Introduction .............................................................................. 8
Round Robin Databases (RRD) ..................................................... 9
SPECTRUM Report Gateway (SRG) Operation ................................. 9
Installation and Setup ................................................................ 11
Installation Recommendations and Requirements ..........................11
Minimum Requirements for SPECTRUM Report Gateway ............11
Implementing SPECTRUM Report Gateway (SRG) ..........................12
Downloading the Required SRG Accessory Pack .............................13
Data Collector: SSLogger Setup ..................................................13
Recommended SSLogger Setup Parameters .............................13
Data Miner: Report Gateway Setup .............................................14
Setting up Report Gateway on a Standalone Windows Machine ...14
Setting up Report Gateway on a Standalone Solaris Machine ......16
Data Graphing Utility: Cacti ........................................................18
Windows Installation ............................................................19
Solaris Installation ...............................................................23
Creating Graphs With Cacti ......................................................... 29
Injecting RRD Information Into Cacti ...........................................29
Inject RRD Information Into Cacti via the Command Line ..........30
Data Sources ............................................................................31
Building a Graph .......................................................................32

Report GatewayUser Guide
Page 4
Document 5141
Adding a Graph to the Graph Hierarchy ........................................35
Service Performance Manager and Report Gateway ................... 38
Introduction .............................................................................38
Installation and Setup ...............................................................39
Data Collector: SPM with Data Logging Enabled .......................39
Data Miner: SPM Report Gateway Setup ..................................40
Configuring SPM Report Gateway with Web Operator on Windows ......................................................................40
Configuring SPM Report Gateway with Web Operator on Solaris .........................................................................42
Data Grapher: Cacti .............................................................44
Appendix A:Sample Configurations ............................................................. 45
Sample Configuration 1 .............................................................45
SSLogger models File ...........................................................45
sslogger.dat File ..................................................................45
SRG.conf File .......................................................................47
Sample Configuration 2 .............................................................49
SSLogger models File ...........................................................49
sslogger.dat File ..................................................................49
SRG.conf File .......................................................................50
Sample Configuration 3 .............................................................52
SSLogger models File ...........................................................52
sslogger.dat File ..................................................................52
SRG.conf File .......................................................................53
Appendix B:Report Gateway Configuration Parameter Definitions .............. 56
The SRG.conf File ......................................................................56
Location of SSLogger Files .....................................................56
RRD Configuration Files ........................................................56
Data Collection Options .........................................................57
Trend Analysis Options .........................................................57

Report GatewayUser Guide
Page 5
Document 5141
Sample SRG.conf Configuration File ........................................57
Configuration Parameter Definitions ............................................60
Appendix C:Sample SRG_SPM Configurations ............................................. 69
SRG_SPM.conf Sample Configuration ...........................................69
Configuration Parameter Definitions ............................................70
Appendix D: Frequently Asked Questions ..................................................... 73
Running SRG Independently .......................................................73
Installing SPECTRUM and SRG on Machines with Different Operating Systems ...............................................73
Changes to SSLogger Files on Remote Machine ........................73
Running Web Operator with SRG and Cacti on a Machine Separate from SPECTRUM ......................................73
General SSLogger Tips ...............................................................74
Trending and SRG .....................................................................74
Index .......................................................................................... 77

Report GatewayUser Guide
Page 6
Document 5141
Preface
In This Section
Intended Audience [page 6]
Text Conventions [page 6]
Document Feedback [page 7]
Online Documents [page 7]
Intended Audience
This guide is intended for users of the SPECTRUM Report Gateway.
Text Conventions
The following text conventions are used in this document:
Element Convention Used Example
Variables
(The user supplies a value for the variable.)
Courier and Italic in angle brackets (<>)
Type the following:
DISPLAY=<workstation name>:0.0 export display
The directory where you installed SPECTRUM
(The user supplies a value for the variable.)
<$SPECROOT> Navigate to:
<$SPECROOT>/app-defaults
Solaris and Windows directory paths
Unless otherwise noted, directory paths are common to both operating systems, with the exception that slashes (/) should be used in Solaris paths, and backslashes (\) should be used in Windows paths.
<$SPECROOT>/app-defaults on Solaris is equivalent to <$SPECROOT>\app-defaults on Windows.
On-screen text Courier The following line displays:
path=�/audit�
User-typed text Courier Type the following path name:
C:\ABC\lib\db

Report GatewayUser Guide
Page 7
Document 5141
Document Feedback
Please send feedback regarding SPECTRUM documents to the following e-mail address:
Thank you for helping us improve our documentation.
Online Documents
SPECTRUM documents are available online at:
http://www.aprisma.com/manuals
Check this site for the latest updates and additions.
Cross-references Underlined and hypertext-blue
See Document Feedback [page 7].
References to SPECTRUM documents (title and number)
Italic SPECTRUM Installation Guide (0675)
Element Convention Used Example

Report GatewayUser Guide
Page 8
Document 5141
Overview
This section introduces the SPECTRUM Report Gateway (SRG). The SRG was designed to create Round Robin Databases (RRD) based on SSLogger configuration and data files.
In This Section
Introduction [page 8]
Round Robin Databases (RRD) [page 9]
SPECTRUM Report Gateway (SRG) Operation [page 9]
Introduction
SPECTRUM�s SSLogger tool (discussed in detail in the SSLogger User Guide 5071) is a SPECTRUM command-line application that works in tandem with the SpectroSERVER to poll network devices and log the polled data to files suitable for import into databases and reporting systems. Because SSLogger records data to flat-files with hex notation, these files can become extremely large and difficult to analyze with no means of efficient archiving or reporting. With the SPECTRUM Report Gateway (SRG), Aprisma has provided one solution to these issues by building a gateway to convert and archive raw SSLogger data into Round Robin Databases (RRD) [page 9]. Once SSLogger data is in RRD format, there are many different tools and utilities available to generate graphical reports. The SRG utilizes SSLogger as its data-collection engine, RRDtool as a means of efficient SpectroSERVER data storage (RRD creation), and Cacti or DDRAW to graph the resulting data sets.
Note: RRDtool, Cacti, and DRRAW are open-source applications (available under the terms of the GNU General Public License) used with the SPECTRUM Report Gateway. These and other referenced open-source products are not designed, developed, or supported by Aprisma Management Technologies. However, for your convenience, this document includes installation instructions for these products.

Report GatewayUser Guide
Page 9
Document 5141
Round Robin Databases (RRD)
A Round Robin Database (RRD) is a system for storing and displaying time-series data (for example, network bandwidth, router CPU, or average server load). An RRD stores data in a very compact way that does not expand over time, and can present useful graphs by processing the data to enforce a certain data density.
SPECTRUM Report Gateway (SRG) Operation
The SPECTRUM Report Gateway (SRG) creates Round-Robin-Databases based on the SSLogger configuration and raw data files. Once SSLogger is properly configured and running, the SRG only needs read access to or a copy of the SSLogger configuration and raw data files.
The SPECTRUM Report Gateway reads the SSLogger configuration files (the model and sslogger.dat files) to convert hexadecimal model handles and attribute IDs to model names and attribute names, respectively, before creating and populating the Round Robin Database(s). This is done so that all data sources (attributes) in the RRDs have meaningful names instead of hexadecimal values. The SPECTRUM Report Gateway also reads the SRG configuration file at runtime (SRG.conf). This file can be used to customize RRD database configurations. SRG calls RRDTool when creating, updating, and/or accessing any RRD.
When SRG is run for the first time, it creates a RRD for each device or port listed in the SSLogger models file. On subsequent runs, it simply updates the pre-existing RRDs or, if any new models or data sources are found in the models, sslogger.dat, SRG.conf file, and/or in the SSLog.log raw data file, SRG will dynamically create/add the new RRD/data source to the appropriate RRD.
Scheduling SRG to update all RRDs with new SSLogger data can be done on both Windows and Solaris by setting the on_rotate_execute parameter in the SSLogger.dat file. You can also schedule SRG updates by using a cron job on Solaris or by setting up a scheduled task on Windows. At the end of each RRD update, SRG records information to a series of log files (i.e. .SRG_history) indicating the work completed as well as any error messages. This verifies which SSLogger files have been archived into Round-Robin-Databases.
In SPECTRUM 6.6.0 Service Pack 5 and later, SRG can perform trending calculations based on historical data. That is, SRG can mine historical data from specified data-sources or RRD files, average the retrieved values, and

Report GatewayUser Guide
Page 10
Document 5141
store the calculated result(s) in newly created RRD file(s). This trend data can then be graphed with current, real-time data for quantitative analysis and comparison based on historical trends. For additional details see Trend Analysis Options [page 57].

Report GatewayUser Guide
Page 11
Document 5141
Installation and Setup
The following section describes installation and setup procedures for running the SPECTRUM Report Gateway (SRG) on Windows and Solaris platforms.
In This Section
Installation Recommendations and Requirements [page 11]
Implementing SPECTRUM Report Gateway (SRG) [page 12]
Downloading the Required SRG Accessory Pack [page 13]
Data Collector: SSLogger Setup [page 13]
Data Miner: Report Gateway Setup [page 14]
Data Graphing Utility: Cacti [page 18]
Installation Recommendations and Requirements
To avoid adding additional workload to the SpectroSERVER, Aprisma recommends installing the Report Gateway and data graphing utility (Cacti or DRRAW) together on a standalone machine. This also provides a single location to store and archive old SSLogger data files. This machine must have access to the SPECTRUM SSLogger machine as well as the SSLogger raw data files.
Minimum Requirements for SPECTRUM Report Gateway
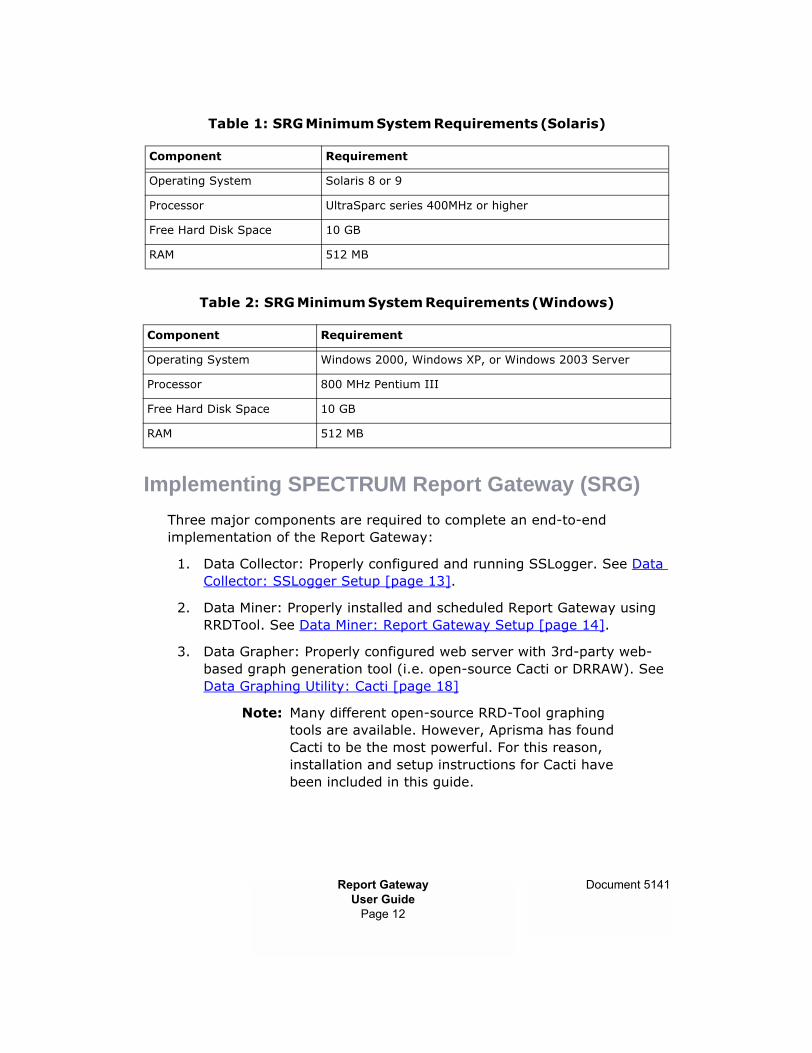
Before installing the SPECTRUM Report Gateway on a dedicated machine, make sure your Solaris or Windows workstation meets the minimum requirements listed in Table 1: SRG Minimum System Requirements (Solaris), or Table 2: SRG Minimum System Requirements (Windows).
For more precise system requirements specific to your service assurance needs, please contact your Aprisma technical representative or authorized Aprisma Channel Partner.
Report GatewayUser Guide
Page 12
Document 5141
Table 1: SRG Minimum System Requirements (Solaris)
Table 2: SRG Minimum System Requirements (Windows)
Implementing SPECTRUM Report Gateway (SRG)
Three major components are required to complete an end-to-end implementation of the Report Gateway:
1. Data Collector: Properly configured and running SSLogger. See Data Collector: SSLogger Setup [page 13].
2. Data Miner: Properly installed and scheduled Report Gateway using RRDTool. See Data Miner: Report Gateway Setup [page 14].
3. Data Grapher: Properly configured web server with 3rd-party web-based graph generation tool (i.e. open-source Cacti or DRRAW). See Data Graphing Utility: Cacti [page 18]
Note: Many different open-source RRD-Tool graphing tools are available. However, Aprisma has found Cacti to be the most powerful. For this reason, installation and setup instructions for Cacti have been included in this guide.
Component Requirement
Operating System Solaris 8 or 9
Processor UltraSparc series 400MHz or higher
Free Hard Disk Space 10 GB
RAM 512 MB
Component Requirement
Operating System Windows 2000, Windows XP, or Windows 2003 Server
Processor 800 MHz Pentium III
Free Hard Disk Space 10 GB
RAM 512 MB
Report GatewayUser Guide
Page 13
Document 5141
Downloading the Required SRG Accessory Pack
For your convenience (and required under the terms of the GNU General Public License), Aprisma has pre-packaged all required open-source software. This SRG Accessory Pack is available for download at:
http://www.aprisma.com/support/secure/download/solutions.cgi
The RRDTool binary executable for both Windows and Solaris is included with SRG. Both SRG and RRDTool can be found in the following directory:
<$SPECROOT>/SSLOGGER/SRG
Data Collector: SSLogger Setup
See the SSLogger User Guide (5071) for complete SSLogger setup instructions.
Recommended SSLogger Setup Parameters
� The recommended minimum poll interval for all attributes is 300 seconds. Polling data more often than 5 minutes could result in degraded SpectroSERVER performance. Set all attributes to poll at the same interval (i.e. 300 seconds).
� Configure SSLogger to create a new log file every hour. Do this by adding the following line to the end of the sslogger.dat file:
Rotate_log_interval: 1
� Ensure that SSLogger is configured to collect Device and/or List attributes as described in the SSLogger User Guide (5071).
Note: The SRG does not support Port level attributes as described in the SSLogger User Guide (5071). To log specific ports and associated attributes, add the required port model handles to the SSLogger models file. See Sample Configuration 3 in Appendix A: Sample Configurations [page 45] for a sample of valid SSLogger.dat and model files when logging specific port data.

Report GatewayUser Guide
Page 14
Document 5141
Data Miner: Report Gateway Setup
Prerequisites
When running the Report Gateway on an independent machine (as recommended), FTP access to the SpectroSERVER machine running SSLogger may be required. FTP is only necessary when mapping or mounting a remote directory is not possible.
� Setting up Report Gateway on a Standalone Windows Machine [page 14]
� Setting up Report Gateway on a Standalone Solaris Machine [page 16]
Setting up Report Gateway on a Standalone Windows Machine
1. Copy the following files from your remote SPECTRUM machine (example: C:\Win32app\Spectrum\SSLOGGER\) to a local directory (i.e. C:\ReportGateway):
SRG\SRG.exe
SRG\SRG.conf
SRG\rrdtool.exe
models
sslogger.dat
All 5 files should now exist locally in C:\ReportGateway (in this example).
2. Edit the SRG.conf file and set all flags to your specific environment. See Appendix B: Report Gateway Configuration Parameter Definitions [page 56] for details on all configuration parameters in the SRG.conf file.
3. If you wish to encrypt your FTP password using 64-bit encryption, run the following command:
command prompt> SRG.exe encrypt
Running this command will encrypt the password in the SRG.conf file. The following changes will occur in the SRG.conf file:
Unencrypted:
FTP PASSWORD = sample_password
Encrypted:
Report GatewayUser Guide
Page 15
Document 5141
FTP PASSWORD (encrypted) =52616e646f6d495641a2a010ab204c8f15
4. Once configuration is complete and SSLogger has collected data for over 1 hour, test your SRG configuration by running it at the command prompt:
command prompt> cd $SPECROOT\SSLOGGER\SRG
command prompt> SRG.exe
The first time SRG is executed, it will create Round-Robin-Databases (RRDs), insert data into the appropriate RRDs, and generate a series of history files�all in the local directory. These history files include:
� .SRG_logfiles
Contains the name of the raw SSLogger log file (or group of files) read by SRG since the last run of SRG. This file is overwritten at each scheduled run of SRG.
� .SRG_history
Contains a history of raw SSLogger log files converted in RRD format with date and timestamp.
� .SRG_data
Contains post-converted data used to update all RRDs. This file is overwritten at each scheduled run of SRG.
� .<rrd_name_1>
For every RRD created by SRG, a corresponding "." (dot) file is created for each. These files contain the data sources configured for each RRD. SRG references these files to determine when a new data source (attribute) is found and to dynamically insert the new data source(s) into the RRD.
WARNING! When SRG is configured and running normally on a scheduled basis, the above files should not be removed or edited. Doing so could corrupt SRG configuration.
If any errors occur in the output of SRG, these errors must first be eliminated before moving forward. Typically, any errors that occur are due to configuration issues. To retest SRG after fixing configuration parameters, you must first remove all .history_files and *.rrd files:
command prompt> cd <$SPECROOT>\SSLOGGER\SRG
Report GatewayUser Guide
Page 16
Document 5141
command prompt> del .*
command prompt> del *.rrd
command prompt> SRG.exe
Important: Do not set up the following until SSLogger has collected data for a minimum of one full hour.
5. Next, schedule SRG.exe to run every hour to update all RRDs with data collected by SSLogger. Ensure that the Task Scheduler service is started and open up the Scheduled Tasks control panel item. Add a new task, browse to your SRG.exe file and click Next. Have the task run daily (for now) and click Next twice until you are at the username/password screen. You must enter a user that has read/write permissions to Cacti rra/ and log/ directories here. Click Next, check the box to open Advanced Properties and click Finish.
Enter the full command line in the Run field. Your command line should look something like:
C:\ReportGateway\SRG.exe
Select the Schedule tab and click Advanced. Check the Repeat task check box and change it to every hour, then change the Duration to 24 hours. This will schedule SRG.exe to run every hour.
Note: To keep DOS boxes from showing up on your screen, schedule the event using an NT service ID such as cacti_service. Doing this will remove those messages from your screen during the execution of the scheduled event.
Setting up Report Gateway on a Standalone Solaris Machine
1. Copy the following files from your remote SPECTRUM machine (<$SPECROOT>/SSLOGGER) to a local directory (i.e. /usr/ReportGateway):
SRG\SRG
SRG\SRG.conf
SRG\rrdtool
models
sslogger.dat
All 5 files should now exist locally in /usr/ReportGateway (for example).

Report GatewayUser Guide
Page 17
Document 5141
2. Edit the SRG.conf file and set all flags to your specific environment. See Appendix B: Report Gateway Configuration Parameter Definitions [page 56] for details on all configuration parameters in the SRG.conf file.
3. If you wish to encrypt your FTP password using 64-bit encryption, run the following command:
shell> ./SRG encrypt
Running this command will encrypt the password in the SRG.conf file. The following changes will occur in the SRG.conf file:
Unencrypted:
FTP PASSWORD = sample_password
Encrypted:
FTP PASSWORD (encrypted) =52616e646f6d495641a2a010ab204c8f15
4. Once configuration is complete and SSLogger has collected data for over 1 hour, test your SRG configuration by running it at the command prompt:
shell> cd $SPECROOT/SSLOGGER/SRG
shell> ./SRG
The first time SRG is executed, it will create Round-Robin-Databases (RRDs), insert data into the appropriate RRDs, and generate a series of history files-all in the local directory. These history files include:
� .SRG_logfiles
Contains the name of the raw SSLogger log file (or group of files) read by SRG since the last run of SRG. This file is overwritten at each scheduled run of SRG.
� .SRG_history
Contains a history of raw SSLogger log files converted in RRD format with date and timestamp.
� .SRG_data
Contains post-converted data used to update all RRDs. This file is overwritten at each scheduled run of SRG.
� .<rrd_name_1>
For every RRD created by SRG, a corresponding "." (dot) file is created for each. These files contain the data sources configured for
Report GatewayUser Guide
Page 18
Document 5141
each RRD. SRG references these files to determine when a new data source (attribute) is found and to dynamically insert the new data source(s) into the RRD.
WARNING! When SRG is configured and running normally on a scheduled basis, the above files should not be removed or edited. Doing so could corrupt SRG configuration.
If any errors occur in the output of SRG, these errors must first be eliminated before moving forward. Typically, any errors that occur are due to configuration issues. To retest SRG after fixing configuration parameters, you must first remove all .history_files and *.rrd files:
shell> cd $SPECROOT/SSLOGGER/SRG
shell> rm .*
shell> rm *.rrd
shell> ./SRG
Important: Do not set up the following until SSLogger has collected data for a minimum of one full hour.
5. Schedule SRG to run every hour to update all RRDs with data collected by SSLogger. This can be done via cron job:
Navigate to /var/spool/cron/crontabs and edit the appropriate cron file for the user that will be running SRG. For example, add the following line to the bottom of the 'root' file:
05 * * * * cd </path/to/SRG>; </path/to/SRG>/SRG
Save the file and reset the root cron by entering the following command:
shell> crontab root
SRG will now update all RRDs at 5-minutes past every hour.
Data Graphing Utility: Cacti
The following section describes setup of one of many open-source graphing utilities for RRDtool called Cacti.
� Windows Installation [page 19]
� Solaris Installation [page 23]

Report GatewayUser Guide
Page 19
Document 5141
Windows Installation
WARNING! Aprisma does not recommend installing Cacti on the same machine as SPECTRUM. Aprisma has identified potential configuration and compatibility issues with Cacti that could corrupt your SPECTRUM installation.
The installation of this 3rd-party open-source tool requires the following files (see Downloading the Required SRG Accessory Pack [page 13]):
� RRDtool version 1.0.42 or higher
� PHP4.0 or newer
WARNING! If downloading from http://www.php.net, use the PHP4.0 zip download only. Do not install the MSI Windows Installer version of PHP because it does not contain all the necessary files.
� MYSQL 4.0.12 Standard or higher
Note: This is not included in the package described in Downloading the Required SRG Accessory Pack [page 13]. Download it from http://www.mysql.com
� Apache 1.3.20 or higher
� Cacti-0.6.8a.tar.gz
� inject_RRDs_CL
1. Unzip the SRG Accessory Pack for Windows to a temporary directory on the target system.
2. Install the Apache web server. (for example, C:\Apache)
3. Extract PHP to a local drive and rename the folder to �PHP� (i.e. C:\PHP).
4. Move the C:\PHP\php4ts.dll file to your system directory: C:\winnt\system32
5. Rename the php.ini-dist file to php.ini, copy it to your winnt/ directory and make the following changes to the file:
extension_dir = C:/php/extensions
extension=php_snmp.dll

Report GatewayUser Guide
Page 20
Document 5141
include_path=C:/apache/htdocs/cacti
register_globals = On
register_argc_argv = On
max_execution_time = 200
session.save_path = C:/temp
Note: Use "/" slash, not "\".
6. Ensure that the value of include_path= (C:/apache/htdocs/cacti above) is your full path to Cacti (to be determined in step 11). In addition, make sure to use forward slashes [/] instead of back-slashes [\] above and that the C:/temp directory exists.
7. Add the following lines to Apache's C:\Apache\conf\httpd.conf file:
LoadModule php4_module c:/php/sapi/php4apache.dll
AddModule mod_php4.c
AddType application/x-httpd-php .php
DirectoryIndex index.html index.htm index.php
8. Ensure that C:/php/sapi/php4apache.dll (specified in step 7) is your full path to the php4apache.dll file.
9. Install MySQL (i.e. in C:\mysql) and start the MySQL service (mysqld-nt.exe).
10. Add C:\mysql\bin to the system path and open a new command-prompt window.
11. Install Cacti. Locate Cacti-0.6.8a.tar.gz and extract the distribution archive. You can use a program like WinZip to open .tar.gz files. These instructions will assume that the archive has been extracted to C:\Apache\htdocs\cacti, although you can use a different path if you wish (making sure the path matches the path value referenced in step 5 and step 6). When using WinZip, make sure you extract with Use folder names enabled, so that the necessary sub-folders will be used.
12. Modify C:\Apache\htdocs\cacti\include\config.php and specify the MySQL user, password, and database configured in step 17:
$database_default = "cacti";
$database_hostname = "localhost";
$database_username = "cactiuser";
$database_password = "cacti";
Report GatewayUser Guide
Page 21
Document 5141
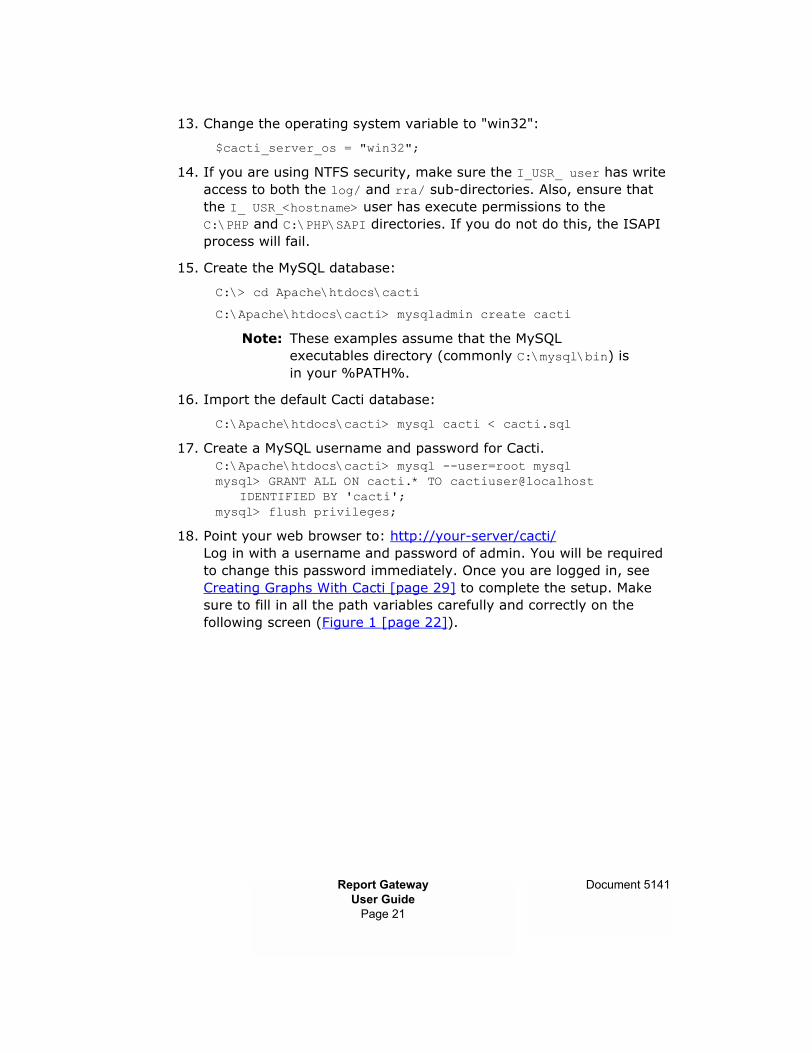
13. Change the operating system variable to "win32":
$cacti_server_os = "win32";
14. If you are using NTFS security, make sure the I_USR_ user has write access to both the log/ and rra/ sub-directories. Also, ensure that the I_ USR_<hostname> user has execute permissions to the C:\PHP and C:\PHP\SAPI directories. If you do not do this, the ISAPI process will fail.
15. Create the MySQL database:
C:\> cd Apache\htdocs\cacti
C:\Apache\htdocs\cacti> mysqladmin create cacti
Note: These examples assume that the MySQL executables directory (commonly C:\mysql\bin) is in your %PATH%.
16. Import the default Cacti database:
C:\Apache\htdocs\cacti> mysql cacti < cacti.sql
17. Create a MySQL username and password for Cacti. C:\Apache\htdocs\cacti> mysql --user=root mysqlmysql> GRANT ALL ON cacti.* TO cactiuser@localhost
IDENTIFIED BY 'cacti';mysql> flush privileges;
18. Point your web browser to: http://your-server/cacti/Log in with a username and password of admin. You will be required to change this password immediately. Once you are logged in, see Creating Graphs With Cacti [page 29] to complete the setup. Make sure to fill in all the path variables carefully and correctly on the following screen (Figure 1 [page 22]).

Report GatewayUser Guide
Page 22
Document 5141
Figure 1: Entering Path Variables
Using the default paths described here, your paths should look something like:
PHP Binary Path:
c:/php/php.exe
RRDtool Binary Path:
c:/rrdtool/rrdtool.exe
Cacti Web Root:
/cacti
Web Server Document Root (Apache default):
c:/apache/htdocs

Report GatewayUser Guide
Page 23
Document 5141
Solaris Installation
WARNING! Aprisma does not recommend installing Cacti on the same machine as SPECTRUM. Aprisma has identified potential configuration and compatibility issues with Cacti that could corrupt your SPECTRUM installation.
Installing Cacti on Solaris is a bit more time consuming since pre-compiled binaries are not available for many of the required 3rd-party applications. For convenience, all required components for Solaris 8 are available as described in Downloading the Required SRG Accessory Pack [page 13]. Unzip the SRG Accessory Pack for Solaris to a temporary directory on the target system
1. Install the necessary compilers. In order to build all required components, Make v3.8 and GCC v2.95.3 are required. These are included in the SRG Accessory Pack. If you download these packages directly from http://www.sunfreeware.com, be sure to download the compiled binary distribution (not the source). Uncompress both files and add the packages using the following commands for each (you must be logged in as the root user in order to run pkgadd). For example:
shell> gzip -d make-3.80-sol8-sparc-local.gz
shell> pkgadd -d make-3.80-sol8-sparc-local all
shell> gzip -d gcc-2.95.3-sol8-sparc-local.gz
shell> pkgadd -d gcc-2.95.3-sol8-sparc-local all
Important: Ensure that the PATH setting for the root user includes both the /usr/local/bin and /usr/ccs/bin paths before proceeding by doing the following:
shell> ksh
shell> echo $PATH
If you do not see the /usr/local/bin and /usr/ccs/bin paths in the echo output, add them both as follows:
shell> ksh
shell> export PATH=/usr/local/bin:/usr/ccs/bin:$PATH
shell> echo $PATH
The echo output should now include the paths added above.

Report GatewayUser Guide
Page 24
Document 5141
2. Install Perl. The Perl Solaris package is included in the SRG Accessory Pack and is also available at http://www.activestate.com (ActivePerl-5.6.1.635-sun4-solaris.gz). Install it by running the following commands as the root user:
shell> gzip -d ActivePerl-5.6.1.635-sun4-solaris.gz
shell> pkgadd -d ActivePerl-5.6.1.635-sun4-solaris all
When prompted, enter the destination directory for the Perl install. Aprisma recommends that the current version of Perl be over-written with this new, updated version. If it is not, your path to Perl may have to be modified and/or changed. Run the following command in another shell window to find the location of the current version of perl:
shell> which perl
If the output of the above command was /usr/bin/perl, then to replace this version with the new version, the destination install directory entered during the pkgadd would be /usr.
3. Install Required Operating System Packages: These packages are included in the SRG Accessory Pack and are also available at http://www.sunfreeware.com. Install these packages by running the following commands:
Uncompress each package by running the following command:
shell> gzip -d <package.gz>
Install the packages:
shell> pkgadd -d m4-1.4-sol8-sparc-local all
shell> pkgadd -d bison-1.875-sol8-sparc-local all
shell> pkgadd -d automake-1.7.2-sol8-sparc-local all
shell> pkgadd -d autoconf-2.57-sol8-sparc-local all
shell> pkgadd -d flex-2.5.4a-sol8-sparc-local all
4. Install Apache: This package is included in the SRG Accessory Pack and is also available at http://www.apache.org (apache_1.3.27.tar.Z). Uncompress and tar the Apache source and build it using the following commands:
shell> uncompress apache_1.3.27.tar.Z
shell> tar -xvf apache_1.3.27.tar
shell> cd apache_1.3.27
shell> ./configure --enable-module=so
Report GatewayUser Guide
Page 25
Document 5141
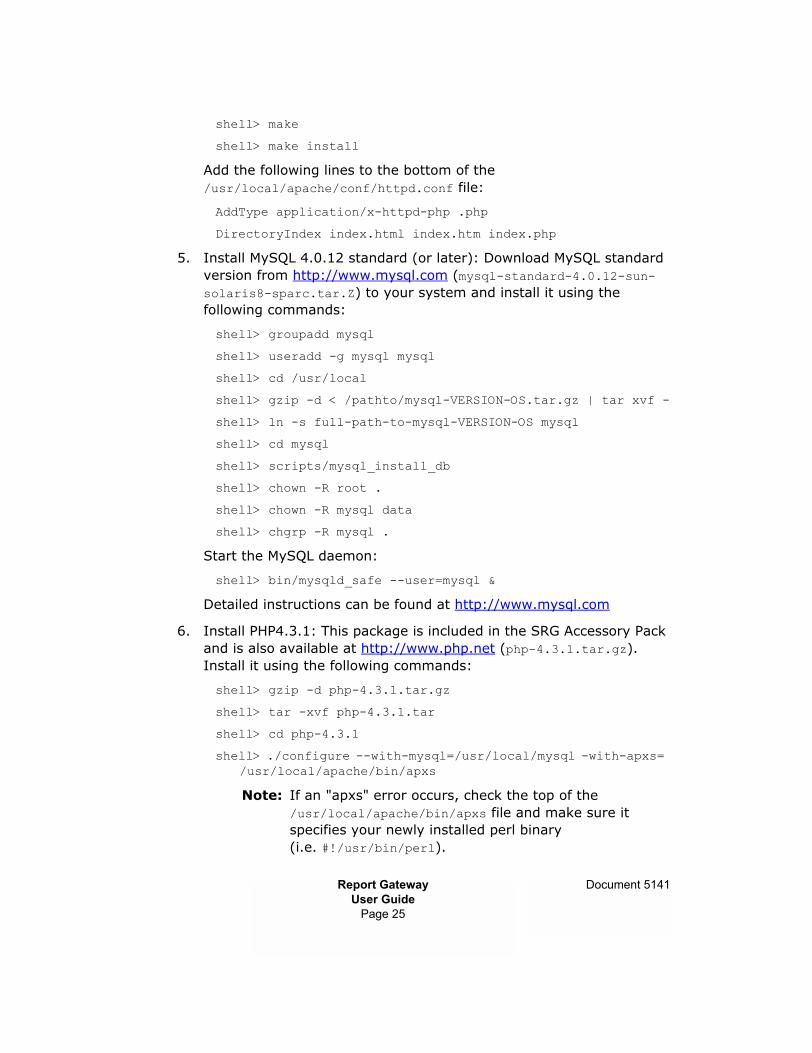
shell> make
shell> make install
Add the following lines to the bottom of the /usr/local/apache/conf/httpd.conf file:
AddType application/x-httpd-php .php
DirectoryIndex index.html index.htm index.php
5. Install MySQL 4.0.12 standard (or later): Download MySQL standard version from http://www.mysql.com (mysql-standard-4.0.12-sun-solaris8-sparc.tar.Z) to your system and install it using the following commands:
shell> groupadd mysql
shell> useradd -g mysql mysql
shell> cd /usr/local
shell> gzip -d < /pathto/mysql-VERSION-OS.tar.gz | tar xvf -
shell> ln -s full-path-to-mysql-VERSION-OS mysql
shell> cd mysql
shell> scripts/mysql_install_db
shell> chown -R root .
shell> chown -R mysql data
shell> chgrp -R mysql .
Start the MySQL daemon:
shell> bin/mysqld_safe --user=mysql &
Detailed instructions can be found at http://www.mysql.com
6. Install PHP4.3.1: This package is included in the SRG Accessory Pack and is also available at http://www.php.net (php-4.3.1.tar.gz). Install it using the following commands:
shell> gzip -d php-4.3.1.tar.gz
shell> tar -xvf php-4.3.1.tar
shell> cd php-4.3.1
shell> ./configure --with-mysql=/usr/local/mysql -with-apxs= /usr/local/apache/bin/apxs
Note: If an "apxs" error occurs, check the top of the /usr/local/apache/bin/apxs file and make sure it specifies your newly installed perl binary (i.e. #!/usr/bin/perl).

Report GatewayUser Guide
Page 26
Document 5141
shell> make
shell> make install
shell> cp php.ini-dist /usr/local/lib/php.ini
Edit /usr/local/lib/php.ini: Make sure you have the following options set in your php.ini file:
register_globals = On
register_argc_argv = On
Detailed instructions can be found at http://www.php.net
7. Install Cacti: This package is included in the SRG Accessory Pack and is also available at http://www.raxnet.net (cacti-0.6.8a.tar.gz) using the following commands.
Note: Aprisma recommends that the version of Cacti included with SRG Accessory Pack be used since a few minor SRG integration enhancements have been made.
shell> gzip -d cacti-0.6.8a.tar.gz
shell> tar -xvf cacti-0.6.8a.tar
shell> mv cacti-0.6.8a cacti
shell> cp -R cacti /usr/local/apache/htdocs
8. Create the MySQL database:
shell> cd /usr/local/apache/htdocs/cacti
shell> /usr/local/mysql/bin/mysqladmin create cacti
9. Import the default Cacti database:
shell> /usr/local/mysql/bin/mysql cacti < cacti.sql
10. Optional: Create a MySQL username and password for Cacti.
shell> mysql --user=root mysql
mysql> GRANT ALL ON cacti.* TO cactiuser@localhostIDENTIFIED BY 'cacti';
mysql> flush privileges;
11. Edit /usr/local/apache/htdocs/cacti/include/config.php: Specify the MySQL user, password and database for your Cacti configuration (configured in step 10).
$database_default = "cacti";
$database_hostname = "localhost";

Report GatewayUser Guide
Page 27
Document 5141
$database_username = "cactiuser";
$database_password = "cacti";
12. Set the appropriate permissions on Cacti's directories for graph/log generation. You should execute these commands from inside Cacti's directory to change the permissions.
shell> chown root rra/ log/
13. Start the Apache Web Server.
shell> /usr/local/apache/bin/apachectl start
Note: To restart Apache if it is already running:
shell> /usr/local/apache/bin/apachectl stop
shell> /usr/local/apache/bin/apachectl start
14. Point your web browser to: http://<your-server>/cacti/
Log in with a username/password of admin. You will be required to change this password immediately. Make sure to fill in all the path variables carefully and correctly on the following screen (Figure 2 [page 28]).
WARNING! Cacti may not function properly when running Netscape on Solaris. Aprisma recommends using Mozilla on Solaris or Windows Internet Explorer web browsers whenever possible for all Cacti administration.

Report GatewayUser Guide
Page 28
Document 5141
Figure 2: Entering Path Variables

Report GatewayUser Guide
Page 29
Document 5141
Creating Graphs With Cacti
This section describes how to generate basic graphical reports using Cacti. For information on advanced techniques, review the documentation included with Cacti and review the RRDTool web page at http://www.rrdtool.com.
In This Section
Injecting RRD Information Into Cacti [page 29]
Data Sources [page 31]
Building a Graph [page 32]
Injecting RRD Information Into Cacti
After successfully logging into Cacti, you must configure it to reference all of the RRDs created by the SRG. If you did not install the version of Cacti in the SRG Accessory Pack, you will need to inject RRD information via the command line as described in Inject RRD Information Into Cacti via the Command Line [page 30]. Otherwise, inject RRD information into Cacti by following this procedure:
Note: The process of injecting RRD information into Cacti simply registers all RRD specific information into Cacti's MySQL database. The MySQL database does not store any statistical information. It only stores RRD data source names and configuration parameters related to Cacti.
Procedure
1. Click Cacti Settings from the top-left menu (under Configuration) and then scrolling down to the bottom of the resulting screen (Figure 3).

Report GatewayUser Guide
Page 30
Document 5141
Figure 3: Inject RRD Information
2. In the RRD: field, input the path to the location of the RRDs and a single RRD name or *.rrd to inject all RRDs. For example:
C:\win32app\Spectrum\SSLOGGER\SRG\your_rrd_name.rrd
or
/usr/Spectrum/SSLOGGER/SRG/*.rrd
3. In the User Name: field, enter the name of the Cacti MySQL database user configured in the config.php during installation (i.e. cactiuser).
4. In the Password: field, enter the password for this user (i.e. cacti) and click Save.
Inject RRD Information Into Cacti via the Command Line
If Figure 3 does not appear in Cacti Settings of your Cacti install, you will need to inject all RRD information via the command line executable. Instructions for doing this follow below.
Procedure
1. Copy the inject_RRDs_CL executable from your apache/htdocs/cacti directory to the same directory where your *.rrd files are located.
2. Open a new shell or command prompt window and type the following:
shell> cd /<location of RRDs>
shell> inject_RRDs_CL *.rrd

Report GatewayUser Guide
Page 31
Document 5141
You will be prompted for the Cacti MySQL database username and password. Use cactiuser and cacti, respectively (unless you�ve configured Cacti differently).
3. Enter the absolute path to the directory containing your RRDs.
All RRD information should now be listed in the Data Sources section of Cacti.
Data Sources
Click Data Sources from the top-left menu bar. You should see a list of all current data sources supplied by each injected RRD (Figure 4).
Figure 4: Current Data Sources

Report GatewayUser Guide
Page 32
Document 5141
Building a Graph
Once data sources are available, graphical reports can be generated.
Procedure
1. Click the Graphs link under Graph Setup in the left menu bar of Cacti.
2. In the upper-right corner of the new window, click Add. The rrdtool Graph Configuration screen will appear (Figure 5).
Figure 5: rrdtool Graph Configuration
3. Enter a graph name in the Title box and click Save at the bottom of the window. You should now have a graph entry (Figure 6).

Report GatewayUser Guide
Page 33
Document 5141
Figure 6: Graph Configuration
4. Click Edit Graph Items on the line of the new graph you just created and click Add in the upper-right corner of the new window displayed. You can now select a data source (attribute) you wish to plot from the Data Source drop-down list (Figure 7).
Figure 7: Graph Items Configuration

Report GatewayUser Guide
Page 34
Document 5141
5. After selecting a data source, choose the color to represent this data source on the graph.
6. Scroll down and enter a name of the data source you wish to appear in the graph legend in the Text field, and click Save. You should now see the data source listed. Clicking Turn Graph Preview On will allow you to view the current graph configuration.
Figure 8: The Graph Hierarchy
7. To add another data source or attribute to this graph, click Add in the upper-right corner and repeat the process above. Once the graph is configured, it must then be added to the Graph Hierarchy (see Adding a Graph to the Graph Hierarchy [page 35]).

Report GatewayUser Guide
Page 35
Document 5141
Adding a Graph to the Graph Hierarchy
The Graph Hierarchy allows you to group graphs in any manner you wish for presentation.
Procedure
1. Click Graph Hierarchy in the menu bar and click Edit Graph Hierarchy.
2. Click Add in the upper-right corner of the new window displayed.
3. Select the This Item is a Graph radio button.
4. Select the graph you just created from the drop-down list, and click Save (Figure 9).
5. The graph is placed in the Graph Hierarchy for presentation. Click the graphs tab at the top of the screen to see the graph.
6. Clicking on the graph will display a series representing all Round-Robin-Archives (RRAs) configured in the SRG.conf file. Now that the graph is built, it will automatically update with new data at the end of each scheduled SRG update (Figure 10 [page 36]).
Figure 9: Adding a Graph to the Graph Hierarchy

Report GatewayUser Guide
Page 36
Document 5141
Figure 10: Graph Hierarchy

Report GatewayUser Guide
Page 37
Document 5141
Figure 11 shows an example of a fully configured Cacti with many graphs represented in a multi-level graph hierarchy.
Figure 11: Multi-Level Graph Hierarchy
Note: Cacti includes many advanced features not discussed here. To learn more about Cacti, go to http://www.raxnet.net/.
Report GatewayUser Guide
Page 38
Document 5141
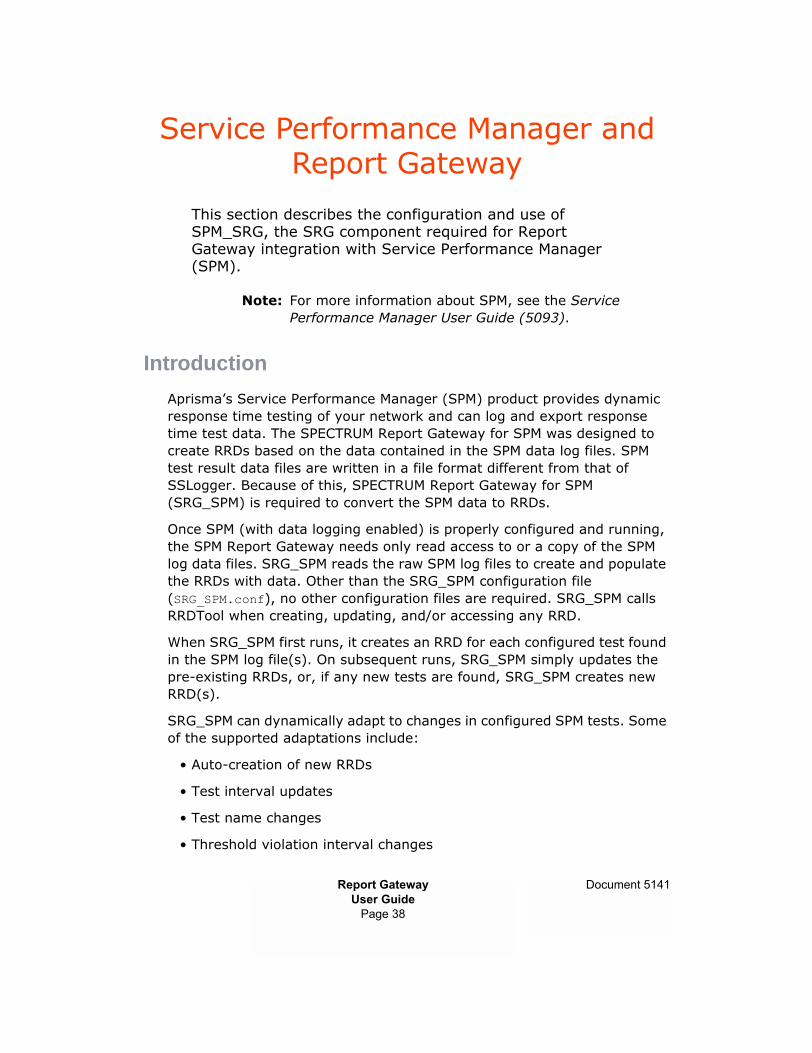
Service Performance Manager and Report Gateway
This section describes the configuration and use of SPM_SRG, the SRG component required for Report Gateway integration with Service Performance Manager (SPM).
Note: For more information about SPM, see the Service Performance Manager User Guide (5093).
Introduction
Aprisma�s Service Performance Manager (SPM) product provides dynamic response time testing of your network and can log and export response time test data. The SPECTRUM Report Gateway for SPM was designed to create RRDs based on the data contained in the SPM data log files. SPM test result data files are written in a file format different from that of SSLogger. Because of this, SPECTRUM Report Gateway for SPM (SRG_SPM) is required to convert the SPM data to RRDs.
Once SPM (with data logging enabled) is properly configured and running, the SPM Report Gateway needs only read access to or a copy of the SPM log data files. SRG_SPM reads the raw SPM log files to create and populate the RRDs with data. Other than the SRG_SPM configuration file (SRG_SPM.conf), no other configuration files are required. SRG_SPM calls RRDTool when creating, updating, and/or accessing any RRD.
When SRG_SPM first runs, it creates an RRD for each configured test found in the SPM log file(s). On subsequent runs, SRG_SPM simply updates the pre-existing RRDs, or, if any new tests are found, SRG_SPM creates new RRD(s).
SRG_SPM can dynamically adapt to changes in configured SPM tests. Some of the supported adaptations include:
� Auto-creation of new RRDs
� Test interval updates
� Test name changes
� Threshold violation interval changes

Report GatewayUser Guide
Page 39
Document 5141
� Source and/or destination configuration changes
Scheduling SRG_SPM to update all RRDs with new SPM data can be done via a cron job on Solaris or a scheduled task on Windows, just like SRG. At the end of each RRD update, SRG_SPM records information to a series of log files (i.e. .SPM_history) indicating the work completed as well as any error messages. This verifies which SPM export files have been archived into Round-Robin-Databases.
Installation and Setup
This section describes installation and setup procedures for running the SPM Report Gateway on Windows and Solaris platforms. Setup of SRG_SPM differs slightly from SRG and requires less manual configuration.
Three major components are required to complete an end-to-end implementation of the SPM Report Gateway:
1. Data Collector: SPM with Data Logging Enabled [page 39].
2. Data Miner: SPM Report Gateway Setup [page 40]. A properly installed and scheduled Report Gateway for SPM using RRDTool.
3. Data Grapher: Cacti [page 44]: A properly configured web-server with 3rd-party web-based graph generation tool (i.e. open-source Cacti or DRRAW). If Cacti or DRRAW is already implemented with SRG, there is no need to complete this step.
Data Collector: SPM with Data Logging Enabled
Note: See the Service Performance Manager User Guide (5093) for complete data export setup instructions.
The following SPM data logging setup parameters are recommended:
1. Configure the SPM data logging feature with the spm-log-file-cycle-time=5 minutes.
2. Configure the SPM data logging feature to write the log files to the same directory where SRG_SPM.exe will exist (i.e. C:\SPM_ReportGateway).
Report GatewayUser Guide
Page 40
Document 5141
Data Miner: SPM Report Gateway Setup
Prerequisites
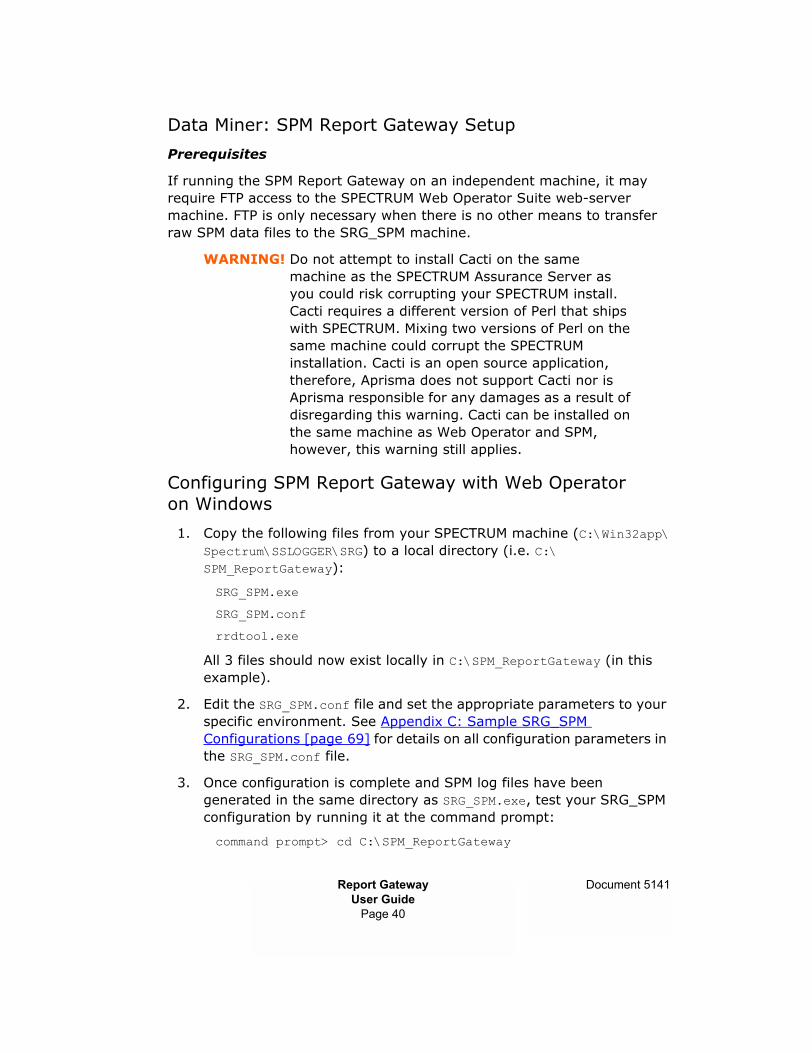
If running the SPM Report Gateway on an independent machine, it may require FTP access to the SPECTRUM Web Operator Suite web-server machine. FTP is only necessary when there is no other means to transfer raw SPM data files to the SRG_SPM machine.
WARNING! Do not attempt to install Cacti on the same machine as the SPECTRUM Assurance Server as you could risk corrupting your SPECTRUM install. Cacti requires a different version of Perl that ships with SPECTRUM. Mixing two versions of Perl on the same machine could corrupt the SPECTRUM installation. Cacti is an open source application, therefore, Aprisma does not support Cacti nor is Aprisma responsible for any damages as a result of disregarding this warning. Cacti can be installed on the same machine as Web Operator and SPM, however, this warning still applies.
Configuring SPM Report Gateway with Web Operator on Windows
1. Copy the following files from your SPECTRUM machine (C:\Win32app\Spectrum\SSLOGGER\SRG) to a local directory (i.e. C:\SPM_ReportGateway):
SRG_SPM.exe
SRG_SPM.conf
rrdtool.exe
All 3 files should now exist locally in C:\SPM_ReportGateway (in this example).
2. Edit the SRG_SPM.conf file and set the appropriate parameters to your specific environment. See Appendix C: Sample SRG_SPM Configurations [page 69] for details on all configuration parameters in the SRG_SPM.conf file.
3. Once configuration is complete and SPM log files have been generated in the same directory as SRG_SPM.exe, test your SRG_SPM configuration by running it at the command prompt:
command prompt> cd C:\SPM_ReportGateway

Report GatewayUser Guide
Page 41
Document 5141
command prompt> SRG_SPM.exe
The first time SRG_SPM is executed, it will create Round-Robin-Databases (RRDs) for all test results included in the SPM log file(s), insert data into the appropriate RRDs, and generate a series of history files-all in the local directory. These history files include:
.SPM_history Contains an up-to-date list of RRDs generated by SRG_SPM.
.SPM_log_history Contains a history of SPM log files converted in RRD format with date and timestamp.
.SPM_dataContains post-converted data used to update all RRDs. This file is overwritten at each scheduled run of SRG.
WARNING! When SRG_SPM is configured and running normally on a scheduled basis, these history files should not be removed or edited. Doing so could corrupt the SRG_SPM configuration.
To retest SRG_SPM after modifying or changing configuration parameters, you must first remove all .<SPM history files> and *.rrd files:
command prompt> cd C:\SPM_ReportGateway
command prompt> del .*
command prompt> del *.rrd
command prompt> SRG_SPM.exe
4. You must run SRG_SPM.exe on a scheduled basis to update all RRDs with new data collected by SPM. The schedule interval is typically the same interval as the spm-log-file-cycle-time configured in step 1 under Data Collector: SPM with Data Logging Enabled [page 39]. To run SRG_SPM.exe on a scheduled basis:
a. Make sure the Task Scheduler service is running.
b. Open up the Scheduled Tasks control panel item.
c. Double-click Add Scheduled Task, browse to your SRG_SPM.exe file, and click Next. Set the task to run daily (for now) and click Next twice until you are at the username/password screen. Click

Report GatewayUser Guide
Page 42
Document 5141
Next, check the box to open Advanced Properties and click Finish.
d. In the Task tab, enter the full command line in the Run field. Your command line should look something like this:
C:\SPM_ReportGateway\SRG_SPM.exe
e. Select the Schedule tab and click Advanced. Check the Repeat task checkbox and change it to every hour, then change the Duration to 24 hours. That should schedule SRG_SPM.exe to run every hour.
Note: You can also schedule the event using an NT service ID such as cacti_service. Doing this will remove the DOS box messages from your screen during the execution of the scheduled event.
Configuring SPM Report Gateway with Web Operator on Solaris
1. Copy the following files from your SPECTRUM machine (<$SPECROOT>/SSLOGGER/SRG) to a local directory (i.e. /usr/SPM_ReportGateway):
SRG_SPM
SRG_SPM.conf
rrdtool
All 3 files should now exist locally in /usr/SPM_ReportGateway (in this example).
2. Edit the SRG_SPM.conf file and set the appropriate parameters to your specific environment. See Appendix C: Sample SRG_SPM Configurations [page 69] for details on all configuration parameters in the SRG_SPM.conf file.
3. Once configuration is complete and SPM log files have been generated in the same directory as SRG_SPM, test your SRG_SPM configuration by running it at the command prompt:
shell> cd /usr/SPM_ReportGateway
shell> ./SRG_SPM
The first time SRG_SPM is executed, it will create Round-Robin-Databases (RRDs) for all test results included in the SPM log file(s), insert data into the appropriate RRDs, and generate a series of history files-all in the local directory. These history files include:

Report GatewayUser Guide
Page 43
Document 5141
.SPM_history Contains an up-to-date list of RRDs generated by SRG_SPM.
.SPM_log_history Contains a history of SPM log files converted in RRD format with date and timestamp.
.SPM_dataContains post-converted data used to update all RRDs. This file is overwritten at each scheduled run of SRG.
WARNING! When SRG_SPM is configured and running normally on a scheduled basis, these history files should not be removed or edited. Doing so could corrupt the SRG_SPM configuration.
To retest SRG_SPM after modifying or changing configuration parameters, you must first remove all .<SPM history files> and *.rrd files:
shell> cd /usr/SPM_ReportGateway
shell> rm .*
shell> rm *.rrd
shell> ./SRG_SPM
4. You must run SRG_SPM on a scheduled basis to update all RRDs with data collected by SPM. The schedule interval is typically the same interval as the spm-log-file-cycle-time configured in step 1 under Data Collector: SPM with Data Logging Enabled [page 39]. To configure SRG_SPM to run on a scheduled basis via cron job:
Navigate to /var/spool/cron/crontabs and edit the appropriate cron file for the user that will be running SRG_SPM. For example, add the following line to the bottom of the 'root' file:
05 * * * * cd <path/to/SRG_SPM>; <path/to/SRG_SPM/SRG_SPM>*
Save the file and reset the root cron by entering the following command:
shell> crontab root
SRG_SPM will now update all RRDs at 5-minutes past every hour.

Report GatewayUser Guide
Page 44
Document 5141
Data Grapher: Cacti
If you are installing Cacti on an independent machine, see the Cacti installation and setup instructions in the SRG section of this document: Data Graphing Utility: Cacti [page 18].
If you are installing Cacti on the same machine as Web Operator, see Running Web Operator with SRG and Cacti on a Machine Separate from SPECTRUM [page 73].

Report GatewayUser Guide
Page 45
Document 5141
Appendix A:Sample Configurations
This section lists three samples of valid SSLogger models, sslogger.dat, and SRG.conf file groupings. All three files in each sample are dependent on each other.
Sample Configuration 1
SSLogger models File0x180598c; 207.3.151.139; 0x3f20000; VH_Switch
0x1800c72; 192.168.25.88; 0x3cb0003; RoamAboutAP
0x1800c76; 192.168.25.89; 0x3cb0003; RoamAboutAP
0x1802123; 192.168.4.2; 0x2c60022; XPedSwRtr
0x18020a1; 192.168.4.1; 0x2c60022; XPedSwRtr
0x18086e9; 192.168.25.27; 0x21b0015; 6H202_24
0x180790c; 192.168.25.20; 0x21b0015; 6H202_24
0x180067c; 192.168.25.13; 0x21b0015; 6H202_24
0x1800c66; 192.168.25.85; 0x3cb0003; RoamAboutAP
0x1800c62; 192.168.25.84; 0x3cb0003; RoamAboutAP
0x18079fc; 192.168.25.83; 0x3cb0003; RoamAboutAP
0x18024a8; 192.168.25.82; 0x3cb0003; RoamAboutAP
0x1808813; amt-ns2; 0x116008c; Host_Sun
0x18087ef; amt-nsm; 0x116008c; Host_Sun
0x18087cc; amt-ns4; 0x116008c; Host_Sun
0x18087c6; amt-ns3; 0x116008c; Host_Sun
0x180000d; SSPerformance; 0x10421; SSPerformance
sslogger.dat Filegroup: device_port_info
ifInOctets ; 300 ; 0x0 ; 0x100cd ; .1
ifOutOctets ; 300 ; 0x0 ; 0x100d3 ; .1
group: CPU_info_XPedSwRtr

Report GatewayUser Guide
Page 46
Document 5141
CPU_Utilization_1 ; 300 ; 0x0 ; 0x2c604d6 ; .0
group: VNM_stats
os_disk_util ; 300 ; 0x0 ; 0x11f8c ; .0
os_cpu_util ; 300 ; 0x0 ; 0x11f96 ; .0
vnm_cpu_util ; 300 ; 0x0 ; 0x11e56 ; .0
vnm_mem_proc_size ; 300 ; 0x0 ; 0x11e8b ; .0
vnm_active_threads ; 300 ; 0x0 ; 0x11e49 ; .0
vnm_timer_latency ; 300 ; 0x0 ; 0x11ed6 ; .0
vnm_notif_latency ; 300 ; 0x0 ; 0x11e95 ; .0
vnm_poll_latency ; 300 ; 0x0 ; 0x11e99 ; .0
vnm_log_latency ; 300 ; 0x0 ; 0x11e7b ; .0
mtype: SSPerformance
VNM_stats
mtype: VH_Switch
device_port_info
mtype: RoamAboutAP
device_port_info
mtype: XPedSwRtr
device_port_info
CPU_info_XPedSwRtr
mtype: 6H202_24
device_port_info
mtype: Host_Sun
device_port_info
Rotate_log_interval: 1

Report GatewayUser Guide
Page 47
Document 5141
SRG.conf File# SRG Version 1.2
##################################################################
# Location of SSLogger configuration and raw data files
##################################################################
# Specify the directory path for the location of raw SSLogger data # files. If the SSLogger data files exist on a remote machine, set # this path to the remote SSLogger directory.
SSLOGGER FILE = /usr/Spectrum/SSLOGGER
# If the SSLogger files exist on a remote machine, set REMOTE
# LOCATION = yes
# and enter the approriate FTP paramters. If the SSLogger files
# are local, set REMOTE LOCATION = no and the FTP paramters will be
# ignored.
REMOTE LOCATION = no
REMOTE MACHINE =
FTP USER NAME =
FTP PASSWORD =
# Specify the location and the name of the SSLogger model file.
MODEL FILE = /RRD/ReportGateway/models
# Specify the location and the name of the SSLogger sslogger.dat
# file.
SSLOGGER DAT = /RRD/ReportGateway/sslogger.dat
##################################################################
# Configuration files that pertain to RRD (Round Robin Database)
##################################################################
# Global step count (in seconds) utilized for all RRD's. Unless an
# RRD specific step count is specified below, all RRD's will be
# created with the GLOBAL STEP. To use a step count unique to
# RRD(s) (or model type(s)), enter the Model Handle from the

Report GatewayUser Guide
Page 48
Document 5141
# SSLogger models file with its unique step count,
# delimited by a colon.
# Example:
# UNIQUE STEP = 0x12345af:60
# UNIQUE STEP = 0x67899eb:180
GLOBAL STEP = 300
# List the data source type for each model attribute specified in
# the sslogger.dat file.
ifInOctets & COUNTER:600:U:U
ifOutOctets & COUNTER:600:U:U
CPU_Utilization_1 & GAUGE:600:U:U
os_disk_util & GAUGE:600:U:U
os_cpu_util & GAUGE:600:U:U
vnm_cpu_util & GAUGE:600:U:U
vnm_mem_proc_size & GAUGE:600:U:U
vnm_active_threads & GAUGE:600:U:U
vnm_timer_latency & GAUGE:600:U:U
vnm_notif_latency & GAUGE:600:U:U
vnm_poll_latency & GAUGE:600:U:U
vnm_log_latency & GAUGE:600:U:U
# Configure the RRA (Round Robin Archive) as desired for data
# collection.
RRA:AVERAGE:0.5:1:600
RRA:AVERAGE:0.5:6:700
RRA:AVERAGE:0.5:24:775
RRA:AVERAGE:0.5:288:797
RRA:MAX:0.5:6:700
RRA:MAX:0.5:24:775
RRA:MAX:0.5:288:797
RRA:LAST:0.5:1:1

Report GatewayUser Guide
Page 49
Document 5141
##################################################################
# Options for data collection
##################################################################
# Determine the amount of time allowed for SSLogger poll responses
# (in seconds).
TIME OVERLAP = 10
# Set COPY FILES = yes to automatically copy all raw SSLogger files
# to a desired directory location for archiving. Used only if
# source directory is local (REMOTE LOCATION = no).
COPY FILES = yes
TO LOCATION = /RRD/SSLogger_Backup
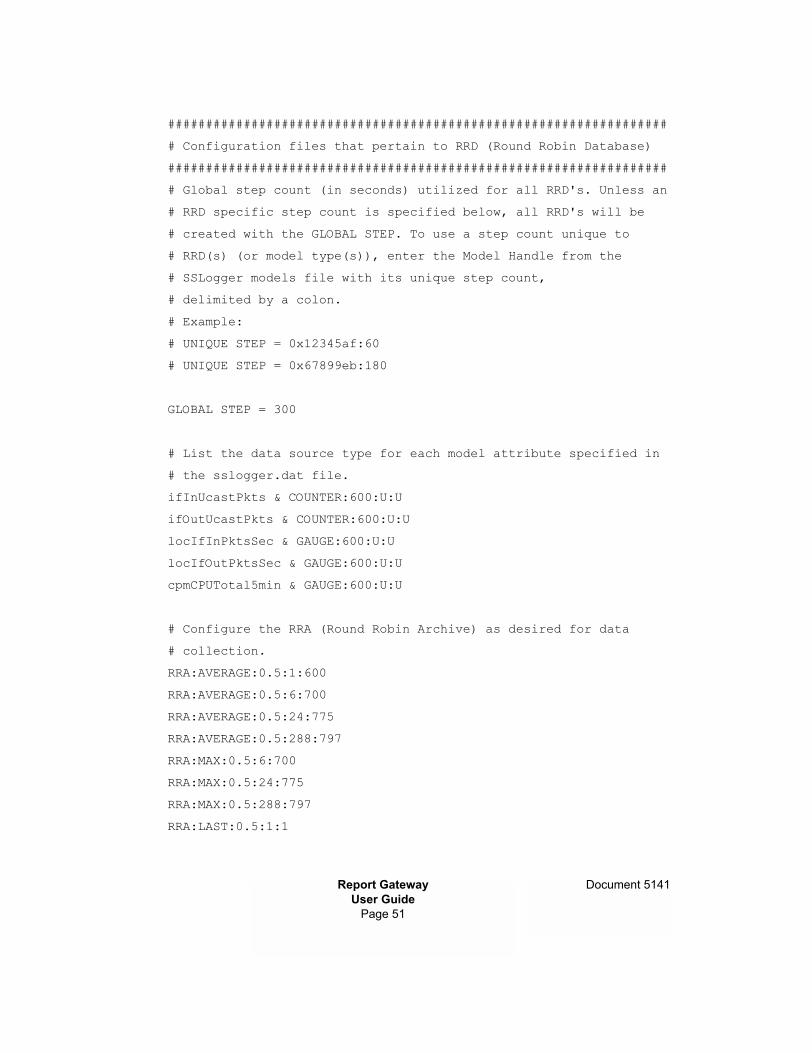
Sample Configuration 2
SSLogger models File0x4005bf; DRR; 0x21000c; Rtr_Cisco
0x400492; Los_Colinas; 0x21000c; Rtr_Cisco
0x400491; Las_Vegas; 0x21000c; Rtr_Cisco
0x400490; Mandalay; 0x21000c; Rtr_Cisco
0x40048f; Etiwanda; 0x21000c; Rtr_Cisco
0x4003b3; Osceola; 0x21000c; Rtr_Cisco
0x4003b2; Indian_River; 0x21000c; Rtr_Cisco
0x4003b1; Shell_Deer_Park; 0x21000c; Rtr_Cisco
sslogger.dat Filegroup: network_stats
ifInUcastPkts ; 300 ; 0x0 ; 0x100ce ; .1
ifOutUcastPkts ; 300 ; 0x0 ; 0x100d4 ; .1
locIfInPktsSec ; 300 ; 0x0 ; 0x2100e1 ; .1
locIfOutPktsSec ; 300 ; 0x0 ; 0x2100e3 ; .1
group: cpu_stats
cpmCPUTotal5min ; 300 ; 0x0 ; 0x210a6b ; .0

Report GatewayUser Guide
Page 50
Document 5141
mtype: Rtr_Cisco
network_stats
cpu_stats
Rotate_log_interval: 1
SRG.conf File# SRG Version 1.2
##################################################################
# Location of SSLogger configuration and raw data files
###################################################################
# Specify the directory path for the location of raw SSLogger data
# files. If the SSLogger data files exist on a remote machine, set
# this path to the remote SSLogger directory.
SSLOGGER FILE = C:\Win32App\Spectrum\SSLOGGER
# If the SSLogger files exist on a remote machine, set REMOTE
# LOCATION = yes and enter the appropriate FTP parameters. If the
# SSLogger files are local, set REMOTE LOCATION = no and the FTP
# parameters will be ignored.
REMOTE LOCATION = no
REMOTE MACHINE =
FTP USER NAME =
FTP PASSWORD =
# Specify the location and the name of the SSLogger model file.
MODEL FILE = C:\ReportGateway\models
# Specify the location and the name of the SSLogger sslogger.dat
# file.
SSLOGGER DAT = C:\ReportGateway\sslogger.dat
Report GatewayUser Guide
Page 51
Document 5141
##################################################################
# Configuration files that pertain to RRD (Round Robin Database)
##################################################################
# Global step count (in seconds) utilized for all RRD's. Unless an
# RRD specific step count is specified below, all RRD's will be
# created with the GLOBAL STEP. To use a step count unique to
# RRD(s) (or model type(s)), enter the Model Handle from the
# SSLogger models file with its unique step count,
# delimited by a colon.
# Example:
# UNIQUE STEP = 0x12345af:60
# UNIQUE STEP = 0x67899eb:180
GLOBAL STEP = 300
# List the data source type for each model attribute specified in
# the sslogger.dat file.
ifInUcastPkts & COUNTER:600:U:U
ifOutUcastPkts & COUNTER:600:U:U
locIfInPktsSec & GAUGE:600:U:U
locIfOutPktsSec & GAUGE:600:U:U
cpmCPUTotal5min & GAUGE:600:U:U
# Configure the RRA (Round Robin Archive) as desired for data
# collection.
RRA:AVERAGE:0.5:1:600
RRA:AVERAGE:0.5:6:700
RRA:AVERAGE:0.5:24:775
RRA:AVERAGE:0.5:288:797
RRA:MAX:0.5:6:700
RRA:MAX:0.5:24:775
RRA:MAX:0.5:288:797
RRA:LAST:0.5:1:1

Report GatewayUser Guide
Page 52
Document 5141
##################################################################
# Options for data collection
##################################################################
# Determine the amount of time allowed for SSLogger poll responses
# (in seconds).
TIME OVERLAP = 10
# Set COPY FILES = yes to automatically copy all raw SSLogger files
# to a desired directory location for archiving. Used only if source directory is local (REMOTE LOCATION = no).
COPY FILES = no
TO LOCATION =
Sample Configuration 3
SSLogger models File0x2600086; 10.253.180.100; 0x21000c; Rtr_Cisco
0x2600019; 10.253.180.1; 0x2c60021; RstoneSwRtr
0x260008f; 10.253.180.100_9; 0x220013; Serial_IF_Port
0x2600090; 10.253.180.100_10; 0x220013; Serial_IF_Port
sslogger.dat Filegroup: device_info_1
avgBusy5 ; 300 ; 0x0 ; 0x2100cd ; .0
locIfCollisions ; 300 ; 0x0 ; 0x2100f3 ; .1
locIfOutBitsSec ; 300 ; 0x0 ; 0x2100e2 ; .1
locIfInBitsSec ; 300 ; 0x0 ; 0x2100e0 ; .1
mtype: Rtr_Cisco
device_info_1
group: device_info_2
Load ; 300 ; 0x0 ; 0x10019 ; .0
ifOutErrors ; 300 ; 0x0 ; 0x100d7 ; .1
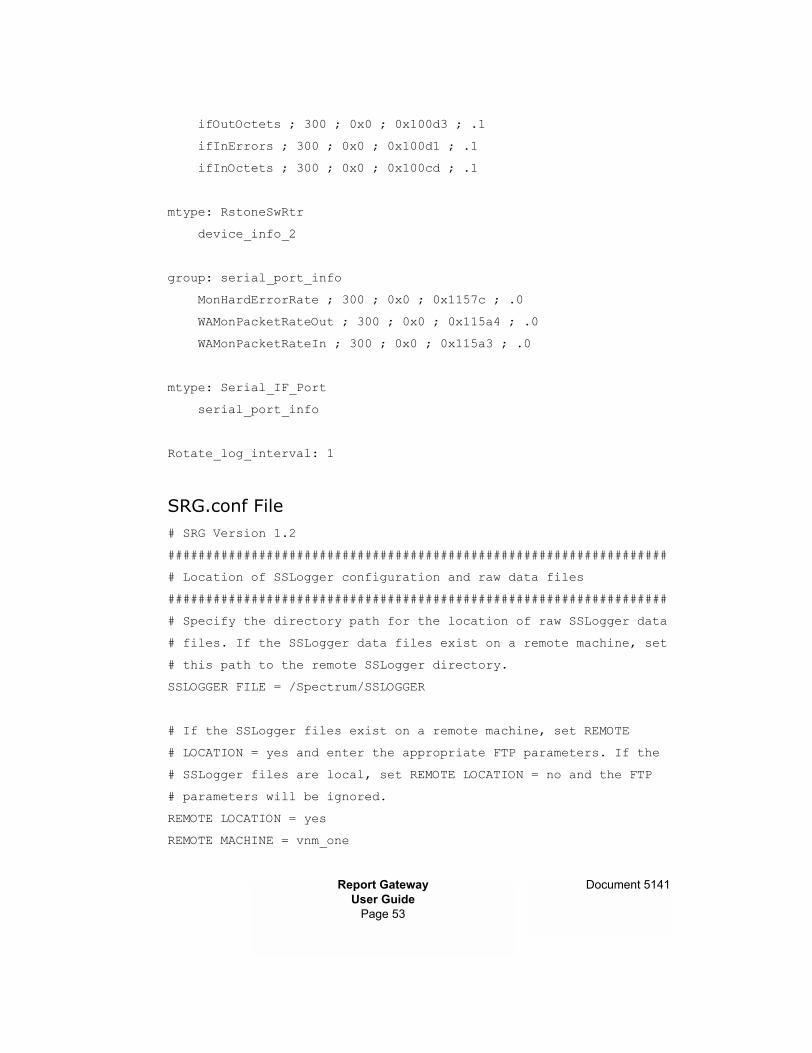
Report GatewayUser Guide
Page 53
Document 5141
ifOutOctets ; 300 ; 0x0 ; 0x100d3 ; .1
ifInErrors ; 300 ; 0x0 ; 0x100d1 ; .1
ifInOctets ; 300 ; 0x0 ; 0x100cd ; .1
mtype: RstoneSwRtr
device_info_2
group: serial_port_info
MonHardErrorRate ; 300 ; 0x0 ; 0x1157c ; .0
WAMonPacketRateOut ; 300 ; 0x0 ; 0x115a4 ; .0
WAMonPacketRateIn ; 300 ; 0x0 ; 0x115a3 ; .0
mtype: Serial_IF_Port
serial_port_info
Rotate_log_interval: 1
SRG.conf File# SRG Version 1.2
##################################################################
# Location of SSLogger configuration and raw data files
##################################################################
# Specify the directory path for the location of raw SSLogger data
# files. If the SSLogger data files exist on a remote machine, set
# this path to the remote SSLogger directory.
SSLOGGER FILE = /Spectrum/SSLOGGER
# If the SSLogger files exist on a remote machine, set REMOTE
# LOCATION = yes and enter the appropriate FTP parameters. If the
# SSLogger files are local, set REMOTE LOCATION = no and the FTP
# parameters will be ignored.
REMOTE LOCATION = yes
REMOTE MACHINE = vnm_one

Report GatewayUser Guide
Page 54
Document 5141
FTP USER NAME = spectrum
FTP PASSWORD = aprisma
# Specify the location and the name of the SSLogger model file.
# MODEL FILE = /local/ReportGateway/models
# Specify the location and the name of the SSLogger sslogger.dat
# file.
SSLOGGER DAT = /local/ReportGateway/sslogger.dat
##################################################################
# Configuration files that pertain to RRD (Round Robin Database)
##################################################################
# Global step count (in seconds) utilized for all RRD's. Unless an
# RRD specific step count is specified below, all RRD's will be
# created with the GLOBAL STEP. To use a step count unique to
# RRD(s) (or model type(s)), enter the Model Handle from the
# SSLogger models file with its unique step count,
# delimited by a colon.
# Example:
# UNIQUE STEP = 0x12345af:60
# UNIQUE STEP = 0x67899eb:180
GLOBAL STEP = 300
# List the data source type for each model attribute specified in
# the sslogger.dat file.
avgBusy5 & GAUGE:600:U:U
locIfCollisions & GAUGE:600:U:U
locIfOutBitsSec & GAUGE:600:U:U
locIfInBitsSec & GAUGE:600:U:U
Load & GAUGE:600:U:U
IfOutErrors & COUNTER:600:U:U
ifOutOctets & COUNTER:600:U:U

Report GatewayUser Guide
Page 55
Document 5141
ifInErrors & COUNTER:600:U:U
ifInOctets & COUNTER:600:U:U
MonHardErrorRate & GAUGE:600:U:U
WAMonPacketRateOut & GAUGE:600:U:U
WAMonPacketRateIn & GAUGE:600:U:U
# Configure the RRA (Round Robin Archive) as desired for data
# collection.
RRA:AVERAGE:0.5:1:600
RRA:AVERAGE:0.5:6:700
RRA:AVERAGE:0.5:24:775
RRA:AVERAGE:0.5:288:797
RRA:MAX:0.5:6:700
RRA:MAX:0.5:24:775
RRA:MAX:0.5:288:797
RRA:LAST:0.5:1:1
##################################################################
# Options for data collection
##################################################################
# Determine the amount of time allowed for SSLogger poll responses
# (in seconds).
TIME OVERLAP = 10
# Set COPY FILES = yes to automatically copy all raw SSLogger files
# to a desired directory location for archiving. Used only if
# source directory is local (REMOTE LOCATION = no).
COPY FILES = no
TO LOCATION =

Report GatewayUser Guide
Page 56
Document 5141
Appendix B:Report Gateway Configuration
Parameter Definitions
This section describes all configuration parameters and recommended settings for the Report Gateway.
In This Section
The SRG.conf File [page 56]
Configuration Parameter Definitions [page 60]
The SRG.conf File
The configuration file SRG.conf contains the following main sections pertaining to various customization parameters:
Location of SSLogger Files [page 56]
RRD Configuration Files [page 56]
Data Collection Options [page 57]
Trend Analysis Options [page 57]
Location of SSLogger Files
In this section, the user must identify the location of all related SSLogger files including:
� SSLogger.log raw data files
� models file
RRD Configuration Files
The bulk of this section contains configuration parameters used upon creation of each round-robin-database. For detailed information on Round-Robin-Archives (RRAs) and Data-Source (DS) types, please review the RRD manual at: http://people.ee.ethz.ch/~oetiker/webtools/rrdtool/manual/rrdcreate.html and the tutorial at: http://people.ee.ethz.ch/~oetiker/webtools/rrdtool/tutorial/rrdtutorial.html

Report GatewayUser Guide
Page 57
Document 5141
Data Collection Options
These settings (see [page 59] of the sample configuration file) let you define backup areas to store data and basic conversion options.
Trend Analysis Options
These settings (see [page 59] of the sample configuration file) let you configure SRG trending options.
Sample SRG.conf Configuration File
Below is a sample SRG.conf configuration file:
# SRG Version 1.2
##################################################################
# Location of SSLogger configuration and raw data files
##################################################################
# Specify the directory path for the location of raw SSLogger log
# files. If the SSLogger log files exist on a remote machine, set
# this path to the remote SSLogger directory.
SSLOGGER FILE = /usr/Spectrum/SSLOGGER
# If the SSLogger log files exist on a remote machine, set REMOTE
# LOCATION = yes and enter the appropriate FTP parameters. If the
# SSLogger files are local, set REMOTE LOCATION = no and the FTP
# parameters will be ignored.
REMOTE LOCATION = no
REMOTE MACHINE = machine_name or IP
FTP USER NAME = anonymous
FTP PASSWORD = [email protected]
# Specify the location and the name of the SSLogger model file.
MODEL FILE = /usr/Spectrum/SSLOGGER/models
# Specify the location and the name of the SSLogger sslogger.dat
# file.

Report GatewayUser Guide
Page 58
Document 5141
SSLOGGER DAT = /usr/Spectrum/SSLOGGER/sslogger.dat
##################################################################
# Configuration files that pertain to RRD (Round Robin Database)
##################################################################
# Global step count (in seconds) utilized for all RRD's. Unless an
# RRD specific step count is specified below, all RRD's will be
# created with the
# GLOBAL STEP. To use a step count unique to RRD(s) (or model
# type(s)), enter the Model Handle from the SSLogger models file
# with its unique step count,
# delimited by a colon.
# Example:
# UNIQUE STEP = 0x12345af:60
# UNIQUE STEP = 0x67899eb:180
GLOBAL STEP = 300
# List the data source type for each model attribute specified in
# the sslogger.dat file.
ifInOctets & COUNTER:600:U:U
ifOutOctets & COUNTER:600:U:U
# Configure the RRA (Round Robin Archive) as desired for data
# collection.
RRA:AVERAGE:0.5:1:600
RRA:AVERAGE:0.5:6:700
RRA:AVERAGE:0.5:24:775
RRA:AVERAGE:0.5:288:797
RRA:MAX:0.5:6:700
RRA:MAX:0.5:24:775
RRA:MAX:0.5:288:797
RRA:LAST:0.5:1:1

Report GatewayUser Guide
Page 59
Document 5141
##################################################################
# Options for data collection
##################################################################
# Determine the amount of time allowed for SSLogger poll responses
# (in seconds).
TIME OVERLAP = 10
# Set COPY FILES = yes to automatically copy all raw SSLogger files
# to a desired directory location for archiving. Used only if
# source directory is local (REMOTE LOCATION = no).
COPY FILES = no
TO LOCATION = /usr/Spectrum/SSLOGGER/SRG
##################################################################
# Options for trend analysis
##################################################################
# Enable trending for all RRD's and data sources. CAUTION: Enabling
# this parameter could significantly decrease SRG response time.
ENABLE GLOBAL TREND = false
# Enable trending for specified RRD's and data sources. If set to
# true, specify the UNIQUE TREND rrd data sources below.
ENABLE UNIQUE TREND = false
# UNIQUE TREND = Rtr_Cisco_192.168.180.1 : ifInOctets_1
# UNIQUE TREND = Rtr_Cisco_192.168.180.1 : ifOutOctets_1
# If trending is enabled, specify the trend scope.
TREND SCOPE = 7d 14d 21d 28d
# Enable trend forecasting and forecast scope.
TREND FORECAST = off
FORECAST SCOPE = 8h
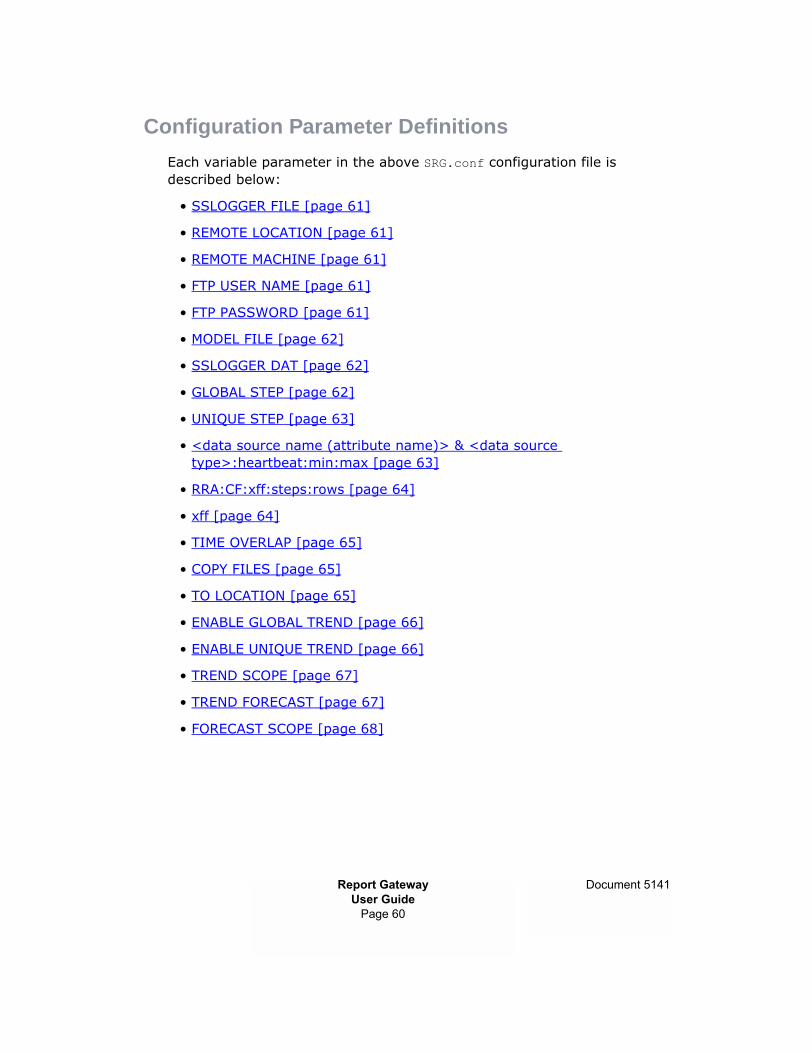
Report GatewayUser Guide
Page 60
Document 5141
Configuration Parameter Definitions
Each variable parameter in the above SRG.conf configuration file is described below:
� SSLOGGER FILE [page 61]
� REMOTE LOCATION [page 61]
� REMOTE MACHINE [page 61]
� FTP USER NAME [page 61]
� FTP PASSWORD [page 61]
� MODEL FILE [page 62]
� SSLOGGER DAT [page 62]
� GLOBAL STEP [page 62]
� UNIQUE STEP [page 63]
� <data source name (attribute name)> & <data source type>:heartbeat:min:max [page 63]
� RRA:CF:xff:steps:rows [page 64]
� xff [page 64]
� TIME OVERLAP [page 65]
� COPY FILES [page 65]
� TO LOCATION [page 65]
� ENABLE GLOBAL TREND [page 66]
� ENABLE UNIQUE TREND [page 66]
� TREND SCOPE [page 67]
� TREND FORECAST [page 67]
� FORECAST SCOPE [page 68]

Report GatewayUser Guide
Page 61
Document 5141
SSLOGGER FILE
This parameter notifies SRG where to look for the SSLogger output data files.
Note: This location can be a mapped or mounted network drive.
Examples:
SSLOGGER FILE = /usr/Spectrum/SSLOGGER
SSLOGGER FILE = C:\win32app\Spectrum\SSLOGGER
REMOTE LOCATION
Specify whether the SSLOGGER FILE directory specified above is local or on a remote system.
Examples:
REMOTE LOCATION = no
REMOTE LOCATION = yes
REMOTE MACHINE
If REMOTE LOCATION = yes, this parameter specifies the name or IP of the remote host machine. If REMOTE LOCATION = no, this parameter is ignored.
Examples:
REMOTE MACHINE = spectrum.aprisma.com
REMOTE MACHINE = spectrum
REMOTE MACHINE = 192.168.100.230
FTP USER NAME
If REMOTE LOCATION = yes, this parameter specifies the FTP user name having access to the REMOTE MACHINE. If REMOTE LOCATION = no, this parameter is ignored.
Example:
FTP USER NAME = anonymous
FTP PASSWORD
If REMOTE LOCATION = yes, this parameter specifies the password for the FTP USER NAME having access to the REMOTE MACHINE. If REMOTE LOCATION = no, this parameter is ignored.
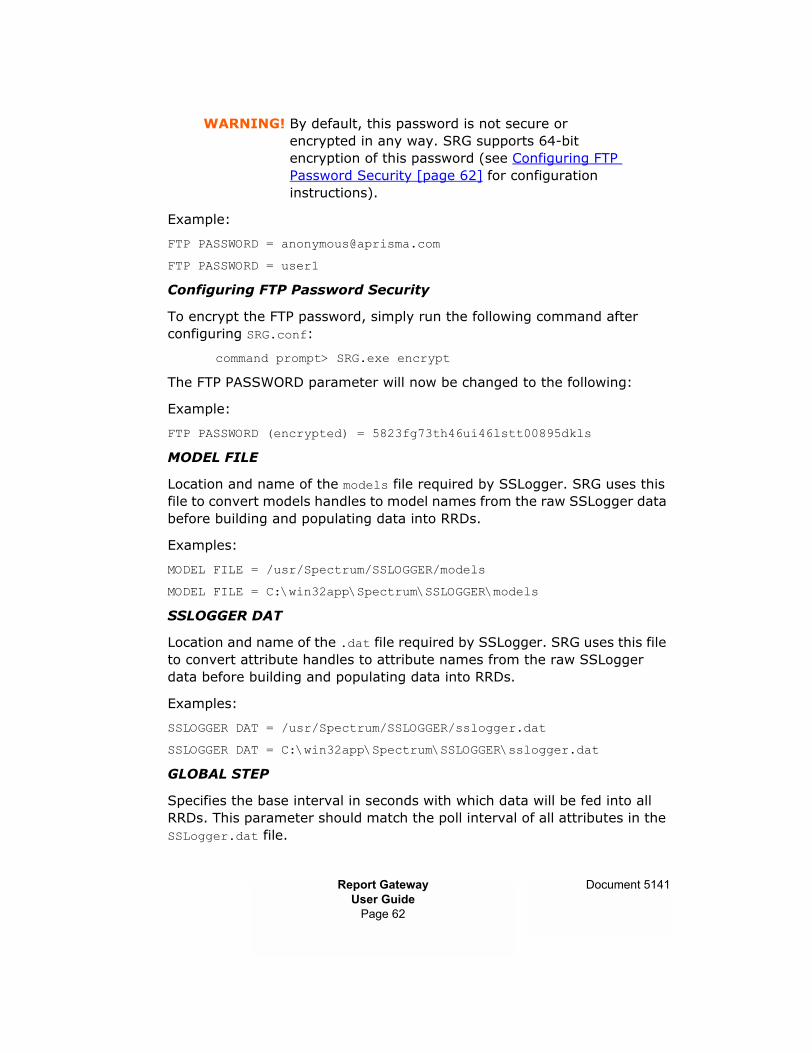
Report GatewayUser Guide
Page 62
Document 5141
WARNING! By default, this password is not secure or encrypted in any way. SRG supports 64-bit encryption of this password (see Configuring FTP Password Security [page 62] for configuration instructions).
Example:
FTP PASSWORD = [email protected]
FTP PASSWORD = user1
Configuring FTP Password Security
To encrypt the FTP password, simply run the following command after configuring SRG.conf:
command prompt> SRG.exe encrypt
The FTP PASSWORD parameter will now be changed to the following:
Example:
FTP PASSWORD (encrypted) = 5823fg73th46ui46lstt00895dkls
MODEL FILE
Location and name of the models file required by SSLogger. SRG uses this file to convert models handles to model names from the raw SSLogger data before building and populating data into RRDs.
Examples:
MODEL FILE = /usr/Spectrum/SSLOGGER/models
MODEL FILE = C:\win32app\Spectrum\SSLOGGER\models
SSLOGGER DAT
Location and name of the .dat file required by SSLogger. SRG uses this file to convert attribute handles to attribute names from the raw SSLogger data before building and populating data into RRDs.
Examples:
SSLOGGER DAT = /usr/Spectrum/SSLOGGER/sslogger.dat
SSLOGGER DAT = C:\win32app\Spectrum\SSLOGGER\sslogger.dat
GLOBAL STEP
Specifies the base interval in seconds with which data will be fed into all RRDs. This parameter should match the poll interval of all attributes in the SSLogger.dat file.

Report GatewayUser Guide
Page 63
Document 5141
Examples:
GLOBAL STEP = 300
GLOBAL STEP = 600
If for a particular model or group of models in the SSLogger models file, sets of attributes are polled at different intervals than the rest, individual step counts can be configured.
UNIQUE STEP
Any model handles not configured with a UNIQUE STEP will retain the GLOBAL STEP setting. The values in this parameter include <model handle>:<step in seconds> as listed in the SSLogger models and sslogger.dat files, respectively. It is recommended that only experienced users use UNIQUE STEP.
Examples:
UNIQUE STEP = 0x12345ab:600
UNIQUE STEP = 0x67891cd:1800
<data source name (attribute name)> & <data source type>:heartbeat:min:max
This section of the SRG.conf file identifies the data source name, data source type, heartbeat (in seconds), and min/max fields [required by RRD-Tool] for each attribute used in the SSLogger.dat file. Data source names (attribute names) are limited to 19 characters and any name exceeding 19 characters will have to be shortened by editing the sslogger.dat file prior to running SRG. The possible data source types are: COUNTER, GAUGE, DERIVE, and ABSOLUTE. See the RRDTool documentation at http://www.rrdtool.com for a complete description of all RRD-specific variables.
Examples:
ifInOctets & COUNTER:600:U:U
ifOutOctets & COUNTER:600:U:U
locIfInPktsSec & GAUGE:600:U:U
locIfOutPktsSec & GAUGE:600:U:U
cpu_busy_5 & GAUGE:600:U:U
Determining the data source type of an attribute (data source) is relatively simple. If the attribute is reading a 32/64-bit counter, the data source should be configured as a COUNTER. If the attribute is reading an integer, float, or any value that can go up or down on each poll, the data

Report GatewayUser Guide
Page 64
Document 5141
source should be configured as a GAUGE. For cases where DERIVE or ABSOLUTE might be used, see the RRDTool documentation at http://www.rrdtool.com.
The heartbeat defines the maximum number of seconds that may pass between two updates of the data source before the value of the data source (attribute) is assumed to be unknown. The general rule-of-thumb is to set the heartbeat at twice the GLOBAL STEP.
RRA:CF:xff:steps:rows
Round-Robin-Archives (RRAs) are used to configure the data compression and granularity for each RRD. It is recommended the default RRAs be used unless RRA functionality is fully understood. See the RRDTool documentation at http://www.rrdtool.com for details.
xff
The x-files-factor (xff) defines what part of a consolidation interval may be made up from *UNKNOWN* data while the consolidated value is still regarded as known. When using SRG, there is no reason to change the default value of 0.5.
Examples:
RRA:AVERAGE:0.5:1:600
RRA:AVERAGE:0.5:6:700
RRA:AVERAGE:0.5:24:775
RRA:AVERAGE:0.5:288:797
RRA:MAX:0.5:6:700
RRA:MAX:0.5:24:775
RRA:MAX:0.5:288:797
RRA:LAST:0.5:1:1
Assuming the GLOBAL STEP = 300, Table 3 provides an explanation of data storage capability and granularity set for each RRD.
Table 3:
Round-Robin-Archive (RRA) Configuration Setting
Sample Count Storage Period
RRA:AVERAGE:0.5:1:600 600 samples of 5 minute Avgs ~2 days of storage
RRA:AVERAGE:0.5:6:700 700 samples of 30 minute Avgs ~2 weeks of storage

Report GatewayUser Guide
Page 65
Document 5141
TIME OVERLAP
This parameter is used for advanced tuning (if necessary) of the input data stream based on the logging interval (step). It is recommended that this value be left at the default of 10 seconds.
Example:
TIME OVERLAP = 10
COPY FILES
SRG has the capability to automatically copy raw SSLogger files from the SSLOGGER FILE location to a specified directory for archiving. This parameter can only be used if SSLOGGER FILE location is local (e.g. REMOTE LOCATION = no).
Note: Mapping or mounting a network drive of the remote SPECTRUM SSLogger directory is virtually the same as a local drive. Therefore, setting COPY FILES = yes would automatically pull all raw SSLogger data files from the remote machine and store them to the specified local destination, as long as the drive remains mapped or mounted.
Examples:
COPY FILES = no
COPY FILES = yes
TO LOCATION
If COPY FILES = yes, this parameter specifies local destination to copy the raw SSLogger files. If COPY FILES = no, this parameter is ignored.
Examples:
TO LOCATION = d:\SSLogger_Backup
TO LOCATION = /local/driveA/SSLogger_Backup
RRA:AVERAGE:0.5:24:775 775 samples of 2 hour Avgs ~2 months of storage
RRA:AVERAGE:0.5:288:797 797 samples of 1 day Avgs ~2 years of storage
Round-Robin-Archive (RRA) Configuration Setting
Sample Count Storage Period
Report GatewayUser Guide
Page 66
Document 5141
ENABLE GLOBAL TREND
Global Trending is disabled by default. Setting this variable to "true" will enable the trending functionality for ALL data-sources for every RRD that currently exists. That is, the number of existing RRD files will double as Global Trending generates a new Trend_RRD file for each existing RRD. The following naming convention is used for the new RRD files containing the calculated trend results: Trend_<current_rrd_name>.rrd.
WARNING! With many RRD files and/or data-sources, setting ENABLE GLOBAL TREND to true will add significant workload to SRG. SRG runtime will be significantly increased as a result. Aprisma recommends that setting ENABLE GLOBAL TREND = true be done only for a small SRG deployment of less than 10 RRD files.
If enabled, this functionality can be disabled at any time by simply setting this variable to "false". Aprisma recommends that SRG trending be enabled by using the ENABLE UNIQUE TREND [page 66] functionality.
Examples:
ENABLE GLOBAL TREND = false
ENABLE GLOBAL TREND = true
ENABLE UNIQUE TREND
Unique trending is disabled by default. If set to "true", SRG requires a list of unique data sources to be used for trend analysis. Since this is a small subset of all RRD files and data-sources, SRG response time is minimally impacted. The data-source list to include for trend analysis uses the following naming convention:UNIQUE TREND = <rrd file name without file extension> :
<data-source name>
Examples:
ENABLE UNIQUE TREND = false
#UNIQUE TREND = Rtr_Cisco_192.168.180.1 : ifInOctets_1
#UNIQUE TREND = Rtr_Cisco_192.168.180.1 : ifOutOctets_1
ENABLE UNIQUE TREND = true
UNIQUE TREND = Rtr_Cisco_192.168.180.1 : ifInOctets_1
UNIQUE TREND = Rtr_Cisco_192.168.180.1 : ifOutOctets_1

Report GatewayUser Guide
Page 67
Document 5141
If enabled, this functionality can be disabled at any time by simply setting this variable back to "false" and commenting out each UNIQUE TREND item with a "#" character. For the example above, on the first run of SRG after setting ENABLE UNIQUE TREND = true and using the two data-sources listed, SRG will retrieve historical data based on the TREND SCOPE [page 67] specified. The retrieved values will be averaged, and the results will be recorded to a Trend_Rtr_192.168.180.1.rrd RRD file. This new "Trend" rrd file will contain two data-sources: ifInOctets_1 and ifOutOctets_1 which store the trend data for each value, respectively.
To determine a valid data-source name to add to the UNIQUE TREND list, DRRAW, Cacti, or rrdtool can be used. See Appendix D: Frequently Asked Questions [page 73].
TREND SCOPE
This variable specifies historical scope or how far back to retrieve data used for trend calculations. If ENABLE UNIQUE TREND = false and/or ENABLE GLOBAL TREND = false, TREND SCOPE is ignored.
Examples:
TREND SCOPE = 7d 14d 21d 28d
At every SRG update interval, SRG will retrieve the values for each data-source (listed as a UNIQUE TREND) at the current time for exactly 1-week ago, 2-weeks ago, etc., up to 4-weeks ago. The values retrieved will be averaged and stored to the appropriate Trend_<rrd_file_name>.rrd file.
TREND SCOPE = 7d 14d 21d 28d 35d 42d 49d 56d
Using this trend scope will cause SRG to retrieve 8-weeks (2-months) worth of history data to include in trend averaging.
TREND FORECAST
The trend forecast functionality is disabled by default. Enabling trend forecast causes SRG to predict the future trend based on calculations conducted from historical data. The length of forecast period (FORECAST SCOPE [page 68]) is set to 8-hours by default-that is, if enabled, SRG will predict the trend up to 8-hours into the future.
Examples:
TREND FORECAST = false
TREND FORECAST = true

Report GatewayUser Guide
Page 68
Document 5141
FORECAST SCOPE
If TREND FORECAST = true, FORECAST SCOPE is used to specify the forecast period. If TREND FORECAST is disabled (false), this variable is ignored. By default, FORECAST SCOPE is set to 8-hours.
Examples:
FORECAST SCOPE = 8h
FORECAST SCOPE = 24h
FORECAST SCOPE = 1h
Important: The trend forecast functionality can only be used with the DRRAW front-end graphing utility or any utility which allows custom x-axis scaling. Cacti does not include functionality to display data beyond the current time-which is required when trend forecasting is enabled.
See Appendix D: Frequently Asked Questions [page 73] for examples of SRG Trending configurations.

Report GatewayUser Guide
Page 69
Document 5141
Appendix C:Sample SRG_SPM Configurations
This section provides a sample of a valid SRG_SPM.conf file.
SRG_SPM.conf Sample Configuration
Listed below is a sample of the SRG_SPM.conf file.
##################################################################
# Location of SPM log files
##################################################################
SPM EXPORT DATA FILE = /usr/Spectrum/SPM_Data
# If the SPM Export Data files exist on a remote machine, set
# REMOTE LOCATION = yes and enter the appropriate FTP parameters. # If the SPM Export Data files are local, set REMOTE LOCATION = no # and the FTP parameters will be ignored.
REMOTE LOCATION = no
REMOTE MACHINE = <host name or IP>
FTP USER NAME = anonymous
FTP PASSWORD = [email protected]
##################################################################
# RRA consolidation functions that apply to each RRD
##################################################################
RRA = AVERAGE
RRA = LAST
RRA = MAX
RRA = MIN
##################################################################
# Options for data collection
##################################################################
# Set COPY FILES = yes to automatically copy all raw SPM Export #Data files to a desired directory location for archiving. Used #only if source directory is local (REMOTE LOCATION = no).

Report GatewayUser Guide
Page 70
Document 5141
COPY FILES = no
TO LOCATION = /usr/SPM/Backup
Configuration Parameter Definitions
Each variable parameter in the sample SRG_SPM.conf configuration file is described below:
� SPM EXPORT DATA FILE [page 70]
� REMOTE LOCATION [page 70]
� REMOTE MACHINE [page 70]
� FTP USER NAME [page 71]
� FTP PASSWORD [page 71]
� RRA [page 71]
� COPY FILES [page 71]
� TO LOCATION [page 72]
SPM EXPORT DATA FILE
This parameter notifies SRG_SPM where to look for the SPM log files.
Note: This location can be a mapped or mounted network drive.
Examples:
SPM EXPORT DATA FILE = /usr/SPM_ReportGateway
SPM EXPORT DATA FILE = C:\SPM_ReportGateway
REMOTE LOCATION
Specify whether the SPM EXPORT DATA FILE directory specified above is local or on a remote system.
Examples:
REMOTE LOCATION = no
REMOTE LOCATION = yes
REMOTE MACHINE
If REMOTE LOCATION = yes, this parameter specifies the name or IP of the remote host machine. If REMOTE LOCATION = no, this parameter is ignored.

Report GatewayUser Guide
Page 71
Document 5141
Examples:
REMOTE MACHINE = spectrum.aprisma.com
REMOTE MACHINE = spectrum
REMOTE MACHINE = 192.168.100.230
FTP USER NAME
If REMOTE LOCATION = yes, this parameter specifies the FTP user name having access to the REMOTE MACHINE. If REMOTE LOCATION = no, this parameter is ignored.
Example:
FTP USER NAME = anonymous
FTP PASSWORD
If REMOTE LOCATION = yes, this parameter specifies the password for the FTP USER NAME having access to the REMOTE MACHINE. If REMOTE LOCATION = no, this parameter is ignored.
Example:
FTP PASSWORD = [email protected]
FTP PASSWORD = user1
SRG_SPM supports 64-bit encryption of this password. To encrypt this password, simply run the following command after configuring SRG_SPM.conf:
command prompt> SRG_SPM.exe encrypt
The FTP PASSWORD parameter will now be changed to the following:
Example:
FTP PASSWORD (encrypted) = 5823fg73th46ui46lstt00895dkls
RRA
Round-Robin-Archives (RRAs) are used to configure the data compression and granularity for each RRD. It is recommended the default RRAs be used unless RRA functionality is fully understood. See the RRDTool documentation at http://www.rrdtool.com for details.
COPY FILES
SRG_SPM has the capability to automatically copy SPM data files from the SPM DATA EXPORT FILE location to a specified directory for archiving. This parameter can only be used if SPM DATA EXPORT FILE location is local (e.g. REMOTE LOCATION = no).

Report GatewayUser Guide
Page 72
Document 5141
Note: Mapping or mounting a network drive of the remote SPM data directory is virtually the same as a local drive. Therefore, setting COPY FILES = yes would automatically pull all SPM data files from the remote machine and store them to the specified local destination, as long as the drive remains mapped or mounted.
Examples:
COPY FILES = no
COPY FILES = yes
TO LOCATION
If COPY FILES = yes, this parameter specifies local destination to copy the SPM data files. If COPY FILES = no, this parameter is ignored.
Examples:
TO LOCATION = d:\SPM_Data_Backup
TO LOCATION = /local/driveA/SPM_Data_Backup
Report GatewayUser Guide
Page 73
Document 5141
Appendix D: Frequently Asked Questions
This section contains frequently asked questions about and tips for using Report Gateway.
In This Section
Running SRG Independently [page 73]
General SSLogger Tips [page 74]
Running SRG Independently
The following tips apply if you are running SRG on a different machine from the machine running SPECTRUM.
Installing SPECTRUM and SRG on Machines with Different Operating Systems
In cases where you have installed SPECTRUM and SSLogger on one machine of a given platform (for example, on a Solaris machine) and you want to install just the SRG components on a separate machine running a different operating system (Windows in this example) independent of the SPECTRUM installation, contact Aprisma Support to obtain the SRG.exe file.
Changes to SSLogger Files on Remote Machine
If you make changes to the data file and/or model file on the machine running SSLogger, you must restart SSLogger and copy the updated files over to the machine running SRG.
Running Web Operator with SRG and Cacti on a Machine Separate from SPECTRUM
It is possible to run Web Operator with SRG and Cacti together on one machine while running SPECTRUM/SSLogger on a second machine. To do this, you must set the Apache HTTP port to something other than 80 when installing Cacti on the Web Operator machine (see Data Graphing Utility: Cacti [page 18]). This is because the Web Operator Tomcat server uses

Report GatewayUser Guide
Page 74
Document 5141
port 80. Additionally, in this configuration, there is no need to install MySQL separately if you configure Cacti to use Web Operator�s instance of MySQL. To do this, follow this procedure:
1. Create the MySQL database using Web Operator�s MySQL:
C:\> cd <$SPECROOT>WebApps\mysql\bin
C:\<$SPECROOT>WebApps\mysql\bin> mysqladmin --user=root --password=root create cacti
2. Import the default Cacti database:
C:\<$SPECROOT>WebApps\mysql\bin> mysql --user=root --password=root cacti < cacti.sql
3. Create a MySQL username and password for Cacti. C:\<$SPECROOT>WebApps\mysql\bin> mysql --user=root
--password=root mysqlmysql> GRANT ALL ON cacti.* TO cactiuser@localhost
IDENTIFIED BY 'cacti';mysql> flush privileges;
Note: Aprisma does not support the open source Cacti and is not responsible for damage to Web Operator that might occur from running it on the same machine.
General SSLogger Tips
If you've added attributes to the SSLogger data file, you must also add the attributes to SRG.conf. If you only added models to the model file and did not add attributes to the SSLogger data file, SRG will be automatically updated.
Trending and SRG
Question
With trending enabled, how does SRG handle historical data retrieval if data doesn't exist for the set TREND SCOPE?
Answer
When historical data is retrieved by SRG, if it receives a value of "NaN" (Not a Number), it does not include this value in the average. For example, let's say we have an existing RRD that SRG has been storing data for 2 weeks. With a TREND SCOPE = 7d 14d 21d 28d, SRG will attempt to

Report GatewayUser Guide
Page 75
Document 5141
retrieve data at this specific time 7-days ago, 14-days ago, 21-days ago, and 28-days ago. The first two scope values (7-days and 14-days ago), SRG retrieves values 1.65k and 2.54k, respectively. However, since SRG has only been running for two weeks, there is no data 21-days ago or 28-days ago; SRG will retrieve "NaN" values for both.
When SRG calculates the average trend value, it will exclude the NaN values from the calculation, therefore, it will record (1.65k + 2.54k)/2 = 2.095k into the "Trend" rrd. Once a third week has passed, SRG will average 3 values, and finally, at the end of 4 weeks, the entire TREND SCOPE will be valid and all 4 values will be averaged.
Question
I just finished setting up SRG and it's been running for a couple hours. I also enabled unique trending using the default TREND SCOPE (7d 14d 21d 28d). The Trend_<rrd> file(s) was built but when I try to graph data from this RRD, I get nothing-the graph is blank. What is wrong?
Answer
Since SRG has only been running for a couple hours, no data exists beyond this time. Therefore, all four values retrieved by SRG for each TREND SCOPE instance are "NaN", no calculation can be made, and the Trend_<rrd> file(s) is not updated with any data. Once SRG has been running for 7-days, data will begin being calculated and recorded to the Trend_<rrd> file(s).
Question
How do I find a list of valid data-source names to use as my UNIQUE TREND values?
Answer
There are many ways but probably the easiest is to use rrdtool. Rrdtool is located the SRG directory. For example, let's say I wanted to analyze trend data for ifInOctets and ifOutOctets on port interface 1 of my Rtr_Cisco_192.168.180.1. How do I know what the exact data-source names are for these attributes? Open a shell or command prompt window and navigate to your SRG directory. Execute rrdtool using the "info" parameter to generate a list of available data-sources in a given rrd file:
shell> cd reporting_gateway/srg
shell> rrdtool info Rtr_Cisco_192.168.180.1.rrd
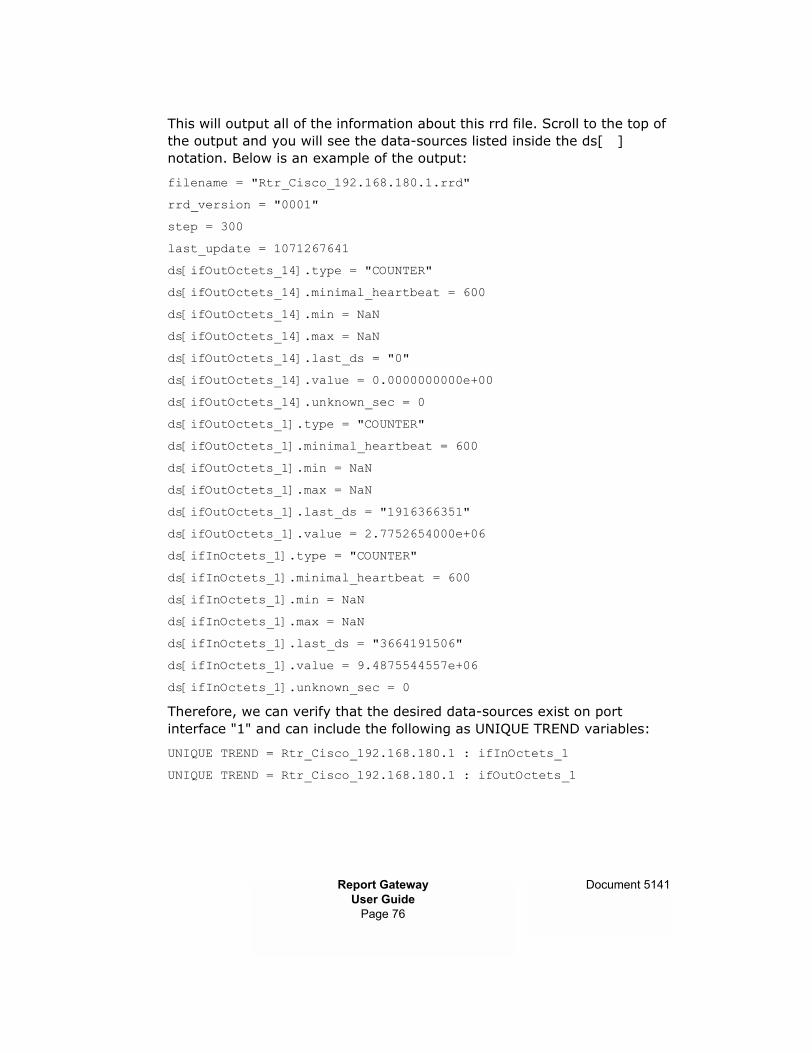
Report GatewayUser Guide
Page 76
Document 5141
This will output all of the information about this rrd file. Scroll to the top of the output and you will see the data-sources listed inside the ds[ ] notation. Below is an example of the output:
filename = "Rtr_Cisco_192.168.180.1.rrd"
rrd_version = "0001"
step = 300
last_update = 1071267641
ds[ifOutOctets_14].type = "COUNTER"
ds[ifOutOctets_14].minimal_heartbeat = 600
ds[ifOutOctets_14].min = NaN
ds[ifOutOctets_14].max = NaN
ds[ifOutOctets_14].last_ds = "0"
ds[ifOutOctets_14].value = 0.0000000000e+00
ds[ifOutOctets_14].unknown_sec = 0
ds[ifOutOctets_1].type = "COUNTER"
ds[ifOutOctets_1].minimal_heartbeat = 600
ds[ifOutOctets_1].min = NaN
ds[ifOutOctets_1].max = NaN
ds[ifOutOctets_1].last_ds = "1916366351"
ds[ifOutOctets_1].value = 2.7752654000e+06
ds[ifInOctets_1].type = "COUNTER"
ds[ifInOctets_1].minimal_heartbeat = 600
ds[ifInOctets_1].min = NaN
ds[ifInOctets_1].max = NaN
ds[ifInOctets_1].last_ds = "3664191506"
ds[ifInOctets_1].value = 9.4875544557e+06
ds[ifInOctets_1].unknown_sec = 0
Therefore, we can verify that the desired data-sources exist on port interface "1" and can include the following as UNIQUE TREND variables:
UNIQUE TREND = Rtr_Cisco_192.168.180.1 : ifInOctets_1
UNIQUE TREND = Rtr_Cisco_192.168.180.1 : ifOutOctets_1

Report GatewayUser Guide
Page 77
Document 5141
Index
AApache Web Server
starting and stopping [27]
CCacti [8], [11], [18], [26]COPY FILES [65]
DData Graphing Utilities [11]Data Source Type [63]DRRAW [8], [11]
EEncrypting your FTP password
Solaris [17]Windows [14]
FFTP password
64-bit encryption of [14], [17]
GGLOBAL STEP [62]GNU General Public License [8]
HHeartbeat [64]

Report GatewayUser Guide
Page 78
Document 5141
Iinject_RRDs_CL [30]Installation requirements [11]
Mmodel file [9]
NNetscape on Solaris [27]NTFS security [21]
PPorts
Logging Data of [13]
RReport Gateway
Schedule RRD Updates [9]Setup [14]
Report Gateway for SPM (SRG_SPM) [38]Requirements
minimum for installing SRG [11]Round-Robin-Database (RRD) [9]RRDTool [8], [12], [29]
SSample Configurations [45], [69]Scheduling RRD Updates [9]Server requirements
Solaris [12]Windows [12]
Service Performance ManagerConfiguring for Report Gateway [39]Report Gateway and [38]
Service Performance Manager User Guide (5093) [38]Solaris
minimum version required [12]SPECTRUM Report Gateway (SRG) [8], [12]

Report GatewayUser Guide
Page 79
Document 5141
SPM [38]SPM_SRG [38]SRG Accessory Pack [13], [19], [23], [26]SRG configuration file (SRG.conf) [9]SRG_SPM
Configuration File (SRG_SPM.conf) [38]SSLogger [8]
Configuration Files [9]Minimum poll interval [13]
SSLogger User Guide (5071) [13]sslogger.dat file [9]System Requirements
minimum [11]
TTIME OVERLAP [65]TO LOCATION [65]Trend_RRD [66]Trending and SRG [74]
UUNIQUE STEP [63]
WWindows
minimum version required [12]
Xx-files-factor (xff) [64]