Reforming, Repairing & Reinforcing Plastic - AIR MOD · 44 Cessna Pilots Association - August 2007...
8
Cessna Pilots Association - August 2007 44 Renovation: Reforming, Repairing & Reinforcing Plastic By Dennis Wolter I n the last article I pretty much laid out all I knew about the good and bad characteristics of that less-than-perfect material Cessna used to fabricate our cabin plastic trim components. Armed with that information, the repair and refinishing techniques used to recondition these interior trim components should make more sense. Dealing with the plastic ren- ovation process involves five basic steps: evaluation, clean- ing, reforming, repairing, and refinishing (filling and painting). Since we covered the evaluation process in last month’s ar- ticle, let’s get started with the cleaning process. The first step in the cleaning process is to remove any oil, grease, or window sealer. We use mineral spirits for this pro- cess. As with most chemistry, give the product you are using time to work. Spray or brush the solvent onto the contaminated area and let it soak for several minutes. Most of you are prob- ably saying, does Dennis think I’m stupid or what?! But I’m speaking from experience here. We use entry level employees to do most of our components cleaning here at Air Mod. If we don’t specifically show them how the soap or the solvent can do the work for you, we end up with parts that are less than thoroughly cleaned. Paint and adhesives won’t bond to dirt. Need I say more? With the grease and sealer re- moved, allow the solvents to gas off and thoroughly spray both sides of the part with Fantastic, 409, or other similar detergent product of your choice. After soaking for several minutes, use a soft short natural bristle scrub brush to aggressively scrub the textured surface of the plastic. We like an old fashioned floor scrub brush with a buzz cut of approximately ¼” bristles. For tight spots, an inexpensive 1” natural bristle paint brush trimmed to about ½” bristle length is the tool of choice. Once thoroughly scrubbed, the part is rinsed with lots of hot water, ensuring that no soap residue is left on the plas- tic. On a related subject, I know there are readers out there who are waiting for me to talk about that sticky mess of film that has developed on some of your molded headliners. Before I tell you how to clean it off, let me tell you what I know about why it formed to begin with (you knew I would!). As mentioned earlier, all plas- tic has a certain amount of chem- istry in it that keeps the material soft and flexible. It turns out that some aggressive one-step clean- ers, if not thoroughly rinsed off, will remain on the surface of the plastic and start a chemical reac- tion that begins to extract the plasticizer in the plastic onto the plastic’s surface. When this gaseous chemistry mixes with oxygen, it dries to the thin sticky film we fight with on those formed plastic headliners. Okay, so much for the background, here’s how to clean the stuff. If the headliner to be cleaned is still in the airplane, we use the aforementioned brushes and ALC6100 isopropyl alcohol available from Aviall. Don’t waste your time with drug store rubbing alcohols – they are diluted with water and literally won’t cut it! Some people have had good luck with strong alcohols available at paint and building supply stores. We use the Aviall stuff. Be very careful not to get this strong al- cohol on any other interior or instrument panel components, as it is a solvent for many of the paints used to finish plastic and metal trim pieces. Always use rubber gloves, eye protection, a charcoal mask and lots of venti- lation. As with all petroleum and distilled solvents, be very care- ful about the fire hazard. Alco- hol is particularly tricky because it burns clear, meaning that the flame is nearly invisible. If the headliner has been re- moved from the aircraft, you can use lacquer thinner and a soft brush to remove the sticky residue. In both cases, use a pan of thinner or solvent and frequently rinse your brush and clean-up rags. Since isopropyl alcohol and lacquer thinner are strong solvents, do not soak the parts as you would if you were using soap or mineral spirits. The plastic surface can be “High-tech” Air Mod cleaning brushes. Typical dimpled deformation caused by misfitting plastic.
Transcript of Reforming, Repairing & Reinforcing Plastic - AIR MOD · 44 Cessna Pilots Association - August 2007...

Cessna Pilots Association - August 2007 44
Renovation:Reforming,Repairing&ReinforcingPlastic By Dennis Wolter
In the last article I pretty much laid out all I knew about the good and bad characteristics
of that less-than-perfect material Cessna used to fabricate our cabin plastic trim components. Armed with that information, the repair and refinishing techniques used to recondition these interior trim components should make more sense.
Dealing with the plastic ren-ovation process involves five basic steps: evaluation, clean-ing, reforming, repairing, and refinishing (filling and painting). Since we covered the evaluation process in last month’s ar-ticle, let’s get started with the cleaning process.
The first step in the cleaning process is to remove any oil, grease, or window sealer. We use mineral spirits for this pro-cess. As with most chemistry, give the product you are using time to work. Spray or brush the solvent onto the contaminated area and let it soak for several minutes. Most of you are prob-ably saying, does Dennis think I’m stupid or what?! But I’m speaking from experience here. We use entry level employees to do most of our components cleaning here at Air Mod. If we don’t specifically show them how the soap or the solvent can do the work for you, we end up with parts that are less than thoroughly cleaned. Paint and adhesives won’t bond to dirt. Need I say more?
With the grease and sealer re-moved, allow the solvents to gas off and thoroughly spray both sides of the part with Fantastic, 409, or other similar detergent product of your choice. After soaking for several minutes, use a soft short natural bristle scrub brush to aggressively scrub the textured surface of the plastic. We like an old fashioned floor scrub brush with a buzz cut of approximately ¼” bristles. For tight spots, an inexpensive 1” natural bristle paint brush trimmed to about ½” bristle length is the tool of choice.
Once thoroughly scrubbed, the part is rinsed with lots of hot water, ensuring that no soap residue is left on the plas-tic. On a related subject, I know there are readers out there
who are waiting for me to talk about that sticky mess of film that has developed on some of your molded headliners. Before I tell you how to clean it off, let me tell you what I know about why it formed to begin with (you knew I would!).
As mentioned earlier, all plas-tic has a certain amount of chem-istry in it that keeps the material soft and flexible. It turns out that some aggressive one-step clean-ers, if not thoroughly rinsed off, will remain on the surface of the plastic and start a chemical reac-
tion that begins to extract the plasticizer in the plastic onto the plastic’s surface. When this gaseous chemistry mixes with oxygen, it dries to the thin sticky film we fight with on those formed plastic headliners.
Okay, so much for the background, here’s how to clean the stuff. If the headliner to be cleaned is still in the airplane, we use the aforementioned brushes and ALC6100 isopropyl alcohol available from Aviall. Don’t waste your time with drug store rubbing alcohols – they are diluted with water and literally won’t cut it! Some people have had good luck with strong alcohols available at paint and building supply stores.
We use the Aviall stuff. Be very careful not to get this strong al-cohol on any other interior or instrument panel components, as it is a solvent for many of the paints used to finish plastic and metal trim pieces. Always use rubber gloves, eye protection, a charcoal mask and lots of venti-lation. As with all petroleum and distilled solvents, be very care-ful about the fire hazard. Alco-hol is particularly tricky because it burns clear, meaning that the flame is nearly invisible.
If the headliner has been re-moved from the aircraft, you can use lacquer thinner and a
soft brush to remove the sticky residue. In both cases, use a pan of thinner or solvent and frequently rinse your brush and clean-up rags. Since isopropyl alcohol and lacquer thinner are strong solvents, do not soak the parts as you would if you were using soap or mineral spirits. The plastic surface can be
“High-tech” Air Mod cleaning brushes.
Typical dimpled deformation caused by misfitting plastic.
www.cessna.org 45
damaged if it is exposed to lacquer thin-ner or isopropyl alcohol for too long. A quick scrub with the brush and thorough rinsing with a solvent-laden cloth will do the job.
Enough about sticky headliners; let’s get back to the main subject at hand.
Once the part you’re repairing is cleaned, it’s time to re-form the compo-nent back to its designed shape. Heat can be your best friend or worst enemy in this part of the job. Success in reheating and re-forming these parts is all about control, control of both the heat and the flimsy plastic once it has become soft and moldable.
Here at Air Mod we have developed several techniques to pull this off. Heat-ing this material to the point of malle-ability falls into two categories. The first is localized heat application, as is needed to reform a hole that has become
dimpled. The chal-lenge here is to only heat the area imme-diately around the hole without distort-ing the general shape of the rest of the part. The second type of heating problem is heating a larger sec-tion of a part that is deformed over a substantial area, if not all, of the com-ponent.
Two additional tools necessary for
success in this process are a means to control the shape of the material until it cools, and a way to quickly cool the ma-terial such as a wet towel or a Windex spray bottle filled with water.
I’ll first discuss how to reform the often-dimpled plastic mounting holes. As usual, I want to discuss what caused the problem. When new, the plastic often did not lay flush against its mat-ing mounting surface. This caused the plastic to deform around the tight screw at the mounting hole. To avoid this, an appropriately sized plastic shim should have been bonded to the back side of the plastic at the mounting hole. Two good things would have happened had this been done. First, no deformation would occur, as the screw would not have to close a gap between the plastic and its mounting point. Second, the bonded plastic shim would serve as a reinforc-
ing doubler and viola!, no cracks at the screw holes.
Moving on to the fix, one of the clever guys in our shop, Travis, came up with a the idea of using a flat blade soldering iron (available at hobby and craft stores) to apply very localized heat at the hole. The flat blade is perfect for pushing the dimple back to its designed flat shape as the plastic becomes ductile. We use various sizes of flat bucking bars as both a backing surface and a press to hold the ma-terial in its designed shape
800-433-0814Toll Free, U.S. & Canada
Tel. 330-698-0280, FAX 330-698-3164
Email: [email protected]
www.preferredairparts.com
We Buy Worldwide!
11234 Hackett Road, P.O. Box 12Kidron, OH 44636 USA
We have in stock
75,000 P/N of New (nos)parts for every civilian Cessnabuilt since 1946 includingsingles, twins, and Citations!
We’ve also
parted out 300 Twinsof all models, 303 thru 441. We have wings and fuselages down to the smallest part! We also stock;
� Rotables, many new and OHC� Control surfaces, rebuilt
referred
ir arp ts
....and parts for nearly anything that flies from light singles to jets including warbird, experimental, ag and helicopter!
Propellers & BladesMcCauley, Hartzell, Hamilton Standard
www.preferredairparts.com/props.htm
InstrumentsMany, including 100’s of the small Rochester and SW gauges
And we have “tons” of new:� Hardware� Consumables
�Wheels, Brakes & Parts� Lighting, Electrical
Engine Parts - 10,000 P/N of
Continental and Lycoming, most at 50% discount, plus a growing stock for turbine and jet engines.
Accessories - 100’s of new
and OHC accessories and parts for almost anything at 40-65% discount!
Check with us for...
Try us...you will soon prefer us too!
Preferred Airparts, LLC
Acrylic shim/doubler bonded to a re-formed and repaired hole.
Flat blade soldering iron used to apply concentrated heat at a deformed mounting hole.
Cessna Pilots Association - August 2007 46
as it cures. The pictures show it all. We use poly-fix to bond these shims in place. Plumbers PVC ce-ment and homemade ac-etone and ground plastic powder adhesive (more on that later) also work well. One final advantage of this bonded shim pro-cess is that many of these holes will be cracked. The bonded shim acts as a reinforcement to repair the crack as well as elimi-nating the old one getting bigger or allowing a new one to start. I love it.
So much for holes; it’s on to warped, often compound-shaped trim pieces. These babies can be very tedious. The challenge here is to control the shape of the plastic once it is heated. To com-pound the problem, as this plastic ages and loses some of its chemistry it will shrink if heated beyond an unknown temperature. I know that sounds vague and scary but it’s true. The trick here is to use as little heat as necessary to get
this stuff to do what you need it to do. At Air Mod, we very carefully use 750º heat guns. I would recommend that a beginner use a tube type hair dryer or a heat lamp and practice on a piece of unusable plastic. If ever practice were to make something perfect, this is it.
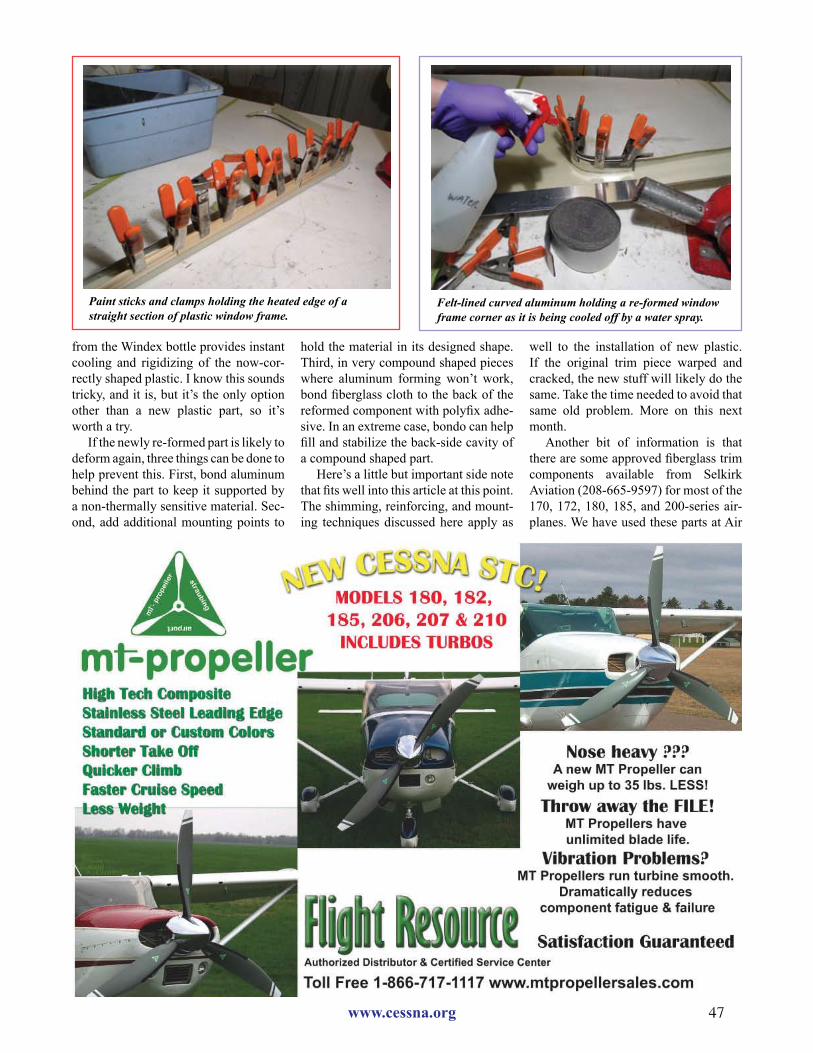
We are most careful when heating an area close to an edge. We will form a piece of wood or aluminum to the de-sired shape of the part and hold the part against this shape as we carefully apply the heat. Once the part is ductile enough to be pushed into shape we will use a cold rag or a hard form to press the part into shape and hold it while it cools. Of-ten we will use paint sticks and spring clamps to do the job. Sometimes we will use bendable pieces of sheet alumi-num to create the inner and outer curved shapes required to form the part.
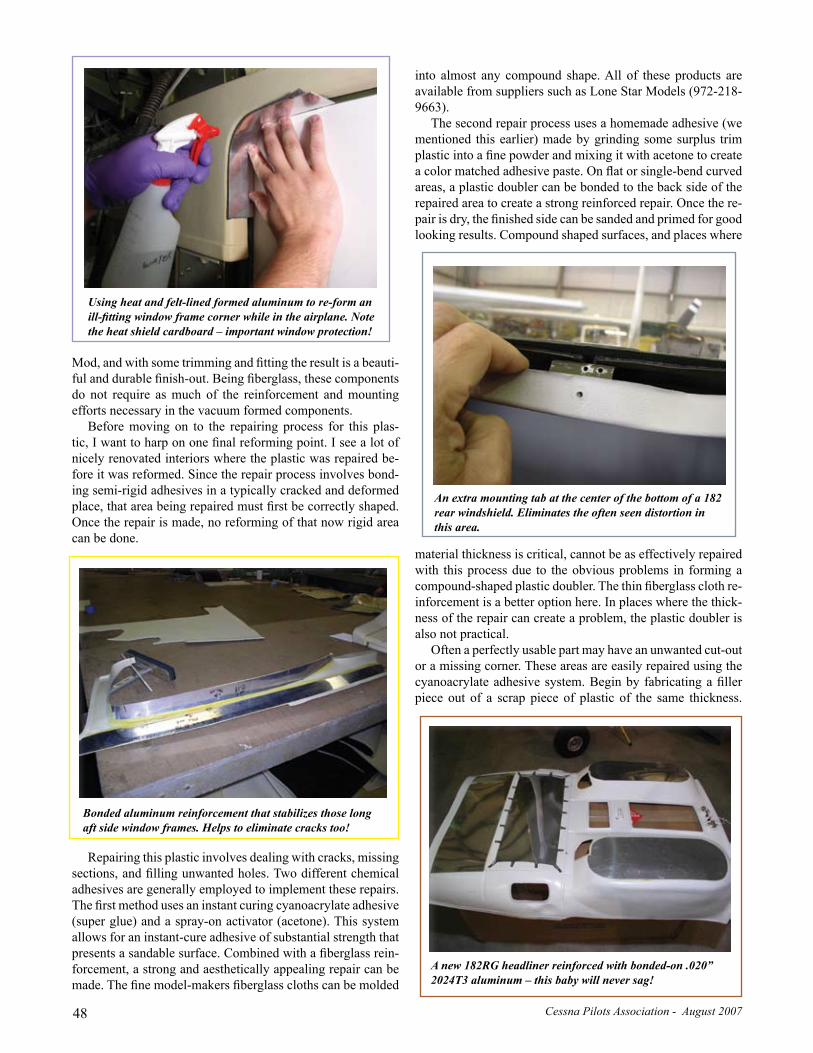
Here’s the tricky process used to re-form complex parts such as com-pound shaped window frame sections. We install the part in the airplane, then put a thick piece of edge-formed card-board against the glass. This cardboard becomes an insulating heat shield that will protect the acrylic window from the heat required to re-form the plastic trim. Heating one side of acrylic windows can cause crazing and cracks. Trust me, my tuition for this lesson was a new 210 windshield – ouch!
With this setup in place, we begin to heat the plastic. As soon as the plas-tic is soft, we will use a .025” piece of aluminum with soft felt bonded to the forming side to carefully push the plas-tic into its desired shape. Spraying water
AsktheTechat
Walter Atkinson • George Braly • John Deakin
(225) 925-2096 <www.advancedpilot.com>
Piston Engine Managementfor the Serious Pilot
Don’t be left behind!
Advanced Pilot Seminars
This course will pay for itselfin reduced maintenance costs— every year.
FAA
WINGS Credit
IA Annual Renewal
Now available ONLINE
as an internet course.
Attention:
Cessna Owners
Organizer Consoles& accessories
Rudder Pedal Extensions
Flight Boss Ltd.
www.Saircorp.com330-669-9099
(BJJ) Wayne Co Airport6020 N Honeytown Rd - Smithville OH
STC/PMA
Consoles also available for Piper PA32/34
Cupholders, Device Mounting Plates, Oxy & Fire Ext. Mounts & more!
Stop by, Call or Visit our Site
Today!
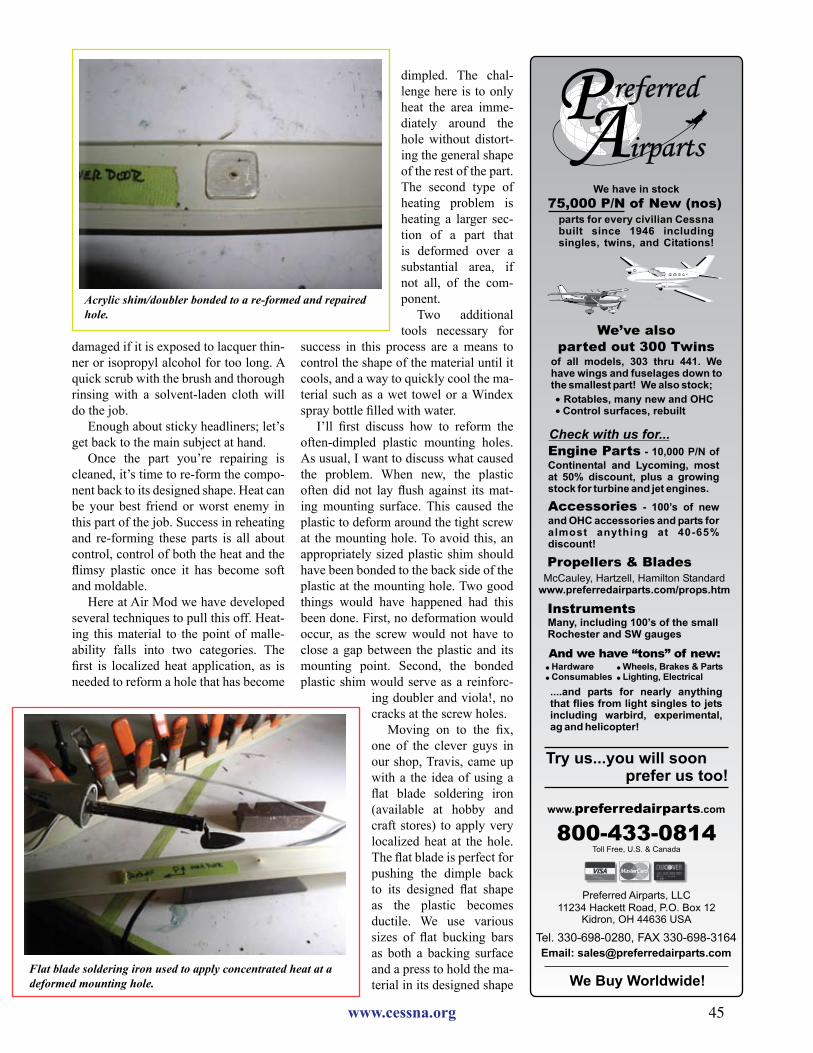
Two bucking bars being used to press and cool a heated deformed hole.
www.cessna.org 47
from the Windex bottle provides instant cooling and rigidizing of the now-cor-rectly shaped plastic. I know this sounds tricky, and it is, but it’s the only option other than a new plastic part, so it’s worth a try.
If the newly re-formed part is likely to deform again, three things can be done to help prevent this. First, bond aluminum behind the part to keep it supported by a non-thermally sensitive material. Sec-ond, add additional mounting points to
hold the material in its designed shape. Third, in very compound shaped pieces where aluminum forming won’t work, bond fiberglass cloth to the back of the reformed component with polyfix adhe-sive. In an extreme case, bondo can help fill and stabilize the back-side cavity of a compound shaped part.
Here’s a little but important side note that fits well into this article at this point. The shimming, reinforcing, and mount-ing techniques discussed here apply as
well to the installation of new plastic. If the original trim piece warped and cracked, the new stuff will likely do the same. Take the time needed to avoid that same old problem. More on this next month.
Another bit of information is that there are some approved fiberglass trim components available from Selkirk Aviation (208-665-9597) for most of the 170, 172, 180, 185, and 200-series air-planes. We have used these parts at Air
Paint sticks and clamps holding the heated edge of a straight section of plastic window frame.
Felt-lined curved aluminum holding a re-formed window frame corner as it is being cooled off by a water spray.
Cessna Pilots Association - August 2007 48
Mod, and with some trimming and fitting the result is a beauti-ful and durable finish-out. Being fiberglass, these components do not require as much of the reinforcement and mounting efforts necessary in the vacuum formed components.
Before moving on to the repairing process for this plas-tic, I want to harp on one final reforming point. I see a lot of nicely renovated interiors where the plastic was repaired be-fore it was reformed. Since the repair process involves bond-ing semi-rigid adhesives in a typically cracked and deformed place, that area being repaired must first be correctly shaped. Once the repair is made, no reforming of that now rigid area can be done.
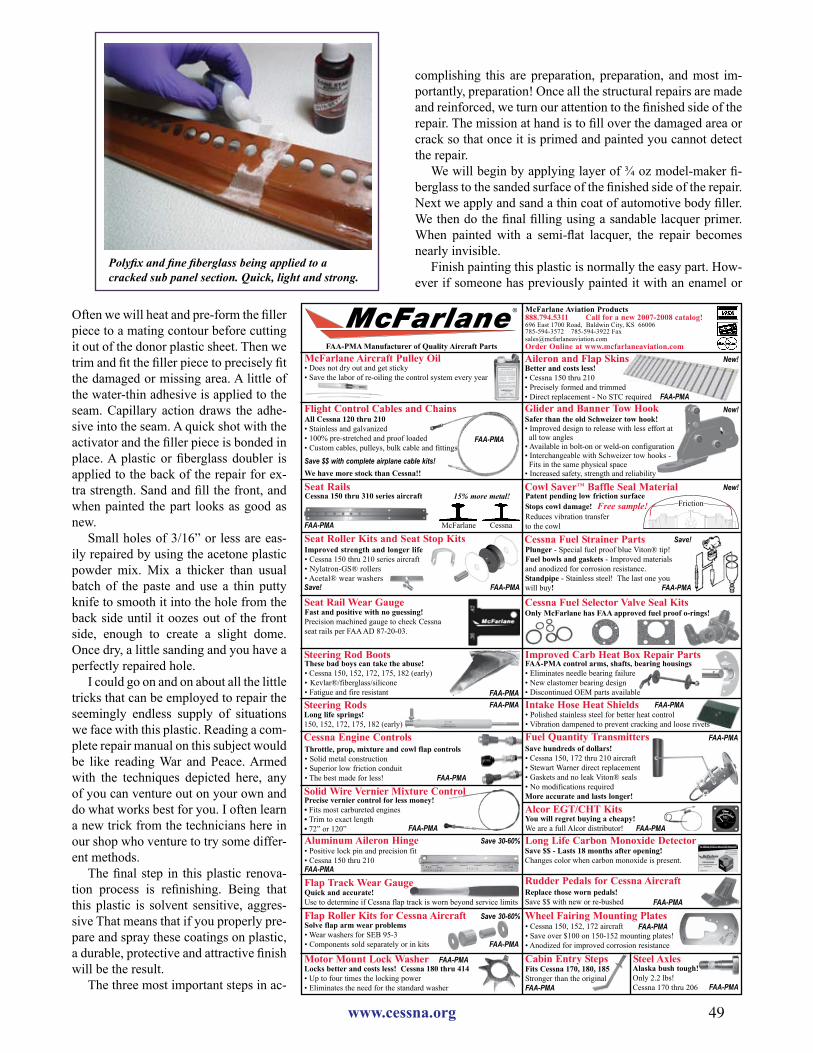
Repairing this plastic involves dealing with cracks, missing sections, and filling unwanted holes. Two different chemical adhesives are generally employed to implement these repairs. The first method uses an instant curing cyanoacrylate adhesive (super glue) and a spray-on activator (acetone). This system allows for an instant-cure adhesive of substantial strength that presents a sandable surface. Combined with a fiberglass rein-forcement, a strong and aesthetically appealing repair can be made. The fine model-makers fiberglass cloths can be molded
into almost any compound shape. All of these products are available from suppliers such as Lone Star Models (972-218-9663).
The second repair process uses a homemade adhesive (we mentioned this earlier) made by grinding some surplus trim plastic into a fine powder and mixing it with acetone to create a color matched adhesive paste. On flat or single-bend curved areas, a plastic doubler can be bonded to the back side of the repaired area to create a strong reinforced repair. Once the re-pair is dry, the finished side can be sanded and primed for good looking results. Compound shaped surfaces, and places where
material thickness is critical, cannot be as effectively repaired with this process due to the obvious problems in forming a compound-shaped plastic doubler. The thin fiberglass cloth re-inforcement is a better option here. In places where the thick-ness of the repair can create a problem, the plastic doubler is also not practical.
Often a perfectly usable part may have an unwanted cut-out or a missing corner. These areas are easily repaired using the cyanoacrylate adhesive system. Begin by fabricating a filler piece out of a scrap piece of plastic of the same thickness.
Using heat and felt-lined formed aluminum to re-form an ill-fitting window frame corner while in the airplane. Note the heat shield cardboard – important window protection!
Bonded aluminum reinforcement that stabilizes those long aft side window frames. Helps to eliminate cracks too!
An extra mounting tab at the center of the bottom of a 182 rear windshield. Eliminates the often seen distortion in this area.
A new 182RG headliner reinforced with bonded-on .020” 2024T3 aluminum – this baby will never sag!
www.cessna.org 49
Often we will heat and pre-form the filler piece to a mating contour before cutting it out of the donor plastic sheet. Then we trim and fit the filler piece to precisely fit the damaged or missing area. A little of the water-thin adhesive is applied to the seam. Capillary action draws the adhe-sive into the seam. A quick shot with the activator and the filler piece is bonded in place. A plastic or fiberglass doubler is applied to the back of the repair for ex-tra strength. Sand and fill the front, and when painted the part looks as good as new.
Small holes of 3/16” or less are eas-ily repaired by using the acetone plastic powder mix. Mix a thicker than usual batch of the paste and use a thin putty knife to smooth it into the hole from the back side until it oozes out of the front side, enough to create a slight dome. Once dry, a little sanding and you have a perfectly repaired hole.
I could go on and on about all the little tricks that can be employed to repair the seemingly endless supply of situations we face with this plastic. Reading a com-plete repair manual on this subject would be like reading War and Peace. Armed with the techniques depicted here, any of you can venture out on your own and do what works best for you. I often learn a new trick from the technicians here in our shop who venture to try some differ-ent methods.
The final step in this plastic renova-tion process is refinishing. Being that this plastic is solvent sensitive, aggres-sive That means that if you properly pre-pare and spray these coatings on plastic, a durable, protective and attractive finish will be the result.
The three most important steps in ac-
complishing this are preparation, preparation, and most im-portantly, preparation! Once all the structural repairs are made and reinforced, we turn our attention to the finished side of the repair. The mission at hand is to fill over the damaged area or crack so that once it is primed and painted you cannot detect the repair.
We will begin by applying layer of ¾ oz model-maker fi-berglass to the sanded surface of the finished side of the repair. Next we apply and sand a thin coat of automotive body filler. We then do the final filling using a sandable lacquer primer. When painted with a semi-flat lacquer, the repair becomes nearly invisible.
Finish painting this plastic is normally the easy part. How-ever if someone has previously painted it with an enamel or
®
• Cessna 150 thru 210• Precisely formed and trimmed• Direct replacement - No STC required FAA-PMA
Aileron and Flap SkinsBetter and costs less!
Seat RailsCessna 150 thru 310 series aircraft
FAA-PMA
15% more metal!
CessnaMcFarlane
New!
Cabin Entry StepsAlaska bush tough!Only 2.2 lbs!Cessna 170 thru 206
Steel AxlesFits Cessna 170, 180, 185Stronger than the originalFAA-PMA
Motor Mount Lock WasherLocks better and costs less! Cessna 180 thru 414• Up to four times the locking power• Eliminates the need for the standard washer
FAA-PMA
FAA-PMA
Replace those worn pedals!Save $$ with new or re-bushed FAA-PMA
Rudder Pedals for Cessna Aircraft
Wheel Fairing Mounting Plates• Cessna 150, 152, 172 aircraft• Save over $100 on 150-152 mounting plates!• Anodized for improved corrosion resistance
FAA-PMASolve flap arm wear problems• Wear washers for SEB 95-3• Components sold separately or in kits
Flap Roller Kits for Cessna Aircraft
FAA-PMA
Save 30-60%
Flap Track Wear GaugeQuick and accurate!Use to determine if Cessna flap track is worn beyond service limits
Long Life Carbon Monoxide DetectorSave $$ - Lasts 18 months after opening!Changes color when carbon monoxide is present.
Aluminum Aileron Hinge• Positive lock pin and precision fit• Cessna 150 thru 210FAA-PMA
Save 30-60%
Solid Wire Vernier Mixture ControlPrecise vernier control for less money!• Fits most carbureted engines• Trim to exact length• 72” or 120” FAA-PMA
Fuel Quantity TransmittersSave hundreds of dollars!• Cessna 150, 172 thru 210 aircraft• Stewart Warner direct replacement• Gaskets and no leak Viton® seals• No modifications requiredMore accurate and lasts longer!
Alcor EGT/CHT KitsYou will regret buying a cheapy!We are a full Alcor distributor! FAA-PMA
Cessna Engine ControlsThrottle, prop, mixture and cowl flap controls• Solid metal construction• Superior low friction conduit• The best made for less! FAA-PMA
FAA-PMA
Intake Hose Heat Shields• Polished stainless steel for better heat control• Vibration dampened to prevent cracking and loose rivets
FAA-PMA
Steering Rod BootsThese bad boys can take the abuse!• Cessna 150, 152, 172, 175, 182 (early)• Kevlar®/fiberglass/silicone• Fatigue and fire resistant FAA-PMASteering RodsLong life springs!150, 152, 172, 175, 182 (early)
FAA-PMA
Cessna Fuel Strainer PartsPlunger - Special fuel proof blue Viton® tip!Fuel bowls and gaskets - Improved materialsand anodized for corrosion resistance.Standpipe - Stainless steel! The last one youwill buy!
Only McFarlane has FAA approved fuel proof o-rings!Cessna Fuel Selector Valve Seal Kits
Save!
FAA-PMA control arms, shafts, bearing housings• Eliminates needle bearing failure• New elastomer bearing design• Discontinued OEM parts available
Improved Carb Heat Box Repair Parts
Seat Rail Wear GaugeFast and positive with no guessing!Precision machined gauge to check Cessnaseat rails per FAA AD 87-20-03.
Seat Roller Kits and Seat Stop KitsImproved strength and longer life• Cessna 150 thru 210 series aircraft• Nylatron-GS® rollers• Acetal® wear washers
FAA-PMASave! FAA-PMA
• Stainless and galvanized• 100% pre-stretched and proof loaded• Custom cables, pulleys, bulk cable and fittings
Flight Control Cables and ChainsAll Cessna 120 thru 210
Save $$ with complete airplane cable kits!We have more stock than Cessna!!
FAA-PMA
McFarlane Aircraft Pulley Oil• Does not dry out and get sticky• Save the labor of re-oiling the control system every year
Glider and Banner Tow Hook New!Safer than the old Schweizer tow hook!• Improved design to release with less effort at all tow angles• Available in bolt-on or weld-on configuration• Interchangeable with Schweizer tow hooks - Fits in the same physical space• Increased safety, strength and reliability
McFarlane Aviation Products888.794.5311 Call for a new 2007-2008 catalog!696 East 1700 Road, Baldwin City, KS 66006785-594-3572 785-594-3922 [email protected] Online at www.mcfarlaneaviation.comFAA-PMA Manufacturer of Quality Aircraft Parts
Friction
Cowl Saver™ Baffle Seal Material New!Patent pending low friction surfaceStops cowl damage! Free sample!Reduces vibration transferto the cowl
Polyfix and fine fiberglass being applied to a cracked sub panel section. Quick, light and strong.
Cessna Pilots Association - August 2007 50
urethane finish some extra prep steps must be taken. If existing coatings are well bonded to the plastic, you must deal with it accordingly. When the existing paint is enamel, a water based barrier primer must be applied before the SEM or lacquer is sprayed on. This is because the solvents in lacquer and SEM will cause the enamel to lift off of the plastic surface. The technique is pretty straight-forward. First, wipe all the plastic down with prepsall to remove any contami-nants. Next sand with a scotchbrite pad, then wipe it down with prepsall one last time. Now you can apply the water base barrier primer, which can then be sanded and top coated with the SEM or lacquer finish coat.
If the existing finish is an acatalyzed urethane, the problem is getting the SEM or lacquer to stick to the impervious surface of the urethane paint. We scrub the urethane surface with a scotchbrite pad and 409 or Fantastik. This one-step process will both sand and clean the sur-face. After a thorough rinsing with warm water, the sanded surface will allow as good a bond as is possible with the new finish. It’s important to mention that all
of the old paint must be sanded off in an area that needs to be repaired. Adhesives and fillers will not thoroughly bond to old paint.
I would like to give the first time do-it-yourself repairers a piece of often stated advice: practice, practice, practice. Try these techniques on a junk piece of plastic first. You’ll be surprised how much better you are the third time you do something that is new to you. Even a professional ball player gets at least three tries at the plate.
Painting aircraft plastic is quite straight-forward. Once reformed, repaired and re-inforced, we re-finish this plastic with an automotive acrylic lacquer. I recommend that a little flattening base be added to the paint to dull the finish slightly to what paint folks refer to as semi-gloss. This slight dullness will help to hide the repairs and give the finish an elegant appearance. Thin the paint with a slow thinner (such as Dietzler DTL105 acrylic lacquer thinner) that does not flash off quickly. The thinner will remain on the surface longer allow-ing the paint to dissolve into the plastic, which creates a much better bond.
As we begin painting the many plastic
www.cessna.org 51
pieces, we keep a pan with some fresh thinner and a rag near the booth. Just prior to spraying the first light coat of paint, we wipe the part with the thinner-soaked rag, avoiding any filled and primed areas. This softens the plastic surface enough to improve the adhesion of the finish. We use the same technique when using the spray can SEM products. A two-coat system is used to spray these coatings, the first being a light tack coat, followed by a full flow cover coat.
Well, you now know just about everything we know about renovating Cessna plastic. I wish some of these new glass ra-dios were as easy to figure out. Until next month, fly safe.
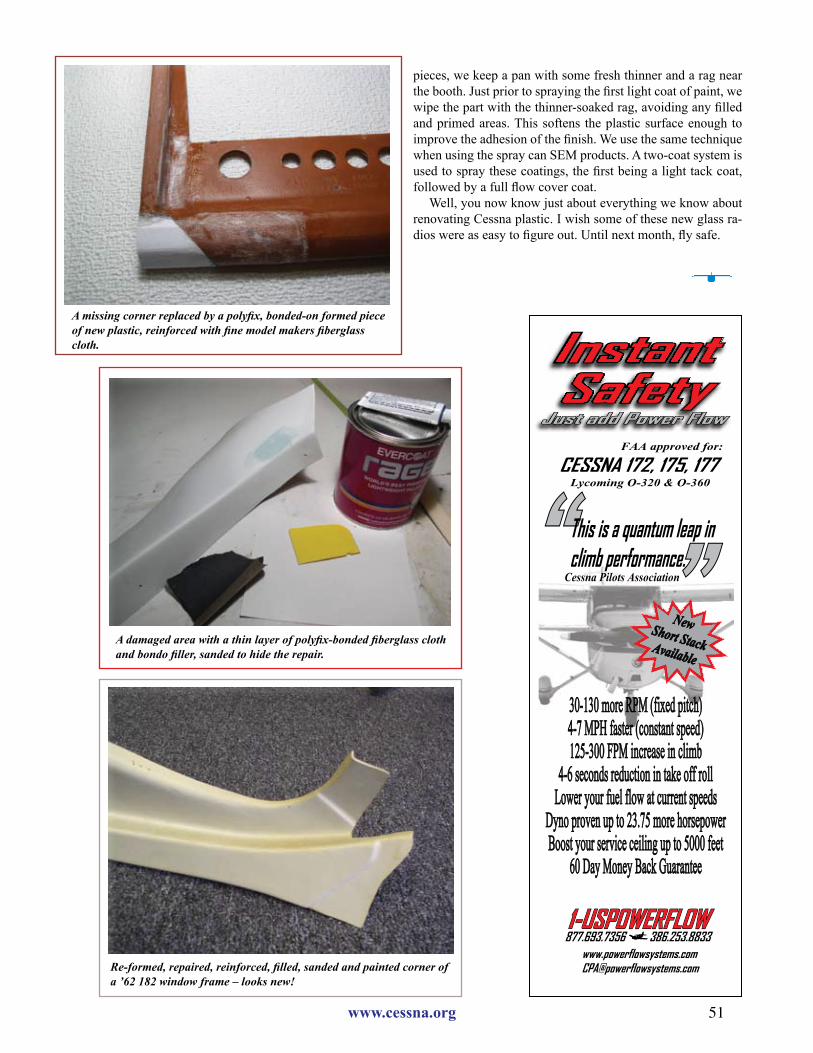
A missing corner replaced by a polyfix, bonded-on formed piece of new plastic, reinforced with fine model makers fiberglass cloth.
A damaged area with a thin layer of polyfix-bonded fiberglass cloth and bondo filler, sanded to hide the repair.
Re-formed, repaired, reinforced, filled, sanded and painted corner of a ’62 182 window frame – looks new!
plug fires is on the order of four times as
much as sea-level atmospheric pressure,thanks to compression by the turbo-charger and the piston. To fire the plugin this higher-pressure environment canrequire 7,000 to 8,000 volts. That’s whyour magnetos are designed to produce upto 20,000 volts at maximum RPM.
High-altitude misfire
voltage pulse, we want that pulse to jumpthe air gap between the electrodes of thespark plug. What we don’t want to hap-pen is for the spark to occur anywhereelse in the system—such as inside themagneto. Such an undesirable spark iscalled an “arc-over” and results in whatwe call “misfire.” (See Figure 1.) To en-sure that the spark occurs where we wantit to occur, we must make sure that thespark plug’s gap represents“the path of least resistance”for the high-voltage pulse gen-erated by the magneto.
climb to higher altitudes in aturbocharged aircraft, the airpressure in the combustionchamber remains relativelyconstant (thanks to the turbo-charger), but the air pressure inthe magneto decreases.Paschen’s Law tells us that asthe air pressure in the magnetodecreases, it becomes easierand easier for the high-voltagepulse to arc-over inside themagneto rather than across thespark plug gap. If we climb high
Cessna Pilots Association
Lycoming O-320 & O-360
FAA approved for: