
Quick Start User Manual -...
22
Quick Start User Manual
Transcript of Quick Start User Manual -...

Quick Start User Manual
2
Table of Contents Quick Search....................................................................................................................... 3
Wild Card ........................................................................................................................ 4 Sorting ............................................................................................................................. 4
Product Summary Screens .................................................................................................. 4 Summary View................................................................................................................ 4 Tile View......................................................................................................................... 5 View Marked................................................................................................................... 6 Product Detail.................................................................................................................. 7
Supplier Info ....................................................................................................................... 8 Supplier Ratings .............................................................................................................. 8
Centerstage.......................................................................................................................... 9 Virtual Samples................................................................................................................. 11 Supplier Search ................................................................................................................. 18
Supplier Summary......................................................................................................... 18 Supplier List .................................................................................................................. 19 Supplier Detail............................................................................................................... 20
ACE® (All supplier Catalogs Electronically) .................................................................. 21 Decorator Search............................................................................................................... 22
3
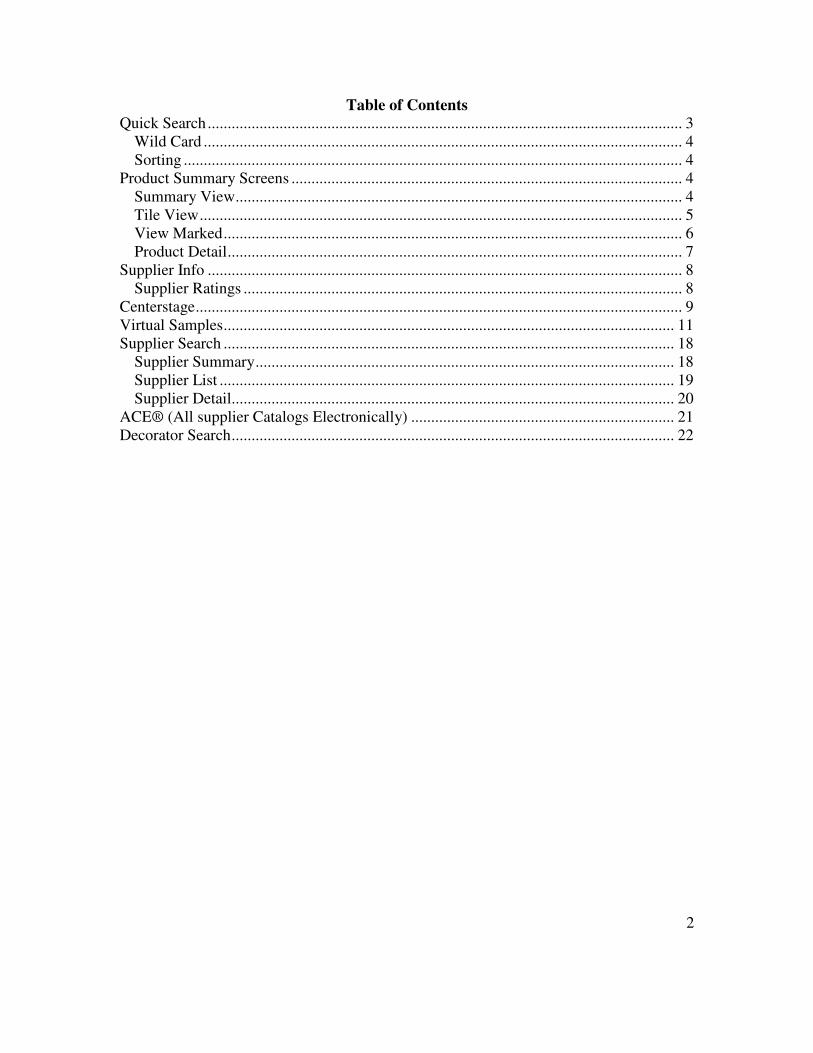
Quick Search Log into ESP Online using your ASI number, User Name and Password. This will bring you directly into Quick Search. If you’ve ever used an internet search engine, this will look very familiar. Using any combination of keywords, numbers, wildcards (*) which will bring up all words with the word in front on the asterisk as the root, and logic (and/or/not), you can search the database. The Quick Search searches on many fields in ESP Online, including Supplier Name, Line Name, and Product Number. If your search results in more than 10,000 matching products, the first 10,000 will be displayed. To narrow down your results, specify the price range. Once you have filled in your information, simply click on the Search button. You can return to Quick Search at any time by clicking on Product Search at the top of the navigation menu on the left. ESP Online is highly customizable. You can change your default screens by clicking on Edit>Preferences (see Beyond Basic Training Guide.) Also featured on the Quick Search screen is the latest industry news, as well as your recent searches in ESP Online and Centerstage presentations saved to Client Projects. Finally, there are links to the discounted services available to ASI members. By clicking on any of these links, you can access the latest news or ASI member benefits, re-execute a search, or open a recently created Centerstage presentation.
4
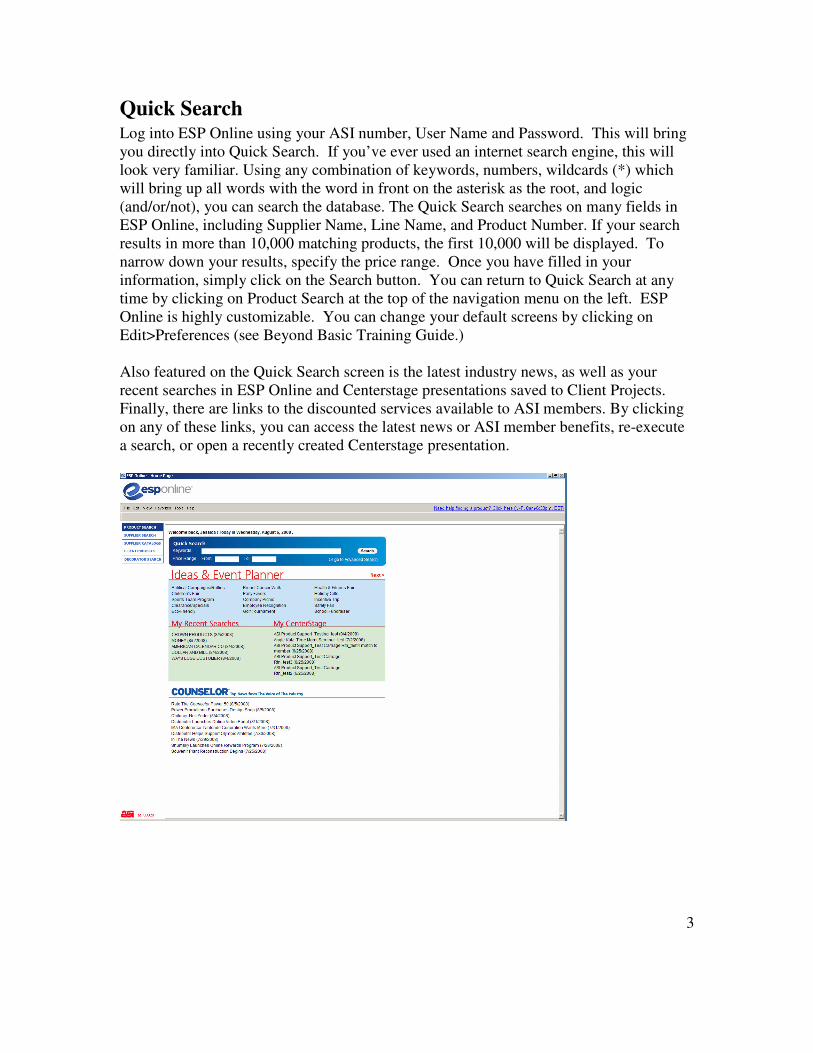
Wild Card Using a WILDCARD (*) in the Word Search fields will return all variations of the root of a word. Type in “ZIP*” instead of “ZIPPER”. This will return all products with any variation of the word “zip” (zip, zips, zipper, zip-up, zip-front, etc.) Once you have entered all of the desired parameters, click on Search or hit Enter.
Sorting You can organize or sort your search results in a variety of ways using the Sort By drop-down menu. This can be found on the right of the tool bar or in the View menu. Sorting is available in Summary View or Tile View by the following criteria:
• Default • ASI # • List Price (low to high) • List Price (high to low) • Net Cost (low to high) • Net Cost (high to low) • Profitability • Category • Supplier Rating • Special • Product #
Product Summary Screens
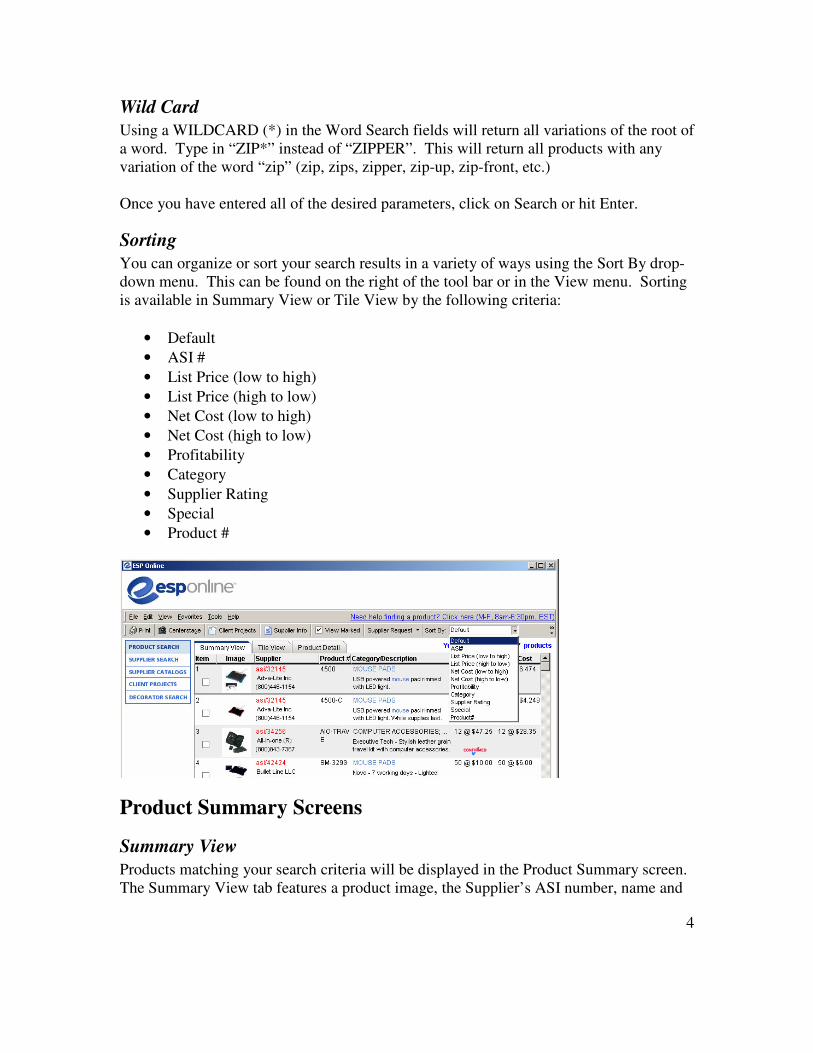
Summary View Products matching your search criteria will be displayed in the Product Summary screen. The Summary View tab features a product image, the Supplier’s ASI number, name and
5
phone number, a description, list price and net cost. NOTE: You may include the Supplier’s Rating instead of their phone number or hide the Net Cost in Summary View by clicking on Edit>Preferences>View. To view additional items in your list use the scroll bar on the right. To select more than one item in this view, click on the box next to the item number in the first field and a checkmark will be displayed. Click the box again to deselect. Double click on a Product to view that Product Detail or click once and then click on the Product Detail tab. Some items will display a Confirmed logo. This means that the supplier has confirmed with us that their product data is correct. ESP Online displays items in either US or Canadian currency. US currency displays a $ while Canadian currency displays a C$.
Use the tool bar at the top of the screen to view items you have marked. Use the buttons at the bottom navigate from Supplier to Supplier. Click on Edit Search to return to your original search criteria. A pop-up window will alert you that you will lose any checked items. You will then have the option of continuing or canceling the edit search request.
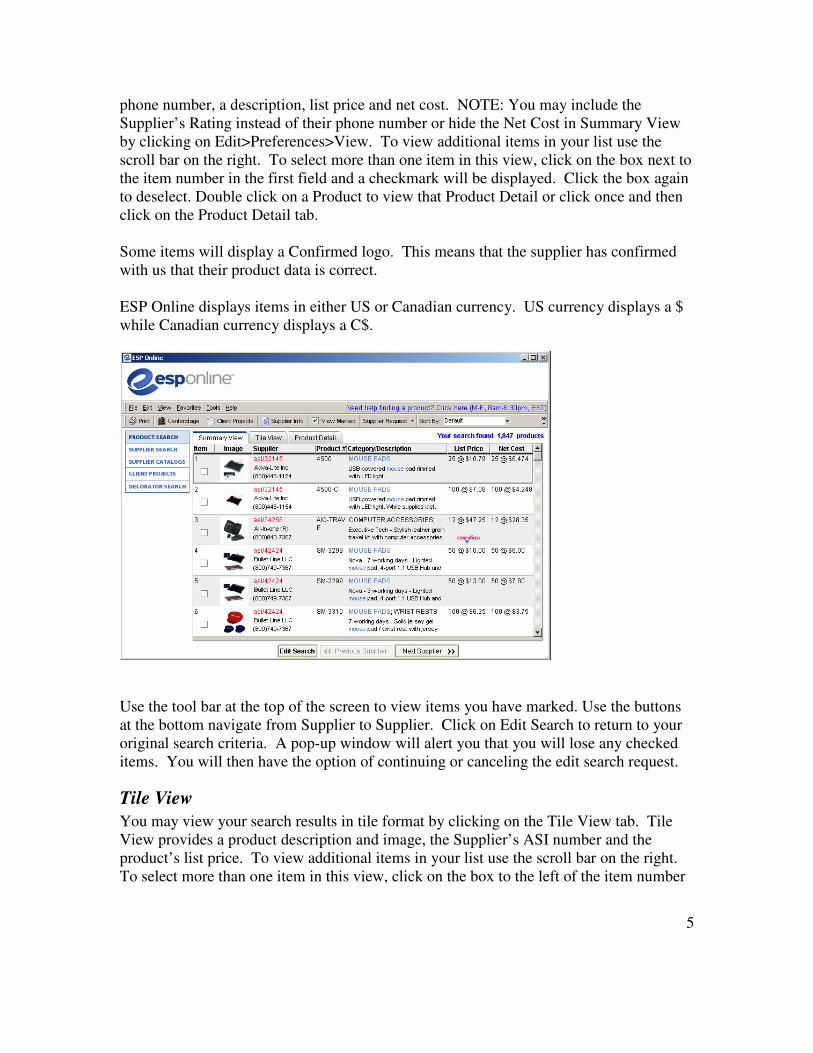
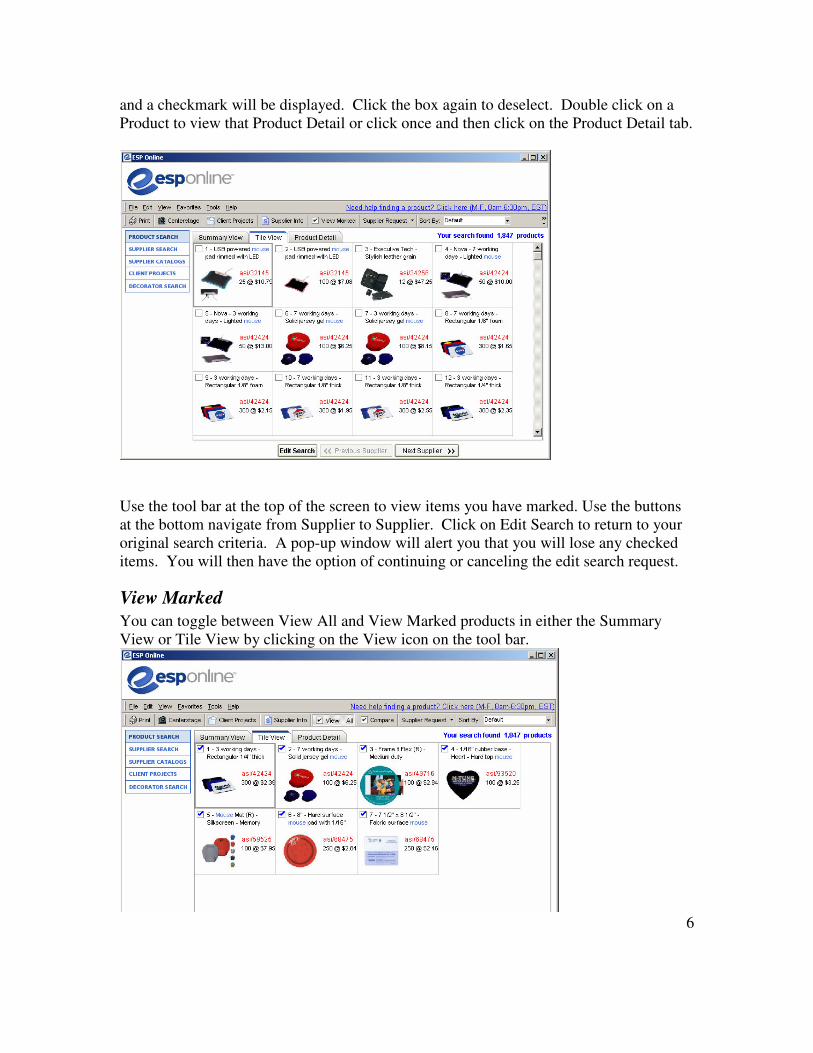
Tile View You may view your search results in tile format by clicking on the Tile View tab. Tile View provides a product description and image, the Supplier’s ASI number and the product’s list price. To view additional items in your list use the scroll bar on the right. To select more than one item in this view, click on the box to the left of the item number
6
and a checkmark will be displayed. Click the box again to deselect. Double click on a Product to view that Product Detail or click once and then click on the Product Detail tab.
Use the tool bar at the top of the screen to view items you have marked. Use the buttons at the bottom navigate from Supplier to Supplier. Click on Edit Search to return to your original search criteria. A pop-up window will alert you that you will lose any checked items. You will then have the option of continuing or canceling the edit search request.
View Marked You can toggle between View All and View Marked products in either the Summary View or Tile View by clicking on the View icon on the tool bar.
7
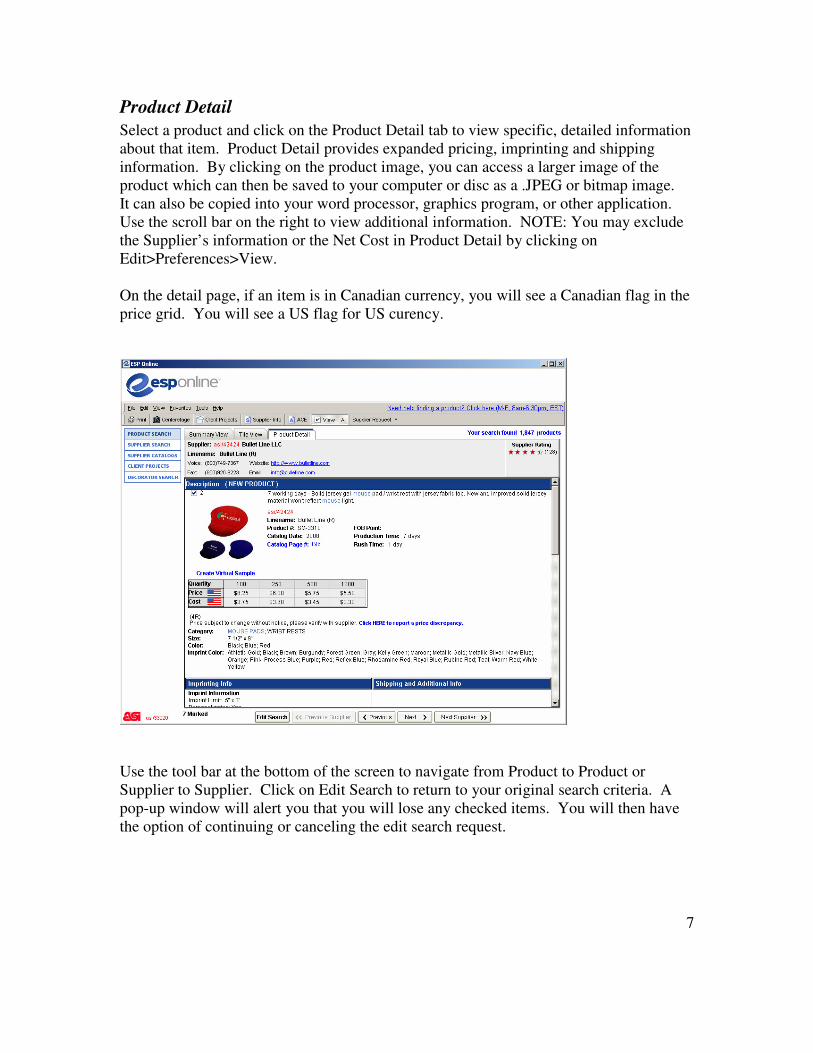
Product Detail Select a product and click on the Product Detail tab to view specific, detailed information about that item. Product Detail provides expanded pricing, imprinting and shipping information. By clicking on the product image, you can access a larger image of the product which can then be saved to your computer or disc as a .JPEG or bitmap image. It can also be copied into your word processor, graphics program, or other application. Use the scroll bar on the right to view additional information. NOTE: You may exclude the Supplier’s information or the Net Cost in Product Detail by clicking on Edit>Preferences>View. On the detail page, if an item is in Canadian currency, you will see a Canadian flag in the price grid. You will see a US flag for US curency.
Use the tool bar at the bottom of the screen to navigate from Product to Product or Supplier to Supplier. Click on Edit Search to return to your original search criteria. A pop-up window will alert you that you will lose any checked items. You will then have the option of continuing or canceling the edit search request.
8
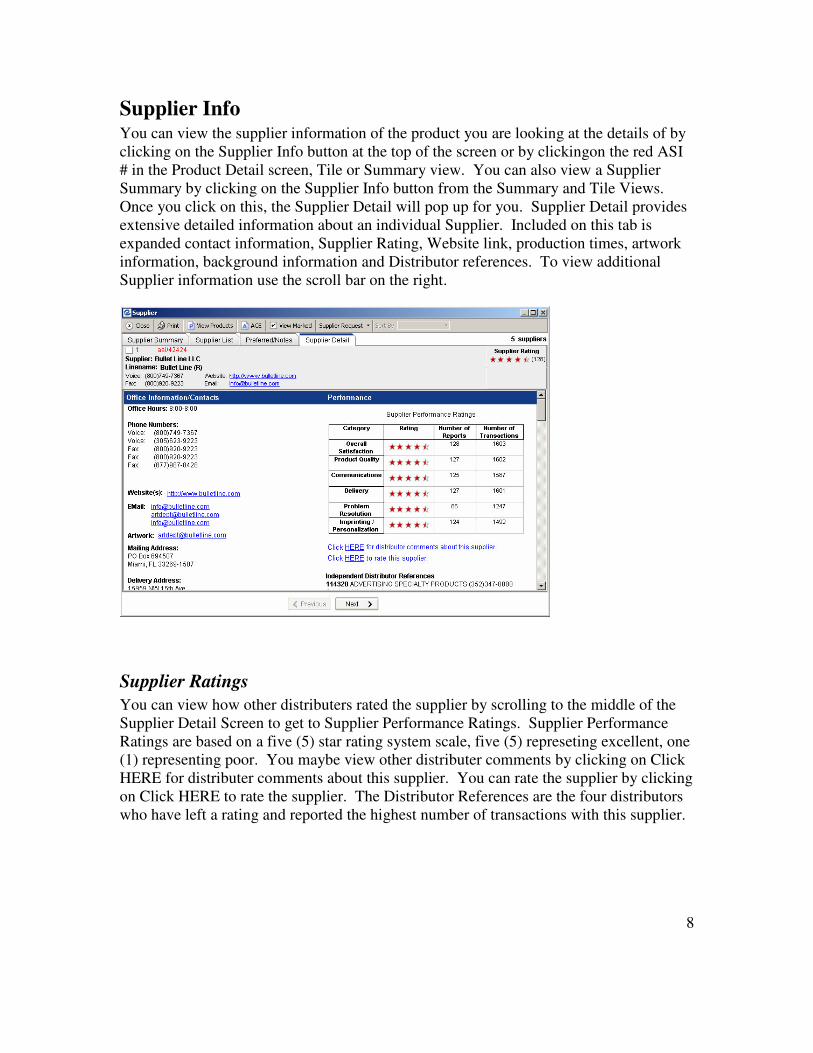
Supplier Info You can view the supplier information of the product you are looking at the details of by clicking on the Supplier Info button at the top of the screen or by clickingon the red ASI # in the Product Detail screen, Tile or Summary view. You can also view a Supplier Summary by clicking on the Supplier Info button from the Summary and Tile Views. Once you click on this, the Supplier Detail will pop up for you. Supplier Detail provides extensive detailed information about an individual Supplier. Included on this tab is expanded contact information, Supplier Rating, Website link, production times, artwork information, background information and Distributor references. To view additional Supplier information use the scroll bar on the right.
Supplier Ratings You can view how other distributers rated the supplier by scrolling to the middle of the Supplier Detail Screen to get to Supplier Performance Ratings. Supplier Performance Ratings are based on a five (5) star rating system scale, five (5) represeting excellent, one (1) representing poor. You maybe view other distributer comments by clicking on Click HERE for distributer comments about this supplier. You can rate the supplier by clicking on Click HERE to rate the supplier. The Distributor References are the four distributors who have left a rating and reported the highest number of transactions with this supplier.
9
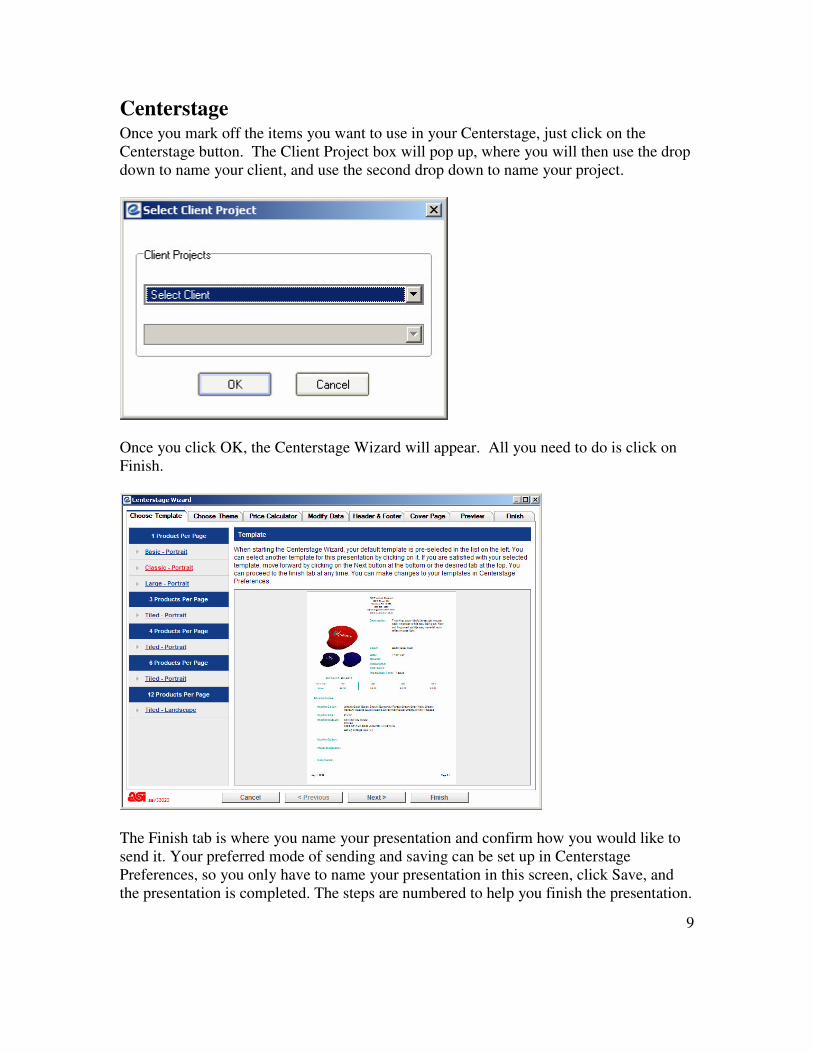
Centerstage Once you mark off the items you want to use in your Centerstage, just click on the Centerstage button. The Client Project box will pop up, where you will then use the drop down to name your client, and use the second drop down to name your project.
Once you click OK, the Centerstage Wizard will appear. All you need to do is click on Finish.
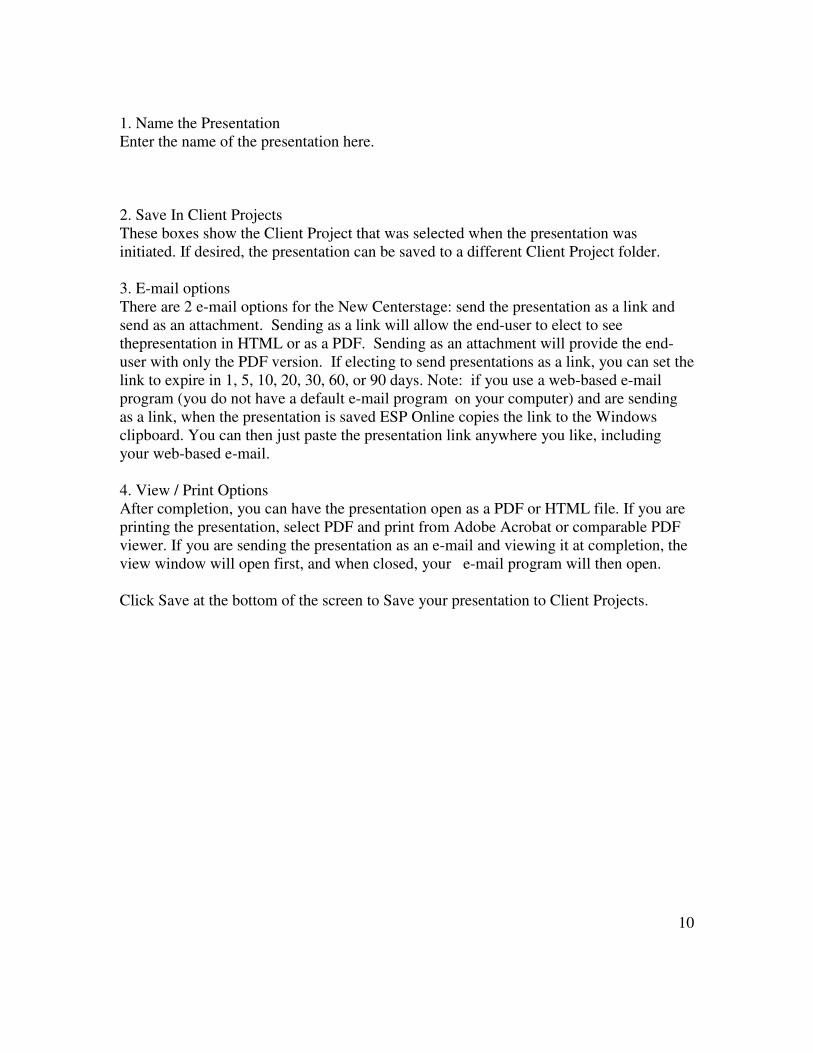
The Finish tab is where you name your presentation and confirm how you would like to send it. Your preferred mode of sending and saving can be set up in Centerstage Preferences, so you only have to name your presentation in this screen, click Save, and the presentation is completed. The steps are numbered to help you finish the presentation.
10
1. Name the Presentation Enter the name of the presentation here. 2. Save In Client Projects These boxes show the Client Project that was selected when the presentation was initiated. If desired, the presentation can be saved to a different Client Project folder. 3. E-mail options There are 2 e-mail options for the New Centerstage: send the presentation as a link and send as an attachment. Sending as a link will allow the end-user to elect to see thepresentation in HTML or as a PDF. Sending as an attachment will provide the end-user with only the PDF version. If electing to send presentations as a link, you can set the link to expire in 1, 5, 10, 20, 30, 60, or 90 days. Note: if you use a web-based e-mail program (you do not have a default e-mail program on your computer) and are sending as a link, when the presentation is saved ESP Online copies the link to the Windows clipboard. You can then just paste the presentation link anywhere you like, including your web-based e-mail. 4. View / Print Options After completion, you can have the presentation open as a PDF or HTML file. If you are printing the presentation, select PDF and print from Adobe Acrobat or comparable PDF viewer. If you are sending the presentation as an e-mail and viewing it at completion, the view window will open first, and when closed, your e-mail program will then open. Click Save at the bottom of the screen to Save your presentation to Client Projects.
11
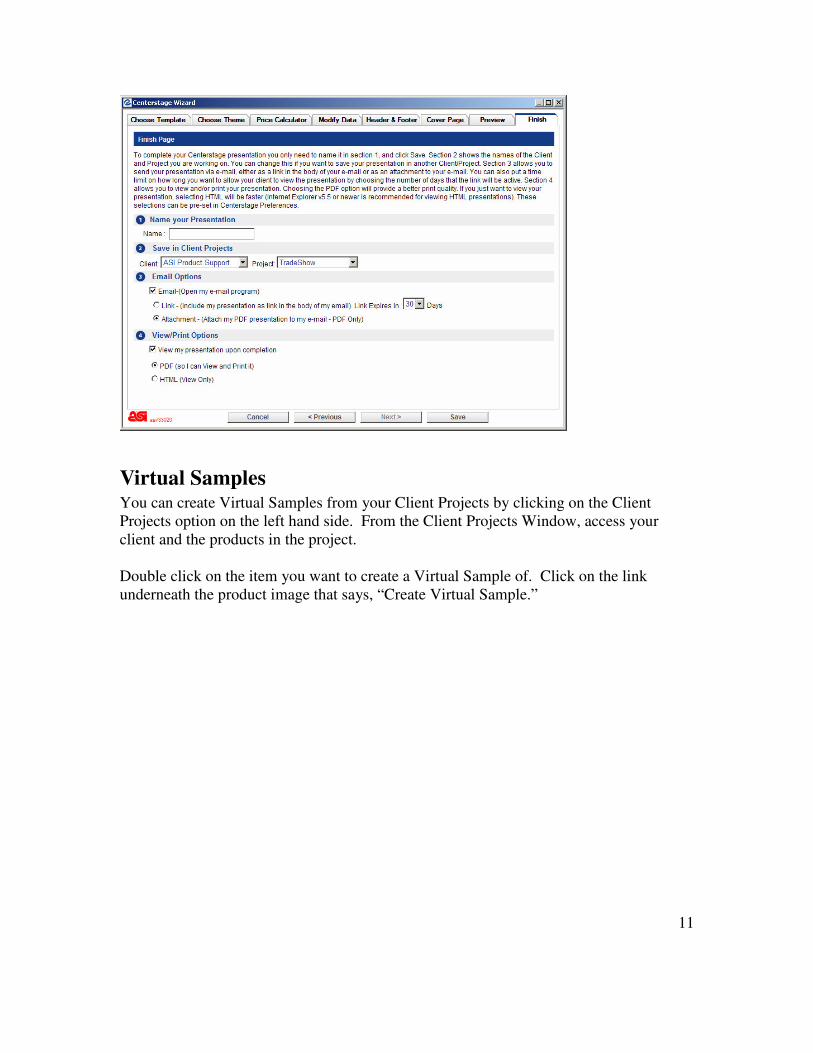
Virtual Samples You can create Virtual Samples from your Client Projects by clicking on the Client Projects option on the left hand side. From the Client Projects Window, access your client and the products in the project. Double click on the item you want to create a Virtual Sample of. Click on the link underneath the product image that says, “Create Virtual Sample.”
12
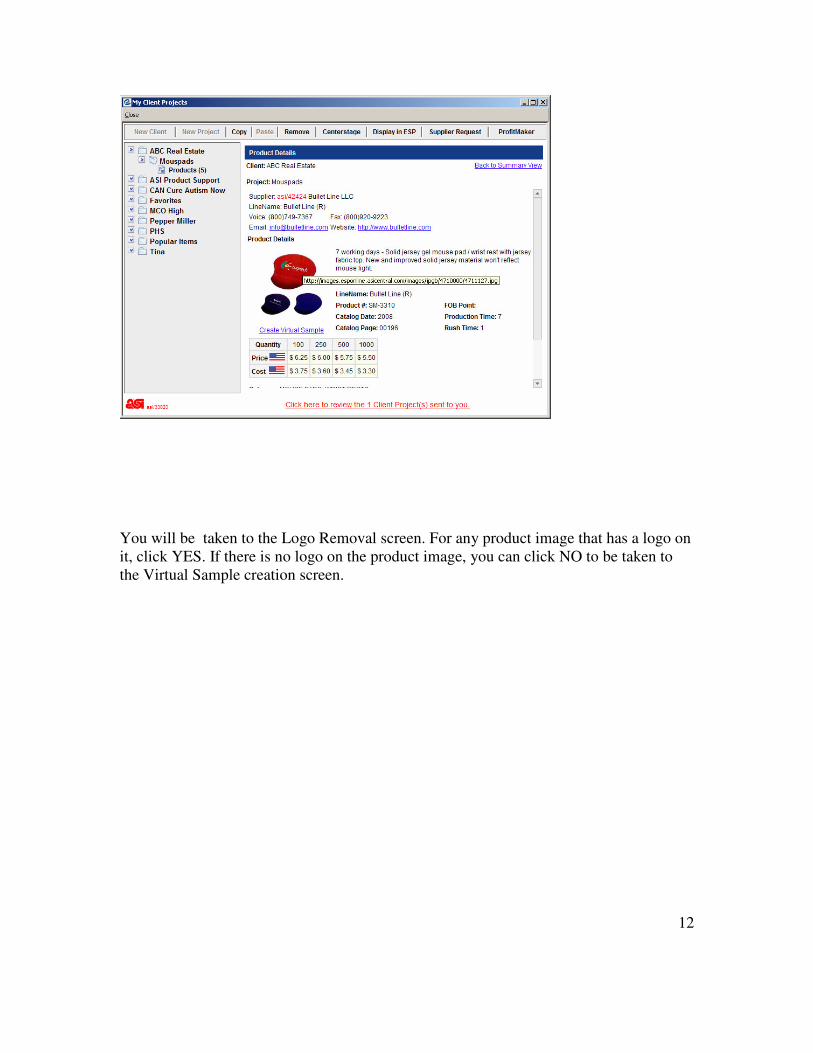
You will be taken to the Logo Removal screen. For any product image that has a logo on it, click YES. If there is no logo on the product image, you can click NO to be taken to the Virtual Sample creation screen.
13
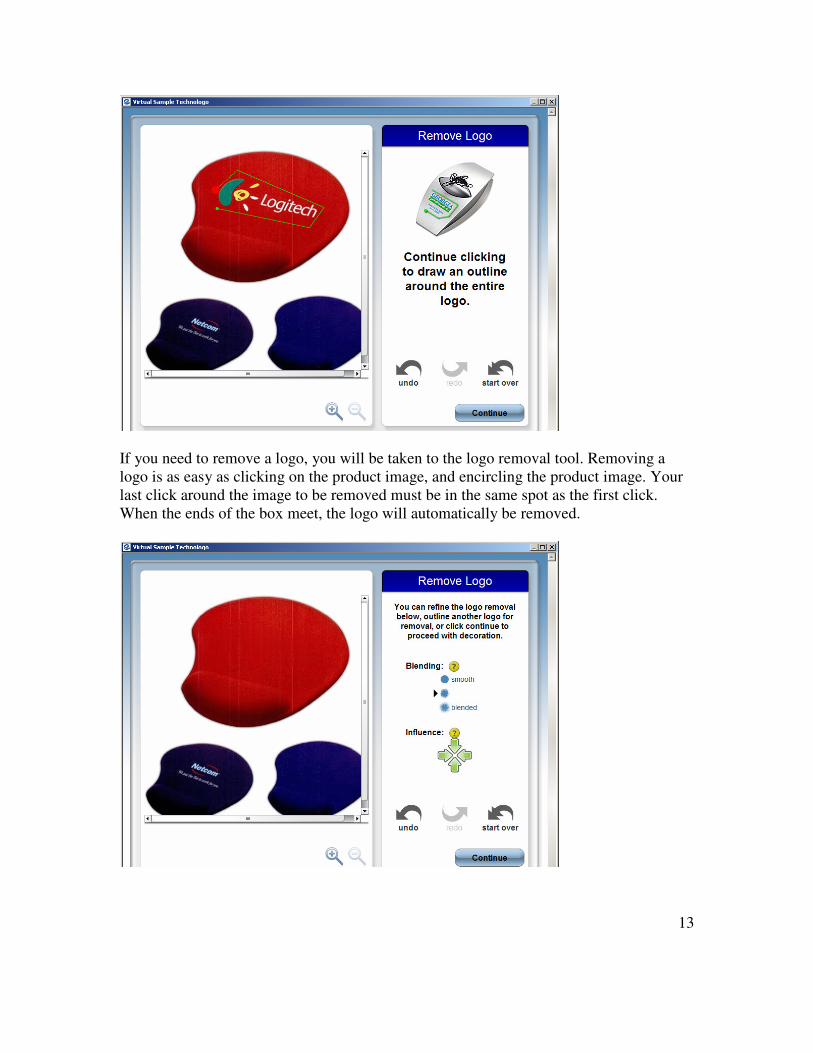
If you need to remove a logo, you will be taken to the logo removal tool. Removing a logo is as easy as clicking on the product image, and encircling the product image. Your last click around the image to be removed must be in the same spot as the first click. When the ends of the box meet, the logo will automatically be removed.
14
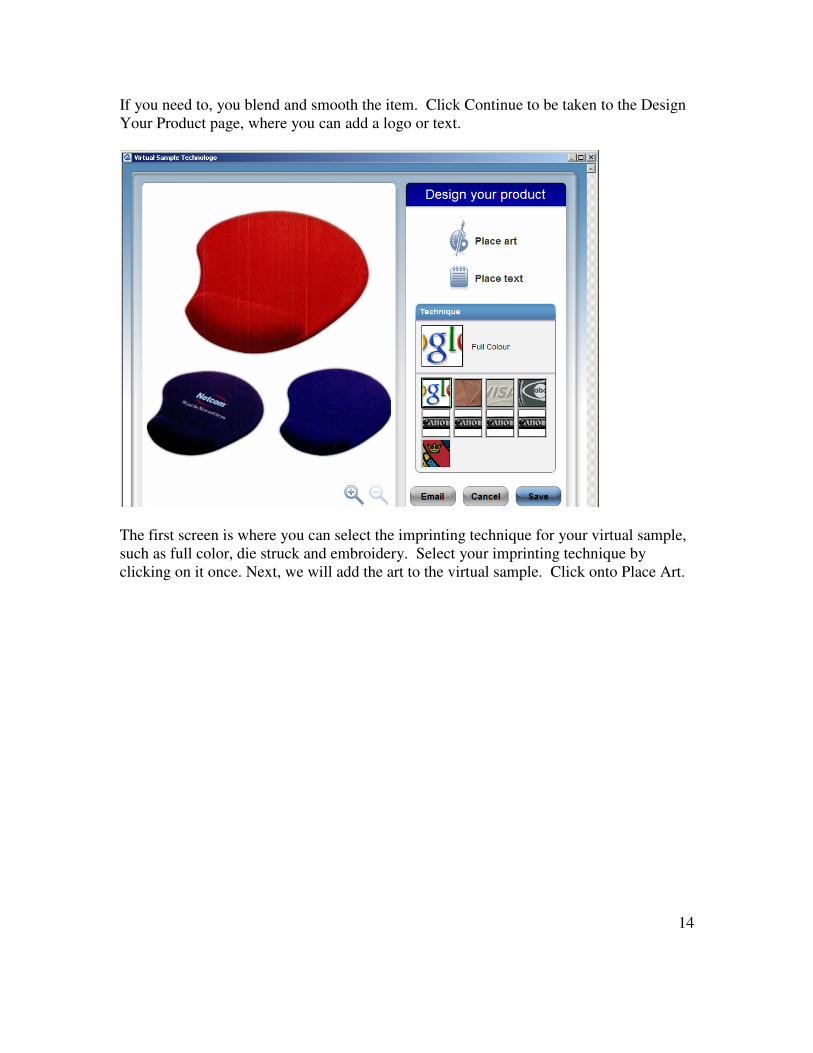
If you need to, you blend and smooth the item. Click Continue to be taken to the Design Your Product page, where you can add a logo or text.
The first screen is where you can select the imprinting technique for your virtual sample, such as full color, die struck and embroidery. Select your imprinting technique by clicking on it once. Next, we will add the art to the virtual sample. Click onto Place Art.
15
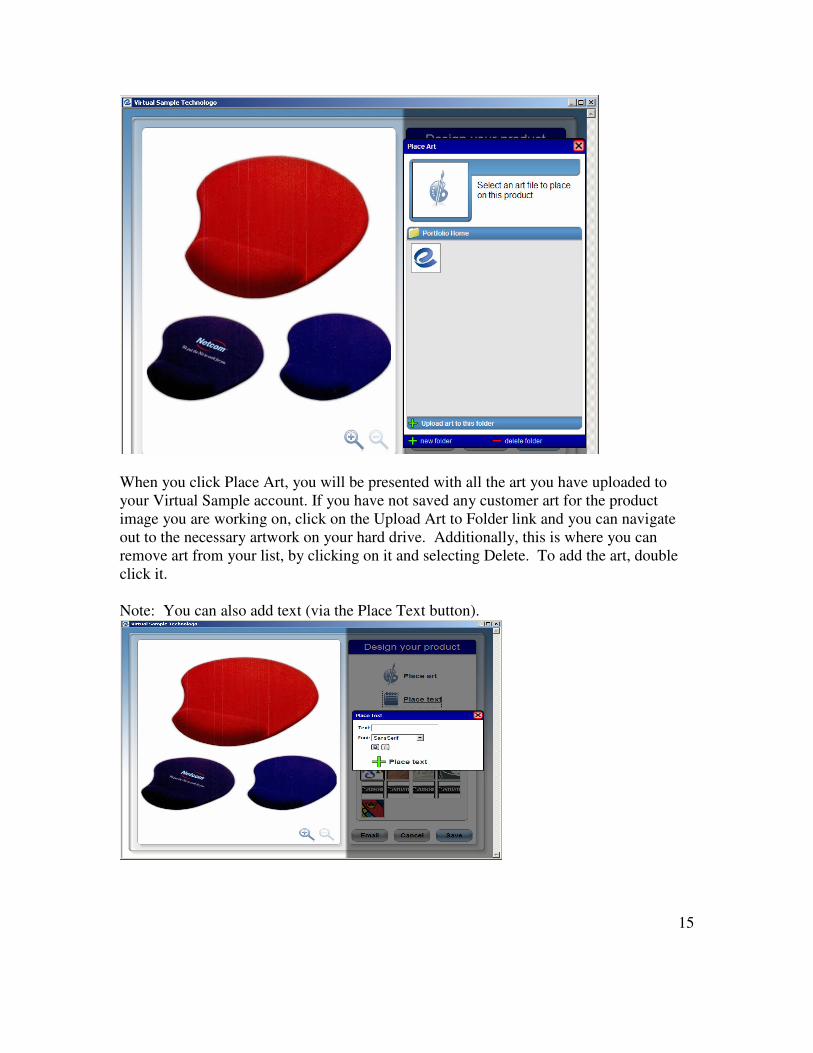
When you click Place Art, you will be presented with all the art you have uploaded to your Virtual Sample account. If you have not saved any customer art for the product image you are working on, click on the Upload Art to Folder link and you can navigate out to the necessary artwork on your hard drive. Additionally, this is where you can remove art from your list, by clicking on it and selecting Delete. To add the art, double click it. Note: You can also add text (via the Place Text button).
16
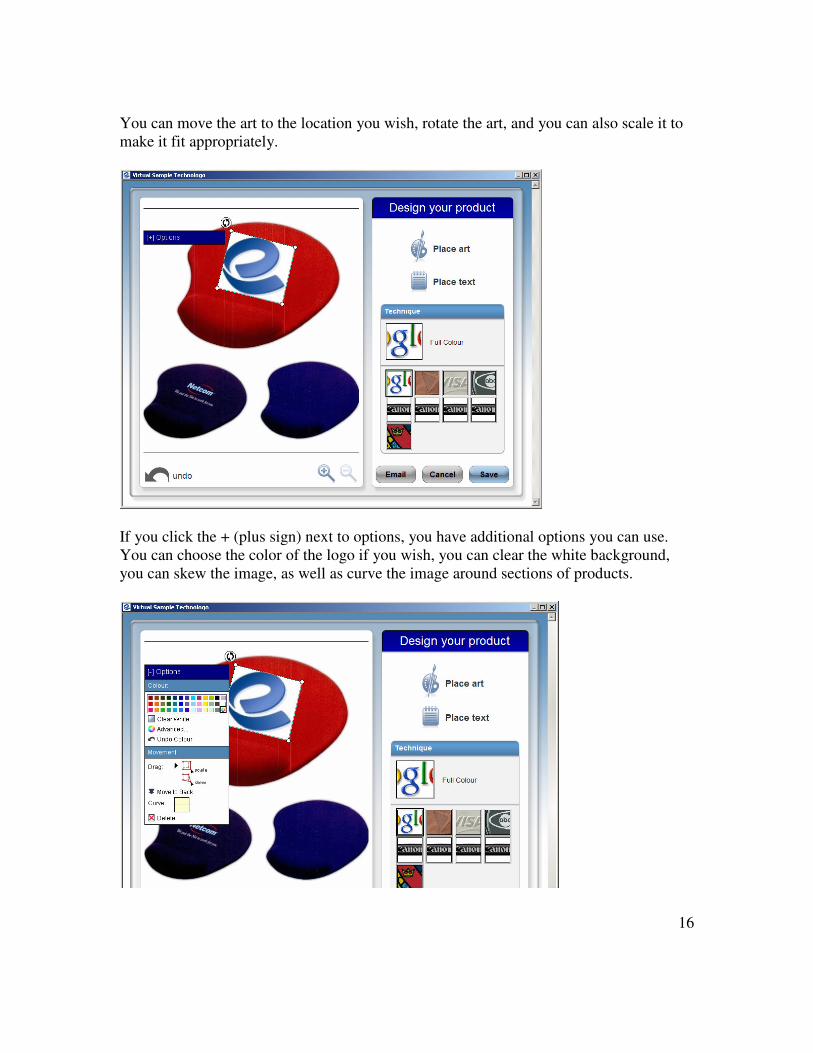
You can move the art to the location you wish, rotate the art, and you can also scale it to make it fit appropriately.
If you click the + (plus sign) next to options, you have additional options you can use. You can choose the color of the logo if you wish, you can clear the white background, you can skew the image, as well as curve the image around sections of products.
17
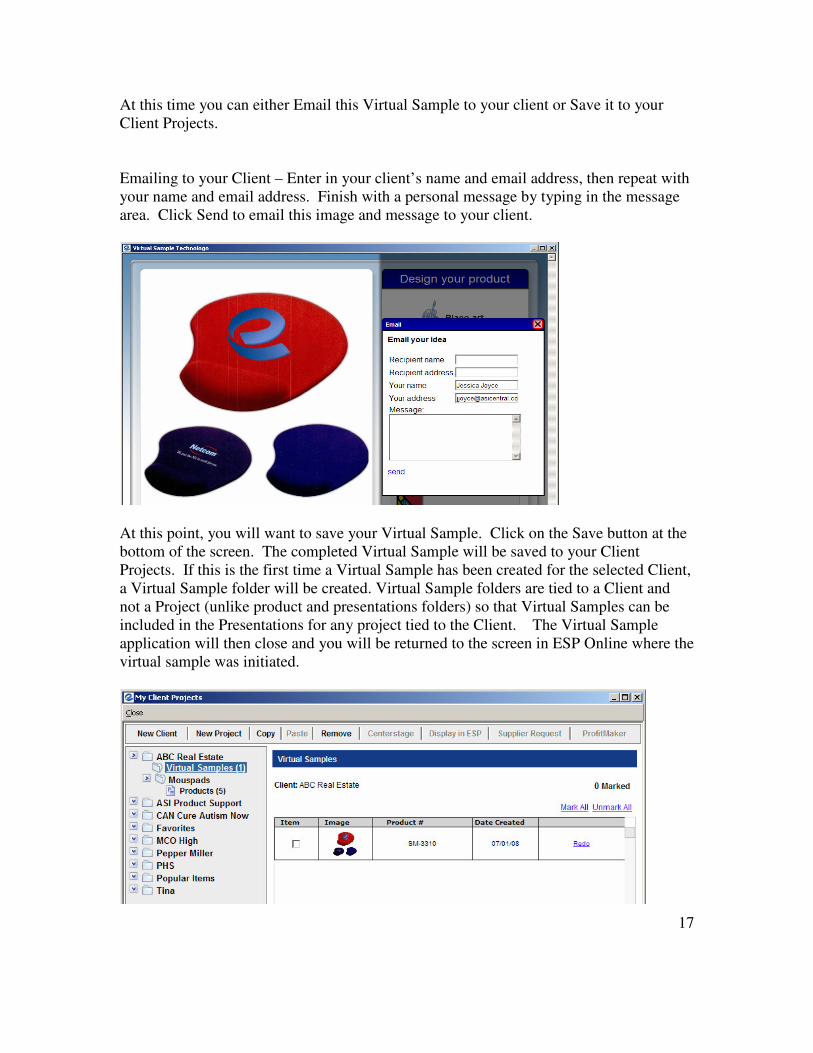
At this time you can either Email this Virtual Sample to your client or Save it to your Client Projects. Emailing to your Client – Enter in your client’s name and email address, then repeat with your name and email address. Finish with a personal message by typing in the message area. Click Send to email this image and message to your client.
At this point, you will want to save your Virtual Sample. Click on the Save button at the bottom of the screen. The completed Virtual Sample will be saved to your Client Projects. If this is the first time a Virtual Sample has been created for the selected Client, a Virtual Sample folder will be created. Virtual Sample folders are tied to a Client and not a Project (unlike product and presentations folders) so that Virtual Samples can be included in the Presentations for any project tied to the Client. The Virtual Sample application will then close and you will be returned to the screen in ESP Online where the virtual sample was initiated.
18
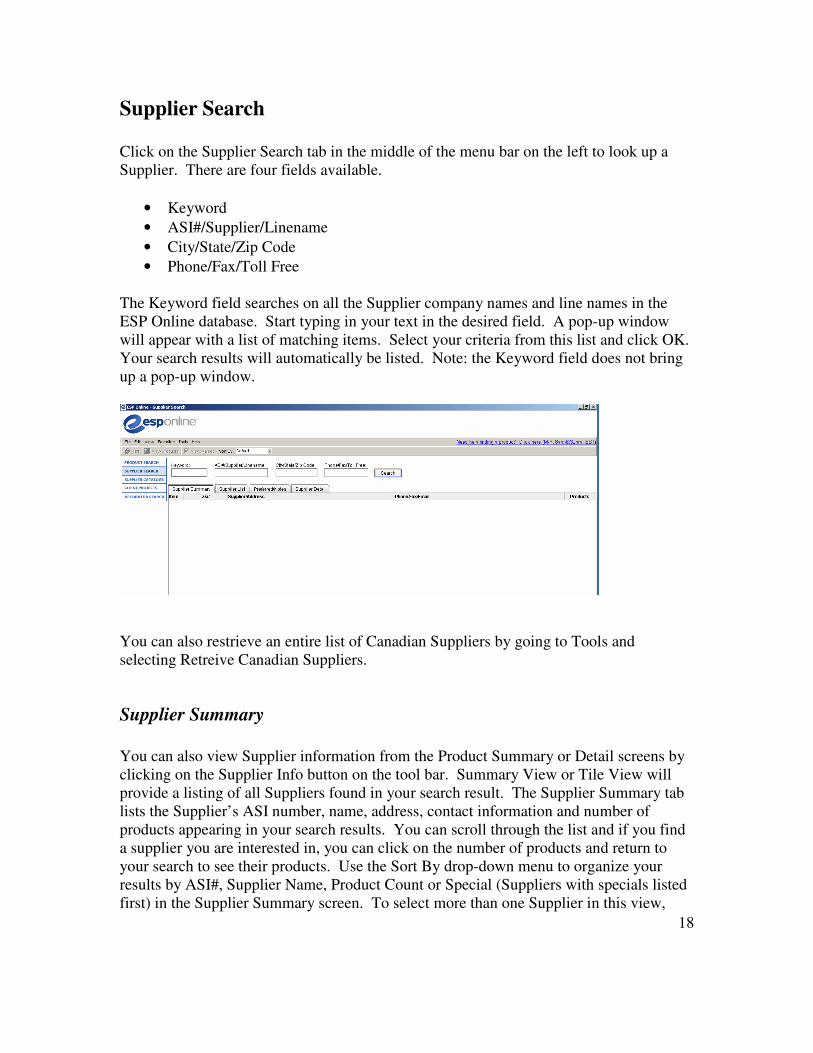
Supplier Search Click on the Supplier Search tab in the middle of the menu bar on the left to look up a Supplier. There are four fields available.
• Keyword • ASI#/Supplier/Linename • City/State/Zip Code • Phone/Fax/Toll Free
The Keyword field searches on all the Supplier company names and line names in the ESP Online database. Start typing in your text in the desired field. A pop-up window will appear with a list of matching items. Select your criteria from this list and click OK. Your search results will automatically be listed. Note: the Keyword field does not bring up a pop-up window.
You can also restrieve an entire list of Canadian Suppliers by going to Tools and selecting Retreive Canadian Suppliers.
Supplier Summary You can also view Supplier information from the Product Summary or Detail screens by clicking on the Supplier Info button on the tool bar. Summary View or Tile View will provide a listing of all Suppliers found in your search result. The Supplier Summary tab lists the Supplier’s ASI number, name, address, contact information and number of products appearing in your search results. You can scroll through the list and if you find a supplier you are interested in, you can click on the number of products and return to your search to see their products. Use the Sort By drop-down menu to organize your results by ASI#, Supplier Name, Product Count or Special (Suppliers with specials listed first) in the Supplier Summary screen. To select more than one Supplier in this view,
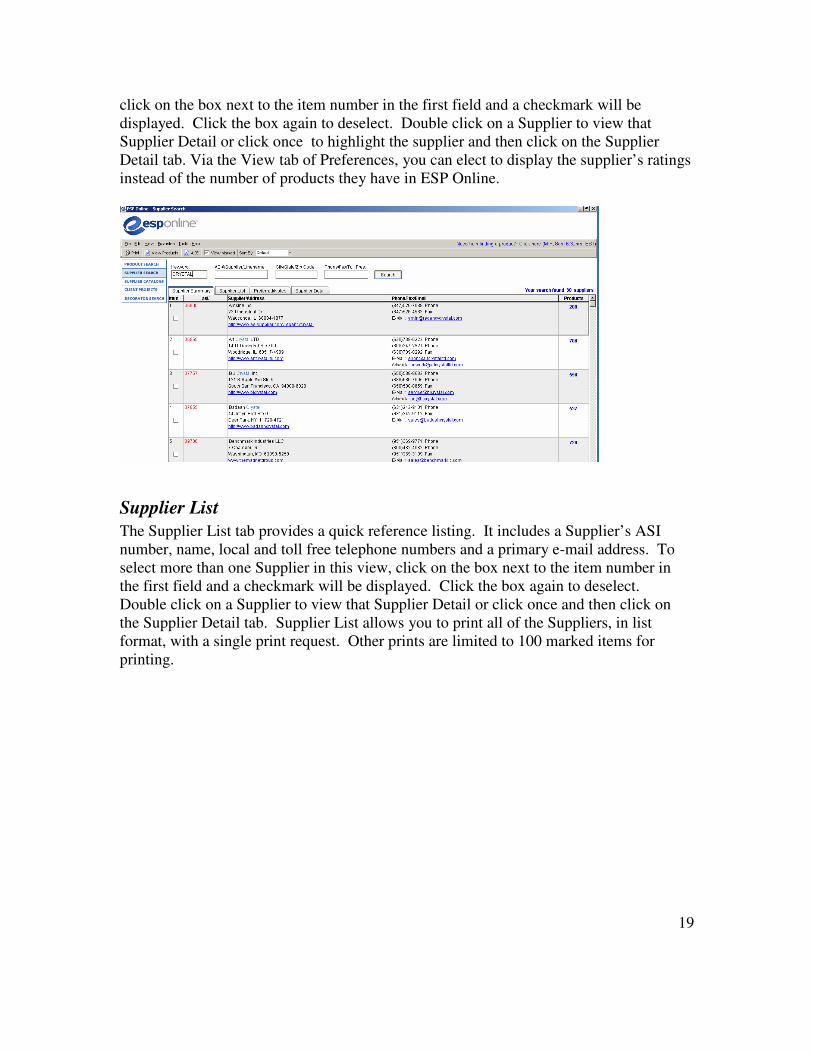
19
click on the box next to the item number in the first field and a checkmark will be displayed. Click the box again to deselect. Double click on a Supplier to view that Supplier Detail or click once to highlight the supplier and then click on the Supplier Detail tab. Via the View tab of Preferences, you can elect to display the supplier’s ratings instead of the number of products they have in ESP Online.
Supplier List The Supplier List tab provides a quick reference listing. It includes a Supplier’s ASI number, name, local and toll free telephone numbers and a primary e-mail address. To select more than one Supplier in this view, click on the box next to the item number in the first field and a checkmark will be displayed. Click the box again to deselect. Double click on a Supplier to view that Supplier Detail or click once and then click on the Supplier Detail tab. Supplier List allows you to print all of the Suppliers, in list format, with a single print request. Other prints are limited to 100 marked items for printing.
20
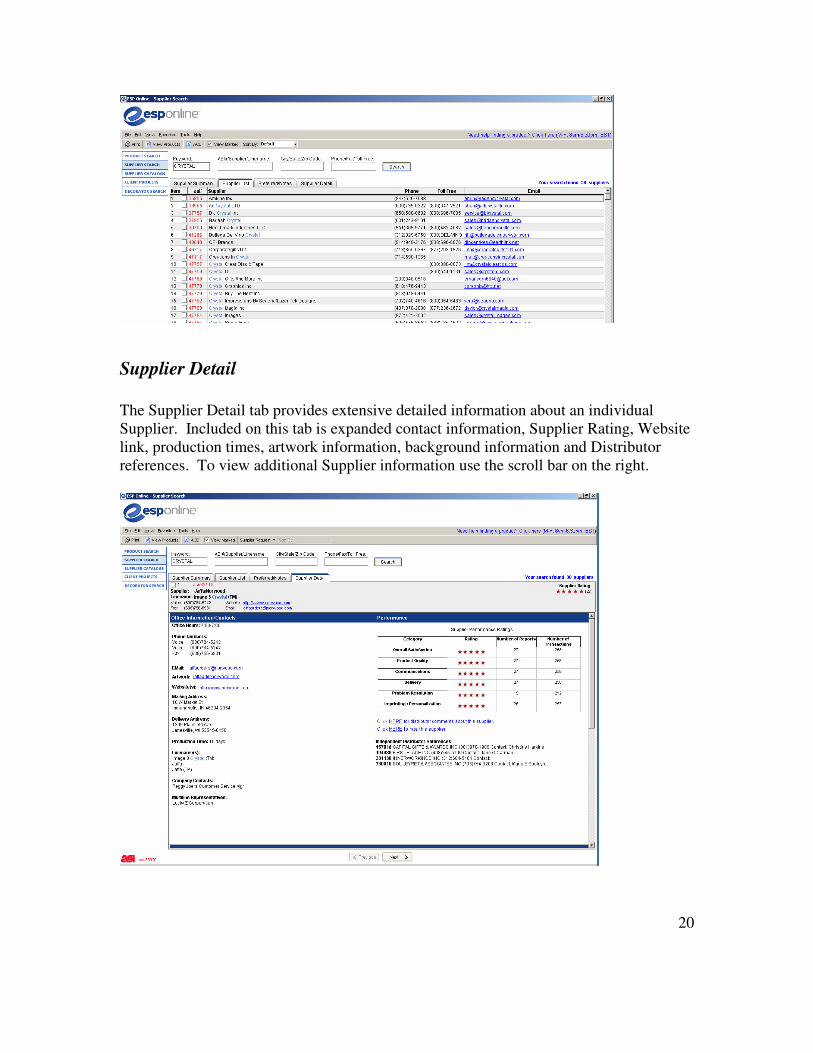
Supplier Detail The Supplier Detail tab provides extensive detailed information about an individual Supplier. Included on this tab is expanded contact information, Supplier Rating, Website link, production times, artwork information, background information and Distributor references. To view additional Supplier information use the scroll bar on the right.
21
Use the Previous and Next buttons at the bottom of the screen to browse through other Suppliers. NOTE: Supplier Summary, Supplier List and Supplier Detail selections and their respective information may all be printed out by clicking on the Print icon on the tool bar.
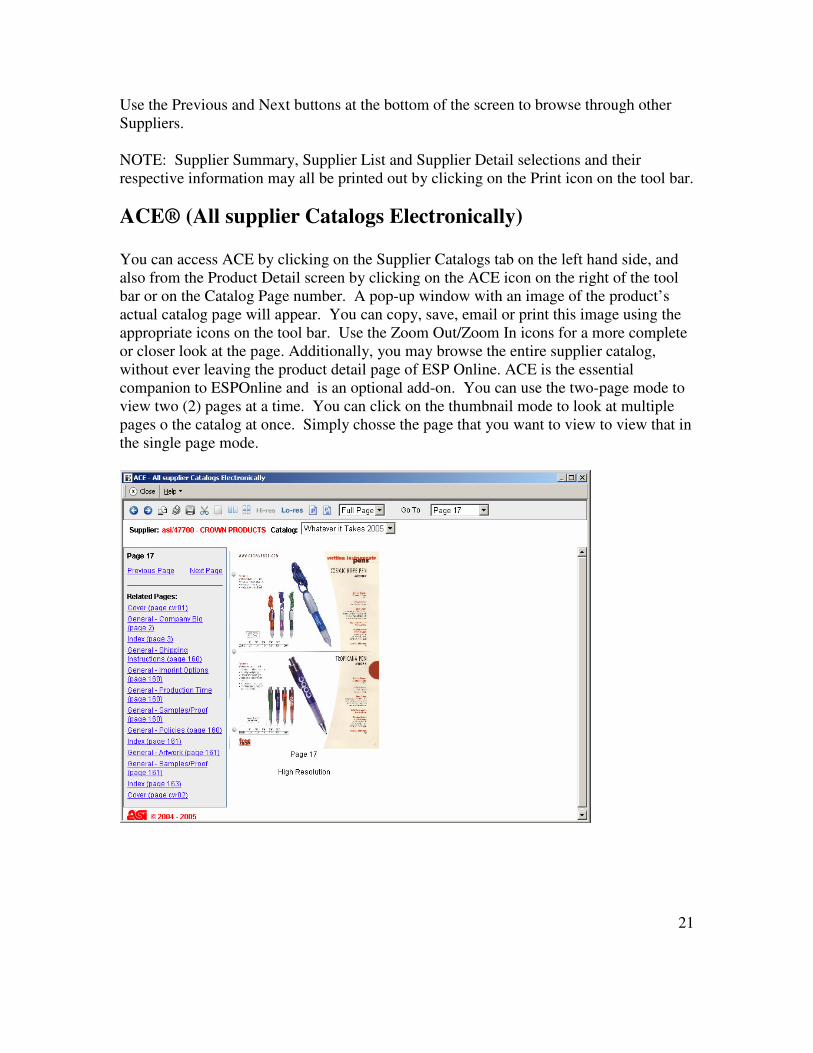
ACE® (All supplier Catalogs Electronically) You can access ACE by clicking on the Supplier Catalogs tab on the left hand side, and also from the Product Detail screen by clicking on the ACE icon on the right of the tool bar or on the Catalog Page number. A pop-up window with an image of the product’s actual catalog page will appear. You can copy, save, email or print this image using the appropriate icons on the tool bar. Use the Zoom Out/Zoom In icons for a more complete or closer look at the page. Additionally, you may browse the entire supplier catalog, without ever leaving the product detail page of ESP Online. ACE is the essential companion to ESPOnline and is an optional add-on. You can use the two-page mode to view two (2) pages at a time. You can click on the thumbnail mode to look at multiple pages o the catalog at once. Simply chosse the page that you want to view to view that in the single page mode.
22
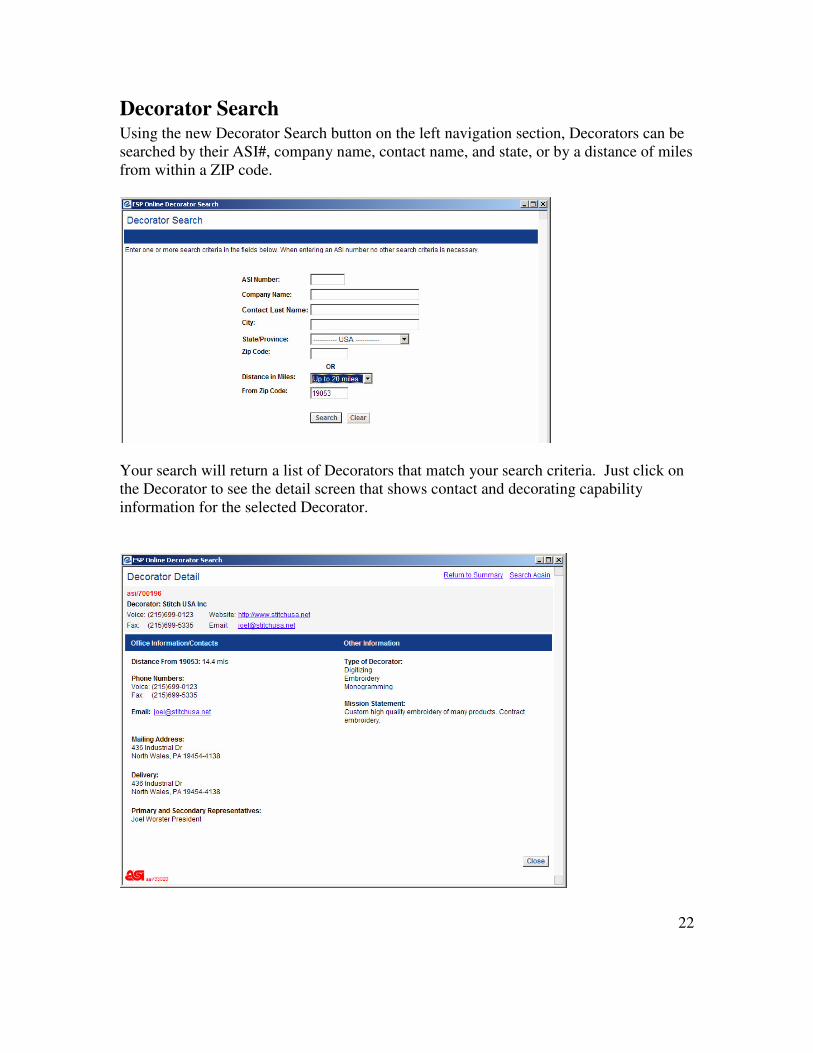
Decorator Search Using the new Decorator Search button on the left navigation section, Decorators can be searched by their ASI#, company name, contact name, and state, or by a distance of miles from within a ZIP code.
Your search will return a list of Decorators that match your search criteria. Just click on the Decorator to see the detail screen that shows contact and decorating capability information for the selected Decorator.