quick Start Guide - Mygica · Quick Start Guide . 2. Congratulations on purchasing your brand new...
20
585 ATV Quick Start Guide www.mygica.tv
Transcript of quick Start Guide - Mygica · Quick Start Guide . 2. Congratulations on purchasing your brand new...

585ATV
Quick Start Guidewww.mygica.tv

2
Congratulations on purchasing your brand new MyGica ATV 585.
Your Satisfaction is the foundation of oursuccess.
Follow this guide to setup your device.
Before use, be sure to read the precautions contained in this User’s Guide. Keep the User’s Guide in a safe place for future reference.
For the most up-to-date information about this product, visit the offcial website atwww.mygica.com orwww.mygica.tv
Like us on Facebook:www.facebook.com/mygicana
Follow us on Twitter:@mygicana
MyGica ATV 585 Full HD HEVC H.265 Quad Core Smart TV box based on ARM Cortex A5 AMlogic S805, paired with the Mali-450 Quad Core GPU and powered by the world’s leading Android 4.4 KitKat Operating System.
You now have full access to the Google PlayStore allowing you to download all of yourfavorite android based applications, andinstalling them right onto your MyGica ATV585 device. You also have access to our veryown MyGica Store, which consists of pre-approved android apps for your MyGica ATV 585. Alternatively, you can download android applications from third party stores and sources and install them directly using an external storage device and the preloaded AppInstaller App.
Your new MyGica ATV 585 comes with anEthernet and WiFi connection, allowing youto connect to your home or o�ce internetconnection, as well many of your otherdevices all on the same network. This way, you can share content amongst your connected devices, such as videos, music and photos.

3
Quick Setup Guide
After opening the box, please check carefully with the packing list. If any item is missing or damaged, please contact your dealer as soon as possible, or contact our customer service department
1 23
4
56
87
9
10
1. Net Status
2. Power Status
3. IR Sensor
4. Micro SD
5. USB 2.0
6. LAN Port
7. A/V
8. HDMI
9. DC Input
10. Wi-Fi Antenna
HDMI Cable Remote Control Quick Start GuideA/V Cable Power Adapter

4
Connecting the Power, Audio and Video
Place ATV 585 on a flat platform near the TV, and make sure nothing blocks the remotecontrol signal.

5
1. Power ON/OFF
2. Volume Down
3. Volume Up
4. Mouse ON/OFF
5. Select Key/Enter
6. Navigation Left, Right, Up, Down Keypad
7. Returns to Home Screen
8. Returns to Previous Screen
9. Stops Playback
10. Play/Pause
11. Fast Forward
12. Rewind
13. Infrared ON/OFF Sensor
14. Menu
15. USB Receiver
How to useFirst plug in the USB Receiver to any USB port on your box. Then press any button to start up the remote control. The Remote Control will go into sleep mode after being idle for one minute. Press any button to wake up the remote control.
Remote AppDo you want to use your Android Device as a Smart Remote Control? Scan the QR Barcode Below using your Android Device!
KR-40 Remote13
1
7
9
4
8
5
14
6
2
12
15
3
11
10

6
First Time Usage
Part 1: Power Up
After powering up, your TV ormonitor will initially display ananimated “MyGica” logo whileloading. When loading is complete,the display will enter the Welcomescreen.
Welcome Screen - Follow the 8 stepsto setup your ATV 585
1.1. Select Next with your remote.
7
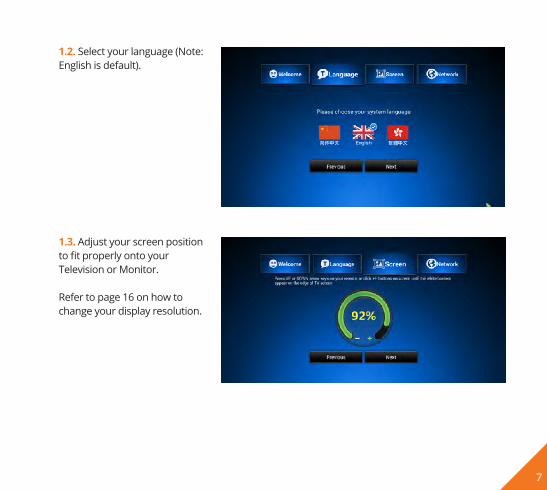
1.2. Select your language (Note:English is default).
1.3. Adjust your screen position to fit properly onto your Television or Monitor.
Refer to page 16 on how to change your display resolution.

8
1.4. Setup your WiFi or EthernetConnection.Refer to Pages 15 & 16 of themanual for more info on how tosetup your internet connection.
1.5. Select “Finish”. You will now betaken to the MyGica Android MenuScreen as shown to the left.
1.6. You are now finished setting upyour unit for the first time. Now, let’stake you through the menus.

9
1.7. The right screen shot is theHome Screen Menu of your ATV585. You will find an Icon labeled“Application” that will bring you toall of your Android Apps, as well as8 Favorite App Icons to the right ofthis icon.
The Settings menu is also built intothe Home Screen, you can accessthe Settings part by simply usingthe IR Remote Control’s Arrow Keys,moving them to the far left or rightof the Home Screen.
1.8. Here is a list of some of thefollowing Android Apps that comepre-installed on your MyGica ATV585:
• Google Play Store• KODI Helix MyGica Edition• You Tube• MyGica Store• Netflix• 4K Video Player• And Many More

10
All of your Pre-Installed AndroidApps can be found by just openingup the “Application” Icon, as shownon the screen shot page to the left.

11
Part 2: Language & Input
Using the right or left arrow key,press until you’ve reached thesettings screen on the right.Select the Language Icon to changeyour language settings.
Here you can change to theLanguage of your choice.(Note: Default Language is English).

12
Part 2.1 - Setting up the Date and Time
Select the Date & Time IconHere you can Set your Date, Time,Time Zone, and Time Displayscreen.
Once done Press the home buttonon the remote to take you back tothe Home Screen.
Click the return button to revert back to the settings menu

13
Part 3: How to change your Settings
3.1. Selecting Favorite Icons on theHome ScreenYou can customize 8 icons on theHome Menu of your choosing. Todo so, using the IR Remote Control,move the cursor to the APP youwant to change, press and holdthe OK button and you will see thefollowing screen.Here we will use YouTube as anexample.
3.2. You will now be taken to a listof all of your installed Android Apps,as shown in the screen shot to theright.The APP with a “Star” at the topright corner of the App Icon is oneof your current selected favoriteapplications located on the HomeScreen Menu. Now choose the APPyou want to switch as one of yournew Favorites APP Icon on the HomeMenu and press OK.
Click the return button to revert back to the settings menu

14
3.3. Here we will choose the AndroidApp “AppInstaller”.Now you can see “AppInstaller” hasbecome one of your favorite applications.You can repeat this processfor each of the 8 Favorites icons thatyou want on your Home Screen.
3.4. Press the Home button onthe remote to be taken back to theHome Screen.

15
3.6. The Settings menu is built intothe Home Screen, you can accessthe Settings part by just using theIR Remote Control’s Arrow Keys,moving them to the far left or rightof the Home Screen.
The settings screen shot menushown above, includes all the basicsettings for the ATV 585, if you wantto access all other settings for theAndroid system, just click on “MoreSetting”, this will take you into the“Native Android Settings Menu”.
Clicking on one of the highlightedicons as shown above, use the OKbutton on the Remote Control toopen that part of the settings menuthat you want to edit.
3.7. WiFi Setup
3.7.1. The available WiFi networksin your area will be scanned when“ON” is selected.

16
3.7.2. Connect to the WiFi networkthat is available to you. If connectingto a secured WiFi network, thecorresponding password will needto be entered in at first, or you willget “failed to connect” and need tore-enter the password.
3.8. Ethernet SetupTo connect your box via Ethernetconnection, you must use a RJ45Ethernet Cable. Connect it to theEthernet port on the back of yourATV 585, then connect the other endto your Router, Ethernet Switch orPowerline Adapter.
You must turn on the Ethernetconnection by checking the Ethernetbox; This will connect to the networkautomatically.
3.9. Display Resolution SettingThe Default resolution setting whenyou first turn on your ATV 585 is720p.
3.9.1. Using the remote, select“HDMI Output Mode Setting”

17
3.9.2. Here you can select yourVideo Resolution Output.The Default resolution setting when
720p.
3.9.3. Output ModeHere you can change the output
2K Resolution.
Make sure the setting you choose issupported by your Television beforeswitching the output mode.
3.9.4. Display Position Setting
menu option. Select OK with theremote to open this setting menu.

18
3.9.5. Display Position SettingUse the navigation keys (Left, Right,Up, Down) and OK buttons of theremote control to adjust yourdisplay position to fit your Televisionscreen to your liking.
4.0. App Market PlacesYou can find and install more apps by using the following marketplaces already pre-installed on you MyGica.
1 - Google Play Store2 - MyGica Store
Both of these apps can be found on your main screen. Both Marketplaces have thousands of appsto choose from such as Games, Movies, TV shows, Live TV, Android Menu Launchers, Web Browsersand so much more.

19
Congratulations!This completes the first time setup process of your brand new MyGica.
For technical support please visit our website http://www.mygicasupport.com

585ATV
Online Support www.mygicasupport.com
Wikiwiki.mygica.tv
Email Support [email protected]
TECHNICAL SUPPORT
CALL TOLL FREE
1-855-MYGICA-8 (694-4228)
www.mygica.tv