Protein Precipitation for Biological Fluid Samples Using ... · high-throughput sample analysis....
11
Application Note Clinical Research Authors Limian Zhao and Megan Juck Agilent Technologies, Inc. Abstract Protein precipitation (PPT) is one of the most popular techniques used to prepare biological fluid (bio-fluid) samples for LC/MS/MS analysis. By applying protein precipitation to bio-fluid samples, proteins can efficiently be removed from the matrix. This Application Note discusses the important steps, considerations, and cautions on PPT for bio-fluid samples. It focuses on in-well PPT using Captiva EMR—Lipid 96-well plates, including the appropriate crashing solvent, ratio, additives, bio-fluid matrix, bio-fluid sample aliquot and crashing solvent addition order on plate, internal standard (IS) addition, and sample mixing in plate. Lastly, a comparison between traditional PPT using centrifugation and PPT followed by Captiva EMR—Lipid cleanup is discussed in detail, including the time, method performance, and impact on instrument. Protein Precipitation for Biological Fluid Samples Using Agilent Captiva EMR—Lipid 96-Well Plates
-
Upload
nguyenkiet -
Category
Documents
-
view
220 -
download
0
Transcript of Protein Precipitation for Biological Fluid Samples Using ... · high-throughput sample analysis....

Application Note
Clinical Research
AuthorsLimian Zhao and Megan Juck Agilent Technologies, Inc.
AbstractProtein precipitation (PPT) is one of the most popular techniques used to prepare biological fluid (bio-fluid) samples for LC/MS/MS analysis. By applying protein precipitation to bio-fluid samples, proteins can efficiently be removed from the matrix. This Application Note discusses the important steps, considerations, and cautions on PPT for bio-fluid samples. It focuses on in-well PPT using Captiva EMR—Lipid 96-well plates, including the appropriate crashing solvent, ratio, additives, bio-fluid matrix, bio-fluid sample aliquot and crashing solvent addition order on plate, internal standard (IS) addition, and sample mixing in plate. Lastly, a comparison between traditional PPT using centrifugation and PPT followed by Captiva EMR—Lipid cleanup is discussed in detail, including the time, method performance, and impact on instrument.
Protein Precipitation for Biological Fluid Samples Using Agilent Captiva EMR—Lipid 96-Well Plates

2
IntroductionProtein precipitation (PPT) has widely been used for bio-fluid sample preparation for LC/MS/MS analysis1. Efficient protein removal is achieved by mixing the bio-fluid sample with 3–5 times the volume of a water-miscible solvent such as acetonitrile (ACN), methanol (MeOH), or a mixture. The addition of organic solvent destroys the hydration layer of proteins, reduces the repulsive forces between protein molecules, and significantly lowers the solubility of the proteins, resulting in proteins precipitating out. The precipitates then can be removed by centrifugation or filtration, and the supernatant can be used for analysis. Even with the potential for some target analyte loss, due to protein binding or analyte stability affected by protein binding, PPT methodology still provides fast, simple, cost-effective sample preparation, and is suitable for high-throughput sample analysis.
Captiva EMR—Lipid 96-well plates allow for in-well PPT, followed by efficient filtration to remove the precipitates. In addition, the EMR—Lipid sorbent can interact with lipids in the matrix during sample filtration, resulting in a cleaner eluent, with proteins and lipids being removed simultaneously. This Application Note focuses on discussion of the critical steps for this important sample preparation technique using Captiva EMR—Lipid 96-well plates.
Crashing solvent and ratioA water-miscible organic solvent is usually used for precipitating proteins, typically ACN, MeOH, or a mixture1. Previous work provides a thorough comparison of PPT using ACN or MeOH2. Using ACN for PPT usually generates large coagulated yellow precipitates, while MeOH normally generates finer coagulated white precipitates (Figure 1). The clarity of the supernatant is usually a good indication of PPT efficiency, with a hazy supernatant indicating that unprecipitated proteins remain. Figure 1A shows that a minimal crashing
ratio of 3:1 when using MeOH, and 2:1 when using ACN can provide a clear supernatant. Figure 1B shows that using ACN with a 3:1 ratio provides a clear supernatant after sample storage at 10 °C for 24 hours. These results clearly demonstrate that ACN provides more efficient protein precipitation than MeOH, and that a minimal crashing ratio of 3:1 is necessary to achieve efficient protein removal. However, a larger crashing ratio also results in more sample dilution. Therefore, a crashing ratio of 3:1–5:1 is usually recommended to achieve efficient protein removal and still maintain reasonable dilution of the sample.
Figure 1. Comparison of ACN versus MeOH for PPT. A) Supernatant appearance after mixing and centrifugation; B) supernatant appearance after 24 hours at 10 °C. Courtesy of Russ Grant2.
Samples after 24 hours at 10 °C
Acetonitrile
3:1 2:1 1:1 3:1 2:1 1:1
Methanol
A
B

3
Another consideration with the crashing solvent is the solvent extraction of target analytes. ACN and MeOH can provide different extraction capabilities on different compounds. A small percentage of MeOH, usually 5–15 %, can be added when there is a need to adjust the solvent extractability of target analytes. However, it is important to understand that even such a small amount of MeOH in the crashing solvent can cause the protein precipitates to be visually different (Figures 2A and 2B). The more MeOH that is mixed with the crashing solvent, the finer the precipitates can be, which can increase the required pressure when using filtration to remove precipitates. Since MeOH is not as efficient as ACN for precipitating protein, excessive amounts of MeOH can negatively impact PPT efficiency. Thus, it is recommended to not exceed 15 % MeOH in the crashing solvent.
The third consideration for using ACN (or primarily ACN) as the crashing solvent is the ease of removal of protein precipitates by filtration. PPT with ACN results in the protein precipitation of larger particulates, making the filtration of precipitates much easier, as they will not clog the filtration frit/membrane. PPT with MeOH results in much finer precipitates, requiring significantly higher pressure for filtration, as fine precipitates tend to clog the filtration frit/membrane easily.
To reduce protein binding, additives such as formic acid (FA) or ammonium hydroxide (NH4OH) are usually spiked into the crashing solvent, with 1 % FA being the most frequently used additive. However, for whole blood PPT, acid addition should be used with caution, as acid can extract more hemoglobin color, resulting in a brown/red supernatant after PPT.
Figures 2C and 2D show the supernatant appearance after PPT using neutral crashing solvent, acidified solvent (with 1 % FA), and basic solvent (with 1 % NH4OH). The supernatant with acidified PPT is dark brown/red in color. Therefore, carefully consider or avoid using acidified crashing solvent for whole blood PPT.
PlasmaA B
C D
Whole blood
PPT by ACN PPT by 95:5 ACN/MeOH
PPT by 85:15 ACN/MeOH
Crashing solvent with 1 % FA
Crashing solvent
Crashing solvent with 1 % NH4OH
Crashing solvent with 1 % FA
Crashing solvent
Crashing solvent with 1 % NH4OH
PPT by ACN PPT by 95:5 ACN/MeOH
PPT by 85:15 ACN/MeOH
Figure 2. Appearance of protein precipitates formed using different crashing solvents for plasma (A) and whole blood (B) PPT, and crashing solvent with different additives before precipitates centrifugation (C) and after (D).
4
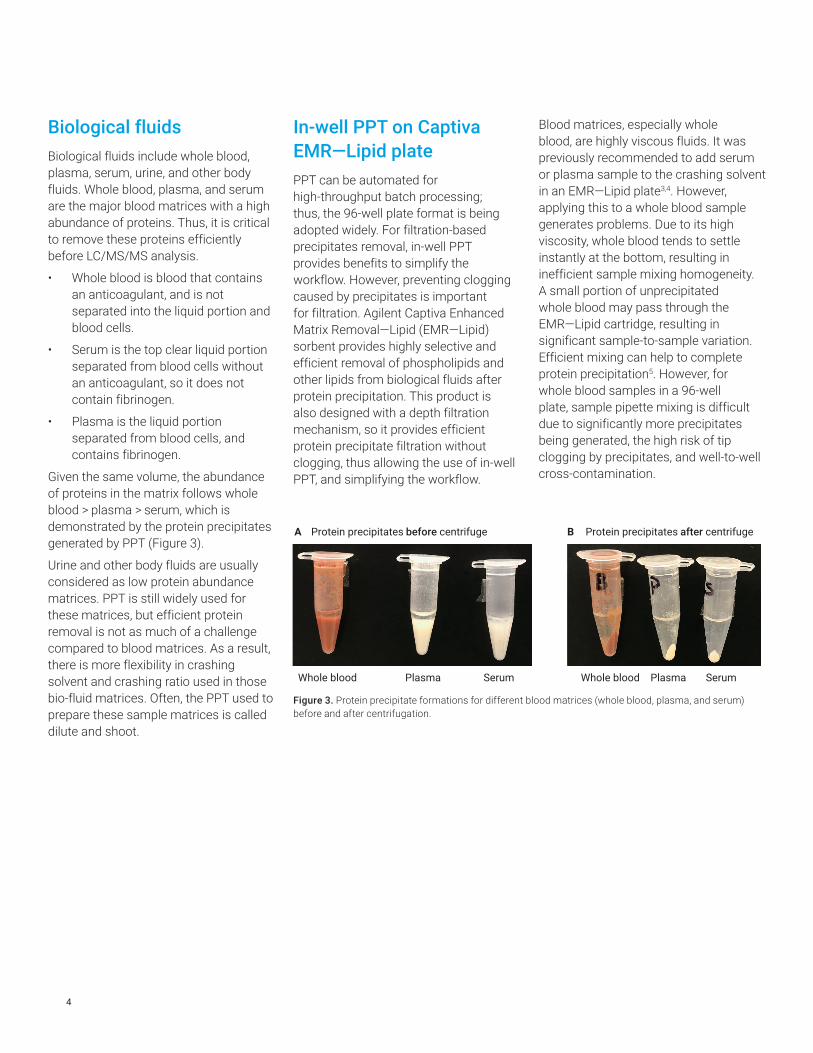
Biological fluids Biological fluids include whole blood, plasma, serum, urine, and other body fluids. Whole blood, plasma, and serum are the major blood matrices with a high abundance of proteins. Thus, it is critical to remove these proteins efficiently before LC/MS/MS analysis.
• Whole blood is blood that contains an anticoagulant, and is not separated into the liquid portion and blood cells.
• Serum is the top clear liquid portion separated from blood cells without an anticoagulant, so it does not contain fibrinogen.
• Plasma is the liquid portion separated from blood cells, and contains fibrinogen.
Given the same volume, the abundance of proteins in the matrix follows whole blood > plasma > serum, which is demonstrated by the protein precipitates generated by PPT (Figure 3).
Urine and other body fluids are usually considered as low protein abundance matrices. PPT is still widely used for these matrices, but efficient protein removal is not as much of a challenge compared to blood matrices. As a result, there is more flexibility in crashing solvent and crashing ratio used in those bio-fluid matrices. Often, the PPT used to prepare these sample matrices is called dilute and shoot.
In-well PPT on Captiva EMR—Lipid platePPT can be automated for high-throughput batch processing; thus, the 96-well plate format is being adopted widely. For filtration-based precipitates removal, in-well PPT provides benefits to simplify the workflow. However, preventing clogging caused by precipitates is important for filtration. Agilent Captiva Enhanced Matrix Removal—Lipid (EMR—Lipid) sorbent provides highly selective and efficient removal of phospholipids and other lipids from biological fluids after protein precipitation. This product is also designed with a depth filtration mechanism, so it provides efficient protein precipitate filtration without clogging, thus allowing the use of in-well PPT, and simplifying the workflow.
Blood matrices, especially whole blood, are highly viscous fluids. It was previously recommended to add serum or plasma sample to the crashing solvent in an EMR—Lipid plate3,4. However, applying this to a whole blood sample generates problems. Due to its high viscosity, whole blood tends to settle instantly at the bottom, resulting in inefficient sample mixing homogeneity. A small portion of unprecipitated whole blood may pass through the EMR—Lipid cartridge, resulting in significant sample-to-sample variation. Efficient mixing can help to complete protein precipitation5. However, for whole blood samples in a 96-well plate, sample pipette mixing is difficult due to significantly more precipitates being generated, the high risk of tip clogging by precipitates, and well-to-well cross-contamination.
A B
Whole blood
Protein precipitates before centrifuge Protein precipitates after centrifuge
Plasma Serum Whole blood Plasma Serum
Figure 3. Protein precipitate formations for different blood matrices (whole blood, plasma, and serum) before and after centrifugation.

5
To resolve these issues, the sample and crashing solvent order was reversed, that is, crashing solvent was added to the whole blood sample. Figure 4 compares sample mixing homogeneity and protein precipitate formation between the two different addition orders. The same amount of crashing solvent and whole blood sample were mixed by adding crashing solvent to whole blood (left) and adding whole blood to crashing solvent (right). The addition of crashing solvent into the whole blood sample provides better sample mixing homogeneity, and thus, more efficient
protein precipitation. With this modified addition order, protein precipitation can be achieved by allowing the sample to sit for five minutes after crashing solvent addition; therefore, pipette mixing is not necessary, and can be skipped. The better mixing homogeneity achieved using this sample first, crashing solvent second method also improves the sample elution consistency well to well, prevents unprecipitated blood from passing through the cartridge, and results in smoother and easier elution. From a workflow perspective, adding samples directly to the Captiva
EMR—Lipid plate allows the addition and mixing of internal standard (IS) in the Captiva EMR—Lipid plate before the addition of crashing solvent. All of the sample preparation steps can be done in the Captiva EMR—Lipid plate, with no sample transfer needed. This saves time and cost, and reduces the risk of sample cross-contamination. The two different protocols, shown at the bottom of Figure 4 for comparison, clearly demonstrate the benefits of the simplified procedure. This addition order is recommended for all 96-well plate protocols using in-well PPT followed by Captiva EMR—Lipid cleanup.
Figure 4. Human whole blood in-well protein precipitation demonstrating the effect of adding crashing solvent into whole blood versus adding whole blood into crashing solvent.
Top view
Side view
Skip a transfer step
Whole blood settled at the bottom; proteins not being precipitated.
Adding crashing solvent into whole blood
Aliquot sample into Captiva EMR—Lipid plate.
Add IS and vortex for mixing.
Add crashing solvent to Captiva EMR—Lipid plate.
Sample elution
Adding whole blood into crashing solvent
Aliquot sample into collection plate.
Add IS and vortex for mixing.
Add crashing solvent to Captiva EMR—Lipid plate.
Transfer sample mixture to Captiva EMR—Lipid plate.
Sample elution

6
Sample aliquot, IS, and crashing solvent additionBecause biological fluids are more viscous, sample aliquoting can be challenging. Pipetting is the method of choice for accurately transferring desired sample volumes. In addition to standard pipetting precautions, it is important to dispense bio-fluid samples with the tip inserted perpendicular to the bottom of the well (Figure 5A) rather than tilted to the well wall (Figure 5B). This prevents sample from sticking to the well wall; otherwise, sample residue on the wall may not be precipitated efficiently.
The use of IS is critical for reliable quantitation. It is important to add IS spiking solution directly into sample matrix, not into the crashing solvent, so that IS compounds can equilibrate with the sample matrix and track analyte behavior in the matrix. The addition of IS spiking solution is usually the second step, after sample aliquoting. Generally, IS solution contains some of the organic component to keep the compounds soluble, but the organic solvent volume used to prepare the IS solution should be as low as possible. IS spiking solution concentration should be adjusted so that only 5–10 % of IS spiking solution volume (relative to the total sample volume) is added. All of the above cautions are to minimize partial
PPT with the IS addition. A repeater pipette is commonly used to simplify the addition of IS spiking solution to multiple samples. Since the added IS spiking solution volumes are typically low (10–20 µL), it is important that the IS spiking solution is added to the sample, not to the container wall. To prevent contamination, do not let the repeater tip touch the sample or container wall. Thorough mixing by vortexing is necessary for getting IS into the matrix and equilibrated.
Addition of crashing solvent usually involves a large volume, and since the same solvent/solution is added to multiple samples, a repeater pipette is usually used. Due to the large volume being added, it is important to add solvent with the tip on top of the well tilted at approximately a 60° angle (Figure 5C). Avoid adding solvent with a perpendicular tip (Figure 5D), otherwise solvent can splash out, and cause cross-contamination.
A B C D
Figure 5. Biological sample aliquoting (A and B) and crashing solvent addition (C and D).

7
Sample mixingSignificant protein precipitation occurs when the crashing solvent is added to the biological sample in the well. However, to complete PPT and achieve the desired PPT efficiency, it is recommended to use either active mixing (vortexing/pipette mixing) or passive mixing (waiting five minutes). For the 96-well plate-based PPT, sample mixing by vortex can be used when the total volume is less than 500 µL. Before vortexing, carefully cover the Captiva EMR—Lipid plate with a plate cover. Since high speed can cause sample cross-contamination, carefully set the vortexing speed. It is important to ensure that the liquid mixing line during vortexing does not touch the plate cover, and that there is no sample residue observed on the plate cover after mixing (Figure 6A). To achieve efficient mixing while preventing sample splashing and subsequent cross-contamination, it is best to use a multitube vortexer at 1,350 rpm.
For sample volumes over 500 µL, it is recommended to use passive mixing by allowing the sample to sit for five minutes. Since adding the crashing solvent to the sample already provides efficient mixing, allowing the samples to sit for five minutes results in efficient PPT (Figure 6B). When active PPT is needed, pipette mixing using wide bore tips is highly recommended (Figure 6C). Wide bore tips prevent precipitates from clogging the tips during mixing.
Figure 6. PPT completion by active mixing using vortexing for sample volume ≤500 µL, or pipette mixing for over 500 µL total volume, and using passive mixing by sample settling for five minutes.
A
B C
Sample vortexing upper line
During vortexing
Allow sample to sit for five minutes
Wide bore pipette tips are needed for pipette mixing
After vortexing
Plate cover free of contamination after vortexing

8
Sample elutionAfter in-well PPT, sample is eluted through a Captiva EMR—Lipid plate, where the protein precipitates are removed by filtration, and lipids are trapped by the EMR—Lipid sorbent. The special design of the Captiva EMR—Lipid plate allows smooth filtration without clogging. To ensure sufficient interaction between the sample matrix and EMR—Lipid sorbent for successful lipid removal, elute slowly and smoothly, at one drop per 3–5 seconds. Elution can be done in three ways:
• Centrifugation
• Positive pressure elution
• Vacuum elution
When centrifugation is used, elution can be performed by low-speed centrifugation (600–700 rpm) for 5–10 minutes. After elution, a short period of high-speed (3,000 rpm) centrifugation for ~one minute is necessary to drain the cartridge. When a positive pressure manifold is used, elution can be performed by applying low pressure (2–5 psi) for ~5–10 minutes, followed by a short period of high pressure (6–9 psi) to drain the cartridge. When a vacuum manifold is used, elution is performed by applying low vacuum (2–5” Hg) for ~5–10 minutes, followed by a short period of high vacuum (8–10” Hg) to drain the cartridge.
Secondary elution is usually performed to ensure complete elution. The typical secondary elution uses 80:20 ACN/water; the volume should be ~20–40 % of the total sample loading volume, and added after the primary elution, when no liquid is visible in the wells. Similar elution conditions should be used for the secondary elution.
Figure 7 shows a typical workflow for in-well PPT + Captiva EMR—Lipid cleanup on 96-well Captiva EMR—Lipid plate.
Is sample total volume >500 µL?
Remove the plate mat; samples are ready for elution.
Add 80:20 ACN/water for secondary elution (optional), depending on the total sample loading volume and analyte recovery needs.
Check the eluent in each well; then, sample eluent is ready for post-treatment such as further dilution, or dry and reconstitute, or direct injection.
Yes
Option 1 Option 2 Option 3
Centrifuge at 600 rpm for ~5–10 minutes
Elution with vacuum at 2–5” Hg for ~5–10 minutes
Elution with PPM at 2–5 psi for ~5–10 minutes
Centrifuge at 600 rpm for ~three minutes,
then at 3,000 rpm for ~one minute
Elution with vacuum at 2–4” Hg for ~three minutes,
then at 8–10” Hg for ~one minute
Elution with PPM at 2–4 psi for ~three minutes, then at 6–9 psi for
~one minute
No
Cover the plate, and vortex at 1,350 rpm for two minutes
Let settle for five minutes, or pipette mix with wide bore pipette tips
Place a Captiva EMR—Lipid 96-well plate onto a Captiva 1-mL collection plate.
Aliquot biological sample.
Add IS, cover the plate, and vortex the plate at 1,350 rpm for one minute.
Add crashing solvent with a crashing ratio of 3:1–5:1.
Figure 7. Typical in-well PPT + Captiva EMR—Lipid 96-well plate cleanup workflow.

9
Traditional PPT versus PPT + Captiva EMR—Lipid cleanupTraditionally, PPT can be conducted either in the 96-well collection plate or in individual vials. Following centrifugation for precipitate removal, the supernatant is transferred to another plate or set of vials for subsequent treatment. When followed by Captiva EMR—Lipid cleanup, PPT is conducted in a Captiva EMR—Lipid plate followed by appropriate elution to remove the protein precipitates and lipids. Table 1 shows the comparison between traditional PPT versus PPT + Captiva EMR—Lipid cleanup.
Compared to traditional PPT, the first advantage of PPT + Captiva EMR—Lipid cleanup is the simplified and automatable workflow. Skipping one transfer step provides an approximate time savings of 30 %. This workflow improves productivity, and also reduces sample loss and cross-contamination risk. Lipid removal is another significant advantage for PPT + Captiva EMR—Lipid cleanup. It has been demonstrated that Captiva EMR—Lipid cleanup provides >99 % removal of phospholipids in biological matrices3–6. This additional lipid removal provided by Captiva EMR—Lipid cleanup significantly reduces matrix ion suppression, and improves method reliability and data quality. The third advantage provided by PPT + Captiva EMR—Lipid cleanup is the impact of running significantly cleaner samples on the instrument, especially in a high-throughput lab. This reduces
maintenance, and prevents instrument downtime, further increasing lab productivity and throughput.
When running samples prepared by traditional PPT, matrix (lipid) interferences can accumulate in the detection flowpath, such as the injection port, LC column, MS source, and so forth. Without efficient cleaning or flushing on the detection system in time, the accumulated interferences will cause sample analysis failure, and result in instrument downtime. Traditional approaches for reducing the contamination and accumulation of matrix interferences on the detection flowpath include using a longer LC gradient, more needle washing, or more blank sample injections after real samples. Even though these strategies work, they all increase run time, limiting daily sample analysis throughput.
Table 1. Comparison of centrifugation-based traditional PPT (96-well plate) on plate versus filtration-based PPT + Captiva EMR—Lipid cleanup (96-well plate). The comparison is based on 96 samples on a 96-well plate, with all lab equipment provided, all reagents prepared in advance, and an experienced technician.
Traditional PPT (96-well plate)(Centrifugation)
PPT + Captiva EMR—Lipid cleanup (96-well plate)(Filtration)
StepTime needed
(min)Consumables
needed StepTime needed
(min)Consumables
needed
Plate labeling and sample aliquot 3096 tips (small size)
1 Collection platePlate labeling and Sample aliquot 30
96 tips (small size)
1 Collection plate
1 EMR—Lipid plate
IS addition 5 1 Repeater tip IS addition 5 1 Repeater tip
Sample mixing 2 Plate cover Sample mixing 2 Plate cover
Crashing solvent addition 5 1 Repeater tip Crashing solvent addition 5 1 Repeater tip
Sample mixing 5 Plate cover Sample mixing or settling 5 Plate cover needed only for mixing
Centrifugation 10 Elution 10
Supernatant transfer, collection plate labeling 3096 tips (medium size)
1 Collection plate Sample post-treatment Various 1 Plate mat
Sample post treatment Various 1 Plate mat
Total SPP time needed 87 minutes by post treatment Total SPP time needed 57 minutes by post treatment (~30 % time savings)
Instrument running time and solvent use 100 % Instrument running time and solvent use <90 % (save at least 10 % on time and solvent use)
Matrix removal Proteins only Matrix removal Proteins and lipids

10
Figure 8A shows an example of chromatograms for whole blood matrix blanks prepared using PPT + Captiva EMR—Lipid cleanup (top) and PPT only (bottom). The black profile in the left top corner shows the target analyte chromatogram. All target analytes were eluted in six minutes. For cleaner samples, the LC gradient can be stopped at six minutes; however, for dirtier samples, additional solvent wash is necessary to elute the matrix junk completely, resulting in 12 minutes run time. Figure 8B shows the results from another test, where the same short LC gradient (six-minute run) was used in both cases, followed by reagent blank injections to monitor for system carryover. For samples prepared by
PPT only, matrix phospholipids cannot be flushed out completely using a short gradient, resulting in significant system contamination that requires up to 10 reagent blanks to completely clean the detection system. Without these blanks, the matrix interferences will accumulate in the detection system as more matrix samples are injected. Sometimes, the short cycle time is used to complete the sequence, but the instrument has to be set for more complete flushing with high organic solution periodically. To reduce matrix contamination of the detection system, more time and solvent use on the instrument are required for any of these solutions.
When injecting the cleaner samples prepared by PPT + Captiva EMR—Lipid cleanup, sample matrix contamination and accumulation in the system are significantly reduced. This saves time and solvent by enabling a shorter LC gradient, or less injection port washing, and less frequent system cleanup. All of these benefits provide the potential to improve sample testing throughput. Even a conservative estimate of 10 % savings on instrument time and solvent use can be significant for high-throughput labs.
5.9
6.0
6.1
6.2
PPT + EMR—Lipid cleanup whole blood matrix blank
0.51.01.52.02.53.03.54.04.5
PPT whole blood matrix blank
0.5 1.0 1.5 2.0 2.5 3.0 3.5 4.0 4.5 5.0 5.5 6.0 6.5 7.0 7.5 8.0 8.5 9.0 9.5 10.0 10.5 11.0 11.5 12.0
0
100
-3 2 7 12
0
100
-3 2 7 12
5.9
6.0
6.1
6.2
5.9
6.0
6.1
6.2
0 1 2 3 4 5 6
PPT—EMR system carryover blank
PPT—EMR whole blood blank
12345
1 2 3 4 5 6 7 8 9 10 11 12
PPT whole blood blank
1
2
3
4
1 2 3 4 5 6
PPT system carryover blanks (1–10)
A
B
Target analytes elution
×105
×105
×105
×106
×106
×106
Acquisition time (min) Acquisition time (min)
Acquisition time (min)
Coun
tsCo
unts
Coun
tsCo
unts
Coun
tsCo
unts
Figure 8. Cleaner samples can shorten the individual sample cycle time (A) and reduce system contamination (B), increasing sample analysis throughput.

www.agilent.com/chem
For Research Use Only. Not for use in diagnostic procedures.
This information is subject to change without notice.
© Agilent Technologies, Inc. 2018 Printed in the USA, April 5, 2018 5991-9222EN
ConclusionsPPT is widely used to prepare bio-fluid samples for LC/MS/MS analysis due to its simplicity and wide applicability. Batch processing using a 96-well plate format improves sample preparation productivity, and is widely used. In-well PPT + Captiva EMR—Lipid cleanup provides many advantages over traditional PPT, including simplified workflow, removal of both protein and lipids, better method reliability, high-quality data, and reduced impact on the detection instrument. It is important to use the appropriate crashing solvent type, ratios, and additives based on analysis requirements. The proper solvent and sample addition order (sample, IS, and crashing solvent) are important factors for achieving efficient mixing homogeneity and preventing sample bypassing. Batch processing on 96-well plates usually runs a higher risk of cross-contamination compared to traditional individual sample handling; therefore, proper pipetting and mixing are critical.
References1. Polson; et al., Optimization of
protein precipitation based upon effectiveness of protein removal and ionization effect in liquid chromatography-tandem mass spectrometry, J. Chromatogr. B 2003, 785(2), 263–275.
2. Grant, R. Solutions Based Extraction Techniques, Presentation on Sample Preparation ASMS Fall Workshop, 2016.
3. Zhao, L.; Lucas, D. Agilent Technologies Application Note, publication number 5991-8006EN, 2017.
4. Lucas, D.; Zhao, L. Agilent Technologies Application Note, publication number 5991-7956EN, 2017.
5. Stevens, J.; Zhao, L. Agilent Technologies Application Note, publication number 5991-8635EN, 2017.
6. Zhao, L.; Lucas, D. Agilent Technologies Application Note, publication number, 5991-8007EN, 2017.