Processing Minor Work Permits - Ohio · PDF fileProcessing Minor Work Permits 1. Once you have...
9
Processing Minor Work Permits 1. Once you have successfully logged in to the new Work Permit Processing System, you will find many of the data entry screens to be similar to the original system. None of the procedural paperwork that is necessary to obtain a Work Permit has changed, so the information that will be entered into this new system is the same information that was entered into the original system. However, there may be some functional differences in this new system, which this walkthrough will attempt to explain. 2. Upon logging into this new system, you will see the “Home” screen. On this screen, you can choose to either “Process Permits” or “Maintain Account”. An example of this “Home” screen is in the image below: The “Permit Process” button will take you to the Work Permit Processing area of the system. This is where you will be able to search for students, add students and issue or revoke permits. The steps in this process will be outlined in section 3 of this walkthrough. The “Maintain Account” button will take you to an account maintenance screen that will allow you to make changes to your account. On that screen, you will be able to change your password, update your security question or correct/edit the information in the system regarding your school/district’s information. An example of the “Maintain Account” screen is in the image below:
Transcript of Processing Minor Work Permits - Ohio · PDF fileProcessing Minor Work Permits 1. Once you have...

Processing Minor Work Permits
1. Once you have successfully logged in to the new Work Permit Processing System, you will find many of the data
entry screens to be similar to the original system. None of the procedural paperwork that is necessary to obtain
a Work Permit has changed, so the information that will be entered into this new system is the same
information that was entered into the original system. However, there may be some functional differences in
this new system, which this walkthrough will attempt to explain.
2. Upon logging into this new system, you will see the “Home” screen. On this screen, you can choose to either
“Process Permits” or “Maintain Account”. An example of this “Home” screen is in the image below:
The “Permit Process” button will take you to the Work Permit Processing area of the system. This is where you
will be able to search for students, add students and issue or revoke permits. The steps in this process will be
outlined in section 3 of this walkthrough.
The “Maintain Account” button will take you to an account maintenance screen that will allow you to make
changes to your account. On that screen, you will be able to change your password, update your security
question or correct/edit the information in the system regarding your school/district’s information. An example
of the “Maintain Account” screen is in the image below:

3. If the “Permit Process” button is selected, you will be directed to a page that looks like the example below:
As you can see in this example, this screen appears to be very similar to the original system. A student can be
searched by last name or date of birth. You can also add a student from this screen. For the following
walkthrough, we will focus on “Add a New Student”.
To “Add” a student in this system, you will select the “Add” button and you will be directed to Student
Information Page. An example of this is in the image below:
The information necessary to complete this page will be found on the “Work Permit Application” that should be
completed by the student and returned to the school/district. Again, note that this screen is similar to the
original system’s “Student Information Page”.

You will enter the Student’s information on this page, including their proof of age documentation, their school of
attendance, their status as a Vocational Student and their current grade. Once that information is completely
filled in, you will select “Add Student”. Once you select “Add Student”, that student’s record will be saved in this
system, under your account. An example of a completed record is in the image below.
*Please Note: in order to process a Work Permit for a student, their information must be completely filled in and
the “Add Student” button must be selected for that student.
After you have completed the Student Information and selected “Add Student”, you will notice that the “Permit
Information” section at the bottom of the page now allows you a choice to “Add New Record”. An example of
this is in the image below:
You will need to select “Add new record” in order to begin processing a student’s Work Permit.
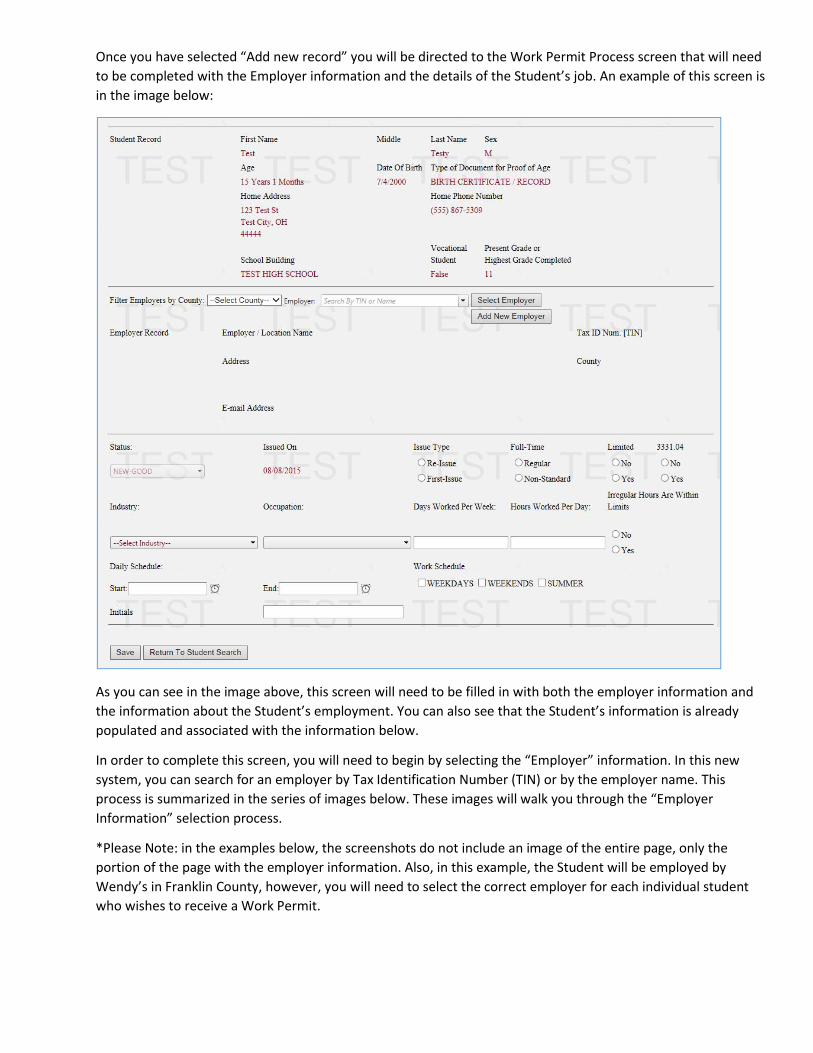
Once you have selected “Add new record” you will be directed to the Work Permit Process screen that will need
to be completed with the Employer information and the details of the Student’s job. An example of this screen is
in the image below:
As you can see in the image above, this screen will need to be filled in with both the employer information and
the information about the Student’s employment. You can also see that the Student’s information is already
populated and associated with the information below.
In order to complete this screen, you will need to begin by selecting the “Employer” information. In this new
system, you can search for an employer by Tax Identification Number (TIN) or by the employer name. This
process is summarized in the series of images below. These images will walk you through the “Employer
Information” selection process.
*Please Note: in the examples below, the screenshots do not include an image of the entire page, only the
portion of the page with the employer information. Also, in this example, the Student will be employed by
Wendy’s in Franklin County, however, you will need to select the correct employer for each individual student
who wishes to receive a Work Permit.

In the event that an Employer is has never been used in the original system or in this new system, you will need
to select “Add New Employer” from the Employer Record screen. That process is outlined in the following series
of images below.

Once the Employer Record is completed and you have clicked on “Select Employer”, you are ready to move to
the entry of the Student’s Employment Information. That process will be outlined in the following series of
images below.

Once you have clicked on “Save” after entering the Work Permit information, you will see a pop-up that is the
printable Work Permit. An example of that is in the image below. You will need to select “Print”, which will
depend on your browser type and the software installed locally on your computer. This permit pop-up will be a
PDF file that can be printed.
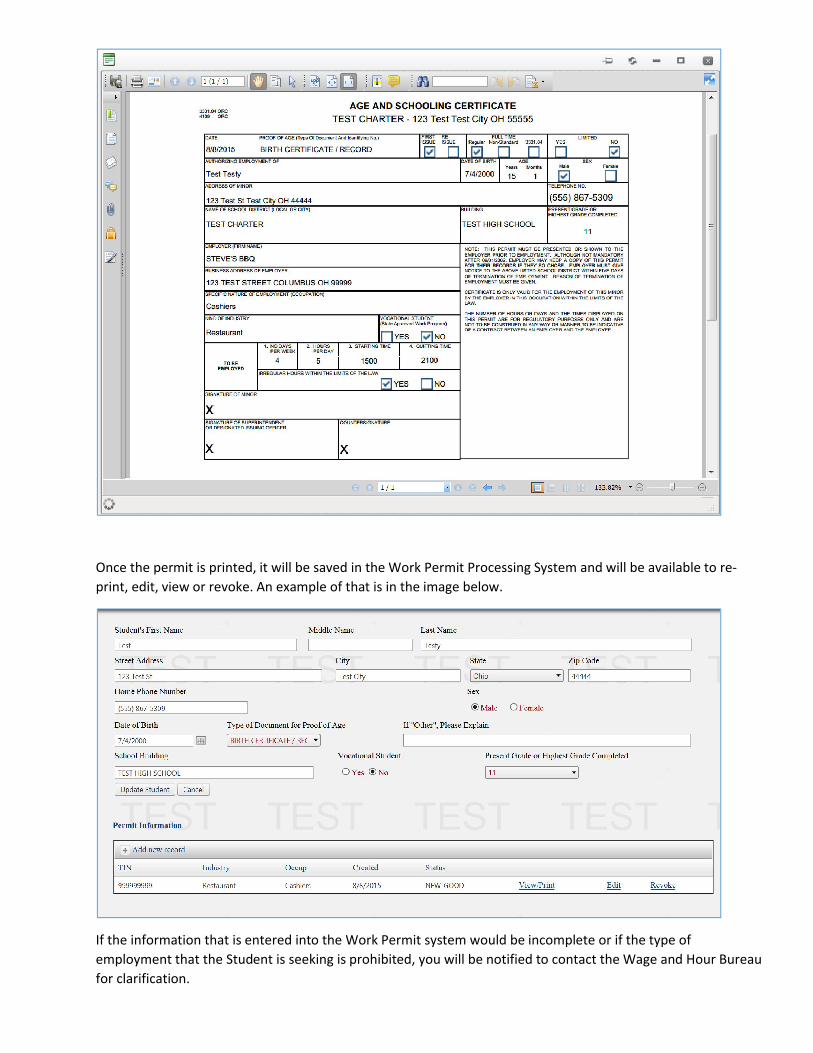
Once the permit is printed, it will be saved in the Work Permit Processing System and will be available to re-
print, edit, view or revoke. An example of that is in the image below.
If the information that is entered into the Work Permit system would be incomplete or if the type of
employment that the Student is seeking is prohibited, you will be notified to contact the Wage and Hour Bureau
for clarification.

4. You have now completed a Work Permit in the new Work Permit Processing System. Once the Work Permit is
processed and printed, you will be taken back to the Student Record.
5. You can be directed back to the “Home” screen at any point by clicking the “Home” icon at the top of the
screen.
From that screen you are able to navigate to and through a student record and see all of the past and present
Work Permits that have been issued to that Student.
If you would encounter any issues that are not addressed in this walkthrough, please email the Wage and Hour
Bureau at [email protected] and include your UserID and a description of your issue.