
PRO Package Procedures Guide - paxtoncharitiesonline.co.uk€¦ · Sales income via services,...
32
PRO Package Procedures Guide
Transcript of PRO Package Procedures Guide - paxtoncharitiesonline.co.uk€¦ · Sales income via services,...

PRO PackageProcedures Guide

This is what you doWelcome to Paxton Charities Accounting. Please follow the steps below to ensure a smooth implementation of
the package.
Install the CDLoad the Paxton Charities Accounting disc to the CD drive of your computer and follow the simple on-screen
instructions.
The installation process will create four desktop icons:-
Paxton Run will start the application
Paxton Accruals HELP will start the accruals HELP module
Paxton R&P HELP will start the receipts & payments HELP module
(not applicable to the PROJECTS package)
Paxton Set Up Guide will create and print your own tailor made Set Up guide.
Apply the Activation KeyYour licence to use the package is enabled by the application of an activation key as follows:-
Start the package by double clicking on the 'Paxton Run' icon.
Press the 'Demo data' button to display the demonstration databases.
Double click on any one of the demonstration databases, and click OK when the activation message is displayed.
Click on the 'Activate' button.
Enter the Serial number, number of users, number of charities and the Activation Key as issued with the package.
The Activation Key is case sensitive and must be entered EXACTLY as notified.
Click on the 'Activate' button and the package is now ready for you to use.
Procedures Guide for PRO Users
The following procedures are suggested when using the PRO package. The procedures have been designed to
facilitate consistency of transaction input.
Make sure that you have followed the steps in the Start Here booklet before running the package for live use.
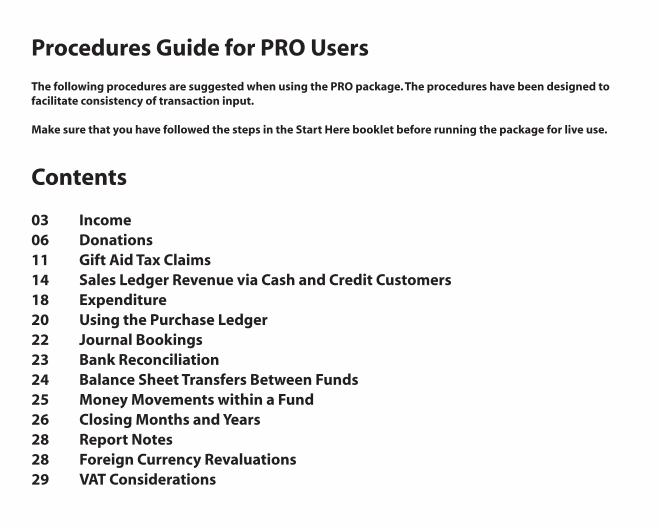
Contents
03 Income
06 Donations
11 Gift Aid Tax Claims
14 Sales Ledger Revenue via Cash and Credit Customers
18 Expenditure
20 Using the Purchase Ledger
22 Journal Bookings
23 Bank Reconciliation
24 Balance Sheet Transfers Between Funds
25 Money Movements within a Fund
26 Closing Months and Years
28 Report Notes
28 Foreign Currency Revaluations
29 VAT Considerations
IncomeThe income received will either be for the general purposes of the charity or for some more specific purpose. This
allocation of income is accommodated through the use of funds. It is important that funds are correctly set within the
package before proceeding. Where appropriate, income can also be assigned to projects.
If income is received in a foreign currency, then it must be booked to a money account of the same currency
Your income will usually include the following categories:-
Normal Income■ Grants received.
■ Fundraising income.
■ Income from charitable activities.
■ Investment income from interest, etc.
■ Sales income via services, merchandising, hall hire, etc.
■ Refunds of previous payments.
Donations■ Donations via standing orders with or without Gift Aid.
■ Donations via cheque or cash with or without Gift Aid.
■ Gift Aid claims.
Sales Revenue ■ Sales invoices to cash and credit customers.
■ Sales credit notes to cash and credit customers.
03 Procedures Guide for PRO Package

Normal Income
Normal income can be booked either using the Income Bookings program for single entries or the Multiple Income
Booking program for multiple entries.
For single entries proceed as follows :
Menu: Nominal Ledger – Income Bookings.
‘Money account' is the account to which the total amount will be booked.
'Receipt reference' will appear in the bank reconciliation and so, enter this as something that may relate it to the bank
statement entry, e.g. paying-in slip number, DD, STO, etc.
The 'Effective date' should be set to the date of the banking if known. Otherwise leave as 'todays' date.
Enter the total amount being booked.
Enter 'Reference 1' usually as the payer name.
Specify the default fund code that will apply to each entry unless specifically entered in the appropriate lines.
Enter the analysis lines in the grid. Each line will require an income analysis account code (either keyed in or selected
by right clicking on the ‘A/C’ field), an amount and a fund code (if different to the default fund code from the screen
header). The project code and Reference 2 fields are optional. If VAT registered then see the notes on Page 29.
When the entries are completed, press Confirm and check the entries for correctness. If amendments are required,
then press Cancel and edit the appropriate entry details. Otherwise, press Record to process.
The Multiple Income Bookings program is normally used where there are multiple payment receipts included on the
same booking reference. The most common example of this is where a single bank paying-in slip for cheques and cash
requires a separate entry line for each payer. Note that this program is not available if your database has been
created as VAT registered.
04Procedures Guide for PRO Package

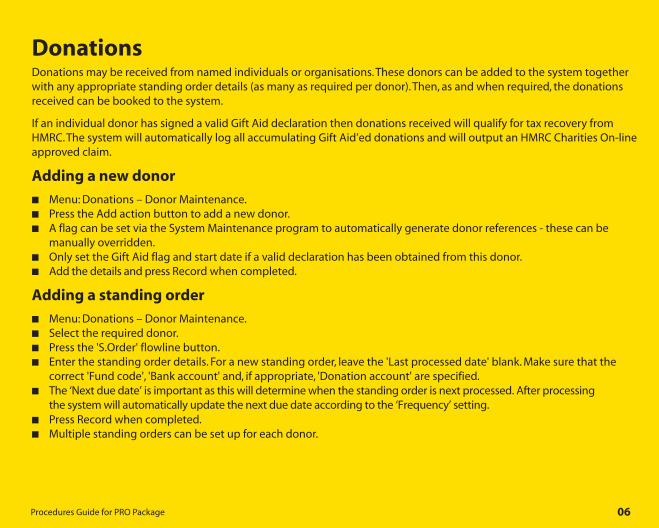
DonationsDonations may be received from named individuals or organisations. These donors can be added to the system together
with any appropriate standing order details (as many as required per donor). Then, as and when required, the donations
received can be booked to the system.
If an individual donor has signed a valid Gift Aid declaration then donations received will qualify for tax recovery from
HMRC. The system will automatically log all accumulating Gift Aid’ed donations and will output an HMRC Charities On-line
approved claim.
Adding a new donor
Menu: Donations – Donor Maintenance.
Press the Add action button to add a new donor.
A flag can be set via the System Maintenance program to automatically generate donor references - these can be
manually overridden.
Only set the Gift Aid flag and start date if a valid declaration has been obtained from this donor.
Add the details and press Record when completed.
Adding a standing order
Menu: Donations – Donor Maintenance.
Select the required donor.
Press the 'S.Order' flowline button.
Enter the standing order details. For a new standing order, leave the 'Last processed date' blank. Make sure that the
correct 'Fund code', 'Bank account' and, if appropriate, 'Donation account' are specified.
The ‘Next due date’ is important as this will determine when the standing order is next processed. After processing
the system will automatically update the next due date according to the ‘Frequency’ setting.
Press Record when completed.
Multiple standing orders can be set up for each donor.
06Procedures Guide for PRO Package
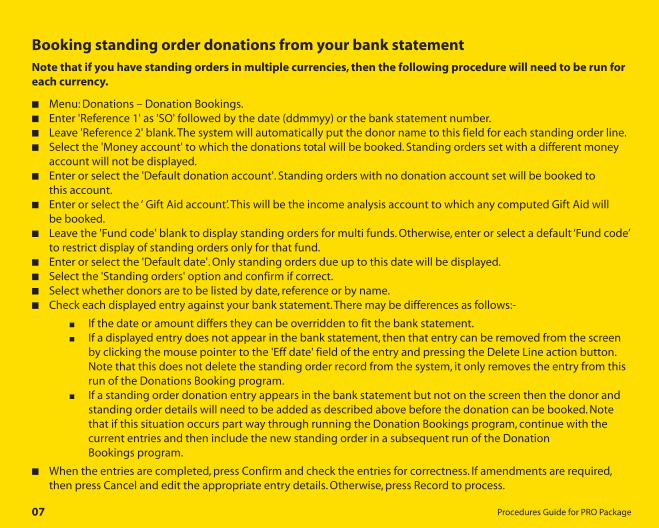
Booking standing order donations from your bank statement
Note that if you have standing orders in multiple currencies, then the following procedure will need to be run for
each currency.
Menu: Donations – Donation Bookings.
Enter 'Reference 1' as 'SO' followed by the date (ddmmyy) or the bank statement number.
Leave 'Reference 2' blank. The system will automatically put the donor name to this field for each standing order line.
Select the 'Money account' to which the donations total will be booked. Standing orders set with a different money
account will not be displayed.
Enter or select the 'Default donation account'. Standing orders with no donation account set will be booked to
this account.
Enter or select the ‘ Gift Aid account’. This will be the income analysis account to which any computed Gift Aid will
be booked.
Leave the 'Fund code' blank to display standing orders for multi funds. Otherwise, enter or select a default ‘Fund code’
to restrict display of standing orders only for that fund.
Enter or select the 'Default date'. Only standing orders due up to this date will be displayed.
Select the 'Standing orders' option and confirm if correct.
Select whether donors are to be listed by date, reference or by name.
Check each displayed entry against your bank statement. There may be differences as follows:-
If the date or amount differs they can be overridden to fit the bank statement.
If a displayed entry does not appear in the bank statement, then that entry can be removed from the screen
by clicking the mouse pointer to the 'Eff date' field of the entry and pressing the Delete Line action button.
Note that this does not delete the standing order record from the system, it only removes the entry from this
run of the Donations Booking program.
If a standing order donation entry appears in the bank statement but not on the screen then the donor and
standing order details will need to be added as described above before the donation can be booked. Note
that if this situation occurs part way through running the Donation Bookings program, continue with the
current entries and then include the new standing order in a subsequent run of the Donation
Bookings program.
When the entries are completed, press Confirm and check the entries for correctness. If amendments are required,
then press Cancel and edit the appropriate entry details. Otherwise, press Record to process.
Procedures Guide for PRO Package07

Booking cheques and cash donations from known donors
Menu: Donations – Donation Bookings.
'Reference 1' will appear in the bank reconciliation and so, if known, enter this as the bank paying-in slip reference.
Enter 'Reference 2' as ‘DB ddmmyy' where 'ddmmyy' is the date.
Select the 'Money account' to which the donations total will be booked. If a foreign currency account is selected, only
donations of the same currency can be booked to it.
Select the 'Default donation account'. This will be used where no donation analysis account code is entered in the
donation line.
Enter or select the ‘ Gift Aid account’. This will be the income analysis account to which any computed Gift Aid
will be booked.
If computation and logging of Gift Aid is to be suppressed, then check the 'No Gift Aid' box.
Enter/select a default ‘Fund code’. This will be used where no fund code is entered in the donation line.
If all entered donation lines are for the same project then enter the 'Project code' as the default. Otherwise, leave
blank and enter projects as, and if, required in each donation line.
Enter or select the 'Default date' that will apply to all entry lines. For accuracy within the bank reconciliation program,
this should be the date that the banking was made.
Select the 'Other donations' option and enter the donation details in the grid. Donor references can either be keyed
in or selected by right clicking in the 'Donor ref' field. If the reference is not known then right click in either the 'Donor
ref ' or 'Name' to select from a list or double click in either of these fields for a fuller search on name, address,
postcode, etc. Note that New donors can be added within this bookings program by pressing the Donor
flowline button. If you select the ‘Weekly gifts’ option, then all donors whose ‘Weekly gift’ flag has been set to ‘Y’ will
be displayed. In this case, only enter a value against those donors that have given.
When the entries are completed, press Confirm and check the details for correctness. If amendments are required,
then press Cancel and edit the appropriate entry details. Otherwise, press Record to process.
08Procedures Guide for PRO Package
Booking cash donations from unknown donorsIndividual cash donations of up to £20 value from unknown doners can be booked under the Gift Aid Small Donations
Scheme (GASDS). Refer to HMRC for eligibility details.
To add a ‘small donations’ donor:
Menu: Donations – GASDS Maintenance.
Press the Add action button to add the new donor.
For your GASDS small donor set the Community Building flag to 'N'. There can only be one small donor under the scheme.
For community buildings set the Community Building flag to 'Y'. There may be many community building donors
under the scheme.
Make sure that you have set the Threshold figure correctly. Set the Start Date to when you have been approved by
HMRC for the scheme. It can not be before 06/04/13.
Donations from the small donations donor and community buildings donors will be entered as normal via the Donation
Bookings program. Threshold checks will prevent over booking in any tax year.
Procedures Guide for PRO Package09

Support CoverProvides exceptional technical support .including access to:-
■ Paxton's Telephone Support Desk
■ Online Database Support
■ FREE software updates
Contact Paxton direct on 01234 216666 to purchase.
Expert TrainingProvides fantastic value exclusively for your organisation with practical, hands-on
assistance to get you started as quickly as possible. Our Quick Start Day covers:-
■ Establishing your chart of accounts
■ Creating your funds
■ Setting your opening balances
■ Defining your initial operating procedures
Call 01234 216666 for pricing and booking information.
Gift Aid Tax ClaimsClaims for recoverable Gift Aid are now made via HMRC's Charities Online facility. You will need to register with HMRC to
use this service. Refer to the HMRC website for registration and claim submission details. If you have used the Donation
Bookings program to enter your donations then you can output a spreadsheet of your claim details for submission as
detailed below. If you are also submitting a claim under the community buildings scheme then a separate spreadsheet
will need to be output for this. Spreadsheets need to be submitted in OpenDocument format (i.e. Open Office format).
Generating your Charities Online Gift Aid ClaimsNew claims will be made as follows:-
Menu: Donations – Gift Aid Schedule.
Enter a Reference and 'Donations up to' date.
For normal donor claims check the 'New schedule' option and the 'Donation schedule' option. For small donation
donor claims (GASDS scheme) or community buildings claims check the appropriate option.
Press the Display button. Claim details for each relevant donor will be listed.
Select the output option required. Note that if Open Office is not available then it can be downloaded free of charge. Alternatively, many versions of Microsoft Excel will allow output to be generated in Open Office format.
SPECIAL NOTE: Spreadsheet transmission only applies to normal donor claims and community building
claims. Using Charities Online you will manually key in your small donation donor claim. WHEN MAKING A
SMALL DONATION DONOR CLAIM IT IS IMPERATIVE THAT YOU PRINT OUT THE CLAIM DETAIL EVEN THOUGH IT
WILL ONLY BE FOR ONE LINE. OTHERWISE, THE SYSTEM WILL NOT KNOW THAT A CLAIM FOR THE SMALL
DONATION DONOR HAS BEEN MADE.
To submit the claim, log in to the HMRC website and follow the Charities On-line instructions.
Procedures Guide for PRO Package11

Printing an internal summaryWhen payment is received from HMRC, it will need to be booked through the accounts with the correct apportionment
across funds if appropriate. This report lists the split between the funds.
■ After the schedule has been printed, run the Gift Aid Schedule program again.
■ Press the 'Reproduce schedule' option and select the 'Reference' of the required schedule.
■ Check the 'Internal summary' box.
■ Press Display and Print. This report will show, for that schedule, the breakdown between funds of the total donations.
Booking the Gift Aid payment from HMRCMake sure that you have the internal summary report for the claim for which payment has been received then book the
payment as follows:-
■ Menu: Nominal Ledger – Income Booking.
■ Money account' is the account to which the total amount will be booked.
■ Enter 'Receipt reference' as how the payment has been made e.g. 'Transfer' or 'Online', etc.
■ The 'Effective date' should be set to the date of the banking if known. Otherwise leave as 'todays' date.
■ Enter the total amount being booked.
■ Enter 'Reference 1' as ‘HMRC’.
■ Enter the analysis lines in the grid. There will be a separate line for each fund code that appears in the internal
summary report. For each required line, enter the A/C code as the ‘Recoverable Gift Aid nominal code’ (the balance
sheet code as declared in the System Maintenance program), the amount for the fund and the fund code.
■ When the entries are completed, press Confirm and check the entries for correctness. If amendments are required,
then press Cancel and edit the appropriate entry details. Otherwise, press Record to process.
12Procedures Guide for PRO Package

Sales Ledger Revenue via Cash and Credit CustomersAdding a new customer
■ Menu: Sales Ledger – Customer Maintenance.
■ Press the Add action button.
■ The 'Name' and 'Account code' are required but all other fields are optional.
■ If the customer is specified as an ‘Individual’ then the entered ‘Title’, ‘First name’ and ‘Surname’ will be automatically
reversed and held as the ‘Name’. This facilitates subsequent name searches.
■ The account code needs to be unique. A suggestion is to use the first 4 characters of the customer name (or surname)
suffixed with 01, 02, etc. E.g. Nuffield Welfare would be NUFF01.
■ If this is a foreign currency customer then enter the currency code.
■ If your charity is VAT registered and this is an EU customer, then enter the EU country code . If you have the VAT
registration number of the EU customer then enter the number and set the VAT code to 8, otherwise leave the VAT
code blank. Press Record when completed.
14Procedures Guide for PRO Package
Booking an invoice to a customer
This facility is used to book invoices NOT raised via the Invoicing program in this package.
■ Menu: Sales Ledger – Sales A/C Centre.
■ Select the required customer.
■ Press the ‘invoice’ flowline button.
■ Check that the ‘Effective date’ is correctly specified.
■ Enter the total amount being booked. Note that if this is a foreign currency customer then all values will be entered in
that currency.
■ Enter 'Reference 1' as the invoice number.
■ Enter a 'Default fund' code.
■ If this is a paid invoice and you wish to enter the payment now, then enter the ‘Payment ref' and ‘Money a/c’. If this is
an invoice on which credit is being taken then leave the ‘Payment ref’ and ‘Money a/c’ fields blank.
■ Enter the analysis line(s) in the grid. Each line will require an income analysis account code and an amount. The
account code can either be keyed in or selected by right clicking in the 'A/C' field. Check that the fund code and, if
appropriate, project code are correctly specified. If VAT registered then see the notes on Page 29.
■ When the entries are completed, press Confirm and check the entries for correctness. If amendments are required,
then press Cancel and edit the appropriate entry details. Otherwise, press Record to process.
Procedures Guide for PRO Package15
Booking payments from a customer
Menu: Sales Ledger – Sales A/C Centre.
Select the customer being paid.
Press the Payment flowline button. The payments screen will list the unpaid invoices.
Enter the total amount of the payment.
Enter 'Reference 1', suggest the bank paying-in slip number or the bank transfer reference. This reference will appear
in the bank reconciliation.
Check that the correct 'Money A/C' and 'Effective date' are set.
Mark off the invoices being paid or part paid:-
The Automatic button will automatically allocate the payment on from the oldest entry.
To pay specific invoices, enter 'P' or a part payment value in the Allocation column.
If the payment total is greater than the allocations made, then the balance will be posted as 'Unallocated cash'.
Press the 'Unallocated' button to include any held unallocated entries for allocation in this booking.
If multiple fund invoices are to be manually allocated, then double click on ‘Multiple’ to expand the invoice
into it’s component lines.
Press Confirm and Record to book the payment.
16Procedures Guide for PRO Package

Raising Invoices
Menu: Sales Ledger – Invoicing.
Select the required customer by ‘A/C code’ or ‘Name’.
The Invoice number will be automatically generated, but you can override it if required.
Check that the Effective date and Fund code are correct. If this invoice applies to a particular project then enter the
'Project code'.
If this is a paid invoice and you wish to enter the payment now, then enter the ‘Receipt ref' and ‘Money a/c’. Otherwise
leave these fields blank.
Enter the invoice lines in the grid:-
If a product code is entered or selected by right clicking in the Product code field, then the Description and
Price will be automatically displayed. These can be amended if required. Enter the Quantity and the line total
will be displayed. If a Product does not apply to this line, then leave the Product code blank and enter the
Description, Quantity and Price.
When the details are correct for all lines, press Confirm and Record.
The Invoice can either be printed by pressing the Print button or printed later via the Invoice/Credit
Print program.
Accounting records will be automatically updated.
Procedures Guide for PRO Package17
Adding products
Menu: Sales Ledger – Product Maintenance.
Press the Add action button.
Enter the Product code and other details. Set ‘Allow decimals’ to ‘Y’ to permit decimal quantities. For example, if this
product is for time where you may bill 4.25 hours at an hourly rate that you would set the hourly rate as the ‘Price’.
If sales of this product are to be analysed to a particular income account, then specify that account in the ‘Revenue
code for invoicing’ field. Otherwise leave this field blank.
If this product is to be analysed to a particular fund then enter this to the ‘Fund code for invoicing’ field.
Press Record when completed.
Expenditure'Payments that have been made for whatever purpose can be booked either through the Multiple Expenditure Booking,
Expenditure Booking, Journal Booking or the Purchase Ledger programs.
Although the Journal Bookings program can be used to book transactions between any accounts in the system, it is
normally used to enter adjustments to the accounts e.g. prepayments, accrued expenses, depreciations, etc.
The Purchase Ledger allows cash and credit invoices and subsequent payments to be booked against suppliers. See the
next page for operating details.
If the purchase ledger is not used and if your organisation is NOT VAT registered, then regular expenditure payments can
be easily booked using the Multiple Expenditure Booking program as follows :-
Menu : Nominal Ledger – Multiple Expenditure Bookngs
Select the required 'Money account'
Enter the 'Effective date' (leave blank for 'today' ) and the 'Fund code' as the defaults for the entries in the
grid below.
In the grid, for each expenditure payment item, enter the Effective date, Expenditure account (right click to
select), Value, Fund code (right click to select), Project code (if appropriate), Payment reference (how paid e.g. DD,
Online, cheque number, etc) and Expenditure reference (who you are paying).
When the entries are completed, enter the total as displayed in the screen header and press Confirm and Record.
NOTE: To book expenditure payments where a single payment needs to be analysed over multiple expenditure heads,
or extra comment description is required, then use the singular Expenditure Booking program. Also, if your organisation
is VAT registered then you would use this program or the purchase ledger to book expenditure.
18Procedures Guide for PRO Package

Using the Purchase LedgerIf the purchase ledger is to be used, then your suppliers will need to be added to the system as follows:-
Adding a new supplier
Menu: Purchase Ledger – Supplier Maintenance.
Press the Add action button to add a new supplier.
The 'Name' and 'Account code' are required but all other fields are optional.
The account code needs to be unique. A suggestion is to use the first 4 characters of the supplier name suffixed with
01, 02, etc. E.g. Arcade Stationers would have an account code ARCA01.
If this is a foreign currency supplier then enter the currency code.
If your charity is VAT registered and this is an EU supplier, then enter the EU country code.
Press Record when completed.
Booking an invoice to a supplier
Menu: Purchase Ledger – Purchase A/C Centre.
Select the required supplier;
Press the Invoice flowline button.
Check that the correct ‘Effective date’ is set and enter the total amount being booked.
Enter 'Reference 1'. Usually the invoice number.
Enter or select a ‘Default fund code’.
If this is a cash invoice and you wish to enter the payment now, then enter the 'Payment ref' (this reference will
appear in the bank reconciliation) and enter the ‘Money a/c’.
If this is an invoice on which credit is being taken (i.e. no payment is being made now), then leave the ‘Payment ref’
and ‘Money a/c’ fields blank.
If this is a foreign currency supplier then amend the exchange rate if required.
For each analysis line in the grid, enter the analysis account code (or right click to select from a dropdown list), the
amount, the fund code and project code if different to the default codes specified in the screen header. If VAT
registered then see the notes on Page 29.
When the entries are completed, press Confirm and check the entries for correctness. If amendments are required,
then press Cancel and edit the appropriate entry details. Otherwise, press Record to process.
20Procedures Guide for PRO Package

Booking payments to a supplier
Menu: Purchase Ledger – Purchase A/C Centre.
Select the supplier being paid.
Press the Payment flowline button. The payments screen will list the unpaid invoices.
Enter the total amount of the payment.
Enter 'Reference 1'. This appears in the bank reconciliation so use the cheque number, BACS reference, etc.
The 'Effective date' should be set to the date that the payment was made. E.g. the date of the cheque.
Check that the correct 'Money A/C' and ‘Effective date’ are set.
Mark off the invoices to be paid or part paid:-
'Automatic' button will automatically allocate the payment against the oldest entry forwards.
To pay specific invoices, enter 'P' or a part payment value in the Allocation column.
If the payment total is greater than the allocations made, then the balance will be posted as 'Unallocated cash'.
Press the 'Unallocated' button to include any unallocated cash for allocation in this payment booking.
If multiple fund invoices are to be manually allocated, then double click on ‘Multiple’ to expand the invoice
into its component lines.
Press Confirm and Record to book the payment.
Journal BookingsMenu: Nominal Ledger – Journal Bookings.
Enter a reference. If a money account is used within this journal, then the reference will appear in the bank
reconciliation for that money account.
Enter a brief 'Comment'.
Select the appropriate 'Default fund’ and ‘Project code’ (if required), and check the 'Effective date'.
In the grid, enter the 'A/C' code, amount and fund code for each entry. Note that a DEBIT value will be applied
positively to the balance on the account and a CREDIT value will be applied negatively. The total values of debits and
credits must be equal for each fund for the journal to be accepted by the system.
If a foreign currency account is specified, then enter the foreign value to the debit or credit column. The system will
compute the base currency value which can be overridden if required. Double click in the ‘Curr’ column to access the
exchange rate and base currency value. The total value of debits and credits in base currency for each fund must
balance for the journal to be accepted. Press Confirm and Record to process.
22Procedures Guide for PRO Package
Bank ReconciliationThe Bank Reconciliation program will be used to validate that your bookings of monies received and paid out check
correctly against your bank statement. A separate reconciliation is required for each different money account to which
you have made a booking. The program can display entries either individually or consolidated by date or by reference on
the same date. Entries from your bank statement that appear on the screen are 'checked off' as reconciled and will not
be displayed when the program is next run. Hence, only unreconciled entries will appear in future displays.
The program can be run as many times as required as follows:-
Menu: Nominal Ledger – Bank Reconciliation.
Select 'New'.
Select the 'Money account' to be reconciled.
Enter a 'Reference'. Suggest that this is the ending bank statement number or date. This reference can be used to
recall a previous reconciliation.
Select the month or date to which the reconciliation is to be performed.
If required, select the 'Consolidate by ref' or ‘Consolidate by date’ option. Note that standing order donations will
always be shown individually.
Enter balance from your bank statement to the 'Bank statement' field.
Press Confirm to display the unreconciled entries.
Press the Change action button and double click in the 'Recon' column for entries that tally with your bank
statement. This will mark the entries as reconciled (Double click again to unset if a mistake is made).
If a displayed entry needs to be amended, then double click in the far right column to display the transaction details.
Normal reverse and re-entry facilities are available to amend or remove the transaction. On return, the transaction
will be amended or removed from the bank reconciliation.'
When all appropriate entries have been marked as reconciled, the 'Difference' box in the screen header should show
zero. If it does not show zero then there is either an erroneous entry or missed entry.
If a difference is shown, then the messages 'Continue to record reconciliation?' and 'There is still a difference’ will be
displayed. If you wish to make changes to the displayed reconciliations, then press ‘No’ otherwise press ‘Yes’
to continue.
If required, press Print to list out the unreconciled entries.
Procedures Guide for PRO Package23

Balance Sheet Transfers Between FundsThe transfer of balance sheet asset and liability values including money values between funds needs to be separately
shown in the accounts, in particular, the transfers to and from restricted and endowment funds which must be
specifically declared in your Charity Commission SOFA Return. Transfers are strictly controlled by the package through
the Inter Fund Transfers program which books all transfer transactions through a specific ‘Fund transfers account code’
that is declared to the system in the System Maintenance program.
The following procedure should be used to book all balance sheet transfers
between funds:-
Menu: Nominal Ledger – Inter Fund Transfers.
Enter or select the 'Effective date' if different to 'today'.
Enter or select the fund code and balance sheet account codes involved in the transfer.
Enter amount to be transferred and a reference.
Enter a brief 'Comment'. This may refer to the authority for the transfer.
If foreign currency money accounts are entered then note that the base currency values must balance for the transfer
to be accepted.
When complete, press Confirm and Record to perform the transfer.
The history of all transfers can be viewed by selecting the ’Fund transfers account code’ within the Nominal
Enquiry program.
24Procedures Guide for PRO Package

Money Movements within a FundThis would typically occur if, for example, you maintained a bank account and a petty cash account. From time to time
you may wish to move monies between the two accounts. If so then proceed as follows:-
Menu: Nominal Ledger – Money Transfers.
Select the ‘Fund code’ and the ‘From and To money accounts’.
Enter the ‘Value’ to be moved.
Enter ‘Reference 1’. This will appear in the bank reconcilliation for both money accounts.
Make sure that the correct ‘Effective date’ is specified.
When complete press Confirm and Record to process.
Procedures Guide for PRO Package25
Closing months and YearsThe package uses calendar monthly accounting periods that are automatically created for you as the date moves on. All
transactions have an effective date which will determine the date and, hence, the month in which any transaction will
take effect. When a transaction is entered, the effective date can be set to any date that lies within an open accounting
month. You will close months as and when you wish to do so. Only the oldest open month can be closed. By closing a
month, a lock is set so that newly entered transactions with an effective date up to the end of that month are blocked
from being booked. Months closed in error can be re-opened.
Your accounting year start date will have been entered when your database was created. As the date moves on, the
system will create new accounting years as it needs them. (Note that the system always requires that one year in advance
always exists. Hence, when the system creates a new year, it will create the next year not the current year). You will decide
when a year is to be closed. A year can only closed if all months within that year are closed. If a year is closed in error, then
it can be re-opened. Only two accounting years can be open at any one time i.e. the current year and the previous year.
Nothing is lost or deleted when a month or year is closed. Hence, all enquiries, reports and previews are available
for all months whether they are closed or not.
Typically, a month will be closed when you are satisfied that there are no more transactions to be booked to it and a
successful bank reconciliation has been performed. You will probably wish to hold the last month of a year open for a
while until the year end inspection or audit has been performed. This will allow any adjustments to be booked to the
previous year before closing it out.
Procedures Guide for PRO Package 26

Closing a month■ Menu: Administration – Open/Close - Close Month.
■ The details of the oldest open month will be displayed.
■ Press Confirm to continue with the closure.
Re-opening a month■ Menu: Administration – Open/Close - Re-Open Month.
■ The details of the most recent closed month will be displayed.
■ Press Confirm to re-open the month.
Closing a year■ Menu: Administration – Open/Close - Close Year.
■ The details of the oldest open year will be displayed. Note that all months within that year must be closed.
■ Press Confirm to continue with the closure.
Re-opening a year■ Menu: Administration – Open/Close - Re-Open Year.
■ The details of the most recent closed year will be displayed.
■ Press Confirm to re-open the year.
27 Procedures Guide for PRO Package

Report NotesA few general points regarding reports:-
■ All reports are 'on demand' at all times. There are no set procedures or restrictions on the use of any report.
■ All current and historical data is available for reporting. No data is lost or deleted when a month or year is closed.
■ Most reports can be previewed on screen. If required, selected or all pages of a preview can be printed.
■ All previewed reports can be transferred directly to Microsoft Excel or to a transfer file.
■ Where relevant, accounting reports can be produced for all or a selected fund.
■ All report definitions can be stored in the 'Catalogue' for subsequent re-use on demand. As dates and months move
on, a report can be selected from the Catalogue, the date changed and the definition written back to the Catalogue
under the same name.
A wide range of reports and enquiries are available within the package. Try experimenting with some of the selections
(suggest as previews!).
Foreign Currency RevaluationsWhen foreign currency payment allocations are booked, the system will automatically post any gains or losses incurred
due to changes in exchange rates to the relevant Gains/Losses account.
From time to time you may wish to revalue foreign currency money accounts, debtors and creditors to the current
exchange rate. To do this, proceed as follows:-
■ Set the correct exchange rate for the required currency via Nominal Ledger—Foreign Currency Maintenance.
■ Then, menu: Nominal Ledger—Currency Revaluation.
■ Select which currency and which accounts are to be revalued.
■ Press the Revalue button to process.
28Procedures Guide for PRO Package

VAT ConsiderationsIf your charity is VAT registered then the package will accumulate goods and VAT values in a VAT register.
By default, VAT periods are assumed to be quarterly. The initial setting of the start date is made within the Create
Database programs when the system was first set up. As time progresses, the system will automatically create new VAT
periods as it needs them. If your VAT period date or durations change, then you will need to manually maintain these via
the VAT Period Maintenance program. Also, VAT rates can be changed via the VAT Rates Maintenance program.
VAT codes (rates) can be specified when entering transactions in the following programs :- Income Bookings,
Expenditure Bookings, Purchase Invoice and Credit Note Bookings, Sales Invoice and Credit Note Bookings, Sales
Invoicing and Sales Credit Notes. In the bookings programs, values can be entered as either VAT inclusive or VAT
exclusive according to the setting of the 'Inc' flag on each entry line. If the VAT total booked does not match the VAT total
on the source document then there is a VAT override facility via the VAT action line button to adjust the figures for each
VAT rate.
The VAT register maintains eight rates of VAT for Inputs and Outputs and for Home and EC values. The VAT register for any
VAT period can be printed on demand via the VAT Report program.
The Close VAT Period program will close the oldest open VAT period and print the VAT register report showing inputs and
outputs for each rate together with the values that need to be entered to each box on your VAT return form for HMRC.
This program will automatically transfer the end of VAT period balance from the VAT Control account to the VAT Payable
account. Hence, VAT payments to HMRC will be booked from the VAT Payable account.
If transactions are back dated into a closed VAT period, then these will be automatically carried forward into
the next open VAT period. For audit purposes a VAT Transaction List is available to list the transactions included
within any VAT period.
Procedures Guide for PRO Package29


Paxton Computers Ltd E: [email protected]
15 Kingsway W: www.paxtoncharities.co.uk
666612 43210 :TdrofdeB
MK42 9EZ F: 01234 212705
V5.5