PRE-CLINICAL PEDIATRIC DENTISTRY DSV 342 · PRE-CLINICAL PEDIATRIC DENTISTRY DSV 342 Use of rubber...
44
PRE-CLINICAL PEDIATRIC DENTISTRY DSV 342 Use of rubber dam in pediatric restorative dentistry 3 update Wednesday, February 08, 2012 Professor Othman Al-Ajlouni Salman Bin Abdul Aziz University College of Dentistry Tuesday 14/2/2012 9:00 -10:00 am Tuesday, November 11, 2014 1 Professor Othman Al-Ajlouni
Transcript of PRE-CLINICAL PEDIATRIC DENTISTRY DSV 342 · PRE-CLINICAL PEDIATRIC DENTISTRY DSV 342 Use of rubber...

PRE-CLINICAL PEDIATRIC DENTISTRY
DSV 342 Use of rubber dam in pediatric restorative dentistry
3 update Wednesday, February 08, 2012
Professor Othman Al-Ajlouni Salman Bin Abdul Aziz University
College of Dentistry Tuesday 14/2/2012
9:00 -10:00 am
Tuesday, November 11, 2014 1 Professor Othman Al-Ajlouni

Use of rubber dam in pediatric restorative dentistry
OBJECTIVES
1. List the indications and contraindications for placing the rubber dam.
2. Advantages of using RD.
3. Describe the purpose of the rubber dam armamentarium.
4. Summarize the steps for placement and removal of the rubber dam.
Tuesday, November 11, 2014 2 Professor Othman Al-Ajlouni

Use of rubber dam in pediatric restorative dentistry
INTRODUCTION
This lecture will provide basic, step-by-step instructions for application of the rubber dam.
The RD aids in in the maintenance of a clean operating field during cavity preparation and placement of the restorations.
Tuesday, November 11, 2014 3 Professor Othman Al-Ajlouni
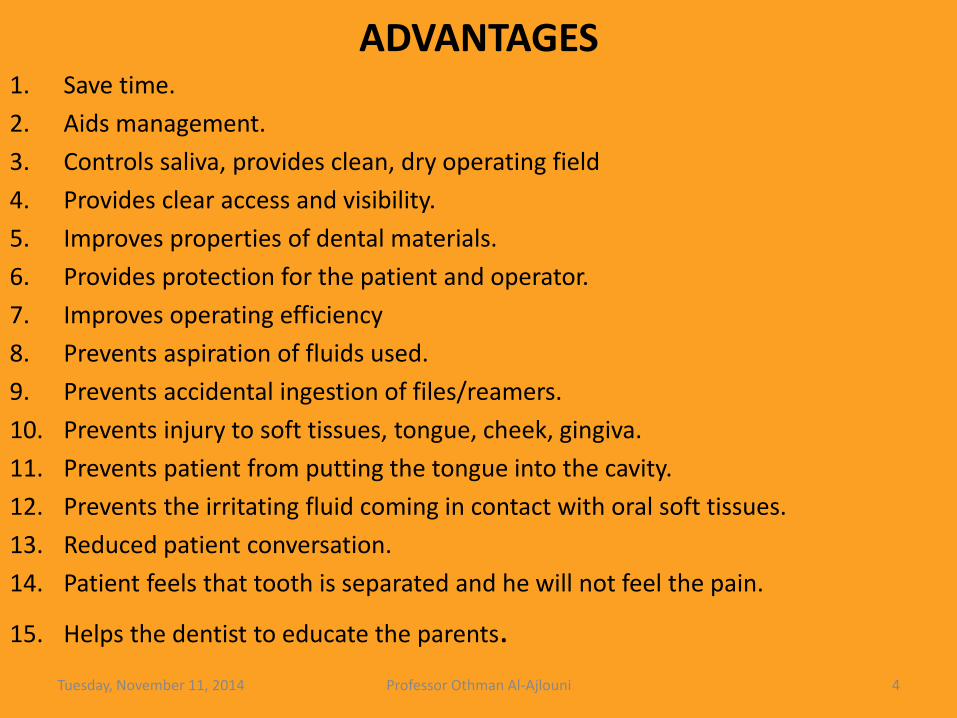
ADVANTAGES 1. Save time.
2. Aids management.
3. Controls saliva, provides clean, dry operating field
4. Provides clear access and visibility.
5. Improves properties of dental materials.
6. Provides protection for the patient and operator.
7. Improves operating efficiency
8. Prevents aspiration of fluids used.
9. Prevents accidental ingestion of files/reamers.
10. Prevents injury to soft tissues, tongue, cheek, gingiva.
11. Prevents patient from putting the tongue into the cavity.
12. Prevents the irritating fluid coming in contact with oral soft tissues.
13. Reduced patient conversation.
14. Patient feels that tooth is separated and he will not feel the pain.
15. Helps the dentist to educate the parents.
Tuesday, November 11, 2014 4 Professor Othman Al-Ajlouni

DISADVANTAGES
1. Time consumption.
2. Patient objection.
3. Incomplete tooth eruption.
4. Third molar isolation.
5. Extremely malpositioned teeth.
6. People suffering from asthma, mouth breathing.
7. Clamped tooth may be sensitive for some hours.
Tuesday, November 11, 2014 5 Professor Othman Al-Ajlouni

Use of rubber dam in pediatric restorative dentistry
INTRODUCTION
One of two placement techniques is routinely used:
1- One step method, in which the dam and the clamp are placed simultaneously or
2- Two-steps method, in which the clamp is placed on the anchor tooth and the dam material is then stretched over the clamp.
Tuesday, November 11, 2014 6 Professor Othman Al-Ajlouni

Use of rubber dam in pediatric restorative dentistry
Clinical success of the rubber dam ISOLATION is determined by the placement and retention methods of the clinician. Problems with rubber dam placement are often the result of:
-Torn rubber dam material,
- Improper hole size and placement, or
- Inadequate tautness of frame placement.
Tuesday, November 11, 2014 7 Professor Othman Al-Ajlouni

Use of rubber dam in pediatric restorative dentistry
The rubber dam is usually placed after local anesthesia has been administered and while waiting for that anesthetic to take effect.
Proper rubber dam placement can be achieved by a clinician in 3 to 5 minutes or, with a team approach, within 2 minutes.
Tuesday, November 11, 2014 8 Professor Othman Al-Ajlouni

Use of rubber dam in pediatric restorative dentistry
PROCEDURE
1. Armamentarium
2. Choosing the rubber dam material
3. Preparing the rubber dam material
4. Placement of the rubber dam
5. Removal of the rubber dam
6. Other types of rubber dams
Tuesday, November 11, 2014 9 Professor Othman Al-Ajlouni

Armamentarium for placing the rubber dam
1. A selection of Clamps.
2. Dental Floss.
3. Clamp Forceps.
4. A RD Frame.
5. A flat-blade instrument.
6. Plasting filling instrument
7. A RD Punch.
8. Rubber dam material:5x5 inch sheets of medium latex.
Tuesday, November 11, 2014 10 Professor Othman Al-Ajlouni

Tuesday, November 11, 2014 Professor Othman Al-Ajlouni 11

Tuesday, November 11, 2014 Professor Othman Al-Ajlouni 12

Tuesday, November 11, 2014 Professor Othman Al-Ajlouni 13

Choosing the rubber dam material
Selection of the RD material is based on the clinicians preferences regarding size, color, and thickness.
- Traditional dam material is latex rubber, but nonlatex rubber dams are for patients or operators with latex hypersensitivity.
- The most common size the precut,6 X 6-inch square (Adult size), which is used for isolation of posterior teeth in the permanent teeth. Another common size is the precut, 5 X 5 –inch square (Pediatric size), which is used for primary dentition or anterior applications.
- A continuous roll of rubber dam material is available as well.
1 INCH= 2.54 CENTEMETER
Tuesday, November 11, 2014 14 Professor Othman Al-Ajlouni

Choosing the rubber dam material
- The color choice ranges from pink to browns, blue, black and greens. The color is used to contrast the tooth, making the treatment field more visible.
- It has a dull and bright surface.
- The rubber dam is also available in thickness (gauges) of thin (0.006”), medium (0.008”), heavy (0.010”), Extra-heavy (0.012”) and special heavy (0.014”). The medium rubber dam is widely used because of its ease of handling and resistance to tearing. Thicker resists tear and thinner pass through tight proximal contact easily. Tuesday, November 11, 2014 15 Professor Othman Al-Ajlouni

Tuesday, November 11, 2014 Professor Othman Al-Ajlouni 16

Preparing the rubber dam material
1. Stamp the rubber dam
2. Punch the Holes
3. Prepare the Clamp
Tuesday, November 11, 2014 17 Professor Othman Al-Ajlouni
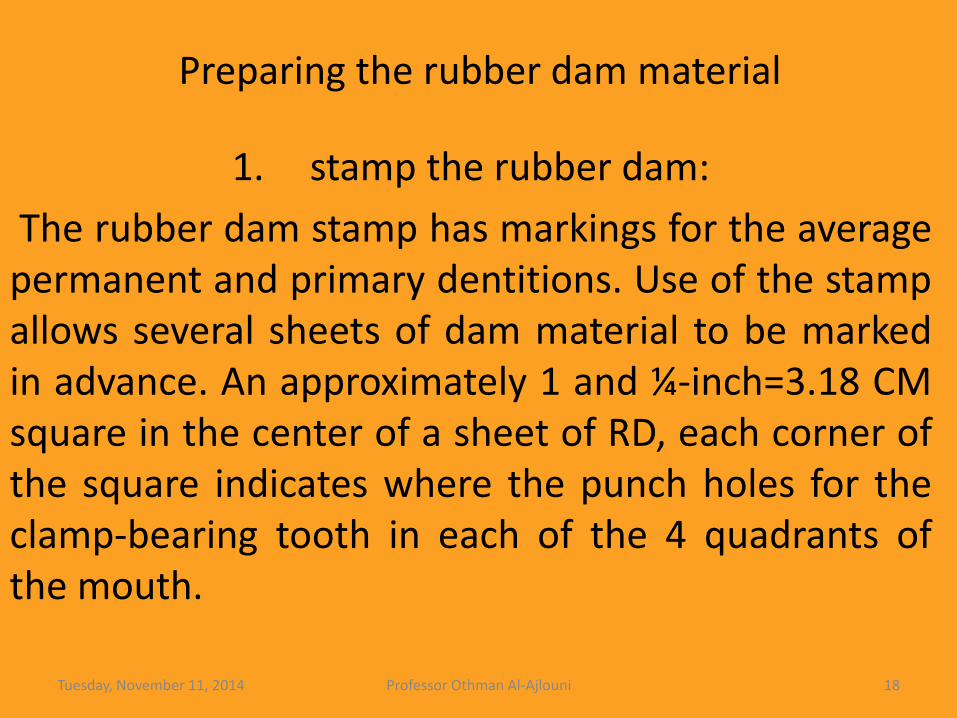
Preparing the rubber dam material
1. stamp the rubber dam:
The rubber dam stamp has markings for the average permanent and primary dentitions. Use of the stamp allows several sheets of dam material to be marked in advance. An approximately 1 and ¼-inch=3.18 CM square in the center of a sheet of RD, each corner of the square indicates where the punch holes for the clamp-bearing tooth in each of the 4 quadrants of the mouth.
Tuesday, November 11, 2014 18 Professor Othman Al-Ajlouni
Preparing the rubber dam material
2. Punch the Holes:
next, holes are punched into the rubber dam to correspond to the teeth that are to be isolated. The rubber dam punched usually consists of a rotating punch plate that allows holes of five or six different sizes and a metal point (punch) that creates the holes. The larger holes are used for permanent posterior teeth, the smaller holes medium sized for premolars, primary molars, maxillary permanent incisors and canines, whereas the smallest holes for primary incisors and lower permanent incisors. Correct holes size plays a critical role in successful tooth isolation. The holes should be punched the same distance apart.
Tuesday, November 11, 2014 19 Professor Othman Al-Ajlouni

Tuesday, November 11, 2014 Professor Othman Al-Ajlouni 20

SELECTION OF A CLAMP RETAINERS
The proper selection of a clamp is of utmost importance.
The clamp be tried on the tooth before placing the RD the clamp is firmly anchored to the tooth, securely and seated and will not be dislodged by the probing of tongue, lip, or cheek musculature.
An 18-inch length of dental floss should be doubled and securely fastened to the bow of the clamp.
Tuesday, November 11, 2014 21 Professor Othman Al-Ajlouni

SELECTION OF A CLAMP
wingless retainers
Retainers for anterior teeth
Winged retainers
Retainers for posterior teeth
Different sizes for different teeth
Parts of a clamp:
Bow
Jaws
Prong
Tuesday, November 11, 2014 22 Professor Othman Al-Ajlouni

SELECTION OF A CLAMP
by threading floss through the facial hole and then tying a knot. This prevents the clamp from being aspirated should it spring free, and allows for quick retrieval. The clamp is used as an anchor for the dam material and to retract the gingiva. Both winged clamps (clamps with extra projections) and wingless clamps (clamps without projections) are available, as are different shapes and sizes to fit the primary and the permanent teeth. the extra projections of winged clamps allow the dam and the clamp to be applied simultaneously. When wingless clamps are used, they are applied first to the tooth, and the rubber dam is then stretched over the clamp and the tooth.
Tuesday, November 11, 2014 23 Professor Othman Al-Ajlouni

Tuesday, November 11, 2014 Professor Othman Al-Ajlouni 24

Preparing the rubber dam material
1. Stamp the rubber dam
2. Punch the Holes
3. Prepare the Clamp
Tuesday, November 11, 2014 25 Professor Othman Al-Ajlouni

Use of rubber dam in pediatric restorative dentistry
PROCEDURE
4. Placement of the rubber dam:
1. Chick the patients record for documentation of the area that needs to be isolated and for potential contraindications. Inform the patient of the procedure and the steps involved in placing the rubber dam.
2. Prepare the RD by stamping and punching the correct holes that will needed for isolation.
3. Stretch the dam material over the bow and wings of the clamp.
4. Place the rubber dam napkin on the patient. This is used to absorb moisture and to reduce latex hypersensitivity.
Tuesday, November 11, 2014 26 Professor Othman Al-Ajlouni

Use of rubber dam in pediatric restorative dentistry
PROCEDURE
4. Placement of the rubber dam: 5. Place the forceps in the clamp, and position it so that the bow of the
clamp is at the distal of the anchor tooth. The forceps are held so that the beaks are directed toward the occlusal surface of the tooth (For a maxillary anchor tooth, the palm of the hand will be up; for a mandibular anchor tooth, the palm of the hand will be down).
Tuesday, November 11, 2014 27 Professor Othman Al-Ajlouni

Use of rubber dam in pediatric restorative dentistry
PROCEDURE
4. Placement of the rubber dam: 6. Place the clamp on the designated anchor tooth. the clamp anchor
tooth is distal to the tooth that will be receiving treatment. Check for proper fit when placing clamp from the lingual to the facial, and keep the clamp stabilized with the index finger while releasing the forceps. Make sure that all four corners of the clamp are not seated on the gingiva.
Tuesday, November 11, 2014 28 Professor Othman Al-Ajlouni
Use of rubber dam in pediatric restorative dentistry
PROCEDURE
4. Placement of the rubber dam: 7. Place the frame on the outside of the rubber dam. The dam is
stretched and hooked onto the projections of the frame. Make sure the dam is smooth and free of tears.
8. Place the last-punched hole of the dam over the tooth on the opposite side of the anchor tooth. This allows the operator to easily locate the remaining holes for the remaining teeth.
9. Once the punch holes are positioned, floss the dam septum ((the dam membrane between the punched holes) into the contact areas of the teeth to be isolated.
Tuesday, November 11, 2014 29 Professor Othman Al-Ajlouni

Use of rubber dam in pediatric restorative dentistry
PROCEDURE
4. Placement of the rubber dam: 10. Place a ligature (a binding) at te opposite of the anchor tooth to
stabilize the dam. This can be done by using floss or a piece of dam material.
11. Invert the rubber dam around the needs of the isolated teeth, using the plaster filling instrument (beaver tail). Imagine the dam being tucked into the sulci of the isolated teeth. This provides a well-sealed field. If possible, gently use air syringe to assist with the inversion and thoroughly dry the area.
Tuesday, November 11, 2014 30 Professor Othman Al-Ajlouni

Use of rubber dam in pediatric restorative dentistry
PROCEDURE
4. Placement of the rubber dam: 12. A variety of special-use rubber dam clamps are available. Use of a
butterfly-shaped clamp. Such clamps are used to retract the gingiva and isolate facial surface of the teeth.
Tuesday, November 11, 2014 31 Professor Othman Al-Ajlouni

Use of rubber dam in pediatric restorative dentistry
PROCEDURE
1. Armamentarium
2. Choosing the rubber dam material
3. Preparing the rubber dam material
4. Placement of the rubber dam
5. Removal of the rubber dam
6. Other types of rubber dams
Tuesday, November 11, 2014 32 Professor Othman Al-Ajlouni

Use of rubber dam in pediatric restorative dentistry
PROCEDURE
5. Removal of the rubber dam:
The items needed for removal of the RD:
i. Scissors
ii. Rubber dam forceps
iii. Explorer
iv. Floss
Tuesday, November 11, 2014 33 Professor Othman Al-Ajlouni

Use of rubber dam in pediatric restorative dentistry
PROCEDURE
5. Removal of the rubber dam:
Removal of the RD may be done while the patient is seated in an upright or supine position.
1. Remove the ligature that is stabilizing the RD.
2. Remove the clamp with the forceps.
3. Before removing the RD, each septum is cut with scissors. The dam is stretched by using a finger rest either under or top of the dam. This is to protect the gingival tissue and to guide the scissors.
Tuesday, November 11, 2014 34 Professor Othman Al-Ajlouni

Use of rubber dam in pediatric restorative dentistry
PROCEDURE
5. Removal of the rubber dam: 4. Pull the RD occlusally to remove it from the interproximal.
Remove the dam and the frame as one unit.
5. Use an explorer in the interproximal area to inspect and remove any remaining pieces of the RD. Retention of dam fragment will cause gingival irritation.
6. Inspect removal RD against a contrasting background to make sure that all dam septa are intact (distinct circular openings).
Tuesday, November 11, 2014 35 Professor Othman Al-Ajlouni

Use of rubber dam in pediatric restorative dentistry
PROCEDURE
5. Removal of the rubber dam: 7. Thoroughly rinse and evacuate the treatment area.
8. Massage the gingiva around the clamped tooth to increase circulation.
Tuesday, November 11, 2014 36 Professor Othman Al-Ajlouni
Use of rubber dam in pediatric restorative dentistry
PROCEDURE
1. Armamentarium
2. Choosing the rubber dam material
3. Preparing the rubber dam material
4. Placement of the rubber dam
5. Removal of the rubber dam
6. Other types of rubber dams
Tuesday, November 11, 2014 37 Professor Othman Al-Ajlouni

Use of rubber dam in pediatric restorative dentistry
6. Other types of rubber dams: Insti-Dam is a pre-framed RD setup. The flexible frame includes the RD material with a pre-punched hole. The Insti-Dam reduces the number of steps in the application and removal of the RD.
Tuesday, November 11, 2014 38 Professor Othman Al-Ajlouni

Use of rubber dam in pediatric restorative dentistry
Tips for the Clinician:
• The RD should cover the upper edge of the lip but should not cover the nose.
• All the interproximal gingiva should be covered.
• Make sure the clamp is secure and stable.
• Check for leakage and torn dam material.
Tuesday, November 11, 2014 39 Professor Othman Al-Ajlouni
Precautions
• Patient must not be a mouth breather.
• Clamps used must be tightly secured in place and a floss thread must be tied to the clamp. Clinicians and patients should wear eye protection during the entire procedure.
• The dam should be checked not to cover the nostril.
• Lips should be lubricated to provide drying.
• The clamps must not impinge on the gingiva nor traumatize the adjacent teeth.
• During removal of the RD, cut the septa very carefully, using a fulcrum, to avoid injury to the gingival tissue.
Tuesday, November 11, 2014 40 Professor Othman Al-Ajlouni

Use of rubber dam in pediatric restorative dentistry
Summary
Placement:
1. Select appropriate RD material (size, color, etc.).
2. Prepare the RD appropriately (correct hole size, hole distance, clamp ligation).
3. Carefully seat the dam.
4. Floss the RD between contact areas.
5. Invert the RD around the necks of the teeth.
6. Ligate the last tooth in the exposed sequence.
Tuesday, November 11, 2014 41 Professor Othman Al-Ajlouni

Use of rubber dam in pediatric restorative dentistry
Summary
Removal:
1. Remove the clamp from the anchor tooth.
2. Cut the clamp septa with scissors.
3. Remove the RD material and the frame as one unit.
4. Inspect the interproximals for RD material.
5. Inspect the removed RD.
6. Rinse and evacuate the oral cavity.
7. Message the gingiva.
Tuesday, November 11, 2014 42 Professor Othman Al-Ajlouni

THE END
Tuesday, November 11, 2014 Professor Othman Al-Ajlouni 43

Tuesday, November 11, 2014 Professor Othman Al-Ajlouni 44