Planning the hatchery - YATMACK INCyatmackinc.weebly.com/uploads/1/0/2/2/10224235/chickens.pdf ·...
41
As opposed to natural methods where the hen sits on the eggs, commercial hatcheries customarily rely on artificial incubators. Chicken hatchery business is more than the ordinary raising of chicken. It basically entails the regular production and supply of day old chicks by artificial incubation. There can be variations in the nature of the hatcheries such that it may be part of a breeding farm, an arrangement where day old chicks and parent stocks are produced or where the breeding stock is not maintained but eggs are purchased to produce day old chicks. A vibrant parent stork that supplies the eggs for hatching has to be maintained if eggs are not going to be purchased. Young chicks that are not going to be sold must be considered as well as adult chicken that go broody. Other poultry species such as ducks, turkeys, guinea fowl, quails and pigeons can also be integrated into the hatchery. Planning the hatchery Licence You will need a licence to operate a hatchery. This licence can be obtained from the Veterinary Department. It is issued after the department is satisfied that the premises meet all phytosanitary requirements and do not expose humans and the environment to pollution and health hazards. Although this project does not fall within the control of the National Environmental Management Authority (NEMA) it will be important to have a good environmental management plan to ensure that the waste produced from the hatcheries does not affect the local population. Scale of operation The turnover rate should be the basic concern because it determines the finances required to set up and run the business. The size of the perceived poultry market, whether local, external or a combination is a good indicator on the size of the hatchery to be set up. For the local market you need to
Transcript of Planning the hatchery - YATMACK INCyatmackinc.weebly.com/uploads/1/0/2/2/10224235/chickens.pdf ·...

As opposed to natural methods where the hen sits on the eggs, commercial
hatcheries customarily rely on artificial incubators. Chicken hatchery business
is more than the ordinary raising of chicken. It basically entails the regular
production and supply of day old chicks by artificial incubation.
There can be variations in the nature of the hatcheries such that it may be part
of a breeding farm, an arrangement where day old chicks and parent stocks are
produced or where the breeding stock is not maintained but eggs are purchased
to produce day old chicks.
A vibrant parent stork that supplies the eggs for hatching has to be maintained
if eggs are not going to be purchased. Young chicks that are not going to be
sold must be considered as well as adult chicken that go broody. Other poultry
species such as ducks, turkeys, guinea fowl, quails and pigeons can also be
integrated into the hatchery.
Planning the hatchery
Licence
You will need a licence to operate a hatchery. This licence can be obtained from
the Veterinary Department. It is issued after the department is satisfied that the
premises meet all phytosanitary requirements and do not expose humans and
the environment to pollution and health hazards. Although this project does not
fall within the control of the National Environmental Management Authority
(NEMA) it will be important to have a good environmental management plan to
ensure that the waste produced from the hatcheries does not affect the local
population.
Scale of operation
The turnover rate should be the basic concern because it determines the
finances required to set up and run the business. The size of the perceived
poultry market, whether local, external or a combination is a good indicator on
the size of the hatchery to be set up. For the local market you need to
investigate the following in order to determine the demand and therefore the
appropriate size of the hatchery:
1. The local chicken or poultry population
2. The number of chicken or poultry farms within the locality
3. Chicken or poultry varieties
4. Number of chicks produced per month
5. Required number of eggs to produce the chicks
6. The number of batches and number of eggs hatching each batch
7. The size of incubators and hatching house area
Site selection
You need to look for the following when selecting a site for the hatchery:
1. A ground that is well drained and preferably a high ground
2. Good infrastructure such as roads for transportation, electricity and water
system
3. Peaceful and clean environment with plenty of fresh air. Polluting
environments such as heavy traffic, slaughter houses, poultry keeping farms,
mining areas, chemical plants can affect the embryo. Check that the
prevailing winds do not carry poultry debris from other farms into the
hatchery.
4. The building should be located at least 150m away from the nearest poultry
house and should have its own entrance and exit separate from the parent
stock house.
Housing
The design and construction must take into account the sanitation, control of
temperature, humidity and diseases. Use appropriate building materials to
prevent leaks and draughts. The floor should be flat, smooth and easy to clean
and the height from floor to ceiling should be about 3.4 to 3.8m. Because of the
necessity for regular washing and disinfection the inside walls should be covered
by hard non-absorbent finish and tiles are preferred.

In order to minimize the risk of disease transmission between eggs and chicks,
arrange the personnel and egg flow such that there is minimum or no back
tracking by staff. Separate the personnel who work in the hatchery from those
working in the breeder farm.
The building should provide rooms for
1. Holding eggs prior to setting
2. Grading and traying of eggs
3. Incubation and hatching machines
4. Chick sexing
5. Grading and holding prior to sales
6. Additional rooms for cleaning of equipment, fumigation and washing of staff
A simple hatchery layout
Required equipment
1. Incubators
2. Egg setting equipment
3. Egg transfer equipment
4. Chick handling and washing equipment
5. Climate control equipment
Heating

Where the heating system uses electricity it is important to install a standby
generator in cases of power failure. Power failure causes failure of temperature
and humidity system.
Breeding
Place a cock for every 10 hens in a separate building. Provide laying nests and
other equipment necessary for production.
Health
Poultry operations pose high risks of disease transmissions which at times can
become epidemics of high proportions. Health and sanitary precautions must
therefore be strictly adhered to. You must design and implement an effective
and comprehensive health and safety programs that comply with international
standards. The following sanitary procedures are recommended:
1. Ensure that eggs for hatching are free from diseases if they have to be
purchased.
2. Fumigate all purchased eggs immediately
3. Wash and disinfect all setting and hatching trays, the incubator and hatcher
rooms, and all rooms in the hatchery after every hatch.
4. Dispose hatchery debris by burning in specially constructed facilities or
burying deeply.
5. Attendants and visitors must be clean and disinfected before proceeding into
the hatchery.
Records
Other than for your own business, it is a requirement that the following records
are properly kept.
1. Name and address of flock owner of all eggs received
2. Number of eggs and date received
3. The number of all hatching eggs and date received
4. The number of all baby chicks sold and flock origin,

5. Date, name and address of purchaser
6. Flock inspection and test results
Hatchery operations
Incubation
1. Store eggs in plastic egg trays at room temperature and 75% relative
humidity.
2. Do not store eggs for long before setting because they lose moisture through
evaporation and therefore hatchability.
3. Line egg cases with plastic to prevent evaporation if eggs must stay long
before setting.
4. Attach a record card to indicate the source of eggs, type and date of setting
5. If the eggs are dirty they should be cleaned by washing in hot water with
disinfectants such as Dettol. However washing increases the chances of
infection and should be discouraged. Alternatively they should be fumigated
prior to setting using formaldehyde.
6. Warm the eggs to room temperature 6 hours before setting.
7. Sort and grade the eggs before placing them in the incubator. Remove all
broken, oversized, undersized or shapeless eggs.
8. Place the eggs in clean trays and warm them to 37.5oC
9. Warm the incubator to 36.5 – 37.5oC then carefully arrange the eggs in
hatching trays. Set the eggs at an angle of 45owith the narrow end pointing
down
10. Maintain humidity at 70 – 80%
11. Read the thermometer every 6 – 8 hours and adjust the heat accordingly
whenever the thermometer reading falls below 36.5oC or rises above 37.5oC.
12. Turn the eggs every 6 – 8 hours and continue doing this up to day 18.
13. Check the temperature every time you turn the eggs and adjust the heat
accordingly.
14. Candle the eggs on day 7 and 14 to ensure you don’t have infertile or
those eggs with dead embryos.
15. Remove and dispose off all broken, infertile and spoilt eggs
16. On day 19 transfer eggs from the incubator to the hatcher.
17. Increase moisture to soften the eggs and help the chicks emerge.
18. Chicks start to come out on day 20. Do not keep for long chicks that
hatch early. Remove them from the hatcher and process them so that they
can be delivered within 12 hours.
19. Most of the chicks will have hatched on day 21.
20. 20. Chicks dry within 30 – 45 minutes after they come out from their
shells. Remove them immediately from the incubator after they are dry to
prevent them from overheating.
21. The day old chicks are now ready for sale or brooding
22. Remove the egg shells, dead chicks and spoilt eggs from the hatching
trays then clean and disinfect the incubator for the next batch of eggs.
Handling chicks
Packing
1. Assemble the chick boxes before pulling the chicks from the hatchers.
2. Pull out the trays one at a time
3. Remove and count the healthy chicks as they are placed into the chick boxes.
4. Leave the poor quality chicks in the trays and dispose them off with empty
shells, unhatched eggs and hatchery debris.
5. Allow the chicks to stand in the chick boxes for 4 – 5 hours to let them
harden.
6. Keep a record of total saleable chicks and hatches each day
Sexing
1. Separate the cockerels and pullets at hatching time.
2. Sexing can be done in three ways i.e. color, feather or vent sexing.
Vaccination
1. Vaccinate against Marek’s Disease and New Castle Disease on day one.
Debeaking
1. If the chicks are meant for broilers debeak them on day one.
2. Debeaking can be done by cold method through a cold knife or scissors by
the hot method through a debeaking machine with a hot blade.
Transportation
1. Transfer chicks ready for delivery into chick holding rooms.
2. Record the breed, fertility, hatchability, number of saleable chicks, percent
hatch and culls before the chicks leave the hatchery.
3. Give customers adequate information about breed, expected performance
and vaccination record of chicks they purchase in a small written guide
############################### END ####################################

Gross margin for 500 commercial layers
Some people have requested for gross margin of raising 500 commercial layers.
Here is a breakdown of the expenses and returns that are expected. The prices
are not uniform throughout the country therefore you are advised to adjust the
prices according to your locality.
Important assumptions
500 birds flock
12 months production period
Eggs
Production of eggs start when birds are 6
months old
10% mortality (50 birds)
90% laying percentage
10% egg losses
Cost of 1 DOC at Kshs 95 each
Building already exist
Day old chicks
500 chicks @ 95 each = Kshs 47,500.00
Brooding costs
Item Unit Quantity Unit price
Total Amount
(Kshs)
Cardboards Pieces 15 450 6,750.00
Paraffin Litres 60 110 6,600.00
Kerosene lamps No 10 900 9,000.00

Total 9000
Feeds
Age
(weeks)
Feed type
Amount
(70kg bags)
Cost
(Kshs)
Total
(Kshs)
0 – 8 Chick and duck
mash 10 3300 33,000.00
8 – 20 Growers mash 50 2400 120,000.00
20 - 75 Layers mash 255 2550 650,000.00
Total 803,250.00
Equipment
Equipment
Quantity
(No)
Unit price
Total Amount
(Kshs)
Round feeders 15 500 7500.00
Round drinkers 20 250 5000.00
Egg trays 20 40 800.00
Total 13,300.00
Veterinary charges

Treatment Frequency
Unit price
(Kshs)
Total Amount
(Kshs)
Gumboro
vaccination 2 500 1000.00
NCD vaccination 3 500 1500.00
Fowl pox 1 500 500.00
Assorted antibiotics 2000.00
Dewormers 1000.00
Total 6000.00
Labour
1 attendant for 18 months @ 4000 each = 72,000.00
Summary of cost
Item Total
Brooding 9,000.00
Day old chicks 47,500.00
Feeds 803,250.00
Equipment 13,300.00
Veterinary 6000.00
Labour 72,000.00

Total 951,050.00
Returns
Item Unit Quantity Unit price Total
Eggs Trays 4300 300 1,290,000.00
Culls No 400 300 120,000.00
Gunny bags No 315 30 9,450.00
Total 1,419,450
Gross margin
Kshs (1,419,450 – 951,050) = Kshs 468,400.00
You can increase the profit margin by cutiing costs and increasing the laying
percentage.
############################### END ####################################

How to boost the productivity of backyard
chicken
Due to poor management given to local chicken, they have become adapted to
free range methods of survival. The birds are able to gather enough nutrients
for growth, production and reproduction but under these circumstances their
yield potential is low.
The average household has about 10 chickens mainly for home consumption,
and however much they try the number remains almost the same. The reason
being that birds are do not get enough drinking water regularly. Another key
production problem relates to the occurrence of diseases such as New Castle
Disease (NCD) and coccidiosis as many farmers do not bother about controlling
diseases. As a result many birds die while others are lost through predators. An
equally important problem is shelter for the birds where farmers live with the
chicken in their houses and release them to scavenge during the day. On
average a farmer loses between 15 – 40% of the stock annually due to these
problems which they can easily control.
Local hens lay a batch of 10 – 12 eggs then they become broody and sit on the
eggs. This is repeated 3 to 4 times a year. Egg hatchability varies from 80 –
90%. The chicks hatched are not cared for and only about 2 – 3% reaches
maturity. Under these conditions the annual output of a flock of 10 chickens can
be estimated roughly at 200 eggs and about 17kg of meat. This performance
can be tremendously improved by applying just simple management practices.
The local chicken can produce more eggs and young chicks if the farmer takes
better care of them. The extra effort and some little spending have always
proved to be profitable.
Feeding
A few hand ful of maize or other available grains and a place to drink are
essential for extra production of eggs and meat. Eggs and meat do not come
from thin air, they come from the edible feed materials the birds are

scavenging. So when they eat more and better feed, the number of eggs
increases. A kilogram of maize is cheaper than a kilogram of eggs or meat and
so a few handfuls a day is clearly profitable.
Housing
Chickens are like children who need to be protected, to be sheltered and to be
fed. They need a clean well ventilated place to roost with laying nests and clean
litter. The shelter should be closed at night to protect the birds from wild
animals. If a hen has a protected place to go to, eggs and day old chicks are not
lost in the bush. There must be laying nests, one for every 5 birds. Carton
boxes will do provided they are always clean with litter on the bottom.
Suppression of broodiness
The next step to increase egg production is to suppress broodiness. Broodiness
is in fact the main cause of low egg production and is a feature which has been
eliminated in hybrid birds by breeding and selection. Broodiness is of course
essential for the farmer to increase his flock but there is usually too much of it.
Nearly half the lifetime of a good laying hen is spent sitting on the eggs and
brooding her chicks.
To get rid of broodiness a hen should be isolated by putting it in a small cage
without litter; the cage is fixed somewhere above the rest of the flock. Feed and
water should be provided. After 3 to 4 days, the broodiness will normally have
disappeared. Note that this is the best way. Most local measures are much too
harsh and often counterproductive. For example immersion in water or the
pulling out of the vent feathers causes stress such that egg production stop
completely.
Rearing chicks
The hatchability of local chicken is good because for every 10 – 12 eggs, 8 – 10
day old chicks appear. But what happens is that gradually in 2 – 3 weeks nearly

all of them disappear. The chicks can be kept alive by protecting and feeding
them. This means constructing or adding a day-old-chick shelter and a small
fenced-off run for chicks only and the mother hen. The chicks should be fed on
mashed maize put in a feeder where grown birds including the mother hen have
no access. In addition they should be able to scavenge in their small run as they
cannot stay alive and well on maize only.
Vaccinations and disease control
A good number of local chicken keepers believe that the local chicken is not
affected by some diseases such as fowl pox and fowl typhoid. But these
diseases affect the local chicken just as they do the exotic birds. It is important
not take chances with the birds because any disease often result in losses for
the poultry keeper. Even more devastating are the diseases that go unnoticed
by the farmer while they reduce vigour of the birds, the growth rates, feed
efficiency, egg production and profits.
In prevention, a good knowledge of poultry keeping and hygiene is very
important. One of the first rules of hygiene is recognizing a sick bird and
establishing an accurate diagnosis. Healthy birds are constantly active, bright
and alert whereas sick birds will stand half-asleep at the corners of the house,
with their feathers ruffled up, their heads drawn into their wings and the tail
drooping.
In poultry the main effort should be in prevention through hygiene and
management and vaccination as the damage is already done when the birds are
infected. Coccidiostats are very effective in controlling coccidiosis and should
always be available especially in rainy weather. Regular disinfection of chicken
housing is recommended to rid the pests and parasites and other disease
causing organisms.
Vaccination against the following diseases is recommended
Type of vaccination How administered Suggested schedule

Mareks disease Injection Day old
New castle disease Intra nasal (drop) At 2 or 3 weeks
In the eye (drop) At 18 weeks and at 6
months intervals
Drinking water Same
Fowl typhoid
In drinking water
Intramascular
At 8 weeks and at 6
months
Fowl pox Wing web method At 18 weeks
Predators, pests and parasites
Not to mention that predators should always be kept at bay by constructing a
safe structure for the birds. External pestssuch as lice, fleas, ticks and mites
suck the blood of the birds and cause weaknesses and a drop in egg production.
Disinfect the poultry house and treat the affected birds with sprays or powders.
Soft ticks (kitungu) are a special problem for poultry keepers in Machakos and
Kitui Counties. The best control is to build poultry house with smooth walls and
apply acaricides and insecticides.
Worms causes a wide range of problems to the birds and can best be controlled
by regular deworming. Drugs against worms are available and are very
effective.
Conclusion
All the above requires the attention of the farmer because no good results can
be achieved without some effort. The farmer will be rewarded for every effort
put into caring for the birds. Chicken do not care for expensive material so the

cost can be very low. However they care for a good, safe and clean environment
and many farmers who have put their effort on only a few of these aspects have
reported very good results.
############################### END ####################################

Layers Keeping Guidelines
Farm enterprise setup
Poultry keeping is a delicate enterprise and before engaging in production, it is important to
have knowledge regarding husbandry aspects such as hygiene practices, disease control,
vaccination program, feeding systems, housing detail and other related factors which work
together to realize a profitable venture.
Information in the following areas is handy to guide on what is expected hence prepare for
the challenges that may lie ahead.
Operational costs.
A farmer needs to know the costs to be incurred before venturing in this business.
The major costs include: -
Housing
Essential farm facilities,
Cost of the foundation stock,
Feeding costs,
Vaccination costs
Animal production in either small or large scale if not properly handled can lead to large
losses due to the delicate nature of the enterprise. The owner should personally get
involved in management and supervision or if the objectives are to be realized, the one who
takes care should have shared interest.
Life stages
Every animal has developmental stages with specific requirements which a farmer should
know and attend to accordingly and separately.
Feeding Plans & Costs
Feeding costs are single major contributor the costs of faming. Feeds should be purchased
from a reputable company. The feed should be of good quality with right proportions of the
required nutrients depending on the stage of your animal. And costs such as transport may
be put into consideration.
If a farmer cannot afford or if has the raw materials, with good training, he can assemble
ingredients in right proportions and process them accordingly. Farmers can get trained on
feed formulation in livestock production centers in their respective districts. The aim is to
reduce the feed costs as much as it is practically possible and hence increase the profits.
Housing
The housing should be done right depending on the ecological conditions of where one is
living to reflect the climate of the place. If not correctly done poor housing may lead to
failure and frustrations due to high losses, frequent disease outbreak, below bar production
level, overcrowding and poor ventilation.
The house should have a right height depending on the system adopted, right roofing, this
means not construction of an expensive house but whichever structure built should have
enough space, be well ventilated, capable on shielding birds from harsh weather conditions
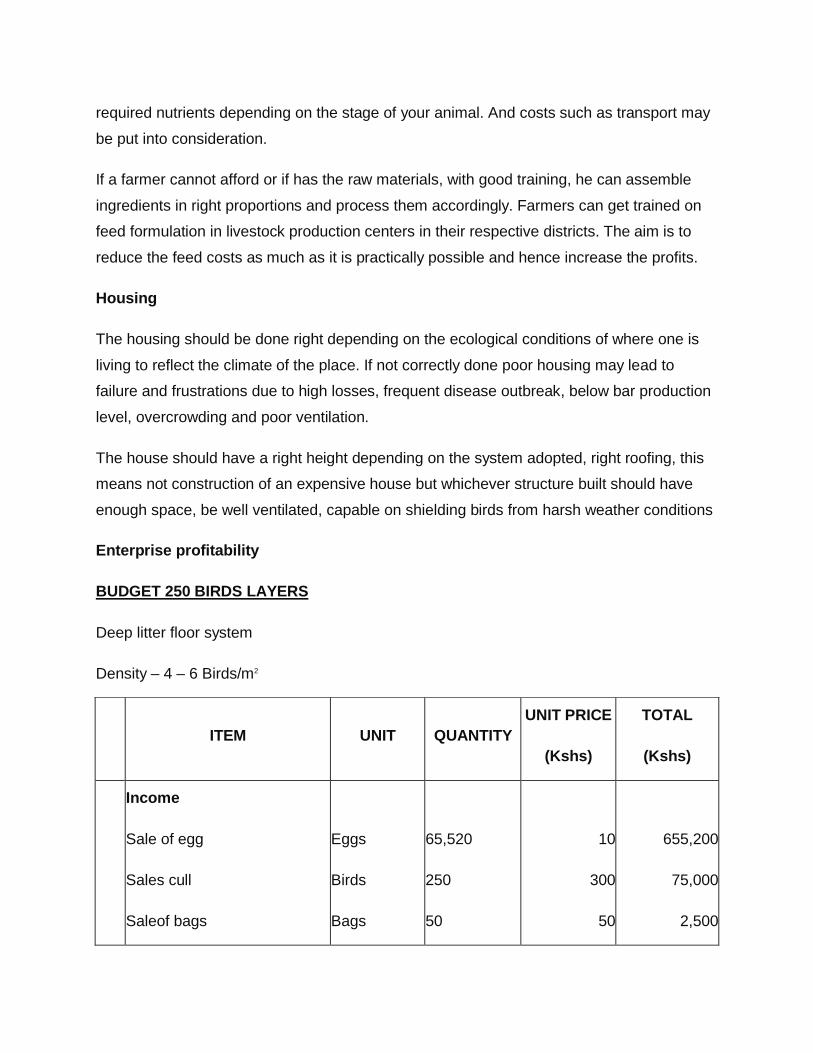
Enterprise profitability
BUDGET 250 BIRDS LAYERS
Deep litter floor system
Density – 4 – 6 Birds/m2
ITEM UNIT QUANTITY
UNIT PRICE
(Kshs)
TOTAL
(Kshs)
Income
Sale of egg
Sales cull
Saleof bags
Eggs
Birds
Bags
65,520
250
50
10
300
50
655,200
75,000
2,500

Sales of manure Tons 20 2000 40,000
Gross Income 772,700
Expenditure
Day old chicks
Chick/Duck mash
Growers Mash
Layers Mash
Medication
Kerosene
Labour 18 months
Egg trays
Charcoal
Cost of construction &
equipments
Miscellaneous
No.
70kg bag
70kg bag
70 kg bag
Birds
Litres
MD
No.
No.
250
7
25
18
250
36
300
6
6
100
3,200
2,900
3,000
60
100
200
30
850
25,000
22,400
72,500
54,000
15,000
3,240
60,000
180
5,100
150,000
30,000
Working capital 392,780
Interest on Working capital 58,917
Total cost 451,697
Gross Margin 321,003
Capital Recovery

Fixed Capital – Ksh. 150,000
Recovery Period – 10 years
Interest rate – 20%
Annual Capital Cost – Ksh150,000 x CRF
Ksh 150,000 x 0.2385
Ksh.35,775
Total Variable Cost Ksh.392,780+ 58,917+35,775=Ksh.487, 472
Expected Net Income – Ksh.772,700– 487, 472
Ksh 285,228
Break Even Price/egg = 7.44
Remarks
When family labour is used Net income will Improve
1. 12 months productivity period has been adopted
2. Eggs/bird to be 255 per year
3. Laying percentage to be 70%
4. Chick and Growers mortality rates to be 5%
5. Layers mortality to be 1%
6. Fowl pox vaccinate at 10-12 weeks once.
7. Fowl-typhoid – vaccinate at 6-8 weeks once
8. New Castle – vaccinate 1 week – 2-3 weeks, 8-10 weeks and every 2-3 months.
9. Infectious bronchitis – 1 week, 2-3 weeks
10. Gumboro – 1-2 weeks, 3-4 weeks
11. NCD + IB + 1BD (killed) – 18 – 20 week
12. Profitability will be realized After 2 years holding other factors of production constant
############################### END ####################################

All about brooding chicks
Brooding chicks is an important aspect of a poultry enterprise that many poultry
farmers often ignore. High chick death rates that are often reported are
normally preventable. The main aim of brooding chicks is to reduce such deaths
and run the venture efficiently and economically. The only trick is to provide a
comfortable
and healthy environment for the growing birds. Failure to provide such an
environment often results in decreased growth and development, poorer feed
conversion, increased incidences of diseases and deaths which ultimately
translate into diminished profits or complete losses.
Among the critical factors to consider are temperature, air quality, humidity and
light. These will dictate the housing design for the chicks. Other factors are
feeding, watering and disease control.
Temperature
The body temperature of a day-old chick is approximately 390 C, but by the fifth
day of age the body temperature rises to 41.10 C, which is the normal body
temperature of an adult bird. Chicks require heat from the time they are
hatched until they are six weeks old because theycannot maintain their body
temperature without an external source. The ability to regulate body
temperature is acquired around 12 to 14 days of age.

brooding chicks
While chicks are more tolerant to high temperatures than adult birds, high
temperatures for extended periods of time increase mortality and have negative
impact on performance. Chicks that are subjected to cold temperature have
impaired immune and digestive systems which result in reduced growth and
increased susceptibility to diseases.
Warm the brooding area before the chicks arrive.Chicks can be easily stressed if
their body temperature decreases or increases by as much as one degree.
During the first week temperatures should be 320 to 350 C then reduced by
2.50 C per week until room temperature is reached. The actions of the chicks
can be a guide in temperature control. Read how to control temperature in a
brooder.
Floor temperatures are also crucial. The average floor temperatures should be
320C on the day that chicks are placed in the house.
Ventilation
Good ventilation is required to control temperature and get rid of carbon
dioxide, ammonia, other gases, moisture, dust and odors. Air entering the
brooding house should be warmed up to brooding temperature before coming

into contact with the chicks to prevent chilling. This also increases moisture
holding capacity thereby helping to maintain litter conditions in the house.
In large brooding houses fans should be used to break up temperature
stratification and provide a more uniform temperature throughout the poultry
house.
Humidity
The level of humidity influences the ability of the bird to cool itself through
panting and influences ammonia production. Relative humidity should be
maintained between 50 and 70 percent during the brooding period. Dusty
conditions in the poultry house are associated with relative humidity below 50
percent. If relative humidity increases above 70 percent ammonia from the
birds fecal material accumulates and has a negative impact on bird health and
performance. High ammonia levels impair the immune system, increases
respiratory diseases and reduces growth rate which is never gained back.
Lighting
The main purpose of lighting during brooding is to ensure that chicks are active
and seek out food and water sources. Chick activity is higher in bright than in
low light intensity. Bright lights assist chicks to locate feed and water and this is
usually accomplished by 7 to 10 days of age. Thereafter the light intensity and
duration should be reduced to a minimum of 25 lux (2.5 foot candles) or more
at bird level. Normally lights are initially allowed 23 hours a day at maximum
intensity. Then the intensity is reduced when chicks are 7 to 10 days of age and
by 10 to 14 days it should
be at 5 lux (0.5 foot
candles).
Housing
Inside a local brooding house

Some people brood their chicks in their homes but this is not recommended.
Brooders present a certain amount of fire risk so a high degree of precaution
should be taken when deciding its location and design.
Brooder houses generally have litter floors, preferably with a layer of wood
shavings at least four inches thick. Brooders with wire floors and a droppings
pan underneath can also be used but they smell worse than the other kinds of
brooders.
The brooding house should be clean, dry and comfortable with adequate heat
and space. The equipment should be clean and in good condition. The location
should be draft-free with good air circulation, access to clean water and be well
protected.
A brooder house measuring 10 by 12 feet accommodates 120 chicks to the age
of eight weeks. Chick guard rings should be12 inches high arranged in a circle 6
feet in diameter around the brooder stove. Feeders are placed in a spoke-like
arrangement radiating outward from underneath the outer portion of the
brooder canopy. This provides chicks access to feed and allows them to move
freely in and out from the heat source.
Age of chicks Floor space per bird
0 to 4 weeks 1/2 square foot
4 to 8 weeks 1 square foot
Water
Chicks should have warm water available right way. Waterers should be placed
on a block to keep the water free from litter. Replace the water twice a day, or
more frequently if necessary to keep the water clean and fresh. Clean the
waterer each time you make the change, and refill it with lukewarm water.

The amount of waterer space recommended for 100 brooding chicks is:
Age of chicks Waterer space
0 to 1 week Six 1-quart jar waterers
1 to 4 weeks Two 2-gallon waterers
4 to 12 weeks Two 5-gallon waterers
Automatic waterers may be used after the first week. Many types of waterers
are available from local agrovets.Note that in the first few days chicks can get
soaked in waterers with wide bowls and may die of chilling. So use small
waterers at first and gradually replace with regular ones.
Feeding
Provide feed and water as soon as the chicks are transferred to the brooder. If
possible the chicks should be fed about three hours after being introduced into
the brooder. Also they tend to be dehydrated and it is important that they drink
the water first before they eat.
Give the first feed on flat surfaces at ground level. One square foot per 50
chicks is a good spacing. Set up the regular feeders and fill them right from the
beginning.
Rapidly growing chicks should have a well-balanced starter diet for proper
growth and development. For the first two days, it is a good idea to feed the
chicks on cracked maize grains to reduce the problem of dried feces attaching
on the rear. Thereafter replace the cracked maize grains with a chick starter
mash.This can be done by feeding grain in the first feeders and chick starter in
the regular feeders.
The feeder space recommended for 100 chicks is:
Age of chicks Feeder space
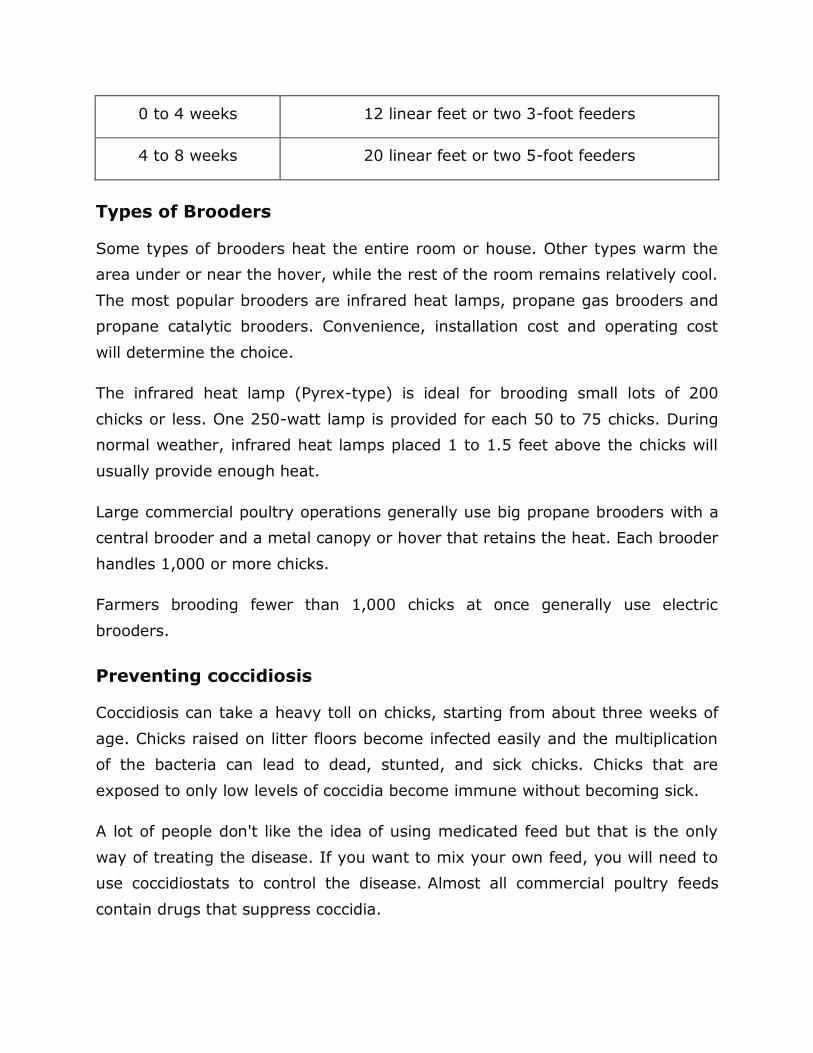
0 to 4 weeks 12 linear feet or two 3-foot feeders
4 to 8 weeks 20 linear feet or two 5-foot feeders
Types of Brooders
Some types of brooders heat the entire room or house. Other types warm the
area under or near the hover, while the rest of the room remains relatively cool.
The most popular brooders are infrared heat lamps, propane gas brooders and
propane catalytic brooders. Convenience, installation cost and operating cost
will determine the choice.
The infrared heat lamp (Pyrex-type) is ideal for brooding small lots of 200
chicks or less. One 250-watt lamp is provided for each 50 to 75 chicks. During
normal weather, infrared heat lamps placed 1 to 1.5 feet above the chicks will
usually provide enough heat.
Large commercial poultry operations generally use big propane brooders with a
central brooder and a metal canopy or hover that retains the heat. Each brooder
handles 1,000 or more chicks.
Farmers brooding fewer than 1,000 chicks at once generally use electric
brooders.
Preventing coccidiosis
Coccidiosis can take a heavy toll on chicks, starting from about three weeks of
age. Chicks raised on litter floors become infected easily and the multiplication
of the bacteria can lead to dead, stunted, and sick chicks. Chicks that are
exposed to only low levels of coccidia become immune without becoming sick.
A lot of people don't like the idea of using medicated feed but that is the only
way of treating the disease. If you want to mix your own feed, you will need to
use coccidiostats to control the disease. Almost all commercial poultry feeds
contain drugs that suppress coccidia.
Treating Coccidiosis
Anti-coccidial drugs are very effective. Infected chicks should be treated
immediately by putting a coccidiostat in the water. Drug substitutes such as
garlic and herbs are not as effective as drugs.
############################### END ####################################
The business of raising day old chicks
Raising day old chicks in Kenya has become very popular because you only
need a viable batch of eggs for hatching, a reliable incubator and a working
knowledge of poultry incubation. Also selling day old chicks can be done both
locally and as a mail order business. Your hatchery could be just what people in
your community needed as a nearby source of day old chicks.
Many people would like to raise chickens themselves, rather than to buy pullets
but are unable to get or hatch enough day old chicks.
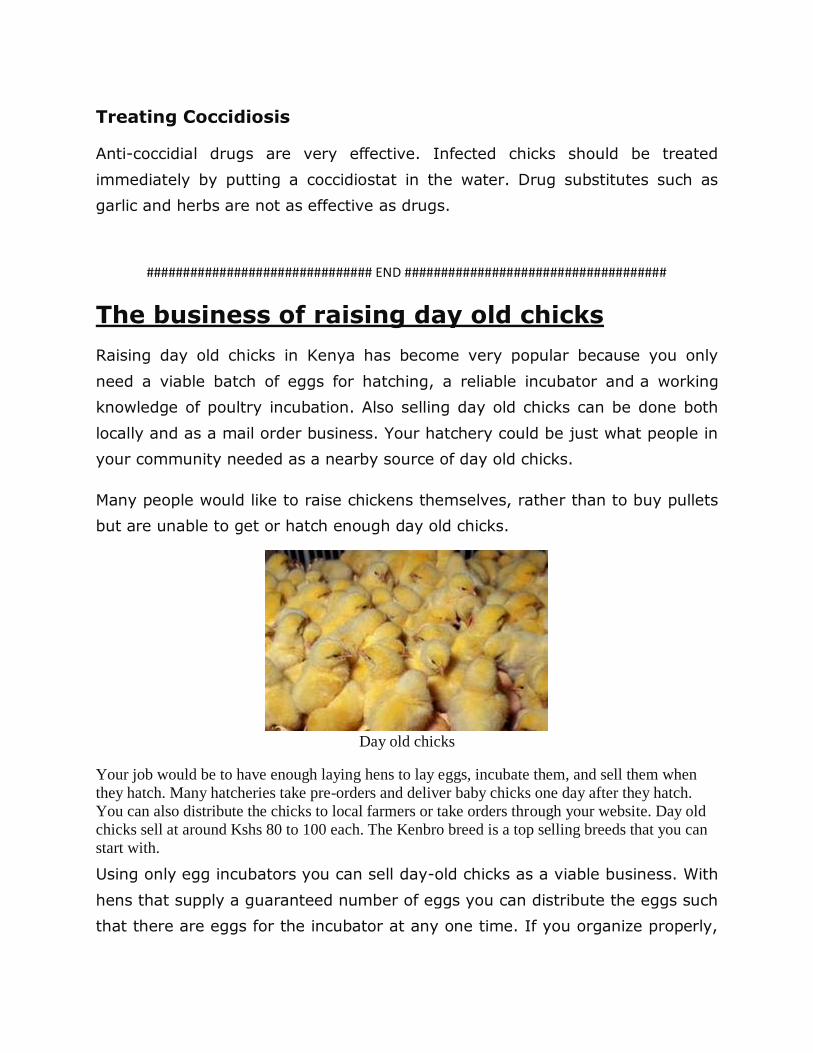
Day old chicks
Your job would be to have enough laying hens to lay eggs, incubate them, and sell them when
they hatch. Many hatcheries take pre-orders and deliver baby chicks one day after they hatch.
You can also distribute the chicks to local farmers or take orders through your website. Day old
chicks sell at around Kshs 80 to 100 each. The Kenbro breed is a top selling breeds that you can
start with.
Using only egg incubators you can sell day-old chicks as a viable business. With
hens that supply a guaranteed number of eggs you can distribute the eggs such
that there are eggs for the incubator at any one time. If you organize properly,

day old chicks can be produced on a weekly basis for the market. The capital
outlay is minimal, no specialized knowledge is needed and very little
infrastructure is required.
This business model is ideal for small-scale farmers who want to start their own
hatcheries with low capital input and high returns on investment. It is a highly
profitable business to start and your capital requirement is very small.
The best way to start is by getting good chicken breeds and rearing them for
laying eggs. Kenbro from Kenchic is very popular with farmers because of its
high egg yield and quality meat. You are unlikely to meet the demand. Within
six months your hens should be ready to give a constant supply of eggs for the
incubator. Your business is to hatch the eggs and sell as day old chicks.
And an even easier way is to outsource the batch of eggs for hatching. But here
you will need to be very careful and observant. The breeder you are getting the
eggs from should be reliable and trustworthy because in order to successfully
accomplish this venture you need to have fertile eggs that produce healthy
embryo.
When choosing the eggs, don’t let the bigger ones fool you. Large eggs are not
ideal eggs for hatching as they develop poorly thus producing sickly chicks. Too
small ones are also not good, as these may not have enough yolk to sustain
growth. Whether the eggs are from your farm or outsourced, always pick for
hatching those of medium size and as much as possible, stain-free eggs. Look
out for signs of cracks, holes and other abnormalities in the shell. Avoid those
with irregular shapes and stay away from those with suspicious marks. Bacterial
infection should be prevented right from the start.
The prices of incubators range from as low as Kshs 15,000. For a medium sized
business you can invest in a 1200 eggs per week incubator which should be
going for Kshs 140,000. Taking 70% hatchability, you should be selling about
800 day old chicks per week. At Kshs 100 per day old chick, this translates to a
gross Kshs 80,000 per week or Kshs 320,000 per month. Other than feeding the

parent stock or purchasing the eggs, there are no major expenses and the profit
margin can easily be Kshs 200,000 monthly.
############################### END ####################################
Care and management of incubators
The success of any hatching of eggs depends on the quality and fertility of the
eggs being incubated and the care and management of the incubator. The
critical factors to consider in management are temperature, humidity,
ventilation and rotating of eggs. Failing to meet the requirements of any one of
these invariably results in disastrous consequences. Farmers often ignore or
forget some of these requirements and as a result suffer losses and become
frustrated with the incubator or the business as whole.
Ensure good egg quality
If you are going to produce the eggs in your farm it is important to consider the
hens that will lay the eggs and the cocks that will fertilize them. Select parents
with proven fertility and good lineage. Purchasing eggs is tricky but get a
reliable source in terms of fertility. Before placing them into the incubator, you
need to inspect the eggs for normal shape, good size and smooth unbroken
shells.
If the eggs are not going to be placed in the incubator immediately, they should
be stored in a cool and humid area (preferably at 12 - 15°C and 70-75%
humidity) with the large end facing upwards, and turning them daily. You can
store the eggs up to 10 days but it has been observed that eggs that are set in
the incubator less than 7 to 10 days after they are laid have the best hatching.
Allow cool eggs to warm up to the ambient temperature before putting them
into the incubator.
Do not wash eggs unless it is necessary, and in that case always use a damp
cloth with water warmer than the egg. This causes the egg to sweat the dirt out
of the pores. Never use water cooler than the egg. Also, do not soak the eggs in
water.
Using simple candling instruments regularly test the quality of eggs by candling.
All the eggs of the same age should look the same. Infertile eggs and dead
embryos can be detected and the eggs removed before they can produce
unwanted gas. Candling is best started on the 9th day and a second one done
after 14 to 18 days of incubation. After the 18th day no candling of eggs should
be done so as not to disturb the growing chicks.
Using the incubator and other procedures
Setting up of the incubator
Place the incubator in a room with good insulation, little fluctuations in
temperatures and good ventilation. If you are using the incubator for the first
time, operate it for at least one week without eggs. Set up a thermometer on
the egg tray with its bulb at a level with the top half of the eggs. If you have
several thermometers check to see that the heat spreads evenly across the
tray. Open up 2 to 4 air holes and wait for the temperature to stabilize, making
adjustments before the incubator settles at the right temperature.
If you are using a lamp, turn the lamp wick up or down to adjust the heat until
you have a constant temperature of 38.9°C. Fill up the lamp regularly with
kerosene to ensure constant supply of heat. When the temperature in the
incubator has remained stable for at least 24 hours without having had to
adjust the thermostat regulation can be said to be complete
Completely fill the water tank with hot water at about 40o C. The heat will
spread better if there is no air in the tank. Put a container of hot water in the
incubator and check the humidity level. When everything is set up properly the
eggs can be put on the tray.
Temperature during incubation
The optimal temperature in the first two weeks is 38.9°C. Any rise above
40.5°C is fatal for the embryos. Also a drop in humidity can have disastrous
results. From the 19th day onward reduce temperature to 36.1oC because the
chicks will be producing their own heat. If new-born chicks with open beaks can

be made out, they are trying to lose heat by breathing more. This might
indicate too high a temperature in the incubator.
Humidity
Humidity levels are influenced by the amount of ventilation and humidity levels
of the incoming air. You can measure humidity by use of a hygrometer but they
are too expensive. A wet bulb thermometer is a cheaper alternative. Adjust the
humidity by putting containers of warm water inside the incubator. Use water at
body temperature rather than cold water to prevent the temperature from
dropping. Put wet sponges or clothes in the incubator if you don’t have enough
containers. Or use a thoroughly cleaned sprayer filled with warm water and
spray into the incubator through the ventilation holes.
Ventilation
Growing chicks may suffocate or choke if there is insufficient ventilation. Open
the ventilation holes regularly. Every time you open the door to turn the eggs
fresh air will enter. When you stop turning the eggs after 19 days you may need
to open extra holes. At least two holes will have to be permanently open in any
case.
Turning the eggs
Hatching results will be very poor if you do not turn the eggs. Turn the eggs 3
times a day at regular intervals for the first 19 days and do not move them.
Turning is no longer necessary thereafter.
To accurately do this mark one end of each egg, say with an X, and the other
with an O. Turn them all so that in one day all have the Xs facing upwards and
on the next, the Os. This is very important to ensure that there is even
temperature on all surfaces of the egg.
Leave the door of the incubator closed as much as possible to prevent the
incubator from cooling down. The best way is to take the entire egg tray out,
turn the eggs 180° and put in the egg tray the other way around. Exchange the

eggs at the centre with the eggs on the edges of the tray if the heat is not
reaching all the eggs equally. Keep your hands clean.
During Hatching
Do not help the chicks from the shell at hatching time. Prematurely helping the
chick hatch could cripple or infect the chick. Humidity is critical at hatching
time.
As soon as the chicks are dry and fluffy or 6 to 12 hours after hatching, remove
the chicks from the incubator. Remove all the chicks at once and destroy any
late hatching eggs.
During Power Outage
In case of power failure ensure that eggs are as warm as possible until the
power returns. Do this by placing insulation materials like blankets over the top
of small incubators. Then place lit candles under the box that covers the
incubator to warm the eggs. The heat from the candles can easily keep the eggs
above 32°C until the power returns. Embryos have survived at temperatures
below 32°C for up to 18 hours. Candle the eggs 4 to 6 days after the outage to
check whether they are still viable and if not, terminate incubation. A power
outage usually delay hatching by a few days and decrease the hatchability to
40-50 percent.
Sanitation of Incubator and Equipment
Lack of sanitation decreases hatchability. Always thoroughly clean and disinfect
the incubator, all hatching trays, water pans and the floor of the hatchery
before and after use, no matter what type of incubation you use. The incubation
room and egg storage area should equally be kept clean.
Keeping Records
Write down the date on which the eggs were put into the incubator. Note the
temperature and humidity twice a day. If hatching results are poor at the end of

the incubation period, your records will tell you whether the temperature or the
humidity levels were to blame.
Normally hatching rates vary from 50 to 70%. It is rare to achieve 80% or over.
############################### END ####################################
Candling eggs
Candling gets its name from people who used candles as the light source to
view the inside of an egg. Candling is done to monitor how the embryos are
growing by examining the egg fertility, embryo viability, moisture level and
other aspects. In short candling eggs allows you to keep track of the progress of
your egg during incubation.
Candling torch
You can use a candling torch or make your own candler using a light bulb as the light source.
The light penetrates the egg and makes it possible to observe the inside of the egg. The easiest
way to make a candler is to place a low energy light bulb inside a cardboard box. Cut on top of
the box a big enough round hole to stand the large end of the egg. Place egg onto this hole and
turn the light on. Do this in a dark room and limit the exposure of the egg to the hot light source
and you will be able to observe the contents of the egg.
The content of white eggs with thin shells is easier to see than that
of darker colored eggs and those with thicker shells. Eggs can be out of the
incubator for 20 – 30 minutes without any impairment.
The presence of embryos can be confirmed easily after 8 to 12 days of
incubation. With practice you can be able to identify the embryo located in the
large end of the egg by the spider-like blood veins radiating under the surface
of the shell. The embryo occupies most of the egg by the 18th day and chicken

eggs should not be candled after that. The air sac size increases as moisture
evaporates from the egg. If the humidity is too high, the air sac will be smaller
and if too low the air sac will be larger than normal.
Non fertile egg
If the embryo dies, the blood draws away from the embryo and forms what is called a blood ring.
Such abnormalities as bloody whites, blood spots, meat spots, and cracked shells can be detected.
By being able to identify and remove non-viable incubating eggs you avoid the risk of rotten
eggs exploding and infecting your hatch with dangerous microbes. Healthy embryos will respond
to the light by moving. Sometimes the movement is very sluggish and it can take 30 to 40
seconds for the embryo to move when held under the candling lamp. This indicates the embryo is
not healthy and the egg should be discarded.
################# END #############
Types of egg incubators available in Kenya
Incubating chicken eggs can be a very good way of making money and a good
business model for farmers interested in the venture. But to go commercial in
this venture you will need quality artificial incubators instead of relying on
natural methods of incubation. In this article we want to explore the various
types of chicken egg incubators available in Kenya and how to choose the best
depending on your situation.
A good incubator is a requirement if you want to avoid disappointments faced
by many farmers. However, management practices around the incubator and
quality eggs are equally key inputs towards the success of this venture.
Types of incubators
An incubator imitates a hen by providing an environment for eggs to hatch into
chicks. It keeps the eggs uniformly moist and warm, for a period of about 21
days. Different sources of heat can be used to warm the eggs, the most
common being electricity, solar energy or fuel such as charcoal, paraffin or gas.
Various types of incubators have likewise emerged on the basis of these sources
of heat.
Manual egg incubators
If you don’t have access to electricity then the best option is a manual
incubator. This provides an easy and affordable way to incubate eggs. A manual
incubator can use charcoal, kerosene or gas to heat and retain eggs in the
hatching chamber where the eggs are placed. Eggs are turned manually;
temperatures and humidity regulation is also manual. Different capacities are
available ranging from 50 up to 300 eggs and the cost range from Kshs. 10,000
to 20,000.
However there has been complains on the output of these kind of incubators.
The average hatching rate as reported by farmers range between 50 and 60%
with good management. However the use of thermometer to regulate
temperature and placing water next to the eggs to regulate humidity has
improved performance for most farmers.
Electrical egg incubators
This kind of incubators requires a constant power supply if the eggs are to be
hatched. Any breakdown in the power supply as is usually frequent in Kenya
causes the eggs to lose their hatching value and must be destroyed.
The incubators can be manual, automatic or semi-automatic. Those that are
automatic come complete with a hatching tray, thermostat to control accurate
incubation temperature and hygrometer to control humidity during egg
hatching. The egg tray has an egg turning system for turning eggs
automatically. An air circulation system ensures that air is circulated evenly in
the incubator and that eggs hatch at the same time. Others are connected to
computers, internet, cell phone-based alarms and remote-control functions for
easy monitoring and control of activities while on the move.
The incubators are available in capacities ranging from about 60 eggs to 1200
eggs with costs currently ranging from Kshs. 15,000 to 140,000.

Solar egg incubators
The solar incubator uses solar energy to hatch eggs. They are meant for use
where electricity is not reliable. A solar panel connected to a battery system
with charge controller assures 24-hour power supply. A combination exists
where you can use a solar system when there is power failure. Heat is
controlled automatically in the entire unit by use of a thermostat to ensure no
damage is done to the eggs due to over heating. Fans are installed for fresh air
circulation. Humidity is usually controlled manually by placing water container
inside the base. The eggs are also turned manually.
One advantage with this is that when the system is not in use, the device can
be used to provide power for lighting. Unlike electrical incubators the eggs need
not have to be disinfected before placing them inside and after every hatching
the entire device can be washed and cleaned.
The incubators are available in capacities ranging from 100 to 1,2000 eggs.
Prices range from Kshs 15,000 to 100,000.
Things to consider when selecting an incubator
Source of heat
Obviously the first is to know the source of heat available to you. In the rural
areas where electricity is lacking a manual incubator that uses charcoal or
kerosene or the solar incubator are the obvious choices depending on your
account balance. On the other hand if you have electric power then you can
take advantage of the advanced features of the electrical incubators. But of late
there has been concern that many farmers are abandoning the electrical
incubators due to frequent power outages and the high costs of electricity. A
system that combines solar and electric incubator is a good back up where
there are electric problems.
If you are going to entirely depend on solar power, ensure that the solar panel
provides twice the power that can maintain the battery when it is at full charge.
Compare models, take your time and seek advice.

Market
If you are in business then the size of the market is important because it will
determine the off-take of chicks and therefore the size of the incubator. Select
an incubator that you can adequately supply with eggs. It will be useless to
have a large incubator when you can only supply a few chicks. If you produce
eggs for hatching, the egg production should match a weekly setting plan.
After sale service
When you purchase an incubator, it will come with an instruction manual where
every step of the incubation process is explained and therefore guarantee
successful hatching. And as part of after sales service, manufacturers provide
various kind of support. Some of them guide and provide information or training
on the incubation procedure and business advice that you need in order to
make your hatchery a success. Look for other available services that they offer
to farmers.
Warranty
Look for those that carry at least a two-year warranty on all the spare parts,
especially if it is an electrical or solar incubator.
################# END #############
Eggs produced by local poultry are often seen as money lying loose that needs
to be collected to prevent losses. However keeping local chicken should be to
make profit hence it is necessary to increase the egg produced as much as
possible. The bulk of local poultry lay eggs only for a short period in the year
and this need not be the case. With a little more attention local birds can be
made to yield eggs throughout the year.
The measures discussed here are also applicable to exotic layers on extensive
systems of production.
Determine the egg laying percentage
Egg laying percentage is always the best measure of egg-producing capacity
and has the advantage in calculating the value of the hens. Relying only on the
actual number of eggs produced may not be very valuable as it does not reflect
the efficiency of the birds in producing the eggs.
Calculate the egg laying percentage by dividing the number of eggs laid by the
number of layers and multiplying by 100. Obtained this figure on a daily basis
and compute the average for the week or month. This will help in assessing the
performance and setting targets for improvement. Averages below 70% means
the feeds are going to waste. Always strive to achieve percentages above 80%.
Select Layers
Laying hens are nearly always noisy. They work and hunt for food all day, and
are the first off the roost and the last to go to roost. They are nervous and very
active, keeping themselves up to the greatest possible pitch.
An indication that the hen is laying is when the pelvic bones are soft and pliable,
and spread sufficiently to allow three fingers to be placed between them.
Experience has shown the hen is not laying at the time of examination if the
pelvic bones are hard, bony and close together.
Select hens that are healthy; comb, wattles and face red; eyes bright and
lustrous; neck not short, but medium to long; breast broad and long, sloping
upward; back, long and broad; abdomen, wide and deeper than breast; shanks,
well spread and rather long; well-spread tail
Only mature pullets should be selected for laying. All birds that are stunted,
undersized, lazy, weak or otherwise undesirable should be weeded out and sold,
especially those that are inferior to other stock hatched at the same time.
Only hens that have proved their worth in the previous year should be kept over
for a second or third year. They usually make good breeders and the breeding
flock should be selected from them rather than from pullets. Too often the
reverse practice is followed whereby hens that are in best condition are sold and

inferior ones used for egg production. This is suicidal to profit and should be
reversed.
Improve Laying Ability
Hens should be brought into laying as early as possible. Pullets that delay in
coming to lay are naturally poor layers and soon burn out. Such fowls should
not be used for breeding and the sooner they are taken out of the flock the
better. In the long run such control helps in improving the flock and it is better
to have some system of selection than to have none at all.
Put everything in readiness for egg production. Pullets and hens should be
placed in their separate quarters early enough and special care taken to prevent
overcrowding. This way the flocks get accustomed to their quarters and there is
less danger of upsetting them when they begin to lay.
Manage Laying Stock
It is just as important to feed well for eggs as it is to breed well. Fowls do best
when given plenty of space to forage in. At all times there should be abundant
clean water available to the hens.
During cold weather increase the energy content of the feed by adding
carbohydrates to the normal ration. As the weather grows colder larger
quantities of energy are used to maintain the body heat. Egg production can
continue without interruption even during extremely cold weather if the hens
are fed well.
Plenty of shade should be provided during hot weather and the houses kept as
open as possible so as to be cool and comfortable for roosting. Reduce the
energy content of the feed by reducing the amount of carbohydrates in the
ration.
Hens that are molting should be fed well but should not get a ration too rich in
protein because they are not laying. They do better when given a ration richer
than usual in energy content. By proper management, many good laying hens

can lay an occasional egg even while going through the molting.
Hens that have stopped laying should be culled out and managed differently
from the rest of the flock. A layers ration and reduced exercise can start them
laying again. Those that do not go back to laying within a reasonable time or lay
for only a few weeks and then stop should be sold.
Manage pullets
Pullets can be fed more highly than hens during the early months of growth. At
this time, they need abundant protein, because they are not only growing in
flesh but are filling out their bones and either preparing for, or actually laying.
A pullet is by no means fully mature when she starts to lay. It needs ample food
to complete its development. Pullets should neither be forced to begin laying
early nor to delay laying.
Handle birds gently
Hens should be protected against sudden changes. Excitement due to rough
handling and fear from any cause are detrimental to the birds. Often the
entrance of foreign objects, animals or visitors in the pens will cause
disturbance, so these should be kept out as much as possible. When it is
necessary to carry some unfamiliar object among the flock, this should be done
gradually. Even the wearing of unusual attire, especially if this is of some flashy
color, will disturb the fowls until they are accustomed to it.
Although birds on free range are not so likely to be disturbed, making sudden
motions, calling loudly, or otherwise startling the fowls should be avoided. Enter
the pens as quietly as possible and if necessary signify entrance by making
some noise such as low whistling, so the hens are alerted of your approach.
Hens, especially laying hens, become attached to their quarters. They therefore
should not be unnecessarily moved as this also affects the laying. Changes
should be done with the least possible disturbance where it is absolutely

necessary. When hens must be handled or carried, this should always be done
at night and the fowls should be held gently with the hand beneath the breast,
never by the feet.
Manage Broodiness
Broodiness is a characteristic of hens. Persistent brooders should be culled out
and never used as breeders. But in otherwise normal hens, broodiness can be
broken when necessary. One of the quickest ways is to confine the hens with a
reserve male in a pen where there are no nests and feeding them well on a
layers ration. Often the hens will begin to lay within a week or ten days. Under
no condition should the hens be starved because it is not only cruel but also
causes injuries to the hen.
######################### END ####################