Physical therapy for lower-extremity amputees. · This manualcontainscopyrighted material....
78
Transcript of Physical therapy for lower-extremity amputees. · This manualcontainscopyrighted material....

WAR DEPARTMENT TECHNICAL MANUAL
PHYSICALTHERAPY
FORLOWER-EXTREMITY
AMPUTEES
WAR DEPARTMENT JZ/iVE 1946


WAR DEPARTMENT TECHNICAL MANUALT M 8 - 293
This manual supersedes TB MED 122, December 1944.
PHYSICALTHERAPY
FORLOWER-EXTREMITY
AMPUTEES
VAR DEPARTMENT JUNE 1946
United States Government Printing OfficeWashington: 1946

This manual contains copyrighted material.
WAR DEPARTMENTWashington 25, D. C., 14 June 1946
TM 8-293, Physical Therapy for Lower-Extremity Amputees, ispublished for the information and guidance of all concerned.
[AG 300.7 (18 Jan 46)]
order of the Secretary of War:
Official : DWIGHT D. EISENHOWERChief of StaffEDWARD F. WITSELL
Major GeneralThe Adjutant General
Distribution :
AGF (5); Dept (1); Arm & Sv Bd (1); Tech Sv (2) except SGO(24); Tech Sv (Tng Div) (2); SvC (1); SvC (Surg) (1); SvC(Tng Div) (1); Named GH (8); RH (1); SH (1); ROTC (1);SvC Lab 8 (1); AAF Sta (Cont) (1); A (5); A (Surg) (1); CHQ(Surg) (1); D (Surg) (1); AF (Surg) (1) O & E 8-580 (2);8-581 (2).
For explanation of distribution formula see FM 21-6.
Acknowledgment is made to the American Physiotherapy Association for the useof Table 11, Comparative Muscle Grading Table.

Paragraph Page
CHAPTER I. INTRODUCTION.Section I. General.
CONTENTS
Purpose 1 1Scope 2 1
II. Administration.Personnel 3 2General procedures 4 2
CHAPTER 2. BANDAGING.Section I. General instructions.
Bandaging technique 5 4Care of bandagqs ; 6 4
//. Special instructions.Thigh stump 7 5Leg stump
, 8 11Self-bandaging 9 11
CHAPTER 3. MUSCLE AND POSTURAL EXAMINATION.Section I. General.
Body mechanics examination chart 10 1411. Flexibility and contracture tests.
Forward flexibility test 11 14Extensibility test 12 15Contracture test 13 18
111. Muscle strength tests.Comparative muscle-grading table - 14 19Gluteus medius muscle, posterior portion, 15 19“Upper” and “lower” anterior abdominal muscles 16 19
IV. Posture tests.Plumb-line tests 17 22Plumb-line test for anteroposterior alignment IS 22Plumb-line test for lateral alignment 19 24
CHAPTER 4. PREPROSTHETIC EXERCISE PROGRAM.Section I. General.
Purpose of exercises 20 26Selection of exercises 21 27
11. Stump exercises.Strengthening weak muscles 22 28Stretching existing contractures 23 28
111. Posture exercises.Typical posture faults 24 31

Paragraph Page
Section IV. Exercises for unilateral amputees.Purpose 25 37Bed stage 26 37Ambulatory stage 27 39
V. General exercises.Purpose 28 40Exercise for oblique abdominal muscles 29 40Exercise for lateral abdominal muscles 30 40Exercise for upper anterior abdominal muscles 31 41Exercise for lower back muscles 32 42Breathing exercise 33 42Exercises contraindicated 34 42
CHAPTER 5. INDIVIDUAL WALKING INSTRUCTION.Section I. General.
Administration 35 43Apparatus 36 43Teaching technique 37 43Classification 38 45
11. Unilateral amputees.Beginners class 30 46Intermediate class 40 48Advanced class.. 41 52
111. Tilting-table amputees.Exercise program 42 53Walking 43 53Sitting 44 53Rising.. 45 53
IV. Bilateral amputees.General 1 46 54Beginners class 47 54Intermediate class 48 55Advanced class 49 57
CHAPTER 6. CAUSES AND CORRECTION OF LIMPS.Recognition of limps 50 58Analysis of limps (A/K unilateral amputees) 51 58
1
This manual supersedes TB MED 122, December 1944.
CHAPTER 1INTRODUCTION
Section I. GENERAL
1. PurposeThis manual is concerned with the role of physical therapy in “manage-ment” of amputees. Management encompasses more then surgery,healing processes, restoration of function, and fitting of artificial limbs.It also takes cognizance of the number of persons who have lost limbs,the dramatic circumstances surrounding the injuries, the psychic traumaof amputation, and the necessity for physical and social adjustment.For this reason treatment for amputation is not considered as specific,but rather as a continuous process which begins on the battlefield orscene of injury and concludes with discharge of the patient from anArmy hospital after he has been properly fitted with an artificial limband educated in its use.
The purpose of this manual is to present a standardized program forphysical therapy management of lower extremity amputations.
2. Scopea. The objectives of physical therapy in the treatment of amputa-
tions are:(1) To shrink and toughen the stump.(2) To give muscle and postural examinations to determine existing
defects in regard to muscle weakness, contractures, and faulty segmentalalignment of the body as a whole.
(3) To maintain or restore normal range of motion and musclestrength of the affected extremity.
(4) To correct the existing defects before the amputee is fitted withhis prosthesis.
(5) To instruct the lower-extremity amputee in correct technique ofwalking, making turns, climbing stairs, picking up objects, etc.
b. Bandaging and therapeutic exercise have been invaluable inaccomplishing these objectives. Other forms of physical therapy suchas massage, hydrotherapy, thermotherapy, ultra-violet irradiation, andcommon ion transfer have been employed extensively at times, but theymust be individually prescribed and administered. Bandaging andtherapeutic exercise, on the other hand, are applicable in the case ofnearly every lower-extremity amputee; therefore they will be dealt within detail in this manual.

2
Section 11. ADMINISTRATION
3. PersonnelFor the very reason that treatment for amputation is a continuous proc-ess, the utmost cooperation must exist among the several persons anddepartments interested in management of a patient. The medicalofficers, ward personnel, physical therapists, occupational therapists,various members of the reconditioning service, and the techniciansfrom the artificial limb shop must work together closely if the programis to succeed.
4. General ProceduresTo further cooperation in the course of treatment certain proceduresmust be agreed upon and adhered to:
a. Except in emergencies, furloughs will not be granted a patientuntil it can be certified that he can satisfactorily manage his prosthesis(graduation from Intermediate Walking Class). This will insure thatno important treatment is interrupted.
b. No amputee should begin walking with his prosthesis untilapproval has been given by the chief of the amputation section and thephysical therapy section.
c. When a prosthesis has been finished it should be delivered to thephysical therapy section and kept there until the patient has com-pleted the beginning phase of walking instructions and has been checkedby the chief of the amputation section, or some person he may designate.Only then is the patient allowed to keep his prosthesis on the ward.
d. All walking instruction will be under the supervision of the physi-cal therapy section.
(1) A record system showing the current status of every amputa-tion case in relation to the walking program will be maintained in thephysical therapy section.
(2) Cases will be divided into four groups for instructions; unilateralbelow-knee amputee (B/K), unilateral above-knee amputee (A/K),amputees fitted with tilting-table prostheses (tilting tables; this cate-gory includes patients with disarticulation of the hip joint or thighamputation too short for fitting with an ischial bearing thigh bucket,that is, stumps less than 3 inches long), and bilateral amputees.
The instruction groups will be as small as possible so that instructionmay be given on an individual basis. Classes 30 minutes in length willbe conducted by physical therapists especially trained for the program.Each patient will receive a proportionate share of instruction.
e. Arrangements should be made for a designated time every 2 dayswhen a qualified orthopedic mechanic SSN 366 (limb fitter) can meetwith the physical therapist in charge of walking instructions and patientswhose prostheses need readjustment.

3
/. A 16-millimeter movie camera with projector, screen, and othernecessary photographic equipment should be assigned to the physicaltherapy section. Sufficient technical personnel from the local SignalCorps or other photographic unit should be placed at the disposal ofthe physical therapy section so that moving picture shots can be takenshowing each emputee at the beginning of his walking program andrecording his progress thereafter.
About 100 feet of film should be exposed at each photographic record-ing to demonstrate:
(1) Full figure walking toward the camera, executing a turn, andwalking away from camera.
(2) Lateral full figure with each side toward the camera in turn.(3) Close-up of lower extremities during walking.(4) Standing for lateral and posterior plumb line tests.The physical therapist will analyze these pictures, then show them
to the amputee, at the same time pointing out defects in posture, co-ordination, or walking; noting improvement; and insuring that thepictures are utilized as much as possible from the instructional viewpoint.
g. No amputee will be discharged from the service until he has com-pleted the walking program outlined for him.

4
CHAPTER 2
BANDAGING
Section I. GENERAL INSTRUCTIONS
5. Bandaging Techniquea. Correct bandaging of a stump is an important part of the physical
therapy treatment in insuring proper healing and shrinkage.After exercise, the stump must be bandaged firmly with as many
bandages as necessary to give even pressure throughout. Bandagingmust he repeated several times daily for the patient to derive maximumbenefit. The bandage is worn continuously until the patient is fittedwith his prosthesis; and for 5 or 6 months after fitting, whenever theprosthesis is removed.
Incorrect bandaging will harm the stump. Common errors to beavoided are:
(1) Exerting a constricting effect. This may produce edema distalto the site of the compression.
(2) Undue general tightness, especially at the edges of the bandagewhere there is less elasticity than in the center. This error rfmst beespecially guarded against by beginners who in striving for neat appear-ance of the bandage cause constriction.
(3) Bandaging unhealed stumps too snugly. Bandaging should beless snug than for healed stumps. Persistence of this error will delayhealing.
b. The bandage stump should have a smooth, even contour withoutbulges.
Four safety pins placed or spaced in diamond shape to secure the cross-wrappings of the hip spica (par. 7) at the lateral side of the hip shouldprevent a certain amount of shifting or crawling of that part of thebandage.
6. Care of BandagesBecause of their elastic qualities, ace type bandages are most suitablefor bandaging stumps. These bandages contain no rubber, but are madeof a soft, porous-weave cotton which must be laundered carefully toretain the elasticity necessary for proper application.
The bandage should be washed with mild white soap and water. Allsoap particles should be removed by through rinsing. Since the bandageswill lose their elasticity if hung, they should be spread on a clean, flatsurface until dry, than rolled evenly and firmly without stretching.

5
Section 11. SPECIAL INSTRUCTIONS
7. Thigh StumpApplication of bandages in thigh amputations is especially difficult andrequires patience and practice in technique.
a. Two 4-inch ace bandages sewed together end to end make a satis-factory bandage for the average thigh stump. The 6-inch bandage isrecommended for larger stumps.
h. A firm, even pressure must be maintained throughout the wholebandaging procedure. The bandages should be applied as firmly as thepatient can tolerate without pain or circulatory interference. Appli-cation is slightly tighter at the distal end of the stump than at the proxi-mal end.
c. The bandage is applied as follows (see FS 8-85):
Figure 1.
(1) Begin with the bandage at the groin where it is held by the pa-tient’s thumb. (See fig. 1.)

6
Figure 2.
(2) Proceed over the end of the stump to the upper thigh, posteriorly,where the bandage is held by the patient’s fingers. (See fig. 2.)
Figure 3.
(3) Return bandage over end of stump, laterally. (See fig. 3.)

7
Figure J+.(4) Again over end of stump, medially. Each recurrent is held like
the first. (See fig. 4.)
Figure 5.
(5) Having completed three recurrent turns, begin the anchoringturn by drawing the bandage laterally from the posterior aspect to thelateral side of the stump. (See fig. 5.)

8
Figure 6.
(6) Encircle, carrying the bandage high in the groin. (See fig. 6.)
Figure 7.
(7) Begin spiral to stump by carrying the bandage from the lateralthigh toward the medial side of the stump. Continue spiral, encirclingstump twice. Then turn patient on his side. (See fig. 7.)

9
Figure 8.
(8) From the posterior thigh, carry the bandage over the lateral sideof the hip, and continue over the crest of the ilium, across the abdomen.(See fig. 8.)
Figure 9.
(9) Continue around lower hip. (See fig. 9.)

10
Figure 10.(10) Return to stump. (See fig. 10.)
Figure 11.(11) Encircle stump, completing first spica. Begin second spica,
following the course of the first. Return to stump and continue spiralsto complete bandage. (See fig. 11.)

11
Figure 12.
(12) Bandage is completed. (See fig. 12.)
8. Leg StumpApply and anchor the three recurrents as demonstrated in figures 1through 6 for the thigh stump.
Then secure the bandage by passing it to one side above the patella,encircling the lower thigh twice, and returning on the opposite side of thepatella to the stump. The patella is left exposed.
9. Self-BandagingEach patient should be taught to bandage his own stump as soon aspossible. All amputees who are ambulatory and who are going to thephysical therapy section should be bandaged once a day under the guid-ance of the physical therapist and be instructed to reapply the bandagethemselves as often as necessary. Group instruction may be given tosave time.
Someone must secure the bandage for the thigh amputee when he doesrecurrent turns over the end of his stump in applying his own bandage.He should be taught to elevate his pelvis with his good leg so that hisstump is held in extension when he applies the spica to his waist.

Table I.BODY MECHANICS EXAMINATION CHART FOR LOWER EXTREMITY AMPUTEES
12
Name | Ward numberHeight j Weight | Age
Site of amputation j Right, left, or bilateralHandedness | Date physical therapy started
PART I. PRE-PROSTHETIC AND POST-PROSTHETIC TESTSTests for Flexibility
Pre-op.Date
Post-op.Date
Post-Pros.Date
Forward Flexibility(Record in inch
string or backExtensibility Test -
(Normal, fair, or
y Test: __ _
es) (If limited, note whether ham-muscles).
poor)LEFT Tests for Contractures
{Record in Degrees)
Gastroc-soleus
RIGHT
Post-Pros.(Date)
Post-op.(Date)
Pre-op.(Date)
Pre-op.(Date)
Post-op.(Date)
Post-Pros.(Date)
HamstringsHip flexors.Hip abductors .
Pectorals (si. mod. ormark.).
Tests for Muscle Strength{Record by Percentage )
“Upper” anterior Ab-dominals: (Trunk-rais-ing test).
“Lower” anterior Ab-dominals: (Leg-rais-ing test)*.
Hip flexors.
LEFT RIGHT
Post-Pros.(Date)
Post-op.(Date)
Pre-op.(Date)
Pre-op.(Date)
Post-op.(Date)
Post-Pros.(Date)
Hip ext. rotatorsHip int. rotatorsTibialis posticusLong toe flexorsGluteus, medius (post.
part).Hip adductorsHip abductors
.
Lateral abdominalsHip extensorsHamstrings. _
Back extensorsQuadriceps
_
Signature of physical therapist Date* If test performed with prosthesis, record results with asterisk.
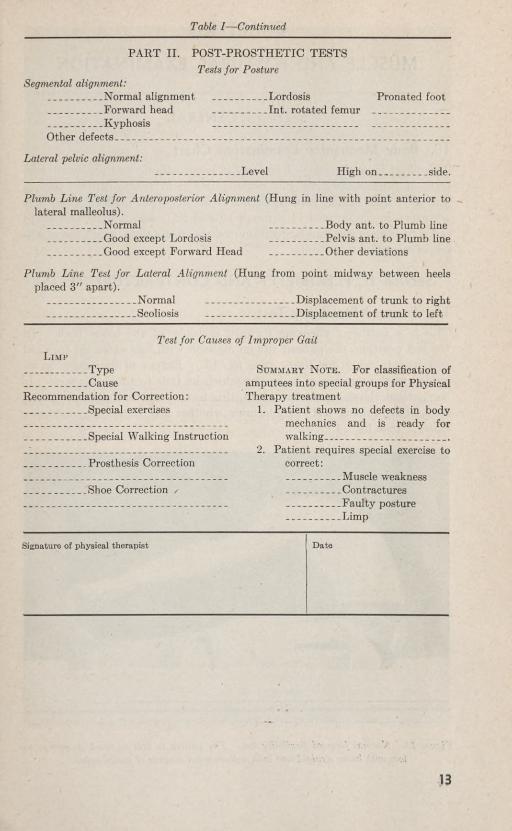
Table I—Continued
13
PART II. POST-PROSTHETIC TESTSTests for Posture
Segmental alignment:_
.Normal alignment_ _ Lordosis Pronated foot
Forward head. _
Int. rotated femurKvnhosis
Other defects._ _
Lateral pelvic alignment:Level High on.. side.
Plumb Line Test for Anteroposterior Alignment (Hung in line with point anterior tolateral malleolus).
Normal Body ant. to Plumb lineGood except Lordosis Pelvis ant. to Plumb lineGood except Forward Head _ Other deviations
Plumb Line Test for Lateral Alignment (Hung from point midway between heelsplaced 3" apart).
Normal_
Displacement of trunk to right_ _ ..
Scoliosis_ . .
Displacement of trunk to left
Test for Causes of Improper GaitLimp
TypeCause
Recommendation for Correction:Special exercises
Summary Note. For classification ofamputees into special groups for PhysicalTherapy treatment
1. Patient shows no defects in bodymechanics and is ready forwalking .
2. Patient requires special exercise tocorrect:
Muscle weakness
.Special Walking Instruction
. Prosthesis Correction
..Shoe Correction / .. ContracturesFanltv nostureLimp
Signature of physical therapist Date

14
CHAPTER 3
MUSCLE AND POSTURAL EXAMINATION
Section I. GENERAL
10. Body Mechanics Examination ChartThis chart is used to record findings in preprosthetic and postprosthetictests of muscle strength and contractures, and postprosthetic test ofposture. It is largely self-explanatory (table I), but detailed directionsare given in paragraphs 11 through 19 and in paragraphs 50 and 51 inorder to explain the standardization of some of the tests, as well as meth-ods of recording test results.
Section 11. FLEXIBILITY AND CONTRACTURE TESTS
11. Forward Flexibility TestThis is a means of checking forward mobility of the lower back. Inthe test position, the patient sits on a plinth with legs extended forwardand tries to reach his toes. (See fig. 13.) Extent of limitation is re-corded as the number of inches by which he fails to touch his toes. Ifthe patient shows much limitation, this test should be followed by thestraight-leg raising test to determine whether any hamstring tightnessexists. (See fig. 14.)
Figure 13. Normal forward flexibility test. The ■patient is able to touch fingertips totoes with knees straight and with well-rounded contour of entire spine.

15
Figure 14• Straight-leg raising test for hamstring tightness. This patient shows markedrestriction due to tightness in hamstring muscles. Normal length of hamstringswould permitflexion of the hip to about 85° with the leg infull extension, as requiredin this test.
a. When the patient reaches forward, the contour of his lower backshould be noted. The hamstring muscles may be relaxed and allowmore than normal hip-joint motion; the upper back may be more thannormally flexible or it may be in a definitely kyphotic position so thatthe patient is able to touch his toes even though his lower back is con-siderably limited in flexibility.
h. Low back flexibility cannot be determined accurately when thetest is given with the patient in a standing position. Any rotation ofthe pelvis (clockwise—forward on the left; or counterclockwise—forwardon the right) will necessarily be accompanied by rotation of the lumbarspines. This, in turn, will limit trunk flexion from a standing position.
When the patient is sitting on a plinth with his legs extended forward,the pelvic rotation usually disappears (except in cases of structuralrotation); thus, trunk flexion becomes a more accurate index of the limi-tation of low back flexibility.
12. Extensibility TestThis is a means of checking general ability to extend hips and knees,flatten lumbar spine, and raise arms overhead. (See fig. 15.) Thepatient should be able to lie supine on a plinth with knees and hips ex-tended,’ lumbar spine flat on the plinth, and arms raised directly over-head. Findings are recorded as N (normal), F (fair), or P (poor).

16
Table11.
ComparativeMuscleGrading
Test
PercentagesLetters
NumeralsNeurologicalratings
Combinationratings
Fullrangeofmotionagainst
gravitywith
normalresistance,repeated
severaltimes
withoutsignsoffatigue.
Contracted orhyper- trophied. 100 95
Normal-}-(N-b)
Normal(N)
Normal—(N—)
5
13 12 11
0
+
+
+
+
Normal(N)
9
Normal—(NM)8
Normal. Increaseagainstre-
sistancebut
quite
normal. Beginningpower
againstaddedre-
sistance.
Fullrangeof
motionagainst
gravitywith
mediumamountof
resistance,repeated
severaltimeswithoutsignoffatigue,but
tiresquicklyoris
unableto
complete
rangeofmotionwithnormal
resistance.90 80 70Good+
(G-f-)Good(G) Good-
(G—)
4
10 9 8
1
+
+
+
Good-}-(GP)7
Fullrangeof
motionagainst
gravity,mini-
mumresistance.Full
rangeofmotionagainst
gravity,no
resistance.Maytireafter3to6
move-
ments.
60 50
Fair-}-(F+)
Fair(F)
3
7 6
2
+
+
Good(G)
6
Well-defined controlover gravity
or
friction.
Almostfullrangeof
motionagainst
gravity.
_40
Fair—(F—)
5
Beginningmotionagainst
gravityorcom-
pletionofarcofmotionwith
gravity
eliminated,eitheragainstfrictionoftable
orwith
minimumresistance.
30
Poor-}-(P+)
4
Good-(GM)5
Beginningaction
againstgravity
orfriction.

17
Nomotionagainst
gravitybutcompletes
20
Poor(P)
2
3
3
+
Fair4-
(FP)
4
Beginningaction
rangeofmotionwith
gravityeliminated
ofjoints
butnot
(nofriction).
againstgravity
or
enoughto
overcomefrictionoftable.
Partialrangeofmotionwithgravity
10
Poor-(P-)
2
Fair—(FM)2
Definitemuscleac-
eliminated.
ti
on
withoutmuchinfluence
+
onthejoint.
Palpableor
visiblecontractionofmuscle,
5
Trace(Tr)
1
1
4
Actionweak1
Definitemuscle
butno
apparentmovementofpart.
(AW)
contraction.Be-
tweenIAand
AWis
fibrella-tionor
question-ablecontraction.
Nocontractionfeltin
muscle._0
0
0
0
5
0
Inactive(IA)0
No
appreciablemotion.

18
Figure 15. Normal extensibility test. Above patient would be rated normal.
13. ContractureTesta. Limitation of motion due to contractures in gastrocnemius, soleus,
hamstrings, hip flexors, and hip abductors is tested and recorded indegrees. In testing limitation of motion due to contractures in the hipflexors, the patient lies on a plinth as illustrated in figure 16. Thepatient tries to extend his right thigh while holding his pelvis flat on thetable; all motion is, therefore, true hip joint motion alone.
Figure 16. Position of patient for measuring degree of hip flexion contracture. Op-posite thigh is flexed on chest to help keep lumbar spine flat on table. The abovepatient shows a hip flexion contracture of approximately 30°.
h. The normal state of extensibility of the pectoral muscles is illus-trated by the position of the arms in figure 15; the amount of tightness

in pectoral muscles should be recorded as si. (slight), mod. (moderate),or mark, (marked).
Section 111. MUSCLE STRENGTH TESTS
14. Comparative Muscle-Grading TableMuscle strength tests of the lower extremity and abdominal musclesare to be recorded in percentages accorded to table 11. Detailed in-structions for testing particular muscles are given in paragraphs 15and 16.
15. Gluteus Medius Muscle, Posterior PortionIn this test the patient lies on his side with his trunk and pelvis in straightalignment. (See fig. 17.) His upper leg is placed in position with legextended and thigh in abduction, slight extension, and slight externalrotation. The patient holds against resistance which is applied to hisankle in a downward and slightly forward direction.
Figure 17. Testing strength of posterior portion of gluteus medius
16. “Upper” and “Lower” Anterior Abdominal MusclesThese muscles are tested and graded as follows
19
Percentage Test
100
(1) With hands clasped behind head, roll pelvis backward and “fold” tositting position. Legs are not supported until trunk flexion iscomplete, but may be supported as soon as the pelvis should nor-mally begin flexing on the thighs. (See fig. 18® and @.)
(2) With hands clasped behind head, roll pelvis backward and holdlumbar spine flat on table as legs are raised and lowered. (Legraising tests are modified for unilateral amputees with prosthesisby resting prosthesis on normal leg.) (See fig. 19.)

20
Percentage Test
80
(1) With arms folded on chest, roll pelvis backward and “fold” to sittingposition.
(2) With hands clasped behind head, roll pelvis backward to flattenlumbar spine. Your legs are then raised at a 40° angle to thetable by the examiner; try to keep back flat on table and at sametimeretain legs in raised position.
60
(1) With arms down at side (but with no assistance from hands or elbows),roll pelvis and “fold” to sitting position.
(2) With hands clasped behind head, roll pelvis backward to flattenlumbar spine. Your legs are then raised at a 60° angle to thetable by the examiner; try to keep back flat on table and at sametime retain legs in raised position.
50
(1) With arms down at side, roll pelvis and lift head and shoulders about4 or 5 inches from the table.
(2) With hands clasped behind head, roll pelvis backward to flattenlumbar spine. Your legs are then raised at a 75° angle to thetable by the examiner; try to keep back flat on table and at sametime retain legs in raised position.

21
® Legs are not supported during movement offlexion of thorax on pelvis.
® J.s trunk-raising continues by flexion of pelvis on thigh, legs are held down on tableby examiner.
Figure 18. Testing strength of “upper” anterior abdominal muscles. Above figuresshow position of arms for 100% ( normal) trunk-raising test. See paragraph 16for positions in 80 percent and 60 percent trunk-raising tests.

22
Figure 19. Testing strength of “lower” anterior abdominal muscles. Strong action ofanterior abdominal muscles keeps lumbar region fiat on table as weight of legs israised and lowered. Test may be modified for unilateral amputees who have beenfitted with prostheses, as above, by placing prosthesis on normal leg to keep kneeof prosthesis extended. Above patient shows 100 percent {normal) strength forthese muscles.
Section IV. POSTURE TESTS17. Plumb-Line TestsThere is one standard reference point in all postures, the base, where thefeet touch the floor. To determine variations in posture, a plumb lineis suspended from a stationary point above the patient’s head to thefixed reference point at his feet.
When a patient has correctly balanced posture, his body will coincidewith the plumb line at several points above the normal base; when hehas faulty posture, there will be a lack of normal alignment. In the testfor anteroposterior alignment, the plumb line will coincide with thefrontal plane of the body in normal posture; in the test for lateral align-ment, it will coincide with the sagittal plane.
18. Plumb-Line Test for Anteroposterior AlignmentTo assume the test position, the patient steps up to the plumb line andplaces his feet so that the plumb-bob hangs in line with a point justanterior to his lateral malleolus. (See fig. 20.)
If his posture is correctly balanced, the patient’s body will coincidewith the plumb line at the following points above the normal base:
a. Posterior to the patella.h. Through the hip joint (anterior to the greater trochanter).c. Midway between abdomen and back.d. Through the shoulder joint.e. Through the lobe of the ear.

® A bove patient shows good postural alignment except that his head and shoulders are slightlyforward.
® Above patient shows faulty postural alignment with pelvis slightly displaced marked lor-dosis and head forward. {Note clockwise rotation of pelvis and trunk; compare withfigure 21®.)
Figure 20. Plumb line test for anteroposterior alignment.
23

24
19. Plumb-Line Test for Lateral AlignmentTo assume the test position, the patient stands with the inner border ofhis heels 3 inches apart and equidistant from a line which coincides with
® Above patient shoivs good (but not perfect) postural alignment, and good weight distri-bution over both legs.
@ Above patient shows faulty postural alignment. Displacement of pelvis, trunk, andhead toward right shows that more weight is being borne on the normal leg than onthe prosthesis.
Figure 21. Plumb line test for lateral alignment.

25
the tip of the plumb-bob. (See fig. 21.) (Bilateral amputees shouldstand with heels as nearly 3 inches apart as possible.) Weight shouldbe distributed evenly on both feet.
If his posture is correctly balanced, the midline of the patient’s bodywill coincide with the plumb line.

26
CHAPTER 4PREPROSTHETIC EXERCISE PROGRAM
Section I. GENERAL
20. Purpose of ExercisesThe purpose of this program is to correct defects in body alignment andto establish muscle balance and normal range of motion before fittingwith prosthesis. This will insure that the body and prosthesis functiontogether with maximum efficiency.
a. Before the patient is ready for the postprosthetic program ofwalking, stair-climbing, turns, etc., he must accomplish the followingobjectives of the preprosthetic program:
Figure 22. Anterior pelvic tilt due to hip flexion contracture.

27
(1) Increasing muscle strength of extremity involved, includingcorrection of existing contractures when condition of patient permits.
(2) Correcting defects in muscle balance and body alignment.(3) In cases of unilateral amputation, improving weight-bearing
strength and balance of normal leg.(4) Maintaining general muscle tone.h. When an amputee is measured for his prosthesis before correction
of defects in body mechanics, the limb-fitter will necessarily fit theprosthesis to the deformity. As a result, the patient tends to be heldin the position of deformity despite subsequent efforts to correct hispostural defects. For example, if an abd'uction contracture exists inthe thigh stump at the time of the fitting, the patient will stand in aposition of lateral pelvic tilt; if a hip flexion contracture of the stump ispresent, the patient will stand in a position of anterior pelvic tilt (lor-dosis), and his prosthesis will fit and tend to hold him in this position.(See fig. 22.)
If defects are corrected by exercise before measuring and fitting takesplace, the need for constant alterations in the fit of the prosthesis will beobviated.
21. Selection of ExercisesThe preprosthetic exercise program may be divided into two stages: thepreoperative (before final surgical revision), and the postoperative (afterfinal surgical revision). This division into stages does not necessarilyinfluence the over-all selection of exercises, since the need for a particularexercise continues until the defect of the given muscle group is corrected.Some exercises may have to be discontinued temporarily during the earlypostoperative stage, but their essentiality will undoubtedly be increasedby the interruption.
The stages through which a patient progresses, however, will influencethe administration of the exercise program in several ways:
a. Preoperative Stage. Exercises of involved part are not usuallygiven during the healing phase following the initial guillotine ampu-tation. As soon as the stump is healed, exercises may be given uponthe approval of the ward officer. However, since the surgical revisionis usually accomplished shortly after the stump has healed, this periodis not very long.
h. Early Postoperative Stage. The intensity of some exercisesgiven in the preoperative stage may have to be decreased from an activeor resistive movement to a movement of static contraction; other ex-ercises may have to be omitted temporarily.
c. Preoperative and Postoperative Ambulatory Phases. Nor-mal leg balance exercises in standing can be added.

28
Section 11. STUMP EXERCISES
22. Strengthening Weak Musclesa. After the initial postoperative period, hip extension, hip adduction,
and quadriceps exercises (for B /K’s) are usually best performed withpulley weights. Care must be taken to insure pelvic fixation in thefirst two of these exercises. Exercises for the remaining muscles of theinvolved extremity are usually best performed against resistance pro-vided by another person.
The governing principle in all of these exercises is to increase resistanceprogressively as muscle strength improves.
b. Occasionally, tests reveal weakness of the muscles involved incontracture. The contracture may be due to changes in joint capsules,ligaments, or soft tissues. Therefore, it is advisable to reduce the de-formity before instituting exercises to strengthen these muscles.
23. Stretching Existing Contracturesa. Hip Flexion. The choice of the exercise position may depend
upon the condition of the patient, available apparatus, or other factors.
Figure 23. Stretching contracted hip flexors with patient in supine position. Notethat the normal thigh is in a comfortably flexed position, the lumbar region is flat-tened, and the pelvis is fixed firmly by the strap. The stretching of the contracted
• hip flexors is a passive procedure accomplished by the physical therapist's steadypressure on the anterior iliac crest and the distal half of the thigh stump. (In prac-tice, the physical therapist stands on the side of the amputation.) The patientassumes the above position only when he cannot assume the preferred position infigure 25.

29
Regardless of what position is employed, however, the technique mustinclude firm fixation of the pelvis to prevent anterior pelvic tilt whilepressure is being exerted to stretch the hip flexors.
(1) The standing position is not recommended because of the diffi-culties encountered in fixing the pelvis. (See par. 116.)
(2) In the supine position (with or without the extension table), astrap is used in addition to the force exerted by flexion of the normalthigh in order to fix the pelvis. When the pelvis is fixed by a strap, thenormal extremity need not remain in such extreme flexion while the hipflexors of the opposite thigh are being stretched; it can rest on the tablein knee-bent position. (See figs. 23 and 26.)
(3) See figure 24 for the prone position.
Figure 24- Stretching contracted hip flexors with the patient prone and with his legsover the end of the plinth. Note that the patient leans as far forward as possiblewith comfort. He grasps the sides of the plinth for support. The physical ther-apist maintains stabilization of the thigh of the patient’s normal extremity by coun-ter pressure of her left knee. This stretching is a passive procedure accomplishedby the physical therapist’s applying traction on the distal half of the stump and,simultaneously, pressure over the gluteal region. The above position is ordinarilyemployed only when the position shown in figure 25 cannot be used.
(4) See figure 25 for the sitting position.b. Hip Abduction. (1) Side-lying position. The extension table
may be used as in hip-flexor stretching. (See fig. 26.) The patient lieson the side of his normal leg with his knee and thigh flexed about 45 ° to

30
60°. The pelvis is fixed to the table by a strap. The weight pullsdownward to stretch the stump abductors.
Figure 25. Stretching contracted hip flexors and hip abductors in the sitting position.Note that the patient is sitting flat against the railing of the frame with his normalleg extended as fully as possible. The strap fixes his pelvis still further; and theweights (not shown) are exerting traction in the direction in which his thigh is ex-tended. The patient is making no active effort at movement of the right hip joint.The use of the radiant heat infra-red lamp, as illustrated, facilitates relaxation ofmuscle spasm. Since the single application of traction, as above, usually pulls thethigh in abduction as well as extension, the abduction component is negated bysecondary traction. This, in turn, pulls the thigh in adduction-extension. Thisappears to be the most satisfactory arrangement for simultaneously stretching con-tracted hip flexors and contracted hip abductors.
(2) -Supine position, or prone position with pillow under abdomen.Fixation of the pelvis is essential in order to localize stretching to thestump abductor muscles. Without pelvic fixation, the pelvis tends toride upward on the side of the normal leg. A wide belt should be fastenedaround the pelvis and attached to the table by a strap which will pullthe pelvis down on the side of the normal leg.
(3) Standing position. This position is not recommended unless thepatient can stand with his pelvis fixed by a pelyic-grip apparatus.
(4) Sitting position. See figure 25.c. Using Weights to Stretch Hip Flexors or Abductors. It
must be strongly emphasized that a weight must be kept on long enoughand be heavy enough to overcome the ability of the muscle to pull against

31
it. Otherwise, the weight will act like a resistance stimulus and willincrease the strength of the muscle instead of stretching it.
(1) The amount of time will usually be a 15- to 30-minute period.(2) The amount of weight will vary with the individual patient—the
length of his stump, the degree of contracture, and his tolerance. Themaximum amount of weight should be used immediately (without gradualincrease); it should be sufficient to produce a definite feeling of relaxationin the muscle within several minutes. Immediately after this exercise,the patient usually complains of temporary pain in the “hip joint”(actually the hip flexors) and of difficulty in flexing his thigh. He shouldbe told to expect such reaction and reassured that the symptoms are notserious.
Figure 26. Use of the extension table in stretching contracted hip flexors.
Section 111. POSTURE EXERCISES24. Typical Posture FaultsIndividual examination of patients will determine individual variationsin exercise. However, since postural defects tend to assume the samepattern in most patients, it is possible to establish a general correctiveexercise program which will apply in most cases.
The following chart outlines conditions of muscle imbalance whichusually accompany (as a cause of, or result of) typical faults in adultposture. It also prescribes exercises to correct muscle imbalance andposture defects:

32
Posturefault
Muscleweakness
Muscletightness
Exercisesandothercorrective
proceduresfor
muscleimbalance
a.Lordosis.
“Lower”anterior abdominals.Lowback
erectorspinae.
Strengthening“lower"
anteriorabdominal
muscles:
(ExternalobliqueandIlio
psoas.
Supineposition:
rectusabdominis.)
Otherhipflexors.
(1)
Rollpelvisuntilbackisflat
ontablebypullingup
and
inwithlower
abdominalmuscles.Holdlowback
Hamstringmusclesand
flaton
tableandbreatheinandoutto
relaxupper
gluteusmaximus,
less
abdominalmuscles.
frequentlythanab-
(2)
Withhandsup
besidethehead,
kneebent,andfoot
dominalmuscles.
flaton
table,rollpelvisuntilbackisflat
ontableby
pullingup
andinwiththelower
abdominalmuscles.
Holdbackflaton
tableandstraightenlegbysliding
heeldown
alongtable.
Keeppelvis
rolledand
returnkneetobentposition.Stump
remainsex-
tendedon
table.(Seefig.27.)
Stretchingtightlowbackmuscles:
Sittingposition:
Withknees
slightlybentand
armsextendedforward,pull
upandinwithlower
abdominalmusclesto
rollthepelvis
back.Thenbend
uppertrunkforwardto
roundlower
back,and
reachtowardtoes.
Strengtheningabdominalmusclesand
stretchinglowbackmuscles
(combinedexercise);
Supineposition:
Witharmsat
sides,palms
up,and
kneesflexedon
chest,
lifthipsa
fewinchesfromtabletoflexpelvis
onthorax
(butnottopointofdorsal
flexion).

33
h.
Kyphosis.
Stretchinghipflexors(see
par.23);
Supineposition:
Keeplow
backflat
ontableby
flexingnormalleg(Knee
tochest)withaidofhandsaroundthigh.As
assistant
pressesstumpdown
towardtable,helpwith
activehip
extension.(Seefig.23.)
Proneposition:
Withlegs
overendoftableandtrunk
restingon
table,fix
pelvisby
pressureagainstnormalleg.Atthe
sametime,
extendhipjointon
stumpsideto
stretchhipflexors.(See
fig.24.)
Sittingposition:
Seefigure25.
Supineposition(with
extensiontable):
Seefigure26.
Dorsalerectorspinae.
Pectoralsand“upper”
anteriorabdominal
Strengtheningdorsalerector
spinaeandmiddleandlower
trapezius:
Middleandlowertrapezi-
muscles(internalob-Sittingposition;
us.
liqueandrectusab-
Onstoolwithlowerbackagainstwall(or
onfloorwithlegs
dominis).
extendedforward,andwithbacktowall),handsup
beside
head—keepinglowbackagainstwall,straightenupperback,
tryingtotouchentire
backtowall.Then
presselbows
andheadbacktowardwall,
keepingchindown
andin.
(Seefig.28.)
Stretchingtight
pectorals:Sittingposition: Starting
witharmsinan
abductedandexternally
rotated
position,movearmsbackward
andslightlyupward.
Physi-
caltherapistaids
armmovement
andstabilizes
upperback
by
pressureofher
knee.(Seefig.29.)

34
Posturefault
Muscleweakness
Muscletightness
Exercisesandothercorrective
proceduresformuscleimbalance
c.Forward
Head.Anteriorneckflexors(an-Cervicalspine
extensors,Strengtheningand
stretching(combinedexercise):
(Thispositionis
usuallyterior-vertebralcervi-
includingupper
Supineposition:
compensatoryfora
de-
pressedchest;its
cor-calspineflexors).
trapezius.
Kneeisbentandfootisflat
ontable,armsarein
“inverse
T”position,|
|
(armselevatedto
shoulderlevel,hands
rectionwillgreatlyde-
pendon
correctionof
faultychestand
upper
backpositions.)
Sternocleidomastoid,up
besidehead).
Raisechest
(withoutarchingback)and
depresschinin
directionof
flatteningcervicalspine.(This
exerciseissomewhat
comparableto
flatteningoflumbar
spineincasesof
lumbarlordosis,exceptthatpatientisnot
expectedtotouchentire
cervicalspinetotable.)
Sittingposition:
Onstoolwithlowerbackagainstwall(or
onfloorwithlegs
extendedforwardandwith
backtowall),handsup
beside
head—keepinglowbackagainstwall,straighten
upper
back,tryingtotouchentire
backtowall.
1’henpress
elbowsandheadbacktowardwall,
keepingchindown
and
in.(Seefig.28.)
d.PronatedFoot.
Tibialisposteriorand
longtoe
flexors.
Peroneals
Inpreweighthearingstage
—footexercisesfortibialis
posterior
andfortoe
flexors:Supine
positions:Withtoesgripped,turnfootina
positionofinversionin
plantarflexion.
In
weight-bearingstage:
Posturalstrain
onweaktibialis
posteriorandtoe
flexorshould
berelievedbyplacing
aninner
borderwedge
ontheheel,
ora
Thomasheel
ontheshoe(ofnormallegincaseofuni-
lateralamputees),ifthewardofficer
sorecommends.

35
e.
InternallyHipexternal
rotators,TensorfasciafemorisIn
preweight-bearingstage—exercisesforexternal
rotators(if
Rotatedparticularlyposterior
examinationshowsthemtobeweak):
Femur.
portiongluteus
medius.
Supineposition:
Withlowerextremitiesin
normalalignment,
performan
outwardaxial
turn.
Side-lyingposition(fig.17):
Asintestforstrengthof
posteriorportionofgluteus
medius
(par.15),
keeptrunkandpelvisin
straightalignment.
Placeupper
legin
positionwithlegextendedandthighin
abduction,slightextension,andslightexternal
rotation.
Holdagainst
resistancewhich
physicaltherapist
appliesto
ankleinadownward
andslightly
forwarddirection.
In
weight-bearingstage:
Strainon
externalrotators
shouldbe
relievedby
placingan
innerborderwedge
onheel,or
Thomasheel
onshoe(of
normallegin
caseofunilateral
amputees),asfor
pronation,
iftheward
officerso
recommends.Withthe
kneein
extension,thehipjoint
andastragalo-
navicularjointact
togetherasa
universaljoint;
thepro-
nationofthefoot
resultsininternal
rotationofthefemur,
andvice
versa.

36
Figure 27. Exercise to strengthen ‘'lower” anterior abdominal muscles.
Figure 28. Exercise to correct faulty positions of upper hack and head. (Directionsin paragraph 2Jfb must be followed exactly.)

Figure 29. Position for stretching contracted 'pectoral muscles.
Section IV. EXERCISES FOR UNILATERAL AMPUTEES
25. PurposeThis section prescribes exercises for strengthening and improving balanceon the normal leg.
The number of repetitions or amount of resistance offered a patient inparticular exercises increases in direct proportion to the return of musclestrength.
26. Bed Stage
37
Exercises Purpose Position and movements
a. Foot Exercises.Dorsiflexion Maintaining tone and
strength of dorsiflexorsand offsetting tendencytoward gastrocnemiussoleus contracture.
Supine position:Pull foot upward (toward
body).
Inversion __ .
Maintaining tone and Supine position:(Exercise is done in strength of tibialis an- Pull foot upward andboth dorsiflexion and terior and tibialis pos- slightly inward.plantar flexion, wherelatter is not contra-indicated by a con-tracture in that po-sition.)
terior muscles. Push foot downward andslightly inward.

38
Exercises Purpose Position and movements
Toe flexion ..Strengthening both long Supine position:
and short flexors oftoes, and preventingcontracture of toeextensors.
Grip toes, strongly flex-ing all toe joints.
Foot circling .. .Maintaining general Supine position;
(Not to be performed strength of leg and Beginning with footwhere contraindi-cation in the form ofcontractures of gas-trocnemius,soleus, peroneals, oror other muscles
foot muscles. turned inward, describea complete circle.
With toes gripped, de-scribe a complete circle,beginning with footturned inward.
exists.)
b. Knee Exercises.Quadriceps “setting” Preventing atrophy and
maintaining tone andstrength of quadricepsmuscle group.
Supine position:Contract quadriceps mus-
cle without movingknee joint, by tensing
.muscle and exerting up-ward pull on patella.
Knee extension _Preventing atrophy and
maintaining tone andstrength of quadricepsmuscle group.
Supine position (pillow underknee);
Raise lower leg to straight-en knee.
Emphasize complete ex-tension of leg.
c. Hip Exercises.Hip extension.. Preventing atrophy and
maintaining tone andstrength of hipextensors.
Prone position:Keeping knee straight,
extend hip fully. (Backmust not arch duringmovement.)
Hip abduction _ Preventing atrophy andmaintaining tone andstrength of hip abduc-tors, with particularattention given togluteus medius muscle.
Side-lying on stump side:Place leg with knee
straight in abduction,slight extension, andoutward rotation; holdagainst resistance.(Same movement as testfor gluteus medius, pos-terior portion.) (See fig.17.)

27. Ambulatory Stage
39
Exercises Purpose Position and movements
d. CombinedExercise. Strengthening muscle Supine position, with hands
groups particularly up beside head, elbowssubject to weakness resting on bed, and kneebecause of position and slightly flexed over pillow:lack of use in bed. Components of following
exercise are performedsimultaneously:(1) Pull foot upward and
slightly inward.(2) Press knee and hip
downward.(3) Pull up and in with
lower abdominal mus-cles, flattening lowerback.
Exercises Purpose Position and movements
a. Balancingon NormalLeg.
Developing coordinationof standing balance.
Standing on normal leg,near bed footrail or othersupport:(1) Stand with hand light-
ly on support and main-tain good postural align-ment. (Use minimumsupport.)
(2) Stand unsupported.(Progression may bemarked by lengthof time (number ofcounts) for which po-sition can be held.)
b. Hopping onNormal Leg.
Developing coordinationof standing balance.
Standing on normal leg nearobject of support:Hop lightly on foot.
(Shock of impact shouldbe absorbed in foot,ankle, knee, and thigh.)
c. Deep Knee Bend-ing.
Developing coordinationof standing balance.
Standing position (fig. 30);Perform deep knee bend,
raising arms forward.

40
Figure 30. Deep knee bending exercise to strengthen normal leg. (Note value of exercise in sitting and risingfrom a chair.)
Section V. GENERAL EXERCISES
28. PurposeThis section describes exercises for muscles which have not previouslyreceived specific attention in this manual.
29. Exercise for Oblique Abdominal MusclesSupine position:
Raise trunk to half-sitting position, twisting to right and reachingwith left hand toward right thigh, keeping legs flat on plinth.
Repeat exercise on opposite side.
30. Exercise for Lateral Abdominal Musclesa. Lateral Hip “Hiking.”
Supine position:“Hike” hip up on right side (draw hip toward shoulder).b. Lateral Trunk Raising. This exercise should not be given to
lateral abdominals on involved side where there is an abduction contractureof the thigh.Lying on right side with legs supported by operator:
With body in straight alignment, raise trunk sideways up from plinth.

41
(See fig. 31.)Repeat exercise on opposite side.
Figure 31. Exercise to strengthen lateral abdominal muscles.
31. Exercise for Upper Anterior Abdominal MusclesSupine position;
Roll pelvis to flatten lower back on plinth. With arms extended, raisehead and shoulders from plinth. Do not attempt to come to a sittingposition, but raise upper trunk as high as back will bend—about 8 inches.(See fig. 32.)
Figure 32. Head and shoulder exercise to strengthen upper anterior abdominal muscles

42
32. Exercise for Lower Back MusclesProne position, with legs supported by operator:
With hands clasped behind back, raise trunk upward, arching back;draw shoulders back, keeping arms free from body.
33. Breathing ExerciseSupine position:
Breathe fully and deeply in through nose and out through mouth.(Aim for intercostal expansion and diaphragmatic contraction. Guardagainst raising the shoulders and mere elevation of the chest by archingthe back.)
34. Exercises ContraindicatedExercises for sternocleidomastoid, pectoral, and hip flexor muscles havebeen‘omitted in this section because ordinary supine bed positions andmovements of the head, arms, and legs in the forward plane of the bodyprovide sufficient use to maintain their tone. Frequently, these musclesare over-used and even necessitate corrective measures such as stretch-ing and lengthening.

43
CHAPTER 5INDIVIDUAL WALKING INSTRUCTION
Section I. GENERAL
35. AdministrationThe general procedures in establishing and managing the instructionprogram are set forth in paragraph 4; a more detailed discussion of classi-fication, apparatus, and teaching technique is set forth below.
36. ApparatusA well-equipped room for conducting walking and exercise classes
should include:a. Parallel Bars (standard item P010230, bars, parallel; two
sections)—about 20 feet long, 3 feet high, and 2 feet 2 inches apart, withlines inches wide and 5 inches apart painted on the floor betweenbars (measurement taken from inner borders of lines).
h. Mirror (standard item P504550, mirror, postural training:triple, full length)—6 feet high and 10 feet wide, composed of portableposture mirrors.
c. Lines on Floor at Right Angles to Mirror—20 feet long, V/2inches wide, and 5 inches apart (measurement taken from inner bordersof lines).
d. Stairs—each step 11 inches wide; six low steps 5 inches high onone side; four high steps 73i> inches high on other side. Rails on bothsides of steps, about 2 feet 8 inches high.
e. Walking Ramp—about 10 feet long, 1 foot 9 inches wide; heightis 1 inch at low end and graded to 18 inches at the upper end. Rails oneach side of ramp, 36 inches high. Three 6-inch steps leading from upperend of ramp to floor.
/. Phonograph and Slow Fox-Trot and March Records.g. 16-mm Projector, Screen, Viewer, and Editing Equipment.
37. Teaching TechniqueIt is imperative for amputees to appreciate the goal of walking classesand the necessity for adhering to their established sequence. Patientsmust be made to realize that merely learning to get around on a pros-thesis is not enough—a patient does not achieve maximum utility fromhis prosthesis until he has learned to walk as normally as possible.
Three components of excellent walking with a prosthesis are balanceand muscular coordination in motion, smoothness of walking rhythm,and steps of equal length. These components should be taught to thepatient as follows:

a. Maintaining Walking Balance. Balance is achieved by equaldistribution of weight above a center of support. Therefore, in orderto obtain walking balance an amputee must walk with his feet under theweight-bearing axis of his body in such a way that he attains equalweight distribution during his walking stride. Helpful exercises are con-sidered in paragraphs 39, 40, and 47.
h. Keeping Soles and Heels Close to Ground During Walking.
In order to duplicate the normal stride with the prosthesis, as nearly aspossible, it is imperative to adjust the travel pattern of the prostheticfoot so that it will duplicate that of the normal foot. Time and traveldistance with the prosthetic foot must be synchronized with that of thenormal foot. Before a patient can do this, he must understand themechanics of both the normal and the prosthetic legs.
Table 111.
44
PHYSICAL THERAPY ACHIEVEMENT TEST FOR LOWER-EXTREMITY AMPUTEESName Ward number
Type of amputation Date of final surgical revision Handedness
Date walking began Date walking completed
Gradings , . r-, .(Check one) Poor! 1 Fair! 1 Good! 1 Excellent! 1
Achievement Beginners IntermediateGeneral posture
Advanced
Balance. ... .. . .
._ .
Forward walking. ,....
Stair climbingRamp walking
.
.. .
Turns: 180°90°45°
Walking on straight lineProsthetic foot close to floor. . . . _ . .
Eoual length stens _ _ „ _ .
Walking rhythm . _. ....
Backward walking_
Sideward walking_ _ .
Sitting on chair_ . .... . .
Rising from chair. ._ .. _ ....
Sitting on floor:... . . ....
Rising from floor..
__
Picking up objects.. ...
Balance on prosthesis....
Curb, stepping on and off.. .. ...
Walking on rough terrainWalking on grass, sand, etcHill climbing
.
-Z. ..
Signature of physical therapist Date

45
In the normal gait, the sole and heel are carried as close to the groundas possible from the point at which the foot leaves the floor to the pointat which it returns in forward position. With this kind of movement,the foot covers the shortest distance between these two points in theleast amount of time, and with the least possible effort.
The normal knee is slightly flexed when the leg is in its forward walk-ing position, whereas the prosthetic knee is completely extended in thatposition. Because of this variance in mechanics, the length of stridewith the prosthesis tends to be slightly longer than the stride with thenormal leg. This tendency can and must be minimized to avoid thetypical “amputee gait.”
Exercises developing the proper kinesthetic sense for carrying the soland heel of the 'prosthetic foot as close to the floor as possible are consideredin paragraphs 39 through 41.
c. Achieving Uniform Stride. Among the common causes oflonger stride with the prosthesis than with the normal leg are: (1)prosthesis longer than normal leg, (2) hyperextension of knee joint,(3) swinging prosthesis in abduction, (4) excessive hip flexion, and (5)elevation of pelvis on side of prosthesis. (The last two result when theprosthetic foot is carried too high above the floor.)
Keeping in mind that the prosthetic leg and the normal leg differ inlength of stride because of variance of mechanics, it is very importantto check the above-knee prosthesis for hyperextension at the knee joint;each 5° of hyperextension will increase the length of stride by about
inches.Exercises to promote uniform stride are set forth in paragraphs 40
and 48.
38. ClassificationWithin each of the four groups described in paragraph 4 (unilateralA/K, unilateral B/K, tilting-table, and bilateral amputees), there arethree distinct classes (or grades) in walking instruction through whichpatients progress according to their walking ability: Beginners, Inter-mediate, and Advanced. (As many of each of these classes are con-ducted as are necessary for individual instruction, each class periodlasting 30 minutes.)
With the exception of bilaterals, all amputees remain in the beginnersclass until they are able to walk comfortably at a normal walking speedwithout such aids as crutches or canes. Thereafter, as soon as they canaccomplish all the activities prescribed for a class, they progress to thesucceeding class.
The Physical Therapy Achievement Test for Lower Extremity Am-putees (table III) will be used to record progress in walking and relatedactivities. This record should represent average performance through-out the walking program.

46
Paragraphs 39 through 41 include exercises for unilateral amputees.In general, these exercises apply to A/K, B/K, and tilting-table cases;however, certain modifications are necessary for the last group. Forexample, patients with disarticulation of the hip joint and loss of con-tiguous muscles obviously cannot have the same degree of balance andcontrol over the prosthesis as persons without such defects. Thesepatients should not be required to perform the check balance exercises.Special instructions or modifications of a particular exercise for one ofthe three groups are called to the attention of the instructor.
Paragraphs 42 through 45 describe problems of sitting and walkingwhich are peculiar to tilting-table amputees because of the mechanicsof the prosthesis.
Paragraphs 46 through 49 include exercises for bilateral amputees.In general, these exercises apply to A/K, B/K, and tilting-table cases.Where modifications or special instructions are necessary for a particulargroup, they are called to the attention of the instructor.
Section 11. UNILATERAL AMPUTEES
39. Beginners Classa. Objectives. In the beginning phase of walking instruction,
emphasis is placed on acquiring balance and a normal walking speed ofabout 120 steps a minute. For example, the instructor requests theamputee to walk with his heels between lines 5 inches apart, but doesnot attempt to influence the patient’s walking stride by insisting thathe synchronize the time of both feet. Such insistence upon form in theearly stage will only hinder the patient’s progress.
The ability to judge the position of the prosthetic foot with respectto the floor is a prerequisite to correction of walking technique. A/Kamputees must learn to swing the lower portion of the prosthesis at aspeed which will produce sufficient momentum to develop this kinestheticsense of position in the stump. (The amputee must have this abilitybefore he is ready for Intermediate Class exercises which require him toscrape the foot of his prosthesis on the floor or to carry it as close to thefloor as possible.) A certain amount of momentum is also necessarybefore the amputee can move his prosthetic foot without lifting thepelvis on the side of the prosthesis. Therefore, speed and balance,rather than form, are the objectives in the Beginners Class.
b. Exercises. (1) Pelvic Tilt. Roll pelvis by action of abdominalmuscles pulling the pubic symphysis toward the sternum.
Note. Instructor checks patient for good body mechanics in upright position,placing special emphasis on lateral and anteroposterior alignment.
(2) Balance Exercise I. Stand with feet Bto 10 inches apart, balanc-ing with aid of crutches or canes.
Stand erect and hold crutches or canes off floor.Balance—first on one leg, then on the other. Hold weight for same
length of time on each leg, keeping both feet on the floor at all times.

47
(3) Balance Exercise 11. Place prosthesis in forward walking posi-tion with weight on normal leg.
Take full step forward with normal leg, placing inner border of normalfoot in line with inner border of prosthetic foot.
Take backward step with normal foot, passing it as close to prostheticfoot as possible.
Repeat exercise about 10 times without interruption. (When exer-cise is properly executed, a feeling of proper walking balance over theprosthetic leg is experienced. No lateral motion of the body shouldexist during the exercise.)
Note. Instructor should emphasize importance of exercise and explain to amputeethe necessity of keeping feet together to maintain balance. Amputee should berequested to conduct the following experiment regarding improper walking balance;
Stand in front of mirror with feet spread about 12 inches apart.Take step directly forward with normal foot.Take step directly backward.Repeat exercise, noting development of lateral motion and feeling of being off
balance. Compare with feeling in balance exercise II above.(4) Forward Walking Exercise. Walk between parallel bars, or on
crutches, with feet not more than 5 inches apart. Always advance normalleg first.
In accomplishing a forward step with the prosthesis, be sure to obtainsufficient speed to break the knee so as to clear the foot from the floor.Check the forward swing of the prosthesis by quickly extending the hipin order to extend the knee.
Note. Instructor should warn patient that unless there is sufficient speed, theprostethic foot will drag on the floor and the consequent buckling of the knee maycause him to fall. Patient may develop faulty walking habits when he tries toovercome fear of falling by raising pelvis on side of prosthesis, or by abducting theprosthesis to maintain knee in extension.
(5) 180° Turns (Walking or Standing). Place normal foot forward,shifting body weight to ball of normal foot, and pivot toward prosthesis.
This leaves prosthetic foot in forward position at completion of theturn and normal leg in position to take forward step.
(6) Stairs (For A/K, B/K, and tilting-table amputees in beginningphase).
To ascend:Place normal foot on first step.Shift body weight over normal leg.Bring prosthetic foot to a position beside normal foot.Repeat.
Note. Tilting-table amputees may be taught to ascend two steps at a time.To descend:
Place a minimum of three-fourths of the prosthetic foot onlower step.
Shift body weight to prosthesis.Bring normal foot to a position beside the prosthetic foot.Repeat.

48
c. Late Stage of Beginners Class. One of the required activitiesis walking the ramp. When walking up or down an inclined plane, theamputee shortens his stride in order to maintain maximum walkingbalance. The reduction in the length of his stride is proportionate tothe angle of the incline. He uses the same technique in breaking theknee as A/K amputees use in descending steps alternately, as requiredby the Intermediate Class exercise, Steps. (See par. 406 (7).)
d. Photography. Each amputee’s walking form will be recorded onon 100 feet of motionpicture film as soon as he can walk without crutches,canes, or other aids.
40. intermediate Classа. Objectives, In this class, the amputees develop uniform stride
and rhythm and learn the more common walking procedures.Each amputee views motion pictures of his walking form along with
his instructor. The instructor points out imperfections in form, andclearly explains reasons for the faults and means of correcting them.
Posture is under constant supervision during this period.б. Exercises. (1) Balance Exercises I and 11. See paragraph
396 (2) and (3).(2) Balance Exercise 111. Place prosthesis in forward walking
position.Take a full step with normal leg, forward and backward.Take a full step forward with normal leg.Take a full step with prosthesis; then step forward with normal foot,
stopping in that position.Rock back on prosthesis.Return normal foot to its backward position.Continue with remainder of exercise, as outlined above.(3) Corrective Walking I. Walk between lines 5 inches apart for
at least 10 minutes of each class period, until principles of good walkingtechnique described in paragraph 37 are mastered.
(4) Standing Turns.45° or 90° Turns (right or left). Stand with feet about 6 inches
apart. Without lifting feet from floor, execute turn as follows:Pivot to left by turning on heel of left foot and ball of right foot(pivot to right by turning on heel of right foot and ball of left).
180° Turns. Place normal foot forward about 6 to 8 inches.Shift body weight to ball of normal foot, and pivot towardside of prosthesis.
(5) Walking Turns.45° Turns. Pivot on either foot.90° Turns. When turning toward prosthesis, always pivot on
prosthetic foot; when turning toward normal leg, pivot oneither foot.
180° Turns. Shift body weight over normal leg when it is in aforward walking position, and pivot toward prosthesis.

(6) Stooping to Pick up Objects.B/K Amputees. Place prosthesis forward, lean forward from
waist, and pick up object from floor.A/K Amputees:
Placing feet slightly apart, weight on normal leg; flex bothknees and bend from waist; or
Placing prosthesis back, weight on normal leg; flex bothknees and bend from waist.
(7) Steps.B/K Amputees. Ascend and descend steps as in Beginners Class
(par. 39) until discomfort is no longer experienced. Stairsmay then be taken alternately, in the normal manner. Thereshould be no difficulty in guiding the placement of the pros-thetic foot on alternate steps.
A/K Amputees:To ascend steps, follow procedure outlined in paragraph
396 (6), but take two steps at a time instead of one.To descend steps, place hand on rail. Place heel of pros-
thesis on edge of step and transfer weight to prosthesis.Move normal foot to alternate step, at the same timebreaking knee ofprosthesis before the normal foot actuallytouches the step. Do not try to descend with any portionof the prosthesis other than the heel on the step.
Note. Instructor should explain to the amputee that his prosthetic knee willbreak automatically as he shifts his weight forward to bring the normal foot to alower level. (See Training Film “Sky is the Limit.”)
(8) Balance Exercise IV. Start with feet Bto 10 inches apart. Faceparallel bars, grasping rail for support.
Shift body weight over prosthesis.Remove normal foot from floor.Hold normal leg and arms in abduction to help maintain balance.Balance away from rail.Shift weight to normal leg and balance.Continue exercise until it is possible to balance on either leg without
any assistance.(9) Balance Exercise V. To develop a finer sense of the fundamental
principles of walking, practice walking on a straight line as follows:Place prosthesis on line.Walk forward, placing normal foot on line in front of prosthesis.Walk length of line; abduct arms, if necessary, to maintain balance.(10) Sitting and Rising from Chair.
Sitting:Approach chair from front.Step close to chair with normal foot about 4 inches in front
of opposite corner of chair.Turn 180° toward prosthesis.
49

50
With weight on normal foot, bring prosthetic foot back tosame level.
Lean slightly forward, place both hands on knees, and lowerbody into chair.
Rising:Place normal foot near chair and prosthesis slightly forward.Lean forward, at the same time lifting body weight out of
chair with normal leg and placing hands on knees to assist.Shift weight to prosthesis and step out on normal foot.
(11) Sitting and Rising from Floor. (In the following exercise, thebody is visualized as in the center of a clock face and facing a positionof 12:00 o’clock.)
Sitting (Directions below are for left prosthesis):Feet are 6 to 8 inches apart laterally, with prosthetic foot 6
to 8 inches forward.Shift weight to normal leg.Flex both prosthetic and normal knees, stoop, and place
right hand on floor at position 4:00 o’clock.Place left hand at 8:00 o’clock and lower body to floor.(An amputee with a right prosthesis places the left hand on
the floor first, in above exercise.)Rising (Directions below are for left prosthesis):
Place right hand on floor at position of 4:00 o’clock.Flex right leg with foot flat on floor.Swing left hand across body and place in position of 1:00
o’clock. At the same time rotate body to right, bearingweight on right leg and hands.
Stand, bearing weight on normal leg.Shift weight to prosthesis and step out on normal foot.(An amputee with a right prosthesis follows the same direc-
tions as above, except that he pivots to the left, instead ofthe right.)
(12) Bach Step.A/K and Tilting-table Amputees. If backward steps are neces-
sary, be sure they are short; never lift the feet from the floor.Keep legs straight and slide feet over floor.
B/K Amputees. Walk backward in the normal manner, liftingfeet from floor.
(13) Side Step.Right Step:
Shift weight to left side.Abduct right leg and take side step, transferring weight to
right leg.Slide left foot over floor to position of normal stance and
repeat exercise.Left Step: Reverse procedure given above for right step.

51
(14) Walking Up and Down Steep Incline.A/K and Tilting-Toble Amputees. Go up sideways, with the normal
leg nearest the top of the incline; or walk up diagonally, with thenormal leg on the uphill side. Descend with normal leg nearesttop of incline.
B/K Amputees. Walk up and down in the normal manner.(15) Curbs.
Step-Up. Approach curb and place heel of prosthetic foot on itwithout looking down; keep knee completely extended. Witha strong push-off, step on the curb with the normal foot. Asskill develops, it is possible to learn to step up on curb witheither foot. (Tilting-table amputees, however, of necessityplace the normal leg on the curb first since there is no hipjoint motion on the side of the amputation.)
Step-Down. Place prosthesis down first in stepping off a curb.(16) Proper Carriage of Prosthetic Foot. A strongly recommended
and practicable way of learning to carry the sole and heel of the foot asclose to the floor as possible is the following “scraping-toe” exercise.Practice this exercise until the prosthesis can be controlled with thehighest degree of proficiency.
Walk at normal walking speed, lightly scraping the toe of both theprosthetic foot and the normal foot, in turn, on the surface of the floor.
Immediately upon scraping the toe, place the heel upon the floor insuch a position that both heels come in contact with an imaginary line2 inches in width.
(17) Development of Uniform Stride. In performing the followingexercise, keep the feet together and soles and heels as close to the flooras possible:
Walk slowly.Look down and study the angles of both feet with relation to the
floor as they are successively placed in forward position. If their strideis uniform, the angle of the prosthetic foot will be comparable to theangle of the normal foot. However, if the stride with the prosthesisis too long, the angle of that foot to the floor will exceed the angle of thenormal foot.
In order to walk slowly and keep the sole of the prosthetic foot closeto the floor, the stride with the prosthesis must be shortened to a pointwhere it will duplicate the stride of the normal foot.
This exercise should be practiced 15 minutes a day until a uniformstride has been developed and all of the foregoing exercises can be per-formed with a fair degree of proficiency. Then the amputee can begraduated to the Advanced Class.
c. Music. Music may prove beneficial in developing rhythm andrelaxation in walking if records are carefully selected.
d. Photography. At the completion of this class, motion picturesshould be taken of each amputee’s walking form.

52
41. Advanced Classa. Objectives. In this class, walking technique should be per-
fected. With this as a goal, the instructor and amputee will view to-gether the motion pictures taken at the end of the Intermediate Class(and any other pictures which may have been taken). The instructorwill point out errors and outline the amputee’s advanced training ac-cordingly.
Faults to be corrected are:(1) Walking.
Stepping off with prosthesis first.Limp of any type.Abduction of the stump.Lifting prosthetic foot too high from floor.Placing feet too far apart during walking stride.Lateral pelvic motion.Rigid walking posture.
(2) Awkward Turns.(3) Stairs.
Inability to descend steps without aid of railing.Improper placement of prosthetic foot on step.
b. Exercises. The following check exercises should be given atthe beginning of this class (these exercises should not be required oftilting table amputees):
(1) Check I (to determine walking balance):Walk at normal speed.Stop at command of instructor and balance on the leg which is
bearing the body weight at the time.Inability to perform this exercise is the result of improper place-
ment of the feet during the walking stride and hence unequaldistribution of body weight.
(2) Check II (to determine efficiency of control over prosthesis):Walk at normal speed, conforming to the fundamentals of good
walking technique set forth in paragraph 37.Scrape the toe of the prosthesis on command.
Above exercise should be practiced until it can be accomplishedsuccessfully.
c. Requirements for Discharge from Advanced Class.(1) Proper walking balance with no detectable fault in gait.(2) Walking with soles and heels as close to the floor as possible.(3) Uniform stride.(4) Walking with ease, arms swinging freely.(5) Passing achievement test. (See table III.)

53
Section Ml. TILTINC-TABLE AMPUTEES
42. Exercise ProgramAs explained in paragraph 38, the exercises for tilting-table amputeesare, in general, the same as those described for unilateral A/K amputeesin paragraphs 39 through 41. Obviously, the tilting-table prosthesispresents special problems in control and balance which may requiremodification of the program for individual cases.
Paragraphs 43 through 45 describe problems of walking, sitting, andrising which are peculiar to tilting-table amputees because of the me-chanics of the prosthesis.
43. WalkingThe technique is the same employed by A/K amputees except for thefollowing points:
a. Since there is no movement of the prosthesis at the hip joint,forward flexion of the entire prosthetic leg is produced by a movementof quick flexion of the pelvis, rather than by ‘‘hiking” the hip and ex-tending the trunk on the pelvis. The last two movements are commonlyseen, but result in an ungainly, awkward gait.
h. The normal leg of tilting-table amputees tends to take a longerstride than the prosthetic leg, contrary to the case of A/K amputees.This is because of the anatomical and mechanical difficulties in bringingthe prosthesis forward in a long step.
c. After a patient acquires skill in controlling his prosthesis, he ispermitted to unlock the knee, so that knee flexion is possible (assumingthat the knee is mechanically arranged for flexion in walking). Walkingwith knee motion contributes materially toward a more normal appear-ing gait.
44. SittingUnlocking the hip and knee joints must be incorporated into the techni-que used by A/K amputees. The knee joint is unlocked first, whenthe patient has turned and is ready to sit. The weight is then shifted tothe normal leg, the hip of the prosthesis is unlocked, and the patient sitsdown, still bearing his weight on the normal leg. The technique shouldbe practiced until the patient unlocks the prosthesis automatically.
45. RisingThe weight is borne on the normal leg. As the patient assumes theerect position, the hip joint locks automatically. The knee is thenlocked normally, the weight is transferred to the prosthesis, and thepatient steps forward with his normal leg.

Section IV. BILATERAL AMPUTEES
46. GeneralThe problem of learning to balance is more difficult for the bilateralamputee than for any other type of amputee because he has no normalleg upon which to support himself.
In general, the B/K bilateral amputee is taught the same walking tech-niques used by unilateral A/K amputees; however, variations may benecessary to meet individual needs.
47. Beginners Classa. Objectives. The exercises in b below are designed to develop a
sense of balance and should be continued until the patient can walk withthe support of canes. Then he is ready for the Intermediate Class.
h. Exercises. Patients who take these exercises with pylons mustrepeat the routine upon acquiring full length prostheses.
(1) Balance Exercise VI—Between Parallel Bars.Stand with feet as close together as possible.Tighten abdominal muscles to correct anterior pelvic tilt.Shift body weight laterally over one prosthesis, theji over the other.Keep the body in good postural alignment.
Note. “Pelvic roll,” as such, is not desired because it is almost always accompaniedby a marked feeling of instability of the knees.
(2) Balance Exercise VII—Between Parallel Bars.A/K Amputees:
Stand with feet no more than 6 inches apart, if possible.Hold pelvis in correct alignment.Bear weight on one prosthesis, flex opposite thigh, and bring
second prosthesis forward.Shift weight to second prosthesis and hold briefly.Then assume original position by bringing first prosthesis
forward.Repeat exercise, alternating prostheses.
Tilting-Table Amputees (with disarticulation). Follow abovedirections, alternating prostheses, but walk forward. (Thiswill provide the momentum necessary for walking with tilt-ing-table prostheses.)
(3) Walking Exercise I—Between Parallel Bars.Stand with feet no more than 6 inches apart, if possible; and with
hands on bars.Shift body weight to right prosthesis and left arm and hand.Advance left prosthesis and right hand.Shift weight to left prosthesis, advancing right prosthesis.Continue moving forward.
54

55
48. Intermediate Classa. Objectives. Amputees should acquire the technique of walking
with canes and of encountering ordinary obstacles.When a patient has developed a uniform stride, is walking with all
of his weight on the prostheses, and can perform the exercises in 6 belowwith a fair degree of proficiency, he progresses to the Advanced Class.
At the completion of this class, 100 feet of motion picture film is takenof each amputee’s walking form.
h. Exercises. (1) Walking Exercise I. Follow directions in para-graph 476(3), using two canes. Do not support all of the body weighton the canes or walk with canes ahead of the body. Try to get into thehabit of swinging the arms as the walking technique improves.
(2) Sitting and Rising from Chair. The following directions are forthe A/K amputee; however, a patient with disarticulation uses the sametechnique, making sure the hip is unlocked.
Sitting:Approach chair from side.Turn trunk and face chair.Place one hand on back of chair and the other on the arm or
seat of the chair.Shift body weight to arms; flex hips, and swing into chair.
Rising:Place right hand on the back, arm, or seat of chair (using
position which feels most stable).Place left hand on arm of chair (if cane is used, place well
forward).Extend left leg and lock knee in extension; raise body out of
chair, bearing weight on hands and on left prosthesis.Turning body toward right side, thrust weight over left
prosthesis.Extend and lock right prosthesis.(It makes no difference whether the right or left prosthesis is
extended first in rising, as long as the same sequence ofevents is followed.)
(3) Turns. An A/K amputee or a patient with hip disarticulation canmake no pivots. Instead, he must move one leg laterally pivoting onthe heel slightly, and then bring the second leg toward it; or he mustwalk in a small circle.
(4) Stairs.Ascending:
(a) A/K Amputee (assuming left railing is used).Place left hand and forearm on rail, and right hand on
cane.Place foot of left prosthesis on step.Pull weight over left prosthesis by pushing off with cane
and pulling up on rail.Bring right foot to position beside left foot.

56
An alternate method is to—
Stand facing railing.Place hands on railing.Swing left (right) foot up on step and lock knee.Pull upon railing and swing (left) foot back and up
on step behind the first foot, assuming stride position;and lock knee.
Rock back on right (left) foot and swing the other footto the next higher step.
Continue up steps.(h) Bilateral Tilting-Table Amputee.
Place one hand on railing and other hand on cane.Put weight on hands, extend elbows and, at the same
time, swing prostheses through to step.Descending (the more advanced walkers may be taught to descend
stairs facing in forward position):(a) A/K Amputee.
Using one railing and one cane; or, ifthe steps are wide, using two canes:
Place left (right) hand on railing and right (left) handon cane.
Lower cane to step and grasp rail.Place heel only of left (right) foot on edge- of step so
that the knee will break. At the same time, lowerthe locked prosthesis to the next step, beside the cane.(The knee of the left (right) prosthesis should breaksimultaneously with the placing of the right (left) heelon the edge of the next lower step.)
Using two canes:Lower left (right) cane to step below and place left
(right) heel on edge of step from which descending.Lower right (left) foot to step below, carrying weight on
left (right) cane.Lower left (right) foot and right (left) cane.
Note. The two techniques which follow are less stable, but practicable:Lower left (right) cane and left (right) foot together; then right (left) cane and
right (left) foot together.Lower both canes together and swing feet to lower step.
(b ) Amputee with Tilting Table Prostheses.Place both hands on railing.Extend elbows to lift body weight; at the same time
swing prostheses to lower step.(c) Amputee with One A/K Prosthesis and One Tilting Table
Prosthesis. Descend, as in (a) above, but lower tilting tableprosthesis first.
(d) Amputee with One B/K Prosthesis and One Tilting TableProsthesis. Descend as in (a) above, but lower tilting tableprosthesis first.

57
(5) Walking the Ramp. In order to maintain balance, shorten thestride proportionately to the angle of the incline.
Use the same technique for breaking the knee as unilateral A/K ampu-tees use in descending steps alternately, as required by the IntermediateClass exercise, Steps. (See par. 406(7).)
(6) Sitting and Rising from Floor.Sitting:
Stand with feet apart and bend at the waist until the fingersalmost touch the floor.
Walk forward on hands to a point where it is possible topivot to a sitting position.
* Rising:Lock knees.Using one heel as a pivot, cross other leg over and turn 180°.
Take weight on hands and side of pivot foot.Walk back on hands until hips are flexed to more than 90°.Come to standing position with aid of cane.
Note. This technique is not recommended for patients with bilateral disarticulation.
49. Advanced Classa. Objectives. Walking technique should be perfected to thepoint
where the amputee no longer feels completely dependent upon his caneseven though he continues to carry them for reasons of security. Withthis as a goal, the amputee and instructor view together the motionpictures taken at the end of the Intermediate Class. The instructorpoints out errors and outlines advanced training accordingly.
Faults to be corrected are;(1) Abduction of stump.(2) Lifting feet too high from the floor.(3) Placing feet too far apart during walking stride,(4) Lateral pelvic motion.(5) Rigid walking posture.
b. Requirements for Discharge from Advanced Class.(1) Proper walking balance with no detectable limp or lateral
motion.(2) Walking with soles and heels as close to the floor as possible.(3) Uniform stride.(4) Walking relaxed, with arms swinging freely.

58
CHAPTER 6CAUSES AND CORRECTION OF LIMPS
50. Recognition of LimpsCertain factors influence the motion of a step, causing an awkward gait.Other factors influence the weight-hearing phases of the step, with re-sultant body “lists” and changes in the level of the pelvis laterally.
Types of limps are best distinguished in relation to the componentparts of a step. If a step were broken down by slow motion, four im-portant parts could be recognized:
a. Weight bearing on the prosthesis.b. Motion of step with normal leg.c. Weight bearing on normal leg.d. Motion of step with prosthesis.
(Actually a and b above occur simultaneously, as do c and d. However,for the purpose of determining the defect which is responsible for apatient’s walking difficulty, each component should be consideredseparately.)
51. Analysis of Limps (A/K Unilateral Amputees)The following chart is used by instructor to determine causes of limpsand means of correcting defects:

59
Limp
Probablecauses
Explanationofgait
Teststo
determinecause
accurately
Correction
a.Abductionof(1)ContractionofhipContractionofthe
abduc-Testfor
degreeofhip
abduc-Exercisesfor
stretchingout
prosthesisabductorson
torsnecessarily
causestion
contracture.contractureinhip
abduc-
INMOTION.
stumpside.
abductionofleg
during
forwardmotionofstep
withprosthesis.
torson
stumpside.
(2)Crotch
pressure.Patientabductsprosthetic
leginmotionto
relieve(a)Observe
areasofredness
onthe
upperinnerpart
Checkingforfitofsocketand
alignmentof
prosthesis.
crotchpressure.
ofthethighfollowing
attemptsat
walking.
Notepresenceof
rollof
fleshover
innerflange
of
prosthesisand
pres-
enceofsebaceous
adenites.(b)Havepatientstandwith
weighton
prosthesis.(c)Havepatientstandwith
bodyweight
inclinedforward(toincreasethe
pressureon
anteriorcrotch),
balancingby
holdingontostallbars,
bars,or
chair.
Patientwillcomplainofpain
dueto
pressureintests(6)
and(c)above.

60
Limp
Probablecauses
Explanationofgait
Teststo
determinecause
accurately
Correction
(3)Weaknessinglu-
Weakgluteus
mediuson
Testforstrengthof
gluteus(a)
Checkinglengthoflegsby
tensmedius
onnormalleg
causespelvismedius
onnormalleg(iso-
heightofanterior
su-
normalleg.
totiltdowntoward
op-
positesideduring
weight
bearingon
normalleg.
Thispelvictiltcreates
an
apparentlengtheningof
•
the
prostheticleg;in
orderto
raiselegfrom
floor,patient
mustab-
ductit.
latingtheposterior
portion).
perioriliacspinesto
determinewhetherpros-
thesisis
shorterand,
hence,causingacon-
stant
weight-bearingstrain
onnormalleg
gluteusmedius.(
b)
Checkingfor
advisabilityofinner
borderwedge
onheelor
Thomasheel
onshoeofnormalfoot.
(c)
Specialexercisesfor
nor-
malleg
gluteusmedius— indicated
onlyif
the
muscleisnot
subjectedto
weight-bearingstrain.
(4)WeaknessoflowerLackof
anteriorpelvicfix-(a)Testfor
strengthoflower
Specialexerciseto
strengthen
anteriorab-
ationthrowsan
excessiveanteriorabdominalthelower
anteriorabdomi-
dominalmusclesload
onhipflexorsinper-
muscles.
nals;andtostretchoutthe
(particularlyif
formingtheforward
mo-(6)Testfor
contracturesin
tightlow
backandhip
i
n
associationtionofstepwith
prosthe-
hipflexorandlowbackflexormusclesinorderto
withlowback
andhipflexor contracture).
sis.If,in
additionto
theabdominal
weakness,thehipflexormuscles
arecontractedtothe
extentthattheirrange
ofactionis
verylimited,
muscles.
reestablishfreerangeof
motionofpelvisin
relation
tofemurandlumbarspine.

61
(5)Fearof
kneethe
patientcannot
raise
thelegforwardsufficient-
lytoliftthefootfromthe
floor.Patientstendto
substitutebyusinglater-
alabductormusclesto
raisefootfromfloor.
Patientmay
beafraidthatTesttoruleoutother
causes(a)
Practicingcorrect
balance
buckling.
hewillnotbeabletoex-of
abduction(aslisted
andfundamentalwalk-
tendthe
kneeafter
“breaking”itinthefor-
wardmotionofa
step.
Asa
resulthe
keepsthe
kneestraightandab-
ductsthelegto
bringit
forward.He
mayalso
fearthatthetoewill
catchandprevent
ex-
tensionoftheleg.
above).
ingtechniques.
(&)
Developingreassurance.

62
Limp
Probablecauses
Explanationofgait
Teststodeterminecause
accurately
Correction
h.WEI
GHT
0N
(1)Weaknessof
hip
Stumpadductor
weaknessTestforstrengthof
stumpExercisesforstump
adductors.
prosthesis;adductorsis
frequentlymentioned
adductors.
PELVICDROP
DOWNONSIDE
OFPROSTHESIS.
onstump.
(2)Prosthesis too
short.(3)Stumpsinksinto prosthesis
in
weight-ing.
asacauseof
abductionof
prosthesisinmotion.
Actuallyadductorweak-
nessdoesnotcausesuch
abduction,becausethe
thighcan
becarriedin
theforwardplanebythe
hipflexors
despitesuch
weakness.However,the
effectof
adductorweak-
nessbecomesapparentin
thephaseof
weightbear-ing
onthe
prosthesis;thestabilizingeffect
whichthesemuscles
nor-
mallygiveinfixingthe
pelvistothethighislost
andthepelvisshiftswith
a
dropon
thesideof
prosthesis. Pelvisdrops
onsideof
prosthesisasin
casesof
shortleg. Prosthesis
maybefitted
forischialweightbearing;
butifpelvistiltsinwalk-
ing,theischium
sepa-Measurelengthof
prosthesis
whilepatientis
standing
withweightevenly
distrib-
utedon
bothfeet.
Todetectanup
anddown
motion,placehand
between
ischialtuberosityandsock-
etwhilepatientstands
Lengtheningof
prosthesisat
directionof
responsiblemedicalofficer.
(а)
Checkingwith
responsiblemedicalofficer
regard-
ingfitof
prosthesis.(б)
Checkingfor
advisability

63
(4)Abductioncontrac-
ratesfrompointof
con-
tactwith
prosthesisand
allowsa
“pistonaction”
ofthestumpinthepros-
thesis.(Note.A
slight
“pistonaction”is
nor-
mal.)
andtransfersweightfrom
onefoottotheother.
of
additionalstump
socks.(c)If
prosthesiscannotbe
corrected,patientshould
consciouslytensemus-
clesofstumpjust
before
takingweight
onpros-
thesis.Thismuscle
“setting”tendsto
less-
entendencyofstumpto
sinkdownintothe
prosthesis.
Contractureofthe
abduc-Testforcontractureofab-
Exercisesforstretchingthigh
c.
Weighton
tureof
stump.torsplacesa
strainon
theadductorswith
re-
sultantlackoffixation
ofthethightothepelvis
asin
actualadductor
weakness.Pelvisshifts
withdrop
onsideofthe
prosthesis.
ductorson
stumpside.
abductors.
StumpabductorLackof
sufficientlateralfix-Test
strengthof
abductorson
Exercisesto
strengthenstump
prosthesis: PELVICDROP
DOWNTOWARD
SIDEOFNORMAL
LEG.
weakness.
ationbetweenpelvisand
femurcauseswidersepa-
rationof
attachmentat
thispoint,asdemonstrat-
edbythetiltofpelvis
downonthe
oppositeside
ina
standingposition.
stumpside.
abductors.

64
Limp
Probablecauses
Explanationofgait
Teststo
determinecause
accurately
Correction
d.
Weighton
Abductor(particularlySeeexplanationof
pelvic(a)Teststrengthof
gluteus(a)Seea(3)
above.
NORMALLEG:
PELVICDROP
DOWNONSIDE
OPPROSTHESIS.
gluteusmedius)
weaknesson
normalleg.
dropundera(3)
above.
mediusonnormal
leg.
(&)
Testfor
balancewith
weighton
normalleg,
whilepatientishold-
ingpelvislevel.
(h)
Practicingbalance
onnor-
malleg.
e.
Weighton prosthesis:
UPPERTRUNK “sinking”
DOWNTOWARDSIDEOP PROSTHESIS (fig.
21®).
(1)Short
stump.(2)
Generalizedweak-
nessof
stumpmuscles,
particu-larly
abductorsor
adductors.Thistrunkmotiontendsto
“lock”the
uppertrunk
onthe
pelvis,andthe
pelvison
theamputated
extremity,inorderto
compensateforinstabil-
ityatthehipjoint.
Teststrengthofall
stump
muscles.
(a)Exercisesfor
strengthen-ingstump
muscles.(
b)
If
stumpistooshortto
produceeffectivelever-
ageon
theprosthesis,
thelimpwillbe
difficulttocorrect.
Workto
correctfaultsof
body
mechanicsgenerallyso
thatbestbalanceis
achievedwithleast
mus-
culareffort.
/■.Weighton
Usuallya
substituteRising
ontoesofnormal
Checkto
determinedefects
Correctionofany
musclede-
NORMALLEG:gaitto
avoidlegab-
foot“suspends”thepros-in
muscleactionwhichfectsand
instructionin
RISINGONTOESductionor
toover-
thesisand
makesit
easymakeit
difficultto
raisecorrectwalking,with
em-
OFNORMAL
FOOT
ATTHE
BEGIN-NINGOF
FOR-WARDMOTIONOF
PROSTHESIS.comedifficultyin
raisingprosthesis
forwardinstep.
for
prosthesistoswing
throughintheforward
motionofa
step.This
createsanup
anddown
motionofbody.Sucha
gaitis
commonforpa-
tientswiththighstumps
shorterthan6
inches.
prosthesisfromfloorand
bringitforward.
phasison
pelvicflexion.

65
g.Transferof
Pearofknee
bucklingThegait
resemblesthatof
(a)Teststrengthof
hip
Generalcorrection
of
body
WEIGHTONTO
plusweaknessor
a
patientwith
residualextensors.
andprosthesis
mechanics.
PROSTHESIS;
poorfunctional
use
quadricepsparalysisfol-(b)
Checkkneeof
prosthesis
TRUNKIN-
CLINEDFORWARD
ASKNEEEX-
TENDS.
ofhip
extensors.lowinganteriorpoliomye-
litis.Thebodyisin-
clinedforwardtoforce
thekneebackwardin
extension.A
prostheticknee
which
mustbeforcedintohy-
perextensionforstability
ofthe
artificiallegwill
producethe
samegait.
for
hyperextension.
h.Body“bobbing
upToolongastepwithIfthestrideis
longeron
(a)HavepatientwalkwithThislimpis
purelyfunctional
ANDDOWN.”
prosthesis.
oneside,thebodydrops
inheightwitheachstep
onthatside.Thereisa
temptationto
lengthen
theforwardstridewith
the
prosthesisbecause
thismakesthenormal
legmaintain
weightand
balancefora
longertime.
Notedistinction
betweenthisdefectandthatof/
above.
equallengthstridefor
bothlegs.
(b)Ruleoutdropdueto
stumpsinkinginto
prosthesis.
—notduetodefectin
body
mechanics.Patient
should
shortenstride.
�U.S.
GOVERNMENTPRINTING
OFFICE:1946
692201