![Epson Stylus Photo T50 Quick Guide · Epson Stylus Photo T50 Quick Guide Basic Printing ... [21.6 × 28 cm]) S041568 50 Epson Photo Quality Self-adhesive Sheets A4 (21.1 × 29.7 cm)](https://static.fdocuments.net/doc/165x107/5ac1a2bb7f8b9a213f8d5110/epson-stylus-photo-t50-quick-guide-stylus-photo-t50-quick-guide-basic-printing-.jpg)
photo printing guideh10032. printing guide. ... 71 copyright and ... Setup Guide Follow the...
92
hp photosmart 100 photo printing guide
Transcript of photo printing guideh10032. printing guide. ... 71 copyright and ... Setup Guide Follow the...

hp photosmart 100
photo printing guide


contents
i
contents...................................1.............................................. 2.............................................. 3
...................................5
.............................................. 5
............................................ 10
............................................ 11
............................................ 12
............................................ 13
............................................ 14
............................................ 17
............................................ 17
............................................ 18
............................................ 19
............................................ 20
............................................ 22
1 welcome...........................................finding information...............................................viewing the onscreen user’s guide..........................
2 getting started ..................................quick reference....................................................
front and back of printer .................................front of printer with paper tray open.................control panel .................................................LCD..............................................................LCD icons .....................................................
setting up your printer...........................................unpacking your printer....................................connecting the power adapter .........................turning the printer on or off .............................loading paper ...............................................installing or removing the print cartridge ...........

3 printing from memory cards...............................................26.............................................26.............................................27.............................................28.............................................29.............................................30.............................................31.............................................33.............................................35.............................................36.............................................37.............................................41.............................................42.............................................44.............................................46.............................................46
.................................47
.............................................47
cont
ents
ii
types of memory cards supported ..........................inserting a memory card.......................................
inserting a CompactFlash memory card ............inserting a SmartMedia memory card...............inserting a Memory Stick memory card.............
reading the memory card status.............................using the setup LCD .............................................printing your photos .............................................
selecting the photo size ..................................selecting photos to print ..................................selecting the number of copies.........................examples ......................................................
printing an index page.........................................canceling a print job............................................clearing print settings ...........................................
4 printing from DPOF files....................printing from a DPOF file ......................................

contents
iii
exiting DPOF mode.......................................................................................... 49............................................ 49
.................................50............................................ 50............................................ 52............................................ 52............................................ 52............................................ 52............................................ 53............................................ 53
.................................55
............................................ 55
............................................ 56
............................................ 57
............................................ 58
............................................ 60
............................................ 60
............................................ 61
returning to DPOF mode .......................................
5 care and maintenance.......................transporting your printer .......................................storing your printer and supplies ............................
storing your printer.........................................storing the print cartridge................................storing paper.................................................
cleaning your printer ............................................printing a test page..............................................
6 troubleshooting.................................reading the status indicators..................................
printer light ...................................................memory card light ..........................................status LCD .....................................................
interpreting error conditions ..................................printer problems.............................................memory card problems ...................................

i
print cartridge problems ..............................................................................64.............................................65.............................................66.............................................70
.................................71
.................................72
.................................73
cont
ents
v
paper problems .............................................other printing problems ........................................getting additional help .........................................
specifications ........................................copyright and trademarks .....................index....................................................

welcom
e
1
1 welcometh your new, easy-to-use,
card without a computer.
ital camera’s memory card.
on page 17.
necting it to a computer. It ew printer, and plenty of
hotos to the hard drive, ily via email, and use your ter with a computer, see the r software CD.
Thank you for purchasing an HP PhotoSmart 100 printer! Wicompact photo printer you can:
• Print beautiful photos from your digital camera’s memory
• Print an index page that shows all the photos on your dig
• Print 4x6 in. photos quickly and easily.
To begin setting up your printer, see “setting up your printer”
This guide describes how to use your new printer without conincludes a quick reference to get you acquainted with your ndetailed printing and troubleshooting information.
You can connect your printer to your computer to save your penhance your photos, share your photos with friends and famphotos in creative projects. For information on using your prinOnscreen User’s Guide included on the HP PhotoSmart printe

finding informationickly and easily set up your printer
ut using your printer without
the printer software CD, to learn th a computer
out the printer’s warranty, review find out where to get help if you
wel
com
e
2
Setup Guide Follow the instructions to qu
Photo Printing Guide(you are here!)
Use this guide to learn aboconnecting it to a computer
Onscreen User’s Guide
Use this guide, included onabout using your printer wi
Services and Support booklet
Use this booklet to learn abregulatory information, andneed it
welcom
e
3
viewing the onscreen user’s guide.0 or later installed to view the Reader, you will be asked to view the Onscreen User’s
M drive.
M drive.
r language.
the HP PhotoSmart 100
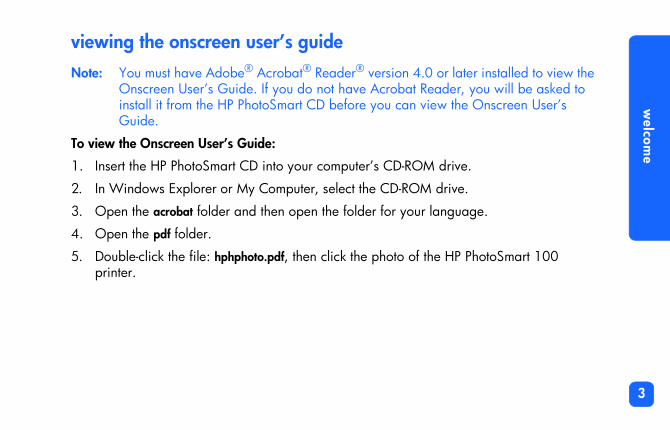
Note: You must have Adobe® Acrobat® Reader® version 4Onscreen User’s Guide. If you do not have Acrobat install it from the HP PhotoSmart CD before you can Guide.
To view the Onscreen User’s Guide:
1. Insert the HP PhotoSmart CD into your computer’s CD-RO
2. In Windows Explorer or My Computer, select the CD-RO
3. Open the acrobat folder and then open the folder for you
4. Open the pdf folder.
5. Double-click the file: hphphoto.pdf, then click the photo ofprinter.

wel
com
e
4

getting started
5
2 getting started
r...
paper, with tab
paper, without tab
ards
quick reference
To print... Use this pape
borderless photos glossy photo 4x6.5 in.
photos with a border glossy photo 4x6 in.
test and calibration pages plain index c4x6 in.

getting started
6
There is a difference between index cards and index pages
e = a print showing numbered ils” of the photos on your memory
dex page to help you select which u want to print.
., Wallet, or Thumbnail of printing your photos in any of
index card = card-weight paperUse plain, 4x6 in. index cards for printing test pages.
index pag“thumbnacardPrint an inphotos yo
There is a difference between paper size and photo size
paper size = 4x6 in.This is the only size of paper your printer can use.
photo size = 4x6 inYou have the choicethese sizes.

getting started
7
Printing photos is easy! Load photo paper, install the print cartridge, insert a camera
X
l Down (-) to scroll hoices for each setting.
memory card containing photos, then...
Ready...
Use Scroll Up (+) or Scrolthrough the available c
Use uTab to move the cursor to the area where you want to change a setting. Try it!

getting started
8
Set...
to print - +) or to scroll of the nt to ss Print.
Tip: You can also choose to print a range of photos, or multiple copies.
1. Set photo size - When the cursor is blinking under this area, use Scroll Up (+) and Scroll Down (-) to pick the size you want your photos.
2. Press uTab to move to the next area.
3. Set photos Use Scroll Up (Scroll Down (-) to the numberphoto you waprint. Then pre
4x6 in.
Wallet
Thumbnail

getting started
9
Print!
Press the Print button and enjoy your photos!
X

getting started
10
front and back of printer
structions.
wUSB port
Power adapter connectionh
Important: Make sure the rear paper path is clear of any ob
Front view
Paper tray door Print cartridge door
Control panelBack vie
Rear paper pat

getting started
11
front of printer with paper tray open
Memory Stick memory card slot
SmartMedia memory card slot
Paper tray
Paper tray extension
Memory card light
CompactFlash memory card slot
Output guide
Paper width guide

getting started
12
control panel
X
uTabPress this button to move from one section to the next when selecting print settings
CancelPress this button to stop printing or reset the print settings
PrintPress this button to start printing the selected photos from a memory card
n, the printer is on e printer is busy); if this inter needs attention
PowerPress this button to turn the printer on or off
SavePress this button to save photo and other files from a memory card to the computer’s hard drive when you have the printer connected to a computer
Scroll Up (+)/Scroll Down (-)Press and hold these buttons to scroll through print settings as you are selecting them
LCDRead this window to see the status of your printer and the current print settings
Printer lightIf this light is gree(blinking means thlight is red, the pr

getting started
13
LCD.
DPOF icon
s section
Paper and Print Cartridge icon
Paper Count icon
Cursor
More Paper icon
Note: The LCD icons are described on the following pages
Attention icon Number of photos Memory Card icon
Status LCD
Setup LCD
Photo Size section Choose Photos section Copie

getting started
14
LCD iconsdifferent printer areas.
printer needs attention.
ble on the memory card.
f you inserted a memory card mory card may not be inserted is a problem with the memory
DPOF) file is on the memory
rint cartridge. If the ink drop is rint cartridge. If the paper
icon) is blinking, there is a
The icons on the top portion of the LCD indicate the status of
Icon Description
Attention icon Indicates something is wrong and the
Number of photos Indicates the number of photos availa
Memory Card icon
Indicates a memory card is inserted. Iand this icon does not appear, the mecorrectly. If the icon is blinking, there card.
DPOF icon Indicates a digital print order format (card.
Paper and Print Cartridge icon
Indicates the status of the paper and pblinking, there is a problem with the psection (the lines at the bottom of the problem with the paper.

getting started
15
The bottom portion of the LCD is where you select the photo size, photo number or range,
right. Use Scroll Up (+) or Scroll
oto size. As you move through the con displays to indicate the
r range of photos to be printed.
s of each photo to print.
are working in. When you press tion.
and number of copies to be printed.
Tip: Use uTab to move from one section to the next, left toDown (-) to change settings within a section.
Section/Icon Description
Photo Size section These three icons indicate the selected phphoto size selections, the corresponding icurrently selected photo size.
Choose Photos section This section indicates the photo number o
Copies section This section indicates the number of copie
Cursor The cursor appears below the section youuTab, the cursor moves to the next sec
4x6 in.
Wallet
Thumbnail

getting started
16
f sheets of paper needed to tings. The maximum number of he print job requires more than six to the paper stack.
Section/Icon Description
Paper Count iconMore Paper icon
The Paper Count icon shows the number ocomplete the print job with the current setpages the paper stack can show is six. If tpages, the More Paper icon appears next
getting started
17
setting up your printer
sure you place any obstruction ting.
Power adapter
cartridge
Sample index cards
Sample photo paper
Services and Support booklet
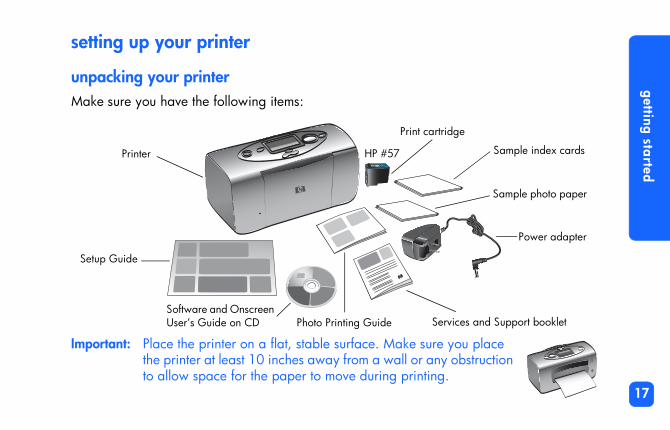
unpacking your printerMake sure you have the following items:
Important: Place the printer on a flat, stable surface. Make the printer at least 10 inches away from a wall orto allow space for the paper to move during prin
Setup Guide
Software and Onscreen User’s Guide on CD
Printer
Photo Printing Guide
HP #57

getting started
18
connecting the power adapter
t Rear paper path
3.
1.
2.
1. Insert the small end of the power adapter into the power adapter connection on the back of the printer. Make sureit is connected firmly.
2. Unfold the two metal prongs on the power adapter.
3. Plug the power adapter into a working electrical outlet.
Important: Make sure the power adapter cord does noblock the rear paper path.

getting started
19
turning the printer on or off
reen when the printer is turned
X
Print button
Printer light
Press the Power button on the top of the printer.
The Printer light (around the outside of the Print button) turns gon. The printer takes about 10 seconds to power up.
Power button

getting started
20
loading paperithout a tear-off tab), plain st output quality. HP papers the Web at:
h the paper slot, out the back, paper path of the printer is at
ion snapshots, photo album prints, borderless prints
on pages, test pages, draft prints, photo index pages (to conserve
sinting requires HP photo paper or paper
You can print color photos on 4x6 in. photo paper (with or wpaper, or index cards. Use HP custom photo paper for the becan be found at most computer and office supply stores or onwww.hpshopping.com (U.S. only).
Your printer supports the following paper types:
Note: As it prints, the printer pulls the paper straight througand then through to the front again. Be sure the rearleast 10 inches away from any obstruction.
Name or type Size Use for
HP premium plus photo paper, glossy
4x6.5 in. with .5 in. tab
Medium- to high-resolutphotos to archive, and
plain index cards 4x6 in. Print cartridge calibratichildren’s projects, andphoto paper)
other brands of photo paper
4x6 in. Photos and index pageNote that borderless prHP premium plus photo

getting started
21
To load paper:
x cards.
x paper types or sizes in the
to the left edge of the paper into the printer correctly so
1. Open the paper tray door.
2. Pull the paper tray extension toward you (away from the inside of the printer) until it is fully extended.
3. Place a stack of paper on the paper tray and slide it underneath the output guide.
• The printer prints on the side of the paper that is facing up. If you are using photo paper, load the paper with the glossy side up. If you are using tabbed paper, load the paper into the tray so the tab feeds into the printer first.
• Load no more than 20 sheets of photo paper or inde
• Use one type and size of paper at a time. Do not mipaper tray.
4. Move the paper width guide on the paper tray to fit closewithout bending the paper. This allows the paper to feedthat your photos will print straight.
Output guide
Paper tray extension
Paper width guide

getting started
22
installing or removing the print cartridgeine HP factory-filled print
57). Damage to the printer or print cartridges is specifically
r is either on or off. When you calibration page. To conserve card.
ge, the calibration page prints
To get the best performance from your printer, use only genucartridges.
Caution: Make sure you are using the correct print cartridge (HP #cartridge resulting from the modification or refilling of HPexcluded from HP warranty coverage.
You can install and remove the print cartridge while the printeinsert a new print cartridge, the printer automatically prints a photo paper, you can print the calibration page on an index
Note: If the printer is off when you change the print cartridwhen you turn the printer on.

getting started
23
To install the print cartridge:
he pink tab to remove the clear
tacts on the print cartridge. ailure.
1. Take the new print cartridge out of its package and pull tplastic tape.
Note: Do NOT touch the ink nozzles or the copper conTouching these parts may cause print cartridge f
2. Open the print cartridge door by pulling the door down.
Copper contacts
Ink nozzles

getting started
24
3. Place the print cartridge in the print cartridge cradle with the copper contacts facing g down.
tacts
toward the inside of the printer and the ink nozzles facin
4. Push the print cartridge into the print cartridge cradle until you feel it snap into place.
5. Close the print cartridge door.
After you insert the print cartridge, the printer automatically prints a calibration page (if the printer is off, the calibration page prints when you turn the printer on). The calibration page verifies that the print cartridge is installed correctly.
Copper con

getting started
25
dge to unsnap it from the print
Gray bars
bration page
To remove the print cartridge:
1. Open the print cartridge door.
2. Push down and pull outward on the top of the print cartricartridge cradle.
3. Remove the print cartridge from the printer.
These print while the print cartridge is being calibrated.
Yellow barsThese finish the calibration.
Cyan, magenta and yellow barsThese should be solid and the correct color. If any of the bars are not correct, print a test page to check the print cartridge.
Cali

printing from m
emory cards
26
3 printing from memory cards
, or Memory Stick™ memory are available in a variety of ou purchased your digital
mory card or the printer.
cards are not supported.
ory Stick
types of memory cards supportedThe printer can read CompactFlash™ Type I or II, SmartMedia™cards. These cards are manufactured by several vendors andstorage capacities. You can purchase memory cards where ycamera or at most computer supply stores.
Caution: Using another type of memory card may damage the me
Note: The IBM Microdrive™ and other Microdrive memory
SmartMediaCompactFlash Mem

printing from m
emory cards
27
inserting a memory cardhe memory card slot you use
e card is being read or written to printer, the memory card, or the
.
Memory Stick memory card slot
SmartMedia memory card slot
There are three different memory card slots on your printer. Tdepends on the type of memory card you have.
Caution: Do not remove the memory card from the printer while th(the memory card light is blinking). This may damage theinformation on the memory card.
Note: Do not use more than one memory card slot at a time
CompactFlash memory card slot
Memory card light

printing from m
emory cards
28
inserting a CompactFlash memory cardft card slot with the card’s pin-e memory card’s label, make
n damage the memory card, f you insert the card upside nd red Printer light all begin
Open the paper tray door. Insert the memory card into the lehole side placed into the printer first. If there is an arrow on thsure the arrow is pointing towards the slot and facing up.
Note: Inserting a CompactFlash memory card incorrectly cathe information on the memory card, or the printer. Idown, the Memory Card light, Memory Card icon, ablinking. Remove the card and re-insert it properly.
Pin holes

printing from m
emory cards
29
inserting a SmartMedia memory cardp right card slot. Insert the end etal contacts on the card are
light, Memory Card icon, and and re-insert it properly.
Open the paper tray door. Insert the memory card into the toof the card with the notch on the corner, and make sure the mfacing down.
Note: If you insert the card upside down, the Memory Cardred Printer light all begin blinking. Remove the card

printing from m
emory cards
30
inserting a Memory Stick memory cardttom right card slot. Insert the ure the contacts are facing k.
may have inserted the card rly.
Open the paper tray door. Insert the memory stick into the boend of the memory stick that has the metal contacts, and be sdown so that you see the arrow on the top of the memory stic
Note: If the Memory Card light does not start blinking, youupside down. Remove the card and re-insert it prope
Memory Stick
32 MG

printing from m
emory cards
31
reading the memory card statust starts blinking and the ds the memory card to s depends on how many .
light remains on, the number ettings appear in the Setup
e memory card is in use (the ter, the memory card, or the
When you insert a memory card, the green memory card lighMemory Card icon appears in the Status LCD. The printer readetermine the number of photos. The amount of time this takephotos are on the memory card (it may take several minutes)
When the printer finishes reading the card, the memory cardof photos appears in the Status LCD, and the current printer sLCD. You are now ready to print your photos.
Caution: Do not remove the memory card from the printer while thmemory card light is blinking). This may damage the prininformation on the memory card.

printing from m
emory cards
32
e copy of the first photo on the
When you insert the memory card, the printer is set to print onmemory card at 4x6 in.Status LCD
Setup LCD
Memory Card iconNumber of photos

printing from m
emory cards
33
using the setup LCDcurrent printer settings. The currently selected section.
Choose Photos sectionChoose the end of a range of photos you want to print
Copies sectionChoose the number of copies you want to print
The Setup LCD is divided into four sections and indicates the cursor (located at the bottom of the Setup LCD) indicates the
Photo Size sectionChoose to print photos in 4x6 in., wallet, or thumbnail size
Choose Photos sectionChoose a single photo or the beginning of a range of photos you want to print
CursorAppears below the selected section

printing from m
emory cards
34
To change printer settings:
tup LCD.
in a section.
X
Up (+)
• Press uTab to move from one section to the next in the Se
• Press Scroll Up (+) or Scroll Down (-) to change settings with
uTab
Scroll Down (-) Scroll

printing from m
emory cards
35
printing your photostakes is a memory card from a
emory card” on page 27). The LCD.
ize.
t a range of photos, see
section.
the photo you want to print is
Printing beautiful photos from your new printer is easy! All it digital camera and five easy steps:
1. Insert the memory card into the printer (see “inserting a mcursor is positioned in the Photo Size section of the Setup
2. Select the size for the printed photos.
• Use Scroll Up (+) or Scroll Down (-) to select the photo s
3. Select which photo you want to print. (If you want to prin“selecting a range of photos to print” on page 39.)
• Press uTab to position the cursor in the Choose Photos
• Press Scroll Up (+) or Scroll Down (-) until the number ofshown in the Setup LCD.

printing from m
emory cards
36
4. Select how many copies you want to print.
ection.
s you want to print is shown in
, see the following sections.
photo size.
int photos at different sizes,
ge
• Press uTab twice to position the cursor in the Copies s
• Press Scroll Up (+) repeatedly until the number of copiethe Setup LCD.
5. Press Print.
Note: For more information on selecting the printer settings
selecting the photo sizeThe Photo Size section has three icons indicating the selected
Note: In a print job, all photos print at the same size. To prstart another print job.
4x6 in.
Wallet (2.5x3.25 in.)
Thumbnail (0.7 x 0.9 in.) for an index pa
printing from m
emory cards
37
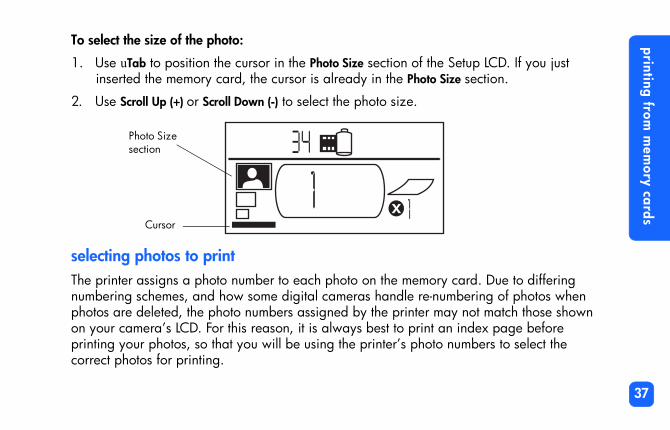
To select the size of the photo:
the Setup LCD. If you just oto Size section.
ory card. Due to differing e-numbering of photos when r may not match those shown
int an index page before oto numbers to select the
1. Use uTab to position the cursor in the Photo Size section ofinserted the memory card, the cursor is already in the Ph
2. Use Scroll Up (+) or Scroll Down (-) to select the photo size.
selecting photos to printThe printer assigns a photo number to each photo on the memnumbering schemes, and how some digital cameras handle rphotos are deleted, the photo numbers assigned by the printeon your camera’s LCD. For this reason, it is always best to prprinting your photos, so that you will be using the printer’s phcorrect photos for printing.
Photo Size section
Cursor

printing from m
emory cards
38
selecting a single photo to print
se Photos section of the Setup
nt.
d down either Scroll Up (+) or you to reach the desired photo utton.
To select a single photo to print:
1. Use uTab to position the cursor in the first part of the ChooLCD.
2. Use Scroll Up (+) or Scroll Down (-) to select the photo to pri
Tip: To get to the desired photo faster, press and holScroll Down (-) to activate auto-repeat. This allows number without having to repeatedly press the b

printing from m
emory cards
39
selecting a range of photos to printmple, you can print photos
se Photos section of the Setup
print (for example, photo
oose Photos section.
You can print a sequence of photos in one print job. For exanumbered 21 to 24.
To select a range of photos to print:
1. Use uTab to position the cursor in the first part of the ChooLCD.
2. Use Scroll Up (+) or Scroll Down (-) to select the first photo tonumber 21).
3. Press uTab to move the cursor to the second part of the Ch
printing from m
emory cards
40
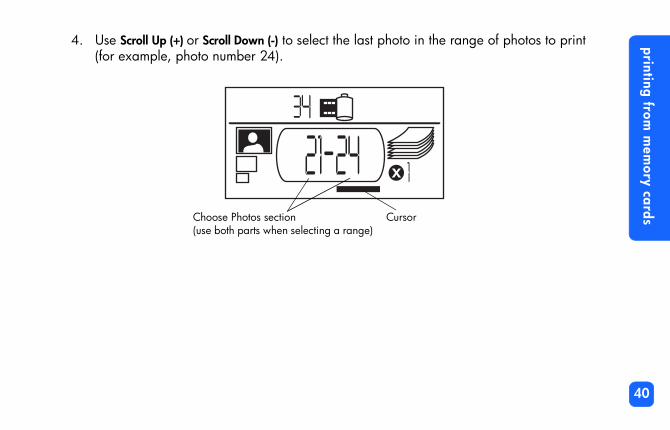
4. Use Scroll Up (+) or Scroll Down (-) to select the last photo in the range of photos to print
(for example, photo number 24).Choose Photos section(use both parts when selecting a range)
Cursor

printing from m
emory cards
41
selecting the number of copies
Setup LCD.
opies to print.
For example, 3 copies of 3.
Cursor
Number of copies
Paper Count icon
More Paper icon
To select the number of copies to print:
1. Use uTab to position the cursor in the Copies section of the
2. Use Scroll Up (+) or Scroll Down (-) to select the number of c
Note: Copies of a range of photos are printed as sets. photos 1–3 print in this order: 1,2,3; 1,2,3; 1,2,
Copies section

printing from m
emory cards
42
The Copies section of the LCD has three icons:
. The default is 1.
r needed to complete the print of copies the number of sheets
n when the print job requires
r photo.
emory card.
• The number shows the number of copies selected to print
• The Paper Count icon shows the number of sheets of papejob with the current settings. As you increase the number increases accordingly.
• The More Paper icon appears next to the Paper Count icomore than six sheets of paper.
examplesTo print only the last photo on a memory card:
1. Insert the memory card into the printer.
2. Press Scroll Up (+) or Scroll Down (-) to select the size of you
3. Press uTab once to move to the Choose Photos section.
4. Press Scroll Down (-) once to select the last photo on the m
5. Press Print.

printing from m
emory cards
43
To print all photos on a memory card:
r photos.
the Choose Photos section.
card.
ose Photos section.
to to be printed.
Choose Photos section.
e printed.
1. Insert the memory card into the printer.
2. Press Scroll Up (+) or Scroll Down (-) to select the size of you
3. Press uTab twice to move the cursor to the second part of
4. Press Scroll Down (-) to select the last photo on the memory
5. Press Print.
To print two copies of photos 4-6 in wallet size:
1. Insert the memory card into the printer.
2. Press Scroll Down (-) to select wallet size prints.
3. Press uTab to position the cursor in the first part of the Cho
4. Press Scroll Up (+) three times to select “4” as the first pho
5. Press uTab to position the cursor in the second part of the
6. Press Scroll Up (+) twice to select “6” as the last photo to b
7. Press uTab to position the cursor in the Copies section.
8. Press Scroll Up (+) to select “2” as the number of copies.
9. Press Print.

printing from m
emory cards
44
printing an index pagen the memory ing on the e several
ge can take
umbnail otos to print.
ated with the hotos from a photo
thumbnail size (the bottom
An index page shows thumbnail views of the photos stored ocard. The index page can print 28 images per page. Dependnumber of photos on the memory card, an index page may bpages long.
Note: Because of the large number of images, an index palonger to print than a regular photo.
The photo number appears in the lower left corner of each thimage on the index page. Use the photo number to select ph
Note: This number may be different from the number associphoto on your digital camera. If you add or delete pmemory card, reprint the index page to see the new numbers.
To print an index page:
1. Insert the memory card into the printer.
2. In the Photo Size section of the Setup LCD, scroll down to icon).

printing from m
emory cards
45
3. Select the range of photos to print:
ice to position the cursor in the croll Down (-) to scroll to the last
de all photos on the memory st part of the Choose Photos
e, set the number of copies.
• To print all photos on the memory card: press uTab twsecond part of the Choose Photos section, then press Sphoto on the memory card.
• If you want to print an index page that does not inclucard: press uTab once to position the cursor in the firsection then select the range of photos to print.
4. If you want to print more than one copy of the index pag
5. Press Print.
Thumbnail size

printing from m
emory cards
46
canceling a print job
nt job.
t busy printing or saving. This emory card, and print one
X
Cancel
To stop printing, press Cancel.
• The partially printed page ejects from the printer.
• The settings on the control panel reflect the cancelled pri
clearing print settingsTo clear the print settings, press Cancel when the printer is norestores the default settings: 4x6 in., print first photo on the mcopy.

printing from D
POF files
47
4 printing from DPOF filesnt while you are reviewing the a digital print order format size of each photo, and how
le to use the control panel to his is because the DPOF file DPOF file specifies “standard” specifies “index” for the photo
Most digital cameras allow you to choose which photos to priphotos using the camera’s LCD. Your selections are stored in (DPOF) file. This file tells the printer which photos to print, themany of each photo to print.
printing from a DPOF fileNote: When you print from a DPOF file, you will not be ab
choose the photo size, range, or number of copies. Tcreated by the camera specifies these settings. If the for the photo size, the photo will print at 4x6 in.; if it size, the photo will print at thumbnail size.

printing from D
POF files
48
To print from a DPOF file:
mory card.
file are specific to your n for information on creating a
“inserting a memory card” on
memory card.
1. Use your digital camera to create a DPOF file on the me
Note: The settings you can use when creating a DPOF camera. See your digital camera’s documentatioDPOF file.
2. Insert the memory card into your printer. For details, see page 27.
The printer automatically recognizes the DPOF file on the
• The DPOF icon appears in the Status LCD to indicate a DPOF file is on the memory card.
• DPOF appears in the Photo Size section to indicate that the photo size (standard or index) will be read from the DPOF file.
• DPOF appears in the Choose Photos section to indicate the photos to be printed will be read from the DPOF file.
3. On the control panel, press Print.

printing from D
POF files
49
exiting DPOF mode DPOF file, exit DPOF mode. accessible.
de. The cursor will be in the
F appears as an additional
to select DPOF.
To print photos from the memory card that are not part of theWhen you exit DPOF mode, the other photos on the card are
To exit DPOF mode:
1. Press uTab, Scroll Up (+), or Scroll Down (-) to exit DPOF moPhoto Size section.
2. Use Scroll Up (+) or Scroll Down (-) to select the photo size.
3. Continue with your selections and print your photos.
returning to DPOF modeWhen there is a DPOF file on the inserted memory card, DPOselection in the Photo Size section.
To return to DPOF mode:
• Use Scroll Up (+) or Scroll Down (-) in the Photo Size section

care and maintenance
50
5 care and maintenancer with care, keep it clean and nter at all times.
printer upright.
printer.
cycle before you disconnect t cartridge correctly.
Your printer requires little maintenance. Transport your printein good condition, and keep the print cartridge inside the pri
transporting your printerYour printer can travel with you. Be sure to always carry the
To transport your printer:
1. Press Power to turn off the printer.
2. Remove all paper from the paper tray.
3. Push the paper tray extension all the way in towards the
4. Close the paper tray door.
Note: Make sure the printer completes its power-down the power. This allows the printer to cap the prin
care and maintenance
51
5. Unplug the power adapter and fold the two metal prongs back into the power adapter.
ct the USB printer cable from
rint cartridge.
ing items with you:
photos)
r, make sure to also bring your
6. If your printer was connected to your computer, disconnethe computer.
Note: When transporting your printer, do not remove the p
When transporting your printer, make sure to bring the follow
• Paper
• Power adapter
• Memory card containing photos, or your digital camera
• Extra HP #57 print cartridges (if you plan to print a lot of
Note: If you are going to connect your printer to a computeUSB printer cable and printer software CD.

care and maintenance
52
storing your printer and supplies
vity. Close the paper tray door nlight and in a place that does
printer. The printer caps the
you disconnect the power. This
th or more, print a test page to s.
e in a cool, dry location.
storing your printerYour printer is built to withstand short or long periods of inactiwhen the printer is not in use. Store the printer out of direct sunot have temperature extremes (such as indoors).
storing the print cartridgeAlways transport and store the used print cartridge inside theprint cartridge to keep the ink fresh longer.
Make sure the printer completes its power-down cycle before allows the printer to cap the print cartridge correctly.
If the printer and print cartridge have been unused for a monclean the print cartridge before using it. See below for detail
storing paperStore photo paper in its original packaging on a level surfac

care and maintenance
53
cleaning your printerlightly moistened with water.
ge the printer’s finish.
rinting it also cleans the print something is wrong with your en you print the test page can
leting a more thorough print
on an index card.
the memory card.
ds. The printer begins to print
To clean the outside of the printer, use a cloth that has been
Important: Do not use cleaners or soaps as they may dama
printing a test pageThe test page is used to diagnose print cartridge problems. Pcartridge. You should print a test page any time you suspect print cartridge—the print cartridge cleaning that happens whresolve many print quality problems.
You can print the test page up to three times, each time compcartridge cleaning.
Note: To conserve photo paper, you can print the test page
To print a test page using the control panel:
1. If there is a memory card in any of the card slots, remove
2. On the control panel, press and hold Print for a few secona test page.

care and maintenance
54
3. Check the print quality of the test page. If it appears that the print cartridge needs ges—each successive test
Ink nozzle qualityIf there are white streaks in these color bars, try cleaning the print cartridge
Estimated ink levelUse this to determine when you should buy a new print cartridge
additional cleaning, you can print up to two more test papage gives a more thorough print cartridge cleaning.
Image print qualityIf this looks good, your photos should print well
Diagnostic informationTo be used when working with HP Customer Support

troubleshooting
55
6 troubleshootingre is a problem, look in this
een your printer and the source is turned on.
ariety of situations. These y. If you suspect a problem
Your printer is designed to be reliable and easy to use. If thesection to find a solution quickly.
Note: Before you begin, make sure the power adapter betwelectrical outlet is securely plugged in and the power
reading the status indicatorsThere are several indicators that show the printer status in a vindicators can help you diagnose problems quickly and easilcheck the:
• Printer light
• Memory Card light
• Status LCD
These indicators are described in the following sections.

troubleshooting
56
printer lighthe light is green, it can be king.
on
ds attention
X
Printer light
Print button
This light, encircling the Print button, can be green or red. If teither solid or blinking. If the printer light is red, it will be blin
Color State Meaning
Green Solid Printer power is
Green Blinking Printer is busy
Red Blinking The printer nee

troubleshooting
57
memory card lighthe front of the printer. It is only
e card is being read or written to printer, the memory card, or the
not being accessed
Memory Card light
This green light is located between the memory card slots on tvisible when the paper tray door is open.
Caution: Do not remove the memory card from the printer while th(the memory card light is blinking). This may damage theinformation on the memory card.
State Meaning
On - solid A memory card is in one of the slots, but it is
On - blinking The memory card is being accessed
Off There are no memory cards in the slots

troubleshooting
58
status LCDstatus as well as the status of
lem and the printer needs
photos on the memory card.
hotos on the memory card, or lem with the photos on the
d is inserted.
Paper and Print Cartridge icon
POF icon
The Status LCD displays icons that indicate the general printer specific printer parts.
Section Description State Meaning
Attention icon Blinking There is a probattention.
Number of photos Solid The number of
Number of photos Blinking There are no pthere is a probmemory card.
Memory card icon Solid A memory car
Attention icon
Number of photos DMemory Card icon

troubleshooting
59
lem with the memory card.
F (digital print order format) file card.
lem with the paper.
lem with the print cartridge.
Section Description State Meaning
Memory Card icon Blinking There is a prob
DPOF icon Solid There is a DPOon the memory
Paper icon Blinking There is a prob
Print Cartridge icon Blinking There is a prob
troubleshooting
60
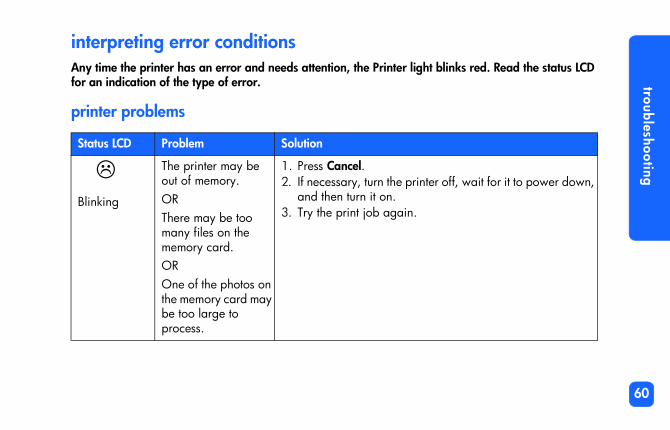
interpreting error conditionsht blinks red. Read the status LCD
nter off, wait for it to power down,
Any time the printer has an error and needs attention, the Printer ligfor an indication of the type of error.
printer problems
Status LCD Problem Solution
Blinking
The printer may be out of memory.ORThere may be too many files on the memory card.OROne of the photos on the memory card may be too large to process.
1. Press Cancel.2. If necessary, turn the pri
and then turn it on.3. Try the print job again.
troubleshooting
61
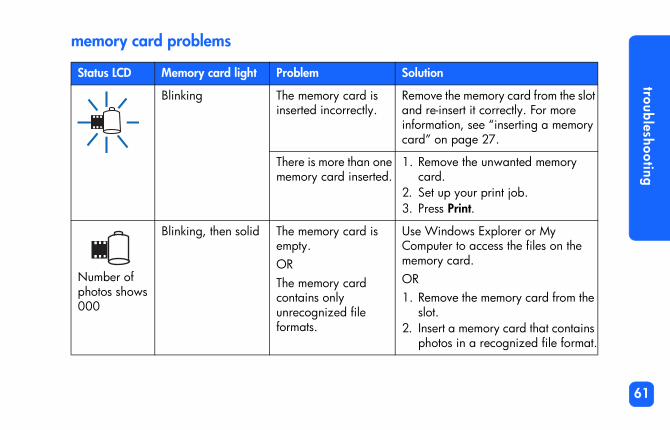
memory card problems
tion
ove the memory card from the slot re-insert it correctly. For more rmation, see “inserting a memory ” on page 27.
emove the unwanted memory ard.et up your print job.ress Print.
Windows Explorer or My puter to access the files on the ory card.
emove the memory card from the lot.nsert a memory card that contains hotos in a recognized file format.
Status LCD Memory card light Problem Solu
Blinking The memory card is inserted incorrectly.
Remandinfocard
There is more than one memory card inserted.
1. Rc
2. S3. P
Number of photos shows 000
Blinking, then solid The memory card is empty.ORThe memory card contains only unrecognized file formats.
UseCommemOR1. R
s2. I
p

troubleshooting
62
emove the memory card from the lot.the following methods of reading files on the card. If none of these k, you will need to use another ory card.
f you have the printer connected o a computer, you can save the ile from the memory card to your omputer, and then print the file rom your software application.ormat the memory card.onnect the camera to the PC to ownload the file.
rint an index page and note hich photos are corrupt.et up your print job, making sure ou have not included the corrupt hotos.ress Print.
Status LCD Memory card light Problem Solution
Blinking The printer cannot read the memory card—it may be damaged or unformatted.
• Rs
Try the wormem• I
tfcf
• F• C
d
Number of corrupt photos flashes next to Memory Card icon
Blinking Multiple photos in the print job are corrupt (the print job is canceled).
1. Pw
2. Syp
3. P

troubleshooting
63
emove the memory card from the lot.f you have the printer connected o a computer, you can save the hoto from the memory card to our computer and then print the hoto from your software pplication.
the memory card further into the ory card slot.
Status LCD Memory card light Problem Solution
Corrupt photo number flashes next to Memory Card icon
Blinking The printer cannot read the selected photo (the photo may be corrupt or in a format the printer does not recognize).
1. Rs
2. Itpypa
LCD showsHP 100
Off (no light) The memory card was not inserted fully.
Pushmem

troubleshooting
64
print cartridge problems
e correct HP print cartridge (# 57) printer.
the plastic tape from the print and re-insert the cartridge. For
ormation, see “installing or the print cartridge” on page 22.
ve the print cartridge. sure there is not any debris on pper contacts.ert the print cartridge.
the incorrect print cartridge and correct HP print cartridge (#57). information, see “installing or the print cartridge” on page 22.
st page to see how much ink is left int cartridge, and to evaluate the lity. If needed, replace the print .
Status LCD Problem Solution
Print cartridge is missing. Install thinto the
You may have forgotten to remove the plastic tape from the print cartridge.
Remove cartridgemore infremoving
The copper contacts on the print cartridge are not connecting with the contacts inside the printer.
1. Remo2. Make
the co3. Re-ins
An incorrect print cartridge is installed. Remove insert theFor moreremoving
The print cartridge may be low on ink (the Printer light does not blink).
Print a tein the prprint quacartridge

troubleshooting
65
paper problems
e paper out of the paper path. sure the paper width guide fits to the edge of the paper without ing the paper. Print to continue printing.
more paper in the paper tray. Print to continue printing.
sure the paper width guide is to the left edge of the paper ut bending the paper. sure there are no more than 20 s of paper in the paper tray. sure there is not more than one
and size of paper in the paper
Status LCD Problem Solution
Paper has jammed.ORThe printer picked up multiple sheets of paper.
1. Pull th2. Make
closebend
3. Press
The printer is out of paper. 1. Place2. Press
The printer could not pick up the paper from the paper tray.
• Makeclosewitho
• Makesheet
• Maketype tray.

troubleshooting
66
other printing problems error condition shown on the tect.
paper out of the paper path.re the paper width guide fits close
dge of the paper without bending er.int to continue printing.
ure the printer power is on.ure that all cable connections are
paper is loaded correctly in the .
a test page. If necessary, replace rtridge.
The printer needs time to finish the information.
If you are having problems with your printouts and there is noprinter, there could be a problem that the printer does not de
Problem Possible cause Solution
My photo did not come out of the printer.
There may be a paper jam. 1. Pull the 2. Make su
to the ethe pap
3. Press Pr
Power may be off or there may be a loose connection.
• Make s• Make s
secure.
You may not have any paper in the paper tray.
Check thatpaper tray
A problem may exist with the print cartridge.
Try printingthe print ca
The printer may still be processing information.
Be patient.processing

troubleshooting
67
The printer needs time to finish the information.
out the paper tray extension.
ure the paper is correctly oriented aper tray.ure the paper width guide is close ft edge of the paper without the paper.
ure you selected the correct paper our software application Printer es (if you are printing from a r).
Problem Possible cause Solution
The printer light is flashing but nothing is printing.
The printer may be processing information.
Be patient.processing
Paper falls to the floor after printing.
The paper tray extension may not be fully extended.
Gently pull
My photo printed at an angle or is off center.
The paper may not be loaded correctly.ORThe paper size may be incorrect.
• Make sin the p
• Make sto the lebending
• Make ssize in yProperticompute
troubleshooting
68
page to see how much ink is left in rtridge, and to evaluate the print eeded, replace the print cartridge.
you have removed the protective from the print cartridge. For more , see “installing or removing the ge” on page 22.
el a print job before the job prints, ejects a blank or partially printed e continuing with the next job.
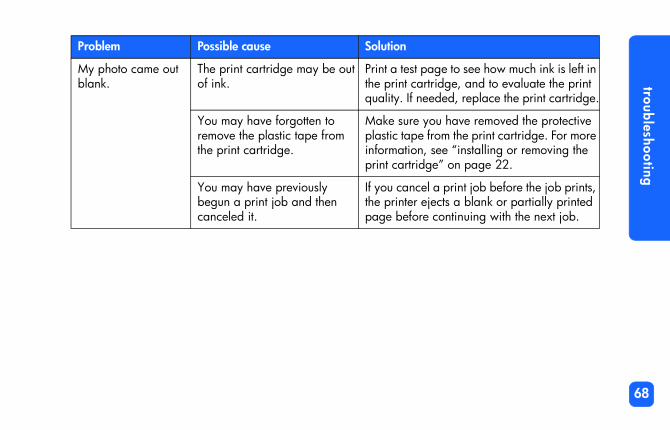
Problem Possible cause Solution
My photo came out blank.
The print cartridge may be out of ink.
Print a test the print caquality. If n
You may have forgotten to remove the plastic tape from the print cartridge.
Make sureplastic tapeinformationprint cartrid
You may have previously begun a print job and then canceled it.
If you cancthe printer page befor

troubleshooting
69
page.unning out of ink, replace the print
ure you are using a type of paper d for the printer. paper that is specifically designed utput you want. For example, to otos, use photo paper rather than per.
ng paper” on page 20 for more about supported paper types.
the paper is loaded with the HP own (print side is up).
page to clean the print cartridge. ng a test page” on page 53.
Problem Possible cause Solution
Print quality is poor.ORColors do not print correctly.
You may be running out of ink. Print a test If you are rcartridge.
You may not be using the best paper type.
• Make sintende
• Choosefor the oprint phplain pa
See “loadiinformation
You may be printing on the wrong side of the paper.
Make surelogo side d
You may need to clean the print cartridge.
Print a test See “printi

troubleshooting
70
getting additional helpr problem persists, see the visit www.hp.com/photosmart.
We hope you found this troubleshooting guide helpful. If youServices and Support booklet that came with your printer, or

specifications
71
specifications
.5 in. with .5 in. tab, 9-mil weight
tMedia, Memory Stick
inting
e
Dimensions 8.8 x 4.7 x 9.1 in.Interface USB 1.1Media sizes 4x6 in. with and without tabMedia types HP Premium Plus Photo Paper 4x6
Index cards 4x6 in.Memory card compatibility CompactFlash Type I and II, SmarPaper tray capacity 20 sheetsPrint cartridge One tri-color cartridge (HP #57)Prints color YesPrint languages PCL3C+, PMLPrint technology Drop on-demand thermal inkjet prResolution Up to 2400x1200 dpiSpeed Approximately 2 minutes per pagTechnology, color PhotoREt III, ColorSmart IIIWeight 2.9 lbs

copyright and trademarks
72
copyright and trademarksed, reproduced, or translated to rd Company.out notice. Hewlett-Packard shall es in connection with the
ystems, Inc.ompany.poration.ple Computer, Inc.rnational Business Machines
Flash Association (CFA).
marks of their respective holders.
© Copyright 2001 Hewlett-Packard CompanyAll rights are reserved. No part of this document may be photocopianother language without the prior written consent of Hewlett-PackaThe information contained in this document is subject to change withnot be liable for errors contained herein or for consequential damagfurnishing, performance, or use of this material.Adobe, Acrobat, and Reader are registered trademarks of Adobe SHP, the HP logo, and PhotoSmart are property of Hewlett-Packard CMicrosoft and Windows are registered trademarks of Microsoft CorMac, the Mac logo, and Macintosh are registered trademarks of ApIBM is a registered trademark and Microdrive is a trademark of InteCorporation.Pentium is a registered trademark of Intel Corporation.CompactFlash, CF, and the CF logo are trademarks of the CompactMemory Stick is a registered trademark of Sony Corporation.SmartMedia is a trademark of the SSFDC Forum.Other brands and their products are trademarks or registered trade

index
73
index
tion icon 58ory card icon 59ory card light 57er of photos 58r icon 59
cartridge icon 59er light 56
el 12, 46r 12, 19
12 12ll Down (-) 12, 34ll Up (+) 12, 3412, 34
Symbols(-) button 34(+) button 34(+) icon 16
Numerics4x6 in. photo size 36
AAdapter
connecting power 18Assistance
viewing the Onscreen User’s Guide 3Attention icon 14, 58Automatic print cartridge alignment 22
BBlinking
Attenmemmemnumbpapeprintprint
ButtonsCancPowePrintSaveScroScroTab

7
C CD-ROMcreen User’s Guide 3ing user’s guide 3Photoson of LCD 15, 33
er 53 print settings 46tFlashting the memory card 28inger adapter 18anelns 12s 13 13tion 10k reference 12
on of LCD 15, 33ting how many to print 41
inde
x
4
Cablepower 18
Calibration page 24Camera files
DPOF 47Camera memory cards
see memory cardsCancel button
location 12what it does 46
Cancelinga print job 46print settings 46
Card slot lightsee memory card light
Card slotssee memory card slots
Care and maintenance 50
Onsview
Choose secti
Cleaningprint
ClearingCompac
inserConnect
powControl p
buttoiconLCDlocaquic
Copiessectiselec

index
75
Copper contacts on print cartridge 23 Iodrive 26
tion 14, 58F 14ion on LCD 13ory Card 14 Paper 16, 42r and Print Cartridge 59r Count 16, 42er Status 14 reference 14
hotosrdsribed 6geribed 6electing photos 44ing 44
Cursor in LCD 15Customer support
see Services and Support booklet
DDefault
printer settings 32Digital Print Order Format
see DPOFDocumentation
viewing the onscreen user’s guide 3DPOF
icon on LCD 14, 58printing from 47
FFilm icon
see memory card iconFlashing lights 55
IBM MicrIcons
AttenDPOlocatMemMorePapePapePrintquick
Imagessee p
Index cadesc
Index padescfor sprint

7
Ink L
tion icon 58ging the settings 34ose Photos section 15ies section 15r 15
s quick reference 14tion of icons 13ning of status icons 58ory Card icon 31
e Paper icon 42ber of copies 41r Count icon 16, 42
o Size section 15k reference 13s icons 58
ory card 27, 31, 57er 19, 56
inde
x
6
see print cartridgeInserting
CompactFlash memory card 28memory cards 27Memory Stick memory card 30paper 21print cartridge 23SmartMedia memory card 29
Installingprint cartridge 23
LCDAttenchanChoCopcursoiconlocameaMemMornumPapePhotquicstatu
Lightmemprint

index
77
Loading Memory cardsMicrodrive 26on LCD 14ator light 31ting 27ting CompactFlash 28ting Memory Stick 30ting SmartMedia 29ion of slots 11s icon on LCD 31leshooting problems 61Stickting the memory card 30ve memory cards 26per icon 16, 42he printer 50
of copies 41
paper 21print cartridge 23
Location of printer 17
MMaintenance 50Maximum amount of paper to load 21Media types and sizes 20Memory card light
location 11, 27what it means 57
Memory card slotsCompactFlash 27Memory Stick 27SmartMedia 27
IBM icon indicinserinserinserinserlocatstatutroub
Memory inser
MicrodriMore PaMoving t
NNumber

7
O Paper and Print Cartridge icon 59unt icon 42y 10, 21nsion 11, 21ting paper 21idth guidesting 21tion 11
rint cartridgepering 21 to use 20eult 32on of LCD 15, 33ting 36
inde
x
8
On/off switch 12Onscreen User’s Guide 3, 17Opening
paper tray door 21print cartridge door 23
Output guidehow to use 21location 11
PPaper
getting it to feed in straight 21how much to use 21loading 21storing 52supported types 20tabbed 21troubleshooting problems 65where to buy 20which side faces up 21
Paper CoPaper tra
doorexteinser
Paper wadjuloca
Pensee p
Photo paloadtype
Photo sizdefasectiselec

index
79
Photos Print cartridgeration page 24er contacts 23nosing problems 53ozzles 23ting 23les 23ving 25ving the tape 23g 52leshooting problems 64
t kind to buy 22ridge doorion 10ing 23ngsing 46ult 32ting on the control panel 34
number on LCD 14printing 35printing all on a memory card 43printing one at a time 38printing several at a time 39printing the last one taken 42
Poweradapter 10, 18button 12, 19connecting 18turning on and off 19
Print buttonlocation 12what it does 36
calibcoppdiagink ninsernozzremoremostorintroubwha
Print cartlocatopen
Print setticleardefaselec

8
Printer Printinghotos on a memory card 43ration page 22eling 46es 41 DPOF files 47x page 44hoto taken 42
ple copies 41os from the control panel 35e of photos 39le photo 38ping 46age from the control panel 53
ory cards 61r 65
o quality 66 cartridge 64etIndex page
inde
x
0
calibration page 24changing the settings 34cleaning 53light 19, 56setting up 17specifications 71status icon on LCD 14, 58storing 52test page 53transporting 50turning on and off 19where to place 17
Printer partsbuttons 12control panel 12LCD 13memory card slots 27paper tray 21print cartridge door 23what comes in the box 17
all pcalibcanccopifromindelast pmultiphotrangsingstoptest p
Problemsmempapephotprint
Proof she see

index
81
Q Scroll Up (+) buttonto use 34ion 12
er of copies 41o size 36os to print 37and Support booklet 17
ecting power 18lling the print cartridge 23ing paper 21Dse Photos section 33
ies section 33 15 Size section 33 papermany to load 21diating the memory card 29
Quick referencecontrol panel 12front and back of printer 10front of printer with paper tray open 11LCD 13LCD icons 14
RRear paper path
location 10Red light on printer 56Removing
print cartridge 25
SSave button
location 12Scroll Down (-) button
how to use 34location 12
how locat
Selectingnumbphotphot
Services Setup
conninstaload
Setup LCChooCopiconsPhoto
Sheets ofhow
SmartMeinser

8
Specifications 71 Test pageing from the control panel 53il photo size 36ting your printer 50hootingory card light 57ory card problems 61r problems 65
cartridge problems 64er light 56ing the status LCD 58ing the Onscreen User’s Guide 3
ng 17
10uidecreen 3ideing onscreen 3
inde
x
2
StatusLCD icons 58of memory card 31
Stopping printing 46Storing
paper 52print cartridge 52printer 52
TTab button
how to use 34location 12
Tabbed paperloading 21
Taperemoving from print cartridge 23
Technical supportsee Services and Support booklet
printThumbnaTransporTroubles
memmempapeprintprintreadview
UUnpackiUSB
port User’s G
OnsUser’s gu
view

index
83
W
Wallet photo size 36
8
inde
x
4


Printed on recycled paperPrinted in Singapore, 8/01
ENERGY STAR® is a U.S. registered mark. As an ENERGY STAR® partner, Hewlett-Packard Company has determined that this product meets the ENERGY STAR® guidelines for energy efficiency.
www.hp.com©2001 Hewlett-Packard Company
C8441-90158