PetaLinux SDK User Guide - Xilinx · Test a Software Image in QEMU Figure 12: PetaLinux Build Menu...
37
PetaLinux SDK User Guide Eclipse Plugin Guide UG979 (v2012.12) December 17, 2012
Transcript of PetaLinux SDK User Guide - Xilinx · Test a Software Image in QEMU Figure 12: PetaLinux Build Menu...

PetaLinux SDKUser Guide
Eclipse Plugin Guide
UG979 (v2012.12) December 17, 2012

Notice of DisclaimerThe information disclosed to you hereunder (the "Materials") is provided solely for the selection and use of Xilinx products. To the maximum extentpermitted by applicable law: (1) Materials are made available "AS IS" and with all faults, Xilinx hereby DISCLAIMS ALL WARRANTIES ANDCONDITIONS, EXPRESS, IMPLIED, OR STATUTORY, INCLUDING BUT NOT LIMITED TO ARRANTIES OF MERCHANTABILITY,NON-INFRINGEMENT, OR FITNESS FOR ANY PARTICULAR PURPOSE; and (2) Xilinx shall not be liable (whether in contract or tort, includingnegligence, or under any other theory of liability) for any loss or damage of any kind or nature related to, arising under, or in connection with, theMaterials (including your use of the Materials), including for any direct, indirect, special, incidental, or consequential loss or damage (including loss ofdata, profits, goodwill, or any type of loss or damage suffered as a result of any action brought by a third party) even if such damage or loss wasreasonably foreseeable or Xilinx had been advised of the possibility of the same. Xilinx assumes no obligation to correct any errors contained in theMaterials or to notify you of updates to the Materials or to product specifications. You may not reproduce, modify, distribute, or publicly display theMaterials without prior written consent. Certain products are subject to the terms and conditions of the Limited Warranties which can be viewed athttp://www.xilinx.com/warranty.htm; IP cores may be subject to warranty and support terms contained in a license issued to you by Xilinx. Xilinxproducts are not designed or intended to be fail-safe or for use in any application requiring fail-safe performance; you assume sole risk and liability foruse of Xilinx products in Critical Applications: http://www.xilinx.com/warranty.htm#critapps.
© Copyright 2012 Xilinx, Inc. Xilinx, the Xilinx logo, Artix, ISE, Kintex, Spartan, Virtex, Vivado, Zynq, and other designated brands included hereinare trademarks of Xilinx in the United States and other countries. All other trademarks are the property of their respective owners.
Revision History
Date Version Notes
2012-08-03 3.1 Initial public release for SDK 3.1 release
2012-09-03 12.9 Updated for PetaLinux SDK 12.9 release
2012-12-17 2012.12 Updated for PetaLinux SDK 2012.12 release
Eclipse Plugin GuideUG979 (v2012.12) December 17, 2012
www.xilinx.com 1

TABLE OF CONTENTS
Table of Contents
Revision History 1
Table of Contents 2
About this Guide 3Related PetaLinux Documents . . . . . . . . . . . . . . . . . . . . . . . . . . . . . . . . 3Prerequisites . . . . . . . . . . . . . . . . . . . . . . . . . . . . . . . . . . . . . . . . . . 3
Installation 4
Getting Started 9Starting PetaLinux Eclipse SDK . . . . . . . . . . . . . . . . . . . . . . . . . . . . . . . 9Installing a BSP . . . . . . . . . . . . . . . . . . . . . . . . . . . . . . . . . . . . . . . . 10Rebuilding a Reference Design Software Image . . . . . . . . . . . . . . . . . . . . . . . 11Test a Software Image in QEMU . . . . . . . . . . . . . . . . . . . . . . . . . . . . . . . 12Test a Software Image on the Board . . . . . . . . . . . . . . . . . . . . . . . . . . . . . 14
Direct Kernel Image Download . . . . . . . . . . . . . . . . . . . . . . . . . . . . . 14Network Boot Kernel Image . . . . . . . . . . . . . . . . . . . . . . . . . . . . . . 15
Board Bringup 17Preparation . . . . . . . . . . . . . . . . . . . . . . . . . . . . . . . . . . . . . . . . . . 17Create and Configure New Software Platform . . . . . . . . . . . . . . . . . . . . . . . . 17Build PetaLinux . . . . . . . . . . . . . . . . . . . . . . . . . . . . . . . . . . . . . . . . 19
Application Development 20Application Creation . . . . . . . . . . . . . . . . . . . . . . . . . . . . . . . . . . . . . 20Application System Configuration . . . . . . . . . . . . . . . . . . . . . . . . . . . . . . 22Building Applications . . . . . . . . . . . . . . . . . . . . . . . . . . . . . . . . . . . . . 25Testing Applications . . . . . . . . . . . . . . . . . . . . . . . . . . . . . . . . . . . . . 26Preparing the build system for debugging . . . . . . . . . . . . . . . . . . . . . . . . . . 27Debugging Applications with GDB . . . . . . . . . . . . . . . . . . . . . . . . . . . . . . 30Importing Existing PetaLinux Applications and Libraries . . . . . . . . . . . . . . . . . . 33
Eclipse Plugin GuideUG979 (v2012.12) December 17, 2012
www.xilinx.com 2

About this Guide
The PetaLinux Eclipse SDK provides an support to develop with PetaLinux from within the EclipseIDE. This includes user application and library development and debugging, aswell as building andconfiguring PetaLinux and bringup of hardware platforms. This guide decribes how to use the variousfunctionality provided by the PetaLinux Eclipse SDK.
It is assumed that the readers of this document have basic Linux knowledge such as how torun Linux commands, basic familiarity with Eclipse and or Xilinx XSDK as well as basic PetaLinuxfamiliarity having read and worked through the examples in the PetaLinux SDK Getting Started Guide.
Related PetaLinux Documents
The following other documents exist to help you to make the most of your PetaLinux experience:
• Application Development Guide
• Board Bringup Guide
• Getting Started Guide
• Installation Guide
• QEMU System Simulation Guide
Prerequisites
This getting started document assumes that the following prerequisites have been satisfied:
• Eclipse or Xilinx SDK has been installed.
• PetaLinux SDK has been installed.
• PetaLinux setup script has been sourced in each command console with which you work withPetaLinux. Run the following command to check whether the PetaLinux environment has beensetup on the command console:
$ echo $PETALINUX
If the PetaLinux working environment has been setup, it should shows the path to the installedPetaLinux. If it shows nothing, please refer to section "Environment Setup" in the"Getting Started with PetaLinux SDK" document to setup the environment.
Eclipse Plugin GuideUG979 (v2012.12) December 17, 2012
www.xilinx.com 3

Installation
This section describes the steps to install the PetaLinux Eclipse SDK into an Eclipse environment.Throughout this guide "Eclipse" can refer to either a standard Eclipse installation or a Xilinx SDKEclipse installation.
1. Start Eclipse.
IMPORTANT: If your Eclipse Installation is installed in a directory that isowned by root, the plugin must be installed as root. However the rest of yourdevelopment can be done as a non-root user.
2. Select an workspace (or create one), this workspace is only required to launch Eclipse.
3. Open Install New Software from the menu Help > Install New Software.
Figure 1: Install New Software Menu Item
4. Specify the location of the site as http://developer.petalogix.com/downloads/eclipse-plugin andpress enter.
5. Please wait for Eclipse to contact the server.
6. Select the checkbox for the PetaLinux SDK and click Next.
Eclipse Plugin GuideUG979 (v2012.12) December 17, 2012
www.xilinx.com 4

Figure 2: Install New Software Wizard
7. Click Next.
Eclipse Plugin GuideUG979 (v2012.12) December 17, 2012
www.xilinx.com 5

Figure 3: Install New Software Wizard
8. Please read the license agreement before accepting, once complete click Finish to install.
Eclipse Plugin GuideUG979 (v2012.12) December 17, 2012
www.xilinx.com 6

Figure 4: License Agreement for PetaLinux Eclipse SDK
9. When prompted that you are installing "unsigned content" click "Ok" to continue.
Figure 5: Unsigned Content Warning
10. When prompted to restart Eclipse select Restart Now.
Eclipse Plugin GuideUG979 (v2012.12) December 17, 2012
www.xilinx.com 7

Figure 6: Restart Eclipse to Apply Software Updates
11. The PetaLinux Eclipse SDK is installed.
Eclipse Plugin GuideUG979 (v2012.12) December 17, 2012
www.xilinx.com 8

Getting Started
Starting PetaLinux Eclipse SDK
To launch Eclipse with the PetaLinux SDK the current PetaLinux environment must first be sourced(see prerequisites for more information).
1. Launch Eclipse
$ eclipse
or Xilinx SDK.
$ xsdk
2. Select the Workspace, it is recommended that you create one workspace for all PetaLinux work.The recommended location is "$PETALINUX/workspace",
Figure 7: Workspace Selection
3. The workspace will be opened/created and the environment will load the PetaLinux SDK.
Eclipse Plugin GuideUG979 (v2012.12) December 17, 2012
www.xilinx.com 9

Installing a BSP
Figure 8: Environment with PetaLinux SDK
Installing a BSP
PetaLinux includes reference designs for you to start working with and customise for your ownprojects. These are provided in the form of installable BSP (Board Support Package) files, and includeall the necessary design and configuration files, including pre-built and tested hardware ad softwareimages, ready for download to your board or for booting in the QEMU system simulation environment.
The PetaLinux Eclipse SDK provides the ability to install BSPs, and can be used in combination withthe "petalinux-install-bsp" command which is documented in the "Installation Guide" .
To install a BSP using the PetaLinux Eclipse SDK follow the below steps:
1. Open the Install BSP Wizard via the PetaLinux SDK > Install BSP menu.
Figure 9: Install BSP Menu Item
Eclipse Plugin GuideUG979 (v2012.12) December 17, 2012
www.xilinx.com 10

Rebuilding a Reference Design Software Image
2. Navigate and select the ".bsp" file, and click "OK".
3. The progress of the installation is shown.
Figure 10: Install BSP Progress Dialog
4. Once complete the BSP(s) will be installed.
Rebuilding a Reference Design Software Image
So far your have tested the PetaLinux reference design pre-built software image both with QEMU andon hardware. You can also rebuild the software image of a reference design software platform. Thefollowing section covers the building of the image and the subsequent sections cover testing on QEMUand on hardware.
1. Select the platform to rebuild through the PetaLinux SDK > Platform Selection submenu.
Figure 11: PetaLinux SDK Platform Selection Sub Menu
2. Select "All" from the Build Menu to rebuild the image.
Eclipse Plugin GuideUG979 (v2012.12) December 17, 2012
www.xilinx.com 11

Test a Software Image in QEMU
Figure 12: PetaLinux Build Menu
3. The build progress is displayed and the log is shown in a console window.
Figure 13: PetaLinux Build
Test a Software Image in QEMU
Now that you have a software system image built, its time to test it out.
1. Run QEMU using the "Boot QEMU (Linux)" menu item in the "PetaLinux SDK" menu.This will run the default configuration of QEMU for the current Platform.
Eclipse Plugin GuideUG979 (v2012.12) December 17, 2012
www.xilinx.com 12

Test a Software Image in QEMU
Figure 14: Boot QEMU (Linux) Menu Item
2. A QEMU terminal will appear in the foreground connected to the console of QEMU.
Figure 15: QEMU Terminal
To run QEMU using custom parameters or with a custom image use the QEMU external tool launcherconfigurations. Open "Run > External Tools > External Tools Configurations...".
Eclipse Plugin GuideUG979 (v2012.12) December 17, 2012
www.xilinx.com 13

Test a Software Image on the Board
Figure 16: PetaLinux QEMU External Tool Launch Configuration
Test a Software Image on the Board
Before downloading the images to the board, the board must first be programmed with thecorresponding FPGA bitstream. The current release of the PetaLinux Eclipse SDK tools does notprovide the ability to download FPGA bitstreams for pre-built or non-pre-built platforms.
Follow the instructions from the "Test New Software Image on Hardware" section ofthe "PetaLinux Getting Started Guide", to download the bitstream, connect the board, serialand JTAG correctly.
Direct Kernel Image Download
1. JTAG boot the kernel image to the board using the "Boot JTAG (Linux)" menu item in the"PetaLinux SDK" menu. This will load the current Linux Kernel image onto the board andexecute it.
Figure 17: Boot JTAG (Linux) Menu Item
Eclipse Plugin GuideUG979 (v2012.12) December 17, 2012
www.xilinx.com 14

Test a Software Image on the Board
2. Watch the serial console, you should see the Linux booting messages shown on the serial console.
Network Boot Kernel Image
1. Make sure that the Linux image is in your TFTP directory "/tftpboot"
2. JTAG boot the u-boot image to the board using the "Boot JTAG (U-Boot)" menu item in the"PetaLinux SDK" menu. This will load the current U-Boot image onto the board and executeit.
Figure 18: Boot JTAG (U-Boot) Menu Item
3. Watch the serial console. When you see "Hit any key to stop autoboot" on the console,press a key to stop auto boot, as shown below.
Figure 19: U-boot
4. Check if the u-boot environment variable serverip is set your workstations IP by runningu-boot print command on the serial console:
U-Boot-PetaLinux> print serverip
Eclipse Plugin GuideUG979 (v2012.12) December 17, 2012
www.xilinx.com 15

Test a Software Image on the Board
The serverip variable defines the IP address from which u-boot will attempt to load the kernelimage, using the TFTP protocol. It should correspond to the IP address of your workstation.
When PetaLinux builds u-boot, it automatically set your workstations IP as the defaultu-boot serverip. However, any previously saved u-boot settings in flash will override thisdefault.
5. Set the u-boot serverip to the IP of your workstation by running this command on the u-boot:
U-Boot-PetaLinux> set serverip <Your workstation IP>
6. Download the PetaLinux image with TFTP and then boot the image by running this commandon u-boot:
U-Boot-PetaLinux> run netboot
You should be able to see the PetaLinux booting messages on the serial communication console.
7. Using u-boot and TFTP to load new kernel images is a great time-saver during the systemdevelopment process, taking just seconds, instead of minutes that are required for a full JTAGboot of the Linux image.
Eclipse Plugin GuideUG979 (v2012.12) December 17, 2012
www.xilinx.com 16

Board Bringup
Preparation
Before using Eclipse to bringup a new board the sections up to "Create New PetaLinux SDKSoftware Platform" of the "Board Bring Up with PetaLinux SDK" document must becompleted.
One complete your workspace should include the PetaLinux BSP Software Project.
Note: Use the workspace that is to be used for Eclipse work for the XSDK import sections ofthe bring up guide.
Create and Configure New Software Platform
The next step is to import the BSP configuration and settings into the PetaLinux environment.
1. Select the BSP project to import (in this example "petalinux_bsp_0").
Figure 20: Workspace with BSP prepared
2. Right click the project and select the "Copy BSP to PetaLinux" menu option.
Eclipse Plugin GuideUG979 (v2012.12) December 17, 2012
www.xilinx.com 17

Create and Configure New Software Platform
Figure 21: Copy BSP to PetaLinux Menu Item
3. Specify the name of the new Platform, and Vendor, and click Finish.
Figure 22: Copy BSP to PetaLinux Menu Item
Eclipse Plugin GuideUG979 (v2012.12) December 17, 2012
www.xilinx.com 18

Build PetaLinux
4. If the Platform does not already exist it will be created, its architecture will be determined byBSP being imported.
5. Once the Platform is created the configuration will be imported.
Figure 23: Copying Platform Configuration
6. Once complete the Platform is ready for use in the PetaLinux environment.
Build PetaLinux
The Platform is now ready to be built. Select "All" from the PetaLinux Build Menu.
Figure 24: PetaLinux Build Menu
Once the platform is built it can be tested on hardware or in QEMU please refer to sections"Test a Software Image on the Board" and "Test a Software Image in QEMU" ofthis document.
Eclipse Plugin GuideUG979 (v2012.12) December 17, 2012
www.xilinx.com 19

Application Development
Application Creation
PetaLinux Eclipse SDK provides a tool to create PetaLinux user applications from either C or C++
templates.
These templates include application source code and Makefiles so that you can easily configure andcompile applications for PetaLinux systems and install them into the root file system.
The basic steps are as follows:
1. Open the New Project Wizard.
Figure 25: New Project Menu
2. In the New Project Wizard, select the PetaLinux New Application item and click Next.
Eclipse Plugin GuideUG979 (v2012.12) December 17, 2012
www.xilinx.com 20

Application Creation
Figure 26: New Project Wizard
3. Enter the name of the Application "myapp", and select the Style "C" for a C application. The"Enable the Application" check box will automatically select the application for thecurrently selected platform. Once complete click Finish.
Figure 27: New Project Wizard
4. The Wizard will complete the action and create the PetaLinux Application. Once complete the
Eclipse Plugin GuideUG979 (v2012.12) December 17, 2012
www.xilinx.com 21

Application System Configuration
Application will appear as a project from within the Eclipse environment.
Figure 28: New User Application, myapp.c
Application System Configuration
In order for the application to be included in the system build and resulting romfs the application mustbe selected in the PetaLinux System Configuration.
1. Open the PetaLinux System Configuration via the PetaLinux Tools > Application/System Configuration menu.
Figure 29: Application/System Configuration Menu
2. Navigate the Application/System Configuration Menuconfig using the Up/Down Arrow and theEnter keys.
Eclipse Plugin GuideUG979 (v2012.12) December 17, 2012
www.xilinx.com 22

Application System Configuration
Figure 30: Application/System Configuration Menuconfig
3. Navigate to the "Custom User Applications" sub-menu.
4. You will see the newly created user application "myapp" listed in the menu.
Eclipse Plugin GuideUG979 (v2012.12) December 17, 2012
www.xilinx.com 23

Application System Configuration
Figure 31: Application/System Configuration Menuconfig, "Custom User Applications"
5. Select the "myapp" item and press the Space key to enable it.
6. Exit the PetaLinux System Configuration.
7. When prompted to save the configuration select "Yes" and press the Enter key.
Eclipse Plugin GuideUG979 (v2012.12) December 17, 2012
www.xilinx.com 24

Building Applications
Figure 32: Application/System Configuration Menuconfig, Save Confirmation
8. It will take a few seconds for PetaLinux to apply the configuration change, please wait until thewindow is closed. Note: while this is happening XSDK/Eclipse will be disabled.
Building Applications
Once you have created the new application, the next step is to compile and build it. By defaultEclipse will automatically compile your application for you when you change any source. To build theapplication into the PetaLinux System complete the following steps:
1. Select the PetaLinux Build Menu
2. Select "all" to build all applications, libraries, kernel, u-boot and romfs
Eclipse Plugin GuideUG979 (v2012.12) December 17, 2012
www.xilinx.com 25

Testing Applications
Figure 33: PetaLinux Build Menu
3. The build is run, with progress shown, The output log of the build is shown in a Console Windowwithin Eclipse.
Figure 34: PetaLinux Build
Testing Applications
So far, you have created and compiled the new application. Now it’s time to test it.
1. Boot the newly created system image, either in QEMU or on your hardware board. If you arenot sure how to do it, please refer to section "Test New Software Image with QEMU" andsection "Test New Software Image on Hardware" in the beginning of this document.
2. Confirm your user application is present on the PetaLinux system by running the followingcommand on the system login console:
Eclipse Plugin GuideUG979 (v2012.12) December 17, 2012
www.xilinx.com 26

Preparing the build system for debugging
# ls /bin
Unless you have changed the user application’s Makefile to put the user application to somewhereelse, the user application will be put into the /bin directory.
3. Run your user application on the PetaLinux system console:
# <user-application-executable-file-name>
e.g. to run user application "myapp":
# myapp
4. Confirm the result of the application is as expected. If the new application is missing from thePetaLinux filesystem, double check to make sure that you completed the "romfs" and "image"Make targets from the PetaLinux Build. These ensure that your application binary is copied intothe root filesystem staging area, and that the PetaLinux system image are updated with this newfilesystem.
Preparing the build system for debugging
1. Change the user application Makefile not disable compiler optimizations. Compiler optimisationsmake debugging difficult because the compiler can re-order or remove instructions that do notimpact the program result, making debugging difficult.
Here is an example taken from a changed Makefile:...ROMFSINST=$(ROOTDIR)/tools/romfs-inst.sh
CFLAGS += -O0
APP = myapp...
2. Open the PetaLinux System Configuration via the PetaLinux Tools > Application/System Configuration menu.
Figure 35: Application/System Configuration Menu
Eclipse Plugin GuideUG979 (v2012.12) December 17, 2012
www.xilinx.com 27

Preparing the build system for debugging
3. Scroll down the "PetaLinux Configuration" menu to "Debugging":
Figure 36: PetaLinux Configuration - Scrolling down to Debugging option
4. Select the "Debugging" sub-menu:
Eclipse Plugin GuideUG979 (v2012.12) December 17, 2012
www.xilinx.com 28
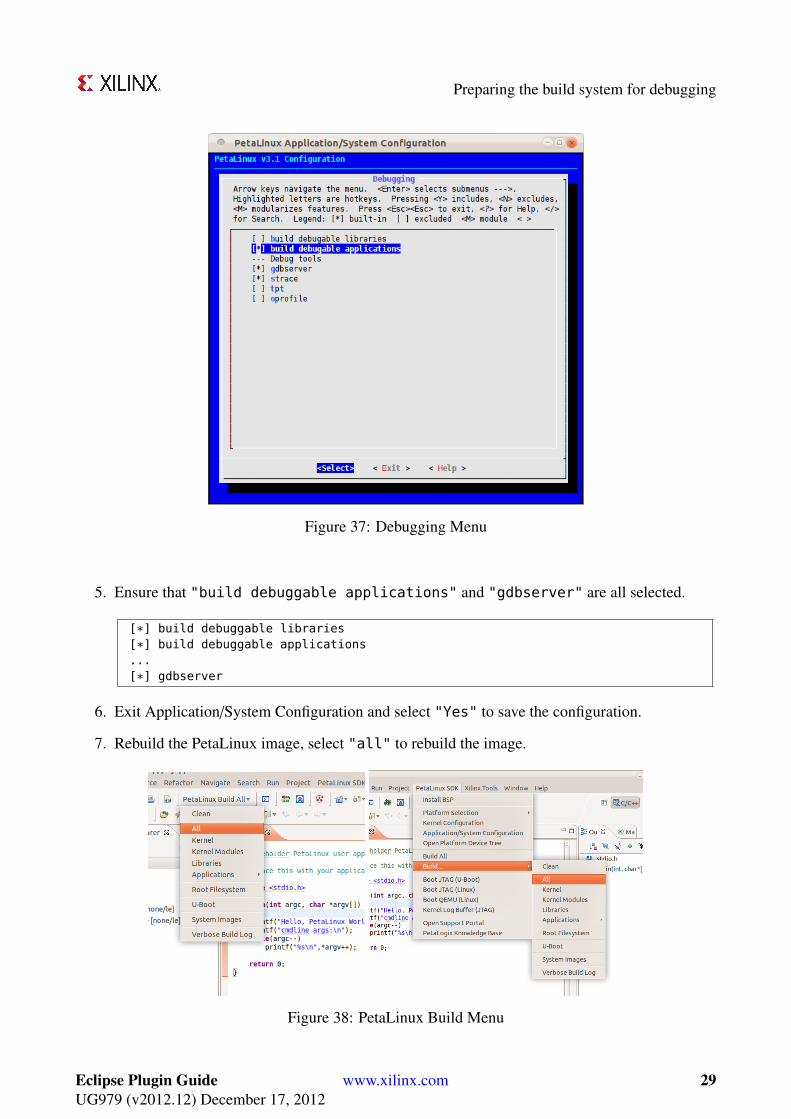
Preparing the build system for debugging
Figure 37: Debugging Menu
5. Ensure that "build debuggable applications" and "gdbserver" are all selected.
[*] build debuggable libraries[*] build debuggable applications...[*] gdbserver
6. Exit Application/System Configuration and select "Yes" to save the configuration.
7. Rebuild the PetaLinux image, select "all" to rebuild the image.
Figure 38: PetaLinux Build Menu
Eclipse Plugin GuideUG979 (v2012.12) December 17, 2012
www.xilinx.com 29
Debugging Applications with GDB
Debugging Applications with GDB
1. Boot your board (or QEMU) with the new image created previously.
2. Run gdbserver with the user application on the PetaLinux console:
# gdbserver host:1234 /bin/myappProcess /bin/myapp created; pid = 73Listening on port 1234
"1234" is the gdbserver port - it can be any unused port number
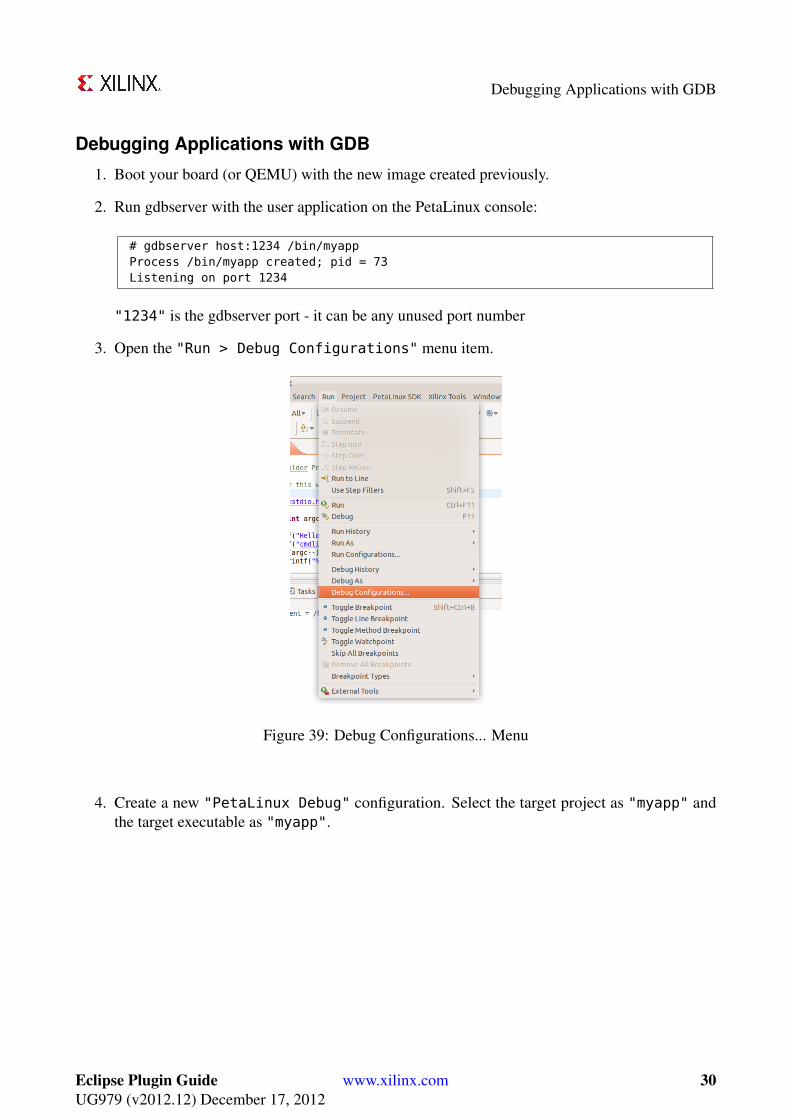
3. Open the "Run > Debug Configurations" menu item.
Figure 39: Debug Configurations... Menu
4. Create a new "PetaLinux Debug" configuration. Select the target project as "myapp" andthe target executable as "myapp".
Eclipse Plugin GuideUG979 (v2012.12) December 17, 2012
www.xilinx.com 30

Debugging Applications with GDB
Figure 40: PetaLinux Debug Launch Configuration
5. Change to the "Connect" tab of the configuration and set the target IP address and Port.
• Use the IP address of the PetaLinux system, e.g.: 192.168.0.10. If you are not sure aboutthe IP address, run ifconfig on the target console to check.
• Use the port "1234". If you chose a different gdbserver port number in the earlier step,use that value instead.
Figure 41: PetaLinux Debug Launch Configuration, Connect Tab
6. Click Apply to save the settings of the Launch Configuration, and click Debug to begin debugging.
Eclipse Plugin GuideUG979 (v2012.12) December 17, 2012
www.xilinx.com 31

Debugging Applications with GDB
NOTE: You can access your Favorite/Recent Debug Launch Configurationsand the Debug Configurations... Dialog from the Debug Toolbar Menu,
Figure 42: Debug Toolbar Menu
7. The Debugging Session will be launched, and Eclipse will switch to the Debug Perspective.
Figure 43: Debug Session
8. The session is now connected to the remote GDB Server, and has started the application, breakingat the function "main".
9. Add a break point to the application by double clicking on the side strip in the code window forthe application code file "myapp.c". A small blue breakpoint icon should appear in the sidestrip for each breakpoint in the code file.
Eclipse Plugin GuideUG979 (v2012.12) December 17, 2012
www.xilinx.com 32

Importing Existing PetaLinux Applications and Libraries
Figure 44: Code Window with Breakpoints active
10. Run the program, using the "Resume" command via the Control Flow Toolbar.
Figure 45: Control Flow Toolbar
11. Try the "step into" and "step over" commands. Try setting and removing breakpoints.
12. When the program finishes, the GDB server application on the target system will exit. Here is anexample of messages shown on the console:
~ # gdbserver host:1234 /bin/myappProcess /bin/myapp created; pid = 58Listening on port 1234Remote debugging from host 192.168.0.9Hello, PetaLinux World!cmdline args:/bin/myapp
Child exited with status 0GDBserver exiting~ #
Importing Existing PetaLinux Applications and Libraries
To work with projects inside the Eclipse environment the projects must existing in the Eclipseworkspace. To work with existing projects (applications, libraries and kernel modules) that werecreated by the command line tools "petalinux-new-..." they must first be imported into theEclipse workspace using the Import Wizard.
1. Open the Import Wizard via the File > Import menu.
Eclipse Plugin GuideUG979 (v2012.12) December 17, 2012
www.xilinx.com 33

Importing Existing PetaLinux Applications and Libraries
Figure 46: Import Wizard Menu
2. Select the "PetaLinux > Import Existing User Application/Library" Wizardand click Next.
Figure 47: Import Wizard
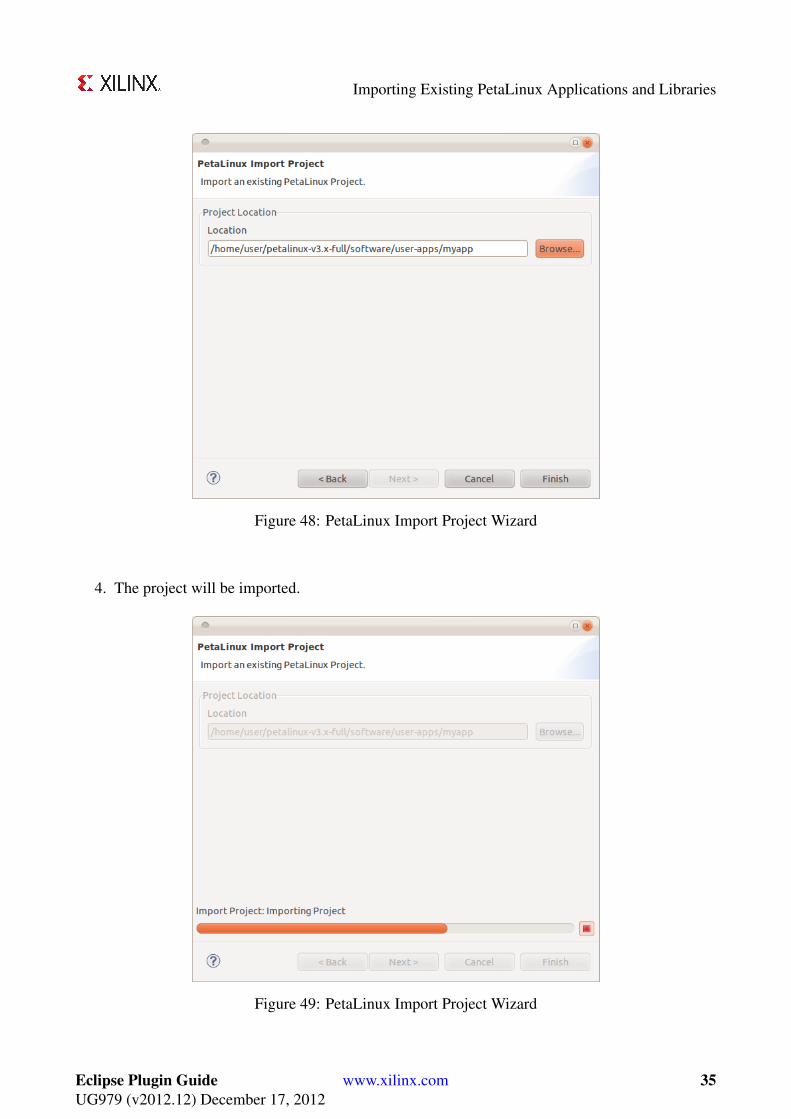
3. Input the location of the application/library to import. This application/library must already beinside the PetaLinux working tree. Once entered click Finish.
Eclipse Plugin GuideUG979 (v2012.12) December 17, 2012
www.xilinx.com 34
Importing Existing PetaLinux Applications and Libraries
Figure 48: PetaLinux Import Project Wizard
4. The project will be imported.
Figure 49: PetaLinux Import Project Wizard
Eclipse Plugin GuideUG979 (v2012.12) December 17, 2012
www.xilinx.com 35

Importing Existing PetaLinux Applications and Libraries
5. The project is now accessible as an Eclipse project.
Figure 50: PetaLinux Project Imported
Eclipse Plugin GuideUG979 (v2012.12) December 17, 2012
www.xilinx.com 36