Owner’s Manual - Fujifilmfujifilm-dsc.com/en/manual/x100t/x100t_om-full_en_01.pdf · Owner’s...
291
Owner’s Manual Owner’s Manual (Basic Operations: ) Owner’s Manual (pdf, available on this website: ) About This Manual Parts of the Camera Camera Displays Introduction Viewing This Manual Parts of the Camera The Selector The Command Dial The Aperture Ring and Shutter Speed Dial The [VIEW MODE] Button The Viewfinder Selector The [DISP/BACK] Button Diopter Adjustment The Indicator Lamp The [DRIVE] Button Shooting: Optical Viewfinder Shooting: Electronic Viewfinder/LCD Monitor Playback: Electronic Viewfinder/LCD Monitor FUJIFILM X100T Owner’s Manual - 1 -
Transcript of Owner’s Manual - Fujifilmfujifilm-dsc.com/en/manual/x100t/x100t_om-full_en_01.pdf · Owner’s...

Owner’s Manual
Owner’s Manual (Basic Operations: )
Owner’s Manual (pdf, available on this website: )
About This Manual
Parts of the Camera
Camera Displays
Introduction Viewing This Manual
Parts of the Camera
The Selector
The Command Dial
The Aperture Ring and Shutter Speed Dial
The [VIEW MODE] Button
The Viewfinder Selector
The [DISP/BACK] Button
Diopter Adjustment
The Indicator Lamp
The [DRIVE] Button
Shooting: Optical Viewfinder
Shooting: Electronic Viewfinder/LCD Monitor
Playback: Electronic Viewfinder/LCD Monitor
FUJIFILM X100T Owner’s Manual
- 1 -

First Steps
Basic Photography and Playback
Basic Movie Recording and Playback
Shooting Mode
[Q] (Quick Menu) Button
Using the [Q] Button
[Fn] (Function) Buttons
The Function Buttons
More on Photography
Attaching the Strap
Charging the Battery
Inserting the Battery and a Memory Card
Turning the Camera on and Off
Basic Setup
Taking Photographs
Viewing Pictures
Deleting Pictures
Recording Movies Viewing Movies
Program AE
Shutter-Priority AE
Aperture-Priority AE
Manual Exposure
Bracketing
Continuous Shooting (Burst Mode)
Multiple Exposures
Panoramas
Macro Mode (Close-ups)
Using the Self-Timer
Interval Timer Photography
Using the Flash
Focus-Frame Selection
Exposure Compensation
Focus/Exposure Lock
Focus Mode
Manual Focus (Focus Mode M)
Metering
Recording Pictures in RAW Format
Long Time-Exposures (T/B)
Film Simulation
White Balance
Advanced Filters
FUJIFILM X100T Owner’s Manual
- 2 -

The Shooting Menu
The Playback Menu
Using the Shooting Menu
Factory Defaults—Shooting Menu
[AUTOFOCUS SETTING]
[ISO]
[IMAGE SIZE]
[IMAGE QUALITY]
[DYNAMIC RANGE]
[FILM SIMULATION]
[FILM SIMULATION BKT]
[ND FILTER]
[COLOR]
[SHARPNESS]
[HIGHLIGHT TONE]
[SHADOW TONE]
[NOISE REDUCTION]
[LONG EXPOSURE NR]
[WHITE BALANCE]
[SELECT CUSTOM SETTING]
[EDIT/SAVE CUSTOM SETTING]
[FUNCTION (Fn) SETTING]
[DISP. CUSTOM SETTING]
[CONVERSION LENS]
[MF ASSIST]
[ADVANCED FILTER]
[INTERVAL TIMER SHOOTING]
[SELF-TIMER]
[AE/AF-LOCK MODE]
[AE/AF-LOCK BUTTON]
[PHOTOMETRY]
[INTERLOCK SPOT AE & FOCUS AREA]
[RED EYE REMOVAL]
[SAVE ORG IMAGE]
[FLASH MODE]
[FLASH COMPENSATION]
[SHUTTER TYPE]
[MOVIE SET-UP]
[WIRELESS COMMUNICATION]
Using the Playback Menu
[RAW CONVERSION]
[ERASE]
[CROP]
[RESIZE]
[PROTECT]
[IMAGE ROTATE]
[RED EYE REMOVAL]
[SLIDE SHOW]
[PHOTOBOOK ASSIST]
[MARK FOR UPLOAD TO]
[IMAGE SEARCH]
[COPY]
[PRINT ORDER (DPOF)]
[instax PRINTER PRINT]
[DISP ASPECT]
[WIRELESS COMMUNICATION]
[PC AUTO SAVE]
FUJIFILM X100T Owner’s Manual
- 3 -

The Setup Menu
Connections
Accessories
For Your Safety
For Your Safety
Appendix
Using the Setup Menu
Factory Defaults—Setup Menu
[DATE/TIME]
[TIME DIFFERENCE]
[ ]
[RESET]
[SILENT MODE]
[FRAME NO.]
[FOCUS RING]
[FOCUS CHECK]
[SOUND SET-UP]
[SCREEN SET-UP]
[SELECTOR BUTTON SETTING]
[EDIT/SAVE QUICK MENU]
[POWER MANAGEMENT]
[SHUTTER COUNT]
[EDIT FILE NAME]
[WIRELESS SETTINGS]
[PC AUTO SAVE SETTING]
[GEOTAGGING SET-UP]
[instax PRINTER CONNECTION SETTING]
[COLOR SPACE]
[FORMAT]
Wireless Transfer
Copying Pictures to a Computer
Printing Pictures via USB
Viewing Pictures on TV
Shoe-mounted flash units
Power Supplies
Remote Releases
Conversion Lens
Stereo microphones
Other
Website of the country or region of purchase
Troubleshooting/FAQ
Warning Messages and Displays
Specifications
Links
Restrictions on Camera Settings
FUJIFILM X100T Owner’s Manual
- 4 -

Introduction
Viewing This Manual
About This Manual
- 5 -

All pages of this manual may be subject to change or deletion without notice.
This manual may not be reproduced in whole or in part without prior permission, exceptfor individual use. Redistribution is prohibited.
Introduction
- 6 -

The Home Page
Content Pages
Searching the Manual
Choose a language.
A table of contents listing the main headings. Click a heading to view sub-headings and clicka sub-heading to view the page for that item.
The complete table of contents. Click a sub-heading to view the page for that item.
Viewing This Manual
- 7 -

The table of contents listing may not display on smartphones and other mobile devices.Click the button to view the table of contents and again to hide it.
Viewing This Manual
- 8 -

The breadcrumb bar shows your current position in the manual.Click the button to return to the table of contents.You can also navigate by clicking headings in the breadcrumb bar.
Click the button at the bottom of the page to jump to the top.
Viewing This Manual
- 9 -

Enter a search term and click to search the manual.
Viewing This Manual
- 10 -

Parts of the Camera
The Selector
The Command Dial
The Aperture Ring and Shutter Speed Dial
The [VIEW MODE] Button
The Viewfinder Selector
The [DISP/BACK] Button
Diopter Adjustment
The Indicator Lamp
The [DRIVE] Button
Parts of the Camera
- 11 -

1 Remove when attaching lens accessories.
Shutter button
Exposure compensation dial
Shutter speed dial
Hot shoe
Flash
Microphone (L)
Viewfinder window
Strap eyelet
Focus mode selector
Aperture ring
Focus ring
Lens
Front ring
AF-assist illuminator
Self-timer lamp
Viewfinder selector
Microphone (R)
[ON/OFF] switch
[Fn] button (function button 1)
Battery latch
Memory card slot
Battery chamber
1
Parts of the Camera
- 12 -

2 Use an HDMI cable no more than 1.5 m (4.9 ft.) long.
Eye sensor
Command dial
Connector cover
DC coupler cable cover
Battery-chamber cover latch
Battery-chamber cover
Tripod mount
Speaker
LCD monitor
Microphone/remote release connector
Micro USB connector
Micro HDMI connector 2
Parts of the Camera
- 13 -

Diopter adjustment control
[VIEW MODE] button
(playback) button
(delete) button (playback mode)
[Fn] button (function button 6)
[Wi-Fi] button
[Fn] button (function button 7)
[DRIVE] button
[AEL/AFL] (autoexposure/autofocuslock) button
Indicator lamp
[Q] (quick menu) button
Selector/function buttons
[DISP] (display)/[BACK] button
Parts of the Camera
- 14 -

Press the selector up ( ), left ( ), right ( ), or down ( ) to highlight items and press[MENU/OK] ( ) to select. The up, left, right, and down buttons also double as the macro,film simulation, white balance, and focus-area selection buttons, respectively, and as functionbuttons 2 through 5.
To prevent accidental operation of the selector and the [Q] button during shooting,press [MENU/OK] until is displayed. The controls can be unlocked by pressing[MENU/OK] until is no longer displayed.
See Also
The Function Buttons ([Fn] (Function) Buttons)
The Selector
- 15 -

The command dial can be used to navigate the menus, to zoom in and out and choose thenumber of pictures displayed during playback, and to select options in the quick menu display.
Press the center of the command dial to zoom in on the active focus area during shooting orplayback.
The Command Dial
- 16 -

Use the aperture ring and shutter speed dial to choose from modes [P], [S], [A], and [M].
Shutter speed dial
Aperture ring
Mode P: Program AE
Mode S: Shutter-Priority AE
Mode A: Aperture-Priority AE
Mode M: Manual Exposure
The Aperture Ring and Shutter Speed Dial
- 17 -

Aperture and shutter speed can be adjusted using program shift.
Aperture: [A]
Shutter speed: [A]
Take pictures at the selected shutter speed. The camera adjusts aperture automatically.
Aperture: [A]
Shutter speed: 1/1000 s
The Aperture Ring and Shutter Speed Dial
- 18 -

Take pictures at the selected aperture. The camera adjusts shutter speed automatically.
Aperture: f/5.6
Shutter speed: [A]
Take pictures at the selected aperture and shutter speed.
Aperture: f/5.6
Shutter speed: 1/1000 s
The Aperture Ring and Shutter Speed Dial
- 19 -

Press the [VIEW MODE] button to cycle through displays as shown below.
[EYE SENSOR]: Automatic display selection using eye sensor
[VIEWFINDER ONLY]: Viewfinder only
[LCD ONLY]: LCD monitor only
[VIEWFINDER ONLY] + : Viewfinder only; eye sensor turns display on or off
The [VIEW MODE] Button
- 20 -

The Eye Sensor
The eye sensor turns the viewfinder on when you put your eye to the viewfinder and turnsit off when you take your eye away (note that the eye sensor may respond to objectsother than your eye or to light shining directly on the sensor). If automatic displayselection is enabled, the LCD monitor will turn on when the viewfinder turns off.
The [VIEW MODE] Button
- 21 -

Use the viewfinder selector to switch between the electronic viewfinder (EVF), the opticalviewfinder (OVF), and a dual optical viewfinder/electronic range finder (ERF) display.
Rotate the selector as shown to choose from the following displays:
EVF
OVF
ERF (dual display)
The Viewfinder Selector
- 22 -

The Hybrid (EVF/OVF/ERF) Viewfinder
The features of the different displays are described below.
Display Description
OVF
The optical display is sharp and free of blur so that your subject’sexpression is always visible. In addition, the OVF shows the area justoutside the frame, making it easier to compose shots on the fly.Because the viewfinder window is a slight distance from the lens, thearea visible in photographs may however differ slightly from thedisplay in the viewfinder due to parallax.
EVFThe live view display gives you a preview of the final picture (includingdepth of field, focus, exposure, and white balance) with exactly thesame frame coverage.
ERF(dual display)
As for the optical viewfinder but with a focus preview. A magnifiedview of the current focus position is shown at the bottom right cornerof the display.
The brightness and clarity of the EVF and LCD monitor can be adjusted using the[SCREEN SET-UP] options in the setup menu.
See Also
[SCREEN SET-UP] (The Setup Menu)
The Viewfinder Selector
- 23 -

The [DISP/BACK] button controls the display of indicators in the viewfinder and LCD monitor.
Shooting: Optical Viewfinder
Shooting: Electronic Viewfinder
Shooting: LCD Monitor
Playback: Electronic Viewfinder/LCD Monitor
Standard Display
Standard
Information off
The [DISP/BACK] Button
- 24 -

Standard
Information off
Standard
Information off
Info display
The [DISP/BACK] Button
- 25 -

Standard
Information off
Info display
Favorites
The optical viewfinder can not be used for playback.
The [DISP/BACK] Button
- 26 -

The items shown in the standard optical viewfinder and electronic viewfinder/LCD monitordisplays (display ) can be selected as described below.
Select [DISP. CUSTOM SETTING] in the shooting menu.1.
Highlight [OVF] or [EVF/LCD] and press [MENU/OK].2.
Highlight items and press [MENU/OK] to select or deselect. Selected items are indicatedby a check mark.
3.
Press [DISP/BACK] to exit when settings are complete.4.
ELECTRONIC LEVEL
Selecting [ELECTRONIC LEVEL] displays a virtual horizon. The camera is level when thetwo lines overlap.
The virtual horizon may not be displayed if the camera lens is pointed up or down.
[FRAMING GUIDELINE]
[ELECTRONIC LEVEL]
[AF DISTANCE INDICATOR]
[MF DISTANCE INDICATOR]
[HISTOGRAM]
[APERTURE/S-SPEED/ISO]
[EXP. COMPENSATION]
[PHOTOMETRY]
[FLASH]
[WHITE BALANCE]
[FILM SIMULATION]
[DYNAMIC RANGE]
[FRAMES REMAINING]
[IMAGE SIZE/QUALITY]
[MOVIE MODE & REC. TIME]
[BATTERY LEVEL]
The [DISP/BACK] Button
- 27 -

Optimal exposure
Overexposed
Underexposed
Histograms
Histograms show the distribution of tones in the image. Brightness is shown by thehorizontal axis, the number of pixels by the vertical axis.
No. of pixels
Pixel brightness
Shadows
Highlights
Pixels are distributed in an even curve throughout the tonerange.
Pixels are clustered on the right side of the graph.
Pixels are clustered on the left side of the graph.
The [DISP/BACK] Button
- 28 -

The camera is equipped with diopter adjustment to accommodate individual differences invision. Rotate the diopter adjustment control until the viewfinder display is in sharp focus.
Diopter Adjustment
- 29 -

Glows green
Blinks green
Blinks green and orange
Glows orange
Blinks orange
Blinks red
The indicator lamp shows camera status as follows:
Focus locked.
Blur, focus, or exposure warning. Picture can be taken.
Recording pictures. Additional pictures can be taken.
Recording pictures. No additional pictures can be taken at thistime.
Flash charging; flash will not fire when picture is taken.
Lens or memory error.
Warnings may also appear in the display.
The indicator lamp turns off when the viewfinder is in use.
Battery Charging Status
If the camera is connected to a computer to charge the battery, the indicator lamp willshow charging status when the camera is off.
Indicator lamp Battery status
On Battery charging.
Off Charging complete.
Blinks Battery fault.
The Indicator Lamp
- 30 -

Use the [DRIVE] button to choose drive mode (burst and bracketing) options.
[STILL IMAGE]
[CONTINUOUS SHOOTING]
[AE BKT]
[ISO BKT]
[FILM SIMULATION BKT]
[WHITE BALANCE BKT]
[DYNAMIC RANGE BKT]
[MULTIPLE EXPOSURE]
[MOTION PANORAMA]
In Advanced Filter mode, drive options are unavailable and only one shot will be takeneach time the shutter button is pressed.
The [DRIVE] Button
- 31 -

Shooting: Optical Viewfinder
Shooting: Electronic Viewfinder/LCD Monitor
Playback: Electronic Viewfinder/LCD Monitor
Camera Displays
- 32 -

The following types of indicator may be displayed during shooting.
In the description that follows, all available indicators are shown for illustrativepurposes; the indicators actually displayed vary with camera settings.
ND (Neutral Density) filter indicator
Depth-of-field preview
Conversion lens
Location data download status
Monitor sunlight mode
Movie mode
Time remaining
Internal memory indicator *
Number of available frames
Image size/quality
Battery level
Shutter speed
AE lock indicator
Metering
Shooting mode
Focus indicator
Manual focus indicator
Focus mode
Histogram
Silent mode indicator
Control lock
Dynamic range
Shooting: Optical Viewfinder
- 33 -

* : indicates that no memory card is inserted and that pictures will be stored in thecamera’s internal memory.
Bright frame
Focus frame
Focus warning
Temperature warning
Electronic level
Distance indicator
Sensitivity
Exposure indicator
Aperture
Film simulation
White balance
Shutter type
Continuous mode
Self-timer indicator
Macro (close-up) mode
Microphone/remote release
Flash mode/Flash compensation
Shooting: Optical Viewfinder
- 34 -

The Electronic Range Finder (ERF)
To view the electronic range finder (ERF), rotate the viewfinder selector as shown whenthe optical viewfinder is displayed.
Shooting: Optical Viewfinder
- 35 -

The following types of indicator may be displayed during shooting.
In the description that follows, all available indicators are shown for illustrativepurposes; the indicators actually displayed vary with camera settings.
ND (Neutral Density) filter indicator
Focus check
Depth-of-field preview
Conversion lens
Location data download status
Monitor sunlight mode
Movie mode
Time remaining
Internal memory indicator *
Number of available frames
Histogram
Distance indicator
Battery level
Sensitivity
Exposure indicator
Aperture
Shutter speed
AE lock indicator
Metering
Shooting mode
Shooting: Electronic Viewfinder/LCD Monitor
- 36 -

* : indicates that no memory card is inserted and that pictures will be stored in thecamera’s internal memory.
The Viewfinder Display
When [ON] is selected for [SCREEN SET-UP] > [EVF AUTOROTATE DISPLAYS] in thesetup menu, the indicators in the viewfinder automatically rotate to match cameraorientation.
The display in the LCD monitor is unaffected.
The brightness and clarity of the EVF and LCD monitor can be adjusted using the[SCREEN SET-UP] options in the setup menu.
Image size/quality
Date and time
Focus frame
White balance
Film simulation
Dynamic range
Focus warning
Temperature warning
Control lock
Silent mode indicator
Focus indicator
Manual focus indicator
Focus mode
Shutter type
Continuous mode
Self-timer indicator
Macro (close-up) mod
Microphone/remote release
Flash mode/Flash compensation
Electronic level
Shooting: Electronic Viewfinder/LCD Monitor
- 37 -

See Also
[SCREEN SET-UP] (The Setup Menu)
Shooting: Electronic Viewfinder/LCD Monitor
- 38 -
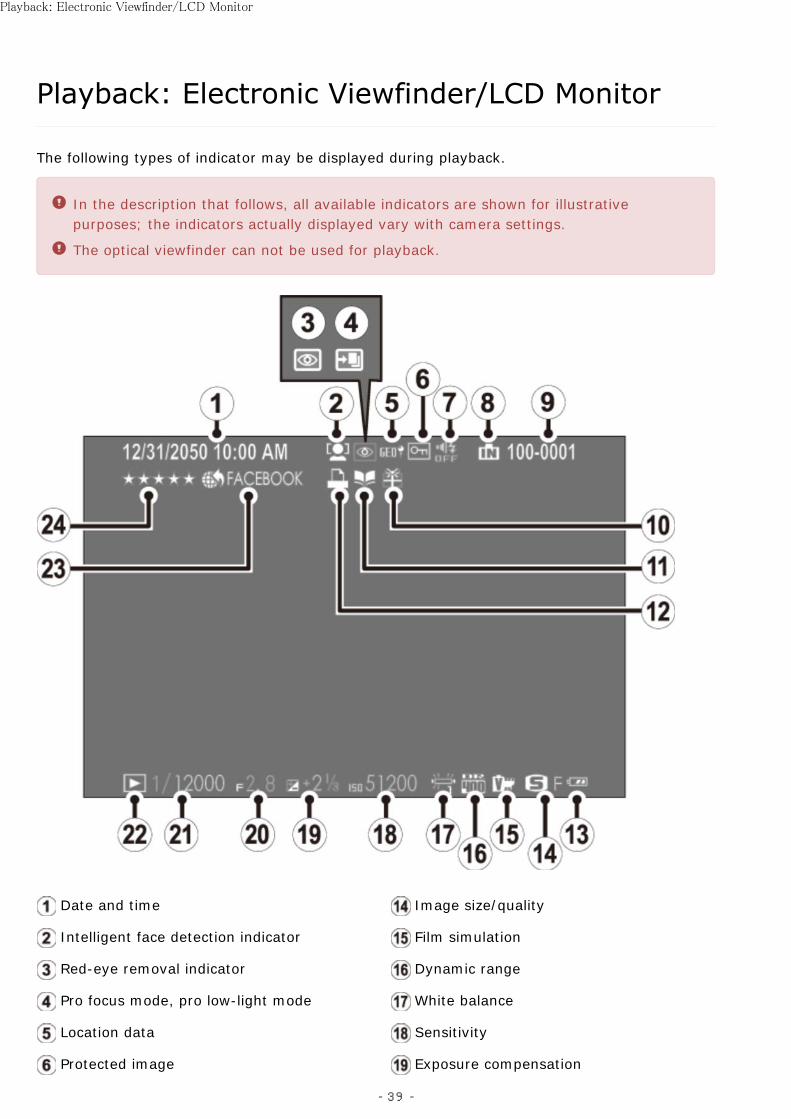
The following types of indicator may be displayed during playback.
In the description that follows, all available indicators are shown for illustrativepurposes; the indicators actually displayed vary with camera settings.
The optical viewfinder can not be used for playback.
Date and time
Intelligent face detection indicator
Red-eye removal indicator
Pro focus mode, pro low-light mode
Location data
Protected image
Image size/quality
Film simulation
Dynamic range
White balance
Sensitivity
Exposure compensation
Playback: Electronic Viewfinder/LCD Monitor
- 39 -

Silent mode indicator
Internal memory indicator
Frame number
Gift image
Photobook assist
DPOF print indicator
Battery level
Aperture
Shutter speed
Playback mode indicator
Mark for upload to
Favorites
Playback: Electronic Viewfinder/LCD Monitor
- 40 -

Attaching the Strap
Charging the Battery
Inserting the Battery and a Memory Card
Turning the Camera on and Off
Basic Setup
First Steps
- 41 -

Attach the strap clips to the camera and then attach the strap.
Open a strap clip.
Use the clip attaching tool to open a strap clip, making sure that the tool and clip are inthe orientations shown.
Keep the tool in a safe place. You will need it to open the strap clips whenremoving the strap.
1.
Place the strap clip on an eyelet.
Hook the strap eyelet in the clip opening. Remove the tool, using the other hand to keepthe clip in place.
2.
Attaching the Strap
- 42 -

Pass the clip through the eyelet.
Rotate the clip fully through the eyelet until it clicks closed.
3.
Attach a protective cover.
Place a protective cover over the eyelet as shown, with the black side of the cover towardthe camera. Repeat Steps 1–4 for the second eyelet.
4.
Insert the strap.
Insert the strap through a protective cover and strap clip.
5.
Attaching the Strap
- 43 -

Fasten the strap.
Fasten the strap as shown. Repeat Steps 5–6 for the second eyelet.
6.
To avoid dropping the camera, be sure the strap is correctly secured.
Attaching the Strap
- 44 -

The battery is not charged at shipment. Charge the battery before use.
The camera uses an NP-95 rechargeable battery.The battery takes about 4 hours to fully charge.
Place the battery in the charger.
Insert the battery in the orientation indicated by the labels.
1.
Charge lamp
Arrow
label
Charging the Battery
- 45 -

Attach the supplied adapter before charging the battery (the adapter is attached atshipment).
Adapter
The supplied AC cord is for use exclusively with the supplied battery charger. Donot use the supplied charger with other cords or the supplied cord with otherdevices.
Plug the charger in.
Plug the charger into an indoor power outlet. The charging indicator will light.
2.
Charge the battery.
Remove the battery when charging is complete.
3.
The Charging Indicator
The charging indicator shows battery charge status as follows:
Chargingindicator
Battery status Action
Off
Battery not inserted. Insert the battery.
Battery fullycharged.
Remove the battery.
On Battery charging. —
Blinks Battery fault.Unplug the charger and remove thebattery.
Charging the Battery
- 46 -

Unplug the charger when it is not in use.
Remove dirt from the battery terminals with a clean, dry cloth. Failure to observe thisprecaution could prevent the battery from charging.
Do not affix stickers or other objects to the battery. Failure to observe this precautioncould make it impossible to remove the battery from the camera.
Do not short the battery terminals. The battery could overheat.
Read the cautions in “The Battery and Power Supply”.
Use only battery chargers designated for use with the battery. Failure to observe thisprecaution could result in product malfunction.
Do not remove the labels from the battery or attempt to split or peel the outer casing.
The battery gradually loses its charge when not in use. Charge the battery one or twodays before use.
Charging times may increase at very low or very high temperatures.
Charging the Battery
- 47 -

Charging via a computerThe battery can be charged by connecting the camera to a computer. Connect the supplied USBcable as shown, making sure the connectors are fully inserted.
Connect the camera directly to the computer; do not use a USB hub or keyboard.
If the computer goes into sleep mode while charging, charging will stop. To continuecharging, disable sleep mode on the computer, and disconnect and connect the USBcable.
Charging may be impossible depending on computer specifications, settings orconditions.
The battery status icons show battery charge status when the camera is turned on, andthe indicator lamp shows it when the camera is turned off.
Battery status icon whencamera on
Indicator lamp whencamera off
Battery status
(yellow) On Battery charging.
(green) OffChargingcomplete.
(red) Blinks Battery fault.
Charging the Battery
- 48 -

Insert the battery and memory card as described below.
Open the battery-chamber cover.
Slide the battery-chamber latch as shown and open the battery-chamber cover.
Do not open the battery-chamber cover when the camera is on. Failure to observethis precaution could damage image files or memory cards.
Do not use excessive force when handling the battery-chamber cover.
1.
Inserting the Battery and a Memory Card
- 49 -

Insert the battery.
Using the battery to keep the battery latch pressed to one side, insert the batterycontacts first in the direction shown by the arrow. Confirm that the battery is securelylatched.
Insert the battery in the orientation shown. Do not use force or attempt toinsert the battery upside down or backwards. The battery will slide in easilyin the correct orientation.
2.
Arrow
Battery latch
Inserting the Battery and a Memory Card
- 50 -

Insert the memory card.
Holding the memory card in the orientation shown, slide it in until it clicks into place atthe back of the slot.
Be sure card is in the correct orientation; do not insert at an angle or use force. Ifthe memory card is not correctly inserted or no memory card is inserted, willappear in the LCD monitor and internal memory will be used for recording andplayback.
3.
Close the battery-chamber cover.4.
Inserting the Battery and a Memory Card
- 51 -

Removing the Battery and Memory Card
Before removing the battery or memory card, turn the camera off and open the battery-chamber cover.
To remove the battery, press the battery latch to the side, and slide the battery out of thecamera as shown.
To remove the memory card, press it in and release it slowly. The card can then beremoved by hand. When a memory card is removed, the card could come out of the slottoo quickly. Use your finger to hold it and gently release the card.
Inserting the Battery and a Memory Card
- 52 -

Rotate the [ON/OFF] switch to [ON] to turn the camera on. Select [OFF] to turn the cameraoff.
Press the button to start playback. Press the shutter button halfway to return toshooting mode.
The camera will turn off automatically if no operations are performed for the length oftime selected for [POWER MANAGEMENT] > [AUTO POWER OFF] in the setupmenu. To reactivate the camera after it has turned off automatically, press the shutterbutton halfway or turn the [ON/OFF] switch to [OFF] and then back to [ON].
Fingerprints and other marks on the lens or viewfinder can affect pictures or the viewthrough the viewfinder. Keep the lens and viewfinder clean.
Turning the Camera on and Off
- 53 -

Battery Level
After turning the camera on, check the battery level in the display.
Battery close to fully charged.
Battery about two-thirds charged.
Battery about one-third charged. Charge as soon as possible.
(red)Battery exhausted. Turn camera off and recharge battery.
Turning the Camera on and Off
- 54 -

A language-selection dialog is displayed the first time the camera is turned on. Set up thecamera as described below (you can reset the clock or change languages at any time using the[DATE/TIME] or [ ] options in the setup menu).
Using the Selector
Press the selector up, down, left, or right to highlight items and press [MENU/OK] toselect.
Move cursor up
Move cursor right
Move cursor down
Move cursor left
Select highlighted item
Basic Setup
- 55 -

Turn the camera on.1.
Highlight a language and press [MENU/OK].
Press [DISP/BACK] to skip the current step. Any steps you skip will be displayedthe next time the camera is turned on.
2.
The date and time will be displayed. Press the selector left or right to highlight the year,month, day, hour, or minute and press up or down to change. To change the order inwhich the year, month, and day are displayed, highlight the date format and press theselector up or down. Press [MENU/OK] when settings are complete.
If the battery is removed for an extended period, the camera clock will be resetand the language-selection dialog will be displayed when the camera is turned on.
3.
Basic Setup
- 56 -

Taking Photographs
Viewing Pictures
Deleting Pictures
Basic Photography and Playback
- 57 -

This section describes how to take pictures using program AE (mode [P]).
Adjust settings for program AE.
Shutter speed: Select [A] (auto)
Exposure compensation: Select [±0]
Focus mode: Select [S] (single AF)
Aperture: Select [A] (auto)
1.
Taking Photographs
- 58 -

Confirm that [P] appears in the display.
OVF
EVF/LCD
Viewfinder Display Selection
Use the viewfinder selector to switch between the optical viewfinder (OVF) andelectronic viewfinder (EVF) displays.
Taking Photographs
- 59 -

Ready the camera.
Hold the camera steady with both hands and brace your elbows against your sides.Shaking or unsteady hands can blur your shots.
To prevent pictures that are out of focus or too dark (underexposed), keep your fingersand other objects away from the lens and flash.
2.
Taking Photographs
- 60 -

Focus.
Frame the picture with your subject in the center of the display and press the shutterbutton halfway to focus.
If the camera is able to focus, it will beep twice and focus area will glow green. Focusand exposure will lock while the shutter button is pressed halfway.
If the camera is unable to focus, the focus frame will turn red, will be displayed.If the subject is close to the camera, select macro mode and try again.
OVF
EVF/LCD
If the subject is poorly lit, the AF-assist illuminator may light.
3.
Taking Photographs
- 61 -

Shoot.
Smoothly press the shutter button the rest of the way down to take the picture.
The flash may fire if lighting is poor. Camera settings can be changed to preventthe flash firing.
4.
Taking Photographs
- 62 -

Viewing Pictures Full Frame
Viewing Photo Information
Zooming in on the Focus Point
Playback Zoom
Multi-Frame Playback
To view pictures full frame, press .
Additional pictures can be viewed by pressing the selector left or right or rotating the focusring. Press the selector or rotate the ring right to view pictures in the order recorded, left toview pictures in reverse order. Keep the selector pressed to scroll rapidly to the desired frame.
Pictures taken using other cameras are indicated by a (“gift image”) icon duringplayback. These pictures may not display correctly and may not be viewable usingplayback zoom.
Viewing Pictures
- 63 -

Favorites: Rating Pictures
To rate the current picture, press [DISP/BACK] and press the selector up and down toselect from zero to five stars.
Viewing Pictures
- 64 -

The photo information display changes each time the selector is pressed up.
Basic data
Info display 1
Info display 2
Press the selector left or right or rotate the focus ring to view other images.
Viewing Pictures
- 65 -

Press the center of the command dial to zoom in on the focus point. Press the center of thecommand dial again to return to full-frame playback.
Viewing Pictures
- 66 -

Rotate the command dial right to zoom in on the current picture, left to zoom out (to viewmultiple images, rotate the command dial left when the picture is displayed full frame). Press[DISP/BACK] or [MENU/OK] to exit zoom.
Zoom indicator
Rotate right
Rotate left
The maximum zoom ratio varies with image size. Playback zoom is not available withcropped or resized copies saved at a size of .
Viewing Pictures
- 67 -

The Navigation Window
When the picture is zoomed in, the selector can be used to view areas of the image notcurrently visible in the display.
Navigation window shows portion of image currently displayed.
Viewing Pictures
- 68 -

To change the number of images displayed, rotate the command dial left when a picture isdisplayed full frame.
Rotate left to view more images.
Rotate right to view fewer images.
Use the selector to highlight images and press [MENU/OK] to view the highlighted image fullframe (to zoom in on the selected image, rotate the command dial right when the picture isdisplayed full frame). In the nine- and hundred-frame displays, press the selector up or down toview more pictures.
Viewing Pictures
- 69 -

To delete individual pictures, multiple selected pictures, or all pictures, press the buttonwhen a picture is displayed full frame and choose from the options on the following pages.Note that deleted pictures can not be recovered. Copy important pictures to acomputer or other storage device before proceeding.
If a message appears stating that the selected images are part of a DPOF print order,press [MENU/OK] to delete the pictures.
If a memory card is inserted, pictures will be deleted from the memory card. Otherwisepictures will be deleted from internal memory.
[FRAME]
[SELECTED FRAMES]
[ALL FRAMES]
Deleting Pictures
- 70 -

Delete pictures one at a time.
Press the button in full-frame playback and select [FRAME].1.
Press the selector left or right to scroll through pictures and press [MENU/OK] to delete(a confirmation dialog is not displayed). Repeat to delete additional pictures.
2.
Delete multiple selected pictures.
Press the button in full-frame playback and choose [SELECTED FRAMES].1.
Highlight pictures and press [MENU/OK] to select or deselect (pictures in photobooks orprint orders are shown by ).
2.
When the operation is complete, press [DISP/BACK] to display a confirmation dialog.3.
Highlight [OK] and press [MENU/OK] to delete the selected pictures.4.
Deleting Pictures
- 71 -

Delete all unprotected pictures.
Press the button in full-frame playback and choose [ALL FRAMES].1.
A confirmation dialog will be displayed; highlight [OK] and press [MENU/OK] to deleteall unprotected pictures. Pressing [DISP/BACK] cancels deletion; note that any picturesdeleted before the button was pressed can not be recovered.
2.
If a memory card is inserted, only the pictures on the memory card will be affected; thepictures in internal memory are only deleted if no memory card is inserted.
If a message appears stating that the selected images are part of a DPOF print order,press [MENU/OK] to delete the pictures.
Deleting Pictures
- 72 -

Recording Movies
Viewing Movies
Basic Movie Recording and Playback
- 73 -

Follow the steps below to record movies with sound.
Press the [Fn] button (function button 1) to start recording.
At default settings, movie recording is assigned to the Fn1 button. For informationon choosing the roles played by the function buttons, see “The Function Buttons”.
Recording indicator
Time remaining
1.
Recording Movies
- 74 -

Press the button again to end recording. Recording ends automatically when themaximum length is reached or the memory card is full.
The indicator lamp lights while movies are being recorded.
2.
Sensitivity and frame size and rate can be selected using the [MOVIE SET-UP] optionin the shooting menu.
Movies shot in [S], [A], and [M] modes are recorded at the settings currently selectedfor photographs; shutter speed and/or aperture can be adjusted during shooting. Inother modes, settings are adjusted automatically.
The optical viewfinder display automatically switches to the electronic viewfinder/LCDmonitor during movie recording. The electronic range finder (ERF) at the bottom rightcorner of the screen mirrors the electronic viewfinder.
See Also
The Function Buttons ([Fn] (Function) Buttons)
[MOVIE SET-UP] (The Shooting Menu)
Recording Movies
- 75 -

The camera can be used with external microphones.
A 2.5 mm adapter is required when connecting microphones with a 3.5 mm diameterplug.
A confirmation dialog will be displayed when a microphone is connected to themicrophone/remote release connector. Press [MENU/OK] and select [MIC/REMOTERELEASE] > [MIC].
Recording Movies
- 76 -

Movies are indicated by a icon during full-frame playback.
Press to begin playback. Progress is shown in the display.
Viewing Movies
- 77 -

Playback in progress ( )
Playback paused ( )
Use the selector to control playback.
End playback
Adjust speed
Pause playback
End playback
Single-frame advance/rewind
Playback
Press the selector up or down to adjust the volume; press [MENU/OK] again to resumeplayback. Volume can also be adjusted from the setup menu.
Viewing Movies
- 78 -

Do not cover the speaker during playback.
Sound is not played back in silent mode.
Playback Speed
Press the selector left or right to adjust playback speed during playback. Speed is shownby the number of arrows ( or ).
Viewing Movies
- 79 -

Program AE
Shutter-Priority AE
Aperture-Priority AE
Manual Exposure
Shooting Mode
- 80 -

In this mode, the camera sets exposure automatically. If desired, you can choose differentcombinations of shutter speed and aperture that will produce the same exposure (programshift).
To select program AE, set shutter speed and aperture to [A].
Aperture: [A]
Shutter speed: [A]
If the subject is outside the metering range of the camera, the shutter speed andaperture displays will show “– – –”.
Program AE
- 81 -

Program Shift
If desired, you can rotate the command dial to select other combinations of shutter speedand aperture without altering exposure (program shift).
Shutter speed
Aperture
The new values for shutter speed and aperture are shown in yellow.
To cancel program shift, turn the camera off.
Program shift will also be cancelled if a flash mode other than off is selected.
Program shift is not available when a flash mode other than off is selected or[AUTO] is selected for [DYNAMIC RANGE].
Program AE
- 82 -

In shutter-priority AE (mode S), you select the shutter speed and let the camera choose theaperture. Set aperture to [A] and rotate the shutter speed dial to the desired setting.
Aperture: [A]
Shutter speed: 1/1000 s
Shutter speed
Shutter-Priority AE
- 83 -

Shutter speed can also be adjusted in increments of 1/3 EV by rotating the commanddial.
If the correct exposure can not be achieved at the selected shutter speed, aperture willbe displayed in red when the shutter button is pressed halfway.
If the subject is outside the metering range of the camera, the aperture display willshow “– – –”.
Shutter-Priority AE
- 84 -

In aperture-priority AE (mode A), you select the aperture and let the camera choose the shutterspeed. Rotate the shutter speed dial to [A] and select the desired aperture.
Aperture: f/5.6
Shutter speed: [A]
Aperture
Aperture-Priority AE
- 85 -

If the correct exposure can not be achieved at the selected aperture, the shutter speedwill be displayed in red when the shutter button is pressed halfway. Adjust apertureuntil the correct exposure is achieved.
If the subject is outside the metering range of the camera, the shutter speed display willshow “– – –”.
The slowest shutter speed available when [ON] is selected for [POWERMANAGEMENT] > [OVF POWER SAVE MODE] in the setup menu is 1/4 s.
Previewing Depth of Field
When [PREVIEW DEPTH OF FIELD] is assigned to a function button using the[FUNCTION (Fn) SETTING] option in the shooting menu, pressing the button stopsaperture down to the selected setting, allowing depth of field to be previewed in theviewfinder or LCD monitor.
See Also
The Function Buttons ([Fn] (Function) Buttons)
Aperture-Priority AE
- 86 -

In this mode, you choose both shutter speed and aperture. The resulting exposure is shown byan indicator in the display; if desired, exposure can be altered from the value suggested by thecamera.
Aperture: f/5.6
Shutter speed: 1/1000 s
Shutter speed
Aperture
Exposure indicator
Manual Exposure
- 87 -

Shutter speed can also be adjusted in increments of 1/3 EV by rotating the commanddial.
Exposure Preview
To preview exposure in the LCD monitor, select [ON] for [SCREEN SET-UP] >[PREVIEW EXP. IN MANUAL MODE].
Select [OFF] when using the flash or on other occasions on which exposure maychange when the picture is taken.
Manual Exposure
- 88 -

Using the [Q] Button
[Q] (Quick Menu) Button
- 89 -

Use the [Q] button to view and adjust camera settings.
Press [Q] to display the quick menu during shooting.
The options displayed in the quick menu can be selected using the [EDIT/SAVEQUICK MENU] option in the setup menu. Quick menu edit options can also bedisplayed by pressing and holding the [Q] button.
1.
Using the [Q] Button
- 90 -

Use the selector to highlight items.
The [Q] button can not be used to adjust custom white balance, choose a colortemperature, or adjust settings for auto ISO sensitivity. These settings can beadjusted using a function button or from the menus.
2.
Rotate the command dial to change the highlighted item.3.
Press [Q] to exit when settings are complete.4.
For quick access to custom settings banks, press and hold the [Q] button while thequick menu is displayed.
See Also
[EDIT/SAVE QUICK MENU] (The Setup Menu)
Using the [Q] Button
- 91 -

The Function Buttons
[Fn] (Function) Buttons
- 92 -

Each of the function buttons can be assigned any one of the roles listed below. Options for theselected item can then be displayed by pressing the button. To choose the roles played by thefunction buttons, press the [DISP/BACK] button until function settings options are displayed,then highlight the desired button and press the selector right.
[ADVANCED FILTER][MULTIPLE EXPOSURE][MACRO][PREVIEW DEPTH OF FIELD][ISO][SELF-TIMER][IMAGE SIZE][IMAGE QUALITY][DYNAMIC RANGE][FILM SIMULATION][WHITE BALANCE][ND FILTER][PHOTOMETRY][AF MODE]
[FOCUS AREA][CORRECTED AF FRAME][FLASH MODE][FLASH COMPENSATION][SELECT CUSTOM SETTING][MOVIE][FACE DETECTION][PREVIEW PIC. EFFECT][HIGH PERFORMANCE][RAW][WIRELESS COMMUNICATION][CONVERSION LENS][SHUTTER TYPE]
The Function Buttons
- 93 -

You can also use the [FUNCTION (Fn) SETTING] option in the shooting menu tochoose the roles played by the function buttons.
You can also display options for any of the function buttons by pressing and holding thebutton.
See Also
[FUNCTION (Fn) SETTING] (The Shooting Menu)
The Function Buttons
- 94 -

Bracketing
Continuous Shooting (Burst Mode)
Multiple Exposures
Panoramas
Macro Mode (Close-ups)
Using the Self-Timer
Interval Timer Photography
Using the Flash
Focus-Frame Selection
Exposure Compensation
Focus/Exposure Lock
Focus Mode
Manual Focus (Focus Mode M)
Metering
Recording Pictures in RAW Format
Long Time-Exposures (T/B)
Film Simulation
White Balance
Advanced Filters
More on Photography
- 95 -

Automatically vary settings over a series of pictures. Bracketing options can be displayed bypressing the [DRIVE] button.
[AE BKT]
[ISO BKT]
[FILM SIMULATION BKT]
[WHITE BALANCE BKT]
[DYNAMIC RANGE BKT]
Bracketing
- 96 -

Press the selector left or right to highlight a bracketing amount. Each time the shutter button ispressed, the camera will take three shots: one using the metered value for exposure, thesecond overexposed by the selected amount, and the third underexposed by the same amount.
The camera may not be able to use the selected bracketing increment if the amount ofover- or under- exposure exceeds the limits of the exposure metering system.
Press the selector left or right to highlight a bracketing amount. Each time the shutter-releasebutton is pressed, the camera will take a picture at the current sensitivity and process it tocreate two additional copies, one with the sensitivity raised and the other with the sensitivitylowered by the selected amount.
This option can not be used if [RAW] is selected for [IMAGE QUALITY].
Each time the shutter is released, the camera takes one shot and processes it to create copieswith the film simulation settings selected for [FILM SIMULATION BKT] in the shooting menu.
This option can not be used if [RAW] is selected for [IMAGE QUALITY].
See Also
[FILM SIMULATION BKT] (The Shooting Menu)
Bracketing
- 97 -

Press the selector left or right to highlight a bracketing amount. Each time the shutter button ispressed, the camera takes three shots: one at the current white balanced setting, one withfine-tuning increased by the selected amount, and another with fine-tuning decreased by theselected amount.
This option can not be used if [RAW] is selected for [IMAGE QUALITY].
Each time the shutter button is pressed, the camera takes three shots at different dynamicrange settings: 100% for the first, 200% for the second, and 400% for the third.
Sensitivity is restricted to a minimum of ISO 800; the sensitivity previously in effect isrestored when bracketing ends.
This option can not be used if [RAW] is selected for [IMAGE QUALITY].
Bracketing
- 98 -

Capture motion in a series of pictures. Burst shooting options can be displayed by pressing the[DRIVE] button.
Press the selector left or right to choose a frame rate. The camera takes photographs while theshutter button is pressed.
Focus and Exposure
To vary focus and exposure with each shot, select focus mode [C]; in other modes, focusand exposure are determined by the first shot in each series.
Focus tracking performance varies with aperture, sensitivity, and shootingconditions.
Continuous Shooting (Burst Mode)
- 99 -

Create a photograph that combines two exposures.
Press the [DRIVE] button to display drive options.1.
Highlight [MULTIPLE EXPOSURE] and press [MENU/OK] to select the highlightedoption and return to shooting mode.
2.
Multiple Exposures
- 100 -

Take the first shot.3.
Press [MENU/OK]. The first shot will be shown superimposed on the view through thelens as a guide to taking the second shot.
To return to Step 3 and retake the first shot, press the selector left. To save thefirst shot and exit without creating a multiple exposure, press [DISP/BACK].
4.
Take the second shot.5.
Press [MENU/OK] to create the multiple exposure, or press the selector left to return toStep 5 and retake the second shot.
6.
Multiple Exposures
- 101 -

Follow an on-screen guide to take photos that will automatically be joined to form a panorama.
Press the [DRIVE] button to display drive options.1.
Highlight [MOTION PANORAMA] and press [MENU/OK] to select the highlightedoption and return to shooting mode.
2.
To select the angle through which you will pan the camera while shooting, press theselector left. Press the selector up or down to highlight an angle and press [MENU/OK].
3.
Panoramas
- 102 -

Press the selector right to view a choice of pan directions. Press the selector up or downto highlight a pan direction and press [MENU/OK].
4.
Press the shutter button all the way down to start recording. There is no need to keep theshutter button pressed during recording.
5.
Pan the camera in the direction shown by the arrow. Shooting ends automatically whenthe progress bar is full and the panorama is complete.
Shooting ends if the shutter button is pressed all the way down during shooting.No panorama will be recorded if the shutter button is pressed before the camerahas been panned through 120°.
6.
For Best Results
For best results, prop your elbows against your sides and move the camera slowly in asmall circle at a steady speed, keeping the camera horizontal and being careful only to panin the direction shown by the guides. Use a tripod for best results. If the desired resultsare not achieved, try panning at a different speed.
Panoramas are created from multiple frames; exposure for the entire panorama isdetermined by the first frame. The camera may in some cases record an greater orlesser angle than selected or be unable to stitch the frames together perfectly. The lastpart of the panorama may not be recorded if shooting ends before the panorama iscomplete.
Shooting may be interrupted if the camera is panned too quickly or too slowly. Panningthe camera in a direction other than that shown cancels shooting.
The desired results may not be achieved with moving subjects, subjects close to thecamera, unvarying subjects such as the sky or a field of grass, subjects that are inconstant motion, such as waves and waterfalls, or subjects that undergo markedchanges in brightness. Panoramas may be blurred if the subject is poorly lit.
Panoramas
- 103 -

When a panorama is displayed in full-frame playback, you can press the selector down toautomatically pan from left to right or (if the panorama is in “tall” orientation) bottom to top.
Panoramas
- 104 -

OFF
MACRO
To focus at close distances, press the selector up to choose a macro mode from the optionslisted below.
At default settings, macro mode selection is assigned to the up button on the selector(function button 2). For information on choosing the roles assigned to the functionbuttons, see “The Function Buttons”.
Macro mode can also be selected using the [AUTOFOCUS SETTING] option in theshooting menu.
Macro mode off
Macro mode
Macro Mode (Close-ups)
- 105 -

Macro mode is available only with the electronic viewfinder and LCD monitor. If theoptical viewfinder or dual optical viewfinder/electronic range finder is on when macromode is selected, the camera will automatically switch to the electronic viewfinder.
The LCD monitor and electronic viewfinder can be used at short ranges without firstenabling macro mode, but the camera may take longer to focus.
The shadow cast by the lens may appear in photographs taken with the flash at veryshort ranges. Zoom out or increase the distance to the subject.
See Also
The Function Buttons ([Fn] (Function) Buttons)
[AUTOFOCUS SETTING] (The Shooting Menu)
Macro Mode (Close-ups)
- 106 -

OFF
The [SELF-TIMER] option in the shooting menu offers a choice of a ten-second timer forself-portraits and a two-second timer to prevent blur caused by camera shake.
Press the selector up or down to highlight the desired option and press [MENU/OK] to select.
The shutter is released two seconds after the shutter button is pressed. Use toreduce blur caused by the camera moving when the shutter button is pressed. Theself-timer lamp will blink as the timer counts down.
The shutter is released ten seconds after the shutter button is pressed. Use forself-portraits. The self-timer lamp on the front of the camera lights when the timerstarts and begins to blink shortly before the photo is taken.
Self-timer off.
Using the Self-Timer
- 107 -

Adjust settings for interval timer photography.
Select [INTERVAL TIMER SHOOTING] in the shooting menu to display interval timershooting options.
1.
Use the selector to choose the interval and number of shots. Press [MENU/OK] toproceed.
2.
Use the selector to choose the starting time and then press [MENU/OK]. Shooting willstart automatically.
3.
Interval timer photography can not be used during panorama or multiple exposurephotography. In burst mode, only one picture will be taken each time the shutter isreleased.
Interval Timer Photography
- 108 -

Use of a tripod is recommended.
Check the battery level before starting.
The display turns off between shots and lights a few seconds before the next shot istaken. The display can be activated at any time by pressing the shutter button all theway down.
Interval Timer Photography
- 109 -

[AUTO]
[FORCED FLASH]
[SLOW SYNCHRO]
[COMMANDER]
[EXTERNAL FLASH]
[SUPPRESSED FLASH]
Use the flash for additional lighting when shooting at night or indoors under low light. The flashmode can be selected using the [FLASH MODE] option in the shooting menu.
Press the selector up or down to highlight the desired flash mode and press [MENU/OK] toselect.
The flash fires when required. Recommended in mostsituations.
The flash fires whenever a picture is taken. Use for backlitsubjects or for natural coloration when shooting in brightlight.
Capture both the main subject and the background underlow light (note that brightly lit scenes may beoverexposed).
A flash mounted on the hot shoe can be used to controloptional remote flash units.
Select when using optional third-party flash units.
The flash does not fire even when the subject is poorlylit. Atripod is recommended.
If is displayed when the shutter button is pressed halfway, the flash will fire whenthe photo is taken.
Except in commander mode, the flash may fire several times with each shot. Do notmove the camera until shooting is complete.
The flash will synchronize with the shutter at shutter speeds of 1/2000 s or slower.
The camera can also be used with optional FUJIFILM shoe-mounted flash units.
Using the Flash
- 110 -

The flash may need more time to charge when the battery is low.
Red-Eye Removal
When “intelligent face detection” is active, and on is selected for “red eye removal”,red-eye removal is available in , , .
Red-eye removal minimizes “red-eye” caused when light from the flash is reflected fromthe subject’s retinas.
Using the Flash
- 111 -

Follow the steps below to choose the focus point used when [AREA] is selected for[AUTOFOCUS SETTING] > [AF MODE] in the shooting menu.
Press the selector down to view the focus area display.
At default settings, focus-area display is assigned to the down button on theselector (function button 5). For information on choosing the roles assigned to thefunction buttons, see “The Function Buttons”.
The focus area can also be selected using the [AUTOFOCUS SETTING] option inthe shooting menu.
1.
Focus-Frame Selection
- 112 -

Focus frame
Focus point
Focus-Frame Selection
- 113 -

Use the selector to position the focus frame.
To select the center frame, press [DISP/BACK].
2.
Focus-Frame Selection
- 114 -

Rotate the command dial to choose the size of the focus frame.
Rotate the dial left to reduce the frame by up to 50%, right to enlarge it by up to150%, or press the center of the dial to restore the frame to its original size.
Press [MENU/OK] to select the chosen frame.3.
If [FOCUS AREA] is selected for [SELECTOR BUTTON SETTING] in the setup menu,the selector can be used to position the focus area without first pressing it down.
See Also
The Function Buttons ([Fn] (Function) Buttons)
[AUTOFOCUS SETTING] (The Shooting Menu)
[SELECTOR BUTTON SETTING] (The Setup Mneu)
Focus-Frame Selection
- 115 -

Rotate the exposure compensation dial to adjust exposure when photographing very bright,very dark, or high-contrast subjects.
Exposure compensation indicator (OVF)
Exposure compensation indicator (EVF/LCD)
Exposure Compensation
- 116 -

Choose positive values (+) to increase exposure
Choose negative values (−) to reduce exposure
When using the optical viewfinder, use the exposure indicator to check exposure.
Exposure Compensation
- 117 -

The camera focuses and sets exposure for photographs when the shutter button is pressedhalfway and focus (AF) and exposure (AE) remain locked while the shutter button is kept in thisposition. Use focus and exposure lock to compose photographs with off-center subjects.
Position the subject in the focus frame.1.
Press the shutter button halfway to set focus and exposure. The focus frame will turngreen.
This process can be repeated as often as desired before the picture is taken.
2.
Focus/Exposure Lock
- 118 -

Recompose the photograph. Do not change the distance to the subject while the shutterbutton is pressed halfway.
3.
Press the shutter button the rest of the way down to take the picture.4.
Focus/Exposure Lock
- 119 -

The [AEL/AFL] Button
Focus and/or exposure can also be locked using the [AEL/AFL] button.
Focus and/or exposure will remain locked while the button is pressed, regardless ofwhether or not the shutter button is pressed halfway.
The role played by the [AEL/AFL] button can be selected using the[AE/AF-LOCK BUTTON] option in the shooting menu:
[AE LOCK ONLY] (the default setting): The [AEL/AFL] button locksexposure only.[AF LOCK ONLY]: The [AEL/AFL] button locks focus only.[AE/AF LOCK]: The [AEL/AFL] button locks both focus and exposure.
If [AE&AF ON/OFF SWITCH] is selected for [AE/AF-LOCK MODE] in theshooting menu, focus and/or exposure will lock when the button is pressed andremain locked until the button is pressed again.
Focus/Exposure Lock
- 120 -

Autofocus
Although the camera boasts a high-precision autofocus system, it may be unable to focuson the subjects listed below.
Very shiny subjects such as mirrors or car bodies.
Fast-moving subjects.
Subjects photographed through a window or other reflective object.Dark subjects and subjects that absorb rather than reflect light, such as hair or fur.Insubstantial subjects, such as smoke or flame.Subjects that show little contrast with the background (for example, subjects inclothing that is the same color as the background).Subjects positioned in front of or behind a high-contrast object that is also in thefocus frame (for example, a subject photographed against a backdrop of highlycontrasting elements).
See Also
[AE/AF-LOCK MODE] (The Shooting Menu)
[AE/AF-LOCK BUTTON] (The Shooting Menu)
Focus/Exposure Lock
- 121 -

M (manual)
C (continuous AF)
S (single AF)
Use the focus mode selector to choose how the camera focuses.
Focus manually. Use if the camera has trouble focusing usingautofocus or to take deliberately out-of-focus shots.
Focus is continually adjusted to reflect changes in the distance to thesubject while the shutter button is pressed halfway. Use for subjectsthat are in motion.
Focus locks while the shutter button is pressed halfway. Choose forstationary subjects.
If [ON] is selected for [AUTOFOCUS SETTING] > [PRE-AF] in the shooting menu,focus will be adjusted continuously in modes S and C even when the shutter button isnot pressed.
Focus Mode
- 122 -

The focus indicator turns green when the subject is in focus and blinks white when the camerais unable to focus. Brackets (“( )”) indicate that the camera is focusing and are displayedcontinuously in mode C. is displayed in manual focus mode.
Checking Focus
To zoom in on the current focus frame for precise focus, press the center of the commanddial. Press the dial again to cancel zoom.
In focus mode [S], focus check is available when [AREA] is selected for[AUTOFOCUS SETTING] > [AF MODE] in the shooting menu.
Focus check is not available when [ON] is selected for [AUTOFOCUS SETTING]> [PRE-AF] in focus mode [C].
See Also
[AUTOFOCUS SETTING] (The Shooting Menu)
Focus Mode
- 123 -

Follow the steps below to focus the camera manually.
Slide the focus mode selector to [M]. will appear in the display.1.
Manual Focus (Focus Mode M)
- 124 -

Focus manually using the focus ring. Rotate the ring left to reduce the focus distance,right to increase.
Use the [FOCUS RING] option in the setup menu to reverse the direction ofrotation for the focus ring.
2.
Take pictures.3.
Quick Focus
To use autofocus to focus on the subject in the selected focus area, press the [AEL/AFL]button. Use this feature (available only in manual focus mode) to quickly focus on achosen subject.
The [AUTOFOCUS SETTING] > [INSTANT AF SETTING] option in the shootingmenu controls how the camera focuses when the [AEL/AFL] button is pressed.Select [AF-S] for single AF (focus is adjusted each time the button is pressed),[AF-C] for continuous AF (focus is adjusted continuously while the button ispressed).
Manual Focus (Focus Mode M)
- 125 -

The following options can be used to check focus in manual focus mode.
The Manual Focus IndicatorThe white line indicates the distance to the subject in the focus area (in meters or feetaccording to the option selected for [SCREEN SET-UP] > [FOCUS SCALE UNITS] in thesetup menu), the blue bar the depth of field, or in other words the distance in front of andbehind the subject that appears to be in focus.
Focus distance (white line)
Depth of field (blue bar)
Focus ZoomTo zoom in on the current focus area for precise focus, press the center of the command dial (if[ON] is selected for [FOCUS CHECK], the camera will also zoom in when the focus ring isrotated). Press the dial again to cancel zoom.
The [MF ASSIST] menu can be displayed by pressing and holding the center of thecommand dial.
STANDARD: Zoom in on the current focus area.
DIGITAL SPLIT IMAGE: Displays a split, black-and-white image in the center of theframe. Frame the subject in the split-image area and rotate the focus ring until the threeparts of the split image are correctly aligned.
Manual Focus (Focus Mode M)
- 126 -

FOCUS PEAK HIGHLIGHT: Highlights high-contrast outlines. Rotate the focus ring untilthe subject is highlighted.
The Electronic Range Finder (ERF)
The area at the bottom right corner of the display is used for focus zoom when theelectronic range finder (ERF) is enabled.
If [DIGITAL SPLIT IMAGE] is selected, the electronic range finder will show onlythe center segment.
See Also
[FOCUS RING] (The Setup Menu)
[FOCUS CHECK] (The Setup Menu)
[SCREEN SET-UP] (The Setup Menu)
[MF ASSIST] (The Shooting Menu)
Manual Focus (Focus Mode M)
- 127 -

To choose how the camera measures the brightness of the subject, press the button.
At default settings, metering is assigned to function button 6. For information onchoosing the roles assigned to the function buttons, see “The Function Buttons”.
Metering can also be selected in the shooting menu.
Metering
- 128 -

[MULTI]
[SPOT]
[AVERAGE]
Automatic scene recognition is used to adjust exposure for a widerange of shooting conditions.
The camera meters lighting conditions in the selected focus area or atthe center of the frame. Recommended when the background is muchbrighter or darker than the main subject.
If [INTERLOCK SPOT AE & FOCUS AREA] is [ON] and[AREA] is selected for [AUTOFOCUS SETTING] > [AFMODE], the camera will meter lighting conditions in theselected focus area. If [INTERLOCK SPOT AE & FOCUSAREA] is [OFF], the camera will meter the center focus area.
Exposure is set to the average for the entire frame. Providesconsistent exposure across multiple shots with the same lighting, andis particularly effective for landscapes and portraits of subjectsdressed in black or white.
See Also
The Function Buttons ([Fn] (Function) Buttons)
[PHOTOMETRY] (The Shooting Menu)
Metering
- 129 -

To record raw, unprocessed data from the camera image sensor, select a [RAW] option forimage quality in the shooting menu as described below. JPEG copies of RAW images can becreated using the [RAW CONVERSION] option in the playback menu, or RAW images can beviewed on a computer using optional [RAW FILE CONVERTER] software.
Press [MENU/OK] in shooting mode to display the shooting menu. Press the selector upor down to highlight [IMAGE QUALITY] and press [MENU/OK].
1.
Highlight an option and press [MENU/OK]. Select [RAW] to record only RAW images, or[FINE+RAW] or [NORMAL+RAW] to record both JPEG copy together with the RAWimages. [FINE+RAW] uses lower JPEG compression ratios for higher-quality JPEGimages, while [NORMAL+RAW] uses higher JPEG compression ratios to increase thenumber of images that can be stored.
2.
RAW image quality options are not available with extended ISO sensitivity.
The Function Buttons
To toggle RAW image quality on or off for a single shot, assign [RAW] to a functionbutton. If a JPEG option is currently selected for image quality, pressing the buttontemporarily selects the equivalent JPEG+RAW option. If a JPEG+RAW option is currentlyselected, pressing the button temporarily selects the equivalent JPEG option, while if[RAW] is selected, pressing the button temporarily selects [FINE]. Taking a picture orpressing the button again restores the previous setting.
See Also
The Function Buttons ([Fn] (Function) Buttons)
RAW FILE CONVERTER (opens in another window)
Recording Pictures in RAW Format
- 130 -

Select a shutter speed of [T] (time) or [B] (bulb) for long time-exposures.
Use of a tripod is recommended to prevent the camera from moving during theexposure.
Time (T)
Bulb (B)
Rotate the shutter speed dial to [T].1.
Rotate the command dial to choose a shutter speed between 30 s and 2 s in steps of 1/3 EV.
2.
Press the shutter button all the way down to take a picture at the selected shutter speed.A count-down timer will be displayed while the exposure is in progress.
3.
Long Time-Exposures (T/B)
- 131 -

Rotate the shutter speed dial to [B].1.
Press the shutter button all the way down. The shutter will remain open for up to 60minutes while the shutter button is pressed; the display shows the time elapsed since theexposure started.
2.
Selecting an aperture of [A] fixes shutter speed at 30 s.To reduce “noise” (mottling) in long time-exposures, select [ON] for [LONGEXPOSURE NR] in the shooting menu. Note that this may increase the time needed torecord images after shooting.
Long Time-Exposures (T/B)
- 132 -

Simulate the effects of different types of film, including sepia and black-and-white. Press theselector left to display a menu of film simulation types.
At default settings, film simulation is assigned to the left button on the selector(function button 3). For information on choosing the roles assigned to the functionbuttons, see “The Function Buttons”.
Film simulation can also be selected in the shooting menu.
Film Simulation
- 133 -

[PROVIA/STANDARD]
[Velvia/VIVID]
[ASTIA/SOFT]
[CLASSIC CHROME]
[PRO Neg. Hi]
[PRO Neg. Std]
[MONOCHROME]
[MONOCHROME+Ye FILTER]
[MONOCHROME+R FILTER]
[MONOCHROME+G FILTER]
[SEPIA]
Standard color reproduction. Suited to a wide rangeof subjects, from portraits to landscapes.
A high-contrast palette of saturated colors, suited tonature photographs.
A soft-toned palette of less saturated colors.
Soft color and enhanced shadow contrast for a calmlook.
Offers slightly more contrast than (PRO Neg.Std). Recommended for outdoor portraitphotography.
A soft-toned palette. The range of hues available forskin tones is enhanced, making this a good choice forstudio portrait photography.
Take pictures in black and white.
Take black-and-white pictures with slightly increasedcontrast. This setting also slightly tones down thebrightness of the sky.
Take black-and-white pictures with increasedcontrast. This setting also tones down the brightnessof the sky.
Soften skin tones in black-and-white portraits.
Take pictures in sepia.
See Also
The Function Buttons ([Fn] (Function) Buttons)
[FILM SIMULATION] (The Shooting Menu)
Film Simulation
- 134 -

Adjust colors to match the light source.
Press the selector right to display white balance options.
At default settings, white balance is assigned to the right button on the selector(function button 4). For information on choosing the roles assigned to the functionbuttons, see “The Function Buttons”.
White balance can also be selected in the shooting menu.
1.
White Balance
- 135 -

AUTO
Press the selector up or down to highlight the desired option.
White balance adjusted automatically.
Measure a value for white balance.
Choose a color temperature.
For subjects in direct sunlight.
For subjects in the shade.
Use under “daylight” fluorescent lights.
Use under “warm white” fluorescent lights.
Use under “cool white” fluorescent lights.
Use under incandescent lighting.
Reduces the blue cast typically associated with underwater lighting.
2.
Press [MENU/OK]. The dialog shown below will be displayed; use the selector tofine-tune white balance and press [MENU/OK] to select, or press [DISP/BACK] to exitwithout fine-tuning.
3.
Results vary with shooting conditions. Play pictures back after shooting to check colors.
Custom White Balance
Color Temperature
White Balance
- 136 -

Choose to adjust white balance for unusual lighting conditions. White balance measurementoptions will be displayed; frame a white object so that it fills the display and press the shutterbutton all the way down to measure white balance (to select the most recent custom value andexit without measuring white balance, press [DISP/BACK], or press [MENU/OK] to selectthe most recent value and display the fine-tuning dialog).
If “COMPLETED!” is displayed, press [MENU/OK] to set white balance to themeasured value.If “UNDER” is displayed, raise exposure compensation and try again.If “OVER” is displayed, lower exposure compensation and try again.
Color temperature is an objective measure of the color of a light source, expressed in Kelvin(K). Light sources with a color temperature close to that of direct sunlight appear white; lightsources with a lower color temperature have a yellow or red cast, while those with a highercolor temperature are tinged with blue. You can match color temperature to the light source asshown in the following table, or choose options that differ sharply from the color of the lightsource to make pictures “warmer” or “colder”.
See Also
The Function Buttons ([Fn] (Function) Buttons)
[WHITE BALANCE] (The Shooting Menu)
Choose for redder light sources or “colder”pictures
Choose for bluer light sources or “warmer”pictures
2000 KCandlelight
5000 KDirect sunlight
15000 KBlue sky
Sunset/sunrise Shade
White Balance
- 137 -

[TOY CAMERA]
[MINIATURE]
[POP COLOR]
[HIGH-KEY]
[LOW-KEY]
[DYNAMIC TONE]
[SOFT FOCUS]
[PARTIAL COLOR (RED)]
[PARTIAL COLOR (ORANGE)]
[PARTIAL COLOR (YELLOW)]
[PARTIAL COLOR (GREEN)]
[PARTIAL COLOR (BLUE)]
[PARTIAL COLOR (PURPLE)]
[OFF]
Take photos with filter effects. Select [ADVANCED FILTER] in the shooting menu and choosefrom the following options:
Choose for a retro toy camera effect.
The tops and bottoms of pictures are blurred for adiorama effect.
Create high-contrast images with saturated colors.
Create bright, low-contrast images.
Create uniformly dark tones with few areas ofemphasized highlights.
Dynamic tone expression is used for a fantasy effect.
Create a look that is evenly soft throughout thewhole image.
Reds are recorded in color, while other colors arerecorded in black and white.
Orange objects are recorded in color, while othercolors are recorded in black and white.
Yellows are recorded in color, while other colors arerecorded in black and white.
Greens are recorded in color, while other colors arerecorded in black and white.
Blues are recorded in color, while other colors arerecorded in black and white.
Purples are recorded in color, while other colors arerecorded in black and white.
Advanced filters off.
Depending on the subject and camera settings, images may in some cases be grainy orvary in brightness and hue.
Selecting an advanced filter sets the [SCREEN SET-UP] > [IMAGE DISP.] option inthe setup menu to [0.5 SEC].
Advanced Filters
- 138 -

Using the Shooting Menu
Factory Defaults—Shooting Menu
[AUTOFOCUS SETTING]
[ISO]
[IMAGE SIZE]
[IMAGE QUALITY]
[DYNAMIC RANGE]
[FILM SIMULATION]
[FILM SIMULATION BKT]
[ND FILTER]
[COLOR]
[SHARPNESS]
[HIGHLIGHT TONE]
[SHADOW TONE]
[NOISE REDUCTION]
[LONG EXPOSURE NR]
[WHITE BALANCE]
[SELECT CUSTOM SETTING]
[EDIT/SAVE CUSTOM SETTING]
[FUNCTION (Fn) SETTING]
[DISP. CUSTOM SETTING]
[CONVERSION LENS]
[MF ASSIST]
[ADVANCED FILTER]
[INTERVAL TIMER SHOOTING]
[SELF-TIMER]
[AE/AF-LOCK MODE]
[AE/AF-LOCK BUTTON]
[PHOTOMETRY]
[INTERLOCK SPOT AE & FOCUS AREA]
[RED EYE REMOVAL]
[SAVE ORG IMAGE]
[FLASH MODE]
[FLASH COMPENSATION]
The Shooting Menu
- 139 -

[SHUTTER TYPE]
[MOVIE SET-UP]
[WIRELESS COMMUNICATION]
The Shooting Menu
- 140 -

Use the shooting menus to adjust shooting settings. The options available vary with theshooting mode selected.
Press [MENU/OK] to display the shooting menu.1.
Press the selector up or down to highlight the desired menu item.2.
Press the selector right to display options for the highlighted item.3.
Press the selector up or down to highlight the desired option.4.
Press [MENU/OK] to select the highlighted option.5.
Press [DISP/BACK] to exit from the menu.6.
Using the Shooting Menu
- 141 -

See Also
[AUTOFOCUS SETTING]
[ISO]
[IMAGE SIZE]
[IMAGE QUALITY]
[DYNAMIC RANGE]
[FILM SIMULATION]
[FILM SIMULATION BKT]
[ND FILTER]
[COLOR]
[SHARPNESS]
[HIGHLIGHT TONE]
[SHADOW TONE]
[NOISE REDUCTION]
[LONG EXPOSURE NR]
[WHITE BALANCE]
[SELECT CUSTOM SETTING]
[EDIT/SAVE CUSTOM SETTING]
[FUNCTION (Fn) SETTING]
[DISP. CUSTOM SETTING]
[CONVERSION LENS]
[MF ASSIST]
[ADVANCED FILTER]
[INTERVAL TIMER SHOOTING]
[SELF-TIMER]
[AE/AF-LOCK MODE]
[AE/AF-LOCK BUTTON]
[PHOTOMETRY]
[INTERLOCK SPOT AE & FOCUS AREA]
[RED EYE REMOVAL]
[SAVE ORG IMAGE]
[FLASH MODE]
[FLASH COMPENSATION]
[SHUTTER TYPE]
[MOVIE SET-UP]
[WIRELESS COMMUNICATION]
Using the Shooting Menu
- 142 -

The factory default settings for the options in the shooting menus are listed below.
These settings can be restored using the [RESET] > [SHOOTING MENU RESET]option in the setup menu.
[AUTOFOCUS SETTING]
[MACRO] [OFF]
[RELEASE/FOCUS PRIORITY]
[AF-S PRIORITY SELECTION] [RELEASE]
[AF-C PRIORITY SELECTION] [RELEASE]
[INSTANT AF SETTING] [AF-S]
[AF MODE] [AREA]
[FACE DETECTION] [OFF]
[PRE-AF] [OFF]
[AF ILLUMINATOR] [ON]
[CORRECTED AF FRAME] [OFF]
[ISO] [200]
[IMAGE SIZE] [3:2]
[IMAGE QUALITY] [FINE]
[DYNAMIC RANGE] [100%]
[FILM SIMULATION] [PROVIA/STANDARD]
[FILM SIMULATION BKT]
[FILM 1] [PROVIA/STANDARD]
[FILM 2] [Velvia/VIVID]
[FILM 3] [ASTIA/SOFT]
[ND FILTER] [OFF]
Factory Defaults—Shooting Menu
- 143 -

[COLOR] (0) [MID]
[SHARPNESS] (0) [STANDARD]
[HIGHLIGHT TONE] (0) [STANDARD]
[SHADOW TONE] (0) [STANDARD]
[NOISE REDUCTION] (0) [STANDARD]
[LONG EXPOSURE NR] [ON]
[WHITE BALANCE] [AUTO]
[FUNCTION (Fn) SETTING]
Fn1 [MOVIE]
Fn2 [MACRO]
Fn3 [FILM SIMULATION]
Fn4 [WHITE BALANCE]
Fn5 [FOCUS AREA]
Fn6 [PHOTOMETRY]
Fn7 [WIRELESS COMMUNICATION]
Factory Defaults—Shooting Menu
- 144 -

[DISPLAY CUSTOM SETTING](OVF, EVF/LCD)
[FRAMING GUIDELINE]
[ELECTRONIC LEVEL]
[AF DISTANCE INDICATOR]
[MF DISTANCE INDICATOR]
[HISTOGRAM]
[APERTURE/S-SPEED/ISO]
[EXP. COMPENSATION]
[PHOTOMETRY]
[FLASH]
[WHITE BALANCE]
[FILM SIMULATION]
[DYNAMIC RANGE]
[FRAMES REMAINING]
[IMAGE SIZE/QUALITY]
[MOVIE MODE & REC. TIME] (EVF/LCD)
[MOVIE MODE & REC. TIME] (OVF)
[BATTERY LEVEL]
[CONVERSION LENS] [OFF]
[MF ASSIST] [STANDARD]
[ADVANCED FILTER] [OFF]
[SELF-TIMER] [OFF]
[AE/AF-LOCK MODE] [AE&AF ON WHEN PRESSING]
[AE/AF-LOCK BUTTON] [AE LOCK ONLY]
[PHOTOMETRY] [MULTI]
[INTERLOCK SPOT AE & FOCUS AREA] [ON]
[RED EYE REMOVAL] [OFF]
[SAVE ORG IMAGE] [OFF]
[FLASH MODE] [FORCED FLASH]
[FLASH COMPENSATION] ±0
[SHUTTER TYPE] [MECHANICAL SHUTTER]
Factory Defaults—Shooting Menu
- 145 -

[MOVIE SET-UP]
[MOVIE MODE] [1920×1080] [60 fps]
[MOVIE ISO] [AUTO]
[MIC LEVEL ADJUSTMENT] [3]
[MIC/REMOTE RELEASE] [MIC]
Factory Defaults—Shooting Menu
- 146 -

[RELEASE]
[FOCUS]
Adjust autofocus settings.
[FOCUS AREA]
[MACRO]
[RELEASE/FOCUS PRIORITY]
[INSTANT AF SETTING]
[AF MODE]
[FACE DETECTION]
[PRE-AF]
[AF ILLUMINATOR]
[CORRECTED AF FRAME]
Focus-area selection is available when [AREA] is selected for [AF MODE] in focus mode [S] or[C]. In focus mode [M], you can press the center of the command dial to zoom in on theselected focus area or focus on the subject in the selected area at the touch of a button.
Select macro (close-up) mode.
Choose how the camera focuses in focus mode [S] or [C].
Shutter response is prioritized over focus. Pictures can be taken when thecamera is not in focus.
Focus is prioritized over shutter response. Pictures can be only taken whenthe camera is in focus.
[AUTOFOCUS SETTING]
- 147 -

[AF-S]
[AF-C]
[MULTI]
[AREA]
Choose how the camera focuses when the [AEL/AFL] button is used for autofocus in focusmode [M].
Focus is adjusted at the time the button is pressed.
Focus is adjusted continuously while the button is pressed.
Choose how the camera selects the focus area in focus modes [S] and [C].
When the shutter button is pressed halfway, the camera detectshigh-contrast subjects near the center of the frame and selects thefocus area automatically.
Choose the focus area manually.
Intelligent Face Detection allows the camera to automatically detect human faces and set focusand exposure for a face anywhere in the frame for shots that emphasize portrait subjects.Choose for group portraits (in horizontal or vertical orientations) to prevent the camera fromfocusing on the background.
Faces can be detected with the camera in vertical or horizontal orientation; if a face is detected,it will be indicated by a green border. If there is more than one face in the frame, the camerawill select the face closest to the center; other faces are indicated by white borders.
In some modes, the camera may set exposure for the frame as a whole rather than theportrait subject.
If the subject moves as the shutter button is pressed, their face may not be in the areaindicated by the green border when the picture is taken.
[AUTOFOCUS SETTING]
- 148 -

If [ON] is selected, the camera will continue to adjust focus even when the shutter-releasebutton is not pressed halfway.
Note that this increases the drain on the battery.
If [ON] is selected, the AF-assist illuminator will light to assist autofocus.
The AF-assist illuminator turns off automatically in silent mode.
The camera may be unable to focus using the AF-assist illuminator in some cases. If thecamera is unable to focus in macro mode, try increasing the distance to the subject.
Avoid shining the AF-assist illuminator directly into your subject’s eyes.
[AUTOFOCUS SETTING]
- 149 -

ON
OFF
If [ON] is selected, a second focus frame for focus distances of about 50 cm (1.6 ft.) will beadded to the display in the optical viewfinder. The focus frame for the current focus distance isdisplayed in green when the shutter button is pressed halfway.
Focus frame for focus distance of infinity
Focus frame for focus distance of about 50 cm (1.6 ft.)
[AUTOFOCUS SETTING]
- 150 -

[AUTO1]/[AUTO2]/[AUTO3]
[6400] – [200]
[H (51200)]/[H (25600)]/[H (12800)]/[L (100)]
Adjust sensitivity. The higher the sensitivity, the less light required to take a photograph; note,however, that mottling may appear at higher values. Choose a value according to shootingconditions.
The camera adjusts sensitivity automatically according tosubject brightness.
Sensitivity is set to the specified value, which is shown inthe display.
Extended settings for special situations. Note that theseoptions may produce mottling or reduced dynamic range.
[L (100)] is reset to ISO 200 and [H (51200)], [H (25600)], and [H (12800)] arereset to ISO 6400 when [RAW], [FINE+RAW], or [NORMAL+RAW] is selected forimage quality.
The following options are available in [AUTO1]/[AUTO2]/[AUTO3] modes.
Option Default
[DEFAULT SENSITIVITY] 200
[MAX. SENSITIVITY][AUTO1]: 800[AUTO2]: 1600[AUTO3]: 3200
[MIN. SHUTTER SPEED] 1/60
The camera automatically chooses a sensitivity between the default and maximum values.Sensitivity is only raised above the default value if the shutter speed required for optimalexposure would be slower than the value selected for [MIN. SHUTTER SPEED].
If the value selected for [DEFAULT SENSITIVITY] is higher than that selected for[MAX. SENSITIVITY], [DEFAULT SENSITIVITY] will be set to the value selected for[MAX. SENSITIVITY].
The camera may select shutter speeds slower than [MIN. SHUTTER SPEED] if pictureswould still be underexposed at the value selected for [MAX. SENSITIVITY].
[ISO]
- 151 -

Choose the size and aspect ratio at which still pictures are recorded.
Option Prints at sizes up to
3:2
34×25 cm (13.5×10 in.) 16:9
1:1
3:2
24×18 cm (9.5×7 in.) 16:9
1:1
3:2
17×13 cm (7×5 in.) 16:9
1:1
The shape of the frame varies with the aspect ratio. Choose an aspect ratio according toyour subject.
[IMAGE SIZE]
- 152 -

Choose a file format and compression ratio. Select [FINE] or [NORMAL] to record JPEGimages, [RAW] to record RAW images, or [FINE+RAW] or [NORMAL+RAW] to record bothJPEG and RAW images. [FINE] and [FINE+RAW] use lower JPEG compression ratios forhigher-quality JPEG images, while [NORMAL] and [NORMAL+RAW] use higher JPEGcompression ratios to increase the number of images that can be stored.
[IMAGE QUALITY]
- 153 -

Control contrast. Higher values are recommended for scenes that include both sunlight anddeep shade or for increased contrast with such subjects as sunlight on water, brightly-litautumn leaves, portraits taken against a blue sky, and white objects or people wearing white;note, however, that mottling may appear in pictures taken at higher values. If [AUTO] isselected, the camera will automatically select values between 100% and 200% in response toshooting conditions.
Option Description
[AUTO]
[100%] Increase contrast when shooting indoors or under overcast skies.
Reduce loss of detail in highlights and shadows whenphotographing high-contrast scenes.
[200%]
[400%]
If [AUTO] is selected, shutter speed and aperture will be displayed when the shutterbutton is pressed halfway.
[200%] is available at sensitivities of ISO 400 and above, [400%] at sensitivities ofISO 800 and above.
[DYNAMIC RANGE]
- 154 -

[PROVIA/STANDARD]
[Velvia/VIVID]
[ASTIA/SOFT]
[CLASSIC CHROME]
[PRO Neg. Hi]
[PRO Neg. Std]
[MONOCHROME]
[MONOCHROME+Ye FILTER]
[MONOCHROME+R FILTER]
[MONOCHROME+G FILTER]
[SEPIA]
Simulate the effects of different types of film, including sepia and black-and-white.
Standard color reproduction. Suited to a wide rangeof subjects, from portraits to landscapes.
A high-contrast palette of saturated colors, suited tonature photographs.
A soft-toned palette of less saturated colors.
Soft color and enhanced shadow contrast for a calmlook.
Offers slightly more contrast than (PRO Neg.Std). Recommended for outdoor portraitphotography.
A soft-toned palette. The range of hues available forskin tones is enhanced, making this a good choice forstudio portrait photography.
Take pictures in black and white.
Take black-and-white pictures with slightly increasedcontrast. This setting also slightly tones down thebrightness of the sky.
Take black-and-white pictures with increasedcontrast. This setting also tones down the brightnessof the sky.
Soften skin tones in black-and-white portraits.
Take pictures in sepia.
[FILM SIMULATION]
- 155 -

Choose film types for film simulation bracketing.
[FILM SIMULATION BKT]
- 156 -

Selecting [ON] enables the camera’s built-in Neutral Density (ND) filter, reducing exposure bythe equivalent of 3 EV. This allows slower shutter speeds or wider apertures to be used withbrightly lit subjects, making it possible to blur motion or soften background details without riskof overexposure.
[ND FILTER]
- 157 -

Adjust color density.
[COLOR]
- 158 -

Sharpen or soften outlines.
[SHARPNESS]
- 159 -

Adjust the appearance of highlights.
[HIGHLIGHT TONE]
- 160 -

Adjust the appearance of shadows.
[SHADOW TONE]
- 161 -

Reduce noise in pictures taken at high sensitivities.
[NOISE REDUCTION]
- 162 -

Select [ON] to reduce mottling in long time-exposures.
[LONG EXPOSURE NR]
- 163 -

AUTO
Adjust colors to match the light source.
Select [WHITE BALANCE] in the shooting menu.1.
Press the selector up or down to highlight the desired option.
White balance adjusted automatically.
Measure a value for white balance.
Choose a color temperature.
For subjects in direct sunlight.
For subjects in the shade.
Use under “daylight” fluorescent lights.
Use under “warm white” fluorescent lights.
Use under “cool white” fluorescent lights.
Use under incandescent lighting.
Reduces the blue cast typically associated with underwater lighting.
2.
[WHITE BALANCE]
- 164 -

Press [MENU/OK]. The dialog shown below will be displayed; use the selector tofine-tune white balance and press [MENU/OK] to select, or press [DISP/BACK] to exitwithout fine-tuning.
3.
Results vary with shooting conditions. Play pictures back after shooting to check colors.
Custom White Balance
Color Temperature
Choose to adjust white balance for unusual lighting conditions. White balance measurementoptions will be displayed; frame a white object so that it fills the display and press the shutterbutton all the way down to measure white balance (to select the most recent custom value andexit without measuring white balance, press [DISP/BACK], or press [MENU/OK] to selectthe most recent value and display the fine-tuning dialog).
If “COMPLETED!” is displayed, press [MENU/OK] to set white balance to themeasured value.If “UNDER” is displayed, raise exposure compensation and try again.If “OVER” is displayed, lower exposure compensation and try again.
[WHITE BALANCE]
- 165 -

Color temperature is an objective measure of the color of a light source, expressed in Kelvin(K). Light sources with a color temperature close to that of direct sunlight appear white; lightsources with a lower color temperature have a yellow or red cast, while those with a highercolor temperature are tinged with blue. You can match color temperature to the light source asshown in the following table, or choose options that differ sharply from the color of the lightsource to make pictures “warmer” or “colder”.
Choose for redder light sources or “colder”pictures
Choose for bluer light sources or “warmer”pictures
2000 KCandlelight
5000 KDirect sunlight
15000 KBlue sky
Sunset/sunrise Shade
[WHITE BALANCE]
- 166 -

Recall settings saved with [EDIT/SAVE CUSTOM SETTING].
See Also
[EDIT/SAVE CUSTOM SETTING] (Shooting Menu)
[SELECT CUSTOM SETTING]
- 167 -

Save custom camera settings for commonly-encountered situations.
Select [EDIT/SAVE CUSTOM SETTING] in the shooting menu.1.
Highlight a custom settings bank and press [MENU/OK] to select.2.
Adjust the following settings as desired.
To replace the settings in the current bank with the settings currently selectedwith the camera, highlight [SAVE CURRENT SETTINGS] and press [MENU/OK].
3. [ISO]
[DYNAMIC RANGE]
[FILM SIMULATION]
[WHITE BALANCE]
[COLOR]
[SHARPNESS]
[HIGHLIGHT TONE]
[SHADOW TONE]
[NOISE REDUCTION]
[EDIT/SAVE CUSTOM SETTING]
- 168 -

Press [DISP/BACK]. A confirmation dialog will be displayed; highlight [OK] and press[MENU/OK].
4.
Settings can be recalled using the [SELECT CUSTOM SETTING] option in the shootingmenu.
See Also
[SELECT CUSTOM SETTING] (The Shooting Menu)
[EDIT/SAVE CUSTOM SETTING]
- 169 -

Choose the roles played by the [Fn] buttons.
Display the shooting menu and select [FUNCTION (Fn) SETTING].1.
Press the selector up or down to highlight the desired button and press [MENU/OK] toselect. You will be given the following choice of functions to assign to the selected button.
Select [NONE] to assign no function to the selected button.
2.
Highlight the desired function and press [MENU/OK] to assign it to the selected button.3.
See Also
The Function Buttons ([Fn] (Function) Buttons)
[ADVANCED FILTER]
[MULTIPLE EXPOSURE]
[MACRO]
[PREVIEW DEPTH OF FIELD]
[ISO]
[SELF-TIMER]
[IMAGE SIZE]
[IMAGE QUALITY]
[DYNAMIC RANGE]
[FILM SIMULATION]
[WHITE BALANCE]
[ND FILTER]
[PHOTOMETRY]
[AF MODE]
[FOCUS AREA]
[CORRECTED AF FRAME]
[FLASH MODE]
[FLASH COMPENSATION]
[SELECT CUSTOM SETTING]
[MOVIE]
[FACE DETECTION]
[PREVIEW PIC. EFFECT]
[HIGH PERFORMANCE]
[RAW]
[WIRELESS COMMUNICATION]
[CONVERSION LENS]
[SHUTTER TYPE]
[FUNCTION (Fn) SETTING]
- 170 -

Choose the information displayed in the optical viewfinder or in the electronic viewfinder andLCD monitor.
Select [DISP. CUSTOM SETTING] in the shooting menu.1.
Highlight [OVF] or [EVF/LCD] and press [MENU/OK].2.
Highlight items and press [MENU/OK] to select or deselect. Selected items are indicatedby a check mark.
3.
Press [DISP/BACK] to exit when settings are complete.4.
[FRAMING GUIDELINE]
[ELECTRONIC LEVEL]
[AF DISTANCE INDICATOR]
[MF DISTANCE INDICATOR]
[HISTOGRAM]
[APERTURE/S-SPEED/ISO]
[EXP. COMPENSATION]
[PHOTOMETRY]
[FLASH]
[WHITE BALANCE]
[FILM SIMULATION]
[DYNAMIC RANGE]
[FRAMES REMAINING]
[IMAGE SIZE/QUALITY]
[MOVIE MODE & REC. TIME]
[BATTERY LEVEL]
[DISP. CUSTOM SETTING]
- 171 -

WIDE
TELE
OFF
Adjust settings for optional conversion lenses.
Choose when using an optional WCL-X100 conversion lens.
Choose when using an optional TCL-X100 conversion lens.
Choose when no conversion lens is attached.
Attach The Conversion Lens
Using a Wide Conversion Lens
[CONVERSION LENS]
- 172 -

Remove the front ring.
If you have trouble removing the front ring, grip the entire ring and rotate it asshown.
1.
Attach the conversion lens.2.
Keep the front ring and lens cap in a safe place when not in use.
[CONVERSION LENS]
- 173 -

When using an optional WCL-X100 wide conversion lens, select [WIDE] for [CONVERSIONLENS]. An icon will be displayed.
Because the optical viewfinder does not cover the full field of view of the conversion lens, thebright frame is replaced by brackets showing approximately 80% of the field of view. Foraccurate framing, compose pictures using the electronic viewfinder or LCD monitor.
The built-in flash may fail to light the entire subject. We recommend using an optionalexternal flash designated for use with this camera.
[CONVERSION LENS]
- 174 -

[STANDARD]
[DIGITAL SPLIT IMAGE]
[FOCUS PEAK HIGHLIGHT]
Choose how focus is displayed in manual focus mode.
Focus is displayed normally (focus peaking and digital splitimage are not available).
A black-and-white split-image display.
The camera heightens high-contrast outlines. Choose acolor and peaking level.
See Also
Manual Focus (Focus Mode M) (More on Photography)
[MF ASSIST]
- 175 -

[TOY CAMERA]
[MINIATURE]
[POP COLOR]
[HIGH-KEY]
[LOW-KEY]
[DYNAMIC TONE]
[SOFT FOCUS]
[PARTIAL COLOR (RED)]
[PARTIAL COLOR (ORANGE)]
[PARTIAL COLOR (YELLOW)]
[PARTIAL COLOR (GREEN)]
[PARTIAL COLOR (BLUE)]
[PARTIAL COLOR (PURPLE)]
[OFF]
Take photos with filter effects.
Choose for a retro toy camera effect.
The tops and bottoms of pictures are blurred for adiorama effect.
Create high-contrast images with saturated colors.
Create bright, low-contrast images.
Create uniformly dark tones with few areas ofemphasized highlights.
Dynamic tone expression is used for a fantasy effect.
Create a look that is evenly soft throughout thewhole image.
Reds are recorded in color, while other colors arerecorded in black and white.
Orange objects are recorded in color, while othercolors are recorded in black and white.
Yellows are recorded in color, while other colors arerecorded in black and white.
Greens are recorded in color, while other colors arerecorded in black and white.
Blues are recorded in color, while other colors arerecorded in black and white.
Purples are recorded in color, while other colors arerecorded in black and white.
Advanced filters off.
Depending on the subject and camera settings, images may in some cases be grainy orvary in brightness and hue.
Selecting an advanced filter sets the [SCREEN SET-UP] > [ IMAGE DISP.] option inthe setup menu to [0.5 SEC].
[ADVANCED FILTER]
- 176 -

Adjust settings for interval timer photography.
Select [INTERVAL TIMER SHOOTING] in the shooting menu to display interval timershooting options.
1.
Use the selector to choose the interval and number of shots. Press [MENU/OK] toproceed.
2.
Use the selector to choose the starting time and then press [MENU/OK]. Shooting willstart automatically.
3.
Interval timer photography can not be used during panorama or multiple exposurephotography. In burst mode, only one picture will be taken each time the shutter isreleased.
[INTERVAL TIMER SHOOTING]
- 177 -

Use of a tripod is recommended.
Check the battery level before starting.
The display turns off between shots and lights a few seconds before the next shot istaken. The display can be activated at any time by pressing the shutter button all theway down.
[INTERVAL TIMER SHOOTING]
- 178 -

OFF
Use the timer for self-portraits or to prevent blur caused by camera shake.
The shutter is released two seconds after the shutter button is pressed. Use toreduce blur caused by the camera moving when the shutter button is pressed. Theself-timer lamp will blink as the timer counts down.
The shutter is released ten seconds after the shutter button is pressed. Use forself-portraits. The self-timer lamp on the front of the camera lights when the timerstarts and begins to blink shortly before the photo is taken.
Self-timer off.
[SELF-TIMER]
- 179 -

If [AE&AF ON WHEN PRESSING] is selected, exposure and/or focus will lock while the[AEL/AFL] button is pressed. If [AE&AF ON/OFF SWITCH] is selected, exposure and/orfocus will lock while the [AEL/AFL] button is pressed and remain locked until the button ispressed again.
[AE/AF-LOCK MODE]
- 180 -

[AE LOCK ONLY]
[AF LOCK ONLY]
[AE/AF LOCK]
Choose whether the [AEL/AFL] button locks exposure (AE), focus (AF), or both.
The [AEL/AFL] button locks exposure only.
The [AEL/AFL] button locks focus only.
The [AEL/AFL] button locks both exposure and focus.
[AE/AF-LOCK BUTTON]
- 181 -

[MULTI]
[SPOT]
[AVERAGE]
Choose how the camera measures the brightness of the subject.
Automatic scene recognition is used to adjust exposure for a widerange of shooting conditions.
The camera meters lighting conditions in the selected focus area or atthe center of the frame. Recommended when the background is muchbrighter or darker than the main subject.
If [INTERLOCK SPOT AE & FOCUS AREA] is [ON] and[AREA] is selected for [AUTOFOCUS SETTING] > [AFMODE], the camera will meter lighting conditions in theselected focus area. If [INTERLOCK SPOT AE & FOCUSAREA] is [OFF], the camera will meter the center focus area.
Exposure is set to the average for the entire frame. Providesconsistent exposure across multiple shots with the same lighting, andis particularly effective for landscapes and portraits of subjectsdressed in black or white.
[PHOTOMETRY]
- 182 -

Select [ON] to meter the current focus frame when [AREA] is selected for [AUTOFOCUSSETTING] > [AF MODE] and [SPOT] is selected for [PHOTOMETRY].
See Also
[PHOTOMETRY] (The Shooting Menu)
[AUTOFOCUS SETTING] (The Shooting Menu)
[INTERLOCK SPOT AE & FOCUS AREA]
- 183 -

Choose [ON] to remove red-eye effects caused by the flash when shooting with Intelligent FaceDetection.
Red-eye reduction is performed only when a face is detected.
Red-eye removal is not available with RAW images.
[RED EYE REMOVAL]
- 184 -

Choose [ON] to save unprocessed copies of pictures taken using [RED EYE REMOVAL].
[SAVE ORG IMAGE]
- 185 -

[AUTO]
[FORCED FLASH]
[SLOW SYNCHRO]
[COMMANDER]
[EXTERNAL FLASH]
[SUPPRESSED FLASH]
Choose a flash mode.
The flash fires when required. Recommended in mostsituations.
The flash fires whenever a picture is taken. Use for backlitsubjects or for natural coloration when shooting in brightlight.
Capture both the main subject and the background underlow light (note that brightly lit scenes may beoverexposed).
A flash mounted on the hot shoe can be used to controloptional remote flash units.
Select when using optional third-party flash units.
The flash does not fire even when the subject is poorlylit. Atripod is recommended.
If is displayed when the shutter button is pressed halfway, the flash will fire whenthe photo is taken.
Except in commander mode, the flash may fire several times with each shot. Do notmove the camera until shooting is complete.
The flash will synchronize with the shutter at shutter speeds of 1/2000 s or slower.
The camera can also be used with optional FUJIFILM shoe-mounted flash units.
The flash may need more time to charge when the battery is low.
Red-Eye Removal
When “intelligent face detection” is active, and on is selected for “red eye removal”,red-eye removal is available in , , .
Red-eye removal minimizes “red-eye” caused when light from the flash is reflected fromthe subject’s retinas.
[FLASH MODE]
- 186 -

Adjust flash brightness.
Note that the desired results may not be achieved depending on shooting conditions andthe distance to the subject.
[FLASH COMPENSATION]
- 187 -

MECHANICAL SHUTTER
ELECTRONIC SHUTTER
MECHANICAL+ELECTRONIC
Choose the shutter type. Choose the electronic shutter to mute the shutter sound.
Take pictures with the mechanical shutter.
Take pictures with the electronic shutter.
The camera chooses the shutter type according to shootingconditions.
If [ELECTRONIC SHUTTER] or [MECHANICAL+ELECTRONIC] is selected, shutterspeeds faster than 1/4,000 s can be chosen by rotating the shutter speed dial to 4000and then rotating the command dial.
Regardless of the option selected, the mechanical shutter is used for motion panoramas.When the electronic shutter is used, the flash turns off, shutter speed and sensitivity arerestricted to values of 1/32,000–1 s and ISO 6400–200 respectively, and long exposurenoise reduction has no effect. In burst mode, focus and exposure are fixed at the valuesfor the first shot in each burst.
Distortion may be visible in shots of moving subjects taken with the electronic shutter,while banding and fog may occur in shots taken under fluorescent lights or otherflickering or erratic illumination. When taking pictures with the shutter muted, respectyour subjects’ image rights and right to privacy.
[SHUTTER TYPE]
- 188 -

Adjust movie settings.
[MOVIE MODE]
[MOVIE ISO]
[MIC LEVEL ADJUSTMENT]
[MIC/REMOTE RELEASE]
Choose a frame size and rate for movies.
Choose the sensitvity for movie recording.
[MOVIE ISO] does not affect the option selected for recording photographs.
Adjust the microphone recording level.
[MOVIE SET-UP]
- 189 -

Specify whether the device connected to the microphone/remote release connector is amicrophone or a remote release.
[MOVIE SET-UP]
- 190 -

Connect to a smartphone or tablet over a wireless network.
See Also
Wireless Transfer (Connections)
The FUJIFILM Smartphone/Tablet/Computer App (opens in another window)
[WIRELESS COMMUNICATION]
- 191 -

Using the Playback Menu
[RAW CONVERSION]
[ERASE]
[CROP]
[RESIZE]
[PROTECT]
[IMAGE ROTATE]
[RED EYE REMOVAL]
[SLIDE SHOW]
[PHOTOBOOK ASSIST]
[MARK FOR UPLOAD TO]
[IMAGE SEARCH]
[COPY]
[PRINT ORDER (DPOF)]
[instax PRINTER PRINT]
[DISP ASPECT]
[WIRELESS COMMUNICATION]
[PC AUTO SAVE]
The Playback Menu
- 192 -

Press the button to enter playback mode.1.
Press [MENU/OK] to display the playback menu.2.
Press the selector up or down to highlight the desired menu item.3.
Press the selector right to display options for the highlighted item.4.
Press the selector up or down to highlight the desired option.5.
Press [MENU/OK] to select the highlighted option.6.
Press [DISP/BACK] to exit from the menu.7.
Using the Playback Menu
- 193 -

See Also
[RAW CONVERSION]
[ERASE]
[CROP]
[RESIZE]
[PROTECT]
[IMAGE ROTATE]
[RED EYE REMOVAL]
[SLIDE SHOW]
[PHOTOBOOK ASSIST]
[MARK FOR UPLOAD TO]
[IMAGE SEARCH]
[COPY]
[PRINT ORDER (DPOF)]
[instax PRINTER PRINT]
[DISP ASPECT]
[WIRELESS COMMUNICATION]
[PC AUTO SAVE]
Using the Playback Menu
- 194 -

Create JPEG copies of RAW pictures. The original image data are unaffected, allowing a singleRAW image to be processed in a multitude of different ways.
Display the desired picture.1.
Highlight [RAW CONVERSION] in the playback menu and press [MENU/OK] to displayRAW conversion options.
These options can also be displayed by pressing the [Q] button during playback.
2.
[RAW CONVERSION]
- 195 -

[REFLECT SHOOTING COND.]
[PUSH/PULL PROCESSING]
[DYNAMIC RANGE]
[FILM SIMULATION]
[WHITE BALANCE]
[WB SHIFT]
[COLOR]
[SHARPNESS]
[HIGHLIGHT TONE]
[SHADOW TONE]
[NOISE REDUCTION]
[COLOR SPACE]
Press the selector up or down to highlight a setting and press the selector right to select.Press the selector up or down to highlight the desired option and press [MENU/OK] toselect and return to the settings list. Repeat this step to adjust additional settings.
Create a JPEG copy using the settings in effect at thetime the photo was taken.
Adjust exposure by −1 EV to +1 EV in increments of1/3 EV.
Enhance details in highlights for natural contrast.
Simulate the effects of different types of film.
Adjust white balance.
Fine-tune white balance.
Adjust color density.
Sharpen or soften outlines.
Adjust highlights.
Adjust shadows.
Process the copy to reduce mottling.
Choose the color space used for color reproduction.
3.
Press the [Q] button to preview the JPEG copy and press [MENU/OK] to save.4.
[RAW CONVERSION]
- 196 -

[FRAME]
[SELECTED FRAMES]
[ALL FRAMES]
Delete pictures one at a time.
Select [FRAME] for [ERASE] in the playback menu.1.
Press the selector left or right to scroll through pictures and press [MENU/OK] to delete(a confirmation dialog is not displayed). Repeat to delete additional pictures.
2.
Delete multiple selected pictures.
Select [SELECTED FRAMES] for [ERASE] in the playback menu.1.
Highlight pictures and press [MENU/OK] to select or deselect (pictures in photobooks orprint orders are shown by ).
2.
When the operation is complete, press [DISP/BACK] to display a confirmation dialog.3.
Highlight [OK] and press [MENU/OK] to delete the selected pictures.4.
[ERASE]
- 197 -

Delete all unprotected pictures.
Select [ALL FRAMES] for [ERASE] in the playback menu.1.
A confirmation dialog will be displayed; highlight [OK] and press [MENU/OK] to deleteall unprotected pictures. Pressing [DISP/BACK] cancels deletion; note that any picturesdeleted before the button was pressed can not be recovered.
2.
If a memory card is inserted, only the pictures on the memory card will be affected; thepictures in internal memory are only deleted if no memory card is inserted.
If a message appears stating that the selected images are part of a DPOF print order,press [MENU/OK] to delete the pictures.
[ERASE]
- 198 -

Create a small copy of the current picture.
Display the desired picture.1.
Select [CROP] in the playback menu.2.
Use the selector and command dial to select the crop.3.
Press [MENU/OK] to display a confirmation dialog.4.
Press [MENU/OK] again to save the cropped copy to a separate file.5.
Larger crops produce larger copies; all copies have an aspect ratio of 3 : 2. If the size ofthe final copy will be , [YES] will be displayed in yellow.
Intelligent Face Detection
If the picture was shot with Intelligent Face Detection, will be displayed in the monitor.Press the selector down to zoom in on the selected face.
[CROP]
- 199 -

Create a resized copy of the current picture.
Display the desired picture.1.
Select [RESIZE] in the playback menu.2.
Highlight a size and press [MENU/OK] to display a confirmation dialog.3.
Press [MENU/OK] again to save the resized copy to a separate file.4.
The sizes available vary with the size of the original image.
[RESIZE]
- 200 -

[FRAME]
[SET ALL]
[RESET ALL]
Protect pictures from accidental deletion. Highlight one of the following options and press[MENU/OK].
Protect selected pictures. Press the selector left or right to view pictures andpress [MENU/OK] to select or deselect. Press [DISP/BACK] when theoperation is complete.
Protect all pictures.
Remove protection from all pictures.
Protected pictures will be deleted when the memory card is formatted.
[PROTECT]
- 201 -

Rotate pictures.
Display the desired picture.1.
Select [IMAGE ROTATE] in the playback menu.2.
Press the selector down to rotate the picture 90° clockwise, up to rotate it 90°counterclockwise.
3.
Press [MENU/OK]. The picture automatically be displayed in the selected orientationwhenever it is played back on the camera.
4.
Protected pictures can not be rotated. Remove protection before rotating pictures.
The camera may not be able to rotate pictures created with other devices. Picturesrotated on the camera will not be rotated when viewed on a computer or on othercameras.
Pictures taken with [SCREEN SET-UP] > [AUTOROTATE PB] are automaticallydisplayed in the correct orientation during playback.
[IMAGE ROTATE]
- 202 -

Remove red-eye from portraits. The camera will analyze the image; if red-eye is detected, theimage will be processed to create a copy with reduced red-eye.
Display the desired picture.1.
Select [RED EYE REMOVAL] in the playback menu.2.
Press [MENU/OK].3.
Red eye may not be removed if the camera is unable to detect a face or the face is inprofile. Results may differ depending on the scene. Red eye can not be removed frompictures that have already been processed using red-eye removal or pictures createdwith other devices.
The amount of time needed to process the image varies with the number of facesdetected.
Copies created with [RED EYE REMOVAL] are indicated by a icon during playback.
Red eye removal can not be performed on RAW images.
[RED EYE REMOVAL]
- 203 -

[NORMAL]/[FADE-IN]
[NORMAL] /[FADE-IN]
[MULTIPLE]
View pictures in an automated slide show. Choose the type of show and press [MENU/OK] tostart. Press [DISP/BACK] at any time during the show to view on-screen help. The show canbe ended at any time by pressing [MENU/OK].
Press the selector left or right to go back or skip ahead oneframe. Select [FADE-IN] for fade transitions betweenframes.
As above, except that camera automatically zooms in onfaces.
Display several pictures at once.
The camera will not turn off automatically while a slide show is in progress.
[SLIDE SHOW]
- 204 -

[SELECT FROM ALL]
[SELECT BY IMAGE SEARCH]
Create books from your favorite photos.
Creating a PhotoBook
Viewing Photobook
Editing and Deleting Photobooks
Select [NEW BOOK] for [PHOTOBOOK ASSIST] in the playback menu and choose fromthe following options:
Choose from all available pictures.
Choose from pictures matching selected searchconditions.
Neither photographs or smaller nor movies can be selected for photobooks.
1.
Scroll through the images and press the selector up to select or deselect. To display thecurrent image on the cover, press the selector down. Press [MENU/OK] to exit when thebook is complete.
2.
The first picture selected becomes the cover image. Press the selector down toselect a different image for the cover.
Highlight [COMPLETE PHOTOBOOK] and press [MENU/OK] (to select all photos or allphotos matching the specified search conditions for the book, choose [SELECT ALL]).The new book will be added to the list in the photobook assist menu.
3.
Books can contain up to 300 pictures.
Books that contain no photos are automatically deleted.
[PHOTOBOOK ASSIST]
- 205 -

[EDIT]
[ERASE]
Photobooks
Photobooks can be copied to a computer using the supplied MyFinePix Studio software.
See Also
MyFinePix Studio (opens in another window)
Highlight a book in the photobook assist menu and press [MENU/OK] to display the book,then press the selector left or right to scroll through the pictures.
Display the photobook and press MENU/OK. The following options will be displayed; select thedesired option and follow the on-screen instructions.
Edit the book as described in “Creating a PhotoBook”.
Delete the book.
[PHOTOBOOK ASSIST]
- 206 -

Select pictures for upload to YouTube, Facebook or MyFinePix.com using MyFinePix Studio(Windows only).
Select [YouTube] to choose movies for upload to YouTube, [Facebook] to choosephotos and movies for upload to Facebook, or [MyFinePix.com] to choose photos forupload to MyFinePix.com.
1.
Press the selector left or right to display pictures and press [MENU/OK] to select ordeselect. Press [DISP/BACK] to exit when all the desired pictures are selected.
2.
Only movies can be selected for upload to YouTube.
Only photos can be selected for upload to MyFinePix.com.
During playback, selected pictures are indicated by [YouTube], [Facebook] or[MyFinepix.com] icons.
Choose [RESET ALL] to deselect all pictures. If the number of pictures affected is verylarge, some time may be required to complete the operation. Press [DISP/BACK] toexit before the operation is complete.
Uploading Pictures (Windows Only)
Selected pictures can be uploaded using the [YouTube/Facebook/MyFinePix.comUpload] option in MyFinePix Studio.
Select with camera
Upload from computer
See Also
MyFinePix Studio (opens in another window)
[MARK FOR UPLOAD TO]
- 207 -

[BY DATE]
[BY FACE]
[BY FAVORITES]
[BY TYPE OF DATA]
[BY UPLOAD MARK]
Search for images by various criteria.
Select [IMAGE SEARCH] in the playback menu, highlight one of the following searchcriteria, and press [MENU/OK]:
Find all pictures taken on a selected date.
Find all pictures based on specified face information.
Find all pictures with a specified rating.
Find all still pictures, all movies, or all RAW pictures.
Find all pictures selected for upload to a specifieddestination.
1.
Select a search condition. Only pictures that match the search condition will be displayed.To delete or protect selected pictures or to view the selected pictures in a slide show,press [MENU/OK] and choose from the following options:
[ERASE]
[PROTECT]
[SLIDE SHOW]
2.
[IMAGE SEARCH]
- 208 -

[FRAME]
[ALL FRAMES]
Copy pictures from internal memory to a memory card.
Select [COPY] in the playback menu.1.
Highlight one of the following options and press the selector right:
[INTERNAL MEMORY] [CARD]Copy pictures from internal memory to a memory card.
[CARD] [INTERNAL MEMORY]Copy pictures from a memory card to internal memory.
2.
Highlight one of the following options and press [MENU/OK]:
Copy selected pictures. Press the selector left or right to view picturesand press [MENU/OK] to copy the current picture.
Copy all pictures.
3.
Copying ends when the destination is full.
DPOF print information is not copied.
[COPY]
- 209 -

[WITH DATE]
[WITHOUT DATE]
The [PRINT ORDER (DPOF)] option in the playback menu can be used to create a digital“print order” for PictBridge-compatible printers or devices that support DPOF.
DPOF
DPOF (Digital Print Order Format) is standard that allows pictures to be printed from “printorders” stored on the memory card. The information in the order includes the pictures tobe printed and the number of copies of each picture.
[WITH DATE]/[WITHOUT DATE]
[RESET ALL]
To modify the DPOF print order, select [PRINT ORDER (DPOF)] in the playback menu andpress the selector up or down to highlight [WITH DATE] or [WITHOUT DATE].
Print date of recording on pictures.
Print pictures without date.
[PRINT ORDER (DPOF)]
- 210 -

Press [MENU/OK] and follow the steps below.
Press the selector left or right to display a picture you wish to include in or remove fromthe print order.
1.
Press the selector up or down to choose the number of copies (up to 99). To remove apicture from the order, press the selector down until the number of copies is 0.
2.
Repeat steps 1–2 to complete the print order. Press [MENU/OK] to save the print orderwhen settings are complete, or [DISP/BACK] to exit without changing the print order.
3.
The total number of prints is displayed in the monitor. Press [MENU/OK] to exit.
The pictures in the current print order are indicated by icon during playback.
4.
[PRINT ORDER (DPOF)]
- 211 -

To cancel the current print order, select [RESET ALL] for [PRINT ORDER (DPOF)]. Theconfirmation shown below will be displayed; press [MENU/OK] to remove all pictures from theorder.
Print orders can contain a maximum of 999 pictures.
If a memory card is inserted containing a print order created by another camera, themessage shown below will be displayed. Pressing [MENU/OK] cancels the print order;a new print order must be created as described above.
[PRINT ORDER (DPOF)]
- 212 -

Print pictures on optional FUJIFILM instax SHARE printers. See the printer manual for details.
See Also
Printer manual (PDF: )
[instax PRINTER PRINT]
- 213 -

16 : 9
3 : 2
Choose how High Definition (HD) devices display pictures with an aspect ratio of 3 : 2 (thisoption is available only when an HDMI cable is connected).
Select 16 : 9 to display the image so that it fills the screen with its top and bottomcropped out, 3 : 2 to display the entire image with black bands at either side.
[DISP ASPECT]
- 214 -

Connect to a smartphone or tablet over a wireless network.
See Also
The FUJIFILM Smartphone/Tablet/Computer App (opens in another window)
[WIRELESS COMMUNICATION]
- 215 -

Upload pictures to a computer over a wireless network.
See Also
The FUJIFILM Smartphone/Tablet/Computer App (opens in another window)
[PC AUTO SAVE]
- 216 -

Using the Setup Menu
Factory Defaults—Setup Menu
[DATE/TIME]
[TIME DIFFERENCE]
[ ]
[RESET]
[SILENT MODE]
[FRAME NO.]
[FOCUS RING]
[FOCUS CHECK]
[SOUND SET-UP]
[SCREEN SET-UP]
[SELECTOR BUTTON SETTING]
[EDIT/SAVE QUICK MENU]
[POWER MANAGEMENT]
[SHUTTER COUNT]
[EDIT FILE NAME]
[WIRELESS SETTINGS]
[PC AUTO SAVE SETTING]
[GEOTAGGING SET-UP]
[instax PRINTER CONNECTION SETTING]
[COLOR SPACE]
[FORMAT]
The Setup Menu
- 217 -

Display the setup menu.
Press [MENU/OK] to display the menu for the current mode.i.
Press the selector left to highlight the tab for the current menu.ii.
Press the selector down to highlight the setup menu tab containing the desired option.iii.
Press the selector right to place the cursor in the setup menu.iv.
1.
Using the Setup Menu
- 218 -

Adjust settings.
Press the selector up or down to highlight a menu item.i.
Press the selector right to display options for the highlighted item.ii.
Press the selector up or down to highlight an option.iii.
Press [MENU/OK] to select the highlighted option.iv.
Press [DISP/BACK] to exit from the menu.v.
2.
Using the Setup Menu
- 219 -

See Also
[DATE/TIME]
[TIME DIFFERENCE]
[ ]
[RESET]
[SILENT MODE]
[FRAME NO.]
[FOCUS RING]
[FOCUS CHECK]
[SOUND SET-UP]
[SCREEN SET-UP]
[SELECTOR BUTTON SETTING]
[EDIT/SAVE QUICK MENU]
[POWER MANAGEMENT]
[SHUTTER COUNT]
[EDIT FILE NAME]
[WIRELESS SETTINGS]
[PC AUTO SAVE SETTING]
[GEOTAGGING SET-UP]
[instax PRINTER CONNECTION SETTING]
[COLOR SPACE]
[FORMAT]
Using the Setup Menu
- 220 -

The factory default settings for the options in the setup menus are listed below.
These settings can be restored using the [RESET] > [SET-UP RESET] option in thesetup menu.
[SILENT MODE] [OFF]
[FRAME NO.] [CONTINUOUS]
[FOCUS RING] [CW]
[FOCUS CHECK] [OFF]
[SOUND SET-UP]
[OPERATION VOL.]
[SHUTTER VOLUME]
[SHUTTER SOUND] [SOUND 1]
[PLAYBACK VOLUME] [7]
[SCREEN SET-UP]
[IMAGE DISP.] [OFF]
[EVF AUTOROTATE DISPLAYS] [ON]
[PREVIEW EXP. IN MANUAL MODE] [ON]
[MONITOR SUNLIGHT MODE] [OFF]
[EVF BRIGHTNESS] [AUTO]
[EVF COLOR] [0]
[LCD BRIGHTNESS] [0]
[LCD COLOR] [0]
[PREVIEW PIC. EFFECT] [ON]
[FRAMING GUIDELINE] [GRID 9]
[AUTOROTATE PB] [ON]
Factory Defaults—Setup Menu
- 221 -

[FOCUS SCALE UNITS] [METERS]
[SELECTOR BUTTON SETTING] [Fn BUTTON]
[EDIT/SAVE QUICK MENU]
[Q1] [SELECT CUSTOM SETTING]
[Q2] [ISO]
[Q3] [DYNAMIC RANGE]
[Q4] [WHITE BALANCE]
[Q5] [NOISE REDUCTION]
[Q6] [IMAGE SIZE]
[Q7] [IMAGE QUALITY]
[Q8] [FILM SIMULATION]
[Q9] [HIGHLIGHT TONE]
[Q10] [SHADOW TONE]
[Q11] [COLOR]
[Q12] [SHARPNESS]
[Q13] [SELF-TIMER]
[Q14] [AF MODE]
[Q15] [FLASH MODE]
[Q16] [EVF/LCD COLOR]
[POWER MANAGEMENT]
[AUTO POWER OFF] [2 MIN]
[OVF POWER SAVE MODE] [OFF]
[HIGH PERFORMANCE] [OFF]
[EDIT FILE NAME]
[sRGB] [DSCF]
[AdobeRGB] [DSF]
[WIRELESS SETTINGS]
[RESIZE IMAGE FOR SMARTPHONE ] [ON]
Factory Defaults—Setup Menu
- 222 -

[GEOTAGGING SET-UP]
[GEOTAGGING] [ON]
[LOCATION INFO] [ON]
[COLOR SPACE] [sRGB]
Factory Defaults—Setup Menu
- 223 -

Set the camera clock.
Select [DATE/TIME] in the playback menu.1.
Press the selector left or right to highlight the year, month, day, hour, or minute andpress up or down to change. To change the order in which the year, month, and day aredisplayed, highlight the date format and press the selector up or down.
2.
Press [MENU/OK] when settings are complete.3.
[DATE/TIME]
- 224 -

Switch the camera clock instantly from your home time zone to the local time at yourdestination when traveling. To specify the difference between local time and your home timezone:
Highlight [LOCAL] and press [MENU/OK].1.
Use the selector to choose the time difference between local time and your home timezone. Press [MENU/OK] when settings are complete.
2.
To set the camera clock to local time, highlight [LOCAL] and press [MENU/OK]. To set theclock to the time in your home time zone, select [HOME]. If [LOCAL] is selected, will bedisplayed for three seconds when the camera is turned on.
[TIME DIFFERENCE]
- 225 -

Choose a language.
[LANG.]
- 226 -

Reset shooting or setup menu options to default values.
Select [RESET] in the playback menu.1.
Highlight the desired option and press the selector right.2.
A confirmation dialog will be displayed; highlight [OK] and press [MENU/OK].3.
[DATE/TIME], [TIME DIFFERENCE], [SHUTTER COUNT],custom white balance,wireless network and PC auto save options, and custom settings banks created using[EDIT/SAVE CUSTOM SETTING] are not affected.
[RESET]
- 227 -

Select [ON] to disable the speaker, flash, and illuminator in situations in which camera soundsor lights may be unwelcome. appears in the display when silent mode is on.
[SILENT MODE]
- 228 -

[CONTINUOUS]
[RENEW]
New pictures are stored in image files named using a four-digit file number assigned by addingone to the last file number used. The file number is displayed during playback as shown atright. [FRAME NO.] controls whether file numbering is reset to 0001 when a new memory cardis inserted or the current memory card or internal memory is formatted.
Frame number
Directory number
File number
Numbering continues from the last file number used or the firstavailable file number, whichever is higher. Choose this option toreduce the number of pictures with duplicate file names.
Numbering is reset to 0001 after formatting or when a new memorycard is inserted.
If the frame number reaches 999-9999, the shutter release will be disabled.
Selecting [RESET] sets [FRAME NO.] to [CONTINUOUS] but does not reset the filenumber.
Frame numbers for pictures taken with other cameras may differ.
[FRAME NO.]
- 229 -

Choose the direction in which the focus ring is rotated to increase the focus distance in manualfocus mode.
[FOCUS RING]
- 230 -

The image will be magnified in the display to assist focus when the focus ring is rotated inmanual focus mode.
[FOCUS CHECK]
- 231 -

Adjust sound settings.
[OPERATION VOL.]
[SHUTTER VOLUME]
[SHUTTER SOUND]
[PLAYBACK VOLUME]
Adjust the volume of the sounds produced when camera controls are operated. Choose (mute) to disable control sounds.
Adjust the volume of the sounds produced when the shutter is released. Choose (mute)to disable the shutter sound.
Choose the sound made by the shutter.
Adjust the volume for movie playback.
[SOUND SET-UP]
- 232 -

CONTINUOUS
[1.5 SEC]/[0.5 SEC]
[OFF]
Adjust display settings.
[IMAGE DISP.]
[EVF AUTOROTATE DISPLAYS]
[PREVIEW EXP. IN MANUAL MODE]
[MONITOR SUNLIGHT MODE]
[EVF BRIGHTNESS]
[EVF COLOR]
[LCD BRIGHTNESS]
[LCD COLOR]
[PREVIEW PIC. EFFECT]
[FRAMING GUIDELINE]
[AUTOROTATE PB]
[FOCUS SCALE UNITS]
Choose how long images are displayed after shooting. Colors may differ slightly from those inthe final image.
Pictures are displayed until the [MENU/OK] button is pressedor the shutter button is pressed halfway. To zoom in on theactive focus point, press the center of the command dial; pressagain to cancel zoom.
Pictures are displayed for 1.5 seconds ([1.5 SEC]) or 0.5seconds ([0.5 SEC]) or until the shutter button is pressedhalfway.
Pictures are not displayed after shooting.
Choose whether the indicators in the viewfinder rotate to match camera orientation.
The display in the LCD monitor is unaffected.
[SCREEN SET-UP]
- 233 -

Select [ON] to enable exposure preview in manual exposure mode. Select [OFF] when using aflash or on other occasions on which exposure may change when the picture is taken.
Select [ON] to make the display in the monitor easier to read in bright light.
Press and hold the [VIEW MODE] button for monitor sunlight mode.
Adjust the brightness of the display in the electronic viewfinder, or choose [AUTO] forautomatic brightness adjustment.
Adjust the hue of the display in the electronic viewfinder.
Adjust monitor brightness.
Adjust monitor hue.
Choose [ON] to preview the effects of film simulation, white balance, and other settings in themonitor. Choose [OFF] to make shadows in low-contrast, back-lit scenes and other hard-to-seesubjects more visible.
If [OFF] is selected, the effects of camera settings will not be visible in the monitor andcolors and tone will differ from those in the final picture. The display will however beadjusted to show the effects of advanced filters and of monochrome and sepia settings.
[SCREEN SET-UP]
- 234 -

GRID 9
GRID 24
HD FRAMING
Choose the type of framing grid available in shooting mode.
For “rule of thirds” composition.
A six-by-four grid.
Frame HD pictures in the crop shown by the lines at the top andbottom of the display.
[SCREEN SET-UP]
- 235 -

Choose [ON] to automatically rotate “tall” (portrait-orientation) pictures during playback.
Choose the units used for the focus distance indicator.
[SCREEN SET-UP]
- 236 -

[Fn BUTTON]
[FOCUS AREA]
Choose the roles played by the up, down, left, and right buttons on the selector.
The selector buttons serve as function buttons.
The selector can be used to position the focus area.
[SELECTOR BUTTON SETTING]
- 237 -

Choose the items displayed in the quick menu.
Display the setup menu and select [EDIT/SAVE QUICK MENU].1.
Highlight the item you wish to change and press [MENU/OK]. You will be given thefollowing choice of items to assign to the selected position in the quick menu.
Select [NONE] to assign no item to the selected position.
When [SELECT CUSTOM SETTING] is selected, the quick menu shows currentsettings as [BASE].
2.
Highlight the desired item and press [MENU/OK] to assign it to the selected position inthe quick menu.
3.
[SELECT CUSTOM SETTING]
[ISO]
[DYNAMIC RANGE]
[WHITE BALANCE]
[NOISE REDUCTION]
[IMAGE SIZE]
[IMAGE QUALITY]
[FILM SIMULATION]
[HIGHLIGHT TONE]
[SHADOW TONE]
[COLOR]
[SHARPNESS]
[SELF-TIMER]
[FACE DETECTION]
[PHOTOMETRY]
[AF MODE]
[FLASH MODE]
[FLASH COMPENSATION]
[MF ASSIST]
[MOVIE MODE]
[MOVIE ISO]
[MIC LEVEL ADJUSTMENT]
[SILENT MODE]
[EVF/LCD BRIGHTNESS]
[EVF/LCD COLOR]
[ADVANCED FILTER]
[CONVERSION LENS]
[SHUTTER TYPE]
[ND FILTER]
[EDIT/SAVE QUICK MENU]
- 238 -

Adjust power management settings.
[AUTO POWER OFF]
[OVF POWER SAVE MODE]
[HIGH PERFORMANCE]
Choose the length of time before the camera turns off automatically when no operations areperformed. Shorter times reduce the drain on the battery; if [OFF] is selected, the cameramust be turned off manually. Note that in some situations the camera turns off automaticallyeven when [OFF] is selected.
Select [ON] to reduce power consumption and increase the number of pictures that can betaken on a single charge when pictures are framed in the optical viewfinder.
Power consumption is not reduced when the electronic viewfinder or electronic rangefinder is used.
Select [ON] for faster focus and to reduce the time needed to restart the camera after it hasbeen turned off.
[POWER MANAGEMENT]
- 239 -

View the approximate number of times the shutter has been released. Other actions may alsoincrement the counter, for example turning the camera off, changing the viewfinder displayselection, or choosing playback mode.
[SHUTTER COUNT]
- 240 -

Replace the default file name prefix (“DSCF” or “_DSF”). Enter the desired prefix, then highlight[SET] and press [MENU/OK].
[EDIT FILE NAME]
- 241 -

Adjust settings for connection to wireless networks.
[GENERAL SETTINGS]
[RESIZE IMAGE FOR SMARTPHONE]
[PC AUTO SAVE SETTINGS]
Choose a name ([NAME]) to identify the camera on the wireless network (the camera isassigned a unique name by default) or select [RESET WIRELESS SETTINGS] to restoredefault settings.
Choose [ON] (the default setting, recommended in most circumstances) to resize largerimages to for upload to smartphones, [OFF] to upload images at their original size.Resizing applies only to the copy uploaded to the smartphone; the original is not affected.
Choose [DELETE REGISTERED DESTINATION PC] to remove selected destinations,[DETAILS OF PREVIOUS CONNECTION] to view computers to which the camera hasrecently connected.
See Also
The FUJIFILM Smartphone/Tablet/Computer App (opens in another window)
[WIRELESS SETTINGS]
- 242 -

Choose an upload destination. Choose [SIMPLE SETUP] to connect using WPS, [MANUALSETUP] to configure network settings manually.
See Also
The FUJIFILM Smartphone/Tablet/Computer App (opens in another window)
[PC AUTO SAVE SETTING]
- 243 -

[GEOTAGGING]
[LOCATION INFO]
View location data downloaded from a smartphone and choose whether to save the data withyour pictures.
Choose whether location data downloaded from a smartphone areembedded in pictures as they are taken.
Display the location data last downloaded from a smartphone.
See Also
The FUJIFILM Smartphone/Tablet/Computer App (opens in another window)
[GEOTAGGING SET-UP]
- 244 -

Enter a printer name (SSID) and password for connection to an optional FUJIFILM instax SHAREprinter. See the printer manual for details.
See Also
Printer manual (PDF: )
[instax PRINTER CONNECTION SETTING]
- 245 -

sRGB
Adobe RGB
Choose the gamut of colors available for color reproduction.
Recommended in most situations.
For commercial printing.
[COLOR SPACE]
- 246 -

If a memory card is inserted in the camera, this option will format the memory card. If nomemory card is inserted, this option will format internal memory.
All data—including protected pictures—will be deleted from the memory card or internalmemory. Be sure important files have been copied to a computer or other storagedevice.
Do not open the battery-chamber cover during formatting.
[FORMAT]
- 247 -

Wireless Transfer
Copying Pictures to a Computer
Printing Pictures via USB
Viewing Pictures on TV
Connections
- 248 -

Access wireless networks and connect to computers, smartphones, or tablets. Visit the followingwebsite for information on camera wireless LAN features and on downloading related apps.
See Also
The FUJIFILM Smartphone/Tablet/Computer App (opens in another window)
Wireless Connections: Smartphones
Wireless Connections: Computers
Install the “FUJIFILM Camera Remote” app on your smartphone to browse the images on thecamera, download selected images, control the camera remotely, or copy location data to thecamera. To connect to the smartphone, press the camera [Wi-Fi] button in playback mode.
At default settings, [WIRELESS COMMUNICATION] is assigned to the [Wi-Fi] button(function button 7). For information on choosing the roles assigned to the functionbuttons, see “The Function Buttons”. You can also connect using the [WIRELESSCOMMUNICATION] options in the shooting and playback menu.
Wireless Transfer
- 249 -

Once you have installed the “FUJIFILM PC AutoSave” application and configured your computeras a destination for the images copied from the camera, you can upload pictures from thecamera using the [PC AUTO SAVE] option in the camera playback menu or by pressing andholding the [Wi-Fi] button in playback mode.
See Also
The Function Buttons ([Fn] (Function) Buttons)
[WIRELESS COMMUNICATION] (The Shooting Menu)
[PC AUTO SAVE] (The Playback Menu)
Wireless Transfer
- 250 -

Connect the camera to the computer using the supplied USB cable and copy pictures asdescribed below.
Start the computer.1.
Turn the camera off.2.
Use the supplied USB cable to connect the camera and computer.
Be sure the connectors are in the correct orientation and fully inserted. Connectthe camera directly to the computer; do not use a USB hub or keyboard.
3.
Turn the camera on.4.
Copy pictures to the computer using MyFinePix Studio or applications provided with youroperating system.
5.
MyFinePix Studio/RAW FILE CONVERTER
Use MyFinePIx Studio (available for Windows only) to copy pictures to a computer, wherethey can be viewed, organized, and printed. To view RAW images on the computer, useRAW FILE CONVERTER.
Copying Pictures to a Computer
- 251 -

If a memory card containing a large number of images is inserted, there may be a delaybefore the software starts and you may be unable to import or save images. Use amemory card reader to transfer pictures.
Make sure that the computer does not display a message stating that copying is inprogress and that the indicator lamp is out before turning the camera off ordisconnecting the USB cable (if the number of images copied is very large, the indicatorlamp may remain lit after the message has cleared from the computer display). Failureto observe this precaution could result in loss of data or damage to the memory card.
Disconnect the camera before inserting or removing memory cards.
In some cases, it may not be possible to access pictures saved to a network serverusing the supplied software in the same way as on a standalone computer.
The user bears all applicable fees charged by the phone company or Internet serviceprovider when using services that require an Internet connection.
See Also
MyFinePix Studio (opens in another window)
RAW FILE CONVERTER powered by SilkyPix (opens in another window)
Copying Pictures to a Computer
- 252 -

If the printer supports PictBridge, the camera can be connected directly to the printer andpictures can be printed without first being copied to a computer.
Connecting the Camera
Printing Selected Pictures
Printing the DPOF Print Order
Printing Pictures via USB
- 253 -

Connect the USB cable as shown and turn the printer on.1.
Turn the camera on. [USB] will be displayed in the monitor, followed by the PictBridgedisplay.
2.
Printing Pictures via USB
- 254 -

Press the selector left or right to display a picture you wish to print.
To print one copy of the current picture, proceed directly to Step 3.
1.
Press the selector up or down to choose the number of copies (up to 99). Repeat steps1–2 to select additional pictures.
2.
Press [MENU/OK] to display a confirmation dialog.3.
Press [MENU/OK] to start printing.4.
If no pictures are selected when the [MENU/OK] button is pressed, the camera willprint one copy of the current picture.
Printing the Date of Recording
To print the date of recording on pictures, press [DISP/BACK] in the PictBridge displayand select [PRINT WITH DATE] (to print pictures without the date of recording, select[PRINT WITHOUT DATE]). To ensure that the date is correct, set the camera clockbefore taking pictures. Some printers do not support date printing.
Printing Pictures via USB
- 255 -

To print the print order created with [PRINT ORDER (DPOF)] in the playback menu.
In the PictBridge display, press [DISP/BACK] to open the PictBridge menu.1.
Press the selector up or down to highlight [PRINT DPOF].2.
Press [MENU/OK] to display a confirmation dialog.3.
Press [MENU/OK] to start printing.4.
Printing Pictures via USB
- 256 -

During Printing
A message is displayed during printing. Press [DISP/BACK] to cancel before all picturesare printed (depending on the printer, printing may end before the current picture hasprinted). If printing is interrupted, turn the camera off and then on again.
Disconnecting the Camera
Confirm that the above message is not displayed and turn the camera off. Disconnect theUSB cable.
Pictures can be printed from internal memory or a memory card that has beenformatted in the camera.
When pictures are printed via direct USB connection, page size, print quality, and borderselections are made using the printer.
See Also
[PRINT ORDER (DPOF)] (The Playback Menu)
Printing Pictures via USB
- 257 -

To show pictures to a group, connect the camera to a TV using an HDMI cable (availableseparately from third-party suppliers; note that the TV can only be used for playback, notshooting).
Turn the camera off.1.
Connect the cable as shown below.
Insert into Micro HDMI connector
Insert into HDMI connector
Use an HDMI cable no more than 1.5 m (4.9 ft.) long.
Be sure the connectors are fully inserted.
2.
Tune the television to the HDMI input channel. See the documentation supplied with thetelevision for details.
3.
Turn the camera on and press button. The camera monitor turns off and pictures andmovies are played back on the TV. Note that the camera volume controls have no effecton sounds played on the TV; use the television volume controls to adjust the volume.
The USB cable can not be used while an HDMI cable is connected.
Some televisions may briefly display a black screen when movie playback begins.
4.
Viewing Pictures on TV
- 258 -

Shoe-mounted flash units
Power Supplies
Remote Releases
Conversion Lens
Stereo microphones
Other
Website of the country or region of purchase
For more information, visit the website of the country or region of purchase (the new windowwill open).
Check the website »
Accessories
- 259 -

EF-20
EF-42
EF-X20
This clip-on flash unit (powered by two AA batteries) has a Guide Number of20/65 (ISO 100, m/ft.) and supports TTL flash control. The flash head can berotated upwards 90° for bounce lighting.
This clip-on flash unit (powered by four AA batteries) has a Guide Number of42/137 (ISO 100, m/ft.) and supports TTL flash control and auto power zoom inthe range 24–105 mm (35 mm format equivalent). The flash head can be rotated90° up, 180° left, or 120° right for bounce lighting.
This clip-on flash unit (powered by two AAA alkaline or Ni-MH batteries) has aGuide Number of 20/65 (ISO 100, m/ft.). With the FUJIFILM's unique flashcontrol technology "i Flash technology", it can automatically optimize the amountof light suitable to every shooting condition. Built-in "Slave Mode" for advancedphotography.
For more information, visit the website of the country or region of purchase (the new windowwill open).
Check the website »
Shoe mount flash EF-20 Shoe mount flash EF-42 Shoe mount flash EF-X20
Shoe-mounted flash units
- 260 -

NP-95
BC-65N
Rechargeable Li-ion batteries
Battery chargers
NP-95
Additional large-capacity NP-95 rechargeable batteries can be purchased asrequired.
BC-65N
Replacement battery chargers can be purchased as required. At +20 °C/+68 °F,the BC-65N charges an NP-95 in about 240 minutes.
For more information, visit the website of the country or region of purchase (the new windowwill open).
Check the website »
Power Supplies
- 261 -

RR-90
Remote Releases RR-90
Use to reduce camera shake or keep the shutter open during a time exposure.
An optional RR-90 remote release can be used for long time-exposures.
Remote Releases
- 262 -

Third-Party Remote Releases
Electronic releases from third-party suppliers can be connected via the microphone/remoterelease connector.
A confirmation dialog will be displayed when a third-party release is connected;press [MENU/OK] and select [REMOTE] for [MIC/REMOTE RELEASE].
For more information, visit the website of the country or region of purchase (the new windowwill open).
Check the website »
Remote Releases
- 263 -

TCL-X100
WCL-X100
Tele Conversion Lens
Wide Conversion Lens
When attached to the X100T, the TCL-X100 increases the focal lengthby approximately 1.4× to 33 mm (equivalent to 50 mm in 35 mmformat).
When attached to the X100T, the WCL-X100 increases the angle ofview for wider-angle shots.
For more information, visit the website of the country or region of purchase (the new windowwill open).
Check the website »
Conversion Lens
- 264 -

MIC-ST1
MIC-ST1
An external microphone for movie recording.
For more information, visit the website of the country or region of purchase (the new windowwill open).
Check the website »
Stereo microphones
- 265 -

Adapter rings
Lens hoods
Protector filters
Leather cases
Hand Grip
Grip Belt
Other
- 266 -

AR-X100 An aluminum adapter ring exclusively for use with the X100T/X100S/X100.It is used when attaching the LH-X100 lens hood or φ49 mm filters availablefrom third-party suppliers.
Attaching Adapter RingsRemove the front ring.
If you have trouble removing the front ring, grip the entire ringand rotate it as shown.
1.
Other
- 267 -

Attach the adapter ring as shown, with the projections facing out.2.
Keep the front ring and lens cap in a safe place when not in use.
Attach the adapter ring before attaching LH-X100 lens hood,PRF-49S protector filter, or third-party filters.
Other
- 268 -

LH-X100 This aluminum lens hood, exclusively for use with the X100T/X100S/X100,comes with an AR-X100 adapter ring made of the same material. Theadapter ring is required when attaching the hood.
Attach the adapter ring before attaching the lens hood.
Align the indentations and rotate as shown.
Other
- 269 -

PRF-49S
LC-X100S
MHG-X100
GB-001
A protective filter exclusively for use with the X100T/X100S/X100.
Attach the adapter ring before attaching the filter.
Requires AR-X100 adapter ring.
This leather case, exclusively for use with the X100T/X100S/X100, combinespracticality with the luxury of leather and comes with a shoulder strap madeof the same material. Pictures can be taken and batteries and memory cardsinserted or removed with the camera still in its case.
To increase the camera's grip. Both battery and memory card can beswapped with the grip in place. Additionally, a tripod screw hole can beplaced in centre of the optical axis and the base parts are equipped with a38mm width dovetail protrusion plate, allowing use as a quick shoe mountwhen using a dovetail groove tripod pedestal.
GB-001 enhances the camera's hold, allowing users to carry the camerafirmly with just one hand.
For more information, visit the website of the country or region of purchase (the new windowwill open).
Check the website »
Other
- 270 -

Select the website of your country or region (the new window will open).
Country/Region Country/Region
Country/Region Country/Region
Country/Region
Website of the country or region of purchase
- 271 -

For Your Safety
For Your Safety
- 272 -

Safety precautions are described in the following pdf:
See Also
For Your Safety (PDF: )
For Your Safety
- 273 -

Troubleshooting/FAQ
Warning Messages and Displays
Specifications
Links
Restrictions on Camera Settings
Appendix
- 274 -

Power and Battery
Menus and Displays
Shooting
Playback
Connections/Miscellaneous
Problem Solution
The camera does notturn on.
The battery is exhausted: Charge the battery or insert a fully-charged spare battery.
The battery is inserted incorrectly: Reinsert in the correctorientation.
The battery-chamber cover is not latched: Latch the battery-chamber cover.
The camera was turned on immediately after having beenturned off: Press the shutter button halfway.
The battery runs downquickly.
The battery is cold: Warm the battery by placing it in a pocketor other warm place and reinsert it in the camera immediatelybefore taking a picture.
There is dirt on the battery terminals: Clean the terminals witha soft, dry cloth.
The battery has been charged many times: The battery hasreached the end of its charging life. Purchase a new battery.
[C] is selected for focus mode: Select a different focus mode.
The camera turns offsuddenly.
The battery is exhausted: Charge the battery or insert a fully-charged spare battery.
The camera has entered sleep mode: Press the shutter buttonhalfway.
Charging does not start.Reinsert the battery in the correct orientation and make sure thatthe charger is plugged in.
Charging is slow. Charge the battery at room temperature.
Troubleshooting/FAQ
- 275 -

Problem Solution
The charging lampblinks, but the batterydoes not charge.
There is dirt on the battery terminals: Clean the terminals witha soft, dry cloth.
The battery has been charged many times: The battery hasreached the end of its charging life. Purchase a new battery. Ifthe battery still fails to charge, contact your FUJIFILM dealer.
Problem Solution
Menus and displays are not in English. Select [ENGLISH] for [ ].
Problem Solution
No picture is taken when theshutter button is pressed.
Memory is full: Insert a new memory card or deletepictures.
Memory is not formatted: Format the memory card orinternal memory.
There is dirt on the memory card contacts: Clean thecontacts with a soft, dry cloth.
The memory card is damaged: Insert a new memory card.
The battery is exhausted: Charge the battery or insert afully-charged spare battery.
The camera has turned off automatically: Turn the cameraon.
The indicator lamp was orange when you attempted torecord a panorama: Wait until the indicator lamps turnsoff.
The display goes dark aftershooting.
The display may darken while the flash charges. Wait for theflash to charge.
Mottling (“noise”) appears inthe monitor or viewfinderwhen the shutter button ispressed halfway.
Gain is increased to aid composition when the subject ispoorly lit and aperture is stopped down, which may resultin noticeable mottling when images are previewed in thedisplays. Images taken with the camera are unaffected.
Troubleshooting/FAQ
- 276 -

Problem Solution
The camera does not focus.
The subject is close to the camera: Select macro mode.
The subject is far away from the camera: Cancel macromode.
The subject is not suited to autofocus: Use focus lock.
No face is detected.
The subject’s face is obscured by sunglasses, a hat, longhair, or other objects: Remove the obstructions.
The subject’s face occupies only a small area of the frame:Change the composition so that the subject’s face occupiesa larger area of the frame.
The subject’s head is tilted or horizontal: Ask the subject tohold their head straight.
The camera is tilted: Keep the camera level.
The subject’s face is poorly lit: Shoot in bright light.
Wrong subject is selected.The selected subject is closer to the center of the frame thanthe main subject. Recompose the picture or turn facedetection off and frame the picture using focus lock.
The flash does not fire.
The flash is charging: Wait for the flash to charge beforepressing the shutter button.
The flash is off: Choose a different flash mode.
The battery is exhausted: Charge the battery or insert afully-charged spare battery.
The camera is in bracketing or continuous mode: Selectsingle frame mode.
The camera is in silent mode: Turn silent mode off.
Some flash modes are notavailable.
The camera is in silent mode: Turn silent mode off.
The flash does not fully lightthe subject.
The subject is not in range of the flash: Position thesubject in range of the flash.
The flash window is obstructed: Hold the camera correctly.
Shutter speed is faster than 1/2000 s: Choose a slowershutter speed.
Troubleshooting/FAQ
- 277 -

Problem Solution
Pictures are blurred.
The lens is dirty: Clean the lens.
The lens is blocked: Keep objects away from the lens.
is displayed during shooting and the focus frame isdisplayed in red: Check focus before shooting.
Pictures are mottled.
A slow shutter speed is selected at high temperatures: Thisis normal and does not indicated a malfunction.
The camera has been used continuously at hightemperatures or a temperature warning is displayed: Turnthe camera off and wait for it to cool down.
The viewfinder display is notclear.
Diopter adjustment is not adjusted correctly: Slide thediopter adjustment control up and down until theviewfinder display is in sharp focus.
Sounds made by the cameraare recorded with movies.
The focus mode selector is set to [C]. Select a differentfocus mode.
Intelligent Face Detection is on: Turn Intelligent FaceDetection off.
Problem Solution
Pictures are grainy. The pictures were taken with a different make or model of camera.
Playback zoomunavailable.
The picture has been saved at , or is from another make ormodel of camera.
No sound in movieplayback.
The camera is in silent mode: Turn silent mode off.
Playback volume is too low: Adjust playback volume.
The microphone was obstructed: Hold the camera correctlyduring recording.
The speaker is obstructed: Hold the camera correctly duringplayback.
Selected pictures arenot deleted.
Some of the pictures selected for deletion are protected. Removeprotection using the device with which it was originally applied.
File numbering isunexpectedly reset.
The battery-chamber cover was opened while the camera was on.Turn the camera off before opening the battery-chamber cover.
Troubleshooting/FAQ
- 278 -

Problem Solution
No picture or sound.
The camera is not properly connected: Connect the cameraproperly. Note that once the camera is connected, pictures willbe displayed on the TV instead of in the camera monitor.
Input on the television is set to “TV”: Set input to “HDMI”.
The volume on the TV is too low: Adjust the volume.
The computer does notrecognize the camera.
Be sure the camera and computer are correctly connected.
Can not transfer RAW orJPEG files to computer.
Use MyFinePix Studio to transfer pictures (Windows only).
Pictures can not beprinted.
The camera is not properly connected: Connect the cameracorrectly.
The printer is off: Turn the printer on.
Only one copy isprinted/the date is notprinted.
The printer is not PictBridge compatible.
The camera isunresponsive.
Temporary camera malfunction: Remove and reinsert thebattery.
The battery is exhausted: Charge the battery or insert a fully-charged spare battery.
The camera does notfunction as expected.
Remove and reinsert the battery. If the problem persists, contactyour FUJIFILM dealer.
No sound. Turn silent mode off.
The hybrid viewfinderdoes not function asexpected.
The viewfinder is temporarily malfunctioning due to an impactcaused, for example, by the camera being dropped: Turn thecamera on and then off again.
Troubleshooting/FAQ
- 279 -

The following warnings are displayed in the LCD monitor:
Warning Description
(red)Low battery. Charge the battery or insert a fully-charged sparebattery.
(blinks red)Battery exhausted. Charge the battery or insert a fully-chargedspare battery.
(displayed in red with redfocus frame)
The camera can not focus. Try one of the following solutions:
Use focus lock to focus on another subject at the samedistance, then recompose the picture.Use macro mode to focus when taking close-ups.
Aperture or shutterspeed displayed in red
The subject is too bright or too dark and the picture will be over-or under-exposed. If the subject is dark, use the flash.
[FOCUS ERROR]
Camera malfunction. Turn the camera off and then on again. Ifthe message persists, contact a FUJIFILM dealer.
[TURN OFF THECAMERA AND TURN
ON AGAIN]
[LENS CONTROLERROR]
[CARD NOTINITIALIZED]
The memory card or internal memory is not formattedor the memory card was formatted in a computer orother device: Format the memory card or internal memoryusing the [FORMAT] option in the camera setup menu.The memory card contacts require cleaning: Clean thecontacts with a soft, dry cloth. If the message is repeated,format the card. If the message persists, replace the card.Camera malfunction: Contact a FUJIFILM dealer.
[PROTECTED CARD] The memory card is locked. Unlock the card.
[BUSY]The memory card is incorrectly formatted. Use the camera toformat the card.
Turn the camera off and wait for it to cool. If no action is taken,the camera will turn off automatically.
[CARD ERROR]The memory card is not formatted for use in the camera. Formatthe card.
Warning Messages and Displays
- 280 -

Warning Description
The memory card contacts require cleaning or the memory cardis damaged. Clean the contacts with a soft, dry cloth. If themessage is repeated, format the card. If the message persists,replace the card.
Incompatible memory card. Use a compatible card.
Camera malfunction. Contact a FUJIFILM dealer.
[MEMORY FULL]
The memory card or internal memory is full and pictures can notbe recorded or copied. Delete pictures or insert a memory cardwith more free space.
[MEMORY FULL]
[INTERNAL MEMORYIS FULL INSERT A
NEW CARD]
[WRITE ERROR]
Memory card error or connection error: Reinsert the cardor turn the camera off and then on again. If the messagepersists, contact a FUJIFILM dealer.Not enough memory remaining to record additionalpictures: Delete pictures or insert a memory card with morefree space.The memory card or internal memory is not formatted:Format the memory card or internal memory.
[READ ERROR]
The file is corrupt or was not created with the camera:The file can not be viewed.The memory card contacts require cleaning: Clean thecontacts with a soft, dry cloth. If the message is repeated,format the card. If the message persists, replace the card.Camera malfunction: Contact a FUJIFILM dealer.
[FRAME NO. FULL]
The camera has run out of frame numbers (current framenumber is 999–9999). Format the memory card and select[RENEW] for [FRAME NO.]. Take a picture to reset framenumbering to 100–0001, then select [CONTINUOUS] for[FRAME NO.].
[TOO MANY FRAMES]
A search has returned more than 30,000 results: Choosea search that returns fewer results.More than 999 images are selected for deletion: Choosefewer images.
[PROTECTED FRAME]An attempt was made to delete or rotate to a protected picture.Remove protection and try again.
[CAN NOT crop] pictures can not be cropped.
[CAN NOT crop] The picture is damaged or was not created with the camera.
Warning Messages and Displays
- 281 -

Warning Description
[CANNOTEXECUTE]
An attempt was made to create a resized copy at a size equal toor larger than the original. Choose a smaller size.
[CANNOTEXECUTE]
[CANNOTEXECUTE]
[CAN NOT ROTATE] An attempt was made to rotate a picture that can not be rotated.
[CAN NOTROTATE]
Movies can not be rotated.
[CANNOTEXECUTE]
Red-eye removal can not be applied to the selected picture.
[CANNOTEXECUTE]
Red-eye removal can not be applied to movies.
[NO CARD]No memory card inserted when [COPY] is selected. Insert amemory card.
[NO IMAGE]The source selected for [COPY] contains no images. Select adifferent source. [NO IMAGE]
[DPOF FILE ERROR]The DPOF print order on the current memory card contains morethan 999 images. Copy the pictures to internal memory andcreate a new print order.
[CAN NOT SET DPOF] The picture can not be printed using DPOF.
[CAN NOT SETDPOF]
Movies can not be printed using DPOF.
[COMMUNICATIONERROR]
A connection error occurred while pictures were being printed orcopied to a computer or other device. Confirm that the device isturned on and that the USB cable is connected.
[PRINTER ERROR]Printer out of paper or ink, or other printer error. Check printer(see printer manual for details). To resume printing, turn theprinter off and then turn it back on.
[PRINTER ERRORRESUME?]
Printer out of paper or ink, or other printer error. Check printer(see printer manual for details). If printing does not resumeautomatically, press [MENU/OK] to resume.
Warning Messages and Displays
- 282 -

Warning Description
[CANNOT BEPRINTED]
An attempt was made to print a movie, a picture not createdwith the camera, or a picture in a format not supported by theprinter. Movies and some pictures created with other devices cannot be printed; if the picture is a still picture created with thecamera, check the printer manual to confirm that the printersupports the JFIF–JPEG or Exif–JPEG format. If it does not, thepictures can not be printed.
Warning Messages and Displays
- 283 -

Model Name FUJIFILM X100T
Number ofeffective pixels
16.3 million pixels
Image sensor 23.6mm × 15.6mm (APS-C) X-Trans CMOS II with primary color filter
Storage mediaInternal memory (approx. 55MB)SD memory card / SDHC memory card / SDXC (UHS-I) memorycard
File format
still imageJPEG (Exif Ver 2.3) , RAW (RAF format), RAW+JPEG (Design rulefor Camera File system compliant / DPOF-compatible)
movieMOV (H.264, Audio : Linear PCM / stereo sound)
Number ofrecorded pixels
L(3:2) 4896 × 3264 / (16:9) 4896 × 2760 / (1:1) 3264 × 3264
M(3:2) 3456 × 2304 / (16:9) 3456 × 1944 / (1:1) 2304 × 2304
S(3:2) 2496 × 1664 / (16:9) 2496 × 1408 / (1:1) 1664 × 1664
<Motion Panorama>
180°Vertical : 9600 × 2160Horizontal : 9600 × 1440
120°Vertical: 6400 × 2160Horizontal: 6400 × 1440
Lens
nameFujinon Single focal length lens
focal lengthf=23mm, equivalent to 35mm on a 35mm format
full-apertureF2
constitution6 groups 8 lenses (1 aspherical glass molded lenses included)
Aperture F2.0 – F16 1/3EV step (controlled with 9-blade aperture diaphragm)
1
2
Specifications
- 284 -

Focus distance(from lenssurface)
NormalApprox. 50cm / 1.6 ft. to infinity
MacroApprox.10cm - 2.0m / 3.9 in.- 6.6 ft.
Sensitivity
AUTO1 / AUTO2 / AUTO3 (Control available up to ISO6400),Equivalent to ISO 200 - 6400 (Standard Output Sensitivity)Extended output sensitivity equivalent to ISO 100, 12800, 25600 and51200
Exposure control TTL 256-zone metering, Multi / Spot / Average
Exposure modeProgrammed AE, Shutter priority AE, Aperture priority AE, Manualexposure
Face detection YES
Exposurecompensation
-3.0EV – +3.0EV 1/3EV step
Shutter speed
Mechanical Shutter(P mode) 4 sec. to 1/4000* sec., (All other modes) 30 sec. to1/4000* sec.Bulb (max.60min.), Time 2 sec. to 30 sec.
Electronic Shutter 1 sec. to 1/32000* sec. (P / A / S /M mode) Bulb / Time 1 sec. fixed
Mechanical + Electronic Shutter (P mode) 4 sec. to 1/32000* sec., (All other modes) 30 sec. to1/32000* sec.Bulb (max.60min.), Time 2 sec. to 30 sec.Mechanical Shutter : Bulb - Mechanical Shutter limitElectronic Shutter : Mechanical Shutter limit - 1/32000
* F2 up to 1/1000 sec., 1/4000 sec. at F8 or smaller aperture
Continuousshooting
TOPHigh : approx. 6.0 fps (max. 25 frames)
Low : approx. 3.0 fps (up to the capacity of the card)
* Max. number of frames can be shot in JPEG setting
LAST-
Best Frame capture-
3
3
Specifications
- 285 -

Auto bracketing
AE Bracketing: ±1/3EV, ±2/3EV, ±1EV
Film Simulation Bracketing: Any 3 type of Film Simulation selectable
Dynamic Range Bracketing: 100% / 200% / 400%
ISO sensitivity Bracketing: ±1/3EV, ±2/3EV, ±1EV
White Balance Bracketing (±1, ±2, ±3)
Focus
modeSingle AF / Continuous AF / MF
typeIntelligent Hybrid AF (TTL contrast AF / TTL phase detection AF), AFassist illuminator available
AF frame selectionMulti / Area
White balance
Automatic scene recognition
PresetFine, Shade, Fluorescent light (Daylight), Fluorescent light (WarmWhite), Fluorescent light (Cool White), Incandescent light,Underwater, Custom, Color temperature selection
Self-timer 10 sec. / 2 sec. delay
Interval timershooting
Yes (Setting: Interval, Number of shots, Startinng time)
Flash
Auto flash (Super Intelligent Flash)Effective range : (ISO 1600)Approx. 50 cm - 9 m / 1.6 ft. - 29.5 ft.
Flash modes
Red-eye Removal OFFAuto, Forced Flash, Suppressed Flash, Slow Synchro, Commander
Red-eye Removal ONRed-eye Reduction Auto, Red-eye Reduction & Forced Flash,Suppressed Flash, Red-eye Reduction & Slow Synchro, Commander
Hot shoe Yes (Dedicated TTL Flash compatible)
Specifications
- 286 -

Viewfinder
Hybrid viewfinderOptical viewfinder (OVF)
Reverse Galilean viewfinder with electronic bright frame display0.5 x magnificationsCoverage of frame area vs. capturing area : approx. 92%
Electronic viewfinder (EVF)0.48-in., Approx. 2,360K-dot color LCD viewfinderCoverage of viewing area vs. capturing area : approx. 100%0.65 x magnifications
Electronic rangefinder (ERF)Displays the enlarged focus area on the optical viewfinder
Eye sensor installedEye point
Approx. 15 mm
Diopter adjustment-2 - +1 m (dpt)
LCD monitor3.0-inch, aspect ratio 3:2 approx. 1040K-dot, TFT color LCD monitor(Approx. 100% coverage)
Movie recording1920 × 1080 pixels / 1280 × 720 pixels (60 fps, 50 fps, 30 fps, 25 fps,24 fps) with stereo sound
Photographyfunctions
Face Detection, Select Custom setting, Shutter Type, Conversion Lens,Auto Red-eye Removal, Color, Sharpness, Highlight Tone, Shadow Tone,Noise Reduction, Dynamic Range, Multiple Exposure, Motion Panorama,Film Simulation (PROVIA/STANDARD, Velvia/VIVID, ASTIA/SOFT,CLASSIC CHROME, PRO Neg Hi, PRO Neg. Std, MONOCHROME,MONOCHROME+Ye FILTER, MONOCHROME+R FILTER,MONOCHROME+G FILTER, SEPIA) , Advanced filter (Toy camera /Miniature / Pop color / High-key / Low-key / Dynamic tone / Partial color/ Soft focus), Electronic level, Histogram display, Framing guideline,Frame No. memory, Pre-AF, Focus Check, Focus Peak Highlight, DigitalSplit Image™ , Release/Focus Priority, Instant AF Setting, InterlockSpot AE & Focus Area, Edit/Save Quick Menu, Corrected AF Frame, 7Function Buttons
Playbackfunctions
RAW Conversion, Erase, Crop, Resize, Protect, Image Rotate, AutoRed-eye Removal, Slide Show, Photobook Assist, Mark For Upload To,Image Search, Copy, Panorama, Favorites, Face Detection, Multi-frameplayback (with micro thumbnail), Histogram display, Exposure warning,Autorotate Playback
Other functions
PictBridge, Exif Print, 35 Languages, Date/Time, Time difference,Shutter sound, Silent mode, Quick start Mode, High Performance,Preview exp. in Manual mode, Monitor sunlight mode, EVF Brightness,EVF Color, LCD Brightness, LCD Color, Preview Pic. Effect, DISP. CustomSetting, Shutter Count, OVF Power Save Mode, Auto Power OFF
-1
4
Specifications
- 287 -

Wirelesstransmitter
StandardIEEE 802.11b / g / n (standard wireless protocol)
Access modeInfrastructure
Wirelessfunction
Geotagging, Wireless communication (Image transfer), View & ObtainImages, Remote camera shooting, instax printer print, PC Autosave
Terminal
Video output-
Digital interfaceUSB2.0 (High-Speed) / micro USB terminal* connectable with Remote Release RR-90 (sold separately)
HDMI outputHDMI Micro connector (Type D)
Audio inputMicrophone / shutter release input: Ø2.5mm, stereo mini connector
Power supply NP-95 Li-ion battery (included)
Dimensions126.5mm (W) × 74.4mm (H) × 52.4mm (D) / 5.0in. (W) × 2.9in. (H) ×2.1in. (D)(Minimum Depth : 31.0mm / 1.2 in.)
Weight
Approx. 440g / 15.5 oz. (including battery and memory card)
Approx. 400g / 14.1 oz. (excluding accessories, battery and memorycard)
OperatingTemperature
0 – 40°C (+32°F – +104°F)
OperatingHumidity
10 – 80% (no condensation)
Guide to thenumber ofavailable framesfor batteryoperation
Approx. 330 frames (up to 700 frames when OVF POWER SAVE MODEis ON)
3
5
Specifications
- 288 -

Accessoriesincluded
Li-ion battery NP-95
Battery charger BC-65N
Shoulder strap
USB cable
Lens cap
Metal strap clip
Protective cover
Clip attaching tool
Owner’s Manual(Basic Operations)
Optionalaccessories
Hand Grip MHG-X100
Li-ion Battery NP-95
Battery Charger BC-65N
Leather Case LC-X100S, LC-X100S B
Wide Conversion Lens WCL-X100S, WCL-X100B
Tele Conversion Lens TCL-X100S, TCL-X100B
Lens Hood LH-X100, LH-X100 B
Adapter Ring AR-X100, AR-X100 B
Shoe Mount Flash EF-20, EF-42, EF-X20
Protector Filter PRF-49S
Stereo Microphone MIC-ST1
Remote Release RR-90
Grip Belt GB-001
1 Please see the Fujifilm website (Memory Cards) to check memory card compatibility.
2 Exif 2.3 is a digital camera file format that contains a variety of shooting information foroptimal printing.
3 The Electronic Shutter may not be suitable for fast-moving objects. Flash can not be used.
4 Digital Split Image is a trademark or a registered trademark of FUJIFILM Corporation.
5 Approximate number of frames / period that can be taken with a fully-charged battery basedon CIPA standard.
6 Lens hood or Adapter Ring required.
6
Specifications
- 289 -

For more information on FUJIFILM digital camera, visit our websites (the new window willopen).
Optional accessories and support information can be found on the following website.
The FUJIFILM app gives you more opportunities to enjoy your pictures on smart phones,tablets, and computers.
MyFinePix Studio (Windows only) can be used to copy pictures to a computer, where theycan be stored, viewed, organized, and printed.
RAW FILE CONVERTER can be used to view RAW images on your computer.
Links
- 290 -

The following table lists the settings available in each mode.
See Also
Restrictions on Camera Settings (PDF: )
Restrictions on Camera Settings
- 291 -