
ONESOURCE STATE APPORTIONMENT - Reuterssupport.rg.thomsonreuters.com/osa/osaug.pdf · 5 Reporting...
323
TAX & ACCOUNTING ® 2009 Thomson Reuters/ONESOURCE. All Rights Reserved. Last Updated September 2009 ONESOURCE ™ STATE APPORTIONMENT User Guide
Transcript of ONESOURCE STATE APPORTIONMENT - Reuterssupport.rg.thomsonreuters.com/osa/osaug.pdf · 5 Reporting...

TAX & ACCOUNTING ® 2009 Thomson Reuters/ONESOURCE. All Rights Reserved.
Last Updated September 2009
ONESOURCE™
STATE APPORTIONMENT User Guide

ONESOURCE STATE APPORTIONMENT Version 2.0 User Guide
User Guide ® 2009 Thomson Reuters/ONESOURCE
(Last Updated September 2009) 2 All Rights Reserved
Proprietary Materials
No use of these Proprietary materials is permitted without the express written consent of or license from
©1999-2009, Thomson Reuters/ONESOURCE. Altering, copying, distributing, or reproducing any of
these proprietary materials in any manner is expressly prohibited.
Software License Agreement
The right to use the software product described in this workbook is specifically conditioned upon your
execution of and compliance with the Tax License Agreement with ©1999-2009, Thomson
Reuters/ONESOURCE.
All contents copyright ©1999-2009, Thomson Reuters/ONESOURCE.

ONESOURCE STATE APPORTIONMENT Version 2.0 User Guide
User Guide ® 2009 Thomson Reuters/ONESOURCE
(Last Updated September 2009) 3 All Rights Reserved
Contents
Contents ....................................................................................................................................................... 3
Technical Support ....................................................................................................................................... 8
Getting Support ................................................................................................................................................... 8
Online Help........................................................................................................................................................... 8
Managing Product Updates and Releases ........................................................................................................ 8
1 Overview .............................................................................................................................................. 9
1.1 What is OSA? .............................................................................................................................................. 9
1.1.1 Product Features .............................................................................................................................. 9
1.2 OSA Workflow ........................................................................................................................................... 11
1.2.1 Typical Users and Roles ................................................................................................................ 11 1.2.2 User Permissions ........................................................................................................................... 11 1.2.3 Initial Setup .................................................................................................................................... 12
1.3 OSA at a Glance: A Visual Overview ....................................................................................................... 13
1.4 Annual Review/Preparing for the Current Year ...................................................................................... 20
2 Logging In and User Options ........................................................................................................... 22
2.1 Logging In and Initial Display .................................................................................................................. 22
2.1.1 Thomson Reuters-Hosted Customers ............................................................................................ 22 2.1.2 Self-Hosted Customers .................................................................................................................. 24
2.2 Changing Your Password ........................................................................................................................ 26
2.2.1 Thomson Reuters-Hosted Customers ............................................................................................ 26 2.2.2 Self-Hosted Customers .................................................................................................................. 26
2.3 Viewing Your User Profile ........................................................................................................................ 26
3 Entering Apportionment Data .......................................................................................................... 27
3.1 Understanding Data Entry ........................................................................................................................ 27
3.1.1 Permissions.................................................................................................................................... 28 3.1.2 Ownership and Data Flow .............................................................................................................. 29 3.1.3 Account Data Types ....................................................................................................................... 29 3.1.4 Keeping an Audit Trail .................................................................................................................... 31 3.1.5 Apportionment Data Entry Process ................................................................................................ 32
3.2 Selecting the Entity, Division, or Group.................................................................................................. 32
3.3 Entering and Saving Apportionment Data .............................................................................................. 33
3.3.1 Apportionment Data Entry Page Display ........................................................................................ 34 3.3.2 Entering Elimination Data ............................................................................................................... 38 3.3.3 Recovering from a Data Entry Error ............................................................................................... 39 3.3.4 Editing Entity/Group Properties ...................................................................................................... 40 3.3.5 Data Entry Troubleshooting ........................................................................................................... 40
ONESOURCE STATE APPORTIONMENT Version 2.0 User Guide
User Guide ® 2009 Thomson Reuters/ONESOURCE
(Last Updated September 2009) 4 All Rights Reserved
3.4 Using the Event History Logs .................................................................................................................. 41
3.4.1 Data Entry History Mode Log ......................................................................................................... 42 3.4.2 Properties Page Event History Log ................................................................................................ 48
3.5 Confirming Account Totals Match Source Document(s) ....................................................................... 53
3.5.1 Reviewing the Apportionment Data Entry Page ............................................................................. 54 3.5.2 Reviewing the Apportionment Calculation Page ............................................................................ 55 3.5.3 Exporting Data to Excel .................................................................................................................. 58 3.5.4 Running a Report ........................................................................................................................... 59
4 Reviewing Calculations .................................................................................................................... 60
4.1 Overview .................................................................................................................................................... 60
4.2 Displaying the Apportionment Calculation Page ................................................................................... 61
4.3 Reviewing the Calculations ...................................................................................................................... 62
4.3.1 Display Options .............................................................................................................................. 64 4.3.2 Exporting to Excel .......................................................................................................................... 65
5 Reporting ........................................................................................................................................... 66
5.1 Overview .................................................................................................................................................... 66
5.2 Report Descriptions .................................................................................................................................. 67
5.2.1 Reports and Permissions ............................................................................................................... 67 5.2.2 Report Summary ............................................................................................................................ 67 5.2.3 Report Detail .................................................................................................................................. 69
5.3 Running Reports ....................................................................................................................................... 92
6 Updating Data Elements ................................................................................................................... 96
6.1 About Entities, Ownership, and Groups ................................................................................................. 96
6.2 Adding an Entity ....................................................................................................................................... 98
6.3 Editing an Entity ...................................................................................................................................... 101
6.3.1 Editing an Entity Using the Entities Page ..................................................................................... 101 6.3.2 Editing Entities Using the Entity Properties Page ......................................................................... 109 6.3.3 Aligning Jurisdictions .................................................................................................................... 115
6.4 Defining Ownership ................................................................................................................................ 116
6.4.1 Understanding the Display ........................................................................................................... 117 6.4.2 Adding an Owner, Owned Entity, or Division ............................................................................... 119 6.4.3 Removing an Owner, Owned Entity, or Division........................................................................... 121
6.5 Adding/Editing Groups ........................................................................................................................... 123
6.5.1 Accessing the Groups Page ......................................................................................................... 123 6.5.2 Adding Groups ............................................................................................................................. 124 6.5.3 Editing Groups ............................................................................................................................. 127
7 Updating Tax Rules ......................................................................................................................... 140
7.1 About Tax Rules ...................................................................................................................................... 140
7.2 Adding and Editing Tax Rules ............................................................................................................... 141

ONESOURCE STATE APPORTIONMENT Version 2.0 User Guide
User Guide ® 2009 Thomson Reuters/ONESOURCE
(Last Updated September 2009) 5 All Rights Reserved
7.3 Editing Options and Rates ..................................................................................................................... 142
7.4 Specifying Included/Excluded Accounts .............................................................................................. 149
7.5 Specifying Included/Excluded Parent Accounts .................................................................................. 150
7.6 Defining Flow-Through Rules ................................................................................................................ 152
8 Updating the System Configuration .............................................................................................. 156
8.1 Adding/Editing OSA Jurisdictions ........................................................................................................ 156
8.2 Adding Ownership Categories ............................................................................................................... 159
8.3 Editing the Account Structure ............................................................................................................... 161
8.4 Editing Entity Account Filters ................................................................................................................ 168
8.5 Adding Date Tags ................................................................................................................................... 172
9 Updating Users and Permissions .................................................................................................. 173
9.1 Understanding User Security ................................................................................................................. 173
9.2 Adding and Managing Users .................................................................................................................. 176
9.2.1 Adding Users................................................................................................................................ 177 9.2.2 Removing Users ........................................................................................................................... 181 9.2.3 Inactivating/Activating Users ........................................................................................................ 182 9.2.4 Editing User Information ............................................................................................................... 183
9.3 Specifying User Permissions ................................................................................................................. 183
9.3.1 Copying Permissions to Other Users ........................................................................................... 187
10 Entering State Data ......................................................................................................................... 189
10.1 Understanding Data Entry ...................................................................................................................... 189
10.1.1 Permissions.................................................................................................................................. 190 10.1.2 Ownership and Data Flow ............................................................................................................ 191 10.1.3 Account Data Types ..................................................................................................................... 191 10.1.4 Keeping an Audit Trail .................................................................................................................. 191 10.1.5 State Data Entry Process ............................................................................................................. 191
10.2 Selecting the Entity, Division, or Group................................................................................................ 192
10.3 Entering and Saving State Data ............................................................................................................. 193
10.3.1 State Data Entry Page Display ..................................................................................................... 194 10.3.2 Recovering from a Data Entry Error ............................................................................................. 195 10.3.3 Editing Entity/Group Properties .................................................................................................... 195
10.4 Using the Event History Logs ................................................................................................................ 196
10.4.1 Data Entry History Mode Log ....................................................................................................... 196 10.4.2 Properties Page Event History Log .............................................................................................. 196
10.5 Confirming Totals Match Source Document(s) .................................................................................... 196
10.5.1 Reviewing the State Data Entry Page .......................................................................................... 197 10.5.2 Reviewing the State Calculation Page ......................................................................................... 198 10.5.3 Exporting Data to Excel ................................................................................................................ 199
10.6 Displaying the State Data Calculation Page ......................................................................................... 200

ONESOURCE STATE APPORTIONMENT Version 2.0 User Guide
User Guide ® 2009 Thomson Reuters/ONESOURCE
(Last Updated September 2009) 6 All Rights Reserved
11 Planning ........................................................................................................................................... 203
11.1 Getting Started ........................................................................................................................................ 203
11.1.1 Entities ......................................................................................................................................... 203 11.1.2 Groups ......................................................................................................................................... 203 11.1.3 Ownership Structure .................................................................................................................... 203 11.1.4 Accounts ...................................................................................................................................... 203 11.1.5 Data ............................................................................................................................................. 204
11.2 Planning Basics ...................................................................................................................................... 204
11.2.1 Creating Scenarios ....................................................................................................................... 204 11.2.2 Populating Scenarios ................................................................................................................... 209 11.2.3 Comparing Scenarios ................................................................................................................... 212
11.3 Planning Examples ................................................................................................................................. 218
11.3.1 Planning Tax Rule Changes ........................................................................................................ 218 11.3.2 Planning Filing Changes .............................................................................................................. 219 11.3.3 Planning Structure Changes ........................................................................................................ 220 11.3.4 Planning Forecast Changes ......................................................................................................... 221
A System Monitoring .......................................................................................................................... 222
A.1 Viewing Event History ............................................................................................................................ 222
A.1.1 Filtering the Event History Log ..................................................................................................... 225 A.1.2 Viewing Event Details (Before and After Values) ......................................................................... 229 A.1.3 Exporting to Excel ........................................................................................................................ 231
A.2 Terminating Active User Sessions ........................................................................................................ 232
A.3 Managing System Messages ................................................................................................................. 234
A.4 Running Diagnostics .............................................................................................................................. 235
A.4.1 Diagnostics Report Descriptions .................................................................................................. 237
B Custom Data Imports ...................................................................................................................... 240
B.1 Overview .................................................................................................................................................. 240
B.2 Managing Import Templates .................................................................................................................. 241
B.2.1 Creating an Import Template ....................................................................................................... 241 B.2.2 Editing an Import Template .......................................................................................................... 242 B.2.3 Deleting an Import Template ........................................................................................................ 243
B.3 Managing Data Maps .............................................................................................................................. 244
B.3.1 Creating Data Maps ..................................................................................................................... 244 B.3.2 Inactivating/Activating Data Maps ................................................................................................ 248 B.3.3 Importing/Exporting Data Maps .................................................................................................... 248
B.4 Using a Custom Import Template .......................................................................................................... 251
C Custom Data Exports ...................................................................................................................... 253
C.1 Overview .................................................................................................................................................. 253
C.2 Managing Export Templates .................................................................................................................. 254
C.2.1 Creating an Export Template ....................................................................................................... 257

ONESOURCE STATE APPORTIONMENT Version 2.0 User Guide
User Guide ® 2009 Thomson Reuters/ONESOURCE
(Last Updated September 2009) 7 All Rights Reserved
C.2.2 Editing an Export Template .......................................................................................................... 262 C.2.3 Deleting an Export Template ........................................................................................................ 262
C.3 Managing Data Maps .............................................................................................................................. 263
C.3.1 Creating Data Maps ..................................................................................................................... 264 C.3.2 Inactivating/Activating Data Maps ................................................................................................ 268 C.3.3 Importing/Exporting Data Maps .................................................................................................... 269
C.4 Using a Custom Export Template .......................................................................................................... 272
D Working with CSV Files .................................................................................................................. 275
D.1 Overview .................................................................................................................................................. 275
D.2 Editing CSV Files .................................................................................................................................... 276
D.2.1 Downloading CSV Files ............................................................................................................... 277 D.2.2 Changing File Type Association ................................................................................................... 278
D.3 Importing and Exporting Files ............................................................................................................... 279
D.3.1 Exporting Files ............................................................................................................................. 280 D.3.2 Importing Files.............................................................................................................................. 284
D.4 Instructions for Populating Files ........................................................................................................... 286
D.4.1 Supporting Data ........................................................................................................................... 316
Index ......................................................................................................................................................... 321

ONESOURCE STATE APPORTIONMENT Version 2.0 User Guide
User Guide ® 2009 Thomson Reuters/ONESOURCE
(Last Updated September 2009) 8 All Rights Reserved
Technical Support
Getting Support
We want to ensure that your Thomson Reuters solution delivers value for your organization, so we offer
a variety of support services to help you during product implementation and ongoing use of our
products.
In addition to product documentation and ongoing updates of product-related tax content, we provide
product support via telephone, email, or fax from staff with expertise in product implementations and in-
depth knowledge of customer solution requirements.
► To contact technical support:
Phone: 650.469.0344
Email: [email protected]
Fax: 650.469.0344 or 877.608.5638
Hours: Monday - Friday, 6am to 6pm, PST
www.liquidengines.com/services_support.htm
Online Help
From the online help page, you can download this user guide, a ZIP file containing data import
templates, and instructions for completing tasks peripheral to OSA.
Managing Product Updates and Releases
Thomson Reuters periodically will release a product update or product-related tax content update as
well as release new versions of the product.
Thomson Reuters-Hosted Applications: when Thomson Reuters is hosting the OSA application,
updates and new releases are applied to the application during non-business hours. The onsite OSA
administrator is notified when a release is applied.
Self-Hosted Applications: when sites are self-hosting the OSA application, updates and releases are
sent to the onsite OSA administrator with instructions for installation and a description of the update or
release contents.
ONESOURCE STATE APPORTIONMENT Version 2.0 User Guide
User Guide (1.1 What is OSA?) ® 2009 Thomson Reuters/ONESOURCE
(Last Updated September 2009) 9 All Rights Reserved
1 Overview
This User Guide describes the use of the ONESOURCE State Apportionment (OSA) application.
Chapter 1 introduces OSAits features and interfaceand it includes the following sections:
1.1: What is OSA?
1.2: OSA Workflow
1.3: OSA at a Glance: A Visual Overview
1.4: Annual Review/Preparing for the Current Year
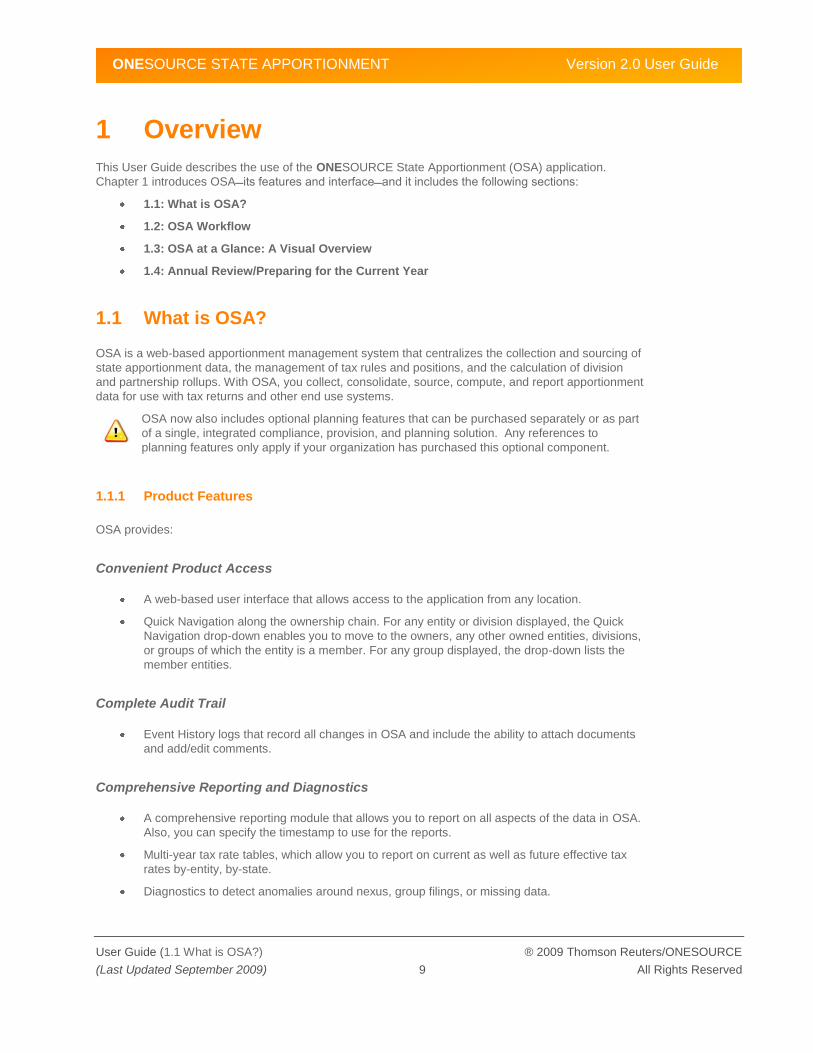
1.1 What is OSA?
OSA is a web-based apportionment management system that centralizes the collection and sourcing of
state apportionment data, the management of tax rules and positions, and the calculation of division
and partnership rollups. With OSA, you collect, consolidate, source, compute, and report apportionment
data for use with tax returns and other end use systems.
OSA now also includes optional planning features that can be purchased separately or as part
of a single, integrated compliance, provision, and planning solution. Any references to
planning features only apply if your organization has purchased this optional component.
1.1.1 Product Features
OSA provides:
Convenient Product Access
A web-based user interface that allows access to the application from any location.
Quick Navigation along the ownership chain. For any entity or division displayed, the Quick
Navigation drop-down enables you to move to the owners, any other owned entities, divisions,
or groups of which the entity is a member. For any group displayed, the drop-down lists the
member entities.
Complete Audit Trail
Event History logs that record all changes in OSA and include the ability to attach documents
and add/edit comments.
Comprehensive Reporting and Diagnostics
A comprehensive reporting module that allows you to report on all aspects of the data in OSA.
Also, you can specify the timestamp to use for the reports.
Multi-year tax rate tables, which allow you to report on current as well as future effective tax
rates by-entity, by-state.
Diagnostics to detect anomalies around nexus, group filings, or missing data.

ONESOURCE STATE APPORTIONMENT Version 2.0 User Guide
User Guide (1.1 What is OSA?) ® 2009 Thomson Reuters/ONESOURCE
(Last Updated September 2009) 10 All Rights Reserved
Customizable Data Entry Page and Instant Calculations
The ability to specify an unlimited number of apportionment accounts.
The ability to limit apportionment accounts to certain entities using the Entity Account Filters.
The ability to enter data at the division or entity level. Division data is rolled up 100% to its
parent, and the OSA interface enables you to enter the division data on its own or on the same
page as the parent entity.
Instant calculation of division and partnership rollups including multi-tier partnership
computations and rules for different state treatments.
Instant group calculation logic with member entity data rolling up to the group. OSA also allows
for data to be entered at the group level.
Instant apportionment percentage calculations. After data entry at any level (division, entity,
group), OSA flows the data appropriately based on the tax rules and ownership information to
calculate an apportionment percentage.
Data Import and Export
Import and export features that facilitate the initial OSA setup as well as data export to other
tax systems or data roll back. To facilitate set up and maintenance, you can import account
data as well as the OSA data elements such as entities, groups, ownership structure, and
more.
Robust Administrative Features
Administrative features that enable you to manage all aspects of OSA from users, to data
elements (entities, ownership structure, and groups) and the system configuration
(jurisdictions, and tax rules and options).
Pre-populated, default tax rules that you can customize when necessary in order to match up
with any filing methodology, tax law change, negotiated position, or industry-specific formula.
A flexible user permissions module that enables you to manage users and tailor their
permissions based on tab access, data type, and/or specific entities/groups.
State Data (Optional)
The ability to enter state tax return data at the legal entity, division, partnership, or group level.
Instant calculation of division and partnership state data rollups including multi-tier partnership
computations and rules for different state treatments.
Instant tax liability calculations. After entering state data at any level, OSA flows the data
appropriately and calculates tax liability based on state tax rules.
Planning (Optional)
Planning scenarios that leverage the entity structure, group filings, apportionment data, state
data, and flexible tax rules to provide unlimited ―what-if‖ modeling. Once the modeling changes
are made, we provide a powerful scenario comparison tool that allows the user to drill-down
and analyze the impact of their changes.

ONESOURCE STATE APPORTIONMENT Version 2.0 User Guide
User Guide (1.2 OSA Workflow) ® 2009 Thomson Reuters/ONESOURCE
(Last Updated September 2009) 11 All Rights Reserved
1.2 OSA Workflow
With OSA, the workflow generally follows the following model:
1. OSA Administrators perform an annual review to ensure that the OSA data elements and
system configuration apply. See section 1.4 Annual Review/Preparing for the Current Year on
page 20.
2. Preparers enter and review the apportionment data. They notify the Reviewers when the
apportionment data is ready for review. See Chapter 3, Entering Apportionment Data on page
27.
3. Reviewers review the apportionment percentage calculations to verify that the data is flowing
appropriately and that there are no anomalies. See Chapter 4, Reviewing Calculations on page
60.
4. OSA Administrator (or other designated OSA User) exports the apportionment data to be used
in compliance or other end use systems.
1.2.1 Typical Users and Roles
Typical users and roles within OSA include:
Preparers: typically, a preparer is responsible for specific entities and groups within OSA. He
or she prepares the apportionment data for their assigned entities and groups, and after
obtaining and reviewing all source documents, enters the apportionment data into OSA. After
entering all apportionment data and making any sourcing adjustments, he or she notifies the
reviewer that the apportionment data for a specific entity or group is ready for review. The
preparer may also prepare Preparer‘s Notes and attach them to the appropriate Event History
log.
Reviewers: typically, a reviewer is responsible for reviewing apportionment calculations and
finalizing the data for use.
Administrators: OSA administrators will have Full Access permissions and be able to perform
all functions within OSA, including adding users and changing their permissions. They typically
provide the first line of product support to other users and have a comprehensive
understanding of all aspects of the product. Typically, they are responsible for updating the
data elements and OSA system configuration when necessary.
Planners: For those customers who have the Planning add-on, the Planner can create
different scenarios to model different planning exercises and analyze potential impact.
1.2.2 User Permissions
Users must be defined in both the authentication server and OSA itself.
Thomson Reuters-Hosted Customers
The initial login and password for a user are defined in ONESOURCE Workstation (OSW). User
creation, permission to access OSA, and authentication happen in OSW. Users are created by the
client administrator.
When a user logs in to OSW and launches OSA, OSA checks the OSA user definition for the user‘s
settings and permissions within OSA.
ONESOURCE STATE APPORTIONMENT Version 2.0 User Guide
User Guide (1.2 OSA Workflow) ® 2009 Thomson Reuters/ONESOURCE
(Last Updated September 2009) 12 All Rights Reserved
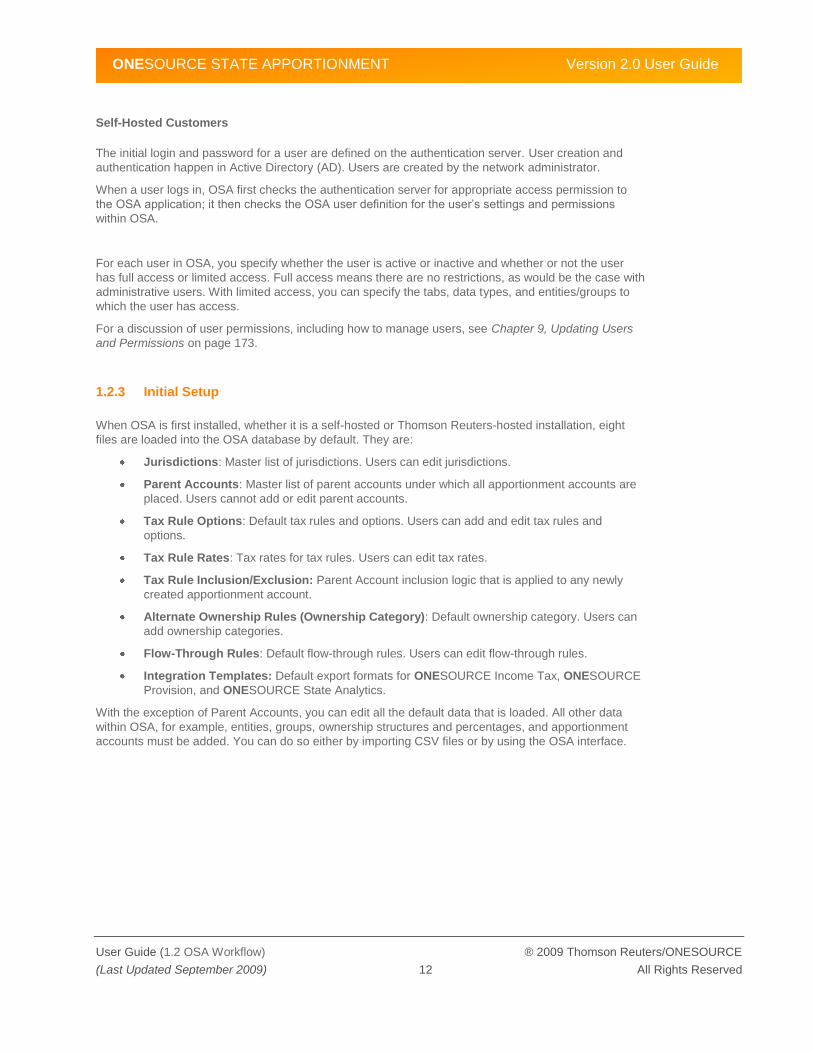
Self-Hosted Customers
The initial login and password for a user are defined on the authentication server. User creation and
authentication happen in Active Directory (AD). Users are created by the network administrator.
When a user logs in, OSA first checks the authentication server for appropriate access permission to
the OSA application; it then checks the OSA user definition for the user‘s settings and permissions
within OSA.
For each user in OSA, you specify whether the user is active or inactive and whether or not the user
has full access or limited access. Full access means there are no restrictions, as would be the case with
administrative users. With limited access, you can specify the tabs, data types, and entities/groups to
which the user has access.
For a discussion of user permissions, including how to manage users, see Chapter 9, Updating Users
and Permissions on page 173.
1.2.3 Initial Setup
When OSA is first installed, whether it is a self-hosted or Thomson Reuters-hosted installation, eight
files are loaded into the OSA database by default. They are:
Jurisdictions: Master list of jurisdictions. Users can edit jurisdictions.
Parent Accounts: Master list of parent accounts under which all apportionment accounts are
placed. Users cannot add or edit parent accounts.
Tax Rule Options: Default tax rules and options. Users can add and edit tax rules and
options.
Tax Rule Rates: Tax rates for tax rules. Users can edit tax rates.
Tax Rule Inclusion/Exclusion: Parent Account inclusion logic that is applied to any newly
created apportionment account.
Alternate Ownership Rules (Ownership Category): Default ownership category. Users can
add ownership categories.
Flow-Through Rules: Default flow-through rules. Users can edit flow-through rules.
Integration Templates: Default export formats for ONESOURCE Income Tax, ONESOURCE
Provision, and ONESOURCE State Analytics.
With the exception of Parent Accounts, you can edit all the default data that is loaded. All other data
within OSA, for example, entities, groups, ownership structures and percentages, and apportionment
accounts must be added. You can do so either by importing CSV files or by using the OSA interface.

ONESOURCE STATE APPORTIONMENT Version 2.0 User Guide
User Guide (1.3 OSA at a Glance: A Visual Overview) ® 2009 Thomson Reuters/ONESOURCE
(Last Updated September 2009) 13 All Rights Reserved
1.3 OSA at a Glance: A Visual Overview
The OSA interface consists of six tabs: Home, Reports, Import, Export, Admin, and Planning. The
majority of the features are contained in the Home and Admin tabs. Home houses the Entity/Group list
along with the Data Entry, Properties, and Calculation pages. The Admin tab houses all the data
elements, tax rules, and system configuration pages, along with the system monitoring pages. A
description of each tab is next, followed by a visual introduction to each.
Home – lists the entities, divisions, and groups you have permission to view. It enables you to
select the entity, division, or group for which you want to enter data, view properties, or view
calculations. From the Home tab, you can access the Entity/Group Properties page, the
Apportionment Data Entry page, or the State Data Entry page. You can also access the Add
Entity and Add Group dialogs if you have the appropriate permissions. From the Entity/Group
Properties page or the Apportionment Data Entry page, you can access the Apportionment
Calculation page. From the Entity/Group Properties page or the State Data Entry page, you
can access the State Calculation page.
The state data was introduced as part of the new (optional) planning functionality. See
Chapter 10, Entering State Data on page 189 for more information.
Reports – provided you have the appropriate permissions, this tab enables you to run any of
the 13 reports provided by OSA. The reports are provided in Excel or PDF file format,
depending on the report. You must allow pop-ups and file downloads in order to run/view OSA
reports.
Import – this tab provides OSA‘s import feature, which you can use for bulk data entry into
OSA. This feature is typically used during the initial set up of OSA, when you are importing
large amounts of data, both structural and account data. However, importing files can be done
at any time. In addition, this tab enables you to create the custom import templates, which
allow you to import data into OSA.
Export – this tab houses OSA‘s export feature, which allows you to export any of the 22 CSV
files, including a list of the jurisdictions defined in the system. In addition, any custom export
templates you create are listed on this tab. In addition, this tab enables you to create the
custom export templates, which allow you to export data from OSA in almost any configuration
you need.
Admin – provides the OSA administrative features and access to the OSA foundational
elements. You can view the event history log, define users and their permissions, as well as
manage user sessions and run data diagnostics. This tab also enables you to update the data
elements (entities, groups, and the ownership structure), the tax rules (options and rates,
inclusion/exclusion list, parent account inclusion/exclusion list, and flow-through rules), and the
system configuration (jurisdictions, ownership categories, account structure, and Entity
Account Filters).
Planning – this tab provides OSA‘s planning feature, which allows you to perform comparative
analysis between scenarios with differing data, structure, and rules. From the Planning tab,
you can drill down into entities and groups, change ownership structure, modify tax rules,
manage scenarios, load and save data, and compare scenarios.
Planning is an optional feature that will only be available if your organization has
purchased this component. See Chapter 11, Planning on page 203 for more
information.
From the OSA header, which is always available, you can access your User Profile, view the Help
system, or log out of OSA.

ONESOURCE STATE APPORTIONMENT Version 2.0 User Guide
User Guide (1.3 OSA at a Glance: A Visual Overview) ® 2009 Thomson Reuters/ONESOURCE
(Last Updated September 2009) 14 All Rights Reserved
Home Tab
The Home tab displays a list of the entities, divisions, and groups you have access to view. Using this
list, you can access the Apportionment Data Entry and Entity/Group Properties pages. From the
Apportionment Data Entry and Entity/Group Properties pages, you can access the Apportionment
Calculations page. Each page is shown next. You can also access the Add Entity and Add Group
dialogs if you have the appropriate permissions.
Home Tab – Apportionment Data Entry Page

ONESOURCE STATE APPORTIONMENT Version 2.0 User Guide
User Guide (1.3 OSA at a Glance: A Visual Overview) ® 2009 Thomson Reuters/ONESOURCE
(Last Updated September 2009) 15 All Rights Reserved
Home Tab – Entity/Group Properties Page
Home Tab – Apportionment Calculation Page

ONESOURCE STATE APPORTIONMENT Version 2.0 User Guide
User Guide (1.3 OSA at a Glance: A Visual Overview) ® 2009 Thomson Reuters/ONESOURCE
(Last Updated September 2009) 16 All Rights Reserved
Reports Tab
The Reports tab provides 13 reports. For report descriptions and instructions on running reports, see
Chapter 5, Reporting on page 66.

ONESOURCE STATE APPORTIONMENT Version 2.0 User Guide
User Guide (1.3 OSA at a Glance: A Visual Overview) ® 2009 Thomson Reuters/ONESOURCE
(Last Updated September 2009) 17 All Rights Reserved
Import Tab
The Import tab enables you to import OSA data using either the OSA-supported CSV files or any
custom import templates you have created. For information on working with CSV files, see Appendix D,
Working with CSV Files on page 275. For information on creating custom import templates, see
Appendix B, Custom Data Imports on page 240. After you import data, you can also run diagnostics
from this page. Diagnostics are available from this and the Admin tab. For instructions on running
diagnostics, see Appendix A, System Monitoring on page 222.

ONESOURCE STATE APPORTIONMENT Version 2.0 User Guide
User Guide (1.3 OSA at a Glance: A Visual Overview) ® 2009 Thomson Reuters/ONESOURCE
(Last Updated September 2009) 18 All Rights Reserved
Export Tab
The Export tab allows you to export OSA data using either the OSA-supported CSV files or any custom
export templates you have created. For information on working with CSV files, see Appendix D,
Working with CSV Files on page 275. For information on creating custom data export templates, see
Appendix C, Custom Data Exports on page 253.
The Output Selection pane contains the ONESOURCE State Apportionment link, which enables you to
export any of the 22 OSA-supported CSV files or as a compressed ZIP file containing the complete set
of CSV files. The ONESOURCE Rollover option enables you to export this year‘s data using the
appropriate maps so you can roll your data over in preparation for next year. The ONESOURCE section
contains 5 predefined export templates for ONESOURCE Income Tax (OIT), ONESOURCE TaxStream
Provision, and ONESOURCE State Analytics (OSX). Other headings will contain any custom export
templates you create.

ONESOURCE STATE APPORTIONMENT Version 2.0 User Guide
User Guide (1.3 OSA at a Glance: A Visual Overview) ® 2009 Thomson Reuters/ONESOURCE
(Last Updated September 2009) 19 All Rights Reserved
Admin Tab
The Admin tab allows you to update the OSA data elements (entities, ownership, and groups), the tax
rules, and the system configuration, which refers to user management, entity account filters, account
structure, jurisdiction list, ownership categories, and date tags. It also provides access to the system
monitoring feature.
For information on:
System Monitoring, see Appendix A, System Monitoring on page 222.
Data Elements, see Chapter 6, Updating Data Elements on page 96.
Tax Rules, see Chapter 7, Updating Tax Rules on page 140.
System Configuration, see Chapter 8, Updating the System Configuration on page 156.

ONESOURCE STATE APPORTIONMENT Version 2.0 User Guide
User Guide (1.4 Annual Review/Preparing for the Current Year) ® 2009 Thomson Reuters/ONESOURCE
(Last Updated September 2009) 20 All Rights Reserved
1.4 Annual Review/Preparing for the Current Year
For each tax year within OSA, you need to set up the Data Elements, Tax Rules and System
Configuration. The most convenient way to do this is to export the information from the previous year
using the ONESOURCE Rollover link, edit the CSV files, and import the edited CSV files into the new
tax year.
Therefore, at the end of each tax year, you need to review all the information within OSA‘s Data
Elements, Tax Rules, and System Configuration to determine whether or not the information is
applicable for the following year and what changes, if any, need to be made.
Appendix D, Working with CSV Files on page 275 provides detailed instructions for exporting, editing,
and importing CSV files.
Examples of what data you need to review are listed below.
Entities
Should all of the entities from the prior year be rolled over to the new tax year? In OSA you
cannot delete an entity once you create it. Therefore, when doing your annual review, you
should delete any inactive entities from the CSV files before importing them into OSA.
Are there any new entities or divisions that need to be added?
Any entities or divisions that were sold, liquidated, or dissolved?
Were there any changes to entity properties such as the FEIN, entity type, industry, financial
classification?
Do you need to make any nexus changes to the existing entities?
Ownership
Were there any changes to the existing ownership?
For any new entities, are any of them flow-through entities that require ownership information?
Groups
Are there any new groups? Or any groups that need to be removed?
Are there any changes in group membership?
Are there any changes in group properties -- such as Worldwide vs. Water's-edge election?
Any changes in group filing type?
Any changes in nexus settings for group members?
Tax Rules
Do the tax rules need to be updated for any changes to apportionment weights,
inclusion/exclusion of accounts, tax rates, flow-through treatment, or ownership category?
Are there any changes to tax rule assignments?

ONESOURCE STATE APPORTIONMENT Version 2.0 User Guide
User Guide (1.4 Annual Review/Preparing for the Current Year) ® 2009 Thomson Reuters/ONESOURCE
(Last Updated September 2009) 21 All Rights Reserved
Account Structure
Should all of the accounts from the prior year be rolled over to the new tax year? When you
create accounts you cannot move them to another parent account or to another apportionment
factor. Do you want to keep them under the same factor/parent account?
Do any new accounts need to be created?
Jurisdictions
Are there any new filing jurisdictions?
Users
Are there any users that need to be added, deleted, or inactivated?
Are there any changes to permissions?
How to review the information described above is covered in the following chapters:
For the data elements, including entities, groups, and ownerships information, see Chapter 6,
Updating Data Elements on page 96.
For the tax rules, see Chapter 7, Updating Tax Rules on page 140.
For the system configuration, including jurisdictions, ownership categories, and account
structure, see Chapter 8, Updating the System Configuration on page 156.
For users and user permissions, see Chapter 9, Updating Users and Permissions on page
173.

ONESOURCE STATE APPORTIONMENT Version 2.0 User Guide
User Guide (2.1 Logging In and Initial Display) ® 2009 Thomson Reuters/ONESOURCE
(Last Updated September 2009) 22 All Rights Reserved
2 Logging In and User Options
This chapter explains how to log in to the OSA application. It also describes the information in your user
profile. Chapter 2 includes the following sections:
2.1: Logging In and Initial Display
2.2: Changing Your Password
2.3: Viewing Your User Profile
2.1 Logging In and Initial Display
OSA is a web-based application—the application is not installed locally on your computer, it is hosted
elsewhere on a server—and you access it by typing the appropriate URL into a web browser window.
2.1.1 Thomson Reuters-Hosted Customers
► To log in:
1. Open an Internet Explorer window. Currently, OSA supports Internet Explorer v7.
2. Type the OSW URL (https://www.onesourcelogin.com) into the Internet Explorer address bar.
The OSW login dialog displays:
Note: If OSW doesn’t display, check that you typed the URL correctly and that you have an
internet connection. Contact your OSW administrator if the problem persists.
4a 3

ONESOURCE STATE APPORTIONMENT Version 2.0 User Guide
User Guide (2.1 Logging In and Initial Display) ® 2009 Thomson Reuters/ONESOURCE
(Last Updated September 2009) 23 All Rights Reserved
3. Enter your user name and password in the appropriate fields then press Enter (or click Login).
Note: If you cannot log in, check that you typed the user name and password correctly, and
that neither Caps Lock nor Num Lock is turned on. Contact your OSW administrator if the
problem persists.
4. If you have forgotten your password:
a. Click the Forgot password? Link.
b. Click the OK button to confirm resetting your password (Cancel abandons the
operation).
c. Click the OK button to proceed.
d. A temporary password will be emailed to you. Login using your login name and
temporary password.
5. Click the Applications button then select the ONESOURCE State Apportionment sub-menu
item from the ONESOURCE INCOME TAX menu.
Note: When you log in to OSW, you will be placed in the default OSA page. You can update
the gadgets displayed and the layout of the page. See the OSW User Guide for more
information.
5

ONESOURCE STATE APPORTIONMENT Version 2.0 User Guide
User Guide (2.1 Logging In and Initial Display) ® 2009 Thomson Reuters/ONESOURCE
(Last Updated September 2009) 24 All Rights Reserved
2.1.2 Self-Hosted Customers
To log in, you will need the URL for the application as well as a user name and password. If you do not
have this information, contact your OSA administrator.
Note: After logging in, keep in mind that the session timeout is set to eight hours; this means that after
eight hours of inactivity, you are logged off the OSA application. If you are logged off due to the session
timing out, any unsaved data is lost.
► To log in:
1. Open an Internet Explorer window. Currently, OSA supports Internet Explorer v7.
2. Type the URL your OSA administrator gave you into the Internet Explorer address bar. The
OSA application displays along with a login dialog:
Note: If OSA doesn’t display, check that you typed the URL correctly and that you have an
internet connection. Contact your OSA administrator if the problem persists.
3. Enter your user name and password in the appropriate fields then press Enter (or click Login).
Note: If you cannot log in, check that you typed the user name and password correctly, and
that neither Caps Lock nor Num Lock is turned on. Contact your OSA administrator if the
problem persists.

ONESOURCE STATE APPORTIONMENT Version 2.0 User Guide
User Guide (2.1 Logging In and Initial Display) ® 2009 Thomson Reuters/ONESOURCE
(Last Updated September 2009) 25 All Rights Reserved
Once you log in, depending on your permissions, you will see a minimum of one tab (e.g., Home) and a
maximum of five tabs: Home, Reports, Import, Export, and Admin. If you do not have permissions to
any tabs yet, a message will display indicating you do not yet have access and to contact your OSA
administrator.
By default, OSA first displays the Home tab, which lists all the entities and groups you have permission
to view.
The tax year is displayed along the top of the OSA application window. To change the tax year, select a
different year from the drop-down. In addition, along the top right of the window is your user name, and
Help and Logout links. Self-hosted customers have a linked user name (as shown above). Clicking on
the link opens the User Profile dialog.
You are ready to begin using OSA.
For instructions on entering data, see Chapter 3, Entering Apportionment Data on page 27.
For instructions on reviewing data calculations, see Chapter 4, Reviewing Calculations on
page 60.
For a discussion of OSA‘s permissions and filtering options, see section 9.1 Understanding
User Security on page173.
For a listing of the other available tasks, refer to the Contents.

ONESOURCE STATE APPORTIONMENT Version 2.0 User Guide
User Guide (2.2 Changing Your Password) ® 2009 Thomson Reuters/ONESOURCE
(Last Updated September 2009) 26 All Rights Reserved
2.2 Changing Your Password
2.2.1 Thomson Reuters-Hosted Customers
Your OSW administrator assigns you a user name and password. You can change your password but
not your user name. To change your password, refer to the ONESOURCE Workstation User Guide.
2.2.2 Self-Hosted Customers
Your network administrator assigns you a user name and password via Active Directory (AD). You can
change your password but not your user name. To change your password, refer to your Windows
operating system instructions.
IMPORTANT: Acceptable password formats are driven by your site’s requirements and are therefore
different for each OSW/AD application. Please ask your OSW/network administrator whether or not
there are any format limitations/requirements for your new password.
2.3 Viewing Your User Profile
Note: The user profile is available to self-hosted customers only.
Your User Profile lists your user name, full name and email address. This information is entered by your
network administrator during user set up. Contact your OSA Administrator with any questions about the
display. For information on how users are set up and how to change the information displayed in your
User Profile, see Chapter 9, Updating Users and Permissions on page 173.
► To view your User Profile:
1. Click the user name link (located in the top right of the OSA window). The User Profile dialog
appears, displaying your information. Click any OSA tab to navigate away from the User
Profile dialog.

ONESOURCE STATE APPORTIONMENT Version 2.0 User Guide
User Guide (3.1 Understanding Data Entry) ® 2009 Thomson Reuters/ONESOURCE
(Last Updated September 2009) 27 All Rights Reserved
3 Entering Apportionment Data
Chapter 3 describes how to enter apportionment data into the OSA application and includes the
following sections:
3.1: Understanding Data Entry
3.2: Selecting the Entity, Division, or Group
3.3: Entering and Saving Apportionment Data
3.4: Using the Event History Logs
3.5: Confirming Account Totals Match Source Document(s)
3.1 Understanding Data Entry
You can enter account data into OSA in two ways:
Importing a CSV file – once the account structure is in place and the entities, divisions, and/or
groups have been defined, you can import account data using the AccountData.csv file.
Using the Apportionment Data Entry page – the Apportionment Data Entry page is available
from the Home tab Entities and Groups list, as is the Entity/Group Properties page.
Typically, you import account data using a CSV file during the initial OSA set up, although you can
import account data at any time. For instructions on importing CSV files, see Appendix D, Working with
CSV Files on page 275. This chapter covers entering data using the OSA Apportionment Data Entry
page.
When you log in to OSA, it is usually the Home tab that first displays. The Home tab Entities and
Groups list shows all the entities (and divisions) and groups you have permission to view and/or edit
and it is from the Home tab that you access both the Apportionment Data Entry page as well as the
Entity/Group Properties page. Once you select an entity or group (and are therefore on either the
Entity/Group Properties or Apportionment Data Entry page), you can then access the Apportionment
Calculation page.
The figure below illustrates the relationship between the four Home tab pages.
Entities/Groups list
Properties page Calculation pageData Entry page

ONESOURCE STATE APPORTIONMENT Version 2.0 User Guide
User Guide (3.1 Understanding Data Entry) ® 2009 Thomson Reuters/ONESOURCE
(Last Updated September 2009) 28 All Rights Reserved
OSA is designed such that regardless of which of the four Home tab pages you‘re on, you can access
the others. The only exception to this is the Apportionment Calculation page because it is jurisdiction-
specific. You can‘t go directly from the Entities/Groups list to the Apportionment Calculation page; you
need to select an entity or group first (and therefore be on either the Entity/Group Properties page or
Apportionment Data Entry page) the select the jurisdiction that you want to see the calculations for.
In the example below, the Entities and Groups list on the Home tab is showing that OSA has 18 entities
(entities and divisions) and 1 group.
From the Home tab Entities and Groups list, you can either:
Click the Apportionment Data icon for an entity or group to go to the Apportionment Data
Entry page where you can begin entering apportionment data, or
Click the entity ID link (e.g., 2564), the FEIN link (e.g., 52-1223987) or the Name link (e.g.,
T.R. Haden, Inc.) to go to the Entity/Group Properties page. On this page, you can view and/or
edit the entity or group properties as well as click the Apportionment Data button or a
Jurisdiction link to begin entering apportionment data.
Note: Editing entity and group properties is covered in Chapter 6, Updating Data Elements on page 96.
3.1.1 Permissions
The OSA data structure can contain:
Entities: C-Corps and entities such as Partnerships and LLCs whose data usually flows
through.
Divisions: Blocks of data within a legal entity.
Groups: Entities grouped together for the purposes of group filing.
Viewing and editing permissions are set at the entity and group level. Permission settings for divisions
follow those of its parent; if you have permissions to view an entity, you can view all divisions of that
entity.

ONESOURCE STATE APPORTIONMENT Version 2.0 User Guide
User Guide (3.1 Understanding Data Entry) ® 2009 Thomson Reuters/ONESOURCE
(Last Updated September 2009) 29 All Rights Reserved
However, if you have permissions to view a group, in order to enter data for an entity within that group,
permission to that specific entity is required. Without permissions to the member entities, you will still
see the member entities and their data in the Apportionment Calculation screens and any group reports,
but you will not be able to enter data for the entities to which you do not have permissions. This is so
that you can always see the data necessary to support the calculations.
And finally, although you might have permission to view an entity, in order to view any entities it owns,
you need permission to the owned entity specifically, and vice versa.
See Chapter 9, Updating Users and Permissions on page 173 for information on permissions.
3.1.2 Ownership and Data Flow
You enter apportionment data for each entity, regardless of the entity type. You should enter data at the
lowest level for which it is available because the user-defined ownership structure and tax rule settings
within OSA automatically flow the data.
Specifically, you should enter data in separately for entities, divisions, and flow-through entities. Each of
those entity‘s balances should be 100% of its own balances and should exclude any balances that will
flow from other entities since OSA will calculate and flow those amounts for you.
Data will flow as follows for each entity type:
C-Corp: Data does not flow for C-Corps. While data does not flow from C-Corp to C-Corp,
defining these ownership relationships within OSA enables you to maintain ownership
information in a single source as well as run reports for review and analysis.
Divisions: Division data always rolls up 100% to the parent entity and the data and audit trail
are retained at both levels.
Flow-through Entities (i.e., GP, LLC, LLP, LP, and SMLLC): OSA flows data based on the
tax rules and the ownership structure and percentages. When entering data, whether it is a
parent or owned entity, enter the data at 100% (versus entering the data at the calculated
amount based on ownership percentage). OSA analyzes the ownership structure and flows the
data to the owning entities at the appropriate percentages.
Groups: Apportionment factors are calculated using the data that was entered in for each
member entity. However, OSA also provides for data entry at the group level; this is helpful for
users that need to make adjustments to a group when the adjustments are not entity-specific.
See Chapter 7, Updating Tax Rules on page 140 for information on tax rules and their impact on data
flow, and Chapter 6, Updating Data Elements on page 96 for information on defining ownership
structure and percentages.
3.1.3 Account Data Types
Normal Accounts
For each apportionment account you create in OSA, you define the calculation behavior. Each account
can be defined as affecting only the numerator (In-State Only Account), only the denominator
(Everywhere Only Account), or both (Normal Account).
The majority of the accounts in OSA are defined as Normal accounts. This means that the numerators
across the jurisdictions sum to the denominator (while excluding local/municipal jurisdiction values for
purposes of calculating the denominator of the various states). The denominator is a calculated number
and is the sum of all the In-State amounts.

ONESOURCE STATE APPORTIONMENT Version 2.0 User Guide
User Guide (3.1 Understanding Data Entry) ® 2009 Thomson Reuters/ONESOURCE
(Last Updated September 2009) 30 All Rights Reserved
The user enters the In-State amounts per the source document into the Normal account. In general,
these amounts should be entered as positive values, unless it is noted specifically that the amount
should be entered as a negative value (e.g., New York Metro – Property Denominator Adjustment).
In-State Only and Everywhere Only Accounts
In order to be able to enter an amount such that it affects only the entity and jurisdiction (state) into
which it is entered, you can define the account as a numerator only (In-State Only) account or
denominator only (Everywhere Only) account.
These accounts are equivalent to an override in a compliance system (although the original data is
retained as a separate line item in OSA) and are identified in the Data Entry page with the or
icon.
To define an account as an In-State Only account, you set the calculation behavior for the account to
Numerator; and, to define an account as an Everywhere Only account, you set the calculation behavior
for the account to Denominator.
For information on adding and/or editing accounts in OSA, see Chapter 8, Updating the System
Configuration on page 156.
Contra and Rent Multiplier Accounts
In OSA, all accounts are placed under a parent account. OSA defines the parent accounts; they cannot
be edited. In addition to the default behavior of normal accounts as described above, certain parent
accounts have specific behavior.
These include the parent accounts related to accumulated depreciation, accumulated depletion, and
rent under the Property factor. The parent accounts related to accumulated depreciation and
accumulated depletion accounts are designated as Contra accounts and the parent accounts related to
rent are identified as Multiplier accounts (i.e., the value entered into OSA is multiplied by a specific
multiplier). These Contra and Multiplier accounts are identified by unique icons as shown below:
Contra: When an account is placed under a Contra parent account, all amounts are
interpreted as negative amounts. During data entry you enter the amounts as positive
numbers. If you enter a negative number, the amount is added rather than subtracted.
Rent Real Property: Amounts placed in accounts under the parent account Rent Real
Property are multiplied by the rent real property capitalization factor defined in the appropriate
tax rule.
Rent Personal Property: Amounts placed in accounts under the parent account Rent
Personal Property are multiplied by the rent personal property capitalization factor defined in
the appropriate tax rule.
For a list of all parent accounts and their behavior, see section D.4.1 Supporting Data on page 316.
Elimination Accounts
For every normal account in OSA, there exists both an in-state and an everywhere elimination account.
These elimination accounts are created automatically during the initial OSA setup as well as each time
you add an apportionment account using the Account Structure page in the OSA interface or by
importing the AccountStructure.csv file. You do not need to create them explicitly.
Data entered into the In-State Elimination accounts only affects the numerator for the specific entity and
jurisdiction (state). Likewise, data entered into the Everywhere Elimination accounts only affects the
denominator for the specific entity and jurisdiction (state).

ONESOURCE STATE APPORTIONMENT Version 2.0 User Guide
User Guide (3.1 Understanding Data Entry) ® 2009 Thomson Reuters/ONESOURCE
(Last Updated September 2009) 31 All Rights Reserved
The data entered rolls up to the appropriate legal entity and/or group. When you enter an elimination
amount for a division, the amount rolls up to the parent. Likewise, when you enter an elimination
amount for an entity within a group, that amount rolls up to the group calculation.
Elimination data entered for a flow-through entity does not flow to its owner(s) or anywhere else in the
product; therefore, eliminations related to flow-through entities need to be entered in at the ultimate C-
Corp owner level.
When you designate a normal account as an In-State Only or Everywhere Only account, this
designation is maintained for the corresponding In-State and Everywhere Elimination accounts.
Likewise, the Contra and Multiplier account designation is also maintained within the In-State and
Everywhere Elimination accounts.
Therefore, in general, you enter amounts into the elimination accounts as positive numbers. OSA knows
to subtract them. If an amount is entered in the elimination accounts as a negative number, the amount
is added. The exception to this is when the account is a Contra account. In this case, as expected,
when you enter a positive number into a Contra-type Elimination account, the amount is added. When
you enter a negative number into a Contra-type Elimination account, the amount is subtracted.
During data entry, you use the Display properties to switch between the display of normal, in-state
elimination, and everywhere elimination accounts, as described in section 3.3.2 Entering Elimination
Data on page 38.
3.1.4 Keeping an Audit Trail
OSA maintains an audit trail of all the changes made to an entity or group. These changes include
those made to account data in the Apportionment Data Entry page as well as changes made using the
Properties page of a given entity or group, as described next:
Entity or Group Properties page: As you make changes to entity or group properties, each
time you click the Save button a record is stored in the log. The event record lists the changes
made since the previous save operation, and provides a timestamp and the name of the user
who made the change.
Apportionment Data Entry page: Similar to the log for the Entity or Group Properties pages,
a record is stored in the log each time you click the Save button. The Apportionment Data
Entry page provides additional detail in that for each event record it highlights the changes to
the data, and additionally, will list previous and current values for any highlighted change. This
functionality can be accessed by clicking on the History Mode link. See section 3.4.1 Data
Entry History Mode Log on page 42 for more information.
For any of the OSA-generated event records, you can add an attachment or edit the system-generated
comment. For example, you can add a source document as an attachment, or enter a comment
justifying a change. You can also make an entry in the log manually. This is useful when you want to
add an attachment that is relevant to the data set as a whole and not a specific event record (such as
preparer notes).
The information captured in each event record and the ability to add attachments and edit comments in
the log enables users to keep a detailed and through record of any changes to the account data and
entity and group properties.
For instructions on viewing the Event History logs as well as adding comments or attachments to them,
see section 3.4 Using the Event History Logs on page 41.
In addition to the Event History logs within the properties pages and the Apportionment Data Entry
page, OSA logs most operations performed within OSA as events in the main Event History log
available on the Admin tab. For more information, including the types of operations that are logged, see
Appendix A, System Monitoring on page 222.

ONESOURCE STATE APPORTIONMENT Version 2.0 User Guide
User Guide (3.2 Selecting the Entity, Division, or Group) ® 2009 Thomson Reuters/ONESOURCE
(Last Updated September 2009) 32 All Rights Reserved
3.1.5 Apportionment Data Entry Process
Data entry into OSA is typically accomplished in one or both of these ways:
Importing CSV files, and/or
Entering apportionment account data into the OSA interface.
For information on importing account data using CSV files, see Appendix D, Working with CSV Files on
page 275.
This section covers the data entry process when using the OSA interface. However, after you import
data using CSV files, you should also review the data in OSA to ensure it coincides with your source
documents and work papers.
In general, the data entry process is as follows:
1. Select the entity, division, or group for which to enter data.
2. Enter and save the data for the desired accounts.
3. Add comments and/or attachments, if appropriate, to the Event History Logs.
4. Confirm that account totals match source document(s).
Each step in the process above is described next, beginning with section 3.2 Selecting the Entity,
Division, or Group.
3.2 Selecting the Entity, Division, or Group
1. Ensure you are working in the correct tax year.
When you log in to OSA, you are placed in the same tax year you were working in when you
logged out of your previous session. If this is your first login, you are placed in the default tax
year for your organization. The tax year drop-down is located to the right of the tabs. Before
you begin data entry, make sure you are in the correct tax year. If you are not, select the
correct year from the drop-down.
See section 2.1 Logging In and Initial Display on page 22 for information on logging in and the
initial OSA display.
3
2b 1
ONESOURCE STATE APPORTIONMENT Version 2.0 User Guide
User Guide (3.3 Entering and Saving Apportionment Data) ® 2009 Thomson Reuters/ONESOURCE
(Last Updated September 2009) 33 All Rights Reserved
2. On the Home tab, find the desired entity, division, or group. The entity/group list is typically
sorted alphabetically by entity ID (divisions are listed with parent entity) with entities listed first,
followed by groups. You can:
a. Use the browser window scroll bar to scroll down the list of entities, divisions, or
groups, or
b. Enter a string in the Search box to filter the list. Only entities/groups with a matching
string in the ID, FEIN, Name, or Type fields will be listed.
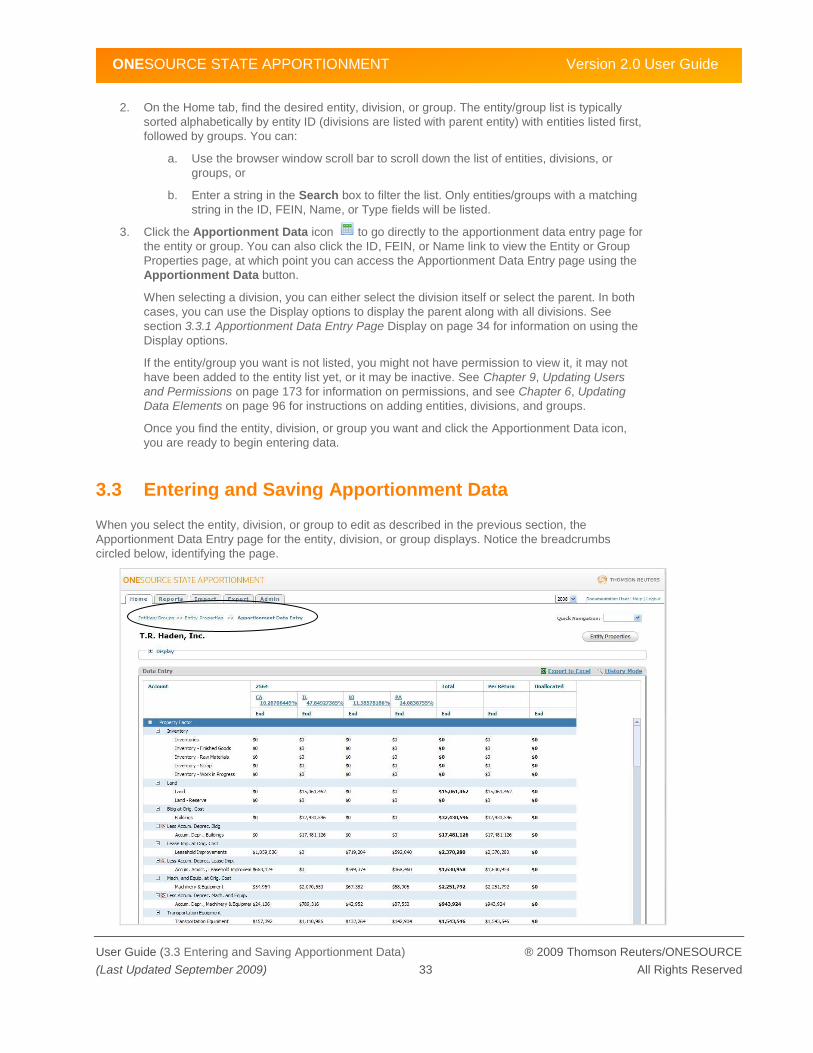
3. Click the Apportionment Data icon to go directly to the apportionment data entry page for
the entity or group. You can also click the ID, FEIN, or Name link to view the Entity or Group
Properties page, at which point you can access the Apportionment Data Entry page using the
Apportionment Data button.
When selecting a division, you can either select the division itself or select the parent. In both
cases, you can use the Display options to display the parent along with all divisions. See
section 3.3.1 Apportionment Data Entry Page Display on page 34 for information on using the
Display options.
If the entity/group you want is not listed, you might not have permission to view it, it may not
have been added to the entity list yet, or it may be inactive. See Chapter 9, Updating Users
and Permissions on page 173 for information on permissions, and see Chapter 6, Updating
Data Elements on page 96 for instructions on adding entities, divisions, and groups.
Once you find the entity, division, or group you want and click the Apportionment Data icon,
you are ready to begin entering data.
3.3 Entering and Saving Apportionment Data
When you select the entity, division, or group to edit as described in the previous section, the
Apportionment Data Entry page for the entity, division, or group displays. Notice the breadcrumbs
circled below, identifying the page.
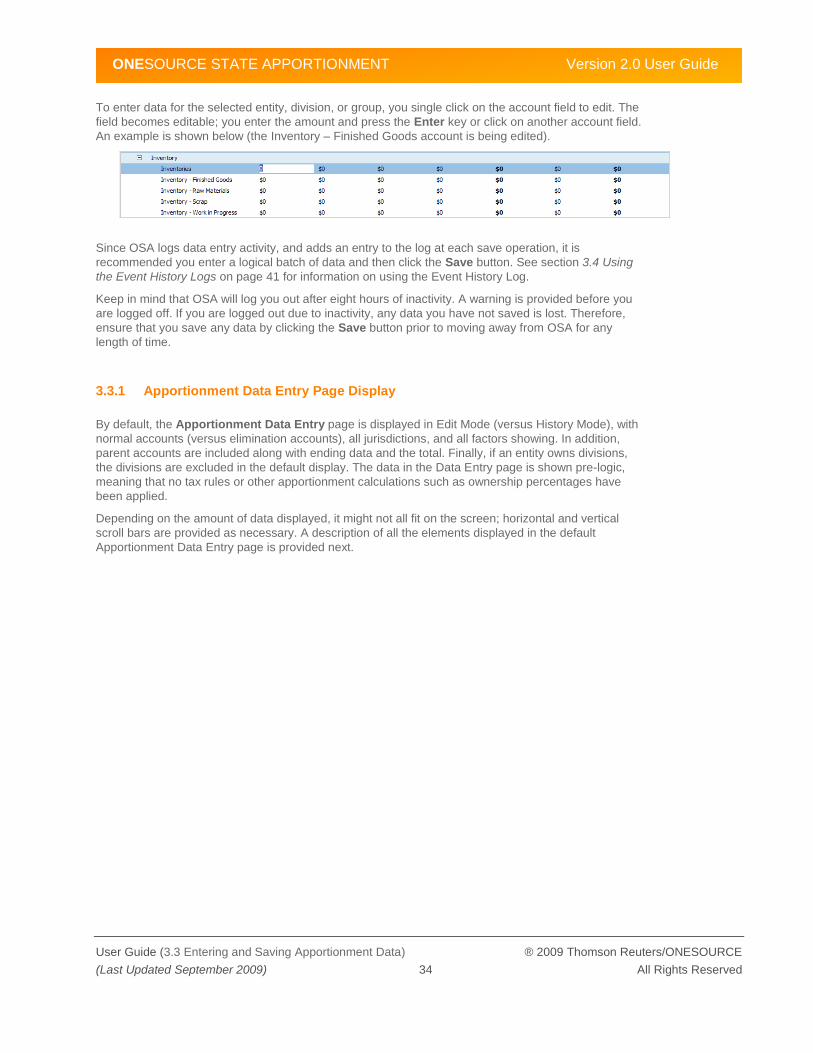
ONESOURCE STATE APPORTIONMENT Version 2.0 User Guide
User Guide (3.3 Entering and Saving Apportionment Data) ® 2009 Thomson Reuters/ONESOURCE
(Last Updated September 2009) 34 All Rights Reserved
To enter data for the selected entity, division, or group, you single click on the account field to edit. The
field becomes editable; you enter the amount and press the Enter key or click on another account field.
An example is shown below (the Inventory – Finished Goods account is being edited).
Since OSA logs data entry activity, and adds an entry to the log at each save operation, it is
recommended you enter a logical batch of data and then click the Save button. See section 3.4 Using
the Event History Logs on page 41 for information on using the Event History Log.
Keep in mind that OSA will log you out after eight hours of inactivity. A warning is provided before you
are logged off. If you are logged out due to inactivity, any data you have not saved is lost. Therefore,
ensure that you save any data by clicking the Save button prior to moving away from OSA for any
length of time.
3.3.1 Apportionment Data Entry Page Display
By default, the Apportionment Data Entry page is displayed in Edit Mode (versus History Mode), with
normal accounts (versus elimination accounts), all jurisdictions, and all factors showing. In addition,
parent accounts are included along with ending data and the total. Finally, if an entity owns divisions,
the divisions are excluded in the default display. The data in the Data Entry page is shown pre-logic,
meaning that no tax rules or other apportionment calculations such as ownership percentages have
been applied.
Depending on the amount of data displayed, it might not all fit on the screen; horizontal and vertical
scroll bars are provided as necessary. A description of all the elements displayed in the default
Apportionment Data Entry page is provided next.
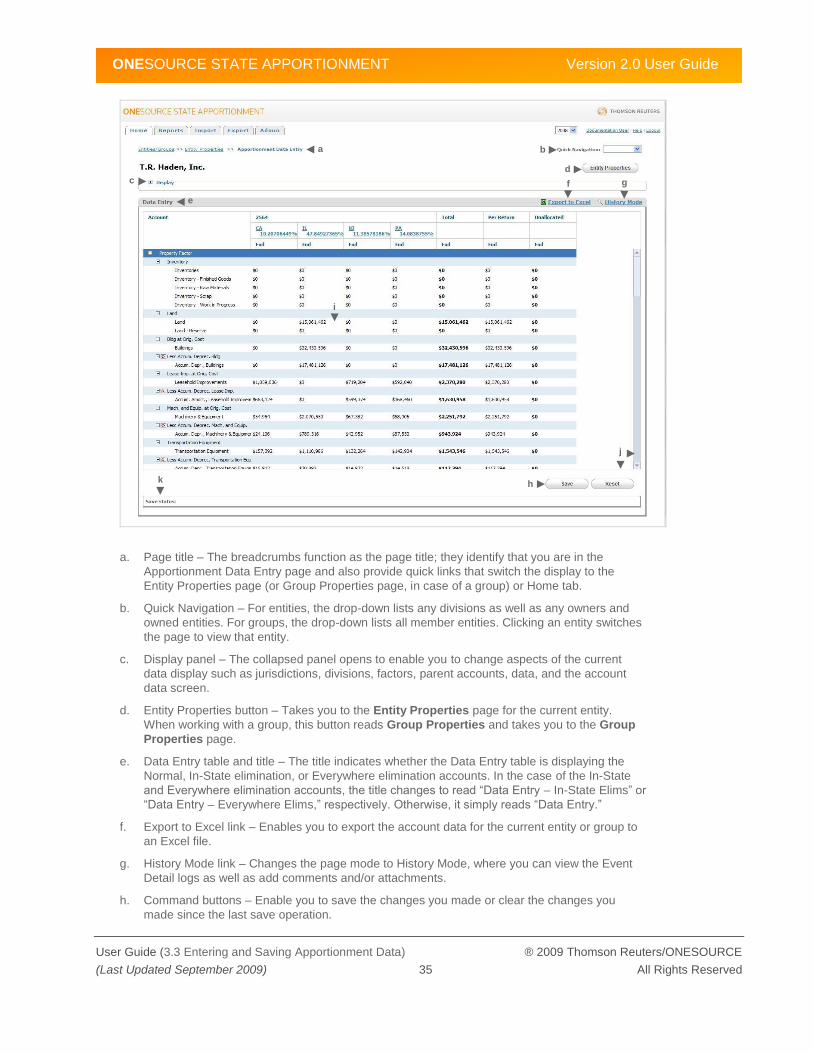
ONESOURCE STATE APPORTIONMENT Version 2.0 User Guide
User Guide (3.3 Entering and Saving Apportionment Data) ® 2009 Thomson Reuters/ONESOURCE
(Last Updated September 2009) 35 All Rights Reserved
a. Page title – The breadcrumbs function as the page title; they identify that you are in the
Apportionment Data Entry page and also provide quick links that switch the display to the
Entity Properties page (or Group Properties page, in case of a group) or Home tab.
b. Quick Navigation – For entities, the drop-down lists any divisions as well as any owners and
owned entities. For groups, the drop-down lists all member entities. Clicking an entity switches
the page to view that entity.
c. Display panel – The collapsed panel opens to enable you to change aspects of the current
data display such as jurisdictions, divisions, factors, parent accounts, data, and the account
data screen.
d. Entity Properties button – Takes you to the Entity Properties page for the current entity.
When working with a group, this button reads Group Properties and takes you to the Group
Properties page.
e. Data Entry table and title – The title indicates whether the Data Entry table is displaying the
Normal, In-State elimination, or Everywhere elimination accounts. In the case of the In-State
and Everywhere elimination accounts, the title changes to read ―Data Entry – In-State Elims‖ or
―Data Entry – Everywhere Elims,‖ respectively. Otherwise, it simply reads ―Data Entry.‖
f. Export to Excel link – Enables you to export the account data for the current entity or group to
an Excel file.
g. History Mode link – Changes the page mode to History Mode, where you can view the Event
Detail logs as well as add comments and/or attachments.
h. Command buttons – Enable you to save the changes you made or clear the changes you
made since the last save operation.
e
a b
c f
d
g
h
i
j
k

ONESOURCE STATE APPORTIONMENT Version 2.0 User Guide
User Guide (3.3 Entering and Saving Apportionment Data) ® 2009 Thomson Reuters/ONESOURCE
(Last Updated September 2009) 36 All Rights Reserved
i. Account data – The account data for the current entity. The Total field shows the sum of the
amounts for all displayed accounts including local or municipal jurisdictions. Therefore, the
Total will not always reflect the denominator used in the apportionment calculation. See
section 3.5 Confirming Account Totals Match Source Document(s) on page 53 for more
information.
j. Scroll bars – When the data exceeds the screen real estate, they enable you to view all the
account data.
k. Save status box – Displays messages indicating whether or not operations performed are
successful.
Changing the Display
Using the options in the Display panel, you can change the display of the Apportionment Data Entry page as follows:
Jurisdictions – you can choose to display one or more
Divisions – if an entity has divisions, you can choose which to display
Factors – you can choose to show one of the four factors or all
Show Municipalities – you can toggle between showing and hiding municipalities. When you
uncheck this, all municipalities are automatically deselected in the Jurisdictions list.
Show Parents – you can choose to show or hide the parent accounts
Show Beginning Data – you can toggle the display between showing and hiding beginning
data
Show Ending Data – you can toggle the display between showing and hiding ending data
Show Total – you can toggle on and off the display of the Total field. This field represents the
sum of all data displayed (which is not necessarily the denominator used for apportionment
calculations)
Show Per Return – works with the Show Total option to display two additional columns in the
data entry grid. One is the data entry field for Per Return values (which can alternately be
imported) and the other is the Unallocated column. Unallocated is equal to the Per Return less
the Total value. Total does not automatically exclude Municipalities so you should use the
Show Municipalities option and exclude any other jurisdictions that should not be totaled when
reviewing Unallocated amounts. This option is enabled only when the Show Total option is
selected.
Show Zero Balance – you can show or hide accounts without balances
Lock Account Column – you can lock the Account column so that as you scroll right, the
account names remain visible
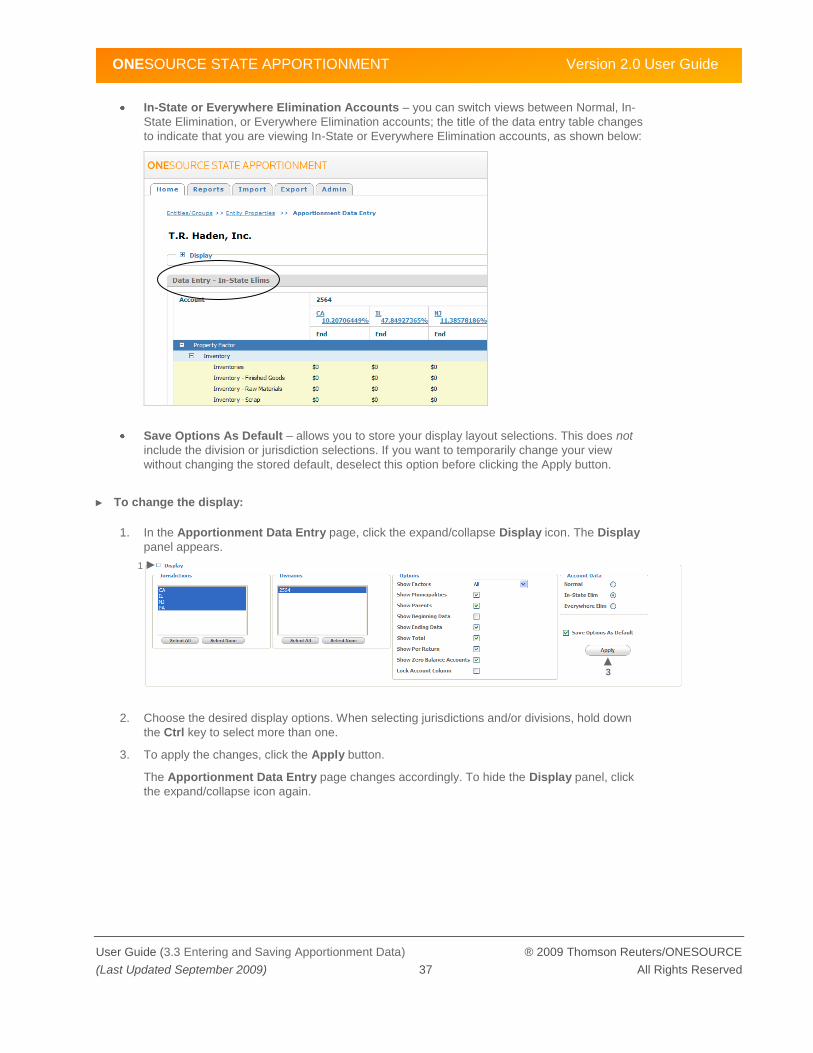
ONESOURCE STATE APPORTIONMENT Version 2.0 User Guide
User Guide (3.3 Entering and Saving Apportionment Data) ® 2009 Thomson Reuters/ONESOURCE
(Last Updated September 2009) 37 All Rights Reserved
In-State or Everywhere Elimination Accounts – you can switch views between Normal, In-
State Elimination, or Everywhere Elimination accounts; the title of the data entry table changes
to indicate that you are viewing In-State or Everywhere Elimination accounts, as shown below:
Save Options As Default – allows you to store your display layout selections. This does not
include the division or jurisdiction selections. If you want to temporarily change your view
without changing the stored default, deselect this option before clicking the Apply button.
► To change the display:
1. In the Apportionment Data Entry page, click the expand/collapse Display icon. The Display
panel appears.
2. Choose the desired display options. When selecting jurisdictions and/or divisions, hold down
the Ctrl key to select more than one.
3. To apply the changes, click the Apply button.
The Apportionment Data Entry page changes accordingly. To hide the Display panel, click
the expand/collapse icon again.
1
3

ONESOURCE STATE APPORTIONMENT Version 2.0 User Guide
User Guide (3.3 Entering and Saving Apportionment Data) ® 2009 Thomson Reuters/ONESOURCE
(Last Updated September 2009) 38 All Rights Reserved
3.3.2 Entering Elimination Data
When you access the Apportionment Data Entry page, as shown in the image below the display
defaults to the Normal account data screen (which means you will be entering data into the normal
versus the elimination accounts). Notice that the Normal radio button is selected under Account Data
and the Data Entry table title reads ―Data Entry.‖
In order to enter elimination amounts, you need to change the Apportionment Data Entry page to
display the In-State or Everywhere Elimination accounts. The sample page below is displaying the In-
State Elimination accounts. Follow the instructions for changing the display in section 3.3.1
Apportionment Data Entry Page Display on page 34.

ONESOURCE STATE APPORTIONMENT Version 2.0 User Guide
User Guide (3.3 Entering and Saving Apportionment Data) ® 2009 Thomson Reuters/ONESOURCE
(Last Updated September 2009) 39 All Rights Reserved
Once the display is changed to show In-State or Everywhere Elimination accounts, you can begin
entering the elimination amounts. Enter the elimination amounts as positive numbers; OSA knows to
subtract them from the total. If you enter a negative number, OSA will add the amount to the total.
Data entered into the elimination accounts rolls up to the appropriate legal entity and/or group. For
example, when you enter an elimination amount for a division, the amount rolls up to the parent.
Likewise, when you enter an elimination amount for an entity within a group, that amount rolls up to the
group calculations. Elimination data entered at the flow-through entity level does not flow through to its
owner(s). Therefore, you should enter flow-through entity related eliminations at the level of the ultimate
owner(s).
3.3.3 Recovering from a Data Entry Error
During data entry, if you determine that you made a data entry error, you can roll back the data to a
previous timestamp. You do this by using the OSA Export and Import tabs.
All changes to account data are stored in the Event History log, both the Data Entry Event History Log
and the overall OSA Event History Log (see Appendix A, System Monitoring on page 222 for details on
what is stored in the Event History Log).
You can export data using the current date/time or a prior timestamp. This allows you to export data
with a timestamp prior to your undesired edits.
Refer to Appendix D, Working with CSV Files on page 275 for instructions on the mechanics of
exporting and importing account data.
► To roll back data:
1. First, determine a date/time when the account data did not have the error (see section 3.4
Using the Event History Logs on page 41 for instructions on viewing entries in the log, if
necessary).
2. Using the OSA export feature, export the apportionment account data using the prior
timestamp.
3. Then, import the CSV file you just exported back into OSA using the OSA import feature.
When importing the account data, select the ―Clear existing values and load new values for
entities included in the file‖ option.
The apportionment account data (for entities and groups existing in OSA at the time of export)
is restored to the way it was at the timestamp you specified for export.
Keep in mind that the OSA import feature is additive and the export/import is only affecting
account data; there is no effect on changes made to other data types or areas in OSA. The
fact that it is additive means that you cannot remove data elements (e.g., entities and groups)
using CSV files. You can only edit existing entities or add new ones. And, since you are only
exporting and importing account data, the properties of the entities and groups are not altered,
only their account data is altered.
Therefore, say you determine you made your data entry error at 8:50am, and it was for entities
A, B, and C. You also added a new entity (entity D) along with some account data at 9am. To
roll back your data entry error for entities A, B, and C, you export the account data with a
timestamp of 8:49am and then import it back into OSA.
The account data for entities A, B, and C, and any other entities and groups in existence at
8:49am is reverted to the state it was in at 8:49am. However, the data for the new entity (entity
D) is unaffected by the export and subsequent import because since that entity did not exist at
8:49am, it was not part of the export and due to the additive nature of the import feature, its
data was not cleared as part of the import.
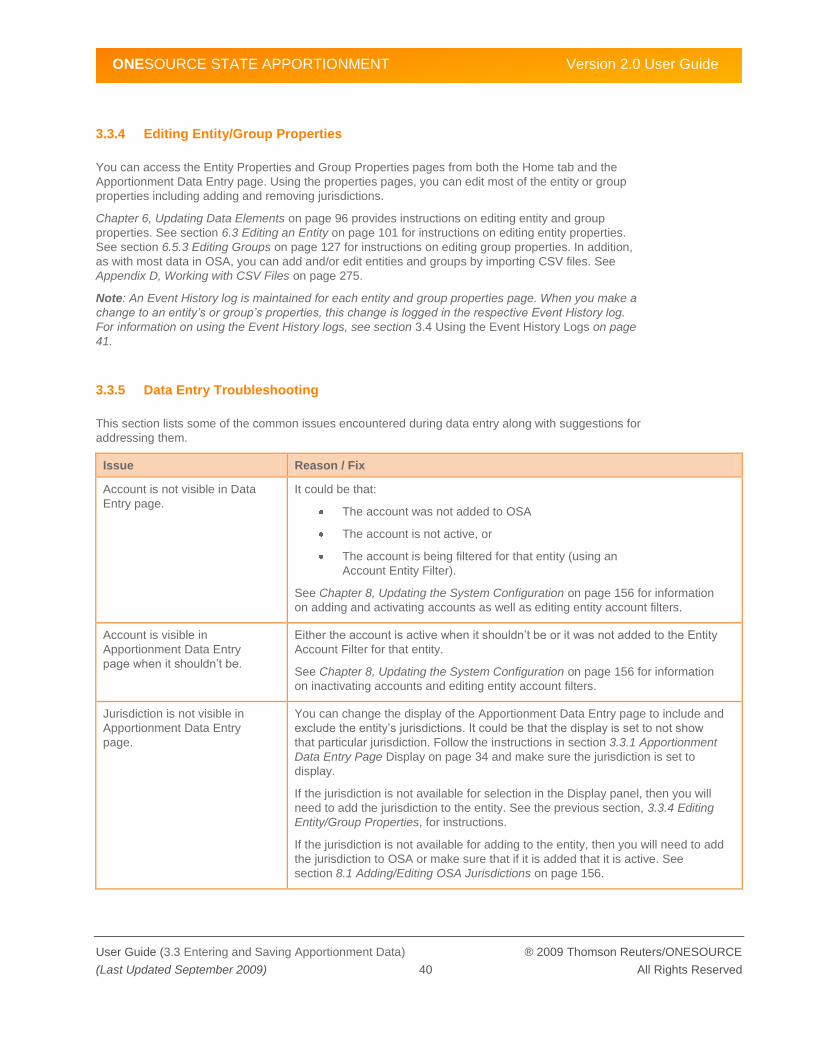
ONESOURCE STATE APPORTIONMENT Version 2.0 User Guide
User Guide (3.3 Entering and Saving Apportionment Data) ® 2009 Thomson Reuters/ONESOURCE
(Last Updated September 2009) 40 All Rights Reserved
3.3.4 Editing Entity/Group Properties
You can access the Entity Properties and Group Properties pages from both the Home tab and the
Apportionment Data Entry page. Using the properties pages, you can edit most of the entity or group
properties including adding and removing jurisdictions.
Chapter 6, Updating Data Elements on page 96 provides instructions on editing entity and group
properties. See section 6.3 Editing an Entity on page 101 for instructions on editing entity properties.
See section 6.5.3 Editing Groups on page 127 for instructions on editing group properties. In addition,
as with most data in OSA, you can add and/or edit entities and groups by importing CSV files. See
Appendix D, Working with CSV Files on page 275.
Note: An Event History log is maintained for each entity and group properties page. When you make a
change to an entity’s or group’s properties, this change is logged in the respective Event History log.
For information on using the Event History logs, see section 3.4 Using the Event History Logs on page
41.
3.3.5 Data Entry Troubleshooting
This section lists some of the common issues encountered during data entry along with suggestions for
addressing them.
Issue Reason / Fix
Account is not visible in Data
Entry page.
It could be that:
The account was not added to OSA
The account is not active, or
The account is being filtered for that entity (using an
Account Entity Filter).
See Chapter 8, Updating the System Configuration on page 156 for information
on adding and activating accounts as well as editing entity account filters.
Account is visible in
Apportionment Data Entry
page when it shouldn‘t be.
Either the account is active when it shouldn‘t be or it was not added to the Entity
Account Filter for that entity.
See Chapter 8, Updating the System Configuration on page 156 for information
on inactivating accounts and editing entity account filters.
Jurisdiction is not visible in
Apportionment Data Entry
page.
You can change the display of the Apportionment Data Entry page to include and
exclude the entity‘s jurisdictions. It could be that the display is set to not show
that particular jurisdiction. Follow the instructions in section 3.3.1 Apportionment
Data Entry Page Display on page 34 and make sure the jurisdiction is set to
display.
If the jurisdiction is not available for selection in the Display panel, then you will
need to add the jurisdiction to the entity. See the previous section, 3.3.4 Editing
Entity/Group Properties, for instructions.
If the jurisdiction is not available for adding to the entity, then you will need to add
the jurisdiction to OSA or make sure that if it is added that it is active. See
section 8.1 Adding/Editing OSA Jurisdictions on page 156.
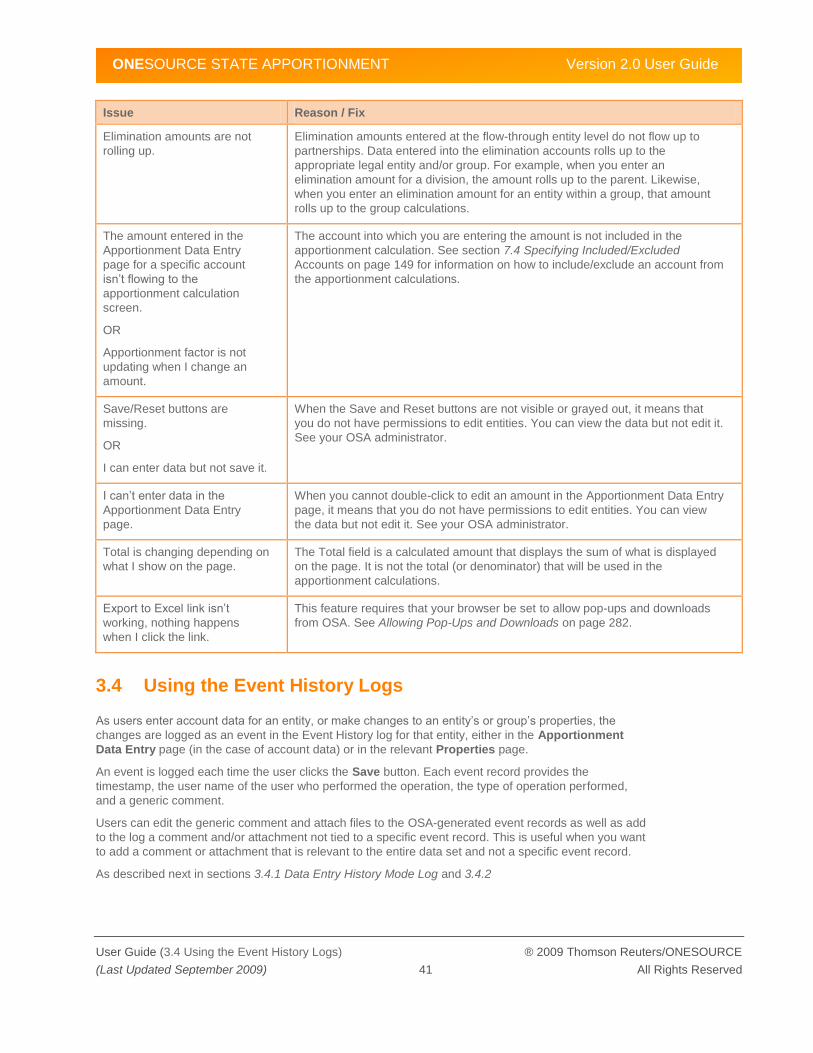
ONESOURCE STATE APPORTIONMENT Version 2.0 User Guide
User Guide (3.4 Using the Event History Logs) ® 2009 Thomson Reuters/ONESOURCE
(Last Updated September 2009) 41 All Rights Reserved
Issue Reason / Fix
Elimination amounts are not
rolling up.
Elimination amounts entered at the flow-through entity level do not flow up to
partnerships. Data entered into the elimination accounts rolls up to the
appropriate legal entity and/or group. For example, when you enter an
elimination amount for a division, the amount rolls up to the parent. Likewise,
when you enter an elimination amount for an entity within a group, that amount
rolls up to the group calculations.
The amount entered in the
Apportionment Data Entry
page for a specific account
isn‘t flowing to the
apportionment calculation
screen.
OR
Apportionment factor is not
updating when I change an
amount.
The account into which you are entering the amount is not included in the
apportionment calculation. See section 7.4 Specifying Included/Excluded
Accounts on page 149 for information on how to include/exclude an account from
the apportionment calculations.
Save/Reset buttons are
missing.
OR
I can enter data but not save it.
When the Save and Reset buttons are not visible or grayed out, it means that
you do not have permissions to edit entities. You can view the data but not edit it.
See your OSA administrator.
I can‘t enter data in the
Apportionment Data Entry
page.
When you cannot double-click to edit an amount in the Apportionment Data Entry
page, it means that you do not have permissions to edit entities. You can view
the data but not edit it. See your OSA administrator.
Total is changing depending on
what I show on the page.
The Total field is a calculated amount that displays the sum of what is displayed
on the page. It is not the total (or denominator) that will be used in the
apportionment calculations.
Export to Excel link isn‘t
working, nothing happens
when I click the link.
This feature requires that your browser be set to allow pop-ups and downloads
from OSA. See Allowing Pop-Ups and Downloads on page 282.
3.4 Using the Event History Logs
As users enter account data for an entity, or make changes to an entity‘s or group‘s properties, the
changes are logged as an event in the Event History log for that entity, either in the Apportionment
Data Entry page (in the case of account data) or in the relevant Properties page.
An event is logged each time the user clicks the Save button. Each event record provides the
timestamp, the user name of the user who performed the operation, the type of operation performed,
and a generic comment.
Users can edit the generic comment and attach files to the OSA-generated event records as well as add
to the log a comment and/or attachment not tied to a specific event record. This is useful when you want
to add a comment or attachment that is relevant to the entire data set and not a specific event record.
As described next in sections 3.4.1 Data Entry History Mode Log and 3.4.2
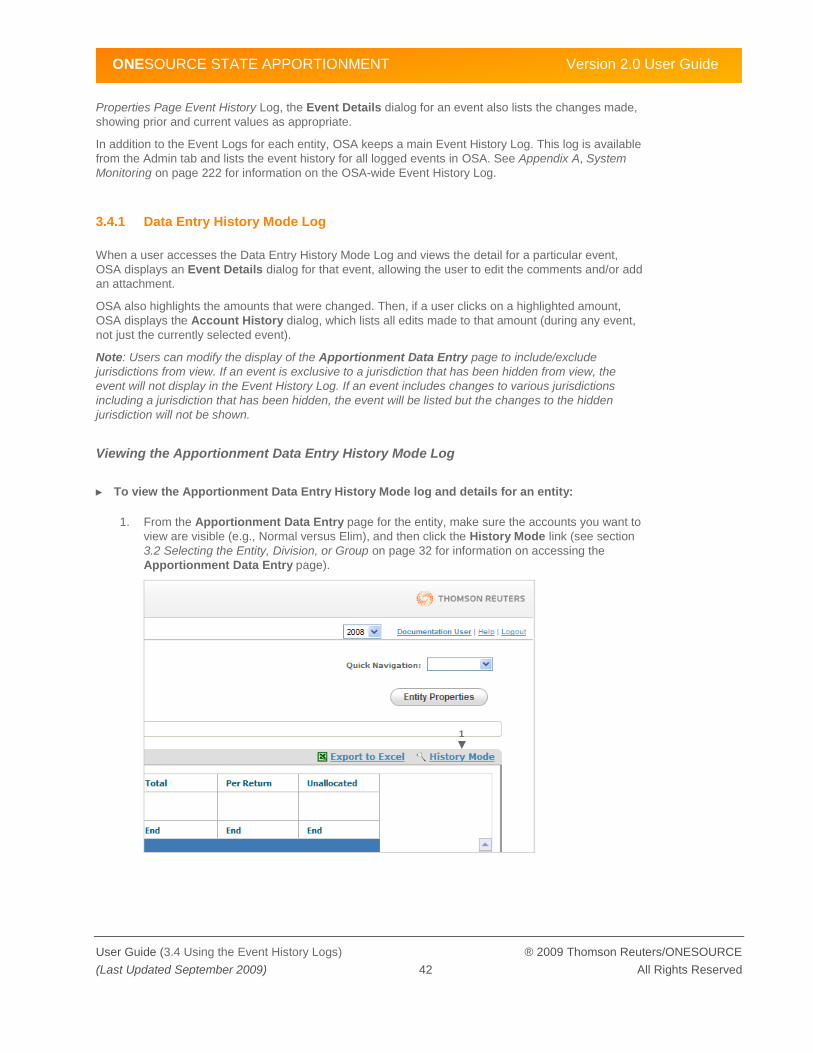
ONESOURCE STATE APPORTIONMENT Version 2.0 User Guide
User Guide (3.4 Using the Event History Logs) ® 2009 Thomson Reuters/ONESOURCE
(Last Updated September 2009) 42 All Rights Reserved
Properties Page Event History Log, the Event Details dialog for an event also lists the changes made,
showing prior and current values as appropriate.
In addition to the Event Logs for each entity, OSA keeps a main Event History Log. This log is available
from the Admin tab and lists the event history for all logged events in OSA. See Appendix A, System
Monitoring on page 222 for information on the OSA-wide Event History Log.
3.4.1 Data Entry History Mode Log
When a user accesses the Data Entry History Mode Log and views the detail for a particular event,
OSA displays an Event Details dialog for that event, allowing the user to edit the comments and/or add
an attachment.
OSA also highlights the amounts that were changed. Then, if a user clicks on a highlighted amount,
OSA displays the Account History dialog, which lists all edits made to that amount (during any event,
not just the currently selected event).
Note: Users can modify the display of the Apportionment Data Entry page to include/exclude
jurisdictions from view. If an event is exclusive to a jurisdiction that has been hidden from view, the
event will not display in the Event History Log. If an event includes changes to various jurisdictions
including a jurisdiction that has been hidden, the event will be listed but the changes to the hidden
jurisdiction will not be shown.
Viewing the Apportionment Data Entry History Mode Log
► To view the Apportionment Data Entry History Mode log and details for an entity:
1. From the Apportionment Data Entry page for the entity, make sure the accounts you want to
view are visible (e.g., Normal versus Elim), and then click the History Mode link (see section
3.2 Selecting the Entity, Division, or Group on page 32 for information on accessing the
Apportionment Data Entry page).
1

ONESOURCE STATE APPORTIONMENT Version 2.0 User Guide
User Guide (3.4 Using the Event History Logs) ® 2009 Thomson Reuters/ONESOURCE
(Last Updated September 2009) 43 All Rights Reserved
2. The display changes to History Mode, as shown next. To change the display back to edit
mode, click the Back to Edit Mode link.
3. To view the details for a particular event, use either the vertical scroll bar or the up/down
arrows to find the event.
4. When you find the desired event, click its View button. The Event Details dialog displays and
the account data that was changed during that event is highlighted in yellow.
5. At this point, you can edit the generic OSA-generated comment or add an attachment to this
event. You can also view the change that was made to the highlighted amount. For instructions
on adding comments and attachments, see the next section.
3
4
3
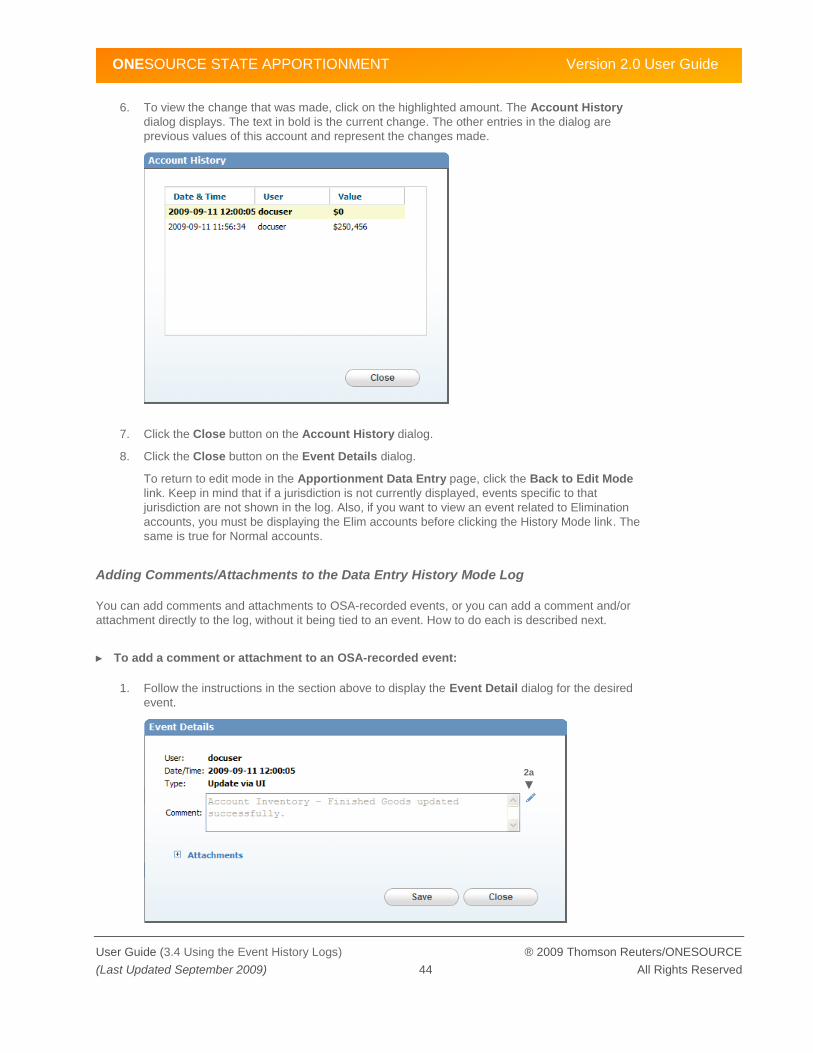
ONESOURCE STATE APPORTIONMENT Version 2.0 User Guide
User Guide (3.4 Using the Event History Logs) ® 2009 Thomson Reuters/ONESOURCE
(Last Updated September 2009) 44 All Rights Reserved
6. To view the change that was made, click on the highlighted amount. The Account History
dialog displays. The text in bold is the current change. The other entries in the dialog are
previous values of this account and represent the changes made.
7. Click the Close button on the Account History dialog.
8. Click the Close button on the Event Details dialog.
To return to edit mode in the Apportionment Data Entry page, click the Back to Edit Mode
link. Keep in mind that if a jurisdiction is not currently displayed, events specific to that
jurisdiction are not shown in the log. Also, if you want to view an event related to Elimination
accounts, you must be displaying the Elim accounts before clicking the History Mode link. The
same is true for Normal accounts.
Adding Comments/Attachments to the Data Entry History Mode Log
You can add comments and attachments to OSA-recorded events, or you can add a comment and/or
attachment directly to the log, without it being tied to an event. How to do each is described next.
► To add a comment or attachment to an OSA-recorded event:
1. Follow the instructions in the section above to display the Event Detail dialog for the desired
event.
2a

ONESOURCE STATE APPORTIONMENT Version 2.0 User Guide
User Guide (3.4 Using the Event History Logs) ® 2009 Thomson Reuters/ONESOURCE
(Last Updated September 2009) 45 All Rights Reserved
2. To update the comment:
a. Click the Edit icon . The Comment box becomes editable and the Save/Cancel
buttons for the Comment box appear.
b. Update the comment as desired. You can delete and add text.
c. Then, click the Comment box Save button (Cancel abandons the edit). The comment
is updated. At this point, you can click the Close button to close the dialog or add an
attachment as described below.
3. To add an attachment:
a. Click the Attachments expand/collapse icon .
2b 2c
3a
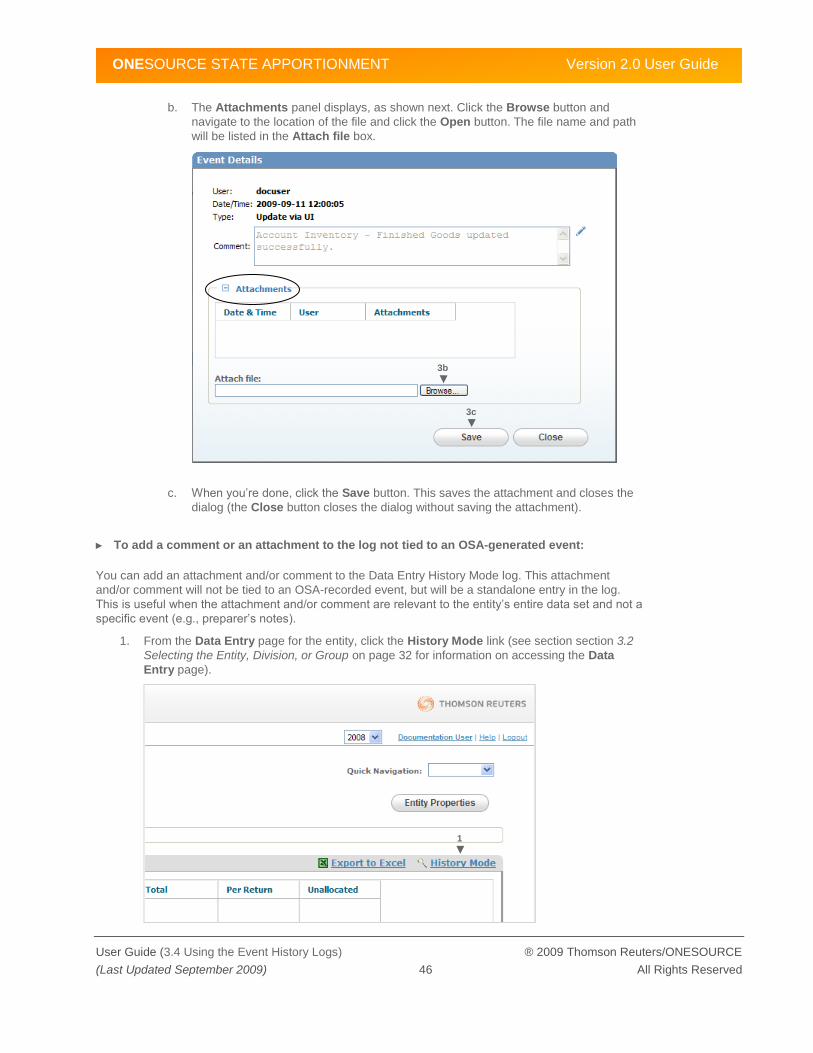
ONESOURCE STATE APPORTIONMENT Version 2.0 User Guide
User Guide (3.4 Using the Event History Logs) ® 2009 Thomson Reuters/ONESOURCE
(Last Updated September 2009) 46 All Rights Reserved
b. The Attachments panel displays, as shown next. Click the Browse button and
navigate to the location of the file and click the Open button. The file name and path
will be listed in the Attach file box.
c. When you‘re done, click the Save button. This saves the attachment and closes the
dialog (the Close button closes the dialog without saving the attachment).
► To add a comment or an attachment to the log not tied to an OSA-generated event:
You can add an attachment and/or comment to the Data Entry History Mode log. This attachment
and/or comment will not be tied to an OSA-recorded event, but will be a standalone entry in the log.
This is useful when the attachment and/or comment are relevant to the entity‘s entire data set and not a
specific event (e.g., preparer‘s notes).
1. From the Data Entry page for the entity, click the History Mode link (see section section 3.2
Selecting the Entity, Division, or Group on page 32 for information on accessing the Data
Entry page).
3b
3c
1

ONESOURCE STATE APPORTIONMENT Version 2.0 User Guide
User Guide (3.4 Using the Event History Logs) ® 2009 Thomson Reuters/ONESOURCE
(Last Updated September 2009) 47 All Rights Reserved
2. The display changes to History Mode, as shown next.
3. Click the Add icon . The Add Attachment dialog displays. You can add either an
attachment or a comment, or both.
4. To attach a file: click the Browse button and navigate to the file, then click the Open button.
The file name and path will display in the Attach file box.
5. To enter a comment: type in the comment in the Comment field.
6. Click the Save button (Close abandons the operation).
Once you click the Save button, the attachment and comment are added to the log. An entry is
also made in the main Event History log available from the Admin tab. To return to edit mode,
click the Back to Edit Mode link.
3
4
6
5

ONESOURCE STATE APPORTIONMENT Version 2.0 User Guide
User Guide (3.4 Using the Event History Logs) ® 2009 Thomson Reuters/ONESOURCE
(Last Updated September 2009) 48 All Rights Reserved
3.4.2 Properties Page Event History Log
When you make a change to a properties page, either for an entity or a group, the change is logged as
an event in the Event History log of the entity‘s or group‘s properties page. The change is also logged in
the overall Event History log available from the Admin tab.
The event includes a timestamp, the user name of the user who made the change, the type of change
made, and an OSA-generated comment. The Event Detail further displays setting (element) changed,
the jurisdiction for which the setting was changed, and the prior and current values, when applicable.
You can edit the OSA-generated comment as well as add attachments to the OSA-recorded events,
and you can add attachments and comments directly to the log without being tied to a specific event.
How to view the Event History log as well as how to add and edit comments and attachments is
described next.
Viewing the Properties Page Event History Log
► To view the Properties page Event History log:
1. Access the Entity or Group Properties page. See the instructions in section 3.3.4 Editing
Entity/Group Properties on page 40.
2

ONESOURCE STATE APPORTIONMENT Version 2.0 User Guide
User Guide (3.4 Using the Event History Logs) ® 2009 Thomson Reuters/ONESOURCE
(Last Updated September 2009) 49 All Rights Reserved
2. Scroll to the bottom of the properties page and click the Event History expand/collapse icon
. The Event History log for the page displays.
3. Use the scroll bar to find the desired event.
4. Click its View button. The Event Details dialog displays, showing the user who made the
change, the date and time of the change, and the type of change made. The dialog also
includes an OSA-generated comment, and a table with the changes made. In this example, the
table shows the elements changed, the jurisdictions in which the elements were changed, and
the prior and new values. The Prior column is FALSE meaning the element was False before
being set to True.
5. At this point, you can use the << Previous and Next >> links to move through the events listed
in the Event History log, you can edit the comment, or add an attachment to this event.
6. Click the Close button to close the dialog, or follow the instructions in the next section to edit
the comment or add an attachment.
4 3
6
5
2

ONESOURCE STATE APPORTIONMENT Version 2.0 User Guide
User Guide (3.4 Using the Event History Logs) ® 2009 Thomson Reuters/ONESOURCE
(Last Updated September 2009) 50 All Rights Reserved
Adding Comments/Attachments to the Properties Page Event History Log
You can add comments and attachments to OSA-recorded events, or you can add a comment and/or
attachment to the log without it being tied to an event. How to do each is described next.
► To add a comment or attachment to an OSA-recorded event:
1. Follow the instructions in the section above to display the Event Detail dialog for the desired
event.
2a
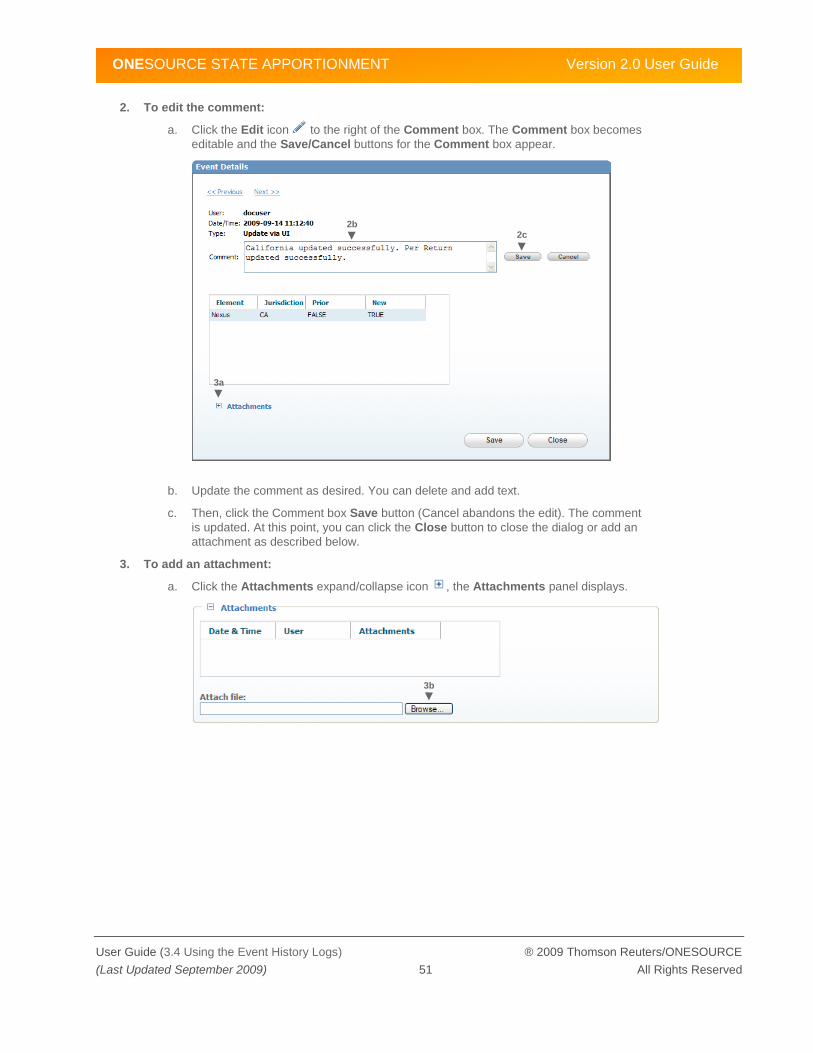
ONESOURCE STATE APPORTIONMENT Version 2.0 User Guide
User Guide (3.4 Using the Event History Logs) ® 2009 Thomson Reuters/ONESOURCE
(Last Updated September 2009) 51 All Rights Reserved
2. To edit the comment:
a. Click the Edit icon to the right of the Comment box. The Comment box becomes
editable and the Save/Cancel buttons for the Comment box appear.
b. Update the comment as desired. You can delete and add text.
c. Then, click the Comment box Save button (Cancel abandons the edit). The comment
is updated. At this point, you can click the Close button to close the dialog or add an
attachment as described below.
3. To add an attachment:
a. Click the Attachments expand/collapse icon , the Attachments panel displays.
2b 2c
3a
3b

ONESOURCE STATE APPORTIONMENT Version 2.0 User Guide
User Guide (3.4 Using the Event History Logs) ® 2009 Thomson Reuters/ONESOURCE
(Last Updated September 2009) 52 All Rights Reserved
b. Click the Browse button and navigate to the location of the file and click the Open
button. The file name and path will be listed in the Attach file box.
c. When you‘re done, click the Save button. This saves the attachment and closes the
dialog (the Close button closes the dialog without saving the attachment).
► To add a comment and/or attachment not tied to an OSA-generated record:
You can add a comment, an attachment, or both to the Event History log. This comment and/or
attachment will not be tied to an OSA-generated event. This is useful when the comment and/or
attachment is relevant to the overall entity and not a specific event record in the log.
1. Access the Entity or Group Properties page. See the instructions in section 3.3.4 Editing
Entity/Group Properties on page 40.
3c
2

ONESOURCE STATE APPORTIONMENT Version 2.0 User Guide
User Guide (3.5 Confirming Account Totals Match Source Document(s)) ® 2009 Thomson Reuters/ONESOURCE
(Last Updated September 2009) 53 All Rights Reserved
2. Scroll to the bottom of the properties page and click the Event History expand/collapse icon
. The Event History log for the page displays.
3. Click the Add Attachment… button. The Add Attachment dialog displays.
4. To add an attachment: click the Browse button and navigate to the file, then click the Open
button. The file name and path will display in the Attach file box.
5. To add a comment: click in the Comment box and type the comment.
6. Click the Save button (Close abandons the operation).
Once you click the Save button, the attachment and comment are added to the log. An entry is
also made in the main Event History log available from the Admin tab. To return to edit mode,
click the Back to Edit Mode link.
3.5 Confirming Account Totals Match Source Document(s)
During data entry, you will want to confirm that the amounts and account totals match your source
documents. There are various ways of doing so:
Review the Apportionment Data Entry page
Review the Apportionment Calculation page
Export data to Excel and review offline
Run a report
3
4
6
5
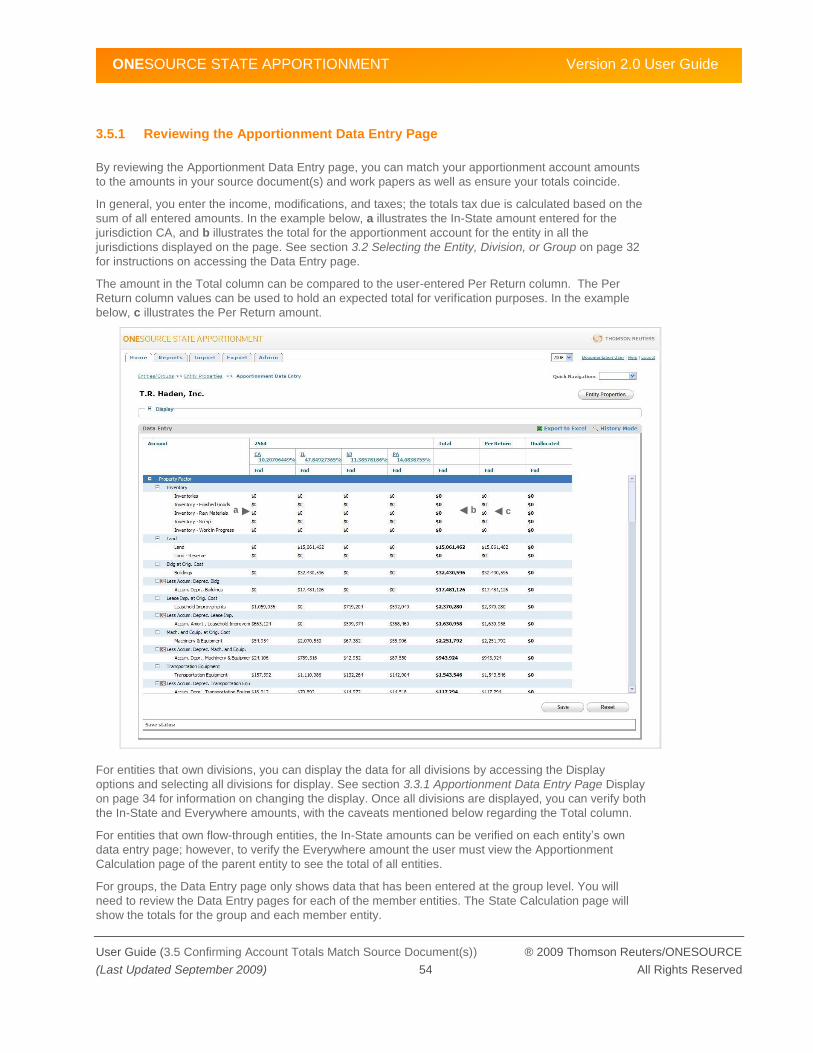
ONESOURCE STATE APPORTIONMENT Version 2.0 User Guide
User Guide (3.5 Confirming Account Totals Match Source Document(s)) ® 2009 Thomson Reuters/ONESOURCE
(Last Updated September 2009) 54 All Rights Reserved
3.5.1 Reviewing the Apportionment Data Entry Page
By reviewing the Apportionment Data Entry page, you can match your apportionment account amounts
to the amounts in your source document(s) and work papers as well as ensure your totals coincide.
In general, you enter the income, modifications, and taxes; the totals tax due is calculated based on the
sum of all entered amounts. In the example below, a illustrates the In-State amount entered for the
jurisdiction CA, and b illustrates the total for the apportionment account for the entity in all the
jurisdictions displayed on the page. See section 3.2 Selecting the Entity, Division, or Group on page 32
for instructions on accessing the Data Entry page.
The amount in the Total column can be compared to the user-entered Per Return column. The Per
Return column values can be used to hold an expected total for verification purposes. In the example
below, c illustrates the Per Return amount.
For entities that own divisions, you can display the data for all divisions by accessing the Display
options and selecting all divisions for display. See section 3.3.1 Apportionment Data Entry Page Display
on page 34 for information on changing the display. Once all divisions are displayed, you can verify both
the In-State and Everywhere amounts, with the caveats mentioned below regarding the Total column.
For entities that own flow-through entities, the In-State amounts can be verified on each entity‘s own
data entry page; however, to verify the Everywhere amount the user must view the Apportionment
Calculation page of the parent entity to see the total of all entities.
For groups, the Data Entry page only shows data that has been entered at the group level. You will
need to review the Data Entry pages for each of the member entities. The State Calculation page will
show the totals for the group and each member entity.
a b c

ONESOURCE STATE APPORTIONMENT Version 2.0 User Guide
User Guide (3.5 Confirming Account Totals Match Source Document(s)) ® 2009 Thomson Reuters/ONESOURCE
(Last Updated September 2009) 55 All Rights Reserved
Keep in mind that the Data Entry page shows all amounts pre-logic (before any tax rules are applied or
other apportionment calculations such as ownership and ownership percentages are applied) whereas
the Apportionment Calculation page shows all amounts post-logic by default. You can change the
display of the Apportionment Calculation page to show pre-logic, as described in the next section.
Also, the Total column in the Data Entry page sums all and only the amounts displayed in the page
including local jurisdictions (municipalities) and foreign entities, which are not included in the
denominator total for the apportionment calculation. And, if a jurisdiction is hidden from view, its
amounts will not be included in the Total field.
You can use the display options described in section 3.3.1 Apportionment Data Entry Page Display on
page 34 to make sure the jurisdictions and divisions you need are displayed.
3.5.2 Reviewing the Apportionment Calculation Page
The Apportionment Calculation page shows the total and by-factor apportionment percentages for an
entity or group for a specified jurisdiction. The example below shows the totals and apportionment
percentages for the entity T.R. Haden, Inc. in California.
You can view the In-State values by factor, the Everywhere values by factor, or both values by factor
(e.g., Property Factor). Clicking the apportionment factor link displays both the In-State and Everywhere
values for the entity (including all its divisions and partners).

ONESOURCE STATE APPORTIONMENT Version 2.0 User Guide
User Guide (3.5 Confirming Account Totals Match Source Document(s)) ® 2009 Thomson Reuters/ONESOURCE
(Last Updated September 2009) 56 All Rights Reserved
Clicking the In-State total or Everywhere total for a factor shows the In-State or Everywhere values,
respectively, including Elimination totals. The example below shows the In-State values.
The values for the entity are shown first followed by values for all the divisions. Any partnership totals
are shown after the division totals.
The next example is for the same entity in the jurisdiction IL. This entity is part of a group in Illinois;
therefore, the Apportionment Calculation page summary shows the Group Everywhere totals.
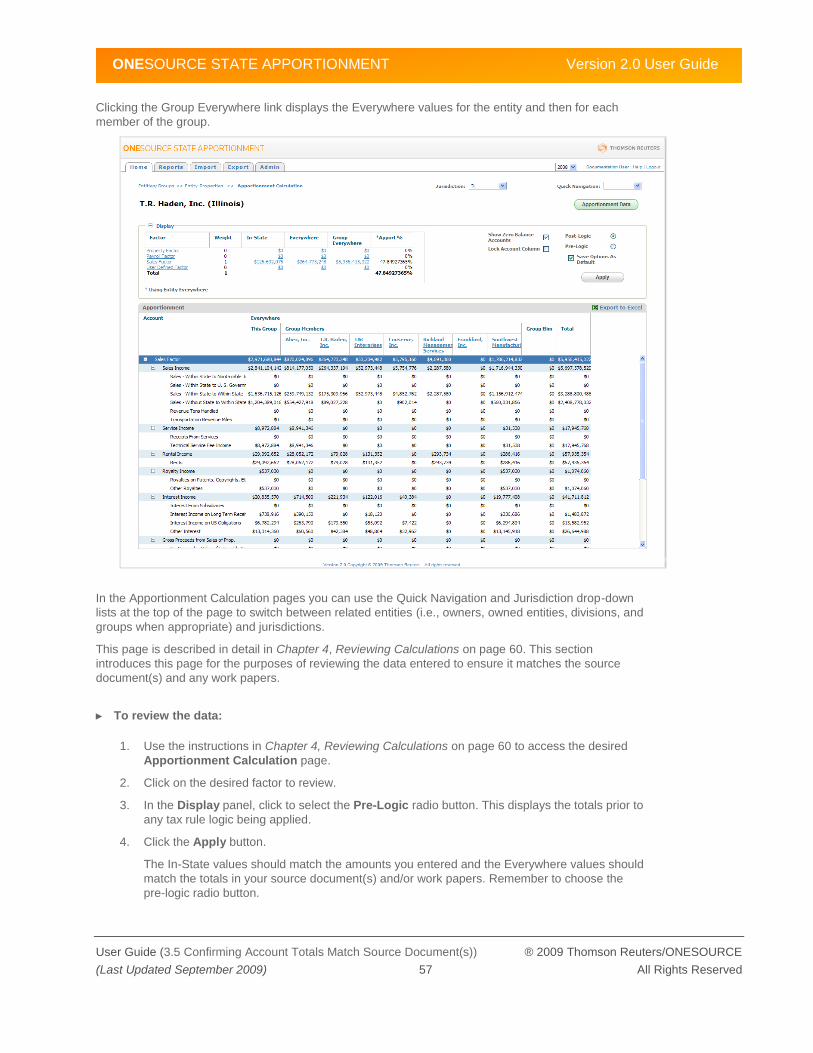
ONESOURCE STATE APPORTIONMENT Version 2.0 User Guide
User Guide (3.5 Confirming Account Totals Match Source Document(s)) ® 2009 Thomson Reuters/ONESOURCE
(Last Updated September 2009) 57 All Rights Reserved
Clicking the Group Everywhere link displays the Everywhere values for the entity and then for each
member of the group.
In the Apportionment Calculation pages you can use the Quick Navigation and Jurisdiction drop-down
lists at the top of the page to switch between related entities (i.e., owners, owned entities, divisions, and
groups when appropriate) and jurisdictions.
This page is described in detail in Chapter 4, Reviewing Calculations on page 60. This section
introduces this page for the purposes of reviewing the data entered to ensure it matches the source
document(s) and any work papers.
► To review the data:
1. Use the instructions in Chapter 4, Reviewing Calculations on page 60 to access the desired
Apportionment Calculation page.
2. Click on the desired factor to review.
3. In the Display panel, click to select the Pre-Logic radio button. This displays the totals prior to
any tax rule logic being applied.
4. Click the Apply button.
The In-State values should match the amounts you entered and the Everywhere values should
match the totals in your source document(s) and/or work papers. Remember to choose the
pre-logic radio button.

ONESOURCE STATE APPORTIONMENT Version 2.0 User Guide
User Guide (3.5 Confirming Account Totals Match Source Document(s)) ® 2009 Thomson Reuters/ONESOURCE
(Last Updated September 2009) 58 All Rights Reserved
3.5.3 Exporting Data to Excel
You can export the Data Entry page or the Apportionment Calculation page to a file in Excel format at
any time. The data displayed on the page is exported; therefore, make sure you set the display the way
you want it prior to exporting the data. See section 3.3.1 Apportionment Data Entry Page Display on
page 34 for information on setting the display of the Data Entry page. Refer to Chapter 4, Reviewing
Calculations on page 60 for information on the Apportionment Calculation page.
The ability to export data to an Excel file is common throughout the OSA pages and is indicated by the
Export to Excel link.
In order to view the Excel file, you need to have the Excel software program on your computer. In
addition, you must configure your browser to allow pop-ups as well as file downloads from OSA. See
section D.3.1 Exporting Files on page 280 for instructions.

ONESOURCE STATE APPORTIONMENT Version 2.0 User Guide
User Guide (3.5 Confirming Account Totals Match Source Document(s)) ® 2009 Thomson Reuters/ONESOURCE
(Last Updated September 2009) 59 All Rights Reserved
3.5.4 Running a Report
OSA provides four reports that you can use to review apportionment data. These reports are described
in detail in Chapter 5, Reporting on page 66.
When running the reports, make sure you set the report to show pre-logic amounts in the detail pages.
Report Description
Entity Calculations Excel file – provides complete visibility into the calculation of one entity‘s
apportionment percentage for a given jurisdiction. Can be set to show pre- or
post-logic amounts in the detail pages.
Entity Detail PDF file – provides account detail for one entity and multiple jurisdictions, and
shows how the apportionment factor was calculated in each selected jurisdiction.
Can be set to show pre- or post-logic amounts in the detail pages as well as filter
out entities without nexus in the selected jurisdictions.
Group Calculations Excel file – provides complete visibility into the calculation of a single group‘s
apportionment percentage for a given jurisdiction. Can be set to show pre- or
post-logic amounts in the detail pages.
Group Detail PDF file – provides account detail for one group and one jurisdiction, and shows
how the apportionment factor was calculated. Can be set to show pre- or post-
logic amounts in the detail pages.
Ultimate Entity Ownership Excel file – provides details on how apportionment data flows into an entity. This
includes detail on flow from all sources in a multi-tier structure.
Ultimate Group Ownership Excel file – provides details on how apportionment data flows into a group. This
includes detail on flow from all sources in a multi-tier structure.

ONESOURCE STATE APPORTIONMENT Version 2.0 User Guide
User Guide (4.1 Overview) ® 2009 Thomson Reuters/ONESOURCE
(Last Updated September 2009) 60 All Rights Reserved
4 Reviewing Calculations
Chapter 4 describes how to review apportionment calculations within OSA to ensure their accuracy. It
includes the following sections:
4.1: Overview
4.2: Displaying the Apportionment Calculation Page
4.3: Reviewing the Calculations
4.1 Overview
To review apportionment calculations, OSA provides the Apportionment Calculation page as well as
several reports. The Apportionment Calculation page displays a summary table that lists the numerator,
denominator, group denominator (when entity belongs to a group and the jurisdiction is a group state)
and apportionment percentages by factor for a single entity or group and for a single jurisdiction. By
clicking on the various numbers in the summary section, you can display the underlying amounts. The
underlying amounts are shown for the entity, all divisions, and all partnerships (flow-through entities),
and include eliminations.
OSA provides four reports that you can use to review apportionment data. By default these reports are
set to show post-logic amounts in the detail pages. As described in Chapter 3, Entering Apportionment
Data, you can set the report to show pre-logic data when reviewing apportionment data during data
entry. For a detailed description of the reports available in OSA and instructions for running them, see
Chapter 5, Reporting on page 66.
Report Description
Entity Calculations Excel file – provides complete visibility into the calculation of one entity‘s
apportionment percentage for a given jurisdiction. Can be set to show pre- or
post-logic amounts in the detail pages.
Entity Detail PDF file – provides account detail for one entity and multiple jurisdictions, and
shows how the apportionment factor was calculated in each selected jurisdiction.
Can be set to show pre- or post-logic amounts in the detail pages as well as filter
out entities without nexus in the selected jurisdictions.
Group Calculations Excel file – provides complete visibility into the calculation of a single group‘s
apportionment percentage for a given jurisdiction. Can be set to show pre- or
post-logic amounts in the detail pages.
Group Detail PDF file – provides account detail for one group and one jurisdiction, and shows
how the apportionment factor was calculated. Can be set to show pre- or post-
logic amounts in the detail pages.

ONESOURCE STATE APPORTIONMENT Version 2.0 User Guide
User Guide (4.2 Displaying the Apportionment Calculation Page) ® 2009 Thomson Reuters/ONESOURCE
(Last Updated September 2009) 61 All Rights Reserved
4.2 Displaying the Apportionment Calculation Page
You can access the Apportionment Calculation page from either the entity/group‘s Apportionment Data
Entry page or the entity/group‘s Properties page. The Apportionment Calculation page shows the
numerator, denominator, and apportionment percentages by factor for one entity/group and one
jurisdiction at a time.
► To display the Apportionment Calculation page:
1. Click the Home tab.
2. Find the desired entity, division, or group in the Entities and Groups list. You can scroll, use
the Search text box, or use Internet Explorer‘s built-in Ctrl-F feature.
3. Click the linked ID or Name for the entity, division, or group. The Properties page displays.
The example below is for T.R.Haden, Inc. (2564).
3
1
2
4

ONESOURCE STATE APPORTIONMENT Version 2.0 User Guide
User Guide (4.3 Reviewing the Calculations) ® 2009 Thomson Reuters/ONESOURCE
(Last Updated September 2009) 62 All Rights Reserved
4. Click on the linked apportionment percentage for the desired jurisdiction. The Apportionment
Calculation page displays. The example shown next is for Illinois.
You can also access the Apportionment Calculation page by clicking the Apportionment Data
Entry icon ( ) in the Entities and Groups list, and then clicking either the linked apportionment
percentage or the linked jurisdiction ID in each column header.
Within the Apportionment Calculation page, you can jump to another jurisdiction for this entity
or group by using the Jurisdiction drop-down list.
You can also jump to any other related group, entity, or division using the Quick Navigation
drop-down list. For example, for T.R. Haden, Inc. the Quick Navigation drop-down list
displays the groups of which the entity is a member, its divisions, and its owned entities. When
you make a selection, the Apportionment Calculation page for that entity, division, or group
displays, for the current jurisdiction.
4.3 Reviewing the Calculations
When you first access the Apportionment Calculation page, it shows a summary table. This summary
table lists the numerator, denominator and apportionment percentages by factor for a single entity or
group and for a single jurisdiction.
When an entity belongs to a group and the selected jurisdiction is a group state, the Group Everywhere
total is also shown, and a note is included indicating whether or not the apportionment percentage is
calculated using the Group Everywhere total. The exception is the Nexus Consolidated group filing type.
This filing type does purely entity-level calculations and does not show group values at the entity level.

ONESOURCE STATE APPORTIONMENT Version 2.0 User Guide
User Guide (4.3 Reviewing the Calculations) ® 2009 Thomson Reuters/ONESOURCE
(Last Updated September 2009) 63 All Rights Reserved
The example below is for T.R. Haden, Inc., an entity with divisions that is a member of one different
filing group.
The apportionment factors (Property, Payroll, Sales, and User Defined) and all totals are links. When
you click on a link, the apportionment detail displays, as follows:
When you click on the apportionment factor link (Property, Payroll, Sales, and User Defined),
the detail shows both the In-State and Everywhere amounts. Included are amounts for the
entity itself, any divisions, any partnerships, and any eliminations. In the case of a group,
included are amounts for the group itself, any member entities, and any group eliminations.
When you click on the In-State total, only the In-State amounts are shown in the detail.
Included are amounts for the entity itself, any divisions, any partnerships, and any eliminations.
In the case of a group, included are amounts for the group itself, any member entities, and any
group eliminations.
When you click on the Everywhere total, only the Everywhere amounts are shown in the detail.
Included are amounts for the entity itself, any divisions, any partnerships, and any eliminations.
In the case of a group, included are amounts for the group itself, any member entities, and any
group eliminations.
When Group Everywhere totals are shown, clicking on the Group Everywhere total displays
the Everywhere amounts for the group itself and any member entities along with any group
eliminations.
The example below shows the T.R. Haden, Inc. (Illinois) Apportionment Calculation page, with the
Property Factor In-State total selected.

ONESOURCE STATE APPORTIONMENT Version 2.0 User Guide
User Guide (4.3 Reviewing the Calculations) ® 2009 Thomson Reuters/ONESOURCE
(Last Updated September 2009) 64 All Rights Reserved
4.3.1 Display Options
When you display the apportionment detail, the Display options become available. The options are:
Option Description
Beginning When checked, shows beginning values. You can choose to display beginning,
ending, average, or a combination of all three.
Ending When checked, shows ending values. You can choose to display beginning,
ending, average, or a combination of all three.
Average When checked, shows average of beginning and ending values. You can choose
to display beginning, ending, average, or a combination of all three.
Show Zero Balance Accounts When checked, displays accounts with no values. Can be used to decrease
enhance the display of large grids.
Lock Account Column When checked, locks the Account column such that it remains visible when
scrolling horizontally.
Post-Logic When selected, the amounts are shown with the tax rule‘s inclusion/exclusion
rules applied. This is the default selection.
Pre-Logic When selected, the amounts are shown without the tax rule‘s inclusion/exclusion
rules applied. Typically, this option is selected when you want to compare
amounts to source documents.
Note: Only the amounts in the detail portion change, the amounts and
percentages in the summary section are always shown Post-Logic.
Save Options As Default When checked, saves the display layout selections such that they are always
used as the default view for this page.
► To change the display options:
1. Display the desired Apportionment Calculation page. The display options are available once
you display a detail page either by clicking the factor or In-State or Everywhere total.
2. In the Display panel, click to select the appropriate check box(es) and/or radio button.
2
3
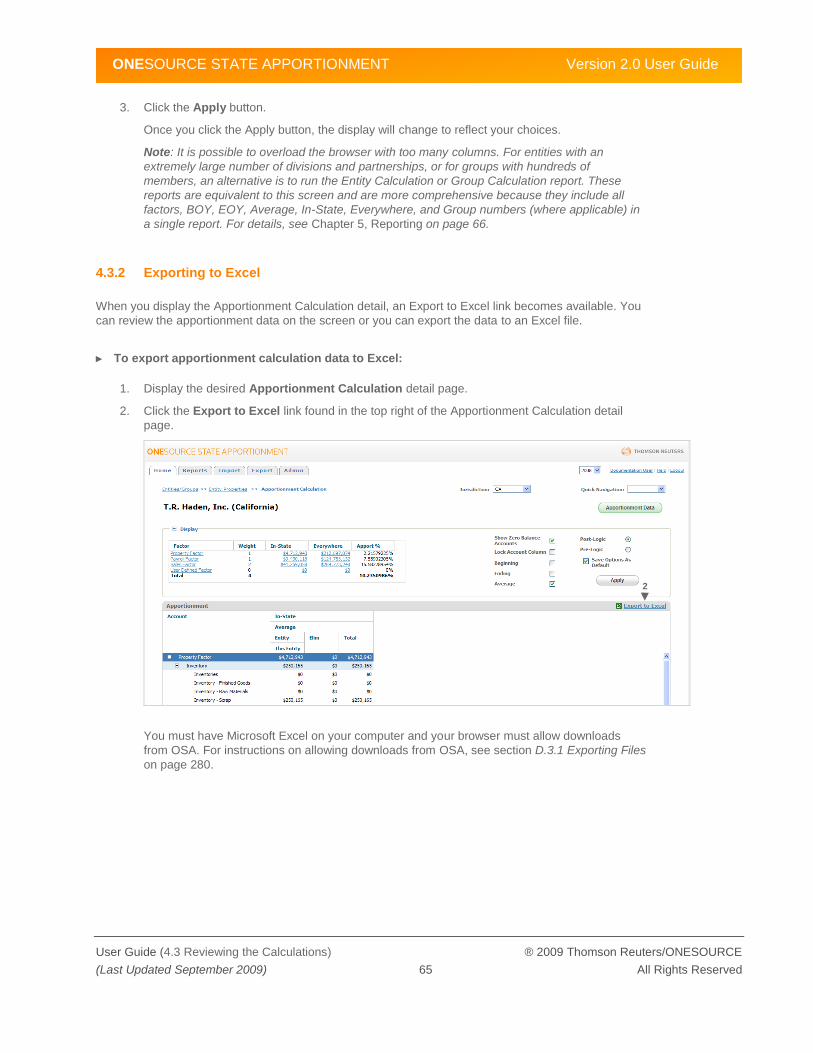
ONESOURCE STATE APPORTIONMENT Version 2.0 User Guide
User Guide (4.3 Reviewing the Calculations) ® 2009 Thomson Reuters/ONESOURCE
(Last Updated September 2009) 65 All Rights Reserved
3. Click the Apply button.
Once you click the Apply button, the display will change to reflect your choices.
Note: It is possible to overload the browser with too many columns. For entities with an
extremely large number of divisions and partnerships, or for groups with hundreds of
members, an alternative is to run the Entity Calculation or Group Calculation report. These
reports are equivalent to this screen and are more comprehensive because they include all
factors, BOY, EOY, Average, In-State, Everywhere, and Group numbers (where applicable) in
a single report. For details, see Chapter 5, Reporting on page 66.
4.3.2 Exporting to Excel
When you display the Apportionment Calculation detail, an Export to Excel link becomes available. You
can review the apportionment data on the screen or you can export the data to an Excel file.
► To export apportionment calculation data to Excel:
1. Display the desired Apportionment Calculation detail page.
2. Click the Export to Excel link found in the top right of the Apportionment Calculation detail
page.
You must have Microsoft Excel on your computer and your browser must allow downloads
from OSA. For instructions on allowing downloads from OSA, see section D.3.1 Exporting Files
on page 280.
2

ONESOURCE STATE APPORTIONMENT Version 2.0 User Guide
User Guide (5.1 Overview) ® 2009 Thomson Reuters/ONESOURCE
(Last Updated September 2009) 66 All Rights Reserved
5 Reporting
Chapter 5 covers reporting within OSA and includes the following sections:
5.1: Overview
5.2: Report Descriptions
5.3: Running Reports
5.1 Overview
OSA provides 13 reports, eight of which are Entity & Group Reports and five of which are OSA
Structure Reports. The Reports tab is shown below.
For each report, you are asked to specify the report parameters and, in some cases, choose an output
type. You can save and name the parameters you choose as a parameter template in order to easily
run the same report again in the future. This is particularly helpful with large data sets when you want to
select the same subset of data each time. Saved parameter templates are user specific and only
available to the user who created them.
The reports are presented as files in either PDF or Excel format. When in Excel format, with the
exception of the Entity and Group Calculations reports, the report is presented as a Pivot Table with the
accompanying data sheet with auto-filters. Therefore, you will need Adobe Acrobat or another PDF file
reader as well as Excel on your computer in order to view the reports.
In addition, OSA reports require that your browser allow pop-ups and that files from OSA are allowed to
be downloaded to your computer. See section D.3.1 Exporting Files on page 280 for instructions on
configuring your browser to allow pop-ups and file downloads from OSA.
When appropriate, reports can be run with a setting of pre- or post-logic. This setting applies to the
detail portion of the report. The summary is always displayed post-logic.
Note: In addition to the Reports tab, OSA offers various ways to extract data from OSA. There is the
Exports tab, an Export to Excel link for all pages that present data, and a custom export feature. See
Appendix D, Working with CSV Files on page 275 for information on using the Exports tab, refer to the
documentation for a specific page for information on the Export to Excel link, and see Appendix B,
Custom Data Exports on page 240 for information on the custom export feature.

ONESOURCE STATE APPORTIONMENT Version 2.0 User Guide
User Guide (5.2 Report Descriptions) ® 2009 Thomson Reuters/ONESOURCE
(Last Updated September 2009) 67 All Rights Reserved
5.2 Report Descriptions
This section describes each OSA report, listing the report‘s parameters, the permissions required to run
it, and its output type. The reports are summarized first, followed by a detailed description. Both lists are
alphabetical by report name.
Some reports allow you to specify whether you want to view pre- or post-logic data. This refers only to
the detailed data; the summary data is always shown post-logic.
Reports are either an Excel or PDF file, depending on the report. When a report is an Excel file, with the
exception of the Entity and Group Calculations reports, the worksheet is presented as a pivot table with
the supporting data sheet. When the report is a PDF file, bookmarks are provided within the file to
facilitate navigation.
5.2.1 Reports and Permissions
To run reports, you must have the appropriate permissions. That is, you must have access to the
Reports tab and, depending on the report you want to run, access to the appropriate data type as well
as permissions for the specific entities and/or groups.
The OSA Reports tab lists only the reports you have the appropriate permissions to run based on the
data type access. Within the specific report‘s parameters page, if there is a list of entities and/or groups
from which to choose, the list will be limited to those you have permission to view (as governed by the
Entities/Groups access list).
However, provided you have access to the appropriate data type and (where applicable) the selected
entity or group, the reports will show all the entities and data necessary to support the calculated
numbers, regardless of permissions to the underlying data.
For example, when running a group report, provided you have access to the group, the report will show
all member entities and their data whether or not you have access specifically to the member entities.
Likewise, when reports show accounts, all accounts are shown regardless of the entity account filters
specified for a given entity. This is to avoid a situation where some necessary data isn‘t displayed.
The required permissions are included in the explanation of each report. Contact your OSA
administrator if your permissions are not adequate.
5.2.2 Report Summary
Report Description
Effective Rate Excel file – for every entity, group, and jurisdiction selected, this report provides
an effective tax rate derived by multiplying the apportionment percentage and tax
rate. You can select which tax year to use for purposes of applying the
apportionment weights and tax rates.
Entity Calculations Excel file – provides complete visibility into the calculation of one entity‘s
apportionment percentage for a given jurisdiction. Can be set to show pre- or
post-logic amounts in the detail pages.
Entity Detail PDF file – provides account detail for one entity and multiple jurisdictions, and
shows how the apportionment factor was calculated in each selected jurisdiction.
Can be set to show pre- or post-logic amounts in the detail pages as well as filter
out entities without nexus in the selected jurisdictions.

ONESOURCE STATE APPORTIONMENT Version 2.0 User Guide
User Guide (5.2 Report Descriptions) ® 2009 Thomson Reuters/ONESOURCE
(Last Updated September 2009) 68 All Rights Reserved
Report Description
Group Calculations Excel file – provides complete visibility into the calculation of a single group‘s
apportionment percentage for a given jurisdiction. Can be set to show pre- or
post-logic amounts in the detail pages.
Group Detail PDF file – provides account detail for one group and one jurisdiction, and shows
how the apportionment factor was calculated. Can be set to show pre- or post-
logic amounts in the detail pages.
Group Membership Excel file – lists the members in each group, per jurisdiction. Enables you to
analyze simultaneously group membership across several jurisdictions.
Nexus and Filing Obligation Excel file – provides a complete nexus breakdown for every entity, group, or
jurisdiction selected.
Nexus Threshold Excel file – for one or more jurisdictions, reports whether the apportionment
factor(s) for the selected entities and groups are above or below a specified
threshold.
Numerator and Denominator Excel file – provides a high-level view of numerators, denominators, and
apportionment percentages for every entity, group, and jurisdiction selected. Can
be set to filter out entities without nexus in the selected jurisdictions.
Ownership Structure Excel file – shows the ownership relationship (and therefore path for data flow)
for each selected entity. This report does not show divisions since they are not
considered a legal entity separate from the parent entity.
Tax Rule Matrix Excel file – identifies all the tax rules available for each jurisdiction and lists the
tax rule each entity is set to use.
Ultimate Entity Ownership Excel file – provides details on how apportionment data flows into an entity. This
includes detail on flow from all sources in a multi-tier structure.
Ultimate Group Ownership Excel file – provides details on how apportionment data flows into a group. This
includes detail on flow from all sources in a multi-tier structure.
Each report is described in detail next.

ONESOURCE STATE APPORTIONMENT Version 2.0 User Guide
User Guide (5.2 Report Descriptions) ® 2009 Thomson Reuters/ONESOURCE
(Last Updated September 2009) 69 All Rights Reserved
5.2.3 Report Detail
Effective Rate
Output Type and File Name
Excel pivot table sorted by entity or group ID, entity type, and jurisdiction ID.
Effective_Rate.xls.
Description
The Effective Rate report provides an apportionment percentage and tax rate for every entity, group,
and jurisdiction selected. It then multiplies the apportionment percentage and tax rate to derive the
effective tax rate.
Group apportionment percentages are calculated as Group Numerator/Group Denominator for all filing
types except Nexus Consolidated; this group filing type does not calculate an apportionment
percentage. The apportionment percentage is then multiplied by the tax rate to derive the effective tax
rate.
In addition to running the report with the current data set and current rates and weights, you can run it
on the current data set with future tax year apportionment factor weighting and rates to assist in
computing deferred rates for provision.
OSA provides future rates out to 2014. You can log in to any future year to add custom tax rules or
change the apportionment factor weighting, and then run the report on the current data set using future
weighting and tax rates.
The pivot table enables you to easily filter the information as desired; in addition to entity/group ID, type,
and jurisdiction information, the pivot table provides entity/group name, FEIN, group association (the
group with which the entity is associated), and whether the data is for an entity or group. Plus, the data
sheet for the pivot table includes auto-filters.
When a flow-through entity is set within OSA to be treated as a C-Corp (the Federal Election setting),
the entity is listed with type ―Partnership – Treated as C-Corp‖ within the report. Other partnership
information is provided for your reference only, given that tax rates are generally not applied at the
partnership level.
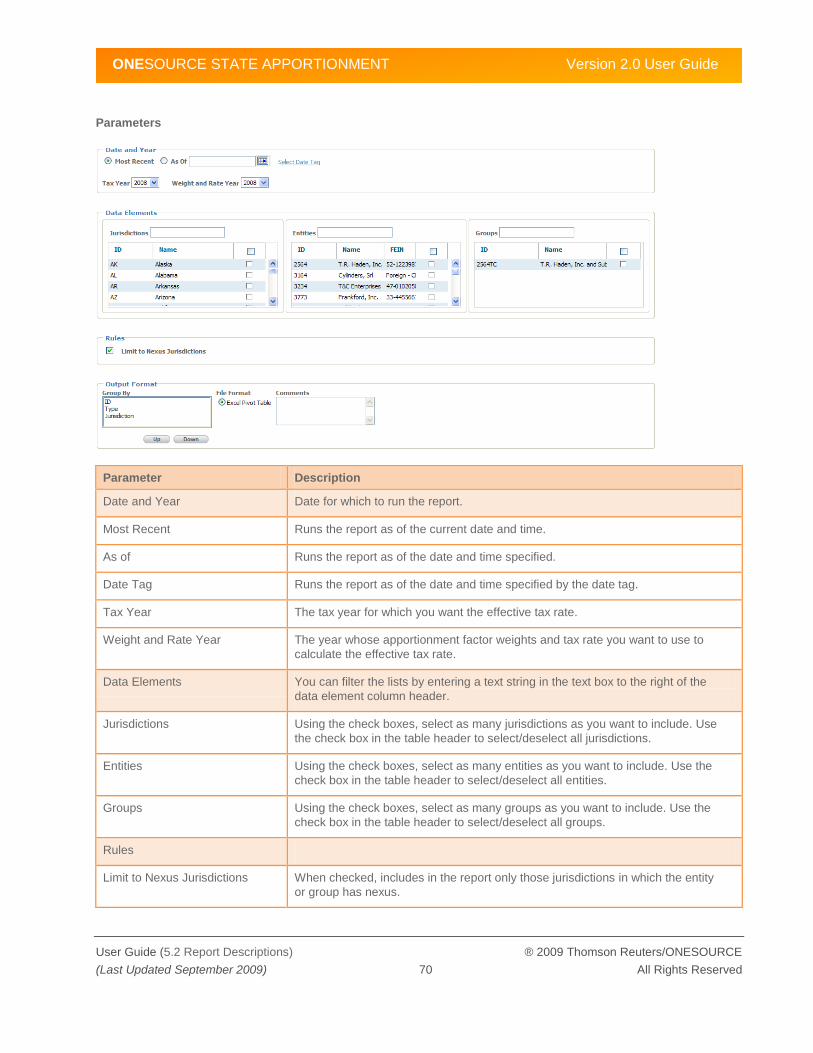
ONESOURCE STATE APPORTIONMENT Version 2.0 User Guide
User Guide (5.2 Report Descriptions) ® 2009 Thomson Reuters/ONESOURCE
(Last Updated September 2009) 70 All Rights Reserved
Parameters
Parameter Description
Date and Year Date for which to run the report.
Most Recent Runs the report as of the current date and time.
As of Runs the report as of the date and time specified.
Date Tag Runs the report as of the date and time specified by the date tag.
Tax Year The tax year for which you want the effective tax rate.
Weight and Rate Year The year whose apportionment factor weights and tax rate you want to use to
calculate the effective tax rate.
Data Elements You can filter the lists by entering a text string in the text box to the right of the
data element column header.
Jurisdictions Using the check boxes, select as many jurisdictions as you want to include. Use
the check box in the table header to select/deselect all jurisdictions.
Entities Using the check boxes, select as many entities as you want to include. Use the
check box in the table header to select/deselect all entities.
Groups Using the check boxes, select as many groups as you want to include. Use the
check box in the table header to select/deselect all groups.
Rules
Limit to Nexus Jurisdictions When checked, includes in the report only those jurisdictions in which the entity
or group has nexus.
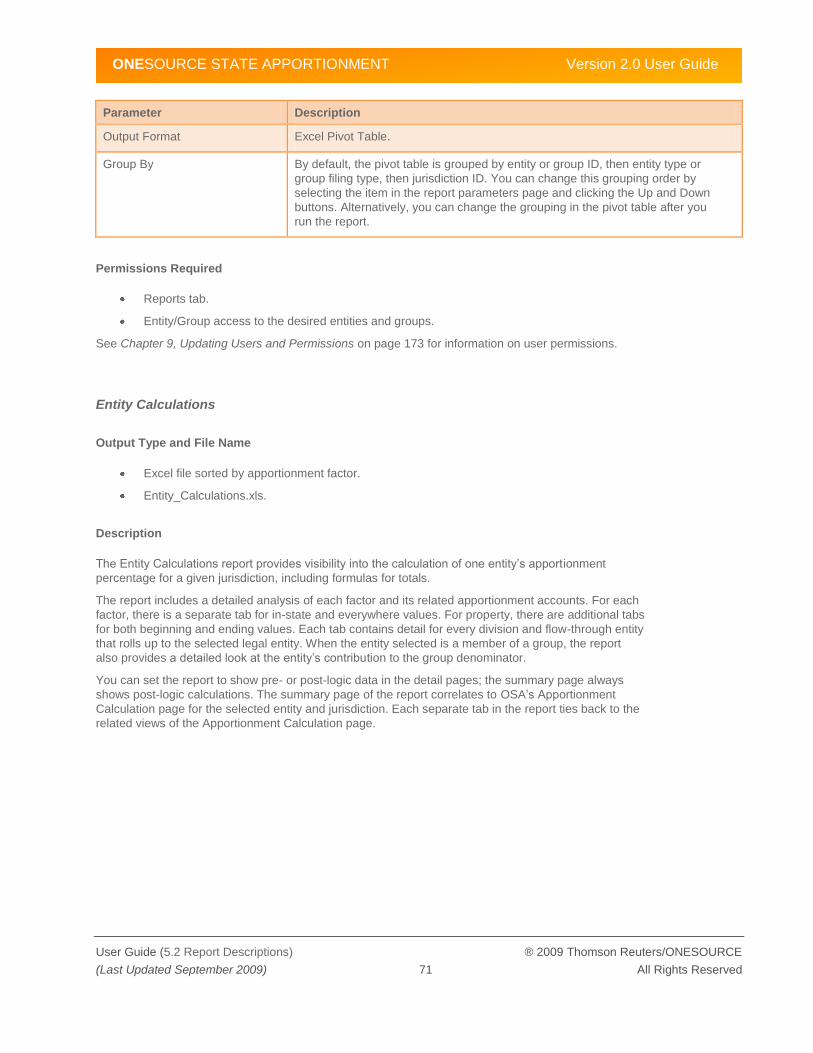
ONESOURCE STATE APPORTIONMENT Version 2.0 User Guide
User Guide (5.2 Report Descriptions) ® 2009 Thomson Reuters/ONESOURCE
(Last Updated September 2009) 71 All Rights Reserved
Parameter Description
Output Format Excel Pivot Table.
Group By By default, the pivot table is grouped by entity or group ID, then entity type or
group filing type, then jurisdiction ID. You can change this grouping order by
selecting the item in the report parameters page and clicking the Up and Down
buttons. Alternatively, you can change the grouping in the pivot table after you
run the report.
Permissions Required
Reports tab.
Entity/Group access to the desired entities and groups.
See Chapter 9, Updating Users and Permissions on page 173 for information on user permissions.
Entity Calculations
Output Type and File Name
Excel file sorted by apportionment factor.
Entity_Calculations.xls.
Description
The Entity Calculations report provides visibility into the calculation of one entity‘s apportionment
percentage for a given jurisdiction, including formulas for totals.
The report includes a detailed analysis of each factor and its related apportionment accounts. For each
factor, there is a separate tab for in-state and everywhere values. For property, there are additional tabs
for both beginning and ending values. Each tab contains detail for every division and flow-through entity
that rolls up to the selected legal entity. When the entity selected is a member of a group, the report
also provides a detailed look at the entity‘s contribution to the group denominator.
You can set the report to show pre- or post-logic data in the detail pages; the summary page always
shows post-logic calculations. The summary page of the report correlates to OSA‘s Apportionment
Calculation page for the selected entity and jurisdiction. Each separate tab in the report ties back to the
related views of the Apportionment Calculation page.
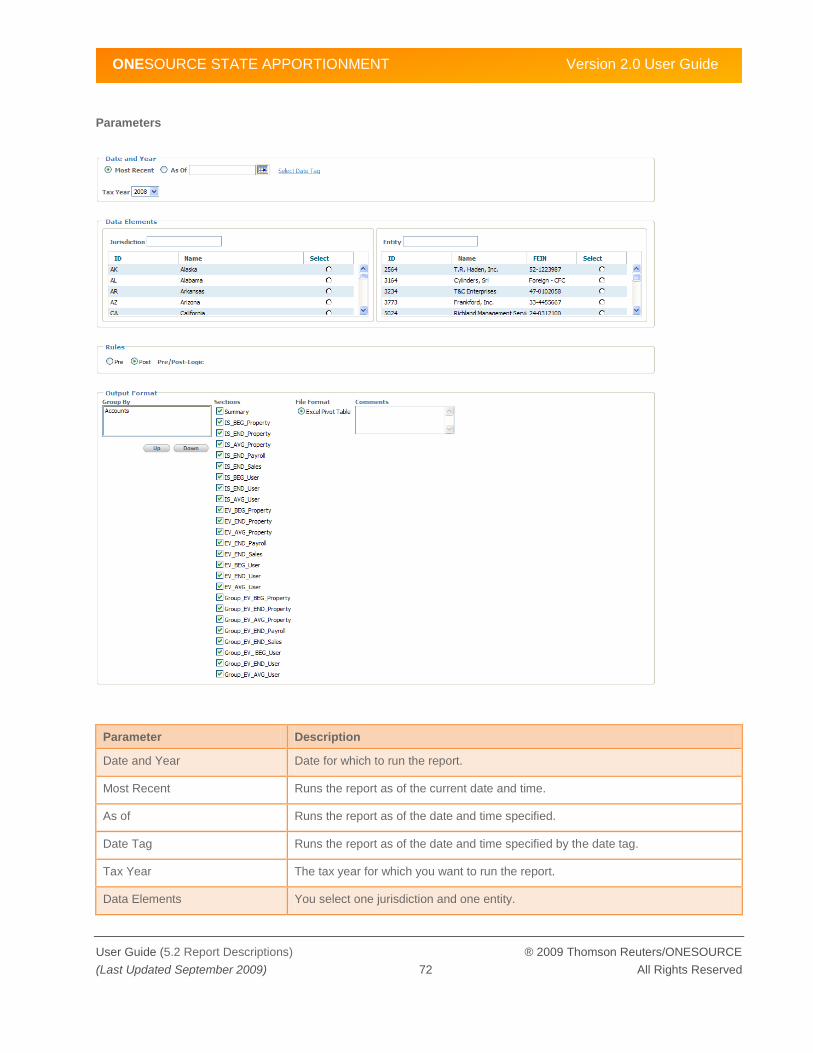
ONESOURCE STATE APPORTIONMENT Version 2.0 User Guide
User Guide (5.2 Report Descriptions) ® 2009 Thomson Reuters/ONESOURCE
(Last Updated September 2009) 72 All Rights Reserved
Parameters
Parameter Description
Date and Year Date for which to run the report.
Most Recent Runs the report as of the current date and time.
As of Runs the report as of the date and time specified.
Date Tag Runs the report as of the date and time specified by the date tag.
Tax Year The tax year for which you want to run the report.
Data Elements You select one jurisdiction and one entity.
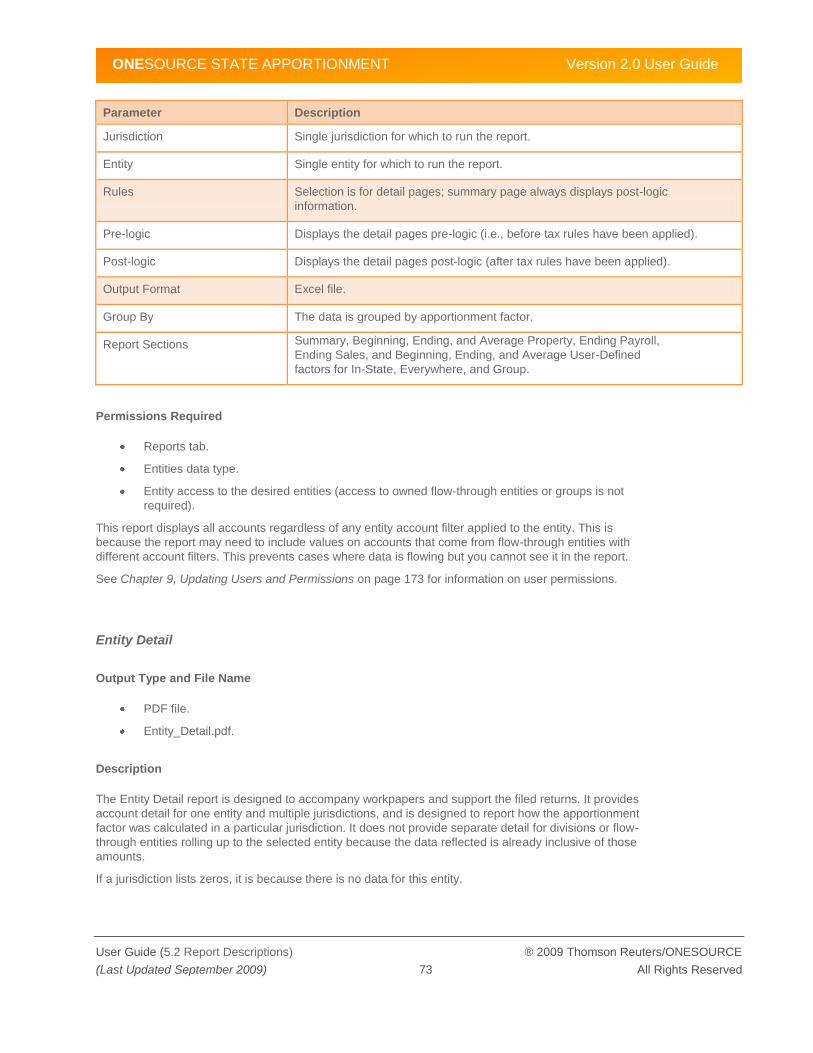
ONESOURCE STATE APPORTIONMENT Version 2.0 User Guide
User Guide (5.2 Report Descriptions) ® 2009 Thomson Reuters/ONESOURCE
(Last Updated September 2009) 73 All Rights Reserved
Parameter Description
Jurisdiction Single jurisdiction for which to run the report.
Entity Single entity for which to run the report.
Rules Selection is for detail pages; summary page always displays post-logic
information.
Pre-logic Displays the detail pages pre-logic (i.e., before tax rules have been applied).
Post-logic Displays the detail pages post-logic (after tax rules have been applied).
Output Format Excel file.
Group By The data is grouped by apportionment factor.
Report Sections Summary, Beginning, Ending, and Average Property, Ending Payroll,
Ending Sales, and Beginning, Ending, and Average User-Defined
factors for In-State, Everywhere, and Group.
Permissions Required
Reports tab.
Entities data type.
Entity access to the desired entities (access to owned flow-through entities or groups is not
required).
This report displays all accounts regardless of any entity account filter applied to the entity. This is
because the report may need to include values on accounts that come from flow-through entities with
different account filters. This prevents cases where data is flowing but you cannot see it in the report.
See Chapter 9, Updating Users and Permissions on page 173 for information on user permissions.
Entity Detail
Output Type and File Name
PDF file.
Entity_Detail.pdf.
Description
The Entity Detail report is designed to accompany workpapers and support the filed returns. It provides
account detail for one entity and multiple jurisdictions, and is designed to report how the apportionment
factor was calculated in a particular jurisdiction. It does not provide separate detail for divisions or flow-
through entities rolling up to the selected entity because the data reflected is already inclusive of those
amounts.
If a jurisdiction lists zeros, it is because there is no data for this entity.
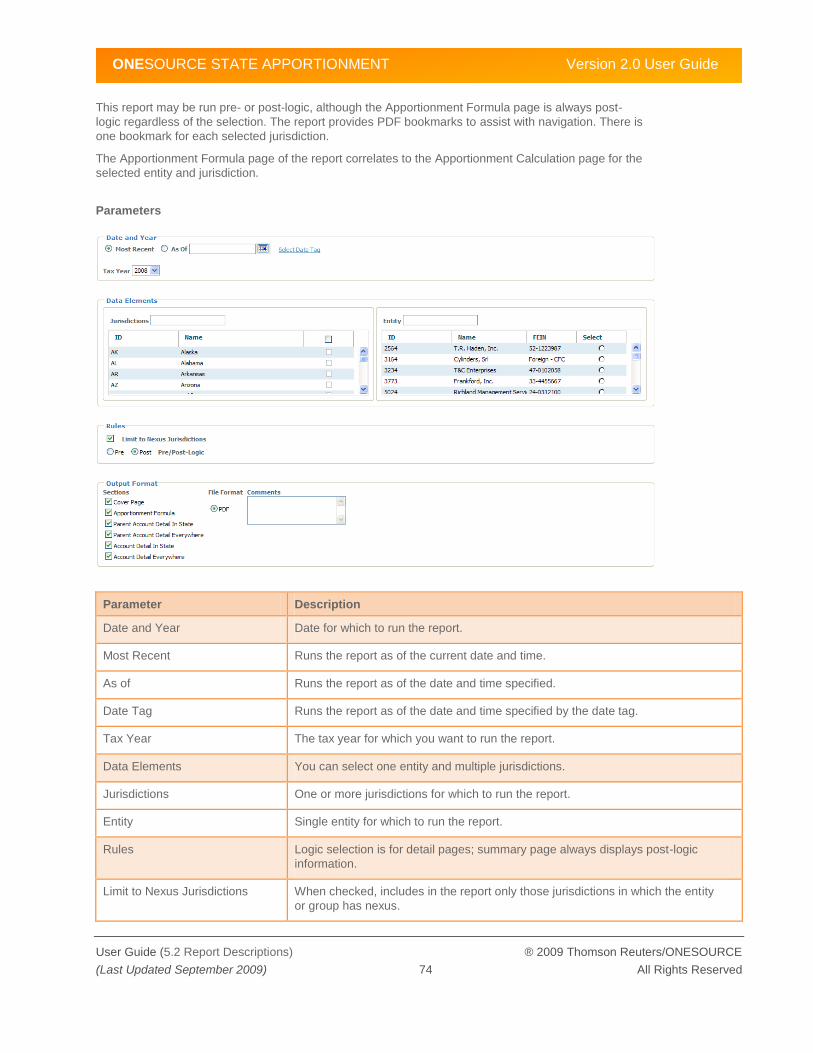
ONESOURCE STATE APPORTIONMENT Version 2.0 User Guide
User Guide (5.2 Report Descriptions) ® 2009 Thomson Reuters/ONESOURCE
(Last Updated September 2009) 74 All Rights Reserved
This report may be run pre- or post-logic, although the Apportionment Formula page is always post-
logic regardless of the selection. The report provides PDF bookmarks to assist with navigation. There is
one bookmark for each selected jurisdiction.
The Apportionment Formula page of the report correlates to the Apportionment Calculation page for the
selected entity and jurisdiction.
Parameters
Parameter Description
Date and Year Date for which to run the report.
Most Recent Runs the report as of the current date and time.
As of Runs the report as of the date and time specified.
Date Tag Runs the report as of the date and time specified by the date tag.
Tax Year The tax year for which you want to run the report.
Data Elements You can select one entity and multiple jurisdictions.
Jurisdictions One or more jurisdictions for which to run the report.
Entity Single entity for which to run the report.
Rules Logic selection is for detail pages; summary page always displays post-logic
information.
Limit to Nexus Jurisdictions When checked, includes in the report only those jurisdictions in which the entity
or group has nexus.

ONESOURCE STATE APPORTIONMENT Version 2.0 User Guide
User Guide (5.2 Report Descriptions) ® 2009 Thomson Reuters/ONESOURCE
(Last Updated September 2009) 75 All Rights Reserved
Parameter Description
Pre-logic Displays the detail pages pre-logic (i.e., before tax rules have been applied).
Post-logic Displays the detail pages post-logic (after tax rules have been applied).
Output Format PDF file, with one or more of the following sections.
Report Sections Cover Page (Summary), Apportionment Formula, Parent Account Detail In State,
Parent Account Detail Everywhere, Account Detail In State, Account Detail
Everywhere.
Permissions Required
Reports tab.
Entities data type.
Entity access to the desired entities (access to owned flow-through entities is not required)
This report displays all accounts regardless of any entity account filter applied to the entity. This is
because the report may need to include values on accounts that come from flow-through entities with
different account filters. This prevents cases where data is flowing but you cannot see it in the report.
See Chapter 9, Updating Users and Permissions on page 173 for information on user permissions.
Group Calculations
Output Type and File Name
Excel file grouped by apportionment factor.
Group_Calculations.xls.
Description
The Group Calculations report provides visibility into the calculation of a single group‘s apportionment
percentage for a given jurisdiction. It includes a detailed analysis of each factor and its related
apportionment accounts. For each factor, there is a separate tab for in-state and everywhere values.
For property, there are additional tabs for both beginning and ending values. It does not, however,
provide information on all divisions and flow-through entities that roll up into the member entities; for this
information, you can run the Entity Calculations report.
The summary page of the report correlates directly to the Apportionment Calculation page for the
selected entity and jurisdiction.
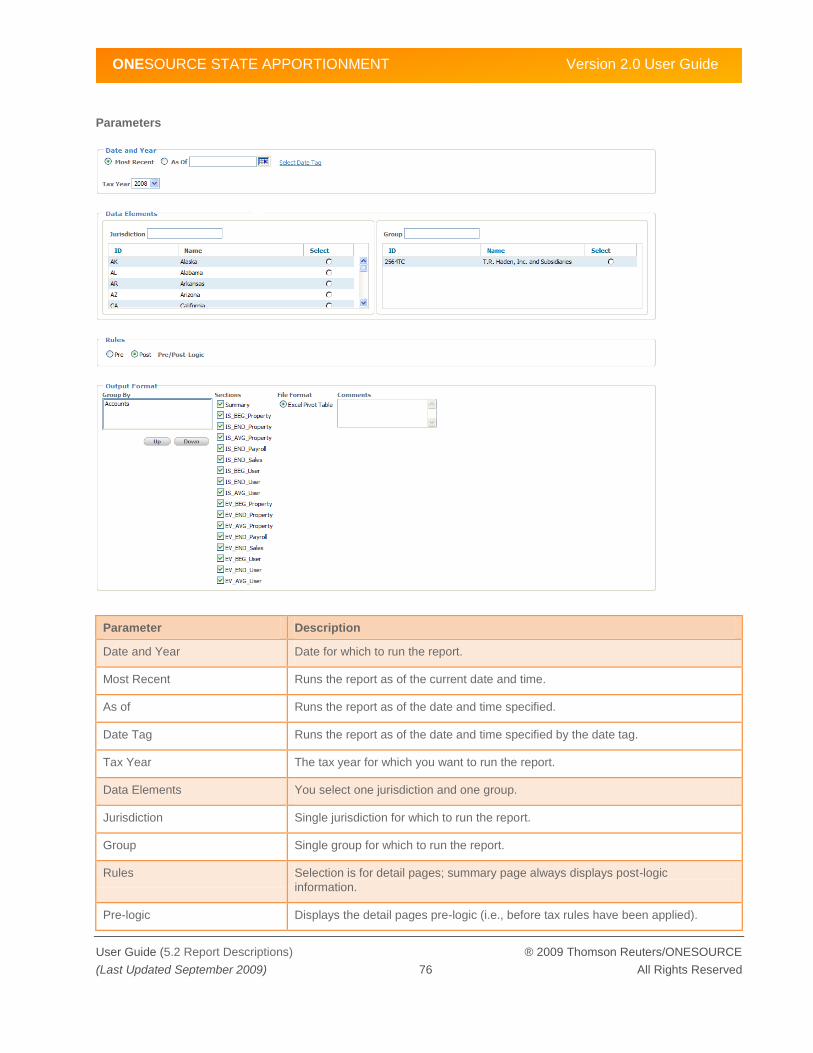
ONESOURCE STATE APPORTIONMENT Version 2.0 User Guide
User Guide (5.2 Report Descriptions) ® 2009 Thomson Reuters/ONESOURCE
(Last Updated September 2009) 76 All Rights Reserved
Parameters
Parameter Description
Date and Year Date for which to run the report.
Most Recent Runs the report as of the current date and time.
As of Runs the report as of the date and time specified.
Date Tag Runs the report as of the date and time specified by the date tag.
Tax Year The tax year for which you want to run the report.
Data Elements You select one jurisdiction and one group.
Jurisdiction Single jurisdiction for which to run the report.
Group Single group for which to run the report.
Rules Selection is for detail pages; summary page always displays post-logic
information.
Pre-logic Displays the detail pages pre-logic (i.e., before tax rules have been applied).

ONESOURCE STATE APPORTIONMENT Version 2.0 User Guide
User Guide (5.2 Report Descriptions) ® 2009 Thomson Reuters/ONESOURCE
(Last Updated September 2009) 77 All Rights Reserved
Parameter Description
Post-logic Displays the detail pages post-logic (after tax rules have been applied).
Output Format Excel file.
Group By The file is grouped by apportionment factor.
Report Sections Summary, Beginning, Ending, and Average Property, Ending Payroll, Ending
Sales, and Beginning, Ending, and Average User-Defined factors for In-State
and Everywhere.
Permissions Required
Reports tab.
Groups data type.
Group access to the desired groups (access specifically to the member entities is not
required).
See Chapter 9, Updating Users and Permissions on page 173 for information on user permissions.
Group Detail
Output Type and File Name
PDF file
Group_Detail.pdf
Description
The Group Detail report is designed to accompany workpapers and support the filed returns. It provides
account detail for one group and one jurisdiction, and is designed to report how the apportionment
factor was calculated in a particular jurisdiction. It does not provide separate detail for divisions or flow-
through entities rolling up to the entities in the selected group because the data reflected is already
inclusive of those amounts. For this detailed information, you can run the Entity Calculations report.
This report may be run pre- or post-logic, although the Apportionment Formula and summary pages are
always post-logic regardless of your selection. The report provides PDF bookmarks to assist with
navigation. There is one bookmark for each selected jurisdiction.
The Apportionment Formula page of the report correlates to the Apportionment Calculation page for the
selected group and jurisdiction.
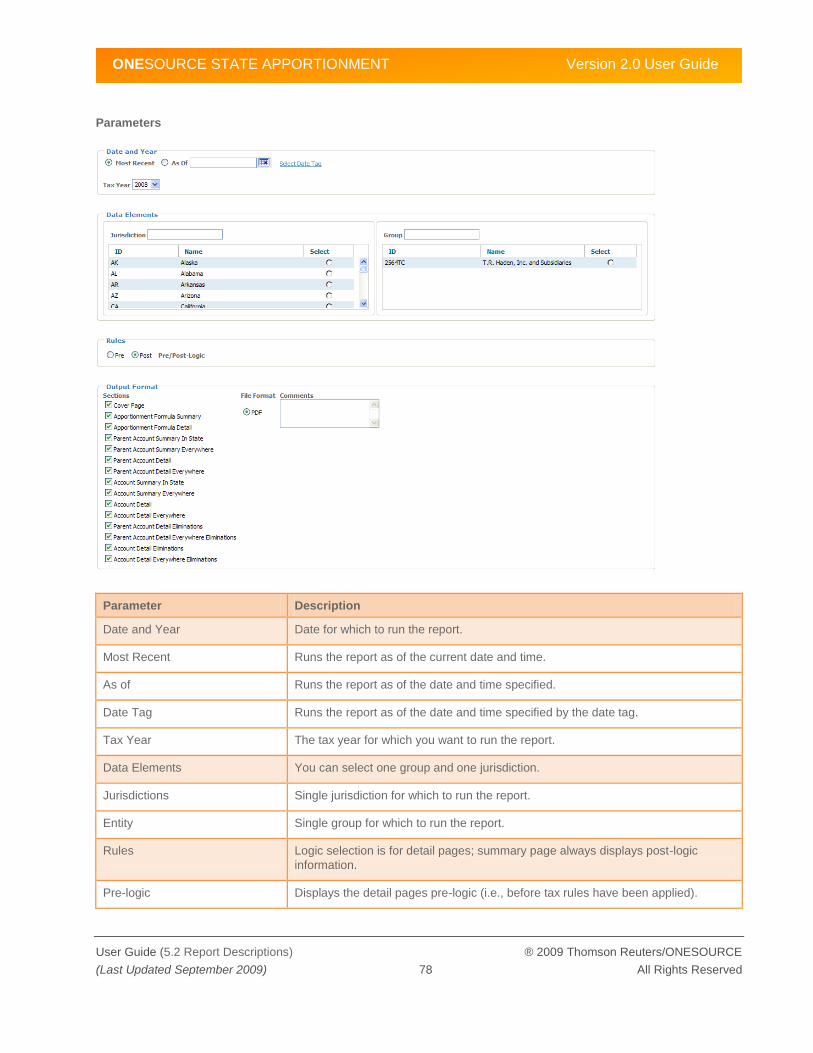
ONESOURCE STATE APPORTIONMENT Version 2.0 User Guide
User Guide (5.2 Report Descriptions) ® 2009 Thomson Reuters/ONESOURCE
(Last Updated September 2009) 78 All Rights Reserved
Parameters
Parameter Description
Date and Year Date for which to run the report.
Most Recent Runs the report as of the current date and time.
As of Runs the report as of the date and time specified.
Date Tag Runs the report as of the date and time specified by the date tag.
Tax Year The tax year for which you want to run the report.
Data Elements You can select one group and one jurisdiction.
Jurisdictions Single jurisdiction for which to run the report.
Entity Single group for which to run the report.
Rules Logic selection is for detail pages; summary page always displays post-logic
information.
Pre-logic Displays the detail pages pre-logic (i.e., before tax rules have been applied).

ONESOURCE STATE APPORTIONMENT Version 2.0 User Guide
User Guide (5.2 Report Descriptions) ® 2009 Thomson Reuters/ONESOURCE
(Last Updated September 2009) 79 All Rights Reserved
Parameter Description
Post-logic Displays the detail pages post-logic (after tax rules have been applied).
Output Format PDF file, with one or more of the following sections.
Report Sections Summary, Apportionment Formula Summary, Apportionment Formula Detail,
Parent Account Summary In State, Parent Account Summary Everywhere,
Parent Account Detail In State, Parent Account Detail Everywhere, Account
Summary In State, Account Summary Everywhere, Account Detail, Account
Detail Everywhere, Parent Account Detail Eliminations, Parent Account Detail
Everywhere Eliminations, Account Detail Eliminations, Account Detail
Everywhere Eliminations.
Permissions Required
Reports tab.
Groups data type.
Group access to the desired groups (access specifically to the member entities is not
required).
See Chapter 9, Updating Users and Permissions on page 173 for information on user permissions.
Group Membership
Output Type and File Name
Excel pivot table grouped by group ID, jurisdiction, filing type, and member ID.
Group_Membership.xls.
Description
The Group Membership report provides a breakdown of the members for each group per jurisdiction,
enabling you to analyze group membership across several jurisdictions simultaneously.
You can filter the report by included or excluded members (and reason for exclusion). The pivot table
data sheet also provides auto-filters.

ONESOURCE STATE APPORTIONMENT Version 2.0 User Guide
User Guide (5.2 Report Descriptions) ® 2009 Thomson Reuters/ONESOURCE
(Last Updated September 2009) 80 All Rights Reserved
Parameters
Parameter Description
Date and Year Date for which to run the report.
Most Recent Runs the report as of the current date and time.
As of Runs the report as of the date and time specified.
Date Tag Runs the report as of the date and time specified by the date tag.
Tax Year The tax year for which you want to run the report.
Data Elements You can select multiple jurisdictions and multiple groups.
Jurisdictions One or more jurisdictions for which to run report.
Groups One or more groups for which to run report.
Output Format Excel Pivot Table.
Group By The pivot table is grouped by group ID, jurisdiction, filing type, member ID.
Permissions Required
Reports tab.
Groups data type.
Group access to the desired groups.
See Chapter 9, Updating Users and Permissions on page 173 for information on user permissions.

ONESOURCE STATE APPORTIONMENT Version 2.0 User Guide
User Guide (5.2 Report Descriptions) ® 2009 Thomson Reuters/ONESOURCE
(Last Updated September 2009) 81 All Rights Reserved
Nexus and Filing Obligation
Output Type and File Name
Excel pivot table presented as two sections, entities and groups, grouped by jurisdiction, entity
or group ID, and name.
Nexus_and_Filing_Obligation.xls.
Description
The Nexus and Filing Obligation report provides a complete nexus (filing) breakdown for every entity,
group, and jurisdiction selected. You can filter the entities and groups by nexus, nexus flow, or tax rule
assigned. The entities are presented first, followed by the groups. The data sheet for the pivot table also
provides auto-filters.
Parameters
Parameter Description
Date and Year Date for which to run the report.
Most Recent Runs the report as of the current date and time.
As of Runs the report as of the date and time specified.
Date Tag Runs the report as of the date and time specified by the date tag.
Tax Year The tax year for which you want to run the report.
Data Elements You can select one or more jurisdictions, entities, and/or groups.
Jurisdictions One or more jurisdiction for which to run the report.
Entities One or more entity for which to run the report.

ONESOURCE STATE APPORTIONMENT Version 2.0 User Guide
User Guide (5.2 Report Descriptions) ® 2009 Thomson Reuters/ONESOURCE
(Last Updated September 2009) 82 All Rights Reserved
Parameter Description
Groups One or more groups for which to run the report.
Output Format Excel Pivot Table with two sections, entities and groups.
Group By The each section in the pivot table is grouped by jurisdiction, entity/group ID, and
entity/group name.
Permissions Required
Reports tab.
Entities and Groups data types.
Entity/Group access to the desired entities and/or groups.
See Chapter 9, Updating Users and Permissions on page 173 for information on user permissions.
Nexus Threshold
Output Type and File Name
Excel pivot table presented in two sections, above and below threshold, and grouped by entity
or group ID, jurisdiction, nexus, and factor.
Nexus_Threshold.xls.
Description
The Nexus Threshold report allows you to define a dollar amount threshold for each apportionment
factor. OSA then shows whether the entity‘s or group‘s numerator, ignoring factor weighting, for that
apportionment factor is above or below the defined thresholds.
Nexus will be true (has nexus) for an entity in a given jurisdiction if any owned flow-through entities
have nexus in that jurisdiction. The data represented in this report is the entity‘s own data plus the sum
of all divisions and flow-through entities rolling up to the selected entity.
The pivot table data sheet also provides auto-filters.

ONESOURCE STATE APPORTIONMENT Version 2.0 User Guide
User Guide (5.2 Report Descriptions) ® 2009 Thomson Reuters/ONESOURCE
(Last Updated September 2009) 83 All Rights Reserved
Parameters
Parameter Description
Date and Year Date for which to run the report.
Most Recent Runs the report as of the current date and time.
As of Runs the report as of the date and time specified.
Date Tag Runs the report as of the date and time specified by the date tag.
Tax Year The tax year for which you want to run the report.
Data Elements You can choose one or more jurisdictions, entities, and groups.
Jurisdictions One or more jurisdictions for which to run the report.
Entities One or more entities for which to run the report.
Groups One or more groups for which to run the report.
Rules Threshold for each apportionment factor.
Property, Payroll, Sales, and
User Defined Thresholds
Enter whole dollar amounts to define the threshold for each factor. Leave blank
those thresholds that should not be considered. Do not enter dollar signs or
commas.
Output Format Excel Pivot Table with two sections, above and below threshold.
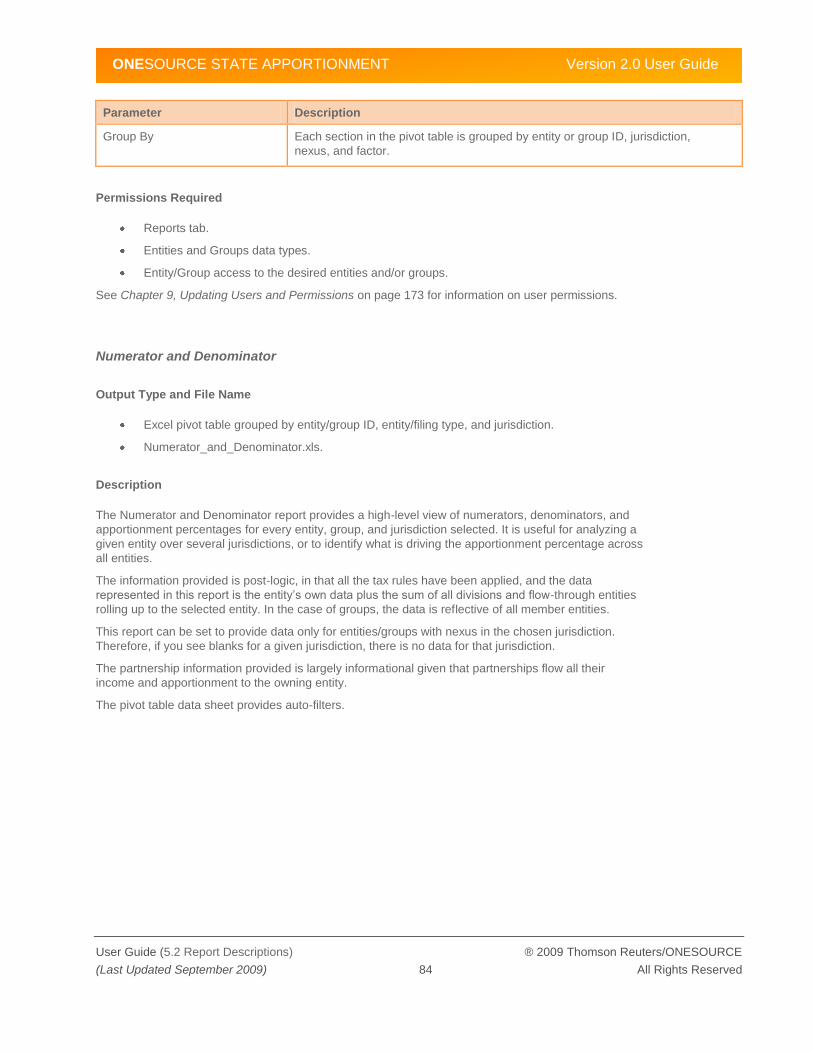
ONESOURCE STATE APPORTIONMENT Version 2.0 User Guide
User Guide (5.2 Report Descriptions) ® 2009 Thomson Reuters/ONESOURCE
(Last Updated September 2009) 84 All Rights Reserved
Parameter Description
Group By Each section in the pivot table is grouped by entity or group ID, jurisdiction,
nexus, and factor.
Permissions Required
Reports tab.
Entities and Groups data types.
Entity/Group access to the desired entities and/or groups.
See Chapter 9, Updating Users and Permissions on page 173 for information on user permissions.
Numerator and Denominator
Output Type and File Name
Excel pivot table grouped by entity/group ID, entity/filing type, and jurisdiction.
Numerator_and_Denominator.xls.
Description
The Numerator and Denominator report provides a high-level view of numerators, denominators, and
apportionment percentages for every entity, group, and jurisdiction selected. It is useful for analyzing a
given entity over several jurisdictions, or to identify what is driving the apportionment percentage across
all entities.
The information provided is post-logic, in that all the tax rules have been applied, and the data
represented in this report is the entity‘s own data plus the sum of all divisions and flow-through entities
rolling up to the selected entity. In the case of groups, the data is reflective of all member entities.
This report can be set to provide data only for entities/groups with nexus in the chosen jurisdiction.
Therefore, if you see blanks for a given jurisdiction, there is no data for that jurisdiction.
The partnership information provided is largely informational given that partnerships flow all their
income and apportionment to the owning entity.
The pivot table data sheet provides auto-filters.

ONESOURCE STATE APPORTIONMENT Version 2.0 User Guide
User Guide (5.2 Report Descriptions) ® 2009 Thomson Reuters/ONESOURCE
(Last Updated September 2009) 85 All Rights Reserved
Parameters
Parameter Description
Date and Year Date for which to run the report.
Most Recent Runs the report as of the current date and time.
As of Runs the report as of the date and time specified.
Date Tag Runs the report as of the date and time specified by the date tag.
Tax Year The tax year for which you want to run the report.
Data Elements You can choose one or more jurisdictions, entities, and/or groups.
Jurisdictions One or more jurisdictions for which to run the report.
Entities One or more entities for which to run the report.
Groups One or more groups for which to run the report.
Rules
Limit to Nexus Jurisdictions When checked, includes in the report only those jurisdictions in which the entity
or group has nexus.
Output Format Excel Pivot Table.
Group By The pivot table grouped by entity/group ID, entity/filing type, and jurisdiction.

ONESOURCE STATE APPORTIONMENT Version 2.0 User Guide
User Guide (5.2 Report Descriptions) ® 2009 Thomson Reuters/ONESOURCE
(Last Updated September 2009) 86 All Rights Reserved
Permissions Required
Reports tab.
Entities and Groups data types.
Entity/Group access to the desired entities and/or groups.
See Chapter 9, Updating Users and Permissions on page 173 for information on user permissions.
Ownership Structure
Output Type and File Name
Excel pivot table presented in two sections, entity structure and circular ownerships, and
grouped by entity ID, partner ID, and relationship.
Ownership_Structure.xls.
Description
The Ownership Structure report shows the ownership relationship (path for data flow) for each selected
entity. Divisions are not included since they are not considered a legal entity separate from their parent
entity. The circular ownership section is shown only when circular ownerships exist.
The report lists both direct and indirect relationships with the corresponding percentages (beginning and
ending). For example if entity A owns entity B, and entity B owns entity C, then A has a direct
relationship with B as well as an indirect relationship with C. The report will provide the ownership
percentages (both beginning and ending) for both the direct relationships (e.g., A‘s ownership
percentage of B) and the indirect relationships (e.g., B‘s ownership percentage of C multiplied by A‘s
ownership percentage of B).
The Ownership Structure link in the OSA Admin tab provides a pictorial view of these relationships. See
section 6.4 Defining Ownership on page 116.
The pivot table data sheet also provides auto-filters.
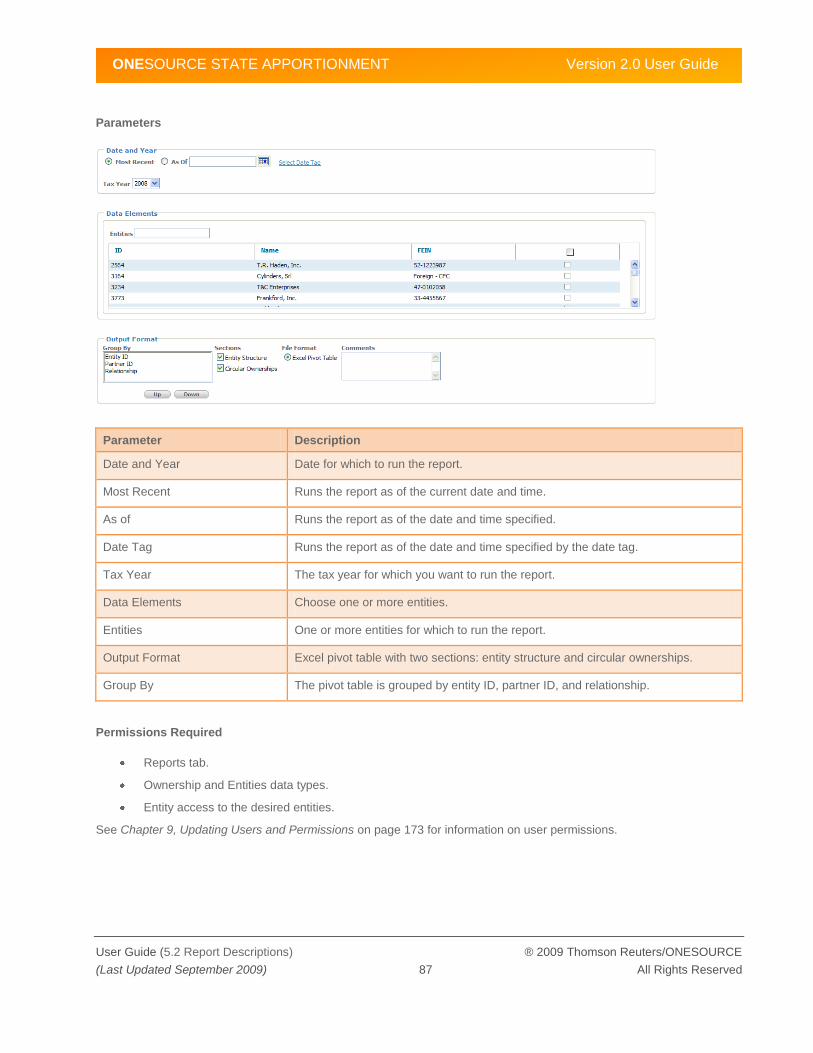
ONESOURCE STATE APPORTIONMENT Version 2.0 User Guide
User Guide (5.2 Report Descriptions) ® 2009 Thomson Reuters/ONESOURCE
(Last Updated September 2009) 87 All Rights Reserved
Parameters
Parameter Description
Date and Year Date for which to run the report.
Most Recent Runs the report as of the current date and time.
As of Runs the report as of the date and time specified.
Date Tag Runs the report as of the date and time specified by the date tag.
Tax Year The tax year for which you want to run the report.
Data Elements Choose one or more entities.
Entities One or more entities for which to run the report.
Output Format Excel pivot table with two sections: entity structure and circular ownerships.
Group By The pivot table is grouped by entity ID, partner ID, and relationship.
Permissions Required
Reports tab.
Ownership and Entities data types.
Entity access to the desired entities.
See Chapter 9, Updating Users and Permissions on page 173 for information on user permissions.
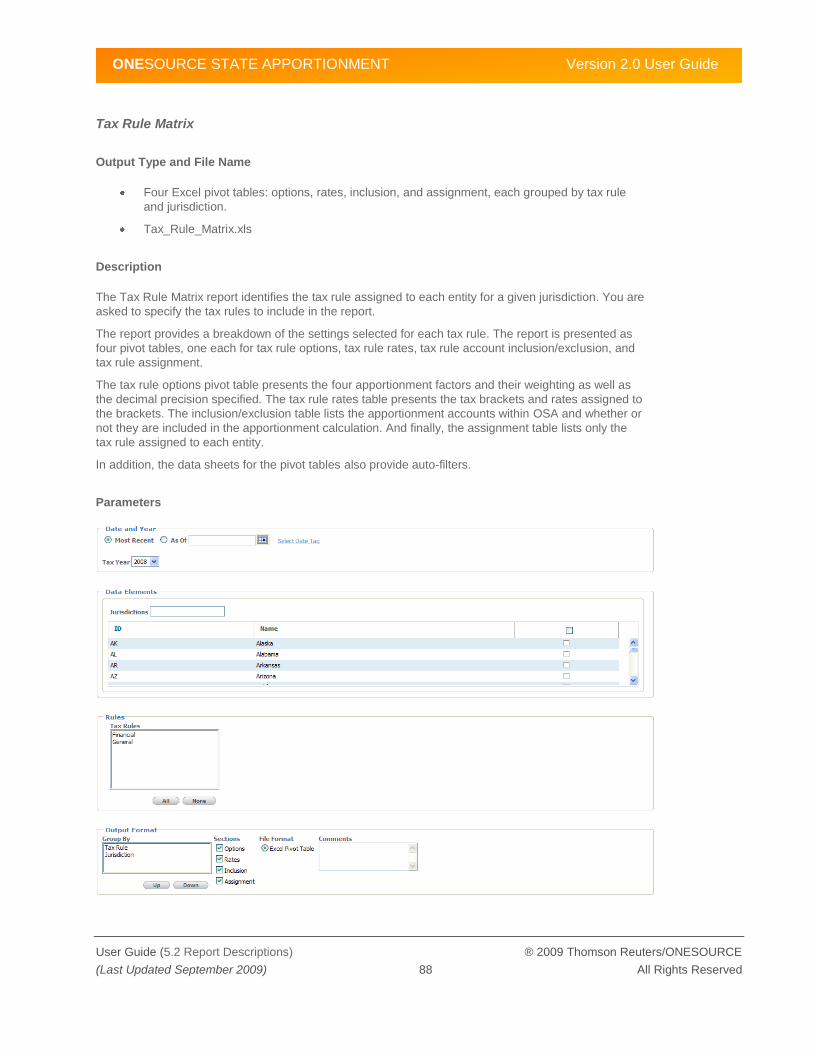
ONESOURCE STATE APPORTIONMENT Version 2.0 User Guide
User Guide (5.2 Report Descriptions) ® 2009 Thomson Reuters/ONESOURCE
(Last Updated September 2009) 88 All Rights Reserved
Tax Rule Matrix
Output Type and File Name
Four Excel pivot tables: options, rates, inclusion, and assignment, each grouped by tax rule
and jurisdiction.
Tax_Rule_Matrix.xls
Description
The Tax Rule Matrix report identifies the tax rule assigned to each entity for a given jurisdiction. You are
asked to specify the tax rules to include in the report.
The report provides a breakdown of the settings selected for each tax rule. The report is presented as
four pivot tables, one each for tax rule options, tax rule rates, tax rule account inclusion/exclusion, and
tax rule assignment.
The tax rule options pivot table presents the four apportionment factors and their weighting as well as
the decimal precision specified. The tax rule rates table presents the tax brackets and rates assigned to
the brackets. The inclusion/exclusion table lists the apportionment accounts within OSA and whether or
not they are included in the apportionment calculation. And finally, the assignment table lists only the
tax rule assigned to each entity.
In addition, the data sheets for the pivot tables also provide auto-filters.
Parameters

ONESOURCE STATE APPORTIONMENT Version 2.0 User Guide
User Guide (5.2 Report Descriptions) ® 2009 Thomson Reuters/ONESOURCE
(Last Updated September 2009) 89 All Rights Reserved
Parameter Description
Date and Year Date for which to run the report.
Most Recent Runs the report as of the current date and time.
As of Runs the report as of the date and time specified.
Date Tag Runs the report as of the date and time specified by the date tag.
Tax Year The tax year for which you want to run the report.
Data Elements You can choose one or more jurisdictions.
Jurisdictions One or more jurisdictions for which to run the report.
Rules OSA lists for selection all the possible tax rules (a union of all tax rule names in
OSA).
Tax Rules Select one or more tax rules to include in the report.
Output Format Excel Pivot Table presented in four sections, options, rates, inclusion, and
assignment.
Group By The pivot table is grouped by tax rule and jurisdiction.
Permissions Required
Reports tab.
Tax Rules data type.
See Chapter 9, Updating Users and Permissions on page 173 for information on user permissions.
Ultimate Entity Ownership
Output Type and File Name
Excel pivot table grouped by entity ID, jurisdiction, account, and filing type.
Ultimate_Entity_Ownership.xls
Description
The Ultimate Entity Ownership report provides all the detail on how data flows into an entity. This data
flow can be traced from each source, through multi-tiered entity structures, to the final destination. The
report also shows where flow stops and provides the reason for the stoppage (e.g., entity flow through
rules, nexus, etc.).

ONESOURCE STATE APPORTIONMENT Version 2.0 User Guide
User Guide (5.2 Report Descriptions) ® 2009 Thomson Reuters/ONESOURCE
(Last Updated September 2009) 90 All Rights Reserved
Parameters
Parameter Description
Date and Year Date for which to run the report.
Most Recent Runs the report as of the current date and time.
As of Runs the report as of the date and time specified.
Date Tag Runs the report as of the date and time specified by the date tag.
Tax Year The tax year for which you want to run the report.
Data Elements You can choose one or more jurisdictions and/or entities.
Jurisdictions One or more jurisdictions for which to run the report.
Entities One or more entities for which to run the report.
Output Format Excel Pivot Table.
Group By The pivot table is grouped by entity ID, jurisdiction, account, and filing type.
Permissions Required
Reports tab.
Entities data type.
Entity access to the desired entities (access to owned flow-through entities is not required).
See Chapter 9, Updating Users and Permissions on page 173 for information on user permissions.
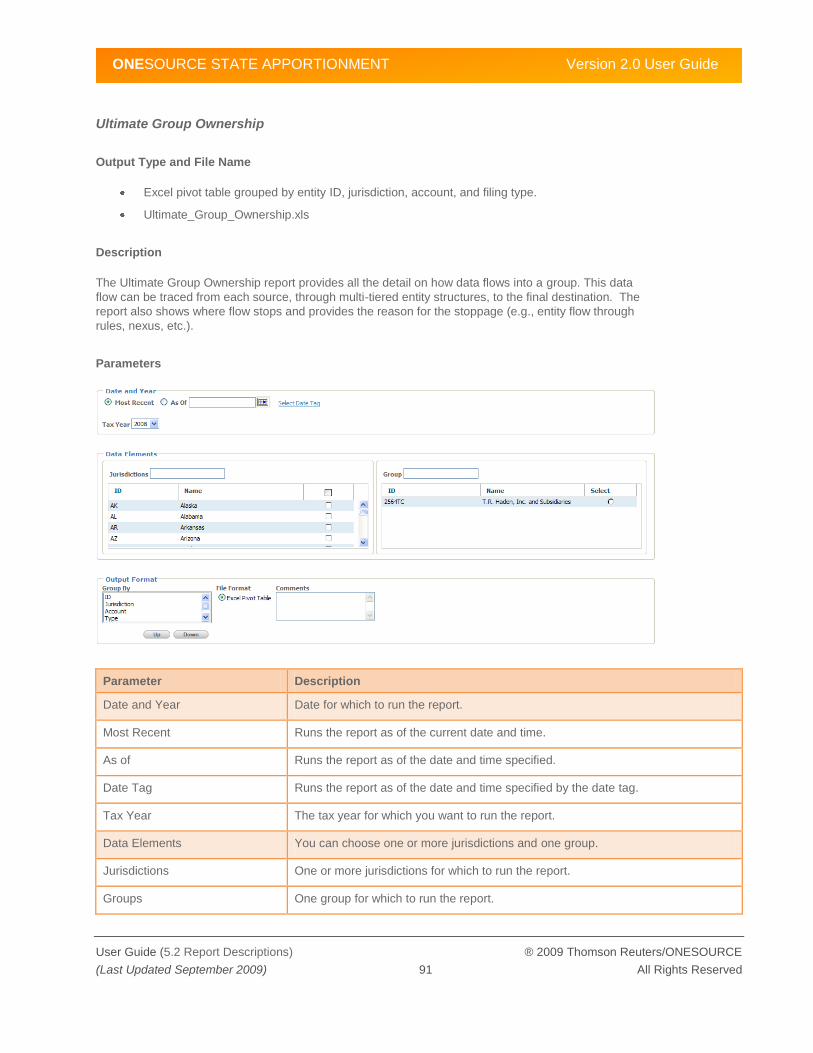
ONESOURCE STATE APPORTIONMENT Version 2.0 User Guide
User Guide (5.2 Report Descriptions) ® 2009 Thomson Reuters/ONESOURCE
(Last Updated September 2009) 91 All Rights Reserved
Ultimate Group Ownership
Output Type and File Name
Excel pivot table grouped by entity ID, jurisdiction, account, and filing type.
Ultimate_Group_Ownership.xls
Description
The Ultimate Group Ownership report provides all the detail on how data flows into a group. This data
flow can be traced from each source, through multi-tiered entity structures, to the final destination. The
report also shows where flow stops and provides the reason for the stoppage (e.g., entity flow through
rules, nexus, etc.).
Parameters
Parameter Description
Date and Year Date for which to run the report.
Most Recent Runs the report as of the current date and time.
As of Runs the report as of the date and time specified.
Date Tag Runs the report as of the date and time specified by the date tag.
Tax Year The tax year for which you want to run the report.
Data Elements You can choose one or more jurisdictions and one group.
Jurisdictions One or more jurisdictions for which to run the report.
Groups One group for which to run the report.
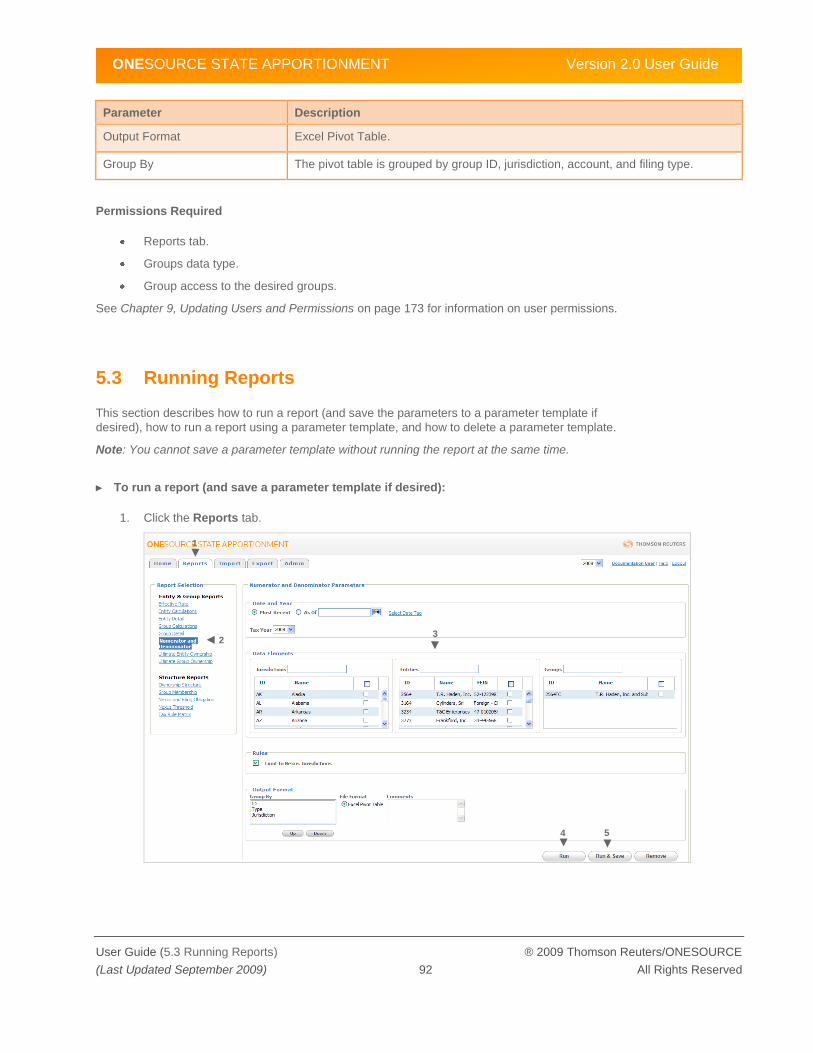
ONESOURCE STATE APPORTIONMENT Version 2.0 User Guide
User Guide (5.3 Running Reports) ® 2009 Thomson Reuters/ONESOURCE
(Last Updated September 2009) 92 All Rights Reserved
Parameter Description
Output Format Excel Pivot Table.
Group By The pivot table is grouped by group ID, jurisdiction, account, and filing type.
Permissions Required
Reports tab.
Groups data type.
Group access to the desired groups.
See Chapter 9, Updating Users and Permissions on page 173 for information on user permissions.
5.3 Running Reports
This section describes how to run a report (and save the parameters to a parameter template if
desired), how to run a report using a parameter template, and how to delete a parameter template.
Note: You cannot save a parameter template without running the report at the same time.
► To run a report (and save a parameter template if desired):
1. Click the Reports tab.
2
1
3
4 5
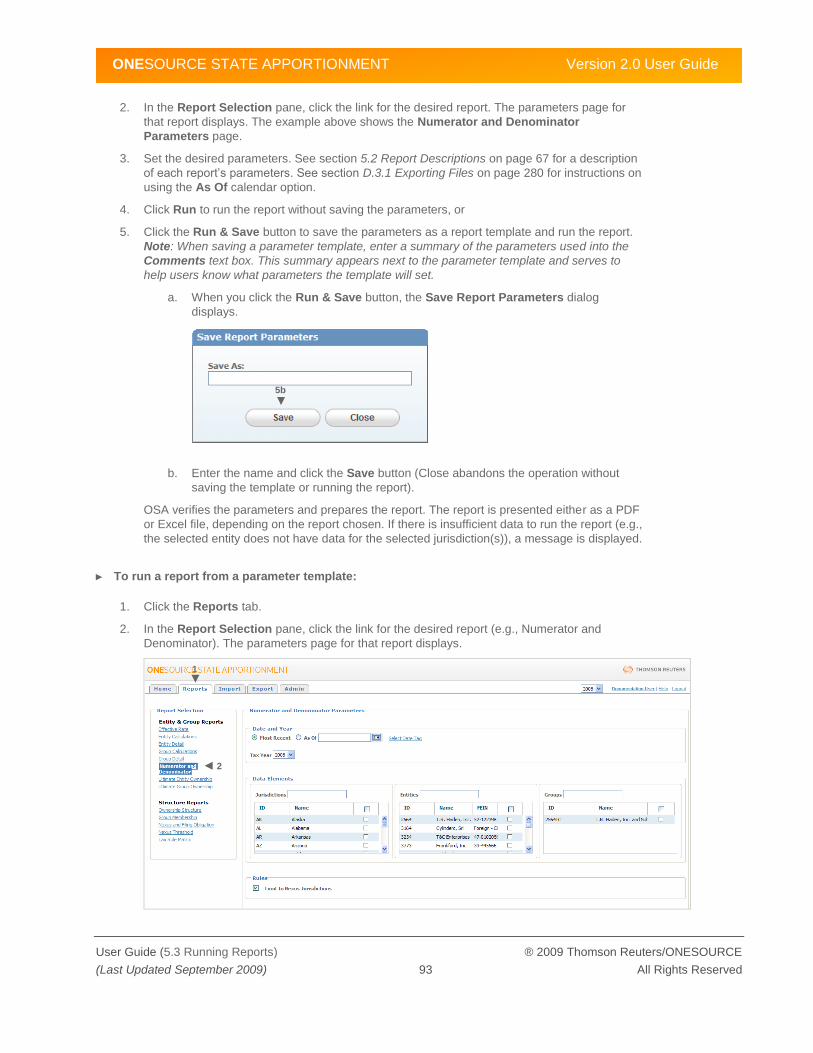
ONESOURCE STATE APPORTIONMENT Version 2.0 User Guide
User Guide (5.3 Running Reports) ® 2009 Thomson Reuters/ONESOURCE
(Last Updated September 2009) 93 All Rights Reserved
2. In the Report Selection pane, click the link for the desired report. The parameters page for
that report displays. The example above shows the Numerator and Denominator
Parameters page.
3. Set the desired parameters. See section 5.2 Report Descriptions on page 67 for a description
of each report‘s parameters. See section D.3.1 Exporting Files on page 280 for instructions on
using the As Of calendar option.
4. Click Run to run the report without saving the parameters, or
5. Click the Run & Save button to save the parameters as a report template and run the report.
Note: When saving a parameter template, enter a summary of the parameters used into the
Comments text box. This summary appears next to the parameter template and serves to
help users know what parameters the template will set.
a. When you click the Run & Save button, the Save Report Parameters dialog
displays.
b. Enter the name and click the Save button (Close abandons the operation without
saving the template or running the report).
OSA verifies the parameters and prepares the report. The report is presented either as a PDF
or Excel file, depending on the report chosen. If there is insufficient data to run the report (e.g.,
the selected entity does not have data for the selected jurisdiction(s)), a message is displayed.
► To run a report from a parameter template:
1. Click the Reports tab.
2. In the Report Selection pane, click the link for the desired report (e.g., Numerator and
Denominator). The parameters page for that report displays.
5b
2
1

ONESOURCE STATE APPORTIONMENT Version 2.0 User Guide
User Guide (5.3 Running Reports) ® 2009 Thomson Reuters/ONESOURCE
(Last Updated September 2009) 94 All Rights Reserved
3. Scroll down to the Parameter Templates table and click the link for the desired parameter
template. OSA loads the parameters from the template.
4. Once the parameters are loaded, click the Run button to run the report.
OSA verifies the parameters and prepares the report as described previously.
► To remove a parameter template:
1. Click the Reports tab.
2. In the Report Selection pane, click the link for the desired report. The parameters page for
that report displays.
3
2
1

ONESOURCE STATE APPORTIONMENT Version 2.0 User Guide
User Guide (5.3 Running Reports) ® 2009 Thomson Reuters/ONESOURCE
(Last Updated September 2009) 95 All Rights Reserved
3. Scroll down to the Parameter Templates table and click the link for the desired parameter
template. OSA loads the parameters from the template.
4. Once the parameters load, click the Remove button. The Remove Report Parameters dialog
displays.
5. Click the Remove button to confirm that you want to delete the parameter template (Cancel
abandons the operation and the report parameters remain loaded).
The Status box displays a message indicating whether or not the operation was successful,
and if not, what error occurred.
3
5
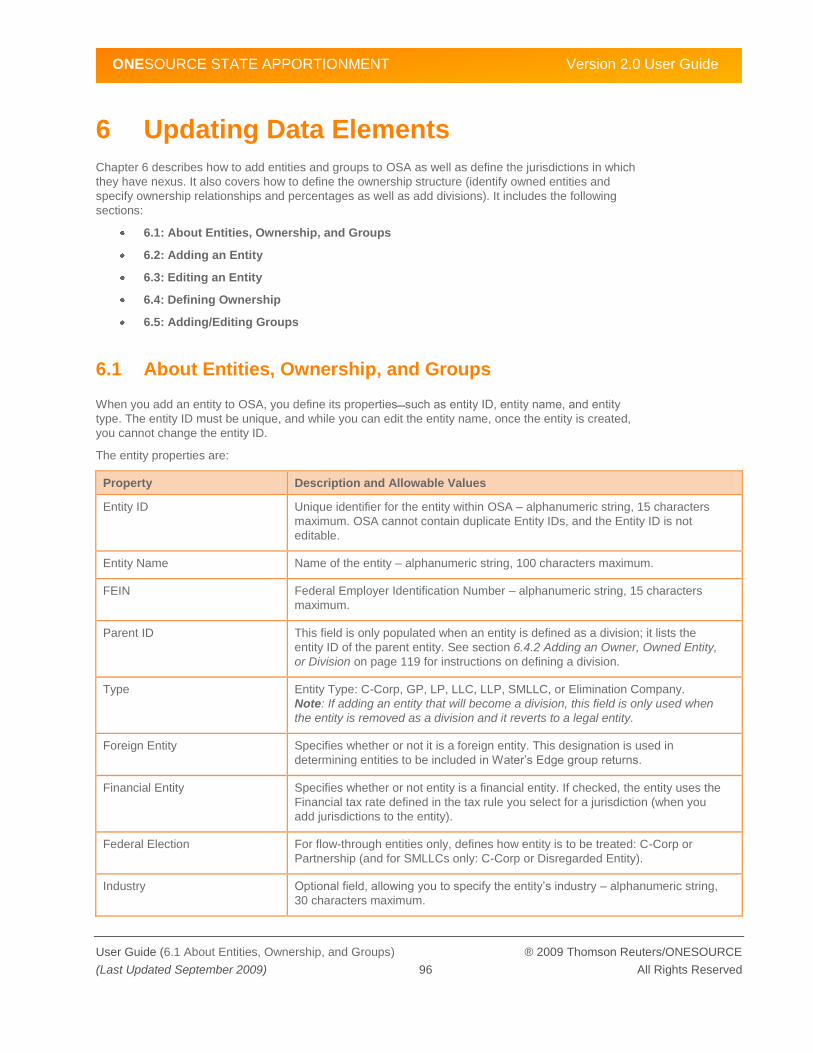
ONESOURCE STATE APPORTIONMENT Version 2.0 User Guide
User Guide (6.1 About Entities, Ownership, and Groups) ® 2009 Thomson Reuters/ONESOURCE
(Last Updated September 2009) 96 All Rights Reserved
6 Updating Data Elements
Chapter 6 describes how to add entities and groups to OSA as well as define the jurisdictions in which
they have nexus. It also covers how to define the ownership structure (identify owned entities and
specify ownership relationships and percentages as well as add divisions). It includes the following
sections:
6.1: About Entities, Ownership, and Groups
6.2: Adding an Entity
6.3: Editing an Entity
6.4: Defining Ownership
6.5: Adding/Editing Groups
6.1 About Entities, Ownership, and Groups
When you add an entity to OSA, you define its propertiessuch as entity ID, entity name, and entity
type. The entity ID must be unique, and while you can edit the entity name, once the entity is created,
you cannot change the entity ID.
The entity properties are:
Property Description and Allowable Values
Entity ID Unique identifier for the entity within OSA – alphanumeric string, 15 characters
maximum. OSA cannot contain duplicate Entity IDs, and the Entity ID is not
editable.
Entity Name Name of the entity – alphanumeric string, 100 characters maximum.
FEIN Federal Employer Identification Number – alphanumeric string, 15 characters
maximum.
Parent ID This field is only populated when an entity is defined as a division; it lists the
entity ID of the parent entity. See section 6.4.2 Adding an Owner, Owned Entity,
or Division on page 119 for instructions on defining a division.
Type Entity Type: C-Corp, GP, LP, LLC, LLP, SMLLC, or Elimination Company.
Note: If adding an entity that will become a division, this field is only used when
the entity is removed as a division and it reverts to a legal entity.
Foreign Entity Specifies whether or not it is a foreign entity. This designation is used in
determining entities to be included in Water‘s Edge group returns.
Financial Entity Specifies whether or not entity is a financial entity. If checked, the entity uses the
Financial tax rate defined in the tax rule you select for a jurisdiction (when you
add jurisdictions to the entity).
Federal Election For flow-through entities only, defines how entity is to be treated: C-Corp or
Partnership (and for SMLLCs only: C-Corp or Disregarded Entity).
Industry Optional field, allowing you to specify the entity‘s industry – alphanumeric string,
30 characters maximum.

ONESOURCE STATE APPORTIONMENT Version 2.0 User Guide
User Guide (6.1 About Entities, Ownership, and Groups) ® 2009 Thomson Reuters/ONESOURCE
(Last Updated September 2009) 97 All Rights Reserved
Property Description and Allowable Values
Business Activity Optional field, allowing you to specify the entity‘s business activity –
alphanumeric string, 30 characters maximum.
Comments Optional comment field – alphanumeric string, 255 characters maximum.
Once an entity is created and the above properties are specified, you need to add jurisdictions (or entity
filings) to the entity before you can add apportionment data to it. When you add a jurisdiction to an
entity, you specify:
The jurisdiction. During initial OSA setup, a default list of jurisdictions is added to OSA. You
can add additional jurisdictions to OSA as well as edit them, if necessary; see Chapter 8,
Updating the System Configuration on page 156 for instructions.
Whether or not the entity has nexus in that jurisdiction.
Whether or not the entity is protected by P.L. 86-272 (for tracking and reporting purposes
only).
The tax rule to use for the entity. During initial setup, a default set of tax rules is added to OSA.
You can add and edit tax rules if necessary; see Chapter 7, Updating Tax Rules on page 140
for instructions.
A filing due date (used for tracking purposes only).
In addition to adding jurisdictions to an entity, in order for OSA to roll up and/or flow data correctly, you
need to define its ownership structure. When you define the ownership structure, you are asked to
specify:
The ownership relationship – Unitary or Non-Unitary and General or Limited Partnership.
The ownership percentages for the relevant ownership categories, for example, ownership,
capital, and/or income. See section 8.2 Adding Ownership Categories on page 159 for
information on adding ownership categories, and section 7.6 Defining Flow-Through Rules on
page 152 for information on defining which category is used to calculate apportionment factors
for a jurisdiction.
Whether or not an entity has divisions. Divisions are not legal entities, they are considered part
of the parent entity and data always rolls up 100% to the parent entity; however, divisions can
own entities.
And finally, you will need to define any filing groups. When you add a group, you define its
propertiesits unique Group ID and its name. You then add members to the group, specifying the key
corporation (Parent Filer).
After adding the members, you can add jurisdictions to the group. As you add jurisdictions to the group,
you specify:
The filing type: Unitary, Unitary Separate Entity, Nexus Combined, Nexus Combined Separate
Entity, or Nexus Consolidated. See section 6.5 Adding/Editing Groups on page 123 for
definitions of these filing types.
Whether or not the group is filing a World Wide or Water‘s Edge return. When filing World
Wide returns, foreign entities are included in the calculations, otherwise they are excluded.
The tax rule to use. Entities within a group are subject to the group‘s tax rule. During initial
setup, a default set of tax rules is added to OSA. You can add and edit tax rules if necessary;
see Chapter 7, Updating Tax Rules on page 140 for instructions.
Whether or not the group is filing an 80-20 return (used for tracking purposes only).
The filing due date (used for tracking purposes only).

ONESOURCE STATE APPORTIONMENT Version 2.0 User Guide
User Guide (6.2 Adding an Entity) ® 2009 Thomson Reuters/ONESOURCE
(Last Updated September 2009) 98 All Rights Reserved
This chapter describes how to add and edit entities, how to define ownership, and how to add and edit
groups.
Note: Apportionment Accounts are added to OSA using the Account Structure link in the Admin tab. For
each entity defined in OSA, you can filter the account list (specify which accounts are visible). See
Chapter 8, Updating the System Configuration on page 156 for information on the account structure and
entity account filters.
6.2 Adding an Entity
There are two ways to add an entity to the OSA application:
Importing CSV files – Most entities are added in batch mode during the initial OSA set up
phase. The OSA administrator adds entities to the EntityList.csv file, the jurisdictions to the
EntityFilings.csv, and tax rule assignments to the TaxRuleAssignments.csv file, and imports
these files into OSA. Using CSV files is an efficient way to add many entities at one time.
Add Entity page (Home and Admin tab) – After the initial set up phase, when you are
typically adding only one or two entities at a time, it is easier to add them using OSA‘s Add
Entity feature.
For information on adding entities by importing CSV files, refer to Appendix D, Working with CSV Files
on page 275. How to add entities within OSA using the Add Entity feature in the Home and Admin tabs
is described next.
Access to the Entities page is limited to users with Admin tab permissions. In addition, users must have
permissions to edit the Entities data type. When users have these permissions, they are able to view
and edit all entities in OSA.
When an entity is added to OSA, initial permission to view and edit the entity on the other OSA tabs
(e.g., Home tab) is limited to the user adding the entity (either directly within OSA or by import) and
users with Full Access.
Therefore, make sure that as you add entities you also update user permissions to enable the
appropriate users to edit or view the entity as necessary. For information on user permissions, see
Chapter 9, Updating Users and Permissions on page 173.
Also, while you can make entities inactive, you cannot delete entities from OSA. This is so OSA can
retain a complete audit trail. Therefore, make sure the Entity ID you specify is both unique and correct
(with respect to your tax technology stack). See section 1.4 Annual Review/Preparing for the Current
Year on page 20 for information on how to remove entities for subsequent tax years.
These instructions are for adding an entity. To add a division, follow the instructions in section 6.4.2
Adding an Owner, Owned Entity, or Division on page 119. To edit an entity, see 6.3 Editing an Entity on
page 101.

ONESOURCE STATE APPORTIONMENT Version 2.0 User Guide
User Guide (6.2 Adding an Entity) ® 2009 Thomson Reuters/ONESOURCE
(Last Updated September 2009) 99 All Rights Reserved
► To add an entity:
1. User or Administrator
a. Click the Home tab.
b. Click the Add Entity… button.
2. Administrator
a. Click the Admin tab.
b. In the navigation pane, under Data Elements, click the Entities link. The Entities
page displays, listing all the entities in OSA.
c. Click the Add button.
2a
2b
2c
1a
1b

ONESOURCE STATE APPORTIONMENT Version 2.0 User Guide
User Guide (6.2 Adding an Entity) ® 2009 Thomson Reuters/ONESOURCE
(Last Updated September 2009) 100 All Rights Reserved
3. The Add Entity dialog displays.
4. Enter the properties for the entity. Fields with an asterisk are required. While you can edit the
entity name at any time, you cannot edit the Entity ID once the entity is created (so OSA can
retain a complete audit trail).
5. Click the Add button to create the entity (Cancel abandons the operation).
Once you click the Add button, the entity is created and is listed on the Entities page in
alphabetical order by Entity ID. Also, the Save status box indicates whether or not the
operation was successful, and if not, what error occurred.
At this point, you can add jurisdictions to the entity as well as define ownership as necessary,
including adding divisions. It is important to define an entity‘s ownership structure so OSA can
roll-up and flow account data when necessary.
You must also set user permissions so the appropriate users can view or edit the entity (see
Chapter 9, Updating Users and Permissions on page 173).
For information on adding jurisdictions, see the next section, 6.3 Editing an Entity. For
instructions on defining an entity‘s ownership structure, including adding a division, refer to
section 6.4 Defining Ownership on page 116.
4
5

ONESOURCE STATE APPORTIONMENT Version 2.0 User Guide
User Guide (6.3 Editing an Entity) ® 2009 Thomson Reuters/ONESOURCE
(Last Updated September 2009) 101 All Rights Reserved
6.3 Editing an Entity
Once an entity is created, you can:
Make it inactive/active – the entity‘s information is retained in OSA but the entity is not visible
to any users (you cannot delete an entity from OSA once it is created. This is so OSA can
retain a complete audit trail. See section 1.4 Annual Review/Preparing for the Current Year on
page 20 for information on how to remove entities for subsequent tax years).
Edit its properties – you can edit all its properties except the Entity ID and Parent ID (in the
case of divisions). This is so OSA can retain a complete audit trail.
Add or edit jurisdictions for the entity – when you add a jurisdiction to the entity, you
specify whether or not the entity has nexus in the jurisdiction and whether or not the entity is a
financial entity (so the appropriate tax rate can be applied if required based on the jurisdiction).
Also, you can specify whether or not the entity is protected by P.L. 86-272, although this
information is for tracking purposes and has no impact on apportionment calculations.
Remove a jurisdiction from an entity – when you remove a jurisdiction that has data
associated with it, the data is retained. If you add the jurisdiction again, the data displays again
in all relevant pages and reports, for example, the Data Entry and Apportionment Calculation
pages.
There are three main ways to edit an entity:
Importing CSV files – you edit all the entity‘s information, but you can‘t remove information
(i.e., remove a jurisdiction) using CSV files. This is due to the additive nature of the OSA
Import feature.
The Entities page (Admin tab) – you can edit all the entity‘s information as well as remove
jurisdictions.
The Entity Properties page (Home tab) – you can edit most of the entity‘s information. The
two differences between this and the Entities page are: 1) on the Entities page, you can
inactivate entities, and 2) the Entities page displays all entities in OSA whereas the Entity
Properties page lists only the entities a user has permission to view. You must have Admin tab
and Entities data type permissions to view the Entities page, and these permissions allow
access to all entities. The Home tab is further governed by Entity/Group list access. Use this
page to make your edits when you do not have Admin tab access or when making a quick
change during data entry.
How to edit an entity by importing CSV files is covered in Appendix D, Working with CSV Files on page
275. This section describes how to edit an entity using both the Entities and Entity Properties pages.
6.3.1 Editing an Entity Using the Entities Page
Access to the Entities page is limited to users with Admin tab permissions. In addition, users must have
permissions to edit the Entities data type. When users have these permissions, they are able to view
and edit all entities in OSA. For information on user permissions, see Chapter 9, Updating Users and
Permissions on page 173.

ONESOURCE STATE APPORTIONMENT Version 2.0 User Guide
User Guide (6.3 Editing an Entity) ® 2009 Thomson Reuters/ONESOURCE
(Last Updated September 2009) 102 All Rights Reserved
Accessing the Entities Page
► To access the Entities page:
1. Click the Admin tab.
2. From the navigation pane, under Data Elements, select the Entities link. The Entities page
displays listing all the entities defined in OSA.
To select an entity and display its properties and any jurisdictions added to it, click anywhere in
the row for the entity.
► To find entities in the Entities table:
Use the Search box – type a text string in the box. The Entities table updates to list only the
entities containing the text string you type.
Sort the table – by default the table is sorted in ascending order by ID. Click on the column
heading to sort by that column. Clicking once sorts in ascending order and click again to sort in
descending order.
Use the scroll bar – you can use the vertical scroll bar to move down the list.
Making an Entity Active/Inactive Using the Entities Page
When you make an entity inactive, the entity‘s information is retained in OSA but the entity is not visible
on any other pages (i.e., Home or Reports tab). You cannot delete an entity from OSA once it is
created. This is so OSA can retain a complete audit trail. See section 1.4 Annual Review/Preparing for
the Current Year on page 20 for information on how to remove entities for subsequent tax years.
► To make an entity active/inactive:
1. Access the Entities page as described previously.
2. In the Entities table, click to select or de-select the Active check box for the desired entity. A
checkmark indicates the entity is active, a blank check box indicates the entity is inactive.
2
1
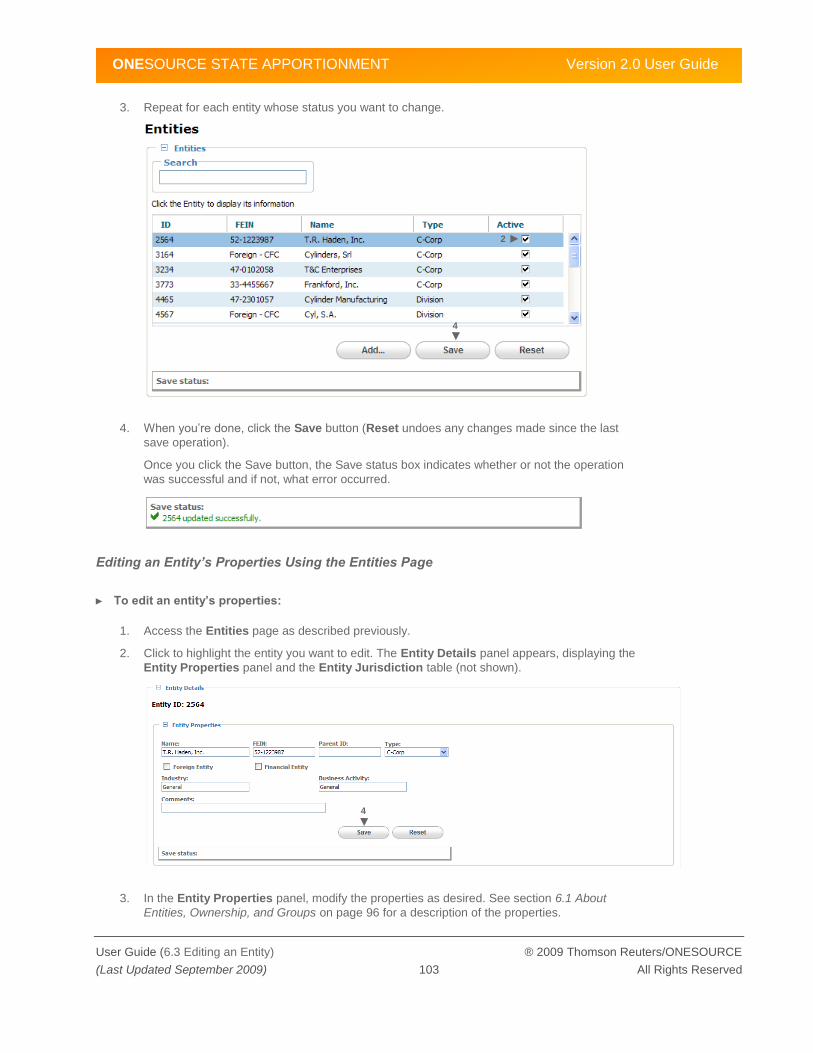
ONESOURCE STATE APPORTIONMENT Version 2.0 User Guide
User Guide (6.3 Editing an Entity) ® 2009 Thomson Reuters/ONESOURCE
(Last Updated September 2009) 103 All Rights Reserved
3. Repeat for each entity whose status you want to change.
4. When you‘re done, click the Save button (Reset undoes any changes made since the last
save operation).
Once you click the Save button, the Save status box indicates whether or not the operation
was successful and if not, what error occurred.
Editing an Entity’s Properties Using the Entities Page
► To edit an entity’s properties:
1. Access the Entities page as described previously.
2. Click to highlight the entity you want to edit. The Entity Details panel appears, displaying the
Entity Properties panel and the Entity Jurisdiction table (not shown).
3. In the Entity Properties panel, modify the properties as desired. See section 6.1 About
Entities, Ownership, and Groups on page 96 for a description of the properties.
4
2
4

ONESOURCE STATE APPORTIONMENT Version 2.0 User Guide
User Guide (6.3 Editing an Entity) ® 2009 Thomson Reuters/ONESOURCE
(Last Updated September 2009) 104 All Rights Reserved
4. When you‘re done, click the Save button in the Entity Properties panel (the Reset button
undoes any changes you made since the last save operation).
Once you click the Save button, the Save status box indicates whether or not the operation
was successful, and if not, what error occurred.
Adding Jurisdictions to an Entity Using the Entities Page
You can add jurisdictions one by one or you can add multiple jurisdictions at once. When you add a
single jurisdiction, you can specify the tax rule to use and whether or not the entity has nexus in that
jurisdiction. When you add multiple jurisdictions at one time, the jurisdictions are added using their
default tax rule and without entity nexus in that jurisdiction. You can then edit each of the added
jurisdictions as necessary.
► To add jurisdictions:
1. Access the Entities page as described previously.
2. Click to highlight the entity to which you want to add jurisdictions. The Entity Details panel
appears, displaying Entity Properties (not shown) and the Entity Jurisdiction table. The
Entity Jurisdiction table lists all the jurisdictions currently defined for the entity.
2
3a 4a

ONESOURCE STATE APPORTIONMENT Version 2.0 User Guide
User Guide (6.3 Editing an Entity) ® 2009 Thomson Reuters/ONESOURCE
(Last Updated September 2009) 105 All Rights Reserved
3. To add a single jurisdiction:
a. Click the Add button. The Add Entity Jurisdiction dialog appears.
b. Enter the information for the jurisdiction. The only information required now is the
jurisdiction; however, at some point you will also need to specify:
Filing Obligation (Nexus): whether or not the entity has nexus in that
jurisdiction. If a jurisdiction does not display in the drop-down it means it is
not in the OSA jurisdiction list or it is inactive, see Chapter 8, Updating the
System Configuration on page 156.
Filing Protection (PL 86-272): whether or not the entity is protected by P.L.
86-272 (for tracking purposes only, does not affect apportionment
calculations).
Tax Rule: the tax rule to use for the entity, if other than the default tax rule,
which is automatically assigned.
Filing Due Date: used for tracking purposes only, does not affect
calculations; and while the date is retained and included during data export,
it is not reflected in the OSA interface.
c. Click the Add button and the jurisdiction is added to the table (Cancel abandons the
add operation).
3c

ONESOURCE STATE APPORTIONMENT Version 2.0 User Guide
User Guide (6.3 Editing an Entity) ® 2009 Thomson Reuters/ONESOURCE
(Last Updated September 2009) 106 All Rights Reserved
4. To add multiple jurisdictions:
a. Click the Add Multiple… button. The Add New Jurisdictions dialog displays.
b. Click the check box for the jurisdictions you want to add. Click the check box in the
column header to select all the jurisdictions in the list (click the check box again to
clear all the check boxes).
c. When you‘re done, click the Add button (Close abandons the add operation). The
jurisdictions are added to the list. Make sure you go back at some point and edit the
entity jurisdictions to ensure proper tax rule and nexus settings.
After you add one or more jurisdictions, the Save status box indicates whether or not
the operation was successful and if not, the error that occurred.
The fields shown in the Entity Jurisdiction table are derived from other settings or information within
OSA and are:
Nexus Flow: an automatically populated field derived from the ownership structure; a check
mark indicates that the entity has ownership in a flow-through entity with nexus in that
jurisdiction and treated as a partnership or disregarded entity.
Filing: indicates which of the five group filing types is specified for that jurisdiction. If the entity
is part of a group, the group filing type is used. If the entity is not part of a filing group, the filing
type will be Separate.
Apportionment: indicates the calculated apportionment percentage for that jurisdiction.
Rate: the tax rate.
4b
4c
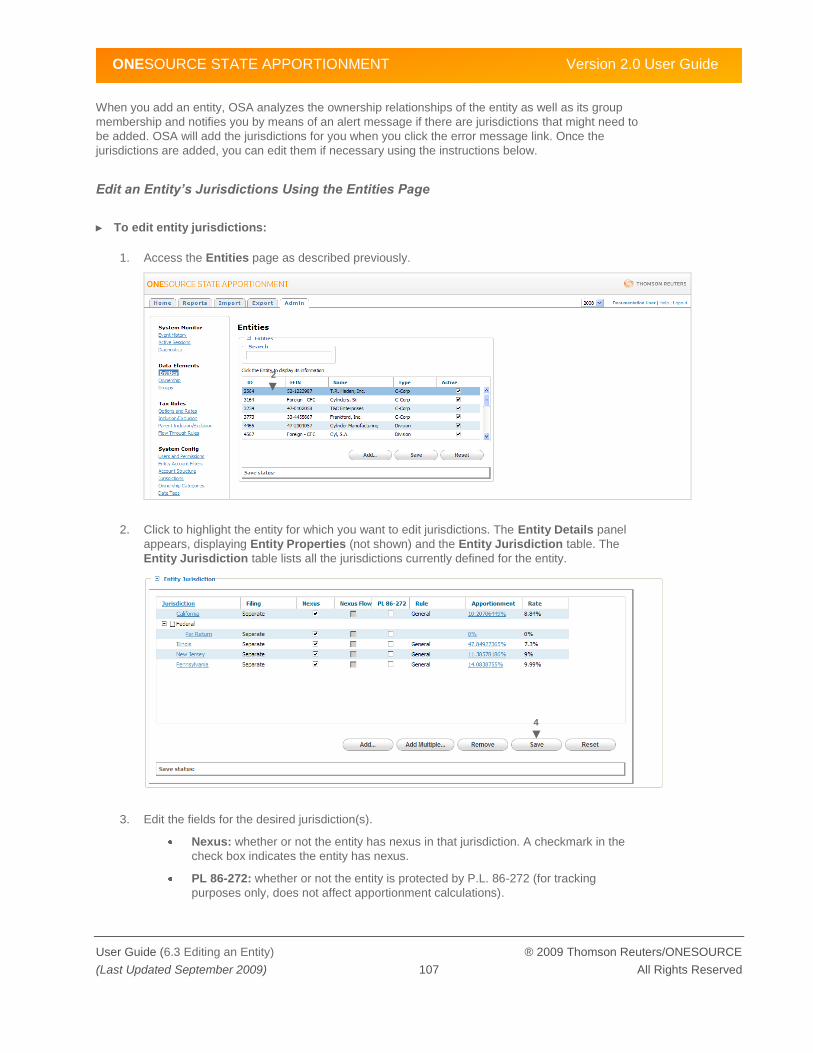
ONESOURCE STATE APPORTIONMENT Version 2.0 User Guide
User Guide (6.3 Editing an Entity) ® 2009 Thomson Reuters/ONESOURCE
(Last Updated September 2009) 107 All Rights Reserved
When you add an entity, OSA analyzes the ownership relationships of the entity as well as its group
membership and notifies you by means of an alert message if there are jurisdictions that might need to
be added. OSA will add the jurisdictions for you when you click the error message link. Once the
jurisdictions are added, you can edit them if necessary using the instructions below.
Edit an Entity’s Jurisdictions Using the Entities Page
► To edit entity jurisdictions:
1. Access the Entities page as described previously.
2. Click to highlight the entity for which you want to edit jurisdictions. The Entity Details panel
appears, displaying Entity Properties (not shown) and the Entity Jurisdiction table. The
Entity Jurisdiction table lists all the jurisdictions currently defined for the entity.
3. Edit the fields for the desired jurisdiction(s).
Nexus: whether or not the entity has nexus in that jurisdiction. A checkmark in the
check box indicates the entity has nexus.
PL 86-272: whether or not the entity is protected by P.L. 86-272 (for tracking
purposes only, does not affect apportionment calculations).
2
4

ONESOURCE STATE APPORTIONMENT Version 2.0 User Guide
User Guide (6.3 Editing an Entity) ® 2009 Thomson Reuters/ONESOURCE
(Last Updated September 2009) 108 All Rights Reserved
Rule: the tax rule to use. Double-click in the tax rule column and if more than one tax
rule is defined for that jurisdiction in OSA, you can choose one from the selection box
that displays. See Chapter 7, Updating Tax Rules on page 140 for information on
adding tax rules.
These fields in the Entity Jurisdiction table are derived from other settings or information
within OSA and are not editable:
Nexus Flow: an automatically populated field derived from the ownership structure; a
check mark indicates that the entity has ownership in a flow-through entity with nexus
in that jurisdiction and treated as a partnership or disregarded entity.
Filing: indicates which of the five group filing types is specified for that jurisdiction. If
the entity is part of a group, the group filing type is used. If the entity is not part of a
filing group, the filing type will be Separate.
Apportionment: indicates the calculated apportionment percentage for that
jurisdiction.
Rate: the tax rate.
4. When you‘re done, click the Save button (Reset undoes all the changes since the last save
operation).
After you click the Save button, the Save status box indicates whether or not the operation was
successful and if not, the error that occurred.
Removing Jurisdictions Using the Entities Page
You can remove one jurisdiction at a time or multiple jurisdictions at once from an entity.
When you remove a jurisdiction with associated data, the data is retained. If you add the jurisdiction
back, the data will display in the relevant pages and reports, for example the Data Entry and
Apportionment Calculation pages.
► To remove jurisdictions:
1. Access the Entities page as described previously.
2. Click to highlight the entity you want to edit. The Entity Details panel appears, displaying both
the Entity Properties panel and Entity Jurisdiction table (shown next). The Entity
Jurisdiction table lists all the jurisdictions currently defined for the entity.
3b
3a

ONESOURCE STATE APPORTIONMENT Version 2.0 User Guide
User Guide (6.3 Editing an Entity) ® 2009 Thomson Reuters/ONESOURCE
(Last Updated September 2009) 109 All Rights Reserved
3. To remove one jurisdiction:
a. Click anywhere in the row (except on the linked jurisdiction name) to highlight the
desired jurisdiction.
b. Click the Remove button. A dialog displays asking you to confirm the deletion.
c. Once you click OK to confirm the deletion, the jurisdiction is removed (Cancel
abandons the operation).
4. To remove multiple jurisdictions:
a. In the Entity Jurisdictions table, select the jurisdictions to remove. While clicking,
use the Ctrl key to select multiple, use the Shift key to select a range.
b. Click the Remove button (Cancel abandons the remove operation).
After you remove one or more jurisdictions, the Save status box indicates whether or
not the operation was successful and if not, the error that occurred.
When you add an entity, OSA analyzes the ownership relationships of the entity as
well as its group membership and creates a list of jurisdictions that might need to be
added to the entity. If you remove one of these jurisdictions, OSA will notify you by
means of an alert message that there are jurisdictions that might need to be added.
OSA will add the jurisdictions for you when you click the error message link. Once the
jurisdictions are added, you can edit them if necessary using the instructions in this
chapter.
6.3.2 Editing Entities Using the Entity Properties Page
A user is able to view entity properties and not have permissions to edit them. To edit entity properties
and jurisdictions, a user must have access to the Home tab, Entities data type access, and also access
permissions to the entity or entities themselves. For information on user permissions, see Chapter 9,
Updating Users and Permissions on page 173.
Accessing the Entity Properties Page
► To access the Entity Properties page:
1. On the Home tab, click the name of the desired entity, or
On the Data Entry page for the desired entity, click the Entity Properties button.
The Entity Properties page for the particular entity is displayed; in this example, the entity is
T.R. Haden, Inc.
3c

ONESOURCE STATE APPORTIONMENT Version 2.0 User Guide
User Guide (6.3 Editing an Entity) ® 2009 Thomson Reuters/ONESOURCE
(Last Updated September 2009) 110 All Rights Reserved
How to edit the entity properties and jurisdictions using this page is described next.
Editing Entity Properties Using the Entity Properties Page
► To edit the entity properties:
1. Access the Entity Properties page.
2. To edit the name:
a. Click the Edit icon to the right of the entity name. An edit box appears.
b. Type the new name.
c. Click the Save button. The name is changed throughout OSA; there is no other
indication of the change other than an entry in the Event History log.
3. To edit the other properties, such as FEIN and entity type:
a. Click the expand/collapse Properties icon directly under the entity name to show
the Properties panel.
b. Edit the properties as desired. See section 6.1 About Entities, Ownership, and
Groups on page 96 for a description of the properties.
3c
3a

ONESOURCE STATE APPORTIONMENT Version 2.0 User Guide
User Guide (6.3 Editing an Entity) ® 2009 Thomson Reuters/ONESOURCE
(Last Updated September 2009) 111 All Rights Reserved
c. Click the Save button (the Reset button undoes any changes made since the last
operation). The change is made and the Properties panel collapses.
After you click the Save button, the Save status box indicates whether or not the
operation was successful, and if not, what error occurred.
Adding Jurisdictions Using the Entity Properties Page
You can add jurisdictions one by one or you can add multiple jurisdictions at once. When you add a
single jurisdiction, you can specify the tax rule to use and whether or not the entity has nexus in that
jurisdiction. When you add multiple jurisdictions at one time, the jurisdictions are added using their
default tax rule and without entity nexus in that jurisdiction. You can then edit each of the added
jurisdictions as necessary.
► To add jurisdictions:
1. Access the Entity Properties page as described previously.
2. The Properties panel and Entity Jurisdiction table for the entity displays. The Entity
Jurisdiction table lists all the jurisdictions currently defined for the entity.
3. To add a single jurisdiction:
a. Click the Add button. The Add Entity Jurisdiction dialog appears.
3a
3c

ONESOURCE STATE APPORTIONMENT Version 2.0 User Guide
User Guide (6.3 Editing an Entity) ® 2009 Thomson Reuters/ONESOURCE
(Last Updated September 2009) 112 All Rights Reserved
b. Enter the information for the jurisdiction. The only information required now is the
jurisdiction; however, at some point you will also need to specify:
Filing Obligation (Nexus): whether or not the entity has nexus in that
jurisdiction. If a jurisdiction does not display in the drop-down it means it is
not in the OSA jurisdiction list or it is inactive, see Chapter 8, Updating the
System Configuration on page 156.
Filing Protection (PL 86-272): whether or not the entity is protected by P.L.
86-272 (for tracking purposes only, does not affect apportionment
calculations).
Tax Rule: the tax rule to use for the entity, if other than the default tax rule,
which is automatically assigned.
Filing Due Date: used for tracking purposes only, does not affect
calculations; and while the date is retained and included during data export,
it is not reflected in the OSA interface.
c. Click the Add button and the jurisdiction is added to the table (Cancel abandons the
add operation).
4. To add multiple jurisdictions:
a. Click the Add Multiple… button. The Add Multiple Entity Jurisdictions dialog
displays.
b. Click the check box for the jurisdictions you want to add. Click the check box in the
column header to select all the jurisdictions in the list (click the check box again to
clear all the check boxes).
c. When you‘re done, click the Add button (Cancel abandons the add operation). The
jurisdictions are added to the list. Make sure you go back at some point and edit the
entity jurisdictions to ensure proper tax rule and nexus settings.
After you add one or more jurisdictions, the Save status box indicates whether or not
the operation was successful and if not, the error that occurred.
The fields shown in the Entity Jurisdiction table are derived from other settings or information within
OSA and are:
Nexus Flow: an automatically populated field derived from the ownership structure; a check
mark indicates that the entity has ownership in a flow-through entity with nexus in that
jurisdiction and treated as a partnership or disregarded entity.
Filing: indicates which of the five group filing types is specified for that jurisdiction. If the entity
is part of a group, the group filing type is used. If the entity is not part of a filing group, the filing
type will be Separate.
Apportionment: indicates the calculated apportionment percentage for that jurisdiction.
Rate: the tax rate.
When you add an entity, OSA analyzes the ownership relationships of the entity as well as its group
membership and notifies you by means of an alert message if there are jurisdictions that might need to
be added. OSA will add the jurisdictions for you when you click the error message link. Once the
jurisdictions are added, you can edit them if necessary using the instructions below.

ONESOURCE STATE APPORTIONMENT Version 2.0 User Guide
User Guide (6.3 Editing an Entity) ® 2009 Thomson Reuters/ONESOURCE
(Last Updated September 2009) 113 All Rights Reserved
Edit an Entity’s Jurisdictions Using the Entity Properties Page
► To edit entity jurisdictions:
1. Access the Entity Properties page as described previously.
2. The Properties and Entity Jurisdiction table for the entity displays. The Entity Jurisdiction
table lists all the jurisdictions currently defined for the entity.
3. Edit the fields for the desired jurisdiction(s).
Nexus: whether or not the entity has nexus in that jurisdiction. A checkmark in the
check box indicates the entity has nexus.
PL 86-272: whether or not the entity is protected by P.L. 86-272 (for tracking
purposes only, does not affect apportionment calculations).
Rule: the tax rule to use. Double-click in the tax rule column and if more than one tax
rule is defined for that jurisdiction in OSA, you can choose one from the selection box
that displays. See Chapter 7, Updating Tax Rules on page 140 for information on
adding tax rules.
These fields in the Entity Jurisdiction table are derived from other settings or information
within OSA and are not editable:
Nexus Flow: an automatically populated field derived from the ownership structure; a
check mark indicates that the entity has ownership in a flow-through entity with nexus
in that jurisdiction and treated as a partnership or disregarded entity.
Filing: indicates which of the five group filing types is specified for that jurisdiction. If
the entity is part of a group, the group filing type is used. If the entity is not part of a
filing group, the filing type will be Separate.
Apportionment: indicates the calculated apportionment percentage for that
jurisdiction.
Rate: the tax rate.
4. When you‘re done, click the Save button (Reset undoes all the changes since the last save
operation).
After you click the Save button, the Save status box indicates whether or not the operation was
successful and if not, the error that occurred.
4

ONESOURCE STATE APPORTIONMENT Version 2.0 User Guide
User Guide (6.3 Editing an Entity) ® 2009 Thomson Reuters/ONESOURCE
(Last Updated September 2009) 114 All Rights Reserved
Removing Jurisdictions Using the Entity Properties Page
You can remove one jurisdiction at a time or multiple jurisdictions at once from an entity.
When you remove a jurisdiction with associated data, the data is retained. If you add the jurisdiction
back, the data will display in the relevant pages and reports, for example the Data Entry and
Apportionment Calculation pages.
► To remove jurisdictions:
1. Access the Entity Properties page as described previously.
2. The Properties and Entity Jurisdiction table for the entity displays. The Entity Jurisdiction
table lists all the jurisdictions currently defined for the entity.
3. To remove one jurisdiction:
a. Click anywhere in the row (except on the linked jurisdiction name) to highlight the
desired jurisdiction.
b. Click the Remove button. A dialog displays asking you to confirm the deletion.
c. Once you click OK to confirm the deletion, the jurisdiction is removed. Cancel
abandons the operation.
4. To remove multiple jurisdictions:
a. In the Entity Jurisdictions table, select the jurisdictions to remove. While clicking,
use the Ctrl key to select multiple, use the Shift key to select a range.
b. Click the Remove button (Cancel abandons the remove operation).
After you remove one or more jurisdictions, the Save status box indicates whether or
not the operation was successful and if not, the error that occurred.
3b
3a
3c

ONESOURCE STATE APPORTIONMENT Version 2.0 User Guide
User Guide (6.3 Editing an Entity) ® 2009 Thomson Reuters/ONESOURCE
(Last Updated September 2009) 115 All Rights Reserved
When you add an entity, OSA analyzes the ownership relationships of the entity as
well as its group membership and creates a list of jurisdictions that might need to be
added to the entity. If you remove one of these jurisdictions, OSA will notify you by
means of an alert message that there are jurisdictions that might need to be added.
OSA will add the jurisdictions for you when you click the error message link. Once the
jurisdictions are added, you can edit them if necessary using the instructions in this
chapter.
6.3.3 Aligning Jurisdictions
OSA provides a time-saving feature that enables you to align jurisdictions along an ownership chain for
all entities in OSA. This Jurisdiction Alignment feature ensures that the owning entity has the same
jurisdictions as all the entities in which it has ownership, and vice versa. The result is that all entities
within an ownership chain (parent and owned entities) will have the same set of jurisdictions. You have
the option to align all jurisdictions or only those from child to parent. Note that the alignment of
jurisdictions has no implication on calculation, but does affect the user interface and reports because
information for jurisdictions that do not exist for an entity or group cannot be displayed.
In some cases, when there are many owned entities, it will be faster to add jurisdictions to the entities
using this feature than to add them one by one. This button will only appear if there are entities that
need to be aligned. If all the jurisdictions are aligned, then this button will not appear.
Important! This feature aligns jurisdictions for all entities in OSA and will add jurisdictions whether or
not the entity has nexus in that jurisdiction. Using this feature may result in the addition of unnecessary
jurisdictions. This feature cannot be stopped once it is started and it cannot be undone. See section 6.3
Editing an Entity on page 101 for instructions on removing jurisdictions.
► To use the Jurisdiction Alignment feature:
1. Click the Admin tab.
2. In the navigation pane, under Data Elements, select the Entities link. The Entities page
displays, listing the entities defined in OSA (unlike the entity list in the Home tab, which is
limited based on user permissions, any user with Admin tab access and Entity permissions is
able to view all entities).
1
3

ONESOURCE STATE APPORTIONMENT Version 2.0 User Guide
User Guide (6.4 Defining Ownership) ® 2009 Thomson Reuters/ONESOURCE
(Last Updated September 2009) 116 All Rights Reserved
3. Click the Jurisdiction Alignment button. The Choose Jurisdiction Alignment Method
dialog appears.
4. Click the Align All Jurisdictions or Align Jurisdictions from Child to Parent radio button
according to the alignment you would like to perform. The operation may take several minutes,
depending on the size of your data set and the complexity of the ownership structure.
5. Click the Align button to continue (Cancel abandons the operation).
The Save status box displays a message indicating whether or not the operation was
successful, and when not, what error occurred.
There is no way to reverse the operation once it has started. And while there is no harm in
having unnecessary jurisdictions added to an entity, you can remove the unnecessary
jurisdictions one by one, if desired, by following the directions in section 6.3 Editing an Entity
on page 101.
6.4 Defining Ownership
OSA flows account data based on the ownership structure and tax rules. Therefore, it is critical that you
properly and thoroughly define an entity‘s ownership structure after you add an entity.
Within OSA, an entity can own any number of other entities. An entity can also have divisions. Divisions
are not legal entities; they are strictly a means to organize data within an entity. However, divisions can
also own entities. In this case, the data for any entities owned by the division flows through to the
division and the division‘s data rolls up to its parent entity.
When an entity (or division) owns a C-Corp, data does not flow. When the entity owns a flow-through
entity, then the data flows based on the ownership percentages defined and the flow through rules.
While data does not flow from C-Corp to C-Corp, defining these ownership relationships within OSA
enables you to maintain ownership information in a single source as well as run reports for review and
analysis.
After you define an owner or owned entity, you need to specify the following:
Relationship of owned entity to owner (does not apply to SMLLCs and
C-Corps). The relationships can be:
Unitary General Partners
Non-Unitary General Partners
Unitary Limited Partners
Non-Unitary Limited Partners
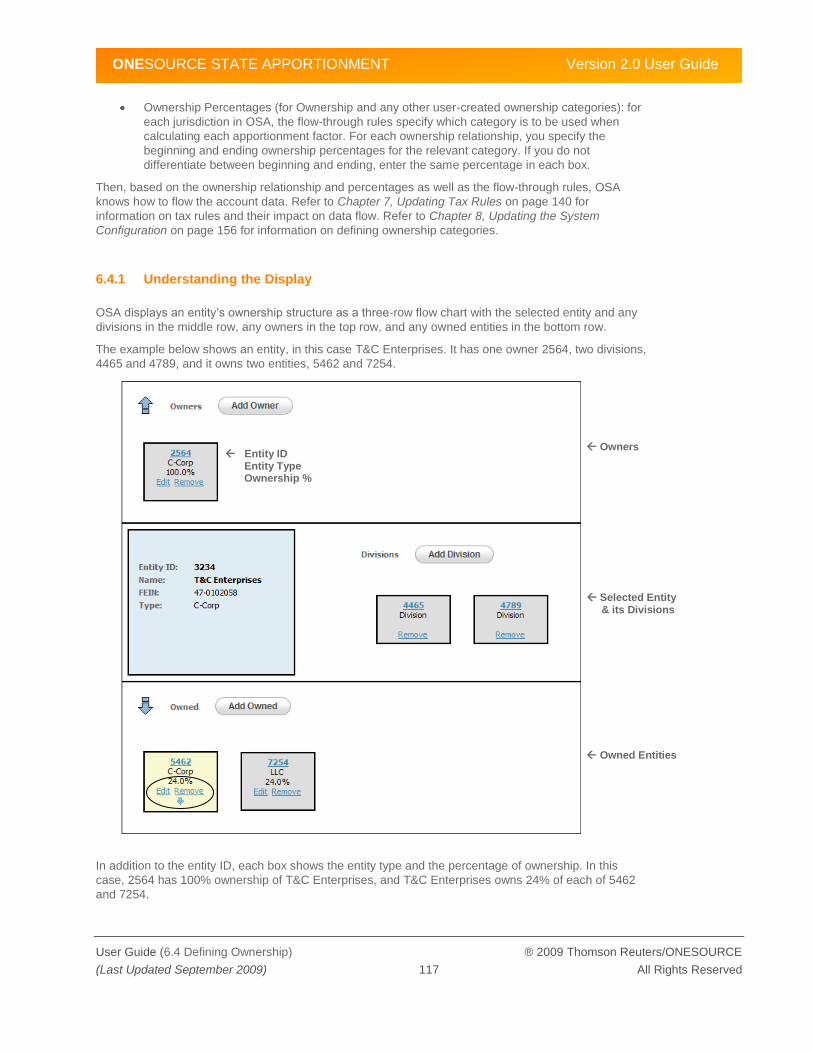
ONESOURCE STATE APPORTIONMENT Version 2.0 User Guide
User Guide (6.4 Defining Ownership) ® 2009 Thomson Reuters/ONESOURCE
(Last Updated September 2009) 117 All Rights Reserved
Ownership Percentages (for Ownership and any other user-created ownership categories): for
each jurisdiction in OSA, the flow-through rules specify which category is to be used when
calculating each apportionment factor. For each ownership relationship, you specify the
beginning and ending ownership percentages for the relevant category. If you do not
differentiate between beginning and ending, enter the same percentage in each box.
Then, based on the ownership relationship and percentages as well as the flow-through rules, OSA
knows how to flow the account data. Refer to Chapter 7, Updating Tax Rules on page 140 for
information on tax rules and their impact on data flow. Refer to Chapter 8, Updating the System
Configuration on page 156 for information on defining ownership categories.
6.4.1 Understanding the Display
OSA displays an entity‘s ownership structure as a three-row flow chart with the selected entity and any
divisions in the middle row, any owners in the top row, and any owned entities in the bottom row.
The example below shows an entity, in this case T&C Enterprises. It has one owner 2564, two divisions,
4465 and 4789, and it owns two entities, 5462 and 7254.
In addition to the entity ID, each box shows the entity type and the percentage of ownership. In this
case, 2564 has 100% ownership of T&C Enterprises, and T&C Enterprises owns 24% of each of 5462
and 7254.
Entity ID Entity Type Ownership %
Owners
Selected Entity & its Divisions
Owned Entities

ONESOURCE STATE APPORTIONMENT Version 2.0 User Guide
User Guide (6.4 Defining Ownership) ® 2009 Thomson Reuters/ONESOURCE
(Last Updated September 2009) 118 All Rights Reserved
Additional levels of ownership are shown using a different box color and up or down-pointing arrows. In
this example, 2564 is not owned by another entity, the owned C-Corp (5462) owns another entity, and
the LLC does not. When there is another level of ownership, the box is shown in yellow versus gray and
it displays an arrow, as is the case with the 5462 box above (note the blue down-pointing arrow circled
in the above example). This indicates that 5462 owns at least one entity.
By clicking the entity ID links, you can navigate up and down the ownership chain. For instance, to view
which entity or entities 5462 owns, click the 5462 link.
5462 becomes the selected entity shown in the middle box, as shown next. The display correctly shows
that 3234 (T&C Enterprises) owns 24% of 5462 (Conserve, Inc.), and that 3234 is owned by at least
one other entity (note the up-pointing arrow and yellow box).
Divisional ownership of partnerships and corporations is indicated for the Division‘s parent in the Ownership screens. When a corporation or partnership is owned by a Division of the parent being viewed, a bar will appear above the owned entity(ies).
To view the current ownership structure for more than one entity at a time, you can run the Ownership
Structure report. Keep in mind however that this report doesn‘t display divisions. See Chapter 5,
Reporting on page 66 for information on running reports.

ONESOURCE STATE APPORTIONMENT Version 2.0 User Guide
User Guide (6.4 Defining Ownership) ® 2009 Thomson Reuters/ONESOURCE
(Last Updated September 2009) 119 All Rights Reserved
6.4.2 Adding an Owner, Owned Entity, or Division
You can add owners, owned entities, or divisions in two ways:
Importing CSV files – you can define entity ownership structure and specify ownership
percentages using the OwnershipStructure.csv and OwnershipPercentages.csv files. To
identify divisions, you use the EntityList.csv file. However, to define ownership categories as
well as specify the ownership category to use when calculating apportionment factors for a
particular jurisdiction, you must use the OSA interface. See section 8.2 Adding Ownership
Categories on page 159 and section 7.6 Defining Flow-Through Rules on page 152,
respectively.
The Ownership page (Admin tab) – you can define the ownership structure (including adding
divisions) as well as define the ownership percentages.
For instructions on adding owners, owned entities, or divisions using CSV files, see Appendix D,
Working with CSV Files on page 275. This section covers adding them using the Ownership page in the
Admin tab.
When adding an owner, owned entity, or a division, OSA provides you a list of existing entities from
which to choose. OSA only displays for selection entities that are eligible. For instance, you cannot add
an entity‘s owner to it as a division or an owned entity; therefore, the owner entity in this case would not
be listed were you to add an owned entity.
Divisions of an entity can own entities. In this case, the data flows to the legal entity through the
division. However, you cannot add owners to divisions, since they already have a parent and are not in
and of themselves legal entities.
When adding divisions, you first create an entity (see section 6.2 Adding an Entity on page 98), and
then add it as a division to another entity using the instructions in this section. When adding an entity,
you are asked to specify an entity type. Once you add the entity as a division, the entity type is ignored,
but should you remove the division, the entity reverts back to a legal entity of the type specified in the
entity properties.
► To add an owner entity, owned entity, or division:
1. Click the Admin tab.
2. In the navigation pane, under Data Elements, click the Ownership link. The Entity Structure
page displays, listing the entities defined in OSA (unlike the entity list in the Home tab, which is
limited based on user permissions, any user with Admin tab access and Entity permissions is
able to view all entities).
3 2
1

ONESOURCE STATE APPORTIONMENT Version 2.0 User Guide
User Guide (6.4 Defining Ownership) ® 2009 Thomson Reuters/ONESOURCE
(Last Updated September 2009) 120 All Rights Reserved
3. Click and highlight the entity for which you want to define an owner (or to which you want to
add owned entities or divisions). The three-row flow chart displays, with the selected entity in
the middle row.
4. Select the button for the desired operation:
a. To add an owner entity, select the Add Owner button in the top row. The Choose
Owner dialog appears.
b. To add an owned entity, click the Add Owned button in the bottom row. The Choose
Owned dialog appears.
c. To add a division, click the Add Division button in the middle row. The Choose
Division dialog appears.
5. In the dialog that appears, click and highlight the entity to add, and click the Apply button. You
can only choose one entity at a time (Close abandons the operation and closes the dialog).
When you click the Apply button, the entity is added to the flow chart. For owner and owned
entities, you also need to specify the ownership percentages. How to do so is described next.
4a
4c
4b

ONESOURCE STATE APPORTIONMENT Version 2.0 User Guide
User Guide (6.4 Defining Ownership) ® 2009 Thomson Reuters/ONESOURCE
(Last Updated September 2009) 121 All Rights Reserved
► To edit ownership relationship and percentage:
1. Click the Edit link for the entity you just added to the flow chart. The Edit Ownership dialog
appears.
2. Ensure that the OSA-selected settings for Unitary with Partner and Limited Partner check
boxes are correct. By default, OSA selects both check boxes unless the owned entity is of type
GP, in which case, the Limited Partner check box is not checked. If you want:
Unitary Limited Partner: select both check boxes.
Unitary General Partner: select Unitary with Partner check box, and don‘t select
Limited Partner check box.
Non-Unitary Limited Partner: do not select Unitary with Partner check box, and do
select Limited Partner check box.
Non-Unitary General Partner: do not select either check box.
3. Enter the ownership percentages and click the Apply button (Close abandons the operation
without making the edits).
If you do not differentiate between beginning and ending percentages for a category, enter the
same percentage for the beginning and ending value. OSA does not prohibit it, but will warn
you if cumulative ownership exceeds 100%. For information on defining ownership categories,
refer to section 8.2 Adding Ownership Categories on page 159. For information on setting a
category for use in calculating the apportionment factor for a particular jurisdiction, see section
7.6 Defining Flow-Through Rules on page 152.
Once you click the Apply button, the ownership percentage is displayed in the chart.
6.4.3 Removing an Owner, Owned Entity, or Division
► To remove an owner, owned entity, or division:
1. Click the Admin tab.
2. In the navigation pane, under Data Elements, click the Ownership link. The Entity Structure
page displays, listing all the entities in OSA (unlike the entity list in the Home tab, which is
limited based on user permissions, any user with Admin tab access and Entity permissions is
able to view all entities).

ONESOURCE STATE APPORTIONMENT Version 2.0 User Guide
User Guide (6.4 Defining Ownership) ® 2009 Thomson Reuters/ONESOURCE
(Last Updated September 2009) 122 All Rights Reserved
3. Click and highlight the entity for which you want to remove an owner, owned entity, or division.
The three-row flow chart displays, with the selected entity in the middle row.
4. Click the Remove link in the appropriate box (e.g., as shown in the 7254 box above).
The entity is removed from this level of ownership.
3 2
1
4

ONESOURCE STATE APPORTIONMENT Version 2.0 User Guide
User Guide (6.5 Adding/Editing Groups) ® 2009 Thomson Reuters/ONESOURCE
(Last Updated September 2009) 123 All Rights Reserved
6.5 Adding/Editing Groups
When you add a group to OSA, you enter a unique Group ID and a group name. You then add
members and specify the key corporation (Parent Filer). And finally, you add jurisdictions, identifying for
each jurisdiction:
The group filing type
Whether or not the group is filing a World Wide return
The tax rule to use, and
Whether or not the group is filing an 80-20 return and the filing due date (this information is
used for tracking purposes only and does not affect calculations).
Groups can be defined as one of five filing types:
Unitary: includes all group members in calculation and calculation is at the group level
Unitary (by Entity): same as Unitary, except calculation is entity numerator over group
denominator
Nexus Combined: includes only group members with nexus in calculation and calculation is at
the group level
Nexus Combined (by Entity): same as Nexus Combined, except calculation is entity
numerator over group denominator
Nexus Consolidated: includes only group members with nexus in calculation and calculation
is at the entity level
Entities within a group are subject to the group‘s tax rule. Also, when filing World Wide returns foreign
entities are included in the calculations, otherwise they are excluded.
There are two ways to add a group to the OSA application:
Importing CSV files – Most groups are added in batch mode during the initial OSA set up
phase. You define groups in the Groups.csv file, indicate group membership in the
GroupMembership.csv file, and add jurisdictions to groups in the GroupFilings.csv file, and
then import these files into OSA. This is an efficient way to add many groups at one time.
Add Group feature (Home and Admin tab) – After the initial set up phase, when you are
typically adding only one or two groups at a time, it is easier to add them using OSA‘s Add
Group feature.
For information on adding groups by importing the Groups.csv file, refer to Appendix D, Working with
CSV Files on page 275. How to add groups within OSA using the Add Group feature in the Home and
Admin tabs is described in this section.
Once a group is created, you can add members and jurisdictions to it. The next sections describe how
to add as well as edit groups (which includes adding jurisdictions) using the Groups page.
6.5.1 Accessing the Groups Page
Access to the Groups page is limited to users with Admin tab permissions. In addition, users must have
permissions to edit the Groups data types. When users have these permissions, they are able to view
and edit all groups in OSA. For information on user permissions, see Chapter 9, Updating Users and
Permissions on page 173.

ONESOURCE STATE APPORTIONMENT Version 2.0 User Guide
User Guide (6.5 Adding/Editing Groups) ® 2009 Thomson Reuters/ONESOURCE
(Last Updated September 2009) 124 All Rights Reserved
► To access the Groups page:
1. Click the Admin tab.
2. In the navigation pane, under Data Elements, click the Groups link. The Groups page
displays, listing all the groups in OSA.
► To find groups in the Groups table:
Use the Search box – type a text string in the box. The Groups table updates to list only the
groups containing the text string you type.
Sort the table – by default the table is sorted in ascending order by ID. Click on the column
heading to sort by that column. Clicking once sorts in ascending order and click again to sort in
descending order.
Use the scroll bar – you can use the vertical scroll bar to move down the list.
6.5.2 Adding Groups
To add a group, you specify a Group ID and a name, and indicate whether or not the group is active.
You can also include an optional comment. Once the group is created, you can then add members and
jurisdictions.
While you can edit the group name at any time, once the group is created, you cannot change the
Group ID. Therefore, make sure the Group ID is correct (with respect to the other systems in your tax
technology stack). And, you cannot delete a group from OSA once it is created; this is so OSA can
retain a complete audit trail of all changes. See section 1.4 Annual Review/Preparing for the Current
Year on page 20 for information on how to remove groups for subsequent tax years.
The group properties are:
Property Description and Allowable Values
Group ID The identifier for the group within OSA – alphanumeric string, 15 characters
maximum.
Group Name Name of the group – alphanumeric string, 100 characters maximum.
2
1

ONESOURCE STATE APPORTIONMENT Version 2.0 User Guide
User Guide (6.5 Adding/Editing Groups) ® 2009 Thomson Reuters/ONESOURCE
(Last Updated September 2009) 125 All Rights Reserved
Property Description and Allowable Values
Comment Optional comment – alphanumeric string, 255 characters maximum.
Active When checked, group is active.
When you add a group to OSA, permission to view it in the Home and/or Reports tabs is limited to users
with Full Access and users with explicit access to the group in the Accessible Entities/Groups list in the
Users and Permissions page.
Therefore, make sure that as you add groups you also update user permissions as necessary to enable
the appropriate users to view the group. For information on user permissions, see Chapter 9, Updating
Users and Permissions on page 173.
► To add a group:
1. User or Administrator
a. Click the Home tab.
b. Click the Add Group… button.
1a
1b

ONESOURCE STATE APPORTIONMENT Version 2.0 User Guide
User Guide (6.5 Adding/Editing Groups) ® 2009 Thomson Reuters/ONESOURCE
(Last Updated September 2009) 126 All Rights Reserved
2. Administrator
a. Access the Groups page, as described in section 6.5.1 Accessing the Groups Page
on page 123.
b. Click the Add button.
3. The Add Group dialog displays.
4. Enter the information for the group and click the Add button (Cancel abandons the operation).
Keep in mind that you cannot delete a group once you create it and, while you can edit other
properties, you cannot edit the Group ID; this is so OSA can retain a complete audit trail of all
changes. See section 1.4 Annual Review/Preparing for the Current Year on page 20 for
information on how to remove groups for subsequent tax years.
Once you click the Add button, the Save status box displays a message indicating whether or
not the operation was successful, and if not, what error occurred.
You can now add members and jurisdictions (if necessary) to the group. How to do so is
described next.
2b

ONESOURCE STATE APPORTIONMENT Version 2.0 User Guide
User Guide (6.5 Adding/Editing Groups) ® 2009 Thomson Reuters/ONESOURCE
(Last Updated September 2009) 127 All Rights Reserved
6.5.3 Editing Groups
Once a group is created, you can:
Add/remove members – in addition, you also identify the key corporation (the Parent Filer in
the group).
Make it active/inactive – when inactive, the group‘s information is retained in OSA but it is not
visible in the other tabs (i.e., Home and Reports). You cannot delete a group from OSA once it
is added; this is so OSA can retain a complete audit trail. See section 1.4 Annual
Review/Preparing for the Current Year on page 20 for information on how to remove groups for
subsequent tax years.
Edit its properties – you can edit its name and key corporation.
Add group jurisdictions – you are asked to specify the group filing type, whether or not the
group is filing a World Wide or Water‘s Edge return, and the tax rule. When removing a group
jurisdiction that has data associated with it, the data is retained. If you add the jurisdiction back
to the group, the data will display again.
Edit group jurisdictions – you can edit any of the settings specified for a group jurisdiction
when you add it.
Remove jurisdictions – when you remove jurisdictions that have data associated with them,
the data is retained. If you add the jurisdiction again, the data is displayed in the relevant
pages such as the Apportionment Data Entry and Calculation pages.
There are three main ways to edit a group:
Importing CSV files – you can edit all group properties and settings using the CSV files
(Groups.csv, GroupMembership.csv, and GroupFilings.csv), but you can‘t remove jurisdictions.
This is due to the additive nature of the Import feature.
The Groups page (Admin tab) – you can edit all group properties and settings in the Groups
page, with the exception of the group name. The Group name is only editable using the CSV
files or Group Properties page.
The Group Properties page (Home tab) – you can edit all group properties and settings with
the exception of making a group inactive/active. The two differences between this and the
Groups page are: 1) on the Groups page, you can inactivate groups, and 2) the Groups page
displays all entities in OSA whereas the Group Properties page lists only the groups a user has
permission to view. You must have Admin tab and Group data type permissions to view the
Groups page and these permissions allow access to all entities. The Home tab is further
governed by Entity/Group list access. Use this page to make your edits when you do not have
Admin tab access or when making a quick change during data entry.
How to edit a group by importing CSV files is covered in Appendix D, Working with CSV Files on page
275. This section covers editing a group using the Groups and Groups Properties pages.
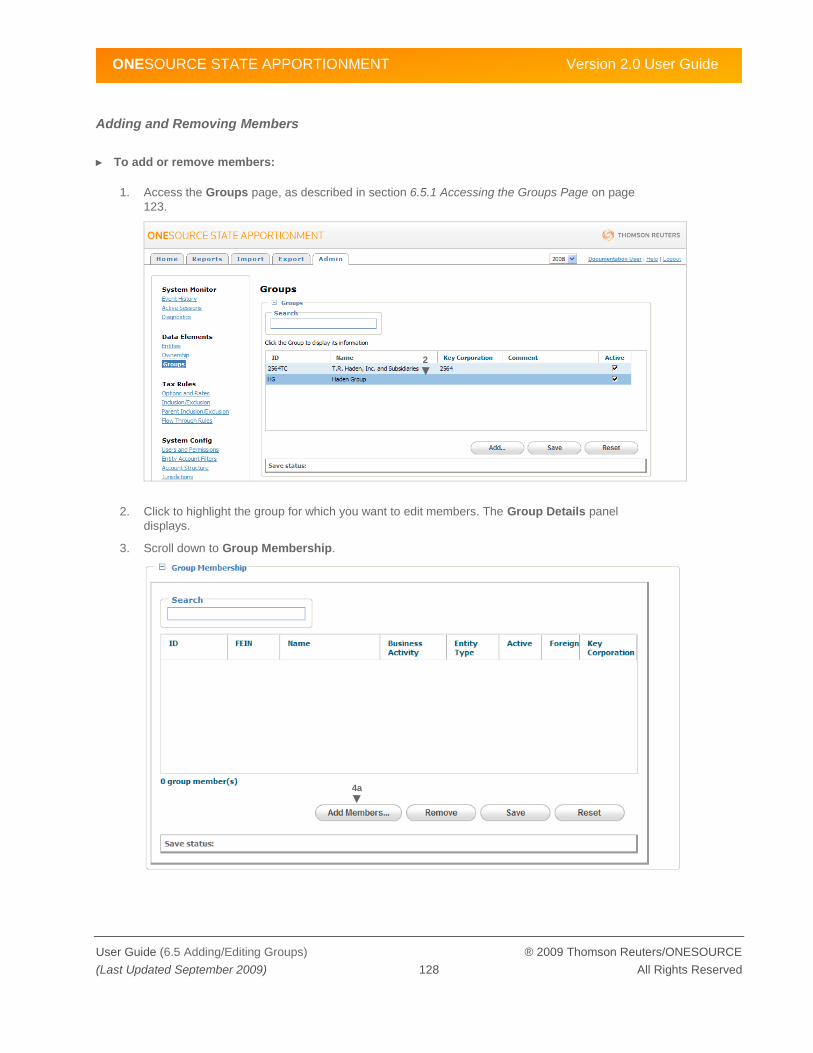
ONESOURCE STATE APPORTIONMENT Version 2.0 User Guide
User Guide (6.5 Adding/Editing Groups) ® 2009 Thomson Reuters/ONESOURCE
(Last Updated September 2009) 128 All Rights Reserved
Adding and Removing Members
► To add or remove members:
1. Access the Groups page, as described in section 6.5.1 Accessing the Groups Page on page
123.
2. Click to highlight the group for which you want to edit members. The Group Details panel
displays.
3. Scroll down to Group Membership.
2
4a
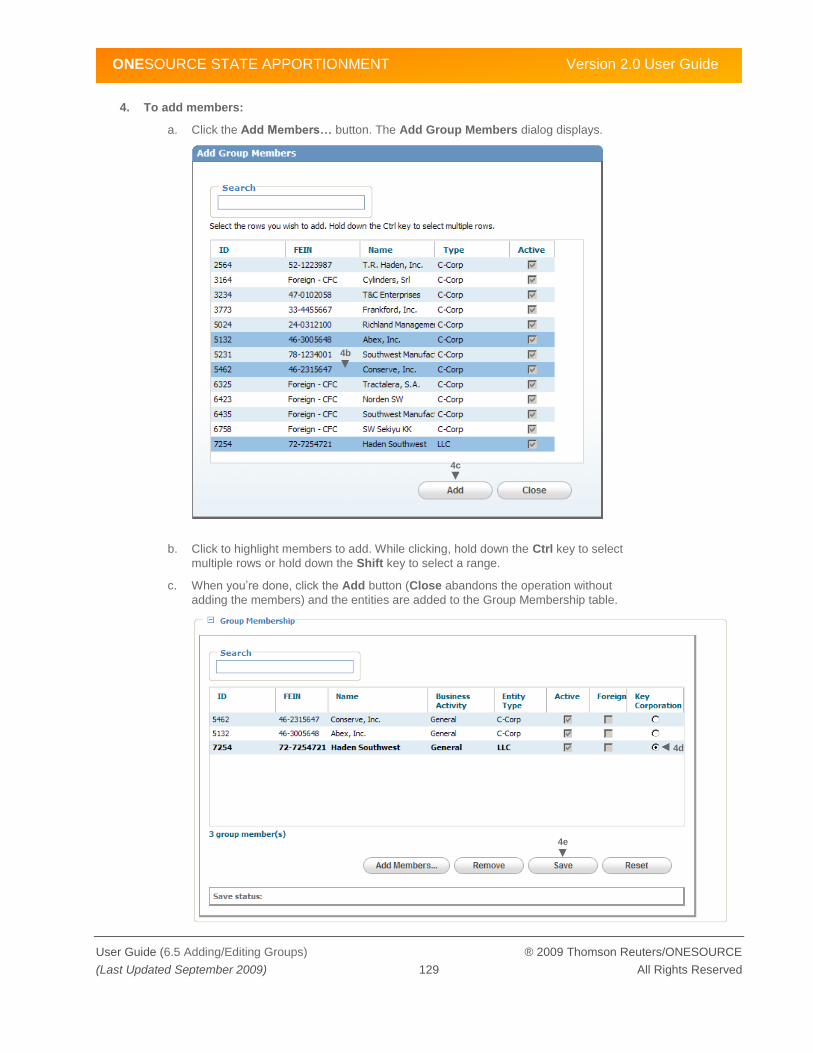
ONESOURCE STATE APPORTIONMENT Version 2.0 User Guide
User Guide (6.5 Adding/Editing Groups) ® 2009 Thomson Reuters/ONESOURCE
(Last Updated September 2009) 129 All Rights Reserved
4. To add members:
a. Click the Add Members… button. The Add Group Members dialog displays.
b. Click to highlight members to add. While clicking, hold down the Ctrl key to select
multiple rows or hold down the Shift key to select a range.
c. When you‘re done, click the Add button (Close abandons the operation without
adding the members) and the entities are added to the Group Membership table.
4b
4c
4e
4d

ONESOURCE STATE APPORTIONMENT Version 2.0 User Guide
User Guide (6.5 Adding/Editing Groups) ® 2009 Thomson Reuters/ONESOURCE
(Last Updated September 2009) 130 All Rights Reserved
d. To identify the key corporation (the Parent Filer), click the radio button for the desired
member. The other check boxes and fields are not editable here; they are read from
the entity‘s settings.
e. Then, click the Save button (Reset undoes any changes you made since the last
save operation, but does not undo the Add member or Remove operations).
5. To remove members:
a. In the Group Membership panel, highlight the member(s) to remove. While clicking,
hold down the Ctrl key to select multiple rows or hold down the Shift key to select a
range.
b. When you‘re done, click the Remove button. A confirmation dialog appears.
c. Click the OK button to confirm the removal (Cancel abandons the operation and does
not remove the members).
Once you add or remove a member or edit the key corporation, the Save status box
displays a message indicating whether or not the operation was successful, and if
not, what error occurred. The example below shows a message after a member is
removed.
Note: You can also edit group membership using the Group Properties page. The
instructions for editing group membership are the same. For information on accessing
the Group Properties page, see page 132.

ONESOURCE STATE APPORTIONMENT Version 2.0 User Guide
User Guide (6.5 Adding/Editing Groups) ® 2009 Thomson Reuters/ONESOURCE
(Last Updated September 2009) 131 All Rights Reserved
Making a Group Active/Inactive
► To make a group active/inactive:
1. Access the Groups page, as described in section 6.5.1 Accessing the Groups Page on page
123.
2. Click the Active check box for the group to make active/inactive. A check mark indicates the
group is active and vice versa.
3. Click the Save button.
When you add or remove a member, the Save status box displays a message indicating
whether or not the operation was successful, and if not, what error occurred.
3
2

ONESOURCE STATE APPORTIONMENT Version 2.0 User Guide
User Guide (6.5 Adding/Editing Groups) ® 2009 Thomson Reuters/ONESOURCE
(Last Updated September 2009) 132 All Rights Reserved
Editing Group Properties
► To access the Group Properties page:
1. Click the Home tab. The Entities and Groups page displays, listing the entities and groups
you have permission to view.
2. Click the ID or Name of the group to edit. The Group Properties page displays.
1
2
2a
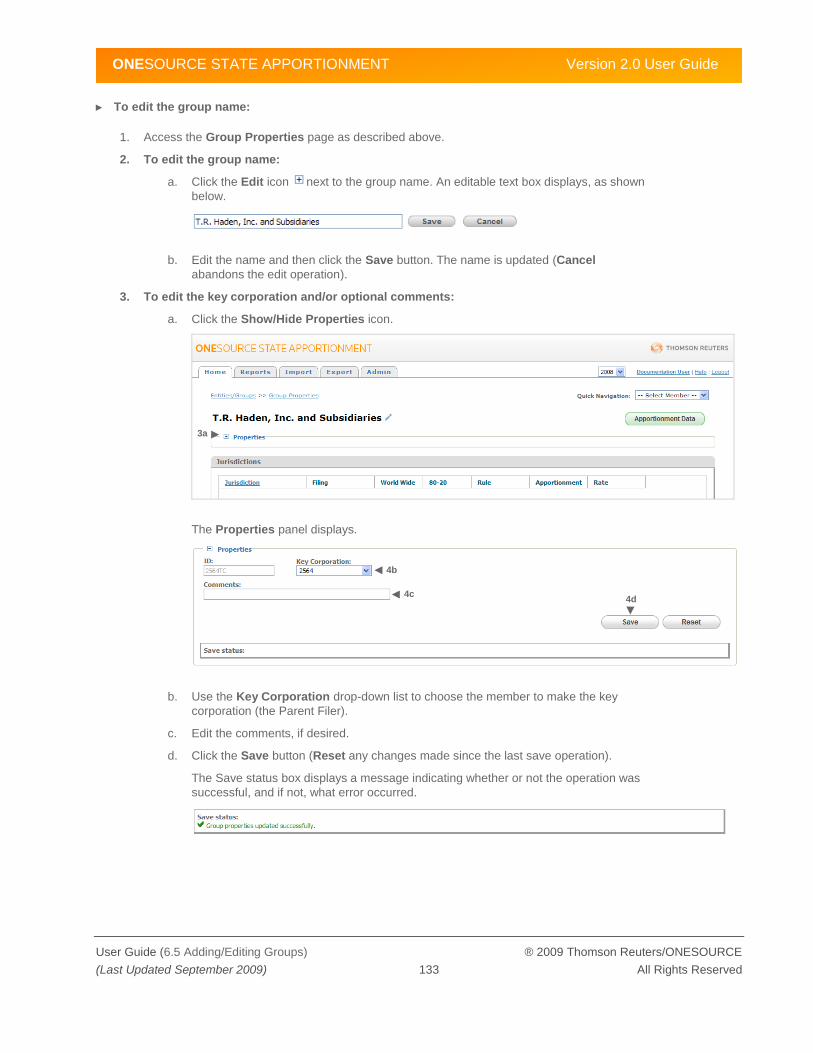
ONESOURCE STATE APPORTIONMENT Version 2.0 User Guide
User Guide (6.5 Adding/Editing Groups) ® 2009 Thomson Reuters/ONESOURCE
(Last Updated September 2009) 133 All Rights Reserved
► To edit the group name:
1. Access the Group Properties page as described above.
2. To edit the group name:
a. Click the Edit icon next to the group name. An editable text box displays, as shown
below.
b. Edit the name and then click the Save button. The name is updated (Cancel
abandons the edit operation).
3. To edit the key corporation and/or optional comments:
a. Click the Show/Hide Properties icon.
The Properties panel displays.
b. Use the Key Corporation drop-down list to choose the member to make the key
corporation (the Parent Filer).
c. Edit the comments, if desired.
d. Click the Save button (Reset any changes made since the last save operation).
The Save status box displays a message indicating whether or not the operation was
successful, and if not, what error occurred.
3a
4b
4c 4d

ONESOURCE STATE APPORTIONMENT Version 2.0 User Guide
User Guide (6.5 Adding/Editing Groups) ® 2009 Thomson Reuters/ONESOURCE
(Last Updated September 2009) 134 All Rights Reserved
Adding Group Jurisdictions
You can add jurisdictions one by one or you can add multiple jurisdictions at once. When you add a
single jurisdiction, you can specify the group filing type, the tax rule to use, and whether or not the group
is filing a worldwide or water‘s edge return. When you add multiple jurisdictions at one time, the
jurisdictions are added using their default tax rule and with a default filing type. You can then edit each
of the added jurisdictions as necessary.
► To add group jurisdictions:
1. Access the Groups page, as described in section 6.5.1 Accessing the Groups Page on page
123.
2. Click to highlight the group you want to edit.
3. The Group Details panel appears, displaying both the Group Jurisdiction and Group
Membership panels. The Group Jurisdiction table lists all the jurisdictions currently defined
for the group. In the following example, no jurisdictions are defined.
2
4a 5a

ONESOURCE STATE APPORTIONMENT Version 2.0 User Guide
User Guide (6.5 Adding/Editing Groups) ® 2009 Thomson Reuters/ONESOURCE
(Last Updated September 2009) 135 All Rights Reserved
4. To add a single jurisdiction:
a. Click the Add button. The Add Group Jurisdiction dialog appears.
b. Enter the information for the jurisdiction. The only required information is the
jurisdiction; however you will need to specify the other information at some point,
which you can do by editing the jurisdictions.
Refer to section 6.5 Adding/Editing Groups on page 123 for information on the fields
in this dialog. If a jurisdiction does not display, it means it is not in the OSA master
jurisdiction list or it is inactive, see 8.1Adding/Editing OSA Jurisdictions on page 156.
The Tax Rule drop-down lists the tax rules defined for the jurisdiction and in some
cases there may only be one.
c. Click the Add button (Cancel abandons the add operation) and the jurisdiction is
added to the group and listed in the table.
5. To add multiple jurisdictions:
a. Click the Add Multiple… button. The Add New Jurisdictions dialog displays.
4c
5c

ONESOURCE STATE APPORTIONMENT Version 2.0 User Guide
User Guide (6.5 Adding/Editing Groups) ® 2009 Thomson Reuters/ONESOURCE
(Last Updated September 2009) 136 All Rights Reserved
b. Click the check box for the jurisdictions you want to add. Click the check box in the
column header to select all the jurisdictions in the list (click the check box again to
clear all the check boxes).
c. When you‘re done, click the Add button (Close abandons the add operation). The
jurisdictions are added to the list. Make sure you go back at some point and edit the
group jurisdictions to ensure the proper tax rule and filing settings.
After you add one or more jurisdictions, the Save status box indicates whether or not the
operation was successful, and if not, what error occurred.
Note: You can also edit group jurisdictions using the Group Properties page. The instructions
for editing jurisdictions are the same. For information on accessing the Group Properties
page, see page 132.
When you add a group, OSA analyzes the ownership relationships of the entities within the
group as well as its group membership and notifies you by means of an alert message that
there are jurisdictions that might need to be added. OSA will add the jurisdictions for you when
you click the error message link. Once the jurisdictions are added, you can edit them if
necessary using the instructions in this chapter.
Editing Group Jurisdictions
► To edit group jurisdiction settings:
1. Access the Groups page, as described in section 6.5.1 Accessing the Groups Page on page
123.
2

ONESOURCE STATE APPORTIONMENT Version 2.0 User Guide
User Guide (6.5 Adding/Editing Groups) ® 2009 Thomson Reuters/ONESOURCE
(Last Updated September 2009) 137 All Rights Reserved
2. Click to highlight the desired group. The Group Details panel displays and includes Group
Jurisdictions table. You can edit the Filing type and Tax Rule as well as both the World
Wide and 80-20 settings:
a. Filing type and Rule (tax rule): double-click on the jurisdiction you want to edit. A
selection box displays. Use the up and down arrow keys to scroll your cursor up and
down the selection box to the desired entry. Then, press the Enter key.
b. World Wide: if the check box is empty, the group filing is Water‘s Edge for this
jurisdiction.
c. 80-20: if the check box is empty, the group is not filing an 80/20 return. This is for
informational purposes only and does not affect calculations.
These fields in the Group Jurisdiction table are derived from other settings or information
within OSA and are not editable:
Apportionment: indicates the calculated apportionment percentage for that
jurisdiction.
Rate: the tax rate.
2a 2b 2c
2a
3

ONESOURCE STATE APPORTIONMENT Version 2.0 User Guide
User Guide (6.5 Adding/Editing Groups) ® 2009 Thomson Reuters/ONESOURCE
(Last Updated September 2009) 138 All Rights Reserved
3. Once you‘ve edited the desired jurisdictions, click the Save button (Reset undoes any changes
made since the last save operation).
The Save status box displays a message indicating whether or not the operation was
successful, and if not, what error occurred.
Note: You can also edit group jurisdiction settings using the Group Properties page. The
instructions for editing jurisdiction settings are the same. For information on accessing the
Group Properties page, see page 132.
Removing Jurisdictions
► To remove a jurisdiction:
1. Access the Groups page, as described in section 6.5.1 Accessing the Groups Page on page
123.
2. Click to highlight the group you want to edit.
3. The Group Details panel appears, displaying both the Group Jurisdiction and Group
Membership panels. The Group Jurisdiction table lists all the jurisdictions currently defined
for the group.
2

ONESOURCE STATE APPORTIONMENT Version 2.0 User Guide
User Guide (6.5 Adding/Editing Groups) ® 2009 Thomson Reuters/ONESOURCE
(Last Updated September 2009) 139 All Rights Reserved
4. Click to highlight the desired jurisdiction(s). While clicking, hold down the Ctrl key to select
multiple rows or hold down the Shift key to select a range.
5. Click the Remove button. A dialog displays asking you to confirm the removal.
6. Click the OK button (Cancel abandons the operation).
Once you click the OK button to confirm the removal, the jurisdiction is removed from the
group.
When removing a group jurisdiction that has data associated with it, the data is retained. If you
add the jurisdiction back to the group, the data will display again in all relevant pages and
reports, for example, the Data Entry and Apportionment Calculation pages.
After you remove a jurisdiction, the Save status box indicates whether or not the operation was
successful, and if not, what error occurred.
Note: You can also remove group jurisdictions using the Group Properties page. The
instructions for removing jurisdictions are the same. For information on accessing the Group
Properties page, see page 132.
4
5
6

ONESOURCE STATE APPORTIONMENT Version 2.0 User Guide
User Guide (7.1 About Tax Rules) ® 2009 Thomson Reuters/ONESOURCE
(Last Updated September 2009) 140 All Rights Reserved
7 Updating Tax Rules
Chapter 7 describes how to edit OSA‘s tax rule options and rates (and how to specify a default tax rule),
how to specify which accounts are included in a tax rule, and how to define flow-through rules for a
jurisdiction. It includes the following sections:
7.1: About Tax Rules
7.2: Adding and Editing Tax Rules
7.3: Editing Options and Rates
7.4: Specifying Included/Excluded Accounts
7.5: Specifying Included/Excluded Parent Accounts
7.6: Defining Flow-Through Rules
Note: In order to perform any of the functions described in this chapter, you must have the appropriate
permissions. Contact your OSA administrator if you do not have adequate permissions.
7.1 About Tax Rules
During the initial OSA setup, a default list of tax rules is loaded. These tax rules are specific to a
jurisdiction and contain the options and settings that are used to calculate the apportionment
percentage for each entity and group.
The tax rules house the tax rates, apportionment weights, and the inclusion/exclusion settings of the
accounts defined in the accounts structure. The tax rules also determine how flow-through entities are
treated in a given state and how their apportionment factors are calculated.
For each tax rule, the following is specified:
The tax rule name (e.g., General)
The jurisdiction to which it applies (each tax rule is uniquely identified by the tax rule name
(e.g., General) and the jurisdiction (e.g., AK))
The options and rates:
Apportionment factor weighting
Tax brackets and rates
Rent Real and Personal Property capitalization factors
Whether or not to average beginning and ending rent balances
Whether or not to average beginning and ending balances for the user-defined factor
Whether or not to ignore zero denominator factors in the weighting of the
apportionment factor calculation
Whether or not property is included at net or original cost (used for tracking purposes)
The included and excluded accounts: which accounts are included in the apportionment
calculations (and therefore which are excluded)
The flow-through rules:
How the entity is treated with regards to filing status within the specified jurisdiction
(State Treatment)

ONESOURCE STATE APPORTIONMENT Version 2.0 User Guide
User Guide (7.2 Adding and Editing Tax Rules) ® 2009 Thomson Reuters/ONESOURCE
(Last Updated September 2009) 141 All Rights Reserved
How the apportionment flows from flow-through entities to its owner(s) by flow-
through entity type (Flow Calculation Method)
Which ownership category should be applied to each apportionment factor within a
given jurisdiction (Apportionment Method Rule)
When you add jurisdictions (or filings) to an entity or group, for each jurisdiction you add you have the
option of specifying the tax rule to use.
OSA has the concept of a default tax rule for a jurisdiction. Therefore, if you do not explicitly specify a
tax rule to use when adding a jurisdiction to an entity or group, or if only the one default tax rule exists,
this default tax rule is used.
During the initial OSA setup and as you add jurisdictions to entities, you should make sure that the
appropriate tax rules are assigned.
See section 7.2 Adding and Editing Tax Rules below for information on adding and editing tax rules as
well as defining the default tax rule for a jurisdiction.
See Chapter 6, Updating Data Elements on page 96 for information on adding entities and jurisdictions
to them, defining ownership, and creating groups.
7.2 Adding and Editing Tax Rules
There are three ways to add tax rules and two ways to edit tax rules (their options and rates, account
inclusion/exclusion lists, and flow-through rules). In addition, there are three ways to assign tax rules to
entities and groups.
You can add tax rules by:
Importing CSV files – you create the tax rule using the TaxRuleOptions.csv file, specify tax
brackets and rates using the TaxRuleRates.csv file, define the account inclusion/exclusion list
using the TaxRuleInclusion.csv file, define the flow-through rules using the
FlowThroughRules.csv file and assign the apportionment method rules using the
ApportionmentMehodRules.csv file.
The Tax Rules > Options and Rates page (Admin tab) – you add a copy of an existing tax
rule, which you can then edit using this and the other Tax Rules pages.
The Jurisdictions page (Admin tab) – when you add a new jurisdiction to OSA, a new blank
tax rule is automatically created, with the name ―General.‖ You will need to edit the rule and
specify the options and settings, accounts, and flow-through rules.
You can edit tax rules by:
Importing CSV files – you use the same files as when you create the tax rule.
The Tax Rules (Admin tab) –
The Options and Rates page: you specify the tax rates, apportionment weights, and
other settings, including the default tax rule for a jurisdiction.
The Inclusion Exclusion Rules page: you specify the accounts to include and
exclude in the apportionment calculations for a tax rule.
The Parent Inclusion Exclusion Rules page: this page lists, per factor, the parent
accounts that are included or excluded in the apportionment calculations. You can
change whether a parent account is included or excluded by default. Any account you
add to the parent account takes on the default inclusion/exclusion setting unless
explicitly changed in the Inclusion Exclusion Rules page.
The Flow-Through Rules page: you specify the flow-through rules for a tax rule.

ONESOURCE STATE APPORTIONMENT Version 2.0 User Guide
User Guide (7.3 Editing Options and Rates) ® 2009 Thomson Reuters/ONESOURCE
(Last Updated September 2009) 142 All Rights Reserved
You can specify the tax rule to use for an entity or group in three ways:
Importing a CSV file – you use the TaxRuleAssignment.csv file.
The Entities (or Groups) page (Admin tab) – as you add jurisdictions to an entity or group,
you can specify the tax rule to use. Once a jurisdiction is added, you can edit the tax rule in the
jurisdictions table.
The Entity Properties (or Group Properties) page (Home tab) – as you add jurisdictions to
an entity or group, you can specify the tax rule to use. Once a jurisdiction is added, you can
edit the tax rule in the jurisdictions table.
How to edit and/or add tax rules by importing the tax rule CSV files is covered in Appendix D, Working
with CSV Files on page 275. How to add jurisdictions to OSA is covered in section 8.1 Adding/Editing
OSA Jurisdictions on page 156. How to use the Entities, Groups, Entity Properties, and Group
Properties pages is covered in Chapter 6, Updating Data Elements on page 96.
The remainder of this chapter describes how to use the Tax Rules pages on the OSA Admin tab.
7.3 Editing Options and Rates
During the initial OSA setup, a default list of tax rules is loaded. You can edit the default tax rules as
well as add your own. In addition, you can change which tax rule to use as the default tax rule for a
jurisdiction.
This section describes how to edit the options and rates for a tax rule, how to add a new tax rule, and
how to change which tax rule is the default tax rule for a jurisdiction.
Tax rules are identified by the tax rule name (e.g., General) and the jurisdiction (e.g., AK) and each tax
rule includes the following options and rates information:
Property Description Allowable Values
Tax Rule Name The tax rule name and jurisdiction ID
together uniquely identify the tax rule.
Alphanumeric string not to exceed
100 characters.
Jurisdiction Name and ID Jurisdiction associated with the tax
rule, e.g., Arizona (AZ)
N/A - Jurisdiction IDs and names are
defined in the Jurisdictions page in
the Admin tab.
Tax Method Identifies how a state calculates its
total tax liability. It is used for the
purposes of OSX and OSA
integration.
Values provided in drop-down list:
INCOME
GREATER OF INCOME AND AMT
GREATER OF INCOME FRANCHISE
AND AMT
GREATER OF INCOME AND
FRANCHISE TAX
SUM OF INCOME AND FRANCHISE
TAX

ONESOURCE STATE APPORTIONMENT Version 2.0 User Guide
User Guide (7.3 Editing Options and Rates) ® 2009 Thomson Reuters/ONESOURCE
(Last Updated September 2009) 143 All Rights Reserved
Property Description Allowable Values
Property Factor at Net Cost Whether or not the tax rule includes
property at net cost. This does not
impact calculations; it is for tracking
purposes only. To change a given tax
rule between Net and Original cost,
the user must revise the depreciation
account settings in the
Inclusion/Exclusion page.
If check box is selected, property
factor is at net cost.
Ignore Zero Denominator Whether or not the tax rule includes
zero denominator factors in the
weighting of the apportionment factor
calculation.
If check box is selected, zero
denominators are ignored.
Average Rent Whether or not the associated tax rule
averages the beginning and ending
rent balances, or if only ending value
should be used.
If check box is selected, rent is
averaged. If not, only ending balance
of rent is included.
Average User Defined Factor Whether or not the user defined factor
should be averaged, or if only ending
value should be used.
If check box is selected, user defined
factor is averaged. If not, only ending
value is used.
Rent Real Property Cap Factor The multiplier applied to the real rent
account balances. Multiplier is
applicable to all account names
associated with the parent account
labeled ―Rent Real Property.‖
Any positive integer.
Rent Personal Property Cap
Factor
The multiplier applied to the personal
rent account balances. Multiplier is
applicable to all account names
associated with the parent account
labeled ―Rent Personal Property.‖
Any positive integer.
Decimal Precision The number of decimal places
included in the calculated
apportionment factor percentage.
Any positive integer.
Property Factor Weight Weighting to be applied to the
Property factor.
Any positive integer.
Payroll Factor Weight Weighting to be applied to the Payroll
factor.
Any positive integer.
Sales Factor Weight Weighting to be applied to the Sales
factor.
Any positive integer.
User Defined Factor Weight Weighting to be applied to the User-
defined factor.
Any positive integer.
Tax Brackets The starting dollar amount for a
particular tax tier.
Any positive integer.
Tax Rates Tax rate associated with the tax
bracket.
Positive number not to exceed six
decimal places.

ONESOURCE STATE APPORTIONMENT Version 2.0 User Guide
User Guide (7.3 Editing Options and Rates) ® 2009 Thomson Reuters/ONESOURCE
(Last Updated September 2009) 144 All Rights Reserved
Property Description Allowable Values
Financial Tax Brackets The starting dollar amount for a tax
tier when the entity is a financial
entity.
Any positive integer.
Financial Tax Rates Tax rate associated with the financial
entity tax bracket.
Positive number not to exceed six
decimal places.
For information on editing the account inclusion/exclusion list, see section 7.4 Specifying
Included/Excluded Accounts on page 149 and for instructions on editing flow-through rules, see section
7.6 Defining Flow-Through Rules on page 152.
► To edit the options and rates for a tax rule:
1. From the Admin tab
a. Click the Admin tab.
b. In the navigation pane, under Tax Rules, click the Options and Rates link. The
Options and Rates page displays.
c. Click the tax rule to edit.
2. From the Inclusion/Exclusion page
a. Access the Inclusion/Exclusion page as described in the next section.
b. Click the Edit Options and Rates link.
2
3
1
2b

ONESOURCE STATE APPORTIONMENT Version 2.0 User Guide
User Guide (7.3 Editing Options and Rates) ® 2009 Thomson Reuters/ONESOURCE
(Last Updated September 2009) 145 All Rights Reserved
3. The options and rates for the tax rule display.
4. Make your edits as desired.
a. To add a tax bracket, click the Add button next to an existing bracket. A new row is
added below.
b. To remove a tax bracket, place your cursor in the bracket to remove and click the
Remove button.
5. When you‘re done with your edits, click the Save button (Reset undoes any changes made
since the last save operation).
Once you click the Save button, the Save status box displays a message indicating whether or
not the operation was successful, and if not, what error occurred.
For instructions on specifying which accounts are included and excluded from the tax rule as
well as defining its flow-through rules, see section 7.4 Specifying Included/Excluded Accounts
on page 149 and section 7.6 Defining Flow-Through Rules on page 152 respectively.
► To add a tax rule:
To add a tax rule, you create a copy of an existing tax rule on the Options and Rates page for a
particular jurisdiction and then make any necessary edits to the options and rates (and then if
necessary, to the account inclusion/exclusion list and flow-through rules). Therefore, make sure you
select a tax rule for the appropriate jurisdiction to copy.
5
4a 4b

ONESOURCE STATE APPORTIONMENT Version 2.0 User Guide
User Guide (7.3 Editing Options and Rates) ® 2009 Thomson Reuters/ONESOURCE
(Last Updated September 2009) 146 All Rights Reserved
1. Click the Admin tab.
2. In the navigation pane, under Tax Rules, click the Options and Rates link. The Options and
Rates page displays.
3. Click the tax rule you want to copy. Again, select an existing tax rule for the desired
jurisdiction, since the jurisdiction is not editable on the added tax rule. The options and rates
for the selected tax rule display.
1
3 2
4

ONESOURCE STATE APPORTIONMENT Version 2.0 User Guide
User Guide (7.3 Editing Options and Rates) ® 2009 Thomson Reuters/ONESOURCE
(Last Updated September 2009) 147 All Rights Reserved
4. Click the Add Copy button. The Create Tax Rule dialog displays.
5. Enter the name for the tax rule. It can be any alphanumeric string not to exceed 100
characters.
6. Click the Add button (Cancel abandons the operation). Keep in mind that once you create a
tax rule, you can edit it but you cannot delete it (so OSA can retain a complete audit trail of all
changes).
Once you click the Add button, the new tax rule is added. Tax rules are listed alphabetically by
jurisdiction ID. Follow the directions in this section for editing a tax rule‘s options and rates.
For instructions on specifying which accounts are included and excluded from the tax rule as
well as defining its flow-through rules, see section 7.4 Specifying Included/Excluded Accounts
on page and section 7.6 Defining Flow-Through Rules on page 152 respectively.
Note: When you add a new jurisdiction to OSA, a default tax rule is created under the name
“General.” Its options and rates are not specified, so make sure you edit the default tax rule’s
options and rates as well as its account inclusion/exclusion list, and flow-through rules.
► To change the tax rule to use as the default for a jurisdiction:
1. Click the Admin tab.
2. In the navigation pane, under Tax Rules, click the Options and Rates link. The Options and
Rates page displays. The Default column lists the tax rule currently set to the default for the
jurisdiction (the default has the check mark).
6
5
3
1
2

ONESOURCE STATE APPORTIONMENT Version 2.0 User Guide
User Guide (7.3 Editing Options and Rates) ® 2009 Thomson Reuters/ONESOURCE
(Last Updated September 2009) 148 All Rights Reserved
3. Click the tax rule you want to make the default. The options and rates details display.
4. Click the Set to Default button. A dialog displays, asking you to confirm your selection.
5. Click the OK button to set the selected tax rule as the default (Cancel abandons the
operation).
When you click the OK button, the Save status box displays a message indicating whether or
not the operation was successful and if not, what error occurred.
The selected tax rule becomes the default tax rule for that jurisdiction. When the jurisdiction is
added to an entity or group, this tax rule is used unless another one is selected.
4

ONESOURCE STATE APPORTIONMENT Version 2.0 User Guide
User Guide (7.4 Specifying Included/Excluded Accounts) ® 2009 Thomson Reuters/ONESOURCE
(Last Updated September 2009) 149 All Rights Reserved
7.4 Specifying Included/Excluded Accounts
Each tax rule has an associated account inclusion and exclusion list. This list defines which accounts
are included or excluded in the apportionment factor calculations. When you create a new tax rule,
which you normally do by copying an existing tax rule, the account inclusion/exclusion list is also
copied. You then edit the list as necessary.
OSA maintains a parent account inclusion/exclusion list. This list defines which parent accounts are
included or excluded by default from the apportionment calculations. Any new accounts added to OSA
take on the default setting of the parent account. You can edit the inclusion/exclusion settings for an
account using the instructions in this section. For instructions on editing the parent account
inclusion/exclusion settings, see the next section 7.5 Specifying Included/Excluded Parent Accounts on
page 150.
Note: When you add a new jurisdiction to OSA, a default tax rule is created under the name “General.”
Its account inclusion/exclusion list and parent account inclusion/exclusion list are created, with all
accounts excluded, so make sure you edit the default tax rule’s account inclusion/exclusion list as well
as its parent account inclusion/exclusion list, options and rates, and flow-through rules.
► To edit the account inclusion/exclusion list:
1. From the Admin tab
a. Click the Admin tab.
b. In the navigation pane, under Tax Rules, click the Inclusion/Exclusion link. The
Inclusions Exclusions Rules page displays.
c. Click the tax rule whose account inclusion/exclusion list you want to edit.
2. From the Options and Rates page
a. Access the Options and Rates page as described previously.
b. Click the Edit Inclusion/Exclusion link.
1
3
2
2b

ONESOURCE STATE APPORTIONMENT Version 2.0 User Guide
User Guide (7.5 Specifying Included/Excluded Parent Accounts) ® 2009 Thomson Reuters/ONESOURCE
(Last Updated September 2009) 150 All Rights Reserved
3. The account inclusion/exclusion list displays.
4. Choose the accounts to include and exclude:
a. To include all accounts, click the Included check box in the column header. All
accounts are checked.
b. To include an individual account, ensure its Included check box has a check mark in
it. Likewise, to exclude it, make sure the check box is cleared.
5. Click the Save button (Reset undoes all changes made since the last save operation).
Once you click Save, the Save status box displays a message indicating whether or not the
operation was successful, and if not, what error occurred.
For information on adding a new tax rule or editing options and rates for a tax rule, see section 7.2
Adding and Editing Tax Rules on page 141, and for information on specifying flow-through rules, see
section 7.6 Defining Flow-Through Rules on page 152.
7.5 Specifying Included/Excluded Parent Accounts
OSA maintains a default parent account inclusion/exclusion list for each tax rule.
When a new account is added to OSA, it takes on the default inclusion/exclusion settings of its parent
account, as set in the Parent Inclusion Exclusion Rules page. You can edit the individual account
inclusion/exclusion setting, as described in the previous section; this parent account inclusion/exclusion
list provides an inclusion/exclusion foundation for the account structure.
4a
4b
5
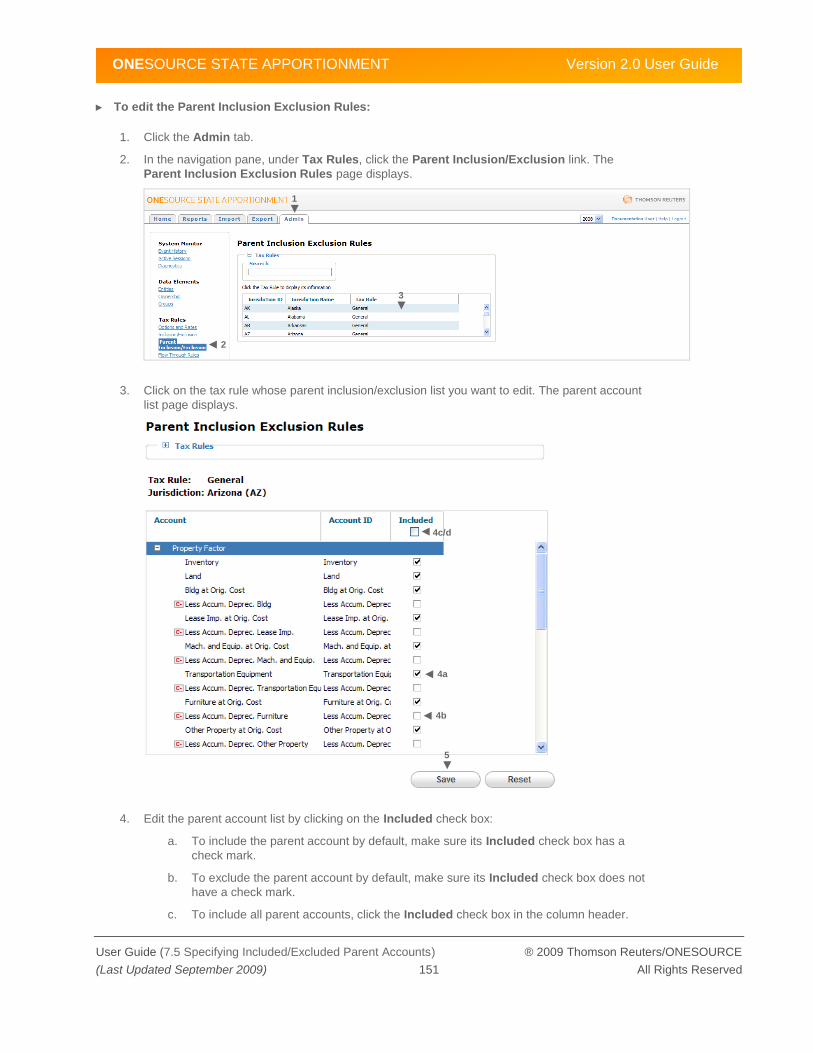
ONESOURCE STATE APPORTIONMENT Version 2.0 User Guide
User Guide (7.5 Specifying Included/Excluded Parent Accounts) ® 2009 Thomson Reuters/ONESOURCE
(Last Updated September 2009) 151 All Rights Reserved
► To edit the Parent Inclusion Exclusion Rules:
1. Click the Admin tab.
2. In the navigation pane, under Tax Rules, click the Parent Inclusion/Exclusion link. The
Parent Inclusion Exclusion Rules page displays.
3. Click on the tax rule whose parent inclusion/exclusion list you want to edit. The parent account
list page displays.
4. Edit the parent account list by clicking on the Included check box:
a. To include the parent account by default, make sure its Included check box has a
check mark.
b. To exclude the parent account by default, make sure its Included check box does not
have a check mark.
c. To include all parent accounts, click the Included check box in the column header.
1
3
2
5
4c/d
4a
4b

ONESOURCE STATE APPORTIONMENT Version 2.0 User Guide
User Guide (7.6 Defining Flow-Through Rules) ® 2009 Thomson Reuters/ONESOURCE
(Last Updated September 2009) 152 All Rights Reserved
d. To exclude all parent accounts, click the Included check box in the column header
once to select all the check boxes and again to clear them all.
5. When you‘re done, click the Save button (Reset undoes any changes made since the last
save operation).
When you click the Save button, the Save status box displays a message indicating whether or
not the operation was successful, and if not, what error occurred.
7.6 Defining Flow-Through Rules
Each jurisdiction has an associated set of flow-through rules that define:
How the entity is treated with regards to filing status within the specified jurisdiction (State
Treatment)
Defines the flow calculation method (i.e., how the apportionment flows from flow-through
entities to its owner(s)) by flow-through entity type:
Partnerships (i.e., GP, LLC, LLP, LP): Identifies the flow calculation method (i.e.,
apportionment, allocation, or no tax) for the four possible relationship types between a
partner and a partnership (Unitary or Non-Unitary and General or Limited)
SMLLC: The flow calculation method is solely dependent upon the State Treatment
defined for each state. There are no additional parameters to dictate the flow as with
the partnerships.
The apportionment method rule identifies which ownership category should be applied to each
apportionment factor within a given jurisdiction. When defining the ownership structure for
entities, you are asked to enter ownership percentages for any ownership categories created
in OSA. Then, OSA uses that ownership percentage when flowing up the apportionment
amounts from a flow-through entity to its partner.
Each is described next.
State Treatment
The possible values for State Treatment are:
For GPs, LLCs, LLPs, and LPs:
Same as Federal – the Federal Election setting chosen for the entity (C-Corp or
Partnership) is used.
C-Corp – this type of entity is to be treated as a C-Corp and its account data will not
flow, regardless of the flow calculation method or any other setting.
Partnership – this type of entity is to be treated as a partnership and its account
data will flow as defined in the flow calculation method.
For SMLLC:
Same as Federal – the Federal Election setting chosen for the entity (C-Corp or
Disregarded Entity) is used.
C-Corp – this type of entity is to be treated as a C-Corp and its account data will not
flow, regardless of any other setting.
Disregarded Entity – this type of entity is to be treated as a disregarded entity and
its account data will flow.
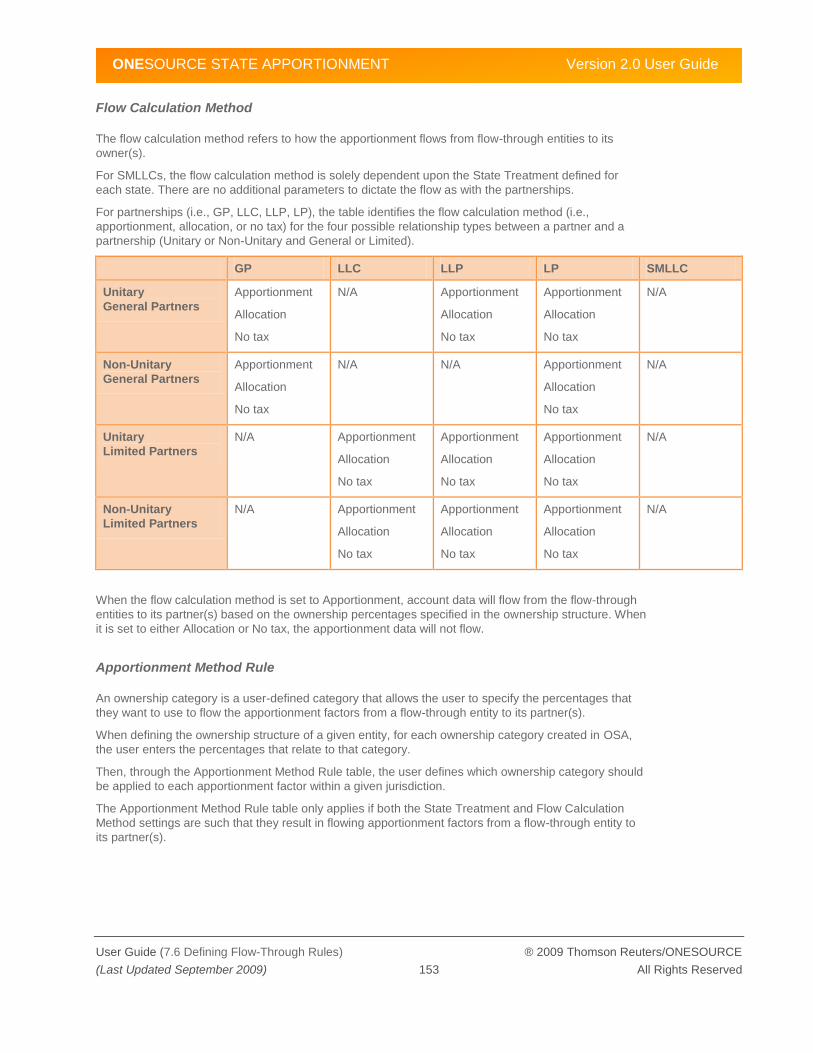
ONESOURCE STATE APPORTIONMENT Version 2.0 User Guide
User Guide (7.6 Defining Flow-Through Rules) ® 2009 Thomson Reuters/ONESOURCE
(Last Updated September 2009) 153 All Rights Reserved
Flow Calculation Method
The flow calculation method refers to how the apportionment flows from flow-through entities to its
owner(s).
For SMLLCs, the flow calculation method is solely dependent upon the State Treatment defined for
each state. There are no additional parameters to dictate the flow as with the partnerships.
For partnerships (i.e., GP, LLC, LLP, LP), the table identifies the flow calculation method (i.e.,
apportionment, allocation, or no tax) for the four possible relationship types between a partner and a
partnership (Unitary or Non-Unitary and General or Limited).
GP LLC LLP LP SMLLC
Unitary
General Partners
Apportionment
Allocation
No tax
N/A Apportionment
Allocation
No tax
Apportionment
Allocation
No tax
N/A
Non-Unitary
General Partners
Apportionment
Allocation
No tax
N/A N/A Apportionment
Allocation
No tax
N/A
Unitary
Limited Partners
N/A Apportionment
Allocation
No tax
Apportionment
Allocation
No tax
Apportionment
Allocation
No tax
N/A
Non-Unitary
Limited Partners
N/A Apportionment
Allocation
No tax
Apportionment
Allocation
No tax
Apportionment
Allocation
No tax
N/A
When the flow calculation method is set to Apportionment, account data will flow from the flow-through
entities to its partner(s) based on the ownership percentages specified in the ownership structure. When
it is set to either Allocation or No tax, the apportionment data will not flow.
Apportionment Method Rule
An ownership category is a user-defined category that allows the user to specify the percentages that
they want to use to flow the apportionment factors from a flow-through entity to its partner(s).
When defining the ownership structure of a given entity, for each ownership category created in OSA,
the user enters the percentages that relate to that category.
Then, through the Apportionment Method Rule table, the user defines which ownership category should
be applied to each apportionment factor within a given jurisdiction.
The Apportionment Method Rule table only applies if both the State Treatment and Flow Calculation
Method settings are such that they result in flowing apportionment factors from a flow-through entity to
its partner(s).
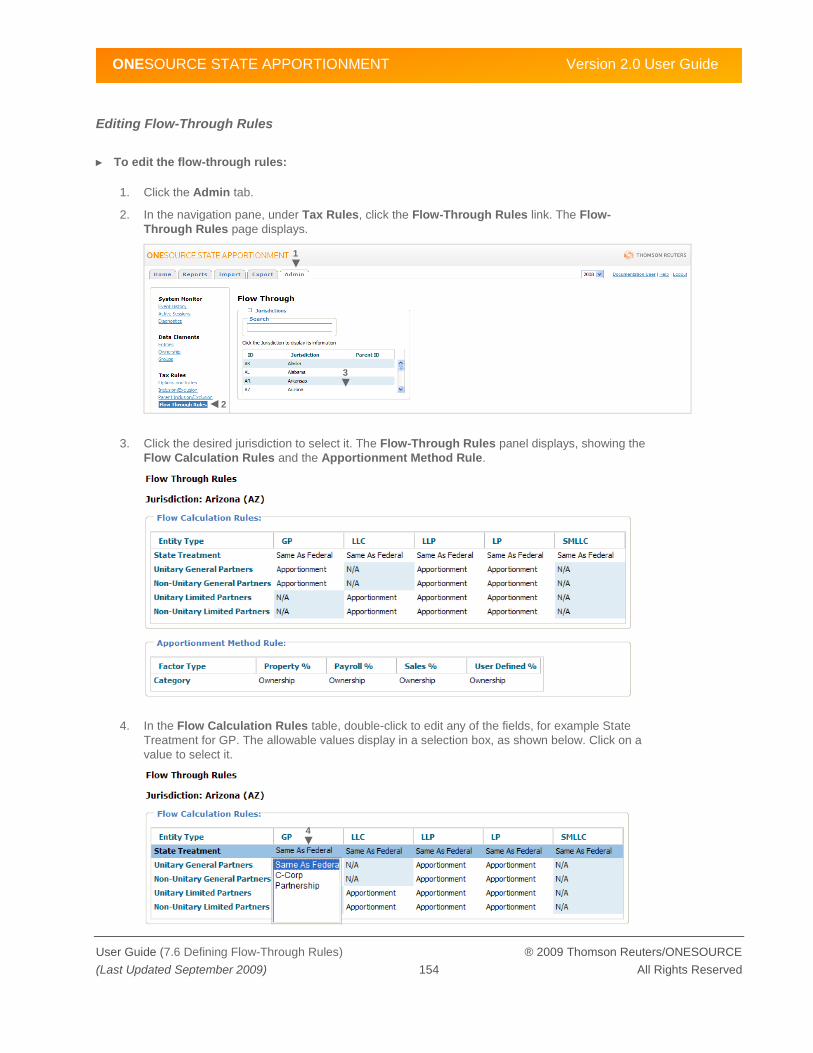
ONESOURCE STATE APPORTIONMENT Version 2.0 User Guide
User Guide (7.6 Defining Flow-Through Rules) ® 2009 Thomson Reuters/ONESOURCE
(Last Updated September 2009) 154 All Rights Reserved
Editing Flow-Through Rules
► To edit the flow-through rules:
1. Click the Admin tab.
2. In the navigation pane, under Tax Rules, click the Flow-Through Rules link. The Flow-
Through Rules page displays.
3. Click the desired jurisdiction to select it. The Flow-Through Rules panel displays, showing the
Flow Calculation Rules and the Apportionment Method Rule.
4. In the Flow Calculation Rules table, double-click to edit any of the fields, for example State
Treatment for GP. The allowable values display in a selection box, as shown below. Click on a
value to select it.
1
3
2
4
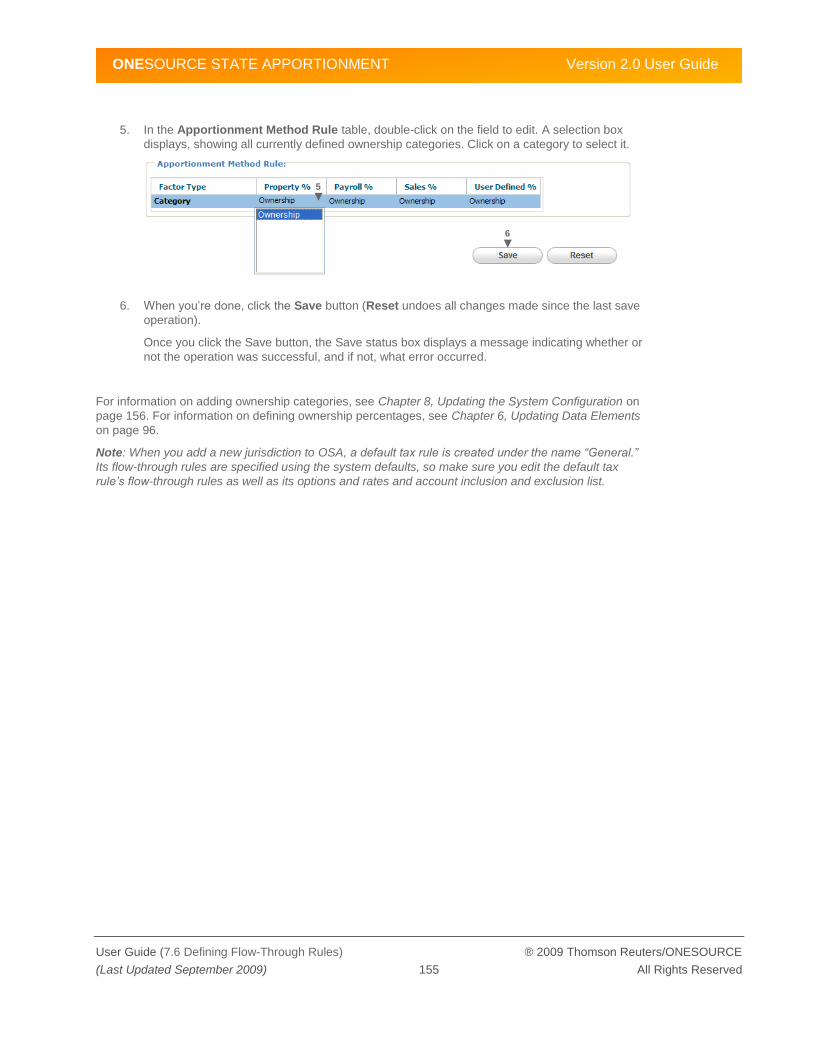
ONESOURCE STATE APPORTIONMENT Version 2.0 User Guide
User Guide (7.6 Defining Flow-Through Rules) ® 2009 Thomson Reuters/ONESOURCE
(Last Updated September 2009) 155 All Rights Reserved
5. In the Apportionment Method Rule table, double-click on the field to edit. A selection box
displays, showing all currently defined ownership categories. Click on a category to select it.
6. When you‘re done, click the Save button (Reset undoes all changes made since the last save
operation).
Once you click the Save button, the Save status box displays a message indicating whether or
not the operation was successful, and if not, what error occurred.
For information on adding ownership categories, see Chapter 8, Updating the System Configuration on
page 156. For information on defining ownership percentages, see Chapter 6, Updating Data Elements
on page 96.
Note: When you add a new jurisdiction to OSA, a default tax rule is created under the name “General.”
Its flow-through rules are specified using the system defaults, so make sure you edit the default tax
rule’s flow-through rules as well as its options and rates and account inclusion and exclusion list.
5
6

ONESOURCE STATE APPORTIONMENT Version 2.0 User Guide
User Guide (8.1 Adding/Editing OSA Jurisdictions) ® 2009 Thomson Reuters/ONESOURCE
(Last Updated September 2009) 156 All Rights Reserved
8 Updating the System Configuration
Chapter 8 describes how to edit OSA‘s system componentsthe master list of jurisdictions and
ownership categories, the account structure, any entity account filters, and date tags. It includes the
following sections:
8.1: Adding/Editing OSA Jurisdictions
8.2: Adding Ownership Categories
8.3: Editing the Account Structure
8.4: Editing Entity Account Filters
8.5: Adding Date Tags
Note: In order to perform any of the functions described in this chapter, you must have the appropriate
permissions. Contact your OSA administrator if you do not have adequate permissions.
8.1 Adding/Editing OSA Jurisdictions
A master list of jurisdictions is loaded into the OSA Jurisdictions page of the Admin tab during the initial
setup; it is part of the default data set that is loaded into OSA.
Jurisdictions must be added to the Jurisdictions page before you can define tax rules for them or add
them to an entity or group.
When you add a jurisdiction to the Jurisdictions page of the Admin tab, a default tax rule is created for it,
with the name ―General.‖ This default tax rule is defined with the most minimal settings, so you will need
to edit the tax rule‘s options and rates, account inclusion/exclusion list, and flow-through rules before
using it. For instructions on editing tax rules, see Chapter 7, Updating Tax Rules on page 140.
For a list of the default jurisdictions loaded into OSA during initial setup, see section D.4.1 Supporting
Data on page 316. You can export the list of jurisdictions to a file in CSV format, as described in
Appendix D, Working with CSV Files on page 275.
Users can:
Add jurisdictions to the master list – you can add jurisdictions using the OSA interface or
importing a CSV file. You cannot delete a jurisdiction once it is added. This is so OSA can
retain a complete audit trail.
Importing a CSV file – once the system has been initialized, you can import
additional jurisdictions using the Jurisdiction.csv file.
Add Jurisdiction feature (Admin tab) – After the initial set up phase, when you are
typically adding only one or two jurisdictions at a time, it is easier to add them using
OSA‘s Add Jurisdiction feature.
Inactivate/activate jurisdictions – you cannot inactivate a jurisdiction that has account or
filing data associated with it. Therefore, inactivating jurisdictions should be done during or
closely after initial setup. When a jurisdiction is inactive, you cannot add it to an entity or group,
nor can you add or edit its tax rules.
For information on working with CSV files, see Appendix D, Working with CSV Files on page 275.
Adding and inactivating/activating jurisdictions using the OSA interface are described next.

ONESOURCE STATE APPORTIONMENT Version 2.0 User Guide
User Guide (8.1 Adding/Editing OSA Jurisdictions) ® 2009 Thomson Reuters/ONESOURCE
(Last Updated September 2009) 157 All Rights Reserved
► To access the Jurisdictions page:
1. Click the Admin tab.
2. In the navigation pane, under System Config, click the Jurisdictions link. The Jurisdictions
page displays.
To find a jurisdiction you can either scroll using the mouse or type any combination of letters in
the Search box and the list is filtered accordingly. Click on any column heading to sort the
table by that column. Clicking on the column heading toggles the sort order between
ascending and descending for that column.
► To add a jurisdiction:
1. Access the Jurisdictions page, as described previously.
1
2
2

ONESOURCE STATE APPORTIONMENT Version 2.0 User Guide
User Guide (8.1 Adding/Editing OSA Jurisdictions) ® 2009 Thomson Reuters/ONESOURCE
(Last Updated September 2009) 158 All Rights Reserved
2. Click the Add… button. The Add Jurisdiction dialog appears.
3. Enter the information for the jurisdiction.
ID: must be uppercase and is limited to 15 characters.
Name: the name is limited to 15 characters and can be any combination of letters,
numbers, and symbols.
Parent ID: identifies the jurisdiction as a local jurisdiction (i.e., municipality). You are
asked to choose an existing jurisdiction as the parent. Numerator amounts entered in
for local jurisdictions do not contribute to the calculated denominator that is used by
the various States.
The Exclude from Nexus Count check box is used for tracking purposes only and
has no impact on the OSA calculations. It is included in OSA as a feature to facilitate
compatibility with Thomson Reuters OSX product. The user should check the box if
they wish for that jurisdiction to be excluded from the Nexus Count in OSX.
4. When you‘re done, click the Save button (Cancel abandons the operation).
Once you click the Save button, the Save status box displays a message indicating whether or
not the operation was successful.
4
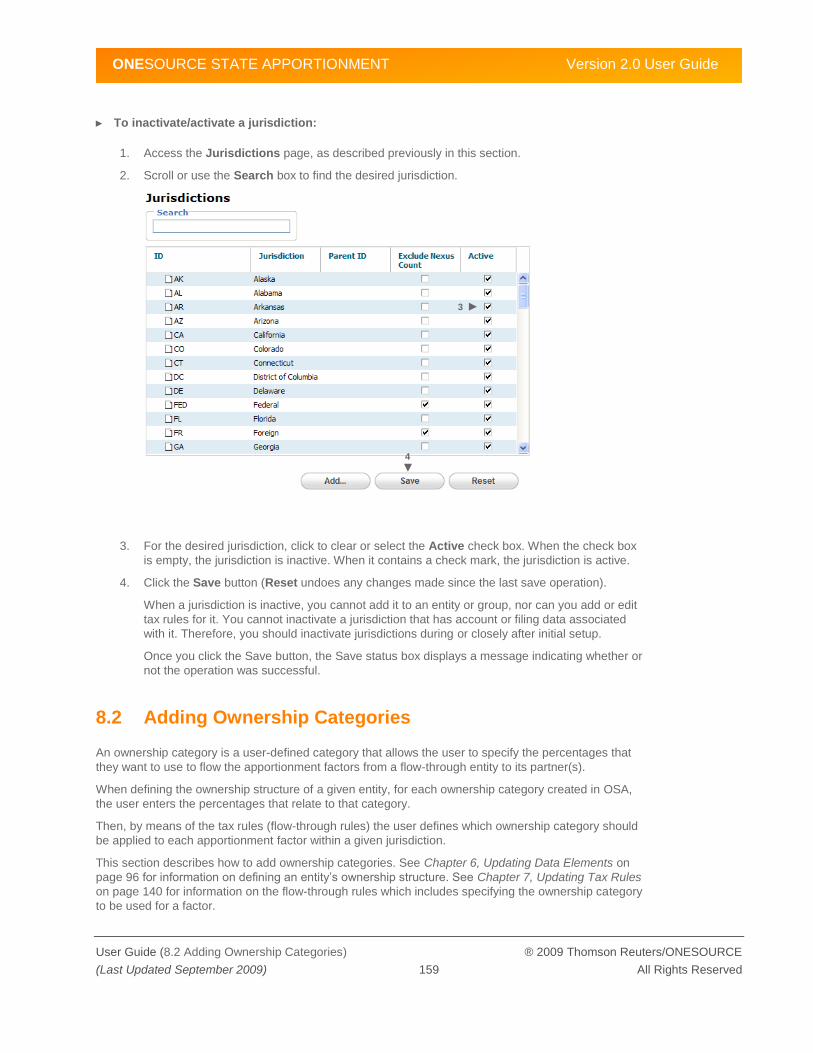
ONESOURCE STATE APPORTIONMENT Version 2.0 User Guide
User Guide (8.2 Adding Ownership Categories) ® 2009 Thomson Reuters/ONESOURCE
(Last Updated September 2009) 159 All Rights Reserved
► To inactivate/activate a jurisdiction:
1. Access the Jurisdictions page, as described previously in this section.
2. Scroll or use the Search box to find the desired jurisdiction.
3. For the desired jurisdiction, click to clear or select the Active check box. When the check box
is empty, the jurisdiction is inactive. When it contains a check mark, the jurisdiction is active.
4. Click the Save button (Reset undoes any changes made since the last save operation).
When a jurisdiction is inactive, you cannot add it to an entity or group, nor can you add or edit
tax rules for it. You cannot inactivate a jurisdiction that has account or filing data associated
with it. Therefore, you should inactivate jurisdictions during or closely after initial setup.
Once you click the Save button, the Save status box displays a message indicating whether or
not the operation was successful.
8.2 Adding Ownership Categories
An ownership category is a user-defined category that allows the user to specify the percentages that
they want to use to flow the apportionment factors from a flow-through entity to its partner(s).
When defining the ownership structure of a given entity, for each ownership category created in OSA,
the user enters the percentages that relate to that category.
Then, by means of the tax rules (flow-through rules) the user defines which ownership category should
be applied to each apportionment factor within a given jurisdiction.
This section describes how to add ownership categories. See Chapter 6, Updating Data Elements on
page 96 for information on defining an entity‘s ownership structure. See Chapter 7, Updating Tax Rules
on page 140 for information on the flow-through rules which includes specifying the ownership category
to be used for a factor.
4
3

ONESOURCE STATE APPORTIONMENT Version 2.0 User Guide
User Guide (8.2 Adding Ownership Categories) ® 2009 Thomson Reuters/ONESOURCE
(Last Updated September 2009) 160 All Rights Reserved
► To add an ownership category:
Once you add an ownership category, you cannot delete it. This is so OSA can retain a complete audit
trail. See section 1.4 Annual Review/Preparing for the Current Year on page 20 for information on how
to remove ownership categories for subsequent tax years.
1. Click the Admin tab.
2. In the navigation pane, under System Config, click the Ownership Categories link. The
Ownership Categories page displays.
3. Click the Add… button. The Add Ownership Category dialog appears.
4. Enter the category name and click the Add button (Cancel abandons the operation). The
category name can be any number of characters and include numbers and symbols.
Once you click the Add button, the Save status box displays a message indicating whether or
not the operation was successful, and if not, what error occurred.
4
3
1
2
ONESOURCE STATE APPORTIONMENT Version 2.0 User Guide
User Guide (8.3 Editing the Account Structure) ® 2009 Thomson Reuters/ONESOURCE
(Last Updated September 2009) 161 All Rights Reserved
8.3 Editing the Account Structure
The account structure typically is defined during the initial OSA setup, and it is usually accomplished by
importing the AccountStructure.csv file. After the initial setup, you can edit the account structure in two
ways:
Importing a CSV file – you edit and import the AccountStructure.csv file.
The Account Structure page (Admin tab)
Once you add an account to OSA, you cannot delete it nor can you assign it to a different
apportionment factor or parent account. This is so OSA can retain a complete audit trail.
However, you can inactivate the account so that it is not available to any entity or group. Also, you can
reorder the accounts within a specified apportionment factor and parent account.
When you add accounts to OSA, you must also specify whether or not they are included in the
apportionment calculations for a given jurisdiction and tax rule (by editing the tax rule‘s account
inclusion/exclusion list). When you add an account to OSA, whether or not it is included or excluded in
the apportionment calculations by default for a particular jurisdiction and tax rule depends on the parent
account to which you add the account. OSA maintains a default parent account inclusion/exclusion list,
as described in Chapter 7, Updating Tax Rules on page 140.
In addition, you can filter accounts using an Entity Account filter. This allows you to display a select
account list for all users for a given entity. See section 8.4 Editing Entity Account Filters on page 168.
How to edit the account structure by importing a CSV file is covered in Appendix D, Working with CSV
Files on page 275. This section covers editing the account structure using the Account Structure page.
Within the Account Structure page, you can:
Add an account – account names are limited to 255 characters and can be any combination
of letters, numbers, or symbols. When adding an account, you are asked to specify factor type
(property, payroll, sales, or user-defined), parent account, calculation behavior, and account
name. Parent accounts are fixed headings used to group related accounts and cannot be
edited. When you add an account, both an equivalent in-state and everywhere elimination
account are created by default.
Add an account ID – optionally, you can associate an ID with each account. You aren‘t asked
to enter an ID during the account add operation, instead, you enter it after the account is
created.
Inactivate/activate accounts – you cannot delete accounts from the account structure, but
you can inactivate them (provided there is not data associated with the account yet). Once you
inactivate an account, it will not be available for data entry. Deleting accounts is prohibited so
OSA can retain a complete audit trail of all changes. See section 1.4 Annual Review/Preparing
for the Current Year on page 20 for information on how to remove accounts for subsequent tax
years.
Change calculation behavior for an account – calculation behavior can be set to In-State,
Everywhere, or Both. When you specify In-State or Everywhere, values entered into those
accounts will impact only the numerator or denominator, respectively, of the entity and state in
which the value is entered. These accounts are similar to an override in a compliance system
because they will adjust the calculation in a single state without impacting the others. When
Both is specified, the sum of the numerators across the States sum to the denominator
(excluding municipal jurisdiction values from the sum) and the denominator is a calculated
field.
Reorder accounts within a specified parent account and factor – unless specified
otherwise during the initial CSV file import, accounts are listed alphabetically within the parent
accounts.

ONESOURCE STATE APPORTIONMENT Version 2.0 User Guide
User Guide (8.3 Editing the Account Structure) ® 2009 Thomson Reuters/ONESOURCE
(Last Updated September 2009) 162 All Rights Reserved
How to perform the actions listed above is described next.
► To access the Account Structure page:
1. Click the Admin tab.
2. In the navigation pane, under System Config, click the Account Structure link. The Account
Structure page appears.
The accounts are filtered by factor, with the accounts for one factor displaying at a time. To
switch the display to a different factor, use the factor drop-down list, as shown below:
3. Click on the desired factor and the account structure display is updated accordingly.
1
2

ONESOURCE STATE APPORTIONMENT Version 2.0 User Guide
User Guide (8.3 Editing the Account Structure) ® 2009 Thomson Reuters/ONESOURCE
(Last Updated September 2009) 163 All Rights Reserved
► To add an account:
1. Access the Account Structure page as described previously.
2. Click the Add… button. The Add Account dialog displays.
2
3

ONESOURCE STATE APPORTIONMENT Version 2.0 User Guide
User Guide (8.3 Editing the Account Structure) ® 2009 Thomson Reuters/ONESOURCE
(Last Updated September 2009) 164 All Rights Reserved
3. Enter the information for the new account, and click the Add button (Cancel abandons the
operation). All fields are required.
Factor Type: can be one of the four OSA-defined values: Property, Payroll, Sales, or
User Defined.
Parent Account: values are OSA-defined, and you must specify one. This drop-down
list automatically populates depending on the chosen factor type.
Calc Behavior: When you specify In-State or Everywhere, values entered into those
accounts will impact only the numerator or denominator, respectively, of the entity
and state in which the value is entered. These accounts are similar to an override in a
compliance system because they will adjust the calculation in a single state without
impacting the others. When Both is specified, the sum of the numerators across the
states sum to the denominator (excluding municipal jurisdiction values from the sum)
and the denominator is a calculated field.
Account Name: limited to 255 characters and can be any combination of letters,
numbers, or symbols. And, for each account you create, equivalent In-State and
Everywhere Elimination accounts are created.
Once you click the Add button, the Save status box displays a message indicating whether or
not the operation was successful. When not successful, the message also describes why the
error occurred.
As described in the introduction to this section, you should make sure that the account you
added is included or excluded from the apportionment calculations as desired. See Chapter 7,
Updating Tax Rules on page 140 for information.
► To add an account ID:
An optional account ID can be entered once the account has been created. This account ID isn‘t used
by OSA but is provided for user convenience (e.g., for users who use IDs to identify accounts).
1. Access the Account Structure page as described on page 162.
2. Click the Account ID field for the account to which you want to add the ID. The Account ID
field becomes an editable text box.
3. Enter the desired ID.
4. Click the Save button (Reset undoes any changes made since the last save operation).
The Save status box displays a message indicating whether or not the operation was
successful. If the operation is not successful, the message also indicates why the error
occurred.
2

ONESOURCE STATE APPORTIONMENT Version 2.0 User Guide
User Guide (8.3 Editing the Account Structure) ® 2009 Thomson Reuters/ONESOURCE
(Last Updated September 2009) 165 All Rights Reserved
► To reorder the accounts:
1. Access the Account Structure page as described on page 162.
2. Using your mouse, click and hold down the mouse button as you drag the account to the
desired location.
Note: Within a parent account, you can’t move an account to the location above the first
account. To place an account before the first account, move the desired account just below the
first account, then move the first account below the second account.
3. When you‘re done reordering accounts, click the Save button (Reset undoes any changes you
made since the last save operation).
The Save status box displays a message indicating whether or not the operation was
successful. If the operation is not successful, the message also indicates why the error
occurred.
You can‘t move an account to a different apportionment factor or to a different parent account,
and you must click the Save button to preserve the new display order. Once you reorder the
accounts, the accounts will display in the new order for all entities.
► To change calculation behavior for an account:
1. Access the Account Structure page as described on page 162.
2. For the desired account, double-click the Calc Behavior field. A selection box displays.
3. Select the new calculation behavior. Calculation behavior can be set to In-State, Everywhere,
or Both. When you specify In-State or Everywhere, values entered into those accounts will
impact only the numerator or denominator, respectively, of the entity and state in which the
value is entered. These accounts are similar to an override in a compliance system because
they will adjust the calculation in a single state without impacting the others. When Both is
specified, the sum of the numerators across the states sum to the denominator (excluding
municipal jurisdiction values from the sum) and the denominator is a calculated field.
3

ONESOURCE STATE APPORTIONMENT Version 2.0 User Guide
User Guide (8.3 Editing the Account Structure) ® 2009 Thomson Reuters/ONESOURCE
(Last Updated September 2009) 166 All Rights Reserved
4. When you‘re done, click the Save button (Reset undoes any changes made since the last
save operation).
The Save status box displays a message indicating whether or not the operation was
successful. If the operation is not successful, the message also indicates why the error
occurred.
4
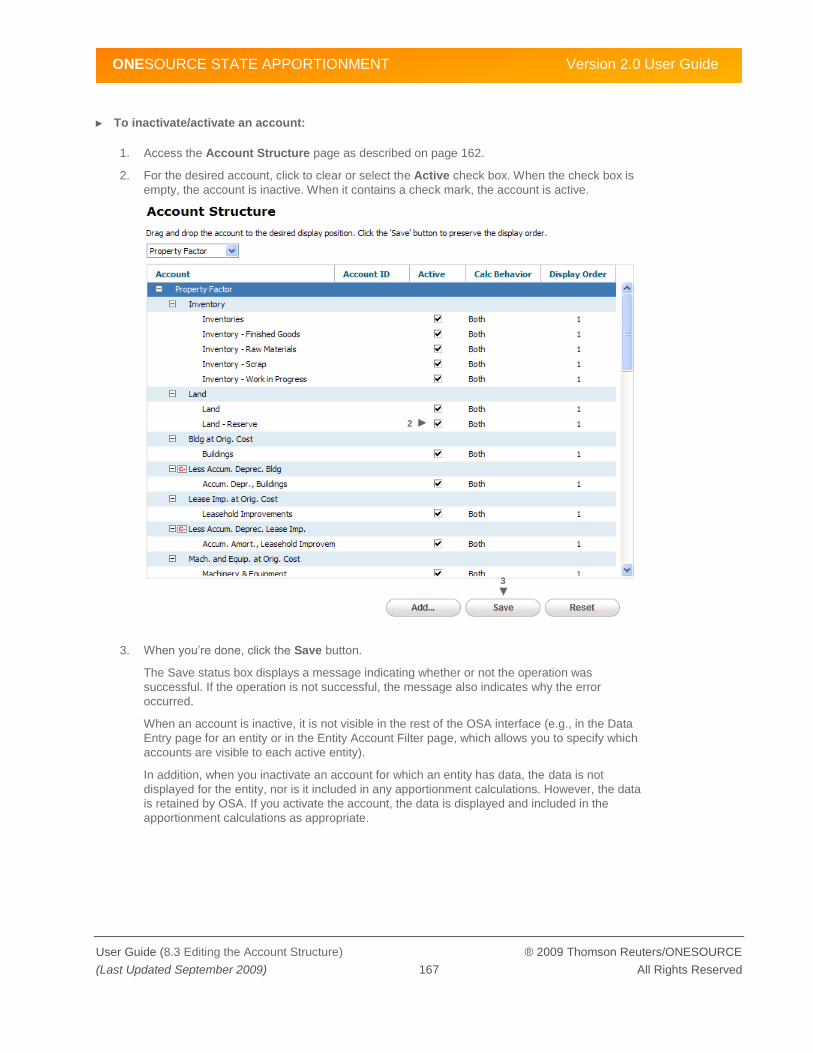
ONESOURCE STATE APPORTIONMENT Version 2.0 User Guide
User Guide (8.3 Editing the Account Structure) ® 2009 Thomson Reuters/ONESOURCE
(Last Updated September 2009) 167 All Rights Reserved
► To inactivate/activate an account:
1. Access the Account Structure page as described on page 162.
2. For the desired account, click to clear or select the Active check box. When the check box is
empty, the account is inactive. When it contains a check mark, the account is active.
3. When you‘re done, click the Save button.
The Save status box displays a message indicating whether or not the operation was
successful. If the operation is not successful, the message also indicates why the error
occurred.
When an account is inactive, it is not visible in the rest of the OSA interface (e.g., in the Data
Entry page for an entity or in the Entity Account Filter page, which allows you to specify which
accounts are visible to each active entity).
In addition, when you inactivate an account for which an entity has data, the data is not
displayed for the entity, nor is it included in any apportionment calculations. However, the data
is retained by OSA. If you activate the account, the data is displayed and included in the
apportionment calculations as appropriate.
3
2

ONESOURCE STATE APPORTIONMENT Version 2.0 User Guide
User Guide (8.4 Editing Entity Account Filters) ® 2009 Thomson Reuters/ONESOURCE
(Last Updated September 2009) 168 All Rights Reserved
8.4 Editing Entity Account Filters
You can restrict the accounts that display for an entity. You can choose to allow all accounts for an
entity or select to display only a subset. This restriction applies to all users accessing that entity and to
both account data entry and importing data using a CSV file. An entity account filter is applied at the
entity level and includes any divisions but does not affect any owned entities. Filters would need to be
applied to any owned entities specifically.
While the filters apply for data entry, the Apportionment Calculation page and Reports tab default to
showing all accounts regardless of the entity account filters. This is because they may need to include
values on accounts that come from flow-through entities with different account filters. This prevents
cases where data is flowing but you cannot see it in the user interface or in reports.
For an account to be visible to the Entity Account Filter page, it must be an active account. See section
8.3 Editing the Account Structure on page 161 for information on inactivating/activating accounts.
You can define entity account filters in two ways:
Importing a CSV file – you edit and import the EntityAccountFilters.csv file.
Using the Entity Account Filters page (Admin tab) – once you define the entity account
filter for one entity, you can apply those same settings to other entities, using the Apply to
Other Entities feature.
How to import CSV files is covered in Appendix D, Working with CSV Files on page 275. Creating the
Entity Account Filters and applying them to other entities are described next.
► To create an Entity Account Filter:
1. Click the Admin tab.
2. In the navigation pane, under System Config, click the Entity Account Filters link. The
Entity Account Filters page displays listing all the entities defined in OSA (unlike the
entity/group list in the Home tab, which is limited based on user permissions, any user with
Admin tab access and System Config permissions is able to view all entities).
1
3b
3a
2

ONESOURCE STATE APPORTIONMENT Version 2.0 User Guide
User Guide (8.4 Editing Entity Account Filters) ® 2009 Thomson Reuters/ONESOURCE
(Last Updated September 2009) 169 All Rights Reserved
3. Find the desired entity.
a. First, ensure that the Allow All check box for that entity does not contain a check
mark. When Allow All is checked, it overrides the Entity Account Filter settings.
b. If it does contain a check mark, click to clear the check mark. Then, click the Save
button.
4. Click to highlight the entity. The Account Filters panel for that entity displays.
5. For each account you want to be visible, click its Allow check box to display a check mark.
When the Allow check box does not display a check mark, the account will not be visible for
that entity.
6. When you‘re done, click the Save button.
The Save status box displays a message indicating whether or not the operation was
successful. If the operation is not successful, the message also indicates why the error
occurred.
At this point, the filter is created. You can select another entity for which to create a filter
(repeat the steps above for another entity) or apply these same settings to other entities (see
below).
6
5

ONESOURCE STATE APPORTIONMENT Version 2.0 User Guide
User Guide (8.4 Editing Entity Account Filters) ® 2009 Thomson Reuters/ONESOURCE
(Last Updated September 2009) 170 All Rights Reserved
► To apply the settings to other entities:
1. Click the Admin tab.
2. In the navigation pane, under System Config, click the Entity Account Filters link. The
Entity Account Filters page displays, listing all the entities defined in OSA (unlike the
entity/group list in the Home tab, which is limited based on user permissions, any user with
Admin tab access and System Config permissions is able to view all entities).
3. Find the desired entities.
a. First, ensure that the Allow All check box for those entities does not contain a check
mark. When Allow All is checked, it overrides the Entity Account Filter settings.
b. If the check boxes do contain a check mark, click each one to clear the check mark.
Then, click the Save button.
4. Then, click to highlight the entity whose entity account filter you want to copy. The Account
Filters panel for that entity displays.
3b
3a
2
1
5

ONESOURCE STATE APPORTIONMENT Version 2.0 User Guide
User Guide (8.4 Editing Entity Account Filters) ® 2009 Thomson Reuters/ONESOURCE
(Last Updated September 2009) 171 All Rights Reserved
5. Click the Apply to Other Entities… button. The Apply Account Filters to Other Entities
dialog appears.
6. The dialog displays all the entities defined in OSA. Click to select the entities to which you
want to apply the same Entity Account Filter. Use the Search box to find entities in the list, and
press the Ctrl key as you click to select more than one entity.
7. When you‘re done selecting entities, click the Apply button.
The Save status box displays a message indicating whether or not the operation was
successful. If the operation is not successful, the message also indicates why the error
occurred. At this point, the filters are applied to the specified entities.
7
6

ONESOURCE STATE APPORTIONMENT Version 2.0 User Guide
User Guide (8.5 Adding Date Tags) ® 2009 Thomson Reuters/ONESOURCE
(Last Updated September 2009) 172 All Rights Reserved
8.5 Adding Date Tags
Date Tags are named points in time. They are designed to make the selection of common dates and times easier than selecting the date and time when running reports or exporting data.
► To add a date tag:
1. Click the Admin tab.
2. In the navigation pane, under System Config, click the Date Tags link. The Date Tags page
displays.
3. Click the Add… button. The Add Date Tag dialog displays.
4. Enter a descriptive label and select the corresponding date and time by clicking the date icon.
5. Click the Add button to add the date tag (Cancel abandons the operation).
Once you click the Add button, the date tag is created and is listed on the Date Tags page.
Also, the Save status box indicates whether or not the operation was successful, and if not,
what error occurred
4
5
1
3
2

ONESOURCE STATE APPORTIONMENT Version 2.0 User Guide
User Guide (9.1 Understanding User Security) ® 2009 Thomson Reuters/ONESOURCE
(Last Updated September 2009) 173 All Rights Reserved
9 Updating Users and Permissions
Chapter 9 covers user management within OSA and includes the following sections:
9.1: Understanding User Security
9.2: Adding and Managing Users
9.3: Specifying User Permissions
Note: In order to perform any of the functions described in this chapter, you must have the appropriate
permissions. Contact your OSA administrator if you do not have adequate permissions.
9.1 Understanding User Security
In OSA, adding users is a two-step process:
Thomson Reuters Hosted Customers
Users must be defined in OSW as well as in OSA itself. The initial login and password for a
user are defined on the OSW server.
When a user logs in to OSW and launches OSA, OSA checks the OSA user definition for the
user‘s settings and permissions within OSA.
Self-Hosted Customers
Users must be defined on your site‘s authentication server as well as in OSA itself. The initial
login and password for a user are defined on the authentication server.
When a user logs in, OSA first checks the authentication server for appropriate access
permission to the OSA application; it then checks the OSA user definition for the user‘s
settings and permissions within OSA.
The settings and permissions you can define per user are: Active or inactive, Full Access or limited
access, and Suspend or not suspended. Each is defined below.
Along with these security settings and permissions, you can further streamline user access by setting
Entity Account Filters. For a given entity, you can determine which accounts are relevant and therefore
viewable. These filters apply to all users and all jurisdictions for that entity. How to set the filters is
described in Chapter 8, Updating the System Configuration on page 156.
Additional user management features available in OSA include viewing event history (i.e., what changes
a user has made), downloading user activity logs, and terminating a user‘s session. These
administrative features are covered in Appendix A, System Monitoring on page 222.
1. Active or inactive – At any time, you can choose to make a user inactive. This disables the
login but does not delete the user information from OSA. You might want to do this, for
instance, when an employee goes on a leave of absence and you want to suspend the
account temporarily and easily reactivate it.

ONESOURCE STATE APPORTIONMENT Version 2.0 User Guide
User Guide (9.1 Understanding User Security) ® 2009 Thomson Reuters/ONESOURCE
(Last Updated September 2009) 174 All Rights Reserved
2. Full Access or limited access – You can give the user full access to all tabs, entities/groups,
and data by checking the Full Access check box while defining the user. In this case, there is
no restriction on what the user can do, regardless of what other permission options are
selected. Or, you can limit access in four ways:
a. Tab type access
b. Data type access
c. Entity/Group access
d. Scenario access
3. Suspend or not suspend (Thomson Reuters-Hosted Customers only) – You can activate or
inactivate a user in OSW. In order to access OSA, a user must be active in both OSW as well
as OSA.
Tab and data type access work in conjunction to control what areas of OSA the user can view, what information he or she can edit, and what files he or she can import and export. Entity/Group access specifies the list of entities/groups
the user can view in any area of OSA. Scenario access defines the planning scenarios the user has access to. Scenarios are only available with the Planning feature. Each type of access is discussed next.
Tab Type Access
The OSA application consists of the following tabs: Home, Reports, Import, Export, Admin, and
Planning. The Planning tab is only available with the Planning feature. If a user does not have
access to the tab, the tab is not visible upon login, and the user is not able to perform any functions
available on that tab.
Data Type Access
In addition to controlling access to tabs, you can control the ability to view and/or edit certain types of
data. Access to data types determines which options are available in the tabs; for example, which file
types the user can import/export in the Import/Export tabs, which links are visible in the Admin tab, and
which reports are available in the Reports tab. Chapter 5, Reporting on page 66 provides a description
of each OSA report; the report descriptions list the specific permissions required to run each report.
The data types to which you can control access are:
Account Data: A user is able to edit the account data in the Home tab as well as import and/or
export it. Without this permission, a user can view account data in the Home tab but not save
any edits to it (the Save button is not visible), and while the user may be able to perform other
functions within the other tabs (e.g., Reports tab), he or she cannot import or export account
data itself.
Historic Data: The user is limited to logging in to the current tax year only.
Entities: A user is able to add and edit entity properties and entity filings as well as
import/export this information. Without this permission, a user can view entities, entity
properties, and entity jurisdictions but cannot edit them, nor is he or she allowed to import or
export entities or entity properties or filings.
Ownership: A user is able to edit ownership categories and percentages as well as
import/export this information. Without this permission, the user can view but not edit this
information, nor can the user import or export it.
Note: Provided the user has Entities data type permission, he or she can add divisions to an
entity without this permission, by means of the EntityList.csv file. This is because divisions are
merely blocks of data within an entity and data always rolls up 100% to the parent so it is not
considered an ownership edit.

ONESOURCE STATE APPORTIONMENT Version 2.0 User Guide
User Guide (9.1 Understanding User Security) ® 2009 Thomson Reuters/ONESOURCE
(Last Updated September 2009) 175 All Rights Reserved
Groups: A user is able to add groups as well as edit group properties and filings. A user can
also import/export this information. Without this permission a user can view groups and group
information, but he or she cannot add or edit it, nor can he or she import or export it.
Tax Rules: A user can edit existing and add new tax rules as well as import/export tax rule
information. Without this permission, the Tax Rule links in the Admin tab are not visible; a user
cannot add or edit tax rules nor can he or she import/export them.
System Config: A user can view the System Monitor and System Config links in the Admin
tab as well as import/export files relating to the account structure, entity account filters, and
security (users, user permissions, and entity access). Without this permission, the user cannot
see the System Monitor or System Config links. In addition, a user cannot import or export files
relating to the account structure, entity account filters, or security (users, entity access). When
a user has System Config permissions, he or she can edit user permissions for him or herself
and for any other user. Therefore, only give access to the System Config tab to users who do
not need to have any permission restrictions.
Custom Import/Export: A user is able to define import templates and data element maps and
perform imports based on those templates and maps. A user can also define custom export
templates and data element maps and perform exports based on them. Without this
permission, the Custom Import and Custom Export sections on the Import and Export tabs,
respectively, are not visible.
State Data: A user is able to edit the state data in the Home tab as well as import and/or
export it. Without this permission, the user is not able to view, import, or export state data.
State Data is an optional feature that may be enabled without the Planning feature but which must be enabled with the Planning feature.
Scenarios: A user can create and archive scenarios in the Admin tab.
Scenarios are only available with the Planning feature.
Entity/Group Access
A user can view all entities in the OSA Home tab or be limited to a list of entities/groups. This is
controlled by the Entity (and Group) Access list. This is useful when a user is responsible for a subset of
entities and/or groups; it customizes the user interface to show only information relevant to that user.
This entity/group list does not apply to the pages within the Admin tab. If a user has access to the
Admin tab, and the appropriate Data Type access, he or she can view all entities/groups in the Admin
tab pages. In addition, divisions take on the permissions of their parent entities; they do not have their
own.
In cases where a user has access to a group but not to all entities within that group, he or she will be
able to view the group and all the members from within the group‘s Data Entry and Apportionment
Calculation page. He or she will also be able to edit the group, including manipulating the entities to
which he or she does not have access (e.g., remove the entity as a member), but he or she will not be
able to navigate to the pages for the entities to which he or she doesn‘t have access.
Ownership does not affect permissions; if an entity owns another entity, and you have permissions to
view the owner entity, in order to view the owned entity, you will need permissions specifically to the
owned entity.
When an entity is added (either directly or by import), permissions are set such that the entity is visible
only to the user who adds it and all Full Access users. In order for the entity to be visible to anyone else,
Entity Access to it will need to be specified. When a group is added (either directly or by import), it is
visible only to Full Access users. Group Access to it will need to be specified for any user who is not a
Full Access user and who needs access to it. See section 9.3 Specifying User Permissions on page
183.

ONESOURCE STATE APPORTIONMENT Version 2.0 User Guide
User Guide (9.2 Adding and Managing Users) ® 2009 Thomson Reuters/ONESOURCE
(Last Updated September 2009) 176 All Rights Reserved
Scenario Access
A user can view all scenarios in the OSA Planning tab or be limited to a list of scenarios. This is
controlled by the Scenario Access list. This allows each user to perform planning activities
independently of other users. See Chapter 11, Planning on page 203 for more information on
Scenarios.
This scenario list does not apply to the Scenario page within the Admin tab. If a user has access to the
Admin tab, and Scenario Data Type access, he or she can view all scenarios in the Admin tab pages.
When a scenario is added, permissions are set such that it is visible only to the user who adds it and all
Full Access users. In order for the scenario to be visible to anyone else, Scenario Access to it will need
to be specified. See section 9.3 Specifying User Permissions on page 183.
9.2 Adding and Managing Users
Thomson Reuters-Hosted Customers
During the initial OSW setup, an OSW database is created for your organization with permission to
access OSA. If an OSW database already exists, OSA permissions are added to the existing database.
A client administrator is identified and then setup in OSW as an administrator.
As described in the previous section, defining a user within the OSA application is a two-step process.
The second step in the process is gaining access to OSA. During the initial OSA setup a default user is
created and given full access. When the client administrator logs in to OSW and launches OSA, the
administrator‘s OSW login ID is substituted for the default user created during initial setup. The OSW
client administrator becomes the OSA administrator as well.
Once the administrator login has been established, other users can be created and assigned
permissions in OSA. The OSW administrator adds the user to OSW, authorizes the user within OSA,
and grants the user permissions in OSA. The user will then be able to log in to OSW and launch OSA.
Note that you must create the user in OSW before creating the user in OSA.
In addition, you can inactivate users. How to inactivate users is described in section 9.2.3
Inactivating/Activating Users on page 182. Note that inactivating users does not alter the data within the
Event History Log (i.e., it does not change or delete existing event records within the log).
Self-Hosted Customers
During the initial OSA setup, a default user is created (your OSA administrator will have the user name).
This default user is given full access. This user can then add all other users. As described in the
previous section, defining a user within the OSA application is a two-step process.
Your system administrator adds the user to the AD server. This step will yield the user name and initial
user password.
At any point, you can create the user within the OSA application. How to do this is described next in
section 9.2.1 Adding Users. However, users will not be able to log in until the user is created on the
authentication server.
In addition, you can inactivate users as well as fully delete them from OSA. How to delete and inactivate
users is described in section 9.2.2 Removing Users on page 181 and section 9.2.3
Inactivating/Activating Users on page 182, respectively. Note that inactivating or deleting users does not
alter the data within the Event History Log (i.e., it does not change or delete existing event records
within the log).

ONESOURCE STATE APPORTIONMENT Version 2.0 User Guide
User Guide (9.2 Adding and Managing Users) ® 2009 Thomson Reuters/ONESOURCE
(Last Updated September 2009) 177 All Rights Reserved
9.2.1 Adding Users
Thomson Reuters-Hosted Customers
Users must be added to OSW and given permission to launch OSA before they can be added to OSA.
The Add User feature must be used to add users. Import will update permissions, but will not add users.
How to add users within OSA using the Add User feature in the Admin tab is described next. For
information on updating user permissions by importing the Users.csv file, refer to Appendix D, Working
with CSV Files on page 275.
Adding and inactivating users are done on the Users and Permissions page within the Admin tab. Each
is described next.
► To add a user:
1. Add one or more users to OSW using the OSW interface or the OSW import feature. For more
information, refer to the OSW User Guide.
2. Log in to OSA, then click the Admin tab.
3. The Users and Permissions page displays and the Users table lists all authorized OSA
users, alphabetically by user name.
2
3
4

ONESOURCE STATE APPORTIONMENT Version 2.0 User Guide
User Guide (9.2 Adding and Managing Users) ® 2009 Thomson Reuters/ONESOURCE
(Last Updated September 2009) 178 All Rights Reserved
4. Click the Unauthorized radio button.
5. Select the users to authorize. While clicking, use the Ctrl key to select multiple, use the Shift key to select a range.
6. Assign permissions for the user(s). For information on permissions, see section 9.3 Specifying
User Permissions on page 183.
5
7

ONESOURCE STATE APPORTIONMENT Version 2.0 User Guide
User Guide (9.2 Adding and Managing Users) ® 2009 Thomson Reuters/ONESOURCE
(Last Updated September 2009) 179 All Rights Reserved
7. Click the Authorize button (Reset undoes all the changes since the last authorize operation).
After you click the Authorize button, the Save status box indicates whether or not the operation
was successful and if not, the error that occurred.
If the operation is successful, the user is moved to the Authorized list.
Self-Hosted Customers
There are two ways to add a user to the OSA application:
Importing a CSV file – Most users are added in batch mode during the initial OSA set up
phase. The OSA administrator adds users (and most permission settings) to the Users.csv file
and imports that file into OSA. This is an efficient way to add many users at one time.
Add User feature (Admin tab) – After the initial set up phase, when you are typically adding
only one or two users at a time, you might want to add them using OSA‘s Add User feature.
How to add users within OSA using the Add User feature in the Admin tab is described next. For
information on adding users by importing the Users.csv file, refer to Appendix D, Working with CSV
Files on page 275.
Adding, removing, and inactivating users are done on the Users and Permissions page within the Admin
tab. Each is described next.
► To add a user:
1. Click the Admin tab.
2. In the navigation pane, under System Config, click the Users and Permissions link.
1
3
2

ONESOURCE STATE APPORTIONMENT Version 2.0 User Guide
User Guide (9.2 Adding and Managing Users) ® 2009 Thomson Reuters/ONESOURCE
(Last Updated September 2009) 180 All Rights Reserved
3. On the Users and Permissions page, click the Add… button. The Add User dialog displays.
The Users and Permissions page displays and the Users table lists all OSA users,
alphabetically by user name.
4. In the Add User dialog, enter the user‘s information.
Note: As noted with the asterisk, the only required information is the user name. This user
name must exactly match (including upper/lowercase) the user name entered in the
authentication server. All other user information is retrieved upon log in from the authentication
server.
5. The Active check box is selected by default. This means that once added, the user will be an
active user. Click to de-select the check box only if you are adding an inactive user (this is not
common).
6. The Full Access check box is not selected by default. Click to select the check box to create a
user with unrestricted access to all tabs, entities/groups, and data. Otherwise, leave the check
box de-selected and remember to specify permissions, as covered in section 9.3 Specifying
User Permissions on page 183.
7. Click the Add button (Cancel abandons the add user operation).
The Save status box then displays a message indicating whether or not the add operation
was successful, and if not, what error occurred. Please note that you do not need to click Save
at this point, the add operation is complete.
In the example below, the user name jdoe was added successfully to OSA but has not yet
been added to the authentication server; OSA warns you to complete that step.
In addition to this message, OSA displays an alert icon before the user name of any user that
is not yet defined on the authentication server.
If you created a user that does not have full access to OSA, remember to specify his or her
permissions, as described in section 9.3 Specifying User Permissions on page 183.
7
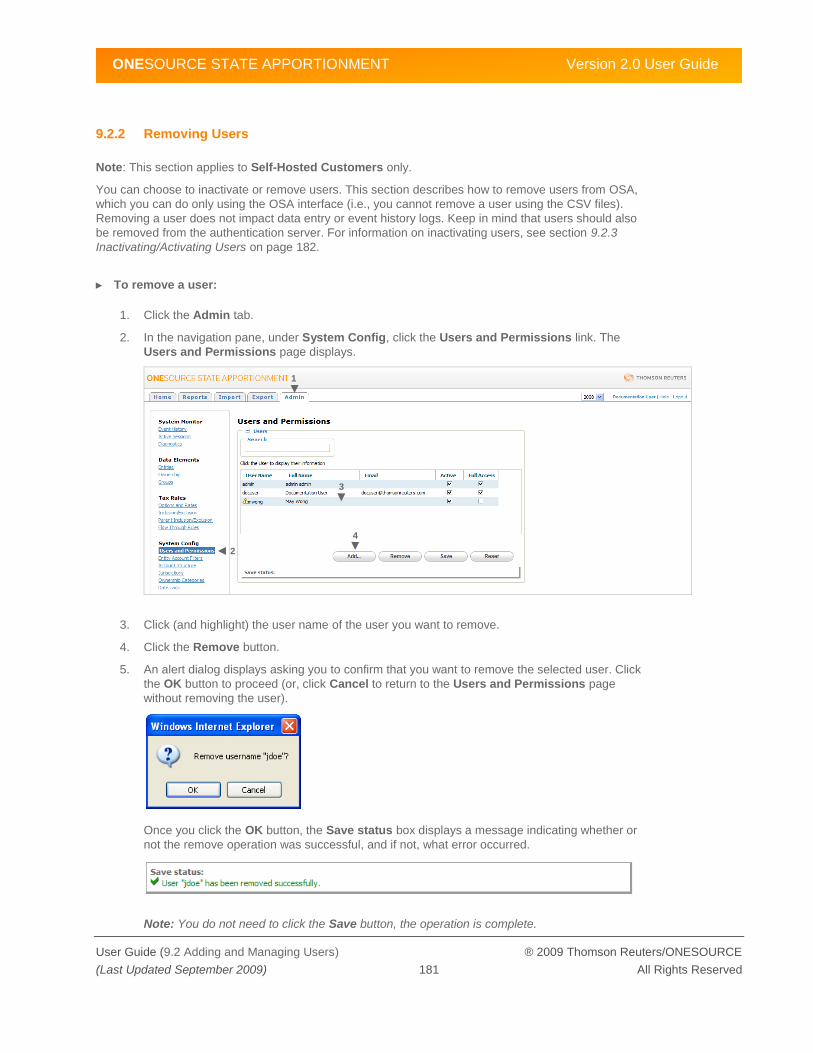
ONESOURCE STATE APPORTIONMENT Version 2.0 User Guide
User Guide (9.2 Adding and Managing Users) ® 2009 Thomson Reuters/ONESOURCE
(Last Updated September 2009) 181 All Rights Reserved
9.2.2 Removing Users
Note: This section applies to Self-Hosted Customers only.
You can choose to inactivate or remove users. This section describes how to remove users from OSA,
which you can do only using the OSA interface (i.e., you cannot remove a user using the CSV files).
Removing a user does not impact data entry or event history logs. Keep in mind that users should also
be removed from the authentication server. For information on inactivating users, see section 9.2.3
Inactivating/Activating Users on page 182.
► To remove a user:
1. Click the Admin tab.
2. In the navigation pane, under System Config, click the Users and Permissions link. The
Users and Permissions page displays.
3. Click (and highlight) the user name of the user you want to remove.
4. Click the Remove button.
5. An alert dialog displays asking you to confirm that you want to remove the selected user. Click
the OK button to proceed (or, click Cancel to return to the Users and Permissions page
without removing the user).
Once you click the OK button, the Save status box displays a message indicating whether or
not the remove operation was successful, and if not, what error occurred.
Note: You do not need to click the Save button, the operation is complete.
1
4
2
3
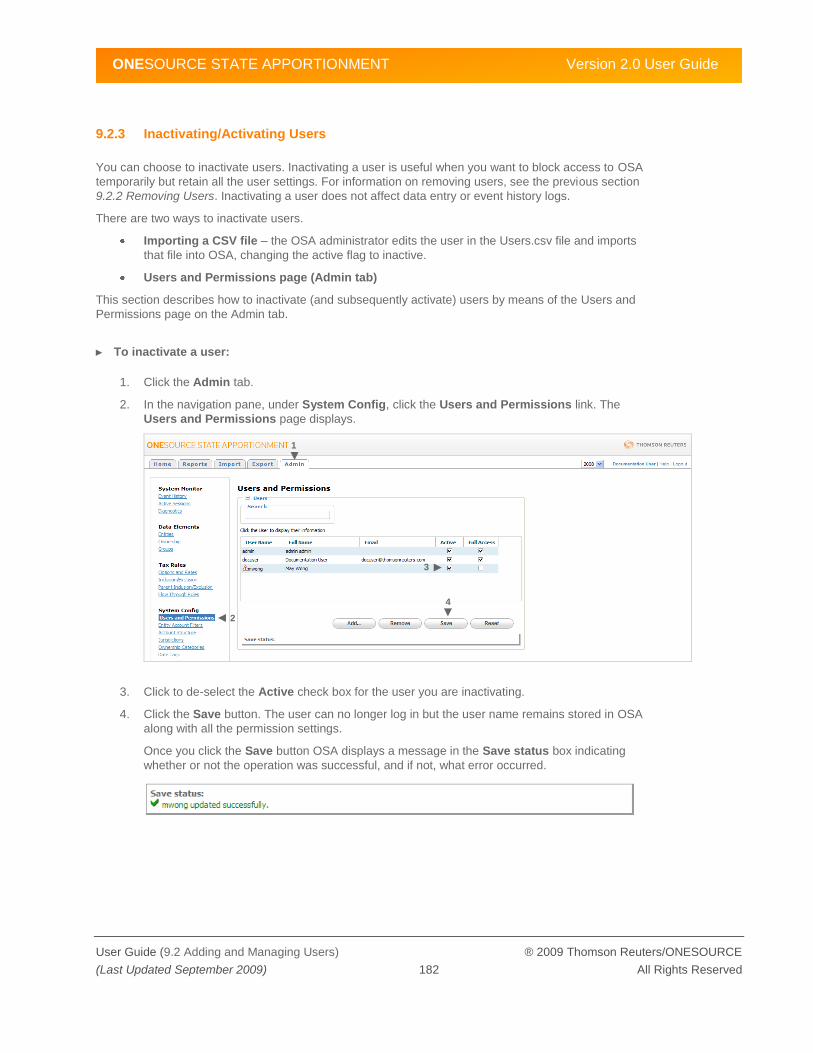
ONESOURCE STATE APPORTIONMENT Version 2.0 User Guide
User Guide (9.2 Adding and Managing Users) ® 2009 Thomson Reuters/ONESOURCE
(Last Updated September 2009) 182 All Rights Reserved
9.2.3 Inactivating/Activating Users
You can choose to inactivate users. Inactivating a user is useful when you want to block access to OSA
temporarily but retain all the user settings. For information on removing users, see the previous section
9.2.2 Removing Users. Inactivating a user does not affect data entry or event history logs.
There are two ways to inactivate users.
Importing a CSV file – the OSA administrator edits the user in the Users.csv file and imports
that file into OSA, changing the active flag to inactive.
Users and Permissions page (Admin tab)
This section describes how to inactivate (and subsequently activate) users by means of the Users and
Permissions page on the Admin tab.
► To inactivate a user:
1. Click the Admin tab.
2. In the navigation pane, under System Config, click the Users and Permissions link. The
Users and Permissions page displays.
3. Click to de-select the Active check box for the user you are inactivating.
4. Click the Save button. The user can no longer log in but the user name remains stored in OSA
along with all the permission settings.
Once you click the Save button OSA displays a message in the Save status box indicating
whether or not the operation was successful, and if not, what error occurred.
1
4
2
3

ONESOURCE STATE APPORTIONMENT Version 2.0 User Guide
User Guide (9.3 Specifying User Permissions) ® 2009 Thomson Reuters/ONESOURCE
(Last Updated September 2009) 183 All Rights Reserved
► To re-activate a user:
At any point in time, you can activate the user again by clicking to select the Active check box and
clicking the Save button.
Note: In order for Thomson Reuters-Hosted user to log in to OSA, the user must be active in both OSW
(Suspend) as well as OSA (Active).
9.2.4 Editing User Information
Thomson Reuters-Hosted Customers
When you authorize users within OSA, you are only required to enter their user name along with
whether or not they are active and whether or not they have full access.
The other information—First Name, Last Name and Email address—are all read from OSW. Therefore,
to edit the information, you will need to ask the OSW Client Administrator to edit the information for you.
Users cannot change their passwords using OSA; they must use OSW. For information on changing
passwords, refer to section 2.2 Changing Your Password on page 26.
Self-Hosted Customers
When you define users within OSA, you are only required to enter their user name along with whether
or not they are active and whether or not they have full access.
The other information—First Name, Last Name and Email address—are all read from the authentication
server. Therefore, to edit the information, you will need to ask your system administrator to edit the
information for you.
Users cannot change their passwords using OSA; they must use AD. For information on changing
passwords, refer to section 2.2 Changing Your Password on page 26.
9.3 Specifying User Permissions
When you add a user in OSA that does not have full access, you will also need to specify their access
permissions at some point. As discussed in section 9.1 Understanding User Security on page 173 , for
each user, you can specify:
The tabs that are visible – Home, Reports, Import, Export, Admin, and/or Planning.
The data types that are editable/importable/exportable/reportable – Account Data, Historic
(Tax Year) Data, Entities, Ownership, Group, Tax Rules, System Configuration, Custom
Import/Export, State Data, and/or Scenarios.
The entities/groups that are visible – Any divisions under the entities take on the
permissions of the entity.
The scenarios that are visible – Applicable if the Planning functionality has been turned on.
By default, users are added with no access to any tabs, data types, entities/groups, or scenarios. In
addition, when new entities, groups, or scenarios are added, permission to view the new entity or new
scenario is automatically given only to the user adding it and Full Access users, and permission to view
the new group is automatically given only to Full Access users.

ONESOURCE STATE APPORTIONMENT Version 2.0 User Guide
User Guide (9.3 Specifying User Permissions) ® 2009 Thomson Reuters/ONESOURCE
(Last Updated September 2009) 184 All Rights Reserved
There are two ways to specify user permissions:
Importing a CSV file – the OSA administrator edits the user(s) in the Users.csv and
UserEntityAccess.csv files and imports these files into OSA, changing the permission settings
and entity/group access list.
Users and Permissions page (Admin tab) – you can specify user permissions individually for
each user or for a group of users by cloning one set of permissions to multiple users. This is
useful when multiple users have the same permissions.
For information on specifying permissions by importing the Users.csv and UserEntityAccess.csv files,
refer to Appendix D, Working with CSV Files on page 275. This section describes how to specify user
permissions using the Users and Permissions page.
How to specify permissions individually for each user is described next. For instructions on copying
permissions to multiple users, see the next section 9.3.1 Copying Permissions to Other Users.
► To specify individual user access permissions:
1. Click the Admin tab.
2. In the navigation pane, under System Config, click the Users and Permissions link. The
Users and Permissions page displays.
1
2
3
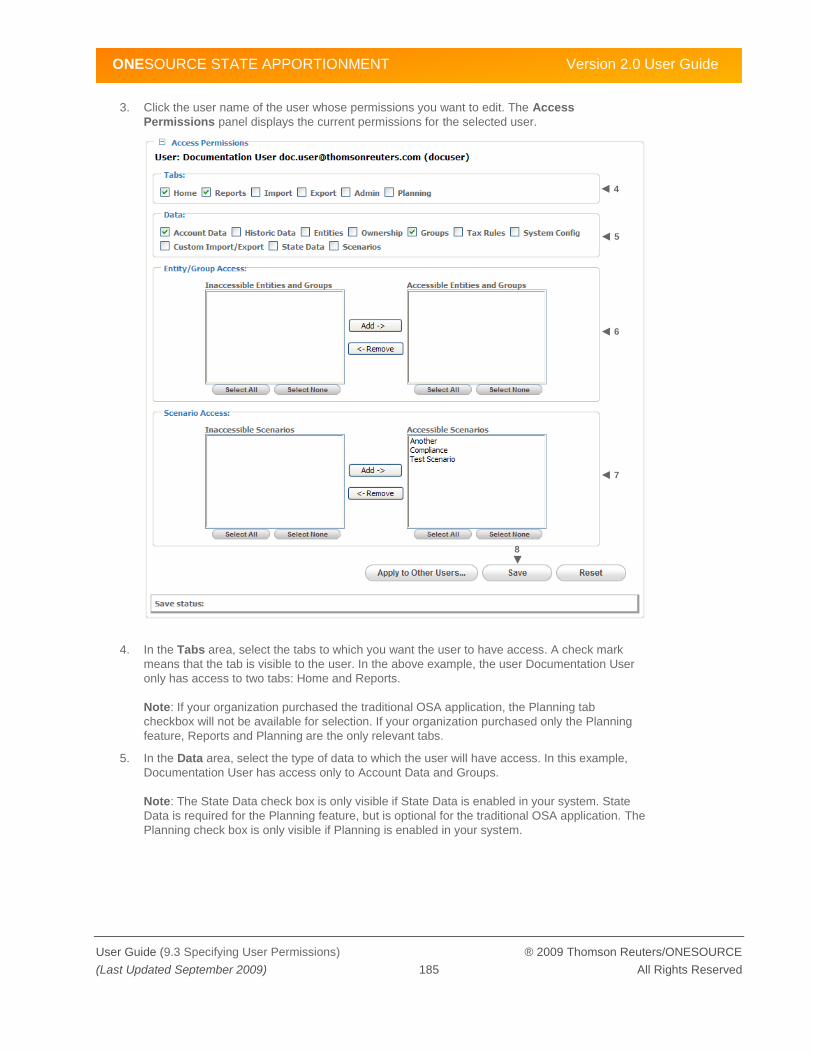
ONESOURCE STATE APPORTIONMENT Version 2.0 User Guide
User Guide (9.3 Specifying User Permissions) ® 2009 Thomson Reuters/ONESOURCE
(Last Updated September 2009) 185 All Rights Reserved
3. Click the user name of the user whose permissions you want to edit. The Access
Permissions panel displays the current permissions for the selected user.
4. In the Tabs area, select the tabs to which you want the user to have access. A check mark
means that the tab is visible to the user. In the above example, the user Documentation User
only has access to two tabs: Home and Reports.
Note: If your organization purchased the traditional OSA application, the Planning tab
checkbox will not be available for selection. If your organization purchased only the Planning
feature, Reports and Planning are the only relevant tabs.
5. In the Data area, select the type of data to which the user will have access. In this example,
Documentation User has access only to Account Data and Groups.
Note: The State Data check box is only visible if State Data is enabled in your system. State
Data is required for the Planning feature, but is optional for the traditional OSA application. The
Planning check box is only visible if Planning is enabled in your system.
4
5
6
8
7

ONESOURCE STATE APPORTIONMENT Version 2.0 User Guide
User Guide (9.3 Specifying User Permissions) ® 2009 Thomson Reuters/ONESOURCE
(Last Updated September 2009) 186 All Rights Reserved
6. In the Entity Access area, use the transfer boxes to select entities/groups and move them
between the Inaccessible and Accessible Entities lists. A user will not be able to view data for
any group/entity that is in the Inaccessible Entities list. There are three exceptions to this: data
for groups, data for flow-through entities, and access via scenarios. If the user has access to a
group, the user can view the data for all the member entities, whether or not he or she has
access to the member entity specifically. However, the user cannot navigate to the individual
entity. The same is true when the user has permissions to an entity that has flow-through
values from an inaccessible entity. The user is not able to navigate to an inaccessible entity,
but he or she is able to view any amounts flowing from any inaccessible entities. This is
designed this way so that the user can accurately reconcile entity calculations.
Note: Entity Access is not used with the Planning feature. Once a user has access to a
scenario, the user has access to all entities and groups in that scenario.
7. In the Scenarios area, use the transfer boxes to select scenarios and move them between the
Inaccessible and Accessible Scenarios lists. A user will not be able to switch to a scenario that
is in the Inaccessible Scenarios list. The exception to this is for Full Access users who have
access to all scenarios.
Note: The Scenario Access area is only available if the Planning feature is enabled.
8. Once you are finished specifying the desired permissions, click the Save button.
If you do not click Save and navigate away or click another user from the list, you will lose your
edits (Reset abandons your edits for that user).
The Save status box displays a message indicating whether or not the save operation was
successful, and if not, what error occurred.

ONESOURCE STATE APPORTIONMENT Version 2.0 User Guide
User Guide (9.3 Specifying User Permissions) ® 2009 Thomson Reuters/ONESOURCE
(Last Updated September 2009) 187 All Rights Reserved
9.3.1 Copying Permissions to Other Users
When multiple users have the same permissions, rather than specify the permissions one-by-one, use
the Apply to Other Users feature to clone one user‘s permissions to any number of other users. The
permissions for the other users are completely overwritten with whatever you copy.
► To apply selected permissions to other users:
1. Follow Steps 1-3 of the previous section to display the Access Permissions panel for the user
whose permissions you want to clone.
2
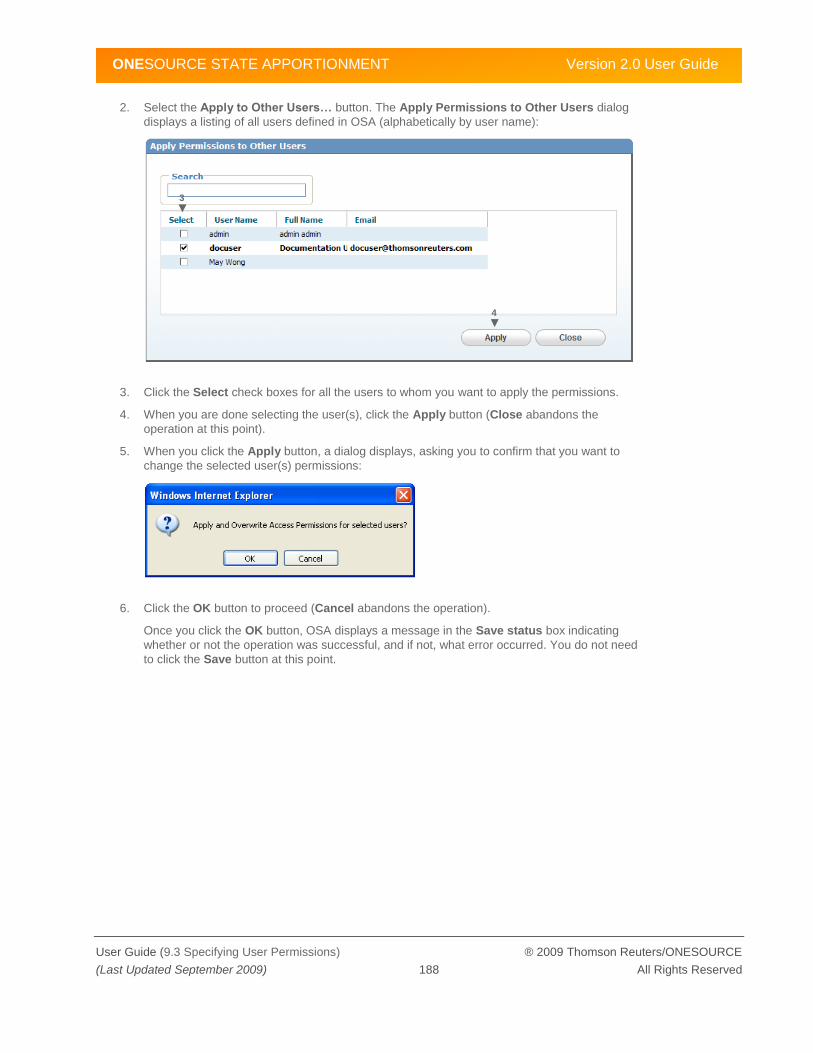
ONESOURCE STATE APPORTIONMENT Version 2.0 User Guide
User Guide (9.3 Specifying User Permissions) ® 2009 Thomson Reuters/ONESOURCE
(Last Updated September 2009) 188 All Rights Reserved
2. Select the Apply to Other Users… button. The Apply Permissions to Other Users dialog
displays a listing of all users defined in OSA (alphabetically by user name):
3. Click the Select check boxes for all the users to whom you want to apply the permissions.
4. When you are done selecting the user(s), click the Apply button (Close abandons the
operation at this point).
5. When you click the Apply button, a dialog displays, asking you to confirm that you want to
change the selected user(s) permissions:
6. Click the OK button to proceed (Cancel abandons the operation).
Once you click the OK button, OSA displays a message in the Save status box indicating
whether or not the operation was successful, and if not, what error occurred. You do not need
to click the Save button at this point.
3
4
ONESOURCE STATE APPORTIONMENT Version 2.0 User Guide
User Guide (10.1 Understanding Data Entry) ® 2009 Thomson Reuters/ONESOURCE
(Last Updated September 2009) 189 All Rights Reserved
10 Entering State Data
Chapter 10 describes how to enter state data into the OSA application and includes the following
sections:
10.1: Understanding Data Entry
10.2: Selecting the Entity, Division, or Group
10.3: Entering and Saving State Data
10.4: Using the Event History Logs
10.5: Confirming Totals Match Source Document(s)
10.1 Understanding Data Entry
The state data functionality was introduced as part of the new Planning feature. State Data must be
enabled when the Planning feature is enabled, but is optional with the traditional OSA features. This
chapter is written from the Planning viewpoint. For more information on Planning, see Chapter 11,
Planning on page 203. Many of the procedures for entering and updating state data are the same as
those for account data. In those instances, you will be referred to the analogous section in Chapter 3,
Entering Apportionment Data for instructions.
You can enter state data into OSA in two ways:
Importing a CSV file – once the account structure is in place and the entities, divisions, and/or
groups have been defined, you can import state data using the StateData.csv file.
Using the State Data Entry page – the State Data Entry page is available from the Entities
and Groups list on both the Home and Planning tabs.
Typically, you import state data using a CSV file during the initial OSA set up, although you can import
state data at any time. For instructions on importing CSV files, see Appendix D, Working with CSV Files
on page 275. This chapter covers entering data using the OSA State Data Entry page.
With the traditional OSA application, when you log in to OSA, it is the Home tab that first displays. With
the Planning feature, it is the Planning tab that displays first (the Home tab is not available). The Home
tab Entities and Groups list shows all the entities (and divisions) and groups you have permission to
view and/or edit whereas the Planning tab Entities and Groups list shows all the entities (and divisions)
and groups. Once you have access to a scenario, you have access to all entities and groups. From the
Home and Planning tabs you have access to the State Data Entry page as well as the Entity/Group
Properties page. Once you select an entity or group (and are therefore on the Entity/Group Properties
or the State Data Entry page), you can then access the State Calculation page.

ONESOURCE STATE APPORTIONMENT Version 2.0 User Guide
User Guide (10.1 Understanding Data Entry) ® 2009 Thomson Reuters/ONESOURCE
(Last Updated September 2009) 190 All Rights Reserved
The figure below illustrates the relationship between the four pages.
Entities/Groups list
Properties page Calculation pageData Entry page
OSA is designed such that regardless of which of the four tab pages you‘re on, you can access the
others. The only exception to this is the State Calculation page because it is jurisdiction-specific. You
can‘t go directly from the Entities/Groups list to the State Calculation page; you need to select an entity
or group first (and therefore be on either the Entity/Group Properties page or State Data Entry page)
then select the jurisdiction you wish to see the calculations for.
From the Home or Planning tab Entities and Groups list, you can either:
Click the State Data icon for an entity or group to go to the State Data Entry page where
you can begin entering state data, or
Click the entity ID link (e.g., 2564), the FEIN link (e.g., 52-1223987) or the Name link (e.g.,
T.R. Haden, Inc.) to go to the Entity/Group Properties page. On this page, you can view and/or
edit the entity or group properties as well as click the State Data button or a Jurisdiction link to
begin entering state data.
Note: Editing entity and group properties is covered in Chapter 6, Updating Data Elements on page 96.
10.1.1 Permissions
The OSA data structure can contain:
Entities: C-Corps and entities such as Partnerships and LLCs whose data usually flows
through.
Divisions: Blocks of data within a legal entity.
Groups: Entities grouped together for the purposes of group filing.
Users have permission to all entities, divisions, and groups within any given scenario. If you are not in a
planning scenario, see section 3.1.1 Permissions on page 28 for more information.

ONESOURCE STATE APPORTIONMENT Version 2.0 User Guide
User Guide (10.1 Understanding Data Entry) ® 2009 Thomson Reuters/ONESOURCE
(Last Updated September 2009) 191 All Rights Reserved
10.1.2 Ownership and Data Flow
The rules for ownership and data flow are the same for state data as for account data. See section 3.1.2
Ownership and Data Flow on page 29 for more information.
10.1.3 Account Data Types
The State Data Entry page in OSA includes a fixed set of accounts that allow the user to mimic state tax
return calculations. State Form Contra accounts are clearly marked with the same icon as
Apportionment Contra Accounts ( ).
10.1.4 Keeping an Audit Trail
An audit trail is kept for State Data the same as for Apportionment Data. See section 3.1.4 Keeping an
Audit Trail on page 31 for more information.
10.1.5 State Data Entry Process
Data entry into OSA is typically accomplished in one or both of these ways:
Importing CSV files, and/or
Entering state form data into the OSA interface.
For information on importing account data using CSV files, see Appendix D, Working with CSV Files on
page 275.
This section covers the data entry process when using the OSA interface. However, after you import
data using CSV files, you should also review the data in OSA to ensure it coincides with your source
documents and work papers.
In general, the data entry process is as follows:
1. Select the entity, division, or group for which to enter data.
2. Enter and save the data for the desired accounts.
3. Add comments and/or attachments, if appropriate, to the Event History Logs.
4. Confirm that account totals match source document(s).
Each step in the process above is described next, beginning with section 10.2 Selecting the Entity,
Division, or Group.

ONESOURCE STATE APPORTIONMENT Version 2.0 User Guide
User Guide (10.2 Selecting the Entity, Division, or Group) ® 2009 Thomson Reuters/ONESOURCE
(Last Updated September 2009) 192 All Rights Reserved
10.2 Selecting the Entity, Division, or Group
1. Ensure you are working in the correct tax year.
When you log in to OSA, you are placed in the same scenario and tax year you were working
in when you logged out of your previous session. If this is your first login, you are asked to
select a scenario and tax year. The tax year drop-down is located to the right of the tabs.
Before you begin data entry, make sure you are in the correct tax year. If you are not, select
the correct year from the drop-down.
See section 2.1 Logging In and Initial Display on page 22 for information on logging in and the
initial OSA display.
2. On the Planning tab, find the desired entity, division, or group. The entity/group list is typically
sorted alphabetically by entity ID (divisions are listed with parent entity) with entities listed first,
followed by groups. You can:
a. Use the browser window scroll bar to scroll down the list of entities, divisions, or
groups, or
b. Enter a string in the Search box to filter the list. Only entities/groups with a matching
string in the ID, FEIN, Name, or Type fields will be listed.
3. Click the State Data icon to go directly to the State Data entry page for the entity or group.
You can also click the ID, FEIN, or Name link to view the Entity or Group Properties page, at
which point you can access the State Data Entry page using the State Data button.
1
2b
3
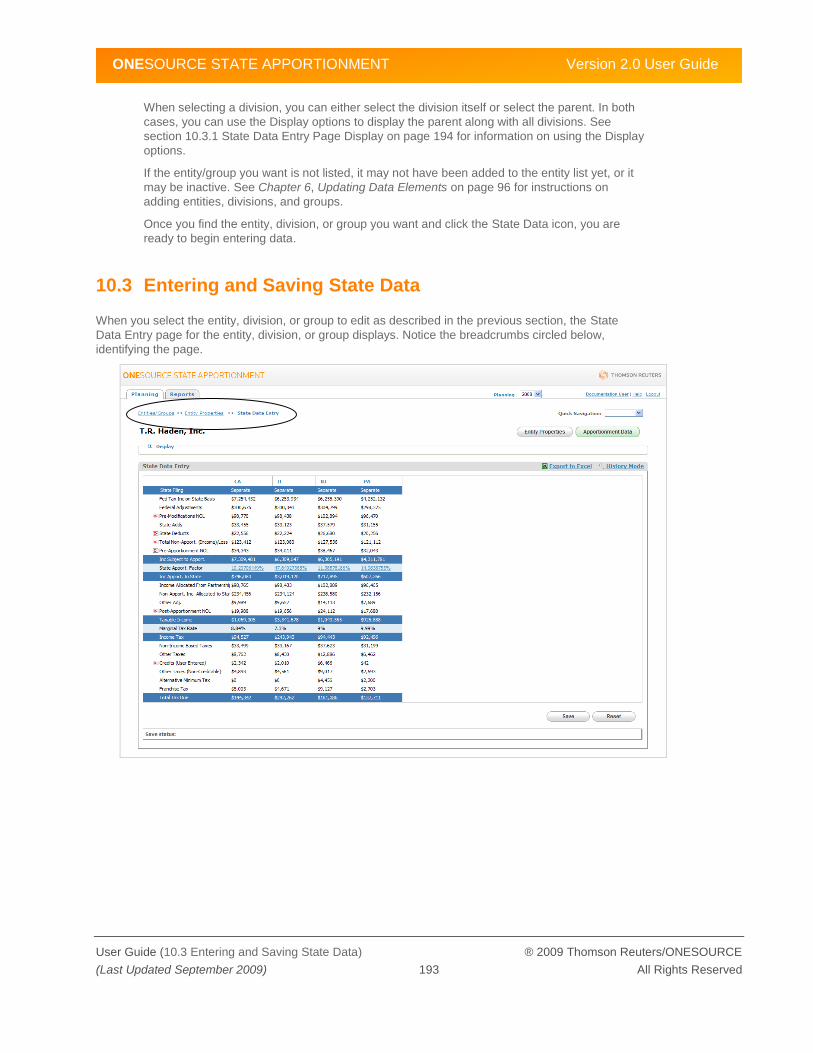
ONESOURCE STATE APPORTIONMENT Version 2.0 User Guide
User Guide (10.3 Entering and Saving State Data) ® 2009 Thomson Reuters/ONESOURCE
(Last Updated September 2009) 193 All Rights Reserved
When selecting a division, you can either select the division itself or select the parent. In both
cases, you can use the Display options to display the parent along with all divisions. See
section 10.3.1 State Data Entry Page Display on page 194 for information on using the Display
options.
If the entity/group you want is not listed, it may not have been added to the entity list yet, or it
may be inactive. See Chapter 6, Updating Data Elements on page 96 for instructions on
adding entities, divisions, and groups.
Once you find the entity, division, or group you want and click the State Data icon, you are
ready to begin entering data.
10.3 Entering and Saving State Data
When you select the entity, division, or group to edit as described in the previous section, the State
Data Entry page for the entity, division, or group displays. Notice the breadcrumbs circled below,
identifying the page.
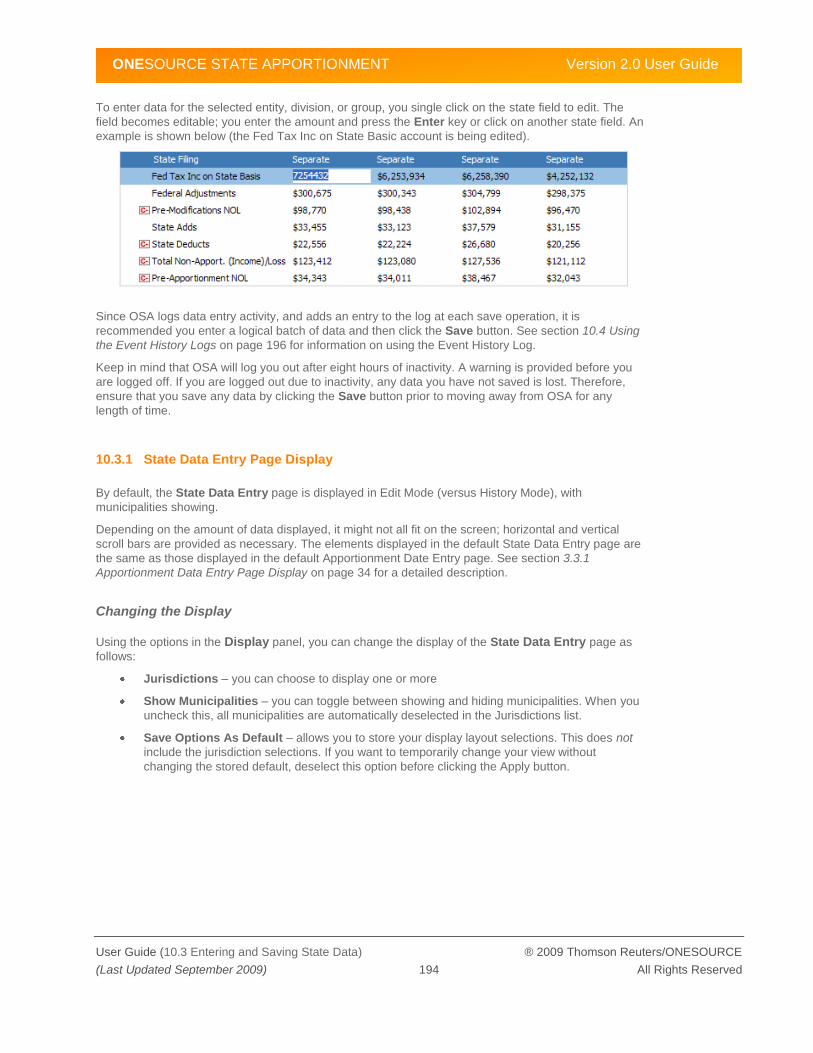
ONESOURCE STATE APPORTIONMENT Version 2.0 User Guide
User Guide (10.3 Entering and Saving State Data) ® 2009 Thomson Reuters/ONESOURCE
(Last Updated September 2009) 194 All Rights Reserved
To enter data for the selected entity, division, or group, you single click on the state field to edit. The
field becomes editable; you enter the amount and press the Enter key or click on another state field. An
example is shown below (the Fed Tax Inc on State Basic account is being edited).
Since OSA logs data entry activity, and adds an entry to the log at each save operation, it is
recommended you enter a logical batch of data and then click the Save button. See section 10.4 Using
the Event History Logs on page 196 for information on using the Event History Log.
Keep in mind that OSA will log you out after eight hours of inactivity. A warning is provided before you
are logged off. If you are logged out due to inactivity, any data you have not saved is lost. Therefore,
ensure that you save any data by clicking the Save button prior to moving away from OSA for any
length of time.
10.3.1 State Data Entry Page Display
By default, the State Data Entry page is displayed in Edit Mode (versus History Mode), with
municipalities showing.
Depending on the amount of data displayed, it might not all fit on the screen; horizontal and vertical
scroll bars are provided as necessary. The elements displayed in the default State Data Entry page are
the same as those displayed in the default Apportionment Date Entry page. See section 3.3.1
Apportionment Data Entry Page Display on page 34 for a detailed description.
Changing the Display
Using the options in the Display panel, you can change the display of the State Data Entry page as
follows:
Jurisdictions – you can choose to display one or more
Show Municipalities – you can toggle between showing and hiding municipalities. When you
uncheck this, all municipalities are automatically deselected in the Jurisdictions list.
Save Options As Default – allows you to store your display layout selections. This does not
include the jurisdiction selections. If you want to temporarily change your view without
changing the stored default, deselect this option before clicking the Apply button.

ONESOURCE STATE APPORTIONMENT Version 2.0 User Guide
User Guide (10.3 Entering and Saving State Data) ® 2009 Thomson Reuters/ONESOURCE
(Last Updated September 2009) 195 All Rights Reserved
► To change the display:
1. In the State Data Entry page, click the expand/collapse Display icon. The Display panel
appears.
2. Choose the desired display options. When selecting jurisdictions, hold down the Ctrl key to
select more than one.
3. To apply the changes, click the Apply button.
The State Data Entry page changes accordingly. To hide the Display panel, click the
expand/collapse icon again.
10.3.2 Recovering from a Data Entry Error
The process for recovering from a data entry error with state data is the same as for apportionment
data. See section 3.3.3 Recovering from a Data Entry Error on page 39 for instructions.
10.3.3 Editing Entity/Group Properties
You can access the Entity Properties and Group Properties pages from both the Planning tab and the
State Data Entry page. Using the properties pages, you can edit most of the entity or group properties
including adding and removing jurisdictions.
Chapter 6, Updating Data Elements on page 96 provides instructions on editing entity and group
properties. See section 6.3 Editing an Entity on page 101 for instructions on editing entity properties.
See section 6.5.3 Editing Groups on page 127 for instructions on editing group properties. In addition,
as with most data in OSA, you can add and/or edit entities and groups by importing CSV files. See
Appendix D, Working with CSV Files on page 275.
Note: An Event History log is maintained for each entity and group properties page. When you make a
change to an entity’s or group’s properties, this change is logged in the respective Event History log.
For information on using the Event History logs, see section 10.4 Using the Event History Logs on page
196.
1
3

ONESOURCE STATE APPORTIONMENT Version 2.0 User Guide
User Guide (10.4 Using the Event History Logs) ® 2009 Thomson Reuters/ONESOURCE
(Last Updated September 2009) 196 All Rights Reserved
10.4 Using the Event History Logs
As users enter state data for an entity, or make changes to an entity‘s or group‘s properties, the
changes are logged as an event in the Event History log for that entity, either in the State Data Entry
page (in the case of state data) or in the relevant Properties page.
An event is logged each time the user clicks the Save button. Each event record provides the
timestamp, the user name of the user who performed the operation, the type of operation performed,
and a generic comment.
Users can edit the generic comment and attach files to the OSA-generated event records as well as add
to the log a comment and/or attachment not tied to a specific event record. This is useful when you want
to add a comment or attachment that is relevant to the entire data set and not a specific event record.
As described next in sections 10.4.1 Data Entry History Mode Log and 10.4.2 Properties Page Event
History Log, the Event Details dialog for an event also lists the changes made, showing prior and
current values as appropriate.
In addition to the Event Logs for each entity, OSA keeps a main Event History Log. This log is available
from the Admin tab and lists the event history for all logged events in OSA. See Appendix A, System
Monitoring on page 222 for information on the OSA-wide Event History Log.
10.4.1 Data Entry History Mode Log
The History Mode functionality for State Data is similar to that for Apportionment Data. See section
3.4.1 Data Entry History Mode Log on page 42 for instructions.
10.4.2 Properties Page Event History Log
The Properties Page Event History Log functionality is the same as that for Apportionment Data. See
section 3.4.2 Properties Page Event History Log on page 48 for instructions.
10.5 Confirming Totals Match Source Document(s)
During data entry, you will want to confirm that the amounts and totals match your source documents.
There are various ways of doing so:
Review the State Data Entry page
Review the State Calculation page
Export data to Excel and review offline
Run a report

ONESOURCE STATE APPORTIONMENT Version 2.0 User Guide
User Guide (10.5 Confirming Totals Match Source Document(s)) ® 2009 Thomson Reuters/ONESOURCE
(Last Updated September 2009) 197 All Rights Reserved
10.5.1 Reviewing the State Data Entry Page
By reviewing the State Data Entry page, you can match your apportionment account amounts to the
amounts in your source document(s) and work papers as well as ensure your totals coincide.
In general, you enter the In-State amounts; the Everywhere amounts are calculated based on the sum
of all In-State amounts. In the example below, a illustrates the federal income amount entered for the
jurisdiction CA, and b illustrates the total tax due for the entity in CA based on the state data entered
and the calculated apportionment percentage. See section 10.2 Selecting the Entity, Division, or Group
on page 192 for instructions on accessing the Data Entry page.
You can use the display options described in section 10.3.1 State Data Entry Page Display on page 194
to make sure the jurisdictions you need are displayed.
a
b

ONESOURCE STATE APPORTIONMENT Version 2.0 User Guide
User Guide (10.5 Confirming Totals Match Source Document(s)) ® 2009 Thomson Reuters/ONESOURCE
(Last Updated September 2009) 198 All Rights Reserved
10.5.2 Reviewing the State Calculation Page
The State Calculation page shows the total tax due for an entity or group for a specified jurisdiction. The
example below shows the total for the entity T.R. Haden, Inc. in California.
Group Name Link

ONESOURCE STATE APPORTIONMENT Version 2.0 User Guide
User Guide (10.5 Confirming Totals Match Source Document(s)) ® 2009 Thomson Reuters/ONESOURCE
(Last Updated September 2009) 199 All Rights Reserved
This entity is part of a group; clicking the group name link displays the State Calculation Detail page for
the group that the entity is a member of.
In the State Calculation pages you can use the Quick Navigation and Jurisdiction drop-down lists at the
top of the page to switch between related entities (i.e., owners, owned entities, divisions, and groups
when appropriate) and jurisdictions.
► To review the data:
1. Use the instructions in section 10.6 Displaying the State Data Calculation Page on page 200 to
access the desired State Data Calculation page.
The income, modifications, and tax values should match the amounts you entered and should
match the values in your source document(s) and/or work papers.
10.5.3 Exporting Data to Excel
The Export Data to Excel functionality for State Data is similar to that for Apportionment Data. See
section 3.5.3 Exporting Data to Excel on page 58 for instructions.

ONESOURCE STATE APPORTIONMENT Version 2.0 User Guide
User Guide (10.6 Displaying the State Data Calculation Page) ® 2009 Thomson Reuters/ONESOURCE
(Last Updated September 2009) 200 All Rights Reserved
10.6 Displaying the State Data Calculation Page
You can access the State Calculation Detail page from either the entity/group‘s State Data Entry page
or the entity/group‘s Properties page. The State Calculation Detail page shows the entered as well as
the calculated values for one entity/group and one jurisdiction at a time.
► To display the State Calculation Detail page:
1. Click the Planning tab.
2. Click the Entities/Groups button.
3. Find the desired entity, division, or group in the Entities and Groups list. You can scroll, use
the Search text box, or use Internet Explorer‘s built-in Ctrl-F feature.
1
3
2

ONESOURCE STATE APPORTIONMENT Version 2.0 User Guide
User Guide (10.6 Displaying the State Data Calculation Page) ® 2009 Thomson Reuters/ONESOURCE
(Last Updated September 2009) 201 All Rights Reserved
4. Click the linked ID or Name for the entity, division, or group. The Properties page displays. The
example below is for T.R.Haden, Inc. (2564).
5. Click on the linked total tax for the desired jurisdiction. The State Calculation Detail page
displays. The example shown next is for California.
5
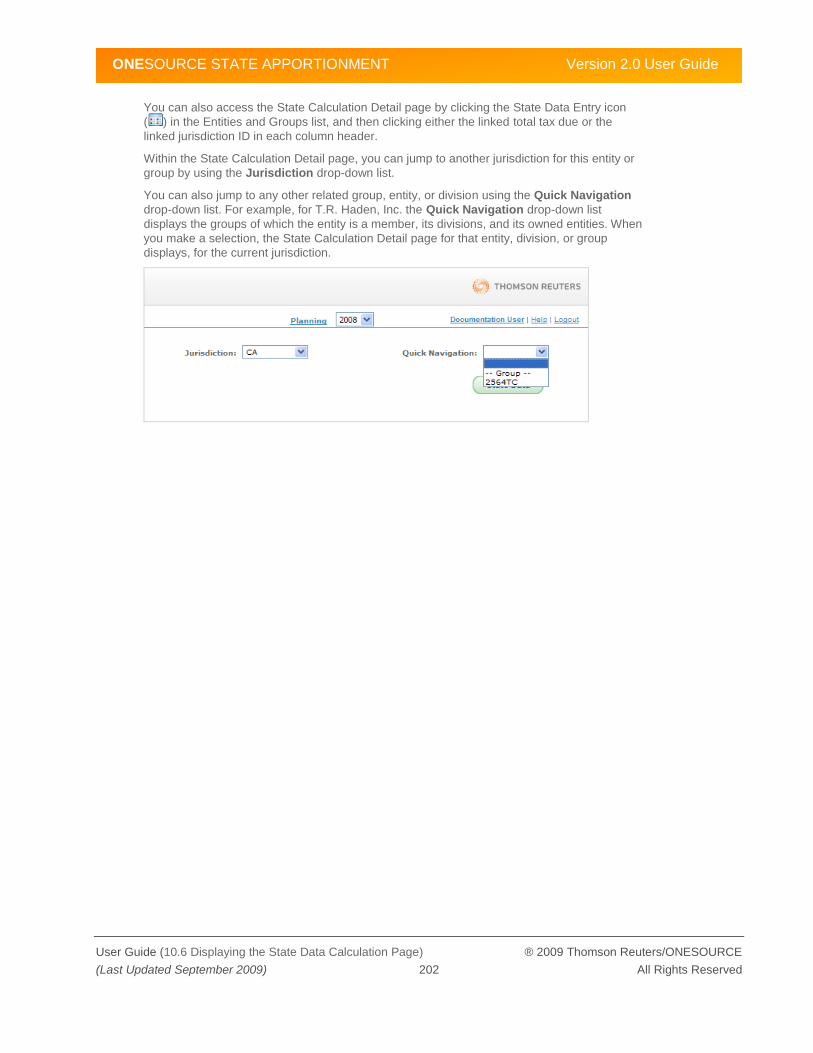
ONESOURCE STATE APPORTIONMENT Version 2.0 User Guide
User Guide (10.6 Displaying the State Data Calculation Page) ® 2009 Thomson Reuters/ONESOURCE
(Last Updated September 2009) 202 All Rights Reserved
You can also access the State Calculation Detail page by clicking the State Data Entry icon
( ) in the Entities and Groups list, and then clicking either the linked total tax due or the
linked jurisdiction ID in each column header.
Within the State Calculation Detail page, you can jump to another jurisdiction for this entity or
group by using the Jurisdiction drop-down list.
You can also jump to any other related group, entity, or division using the Quick Navigation
drop-down list. For example, for T.R. Haden, Inc. the Quick Navigation drop-down list
displays the groups of which the entity is a member, its divisions, and its owned entities. When
you make a selection, the State Calculation Detail page for that entity, division, or group
displays, for the current jurisdiction.

ONESOURCE STATE APPORTIONMENT Version 2.0 User Guide
User Guide (11.1 Getting Started) ® 2009 Thomson Reuters/ONESOURCE
(Last Updated September 2009) 203 All Rights Reserved
11 Planning
Chapter 11 describes the Planning functionality available within OSA. This chapter includes the
following sections:
11.1: Getting Started
11.2: Planning Basics
11.3: Planning Examples
11.1 Getting Started
For organizations that have the Planning feature exclusively, users are prompted to select a scenario
and tax year to enter when logging in to OSA for the first time. The system remembers the scenario and
tax year you were in when you log out. So, the next time you log in, you will be placed into that scenario
and tax year.
There are five areas that need to be defined to begin planning within OSA: Entities, Groups, Ownership
Structure, Accounts, and Data.
11.1.1 Entities
The first step in planning is to set up the entities: create the entities, define entity jurisdictions then set
entity nexus. See section 6.2 Adding an Entity on page 98 for information on adding entities and section
6.3 Editing an Entity on page 101 for information on defining entity jurisdictions and setting entity nexus.
11.1.2 Groups
The second step is to set up the groups: create the groups, set group membership then define group
filings. See section 6.5.2 Adding Groups on page 124 for information on creating groups and section
6.5.3 Editing Groups on page 127 for information on setting group membership and defining group
filings.
11.1.3 Ownership Structure
The third step is to set up the ownership structure: create ownership, set ownership properties then
define alternate ownership categories (if applicable). See section 6.4 Defining Ownership on page 116
for information on creating ownership, setting ownership properties, and defining alternate ownership
categories.
11.1.4 Accounts
The fourth step is to set up the accounts: create property, payroll and sales accounts. See section 8.3
Editing the Account Structure on page 161 for information on creating property, payroll and sales
accounts. OSA also provides you with the option to use a default account structure when you create a
new scenario. If you do not need to define your own custom account structure, using the Create Default
Account Structure option will allow you to skip this step entirely, simplifying the process.
ONESOURCE STATE APPORTIONMENT Version 2.0 User Guide
User Guide (11.2 Planning Basics) ® 2009 Thomson Reuters/ONESOURCE
(Last Updated September 2009) 204 All Rights Reserved
11.1.5 Data
The fifth step is to enter the data: enter apportionment and state income and modification data. See
section 3.3 Entering and Saving Apportionment Data on page 33 for information on entering
apportionment data and section 10.3 Entering and Saving State Data on page 193 for information on
entering income and modification data.
11.2 Planning Basics
Planning consists of three steps: creating, populating, and comparing scenarios.
11.2.1 Creating Scenarios
To create a scenario, use the Create Scenario feature available on the Scenarios page. Access to the
Scenarios page is limited to users with either Planning tab permissions or users with Admin tab
permissions and permission to edit the Scenarios data type. The difference between accessing the
Scenarios page from the Planning tab versus the Admin tab is that of permissions. When accessing the
Scenarios page from the Admin tab, users have access to all scenarios whereas the scenarios
accessible from the Planning tab are filtered based on the Scenario access list. See section 9.3
Specifying User Permissions on page 183 for instructions on granting scenario access.
When a scenario is added to OSA, initial permission to view and edit the scenario on the other OSA
tabs (i.e., Planning tab) is limited to the user creating the scenario and users with Full Access.
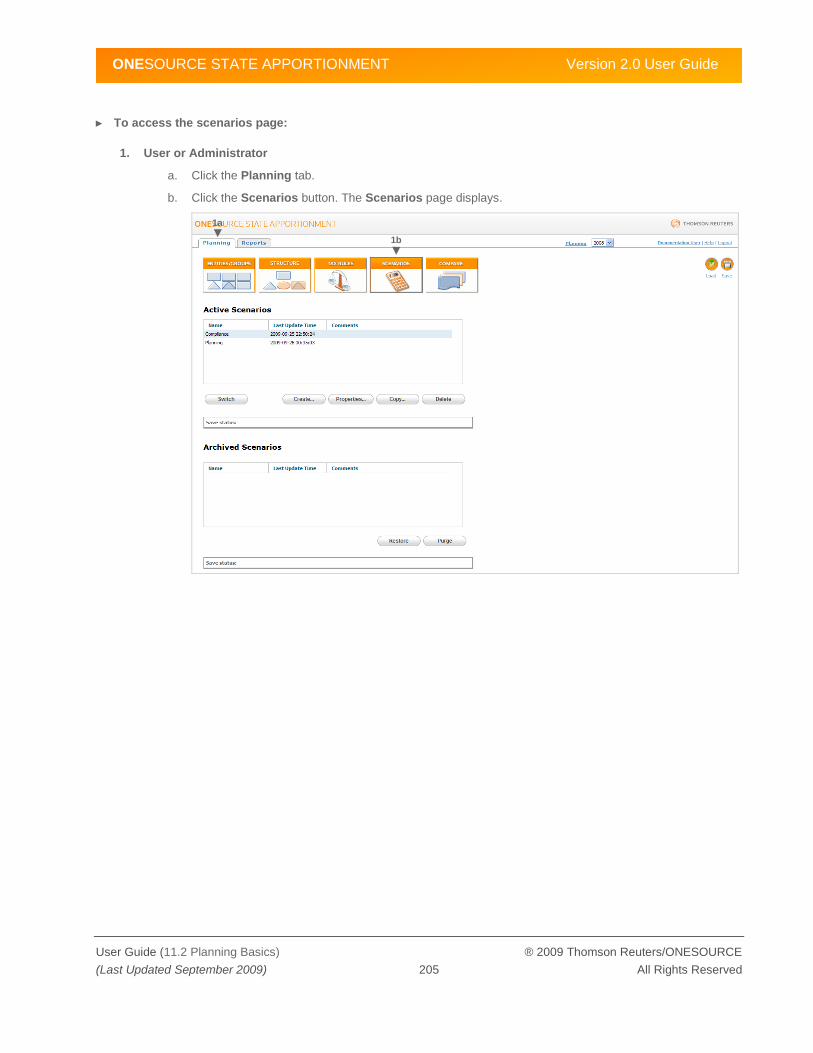
ONESOURCE STATE APPORTIONMENT Version 2.0 User Guide
User Guide (11.2 Planning Basics) ® 2009 Thomson Reuters/ONESOURCE
(Last Updated September 2009) 205 All Rights Reserved
► To access the scenarios page:
1. User or Administrator
a. Click the Planning tab.
b. Click the Scenarios button. The Scenarios page displays.
1a
1b
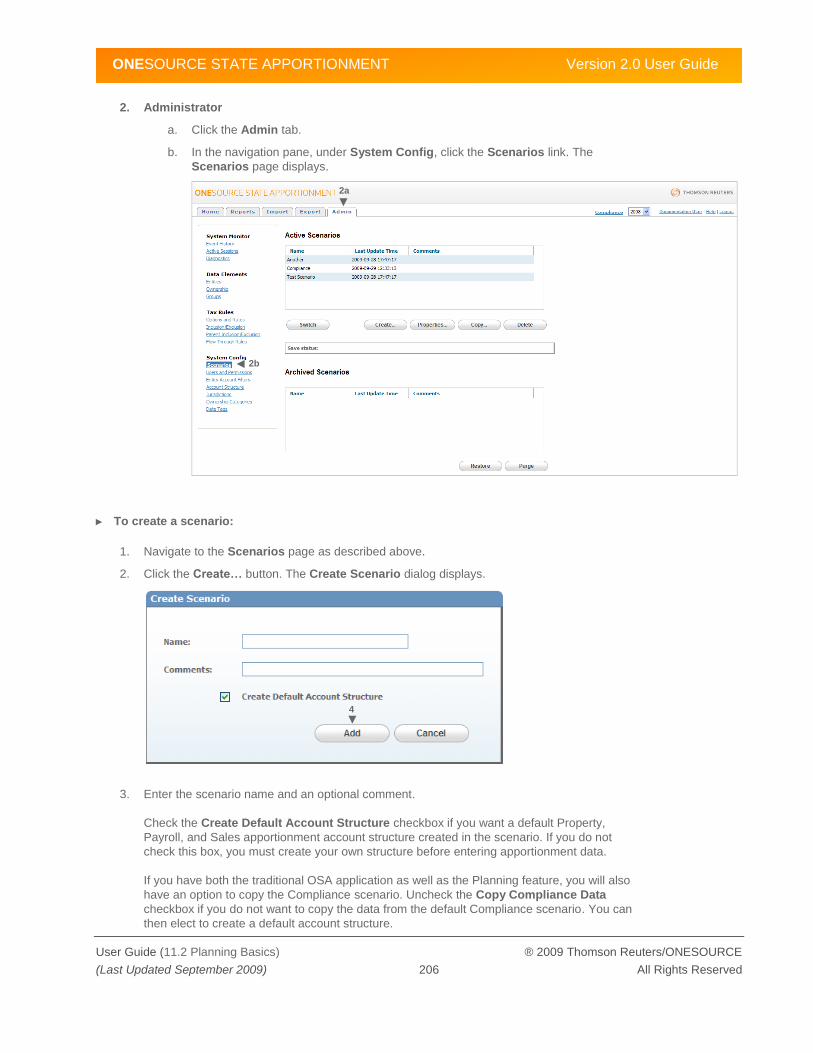
ONESOURCE STATE APPORTIONMENT Version 2.0 User Guide
User Guide (11.2 Planning Basics) ® 2009 Thomson Reuters/ONESOURCE
(Last Updated September 2009) 206 All Rights Reserved
2. Administrator
a. Click the Admin tab.
b. In the navigation pane, under System Config, click the Scenarios link. The
Scenarios page displays.
► To create a scenario:
1. Navigate to the Scenarios page as described above.
2. Click the Create… button. The Create Scenario dialog displays.
3. Enter the scenario name and an optional comment.
Check the Create Default Account Structure checkbox if you want a default Property,
Payroll, and Sales apportionment account structure created in the scenario. If you do not
check this box, you must create your own structure before entering apportionment data.
If you have both the traditional OSA application as well as the Planning feature, you will also
have an option to copy the Compliance scenario. Uncheck the Copy Compliance Data
checkbox if you do not want to copy the data from the default Compliance scenario. You can
then elect to create a default account structure.
4
2a
2b

ONESOURCE STATE APPORTIONMENT Version 2.0 User Guide
User Guide (11.2 Planning Basics) ® 2009 Thomson Reuters/ONESOURCE
(Last Updated September 2009) 207 All Rights Reserved
4. Click the Add button and the scenario is created (Cancel abandons the add operation).
Once you click the Add button, the scenario is created and is listed on the Scenarios page in
alphabetical order by scenario name. Also, the Save status box indicates whether or not the
operation was successful, and if not, what error occurred.
► To copy a scenario:
1. Navigate to the Scenarios page as described above.
2. Click the scenario you want to copy.
3. Click the Copy… button. The Copy Scenario dialog appears.
4. Enter the scenario name and an optional comment.
5. Click the Copy button (Cancel abandons the copy operation).
6. A dialog displays, asking you to confirm that you want to proceed with the copy operation.
Click the OK button to proceed with the copy (Cancel abandons the copy operation).
The Save status box displays a message indicating whether or not the operation was
successful, and if not, what error occurred.
5

ONESOURCE STATE APPORTIONMENT Version 2.0 User Guide
User Guide (11.2 Planning Basics) ® 2009 Thomson Reuters/ONESOURCE
(Last Updated September 2009) 208 All Rights Reserved
► To delete a scenario:
1. Navigate to the Scenarios page as described above.
2. Click the scenario you want to delete.
3. Click the Delete button.
4. A dialog displays, asking you to confirm that you want to delete the scenario. Click the OK
button to proceed (Cancel abandons the delete operation).
The Status box displays a message indicating whether or not the operation was successful,
and if not, what error occurred.
The steps above move the scenario from the Active Scenarios list to the Archived Scenarios
list. In order to completely remove the scenario from OSA, you must purge the scenario from
the Archived Scenarios list.
5. Click the scenario in the Archived Scenarios list that you just deleted from the Active Scenarios
list.
6. Click the Purge button.
6
5
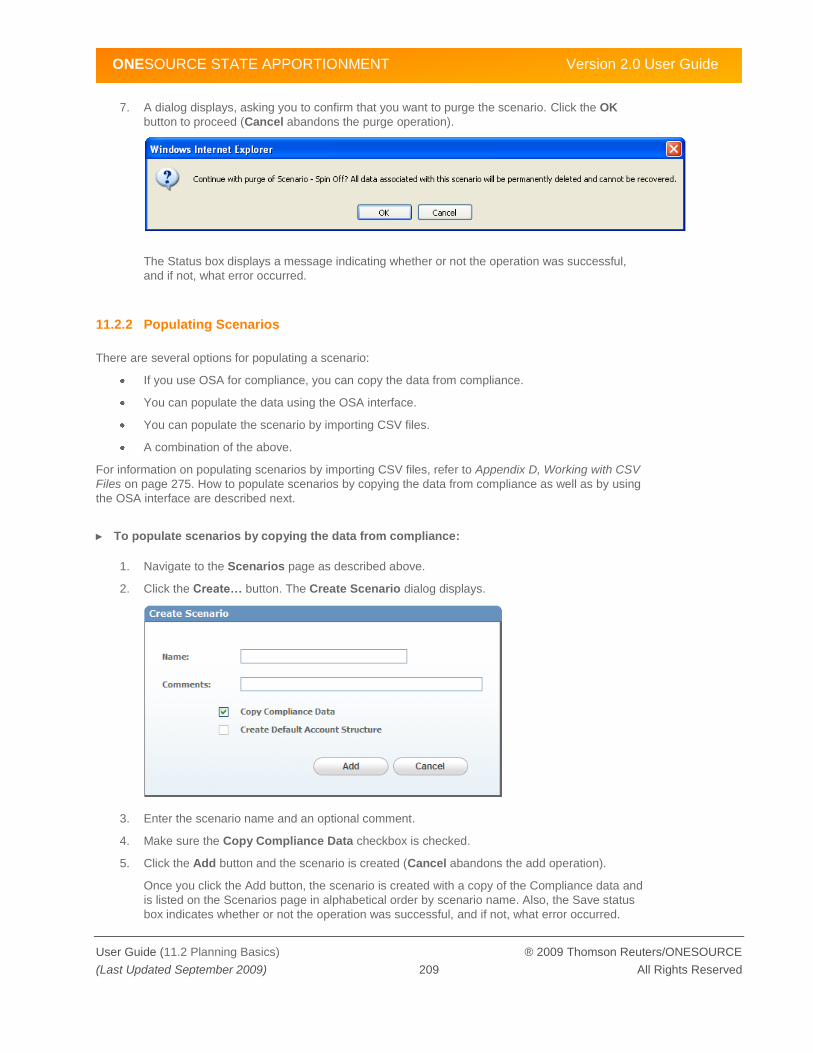
ONESOURCE STATE APPORTIONMENT Version 2.0 User Guide
User Guide (11.2 Planning Basics) ® 2009 Thomson Reuters/ONESOURCE
(Last Updated September 2009) 209 All Rights Reserved
7. A dialog displays, asking you to confirm that you want to purge the scenario. Click the OK
button to proceed (Cancel abandons the purge operation).
The Status box displays a message indicating whether or not the operation was successful,
and if not, what error occurred.
11.2.2 Populating Scenarios
There are several options for populating a scenario:
If you use OSA for compliance, you can copy the data from compliance.
You can populate the data using the OSA interface.
You can populate the scenario by importing CSV files.
A combination of the above.
For information on populating scenarios by importing CSV files, refer to Appendix D, Working with CSV
Files on page 275. How to populate scenarios by copying the data from compliance as well as by using
the OSA interface are described next.
► To populate scenarios by copying the data from compliance:
1. Navigate to the Scenarios page as described above.
2. Click the Create… button. The Create Scenario dialog displays.
3. Enter the scenario name and an optional comment.
4. Make sure the Copy Compliance Data checkbox is checked.
5. Click the Add button and the scenario is created (Cancel abandons the add operation).
Once you click the Add button, the scenario is created with a copy of the Compliance data and
is listed on the Scenarios page in alphabetical order by scenario name. Also, the Save status
box indicates whether or not the operation was successful, and if not, what error occurred.

ONESOURCE STATE APPORTIONMENT Version 2.0 User Guide
User Guide (11.2 Planning Basics) ® 2009 Thomson Reuters/ONESOURCE
(Last Updated September 2009) 210 All Rights Reserved
► To populate scenarios by using the OSA interface:
All scenario data can be accessed via the Planning tab. To add/edit a data element, navigate to the
corresponding section on the Planning tab then follow the instructions in the referenced section below to
add/edit the data.
Below is a list of the scenario data elements along with where, on the Planning tab, each can be found.
Entities/Groups button
Entities
Entity Filings
Account Data
State Data
Groups
Group Membership
Group Filings
Entities/Groups

ONESOURCE STATE APPORTIONMENT Version 2.0 User Guide
User Guide (11.2 Planning Basics) ® 2009 Thomson Reuters/ONESOURCE
(Last Updated September 2009) 211 All Rights Reserved
Structure button
Account Structure
Ownership Structure (Entity Structure)
Ownership Percentages
Tax Rules button
Tax Rule Options
Tax Rule Rates
Tax Rule Inclusion
Tax Rule Assignment
Parent Inclusion
Flow Through Rules
Apportionment Method Rules
Structure
Tax Rules
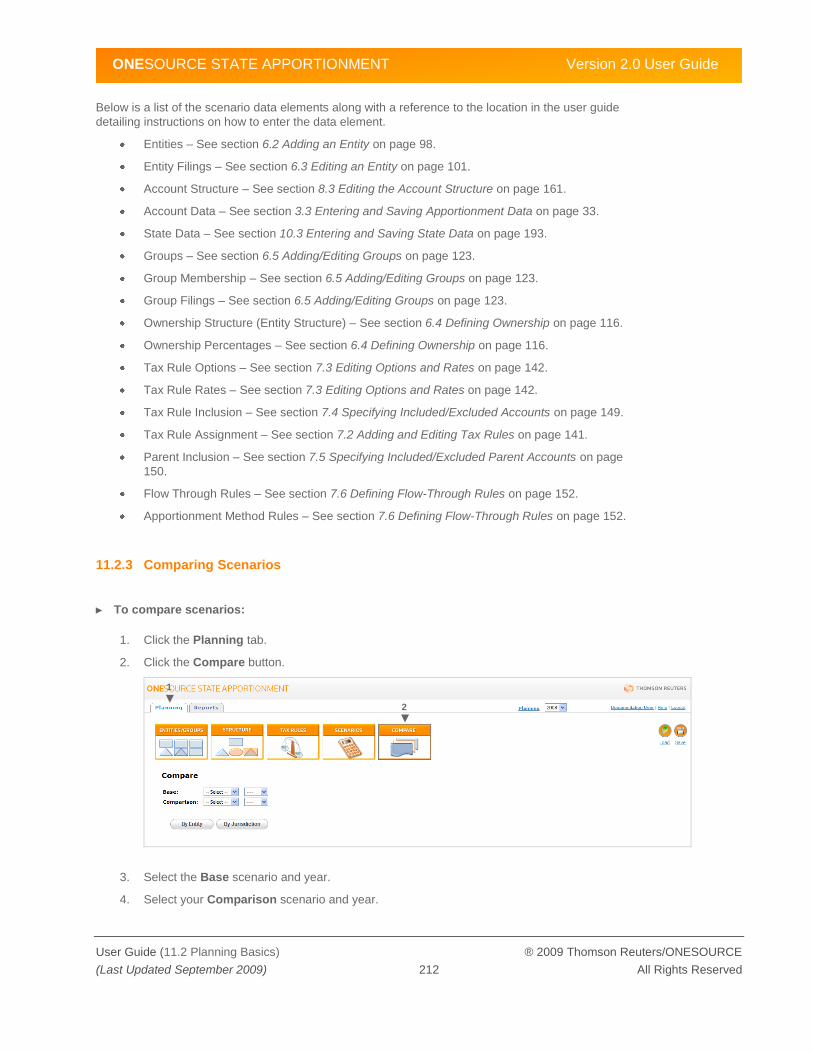
ONESOURCE STATE APPORTIONMENT Version 2.0 User Guide
User Guide (11.2 Planning Basics) ® 2009 Thomson Reuters/ONESOURCE
(Last Updated September 2009) 212 All Rights Reserved
Below is a list of the scenario data elements along with a reference to the location in the user guide
detailing instructions on how to enter the data element.
Entities – See section 6.2 Adding an Entity on page 98.
Entity Filings – See section 6.3 Editing an Entity on page 101.
Account Structure – See section 8.3 Editing the Account Structure on page 161.
Account Data – See section 3.3 Entering and Saving Apportionment Data on page 33.
State Data – See section 10.3 Entering and Saving State Data on page 193.
Groups – See section 6.5 Adding/Editing Groups on page 123.
Group Membership – See section 6.5 Adding/Editing Groups on page 123.
Group Filings – See section 6.5 Adding/Editing Groups on page 123.
Ownership Structure (Entity Structure) – See section 6.4 Defining Ownership on page 116.
Ownership Percentages – See section 6.4 Defining Ownership on page 116.
Tax Rule Options – See section 7.3 Editing Options and Rates on page 142.
Tax Rule Rates – See section 7.3 Editing Options and Rates on page 142.
Tax Rule Inclusion – See section 7.4 Specifying Included/Excluded Accounts on page 149.
Tax Rule Assignment – See section 7.2 Adding and Editing Tax Rules on page 141.
Parent Inclusion – See section 7.5 Specifying Included/Excluded Parent Accounts on page
150.
Flow Through Rules – See section 7.6 Defining Flow-Through Rules on page 152.
Apportionment Method Rules – See section 7.6 Defining Flow-Through Rules on page 152.
11.2.3 Comparing Scenarios
► To compare scenarios:
1. Click the Planning tab.
2. Click the Compare button.
3. Select the Base scenario and year.
4. Select your Comparison scenario and year.
1
2

ONESOURCE STATE APPORTIONMENT Version 2.0 User Guide
User Guide (11.2 Planning Basics) ® 2009 Thomson Reuters/ONESOURCE
(Last Updated September 2009) 213 All Rights Reserved
5. Click the button to compare the scenarios By Entity or By Jurisdiction as your primary pivot.
When comparing scenarios, OSA provides the ability to filter the data based on entity/jurisdiction ID and
Name. The scenario comparison display allows you to navigate several levels of detail, down to the
state form data. You can also export these screens to Excel, enabling you to review the data offline.
► To change the display:
Search – You can easily locate a specific entity or jurisdiction using the Search feature. Enter
a string in the Search box to filter the list. Only entities/jurisdictions with a matching string in
the ID or Name fields will be listed.
Ignore Diff Amounts Less Than – Use this filter to limit the view to material differences only
or display all entities/jurisdictions. Enter a number in the Ignore Diff Amounts Less Than box
then hit the Enter key to filter the list. Click the Clear link or enter a zero to display all items.
3
4
5

ONESOURCE STATE APPORTIONMENT Version 2.0 User Guide
User Guide (11.2 Planning Basics) ® 2009 Thomson Reuters/ONESOURCE
(Last Updated September 2009) 214 All Rights Reserved
► To drill down into comparison data:
1. By Entity
a. Compare two scenarios as described above.
b. Click the entity ID or entity Name link. The differences for the selected entity (2564)
are displayed.
1b
1c

ONESOURCE STATE APPORTIONMENT Version 2.0 User Guide
User Guide (11.2 Planning Basics) ® 2009 Thomson Reuters/ONESOURCE
(Last Updated September 2009) 215 All Rights Reserved
c. Click the jurisdiction ID or Name link. The state form data for the selected entity
(2564) in the selected jurisdiction (California) is displayed.
d. Use the breadcrumbs to navigate backwards in the comparison.
2. By Jurisdiction
a. Compare two scenarios as described above.
2b
1d
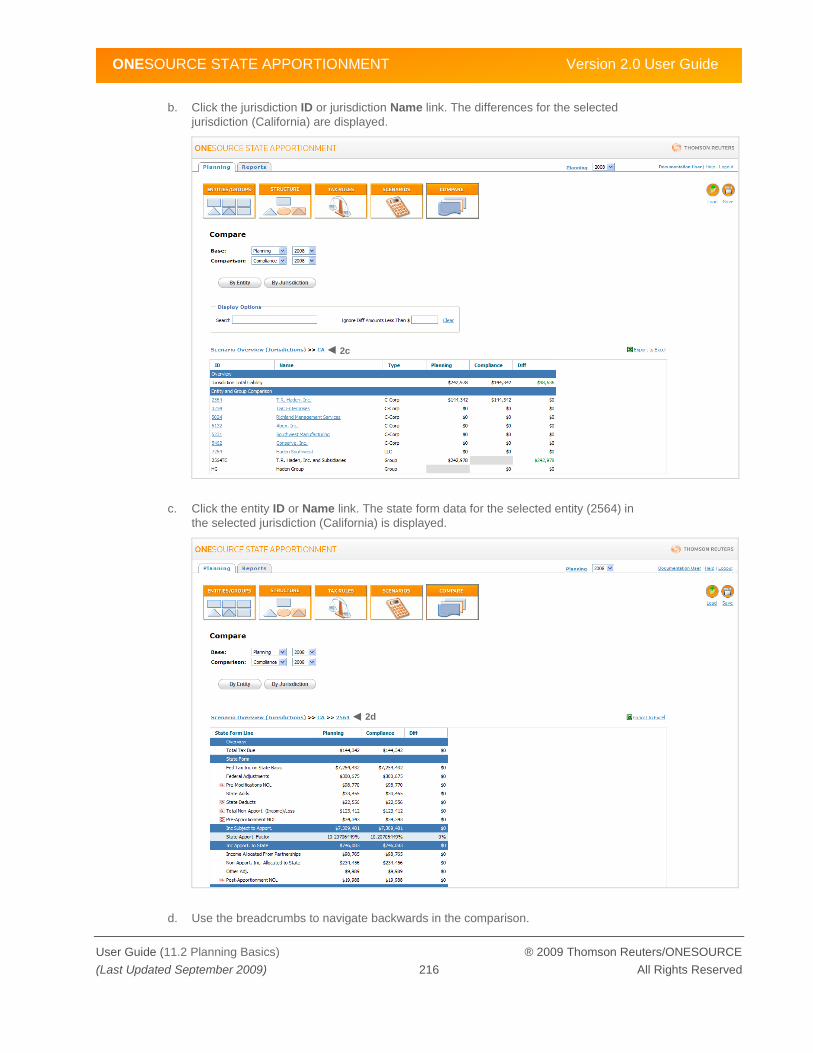
ONESOURCE STATE APPORTIONMENT Version 2.0 User Guide
User Guide (11.2 Planning Basics) ® 2009 Thomson Reuters/ONESOURCE
(Last Updated September 2009) 216 All Rights Reserved
b. Click the jurisdiction ID or jurisdiction Name link. The differences for the selected
jurisdiction (California) are displayed.
c. Click the entity ID or Name link. The state form data for the selected entity (2564) in
the selected jurisdiction (California) is displayed.
d. Use the breadcrumbs to navigate backwards in the comparison.
2c
2d

ONESOURCE STATE APPORTIONMENT Version 2.0 User Guide
User Guide (11.2 Planning Basics) ® 2009 Thomson Reuters/ONESOURCE
(Last Updated September 2009) 217 All Rights Reserved
► To export comparison data to Excel:
1. Compare two scenarios as described above.
2. Click the Export to Excel link
3. Choose whether to Open or Save the file.
a. When choosing to open the file, your browser must allow pop-ups from OSA and
you must have Excel installed on your computer.
b. When choosing to save the file, you are asked to specify the location on your
computer to save the file. Follow the prompts to save the file. You can then view the
file using Excel.
Once you view it, ensure you save it to the location of your choice, as the file is not
automatically saved.
2
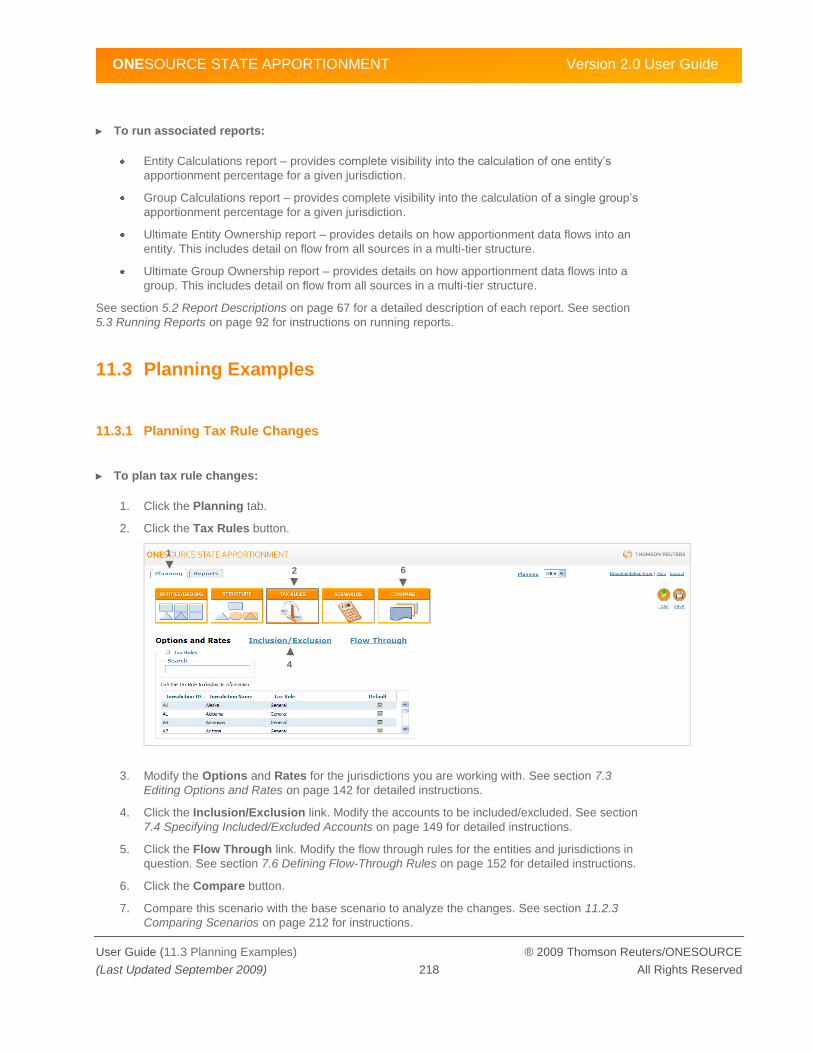
ONESOURCE STATE APPORTIONMENT Version 2.0 User Guide
User Guide (11.3 Planning Examples) ® 2009 Thomson Reuters/ONESOURCE
(Last Updated September 2009) 218 All Rights Reserved
► To run associated reports:
Entity Calculations report – provides complete visibility into the calculation of one entity‘s
apportionment percentage for a given jurisdiction.
Group Calculations report – provides complete visibility into the calculation of a single group‘s
apportionment percentage for a given jurisdiction.
Ultimate Entity Ownership report – provides details on how apportionment data flows into an
entity. This includes detail on flow from all sources in a multi-tier structure.
Ultimate Group Ownership report – provides details on how apportionment data flows into a
group. This includes detail on flow from all sources in a multi-tier structure.
See section 5.2 Report Descriptions on page 67 for a detailed description of each report. See section
5.3 Running Reports on page 92 for instructions on running reports.
11.3 Planning Examples
11.3.1 Planning Tax Rule Changes
► To plan tax rule changes:
1. Click the Planning tab.
2. Click the Tax Rules button.
3. Modify the Options and Rates for the jurisdictions you are working with. See section 7.3
Editing Options and Rates on page 142 for detailed instructions.
4. Click the Inclusion/Exclusion link. Modify the accounts to be included/excluded. See section
7.4 Specifying Included/Excluded Accounts on page 149 for detailed instructions.
5. Click the Flow Through link. Modify the flow through rules for the entities and jurisdictions in
question. See section 7.6 Defining Flow-Through Rules on page 152 for detailed instructions.
6. Click the Compare button.
7. Compare this scenario with the base scenario to analyze the changes. See section 11.2.3
Comparing Scenarios on page 212 for instructions.
2
1
4
6
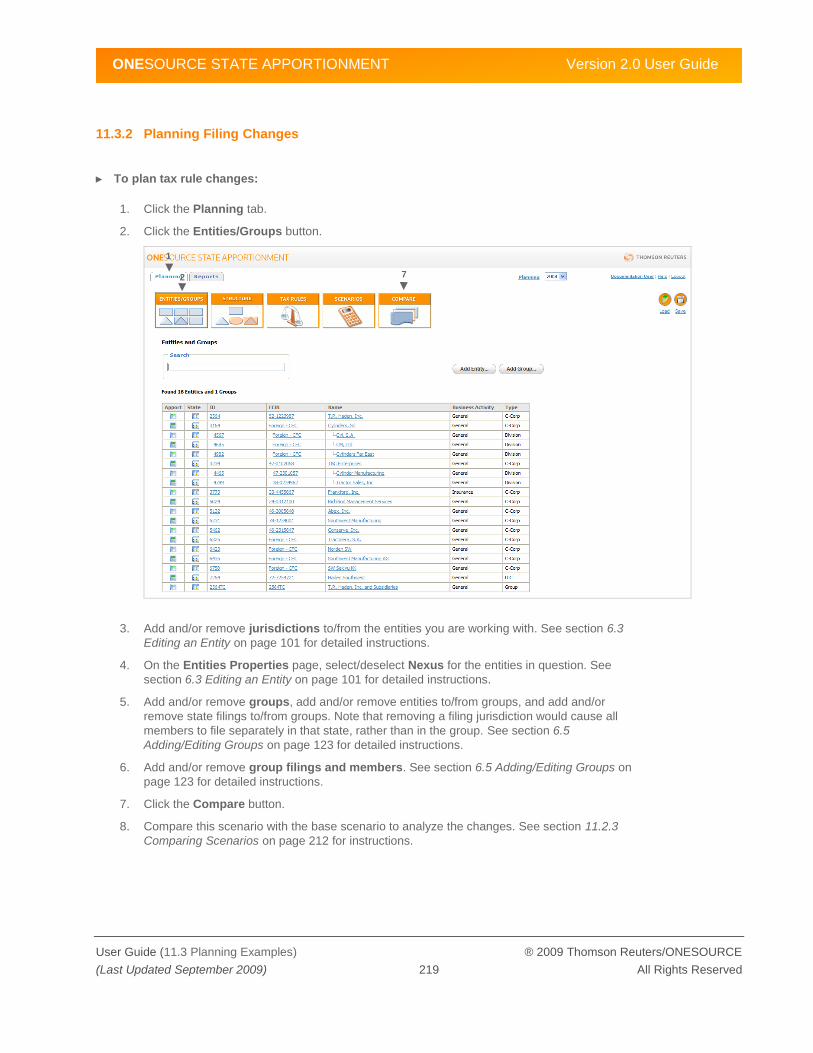
ONESOURCE STATE APPORTIONMENT Version 2.0 User Guide
User Guide (11.3 Planning Examples) ® 2009 Thomson Reuters/ONESOURCE
(Last Updated September 2009) 219 All Rights Reserved
11.3.2 Planning Filing Changes
► To plan tax rule changes:
1. Click the Planning tab.
2. Click the Entities/Groups button.
3. Add and/or remove jurisdictions to/from the entities you are working with. See section 6.3
Editing an Entity on page 101 for detailed instructions.
4. On the Entities Properties page, select/deselect Nexus for the entities in question. See
section 6.3 Editing an Entity on page 101 for detailed instructions.
5. Add and/or remove groups, add and/or remove entities to/from groups, and add and/or
remove state filings to/from groups. Note that removing a filing jurisdiction would cause all
members to file separately in that state, rather than in the group. See section 6.5
Adding/Editing Groups on page 123 for detailed instructions.
6. Add and/or remove group filings and members. See section 6.5 Adding/Editing Groups on
page 123 for detailed instructions.
7. Click the Compare button.
8. Compare this scenario with the base scenario to analyze the changes. See section 11.2.3
Comparing Scenarios on page 212 for instructions.
1
2 7

ONESOURCE STATE APPORTIONMENT Version 2.0 User Guide
User Guide (11.3 Planning Examples) ® 2009 Thomson Reuters/ONESOURCE
(Last Updated September 2009) 220 All Rights Reserved
11.3.3 Planning Structure Changes
► To plan tax structure changes:
1. Click the Planning tab.
2. Click the Structure button.
3. Modify the entity structure to match your model. See section 6.4 Defining Ownership on page
116 for detailed instructions.
4. Add entities as appropriate. See section 6.3 Editing an Entity on page 101 for detailed
instructions.
5. Update entity properties to meet your requirements. See section 6.3 Editing an Entity on
page 101 for detailed instructions.
6. Click the Compare button.
7. Compare this scenario with the base scenario to analyze the changes. See section 11.2.3
Comparing Scenarios on page 212 for instructions.
1
2 6
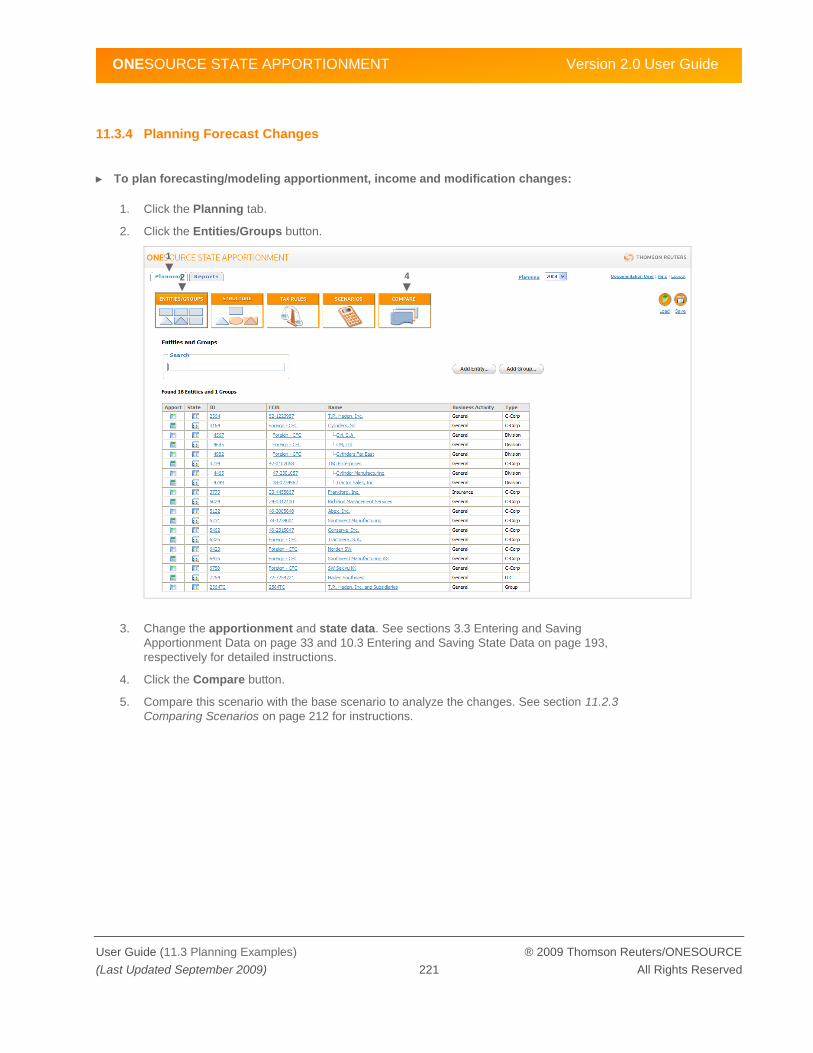
ONESOURCE STATE APPORTIONMENT Version 2.0 User Guide
User Guide (11.3 Planning Examples) ® 2009 Thomson Reuters/ONESOURCE
(Last Updated September 2009) 221 All Rights Reserved
11.3.4 Planning Forecast Changes
► To plan forecasting/modeling apportionment, income and modification changes:
1. Click the Planning tab.
2. Click the Entities/Groups button.
3. Change the apportionment and state data. See sections 3.3 Entering and Saving
Apportionment Data on page 33 and 10.3 Entering and Saving State Data on page 193,
respectively for detailed instructions.
4. Click the Compare button.
5. Compare this scenario with the base scenario to analyze the changes. See section 11.2.3
Comparing Scenarios on page 212 for instructions.
1
2 4

ONESOURCE STATE APPORTIONMENT Version 2.0 User Guide
User Guide (A.1 Viewing Event History) ® 2009 Thomson Reuters/ONESOURCE
(Last Updated September 2009) 222 All Rights Reserved
A System Monitoring
This appendix describes the OSA administrative features that enable you to run system and data
diagnostics, terminate user sessions, manage system messages, and view the history of when
operations and data changes occurred within the application. It includes the following sections:
A.1: Viewing Event History
A.2: Terminating Active User Sessions
A.3: Managing System Messages
A.4: Running Diagnostics
Note: To use the features described in this appendix, you must have the appropriate access
permissions. Contact your OSA administrator to discuss your permissions.
A.1 Viewing Event History
As users work in OSA, most operations performed are logged as events in the main Event History log.
The event record includes the scenario name, an OSA-generated ID, who performed the operation, the
type of operation, the type of data affected, a comment field, and a timestamp. In some cases, you can
view additional event detail that includes both previous and updated values or view files attached to the
event history record (e.g., a source file imported by a user). The types of operations that are logged and
the data types impacted (including which provide before and after values) are listed in the tables below.
The log available from the Admin tab lists the event history for all logged events in OSA. You can also
view logs for events specific to entity properties, group properties, and account and state data only. See
Chapter 3, Entering Apportionment Data on page 27 and Chapter 10, Entering State Data on page 189
for viewing these other Event History logs.
To find specific records, you can sort the data in the Event History log by any column header. You can
also use the Search feature or filter records by date, by scenario, by user (who performed the
operation), by operation type, or by type of data affected.
Finally, you can export the current view of the Event History log to Excel. The operations listed below
apply to all logs in OSA.
Operation Logged Description
Create via UI Item is created via the user interface (i.e., not an import operation)
Default Data Load Import of default OSA data during initial setup
Export An export operation is performed. Import files are attached to the event.
Import An import operation is performed. Import files are attached to the event.
Scenario A scenario operation is performed
Update via UI Item is updated via the user interface (i.e., not an import operation)

ONESOURCE STATE APPORTIONMENT Version 2.0 User Guide
User Guide (A.1 Viewing Event History) ® 2009 Thomson Reuters/ONESOURCE
(Last Updated September 2009) 223 All Rights Reserved
The following table lists all possible data types impacted and reflected in the logs. When viewing logs
specific to a type of data, for example entity properties, only data types relating to entity properties will
apply. The table is organized by the data types that will show before and after values versus those that
do not show before and after values and simply log the event.
Data Type Impacted by Operation Additional Description
Before and after values are listed
Entity List
Entity Filings List of jurisdictions for an entity
Account Structure
Account Data
State Data
Groups
Group Membership
Group Filings List of jurisdictions for a group
Ownership Structure
Ownership Percentages
Tax Rule Options
Tax Rule Rates
Tax Rule Inclusion
Tax Rule Assignment
Flow Through Rules
Apportionment Method Rule Apportionment method used for each factor type of a jurisdiction
Before and after values are not listed
Zip File Set Entire set of CSV files
Users
User Permissions
Entity Account Filters Filter limiting the list of available accounts that a particular entity may
have in its Data Entry page
Ownership Category
Jurisdictions
Parent Account
Import Template Used with the Custom Import feature
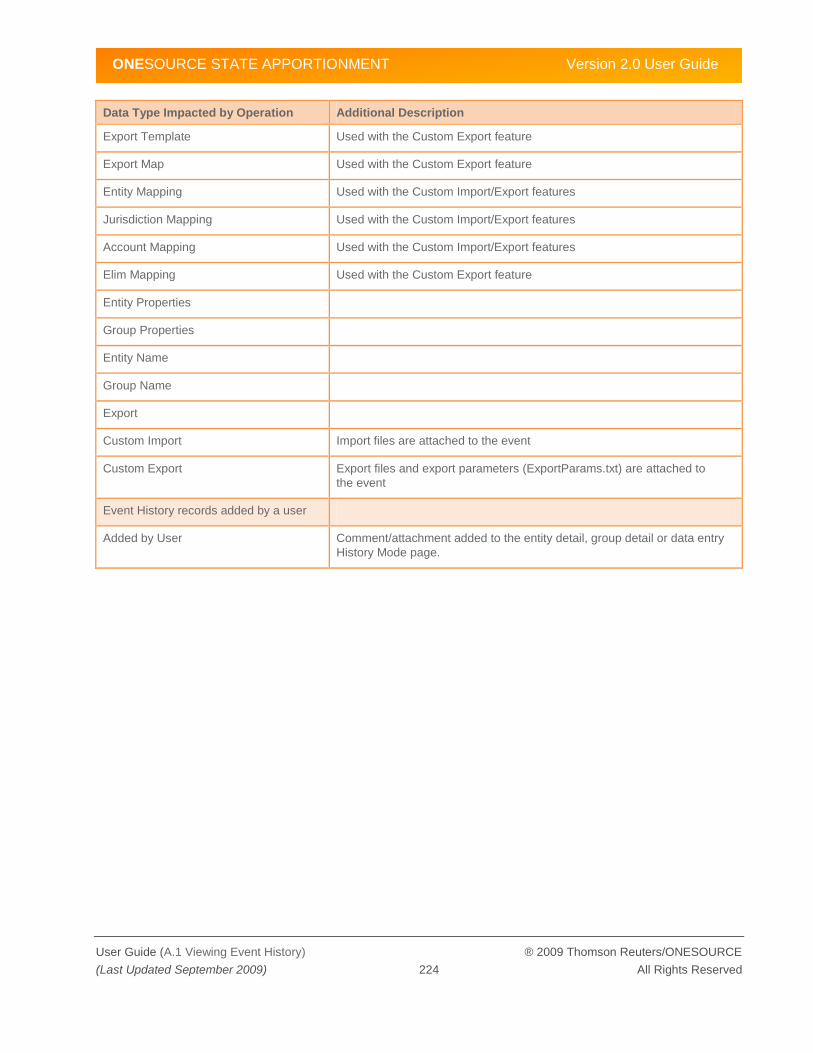
ONESOURCE STATE APPORTIONMENT Version 2.0 User Guide
User Guide (A.1 Viewing Event History) ® 2009 Thomson Reuters/ONESOURCE
(Last Updated September 2009) 224 All Rights Reserved
Data Type Impacted by Operation Additional Description
Export Template Used with the Custom Export feature
Export Map Used with the Custom Export feature
Entity Mapping Used with the Custom Import/Export features
Jurisdiction Mapping Used with the Custom Import/Export features
Account Mapping Used with the Custom Import/Export features
Elim Mapping Used with the Custom Export feature
Entity Properties
Group Properties
Entity Name
Group Name
Export
Custom Import Import files are attached to the event
Custom Export Export files and export parameters (ExportParams.txt) are attached to
the event
Event History records added by a user
Added by User Comment/attachment added to the entity detail, group detail or data entry
History Mode page.
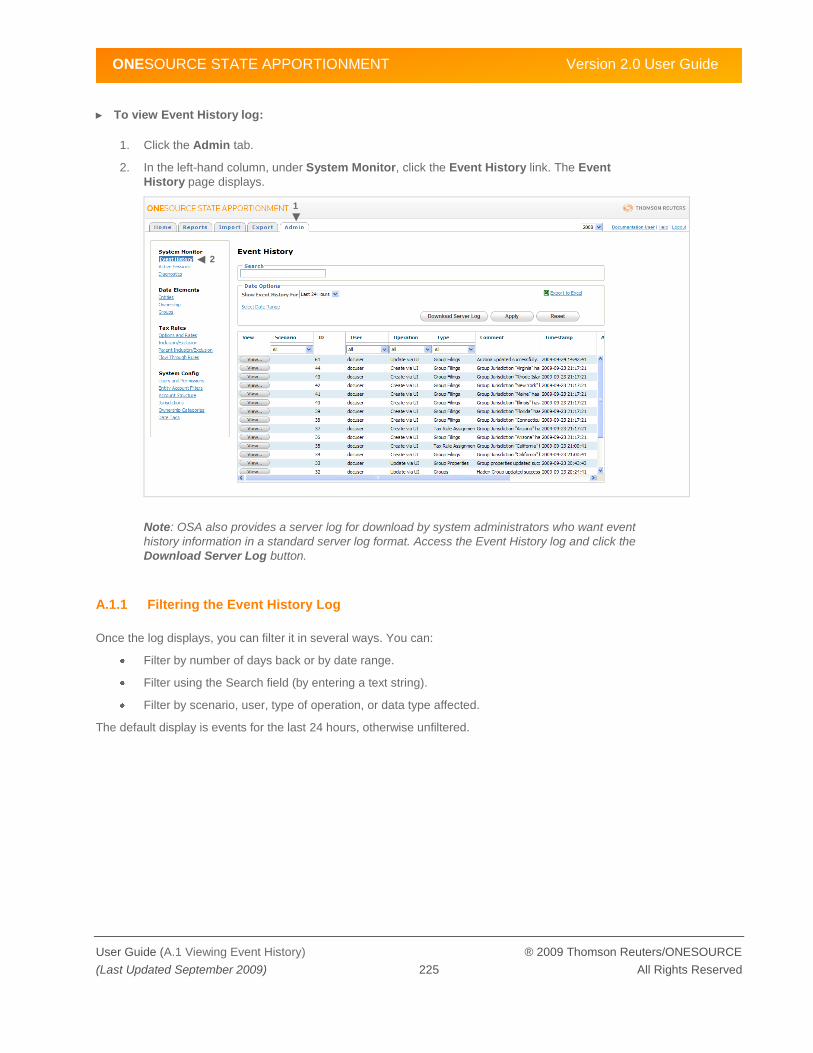
ONESOURCE STATE APPORTIONMENT Version 2.0 User Guide
User Guide (A.1 Viewing Event History) ® 2009 Thomson Reuters/ONESOURCE
(Last Updated September 2009) 225 All Rights Reserved
► To view Event History log:
1. Click the Admin tab.
2. In the left-hand column, under System Monitor, click the Event History link. The Event
History page displays.
Note: OSA also provides a server log for download by system administrators who want event
history information in a standard server log format. Access the Event History log and click the
Download Server Log button.
A.1.1 Filtering the Event History Log
Once the log displays, you can filter it in several ways. You can:
Filter by number of days back or by date range.
Filter using the Search field (by entering a text string).
Filter by scenario, user, type of operation, or data type affected.
The default display is events for the last 24 hours, otherwise unfiltered.
1
2

ONESOURCE STATE APPORTIONMENT Version 2.0 User Guide
User Guide (A.1 Viewing Event History) ® 2009 Thomson Reuters/ONESOURCE
(Last Updated September 2009) 226 All Rights Reserved
► To filter the Event History log by number of days back:
1. Access the Event History log, as described in section A.1 Viewing Event History.
2. In the Date Options of the Event History page, use the Show Event History For drop-down
list to choose the desired number of days back to show.
3. Then, click the Apply button.
If the Show Event History For drop-down option is not available, click the Reset button. This
resets the Date Options panel to the default, which is Show Event History For Last 24
Hours. You can then choose the number of days back using the drop-down list.
► To filter the Event History log by date range:
1. Access the Event History log, as described in section A.1 Viewing Event History.
2. In the Date Options panel of the Event History page, click the Select Date Range link. The
Date Options display changes to provide From and To text boxes, enabling you to enter the
start and end date for the range.
2 3
2

ONESOURCE STATE APPORTIONMENT Version 2.0 User Guide
User Guide (A.1 Viewing Event History) ® 2009 Thomson Reuters/ONESOURCE
(Last Updated September 2009) 227 All Rights Reserved
3. Click the date picker icon for the From text box to display a calendar.
4. Click on a date to choose it (you can also specify time, if desired).
If a time is not specified, the current time is used. When you specify a time, do so before
clicking the date.
Click the help icon [?] in the top left of the calendar for a list of available date picker
commands. They are:
a. Click Today to pick today‘s date and the current time, or
b. Click << or >> to go back and forward one year, respectively
c. Click < or > to go back and forward one month, respectively
d. Click on a day of the week and the display of the calendar changes such that the
week starts on that day (e.g., click Mon to show the week Mon-Sun)
e. If you want to specify a time, click the hour or minute box to increase the number by
one, or use Shift+click to decrease it by one. Specify a time before clicking the date.
5. Repeat Steps 3 - 4 for the To text box.
6. After you have selected the From and To dates, click the Apply button.
The list is filtered to show only the operations with a timestamp that falls within the range
specified.
Note: While clicking on the date picker icon is the most convenient, you can also type a date
and time. The format is:
dd-Mmm-yyyy hh:mm AM/PM
…where:
dd: the day of the month
Mmm: the three letter month abbreviation, initial letter capitalized (e.g., Jun)
yyyy: the year
hh: the hour
mm: the minutes
AM/PM: either AM or PM
For example:
09-Jun-2008 02:08 PM
3

ONESOURCE STATE APPORTIONMENT Version 2.0 User Guide
User Guide (A.1 Viewing Event History) ® 2009 Thomson Reuters/ONESOURCE
(Last Updated September 2009) 228 All Rights Reserved
► To filter the Event History log using the Search field:
1. Access the Event History log, as described in section A.1 Viewing Event History.
2. In the Search field, type any combination of letters and numbers. You do not need to click the
Apply button or press the Enter key.
OSA displays only event records that contain a match in any word in all fields in the event log
to the string typed. The Date Options apply, so first ensure you are viewing the desired date
range. In the example below, ―de‖ was typed in the Search box so records from the last 24
hours containing the string ―de‖ such as ―default‖ and ―added‖ are included in the filtered
results list.
Note: The timestamp field is the only field not included in the search.
2

ONESOURCE STATE APPORTIONMENT Version 2.0 User Guide
User Guide (A.1 Viewing Event History) ® 2009 Thomson Reuters/ONESOURCE
(Last Updated September 2009) 229 All Rights Reserved
► To filter the Event History log by user, type of operation, and/or type of data affected:
In the Event History page, once you have specified the desired date range to display, you can further
filter the resulting list by user, type of operation, and/or data type affected. To do so:
1. Access the Event History log, as described in section A.1 Viewing Event History.
2. Use any combination of the Scenario, User, Operation, and/or Type drop-down lists. Choose
an option from the list and the list is immediately filtered. You do not need to click the Apply
button or press the Enter key.
A.1.2 Viewing Event Details (Before and After Values)
When operations are performed on certain data types, the values before and after the change are
logged in the Event Detail for that event. You can then see these details by clicking the View button for
the event record. For a list of which data types result in logged values (i.e., before and after values), see
the table on page 222.
You can also export the contents of the Event Detail window to an Excel file. The Event Details window
is shown and explained next.

ONESOURCE STATE APPORTIONMENT Version 2.0 User Guide
User Guide (A.1 Viewing Event History) ® 2009 Thomson Reuters/ONESOURCE
(Last Updated September 2009) 230 All Rights Reserved
The Event Details window header provides the following information:
Event ID (OSA generated ID for event)
Operation (type of operation performed)
User (who performed the operation)
Attachments (list of attachments)
Timestamp (day and time the operation was performed)
Type (data type affected)
Comment (OSA-generated comment specifying changes made)
The detailed information it provides is:
<Data Type> key: where <Data Type> is the type of data modified (e.g., Account Data). This
field provides detailed information on the data or field modified such that it can be readily
identified.
Note: To view the entire contents of this column, place your cursor over the field to display the
tooltip, or widen the column by placing your cursor over the column divider line and
pressing/holding down the left mouse button as you drag the cursor.
Field: specifies the OSA-internal name of the field updated. Refer to Appendix D, Working with
CSV Files on page 275 for a list of the OSA-internal field names.
Before and After values: when applicable, shows original and modified value, respectively.
All entries are visible by default. By clicking the Collapse All button, you can collapse all the entries to
view only the keys, making it easier to skim all the entries. Click the Expand All button to make the
details visible again. Use the expand/collapse icons (+/–) to show and hide the display of each
individual entry.
Click the Close button to close the window, and click the Export to Excel link to export the contents of
the window to an Excel file. See section A.1.3 Exporting to Excel on page 231 for details on the Export
to Excel feature. The resulting file is called event_history_detail.xls.
► To display the Event Details window:
1. Access the Event History log, as described in section A.1 Viewing Event History.
2. Click the View button for the desired event. The Event Details window for the event displays.
3

ONESOURCE STATE APPORTIONMENT Version 2.0 User Guide
User Guide (A.1 Viewing Event History) ® 2009 Thomson Reuters/ONESOURCE
(Last Updated September 2009) 231 All Rights Reserved
A.1.3 Exporting to Excel
The Export to Excel feature is available from the Event History page and the Event Details window.
In each case, the feature exports the current display to a file in Microsoft Excel format. The Event
History file is called event_history.xls, and the Event Detail file is called event_history_detail.xls.
During the export, you can choose to save the file to your computer or open it for viewing. If you choose
to save the file, you can rename it from the default name listed above. If you choose to open the file for
viewing, you must have Excel installed on your computer and your browser must allow pop-ups from
OSA. See section D.3.1 Exporting Files on page 280 for information on configuring your browser to
allow pop-ups.
► To export the Event History log to Excel:
2. Access the Event History log, as described in section A.1 Viewing Event History.
3. Before you export, use the Date Options and other filtering options to show the data you want.
4. Click the Export to Excel link.
5. Choose whether to Open or Save the file.
a. When choosing to open the file, your browser must allow pop-ups from OSA and
you must have Excel installed on your computer.
Once you view it, ensure you save it to the location of your choice, as the file is not
automatically saved.
b. When choosing to save the file, you are asked to specify the location on your
computer to save the file. Follow the prompts to save the file. You can then view the
file using Excel.
4

ONESOURCE STATE APPORTIONMENT Version 2.0 User Guide
User Guide (A.2 Terminating Active User Sessions) ® 2009 Thomson Reuters/ONESOURCE
(Last Updated September 2009) 232 All Rights Reserved
► To export the Event Details window to Excel:
1. Access the Event Details window as described in section A.1.2 Viewing Event Details (Before
and After Values).
2. Click the Export to Excel link.
3. Choose whether to Open or Save the file.
a. When choosing to open the file, your browser must allow pop-ups from OSA and
you must have Excel installed on your computer.
Once you view it, ensure you save it to the location of your choice, as the file is not
automatically saved.
b. When choosing to save the file, you are asked to specify the location on your
computer to save the file. Follow the prompts to save the file. You can then view the
file using Excel.
A.2 Terminating Active User Sessions
Using this feature, you can terminate any user session other than your own. Terminating a user‘s
session means that he or she is logged out of OSA. This should be done only when necessary because
the user is logged out without notice and will lose any unsaved data. Terminating a user‘s session does
not affect any other users of the application or any saved data. Should the user log back in, any saved
data is retained.
Note: OSA provides a user activity log for download for use by system administrators who want to view
detailed user activity in standard activity log format. Access the Active Sessions page as described
next, then click the Download User Activity Log button.
2
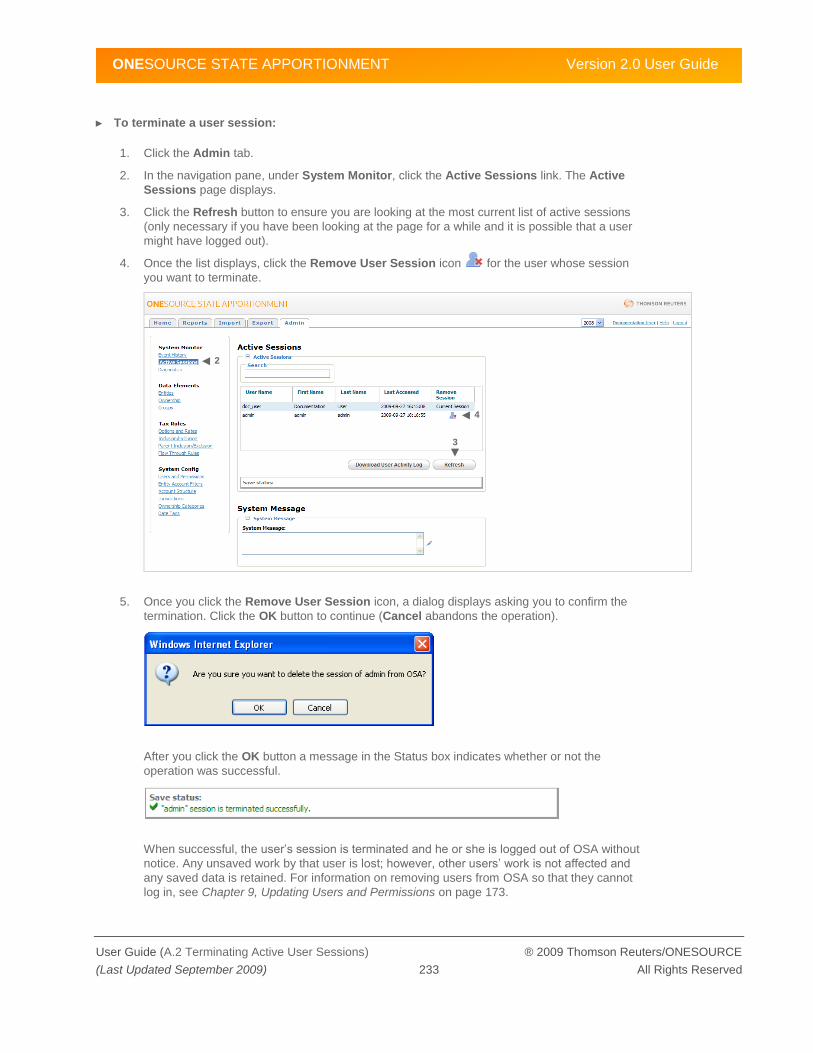
ONESOURCE STATE APPORTIONMENT Version 2.0 User Guide
User Guide (A.2 Terminating Active User Sessions) ® 2009 Thomson Reuters/ONESOURCE
(Last Updated September 2009) 233 All Rights Reserved
► To terminate a user session:
1. Click the Admin tab.
2. In the navigation pane, under System Monitor, click the Active Sessions link. The Active
Sessions page displays.
3. Click the Refresh button to ensure you are looking at the most current list of active sessions
(only necessary if you have been looking at the page for a while and it is possible that a user
might have logged out).
4. Once the list displays, click the Remove User Session icon for the user whose session
you want to terminate.
5. Once you click the Remove User Session icon, a dialog displays asking you to confirm the
termination. Click the OK button to continue (Cancel abandons the operation).
After you click the OK button a message in the Status box indicates whether or not the
operation was successful.
When successful, the user‘s session is terminated and he or she is logged out of OSA without
notice. Any unsaved work by that user is lost; however, other users‘ work is not affected and
any saved data is retained. For information on removing users from OSA so that they cannot
log in, see Chapter 9, Updating Users and Permissions on page 173.
3
2
4

ONESOURCE STATE APPORTIONMENT Version 2.0 User Guide
User Guide (A.3 Managing System Messages) ® 2009 Thomson Reuters/ONESOURCE
(Last Updated September 2009) 234 All Rights Reserved
A.3 Managing System Messages
The system message feature allows the administrator to enter a system message alert for all users. The
message will appear in a popup alert box.
Users that are already logged in will receive the alert message when they navigate to their next page.
Users logging into the system will receive the alert message upon login.
► To manage system messages:
1. Click the Admin tab.
2. In the left-hand column, under System Monitor, click the Active Sessions link. The Active
Sessions page displays.
3. Click the edit icon to edit the message. The System Message box becomes editable.
4. Enter your message. Click the Clear button to clear the message. Then click the Save button
(Cancel abandons the operation). The system message is updated. Below is an example of
the alert box with the system message:
1
2
3

ONESOURCE STATE APPORTIONMENT Version 2.0 User Guide
User Guide (A.4 Running Diagnostics) ® 2009 Thomson Reuters/ONESOURCE
(Last Updated September 2009) 235 All Rights Reserved
A.4 Running Diagnostics
OSA provides a set of diagnostics reports designed to notify the user of potential issues with the data
and settings currently defined in OSA. The output of a given diagnostic report does not necessarily
represent an error. Rather, it represents a general abnormality that you should understand and, if
appropriate, correct.
Diagnostic reports are most commonly used after importing data; however, you can run diagnostic
reports at any time. Diagnostic reports are not the same as the error log messages that are displayed
during CSV file imports. Error log messages identify problems with specific records during the import of
one or more CSV files causing the import process to reject the file whereas diagnostics analyze data
and settings within OSA and report on possible issues. See Appendix D, Working with CSV Files on
page 275 for information on import error messages.
OSA provides year-specific and multi-year diagnostic reports. As expected, year-specific diagnostic
reports run the selected diagnostic tests on the tax year selected whereas multi-year diagnostics
analyze the data and settings across all tax years in OSA.
► To run a diagnostics report:
1. Click the Admin tab.
2. In the navigation pane, under System Monitor, click the Diagnostics link. The Diagnostics
page displays.
3. Select the diagnostics report(s) to run. For the year-specific diagnostics report, use the Tax
Year drop-down list to select the tax year.
1
3 2
4

ONESOURCE STATE APPORTIONMENT Version 2.0 User Guide
User Guide (A.4 Running Diagnostics) ® 2009 Thomson Reuters/ONESOURCE
(Last Updated September 2009) 236 All Rights Reserved
4. Click the Diagnostic button to run the selected diagnostics reports. When the reports are
done, a message displays at the top of the page.
The selected diagnostics reports are run and the results are displayed at the bottom of the
Diagnostics page. A sample is shown next.
When the selected diagnostics report does not encounter the particular circumstances for
which it is testing, a message displays indicating that there is no data available for the
diagnostic type. For example, if you select the first diagnostics report, ―Apportionment Entities
Lacking Payroll Factors,‖ and all entities have balances for Payroll Factor accounts, the
message will read ―There is no data available for this diagnostic type.‖
You can also export the results to a comma-delimited file (.csv), as explained next.
► To export a diagnostics report to a file:
The results of the selected diagnostic reports appear directly on the Diagnostics page in OSA. However,
in addition, you can export the diagnostics report to comma-delimited file (.csv).
Once the selected diagnostics reports are run and the results are displayed, OSA provides an Export
Diagnostics Report link at the top of the results. To export the report, click the link.
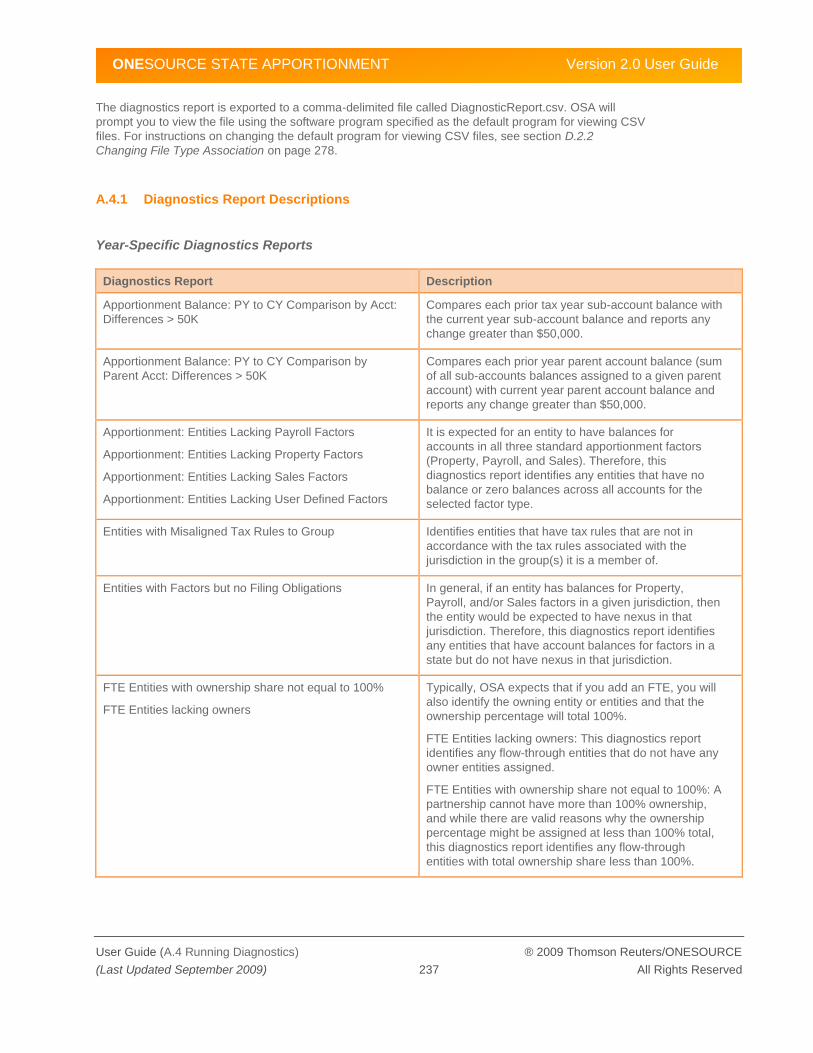
ONESOURCE STATE APPORTIONMENT Version 2.0 User Guide
User Guide (A.4 Running Diagnostics) ® 2009 Thomson Reuters/ONESOURCE
(Last Updated September 2009) 237 All Rights Reserved
The diagnostics report is exported to a comma-delimited file called DiagnosticReport.csv. OSA will
prompt you to view the file using the software program specified as the default program for viewing CSV
files. For instructions on changing the default program for viewing CSV files, see section D.2.2
Changing File Type Association on page 278.
A.4.1 Diagnostics Report Descriptions
Year-Specific Diagnostics Reports
Diagnostics Report Description
Apportionment Balance: PY to CY Comparison by Acct:
Differences > 50K
Compares each prior tax year sub-account balance with
the current year sub-account balance and reports any
change greater than $50,000.
Apportionment Balance: PY to CY Comparison by
Parent Acct: Differences > 50K
Compares each prior year parent account balance (sum
of all sub-accounts balances assigned to a given parent
account) with current year parent account balance and
reports any change greater than $50,000.
Apportionment: Entities Lacking Payroll Factors
Apportionment: Entities Lacking Property Factors
Apportionment: Entities Lacking Sales Factors
Apportionment: Entities Lacking User Defined Factors
It is expected for an entity to have balances for
accounts in all three standard apportionment factors
(Property, Payroll, and Sales). Therefore, this
diagnostics report identifies any entities that have no
balance or zero balances across all accounts for the
selected factor type.
Entities with Misaligned Tax Rules to Group Identifies entities that have tax rules that are not in
accordance with the tax rules associated with the
jurisdiction in the group(s) it is a member of.
Entities with Factors but no Filing Obligations In general, if an entity has balances for Property,
Payroll, and/or Sales factors in a given jurisdiction, then
the entity would be expected to have nexus in that
jurisdiction. Therefore, this diagnostics report identifies
any entities that have account balances for factors in a
state but do not have nexus in that jurisdiction.
FTE Entities with ownership share not equal to 100%
FTE Entities lacking owners
Typically, OSA expects that if you add an FTE, you will
also identify the owning entity or entities and that the
ownership percentage will total 100%.
FTE Entities lacking owners: This diagnostics report
identifies any flow-through entities that do not have any
owner entities assigned.
FTE Entities with ownership share not equal to 100%: A
partnership cannot have more than 100% ownership,
and while there are valid reasons why the ownership
percentage might be assigned at less than 100% total,
this diagnostics report identifies any flow-through
entities with total ownership share less than 100%.

ONESOURCE STATE APPORTIONMENT Version 2.0 User Guide
User Guide (A.4 Running Diagnostics) ® 2009 Thomson Reuters/ONESOURCE
(Last Updated September 2009) 238 All Rights Reserved
Diagnostics Report Description
Jurisdictions: Lacking Filing Obligations
There are some states where having no obligations is
expected because they do not levy Corporate State
Income Taxes (i.e., Nevada, South Dakota) or you may
not have companies doing business in the state.
However, this diagnostics report lists any jurisdictions
defined in OSA that do not have any entities or groups
with nexus in that jurisdiction.
Jurisdictions: Number of Filing Obligations This diagnostics report lists all the jurisdictions defined
within OSA and the number of entities and groups with
nexus in that jurisdiction.
SMLLC Entities with multiple owners Identifies SMLCC's with more than one owner assigned.
Tax Rules with no entities or groups assigned This diagnostics report identifies any unused tax rules.
Unused tax rules could possibly indicate missed entity
assignments (cases where a tax rule should have been
assigned to an entity but wasn‘t).
Multi-Year Diagnostics Reports
Diagnostics Report Description
C-Corp Entities not included in any Group Filings This is a list of entities of type C-Corp that are not
included in any Groups. There are tax reasons why an
entity may or may not be included in a particular group,
but in general most of a client‘s corporations will be
included in at least one group. This diagnostic helps
identify any entities (possibly newly acquired entities)
that may have slipped thru the cracks when setting up
the group membership for the latest tax year.
C-Corp and SMLLC entities with non-Limited and non-
Unitary owners
When adding entities and defining ownership, you
assign the owning entities and the percentage of
ownership. Two additional characteristics of ownership
are whether the owner is a Limited or General Partner
and whether the owned entity‘s business is Unitary or
Non-Unitary to the owner.
This diagnostics report identifies any C-Corp or SMLLC
entities with owners that are not a) Limited Partners or
b) Unitary. The significance is that for these entities,
typically, any owners should have the characteristics of
Limited and Unitary; therefore, this report identifies
unusual relationships.
Entities in multiple active Groups for Jurisdiction Identifies entities that are members of more than one
filing group in a given jurisdiction.
Entities lacking Filing Obligations Typically, an entity will have at least one filing obligation
(nexus in at least one jurisdiction), and this diagnostics
report identifies entities that do not have nexus in any
jurisdictions.
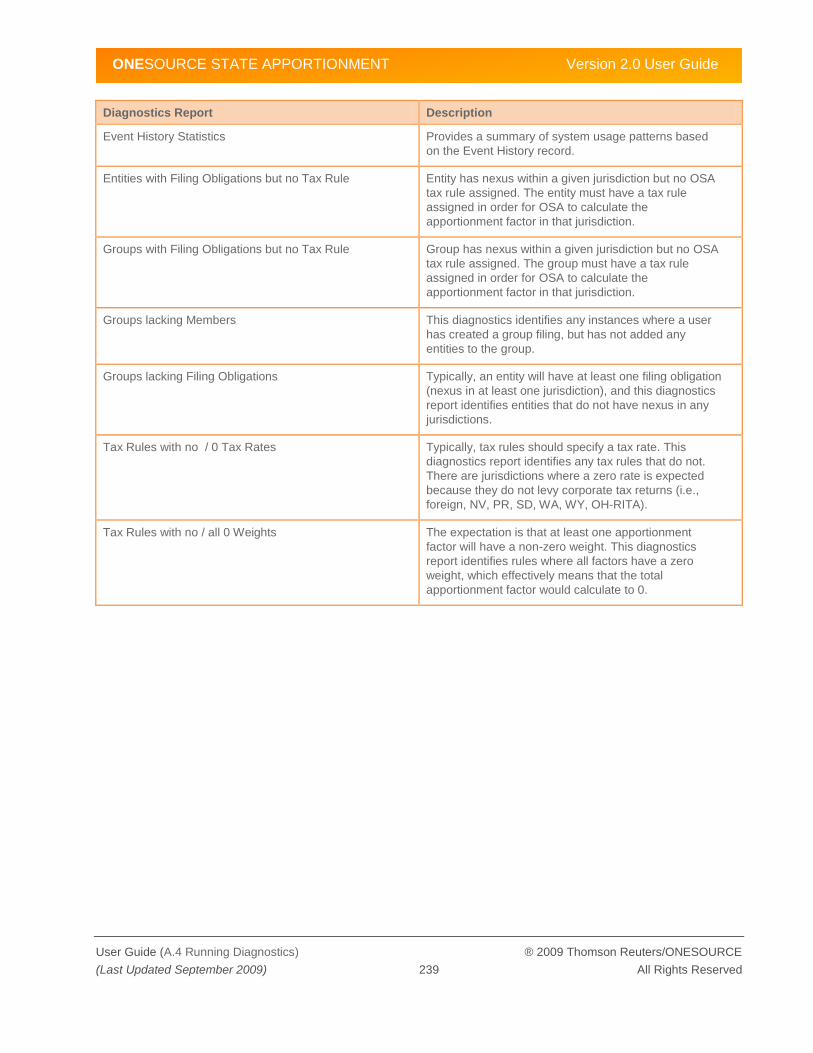
ONESOURCE STATE APPORTIONMENT Version 2.0 User Guide
User Guide (A.4 Running Diagnostics) ® 2009 Thomson Reuters/ONESOURCE
(Last Updated September 2009) 239 All Rights Reserved
Diagnostics Report Description
Event History Statistics Provides a summary of system usage patterns based
on the Event History record.
Entities with Filing Obligations but no Tax Rule Entity has nexus within a given jurisdiction but no OSA
tax rule assigned. The entity must have a tax rule
assigned in order for OSA to calculate the
apportionment factor in that jurisdiction.
Groups with Filing Obligations but no Tax Rule Group has nexus within a given jurisdiction but no OSA
tax rule assigned. The group must have a tax rule
assigned in order for OSA to calculate the
apportionment factor in that jurisdiction.
Groups lacking Members This diagnostics identifies any instances where a user
has created a group filing, but has not added any
entities to the group.
Groups lacking Filing Obligations Typically, an entity will have at least one filing obligation
(nexus in at least one jurisdiction), and this diagnostics
report identifies entities that do not have nexus in any
jurisdictions.
Tax Rules with no / 0 Tax Rates Typically, tax rules should specify a tax rate. This
diagnostics report identifies any tax rules that do not.
There are jurisdictions where a zero rate is expected
because they do not levy corporate tax returns (i.e.,
foreign, NV, PR, SD, WA, WY, OH-RITA).
Tax Rules with no / all 0 Weights The expectation is that at least one apportionment
factor will have a non-zero weight. This diagnostics
report identifies rules where all factors have a zero
weight, which effectively means that the total
apportionment factor would calculate to 0.

ONESOURCE STATE APPORTIONMENT Version 2.0 User Guide
User Guide (B.1 Overview) ® 2009 Thomson Reuters/ONESOURCE
(Last Updated September 2009) 240 All Rights Reserved
B Custom Data Imports
Appendix B covers OSA‘s custom import feature. This feature enables you to create custom import
templates and data translation tables (data maps) for purposes of importing OSA account data or
apportionment percentages and tax rates from an Excel or comma-delimited text file (.csv). These files
are typically exported from other tax systems (e.g., Compliance, Provision, Planning). This appendix
includes the following sections:
B.1: Overview
B.2: Managing Import Templates
B.3: Managing Data Maps
B.4: Using a Custom Import Template
B.1 Overview
Import Templates define the Data Mappings to be used when importing data from a given source.
Similar to the custom export capabilities, a custom transform can be defined to run on import data. This
ability enables OSA to handle nearly any type of input format. Typically, custom import templates are
paired with custom import scripts to read and manipulate data from source XLS files. Contact
Professional Services if you have any questions or need assistance generating transformations.
Data map is the term used in OSA to describe lookup tables created and stored in OSA to translate the
value in the import file to its corresponding field in OSA. For example, an account may be called
Accumulated Depreciation Buildings in another system, but be called Less Accum. Deprec. Buildings in
OSA. You can create entity, jurisdiction, and account maps.
Data maps offer a great deal of flexibility. For example, you can use an account map to map two
separate import accounts to the same OSA account. Maps can also be used to indicate data that should
be excluded from the import. You can create multiple maps for all three types of maps to accommodate
different originating systems‘ values. You may also use the same data map in multiple import templates.
Once you create a data map, you cannot delete it, but you can make it inactive. Data maps are specific
to the current year, but you can import and export the data maps themselves, so you do not have to re-
create them year-to-year. Data maps are the core of the import feature and it is important that you
understand the data structure in both the originating system and OSA in order to map the data
optimally.
Import Template is the term used in OSA to describe the format and settings used for a given custom
import file. When creating an import template, you are asked to specify which data maps (if any) should
be used.
To create a custom import template or data maps, users require both Import tab access and Custom
Import/Export data type permissions. To use the import templates, users require Import tab access and
Entities, Account Data, and/or Groups data type access, depending on the type of template it is. In
addition, the entities and groups they can choose to import are governed by a user‘s entity/group
access list (the list of entities and groups the user has permission to view). Refer to Chapter 9, Updating
Users and Permissions on page 173 for information on user permissions.

ONESOURCE STATE APPORTIONMENT Version 2.0 User Guide
User Guide (B.2 Managing Import Templates) ® 2009 Thomson Reuters/ONESOURCE
(Last Updated September 2009) 241 All Rights Reserved
B.2 Managing Import Templates
To create import templates, you reference the appropriate data maps. You can delete import templates
as well as update the options and change the data maps it references.
The mappings you can specify for the import template are:
Mappings
Entity, Account, and/or Jurisdiction Map Select the data maps that apply to this import template.
B.2.1 Creating an Import Template
► To create an import template:
1. Click the Import tab.
2. In the navigation pane, under Custom Import, click the Import Templates link. The Import
Templates page displays.
3. Click the Add… button. The Add Import Template dialog displays.
4. Enter the name for the template.
1
2
3
5

ONESOURCE STATE APPORTIONMENT Version 2.0 User Guide
User Guide (B.2 Managing Import Templates) ® 2009 Thomson Reuters/ONESOURCE
(Last Updated September 2009) 242 All Rights Reserved
5. Click the Add button (Cancel abandons the add operation). The template is created and the
Import Templates panel closes, leaving the options and mappings page displayed, as shown
next.
6. Select the desired entity, jurisdiction, and/or account maps.
7. Click the Save button (Reset undoes any changes made since the last save operation).
The Save status box displays a message indicating whether or not the operation was
successful, and if not, what error occurred.
B.2.2 Editing an Import Template
► To edit an import template:
1. Access the Import Templates page, as described in Steps 1 and 2 above.
2. Click to highlight and select the template to edit. The options and mappings for the template
display.
3. Edit the desired options and mappings.
4. Click the Save button (Reset undoes any changes made since the last save operation).
The Save status box displays a message indicating whether or not the save operation was
successful, and if not, what error occurred.
7

ONESOURCE STATE APPORTIONMENT Version 2.0 User Guide
User Guide (B.2 Managing Import Templates) ® 2009 Thomson Reuters/ONESOURCE
(Last Updated September 2009) 243 All Rights Reserved
B.2.3 Deleting an Import Template
1. Click the Import tab.
2. In the navigation pane, under Custom Import, click the Import Templates link. The Import
Templates page displays.
3. Click to highlight and select the template to delete.
4. In the template page, click the Remove button. A confirmation dialog displays.
1
2
3
4
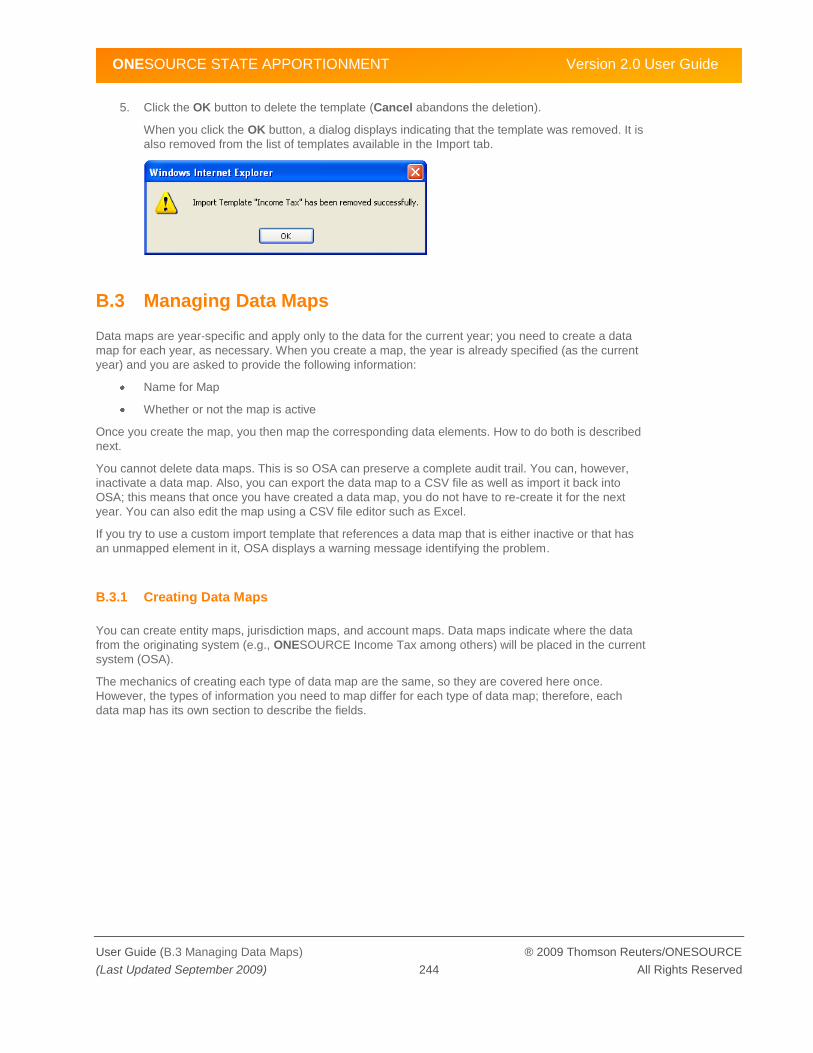
ONESOURCE STATE APPORTIONMENT Version 2.0 User Guide
User Guide (B.3 Managing Data Maps) ® 2009 Thomson Reuters/ONESOURCE
(Last Updated September 2009) 244 All Rights Reserved
5. Click the OK button to delete the template (Cancel abandons the deletion).
When you click the OK button, a dialog displays indicating that the template was removed. It is
also removed from the list of templates available in the Import tab.
B.3 Managing Data Maps
Data maps are year-specific and apply only to the data for the current year; you need to create a data
map for each year, as necessary. When you create a map, the year is already specified (as the current
year) and you are asked to provide the following information:
Name for Map
Whether or not the map is active
Once you create the map, you then map the corresponding data elements. How to do both is described
next.
You cannot delete data maps. This is so OSA can preserve a complete audit trail. You can, however,
inactivate a data map. Also, you can export the data map to a CSV file as well as import it back into
OSA; this means that once you have created a data map, you do not have to re-create it for the next
year. You can also edit the map using a CSV file editor such as Excel.
If you try to use a custom import template that references a data map that is either inactive or that has
an unmapped element in it, OSA displays a warning message identifying the problem.
B.3.1 Creating Data Maps
You can create entity maps, jurisdiction maps, and account maps. Data maps indicate where the data
from the originating system (e.g., ONESOURCE Income Tax among others) will be placed in the current
system (OSA).
The mechanics of creating each type of data map are the same, so they are covered here once.
However, the types of information you need to map differ for each type of data map; therefore, each
data map has its own section to describe the fields.
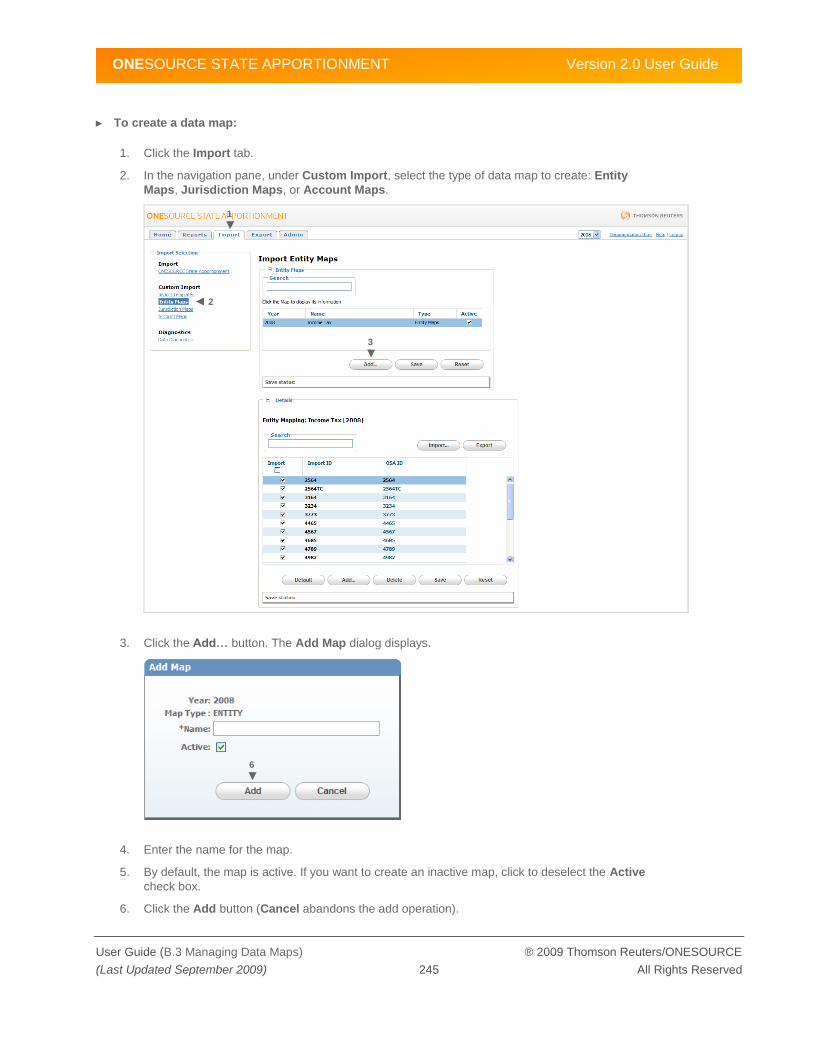
ONESOURCE STATE APPORTIONMENT Version 2.0 User Guide
User Guide (B.3 Managing Data Maps) ® 2009 Thomson Reuters/ONESOURCE
(Last Updated September 2009) 245 All Rights Reserved
► To create a data map:
1. Click the Import tab.
2. In the navigation pane, under Custom Import, select the type of data map to create: Entity
Maps, Jurisdiction Maps, or Account Maps.
3. Click the Add… button. The Add Map dialog displays.
4. Enter the name for the map.
5. By default, the map is active. If you want to create an inactive map, click to deselect the Active
check box.
6. Click the Add button (Cancel abandons the add operation).
1
2
3
6

ONESOURCE STATE APPORTIONMENT Version 2.0 User Guide
User Guide (B.3 Managing Data Maps) ® 2009 Thomson Reuters/ONESOURCE
(Last Updated September 2009) 246 All Rights Reserved
► To perform and save the data element mapping:
1. Access the appropriate data map page as described in Steps 1 and 2 above.
2. Click to select the map to edit. The mapping table displays underneath in the Details panel.
The example below is for an Entity Map called Income Tax.
3. For each record you want to import, ensure the Import check box contains a checkmark. Use
the check box in the column header to select/de-select all the check boxes.
4. For the columns that start with the word ―Import,‖ you need to fill in the appropriate name/value
for each field. You can do this in three ways:
a. Double-click in the field and type the value manually.
5
4a
3
4b
4c

ONESOURCE STATE APPORTIONMENT Version 2.0 User Guide
User Guide (B.3 Managing Data Maps) ® 2009 Thomson Reuters/ONESOURCE
(Last Updated September 2009) 247 All Rights Reserved
b. Click the Default button. OSA fills all the import fields with the OSA names/values.
You can then make any necessary edits manually.
c. Import an existing mapping file by clicking the Import… button. For instructions on
importing and exporting data maps, see section B.3.3 Importing/Exporting Data Maps
on page 248.
5. When you are done filling the import fields with the desired names/values, click the Save
button (Reset undoes any changes made since the last save operation).
When you click the Save button, the Save status box displays a message indicating whether or
not the operation was successful, and if not, what occurred
Entity Maps
When creating an entity map, you are asked to map the following fields:
Incoming ID OSA Field Description
Import ID OSA ID Entity ID
Jurisdiction Maps
When creating a jurisdiction map, you are asked to map the following fields:
Incoming ID OSA Field Description
Import ID OSA ID Jurisdiction ID
Account Maps
When creating an account map, you are asked to map the following fields:
Incoming ID OSA Field Description
Import ID Account Account the amount is imported into.
None Jurisdiction Jurisdiction the entry is imported into.
None Multiplier The amount imported is multiplied by
this value.
None Parent Account N/A. It is not mapped to an export
field. It is included in the table to
facilitate identification of the OSA
field.
None Factor Apportionment Factor under which
the account resides.
None Account ID N/A

ONESOURCE STATE APPORTIONMENT Version 2.0 User Guide
User Guide (B.3 Managing Data Maps) ® 2009 Thomson Reuters/ONESOURCE
(Last Updated September 2009) 248 All Rights Reserved
B.3.2 Inactivating/Activating Data Maps
You cannot delete a data map once you have created it. However, you can inactivate it. Once you
inactivate a data map, you cannot reference it from an import template. And, if an existing import
template references a data map that you subsequently make inactive, trying to use that import template
will generate an error message for the user indicating the type of data map and that it is inactive.
► To inactivate/activate a data map:
1. Click the Import tab.
2. In the navigation pane, under Custom Import, select the desired data map type: Entity Maps,
Jurisdiction Maps, or Account Maps.
3. From the data maps table that displays, click the Active check box for the data map whose
status you want to change. A check mark indicates that the map is active.
4. Click the Save button.
Once you click the Save button, the data map is updated. The Save status box displays a
message indicating whether or not the operation was successful, and if not, what error
occurred.
B.3.3 Importing/Exporting Data Maps
You can export the data mapping to a comma-delimited (CSV) file. This is useful for reviewing the
mapping, editing it (since you can use Excel and its editing features), or for importing it for use in
another OSA tax year. Once you have exported the mapping to a file, you can then import it.
For the entity map CSV file, OSA requires only that Entity ID be the second column, and that the Entity
IDs be valid and unique entries. OSA populates the Entity Name and FEIN fields from the OSA
database; it does not populate these values from the imported file and, therefore, it is unimportant what
is contained in the OSA Entity Name and OSA FEIN columns in the CSV file. The other fields are
populated directly from the imported CSV file and OSA places no restrictions on the content.
The default file names for the exported map CSV files are entity_maps.csv, jurisdiction_maps.csv, and
account_maps.csv. If desired, you can change the name of a map file when saving it during export.
1
3 2
4

ONESOURCE STATE APPORTIONMENT Version 2.0 User Guide
User Guide (B.3 Managing Data Maps) ® 2009 Thomson Reuters/ONESOURCE
(Last Updated September 2009) 249 All Rights Reserved
► To export the data mapping:
1. Click the Import tab.
2. In the navigation pane, under Custom Import, select the desired data map type: Entity Maps,
Jurisdiction Maps, or Account Maps.
3. From the data maps table that displays, click the data map for which you want to export the
mapping. The Details panel displays underneath the map table.
4. Click the Export button. The file is exported to a CSV file. You are asked whether or not you
want to open or save the file. If you choose to save the file, you are then asked to browse and
select the folder in which to save the file. You may then also rename the file from the default, if
desired.
3 2
1
4
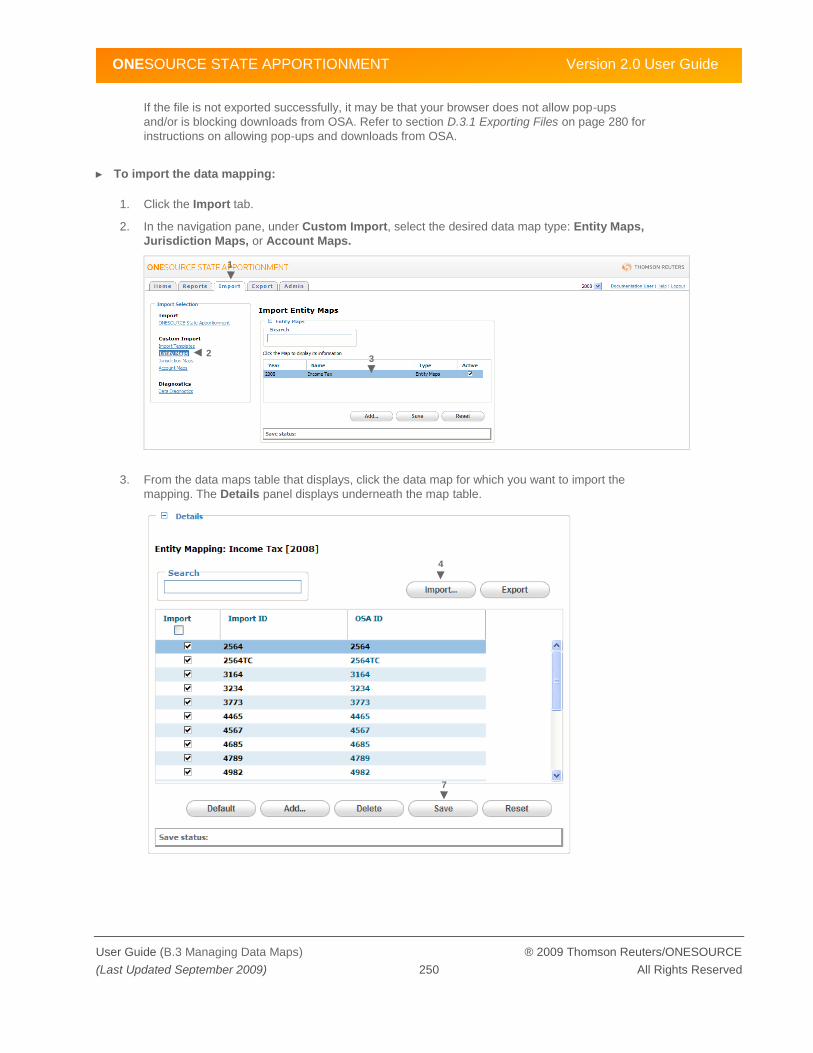
ONESOURCE STATE APPORTIONMENT Version 2.0 User Guide
User Guide (B.3 Managing Data Maps) ® 2009 Thomson Reuters/ONESOURCE
(Last Updated September 2009) 250 All Rights Reserved
If the file is not exported successfully, it may be that your browser does not allow pop-ups
and/or is blocking downloads from OSA. Refer to section D.3.1 Exporting Files on page 280 for
instructions on allowing pop-ups and downloads from OSA.
► To import the data mapping:
1. Click the Import tab.
2. In the navigation pane, under Custom Import, select the desired data map type: Entity Maps,
Jurisdiction Maps, or Account Maps.
3. From the data maps table that displays, click the data map for which you want to import the
mapping. The Details panel displays underneath the map table.
3 2
1
4
7

ONESOURCE STATE APPORTIONMENT Version 2.0 User Guide
User Guide (B.4 Using a Custom Import Template) ® 2009 Thomson Reuters/ONESOURCE
(Last Updated September 2009) 251 All Rights Reserved
4. Click the Import… button. The Import Map from File dialog displays, prompting you to enter
the file path and name.
5. Click the Browse button to navigate to and open the file.
6. When the file path and name are listed in the File Name box, click the Import button (Cancel
abandons the import operation). When the import operation is successful, you will see the data
fields update in the Details table.
7. Click the Save button.
In order to retain the imported values, you must click the Save button. Import only updates the
values on the screen.
B.4 Using a Custom Import Template
When custom import templates are created, they are listed for use in the Import tab. In the Import tab,
the template is available when importing Account Data in the ONESOURCE State Apportionment area.
To use the import template, you will require permissions to the Import tab in addition to Account Data
and Entities data type permissions. If the template is set up to import Group data, then Groups data
type permissions is also required.
Also, during import, you can save and name the import options you choose in order to import the same
data set again in the future. This is particularly helpful with large data sets when you want to select the
same subset of data each time. Saved options are user specific and only available to the user who
created them.
6

ONESOURCE STATE APPORTIONMENT Version 2.0 User Guide
User Guide (B.4 Using a Custom Import Template) ® 2009 Thomson Reuters/ONESOURCE
(Last Updated September 2009) 252 All Rights Reserved
► To use a custom import template:
1. Click the Import tab.
2. Select Account Data from the FileType drop-down.
3. Specify the following.
a. Select the desired custom import template to map the account data.
b. Whether to add to and update the existing account data or clear the existing data and
replace it with the data in the file. Select the radio button for the desired choice.
c. Whether to update only beginning values, only ending values, or both. Place a check
mark in the check box for the values you want to update.
4. For the Select the File to Import text box, click the Browse button. A dialog appears allowing
you to navigate to and select the file for import. Find the file and click the Open button
5. Once the file name and path appear in the Select the File to Import text box, click the Import
button.
OSA opens the specified file(s), and begins the import process. This might take from a few to
many minutes depending on the size of the files being imported.
If the import is successful, a message to that effect is displayed. At this point, you should run
the recommended diagnostics to ensure data integrity. To do so, select the Diagnostics link.
Refer to Appendix A, System Monitoring on page 222 for information on how to run and
interpret the diagnostic reports.
If there are errors, you are notified and the errors are listed. Refer to Possible Import Errors in
section D.3.2 Importing Files on page 284.
1
2
3

ONESOURCE STATE APPORTIONMENT Version 2.0 User Guide
User Guide (C.1 Overview) ® 2009 Thomson Reuters/ONESOURCE
(Last Updated September 2009) 253 All Rights Reserved
C Custom Data Exports
Appendix C covers OSA‘s custom export feature. This feature enables you to create custom export
templates and data translation tables (data maps) for purposes of exporting OSA account data or
apportionment percentages and tax rates to an Excel or comma-delimited text file (.csv) for import into
other tax systems (e.g., Compliance, Provision, Planning). This appendix includes the following
sections:
C.1: Overview
C.2: Managing Export Templates
C.3: Managing Data Maps
C.4: Using a Custom Export Template
C.1 Overview
With OSA‘s custom export feature, you create export templates and data maps to define the file format
and types of data to be contained in your custom export.
Data map is the term used in OSA to describe lookup tables created and stored in OSA to translate the
value in the OSA field to its corresponding value in the target system. For example, an account may be
called Less Accum. Deprec. Buildings in OSA, but be called Accumulated Depreciation Buildings in the
destination system. You can create entity, jurisdiction, account, and eliminations data maps.
Data maps offer a great deal of flexibility. For example, you can use an account map to map two
separate OSA accounts to the same destination system account. In this case, the export will not only
translate the Account ID, but will also sum the balances together in the output file. Maps can also be
used to indicate data that should be excluded from the custom export file and to indicate whether a
particular account‘s balance should be positive or negative in the output file. You can create multiple
maps for all four types of maps to accommodate different destination systems‘ values. You may also
use the same data map in multiple export templates.
Once you create a data map, you cannot delete it, but you can make it inactive. Data maps are specific
to the current year, but you can import and export the data maps themselves, so you do not have to re-
create them year-to-year. Data maps are the core of the export feature and it is important that you
understand the data structure in both OSA and the target system in order to map the data optimally.
Export Template is the term used in OSA to describe the format and settings used for a given custom
export report file. When creating an export template, you are asked to specify various settings including
the template category (compliance, tax accounting, planning, or other), the output format (Excel or CSV
file), the type of information to export (account data or apportionment percentages and tax rates), the
logic rules (e.g., apply account tax rules, capitalize rent, rollup division to parent), how to handle
beginning and ending data values (for account data export templates), and which data maps (if any)
should be used. All export templates are required to use an account map, however the use of entity,
jurisdiction, and elimination maps are optional. Finally, to format the output, you are presented with all
the possible fields and asked to organize and name the report column(s).
To create a custom export template or data maps, users require both Export tab access and Custom
Import/Export data type permissions. To use the export templates, users require Export tab access and
Entities, Account Data, and/or Groups data type access, depending on the type of template it is. In
addition, the entities and groups they can choose to export are governed by a user‘s entity/group
access list (the list of entities and groups the user has permission to view). Refer to Chapter 9, Updating
Users and Permissions on page 173 for information on user permissions.

ONESOURCE STATE APPORTIONMENT Version 2.0 User Guide
User Guide (C.2 Managing Export Templates) ® 2009 Thomson Reuters/ONESOURCE
(Last Updated September 2009) 254 All Rights Reserved
C.2 Managing Export Templates
To create export templates, you specify the options and settings, reference the appropriate data maps,
and format the output columns. You can delete export templates as well as edit the settings, change the
data maps it references, and update the output format.
The options and settings you can specify for the export template are listed in the following table.
Field Values and/or Description
Options Applies to Account and Apportionment templates; does not apply to Rollover
templates.
Category Compliance, Tax Accounting, Planning, Other. This enables you to organize your
templates into one of four categories. Your choice has no effect on the template
except that the template is displayed under this category in the Export tab.
File Format CSV, Excel. Format in which to export the data. Choose the file format easiest to
use for your purposes, e.g., to import into your target system.
File Option Single Consolidated File, One File for Each Entity. Choose to export the data for
all entities in one consolidated file or in multiple files with one file for each entity,
in which case the files are added to a compressed file in ZIP format for
download.
Mappings
Entity, Account, Jurisdiction,
and/or Elim Map
Select the data maps that apply to this export template. When creating an
Account Data template, at minimum you must specify an Account Map.
Account Data Options For use when creating an Account Data export template.
Export Data For: Entities,
Divisions, Groups, Eliminations
Specifies whether or not to export account data for entities, divisions, groups,
and/or eliminations. A check mark indicates data will be exported. In order to
export data for divisions, you must also export entity data.
Export EOY/BOY Values As:
Separate Columns for the
Same Year
In the output, separate columns are included for beginning and ending values.
Separate Rows for Current
and Prior Year
In the outpu t, beginning and ending balances are included in different rows and
the tax year field is used to distinguish between the years.
Single Amount Only ending balances are included in the output. Only the In-State balances are
included for accounts set up with a calculation method of Numerator Only or Both
while only the Everywhere balances are included for accounts with a calculation
method of Denominator Only.
Raw Data Data is exported as it resides in OSA. You do not have the ability to specify the
columns to output.
Logic Rules:
Apply Account Tax Rules When checked, OSA applies the account inclusion and exclusion lists specified
by the assigned tax rule. Any excluded accounts are not included.

ONESOURCE STATE APPORTIONMENT Version 2.0 User Guide
User Guide (C.2 Managing Export Templates) ® 2009 Thomson Reuters/ONESOURCE
(Last Updated September 2009) 255 All Rights Reserved
Field Values and/or Description
Capitalize Rent When checked, specifies that OSA should apply the rent multiplier to the rent
accounts.
Include Zero Balances When checked, the export includes accounts with zero balances.
IMPORTANT! This option can take significantly longer to run and can result in
very large file sizes.
Don‘t Aggregate Data When checked, the contributions from each division and/or owned flow-through
entity are separated into their own rows in the export file, with the contributing
entity's ID listed as the Source ID. By default, this is not checked, and all
amounts for a given entity/jurisdiction/account are consolidated and the Source
ID in the output file is listed as AGGREGATED.
Make sure to include the Source ID field in the export format when using this
option.
Rollup Division to Parent When checked, and divisions are included, specifies that data for divisions
should be rolled up to parent and not listed separately.
Include Partnership Flows When checked, OSA flows the balances from flow-through entities to the parent.
Keep SMLLC Flow
Separate
This option, when used in conjunction with the ―Include Partnership Flows‖
option, does not flow SMLLC data into the partners. Instead, the SMLLCs
balances are listed separately in the output file. This is used in cases where
SMLLCs are treated more like divisions in a compliance system and you want to
keep the SMLLC data separate.
Flow All Partnerships When checked, all partnership amounts flow in the export file irrespective of the
partnership rules to allocate or treat partnerships as C-Corps.
Apportionment Data Options
for TaxStream
For use when creating a TaxStream Apportionment export template; does not
apply to non-TaxStream Apportionment templates.
Export Data For: Entities,
Divisions, Groups, Eliminations
Specifies whether or not to export account data for entities, divisions, groups,
and/or eliminations. A check mark indicates data will be exported. In order to
export data for divisions, you must also export entity data.
Apportionment % Output: Select neither option to output the entity‘s own apportionment % in all
jurisdictions.
Use Group % for Members Use the group‘s apportionment % (vs. the entity‘s own apportionment %) for
jurisdictions in which the entity is a member of a group.
Use Parent % for Divisions
and SMLLCs
Use the parent‘s apportionment % (vs. the Division or SMLLCs own
apportionment %) for jurisdictions in which the parent files.
Rollover Options For use when creating a Rollover export template.
Export EOY/BOY Values As:
Compliance (Ending to
Beginning)
Exports current account data and ownership % ending values as the beginning
values in the output file; ending values are empty.
Copy Beginning and
Ending
Creates an exact copy of account data and ownership %.
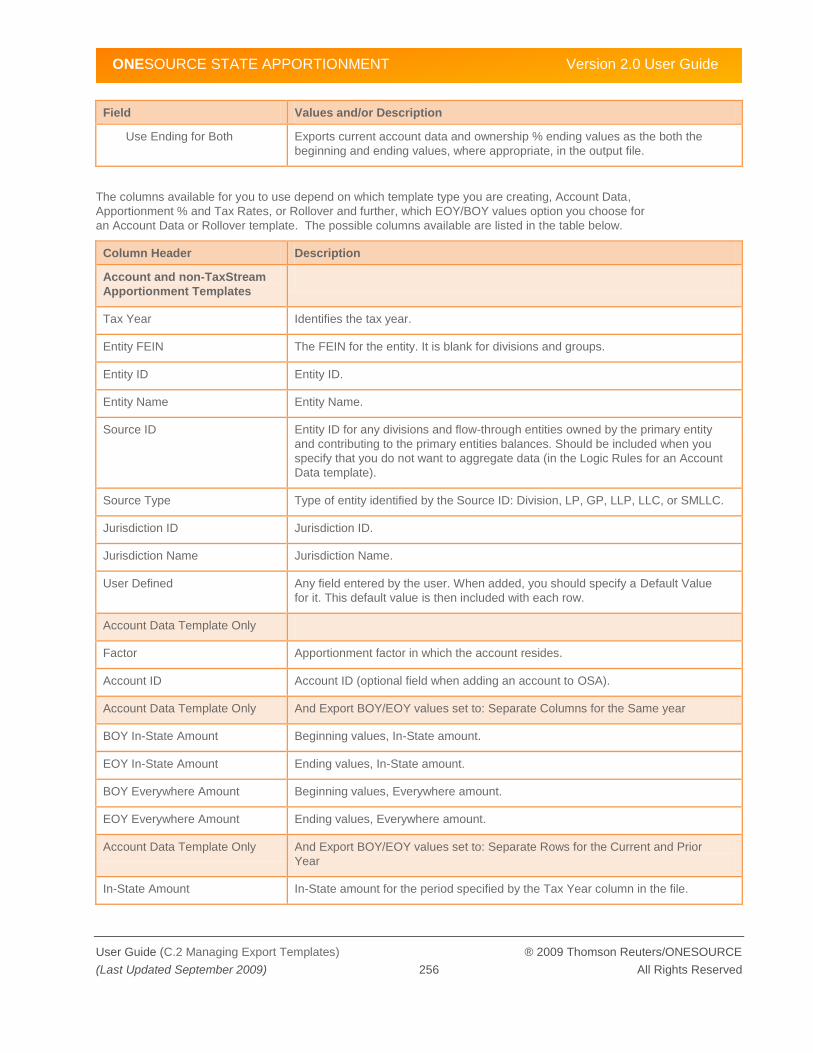
ONESOURCE STATE APPORTIONMENT Version 2.0 User Guide
User Guide (C.2 Managing Export Templates) ® 2009 Thomson Reuters/ONESOURCE
(Last Updated September 2009) 256 All Rights Reserved
Field Values and/or Description
Use Ending for Both Exports current account data and ownership % ending values as the both the
beginning and ending values, where appropriate, in the output file.
The columns available for you to use depend on which template type you are creating, Account Data,
Apportionment % and Tax Rates, or Rollover and further, which EOY/BOY values option you choose for
an Account Data or Rollover template. The possible columns available are listed in the table below.
Column Header Description
Account and non-TaxStream
Apportionment Templates
Tax Year Identifies the tax year.
Entity FEIN The FEIN for the entity. It is blank for divisions and groups.
Entity ID Entity ID.
Entity Name Entity Name.
Source ID Entity ID for any divisions and flow-through entities owned by the primary entity
and contributing to the primary entities balances. Should be included when you
specify that you do not want to aggregate data (in the Logic Rules for an Account
Data template).
Source Type Type of entity identified by the Source ID: Division, LP, GP, LLP, LLC, or SMLLC.
Jurisdiction ID Jurisdiction ID.
Jurisdiction Name Jurisdiction Name.
User Defined Any field entered by the user. When added, you should specify a Default Value
for it. This default value is then included with each row.
Account Data Template Only
Factor Apportionment factor in which the account resides.
Account ID Account ID (optional field when adding an account to OSA).
Account Data Template Only And Export BOY/EOY values set to: Separate Columns for the Same year
BOY In-State Amount Beginning values, In-State amount.
EOY In-State Amount Ending values, In-State amount.
BOY Everywhere Amount Beginning values, Everywhere amount.
EOY Everywhere Amount Ending values, Everywhere amount.
Account Data Template Only And Export BOY/EOY values set to: Separate Rows for the Current and Prior
Year
In-State Amount In-State amount for the period specified by the Tax Year column in the file.
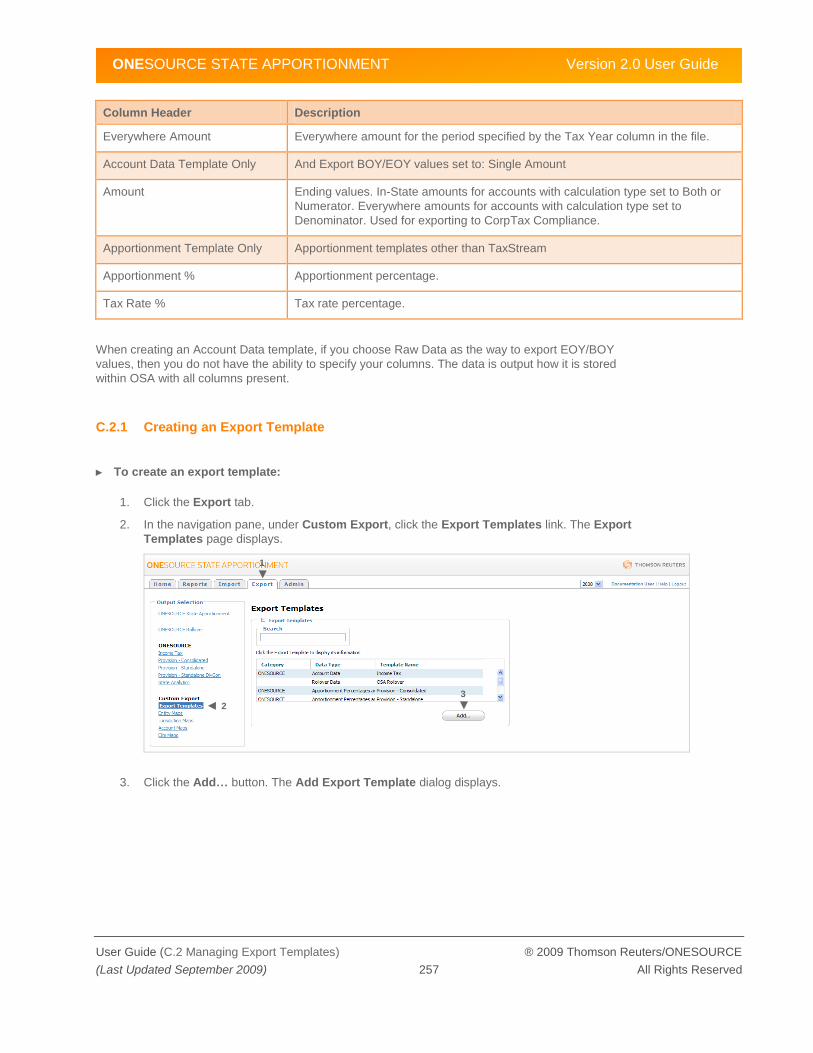
ONESOURCE STATE APPORTIONMENT Version 2.0 User Guide
User Guide (C.2 Managing Export Templates) ® 2009 Thomson Reuters/ONESOURCE
(Last Updated September 2009) 257 All Rights Reserved
Column Header Description
Everywhere Amount Everywhere amount for the period specified by the Tax Year column in the file.
Account Data Template Only And Export BOY/EOY values set to: Single Amount
Amount Ending values. In-State amounts for accounts with calculation type set to Both or
Numerator. Everywhere amounts for accounts with calculation type set to
Denominator. Used for exporting to CorpTax Compliance.
Apportionment Template Only Apportionment templates other than TaxStream
Apportionment % Apportionment percentage.
Tax Rate % Tax rate percentage.
When creating an Account Data template, if you choose Raw Data as the way to export EOY/BOY
values, then you do not have the ability to specify your columns. The data is output how it is stored
within OSA with all columns present.
C.2.1 Creating an Export Template
► To create an export template:
1. Click the Export tab.
2. In the navigation pane, under Custom Export, click the Export Templates link. The Export
Templates page displays.
3. Click the Add… button. The Add Export Template dialog displays.
1
3
2
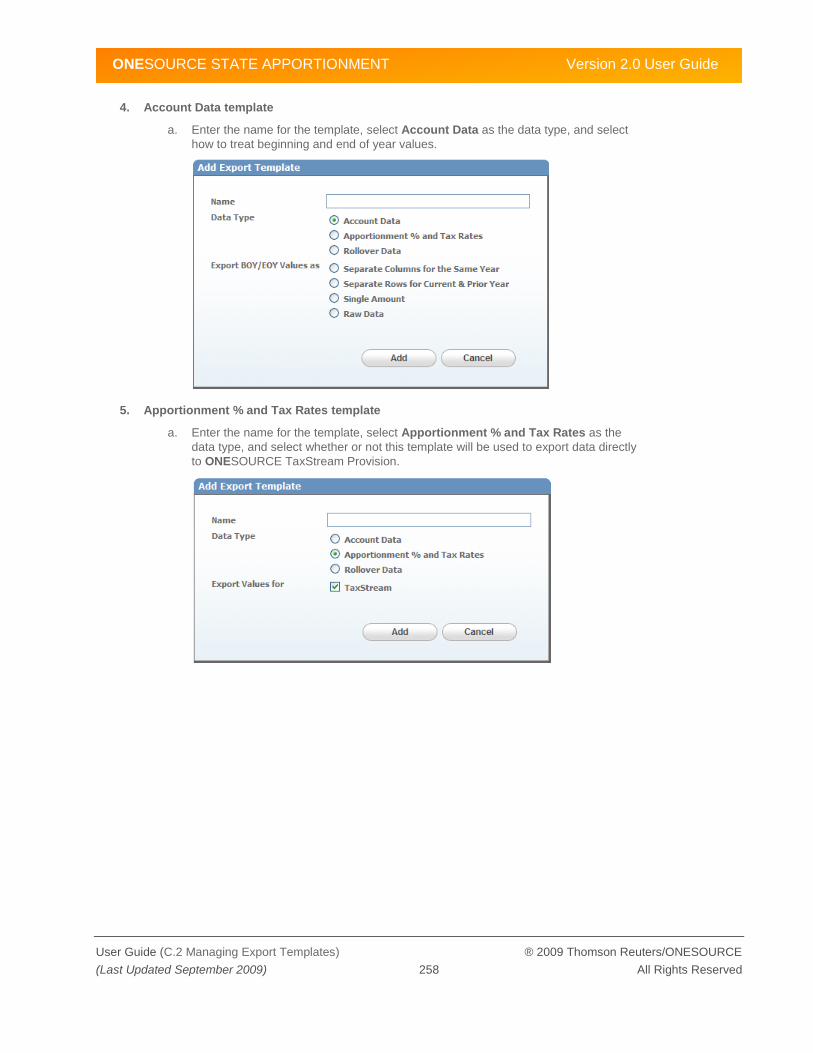
ONESOURCE STATE APPORTIONMENT Version 2.0 User Guide
User Guide (C.2 Managing Export Templates) ® 2009 Thomson Reuters/ONESOURCE
(Last Updated September 2009) 258 All Rights Reserved
4. Account Data template
a. Enter the name for the template, select Account Data as the data type, and select
how to treat beginning and end of year values.
5. Apportionment % and Tax Rates template
a. Enter the name for the template, select Apportionment % and Tax Rates as the
data type, and select whether or not this template will be used to export data directly
to ONESOURCE TaxStream Provision.

ONESOURCE STATE APPORTIONMENT Version 2.0 User Guide
User Guide (C.2 Managing Export Templates) ® 2009 Thomson Reuters/ONESOURCE
(Last Updated September 2009) 259 All Rights Reserved
6. Rollover template
a. Enter the name for the template, select Rollover Data as the data type, and select
how to treat beginning and end of year values.
7. When done, click the Add button (Cancel abandons the add operation). The template is
created and the Export Templates panel closes, leaving the options and settings page
displayed, as shown next.
a. Account Data
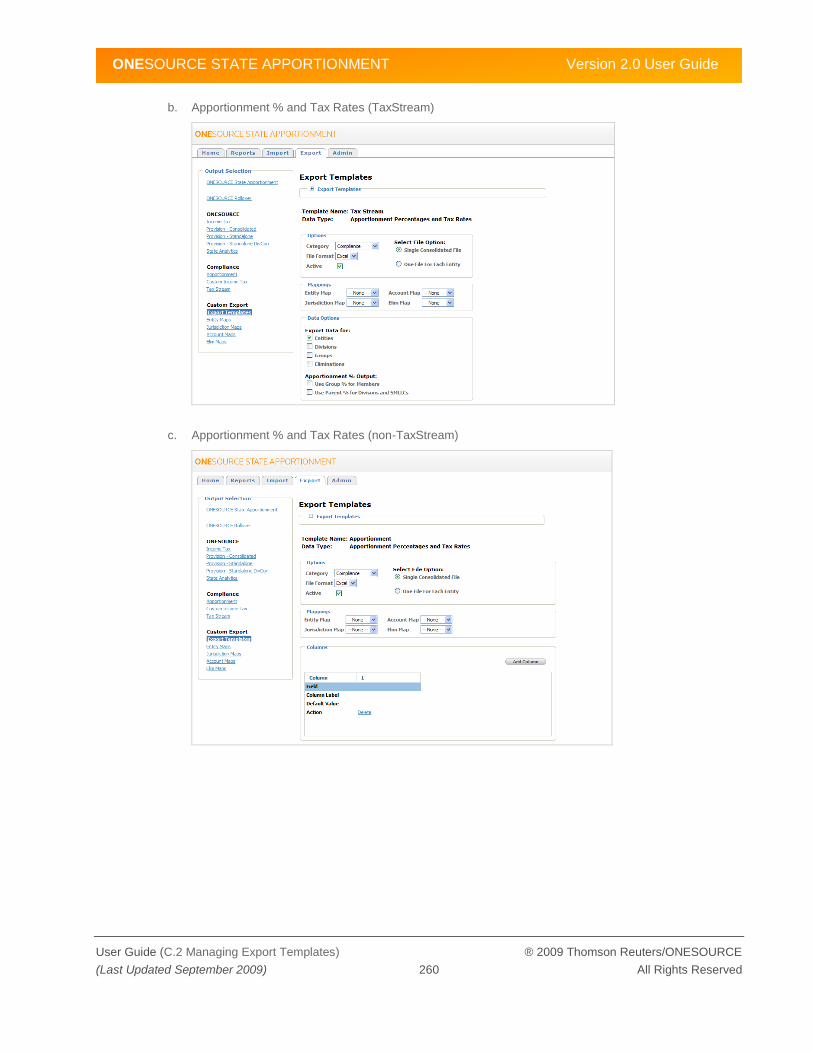
ONESOURCE STATE APPORTIONMENT Version 2.0 User Guide
User Guide (C.2 Managing Export Templates) ® 2009 Thomson Reuters/ONESOURCE
(Last Updated September 2009) 260 All Rights Reserved
b. Apportionment % and Tax Rates (TaxStream)
c. Apportionment % and Tax Rates (non-TaxStream)
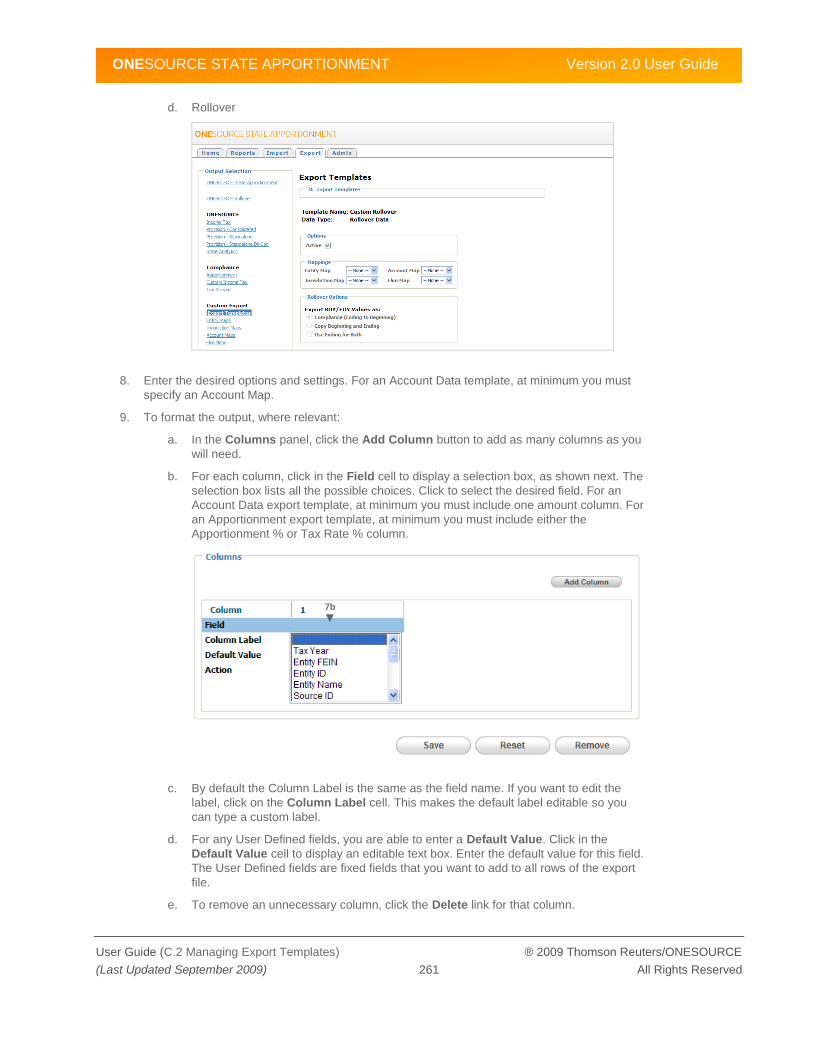
ONESOURCE STATE APPORTIONMENT Version 2.0 User Guide
User Guide (C.2 Managing Export Templates) ® 2009 Thomson Reuters/ONESOURCE
(Last Updated September 2009) 261 All Rights Reserved
d. Rollover
8. Enter the desired options and settings. For an Account Data template, at minimum you must
specify an Account Map.
9. To format the output, where relevant:
a. In the Columns panel, click the Add Column button to add as many columns as you
will need.
b. For each column, click in the Field cell to display a selection box, as shown next. The
selection box lists all the possible choices. Click to select the desired field. For an
Account Data export template, at minimum you must include one amount column. For
an Apportionment export template, at minimum you must include either the
Apportionment % or Tax Rate % column.
c. By default the Column Label is the same as the field name. If you want to edit the
label, click on the Column Label cell. This makes the default label editable so you
can type a custom label.
d. For any User Defined fields, you are able to enter a Default Value. Click in the
Default Value cell to display an editable text box. Enter the default value for this field.
The User Defined fields are fixed fields that you want to add to all rows of the export
file.
e. To remove an unnecessary column, click the Delete link for that column.
7b
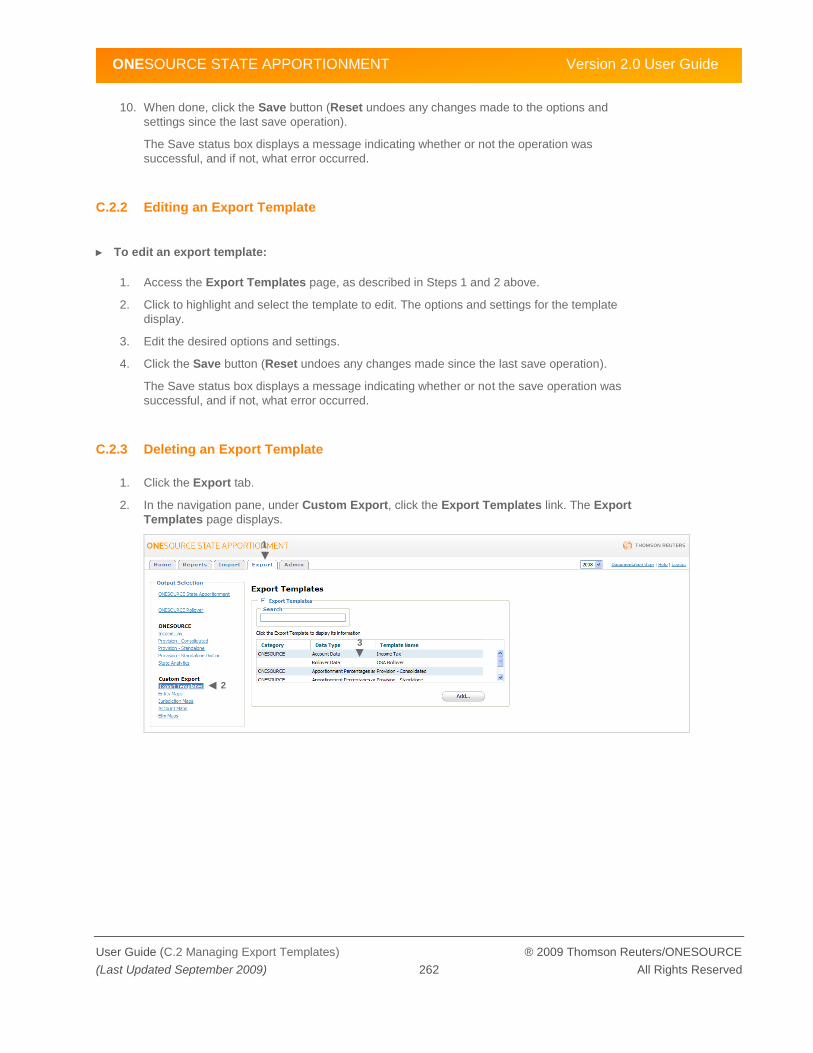
ONESOURCE STATE APPORTIONMENT Version 2.0 User Guide
User Guide (C.2 Managing Export Templates) ® 2009 Thomson Reuters/ONESOURCE
(Last Updated September 2009) 262 All Rights Reserved
10. When done, click the Save button (Reset undoes any changes made to the options and
settings since the last save operation).
The Save status box displays a message indicating whether or not the operation was
successful, and if not, what error occurred.
C.2.2 Editing an Export Template
► To edit an export template:
1. Access the Export Templates page, as described in Steps 1 and 2 above.
2. Click to highlight and select the template to edit. The options and settings for the template
display.
3. Edit the desired options and settings.
4. Click the Save button (Reset undoes any changes made since the last save operation).
The Save status box displays a message indicating whether or not the save operation was
successful, and if not, what error occurred.
C.2.3 Deleting an Export Template
1. Click the Export tab.
2. In the navigation pane, under Custom Export, click the Export Templates link. The Export
Templates page displays.
1
2
3

ONESOURCE STATE APPORTIONMENT Version 2.0 User Guide
User Guide (C.3 Managing Data Maps) ® 2009 Thomson Reuters/ONESOURCE
(Last Updated September 2009) 263 All Rights Reserved
3. Click to highlight and select the template to delete.
4. In the template page, click the Remove button. A confirmation dialog displays.
5. Click the OK button to delete the template (Cancel abandons the deletion).
When you click the OK button, a dialog displays indicating that the template was removed. It is
also removed from the list of templates available in the Export tab.
C.3 Managing Data Maps
Data maps are year-specific and apply only to the data for the current year; you need to create a data
map for each year, as necessary. When you create a map, the year is already specified (as the current
year) and you are asked to provide the following information:
Name for Map
Whether or not the map is active
Once you create the map, you then map the corresponding data elements. How to do both is described
next.
You cannot delete data maps. This is so OSA can preserve a complete audit trail. You can, however,
inactivate a data map. Also, you can export the data map to a CSV file as well as import it back into
OSA; this means that once you have created a data map, you do not have to re-create it for the next
year. You can also edit the map using a CSV file editor such as Excel.
When users add new entities, jurisdictions, or accounts, the appropriate data map is automatically
updated to contain the new data element. However, the data is not automatically mapped. Therefore,
any time a user adds a new entity, jurisdiction, or account, you will need to edit the related data map (to
map the data for that new data element).
If you try to use a custom export template that references a data map that is either inactive or that has
an unmapped element in it, OSA displays a warning message identifying the problem.
4
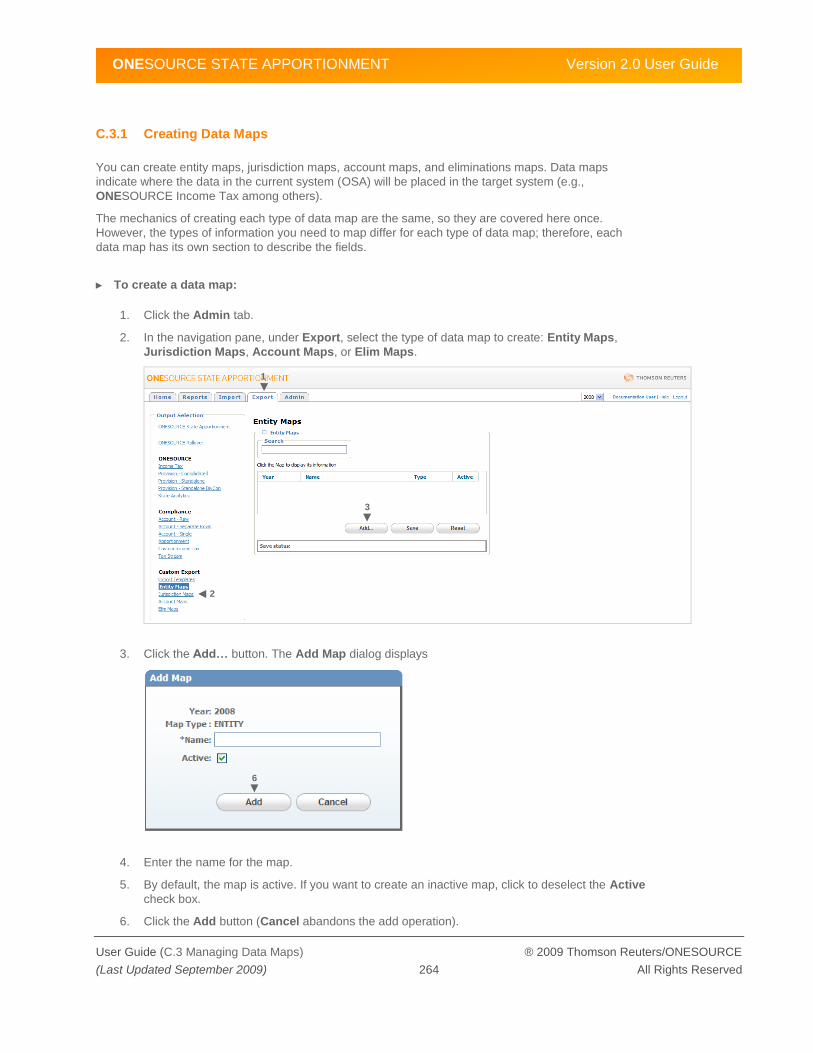
ONESOURCE STATE APPORTIONMENT Version 2.0 User Guide
User Guide (C.3 Managing Data Maps) ® 2009 Thomson Reuters/ONESOURCE
(Last Updated September 2009) 264 All Rights Reserved
C.3.1 Creating Data Maps
You can create entity maps, jurisdiction maps, account maps, and eliminations maps. Data maps
indicate where the data in the current system (OSA) will be placed in the target system (e.g.,
ONESOURCE Income Tax among others).
The mechanics of creating each type of data map are the same, so they are covered here once.
However, the types of information you need to map differ for each type of data map; therefore, each
data map has its own section to describe the fields.
► To create a data map:
1. Click the Admin tab.
2. In the navigation pane, under Export, select the type of data map to create: Entity Maps,
Jurisdiction Maps, Account Maps, or Elim Maps.
3. Click the Add… button. The Add Map dialog displays
4. Enter the name for the map.
5. By default, the map is active. If you want to create an inactive map, click to deselect the Active
check box.
6. Click the Add button (Cancel abandons the add operation).
1
3
2
6
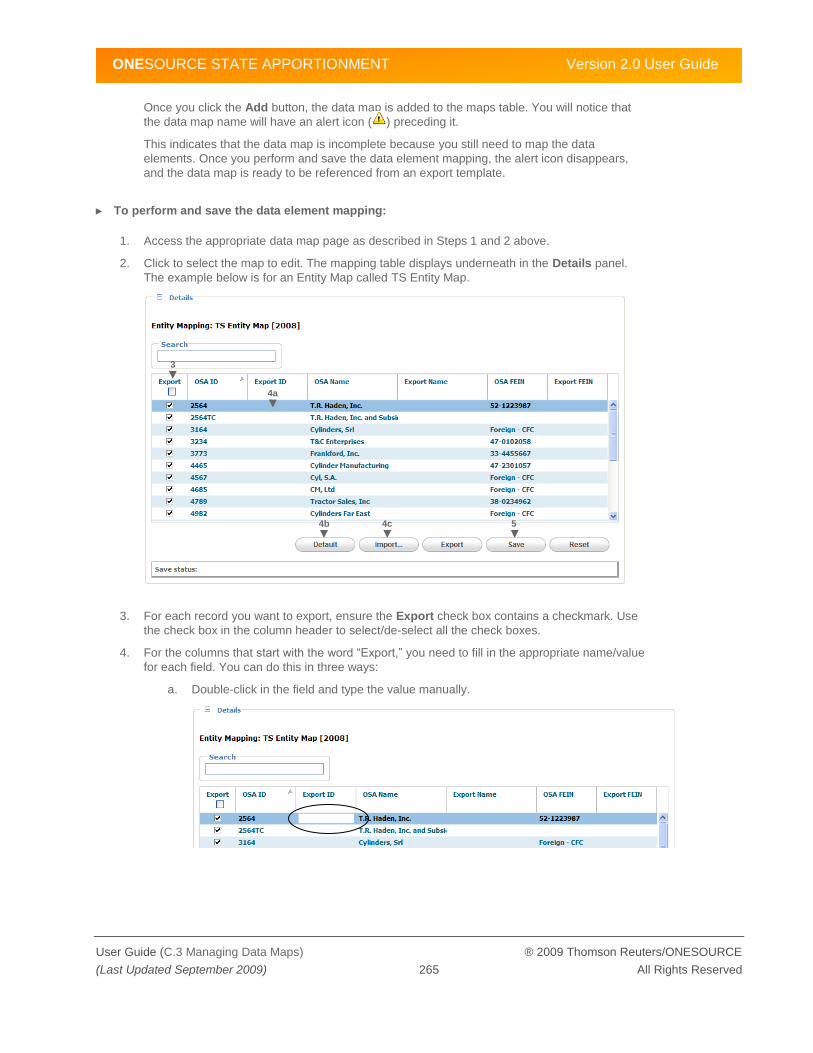
ONESOURCE STATE APPORTIONMENT Version 2.0 User Guide
User Guide (C.3 Managing Data Maps) ® 2009 Thomson Reuters/ONESOURCE
(Last Updated September 2009) 265 All Rights Reserved
Once you click the Add button, the data map is added to the maps table. You will notice that
the data map name will have an alert icon ( ) preceding it.
This indicates that the data map is incomplete because you still need to map the data
elements. Once you perform and save the data element mapping, the alert icon disappears,
and the data map is ready to be referenced from an export template.
► To perform and save the data element mapping:
1. Access the appropriate data map page as described in Steps 1 and 2 above.
2. Click to select the map to edit. The mapping table displays underneath in the Details panel.
The example below is for an Entity Map called TS Entity Map.
3. For each record you want to export, ensure the Export check box contains a checkmark. Use
the check box in the column header to select/de-select all the check boxes.
4. For the columns that start with the word ―Export,‖ you need to fill in the appropriate name/value
for each field. You can do this in three ways:
a. Double-click in the field and type the value manually.
3
4a
4b 4c 5
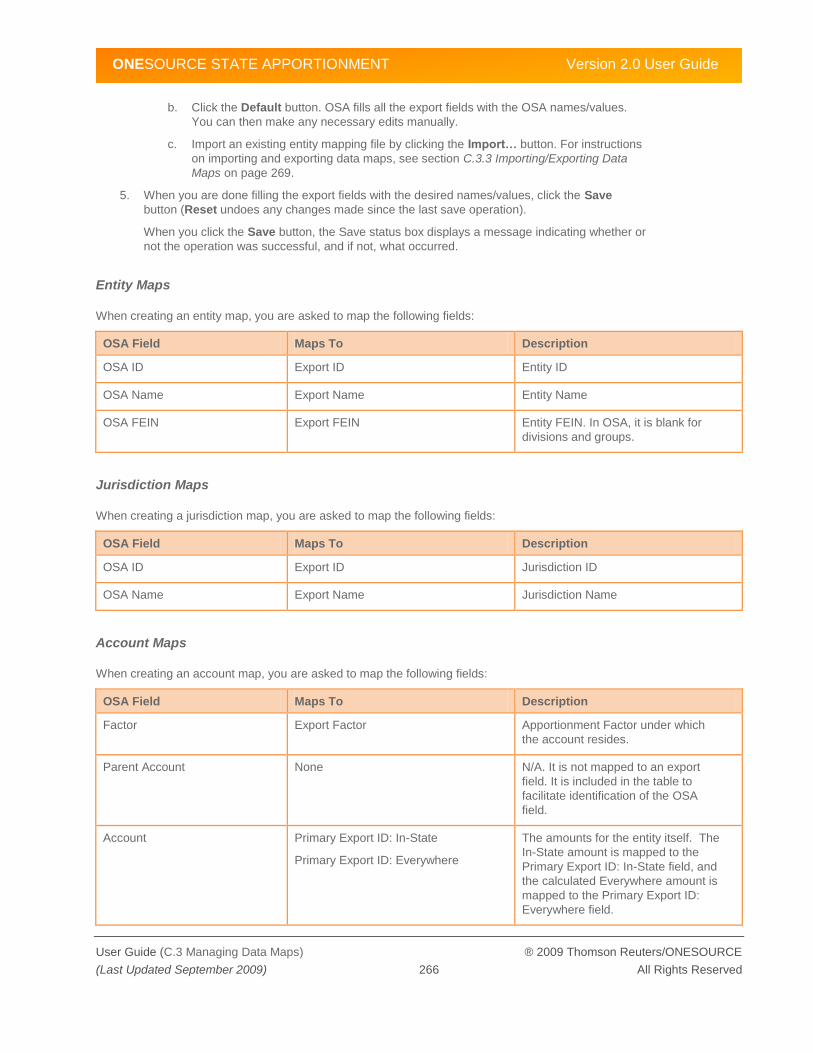
ONESOURCE STATE APPORTIONMENT Version 2.0 User Guide
User Guide (C.3 Managing Data Maps) ® 2009 Thomson Reuters/ONESOURCE
(Last Updated September 2009) 266 All Rights Reserved
b. Click the Default button. OSA fills all the export fields with the OSA names/values.
You can then make any necessary edits manually.
c. Import an existing entity mapping file by clicking the Import… button. For instructions
on importing and exporting data maps, see section C.3.3 Importing/Exporting Data
Maps on page 269.
5. When you are done filling the export fields with the desired names/values, click the Save
button (Reset undoes any changes made since the last save operation).
When you click the Save button, the Save status box displays a message indicating whether or
not the operation was successful, and if not, what occurred.
Entity Maps
When creating an entity map, you are asked to map the following fields:
OSA Field Maps To Description
OSA ID Export ID Entity ID
OSA Name Export Name Entity Name
OSA FEIN Export FEIN Entity FEIN. In OSA, it is blank for
divisions and groups.
Jurisdiction Maps
When creating a jurisdiction map, you are asked to map the following fields:
OSA Field Maps To Description
OSA ID Export ID Jurisdiction ID
OSA Name Export Name Jurisdiction Name
Account Maps
When creating an account map, you are asked to map the following fields:
OSA Field Maps To Description
Factor Export Factor Apportionment Factor under which
the account resides.
Parent Account None N/A. It is not mapped to an export
field. It is included in the table to
facilitate identification of the OSA
field.
Account Primary Export ID: In-State
Primary Export ID: Everywhere
The amounts for the entity itself. The
In-State amount is mapped to the
Primary Export ID: In-State field, and
the calculated Everywhere amount is
mapped to the Primary Export ID:
Everywhere field.

ONESOURCE STATE APPORTIONMENT Version 2.0 User Guide
User Guide (C.3 Managing Data Maps) ® 2009 Thomson Reuters/ONESOURCE
(Last Updated September 2009) 267 All Rights Reserved
OSA Field Maps To Description
Partnership ID: In-State
Partnership ID: Everywhere
The amounts for any flow-through
entities owned by and flowing to the
entity itself. The In-State amount is
mapped to the Partnership Export ID:
In-State field, and the calculated
Everywhere amount is mapped to the
Partnership Export ID: Everywhere
field.
Elim Export ID: In-State
Elim Export ID: Everywhere
The elimination amounts for the entity
itself. The In-State amount is mapped
to the Elim Export ID: In-State field,
and the calculated Everywhere
amount is mapped to the Elim Export
ID: Everywhere field.
Account ID None N/A
Positive Export Multiplier None When checked, the amount exported
is multiplied by 1. When unchecked,
the amount is multiplied by -1
(negative 1). For example, in OSA,
amounts in Contra accounts (e.g.,
depreciation) are stored as negative
numbers. If you want the amount for a
Contra account to export as a positive
number, then this box should be
unchecked for the account (since a
negative number multiplied by a
negative number results in a positive
number). By default, the boxes are
checked.
Positive Elim Multiplier None When checked, the elimination
amount is multiplied by 1. When
unchecked, the amount exported is
multiplied by -1. If you want an
elimination amount to export as a
negative number, this box should be
unchecked (since a negative number
multiplied by a negative number
results in a positive number). By
default, the boxes are unchecked.
With account maps, the In-State and Everywhere entity, partnership, and elimination amounts are all
provided separately for maximum flexibility. You can choose to sum the amounts together or maintain
them apart simply by mapping them to the same or different accounts.

ONESOURCE STATE APPORTIONMENT Version 2.0 User Guide
User Guide (C.3 Managing Data Maps) ® 2009 Thomson Reuters/ONESOURCE
(Last Updated September 2009) 268 All Rights Reserved
Elim Maps
When creating an elimination map, you are asked to map the following fields:
OSA Field Maps To Description
OSA Group ID Export ID Group ID
OSA Jurisdiction ID Export ID Jurisdiction ID
With elim maps, the OSA group and jurisdiction IDs map to one export field, Export ID.
C.3.2 Inactivating/Activating Data Maps
You cannot delete a data map once you have created it. However, you can inactivate it. Once you
inactivate a data map, you cannot reference it from an export template. And, if an existing export
template references a data map that you subsequently make inactive, trying to use that export template
will generate an error message for the user indicating the type of data map and that it is inactive.
► To inactivate/activate a data map:
1. Click the Export tab.
2. In the navigation pane, under Custom Export, select the desired data map type: Entity Maps,
Jurisdiction Maps, Account Maps, or Elim Maps.
3. From the data maps table that displays, click the Active check box for the data map whose
status you want to change. A check mark indicates that the map is active.
4. Click the Save button.
Once you click the Save button, the data map is updated. The Save status box displays a
message indicating whether or not the operation was successful, and if not, what error
occurred
1
3
4
2
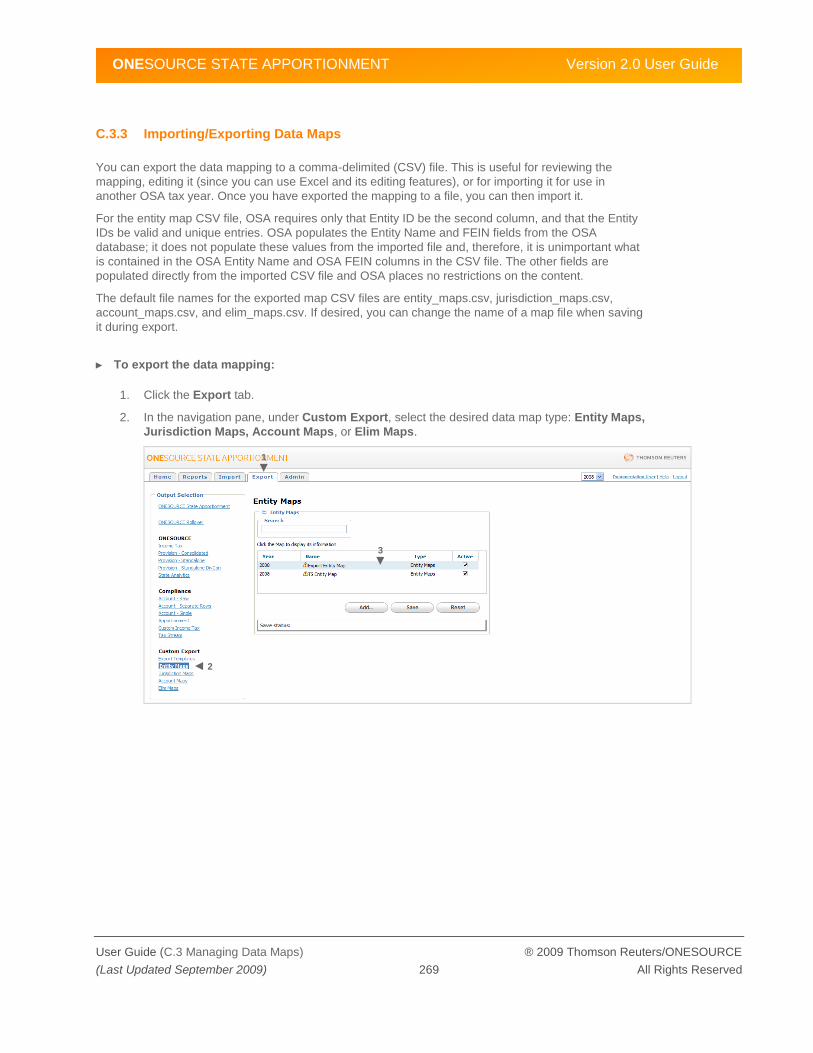
ONESOURCE STATE APPORTIONMENT Version 2.0 User Guide
User Guide (C.3 Managing Data Maps) ® 2009 Thomson Reuters/ONESOURCE
(Last Updated September 2009) 269 All Rights Reserved
C.3.3 Importing/Exporting Data Maps
You can export the data mapping to a comma-delimited (CSV) file. This is useful for reviewing the
mapping, editing it (since you can use Excel and its editing features), or for importing it for use in
another OSA tax year. Once you have exported the mapping to a file, you can then import it.
For the entity map CSV file, OSA requires only that Entity ID be the second column, and that the Entity
IDs be valid and unique entries. OSA populates the Entity Name and FEIN fields from the OSA
database; it does not populate these values from the imported file and, therefore, it is unimportant what
is contained in the OSA Entity Name and OSA FEIN columns in the CSV file. The other fields are
populated directly from the imported CSV file and OSA places no restrictions on the content.
The default file names for the exported map CSV files are entity_maps.csv, jurisdiction_maps.csv,
account_maps.csv, and elim_maps.csv. If desired, you can change the name of a map file when saving
it during export.
► To export the data mapping:
1. Click the Export tab.
2. In the navigation pane, under Custom Export, select the desired data map type: Entity Maps,
Jurisdiction Maps, Account Maps, or Elim Maps.
1
3
2

ONESOURCE STATE APPORTIONMENT Version 2.0 User Guide
User Guide (C.3 Managing Data Maps) ® 2009 Thomson Reuters/ONESOURCE
(Last Updated September 2009) 270 All Rights Reserved
3. From the data maps table that displays, click the data map for which you want to export the
mapping. The Details panel displays underneath the map table.
4. Click the Export button. The file is exported to a CSV file. You are asked whether or not you
want to open or save the file. If you choose to save the file, you are then asked to browse and
select the folder in which to save the file. You may then also rename the file from the default, if
desired.
If the file is not exported successfully, it may be that your browser does not allow pop-ups
and/or is blocking downloads from OSA. Refer to section D.3.1 Exporting Files on page 280 for
instructions on allowing pop-ups and downloads from OSA.
► To import the data mapping:
1. Click the Export tab.
2. In the navigation pane, under Custom Export, select the desired data map type: Entity Maps,
Jurisdiction Maps, Account Maps, or Elim Maps.
4
1
3
2

ONESOURCE STATE APPORTIONMENT Version 2.0 User Guide
User Guide (C.3 Managing Data Maps) ® 2009 Thomson Reuters/ONESOURCE
(Last Updated September 2009) 271 All Rights Reserved
3. From the data maps table that displays, click the data map for which you want to import the
mapping. The Details panel displays underneath the map table.
4. Click the Import… button. The Import Map from File dialog displays, prompting you to enter
the file path and name.
5. Click the Browse button to navigate to and open the file.
6. When the file path and name are listed in the File Name box, click the Import button (Cancel
abandons the import operation). When the import operation is successful, you will see the data
fields update in the Details table.
7. Click the Save button.
In order to retain the imported values, you must click the Save button. Import only updates the
values on the screen.
4 7
6
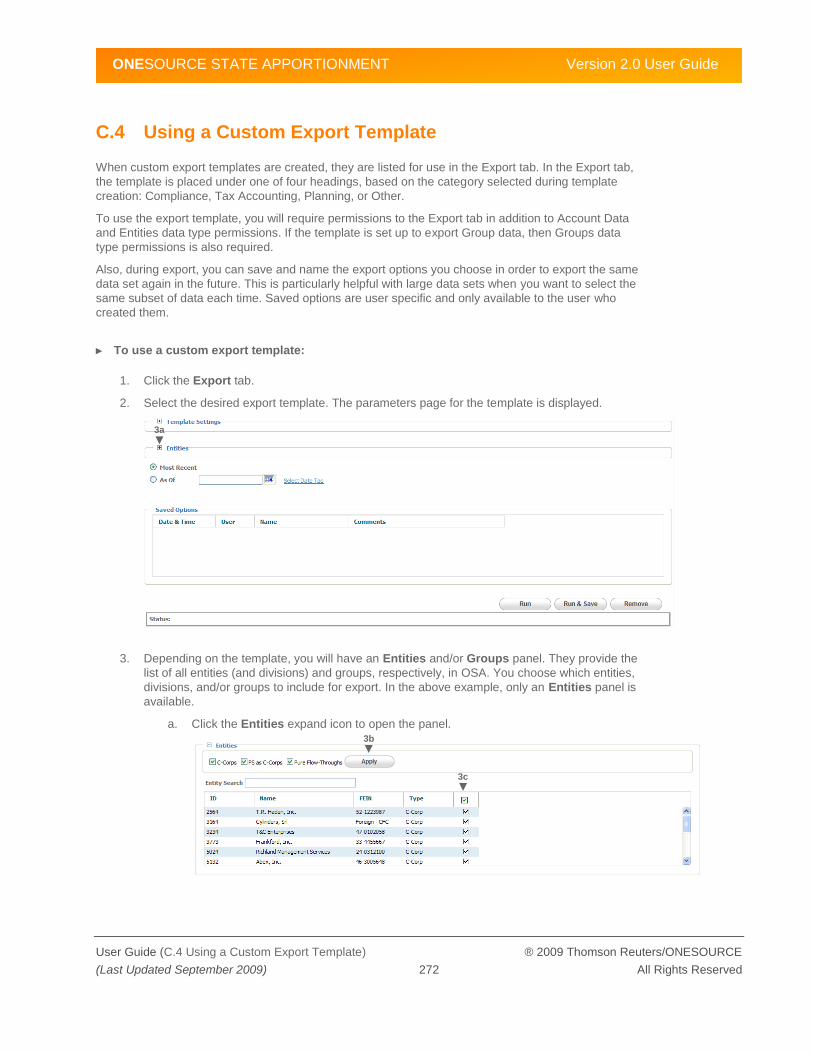
ONESOURCE STATE APPORTIONMENT Version 2.0 User Guide
User Guide (C.4 Using a Custom Export Template) ® 2009 Thomson Reuters/ONESOURCE
(Last Updated September 2009) 272 All Rights Reserved
C.4 Using a Custom Export Template
When custom export templates are created, they are listed for use in the Export tab. In the Export tab,
the template is placed under one of four headings, based on the category selected during template
creation: Compliance, Tax Accounting, Planning, or Other.
To use the export template, you will require permissions to the Export tab in addition to Account Data
and Entities data type permissions. If the template is set up to export Group data, then Groups data
type permissions is also required.
Also, during export, you can save and name the export options you choose in order to export the same
data set again in the future. This is particularly helpful with large data sets when you want to select the
same subset of data each time. Saved options are user specific and only available to the user who
created them.
► To use a custom export template:
1. Click the Export tab.
2. Select the desired export template. The parameters page for the template is displayed.
3. Depending on the template, you will have an Entities and/or Groups panel. They provide the
list of all entities (and divisions) and groups, respectively, in OSA. You choose which entities,
divisions, and/or groups to include for export. In the above example, only an Entities panel is
available.
a. Click the Entities expand icon to open the panel.
3a
3b
3c

ONESOURCE STATE APPORTIONMENT Version 2.0 User Guide
User Guide (C.4 Using a Custom Export Template) ® 2009 Thomson Reuters/ONESOURCE
(Last Updated September 2009) 273 All Rights Reserved
b. By default, all entity types are displayed in the selection list (C-Corps, Flow-Through
Entities (or PS) treated as C-Corps, and Flow-Through Entities). Check to de-select
an entity type if you do not want to display it in the selection list.
c. Then, click the Apply button. The selection list is updated.
4. To include an entity, make sure its check box is selected. If you do not want to include it, click
to de-select the check box. The check box in the column header selects and de-selects all the
check boxes at once. Divisions cannot be included without their parent.
5. Once you choose the entities, divisions, and/or groups to include, you need to specify the date
and time stamp for the report. You can choose:
Most Recent: the data exported is the most current.
As of: the data exported has the specified date/time stamp. Any changes made after
the date/time specified are not included in the export. See section D.3.1 Exporting
Files on page 280 for instructions on using the calendar.
Date Tag: the data exported is as of the date and time specified in the named date
tag.
6. Click Run to export the data without saving the options, or
7. Click the Run & Save button to save the options and export the data.
Note: When saving the options, enter a summary of the options used into the Comments text
box. This summary appears next to the saved options and serves to help users know what
options will be set.
a. When you click the Run & Save button, the Save Export Parameters dialog
displays.
6 7
5
7b
ONESOURCE STATE APPORTIONMENT Version 2.0 User Guide
User Guide (C.4 Using a Custom Export Template) ® 2009 Thomson Reuters/ONESOURCE
(Last Updated September 2009) 274 All Rights Reserved
b. Enter the name and click the Save button (Close abandons the operation without
saving the options or exporting the data).
OSA verifies the options and prepares the export. If there is insufficient data to export, a
message is displayed. If you opted to save the options, the Saved Options box lists the name
of the saved options as well as the export template used.
To use an export that you saved, in Step 3 rather than selecting the entities, divisions, and/or
groups, scroll down to the Saved Options box and click on the saved export to use. Then,
proceed to Step 5 or 6.

ONESOURCE STATE APPORTIONMENT Version 2.0 User Guide
User Guide (D.1 Overview) ® 2009 Thomson Reuters/ONESOURCE
(Last Updated September 2009) 275 All Rights Reserved
D Working with CSV Files
This appendix describes how to work with the OSA CSV files and includes the following sections:
D.1: Overview
D.2: Editing CSV Files
D.3: Importing and Exporting Files
D.4: Instructions for Populating Files
OSA also provides custom import and export capabilities that enable you to import data from other
systems as well as export data into formats other than CSV for use with other systems. Please see
Appendix B, Custom Data Imports on page 240 and Appendix C, Custom Data Exports on page 253 for
more information.
D.1 Overview
During the initial setup of OSA, there is typically a large amount of data that needs to be entered. This
includes information such as the entity list, ownership structure, groups, jurisdictions, user names, user
permission settings, the account structure, and of course, the account data.
While you can enter these items one-by-one using the OSA interface, OSA provides a file import and
export capability to facilitate data entry. This feature also facilitates data export out of OSA for review
and/or recordkeeping. Also, you can specify a timestamp when exporting, therefore in most cases you
can use this to undo an error or recover data. See D.3 Importing and Exporting Files on page 279 for
more detail.
The OSA Import/Export feature supports text files with comma-delimited values referred to as CSV files.
The first line in the CSV file is a header line listing the fields in each record. Each line represents a
record, and the values for each record are listed in the line separated by commas.
The figure below shows an excerpt from the EntityList.csv file. In this example, the file is open in
Excel. There is a header row and 8 rows of data. There are 14 possible values for each row, starting
with Time_Period and ending with Comments.
Although you can edit the files using any text editor, an easy way to view and edit the CSV files is to use
Microsoft Excel since each record becomes a row and each field becomes a column. Refer to the next
section D.2 Editing CSV Files for information on the mechanics of editing the files.

ONESOURCE STATE APPORTIONMENT Version 2.0 User Guide
User Guide (D.2 Editing CSV Files) ® 2009 Thomson Reuters/ONESOURCE
(Last Updated September 2009) 276 All Rights Reserved
In order to import and/or export files within OSA, users must have the appropriate permissions. He or
she must have access to the tabs and must have access to the data type being exported and/or
imported. See Chapter 9, Updating Users and Permissions on page 173 for more information.
The full set of CSV files is available as a ZIP file for download from the OSA Help link. Once you have
imported data into or added data to OSA, you can then export CSV file(s), edit the data, and then import
them back into OSA.
The recommended process for initially downloading and using the CSV files is outlined below:
1. Create a directory to hold only the CSV files.
2. Download the full set of CSV files from the OSA Help System (see section D.2.1 Downloading
CSV Files on page 277).
3. Extract the files to the directory you created.
4. Edit the files as desired (see D.2 Editing CSV Files on page 276 and D.4 Instructions for
Populating Files on page 286). Microsoft Excel is the recommended editor, but you can use
any program that supports CSV files.
5. Import the files into OSA. You can either import the files one by one or create a compressed
file and import the entire set at one time. (See D.3 Importing and Exporting Files on page 279 )
6. Run Diagnostics to ensure data integrity (see Appendix A, System Monitoring on page 222).
Subsequently, you can export one or more of the files from OSA into this directory (see D.3 Importing
and Exporting Files on page 279) and then edit them.
D.2 Editing CSV Files
You can obtain the CSV files for editing from the OSA Help link. They are available for download from
the OSA Help System. Once you download the CSV files, then it is a matter of opening the desired file
and editing it. Instructions for downloading the CSV files from the OSA Help System are provided below
in section D.2.1 Downloading CSV Files on page 277.
When editing OSA‘s CSV files, you can use any text editor (e.g., NotePad, WordPad), database
program (e.g., Microsoft Access), or spreadsheet software (e.g., Microsoft Excel). Instructions for
editing CSV files in Excel are provided below.
When you edit CSV files, you cannot add any formatting to the files. The CSV format is strictly text with
no formatting or features of any kind. When you edit the files using a text editor, make sure each new
line has a carriage return at the end and that there are no tab characters between fields of each line.
And, regardless of the program you use, be sure to save the file in CSV (comma-delimited) format
without any additional formatting.
When you open a CSV file, your computer will attempt to open it with whatever software program is
associated with the .csv file extension. You can change the association, as described in section D.2.2
Changing File Type Association on page 278.
► To edit a CSV file with Excel:
1. Obtain the latest version of the file you want to edit (either by downloading from the Help link in
OSA, as described in section C.2.1 Downloading CSV Files below, or by exporting it from
OSA. See section D.3.1 Exporting Files on page 280).
2. Open the desired .csv file with Excel.
You can open Excel and browse to the location of the file or double-click on the file in Windows
Explorer. If you exported the entire set in ZIP format, extract the files first. If you double-click
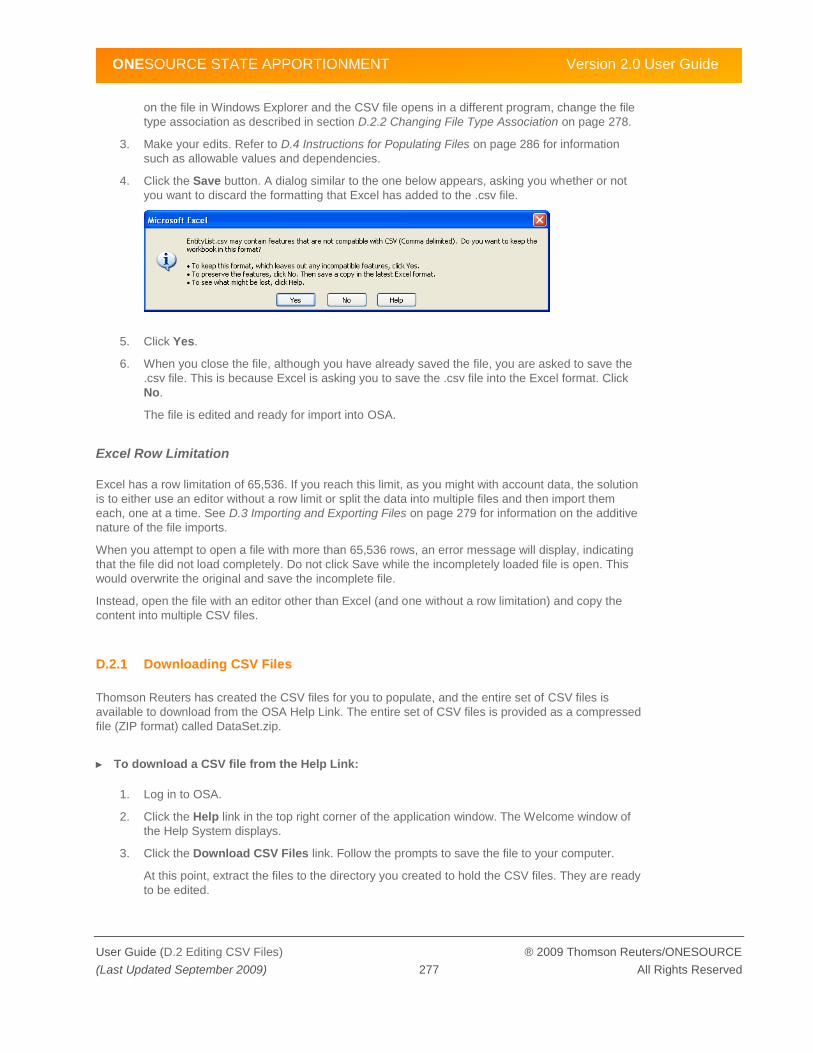
ONESOURCE STATE APPORTIONMENT Version 2.0 User Guide
User Guide (D.2 Editing CSV Files) ® 2009 Thomson Reuters/ONESOURCE
(Last Updated September 2009) 277 All Rights Reserved
on the file in Windows Explorer and the CSV file opens in a different program, change the file
type association as described in section D.2.2 Changing File Type Association on page 278.
3. Make your edits. Refer to D.4 Instructions for Populating Files on page 286 for information
such as allowable values and dependencies.
4. Click the Save button. A dialog similar to the one below appears, asking you whether or not
you want to discard the formatting that Excel has added to the .csv file.
5. Click Yes.
6. When you close the file, although you have already saved the file, you are asked to save the
.csv file. This is because Excel is asking you to save the .csv file into the Excel format. Click
No.
The file is edited and ready for import into OSA.
Excel Row Limitation
Excel has a row limitation of 65,536. If you reach this limit, as you might with account data, the solution
is to either use an editor without a row limit or split the data into multiple files and then import them
each, one at a time. See D.3 Importing and Exporting Files on page 279 for information on the additive
nature of the file imports.
When you attempt to open a file with more than 65,536 rows, an error message will display, indicating
that the file did not load completely. Do not click Save while the incompletely loaded file is open. This
would overwrite the original and save the incomplete file.
Instead, open the file with an editor other than Excel (and one without a row limitation) and copy the
content into multiple CSV files.
D.2.1 Downloading CSV Files
Thomson Reuters has created the CSV files for you to populate, and the entire set of CSV files is
available to download from the OSA Help Link. The entire set of CSV files is provided as a compressed
file (ZIP format) called DataSet.zip.
► To download a CSV file from the Help Link:
1. Log in to OSA.
2. Click the Help link in the top right corner of the application window. The Welcome window of
the Help System displays.
3. Click the Download CSV Files link. Follow the prompts to save the file to your computer.
At this point, extract the files to the directory you created to hold the CSV files. They are ready
to be edited.
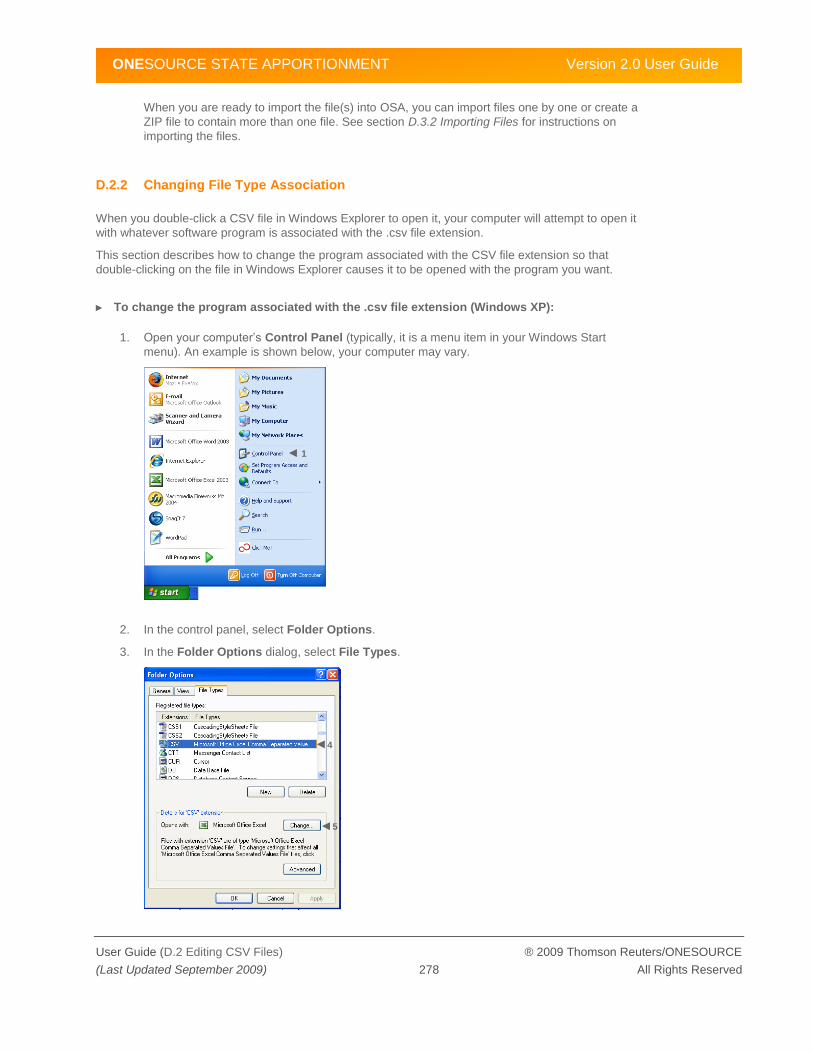
ONESOURCE STATE APPORTIONMENT Version 2.0 User Guide
User Guide (D.2 Editing CSV Files) ® 2009 Thomson Reuters/ONESOURCE
(Last Updated September 2009) 278 All Rights Reserved
When you are ready to import the file(s) into OSA, you can import files one by one or create a
ZIP file to contain more than one file. See section D.3.2 Importing Files for instructions on
importing the files.
D.2.2 Changing File Type Association
When you double-click a CSV file in Windows Explorer to open it, your computer will attempt to open it
with whatever software program is associated with the .csv file extension.
This section describes how to change the program associated with the CSV file extension so that
double-clicking on the file in Windows Explorer causes it to be opened with the program you want.
► To change the program associated with the .csv file extension (Windows XP):
1. Open your computer‘s Control Panel (typically, it is a menu item in your Windows Start
menu). An example is shown below, your computer may vary.
2. In the control panel, select Folder Options.
3. In the Folder Options dialog, select File Types.
1
4
5

ONESOURCE STATE APPORTIONMENT Version 2.0 User Guide
User Guide (D.3 Importing and Exporting Files) ® 2009 Thomson Reuters/ONESOURCE
(Last Updated September 2009) 279 All Rights Reserved
4. Scroll down to find the extension CSV. If it is not listed, click the New button to add the file type
and follow the directions for adding it.
5. Click the Change button to change the program associated with the CSV file type. The Open
With dialog displays.
6. Select the desired program from the list (Excel in this example), and click the OK button.
7. Then click the OK button in the Folder Options dialog.
8. Then close the Control Panel.
At this point, any time you open a .csv file, it is opened using Excel.
D.3 Importing and Exporting Files
The full set of CSV files is available for download from the Help link in OSA. Once you have imported
data into or added data to OSA, you can export the file(s) from OSA at any time you need to edit them.
You can export one file at a time or the entire set at once. Follow the instructions below for exporting.
As discussed in D.1 Overview on page 275, users need appropriate permissions for importing and
exporting data. Please see Chapter 9, Updating Users and Permissions on page 173 for information on
user permissions.
Because you can specify a timestamp when exporting files, you can use the Import/Export feature to
undo changes you have made to the data. You would export files using a timestamp prior to the
undesired change then import the exported files. This only affects existing or new data; you cannot
delete data in OSA using the Import/Export feature. As discussed below in section D.3.2 Importing Files
on page 284, the import feature is additive.
When importing files, data is either added or changed according to the data in the file. In the case of the
AccountData.csv, you are able to choose whether to maintain or clear existing values as you update,
and you can specify whether to load only one of or both beginning and ending data. See D.3.2
Importing Files on page 284 for information on the options available.
6

ONESOURCE STATE APPORTIONMENT Version 2.0 User Guide
User Guide (D.3 Importing and Exporting Files) ® 2009 Thomson Reuters/ONESOURCE
(Last Updated September 2009) 280 All Rights Reserved
D.3.1 Exporting Files
The export feature downloads data to your computer. Therefore, make sure your browser is set to allow
downloads from OSA. Instructions for adding OSA to your list of trusted sites and to allow downloads
are provided below. When you export a file, your computer‘s download dialog displays, asking you
whether you want to view or save the file.
When you select to view the file, the file will be displayed in whatever program you have selected to
display .csv files. Instructions for changing the program associated to .csv files are provided in D.2
Editing CSV Files on page 276.When you select to save the file, the file is saved to the location you
specify, and you can open it at any time.
When you export data from OSA, you can specify an export timestamp. Any changes made to the data
after the specified timestamp are not included.
ONESOURCE Rollover
To facilitate rolling data over from one tax year to another, use the Rollover feature. You can use the predefined rollover template (OSA Rollover) or create your own custom template and mappings.
ONESOURCE
To facilitate integration with other ONESOURCE products, OSA provides several predefined export
templates. The output of these exports is in a form ready to import into the target system. If the predefined templates do not meet your needs, You can create your own ONESOURCE Income Tax and
TaxStream Provision export templates. If you do, contact Customer Support or Professional Services as some additional setup is required.
Income Tax – Use to create apportionment .dif files for import into ONESOURCE Income Tax.
Provision - Consolidated – Use to create the Apportionment template for import to
ONESOURCE TaxStream Provision. This template uses the ‗Use Group % for Members‘
option, meaning that in states where an entity is a member, the group‘s apportionment % will
be used for the entity.
Provision - Standalone – Use to create the Apportionment template for import to
ONESOURCE TaxStream Provision. The apportionment % output for the entity will be its own
% in all states, regardless of the entity type.
Provision - Standalone DivCon – Use to create the Apportionment template for import to
ONESOURCE TaxStream Provision. This template uses the option ‗Use Parent % for
Divisions and SMLLCs‘‘, meaning that for divisions and SMLLCs, their parent‘s apportionment
% is output for the entity.
State Analytics – Use to create a scenario loader .zip file for import to ONESOURCE State
Analytics
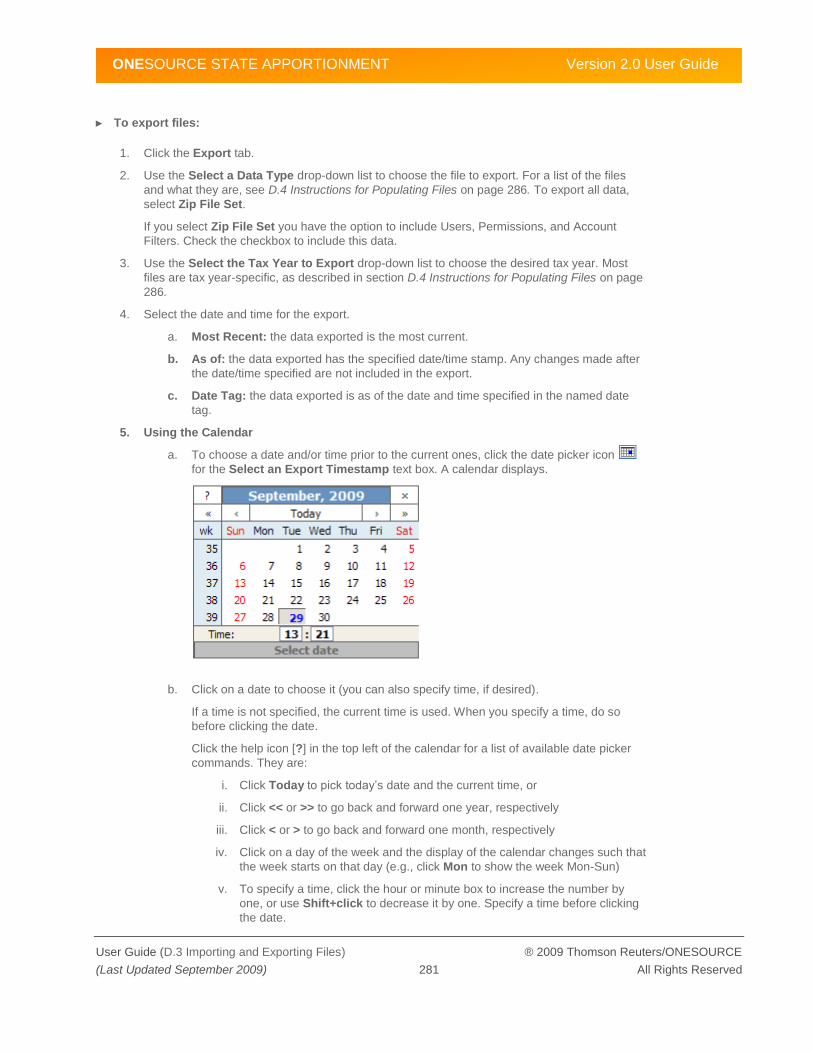
ONESOURCE STATE APPORTIONMENT Version 2.0 User Guide
User Guide (D.3 Importing and Exporting Files) ® 2009 Thomson Reuters/ONESOURCE
(Last Updated September 2009) 281 All Rights Reserved
► To export files:
1. Click the Export tab.
2. Use the Select a Data Type drop-down list to choose the file to export. For a list of the files
and what they are, see D.4 Instructions for Populating Files on page 286. To export all data,
select Zip File Set.
If you select Zip File Set you have the option to include Users, Permissions, and Account
Filters. Check the checkbox to include this data.
3. Use the Select the Tax Year to Export drop-down list to choose the desired tax year. Most
files are tax year-specific, as described in section D.4 Instructions for Populating Files on page
286.
4. Select the date and time for the export.
a. Most Recent: the data exported is the most current.
b. As of: the data exported has the specified date/time stamp. Any changes made after
the date/time specified are not included in the export.
c. Date Tag: the data exported is as of the date and time specified in the named date
tag.
5. Using the Calendar
a. To choose a date and/or time prior to the current ones, click the date picker icon
for the Select an Export Timestamp text box. A calendar displays.
b. Click on a date to choose it (you can also specify time, if desired).
If a time is not specified, the current time is used. When you specify a time, do so
before clicking the date.
Click the help icon [?] in the top left of the calendar for a list of available date picker
commands. They are:
i. Click Today to pick today‘s date and the current time, or
ii. Click << or >> to go back and forward one year, respectively
iii. Click < or > to go back and forward one month, respectively
iv. Click on a day of the week and the display of the calendar changes such that
the week starts on that day (e.g., click Mon to show the week Mon-Sun)
v. To specify a time, click the hour or minute box to increase the number by
one, or use Shift+click to decrease it by one. Specify a time before clicking
the date.

ONESOURCE STATE APPORTIONMENT Version 2.0 User Guide
User Guide (D.3 Importing and Exporting Files) ® 2009 Thomson Reuters/ONESOURCE
(Last Updated September 2009) 282 All Rights Reserved
6. When you‘re done, click the Export button. The Windows download dialog displays, asking
whether you want to view or save the file.
7. Click the View button to view the data in the program associated with CSV files, and click the
Save button to save the CSV file to the location you specify.
A message appears at the top of the Export page indicating whether or not the download was
successful. In case of an error, the error is listed along with information for correcting the
problem.
The most common export error is Windows not allowing the download of files to your
computer. Ensure your computer‘s security settings allow for the download of files. The
instructions below describe how to add OSA to your list of trusted sites and to allow
downloads. If you exported the Zip File Set, you will need to extract the CSV files.
Allowing Pop-Ups and Downloads
Internet Explorer v7 comes with a built-in pop-up blocker. You will need to either turn it off or configure it
to allow the OSA site.
► To turn off the IE pop-up blocker:
1. In your Internet Explorer window, click on the Tools menu item.
2. Select Pop-Up Blocker > Turn Off Pop-up Blocker.
This turns off your pop-up blocker for Internet Explorer.
► Follow the instructions below to add OSA as a trusted site and enable downloads:
1. In your Internet Explorer window, click on the Tools menu item, and select Internet Options.
2. In the Internet Options dialog, click on the Security tab.

ONESOURCE STATE APPORTIONMENT Version 2.0 User Guide
User Guide (D.3 Importing and Exporting Files) ® 2009 Thomson Reuters/ONESOURCE
(Last Updated September 2009) 283 All Rights Reserved
3. Select Trusted Sites to highlight it.
4. Click the Sites button. The Trusted Sites dialog appears.
5. In the Trusted Sites dialog, add the OSA website and click the Add button.
6. Also, if the Require server verification https check box is checked, click on it to clear it.
7. Click the Close button. You are returned to the Internet Options dialog.

ONESOURCE STATE APPORTIONMENT Version 2.0 User Guide
User Guide (D.3 Importing and Exporting Files) ® 2009 Thomson Reuters/ONESOURCE
(Last Updated September 2009) 284 All Rights Reserved
8. In the Internet Options dialog, click the Custom level… button. The Security Settings
window opens.
9. Scroll down to the Downloads section and set all three options to Enable.
10. Click OK to close the Security Settings dialog.
11. Click OK to close the Internet Options dialog.
At this point, OSA is a trusted site for Internet Explorer and the Download dialog will display
without additional prompting.
► To configure Third-party pop-up blockers:
Many 3rd party tools such as Yahoo or Google toolbar will include a pop-up blocker that will prevent
downloads. To deal with this, you can either disable the pop-up blocker entirely, or you can add OSA as
a site from which you allow pop-ups. This configuration depends on the pop-up blocker.
D.3.2 Importing Files
Most of the CSV files reference existing data, for example, the AccountData.csv file references Entity
IDs and Account Names (so it can add the amounts to the correct entity and account). Therefore, if the
referenced data does not yet exist in OSA, either import the files with the referenced data first (for
example, EntityList.csv and AccountStructure.csv) or enter the data directly in OSA.
When you import the entire data set, OSA handles the dependencies properly so you don‘t need to
worry about ordering. See D.4 Instructions for Populating Files on page 286 for information on the
dependencies, and refer to Creating the DataSet.zip below for information on creating a compressed file
of the entire data set for import. Any errors encountered during the import are described along with
instructions for correcting them (see Possible Import Errors below).

ONESOURCE STATE APPORTIONMENT Version 2.0 User Guide
User Guide (D.3 Importing and Exporting Files) ® 2009 Thomson Reuters/ONESOURCE
(Last Updated September 2009) 285 All Rights Reserved
Also, the import feature is additive. In other words, say you import the EntityList.csv file. Then you
realize you need to add more entities to OSA, so you edit the file and import it again. Any changes you
made to the data in the file are made to the existing data in OSA and any new data you added to the file
is added to OSA.
However, if you removed any rows from the file, this data is not deleted from OSA. For instructions on
deleting information from OSA, refer to the chapter discussing that data type.
► To import files:
1. Click the Import tab.
2. Use the Select a File Type drop-down list to select the file to import. When importing the zip
file, select Zip file set.
3. When you select Account Data, you are also asked to specify the following:
a. Optionally, select a custom import template to map the account data.
b. Whether to add to and update the existing account data or clear the existing data and
replace it with the data in the file. Select the radio button for the desired choice.
c. Whether to update only beginning values, only ending values, or both. Place a check
mark in the check box for the values you want to update.
4. For the Select the File to Import text box, click the Browse button. A dialog appears allowing
you to navigate to and select the file for import. Find the file and click the Open button.
5. Once the file name and path appear in the Select the File to Import text box, click the Import
button.
OSA opens the specified file(s), and begins the import process. This might take from a few to
many minutes depending on the size of the files being imported.
If the import is successful, a message to that effect is displayed. At this point, you should run
the recommended diagnostics to ensure data integrity. To do so, select the Diagnostics link.
Refer to Appendix A, System Monitoring on page 222 for information on how to run and
interpret the diagnostic reports.
If there are errors, you are notified and the errors are listed. Refer to the section Possible
Import Errors below.
Creating the DataSet.zip File
When you are ready to import files into OSA, you can import the files one by one as described above, or
you can create a ZIP file called DataSet.zip containing multiple CSV files for import. Then, when you
import the files, select Zip File Set and OSA will import the DataSet.zip file and extract any files it
contains.
How to create a ZIP file depends on the operating system you are using. These instructions are for
Windows XP.

ONESOURCE STATE APPORTIONMENT Version 2.0 User Guide
User Guide (D.4 Instructions for Populating Files) ® 2009 Thomson Reuters/ONESOURCE
(Last Updated September 2009) 286 All Rights Reserved
► To create DataSet.zip:
1. In Windows Explorer, navigate to the directory containing the CSV files.
2. Click to highlight the CSV files to include in the ZIP file. Hold down the Ctrl key as you click to
select multiple files at once.
3. When you‘re done selecting files, click the File menu.
4. Click Send to and select Compressed (zipped) folder. The ZIP file is created in the same
directory as the files and is given the same name as the first file selected.
5. Change the name of the ZIP file to DataSet.zip. To do so, highlight the ZIP file, and click the
File menu and select Rename.
6. The file name is highlighted. Type the new name and press the Enter key.
Possible Import Errors
In most cases, import errors occur due to invalid or missing data within a file. See section D.4
Instructions for Populating Files on page 286 for detailed information on allowable formats and required
fields. In some cases, data is case sensitive.
Also, keep in mind that many of the CSV files reference existing data (such as Entity ID, Account
Names, etc.) so ensure that the referenced data exists in OSA already, you are importing the file with
the referenced data first, or that you are importing the Zip File Set and it contains the file with the
referenced data.
Error How to Correct
Duplicate records found There are duplicate records within the CSV file. Delete the duplicate record(s).
Maximum length exceeded Some fields have length restrictions. Edit the field to conform to the length limit.
Invalid or missing information Information is missing or the data doesn‘t conform to the field requirements (e.g.,
isn‘t uppercase or isn‘t an allowable value). The invalid or missing information is
listed in the error message. Specify a valid value.
When importing a Zip File Set, some but not all of the files may be imported successfully. In this case,
the error message will display listing the files in the Zip File Set and whether or not the import was
successful for that particular file. You can either correct the errors and re-import the entire Zip File Set
or import only the files that did not import successfully.
D.4 Instructions for Populating Files
The CSV files available for import into/export from OSA are listed in the table below and then described
in detail after. As described in section D.3.2 Importing Files most CSV files reference existing data.
Therefore, either import the file with the referenced data first or add it to OSA using the user interface.
In the case of Jurisdictions and Default Parent Accounts, this data is loaded during initial OSA setup.
See section D.4.1 Supporting Data on page 316 for a list of the Jurisdictions and Parent Accounts pre-
loaded into OSA for you.

ONESOURCE STATE APPORTIONMENT Version 2.0 User Guide
User Guide (D.4 Instructions for Populating Files) ® 2009 Thomson Reuters/ONESOURCE
(Last Updated September 2009) 287 All Rights Reserved
File Name Description Dependencies
EntityList.csv List of entities None
EntityFilings.csv Adds jurisdictions to entities References existing entities and
jurisdictions
(EntityList.csv and Jurisdiction.csv)
AccountStructure.csv List of accounts None
AccountData.csv Account Data References existing entities,
jurisdictions, and account names
(EntityList.csv, AccountStructure.csv,
and Jurisdiction.csv)
Groups.csv List of groups References existing entities
(EntityList.csv)
GroupMembership.csv Members of groups References existing entities and
groups
(EntityList.csv and Groups.csv)
GroupFilings.csv Assigns jurisdictions to groups References existing groups and
jurisdictions
(Groups.csv and Jurisdiction.csv)
OwnershipStructure.csv Any ownership between entities,
includes divisions
References existing entities
(EntityList.csv)
OwnershipPercentages.csv Defines ownership percentages for
ownership structures
References existing entities. Also,
ownership structure must be defined
(EntityList.csv and
OwnershipStructure.csv)
TaxRuleOptions.csv Defines tax rules including factor
weights, decimal precisions, and rent
multipliers
References existing jurisdictions
(Jurisdiction.csv)
TaxRuleRates.csv Defines rates and brackets for tax
rules
References existing tax rules
(TaxRuleOptions.csv)
TaxRuleInclusion.csv Identifies accounts to include in the
tax rule for a particular jurisdiction
References existing tax rules,
jurisdictions, and account names
(TaxRuleOptions.csv,
AccountStructure.csv, and
Jurisdiction.csv)
TaxRuleAssignment.csv Assigns tax rules to entities References existing entities,
jurisdictions, and tax rules
(EntityList.csv, TaxRuleOptions.csv,
and Jurisdiction.csv)

ONESOURCE STATE APPORTIONMENT Version 2.0 User Guide
User Guide (D.4 Instructions for Populating Files) ® 2009 Thomson Reuters/ONESOURCE
(Last Updated September 2009) 288 All Rights Reserved
File Name Description Dependencies
FlowThroughRules.csv Identifies flow-through rules for flow-
through entity types
References existing jurisdictions
(Jurisdiction.csv)
Users.csv List of OSA users and their
permissions
None
UserEntityAccess.csv List of users and the entities they can
access
References existing users
(Users.csv)
EntityAccountFilters.csv List of visible accounts for the entities References existing entities and
account names
(EntityList.csv and
AccountStructure.csv)
Jurisdiction.csv List of additional jurisdictions. None
ApportionmentMethodRules.csv Defines which ownership category to
be used to flow each apportionment
factor in a given jurisdiction and year.
References existing jurisdictions and
ownership categories
(Jurisdiction.csv and
OwnershipCategories.csv)
OwnershipCategories.csv List of additional ownership
categories.
None
ParentTaxRuleInclusion.csv For a given tax rule (jurisdiction, year,
tax rule name), defines the default
behavior of any new child accounts of
the given parent account.
References existing jurisdictions and
tax rules
(Jurisdiction.csv and TaxRules.csv)
StateData.csv State form data for entities and
groups.
References existing entities, groups,
and jurisdictions
(EntityList.csv, Groups.csv, and
Jurisdiction.csv)
DataSet.zip
(Zip File Set)
Compressed ZIP file containing all or
some of the above files.
Dependencies of the individual files
apply
Each of the files, except Jurisdiction.csv and DataSet.zip, is explained in detail below. Most but not all
files have a field labeled Time_Period or Year which specifies the tax year to which the data applies.
When this field is missing, it means the data is not tax year specific, as is the case with Users.csv.
Also, in order to import or export a file, you must have the appropriate permissions. In addition, in some
cases, access to the data imported is limited, and permissions must then be set for other users to view
the data. See Chapter 9, Updating Users and Permissions on page 173 for information on user
permissions with respect to importing and exporting data.
Where noted, the data you enter in the fields is case sensitive. In addition, keep in mind that you cannot
apply any formatting to the files.
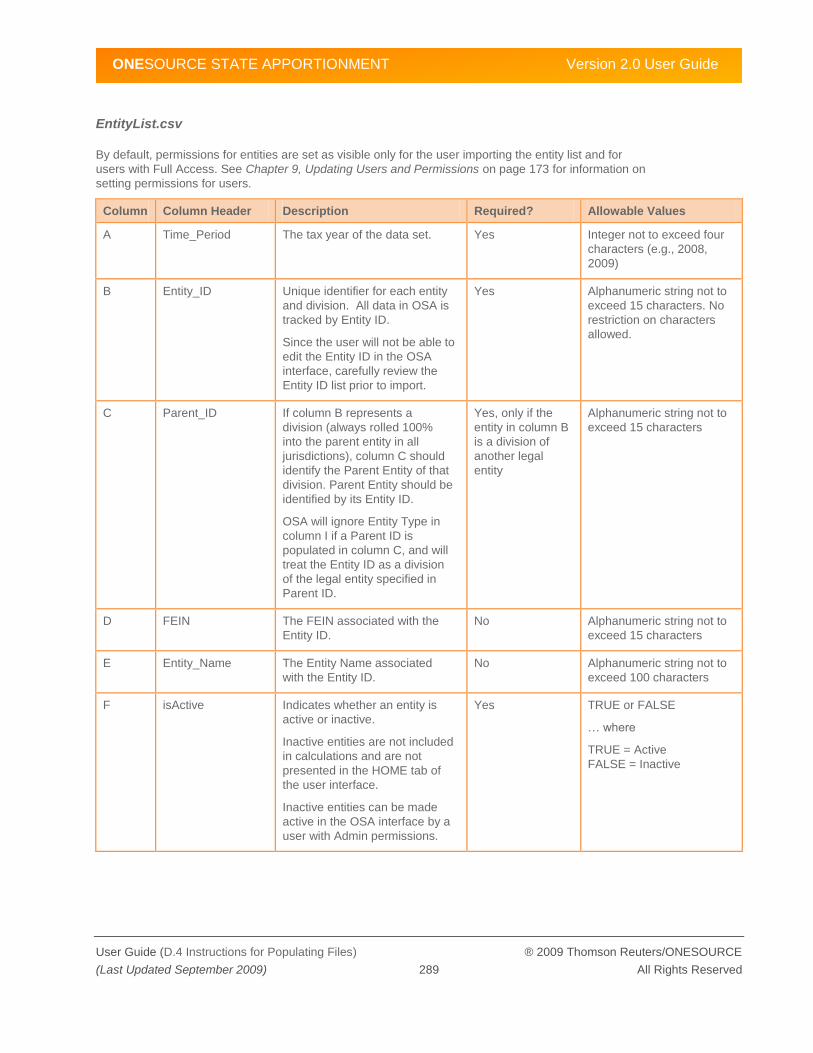
ONESOURCE STATE APPORTIONMENT Version 2.0 User Guide
User Guide (D.4 Instructions for Populating Files) ® 2009 Thomson Reuters/ONESOURCE
(Last Updated September 2009) 289 All Rights Reserved
EntityList.csv
By default, permissions for entities are set as visible only for the user importing the entity list and for
users with Full Access. See Chapter 9, Updating Users and Permissions on page 173 for information on
setting permissions for users.
Column Column Header Description Required? Allowable Values
A Time_Period The tax year of the data set. Yes Integer not to exceed four
characters (e.g., 2008,
2009)
B Entity_ID Unique identifier for each entity
and division. All data in OSA is
tracked by Entity ID.
Since the user will not be able to
edit the Entity ID in the OSA
interface, carefully review the
Entity ID list prior to import.
Yes Alphanumeric string not to
exceed 15 characters. No
restriction on characters
allowed.
C Parent_ID If column B represents a
division (always rolled 100%
into the parent entity in all
jurisdictions), column C should
identify the Parent Entity of that
division. Parent Entity should be
identified by its Entity ID.
OSA will ignore Entity Type in
column I if a Parent ID is
populated in column C, and will
treat the Entity ID as a division
of the legal entity specified in
Parent ID.
Yes, only if the
entity in column B
is a division of
another legal
entity
Alphanumeric string not to
exceed 15 characters
D FEIN The FEIN associated with the
Entity ID.
No Alphanumeric string not to
exceed 15 characters
E Entity_Name The Entity Name associated
with the Entity ID.
No Alphanumeric string not to
exceed 100 characters
F isActive Indicates whether an entity is
active or inactive.
Inactive entities are not included
in calculations and are not
presented in the HOME tab of
the user interface.
Inactive entities can be made
active in the OSA interface by a
user with Admin permissions.
Yes TRUE or FALSE
… where
TRUE = Active
FALSE = Inactive

ONESOURCE STATE APPORTIONMENT Version 2.0 User Guide
User Guide (D.4 Instructions for Populating Files) ® 2009 Thomson Reuters/ONESOURCE
(Last Updated September 2009) 290 All Rights Reserved
Column Column Header Description Required? Allowable Values
G isDomestic Whether an entity is domestic or
foreign.
This designation is used for
Group settings in determining
entities to be included in World
Wide versus Water‘s Edge
group returns.
Yes TRUE or FALSE
…where
TRUE = Domestic
FALSE = Foreign
H isFinancialEntity Whether or not an entity is a
financial entity --- so the
appropriate tax rate can be
applied in different jurisdictions
as appropriate.
This column correlates with the
isFinancialRate flag in the
TaxRuleRates.csv file.
Yes TRUE or FALSE
…where
TRUE = Financial Entity
FALSE = Non Financial
Entity
I Entity_Type The Entity Type associated with
the Entity ID.
Yes - Required
for all Entity IDs
including
divisions.
The Entity Type
of a division is
ignored unless
the Parent ID is
removed from the
division, at which
point the division
becomes an
entity of the
Entity Type
defined here.
CCORP
LLC
SMLLC
LP
LLP
GP
J Fed_Election The Federal Election of the
entity.
Yes, if Entity
Type is a flow-
through entity
(GP, LP, LLP,
LLC, or SMLLC).
For GP, LP, LLP and LLC:
CCORP or
PARTNERSHIP
For SMLLC:
CCORP or
DISREGARDED_ENTITY
K Industry User defined Industry of the
entity.
No Alphanumeric string not to
exceed 30 characters
L Activity User defined Activity of the
entity.
No Alphanumeric string not to
exceed 30 characters
M Comments User defined Comments relating
to the entity.
No Alphanumeric string not to
exceed 255 characters

ONESOURCE STATE APPORTIONMENT Version 2.0 User Guide
User Guide (D.4 Instructions for Populating Files) ® 2009 Thomson Reuters/ONESOURCE
(Last Updated September 2009) 291 All Rights Reserved
EntityFilings.csv
Column Column Header Description Required? Allowable Values
A Time_Period The tax year of the data set. Yes Integers not to exceed four
characters (e.g., 2008,
2009)
B Tax_Type The tax base (e.g., Income,
Capital, etc.) to which
apportionment data in OSA
relates.
In the current release of OSA,
income is the only tax base
supported.
No INCOME
C Entity_ID Unique identifier of each entity
and division.
Entity ID must correlate to an
Entity ID included in the
EntityList.csv file.
Yes Alphanumeric string not to
exceed 15 characters
D Jurisdiction_ID The Jurisdiction ID where the
Entity ID has a filing. Jurisdiction
ID must correlate to a
Jurisdiction listed in the OSA
ADMIN tab/Jurisdictions page.
See page 317 for a list of
jurisdictions loaded by default.
This data element determines
which jurisdictions are available
for a given entity in the user
interface, it does not determine
nexus.
Yes Alphanumeric string not to
exceed 10 characters
(e.g., AK, NY, NY-NYC)
Field is case sensitive
E isObligated Whether or not the Entity ID has
nexus in the associated
Jurisdiction ID.
Yes TRUE or FALSE
…where
TRUE = Nexus
FALSE = No nexus
F isProtected Whether or not the Entity ID is
protected by P.L. 86-272 in the
associated Jurisdiction ID.
This data element is used solely
to track and report on P.L. 86-
272 positions. It has no impact
on calculations.
Yes TRUE or FALSE
…where
TRUE = Protected
FALSE = Not Protected
G Filing_Due_Date The due date for the return to be
filed.
No Date if MM/DD/YYYY
format

ONESOURCE STATE APPORTIONMENT Version 2.0 User Guide
User Guide (D.4 Instructions for Populating Files) ® 2009 Thomson Reuters/ONESOURCE
(Last Updated September 2009) 292 All Rights Reserved
AccountStructure.csv
Column Column Header Description Required? Allowable Values
A Time_Period The tax year of the data set. Yes Integers not to exceed four
characters (e.g., 2008,
2009)
B Account_ID The Account ID related to the
Account Name.
While optional, it is
recommended that CorpTax
customers include it.
No Alphanumeric string not to
exceed 15 characters
C Account_Name Each Account Name to be
included in OSA, typically
mimicking the accounts included
in the compliance system.
The Account Name + Parent
Account serves as the unique
key for each account and all
associated data.
Yes Alphanumeric string not to
exceed 255 characters
D Parent_Account Default parent account under
which to place account.
OSA Parent Accounts are pre-
defined by Thomson Reuters
and not editable by the user.
IMPORTANT! This column must
be populated with one of the
OSA Default Parent Accounts,
see page 316.
Yes Alphanumeric string not to
exceed 100 characters
IMPORTANT! This column
must be populated with
one of the Default Parent
Accounts, see page 316.
E Factor The apportionment factor to
which the Account Name
pertains.
Yes PROPERTY
PAYROLL
SALES
USER DEFINED
F Display_Order Changes the display order of
Account Names under the
Parent Account. By default,
display is alphabetical by
Account Name.
No Integers (e.g., 1, 2, 3)
G Account_Type Account Type relates to special
apportionment functionality not
currently included in OSA.
Ignore this column for purposes
of populating this file.
No Alphanumeric string not to
exceed 15 characters

ONESOURCE STATE APPORTIONMENT Version 2.0 User Guide
User Guide (D.4 Instructions for Populating Files) ® 2009 Thomson Reuters/ONESOURCE
(Last Updated September 2009) 293 All Rights Reserved
Column Column Header Description Required? Allowable Values
H Calc_Behavior Specifies whether values in this
account adjust the Numerator
only, the Denominator only, or
Both.
If Numerator or Denominator
only, the value impacts only the
entity or State in which the value
is entered. These accounts are
equivalent to an override in a
compliance system.
If Both, the sum of the
numerators across the States
sum to the denominator (while
excluding municipal jurisdiction
values from the sum).
Yes NUMERATOR
DENOMINATOR
BOTH
I IsActive Indicates whether the Account
Name is active.
If an account is inactive, it is
visible or available for data input
in the user interface.
Yes TRUE or FALSE
…where
TRUE = Active
FALSE = Inactive
Field is case sensitive
AccountData.csv
Column Column Header Description Required? Allowable Values
A Time_Period The tax year of the data set. Yes Integers not to exceed four
characters (e.g., 2008,
2009)
B Entity_ID Unique identifier for each entity
and division.
Entity ID must correlate to an
Entity ID included in the
EntityList.csv file.
Yes Alphanumeric string not to
exceed 15 characters
C Jurisdiction_ID The Jurisdiction ID where the
Entity ID has a balance for the
Account ID. Jurisdiction ID must
correlate to a Jurisdiction listed
in the OSA ADMIN
tab/Jurisdictions page. See
page 317 for a list of
jurisdictions loaded by default.
This data element determines
which jurisdictions are available
for a given entity in the user
interface, it does not determine
nexus.
Yes Alphanumeric string not to
exceed 10 characters
(e.g., AK, NY, NY-NYC)
Field is case sensitive

ONESOURCE STATE APPORTIONMENT Version 2.0 User Guide
User Guide (D.4 Instructions for Populating Files) ® 2009 Thomson Reuters/ONESOURCE
(Last Updated September 2009) 294 All Rights Reserved
Column Column Header Description Required? Allowable Values
D Account_Name Account Name to be included in
OSA. Typically mimics the
accounts included in the
compliance system.
IMPORTANT! Account Name
must correlate to Account Name
in the AccountStructure.csv file.
Yes Alphanumeric string not to
exceed 255 characters
IMPORTANT! Account
Name must correlate to
existing account name
E Parent_Account Parent Account associated with
the Account Name as defined in
the AccountStructure.csv file.
Yes Alphanumeric string not to
exceed 100 characters
F Factor The apportionment factor to
which the Account Name
pertains (as defined in the
AccountStructure.csv file).
Yes One of four possible
values:
PROPERTY
PAYROLL
SALES
USER DEFINED
G isEnding Whether the amount relates to
the Beginning or End of the
year.
Yes TRUE or FALSE
…where
TRUE = Ending Value
FALSE = Beginning Value
H Account_Datatype Whether the amount is an
elimination amount or a
traditional apportionment
account amount.
Yes FALSE
NUMERATOR
DENOMINATOR
…where
FALSE = traditional
account data (non
elimination value)
NUMERATOR = for in-
state elimination
DENOMINATOR = for
everywhere elimination
I Amount Amount to be populated into the
account.
Yes Negative or positive
numbers, including
decimals (e.g., 50000,
9850, 65.50). While you
can enter any number of
decimal places, the OSA
interface rounds decimal
places to six.

ONESOURCE STATE APPORTIONMENT Version 2.0 User Guide
User Guide (D.4 Instructions for Populating Files) ® 2009 Thomson Reuters/ONESOURCE
(Last Updated September 2009) 295 All Rights Reserved
Groups.csv
By default, permissions for entities are set as visible only for users with Full Access. See Chapter 9,
Updating Users and Permissions on page 173 for information on setting permissions for users.
Column Column Header Description Required? Allowable Values
A Time_Period The tax year of the data set. Yes Integer not to exceed four
characters (e.g., 2008,
2009)
B Group_ID Unique identifier for the filing
group.
A filing group is determined by
group membership. A group
that files in multiple jurisdictions
only need be included once in
this file. The jurisdictions in
which each Group ID files are
identified in the
GroupFilings.csv file.
The user is not able to edit the
Group ID in the OSA interface;
therefore, carefully review the
Group ID list prior to import.
Yes Alphanumeric string not to
exceed 15 characters
C Group_Name The name of the Group ID No Alphanumeric string not to
exceed 100 characters
D isActive Whether a group is active or
inactive.
Inactive groups are not included
in calculations nor are
presented in the HOME tab of
the user interface; a user with
Admin access rights can
activate a group.
Yes TRUE or FALSE
…where
TRUE = Active
FALSE = Inactive
E Key_Corporation_I
D
The Entity ID of the key
corporation (Parent Filer) in the
group.
Entity ID must correlate to an
Entity ID included in the
EntityList.csv file.
No Alphanumeric string not to
exceed 15 characters
F Comments User-specified comments
relating to the group.
No Alphanumeric string not to
exceed 255 characters

ONESOURCE STATE APPORTIONMENT Version 2.0 User Guide
User Guide (D.4 Instructions for Populating Files) ® 2009 Thomson Reuters/ONESOURCE
(Last Updated September 2009) 296 All Rights Reserved
GroupMembership.csv
Column Column Header Description Required? Allowable Values
A Time_Period The tax year of the data set. Yes Integer not to exceed four
characters (e.g., 2008,
2009)
B Group_ID Unique identifier for a filing
group.
Group ID must correlate to a
Group ID included in the
Groups.csv file.
Yes Alphanumeric string not
to exceed 15 characters
C Entity_ID The Entity IDs of the members
filing as part of the Group ID.
Entity ID must correlate to an
Entity ID included in the
EntityList.csv file.
Yes Alphanumeric string not
to exceed 15 characters
D isMember Whether or not the Entity ID is
a member of the Group ID.
Yes TRUE or FALSE
…where
TRUE = Member
FALSE = Non-member
GroupFilings.csv
Column Column Header Description Required? Allowable Values
A Time_Period The tax year of the data set. Yes Integer not to exceed four
characters (e.g., 2008,
2009)
B Group_ID Unique identifier for the filing
group.
Group ID must correlate to a
Group ID in the Groups.csv
file. A group with the same
membership that files in
multiple jurisdictions will have
the same Group ID for each of
the jurisdictions in which it files.
Yes Alphanumeric string not
to exceed 15 characters
C Tax_Type The tax base (e.g., Income,
Capital, etc.) for which the
OSA apportionment data
relates.
Currently, a Tax Type of
Income is the only tax base
supported.
No INCOME
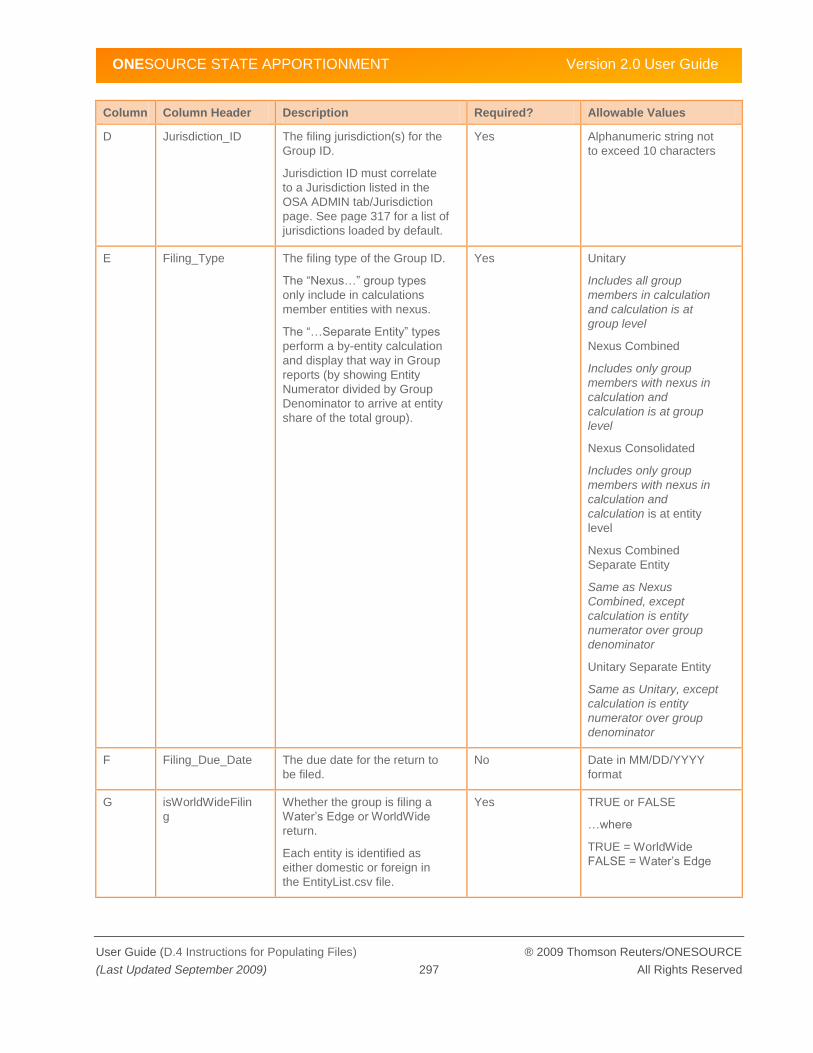
ONESOURCE STATE APPORTIONMENT Version 2.0 User Guide
User Guide (D.4 Instructions for Populating Files) ® 2009 Thomson Reuters/ONESOURCE
(Last Updated September 2009) 297 All Rights Reserved
Column Column Header Description Required? Allowable Values
D Jurisdiction_ID The filing jurisdiction(s) for the
Group ID.
Jurisdiction ID must correlate
to a Jurisdiction listed in the
OSA ADMIN tab/Jurisdiction
page. See page 317 for a list of
jurisdictions loaded by default.
Yes Alphanumeric string not
to exceed 10 characters
E Filing_Type The filing type of the Group ID.
The ―Nexus…‖ group types
only include in calculations
member entities with nexus.
The ―…Separate Entity‖ types
perform a by-entity calculation
and display that way in Group
reports (by showing Entity
Numerator divided by Group
Denominator to arrive at entity
share of the total group).
Yes Unitary
Includes all group
members in calculation
and calculation is at
group level
Nexus Combined
Includes only group
members with nexus in
calculation and
calculation is at group
level
Nexus Consolidated
Includes only group
members with nexus in
calculation and
calculation is at entity
level
Nexus Combined
Separate Entity
Same as Nexus
Combined, except
calculation is entity
numerator over group
denominator
Unitary Separate Entity
Same as Unitary, except
calculation is entity
numerator over group
denominator
F Filing_Due_Date The due date for the return to
be filed.
No Date in MM/DD/YYYY
format
G isWorldWideFilin
g
Whether the group is filing a
Water‘s Edge or WorldWide
return.
Each entity is identified as
either domestic or foreign in
the EntityList.csv file.
Yes TRUE or FALSE
…where
TRUE = WorldWide
FALSE = Water‘s Edge

ONESOURCE STATE APPORTIONMENT Version 2.0 User Guide
User Guide (D.4 Instructions for Populating Files) ® 2009 Thomson Reuters/ONESOURCE
(Last Updated September 2009) 298 All Rights Reserved
Column Column Header Description Required? Allowable Values
H isEightyTwenty Whether or not a group is filing
an 80/20 return.
This data element is used
solely to track and report on
80/20 groups. It has no impact
on calculations.
No TRUE or FALSE
…where
TRUE = 80/20
FALSE = Not 80/20
OwnershipStructure.csv
Column Column Header Description Required? Allowable Values
A Time_Period The tax year for which the
ownership structure is
applicable.
Yes Integer not to exceed four
characters (e.g., 2008,
2009).
B Entity_ID Unique identifier of each
owned entity.
Entity ID must correlate to an
Entity ID included in the
EntityList.csv file.
This file is for legal entity
relationships only (e.g., Corp to
Corp, Corp to partnership,
Corp to LLC, Corp to SMLLC
or partnership to partnership).
Division ownership is not
captured in this file (please see
EntityList.csv file.)
Yes Alphanumeric string not
to exceed 15 characters.
C Owner_ID Unique identifier of each owner
entity.
Owner ID must correlate to an
Entity ID included in the
EntityList.csv file.
Yes Alphanumeric string not
to exceed 15 characters.
D isUnitary Whether or not each owned
entity is in a Unitary business
with the owner.
Yes, except for:
SMLLCs as
defined in the
EntityList.csv
file, and
C-Corp to C-
Corp ownership
In these cases,
this field should
be left blank.
TRUE or FALSE
…where
TRUE = Unitary Partner
FALSE = Non-Unitary
Partner
Upon export of the OSA
dataset, this field defaults
to FALSE for SMLLCs
and C-Corp to C-Corp
ownership.
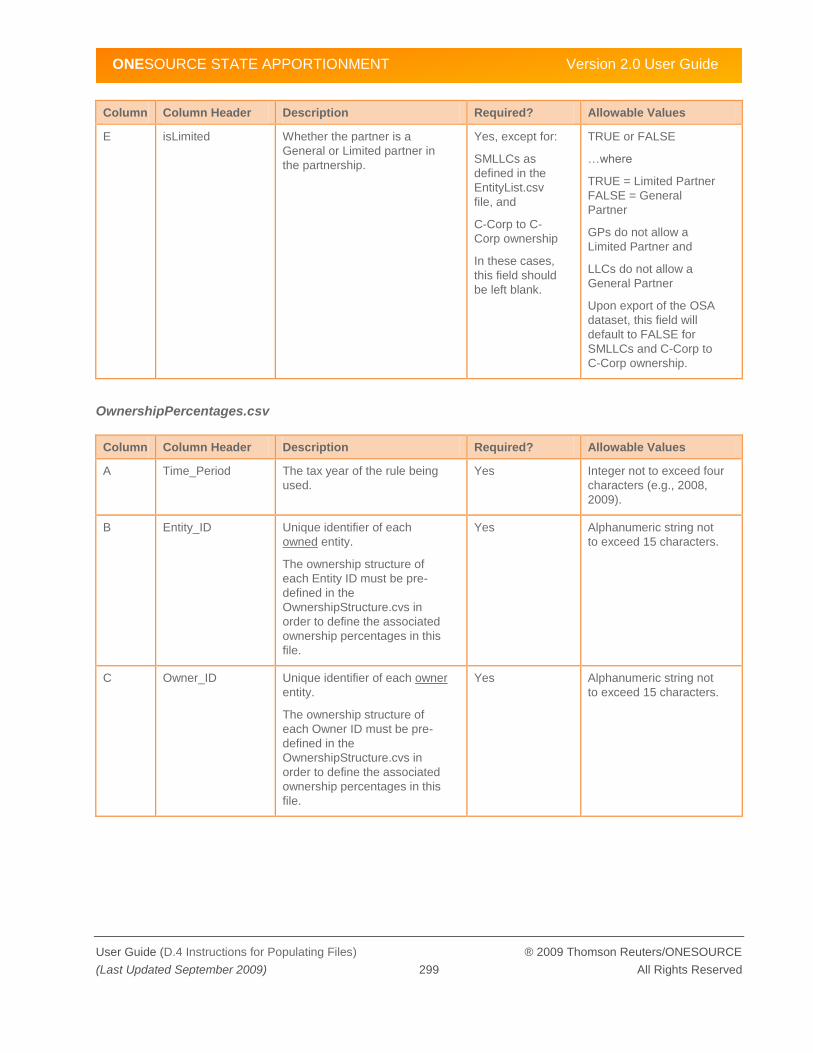
ONESOURCE STATE APPORTIONMENT Version 2.0 User Guide
User Guide (D.4 Instructions for Populating Files) ® 2009 Thomson Reuters/ONESOURCE
(Last Updated September 2009) 299 All Rights Reserved
Column Column Header Description Required? Allowable Values
E isLimited Whether the partner is a
General or Limited partner in
the partnership.
Yes, except for:
SMLLCs as
defined in the
EntityList.csv
file, and
C-Corp to C-
Corp ownership
In these cases,
this field should
be left blank.
TRUE or FALSE
…where
TRUE = Limited Partner
FALSE = General
Partner
GPs do not allow a
Limited Partner and
LLCs do not allow a
General Partner
Upon export of the OSA
dataset, this field will
default to FALSE for
SMLLCs and C-Corp to
C-Corp ownership.
OwnershipPercentages.csv
Column Column Header Description Required? Allowable Values
A Time_Period The tax year of the rule being
used.
Yes Integer not to exceed four
characters (e.g., 2008,
2009).
B Entity_ID Unique identifier of each
owned entity.
The ownership structure of
each Entity ID must be pre-
defined in the
OwnershipStructure.cvs in
order to define the associated
ownership percentages in this
file.
Yes Alphanumeric string not
to exceed 15 characters.
C Owner_ID Unique identifier of each owner
entity.
The ownership structure of
each Owner ID must be pre-
defined in the
OwnershipStructure.cvs in
order to define the associated
ownership percentages in this
file.
Yes Alphanumeric string not
to exceed 15 characters.

ONESOURCE STATE APPORTIONMENT Version 2.0 User Guide
User Guide (D.4 Instructions for Populating Files) ® 2009 Thomson Reuters/ONESOURCE
(Last Updated September 2009) 300 All Rights Reserved
Column Column Header Description Required? Allowable Values
D Category Category (i.e., Ownership,
Income, Capital) by which the
property, payroll, sales and
user-defined factors flow from
the owned entity to the owner
entity.
Each ownership category can
have its own beginning and
ending ownership percentages
as defined by the user.
Yes One possible default
value:
Ownership
Or, any user-created
categories. Categories
are created via the OSA
interface. See Chapter 8,
Updating the System
Configuration.
E Percentage Identifies the ownership
percentage of each owner.
Cumulative ownership of a
given Entity ID should not
exceed 100% but OSA does
not prohibit this. OSA will warn
you when this happens (in
ADMIN tab/Ownership page).
Yes Integers not to exceed six
decimal places (e.g., 1,
0.75, 0.333333)
F isEndingValue Whether the Percentage
relates to the beginning or
ending value.
Even if you do not differentiate
between beginning and ending
ownership percentages, two
records are still required for
each Entity ID (insert the same
percentage for both beginning
and ending values).
Yes TRUE or FALSE
…where
TRUE = Ending Value
FALSE = Beginning
Value
TaxRuleOptions.csv
The user can create additional tax rules by adding a row for each additional tax rule in the
TaxRuleOptions.csv file and populating columns A through P as appropriate.
For each additional tax rule, additional rows also need to be included in the TaxRuleRates.csv and
TaxRuleInclusion.csv files and their columns populated as appropriate.
To add an additional tax rule, it is recommended to copy and paste the row(s) of an existing tax rule that
closely resembles the tax rule to be added in each of the files and only revise the necessary fields.
Finally, the additional tax rule(s) needs to be assigned to the appropriate entity or entities in the
TaxRuleAssignemnt.csv file.
Column Column Header Description Required? Allowable Values
A Time_Period The tax year of the data set. Yes Integer not to exceed four
characters (e.g., 2008,
2009)

ONESOURCE STATE APPORTIONMENT Version 2.0 User Guide
User Guide (D.4 Instructions for Populating Files) ® 2009 Thomson Reuters/ONESOURCE
(Last Updated September 2009) 301 All Rights Reserved
Column Column Header Description Required? Allowable Values
B Tax_Type Identifies the tax base (e.g.,
Income, Capital) to which the
OSA apportionment data
relates.
Currently, only a Tax Type of
Income is supported.
No INCOME
C Tax_Rule_Name The name of the tax rule. The
Tax Rule Name + Jurisdiction
ID uniquely defines each tax
rule.
User may add additional tax
rules as appropriate.
Yes Alphanumeric string not
to exceed 100 characters
D Jurisdiction_ID The Jurisdiction ID associated
with the Tax Rule Name.
Jurisdiction ID must correlate
to a Jurisdiction listed in the
ADMIN tab/Jurisdiction page of
the user interface. See page
317 for a list of jurisdictions
loaded by default.
Yes Alphanumeric string not
to exceed 10 characters
(e.g., AK, NY, NY-NYC)
Field is case sensitive
E Tax_Method Identifies how a state
calculates its total tax liability.
It is used for the purposes of
OSX and OSA integration
(optional).
No One of the following five
entries:
INCOME
GREATER OF INCOME
AND AMT
GREATER OF INCOME
FRANCHISE AND AMT
GREATER OF INCOME
AND FRANCHISE TAX
SUM OF INCOME AND
FRANCHISE TAX
F isNetCost Whether or not the Tax Rule
Name includes property at net
cost.
This data element is used
solely for tracking and has no
impact on calculations. To
change a given tax rule
between Net and Original cost
the user must revise the
depreciation account settings
in the TaxRuleInclusion.csv file
as appropriate.
No TRUE or FALSE
…where
TRUE = Net Cost
FALSE = Original Cost
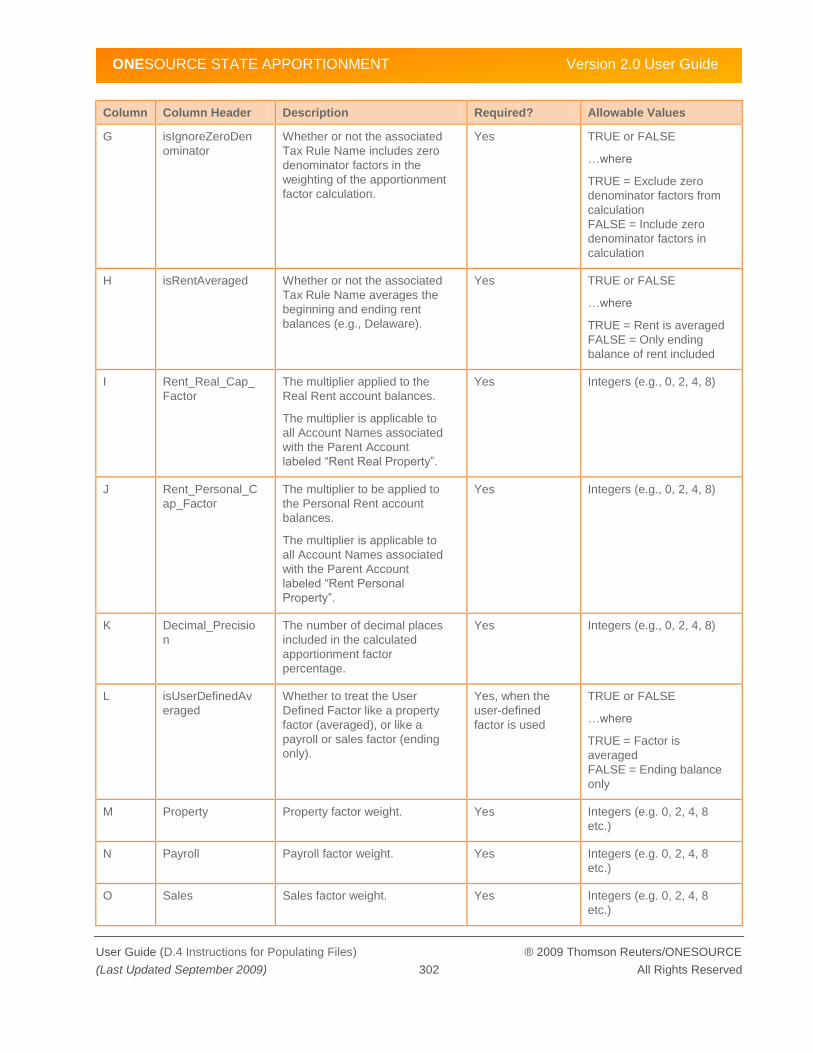
ONESOURCE STATE APPORTIONMENT Version 2.0 User Guide
User Guide (D.4 Instructions for Populating Files) ® 2009 Thomson Reuters/ONESOURCE
(Last Updated September 2009) 302 All Rights Reserved
Column Column Header Description Required? Allowable Values
G isIgnoreZeroDen
ominator
Whether or not the associated
Tax Rule Name includes zero
denominator factors in the
weighting of the apportionment
factor calculation.
Yes TRUE or FALSE
…where
TRUE = Exclude zero
denominator factors from
calculation
FALSE = Include zero
denominator factors in
calculation
H isRentAveraged Whether or not the associated
Tax Rule Name averages the
beginning and ending rent
balances (e.g., Delaware).
Yes TRUE or FALSE
…where
TRUE = Rent is averaged
FALSE = Only ending
balance of rent included
I Rent_Real_Cap_
Factor
The multiplier applied to the
Real Rent account balances.
The multiplier is applicable to
all Account Names associated
with the Parent Account
labeled ―Rent Real Property‖.
Yes Integers (e.g., 0, 2, 4, 8)
J Rent_Personal_C
ap_Factor
The multiplier to be applied to
the Personal Rent account
balances.
The multiplier is applicable to
all Account Names associated
with the Parent Account
labeled ―Rent Personal
Property‖.
Yes Integers (e.g., 0, 2, 4, 8)
K Decimal_Precisio
n
The number of decimal places
included in the calculated
apportionment factor
percentage.
Yes Integers (e.g., 0, 2, 4, 8)
L isUserDefinedAv
eraged
Whether to treat the User
Defined Factor like a property
factor (averaged), or like a
payroll or sales factor (ending
only).
Yes, when the
user-defined
factor is used
TRUE or FALSE
…where
TRUE = Factor is
averaged
FALSE = Ending balance
only
M Property Property factor weight. Yes Integers (e.g. 0, 2, 4, 8
etc.)
N Payroll Payroll factor weight. Yes Integers (e.g. 0, 2, 4, 8
etc.)
O Sales Sales factor weight. Yes Integers (e.g. 0, 2, 4, 8
etc.)

ONESOURCE STATE APPORTIONMENT Version 2.0 User Guide
User Guide (D.4 Instructions for Populating Files) ® 2009 Thomson Reuters/ONESOURCE
(Last Updated September 2009) 303 All Rights Reserved
Column Column Header Description Required? Allowable Values
P User User-defined factor weight. Yes Integers (e.g. 0, 2, 4, 8
etc.)
TaxRuleRates.csv
Column Column Header Description Required? Allowable Values
A Time_Period The tax year of the data set. Yes Integer not to exceed four
characters (e.g., 2008,
2009)
B Tax_Type The tax base (e.g., Income,
Capital) to which the OSA
apportionment data relates.
Currently, only a Tax Type of
Income is supported.
No INCOME
C Tax_Rule_Name The Tax Rule Name for which
the Tax Rate(s) apply.
Tax Rule Name must correlate
to a Tax Rule Name included
in the TaxRuleOptions.csv file.
Yes Alphanumeric string not
to exceed 100 characters
D Jurisdiction_ID The Jurisdiction ID associated
with the Tax Rule Name.
Jurisdiction ID must correlate
to a Jurisdiction listed in the
Admin screen of the user
interface. See page 317 for a
list of jurisdictions loaded by
default.
Yes Alphanumeric string not
to exceed 10 characters
(e.g., AK, NY, NY-NYC)
E isFinancialRate Whether the Tax Rate
represents a Financial Entity
rate (e.g. CA applies a different
tax rate to financial entities).
This field works in conjunction
with the isFinancialEntity flag in
the EntityList.csv file.
Yes TRUE or FALSE
…where
TRUE = Is Financial tax
rate
FALSE = Is not Financial
tax rate
F Tax_Bracket The starting dollar amount of a
particular tax tier.
For states with non-tiered tax
rates, this field should be set to
zero.
Yes Integers (e.g., 0, 10000,
20001)
G Tax_Rate The Tax Rate of the associated
Tax Bracket.
Yes Numbers not to exceed 6
decimal places (e.g.,
0.045, 0.06, 0.000085)

ONESOURCE STATE APPORTIONMENT Version 2.0 User Guide
User Guide (D.4 Instructions for Populating Files) ® 2009 Thomson Reuters/ONESOURCE
(Last Updated September 2009) 304 All Rights Reserved
TaxRuleInclusion.csv
Column Column Header Description Required? Allowable Values
A Time_Period The tax year of the data set. Yes Integer not to exceed four
characters (e.g., 2008,
2009)
B Tax_Type The tax base (e.g., Income,
Capital) to which the OSA
apportionment data relates.
Currently, only a Tax Type of
Income is supported.
No INCOME
C Tax_Rule_Name The Tax Rule Name for which
the Account Name
Inclusion/Exclusion is to apply.
Tax Rule Name must correlate
to a Tax Rule Name included
in the TaxRuleOptions.csv file.
Yes Alphanumeric string not
to exceed 100 characters
D Jurisdiction_ID The Jurisdiction ID associated
with the Tax Rule Name.
Jurisdiction ID must correlate
to a Jurisdiction listed in the
OSA ADMIN tab/Jurisdiction
page. See page 317 for a list of
jurisdictions loaded by default.
Yes Alphanumeric string not
to exceed 10 characters
(e.g. AK, NY, NY-NYC)
Field is case sensitive
E Account_Name The Account Name to be
Included or Excluded from the
associated Tax Rule Name in
the isIncluded field in column
H.
Account Name must correlate
to an Account Name in the
AccountStructure.csv file.
Yes Alphanumeric string not
to exceed 255 characters
F Parent_Account The Parent Account associated
with the Account Name as
defined in the
AccountStructure.csv file.
Yes Alphanumeric string not
to exceed 100 characters
G Factor The apportionment factor to
which the Account Name
pertains as defined in the
AccountStructure.csv file.
Yes Four possible values:
PROPERTY
PAYROLL
SALES
USER DEFINED

ONESOURCE STATE APPORTIONMENT Version 2.0 User Guide
User Guide (D.4 Instructions for Populating Files) ® 2009 Thomson Reuters/ONESOURCE
(Last Updated September 2009) 305 All Rights Reserved
Column Column Header Description Required? Allowable Values
H isIncluded Whether the Account Name is
included in the Tax Rule Name
of the associated Jurisdiction
ID.
Yes TRUE or FALSE
…where
TRUE = Included
FALSE = Excluded
TaxRuleAssignment.csv
Column Column Header Description Required? Allowable Values
A Time_Period The tax year of the data set. Yes Integer not to exceed four
characters (e.g., 2008,
2009)
B Tax_Type The tax base (e.g., Income,
Capital) to which the OSA
apportionment data relates.
Currently, only a Tax Type of
Income is supported.
No INCOME
C Tax_Rule_Name The Tax Rule Name to be
assigned to the Entity ID in the
associated Jurisdiction ID.
Tax Rule Name must correlate
to a Tax Rule Name included
in the TaxRuleOptions.csv file.
Yes Alphanumeric string not
to exceed 100 characters
D Jurisdiction_ID The Jurisdiction ID associated
with the Tax Rule Name.
Jurisdiction ID must correlate
to a Jurisdiction listed in the
Admin screen of the user
interface. See page 317 for a
list of jurisdictions loaded by
default.
Yes Alphanumeric string not
to exceed 10 characters
(e.g., AK, NY, NY-NYC)
Field is case sensitive
E Entity_ID The Entity ID to be assigned to
the Tax Rule Name in the
associated Jurisdiction ID.
Entity ID must correlate to an
Entity ID included in the
EntityList.csv file.
Yes Alphanumeric string not
to exceed 15 characters

ONESOURCE STATE APPORTIONMENT Version 2.0 User Guide
User Guide (D.4 Instructions for Populating Files) ® 2009 Thomson Reuters/ONESOURCE
(Last Updated September 2009) 306 All Rights Reserved
FlowThroughRules.csv
Column Column Header Description Required? Allowable Values
A Time_Period The tax year of the data set. Yes Integers not to exceed
four characters (e.g.,
2008, 2009)
B Tax_Type The tax base (e.g., Income,
Capital) to which the OSA
apportionment data relates.
Currently, only a Tax Type of
Income is supported.
No INCOME
C Jurisdiction_ID The Jurisdiction ID associated
with the Entity Type.
Jurisdiction ID must correlate
to a Jurisdiction listed in the
Admin screen of the user
interface. See page 317 for a
list of jurisdictions loaded by
default.
Yes Alphanumeric string not
to exceed 10 characters
(e.g. AK, NY, NY-NYC)
Field is case sensitive
D Entity_Type The Entity Type for which the
Flow Through Rules are
applicable.
Yes GP
LLC
LLP
LP
SMLLC
E State_Treatment Defines how the particular
Entity Type is treated in the
associated Jurisdiction ID, with
regards to filing status.
Yes Four allowable values
include:
SAME (same as Federal)
DISREGARDED ENTITY
(allowed for SMLLCs
only)
CCORP
PARTNERSHIP (allowed
for all entity types except
SMLLCs)
F Unitary_General_
Method
Defines the flow calculation
method (Apportion vs.
Allocation) for General Partner
treatment of Unitary
Partnerships of the particular
Entity Type in the associated
Jurisdiction ID.
Yes, except for
LLC and
SMLLC, in
which case the
field should be
left blank
Allowable values are:
APPORTIONMENT
ALLOCATION

ONESOURCE STATE APPORTIONMENT Version 2.0 User Guide
User Guide (D.4 Instructions for Populating Files) ® 2009 Thomson Reuters/ONESOURCE
(Last Updated September 2009) 307 All Rights Reserved
Column Column Header Description Required? Allowable Values
G Unitary_Limited_
Method
Defines the flow calculation
method (Apportion vs.
Allocation) for Limited Partner
treatment of Unitary
Partnerships of the particular
Entity Type in the associated
Jurisdiction ID.
Yes, except for
GP and SMLLC
for which the
field should be
left blank
Allowable values are:
APPORTIONMENT
ALLOCATION
H Non_Unitary_Ge
neral_Method
Defines the flow calculation
method (Apportion vs.
Allocation) for General Partner
treatment of Non-Unitary
Partnerships of the particular
Entity Type in the associated
Jurisdiction ID.
Yes, except for
LLC and SMLLC
for which the
field should be
left blank
Allowable values are:
APPORTIONMENT
ALLOCATION
I Non_Unitary_Lim
ited_Method
Defines the flow calculation
method (Apportion vs.
Allocation) for Limited Partner
treatment of Non-Unitary
Partnerships of the particular
Entity Type in the associated
Jurisdiction ID.
Yes, except for
GP and SMLLC
for which the
field should be
left blank
Allowable values are:
APPORTIONMENT
ALLOCATION
Users.csv
The data included in the Users.csv file applies to all Time Periods (tax years) present in the OSA
instance. Some data in this file, the fields First_Name, Last_Name, and Email, is overwritten by the
information in the authentication server. See Chapter 9, Updating Users and Permissions.
Column Column Header Description Required? Allowable Values
A User_Name Unique ID assigned to each
OSA User.
Yes Alphanumeric string not
to exceed 255 characters
B First_Name First name associated with
User ID.
No Alphanumeric string not
to exceed 255 characters
C Last_Name Last name associated with
User ID.
No Alphanumeric string not
to exceed 255 characters
D Email Email address associated with
User ID
No Alphanumeric string not
to exceed 255 characters
E isActive Whether the User ID is active
or inactive.
Yes TRUE or FALSE
…where
TRUE = Active
FALSE = Inactive

ONESOURCE STATE APPORTIONMENT Version 2.0 User Guide
User Guide (D.4 Instructions for Populating Files) ® 2009 Thomson Reuters/ONESOURCE
(Last Updated September 2009) 308 All Rights Reserved
Column Column Header Description Required? Allowable Values
F hasHomeTab Whether the User ID has
access to the HOME tab in the
user interface.
For columns F through Q
(except column J, ADMIN tab
Access), access for each user
is limited to the Entity IDs
defined in the
UserEntityAcess.csv file.
Yes TRUE or FALSE
…where
TRUE = Has Access
FALSE = Does Not Have
Access
G hasReportsTab Whether the User ID has
access to the REPORTS tab
and its features in the user
interface.
Yes TRUE or FALSE
…where
TRUE = Has Access
FALSE = Does Not Have
Access
H hasImportTab Whether the User ID has
access to the IMPORT tab and
its features in the user
interface.
Yes TRUE or FALSE
…where
TRUE = Has Access
FALSE = Does Not Have
Access
I hasExportTab Whether the User ID has
access to the EXPORT tab and
its features in the user
interface.
Yes TRUE or FALSE
…where
TRUE = Has Access
FALSE = Does Not Have
Access
J hasAdminTab Whether the User ID has
access to the ADMIN tab and
its features in the user
interface.
Any user with Admin access to
a data type (e.g., hasEntities =
TRUE) has access to all
objects for that data type within
the ADMIN tab. For the above
example, if a user has
hasAdminTab = TRUE and
hasEntities = TRUE then they
can add entities and edit entity
properties.
Yes TRUE or FALSE
…where
TRUE = Has Access
FALSE = Does Not Have
Access

ONESOURCE STATE APPORTIONMENT Version 2.0 User Guide
User Guide (D.4 Instructions for Populating Files) ® 2009 Thomson Reuters/ONESOURCE
(Last Updated September 2009) 309 All Rights Reserved
Column Column Header Description Required? Allowable Values
K hasAccountData Whether or not the User ID can
edit account data in the HOME
tab.
A value of TRUE indicates he
or she can edit account data, a
value of FALSE indicates he or
she can view the data but not
edit it, and the ability to import
or export account data itself is
also prohibited.
Yes TRUE or FALSE
…where
TRUE = Has Access
FALSE = Does Not Have
Access
L hasHistoricData For future use. Will control
whether the User ID has
access to non-current years via
the OSA login page.
Yes TRUE or FALSE
…where
TRUE = Has Access
FALSE = Does Not Have
Access
M hasEntities Whether or not the User ID has
ability to add entities or edit
entity properties.
Yes TRUE or FALSE
…where
TRUE = Has Access
FALSE = Does Not Have
Access
N hasOwnership Whether the User ID has
access to functions and the
ability to edit in the user
interface.
This primarily impacts
selectable options and/or
allowable functions in the
Reports, Import, Export, and
Admin tabs.
Yes TRUE or FALSE
…where
TRUE = Has Access
FALSE = Does Not Have
Access
O hasGroups Whether the User ID has ability
to add groups and edit group
properties.
Yes TRUE or FALSE
…where
TRUE = Has Access
FALSE = Does Not Have
Access
P hasTaxRules Whether the User ID has
access to Tax Rules functions
and ability to edit them in the
user interface.
Yes TRUE or FALSE
…where
TRUE = Has Access
FALSE = Does Not Have
Access

ONESOURCE STATE APPORTIONMENT Version 2.0 User Guide
User Guide (D.4 Instructions for Populating Files) ® 2009 Thomson Reuters/ONESOURCE
(Last Updated September 2009) 310 All Rights Reserved
Column Column Header Description Required? Allowable Values
Q hasSystemConfig Whether the User ID has
access to System
Configurations functions and
ability to edit in the user
interface.
Yes TRUE or FALSE
…where
TRUE = Has Access
FALSE = Does Not Have
Access
R isSuper Whether the User ID is a full
access user.
Yes TRUE or FALSE
…where
TRUE = Has Access
FALSE = Does Not Have
Access
S hasPlanningTab Whether the User ID has
access to the (optional)
PLANNING tab and its features
in the user interface.
Yes TRUE or FALSE
…where
TRUE = Has Access
FALSE = Does Not Have
Access
T hasStateData Whether the User ID has
access to State Data and
ability to edit in the user
interface.
Yes TRUE or FALSE
…where
TRUE = Has Access
FALSE = Does Not Have
Access
U hasScenarios Whether the User ID has
access to Scenarios and ability
to edit in the user interface.
Yes TRUE or FALSE
…where
TRUE = Has Access
FALSE = Does Not Have
Access
UserEntityAccess.csv
The data included in the UserEntityAcces.csv file applies to all Time Periods (tax years) present in the
OSA instance.
Column Column Header Description Required? Allowable Values
A User_Name The unique User ID of each
OSA user.
User ID must correlate to a
User ID in the Users.csv file.
Yes Alphanumeric string not
to exceed 255 characters
B Entity_ID Unique identifier of each entity.
Entity ID must correlate to an
Entity ID included in the
EntityList.csv file.
Yes Alphanumeric string not
to exceed 15 characters
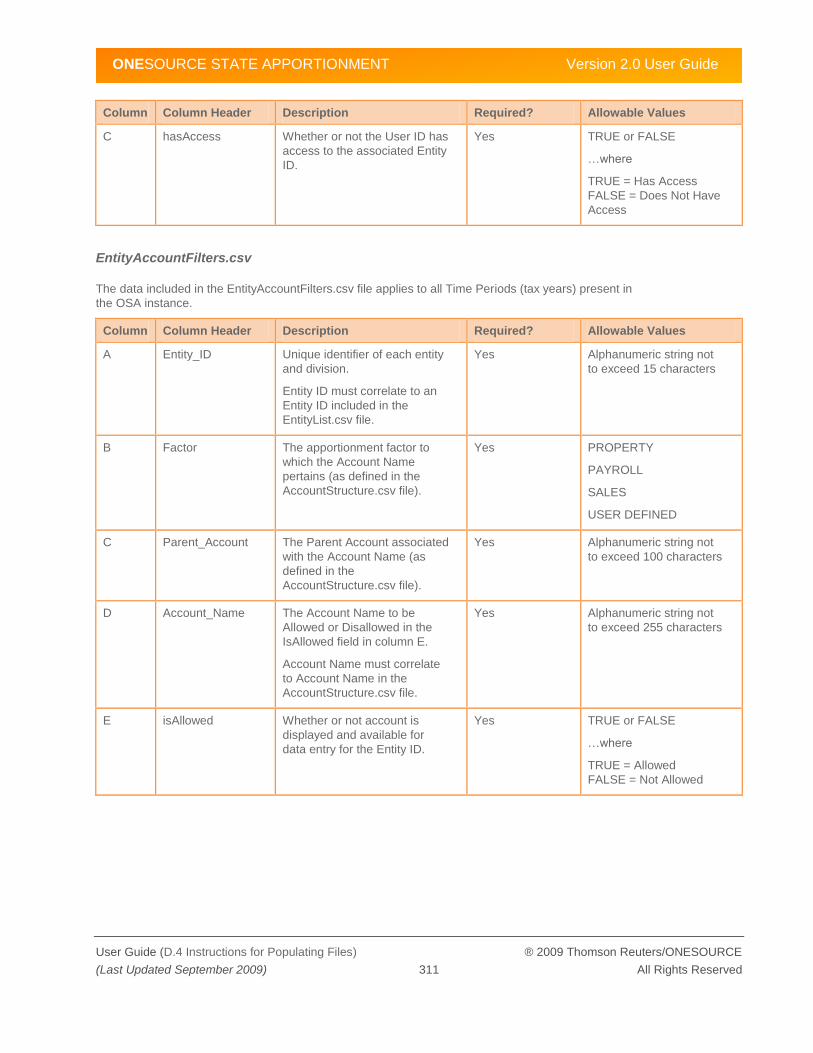
ONESOURCE STATE APPORTIONMENT Version 2.0 User Guide
User Guide (D.4 Instructions for Populating Files) ® 2009 Thomson Reuters/ONESOURCE
(Last Updated September 2009) 311 All Rights Reserved
Column Column Header Description Required? Allowable Values
C hasAccess Whether or not the User ID has
access to the associated Entity
ID.
Yes TRUE or FALSE
…where
TRUE = Has Access
FALSE = Does Not Have
Access
EntityAccountFilters.csv
The data included in the EntityAccountFilters.csv file applies to all Time Periods (tax years) present in
the OSA instance.
Column Column Header Description Required? Allowable Values
A Entity_ID Unique identifier of each entity
and division.
Entity ID must correlate to an
Entity ID included in the
EntityList.csv file.
Yes Alphanumeric string not
to exceed 15 characters
B Factor The apportionment factor to
which the Account Name
pertains (as defined in the
AccountStructure.csv file).
Yes PROPERTY
PAYROLL
SALES
USER DEFINED
C Parent_Account The Parent Account associated
with the Account Name (as
defined in the
AccountStructure.csv file).
Yes Alphanumeric string not
to exceed 100 characters
D Account_Name The Account Name to be
Allowed or Disallowed in the
IsAllowed field in column E.
Account Name must correlate
to Account Name in the
AccountStructure.csv file.
Yes Alphanumeric string not
to exceed 255 characters
E isAllowed Whether or not account is
displayed and available for
data entry for the Entity ID.
Yes TRUE or FALSE
…where
TRUE = Allowed
FALSE = Not Allowed

ONESOURCE STATE APPORTIONMENT Version 2.0 User Guide
User Guide (D.4 Instructions for Populating Files) ® 2009 Thomson Reuters/ONESOURCE
(Last Updated September 2009) 312 All Rights Reserved
Jurisdiction.csv
Column Column Header Description Required? Allowable Values
A Jurisdiction_ID ID the jurisdiction will be
referenced by.
Yes Alphanumeric string not
to exceed 10 characters
(e.g. AK, NY, NY-NYC)
Field is case sensitive
B Name Name of the jurisdiction. Yes Alphanumeric string not
to exceed 255 characters
C Parent_ID For municipalities, the ID of the
parent jurisdiction.
No Alphanumeric string not
to exceed 10 characters
(e.g. AK, NY, NY-NYC)
Field is case sensitive
D IsExcludedFromN
exusCount
Whether the jurisdiction is
excluded from nexus count.
Yes TRUE or FALSE
…where
TRUE = Excluded
FALSE = Included
E IsUsed Whether the jurisdiction is
active.
Yes TRUE or FALSE
…where
TRUE = Active
FALSE = Not Active
ApportionmentMethodRules.csv
Column Column Header Description Required? Allowable Values
A Year The tax year of the data set. Yes Integer not to exceed four
characters (e.g., 2008,
2009)
B Jurisdiction_ID The Jurisdiction ID associated
with the Apportionment Method
Rule.
Yes Alphanumeric string not
to exceed 10 characters
(e.g. AK, NY, NY-NYC)
Field is case sensitive
C PropertyCategory Ownership Category to use to
flow property amounts for the
given jurisdiction and tax year.
Yes One possible default
value:
Ownership
Or, any user-created
categories.

ONESOURCE STATE APPORTIONMENT Version 2.0 User Guide
User Guide (D.4 Instructions for Populating Files) ® 2009 Thomson Reuters/ONESOURCE
(Last Updated September 2009) 313 All Rights Reserved
Column Column Header Description Required? Allowable Values
D PayrollCategory Ownership Category to use to
flow payroll amounts for the
given jurisdiction and tax year.
Yes One possible default
value:
Ownership
Or, any user-created
categories.
E SalesCategory Ownership Category to use to
flow sales amounts for the given
jurisdiction and tax year.
Yes One possible default
value:
Ownership
Or, any user-created
categories.
F UserCategory Ownership Category to use to
flow user defined amounts for
the given jurisdiction and tax
year.
Yes One possible default
value:
Ownership
Or, any user-created
categories.
OwnershipCategories.csv
Column Column Header Description Required? Allowable Values
A Ownership_Category Ownership category to add. Yes Alphanumeric string not to
exceed 255 characters
ParentTaxRuleInclusion.csv
Column Column Header Description Required? Allowable Values
A Year The tax year of the data set. Yes Integers not to exceed four
characters (e.g., 2008,
2009)
B TaxType The tax base (e.g., Income,
Capital) to which the OSA
apportionment data relates.
Currently, only a Tax Type of
Income is supported.
Yes INCOME
C Jurisdiction_ID The Jurisdiction ID associated
with the Tax Rule Name.
Jurisdiction ID must correlate to
a Jurisdiction listed in the OSA
ADMIN tab/Jurisdiction page.
See page 317 for a list of
jurisdictions loaded by default.
Yes Alphanumeric string not
to exceed 10 characters
(e.g. AK, NY, NY-NYC)
Field is case sensitive

ONESOURCE STATE APPORTIONMENT Version 2.0 User Guide
User Guide (D.4 Instructions for Populating Files) ® 2009 Thomson Reuters/ONESOURCE
(Last Updated September 2009) 314 All Rights Reserved
Column Column Header Description Required? Allowable Values
D TaxRuleName The Tax Rule Name for which
the Account Name
Inclusion/Exclusion is to apply.
Tax Rule Name must correlate
to a Tax Rule Name included in
the TaxRuleOptions.csv file.
Yes Alphanumeric string not to
exceed 100 characters
E Parent_Name The Parent Account Name to
be Included or Excluded from
the associated Tax Rule Name
in the Included field in column
G.
Yes Alphanumeric string not to
exceed 255 characters
F Factor The apportionment factor to
which the Parent Account Name
pertains as defined in the
AccountStructure.csv file.
Yes Four possible values:
PROPERTY
PAYROLL
SALES
USER DEFINED
G Included Whether the Account Name is
included in the Tax Rule Name
of the associated Jurisdiction ID.
Yes TRUE or FALSE
…where
TRUE = Included
FALSE = Excluded
StateData.csv
Column Column Header Description Required? Allowable Values
A Time_Period The tax year of the data set. Yes Integers not to exceed four
characters (e.g., 2008,
2009)
B Entity_ID Unique identifier of each entity
and division.
Entity ID must correlate to an
Entity ID included in the
EntityList.csv file.
Yes Alphanumeric string not to
exceed 15 characters
C Jurisdiction_ID The Jurisdiction ID of the
jurisdiction associated with this
data value.
Yes Alphanumeric string not to
exceed 10 characters
(e.g., AK, NY, NY-NYC)
Field is case sensitive
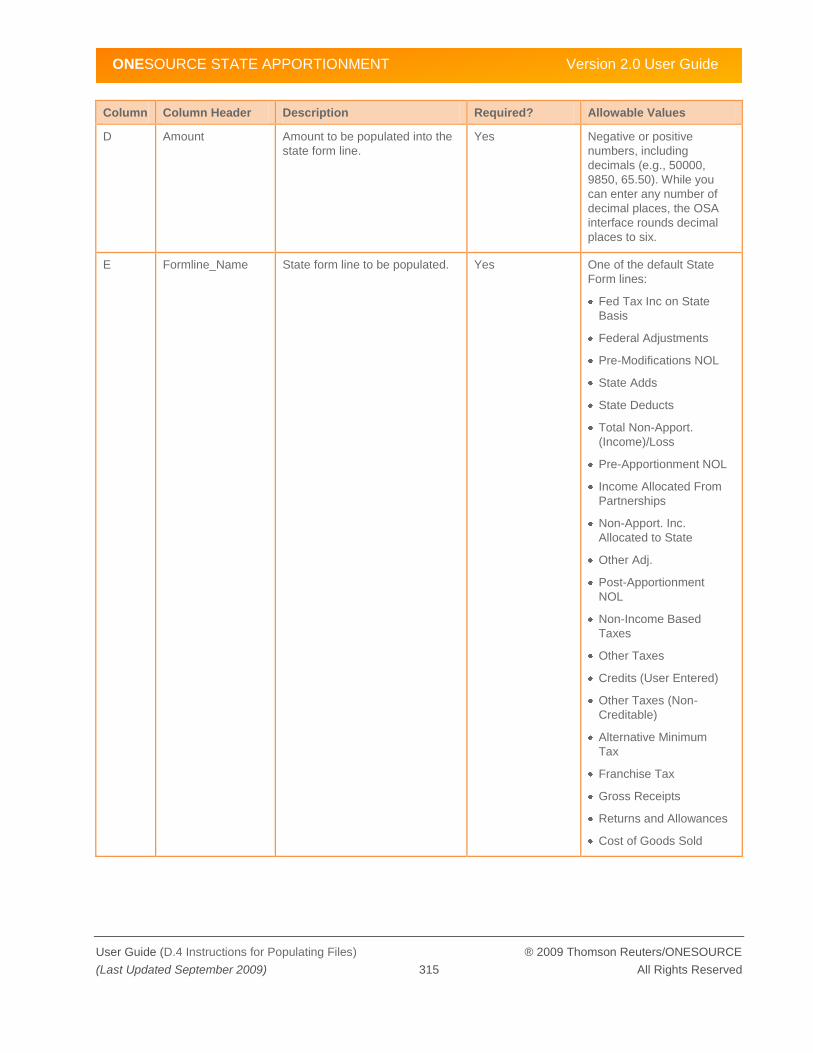
ONESOURCE STATE APPORTIONMENT Version 2.0 User Guide
User Guide (D.4 Instructions for Populating Files) ® 2009 Thomson Reuters/ONESOURCE
(Last Updated September 2009) 315 All Rights Reserved
Column Column Header Description Required? Allowable Values
D Amount Amount to be populated into the
state form line.
Yes Negative or positive
numbers, including
decimals (e.g., 50000,
9850, 65.50). While you
can enter any number of
decimal places, the OSA
interface rounds decimal
places to six.
E Formline_Name State form line to be populated. Yes One of the default State
Form lines:
Fed Tax Inc on State
Basis
Federal Adjustments
Pre-Modifications NOL
State Adds
State Deducts
Total Non-Apport.
(Income)/Loss
Pre-Apportionment NOL
Income Allocated From
Partnerships
Non-Apport. Inc.
Allocated to State
Other Adj.
Post-Apportionment
NOL
Non-Income Based
Taxes
Other Taxes
Credits (User Entered)
Other Taxes (Non-
Creditable)
Alternative Minimum
Tax
Franchise Tax
Gross Receipts
Returns and Allowances
Cost of Goods Sold

ONESOURCE STATE APPORTIONMENT Version 2.0 User Guide
User Guide (D.4 Instructions for Populating Files) ® 2009 Thomson Reuters/ONESOURCE
(Last Updated September 2009) 316 All Rights Reserved
D.4.1 Supporting Data
The following default data is referenced by one or more CSV files during import, and is loaded during
the initial OSA setup.
Default Parent Accounts
These default parent account names are referenced in AccountStructure.csv.
Display Order Account Name Factor Multiplier Type
1 Inventory Property Factor
2 Land Property Factor
3 Bldg at Orig. Cost Property Factor
4 Less Accum. Deprec. Bldg Property Factor CONTRA
5 Lease Imp. at Orig. Cost Property Factor
6 Less Accum. Deprec. Lease Imp. Property Factor CONTRA
7 Mach. and Equip. at Orig. Cost Property Factor
8 Less Accum. Deprec. Mach. and Equip. Property Factor CONTRA
9 Transportation Equipment Property Factor
10
Less Accum. Deprec. Transportation
Equipment Property Factor CONTRA
11 Furniture at Orig. Cost Property Factor
12 Less Accum. Deprec. Furniture Property Factor CONTRA
13 Other Property at Orig. Cost Property Factor
14 Less Accum. Deprec. Other Property Property Factor CONTRA
15 Other Non-Depreciable Assets Property Factor
16 Depletable Assets Property Factor
17 Less Accum. Depletion Property Factor CONTRA
18 Intangible Assets Property Factor
19 Less Accum. Amortization Intangible Assets Property Factor CONTRA
20 Construction in Progress Property Factor
21 Rent Real Property Property Factor Rent Real Property
22 Rent Personal Property Property Factor Rent Personal Property

ONESOURCE STATE APPORTIONMENT Version 2.0 User Guide
User Guide (D.4 Instructions for Populating Files) ® 2009 Thomson Reuters/ONESOURCE
(Last Updated September 2009) 317 All Rights Reserved
Display Order Account Name Factor Multiplier Type
1 Salaries and Wages Payroll Factor
2 Officers Compensation Payroll Factor
1 Sales Income Sales Factor
2 Service Income Sales Factor
3 Rental Income Sales Factor
4 Royalty Income Sales Factor
5 Dividends Income Sales Factor
6 Interest Income Sales Factor
7 Gross Proceeds from Sales of Prop. Sales Factor
8 Net Gains from Sales of Prop. Sales Factor
9 Other Business Receipts Sales Factor
1 Miscellaneous Accounts User Defined Factor
Jurisdictions
Jurisdictions are referenced by several CSV files. This table lists the jurisdictions loaded by default
during initial OSA setup. Users with appropriate permissions may also add jurisdictions to OSA. See
Chapter 8, Updating the System Configuration on page 156 for instructions on how to add jurisdictions
using the OSA interface. See the section above for instructions on importing additional jurisdictions.
ID Name Parent ID
AK Alaska
AL Alabama
AR Arkansas
AZ Arizona
CA California
CO Colorado
CT Connecticut
DC District of Columbia
DE Delaware
FED Federal
FL Florida

ONESOURCE STATE APPORTIONMENT Version 2.0 User Guide
User Guide (D.4 Instructions for Populating Files) ® 2009 Thomson Reuters/ONESOURCE
(Last Updated September 2009) 318 All Rights Reserved
ID Name Parent ID
FR Foreign
GA Georgia
HI Hawaii
IA Iowa
ID Idaho
IL Illinois
IN Indiana
KS Kansas
KY Kentucky
KY-BOWLING Bowling Green KY
KY-CAMPB Campbell County KY
KY-CUMBER Cumberland County KY
KY-LOUISV Louisville KY
KY-LEXNGTN Lexington KY
LA Louisiana
MA Massachusetts
MD Maryland
ME Maine
MI Michigan
MI-GRNDRPD Grand Rapids MI
MI-BATLCRK Battle Creek MI
MI-DETROIT Detroit MI
MI-FLINT Flint MI
MI-JACKSON Jackson MI
MN Minnesota
MO Missouri
MO-KC Kansas City MO
MO-STL St. Louis MO
MS Mississippi

ONESOURCE STATE APPORTIONMENT Version 2.0 User Guide
User Guide (D.4 Instructions for Populating Files) ® 2009 Thomson Reuters/ONESOURCE
(Last Updated September 2009) 319 All Rights Reserved
ID Name Parent ID
MT Montana
NC North Carolina
ND North Dakota
NE Nebraska
NH New Hampshire
NJ New Jersey
NM New Mexico
NV Nevada
NY New York
NY-NYC New York City NY
NY-MTA New York MTA NY
NY-MCTD New York MCTD NY
OH Ohio
OH-BDFRD Bedford Heights OH
OH-CINCI Cincinnati OH
OH-CLEVE Cleveland OH
OH-COLUM Columbus OH
OH-DBLN Dublin OH
OH-MYFLD Mayfield Heights OH
OH-RITA Rita OH
OH-WRNSVLE Warensville OH
OK Oklahoma
OR Oregon
OR-PORT Portland OR
OR-MLTNOMA Multnomah OR
PA Pennsylvania
PA-PHI Philadelphia PA
PR Puerto Rico
RI Rhode Island

ONESOURCE STATE APPORTIONMENT Version 2.0 User Guide
User Guide (D.4 Instructions for Populating Files) ® 2009 Thomson Reuters/ONESOURCE
(Last Updated September 2009) 320 All Rights Reserved
ID Name Parent ID
SC South Carolina
SD South Dakota
TN Tennessee
TX Texas
UT Utah
VA Virginia
VT Vermont
WA Washington
WI Wisconsin
WV West Virginia
WY Wyoming
XX Miscellaneous
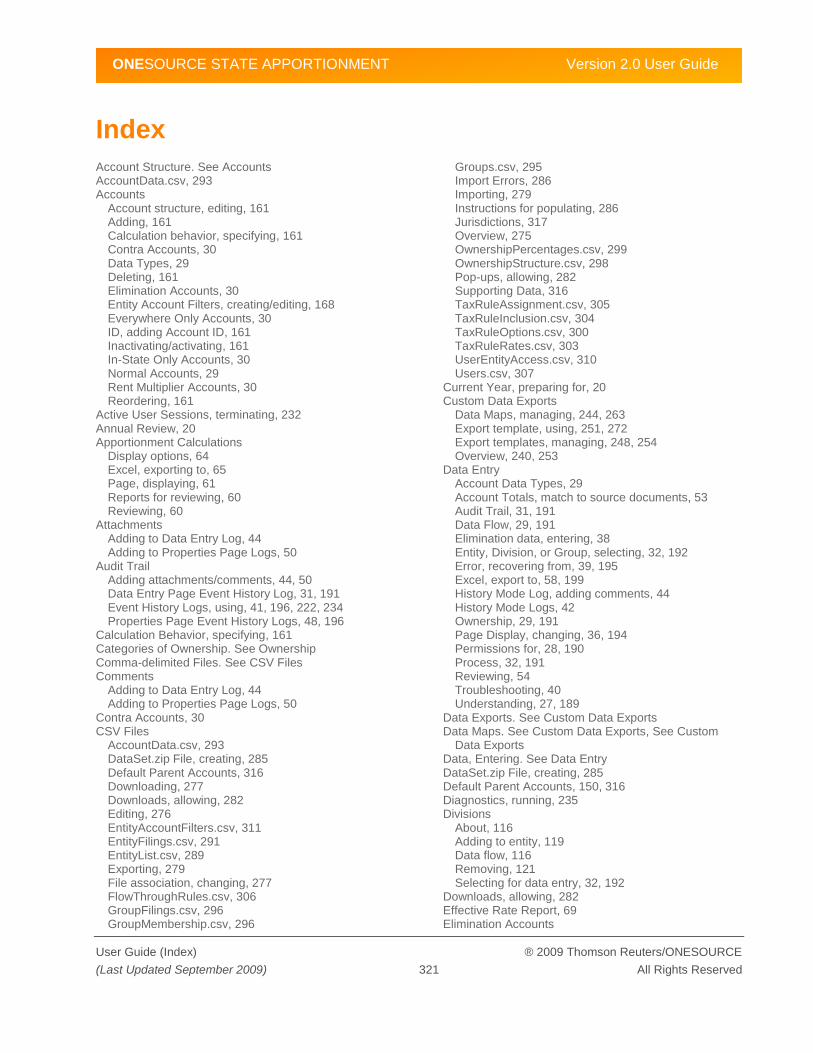
ONESOURCE STATE APPORTIONMENT Version 2.0 User Guide
User Guide (Index) ® 2009 Thomson Reuters/ONESOURCE
(Last Updated September 2009) 321 All Rights Reserved
Index
Account Structure. See Accounts AccountData.csv, 293 Accounts
Account structure, editing, 161 Adding, 161 Calculation behavior, specifying, 161 Contra Accounts, 30 Data Types, 29 Deleting, 161 Elimination Accounts, 30 Entity Account Filters, creating/editing, 168 Everywhere Only Accounts, 30 ID, adding Account ID, 161 Inactivating/activating, 161 In-State Only Accounts, 30 Normal Accounts, 29 Rent Multiplier Accounts, 30 Reordering, 161
Active User Sessions, terminating, 232 Annual Review, 20 Apportionment Calculations
Display options, 64 Excel, exporting to, 65 Page, displaying, 61 Reports for reviewing, 60 Reviewing, 60
Attachments Adding to Data Entry Log, 44 Adding to Properties Page Logs, 50
Audit Trail Adding attachments/comments, 44, 50 Data Entry Page Event History Log, 31, 191 Event History Logs, using, 41, 196, 222, 234 Properties Page Event History Logs, 48, 196
Calculation Behavior, specifying, 161 Categories of Ownership. See Ownership Comma-delimited Files. See CSV Files Comments
Adding to Data Entry Log, 44 Adding to Properties Page Logs, 50
Contra Accounts, 30 CSV Files
AccountData.csv, 293 DataSet.zip File, creating, 285 Default Parent Accounts, 316 Downloading, 277 Downloads, allowing, 282 Editing, 276 EntityAccountFilters.csv, 311 EntityFilings.csv, 291 EntityList.csv, 289 Exporting, 279 File association, changing, 277 FlowThroughRules.csv, 306 GroupFilings.csv, 296 GroupMembership.csv, 296
Groups.csv, 295 Import Errors, 286 Importing, 279 Instructions for populating, 286 Jurisdictions, 317 Overview, 275 OwnershipPercentages.csv, 299 OwnershipStructure.csv, 298 Pop-ups, allowing, 282 Supporting Data, 316 TaxRuleAssignment.csv, 305 TaxRuleInclusion.csv, 304 TaxRuleOptions.csv, 300 TaxRuleRates.csv, 303 UserEntityAccess.csv, 310 Users.csv, 307
Current Year, preparing for, 20 Custom Data Exports
Data Maps, managing, 244, 263 Export template, using, 251, 272 Export templates, managing, 248, 254 Overview, 240, 253
Data Entry Account Data Types, 29 Account Totals, match to source documents, 53 Audit Trail, 31, 191 Data Flow, 29, 191 Elimination data, entering, 38 Entity, Division, or Group, selecting, 32, 192 Error, recovering from, 39, 195 Excel, export to, 58, 199 History Mode Log, adding comments, 44 History Mode Logs, 42 Ownership, 29, 191 Page Display, changing, 36, 194 Permissions for, 28, 190 Process, 32, 191 Reviewing, 54 Troubleshooting, 40 Understanding, 27, 189
Data Exports. See Custom Data Exports Data Maps. See Custom Data Exports, See Custom
Data Exports Data, Entering. See Data Entry DataSet.zip File, creating, 285 Default Parent Accounts, 150, 316 Diagnostics, running, 235 Divisions
About, 116 Adding to entity, 119 Data flow, 116 Removing, 121 Selecting for data entry, 32, 192
Downloads, allowing, 282 Effective Rate Report, 69 Elimination Accounts

ONESOURCE STATE APPORTIONMENT Version 2.0 User Guide
User Guide (Index) ® 2009 Thomson Reuters/ONESOURCE
(Last Updated September 2009) 322 All Rights Reserved
About, 30 Entering data, 38
Entities About, 96 Adding, 98 Editing, 101 Jurisdictions, aligning, 115 Ownership structure, 97 Ownership, defining, 119 Ownership, removing, 121 Properties, 96 Selecting for data entry, 32, 192
Entity Account Filters Creating/editing, 168 Settings, applying to other entities, 170, 172
Entity Calculations Report, 71 Entity Detail Report, 73 Entity Properties
Editing, 40, 195 Event History Log, 48, 196
EntityAccountFilters.csv, 311 EntityFilings.csv, 291 EntityList.csv, 289 Errors
CSV File import, during, 286 Data Entry, recovering from, 39, 195
Event History Details, viewing, 229 Excel, exporting to, 231 Filtering, 225 Logs, Data Entry page, 42, 196 Logs, Properties Pages, 48, 196 Logs, using, 41, 196 Viewing, 222, 234
Everywhere Only Accounts, 30 Excel
Export to, 58, 199 Exporting apportionment calculations to, 65 Row limitation, 277
Export Templates. See Custom Data Exports, See Custom Data Exports
Exporting Apportionment Calculations to Excel, 65 Custom data exports. See Custom Data Exports Data to Excel, 58, 199
Features Overview, 9 File Type Association, changing, 278 Filing Types, 97, 123 Filters
Entity Account Filters, creating/editing, 168 Entity/group list, 33, 192 User permissions, 173
Flow-Through Rules Apportionment Method Rule, 153 Defining for Tax Rules, 152 Editing, 154 Flow Calculation Method, 153 State Treatment values, 152
FlowThroughRules.csv, 306 Group Calculations Report, 75
Group Detail Report, 77 Group Membership Report, 79 Group Properties
Editing, 40, 195 Event History Log, 48, 196
GroupFilings.csv, 296 GroupMembership.csv, 296 Groups
About, 96 Activating/inactivating, 131 Adding/editing, 123 Filing Types, 97, 123 Jurisdictions, adding/editing, 134 Members, adding/removing, 128 Properties, 97 Properties, editing, 132 Selecting for data entry, 32, 192
Groups.csv, 295 History Mode, data entry, 42, 196 Included/Excluded Accounts
Parent Accounts, specifying for Tax Rules, 150 Specifying for Tax Rules, 149
In-State Only Accounts, 30 Jurisdictions
Aligning for entities, 115 Groups, adding/editing jurisdictions, 134 Master list, adding/editing, 156
Logging In, 22 Maps, for custom export templates, 244, 263 Membership in Groups. See Groups Monitoring, System, 222 Nexus and Filing Obligation Report, 81 Nexus Threshold Report, 82 Normal Accounts, 29 Numerator and Denominator Report, 84 Options and Rates, editing, 142, 200 Ownership
About, 96 Categories, adding, 159 Data Entry for, 29, 191 Defining, 116 Percentage, defining, 121 Relationships, 116 Removing, 121 Report, 86
OwnershipPercentages.csv, 299 OwnershipStructure.csv, 298 Parent Accounts, 30, 150 Password, changing, 26 Percentage Ownership, defining, 121 Permissions
Copying to other users, 187 Data Type Access, 174 Entity/Group Access, 175, 176 Specifying, 183 Tab Type Access, 174 Updating, 173
Pop-ups, allowing, 282 Process for Data Entry, 32, 191 Product
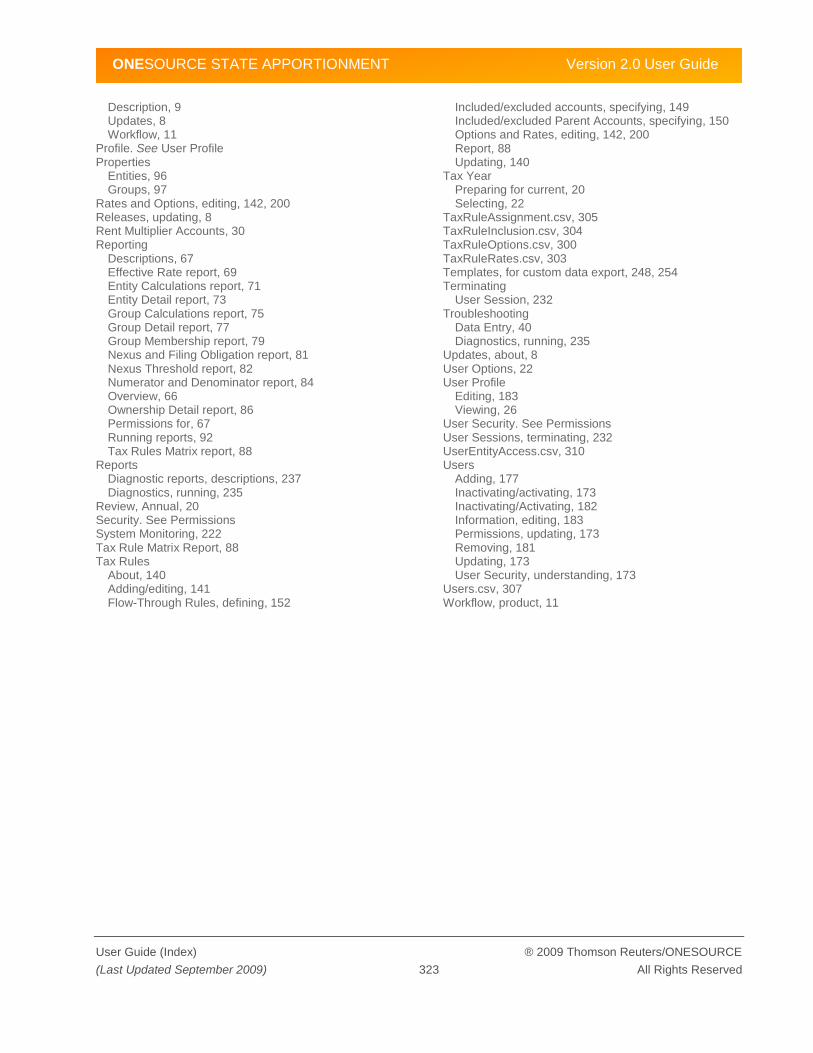
ONESOURCE STATE APPORTIONMENT Version 2.0 User Guide
User Guide (Index) ® 2009 Thomson Reuters/ONESOURCE
(Last Updated September 2009) 323 All Rights Reserved
Description, 9 Updates, 8 Workflow, 11
Profile. See User Profile Properties
Entities, 96 Groups, 97
Rates and Options, editing, 142, 200 Releases, updating, 8 Rent Multiplier Accounts, 30 Reporting
Descriptions, 67 Effective Rate report, 69 Entity Calculations report, 71 Entity Detail report, 73 Group Calculations report, 75 Group Detail report, 77 Group Membership report, 79 Nexus and Filing Obligation report, 81 Nexus Threshold report, 82 Numerator and Denominator report, 84 Overview, 66 Ownership Detail report, 86 Permissions for, 67 Running reports, 92 Tax Rules Matrix report, 88
Reports Diagnostic reports, descriptions, 237 Diagnostics, running, 235
Review, Annual, 20 Security. See Permissions System Monitoring, 222 Tax Rule Matrix Report, 88 Tax Rules
About, 140 Adding/editing, 141 Flow-Through Rules, defining, 152
Included/excluded accounts, specifying, 149 Included/excluded Parent Accounts, specifying, 150 Options and Rates, editing, 142, 200 Report, 88 Updating, 140
Tax Year Preparing for current, 20 Selecting, 22
TaxRuleAssignment.csv, 305 TaxRuleInclusion.csv, 304 TaxRuleOptions.csv, 300 TaxRuleRates.csv, 303 Templates, for custom data export, 248, 254 Terminating
User Session, 232 Troubleshooting
Data Entry, 40 Diagnostics, running, 235
Updates, about, 8 User Options, 22 User Profile
Editing, 183 Viewing, 26
User Security. See Permissions User Sessions, terminating, 232 UserEntityAccess.csv, 310 Users
Adding, 177 Inactivating/activating, 173 Inactivating/Activating, 182 Information, editing, 183 Permissions, updating, 173 Removing, 181 Updating, 173 User Security, understanding, 173
Users.csv, 307 Workflow, product, 11