Ohio Department of Transportation Special Hauling Permit Section
109
Page 1 of 109 Revised:4/20/2009 Ohio Department of Transportation Special Hauling Permit Section Training Manual for Internet Online Permit Ordering System Revised April 17, 2009
Transcript of Ohio Department of Transportation Special Hauling Permit Section
Page 1 of 109 Revised:4/20/2009
Ohio Department of Transportation Special Hauling Permit Section Training Manual for Internet Online Permit Ordering System Revised April 17, 2009
Page 2 of 109 Revised:4/20/2009
Table of Content INTRODUCTION ...........................................................................................................................5
Permit Request Web Site .....................................................................................................5 Informational Web Site .....................................................................................................5 Maps.....................................................................................................................................5 Map loading Problems .........................................................................................................6 Routing ................................................................................................................................6 PERMIT OFFICE BUSINESS RULES ..............................................................................6 Individual PC Adjustments ..................................................................................................6
Ch. 1-Special Hauling Permit On-Line Quick Start Guide ..............................................................8 Ch. 2- LOGIN screen. ......................................................................................................................9 Ch. 3-WELCOME screen ..............................................................................................................10
Ch. 3-WELCOME screenBHauler. ....................................................................................11 Ch. 3-WELCOME screenBPermit Service ........................................................................12
Ch. 4-Permit Step 1 B Acknowledgment of Permit Conditions. ....................................................15 Ch. 4-Permit Step 2 B Vehicle and Load Information ...................................................................16
Stored Vehicles/Units ........................................................................................................17 Vehicle Information ...........................................................................................................19
Vehicle Type ..........................................................................................................19 Conveyance ............................................................................................................19 Power Unit .............................................................................................................19 Trailers ...................................................................................................................21
Load Information ...............................................................................................................21 Overall Vehicle Dimensions ..............................................................................................23 Axle and Load Information ................................................................................................23
Ch. 4-Permit Step 3-4-5. ................................................................................................................24
Step 3 Travel Dates ............................................................................................................24 Step 4 Route Information ...................................................................................................25 Step 5 Application Review ................................................................................................25
Ch. 4-Permit Step 6-Map Load. .....................................................................................................26
Ch. 4-Permit Step 6- Map Message ...................................................................................27 Ch. 4-Permit Step 6-Route Selection at State Border ....................................................................29 Ch. 4-Permit Step 6- Select Method of Routing ............................................................................31
Text Based Routing Method ..............................................................................................32

Page 3 of 109 Revised:4/20/2009
Text Based Routing Method B Multiple Intersection Options ...............................35 Text Based Routing Method - New Segment ........................................................41
Picking Route Segments Routing Method .........................................................................42 Example of APicking Route Segments@ Routing Method ......................................44
Loading Saved Trip Routing Method ................................................................................55 Ch. 4-Permit Step 6 - Analyze. ......................................................................................................57 Ch. 4-Permit Step 6 - Route Usage. ...............................................................................................58 Ch. 4-Permit Confirmation ............................................................................................................59 Ch. 4--Permit Step 8 B Permit Delivery and Payment. .............................................................61
Escrow Payment Method ...................................................................................................62 Credit Card Payment Method ............................................................................................63 Common Payment Fields ...................................................................................................64 For System Issued Permits .................................................................................................65 For Permit Requests Requiring Permit Office Review ......................................................66
Ch. 5-My Vehicles screen. .............................................................................................................67
Ch. 5-My Vehicles-Define screen ......................................................................................68 Ch. 5-My Vehicles-Details screen .....................................................................................71 Ch. 5-My Vehicles-Modify screen ....................................................................................72 Ch. 5-My Vehicles-Remove screen ...................................................................................73 Ch. 5-My Vehicles-Help screen .........................................................................................74
Ch. 6-My Reports screen ...............................................................................................................75
Ch. 6-My Reports B Report By Permit Number ................................................................76 Ch. 6-My Reports B Report By Trip ID .............................................................................76 Ch. 6-My Reports B Status Description .............................................................................77 Ch. 6-My Reports B Most Recent Requests .......................................................................78 Ch. 6-My Reports B View an Existing Permit ...................................................................79 Ch. 6-My Reports B View Account Transactions ..............................................................80
Ch. 7-My Profile screen .................................................................................................................81 Ch. 8-Contact Us screen ................................................................................................................82 Ch. 9-Additional Functions ............................................................................................................83
Ch. 9-Job Status screen ......................................................................................................84 Ch. 9-Pending and Returned Jobs ......................................................................................86 Ch. 9-Copy Job/Permit.......................................................................................................88 Ch. 9-Revise Issued ...........................................................................................................89 Ch. 9-Revise Fax ................................................................................................................90
Page 4 of 109 Revised:4/20/2009
Ch. 9-Downloadable Forms ...............................................................................................91 Ch. 9-FAQ..........................................................................................................................92
Appendix A ...................................................................................................................................93
Error Conditions .................................................................................................................93 Appendix B ...................................................................................................................................94
Sample Application Form (OS-1) ......................................................................................94 Appendix C ...................................................................................................................................96
Fax / Re-Fax / Re-Fax Requests ........................................................................................96 Appendix D ...................................................................................................................................97
Definitions of Special Hauling Permit terms: ....................................................................97 Appendix E ...................................................................................................................................98
Sample Permit ....................................................................................................................98 Appendix F..................................................................................................................................100
Mile Point (MP) ...............................................................................................................100 Appendix G .................................................................................................................................102
Michigan Legal permit request ........................................................................................102 Appendix H .................................................................................................................................106
Steel Coil permit request ..................................................................................................106 Appendix I ..................................................................................................................................108
Self Propelled Step 2 sample .........................................................................................108
Page 5 of 109 Revised:4/20/2009
INTRODUCTION This manual can be used for training and for reference. This manual will be revised as required to keep information current. The revision date will appear on the front cover and on lower right corner of each page. A new copy can be down loaded or printed from our document web page [www.dot.state.oh.us/permits]. The Ohio Department of Transportation (ODOT), Special Hauling Permit section (SHP) has two web sites. One site is informational C providing forms and various information. The second site is for creating permit requests. This manual will explain creating permit requests. Permit Request Web Site The Permit Request Web Site is used to submit permit requests. Do not submit practice permit requests in the production systemCthey may get issued and you will be charged for the permit. All ODOT special hauling permits can be requested at this site.
PERMIT Request Web Site Address; http://ohpass.dot.state.oh.us/ohpass User Name; user-name-id assigned to your account Password; password for your account (default password is Apassword@)
If you are in the Permit Request Web Site, you can get to the Informational Web Site by clicking on AContact Us@ on the menu line. Informational Web Site The Informational web site contains manuals, forms, and various information about requesting permits. You can NOT submit permit requests from this site. Items on this web site can be downloaded to your PC or printed to your printer. Most of your questions about Ohio Special Hauling permits can be answered at this web site.
Informational Web Site Address; www.dot.state.oh.us/permits If you are in the Informational Web Site, you can get to the Permit Request Web Site by clicking on ALogin and Request a Permit@ in upper left corner of screen. Maps You must have a state map to do your routing. County maps for the areas you normally travel would also be very beneficial.
Page 6 of 109 Revised:4/20/2009
Map loading Problems The map will NOT load to an Apple computer. If the map area is blank or displays Apage error@, the map has failed to load for one of several reasons. The map may not load due to advertisement and pop-up blockers, or due to an internet firewall setup. Have your computer personnel look at ASystem Configuration, Information, & Troubleshooting@ which is at the bottom of the login page. This file offers several trouble shooting suggestions. Routing AStep 6 Route Selection@ ONLY uses STATE, US, and INTERSTATE routes. NO city streets, township roads, county roads, the Ohio Turnpike, addresses, or cities can be used in the route section. You may be surprised that some road intersections are not recognized in Step 6 Route Selection since they contain one of the non-usable items shown in previous sentence. If you find any intersections between STATE, US, and INTERSTATE routes that are not recognized by Step 6 Route Selection, please send an e-mail to [email protected] so this can be corrected. PERMIT OFFICE BUSINESS RULES Our standard business rules remain the same:
! OS-32 insurance form required ! OS-1A form must accompany permit ! Escrow accounts must have sufficient funds to cover permit ! Superload permit administration and processing ! AMichigan Legal@ (i.e., Toledo Port, Delta Steel) ! What is permittable and when it may move
Individual PC Adjustments You can adjust the color and display-pixel settings on your PC to improve your screen visibility. The section ASystem Configuration, Information, & Troubleshooting@ is near the bottom of the login page and contains information that might be useful in setting up your PC. Setting your screen display to 1024 x 768 or greater, will allow more screen area to display. AF11" key B press F11 key once to remove boarder around the display screen. This will increase the display area.
B press F11 key a second time to put the boarder back on the screen.

Page 7 of 109 Revised:4/20/2009
This page left blank.
Page 8 of 109 Revised:4/20/2009
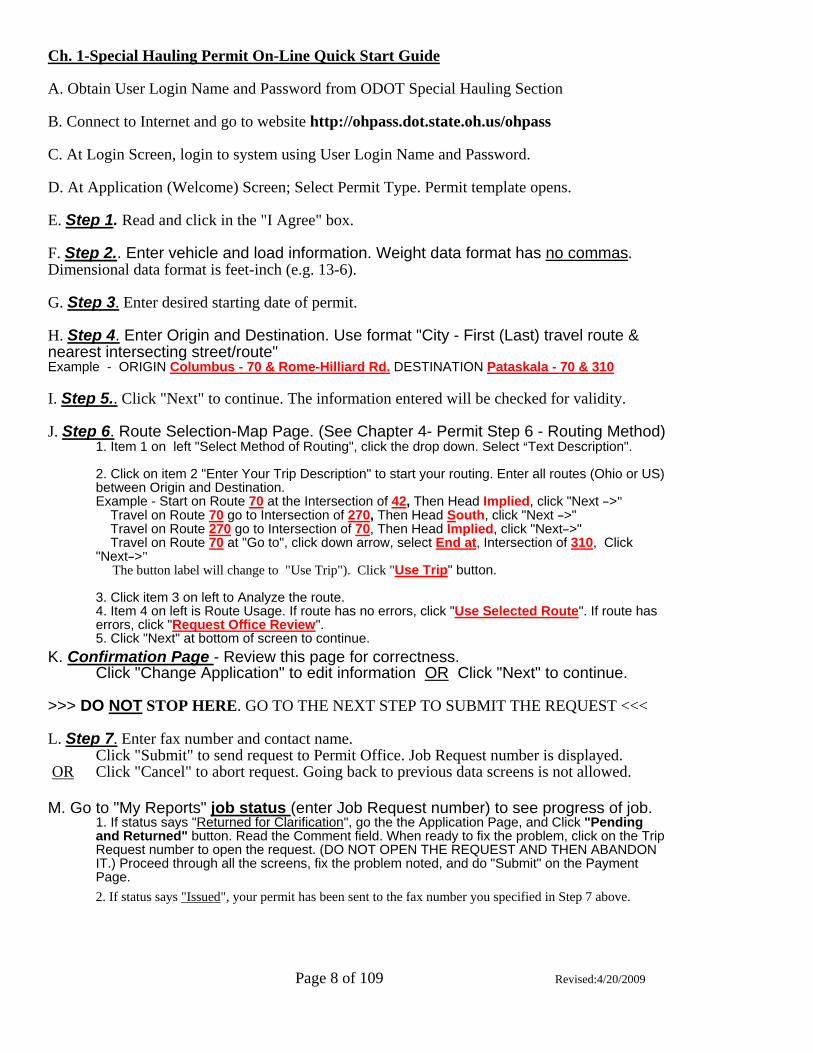
Ch. 1-Special Hauling Permit On-Line Quick Start Guide A. Obtain User Login Name and Password from ODOT Special Hauling Section
B. Connect to Internet and go to website http://ohpass.dot.state.oh.us/ohpass C. At Login Screen, login to system using User Login Name and Password. D. At Application (Welcome) Screen; Select Permit Type. Permit template opens. E. Step 1. Read and click in the "I Agree" box. F. Step 2.. Enter vehicle and load information. Weight data format has no commas. Dimensional data format is feet-inch (e.g. 13-6). G. Step 3. Enter desired starting date of permit. H. Step 4. Enter Origin and Destination. Use format "City - First (Last) travel route & nearest intersecting street/route" Example - ORIGIN Columbus - 70 & Rome-Hilliard Rd. DESTINATION Pataskala - 70 & 310 I. Step 5.. Click "Next" to continue. The information entered will be checked for validity. J. Step 6. Route Selection-Map Page. (See Chapter 4- Permit Step 6 - Routing Method)
1. Item 1 on left "Select Method of Routing", click the drop down. Select AText Description".
2. Click on item 2 "Enter Your Trip Description" to start your routing. Enter all routes (Ohio or US) between Origin and Destination. Example - Start on Route 70 at the Intersection of 42, Then Head Implied, click "Next B>" Travel on Route 70 go to Intersection of 270, Then Head South, click "Next B>" Travel on Route 270 go to Intersection of 70, Then Head Implied, click "NextB>" Travel on Route 70 at "Go to", click down arrow, select End at, Intersection of 310, Click "NextB>" The button label will change to "Use Trip"). Click "Use Trip" button.
3. Click item 3 on left to Analyze the route. 4. Item 4 on left is Route Usage. If route has no errors, click "Use Selected Route". If route has errors, click "Request Office Review". 5. Click "Next" at bottom of screen to continue.
K. Confirmation Page - Review this page for correctness. Click "Change Application" to edit information OR Click "Next" to continue.
>>> DO NOT STOP HERE. GO TO THE NEXT STEP TO SUBMIT THE REQUEST <<< L. Step 7. Enter fax number and contact name.
Click "Submit" to send request to Permit Office. Job Request number is displayed. OR Click "Cancel" to abort request. Going back to previous data screens is not allowed. M. Go to "My Reports" job status (enter Job Request number) to see progress of job.
1. If status says "Returned for Clarification", go the the Application Page, and Click "Pending and Returned" button. Read the Comment field. When ready to fix the problem, click on the Trip Request number to open the request. (DO NOT OPEN THE REQUEST AND THEN ABANDON IT.) Proceed through all the screens, fix the problem noted, and do "Submit" on the Payment Page.
2. If status says "Issued", your permit has been sent to the fax number you specified in Step 7 above.
Page 9 of 109 Revised:4/20/2009
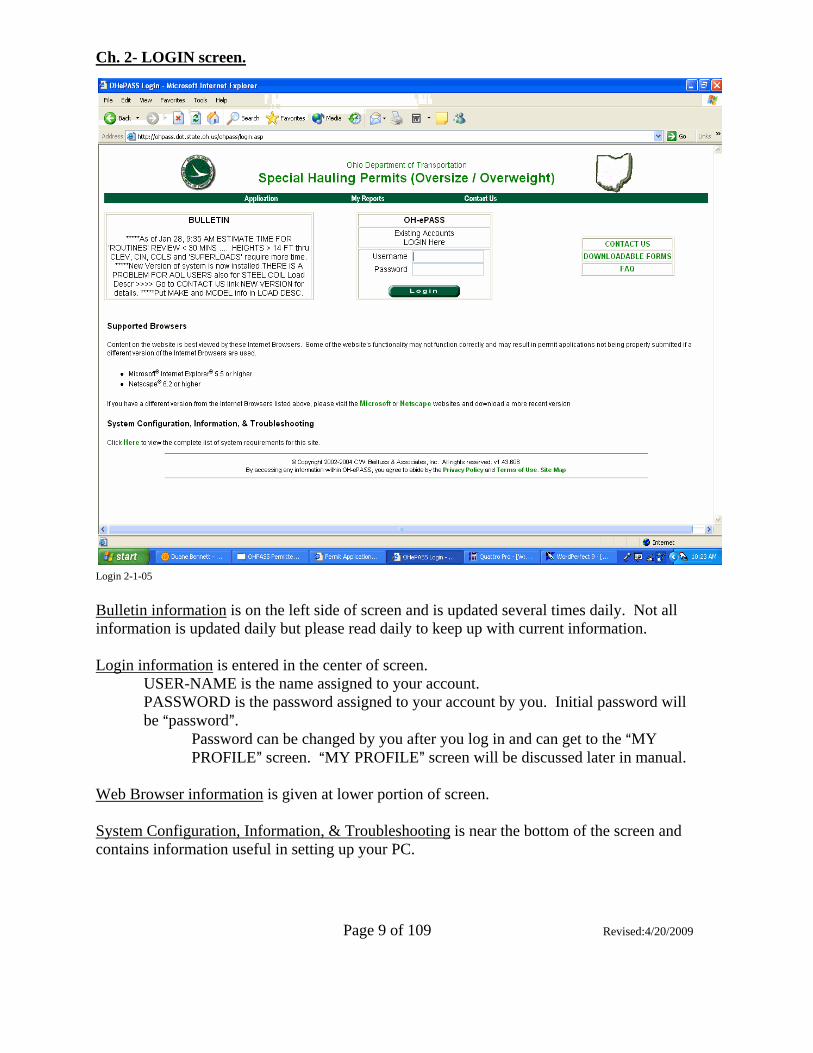
Ch. 2- LOGIN screen.
Login 2-1-05 Bulletin information is on the left side of screen and is updated several times daily. Not all information is updated daily but please read daily to keep up with current information. Login information is entered in the center of screen.
USER-NAME is the name assigned to your account. PASSWORD is the password assigned to your account by you. Initial password will be Apassword@.
Password can be changed by you after you log in and can get to the AMY PROFILE@ screen. AMY PROFILE@ screen will be discussed later in manual.
Web Browser information is given at lower portion of screen. System Configuration, Information, & Troubleshooting is near the bottom of the screen and contains information useful in setting up your PC.
Page 10 of 109 Revised:4/20/2009
Ch. 3-WELCOME screen From here we will walk through the steps in the permit process. Screens that are used only by Permit Services will be noted by ** Permit Service Only ** at the top center of the page. Screens that are used only by Hauler Users will be noted by ** Hauler Use Only ** at the top center of the page. All other pages will be used by all customers.
Page 11 of 109 Revised:4/20/2009
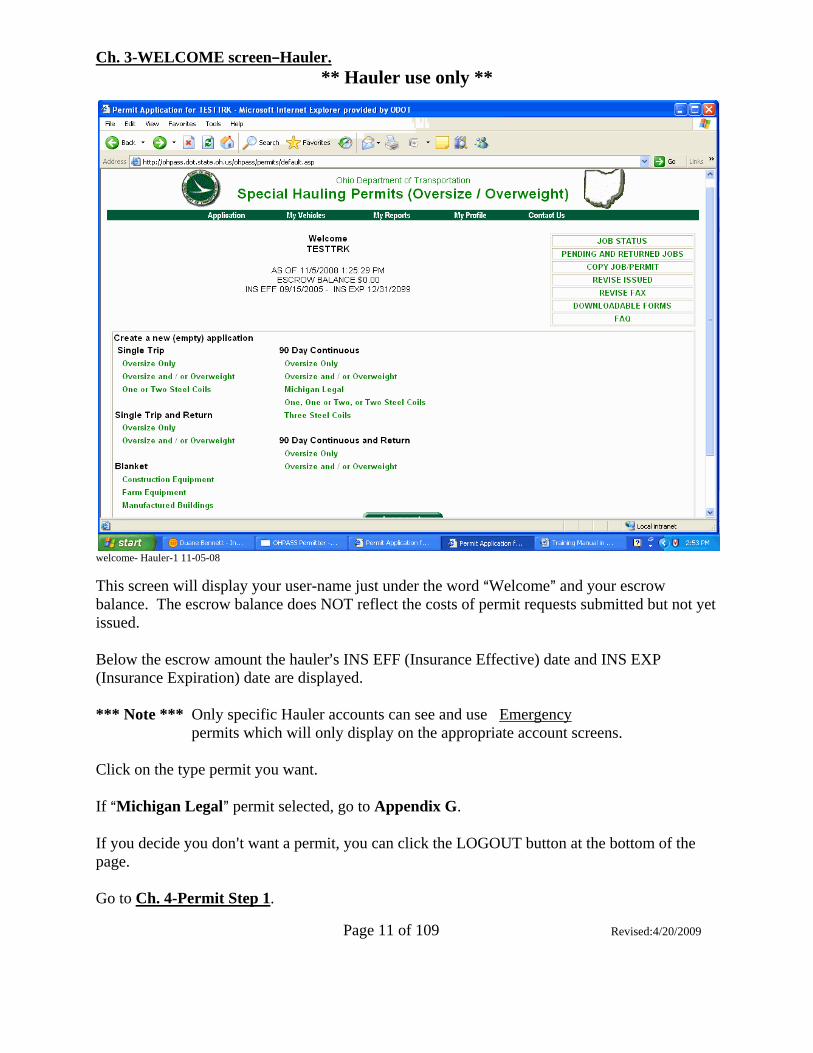
Ch. 3-WELCOME screenBHauler. ** Hauler use only **
welcome- Hauler-1 11-05-08
This screen will display your user-name just under the word AWelcome@ and your escrow balance. The escrow balance does NOT reflect the costs of permit requests submitted but not yet issued. Below the escrow amount the hauler=s INS EFF (Insurance Effective) date and INS EXP (Insurance Expiration) date are displayed. *** Note *** Only specific Hauler accounts can see and use Emergency
permits which will only display on the appropriate account screens. Click on the type permit you want. If AMichigan Legal@ permit selected, go to Appendix G. If you decide you don=t want a permit, you can click the LOGOUT button at the bottom of the page. Go to Ch. 4-Permit Step 1.
Page 12 of 109 Revised:4/20/2009
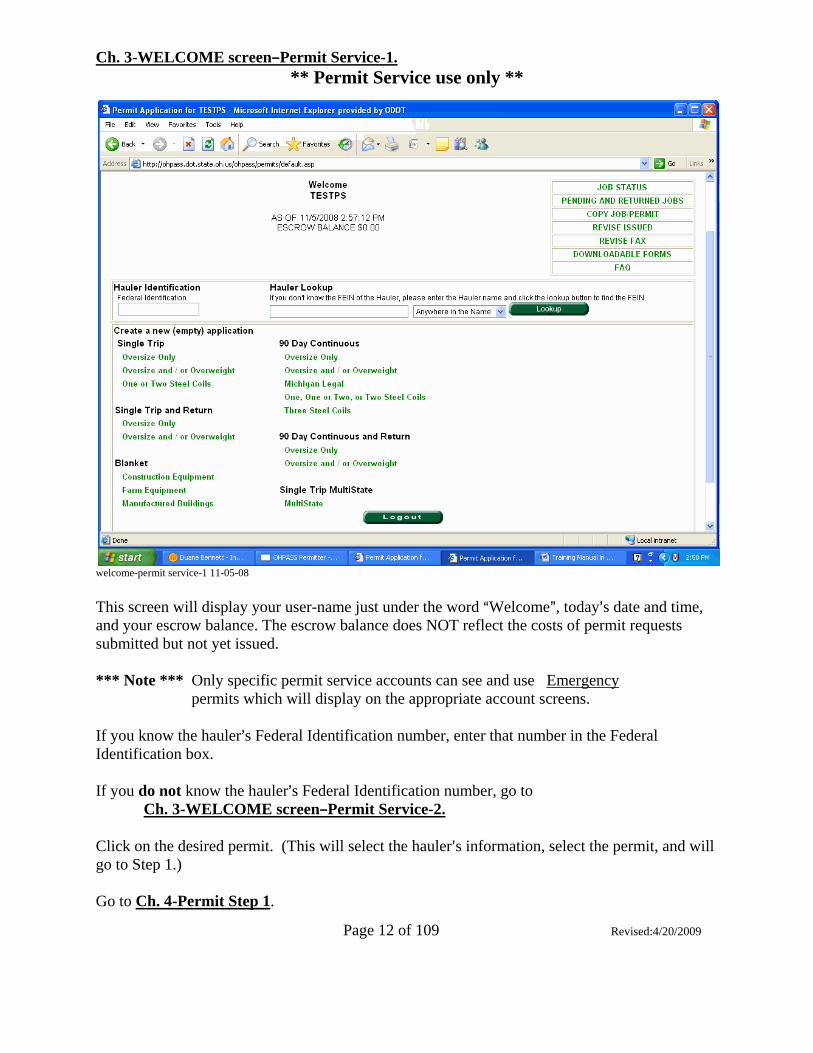
Ch. 3-WELCOME screenBPermit Service-1. ** Permit Service use only **
welcome-permit service-1 11-05-08 This screen will display your user-name just under the word AWelcome@, today=s date and time, and your escrow balance. The escrow balance does NOT reflect the costs of permit requests submitted but not yet issued.
*** Note *** Only specific permit service accounts can see and use Emergency
permits which will display on the appropriate account screens. If you know the hauler=s Federal Identification number, enter that number in the Federal Identification box. If you do not know the hauler=s Federal Identification number, go to Ch. 3-WELCOME screenBPermit Service-2. Click on the desired permit. (This will select the hauler=s information, select the permit, and will go to Step 1.) Go to Ch. 4-Permit Step 1.
Page 13 of 109 Revised:4/20/2009
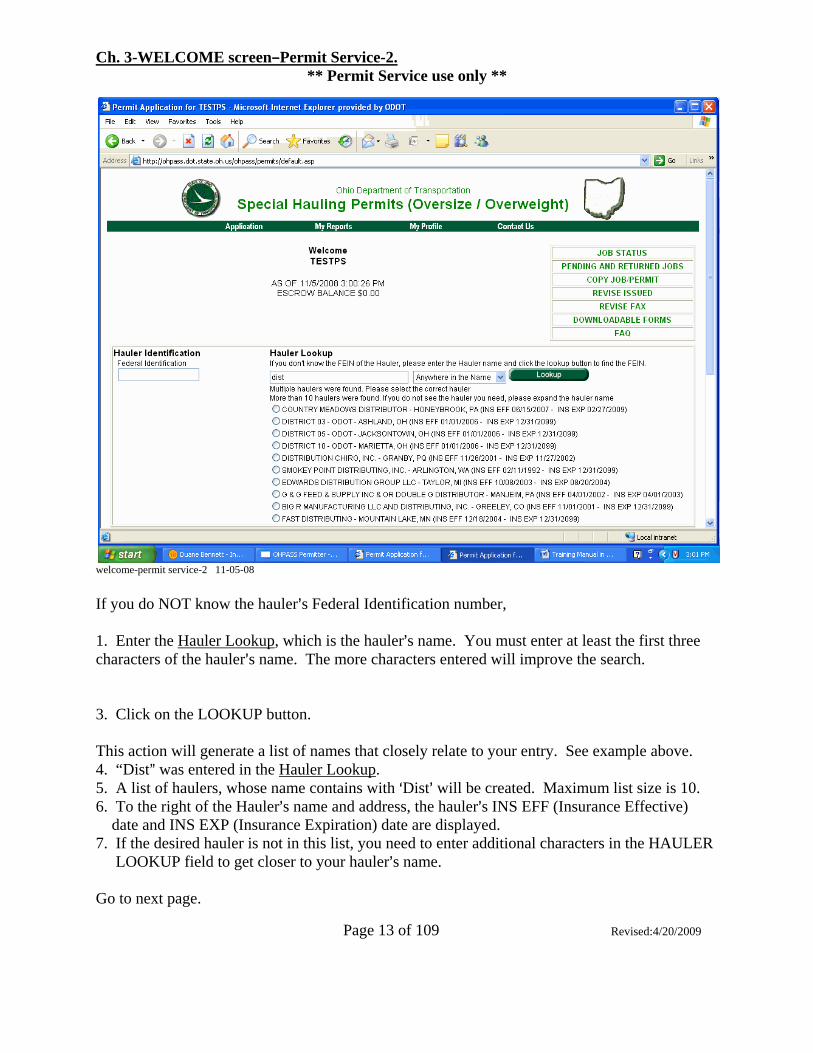
Ch. 3-WELCOME screenBPermit Service-2. ** Permit Service use only **
welcome-permit service-2 11-05-08 If you do NOT know the hauler=s Federal Identification number, 1. Enter the Hauler Lookup, which is the hauler=s name. You must enter at least the first three characters of the hauler=s name. The more characters entered will improve the search. 3. Click on the LOOKUP button.
This action will generate a list of names that closely relate to your entry. See example above. 4. “Dist@ was entered in the Hauler Lookup. 5. A list of haulers, whose name contains with >Dist= will be created. Maximum list size is 10. 6. To the right of the Hauler=s name and address, the hauler=s INS EFF (Insurance Effective) date and INS EXP (Insurance Expiration) date are displayed. 7. If the desired hauler is not in this list, you need to enter additional characters in the HAULER LOOKUP field to get closer to your hauler=s name. Go to next page.
Page 14 of 109 Revised:4/20/2009
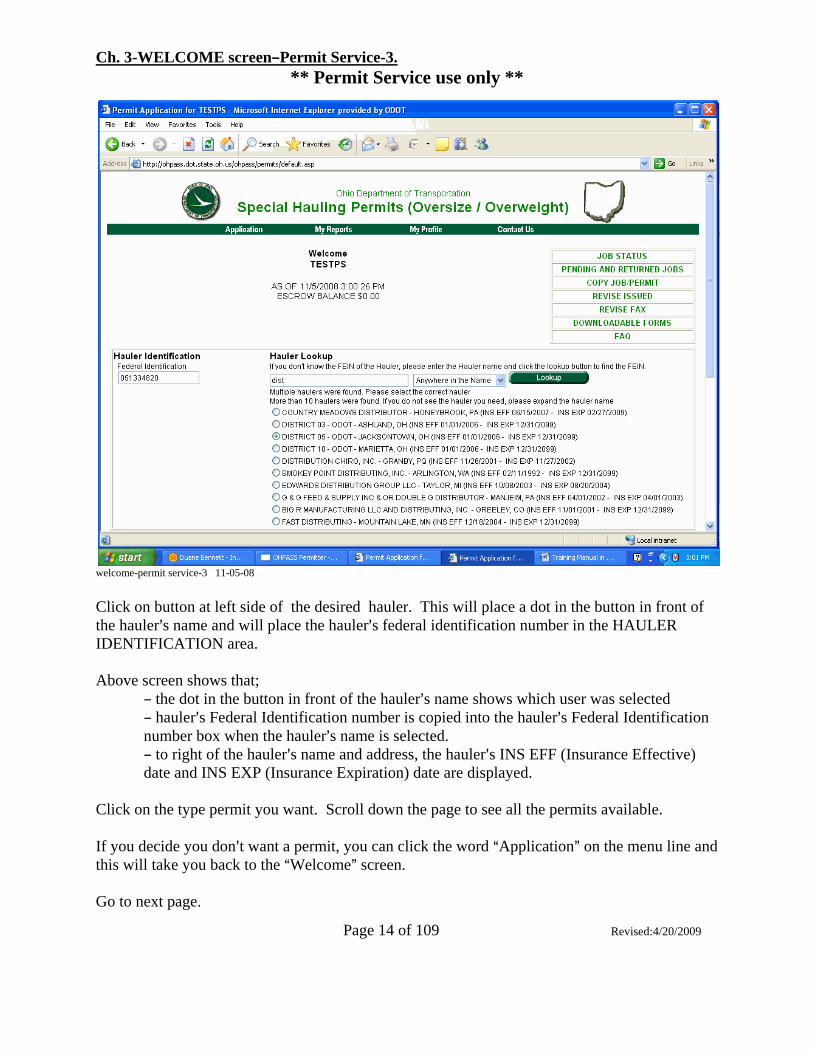
Ch. 3-WELCOME screenBPermit Service-3. ** Permit Service use only **
welcome-permit service-3 11-05-08 Click on button at left side of the desired hauler. This will place a dot in the button in front of the hauler=s name and will place the hauler=s federal identification number in the HAULER IDENTIFICATION area. Above screen shows that;
B the dot in the button in front of the hauler=s name shows which user was selected B hauler=s Federal Identification number is copied into the hauler=s Federal Identification number box when the hauler=s name is selected. B to right of the hauler=s name and address, the hauler=s INS EFF (Insurance Effective) date and INS EXP (Insurance Expiration) date are displayed.
Click on the type permit you want. Scroll down the page to see all the permits available. If you decide you don=t want a permit, you can click the word AApplication@ on the menu line and this will take you back to the AWelcome@ screen. Go to next page.
Page 15 of 109 Revised:4/20/2009
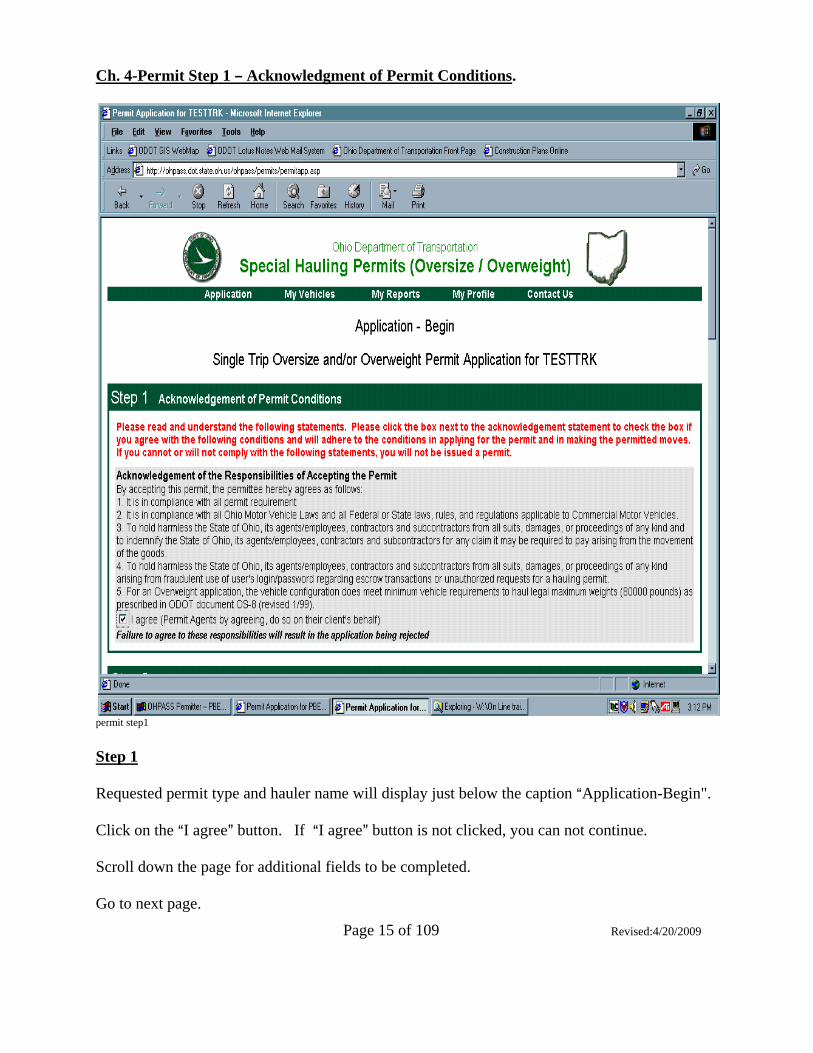
Ch. 4-Permit Step 1 B Acknowledgment of Permit Conditions.
permit step1
Step 1
Requested permit type and hauler name will display just below the caption AApplication-Begin". Click on the AI agree@ button. If AI agree@ button is not clicked, you can not continue. Scroll down the page for additional fields to be completed. Go to next page.
Page 16 of 109 Revised:4/20/2009
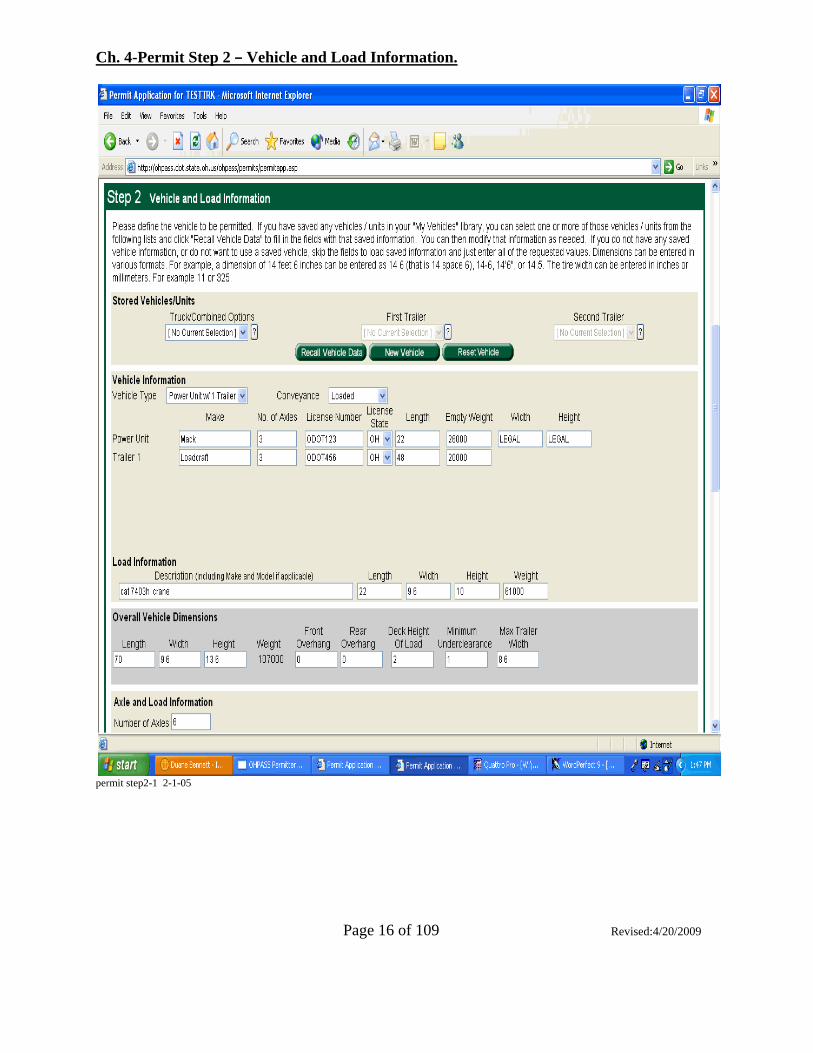
Ch. 4-Permit Step 2 B Vehicle and Load Information.
permit step2-1 2-1-05
Page 17 of 109 Revised:4/20/2009
Ch. 4-Permit Step 2-Information-1. Step 2 ** NOTE ** Just below the caption AStep 2" is a paragraph displaying information on the
entry of permit data. This information appears on the screen and the opposite page. Measurements have been entered in various formats for demonstration: 17 is feet only; 4 5 (4 space 6) is 4 feet 6 inches; 4-6 is 4 feet 6 inches; 4'6" is 4 feet 6 inches; 0 8 (zero space 8) is 8 inches.
Use the TAB key to move to next field or you can click with mouse in next field. All measurement data is feet and inches unless otherwise noted. Do NOT use commas in weight numbers. Stored Vehicles/Units; *** Note *** Permit Services and ODOT District Offices
At this point, you can click on the ANew Vehicle@ button to enter and store vehicle information for the currently selected customer. The fields are explained at Ch. 5-My Vehicles-Define-screen-1. You can AModify@ customer vehicle information by selecting a vehicle in ATruck/Combined Options@, AFirst Trailer@, or ASecond Trailer@ field and click on the Modify button.
Hauling Users can click on the ANew Vehicles@ button to enter and store vehicle information now or they can go to AMy Vehicles@ on the menu bar. AMy Vehicles@ is described at Ch.5BMy Vehicles screen. If you have NOT stored vehicle information, go to Vehicle Information section on the next page and manually enter the vehicle information. You can select the stored information here. ** NOTE ** each of the three Stored Vehicles/Units fields has a >?=symbol. By clicking the
>?= you see the details for a selected vehicle/unit appropriate to that field. B NOTE B >First Trailer= field will not become active until a >Truck= field selection is made.
>Second Trailer= field will not become active until a >First Trailer= selection is made.
1. Select the desired choice under Truck/Combined Options 2. Select the desired choice under First Trailer 3. Select the desired choice under Second Trailer 4. Press Recall Vehicle Data. This will import the vehicle data into the Vehicle Information fields. Note B all retrieved data can be change at this time.
To select another vehicle, press Reset Vehicle and repeat above steps.
Page 18 of 109 Revised:4/20/2009
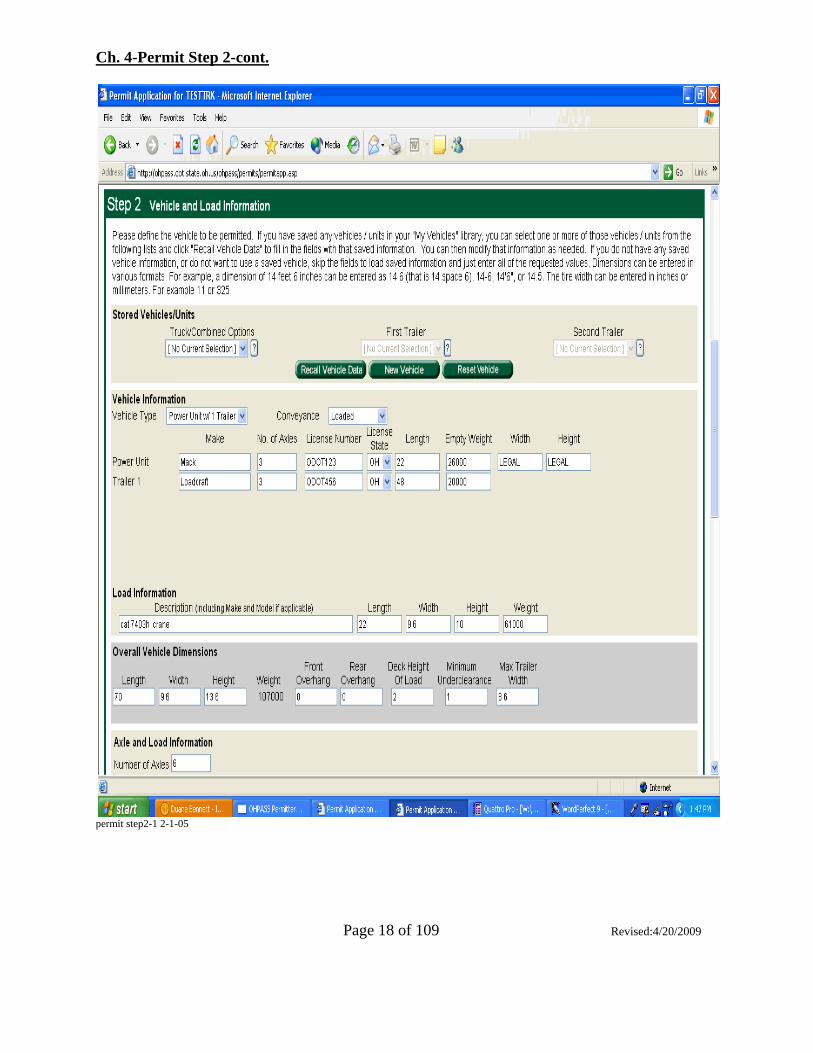
Ch. 4-Permit Step 2-cont.
permit step2-1 2-1-05
Page 19 of 109 Revised:4/20/2009
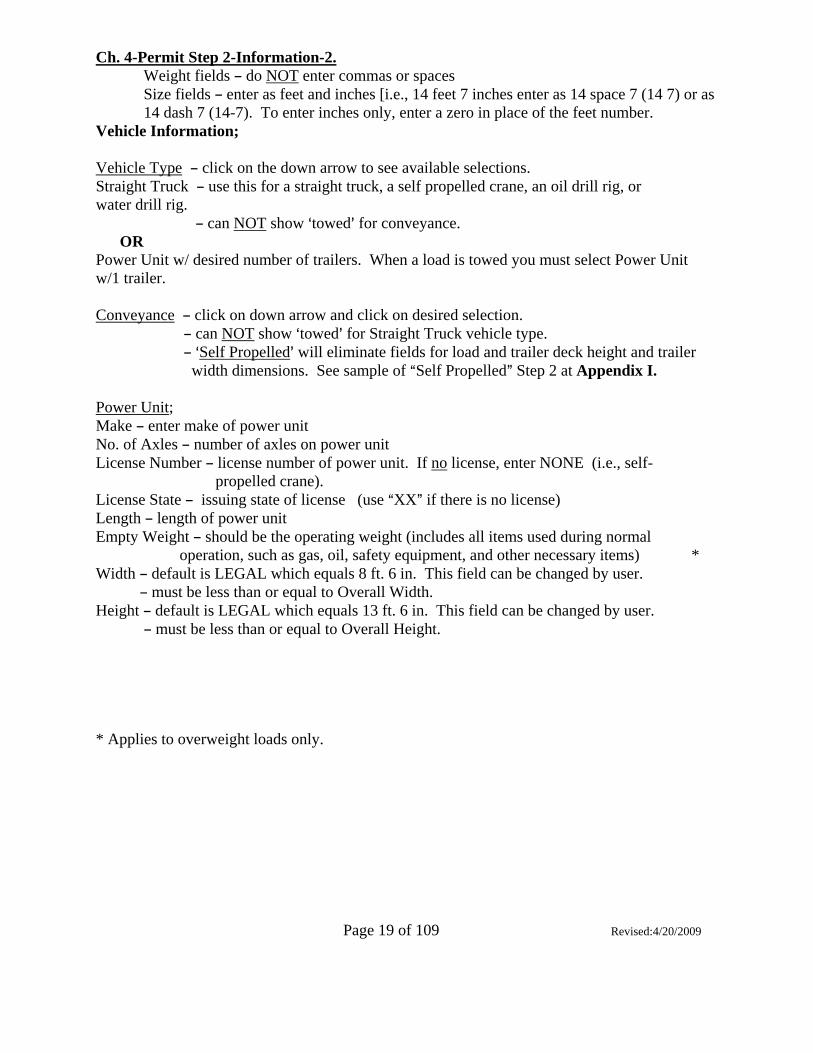
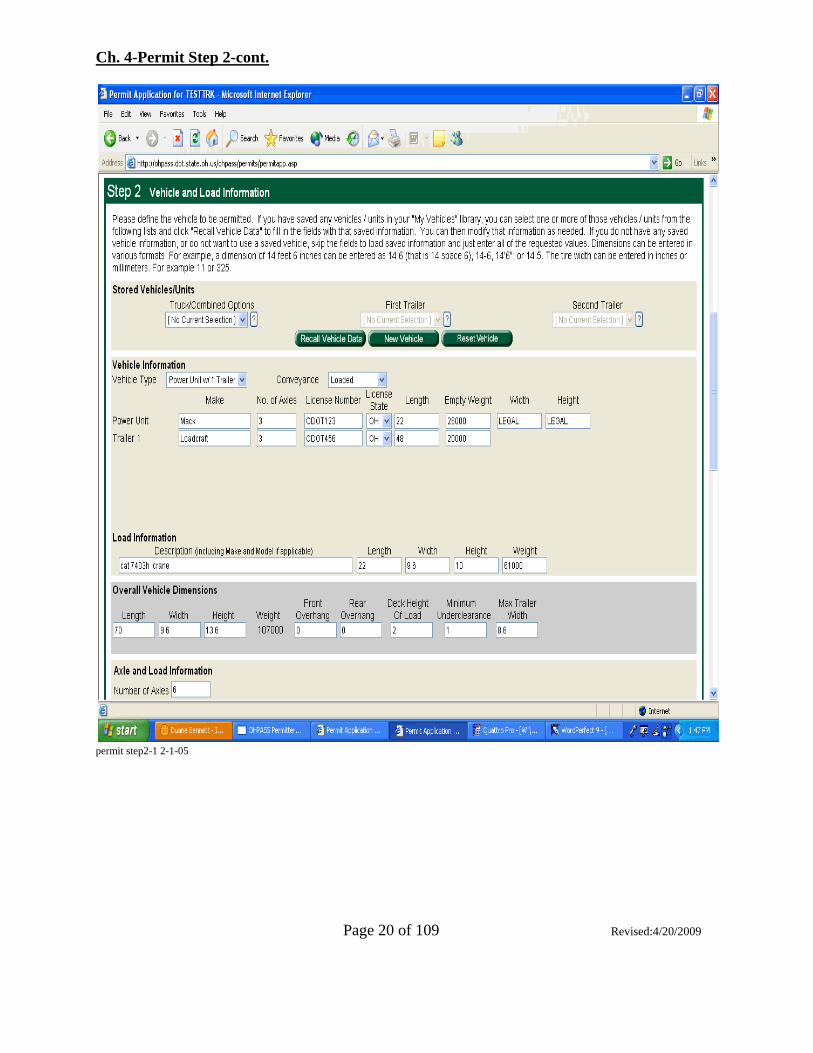
Ch. 4-Permit Step 2-Information-2. Weight fields B do NOT enter commas or spaces Size fields B enter as feet and inches [i.e., 14 feet 7 inches enter as 14 space 7 (14 7) or as 14 dash 7 (14-7). To enter inches only, enter a zero in place of the feet number.
Vehicle Information; Vehicle Type B click on the down arrow to see available selections. Straight Truck B use this for a straight truck, a self propelled crane, an oil drill rig, or water drill rig.
B can NOT show >towed= for conveyance. OR Power Unit w/ desired number of trailers. When a load is towed you must select Power Unit w/1 trailer. Conveyance B click on down arrow and click on desired selection.
B can NOT show >towed= for Straight Truck vehicle type. B >Self Propelled= will eliminate fields for load and trailer deck height and trailer
width dimensions. See sample of ASelf Propelled@ Step 2 at Appendix I. Power Unit; Make B enter make of power unit No. of Axles B number of axles on power unit License Number B license number of power unit. If no license, enter NONE (i.e., self- propelled crane). License State B issuing state of license (use AXX@ if there is no license) Length B length of power unit Empty Weight B should be the operating weight (includes all items used during normal operation, such as gas, oil, safety equipment, and other necessary items) * Width B default is LEGAL which equals 8 ft. 6 in. This field can be changed by user.
B must be less than or equal to Overall Width. Height B default is LEGAL which equals 13 ft. 6 in. This field can be changed by user.
B must be less than or equal to Overall Height. * Applies to overweight loads only.
Page 20 of 109 Revised:4/20/2009
Ch. 4-Permit Step 2-cont.
permit step2-1 2-1-05
Page 21 of 109 Revised:4/20/2009
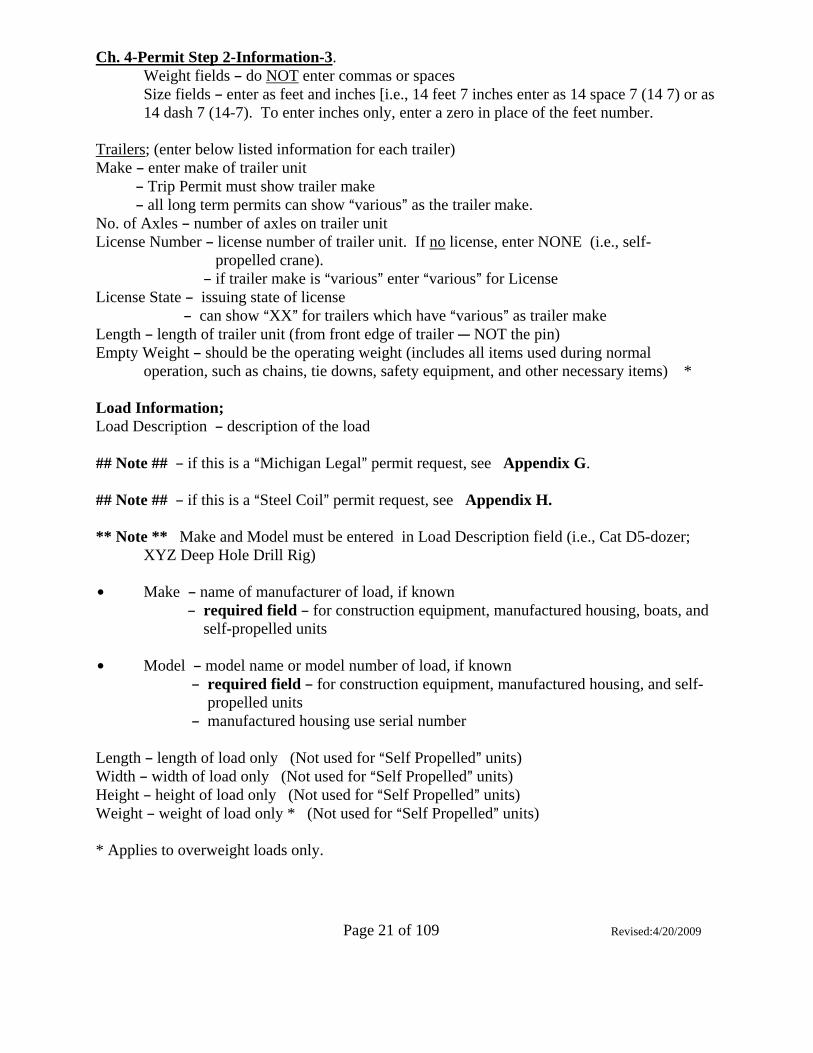
Ch. 4-Permit Step 2-Information-3. Weight fields B do NOT enter commas or spaces Size fields B enter as feet and inches [i.e., 14 feet 7 inches enter as 14 space 7 (14 7) or as 14 dash 7 (14-7). To enter inches only, enter a zero in place of the feet number.
Trailers; (enter below listed information for each trailer) Make B enter make of trailer unit B Trip Permit must show trailer make B all long term permits can show Avarious@ as the trailer make. No. of Axles B number of axles on trailer unit License Number B license number of trailer unit. If no license, enter NONE (i.e., self- propelled crane).
B if trailer make is Avarious@ enter Avarious@ for License License State B issuing state of license
B can show AXX@ for trailers which have Avarious@ as trailer make Length B length of trailer unit (from front edge of trailer C NOT the pin) Empty Weight B should be the operating weight (includes all items used during normal
operation, such as chains, tie downs, safety equipment, and other necessary items) * Load Information; Load Description B description of the load ## Note ## B if this is a AMichigan Legal@ permit request, see Appendix G. ## Note ## B if this is a ASteel Coil@ permit request, see Appendix H. ** Note ** Make and Model must be entered in Load Description field (i.e., Cat D5-dozer;
XYZ Deep Hole Drill Rig) $ Make B name of manufacturer of load, if known
B required field B for construction equipment, manufactured housing, boats, and self-propelled units
$ Model B model name or model number of load, if known B required field B for construction equipment, manufactured housing, and self- propelled units
B manufactured housing use serial number Length B length of load only (Not used for ASelf Propelled@ units) Width B width of load only (Not used for ASelf Propelled@ units) Height B height of load only (Not used for ASelf Propelled@ units) Weight B weight of load only * (Not used for ASelf Propelled@ units) * Applies to overweight loads only.
Page 22 of 109 Revised:4/20/2009
Ch. 4-Permit Step 2 -cont.
permit step2-2 10-1-07
Page 23 of 109 Revised:4/20/2009
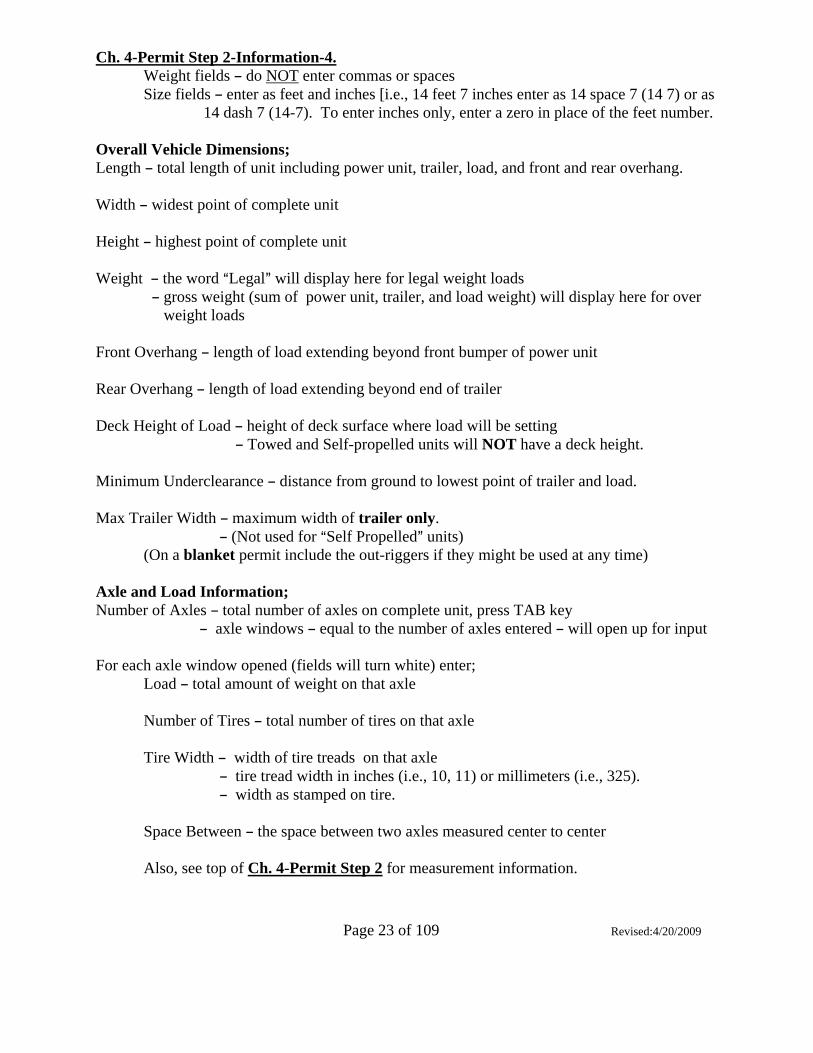
Ch. 4-Permit Step 2-Information-4. Weight fields B do NOT enter commas or spaces Size fields B enter as feet and inches [i.e., 14 feet 7 inches enter as 14 space 7 (14 7) or as 14 dash 7 (14-7). To enter inches only, enter a zero in place of the feet number.
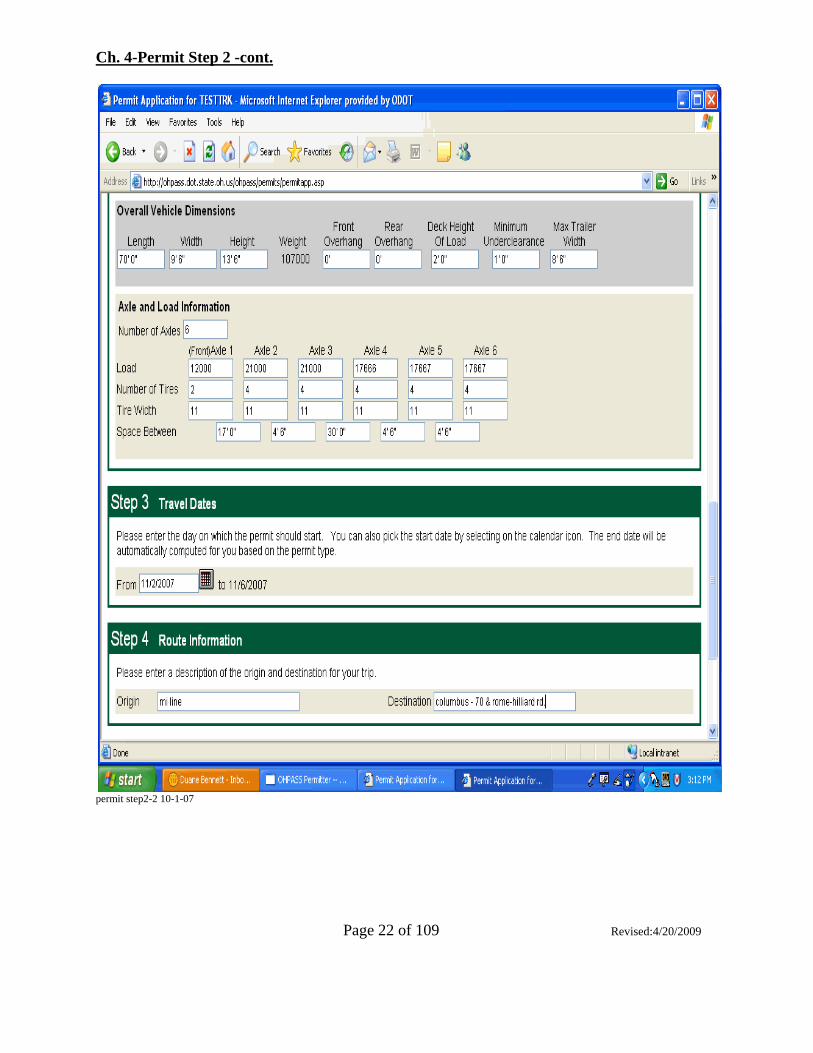
Overall Vehicle Dimensions; Length B total length of unit including power unit, trailer, load, and front and rear overhang. Width B widest point of complete unit Height B highest point of complete unit Weight B the word ALegal@ will display here for legal weight loads
B gross weight (sum of power unit, trailer, and load weight) will display here for over weight loads
Front Overhang B length of load extending beyond front bumper of power unit Rear Overhang B length of load extending beyond end of trailer Deck Height of Load B height of deck surface where load will be setting
B Towed and Self-propelled units will NOT have a deck height. Minimum Underclearance B distance from ground to lowest point of trailer and load. Max Trailer Width B maximum width of trailer only.
B (Not used for ASelf Propelled@ units) (On a blanket permit include the out-riggers if they might be used at any time)
Axle and Load Information; Number of Axles B total number of axles on complete unit, press TAB key B axle windows B equal to the number of axles entered B will open up for input For each axle window opened (fields will turn white) enter;
Load B total amount of weight on that axle
Number of Tires B total number of tires on that axle
Tire Width B width of tire treads on that axle B tire tread width in inches (i.e., 10, 11) or millimeters (i.e., 325). B width as stamped on tire.
Space Between B the space between two axles measured center to center
Also, see top of Ch. 4-Permit Step 2 for measurement information.
Page 24 of 109 Revised:4/20/2009
Ch. 4-Permit Step 3-4-5.
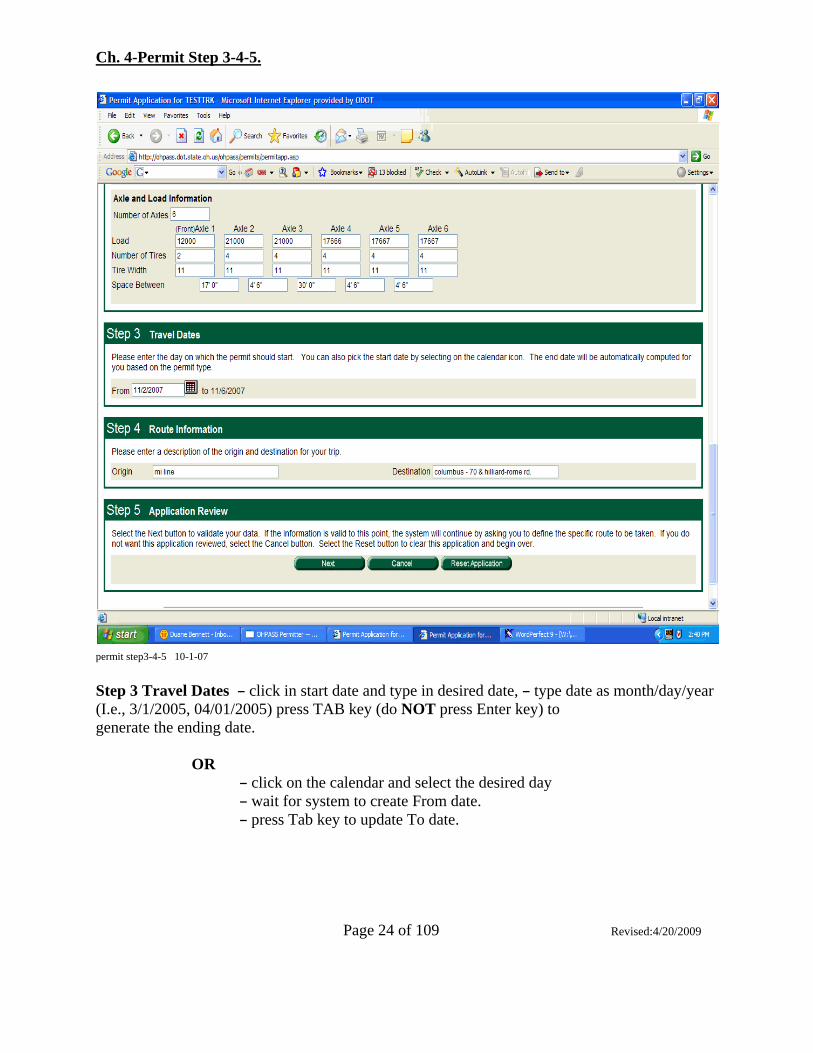
permit step3-4-5 10-1-07 Step 3 Travel Dates B click in start date and type in desired date, B type date as month/day/year (I.e., 3/1/2005, 04/01/2005) press TAB key (do NOT press Enter key) to generate the ending date.
OR
B click on the calendar and select the desired day B wait for system to create From date. B press Tab key to update To date.

Page 25 of 109 Revised:4/20/2009
Ch. 4-Permit Step 3-4-5-Information. Step 4 Route Information; In Origin and/or Destination, only use the intersection of a State, US, or Interstate route with a
City street, county road or township road. Do NOT show any city, county, or township roads or streets traveled prior to the intersection with a State, US, or Interstate route.
Origin B (Where are you leaving from??) From within Ohio:
B type in the starting city(i.e., Akron, Dayton) B type a space, a hyphen, and another space B type in the first State, US, or Interstate route you will contact(i.e., 127, 37, 77) B type a space, an ampersand (&), and another space B type intersecting city street, township road, county road, or state route B an example would be: Delaware - 37 & Main St
or From state border:
B type in the state border where you are entering the state(i.e., Ky Line, WV Line) B type a space, a hyphen, and another space B type in the first State, US, or Interstate route you will contact(i.e., 23, 30, 77, 470) B an example would be: WV Line
Destination B (Where are you going to??) To point within Ohio:
B type in the ending city(i.e., Warren, Troy) B type a space, a hyphen, and another space
B type in the last State, US, or Interstate route you will leave(i.e., 127, 37, 77) B type a space, an ampersand (&), and another space B type intersecting city street, township road, county road, or state route
B an example would be: Baltimore - 256 & Church St or To state border:
B type in the state border where you are leaving the state(i.e., Ky Line, WV Line) B type a space, a hyphen, and another space B type in the last State, US, or Interstate route you will leave(i.e., 23, 30, 77, 470) B an example would be: MI Line
Step 5 Application Review; Next B click here to review the permit request and pass it to Step 6 Route Selection. Cancel B click here to cancel the permit request and return to the Welcome screen. Reset Application B click here reset all fields in the permit request to blank, but the system
leaves you here. Now you can click Cancel (see note above) or scroll to previous fields. Go to next page.
Page 26 of 109 Revised:4/20/2009
Ch. 4-Permit Step 6-Map Load.
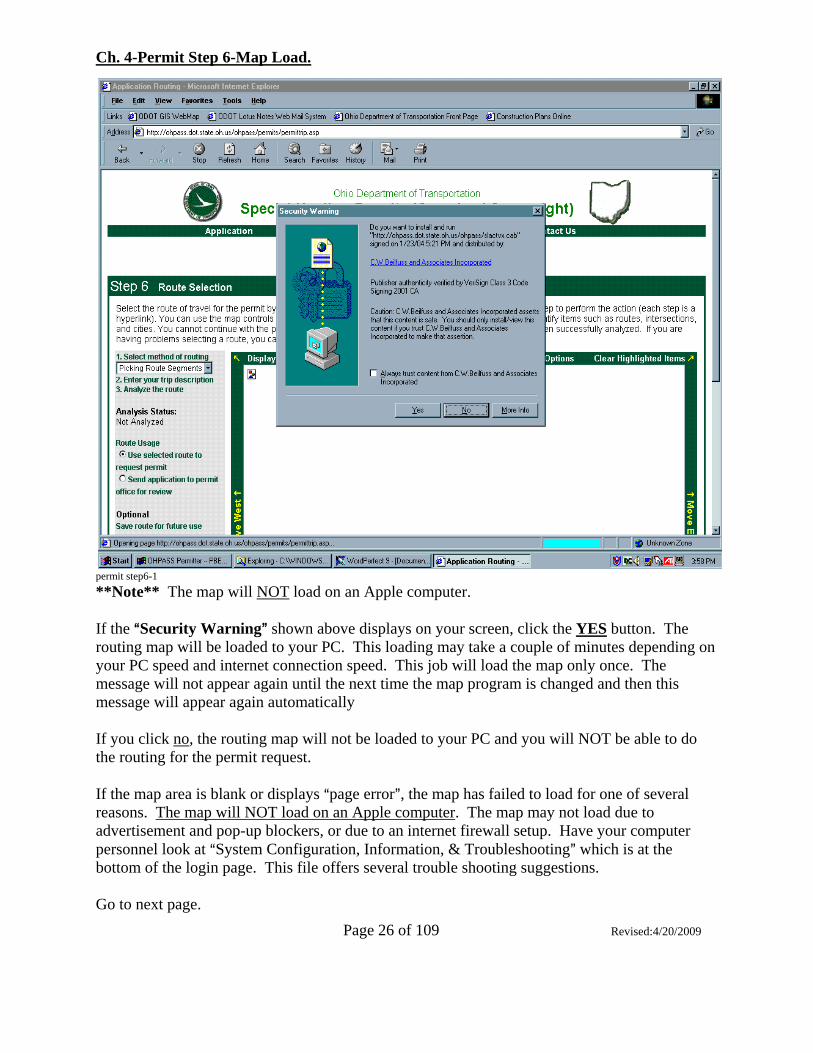
permit step6-1 **Note** The map will NOT load on an Apple computer. If the ASecurity Warning@ shown above displays on your screen, click the YES button. The routing map will be loaded to your PC. This loading may take a couple of minutes depending on your PC speed and internet connection speed. This job will load the map only once. The message will not appear again until the next time the map program is changed and then this message will appear again automatically If you click no, the routing map will not be loaded to your PC and you will NOT be able to do the routing for the permit request. If the map area is blank or displays Apage error@, the map has failed to load for one of several reasons. The map will NOT load on an Apple computer. The map may not load due to advertisement and pop-up blockers, or due to an internet firewall setup. Have your computer personnel look at ASystem Configuration, Information, & Troubleshooting@ which is at the bottom of the login page. This file offers several trouble shooting suggestions. Go to next page.
Page 27 of 109 Revised:4/20/2009
Ch. 4-Permit Step 6- Map Message.
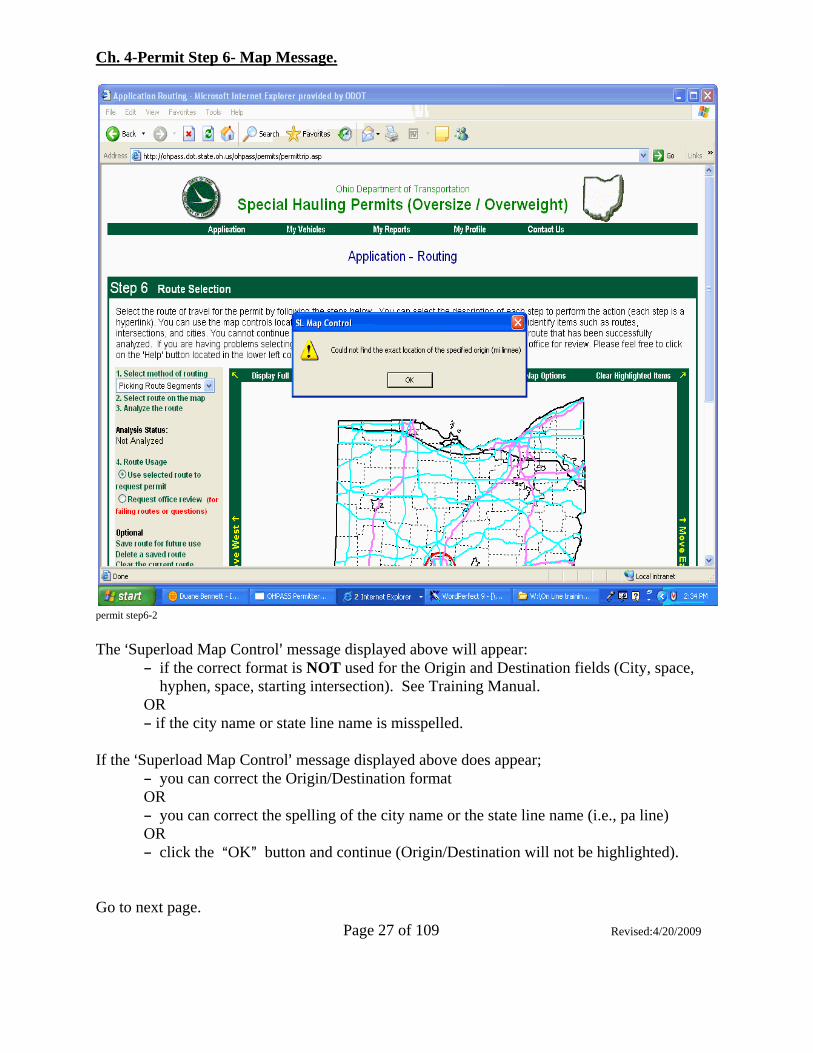
permit step6-2 The >Superload Map Control= message displayed above will appear:
B if the correct format is NOT used for the Origin and Destination fields (City, space, hyphen, space, starting intersection). See Training Manual. OR B if the city name or state line name is misspelled.
If the >Superload Map Control= message displayed above does appear;
B you can correct the Origin/Destination format OR B you can correct the spelling of the city name or the state line name (i.e., pa line) OR B click the AOK@ button and continue (Origin/Destination will not be highlighted).
Go to next page.
Page 28 of 109 Revised:4/20/2009
Ch. 4-Permit Step 6- Routing Method.
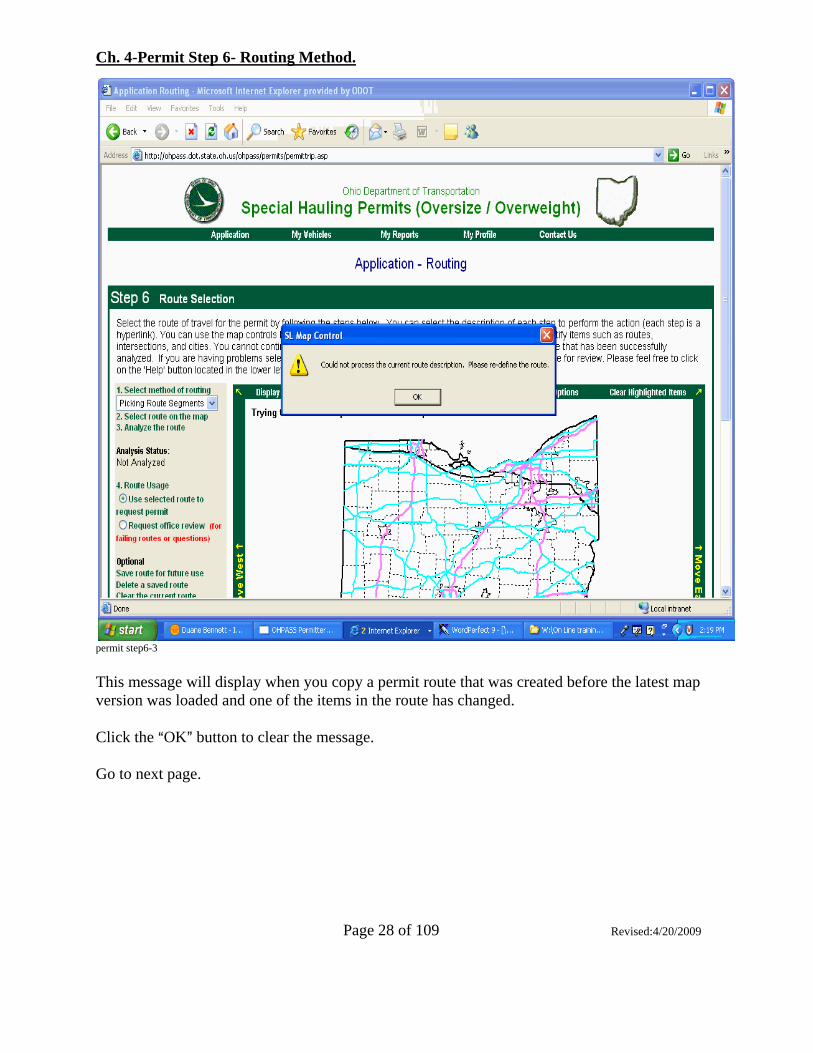
permit step6-3 This message will display when you copy a permit route that was created before the latest map version was loaded and one of the items in the route has changed. Click the AOK@ button to clear the message. Go to next page.
Page 29 of 109 Revised:4/20/2009
Ch. 4-Permit Step 6-Route Selection at State Border.
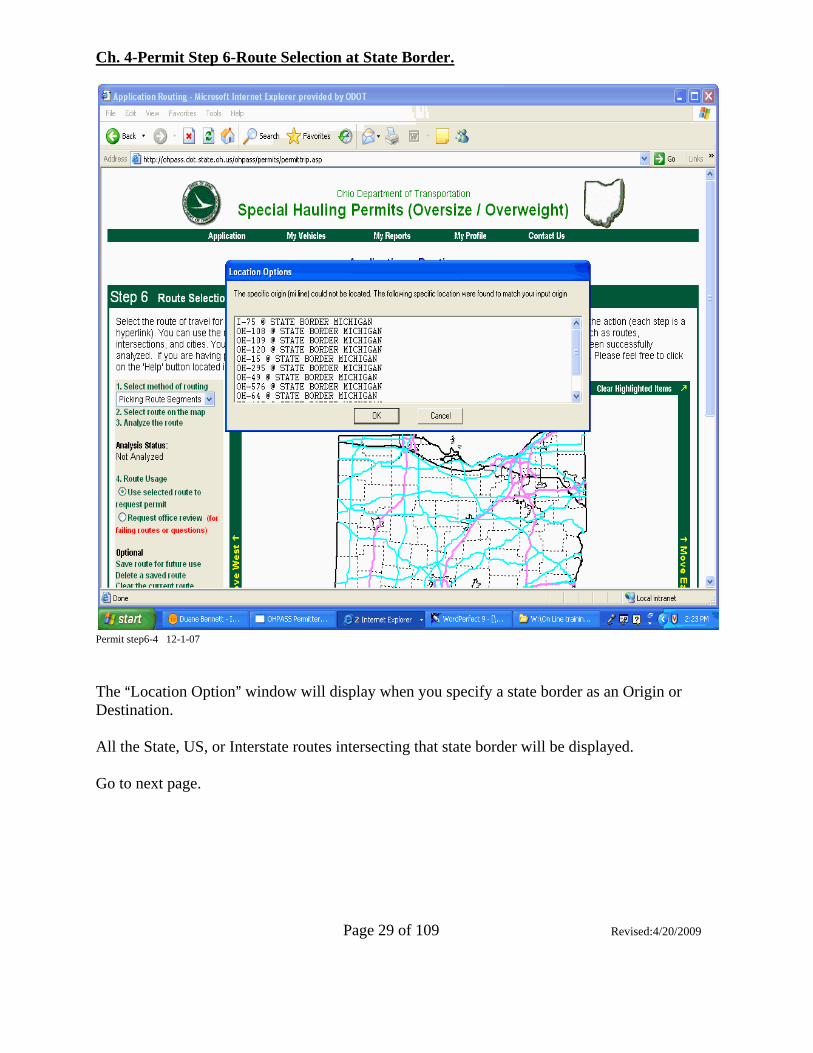
Permit step6-4 12-1-07 The ALocation Option@ window will display when you specify a state border as an Origin or Destination. All the State, US, or Interstate routes intersecting that state border will be displayed. Go to next page.
Page 30 of 109 Revised:4/20/2009
Ch. 4-Permit Step 6-Route Selection at State Border.
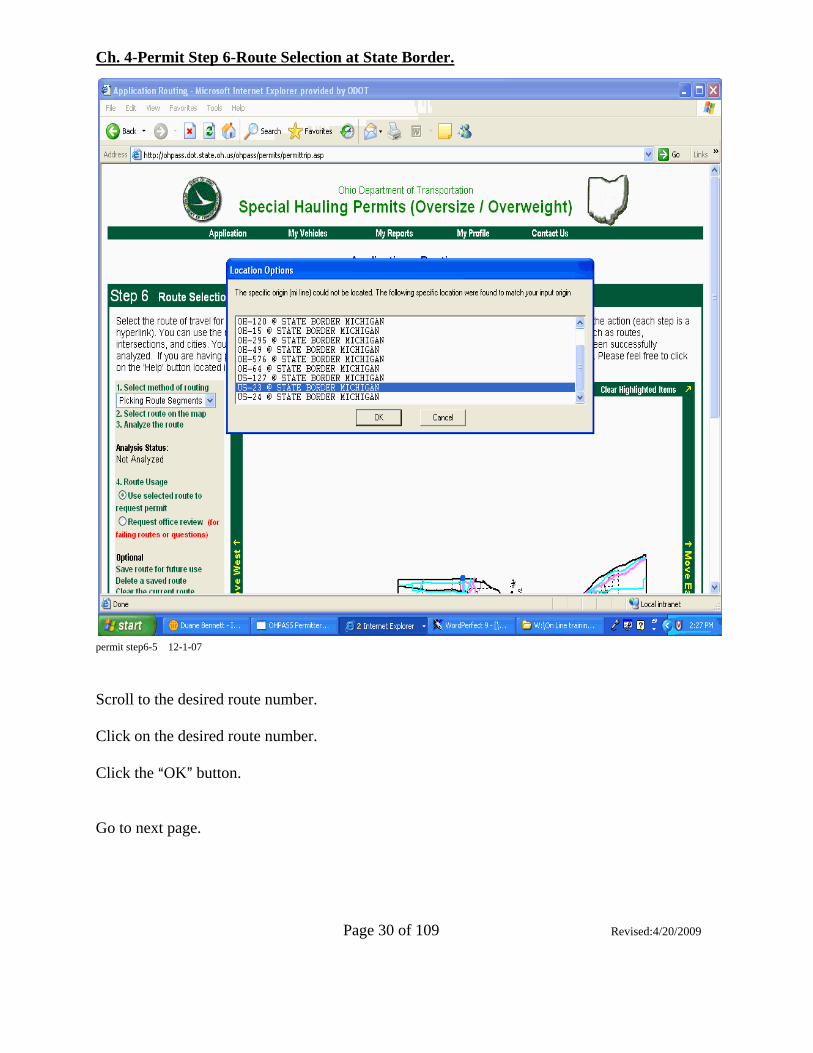
permit step6-5 12-1-07 Scroll to the desired route number. Click on the desired route number. Click the AOK@ button. Go to next page.
Page 31 of 109 Revised:4/20/2009
Ch. 4-Permit Step 6- Select Method of Routing.
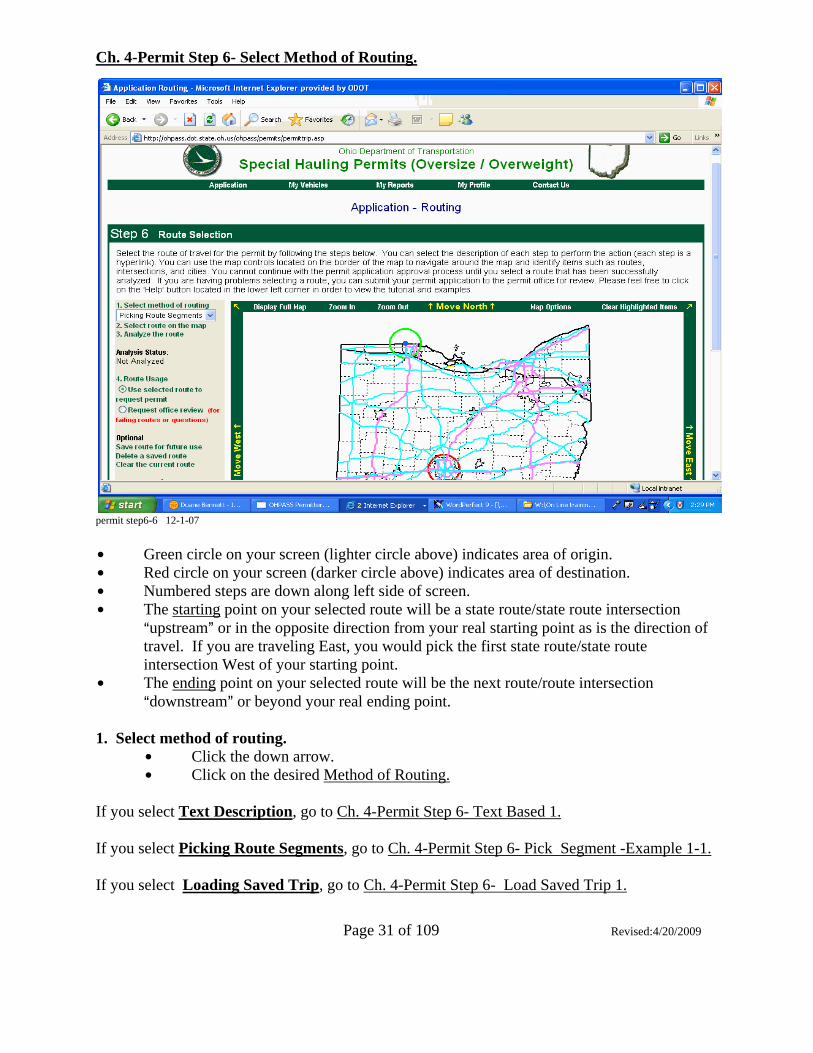
permit step6-6 12-1-07 $ Green circle on your screen (lighter circle above) indicates area of origin. $ Red circle on your screen (darker circle above) indicates area of destination. $ Numbered steps are down along left side of screen. $ The starting point on your selected route will be a state route/state route intersection
Aupstream@ or in the opposite direction from your real starting point as is the direction of travel. If you are traveling East, you would pick the first state route/state route intersection West of your starting point.
$ The ending point on your selected route will be the next route/route intersection Adownstream@ or beyond your real ending point.
1. Select method of routing.
$ Click the down arrow. $ Click on the desired Method of Routing.
If you select Text Description, go to Ch. 4-Permit Step 6- Text Based 1. If you select Picking Route Segments, go to Ch. 4-Permit Step 6- Pick Segment -Example 1-1. If you select Loading Saved Trip, go to Ch. 4-Permit Step 6- Load Saved Trip 1.
Page 32 of 109 Revised:4/20/2009
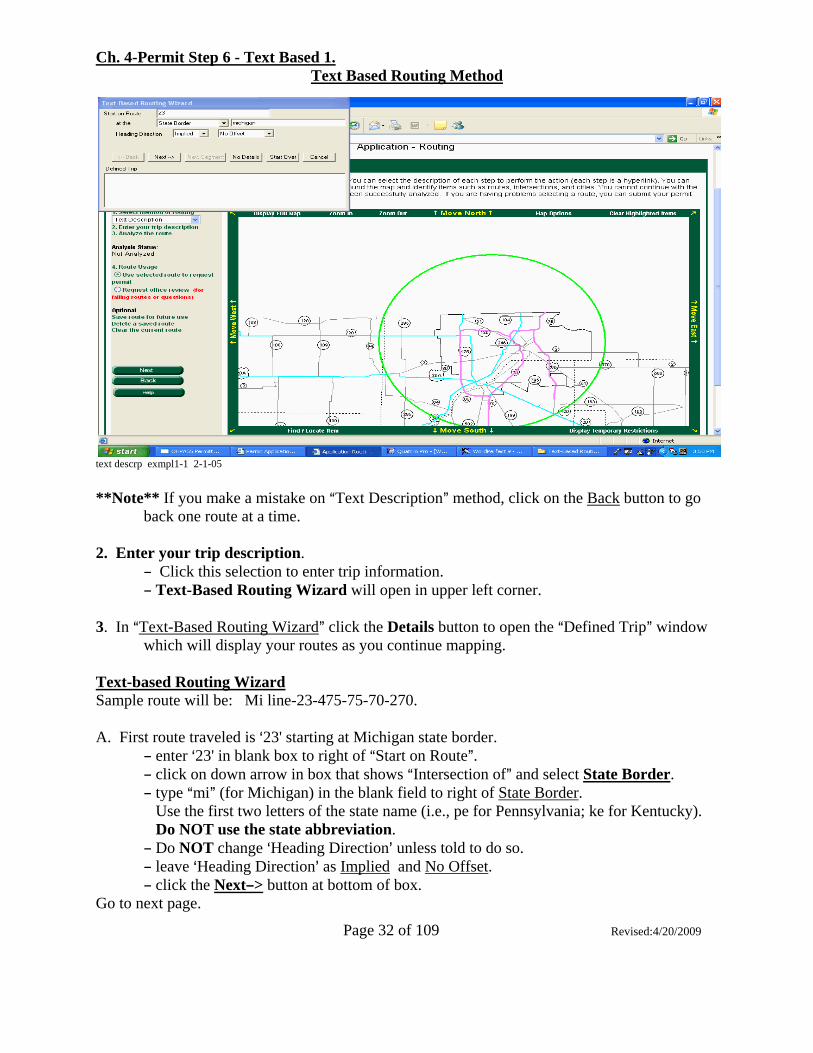
Ch. 4-Permit Step 6 - Text Based 1. Text Based Routing Method
text descrp exmpl1-1 2-1-05 **Note** If you make a mistake on AText Description@ method, click on the Back button to go
back one route at a time. 2. Enter your trip description.
B Click this selection to enter trip information. B Text-Based Routing Wizard will open in upper left corner.
3. In AText-Based Routing Wizard@ click the Details button to open the ADefined Trip@ window
which will display your routes as you continue mapping. Text-based Routing Wizard Sample route will be: Mi line-23-475-75-70-270. A. First route traveled is >23' starting at Michigan state border.
B enter >23' in blank box to right of AStart on Route@. B click on down arrow in box that shows AIntersection of@ and select State Border. B type Ami@ (for Michigan) in the blank field to right of State Border. Use the first two letters of the state name (i.e., pe for Pennsylvania; ke for Kentucky). Do NOT use the state abbreviation. B Do NOT change >Heading Direction= unless told to do so. B leave >Heading Direction= as Implied and No Offset. B click the NextB> button at bottom of box.
Go to next page.
Page 33 of 109 Revised:4/20/2009
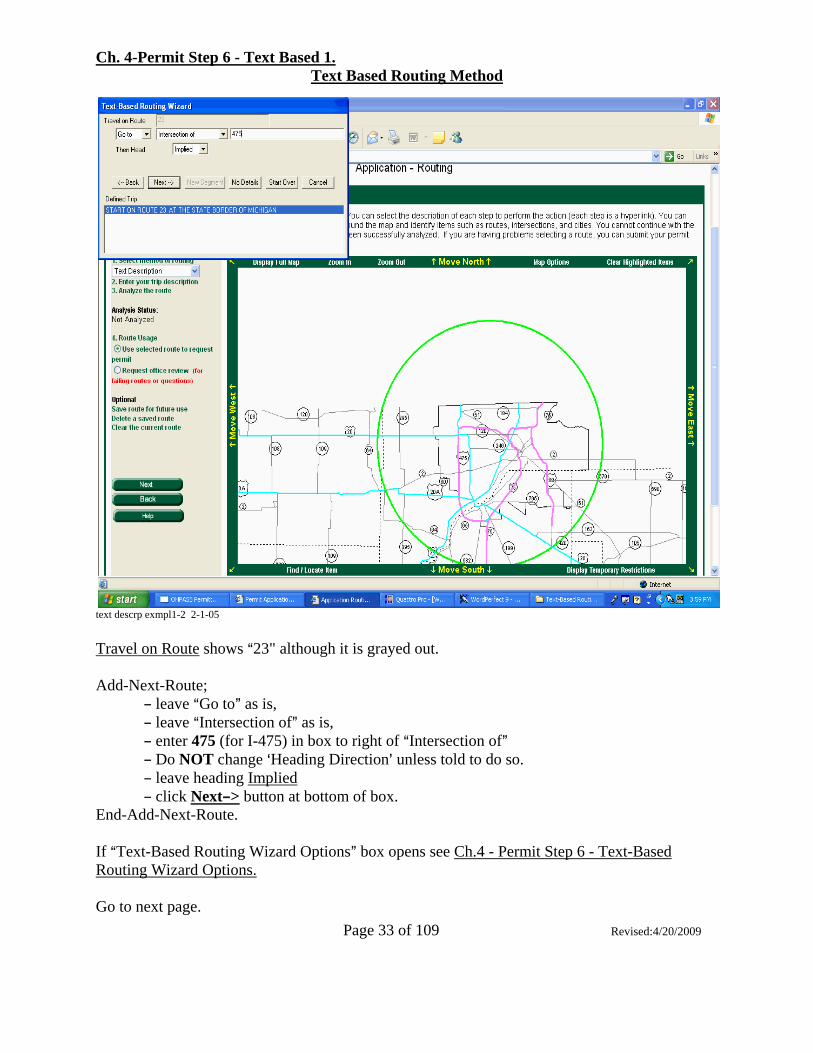
Ch. 4-Permit Step 6 - Text Based 1. Text Based Routing Method
text descrp exmpl1-2 2-1-05 Travel on Route shows A23" although it is grayed out. Add-Next-Route;
B leave AGo to@ as is, B leave AIntersection of@ as is, B enter 475 (for I-475) in box to right of AIntersection of@ B Do NOT change >Heading Direction= unless told to do so. B leave heading Implied B click NextB> button at bottom of box.
End-Add-Next-Route. If AText-Based Routing Wizard Options@ box opens see Ch.4 - Permit Step 6 - Text-Based Routing Wizard Options. Go to next page.
Page 34 of 109 Revised:4/20/2009
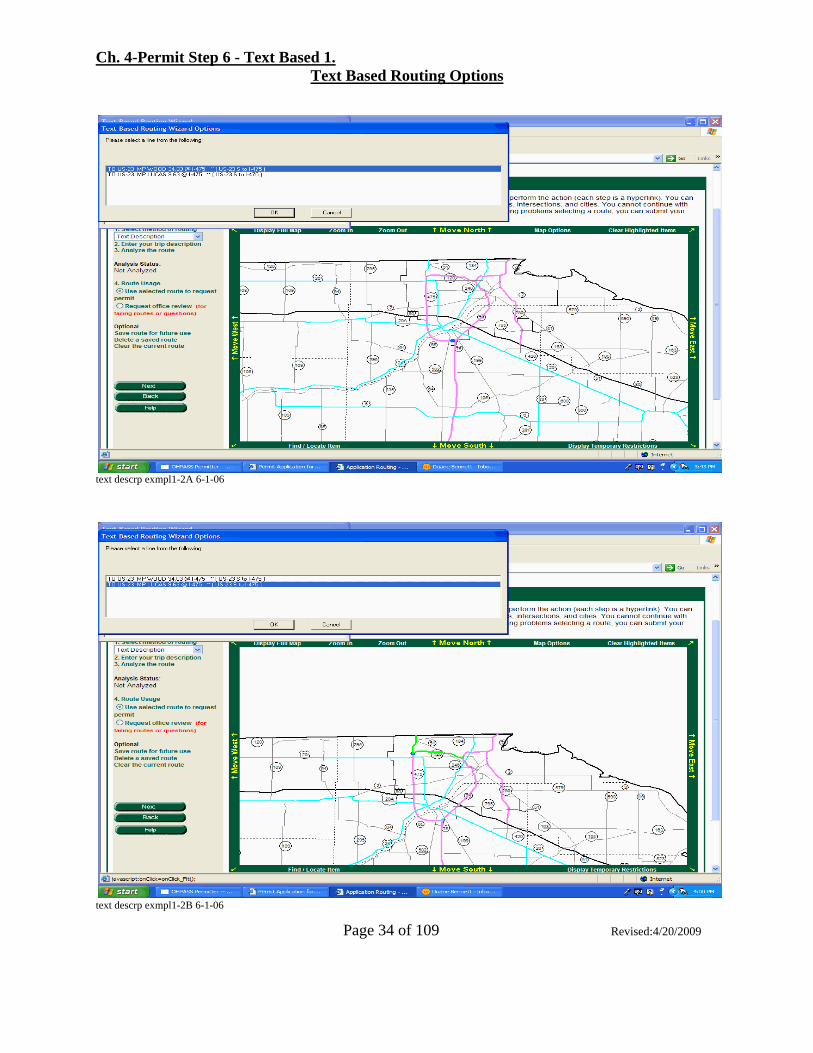
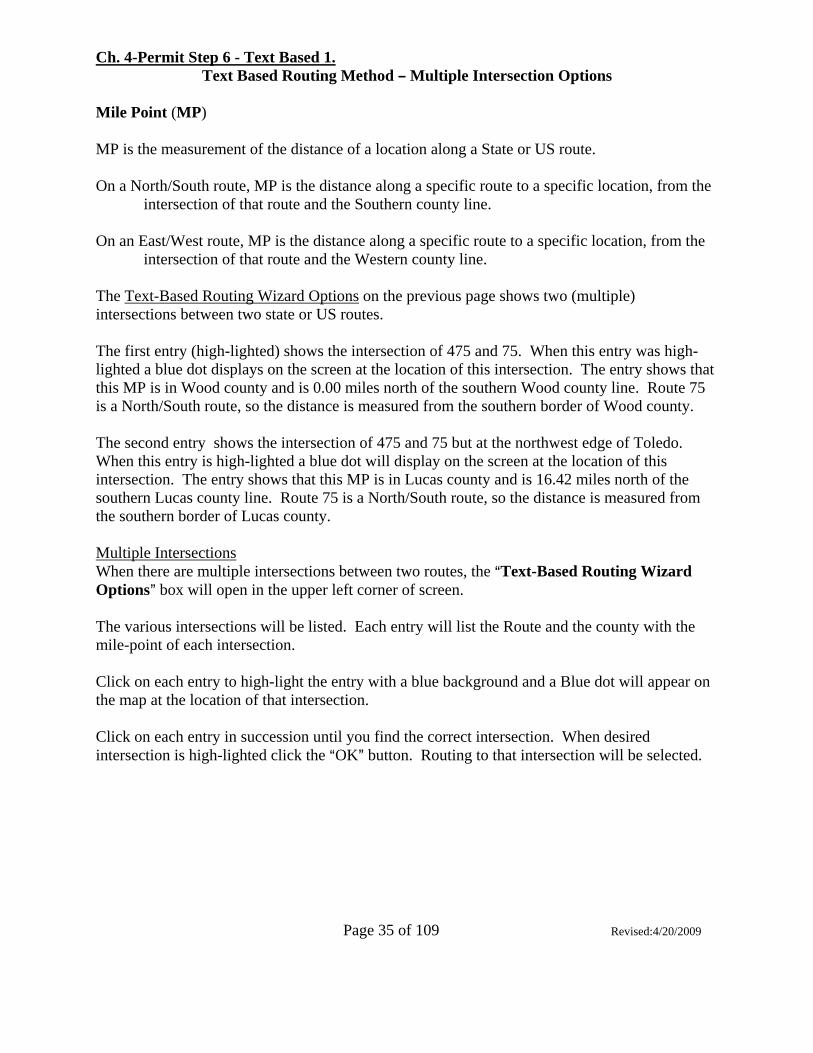
Ch. 4-Permit Step 6 - Text Based 1. Text Based Routing Options
text descrp exmpl1-2A 6-1-06
text descrp exmpl1-2B 6-1-06
Page 35 of 109 Revised:4/20/2009
Ch. 4-Permit Step 6 - Text Based 1. Text Based Routing Method B Multiple Intersection Options Mile Point (MP) MP is the measurement of the distance of a location along a State or US route. On a North/South route, MP is the distance along a specific route to a specific location, from the
intersection of that route and the Southern county line. On an East/West route, MP is the distance along a specific route to a specific location, from the
intersection of that route and the Western county line. The Text-Based Routing Wizard Options on the previous page shows two (multiple) intersections between two state or US routes. The first entry (high-lighted) shows the intersection of 475 and 75. When this entry was high-lighted a blue dot displays on the screen at the location of this intersection. The entry shows that this MP is in Wood county and is 0.00 miles north of the southern Wood county line. Route 75 is a North/South route, so the distance is measured from the southern border of Wood county. The second entry shows the intersection of 475 and 75 but at the northwest edge of Toledo. When this entry is high-lighted a blue dot will display on the screen at the location of this intersection. The entry shows that this MP is in Lucas county and is 16.42 miles north of the southern Lucas county line. Route 75 is a North/South route, so the distance is measured from the southern border of Lucas county. Multiple Intersections When there are multiple intersections between two routes, the AText-Based Routing Wizard Options@ box will open in the upper left corner of screen. The various intersections will be listed. Each entry will list the Route and the county with the mile-point of each intersection. Click on each entry to high-light the entry with a blue background and a Blue dot will appear on the map at the location of that intersection. Click on each entry in succession until you find the correct intersection. When desired intersection is high-lighted click the AOK@ button. Routing to that intersection will be selected.
Page 36 of 109 Revised:4/20/2009
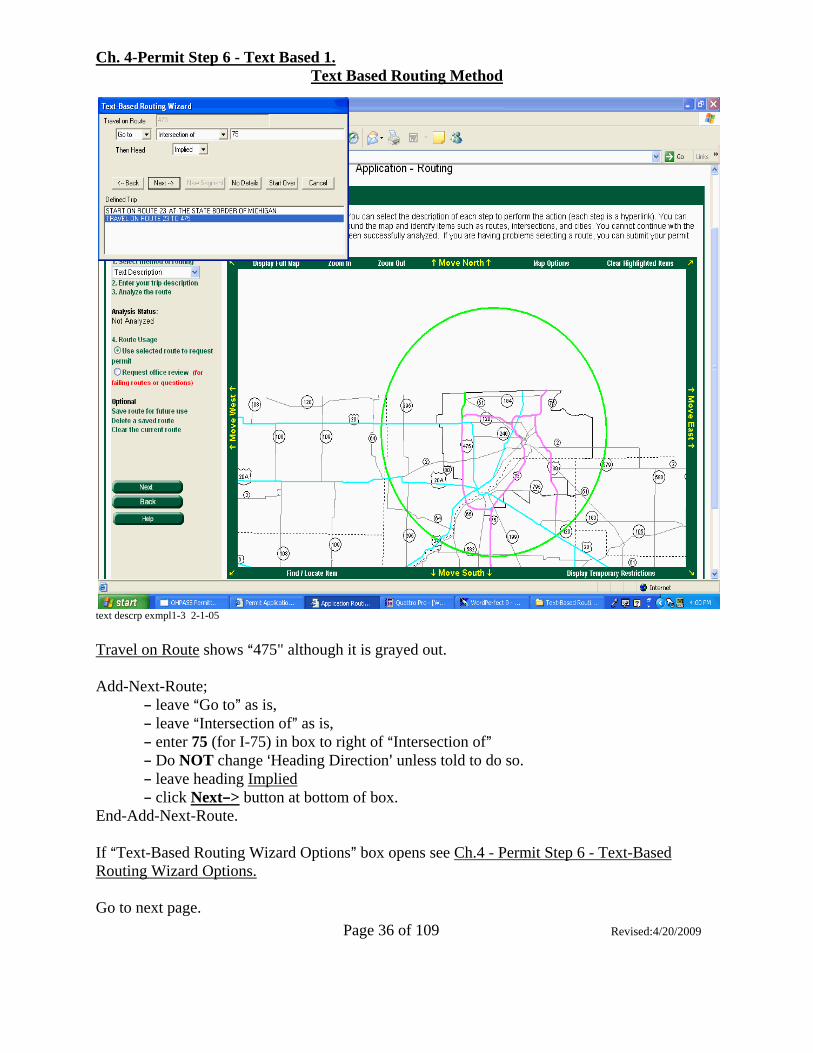
Ch. 4-Permit Step 6 - Text Based 1. Text Based Routing Method
text descrp exmpl1-3 2-1-05 Travel on Route shows A475" although it is grayed out. Add-Next-Route;
B leave AGo to@ as is, B leave AIntersection of@ as is, B enter 75 (for I-75) in box to right of AIntersection of@ B Do NOT change >Heading Direction= unless told to do so. B leave heading Implied B click NextB> button at bottom of box.
End-Add-Next-Route. If AText-Based Routing Wizard Options@ box opens see Ch.4 - Permit Step 6 - Text-Based Routing Wizard Options. Go to next page.

Page 37 of 109 Revised:4/20/2009
Ch. 4-Permit Step 6 - Text Based 1. Text Based Routing Method
text descrp exmpl1-4 2-1-05 75 and 475 connect at two locations. The Text-Based Routing Wizard Options message box shows the various intersections between
two routes. Click on a choice to highlight it. A blue dot will appear on the highlighted route. You can
highlight the various choices to see the blue dot move and see how the routing for that choice would proceed.
Highlight your final choice. Click the OK button. The route to that intersection will be selected. Go to next page.
Page 38 of 109 Revised:4/20/2009
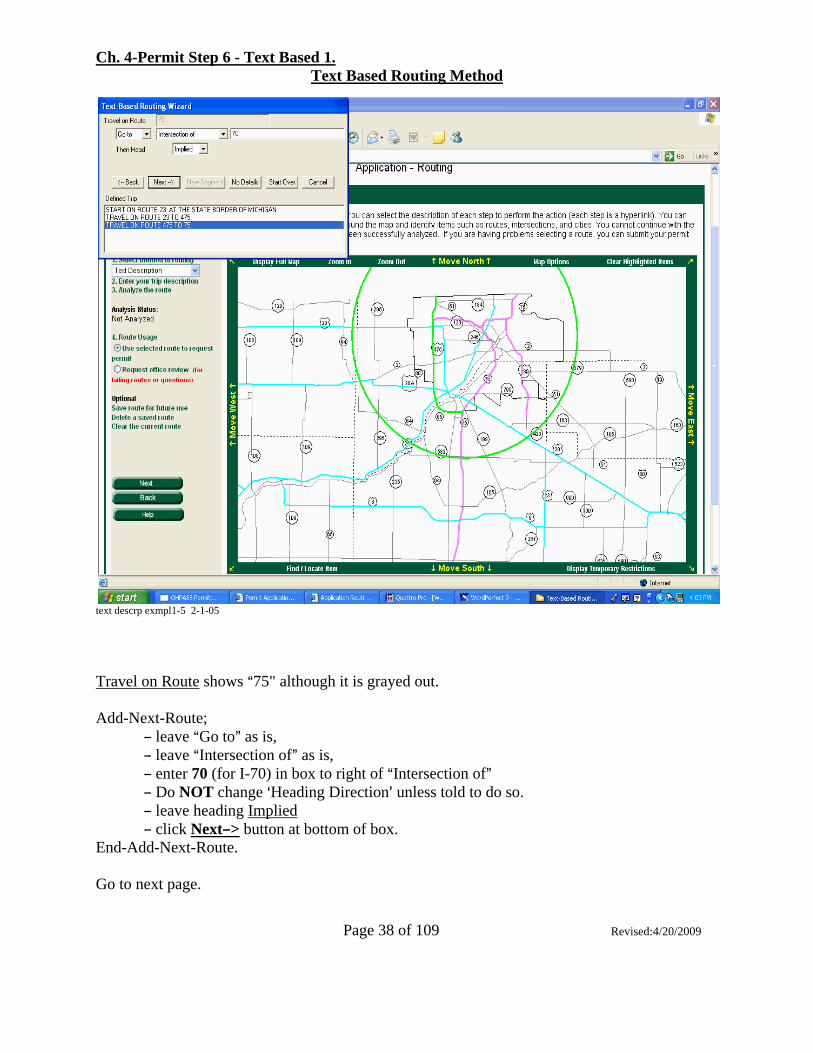
Ch. 4-Permit Step 6 - Text Based 1. Text Based Routing Method
text descrp exmpl1-5 2-1-05 Travel on Route shows A75" although it is grayed out. Add-Next-Route;
B leave AGo to@ as is, B leave AIntersection of@ as is, B enter 70 (for I-70) in box to right of AIntersection of@ B Do NOT change >Heading Direction= unless told to do so. B leave heading Implied B click NextB> button at bottom of box.
End-Add-Next-Route. Go to next page.
Page 39 of 109 Revised:4/20/2009
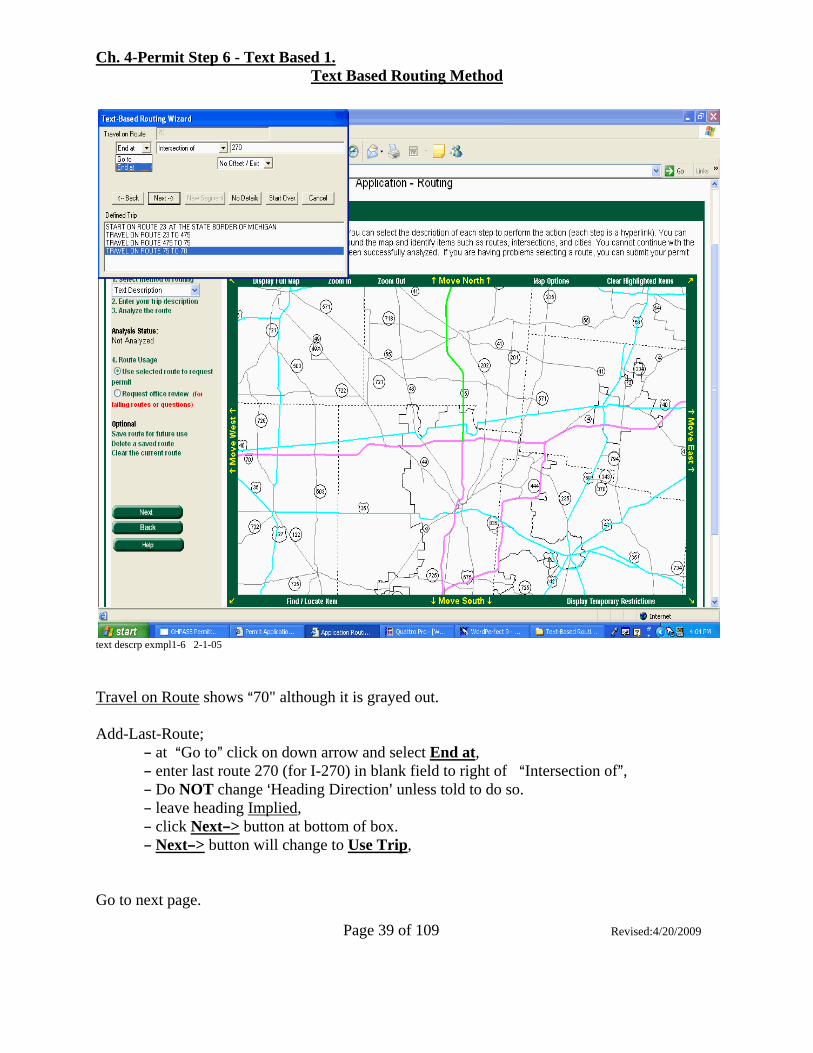
Ch. 4-Permit Step 6 - Text Based 1. Text Based Routing Method
text descrp exmpl1-6 2-1-05 Travel on Route shows A70" although it is grayed out. Add-Last-Route;
B at AGo to@ click on down arrow and select End at, B enter last route 270 (for I-270) in blank field to right of AIntersection of@, B Do NOT change >Heading Direction= unless told to do so. B leave heading Implied, B click NextB> button at bottom of box. B NextB> button will change to Use Trip,
Go to next page.
Page 40 of 109 Revised:4/20/2009
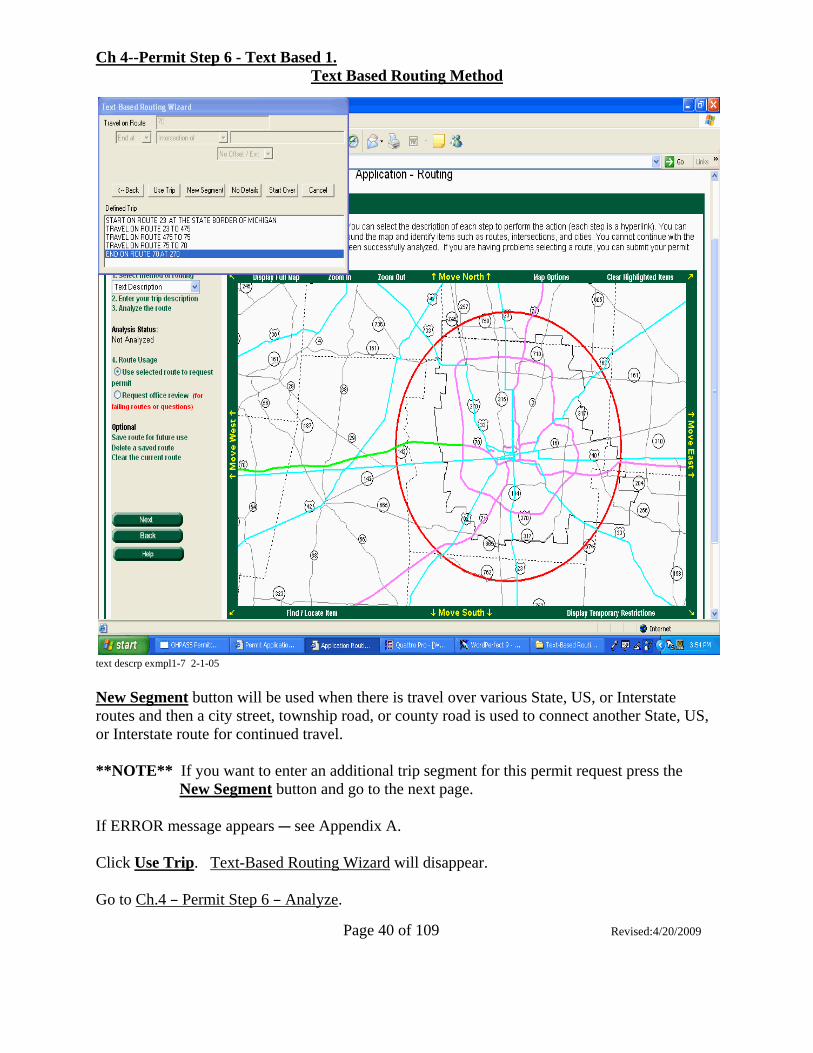
Ch 4--Permit Step 6 - Text Based 1. Text Based Routing Method
text descrp exmpl1-7 2-1-05 New Segment button will be used when there is travel over various State, US, or Interstate routes and then a city street, township road, or county road is used to connect another State, US, or Interstate route for continued travel. **NOTE** If you want to enter an additional trip segment for this permit request press the New Segment button and go to the next page. If ERROR message appears C see Appendix A. Click Use Trip. Text-Based Routing Wizard will disappear. Go to Ch.4 B Permit Step 6 B Analyze.
Page 41 of 109 Revised:4/20/2009
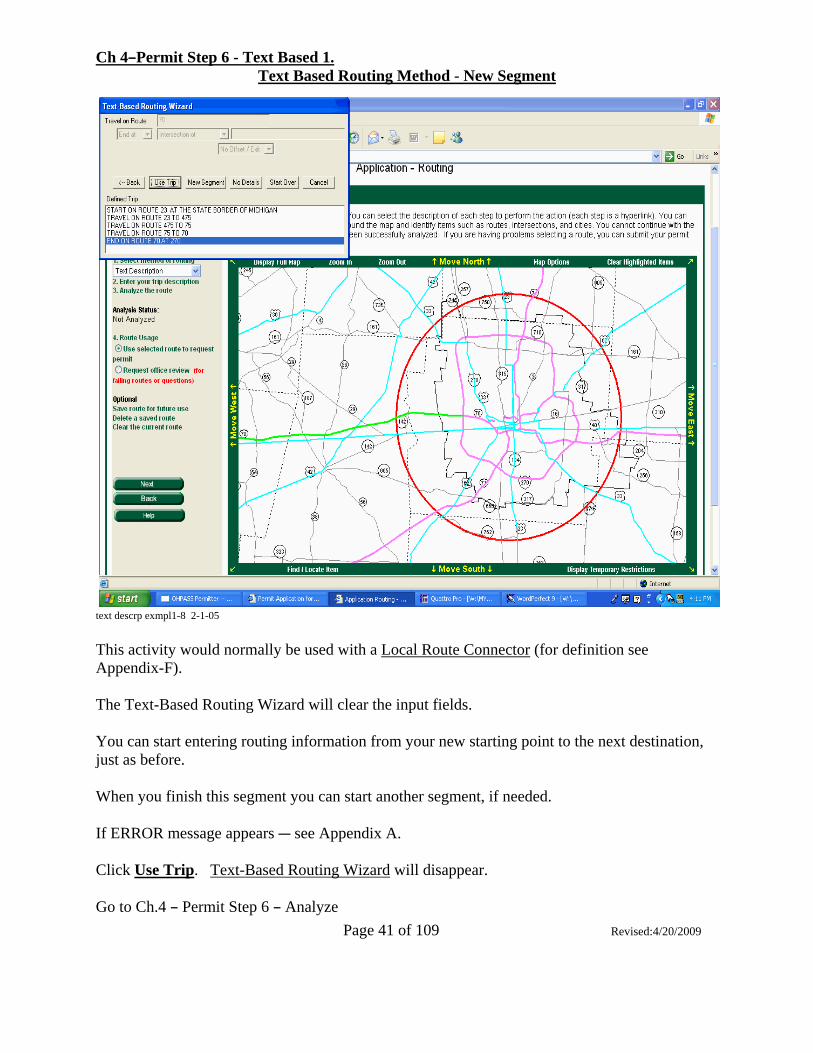
Ch 4BPermit Step 6 - Text Based 1. Text Based Routing Method - New Segment
text descrp exmpl1-8 2-1-05 This activity would normally be used with a Local Route Connector (for definition see Appendix-F). The Text-Based Routing Wizard will clear the input fields. You can start entering routing information from your new starting point to the next destination, just as before. When you finish this segment you can start another segment, if needed. If ERROR message appears C see Appendix A. Click Use Trip. Text-Based Routing Wizard will disappear. Go to Ch.4 B Permit Step 6 B Analyze
Page 42 of 109 Revised:4/20/2009
Ch. 4B Permit Step 6 - Pick Segment-Example 1-1. Picking Route Segments Routing Method
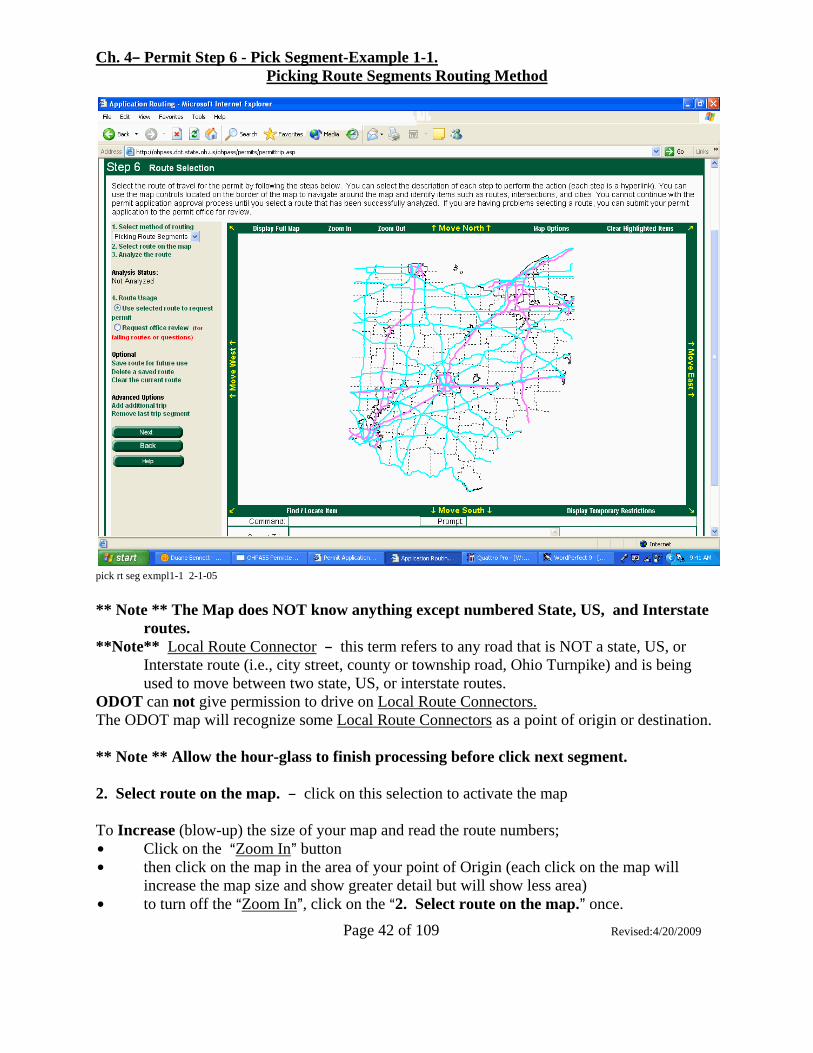
pick rt seg exmpl1-1 2-1-05 ** Note ** The Map does NOT know anything except numbered State, US, and Interstate
routes. **Note** Local Route Connector B this term refers to any road that is NOT a state, US, or
Interstate route (i.e., city street, county or township road, Ohio Turnpike) and is being used to move between two state, US, or interstate routes.
ODOT can not give permission to drive on Local Route Connectors. The ODOT map will recognize some Local Route Connectors as a point of origin or destination. ** Note ** Allow the hour-glass to finish processing before click next segment. 2. Select route on the map. B click on this selection to activate the map To Increase (blow-up) the size of your map and read the route numbers; $ Click on the AZoom In@ button $ then click on the map in the area of your point of Origin (each click on the map will
increase the map size and show greater detail but will show less area) $ to turn off the AZoom In@, click on the A2. Select route on the map.@ once.
Page 43 of 109 Revised:4/20/2009
Ch. 4B Permit Step 6 - Pick Segment. Picking Route Segments Routing Method To Decrease the size of your map; $ Click on the AZoom Out@ button $ then click anywhere on the map (each click on the map will decrease the map size and
show less detail but will show more area) $ to turn off the AZoom Out@, click on the A2. Select route on the map.@ once. Selecting your Route Segments; **Note ** After clicking on a segment, wait for the hour glass to finish before clicking next segment. $ The starting point on your selected route will be the actual intersection of your Origin or
a point Aupstream@ from the point of Origin. AUpstream@ is a point in the opposite direction from your actual starting point as your direction of travel.
$ The first Route Segment needs TWO (2) single clicks. - The first click is on the desired segment near the point of origin. - The second click is on the highlighted segment but move the cursor along the segment in the direction of travel about 2 inch. - Do NOT click at the intersection. Click on the route near the intersection.
$ Click once on all remaining map segments. $ The ending point on your selected route, will be at or past the Destination intersection. $ If you make a mistake on clicking the routes, you can use ARemove last trip segment@
which is discussed below under AAdvanced Options@. $ If you get an error message indicating two routes don=t connect, zoom-in on the area one
or two more times. There may be a short segment of another route intervening. Advanced Options; (this item only displays when the APicking Routing Segments@ routing
method is selected) Add additional trip B this option can be use when the route of travel contains NON-State or
NON-US routes (i.e., turnpike, county rd.). 1. Select all routes from point of origin to first NON-State or NON-US route (turnpike, cnty rd). 2. Click on AAdd Additional Trip@. 3. Start selecting routes again at first intersection of NON-State route with a State or US route. 4. Continue selecting routes to point of Destination. 5. At Step 7 type your connecting routes in the COMMENTS area [i.e., 75-tp-80 (tp is non-state
route connector); 71-Franks Rd.-104 (Frank Rd. is non-state route connector)]. Remove last trip segment B click this option once to remove the last segment entered
B continuing to click this option will continue to remove segments backward until base route segment (first route segment selected).
If ERROR message appears C see Appendix A. To see an another example of the APicking Route Segments@ routing method, go to next page. When routing is completed, Go to Ch.4 B Permit Step 6 B Analyze.
Page 44 of 109 Revised:4/20/2009
Ch. 4-Step 6-Pick Segment-Example 2-0. Example of APicking Route Segments@ Routing Method
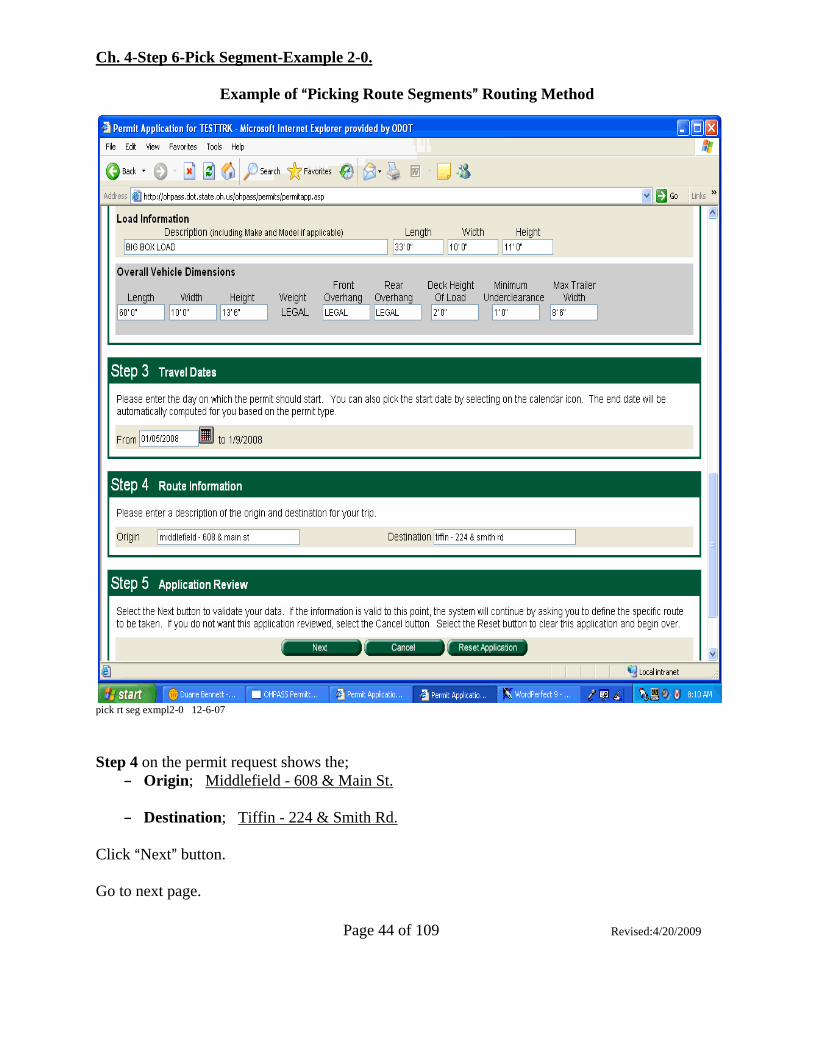
pick rt seg exmpl2-0 12-6-07 Step 4 on the permit request shows the; B Origin; Middlefield - 608 & Main St. B Destination; Tiffin - 224 & Smith Rd. Click ANext@ button. Go to next page.
Page 45 of 109 Revised:4/20/2009
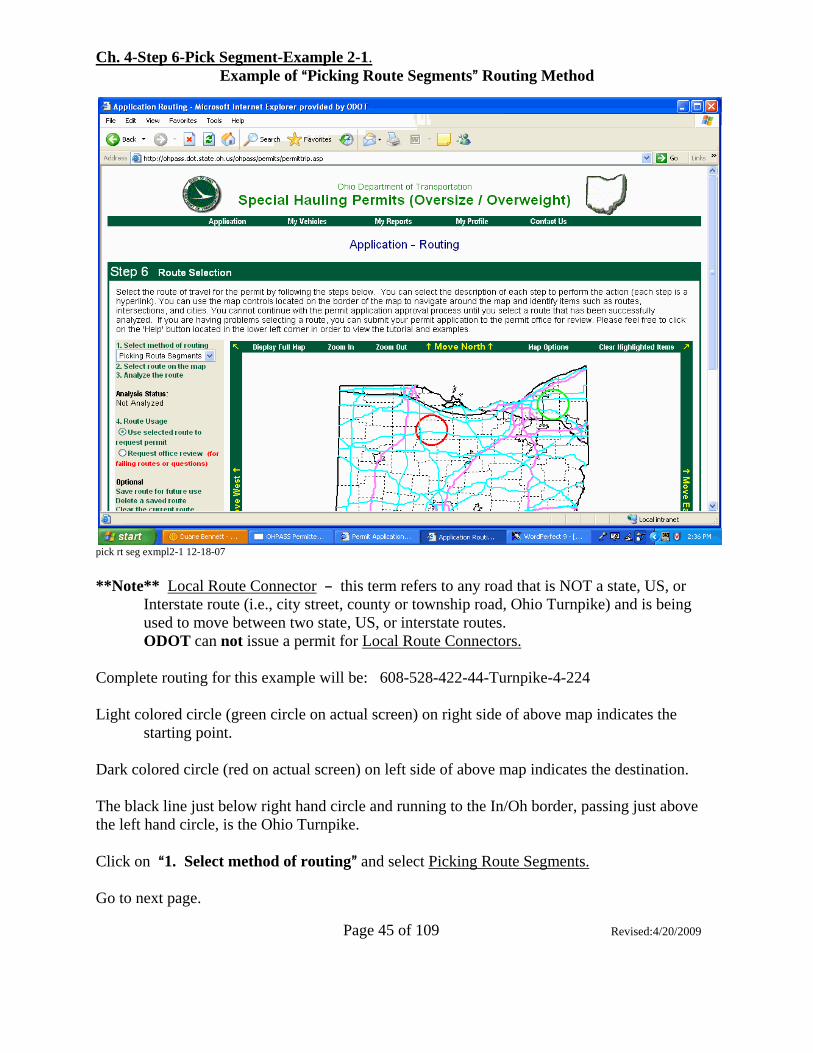
Ch. 4-Step 6-Pick Segment-Example 2-1. Example of APicking Route Segments@ Routing Method
pick rt seg exmpl2-1 12-18-07 **Note** Local Route Connector B this term refers to any road that is NOT a state, US, or
Interstate route (i.e., city street, county or township road, Ohio Turnpike) and is being used to move between two state, US, or interstate routes. ODOT can not issue a permit for Local Route Connectors.
Complete routing for this example will be: 608-528-422-44-Turnpike-4-224 Light colored circle (green circle on actual screen) on right side of above map indicates the
starting point. Dark colored circle (red on actual screen) on left side of above map indicates the destination. The black line just below right hand circle and running to the In/Oh border, passing just above the left hand circle, is the Ohio Turnpike. Click on A1. Select method of routing@ and select Picking Route Segments. Go to next page.
Page 46 of 109 Revised:4/20/2009
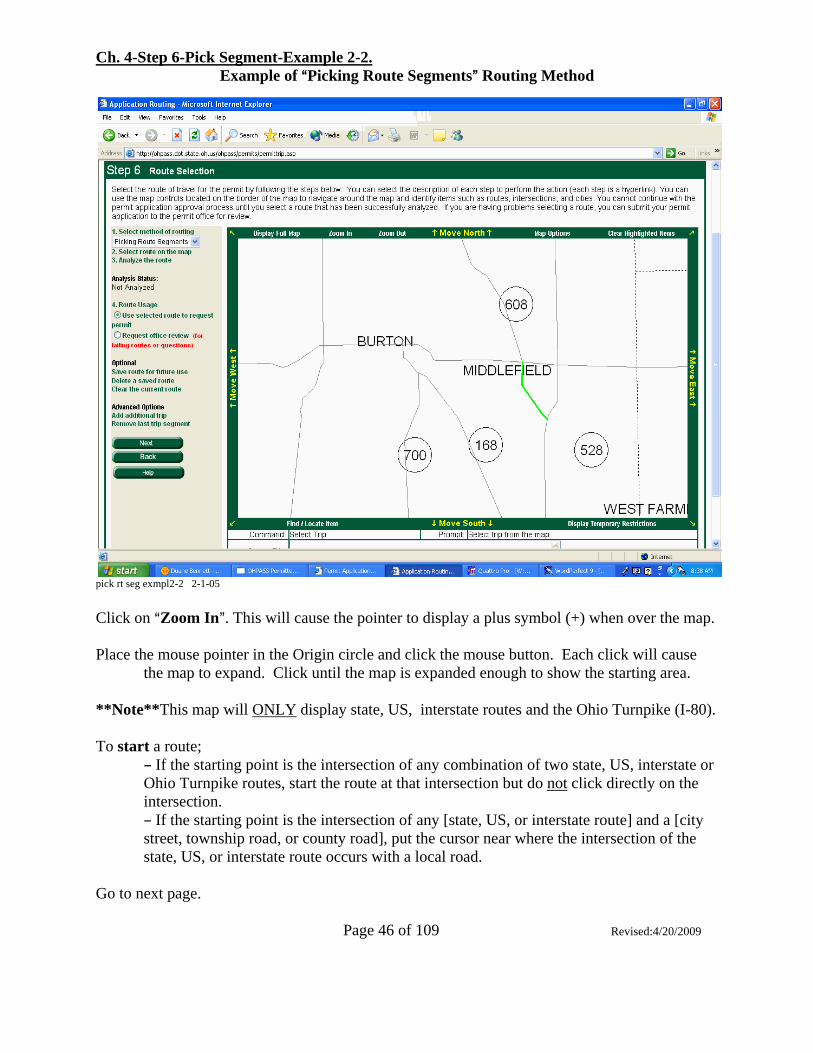
Ch. 4-Step 6-Pick Segment-Example 2-2. Example of APicking Route Segments@ Routing Method
pick rt seg exmpl2-2 2-1-05 Click on AZoom In@. This will cause the pointer to display a plus symbol (+) when over the map. Place the mouse pointer in the Origin circle and click the mouse button. Each click will cause
the map to expand. Click until the map is expanded enough to show the starting area. **Note**This map will ONLY display state, US, interstate routes and the Ohio Turnpike (I-80). To start a route;
B If the starting point is the intersection of any combination of two state, US, interstate or Ohio Turnpike routes, start the route at that intersection but do not click directly on the intersection. B If the starting point is the intersection of any [state, US, or interstate route] and a [city street, township road, or county road], put the cursor near where the intersection of the state, US, or interstate route occurs with a local road.
Go to next page.
Page 47 of 109 Revised:4/20/2009
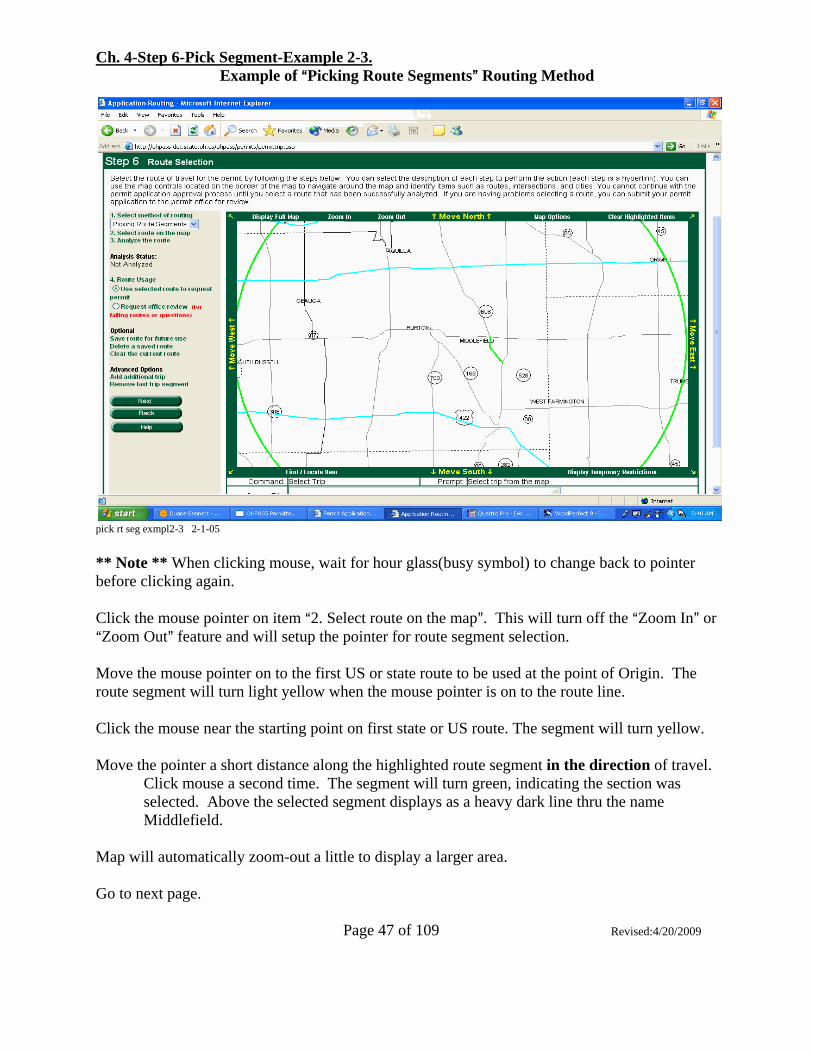
Ch. 4-Step 6-Pick Segment-Example 2-3. Example of APicking Route Segments@ Routing Method
pick rt seg exmpl2-3 2-1-05 ** Note ** When clicking mouse, wait for hour glass(busy symbol) to change back to pointer before clicking again. Click the mouse pointer on item A2. Select route on the map@. This will turn off the AZoom In@ or AZoom Out@ feature and will setup the pointer for route segment selection. Move the mouse pointer on to the first US or state route to be used at the point of Origin. The route segment will turn light yellow when the mouse pointer is on to the route line. Click the mouse near the starting point on first state or US route. The segment will turn yellow. Move the pointer a short distance along the highlighted route segment in the direction of travel.
Click mouse a second time. The segment will turn green, indicating the section was selected. Above the selected segment displays as a heavy dark line thru the name Middlefield.
Map will automatically zoom-out a little to display a larger area. Go to next page.
Page 48 of 109 Revised:4/20/2009
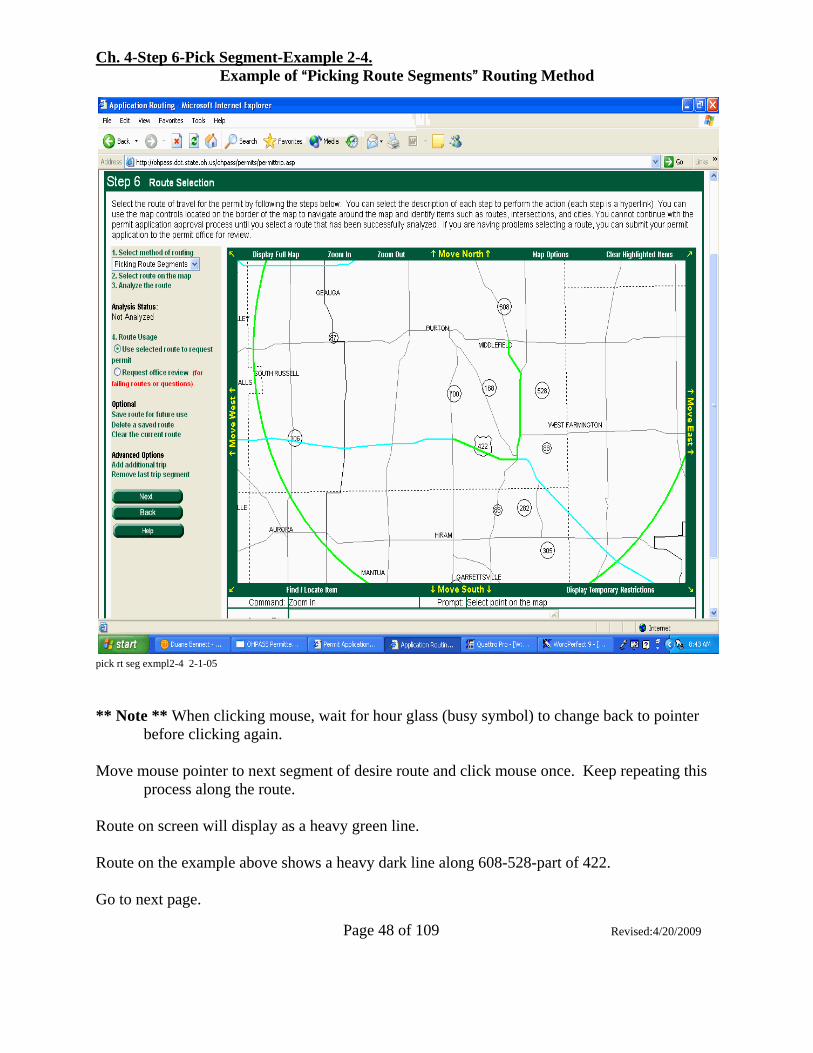
Ch. 4-Step 6-Pick Segment-Example 2-4. Example of APicking Route Segments@ Routing Method
pick rt seg exmpl2-4 2-1-05 ** Note ** When clicking mouse, wait for hour glass (busy symbol) to change back to pointer
before clicking again. Move mouse pointer to next segment of desire route and click mouse once. Keep repeating this
process along the route. Route on screen will display as a heavy green line. Route on the example above shows a heavy dark line along 608-528-part of 422. Go to next page.
Page 49 of 109 Revised:4/20/2009
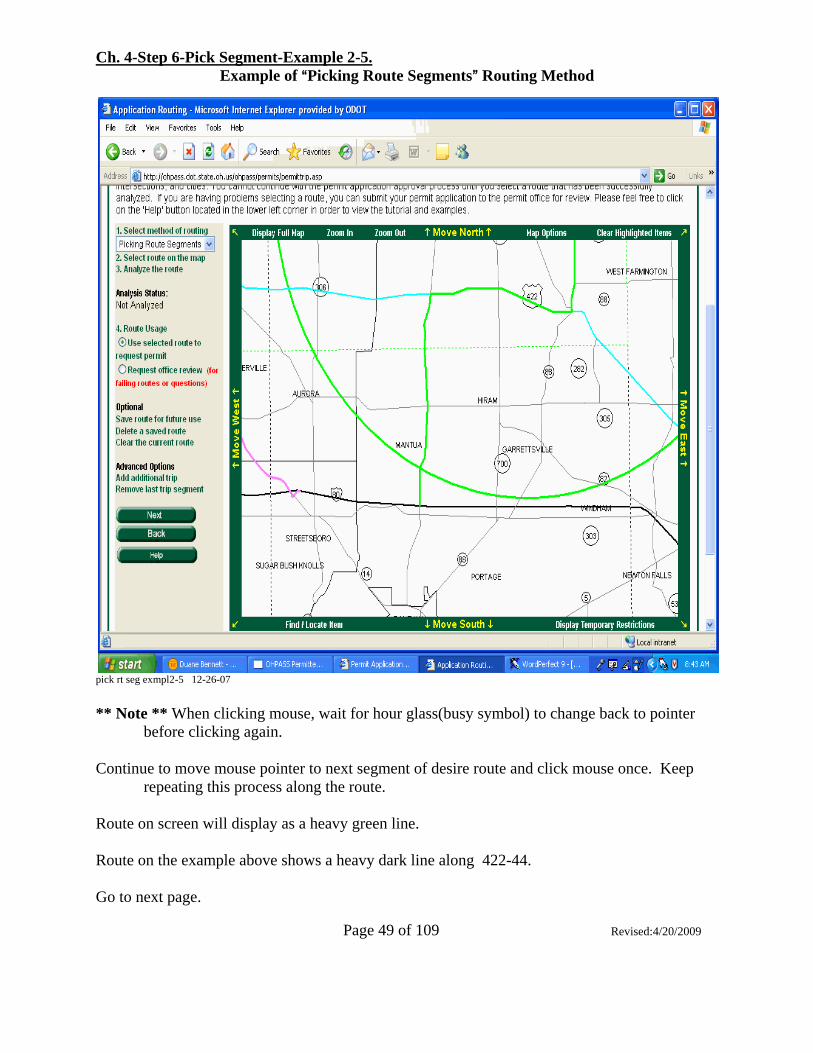
Ch. 4-Step 6-Pick Segment-Example 2-5. Example of APicking Route Segments@ Routing Method
pick rt seg exmpl2-5 12-26-07 ** Note ** When clicking mouse, wait for hour glass(busy symbol) to change back to pointer
before clicking again. Continue to move mouse pointer to next segment of desire route and click mouse once. Keep
repeating this process along the route. Route on screen will display as a heavy green line. Route on the example above shows a heavy dark line along 422-44. Go to next page.
Page 50 of 109 Revised:4/20/2009
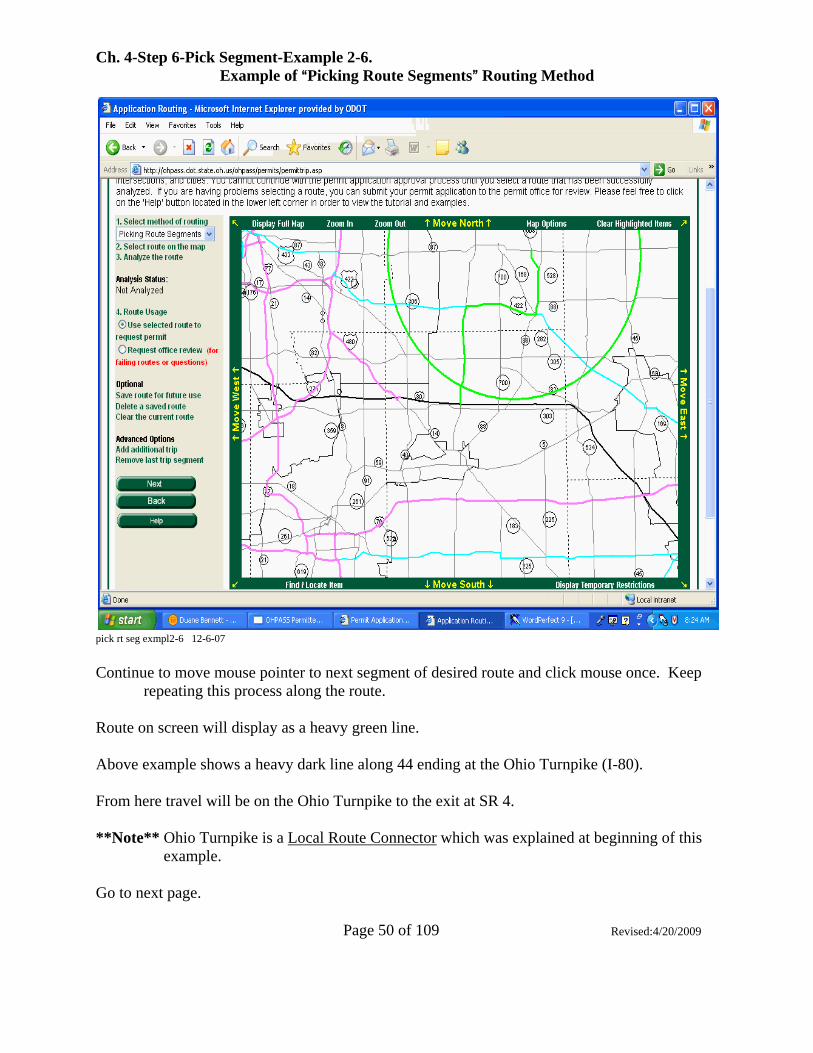
Ch. 4-Step 6-Pick Segment-Example 2-6. Example of APicking Route Segments@ Routing Method
pick rt seg exmpl2-6 12-6-07 Continue to move mouse pointer to next segment of desired route and click mouse once. Keep
repeating this process along the route. Route on screen will display as a heavy green line. Above example shows a heavy dark line along 44 ending at the Ohio Turnpike (I-80). From here travel will be on the Ohio Turnpike to the exit at SR 4. **Note** Ohio Turnpike is a Local Route Connector which was explained at beginning of this
example. Go to next page.
Page 51 of 109 Revised:4/20/2009
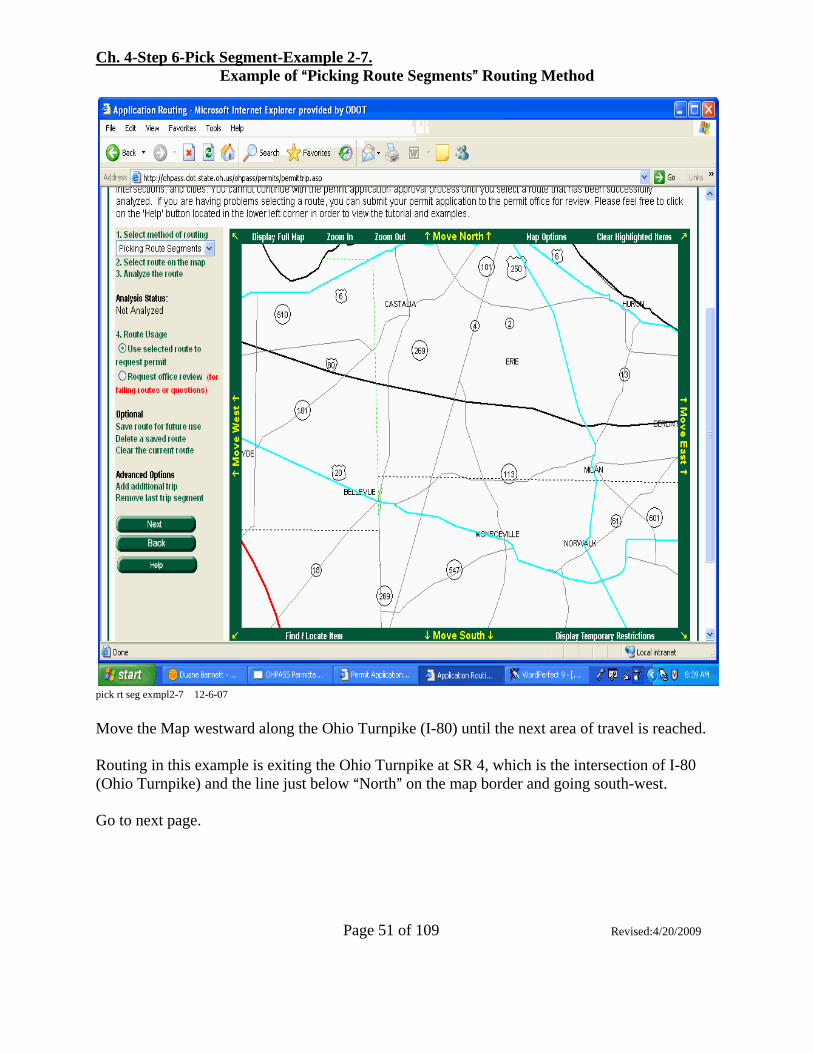
Ch. 4-Step 6-Pick Segment-Example 2-7. Example of APicking Route Segments@ Routing Method
pick rt seg exmpl2-7 12-6-07 Move the Map westward along the Ohio Turnpike (I-80) until the next area of travel is reached. Routing in this example is exiting the Ohio Turnpike at SR 4, which is the intersection of I-80 (Ohio Turnpike) and the line just below ANorth@ on the map border and going south-west. Go to next page.
Page 52 of 109 Revised:4/20/2009
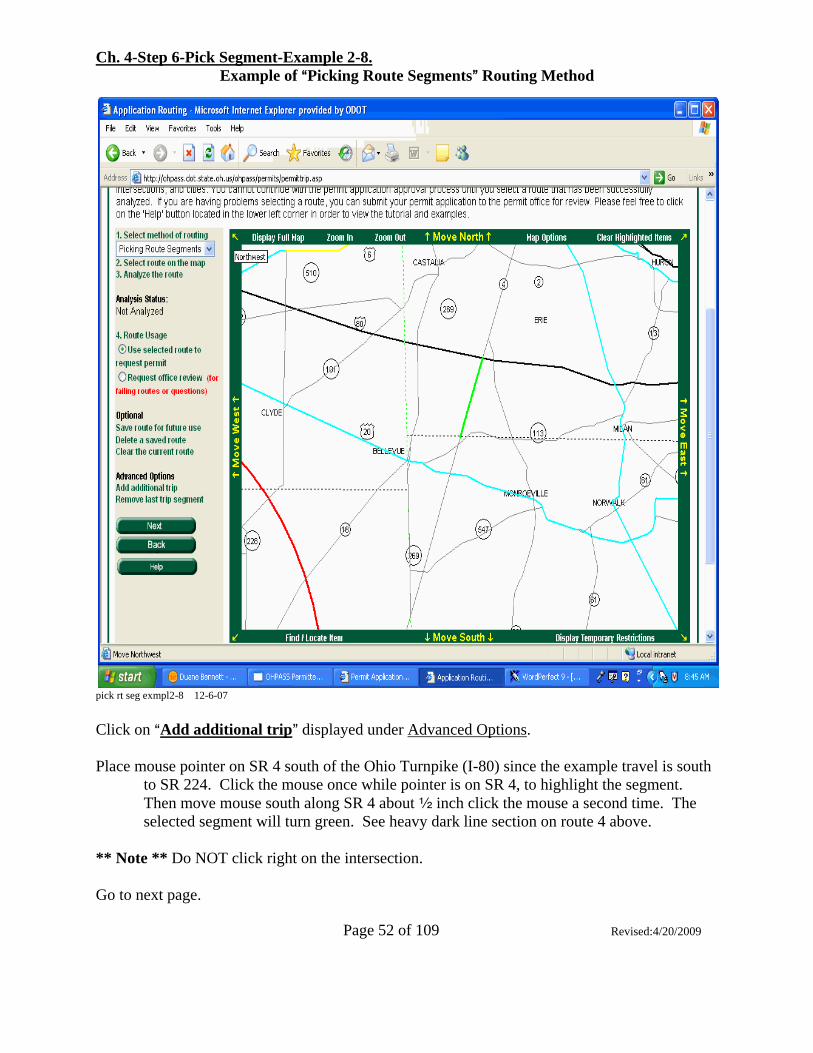
Ch. 4-Step 6-Pick Segment-Example 2-8. Example of APicking Route Segments@ Routing Method
pick rt seg exmpl2-8 12-6-07 Click on AAdd additional trip@ displayed under Advanced Options. Place mouse pointer on SR 4 south of the Ohio Turnpike (I-80) since the example travel is south
to SR 224. Click the mouse once while pointer is on SR 4, to highlight the segment. Then move mouse south along SR 4 about 2 inch click the mouse a second time. The selected segment will turn green. See heavy dark line section on route 4 above.
** Note ** Do NOT click right on the intersection. Go to next page.
Page 53 of 109 Revised:4/20/2009
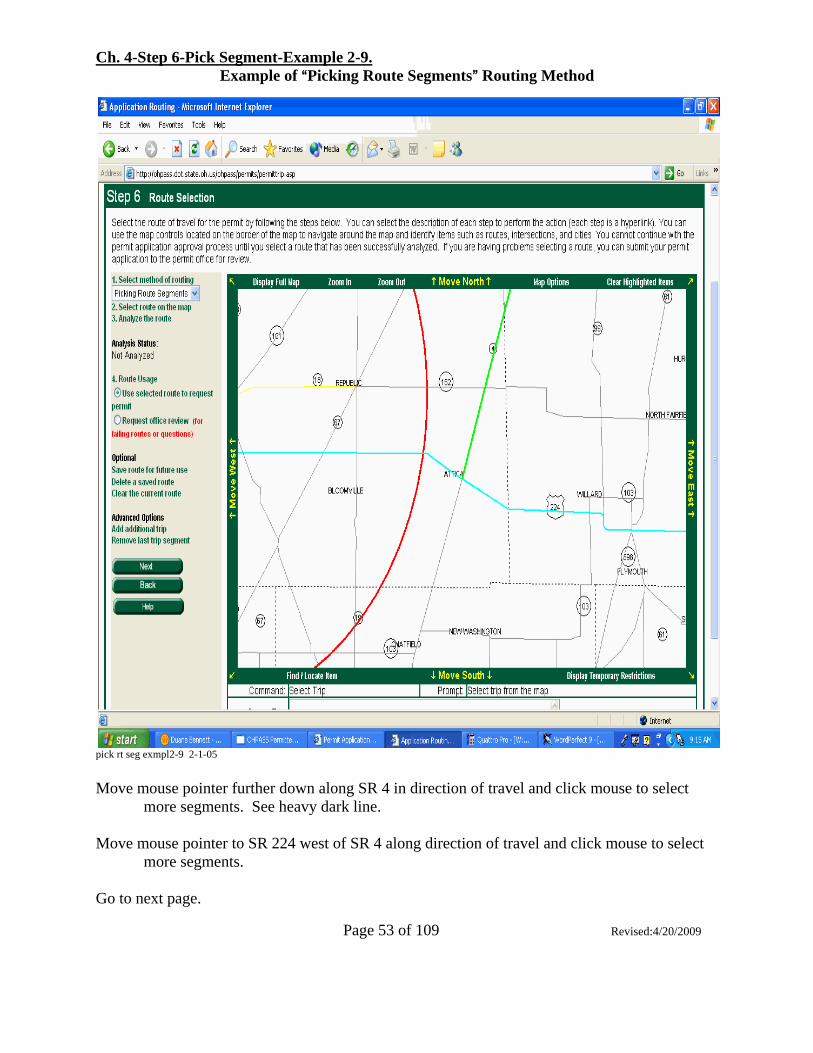
Ch. 4-Step 6-Pick Segment-Example 2-9. Example of APicking Route Segments@ Routing Method
pick rt seg exmpl2-9 2-1-05 Move mouse pointer further down along SR 4 in direction of travel and click mouse to select
more segments. See heavy dark line. Move mouse pointer to SR 224 west of SR 4 along direction of travel and click mouse to select
more segments. Go to next page.

Page 54 of 109 Revised:4/20/2009
Ch. 4-Step 6-Pick Segment-Example 2-10. Example of APicking Route Segments@ Routing Method
pick rt seg exmpl2-10 2-1-05 Continue clicking the mouse pointer along the route until the destination is reached. ** Note ** This map only shows state, US, interstate routes, and the Ohio Turnpike. To end a route;
B If the ending point is the intersection of any combination of two state, US, interstate or Ohio Turnpike routes, end the route at that intersection. B If the ending point is the intersection of any state, US, or interstate route and a city street, township road, or county road, put the ending point of travel at the area of the ending intersection or just past the ending intersection.
End of APicking Route Segments@ Routing Method. Go to Ch.4 B Permit Step 6 B Analyze.
Page 55 of 109 Revised:4/20/2009
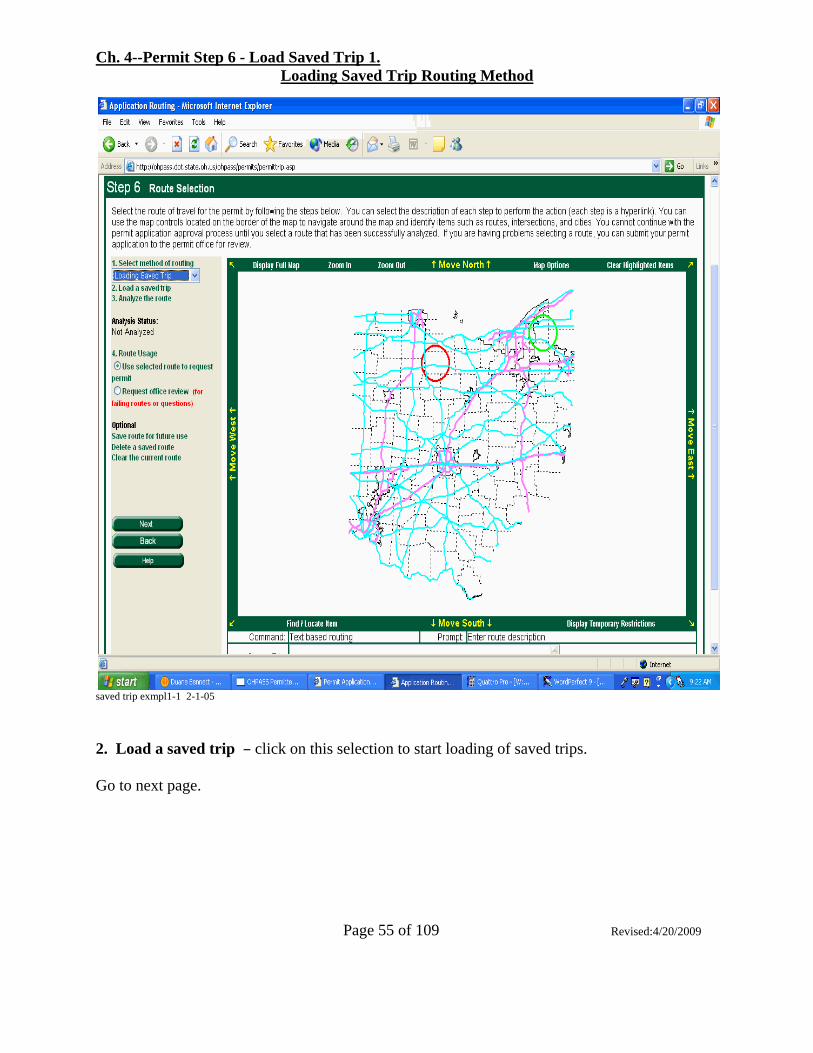
Ch. 4--Permit Step 6 - Load Saved Trip 1. Loading Saved Trip Routing Method
saved trip exmpl1-1 2-1-05 2. Load a saved trip B click on this selection to start loading of saved trips. Go to next page.
Page 56 of 109 Revised:4/20/2009
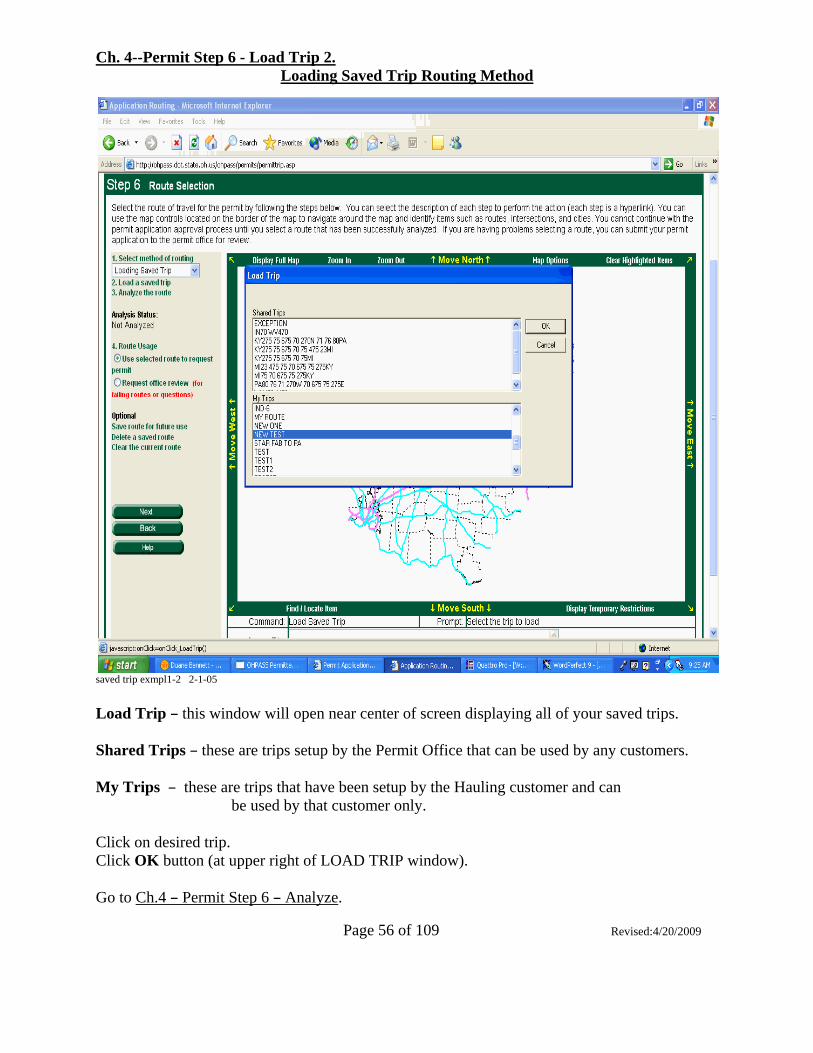
Ch. 4--Permit Step 6 - Load Trip 2. Loading Saved Trip Routing Method
saved trip exmpl1-2 2-1-05 Load Trip B this window will open near center of screen displaying all of your saved trips. Shared Trips B these are trips setup by the Permit Office that can be used by any customers. My Trips B these are trips that have been setup by the Hauling customer and can be used by that customer only. Click on desired trip. Click OK button (at upper right of LOAD TRIP window). Go to Ch.4 B Permit Step 6 B Analyze.
Page 57 of 109 Revised:4/20/2009
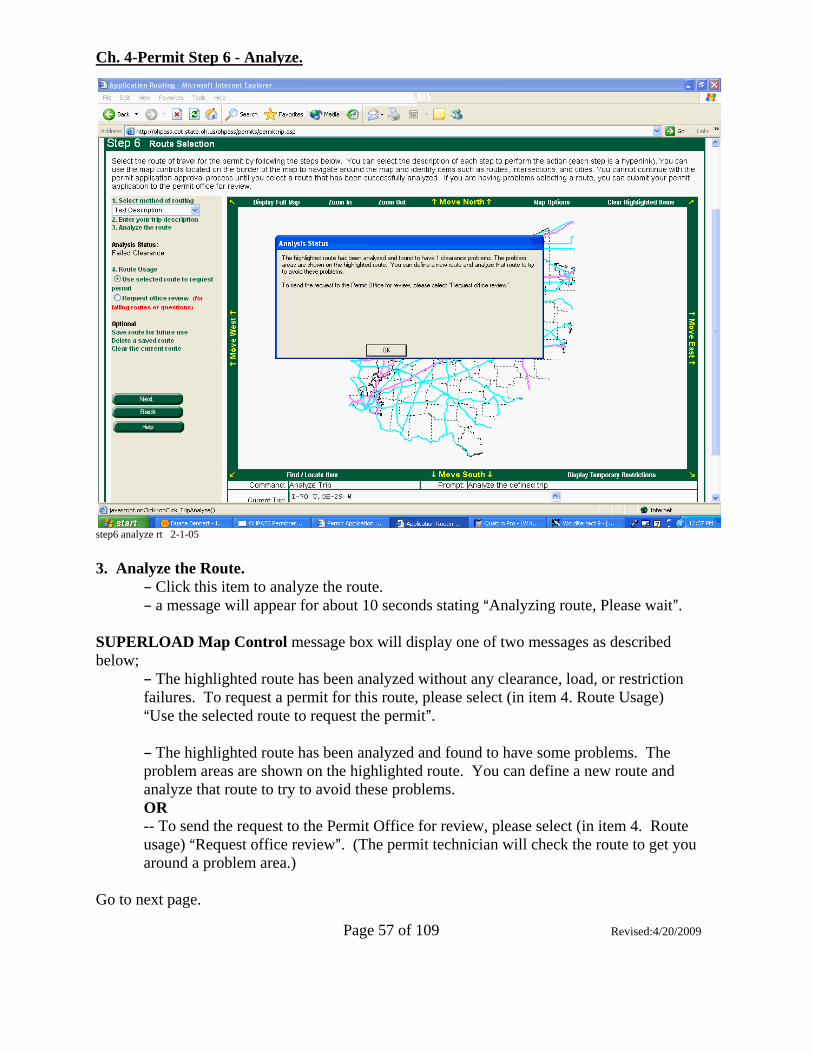
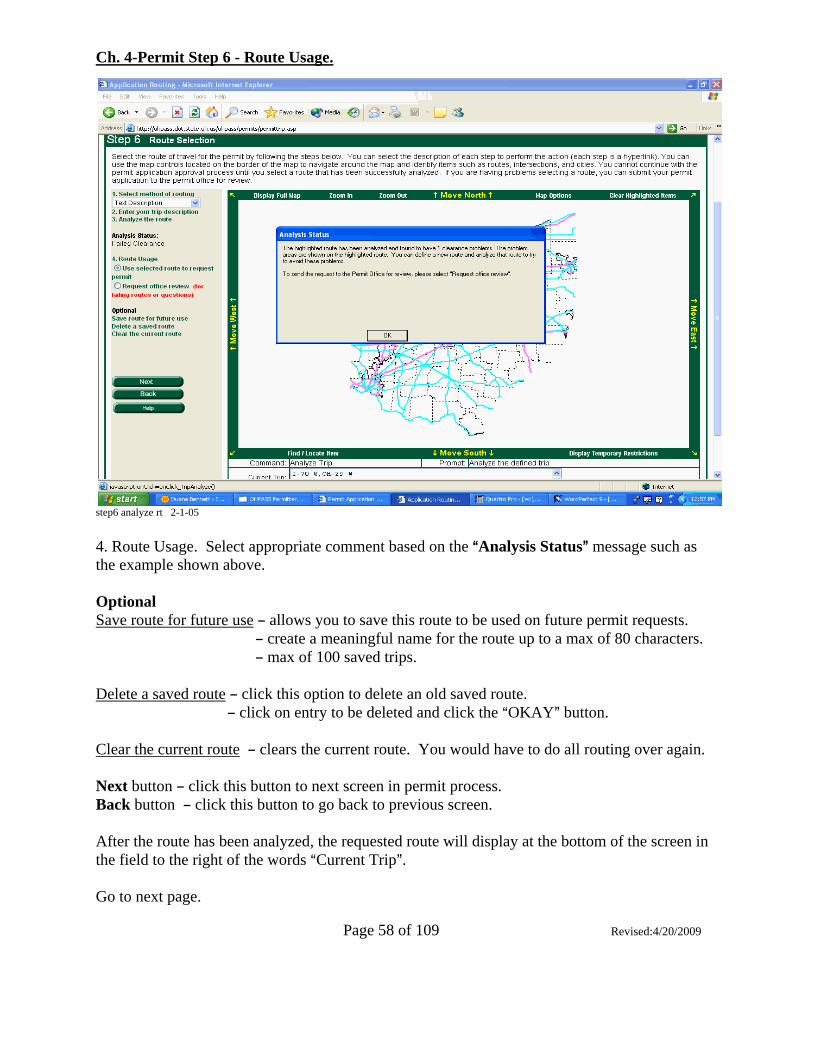
Ch. 4-Permit Step 6 - Analyze.
step6 analyze rt 2-1-05 3. Analyze the Route.
B Click this item to analyze the route. B a message will appear for about 10 seconds stating AAnalyzing route, Please wait@.
SUPERLOAD Map Control message box will display one of two messages as described below;
B The highlighted route has been analyzed without any clearance, load, or restriction failures. To request a permit for this route, please select (in item 4. Route Usage) AUse the selected route to request the permit@.
B The highlighted route has been analyzed and found to have some problems. The problem areas are shown on the highlighted route. You can define a new route and analyze that route to try to avoid these problems. OR -- To send the request to the Permit Office for review, please select (in item 4. Route usage) ARequest office review@. (The permit technician will check the route to get you around a problem area.)
Go to next page.
Page 58 of 109 Revised:4/20/2009
Ch. 4-Permit Step 6 - Route Usage.
step6 analyze rt 2-1-05 4. Route Usage. Select appropriate comment based on the AAnalysis Status@ message such as the example shown above. Optional Save route for future use B allows you to save this route to be used on future permit requests.
B create a meaningful name for the route up to a max of 80 characters. B max of 100 saved trips.
Delete a saved route B click this option to delete an old saved route.
B click on entry to be deleted and click the AOKAY@ button. Clear the current route B clears the current route. You would have to do all routing over again. Next button B click this button to next screen in permit process. Back button B click this button to go back to previous screen. After the route has been analyzed, the requested route will display at the bottom of the screen in the field to the right of the words ACurrent Trip@. Go to next page.
Page 59 of 109 Revised:4/20/2009
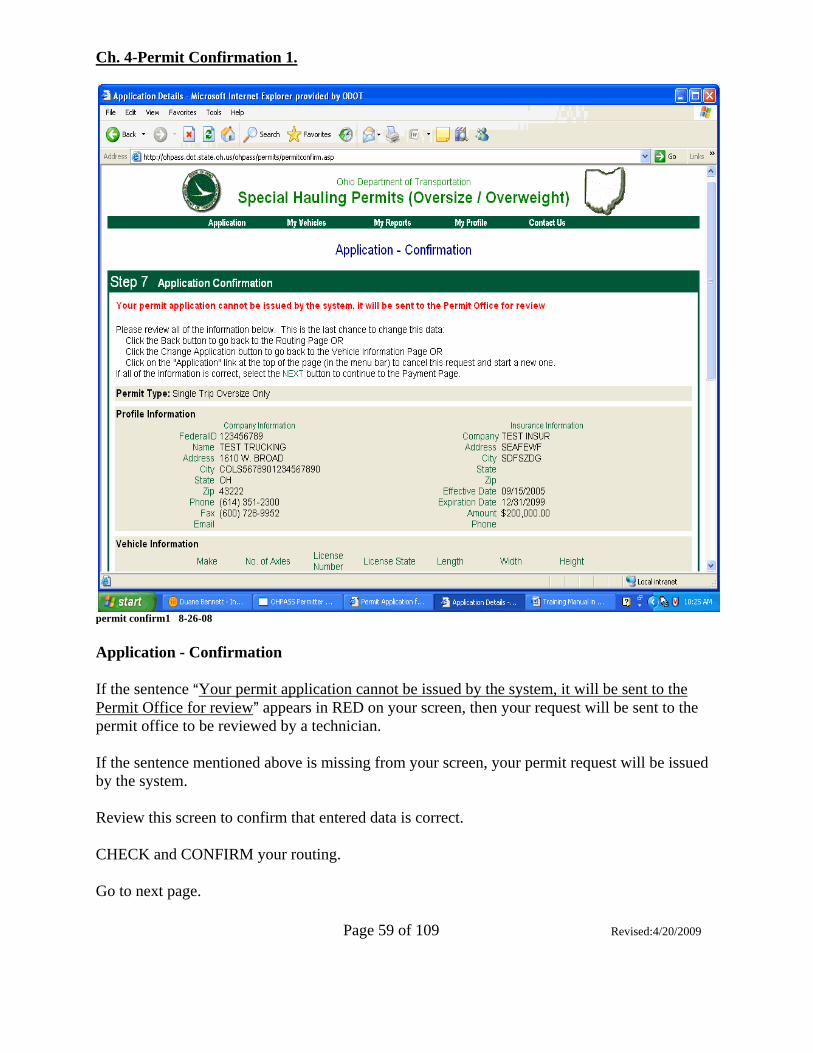
Ch. 4-Permit Confirmation 1.
permit confirm1 8-26-08 Application - Confirmation If the sentence AYour permit application cannot be issued by the system, it will be sent to the Permit Office for review@ appears in RED on your screen, then your request will be sent to the permit office to be reviewed by a technician. If the sentence mentioned above is missing from your screen, your permit request will be issued by the system. Review this screen to confirm that entered data is correct. CHECK and CONFIRM your routing. Go to next page.
Page 60 of 109 Revised:4/20/2009
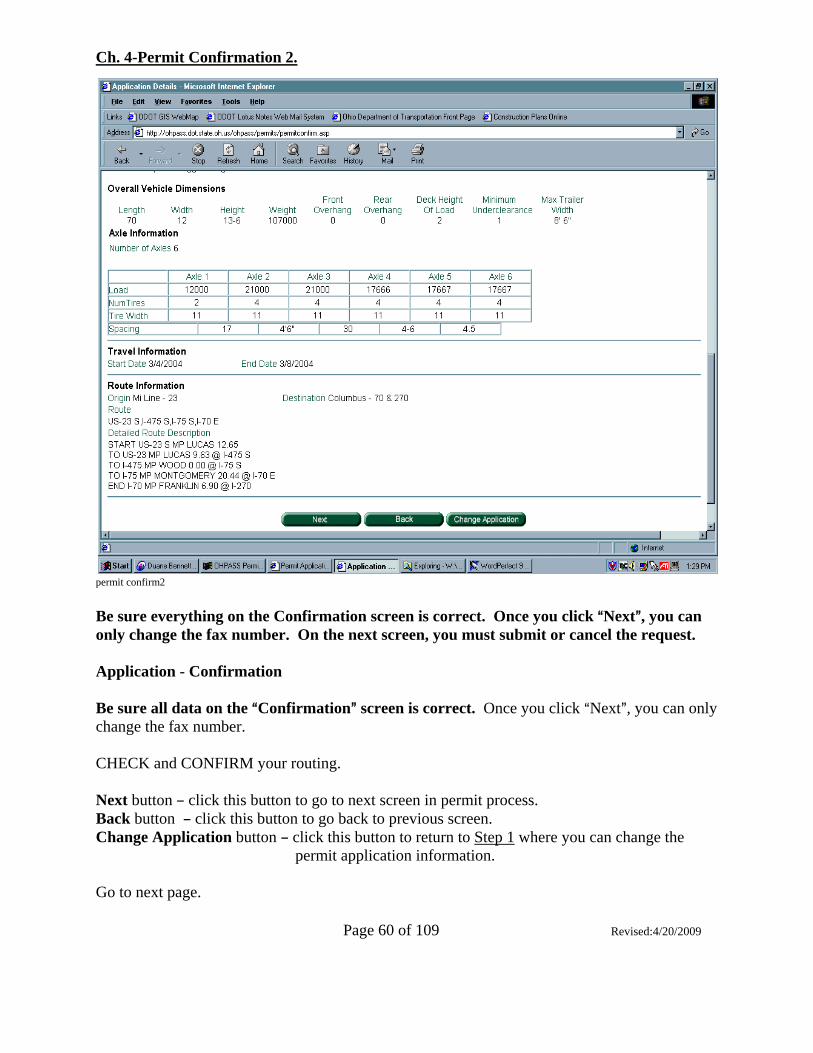
Ch. 4-Permit Confirmation 2.
permit confirm2 Be sure everything on the Confirmation screen is correct. Once you click ANext@, you can only change the fax number. On the next screen, you must submit or cancel the request. Application - Confirmation Be sure all data on the AConfirmation@ screen is correct. Once you click ANext@, you can only change the fax number. CHECK and CONFIRM your routing. Next button B click this button to go to next screen in permit process. Back button B click this button to go back to previous screen. Change Application button B click this button to return to Step 1 where you can change the
permit application information. Go to next page.
Page 61 of 109 Revised:4/20/2009
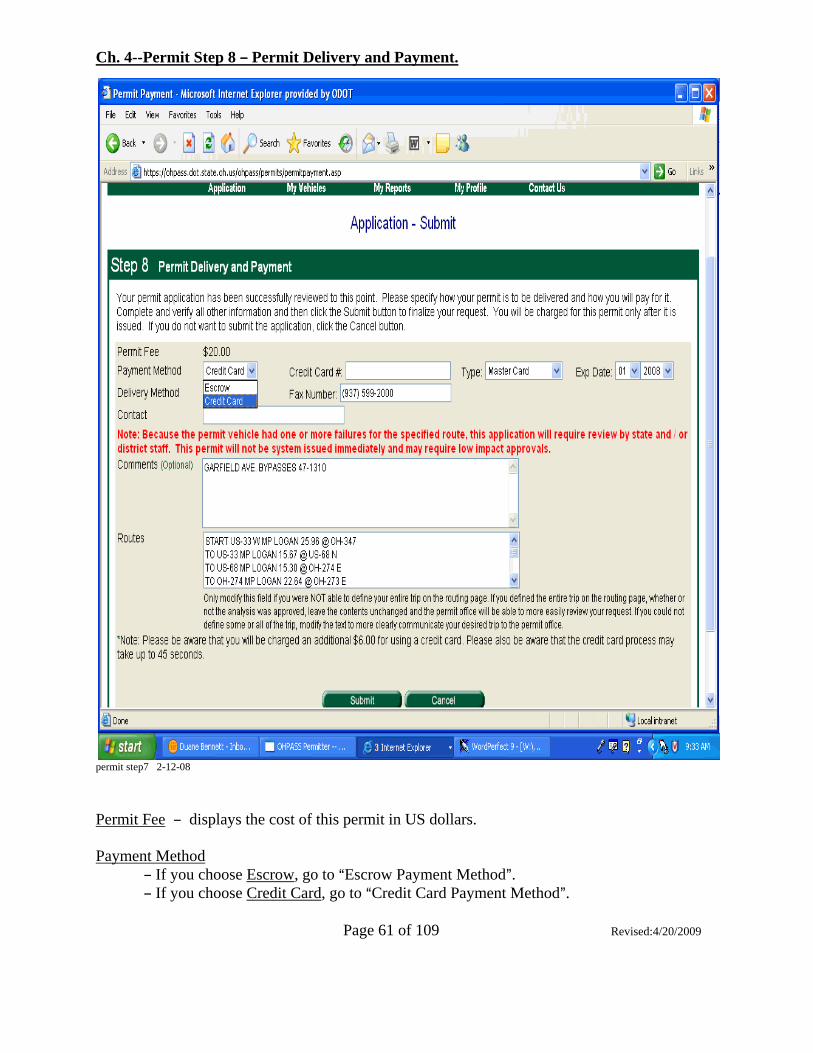
Ch. 4--Permit Step 8 B Permit Delivery and Payment.
permit step7 2-12-08
Permit Fee B displays the cost of this permit in US dollars. Payment Method
B If you choose Escrow, go to AEscrow Payment Method@. B If you choose Credit Card, go to ACredit Card Payment Method@.

Page 62 of 109 Revised:4/20/2009
Ch. 4--Permit Step 8 B Permit Delivery and Payment. Escrow Payment Method
permit step7-4 7-14-06
Permit Fee B displays the cost of this permit in US dollars. Payment Method B Escrow B permit cost will be deducted from you escrow account. Go to Common Payment Fields.
Page 63 of 109 Revised:4/20/2009
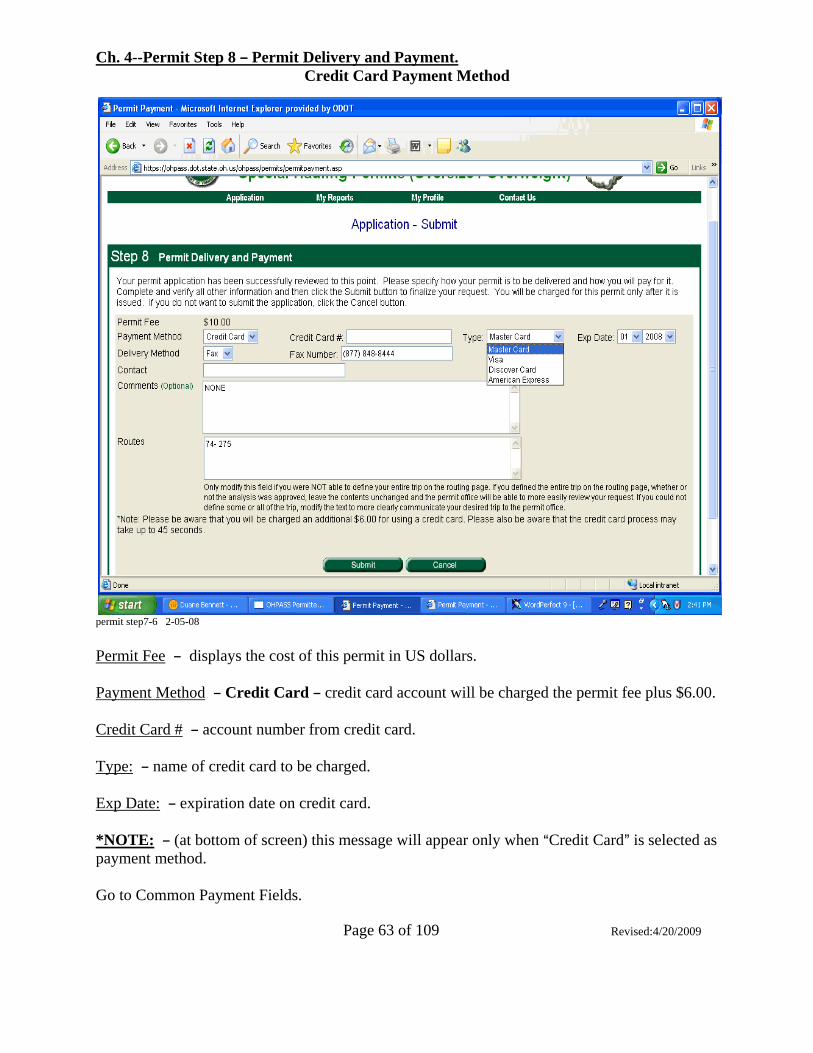
Ch. 4--Permit Step 8 B Permit Delivery and Payment. Credit Card Payment Method
permit step7-6 2-05-08 Permit Fee B displays the cost of this permit in US dollars. Payment Method B Credit Card B credit card account will be charged the permit fee plus $6.00. Credit Card # B account number from credit card. Type: B name of credit card to be charged. Exp Date: B expiration date on credit card. *NOTE: B (at bottom of screen) this message will appear only when ACredit Card@ is selected as payment method. Go to Common Payment Fields.
Page 64 of 109 Revised:4/20/2009
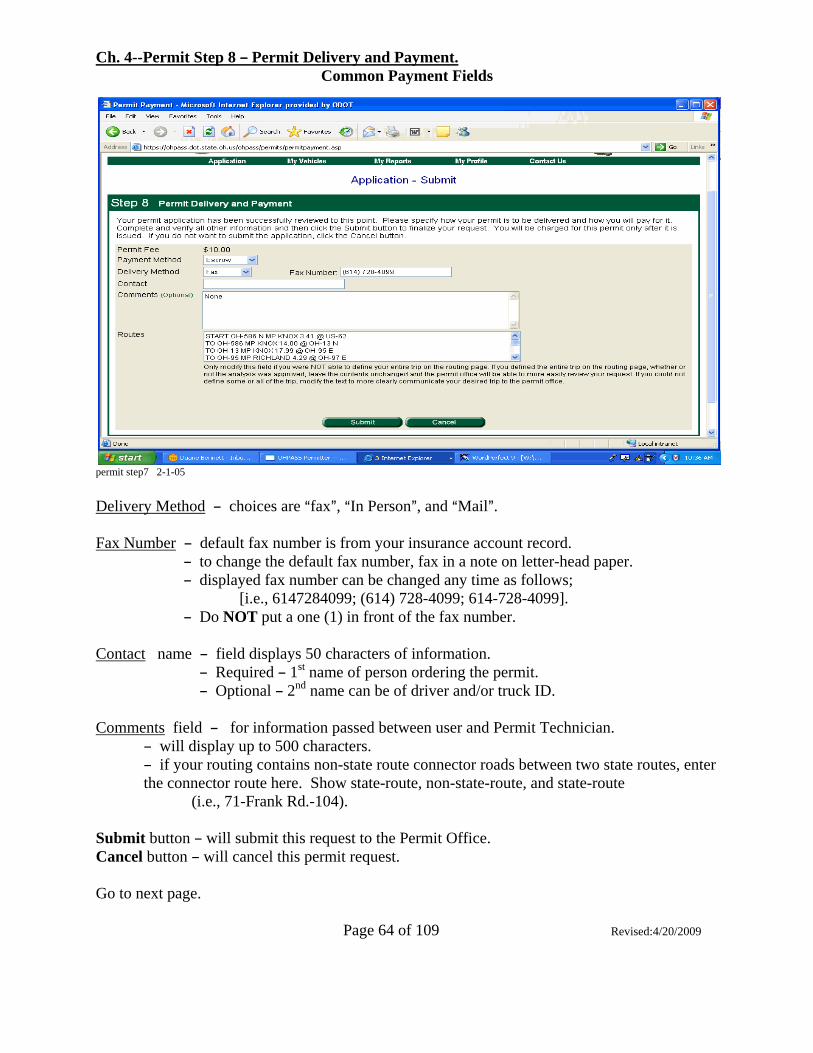
Ch. 4--Permit Step 8 B Permit Delivery and Payment. Common Payment Fields
permit step7 2-1-05 Delivery Method B choices are Afax@, AIn Person@, and AMail@. Fax Number B default fax number is from your insurance account record.
B to change the default fax number, fax in a note on letter-head paper. B displayed fax number can be changed any time as follows;
[i.e., 6147284099; (614) 728-4099; 614-728-4099]. B Do NOT put a one (1) in front of the fax number.
Contact name B field displays 50 characters of information.
B Required B 1st name of person ordering the permit. B Optional B 2nd name can be of driver and/or truck ID.
Comments field B for information passed between user and Permit Technician.
B will display up to 500 characters. B if your routing contains non-state route connector roads between two state routes, enter the connector route here. Show state-route, non-state-route, and state-route
(i.e., 71-Frank Rd.-104). Submit button B will submit this request to the Permit Office. Cancel button B will cancel this permit request. Go to next page.
Page 65 of 109 Revised:4/20/2009
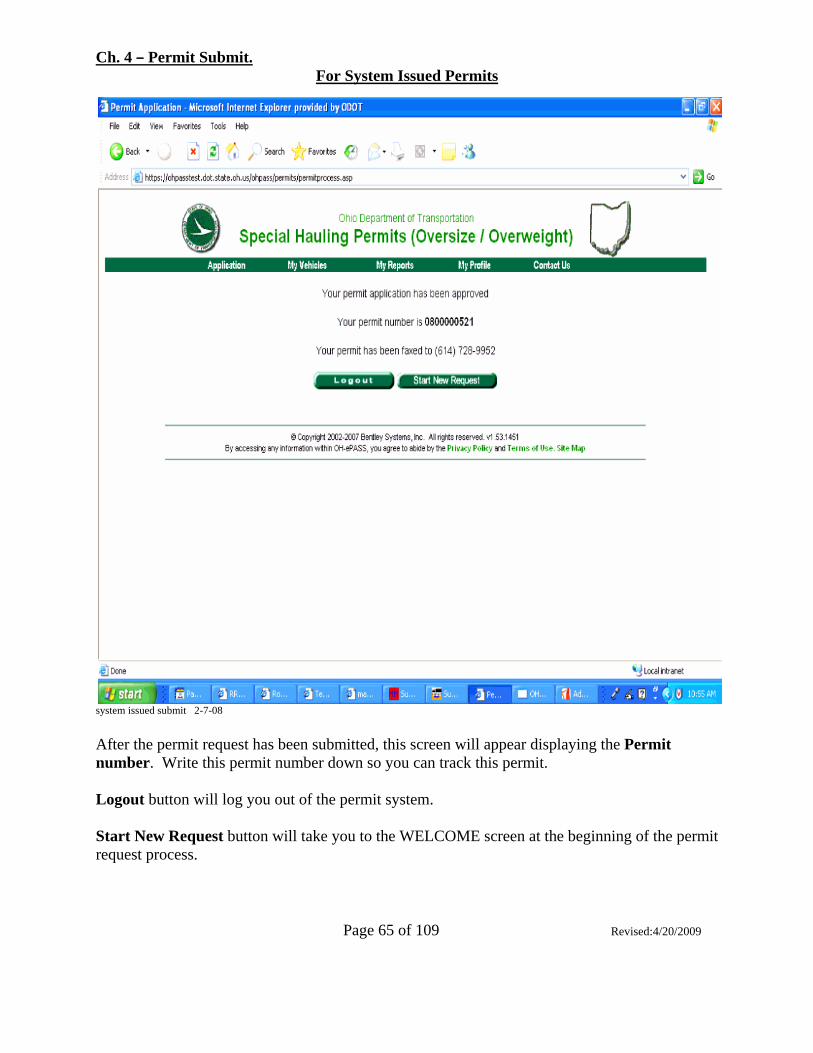
Ch. 4 B Permit Submit. For System Issued Permits
system issued submit 2-7-08 After the permit request has been submitted, this screen will appear displaying the Permit number. Write this permit number down so you can track this permit. Logout button will log you out of the permit system. Start New Request button will take you to the WELCOME screen at the beginning of the permit request process.
Page 66 of 109 Revised:4/20/2009
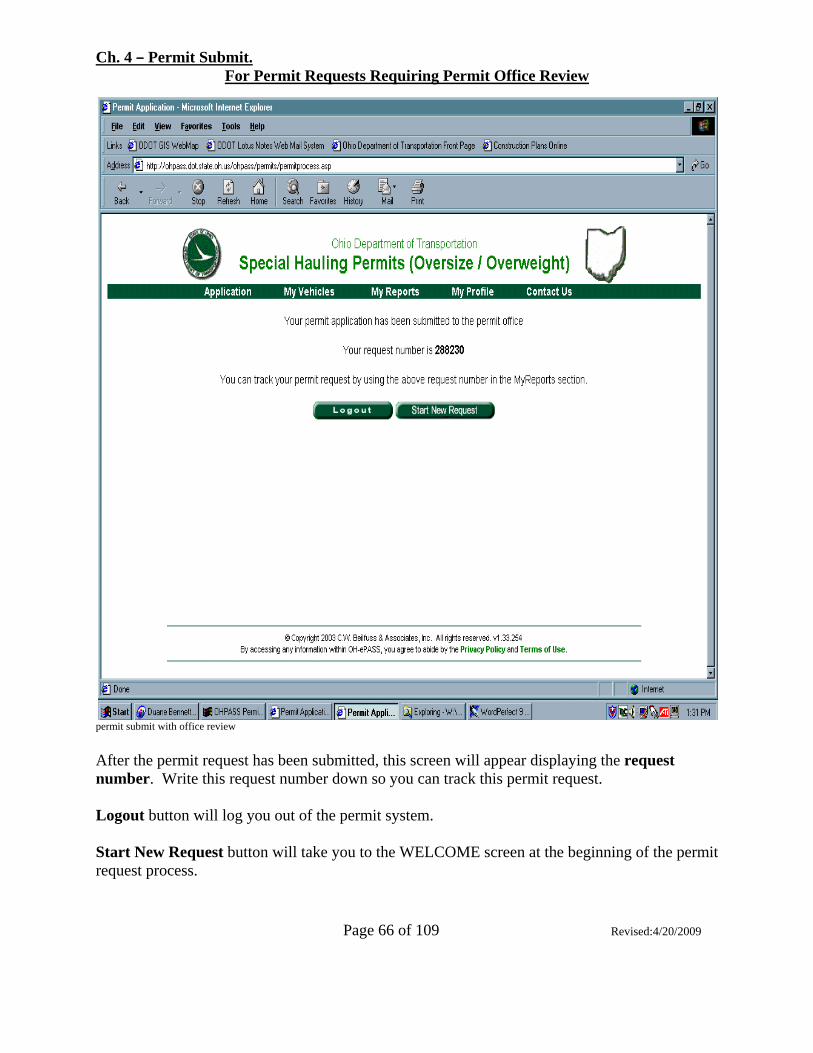
Ch. 4 B Permit Submit. For Permit Requests Requiring Permit Office Review
permit submit with office review After the permit request has been submitted, this screen will appear displaying the request number. Write this request number down so you can track this permit request. Logout button will log you out of the permit system. Start New Request button will take you to the WELCOME screen at the beginning of the permit request process.
Page 67 of 109 Revised:4/20/2009
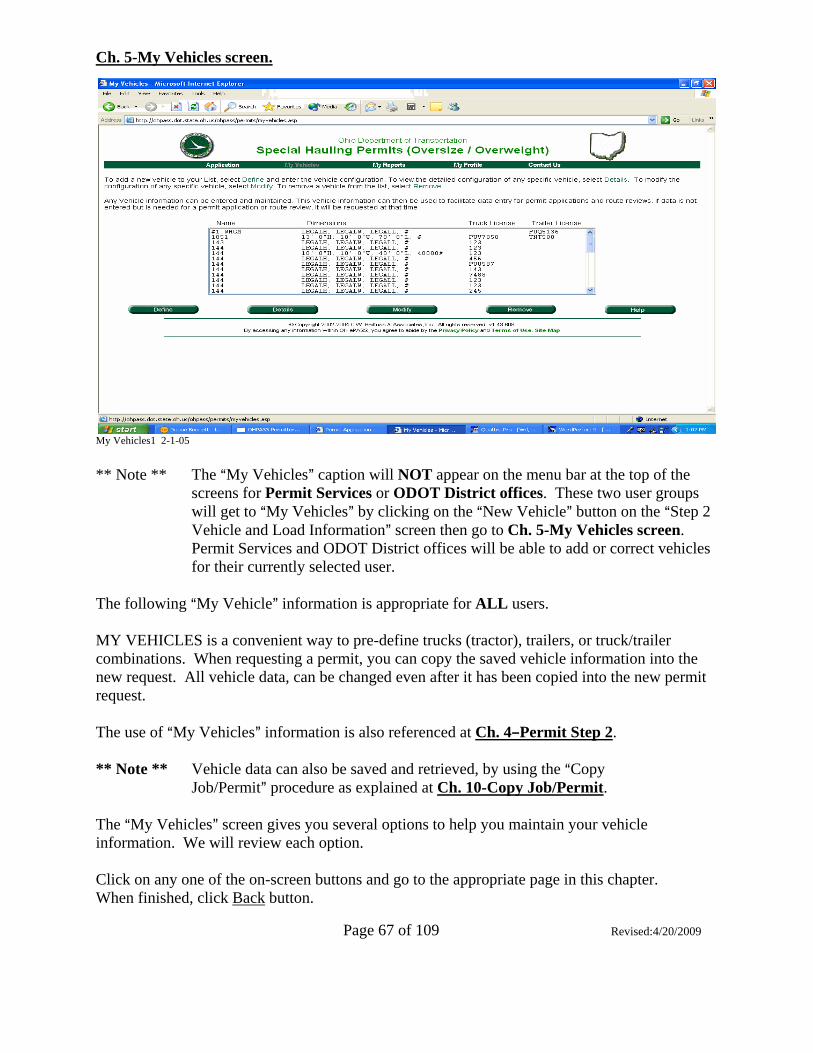
Ch. 5-My Vehicles screen.
My Vehicles1 2-1-05 ** Note ** The AMy Vehicles@ caption will NOT appear on the menu bar at the top of the
screens for Permit Services or ODOT District offices. These two user groups will get to AMy Vehicles@ by clicking on the ANew Vehicle@ button on the AStep 2 Vehicle and Load Information@ screen then go to Ch. 5-My Vehicles screen.
Permit Services and ODOT District offices will be able to add or correct vehicles for their currently selected user.
The following AMy Vehicle@ information is appropriate for ALL users. MY VEHICLES is a convenient way to pre-define trucks (tractor), trailers, or truck/trailer combinations. When requesting a permit, you can copy the saved vehicle information into the new request. All vehicle data, can be changed even after it has been copied into the new permit request. The use of AMy Vehicles@ information is also referenced at Ch. 4BPermit Step 2. ** Note ** Vehicle data can also be saved and retrieved, by using the ACopy
Job/Permit@ procedure as explained at Ch. 10-Copy Job/Permit. The AMy Vehicles@ screen gives you several options to help you maintain your vehicle information. We will review each option. Click on any one of the on-screen buttons and go to the appropriate page in this chapter. When finished, click Back button.
Page 68 of 109 Revised:4/20/2009
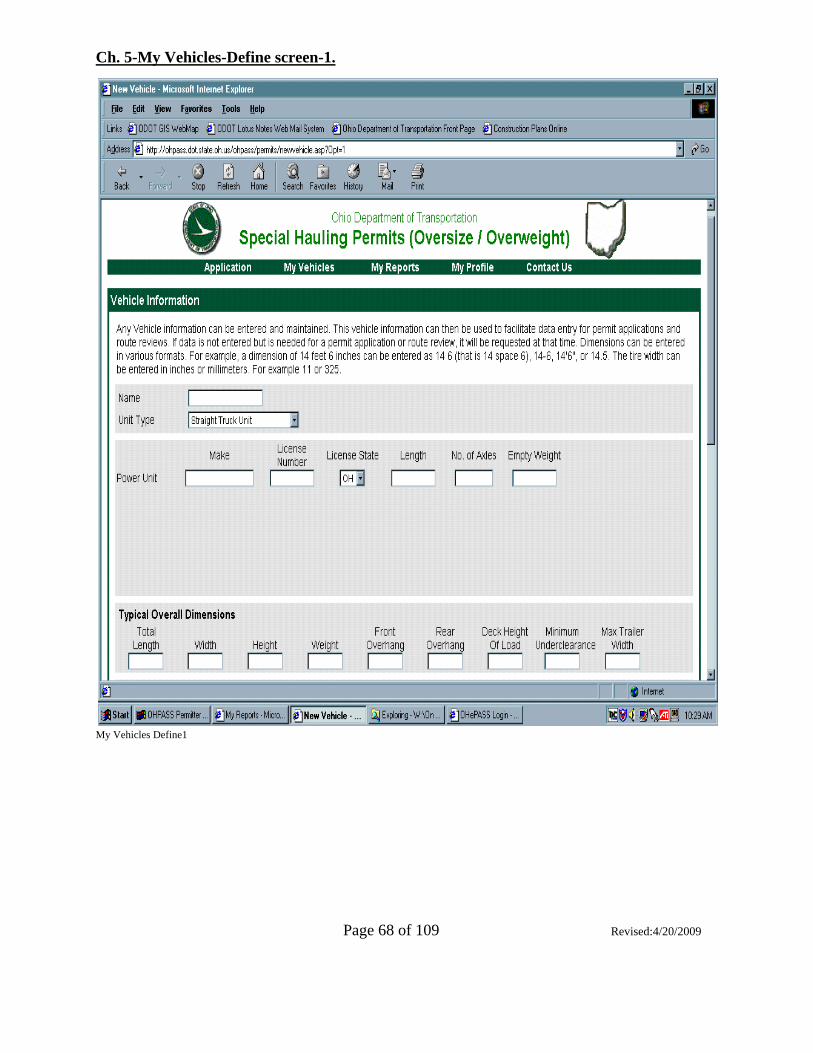
Ch. 5-My Vehicles-Define screen-1.
My Vehicles Define1
Page 69 of 109 Revised:4/20/2009
Ch. 5-My Vehicles-Define-Information. There is no checking of information entered on the vehicle screens. Anything can be entered in any field C so please be careful. ** Note ** The vehicle information WILL be checked when it is copied into
the permit request. All vehicle information can be edited after it has been copied into the permit request.
Name B enter name or ID for each vehicle (i.e., driver=s name, unit number, license number, etc.). Unit Type B AStraight Truck@ for semi-tractor units.
AStraight Truck@ for self-propelled cranes and drilling rigs. AStraight Truck@ for trucks carrying a load but NOT towing anything.
B select ACombined truck/trailer@ for units always pulling the SAME trailers in the same order.
B select ATrailer@ for Hauling trailers which will be attached to various tow units.
Fields required for each unit are generally self explanatory with a few exception. Empty Weight B weight of unit only without any load but should include items used during
normal operations (i.e., fuel, water, safety equipment, chains, fire extinguishers, etc.). Typical Overall Dimensions; Width B widest points of the load or tractor/trailer unit C whichever is greater. Front Overhang B length of load extending beyond front bumper of tow vehicle.
B this is Zero (0) for towed unit. Rear Overhang B length of load extending beyond rear bumper of carrier unit.
B this is Zero (0) for towed unit. Deck Height of Load B height of deck (from the ground) which is supporting the load.
B this is Zero (0) for towed and self-propelled units. Minimum Underclearance B distance from ground to the lowest point on the trailer and load. Max Trailer Width B maximum width of the trailer ONLY.
Page 70 of 109 Revised:4/20/2009
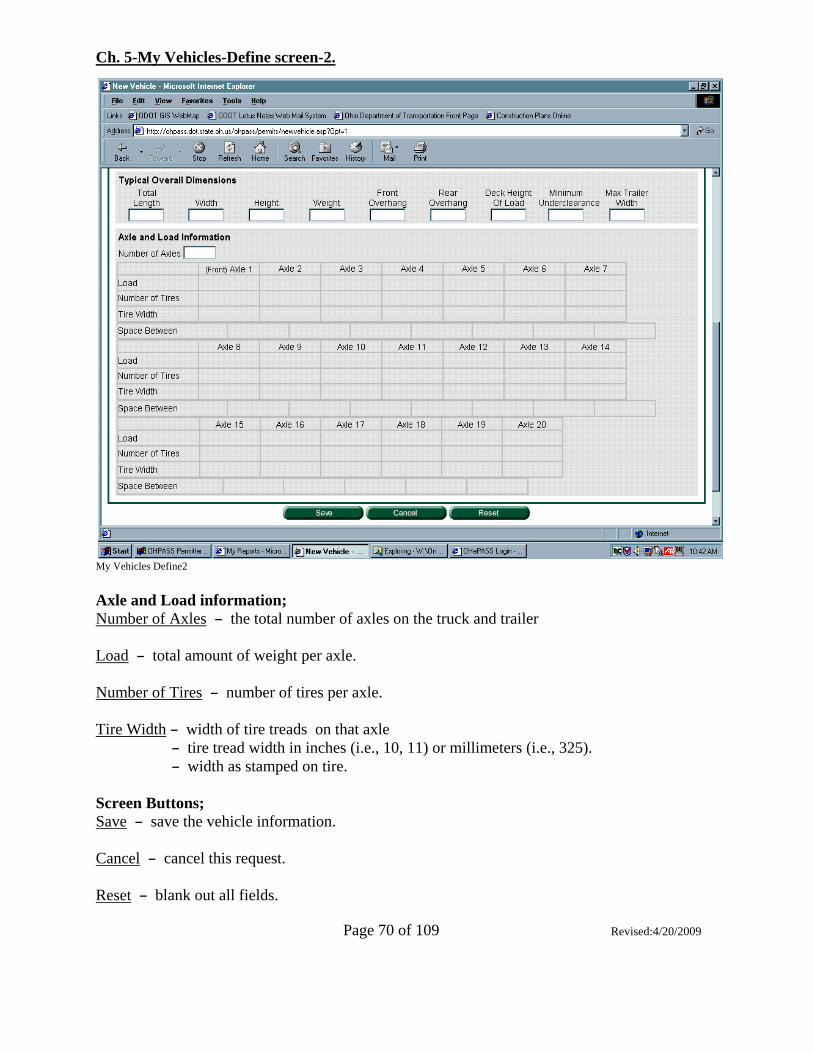
Ch. 5-My Vehicles-Define screen-2.
My Vehicles Define2 Axle and Load information; Number of Axles B the total number of axles on the truck and trailer Load B total amount of weight per axle. Number of Tires B number of tires per axle. Tire Width B width of tire treads on that axle
B tire tread width in inches (i.e., 10, 11) or millimeters (i.e., 325). B width as stamped on tire.
Screen Buttons; Save B save the vehicle information. Cancel B cancel this request. Reset B blank out all fields.
Page 71 of 109 Revised:4/20/2009
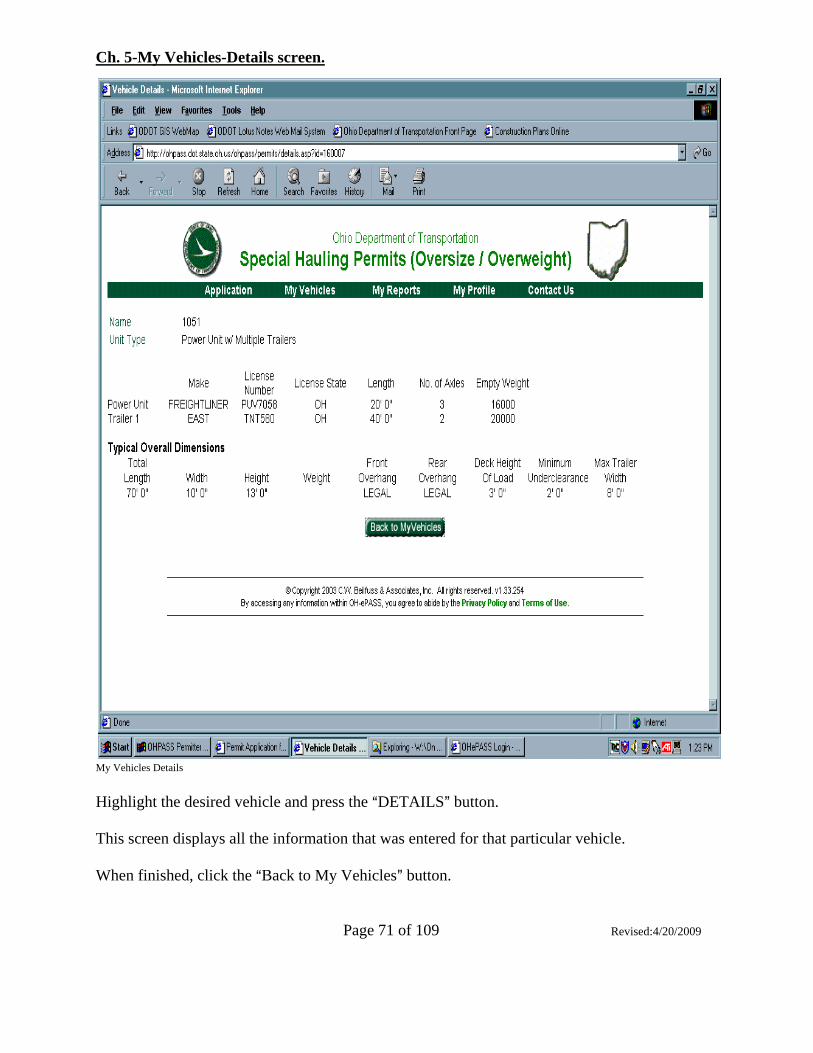
Ch. 5-My Vehicles-Details screen.
My Vehicles Details Highlight the desired vehicle and press the ADETAILS@ button. This screen displays all the information that was entered for that particular vehicle. When finished, click the ABack to My Vehicles@ button.
Page 72 of 109 Revised:4/20/2009
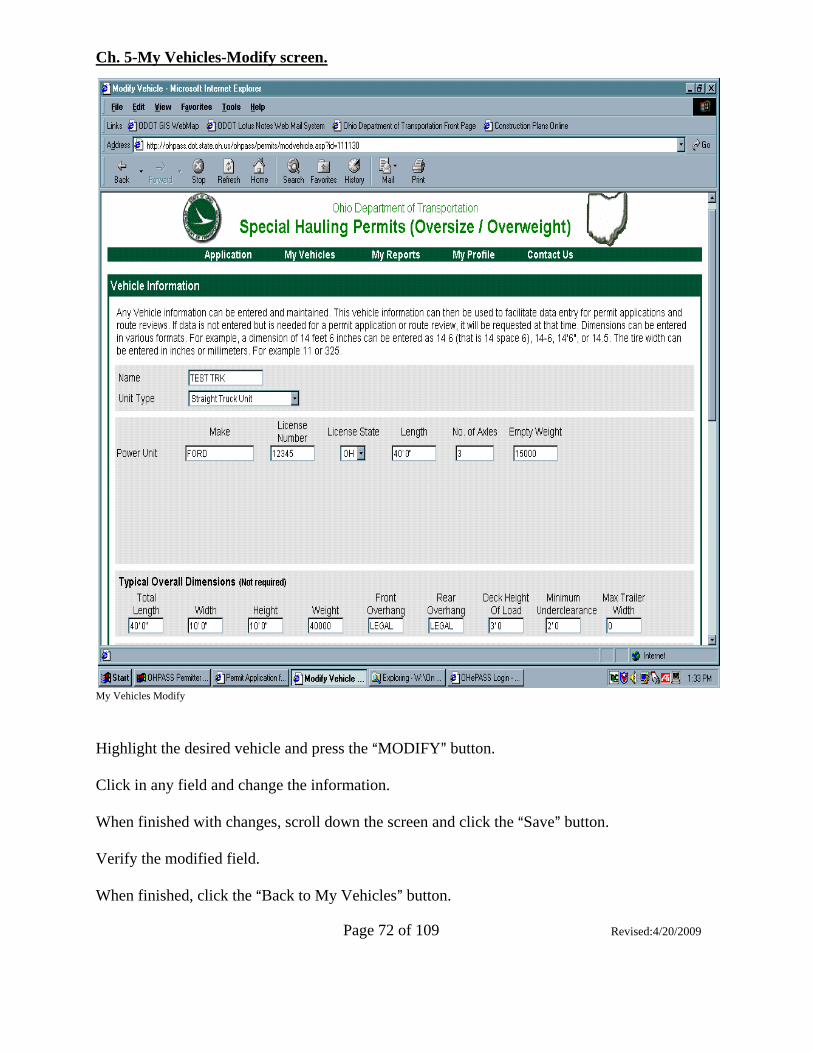
Ch. 5-My Vehicles-Modify screen.
My Vehicles Modify Highlight the desired vehicle and press the AMODIFY@ button. Click in any field and change the information. When finished with changes, scroll down the screen and click the ASave@ button. Verify the modified field. When finished, click the ABack to My Vehicles@ button.
Page 73 of 109 Revised:4/20/2009
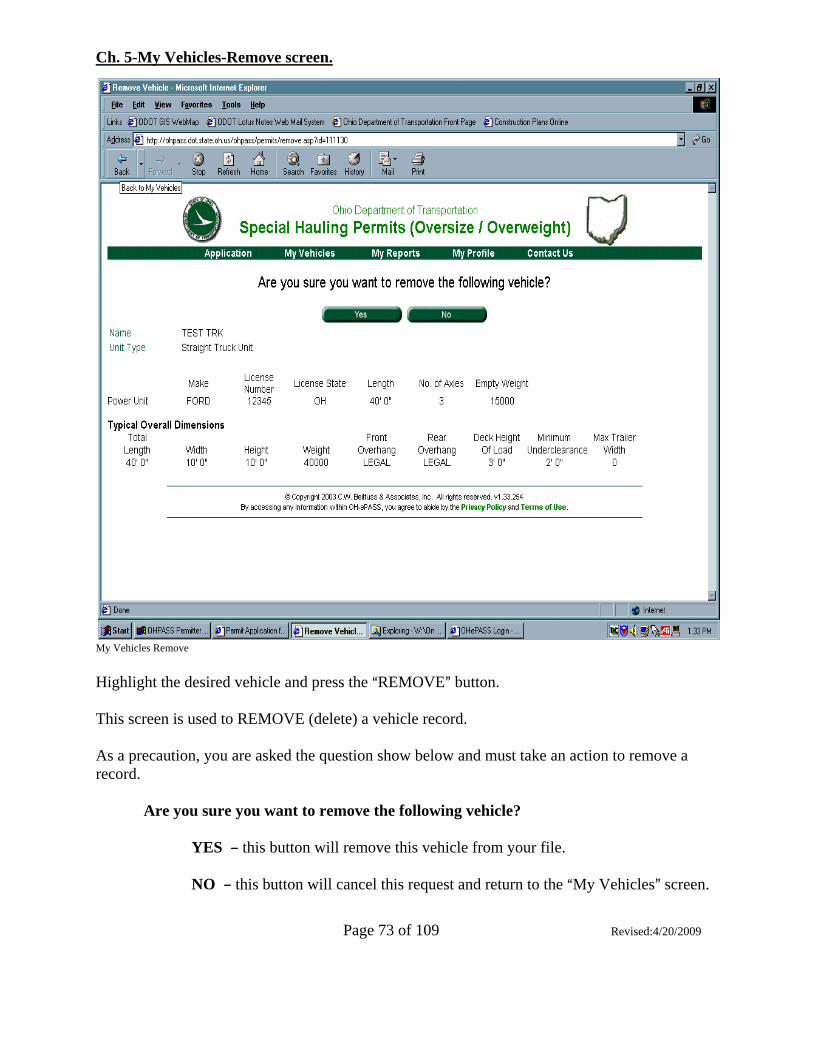
Ch. 5-My Vehicles-Remove screen.
My Vehicles Remove Highlight the desired vehicle and press the AREMOVE@ button. This screen is used to REMOVE (delete) a vehicle record. As a precaution, you are asked the question show below and must take an action to remove a record.
Are you sure you want to remove the following vehicle?
YES B this button will remove this vehicle from your file.
NO B this button will cancel this request and return to the AMy Vehicles@ screen.
Page 74 of 109 Revised:4/20/2009
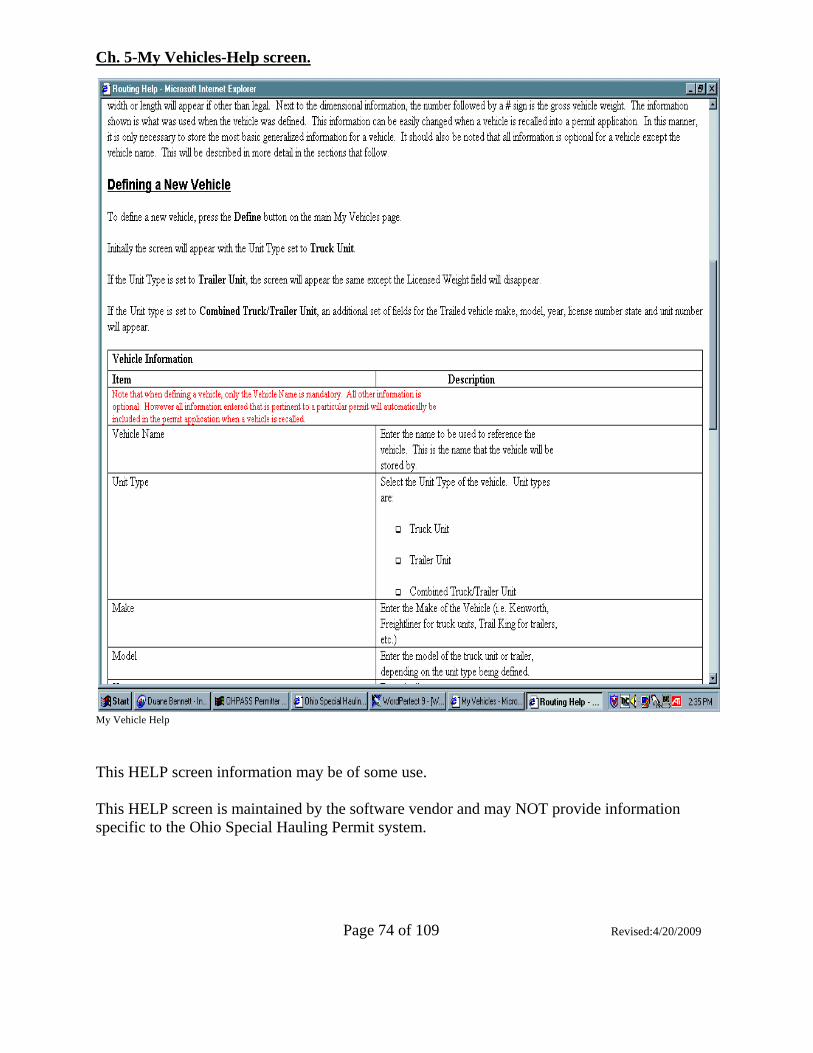
Ch. 5-My Vehicles-Help screen.
My Vehicle Help This HELP screen information may be of some use. This HELP screen is maintained by the software vendor and may NOT provide information specific to the Ohio Special Hauling Permit system.
Page 75 of 109 Revised:4/20/2009
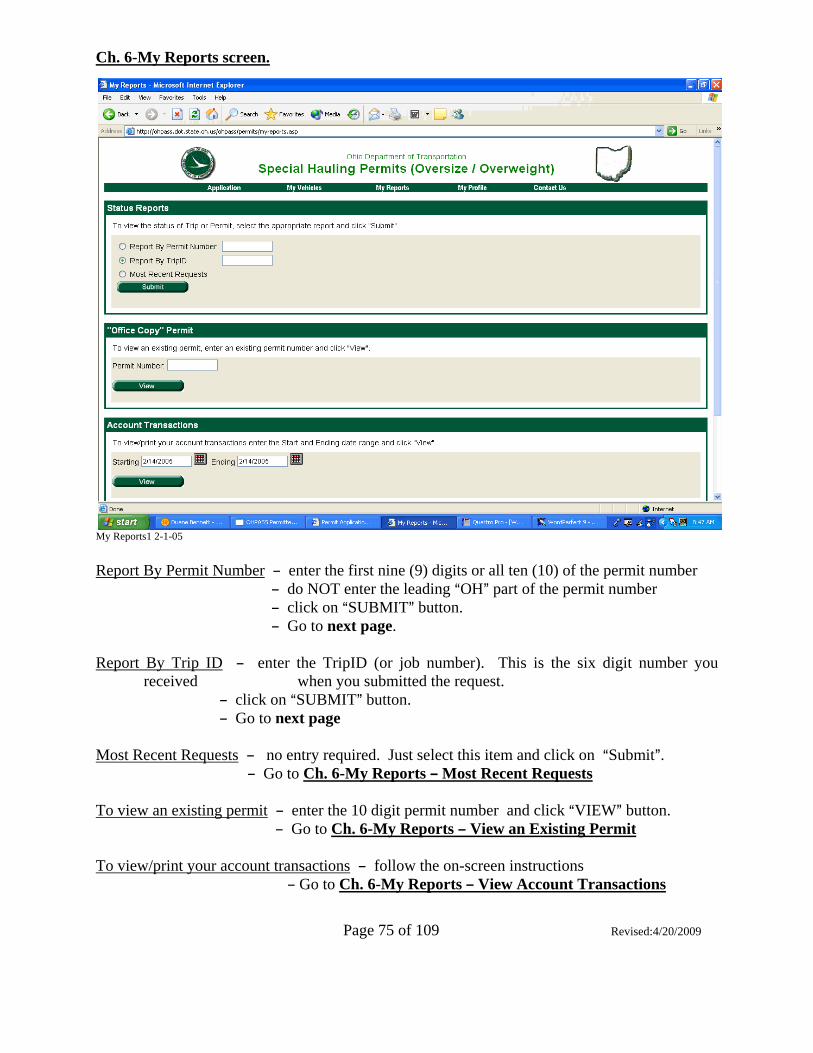
Ch. 6-My Reports screen.
My Reports1 2-1-05 Report By Permit Number B enter the first nine (9) digits or all ten (10) of the permit number
B do NOT enter the leading AOH@ part of the permit number B click on ASUBMIT@ button. B Go to next page.
Report By Trip ID B enter the TripID (or job number). This is the six digit number you
received when you submitted the request. B click on ASUBMIT@ button. B Go to next page
Most Recent Requests B no entry required. Just select this item and click on ASubmit@.
B Go to Ch. 6-My Reports B Most Recent Requests To view an existing permit B enter the 10 digit permit number and click AVIEW@ button.
B Go to Ch. 6-My Reports B View an Existing Permit To view/print your account transactions B follow the on-screen instructions
B Go to Ch. 6-My Reports B View Account Transactions
Page 76 of 109 Revised:4/20/2009
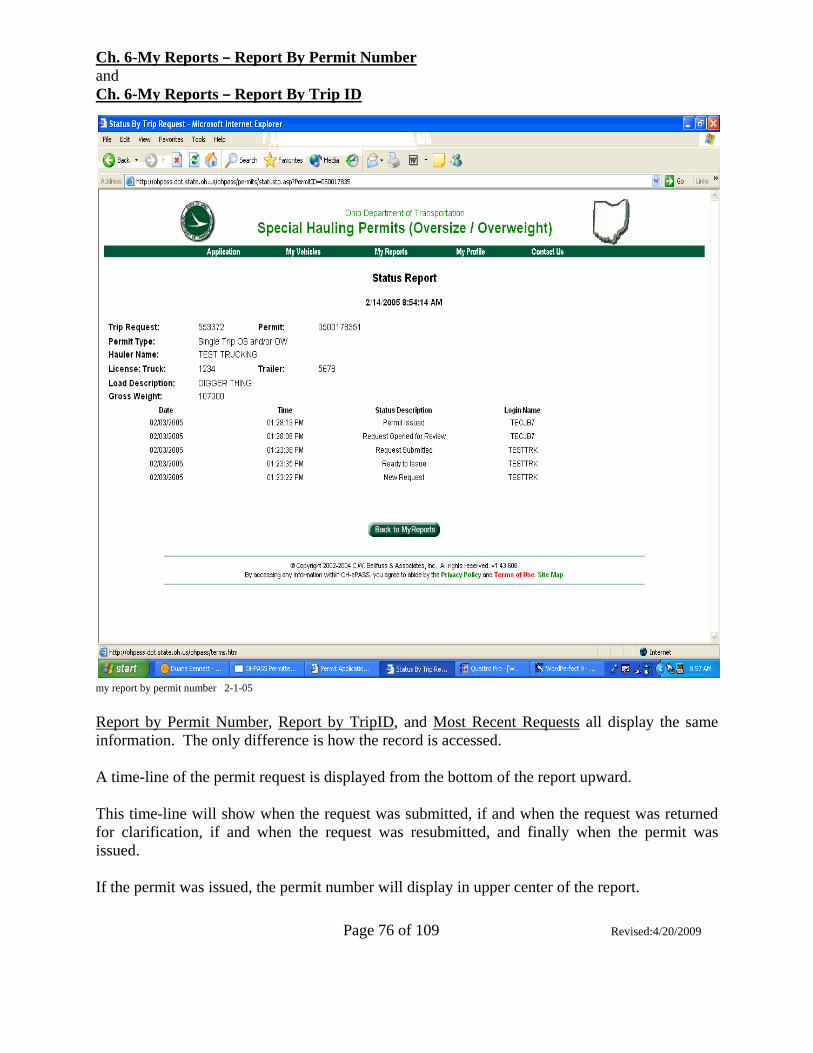
Ch. 6-My Reports B Report By Permit Number and Ch. 6-My Reports B Report By Trip ID
my report by permit number 2-1-05 Report by Permit Number, Report by TripID, and Most Recent Requests all display the same information. The only difference is how the record is accessed. A time-line of the permit request is displayed from the bottom of the report upward. This time-line will show when the request was submitted, if and when the request was returned for clarification, if and when the request was resubmitted, and finally when the permit was issued. If the permit was issued, the permit number will display in upper center of the report.
Page 77 of 109 Revised:4/20/2009
Ch. 6-My Reports B Status Description (my reports status description.wpd) (Listed in alphabetic order) Bridge Analysis Required C over weight load; route analysis failed or not attempted. Technician will review requested route. New Request C message and time created when user goes to Step 7. Permit Issued C valid permit has been issued. Issue time will show just to left of comment.
Faxed permit should be received within 5 minutes of issue time. Ready to Issue C passed computer checks at Step 5 and route analysis at Step 6. Request Closed Pending Further Analysis C technician looked at request but has closed it until
they receive addition information from a District Office or Bridge Analysis office. Request Opened for Review C technician has the request open and is reviewing it.. Request Submitted C user has submitted the request to the Special Hauling Permit office by
clicking SUBMIT at Step 7. Return for Clarification C request has been returned to user for additional information. Routing Required C route analysis failed or not attempted. Technician will review requested
route. SL Weight C request is for a Superload weight. Trip Request Recalled by User C user clicked on job or trip-ID number to recall a request.
Permit Office can not see a recalled request. If you do not resubmit the job, the job is cancelled.
Page 78 of 109 Revised:4/20/2009
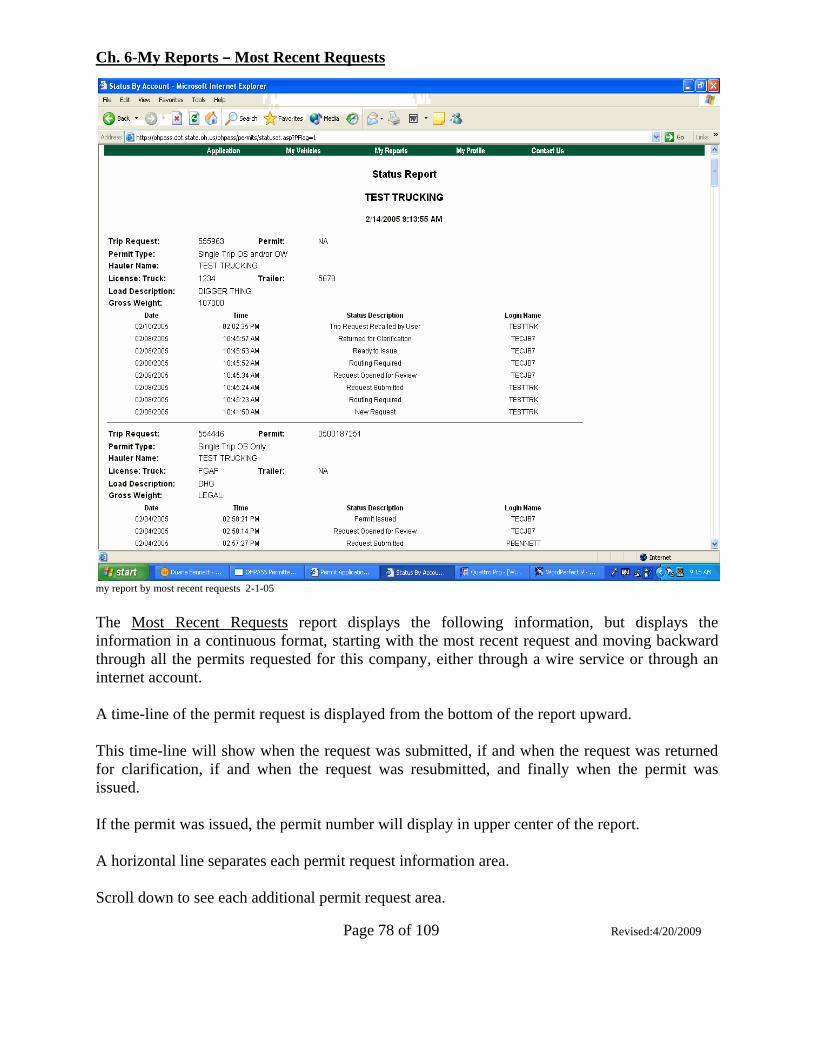
Ch. 6-My Reports B Most Recent Requests
my report by most recent requests 2-1-05 The Most Recent Requests report displays the following information, but displays the information in a continuous format, starting with the most recent request and moving backward through all the permits requested for this company, either through a wire service or through an internet account. A time-line of the permit request is displayed from the bottom of the report upward. This time-line will show when the request was submitted, if and when the request was returned for clarification, if and when the request was resubmitted, and finally when the permit was issued. If the permit was issued, the permit number will display in upper center of the report. A horizontal line separates each permit request information area. Scroll down to see each additional permit request area.
Page 79 of 109 Revised:4/20/2009
Ch. 6-My Reports B View an Existing Permit
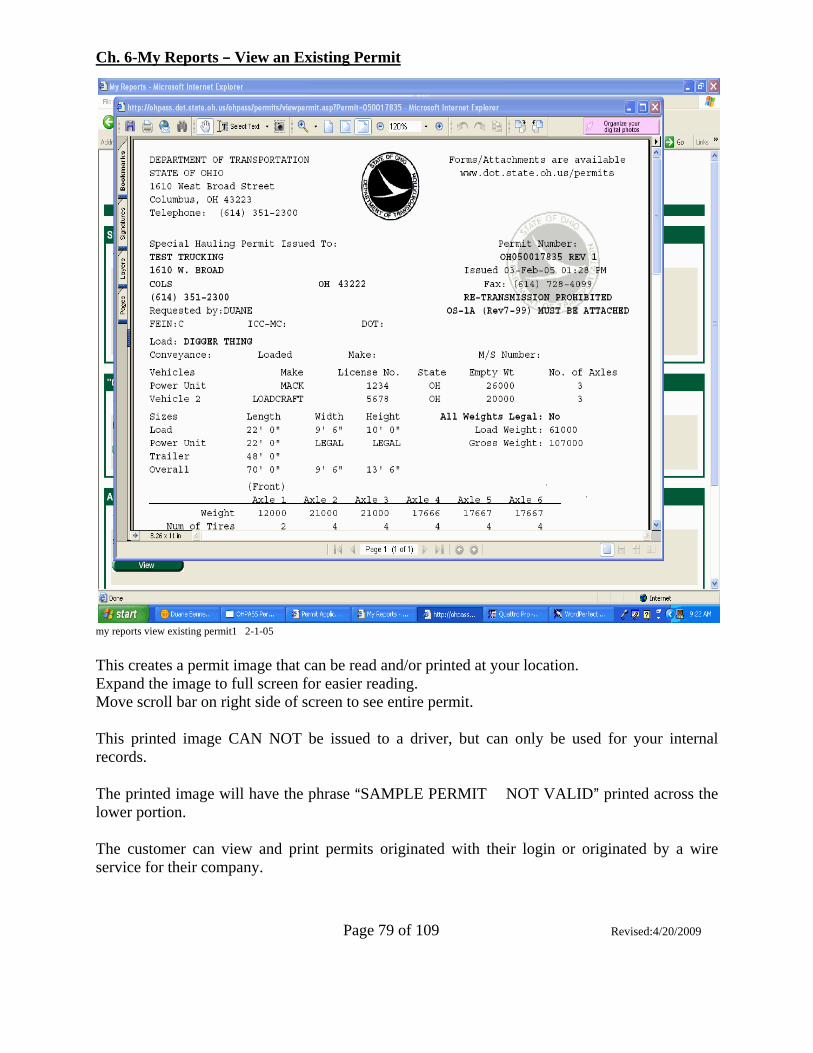
my reports view existing permit1 2-1-05 This creates a permit image that can be read and/or printed at your location. Expand the image to full screen for easier reading. Move scroll bar on right side of screen to see entire permit. This printed image CAN NOT be issued to a driver, but can only be used for your internal records. The printed image will have the phrase ASAMPLE PERMIT NOT VALID@ printed across the lower portion. The customer can view and print permits originated with their login or originated by a wire service for their company.
Page 80 of 109 Revised:4/20/2009
Ch. 6-My Reports B View Account Transactions
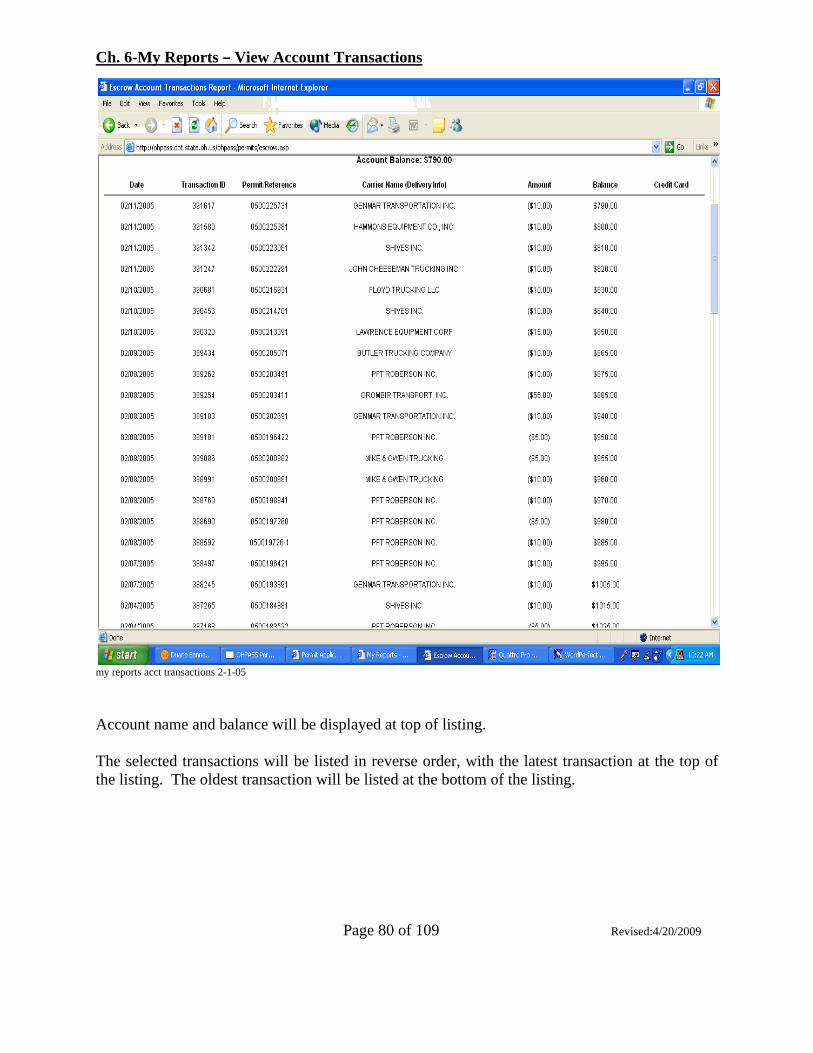
my reports acct transactions 2-1-05 Account name and balance will be displayed at top of listing. The selected transactions will be listed in reverse order, with the latest transaction at the top of the listing. The oldest transaction will be listed at the bottom of the listing.
Page 81 of 109 Revised:4/20/2009
Ch. 7-My Profile screen.
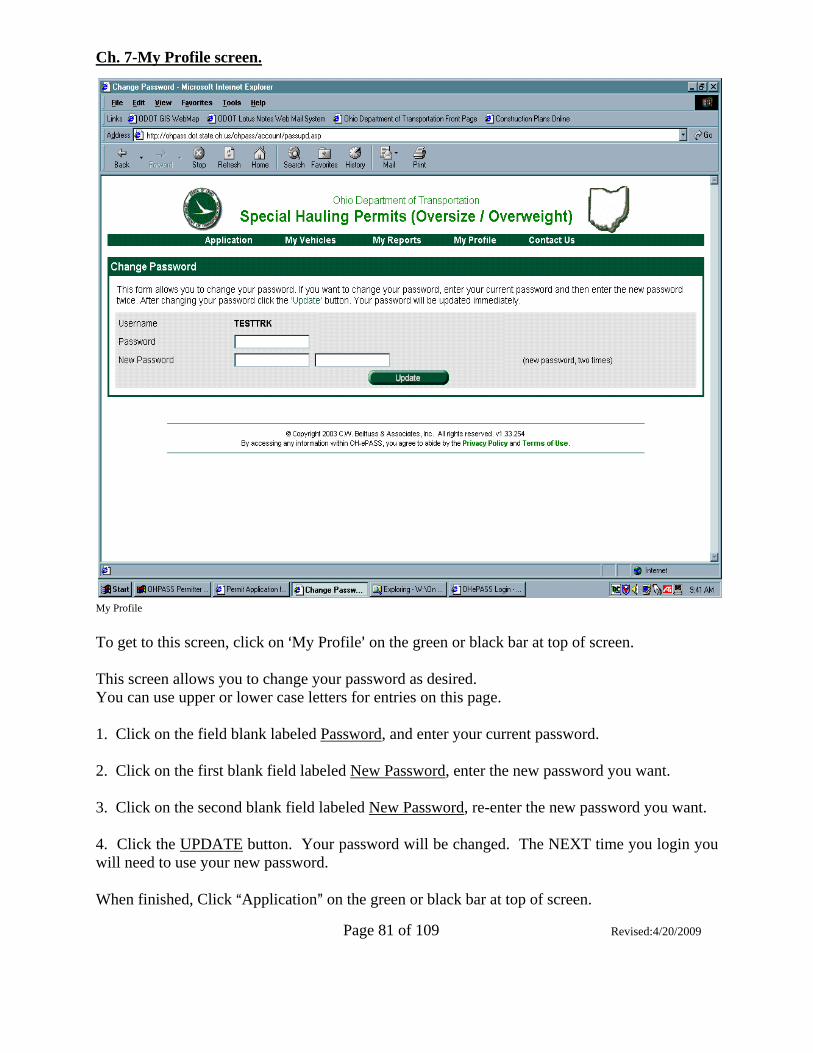
My Profile To get to this screen, click on >My Profile= on the green or black bar at top of screen. This screen allows you to change your password as desired. You can use upper or lower case letters for entries on this page. 1. Click on the field blank labeled Password, and enter your current password. 2. Click on the first blank field labeled New Password, enter the new password you want. 3. Click on the second blank field labeled New Password, re-enter the new password you want. 4. Click the UPDATE button. Your password will be changed. The NEXT time you login you will need to use your new password. When finished, Click AApplication@ on the green or black bar at top of screen.
Page 82 of 109 Revised:4/20/2009
Ch. 8-Contact Us screen.
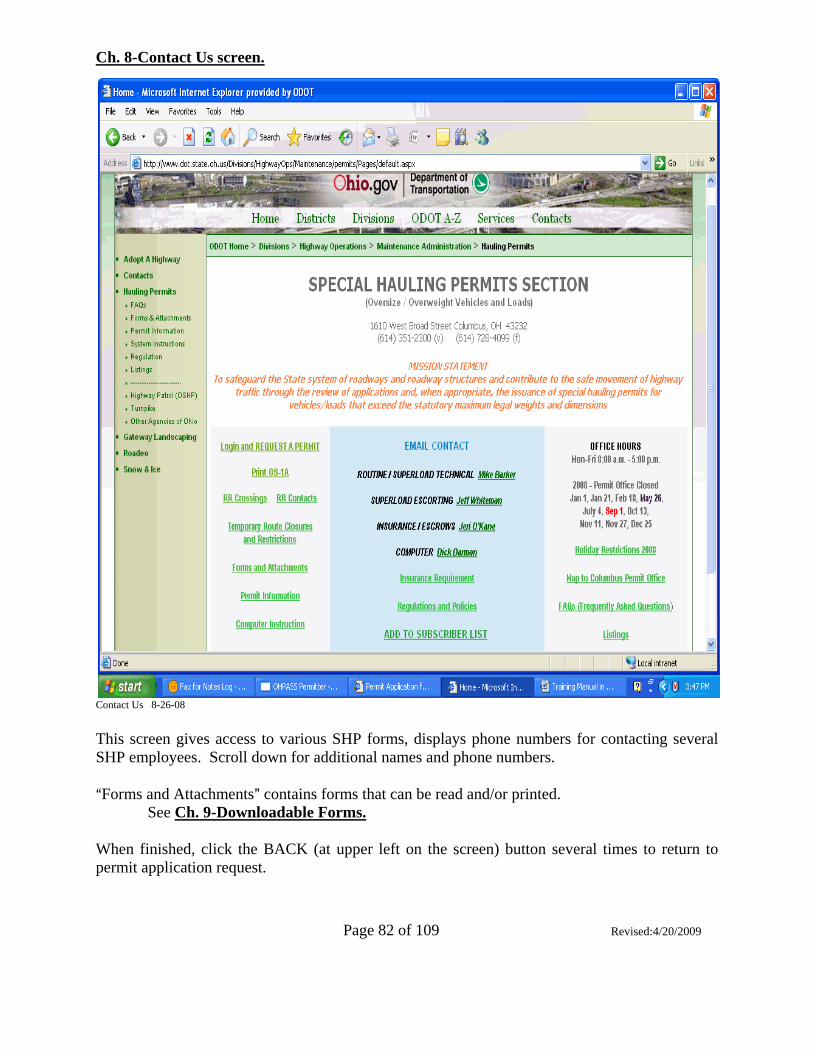
Contact Us 8-26-08 This screen gives access to various SHP forms, displays phone numbers for contacting several SHP employees. Scroll down for additional names and phone numbers. AForms and Attachments@ contains forms that can be read and/or printed.
See Ch. 9-Downloadable Forms. When finished, click the BACK (at upper left on the screen) button several times to return to permit application request.
Page 83 of 109 Revised:4/20/2009
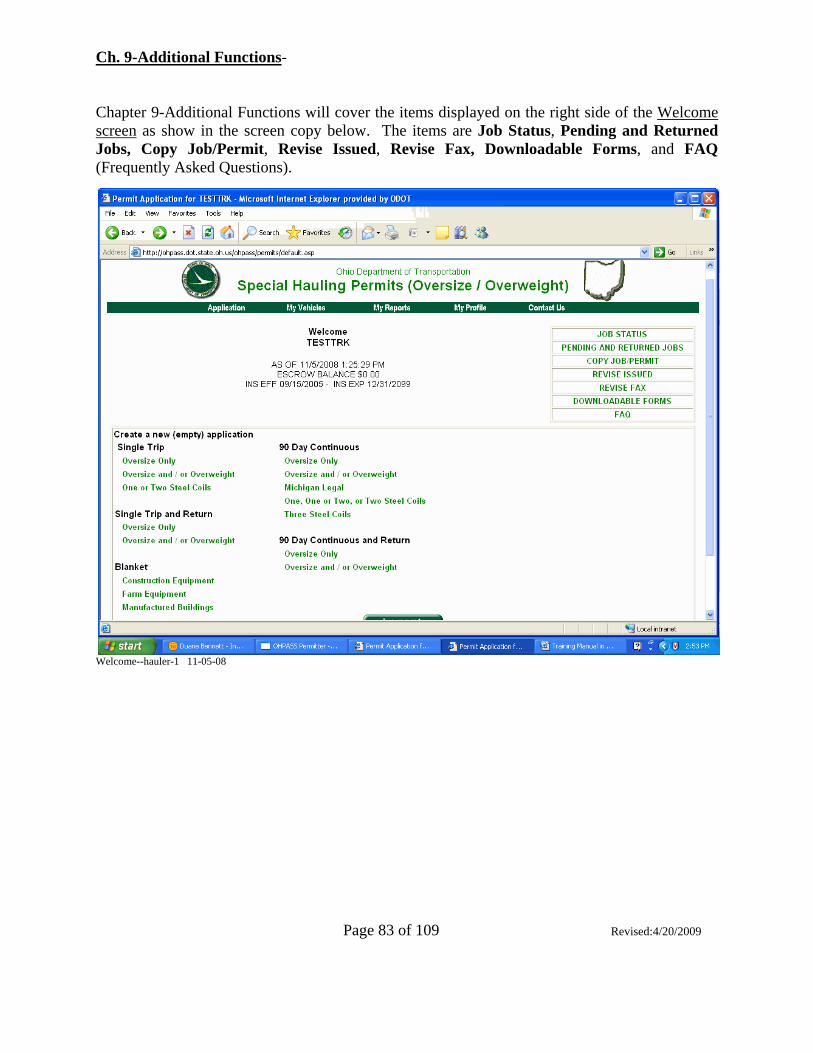
Ch. 9-Additional Functions- Chapter 9-Additional Functions will cover the items displayed on the right side of the Welcome screen as show in the screen copy below. The items are Job Status, Pending and Returned Jobs, Copy Job/Permit, Revise Issued, Revise Fax, Downloadable Forms, and FAQ (Frequently Asked Questions).
Welcome--hauler-1 11-05-08
Page 84 of 109 Revised:4/20/2009
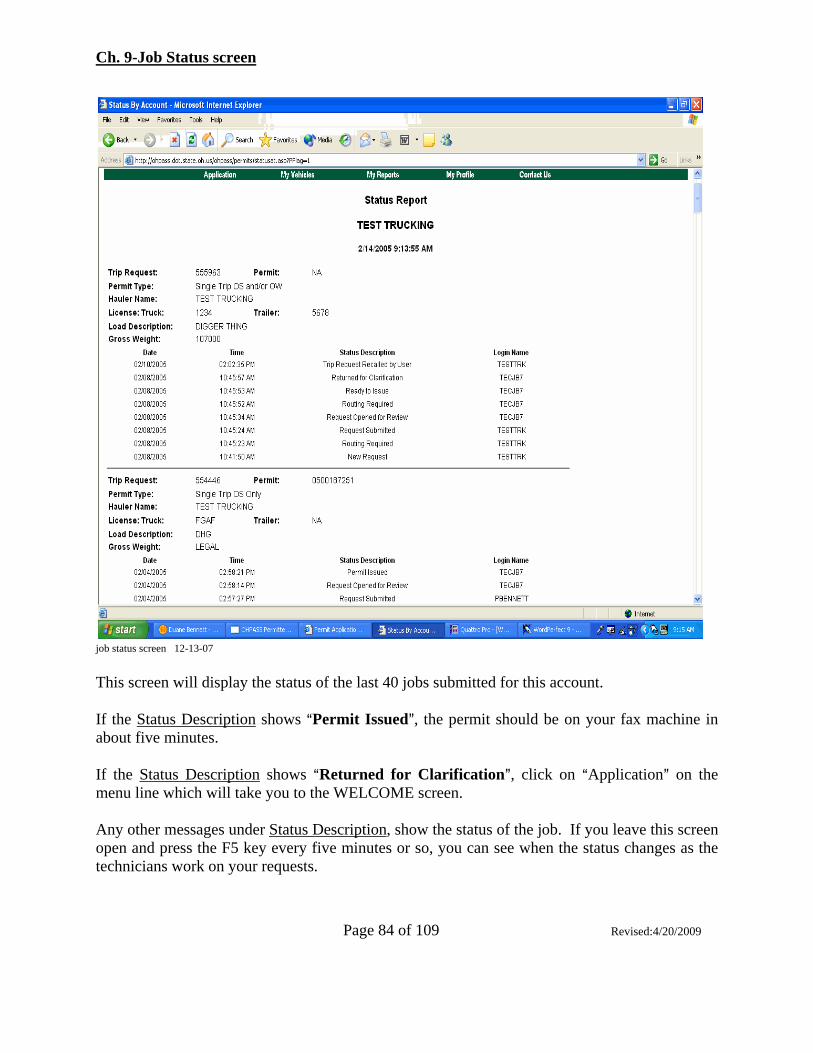
Ch. 9-Job Status screen
job status screen 12-13-07 This screen will display the status of the last 40 jobs submitted for this account. If the Status Description shows APermit Issued@, the permit should be on your fax machine in about five minutes. If the Status Description shows AReturned for Clarification@, click on AApplication@ on the menu line which will take you to the WELCOME screen. Any other messages under Status Description, show the status of the job. If you leave this screen open and press the F5 key every five minutes or so, you can see when the status changes as the technicians work on your requests.

Page 85 of 109 Revised:4/20/2009
This page left blank.
Page 86 of 109 Revised:4/20/2009
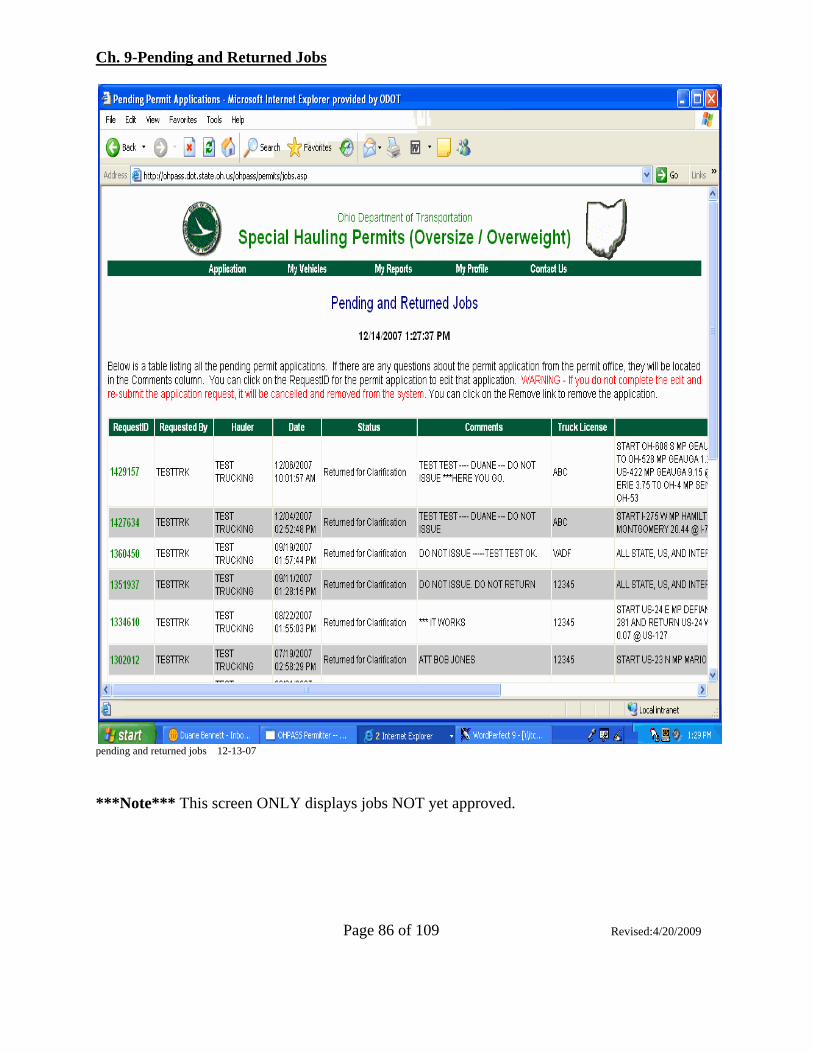
Ch. 9-Pending and Returned Jobs
pending and returned jobs 12-13-07 ***Note*** This screen ONLY displays jobs NOT yet approved.
Page 87 of 109 Revised:4/20/2009
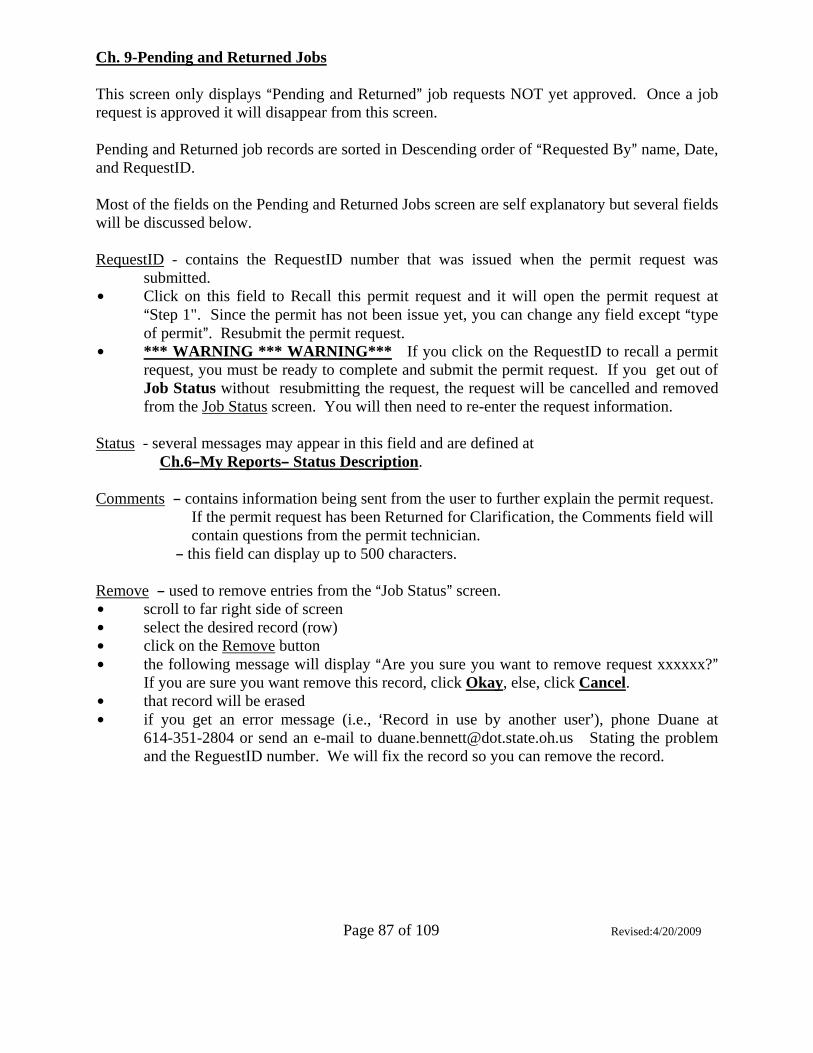
Ch. 9-Pending and Returned Jobs This screen only displays APending and Returned@ job requests NOT yet approved. Once a job request is approved it will disappear from this screen. Pending and Returned job records are sorted in Descending order of ARequested By@ name, Date, and RequestID. Most of the fields on the Pending and Returned Jobs screen are self explanatory but several fields will be discussed below. RequestID - contains the RequestID number that was issued when the permit request was
submitted. $ Click on this field to Recall this permit request and it will open the permit request at
AStep 1". Since the permit has not been issue yet, you can change any field except Atype of permit@. Resubmit the permit request.
$ *** WARNING *** WARNING*** If you click on the RequestID to recall a permit request, you must be ready to complete and submit the permit request. If you get out of Job Status without resubmitting the request, the request will be cancelled and removed from the Job Status screen. You will then need to re-enter the request information.
Status - several messages may appear in this field and are defined at
Ch.6BMy ReportsB Status Description. Comments B contains information being sent from the user to further explain the permit request.
If the permit request has been Returned for Clarification, the Comments field will contain questions from the permit technician.
B this field can display up to 500 characters. Remove B used to remove entries from the AJob Status@ screen. $ scroll to far right side of screen $ select the desired record (row) $ click on the Remove button $ the following message will display AAre you sure you want to remove request xxxxxx?@
If you are sure you want remove this record, click Okay, else, click Cancel. $ that record will be erased $ if you get an error message (i.e., >Record in use by another user=), phone Duane at
614-351-2804 or send an e-mail to [email protected] Stating the problem and the ReguestID number. We will fix the record so you can remove the record.

Page 88 of 109 Revised:4/20/2009
Ch. 9-Copy Job/Permit
Copy-Job-Permit You can use this screen to copy the information from a job number (RequestID) or permit number that is similar to the permit request that you want to enter now. Any data fields can be changed. **Note** Only the last valid version of a job/permit will be copied. If a permit was revised
several times, only the last revision will be copied. 1. Enter the Job Number in the blank box
OR Click the down-arrow in the Job Number box, click on Permit Number, and enter the Permit Number in the blank box. 2. Click on Load Application button. 3. Permit application will copy the information into the new permit request and go to Step 1. 4. Continue the same as getting a new permit.
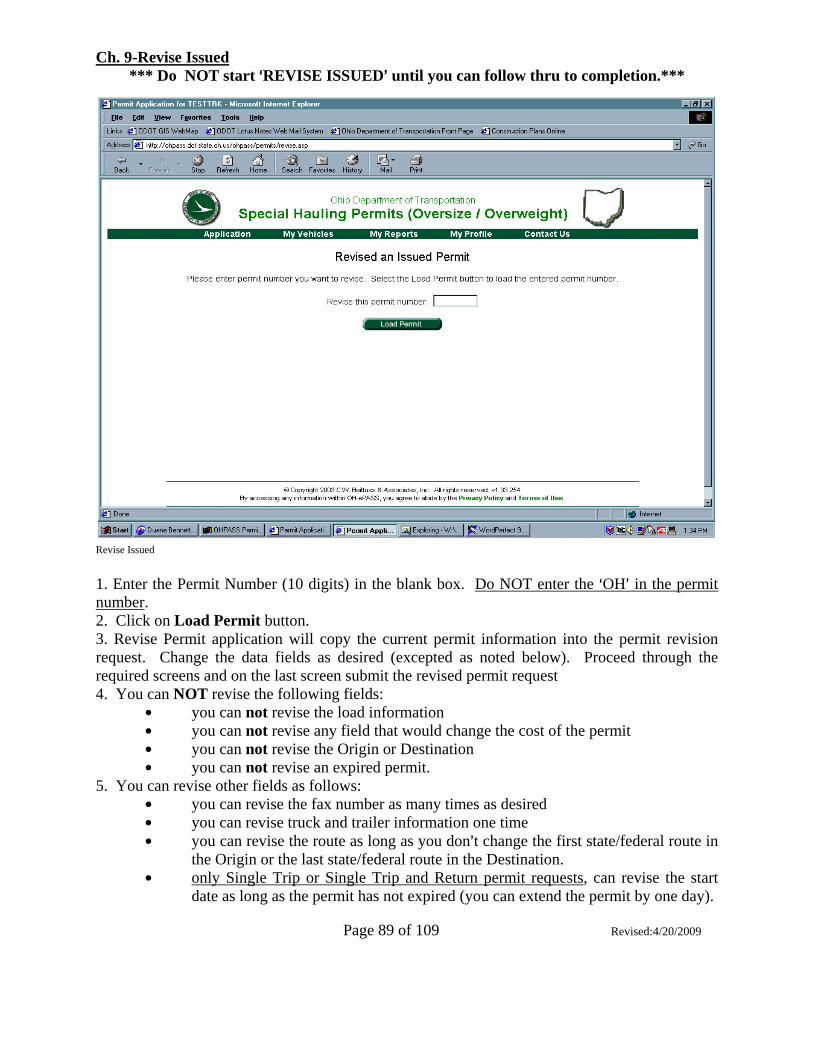
Page 89 of 109 Revised:4/20/2009
Ch. 9-Revise Issued *** Do NOT start >REVISE ISSUED= until you can follow thru to completion.***
Revise Issued 1. Enter the Permit Number (10 digits) in the blank box. Do NOT enter the >OH= in the permit number. 2. Click on Load Permit button. 3. Revise Permit application will copy the current permit information into the permit revision request. Change the data fields as desired (excepted as noted below). Proceed through the required screens and on the last screen submit the revised permit request 4. You can NOT revise the following fields:
$ you can not revise the load information $ you can not revise any field that would change the cost of the permit $ you can not revise the Origin or Destination $ you can not revise an expired permit.
5. You can revise other fields as follows: $ you can revise the fax number as many times as desired $ you can revise truck and trailer information one time $ you can revise the route as long as you don=t change the first state/federal route in
the Origin or the last state/federal route in the Destination. $ only Single Trip or Single Trip and Return permit requests, can revise the start
date as long as the permit has not expired (you can extend the permit by one day).
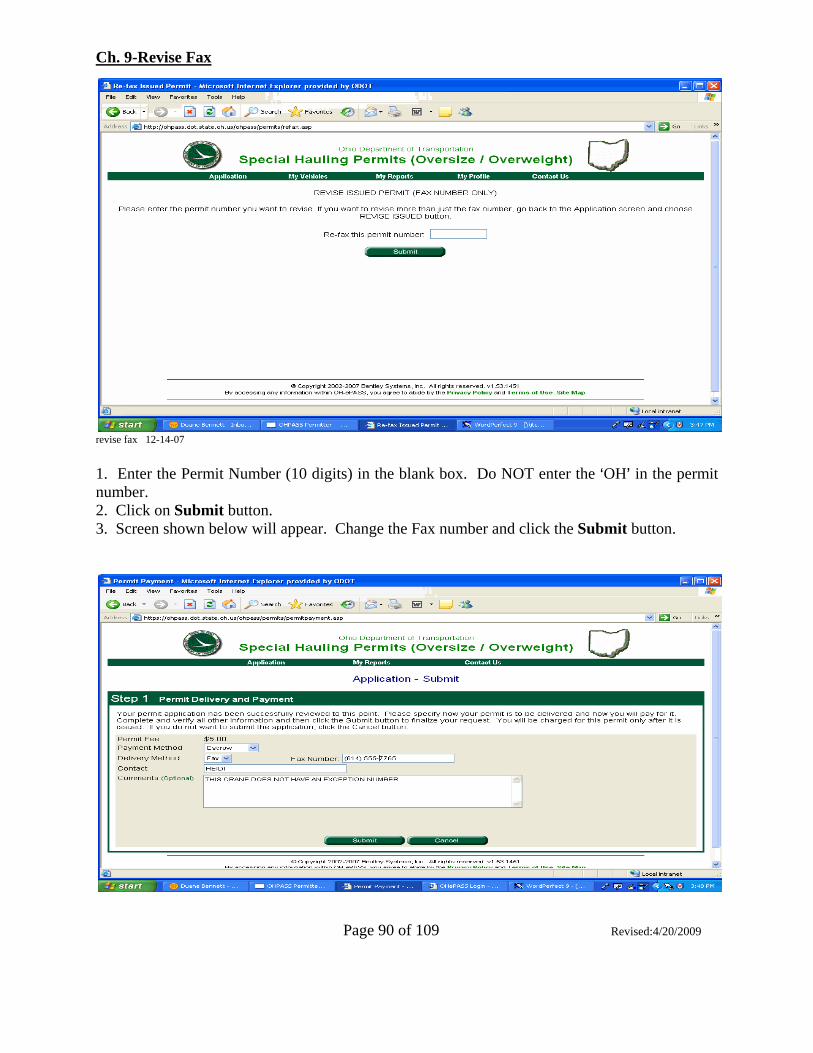
Page 90 of 109 Revised:4/20/2009
Ch. 9-Revise Fax
revise fax 12-14-07 1. Enter the Permit Number (10 digits) in the blank box. Do NOT enter the >OH= in the permit number. 2. Click on Submit button. 3. Screen shown below will appear. Change the Fax number and click the Submit button.
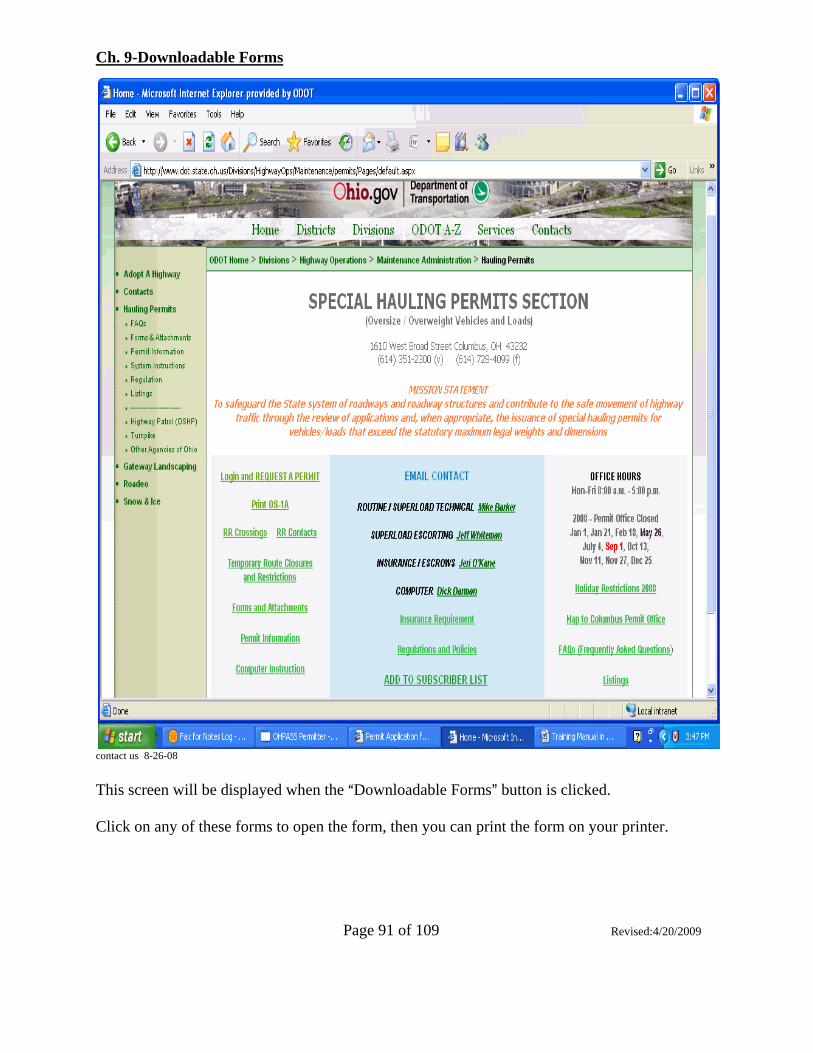
Page 91 of 109 Revised:4/20/2009
Ch. 9-Downloadable Forms
contact us 8-26-08 This screen will be displayed when the ADownloadable Forms@ button is clicked. Click on any of these forms to open the form, then you can print the form on your printer.
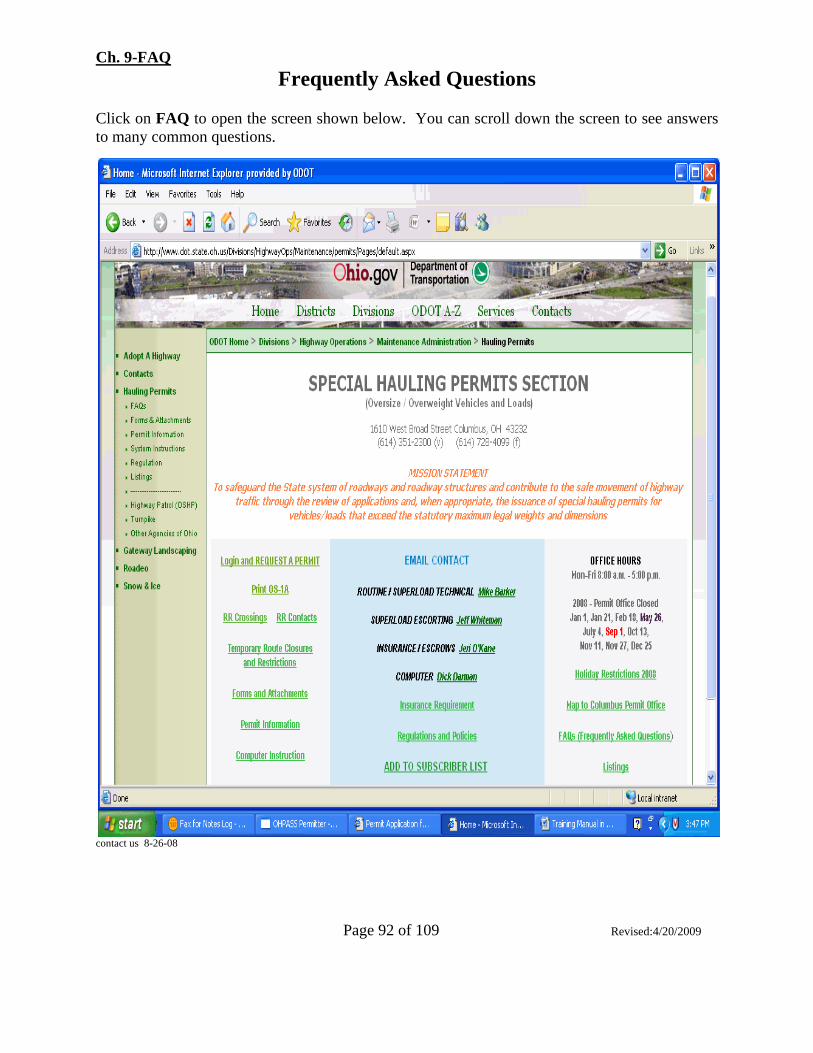
Page 92 of 109 Revised:4/20/2009
Ch. 9-FAQ Frequently Asked Questions Click on FAQ to open the screen shown below. You can scroll down the screen to see answers to many common questions.
contact us 8-26-08
Page 93 of 109 Revised:4/20/2009
Appendix A Error Conditions; $ You get a message indicating that the next route does not connect to your current route. $ Your route (NOT including Point Of Origin or Point Of Destination) contains city streets,
county roads, or township roads. Call Duane Bennett at 614-351-2804. $ Your route (NOT including Point Of Origin or Point Of Destination) contains Ohio
Turnpike travel. Call Duane Bennett at 614-351-2804. 1. Stop further routing. 2. Back up one route (this is the last good route). 3. For any routing errors, where the Step 6 Routing indicates that two state and/or US routes do NOT connect, and you know that they do connect, please e-mail [email protected] with the route junctions that are in error.
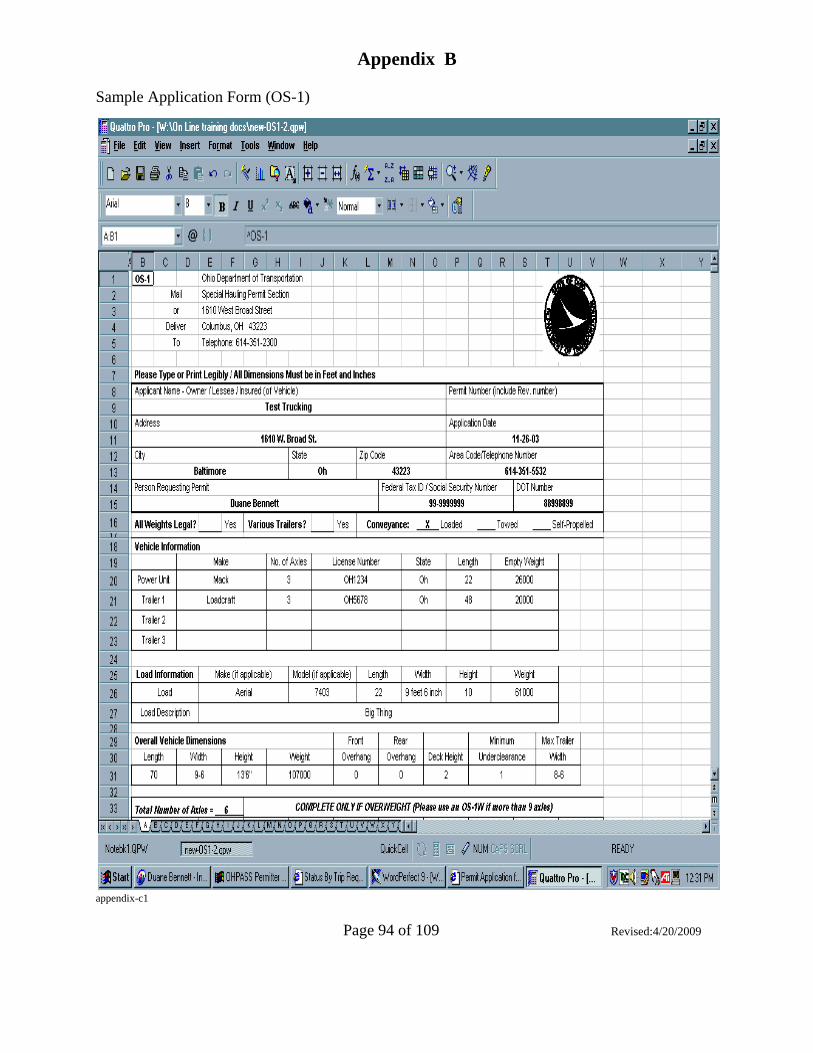
Page 94 of 109 Revised:4/20/2009
Appendix B Sample Application Form (OS-1)
appendix-c1
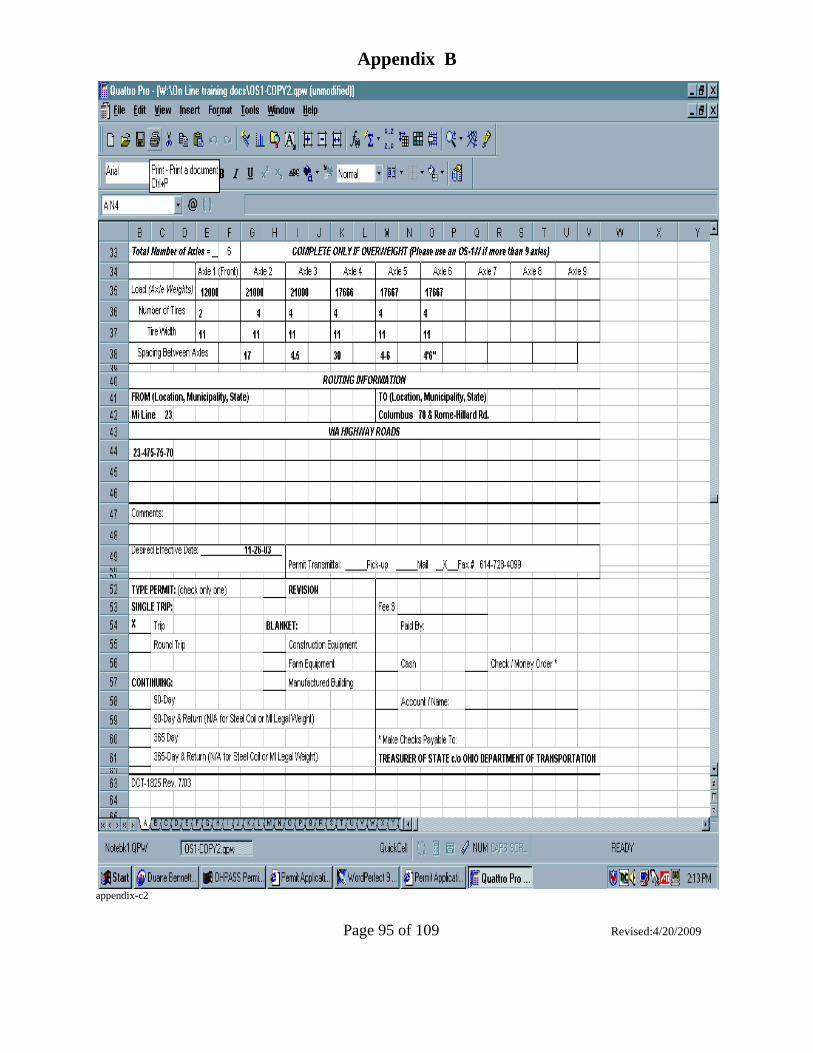
Page 95 of 109 Revised:4/20/2009
Appendix B
appendix-c2
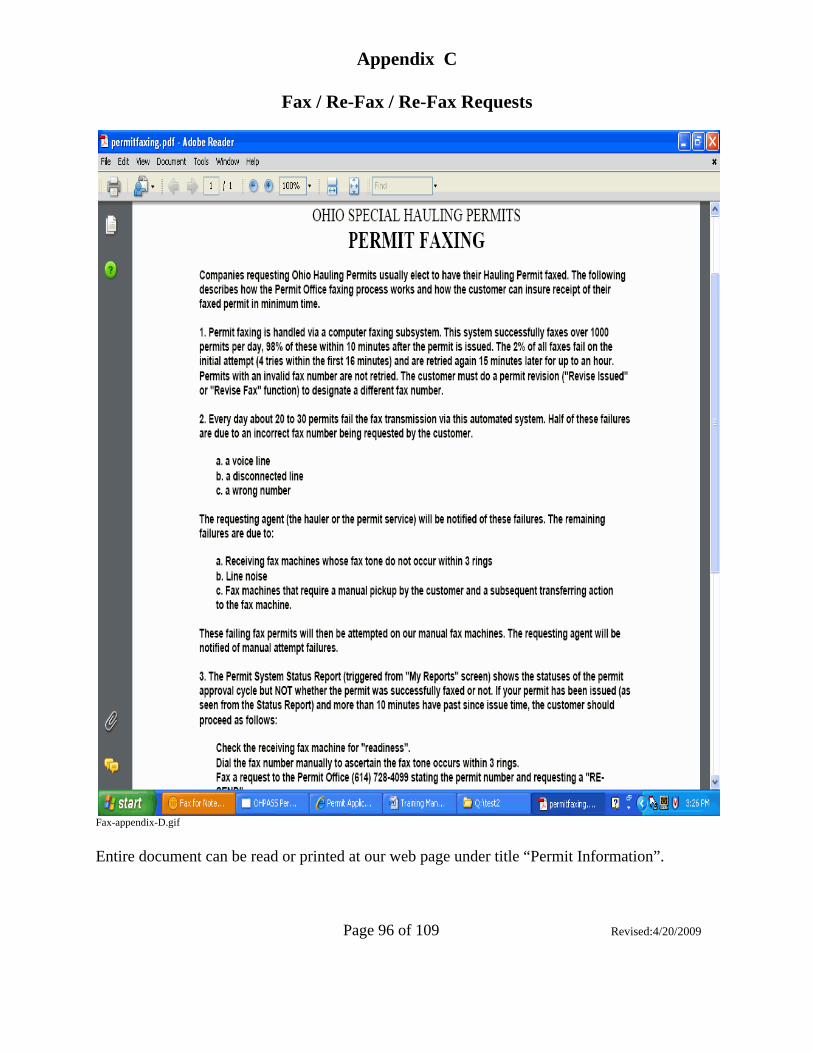
Page 96 of 109 Revised:4/20/2009
Appendix C Fax / Re-Fax / Re-Fax Requests
Fax-appendix-D.gif Entire document can be read or printed at our web page under title “Permit Information”.
Page 97 of 109 Revised:4/20/2009
Appendix D Definitions of Special Hauling Permit terms: O.D.O.T. or ODOT B Ohio Department of Transportation Local Route Connector B any local street or road owned by a city, township, or county, that is
NOT a State, US, or Interstate route, that is used to move a permitted load between two permitted routes. Permitted routes can only be State, US, or Interstate routes or any combination thereof.
Permit Service B a company which enters permit information for various haulers. Permitted Load B any oversize/overweight load that has been issued a permit to move. Permitted Route B any combination of State, US, or Interstate routes on an issued Special
Hauling Permit. Permitted routes can only be State, US, or Interstate routes or any combination thereof.
SHP B Special Hauling Permit
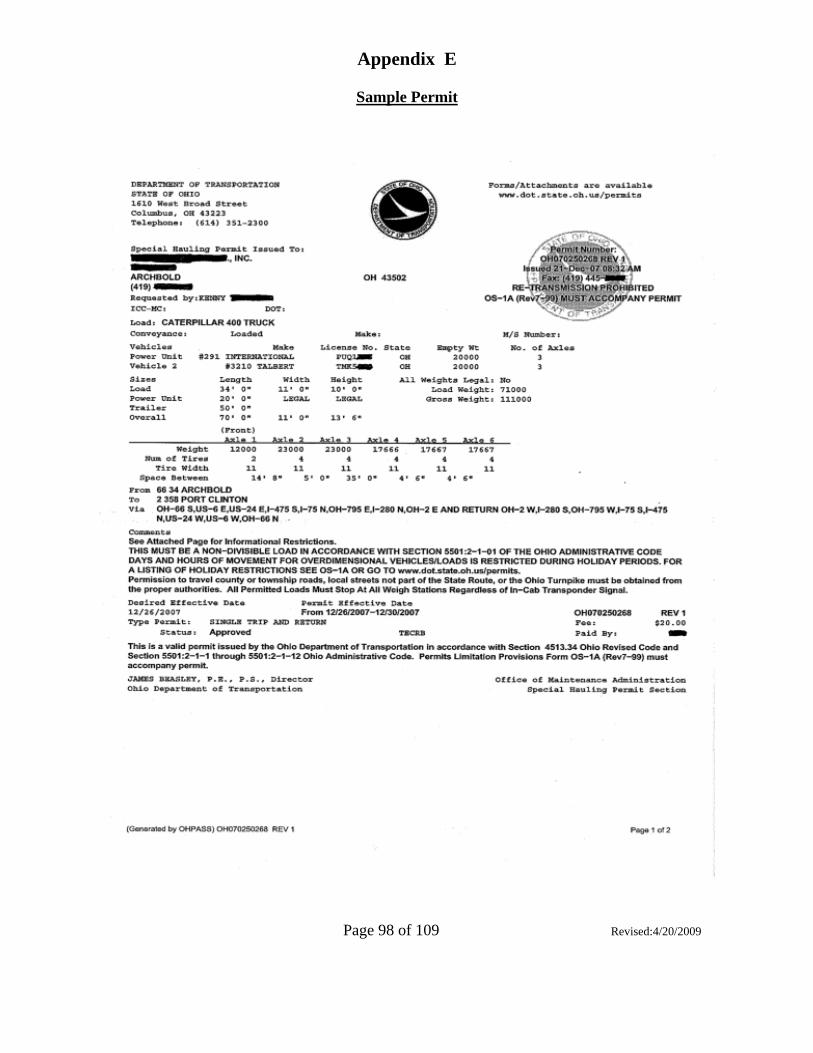
Page 98 of 109 Revised:4/20/2009
Appendix E Sample Permit
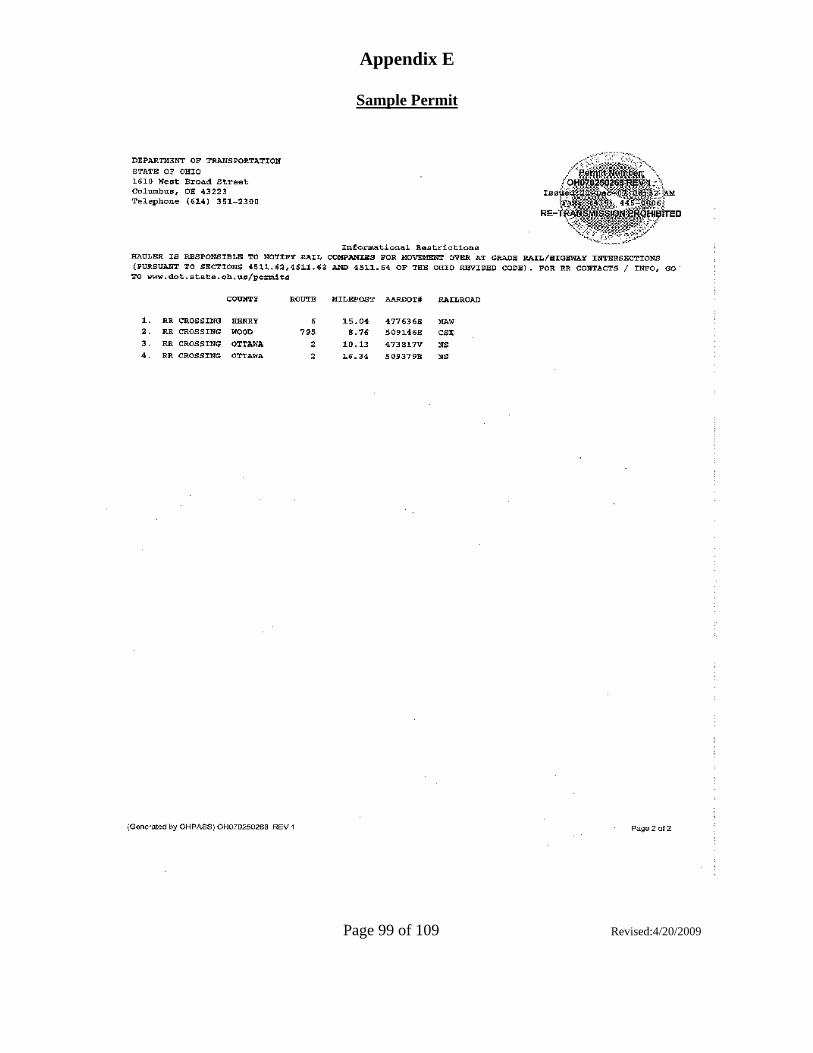
Page 99 of 109 Revised:4/20/2009
Appendix E
Sample Permit
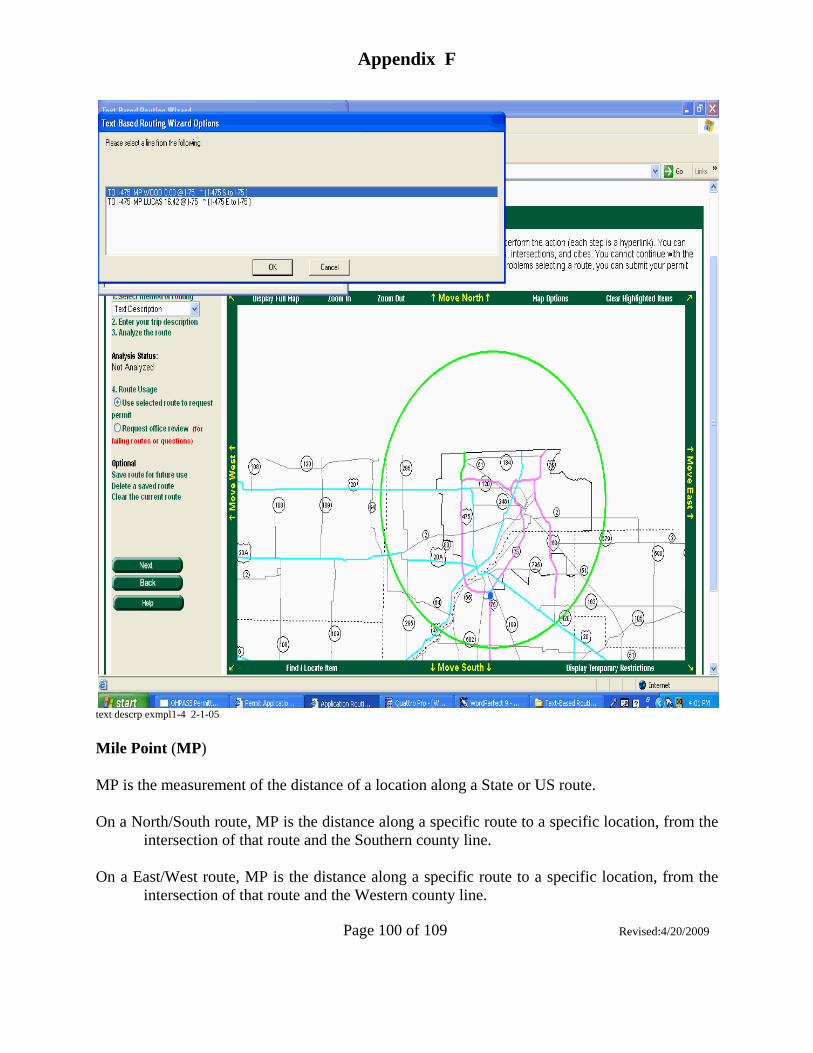
Page 100 of 109 Revised:4/20/2009
Appendix F
text descrp exmpl1-4 2-1-05 Mile Point (MP) MP is the measurement of the distance of a location along a State or US route. On a North/South route, MP is the distance along a specific route to a specific location, from the
intersection of that route and the Southern county line. On a East/West route, MP is the distance along a specific route to a specific location, from the
intersection of that route and the Western county line.
Page 101 of 109 Revised:4/20/2009
Appendix F The Text-Based Routing Wizard Options on the previous page shows two MP entries. The first entry (high-lighted) shows the intersection of 475 and 75. When this entry was high-lighted a blue dot displays on the screen at the location of this intersection. The entry shows that this MP is in Wood county and is 0.00 miles north of the southern Wood county line. Route 75 is a North/South route, so the distance is measured from the southern border of Wood county. The second entry shows the intersection of 475 and 75 but at the northeast edge of Toledo. When this entry is high-lighted a blue dot will display on the screen at the location of this intersection. The entry shows that this MP is in Lucas county and is 16.42 miles north of the southern Lucas county line. Route 75 is a North/South route, so the distance is measured from the southern border of Lucas county.
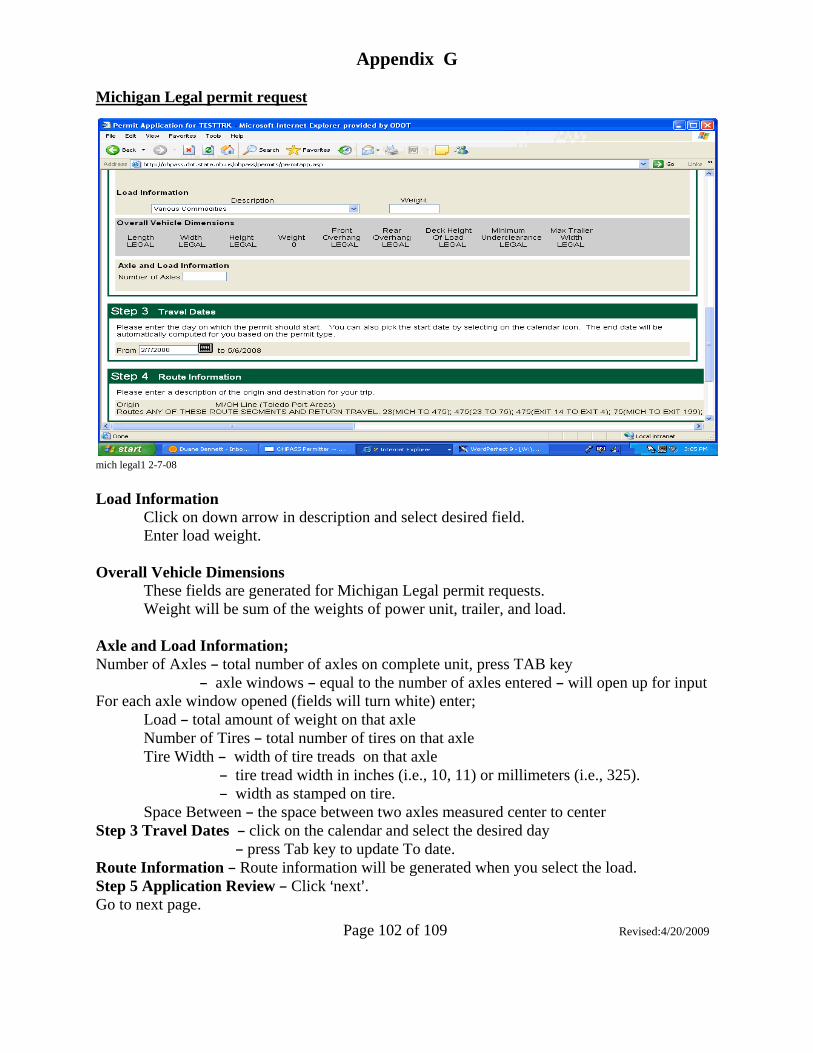
Page 102 of 109 Revised:4/20/2009
Appendix G Michigan Legal permit request
mich legal1 2-7-08 Load Information
Click on down arrow in description and select desired field. Enter load weight.
Overall Vehicle Dimensions
These fields are generated for Michigan Legal permit requests. Weight will be sum of the weights of power unit, trailer, and load.
Axle and Load Information; Number of Axles B total number of axles on complete unit, press TAB key B axle windows B equal to the number of axles entered B will open up for input For each axle window opened (fields will turn white) enter;
Load B total amount of weight on that axle Number of Tires B total number of tires on that axle Tire Width B width of tire treads on that axle
B tire tread width in inches (i.e., 10, 11) or millimeters (i.e., 325). B width as stamped on tire.
Space Between B the space between two axles measured center to center Step 3 Travel Dates B click on the calendar and select the desired day
B press Tab key to update To date. Route Information B Route information will be generated when you select the load. Step 5 Application Review B Click >next=. Go to next page.
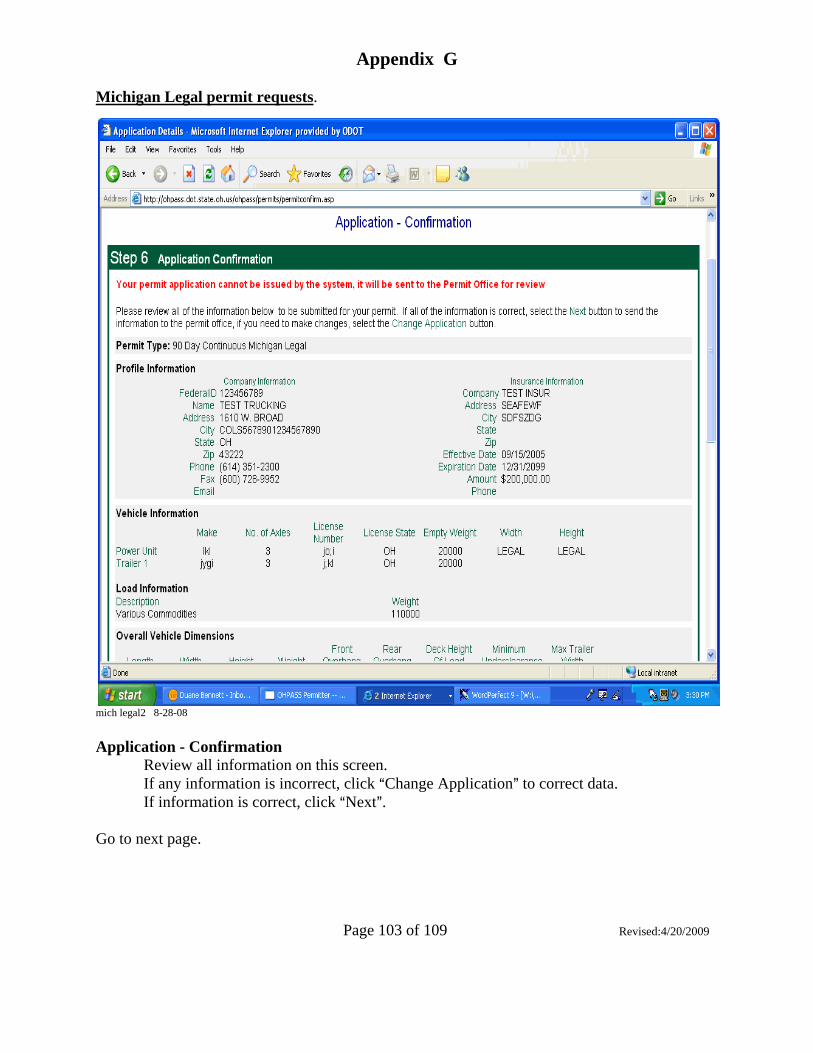
Page 103 of 109 Revised:4/20/2009
Appendix G Michigan Legal permit requests.
mich legal2 8-28-08 Application - Confirmation
Review all information on this screen. If any information is incorrect, click AChange Application@ to correct data. If information is correct, click ANext@.
Go to next page.
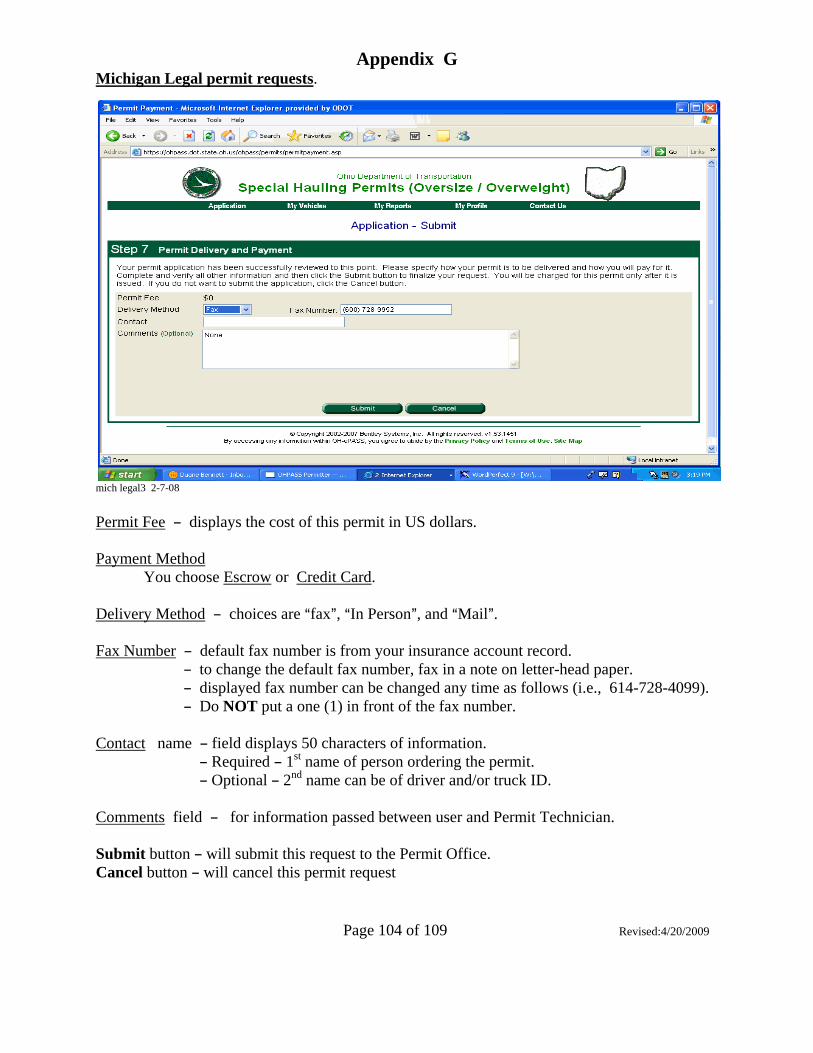
Page 104 of 109 Revised:4/20/2009
Appendix G Michigan Legal permit requests.
mich legal3 2-7-08 Permit Fee B displays the cost of this permit in US dollars. Payment Method
You choose Escrow or Credit Card. Delivery Method B choices are Afax@, AIn Person@, and AMail@. Fax Number B default fax number is from your insurance account record.
B to change the default fax number, fax in a note on letter-head paper. B displayed fax number can be changed any time as follows (i.e., 614-728-4099). B Do NOT put a one (1) in front of the fax number.
Contact name B field displays 50 characters of information.
B Required B 1st name of person ordering the permit. B Optional B 2nd name can be of driver and/or truck ID.
Comments field B for information passed between user and Permit Technician. Submit button B will submit this request to the Permit Office. Cancel button B will cancel this permit request

Page 105 of 109 Revised:4/20/2009
This page was left blank.
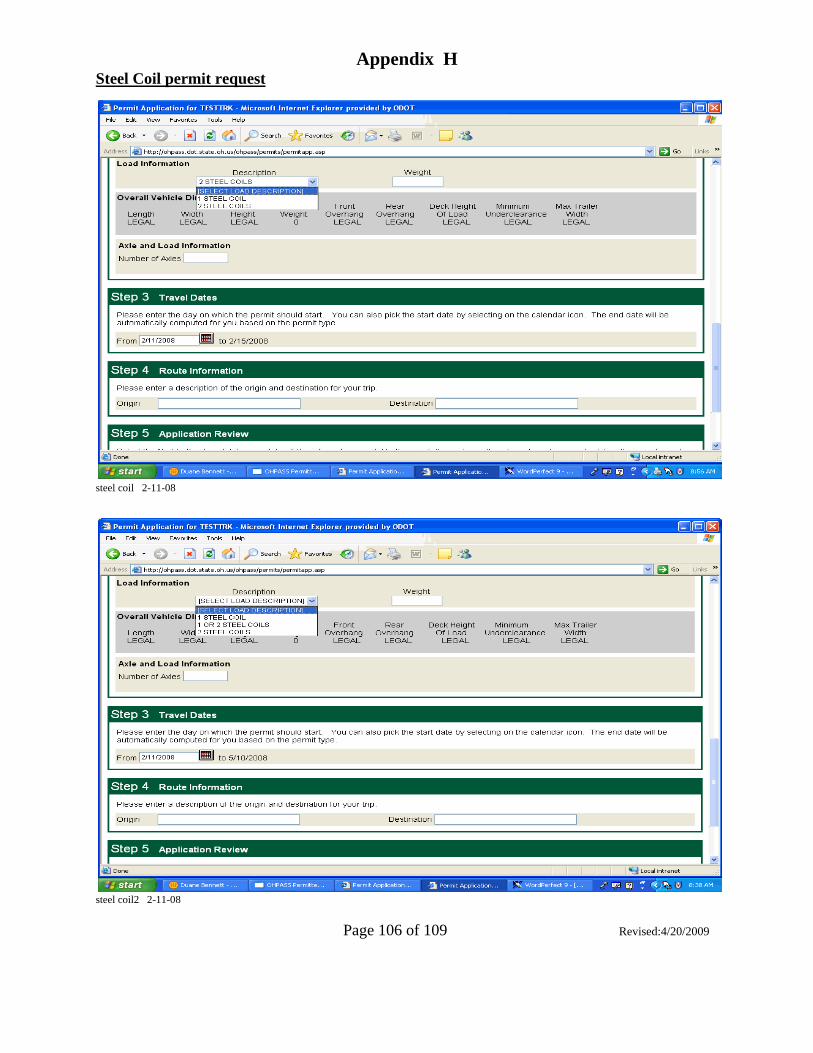
Page 106 of 109 Revised:4/20/2009
Appendix H Steel Coil permit request
steel coil 2-11-08
steel coil2 2-11-08
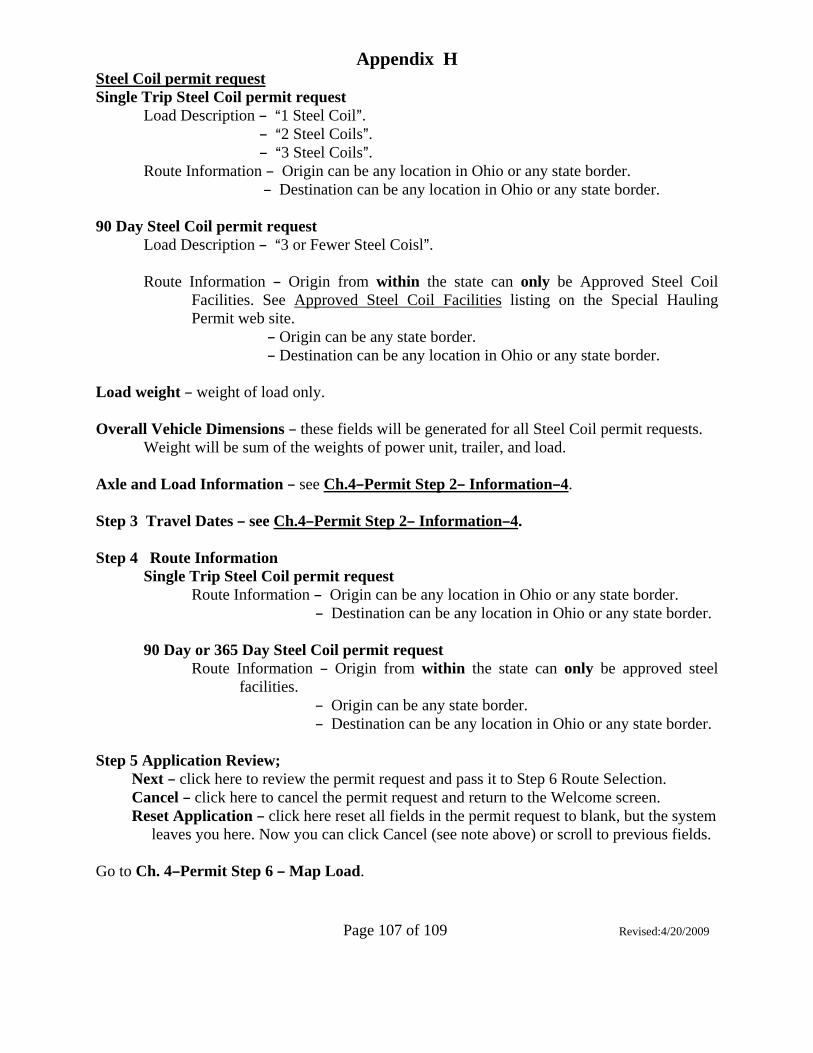
Page 107 of 109 Revised:4/20/2009
Appendix H Steel Coil permit request Single Trip Steel Coil permit request
Load Description B A1 Steel Coil@. B A2 Steel Coils@. B A3 Steel Coils@.
Route Information B Origin can be any location in Ohio or any state border. B Destination can be any location in Ohio or any state border.
90 Day Steel Coil permit request
Load Description B A3 or Fewer Steel Coisl@.
Route Information B Origin from within the state can only be Approved Steel Coil Facilities. See Approved Steel Coil Facilities listing on the Special Hauling Permit web site.
B Origin can be any state border. B Destination can be any location in Ohio or any state border.
Load weight B weight of load only. Overall Vehicle Dimensions B these fields will be generated for all Steel Coil permit requests.
Weight will be sum of the weights of power unit, trailer, and load. Axle and Load Information B see Ch.4BPermit Step 2B InformationB4. Step 3 Travel Dates B see Ch.4BPermit Step 2B InformationB4. Step 4 Route Information
Single Trip Steel Coil permit request Route Information B Origin can be any location in Ohio or any state border.
B Destination can be any location in Ohio or any state border.
90 Day or 365 Day Steel Coil permit request Route Information B Origin from within the state can only be approved steel
facilities. B Origin can be any state border.
B Destination can be any location in Ohio or any state border.
Step 5 Application Review; Next B click here to review the permit request and pass it to Step 6 Route Selection. Cancel B click here to cancel the permit request and return to the Welcome screen. Reset Application B click here reset all fields in the permit request to blank, but the system
leaves you here. Now you can click Cancel (see note above) or scroll to previous fields. Go to Ch. 4BPermit Step 6 B Map Load.
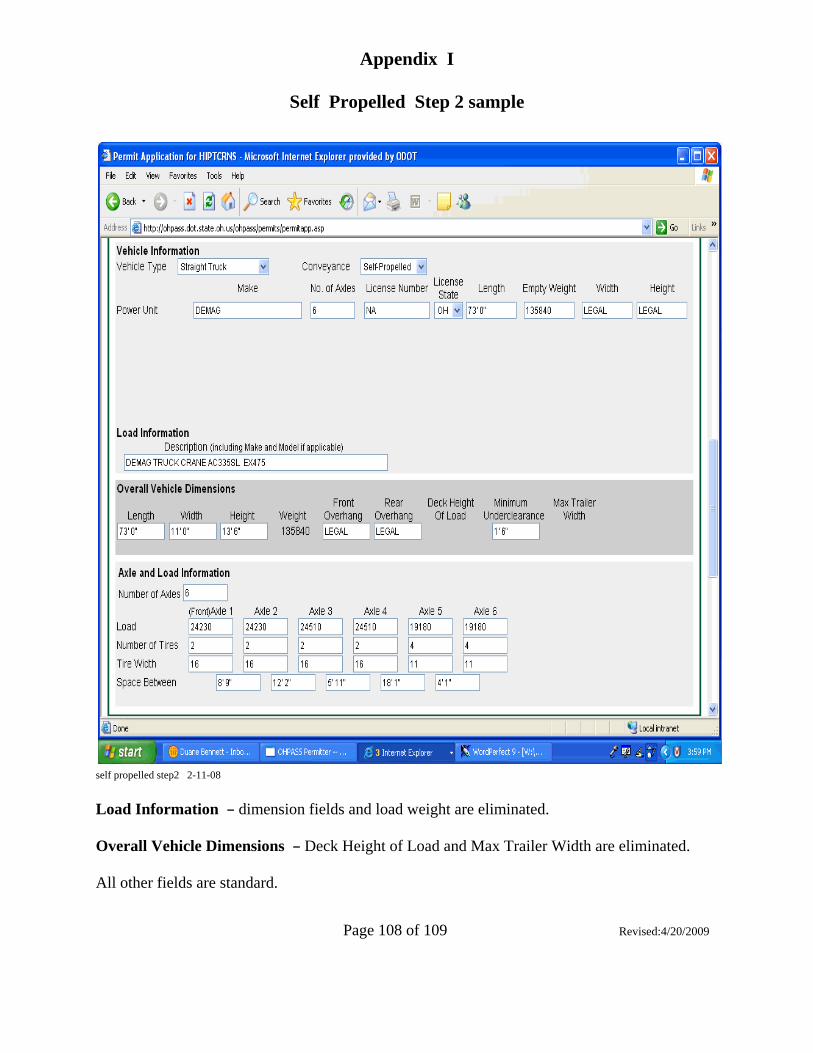
Page 108 of 109 Revised:4/20/2009
Appendix I Self Propelled Step 2 sample
self propelled step2 2-11-08 Load Information B dimension fields and load weight are eliminated. Overall Vehicle Dimensions B Deck Height of Load and Max Trailer Width are eliminated. All other fields are standard.

Page 109 of 109 Revised:4/20/2009
THIS PAGE LEFT BLANK INTENTIONALLY.