OFFICE OF TECHNOLOGY AND STRATEGIC SERVICES...MSIS Year End/Month 09 Training Manual MSIS Year...
56
MSIS Year End/Month 09 Training Manual MSIS Year End/Month 09 Page 1 OFFICE OF TECHNOLOGY AND STRATEGIC SERVICES MSIS YEAR END/MONTH 09 TRAINING MANUAL
Transcript of OFFICE OF TECHNOLOGY AND STRATEGIC SERVICES...MSIS Year End/Month 09 Training Manual MSIS Year...

MSIS Year End/Month 09 Training Manual
MSIS Year End/Month 09 Page 1
OFFICE OF TECHNOLOGY
AND
STRATEGIC SERVICES
MSIS YEAR END/MONTH 09 TRAINING MANUAL

MSIS Year End/Month 09 Training Manual
MSIS Year End/Month 09 Page 2

MSIS Year End/Month 09 Training Manual
MSIS Year End/Month 09 Page 3
Contents
CHAPTER 1 Timeline ............................................................................................... 5
A. Summer To Do List ...................................................................................... 5
B. Monthly Process ............................................................................................ 5
C. In July ........................................................................................................... 5
D. June through September .............................................................................. 6
June ............................................................................................................... 6
July and August ............................................................................................ 6
September ..................................................................................................... 6
CHAPTER 2 Send Student Data to MSIS ................................................................ 7
A. Summer School Data Transaction (SSD) File ............................................. 8
B. Monthly Student Historical Transaction (MSH) File ............................... 9
C. Error Message (err) File ............................................................................... 9
D. Vocational Required Data Elements for Month 09 ................................... 9
E. 11th Graders that Receive Traditional Diplomas.................................... 11
CHAPTER 3 View/Download Results .................................................................... 12
A. View Results ................................................................................................ 12
B. Download Results ....................................................................................... 14
CHAPTER 4 Student Reports ................................................................................ 15
A. Holding Area Reports ................................................................................. 15
Student Roster ............................................................................................ 15
Holding Area Student Indicators ............................................................... 15
Holding Area Absences ............................................................................... 15
Holding Area Carnegie Unit Courses with Zero Credits .......................... 15
Holding Area Vocational Student Indicators ............................................ 16
Holding Area Student Entries .................................................................... 16
Holding Area Student Withdrawals .......................................................... 16
Holding Area Incidents/Dispositions ......................................................... 16
B. Carnegie Unit Courses with Zero Credits.................................................. 16
C. Graduates/Completers ................................................................................ 16
Counts by District ....................................................................................... 16
Detail Listing ............................................................................................... 16

MSIS Year End/Month 09 Training Manual
MSIS Year End/Month 09 Page 4
D. Summer Activity ......................................................................................... 16
CHAPTER 5 Approved Imported Student Data .................................................... 18
CHAPTER 6 Year-End Student Transfer Screen................................................... 20
A. To Access the Year-End Student School Transfers ................................... 21
B. To Select a District/School/Grade ............................................................... 22
C. What If I Transferred the Student to the Wrong School?...................... 28
D. Exit Year-End Student Transfer Screen ................................................... 29
CHAPTER 7 Update Student Grades/Promotion/Graduate Type ....................... 30
A. Update Grades ............................................................................................ 30
B. Update Promotion/Graduate Type ............................................................ 33
CHAPTER 8 Summer Activity Screen ................................................................... 34
A. Summer Activity Reasons.......................................................................... 35
B. Summer Activity Dropout Reasons .......................................................... 35
CHAPTER 9 Post-Graduate Plans ......................................................................... 36
CHAPTER 10 Good Cause Exemption .................................................................. 37
CHAPTER 11 Graduation Option........................................................................... 38
CHAPTER 12 MS Scholar Information.................................................................. 39
CHAPTER 13 Initial Load ....................................................................................... 40
A. Initial Student Load Transaction (ISL) File .............................................. 40
B. Initial MSIS ID Transaction (IMT) File .................................................... 40
C. Initial Load Duplicate Student Report ....................................................... 40
CHAPTER 14 District Demographics .................................................................... 41
CHAPTER 15 School Identification/Demographics ............................................ 43
CHAPTER 16 School Board Members ................................................................. 45
CHAPTER 17 District Pay Scale ............................................................................ 47
CHAPTER 18 District Events Calendar ................................................................. 49
CHAPTER 19 Summer School Report Entry ......................................................... 50
A. Entering Summer Program Data............................................................... 50
B. Entering Summer Program Employees ..................................................... 52
CHAPTER 20 Roll Employee/Schedule ................................................................. 54

MSIS Year End/Month 09 Training Manual
MSIS Year End/Month 09 Page 5
CHAPTER 1 Timeline
A. Summer To Do List
- Districts may submit Initial Student Load Transaction (ISL) files to MSIS from June 1st until noon
on September 30th. This is only for students who are under the age of 7 by September 1st and do not
already have an MSIS ID.
- Districts may submit Summer School Data Transaction (SSD) files to MSIS from June 1st until the
2nd Monday in September.
- Accreditation deadline is September 1st.
- Districts (Public, Special and Non-Public) should roll Personnel data from last school year and begin
working on Personnel data for the new school year. Rolling Personnel also rolls SPED Student data
to the new school year.
- Districts should update District and School Demographics for the new school year and make
changes during the school year as needed. School Board Member data should be updated as needed
also.
- Make adjustments to graduates/completers and promotions/non-promotions on the Update Student
Grades screen (Update Promotion tab).
- The Post-Graduate Plans for the students who are prior-year graduates/completers should be
entered in MSIS by August 31st using the Post-Graduate Plans screen.
- Submit Monthly Student Historical Transaction (MSH) files as soon as Month 09 is completed.
B. Monthly Process
- Each school should have MSIS IDs for and ownership of all of their students by the end of the
reporting month.
- Send Daily Student Data (DSD) files as needed to change a student’s Special Education status (Y or
N) and/or report incidents
- Create Monthly Student Data Transaction (MSD) files and run them against the pre-processor to
check that the students’ and teachers’ schedules are matching, schools have ownership of the
students, etc. prior to sending MSD files to MSIS
- Personnel should be approved each day that changes are made so the Mississippi Adequate
Education Program (MAEP), and Accreditation procedures will run at night for the approved
districts.
- Begin submitting Monthly Days Taught (MDT) and Monthly Student Data Transaction (MSD) files
at noon on last school day of the reporting month, if the last day of the month falls on a weekend,
then, the file submission begins at noon on the last Friday of the month.
- Once a school has a successful MSD file, run the Pre-Approved Monthly Attendance report and
all Holding Area reports.
- Check reports to ensure accuracy of submitted data. Keep hard copies of Holding Area reports or
save PDF files of Holding Area reports for auditing purposes. Approve school in MSIS if data is
correct in Holding Area. Once all schools are approved, approve the district. The deadline for a
reporting month is the 10th of the following month (refer to the district timeline for details).
C. In July
- MSIS will be unavailable on July 1st.
- Ownership records are built for new school year.
- Roll data that needs to be rolled (Personnel, etc.)
- Years of experience is increased on employees who had 100% district time for the previous school
year.
- Changes will be active when the system comes back up.
- Business Managers can start submitting financial data as soon as MSIS is brought online in July.

MSIS Year End/Month 09 Training Manual
MSIS Year End/Month 09 Page 6
D. June through September
June
- Districts must approve Month 09 Monthly Student Data Transaction (MSD) files (10 calendar days
after students’ last day of school).
- Districts must use the Year-End Student Transfer screen to move students from one school to
another before records are built for the new school year. Last day is June 30th.
- Districts may submit Initial Student Load Transaction (ISL) files from June 1st to September 30th.
This is only for students who are under the age of 7 by September 1st and need an MSIS ID.
- Districts must submit Monthly Student Historical (MSH) files as soon as Month 09 is completed.
- Graduation Option deadline for seniors is June 30th
.
- Districts must complete Summer Program Report Entry screen for all schools offering summer
programs.
July and August
- Access to ACCRED Live Data reports
- District and School Demographics
- District must enter Pay Scale in MSIS by the last business day in July.
- District Personnel data (Public, Special and Non-Public)
- District Post Graduate Plan data
- Initial Student Load Transaction (ISL) files
- Summer School Data Transaction (SSD) files
- Good Cause Exemption deadline will be August 15th
.
September
- Districts must submit SSD files by the 2nd Monday in September.
- Districts must submit ISL files by noon September 30th.
- Any adjustments to graduates, completers and promotions must be updated on the Update Student
Grades screen (Update Promotion tab) by September 30th
, prior to Month 01 files being sent to
MSIS.
- Each school must have MSIS IDs and ownership of all students before submitting the Month 01 file.
- Districts should start submitting Month 01 Monthly Days Taught Transaction (MDT) and Monthly
Student Data Transaction (MSD) files on September 30th
.
- Districts must enter and approve Personnel data by September 30th (Public, Special and Non-
Public).
- Beginning September 1st, Certification update for MSIS is run daily.
- School Board Member data is due to be updated no later than September 1st.

MSIS Year End/Month 09 Training Manual
MSIS Year End/Month 09 Page 7
CHAPTER 2 Send Student Data to MSIS School Enters Data
into SAP
Data is Submitted
Monthly to MSIS
Data is Formatted
Correctly
Data is Formatted
Incorrectly
Successful File is Sent to Holding Area Correct Error
User Runs Reports to Verify Accuracy of
Submitted Data
Accuracy Data is Inaccurate
Data is
Accurate
Primary Contact Approves School
Primary Contact Approves District After Approving All Schools
Figure 1: Send Data to MSIS Flowchart
Submission

MSIS Year End/Month 09 Training Manual
MSIS Year End/Month 09 Page 8
The screen below can be accessed by going to INTERFACES > SEND DATA TO MSIS.
Figure 2: Send Data to MSIS Screen
Special characters (<, >, &,” and ’) may cause the submitted file to have an XML error. Avoid using these
characters in the fields in the school package when possible. We have seen the & character used a lot in the
incident description field, and this special character as well as < will cause an XML error.
There are several different types of files that you will send to MSIS at various times.
A. Summer School Data Transaction (SSD) File
The home school will submit a Summer School Data Transaction (SSD) file if they have any students to
attend summer school within the state. The SSD file should be submitted by the school that owns the
student not the school offering summer school. The data on the SSD file consists of the MSIS ID,
student’s name, ssn (optional), date of birth, promotion indicator, promotion date, graduation type (if
applicable), course code, final grade, term semester code (su), credits and carnegie units. No teacher
information is sent in an SSD file.
Name: S_<Dist#>_<Sch#>_<mmddyyyy>_SSD_<Sequence#>.xml
Example: S_2520_008_08272001_SSD_00001.xml
NOTE: The S and SSD must be capitalized.

MSIS Year End/Month 09 Training Manual
MSIS Year End/Month 09 Page 9
Remember to include correspondence, on-line, virtual school and dual credit courses along with summer
school courses in the Summer School Data Transaction (SSD) file, which is Month 10.
When deciding who to include in your SSD file and who not to include, you need to think about what you are
doing to the student’s cumulative folder.
If you have students that did not meet all their objectives during the regular school year; therefore, you extend
their school year out so that you can work with them to meet those objectives, (these would most likely be
Elementary students) you would include them in your Month 09 file as Not Promoted and with either a
failing grade or an I for incomplete. Then once they finish their extended year, you use the Update Student
Grades screen in MSIS to change their grade and to promote them if they passed.
For students earning Credits for courses (grades 7-12) these SHOULD be included in the SSD file
REGARDLESS IF they are replacing a failed grade or this is a new course on the student’s record. Those
courses earning credit are listed each time the student takes the course on the cumulative folder.
In some cases of Extended Year (especially for SPED and Enrichment), nothing is entered on the cumulative
folder so these students would not be listed in SSD file.
Summer School Data Transaction (SSD) files must be sent prior to 1st month submission for the
new school year. MSIS will not accept SSD files after noon on September 30th.
B. Monthly Student Historical Transaction (MSH) File
This file contains information such as birth certificate number, immunization compliance date, all
courses taken by the student, all schools attended by the student, etc. This file is normally sent at the end
of the school year.
Name: S_<Dist#>_<Sch#>_<mmddyyyy>_MSH_<Sequence#>.xml
Example: S_2520_008_05072002_MSH_00001.xml
NOTE: The S and MSH must be capitalized.
C. Error Message (err) File
Results’ file that you will see under View/Download Results if your file failed due to XML errors. If you
are using Internet Explorer, Google Chrome or Firefox as your browser, you can view this file to see
information about the XML errors.
You can contact the MSIS Help Desk through Footprints https://servicedesk.mde.k12.ms.us or send an
email to [email protected] for assistance with XML errors.
Name: S_<Dist#>_<Sch#>_<mmddyyyy>_File Type_<Sequence#>.XML.err
Example: S_2520_008_05072002_MSD_00001.XML.err
D. Vocational Required Data Elements for Month 09
The screen below can be accessed by going to Modules > Career and Technical > View Voc Ed
Student > Vocational.
Check your vocational data - you need to be sure to check that the vocational indicators are correct before
submitting Month 09. The following indicators are to be checked by the last submission of data:

MSIS Year End/Month 09 Training Manual
MSIS Year End/Month 09 Page 10
Figure 3: View/Update Vocational Education Student Record Screen - Vocational Tab
1. Single parent - those unmarried students (male or female) who have children or a child. This
category also includes single pregnant women.
2. Disadvantaged - those students who are academically disadvantaged, however the local district
makes this determination. Mark this indicator only if the student is academically disadvantaged or a
foster child. The Office of Child Nutrition will provide the information of those students who are
economically disadvantaged as determined by free and reduced lunch.
3. Disabled - those students who are disabled as determined by Individuals with Disabilities Education Act
(IDEA)
4. Displaced homemaker - generally does not apply to secondary students
5. Capstone - those students who are enrolled in a Cooperative Education program after completion of
another two-year vocational skills program. The district must have a Cooperative Education program
in order to have Capstone students. Cooperative Education programs do not necessarily have
Capstone students.

MSIS Year End/Month 09 Training Manual
MSIS Year End/Month 09 Page 11
The screen below can be accessed by going to Modules > Career and Technical > View Voc Ed Student >
Other Ind.
6. LEP - those students who have limited English proficiency
Figure 4: View/Update Vocational Education Student Record Screen - Other Ind Tab
E. 11th Graders that Receive Traditional Diplomas
Any 11th grader who receives a traditional diploma must be transferred from grade level 11 (T1 – transfer to
another grade in this school) to grade level 12 (E2 – transfer from another grade in this school) in reporting
Month 09 (you must use a different date for each of these). This must be done before you can enter a graduate
type of T.
EXAMPLE: T1 on May 16, 2018 from grade level 11 and E2 on May 17, 2018 to grade level 12

MSIS Year End/Month 09 Training Manual
MSIS Year End/Month 09 Page 12
Error Status MSIS ID SAP Uid Field Value Line # FAILURE 000999999 587999999 200200 147352
AMOS, TORI
CHAPTER 3 View/Download Results
A. View Results
The screen below can be accessed by going to INTERFACES > VIEW/DOWNLOAD STUDENT
RESULTS.
Figure 5: View/Download Results Screen
This screen allows authorized District and School users to view the results of their data transmission to MSIS.
The user can see if the file was a SUCCESS or FAILURE. In most cases, corrections to the data should be made
in the school package, and a new file created then submitted to MSIS.
Below is an example of a results file with errors.
MSIS Monthly Student Data Transaction Results
District Number: 9999
School Number: 004
Period: 09
Tracking ID: 9999-004-05-26-2006-00147
Transaction Status: FAILURE
Field in Error: SAP_TRANS>TR_STUDENT>STUDENT>SCHEDULE>COURSE>CARNEGIE>
Error Reason: CODE NOT FOUND OR IS INACTIVE FOR COURSE 132129

MSIS Year End/Month 09 Training Manual
MSIS Year End/Month 09 Page 13
Error Status MSIS ID SAP Uid Field Value Line # FAILURE 000999999 587999999 70060 SIMPSON, LISA Field in Error: SAP_TRANS>TR_STUDENT>STUDENT>SCHEDULE>COURSE>CREDITS>
Error Reason: MUST BE FORMAT 9.9
Below is an example of a successful file.
MSIS Monthly Student Data Transaction Results
District Number: 9999
School Number: 004
Period: 09
Tracking ID: 9999-004-05-26-2006-00149
Transaction Status: SUCCESS
MSIS Year End/Month 09 Training Manual
MSIS Year End/Month 09 Page 14
B. Download Results
Figure 6: View/Download Results Screen with Context Menu
You will use this screen to download the Initial MSIS ID Transaction (IMT) file containing your new MSIS IDs
so that you can import the data into your student package and not have to key each MSIS ID individually into
your package.
Right-click on a file listed under File Description and select Save target as…. This entry may be listed as Save
link as… depending on which browser you are using. Select the C drive, MSIS directory and IN folder
(C:\MSIS\IN) or the preferred directory. Click on SAVE to save the file to the selected directory. Your vendor
should have told you how to import the file into your package.

MSIS Year End/Month 09 Training Manual
MSIS Year End/Month 09 Page 15
CHAPTER 4 Student Reports
A. Holding Area Reports All Holding Area reports should only be run when the school has a SUCCESS on their Monthly
Days Taught (MDT) and Monthly Student Data Transaction (MSD) files.
Student Roster
This report can be accessed by going to Reports > Student Data > Student Roster > Holding
Area.
This report lists the student's name, MSIS ID and grade level alphabetically by school based on
data in the Holding Area. This allows you to see the students that were sent in the MSD file.
The District and School Student Administrator roles have rights to run this report.
Run the Student Roster Holding Area report to check your data before approving the school.
For Month 09, this report lists the promotion indicator on each student (Y, N or blank on
transferred/dropout students) and the graduate/completer type on those students who finished their
education. In the past, we have had schools that sent all or most of the students in the school as
non-promoted in Month 09, or all or most of the students in the school were marked as
graduates/completers. Please be aware of the defaults in your school package so that you do not
have these problems.
0000145000 CYRUS, MILEY
Figure 7: Holding Area Student Roster Report
Holding Area Student Indicators The user can choose an indicator and run a listing of students with that indicator marked
in the last submitted Monthly Student Data Transaction (MSD) file. For example, the user could run
a listing of all students marked as Gifted, a listing of Voc Ed students or a listing of Special Ed
students.
Holding Area Absences This report lists the MSIS ID, student’s name, ssn, grade level, birth date, each day the student was absent and whether the absence was excused or unexcused. The report is sorted by grade level then by student name. This report is run against the Holding Area so that you can see the absences that you are reporting for a reporting month before you approve the month. This allows you to verify the data before approving the school for the reporting month.
Holding Area Carnegie Unit Courses with Zero Credits This report will list student’s name, MSIS ID, grade level, course code, description,
local code, local name, final grade, credits and carnegie units for students in the selected school
who have a final grade on a carnegie unit course but have zero in the credit field in the Holding
Area. This allows you to verify the data before approving the school for the reporting month.

MSIS Year End/Month 09 Training Manual
MSIS Year End/Month 09 Page 16
Holding Area Vocational Student Indicators This report will list the student’s name, MSIS ID, grade level and indicators (Vocational, LEP, Capstone, Disabled, Disadvantaged, Nontraditional, Single Parent and Displaced Homemaker) for students in the selected school who have a Vocational indicator of Y in the Holding Area. This allows you to verify the data before approving the school for the reporting month.
Holding Area Student Entries This report lists the student's name, MSIS ID and grade level alphabetically by school
based on data in the Holding Area. This allows you to see the students that were sent in with an
entry in the Monthly Student Data Transaction (MSD) file. The District and School Student
Administrator roles have rights to run this report.
Holding Area Student Withdrawals This report lists the student's name, MSIS ID and grade level alphabetically by school
based on data in the Holding Area. This allows you to see the students that were sent in with a
withdrawal in the MSD files. The District and School Student Administrator roles have rights to run
this report.
Holding Area Incidents/Dispositions
This report lists the incident description and disposition code with totals of each that are in the
Holding Area. This allows you to see the incidents/dispositions that were sent in
the MSD files. The District and School Student Administrator roles have rights to run this report.
B. Carnegie Unit Courses with Zero Credits This report will list the student’s name, MSIS ID, grade level, course code, description, local code, local name, final grade, credits and carnegie units for students in the selected school who have a final grade on a carnegie unit course but have zero in the credit field.
C. Graduates/Completers
Counts by District This report can be accessed by going to REPORTS > STUDENT DATA >
GRADUATES/COMPLETERS > COUNTS BY DISTRICT.
This report lists the number of recipients for Traditional and Occupational diplomas, Certificate,
GED completers and the total graduates/completers for your district.
Detail Listing
This report can be accessed by going to REPORTS > STUDENT DATA >
GRADUATES/COMPLETERS > DETAIL LISTING.
This report lists each student with their MSIS ID, name, race, gender, date of birth, promotion
indicator and graduate/completer type. The report is sorted by graduate/completer type, last name and
first name. There are totals at the end of each school and for the district. The District and School
Student Administrator roles have rights to run this report.
Be sure to change the Start Year and the End Year for the school year that the report is for.
D. Summer Activity
This report can be accessed by going to REPORTS > STUDENT DATA > SUMMER ACTIVITY. Once the Summer Activity screen has been populated, this report can be run and given to the

MSIS Year End/Month 09 Training Manual
MSIS Year End/Month 09 Page 17
School Attendance Officer (SAO). The School Attendance Officer will determine the reason that
each student is not in school and return the report to the school. After updating the students, the
school can run the report to check that data has been entered on all students.

MSIS Year End/Month 09 Training Manual
MSIS Year End/Month 09 Page 18
CHAPTER 5 Approved Imported Student Data
The screen below can be accessed by going to MODULES > DISTRICT/SCHOOL > APPROVE
IMPORTED STUDENT DATA.
Figure 8: Approve Imported Student Data Screen
This screen allows the authorized District Student Administrator role to see the current status of student data
imported for each school. You can see the date that the last Monthly Student Data Transaction (MSD) file was
sent and whether it passed the edits or not. If the Holding Date is blank then no MSD files have been sent for
that school for that reporting period. If the school is red then the MSD file has errors that need to be corrected.
Look in View/Download Results to see the errors and clear them up. Recreate and resubmit the file once
corrections have been made in the school package.
When the file passes all the edits and the file is a success, the Valid field will have a Y. The Report Run field
will have an N. When a school has successfully transmitted an MSD file, you should go to REPORTS >
MONTHLY ATTENDANCE > PRE-APPROVED, run the report for that school and verify the data. You
should also go to REPORTS > STUDENT DATA > STUDENT ROSTER > HOLDING AREA, run the
report and verify that all students have been sent. Other Holding Area reports should also be run at this time.
These reports are Holding Area Student Entries, Holding Area Student Withdrawals, Holding Area
Incidents/Dispositions, Holding Area Student Indicators, Holding Area Absences, Holding Area
Carnegie Unit With No Credit (important for Month 09) and Holding Area Vocational Student Indicators.
A hard copy or PDF file of each month’s Holding Area reports should be saved for auditing purposes. These
reports are accessed by going to REPORTS > STUDENT DATA > HOLDING AREA and then selecting the
desired report. If the reports look okay then go to the Approve Imported Student Data screen and click in the
Approved Date field for that school. The date will default to the current date. You will not

MSIS Year End/Month 09 Training Manual
MSIS Year End/Month 09 Page 19
be able to approve a school if the PRE-APPROVED MONTHLY ATTENDANCE report has not been
run. Click on the green diskette in the upper left corner to save the approval. Repeat this until all schools
have been approved.
Once all schools have been approved for the reporting period, the Approved Date for the district will be
enabled. Click in that field and the current date will be entered. It will say PENDING in the Status field. A
procedure will run each night that will move the data from the Holding Area to the Permanent Area for all
districts that are PENDING. The next day the Status should say COMPLETED for that reporting period.
Once it says COMPLETED, your student data for that month can be viewed in MSIS.
If any changes should be saved, click before exiting the screen.

MSIS Year End/Month 09 Training Manual
MSIS Year End/Month 09 Page 20
CHAPTER 6 Year-End Student Transfer Screen
The Year-End Student Transfer section will explain how to transfer an entire or partial grade level of
students from one school to another school. This screen will only be accessible for a short period of time
between May and June 30th. This process is only used at the end of the school year when the students need to
be promoted to a grade level for the next school year that is not taught at their current school. Ownership
records for the students for the new school year will be built placing the students at the new school. Any
student that is not transferred through this screen will have an ownership record built from the current school
for the new school year. After ownership records are built for all students for the new school year (this will be
done on July 1st) the Release/Transfer screen will have to be used to move a student to a new school.
Only regular schools are listed for selection. Regular schools do not include the District Office, Alternative or
Vocational schools.
Once your district has completed Month 09, if you have students who need to move from one school to another
over the summer use the Year-End Student Transfer screen.
The Year-End Student Transfer screen has been assigned to the District Student Administrator role. Use this
screen to transfer your students from one school to their next school within your district.
Remember, only students with Promote indicators set to Y will show up on this screen.
You will have access to this screen through June 30th. On July 1st, you will not have access to MSIS while the
new student ownership tables are built for new school year.
If you have completed Month 09, you are ready to use the Year-End Student Transfer screen.
The module can be accessed by going to Modules > Student > Year-End Student School Transfers.
Please remember the following concerning this screen:
1. It only pulls students whose promote indicator is set to Y.
2. You can use it as many times as needed until June 30th.
3. The screen is associated with the District Student Administrator role. This is not a school level screen.
4. You should create any new schools that you have opening this fall before using the screen (if you
need to transfer students to the new school).
5. Do not make any schools inactive until you use this screen to transfer students.
6. You will not see the ownership for the transfer school until we run the new ownership procedure in
MSIS on July 1st.
7. June 30th is the last day to use this screen.

MSIS Year End/Month 09 Training Manual
MSIS Year End/Month 09 Page 21
A. To Access the Year-End Student School Transfers
Figure 9: Year End Student Transfer Screen – District Tab
1. Click on Modules from the menu-bar
2. Select Student
3. Click on Year-End Student School Transfers
4. User will then access the Year-End Student School Transfers screen
Note: If the District user has access to only one district, the user is defaulted to that district, and the District
tab is not enabled.

MSIS Year End/Month 09 Training Manual
MSIS Year End/Month 09 Page 22
B. To Select a District/School/Grade
Figure 10: Year End Student Transfer Screen – Grades Tab
1. From the District tab, select a District or perform a query for the district
2. Double-click on the District
3. User is then prompted to the School tab.
4. From the School tab, select a school or perform a query for the school
5. Double-click on the school
6. User is then prompted to the Grades tab.
7. From the Grades tab, select a Grade or perform a query for the grade
8. Double-click on the Grade
9. User is then prompted to the Student Roster tab.
NOTE: Upon initial entry into the Student Roster tab, a query for students in the selected District,
School and Grade that have not been transferred, has already been performed. Students
Transferred field is automatically set to No.
MSIS Year End/Month 09 Training Manual
MSIS Year End/Month 09 Page 23
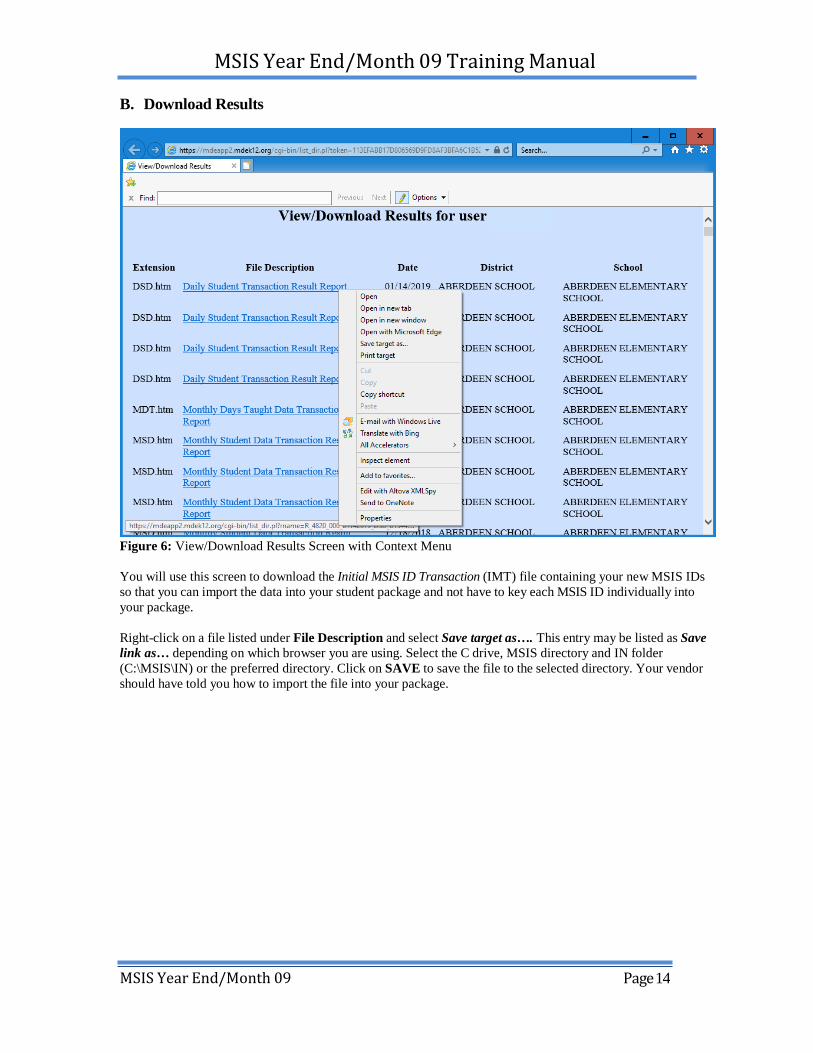
Figure 11: Year End Student Transfer Screen – Student Roster Tab
1. To list students in the selected District, School and Grade, click on the down arrow in the Students
Transferred field.
2. Select Yes to see students that have already been transferred.
NOTE: In this example, no students have been transferred.

MSIS Year End/Month 09 Training Manual
MSIS Year End/Month 09 Page 24
Figure 12: Year End Student Transfer Screen – Students Transferred is Yes
1. Select All to see all the students in the selected District, School and Grade.
Figure 13: Year End Student Transfer Screen – Students Transferred is All
2. Select No to see students in the selected District, School and Grade that have not been
transferred (same selection as initial entry into screen). The New School and New District
columns are blank for students that have not been transferred.
MSIS Year End/Month 09 Training Manual
MSIS Year End/Month 09 Page 25
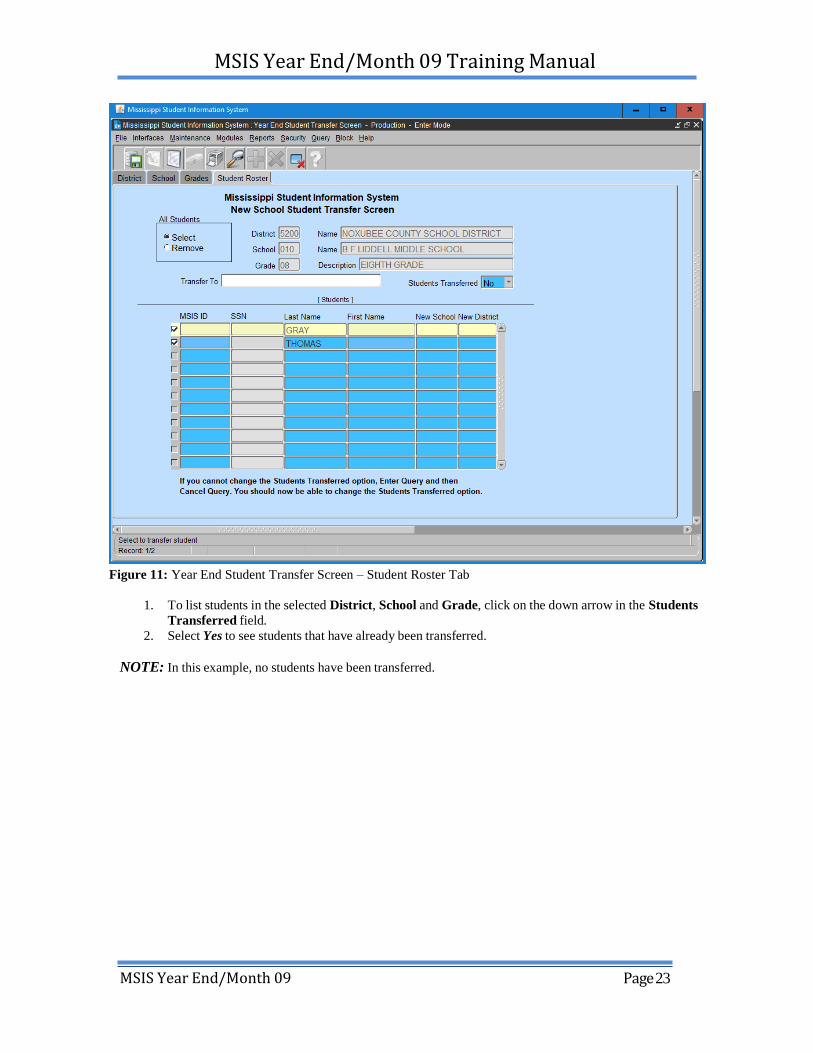
Figure 14: Year End Student Transfer Screen - Students Transferred is No
a. Perform a query to get a specific list of students
b. To remove the selection of an individual student to be transferred, click on the
checked box beside the student. This will remove the check (selection) for the student.
Figure 15: Year End Student Transfer Screen – Remove Selection of Student
c. To select all students to be transferred, click on the All Students Select button. This
will add the check (selection) for each student listed. The default is Select. Each time a
list of students is created, all students listed are selected.

MSIS Year End/Month 09 Training Manual
MSIS Year End/Month 09 Page 26
Figure 16: Year End Student Transfer Screen – All Students Select Button
d. To remove the selection of all students to be transferred, click on the Remove button in
the All Students box (located in the upper left corner of the screen).
This will remove the check (selection) of each student listed.
Figure 17: Year End Student Transfer Screen – All Students Remove Button
e. To select a student to be transferred, click on the unchecked box beside the student.
This will add the checkmark for the student.

MSIS Year End/Month 09 Training Manual
MSIS Year End/Month 09 Page 27
Figure 18: Year End Student Transfer Screen – Select Student(s)
Note: The Ownership Table is not built immediately after you save your transfers. This allows you to correct the release
of any students to the wrong school. After July 1st, schools will have to use the Release/Transfer screen for any students
that were transferred to the wrong school.
f. Click in the Transfer To field to select the new school. Once the desired school is selected, click
OK.
Figure 19: Year End Student Transfer Screen – Transfer To (list of schools in the district)
g. If any changes should be saved, click before exiting the screen.

MSIS Year End/Month 09 Training Manual
MSIS Year End/Month 09 Page 28
C. What If I Transferred the Student to the Wrong School?
Figure 20: Year End Student Transfer Screen – New School and District Values
1. Click on the down arrow in the Students Transferred field and select Yes. This will list all students
from the selected District, School and Grade that have been transferred. Perform a query for
students assigned to a New School.
2. All students listed are selected. Student can be de-selected as needed. 3. Select correct school to transfer the selected students to
4. Save changes

MSIS Year End/Month 09 Training Manual
MSIS Year End/Month 09 Page 29
D. Exit Year-End Student Transfer Screen
1. To exit the Year-End Student Transfer screen and return to the MSIS Main screen, click
on the X in the upper right corner of the screen or select File on the menu bar and select
Exit.
Figure 21: Year End Student Transfer Screen – Click X to Exit
NOTE: If you have any unsaved changes, an alert box will ask if you want to save changes, click on the
appropriate button.
Figure 22: MSIS Main Screen
2. User is returned to the MSIS Main screen.

MSIS Year End/Month 09 Training Manual
MSIS Year End/Month 09 Page 30
CHAPTER 7 Update Student Grades/Promotion/Graduate Type
The screen below can be accessed by going to MODULES > STUDENT > UPDATE STUDENT GRADES.
Each district will decide who they want to have access to this screen because it is not assigned to a particular
security role.
A. Update Grades
Figure 23: Update Student Grades Screen – Update Grades Tab
This screen allows the user to update a student's Vocational (Voc) Status, Semester (Sem)/Term Grade,
Carnegie Units, Credits and Final Grade on a selected course. When a Final Grade has been changed, a
reason must be entered for the change. The choices consist of Credit Recovery, Did Not Report or Entered
Grade Wrong. A history is kept of the changes showing the old and new data as well as who made the
change. Changes should be made by September 30th before sending a Month 01 file for the next school
year.
1. The Vocational (Voc) Status indicator is required in Month 09 (or whenever a Final Grade is
submitted for a vocational course):
P – Passed
F – Failed
2. Final Grade for all courses on a student's schedule. This is an alphanumeric field. Any letter or
number on the keyboard is a valid entry in the final grade field. The Final Grade field cannot be

MSIS Year End/Month 09 Training Manual
MSIS Year End/Month 09 Page 31
empty.
3. Carnegie Units - must match those in MSIS for the course code
4. Credits - must equal the last 2 digits of the Carnegie Units or 0.0 (if the student did not pass the
course). There has been a problem with high schools not sending credits. Please verify that credits
are in the XML file sent to MSIS. Elementary courses, courses with Carnegie Units of 000, 100 or
200 and failed courses should have a credit of 0.0. All other course should have Credits of 0.5, 1.0,
1.5, 2.0 or 2.5 whatever is applicable for the course code.
5. Semester 1 and Semester 2 grades - this is an alphanumeric field. Any letter or number on
the keyboard is a valid entry in the semester grade field. This is Optional but keep in mind that
a high school student's record in MSIS is incomplete in most cases without the semester grades.
Figure 24: Update Student Grades Screen – Update Promotion Tab
6. Promote indicator - must be Y or N. You should run the Student Roster Holding Area report
when your school has a successful Monthly Student Data Transaction (MSD) file, but before you
approve the school. This report lists the students that are in the XML file and shows on each student
whether their promotion indicator is Y or N. It is very important to check this data before approving
the school for Month 09. If the promotion indicator is incorrect, you may not be able to use the
Year- End Student Transfer screen properly.
7. Promote Date (MM/DD/YYYY) - date must be within current school year
8. Graduation Type for all your graduates/completers
MSIS Year End/Month 09 Training Manual
MSIS Year End/Month 09 Page 32
CODE DESCRIPTION
T Traditional diploma can only be used if student is in grade level 12
G GED
O Other Completers (Special Education certificate)
OD Occupational Diploma (for SPED students only)
You should run the Student Roster Holding Area report when your school has a successful file, but before
you approve the school. This report lists the students that are in the XML file and shows on each student
whether their promotion indicator is Y or N. On students that are completers or graduates, the type of
completer/graduate code sent in the XML file will be shown on this report. It is very important to check this
data before approving the school for Month 09. If the completer/graduate code is missing then MSIS assumes
that the student did not finish. Therefore, the student will not be counted when the graduation rate is
calculated, and the student will be on the Summer Activity screen for new school year since the student will
not be enrolled anywhere for the school year.
If any changes should be saved, click before exiting the screen.

MSIS Year End/Month 09 Training Manual
MSIS Year End/Month 09 Page 33
B. Update Promotion/Graduate Type
Figure 25: Update Student Grades Screen – Update Promotion Tab
The user can also update the promotion indicator (Promoted?), Promotion Date and Graduation Type on
the selected student.
Changes to promotion indicator and Graduation Type should be made by noon on September 30th before
reporting Month 01 of the next school year. Remember that only students in grade level 12 can have a
Graduation Type of T.
MSIS will not accept any more data on students that have a graduate/completer code. So, if a student has a
Graduation Type of T and you try to send the student in the Monthly Student Data Transaction (MSD) file,
you will get the error message stating “STUDENT HAS ALREADY GRADUATED. THIS STUDENT CAN
NOT BE INCLUDED IN THE TRANSACTION.”.
If any changes should be saved, click before exiting the screen.

MSIS Year End/Month 09 Training Manual
MSIS Year End/Month 09 Page 34
CHAPTER 8 Summer Activity Screen
The screen below can be accessed by going to MODULES > STUDENT > SUMMER ACTIVITY.
Figure 26: Summer Activity Screen
On students that were in net membership at the end of Month 09 for the previous school year and do not return
to a Mississippi public school in Month 01 of the next school year, the school will have to mark each student
with the reason that they did not return.
Once all of the districts in the state clear Month 01, a procedure will be run to populate this screen. This
procedure should be run by the end of October and the screen will be populated with students by the first
week of November. Each student on the screen will have to be updated with a reason for not returning to
school for the new school year.
A Summer Activity report should then be run by the school and given to the School Attendance Officer
(SAO). The SAO will determine the reason that each student is not in school and return the report to the
school.
The school will then key in the reason for each student on the Summer Activity screen. Once the data is keyed
in, the School Attendance Officer (SAO) will verify the data in MSIS. You can check the district timeline for
the deadline.
If any changes should be saved, click before exiting the screen.

MSIS Year End/Month 09 Training Manual
MSIS Year End/Month 09 Page 35
A. Summer Activity Reasons
ST04 - Transfer to a nonpublic school ST05 - Transfer to another state or country
ST07 - Transfer to an approved community based GED program (paperwork must be completed with
Compulsory School Attendance Office to use this code)
ST08 - Transfer to Home School
SZ01 - Death
SD01 - SD21 - Dropout Reasons (see below) IS01 - In attendance but not reported in your district
IS02 - In attendance but not reported by another MS public school district IS03 - Entered school in your
district after Month 01
GR01 - Graduated last school year, but not reported in MSIS FL01 - Completed Academics but failed FLE
or subject area test
B. Summer Activity Dropout Reasons
SD01 - Physical illness or physical disability
SD02 - Drug and/or alcohol problem
SD03 - Emotional disturbance
SD04 - Behavioral difficulty exclusive of suspension/expulsion
SD05 - Suspended/expelled
SD06 - Restrained by court action
SD07 - Would/could not keep up with work / was failing
SD08 - Peer pressure
SD09 - Felt I did not belong
SD10 - Disliked school experience
SD11 - > or < Compulsory attendance age
SD12 - Entered a GED Program or an institutional program not primarily
educational
SD13 - Lack of parental support/interest
SD14 - Must care for family member
SD15 - Economic reasons SD16 - Married
SD17 - Pregnant
SD18 - Whereabouts unknown
SD19 - Reason unknown
SD20 - Other (Specify)
SD21 - Did not graduate, attending Community College

MSIS Year End/Month 09 Training Manual
MSIS Year End/Month 09 Page 36
CHAPTER 9 Post-Graduate Plans
The screen below can be accessed by going to MODULES > DISTRICT/SCHOOL > POST
GRADUATE PLANS.
Figure 27: Post Graduate Plans Screen
Rights to this screen have been given to the District and School Student Administrator roles. The information
should only be entered on schools with grade level 12. The information should be entered at the end of the
school year for your graduates for that school year.
If any changes should be saved, click before exiting the screen.

MSIS Year End/Month 09 Training Manual
MSIS Year End/Month 09 Page 37
CHAPTER 10 Good Cause Exemption
The screen below can be accessed by going to MODULES > STUDENT > DATA ENTRY > GOOD
CAUSE EXEMPTION.
Figure 28: Good Cause Exemption Screen
All third grade promoted students will display on this screen. If the student was promoted because of good
cause, then you should choose one of the Good Cause Exemption options listed.
You will be reporting data for the previous school year, so be sure to select the correct school year from the
dropdown menu.
If any changes should be saved, click before exiting the screen.

MSIS Year End/Month 09 Training Manual
MSIS Year End/Month 09 Page 38
CHAPTER 11 Graduation Option
The screen below can be accessed by going to MODULES > STUDENT > DATA ENTRY >
GRADUATION OPTION.
Figure 29: Graduation Option Screen
This screen lists graduates with a Traditional diploma. For each subject area, you will select the option that
was utilized for the student to graduate.
PASS TEST is automatically defaulted.
If any changes should be saved, click before exiting the screen.

MSIS Year End/Month 09 Training Manual
MSIS Year End/Month 09 Page 39
CHAPTER 12 MS Scholar Information
The screen below can be accessed by going to MODULES > STUDENT > DATA ENTRY > MS
SCHOLAR INFORMATION.
Figure 30: Senior MS Scholar Information Screen
Only graduated seniors will display on this screen.
Choose the correct school year. Select the program completed for each student:
or
If any changes should be saved, click before exiting the screen.

MSIS Year End/Month 09 Training Manual
MSIS Year End/Month 09 Page 40
CHAPTER 13 Initial Load
A. Initial Student Load Transaction (ISL) File This file is used to assign MSIS IDs in large numbers. The process will run each year from June 1st to
September 30th. This will allow you to get MSIS numbers for your Kindergarten and First Grade students each
year who do not already have MSIS ID numbers. Please do not include students who already have an MSIS ID
because they have been receiving Special Ed services in School 500 Non-Public Sped.
MSIS will check the birth date to make sure that the students sent are under the age of 7 by September 1st.
Name: S_<Dist#>_<Sch#>_<mm/dd/yyyy>_ISL_ <Sequence#>.xml
Example: S_2520_008_06072001_ISL_00001.xml
NOTE: The S and ISL must be capitalized.
B. Initial MSIS ID Transaction (IMT) File This is the only file at this time that is returned to you from MSIS to upload into your package - this file contains
your new MSIS IDs. You should keep at least two copies of this file - one copy in your database and one copy
external to your database.
Name: S_<Dist#>_<Sch#>_<mm/dd/yyyy>_IMT_<Sequence#>.xml
Example: S_2520_008_06072001_IMT_00001.xml
NOTE: The file corresponds to the ISL file that you submitted to request MSIS IDs.
C. Initial Load Duplicate Student Report The report is automatically generated once your ISL file is processed.
The Initial Load Duplicate Student report will list duplicate students who were not assigned an MSIS ID number
in the Initial Load process.
Figure 31: MSIS Initial Load Duplicate Report
MSIS Year End/Month 09 Training Manual
MSIS Year End/Month 09 Page 41
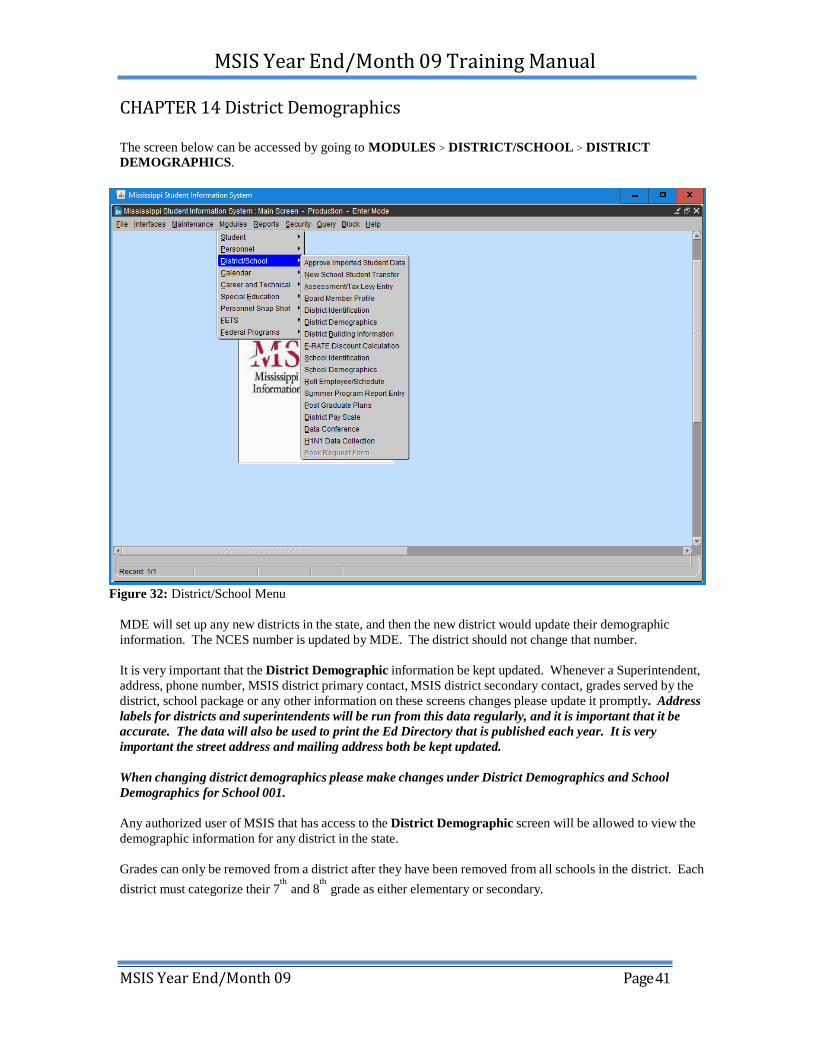
CHAPTER 14 District Demographics The screen below can be accessed by going to MODULES > DISTRICT/SCHOOL > DISTRICT
DEMOGRAPHICS.
Figure 32: District/School Menu
MDE will set up any new districts in the state, and then the new district would update their demographic
information. The NCES number is updated by MDE. The district should not change that number.
It is very important that the District Demographic information be kept updated. Whenever a Superintendent,
address, phone number, MSIS district primary contact, MSIS district secondary contact, grades served by the
district, school package or any other information on these screens changes please update it promptly. Address
labels for districts and superintendents will be run from this data regularly, and it is important that it be
accurate. The data will also be used to print the Ed Directory that is published each year. It is very
important the street address and mailing address both be kept updated.
When changing district demographics please make changes under District Demographics and School
Demographics for School 001.
Any authorized user of MSIS that has access to the District Demographic screen will be allowed to view the
demographic information for any district in the state.
Grades can only be removed from a district after they have been removed from all schools in the district. Each
district must categorize their 7th and 8
th grade as either elementary or secondary.

MSIS Year End/Month 09 Training Manual
MSIS Year End/Month 09 Page 42
Figure 33: District Demographic Screen – Deomographics Tab

MSIS Year End/Month 09 Training Manual
MSIS Year End/Month 09 Page 43
CHAPTER 15 School Identification/Demographics
The screen below can be accessed by going to MODULES > DISTRICT/SCHOOL > SCHOOL
IDENTIFICATION.
Figure 34: School Identification Screen – Schools Tab
This screen will provide district users with the ability to create new schools, update/modify school information
for existing schools and to inactivate schools. The school NCES number is updated by MDE. The district
should not change that number. On new schools, the NCES number will be zeroes.
A school cannot be inactivated if it has submitted Month 01 data to MSIS.
There are several different school types (District Office, Regular, Alternative, Vocational and Special Ed Non-
Public). School 001 is always the District Office.
Use this screen to change a school's name when necessary.

MSIS Year End/Month 09 Training Manual
MSIS Year End/Month 09 Page 44
The screen below can be accessed by going to MODULES > DISTRICT/SCHOOL > SCHOOL
DEMOGARPHICS.
Figure 35: School Demographic Screen – Demographics Tab
It is very important that the School Demographic information be kept updated. Whenever a Principal,
address, phone number, MSIS school contact, grades served by the school or any other information on these
screens changes please update it promptly. Address labels for schools and principals will be run from this
data regularly, and it is important that it is accurate. The data will also be used to print the Ed Directory
that is published each year. It is very important that both the street address and mailing address are kept
updated.
Grades cannot be removed from a school if Month 01 enrollment for that grade has been submitted to
MSIS.
This screen provides the user with the ability to update and view School Demographic data for new and
existing schools. Any authorized MSIS user that has access to this screen will be allowed to view the
demographic data for any school in the state.

MSIS Year End/Month 09 Training Manual
MSIS Year End/Month 09 Page 45
CHAPTER 16 School Board Members This screen is accessed by going to MODULES > DISTRICT/SCHOOL > BOARD MEMBER PROFILE.
Users with the District Personnel role can access the screen.
This data needs to be kept up to date. The Office of Leadership Development uses this data.
Inactive board members should be deleted. To delete someone, select the board member you want to delete,
click on the Board Member tab then click the delete icon button (red X) to delete the person.
Figure 36: Board Member Screen – Select Board Member Tab
Mississippi Code 37-7-207 states that:
(1) There is hereby established a county board of education in each county of the State of
Mississippi. Said county board of education shall consist of five (5) members, one (1) of which,
subject to the further provisions of this chapter and except as is otherwise provided in Section 37-5-
1(2), shall be elected by the qualified electors of each board of education district of the county.
Except as is otherwise provided in Section 37-5-3, each member so elected shall be a resident and
qualified elector of the district from which he is elected.
(2) The county board of education shall apportion the county school district into five (5) single
member board of education districts. The county board of education shall place upon its minutes the
boundaries determined for the new five (5) board of education districts. The board of education of
said county shall thereafter publish the same in some newspaper of general circulation within said
county for at least three (3) consecutive weeks and after having given notice of publication and
recording the same upon the minutes of the board of education of said county, said new district lines
will thereafter be effective. The board of education of said county shall reapportion the board of
education districts in accordance with the procedure described herein for the original
apportionment of districts as soon as practicable after the results of the 2000 decennial census are
published and as soon as practicable after every decennial census thereafter.

MSIS Year End/Month 09 Training Manual
MSIS Year End/Month 09 Page 46
(3) In counties where the office of "administrative superintendent" as defined in Section 37-6-3, Mississippi Code of 1972 has been abolished, there shall be no county board of education.

MSIS Year End/Month 09 Training Manual
MSIS Year End/Month 09 Page 47
CHAPTER 17 District Pay Scale
This screen is accessed by going to MODULES > DISTRICT/SCHOOL > DISTRICT PAY SCALE.
Each year the Mississippi Department of Education (MDE) - Office of Management Information Systems
(MIS) collects a salary schedule from each school district. The data is collected using the Mississippi
Student Information (MSIS). Salaries entered must reflect the entire amount paid by the district and not just
the MAEP salary schedule. Based on the number of years’ experience and type of certificate held, indicate
under each appropriate certification heading, the salary for classroom teachers in your district. Please have
this information entered in MSIS by the last business day in July. Your District's Personnel person has
security rights to the screen.
Figure 37: District/School Menu – District Pay Scale Option
Click the District tab, then the District Pay Scale tab and you should see 0 for all your money amounts.
The screen is defaulting to the old school year until July 1st. The school year in the school year box MUST
BE the current school year. You can start typing in your amounts for each year of experience. You must
enter an amount greater than the MP Pay Scale amount.

MSIS Year End/Month 09 Training Manual
MSIS Year End/Month 09 Page 48
Figure 38: District Pay Scale Screen – Districts Tab
Figure 39: MAEP Salary Schedule Screen
When you are complete, you go to File then Save or Exit and it will ask you if you want to save your changes.
You must enter an amount greater than the MP Pay Scale amount.
MSIS Year End/Month 09 Training Manual
MSIS Year End/Month 09 Page 49
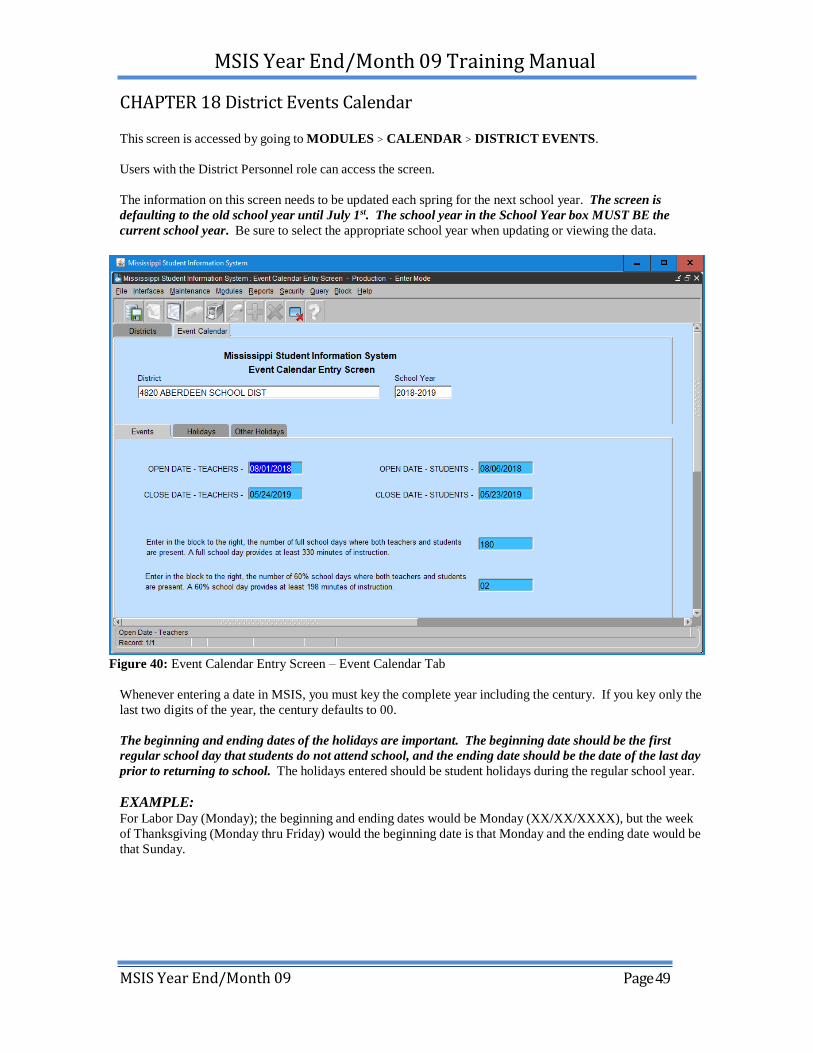
CHAPTER 18 District Events Calendar
This screen is accessed by going to MODULES > CALENDAR > DISTRICT EVENTS.
Users with the District Personnel role can access the screen.
The information on this screen needs to be updated each spring for the next school year. The screen is
defaulting to the old school year until July 1st. The school year in the School Year box MUST BE the
current school year. Be sure to select the appropriate school year when updating or viewing the data.
Figure 40: Event Calendar Entry Screen – Event Calendar Tab
Whenever entering a date in MSIS, you must key the complete year including the century. If you key only the
last two digits of the year, the century defaults to 00.
The beginning and ending dates of the holidays are important. The beginning date should be the first
regular school day that students do not attend school, and the ending date should be the date of the last day
prior to returning to school. The holidays entered should be student holidays during the regular school year.
EXAMPLE: For Labor Day (Monday); the beginning and ending dates would be Monday (XX/XX/XXXX), but the week
of Thanksgiving (Monday thru Friday) would the beginning date is that Monday and the ending date would be
that Sunday.

MSIS Year End/Month 09 Training Manual
MSIS Year End/Month 09 Page 50
CHAPTER 19 Summer School Report Entry
This screen can be accessed by going to MODULES > DISTRICT/SCHOOL > SUMMER PROGRAM
REPORT ENTRY.
The District Personnel and School Personnel roles will have access to this screen.
The Summer Program Report Entry screen will provide authorized users the ability to enter Summer
Programs data for schools and employee data.
This screen is used to collect summer school data for Accreditation. It needs to be completed by August 30th.
This information has previously been collected on paper.
A. Entering Summer Program Data
1. Select a School on the Schools tab by using the up and down arrow keys on the keyboard or performing
a query.
2. User is prompted to the Summer Programs tab.
NOTE: The School Year defaults to the current school year. When the selected year is not the current school
year, the data will be read only.
Figure 41: Summer School Report Entry Screen – Summer Programs Tab
3. Enter the Principal SSN for the Summer Program for the selected School
4. Enter the Phone Area Code and Phone Number
5. Click on the down arrow in the Summer Program Type field. Select a Summer Program Type. Each
Summer Program Type can only be selected one time per School.

MSIS Year End/Month 09 Training Manual
MSIS Year End/Month 09 Page 51
Figure 42: Summer School Report Entry Screen - Summer Program Types
6. Enter Date Session Begins - valid formats include MMDDYYYY and MM/DD/YYYY. Date must be
in current school year. For this screen, the months of July and August are not considered the next
school year.
7. Enter Date Session Ends - valid formats include MMDDYYYY and MM/DD/YYYY. Date must be in
current school year. For this screen, the months of July and August are not considered the next school
year. Session End Date cannot be earlier than the Session Begin Date.
8. Total Days in Session is automatically populated when both the Date Session Begins and Date
Session Ends are entered. This field displays the number of business days from the beginning to the
end of each session. It does not exclude holidays.
9. Enter Military Beginning Time - valid formats include 8 and 8:30.
10. Enter Military Ending Time - valid formats include 8 and 8:30 (13:00 would be 1:00 PM). Military
Ending Time cannot be earlier than Military Beginning Time.
11. Click on the down arrow in the Funding Source field. Select a Funding Source for the selected
program. Each Summer Program Type can only have one Funding Source.
Figure 43: Summer School Report Entry Screen – Funding Source
12. Enter Grade Level Served for the selected program or double-click in the field and a list of active
grade levels will be displayed to choose from. A grade level cannot be entered more than once for the
selected program.
13. Enter Number of Students Enrolled in the grade level for the selected program.
14. To add additional Grade Levels, use the down arrow key on the keyboard or click on the insert icon
button (+) and repeat steps 13 and 14.
15. Save the record by clicking on the Save icon button or clicking on File from the menu bar and selecting
Save.
16. To enter additional Summer Programs for the selected School, click in the Date Session Begins field
and then use the down arrow key on the keyboard or click on the insert icon button (+) and repeat steps
6 and 16.
Figure 44: Summer School Report Entry Screen – Date Session Begins
NOTE: Cursor must be located somewhere in the Date Session Begins field (as shown) in order to insert a
new Summer Program record.

MSIS Year End/Month 09 Training Manual
MSIS Year End/Month 09 Page 52
B. Entering Summer Program Employees
1. Click on Employees tab
2. If the screen is blank, then no Employees have been entered for the selected school and year.
Figure 45: Summer School Report Entry Screen – Employees Tab
3. User must query for an Employee. If the query returns multiple Employees (as shown in this
example), scroll to select the correct Employee.
Figure 46: Summer School Report Entry Screen – Employees Section
4. If query returns only one Employee, user can begin entering Schedule information.
5. Once an Employee is selected (record is highlighted) click in the Course Code field in the
Schedules section.
6. Course Code - enter a valid Course Code or double-click in the field to get a list of values to select
from.
7. Courses Title – default
8. School - default
9. Enter number of Hours Per Day that the course is taught.
10. Enter the number of Students that are taking the course.
11. Enter the Grade Level Lo or double-click in the field to get a list of values to select from.
12. Enter the Grade Level Hi or double-click in the field to get a list of values to select from.
Grade Level Hi must not be lower than the Grade Level Lo and must not be higher than the high
grade for the selected course.
13. Click on the down arrow in the Summer Program Type/Funding Source field and select a
Program Type.

MSIS Year End/Month 09 Training Manual
MSIS Year End/Month 09 Page 53
Figure 47: Summer School Report Entry Screen – Schedules Section
14. To enter additional Course records on the Schedule, click in the next blank Course Code field and
repeat steps 6 through 11
15. Save the record by clicking on the Save icon button or clicking on File from the menu bar and
selecting Save
16. To enter additional Employees, repeat steps 3 through 13

MSIS Year End/Month 09 Training Manual
MSIS Year End/Month 09 Page 54
CHAPTER 20 Roll Employee/Schedule
Before entering your personnel for the new school year in MSIS you will need to Roll Employees. You
must roll so that your Sped student data will be brought forward from the last school year. Any employee
who is no longer in your district or is not returning for the new school year should be marked INACTIVE
on the DISTRICT INFO tab of the GENERAL/SCHEDULE ENTRY screen for the previous school
year. The school year can be changed on the SELECT DISTRICT tab of this screen. To roll personnel
data go to MODULES > DISTRICT/SCHOOL > ROLL EMPLOYEE/SCHEDULE. This should be
done prior to any entry of personnel data for the new school year. In order for an employee to be rolled, the
employee must be active for the current school year and have a Roll Indicator of Yes.
Figure 48: District/School Menu – Roll Employee/Schedule Option

MSIS Year End/Month 09 Training Manual
MSIS Year End/Month 09 Page 55
Figure 49: Roll Schedule/Employee Screen – Schools Tab
This screen allows the user to select an individual school or all schools to roll. The default is to roll schedule
and district data, but you can choose to not roll the schedule. The district data must be rolled. Once data is
rolled, the District Time and Days Employed must be re-entered on the District Info screen. The period
numbers on the schedule will be set to zero and must be re-entered. The previous year’s schedule will roll to
the new school year but should be edited to ensure that the data is correct for the current school year.
MDE will run a procedure in MSIS to increase the years of experience on all employees who had 100%
district time in the previous school year by one. The district should check the years of experience for its
employees to verify that the data is correct in MSIS.

MSIS Year End/Month 09 Training Manual
MSIS Year End/Month 09 Page 56